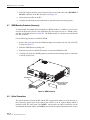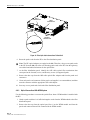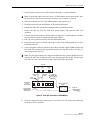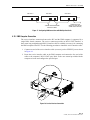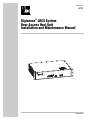
1
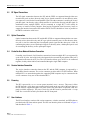
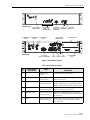
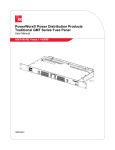
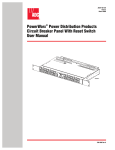
ADCP-75-169
Issue 1
June 2004
Digivance® LRCS System
Rear Access Host Unit
Installation and Maintenance Manual
19717-A
1284820 Rev A
ADCP-75-169 • Issue 1 • June 2004 • Preface
COPYRIGHT
© 2004, ADC Telecommunications, Inc.
All Rights Reserved
Printed in the U.S.A.
REVISION HISTORY
ISSUE
DATE
1
06/2004
REASON FOR CHANGE
Original release.
LIST OF CHANGES
The technical changes incorporated into this issue are listed below.
PAGE
IDENTIFIER
All
DESCRIPTION OF CHANGE
Original release
TRADEMARK INFORMATION
ADC, Digivance, PowerWorx, and FiberGuide are registered trademarks of ADC Telecommunications, Inc.
DISCLAIMER OF LIABILITY
Contents herein are current as of the date of publication. ADC reserves the right to change the contents without prior notice. In no
event shall ADC be liable for any damages resulting from loss of data, loss of use, or loss of profits and ADC further
disclaims any and all liability for indirect, incidental, special, consequential or other similar damages. This disclaimer of
liability applies to all products, publications and services during and after the warranty period.
This publication may be verified at any time by contacting ADC’s Technical Assistance Center at 1-800-366-3891, extension 73475
(in U.S.A. or Canada) or 952-917-3475 (outside U.S.A. and Canada), or by e-mail to [email protected].
ADC Telecommunications, Inc.
P.O. Box 1101, Minneapolis, Minnesota 55440-1101
In U.S.A. and Canada: 1-800-366-3891
Outside U.S.A. and Canada: (952) 938-8080
Fax: (952) 917-1717
Page ii
ADCP-75-169 • Issue 1 • June 2004 • Preface
TABLE OF CONTENTS
Content
Page
ABOUT THIS MANUAL . . . . . . . . . . . . . . . . . . . . . . . . . . . . . . . . . . . . . . . . . . . . . . . . . . . . . . . . . . . . . . . . . . . . . . . . . v
Related Publications . . . . . . . . . . . . . . . . . . . . . . . . . . . . . . . . . . . . . . . . . . . . . . . . . . . . . . . . . . . . . . . . . . . . . . . . . . v
ADMONISHMENTS . . . . . . . . . . . . . . . . . . . . . . . . . . . . . . . . . . . . . . . . . . . . . . . . . . . . . . . . . . . . . . . . . . . . . . . . . . . v
GENERAL SAFETY PRECAUTIONS . . . . . . . . . . . . . . . . . . . . . . . . . . . . . . . . . . . . . . . . . . . . . . . . . . . . . . . . . . . . . . . . . vi
STANDARDS CERTIFICATION . . . . . . . . . . . . . . . . . . . . . . . . . . . . . . . . . . . . . . . . . . . . . . . . . . . . . . . . . . . . . . . . . . . . vi
LIST OF ACRONYMS AND ABBREVIATIONS . . . . . . . . . . . . . . . . . . . . . . . . . . . . . . . . . . . . . . . . . . . . . . . . . . . . . . . . . . . vi
1
INTRODUCTION. . . . . . . . . . . . . . . . . . . . . . . . . . . . . . . . . . . . . . . . . . . . . . . . . . . . . . . . . . . . . . . . . . . . . . . . . 1
2
HOST UNIT DESCRIPTION. . . . . . . . . . . . . . . . . . . . . . . . . . . . . . . . . . . . . . . . . . . . . . . . . . . . . . . . . . . . . . . . . . 1
3
4
2.1
Mounting . . . . . . . . . . . . . . . . . . . . . . . . . . . . . . . . . . . . . . . . . . . . . . . . . . . . . . . . . . . . . . . . . . . . . . . 1
2.2
RF Signal Connections . . . . . . . . . . . . . . . . . . . . . . . . . . . . . . . . . . . . . . . . . . . . . . . . . . . . . . . . . . . . . . 2
2.3
Optical Connection . . . . . . . . . . . . . . . . . . . . . . . . . . . . . . . . . . . . . . . . . . . . . . . . . . . . . . . . . . . . . . . . 2
2.4
Controller Area Network Interface Connection . . . . . . . . . . . . . . . . . . . . . . . . . . . . . . . . . . . . . . . . . . . . . . 2
2.5
Service Interface Connection. . . . . . . . . . . . . . . . . . . . . . . . . . . . . . . . . . . . . . . . . . . . . . . . . . . . . . . . . . 2
2.6
Powering . . . . . . . . . . . . . . . . . . . . . . . . . . . . . . . . . . . . . . . . . . . . . . . . . . . . . . . . . . . . . . . . . . . . . . . 2
2.7
User Interface . . . . . . . . . . . . . . . . . . . . . . . . . . . . . . . . . . . . . . . . . . . . . . . . . . . . . . . . . . . . . . . . . . . . 2
HOST UNIT ACCESSORIES . . . . . . . . . . . . . . . . . . . . . . . . . . . . . . . . . . . . . . . . . . . . . . . . . . . . . . . . . . . . . . . . . 5
3.1
Interface Panels . . . . . . . . . . . . . . . . . . . . . . . . . . . . . . . . . . . . . . . . . . . . . . . . . . . . . . . . . . . . . . . . . . 5
3.2
Wavelength Division Multiplexer System . . . . . . . . . . . . . . . . . . . . . . . . . . . . . . . . . . . . . . . . . . . . . . . . . 6
3.3
Coarse Wavelength Division Multiplexer System . . . . . . . . . . . . . . . . . . . . . . . . . . . . . . . . . . . . . . . . . . . . 7
INSTALLATION PROCEDURES . . . . . . . . . . . . . . . . . . . . . . . . . . . . . . . . . . . . . . . . . . . . . . . . . . . . . . . . . . . . . . . 8
4.1
Before Starting Installation . . . . . . . . . . . . . . . . . . . . . . . . . . . . . . . . . . . . . . . . . . . . . . . . . . . . . . . . . . . 8
4.2
Unpacking and Inspection . . . . . . . . . . . . . . . . . . . . . . . . . . . . . . . . . . . . . . . . . . . . . . . . . . . . . . . . . . . . 9
4.3
OSP Fiber Cable Installation Guidelines . . . . . . . . . . . . . . . . . . . . . . . . . . . . . . . . . . . . . . . . . . . . . . . . . . 9
4.4
HU Mounting Procedure . . . . . . . . . . . . . . . . . . . . . . . . . . . . . . . . . . . . . . . . . . . . . . . . . . . . . . . . . . . . 10
4.5
Chassis Ground Connection. . . . . . . . . . . . . . . . . . . . . . . . . . . . . . . . . . . . . . . . . . . . . . . . . . . . . . . . . . 12
4.6
Coaxial Cable Connections . . . . . . . . . . . . . . . . . . . . . . . . . . . . . . . . . . . . . . . . . . . . . . . . . . . . . . . . . . 12
4.7
WDM Mounting Procedure (Accessory). . . . . . . . . . . . . . . . . . . . . . . . . . . . . . . . . . . . . . . . . . . . . . . . . . 14
4.8
Optical Connections . . . . . . . . . . . . . . . . . . . . . . . . . . . . . . . . . . . . . . . . . . . . . . . . . . . . . . . . . . . . . . . 14
4.9
Controller Area Network Connections . . . . . . . . . . . . . . . . . . . . . . . . . . . . . . . . . . . . . . . . . . . . . . . . . . . 18
4.10 EMS Computer Connection . . . . . . . . . . . . . . . . . . . . . . . . . . . . . . . . . . . . . . . . . . . . . . . . . . . . . . . . . . 19
4.11 External Alarm System Connections . . . . . . . . . . . . . . . . . . . . . . . . . . . . . . . . . . . . . . . . . . . . . . . . . . . . 20
4.12 DC Power Connections . . . . . . . . . . . . . . . . . . . . . . . . . . . . . . . . . . . . . . . . . . . . . . . . . . . . . . . . . . . . . 21
4.13 Installation Complete . . . . . . . . . . . . . . . . . . . . . . . . . . . . . . . . . . . . . . . . . . . . . . . . . . . . . . . . . . . . . . 22
5
MAINTENANCE . . . . . . . . . . . . . . . . . . . . . . . . . . . . . . . . . . . . . . . . . . . . . . . . . . . . . . . . . . . . . . . . . . . . . . . . 22
6
CUSTOMER INFORMATION AND ASSISTANCE . . . . . . . . . . . . . . . . . . . . . . . . . . . . . . . . . . . . . . . . . . . . . . . . . . . 24
5.1
Host Unit Fan Replacement Procedure . . . . . . . . . . . . . . . . . . . . . . . . . . . . . . . . . . . . . . . . . . . . . . . . . . 22
Page iii
© 2004, ADC Telecommunications, Inc.
ADCP-75-169 • Issue 1 • June 2004 • Preface
TABLE OF CONTENTS
Content
Page
Blank
Page iv
© 2004, ADC Telecommunications, Inc.
ADCP-75-169 • Issue 1 • June 2004 • Preface
ABOUT THIS MANUAL
This publication provides a basic description of the Digivance LRCS rear access Host Unit (HU)
plus the installation and maintenance procedures. Also described are various accessories that
may be used with the HU. An overview of the Digivance System, a complete description of the
system components, the system turn-up and test procedures, and the system troubleshooting
procedures are provided in the applicable Digivance System Operation and Maintenance
Manual (see Related Publications section). The rear access HU is installed in conjunction with
the Digivance Remote Unit.
RELATED PUBLICATIONS
Listed below are related manuals and their publication numbers. Copies of these publications
can be ordered by contacting the ADC Technical Assistance Center at 1-800-366-389, extension
73475 (in U.S.A. or Canada) or 1-952-917-3475 (outside U.S.A. and Canada).
Title
ADCP Number
Digivance LRCS SMR System with Version 3.01 EMS Software Operation
and Maintenance Manual
75-170
Digivance LRCS SMR Interface Panels User Manual
75-143
Digivance Coarse Wavelength Division Multiplexer User Manual
75-142
Digivance LRCS Dual-STM Systems Supplemental Manual
75-157
ADMONISHMENTS
Important safety admonishments are used throughout this manual to warn of possible hazards to
persons or equipment. An admonishment identifies a possible hazard and then explains what
may happen if the hazard is not avoided. The admonishments — in the form of Dangers,
Warnings, and Cautions — must be followed at all times. These warnings are flagged by use of
the triangular alert icon (seen below) and are listed in descending order of severity of injury or
damage and likelihood of occurrence.
Danger: Danger is used to indicate the presence of a hazard that will cause severe personal
injury, death, or substantial property damage if the hazard is not avoided.
Warning: Warning is used to indicate the presence of a hazard that can cause severe personal
injury, death, or substantial property damage if the hazard is not avoided.
Caution: Caution is used to indicate the presence of a hazard that will or can cause minor
personal injury or property damage if the hazard is not avoided.
Page v
© 2004, ADC Telecommunications, Inc.
ADCP-75-169 • Issue A • June 2001 • Preface
GENERAL SAFETY PRECAUTIONS
Warning: Wet conditions increase the potential for receiving an electrical shock when
installing or using electrically-powered equipment. To prevent electrical shock, never install or
use electrical equipment in a wet location or during a lightning storm.
STANDARDS CERTIFICATION
FCC: This equipment complies with the applicable sections of Title 47 CFR Part 90 (SMR).
UL/CUL: This equipment complies with UL and CUL 50 Standard for Enclosures for
Electrical Equipment. This equipment provides the degree of protection specified by IP43 as
defined in IEC Publication 529.
FDA/CDRH: This equipment uses a Class 1 LASER according to FDA/CDRH Rules. This
product conforms to all applicable standards of 21 CFR Part 1040.
IC: This equipment complies with the applicable sections of RSS-131. The term “IC:” before the
radio certification number only signifies that Industry Canada Technical Specifications were met.
LIST OF ACRONYMS AND ABBREVIATIONS
The acronyms and abbreviations used in this manual are detailed in the following list:
AWG
C
CAN
CDRH
CUL
CWDM
DC
DCE
DIV
DTE
EBTS
EIA
EMS
ESD
F
FCC
FDA
FWD
HU
IC
Page vi
© 2004, ADC Telecommunications, Inc.
American Wire Gauge
Centigrade
Controller Area Network
Center for Devices and Radiological Health
Canadian Underwriters Laboratories
Coarse Wavelength Division Multiplexer
Direct Current
Data Communications Equipment
Diversity
Data Terminal Equipment
Enhanced Base Transceiver Station
Electronic Industries Association
Element Management System
Electrostatic Discharge
Fahrenheit
Federal Communications Commission
Food and Drug Administration
Forward
Host Unit
Industry Canada
ADCP-75-169 • Issue 1 • June 2004 • Preface
LED
LPA
LRCS
MHz
MPE
MTBF
NEM
NEMA
NO
NOC
OSP
PA
REV
RF
RMA
RU
SMR
STM
UL
VDC
VSWR
WECO
WDM
Light Emitting Diode
Linear Power Amplifier
Long-Range Coverage Solution
Mega Hertz
Maximum Permissible Exposure
Mean Time Between Failure
Network Element Manager
National Electrical Manufacturers Association
Normally Open
Network Operations Center
Outside Plant
Power Amplifier
Reverse
Radio Frequency
Return Material Authorization
Remote Unit
Specialized Mobile Radio
Spectrum Transport Module
Underwriters Laboratories
Volts Direct Current
Voltage Standing Wave Ratio
Western Electric Company
Wave Division Multiplexer
Page vii
© 2004, ADC Telecommunications, Inc.
ADCP-75-169 • Issue A • June 2001 • Preface
Blank
Page viii
© 2004, ADC Telecommunications, Inc.
ADCP-75-169 • Issue 1 • June 2004
1
INTRODUCTION
The rear access Host Unit serves as the EBTS servicing unit for the Digivance LRCS system. A
typical LRCS system consists of a Host Unit (HU) and a Remote Unit (RU). The HU consists of
an electronic chassis assembly that mounts in a standard equipment rack. The RU consists of
multiple electronic and optical modules that mount in either an outdoor cabinet or an indoor
mounting shelf. The HU and the RU together comprise an LRCS system. Various accessory
items are also available for use with the basic LRCS system. All items referenced as “accessory
items” are not furnished with the basic system and must be purchased separately.
2
HOST UNIT DESCRIPTION
The HU, shown in Figure 1, consists of an electronic circuit board assembly and a fan assembly
that are mounted within a powder-paint coated sheet metal enclosure. The enclosure provides a
mounting point for the circuit board and fan assemblies and controls RF emissions. The only
user-replaceable component is the fan assembly. The HU is designed for use within a noncondensing indoor environment such as inside a wiring closet or cabinet. The RF connectors,
optical connectors, alarm output connectors, DC power terminal strip, and grounding lug are
mounted on the HU rear side. The On/Off power switch, LED indicators, service interface
connector, and Controller Area Network (CAN) connectors are mounted on the HU front panel.
17.1 INCHES
(433 mm)
FRONT PANEL
MOUNTING
BRACKET
(BOTH SIDES)
3.5 INCHES
(88 mm)
12.2 INCHES
(311 mm)
17857-A
Figure 1. Host Unit
2.1
Mounting
The HU is intended for rack-mount applications. A pair of reversible mounting brackets is
provided that allow the HU to be mounted in either a 19-inch or 23-inch EIA or WECO
equipment rack. When installed, the front panel of the HU is flush with the front of the rack.
Screws are provided for securing the HU to the equipment rack.
Page 1
© 2004, ADC Telecommunications, Inc.
ADCP-75-169 • Issue 1 • June 2004
2.2
RF Signal Connections
The RF signal connections between the HU and the EBTS are supported through either two
(non-diversity unit) or three (diversity unit) N-type female connectors. On non-diversity units,
one connector is used for the forward path RF signal. The other connector is used for the reverse
path RF signal. On diversity units, a third connector is used for the diversity path RF signal. In
installations where multiple EBTS’s will be connected to a single HU, it will usually be
necessary to install a Primary Interface Panel and an Expansion Panel (accessory items) to
support the interface between the HU and the EBTS. The HU should be as close as possible to
the EBTS to minimize cable losses.
2.3
Optical Connection
Optical connections between the HU and the RU (STM) are supported through either two (nondiversity unit) or three (diversity unit) SC-type optical connector ports. On non-diversity units,
one port is used for connecting the forward path optical signal and the other port is used for
connecting the primary reverse path optical signal. On diversity units, a third optical port is used
for connecting the diversity reverse path optical signal.
2.4
Controller Area Network Interface Connection
Controller Area Network (CAN) interface connections between multiple HU’s are supported by
a pair of RJ-45 jacks. One of the jacks is designated as the network IN port and the other jack is
designated as the network OUT port. The CAN interface allows up to 24 HU’s to be connected
together (in daisy-chain fashion) and controlled through a single EMS computer.
2.5
Service Interface Connection
The service interface connection between the HU and the EMS computer is supported by a
single DB-9 female connector. The service connector provides an RS-232 DTE interface. When
multiple HU’s are networked together, the supporting EMS computer may be connected to the
service connector of any one of the networked HU’s.
2.6
Powering
The HU is powered by ± 21 to ± 60 VDC power (nominal ± 24 or ± 48 VDC). The power is fed to
the HU through a screw-down type terminal strip located on the rear side of the unit. Power to
the HU must be supplied through a fuse panel such as the PowerWorx 20-position GMT fuse
panel (available separately). The power circuit for each HU must be protected with a 3 Amp
GMT fuse. An On/Off switch is provided on the HU front panel.
2.7
User Interface
The HU user interface consists of the various connectors, switches, terminals, and LEDs that are
provided on the HU front and rear panels. The HU user interface points are indicated in Figure 2
and described in Table 1.
Page 2
© 2004, ADC Telecommunications, Inc.
ADCP-75-169 • Issue 1 • June 2004
FRONT VIEW
(1) DC POWER
ON/OFF SWITCH
(12) REVERSE 1 (13) REVERSE 2
RF OUT
RF OUT
(REFERENCE
ITEMS 2 - 8)
LED INDICATORS
(14) FORWARD
RF IN
(9) SERVICE
(10) NET IN (11) NET OUT
INTERFACE CONNECTOR CONNECTOR
CONNECTOR
(15) DC POWER
TERMINAL STRIP
(16) COVER PLATE
19722-A
REAR VIEW
(17) ALARM
OUTPUT CONNECTOR
(18)
PORT 1
(19)
PORT 2
(20)
PORT 3
(21) GROUNDING
STUD
Figure 2. Host Unit User Interface
Table 1. Host Unit User Interface
REF
NO
USER INTERFACE
DESIGNATION
DEVICE
FUNCTIONAL
DESCRIPTION
1
I/0
On/Off rocker
switch
Provides DC power on/off control.
2
POWER
Multi-colored LED
(green/yellow)
Indicates if the HU is powered (green) or unpowered (off). See Note.
3
STANDBY
Multi-colored LED
(green/yellow/red)
Indicates if the system is in the Normal (off),
Standby (blinking green), Test (blinking red), or
Program Load (blinking yellow) state. See Note.
4
HOST UNIT
Multi-colored LED
(green/yellow/red)
Indicates if the HU is normal (green), overheated
(yellow), or faulty (red). See Note.
5
REMOTE UNIT
Multi-colored LED
(green/yellow/red)
Indicates if no alarms (green), a minor alarm
(yellow), or a major alarm (red) is reported by the
RU. See Note.
6
DRIVE
Multi-colored LED
(green/yellow/red)
Indicates if the level of the RF input signal to the
HU is normal (green), low (yellow), or high
(red). See Note.
Page 3
© 2004, ADC Telecommunications, Inc.
ADCP-75-169 • Issue 1 • June 2004
Table 1. Host Unit User Interface, continued
REF
NO
USER INTERFACE
DESIGNATION
DEVICE
FUNCTIONAL
DESCRIPTION
7
PORT 1/PORT 2
Multi-colored LED
(green/red)
Indicates if the reverse/forward path optical signals from the STM/HU are normal (green), if no
signals are detected (red), or if excessive errors
are detected (red). See Note.
8
PORT 3
(diversity unit only)
Multi-colored LED
(green/yellow)
Indicates if the diversity reverse path optical signal
from the RU is normal (green), if no signal is
detected (yellow), or if excessive errors are
detected (yellow). See Note.
9
SERVICE
DB-9 connector
(female)
Connection point for the RS-232 service interface cable.
10
NET IN
RJ-45 jack (female)
Connection point for the CAN interface input
cable.
11
NET OUT
RJ-45 jack (female)
Connection point for the CAN interface output
cable.
12
REV RF OUT
N-type female RF
coaxial connector
Output connection point for the primary reverse
path RF coaxial cable.
13
REV DIV RF OUT
N-type female RF
coaxial connector
Output connection point for the diversity reverse
path RF coaxial cable.
14
FWD RF IN
N-type female RF
coaxial connector
Input connection point for the forward path RF
coaxial cable.
15
POWER 24–48 VDC
Screw-type terminal
strip
Connection point for the DC power wiring.
16
No designation
Cover plate
Covers the mounting slot for the wavelength division multiplexer module.
17
ALARM OUTPUT
Screw-type terminal
connector (14–26
AWG)
Connection point for an external alarm system.
Includes normally open (NO), normally closed
(NC), and common (COM) wiring connections.
18
PORT 1
SC connector
(single-mode)
Output connection point for the forward path
optical fiber.
19
PORT 2
SC connector
(single-mode)
Input connection point for the reverse path primary optical fiber.
20
PORT 3
(diversity unit only)
SC connector
(single-mode)
Input connection point for the reverse path diversity optical fiber.
Chassis ground stud
Connection point for a chassis grounding wire.
21
Note: A more detailed description of LED operation is provided in the applicable System Operation and
Maintenance Manual.
Page 4
© 2004, ADC Telecommunications, Inc.
ADCP-75-169 • Issue 1 • June 2004
3
HOST UNIT ACCESSORIES
This section provides a brief description of various accessory items that are available separately.
The accessory items may or may not be required depending on the application.
3.1
Interface Panels
The interface panels are accessory items that are used when multiple EBTS’s require connection
to a single HU. Two types of panels are available: the Primary Interface Panel and the
Expansion Panel. The Primary Interface Panel, shown in Figure 3, provides combining and
splitting (as needed) of the forward and reverse path RF signal. The Primary Interface Panel also
provides attenuation of the forward path signal to the level required for input to the HU. Up to 6
EBTS’s may be connected to a single HU using the Primary Interface Panel.
18221-A
Figure 3. Primary Interface Panel
The Expansion Panel, shown in Figure 4, is used in conjunction with the Primary Interface
Panel when more than 6 EBTS’s must be connected to a single HU. The Primary Interface Panel
can support two Expansion Panels and each Expansion Panel can support up to six EBTS’s. For
complete information about the SMR Interface Panels, refer to the Digivance Long Range
Coverage Solution SMR Interface Panels User Manual (ADCP-75-143).
Page 5
© 2004, ADC Telecommunications, Inc.
ADCP-75-169 • Issue 1 • June 2004
18824-A
Figure 4. Expansion Panel
3.2
Wavelength Division Multiplexer System
The Wavelength Division Multiplexer (WDM) system is an accessory product that is used when
it is desirable or necessary to combine the forward and reverse path optical signals from one
Digivance system onto a single optical fiber. Each WDM system consists of a host module and a
remote module. The HU provides a mounting slot for installing a WDM host module. Both the
RU outdoor cabinet the RU indoor mounting shelf provide a mounting slot for installing a
WDM remote module.
Each WDM module consists of a bi-directional wavelength division multiplexer mounted
within a power-paint coated sheet metal enclosure. A straight SC-type optical connector port is
provided for connecting the forward/reverse path optical fiber to the WDM module. A pair of
pigtail leads with SC-type connectors are provided for connecting the WDM module to the
forward and reverse path optical ports on the HU or STM. The WDM host/remote module is
shown in Figure 5.
17013-A
Figure 5. WDM Host/Remote Module
Page 6
© 2004, ADC Telecommunications, Inc.
ADCP-75-169 • Issue 1 • June 2004
3.3
Coarse Wavelength Division Multiplexer System
The Coarse Wavelength Division Multiplexer (CWDM) system is an accessory product that is
used when it is desirable or necessary to combine the forward and reserve path optical signals
from up to four Digivance systems onto a single optical fiber. Each CWDM system consists of a
Host Module, Host Module mounting shelf, and Remote Module. The CWDM Host Module
mounting shelf can support up to three CWDM Host Modules. The RU single-STM mounting
shelf and the outdoor cabinets provide a mounting slot for installing a CWDM Remote Module.
The CWDM Host Module and Host Module Mounting Shelf are shown in Figure 6. The
CWDM Remote Module is shown in Figure 7. For complete information about the CWDM
system, refer to the Digivance System Coarse Wavelength Division Multiplexer User Manual
(ADCP-75-142).
18647-A
Figure 6. CWDM Host Module and Host Module Mounting Shelf
18648-A
Figure 7. CWDM Remote Module
Page 7
© 2004, ADC Telecommunications, Inc.
ADCP-75-169 • Issue 1 • June 2004
4
INSTALLATION PROCEDURES
This section provides the installation procedures for the HU and the WDM host module
(accessory item). The installation procedures for the Interface Panels are provided in the
Digivance Long Range Coverage Solution SMR Interface Panels User Manual (ADCP-75-143).
The installation procedures for the CWDM Host Module and the Host Module Mounting Shelf
are provided in the Digivance System Coarse Wavelength Division Multiplexer User Manual
(ADCP-75-142). Installation of the RU components may proceed separately from installation of
the HU.
4.1
Before Starting Installation
Before beginning the installation, review the system design plan with the system engineer.
Make sure each equipment installation site is identified and located and all cable runs are
mapped out. Also identify all tools and materials that are required to complete the installation.
4.1.1
Tools and Materials
The following tools are required to complete the procedures in this section:
•
•
•
•
•
•
•
•
•
•
•
Box cutter
Pencil or scribe
Medium size flat-bladed screwdriver
Phillips screwdriver (#2)
TORX screwdriver (T20 bit)
Pliers
Wire cutters
Wire stripper
Tool kit for attaching N-type male connectors to coaxial cable
Multimeter
Optical power meter
The following materials are required to complete the procedures in this section:
•
•
•
•
•
•
•
•
•
#18 AWG (1.0 mm) insulated stranded copper wire (for chassis grounding wire)
#18 AWG (1.0 mm) red and black insulated copper wire (for DC power wires)
Category 3 or 5 cable (for external alarm system wires)
#6 ring terminal (1) for #18 wire (for chassis ground wire connection)
#6 fork terminals (2) for #18 wire (for DC power wiring connection)
Single-mode patch cord(s) with SC connectors (1, 2 or 3 depending on the application)
High performance, flexible, low-loss 50-ohm coaxial cable
N-type male connectors
Wire ties
Page 8
© 2004, ADC Telecommunications, Inc.
ADCP-75-169 • Issue 1 • June 2004
4.2
Unpacking and Inspection
This section provides instructions for opening the shipping boxes, verifying that all parts have
been received, and verifying that no shipping damage has occurred. Use the following
procedure to unpack and inspect the HU and any accessories:
1. Open the shipping cartons and carefully unpack each component from the protective
packing material.
2. Check each component for broken or missing parts. If there are damages, contact ADC
(see section 6 at the end of this manual) for an RMA (Return Material Authorization) and
to reorder if replacement is required.
4.3
OSP Fiber Cable Installation Guidelines
The outside plant (OSP) fiber optic cables should be routed between the HU and RU and
terminated before the equipment is installed. A diagram of a typical OSP cable routing is shown
in Figure 8. At the HU, the OSP cable should be terminated at a fiber distribution panel and
spliced to pigtails. Jumper patch cords may then be used to link the HU optical ports to the OSP
cable terminations. Whenever possible, a guideway such as the FiberGuide system should be
provided to protect the fiber optic patch cords from damage and to prevent excessive bending.
The procedures for connecting the OSP cable optical fibers to the HU is provided in Section 4.8.
X
SPLICE
HOST UNIT
TERMINATION
HOST SITE
FIBER DISTRIBUTION
PANEL
PATCH
CORDS
X
OUTSIDE PLANT
CABLE
OUTDOOR
REMOTE SITE
INDOOR
REMOTE SITE
INDOOR
MOUNTING
SHELF
STM
STM
PATCH
CORDS
OUTDOOR
CABINET
INDOOR/OUTDOOR
CABLE WITH
PIGTAIL LEADS
X
SPLICE
ENCLOSURE
FIBER DISTRIBUTION
PANEL
X
18626-B
Figure 8. Typical Fiber Optic Cable Routing
Page 9
© 2004, ADC Telecommunications, Inc.
ADCP-75-169 • Issue 1 • June 2004
When routed to the RU outdoor cabinet, the OSP fiber optic cable should be spliced to a
connectorized outdoor-rated cable (consisting of individual jacketed pigtails) which is then
routed into the outdoor cabinet. The individual pigtails can then be connected directly to the
STM optical ports. A connector is provided on the bottom of the RU outdoor cabinet to seal the
cable entry point and provide strain relief. The procedure for routing the fiber cable into an
outdoor cabinet in provided in the applicable Remote Unit Installation and Maintenance Manual
(see Related Publications section).
When routed to the RU indoor mounting shelf, the OSP cable should be terminated at a fiber
distribution panel and spliced to pigtails. Jumper patch cords may then be used to link the STM
optical ports to the OSP cable terminations. Whenever possible, a guideway such as the
FiberGuide system should be provided to protect the fiber optic patch cords from damage and to
prevent excessive bending. The procedure for connecting the OSP optical fibers to an STM
mounted in the indoor mounting shelf is provided in the applicable Remote Unit Installation and
Maintenance Manual (see Related Publications section).
4.4
HU Mounting Procedure
The HU may be mounted in either a 19-inch or 23-inch EIA or WECO equipment rack. Both
US standard and metric machine screws are included for rack mounting the HU. When loading
the HU in a rack, make sure the mechanical loading of the rack is even to avoid a hazardous
condition such as a severely unbalanced rack. The rack should safety support the combined
weight of all the equipment it holds. In addition, maximum recommended ambient temperature
for the HU is 50º C (122º F). Allow sufficient air circulation or space between units when the
HU is installed in a multi-rack assembly because the operating ambient temperature of the rack
environment might be greater than room ambient.
Warning: Wet conditions increase the potential for receiving an electrical shock when
installing or using electrically powered equipment. To prevent electrical shock, never install or
use electrical equipment in a wet location or during a lightning storm.
Note: To insure that all optical connectors remain dust-free during installation, leave all dust
caps and dust protectors in place until directed to remove them for connection.
Use the following procedure to install the HU in the equipment rack:
1. The HU is shipped with the mounting brackets installed for 19-inch rack installations. If
mounting the HU in a 19-inch rack, proceed to step 4. If mounting the HU in a 23-inch
rack, proceed to step 2.
2. Remove both mounting brackets from the HU (requires TORX screwdriver with T20 bit)
and save screws for reuse.
3. Reinstall both mounting brackets so the long side of the bracket is flush with the HU front
panel as shown in Figure 9. Use the screws removed in step 2 to re-attach the brackets to
the HU chassis.
Page 10
© 2004, ADC Telecommunications, Inc.
ADCP-75-169 • Issue 1 • June 2004
FOR INSTALLATION IN 23-INCH
RACKS, REMOVE AND REINSTALL
MOUNTING BRACKETS AS SHOWN
17864-A
Figure 9. Installing the Mounting Brackets for 23-Inch Rack Installations
4. Position the HU in the designated mounting space in the rack (per system design plan) and
then secure (but do not tighten) the HU to the rack using the four machine screws provided
(use #12-24 or M6 x 10 screws, whichever is appropriate) as shown in Figure 10.
Note: Provide a minimum of 3 inches (76 mm) of clearance space on both the left and
right sides of the HU for air intake and exhaust.
17865-A
Figure 10. HU Rack Mount Installation
Page 11
© 2004, ADC Telecommunications, Inc.
ADCP-75-169 • Issue 1 • June 2004
4.5
Chassis Ground Connection
A stud is provided on the rear side of the chassis for connecting a grounding wire to the chassis.
Use the following procedure to connect the grounding wire to the chassis and to route the
grounding wire to an approved earth ground source.
1. Obtain a length of #18 AWG (1.00 mm) insulated stranded copper wire for use as a
chassis grounding wire.
2. Terminate one end of the wire with a ring terminal.
3. Locate the chassis ground stud at the rear of the HU as shown in Figure 11.
4. Attach the ring end of the wire to the chassis ground stud (see Figure 11).
17866-A
Figure 11. Chassis Ground Stud
5. Route the free end of the chassis grounding wire to an approved (per local code or
practice) earth ground source.
6. Cut the chassis grounding wire to length and connect it to the approved ground source as
required by local code or practice.
Note: Be sure to maintain reliable grounding. Pay particular attention to ground source
connections.
4.6
Coaxial Cable Connections
The RF interface between the HU and the EBTS is supported through either two (non-diversity)
or three (diversity) type N female connectors mounted on the HU rear panel. On non-diversity
units, one connector provides the coaxial cable connection for the forward path (downlink)
signal and the other connector provides the coaxial cable connection for the reverse path
(uplink) signal. On diversity units, a third connector provides the coaxial cable connection for
the diversity reverse path (uplink) signal.
In most installations, it is usually necessary to insert an external attenuator into the forward
path link between the HU and the EBTS. A signal level that is greater than –9 dBm will
overdrive and possibly damage the HU receiver. Before completing the forward path connection
at the EBTS, verify that the composite forward path RF signal level at the HU is between –9
Page 12
© 2004, ADC Telecommunications, Inc.
ADCP-75-169 • Issue 1 • June 2004
and –40 dBm. Refer to the applicable System Operation and Maintenance Manual for the
procedure to determine the forward path input signal level. If the Primary Interface Panel and
Expansion Panel are required, refer to the Digivance LRCS SMR Interface Panels User Manual
(ADCP-75-143) for the coaxial cable installation procedures.
The HU should be mounted as close as possible to the EBTS to minimize cable losses. Use the
following procedure to route and connect the forward and reverse path coaxial cables to the HU:
1. Obtain the required lengths of high performance, flexible, low loss 50-ohm coaxial
communications cable (RG-400 or equivalent) for all coaxial connections.
2. Route the forward and reverse path coaxial cables and the diversity reverse path cable (if
the HU supports diversity) between the HU and the EBTS interface (per system design
plan) and cut to the required length. Allow sufficient slack for dressing and organizing
cables at the HU and for installing an external attenuator in the forward path link.
3. Terminate each cable with an N-type male connector following the connector supplier’s
recommendations.
4. If required, install an external attenuator in the forward path.
Note: The composite forward path RF signal level at the HU must be between –9 and
–40 dBm. Do not connect the forward path cable until the composite forward path RF
signal level is measured and the amount of external attenuation required is determined.
5. Connect the forward path cable to the FORWARD RF IN connector on the HU front
panel as shown in Figure 12.
6. Connect the reverse path cable to the REVERSE 1 RF OUT connector on the HU front
panel (see Figure 12).
REVERSE 1
RF OUT CONNECTOR
(REVERSE PATH)
REVERSE 2
RF OUT CONNECTOR
(DIVERSITY
REVERSE PATH)
19719-A
FORWARD RF IN
CONNECTOR
(FORWARD PATH)
TYPE-N MALE
CONNECTOR
Figure 12. Forward and Reverse Path Coaxial Cable Connections
Page 13
© 2004, ADC Telecommunications, Inc.
ADCP-75-169 • Issue 1 • June 2004
7. If the HU supports diversity, connect the diversity reverse path cable to the REVERSE 2
RF OUT connector on the HU front panel (see Figure 12).
8. Dress and secure cables at the HU.
9. Complete all remaining coaxial connections as specified in the system design plan.
4.7
WDM Mounting Procedure (Accessory)
A bi-directional wavelength division multiplexer (WDM) module is available as an accessory
item for the Digivance system. If the application does not require the use of a WDM system,
skip this section and proceed to Section 4.8. The WDM mounts in a slot that is provided at the
rear side of the HU.
Use the following procedure to install the WDM:
1. Remove the cover plate from the WDM mounting slot located on the rear side of the HU
as shown in Figure 13.
2. Slide the WDM into the mounting slot.
3. Push inward on the two Push/Pull fasteners to secure the WDM to the HU.
4. Carefully coil up the two WDM pigtails to protect them from damage prior to connection
to the HU optical ports.
19720-A
WDM MODULE
REMOVE COVER PLATE
FOR WDM MODULE
INSTALLATION
Figure 13. WDM Installation
4.8
Optical Connections
The optical interface between the HU and the RU is supported by either two (non-diversity) or
three (diversity) optical ports. Each optical port consists of an SC optical adapter which is
mounted on the HU front panel. The PORT 1 port provides the optical connection for the
forward path (downlink) signal. The PORT 2 port provide the optical connection for the reverse
Page 14
© 2004, ADC Telecommunications, Inc.
ADCP-75-169 • Issue 1 • June 2004
path (uplink) signal. The PORT 3 port provides the optical connection for the diversity reverse
path (uplink) signal.
The optical connections are dependent on whether or not a WDM host module (accessory) or
CWDM host module (accessory) is installed:
• If the installation does not include either a WDM or CWDM module, proceed to
Section 4.8.1 for the optical connections procedure.
• If the installation includes a WDM module, proceed to Section 4.8.2 for the optical
connections procedure.
• If the installation includes a CWDM module, refer to the Digivance System Coarse
Wavelength Division Multiplexer User Manual (ADCP-75-142) for the optical connection
procedure.
Danger: This equipment uses a Class 1 Laser according to FDA/CDRH rules. Laser radiation
can seriously damage the retina of the eye. Do not look into the ends of any optical fiber. Do not
look directly into the optical transmitter of any unit or exposure to laser radiation may result.
An optical power meter should be used to verify active fibers. A protective cap or hood MUST
be immediately placed over any radiating transmitter or optical fiber connector to avoid the
potential of dangerous amounts of radiation exposure. This practice also prevents dirt particles
from entering the connector.
4.8.1
Optical Connections Without WDM or CWDM System
Use the following procedure to connect the optical fibers when a WDM is not installed with the HU:
1. Obtain two (non-diversity) or three (diversity) patch cords that are of sufficient length to
reach from the HU to the fiber distribution panel.
2. Designate one of the patch cords as the forward path link and the other as the reverse
path link and attach an identification label or tag next to the connector. For diversity
systems, designate and label or tag a third patch cord as the diversity reverse path link.
3. Remove the dust caps from the HU optical ports and from the patch cord connectors that
will be connected to the HU.
4. Clean each patch cord connector following the patch cord supplier’s recommendations.
Note: To protect the optical receivers, insert a 15 dB attenuator in each optical path. When
the system is turned-up and tested, the attenuator may be resized or removed.
5. Insert each patch cord connector into the appropriate optical port as shown in Figure 14
and as specified by the following:
PORT 1 - Forward path patch cord
PORT 2 - Reverse path patch cord
PORT 3 - Diversity reverse path patch cord
Page 15
© 2004, ADC Telecommunications, Inc.
ADCP-75-169 • Issue 1 • June 2004
PORT 1
FORWARD PATH
PORT 2
REVERSE PATH
19721-A
PORT 3
DIVERSITY
REVERSE PATH
Figure 14. Fiber Optic Cable Connections To Host Unit
6. Route the patch cords from the HU to the fiber distribution panel.
Note: The HU optical adapters are angled to the left. Therefore, always route patch cords
to the HU from the left side of the rack. Routing patch cords to the HU from the right may
exceed the bend radius limitations for the optical fiber.
7. At the fiber distribution panel, identify the OSP cable optical fiber terminations that
correspond to the forward, reverse, and diversity reverse (if supported) paths.
8. Remove the dust caps from the OSP cable optical fiber adapters and from the patch cord
connectors.
9. Clean each patch cord connector (follow patch cord supplier’s recommendations) and then
mate the connector with the appropriate OSP cable adapter.
10. Store any excess patch cord slack at the fiber distribution panel.
4.8.2
Optical Connections With WDM System
Use the following procedure to connect the optical fibers when a WDM module is installed with
the HU:
1. Obtain a patch cord that is of sufficient length to reach from the WDM module to the fiber
distribution panel.
2. Remove the dust cap from the optical port (Port 1) on the WDM module and from the
patch cord connector that will be connected to the WDM module.
Page 16
© 2004, ADC Telecommunications, Inc.
ADCP-75-169 • Issue 1 • June 2004
3. Clean the patch cord connector (follow patch cord supplier’s recommendations).
Note: To protect the optical receivers, insert a 15 dB attenuator in each optical path. After
the optical power has been measured, the attenuator may be resized or removed.
4. Insert the connector into one of the WDM module’s optical port (port 1).
5. Route the patch cord from the WDM to the fiber distribution panel.
6. Identify the OSP cable optical fiber termination that corresponds to the RU.
7. Remove the dust cap from the OSP cable optical adapter and from the patch cord
connector.
8. Clean the patch cord connector (follow patch cord supplier’s recommendations) and then
mate the connector with the appropriate OSP cable adapter.
9. Store any excess patch cord slack at the fiber distribution panel.
10. Remove the dust caps from the HU optical ports and from the WDM pigtails that will be
connected to the HU.
11. Clean each pigtail connector (follow the procedures provided with the WDM module) and
then insert the connector into the appropriate optical port on the HU as shown in Figure 14
and as diagramed in Figure 15.
Note: The HU optical adapters are angled to the left. Therefore, pigtails should always be
routed to the HU from the left side of the rack. Routing pigtails to the HU from the right
side of the rack may exceed the bend radius limitations for the optical fiber.
HOST UNIT
PORT
1
PORT
2
REVERSE
PATH
FORWARD
PATH
PORT
3
DIVERSITY
REVERSE PATH
(IF SUPPORTED)
WDM
PIGTAILS
WAVELENGTH
DIVISION
MULTIPLEXER
BI-DIRECTIONAL
FIBER LINK WITH
REMOTE UNIT
1
2
3
FIBER DISTRIBUTION
PANEL
X
FROM STM
X
TO/FROM REMOTE
WDM MODULE
19718-A
Figure 15. Fiber Optic Connections To WDM Module
12. If the HU supports diversity, follow steps 2–5 in Section 4.8.1 for routing and connecting
the diversity reverse path link.
Page 17
© 2004, ADC Telecommunications, Inc.
ADCP-75-169 • Issue 1 • June 2004
4.9
Controller Area Network Connections
Controller area Network (CAN) interface connections between multiple HU’s are supported by
a pair of RJ-45 jacks. One of the jacks is designated as the NET IN port and the other jack is
designated as the NET OUT port. The CAN interface allows up to 24 HU’s to be connected
together (in daisy-chain fashion) and controlled through a single Digivance EMS computer. A
one meter long cable is available (accessory) for CAN connections. Use the following
procedure to connect CAN interface cables between multiple HU’s:
1. Connect one end of the CAN interface cable (accessory) to either the NET IN or NET
OUT port on HU #1 as shown in Figure 16.
2. Route the CAN interface cable to HU #2 and connect the cable’s free end to the port that is
the logical opposite of the CAN interface connection at HU #1.
Note: Connect OUT to IN and IN to OUT. If connected to a NET OUT port at HU #1,
connect to the NET IN port at HU #2. If connected to a NET IN port at HU #1, connect to
a NET OUT port at HU #2.
3. If a third HU will be connected to the network, connect a second CAN interface cable to
the remaining network port on HU #2.
NET IN
NET OUT
17869-B
RJ-45 CONNECTOR
DETAIL
Figure 16. Controller Area Network Connections
4. Route the second CAN interface cable to HU #3 and connect the cable’s free end to the
port that is the logical opposite of the CAN interface connection at HU #2.
5. Repeat steps 3 and 4 for each additional HU that is added to the network up to a total of 24
HU’s. A diagram of typical CAN interface connections is shown in Figure 17.
Page 18
© 2004, ADC Telecommunications, Inc.
ADCP-75-169 • Issue 1 • June 2004
HOST UNIT 1
NET IN NET OUT
HOST UNIT 2
HOST UNIT 3
NET IN NET OUT
NET IN NET OUT
16900-B
TO NEXT HOST UNIT
(NOTE: LAST HOST HAS NO
CONNECTION AT NET OUT)
CONTROLLER AREA NETWORK
INTERFACE CABLES
Figure 17. Configuring CAN Connections with Multiple Host Units
4.10 EMS Computer Connection
The service interface connection between the HU and the EMS computer is supported by a
single DB-9 female connector. The service connector provides an RS-232 DTE interface. A
three meter long straight-through RS-232 interface cable is available (accessory) for connecting
the EMS computer to the HU. Use the following procedure to install the service interface cable:
1. Connect one end of the service interface cable (accessory) to the SERVICE port as shown
in Figure 18.
2. Route the service interface cable to the EMS computer and connect the free end of the
cable to the computer’s RS-232 DCE port. Refer to the user manual provided with the
computer to locate and configure the specified port.
17870-A
Figure 18. Service Interface Connection
Page 19
© 2004, ADC Telecommunications, Inc.
ADCP-75-169 • Issue 1 • June 2004
4.11 External Alarm System Connections
The alarm interface between the HU and an external alarm system is supported by a six-terminal
plug (with screw-type terminals) that connects to a receptacle mounted on the HU front panel.
The terminal plug provides connections to normally open (NO) and normally closed (NC) dry
type alarm contacts for both major and minor alarms. A category 3 or 5 cable is typically used to
connect the HU to the external alarm system. Use the following procedure to install the alarm
wiring and connect it to the HU:
1. Obtain the required length of category 3 or 5 cable.
2. Route the cable between the HU and the external alarm system (if not already routed) and
then cut to the required length. Allow sufficient slack for dressing and organizing the cable
at the HU.
3. Strip back the outer cable sheath and insulation to expose the wires at both ends of the
cable and strip back 0.2 inches (5 mm) of insulation from each wire.
4. Connect the Major alarm wire pair to the MAJOR COM/NC or MAJOR COM/NO
terminals (whichever is required by the external alarm system) on the HU alarm terminal
connector (supplied with HU) as shown in Figure 19.
ALARM
CONNECTOR
17871-A
NO
COM
NC
MINOR ALARM WIRES
NC
NO COM
MAJOR ALARM WIRES
Figure 19. External Alarm System Connections
5. Connect the Minor alarm wire pair to the MINOR COM/NC or MINOR COM/NO
terminals (whichever is required by the external alarm system) on the HU alarm terminal
connector (see Figure 19).
Page 20
© 2004, ADC Telecommunications, Inc.
ADCP-75-169 • Issue 1 • June 2004
6. Connect the Major and Minor alarm wire pairs to the appropriate terminals on the external
alarm system.
7. Dress and secure cable per standard industry practice.
4.12 DC Power Connections
The HU is powered by ± 21 to 60 VDC power (nominal ± 24 or ± 48 VDC). The power is fed to
the HU through a screw-down type terminal strip located on the rear side of the unit. Power to
the HU must be supplied through a fuse panel such as the 20 position PowerWorx GMT Fuse
Panel (available separately) and the power must be protected with a 3 Amp GMT fuse. Use the
following procedure to install the power wiring:
1. Obtain one pair of #18 AWG (1.00 mm) red and black insulated copper wire for use as the
power wiring.
2. Terminate one end of each wire with a fork terminal as shown in Figure 20.
3. Connect the power wires to the power terminal strip at the rear of the HU.
4. Route the free ends of the wires to the fuse panel and locate the terminals that will be used
for the power feed. Refer to the user manual provided with the fuse panel for specific
information.
5. Remove the fuse from the circuit that will power the HU.
+ (BLACK)
FORK
TERMINALS
– (RED)
#18 AWG
(1.0 mm)
COPPER
WIRE
17872-B
Figure 20. DC Power Connections
Page 21
© 2004, ADC Telecommunications, Inc.
ADCP-75-169 • Issue 1 • June 2004
6. Connect the power wires to the appropriate terminals as specified in the fuse panel user
manual.
Note: When connecting the equipment to the supply circuit, be sure to check equipment
nameplate ratings to avoid overloading circuits which may cause damage to over-current
protection devices and supply wiring.
7. Dress and secure the power wiring at the fuse panel and the HU. The procedure for
checking the voltage level and verifying that the HU is ready to power up is provided in
the applicable System Operation and Maintenance Manual (see Related Publications
section).
4.13 Installation Complete
When the installation is complete, refer to the applicable System Operation and Maintenance
Manual (see Related Publications section) for the system turn-up and test procedures.
5
MAINTENANCE
This section provides the HU maintenance procedures. Refer to this section when scheduled
maintenance is required. The fault isolation and troubleshooting procedures are provided in the
applicable System Operation and Maintenance Manual (see Related Publications section).
5.1
Host Unit Fan Replacement Procedure
The HU is equipped with two cooling fans which are located on the right side of the HU
enclosure. The cooling fans blow cool air into the enclosure. Heated air is exhausted through the
vent openings on the left side of the enclosure. Replacement of the fans requires that the HU be
turned off for a short period of time. The recommended replacement interval is 60 months. Use
the following procedure to remove and replace the HU cooling fans:
1. Before working on the HU or handling a fan, slip on an Electro-Static Discharge (ESD)
wrist strap and connect the ground wire to an earth ground source. Wear the ESD wrist
strap while completing each section of the fan installation procedure.
Warning: Electronic components can be damaged by static electrical discharge. To prevent
ESD damage, always wear an ESD wrist strap when working on the HU, STM, or LPA and
when handling electronic components.
2. Notify the NOC or alarm monitoring system operator that the system is going offline.
3. Place the HU On/Off switch in the OFF position (press O).
4. Remove the six flat-head screws (requires TORX screwdriver with T10 bit) that secure the
fan/grill assembly to the right side of the HU enclosure as shown in Figure 21. Save
screws for reuse.
5. Carefully withdraw the fan/grill assembly from the enclosure until the wiring harness is
exposed and the connectors are accessible.
Page 22
© 2004, ADC Telecommunications, Inc.
ADCP-75-169 • Issue 1 • June 2004
17873-A
Figure 21. Host Unit Fan/Grill Assembly Removal
6. Lift the small latch on each wiring harness connector and carefully unplug each connector
from the circuit board connector.
7. Remove the plastic rivets that secure each fan to the grill by pushing outward on the rivet
center post until the rivet can be withdrawn from the grill as shown in Figure 22.
16173-B
Figure 22. Removing Host Unit Fans From Grill
8. Remove both fans from the grill
9. Use the rivets removed in step 7 to secure the replacement fans to the grill. Orient each fan
so the wiring harness is on the top and the arrow on the fan points into the enclosure.
10. Connect the two wiring harness connectors to the circuit board connectors.
11. Secure the fan/grill assembly to the side of the enclosure (see Figure 21) using the six flathead screws removed in step 4.
12. Place the HU On/Off switch in the ON position (press I).
13. Verify that the fans run properly following power-up.
14. Notify the NOC or alarm monitoring system operator that the system is going back online.
Page 23
© 2004, ADC Telecommunications, Inc.
ADCP-75-169 • Issue 1 • June 2004
6
CUSTOMER INFORMATION AND ASSISTANCE
PHONE:
EUROPE
Sales Administration: +32-2-712-65 00
Technical Assistance: +32-2-712-65 42
EUROPEAN TOLL FREE NUMBERS
Germany: 0180 2232923
UK:
0800 960236
Spain:
900 983291
France: 0800 914032
Italy:
0800 782374
U.S.A. OR CANADA
Sales: 1-800-366-3891 Extension 73000
Technical Assistance: 1-800-366-3891
Connectivity Extension 73475
Wireless Extension 73476
ASIA/PACIFIC
Sales Administration: +65-6294-9948
Technical Assistance: +65-6393-0739
ELSEWHERE
Sales Administration: +1-952-938-8080
Technical Assistance: +1-952-917-3475
WRITE:
ADC TELECOMMUNICATIONS, INC
PO BOX 1101,
MINNEAPOLIS, MN 55440-1101, USA
ADC TELECOMMUNICATIONS (S'PORE) PTE. LTD.
100 BEACH ROAD, #18-01, SHAW TOWERS.
SINGAPORE 189702.
ADC EUROPEAN CUSTOMER SERVICE, INC
BELGICASTRAAT 2,
1930 ZAVENTEM, BELGIUM
PRODUCT INFORMATION AND TECHNICAL ASSISTANCE:
[email protected]
[email protected]
[email protected]
13944-L
[email protected]
Contents herein are current as of the date of publication. ADC reserves the right to change the contents without prior notice.
In no event shall ADC be liable for any damages resulting from loss of data, loss of use, or loss of profits and ADC further
disclaims any and all liability for indirect, incidental, special, consequential or other similar damages. This disclaimer of
liability applies to all products, publications and services during and after the warranty period. This publication may be
verified at any time by contacting ADC's Technical Assistance Center.
© 2004, ADC Telecommunications, Inc.
All Rights Reserved
Printed in U.S.A.
Page 24