1
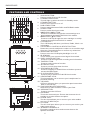
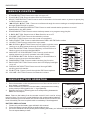
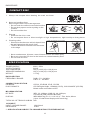
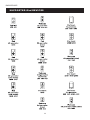
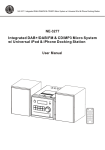
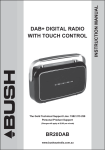
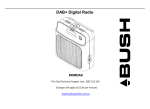
DAB+ CD Mico System
with Universal Dock for iPod
The Gold Technical Support Line: 1902 215 259
Personal Product Support
(Charges will apply at $2.95 per minute)
BMS05DABIP
BMS05DABIP
Introduction
Thank you for buying this Bush product, which is designed to give you many years of trouble
free service.
You may already be familiar with using a similar unit, but please take time to read these
instructions. They are designed to familiarise you with the unit's many features and to ensure
you get the very best from your purchase.
Safety is important
Your safety and the safety of others is important.
Please therefore, ensure you read the “Safety Instructions” before you operate this unit.
Warranty
In the unlikely event that your product fails to work normally, please call the below free phone
number to discuss the problem with one of our qualified service engineers.
Australia.
Bush Warranty: 1800 509 394
New Zealand
Bush Warranty: 0800 450 259
2
BMS05DABIP
SAFETY PRECAUTIONS
To achieve the utmost in enjoyment, performance and in order to become familiar with its features, please
read this manual carefully before attempting to operate the unit.
Important Notes
The below safety and operating instructions should be retained for future reference.
* Do not exposed this Micro System to any types of liquid as they will cause serious damage to the unit. Do
not place any objects filled with water on or near the unit.
* Do not place the unit in areas with direct sunlight or close to heat radiating appliances, such as; heaters
etc. This may cause the unit to overheat and damage the unit.
* Keep the unit in area that is well ventaliated and is not dusty.
* Place the unit on a clean flat surface that does not experience vibration or is exposed to humid or moist
conditions.
* Do not place any candles on or near the unit.
* Make sure you dispose of your old batteries in a safe and eco-friendly way.
* Do not allow anything to cover or obstruct the units ventilation openings. A minimum of 10cm should be
kept around the unit for ventilation.
* Please operate all features and functions as outlined in this manual. Any modifications or non-outlined
activities will make the warranty void.
* Make sure you connect the power cord correctly and turn the power on at the mains power before
operating the unit.
* Make sure you use the iPod Dock connectors to connect your iPod to the unit. This will protect both the
unit and you iPod.
* Store your CDs in a cool area to avoid any damage.
* There are no serviceable parts in this unit. If you have any issues with the operation of this unit please
contact the Bush Service and Warranty number provided on the front page of this manual.
CAUTION: TO REDUCE THE RISK OF ELECTRIC SHOCK DO NOT REMOVE COVER (OR BACK), NO
USER SERVICEABLE PARTS INSIDE, REFER SERVICING TO QUALIFIED SERVICE PERSONNEL.
DANGEROUS VOLTAGE
This unit is a conductor of dangerous voltage, do not open or modify this unit to avoid any risk
of electric shock to persons within this product's enclosure.
ATTENTION
The owner's manual contains important operating and maintenance instructions, for your
safety, it is necessary to refer to the manual.
WARNING :TO PREVENT FIRE OR SHOCK HAZARD, DO NOT EXPOSE THIS APPLIANCE TO DRIPPING
OR SPLASHING WATER OR LIQUID .
Note: This unit will become warm when used for a long periods of time. This is normal and does not indicate
a problem with the unit. This unit includes micro-processors which may malfunction as a result of external
electrical interference/noise or electrostatic discharge . If the unit is not working properly, disconnect the
power source and then reconnect it.
3
BMS05DABIP
Contents
FEATURES AND CONTROLS …….........……………………………………………….…………….... 5
REMOTE CONTROL …………..........……………………………………..…………….……………... 6
REMOTE BATTERY OPERATION........................................... ……………......…………………… 6
LISTENING TO YOUR RADIO ……..…………………………….……………................…………. 7-8
STATION PRESETS (remote control only) ……….........................................................…….… 9
FACTORY RESET …………………………………………………………...………..................…….. 9
LISTENING TO YOUR COMPACT DISCS …….……………...…………..........................…….. 9-11
LISTENING TO YOUR iPod ……………………………………...……….............................…….. 11
CHARGING UP YOUR iPod ……………………………………………...............…...…………….. 11
AUX INPUT …………………………………………………………...….........................………….. 11
ON TIMER FUNCTION ………….……………………………………….....................…………….. 11
SLEEP FUNCTION ……………………………………………………...….....................………….. 12
PRESET EQ (remote control only) …………………………………………...........…...…………….. 12
X-BASS FUNCTION (remote control only) ………………………...…….........................……….. 12
MUTE FUNCTION (remote control only) ……………………...………...............................…….. 12
BACKLIGHT FUNCTION ……………………...……………...................................................... 12
HEADPHONE INPUT …………………...……...........................................................……….. 12
COMPACT DISC ……………………...………..............................................................……... 13
SPECIFICATION …………………….................................................................…………….. 13
SUPPORTED iPod DEVICES ………….............................................................…………...... 14
WARRANTY …………………………………………...………….……………...……………………… 15
4
BMS05DABIP
FEATURES AND CONTROLS
1 2
4 5
6
7 8
3
1.
9 11
10
2.
3.
4.
5.
6.
7.
8.
12 13 14 15 16
17
9.
10.
11.
12.
13.
18
14.
15.
19
16.
20
17.
18.
21
22
19.
20.
21.
22.
23.
24.
23
24
iPod/CD BUTTON:
Press to select iPod or CD function.
STANDBY INDICATOR:
This will light up when the unit is in Standby mode.
STANDBY BUTTON:
Press to turn the unit on or off.
DAB+/FM BUTTON:
Press to switch between DAB+ and FM Radio mode.
AUX BUTTON:
Press to select Aux Input mode.
I◀◀/ SCROLL ▼ BUTTON:
Press to scroll down through the menu settings or to
skip backwards through iPod/CD/AUX In modes.
▶▶I / SCROLL ▲ BUTTON:
Press to scroll up through the menu settings or to skip
forwards through iPod/CD/AUX In modes.
LCD DISPLAY:
The LCD Display will show your Menu, Radio, Music etc
information.
VOL/SCROLL CONTROL & SELECT BUTTON:
Rotate the control to adjust the volume or to scroll through
the menu. Press this button to confirm any selections.
BACKLIGHT BUTTON:
Press to turn the LCD Display backlight on or off.
IR SENSOR:
This is where your remote control signal is received.
DISPLAY/INFO BUTTON:
Press to scroll through DAB+ scrolling text information.
TIMER BUTTON:
Press to set the on timer function.
SLEEP BUTTON:
Press to set unit sleep time function.
STOP/MENU BUTTON:
Press to stop play in iPod/CD/Aux In Mode or press to
access the Main Menu.
PLAY/PAUSE BUTTON:
Press to play or pause in iPod/CD/Aux in mode.
HEADPHONE JACK:
This input allows you to connect your headphones for
personal listening.
CD DOOR:
CD Door will open when you press the open button then
load or remove disc.
iPod DOCKING STATION DOOR:
Slide door to open and then connect your iPod.
OPEN BUTTON:
Press to open the CD Door.
ANTENNA:
This is the Antenna Input. Ensure the Antenna wire is
straight to receive the best reception.
AUX IN JACK:
The Aux Input allows you to connect your other audios
sources i.e. MP3 Player.
AC CORD:
The AC Cord input allows you to connect your unit to your
main power source.
SPEAKER TERMINALS:
Extend the speaker wires and connect them to the
speaker terminals.
5
BMS05DABIP
REMOTE CONTROL
1.
2.
3.
4.
5.
6.
7.
8.
9.
10.
11.
12.
13.
14.
15.
16.
17.
STANDBY BUTTON: Press to turn the unit on or off.
iPod/CD BUTTON: Press to select iPod or CD function.
SELECT/REPEAT BUTTON: Press to confirm selections in the main menu or press to repeat play
in CD/iPod/Aux In mode.
I◀◀/ SCROLL ▼ BUTTON: Press to scroll down through the menu settings or to skip backwards
through iPod/CD/AUX In modes.
NAVIGATE DOWN/FOLDER BUTTON: Press to recall stored station presets or to scroll
downwards in the MP3 folder.
PROGRAM BUTTON: Press to store station presets or to program song playlist.
X-BASS BUTTON: Press to turn X-Bass function on or off.
VOLUME - BUTTON: Press to decrease the volume.
MUTE BUTTON: Press to turn the sound off completely.
DAB+/FM BUTTON: Press to switch between DAB+ and FM Radio modes.
AUX BUTTON: Press to select Aux Input mode.
▶▶I / SCROLL ▲ BUTTON: Press to scroll up through the menu
settings or to skip forwards through iPod/CD/AUX In modes.
9
1
PLAY/PAUSE BUTTON: Press to stop play in iPod/CD/Aux In
10
Mode or press to access the Main Menu.
2
11
NAVIGATE UP /FOLDER BUTTON: Press to recall stored
3
station presets or to scroll upwards in the MP3 folder.
12
STOP/MENU BUTTON: Press to stop play in iPod/CD/Aux In
13
4
14
Mode or press to access the Main Menu.
5
15
RANDOM BUTTON: Press to select random play function.
16
17
6
BACKLIGHT BUTTON: Press to turn the LCD Display backlight
on or off.
18. DISPLAY/INFO BUTTON: Press to scroll through DAB+
scrolling text information.
19. EQ BUTTON: Press ti scroll through the EQ Preset options.
20. VOLUME + BUTTON: Press to increase the volume.
7
8
18
19
20
REMOTE BATTERY OPERATION
1.
2.
3.
Press downwards on the compartment cover of the remote control to
open battery compartment.
Place the battery (CR2032) into the battery compartment according
to the polarity marking(place the “+” sign upwards).
Replace the cover by inserting the cover and pressing downwards.
Make sure it snaps in.
** Battery Included **
Note: Remove the battery from the remote control if not in use for a long
period of time. Do not mix normal batteries with rechargeable batteries.
When the battery becomes weak, the remote control will not function to the
best of its ability. Be sure to replace with a new battery if that happened.
BATTERY PRECAUTIONS
1. Please only use the battery type outlined in this manual.
2. Place the battery into the remote as outlined above only.
3. Be sure to follow the correct polarity when installing the battery as indicated in the battery compartment.
Do not expose battery to heat.
6
BMS05DABIP
LISTENING TO YOUR RADIO
Hints for better reception
This unit is fitted with a single lead wire DAB+/FM antenna, to obtain the best performance, you
should fully extend the wire antenna and adjust the position as well as the direction until you find the
best reception. For ideal DAB+ reception, always maintain the lead wire antenna in a vertical
position is highly recommended.
Getting started DAB+ mode
When the unit is powered up for the first time, it will be in standby mode. The display will show as
“00:00”. Press the STANDBY Button to turn the on and it will automatically enter into the DAB+ mode
and perform full station scan. During the scan the display will show “Scanning …” together with a
slide bar that indicates the progress of the scan and the amount of stations that have been found so
far. (F. 1) (F. 2) (F. 3)
F1
F2
F3
Once the scan has finished, the radio will select the first station found. You can now with the
VOL/SCROLL Control or press the SCROLL ▲ or ▼ Buttons explore the new DAB+ stations. Press
the SELECT Button to select the station you wish to listen to.
Note: If there are no stations found after the full scan, the radio will enter into the Tune Select Menu
and you can press the SCROLL ▲ or ▼ Buttons and the SELECT Button to Manually Scan for the
DAB+ stations in your area. Visit www.digitalradioplus.com.au to check your postcodes receives
digital radio.
Clock
The clock will only be shown and automatically updated if you can receive DAB+ signals in your
location. While the clock synchronises to the current local time please keep the unit in DAB+ mode.
DAB+ Full Scan
When you conduct a Full Scan the unit will search for all available DAB+ stations. Once the scan is
complete, the stations will be stored in alphanumerical order.
1.
To conduct a DAB+ Full Scan, press the MENU Button and scroll to the Tune Select Menu. Then
press the SCROLL ▲ or ▼ Buttons to select “Full scan” and press the SELECT Button to
confirm. The display will show “Scanning...” and a progressing slide bar. (F.4) (F.5)
2.
All the stations found will be stored automatically. To scroll through the stored stations rotate
the VOL/SCROLL Control or press the SCROLL ▲ or ▼ Buttons and press the SELECT Button
to confirm and play selected stations.
F4
F5
DAB+ Manual Scan
1.
To conduct a Manual Station Scan, press the MENU Button and enter the Tune Select Menu.
Then press the SCROLL ▲ or ▼ Buttons to select “Manual tune”. Press the SELECT Button to
confirm. (F. 6)
2.
Rotate the VOL/SCROLL Control or press the SCROLL ▲ or ▼ Buttons to move through the
DAB+ station frequencies. “5A to 13F” will display on the screen with their associated
frequencies (F. 7)
3.
When your desired frequency appears on the display, press the SELECT Button to confirm.
The name of the station group (ensemble/multiplex) will also be displayed.
4.
To listen to the station selected, press on the SELECT Button again.
F6
F7
7
BMS05DABIP
LISTENING TO YOUR RADIO
DAB+ Display Modes
Every time you press the DISPLAY/INFO Button, the display will cycle through the following display
information:
Time/Date
Frequency
Audio Bit Rate
Programme Type
Ensemble/Multiplex (Group name)
DLS
Signal strength
Time and date
The time and date will be the time and date provided by the broadcaster. In the unlikely event that no
clock information is received, the display will show “[No Time]”.
Frequency
The frequency of the present station will be displayed.
Audio bit rate
The display will show the digital audio bit rate being received.
Signal strength
The display will show a slide bar to indicate the signal strength, the stronger the signal, the longer
the bar will be from left to right.
DLS
DLS stands for Dynamic Label Segment which is the scrolling text information provided by the
broadcaster. The information displayed may include song titles, album information etc.
Programme type
This describes the style of the programme that is being broadcast. If the information is not available,
the display will show “[No PTY]”.
Ensemble/Multiplex (Group name)
The Ensemble/Multiplex is the station broadcaster information.
Note: Press and hold the DISPLAY/INFO Button for longer than 2 seconds to view the software
information.
FM Radio
1.
To switch to FM, press the DAB+/FM Button. (F. 8)
2.
To search for the next available frequency, press and hold the I◀◀ or ▶▶I Buttons. The search
will stop automatically once a station has been found.
3.
To manually search for the next available frequency, press the I◀◀ or ▶▶I Buttons or press the
SELECT Button then rotate the VOL/SCROLL Control until the desired frequency is displayed on
the screen.
4.
To select audio mode, press the PLAY/PAUSE Button to toggle between the “Stereo” or “Mono”
selection.
Note: The radio will automatically switch between stereo and mono mode, but you can override this
and switch this function manually which is helpful for poor signal reception.
F8
8
BMS05DABIP
STATION PRESETS (remote control only)
You can store 10 DAB+ or 10 FM Stations Presets for easy access to your favourite stations.
1. To store a Station Preset, tune to the desired station and press and hold the PROGRAM Button on
the remote control until the display shows the preset number. (F. 9)
2.
Press the SCROLL ▲ or ▼ Button to select the desired Station Preset number.
3.
Press the PROGRAM Button again to confirm your selection, the display will show “Preset #
stored”. (F.10)
4.
To recall a Station Preset that you have stored, press the NAVIGATE/FOLDER Buttons on the
remote control, the display will show the preset number and the associated information. (F.11)
F9
F10
F11
FACTORY RESET
To conduct a Factory Reset, please follow the below instructions. Please note this will clear all settings.
1.
Press and hold the MENU Button until the display shows “Press SELECT to confirm reset”.
2.
Release the MENU Button and press the SELECT Button, the display will show “Restarting …”
and once reset is complete it will then perform full station scan.
3.
After the scan has finished, the radio will select and display the first station found.
Note: All of your stored DAB+ & FM presets will be lost once the reset has taken place.
LISTENING TO YOUR COMPACT DISCS
NOTE : Although this CD/MP3 player can read CD-R and CD-RW discs in addition to normal CDs, the
playability of CD-R and CD-RW discs may be affected by the type of software that was used to create
the discs, as well as the quality and condition of the blank media you are using.
This is not an indication of a problem with the player.
Playing a CD
1.
Press the iPod/CD Button to select CD function. The display will show “CD” and “NO DISC” if you
have not yet inserted your CD. (F.12) (F.13)
2.
Press the OPEN Button on the top panel to open the CD door, load the disc with the printed label
side facing up and then close the CD door. The display will first show “READING” and then the
total track number and time. (F.14)
3.
To start playback from the beginning, press the PLAY/PAUSE Button, the display will show the
current track number and the elapsed time. (F.15)
4.
If a CD/MP3 disc is being played, the display will show “MP3” together with the current folder and
track number. To see the ID3 tag if available, press the DISPLAY/INFO Button.
5.
Press the PLAY/PAUSE Button to play or pause the CD. The display will show “ II ” when the unit is
paused. (F.16)
6.
To resume playback, press the PLAY/PAUSE Button again.
7.
To stop playback, press the ■ Button.
F12
F13
F15
F16
F14
9
BMS05DABIP
LISTENING TO YOUR COMPACT DISCS
Selecting a different track during play
1.
To select a different track during play, press the I◀◀ or ▶▶I Buttons until your desired track
number is displayed. Release the button for playback.
2.
To select other folders in the MP3 disc, press the NAVIGATE/FOLDER Buttons on the remote
control.
3.
To play the next track, press the ▶▶I Button.
4.
To play the current track again from the beginning during play, press the I◀◀ Button.
5.
To play the previous track, press the I◀◀ Button twice.
Repeat play (remote control only)
During normal playback, you can press the REPEAT Button on the remote control to select the
repeat play function:
1.
To repeat the same track, press the REPEAT Button once, the display will show “ 1 ” (F. 17)
2.
To repeat the entire disc, press the REPEAT Button again, the display will show “
”. (F. 18)
3.
If you are playing a MP3 disc, an additional “
” option will appear. This will repeat the
current folder. (F. 19)
4.
To cancel repeat play, repeatedly press the REPEAT Button until the repeat icon disappears
from the display.
Random play (remote control only)
1. During CD operation, press the RANDOM Button to start random play, the display will show
“RANDOM” and the tracks will be played randomly. (F.20)
2.
To resume normal playback, press the RANDOM Button again and “RANDOM” will disappear
from the display.
3.
To cancel random play, press the ■ Button.
Program play (remote control only)
You can use the program play feature to play up to 20 tracks on a disc in any desired order. You may
also program a particular track to play several times within a programmed sequence.
1.
Load your disc as usual and wait until the display shows the total number of tracks on the disc.
2.
Ensure it is in CD mode, press the PROGRAM Button on the remote control once, the display
will show “MEM” and “P-01”.(F.21)
3.
Press the I◀ ◀ or ▶ ▶I Buttons to select the first track number to be programmed. When the
desired track number appears in the display, press the PROGRAM Button to confirm and it is
programmed. The program memory number will advance to “P-02” and ready for the next entry.
4.
If a MP3 disc is being loaded, press the NAVIGATE/FOLDER Buttons to select the folder.
5.
Repeat the above steps to program other tracks, a maximum number of 20 tracks can be
programmed. When you have completed programming, press the PLAY/PAUSE Button to begin
program play, playback will be started on the first track you programmed and will continue until
the last programmed track has played.
6.
When the program play is completed, the player stops and “PROG” will be displayed. The
player remains in the program play mode. Press the PLAY/PAUSE Button will play the
programmed sequence again.
7.
To erase the program, in CD stop mode, press the ■ Button once; in CD play mode, press the ■
Button twice. “PROG” will disappear in the display.
F17
F18
F20
F21
F19
10
BMS05DABIP
LISTENING TO YOUR COMPACT DISCS
Repeat program play (remote control only)
You may use the program play and the repeat play features together to continuously repeat a
programmed playback. First program the desired playback sequence, then press the REPEAT
Button to select repeating the current track or the entire programmed sequence.
LISTENING TO YOUR iPod
This unit allows you to play all your favorite songs from your iPod through the iPod dock.
1. To select iPod operation, press the iPod/CD Button until the display shows “Insert iPod”.
2. Slide the door of iPod docking station located on the top of the unit, insert your iPod into the
docking tray, once connected the display will show “iPod” on the display.
3.
Press the ►II Button to Play or Pause tracks on your iPod.
4.
Press the ▶▶I or I◀◀ Buttons to skips to the next or previous iPod track.
5.
To access the “iPod Menu”, press the MENU button.
6.
To scroll up or down in the “iPod Menu”, press the NAVIGATE/FOLDER Buttons on the remote
control.
7.
To confirm the selection in the “iPod Menu”, press the SELECT Button on the remote control.
CHARGING UP YOUR iPod
You can charge your iPod when you dock your iPod in both standby or on modes. It will charge
automatically when it is docked.
AUX INPUT
A 3.5mm Stereo AUX IN is located at the back of the unit, you can connect any other music player
(MP3 Player) devices you wish to listen to.
1.
You will need an Auxilary Cable (not included) to connect your other audio sources.
2.
Press the AUX Button to select the AUX Input mode, the display will show “AUX”.
3.
Adjust the volume control for your desired sound output level.
ON TIMER FUNCTION
You can set the unit to turn on at a selected time
1.
Press the TIMER Button to select between “On” and “Off”, your selection will be displayed on
the screen.(F.22)
2.
To set the timer, ensure the unit is in standby mode, press and hold the TIMER Button until the
display shows “Timer Set” and the “hour” digit of the timer clock on the display will flash. (F.23)
3.
Press the ▲ or ▼ Buttons to set the time and press the TIMER Button to confirm.
4.
When the time to switch on the system is set, press the ▲ or ▼ Buttons to select the mode you
wish the unit turn on to (FM/DAB/CD/iPod). Press the TIMER Button to confirm.
5.
The display will then flash the volume level. Press the ▲ or ▼ Buttons to select the on volume
level and then press the TIMER Button to confirm and the timer setting is now completed.
F22
F23
11
BMS05DABIP
SLEEP FUNCTION
This function allows you to program the system to switch off after a set period of time.
1. To activate the sleep function, repeatedly press the SLEEP Button to select one of the sleep
times below.
90
80
70
60
30
10
Off
2.
3.
When the display shows your desired sleep time, release the button and the sleep timer will be
activated. The display will show “ ” with the time selected.
To cancel the sleep function, repeatedly press the SLEEP Button until the display shows “Sleep
Off”.
PRESET EQ (remote control only)
Press the EQ Button on the remote control to select different preset EQ modes, the display will show
in the below. Press the EQ Button repeatedly to select desired mode.
X-BASS FUNCTION (remote control only)
Press the X-BASS Button on the remote control to turn this function on or off. The display will show
“X-BASS ON” or “X-BASS OFF”. When the X-BASS is on, the bass sound is enhanced.
MUTE FUNCTION (remote control only)
Press the MUTE Button on the remote control to turn the sound off completely. The display will flash
“MUTE” to show the function has been turned on. To cancel mute and restore the sound, press the
MUTE Button again or the VOLUME +/- Buttons and the “MUTE” will disappear from the display.
BACKLIGHT FUNCTION
Press the BACKLIGHT Button to turn the display backlight on or off. The backlight will automatically
be off in standby mode.
HEADPHONE INPUT
A 3.5mm stereo headphone input is located on the front panel. Connect a set of stereo headphones
(not included) to this input for private listening. The external speakers will be automatically
disconnected when the headphones are in use.
IMPORTANT: When using headphones always set the volume to a low level before you put the
headphones on. Then gradually increase the volume to a comfortable listening level.
12
BMS05DABIP
COMPACT DISC
1.
Always use compact discs bearing the mark as shown.
2.
Notes on handling discs
Removing the disc from its storage case.
* Do not touch the reflective recorded surface.
* Do not stick paper or write anything on the
surface.
* Do not bend the disc.
3.
Storage
* Store the disc in its case.
* Do not expose discs to direct sunlight or high temperatures, high humidity or dusty places.
4.
Cleaning a disc
* Should the disc become soiled, wipe off dust,
dirt and fingerprints with a soft cloth.
* The disc should be cleaned from the centre
to the edge.
FROM THE CENTRE TO THE EDGE
CORRECT
INCORRECT
* Never use benzene, thinners, record cleaner fluid or anti static spray.
* Be sure to close the CD door so the lens is not contaminated by dust.
* Do not touch the lens.
SPECIFICATION
POWER SUPPLY:
OUTPUT POWER:
UNIT DIMENSION:
SPEAKER DIMENSION:
WEIGHT:
RADIO SECTION
FREQUENCY RANGE:
COMPACT DISC SECTION
CD MEDIA:
DISC FORMATS:
230V~ 50Hz
5W X2
145 (L) x 235 (W) x 130 (H) mm
125 (L) x 168 (W) x 130 (H) mm
2.71 kg
DAB+ 174 - 240 MHz
FM 87.5 – 108 MHz
CD-DA, CD-ROM, CD-R, CD-RW
CD-DA Digital Audio, ISO9660 (CD-R), ISO13346UDF (CD-RW)
Mixed mode and Enhanced CD
MP3/WMA SECTION
BIT RATE:
MP3: 32-128kbps, WMA: 32, 48-192kbps,
Constant & VBR (Variable Bit Rate)
DISPLAY:
MP3/WMA Tag (V1.0, V1.1& V2.3) – Title, Artist, Album
(Up to 32 characters displayed for each tag)
TOTAL NO. OF TRACKS /ALBUM: 999
AUX INPUT
INPUT VOLTAGE RANGE:
IMPEDANCE:
350-500mV
47KΩ
** SPECIFICATION SUBJECT TO CHANGE WITHOUT FURTHER NOTICE
13
BMS05DABIP
SUPPORTED iPod DEVICES
14
BMS05DABIP
War ranty
Please keep your receipt as proof of purchase. This product is warranted for any defect in
materials or workmanship for one year after the original date of purchase. This product is for
normal domestic and office use only. This warranty does not cover damage from misuse or
neglect, accidental damage, vermin infestation, excessive voltages such us lightning or power
surges or any alternation that affects the performance or reliability of the product.
In the unlikely event that your product fails to work normally, please contact the Bush
Warranty on 1800 509 394 (Australia) or 0800 450 259 (New Zealand) and have your receipt
of purchase on hand.
This warranty is subject to the following provisions:
●
It is only valid within boundaries of the country of purchase;
●
The product must be correctly assembled and operated in accordance with the
instructions contained in the manual;
●
This product must be used solely for domestic purposes;
●
The warranty does not cover accidental damage;
●
The warranty will be rendered invalid if the product is resold or has been damaged by
inexpert repair;
●
The manufacturer disclaims any liability for incidental or consequential damaged.
This warranty is in addition to, and does not diminish, your statutory or legal rights.
PO BOX 6287
Silverwater NSW 1811
www.bushaustralia.com.au
Bush Warranty: 1800 509 394 Australia
Bush Warranty: 0800 450 259 New Zealand
15
BMS05DABIP
PO BOX 6287
Silverwater NSW 1811
www.bushaustralia.com.au
16