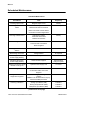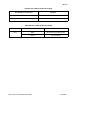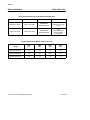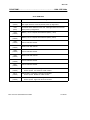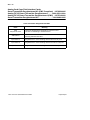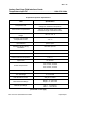
1
RS3t Service Quick Reference Guide August 1998 U.S. Manual PN: 10P57000201 E 1991--1999 Fisher-Rosemount Systems, Inc. All rights reserved. Printed in the U.S.A. Components of the RS3 distributed process control system may be protected by U.S. patent Nos. 4,243,931; 4,370,257; 4,581,734. Other Patents Pending. RS3 is a mark of one of the Fisher-Rosemount group of companies. All other marks are property of their respective owners. The contents of this publication are presented for informational purposes only, and while every effort has been made to ensure their accuracy, they are not to be construed as warranties or guarantees, express or implied, regarding the products or services described herein or their use or applicability. We reserve the right to modify or improve the designs or specifications of such products without notice. Fisher-Rosemount Systems, Inc. 8301 Cameron Road Austin, Texas 78754--3895 U.S.A. Telephone: FAX: (512) 835--2190 (512) 834--7313 SQ: iii About This Manual This manual is intended as an aid for service personnel supporting the RS3. It covers troubleshooting techniques, maintenance procedures, and data on virtually all of the hardware used with the system. This is a condensed quick reference manual. Full details are found in the Site Preparation and Installation Manual (SP) and in the Service Manual (SV). The best way to find data on a specific device is to use the index. You can look up the device part number, device name, or the legend printed on the printed circuit board. The legends are shown in all capital letters in the index. Another way to find a specific device is to scan the Table of Contents. This lists the contents of each page. Similar devices are grouped on a page with the devices listed in decreasing part number order. The device with the highest part number is listed first. Section 1 Troubleshooting procedures. Section 2 Maintenance procedures. Section 3 Hardware data (LED meanings, test point meanings, jumper settings, and fuse values) for the power distribution system. Section 4 Hardware data for the Twinax and Optical PeerWay. Section 5 Hardware data for consoles and peripheral devices. Section 6 Hardware data for ControlFiles. Section 7 Hardware data for the Analog Card Cage and Multipoint I/O devices. Section 8 Hardware data for PeerWay Interface devices such as the SCI, HIA, and RNI. RS3: Service Quick Reference Guide About This Manual SQ: iv Changes for This Release D D Numerous corrections and minor revisions have been made throughout the manual. Many changes to this manual reflect hardware installation and service requirements for a new system power supply, the new RS3 Millennium Package (RMP), and the new MPC5 controller with 4 Meg NV Memory. RS3: Service Quick Reference Guide About This Manual SQ: v Revision Level for This Manual This manual is independent of Software Release level. New equipment is added with each release and older material is updated. You should always use the latest version. For This Software Version: All Refer to This Document: Title Service Quick Reference Guide RS3: Service Quick Reference Guide Date Part Number August 1998 10P57000201 About This Manual SQ: vi References to Other Manuals References to other RS3 user manuals list the manual, chapter, and sometimes the section as shown below. Example Entries: For ..., see CC: 3. For ..., see CC: 1-1. Manual Title Chapter Manual Title Chapter-Section Abbreviations of Manual Titles AL = Alarm Messages BA = ABC Batch CB = ControlBlock Configuration CC = Console Configuration DT = Disk and Tape Functions IO = I/O Block Configuration OP = Operator’s Guide OV = System Overview and Glossary PW = PeerWay Interfaces RB = Rosemount Basic Language RI = RNI Installation Guide RP = RNI Programmer’s Reference Manual RR = RNI Release Notes SP = Site Preparation and Installation SV = Service RS3: Service Quick Reference Guide About This Manual SQ: vii Reference Documents Prerequisite Documents You should be familiar with the information in the following documents before using this manual: System Overview Manual and Glossary 1984-2640-21x0 Software Release Notes, Performance Series 1 10P56870106 Related Documents You may find the following documents helpful when using this manual: ABC Batch Software Manual 1984-2654-21x0 Alarm Messages Manual ABC Batch Quick Reference Guide 1984-2657-19x1 1984-2818-1103 Configuration Quick Reference Guide 1984-2812-0808 Console Configuration Manual ControlBlock Configuration Manual 1984-2643-21x0 1984-2646-21x0 I/O Block Configuration Manual 1984-2645-21x0 Operator’s Guide PeerWay Interfaces Manual 1984-2647-19x1 1984-2650-21x0 RNI Programmer’s Reference Manual 1984-3356-03x1 RNI Release Notes and Installation Guide Rosemount Basic Language Manual 1984-3357-02x3 1984-2653-21x0 Service Manual, Volume 1 10P569802x1 Service Manual, Volume 2 10P569802x2 Site Preparation and Installation Manual 10P569902x1 Software Discrepancies for Performance Series 1 10P56870304 User Manual Master Index RS3: Service Quick Reference Guide 1984-2641-21x0 About This Manual SQ: viii RS3: Service Quick Reference Guide About This Manual Contents Section 1: Troubleshooting . . . . . . . . . . . . . . . . . . . . . . . . . . . . . . . . . 1-1 Problem Reporting Terms . . . . . . . . . . . . . . . . . . . . . . . . 1-2 Troubleshooting the Power System . . . . . . . . . . . . . 1-4 Troubleshooting a PeerWay . . . . . . . . . . . . . . . . . . . . . . PeerWay Overview Screen [PO] . . . . . . . . . . . . . . . . 1-5 1-5 Plant Status Screen [PS] . . . . . . . . . . . . . . . . . . . . . . 1-5 Peerway Node Screen [PN] xx . . . . . . . . . . . . . . . . . 1-5 Diagnosing a Console or SCI PeerWay Problem . . . . Diagnosing a ControlFile PeerWay Problem . . . . . . . . 1-6 1-7 Troubleshooting Twinax PeerWay Cables . . . . . . . . . . 1-9 General Console Troubleshooting Procedures . . . . . . Console Power-Up Diagnostics . . . . . . . . . . . . . . . . . . . 1-10 1-11 Console Off-Line Diagnostics . . . . . . . . . . . . . . . . . . . . . 1-17 Console Crash Dump Screen ................... 1-22 Memory Dump . . . . . . . . . . . . . . . . . . . . . . . . . . . . . . . . . Memory View Screen . . . . . . . . . . . . . . . . . . . . . . . . . . . . 1-23 1-24 Node Dump Screen . . . . . . . . . . . . . . . . . . . . . . . . . . . . . 1-26 Menu Confidence Screen . . . . . . . . . . . . . . . . . . . . . . . . Keyboard Problems . . . . . . . . . . . . . . . . . . . . . . . . . . . . . 1-26 1-26 CRT Problems . . . . . . . . . . . . . . . . . . . . . . . . . . . . . . . . . 1-26 Troubleshooting OI Card Cage Problems . . . . . . . . . . . 1-27 Troubleshooting ControlFiles . . . . . . . . . . . . . . . . . . . . . ControlFile Status Screen . . . . . . . . . . . . . . . . . . . . . . . . 1-29 1-36 Wipe Bubble Procedure . . . . . . . . . . . . . . . . . . . . . . . . . 1-37 Troubleshooting I/O . . . . . . . . . . . . . . . . . . . . . . . . . . . . . 1-38 Restoring Redundant FICs . . . . . . . . . . . . . . . . . . . . . . . Field I/O Status Screen (FIC Status Screen) . . . . . . . . 1-39 1-46 FIC Detail Screen . . . . . . . . . . . . . . . . . . . . . . . . . . . . . . . 1-52 RS3: Service Quick Reference Guide Contents SQ: x Section 2: Section 3: Section 4: Maintenance . . . . . . . . . . . . . . . . . . . . . . . . . . . . . . . . . . . . . 2-1 Scheduled Maintenance . . . . . . . . . . . . . . . . . . . . . . . . . Filter Replacements . . . . . . . . . . . . . . . . . . . . . . . . . . . . . Cleaning Tape Drives . . . . . . . . . . . . . . . . . . . . . . . . . . . . Cleaning Floppy Disk Drives . . . . . . . . . . . . . . . . . . . . . . Cleaning the Trackball . . . . . . . . . . . . . . . . . . . . . . . . . . . Removing and Installing Cards . . . . . . . . . . . . . . . . . . . Cleaning Cards . . . . . . . . . . . . . . . . . . . . . . . . . . . . . . . . . Storing Cards . . . . . . . . . . . . . . . . . . . . . . . . . . . . . . . . . . 2-2 2-4 2-5 2-5 2-6 2-7 2-8 2-8 Power . . . . . . . . . . . . . . . . . . . . . . . . . . . . . . . . . . . . . . . . . . . 3-1 DC Power Distribution System Color Codes . . . . . . . . AC Entrance Panel . . . . . . . . . . . . . . . . . . . . . . . . . . . . . . System Power Supply Unit Module Housing Fan Replacement Kit . . . . . . . . . . . . . . . . . . . . . . . . . . . . AC/DC Power Supply (With Battery Backup) . . . . . . . . . . . . . . . . . . . . . . . . . . . Battery Charger Card . . . . . . . . . . . . . . . . . . . . . . . . . . . . AC/DC Power Supply (Without Battery Backup) . . . . . . . . . . . . . . . . . . . . . . . . MTCC Remote Power Supply . . . . . . . . . . . . . . . . . . . . DC/DC Power Supply . . . . . . . . . . . . . . . . . . . . . . . . . . . AC/DC Unregulated Power Supply . . . . . . . . . . . . . . . . Remote I/O Power Supply . . . . . . . . . . . . . . . . . . . . . . . . Remote Power OI Supply . . . . . . . . . . . . . . . . . . . . . . . . Remote Power Supply For Operator Interface (OI) Applications . . . . . . . . . . . . AC Distribution Block . . . . . . . . . . . . . . . . . . . . . . . . . . . . DC Output Card . . . . . . . . . . . . . . . . . . . . . . . . . . . . . . . . 3-2 3-3 PeerWay . . . . . . . . . . . . . . . . . . . . . . . . . . . . . . . . . . . . . . . . Twinax PeerWay Tap Block Set Tap Box A (CE Approved) Tap Box B (CE Approved) . . . . . . . . . . . . . . . . . . . . . . . Optical Tap Box A Optical Tap Box B . . . . . . . . . . . . . . . . . . . . . . . . . . . . . . . Electrical Tap Box A Electrical Tap Box B . . . . . . . . . . . . . . . . . . . . . . . . . . . . . PeerWay Extender (PX) PeerWay A PeerWay B . . . . . . . . . . . . . . . . . . . . . . . . . . . . . . . . . . . . RS3: Service Quick Reference Guide 3-4 3-5 3-7 3-8 3-9 3-10 3-11 3-12 3-12 3-13 3-14 3-15 4-1 4-2 4-4 4-5 4-6 Contents SQ: xi Section 5: Optical Repeater/Attenuator . . . . . . . . . . . . . . . . . . . . . . 4-8 Consoles . . . . . . . . . . . . . . . . . . . . . . . . . . . . . . . . . . . . . . . . 5-1 Keyboard Alarm . . . . . . . . . . . . . . . . . . . . . . . . . . . . . . . . 5-3 Enhanced Engineering Keyboard Main Keyboard/Trackball Main Keyboard/Trackball/Option . . . . . . . . . . . . . . . . . . 5-4 Trackball Assembly . . . . . . . . . . . . . . . . . . . . . . . . . . . . . 5-5 Option Keyboard . . . . . . . . . . . . . . . . . . . . . . . . . . . . . . . 5-6 Joystick Touchpad . . . . . . . . . . . . . . . . . . . . . . . . . . . . . . . . . . . . . . 5-7 Keyboard Electronics Board . . . . . . . . . . . . . . . . . . . . . . 5-8 Trackball Electronics Board . . . . . . . . . . . . . . . . . . . . . . 5-9 Trackball Keyboard Replacement Subassembly . . . . . 5-10 Keyboard Interface . . . . . . . . . . . . . . . . . . . . . . . . . . . . . . 5-11 Multitube Command Console CRT . . . . . . . . . . . . . . . . 5-13 Pedestal Command Console Keyboard Interface . . . . . . . . . . . . . . . . . . . . . . . . . . . . . . 5-15 Pedestal Command Console CRT Conrac 7211 . . . . . . . . . . . . . . . . . . . . . . . . . . . . . . . . . . . 5-16 Monochrome Video Generator . . . . . . . . . . . . . . . . . . . . 5-17 MiniConsole Floppy Interface (SCSI) . . . . . . . . . . . . . . . . . . . . . . . . . . 5-18 Floppy Disk Power Supply . . . . . . . . . . . . . . . . . . . . . . . 5-19 Hard Disk Drive IBM Deskstar 540 LPS 270S LPS 170S LPS 105S 80S Q280 Q540 . . . . . . . . . . . . . . . . . . . . . . . . . . . . . . . . . . . . . . . . . 5-20 Floppy Disk Drive: 3.5-inch . . . . . . . . . . . . . . . . . . . . . . 5-25 Floppy Disk Drive: 5.25-inch . . . . . . . . . . . . . . . . . . . . . 5-26 Magnetic Tape Drive Tandberg 5623 Viper 2150S Viper 2060S Scorpion 5945S Scorpion 5945C . . . . . . . . . . . . . . . . . . . . . . . . . . . . . . . . 5-27 Printer: Fujitsu DPL24C . . . . . . . . . . . . . . . . . . . . . . . . . 5-28 Printer: Fujitsu DL3800 . . . . . . . . . . . . . . . . . . . . . . . . . . 5-31 Printer: Fujitsu DL4600 . . . . . . . . . . . . . . . . . . . . . . . . . . 5-34 RS3: Service Quick Reference Guide Contents SQ: xii Section 6: Printer: Texas Instruments 810 . . . . . . . . . . . . . . . . . . . 5-36 Alarm Output Board . . . . . . . . . . . . . . . . . . . . . . . . . . . . . 5-38 PeerWay Interface . . . . . . . . . . . . . . . . . . . . . . . . . . . . . . 5-39 OI Power Supply . . . . . . . . . . . . . . . . . . . . . . . . . . . . . . . . 5-41 OI Processor OI 68040 OI 68020 OI 68000 . . . . . . . . . . . . . . . . . . . . . . . . . . . . . . . . . . . . . . 5-43 OI Processor: 68040 . . . . . . . . . . . . . . . . . . . . . . . . . . . . 5-45 OI Processor: 68020 . . . . . . . . . . . . . . . . . . . . . . . . . . . . 5-46 OI Processor: OI 68000 . . . . . . . . . . . . . . . . . . . . . . . . . 5-47 Pixel Graphics Video Generator . . . . . . . . . . . . . . . . . . . 5-48 Character Graphics Video Generator . . . . . . . . . . . . . . 5-49 Printer Interface . . . . . . . . . . . . . . . . . . . . . . . . . . . . . . . . 5-50 SCSI (Small Computer System Interface) . . . . . . . . . . . 5-52 OI Nonvolatile Memory OI NV RAM OI Bubble OI Bubble SC . . . . . . . . . . . . . . . . . . . . . . . . . . . . . . . . . . 5-55 OI Bubble Memory . . . . . . . . . . . . . . . . . . . . . . . . . . . . . . 5-56 OI NV RAM . . . . . . . . . . . . . . . . . . . . . . . . . . . . . . . . . . . . 5-59 ControlFiles . . . . . . . . . . . . . . . . . . . . . . . . . . . . . . . . . . . . . 6-1 ControlFile Card Cage . . . . . . . . . . . . . . . . . . . . . . . . . . . 6-2 PeerWay Buffer . . . . . . . . . . . . . . . . . . . . . . . . . . . . . . . . . 6-4 ControlFile Power Regulator 5 VDC Only . . . . . . . . . . . 6-6 ControlFile Power Regulator 5 and 12 VDC . . . . . . . . . 6-8 CP (Coordinator Processor): CP-IV+ CP-IV CP-II CP-I . . . . . . . . . . . . . . . . . . . . . . . . . . . . . . . . . . . . . . . . . . 6-10 NV (Nonvolatile) Memory: RAM . . . . . . . . . . . . . . . . . . 6-16 NV (Nonvolatile) Memory: Bubble . . . . . . . . . . . . . . . . . 6-20 Controller Processor: MPC5 MPC II MPC MLC SSC CC MUX and PLC . . . . . . . . . . . . . . . . . . . . . . . . . . . . . . . . . . 6-22 Controller Processor: MPC5 . . . . . . . . . . . . . . . . . . . . . 6-25 RS3: Service Quick Reference Guide Contents SQ: xiii Section 7: Controller Processor: MPC II . . . . . . . . . . . . . . . . . . . . . 6-27 Controller Processor: MPC . . . . . . . . . . . . . . . . . . . . . . 6-30 Controller Processor: MLC SSC MUX and PLC . . . . . . . . . . . . . . . . . . . . . . . . . . . . . . . . . . 6-32 Input/Output . . . . . . . . . . . . . . . . . . . . . . . . . . . . . . . . . . . . . 7-1 Analog Card Cage . . . . . . . . . . . . . . . . . . . . . . . . . . . . . . 7-3 Communications Connect Card V (EMC Compliant) Communications Connect Card IV Communications Connect Card III . . . . . . . . . . . . . . . . . 7-4 Communications Connect Card II . . . . . . . . . . . . . . . . . 7-5 Analog Transfer Card . . . . . . . . . . . . . . . . . . . . . . . . . . . . 7-6 Output Bypass Card (OBC) . . . . . . . . . . . . . . . . . . . . . . 7-7 Analog Card Cage Field Interface Cards: Analog FIC (EMC Compliant) Analog FIC . . . . . . . . . . . . . . . . . . . . . . . . . . . . . . . . . . . . 7-8 Analog Card Cage Field Interface Cards: Smart Transmitter Daughterboard Kit (EMC Compliant) Analog FIC W/Smart Transmitter Daughterboard Analog FIC W/Smart Transmitter Daughterboard (EMC) Smart Transmitter Daughterboard Kit . . . . . . . . . . . . . . 7-10 Analog Card Cage Field Interface Cards: Pulse I/O FIC (EMC Compliant) Pulse I/O FIC . . . . . . . . . . . . . . . . . . . . . . . . . . . . . . . . . . . 7-11 Analog Card Cage Field Interface Cards: Temperature Input FIC . . . . . . . . . . . . . . . . . . . . . . . . . . . 7-15 Contact Card Cage Contact FlexTerm . . . . . . . . . . . . . . . . . . . . . . . . . . . . . . . 7-18 Contact Termination Board . . . . . . . . . . . . . . . . . . . . . . . 7-19 Contact Marshaling Panel . . . . . . . . . . . . . . . . . . . . . . . . 7-20 Optical Isolator Modules . . . . . . . . . . . . . . . . . . . . . . . . . 7-21 Contact FIC . . . . . . . . . . . . . . . . . . . . . . . . . . . . . . . . . . . . 7-22 MUX Marshaling Panels Voltage Current RTD . . . . . . . . . . . . . . . . . . . . . . . . . . . . . . . . . . . . . . . . . . 7-24 PLC FlexTerm . . . . . . . . . . . . . . . . . . . . . . . . . . . . . . . . . . 7-26 Port I/O Card: RS-422/RS-232 . . . . . . . . . . . . . . . . . . . 7-27 Port I/O Card: RS-422/RS-422 . . . . . . . . . . . . . . . . . . . 7-29 Analog Input FIC: Non-Isolated . . . . . . . . . . . . . . . . . . . 7-31 Analog Input FIC: Smart Transmitter . . . . . . . . . . . . . . 7-32 RS3: Service Quick Reference Guide Contents SQ: xiv Analog Input FIC: Isolated . . . . . . . . . . . . . . . . . . . . . . . 7-33 Analog Output FIC: Non-Isolated . . . . . . . . . . . . . . . . . 7-34 Analog Output FIC: Isolated . . . . . . . . . . . . . . . . . . . . . . 7-36 I/O Scanning Rates . . . . . . . . . . . . . . . . . . . . . . . . . . . . . 7-38 Remote Communications Termination Panel II Remote Communications Termination Panel I . . . . . . . 7-39 Fiber Optic I/O Converter . . . . . . . . . . . . . . . . . . . . . . . . 7-41 Standard Remote Termination Panel . . . . . . . . . . . . . . . 7-42 Direct Discrete Termination Panel . . . . . . . . . . . . . . . . . 7-43 Direct Discrete Termination Panel II . . . . . . . . . . . . . . . . 7-45 Multi-FIM Discrete Termination Panel . . . . . . . . . . . . . . 7-47 Isolated Discrete Termination Panel A & B . . . . . . . . . 7-48 High Density Isolated Discrete Termination Panel . . . . 7-50 Discrete Field Interface Module (FIM) Multipoint Discrete I/O FIM MDIOH (High-side switch, EMC approved) MDIOL (Low-side switch, EMC approved) MDIO (Low-side switch) . . . . . . . . . . . . . . . . . . . . . . . . . 7-51 MAIO16 Termination Panel (Field wires land on panel) (Field wires on panel or on marshaling panel) . . . . . . . 7-52 MAIO Termination Panel (Field wires land on panel) (Field wires on panel or on marshaling panel) . . . . . . . 7-54 MAI32 Termination Panel (Field wires land on panel) (Field wires on panel or on marshaling panel) . . . . . . . 7-56 Loop Power Module (LPM) . . . . . . . . . . . . . . . . . . . . . . . 7-58 MAIO Input FIM MAI16 (EMC Approved) MAIO . . . . . . . . . . . . . . . . . . . . . . . . . . . . . . . . . . . . . . . . . 7-59 MAIO Output FIM MAO16 (EMC Approved) MAO . . . . . . . . . . . . . . . . . . . . . . . . . . . . . . . . . . . . . . . . . . 7-61 MAI32 Input FIM (EMC Approved) . . . . . . . . . . . . . . . . . 7-63 Elcon Series 1000 Intrinsically Safe Termination Panel 1216/CW-ROS4 . . . . . . . . . . . . . . . . . . . . . . . . . . . . . . . . 7-65 MTL IS Termination Panel A . . . . . . . . . . . . . . . . . . . . . . 7-68 MTL IS Termination Panel B . . . . . . . . . . . . . . . . . . . . . . 7-72 MTL IS Analog Termination . . . . . . . . . . . . . . . . . . . . . . . 7-74 RS3: Service Quick Reference Guide Contents SQ: xv Section 8: PeerWay Interface . . . . . . . . . . . . . . . . . . . . . . . . . . . . . . . . 8-1 Supervisory Computer Interface (SCI) . . . . . . . . . . . . . 8-2 Highway Interface Adapter (HIA) . . . . . . . . . . . . . . . . . . 8-5 MicroVAX-PeerWay Marshaling Panel (MicroVAX II) (MicroVAX 3000) . . . . . . . . . . . . . . . . . . . . . . . . . . . . . . . 8-8 VAX QBUS Interface Circuit Cards: QBUS Board 1 QBUS Board 2 . . . . . . . . . . . . . . . . . . . . . . . . . . . . . . . . . 8-9 Diogenes Interface TI Communications Card . . . . . . . . . . . . . . . . . . . . . . . . . 8-13 RNI . . . . . . . . . . . . . . . . . . . . . . . . . . . . . . . . . . . . . . . . . . . 8-14 RS3: Service Quick Reference Guide Contents SQ: xvi RS3: Service Quick Reference Guide Contents SQ: 1-1 Section 1: Troubleshooting Problem Reporting Terms . . . . . . . . . . . . . . . . . . . . . . . . Troubleshooting the Power System . . . . . . . . . . . . . . Troubleshooting a PeerWay . . . . . . . . . . . . . . . . . . . . . . PeerWay Overview Screen [PO] . . . . . . . . . . . . . . . . Plant Status Screen [PS] . . . . . . . . . . . . . . . . . . . . . . . Peerway Node Screen [PN] xx . . . . . . . . . . . . . . . . . . Diagnosing a Console or SCI PeerWay Problem . . . . . Diagnosing a ControlFile PeerWay Problem . . . . . . . . Troubleshooting Twinax PeerWay Cables . . . . . . . . . . . General Console Troubleshooting Procedures . . . . . . . Console Power-Up Diagnostics . . . . . . . . . . . . . . . . . . . Console Off-Line Diagnostics . . . . . . . . . . . . . . . . . . . . . Console Crash Dump Screen ................... Memory Dump . . . . . . . . . . . . . . . . . . . . . . . . . . . . . . . . . . Memory View Screen . . . . . . . . . . . . . . . . . . . . . . . . . . . . Node Dump Screen . . . . . . . . . . . . . . . . . . . . . . . . . . . . . Menu Confidence Screen . . . . . . . . . . . . . . . . . . . . . . . . Keyboard Problems . . . . . . . . . . . . . . . . . . . . . . . . . . . . . CRT Problems . . . . . . . . . . . . . . . . . . . . . . . . . . . . . . . . . . Troubleshooting OI Card Cage Problems . . . . . . . . . . . Troubleshooting ControlFiles . . . . . . . . . . . . . . . . . . . . . . ControlFile Status Screen . . . . . . . . . . . . . . . . . . . . . . . . Wipe Bubble Procedure . . . . . . . . . . . . . . . . . . . . . . . . . . Troubleshooting I/O . . . . . . . . . . . . . . . . . . . . . . . . . . . . . . Restoring Redundant FICs . . . . . . . . . . . . . . . . . . . . . . . Field I/O Status Screen (FIC Status Screen) . . . . . . . . FIC Detail Screen . . . . . . . . . . . . . . . . . . . . . . . . . . . . . . . RS3: Service Quick Reference Guide 1-2 1-4 1-5 1-5 1-5 1-5 1-6 1-7 1-9 1-10 1-11 1-17 1-22 1-23 1-24 1-26 1-26 1-26 1-26 1-27 1-29 1-36 1-37 1-38 1-39 1-46 1-52 Troubleshooting SQ: 1-2 Problem Reporting Terms Please use the following set of terms when making a problem report. The terms have been defined in an attempt to reduce confusion in communication between users, System Support, and the development staff. Definition of Terms Term Definition Action Tape loaded upon insertion in the drive. “Tape Auto Load” field active on the [CCC] screen. Boot To start up a device by loading a program from a storage device to a processor board. Called Up Define HOW you called up the screen. By use of: Loop Callup Button Command Line Next Option Select Other Button Crash The processor stops processing: Red LED on processor board All functions halted in the node Console clock not updating (console crash) Crash Dump Screen appears (68020 crash) Create Boot Tape The operation which initialized a tape, crates a console program on the tape, and backs up the disk files onto the tape. Disk Backup The process of copying all disk files onto the tape. Disk File Backup The operation that copies a file from disk to tape or to another disk. Disk File Copy The operation that copies a file from one disk to another. (continued on next page) RS3: Service Quick Reference Guide Troubleshooting SQ: 1-3 Definition of Terms (continued) Term Definition Disconnected PeerWay Removed node from the PeerWay by: Physically disconnecting the Drop Cables Physically removing the PeerWay Buffer Card Use of the PeerWay Overview screen Use of the PeerWay Node screen Folder Backup The operation that copies a folder from disk to tape or to another disk. Insert Tape Physically placing the tape in the drive. Loaded Tape Tape Load: The software activity. Manual Load Tape was loaded by Disk Activity screen operation “Tape load”. RS3: Service Quick Reference Guide Troubleshooting SQ: 1-4 Troubleshooting the Power System AC/DC Power Supply Troubleshooting Condition PS FAULT (red LED) on. PS NORM (green LED) off. Amber AC IN lamp not on and no A/C is present. Action 1. Turn BATT ON/OFF switch OFF. Disconnect the DC power plug at supply. Voltage should measure between 28 and 34 volts DC. If not, replace the power supply. 2. Replace the battery charger board. BATT TEST FAULT (red LED) on. 1. Wait 60 minutes and press the BATT TEST pushbutton. NOTE: The power supply will continue to share the DC load without the battery or the battery charger board installed. 2. Open the battery compartment and determine if the battery connections are OK. NOTE: If the batteries show any sign of leaking, such as white corrosion on the battery posts, replace the batteries. 3. Check the fuse that is next to the battery compartment inside the power supply. 4. Replace the battery charger board. Wait for 60 minutes and press the BATT TEST pushbutton. 5. Replace the batteries. RS3: Service Quick Reference Guide Troubleshooting SQ: 1-5 Troubleshooting a PeerWay Three screens are useful in diagnosing PeerWay problems. See the Service manual, SV:10--1, for definitions of the screen fields. Peerway Node Screen [PN] xx This screen shows details for the named node (xx). Observe Qual A and Qual B, Noecho, Badecho, DupNode, AB Swap, and Coupler. PeerWay Overview Screen [PO] A dot indicates no errors, a number shows the number of errors, and ** indicates more than 99 errors. A vertical line of errors indicates a transmission problem, a horizontal line indicates a reception problem. The A and B columns at the right side show each node’s opinion of PeerWay A and B quality. Zero is perfect; 100 is a warning; and 500 shows very poor communication performance. A node can be disconnected from PeerWay A by entering “A” at the prompt on the right. “B” disconnects the node from PeerWay B. ”AB” disconnects both PeerWays. The Actual margin should be between 495 and 505. A lower margin indicates a PeerWay B problem, a higher one indicates a PeerWay A problem. Plant Status Screen [PS] This screen shows the device at each node. Backlighting indicates ownership of the device by this console. RS3: Service Quick Reference Guide Troubleshooting SQ: 1-6 Diagnosing a Console or SCI PeerWay Problem - To diagnose a Console or SCI PeerWay problem: 1. Move the drop cable from one tap connection to another. CAUTION When moving drop cables and PeerWay buffers from a ControlFile for troubleshooting purposes, make certain you move only those associated with the suspect PeerWay. If anything on the good PeerWay is disconnected, the ControlFile or console could be taken off the PeerWay. Look at the PeerWay Node screen for this device, and note the “Noecho” and “Badecho” Fields. If the problem is now cleared, replace the Tap Box at the earliest convenience. If all of the tap connections are used, swap two drop cables at the Tap Box. Determine if the problem moves to the node that was swapped. If the problem moved, replace the Tap Box. 2. Replace the Console PeerWay Interface Card. 3. Replace the Console Power Regulator Card. 4. Replace the drop cable. 5. Command Console and Basic Command Console only: Pull the console card cage out and connect the drop cable directly to the back of the motherboard, bypassing the short marshaling panel cable. Use extreme caution when removing and installing the console card cage to avoid damaging any cables. RS3: Service Quick Reference Guide Troubleshooting SQ: 1-7 Diagnosing a ControlFile PeerWay Problem The procedure for checking PeerWay problems differs if there is one ControlFile or several ControlFiles on the PeerWay. - To diagnose a ControlFile PeerWay problem with one ControlFile on the PeerWay: 1. Move the drop cable from one tap connection to another. WARNING When moving drop cables and PeerWay buffers from a ControlFile for troubleshooting purposes, make certain you move only those associated with the suspect PeerWay. If anything on the good PeerWay is disconnected, the ControlFile or console could be taken off the PeerWay. Look at the PeerWay Node screen for this device, and note the “Noecho” and “Badecho” Fields on this screen. If the problem is now cleared, replace the Tap Box. If all of the tap connections are used, swap two drop cables at the Tap Box. Determine if the problem moves to the node that was swapped. If the problem moved, replace the Tap Box. 2. Remove the PeerWay Buffer card from the ControlFile on the faulty PeerWay. Follow step a or b below depending on the part number of the card. a. Part number 1984--1402--0003: The card must be replaced to determine if it is bad. If no spares are available, the card can be swapped with the other buffer in this cage. This will take the node off of the PeerWay. b. Part number 1984--1502--0001: Remove the card and move the seven jumpers (HD 2, 3, 4, 5, 6, 7, and 8) on the card to the TEST position. Install the card and look at the PeerWay Node screen and determine if the Noecho and Badecho Fields are at 0. If they are now at 0, the PeerWay Buffer Card is bad and must be replaced. WARNING If the Coordinator Processor Card is disabled on a running process, all operator process changes, links running between controllers in that cage, and links to and from that ControlFile will freeze at the last value received. The controllers will continue to operate the process under these conditions. As soon as the Coordinator Processor Card is restarted all links will be updated. RS3: Service Quick Reference Guide Troubleshooting SQ: 1-8 3. Replace the Coordinator Processor Card. If there are several ControlFiles on the PeerWay, use the following procedure. - To diagnose a ControlFile PeerWay problem with multiple ControlFiles on the PeerWay: 1. Move the drop cable from one tap connection to another. WARNING When moving drop cables and PeerWay Buffer Cards from a ControlFile for troubleshooting purposes, make certain you move only those cards and cables associated with the suspect PeerWay. If anything on the good PeerWay is disconnected, the ControlFile could be taken off the PeerWay. 2. Look at the PeerWay Node screen from the Tap Box, and note the “Noecho” and “Badecho” Fields on the screen. If the problem is now cleared, replace the Tap Box at your earliest convenience. If all of the tap connections are used, swap two drop cables at the Tap Box. Determine if the problem moves to the node that was swapped. If the problem moved, replace the Tap Box. 3. Swap the PeerWay Buffer Card from this node’s bad PeerWay with a PeerWay Buffer Card from the same PeerWay of another ControlFile. If the problem moves, replace the PeerWay Buffer Card. WARNING If the Coordinator Processor Card is disabled on a running process, all operator process changes, links running between controllers in that cage, and links to and from that ControlFile will freeze at the last value received. The controllers will continue to operate the process under these conditions. As soon as the Coordinator Processor Card is restarted all links will be updated. 4. If the problem does not move to the other ControlFile in step 3, replace the Coordinator Processor Card in the suspect card cage. RS3: Service Quick Reference Guide Troubleshooting SQ: 1-9 Troubleshooting Twinax PeerWay Cables - To diagnose a twinax PeerWay cable problem: 1. Check all twinax cable connections for proper seating on the Tap Boxes. 2. Check that both ends of the PeerWay are properly terminated. 3. Check for multiple grounds. Only one Tap Box on each PeerWay (A and B) can have the jumper in the “SHIELD” position. 4. Check to make sure that all twinax cable connectors are isolated from ground. 5. Remove the “T” connector from the Tap Box, keeping the two twinax cables connected to the “T” connector. NOTE: The “Force Margin” field on the Peerway Overview screen should show “None”. Use an ohmmeter to measure the following resistances: a. Between 1 and 2: 50 ohms nominal (acceptable range: 45 to 70 ohms) b. Between 1 and shield: resistance greater than 1 megohm c. Between 2 and shield: resistance greater than 1 megohm. If the resistance between 1 and 2 is 100 ohms or greater (or in extended length cable, 124 ohms or greater), there is a break in one of the twinax cable segments. Disconnect the two twinax cables from the “T” and measure between 1 and 2 of both cable ends. The reading should be between 100 and 140 ohms. Follow the faulty cable back until the open is located. Terminations at both ends should read 100 or 124 ohms. If the resistance between 1 and shield or between 2 and shield measures less then 1 megohm, this indicates a short between one of the lines and the shield. Disconnect the two twinax cables from the “T” connector and measure each cable to find the faulty end. Continue following the cable segments until the fault is found. RS3: Service Quick Reference Guide Troubleshooting SQ: 1-10 General Console Troubleshooting Procedures - To diagnose Console problems: 1. Load from boot tape. If the console loads OK, replace the hard disk drive. NOTE: Use a tape made from the “Create Boot Tape” function. To load from tape, insert the boot tape and power up the console. Hold [HDWR ALARM] throughout the Hardware Power Up Diagnostics screen until the console indicates loading from the streaming tape. After the console displays the Main Menu, enter [DISK DIRECTORY PEERWAY], cursor to the “TAPE” field, and press [ENTER]. Then perform the “Restore Tape Files to Disk” function. Cycle DC power and try to load using the Winchester disk. If the console still will not boot from the hard disk, replace the disk drive assembly. For the Enhanced or Standard Engineering Keyboard (1984--1654--000x): Hold the “H” key in place of [HDWR ALARM]. 2. If the console will not load from tape, replace the SCSI interface card. NOTE: Do not replace a SCSI Interface card with a Disk Interface card. RS3: Service Quick Reference Guide Troubleshooting SQ: 1-11 Console Power-Up Diagnostics When power is applied to a console, the console is put through a series of comprehensive tests to verify console card operation. If a failure occurs on any one of the console cards, the word “PASSED” is replaced with “FAILED” or “MISSING”. The console will then finish the power-up tests, and an alarm at the bottom of the screen will indicate “CRITICAL FAULTY OR MISSING”. If any card is indicated as missing, the card has failed to the point that it cannot be detected in the card cage and the console will not run. If a card indicates “FAILED”, the test that failed will be backlit in red and the console may still be able to run, depending on the fault of the card. Pressing [ACK] on the Loop Control Panel or the red [ALARM ACK] button on the Operator Keyboard will attempt the system boot. Before pressing [ACK], note which card and the specific test that failed for future reference. NOTE: For the Enhanced Engineering Keyboard (1984--1654--000x): The red ACK key is not recognized until the console has finished booting. Press the “A” key or “F10” to acknowledge the alarm. Console Power-Up Tests Item Test Definition Console Bus/Interrupt Test This is a test of the processor card ability to talk to the other cards on an interrupt level. A failure here could indicate that the processor card is bad or one of the other cards in the console could be affecting the test. The power should be turned off to the console and all cards but the power supply and processor removed. The front panel keyboard cable should also be removed. The console should again be turned on and, after 30 seconds, the green LED on the processor card should turn on, indicating the card passed all tests. The rest of the cards should then be added one by one until the fault again appears and that card should be replaced. (continued on next page) RS3: Service Quick Reference Guide Troubleshooting SQ: 1-12 Console Power-Up Tests (continued) Item Test Definition Console (cont.) EDAC Test This is a test of the Error Detection and Correction circuitry. An error is purposely written into a number of RAM addresses to verify that the EDAC will correct it. If the card has failed the EDAC test and passed the RAM test there should be no fault that would corrupt data. The card should operate for a period of time but could reset the console frequently. The processor card should be replaced as soon as possible. Four Meg RAM Test An address and data test is run on all of the RAM on the processor card. If a failure is indicated here the console will probably not run reliably. NOTE: If a single bit error is detected during the RAM test, the Error Detection and Correction (EDAC) circuit will correct for a single RAM chip failure. The EDAC test on the processor card will be bypassed (indicated by the EDAC test also being backlit) and the console will not halt on this screen but will start up from disk in the normal way. A “Console Weak RAM Chip,bit XX” alarm will be generated and placed on the Active Alarm List. Instruction Set Test This is a test of the microprocessor itself. An elaborate algorithm is run using many of the varied instructions to verify the integrity of the microprocessor. If a failure is indicated here, the processor may be bad and the card should be replaced. Power regulator voltage should also be checked. Processor Boot Version This number indicates the software revision number of the ROM memory parts of the processor card. The ROM contains the information that the processor needs to run the power-up diagnostics and the routine needed to load the Boot Disk into the console in order to begin operating. (continued on next page) RS3: Service Quick Reference Guide Troubleshooting SQ: 1-13 Console Power-Up Tests (continued) Item Test Definition Console (cont.) ROM Test A test of the integrity of the boot ROMs on the processor card that instruct the processor on how to run the power up diagnostics. If a failure is indicated here and the acknowledge button will start up the console, the failure will not affect the operation of the console once it is running. The boot ROMs are only used during start up. The online test of the ROM (MCT Screen) may also indicate test failures. SR Test SRAM test. If a fault is indicated here the card should be replaced. Watch Dog Timer The watch dog circuit is allowed to time out and reset the microprocessor to verify its operation. The card will operate if the watch dog circuit is not functioning. However, the card should be replaced as soon as possible or, if a fault does appear, the card may not reset in the case of a bad instruction. All Lamps on for Visual Check All the LEDs on the Loop Callup Panel are turned on to verify that they are all working. Keyboard Display Panel The panel is asked for the firmware revision number. The response is checked for correct format and checksum. The firmware level is displayed on the screen. If there is no response, the panel is assumed not installed. Keyboard Interface Same as Display panel. Option Panel Same as Display panel. Trackball Same as Display panel. TTY Keyboard This indicates that the null character was not received from the keyboard microprocessor by the console processor. A fault here could indicate a bad TTY Keyboard, a disconnected keyboard cable or a bad cable connection on the console motherboard. NOTE: If the cable between the motherboard and the Loop Callup Panel is disconnected, the console will show a fault yet would also load the disk. The console screen then locks up showing the date, time, and an alarm at the bottom of the screen with no menu. (continued on next page) RS3: Service Quick Reference Guide Troubleshooting SQ: 1-14 Console Power-Up Tests (continued) Item Test Definition PeerWay Jabber Halt A circuit on the card is intended to keep a faulty node from transmitting too long on the PeerWay. If this test indicates a fault, the card may operate, but should be replaced as soon as possible. Local Loop Back This is a test of the console ability to hear its own echo through the PeerWay system. If a failure is indicated here, this indicates that the console is not working on one or both PeerWays. The Tap Box could be faulty, drop cables could be disconnected, or the PeerWay Interface card could be bad. RAM Test #1 This is a data test of the RAM on the card. The card should be replaced if a fault is indicated. RAM Test #2 This is an addressing test of the RAM. The card should be replaced if a fault is indicated. Register Check Power Supply +5 V and +12 V A: +30 and B: +30 Printer This is a check of the several chips on the card. If this test indicates a fault, the card should be replaced. A voltage sense circuit is read and if the +5 or +12 volt supply on the power supply card is not in tolerance, the voltage will be backlit. The power supply should be replaced. The voltage sense on the incoming DC bus is monitored and, if one of them is below approximately 18 volts, the indication will show a fault. However, many consoles use only one DC bus for power so the card fault will not indicate “FAILED”. NVRAM Test A checksum is run on the data in NVRAM. If the checksum is incorrect, the test will indicate a fault. The system will run if this is showing a fault, but some of the console configuration could be corrupt. The online NVRAM checksum test should also be checked on the Menu Confidence Test screen. Periodic Interrupt This is a test of the interrupt system generated off the clock. If this test indicates a fault, the card should be replaced. (continued on next page) RS3: Service Quick Reference Guide Troubleshooting SQ: 1-15 Console Power-Up Tests (continued) Item Test Printer (cont.) Printer Ready SCSI Board (MTCC) Definition This indicates if the printer is present and on line. If the printer is not connected, it will not cause the diagnostic screen to lock up, but printer indication will be backlit, indicating no printer is connected. RTC The operation of the Real Time Clock is tested. If a fault is indicated, the card should be replaced. RTC Battery This indicates the state of the charge on the batteries used to back up the Real Time Clock. If a fault is indicated, the battery charge is low or the battery jumper switch is in the off position. The battery status is also monitored on the MCT screen. DMA Registers The registers of several of the devices on the card are tested to verify operation of the board. If a fault is indicated here, the console may not boot up from disk. If it does, operation can be attempted, but the card should be replaced as soon as possible. Disk Drive (MC and BCC) RAM Test #1 This is a data test of the RAM on the Disk Interface card. If a fault is indicated here, the card should be replaced. RAM Test #2 This is an addressing test of the RAM on the Disk Interface card. If a fault is indicated here, the card should be replaced. SCSI Controller This test checks the registers of the specialized SCSI interface bus devices for proper power up conditions. SCSI Master This indicates which console is the SCSI master. (continued on next page) RS3: Service Quick Reference Guide Troubleshooting SQ: 1-16 Console Power-Up Tests (continued) Item Test Definition Video Generator Color Test Tests for shorts between the RGB lines. An error could be a board fault or a cable fault. DAC Test Test of the Digital to analog Converter which measures voltages on the RGB output lines to the monitor. An error here can indicate that a video driver has failed so the card must be replaced. It could also indicate that the monitor is not properly terminated, the video cables are damaged, that the shields are shorted to ground, or the type of cable is wrong. PIT Test Test of the Parallel Interface Timer which is used to control interrupts. If a fault is indicated the Video Generator card should be replaced. RAM Test Addressing and data test is run on the RAM in the Video Generator. If a fault is indicated here the card should be replaced. Synch Test Tests synch signal rates. If a fault is indicated the Video Generator card should be replaced. Tape Drive Test to check for the presence of the tape drive SCSI controller board and checks for tape ready signal. If no tape is installed the tape indication will be backlit blue. If a tape is present, it will rewind the tape. NOTE: If the cable between SCSI controller card located on the tape unit and the tape unit is disconnected, this test will not indicate a fault without a tape installed. This can be verified by installing a tape in the unit and the tape test should not be in the blue color. Winchester Tests to check for disk ready signal, and verifies the integrity of several sections of the disk to make sure it works properly. NOTE: If the cable between the SCSI controller card located on the disk unit and the disk unit is not connected, both the disk and tape unit will indicate fault by being backlit in red. RS3: Service Quick Reference Guide Troubleshooting SQ: 1-17 Console Off-Line Diagnostics Off-line diagnostics for the console are loaded from tape or floppy disk depending on the console in use. Tests are the same with the exception of the keyboard tests which are suited to the individual console. - To run the off-line diagnostics: 1. For a Command Console, insert the appropriate Off-Line Diagnostics tape in the console tape drive, turn the console power off for 30 seconds and then back on. Hold down the “Hardware Alarm” button during the power-up diagnostics until the console indicates it is “Booting From Streaming Tape”. This boots the console and brings up the Off-Line Diagnostic Menu. For a MiniConsole or Basic Command Console, insert the appropriate Off-Line Diagnostics disk in either disk drive, turn off the console power for 30 seconds and then back on. This boots the console and brings up the Off-Line Diagnostic Menu. 2. Check the Power-Up Diagnostic screen for any faults. 3. Run desired tests. RS3: Service Quick Reference Guide Troubleshooting SQ: 1-18 Console Off Line Diagnostic Menu Definitions Item Definition Test Revision No. Processor Card Printer Interface This indicates the software revision of the Off-line Diagnostics test disk being used. 1. Processor RAM Test This is a thorough address and data test of all of the RAM on the card. The test takes approximately 4 minutes and runs indefinitely unless stopped by pressing the [CTL] and [C] buttons together (Control C function) or power to the MiniConsole is shut off. 2. Processor ROM Test A checksum test is run on the boot ROMs on the Processor card. The test is run very rapidly and will run indefinitely unless halted by a Control C function. 3. Reset System -- Power-up Test This function will force the MiniConsole to go through the power-up test and reboot from disk. 4. Processor RAM Test This is a thorough address and data test of all of the SRAM on the card. 5. NVRAM Test This is a nondestructive test of the nonvolatile RAM on the Printer Interface card. The test must be allowed to run up to 8192 before the test is complete. Any write errors will be reported. 6. Clear NVRAM This is a destructive test of the nonvolatile RAM on the Printer Interface card. It will write all zeros to the NVRAM. Any write errors will be reported. The NVRAM must be reloaded from the disk Console Configuration file. (continued on next page) RS3: Service Quick Reference Guide Troubleshooting SQ: 1-19 Console Off Line Diagnostic Menu Definitions (continued) Item Printer Interface (cont.) Definition Test 7. Printer Port Loopback Test This initiates a test of the circuitry to drive the printer. Before starting the test the Printer Interface card must be removed and jumpers HD 7, HD 8, and HD 9 must be moved to the test position and jumpers HD 1 through 6 should be removed. NOTE: All tests except the Printer Barber Pole test can be run with the jumpers in this position. Video Generator Keyboard Assemblies 8. Printer Barber Pole This test outputs a barber pole printer pattern for testing the printer. The printer must be set up for 9600 baud. 9. Color Palette RAM Test This tests the color palette. 10. Video RAM Test 16 pages can be written into the Video RAM. During the test, patterns are written to each page of the Video RAM. 11. Video Convergence Pattern This generates a test pattern to enable checking the CRT for alignment and linearity. No test results are given. 12. Alarm Contacts Test Tests the alarm contacts. 13. Command Entry Keyboard Test This test allows for the testing the Main Operator Keyboard Keys. All keys are pictured on the screen and each key picture will light when the corresponding key is pushed. 14. TTY/ASCII Keyboard Test This test allows for the testing part of the individual TTY keys. All keys are pictured on the screen and each key picture will light when the corresponding key is pushed. (continued on next page) RS3: Service Quick Reference Guide Troubleshooting SQ: 1-20 Console Off Line Diagnostic Menu Definitions (continued) Item Keyboard Assemblies (cont.) Floppy Utilities Definition Test 15. Old TTY Cursor/numeric Keys Test This test is used to test the Cursor/Numeric keys of the old configuration keyboard. 16. New TTY Cursor/numeric Keys Test This test is used to test the Cursor/Numeric keys of the new configuration keyboard. 17. MTO Cursor/Numeric Keys Test This test is used to test the Cursor/Numeric keys of the enhanced keyboard. 18. Loop Callup Keyboard Test This test allows for the testing the individual Loop Callup keys. All keys are pictured on the screen and each key picture will light when the corresponding key is pushed. 19. Trackball Keyboard Test This tests the trackball. 20. Keyswitch Test This test allows for the testing of the Key Switch. Each key can be inserted in the key switch and the key number seen by the system is reported on the screen. 21. Panel Light Test This test lights all the panel LEDs in single sequence and then in rows. It is used to verify all LEDs are working and no shorts exist between lights. 22. Winchester Disk Exerciser This test reads and writes to the hard disk to determine if there is a hardware problem or a media problem. This test will destroy all information on the disk. 23. Winchester Formatter This test destroys all information on the disk and formats the disk. (continued on next page) RS3: Service Quick Reference Guide Troubleshooting SQ: 1-21 Console Off Line Diagnostic Menu Definitions (continued) Item Floppy Utilities (cont.) Test 24. Tape Tests Definition This brings up a tape test menu which allows the user to choose between the following tests to be performed on the tape drive: Retension Tape Erase Tape Tester/Exerciser Disk Copy Compare Tape Copy Unload Tape These tests can be used to test the tape drive. CAUTION: “Erase Tape” and “Tester/Exerciser” will destroy all information on the tape. PeerWay Interface Card 25. Floppy Disk Exerciser This test performs reads and writes to the floppy disk drive to determine if there are any drive problems. This test will destroy all information on the disk. 26. Floppy Formatter This test destroys all information on the disk and formats the disk. 27. PeerWay Interface Card test Runs these tests on the PeerWay Interface Card: RAM Test #1 RAM Test #2 Jabber-Halt Local Loop Back RS3: Service Quick Reference Guide Troubleshooting SQ: 1-22 Console Crash Dump Screen This screen is intended to trap software errors and may appear because of faulty processor RAM or other hardware faults or software problems. If this screen appears, note which function was being performed when the screen appeared and make a screen print. If you are unable to get a printout of the screen, copy down all the items highlighted in the figure. D Screen Title D Time D System Error Trap Number.......SR Number.......PC Number....... D All of the lines of the System Stack D All of the lines of the User Stack It is also important to note which software revision levels are being run at the time of the crash. If the console locks up repeatedly, perform the Off Line Diagnostics on the processor card ROM, disk or SCSI RAM, and Video Generator RAM. RS3: Service Quick Reference Guide Troubleshooting SQ: 1-23 Memory Dump The memory dump helps service personnel diagnose software problems. A node’s RAM memory can be captured and viewed or saved to a file. The contents of RAM memory can often be used to help solve difficult software problems. Disk event messages are generated as the result of memory dump activities. D D D - The memory dump can only be performed on consoles, CPs, and SRUs. The node must be active. If the PeerWay Node screen is functioning, the node is active. A memory dump can only be performed on 68020 consoles running Version 15 or higher. To make a memory dump of a node: 1. Cursor to the command line. Type: MD (node #) , (filename) [ENTER] 2. The memory of the specified node is put into the specified file in the Log Files folder. The file is of the type Memory Dump. The memory dump is performed in the background and may take a few minutes to complete. You can perform other tasks while the dump is occurring. - To stop a memory dump before it is finished: 1. Cursor to the command line. Type: KMD [ENTER] RS3: Service Quick Reference Guide Troubleshooting SQ: 1-24 Memory View Screen The Memory View screen has been added to allow you to view the contents of a memory dump file or the current contents of memory. The screen is only available with 68020 pixel consoles. - To read current memory data from a node: 1. Call up the Memory View screen. MV [ENTER] 2. If you want to look at a node other than the one you are at, change the “Node” field entry. - To read memory data from a file: 1. Call up the Memory View screen. MV [ENTER] 2. Cursor to the “Memory” field and press [ENTER]. The field changes to “File”. 3. Enter the “Volume”, “File Type”, and “Filename” of the file that contains the memory data. 4. Cursor to the “Read” field and press [ENTER]. 5. To access other screens to see more memory data: [PAGE AHEAD] and [PAGE BACK] Memory View Screen Field Description Field Addr Decimal/Hex Description Specifies the starting address of the memory data displayed on the screen. Specifies that addresses are shown in decimal or hexadecimal. To change this field, press [ENTER]. File/Memory Specifies that the memory data is being read from a file or directly from the node. You can change this field by pressing [ENTER]. File Type Specifies the type of folder that contains the file you want to view. For memory dumps, the type should be “Log File”. (continued on next page) RS3: Service Quick Reference Guide Troubleshooting SQ: 1-25 Memory View Screen Field Description (continued) Field Filename Description Specifies the name of the file that contains the memory data. Hex/Decimal See the “Decimal/Hex” field. Memory/File See the “File/Memory“ field. Node Specifies the node number of the source of the memory data. Reads the current memory data onto the screen, or reads data from a file. Press [ENTER] to read new data. Read The Memory View screen takes a snapshot of memory. This field allows you to refresh the screen with the current contents of memory. Specifies how the data is interpreted and displayed. Byte =2 hex character groups Char =2 hex character groups View Float =Floating point numbers Link =Link addresses Long =8 hex character groups Short =4 hex character groups Time =System time Volume Specifies the name of the volume that contains the memory data file. RS3: Service Quick Reference Guide Troubleshooting SQ: 1-26 Node Dump Screen The Node Dump screen shows details after a crash of a console or ControlFile. Enter ND nn where nn is the node number. Menu Confidence Screen The Menu Confidence screen allows you to view the status of console power, the status and results of ongoing RAM and ROM tests, and the battery jumper position. Enter MCT to call up the screen. You may boot the console by cursoring to “Power Up Test” and pressing [SELECT]. You can also configure the console to play a tune on boot up by changing the “Startup Tune” parameter. Keyboard Problems A locked keyboard may be reset by holding down [CTRL], [ALT], and [INSERT] simultaneously. The console will report bad keys (shorted or excessive length keystroke) by the message “Keyboard Error X:XX” where the first X represents the keyboard number and the XX represents the key. The numbers for the keyboards keys depend on the type of console. CRT Problems If there are problems with the CRT, a quick way to test whether it is the monitor or the video source is to connect another monitor to the video cables. Another trick is to connect the video cables to another OI Card Cage. RS3: Service Quick Reference Guide Troubleshooting SQ: 1-27 Troubleshooting OI Card Cage Problems NOTE: All procedures assume that you have found all red fault LEDs and that they have been corrected before proceeding to the troubleshooting process. The procedure is to reduce the Operator Interface (OI) to a configuration which you know works. From that point you can selectively add removed components until the faulty component is isolated. CAUTION Remove power from the card cage each time a card is removed or inserted. Do not touch the gold edge connectors on any board. If at any point the installation of a circuit card stops the progress of booting, that card should be replaced. If this process does not find faulty components, contact FRSI for further assistance. - To diagnose a OI Card Cage problem: 1. Remove all OI card cage circuit boards except the Power Regulator. Put them on a grounded static mat. CAUTION Use a grounded wrist strap with a built-in one megohm resistor for your safety and the protection of static sensitive circuits. The resistor allows static electricity to drain to ground and still isolates you from direct ground. 2. If the Power Regulator green LED comes on when power is applied, the Power Regulator is operational. 3. Install the the OI Processor. When power is applied the red LED will be on until the processor completes running the self-diagnostics. When the green LED comes on, the Processor has passed all the power up diagnostics and should be considered operational. 4. Install the Video Generator. Either the green or the red LED will be on until the processor starts to run the diagnostics on this board. While diagnostics are being run, the red LED will be on. When the diagnostics are completed successfully, the green LED is turned on by the processor. As soon as the Video Generator is installed, you should be able to see the progress of the diagnostic tests on the screen. RS3: Service Quick Reference Guide Troubleshooting SQ: 1-28 5. Monitor the Console Power-Up screen for error indications. 6. Install the PeerWay Interface. Either the green or the red LED will be on until the processor starts to run the diagnostics on this board. While diagnostics are being run, the red LED will be on. When the diagnostics are completed successfully, the green LED is turned on by the processor. 7. Install the Printer Interface. Either the green or the red LED will be on until the processor starts to run the diagnostics on this board. While diagnostics are being run, the red LED will be on. When the diagnostics are completed successfully, the green LED is turned on by the processor. 8. Install the SCSI Host Adapter. Either the green or the red LED will be on until the processor starts to run the diagnostics on this board. While diagnostics are being run, the red LED will be on. When the diagnostics are completed successfully, the green LED is turned on by the processor. CAUTION Before you put the console back into service, be sure to switch all of the OI card cages off. Switch them back on together to ensure that the proper cage becomes the SCSI Master. RS3: Service Quick Reference Guide Troubleshooting SQ: 1-29 Troubleshooting ControlFiles All procedures assume that you have found all red fault LEDs and that they have been corrected before proceeding to the troubleshooting process. The general procedure is to reduce the ControlFile to a configuration which you know works. From that point you can selectively add removed components until the faulty component is isolated. CAUTION Use a grounded wrist strap with a built-in one megohm resistor for your safety and the protection of static sensitive circuits. The resistor allows static electricity to drain to ground and still isolates you from direct ground. Do not touch the gold edge connectors on any board. Remove all ControlFile circuit boards except the Power Regulator, one Coordinator Processor, and the Nonvolatile Memory. If the green LED on the Power Regulator and the Coordinator Processor comes on when enabled, they should be considered operational. If the Coordinator Processor does not successfully boot, replace the Nonvolatile Memory, Coordinator Processor or the Power Regulator. The goal at this point is to have the ControlFile Coordinator Processor operating. Next install the the PeerWay Buffers. At this point you should be able to see the ControlFile Status on the console. Continue installing the other Power Regulator, Coordinator Processor, and the Controller Processors one at a time until the faulty component is found. If, at any point, the installation of a circuit card stops the progress of Booting, that card should be replaced. CAUTION When performing this procedure care must be taken to disable the Nonvolatile Memory and then the Coordinator Processors each time a card is removed or inserted (with the exception of the PeerWay Buffer cards). Turn off the Nonvolatile Memory card before removing AC and DC power. NOTE: Any slot which previously contained a PLC, RBLC, or MUX Controller must have either a WIPE BUBBLE or KILL CONTROLLER performed on it prior to loading an image or configuration. Failure to do so could cause some strange errors or problems with the controller. RS3: Service Quick Reference Guide Troubleshooting SQ: 1-30 If a nonredundant Coordinator Processor card is disabled on a running process, all operator process changes, links between controllers in that cage, and links to and from that ControlFile will freeze at the last value received. The controller will continue to operate the process under these conditions. As soon as the Coordinator Processor is restarted, all links will be updated. If a Controller Processor card is disabled on a running process, the analog output Field interface card and the discrete output module will either hold their last value or go to zero, depending on the position of the jumper on the Field interface card. If it is necessary to close (go to zero) the output of the field device that uses the ”HOLD” mode after the controller is disabled, the Field Interface card must be removed. If both PeerWay Buffer cards are removed from the ControlFile on a running process, all operator changes and links to and from this ControlFile will freeze at the last value received. The links within the ControlFile will continue to update. The Controller Processors will continue to operate under these conditions. RS3: Service Quick Reference Guide Troubleshooting SQ: 1-31 ControlFile Troubleshooting Action Condition Controller Processor card will not pass Power Up Diagnostics. 1. Replace the Controller Processor card. Green LED does not come on. Controller Processor card will not start. The green LED comes on briefly with all yellow LEDs on. 1. The yellow LEDs on the Coordinator Processor and Nonvolatile Memory cards must be flickering, indicating that the cards are operating properly. NOTE: if no Controller Processor card is running inside this ControlFile, the Nonvolatile Memory card will have only a green LED on. If the Coordinator Processor and Nonvolatile Memory card LEDs are not as indicated, see section on “Coordinator Processor will not load from Nonvolatile Memory“. 2. Perform a Wipe Bubble command on the suspect Controller Processor card. Re-enable the Controller Processor card after the Wipe Bubble procedure is performed. If the Controller Processor now starts, the plant Configuration must be reloaded from disk for that controller. Refer to the Wipe Bubble Procedure in this section. 3. Using a disk with the same software level as in the ControlFile, perform a Disk Load Program command on that ControlFile. It is normal to have an active hardware alarm “Program Image Bad” for this node during the Disk Load Program function. The alarm must clear after the Disk Load Program is complete. If the Disk Load Program is successful, try to restart the Controller Processor card. 4. If the Controller Processor card has been jumpered for additional images, check the jumper positions on the card. See Chapter 4 of this manual for jumper positions and locations. 5. Replace the Nonvolatile Memory card if the Disk Load Program is not successful. (Then attempt the Nonvolatile Memory Recovery Procedure.) 6. Replace the Controller Processor card. 7. Replace the Coordinator Processor card. (continued on next page) RS3: Service Quick Reference Guide Troubleshooting SQ: 1-32 ControlFile Troubleshooting (continued) Condition Controller Processor card will not start with the Coordinator Processor card in one of the two Coordinator Processor card slots. Action 1. Replace the Controller Processor card. 2. Replace the Coordinator Processor card. 3. Check the terminators on the back of the ControlFile motherboard 4. Replace the terminators. If the Coordinator Processor card is installed in the other slot, the controller will run. Controller Processor card will run alone, but will not run as a redundant pair. (Either controller alone will start and run.) Coordinator Processor will not pass Power Up Diagnostics. The green LED does not come on and the top yellow LED is off. 1. Check the Controller Processor cables on the back of the motherboard and verify that both the upper and lower cable connections for the two redundant Controller Processor slots are in place. 2. Ensure that both Controller Processors are seated properly inside the ControlFile. 3. Replace one Controller Processor at a time with a known good Controller Processor in redundant configuration. 1. Replace the Coordinator Processor card. (continued on next page) RS3: Service Quick Reference Guide Troubleshooting SQ: 1-33 ControlFile Troubleshooting (continued) Condition Coordinator Processor will not load from the Nonvolatile Memory card. The green LED comes on briefly, then the red FAULT LED comes on. The top yellow LED is on. Action 1. Insure that the Nonvolatile Memory card switch is in the ENABLE position. 2. Insure that the Nonvolatile Memory card is in the proper slot within the ControlFile. (See diagram on ControlFile door.) NOTE: If the primary Coordinator Processor is running and the secondary is not, the primary should NOT be disabled at this time. An attempt should be made to load the Plant Program into the nonvolatile memory (Disk Load Program function). If the function fails the Nonvolatile Memory card must be replaced. 3. Move the Coordinator Processor card to its redundant slot. If the Coordinator Processor works in the redundant slot, see the Troubleshooting section on “Coordinator Processor will not start in one of the two slots”. 4. Replace the Nonvolatile Memory card. NOTE: The Nonvolatile Memory Recovery Procedure may help recover the card if it is bad. The PeerWay Boot Procedure is also available. 5. Replace the Coordinator Processor card. 6. Insure ControlFile upper and lower terminators are installed correctly. NOTE: If no Controller Processors were running, the plant configuration must be reloaded from disk. (continued on next page) RS3: Service Quick Reference Guide Troubleshooting SQ: 1-34 ControlFile Troubleshooting (continued) Condition Coordinator Processor starts but stops after a short period of time. ControlFile appears on the ControlFile Status screen and then disappears. Action 1. Pull out the two PeerWay Buffer cards in the ControlFile. 2. Reseat the Coordinator Processor and Nonvolatile Memory cards and try to restart the Coordinator Processor. 3. If the Coordinator Processor now starts and runs, check the Control Block Directory screens (a configuration key must be used when viewing the screens) of all other ControlFiles on the PeerWay for corrupted data. Look for scrambled loop tags and abnormal block status and dynamic memory sizes. 4. If a suspect controller is located, the Kill Controller function must be performed on all Controller Processors in that cage. After the Kill Controller has been performed, the plant configuration must be reloaded from the disk to the ControlFile. 5. With the PeerWay Buffers cards still removed, disable and remove all Controller Processor cards within the faulty cage. 6. Reseat the Coordinator Processor and Nonvolatile Memory cards and try to start just these two cards. If the Coordinator Processor will not stay running, replace it. 7. If the Coordinator Processor now starts and runs, begin installing the Controller Processor cards one at a time. As each card is installed, restart the Coordinator Processor and Controller Processor cards (this is done to determine if one of the Controller Processors is preventing the Coordinator Processor from running). 8. If a Controller Processor is found that prevents the Coordinator Processor from running, reseat and start the Coordinator Processor and Nonvolatile Memory cards with all Controller Processors set to DISABLE. After the Coordinator Processor is running, reinstall the PeerWay Buffer cards and perform the Wipe Bubble command for all Controller Processors in the ControlFile. 9. Turn all Controller Processors to ENABLE and allow them to restart. If one of the Controller Processors will not start, or if it will not allow the Coordinator Processor to start, replace that Controller Processor card. 10. After the ControlFile is running with all of its Controller Processors, load the Plant Configuration from disk for that ControlFile. (continued on next page) RS3: Service Quick Reference Guide Troubleshooting SQ: 1-35 ControlFile Troubleshooting (continued) Condition Coordinator Processor card will not start in one of the two Coordinator Processor slots, but will start and run in the other slot. Action 1. Remove all cards in the ControlFile except for one Power Regulator card, one Nonvolatile Memory card, and one Coordinator Processor card in the faulty slot. Re-enable the Coordinator Processor and Nonvolatile Memory cards. If the Coordinator Processor now runs, proceed to step 5. 2. If the Coordinator Processor does not start, replace the Nonvolatile Memory card. 3. If the Coordinator Processor still does not start, replace the Power Regulator card. 4. If the Coordinator Processor still will not run in this slot, check the ControlFile terminators on the back of the ControlFile card cage. 5. Once the Coordinator Processor is running in this minimum configuration, install the remaining cards one at a time until the card is found that prevents the Coordinator Processor from running. Replace the faulty card. Coordinator Processors will run separately, but not as a redundant pair. 1. Replace the Nonvolatile Memory card. 2. Replace the Coordinator Processor cards one at a time. 3. Check the ControlFile terminators on the back of the ControlFile card cage. RS3: Service Quick Reference Guide Troubleshooting SQ: 1-36 ControlFile Status Screen The ControlFile Status screen is where you can find out what program type (such as $$CP, $$CPMax, or $$CPBat), and version level is loaded in the CP boards. The Coordinator Processor and Controller Processor must be booted to determine what $$CP program and version is loaded in the NV Memory . You can find the Image type and the version level for each controller card on this screen by reading the “Card Type” Field, and the “Prgm Rev” fields for each Controller card. Also, you can tell what additional images are loaded in the NV Memory by the “Additional Images” fields, but you cannot tell what level of each Image is loaded in the NV Memory. The Jumper Code field indicates MPC II or MPC5 functionality and image selection as determined by jumpers on the MPC II card. Displayed as X_Y_Z where: X = MPC II HD2 setting: 0 for MPC I functionality 1 for MPC II functionality Y = combination of HD6, HD7, and HD8 as an octal number Z = combination of HD4, HD5, and HD9 as an octal number See Section 4--2 for jumper details and CB: 3--4 for a complete description of this screen. RS3: Service Quick Reference Guide Troubleshooting SQ: 1-37 Wipe Bubble Procedure The following procedure describes how to perform a Wipe Bubble procedure on the ControlFile Nonvolatile Memory. Wiping rewrites the header and purges the plant configuration information for the specified Controller Processor card. The command works on Bubble NV Memory and RAM NV Memory. CAUTION When a Wipe Bubble or a Kill Controller procedure is performed on an MPC I controller, all *ENTRY and *VALUE items will be lost. Write down the values BEFORE wiping the configuration. When a Wipe Bubble or a Kill Controller procedure is performed on a MUX configuration the calibration constant of the FEMs will be lost. The calibration constants should be written on the FEM. - To wipe the NV memory: 1. Toggle the desired Controller Processor card enable/disable switch to DISABLE. 2. Move the cursor to the command line and press: WB = [Controller Processor address] An alarm is generated: BUBBLE WIPED FOR CONTROLLER=xx The NV memory is now wiped. 3. Toggle the Controller Processor card enable/disable switch to ENABLE. RS3: Service Quick Reference Guide Troubleshooting SQ: 1-38 Troubleshooting I/O This section covers I/O troubleshooting: D General I/O problems D Analog Card Cages D FlexTerms D Field Interface cards. D RBL controller and cards. These procedures assume that you have found all red fault LEDs and that they have been corrected before you proceed to the troubleshooting process. CAUTION Use a grounded wrist strap with a built-in one megohm resistor for your safety and the protection of static-sensitive circuits. All cards should be placed on a grounded static mat or be placed in a static protection envelope. Potential problem areas include: D Bad fuses (in and out -- no indicators) D Bad card D Bad Controller card D Bad cable D Bad software D Bad firmware D Bad I/O Block or ControlBlock configuration D Bad field device CAUTION Remove power from the Multiplexer FlexTerm before installing or removing any cards. RS3: Service Quick Reference Guide Troubleshooting SQ: 1-39 Restoring Redundant FICs When a primary FIC with redundancy fails, the redundant FIC takes over. The failed FIC lights its red LED or flashes its green LED. Replace the failed FIC and determine that the new FIC has its green LED lighted and that the FIC Status screen shows no error for the FIC. The “Health” field of the primary FIC will still show “Bad”. The original configuration must be restored to have redundancy effective again. WARNING Do not pull the redundant FIC to force a switch back to the primary FIC. This introduces a “double hardware failure” and may result in unexpected operation. - To restore FIC redundancy: 1. Call up the RIOB screen. 2. Put the RIOB in MANUAL. 3. Highlight the line: Reset Backup of Line n (Press Enter) and press [ENTER]. This restores the primary FIC and resets the backup FIC for backup action. The Health field of the primary FIC will now show “Good”. 4. Put the RIOB in AUTO. Normal redundancy operation is restored. RS3: Service Quick Reference Guide Troubleshooting SQ: 1-40 Serial (MPC) I/O Troubleshooting Action Condition Analog Input No Reading Inst. Low Alarm AIB Field Reading -- 25% 1. Use a VOM to check that the input current is in the range 4--20 mA. If a transfer card is installed, measure between test points on the card. Otherwise, measure at the marshaling panel by breaking the loop. If the current is OK: Check the FlexTerm to ControlFile cables. Replace the FIC. Replace the Controller Processor Card. If the current is not OK: Check all fuses on the FIC. 2. Using the RMT 262 Field calibrator (or similar device), input an appropriate current signal into the marshaling panel. If the value is wrong on the AIB screen, replace the FIC. If the value is correct on the AIB screen, check the field wiring and the transmitter. Be sure to check the system/self-powered jumper on the FIC. Analog Input shows incorrect or unstable reading. 1. Using the RMT 262 Field Calibrator (or similar device), input an appropriate current signal into the marshaling panel. Check the Field Reading on the AIB screen. If the reading is incorrect: Calibrate the point. Replace the FIC. Replace the Controller Processor Card. If the reading is correct: Measure the transmitter current with the RMT 262 (or similar device). Check the field wiring for shorts and resistance to ground. (continued on next page) RS3: Service Quick Reference Guide Troubleshooting SQ: 1-41 Serial (MPC) I/O Troubleshooting (continued) Condition Action Analog output 1. Remove the field wiring from the marshaling panel for this FIC. Connect a Rosemount 262 Field Calibrator (or similar device) to the terminals. Put the AOB in MANUAL and enter an output value of 50.00%. Check the Actual Value reading on the AOB (it should be 50%) and verify that the Rosemount 262 meter reading is also 50% (12 mA). Feedback check alarm 2. If the Actual Value Reading and the meter reading are not 50%: Check all fuses on the output FIC. Calibrate the point. Replace the FIC. Replace the controller. 3. If the Actual Value and meter readings are 50% and the alarm clears off the Active Hardware Alarm List, the problem is an open circuit in the field wiring or the field device. (continued on next page) RS3: Service Quick Reference Guide Troubleshooting SQ: 1-42 Serial (MPC) I/O Troubleshooting (continued) Condition Discrete input module does not work. Input FIC point LED not on. FIC communications are OK. Action 1. Check the mode of the CIB; it must be in AUTO or MANUAL. If the Status Field is blank, this indicates an override condition, which is illegal for a CIB. Check if the discrete manual bypass is turned on for this point. Replace the FIC. Replace the FlexTerm motherboard. 2. Measure the voltage across the input terminations for the faulty point. NOTE: If the CIB is configured for Normally Closed (N.C.) operation, the Field State on the CIB screen will show ON when the module has no voltage across it and OFF when the module has voltage across it. 3. If no voltage is present across the point: Check the polarity for the DC module. Replace the module. Replace the FIC. 4. If all of the points on this FIC and the card next to it are not working, the FIC may not be seated properly in its connectors. It is possible one of the two connector tabs are not seated correctly in the FlexTerm motherboard connectors. WARNING Before proceeding, remove all field voltage from the FIC to prevent shock or equipment damage. Loosen the two captive screws holding the FIC in place. Gently move the card away from the FlexTerm mounting plate and verify that both card connector tabs are properly plugged into the motherboard connectors. RS3: Service Quick Reference Guide Troubleshooting SQ: 1-43 Multiplex I/O Troubleshooting Action Condition Multiplex input point(s) bad. 1. Put an appropriate substitute signal into the point. Verify the accuracy to determine if the problem is system or field related. CAUTION Always remove field DC power before working on a 4 -- 20 mA input Front End Module (FEM). NOTE: FEMs should not be removed or inserted with power on. If the problem is in the system: a. For thermocouples, check the configuration of the MIB. Verify that the “SIG CHAR” field is not configured for millivolts (example: J NBS is correct; do not use NBS mV). b. For 4--20 mA inputs with the 10 ohm dropping resistors mounted on the marshaling panel, remove the field wiring and measure the resistance of the resistor. c. Replace the FEM. 2. Remove the input signal from the FEM. Configure the MIB for “Raw Counts”. The MIB input reading should be about 20000. If it is much lower, replace the FEM. MIB I/O Block configuration shows FEM type “None Type C”. RS3: Service Quick Reference Guide The FEM may have been inserted with MUX power ON. Turn MUX power OFF and then ON to force the MUX CPU to reinitialize. Troubleshooting SQ: 1-44 RTD and Thermocouple I/O Troubleshooting Action Condition RTD and thermocouple field problems. For RTD and thermocouple field problems, the following items should be checked carefully: Loose or corroded connections or FEM not securely mounted in MUX. This can cause all input points to read as negative numbers. For FEM mounting instructions see SV: 5--3. Reverse polarity Wires shorted to case at temperature sensor Wrong type of thermocouple wire Noise caused by close proximity to AC wires High common node voltage. Measure from all device leads to chassis with a digital voltmeter using both AC and DC meter scales. Universal Voltage FEM shows positive overload on open circuit. This appears when Universal Voltage FEM is connected through a remote communication link and configured as a thermocouple input. The system cannot differentiate between a thermocouple with a high temperature reading and one with a broken or open loop. Check that the MUX CPU PROM is Doric (Beckman) part number 278--7000--03B. Communication failure to MUX CPU and the Coordinator Processor. Ensure that TransZorbs CR17 through CR20 are bipolar (PGKE47CA). The correct units have no polarity marking. Low thermocouple reading (or reading at low value) for thermocouples attached to Universal FEM. This appears when MIB is configured for TC or mv input. Incorrect 1. Check for correct wiring at FEM. See SV:5. RTD readings with two or three-wire RTDs. Replace the FEM. 2. Check for correct wiring at RTD Marshaling Panel and at FEM. See SV: 5. (continued on next page) RS3: Service Quick Reference Guide Troubleshooting SQ: 1-45 RTD and Thermocouple I/O Troubleshooting (continued) Condition Action TC/RTD FIC shows poor accuracy. If the sensor of an 1984--2731--000x TC/RTD FIC is disconnected and reconnected, the reading will be inaccurate for approximately ten minutes. The reading will be within 1% in one minute and will gradually gain accuracy. This is a characteristic of the circuit. Discrete output module does not work. FIC communications are OK. 1. Put the COB into MANUAL Status and command the output to ON. Verify that the output LED for the FIC is on. The proper load must be connected. 2. If the LED is on: Check the module fuse Check the field voltage Replace the module If the LED is not on: Replace the module Replace the FIC NOTE: Output Modules ODC5A5 and OAC5A5 are Normally Closed Modules. 3. If all of the points on this FIC and the FIC next to it are not working, the FIC may not be seated properly in its connectors. It is possible one of the two connector tabs are not seated correctly in the FlexTerm motherboard connectors. WARNING Before proceeding, remove all field voltage from the FlexTerm Termination card to prevent shock or equipment damage. Loosen the two captive screws holding the FIC in place. Gently move the card away from the FlexTerm mounting plate and verify that both card connector tabs are plugged into the motherboard connectors properly. RS3: Service Quick Reference Guide Troubleshooting SQ: 1-46 Field I/O Status Screen (FIC Status Screen) The Field I/O Status Screen (previously the FIC Status screen) displays information about the Field Interface Cards (FICs) and Field interface Modules (FIMs) that communicate with a Controller Processor. This screen is for display purposes only. No screen entries are allowed. To call up the Field I/O Status screen, type the command FS [=address] [ENTER] where “address” is the hardware address such as =87F. NOTE: MultiLoop FlexTerms, some Contact FlexTerms, and Multiplexor FlexTerms cannot be displayed on this screen. Field I/O Status Screen Fields Field Cont 1 2 3 4 5 6 7 8 A, B, C, D Description of Displayed Information Address of the Controller Processor in the ControlFile. Communication line from the controller. Card cage address letter. Configured type of FIC. When the type is changed, this is displayed in the corresponding alarm color. AO Early analog output card AIO Analog I/O (2 in 1 out or 3 in FIC with all programs in ROM) AIO_R Redundant Analog I/O (2 in 1 out or 3 in FIC with redundancy and down-loadable code in battery backed RAM) AIO_RS Redundant Analog I/O with Smart daughterboard (2 in 1 out or 3 in FIC with redundancy, downloadable code in battery backed RAM, and a Smart daughterboard for HART communication) CIO Contact I/O (six points per card) Type DIO Discrete I/O (32 point discrete input/output FIM) MAI Multipoint Analog Input (16 point Input FIM) MAI32--x Multipoint Analog 32 Point Input (32 point input FIM). “x” shows cage address of the “other” 16 points. MAO Multipoint Analog Output (16 point output FIM) PIOB Pulse input/output FIC SI HART input card TIB Temperature input FIC (continued on next page) RS3: Service Quick Reference Guide Troubleshooting SQ: 1-47 Field I/O Status Screen Fields (continued) Field Description of Displayed Information F-Rev Revision level and firmware of the FIC. S-Rev Revision level of the FIC software. Status Displays the status of the FIC. Refer to the next table for a list and description of the status bits that may appear. RS3: Service Quick Reference Guide Troubleshooting SQ: 1-48 FIC/FIM Status Bits Status for: Status Bits Any NONBOOT Analog FIC Bits: 1xxx xxxx 7 Lost calibration: Set to 1 if any A/D or D/A calibration constants become questionable. x1xx xxxx 6 A/D converter failure. Set to 1 if any A/D converter does not complete a conversion within 45 milliseconds. xx1x xxxx 5 Smart Transmitter message available. Set to 1 when a message is available. xxx1 xxxx 4 Redundancy Jumper. Set to 1 for 1:1 redundancy. Set to 0 for other redundancy (including none). xxxx 1xxx 3 Output Bypass Unit status. Set to 1 when the Output Bypass Unit is active. xxxx x1xx 2 Hold/Zero jumper setting. Set to 1 to hold output value if a problem occurs. xxxx xx1x 1 Normal/Inverse acting valve jumper setting. Set to 1 for inverse acting valves. xxxx xxx1 0 Background diagnostics failure. Set to 1 if any background diagnostic test (except calibration constants) fails. 1xxx xxxx 7 Indicates the health of the other FIM. Set to 1 if the other FIM is “sick” or missing. x1xx xxxx 6 Set to 1 if this FIM is disconnected from the field. xx1x xxxx 5 Indicates the health of this FIM. Set to 1 if this FIM is “sick”. Analog FIM Bits: Bit Description Indicates that the FIC/FIM program needs to be loaded. Input Data Validity; good. xxx1 xxxx 4 Set to 0 if the data is Set to 1 if the data is invalid. Output Data Validity: This bit is not used for outputs. (continued on next page) RS3: Service Quick Reference Guide Troubleshooting SQ: 1-49 FIC/FIM Status Bits (continued) Status for: Status Bits Bit Analog FIM Bits: (continued) xxxx 1xxx 3 Not currently used. Always set to 0. (Early versions reported DC power status with this bit.) xxxx x1xx 2 Loop Power Module status bits: 0 for Loop Power Module A. 1 for Loop Power Module B. xxxx xx1x 1 Set to 0 when the Loop Power Module is good. Set to 1 when there is a problem with the Loop Power Module. xxxx xxx1 0 Set to 0 when the Loop Power Module is present. Set to 1 when the Loop Power Module is absent. 1xxx xxxx 7 Setting of the Hold jumper: 1 = Hold, 0 = Off x1xx xxxx 6 Diagnostics: 1 = Fault, 0 = OK xx1x xxxx 5 Point 6 when the OBU is connected: 1 = Normal, 0 = Override xxx1 xxxx 4 Point 5 when the OBU is connected xxxx 1xxx 3 Point 4 when the OBU is connected xxxx x1xx 2 Point 3 when the OBU is connected xxxx xx1x 1 Point 2 when the OBU is connected xxxx xxx1 0 Point 1 when the OBU is connected 1xxx xxxx 7 RAM test result: Set to 1 if the RAM background test fails. x1xx xxxx 6 ROM test result: Set to 1 if the ROM checksum fails. xx1x xxxx 5 CPU test result: Set to 1 if the CPU test fails. Contact Bits: Pulse Bits: Description (continued on next page) RS3: Service Quick Reference Guide Troubleshooting SQ: 1-50 FIC/FIM Status Bits (continued) Status for: Status Bits Bit Pulse Bits: (continued) xxx1 xxxx 4 Redundancy status: Set to 1 for 1:1 redundancy; set to 0 for any other redundancy (including none). xxxx 1xxx 3 Not used. xxxx x1xx 2 D/A failure: Set to 1 when the D/A has failed three times in a row. xxxx xx1x 1 Open loop: Set to 1 if analog output is open circuit. xxxx xxx1 0 General diagnostic status: Set to 1 if any diagnostic test fails. 1xxx xxxx 7 Lost calibration: Set to 1 if any A/D calibration constant becomes questionable. x1xx xxxx 6 A/D Converter failure. xx1x xxxx 5 Not used. xxx1 xxxx 4 Redundancy Jumper setting. xxxx 1xxx 3 Not used. xxxx x1xx 2 Not used. xxxx xx1x 1 Not used. xxxx xxx1 0 General diagnostic status: Set to 1 if any background diagnostic test fails. Temp Bits: Description (continued on next page) RS3: Service Quick Reference Guide Troubleshooting SQ: 1-51 FIC/FIM Status Bits (continued) Status for: Status Bits Bit Discrete I/O FIM Bits: 1xxx xxxx 7 Health of the other FIM: Set to 1 when the other FIM is bad or is not present. x1xx xxxx 6 Disconnect bit: Set to 1 when the other FIM has been disconnected by this FIM. xx1x xxxx 5 Configuration bit: Set to 1 when there is a problem with the configuration of this FIM. xxx1 xxxx 4 A/D #4: Set to 1 when there is a problem with A/D group 4 (points 25--32). xxxx 1xxx 3 A/D #3: Set to 1 when there is a problem with A/D group 4 (points 17--24). xxxx x1xx 2 A/D #2: Set to 1 when there is a problem with A/D group 4 (points 9--16). xxxx xx1x 1 A/D #1: Set to 1 when there is a problem with A/D group 4 (points 1--8). xxxx xxx1 0 Overall test: Set to 1 if any test fails. RS3: Service Quick Reference Guide Description Troubleshooting SQ: 1-52 FIC Detail Screen The FIC Detail screen displays information about the blocks that are associated with an individual FIC or FIM. This screen is for display purposes only. To call up the FIC Detail screen, cursor to the desired FIC or FIM and press [SELECT] from the FIC Status screen. To view the FIC Detail screen for a FIC or FIM, cursor to the desired card and press [SELECT]. If any I/O Block is in alarm the associated FIC or FIM will be in a corresponding color. There are five groups of status bits. The first is the same as for the FIC Status screen. The next four are for points 1--4, 5--8, 9--12, and 13--16. FIC Detail Screen Fields Field Description of Displayed Information Controller Address of the Controller Processor associated with the particular FICs. None is displayed if no Controller Processor has been assigned. Type Configured type of FIC: analog I/O (AIO), contact I/O (CIO), redundant analog I/O (AIO-R), redundant AIO with Smart daughter board (AIO-RS), discrete I/O (DIO). FIC Slot number of the FIC within the Controller Processor. F-Rev Revision level and firmware of the FIC. S-Rev Revision level of the FIC software. Status Displays the status of the FIC. Tag/Address Tag or address of the FICs residing in the Controller Processor. Type Type of block on the FIC. Value Output value of the block. Mode Mode of the FIC: AUTO, MANUAL, or SIMULATE. RS3: Service Quick Reference Guide Troubleshooting SQ: 1-53 FIC/FIM Status Bits Status Bits Bit 1xxx xxxx 7 Not used. Multipoint x1xx xxxx 6 Not used. Discrete xx1x xxxx 5 Input Latch for points 25--32: Set to 1 if bad. I/O xxx1 xxxx 4 Input Latch for points 17--24: Set to 1 if bad. FIM xxxx 1xxx 3 Input Latch for points 9--16: Set to 1 if bad. (MDIO) xxxx x1xx 2 Input Latch for points 1--8: Set to 1 if bad. xxxx xx1x 1 Output Latch for points 9--16: Set to 1 if bad. xxxx xxx1 0 Output Latch for points 1--8: Set to 1 if bad. 1xxx xxxx 7 Overall health of point 4, 8, 12, or 16 Multipoint x1xx xxxx 6 Calibration Constant condition of point 4, 8, 12, or 16 Analog xx1x xxxx 5 Overall health of point 3, 7, 11, or 15 Input xxx1 xxxx 4 Calibration Constant condition for point 3, 7, 11, or 15 FIM xxxx 1xxx 3 Overall health of point 2, 6, 10, or 14 (MAI) xxxx x1xx 2 Calibration Constant condition for point 2, 6, 10, or 14 xxxx xx1x 1 Overall health of point 1, 5, 9, or 13 xxxx xxx1 0 Calibration Constant condition for point 1, 5, 9, or 13 1xxx xxxx 7 Feedback check for point 4, 8, 12, or 16 Multipoint x1xx xxxx 6 Calibration Constant condition for point 4, 8, 12, or 16 Analog xx1x xxxx 5 Feedback check of the point for point 3, 7, 11, or 15 Status for: Description (continued on next page) RS3: Service Quick Reference Guide Troubleshooting SQ: 1-54 FIC/FIM Status Bits (continued) Status for: Status Bits Bit Description Output xxx1 xxxx 4 Calibration Constant condition for point 3, 7, 11, or 15 FIM xxxx 1xxx 3 Feedback check for point 2, 6, 10, or 14 (MAO) xxxx x1xx 2 Calibration Constant condition for point 2, 6, 10, or 14 xxxx xx1x 1 Feedback check for point 1, 5, 9, or 13 xxxx xxx1 0 Calibration Constant condition for point 1, 5, 9, or 13 RS3: Service Quick Reference Guide Troubleshooting SQ: 2-1 Section 2: Maintenance Scheduled Maintenance . . . . . . . . . . . . . . . . . . . . . . . . . . Filter Replacements . . . . . . . . . . . . . . . . . . . . . . . . . . . . . Cleaning Tape Drives . . . . . . . . . . . . . . . . . . . . . . . . . . . . Cleaning Floppy Disk Drives . . . . . . . . . . . . . . . . . . . . . . Cleaning the Trackball . . . . . . . . . . . . . . . . . . . . . . . . . . . Removing and Installing Cards . . . . . . . . . . . . . . . . . . . . Cleaning Cards . . . . . . . . . . . . . . . . . . . . . . . . . . . . . . . . . Storing Cards . . . . . . . . . . . . . . . . . . . . . . . . . . . . . . . . . . . RS3: Service Quick Reference Guide 2-2 2-4 2-5 2-5 2-6 2-7 2-8 2-8 Maintenance SQ: 2-2 Scheduled Maintenance Scheduled Maintenance Procedures Item Frequency Cleaning Tape Drives Magnetic Tape Drives Weekly Cleaning Console Fan Filters MiniConsole Cage Fan Filters Weekly MiniConsole Disk Drive Filters Basic Command Console Filters Command Console Cage Filters Cleaning Cabinet Filters Cabinet Door Filters ControlFile Fan Filters Weekly Cabinet Fan Screens Checking LEDs Disk Drives Weekly Consoles and ControlFiles Power Supplies Checking Active Hardware Alarms Hardware Alarm List Weekly Maintaining the Printer Change Ribbon As required Checking the AC/DC Power Supply Battery Battery 6 Months Replacing the AC/DC Power Supply Battery AC/DC Power Supplies Approximately every four years Replacing the Power Supply Module Cooling Fan System Power Supply Unit 3.5 Years Maintaining the CRT Glare Filter on MiniConsole CRT 6 Months CC and BCC CRT, Clean and Degauss Running Off-Line Console Diagnostic Programs Checking Calibration Off-Line Background Diagnostic Checks NOTE: This should be done only by authorized FRSI personnel. 6 Months Analog Input Blocks (AIB) 6 Months Analog Output Blocks (AOB) 6 Months Multiplexer Input Blocks (MIB) 6 Months (continued on next page) RS3: Service Quick Reference Guide Maintenance SQ: 2-3 Scheduled Maintenance (continued) Procedures Item Frequency Checking Voltages ControlFile Power Regulator 6 Months Console Power Regulator 6 Months Checking Backup Cards in Redundant Pairs Coordinator Processor 6 Months Controllers 6 Months Cleaning Cards Consoles, Printer, ControlFiles & FlexTerms 12 Months / as required WARNING The AC/DC Power Supply weighs 70 pounds (32 kg). At least two persons should remove the supply from the cabinet to prevent injury. WARNING Prevent the CRT from sliding off the table, hold the CRT pan so that it does not tilt while you are removing the CRT screws. WARNING The fan blades are exposed during the console fan filter cleaning procedure. To avoid injury, keep fingers away from the fan. WARNING To prevent injury or damage to components, all field power to the FlexTerm must be removed before attempting to remove a Contact FlexTerm. WARNING To prevent accidental injury, make certain you have turned off the correct circuit breaker for the AC/DC Power Supply. The amber light on the front of the power supply should be off. WARNING When removing the Command Console Hard Disk Drive, disconnect the AC plugs in the support column to prevent shock when disconnecting the AC power cables on the supply. RS3: Service Quick Reference Guide Maintenance SQ: 2-4 WARNING The Serial I/O Analog Output Points calibration procedures require that the process measurement or output drive be completely disconnected from the control system. Any control scheme using a measurement to be calibrated must be in MANUAL mode. Any devices connected to an output to be calibrated must be isolated from the process. Filter Replacements Filter Replacements Application Filter Part Name MiniConsole Card Cage G12918--0001 Fan Filter Replacement MiniConsole Floppy Disk Drive G12918--0002 Fan Filter Replacement Multitube EC Cabinet 1984--0359--0006 Fan Filter Replacement Command Console G12918--0002 Fan Filter Replacement Cabinet Door, Series I 1984--0359--0003 Filter Replacement, Door Cabinet Door, Series 2 1984--0359--0008 Cabinet Filter ControlFile 1984--0359--0001 Fan Filter Replacement OI Card Cage HIA SCI SRU 1984--0359--0002 Filter Replacement -- HIA, SCI, SRU Tower Electronics Cabinet 1984--0359--0007 Filter Replacement -- Tower Door 7U Hanging Cabinet 10P55500011 Filter Replacement -- Bottom of Cabinet WARNING The fan blades are exposed during the filter cleaning procedure. To avoid injury, keep fingers away from the fan. RS3: Service Quick Reference Guide Maintenance SQ: 2-5 Cleaning Tape Drives Magnetic tape drives should be cleaned once a week or after every eight hours of tape operation. Clean the drive after 2 hours of operation with new tape cartridges. Use a 1984--2154--0001 Tape Drive Head Cleaner Kit. Additional supplies are available in the 1984--2154--0002 Tape Drive Head Cleaner Refill Kit. Follow the directions supplied with the kit. Cleaning Floppy Disk Drives Disk drives should be cleaned periodically or when excessive errors occur. Use a 1984--2891--0001 Floppy Drive Cleaner Kit for the 3.5-inch drives and a 1984--2891--0002 Floppy Drive Cleaner Kit for the 5.25-inch drives. RS3: Service Quick Reference Guide Maintenance SQ: 2-6 Cleaning the Trackball Most problems with a trackball can be cured by a thorough cleaning. Dirt accumulates around the ball itself and in the optical disk readouts inside the assembly. The trackball itself can be replaced without replacing the entire assembly. - To clean a trackball: Required tools: #1 Phillips screwdriver 1/16-inch Allen wrench Source of dry air under pressure (20 psi max) Denatured alcohol 1. The Trackball Assembly can be part of the Operator Keyboard Assembly or be free standing. a. Operator Keyboard Assembly: Unplug the keyboard cable from the keyboard interface card. Turn the keyboard assembly over and remove the four screws that hold the Trackball Assembly to the Operator Keyboard. b. Free-standing trackball: Unplug the trackball cable. Remove the four screws that hold the base in place. 2. Remove the two brackets that hold the black box containing the trackball. Push the black box out. This may require some force since the black box is glued to the assembly. 3. Unplug the black box from the trackball electronics. 4. Remove the black box top cover (four Allen screws). 5. Remove and clean the ball and the area around the hole in the cover. 6. Use dry air to blow dust and dirt out of the optical sensor wheels and sensors. 7. Clean the bearing that holds the ball tightly against the sensor wheels. 8. Reassemble the black box. 9. Connect the trackball electronics cable and install the box in the trackball assembly, being careful to center the ball in the hole in the keyboard before you tighten the brackets. 10. Replace the base or reinstall in the keyboard assembly. 11. Plug in the cable and test. If the trackball does not work, replace the black box (1984--1653--000x). RS3: Service Quick Reference Guide Maintenance SQ: 2-7 Removing and Installing Cards Proper procedures must always be followed when removing or inserting cards in the system. Observe the following precautions and instructions when working on the system. D D D D Use a grounded wrist strap with a built-in one megohm resistor for your safety and to prevent damage to static sensitive circuits. The resistor allows static electricity to drain to ground while isolating you from direct ground. Before removing AC and DC power from the system, move all Nonvolatile Memory card ENABLE/DISABLE switches to the DISABLE position. Before removing or inserting any card (except a PeerWay buffer card) in a ControlFile, first disable the Nonvolatile Memory card and then the Coordinator processor card by placing the ENABLE/DISABLE switches to the DISABLE position. Always power down consoles before removing or installing cards. NOTE: The Disk shutdown (DS) command should always be performed before powering down the console. This will purge the cache and prevent possible loss of data. D Check the jumper positions when you replace a card. D Ensure that cards are seated properly. D D D — Place your right thumb on the upper plastic card extractor lever and place your left thumb on the lower extractor. — Push evenly and firmly with both thumbs at the same time. You should feel the card seat. All circuit cards must be in antistatic bags when outside their card cage. Use approved antistatic bags when shipping or storing cards. Never handle circuit cards by the edge connectors. Small amounts of oil from your skin can contaminate the edge connectors, causing problems with intermittent contacts. Use only approved nonstatic brushes to clean edge connectors. Never use erasers, abrasive materials, or nylon brushes. Abrasives can remove the gold flash, and other materials can cause static electricity damage to onboard components. Follow the instructions in “Cleaning Cards” in this section. RS3: Service Quick Reference Guide Maintenance SQ: 2-8 Cleaning Cards Cards should be removed from the system and cleaned once a year (more often in installations where conductive dust is present). The cards must be removed and cleaned in an antistatic work area, using an antistatic mat on the work surface and an antistatic wrist strap. Clean cards with an air hose or vacuum cleaner that is static protected. - To remove dust from cards: 1. Use an air hose to blow the dust off the cards and assemblies. Use very dry air or an ionizing nozzle on the air hose to prevent static damage to the cards. Air pressure should be limited to 2.1 Kg/cm2 (30 PSI). or 2. Use a vacuum cleaner. We recommend use of a dust attachment with a wire wrapped around the brush bristles, connecting to ground through a 1 megohm resistor to eliminate static buildup on the brush. - To clean edge connectors: CAUTION Do not use a rubber eraser to clean edge connectors. A rubber eraser wears away the thin gold coating on the connector and will then allow the contacts to corrode. 1. Use a “RUSH BRUSH” or similarly designed edge connector brush to remove oxidation and contaminants from the gold coated edge connectors. 2. To remove contaminants, wipe connector contacts with a soft tissue wetted with denatured alcohol. Storing Cards Cards must be stored in a clean area, free of corrosives. Always store cards in an approved antistatic bag. RS3: Service Quick Reference Guide Maintenance SQ: 3-1 Section 3: Power DC Power Distribution System Color Codes . . . . . . AC Entrance Panel . . . . . . . . . . . . . . . . . . . . . . . . . . . . System Power Supply Unit Module Housing Fan Replacement Kit . . . . . . . . . . . . . . . . . . . . . . . . . . AC/DC Power Supply (With Battery Backup) OI Remote Power Supply . . . . . . . . . . . . . . . . . . . . . . Battery Charger Card . . . . . . . . . . . . . . . . . . . . . . . . . . AC/DC Power Supply (Without Battery Backup) . . . MTCC Remote Power Supply . . . . . . . . . . . . . . . . . . DC/DC Power Supply . . . . . . . . . . . . . . . . . . . . . . . . . AC/DC Unregulated Power Supply . . . . . . . . . . . . . . Remote I/O Power Supply . . . . . . . . . . . . . . . . . . . . . . Remote Power Supply For Operator Interface (OI) Applications For Input/Output (I/O) Applications . . . . . . . . . . . . . . AC Distribution Block DC Distribution Block . . . . . . . . . . . . . . . . . . . . . . . . . . DC Output Card . . . . . . . . . . . . . . . . . . . . . . . . . . . . . . RS3: Service Quick Reference Guide 3-2 3-3 3-4 3-5 3-7 3-8 3-9 3-10 3-11 3-12 3-13 3-14 3-15 Power SQ: 3-2 DC Power Distribution System Color Codes Standard Color Codes for Wiring and Test Points (1) Color Voltage Orange +30 VDC Brown Ground Return Red +12 VDC Blue --12 VDC Yellow +5 VDC Purple +9 VDC (Unregulated) (1) White +5 V Relative Current Indication Green +12 V Relative Current Indication Gray Isolated Ground Return Violet is used for test points on the --2494 Analog Transfer Card. RS3: Service Quick Reference Guide Power SQ: 3-3 AC Entrance Panel . . . . . . . . . . . . . . . . . . . . . . . . . . . . . . . . . . 10P5662000x . . . . . . . . . . . . . . . . . . . . . . . . . . . . . . . . . . . . . . . . . . . . . . . . . . 1984--0303--000x AC Input Wiring Terminal 115 VAC Wiring 230 VAC Wiring L1 Hot Line 1 L2/N Neutral Line 2 Ground Ground Dual Feed AC Entrance Panel Fuses Fuse F1 F2 FRSI Part No. Bussman Part No. Littelfuse Part No. Characteristics G09140--0017 MDQ 1/2 313.500 .5 A 250 V Slow Blow WARNING For personal safety, it is wise to use a circuit breaker lockout device to ensure that an opened breaker is not accidentally closed while you are working on the line. WARNING Dangerous AC voltage may be present even if the “AC IN” indicator is not lit. If the input fuse is blown, AC may still be present at the input terminal block. RS3: Service Quick Reference Guide Power SQ: 3-4 System Power Supply Unit Module . . . . . . . . . . . . . . . . . . . . . . . . . . . . . . . . . . . . . . . . . . . 12P0238X012 Housing . . . . . . . . . . . . . . . . . . . . . . . . . . . . . . . . . . . . . . . . . . 12P0236X012 Fan Replacement Kit . . . . . . . . . . . . . . . . . . . . . . . . . . . . . . 12P0239X012 System Power Supply Module Parts Replacement Part No. Replaces Comment The 12P0238X012 supply module is NRTL/C certified and CE-compliant. 12P0238X012 -- -- Each power supply unit consists of at least one power supply module and one power supply housing. They cannot be mixed with 10P5658--XXXX, 1984--2298--XXXX, 10P5664--XXXX, or 1984--0390--XXXX AC/DC power supplies on the same DC bus. RS3: Service Quick Reference Guide Power SQ: 3-5 AC/DC Power Supply (With Battery Backup) . . . . . . . . . . . . . . . . . . . . . . . . . . . . . . . 10P5658000x . . . . . . . . . . . . . . . . . . . . . . . . . . . . . . . . . . . . . . . . . . . . . . . . . . . 1984-2298-000x . . . . . . . . . . . . . . . . . . . . . . . . . . . . . . . . . . . . . . . . . . . . . . . . . . . 1984-0298-000x OI Remote Power Supply . . . . . . . . . . . . . . . . . . . . . . . . . . 1984-1046-000x AC/DC Power Supply (With Battery Backup) Parts Replacement Part No. Replaces Comment 10P5658000x 1984--0298--000x 1984--2298--000x The 10P5658000x supply is CE-compliant 1984--2298--000x 1984--0298--000x Supplies are fully interchangeable 1984--0298--000x 1984--2298--000x Supplies are fully interchangeable 1984--2298--000x or 1984--0298--000x 1984--0390--000x Either supply may replace a --0390 AC/DC Power Supply (Without Battery Backup) but the BATT switch must be turned OFF. NOTE: The PS FAULT alarm jumper (HD1) must be set to 2--3 since the --0390 contacts are Normally Closed (N.C.). Power Supply (With Battery Backup) Indicators and Controls Item BATT ON/OF Toggle Switch BATT TEST Pushbutton AC IN Indicator (Orange) Function Removes the battery backup circuit from the system when in OFF position. The Battery Test Pushbutton is used to manually enable the 16 amp, 5 second battery test. If battery voltage falls below 20 V during the test, the BATT FAULT LED lights and the battery alarm activates. NOTE: The battery cannot be tested until the system has been running for at least five minutes or until five minutes after the last battery test. Indicates that AC input is present. (continued on next page) RS3: Service Quick Reference Guide Power SQ: 3-6 Power Supply (With Battery Backup) Indicators and Controls (continued) Item Function OUTPUT CURRENT (Bar Graph LED) (Red) This is a series of LEDs indicating the relative current being delivered to the DC distribution system by the AC/DC power supply. It indicates the load share provided by the power supply with a readout in 3 amp intervals. Power supplies should be within 1 to 2 LEDs of the others on the DC distribution system for proper load sharing. PS FAULT LED (DS1) (Red) The 30 Volt DC output has dropped below 26 Volts. The power supply alarm is actuated when this LED is on. PS NORM LED (DS2) (Green) The DC output voltage and battery status (if the battery is used with the header jumper enabled) is in normal working condition. BATT FAULT LED (DS3) (Red) The battery has failed the periodic load test. Approximately once every 24 hours the unit automatically tests the batteries under a 16 amp load for five seconds. If battery voltage drops below 20 Volts DC (24 Volts nominal), the BATT FAULT LED will light, the PS NORM LED will go out, and the battery fault alarm will activate. The battery fault alarm will also activate if the battery test fails. AC/DC Power Supply (With Battery Backup) Fuse Fuse FRSI Part No. Bussman Part No. Littelfuse Part No. Characteristics F1 G50527-0004 ---- SLC50 50 A 300 V Time Delay F2 50P03980007 SC--30 ---- 30 A 300 V Time Delay RS3: Service Quick Reference Guide Power SQ: 3-7 Battery Charger Card . . . . . . . . . . . . . . . . . . . . . . . . . . . . . 1984--1283--000x Battery Charger Card Test Points Test Point Function TP1 Return reference TP2 Reference voltage 2.35 Volts Adjust with variable resistor R1 TP3 Battery voltage 27.6 Volts Adjust with variable resistor R2 Comment Battery Charger Card Jumper Positions Jumper Purpose HD1 Alarm contact for power supply fault 1--2 N.O. -- Contact is normally open 2--3 N.C. -- Contact is normally closed HD2 Alarm contact for battery fault 1--2 N.O. -- Contact is normally open 2--3 N.C. -- Contact is normally closed HD3 Battery connection Position 1--2 W BAT -- Test Battery every 24 hours 2--3 W/O BATT -- Do not test Battery Battery Charger Card Fuses Fuse FRSI Part No. Bussman Part No. Littelfuse Part No. F1 G09140-0016 AGC 1/2 312.500 .5 A V 250 Quick Acting F2 G09140-0030 AGC 2 312002 2 A 250 V Quick Acting RS3: Service Quick Reference Guide Characteristics Power SQ: 3-8 AC/DC Power Supply (Without Battery Backup) . . . . . . . . . . . . . . . . . . . . . . . . . . . . 10P5664000x . . . . . . . . . . . . . . . . . . . . . . . . . . . . . . . . . . . . . . . . . . . . . . . . . . . 1984-0390-000x AC/DC Power Supply (Without Battery Backup) Parts Replacement Part No. Replaces Comment 10P5658000x Power Supplies are interchangeable only in systems that do not use batteries. The BATT switch on the replaced unit must have been turned OFF. The PS FAULT contact (if used) must have been jumpered as Normally Closed (N.C.). 1984-0298-000x 1984 0298 000 or 1984-2298-000x Power Supplies are interchangeable only in systems where the batteries are not being used. The BATT switch on the replaced unit must have been turned OFF. The PS FAULT contact (if used) must have been jumpered as Normally Closed (N.C.). 10P5664000x 1980-0390-000x AC/DC Power Supply (Without Battery Backup) Indicators Item Function AC IN (Orange) Indicates that AC input is present. POWER (Green) Indicates that the DC output voltage is in normal working range. The power supply alarm is actuated when this LED is off. AC/DC Power Supply (Without Battery Backup) Fuse Fuse FRSI Part No. Bussman Part No. Littelfuse Part No. Characteristics F1 50P03980007 SC--30 ---- 30 A 300 V Time Delay RS3: Service Quick Reference Guide Power SQ: 3-9 MTCC Remote Power Supply . . . . . . . . . . . . . . . . . . . . . . . . . 10P5645000x . . . . . . . . . . . . . . . . . . . . . . . . . . . . . . . . . . . . . . . . . . . . . . . . . . . 1984-3023-000x MTCC 1984-3023-000x Remote Power Supply Jumper Jumper Position In place (--0001 110 V input) Internal Wire Removed (--0002 220 V input) MTCC Remote Power Supply Fuse Fuse FRSI Part No. Bussman Part No. Littelfuse Part No. Characteristics F1 power supply: 1984--3023--000x G09140--0064 GMC--5 -- -- 5 A 250 V Miniature F1 power supply: 10P5645000x G09140--0041 MTH5 312005 5 A 250 V 1--1/4 in. RS3: Service Quick Reference Guide Power SQ: 3-10 DC/DC Power Supply . . . . . . . . . . . . . . . . . . . . . . . . . . . . . . 1984-0393-000x DC/DC Power Supply Specifications Parameter Specification Power supply type Switching regulator Temperature range 0o C to 50o C Input voltage 30 Volts DC Input voltage range 10 Volts DC to 60 Volts DC Line regulation ± .5% with input voltage >15 Volts Output voltage 1984--0393--0001: set @ 24 Volts DC 1984--0393--0002: set @ 24 Volts DC 1984--0393--0003: set @ 15 Volts DC Output voltage range 4.4 Volts DC to 30 Volts DC Output current 0 to 12 Amps Output ripple 50 milliVolts (0--25K Hz) 150 milliVolts (total) DC/DC Power Supply Fuses Fuse FRSI Part No. Bussman Part No. Littelfuse Part No. Characteristics All G09140-0036 MDL 3 313003 3 A 250 V Slow Blow RS3: Service Quick Reference Guide Power SQ: 3-11 AC/DC Unregulated Power Supply . . . . . . . . . . . . . . . . . . 1984-1089-000x AC/DC Power Supply Specifications Parameter Specification Voltage 1984--1089--0001: 115 Volts AC 1984--1089--0002: 220 Volts AC Input Voltage Range 1984--1089--0001: 104 to 127 Volts AC 1984--1089--0002: 198 to 242 Volts AC Frequency Range 47 to 63 Hz Output Source Nominal: 27.5 Volts, 7.5 Amps AC/DC Unregulated Power Supply Fuse Fuse FRSI Part No. Bussman Part No. Littelfuse Part No. Characteristics F1 G09140-0046 AGC 10 311010 10 A 32 V Regular RS3: Service Quick Reference Guide Power SQ: 3-12 Remote I/O Power Supply . . . . . . . . . . . . . . . . . . . . . . . . . . . . 10P57010001 . . . . . . . . . . . . . . . . . . . . . . . . . . . . . . . . . . . . . . . . . . . . . . . . . . 1984--4302--000x The Remote I/O Power Supply is used with an AC Distribution Block and a DC Distribution Block and their internal fuses. Remote I/O Power Supply Specifications Power Supply Voltage 10P57010001 110 Volts AC to 230 Volts AC Autosensing 1984--4302--0001: 110 Volts AC 1984--4302--0002: 220 Volts AC Remote Power OI Supply . . . . . . . . . . . . . . . . . . . . . . . . . . . . 10P57560001 Remote 10P5756 OI Power Supply Specifications Power Supply Voltage 10P57560001 110 Volts AC to 230 Volts AC Autosensing RS3: Service Quick Reference Guide Power SQ: 3-13 Remote Power Supply . . . . . . . . . . . . . . . . . . . . . . . . . . . . . . . . . . . . . . . . . . . . For Operator Interface (OI) Applications . . . . . . . . . . . . . . . 10P5409000x For Input/Output (I/O) Applications . . . . . . . . . . . . . . . . . . . 10P5503000x The supplies differ only in mounting bracket and cables. The 10P5503 unit is used in conjunction with the AC Distribution Block and DC Distribution Block. Remote Power Supply Specifications Parameter Specification Voltage --0001 & 3: 115 Volts AC --0002 & 4: 230 Volts AC Output 24 VDC, adjustable ¦1 Volt 6 Amp Remote Power Supply Fuses FRSI P/N Wickman P/N Schurter P/N Characteristics ---- 19372K Series MST 250 3.15 A, 250 V Slow Blow, Plug-In Connector Pin-Out Pin Description 6 DC + output 14 DC return 16 Jumper to pin 32 (connects DC return to AC safety ground) 28 L1 AC line 1 30 L2/N AC line 2 (230 V) or neutral (115 V) 32 AC safety ground RS3: Service Quick Reference Guide Power SQ: 3-14 AC Distribution Block . . . . . . . . . . . . . . . . . . . . . . . . . . . . 1984--4329--0001 DC Distribution Block . . . . . . . . . . . . . . . . . . . . . . . . . . . . 1984--4329--0002 . . . . . . . . . . . . . . . . . . . . . . . . . . . . . . . . . . . . . . . . . . . . . . . . . . 1984--4329--0003 The AC Distribution Block and DC Distribution Block are used with the Remote Power Supply and the Remote I/O Power Supply. Each distribution block has internal fuses. Input power must be connected to the side of the block holding the jumper. Distribution Block Fuses Block FRSI P/N Wickman P/N Littelfuse P/N Characteristics AC Distribution G53394--3000--1 Series 19197 Series 235 3.0 amp 250 V CSA approved DC Distribution 10 Circuits G53394--1000--1 Series 19197 Series 235 1.0 amp 250 V CSA approved DC Distribution 1 Circuit G53394--3000--1 Series 19197 Series 235 3.0 amp 250 V CSA approved RS3: Service Quick Reference Guide Power SQ: 3-15 DC Output Card . . . . . . . . . . . . . . . . . . . . . . . . . . . . . . . . . . . 1984-1264-000x DC Output Card Fuses FRSI Part No. Bussman Part No. Littelfuse Part No. Characteristics Multitube Command Console: 1 Tube G09140--0047 AGC 15 311015 15 A 32 V Regular Multitube Command Console: 2 Tubes G09140--0061 ABC 20 314020 20 A 250 V Regular Multitube Command Console: 3 Tubes G09140--0061 ABC 20 314020 20 A250 V Regular Command Console G09140--0047 AGC 15 311015 15 A 32 V Regular MiniConsole G09140--0047 AGC 15 311015 15 A 32 V Regular ControlFile G09140--0061 ABC 20 314020 20 A250 V Regular ControlFile Fan G09140--0046 AGC 10 311010 10 A 32 V Regular I/O Card Cage G09140--0047 AGC 15 311015 15 A 32 V Regular FlexTerm G09140--0046 AGC 10 311010 10 A 32 V Regular System Resource Unit (SRU) G09140--0047 AGC 15 311015 15 A 32 V Regular Highway Interface Adapter (HIA) G09140--0047 AGC 15 311015 15 A 32 V Regular Supervisory Computer Interface (SCI) G09140--0047 AGC 15 311015 15 A 32 V Regular System Manager Station (SCI) G09140--0047 AGC 15 311015 15 A 32 V Regular RS3 Network Interface (RNI) G09140--0046 AGC 10 311010 10 A 32 V Regular Device (continued on next page) RS3: Service Quick Reference Guide Power SQ: 3-16 DC Output Card Fuses (continued) FRSI Part No. Bussman Part No. Littelfuse Part No. Characteristics Multipoint I/O Term Panels G09140--0046 AGC 10 311010 10 A 32 V Regular Fiber Optic I/O Converter G09140--0046 AGC 10 311010 10 A 32 V Regular Device RS3: Service Quick Reference Guide Power SQ: 4-1 Section 4: PeerWay Twinax PeerWay Tap Block Set Tap Box A (CE Approved) Tap Box B (CE Approved) . . . . . . . . . . . . . . . . . . . . . . Optical Tap Box A Optical Tap Box B . . . . . . . . . . . . . . . . . . . . . . . . . . . . . Electrical Tap Box A Electrical Tap Box B . . . . . . . . . . . . . . . . . . . . . . . . . . . PeerWay Extender (PX) PeerWay A PeerWay B . . . . . . . . . . . . . . . . . . . . . . . . . . . . . . . . . . . Optical Repeater/Attenuator . . . . . . . . . . . . . . . . . . . . RS3: Service Quick Reference Guide 4-2 4-4 4-5 4-6 4-8 PeerWay SQ: 4-2 Twinax PeerWay Tap Block Set . . . . . . . . . . . . . . . . . . . . 1984--0496--000x Tap Box A (CE Approved) . . . . . . . . . . . . . . . . . . . . . . . . . . . . 10P52760001 . . . . . . . . . . . . . . . . . . . . . . . . . . . . . . . . . . . . . . . . . . . . . . . . . . 1984--0488--000x Tap Box B (CE Approved) . . . . . . . . . . . . . . . . . . . . . . . . . . . . 10P52790001 . . . . . . . . . . . . . . . . . . . . . . . . . . . . . . . . . . . . . . . . . . . . . . . . . . 1984--0489--000x NOTE: One tap box must be grounded on each PeerWay. Ground both PeerWay A and B at the same tap box. PeerWay Tap Box Parts Replacement Part Part No. Replaces Tap A 10P52760001 1984--0488--000x 1984--0488--000x 10P52760001 10P52790001 1984--0489--000x 1984--0489--000x 10P52790001 Tap B Comment All installations. Non-EMC installations only. All installations. Non-EMC installations only. PeerWay Tap Box Test Points Test Point Range Comment TP1, 2 Yellow -- Brown 4.75--5.25 VDC Power for tap 1 TP3, 4 Yellow -- Brown 4.75--5.25 VDC Power for tap 2 TP5, 6 Yellow -- Brown 4.75--5.25 VDC Power for tap 3 TP7, 8 Yellow -- Brown 4.75--5.25 VDC Power for tap 4 RS3: Service Quick Reference Guide PeerWay SQ: 4-3 10P5276 and 10P5279 Tap Box Grounding Grounding Screw Position Function GROUND Grounds the PeerWay Shield OPEN Normal setting 1984--0488 and --0489 Tap Box Grounding Jumper Position Comment HD3 GND Grounds the PeerWay Shield HOLD Normal setting RS3: Service Quick Reference Guide PeerWay SQ: 4-4 Optical Tap Box A . . . . . . . . . . . . . . . . . . . . . . . . . . . . . . . . . 1984-3211-0001 . . . . . . . . . . . . . . . . . . . . . . . . . . . . . . . . . . . . . . . . . . . . . . . . . . . 1984-1191-0001 Optical Tap Box B . . . . . . . . . . . . . . . . . . . . . . . . . . . . . . . . . 1984-3214-0001 . . . . . . . . . . . . . . . . . . . . . . . . . . . . . . . . . . . . . . . . . . . . . . . . . . . 1984-1192-0001 WARNING Use care when handling optical cables. The ends are subject to damage from chipping, dust, and dirt. The cable may be damaged if it is bent at too small a radius. Optical Tap Box Replacement Data Part No. Replaces Comment 1984--3211--0001 1984--1191--0001 PeerWay A Optical Tap Box 1984--1191--0001 1984--3211--0001 PeerWay A Optical Tap Box 1984--3214--0001 1984--1192--0001 PeerWay B Optical Tap Box 1984--1192--0001 1984--3214--0001 PeerWay B Optical Tap Box NOTE: One tap box, either optical or electrical, must be grounded in each set. Ground both PeerWay A and B at the same tap box. Optical Tap Box Jumpers Jumper Position Comment HD3 GND Grounds the tap box HOLD Normal setting RS3: Service Quick Reference Guide PeerWay SQ: 4-5 Electrical Tap Box A . . . . . . . . . . . . . . . . . . . . . . . . . . . . . . . 1984-3211-0002 . . . . . . . . . . . . . . . . . . . . . . . . . . . . . . . . . . . . . . . . . . . . . . . . . . . 1984-1193-0002 Electrical Tap Box B . . . . . . . . . . . . . . . . . . . . . . . . . . . . . . . 1984-3214-0002 . . . . . . . . . . . . . . . . . . . . . . . . . . . . . . . . . . . . . . . . . . . . . . . . . . . 1984-1194-0002 Electrical Tap Boxes are used only with Optical Tap boxes. NOTE: Electrical Tab Box Replacement Data Part No. Replaces Comment 1984--3211--0002 1984--1193--0001 PeerWay A Electrical Tap Box 1984--1193--0002 1984--3211--0002 PeerWay A Electrical Tap Box 1984--3214--0002 1984--1194--0001 PeerWay B Electrical Tap Box 1984--1194--0002 1984--3214--0002 PeerWay B Electrical Tap Box NOTE: One tap box, either optical or electrical, must be grounded in each group of optical and electrical tap boxes. Ground both PeerWay A and B at the same tap box. Electrical Tap Box Jumpers Jumper Position Comment HD3 GND Grounds the tap box HOLD Normal setting RS3: Service Quick Reference Guide PeerWay SQ: 4-6 PeerWay Extender (PX) . . . . . . . . . . . . . . . . . . . . . . . . . . . . . . . . . . . . . . . . . . . PeerWay A . . . . . . . . . . . . . . . . . . . . . . . . . . . . . . . . . . . . . . . . . . 10P50930001 PeerWay B . . . . . . . . . . . . . . . . . . . . . . . . . . . . . . . . . . . . . . . . . . 10P50960001 CAUTION The PX must be supplied with a reliable source of DC power. If the PX loses power, the PeerWay is broken at that point. PX Parts Replacement Data Part No. Replaces Name Tap A 10P52760001 Twinax Tap Box A Provides only two PeerWay drops. 10P50930001 1984--0488--0001 Twinax Tap Box A Provides only two PeerWay drops. 1984--3211--0001 Optical Tap Box A Provides only two PeerWay drops. Cannot connect to Electrical Tap Boxes. 1984--1191--0001 Optical Tap Box A Provides only two PeerWay drops. Cannot connect to Electrical Tap Boxes. Tap B 10P52760002 Twinax Tap Box B Provides only two PeerWay drops. 10P50960002 1984--0488--0002 Twinax Tap Box B Provides only two PeerWay drops. 1984--3211--0002 Optical Tap Box B Provides only two PeerWay drops. Cannot connect to Electrical Tap Boxes. 1984--1191--0002 Optical Tap Box B Provides only two PeerWay drops. Cannot connect to Electrical Tap Boxes. RS3: Service Quick Reference Guide Comment PeerWay SQ: 4-7 PX LEDs Meaning LED STATUS (Yellow) The PX is running and has adequate power applied. XMT (Yellow) Fiber Optic Transmit -- ON when messages are being transmitted on the fiber optic channel. ON continuously indicates a stuck transmitter. RECV (Yellow) Fiber Optic Receive -- ON when messages are being received on the fiber optic channel. ON continuously indicates a stuck transmitter at the other end of the fiber. Fiber Optic Power Switch S3 Position Effect HIGH POWER Full optical transmitter power is used LOW POWER Optical transmitter power is reduced 7 -- 10 dB Normal/Test Switch S1 Position S2 Position Effect Right Right Normal Mode Right Left Disabled Left Right Disabled Left Left Test Mode PX Fuses Fuse FRSI Part No. Littelfuse Part No. Schurter Part No. Characteristics F1, F2 G50382--0009 273.125 MSF 034.4210 1/8 A 125 V Plug-In F3 G50382--0019 273.001 MSF 034.4221 1 A 125 V Plug-In RS3: Service Quick Reference Guide PeerWay SQ: 4-8 Optical Repeater/Attenuator . . . . . . . . . . . . . . . . . . . . . . . . 1984-0514-000x LEDs for Optical Repeater/Attenuator LED Meaning DS1 Hardware Good DS2 Hardware Bad DS3 +30V Fuse Blown DS4 FO TX1 Failed DS5 FO TX2 Failed DS6 Data 1 DS7 Data 2 Optical Repeater/Attenuator Jumper Settings Jumper Normal Position Test Position HD1 1-2 2-3 HD2 1-2 2-3 RS3: Service Quick Reference Guide PeerWay SQ: 5-1 Section 5: Consoles Keyboard Alarm . . . . . . . . . . . . . . . . . . . . . . . . . . . . . . Enhanced Engineering Keyboard Main Keyboard/Trackball Main Keyboard/Trackball/Option . . . . . . . . . . . . . . . . Trackball Assembly . . . . . . . . . . . . . . . . . . . . . . . . . . . Option Keyboard . . . . . . . . . . . . . . . . . . . . . . . . . . . . . . Joystick Touchpad . . . . . . . . . . . . . . . . . . . . . . . . . . . . . . . . . . . . Keyboard Electronics Board . . . . . . . . . . . . . . . . . . . . Trackball Electronics Board . . . . . . . . . . . . . . . . . . . . Trackball Keyboard Replacement Subassembly . . . Keyboard Interface . . . . . . . . . . . . . . . . . . . . . . . . . . . . Multitube Command Console CRT . . . . . . . . . . . . . . Pedestal Command Console Keyboard Interface . . . . . . . . . . . . . . . . . . . . . . . . . . . . Pedestal Command Console CRT Conrac 7211 . . . . . . . . . . . . . . . . . . . . . . . . . . . . . . . . . Monochrome Video Generator . . . . . . . . . . . . . . . . . . MiniConsole Floppy Interface (SCSI) . . . . . . . . . . . . . . . . . . . . . . . . Floppy Disk Power Supply . . . . . . . . . . . . . . . . . . . . . Hard Disk Drive IBM Deskstar 540 LPS 270S LPS 170S LPS 105S 80S Q280 Q540 . . . . . . . . . . . . . . . . . . . . . . . . . . . . . . . . . . . . . . . . Floppy Disk Drive: 3.5-inch . . . . . . . . . . . . . . . . . . . . . . . . . . . . . . . . . . . . . . Floppy Disk Drive: 5.25-inch . . . . . . . . . . . . . . . . . . . . . . . . . . . . . . . . . . . . Magnetic Tape Drive Tandberg 5623 Viper 2150S Viper 2060S Scorpion 5945S Scorpion 5945C . . . . . . . . . . . . . . . . . . . . . . . . . . . . . . RS3: Service Quick Reference Guide 5-3 5-4 5-5 5-6 5-7 5-8 5-9 5-10 5-11 5-13 5-15 5-16 5-17 5-18 5-19 5-20 5-25 5-26 5-27 Consoles SQ: 5-2 Printer: Fujitsu DPL24C . . . . . . . . . . . . . . . . . . . . . . . . . . . . . . . Printer: Fujitsu DL3800 . . . . . . . . . . . . . . . . . . . . . . . . . . . . . . . Printer: Fujitsu DL4600 . . . . . . . . . . . . . . . . . . . . . . . . . . . . . . . Printer: Texas Instruments 810 . . . . . . . . . . . . . . . . . . . . . . . . . Alarm Output Board . . . . . . . . . . . . . . . . . . . . . . . . . . . PeerWay Interface . . . . . . . . . . . . . . . . . . . . . . . . . . . . OI Power Supply . . . . . . . . . . . . . . . . . . . . . . . . . . . . . . OI Processor OI 68040 OI 68020 OI 68000 . . . . . . . . . . . . . . . . . . . . . . . . . . . . . . . . . . . . OI Processor: 68040 . . . . . . . . . . . . . . . . . . . . . . . . . . OI Processor: 68020 . . . . . . . . . . . . . . . . . . . . . . . . . . OI Processor: OI 68000 . . . . . . . . . . . . . . . . . . . . . . . Pixel Graphics Video Generator . . . . . . . . . . . . . . . . . Character Graphics Video Generator . . . . . . . . . . . . Printer Interface . . . . . . . . . . . . . . . . . . . . . . . . . . . . . . SCSI (Small Computer System Interface) . . . . . . . . OI Nonvolatile Memory OI NV RAM OI Bubble OI Bubble SC . . . . . . . . . . . . . . . . . . . . . . . . . . . . . . . . OI Bubble Memory . . . . . . . . . . . . . . . . . . . . . . . . . . . . OI NV RAM . . . . . . . . . . . . . . . . . . . . . . . . . . . . . . . . . . RS3: Service Quick Reference Guide 5-28 5-31 5-34 5-36 5-38 5-39 5-41 5-43 5-45 5-46 5-47 5-48 5-49 5-50 5-52 5-55 5-56 5-59 Consoles SQ: 5-3 Keyboard Alarm Hardware alarm 090 warns of bad keys: Board: Key <p:kkk> is bad Where “p” is the keyboard number and “kkk” is the key number. Multitube Command Console Keyboard Numbers Keyboard Number Keyboard 1 Configuration Keyboard (Alphanumeric Keyboard) 2 Trackball Keyboard 3 Operator Keyboard 4 Callup Option Keyboard 1 (Left) 5 Callup Option Keyboard 2 (Middle) 6 Callup Option Keyboard 3 (Right) RS3: Service Quick Reference Guide Consoles SQ: 5-4 Enhanced Engineering Keyboard . . . . . . . . . . . . . . . . . . 1984--2386--000x Main Keyboard/Trackball . . . . . . . . . . . . . . . . . . . . . . . . . . 1984--1634--000x Main Keyboard/Trackball/Option . . . . . . . . . . . . . . . . . . . 1984--2372--000x Main Keyboard Parts Replacement Part Part No. Replaces Characteristics Keyboard Electronics 68HC05 1984--2871--000x 1984--1970--000x EMC compliant. Can replace any other board Keyboard Electronics 1984--1970--000x 1984--2871--000x Fully interchangeable except Not EMC Compliant. Main Keyboard Replacement Subassembly 1984--1695--000x Keyboard top Without base or cable Keyboard Electronics Board Jumper Positions for Use in Main Keyboard Board use HD1 (J1) HD2 (J2) HD3 (J3) HD4 (J4) Main Keyboard 1--2 1--2 2--3 2--3 RS3: Service Quick Reference Guide Consoles SQ: 5-5 Trackball Assembly . . . . . . . . . . . . . . . . . . . . . . . . . . . . . . 1984--1631--000x Trackball Keyboard Parts Replacement Part No. Name Replaces Characteristics 10P52850004 Keyboard Electronics Board 68HCC05 1984--1975--000x 1984--2662--000x EMC compliant. Can replace any other board 1984--2662--000x Keyboard Electronics Board 68HCC05 10P52850004 1984--1975--000x Keyboard Electronics boards are interchangeable except for EMC compliance 1984--1975--000x6 Keyboard Electronics Board 10P52850004 1984--2662--000x Keyboard Electronics boards are Interchangeable except for EMC compliance 10P53240001 0002, 0003, 0009 Trackball Keyboard Replacement Subassembly 1984--1693--000x EMC compliant. Use in any console. Replaces the keyboard top only. Has no base or cable 1984--1693--000x Trackball Keyboard Replacement Subassembly Keyboard top Not EMC Compliant -Replaces keyboard top only. Has no base or cable Trackball Replaces the “black box” containing the trackball NOTE: Use the sealed version only where needed. It is much stiffer. 1984--1653--0003 Normal Trackball 1984--1653--0004 Teflon Sealed Trackball RS3: Service Quick Reference Guide Consoles SQ: 5-6 Option Keyboard . . . . . . . . . . . . . . . . . . . . . . . . . . . . . . . . . 1984--1632--000x Option Keyboard Electronics Board Parts Replacement Part No. Replaces Name on PWA Characteristics 1984--2871--000x 1984--1970--000x KEYBOARD ELECTRONICS EMC Compliant. Replaces any other board. 1984--2871--000x KEYBOARD ELECTRONICS Fully interchangeable, except for EMC Compliance. 1984--1970--000x Keyboard Electronics Board Jumper Positions Usage HD1 (J1) HD2 (J2) HD3 (J3) HD4 (J4) Option Keyboard 1 1--2 1--2 1--2 2--3 Option Keyboard 2 1--2 1--2 2--3 1--2 Option Keyboard 3 1--2 1--2 1--2 1--2 RS3: Service Quick Reference Guide Consoles SQ: 5-7 Joystick . . . . . . . . . . . . . . . . . . . . . . . . . . . . . . . . . . . . . . . . . 1984--3038--000x Touchpad . . . . . . . . . . . . . . . . . . . . . . . . . . . . . . . . . . . . . . . . 1984--2844--000x . . . . . . . . . . . . . . . . . . . . . . . . . . . . . . . . . . . . . . . . . . . . . . . . . . 1984--2321--000x Joystick Parts Replacement Item Part No. Joystick 1984--3038--000x Joystick Upgrade Kit 1984--3040--000x Keyboard Electronics Board 68HCC05 10P52850004 1984--1975--000x 1984--2662--000x EMC compliant. Can replace any other board Keyboard Electronics Board 68HCC05 1984--2662--000x 10P52850004 1984--1975--000x Keyboard Electronics boards are Interchangeable except for EMC compliance Keyboard Electronics Board 1984--1975--000x 10P52850004 1984--2662--000x Keyboard Electronics boards are Interchangeable except for EMC compliance Replaces Characteristics Replaces the Touchpad. Touchpad Replacement Item Part No. Characteristics Touchpad 1984--2321--000x 1984--2844--000x A Touchpad should be replaced with a Joystick upgrade kit. Touchpad Keyboard Electronics Board 1984--1981--000x A Touchpad Keyboard Electronics Board should be replaced with a Joystick upgrade kit. Keyboard, Cursor Control (Modified) 1984--2335--000x The membrane keyboard may be replaced with any dash number (--000x) keyboard assembly or with a Joystick upgrade kit. RS3: Service Quick Reference Guide Consoles SQ: 5-8 Keyboard Electronics Board . . . . . . . . . . . . . . . . . . . . . . 1984--2871--000x . . . . . . . . . . . . . . . . . . . . . . . . . . . . . . . . . . . . . . . . . . . . . . . . . . 1984--1970--000x Keyboard Electronics Board Parts Replacement Item Part No. Replaces Characteristics Keyboard Electronics board 1984--2871--000x 1984--1970--000x Completely interchangeable Keyboard Electronics board 1984--1970--000x 1984--2871--000x Completely interchangeable Keyboard Electronics Board Jumper Positions Usage HD1 (J1) HD2 (J2) HD3 (J3) HD4 (J4) Main Keyboard 1-2 1-2 2-3 2-3 Option Keyboard 1 1--2 1--2 1--2 2--3 Option Keyboard 2 1--2 1--2 2--3 1--2 Option Keyboard 3 1--2 1--2 1--2 1--2 RS3: Service Quick Reference Guide Consoles SQ: 5-9 Trackball Electronics Board . . . . . . . . . . . . . . . . . . . . . . . . . . 10P52850004 . . . . . . . . . . . . . . . . . . . . . . . . . . . . . . . . . . . . . . . . . . . . . . . . . . 1984--2662--000x . . . . . . . . . . . . . . . . . . . . . . . . . . . . . . . . . . . . . . . . . . . . . . . . . . 1984--1975--000x NOTE: Trackball Electronics Boards are completely interchangeable except that only 10P5285 can be used in a EMC compliant console. Trackball Electronics Board Replacement Name on PWA Part No. Replaces Characteristics TRACKBALL 68HC05 10P5285000x 1984--2662--000x 1984--1975--000x EMC compliant. Useable in any console. TRACKBALL 68HC05 1984--2662--000x 1984--1975--000x 10P5285000x Not for an EMC compliant console. TRACKBALL KEYBOARD 1984--1975--000x 1984--2662--000x 10P52850004 Not for an EMC compliant console. RS3: Service Quick Reference Guide Consoles SQ: 5-10 Trackball Keyboard Replacement Subassembly . . . . . . . . . . . . . . . . . . . . . . . . . . . . . . . . . . . . . . . . . . . . . . . . . . . . . 10P53240001 . . . . . . . . . . . . . . . . . . . . . . . . . . . . . . . . . . . . . . . . . . . . . . . . . . 1984--1693--000x Trackball Keyboard Replacement Subassembly Name Part No. Replaces Characteristics Trackball Keyboard Replacement Subassembly 10P53240001 1984--1693--000x EMC compliant. Useable in any console. Trackball Keyboard Replacement Subassembly 1984--1693--000x 10P53240001 Not for an EMC compliant console. RS3: Service Quick Reference Guide Consoles SQ: 5-11 Keyboard Interface . . . . . . . . . . . . . . . . . . . . . . . . . . . . . . . . . . 10P50842004 . . . . . . . . . . . . . . . . . . . . . . . . . . . . . . . . . . . . . . . . . . . . . . . . . . . 1984-3222-x00x . . . . . . . . . . . . . . . . . . . . . . . . . . . . . . . . . . . . . . . . . . . . . . . . . . . 1984-2889-x00x . . . . . . . . . . . . . . . . . . . . . . . . . . . . . . . . . . . . . . . . . . . . . . . . . . . 1984-1978-000x Keyboard Interface Parts Replacement Part No. Replaces Name on PWA Characteristics 10P50842004 1984--3222--2004 KEYBD INTERFACE/ VIDEO ISOLATOR EMC compliant Password Security Software 1984--3222--2004 None KEYBD INTERFACE/ VIDEO ISOLATOR Password Security Software 10P50840004 1984--3222--0004 1984--2889--0004 1984--1978--000x KEYBD INTERFACE/ VIDEO ISOLATOR EMC compliant Standard Keyswitch only 1984--3222--0004 1984--2889--0004 1984--1978--000x KEYBD INTERFACE/ VIDEO ISOLATOR Standard Keyswitch or Dual Keyswitch (Uses 1984--3223--xxx Dual Keyswitch Cable) 1984--2889--0004 1984--1978--000x KEYBD INTERFACE/ VIDEO ISOLATOR Standard Keyswitch or Dual Keyswitch 1984--1978--000x None CONSOLE/ KEYBOARD INTERFACE Standard Keyswitch No video isolation 1984--3222--1004 1984--2889--1004 KEYBD INTERFACE/ VIDEO ISOLATOR Remote Keyswitch (Uses 1984--3267--xxxx Remote Keyswitch Cable) 1984--2889--1004 None KEYBD INTERFACE/ VIDEO ISOLATOR Remote Keyswitch (with pigtail cable) RS3: Service Quick Reference Guide Consoles SQ: 5-12 Keyboard Interface LEDs LED Color Meaning DS1 Yellow Flashes when receiving data from the printer interface DS2 Yellow Flashes when sending data to the printer interface DS3 Red Fuse F1 is blown Keyboard Interface Jumper Setting Jumper Position Function HD2 1--2 12.86¯ Console software is at revision 12.86 or lower (Not present on 1984--1978--000x) HD2 2--3 12.90 Console software is at revision 12.90 or higher (Not present on 1984--1978--000x) J414 Jumper wire 1984--3222--1004 only. Standard keyswitch application J414 Dual keyswitch cable 1984--3222--0004 only. Dual keyswitch application Keyboard Interface Fuses Part No. Name on PWA Fuse 1984-3222--000x 1984-2889--000x Keybd Interface/ Video Isolator F1 1984--1978 --000x Console/ Keyboard Interface F1 F2 RS3: Service Quick Reference Guide FRSI Schurter Littelfuse Part No. Part No. Part No. C50382--0 021 MSF 034.4224 273002 C50382--0 021 MSF 034.4224 273002 Characteristics 2 A 125 V Plug-In 2 A 125 V Plug-In Consoles SQ: 5-13 Multitube Command Console CRT Conrac 7241 Components Component FRSI part number Conrac part number Scan Board (Selectable) 1984--1651--0018 162885--77 BNC (Selectable) 1984--1651--0033 162938--74A Video Processor Board 1984--1651--0004 162838--72 High Voltage Module 1166--0524--0010 106513--6 Low Voltage Regulator Board 1984--1651--0007 162931--71 CRT Socket Board 1984--1651--0019 162921--72 Control Board 1984--1651--0020 162951--71 Adaptor Cables for Sony CRTs Part No Model No Adaptor Cable 1984--3286--000x CPD--1430 1984--3287--9500 1984--3246--000x CPD--1304S C--1404S 1984--3245--0001 1984--2633--000x CPD--1304 1984--3005--9030 RS3: Service Quick Reference Guide Consoles SQ: 5-14 Sony Monitor Adjustments Control Function AUTO SIZE Must be set to “ADJ” to enable use of the other controls. H Size (horizontal size) Used to adjust the horizontal size of the display. H Shift (horizontal shift) Used to adjust the center of the display horizontally. V Size (vertical size) Used to adjust the vertical size of the display. V Cent (vertical center) Used to adjust the center of the display vertically. RS3: Service Quick Reference Guide Consoles SQ: 5-15 Pedestal Command Console Keyboard Interface . . . . . . . . . . . . . . . . . . . . . . . . . . . . . . . . 1984-1782-000x . . . . . . . . . . . . . . . . . . . . . . . . . . . . . . . . . . . . . . . . . . . . . . . . . . . 1984-1921-000x Command Console Key Map Key Number Keyboard Part Number 1 -- 26 32 -- 63 Command Console Entry Keyboard 1984--1731--000x 64 -- 68 Trackball and Cursor Control 1984--1779--000x 72 -- 87 Block Configuration 1984--1776--000x 27 -- 31 69 -- 71 Not Used -- -- Keyboard Interface Parts Replacement Part No. Part Name on PWA Replaces 1984--1921--000x OS KEYBOARD INTERFACE 1984--1782--000x 1984--1782--000x OI KEYBOARD INTERFACE Itself RS3: Service Quick Reference Guide Consoles SQ: 5-16 Pedestal Command Console CRT Conrac 7211 . . . . . . . . . . . . . . . . . . . . . . . . . . . . . . . . . . . . . . 1984-1872-000x Conrac 7211 CRT Components Component Rosemount Part Number Scan Board (15.75 kHz) 1166--0524--0016 BNC (Differential) 1166--0524--0044 Video Processor Board (Differential) 1166--0524--0045 BNC (Single Ended) 1166--0524--0011 Replaced by 1984--0524--0044 Video Processor Board (Single Ended) 1166--0524--0012 Replaced by 1984--0524--0045 High Voltage Module 1166--0524--0010 Low Voltage Regulator Board 1166--0524--0015 CRT Socket Board 1166--0524--0013 Rectifier and Filter Board 1166--0524--0014 Control Board 1166--0524--0017 RS3: Service Quick Reference Guide Comment Consoles SQ: 5-17 Monochrome Video Generator . . . . . . . . . . . . . . . . . . . . . . 1981-1002-000x LEDs for Monochrome Video Generator LED Meaning DS1 Card good. No faults detected on the video generator card. Controller processor lights DS1 when power up diagnostics are completed. DS2 Card fault. DS2 lights if the video generator card fails power up diagnostics. DS3 Indicates that fuse F1, directing 12 volts to the CRT MONITOR, is bad. Monochrome Video Generator Fuse Fuse Rosemount Part No. Bussman Part No. Littelfuse Part No. Characteristics F1 G09140--0032 MDL 2 313002 2 A 250 V Slow Blow RS3: Service Quick Reference Guide Consoles SQ: 5-18 MiniConsole Floppy Interface (SCSI) . . . . . . . . . . . . . . . . . . . . . . . . . . . . 1984-1053-000x LEDs for MiniConsole Floppy Interface (SCSI) LED Meaning DS1 Card Good. No faults are detected on the card. DS2 Card Fault. A fault has been detected on the Interface card. DS4 (Not used) DS5 (Not used) DS6 Write Data. The Interface card is writing to one of the Disk Drives. DS7 Head Load. The read/write head on a disk drive is in the loaded position. DS8 Read Data. Data is being transmitted from the disk drive to the Interface card. DS9 Ready. The disk drive is sending a signal that it is ready for use. DS10 Drive Sel 1. Disk drive number 1 is doing an active command. DS11 Drive Sel 2. Disk drive number 2 is doing an active command. DS12 CMD Request. A request for data to or from the drives is awaiting execution. DS13 CMD Active. The system is currently sending a command for data transfer. DS14 Retry. System is doing rereads or rewrites because of incomplete data on the first try. RS3: Service Quick Reference Guide Consoles SQ: 5-19 Floppy Disk Power Supply . . . . . . . . . . . . . . . . . . . . . . . . . 1984-1050-000x Floppy Disk Power Supply Fuses Fuse Rosemount Part No. Bussman Part No. Littelfuse Part No. Characteristics F1 G09140-0011 MD1 1/4 -- -- 1/4 A 250 V Slow Blow F2 G09140-0045 AGC 8 -- -- 8 A 250 V Regular RS3: Service Quick Reference Guide Consoles SQ: 5-20 Hard Disk Drive IBM Deskstar 540 . . . . . . . . . . . . . . . . . . . . . . . . . . . . . . . . . . . . 10P5665000x LPS 270S . . . . . . . . . . . . . . . . . . . . . . . . . . . . . . . . . . . . . . . . . . . 10P52800002 LPS 170S . . . . . . . . . . . . . . . . . . . . . . . . . . . . . . . . . . . . . . . . . 1984-3500-0002 LPS 105S . . . . . . . . . . . . . . . . . . . . . . . . . . . . . . . . . . . . . . . . . 1984-3100-0002 80S . . . . . . . . . . . . . . . . . . . . . . . . . . . . . . . . . . . . . . . . . . . . . . 1984-2780-0001 Q280 . . . . . . . . . . . . . . . . . . . . . . . . . . . . . . . . . . . . . . . . . . . . . 1984-2307-0001 Q540 . . . . . . . . . . . . . . . . . . . . . . . . . . . . . . . . . . . . . . . . . . . . . 1984-1928-0001 Warning The metal frame of the disk drive must not make electrical contact with the mounting frame in the console. Use either the black coated mounting can or use mylar insulating pads between the drive and the yellow can. Hard Disk Drive Parts Replacement Part No. Replaces Characteristics 10P5665000x Itself only 3.5-inch disk IBM Deskstar 540 540 Meg Formatted 10P52800002 1984--3500--0002 1984--3100--0002 3.5-inch disk Quantum ProDrive LPS 270S 270 Meg Unformatted, Built--in SCSI 1984--3500--0002 1984--3100--0002 3.5-inch disk Quantum ProDrive LPS 170S 170 Meg Unformatted, Built--in SCSI 1984--3100--0002 1984--2780--000x 1984--2307--000x 1984--1928--000x 3.5-inch disk Quantum ProDrive LPS 105S 102 Meg Formatted 1984--2780--0001 1984--2307--000x 1984--1928--000x 3.5-inch disk Quantum ProDrive 80S 100 Meg Unformatted, 84 Meg Formatted 1984--2307--0001 1984--1928--000x 5.25-inch disk Quantum Q280 100 Meg Unformatted, 80 Meg Formatted 1984--1928--0001 Itself only 5.25-inch disk Quantum Q540 40 Meg RS3: Service Quick Reference Guide Consoles SQ: 5-21 Cable 10P56840001 Inline Fuses Fuses FRSI Bussman Littelfuse Part No. Part No. Part No. G01940--0046 AGC 10 311010 Fuse F1 & F2 Characteristics 10 A 32 V Regular IBM Deskstar 540 Jumpers Jumper Factory Setting 1 ON (Jumper) 2 OFF (No Jumper) 3 ON (Jumper) 4 OFF (No Jumper) 5 ON (Jumper) 6 ON (Jumper) 7 ON (Jumper) 8 OFF (No Jumper) 9 OFF (No Jumper) 10 OFF (No Jumper) 11 OFF (No Jumper) 12 OFF (No Jumper) RS3: Service Quick Reference Guide Consoles SQ: 5-22 LPS and 80S Drive Address Jumpers Jumper Factory Setting A0 ON (Jumper) A1 OFF (No Jumper) A2 ON (Jumper) LPS 105S and 80S Drive Option Jumpers Jumper Purpose WS Wait Spin Option EP Enable Parity Option SS Self Seek Test Option RS3: Service Quick Reference Guide Factory Setting OFF (No Jumper) ON (Jumper) OFF Consoles SQ: 5-23 Q280 Version 1 Drive Option Jumpers Jumper Purpose WS Wait Spin Option EP Enable Parity Option SS Self Seek Test Option Factory Setting OFF (No Jumper) ON (Jumper) OFF R0 R1 OFF No function ON Q280 Version 2 Drive Option Jumpers Jumper Purpose WS Wait Spin Option EP Enable Parity Option SS Self Seek Test Option OFF P1 No function ON P2 No function ON RS3: Service Quick Reference Guide Factory Setting OFF (No Jumper) ON (Jumper) Consoles SQ: 5-24 Q280 Drive Address Jumpers Drive Address Jumper A0 Jumper A1 Jumper A2 0 OFF OFF OFF 1 ON OFF OFF 2 OFF ON OFF 3 ON ON OFF 4 OFF OFF ON 5 ON OFF ON 6 OFF ON ON 7 ON ON ON Q540 Drive Jumpers Jumper Setting A--B ON C--D No Jumper E--F No Jumper G--H No Jumper J--K ON DG No Jumper PAR ON A4 ON A2 No Jumper A1 ON RS3: Service Quick Reference Guide Consoles SQ: 5-25 Floppy Disk Drive: 3.5-inch . . . . . . . . . . . . . . . . . . . . . . . . . . . . . . . . . . . . . . . . . . 1984-2837-000x 8-Bit Switch Setting Switch Position 1 OFF 2 OFF 3 OFF 4 OFF 5 ON 6 ON 7 ON 8 ON 4-Bit Switch Setting Switch Position 1 ON 2 ON 3 ON 4 OFF RS3: Service Quick Reference Guide Consoles SQ: 5-26 Floppy Disk Drive: 5.25-inch . . . . . . . . . . . . . . . . . . . . . . . . . . . . . . . . . . . . . . . . . 1984-1803-000x 5.25-Inch Floppy Disk Drive Parts Replacement Part No. Characteristics 1984-1803-000x Kit includes drive and mounting hardware Model Jumper Pansonic JU475--4AEG DA, RDY, MS, GX, AX, BX, PH, TM NOTE: TM is removed for drive 2 Pansonic JU475--3AEG NAX, MDA, BX, 1, OP, TM NOTE: TM is removed for drive 2 Pansonic JU475--2AEG MS, DA, IX, BX, RD, AX, MX--DS (RIGHT), 1 NOTE: Resistor pack is removed for drive 2 RS3: Service Quick Reference Guide Consoles SQ: 5-27 Magnetic Tape Drive Tandberg 5623 . . . . . . . . . . . . . . . . . . . . . . . . . . . . . . . . . . . . . . 10P5685000x Viper 2150S . . . . . . . . . . . . . . . . . . . . . . . . . . . . . . . . . . . . . . 1984-3389-000x Viper 2060S . . . . . . . . . . . . . . . . . . . . . . . . . . . . . . . . . . . . . . 1984-3289-000x Scorpion 5945S . . . . . . . . . . . . . . . . . . . . . . . . . . . . . . . . . . . 1984-1989-000x Scorpion 5945C . . . . . . . . . . . . . . . . . . . . . . . . . . . . . . . . . . 1984-1927-000x Magnetic Tape Drive Parts Replacement Part No. Replaces Characteristics 10P5685000x 1984--3389--000x Tandberg tape drive with embedded SCSI controller. NOTE: The Tandberg can read tapes written by any of the drives below. Of the drives listed below, only the Viper 2150S can read tapes written by the Tandberg. 1984--3389--000x 1984--3289--000x 1984--1989--000x 1984--1927--000x Viper 2150S tape drive with embedded SCSI controller. NOTE: The Viper 2150S can read tapes written by any of the drives below. The drives below CANNOT read tapes written by the Viper 2150S. 1984--3289--000x 1984--1989--000x 1984--1927--000x Viper 2060S tape drive with embedded SCSI controller 1984--1989--000x 1984--1927--000x Scorpion 5945S tape drive with embedded SCSI controller 1984--1927--000x None Drive Tandberg 5623 Scorpion 5945C tape drive with SCSI controller board Jumper or Switches PARITY, 2, and TERMPWR Viper 2150S BUFFER DISCONNECT SIZE (16K) Viper 2060S CF2, CF0, ID2 Scorpion 5945S Switches 3, 5, 8 ON, all others OFF Scorpion 5945C Switches 1, 3, 5, 8 ON, all others OFF RS3: Service Quick Reference Guide ON ON Consoles SQ: 5-28 Printer: Fujitsu DPL24C . . . . . . . . . . . . . . . . . . . . . . . . . . . . . . . . . . . 1984-0510-000x Fujitsu DPL24C Printer Switch Settings Dip Switch 1 2 3 4 5 6 7 8 A ON OFF ON OFF OFF OFF OFF ON B ON ON OFF OFF OFF OFF OFF OFF C OFF OFF OFF OFF OFF OFF (Don’t care) (Don’t care) D ON ON ON ON OFF ON OFF OFF Fujitsu DL2600 Printer Paper Thickness Paper Notch Single part, 10 pound 1 or 2 Two part 2 Three part 3 Four part 4 Ribbon removal D RS3: Service Quick Reference Guide Consoles SQ: 5-29 - To set up the Fujitsu DL2600 printer: 1. Hold down ALT and then press SETUP. The display shows “SET-UP MODE” and then “FUNCTION: STYLE”. 2. Press ITEM to enter the “style” level. 3. Press SELECT to display each of the items listed below. When the correct item is displayed, press ITEM to enter it in memory. Fujitsu DL2600 Printer Setup * Item Value Item Value PPR OUT: DETECT * COLOR: AUTOSEL * LF-CODE: LF ONLY LINE SP: 6 LPI * BUZZER: ON * PRF SKP: NO * QUALITY: DRAFT OFFSET: 0* ATTRIB: NONE * CR-CODE: CR ONLY * CHAR SP: 10 CPI * PRT-DIR: BI-DIR * indicates a factory setting 4. Press FUNCTION until “FUNCTION: INTERFACE” is displayed. Press ITEM to enter the “function” level. 5. Press SELECT to display each of the items listed below. When the correct item is displayed, press ITEM to enter it in memory. Fujitsu DL2600 Printer Setup Item Value Item Value TYPE: SERIAL PROTOCL: XON/XOF WORD LG: 8 BIT DUPLEX: FULL FORMAT: 8NONE 1 CONTROL: 3 WIRE BAUD RT: 4800 RS3: Service Quick Reference Guide Consoles SQ: 5-30 6. Press FUNCTION until “FUNCTION SAVE” is displayed. Press ITEM to have the printer save the selected options in nonvolatile memory. 7. Press ONLINE to resume normal operation. RS3: Service Quick Reference Guide Consoles SQ: 5-31 Printer: Fujitsu DL3800 . . . . . . . . . . . . . . . . . . . . . . . . . . . . . . . . . . . . 1984-3318-000x - To set up the Fujitsu DL 3800 printer: 1. Have continuous form paper loaded. The setup procedure will require several sheets. 2. Put the printer in setup mode: Put the printer off-line (press ONLINE until the ONLINE light goes out). Press both the FONT and MENU buttons until the printer beeps. --or-Turn the printer off. Press both the FONT and MENU buttons. Turn the printer on. The printer will beep. 3. The printer will print a header describing the setup procedure, a Help menu, and the <<FUNCTION>> menu. The red cursor on the print guide is positioned at the SAVE&END function. 4. Press LOCK to move the cursor to the MENU1 function. Press FONT to select it. The printer will print the first item in the menu and the options for the item. 5. The cursor will stop at the option currently stored in memory. This option will have a short underline on the paper. Use LOCK to move the cursor to the desired option. 6. Use FONT to select the option. When an option is selected it is completely underlined. The next item in the menu is then printed. 7. Set MENU1 to the options shown below. 8. Press ONLINE to return to the <<FUNCTION>> menu. Press LOCK to position the cursor at MENU2. Press FONT to select MENU2. Set the options in MENU2 as shown below. RS3: Service Quick Reference Guide Consoles SQ: 5-32 Fujitsu DL3800 Printer MENU1 and MENU 2 Options Item Option Item Option EMULATE DPL24+ TOP-MRG 1 LINE FONT COUR10 LANGUAGE PAGE 437 QUALITY DRAFT CHR-SET SET 2 PITCH 10 CPI PRF-SKP NO SKIP LINE SP 6 LPI WIDTH 13.6 IN CHAR-W NORMAL ZEROFNT NO-SLSH CHAR-H NORMAL DC3-CDE ENABLE ATTRIB NONE CR-CODE CR ONLY PAGE LG 11.0 IN LF-CODE LF ONLY COLOR AUTOSEL RGHTEND WRAP LFT-END 1 COLM -- Continued -- RS3: Service Quick Reference Guide Consoles SQ: 5-33 9. Press ONLINE to return to the <<FUNCTION>> menu. Press LOCK to position the cursor at HARDWARE and press FONT to select it. Set options in the HARDWARE menu as shown below. Fujitsu DL3800 Printer HARDWARE Menu Options Item Option Item Option PPR-OUT CNTONLY INTRFCE SERIAL PRT-DIR BI-DIR FORMAT 8NONE1 BUZZER ON BAUE-RT 4800 WORD-LG 8-BIT PROTOCL XON/XOFF BUFFER 8KB NOTE: Do not use a buffer size larger than 8 kB. DSR IGNORE FEEDER REAR DUPLEX FULL 10. Press ONLINE to return to the <<FUNCTION>> menu. Press LOCK to position the cursor at SAVE&END and press LOCK to select it. The configuration will be saved in memory. The printer will be in ONLINE mode, ready for use. 11. The printout is a record of the configuration. Selected options have full underlines. Options that were changed have a partial underline at the original value. RS3: Service Quick Reference Guide Consoles SQ: 5-34 Printer: Fujitsu DL4600 . . . . . . . . . . . . . . . . . . . . . . . . . . . . . . . . . . . . 1984-0543-000x - To set up the Fujitsu DL4600 printer: 1. Press “NEXT DISPLAY” until “enter setup” appears in the display window. Press F1, “Menu 1” appears in the display window. Scroll through the options and verify the settings shown below. Scroll with F2. Change options with F3. 2. Press F1, “Menu 2” appears in the display window. Scroll through the options and verify the settings. Menu 2 must be identical to Menu 1. Fujitsu DL4600 Printer Setup Menu Item Value Menu Item Value EMULATE DPL24C TOP-MRG 1 LINE FONT COUR10 LANGUAGE USA QUALITY DRAFT CHR-SET SET 2 PITCH 10 CPI PRT-SKIP NO-SKIP LINE SP 6 LPI WIDTH 13.6 IN CHAR-W NORMAL ZEROFNT NO-SLASH CHAR-H NORMAL DC3-CDE ENABLE ATTRIB NONE CR-CODE CR ONLY PAGE LG 11.0 IN LF-CODE LF ONLY COLOR AUTOSEL RGHTEND WRAP LFT-END 1 COLM =END= RS3: Service Quick Reference Guide Consoles SQ: 5-35 3. Press F1 until “Hardware Features” appears in the display window. Scroll through the options and verify the settings shown below. Scroll with F2. Change options with F3. Fujitsu DL4600 Printer Setup Menu Item Value Menu Item Value SensePE REAR FORMAT 8 NONE 1 PRT-DIR BI-DIR BAUD-RT 4800 BUZZER ON PROTOCOL XON/XOF WORD-LG 8 BIT DSR IGNORE BUFFER 8 KB NOTE: Do not use a buffer size larger than 8 KB. DUPLEX FULL FEEDER REAR =END= INTRFCE SERIAL 4. Press F1 until “Save” appears in the display window. Press F3 to save the configuration. 5. Press F1 until “Func LIST” appears. Press F3 to print the option lists. Verify the printed lists. 6. Press F1 until “Self Test” appears in the display window. Press F3 to start the test, press F2 to stop it after about 30 seconds. Press F1 to exit the self test. 7. Press the “ON LINE” button to resume normal operation. RS3: Service Quick Reference Guide Consoles SQ: 5-36 Printer: Texas Instruments 810 . . . . . . . . . . . . . . . . . . . . . . . . . . . . . 1984-0317-000x TI 810 Processor Board Jumpers Jumpers Setting E1--E2--E3 E2--E3 E4--E5--E6 E5--E6 E7--E8--E9 E8--E9 E10--E11--E12 E11--E12 E13--E14--E15 E13--E14 E16--E17--E18 E17--E18 E19--E20--E21 OPEN E22--E23--E24 OPEN TI 810 Printer Motherboard Jumpers Jumpers Setting E1--E2 JUMPERED E3--E4 JUMPERED E11--E12--E13 E11--E12 RS3: Service Quick Reference Guide Consoles SQ: 5-37 TI 810 Printer Baud Rate (Pencil) Switches Switch Setting Switch Setting 1 ON 5 OFF 2 OFF 6 ON 3 ON 7 ON 4 OFF TI 810 Printer Voltage Checks Test Point Voltage Tolerance E4 +12 VDC ± .6 VDC E5 --12 VDC ± .6 VDC E6 +8 VDC ± 1 VDC E7 --75 VDC ± 15 VDC E8 --5 VDC ± .25 VDC E9 +30 VDC ± 10 VDC E10 +5 VDC ± .05 VDC RS3: Service Quick Reference Guide Consoles SQ: 5-38 Alarm Output Board . . . . . . . . . . . . . . . . . . . . . . . . . . . . . . . 1984-0744-000x Alarm Output Board Fuses Fuse F1 F2 Rosemount Part No. Bussman Part No. Characteristics G09140--0029 MDQ--1--1/2 1.5 A 250 V Slow Blow RS3: Service Quick Reference Guide Consoles SQ: 5-39 PeerWay Interface . . . . . . . . . . . . . . . . . . . . . . . . . . . . . . . . . 1984-1045-000x LEDs for PeerWay Interface LED Meaning DS1 Card Good: No faults are detected on the card. DS2 Card fault: A fault has been detected in the communication link. DS4 PW Tap ST A: The Timer in tap A has timed out. DS5 PW Tap ST B: The Timer in tap B has timed out. DS6 RTS: Ready to send generated from the PeerWay Interface. DS7 Bus Active: The PeerWay Interface is receiving data. DS8 A Active: The Interface is using the A PeerWay. DS9 B Active: The Interface is using the B PeerWay. DS10 CMD Active: Command active. The software is actively executing a command on the Interface Board. PeerWay Interface Test Points Test Point Function TP1 +5 V Isolated DC for Tap A TP2 A return TP3 +5 V Isolated DC for Tap B TP4 B return RS3: Service Quick Reference Guide Consoles SQ: 5-40 To set the jumpers for an address on PeerWay 1, set the jumpers so: node address = (Sum of jumpers) + 2 To set the jumpers for use on PeerWay “P”: Jumper setting = (Node Number) -- 32(P--1) PeerWay Interface Jumper Values Jumper Value at 1--2 Value at 2--3 HD1 2 0 HD2 4 0 HD3 8 0 HD4 16 0 RS3: Service Quick Reference Guide Consoles SQ: 5-41 OI Power Supply . . . . . . . . . . . . . . . . . . . . . . . . . . . . . . . . . . 1984-1137-000x OI Power Supply Parts Replacement Part No. Replaces 1984--1137--000x 1984--1017--000x Characteristics 24 V or 30 VDC Input. 12 V Output 3 Amps 5 V Output 20 Amps Comment Replaces any 1984--1017--000x. 30 VDC Input. 12 V Output 2 Amps 1984--1017--000x 5 V Output 11 Amps OI Power Supply LEDs LED Meaning DS1 Card Good: Comparators are within tolerance. DS2 Card fault: +5V or +12V comparator has sensed voltage out of tolerance. DS3 Fuse F1 is bad: Regulator. DS4 Fuse F2 is bad: Fan. DS6 +5V Good: The +5V comparator is within tolerance. DS7 +12V Good: The +12V comparator is within tolerance. DS8 +30V Bus A Good: The 30VDC A power bus is within tolerance. DS9 +30V Bus B Good: The 30VDC B power bus is within tolerance. RS3: Service Quick Reference Guide Consoles SQ: 5-42 OI Power Supply Test Points Test Point Function TP1--TP2 (Violet -- Gray) Isolated +9V A and Return TP3--TP4 (Violet -- Gray) Isolated +9V B and Return TP5--TP6 (Yellow -- Brown) +5 V and Return TP7--TP8 (Red -- Brown) +12 V and Return OI Power Supply Jumper Settings Jumper HD1 Position Input Voltage 1--2 30 VDC 2--3 24 VDC OI Power Supply Fuses FRSI Bussman Littelfuse Part No. Part No. Part No. F1 G09140--0047 AGC 15 311015 15 A 32 V Regular F2 G09140--0023 MDQ 1 313001 1 A 250 V Slow Blow F1 G09140--0044 AGC 7--1/2 31107.5 7.5 A 32 V Regular F2 G09140--0023 MDQ 1 313001 1 A 250 V Slow Blow Card Fuse 1984-1137--000x 1984-1017--000x RS3: Service Quick Reference Guide Characteristics Consoles SQ: 5-43 OI Processor OI 68040 . . . . . . . . . . . . . . . . . . . . . . . . . . . . . . . . . . . . . . . . . . . . 10P5527001x . . . . . . . . . . . . . . . . . . . . . . . . . . . . . . . . . . . . . . . . . . . . . . . . . . 1984--3202--0010 OI 68020 . . . . . . . . . . . . . . . . . . . . . . . . . . . . . . . . . . . . . . . . . 1984--1540--0009 . . . . . . . . . . . . . . . . . . . . . . . . . . . . . . . . . . . . . . . . . . . . . . . . . . 1984--1161--0009 OI 68000 . . . . . . . . . . . . . . . . . . . . . . . . . . . . . . . . . . . . . . . . . . . . 10P57140008 . . . . . . . . . . . . . . . . . . . . . . . . . . . . . . . . . . . . . . . . . . . . . . . . . . 1984--2759--0008 . . . . . . . . . . . . . . . . . . . . . . . . . . . . . . . . . . . . . . . . . . . . . . . . . . 1984--2137--0008 . . . . . . . . . . . . . . . . . . . . . . . . . . . . . . . . . . . . . . . . . . . . . . . . . . 1984--2122--0007 . . . . . . . . . . . . . . . . . . . . . . . . . . . . . . . . . . . . . . . . . . . . . . . . . . 1984--2120--0008 . . . . . . . . . . . . . . . . . . . . . . . . . . . . . . . . . . . . . . . . . . . . . . . . . . 1984--2107--0005 . . . . . . . . . . . . . . . . . . . . . . . . . . . . . . . . . . . . . . . . . . . . . . . . . . 1984--1061--0005 OI Processor Replacement Data Part No. Replaces RAM Used In PWA Marked 10P55270011 -- -- 16 Meg SMS OI PROCESSOR V 10P55270010 1984--3202--0010 16 Meg MTCC OI PROCESSOR V 1984--3202--0010 1984--1540--0009* 1984--1161--0009* 16 Meg MTCC OI PROCESSOR V 1984--1540--0009 1984--1161--0009 All below* 4 Meg MTCC HIA SCI OI PROCESSOR 68020 W/ASIC OI PROCESSOR 68020 2 Meg MC CC MTCC HIA SCI OI PROCESSOR III 2 Meg MC CC MTCC HIA SCI OI PROCESSOR III 10P57140008 1984--2759--0008 * 1984--2759--0008 All below Use of this processor requires pixel graphics and may require changing software. (continued on next page) RS3: Service Quick Reference Guide Consoles SQ: 5-44 OI Processor Replacement Data (continued) Part No. Replaces RAM Used In PWA Marked OI PROCESSOR 1 MEG 1984--2137--0008 All below 1 Meg MC BCC CC MTCC HIA SCI 1984--2122--0007 All below 1 Meg BCC CC OI PROCESSOR 1 MEG 1984--2120--0008 1984--2107--00051 984--1061--0005 1/2 Meg MC BCC OI PROCESSOR 1984--2107--0005 1984--1061--0005 1/2 Meg MC BCC OI PROCESSOR 1/2 Meg MC BCC OI PROCESSOR 1984--1061--0005 * Use of this processor requires pixel graphics and may require changing software. RS3: Service Quick Reference Guide Consoles SQ: 5-45 OI Processor: 68040 . . . . . . . . . . . . . . . . . . . . . . . . . . . . . . . . . . . . . . . . . . . . . . 10P5527001x . . . . . . . . . . . . . . . . . . . . . . . . . . . . . . . . . . . . . . . . . . . . . . . . . . . 1984-3202-0010 OI Processor 68040 LEDs LED Meaning DS1 Card Good: No faults are detected on the card. DS2 Card Fault: A fault has been detected on the Processor Card. DS6 Display Active: Processor is updating Video Generator RAM. DS7 Keyboard Active: Processor is operating on an instruction from a keyboard. DS8 Controller I/O: Processor is working on a data update from a Controller. OI Processor 68040 Jumper Positions Jumper Position 1--2 Position 2--3 HD1 Not used Hard wired HD2 Not used Hard wired HD3 PeerWay Boot Disk Boot (Normal) HD4 Not used Hard wired HD5 Not used Hard wired HD6 Not used Hard wired RS3: Service Quick Reference Guide Consoles SQ: 5-46 OI Processor: 68020 . . . . . . . . . . . . . . . . . . . . . . . . . . . . . . . . . . . . . . . . . . . . 1984-1540-0009 . . . . . . . . . . . . . . . . . . . . . . . . . . . . . . . . . . . . . . . . . . . . . . . . . . . 1984-1161-0009 OI Processor 68020 LEDs LED Meaning DS1 Card Good: No faults are detected on the card. DS2 Card Fault: A fault has been detected on the Processor Card. DS6 Display Active: Processor is updating Video Generator RAM. DS7 Keyboard Active: Processor is operating on an instruction from a keyboard. DS8 Controller I/O: Processor is working on a data update from a Controller. OI Processor 68020 Jumper Positions Jumper Position 1--2 Position 2--3 HD3 PeerWay Boot Disk Boot (Normal) HD4 Not used Factory set HD5 Not used Factory set RS3: Service Quick Reference Guide Consoles SQ: 5-47 OI Processor: OI 68000 . . . . . . . . . . . . . . . . . . . . . . . . . . . . . . . . . . . . . . . . . . . . 10P57140008 . . . . . . . . . . . . . . . . . . . . . . . . . . . . . . . . . . . . . . . . . . . . . . . . . . 1984--2759--0008 . . . . . . . . . . . . . . . . . . . . . . . . . . . . . . . . . . . . . . . . . . . . . . . . . . 1984--2137--0008 . . . . . . . . . . . . . . . . . . . . . . . . . . . . . . . . . . . . . . . . . . . . . . . . . . 1984--2122--0007 . . . . . . . . . . . . . . . . . . . . . . . . . . . . . . . . . . . . . . . . . . . . . . . . . . 1984--2120--0008 . . . . . . . . . . . . . . . . . . . . . . . . . . . . . . . . . . . . . . . . . . . . . . . . . . 1984--2107--0005 . . . . . . . . . . . . . . . . . . . . . . . . . . . . . . . . . . . . . . . . . . . . . . . . . . 1984--1061--0005 OI Processor 68000 LEDs Meaning LED DS1 Card Good: No faults are detected on the card. DS2 Card Fault: A fault has been detected on the Processor Card. DS3 Ext Loop Sel 30V Fuse: Fuse F1 is bad. DS4 Fuse Blown: 5V Keyboard fuse blown. DS6 Display Active: Processor is updating Video Generator RAM. DS7 Keyboard Active: Processor is operating on a keyboard instruction. DS8 Controller I/O: Processor is working on a data update from a Controller. OI Processor 68000 Jumper Positions Card Jumper HD2 Position 2--3 Jumper HD2 Position 1--2 10P57140008 1984--2759--0008 No movable Jumpers No movable Jumpers 1984--2137--0008 1984--2122--0007 1984--2120--0008 1984--2107--0005 1984--1061--0005 256K EPROM installed (Normal) 128K EPROM installed OI Processor 68000 Fuses Fuse FRSI Part No. Bussman Part No. Littelfuse Part No. Characteristics F1 G09140--0036 MDL--3 313003 3A 250 V Slow Blow F2 G09140--0041 MDL--5 312005 5 A 250 V Regular RS3: Service Quick Reference Guide Consoles SQ: 5-48 Pixel Graphics Video Generator . . . . . . . . . . . . . . . . . . . . 1984-2503-0001 Pixel Graphics Video Generator LEDs LED DS1 (Green) DS2 (Red) Meaning No faults are detected on the card. DS1 lights when the OI Processor completes power up diagnostics. The Pixel Graphics Video Generator has a fault. DS8 (Yellow) The Graphics Processor on the Pixel Graphics Video Generator is executing commands. DS8 lights when the CRT screen is periodically updated. DS9 (Yellow) The specific area of memory where commands are stored is being used. When the Graphics Processor is finished executing commands, DS9 goes out and the command area can be accessed. DS10 (Yellow) The memory bus is in use. DS10 lights when the OI Processor is reading into or writing from the Pixel Graphics Video Generator memory. DS11 (Yellow) Text fields on the CRT screen are being updated. DS11 goes out after the fields are updated. DS12 (Yellow) Horizontal sync. Under normal operation, DS12 blinks at a regular rate. RS3: Service Quick Reference Guide Consoles SQ: 5-49 Character Graphics Video Generator . . . . . . . . . . . . . . . . 1984-1064-0001 Character Graphics Video Generator LEDs LED DS1 (Green) Meaning No faults are detected on the card. DS1 lights when the OI Processor completes power up diagnostics. DS2 (Red) Card fault. DS2 lights if the Video Generator Card does not pass power up diagnostics. DS3 (Red) Not used. DS6 (Yellow) Page 0 is active. Page 0 and page 1 store information for the CRT display. Depending on the amount of screen information, either DS6 or DS7 lights, or both DS6 and DS7 light. DS7 (Yellow) Page 1 is active. Page 0 and page 1 store information for the CRT display. Depending on the amount of screen information, either DS6 or DS7 lights, or both DS6 and DS7 light. DS8 (Yellow) Hardware alarm contact. The signal sent to light DS8 has also been sent to open or close the hardware alarm contact. DS9 (Yellow) Process alarm contact. The signal sent to light DS9 has also been sent to open or close the process alarm contact. DS10 (Yellow) Diagnostic routine is in progress during a power up procedure. DS11 (Yellow) Screen blank is active. On a normally functioning Character Graphics Video Generator Card, DS11 shows a slight but constant flicker. Character Graphics Video Generator Fuse Fuse Rosemount Part No. Bussman Part No. Littelfuse Part No. Characteristics F1 G09140--0032 MDL--2 312002 2A 250 V slow blow RS3: Service Quick Reference Guide Consoles SQ: 5-50 Printer Interface . . . . . . . . . . . . . . . . . . . . . . . . . . . . . . . . . . . 1984-1011-000x Printer Interface Parts Replacement Part No. Replaces 1984--1011--0001 1984--1011--0002 1984--1011--0003 1984--1011--0004 Characteristics No RS-422 Interface 1984--1011--0001 1984--1011--0002 RS-422 Interface for Multitube Consoles Printer Interface Card --0001, --0002 (without RS-422 interface) LEDs LED Meaning DS1 Card good. No faults are detected on the card. DS2 Card fault. A fault has been detected in the communication link. DS8 TXD. Indicates data being transmitted to the printer. DS9 CTS. Clear To Send. Printer is connected and ready to accept data. DS10 NV Write. The nonvolatile RAM is being written. DS11 Clock. A one-second pulse that the RTC is running. DS12 Software Clock. The internal software clock of the console is running. RS3: Service Quick Reference Guide Consoles SQ: 5-51 Printer Interface Card --0003, --0004 (with RS-422 interface) LEDs Meaning LED DS1 Card good. No faults are detected on the card. DS2 Card fault. A fault has been detected in the communication link. DS6 TXD A. Indicates data being transmitted to the keyboard. DS7 CTS A. Clear To Send. Keyboard is connected and ready to accept data. DS8 TXD B. Indicates data being transmitted to the printer. DS9 CTS B. Clear To Send. Printer is connected and ready to accept data. DS10 NV Write. The nonvolatile RAM is being written. DS11 Clock. A one-second pulse that the RTC is running. DS12 Software Clock. The internal software clock of the console is running. Printer Interface Jumpers Jumper Position Function HD10 1--2 Clock battery connected (Operating position) 2--3 Clock battery disconnected (Storage position) HD1--HD6 M Configured as Modem (Normal position) HD7--HD9 N Test disabled (Normal position) RS3: Service Quick Reference Guide Consoles SQ: 5-52 SCSI (Small Computer System Interface) . . . . . . . . . . . . 1984-3301-0001 . . . . . . . . . . . . . . . . . . . . . . . . . . . . . . . . . . . . . . . . . . . . . . . . . . . 1984-1140-0001 SCSI Card Parts Replacement Part No Replaces 1984--3301--0001 1984--1140--000x NOTE: You cannot mix --3301 and --1140 boards in a MultiTube console. Requires OI 68020 or 68040 Processor with boot ROM at least 9.xx (68020) or 10.xx (68040). 1984--1140--000x Itself only Cannot be used with a --1140 board in a MultiTube console. Characteristics NOTE: With a disk-only console, SCSI termination is required. Use 1984--3301--0001 with the proper termination jumper settings, or use 1984--1140--0003, which has termination resistors. SCSI Card LEDs LED DS1 (Green) DS2 (Red) Meaning No faults are detected on the card. DS1 lights when the card has passed power up diagnostics. A fault has been detected on the card. DS2 lights when the card has failed power up diagnostics. DS6 (Yellow) SCSI bus is busy. DS6 is a hardware driven LED and will flicker under normal operation. DS7 (Yellow) Message or status information is being transferred on the SCSI bus. DS7 is driven by the target device and will flicker under normal operation. A steady ON indicates the bus is locked. DS8 (Yellow) Indicates data is being transferred to the tape or drive. DS8 is driven by a target device and will flicker under normal operation. A steady ON indicates the bus is locked. DS9 (Yellow) Indicates messages or commands are being transferred on the SCSI bus. DS9 is driven by a target device and will flicker under normal operation. A steady ON indicates the bus is locked. DS10 (Yellow) Direct memory access request. Indicates a data transfer between the disk or tape and SCSI Interface card. (continued on next page) RS3: Service Quick Reference Guide Consoles SQ: 5-53 SCSI Card LEDs (continued) LED Meaning DS12 (Yellow) Hard disk access. A command is being issued to the hard disk. DS13 (Yellow) Indicates a command is being issued to the tape drive. DS13 will blink every second as the tape drive is monitored for tape insertion or removal. DS14 (Yellow) Indicates cache memory on the SCSI board is being accessed. The most recently used disk sectors are stored in cache memory. SCSI Board 2 (1984-3301-0001) ID Jumper Setting SCSI Device ID Put Jumper On Used For 0 HD0 Card Cage A 1 HD1 Card Cage B 2 HD2 Card Cage C SCSI Board 2 (1984-3301-0001) Bus Terminal Jumper Setting HD3 Action 1--2 Enabled (disk-only console) 2--3 Disabled (Normal setting) RS3: Service Quick Reference Guide Consoles SQ: 5-54 OI SCSI Host Adapter (1984-1140-0001) Device ID Jumper SCSI Device ID Put Jumper On Used For 0 HD1 Card Cage A 1 HD2 Card Cage B or Command Console 2 HD3 Card Cage C 3--7 HD4--HD8 These device IDs are not used in Console Card Cages OI SCSI Host Adapter (1984-1140-0001) Address Jumpers SCSI Bus Address HD9 HD10 HD11 Used For 0 2--3 2--3 2--3 Card Cage A 1 2--3 2--3 1--2 Card Cage B or Command Console 2 2--3 1--2 2--3 Card Cage C 3 2--3 1--2 1--2 Not used 4 1--2 2--3 2--3 Not used 5 1--2 2--3 1--2 Not used 6 1--2 1--2 2--3 Not used 7 1--2 1--2 1--2 Not used RS3: Service Quick Reference Guide Consoles SQ: 5-55 OI Nonvolatile Memory OI NV RAM . . . . . . . . . . . . . . . . . . . . . . . . . . . . . . . . . . . . . . . . 1984-1547-000x OI Bubble . . . . . . . . . . . . . . . . . . . . . . . . . . . . . . . . . . . . . . . . . 1984-1147-000x OI Bubble SC . . . . . . . . . . . . . . . . . . . . . . . . . . . . . . . . . . . . . 1984-1167-000x OI NV Memory Replacement Data Part No. Replaces Characteristics 1984--1547--0001 --0002 1984--1147--000x 1984--1167--000x 256K RAM Memory --0001 has X.25 --0002 has X.25 disabled 1984--1547--0003 --0004 1984--1147--000x 1984--1167--000x 512K RAM Memory --0003 has X.25 --0004 has X.25 disabled 1984--1167--0001 --0002 1984--1147--000x 256K Bubble Memory --0001 has X.25 --0002 has X.25 disabled 1984--1147--000x -- RS3: Service Quick Reference Guide Original 256K Bubble Memory Does not have X.25 capability Consoles SQ: 5-56 OI Bubble Memory . . . . . . . . . . . . . . . . . . . . . . . . . . . . . . . . 1984-1147-000x . . . . . . . . . . . . . . . . . . . . . . . . . . . . . . . . . . . . . . . . . . . . . . . . . . . 1984-1167-000x OI Bubble Memory LEDs LED DS1 (Green) DS2 (Red) Meaning No faults are detected on the card. DS1 lights when the card has passed power up diagnostics. A fault has been detected on the card. DS2 lights when the card has failed power up diagnostics. DS6 (Yellow) TXD for RS-422 channel. DS7 (Yellow) RXD for RS-422 channel. DS8 (Yellow) CTS for RS-422 channel. DS9 (Yellow) RXD for RS-232 channel. DS10 (Yellow) CTS for RS-232 channel. DS11 (Yellow) TXD for RS-232 channel. DS12 (Yellow) Status LED 1: Operation: Program Access Power-up Test: Low order bit of test number. DS13 (Yellow) Status LED 2: Operation: Writing to the Bubble. Power-up Test: Middle bit of test number. DS14 (Yellow) Status LED 3: Operation: Reading from the Bubble. Power-up Test: High order bit of test number. RS3: Service Quick Reference Guide Consoles SQ: 5-57 OI Bubble LED Sequences Status LEDs (DS12, 13, 14) Failed Test ---OFF Unable to initialize. OFF ---OFF Write failure. ON ---ON Read failure. OFF ---ON Read or write failure. ON ON ON Both 30 VDC power supplies are bad. ON OI Bubble Jumpers Jumper Value Purpose HD1 (BATT) ON Real Time Clock battery connected OFF Real Time Clock battery disconnected T No longer used by software N No longer used by software 1--2 Bubble test (Factory use only) 2--3 Normal operation 1--2 Bubble test (Factory use only) HD2 (BOOT SWAP) HD3 (SYNC) HD4 (CS1) (continued on next page) RS3: Service Quick Reference Guide Consoles SQ: 5-58 OI Bubble Jumpers (continued) Jumper Value Purpose 2--3 Normal operation 1--2 Bubble test (Factory use only) 2--3 Normal operation 1--2 Bubble test (Factory use only) 2--3 Normal operation N Normal Communications (RS-232) T Communications Loopback Test(RS-232) M Function as a Modem (RS-232) T Function as a Terminal (RS-232) HD14 -- Not Used HD15, 16, 17, 18 T Communications Loopback Test (RS-422) N Normal Communications (RS-422) HD5 (SYNC) HD6 (CS2) HD7, HD10 HD8, 9, 11, 12, 13 HD19 DOWNLOAD NORMAL HD20 HD21 Address this board as Secondary (See text) Address this board as Primary (See text) M Function as a Modem (RS-422) T Function as a Terminal (RS-422) T Function as a Terminal (RS-422) M Function as a Modem (RS-422) RS3: Service Quick Reference Guide Consoles SQ: 5-59 OI NV RAM . . . . . . . . . . . . . . . . . . . . . . . . . . . . . . . . . . . . . . . . 1984-1547-000x OI NV RAM LEDs LED DS1 (Green) DS2 (Red) Meaning No faults are detected on the card. DS1 lights when the card has passed power up diagnostics. A fault has been detected on the card. DS2 lights when the card has failed power up diagnostics. DS4 (Yellow) Battery 1 is low. Replace both batteries (battery 1 first). DS5 (Yellow) Battery 2 is low. Replace both batteries (battery 2 first). DS6 (Yellow) TXD for RS-422 channel. DS7 (Yellow) RXD for RS-422 channel. DS8 (Yellow) CTS for RS-422 channel. DS9 (Yellow) RXD for RS-232 channel. DS10 (Yellow) CTS for RS-232 channel. DS11 (Yellow) TXD for RS-232 channel. DS12 (Yellow) Status LED 1: Operation: Program Access Power-up Test: Low order bit of test number. DS13 (Yellow) Status LED 2: Operation: Writing to the Bubble. Power-up Test: Middle bit of test number. DS14 (Yellow) Status LED 3: Operation: Reading from the Bubble. Power-up Test: High order bit of test number. RS3: Service Quick Reference Guide Consoles SQ: 5-60 OI NV VAM LED Sequences Status LEDs (DS12, 13, 14) Meaning OFF ON ON Failure in read/write tests of RAM. ON ON ON Bad program length, failed SCI image checksum, or both 30 VDC power supplies are bad. OI NV RAM Memory Test Points Test Point Color Purpose TP1 +5V1 Yellow RS-422 isolated +5 V supply TP2 IG1 Gray RS-422 isolated ground TP3 +5V2 Yellow RS-232 isolated +5 V supply TP4 IG2 Gray RS-232 isolated ground TP5 +9V Purple Comparator supply TP6 B1C White Battery 1 current TP7 B2C Green Battery 2 current TP8 B1V White Battery 1 voltage TP9 B2V Green Battery 2 voltage TP10 GND Brown Logic ground OI NV RAM Jumpers Jumper Value Purpose HD1 (BATT 1) ON Battery 1 Connected OFF Battery 1 Disconnected ON Battery 2 Connected OFF Battery 2 Disconnected HD2 (BATT 2) (continued on next page) RS3: Service Quick Reference Guide Consoles SQ: 5-61 OI NV RAM Jumpers (continued) Jumper Value Purpose HD3 (RTCPWR) BAT&PS Hardwired PS ONLY HD4 (NVM SIZE) HD5 (PEERWAY BOOT) HD7, HD10 HD8, 9, 11, 12, 13 HD15, 16, 17, 18 HD19 (BD ADRR DECODE) HD20 HD21 512 KB Hardwired for number of RAM chips used 256KB Hardwired for number of RAM chips used PWAY Force PeerWay boot NORM Normal operation R Run Normal Communications (RS-232) L Communications Loopback Test (RS-232) M Function as a Modem (RS-232) (Remove for Loopback Test) T Function as a Terminal (RS-232) (Remove for Loopback Test) L Communications Loopback Test (RS-422) R Run Normal Communications (RS-422) 2NDARY Address this board as Secondary (See text) PRIMARY Address this board as Primary (See text) M Function as a Modem (RS-422) T Function as a Terminal (RS-422) (Hardwired for non-X.25 operation) M Function as a Modem (RS-422) (Hardwired for non-X.25 operation) T Function as a Terminal (RS-422) RS3: Service Quick Reference Guide Consoles SQ: 5-62 RS3: Service Quick Reference Guide Consoles SQ: 6-1 Section 6: ControlFiles ControlFile Card Cage . . . . . . . . . . . . . . . . . . . . . . . . . PeerWay Buffer . . . . . . . . . . . . . . . . . . . . . . . . . . . . . . . ControlFile Power Regulator 5 VDC Only . . . . . . . . ControlFile Power Regulator 5 and 12 VDC . . . . . . CP (Coordinator Processor): CP-IV+ CP-IV CP-II CP-I . . . . . . . . . . . . . . . . . . . . . . . . . . . . . . . . . . . . . . . . . NV (Nonvolatile) Memory: RAM . . . . . . . . . . . . . . . . NV (Nonvolatile) Memory: Bubble . . . . . . . . . . . . . . Controller Processor: MPC5 MPC II MPC MLC SSC CC MUX and PLC . . . . . . . . . . . . . . . . . . . . . . . . . . . . . . . . Controller Processor: MPC5 . . . . . . . . . . . . . . . . . . . Controller Processor: MPC II . . . . . . . . . . . . . . . . . . . Controller Processor: MPC . . . . . . . . . . . . . . . . . . . . Controller Processor: MLC SSC MUX and PLC . . . . . . . . . . . . . . . . . . . . . . . . . . . . . . . . RS3: Service Quick Reference Guide 6-2 6-4 6-6 6-8 6-10 6-16 6-20 6-22 6-25 6-27 6-30 6-32 ControlFiles SQ: 6-2 ControlFile Card Cage . . . . . . . . . . . . . . . . . . . . . . . . . . . . . . . 10P52960001 . . . . . . . . . . . . . . . . . . . . . . . . . . . . . . . . . . . . . . . . . . . . . . . . . . . 1984-3048-000x . . . . . . . . . . . . . . . . . . . . . . . . . . . . . . . . . . . . . . . . . . . . . . . . . . . 1984-0023-000x 3 4 5 6 8 7 1 A 2 Support Section B C D E F G H Controller Processor Cards ControlFile Cards Item Card Item Card 1 PeerWay Buffer A 5 Coordinator Processor (CP) 2 PeerWay Buffer B 6 Redundant Coordinator Processor (optional) 3 Power Regulator 7 Nonvolatile Memory 4 Second Power Regulator (optional) 8 Controller Processor A--H NOTE: Redundant processors must be installed in adjacent slots (AB, CD, EF, GH) NOTE: 10P52960001 is EMC (CE) compliant and has built-in data bus terminators. RS3: Service Quick Reference Guide ControlFiles SQ: 6-3 ControlFile Address Jumper Values NOTE: Jumper Value at H Value at L 5 16 0 4 8 0 3 4 0 2 2 0 1 1 0 The Node Address is the sum of the jumpers plus 1. RS3: Service Quick Reference Guide ControlFiles SQ: 6-4 PeerWay Buffer . . . . . . . . . . . . . . . . . . . . . . . . . . . . . . . . . . . 1984-1502-000x . . . . . . . . . . . . . . . . . . . . . . . . . . . . . . . . . . . . . . . . . . . . . . . . . . . 1984-1402-000x Parts Replacement for PeerWay Buffer Part No. Replaces Characteristics 1984--1502--000x 1984--1402--000x Marked “PEERWAY BUFFER” on the PWA 1984--1402--000x No name marked on the PWA PeerWay Buffer LEDs LED Meaning and Response RTS (DS7) Request-To-Send signal active; enables transmission on PeerWay. TXD (DS6) Transmitting to the PeerWay. BUS ACTIVE (DS5) Card active; Data is being transmitted or received through the Coordinator Processor. +5 V FAULT (DS4) PeerWay buffer voltage comparators sense that the main regulator is out of operating tolerance (high or low). FUSE BLOWN (DS3) Replace Fuse F1 (Supplies power to the PeerWay Buffer Power Regulator). STATUS FAULT (DS2) The status timer has timed out, indicating the RTS Signal has been enabled too long and the jabber-halt relay has opened. The RTS signal is forced OFF to keep the node from interfering with the PeerWay. The fault could be the status timer in the PeerWay Tap, the RTS signal on the Coordinator Processor, the Tap Board connection, or loss of the onboard clock, which is a PeerWay Buffer or Coordinator Processor problem. STATUS GOOD (DS1) The timer on the PeerWay Tap is in its normal operating mode. RS3: Service Quick Reference Guide ControlFiles SQ: 6-5 PeerWay Buffer 1984-1502-000x Jumper Positions Jumper Signal Normal Loop Back Test HD1 Not used Not used Not used HD2 Receive Clock 2--3 1--2 HD3 Transmit Clock 2--3 1--2 HD4 Receive Data 2--3 1--2 HD5 Transmit Data 2--3 1--2 HD6 Ready to Send 2--3 1--2 HD7 BSL (Coupler Status) 2--3 1--2 HD8 Clear to Send 2--3 1--2 PeerWay Buffer Fuse Fuse FRSI Part No. Bussman Part No. Littelfuse Part No. Characteristics F1 G09149--0022 AGC 1 312001 1 A 250 V Quick Acting RS3: Service Quick Reference Guide ControlFiles SQ: 6-6 ControlFile Power Regulator 5 VDC Only . . . . . . . . . . . . 1984-3505-000x ControlFile Power Regulator 5 VDC Only Parts Replacement Part No. Replaces Characteristics 1984--3505--000x 1984--1505--000x 1984--1432--000x Replaces these cards ONLY in ControlFiles that use NVRAM and MPC Processors. ControlFile Power Regulator 5 VDC Only LEDs and Test Points LED Meaning and Response +5 V POWER CHARGE (DS10) Input capacitors are charging as you insert the card with card cage power on. Slowly insert the card into the ControlFile Motherboard connector (the LED will blink on briefly). INPUT B STATUS (DS9) Bus B (24 VDC or 30 VDC) from the DC distribution system is within operating tolerance. Normally OFF If only one DC bus used. INPUT A STATUS (DS8) Bus A (24 VDC or 30 VDC) from the DC distribution system is within operating tolerance. +5 V STATUS (DS5) The +5 VDC regulator is within operating tolerance. CARD FAULT (DS4) The +5 VDC regulator section is out of operating tolerance. Replace the card. 5 V FUSE BLOWN (DS2) Replace Fuse F2 (Power to the +5 VDC Power Regulator). CARD GOOD (DS1) +5 VDC Supply is within operating tolerance. Does not include status of the DC buses. Test Point Function BROWN Ground return YELLOW +5 VDC Regulator WHITE +5 V Relative current indication RS3: Service Quick Reference Guide ControlFiles SQ: 6-7 ControlFile Power Regulator 5 VDC Only Jumper Positions Position 1--2 Jumper HD1 Position 2--3 30 V Input ON 24 V Input ON ControlFile Power Regulator 5 VDC Only Fuse Fuse FRSI Part No. Bussman Part No. Littelfuse Part No. Characteristics F2 G09140--0061 ABC 20 314020 20 A 250 V Regular RS3: Service Quick Reference Guide ControlFiles SQ: 6-8 ControlFile Power Regulator 5 and 12 VDC . . . . . . . . . . 1984-1505-000x . . . . . . . . . . . . . . . . . . . . . . . . . . . . . . . . . . . . . . . . . . . . . . . . . . . 1984-1432-000x ControlFile Power Regulator 5 and 12 VDC Parts Replacement Part No. Replaces 1984--1505--000x 1984--1432--000x Characteristics 30 or 24 VDC input jumper-selected. 3 or 6 amp 12 VDC jumper-selected output 1984--3505--0001 ONLY in a ControlFile with NVRAM ControlFile Power Regulator 1984-1505-000x Jumper Positions Jumper 30 V Input 24 V Input HD1 2--3 1--2 3 Amp Output 6 Amp Output HD2 Open Bar HD3 Bar Open HD4 1--2 2--3 HD5 1--2 2--3 ControlFile 5 VDC Only Power Regulator Fuse Fuse FRSI Part No. Bussman Part No. Littelfuse Part No. Characteristics F1 (12 VDC) G09140--0044 AGC 7--1/2 31107.5 7.5 A 32 V Regular F2 (5VDC) G09140--0061 ABC 20 314020 20 A 250 V Regular RS3: Service Quick Reference Guide ControlFiles SQ: 6-9 ControlFile Power Regulator 5 and 12 VDC LEDs and Test Points Meaning and Response LED +12 V POWER CHARGE (DS11) +5 V POWER CHARGE (DS10) Input capacitors are charging as you insert the card with card cage power on. Slowly insert the card into the ControlFile Motherboard connector (+12 AND +5 V Power Charge LEDs will blink on briefly). Same as +12 V Power Charge above. INPUT B STATUS (DS9) Bus B (24 VDC or 30 VDC) from the DC distribution system is within operating tolerance. Normally OFF If only one DC bus used. INPUT A STATUS (DS8) Bus A (24 VDC or 30 VDC) from the DC distribution system is within operating tolerance. --12 V STATUS (DS7) The --12 VDC regulator is within operating tolerance. If HD2 is jumpered, DS7 is forced ON and --12 VDC is disabled. +12 V STATUS (DS6) The +12 VDC regulator is within operating tolerance. +5 V STATUS (DS5) The +5 VDC regulator is within operating tolerance. CARD FAULT (DS4) One of the regulator sections (+5, +12, --12 VDC) is out of operating tolerance. Replace the card. 12 V FUSE BLOWN (DS3) Replace Fuse F1 (+ 12 VDC supply sections of the Power Regulator). 5 V FUSE BLOWN (DS2) Replace Fuse F2 (Power to the +5 VDC Power Regulator). CARD GOOD (DS1) +5, +12, and --12 VDC Supplies are within operating tolerance. Does not include status of the DC buses. Test Point Function BROWN Ground return BLUE --12 VDC Regulator YELLOW +5 VDC Regulator RED +12 VDC Regulator WHITE +5 V Relative current indication GREEN +12 V Relative current indication RS3: Service Quick Reference Guide ControlFiles SQ: 6-10 CP (Coordinator Processor): CP-IV+ . . . . . . . . . . . . . . . . . . . . . . . . . . . . . . . . . . . . . . . . . . . . . . 10P50870004 . . . . . . . . . . . . . . . . . . . . . . . . . . . . . . . . . . . . . . . . . . . . . . . . . . . 1984-4164-000x CP-IV . . . . . . . . . . . . . . . . . . . . . . . . . . . . . . . . . . . . . . . . . . . . . 1984-4064-000x CP-II . . . . . . . . . . . . . . . . . . . . . . . . . . . . . . . . . . . . . . . . . . . . . 1984-1594-000x CP-I . . . . . . . . . . . . . . . . . . . . . . . . . . . . . . . . . . . . . . . . . . . . . . 1984-1448-000x . . . . . . . . . . . . . . . . . . . . . . . . . . . . . . . . . . . . . . . . . . . . . . . . . . . 1984-1240-000x Coordinator Processor Parts Replacement Name Part No. Replaces 1984--4164--000x 1984--4064--000x CP-IV+ 10P50870004 CP-IV+ 1984--4164--000x NOTE: For use with MPC I, MPC II, or MPC5 CP-IV 1984--4064--000x NOTE: for use with MPC II only CP-II 1984--1594--000x CP-I 1984--1448--000x CP-I 1984--1240--000x NOTE: For use with MPC I, MPC II, or MPC5 1984--4064--000x 1984--4164--000x 1984--1448--000x 1984--1240--000x 1984--1240--000x RS3: Service Quick Reference Guide Characteristics EMC compliant 64 MHz oscillator; 4 Meg RAM; 68020 microprocessor 64 MHz oscillator; 4 Meg RAM; 68020 microprocessor 64 MHz oscillator; 4 Meg RAM; 68020 microprocessor 48 MHz oscillator; 512K RAM 40 MHz Oscillator; 128K RAM 40 MHz Oscillator; 128K RAM ControlFiles SQ: 6-11 Coordinator Processor LEDs and Test Points Meaning and Response LED TIC (DS10) Beginning of a new time interval counter period (one tic is 1/4 second). The system operates on a 1/4 second data transfer rate for all PeerWay nodes (electrical drops). CONT (DS9) The Coordinator Processor is communicating with a Controller via the Motherboard. With redundant Coordinator Processors, this LED indicates which one is active. BUS A (DS8) The Coordinator Processor is using PeerWay A to transmit or receive data. BUS B (DS7) The Coordinator Processor is using PeerWay B to transmit or receive data. RTS PEERWAY (DS6) 5 V FUSE BLOWN (DS3) CARD FAULT (DS2) CARD ENABLE (DS1) The Ready-To-Send signal is active and data is transmitting on one of the two PeerWays. Replace Fuse F1 (Supplies 5 VDC to the Coordinator Processor). A fault has been detected on the Coordinator Processor, or the Enable/Disable Switch is in the DISABLE position. If the switch is ENABLED and this LED is on, replace the Coordinator Processor. The Enable/Disable Switch is ENABLED and no hardware faults are detected on the Coordinator Processor. Test Point Function Yellow 5 V (± 0.1 V) Brown Ground Return RS3: Service Quick Reference Guide ControlFiles SQ: 6-12 CP Fault Indications Fault Condition: Green LED OFF, Red LED ON, Yellow LED Conditions OFF OFF OFF ON OFF 1. CPU Test fault OFF OFF ON OFF OFF 2. Boot ROM Checksum fault OFF OFF ON ON OFF 3. Vector Test fault OFF ON OFF OFF OFF 4. Watchdog Timer fault OFF ON OFF ON OFF 5. Nondestructive RAM OFF ON ON OFF OFF 6. Destructive RAM Test or EDAC fault OFF ON ON ON OFF 7. Synch Bus Test Level 1 & 2 and checks on interrupts RS3: Service Quick Reference Guide ControlFiles SQ: 6-13 CP Fault Indications Yellow LED Conditions Fault Condition: Green LED ON Then OFF, Red LED ON ON OFF OFF OFF OFF 1. Nonvolatile Memory write test failed before the PeerWay boot procedure was performed. The Nonvolatile Memory card should be replaced. ON OFF OFF ON OFF 2. No Nonvolatile Memory card is present or the Nonvolatile Memory card switch is in the DISABLE position. ON OFF ON OFF OFF 3. Checksum invalid after load. If the problem persists, a nonvolatile memory reload from disk may be necessary. ON OFF ON ON OFF 4. Uncorrectable error detected in CP card communications. Replace the CP card. ON ON OFF OFF OFF 5. Nonvolatile memory initialize failed. Nonvolatile Memory card problem. See Chapter 10, Troubleshooting. ON ON OFF ON OFF 6. Nonvolatile memory table checksum bad. Nonvolatile Memory card problem. See Chapter 10, Troubleshooting. ON ON ON OFF OFF 7. No program image stored in the nonvolatile memory. See Chapter 10, Troubleshooting. RS3: Service Quick Reference Guide ControlFiles SQ: 6-14 CP Fault Indications (continued) Yellow LED Conditions Fault Condition: Green LED ON Then OFF, Red LED ON ON ON ON ON OFF 8. Nonvolatile Memory card hardware error on read. If the Nonvolatile Memory card was enabled, the card should be replaced. ON OFF OFF ON OFF 9. No Nonvolatile Memory card is present or the Nonvolatile Memory card switch is set at DISABLE. CP-IV+ Jumper Positions Jumper Position HD3 to HD6 1--2 HD7 MPC II or MPC5 (1--2) Function Factory set -- do not move Working with MPC II or MPC5 Controller Processors only (Factory Setting) OTHER (2--3) Working with MPC I Controller Processors or a mix of MPC I and MPC II CP-IV Jumper Position Jumper Position HD3 to HD6 1--2 Function Factory set -- do not move CP-II Software Jumper Positions Software Jumper HD8 Jumper HD16 $$CPBATxx 2--3 2--3 $$CPxx V9 1--2 1--2 $$CPMAXXxx V9 and above $$CPxx V11 and above 2--3 1--2 RS3: Service Quick Reference Guide ControlFiles SQ: 6-15 CP-II Factory Set Jumpers Jumper Position HD2 2--3 HD5 1--2 HD7 1--2 HD10 through HD15 Open CP-I Factory Set Jumpers Jumper Position HD2 2--3 HD5 2--3 HD7 1--2 CP Fuses Card Fuse FRSI Part No. Bussman Part No. Littelfuse Part No. Characteristics CP-IV+ 10P50870004 1984--4164--000x F1 G09140--0041 MTH 5 312005 5 A 250 V Regular CP-IV 1984--4064--000x F1 G09140--0041 MTH 5 312005 5 A 250 V Regular CP-II 1984--1594--000x F1 G09140--0039 AGC 5 311005 5 A 32 V Regular CP-I 1984--1448--000x F1 G09140--0037 AGC 4 311004 4 A 32 V Regular CP-I 1984--1240--000x F1 G09140--0037 AGC 4 311004 4 A 32 V Regular RS3: Service Quick Reference Guide ControlFiles SQ: 6-16 NV (Nonvolatile) Memory: RAM . . . . . . . . . . . . . . . . . . . . . . . . . . . . . . . . . . . . . . . . . . . . . 1984-2347-000x CAUTION Disable the NV Memory and then the Coordinator Processor cards before removing any card (other than a PeerWay Buffer card) from the ControlFile. Failure to do so may result in a corrupted data transfer. RAM NV Memory Parts Replacement Part No. Replaces 1984--2347--0041 Memory Board Marked 4 Megabyte RAM NV MEMORY 1984--2347--0021 Any card below 2 Megabyte RAM NV MEMORY 1984--2347--0011 Any card below 1 Megabyte RAM NV MEMORY RAM NV Memory LEDs and Test Points LED Meaning and Response BATTERY 2 LOW (DS10) Battery 2 voltage is low. Replace both batteries. (One at a time) BATTERY 1 LOW (DS9) Battery 1 voltage is low. Replace both batteries. (One at a time) PROGRAM ACCESS (DS8) The Coordinator Processor is accessing the main operating programs of a Controller Processor or itself. The CP is reading from Nonvolatile memory to download data to a card, or is writing to Nonvolatile memory from the ControlFile. WRITE (DS7) The Coordinator Processor is writing to the Nonvolatile memory. READ (DS6) The Coordinator Processor is reading the Nonvolatile memory. (continued on next page) RS3: Service Quick Reference Guide ControlFiles SQ: 6-17 RAM NV Memory LEDs and Test Points (continued) LED +5 VDC BAD (DS3) CARD BAD (DS2) CARD GOOD (DS1) Meaning and Response Replace Fuse F1. Enable/Disable switch is set at DISABLE or the card failed power-up diagnostics. Card passed power-up diagnostics. Test Point Function Brown Ground Return Yellow +5 VDC Green Voltage of Battery #2 White Voltage of Battery #1 NV RAM LED Sequence Yellow LED Pattern Fault Condition: Red “Card Bad” LED ON Green LED OFF OFF OFF 0 MC68000 Microprocessor test OFF OFF OFF 1 EPROM checksum test ON OFF ON 2 Program & Dual Port ROM test OFF OFF ON 3 Watchdog Timeout test ON (continued on next page) RS3: Service Quick Reference Guide ControlFiles SQ: 6-18 NV RAM LED Sequence (continued) Yellow LED Pattern Fault Condition: Red “Card Bad” LED ON Green LED OFF ON OFF 4 Not used OFF ON OFF 5 Interrupt test ON ON ON 6 Parallel Interface test OFF ON ON 7 Not used ON RAM NV Memory Battery Jumper Positions Jumper Position Action HD6 1--2 Battery 2 enabled 2--3 Battery 2 disabled 1--2 Battery 1 enabled 2--3 Battery 1 disabled HD7 RS3: Service Quick Reference Guide ControlFiles SQ: 6-19 RAM NV Memory Jumper Positions Card HD3 HD4 HD5 Characteristics 1984--2347--0011 1--2 1--2 1--2 Hard wired 1 Meg RAM 1984--2347--0021 1--2 2--3 1--2 Hard wired 2 Meg RAM 1984--2347--0041 -- -- 2--3 Hard wired 2--3 Hard wired 4 Meg RAM RAM NV Memory Fuse Data Fuse FRSI Part No. Bussman Part No. Littelfuse Part No. Characteristics F1 G09140--0037 AGC 4 311004 4 A 32 V Regular RS3: Service Quick Reference Guide ControlFiles SQ: 6-20 NV (Nonvolatile) Memory: Bubble . . . . . . . . . . . . . . . . . . . . . . . . . . . . . . . . . . . . . . . . . . . 1984-1598-000x . . . . . . . . . . . . . . . . . . . . . . . . . . . . . . . . . . . . . . . . . . . . . . . . . . . 1984-1483-000x . . . . . . . . . . . . . . . . . . . . . . . . . . . . . . . . . . . . . . . . . . . . . . . . . . . 1984-1224-000x CAUTION Disable the NV Memory and then the Coordinator Processor cards before removing any card (other than a PeerWay Buffer card) from the ControlFile. Failure to do so may result in a corrupted data transfer. Bubble NV Memory Parts Replacement Part No. Replaces Memory Board Marked 1984--1598--0001 Any card below 1 Megabyte Bubble 1984--1483--000x 1984--1224--000x 1/2 Megabyte Bubble NV BUBBLE MEMORY 1984--1224--000x ---- 1/2 Megabyte Bubble NV BUBBLE MEMORY 4 MEG NV BUBBLE MEMORY (NOTE: This is 4 Megabits, which gives 1 Megabyte of useable memory) Bubble NV Memory LEDs and Test Points LED Meaning and Response PROGRAM ACCESS (DS8) The Coordinator Processor is accessing the main operating programs of a Controller Processor or itself. The card is reading from Nonvolatile Memory to download data to a card, or is writing to the memory card from the disk drive. WRITE (DS7) The Coordinator Processor is writing to the Nonvolatile Memory Card. READ (DS6) The Coordinator Processor is reading the Nonvolatile Memory Card. 12 V FUSE BLOWN (DS4) Replace Fuse F2 (Supplies 12 VDC to the card). RS3: Service Quick Reference Guide ControlFiles SQ: 6-21 Bubble NV Memory LEDs and Test Points LED Meaning and Response 5 V FUSE BLOWN (DS3) Replace Fuse F1 (Supplies 5 VDC to the card). CARD FAULT (DS2) A fault is detected on the nonvolatile memory or the Enable/Disable Switch is DISABLED. If the switch is ENABLED and this LED is ON, replace the card. CARD ENABLED (DS1) The Enable/Disable switch is ENABLED and no hardware faults are detected on the Nonvolatile Memory card. Test Point Function Yellow +5 V (± 0.1 V) Red +12 V (± 0.1 V) Brown Ground Return Bubble NV Memory Fuses Card Fuse FRSI Part No. Bussman Part No. Littelfuse Part No. Characteristics 1984--1598--000x F1 G09140--0060 MTH 4 312004 4 A 250 V Regular F2 G09140--0041 MTH 5 312005 5 A 250V Regular F1 G09140--0060 MTH 4 312004 4 A 250 V Regular F2 G09140--0030 AGC 2 312002 2 A 250 V Quick Acting F1 G09140--0038 MDL 4 313004 4 A 250V Slow Blow F2 G09140--0030 AGC 2 312002 2 A 250 V Quick Acting 1984--1483--000x 1984--1224--000x RS3: Service Quick Reference Guide ControlFiles SQ: 6-22 Controller Processor: MPC5 . . . . . . . . . . . . . . . . . . . . . . . . . . . . . . . . . . . . . . . . . . . . . . 10P57520007 MPC II . . . . . . . . . . . . . . . . . . . . . . . . . . . . . . . . . . . . . . . . . . . . . . 10P50400006 . . . . . . . . . . . . . . . . . . . . . . . . . . . . . . . . . . . . . . . . . . . . . . . . . . 1984--4068--000x MPC . . . . . . . . . . . . . . . . . . . . . . . . . . . . . . . . . . . . . . . . . . . . . 1984--2500--000x MLC . . . . . . . . . . . . . . . . . . . . . . . . . . . . . . . . . . . . . . . . . . . . . 1984--1439--000x . . . . . . . . . . . . . . . . . . . . . . . . . . . . . . . . . . . . . . . . . . . . . . . . . . 1984--1249--000x SSC . . . . . . . . . . . . . . . . . . . . . . . . . . . . . . . . . . . . . . . . . . . . . 1984--1442--000x . . . . . . . . . . . . . . . . . . . . . . . . . . . . . . . . . . . . . . . . . . . . . . . . . . 1984--1371--000x CC . . . . . . . . . . . . . . . . . . . . . . . . . . . . . . . . . . . . . . . . . . . . . . 1984--1445--000x . . . . . . . . . . . . . . . . . . . . . . . . . . . . . . . . . . . . . . . . . . . . . . . . . . 1984--1374--000x MUX and PLC . . . . . . . . . . . . . . . . . . . . . . . . . . . . . . . . . . . . 1984--1494--000x Controller Processor Parts Replacement Name Part No. Replaces Characteristics MPC5 10P57520007 -- -- MPC Multipurpose MPC II 10P50400006 1984--4068--000x 1984--2500--000x MPC Multipurpose 1984--1445--000x 1984--1374--000x CC Contact 1984--1494--000x MUX and PLC 1984--1445--000x 1984--1374--000x CC Contact 1984--1494--000x MUX and PLC MPC 1984-2500-000x MLC 1984--1439--000x 1984--1249--000x MLC MultiLoop SSC 1984--1442--000x 1984--1371--000x SSC Single-Strategy CC 1984--1445--000x 1984--1374--000x CC Contact MUX PLC 1984--1449--000x Itself only MUX and PLC RS3: Service Quick Reference Guide ControlFiles SQ: 6-23 Controller Processor LEDs and Test Points Meaning and Response LED 5 V Fuse Blown (DS3) Replace Fuse F4 (Supplies 5 VDC to the Contact Processor). Card Fault (DS2) A fault has been detected on the Contact Processor, or the ENABLE/DISABLE Switch is in the DISABLE position. If the switch is enabled and this LED is on, replace the Contact Processor. Card Enable (DS1) The ENABLE/DISABLE Switch is enabled and no hardware faults are detected on the Contact Processor. Block Evaluation (DS8) The microprocessor is evaluating an input or output block. With redundant Contact Processors, this LED indicates the active card. CP Access (DS7) The Coordinator Processor is accessing the Contact Processor’s RAM memory and transferring configuration and dynamic data to the NV Memory. If the Contact Processor loses memory, current data is quickly reloaded from NV Memory. Interrupt (DS6) The Contact Processor is resetting its watchdog timer to prevent timing out or to acknowledge the synchronizing clock pulse. Test Point Function Yellow +5 V (± 0.1 V) Brown Ground Return RS3: Service Quick Reference Guide ControlFiles SQ: 6-24 Controller Processor Fault Indications Fault Condition Yellow LED Conditions OFF OFF CPU Test Fault ON OFF ON Boot ROM Checksum Fault OFF OFF ON Vector Test Fault ON ON OFF Watchdog Timer OFF ON OFF Nondestructive RAM ON ON ON Destructive RAM Test or EDAC Fault OFF ON ON Sync Bus Test Levels 1 & 2 and Checks on Interrupts ON RS3: Service Quick Reference Guide ControlFiles SQ: 6-25 Controller Processor: MPC5 . . . . . . . . . . . . . . . . . . . . . . . . . . . . . . . . . . . . . . . . . . . . . . 10P57520007 MPC5 Controller Processor Parts Replacement Name Part No. Replaces Characteristics MPC5 10P57520007 -- -- Replaces itself (Requires jumper setting) Jumpers for MPC5 Processor Functionality Image Select HD6 HD7 HD8 Additional Image #1 1--2 1--2 1--2 Additional Image #2 1--2 2--3 2--3 Additional Image #3 1--2 2--3 1--2 Additional Image #4 1--2 1--2 2--3 RS3: Service Quick Reference Guide ControlFiles SQ: 6-26 ControlFile Status Screen Jumper Code Jumper Code Image Selection MPC5 Image Functionality 145 Additional Image #2 MUX5 146 Additional Image #2 PLC5 147 Additional Image #2 MPC5 155 Additional Image #3 MUX5 156 Additional Image #3 PLC5 157 Additional Image #3 MPC5 165 Additional Image #4 MUX5 166 Additional Image #4 PLC5 167 Additional Image #4 MPC5 175 Additional Image #1 MUX5 176 Additional Image #1 PLC5 177 Additional Image #1 MPC5 MPC5 Fuse Fuse FRSI Part No. Bussman Part No. Littelfuse Part No. Characteristics F1 G09140--0034 ACG 3 312003 3 A 250 V Regular RS3: Service Quick Reference Guide ControlFiles SQ: 6-27 Controller Processor: MPC II . . . . . . . . . . . . . . . . . . . . . . . . . . . . . . . . . . . . . . . . . . . . . . 10P50400006 . . . . . . . . . . . . . . . . . . . . . . . . . . . . . . . . . . . . . . . . . . . . . . . . . . . 1984-4068-000x MPCII Controller Processor Parts Replacement Name MPC II Part No. Replaces Characteristics 10P50400006 1984--4068--000x 1984--2500--000x 1984--1439--000x 1984--1249--000x 1984--1442--000x 1984--1371--000x 1984--1445--000x 1984--1374--000x 1984--1494--000x Replaces MPC as well as CC, PLC, and MUX Controller Processors (Requires jumper setting) MPC II Communication Rate Jumper Communication Rate HD21 HD22 HD23 HD24 Rosemount 10.4 K Baud 2--3 2--3 2--3 2--3 Industry Standard 1--2 1--2 1--2 1--2 MPC II Processor Functionality Jumper Processor Functionality HD2 MPC II 1--2 MPC 2--3 RS3: Service Quick Reference Guide ControlFiles SQ: 6-28 Jumpers for MPC Processor Functionality Image Select HD6 HD7 HD8 Contact (CC) 2--3 2--3 1--2 Multiplexor (MUX) 2--3 1--2 1--2 Additional Image #1 1--2 1--2 1--2 Additional Image #2 1--2 2--3 2--3 Additional Image #3 1--2 2--3 1--2 Additional Image #4 1--2 1--2 2--3 Jumpers for MPC II Processor Functionality Image Select HD6 HD7 HD8 Additional Image #1 1--2 1--2 1--2 Additional Image #2 1--2 2--3 2--3 Additional Image #3 1--2 2--3 1--2 Additional Image #4 1--2 1--2 2--3 Jumpers for MPC2+ Image Functionality MPC II+ Image Functionality HD4 HD5 HD9 MPC+ 1--2 1--2 1--2 PLC+ 1--2 1--2 2--3 MUX+ 1--2 2--3 1--2 RS3: Service Quick Reference Guide ControlFiles SQ: 6-29 ControlFile Status Screen Jumper Code (Visible with MPC II Image only) Jumper Code Processor Functionality Image Selection MPC II+ Image Functionality 0xx (Red) MPC I Jumper HD2 is set for MPCI functionality with an MPCII image 145 MPC II Additional Image #2 MUX+ 146 MPC II Additional Image #2 PLC+ 147 MPC II Additional Image #2 MPC+ 155 MPC II Additional Image #3 MUX+ 156 MPC II Additional Image #3 PLC+ 157 MPC II Additional Image #3 MPC+ 165 MPC II Additional Image #4 MUX+ 166 MPC II Additional Image #4 PLC+ 167 MPC II Additional Image #4 MPC+ 175 MPC II Additional Image #1 MUX+ 176 MPC II Additional Image #1 PLC+ 177 MPC II Additional Image #1 MPC+ MPC II Fuse Fuse FRSI Part No. Bussman Part No. Littelfuse Part No. Characteristics F1 G09140--0041 MTH 5 312005 5 A 250 V Regular RS3: Service Quick Reference Guide ControlFiles SQ: 6-30 Controller Processor MPC . . . . . . . . . . . . . . . . . . . . . . . . . . . . . . . . . . . . . . . . . . . . . 1984--2500--000x MPC Parts Replacement Name Part No. Replaces Characteristics MPC 1984-2500-000x 1984--1439--000x 1984--1249--000x MLC MultiLoop 1984--1442--000x 1984--1371--000x SSC Single-Strategy 1984--1445--000x 1984--1374--000x CC Contact 1984--1494--000x MUX and PLC MPC Image Jumper Positions Image Jumper HD6 Jumper HD7 Jumper HD8 Contact 2--3 2--3 1--2 Multiplexer 2--3 1--2 1--2 Additional Image #1 1--2 1--2 1--2 Additional Image #2 1--2 2--3 2--3 Additional Image #3 1--2 2--3 1--2 Additional Image #4 1--2 1--2 2--3 RS3: Service Quick Reference Guide ControlFiles SQ: 6-31 MPC Communications Jumper Positions Communication Rate Jumper HD21 Jumper HD22 Jumper HD23 Jumper HD24 Rosemount 10.4K Baud 2--3 2--3 2--3 2-3 Industry Standard (9600 Baud) 1--2 1--2 1--2 1--2 MPC Fuse Fuse FRSI Part No. Bussman Part No. Littelfuse Part No. Characteristics F1 G09140--0041 MTH 5 312005 5 A 250 V Regular RS3: Service Quick Reference Guide ControlFiles SQ: 6-32 Controller Processor: MLC . . . . . . . . . . . . . . . . . . . . . . . . . . . . . . . . . . . . . . . . . . . . . .................................................. SSC . . . . . . . . . . . . . . . . . . . . . . . . . . . . . . . . . . . . . . . . . . . . . .................................................. MUX and PLC . . . . . . . . . . . . . . . . . . . . . . . . . . . . . . . . . . . . 1984--1439--000x 1984--1249--000x 1984--1442--000x 1984--1371--000x 1984--1494--000x LEDs and Test Points LED Meaning and Response 12 V Fuse Blown (DS10) Replace Fuse F1 (Supplies --12 VDC to the card). +12 V Fuse Blown (DS9) Replace Fuse F2 (Supplies +12 VDC to the card). Block Evaluation (DS8) The microprocessor is evaluating an input or output block. With redundant MultiLoop processors, this LED indicates which one is active. CP Access (DS7) The Coordinator Processor is accessing the MultiLoop Processor RAM Memory and transferring configuration and dynamic data to the NV Memory. If the MultiLoop Processor loses memory, current data is quickly reloaded from nonvolatile memory. Interrupt (DS6) The MultiLoop Processor is resetting its watchdog timer to prevent timing out or to acknowledge a synchronizing clock pulse. 5 V Fuse Blown (DS3) Card Fault (DS2) Card Enable (DS1) Replace Fuse F4 (Supplies 5 VDC to the MultiLoop Processor). A fault has been detected on the MultiLoop Processor or the ENABLE/DISABLE Switch is in the disable position. If the switch is enabled and this LED is on, replace the MultiLoop Processor. The ENABLE/DISABLE Switch is enabled and no hardware faults are detected on the MultiLoop Processor. Test Point Function Yellow +5 V (± 0.1 V) Red +12 V (± 0.1 V) Brown Ground Return RS3: Service Quick Reference Guide ControlFiles SQ: 6-33 Image Jumper Positions Image Jumper HD6 Jumper HD7 Jumper HD8 Contact 2--3 2--3 1--2 Multiplexer 2--3 1--2 1--2 Additional Image #1 1--2 1--2 1--2 Additional Image #2 1--2 2--3 2--3 Additional Image #3 1--2 2--3 1--2 Additional Image #4 1--2 1--2 2--3 Image Jumper Positions for MLC and SS Image Jumper HD6 Jumper HD7 Jumper HD8 MLC (MultiLoop Controller) 2--3 2--3 2--3 SS (Single Strategy) 2--3 2--3 2--3 Communications Jumper Positions Communication Rate Jumper HD21 Jumper HD22 Jumper HD23 Jumper HD24 Rosemount 10.4K Baud 2--3 2--3 2--3 2--3 Industry Standard (9600 Baud) 1--2 1--2 1--2 1--2 RS3: Service Quick Reference Guide ControlFiles SQ: 6-34 Fuses Fuse FRSI Part No. Bussman Part No. Littelfuse Part No. Characteristics F1 F2 G09140--0016 AGC 1/2 312.500 1/2 A 250 V Quick Acting F1 F4 G09140--0041 MTH 5 312005 5 A 250 V Regular RS3: Service Quick Reference Guide ControlFiles SQ: 7-1 Section 7: Input/Output Analog Card Cage . . . . . . . . . . . . . . . . . . . . . . . . . . . . 7-3 Communications Connect Card V (EMC Compliant) Communications Connect Card IV Communications Connect Card III . . . . . . . . . . . . . . . 7-4 Communications Connect Card II . . . . . . . . . . . . . . . 7-5 Analog Transfer Card . . . . . . . . . . . . . . . . . . . . . . . . . . 7-6 Output Bypass Card (OBC) . . . . . . . . . . . . . . . . . . . . 7-7 Analog Card Cage Field Interface Cards: Analog FIC (EMC Compliant) Analog FIC . . . . . . . . . . . . . . . . . . . . . . . . . . . . . . . . . . . 7-8 Analog Card Cage Field Interface Cards: Smart Transmitter Daughterboard Kit (EMC Compliant) Analog FIC W/Smart Transmitter Daughterboard Smart Transmitter Daughterboard Kit . . . . . . . . . . . . 7-10 Analog Card Cage Field Interface Cards: Pulse I/O FIC (EMC Compliant) Pulse I/O FIC . . . . . . . . . . . . . . . . . . . . . . . . . . . . . . . . . 7-11 Analog Card Cage Field Interface Cards: Temperature Input FIC . . . . . . . . . . . . . . . . . . . . . . . . . 7-15 Contact Card Cage Contact FlexTerm . . . . . . . . . . . . . . . . . . . . . . . . . . . . . 7-18 Contact Termination Board . . . . . . . . . . . . . . . . . . . . . 7-19 Contact Marshaling Panel . . . . . . . . . . . . . . . . . . . . . . 7-20 Optical Isolator Modules . . . . . . . . . . . . . . . . . . . . . . . 7-21 Contact FIC . . . . . . . . . . . . . . . . . . . . . . . . . . . . . . . . . . 7-22 MUX Marshaling Panels Voltage Current RTD . . . . . . . . . . . . . . . . . . . . . . . . . . . . . . . . . . . . . . . . . 7-24 PLC FlexTerm . . . . . . . . . . . . . . . . . . . . . . . . . . . . . . . . 7-26 Port I/O Card: RS-422/RS-232 . . . . . . . . . . . . . . . . . . . . . . . . . . . . . . . 7-27 Port I/O Card: RS-422/RS-422 . . . . . . . . . . . . . . . . . 7-29 Analog Input FIC: Non-Isolated . . . . . . . . . . . . . . . . . 7-31 Analog Input FIC: Smart Transmitter . . . . . . . . . . . . 7-32 RS3: Service Quick Reference Guide Input/Output SQ: 7-2 Analog Input FIC: Isolated . . . . . . . . . . . . . . . . . . . . . Analog Output FIC: Non-Isolated . . . . . . . . . . . . . . . Analog Output FIC: Isolated . . . . . . . . . . . . . . . . . . . I/O Scanning Rates . . . . . . . . . . . . . . . . . . . . . . . . . . . Remote Communications Termination Panel II Remote Communications Termination Panel I . . . . . Fiber Optic I/O Converter . . . . . . . . . . . . . . . . . . . . . . Standard Remote Termination Panel . . . . . . . . . . . . Direct Discrete Termination Panel . . . . . . . . . . . . . . . Direct Discrete Termination Panel II . . . . . . . . . . . . . Multi-FIM Discrete Termination Panel . . . . . . . . . . . . Isolated Discrete Termination Panel A & B . . . . . . . . High Density Isolated Discrete Termination Panel . Discrete Field Interface Module (FIM) Multipoint Discrete I/O FIM MDIOH (High-side switch, EMC approved) MDIOL (Low-side switch, EMC approved) MDIO (Low-side switch) . . . . . . . . . . . . . . . . . . . . . . . MAIO16 Termination Panel (Field wires land on panel) (Field wires on panel or on marshaling panel) . . . . . MAIO Termination Panel (Field wires land on panel) (Field wires on panel or on marshaling panel) . . . . . MAI32 Termination Panel (Field wires land on panel) (Field wires on panel or on marshaling panel) . . . . . Loop Power Module (LPM) . . . . . . . . . . . . . . . . . . . . . MAIO Input FIM MAI16 (EMC Approved) MAIO . . . . . . . . . . . . . . . . . . . . . . . . . . . . . . . . . . . . . . . MAIO Output FIM MAO16 (EMC Approved) MAO . . . . . . . . . . . . . . . . . . . . . . . . . . . . . . . . . . . . . . . . MAI32 Input FIM (EMC Approved) . . . . . . . . . . . . . . Elcon Series 1000 Intrinsically Safe Termination Panel 1216/CW-ROS4 . . . . . . . . . . . . . . . . . . . . . . . . . . . . . . MTL IS Termination Panel A . . . . . . . . . . . . . . . . . . . . MTL IS Termination Panel B . . . . . . . . . . . . . . . . . . . . MTL IS Analog Termination . . . . . . . . . . . . . . . . . . . . . RS3: Service Quick Reference Guide 7-33 7-34 7-36 7-38 7-39 7-41 7-42 7-43 7-45 7-47 7-48 7-50 7-51 7-52 7-54 7-56 7-58 7-59 7-61 7-63 7-65 7-68 7-72 7-74 Input/Output SQ: 7-3 Analog Card Cage . . . . . . . . . . . . . . . . . . . . . . . . . . . . . . . . 1984--2526--0002 6 Ä Ä Ä Ä 1 2 3 2 4 5 Analog Card Cage Item Name 1 FIC (Field Interface Card) 1--4 2 Analog Transfer Card or Output Bypass Card 3 FIC (Field Interface Card) 5--8 4 Communication Connect Card (Connects to ControlFile and provides 8 Communication Lines) 5 Power Connectors 6 Marshaling Panel Connector NOTE: Redundancy: 7--1 Redundant FIC in Slot 8 (for FIC 1--7) 3--1 Redundant FIC in Slot 4 (for FIC 1--3) or 8 (for FIC 5--7) 1--1 Redundant FIC in adjacent slot 1--2, 3--4, 5--6, or 7--8 RS3: Service Quick Reference Guide Input/Output SQ: 7-4 Communications Connect Card V (EMC Compliant) . . . . . 10P54560001 Communications Connect Card IV . . . . . . . . . . . . . . . . . . . . 10P54530001 Communications Connect Card III . . . . . . . . . . . . . . . . . . . . 1984-2543-000x Warning The transient suppression networks are sufficient for cables within a building. For runs between buildings, put lightning arrestors where the cable enters the building. FRSI recommends metal conduit or a copper ground wire. (Or use a Fiber Optic I/O Converter.) Cage Address Jumper Positions Card Cage Address Jumper HD1 Jumper HD2 A 1--2 ZERO 1--2 ZERO B 2--3 ONE 1--2 ZERO C 1--2 ZERO 2--3 ONE D 2--3 ONE 2--3 ONE Controller Redundancy Jumper Positions Jumper Controller Not Redundant Controller Redundant HD4 A HD4 B 1--2 NORMAL 2--3 REDUNDANT Jumper Card Cage in ControlFile Area Card Cage in Remote Location HD5 2--3 CONTROL FILE AREA 1--2 REMOTE I/O RS3: Service Quick Reference Guide Input/Output SQ: 7-5 Communications Connect Card II . . . . . . . . . . . . . . . . . . . 1984-2491-000x Cage Address Jumper Positions Card Cage Address Jumper HD1 Jumper HD2 Applies to: A 1--2 ZERO 1--2 ZERO Analog Card Cages B 2--3 ONE 1--2 ZERO Analog Card Cages C 1--2 ZERO 2--3 ONE Analog Card Cages D 2--3 ONE 2--3 ONE Analog Card Cages Comm Line Select Jumper Positions Jumpers A--J No of Comm Lines Connected 2--3 1--8 Controller Redundancy Jumper Positions Jumper Controller Not Redundant Controller Redundant HD4 A HD4 B 1--2 NORMAL 2--3 REDUNDANT Location Jumper Positions Jumper Card Cage in ControlFile Area Card Cage in Remote Location HD5 2--3 CONTROL FILE AREA 1--2 REMOTE I/O RS3: Service Quick Reference Guide Input/Output SQ: 7-6 Analog Transfer Card . . . . . . . . . . . . . . . . . . . . . . . . . . . . . . 1984-2494-0001 Analog Transfer Card LEDs LED Meaning DS2 (Red) 30V Fuse Blown DS1 (Green) +5V Status: The card has power and the regulator is operational. During a transfer card test, completely disconnect the leads at each point. Failing to disengage leads before going to the next point may damage the Transfer Card. Test Points for Analog Transfer Card Test Point Function 101 501 Slot 1 or 5, Point 1 102 502 Slot 1 or 5, Point 2 103 503 Slot 1 or 5, Point 3 201 601 Slot 2 or 6, Point 1 202 602 Slot 2 or 6, Point 2 203 603 Slot 2 or 6, Point 3 301 701 Slot 3 or 7, Point 1 302 702 Slot 3 or 7, Point 2 303 703 Slot 3 or 7, Point 3 401 801 Slot 4 or 8, Point 1 402 802 Slot 4 or 8, Point 2 403 803 Slot 4 or 8, Point 3 Analog Transfer Card Fuse Data Fuse FRSI Part No. Littelfuse Part No. Schurter Part No. Characteristics F1 G50382--0014 273.500 MSF 034.4216 1/2 A 125 V Plug-In RS3: Service Quick Reference Guide Input/Output SQ: 7-7 Output Bypass Card (OBC) . . . . . . . . . . . . . . . . . . . . . . . . 1984-2551-0001 Output Bypass Card Fuses Fuse FRSI Part No. Bussman Part No. Littelfuse Part No. Schurter Part No. Characteristics F1 G09140--0030 AGC 2 312002 -- -- 2 A 250 V Quick Acting F2 G50382--0009 -- -- 273.125 MSF 034.4210 1/8 A 125 V Plug-In RS3: Service Quick Reference Guide Input/Output SQ: 7-8 Analog Card Cage Field Interface Cards: Analog FIC (EMC Compliant) . . . . . . . . . . . . . . . . . . . . . . . . . 10P54440002 Analog FIC . . . . . . . . . . . . . . . . . . . . . . . . . . . . . . . . . . . . . . . . 1984-2518-0002 Analog FIC Specifications Item Specification Temperature 0--50° C Humidity 10--90% Power Supply voltage Current (typical) Accuracy Resolution over 4--20 mA span Drift/Temperature Nominal 24 VDC to 30 VDC, Minimum 22 VDC, Maximum 34 VDC, Minimum Battery Backup 18 VDC At 30 VDC 214 mA; At 24 VDC 260 mA; At 18 VDC 347 mA .1% of span Input (A/D) 13 bits (0.012%) Output (D/A) 12.4 bits (0.019%) .1 % of span from 25° C to any temperature in 0--50° range Analog FIC LEDs LEDs Meaning DS1 Card Good: No card faults are detected and the controller processor card is controlling the output current. Blinking LED indicates the FIC is not connected to the field (I/O redundancy) or the output is being controlled by the Output Bypass card. DS2 Card Fault: A card fault is detected or communications with the Controller Processor card have ceased. DS3 TX Enable: Indicates communications activity. The signal that enables the transmit signal from the Field Interface card to the Controller Processor card is active. DS4 30V Fuse Blown: Power fuse F1 has blown. This LED does not indicate the status of the fuses in the I/O loops. All fuses are installed in sockets and are removable without soldering. RS3: Service Quick Reference Guide Input/Output SQ: 7-9 Analog FIC Jumper Positions Jumper Value Action FAIL HD1 HOLD 1--2 Hold output on failure ZERO 2--3 Zero output on failure NORM 1--2 Normal output action (Jumper not used by software. Leave in the 1--2 position.) REV 2--3 Reversed output action (Jumper not used by software.) REDUNDANCY 1--2 1--7 redundancy or no redundancy HD4 HD5 (Rev A) 2--3 1--1 redundancy PWR SYS 1--2 System power for external devices HD11, HD21, HD31 SELF 2--3 External devices are self powered OUT HD2 Analog FIC Fuses Fuse FRSI Part No. Littelfuse Part No. Schurter Part No. Characteristics F1 G50382--0021 273002 MSF 034.4224 2 A 125 V Plug-In F11 F12 F21 F22 F31 F32 G50382--0011 273.250 MSF 034.4213 1/4 A 125 V Plug-In RS3: Service Quick Reference Guide Input/Output SQ: 7-10 Analog Card Cage Field Interface Cards: Smart Transmitter Daughterboard Kit (EMC Compliant) 10P54500005 Analog FIC W/Smart Transmitter Daughterboard . . . . 1984--2519--000x Analog FIC W/Smart Transmitter Daughterboard (EMC) 10P57240002 Smart Transmitter Daughterboard Kit . . . . . . . . . . . . . . . 1984-2483-0005 Smart Transmitter Daughterboard LEDs LEDs RTS Request to Send XMIT/RECV Meaning The Smart daughterboard generated a request to send. The card is transmitting to a Smart device. Shows data transmission in either direction. Flickering indicates data flow. Input Select 3 Daughterboard is communicating with the third FIC I/O point. Input Select 2 Daughterboard is communicating with the second FIC I/O point. Input Select 1 Daughterboard is communicating with the first FIC I/O point. RS3: Service Quick Reference Guide Input/Output SQ: 7-11 Analog Card Cage Field Interface Cards: Pulse I/O FIC (EMC Compliant) . . . . . . . . . . . . . . . . . . . . . . . 10P54470002 Pulse I/O FIC . . . . . . . . . . . . . . . . . . . . . . . . . . . . . . . . . . . . . . 1984-2456-000x Pulse I/O FIC Input Specifications Term Voltage Input Specification Contact Input Specification Input Frequency Sine Wave 1 Hz -- 50K Hz Square Wave .002 Hz -- 50K Hz .002 Hz -- 50K Hz Input Accuracy 0.05% of reading 0.05% of reading Resolution 0.01% of reading 0.01% of reading Count Match Response Time 5 ms maximum 5 ms maximum Minimum Pulse Width 10 ms 10 ms Voltage Range 50 mV to 30 V peak-to-peak -- ON State Current -- 9 mA minimum OFF State Current -- 5 mA maximum Short Circuit Current -- 20 mA nominal Open Circuit Voltage -- 21 V minimum, 24 V maximum Impedance 100 K ohms minimum 300 pF maximum -- Temperature Effect 0.01% within 0° to 50° C 0.01% within 0° to 50° C Common Mode Rejection 80DB 47--52, 57--63 Hz, at 3 V peak-to-peak -- Normal Mode Protection Fuse and transient suppressors -- Isolation point-to-point point-to-point RS3: Service Quick Reference Guide Input/Output SQ: 7-12 Pulse I/O FIC Output Specifications Term Pulse Output Specification Analog Output Specification Output Range 0 to 1K Hz 0--60 mA Output Accuracy -- 0.5% of 4--20 mA span below 20 mA, 0.4% of reading above 20 mA OFF State Leakage Current 20 mA maximum 20 mA maximum Output Current Limit 20 +/--0.5 mA 60 mA min 65 mA max Source Resistance 100 ohms maximum 25 ohms maximum (supply mode) Open Loop Voltage 21--24 V 21.5 V to 24.5 V Output Resolution -- 11 bits 4--20 mA range on 7.5 mA Output Fail Options None Off only Timing Accuracy +/-- [20 ms + 0.01% of interval] -- Timing Resolution 1 msec -- Minimum Pulse Width 0.5 msec -- Maximum Frequency 1K Hz with one output point -- Temperature Effect 0.01%, within 0° to 50° C on timing 0.1% of 4--20 mA span, within 0° to 50° C on output current Isolation point-to-point point-to-point RS3: Service Quick Reference Guide Input/Output SQ: 7-13 Pulse I/O FIC LEDs LEDs Meaning DS1 Card Good: No card faults are detected and the Controller Processor card is controlling the output current. Blinking LED indicates the FIC is not connected to the field (I/O). DS2 Card Fault: A card fault is detected or communications with the Controller Processor card have ceased. DS3 TX Enable: Indicates communications activity. The signal that enables the transmit signal from the Field Interface card to the Controller Processor card is active. DS4 30V Fuse Blown: Power fuse F1 has blown. This LED does not indicate the status of the fuses in the I/O loops. DS5 Status 1: Represents the state of INPUT 1. (Note: the state is shown after the prescaler.) DS6 Status 2: Represents the state of INPUT 2. (Note: The state is shown after the prescaler.) Not Used: For future use. Pulse I/O FIC Card Jumper Positions Jumper 1:7, 1:3, or No Redundancy 1:1 Redundancy HD4A HD4B HD4C 1--2 2--3 RS3: Service Quick Reference Guide Input/Output SQ: 7-14 Pulse I/O Field Interface Card Fuses Fuse FRSI Part No. Littelfuse Part No. Schurter Part No. Characteristics F1 G50382--0021 273002 MSF 034.4224 2.0 A 125 V Plug-In F11 F12 F21 F22 F31 F32 G50382--0011 273.250 MSF 034.4213 1/4 A 125 V Plug-In RS3: Service Quick Reference Guide Input/Output SQ: 7-15 Analog Card Cage Field Interface Cards: Temperature Input FIC . . . . . . . . . . . . . . . . . . . . . . . . . . . . . 1984-2731-000x Temperature Input FIC Specifications Term Specification Temperature Drift ±.125%Full Scale/25 °C change from calibration temperature Cold Junction Compensation RTD 57.72 ohms nickel sensor value broadcast through Controller Processor Cold Junction Temperature Range --30 C to +70 °C Accuracy Cold Junction Compensation Circuit ±.55 °C Input Isolation point-to-point Maximum Sensor Wiring Resistance 500 ohms per line RFI Immunity .2% to .6% Full Scale External Resistance 3.21 to 390 ohms Ambient Cabinet Temperature 0--50 °C Input Power 16--36 VDC Power Requirements 35 V 100 mA, nominal 30 V 112 mA, nominal 24 V 140 mA, nominal 20 V 164 mA, nominal Turn On Voltage 20 V, nominal Turn Off Voltage 15 V, nominal RTD Excitation Current 229 mA, nominal RTD Resistance Range Range 1: 0--100 ohms Range 2: 0--400 ohms Millivolt Input Range Gain 1: --4 to 22 mV Gain 2: --16 to 88 mV (continued on next page) RS3: Service Quick Reference Guide Input/Output SQ: 7-16 Temperature Input FIC Specifications (continued) Term Specification Accuracy (at calibration temperature) TC/mv, Range 1: ±0.075% (19.5 mV) TC/mv, Range 2: ±0.048% (50 mV) RTD/Ω, Range 1: ±150 Milliohms RTDΩ/, Range 2: ±200 Milliohms Input Impedance for Thermocouples >100 Megohm Temperature Input FIC LEDs LEDs Meaning DS1 Card Good: No card faults are detected. DS2 Card Fault: A card fault is detected or communications with the Controller Processor card have ceased. DS3 TX Enable: Indicates communications activity. The signal that enables the transmit signal from the Field Interface Card to the Controller Processor is active. DS4 30V Fuse Blown: Power Fuse F1 has blown. Temperature Input FIC Card Jumper Positions Jumper 1:7, 1:3, or No Redundancy 1:1 Redundancy HD2 HD3 HD4 1-2 2--3 RS3: Service Quick Reference Guide Input/Output SQ: 7-17 Temperature Input Field Interface Card Fuses Fuse FRSI Part No. Littelfuse Part No. Schurter Part No. Characteristics F1 G50382--0021 273002 MSF 034.4224 2.0 A 125 V Plug-In F6 to F11 G50382--0009 273.125 MSF 034.4210 1/8 A 125 V Plug-In RS3: Service Quick Reference Guide Input/Output SQ: 7-18 Contact Card Cage . . . . . . . . . . . . . . . . . . . . . . . . . . . . . . . 1984--2576--0001 Contact FlexTerm . . . . . . . . . . . . . . . . . . . . . . . . . . . . . . . . 1984--1175--000x . . . . . . . . . . . . . . . . . . . . . . . . . . . . . . . . . . . . . . . . . . . . . . . . . . 1984--1336--000x Parts Replacement Part No. Replaces 1984--2576--0001 None 1984--1336--000x 1984--1175--000x 1984--1175--000x None Characteristics Used only with MPCx images Used only with CC image. Used only with CC image. Has marshaling panel connectors Contact Card Cage and Contact FlexTerm Jumper Positions Jumper Purpose Position HD1, HD2 Indicates whether redundant Controller Processor Cards are connected to the Contact Card Cage and the ControlFile. NORMAL: No redundant Controller Processors REDUNDANT: Redundant Controller Processors (HD1 and HD2 must be jumpered in the same position.) HD3A through HD3H Indicates whether the Contact Card Cage is Card Cage A or Card Cage B. The eight sets of jumpers correspond to the eight contact FICs. --Card Cage A-- Indicates card cage A --Card Cage B-- Indicates card cage B NOTE: HD3A through HD3H must be jumpered in the same position. Contact Card Cage and Contact FlexTerm Fuses FRSI Part No. Bussman Part No. Littelfuse Part No. Characteristics G09140--0032 MDL 2 313002 2 A 250 V Slow Blow RS3: Service Quick Reference Guide Input/Output SQ: 7-19 Contact Termination Board . . . . . . . . . . . . . . . . . . . . . . . . . 1984-1288-0001 Analog Transfer Card Fuse Data Fuse FRSI Part No. Bussman Part No. F1 to F24 G09140--0029 MDQ 1-1/2 Characteristics 1.5 A 250 V Slow Blow RS3: Service Quick Reference Guide NOTE: Other fuses may be used to match the applied load. Input/Output SQ: 7-20 Contact Marshaling Panel . . . . . . . . . . . . . . . . . . . . . . . . . . 1984-2486-000x Contact Marshaling Panel Specifications Term Specification Current Ratings/Temperature DC Output: 2.3 amps at 25° C 1.8 amps at 40° C 1.0 amps at 60° C AC Output: 3.0 amps at 25° C 2.3 amps at 40° C 1.2 amps at 60° C Voltage Maximum: 300 V rms Fusing 4 amp slow blow per Optical Isolator Module Cabling 50 conductor round cable Maximum distance Card Cage or FlexTerm to Marshaling Panel: 750 feet Connection to Card Cage or FlexTerm 50 conductor cable terminated to connector on motherboard. Wire gauge 14--22 AWG solid or stranded Contact Marshaling Panel Fuses Fuse FRSI Part No. Bussman Part No. Littelfuse Part No. Characteristics 4 A 250 V Slow Blow F1 to F24 G09140--0038 MDL 4 RS3: Service Quick Reference Guide 313004 NOTE: Smaller fuses should be used if smaller loads are applied. Input/Output SQ: 7-21 Optical Isolator Modules . . . . . . . . . . . . . . . . . . . . . . . . . . . . . G12243-00xx Optical Isolator Modules Part Number C12243-- Model Function Output Contact* Voltage Color 0005 IAC5A Input None 180--280 VAC/DC Yellow 0006 IDC5 Input None 10--32 VDC White 0007 IDC5B IDC5F Input None 4--16 VDC White 0008 IAC5 Input None 90--140 VAC/DC Yellow 0009 ODC5 Output N.O. 5--60 VDC Red 0010 ODC5A Output N.O. 5--200 VDC Red 0011 OAC5A5 Output N.C. 24--280 VAC Black 0012 OAC5 Output N.O. 12--140 VAC Black 0013 OAC5A Output N.O. 24--280 VAC Black * All output modules, except OAC5A5, have normally open (N.O.) outputs. The output contact is open when the block output is false. Maximum Current Ratings for Modules Mounted on Marshaling Panels Ambient Temperature DC Output Modules AC Output Modules 25 °C 2.3 Amps 3.0 Amps 40 °C 1.8 Amps 2.3 Amps 60 °C 1.0 Amp 1.2 Amps RS3: Service Quick Reference Guide Input/Output SQ: 7-22 Contact FIC . . . . . . . . . . . . . . . . . . . . . . . . . . . . . . . . . . . . . . . 1984-1460-000x . . . . . . . . . . . . . . . . . . . . . . . . . . . . . . . . . . . . . . . . . . . . . . . . . . . 1984-1304-000x Contact FIC Specifications Item Specification Power: Voltage Current 22--34 VDC 90 mA at 30 V typical. Switching current 10 mA typical, 8 mA minimum Contact FIC LEDs LEDs Meaning DS5--DS10 I/O 1--6: Indicates the logic state of the module‘s input or output. With a normally open input or output, the module is on if the LED is on. With a special order normally-closed output module, contact is made with no power applied. The LED is on with an open contact on the module. DS3 30V Fuse Blown: Replace power fuse F1 on the Contact Field Interface Card. DS4 TX Enable: The signal which enables the transmit signal from the Field Interface Card to the Contact Processor is active. DS2 Card Fault: A Fault is detected on the contact Field Interface card, or communications with the contact processor have ceased. Discrete outputs will go to the condition called for by the position of jumper HD1 (hold or off). DS1 Card Good: No faults are detected on the Contact Field Interface card and communication with the Contact Processor is active. RS3: Service Quick Reference Guide Input/Output SQ: 7-23 Contact FIC Jumper Positions Jumper Position Effect HD1 HOLD Hold output value on communications failure OFF Drive output to zero on communications failure Contact FIC Fuses Card 1984-1460-000x Fuse FRSI Part No. Bussman Part No. Littelfuse Part No. F1 G50382--001 4 -- -- 273.500 AGC 1/2 312.500 Schurter Part No. MSF 034.4216 Characteristics 1/2 A 125 V Plug-In Card 1984-1304-000x F1 G9140--0016 RS3: Service Quick Reference Guide -- -- 1/2 A 250 V Quick Acting Input/Output SQ: 7-24 MUX Marshaling Panels Voltage . . . . . . . . . . . . . . . . . . . . . . . . . . . . . . . . . . . . . . . . . . 1984--2457--0002 Current . . . . . . . . . . . . . . . . . . . . . . . . . . . . . . . . . . . . . . . . . . 1984--2458--0001 RTD . . . . . . . . . . . . . . . . . . . . . . . . . . . . . . . . . . . . . . . . . . . . . 1984--2456--0002 Voltage MUX Marshaling Panel Specifications Item Specification Voltage CSA: 150 V rms With a locally coated connector: 250V rms Wire gauge 12--20 AWG solid, stranded, lugged Temperature Maximum: 105° C Connection to FlexTerm 50 conductor cable terminated to connector on FlexTerm motherboard. 4--20 mA MUX Marshaling Panel Specifications Item DC power isolation and fusing Per point fusing Specification 1984--1321 fuse module with isolating diodes 1/4 A Temperature range 0--70° C Maximum voltage Transmitter powered: 250 V rms System and remote powered: 150 V rms Wire gauges Connection to FEM 12--20 AWG solid, stranded, lugged 50 conductor cable terminated directly to FEM terminals. RS3: Service Quick Reference Guide Input/Output SQ: 7-25 RTD MUX Marshaling Panel Specifications Specification Item Voltage CSA 150 V rms With a locally coated connector: 250V rms Wire gauge 12--20 AWG solid, stranded, lugged Temperature Maximum: 105° C Connection to FlexTerm 50 conductor cable terminated to connector on FlexTerm motherboard. RS3: Service Quick Reference Guide Input/Output SQ: 7-26 PLC FlexTerm . . . . . . . . . . . . . . . . . . . . . . . . . . . . . . . . . . . . . . . 10P53200001 . . . . . . . . . . . . . . . . . . . . . . . . . . . . . . . . . . . . . . . . . . . . . . . . . . . 1984-2409-0001 NOTE: Use only 10P53200001 for EMC (CE) compliant installations. PLC FlexTerm Jumpers Jumper No Redundancy Redundancy HD1A HD1B 1--2 2--3 HD2A HD2B 1--2 2--3 NOTE: If only communication lines are used, the FlexTerm redundancy jumpers are inactive. Parts Replacement Part No. Replaces 10P53200001 1984--2409--0001 1984--2409--0001 10P53200001 RS3: Service Quick Reference Guide Characteristics Replaces in all cases. Except in EMC compliant installations or ones using the communication lines. Input/Output SQ: 7-27 Port I/O Card: RS-422/RS-232 . . . . . . . . . . . . . . . . . . . . . . . . . . . . . . . . . . . . . . 10P54880001 . . . . . . . . . . . . . . . . . . . . . . . . . . . . . . . . . . . . . . . . . . . . . . . . . . . 1984-2402-0001 NOTE: Use only 10P54880001 for EMC (CE) compliant installations Parts Replacement for the RS-422/RS-232 Port I/O Card Part No Replaces 10P54880001 1984--2402--000x 1984--2402--0001 10P54880001 Comments Always permitted. Only for non-EMC approved installations. RS-232C Pin Assignments PLC Plug (15 Pin) (For Allen Bradley KE Module only) Signal Port I/O Card (25 Pin) Signal 1 SHLD 1 SHLD 2 TXD 2 TXD 3 RXD 3 RXD 4 RTS 4 RTS 5 CTS 5 CTS 6 DSR 6 SR 7 GND 7 GND 8 DCD 8 DCD 11 DTR 11 GND 13 GND 20 DTR RS3: Service Quick Reference Guide Input/Output SQ: 7-28 Port I/O Card RS-422/RS-232 LEDs LEDs Meaning DS4 Receive Data: Indicates that data is being received from the PLC device. DS3 TX Data: Indicates that data is being sent to the PLC device. DS2 30V Fuse Blown: Power fuse F1 is blown. DS1 Card Good: Voltages are within tolerances. RS-422/RS-232 Port I/O Card Jumper Positions Jumper Position Effect HD1A--D A B Use Communications Port A Use Communications Port B HD2A--B MOD TERM Port I/O Card is a Modem Port I/O Card is a Terminal HD3 S M Single Point: One PLC MultiDrop: Several PLCs RS-422/RS-232 Port I/O Card Fuse Fuse FRSI Part No. Littelfuse Part No. Schurter Part No. Characteristics F1 G50382--0014 273.500 MSF 034.4216 1/2 A 125 V Plug-In RS3: Service Quick Reference Guide Input/Output SQ: 7-29 Port I/O Card: RS-422/RS-422 . . . . . . . . . . . . . . . . . . . . . . . . 10P54850001 . . . . . . . . . . . . . . . . . . . . . . . . . . . . . . . . . . . . . . . . . . . . . . . . . . . 1984-2441-0001 NOTE: Use only 10P54850001 for EMC (CE) compliant installations. Parts Replacement for the RS-422/RS-232 Port I/O Card Part No Replaces 10P54850001 1984--2441--000x 1984--2441--000x 10P54850001 Comments Always permitted. Only for non-EMC approved installations. Port I/O Card RS-422/RS-422 LEDs LEDs Meaning DS4 Receive Data: Indicates that data is being received from the PLC device. DS3 TX Data: Indicates that data is being sent to the PLC device. DS2 30V Fuse Blown: Power fuse F1 is blown. DS1 Card Good: All voltages are within tolerances. RS-422 Pin Assignments Pin Signal 1 To Cable Shield 3 Transmit Data -- 9 Transmit Data + 4 Receive Data -- 6 Receive Data + 5 Isolated Return RS3: Service Quick Reference Guide Input/Output SQ: 7-30 RS-422/RS-422 Port I/O Card Jumpers Jumper Port A Port B HD1A--D A B RS-422/RS-422 Port I/O Card Fuse Fuse FRSI Part No. Littelfuse Part No. Schurter Part No. Characteristics F1 G50382--0021 273002 MSF 034.4224 2 A 125 V Plug-In RS3: Service Quick Reference Guide Input/Output SQ: 7-31 Analog Input FIC: Non-Isolated . . . . . . . . . . . . . . . . . . . . 1984-1463-0001 . . . . . . . . . . . . . . . . . . . . . . . . . . . . . . . . . . . . . . . . . . . . . . . . . . . 1984-1394-000x Non-Isolated Analog Input FIC LEDs LEDs Meaning 30V Fuse Blown: The 30 VDC power fuse to the card is blown. Note that this LED does not indicate whether field transmitter power and input current fuses are operational. -DS1 +12V Status: Power is present and the regulator is operational. Non-Isolated Analog Input FIC Test Points Test Points Meaning Brown Ground return. Yellow 1 to 5 V analog signal to controller. Non-Isolated Analog Input FIC Jumper Positions Jumper Position Purpose HD1 1--2: System supplies power to transmitter output device. 2--3: Transmitter or output device supplies its own power. Specifies FICs power setup. Non-Isolated Analog Input FIC Fuses Fuse FRSI Part No. Bussman Part No. Littelfuse Part No. Characteristics F1 F2 F3 G09140--0010 AGC 1/4 312.250 1//4 A 250 V Quick Acting RS3: Service Quick Reference Guide Input/Output SQ: 7-32 Analog Input FIC: Smart Transmitter . . . . . . . . . . . . . . 1984-2412--0001 Smart Transmitter FIC LEDs+ LEDs Meaning DS4 Communications Activity: Indicates communications activity. The signal that enables the transmit signal from the Field Interface Card to the Controller Processor card is active. DS3 Fuse F3 Blown: Power fuse F3 has blown. This LED does not indicate the status of the fuses in the I/O loops. DS2 Card Bad: A card fault is detected or communications with the Controller Processor have ceased. DS1 Card Good: Card has passed power-up diagnostics. Smart Transmitter FIC Test Points Test Point TP1 Controller TP2 GND Meaning Controller loop current measured across 250 ohm resistor. Ground. Smart Transmitter FIC Jumper Values Jumper Smart Transmitter Powered by System Smart Transmitter Self Powered HD1 1--2 2--3 Smart Transmitter FIC Fuses Fuse FRSI P/N Littelfuse P/N Schurter P/N Characteristics F1 F2 G50382--11 273.250 MSF 034.4213 1/4 A Plug-In F3 G50382--14 273.500 MSF 034.4216 1/2 A Plug-In RS3: Service Quick Reference Guide Input/Output SQ: 7-33 Analog Input FIC: Isolated . . . . . . . . . . . . . . . . . . . . . . . . 1984--1325--0001 Isolated Analog Input FIC LEDs LEDs Meaning DS4 Input Signal: Indicates that the field input is present. The LED glows brighter as the field input increases. With no input, the LED is off. DS3 30V Fuse Blown: The 30 VDC power fuse to the card is blown. Note that this LED does not indicate whether field transmitter power and input current fuses are operational. DS2 +12V Non-Isolated Status: The non-isolated +12 V regulator is operational. DS1 +12V ISO Status: The isolated +12 V regulator is operational. Isolated Analog Input FIC Test Points Test Point Meaning Yellow 1 to 5 V analog signal to controller. Brown Ground return. Isolated Analog Output FIC Jumper Positions Jumper Position HD1 1--2 System supplies power to transmitter or output device. 2--3 Transmitter or output device supplies it own power. Purpose Isolated Analog Output FIC Fuses Fuse FRSI P/N Bussman P/N Littelfuse P/N Characteristics F1 F2 G09140--0010 AGC 1/4 312.250 1/4 A 250 V Quick Acting F3 G09140--0016 AGC 1/2 312.500 1/2 A 250 V Quick Acting RS3: Service Quick Reference Guide Input/Output SQ: 7-34 Analog Output FIC: Non-Isolated . . . . . . . . . . . . . . . . . . 1984--1490--0001 . . . . . . . . . . . . . . . . . . . . . . . . . . . . . . . . . . . . . . . . . . . . . . . . . . 1984--1273--0001 Non-Isolated Analog Output FIC LEDs LEDs Meaning DS4 TX Enable: The signal that enables the transmit signal from the Field Interface Card to the MultiLoop Processor is active. DS3 30V Fuse Blown: One of three fuses has blown: F3 = digital section power regulator; F4 = analog panel station power; F5 = analog section power. This LED does not indicate the status of the two fuses on the output. DS2 Card Fault: A card fault is detected, or communications with the MultiLoop Processor have stopped. If a communication problem occurs, the output current is held at its last value or goes to zero. DS1 Card Good: No card faults are detected and the MultiLoop Processor or an analog panel station is controlling the output current. Non-Isolated Analog Output FIC Test Points Test Points Meaning Brown Ground return. Yellow Main 5V regulator. RS3: Service Quick Reference Guide Input/Output SQ: 7-35 Non-Isolated Analog Output FIC Jumper Positions Jumper Purpose HD1 Indicates whether the FIC holds the last output value or sets the output current to zero if there is loss of communication with the Controller Processor card. Position HOLD: The last output value is held if there is a failure within the ControlFile, with the comm lines, or at the FIC. If the power supply should fail, the output current goes to zero. OFF: The output value is held for about 1/2 second before going to zero if there is a failure in the FIC processors. For other types of failures, the output value is held for up to four seconds before the output current goes to zero. HD2 1984--1490--000x only Select normal or reversed output 1--2 Normal Output 2--3 Reversed Output Non-Isolated Analog Output FIC Fuses Fuse FRSI P/N Littelfuse P/N Schurter P/N Characteristics F1 F2 G50382--0011 273.250 MSF 034.4213 1/4 A 125 V Plug-In F3 F5 G50382--0014 273.500 MSF 034.4216 1/2 A 125 V Plug-In F4 G50382--0021 273.002 MSF 034.4224 2 A 125 V Plug-In RS3: Service Quick Reference Guide Input/Output SQ: 7-36 Analog Output FIC: Isolated . . . . . . . . . . . . . . . . . . . . . . 1984--1525--000x . . . . . . . . . . . . . . . . . . . . . . . . . . . . . . . . . . . . . . . . . . . . . . . . . . 1984--1469--0003 . . . . . . . . . . . . . . . . . . . . . . . . . . . . . . . . . . . . . . . . . . . . . . . . . . 1984--1334--000x Isolated Analog Output FIC LEDs LEDs Meaning DS4 TX Enable: The signal that enables the transmit signal from the Field Interface Card to the MultiLoop Processor is active. DS3 30V Fuse Blown: One of three fuses has blown: F3 = digital section power regulator; F4 = analog panel station power; F5 = analog section power. This LED does not indicate the status of the two fuses on the output. DS2 Card Fault: A card fault is detected, or communications with the MultiLoop processor have ceased. If a communication problem occurs, the output current is held at its last value or goes to zero. DS1 Card Good: No card faults are detected and the MultiLoop Processor or an analog panel station is controlling the output current. Isolated Analog Output FIC Test Points Test Points Meaning Brown Ground return. Yellow Main 5V regulator. RS3: Service Quick Reference Guide Input/Output SQ: 7-37 Isolated Analog Output FIC Jumper Positions Jumper Card 1984--1525--000x 1984--1469--000x HD1A and HD1B HD2 1984--1334--000x HD1 HD2 Purpose Position Indicates whether the FIC holds the last output value or sets the output current to zero if there is loss of communication with the Controller Processor card. Select normal or reversed output Indicates whether the FIC holds the last output value or sets the output current to zero if there is loss of communication with the Controller Processor card. HOLD: The last output value is held if there is a failure within the ControlFile, with the comm lines, or at the FIC. If the power supply should fail, the output current goes to zero. OFF: The output value is held for about 1/2 second before going to zero if there is a failure in the FIC processors. For other types of failures, the output value is held for up to four seconds before the output current goes to zero. 1--2 Normal Output 2--3 Reversed Output HOLD: The last output value is held if there is a failure within the ControlFile, with the comm lines, or at the FIC. If the power supply should fail, the output current goes to zero. OFF: The output value is held for about 1/2 second before going to zero if there is a failure in the FIC processors. For other types of failures, the output value is held for up to four seconds before the output current goes to zero. Isolated Analog Output FIC Fuses Fuse FRSI P/N Littelfuse P/N Schurter P/N Characteristics F1 F2 F3 F4 G50382--0014 273.500 MSF 034.4216 1/2 A 125 V Plug-In RS3: Service Quick Reference Guide Input/Output SQ: 7-38 I/O Scanning Rates NOTE: Addressing any panel or card cage as “B”, “C”, or “D” drops the scanning rate to the slowest rate shown even if there are no other addressed panels or cages. The controller scan time (1.0, .50, .25, .125 second), selected from the ControlFile Status screen, must always be greater than the I/O point scan time. The controller scan time applies to all card cages served by the controller, so the scan time of the slowest cage must be used. Highest Card Cage Address Cage Scan Rate Cage Scan Pattern Minimum Controller Scan Time (Seconds) (Scans Per Second) MDIO MAIO A AAAA 32 .125 .25 B ABAB 16 .125 .50 C ABAC .25 25 10 1.0 D ABCD .25 1.0 A: 16 RS3: Service Quick Reference Guide B, C: 8 8 Input/Output SQ: 7-39 Remote Communications Termination Panel II . . . . . . 1984--4205--0001 Remote Communications Termination Panel I . . . . . . 1984--2552--0001 Remote Communications Termination Panel Parts Replacement Part No 1984--4409--0001 (Kit) Replaces Characteristics 1984--2552--000x The Kit replaces a Remote Communications Termination Panel I. The kit contains two Remote Communications Termination Panel II units and a DIN rail for mounting them. Remote Communications Termination Panel II Jumpers Jumper Position Effect HD1 REMOTE I/O (1--2) Used when the panel is at the remote end of the communication line; at the card cage or FlexTerm. CONT FILE (2--3) Used when the panel is at the ControlFile (source) end of the communication line. HD4A HD4B NORMAL (1--2) REDUNDANT (2--3) RS3: Service Quick Reference Guide Normal operation. One cable is used from the ControlFile to the panel. The panel is connected to one Controller Processor. Redundant operation. Two cables are used between the ControlFile and the panel. The panel is connected to two Controller Processors. Input/Output SQ: 7-40 Remote Communications Termination Panel I Jumpers Jumper Position HD1A HD1B (Top panel) NORMAL (1--2) HD3 (Top panel) HD4 (Lower panel) Normal operation. One cable is used from the ControlFile to the panel. REDUNDANT (2--3) Redundant operation. Two cables are used between the ControlFile and the panel. REMOTE I/O (1--2) Used when the panel is at the remote end of the communication line: at the card cage or FlexTerm. CONTROL FILE (2--3) HD2A HD2B (Lower panel) Effect NORMAL (1--2) Used when the panel is at the ControlFile (source) end of the communication line. Normal operation. One cable is used from the ControlFile to the panel. REDUNDANT (2--3) Redundant operation. Two cables are used between the ControlFile and the panel. REMOTE I/O (1--2) Used when the panel is at the remote end of the communication line: at the card cage or FlexTerm. CONTROL FILE (2--3) RS3: Service Quick Reference Guide Used when the panel is at the ControlFile (source) end of the communication line. Input/Output SQ: 7-41 Fiber Optic I/O Converter . . . . . . . . . . . . . . . . . . . . . . . . . 1984--3278--0001 NOTE: Use Minimum Revision C/D or higher for EMC (CE) compliant installations. Fiber Optic I/O Converter LEDs LED Color 5V POWER GREEN RECEIVE DATA YELLOW Flashes when the unit is receiving data. TRANSMIT DATA YELLOW Flashes when the unit is transmitting data. RS3: Service Quick Reference Guide Function ON when power is ON. Input/Output SQ: 7-42 Standard Remote Termination Panel . . . . . . . . . . . . . . . 1984--4344--0001 Standard Remote Termination Panel, Marshaling Panel Cable Application Use Cable Multi-FIM Termination Panel 1984--4299--xxxx Multi-FIM Termination Panel, Redundant FIMs 1984--4319--xxxx High Density Isolated Discrete Termination Panel 1984--4298--xxxx High Density Isolated Discrete Termination Panel, NEC/CSA 1984--4345--xxxx RS3: Service Quick Reference Guide Input/Output SQ: 7-43 Direct Discrete Termination Panel . . . . . . . . . . . . . . . . . 1984--4127--0001 NOTE: For most applications, FRSI recommends that VTH be ½Vsource. For an input point with VTH = ½Vsource, the resistance to Vsource of the field device in the ON state must be 1400 ohms or less to ensure positive turn-ON. The resistance to Vsource of the field device in the OFF state must be 3200 ohms or greater to ensure positive turn-OFF. Parts Replacement for the Direct Discrete Termination Panel Part No. 10P52700001 1984--4127--0001 Replaces Name on PWA Characteristics 1984--4127--0001 DIRECT DISCRETE TERMINATION PANEL II Use only the MDIOL Low-Side Switch FIM to ensure compatibility. 10P52700001 DIRECT DISCRETE TERMINATION PNL Valid replacement only in non-EMC installations that use the MDIOL Low-Side Switch FIM. Direct Discrete Termination Panel Jumpers Jumper Value HD1 A FIM address A (factory setting) B FIM address B C FIM address C D FIM address D E Not used F Factory setting, do not move HD2 Both Jumpers ON or both jumpers at NORM or both wires intact Both Jumpers OFF or both jumpers at FIM REDUND or both wires cut RS3: Service Quick Reference Guide Effect Normal single FIM operation with online replacement capability Redundant FIM operation Input/Output SQ: 7-44 Direct Discrete Termination Panel Fuses Fuse FRSI Part No. Littelfuse Part No. Wickman Part No. Characteristics F1 to F32 G53394--1000--0005 216 001 19 194 1 A 1 A 250 V (IEC) Quick action 5x20 mm Ceramic RS3: Service Quick Reference Guide Input/Output SQ: 7-45 Direct Discrete Termination Panel II . . . . . . . . . . . . . . . . . . 10P52700001 NOTE: For most applications, FRSI recommends that VTH be ½Vsource. For an input point with VTH = ½Vsource, the resistance to Vsource of the field device in the ON state must be 1400 ohms or less to ensure positive turn-ON. The resistance to Vsource of the field device in the OFF state must be 3200 ohms or greater to ensure positive turn-OFF. Parts Replacement for the Direct Discrete Termination Panel Part No. Replaces Name on PWA 10P52700001 1984--4127--000 1 DIRECT DISCRETE TERMINATION PANEL II Use only the MDIOL Low-Side Switch FIM to ensure compatibility. 1984--4127--0001 10P52700001 DIRECT DISCRETE TERMINATION PNL Valid replacement only for non-EMC installations that use the MDIOL Low-Side Switch FIM. Characteristics Direct Discrete Termination Panel II Jumper Settings Jumper Setting HD1--HD16 Left (One jumper per point) Right Function MDIOL: Input or Output Point MDIOH: Input Point MDIOH: Output Point A Use Card Cage Address A HD17 B Use Card Cage Address B (One jumper) C Use Card Cage Address C D Use Card Cage Address D E Not used F Not used (continued on next page) RS3: Service Quick Reference Guide Input/Output SQ: 7-46 Direct Discrete Termination Panel II Jumper Settings Jumper Setting Function HD18 NORM Normal single-FIM operation (Two jumpers) REDUN Redundant operation with two FIMs Direct Discrete Termination Panel II Fuses Fuse FRSI Part No. Littelfuse Part No. Wickman Part No. Characteristics F1 to F32 G53394--1 000--0005 216 001 19 194 1A 1 A 250 V (IEC) Quick action 5x20 mm Ceramic RS3: Service Quick Reference Guide Input/Output SQ: 7-47 Multi-FIM Discrete Termination Panel . . . . . . . . . . . . . . 1984--4282--0001 Multi-FIM Discrete Termination Panel Jumpers Jumper Value Effect HD1, 2, 3 A ON FIM address A (factory setting) NOTE: Only one jumper is allowed in positions A--D B ON FIM address B C ON FIM address C D ON FIM address D E OFF Not used F ON Factory setting, do not move 1--2 Normal individual FIM operation 2--3 Redundant operation of FIMs A and B 1--8 OFF 2--7 ON 3--6 ON 4--5 ON Normal loop operation HD4--8 HD9, 10, 11 1--8 ON 2--7 OFF 3--6 OFF 4--5 OFF HD12 Used with Intrinsically Safe barriers CAUTION Remove power from the panel before moving jumpers on HD9, 10, or 11. The FIM may be damaged if 1--8 is ON when any of the other positions are ON. OFF (No jumpers) Communication Ports A and B are independent (normal operation of FIMs A and B) 1--12 ON 3--10 ON 5--6 ON Communication Ports A and B are connected (for online replacement operation of FIMs A and B) RS3: Service Quick Reference Guide Input/Output SQ: 7-48 Isolated Discrete Termination Panel A . . . . . . . . . . . . . . . . . . . . . . . . . . . . . . . . . . . . . . . . . . . . . . . . 1984--4121--0001 B . . . . . . . . . . . . . . . . . . . . . . . . . . . . . . . . . . . . . . . . . . . . . . . . 1984--4124--0001 NOTE: You must configure an I/O Block at FIM I/O address 1 to set the switch voltage for the entire FIM. Set to 1.7 volts for reliable operation. WARNING The solid state relays may be hot enough to cause burns. Solid State Relays Part Number C12243-- Model Function Output Contact* Voltage Color 0005 IAC5A AC Input None 180--280 VAC/DC** Yellow 0006 IDC5 DC Input None 10--32 VDC White 0007 IDC5--B IDC5--F DC Input None 4--16 VDC White 0008 IAC5 AC Input None 90--140 VAC/DC** Yellow 0009 ODC5 DC Output N.O. 5--60 VDC Red 0010 ODC5A DC Output N.O. 5--200 VDC** Red 0011 OAC5A5 AC Output N.C. 24--280 VAC** Black 0012 OAC5 AC Output N.O. 12--140 VAC** Black 0013 OAC5--A OAC5--1 AC Output N.O. 24--280 VAC** Black 0014 IDC5G IDC5N DC Input None 35--60 VAC/DC White 0015 ODC5RM ORR5--1 Dry Contact Relay N.O. 100 VDC 130 VAC (Max switching current .5 A, 10 VA contact rating)** * All output modules, except OAC5A5, have normally open (N.O.) outputs. The output contact is open when the block output is FALSE. ** CAUTION Hazardous voltages may be present on field wiring. Lock out and tag hazardous voltage circuits prior to servicing. RS3: Service Quick Reference Guide Input/Output SQ: 7-49 Isolated Discrete Termination Panel A Jumpers Jumper Value Effect HD1 (Panels “A” & “B”) A Card cage A (factory setting) B Card cage B C Card cage C D Card cage D E Not used F Factory setting, do not move Both Jumpers ON or both jumpers at NORM or both wires intact Normal single FIM operation with online replacement capability Both Jumpers OFF or both jumpers at FIM REDUND or both wires cut Redundant FIM operation HD2 (Panel “A” only) Isolated Discrete Termination Panel Fuses Fuse FRSI Part No. Littelfuse Part No. Wickman Series Characteristics F1 to F32 G53394--3150--0005 216 3.15 19 194 3.15 A 3.15 A 250 V (IEC) Quick action 5x20 mm Ceramic CAUTION Hazardous voltages may be present. Lock out and tag hazardous voltage circuits prior to servicing. RS3: Service Quick Reference Guide Input/Output SQ: 7-50 High Density Isolated Discrete Termination Panel . . . 1984--4167--0001 NOTE: You must configure an I/O Block at FIM I/O address 1 to set the switch voltage for the entire FIM. Set to 1.7 volts for reliable operation. WARNING The solid state relays may be hot enough to cause serious burns. HIgh Density Isolated Discrete Termination Panel Address Jumpers Position Effect A Termination panel address is A (factory setting) (2--3 is ON) B Termination panel address is B C Termination panel address is C D Termination panel address is D E Not used F Factory setting, do not move High Density Isolated Discrete Termination Panel Solid State Relays Part Number C60350-- Model Function Output Contact Voltage 0001 70M--IAC5--A AC Input None 180--280 VAC* 0002 70M--IDC5 DC Input None 10--32 VDC 0003 70M--IAC5 AC Input None 90--140 VAC* 0004 70M--ODC5 DC output NO 5--60 VDC 0007 70M--OAC5--A AC output NO 24--280 VAC* *CAUTION Hazardous voltages may be present. Lock out and tag hazardous voltage circuits prior to servicing. RS3: Service Quick Reference Guide Input/Output SQ: 7-51 Discrete Field Interface Module (FIM) Multipoint Discrete I/O FIM MDIOH (High-side switch, EMC approved) . . . . . . . . . . . . . 10P53550006 MDIOL (Low-side switch, EMC approved) . . . . . . . . . . . . . 10P53520006 MDIO (Low-side switch) . . . . . . . . . . . . . . . . . . . . . . . . . . . 1984--4080--0001 Parts Replacement for the Discrete Field Interface Module Part No. Replaces Name on Label Characteristics 10P53550006 None DISCRETE FIELD INTERFACE MODULE: HIGH SIDE SWITCH High-side switching FIM (CE approved) 10P53520006 1984--4080--000x DISCRETE FIELD INTERFACE MODULE: LOW SIDE SWITCH Low-side switching FIM (CE approved). Use in any installation. 1984--4080--000x 10P53520006 DISCRETE FIELD INTERFACE MODULE Low-side switching FIM Use only in non-CE approved installations. Discrete FIM LEDs LED On: FIM Good Flashing: FIM Inactive (Green) Meaning ON steady when the FIM is in normal operation. Flashing when the FIM is disconnected from the field. FIM Failure (Red) ON when FIM considers itself failed or when the FIM is not communicating with the Controller. Comm Active (Yellow) Flashes when the FIM is communicating with the Controller Processor. Input: Input/Output Points 1--16 (Yellow) Input-Only Points 17--32 (Yellow) Output: ON for voltage above threshold or for a closed contact OFF otherwise ON when point is commanded ON OFF otherwise ON for voltage above threshold or for a closed contact OFF otherwise RS3: Service Quick Reference Guide Input/Output SQ: 7-52 MAIO16 Termination Panel (Field wires land on panel) . . . . . . . . . . . . . . . . . . . . . . . . . . . 10P54770001 (Field wires on panel or on marshaling panel) . . . . . . . 10P54770002 MAIO16 is EMC compliant. NOTE: All input points must be constrained to operate within the common mode range of +29 to --2 VDC. This is automatic when all inputs are system powered. The ground levels must remain within ± 2 Volts of each other or erroneous results will be reported. The ground reference is available on TB17. Parts Replacement for the MAIO16 Termination Panel Part No. 10P54770001 10P54770002 Replaces Characteristics 1984--4383--0001 Replaces all cases. 10P54770002 1984--4383--0002 Only if marshaling cable is not used. 10P54770001 1984--4383--0001 1984--4383--0002 Replaces all cases. MAIO16 Termination Panel Jumpers Jumper Value HD1--HD16 Full left HD17 Effect Self-Powered Input Point with external ground reference or Output Point Centered System-Powered Input Point Full right Self-Powered Input Point with ground reference at the Termination Panel A at 1--2 Cage address A (Factory setting) B at 1--2 Cage address B C at 1--2 Cage address C D at 1--2 Cage address D RS3: Service Quick Reference Guide Input/Output SQ: 7-53 MAIO16 Termination Panel Jumpers Jumper Value HD18 HD19 Both at “N” (1--2) Normal single FIM operation Both at “R” (2--3) Redundant FIM operation (Requires two FIMs and two communication lines) V--, SH and CH jumpered (4-tab jumper installed) Loop power negative and field wiring shields connected to chassis ground. Use with LPMs. (New factory setting.) SH to CH jumpered (4-tab jumper straddling TB18 or 2 tab jumper installed) Field wire shields connected to chassis ground. Use with locally grounded source of loop power. (Old factory setting with 2 tab jumper.) TB17 TB18 TB17 TB18 SH to CH open (Jumper removed) TB19 TB20 TB21 TB22 Jumpers fully installed, absent, or in “holder for loop position”. RS3: Service Quick Reference Guide Effect Allows connecting shield to a different ground reference than chassis. Fully installed: Power at TBA used for loop power. Holder position: Loop power connected at TB17 Absent: LPMs used for loop power Input/Output SQ: 7-54 MAIO Termination Panel (Field wires land on panel) . . . . . . . . . . . . . . . . . . . . . . . . 1984--4383--0001 (Field wires on panel or on marshaling panel) . . . . . . 1984--4383--0002 NOTE: All input points must be constrained to operate within the common mode range of +29 to --2 VDC. This is automatic when all inputs are system powered. The ground levels must remain within ± 2 Volts of each other or erroneous results will be reported. The ground reference is available on TB17. Parts Replacement for the MAIO Termination Panel Part No. Replaces 1984--4383--0001 1984--4383--0002 Only if marshaling cable is not used. 1984--4383--0002 1984--4383--0001 Replaces all cases. Characteristics MAIO Termination Panel Jumpers Jumper Value HD1--HD16 Full left HD17 HD18 HD19 Effect Self-Powered Input Point with external ground reference or Output Point Centered System-Powered Input Point Full right Self-Powered Input Point with ground reference at Termination Panel A at 1--2 Cage address A (Factory setting) B at 1--2 Cage address B C at 1--2 Cage address C D at 1--2 Cage address D Both at “N” (1--2) Normal single FIM operation Both at “R” (2--3) Redundant FIM operation Requires two FIMs and two communication lines (continued on next page) RS3: Service Quick Reference Guide Input/Output SQ: 7-55 MAIO Termination Panel Jumpers Jumper TB18 TB19 TB20 TB21 TB22 Value Effect V--, SH & CH jumpered (4 tab jumper installed) Loop power negative and field wiring shields connected to chassis ground. Use with LPMs. (New factory setting.) SH to CH jumpered (4 tab jumper straddling TB18 or 2 tab jumper installed) Field wire shields connected to chassis ground. Use with locally grounded source of loop power. (Old factory setting with 2 tab jumper.) SH to CH open (Jumper removed) Allows connecting shield to a different ground reference than chassis. Jumpers fully installed, absent, or in ”holder for loop position”. Fully installed: Power at TBA used for loop power Holder position: Loop power connected at TB17 Absent: LPMs used for loop power RS3: Service Quick Reference Guide Input/Output SQ: 7-56 MAI32 Termination Panel (Field wires land on panel) . . . . . . . . . . . . . . . . . . . . . . . . . . . 10P53490001 (Field wires on panel or on marshaling panel) . . . . . . . . . 10P53490002 The panel supports 32 analog input points using two termination panel addresses and two input blocks. The first address supports the Left Group of points (L1--L16), the second address supports the Right Group of points (R1--R16). An Analog Input Block (AIB) or a Smart Transmitter Input Block (SIB) must be configured for each address. HART variables can be addressed by configuring a VIB. The Field I/O Status Screen (previously the FIC Status Screen) shows the type of device connected to each controller. The MAI32 FIM will have two entries, one for each cage address used. The type code is “MAI32-x” where the “x” shows the card cage of the OTHER set of 16 points. Thus if the panel is addressed as A and C, the first entry will show “MAI32-C” and the second will show “MAI32-A”. Multipoint Analog I/O Termination Panel Parts Replacement Part No Replaces 10P53490001 10P53490002 Only if marshaling cable is not used. 10P53490002 10P53490001 Valid for all cases. Comments MAI32 Termination Panel Jumpers Jumper Position HDL01--HDL16 HDR01--HDR16 Full left Point Type Full right HD33 One jumper A--C at 1--2 Cage address for Left Group of points L01--L16 (A is recommended) ADDRESS One jumper B--D at 1--2 Cage address for Right Group of points R01--R16 (B is recommended) P at 1--2 Effect System-powered input point Self-powered input point Required for correct parity (continued on next page) RS3: Service Quick Reference Guide Input/Output SQ: 7-57 MAI32 Termination Panel Jumpers (continued) Jumper Position Effect HD34 ENABLE Enables detection of loop power loss LOOP PWR DETECT DISABLE Disables detection of loop power loss TB21 SH and CH connected All field wiring shields are connected to panel chassis ground Shield Grounding SH and CH open All field wiring shields are connected together and are floating with respect to panel chassis ground SH connected to external ground All field wiring shields are connected together and are connected to the external ground point MAI32 Termination Panel Fuses Fuse FRSI Part No. Littelfuse Part No. Wickman Part No. Characteristics F1 to F32 G53394--0080--0005 Series 216 Series 19194 0.08 A 250 V (IEC) Quick acting RS3: Service Quick Reference Guide Input/Output SQ: 7-58 Loop Power Module (LPM) . . . . . . . . . . . . . . . . . . . . . . . . 1984--4398--0001 10P57070001 NOTE: The LPM produces up to 380 mA DC at 25.0 to 25.5 Volts. Loop Power Module LEDs LED GOOD (Green) BAD (Red) None Lit Meaning LPM functioning normally. LPM out of specification or failed. LPM out of specification, failed, or no input power. RS3: Service Quick Reference Guide Input/Output SQ: 7-59 MAIO Input FIM MAI16 (EMC Approved) . . . . . . . . . . . . . . . . . . . . . . . . . . . 10P54040004 or 10P57700005 MAIO . . . . . . . . . . . . . . . . . . . . . . . . . . . . . . . . . . . . . . . . . . . . 1984--4414--1001 MAIO FIM Parts Replacement Part No 10P54040004 1984--4414--100x Replaces 1984--4414--0001 1984--4414--100x 1984--4414--0001 Comments All cases. All cases. MAIO FIM LEDs LED On: FIM Good Flashing: FIM Inactive (Green) FIM Failure (Red) Meaning ON steady when the FIM is in normal operation. Flashing when the FIM is disconnected from the field. ON when FIM considers itself failed. Flashing when the FIM is not communicating with the Controller. Port A Active (Yellow) Flashes when communication Port A is active. Port B Active (Yellow) For factory use only. Status 1 (Yellow) Flashes steadily while the FIM operates. Status 2 (Yellow) Flashes a diagnostic code if the FIM is disabled and the red LED is ON. RS3: Service Quick Reference Guide Input/Output SQ: 7-60 MAIO Input “Status 2” LED Diagnostic Codes Meaning LED Code 1 RAM failure. 2 Voltage failure, one or more internal voltages are out of tolerance. 3 Not assigned. 4 ADC failure. 5 Address jumpers on the Termination Panel are not set to A, B, C, or D. 6 Write or erase failure in FLASH. 7 Verification failure in BOOT or APP code. 8 Not assigned. 9 Not assigned. 10 Point diagnostic failure. 11 Not assigned. RS3: Service Quick Reference Guide Input/Output SQ: 7-61 MAIO Output FIM MAO16 (EMC Approved) . . . . . . . . . . . . . . . . . . . . . . . . . . . . . 10P54080004 MAO . . . . . . . . . . . . . . . . . . . . . . . . . . . . . . . . . . . . . . . . . . . . 1984--4418--0001 MAIO FIM Parts Replacement Part No Replaces 10P54080004 1984--4418--000x Comments All cases. MAIO Output FIM LEDs LED Meaning On: FIM Good Flashing: FIM Inactive (Green) ON steady when the FIM is in normal operation. Flashing when the FIM is disconnected from the field. FIM Failure (Red) ON when FIM considers itself failed. Flashing when the FIM is not communicating with the Controller. Port A Active (Yellow) Flashes when communication Port A is active. Port B Active (Yellow) For factory use only. Status 1 (Yellow) Flashes steadily while the FIM operates. Status 2 (Yellow) Flashes a diagnostic code when the red LED is disabled and the red LED is ON. RS3: Service Quick Reference Guide Input/Output SQ: 7-62 MAIO Output FIM “Status 2” LED Codes Meaning LED Code 1 RAM failure. 2 Voltage failure, one or more internal voltages are out of tolerance. 3 Not assigned. 4 ADC failure. 5 Address jumpers on the Termination Panel are not set to A, B, C, or D. 6 Write or erase failure in FLASH. 7 Verification failure in BOOT or APP code. 8 Not assigned. 9 Not assigned. 10 Point diagnostic failure. 11 Not assigned. RS3: Service Quick Reference Guide Input/Output SQ: 7-63 MAI32 Input FIM (EMC Approved) . . . . . . . . . . . . . . . . . . . . . 10P53190004 The FIM supports 32 analog input points using two termination panel addresses and two input blocks. The first address supports the Left Group of points (L1--L16), the second address supports the Right Group of points (R1--R16). An Analog Input Block (AIB) or a Smart Transmitter Input Block (SIB) must be configured for each address. HART variables can be addressed by configuring a VIB. The Field I/O Status Screen (previously the FIC Status Screen) shows the type of device connected to each controller. The MAI32 FIM will have two entries, one for each cage address used. The type code is “MAI32-x” where the “x” shows the card cage of the OTHER set of 16 points. Thus if the panel is addressed as A and C, the first entry will show “MAI32-C” and the second will show “MAI32-A”. MAI32 Input FIM LEDs LED On: FIM Good Flashing: FIM Inactive (Green) FIM Failure (Red) Meaning ON steady when the FIM is in normal operation. Flashing when the FIM is disconnected from the field. ON when FIM considers itself failed. Flashing when FIM is not communicating with the Controller. Port A Active (Yellow) Flashes when communication Port A is active. Port B Active (Yellow) For factory use only. Status 1 (Yellow) Flashes steadily while the FIM operates. Status 2 (Yellow) Flashes a diagnostic code when the FIM is disabled and the red LED is ON. RS3: Service Quick Reference Guide Input/Output SQ: 7-64 MAI32 FIM “Status 2” LED Patterns LED Code Number Meaning 1 RAM failure. 2 Voltage failure, one or more internal voltages are out of tolerance. 3 Point failure. 4 ADC failure. 5 Address jumpers on the Termination Panel are not set to A, B, C, or D. 6 Write or erase failure in FLASH. 7 Verification failure in BOOT or APP code. 8 Not assigned. 9 Not assigned. 10 Point diagnostic failure. 11 Temperature failure. RS3: Service Quick Reference Guide Input/Output SQ: 7-65 Elcon Series 1000 Intrinsically Safe Termination Panel . . . . . . . . . . . . . . . . . . . . . . . . . . . . . . . . . . . . . . . . . . . . . . . . . . . 1216/CW-ROS4 NOTE: Elcon barriers require a DC source between 21.5 and 28 Volts. The standard RS3 power bus can exceed these limits, so the panel should not be powered directly from the standard DC bus. A Remote I/O Power Supply (1984--4302--0000x) can be used. Elcon Panel Cross Wiring for Discrete Applications G H M N FROM TO T V R U J K G J H R M K N U Elcon Discrete IS Barriers Configuration Comment Contact/Proximitor Input, Relay Output 2 Input 1842 C0 0030 CC Contact/Proximitor Input, Optocoupler Output 2 Input 1862 1862 L0 0060 CC Contact Actuator 12 Output 1872 1872 L0 0060 WW Solenoid Valve Driver (35 mA per channel) 6 Output 1882 1882 L0 0060 UU Solenoid Valve Driver (70 mA per channel) Solenoid Valve Normally Energized 2 Output 1882 1882 L0 0060 WW Solenoid Valve Driver (70 mA per channel) Solenoid Valve Normally Deenergized 2 Output Model Elcon P/N 1822 1822 C0 0030 CC 1842 Description RS3: Service Quick Reference Guide Input/Output SQ: 7-66 Elcon Panel Cross Wiring for Analog Applications G H M N FROM TO G R H J T V M U R U N K J K Elcon Analog IS Barriers Configuration Comment Volt/mA Converter 7 Input 1022 A0 0242 AA Smart Transmitter Barrier (Low Frequency Protocols) 6 Input 1026 1026 A0 0242 AA Smart (High Frequency Protocols) or Non-Smart Transmitter Barrier 6 Input 1032 1032 H0 0242 AA Bus Powered Analog Output Barrier 6 Output 1034 1034 H0 0242 AA Loop Powered Analog Output Barrier 6 Output 1072 1072 D3 0510 AA RTD/tx Potential Converter 7 Output 1072 1072 F3 0510 AA RTD/tx Potential Converter 7 Output Model Elcon P/N 1012 1012 V0 0444 AA 1022 Description RS3: Service Quick Reference Guide Input/Output SQ: 7-67 Elcon IS Panel Fuses Panel Wickman P/N Characteristics Input 19 194 1.60 A 1.6 Amp 5x20 mm Ceramic 250 V IEC Output 19 194 3.15 A 3.15 Amp 5x20 mm Ceramic 250 V IEC RS3: Service Quick Reference Guide Input/Output SQ: 7-68 MTL IS Termination Panel A . . . . . . . . . . . . . . . . . . . . . . . . . . 10P50370001 NOTE: The MTL discrete isolators can be operated from the standard RS3 DC bus but you must be aware that the isolators will stop operating at low voltage before the system stops. Mapping of I/O Points to MTL Discrete Panel A Isolators Input Point Output Point Isolator Position 1--2 1 1 3--4 3 2 5--6 5 3 7--8 7 4 9--10 9 5 11--12 11 6 13--14 13 7 15--16 15 8 17--18 9 19--20 10 21--22 11 23--24 12 25--26 13 27--28 14 29--30 15 31--32 16 RS3: Service Quick Reference Guide Comment The common LFD signal is on input point 32. Do not put an isolator in position 16 if common LFD is used. Input/Output SQ: 7-69 MTL Discrete IS Isolators MTL P/N Name Comment MTL4016 Two-Channel Switch/Proximity Detector Interface, With Line Fault Detection Single-channel input -- Serves an odd-numbered point on Panel A with the LFD signal on the even-numbered point. MTL4021 Solenoid/Alarm Driver Single-channel output -- Serves an odd-number point on Panel A or an even-number point on Panel B. MTL4023 Solenoid/Alarm Driver, With Line Fault Detection Single-channel output -- Serves an odd-numbered point on Panel A or an even-numbered point on Panel B (Common LFD is available). MTL4025 Solenoid/Alarm Driver, Low Current Output Single-channel output -- Serves an odd-number point on Panel A or an even-number point on Panel B. RS3: Service Quick Reference Guide Input/Output SQ: 7-70 MTL Discrete Panel A Jumpers Jumper Value HD1--HD16 See diagrams below Selects use of input/output, no LFD, common LFD, or individual LFD for the associated isolator 1--16. HD17 A, B, C, OR D at 1--2 F MUST be at 1--2 Sets panel FIM address to A, B, C, or D. Jumper F sets standard transmission speed. HD18 ENABLE Enables common LFD for panels A and B. DISABLE Disables common LFD for panels A and B. HD20--HD21 Action Both at “N” Normal single FIM operation. Both at “R” Redundant FIM operation. RS3: Service Quick Reference Guide Input/Output SQ: 7-71 HD1 TO HD16 JUMPER SETTINGS 1 2 3 1 4 2 3 4 1 2 3 4 I I O O INPUT(S) WITH INDIVIDUAL LFD INPUT(S) WITH COMMON LFD, ALSO ENABLE HD18 INPUT(S) WITH NO LFD HD1 TO HD8 JUMPER SETTINGS FOR OUTPUT(S) 1 2 3 1 4 2 3 4 1 I I O O OUTPUT(S) WITH COMMON LFD, ALSO ENABLE HD18 OUTPUT(S) WITH INDIVIDUAL LFD 2 3 4 OUTPUT(S) WITH NO LFD MTL Discrete Panel A Fuse FRSI P/N Wickman P/N Littelfuse P/N Characteristics G53394--3150-0005 19 194 3.15 A 216 3.15 3.15 Amp 5x20 mm Ceramic 250 V IEC RS3: Service Quick Reference Guide Input/Output SQ: 7-72 MTL IS Termination Panel B . . . . . . . . . . . . . . . . . . . . . . . . . . 10P5049000x NOTE: The MTL discrete isolators can be operated from the standard RS3 DC bus but you must be aware that the isolators will stop operating at low voltage before the system stops. Mapping of I/O Points to MTL Discrete Panel B Isolators Input Point Output Point Isolator Position 2 17 4 18 6 19 8 20 10 21 12 22 14 23 16 24 RS3: Service Quick Reference Guide Comment 25 Not Used 26 Not Used 27 Not Used 28 Not Used 29 Not Used 30 Not Used 31 Not Used 32 Not Used Input/Output SQ: 7-73 MTL Discrete Panel B Jumpers Jumper Value Action HD1 A, B, C, or D at 1--2 F MUST be at 1--2 HD17--HD32 DISABLE Default setting. Disables common LFD for the associated isolator 17--32. ENABLE Enables common LFD for the associated isolator 17--32. Jumper HD18 on Panel A must be set to “ENABLE:. Sets panel FIM address to A, B, C, or D. Jumper F sets standard transmission speed. Must be identical to the Panel A setting. MTL Discrete Panel B Fuse FRSI P/N Wickman P/N Littelfuse P/N Characteristics G53394--3150-0005 19 194 3.15 A 216 3.15 3.15 Amp 5x20 mm Ceramic 250 V IEC RS3: Service Quick Reference Guide Input/Output SQ: 7-74 MTL IS Analog Termination . . . . . . . . . . . . . . . . . . . . . . . . . . 10P50340001 The MTL analog IS isolators that work with RS3 are listed below. See the MTL catalog for details. MTL Analog Input and Output Isolators MTL P/N Description Comment MTL4041B Repeater Power supply, 4/20 mA, for 2- or 3-wire Transmitters (Smart Devices) Single-channel input -- Works with 2- or 3-wire 4/20 mA transmitters (Smart Devices) MTL4041P High-power Repeater Power supply, 4/20 mA, for 2- or 3-wire Transmitters Single-channel input -- Works with 2- or 3-wire 4/20 mA transmitters and smart transmitters MTL4045B Isolating Driver, 4/20 mA, for I/P Converters Single-channel output -- Works with 4/20 mA current/pressure (I/P) converters MTL4046P High-power Isolating Driver, for HART Valve Positioners Single-channel output -- Works with 4/20 mA devices and HART valve positioners. MTL Analog Termination Panel Jumpers Jumper Value HD3 A, B, C, OR D at 1--2 HD1--HD2 Both at “N” Normal single FIM operation. Both at “R” Redundant FIM operation. Action Sets panel FIM address to A, B, C, or D. MTL Analog Fuse FRSI P/N Wickman P/N Littelfuse P/N Characteristics G53394--3150-0005 19 194 3.15 A 216 3.15 3.15 Amp 5x20 mm Glass 250 V IEC RS3: Service Quick Reference Guide Input/Output SQ: 8-1 Section 8: PeerWay Interface Supervisory Computer Interface (SCI) . . . . . . . . . . . Highway Interface Adapter (HIA) . . . . . . . . . . . . . . . . MicroVAX-PeerWay Marshaling Panel (MicroVAX II) (MicroVAX 3000) . . . . . . . . . . . . . . . . . . . . . . . . . . . . . . VAX QBUS Interface Circuit Cards: QBUS Board 1 QBUS Board 2 . . . . . . . . . . . . . . . . . . . . . . . . . . . . . . . Diogenes Interface TI Communications Card . . . . . RNI . . . . . . . . . . . . . . . . . . . . . . . . . . . . . . . . . . . . . . . . . RS3: Service Quick Reference Guide 8-2 8-5 8-8 8-9 8-13 8-14 PeerWay Interface SQ: 8-2 Supervisory Computer Interface (SCI) NOTE: The SCI can be connected to a host computer by: RS-232 RS-422 RS-422 X.25 RS-232C Signals and Connector Pin Assignments Pin Signal Pin Signal 1 ---- 2 TXD Data transmit 15 3 RXD Data receive 16 4 RTS Ready to send 17 5 CTS Clear to send 18 6 DSR Data set ready 19 ------------------- 7 Signal ground 20 DTR Data terminal ready 8 DCD Data carrier detect 21 9 10 11 12 13 ---------------- RS3: Service Quick Reference Guide 14 22 23 24 25 ------------------- PeerWay Interface SQ: 8-3 RS-422 Pins and Signals Pin Signal Pin Signal 2 ------- 3 CTS+ Clear to send 11 TXC-- (X.25 only) 4 CTS-- Clear to send 12 RXC+ (X.25 only) 5 RXD+ Data receive 13 RXC-- (X.25 only) 6 RXD-- Data receive 14 RTS+ Ready to send 7 TXD+ Data transmit 15 RTS-- Ready to send 8 TXD-- Data transmit 1 9 ---- 10 TXC+ (X.25 only) X.25 Clocking Parameters SCI Electrical Configuration Nonvolatile Memory Jumper Configuration Source of Clock Signals Direction of Clock Lines (TXC and RXC) Modem Internal Clock SCI Output Terminal External Clock Modem Input RS3: Service Quick Reference Guide PeerWay Interface SQ: 8-4 EIA Options Description EIA Option CTS SCI configured as a modem: When DTR (pin 20) is asserted by the host, the SCI can transmit. SCI configured as a terminal: When DCD (pin 8) is asserted by the host, the SCI can transmit. MODEM SCI configured as a terminal: The SCI monitors the modem Carrier Detect (CD) signal to determine when the host has called in. When DTR (pin 20) is asserted by the SCI, the modem answers the phone and establishes the carrier. When DTR is dropped by the SCI, the modem hangs up the line. Unless dropped to hang up the line, this pin remains asserted once software initialization is complete. DCD (pin 8) is asserted by the modem to inform the SCI that the data carrier is detected. NONE No EIA option is selected. RS3: Service Quick Reference Guide PeerWay Interface SQ: 8-5 Highway Interface Adapter (HIA) NOTE: Settings on the Configure HIA screen must match jumper settings on the HIA cards. When modems are used, a Black Boxr Data Converter is required on each end of the line. HIA/Black Box Cable Assembly Pin Assignments Twisted Pair 1 2 3 4 5 6 1--6 Wire Color RS-422 Connector (HIA) Black 6 6 Red 5 24 -- Black 15 7 RTS + White 14 25 Signal RXD -- RXD + RTS RS-449 Connector (Black Box) -- Black 11 5 TXC + Green 10 23 -- Black 13 8 RXC + Blue 12 26 TXC RXC -- Black 8 4 TXD + Yellow 7 22 -- Black 4 9 CTS + Brown 3 27 Ground Drain Wires 2 19, 20, 37 Jumper Wire (0.25 mm2 24 AWG) White 7 TO 12 Jumper Wire (0.25 mm2 24 AWG) White 25 TO 30 TXD CTS RS3: Service Quick Reference Guide PeerWay Interface SQ: 8-6 HIA Status Screen Field Definitions Definition Item NRoute Point-to-point messages routed across this HIA. RCount Messages received directly from the partner HIA. XCount Messages transmitted. ICount Level 3 direct communication interrupts. RTic TIC messages received directly from the partner HIA. RDist Distance information messages received. RNode Node/type information messages received. RPoint Point-to-point messages received. RAck ACK direct messages received (piggybacked on HIA partner message) RStat Partner HIA direct communication status messages received. MaxHop Messages discarded for taking more than the maximum number of hops. DupRout Duplicate route messages (a message ID with the same, or higher, content has been seen) NoPath ReQueue Messages where this HIA does not know the current path to the destination node. Messages requeued for transmission on another path. CRC Messages with bad Cyclical Redundancy Check received from partner HIA. Abort Direct messages aborted. Size Number of messages received with size errors. BCount Number of messages received with byte count errors. Overrun Number of messages received with overrun errors. (scaled x1) Number of messages received with gross transmit communications timeouts. (scaled x200) 403 means 2 transmit timeouts and 3 overrun errors. XToss Transmit messages toss for debugging. (continued on next page) RS3: Service Quick Reference Guide PeerWay Interface SQ: 8-7 HIA Status Screen Field Definitions (continued) Item RToss TimeOut Definition Received messages toss for debugging. Transmit queue timeouts. TicLost TIC messages lost (unacknowledged). LnkLost LINK messages lost (unacknowledged). RNack Not acknowledged responses received from the partner HIA. RBusy Buffer busy responses received. REnq Status enquiries received from partner HIA. BadSeq Bad message sequence number ID for messages between HIAs. XBusy Busy responses sent to partner HIA (HIA direct buffers busy). XEnq Status enquiries sent to partner HIA. RS3: Service Quick Reference Guide PeerWay Interface SQ: 8-8 MicroVAX-PeerWay Marshaling Panel (MicroVAX II) . . . . . . . . . . . . . . . . . . . . . . . . . . . . . . . . . . . . . 1984--2533--0001 (MicroVAX 3000) . . . . . . . . . . . . . . . . . . . . . . . . . . . . . . . . . 1984--2622--0001 MicroVAX/PeerWay Interface Marshaling Panel LEDs LED Description B1 (RED) Indicates the condition of the CPU card. (Board 1) B2 (RED) Indicates the condition of the PeerWay Interface card. (Board 2) TXA (YELLOW) Indicates transmission of data to PeerWay A. Blinks when data is sent. TXB (YELLOW) Indicates transmission of data to PeerWay B. Blinks when data is sent. RXA (YELLOW) Indicates data received from PeerWay A. Blinks when data is received. RXB (YELLOW) Indicates data received from PeerWay B. Blinks when data is received. RS3: Service Quick Reference Guide PeerWay Interface SQ: 8-9 VAX QBUS Interface Circuit Cards: QBUS Board 1 . . . . . . . . . . . . . . . . . . . . . . . . . . . . . . . . . . . 1984--3261--0002 . . . . . . . . . . . . . . . . . . . . . . . . . . . . . . . . . . . . . . . . . . . . . . . . . . 1984--2507--000x QBUS Board 2 . . . . . . . . . . . . . . . . . . . . . . . . . . . . . . . . . . . 1984--2510--0001 MicroVAX/PeerWay Interface Circuit Card Requirements Item Board 1 (CPU Card) 1984--3261--0002 1984--2507--000x Board 2 (PeerWay Interface Card) 1984--2510--0001 5 VDC current 4A 1.5 A 12 VDC current ------ 700 mA Total Watts 20 W 15.9 W AC bus loads 1 AC load 0 AC load DC bus loads 1 DC load 0 DC load Board 1 Jumper Settings Jumper Setting HD1 2--3 (1984--2507--000x board only) Factory setting, do not move. HD2 2--3 Factory setting, do not move. HD4--HD8 See text for data I/O Space Code, determines the base address used. HD13--HD18 See text for data Memory Identification, first or second memory window. HD29--HD30 RS3: Service Quick Reference Guide Function Not used. PeerWay Interface SQ: 8-10 1 2 3 HD18 HD18 HD17 HD17 HD16 HD16 HD15 HD15 HD14 HD14 HD13 HD13 4 Jumper position to use the first memory window. 1 2 3 4 Jumper position to use the second memory window. Board 1 Memory Identification Jumper Positions RS3: Service Quick Reference Guide PeerWay Interface SQ: 8-11 Base address 7 6 6 0 2 0 This digit is determined by jumpers HD4 and HD5. HD5 is the most significant digit. This digit is determined by jumpers HD6, HD7, and HD8. HD6 is the least significant digit and HD8 is the most significant digit. The 3--4 jumper position represents a 0 value. The 2--3 jumper position represents a 1 value. 2 1 3 4 Never use the 1--2 jumper position. HD4 HD4 HD5 HD5 HD6 HD6 HD7 HD7 HD8 HD8 1 2 3 4 This is the jumper position of the shipped board and represents 766020 octal. 1 2 3 4 This jumper position represents 766520 octal. HD5 is set to 1, HD4 is set to 0, giving 100 binary or 4 octal. HD8 is set to 1, HD7 to 0, and HD8 to 1, giving 101 binary or 5 octal. Board 1 I/O Space Code Jumper Positions RS3: Service Quick Reference Guide PeerWay Interface SQ: 8-12 Board 2 LEDs LED Indications Mode Power on, but not yet booted; board reset The bottom two LEDs alternate on and off and the bottom yellow LED is steady on. Diagnostics The bottom red LED is steady on. The yellow LEDs blink as diagnostics are run. Running NOTE: The green LED is steady on. The yellow LEDs blink as indicated above. The PeerWay address is the sum of the jumper values plus 1. Board 2 PeerWay Address Jumpers Jumper Value at 1--2 Value at 2--3 J1 1 0 J2 2 0 J3 4 0 J4 8 0 J5 16 0 RS3: Service Quick Reference Guide PeerWay Interface SQ: 8-13 Diogenes Interface TI Communications Card . . . . . . . . . . . . . . . . . . . . . . . . . 1984--0408--0001 RS-232 connection Current loop connection Diogenes TI Comm Card Jumpering RS3: Service Quick Reference Guide PeerWay Interface SQ: 8-14 RNI . . . . . . . . . . . . . . . . . . . . . . . . . . . . . . . . . . . . . . . . . . . . . . . . . 10P53330001 NOTE: The RNI Fan assembly (10P53910001) plugs into jack J4 on the RNI power supply board. The fan is the only field-replaceable component of the RNI. RNI LEDs LED Color HW GOOD Green HW BAD Red COMM Yellow Blinks when internal communications occur in normal operation. PW A/B Yellow ON when PeerWay A is active. OFF when PeerWay B is active. Meaning The hardware has passed all diagnostic tests and is running normally. The hardware has failed one or more diagnostic tests. The RNI is not operating. Indicates failure of a diagnostic test if the red LED is ON and this LED flashes. The number of flashes indicates the failed test. ERROR Yellow TMSTR Yellow 1 2 3 4 5 6 7 8 9 10 11 12 CPU ROM CRC Memory Controller Main Memory 68302 Static Memory Main Memory Size TRAP Exceptions TEA Exceptions Read/Write Latch Real Time Clock Watchdog Interrupt Ethernet Loopback ON if the RNI is the PeerWay Tick-Master. RS3: Service Quick Reference Guide PeerWay Interface SQ: 8-15 RNI Switches Meaning Switch RESET Resets and reboots the RNI RNI Connectors Connector CONSOLE/ SERIAL PORT 1 Meaning Connection for ASCII terminal. RNI Jumper Jumper Setting HD1 10BASE2 The 10Base2 Ethernet connector is enabled. ETHERNET 10BASET The 10BaseT Ethernet connector is enabled. Function RNI Fuse Fuse FRSI Part No. Littelfuse Part No. Bussman Part No. Characteristics F1 G50382--0021 273003 MSF 034.4224 2 Amp Plug-in (On the Power Supply card) RS3: Service Quick Reference Guide PeerWay Interface SQ: 8-16 RS3: Service Quick Reference Guide PeerWay Interface SQ:Index-1 RS3t Service Quick Reference Guide Index Numbers 1012 V0 0444 AA, 7-66 1022 A0 0242 AA, 7-66 1026 A0 0242 AA, 7-66 1032 H0 0242 AA, 7-66 1034 H0 0242 AA, 7-66 1072 D3 0510 AA, 7-66 1072 F3 0510 AA, 7-66 10P 50340001, 7-74 5037000x, 7-68 5040000x, 6-22, 6-25, 6-27 5049000X, 7-72 50842004, 5-11 5087000x, 6-10 50930001, 4-6 50960001, 4-6 52700001, 7-45 52760001, 4-2 52790001, 4-2 52800002, 5-20 5285000x, 5-9 5296000x, 6-2 53190004, 7-63 5320000x, 7-26 5324000x, 5-10 53330001, 8-14 5349000x, 7-56 53520006, 7-51 53550006, 7-51 53910001, 8-14 54040004, 7-59 54080004, 7-61 5409000x, 3-13 54440002, 7-8 RS3: Service Quick Reference Guide 54470002, 7-11 54500005, 7-10 54530001, 7-4 54560001, 7-4 5477000x, 7-52 54850001, 7-29 54880001, 7-27 5503000x, 3-13 5527001x, 5-45 5645000x, 3-9 5658000x, 3-5 5662000x, 3-3 5664000x, 3-8 5665000x, 5-20 5685000x, 5-27 57010001, 3-12 57140008, 5-47 57240002, 7-10 57560001, 3-12 57700005, 7-59 1216/CW--ROS4, 7-65 12P 0236X012, 3-4 0238X012, 3-4 0239X012, 3-4 1822 C0 0030 CC, 7-65 1842 C0 0030 CC, 7-65 1862 L0 0060 CC, 7-65 1872 L0 0060 WW, 7-65 1882 L0 0060 UU, 7-65 1882 L0 0060 WW, 7-65 1984-0023--000x, 6-2 0298--000x, 3-5 0303--000x, 3-3 0317--000x, 5-36 0359--000X, 2-4 Index SQ:Index-2 0390--000x, 0393--000x, 0408--0001, 0488--000x, 0489--000x, 0496--000x, 0510--000x, 0514--000x, 0543--000x, 0744--000x, 1002--000x, 1011--000x, 1045--000x, 1046--000x, 1050--000x, 1053--000x, 1061--000x, 1064--0001, 1089--000x, 1137--000x, 1140--0001, 1147--000x, 1161--0009, 1167--000x, 1175--000x, 1191--000x, 1192--000x, 1193--000x, 1194--000x, 1224--000x, 1240--000x, 1249--000x, 1264--000x, 1273--000x, 1283--000x, 1288--000x, 1304--000x, 1325--000x, 1334--000x, 1336--000x, 1371--000x, 1374--000x, 1394--000x, 1402--000x, 1432--000x, 1439--000x, 1442--000x, 1445--000x, 1448--000x, 1460--000x, 1463--000x, 1469--000x, 3-8 3-10 8-13 4-2 4-2 4-2 5-28 4-8 5-34 5-38 5-17 5-50 5-39 3-5 5-19 5-18 5-47 5-49 3-11 5-41 5-52 5-56 5-46 5-56 7-18 4-4 4-4 4-5 4-5 6-20 6-10 6-22, 3-15 7-34 3-7 7-19 7-22 7-33 7-36 7-18 6-22, 6-22 7-31 6-4 6-8 6-22, 6-22, 6-22 6-10 7-22 7-31 7-36 6-32 6-32 6-32 6-32 RS3: Service Quick Reference Guide 1483--000x, 1490--000x, 1494--000x, 1502--000x, 1505--000x, 1525--000x, 1540--0009, 1547--000x, 1594--000x, 1598--000x, 1631--000x, 1632--000x, 1634--000x, 1653--000x, 1693--000x, 1782--000x, 1803--000x, 1872--000x, 1921--000x, 1927--000x, 1928--000x, 1970--000x, 1975--000x, 1989--000x, 2107--000x, 2120--000x, 2122--000x, 2137--000x, 2154--000x, 2298--000x, 2307--000x, 2321--000x, 2347--000x, 2372--000x, 2386--000x, 2402--000x, 2409--000x, 2412--000x, 2441--000x, 2456--000x, 2457--000x, 2458--000x, 2483--000x, 2486--000x, 2491--000x, 2494--000x, 2500--000x, 2503--0001, 2507--000x, 2510--000x, 2518--000x, 2519--000x, 6-20 7-34 6-22, 6-32 6-4 6-8 7-36 5-46 5-59 6-10 6-20 5-5 5-6 5-4 2-6 5-10 5-15 5-26 5-16 5-15 5-27 5-20 5-8 5-9 5-27 5-47 5-47 5-47 5-47 2-5 3-5 5-20 5-7 6-16 5-4 5-4 7-27 7-26 7-32 7-29 7-11, 7-24 7-24 7-24 7-10 7-20 7-5 7-6 6-22, 6-30 5-48 8-9 8-9 7-8 7-10 Index SQ:Index-3 2526--000x, 7-3 2533--0001, 8-8 2543--000x, 7-4 2551--000x, 7-7 2552--000x, 7-39 2576--000x, 7-18 2662--0001, 8-8 2662--000x, 5-9 2731--000x, 7-15 2759--000x, 5-47 2780--000x, 5-20 2837--000x, 5-25 2844--000x, 5-7 2871--000x, 5-8 2889--000x, 5-11 2889--x00x, 5-11 2891--000x, 2-5 3023--000x, 3-9 3038--000x, 5-7 3048--000x, 6-2 3100--000x, 5-20 3202--0010, 5-45 3211--000x, 4-4, 4-5 3214--000x, 4-4, 4-5 3222--x00x, 5-11 3261--0002, 8-9 3278--000x, 7-41 3289--000x, 5-27 3301--0001, 5-52 3318--000x, 5-31 3389--000x, 5-27 3500--000x, 5-20 3505--000x, 6-6 4064--000x, 6-10 4068--000x, 6-22, 6-27 4080--000x, 7-51 4121--000x, 7-48 4124--000x, 7-48 4127--000x, 7-43 4164--000x, 6-10 4167--000x, 7-50 4205--000x, 7-39 4282--000x, 7-47 4302--000x, 3-12 4329--000x, 3-14 4344--000x, 7-42 4383--000x, 7-54 4398--000x, 7-58 4414--000x, 7-59 4418--000x, 7-61 4 MEG NV BUBBLE MEMORY, 6-20 RS3: Service Quick Reference Guide 4--20 MUX MARSHALLING PANEL, 7-24 80S, 5-20 A AC Distribution Block, 3-14 AC Entrance Panel, 3-3 AC/DC Power Supply With Battery Backup, 3-5 Without Battery Backup, 3-8 AC/DC Unregulated Power Supply, 3-11 Alarm, keyboard, 5-3 Alarm Output Board, 5-38 Analog Card Cage, 7-3 Analog FIC, 7-8 With Smart Transmitter Daughterboard, 7-10 Analog Input FIC, 7-31 Isolated, 7-33 Smart Transmitter, 7-32 ANALOG INPUT NON-ISOLATED, 7-31 ANALOG MARSHALING PANEL, 7-24 Analog Output FIC Isolated, 7-36 Non-Isolated, 7-34 ANALOG OUTPUT ISOLATED, 7-36 ANALOG TRANSFER, 7-6 Analog Transfer Card, 7-6 B Battery Charger Card, 3-7 Bubble Memory. See NV Memory C cards cleaning, 2-8 removing and installing, 2-7 storing, 2-9 CC, 6-22 Character Graphics Video Generator, 5-49 Index SQ:Index-4 cleaner kit, tape drive, 2-5 cleaning floppy disk drives, 2-5 tape drives, 2-5 trackball, 2-6 cleaning cards, 2-8 COMM TERM PNL II, 7-39 COMM TERMINATION PNL, 7-39 Communications Connect Card II, 7-5 Communications Connect Card III, 7-4 Communications Connect Card IV, 7-4 Communications Connect Card V, 7-4 Communications Protocol RS-232, 8-2 RS-422, 8-2 X.25, 8-2 Conrac 7211, 5-16 Conrac 7241, 5-13 console Crash Dump screen, 1-22 Memory Dump screen, 1-23 off-line diagnostics, 1-17 Off-Line Diagnostic screen, 1-17 power-up diagnostics, 1-11 Console Crash Dump screen, 1-22 Console Off-Line Diagnostics screen, 1-17 Consoles, 5-1, 5-2 Contact Card Cage, 7-18 Contact FIC, 7-22 CONTACT FIELD TERMINATION, 7-19 Contact FlexTerm, 7-18 CONTACT FLEXTERM MOTHERBOARD, 7-18 CONTACT FLEXTERM MOTHERBOARD II, 7-18 CONTACT I/O, 7-22 Contact Marshaling Panel, 7-20 CONTACT MARSHALLING PANEL, 7-20 Contact Termination Board, 7-19 ControlFile, 6-1, 6-2 Card Cage, 6-2 Controller Processor, 6-22 CP, 6-10 NV Memory Bubble, 6-20 RAM, 6-16 Power Regulator 5 and 12 V DC, 6-8 RS3: Service Quick Reference Guide ControlFile Card Cage, 6-2 CONTROLFILE POWER REGULATOR, 6-8 ControlFile Power Regulator 5 V DC Only, 6-6 CONTROLFILE POWER REGULATOR 5V ONLY, 6-6 ControlFile Status screen, 1-36 Controller Processor MLC, 6-32 MPC, 6-30 MPC II, 6-27 MPC5, 6-25 MUX, 6-32 parts replacement, 6-22 PLC, 6-32 SSC, 6-32 Coordinator Processor. See CP CP, 6-10 CP-I, 6-10 CP-II, 6-10 CP-IV, 6-10 CP-IV+, 6-10 CRT Conrac, 5-13 Pedestal Command Console, 5-16 problems, 1-26 Sony, 5-13 D DC Distribution Block, 3-14 DC Output Card, 3-15 DC System Color Codes, 3-2 DC/DC Power Supply, 3-10 diagnosing, ControlFile PeerWay problem, 1-7 Diogenes Interface, 8-13 Direct Discrete Termination Panel, 7-43 Direct Discrete Termination Panel II, 7-45 Discrete Field Interface Module, 7-51 Discrete Termination Panel Direct, 7-43 Direct II, 7-45 High Density Isolated, 7-50 Isolated, 7-48 Multi-FIM, 7-47 DL3800, 5-31 DL4600, 5-34 Index SQ:Index-5 DPL24C, 5-28 dump, memory, 1-23 E EIGHT LINE COMM CONNECT, 7-5 Elcon I S Termination Panel, 7-65 Electrical Tap Box, 4-5 Enhanced Engineering Keyboard, 5-4 F Fiber Optic I/O Converter, 7-41 FIBER OPTIC REPEATER, 4-8 FIC Analog, 7-8 Analog Input, Smart Transmitter, 7-32 Analog input, Isolated, 7-33 Analog Output Isolated, 7-36 Non-Isolated, 7-34 Analog, Non-Isolated, 7-31 Contact, 7-22 Detail screen, 1-52 Field I/O Status screen, 1-46 Pulse I/O, 7-11 restoring redundant, 1-39 Status screen, 1-46 Temperature Input, 7-15 FIC 4--20 MA, 7-8 FIC Detail screen, 1-52 field definitions, 1-52 FIC NON-ISOLATED INPUT, 7-31 Field I/O Status screen, 1-46 Field Interface Module, Discrete. See FIM FIM Discrete, 7-51 MAI16 Input, 7-59 MAI32 Input, 7-63 MAIO Input, 7-59 MAIO Output, 7-61 MAO16 Output, 7-61 MDIO, 7-51 MDIOH, 7-51 MDIOL, 7-51 Multipoint Discrete I/O, 7-51 RS3: Service Quick Reference Guide FIM Detail screen, 1-52 FIM Status screen, 1-46 Floppy Disk Drive 3.5 Inch, 5-25 5.25 Inch, 5-26 floppy disk drive, cleaning, 2-5 Floppy Disk Power Supply, 5-19 Floppy Drive Cleaner Kit, 2-5 Floppy Interface (SCSI), 5-18 Fujitsu DL3800, 5-31 DL4600, 5-34 DPL24C, 5-28 G G12243--00xx, 7-21 G12918--000X, 2-4 H Hard Disk Drive, 5-20 80S, 5-20 IBM Deskstar 540, 5-20 LPS 105S, 5-20 LPS 170S, 5-20 LPS 270S, 5-20 Q280, 5-20 Q540, 5-20 HIA, 8-5 HIGH DENSITY ISOLATED DISCRETE TERMINATION PANEL, 7-50 High Density Isolated Discrete Termination Panel, 7-50 Highway Interface Adapter. See HIA I I/O, scanning rates, 7-38 IBM Deskstar, 540, 5-20 Input/Output, 7-1 INTERFACE RS-422--RS-232, 7-27 INTERFACE RS-422--RS-422, 7-29 Isolated Discrete Termination Panel, 7-48 ISOLATED INPUT, 7-33 ISOLATED OUTPUT FIC, 7-36 ISOLATED OUTPUT FIC 0--20 MA, 7-36 Index SQ:Index-6 J Joystick, 5-7 K Keyboard Enhanced Engineering, 5-4 Joystick, 5-7 Main Keyboard/Trackball, 5-4 Option, 5-6 Touchpad, 5-7 Trackball, 5-5 Keyboard Alarm, 5-3 Keyboard Electronics Board, 5-8 Keyboard Interface, 5-11 Pedestal Command Console, 5-15 keyboard problems, 1-26 L Loop Power Module, 7-58 LPM, 7-58 LPS 105S, 5-20 170S, 5-20 270S, 5-20 M Magnetic Tape Drive, 5-27 Scorpion 5945C, 5-27 Scorpion 5945S, 5-27 Tandberg 5623, 5-27 Viper 2060S, 5-27 Viper 2150S, 5-27 magnetic tape drive, cleaner kit, 2-5 MAI16 Input FIM, 7-59 MAI32 Input FIM, 7-63 MAI32 Termination Panel, 7-56 Main Keyboard/Trackball, 5-4 Main Keyboard/Trackball/Option, 5-4 maintenance, 2-2 MAIO Input FIM, 7-59 MAIO MTL IS Analog Termination Panel, 7-74 RS3: Service Quick Reference Guide MAIO MTL IS TERMINATION PANEL, 7-74 MAIO Output FIM, 7-61 MAIO Termination Panel, 7-54 MAIO16 Termination Panel, 7-52 MAO16 Output FIM, 7-61 Mark 1 Remote Power Supply, 3-13 MDIO, 7-51 MDIO MTL IS ISOLATOR BARRIERS TERMINATION PANEL B, 7-72 MDIO MTL IS ISOLATOR BARRIERS TERMINATION PANEL A, 7-68 MDIO MTL IS Termination Panel, 7-68 MDIO MTL IS Termination Panel B, 7-72 MDIOH, 7-51 MDIOL, 7-51 memory, dump, 1-23 Memory Dump screen, 1-23 Memory View screen, 1-24 field definitions, 1-24 Menu Confidence screen, 1-26 MicroVAX-PeerWay Marshaling Panel MicroVAX 3000, 8-8 MicroVAX II, 8-8 MiniConsole, SCSI, 5-18 MLC, 6-22, 6-32 Monochrome Video Generator, 5-17 MPC, 6-22, 6-30 MPC CONTACT FLEXTERM MOTHERBOARD, 7-18 MPC II, 6-27 MPC5, 6-25 MPCII, 6-22 MTCC Remote Power Supply, 3-9 MTL 4014, 7-69 4021, 7-69 4023, 7-69 4025, 7-69 4041B, 7-74 4041P, 7-74 4045B, 7-74 4046P, 7-74 IS Analog Termination Panel, 7-74 IS Termination Panel A, 7-68 IS Termination Panel B, 7-72 Multi-FIM Discrete Termination Panel, 7-47 MULTI-FIM TERMINATION PANEL, 7-47 Index SQ:Index-7 MULTI-STRATEGY MARSHALLING PANEL, 7-24 Multipoint Analog I/O. See MAIO Multipoint Discrete I/O FIM, 7-51 Multitube Command Console, 5-13 CRT, 5-13 MUX, 6-22, 6-32 MUX MARSH PANEL, 7-24 MUX Marshaling Panel Current, 7-24 RTD, 7-24 Voltage, 7-24 N Node Dump screen, 1-26 NON-ISO ANALOG OUTPUT, 7-34 NON-ISOLATED ANALOG OUTPUT, 7-34 Nonvolatile Memory. See NV Memory NV BUBBLE MEMORY, 6-20 NV MEMORY, 6-16 NV Memory Bubble, 5-56, 6-20 parts replacement, 5-55 RAM, 5-59, 6-16 O OBC, 7-7 OI 68000, 5-47 OI 68020, 5-46 OI 68040, 5-45 OI Bubble Memory, 5-56 OI Card Cage, troubleshooting, 1-27 OI NV RAM, 5-59 OI Power Supply, 5-41 OI Processor 6800, 5-47 68020, 5-46 68040, 5-45 parts replacement, 5-43 OI Remote Power Supply, 3-5 Optical Isolator Modules, 7-21 Optical Repeater/Attenuator, 4-8 Optical Tap Box, 4-4 Option Keyboard, 5-6 Output Bypass Card, 7-7 RS3: Service Quick Reference Guide P Pedestal Command Console CRT, 5-16 Keyboard Interface, 5-15 PeerWay, 4-1, 4-2 PEERWAY BUFFER, 6-4 PeerWay Buffer, 6-4 PeerWay Extender, 4-6 PeerWay Interface, 5-39, 8-1 PeerWay Tap A, 4-2 PeerWay Tap B, 4-2 Pixel Graphics Video Generator, 5-48 PLC, 6-22, 6-32 PLC FlexTerm, 7-26 Port I/O Card RS-422/RS-422, 7-29 RS422/RS232, 7-27 Power, 3-1, 3-2 Power Supply AC/DC Unregulated, 3-11 AC/DC W/O Battery Backup, 3-8 AC/DC With Battery Backup, 3-5 DC/DC, 3-10 MTCC Remote, 3-9 OI, 5-41 OI Remote, 3-5 Remote I/O, 3-12 Remote OI, 3-12 System Power Supply Unit, 3-4 Power supply, Mark 1 Remote, 3-13 Printer Fujitsu DL3800, 5-31 Fujitsu DL4600, 5-34 Fujitsu DPL24C, 5-28 Interface, 5-50 TI 810, 5-36 Printer Interface, 5-50 problem reporting terms, 1-2 PULSE I/O, 7-11 Pulse I/O FIC, 7-11 PX, 4-6 Q Q280, 5-20 Q540, 5-20 QBI, 8-8 QBUS Board, 8-9 QBUS TO PEERWAY INTERFACE, 8-9 Index SQ:Index-8 R Remote Communications Termination Panel, 7-39 Remote I/O Power Supply, 3-12 Remote OI Power Supply, 3-12 Remote Termination Panel, Standard, 7-42 removing and installing cards, 2-7 restore operations, redundant FICs, 1-39 RNI, 8-14 Fan Assembly, 8-14 RPQNA, 8-8 RS-232 Asynchronous Communications Protocol, 8-2 RS-422 Asynchronous Communications Protocol, 8-2 RS-422/RS-232 Port I/O Card, 7-27 RS-422/RS-422 Port I/O Card, 7-29 RTD MUX MARSHALLING PANEL, 7-24 S Scanning Rates, I/O, 7-38 scheduled maintenance, 2-2 Scorpion 5945C, 5-27 5945S, 5-27 screen Console Crash Dump, 1-22 ControlFile Status, 1-36 FIC Detail, 1-52 FIC Status, 1-46 Field I/O Status, 1-46 FIM Detail, 1-52 FIM Status, 1-46 Memory Dump, 1-23 Memory View, 1-24 Menu Confidence, 1-26 Node Dump, 1-26 Off-Line Diagnostics, 1-17 SCSI, 5-52 Smart Transmitter Daughterboard Kit, 7-10 RS3: Service Quick Reference Guide SMART TRANSMITTER OPTION, 7-10 SMART XMTR FIC, 7-32 Sony CRT, 5-13 SSC, 6-22, 6-32 STANDARD REMOTE TERMINATION PANEL, 7-42 Standard Remote Termination Panel, 7-42 storing cards, 2-9 System Power Supply Unit, 3-4 T Tandberg, 5623, 5-27 Tap Block Set, 4-2 Tap Box Electrical, 4-5 Optical, 4-4 PeerWay Extender, 4-6 PX, 4-6 Twinax, 4-2 tape drive, cleaning, 2-5 Tape Drive Head Cleaner, Refill Kit, 2-5 TC/RTD FIC, 7-15 Temperature Input FIC, 7-15 Termination Panel MAI32, 7-56 MAIO, 7-54 MAIO16, 7-52 terms, 1-2 TI 810, 5-36 TI Communications Card, 8-13 Touchpad, 5-7 Trackball Assembly, 5-5 Trackball Electronics Board, 5-9 Trackball Keyboard cleaning, 2-6 replacing trackball, 2-6 Trackball Keyboard Replacement Subassembly, 5-10 troubleshooting OI Card Cage problems, 1-27 Twinax PeerWay cables, 1-9 Twinax PeerWay, troubleshooting cables, 1-9 Twinax PeerWay Tap Block Set, 4-2 Index SQ:Index-9 V VAX QBUS Interface, 8-9 Video Generator Character Graphics, 5-49 Pixel Graphics, 5-48 Viper 2060S, 5-27 2150S, 5-27 VOLTAGE MUX MARSHALLING PANEL, 7-24 RS3: Service Quick Reference Guide W Wipe Bubble procedure, 1-37 X X.25 Communications Protocol, 8-2 Index SQ:Index-10 RS3: Service Quick Reference Guide Index