1
XStudio 3
© Copyright 2003-2015 C-R Media All Rights Reserved.
XStudio 3
© Copyright 2003-2015 C-R Media All Rights Reserved.
All rights reserved. No parts of this work may be reproduced in any form or by any means - graphic, electronic, or
mechanical, including photocopying, recording, taping, or information storage and retrieval systems - without the
written permission of the publisher.
Products that are referred to in this document may be either trademarks and/or registered trademarks of the
respective owners. The publisher and the author make no claim to these trademarks.
While every precaution has been taken in the preparation of this document, the publisher and the author assume no
responsibility for errors or omissions, or for damages resulting from the use of information contained in this document
or from the use of programs and source code that may accompany it. In no event shall the publisher and the author be
liable for any loss of profit or any other commercial damage caused or alleged to have been caused directly or
indirectly by this document.
Printed: February 2015 in Eden Prairie, MN USA.
Publisher
Rich Habedank
Printed
February 2015 in Eden Prairie,
MN USA
Special thanks to:
All those who have offered insights and suggestions for
enhancement of this product.
Contents
3
Table of Contents
Part I Welcome to XStudio!
8
1 Key Features................................................................................................................................... 9
2 What's New ...................................................................................................................................
in XStudio
11
3 Warranty & License
...................................................................................................................................
Agreement
12
Part II System Requirements & Installation
16
1 System Requirements
................................................................................................................................... 16
2 Installing XStudio
................................................................................................................................... 17
Part III Configuring XStudio
20
1 General Settings
................................................................................................................................... 20
2 Setting up Stations
................................................................................................................................... 27
3 Audio Properties
................................................................................................................................... 32
4 Cart Categories
................................................................................................................................... 39
5 User Interface
...................................................................................................................................
Settings
43
Part IV Operation - Using XStudio
48
1 The XStudio...................................................................................................................................
Main Display
50
2 Audio Playback
................................................................................................................................... 51
3 Hot Buttons................................................................................................................................... 57
4 Log Editing ...................................................................................................................................
& Validation
63
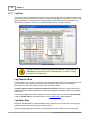
Opening a Log
.......................................................................................................................................................... 63
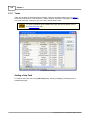
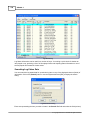
Editing a Log.......................................................................................................................................................... 65
Working with
.........................................................................................................................................................
Edit Dialogs
68
Functionality Common
.........................................................................................................................................
to All Edit Dialogs
69
Blank Line Dialog
......................................................................................................................................... 74
Spot (Cart) Dialog
......................................................................................................................................... 74
Load Directive Dialog
......................................................................................................................................... 76
Load Window/Execute
.........................................................................................................................................
Function Dialog
77
Log Note Dialog......................................................................................................................................... 78
Open Avail Insert
......................................................................................................................................... 78
Play Cart Dialog......................................................................................................................................... 79
Program Title Dialog
......................................................................................................................................... 80
Saving a Log .......................................................................................................................................................... 81
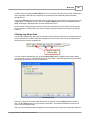
Changing Log..........................................................................................................................................................
Appearance
81
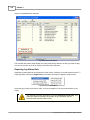
Searching a Log
.......................................................................................................................................................... 86
Copy and Paste
..........................................................................................................................................................
Commercials
86
Using the Inventory
.......................................................................................................................................................... 87
Printing Logs.......................................................................................................................................................... 90
Emergency Logs
.......................................................................................................................................................... 92
Log Validation
.......................................................................................................................................................... 93
© Copyright 2003-2015 C-R Media All Rights Reserved.
3
4
XStudio 3
Cart Length
.........................................................................................................................................................
Checking
95
Part V Reference
98
1 Automation ...................................................................................................................................
Database Maintenance
98
Common Table
..........................................................................................................................................................
Display Functionality
98
Work Stations
.......................................................................................................................................................... 105
External Resources
.......................................................................................................................................................... 106
Input Relay
.........................................................................................................................................................
Lock-Out Dialog
112
Actions
.......................................................................................................................................................... 114
Action Edit
.........................................................................................................................................................
Dialog
116
Embedding
.........................................................................................................................................................
an Action in a Cart
117
Tasks
.......................................................................................................................................................... 120
Scheduled Events
.......................................................................................................................................................... 123
Event Properties
.........................................................................................................................................................
Dialog
124
Log Data .......................................................................................................................................................... 126
Log Status
.........................................................................................................................................................
Dialog
127
Log Splice
.........................................................................................................................................................
Comparison Dialog
131
Music Data .......................................................................................................................................................... 134
Exporting
.........................................................................................................................................................
Data from your Music Scheduling System
137
Exporting MusicMaster
......................................................................................................................................... 137
MusicMaster DOS
...................................................................................................................................
Export
143
Exporting POWERGOLD
......................................................................................................................................... 148
Exporting Selector
......................................................................................................................................... 149
Setup Auto-Update
.........................................................................................................................................................
Music Data
150
2 Database Reference
................................................................................................................................... 153
Database Files
..........................................................................................................................................................
Location
153
Database Tables
.......................................................................................................................................................... 153
Actions Table
......................................................................................................................................................... 153
Events Table
......................................................................................................................................................... 154
External.........................................................................................................................................................
Devices Table
155
Log Data.........................................................................................................................................................
Table
155
Music Data
.........................................................................................................................................................
Table
156
System Data
.........................................................................................................................................................
Table
157
Tasks Table
......................................................................................................................................................... 157
Work Stations
.........................................................................................................................................................
Table
158
Database Sharing
.......................................................................................................................................................... 158
Inventory Manager
..........................................................................................................................................................
Database
160
InvMgr Files
.........................................................................................................................................................
Location
160
InvMgr Database
.........................................................................................................................................................
Tables
160
Inventory Data .........................................................................................................................................
Table
161
System Data Table
......................................................................................................................................... 161
Sharing .........................................................................................................................................................
the InvMgr Database
162
3 Data Navigators
................................................................................................................................... 163
4 Keyboard Shortcuts
................................................................................................................................... 164
5 Log Directives
................................................................................................................................... 168
6 Operating Modes
................................................................................................................................... 174
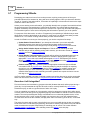
7 Programming
...................................................................................................................................
XStudio
178
Satellite Automation
..........................................................................................................................................................
Programming Example
179
Satellite .........................................................................................................................................................
Programming - Special Events
185
Local Automation
..........................................................................................................................................................
Programming Example
188
8 Task Reference
................................................................................................................................... 192
© Copyright 2003-2015 C-R Media All Rights Reserved.
Contents
5
Properties Common
..........................................................................................................................................................
to All Tasks
193
Banner Message
..........................................................................................................................................................
Task
197
Remap Input..........................................................................................................................................................
Relays Task
199
Send Control
..........................................................................................................................................................
Command Task
204
Set Auto-Segue
..........................................................................................................................................................
Task
207
Set Clock Task
.......................................................................................................................................................... 208
Set Mode (Operating
..........................................................................................................................................................
Mode) Task
209
Set Voice Task
.......................................................................................................................................................... 210
Start Play Task
.......................................................................................................................................................... 211
Using Cart
.........................................................................................................................................................
Macro Characters
213
Stop Play Task
.......................................................................................................................................................... 216
Switcher Fade
..........................................................................................................................................................
Task
218
System Backup
..........................................................................................................................................................
Task
220
Timer Task .......................................................................................................................................................... 222
Update DOut..........................................................................................................................................................
Task
224
Update Switcher
..........................................................................................................................................................
Task
226
Use Existing..........................................................................................................................................................
Action Task
229
9 Using the Audio
...................................................................................................................................
Clipboard
231
10 Using the Cart
...................................................................................................................................
Distribution/Include List Panel
234
11 Using the Cart
...................................................................................................................................
Mask Edit Panel
235
Cart Masks Explained
.......................................................................................................................................................... 235
12 Using the Color
...................................................................................................................................
Customization Dialog
237
13 Using a Remote
...................................................................................................................................
Database
238
Database Server
..........................................................................................................................................................
List Maintenance
238
TCP/IP Port Information
.......................................................................................................................................................... 242
14 Using the XStudio
...................................................................................................................................
Cart Wall
244
Controlling the
..........................................................................................................................................................
Cart Wall Size & Position
245
Hot Button Toolbars
.......................................................................................................................................................... 245
Adjusting Button
..........................................................................................................................................................
Settings
246
Adjusting Page
..........................................................................................................................................................
(Tab) Settings
247
Clearing an Entire
..........................................................................................................................................................
Page of Buttons
247
Working with
..........................................................................................................................................................
Hot Button File Sets
248
15 Using the XStudio
...................................................................................................................................
Clock & Backtimer
250
About the XStudio
..........................................................................................................................................................
Backtimer
252
16 Using the XStudio
...................................................................................................................................
Intro Countdown Timer
255
17 Using the XStudio
...................................................................................................................................
Message Center
257
18 Using the XStudio
...................................................................................................................................
Music Search Dialog
260
19 Using the XStudio
...................................................................................................................................
Relay Queue Maintenance Dialog
265
20 Using the XStudio
...................................................................................................................................
Switcher Status Dialog
270
21 XEngine Reference
................................................................................................................................... 272
XEngine Configuration
.......................................................................................................................................................... 272
Using XEngine
.......................................................................................................................................................... 273
What's New ..........................................................................................................................................................
in XEngine
276
Part VI Troubleshooting
278
1 Audio Playback
...................................................................................................................................
Problems
279
2 AV When Starting
...................................................................................................................................
or Stopping XStudio
280
3 Problems Connecting
...................................................................................................................................
to the Host Audio Engine
280
© Copyright 2003-2015 C-R Media All Rights Reserved.
5
6
XStudio 3
XStudio Fails
..........................................................................................................................................................
to Connect to XEngine
281
XStudio Fails
..........................................................................................................................................................
to Connect to DCS or Maestro
281
4 Remote Database
...................................................................................................................................
Problems
283
Problems Connecting
..........................................................................................................................................................
to the Remote Database
283
Slow Database
..........................................................................................................................................................
Performance
283
5 Session Properties
................................................................................................................................... 285
6 Using Application
...................................................................................................................................
Event Logs
286
7 Vista, Windows
...................................................................................................................................
7 & WIndows 8 Notes
287
8 XStudio "Hangs"
...................................................................................................................................
on Shutdown
289
Part VII Contacting dcsTools.com
292
Part VIII Appendices
294
1 Registration
................................................................................................................................... 294
2 System Backup
...................................................................................................................................
and Restore
298
3 Remote Start
...................................................................................................................................
Interface
301
4 Companion...................................................................................................................................
Programs & Utilities
302
5 Using XStudio
...................................................................................................................................
with DCS or Maestro
303
6 List of Files................................................................................................................................... 304
7 Preferences
...................................................................................................................................
File Documentation
308
8 Generic Log
...................................................................................................................................
File Specification
326
ID Record Type
.......................................................................................................................................................... 328
Commercial..........................................................................................................................................................
Record Type
329
Directive Record
..........................................................................................................................................................
Type
330
Program Title
..........................................................................................................................................................
Record Type
333
Log Note Record
..........................................................................................................................................................
Type
333
Blank Record
..........................................................................................................................................................
Type
333
Generic Log..........................................................................................................................................................
Construction Guidelines
334
9 Audit File Specification
................................................................................................................................... 336
Fixed Length
..........................................................................................................................................................
Segment
337
Transaction
.........................................................................................................................................................
Types
338
Status Types
......................................................................................................................................................... 340
Variable Length
..........................................................................................................................................................
Segment
343
10 Revision History
................................................................................................................................... 344
Part IX Glossary of Terms
Index
350
355
© Copyright 2003-2015 C-R Media All Rights Reserved.
Welcome to XStudio!
Part
I
8
XStudio 3
XStudio is an easy-to-use, powerful system featuring multi-channel, multi-stream playback, multiple
user-selected operating modes, audio switcher control and user-defined actions for automatic task
execution. Tasks can be initiated from the broadcast log, in response to an audio switcher relay or from
the XStudio scheduled events table, providing maximum flexibility in automation control.
XStudio can be utilized in a number of ways:
A stand-alone audio playback system supporting live, local automation and basic satellite
modes of operation. Multiple XStudio work stations in the same facility can share centrally stored
audio files.
A portable playback system - for instance, on a laptop computer.
A supplemental playback system for secondary program services in HD radio.
An emergency playback system for use with a DCS™ or Maestro™ in the event of a system
failure.
Remotely control a DCS or Maestro system (in combination with rcServer).
If you're using an older DCS™ or Maestro™ system, XStudio is a great migration path! XStudio utilizes
the same logs (schedules) and audio files (.DAF files) as DCS and Maestro systems.
A Flexible, Powerful Audio Delivery System!
Utilizing a standard PC or laptop PC equipped with a standard Windows-compliant audio card, XStudio
can follow the log, playing audio in sequence, including audio overlap. A single audio output device is
used, with as many as three (3) streams of audio, mixed 1-to-1, playing simultaneously. This ensures
smooth audio overlap. XStudio also supports multi-channel audio cards and can use as many as four
(4) discreet outputs, each supporting three (3) streams of audio.
XStudio can be used to execute live, local automation and satellite programming formats, including
transitioning among these modes of operation for mixed formats. See the topic on programming
XStudio for an overview of concepts and specific examples.
XStudio works well with popular music scheduling and radio traffic systems. You can create logs
(program schedules) using your traffic system or in combination with your music scheduling system,
depending on your format and needs. You can also create and edit logs with XStudio's built-in log
editor or by using one of our log editing utilities.
Reconciling music and commercial content is easy, as XStudio automatically documents air play of
both scheduled and unscheduled elements.
Audio files can be located on the local hard drive in a single folder or can be played directly from a
network location. If XStudio is integrated with an existing DCS or Maestro system, the source audio
files would typically be played directly from the audio folder of an ACP server.
In addition to being a complete standalone system, XStudio is a cost-efficient solution for DCS or
Maestro users in need of either a portable or emergency audio playback system.
XStudio is supplied with XEngine, an audio playback server application that allows XStudio to be
operated independently as a stand-alone system. XStudio can also be used as a control system for a
host DCS or Maestro audio unit when combined with rcServer. In this case, the host DCS or Maestro
becomes the "audio engine".
Copyrights and Trademarks
Copyrights
Copyright © 2003-2015 dcsTools.com, C-R Media, KTC Technology, Ltd. All rights reserved
© Copyright 2003-2015 C-R Media All Rights Reserved.
Welcome to XStudio!
9
Portions copyright © Microsoft Corporation. All rights reserved.
Information in this document is subject to change without notice. The software described in this
document is furnished under a license agreement or nondisclosure agreement. The software
may be used or copied only in accordance with the terms of those agreements. No part of this
publication may be reproduced, stored in a retrieval system, or transmitted in any form or any
means electronic or mechanical, including photocopying and recording for any purpose other
than the purchaser’s personal use without the written permission of C-R Media.
C-R Media
8494 Saratoga Lane
Eden Prairie, MN 55347
USA
Trademarks
apt-X® is a registered trademark of APT - Applied Processing Technology, Belfast
DCS™ and Maestro™ are trademarks of WideOrbit, Inc., San Francisco, CA
(formerly Computer Concepts Corporation, Lenexa, KS, dMarc Broadcasting, Newport Beach,
CA and Google, Inc., Mountain View, CA)
Windows 95®, Windows 98®, Windows Me®, Windows NT®, Windows 2000®, Windows
XP®, Windows Server 2003®, Windows Vista®, Windows Server 2008®, Windows 7®,
Windows 8®, WIndows 8.1®, Windows Server 2012® and Windows Server 2012R2® are
registered trademarks of Microsoft Corporation.
Other brands and their products are trademarks or registered trademarks of their respective
holders and should be noted as such.
1.1
Key Features
XStudio offers a number of powerful features and delivers a reliable, simple-to-use audio delivery
system experience.
Execute a program log in sequence, including audio overlap, using any of 4 modes of
operation, including Live, Local Automation, Satellite and Emergency. XStudio's behavior,
including how it reacts to log directives, audio switcher input relays, etc., changes with each
mode, allowing you to choose the mode of operation that best suits your programming needs.
Modes can be manually changed on-the-fly or automatically with a log directive, user-defined
action or as a log-independent scheduled event.
Up to 4 channel outputs with up to three (3) audio files (streams) playing concurrently, mixed 1to-1, on each output deck. Play up to 12 streams of audio simultaneously!
Audio overlap, using the .DAF file AUX mark, for up to 3 elements per deck (triple-overlap).
PCM (linear) and MPEG 2 files supported standard, apt-X™ files supported with optional
decoder.
Sample rates of 16, 32, 44.1 and 48 KHz are supported.
Hot buttons - just click and play! Hot Buttons can also be used to initiate user-defined actions,
including setting operating mode, updating an audio switcher, etc. Each personality can create
unique sets of 300 buttons to completely personalize hot buttons.
Audio switcher control and input relay detection for most Broadcast Tools switchers, including
the SS8.2, ACS8.2, and SS16.4 models.
On-screen switcher status display with on-demand channel on/off control.
© Copyright 2003-2015 C-R Media All Rights Reserved.
10
XStudio 3
External device control via RS-232 interface. Send user-defined control data to an external
device.
Automated Tasks, including switcher updates, start/stop audio playback, set the clock, set
operating mode, relay outputs, precision timers and more. Tasks are grouped together as action
lists and can be nested for maximum flexibility. Each task is validated for mode of operation, day
and time of day for conditional execution, including time ranges and hour parts.
Use DCS or Maestro logs that you may already have prepared for use on-air, or create your own.
XStudio supports virtually all DCS and Maestro log directives and adds some of its own,
including Hard Sync.
User-configurable log display, including song title and artist information. You control what log
elements are displayed, their size, location, element color and font size!
Use existing DCS or Maestro audio files (*.DAF) or create your own, using dcsTools' XChange
and XTractor software. XStudio supports multi-cut carts, observing cut rotation and date
sensitivity, if enabled.
User options for Auto-Segue, Play through Directives and Wrap the Log that can be changed
on-the-fly.
User-selectable option to enforce cart dates.
A DCS/Maestro compatible audit data file is generated, documenting system performance.
Standard DCS and Maestro tools for reviewing audit data can be used, including our own
ezAudit and ezSuite.
Remote start functionality via a PC game port.
Drag and drop operation for moving audio items around on the log, including scrolling the log
view while dragging.
Drag and drop audio items (carts) from the station inventory to the log.
Copy and Paste audio items to and from the log.
Search the Log by cart number or description.
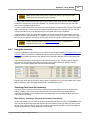
Hourly log content totals, calculated from the inventory (if used), along with directive segment
time totals. Directive segment totals, too.
Log Validation. Validation reports can be printed or saved to file.
Print logs, including print preview and selective printing of pages.
Inventory printing, including print preview and user-defined filtered inventory lists.
Integrated context-sensitive help in all editing dialogs.
© Copyright 2003-2015 C-R Media All Rights Reserved.
Welcome to XStudio!
1.2
11
What's New in XStudio
Here are the latest changes, enhancements and corrections to XStudio by version number and date.
For information on less-recent changes and enhancements, see the Revision History topic.
Version 3.4.0.450 - 02/05/2015
1. Enhancement. A new start-up option, Start Audio Engine, has been added. If enabled, XStudio will
check to see if XEngine is running at start-up and if not, offer to start XEngine.
2. Change. XStudio event logging has been changed somewhat to be more consistent in how event
entries are constructed and written to the daily event log. The change should improve readability of
the event log.
3. Fix. When in Live mode, XStudio would transition to the next-day log when Play Through
Directives was disabled and there were directives on the log beyond the last playable log element.
Now, XStudio will play the last element and stop. If Play Through Directives is enabled, XStudio will
behave as before, transitioning to the next-day log.
4. Fix. If a user unintentionally caused XStudio to transition to the next-day log and then manually
opened the correct log using the standard XStudio open log dialog, XStudio did not correctly reset
the current-day and next-day log dates.
© Copyright 2003-2015 C-R Media All Rights Reserved.
12
1.3
XStudio 3
Warranty & License Agreement
PLEASE READ THIS DOCUMENT CAREFULLY. BY INSTALLING AND USING THE SOFTWARE, YOU ARE AGREEING TO
BECOME BOUND BY THE TERMS OF THIS AGREEMENT. IF YOU DO NOT AGREE TO THE TERMS OF THE
AGREEMENT, PLEASE DO NOT INSTALL OR USE THE SOFTWARE.
This is a legal agreement between you and C-R Media. This Agreement states the terms and conditions upon which C-R Media
offers to license the software. Whether contained in the disk package or having been pre-loaded by C-R Media on the
machine's hard drive, together with all related documentation and accompanying items including, but not limited to, the
executable programs, drivers, libraries and data files associated with such programs (collectively, the "Software").
LICENSE
Grant of License. The Software is licensed, not sold, to you for use only under the terms of this Agreement. You own the disk
or other media on which the Software is originally or subsequently recorded or fixed; but, as between you and C-R Media (and,
to the extent applicable, its licensors), C-R Media retains all title to and ownership of the Software and reserves all rights not
expressly granted to you.
For Use on a Single Computer. You may use the Software only on a single computer by a single user at any one time. You
may transfer the machine-readable portion of the Software from one computer to another computer, provided that
(a) the Software (including any portion or copy thereof) is erased from the first computer, and
(b) there is no possibility that the Software will be used on more than one computer at a time.
Stand-alone Basis. You may use the Software only on a stand-alone basis, such that the Software and the functions it
provides are accessible only to persons who are physically present at the location of the computer on which the Software is
loaded. You may not allow the Software or its functions to be accessed remotely, or transmit all or any portion of the Software
through any network or communication line.
One Archival Copy. You may make one (1) archival copy of the machine-readable portion of the Software for backup purposes
only in support of your use of the Software on a single computer, provided that you reproduce on the copy all copyright and
other proprietary rights notices included on the originals of the Software.
No Merger or Integration. You may not merge any portion of the Software into, or integrate any portion of the Software with,
any other program, except to the extent expressly permitted by the laws of the jurisdiction where you are located. Any portion of
the Software merged into or integrated with another program, if any, will continue to be subject to the terms and conditions of
this Agreement, and you must reproduce on the merged or integrated portion all copyright and other proprietary rights notices
included on the originals of the Software.
Network Version. If you have purchased a "network" version of the Software, this Agreement applies to the installation of the
Software on a single "file server". It may not be copied onto multiple systems. Each "node" connected to the "file server" must
also have its own license of a "node copy" of the Software, which becomes a license only for that specific "node".
Transfer of License. You may transfer your license of the Software, provided that
(a) you transfer all portions of the Software or copies thereof,
(b) you do not retain any portion of the Software or any copy thereof, and,
(c) the transferee reads and agrees to be bound by the terms and conditions of this Agreement.
Limitations on Using, Copying, and Modifying the Software. Except to the extent expressly permitted by this Agreement or
by the laws of the jurisdiction where you acquired the Software, you may not use, copy or modify the Software. Nor may you
sub-license any of your rights under this Agreement.
Decompiling, Disassembling, or Reverse Engineering. You acknowledge that the Software contains trade secrets and other
proprietary information of C-R Media and its licensors. Except to the extent expressly permitted by this Agreement or by the
laws of the jurisdiction where you are located, you may not decompile, disassemble or otherwise reverse engineer the
Software, or engage in any other activities to obtain underlying information that is not visible to the user in connection with
normal use of the Software. In any event, you will notify C-R Media of any information derived from reverse engineering or such
other activities, and the results thereof will constitute the confidential information of C-R Media that may be used only in
connection with the Software.
TERMINATION
The license granted to you is effective until terminated. You may terminate it at any time by returning the Software (including
any portions or copies thereof) to C-R Media. The license will also terminate automatically without any notice from C-R Media if
you fail to comply with any term or condition of this Agreement. You agree upon such termination to return the Software
(including any portions or copies thereof) to C-R Media. Upon termination, C-R Media may also enforce any rights provided by
law. The provisions of this Agreement that protect the proprietary rights of C-R Media will continue in force after termination.
LIMITED WARRANTY
C-R Media warrants, as the sole warranty that the disks on which the Software is furnished will be free of defects, as set forth in
the Warranty Card or printed manual included with the Software. No distributor, dealer or any other entity or person is
authorized to expand or alter this warranty or any other provisions of this Agreement. Any representation, other than the
warranties set forth in this Agreement, will not bind C-R Media.
© Copyright 2003-2015 C-R Media All Rights Reserved.
Welcome to XStudio!
13
C-R Media does not warrant that the functions contained in the Software will meet your requirements or that the operation of
the Software will be uninterrupted or error-free. EXCEPT AS STATED ABOVE IN THIS AGREEMENT, THE SOFTWARE IS
PROVIDED AS-IS WITHOUT WARRANTY OF ANY KIND, EITHER EXPRESS OR IMPLIED, INCLUDING, BUT NOT LIMITED
TO, ANY IMPLIED WARRANTIES OF MERCHANTABILITY AND FITNESS FOR A PARTICULAR PURPOSE.
You assume full responsibility for the selection of the Software to achieve your intended results, and for the installation, use and
results obtained from the Software. You also assume the entire risk as it applies to the quality and performance of the
Software. Should the Software prove defective, you (and not C-R Media, or its distributors or dealers) assume the entire cost of
all necessary servicing, repair or correction.
This warranty gives you specific legal rights, and you may also have other rights, which vary from country/state to country/state.
Some countries/states do not allow the exclusion of implied warranties, so the above exclusion may not apply to you. C-R
Media disclaims all warranties of any kind if the Software was customized, repackaged or altered in any way by any third party
other than C-R Media.
LIMITATION OF REMEDIES AND DAMAGES
THE ONLY REMEDY FOR BREACH OF WARRANTY WILL BE THAT SET FORTH IN THE WARRANTY CARD OR PRINTED
MANUAL INCLUDED WITH THE SOFTWARE. IN NO EVENT WILL C-R MEDIA OR ITS LICENSORS BE LIABLE FOR ANY
INDIRECT, INCIDENTAL, SPECIAL OR CONSEQUENTIAL DAMAGES OR FOR ANY LOST PROFITS, LOST SAVINGS,
LOST REVENUES OR LOST DATA ARISING FROM OR RELATING TO THE SOFTWARE OR THIS AGREEMENT, EVEN IF
C-R MEDIA OR ITS LICENSORS HAVE BEEN ADVISED OF THE POSSIBILITY OF SUCH DAMAGES. IN NO EVENT WILL
C-R MEDIA'S LIABILITY OR DAMAGES TO YOU OR ANY OTHER PERSON EVER EXCEED THE AMOUNT PAID BY YOU
TO USE THE SOFTWARE, REGARDLESS OF THE FORM OF THE CLAIM.
Some countries/states do not allow the limitation or exclusion of liability for incidental or consequential damages, so the above
limitation or exclusion may not apply to you.
PRODUCT RETURNS
IF YOU MUST SHIP THE SOFTWARE TO C-R MEDIA OR AN AUTHORIZED C-R MEDIA DISTRIBUTOR OR DEALER, YOU
MUST PREPAY SHIPPING AND EITHER INSURE THE SOFTWARE OR ASSUME ALL RISK OF LOSS OR DAMAGE IN
TRANSIT.
U.S. GOVERNMENT RESTRICTED RIGHTS
All Software and related documentation are provided with restricted rights. Use, duplication or disclosure by the U.S.
Government is subject to restrictions as set forth in subdivision (b)(3)(ii) of the Rights in Technical Data and Computer Software
Clause at 252.227-7013. If you are sub-licensing or using the Software outside of the United States, you will comply with the
applicable local laws of your country, U.S. export control law, and the English version of this Agreement.
CONTRACTOR/MANUFACTURER
The Contractor/Manufacturer for the Software is:
C-R Media
8494 Saratoga Lane
Eden Prairie, MN 55347 USA
GENERAL
This Agreement is binding on you as well as your employees, employers, contractors and agents, and on any successors and
assignees. Neither the Software nor any information derived therefrom may be exported except in accordance with the laws of
the United States or other applicable provisions. The laws of the State of Minnesota govern this Agreement (except to the
extent federal law governs copyrights and federally registered trademarks). This Agreement is the entire agreement between us
and supersedes any other understandings or agreements, including, but not limited to, advertising, with respect to the
Software.
If any provision of this Agreement is deemed invalid or unenforceable by any country or government agency having jurisdiction,
that particular provision will be deemed modified to the extent necessary to make the provision valid and enforceable, and the
remaining provisions will remain in full force and effect.
For questions concerning this Agreement, please contact C-R Media at the address stated above. For questions on product or
technical matters, contact the C-R Media technical support center nearest you.
SPECIAL PROVISIONS APPLICABLE TO THE EUROPEAN UNION
If you acquired the Software in the European Union (EU), the following provisions also apply to you. If there is any
inconsistency between the terms of the Software License Agreement set out above and the following provisions, the following
provisions shall take precedence:
Decompilation.
You agree not for any purpose to transmit the Software or display the Software's object code on any computer screen or to
make any hard copy memory dumps of the Software's object code. If you believe you require information related to the inter
operability of the Software with other programs, you shall not decompile or disassemble the Software to obtain such
information, and you agree to request such information from C-R Media at the address listed above. Upon receiving such a
© Copyright 2003-2015 C-R Media All Rights Reserved.
14
XStudio 3
request, C-R Media shall determine whether you require such information for a legitimate purpose and, if so, C-R Media will
provide such information to you within a reasonable time and on reasonable conditions.
Limited Warranty.
EXCEPT AS STATED ABOVE IN THIS AGREEMENT, AND AS PROVIDED BELOW UNDER THE HEADING "STATUTORY
RIGHTS", THE SOFTWARE IS PROVIDED AS-IS WITHOUT WARRANTY OF ANY KIND, EITHER EXPRESS OR IMPLIED,
INCLUDING, BUT NOT LIMITED TO, ANY IMPLIED WARRANTIES OR CONDITIONS OF MERCHANTABILITY, QUALITY
AND FITNESS FOR A PARTICULAR PURPOSE.
Limitation of Remedy and Damages.
THE LIMITATIONS OF REMEDIES AND DAMAGES IN THE SOFTWARE LICENSE AGREEMENT SHALL NOT APPLY TO
PERSONAL INJURY (INCLUDING DEATH) TO ANY PERSON CAUSED BY C-R MEDIA'S NEGLIGENCE AND ARE
SUBJECT TO THE PROVISION SET OUT BELOW UNDER THE HEADING "STATUTORY RIGHTS".
Statutory rights.
Irish law provides that certain conditions and warranties may be implied in contracts for the sale of goods and in contracts for
the supply of services. Such conditions and warranties are hereby excluded, to the extent such exclusion, in the context of this
transaction, is lawful under Irish law. Conversely, such conditions and warranties, insofar as they may not be lawfully excluded,
shall apply. Accordingly nothing in this Agreement shall prejudice any rights that you may enjoy by virtue of Sections 12, 13, 14
or 15 of the Irish Sale of Goods Act 1893 (as amended).
General: the laws of the Republic of Ireland govern This Agreement.
The local language version of this agreement shall apply to Software acquired in the EU. This Agreement is the entire
agreement between us and you agree that C-R Media will not have any liability for any untrue statement or representation
made by it, its agents or anyone else (whether innocently or negligently) upon which you relied upon entering this Agreement,
unless such untrue statement or representation was made fraudulently.
© Copyright 2003-2015 C-R Media All Rights Reserved.
System Requirements &
Installation
Part
II
16
XStudio 3
In order to use XStudio successfully, certain hardware and Windows operating system requirements
must be met. You must also install the XStudio software on the PC, using an installation program.
This section documents the system requirements for XStudio and covers the process of installing,
updating and removing the XStudio software.
2.1
System Requirements
Here are the base hardware and operating system requirements to run XStudio:
Operating System: Windows 2000 Pro (SP4), Windows XP Pro, Vista, Windows 7 or Windows 8.
Vista is not recommended as the host operating system for XStudio. Internal
testing suggests performance under Vista is degraded compared to the other
supported operating systems.
CPU Speed: 1 GHz or greater
RAM Memory: 256 MB RAM or greater for Windows 2000 & XP Pro, 512MB (1GB recommended)
for Vista, Windows 7 & Windows 8.
VGA Display: A minimum of 800 x 600 resolution, 1024 x 768 or greater is highly recommended as
this resolution is necessary to display all four playback decks properly. A second monitor is desirable
if making extensive use of Cart Wall.
Audio Card: An audio card supported by the operating system - one playback channel as a
minimum. Two (2) or three (3) playback channels are recommended with a maximum of 4 physical
output channels supported.
If only a single audio device is present in the system, that device will also be the
one used by Windows to play system sounds. It is highly recommended that all
system sounds be disabled if the PC has just one audio device. This will
prevent unwanted sounds during audio playback.
Game Port: For use as the interface for remote starts (optional).
Default Print Device: You must have a default print device assigned. XStudio can produce printed
reports and lists and expects to have an available default printer. If you do not have a printer, you
can use one of the available non-printing devices like the Microsoft XPS Document Writer.
Disk Space: At least 40 MB free disk space for XStudio, audio engine and documentation files.
XStudio Database and Inventory Manager Database files may consume 100MB or more, depending
on the size of the audio inventory, music library size and number of Tasks, Actions and Scheduled
Events. Additionally, you must have sufficient available disk space to accommodate carts (audio
files) that are stored locally.
A 100 mbs or better LAN card (NIC): The OS’ TCP/IP client must be installed on the PC. XStudio
uses TCP/IP to communicate with the host audio server, whether it is the supplied XEngine or a host
DCS or Maestro connecting via rcServer.
To use XStudio, you need access to source audio files (.DAF files), either those used with a DCS or
Maestro system or created to meet the .DAF file specification, and optionally, the log files. This means
you need to be connected to the network (LAN) in which the DCS and/or Maestro units are running, if
integrating XStudio with an existing delivery system or if audio is stored on a file server. Be sure that
your system administrator has provided you the necessary access rights to these file locations. For
© Copyright 2003-2015 C-R Media All Rights Reserved.
System Requirements & Installation
17
logs, you will need both read and write access to save log files. For audio files, you need only have
read rights unless you wish to edit cart header information, which requires read and write privileges.
2.2
Installing XStudio
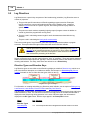
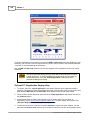
The XStudio installation program provides step-by-step instructions on every screen displayed during
the installation. Follow the instructions on each screen to install XStudio.
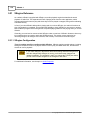
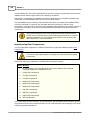
The standard XStudio installation does not install the support files needed for
playing back apt-X™ audio files, as apt-X decoding may not be needed. To
install the apt-X decoder files, select the Standard + apt-X Installation or the
Custom Installation option and ensure the Install apt-X Support component
is selected (checked).
Before you install
1. Close all other programs, including any anti-virus programs. Anti-virus programs in particular
may impede or completely disable your ability to install programs on your computer.
2. If you are installing on Windows 2000, Windows XP, Vista, Windows 7 or Windows 8, log on
to your computer with administrator privileges.
You must have administrator privileges to perform an installation or a software
update when running on Windows 2000 Pro, XP, Vista, Windows 7 or Windows
8.
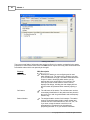
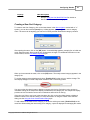
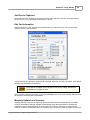
Installing XStudio
XStudio is distributed as a down-loadable installation program. The latest version of the software is
always available on our web site on the XStudio product home page and the general downloads page.
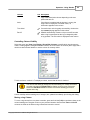
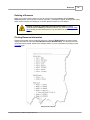
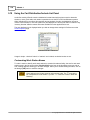
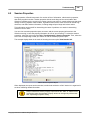
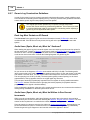
1. After you have downloaded the installation program to your computer, locate the setup
program, XStudio3Setup.exe, in the folder to which you downloaded the file. [DoubleClick] on the setup program to begin installation.
2. Follow the instructions on each screen to install the software.
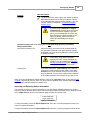
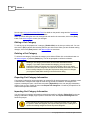
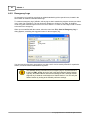
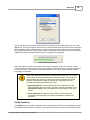
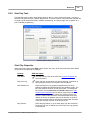
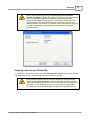
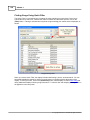
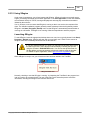
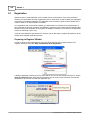
Updating XStudio
1. If you have downloaded or otherwise received a revision for XStudio, the process for
updating the software is virtually identical to the initial installation. However, the installation
dialogs may be a bit different. When updating, you are not typically given an opportunity to
select the target folder for installation, as that choice has already been made in a previous
installation.
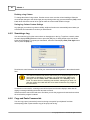
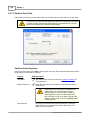
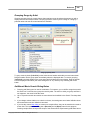
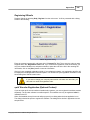
2. You may be prompted that an old version of XStudio has been found and that it must be
uninstalled (removed) before continuing with the update. If you see this prompt when
updating XStudio, you should answer "Yes" to remove the old version, and if prompted to
confirm the removal of the old version, again answer "Yes".
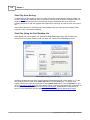
3. On occasion, updating XStudio may require some additional tasks be performed during the
update. Such tasks might include validating and/or updating your registration and making
adjustments to your preferences settings. If these tasks are needed, you will be prompted
© Copyright 2003-2015 C-R Media All Rights Reserved.
18
XStudio 3
for any input required and notified if the update task could not be completed successfully.
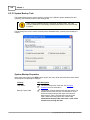
4. When updating XStudio, the installation program will typically offer the option of backing up
the existing program and support files before performing the actual update.
Special Note on Updating XStudio: When updating the software, be aware
that if you deselect a set of files or an option for shortcuts that were a part of the
original installation, the files and/or shortcuts are not removed. However,
selecting a previously-unselected option does add the files and/or shortcuts.
If you need to remove a previously-installed option, use the standard uninstall
procedure, followed by a new installation. So long as the new installation is
placed in the same folder as the original, no data or preference settings are
lost.
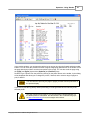
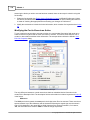
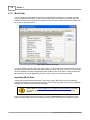
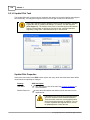
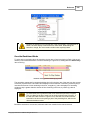
To Uninstall XStudio
To remove XStudio from your PC, select the Control Panel applet Add/Remove Programs. Select
XStudio and click on the [Remove] or [Uninstall] button. Follow the prompts to uninstall the software.
When uninstalling XStudio, only files originally installed are removed. Event
log files, your preferences files and any backup files are not removed. See the
List of Files topic for more information on files that are installed or created by
XStudio.
Notes for Novell Netware Users
1. XStudio must not be installed on a Novell Netware server volume. Novell Netware is not compatible
with the XStudio database engine and database errors will occur if you are using the default
database configuration and attempting to run XStudio from a Netware volume.
2. Logs, audit files and audio files can be located on all versions of a Novell Netware server. The
logged-on user must have the appropriate user rights for the volumes and folders used.
3. The latest Microsoft operating systems, starting with Vista, do not include a Netware client. This
means that you cannot directly access a Novell Netware server with a PC running these operating
systems. A possible workaround is to implement usage of Microsoft's Gateway Services for
Netware, available on Windows 2000 Server. However, using Gateway Services for Netware may
negatively affect performance.
© Copyright 2003-2015 C-R Media All Rights Reserved.
Configuring XStudio
Part
III
20
XStudio 3
In order to use XStudio, the application needs to know about the station(s) logs which you will be using
for playback, the location of the audio files to be played, and which available audio channel (audio
output) will be associated with each displayed playback deck, among other things. In the preferences
area, you define stations, their call letters and location of the logs. The path to the audio files is defined,
as are the audio channel-to-deck mappings. You can also define cart categories (which contain cart
masks) that can be used to "filter" the audio inventory information and apply specific color schemes for
each type of audio on the log display.
There are a number of preference settings that enable or disable certain features within XStudio and
other settings that affect the behavior of XStudio at run-time.
When changes are made and "applied" (saved), XStudio automatically updates its behavior to match
the new settings, with just a few exceptions - notably, changes to the database location and audio
server TCP/IP port settings.
This section provides details on each of the available preference settings, organized as they are
displayed.
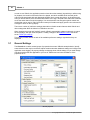
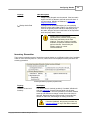
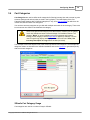
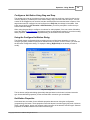
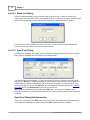
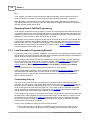
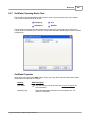
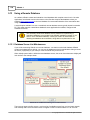
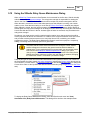
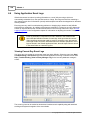
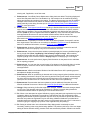
3.1
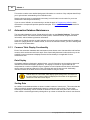
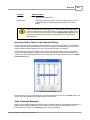
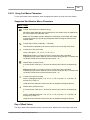
General Settings
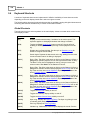
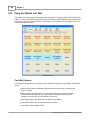
The General tab contains several groups of properties that control XStudio startup behavior, identify
external devices that may be connected, adjust certain automation database settings and configure the
application event logging. All property settings on this page have default settings, so you need change
only those settings that are applicable to your use of XStudio and can leave the balance of the
properties as-is.
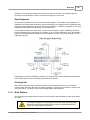
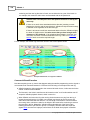
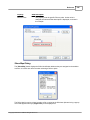
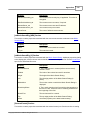
General properties
© Copyright 2003-2015 C-R Media All Rights Reserved.
Configuring XStudio
21
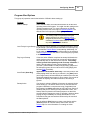
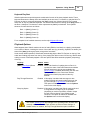
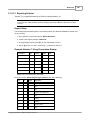
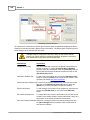
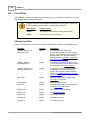
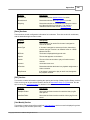
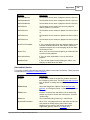
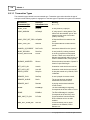
Program Start Options
This group of properties controls the behavior of XStudio when starting up.
Property
Description
Mode at Startup
When XStudio starts, the mode selected here will be the initial
operating mode of the system. You might view this setting as the
"default operating mode". For more information on XStudio
operating modes, refer to the topic on Operating Modes. The
default value for this property is Emergency mode.
This setting could be superseded during the
startup process if you have a Startup Action
assigned and the Action includes one or more
conditional Set Mode tasks based on the time of
day and day of week, for instance.
Load Today's Log at Startup This property controls whether or not XStudio attempts to load a
log at startup. If checked, XStudio will load the current day's log
for the defined "Default Station" when starting. Additionally, if a
log for today is not found, a check will be made for the existence
of an Emergency Log for the station. If the emergency log exists,
it will be loaded.
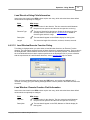
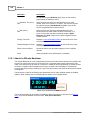
Play Log on Startup
If checked, when XStudio completes its startup initialization the
audio element on the log closest to current time will be played
automatically with no user intervention required. This setting
will be ignored if the operating mode at startup is Satellite. If
audio is already playing on the primary playback channel
(channel 1) when XStudio is ready to begin playing, playback of
the selected log item will occur when the currently playing item
reaches EOM (Aux Mark).
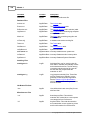
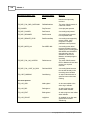
Auto-Enable [Auto-Seg]
Applicable in Automation mode only. If checked, when a user
starts playing audio from the log on channel 1, the [Auto] button
(auto-segue button) will automatically be enabled if the user had
temporarily disabled auto-segue for some reason. If the mode of
operation is anything other than Automation, this setting is
ignored.
Startup Action
If an Action is selected, XStudio will execute the selected Action
when starting up. The Action chosen here is executed after all
program initialization is complete and a log (if applicable) has
been loaded, but before attempting to play audio from the log (if
enabled) and prior to checking for any scheduled events. The
Startup Action is placed in the startup sequence so that if the
executed Action changes the mode of operation, decisions about
playing the log immediately on startup and whether or not a
scheduled event gets executed are influenced by the results of
the Startup Action.
Use the adjacent [New] button to create a new Action and the
[Remove] button to clear the Startup Action field. See the
Actions topic for more information on creating an Action.
© Copyright 2003-2015 C-R Media All Rights Reserved.
22
XStudio 3
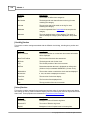
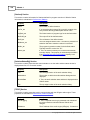
Property
Description
Emergency Action
If XStudio is used as an emergency backup system for a DCS or
Maestro, or you want to implement a special way of handling
emergencies when XStudio is the primary on-air delivery system,
you can assign an Action that will be performed in an
emergency. If an Action is selected for this field, that Action will
be performed when the "Emergency Relay" is triggered. This
special relay exists so that users who do not have an audio
switcher (and therefore no input relays) have a way to externally
signal XStudio that an emergency has occurred. The Emergency
Relay is a part of the remote start interface that uses a game
port and as a default, Button 4 is used as the Emergency Relay see the topic Remote Start Interface for more information, as
you have the option to disable the Emergency Relay by
assigning it to playback Deck 4.
Use the adjacent [New] button to create a new Action and the
[Remove] button to clear the Emergency Action field. See the
Actions topic for more information on creating an Action.
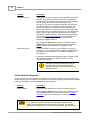
Start Audio Engine
If checked, XStudio will check to see if XEngine is running at
start-up and if not, will prompt the user, asking if XEngine should
be started. If the user answers "Yes", XStudio will attempt to
start XEngine.
If XStudio is starting unattended and this option is enabled, it will
automatically attempt to start XEngine if there is no user
response to the prompt.
This option should be enabled only if you are
using XEngine as the host audio engine. If
XStudio is running in multi-instance mode, this
setting is ignored.
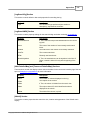
Audio Switcher Properties
If you will be using an audio switcher with XStudio, you select the device in this section. At present,
XStudio supports just one switcher at a time and does not support "ganging" audio switchers together,
a feature is available on some Broadcast Tools audio switchers.
Property
Description
Select Switcher
Select the audio switcher to be used from the drop-down list.
Use the adjacent [New] button to create a new switcher resource
and the [Remove] button to clear the field. See the External
Resources topic for more information on creating a switcher
resource.
If you change the selected audio switcher and apply (save) the settings,
XStudio will update when the Preferences dialog is closed. This includes
changing to the COM port that is used by the new switcher and retrieving the
© Copyright 2003-2015 C-R Media All Rights Reserved.
Configuring XStudio
23
input relay map. If you change switchers, be sure the newly-selected device is
connected to the PC on the correct COM port.
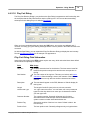
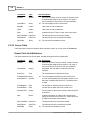
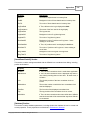
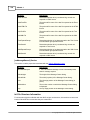
External Control Port Properties
If you need to control an external device with serial data, you can optionally enable this feature set.
This set of properties enables external control usage and allows you to assign a COM port and baud
rate to be used. The External Control Port is used in conjunction with the Send Control Command task.
Property
Description
Enable External Control Port If checked, processing of Send Control Command tasks is
enabled.
COM Port
Select the COM port to be used for Send Control Command
tasks. Valid port numbers are 1-8. Use the [Select COM Port]
button to select the COM port from a list of ports available on the
host PC. The default port number is 1.
Note: If you are also using an audio switcher, the external
control COM port must be a different port number.
Baud Rate
Select the baud rate to be used from the drop-down list of
available speeds. The default baud rate is 9600.
COM port settings other than the port number and baud rate are not useradjustable. Standard settings are used for parity, data bits and stop bits. These
settings are:
Parity: None
Data Bits: 8
Stop Bits: 1
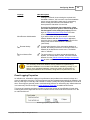
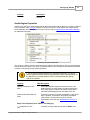
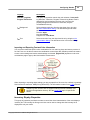
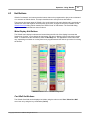
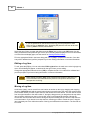
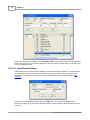
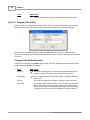
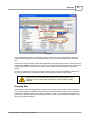
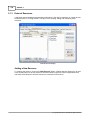
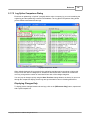
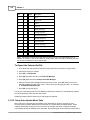
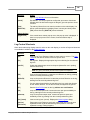
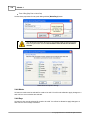
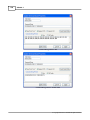
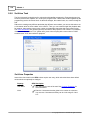
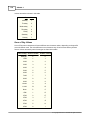
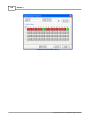
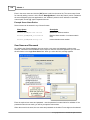
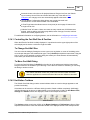
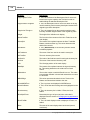
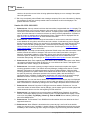
Database Properties
By default, XStudio automatically creates and maintains a set of tables that contain automation data resources, tasks, actions, and scheduled events - along with song titles and artists and log archive
information. Under normal circumstances, no adjustments to the default database properties are
needed to operate XStudio. See the Database Reference for more information.
However, XStudio offers some flexibilities that you may find useful, including the ability to allow remote
access to the XStudio local database or to access a centralized database which may be physically
located on another PC.
© Copyright 2003-2015 C-R Media All Rights Reserved.
24
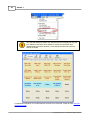
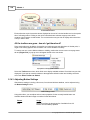
XStudio 3
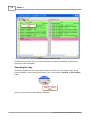
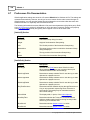
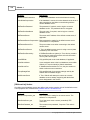
Database properties (expanded view)
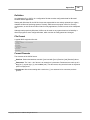
There are two sets of properties in the database group, one for implementing connection to a remote
database server and one for enabling access to the default local database controlled by XStudio. By
nature, these two sets of properties are mutually exclusive - if you are using a remote database, local
administration properties are ignored and vice versa.
If you make changes to the database properties, the changes will not take
effect until XStudio is restarted.
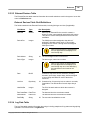
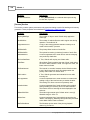
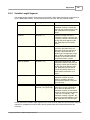
Items with a check mark in the REQ column require user entry, while unchecked items have default
values which can optionally be changed.
Property
Use Remote Database
REQ Description
If checked, XStudio will use a remote database instead of
the default local database. In order to use a remote
database running as a stand-alone database server, you
must have a database server application installed,
configured and running. As a default, this option is
disabled.
Do not check this item unless you are
sure you have a remote database server
installed and operating properly! If
selected, XStudio will not use the default
local database and will try to find a remote
database.
Remote Server Name
If you are using a remote database server, the correct
name and address of the server are entered in this field.
Use the adjacent [Select] and [Maintain List] buttons to
select a defined database server or create a list of
available servers respectively. See the topic on Database
Server List Maintenance for more information.
Remote Server Port
If you are using a remote database server, the port
number must match the one the server is using. The
default value is 16000.
Data Compression
As a default, when using a remote database server, data
is transferred between the database server and XStudio
uncompressed. If your LAN performance is slow, you can
implement varying degrees of data compression, which
causes the database server to compress the data before
© Copyright 2003-2015 C-R Media All Rights Reserved.
Configuring XStudio
Property
25
REQ Description
sending it to XStudio, thus reducing the required LAN
bandwidth. However, this is at some cost as the database
server must go through the extra step of compressing
before sending the information and XStudio must
decompress the data when it is received.
If you wish to implement data compression, select
one of the compression options from the drop-down
list that appears when editing the property. See the
topic on Implementing Data Compression for further
information on data compression settings.
If you wish to allow remote administration of the local
XStudio database with the XStudio Admin application,
check this item to enable the feature. The default for this
setting is that remote administration is disabled
(unchecked).
Allow Remote Administration
Remote Identity
If remote administration of the automation database is
enabled, the identity entered here is how this instance of
XStudio will be identified to remote users. The default
value is "XStudio".
Local Access Port
The port number to use when remote administration is
allowed. The default value is 16000. This value must be
different from the XStudio Inventory Manager local access
port to avoid conflicts.
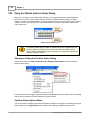
The necessary stand-alone database server software for implementing a
centralized database is not included in the XStudio installation package. If you
wish to use a centralized database, contact your vendor for information on
obtaining the database server software, along with its requirements for use.
Event Logging Properties
As XStudio runs, information relating to its performance and problems encountered is written to a
group of application event logs. The event logs are text files maintained automatically by XStudio in the
form of event logs for each day, with a default of 14 days (14 daily files) being available for review at all
times. Event logs are generally used in troubleshooting problems or determining why XStudio behaved
in a certain way. Review the topic on using application event logs for additional information.
This group of properties provides the means to control the number of days XStudio will retain daily
event log files, and to adjust the amount of information that is stored to the file as XStudio runs - the
so-called "detail level".
Event Log properties (expanded view)
© Copyright 2003-2015 C-R Media All Rights Reserved.
26
XStudio 3
Property
Description
Daily Event Log Count
The default is to keep daily event logs around for 14 days. Use
the spin-edit control that appears when you begin editing the
property to increase or decrease the number of days you wish to
keep daily event logs. The minimum number of days is 7, the
maximum number is 62.
Event Log Detail Level
The default detail level is "Normal". As you change the detail
level to Medium, High, Debug, and Highest, XStudio logs more
and more information to the daily event log. The higher the detail
level, the larger the daily event log file size will be. For
troubleshooting, you should set the detail level to "Debug" as a
minimum.
© Copyright 2003-2015 C-R Media All Rights Reserved.
Configuring XStudio
3.2
27
Setting up Stations
The Stations tab is used to create and maintain a list of stations for which XStudio will be used. For
each defined station, you will provide a name for identification purposes, the station's call letters,
station number (log identification), and the path where the station's logs are located. Optionally, you
can designate an external inventory file (CMINV??.DAT) if you will be using audio inventory information
not generated by XStudio - for instance, a DCS or Maestro-generated inventory data file.
Stations properties
Adding a New Station
To add a station, click on the insert button on the stations data navigator, displayed as a "+" (plus
symbol) or touch the [Insert] key. A new record will be created and displayed, similar to the example
shown.
© Copyright 2003-2015 C-R Media All Rights Reserved.
28
XStudio 3
Creating a new station
There are several fields of information that need to be filled in for a station, as detailed in the station
properties list. Items with a check mark in the REQ column require user entry, while unchecked items
have default values which can optionally be changed.
Property
REQ Description
Station Name
Identifies the station you are configuring and is used
within XStudio only. The name can be anything you wish,
up to 30 characters in length. The station name should be
unique for ease in identifying which station you are
working with, but a unique name is not required. The
name you provide for the station is used in various
displays and dialogs, including the main display title bar
and the station list presented when manually opening a
log.
Call Letters
The call letters of the station. The call letters are used as
a secondary identification for the station and are placed in
the log file if you edit a log with XStudio and subsequently
save the log.
Station Number
The assigned station number for this station. The station
number is typically assigned within a traffic system and
consists of a one or two character ID, like "S1", "S2", etc.
If you enter a single character in this field, it will
automatically be converted to two characters by
prepending the letter "S" to your entered information.
© Copyright 2003-2015 C-R Media All Rights Reserved.
Configuring XStudio
Property
29
REQ Description
Log Path
The drive and folder where logs for this station are stored.
UNC paths should be used if the log location is a server
or PC other than the machine running XStudio. If you are
running XStudio on Windows 7, avoid using mapped
network drives.
If you are using a UNC path or mapped
network drive, ensure that you are logged
in to the host server machine or you will
get an error message that no log files can
be found when you select a station in the
Open Log dialog. XStudio will also be
unable to automatically load a log at
startup.
Optional Inventory Info - Use only if you are not generating inventory information
directly with XStudio
Use External Inventory File
Check this item if you wish to use an inventory data file
not generated by XStudio. This option would be typically
be enabled only if you are using XStudio to control a DCS
or Maestro machine.
This setting, along with the specified
inventory file name, will be overridden by
XStudio if you have enabled the Generate
and Use Local Inventory option on the
Audio Properties page of Preferences.
Inventory File
If you have checked the "Use Inventory" item, then you
must select a valid inventory for this station. If the "Use
Inventory" item is not checked, then you do not need an
entry for this field. You can use the ellipse button adjacent
to the field to browse for the inventory file you wish to use.
When you have completed the station definition, click on the "post edit" button on the stations data
navigator, displayed as a check mark. Your entries will be validated and a message displayed if you
have entered invalid information for a station field.
Importing and Exporting Station information
You may wish to save your station information for use with another XStudio system or for archival
purposes. XStudio provides the means to export and import station information via the Stations context
menu. [Right-Click] anywhere on the Stations page to invoke the context menu.
Stations Context Menu
To export information, select the Export Station Info menu item. You'll be prompted to select a file
name for exported information.
To import information, select the Import Station Info menu item. You'll be prompted to select the file
© Copyright 2003-2015 C-R Media All Rights Reserved.
30
XStudio 3
containing the station information. If you already have some stations defined in XStudio, you have the
option to replace them with the imported information or to append the imported information to the
existing station information.
No duplicate checking is done when importing station information into existing
station information using the option to append station records. You should
check for duplicates when the import process has completed and remove any
duplicates. You should also check your default station setting, particularly if you
replace existing station information with imported information.
As a default, XStudio uses the file extension .stns when exporting or importing station information. The
information is stored in an ini file structure.
Editing a Station
To edit information about a defined station, select the station by using the data navigator to locate the
station or by using the [Select Station] button, which displays a drop-down list of the stations.
Select Station List
When the station information you wish to edit is displayed, select the field to edit and make the needed
changes. Refer to the description of each of the station properties for additional information on field
requirements.
When you have completed your edits, click on the "post edit" button on the stations data navigator,
displayed as a check mark. Your entries will be validated and a message displayed if you have entered
invalid information for a station field.
Deleting a Station
To remove a station from the stations table, select the station you wish to delete, using the navigation
methods described in the Editing a Station section.
When the station you wish to delete is displayed, either click on the "delete record" button (displayed
as a minus sign) on the stations data navigator or touch the [Delete] key. You will be prompted to
confirm that you wish to delete the selected station.
Deleting a station definition removes all information about that station. If you
didn't mean to delete the station, you must close the Preferences dialog and
choose not to save the changes. When you reopen Preferences, the Stations
list is restored to its last saved state. Be aware that not saving changes on
exiting the Preferences dialog saves no changes you may have made
anywhere else while working in the Preferences dialog.
Setting the Default Station
The default station is the station information that will be used by XStudio when starting up. The
© Copyright 2003-2015 C-R Media All Rights Reserved.
Configuring XStudio
31
assigned default station information is used for loading the current day’s log (if enabled) and creating
audit records, until such time as the station is changed, typically by loading a log for a different station.
While setting a default station is not required, if no default station is assigned XStudio will not load a
log or perform other tasks that are station-specific when starting up. Unless you are using XStudio as
an emergency playback system and may not know which of the stations you will be running until the
need arises, you should assign a default station.
To set the default station, select the station whose logs, etc., you want XStudio to load on startup,
using the data navigator or the [Select Station] button. Then, click on the [Set Default Station] button.
Stations toolbar
When closing XStudio preferences and changes have been made to settings,
you will be alerted if you have not set a default station and offered the
opportunity to do so.
© Copyright 2003-2015 C-R Media All Rights Reserved.
32
3.3
XStudio 3
Audio Properties
The Audio Properties tab includes several groups of settings related to audio handling, including
location of audio files, XStudio inventory list generation and maintenance, audio channel-to-deck
mapping, remote starts and audio engine communication parameters.
Audio Properties
Audio Settings
The audio settings group of properties is used to identify the location of your audio files, decide
whether or not you want XStudio to enforce start and end dates for audio playback, and optionally
designate a backup audio folder. Items with a check mark in the REQ column require user entry, while
unchecked items have default values which can optionally be changed.
Property
REQ Description
Enforce Cart Dates
If checked and the host audio engine is XEngine, audio
files (carts) that are out of date will not be played. If the
host audio engine is a DCS or Maestro system, this
setting has no effect. The DCS or Maestro unit
determines whether or not out of date carts are played.
The default for this property is unchecked, meaning cart
dates will not be enforced.
Audio Path
This property defines the drive and folder location of audio
files that are used for playback. If the host audio engine is
© Copyright 2003-2015 C-R Media All Rights Reserved.
Configuring XStudio
Property
33
REQ Description
XEngine, then this path must be entered. If the host audio
engine is a DCS or Maestro, this field can be left blank. If
you are running XStudio on Windows 7, avoid using
mapped network drives.
Backup Audio Path
If XEngine is the host audio engine, you can optionally
define a backup audio folder location. If an audio file is not
found in the primary Audio Path when attempting to play
the audio, XEngine will look in this folder for the requested
audio and play it back, if found.
XStudio does not automatically
synchronize the contents of the primary
Audio Path and Backup Audio Path
locations. There are a number of readilyavailable, inexpensive software tools that
perform this task. Consult with your
XStudio vendor for current
recommendations.
Inventory Generation
The inventory generation group of properties controls whether or not XStudio builds a list of available
audio for use in inventory lists, etc., and if so, offers control over displayed inventory and audio file
scanning operations.
Inventory Generation properties (expanded view)
Property
Description
Generate & Use Local
Inventory
The default value is checked (enabled). If enabled, XStudio will
scan the Audio Path for audio files and build a list of audio
available for playback. The scan operation occurs when XStudio
starts up and whenever a change in audio files in the folder is
detected. Detected changes include arrival of new audio files,
deletion of audio files, and changes in existing audio files.
If checked (enabled), this property overrides any
inventory settings for any of the defined stations.
© Copyright 2003-2015 C-R Media All Rights Reserved.
34
XStudio 3
Property
Description
Limit Displayed
Inventory
As a default, XStudio will create an inventory list for its own use
that includes all audio found in the Audio Path. Audio files used
by XStudio contain distribution information referred to as "node
numbers" or "station distribution". There may be as many as 64
different "work stations" (nodes) that are allowed to use a given
audio file. This property allows you to restrict the displayed lists
of audio files that XStudio has cataloged to just those nodes or
work stations that you select. Changing this property has the
effect, generally, of reducing the number of carts displayed in the
XStudio inventory lists.
See the topic on using the Include List edit dialog for more
information on selecting nodes to include and editing the node
list for more user-friendly names.
Limiting the displayed inventory does not affect
whether or not XStudio can play a particular
cart (audio file). Even though a cart might not be
visible in the inventory list, if XStudio is called
upon to play the cart, an attempt will be made to
play it. Normal date restrictions, if enabled, apply.
Copy Inventory File to...
The locally-generated inventory file can be copied to a userdefined location and file name for use by another application. To
enable the feature, enter a fully-qualified file name in this field. If
this entry exists at run-time, each time XStudio's local inventory
is updated, a copy of the inventory data file is made. If the field is
left blank, no copy is made.
Inventory Manager Options
Watch Interval
The watch interval is the frequency with which XStudio checks
the primary audio folder for changes, in seconds. The default
value is 60 seconds (every minute). This property applies to
network drives only. If your primary audio folder is a local drive,
this setting is ignored. Valid interval entries range from 30 (30
seconds) to 86,340 (23 hours, 59 minutes).
Allow Remote Access
This property, when enabled (checked), allows other Inventory
Manager-aware applications to access inventory data that is
created and maintained by XStudio.
Remote Identity
If remote access to inventory data is enabled, this is the name by
which XStudio's inventory information will be identified.
Local Access Port
The port number used by other applications to connect to the
XStudio inventory database. This port number must be different
than the main XStudio database local access port or conflicts will
occur. The default value is 16100.
Audio Output Selection
This group of properties allows you map available physical audio output channels to the XStudio
playback decks. This setting is applicable only if you are using XEngine as the host audio engine (the
default).
© Copyright 2003-2015 C-R Media All Rights Reserved.
Configuring XStudio
35
If you are connecting to a DCS or Maestro, playback channel 1 on the host unit
will be used for log playback and channels 2 and 3 map to the DCS or Maestro
channels of the same number, as applicable. Refer to the topic on Using
XStudio with DCS or Maestro for more information.
Map each XStudio playback deck using the drop-down list of available audio outputs. If a PC has a
single sound card with a single audio output available, there will usually be two items in the list. The
first item is typically named "Microsoft Sound Mapper" and corresponds to the audio device you have
set as the default device to play Windows sounds - OS startup, close, etc. The second device will be
the actual sound card in the PC. In this example, the two entries end up at the same place - the single
audio output on the PC.
If your PC is equipped with only one sound card, be aware that Windows will be
using the same device to play system sounds. It is highly recommended that
you disable all system sounds in this case. This will prevent unwanted sound
from appearing on your "on-air" channel.
If you have more than one sound card or a sound card equipped with multiple audio outputs, the list of
available devices will be larger. It is highly recommended that you select a device other than the
"Microsoft Sound Mapper" or the audio device that is set as the default audio device in Windows.
If you have a single sound card with a single output, you can still use the second, third and fourth audio
decks in XStudio, if desired. Simply assign the same audio output as used for the Log Playback
Device. At playback time, the audio playing on decks 1, 2, 3 and/or 4 will be mixed to the single output
device.
Many standard sound cards will support 12 streams of audio mixed together (3
from each playback deck) on a single output. However, not all support that
many streams. Consult your sound card documentation for information on how
many streams are supported by the sound card.
Items with a check mark in the REQ column require user entry, while unchecked items have default
values which can optionally be changed. Note that if no audio output channel is mapped to a deck,
playback for that deck will be routed to the default Windows playback device.
Property
REQ Description
Audio Output for Log
(Deck 1)
Select the audio output channel that will be used with
Deck 1, the primary audio playback channel, from the
drop-down list. As a default, all log items will play through
this deck.
Audio Output for Deck 2
Select the audio output channel that will be used with
Deck 2 from the drop-down list.
Audio Output for Deck 3
Select the audio output channel that will be used with
Deck 3 from the drop-down list.
Audio Output for Deck 4
Select the audio output channel that will be used with
Deck 4 from the drop-down list.
Default Hot Button Deck
Select the audio playback deck that will be used with hot
buttons from the drop-down list. When a blank (nonconfigured) button is configured using the hot button
© Copyright 2003-2015 C-R Media All Rights Reserved.
36
XStudio 3
Property
REQ Description
configuration dialog or is configured by drag and drop
from the log or inventory, the default deck selected here is
assigned as the playback deck. The default value for this
property is Deck 1.
Remote Starts
If the PC running XStudio is equipped with a game port, you can wire up remote starts to the game port
and enable them for use with XStudio. See the Remote Start Interface topic for wiring specifics.
Remote Start Properties (Expanded View)
This group of properties optionally enables the remote starts and allows you to adjust both sensitivity
(frequency of polling) and de-bounce.
Property
Description
Enable Remote Starts
The default is unchecked - remote starts are disabled. If
checked, XStudio will attempt to initialize the game port for use.
Remote Start Options
Ignore if Deck Active
This property applies to Live mode only. The default is
unchecked - the feature is disabled. To enable the feature,
check this item. When enabled, if the playback deck for which
the remote start was pressed is already playing audio and the
deck playback source is the log, the remote start will be
suppressed (ignored).
Remote Start Button 4
Usage
Choose whether Button 4 of the Remote Start Interface is used
as an emergency relay (the default for backward compatibility) or
is assigned to playback Deck 4 as a remote start ala Decks 1..3.
Sensitivity
When remote starts are enabled, XStudio polls them every few
milliseconds to see if one of the remote starts has been pressed.
This property controls the frequency of polling. The default value
is 100 milliseconds (1/10th second). Valid entries range from 50
- 250 milliseconds.
Debounce
This property controls the de-bounce duration and can be used
to reduce the number of "double-fire" possibilities where a user
presses the remote start repeatedly and rapidly or if you have
issues with the remote start wiring circuit inadvertently issuing
two pulses (button-presses) when only one is intended. When
the remote start button is pressed (closed), XStudio will discard
any additional closures of the button for the time value entered in
this field, in milliseconds. The default value is 500 milliseconds.
Valid entries range from 0 (disabled) to 1000 milliseconds (1
© Copyright 2003-2015 C-R Media All Rights Reserved.
Configuring XStudio
Property
37
Description
second).
Audio Engine Properties
XStudio uses TCP/IP to communicate with the host audio engine, either XEngine or a DCS or Maestro
host. In the latter case, rcServer software is used to convert the TCP/IP data to serial data that the
DCS or Maestro can understand and act upon. See the topic on Using XStudio with DCS or Maestro
for additional information.
Audio Engine Properties (Expanded)
At a minimum, XStudio needs to know the host’s IP address and the ports to use for communications
with the host audio engine. This group of properties allows you to change communication parameters,
if needed, and change several optional properties.
If you are using the default XEngine in a standard configuration, you will not
need to adjust IP address and port properties unless some other application on
the XStudio PC is already using one of the TCP/IP ports that are used by
XStudio as a default.
Property
REQ Description
Display Countdown to Aux
Mark
As a default XStudio displays countdown values in the
playback decks as values relative to total remaining play
time. If this option is enabled, countdown values will be
calculated and displayed to the Aux Mark of the cart.
Enable Actions Embedded in
Carts
If checked, execution of Actions embedded in carts (audio
files) is enabled. As a default, this property is disabled
(unchecked). For information on how to use this
functionality, review the topic Embedding an Action in a
Cart.
Music Fade Properties (Uses "Music" Cart Category)
Enable Music Fade
© Copyright 2003-2015 C-R Media All Rights Reserved.
If enabled, all carts matching the defined "Music" cart
38
XStudio 3
Property
REQ Description
category will be faded down at Aux Mark during playback.
Music fade applies to all playback channels (decks).
Fade Rate
If music fade is enabled, this value determines how
quickly the audio is faded. The default value is 1000, the
maximum value is 32000. The higher the value, the
quicker the audio fade.
Connection Properties
IP Address
The IP address of the host audio engine. The default
value is: 127.0.0.1
The default value should be used unless XEngine is
installed on another PC or the rcServer software used to
convert TCP/IP to serial for DCS and Maestro is located
on another PC.
Listen Port
Default: 5391 This TCP/IP port is used for control and
response communications with the audio server engine.
The value must be the same for both XStudio and the
host. If XEngine is used and is located on the same PC,
changes to the port numbers are automatically updated
for XEngine. If this property is changed, you will need to
restart XStudio for the changes to take effect.
File Xfr Port
Default: 6001 This TCP/IP port is reserved for transferring
file data between XStudio and the host audio server and
is not presently used. It is for future expansion.
User Name
Default: XStudio This setting is used only when using
XStudio to control a DCS or Maestro system. It identifies
XStudio to the rcServer application, which may be hosting
several connections.
Enabled IP Event Logging
If checked, XStudio will log TCP/IP-specific events to a
separate log file and would typically be used for
troubleshooting communications problems between
XStudio and a host audio server not located on the same
PC as XStudio. The default value is unchecked
(disabled).
Advanced Properties
Audio Buffers
The number of audio buffers that will be used by the audio
engine. The default is 30. To reduce audio stutter or skip
when audio files are located on a network drive, you can
increase this value to a maximum of 256. Settings ranging
between 30 (the default) and 90 should be adequate for
most operating environments.
Enable PCM Silence Trim
If enabled, any "dead air" at the beginning of a PCM cart
will be skipped when the cart is played. Applies to PCM
carts only, apt-X and MPEG are not supported.
Master Gain
The master gain adjustment for XEngine (the audio
engine). Valid values range from -60 to +6, the default is
zero.
© Copyright 2003-2015 C-R Media All Rights Reserved.
Configuring XStudio
3.4
39
Cart Categories
Cart Categories are used to define audio categories for filtering inventory lists and to create log color
schemes (background and text) that are used in the log display. The initial display of the Cart
Categories page shows a table of defined categories, if any, and a data navigator bar which can be
used to add, edit and delete cart categories.
You can have as many categories as you wish with multiple cart masks in each category. There must
be at least one cart mask for each defined cart category.
There is one special cart category name that must be created if you are playing
music with XStudio and want to take advantage of all available features. The
category "Music" is used (in addition to log color schemes and inventory
filtering) as the category to which Music Fade is applied (if enabled). It is also
used for special log display handling if you have the main menu View | Use
Inventory Description on Logs feature enabled (checked).
The example screen shot depicts a few of the commonly-defined cart categories. The example cart
categories shown are included in the XStudio installation and can be imported to get started quickly
with some basic categories.
Cart Categories
XStudio Cart Category Usage
Cart categories are used in a number of ways in XStudio:
© Copyright 2003-2015 C-R Media All Rights Reserved.
40
XStudio 3
1. Log Display. When applied to a displayed log, any cart number that matches any one of the
individual cart masks within a defined Cart Category will be displayed with the text and background
color associated with the category. By using distinctive color combinations, you can more easily
spot commercial clusters, for instance.
If you define duplicate cart masks for different categories, a log item's color
scheme will be the text and background color of the first category the log
item's cart number matches. Categories are sorted alphabetically by name.
2. Inventory Display. When applied to an inventory list, any cart number that matches any one of the
individual cart masks within a defined Cart Category will the included in the displayed inventory
list. For instance, the sample display shows several categories, including one called
"Commercials". You can see from the display that the cart mask associated with the Commercials
definition is "T???". This filter definition means that, when selected, only carts beginning with the
letter "T" will be displayed in the inventory list.
For purposes of displaying filtered inventory, duplicate cart masks in different
cart categories do not affect filtering as you are selecting a specific filter and
matching carts to that filter only. If you wish to use some complex filters for
inventory display and want to avoid disrupting the log color scheme, make sure
you name the inventory-only cart category in such a way that it appears
alphabetically after all categories you have defined that are used for the log
color scheme. You might, for instance, create a name like "ZZ My Category" to
ensure that the category gets pushed to the end of the list.
3. Automatic Music Fade. If this option is enabled, all audio items matching this category are
automatically faded at Aux Mark. If you do not have a category named "Music" or your music
content is part of another category, music fades will not occur.
4. Main menu View | Use Inventory Description on Logs feature enabled (checked). When this
option is enabled, any log item matching the "Music" category is left alone - that is, the audio
inventory description is not displayed in the log's Description field.
Cart Category Properties
Items with a check mark in the REQ column require user entry, while unchecked items have default
values which can optionally be changed.
Property
REQ Description
Category Name
The name by which you will identify a category. Category
names should be unique to avoid ambiguity.
Text Color
Select a text color from the drop-down list or by using the
color customization dialog. The default text color is Navy
Blue.
Background
Select a background color from the drop-down list or by
using the color customization dialog. The default color is
either Gray or Tan, depending on the operating system
you are using.
Cart Masks
At least one cart mask is required. See the Cart Masks
Explained topic for information on valid cart masks and
© Copyright 2003-2015 C-R Media All Rights Reserved.
Configuring XStudio
Property
41
REQ Description
the topic Using the Cart Mask Edit Panel for details on
how to edit cart masks for a category.
Creating a New Cart Category
To create a new Cart Category, click on the insert button in the data navigator, marked with a " + "
symbol - you can also used the [Insert] key. A dialog appears, prompting you to enter a category
name. The name can be anything you wish and is usually text that identifies the category contents.
After entering the name, click on the [OK] button. A second dialog appears, prompting for an initial cart
mask. Enter the mask, which must be four (4) characters in length. For additional information on cart
mask creation, see the Cart Masks Explained topic.
When you have entered the mask, click on the [OK] button. The newly-created category appears in the
category list.
To set the category text and background colors, [Double-Click] on the color you wish to change. The
field display changes to reveal a drop-down list button and a color dialog button.
You can use the drop-down button to display commonly-used colors. Selecting a color causes an
immediate change in the sample text display, located above the category list. The sample text display
provides an idea of what the current color combinations will look like on the log.
If the color you’d like to use is not in the drop-down list, click on the color dialog button to display a
standard custom color selection dialog. For more information on using the custom color selection
dialog, see the Using the Color Customization Dialog topic.
To add additional cart masks to the category, or to edit the existing cart mask, [Double-Click] on the
mask field. When editing the cart mask(s) for a category, a panel is displayed for managing the masks.
© Copyright 2003-2015 C-R Media All Rights Reserved.
42
XStudio 3
Cart Mask Edit Panel
See the topic Using the Cart Mask Edit Panel for details on the panel’s usage and the Cart Masks
Explained topic for information on valid cart masks.
When you finish editing the text color, background color and/or the cart masks, click on the [Post]
button in the data navigator to save your changes.
Editing a Cart Category
To edit any one of the properties of a category, [Double-Click] on the item you wish to edit. You can
also use the [F2] keystroke after selecting the item you wish to edit. When you have finished making
changes, click on the [Post] button in the data navigator to save them.
Deleting a Cart Category
To delete a cart category, first select the category to be deleted. Either click on the delete button on
the data navigator or press the [Delete] key. You will be prompted to confirm the deletion.
Deleting a cart category also deletes all cart masks associated with the
category. If you didn't mean to delete the category, you must close the
Preferences dialog and choose not to save the changes. When you reopen
Preferences, the cart categories are restored to their last saved state. Be aware
that not saving changes on exiting the Preferences dialog saves no changes
you may have made while working in the Preferences dialog.
Exporting Cart Category Information
Cart category information can be exported to an external file for backup purposes or to perhaps create
a standard set of categories that might be used among several work stations. All categories are
exported, including the name, colors and cart masks. [Right-Click] on the cart category data table to
display a pop-up menu. Select the menu item Export Cart Categories. You will be prompted for a file
name for the exported information.
Importing Cart Category Information
You can import cart category information previously exported from XStudio. [Right-Click] on the cart
category data table to display a pop-up menu. Select the menu item Import Cart Categories and
follow the prompts.
When importing cart categories and some categories already exist, you have
the option to either add (append) the imported categories to the existing list or
replace the existing categories with the imported categories.
© Copyright 2003-2015 C-R Media All Rights Reserved.
Configuring XStudio
3.5
43
User Interface Settings
The User Interface tab includes a number of properties that allow you to control how a broadcast log
(schedule) is displayed, along with settings to control access to the Preferences area. All settings on
this page have default values and need be changed only if you wish to modify how XStudio displays the
log or if you wish to restrict access to all Preferences settings.
User Interface properties
General User Interface Properties
General properties affect all of XStudio wherever a particular feature controlled by a property is used.
At present, there's only one setting implemented for user convenience.
Property
Description
Enable Double-Click on Log When manually opening a log, a dialog is displayed containing
Open Dialog
calendar dates, each indicating whether or not a log is available
for the selected station and date. If this feature is enabled
(checked), a [Double-Click] on that date will open the log
immediately. The standard (default) behavior is to select a date
and then click on the dialog [OK] button.
Log Display Properties
This group of properties provides the means to control several visual characteristics of a displayed
© Copyright 2003-2015 C-R Media All Rights Reserved.
44
XStudio 3
broadcast log. The base log font type and size, along with text and background colors for non-audio log
items are included in this group. Changes made in this group are dynamic - when you make changes
and save (apply) them, the log's display characteristics are updated immediately upon exiting the
Preferences area.
Where color combinations are selected, a sample of the appearance of the color combination is
displayed for immediate feedback on your choices.
Property
Description
Duplicate Log Desc to
Song Title
If you are using a music database with XStudio so that the full
song title and artist for logged audio elements can be displayed,
these items are placed in a columns separate from the standard
log description. These columns may or may not be visible,
depending on your preference. Non-music elements for these
columns initially contain no information. Many users would prefer
not to display the standard log description column when using a
music database and displaying the song title and artist. This
option, if enabled (checked), causes XStudio to copy non-music
audio element standard descriptions to the song title column,
thus allowing you to hide the standard log description column
from view, saving some display space. When enabled, this
feature has no effect on log elements that are songs - cart
numbers found in the music database - it only affects carts
(audio elements) not a part of the music database.
Log Font Properties - These settings affect all log items, audio and non-audio
Display Font
Select the font you wish to use for the log from the drop-down list
of fonts available on your system. Font appearance is previewed
as you scroll through the list of available fonts. The default font
used for the log is Arial.
Font Size
Set the font size using the spin edit buttons. Allowed sizes range
from 8 to 80. The default font size is 10.
Bold Font
Check this item if you want all log items to be displayed in bold.
If checked, any other bold font settings you have chosen for
specific log items - problem carts, for instance - will not be
distinguishable from other log items. The default setting is
unchecked - normal font weights will be used for standard log
items.
Problem Cart Display
Colors
Problem carts can be displayed using a custom color scheme so
that audio elements that are either missing or out-of-date can be
highlighted. If the Cart Status Displayed option is enabled, any
missing or out-of-date carts will be displayed using the color
combination selected regardless of any cart category they may
be a part of.
Background
Select a background color from the drop-down list or by using
the color customization dialog. The default color is either Gray or
Tan depending on your operating system.
Text
Select a text color from the drop-down list or by using the color
customization dialog. The default color is Red.
Bold
If checked, problem carts' text will be Bold. The default is
unchecked - the normal font weight will be used.
© Copyright 2003-2015 C-R Media All Rights Reserved.
Configuring XStudio
45
Property
Description
Directive, Log Note,
Program Title Colors
This group of properties controls the color scheme of non-audio
log elements - Directives, Program Titles and Log Notes. Each is
assigned its own background and text color, but since the
property assignment is the same in each case, they are
consolidated for brevity.
Background
Select a background color from the drop-down list or by using
the color customization dialog. The default background colors
are:
Directive: Aqua
Log Note: Yellow
Program Title: Lime Green
Text
Select a text color from the drop-down list or by using the color
customization dialog. The default text color in all cases is Navy
Blue.
Importing and Exporting Font and Color Information
You may have created the perfect color combinations for non-audio log items and want to preserve it
for future use or to be able to restore the combination at some later date. XStudio provides the means
to save current settings and restore saved settings on-demand. [Right-Click] anywhere on the color
combinations page to pop-up the User Interface context menu.
User Interface Settings context menu
When importing or exporting these settings, you are prompted for a file name. As a default, log settings
files have the file extension .LCF (for Log Colors File). The information is stored in an ini file structure.
Sample log color and font files are supplied with the XStudio installation and
placed in the application directory. See the List of Files topic for specific file
names.
Inventory Display Properties
This group of properties provides the means to control the visual characteristics of the main display's
inventory list. The inventory list font type and size can be used to change how the inventory list is
displayed to suit your needs.
© Copyright 2003-2015 C-R Media All Rights Reserved.
46
XStudio 3
Property
Description
Display Font
Select the font you wish to use for the log from the drop-down list
of fonts available on your system. Font appearance is previewed
as you scroll through the list of available fonts. The default font
used for the inventory list is Arial.
Font Size
Set the inventory display font size using the spin edit buttons.
Allowed sizes range from 8 to 80. The default font size is 8.
Security Preferences
There is a single displayed property in this group, used to force users to enter a password when
accessing the Preferences area. The default security setting is that all users have free access to all
available Preference settings.
Property
Description
Enable Configuration
Security
If enabled (checked), users must enter a password to access the
Preferences area. When this item is checked, a dialog appears
asking you to enter a password twice to confirm your password
choice. If the two entered passwords match and you save (apply)
the changes, the next time a user attempts to access
Preferences, a password prompt will appear and access will be
granted only if the correct password is entered. Passwords are
not case sensitive, but are stored in the XStudio settings file
as "scrambled" text, ensuring a moderate level of security.
Enabling Configuration Security has no effect on the ability of users to freely
access the Automation Setup database and perform maintenance functions in
that area.
© Copyright 2003-2015 C-R Media All Rights Reserved.
Operation - Using XStudio
Part
IV
48
XStudio 3
XStudio is fairly straightforward to use as an audio playback system. This section covers a number of
topics, including a tour of the main user interface, audio playback and the controls that affect playback,
and editing the log (program schedule) to change the content and/or content playback order.
If you're just starting out with XStudio and want to follow the quickest path to audio playback, refer to
the XStudio Quick Start Guide supplied separately, which guides you through a short series of steps
to get started quickly. For more detailed information on technical aspects of XStudio, keyboard
shortcuts, programming XStudio, database and automated task information, refer the Reference
section.
Launching XStudio
After XStudio has been installed, there will be shortcuts on your desktop (if you opted to have them
created), menu items available in the Start | Programs menu area, and optionally, shortcuts in the
Start | Programs | Startup folder to automatically launch both XEngine and XStudio when you login to
your system.
If you've not opted to have XStudio start automatically at login, perform the following steps to launch
XStudio:
1. Find the desktop shortcut or the menu item for XEngine and launch the program. This
starts the audio engine, which handles the actual audio playback.
For additional information on launching XEngine, see the XEngine
Reference topic.
2. Find the desktop shortcut or the menu item for XStudio and launch the program. This starts
the XStudio main interface where virtually all interaction with XStudio occurs.
When successfully started, the main XStudio display will appear and look similar to the example
shown.
© Copyright 2003-2015 C-R Media All Rights Reserved.
Operation - Using XStudio
49
XStudio Main Display (shown with 4 decks enabled)
The example display shown is typical of the visual appearance of XStudio after the system has been
configured in Preferences.
Before you can use XStudio successfully, a minimal number of system
properties must be customized to meet your needs. See the section on system
configuration or the separate Quick Start Guide document for additional
information.
It is important that XStudio be connected to a host audio server, either XEngine (supplied with XStudio)
or a host DCS or Maestro via rcServer. There is an LED on the status bar at the bottom of the main
display that indicates your connection status to a host. In order to actually play audio, the LED color
must be green - in other words, a connection exists.
Green = Connected, Red or
Yellow = Not Connected
If there is no connection, no audio will be played and attempts to play audio will result in an error
message telling you that you are not connected to a host. For information on troubleshooting the audio
engine connection, see the Problems Connecting to the Host Audio Engine topic.
© Copyright 2003-2015 C-R Media All Rights Reserved.
50
4.1
XStudio 3
The XStudio Main Display
The arrangement, sizing and visibility of items on the main display can be customized to suit your
preferences. Typically, you'll see three (3) or four (4) playback decks that correspond to playback
channels 1, 2, 3 and/or 4 respectively, a menu and tool bars, the log (program schedule), hot buttons
and inventory information. Here's an overview of the most prominent features of the main display:
Title Bar. The Title Bar appears at the very top of the XStudio display and shows you the
current station name and current operating mode.
Main Menu. Directly below the Title Bar is the main menu, which provides access to all
XStudio features and functionality.
Main Toolbar. The main toolbar provides quick access to commonly used features,
including opening a log, saving a log, log validation, printing a log, jumping to the "now
playing" item on the log, jumping to the current time on the log, and system help. The toolbar
can be floated away from the main display or completely hidden, if desired.
XStudio Clock & Backtimer. The XStudio clock is a floating window that can be moved
anywhere on the screen. As a default, the clock is not displayed. The window can also
optionally display the XStudio Backtimer. When the clock and/or backtimer is displayed by
enabling the options under the View menu, you can also change the size of the text, text and
background colors. For additional information, see the Using the XStudio Clock & Backtimer
and About the XStudio Backtimer topics.
Playback Area. The playback area consists of 1, 2, 3 or 4 playback decks, each with
transport controls. You control how many decks are visible beyond deck 1, which is the
primary playback deck and always displayed.
The Log. The log display is located centrally right below the audio playback decks and
occupies a majority of the main display area. The log functions as both the schedule of
events and the playback document. You can add, edit, delete and move log items to modify
the original schedule and control playback sequence of audio items on the log.
Log items successully played by XStudio
In addition to the standard information you might expect to see on the log, XStudio also
marks successfully played items, as shown above.
XStudio always keeps the entire current-day (or emergency) log in memory and available to
the user for browsing and editing. If operating in a mode other than Emergency Mode,
XStudio will periodically check to see if the next-day log is available and if so, will load it. The
next day's log can be viewed and edited on demand, if available.
If the broadcast log is changed by another application and the changed log is saved, XStudio
will detect the change and reload the log as needed. This applies to both the current-day log
and next-day log, if available and used. In the case of the current-day log (today's log),
program content on the log prior to the current execution point is retained and only content
that occurs beyond the current execution point is updated. This is known as "log splicing".
Hot Buttons. A group of seven (7) buttons is displayed to the left side of the log as a
© Copyright 2003-2015 C-R Media All Rights Reserved.
Operation - Using XStudio
51
default. Each button can be programmed to play a cart (audio file), perform an XStudio
Action, or, if applicable, signal a host DCS or Maestro to perform one of its own user
functions. The buttons re-size automatically as the main display size is changed and you can
manually make them wider using the splitter control that separates the hot buttons from the
log. A larger second set of hot buttons is available via the XStudio Cart Wall dialog, which
contains user-defined "sets" of 300 buttons and can be shown or hidden on-demand.
Audio Clipboard. The audio clipboard is located immediately below the playback decks and
to the right of the log. The clipboard is used to create a list of carts for ad hoc usage on
playback decks 2, 3 and 4. You can place items from the log or from the audio inventory list
in the clipboard. The order of items in the audio clipboard can be controlled by dragging the
items up or down in the list. The width of the clipboard is controlled using the splitter control
that separates the log and audio clipboard. The audio clipboard can also be completely
hidden (collapsed) if desired.
If you adjust the width of the audio clipboard or collapse it completely to
hide it, the changes also affect the Next Event and Running Actions
display panels.
Next Scheduled Event Status. If you have any Scheduled Events, the next one that will
execute is displayed in the Next Event window, located immediately below the audio
clipboard. This display is automatically updated and is for information purposes only.
Running Actions Panel. This control displays any XStudio Actions that are currently
running (being performed). The panel lists all Actions that are running and is for information
purposes only.
Audio Inventory. The audio inventory is a list of carts (audio files) available for playback.
Carts in the list can be dragged and dropped on the log, dragged and dropped into the audio
clipboard, dragged and dropped to program a hot button, dragged and dropped on any of the
playback decks for immediate playback, and added to the audio clipboard using the [Ctrl-A]
keystroke. The vertical size of the list (number of items displayed) can be adjusted by using
the splitter control that separates the log and the inventory list. You can completely hide the
inventory list, if desired, to make more room for the log display. The horizontal width of the
inventory list is automatically adjusted based on the main display size and any hot button
resizing you do.
XStudio Status Bar. Located at the very bottom of the main display, the status bar provides
several bits of information, including short messages about recent operations, status of the
log (edited or not edited), number of items on the log and in the inventory list, the current
time and a group of LED's that provide status information on the state of Play Through
Directives, tomorrow's log (available or not), and whether or not XStudio is connected to the
host audio engine (XEngine or a DCS or Maestro).
You will probably want to run XStudio at or near the full screen size. You can manually resize the
XStudio main display by dragging the tab on the lower-right corner of the status bar at the bottom of the
XStudio main window. XStudio will remember its size, screen location and monitor (if a multi-monitor
system) and restore the settings each time you start the program. Other settings like the size of the
inventory display and audio clipboard are also saved at program close and restored when XStudio is
restarted.
4.2
Audio Playback
Playing audio is a primary function of XStudio. Typically, playback of audio carts starts with the log - a
station's program schedule. Audio playback can also be initiated with a hot button, from the audio
clipboard and as an automation Task.
© Copyright 2003-2015 C-R Media All Rights Reserved.
52
XStudio 3
This section focuses on playing audio from the log. There are two steps involved: a) "marking" the item
you wish to play; and b) initiating playback in one of several ways.
Setting the "Next-To-Play" Log Item Manually
In order to play an audio item from the log, XStudio needs to know which item to play. This is achieved
by "marking" a selected log item (cart) as the Next-To-Play item. To set the next item to play, select
the item you wish to mark. Use the scroll bars or keyboard shortcuts to bring the item into view and
select the item by clicking on it.
Mark the selected item using the [F7] keystroke or by double-clicking and answering "Yes" to the
prompt. The newly-marked Next-To-Play item will be highlighted using a reverse color scheme and the
text Next=> in the Status Info column.
XStudio will automatically advance and set Next-To-Play log items as the log is performed, marking the
next playable log item found when a cart starts playing and its play source is the log.
Any valid audio item (cart) on the log can be manually set as the Next-To-Play
item, including items previous to the currently playing item, even if the item has
already played. Similarly, any items on the log after the current item can be
marked, making it easy to skip over items or jump back on the log as needed.
Playback Using Deck Transport Buttons
Once a log item has been marked as the Next-To-Play item, the most common method of starting
playback is to use the primary playback deck (Deck 1) transport's [Play] button. The Deck 1 playback
source is always the log, if present. Decks 2 and 3 use the audio clipboard as their playback source as
a default. Refer to the section on Using Playback Decks 2, 3 and 4 for details.
Deck 1 Transport - Idle
When you click the [Play] button, XStudio sends a command to the audio engine to begin playing the
log item marked as Next-To-Play. The Deck 1 (primary) transport is updated to reflect the item that is
© Copyright 2003-2015 C-R Media All Rights Reserved.
Operation - Using XStudio
53
now playing.
Deck 1 Transport - Active
When an audio item is active on a playback deck, the [Stop] button is enabled, as shown. The deck
displays the remaining play time of the cart, along with its number and description. Decks also have a
status light (LED) that indicates the deck is active and a cart is playing.
As many as three (3) carts, also referred to as audio streams, can be playing
simultaneously on each of the available decks. The remaining play time, cart
number and description of the most recently started cart is displayed on the
deck.
If an active audio item came from the log, the log item is marked so you can easily distinguish the
items currently playing from the log. Generally, there will only be one item marked as On=>, but there
could be more than one if XStudio is transitioning from one audio item (cart) to another and audio
overlap is occurring.
When a playing cart (audio item) reaches its end-of-message (Aux Mark), what XStudio does next is
dependent on several playback options that you control. For instance, XStudio may simply finish
playing the audio and wait for you to do something else. More commonly, XStudio will automatically
start the next valid cart on the log, starting playback of the next item even as the previous item is
finishing, which results in audio overlap - a smooth, seamless transition from one cart to another. See
Playback Options later in this topic for details on how you control what XStudio does as the end of
audio playback occurs for a log item.
Using Playback Decks 2, 3 and 4
Playback decks 2, 3 and 4 in XStudio are generally used for specialized audio playback actions. You
© Copyright 2003-2015 C-R Media All Rights Reserved.
54
XStudio 3
might use one of these decks, for instance, to play a cart from the audio clipboard - a playback activity
that has nothing to do with the log. These secondary decks are also used for playback using hot
buttons and may be used as a place to audition audio off-air.
As a default, decks 2, 3 and 4 do not interact with the log - the audio source for each is the audio
clipboard. When the deck playback source is the audio clipboard, the [Play] button is armed only if
there are carts in the clipboard. These decks can be used to play the Next-To-Play log item by setting
the deck source to the log.
Playback Decks 2, 3 & 4 Source Selection
The example deck display shows the appearance of the decks when the playback deck source is set to
the log (Deck 2) and when the playback source is set to the audio clipboard (Deck 3). The deck source
button is a toggle, meaning as you click on it, the deck's source is set to the opposite of the current
deck source setting.
Setting a Deck 2, 3 or 4 playback source to the log is most often used when you are running a live air
shift and want to cross-fade from one audio item to the next when both items are on the log.
When the deck playback source is set to the log and the [Play] button is
pressed, the log item marked as Next-To-Play is started on the selected
playback deck.
At the same time, the [Auto] button is turned off (if it was on) to provide
full control over when the next audio item on the log will be started.
To resume normal auto-sequencing of log playback following usage of either
Deck 2, 3 or 4 to play from the log, you will need to turn the [Auto] button back
on (enable auto-segue). For information on automatically enabling auto-segue
when operating in Automation mode, review the property setting that controls
this action in Preferences.
Alternate Playback Controls
Besides using the deck transport [Play] buttons to start playing audio, there are two other methods of
starting playback that have the same effect as clicking on the transport [Play] button for a selected
deck.
Remote Start
Optionally, remote starts can be enabled in XStudio. When remote starts are wired up to your PC and
you have enabled them in Preferences, pushing the appropriate remote start button associated with
Deck 1, 2, 3 and optionally Deck 4, has exactly the same effect as clicking on the deck's [Play] button.
For more information on implementing remote starts, see the topic on the Remote Start Interface and
the Preferences Remote Starts topic.
© Copyright 2003-2015 C-R Media All Rights Reserved.
Operation - Using XStudio
55
Keyboard Play Start
XStudio implements a special keystroke combination for each of the three playback decks. These
keyboard shortcuts are always active and available to the end-user. For instance, to play the Next-ToPlay item on the log, press and hold down the [Ctrl] (control) key, followed by the [1] key, located
above the "Q" key on a standard keyboard. This has the same effect as clicking on the [Play] button on
the Deck 1 transport. This shortcut is often represented as [Ctrl-1] in shorthand. The keyboard
shortcuts for each deck are as follows:
Deck 1 = [Ctrl-1] (Control-1)
Deck 2 = [Ctrl-2] (Control-2)
Deck 3 = [Ctrl-3] (Control-3)
Deck 4 = [Ctrl-4] (Control-4)
For a complete list of available shortcuts, see the topic Keyboard Shortcuts.
Playback Options
What happens when XStudio reaches the end-of-audio (EOM or Aux Mark) on a playing cart depends
on a number of factors, including the source of the audio item (log, inventory, clipboard, hot button), the
state of the [Auto] (auto-segue) button, along with a few others.
Under normal default operation, XStudio will automatically play the Next-To-Play item on the log if the
audio item finishing play came from the log. If the playing item did not come from the log, XStudio does
nothing in terms of automatic playback. Here are options that affect automatic playback (sequencing)
of the log:
Property
Default Effect
[Auto] (Auto-Segue) Button
Enabled When end-of-audio of a playing item on Deck 1 is
reached, the state of this button determines whether
XStudio attempts to play the next available cart
(Next-To-Play). If enabled (the default), the next item
is played. If disabled, the current item finishes
playing and no further play action is taken by
XStudio.
Play Through Directives
Enabled If this option is enabled and auto-segue is also
enabled, XStudio will continue playing items on the
log, even though a Log Directive is encountered.
This option is enabled or disabled from the Options
menu on the main display.
Wrap Log Option
Disabled If this option is enabled and XStudio reaches the end
of a log and the next day's log is not available
(depending on mode of operation), XStudio "wraps
around" to the beginning of the loaded log and
continues. This option is enabled or disabled from
the Options menu on the main display.
The current operating mode and changes to the operating mode, whether done
manually or as an automated Task, will have an effect on these settings. In
Satellite mode, for instance, the Play Through Directives option is disabled
© Copyright 2003-2015 C-R Media All Rights Reserved.
56
XStudio 3
when the mode is set so XStudio knows the boundaries of a local break. See
the topic on Operating Modes for additional information on modes of operation
XStudio supports and how these modes affect operation.
Playback Using Hot Buttons
Playing audio with a hot button is as simple as clicking on the button. The audio will be played
immediately on the playback channel you selected when configuring the button. For details on setting
up hot buttons, see the topic on Hot Buttons.
When a cart is played from a hot button, XStudio treats the cart differently than a cart played from the
log. Here's a summary of how XStudio handles a cart played from a hot button:
Playing a cart with a hot button does not affect any audio currently playing on the target
audio channel (deck).
A cart played from a hot button does not affect normal auto-sequencing of audio items on
the log if log playback is active. Normal audio overlap will occur when a cart playing from the
log signals EOM (Aux Mark). The hot button cart's EOM is ignored for purposes of autosequencing the log.
A hot button can be clicked multiple times, resulting in multiple plays of the same cart. The
current limit is three (3) streams of audio per output channel playing simultaneously. An error
message is displayed if you attempt to play more than 3 items simultaneously.
If the cart programmed for the hot button does not exist, an error message is displayed.
If you have the option Enforce Cart Dates set and are using XEngine as the host audio
server, hot button carts that are out-of-date will not play and an error message is displayed.
© Copyright 2003-2015 C-R Media All Rights Reserved.
Operation - Using XStudio
4.3
57
Hot Buttons
XStudio "hot buttons" are instant-execution buttons that can be programmed to play a cart on demand
or to execute an XStudio Action. This topic describes how to set up and use hot buttons.
There are two hot button areas in XStudio. One set is located on the main display and is a minimal set
intended for items that might be used frequently by all users. A larger second set is available via the
XStudio Cart Wall dialog, which contains user-defined "sets" of 300 buttons. The Cart Wall dialog
might be used for individual user sets of buttons.
Main Display Hot Buttons
The XStudio main display hot buttons are located along the left side of the display in an area that
features two (2) tabs - one to display the hot buttons, the other to display a list of hourly audio content
totals. To view and use the hot buttons, select the Hot Keys tab. The appearance of the buttons will
vary, depending on whether or not they have been programmed and the choices you make for coloring
the buttons.
XStudio Hot Buttons - Before and After Configuration
Cart Wall Hot Buttons
The XStudio Cart Wall can be displayed or hidden using the main menu's View / Show Cart Wall
menu item or by using the key combination [Ctrl-H].
© Copyright 2003-2015 C-R Media All Rights Reserved.
58
XStudio 3
The Cart Wall window is hidden as a default and does not display the very first
time XStudio is launched. When XStudio is closed, the Cart Wall's state
(shown/hidden and screen position ) is recorded and restored the next time
XStudio is started.
For additional information on Cart Wall features and how to use Cart Wall, review the topic Using the
XStudio Cart Wall.
© Copyright 2003-2015 C-R Media All Rights Reserved.
Operation - Using XStudio
59
Configure a Hot Button Using Drag and Drop
The easiest way to set up a hot button to play a cart is to select an audio item (cart) from the log, the
inventory display or (if enabled) the music search dialog, drag it onto the button and drop it. The cart
number of the dragged item is recorded, and the cart description becomes the button’s caption. If the
target button was not configured or was configured as a Play Cart, the change is immediate. If the
button was originally a CCC Function or XStudio Action, you will be prompted to confirm that you
want to make the change.
When using drag and drop to configure a hot button for audio playback, if the cart number falls within
any of the defined Cart Categories, the category colors are automatically applied. If you wish to modify
these properties, use the button configuration dialog, as described in the next section.
Using the Configure Hot Button Dialog
The XStudio button configuration dialog provides access to all hot button properties. In order to
configure (program) a button to perform an XStudio Action or perform a CCC Function, you must use
the hot button configuration dialog. To display the dialog, [Right-Click] on the button you wish to
modify.
Play Cart Configuration
The hot button configuration dialog dynamically changes based on the button's selected execution
type. Unneeded fields (properties) for the selected button execution type are disabled.
Hot Button Properties
Hot buttons have a number of user-definable properties that are set during the configuration
(programming) of a button. These properties control the button's execution type (play audio, initiate an
Action), button caption, button color scheme and the specifics of the button's execution type. Selected
properties are disabled based on the button execution type.
© Copyright 2003-2015 C-R Media All Rights Reserved.
60
XStudio 3
Property
Description
Action Type
Determines what action will be taken when the button is pressed
(clicked). Options are Play Cart (default), CCC Function, and
XStudio Action. This property also dictates which other properties
are enabled when programming a button.
The CCC Function execution type is applicable only
when you are using a DCS or Maestro unit as the host
audio engine.
Playback Deck
If the button Action Type is Play Cart, this property is enabled and
allows you to select from a drop-down list which of the playback
decks on which the cart will be played. For other Action Types, this
property is disabled.
XStudio Action
If the button Action Type is XStudio Action, this property is enabled.
Select the Action you wish to execute when the button is clicked from
the drop-down list of available Actions. For other Action Types, this
property is disabled.
Cart No |
Function Name |
Action Name
This property is used for the cart number if the Action Type is Play
Cart, and is used to enter the function name if the Action Type is
CCC Function.
CCC Function names are case sensitive! Make
sure you enter the function name exactly as it appears
in the host DCS or Maestro system. The maximum
allowable length of the function name is 25
characters. The host system may restrict a function
name length to fewer characters.
This property is automatically maintained if the Action Type is an
XStudio Action.
As you change the Action Type, the label for this property changes to
reflect the correct type of information that is required.
Caption
The text (caption) that will be displayed on the button to identify the
button's purpose. The maximum length of text you enter is limited to
25 characters.
Background Color
The button's background color. Select a color from the drop-down list
or by using the color customization dialog. You can also use the [Use
Last Colors] or [Use Default Colors] buttons to assign both
background and text color simultaneously.
Text Color
The button's text color. Select a color from the drop-down list or by
using the color customization dialog. You can also use the [Use Last
Colors] or [Use Default Colors] buttons to assign both background
and text color simultaneously.
Programming a Cart Play
To configure a hot button to play a cart when clicked, select Play Cart as the Action Type. Enter the
cart number you wish to play in the Cart No field, exactly 4 characters, as shown in the Play Cart
© Copyright 2003-2015 C-R Media All Rights Reserved.
Operation - Using XStudio
61
Configuration graphic above.
Enter a caption of your choosing - this becomes the button text and should describe the audio that will
be played when the button is clicked.
The quickest way to program a hot button to play a cart is to drag a cart from
the log or from the inventory onto the button. Then, open the hot button
configuration dialog to make any desired changes in the button caption and
button colors.
When you have completed the button configuration, click on the [Apply] button to make your changes
effective. Use the [Cancel] button to discard any changes, keeping the button configuration as it was
before you began editing properties
Programming an XStudio Action
To configure a hot button to execute an XStudio Action when clicked, select XStudio Action as the
Action Type. The display will update and look similar to the example.
XStudio Action Configuration
Select the Action to perform from the drop-down list of available Actions under the Select XStudio
Action label. The Action Name property is automatically updated with your selected Action name.
Enter a caption of your choosing - this becomes the button text and should describe what the button
will do when clicked.
When you have completed the button configuration, click on the [Apply] button to make your changes
effective. Use the [Cancel] button to discard any changes, keeping the button configuration as it was
before you began editing properties.
© Copyright 2003-2015 C-R Media All Rights Reserved.
62
XStudio 3
Programming a CCC Function
To configure a hot button to have a host DCS or Maestro system execute a CCC Function, select CCC
Function as the Action Type. The display will update and look similar to the example.
CCC Function Configuration
Enter the name of the function you want the host DCS or Maestro system to execute exactly as it
appears in the host system.
CCC Function names are case sensitive! Make sure you enter the function
name exactly as it appears in the host DCS or Maestro system. The maximum
allowable length of the function name is 25 characters. The host system may
restrict a function name length to fewer characters.
Enter a caption of your choosing - this becomes the button text and should describe what the button
will do when clicked.
When you have completed the button configuration, click on the [Apply] button to make your changes
effective. Use the [Cancel] button to discard any changes, keeping the button configuration as it was
before you began editing properties.
Clearing a Button Configuration
You can "erase" the contents of a button using the [Clear] button located at the bottom of the dialog.
Clearing a button erases the cart number and description information, resets the button colors to the
default background and text colors and resets the Action Type to Play Cart.
Click on the [Apply] button to complete the action. The button's stored properties are erased.
© Copyright 2003-2015 C-R Media All Rights Reserved.
Operation - Using XStudio
4.4
63
Log Editing & Validation
Operation of XStudio can involve quite a bit of interaction with the broadcast log (schedule), including
such things as opening or creating a log, editing the log by adding, changing, deleting or moving log
items and saving log changes. In addition, you can validate a log - that is, compare the log against the
available inventory to see what items might be missing or have date problems.
This section covers these topics, plus information on managing the log's appearance, searching the
log, printing logs, using the inventory list with logs and emergency logs.
4.4.1
Opening a Log
To open a log, click on the [Open Log] button on the main toolbar. You'll be presented with a display of
available stations and a calendar from which to choose a log.
The calendar display shows station logs that are available for the calendar dates. A check-mark and
the word "LOG" appears on dates where there are logs for the selected station.
Select a Station
To select a different station, click on the down-arrow icon in the station list. A list of available stations is
displayed from which to choose. Stations are identified and set up in Preferences on the Stations tab.
You can also use the [Alt-DnArrow] keystroke if the Select Station field is active.
Select a Log Date
To select a log date, [Left-Click] on the date you want. If you select a date that has no log and click
[OK], you'll be prompted to create a new log, if desired, or cancel the operation.
© Copyright 2003-2015 C-R Media All Rights Reserved.
64
XStudio 3
You can also use a [Double-Click] to open a selected log without having to
click on the [OK] button by enabling this functionality in Preferences.
Navigating the Calendar Display
In addition to mouse control and selection of logs, you can also use the keyboard. As with most
Windows applications, use the [Tab] to move from control (or button) to control.
Within the calendar control, use the [LeftArrow], [RightArrow], [UpArrow] and [DnArrow] keys to
move among the displayed days.
[PgUp] changes the calendar to the previous month, [PgDn] changes the calendar to the next month.
[Ctrl-PgUp] moves to the previous year, [Ctrl-PgDn] moves to the next year.
To return to today's date on the calendar, click on the 'GT' (Go Today) button in
the lower right portion of the calendar.
When you have selected the log date for a selected station, click on [OK] and the log will be opened. A
gauge at the bottom of the main display indicates the progress of opening the file.
Immediately after the log is loaded, it is checked for out-of-sequence times and
conflicts like having two items on the log at the same time. If problems are
found, they are fixed and a dialog is presented, offering you the opportunity to
see what changes were made. You can save the change log if needed for later
review. [Right-Click] on the changes log display and select the Save to File
option. You'll be prompted to select a file name. The change log is saved as a
standard text file.
© Copyright 2003-2015 C-R Media All Rights Reserved.
Operation - Using XStudio
4.4.2
65
Editing a Log
When a log has been selected and opened, the main display will appear similar to the example shown
here. There are three main areas in this display: a) hourly audio content totals; b) the log; and c)
inventory display. There is a tool bar (similar to the one shown) that provides button access to
commonly-used functions. To determine a button's use, float your mouse over it for a hint.
The log display table is where most of your work will be done. There are a number of basic actions that
you will perform, including inserting an item, editing an item and deleting an item.
Inserting a Log Item
Inserting a log item places the new item immediately in front of (ahead of) the current selected log
item. To insert an item, touch the [Ins] key. Alternatively, you can [Right-Click] and select the menu
item Add Log Item or select Edit | Add Log Item from the main menu. In all cases, an insert dialog is
displayed, allowing you to choose the type of item to insert.
© Copyright 2003-2015 C-R Media All Rights Reserved.
66
XStudio 3
If you are positioned on the last item on the log, you'll be prompted to either
insert an item or append an item. Appending will place the new item at the end
of the log after the current, selected item.
Select the type of item you want and either press the [Enter] key or click on the [OK] button. An edit
dialog customized for the particular type of item you're inserting will be displayed. For more information
on each of the edit display types, see the section on Working with Edit Dialogs.
Fill in the appropriate fields in the insert dialog and click on [OK] to complete the insertion. Your data
entry will be validated and you'll be prompted if you have missing information or incorrect information.
Editing a Log Item
To edit, press the [F3] key. You can also select Edit Log Item from the main menu or the log's pop-up
menu. An edit dialog will appear, customized for the type of item you are editing.
Change the appropriate fields and click on [OK] to complete the edit. Your edits will be validated and
you'll be prompted if you have missing information or incorrect information.
When editing Log Notes, Blank Lines, Directives and Program Titles, the Log
Time of the item must fall between the previous non-spot time and the next
non-spot time on the log.
Moving a Log Item
Audio items (carts), can be moved from one location to another on the log by dragging and dropping
the item. [Left-Click] and hold the mouse button down on an audio item, then move the mouse pointer
to the location where you wish to place the item and release the mouse button. The item will be moved
from its original location to the new location. If, during the drag process, you drag above the top visible
item or bottom visible item on the log, the log will "scroll" in the appropriate direction. Moving the
mouse back into the visible items area of the log will stop the scrolling and you can then drop the item
to its new location. If you decide not to drop the item, meaning you want to cancel the move, drag the
item completely out of the visible items area of the log and release the mouse button. The item will not
be moved.
© Copyright 2003-2015 C-R Media All Rights Reserved.
Operation - Using XStudio
67
XStudio allows ONLY audio items to be moved. All other non-audio items
(program titles, directives, etc.) must either be edited to change the item time or
deleted and re-inserted at the appropriate time.
Deleting a Log Item
To delete an item, press the [Del] key or select Delete Log Item from either the main menu or pop-up
menu. You'll be asked to confirm that you really want to delete the item. If you answer "Yes", the item is
deleted from the log. Answering "No" cancels the deletion.
Adding, editing, deleting and moving carts around on the log do not affect the
original log on hard disk. The changes you've made take effect only when you
save the log. XStudio does use the displayed log for playback, though, whether
or not changes made to the log are saved to disk. Behind the scenes, XStudio
also takes a "snapshot" of the log at periodic intervals so that even if a log is
modified and not saved, a record is kept of what the log looked like when it was
performed.
Finding the Next Open Avail
Press the [F8] key to jump to the next open avail - the next available position on the log to insert an
audio item (cart). Pressing the [Shift-F8] keys will jump to the previous open avail.
Jumping to the Next Directive
Press the [F4] key to jump to the next directive item on the log. Pressing the [Shift-F4] keys will jump
to the previous directive.
Searching the Log
Press the [F11] key to display a log search dialog. You can search for a cart number or search the
description. Once a search has been performed, you can search again by pressing the [F12] key. The
search again will start from the last successful search position on the log, enabling you to search the
entire log by repeatedly pressing the [F12] key. The log search features can also be accessed from the
Edit menu. The search mechanism will find the search text you've entered anywhere in the cart
number or description. For instance, you could search for "john" in the description field and "Elton
John", "Rob Johnson" and "John-Boy" will be found. The same is true of searching cart numbers,
although if you enter a 4-digit cart number, the match will have to be exact as there are only 4 digits in
the cart number. For additional information, see the topic Searching a Log.
Hourly Totals (Jump to Time)
The left side of the main display lists the 24 hours in a log, along with the scheduled audio content
length for each hour. If an inventory is used with a given station, the hourly totals will be based on the
inventory, using the Aux Mark time of each cart on the log. If a cart does not exist in the inventory, the
log length value is used in the total. If no inventory is used, hourly totals are calculated entirely on the
log length values of the carts on the log.
The size of the text that displays the hour number and the total for the hour can be increased or
decreased for readability by using a pop-up menu. [Right-Click] on the Hour Totals list and either
increase or decrease the font size of the text.
© Copyright 2003-2015 C-R Media All Rights Reserved.
68
XStudio 3
You can use the "splitter bar" between the Hourly Totals list and the log display
to widen the list so you can see the entire line of text if you increase the text
size.
The hourly totals list also serves as a method of jumping to a particular hour on the log. [Double-Click]
on any one of the hours to jump to the beginning of the selected hour on the log. Selecting an hour and
pressing the [Enter] key can also be used to jump to the selected hour.
You can jump to a specific time on the log by pressing the [F2] key. You'll be
prompted for the time to jump to. See the reference section on Keyboard
Shortcuts for a complete list of keyboard shortcuts you can use.
Inventory
The bottom-right section of the main log editing window is the inventory list, if used. You can sort, filter
and place carts from the inventory on the log (using drag and drop operations). For more details, see
the section on Using the Inventory.
You can increase or decrease the size of the inventory display (it affects the log
display, too) by dragging the "splitter bar" located between the log display and
the inventory display. Float your mouse over the display until you see the
standard resize cursor, then [Left-Click] and drag the splitter up or down to get
the size you want. XStudio "remembers" this setting next time you start the
program.
4.4.2.1 Working with Edit Dialogs
The type of information you need to edit varies with each log record type, and, to make your task
easier, there is a customized edit dialog for each. While each record type varies in information, there
are some consistent types of information that will be entered. Each of these information types is
handled consistently among the edit dialogs. Many of the edit fields help you speed the process by
either presenting a list of choices or making it easier to enter information by interpreting what you
mean. The first part of this section provides information on various field types and hints on using them
effectively. The latter parts include information specific to a particular log record type.
When you are working with a log and wish to edit an item, press the [F3] key to
automatically bring up the appropriate edit dialog. See the Reference section for
a complete list of keyboard shortcuts in edit dialogs.
Insert Log Item Dialog
When inserting a new log item, a dialog is displayed providing the means to select the type of log item
you wish to insert.
© Copyright 2003-2015 C-R Media All Rights Reserved.
Operation - Using XStudio
69
Based on the selected type, a custom dialog specific to the log item type is displayed for data entry.
Navigating Edit Dialogs
You can move through the fields displayed in an edit dialog by pressing the [Tab] or [Enter] key. Either
will advance you to the next field or button in the dialog. [Shift-Tab] moves backward through the fields
and buttons. Directly select a field for editing using your mouse with [Left-Click].
Most buttons have "accelerator" keys - press and hold the [Alt] key, then press the letter that's
underlined on the button. This will have the effect of pressing or clicking on the button.
4.4.2.1.1 Functionality Common to All Edit Dialogs
Some log records require a log time entry, some require a program or spot length. Some require a log
Type Code or Directive Type. Where possible, entry of this information is made easier with special edit
controls.
Time Fields
Time fields require a valid time be entered. The time entry fields in XStudio allow you to take some
short cuts in data entry.
For instance, if you want to enter a time of "3:00 PM", you can simply type "3p" and [Tab] to the next
field. The time will be correctly listed as "3:00 PM".
To enter a time of "3:15 PM", you can type "3.15p" or "15.15". Notice that you don't have to use a colon
( : ) in entry - a period will work just as well. For minute values like ":03", you can enter ".3" (no leading
zero required).
Log times are always expressed as hours and minutes with no seconds value, adhering to the
requirements of a log for DCS or Maestro.
Times entered without an "AM" or "PM", if entered in 12-hour format, will default
to "AM".
Length Fields
Length fields are those used for the length of an audio cart, the duration of a program, and the length
of a directive. These are not really clock times, but are expressed as hours, minutes and seconds of
© Copyright 2003-2015 C-R Media All Rights Reserved.
70
XStudio 3
length. The edit dialogs make some assumptions about typical lengths you might enter.
For instance, if you enter "10" in a length field, the result will be "0 hours, 10 minutes, 0 seconds".
If you enter "100", the result will be "1 hour, 40 minutes, 0 seconds".
To enter a value of 30 seconds, type "0.0.30".
The maximum allowed time for a length field is 16 hours, 39 minutes, 59 seconds, which adheres to
the maximum logged length for XStudio.
The log display shows lengths as mmm:ss (up to 999 minutes, 59 seconds).
These numbers are translated to hours, minutes, seconds in the edit dialog,
then translated from standard hours, minutes, seconds to mmm:ss on the log
display.
Cart Number Fields
Cart numbers are always four (4) characters in length and may include the following characters only:
A..Z, 0..9, {, }, !, #, %, ^, @, =, +. Note that the last six (6) of the allowed characters are macro
characters, which are translated at run-time by the on-air audio delivery system.
Supported Cart Number Macro Characters
Macro Usage
##
Current Voice Number (2-character string)
Whenever these characters are encountered in a cart number, they are replaced by
the current global Voice Number value.
Note: You must always use two characters for defining a voice number and always
use the ## (pound sign, pound sign) designation when entering the Current Voice
Number macro.
%
Current Day of Week (1=Monday .. 7=Sunday)
This character is replaced by the numeric value for the current day of the week.
^
Current Hour (12-hour format)
Hours 1 through 9 = 1..9, 10 = A, 11 = B, 12 = C
Note: Because this is a 12-hour format, the current hour value used when
substituting for this macro character can occur twice during the day. For instance
the 10 AM and 10 PM hours will return the same value - "A".
@
Nearest Hour (12-hour format)
If current minute of the hour >= 30, then the returned hour value is incremented by
1.
Note: Because this is a 12-hour format, the current hour value used when
substituting for this macro character can occur twice during the day. For instance
the 10 AM and 10 PM hours will return the same value - "A".
© Copyright 2003-2015 C-R Media All Rights Reserved.
Operation - Using XStudio
71
Macro Usage
=
Current Hour (24-hour format)
Hours 0 (midnight) through 9 = 0..9, 10 = A, 11 = B, 12 (noon) = C, 13 (1 PM) = D
through 23 (11 PM) = N
Using this macro character format, there are no duplicates throughout the day.
+
Nearest Hour (24-hour format)
If current minute of the hour >= 30, then the returned hour value is incremented by
1.
Hours 0 (midnight) through 9 = 0..9, 10 = A, 11 = B, 12 (noon) = C, 13 (1 PM) = D
through 23 (11 PM) = N
Using this macro character format, there are no duplicates throughout the day.
Day of Week Values
The day of week macro character returns a numeric value, based on the current day of the week.
Values returned are shown in this table.
Day
Value
Monday
1
Tuesday
2
Wednesday
3
Thursday
4
Friday
5
Saturday
6
Sunday
7
Hour of Day Values
Hour of Day macro characters will return different one-character values, depending on the specific
macro character used. The main differences occur between any 12-hour format and any 24-hour
format. Values returned by each format type are listed in this table.
Hour of Day 12-Hour Format 24-Hour Format
Midnight
C
0
1 AM
1
1
2 AM
2
2
3 AM
3
3
4 AM
4
4
© Copyright 2003-2015 C-R Media All Rights Reserved.
72
XStudio 3
Hour of Day 12-Hour Format 24-Hour Format
5 AM
5
5
6 AM
6
6
7 AM
7
7
8 AM
8
8
9 AM
9
9
10 AM
A
A
11 AM
B
B
Noon
C
C
1 PM
1
D
2 PM
2
E
3 PM
3
F
4 PM
4
G
5 PM
5
H
6 PM
6
I
7 PM
7
J
8 PM
8
K
9 PM
9
L
10 PM
A
M
11 PM
B
N
Type Code Fields
Type Code fields use a dropdown list to select type codes. You can also begin typing and the list will
show the closest match. The lists are presented as full words to enhance readability. When working
with a dropdown list, you can display the list by either clicking on the dropdown button or by using the
keystroke [Alt-DnArrow].
Most type code lists are fixed, meaning the user cannot change existing codes
or enter new codes. The spot (audio item) Commercial Type is an exception you can enter codes that do not appear on the list.
Directive Type Fields
Directive Type fields use a dropdown list to select a directive type. Also, typing a directive type will
show the closest match. When working with a dropdown list, you can display the list by either clicking
on the dropdown button or by using the keystroke [Alt-DnArrow].
Directive selection fields will also place a default value in the Description field. If you are inserting a
new Directive on the log and select a "Time Approximate Load Play" directive, the Description field
will be filled in with "~ Load Play". If you select a "Cast-Off Load Play" directive, the Description field
© Copyright 2003-2015 C-R Media All Rights Reserved.
Operation - Using XStudio
73
will be filled in with "$ Load Play".
Automatic insertion of default description text is done only if the Description
field is blank on opening the dialog. If you are editing a Directive and change
the directive type, the default text will not be automatically inserted to replace
existing text.
Copy and Paste Text
For fields that contain text, you can copy and paste text using standard Windows keystrokes. Select
text and use [Ctrl-C] to copy the text to the clipboard, use [Ctrl-V] to paste the text from the clipboard
into a field. Most fields also support the standard mouse [Right-Click] on the field to present menu
options to copy, cut, paste and delete field contents.
Confirming or Canceling Edits
Once you have edited a new or existing log item, clicking on the [OK] button will confirm the changes.
To cancel the edits, click on the [Cancel] button. You can also press [Esc] or click on the edit dialog's
close icon ( X ) to cancel an edit.
When you confirm your changes, the information you've entered is validated.
Fields that are required or have special requirements are checked. If there's
something wrong with your edits, you'll get a message telling you what's wrong
and the edit cursor is placed in the problem field. You will be unable to confirm
(save) your changes until all fields that have special requirements are OK. On
most dialogs, there are fields that are not required for the log to be valid and
workable with XStudio. These fields can be left blank if desired.
Context Help for Edit Dialogs
Each of the edit dialogs has context help available. To use context help, click on the context help
button ( ? ) on the title bar, then click on the field for which you need help. You can also touch the [F1]
key while in a field and get help for that field.
© Copyright 2003-2015 C-R Media All Rights Reserved.
74
XStudio 3
4.4.2.1.2 Blank Line Dialog
XStudio provides the ability to insert a so-called "blank" line in the log. In reality, the blank line is
nothing more than a time place holder. It is generally used as a visual aid in log layout. XStudio ignores
blank lines in general and does not treat them as a separator in satellite breaks, for instance.
The only field to fill out in a Blank Line record is the time. The time entered must fall between the
previous not-spot time and the next non-spot time on the log.
4.4.2.1.3 Spot (Cart) Dialog
It's likely that a majority of your editing will involve adding or editing cart records (a.k.a. spot records).
When opened, the display format is similar to the example shown.
You can edit each field individually, or, if using an inventory for the log, simply fill in the cart number
and press the [Enter] key. If the cart number you entered exists in the inventory, the Description and
Length fields will be filled in automatically with the inventory information. You can also select a cart
from the inventory list - click on the [Show Inv] button to display the inventory list (see the expanded
spot dialog below) and [Double-Click] on the cart you wish to use.
When you have completed editing and press the [OK] button, your entries are validated and, if
incorrect or missing, you get a warning message and the cursor is placed in the field that needs to be
corrected.
Spot (Cart) Dialog Field Information
Items with a check mark in the REQ column require user entry, while unchecked items have default
values which can optionally be changed. Items mark RO are read-only and not editable.
© Copyright 2003-2015 C-R Media All Rights Reserved.
Operation - Using XStudio
Field
75
REQ Usage
Log Time
RO Displays base time for the log item.
Cart Number
The cart number of the log item. This entry can include valid macro
characters. When the dialog is closed, the contents of this field are
checked to be sure only valid cart number characters have been
entered.
Description
The text that will appear on the XStudio display for this log item.
Length
The length of audio file (cart) as hours, minutes, seconds.
Commercial Type
The Type Code for this item. You can select one of the pre-defined
types from the drop-down list or enter up to 4 characters to define
your own type code.
If the item is music cart, this field can be used to enter
the song's intro time. The intro time can be entered as
a one or two-digit number. The value can be preceded
by a colon (:) if desired.
Customer Number
The customer number. Generally will appear only for items
associated with a broadcast spot order and identifies the traffic
system customer number associated with the cart.
Position Flag
Sets anchor position of the item in a cluster. Default is blank - the
field is empty.
Product Code
The item product code. Generally will appear only on logs that have
items on them that were exported from a commercial traffic system.
Mod ID
RO < Not Used >
To create an "open" or "blank" avail, enter a cart number of "****" (4 asterisks)
and leave all other fields blank. You can create an open avail more easily by
selecting the item Open Avail from the Insert Log Item dialog.
You can expand the spot dialog display to show the inventory (if enabled) and select carts (spots) from
the inventory list. For more information on using the inventory, see the section on Using the Inventory.
© Copyright 2003-2015 C-R Media All Rights Reserved.
76
XStudio 3
When the inventory list is displayed, you can [Double-Click] on an inventory item to fill in all applicable
fields in the spot record. You can also drag an item from the inventory list and drop it on the edit panel
to fill in all applicable fields.
4.4.2.1.4 Load Directive Dialog
Load directives are key components to satellite or full local automation in XStudio. It is important that
you understand the use and meaning of directives. If you have questions about the proper use of
directives, or need details on the specifics of using a particular directive, consult the topic on Log
Directives.
When you have completed editing and press the [OK] button, your entries are validated and, if
incorrect or missing, you get a warning message and the cursor is placed in the field that needs to be
corrected.
© Copyright 2003-2015 C-R Media All Rights Reserved.
Operation - Using XStudio
77
Load Directive Dialog Field Information
Items with a check mark in the REQ column require user entry, while unchecked items have default
values which can optionally be changed.
Field
REQ Usage
Log Time
Execution time for the directive. The time entered must fall between
the previous not-spot time and the next non-spot time on the log.
Directive Type
The type of directive for this log item. Select the directive type from
the drop-down list. See the topic on Log Directives for details on
directive types and their usage.
Description
The text that will appear on the XStudio display for this log item.
Length
The execution length of the directive, as hours, minutes, seconds.
4.4.2.1.5 Load Window/Execute Function Dialog
This dialog is displayed when you select either a Load Window directive or an Execute Function
directive. The information required for each of these directives is essentially the same. The key value is
the Relay Number, which identifies which function or action to execute by number. The difference for
the Load Window directive is that it requires special text in the Description field. If you are unfamiliar
with the requirements of Load Windows directives, see the Log Directive topic for details.
When you have completed editing and press the [OK] button, your entries are validated and, if
incorrect or missing, you get a warning message and the cursor is placed in the field that needs to be
corrected.
Load Window / Execute Function Field Information
Items with a check mark in the REQ column require user entry, while unchecked items have default
values which can optionally be changed.
Field
REQ Usage
Log Time
Execution time for the directive. The time entered must fall between
the previous not-spot time and the next non-spot time on the log.
Description
The text that will appear on the DCS, Maestro or XStudio display for
this log item.
© Copyright 2003-2015 C-R Media All Rights Reserved.
78
XStudio 3
Field
REQ Usage
Relay Number
For an Execute Function, the Action ID number for the Action, taken
from the XStudio automation configuration. For a Load Window Set
Voice, enter 99. Valid relay numbers are 1-9999.
4.4.2.1.6 Log Note Dialog
Log Notes are informational in nature and XStudio ignores them. XStudio does not treat them as a
separator in satellite breaks, for instance.
When you have completed editing and press the [OK] button, your entries are validated and, if
incorrect or missing, you get a warning message and the cursor is placed in the field that needs to be
corrected.
Log Note Field Information
Items with a check mark in the REQ column require user entry, while unchecked items have default
values which can optionally be changed.
Field
REQ Usage
Log Time
The time at which the note appears on the log. The time entered
must fall between the previous not-spot time and the next non-spot
time on the log.
Description
The informational text that will appear on the log display for this item.
4.4.2.1.7 Open Avail Insert
An "Open Avail" is simply a spot record with asterisks (****) as the cart number. If you choose to insert
an Open Avail in the log from the insert item list, no dialog is presented as there's no information for
you to edit. An open avail on the log appears as a standard spot (cart) record with the 4 asterisks as
the cart number.
To edit an Open Avail, press the [F3] key and the standard Spot Dialog will be presented. You can
search the for open avails using the [F8] and [Shift-F8] keystrokes. See the Reference section on
keyboard shortcuts for a list of available shortcuts when working with a log.
© Copyright 2003-2015 C-R Media All Rights Reserved.
Operation - Using XStudio
79
4.4.2.1.8 Play Cart Dialog
The Play Cart Directive Dialog is very similar to the Spot Dialog in appearance and functionality, with
the exception that the Play Cart Directive needs a valid log time. You can use the same editing
techniques for this dialog as you do with the Spot Dialog.
When you have completed editing and press the [OK] button, your entries are validated and, if
incorrect or missing, you get a warning message and the cursor is placed in the field that needs to be
corrected.
As with the Spot Dialog, you can expand the Play Cart Directive Dialog to display the cart inventory.
See the expanded spot dialog for an example of its appearance.
Play Cart Dialog Field Information
Items with a check mark in the REQ column require user entry, while unchecked items have default
values which can optionally be changed.
Field
REQ Usage
Log Time
Displays execution time for the directive. The time entered must fall
between the previous not-spot time and the next non-spot time on
the log.
Cart Number
The cart number of the log item. This entry can include valid macro
characters. When the dialog is closed, the contents of this field are
checked to be sure only valid cart number characters have been
entered.
Description
The text that will appear on the DCS, Maestro or XStudio display for
this log item.
Length
The length of audio file (cart) as hours, minutes, seconds.
Commercial Type
The Type Code for this item. You can select one of the pre-defined
types from the drop-down list or enter up to 4 characters to define
your own type code.
Customer Number
The customer number. Generally will appear only for items
associated with a broadcast spot order and identifies the traffic
system customer number associated with the cart.
Position Flag
Sets anchor position of the item in a cluster. Default is blank - the
field is empty.
Product Code
The item product code. Generally will appear only on logs that have
© Copyright 2003-2015 C-R Media All Rights Reserved.
80
XStudio 3
Field
REQ Usage
items on them that were exported from a commercial traffic system.
4.4.2.1.9 Program Title Dialog
Program Titles are used primarily to communicate, via the log, program elements to an operator of
XStudio. Usage of Program Titles is most common for live-assist hours of the broadcast day.
When you have completed editing and press the [OK] button, your entries are validated and, if
incorrect or missing, you get a warning message and the cursor is placed in the field that needs to be
corrected.
Program Title Field Information
Items with a check mark in the REQ column require user entry, while unchecked items have default
values which can optionally be changed.
Field
REQ Usage
Log Time
Start time for the program. The time entered must fall between the
previous not-spot time and the next non-spot time on the log.
Description
The text that will appear on the XStudio, DCS, or Maestro display for
this log item.
Length
The execution length of the program, as hours, minutes, seconds.
Type Code
The Program Type Code for this item. You can select one of the predefined types from the drop-down list or enter up to 4 characters to
define your own type code. Manually entered type codes can exceed
4 characters, but only the first four characters are saved to the log.
© Copyright 2003-2015 C-R Media All Rights Reserved.
Operation - Using XStudio
4.4.3
81
Saving a Log
Save a log by selecting File | Save Log. You can also use the toolbar button for saving a log. If the log
already exists in the save location, you'll be prompted and offered the opportunity to either overwrite
the existing log or cancel the save operation.
A check will be made, prior to saving, to see if the log file might have been changed by someone else
while you were editing. If so, a prompt will appear advising you that the log on disk has changed from
when you opened it. You can either continue with the save or cancel saving.
You can also "Save a Log As.." When this menu item is selected, a save log
dialog appears, similar to the display you see when opening a log. You can
even select an entirely different station and save the log!
A log can also be saved as an XStudio Emergency Log. See the topic on
Emergency Logs for more information.
4.4.4
Changing Log Appearance
You can change certain aspects of how log items are displayed from the View menu. XStudio offers
multiple ways to display cart (audio item) times, and provides the means to highlight carts (audio items)
that are either not valid for the log date or missing from the audio inventory. In addition, the text and
background color of all log items can be controlled, as can the log font style and size.
Settings modified from the View menu take effect immediately when changed
and are "remembered" by XStudio, so the next time you launch the program,
your settings are restored.
Display Spot Times
You can choose how to display spot times - the default is not to display them at all - by selecting the
menu item View | Log Display | Spot Times and then selecting how you want the spot times
displayed, as shown.
Select the option "Log Times" to display the spot (audio item) times in the traditional format that DCS
© Copyright 2003-2015 C-R Media All Rights Reserved.
82
XStudio 3
and Maestro log editors use, with each item incrementing one second from the previous item.
Select the option "Estimated Air Times' to display spot (audio item) times as an estimate of when the
item would be played in a given hour. The estimated play time is hour-based, meaning that the first
item in a given hour is estimated to play at the straight-up of the hour and each subsequent item is
offset by the previous items' play length, either based on the log's Length field or, if used, the audio
inventory's Aux Mark for the cart. This option is useful for stations running local automation.
To suppress the display of log times for audio items, select the option "None".
Estimated Air Times Displayed
Highlight Problem Carts
You can display "problem carts" in a different color scheme (the default is not to display "problem cart"
information) if desired. Select the menu item View | Log Display | Cart Status Display to toggle
problem cart highlighting on and off.
© Copyright 2003-2015 C-R Media All Rights Reserved.
Operation - Using XStudio
83
See the topic on Log Colors for more information on setting the specific colors and properties of audio
items that are either out-of-date for the log date or missing from the audio inventory.
Show Log Times as AM/PM
You can change the time display of log items from military time (the default) to AM/PM times. Select
the menu item View | Log Display | Show Log Time as AM/PM to toggle log item times between
military and AM/PM display.
Changing how log item times are displayed does not affect the underlying log
data, which will be saved in military time format. Displaying times as AM/PM
time is for user convenience.
Cart Category Colorization
You can use the background and text colors associated with Cart Filters (Cart Categories) to make it
easier to quickly identify different audio item groups on the log. The example log shown above uses
© Copyright 2003-2015 C-R Media All Rights Reserved.
84
XStudio 3
different color schemes for commercials, jingles, music, and voice tracks to make them readily
identifiable at a glance. See the topic on Cart Categories for more information on defining colors
associated with various groups of audio items.
Customizing Log Column Width, Location and Visibility
The XStudio log is displayed as a group of columns of information. The size, order and visibility of each
column can be controlled to produce a display customized to your preferences. The following table
describes each of the columns of information available for display. Columns that are displayed to the
end-user as a default are identified, should you make changes and then decide you'd like to revert
back to the default display organization. If you have configured XStudio to load and display the nextday log, column settings for it can also be controlled separately.
Column
Def Description
Time
Displays the logged time of the log item. For audio items,
the format of the displayed time is controlled Display Spot
Times setting. You can modify the width of this
column, but cannot move or hide the column.
Air OK
When an audio item has successfully played, a check
mark appears in this column. You can modify the width
of this column, but cannot move or hide the column.
Status Info
This column displays log status information. The
"NextToPlay" and "OnAir" markers appear in this column.
Line Type
The log item line type, which identifies whether it is a Log
Note, Directive, Program Title or audio item. This column
is not displayed as a default.
Dir Type
If a log item is a Directive, this column displays the type of
directive. It is not displayed as a default.
Cart Number
The Cart Number is the audio item identifier.
Description
The logged item description. The information displayed
comes from either the music or traffic scheduling system,
depending on the type of record, as a default.
Length
The expected length (duration) of a log item. For audio
items, the value is the expected playback length. For
other types of log records, the value is the expected
duration.
Type Code
The log item type code. Types include CM (Commercial),
Music, News, Educational, to name a few.
Relay | Cust#
This column will contain varying kinds of information,
depending on the type of log item. For commercials, it
generally contains the customer number from the traffic
system. If the log item is a directive that involves a relay,
the relay number appears in this column.
Prod Code
For commercials, this column contains the product code
(or product being promoted) for the log record.
Title
If the feature is enabled and the log item is a song, the
song title is displayed in this column. If the log item is not
a song, the column will either be blank or will contain a
© Copyright 2003-2015 C-R Media All Rights Reserved.
Operation - Using XStudio
Column
85
Def Description
copy of the Description column depending on the user
options that are set.
Artist
If the feature is enabled and the log item is a song, the
song's artist is displayed. In all other cases, no
information appears in this column.
Time Aired
If an audio item on the log plays successfully, the time the
item started playing appears in this column.
Rec ID
XStudio automatically creates a unique record ID number
when a log is opened and as the log is changed by edits
or log updates. The ID number is displayed in this column.
Controlling Column Visibility
Select the menu item View | Log Display | Show/Hide Columns to modify which log columns are
visible. A dialog appears, listing all available columns, the current order of columns (left to right) and a
check box that indicates whether or not the column is currently visible.
To hide a column, uncheck it. To display a column, ensure that the item is checked.
You can use this dialog to change the column heading, too. Select the column
you wish to change and [Right-Click] to display a pop-up menu. Select the
menu item Edit Item Text and enter the new column heading you wish to
appear on the log.
Column visibility and the heading text, if changed, are updated immediately upon closing this dialog.
Moving a Log Column
To move a log column from one place to another, press and hold the [Left] mouse button down on the
column heading text. Drag the column to your preferred location. Note that the Time and Air OK
columns are fixed as the left-most log columns and cannot be moved.
© Copyright 2003-2015 C-R Media All Rights Reserved.
86
XStudio 3
Resizing a Log Column
To change the width of a log column, float the mouse cursor over the column headings. When the
cursor shape changes to the divider style (arrows pointing either way), press and hold the [Left] mouse
button down. Move the mouse left or right to make the column width smaller or larger.
Saving Log Column Custom Settings
Any changes you make to log column visibility, width and location are automatically saved when you
exit XStudio and restored the next time you start XStudio.
4.4.5
Searching a Log
You can search a log for either cart numbers or descriptions on the log. To perform a search, select
the main display's Edit | Find menu item or press the [F11] key. A dialog similar to the one shown
below will be displayed. To repeat your last search, select the main display's Edit | Find Again menu
item or press the [F12] key.
Searches are case-insensitive and will find your entered search text anywhere in the selected search
field.
The search mechanism will find the search text you've entered anywhere in the
cart number or description. For instance, you could search for "john" in the
description field and "Elton John", "Rob Johnson" and "John-Boy" will be
found. The same is true of searching cart numbers, although if you enter a 4digit cart number, the match will have to be exact as there are only 4 digits in
the cart number.
If a search is unsuccessful, a warning sound will be issued and the main display's status bar will
display a message indicating the search text was not found.
XStudio saves the search field and text to find when you exit the program and restores those values
the next time the program is started.
4.4.6
Copy and Paste Commercials
You can copy a spot (commercial) record on the log to a special "spot clipboard" and then
subsequently paste it (insert another copy of the spot) into the log.
© Copyright 2003-2015 C-R Media All Rights Reserved.
Operation - Using XStudio
87
ONLY spot records (carts) can be copied and pasted. Log items other than
audio (spot) records require manual insertion.
To copy a spot record, select the spot on the log you wish to copy. Then, you can use the [Ctrl-F3]
keystroke to copy the item to the spot clipboard. You can also use menu items from the main Edit
menu or the log display's pop-up menu.
To paste a copied spot record, select the row on the log where you want the spot inserted. Press [CtrlIns] to insert the spot. The record will be inserted immediately above the selected row. You can also
use the main Edit menu or log display pop-up menu to paste from the spot clipboard.
Copy and Paste is active only when the log table is the active control on the main display. Copy and
paste can also be used across logs. For instance, you may have today's log open in a window, copy a
spot record, then switch to another log window (say, tomorrow's log) and paste the spot into that log.
See the Reference section on Keyboard Shortcuts for a complete list of
keyboard shortcuts you can use.
4.4.7
Using the Inventory
If you have defined an external inventory for a station or are using the default Generate and Use Local
Inventory setting in Preferences, XStudio will display available inventory information. The inventory list
can be used for adding items to the log, adding items to the audio clipboard, and to edit selected cart
properties.
The inventory information can be sorted and/or filtered for ease of use. The same type of display is
also used for cart selection when adding or editing a spot record or adding or editing a play cart
directive. The inventory display will look similar to the following:
Expired carts, those that are invalid for today's date, are displayed in red and future-dated carts, those
that are valid from some date range beyond today, are displayed in green.
Selecting Carts from the Inventory
You can use the inventory to insert carts on the log (on the main display) and to select carts when
adding or editing a spot record or play cart directive. The selection process is slightly different,
depending on whether you are working on the main display with a log or editing a single cart item in
one of the pop-up dialogs.
Main Display - Inserting a Cart from the Inventory into the Log
On the main display, you can select a cart from the inventory and place it on the log. [Left-Click] on the
cart, hold the mouse button down and drag the cart to the position on the log where you want to insert
the cart. Then, drop it on the log. If the cart is invalid for the selected log date, you'll be prompted and
offered the opportunity to cancel adding the cart to the log.
© Copyright 2003-2015 C-R Media All Rights Reserved.
88
XStudio 3
Selecting a Cart in an Edit Dialog
To select a cart in one of the edit dialogs, [Double-Click] on the cart you wish to select, or, if you prefer
using the keyboard, highlight the cart and press the [Enter] key. In either case, the cart number,
description and length of the cart will be placed in the edit fields. You can also drag a cart from the
inventory and drop it on the record display, similar to the main display drag and drop operation.
Filtering Carts
The left portion of the display is for "filtering" the inventory list. There are predefined filters for all carts,
expired carts and future-dated carts. Additionally, you can create your own filters in Preferences. The
use of cart filters reduces the size of the list to only those items you wish to see. You can change the
filter or, if you have the User Filters view selected, change the Cart Filter at any time.
Sorting Carts
You can sort the inventory by clicking on the column header on which you wish to sort. Most, but not
all, columns can be used for sorting. Clicking once on the column sorts in ascending order on the
column; clicking again reverses the sort to descending order.
The following items are available on the main display only! None of the log
record edit dialogs that include an inventory list have these options available.
The XStudio Inventory Pop-Up Menu
The XStudio inventory pop-up menu provides some options related to the inventory display. To access
the menu, [Right-Click] on the displayed inventory list.
XStudio Inventory Pop-Up Menu
There are a number of options available on the inventory pop-up menu. Certain menu items are
enabled or disabled, depending on whether you have a cart selected in the list.
Play Cart (Channel 1, 2, 3, 4)
If you have a cart (audio item) selected when you access the inventory pop-up menu, you can
immediately play the selected cart to a particular channel (deck) by selecting the menu item for the
channel on which you wish to play the cart. If the selected cart is missing or out-of-date (and Enforce
Cart Dates is enabled), an advisory message is displayed.
© Copyright 2003-2015 C-R Media All Rights Reserved.
Operation - Using XStudio
89
Add Cart to Clipboard
Select this menu item to place the selected cart in the audio clipboard. The item will be appended to
the list of items, if any, and appear at the bottom of the list.
Edit Cart Information
XStudio allows you to edit selected cart properties when you select this menu item. An edit dialog
appears, similar to the one shown.
You can edit the cart description, agency field, log length, start date, end date, AUX Mark, audio length
(shorten only), distribution and gain trim.
Items that can be edited vary by the type of cart you are editing. Not all items
are available for all types of carts.
Once you have completed your edits, click on the [Commit] button to save the changes. XStudio saves
the revisions, which take effect immediately.
Manually Update Local Inventory
Selecting this menu item forces XStudio to re-scan the audio folder and rebuild the list of available
inventory immediately. Normally, XStudio will periodically check the audio folder for changes and
rebuild the inventory automatically. If the audio folder is a local drive, detection of changes to the
inventory on-disk is virtually immediate. On a network drive, the check is made at regular intervals that
© Copyright 2003-2015 C-R Media All Rights Reserved.
90
XStudio 3
are user-definable. This menu option allows you to update the inventory on-demand and is particularly
useful when the audio folder is a network drive and you have the Scan Interval set to a high value.
Load Inventory
This menu option allows you to load and display an inventory file of your choosing. You are prompted
to select a file name.
Printing a Cart List
You can print a list of carts at any time. [Right-Click] on the inventory display and select the menu
item Print Inventory from the pop-up menu. You're offered the chance to select a printer, print the list
or cancel printing. The printed list will be as the inventory is displayed on-screen - that is, the printed list
reflects the current filter and current sorting of the inventory.
4.4.8
Printing Logs
You can print an opened log at any time. Access the print log feature by selecting the menu item File |
Print Log, by clicking on the [Print Log] toolbar button, or by right-clicking your mouse over the log
display and selecting the Print Log item.
Initially, you'll see a dialog that allows you to choose whether to preview the printed log on-screen, print
directly to a printer, or save the printed output to a file. The [Setup] button allows you to choose the
printer and change various printer settings.
If you select the Preview option (the default), the printed log will be generated and displayed in a
preview window similar to the one shown below.
© Copyright 2003-2015 C-R Media All Rights Reserved.
Operation - Using XStudio
91
In the preview window, you can page through the log on-screen by using the forward and back toolbar
buttons. You can zoom the preview in and out using the magnifying glass buttons on the toolbar. Scroll
the page with the scroll bar to see the lower portions of the page. You can also scroll the page using
the [PgUp] and [PgDn] keys and the [UpArrow] and [DnArrow] keys.
Send the log to a printer from the preview by clicking on the printer button on the toolbar. A print dialog
will be displayed that allows you to change the printer, if desired, and to select a range of pages to
print, if desired.
You can choose to print only the page or pages you wish from the print button in
the preview display.
If you elect to print the log directly without previewing, it will be generated and sent directly to the
selected printer.
The print routines will fail if the PC you are using has no printers defined or if
the default printer is unavailable. See the section in the Troubleshooting topic
on basic troubleshooting for error messages and solutions.
© Copyright 2003-2015 C-R Media All Rights Reserved.
92
4.4.9
XStudio 3
Emergency Logs
An emergency log is nothing more than an undated standard log with a special name, located in the
same folder as a station's standard dated logs.
To create an emergency log in XStudio, edit any log so that it contains the program content you wish to
use in case of an emergency. The log can be any length up to 24 hours. You might, for instance,
create a log that contains only three or four hours of content - or create an entire day's worth of content
to be used in an emergency.
When you are satisfied with the content, select the menu item File | Save As Emergency Log. A
dialog appears, containing the suggested name for the emergency log.
You can save the emergency log anywhere you wish, but for it to be used by XStudio for a particular
station, it must be located in that station's log folder.
The standard naming convention for an emergency log for use with XStudio is
in the form EML_xx.log, where the "xx" is the target station's Station Number.
Typically, the Station Number would be something like "S1", although XStudio
supports any 2-character combination as a Station Number. You can verify the
Station Number by looking at the XStudio preference settings.
© Copyright 2003-2015 C-R Media All Rights Reserved.
Operation - Using XStudio
93
4.4.10 Log Validation
Log validation checks the items on a log to see if they exist in the inventory of the XStudio machine on
which the log will be aired, and checks whether or not the item is valid for the log date. A report is
generated that can be printed or saved to file.
To validate a log, select the menu item File | Validate Log. The current log is validated and a dialog
similar to the example shown is displayed, containing the results of the validation.
When the validation process is complete, you can scroll the bottom portion of the display to see
individual items that have failed validation and why. The top portion of the display shows statistics
about the log, inventory and number of validation errors.
Display Columns
Validation reports are displayed in a columnar format.
Report columns can be moved and re-sized as desired for each data view. The
columns' location and size information are saved when the report window is
closed and restored the next time a report window is opened.
Here's a brief description of the information displayed, by column:
Column Name
Description
Problem
The specific problem with validating the log item. Problems commonly
include the cart's run dates not being valid for the log date, the log item
is missing from the audio delivery system inventory, or the logged length
of the item and its actual length do not match (if Length-Checking
© Copyright 2003-2015 C-R Media All Rights Reserved.
94
XStudio 3
Column Name
Description
enabled).
Time
The scheduled log time.
Cart No
The number of the cart (audio file) played.
Description
Log description of the item.
Length
The playback length of a cart, expressed as minutes, seconds and
hundredths of a second.
Type
The item's Type Code, also known as Commercial Type.
Cust No (Customer
Number)
The customer number associated with the cart, if originally present on
the broadcast log created by the traffic system.
Begin Date
If available, the begin date of the audio item. The date is retrieved from
the audio delivery system's inventory.
End Date
If available, the end date of the audio item. The date is retrieved from
the audio delivery system's inventory.
Cart Length-Checking
Validation can include cart length-checking. This feature is enabled or disabled from the Options
menu. Select the Cart Length Check item and then set the +/- range, in seconds, to use. When lengthchecking is enabled, the validation process first checks the cart's date to ensure it's valid for the log
date. Then, the logged length (from the log) is compared against the inventory's reported actual cart
length (to AUX mark). If the actual length does not fall within the range of the logged length plus or
minus the selected number of seconds, it is reported as having a length problem and will appear in the
list of problems. If you change the number of seconds to evaluate, you're prompted to re-validate the
log, which will now use the new value to determine if a cart meets the length requirements.
Filtering the Report
You can use the displayed Cart Mask combo box to select a cart filter to use. Cart filters are set up in
Preferences and are global to both inventory filtering and validation report filtering. See the section in
Preferences on Cart Filters for more information on creating cart filters. The effect of using cart filters is
to include only cart numbers that match a given filter set, thus reducing the displayed validation errors
to just those a particular user might want to see or take action on. For instance, the traffic department
might be interested only in commercials that don't validate, not music or jingles or promos.
Sorting the Report
You can change the sort order of the items list - just click on the column name that you wish to use for
sorting. Clicking once on a column sorts ascending; clicking a second time sorts descending.
Report Views
You can select different "views" of the data, which changes the display layout and affects which data is
displayed. You can choose to display only date problems, only length problems, only missing carts or
group data by problem type or cart number.
Printing the Validation Report
To print the validation information, click on the [Print] button on the tool bar or select the menu item
© Copyright 2003-2015 C-R Media All Rights Reserved.
Operation - Using XStudio
95
File | Print Validation Report. A print dialog will be displayed, allowing you to select the printer,
choose portrait or landscape mode, choose to print only selected items on the report, or cancel the
print operation. The printed report may span more than one page, depending on the number of items
that failed validation. The report columns will fit on a standard page in portrait mode, which is the
default.
To print only a selected number of items, you can select multiple items in the
display using the standard Windows methods for multiple item selection. Then,
when printing, check the "Print Only Selected Items" checkbox. You can use
this feature to print only one instance of a non-validated item rather than all 10
times the item appeared on the log.
Saving Validation Report Info to a File
You can save the validation information to a standard text file that can be opened in any text editor or
word processor. Click on the [Save] button, or select File | Save Validation Report, and you'll be
prompted to enter a file name and choose a location for saving.
You can [Right-Click] on the items display to pop up a menu that also provides
the print and save features.
4.4.10.1Cart Length Checking
You can check logged lengths versus actual cart length (to AUX mark) as a part of the log validation
process.
Use the validation pop-up menu to access cart length-checking settings. [Right-Click] and select the
menu item Cart Length Check, as shown. The selected length range will be displayed with a check
mark adjacent to the item.
If you change the cart length check value, you will be offered the opportunity to re-validate the current
log using the new length check value.
XStudio will remember the setting you make and it will be in effect the next time you open a validation
window.
© Copyright 2003-2015 C-R Media All Rights Reserved.
96
XStudio 3
This page intentionally blank.
Reference
Part
V
98
XStudio 3
This section contains more detailed background information on a number of key subjects that will help
you to gain a better understanding of how XStudio works.
Studying these sections is not absolutely necessary, but it will make it much easier for you to use
XStudio more efficiently and effectively.
If you are new to XStudio, we recommend you review the topic on Programming XStudio, which
discusses the concepts and provides practical examples. The Keyboard Shortcuts topic is useful for
operators.
5.1
Automation Database Maintenance
The automation database is a set of data tables referred to as the XStudio Database. These tables
store tasks, actions, the external resources used by tasks, scheduled events, song title and artist
information, and broadcast log historical information.
If your use of XStudio requires an audio switcher, the need to perform automated tasks like updating a
switcher or playing breaks in a satellite format, or the use of scheduled events, you will be working with
one or more of the data tables.
5.1.1
Common Table Display Functionality
Each of the automation database table maintenance areas shares some characteristics and interface
controls, which are documented in this topic. Some functionality discussed in this section may not be
available in some maintenance displays because the functionality is not applicable for that
maintenance area.
Data Display
All database tables are displayed in tabular format - rows of information, each containing columns of
individual record field information (properties). The display of records for a given table can be
manipulated in a number of different ways to organize or limit information that is shown. Information
can be sorted, grouped and filtered for ease of working with specific data records. Additionally,
individual columns in the table can be moved and resized to suit your needs.
XStudio does not "remember" data display layout settings from one session to
the next. When re-opened, tables will display the information in the application
default sort order and column layout.
Sorting Data
As a default, most database tables are shown in what's known as "sorted order". This means that the
data is organized, generally alphabetically, based on a particular column (field). The sort order,
ascending or descending, can be modified on demand. Columns that are a part of the current sort
order contain a small triangular mark pointing either up or down to indicate the column's sort direction.
© Copyright 2003-2015 C-R Media All Rights Reserved.
Reference
99
Sorting Data
To sort displayed information on a particular column, click on the column's header text. Initially, the
data is sorted ascending. To sort the data descending, click on the column's header text a second
time.
You can also sort on multiple columns where applicable. After setting the sort order on the first column,
hold down the [Shift] key and click on a second column's heading text. Both columns are now included
in the sorting, first by the original column, then for equal values in the first column, by the second
column.
To remove a column from a group of columns used for sorting, hold down the [Ctrl] key and click on
the column's header text. The selected column will no longer be included in data sorting.
Not all columns in some data table displays have sorting available. If you
attempt to sort on a column that does not have sorting enabled, nothing
happens.
Grouping Data
Another way to organize displayed data is to group the information based on like data. For instance,
you may wish organize the display so that all Tasks of the same kind are together. When grouping is
available for a displayed table, a group panel, as shown, is visible. To group information based on a
given column, press and hold the left mouse button down on the column header text, drag the column
into the group panel and drop it.
© Copyright 2003-2015 C-R Media All Rights Reserved.
100
XStudio 3
Grouping Data
When grouping of data is applied, the resulting display is similar in appearance to the example shown
below.
Data grouped by Task Type
You can group on multiple columns where applicable. The effect is to have groups within groups, also
known as sub-groups. To add a column to the current grouping, drag another column into the group
panel as you did with the original column.
© Copyright 2003-2015 C-R Media All Rights Reserved.
Reference
101
Grouping is not available for all columns in some data tables. If you attempt to
drag a column into the group panel that is not allowed, the mouse cursor
changes to indicate dropping the column in the group panel is not allowed.
Filtering Data
Displayed records can be reduced to just those items you wish to view using data filters. There are two
ways to filter data - by using the dropdown list of filters for a given column of data, and by creating your
own custom filters.
To use the built-in column filtering, click on the filter access button for a given column.
Drop-down filter list
Select an item from the list of available filter criteria to display only selected records.
© Copyright 2003-2015 C-R Media All Rights Reserved.
102
XStudio 3
Data filtering active
Data filtering can be temporarily disabled, if desired. Uncheck the filter in the active filter panel and all
data will again be displayed. To re-enable the filter, check the filter item in the active filter panel.
Filtering is not available for all columns in some data tables. In a given table
display, columns that can be filtered display a dropdown list graphic. Columns
that do not support filtering do not contain the filter graphic.
Custom Data Filters
In addition to standard filtering using the dropdown lists for columns, you can also create more
complex filtering using custom data filters. To display the custom filter builder dialog, click on the
[Customize] button in the filter panel.
Launch filter builder dialog
The custom filter builder dialog allows you to modify current filter parameters and to add fields
(columns) to the data filter, creating complex filters.
© Copyright 2003-2015 C-R Media All Rights Reserved.
Reference
103
Filter builder dialog
Filters you create can be saved using the [Save As] button and later reloaded using the [Open] button.
You can use wildcard characters in filters. The "_" (underscore) character is
used for single-character wildcards, the "%" (percent) symbol is used for multicharacter wildcards.
Adj usting Column Size and Position
Data display columns can be both moved and resized to accommodate your needs. To change the
width of a column, move the mouse over the end of the column you wish to resize. The mouse cursor
shape changes as shown. Press and hold the left mouse button down, then move left or right to
decrease or increase the width of the selected column.
© Copyright 2003-2015 C-R Media All Rights Reserved.
104
XStudio 3
Resizing a column
You can reorder columns by moving a column to a different location. To move a column, press and
hold the left mouse button down on the column header text. Drag the column header to another
location and drop it. As shown, a pair of arrows appears as you are dragging the column header,
indicating the new position of the column if you drop it.
Moving a column
© Copyright 2003-2015 C-R Media All Rights Reserved.
Reference
105
Resizing or moving column display information has no effect on the data - the changes made are
cosmetic and are available for users to customize the display for ease of use.
Data Navigators
Several areas in XStudio make use of so-called "data navigators." Essentially, a data navigator is an
organized set of buttons that provides an easy-to-use interface for navigating around in displayed data
like the log, station definitions, cart masks, and music databases. In addition to navigation, some of the
navigators include buttons to add (insert), edit, & delete items.
Two example navigators are shown here – there are two because the "state" (availability) of buttons
will vary depending on the current task. For instance, if you are at the beginning of a log, the navigator
buttons for moving backwards through the log are disabled – at least, until you move away from the
beginning of the log.
Depending upon the area of XStudio in which you’re working, some of the navigator buttons depicted
are not visible because the functionality they provide is not allowed.
Printing Lists
Most of the maintenance areas provide an option to print selected information, such as external
resource maps and action task lists, for reference purposes. Typically, the print option is a part of popup context menus. The printer used is the operating system's default printer.
5.1.2
Work Stations
You can define work stations that are a part of an audio system site and assign a unique work station
ID number.
Work Station settings are not presently used and are a part of planned future
expansion. Defining work stations will do no harm, but these definitions will
not be used for any purpose at present.
© Copyright 2003-2015 C-R Media All Rights Reserved.
106
5.1.3
XStudio 3
External Resources
A significant part of handling automated task performance is the need to respond to or control devices
connected to the PC running XStudio. This topic covers creating, editing and configuring these
resources.
External Resource Display
Adding a New Resource
To create a new resource, click on the [Add Resource] button. A dialog appears, allowing you to enter
a user-friendly name for the new resource, select the resource type from a list of supported devices,
and select the COM port to which the resource is connected on the host PC.
© Copyright 2003-2015 C-R Media All Rights Reserved.
Reference
107
Selecting the Resource Type
Add Resource Properties
Items with a check mark in the REQ column require user entry, while unchecked items have default
values which can optionally be changed.
Property
REQ Description
Resource Name
The user-friendly name of the resource. Maximum length is 30
characters.
Resource Type
Select the resource type from the dropdown list. All supported
resources are listed.
COM Port
Select the COM port to which the device is connected from the
dropdown list. COM ports 1 through 8 are supported.
Host Work Station
Not used. For future expansion.
When you have completed setting the properties for the new resource, click on the [Apply] button. The
database record for this resource is created, along with a device map that displays available input
channels, output channels, TTL Inputs, TTL Outputs, Digital Audio Inputs and Digital Audio Outputs, as
applicable.
Resource Labeling
Each resource has some combination of audio input channels, audio output channels, relay inputs and
relay outputs. Not all resources have all of these features, but all have at least some of them.
When a resource is first created, a default set of labels is applied to all items available in the resource
as a starting point. For ease in identification as you are using the resource, it's a good idea to label
them to better identify each item's purpose.
To edit a resource label, select the item you wish to edit, then either use the [F2] key or [Left-Click] to
begin editing, as shown.
© Copyright 2003-2015 C-R Media All Rights Reserved.
108
XStudio 3
Editing Resource Labels
When you have completed the label edits, press the [Enter] key or select another label to edit. All label
edits are automatically saved when you move to a new resource record or use the [Post] button on the
resources data navigator.
Attaching Actions to Relay Inputs
If a selected resource has relay inputs, you can associate an Action with an input. When XStudio
receives a message from the resource that the input relay has been triggered, XStudio executes the
assigned action.
You must have created at least one Action in order to be able to assign an
Action to a Relay Input. See the Actions topic for information on creating
actions.
To assign an Action to an input relay, [Right-Click] on the relay input label to display a pop-up context
menu of options. Select the item Assign Action to Relay Input... A dialog appears, containing a
dropdown list of all available Actions.
© Copyright 2003-2015 C-R Media All Rights Reserved.
Reference
109
Assign Action to Input Relay Dialog
When you have selected the Action you want associated with the Input Relay, click on the [Apply]
button to save your selection. The selected resource label will be updated to reflect the assignment.
Action Assigned to Relay Input
Actions assigned to input relays here are considered the "default" input relay mapping (the connection
of an Action to an Input Relay). During XStudio program execution, these input relay connections can
be overridden using the Remap Input Relays Task. The same task type can also be used to restore the
default input relay mapping assigned here. This type of functionality is particularly useful when
executed special programming like sports broadcasts or music specials delivered by a satellite
programming service.
Remove (Clear) an Action from an Input Relay
To remove or "unhook" an Action from an Input Relay, [Right-Click] on the relay input label and select
the menu item Clear Action from Relay Input ... The attached Action is cleared and Input Relay
graphic changes to a red "X" to reflect that it no longer has an Action assigned to it.
© Copyright 2003-2015 C-R Media All Rights Reserved.
110
XStudio 3
Adj usting Input Relay Lock-Out Values
If a selected resource has input relays, you can "lock out" the relay for a specified period of time after it
is initially triggered. The effect is to ignore any further trigger messages from the device until the "lockout" time has elapsed. The idea is to prevent multiple Input Relay triggers, either as a result of
erroneous multiple relay assertions by the device signaling the Input Relay or so-called "relay bounce."
Adjusting relay lock-out values is also sometimes referred to as "setting relay de-bounce."
To adjust lock-out values, [Right-Click] anywhere on the resource map (the list of resource labels). A
context menu appears, similar to the example shown.
Select the Input Relay Lock-Out Values menu item to display the Modify Device Input Relay Lock-Out
dialog. When edits are complete and applied, the dialog closes and resource record is updated.
Resource Usage
Several types of automation Tasks are resource-specific, such as tasks that update switcher channels,
fade an audio channel on the switcher, or pulse a DOut (Relay Output). You can see which tasks are
using a resource by selecting the resource and clicking on the [Resource Usage] button. All tasks are
scanned to see which of them use the selected resource and when the scan is complete, a dialog is
displayed containing a list of the tasks that use the resource you selected.
The displayed list includes the task name and its unique ID number. This list can be printed, if desired.
[Right-Click] on the list of tasks and select the Print List to Default Printer menu item. See the
Printing Lists topic for more information on printing.
© Copyright 2003-2015 C-R Media All Rights Reserved.
Reference
111
Deleting a Resource
When you no longer need a resource, you can remove it from the database with the [Delete
Resource] button. If the resource is used by any tasks, a message will appear, identifying how many
tasks use the resource and asking you to confirm that the resource is to be deleted.
Deleting a resource is permanent and cannot be undone! It is highly
recommended that before you delete a resource, you create a resource usage
report so that you know which tasks, if any, will need to be modified or
removed.
Printing Resource Information
Resource information can be printed for reference, if desired. [Right-Click] on the resource map
display and select the menu item Print Resource Info to Default Printer. The selected resource
information will be printed, similar to the example shown. For more information on printing, see the
Print Lists topic.
Sample Resource Report
© Copyright 2003-2015 C-R Media All Rights Reserved.
112
XStudio 3
5.1.3.1 Input Relay Lock-Out Dialog
The Input Relay Lock-Out dialog is used to set the "lock-out" time of each Input Relay for an external
device that includes input relays. The display identifies the selected resource name and type, along
with displaying a list of input relays, their labels and current lock-out values.
Input Relay Lock-Out Properties Dialog
Lock-out values are expressed in seconds, in a range of 0..59 seconds. Setting a non-zero value
instructs XStudio to ignore any additional Input Relay signals received for the number of seconds
specified.
Setting All Lock-Out Values at Once
You can set all lock-out values for the resource at once, if desired. To do so, [Right-Click] on an input
name, which displays a context menu. Select the menu item Set All Values to .. and enter the value to
set for all Input Relays.
Printing Lock-Out Settings
If desired, you can print the lock-out values you have assigned to the resource for reference. [RightClick] on an input name and select the menu item Print Lock-Out Information. See the Printing Lists
topic for more information.
© Copyright 2003-2015 C-R Media All Rights Reserved.
Reference
Sample Relay Lock-Out Report
© Copyright 2003-2015 C-R Media All Rights Reserved.
113
114
5.1.4
XStudio 3
Actions
An Action is a set of instructions you create (and name) to perform one or more Tasks. Actions are a
powerful key component of XStudio program execution. Actions execute as a result of some sort of
stimulus or "trigger," which can be as a response to an Input Relay, a scheduled event, a log directive,
a hot-key or embedded in a cart and triggered at start of playback.
Action Maintenance Display
Actions are essentially ordered lists of Tasks to perform. By design, Tasks are reusable - once a Task
is created, you can use it in multiple Actions, as needed. When creating new Actions or editing them,
you work with the Action Edit Dialog.
Adding a New Action
In order to create a new action, at least one Task must be defined. If you
attempt to create a new Action and there are no Tasks defined, you will be
prompted to first create a Task.
To create a new Action, click on the [Add Action] button. The Action edit dialog is displayed. Refer to
the Action edit dialog topic for details on naming the Action and creating the the list of Tasks to
perform. When you have completed creation of the new Action and applied the changes, the Action
appears in the actions table display and its tasks are displayed in the Action Task List.
Editing an Action
To edit an Action, select the action you wish to change and [Double-Click] on it. The Action edit dialog
is displayed, as it is when creating a new Action. Edit the Action name or add, remove and reorder
Tasks in the action task list and click on the [Apply] button to save your changes.
© Copyright 2003-2015 C-R Media All Rights Reserved.
Reference
115
You can also begin editing an Action by double-clicking on the selected
Action's task list display.
Deleting an Action
To delete an existing Action that is no longer needed, select the Action you wish to delete and click on
the [Delete Action] button.
Deleting an Action is permanent and cannot be undone! When an Action is
deleted, its unique ID number is also removed and is not automatically used
again until such time as the maximum ID number (~4 billion) is reached. If you
wish to retain the Action ID number for future usage, you may wish to edit the
Action instead, changing the name to something like "Unused Action # 12" and
modifying the task list to be a single task like a 5-second timer. This will
preserve the Action ID without creating any problems should the Action
inadvertently be executed. We used a Timer task in our example because such
a task does nothing but wait around for the prescribed amount of time and then
exits.
Validating an Action
Tasks are global in nature and can be used (shared) by any number of Actions, so it is a possibility that
you might inadvertently delete a Task that is still in use as a part of an Action. Action validation checks
all Tasks that are a part of the Action to ensure that they exist in the Tasks table.
How Actions are Referenced
Actions are referenced by their unique Action ID number, which is assigned by XStudio when created.
Under normal circumstances, you will not need to know the Action ID value when assigning the Action
to an input relay or a scheduled event, as XStudio presents the Actions in a list for selection by their
user-friendly name. However, if you use an Execute Function log directive to execute an Action or are
embedding an Action reference in a cart for execution at start of play, you will need to know the Action
ID number. These methods require the Action ID number reference for execution. In both cases, you
are limited to using Action ID's 1 - 9999, as the maximum length of the reference number is 4-digits.
© Copyright 2003-2015 C-R Media All Rights Reserved.
116
XStudio 3
5.1.4.1 Action Edit Dialog
Creating new Actions and editing an Action are performed with the Action edit dialog, shown here.
Using this dialog, you can rename the Action to be more meaningful; add, remove and reorder Tasks
that are a part of the Action task list; and add or edit Tasks that you might wish to include in the Action.
Action Edit Dialog
Action Edit Dialog Properties
Items with a check mark in the REQ column require user entry, while unchecked items have default
values which can optionally be changed.
Property
REQ Description
Action ID
A unique ID number is automatically generated for each new
Action. The ID number is in a range of 1 to ~4 billion and autogeneration starts at 1 and counts up. When editing a Action, the
Action ID is displayed for reference. When creating a new Action,
the Action ID is not displayed as it is not assigned until the Action
is saved using the [Apply] button.
Action Name
The user-friendly name of the Action. Maximum length is 30
characters.
Action Task List
The Action task list is as implied - an ordered list of Tasks to be
performed as a part of the Action. Task properties related to
operating mode, day of week and time of day control whether or
not a specific task is actually executed at Action run-time.
Adding Tasks to the Action Task List
To add a Task to the Action task list, select the Task from the table of available tasks. Hold the [Left]
© Copyright 2003-2015 C-R Media All Rights Reserved.
Reference
117
mouse button down and drag the Task into task list box, then drop it (release the [Left] mouse button).
When dragging the item, you can determine its position in the list by hovering the mouse in the exact
position you want the Task before releasing the mouse button to drop it.
Moving a Task within the Action Task List
To move a Task up or down in the list, select the item you wish to move, hold down the [Left] mouse
button, drag the item to its new position and release the mouse button.
Deleting a Task from the Action Task List
To delete a Task from the Action task list, select the item and either; 1) Press the [Delete] key; or 2)
[Right-Click] and select the Delete Item from List menu option.
Action Task List Context
Menu
Editing a Task in the Action Edit Dialog
Tasks can be edited while working in the Action Edit dialog. [Double-Click] on the Task you wish to
edit to display the selected task's properties edit dialog. Make the desired changes and click on the
task properties [Apply] button to save the changes.
Keep in mind that Tasks are global in nature and may be used in other Actions.
Any changes you make to a Task will also be in effect when other Actions using
the task are executed.
Adding a New Task in the Action Edit Dialog
If you find yourself in need of a new Task when editing an Action, [Right-Click] on any Task in the
Available Tasks table. Select the Create New Task menu item from the menu, as shown.
Available Tasks
Context Menu
Create the new task as normal. After saving the Task, it will be available for selection and use in the
Action Task List.
5.1.4.2 Embedding an Action in a Cart
In XStudio, you can cause an Action to be executed when a cart (audio item) begins playing. This
technique might be useful if you need to perform certain tasks at a non-scheduled time. By linking the
execution of an Action to the play start of a specific cart, the Action can be executed on-demand
without regard to time or reliance on a relay closure or other method of triggering execution of an
Action.
© Copyright 2003-2015 C-R Media All Rights Reserved.
118
XStudio 3
Assuming the Action you wish to execute has been created, there are two steps involved in using this
functionality:
1. Enable the functionality (see Enable Actions Embedded in Carts) in XStudio Preferences. Unless
this feature is enabled, XStudio will ignore any Actions embedded in carts. Enabling this feature is
a matter of checking the appropriate item and saving your changes in Preferences.
2. Modify the cart header to include the Action information, which consists of a keyword and an Action
ID.
Modifying the Cart to Execute an Action
To use a particular cart number to execute an Action, the cart's header Description field needs to be
edited to include a keyword and an Action ID number to execute. This can be done when the cart is
created, or later edited to add the Action information. The example shown utilizes the XStudio View/
Edit Cart Properties dialog.
Embeded Action Example
The only difference between a normal cart and one that has embedded Action information is the
content of the Description field. The description field must be edited to include a keyword and Action ID
in the format:
XSA=nnnn
The XSA= part is the keyword, the nnnn part is the 4-digit Action ID to be executed. There must be no
spaces between any of the characters and the characters following the equals sign must be numeric
and a full 4 characters in the range 0001 to 9999. Note that if the Action ID number is, for instance,
"99", the text entered here must be "0099" to meet the 4-digit requirement.
© Copyright 2003-2015 C-R Media All Rights Reserved.
Reference
119
The keyword side (XSA=) can be upper or lowercase (or a mixture), but must be exactly those 3
characters followed by the equals sign.
When you have completed your edits, save the changes. In the example shown, you'd click on the
[Commit Changes] button.
How do embedded Actions work?
The inner workings of Actions embedded in carts are fairly straightforward. When this feature is
enabled and XStudio signals the audio engine to play a cart, the audio engine looks at the cart
information to determine if there is an embedded Action. If the keyword "XSA=" is found, the 4 digits
following the keyword are extracted and the audio engine signals XStudio to perform the Action,
passing the 4-digit ID value. This special signal is sent a few milliseconds before actual start of
playback. The audio engine then begins playing the cart as normal.
When XStudio receives notification to execute the Action, the same things that are done with all Action
execution are done - XStudio tries to find the Action and if so, starts execution. If the Action is not
found, that fact is logged to the event log and nothing happens. Within the Action itself, all normal
execution rules apply, including any restrictions placed tasks relating to mode of operation, time of day
and day of week. In other words, executing an Action in this way behaves the same as an Action
initiated by any of the other available methods. The only thing that's different is that XStudio doublechecks the ID value it receives to make sure it evaluates to a number. This is done to catch situations
where you might have inadvertently entered the wrong information or somehow managed to create the
keyword (XSA=) when entering a normal cart description.
While not important to the actual Action execution, the length and audio content
of the cart should be considered. If, for instance, XStudio is being used as
network programming originator and needs to signal affiliates for a local break,
it may be that the audio content of the cart could be nothing more than 1
second of silence - enough time to execute the Action, which in this example
would include Send Control Command task to perform the affiliate break signal,
and allow enough time for the affiliate to switch away before XStudio plays the
next cart on the log, which in this example would be the first element of a break.
© Copyright 2003-2015 C-R Media All Rights Reserved.
120
5.1.5
XStudio 3
Tasks
Tasks are the basis of automated task processing. Tasks are ultimately made a part of an Action,
which is an ordered list of Tasks to perform. XStudio supports a number of task types, each with its
own set of properties. In this area, you can create, edit and delete Tasks.
For more information about available task types and their properties, refer to
the Task Reference topic.
Task Maintenance Display
Adding a New Task
To create a new Task, click on the [Add Task] button. A dialog is displayed, containing a list of
available task types.
© Copyright 2003-2015 C-R Media All Rights Reserved.
Reference
121
Add Task Dialog
Select the type of task you wish to create and click on the [Apply] button. The new task's properties
dialog will be displayed. Edit the task properties as appropriate and save the Task by clicking on the
[Apply] button. The new Task will appear in the tasks table.
Some task types require an external resource in order for the task to be
functional. If no external resources exist in the automation database, you will be
prompted to create a new resource before trying to create the selected task
type.
Editing a Task
To edit an existing Task, [Double-Click] on the task you wish to edit. The appropriate task properties
dialog will be displayed. When edits are complete, click on the [Apply] button to save the changes.
Deleting a Task
To delete an existing Task, select the Task to be deleted and click on the [Delete Task] button. A
check is made to see if the Task is used by any Actions. If so, you will be prompted to confirm the
deletion.
Task Deletion Confirmation Prompt
Deleting a Task is permanent and cannot be undone! It is highly
recommended that before you delete a Task, you create a task usage report so
that you know which Actions, if any, will need to be updated.
© Copyright 2003-2015 C-R Media All Rights Reserved.
122
XStudio 3
Task Usage Report
A task usage report produces a list of Actions that use a selected Task. This report is useful if you are
planning to modify a Task and wish to know how many Actions will be affected, or if you believe the
Task is no longer needed and are preparing to delete it.
To generate the report, select a Task and click on the [Task Usage] button. The Actions table is
scanned and a list of all Actions that use the selected Task is displayed.
Task Usage Dialog
The list can be printed or saved to file if desired. For more information on printing, see the Print Lists
topic.
© Copyright 2003-2015 C-R Media All Rights Reserved.
Reference
5.1.6
123
Scheduled Events
Scheduled events are a way of executing an Action (a group of Tasks) at a predetermined time of the
day. You can control the execution of a scheduled event in several ways, including disabling the event
altogether.
Scheduled Events Maintenance Display
Adding a New Scheduled Event
To create a new Scheduled Event, click on the [Add Event] button. The Scheduled Event properties
dialog will be displayed. Select the Action to be performed and set other property settings as needed.
In order to create a scheduled event, at least one Action must exist in the
automation database. If there are no Actions, you will be prompted to create
one before adding a scheduled event.
Editing a Scheduled Event
To edit an existing event, [Double-Click] on the event you wish to edit. The Scheduled Event
properties dialog will be displayed. Revise the event properties as desired and click on the the [Apply]
button to save the changes.
Temporarily Disable an Event
To temporarily disable a scheduled event, select the event you wish to disable and [Double-Click] on it
to open the Scheduled Event properties dialog. Uncheck the Event Enabled property and click on
[Apply] to save the changes.
© Copyright 2003-2015 C-R Media All Rights Reserved.
124
XStudio 3
Deleting a Scheduled Event
Deleting a Scheduled Event is permanent and cannot be undone! If you
are not sure you want to permanently remove an event, temporarily disable the
event instead, as described above.
To permanently remove an event from the schedule, select the event and click on the [Delete Event]
button.
5.1.6.1 Event Properties Dialog
When working with a Scheduled Event, the Event Properties dialog is to used to name the event,
select the Action to be performed, set the event execution time, and a date range for which the event
will be valid.
Scheduled Event Properties Dialog
Scheduled Event Properties
Items with a check mark in the REQ column require user entry, while unchecked items have default
values which can optionally be changed.
Property
REQ Description
Event Name
The user-friendly name of the event. Maximum length is 30
characters.
Action to Perform
Select the Action to be executed from the dropdown list.
Event Enabled
Events are enabled (checked) as a default. Use this property to
temporarily disable the event. If disabled, the event will not
execute.
Event Time
The time at which the event is to be executed. Enter the time as
© Copyright 2003-2015 C-R Media All Rights Reserved.
Reference
Property
125
REQ Description
military time in the format hour, minute, seconds.
Start Date
The first date on which the event is valid for execution. The default
value when creating a new event is today's date.
End Date
The last date on which the event is valid for execution. The default
end date is December 31, 2099.
Advanced Event Properties
As with Tasks, there is a set of advanced execution control properties you can access with the [Mode/
Days] button. These additional properties include the XStudio operating mode and days of the week.
See the topic on Advanced Task Properties for details on how to use these properties.
The Hours / Hour Parts advanced property should be left at the default values
with a starting time of midnight (00:00:00) and ending time of 23:59:59. Since a
Scheduled Event is executed at a specific time, this property is not particularly
meaningful, but will be evaluated at run-time to establish whether the event is
valid. Using the default start and end times ensures that if you change the
scheduled event execution time in the future, it will not inadvertently be
invalidated when this property is checked.
© Copyright 2003-2015 C-R Media All Rights Reserved.
126
5.1.7
XStudio 3
Log Data
The Log Data area contains historical information about program logs. XStudio maintains a table of log
information, including snapshots of the log as it is performed throughout the day and a record of all "log
splicing" operations - the merging of the current log with a newly-edited log for the same date. Log
Splice and Log Snapshot records are automatically maintained for a period of 62 days.
Log Data Table Display
Log data records are automatically maintained by XStudio. These records are
view-only and are generally used for troubleshooting or for review of activity
that affected the broadcast log.
Log Snapshot Data
A log snapshot is, as it implies, a "snapshot" of the broadcast log (schedule). The snapshot includes all
log items as they are organized at the moment the snapshot is taken. Items that have played
successfully are noted, along with the time that the item began playing.
A single snapshot record is created and updated for each day. Every time a logged audio item is
played successfully, XStudio updates the current-day log snapshot, overwriting the previous snapshot,
if one exists.
To review log snapshot information, select the record you wish to view and click on the [View Details]
button or [Double-Click] on the selected record. The Log Status dialog will be displayed.
Log Splice Data
Whenever XStudio detects an updated broadcast log on-disk for the current day, the in-memory log is
updated using a technique referred to as "splicing the log".
Since the changed log is the current-day log, XStudio has executed at least a portion of the log. All
© Copyright 2003-2015 C-R Media All Rights Reserved.
Reference
127
items on the updated log that are at times prior to the current time would not be used, so the executed
portion of the log is retained and only content beyond the current log execution point is updated.
Determining Log Splice Point
The point at which the updated log content is "spliced" with the in-memory log is determined by locating
the first Log Directive beyond the current execution point, as shown in the example.
XStudio saves copies of the current in-memory log and updated log each time an updated log is
detected and a log splice is performed. Depending on how often the current-day log is revised
externally, there could be several log splice records for a given day - one for each time the log was
updated from disk.
The log splice records stored in the database can be reviewed to see the changes that occurred [Double-Click] on the record or select it and click on the [View Details] button. The Log Splice
Comparison dialog will be displayed.
Log splice comparisons display differences for the entire log, including log
elements prior to the splice-point. Differences in the log prior to the splice point
were not made a part of the spliced log and are there for reference purposes
only.
Viewing Log Data Records
To view details on a log data record, [Double-Click] on the record you wish to review. You can also
select the record you wish to view and click on the [View Details] button. The appropriate detail view
dialog will be displayed containing the data for the selected record.
5.1.7.1 Log Status Dialog
The Log Status dialog displays the contents of a log snapshot - the state of log items at the moment
the snapshot was taken. Log items successfully played are marked, along with the time the item began
playing.
© Copyright 2003-2015 C-R Media All Rights Reserved.
128
XStudio 3
Log Status Dialog
Log Status information can be useful in a number of ways - for making a quick check of whether an
item played or not, producing a list of of all unplayed items and exporting status information to one of
several popular file formats for further review.
Searching Log Status Data
You can search the log status data for a particular log item on any of the displayed columns (fields) of
information. Click on the [Search] button or use the keyboard shortcut [F11] to display the search
dialog.
Log Status Search Dialog
Enter text representing the item you wish to locate in the Search For field and select the field (column)
© Copyright 2003-2015 C-R Media All Rights Reserved.
Reference
129
to search from the dropdown Search Field list. You can choose to limit the search to find matching text
at the beginning of the field only or anywhere in the search field and optionally search backward
through the log.
Click on the [Search] button to execute the search. If the item you're looking for is found, the log record
is highlighted. To repeat the search, click on the [Search Again] button or use the keyboard shortcut
[F12]. A message is displayed when no further matches are found.
Search criteria, including the text of the last several items searched, the search field, search type and
search direction, is retained when you close the search dialog and restored the next time you perform
a search.
Filtering Log Status Data
You can filter displayed log status data on selected columns (fields) to drill down to just those log items
you are interested in. Columns displaying a dropdown list in the column title can be quickly filtered by
selecting an item from the dropdown list.
For more complex data filtering, click on the [Custom Filter] button to display a filter building dialog.
You can create some very complex filters using the filter builder - since filtering the data does not affect
the underlying information, feel free to experiment.
Filter Building Dialog
Filters you create can be saved to disk and reused on demand. Use the [Save As] button to save a
filter, use the [Open] button to load a previously saved filter. The XStudio installation includes one or
more of the most popular filters.
When you have created the filter and applied it to the snapshot data, only those records that match the
© Copyright 2003-2015 C-R Media All Rights Reserved.
130
XStudio 3
criteria you established are displayed.
Log Status with a Filter Applied
The example filter results shown display only carts (audio items) that were on the log but did not play.
You can turn the filter on or off by clicking on the filter status checkbox.
Exporting Log Status Data
Displayed log status data can be exported for further review, if desired, to several popular formats. To
export log status information, [Right-Click] on the status information to display a context menu.
Log Status Export Context Menu
Select the type of export you wish to make. You'll be prompted for a file name and location for the
export.
The exported Log Status information will contain displayed records only. This
makes the export functionality very flexible, as you can export only the
information that requires further review.
© Copyright 2003-2015 C-R Media All Rights Reserved.
Reference
131
5.1.7.2 Log Splice Comparison Dialog
Each time an updated log is "spliced" (merged) with the active in-memory log, a record containing the
original log and the updated log is stored in the database. The Log Splice Comparison dialog shows
you the differences between the two logs.
Log Splice Comparison - All Data
When initially displayed, all log records for the original log and the new log are shown, side-by-side.
Unique colors are used for changed lines, added lines and deleted lines. A status bar contains the
color key, along with the number of items that fall into each of the change categories.
You can jump to changes quickly using the Next / Previous change buttons, as shown. As you move
through the comparison display, the two logs are synchronized for ease in reviewing differences.
Displaying Changes Only
To display just the changes between the two logs, click on the [Differences Only] button, represented
with a spiral notepad icon.
© Copyright 2003-2015 C-R Media All Rights Reserved.
132
XStudio 3
Log Splice Comparison - Differences Only
As shown in the example, only log records (lines) that do not match are displayed, condensing the
material to review considerably.
Searching the Logs
Searches for specific text can be performed on either log. Select one of the displayed logs - simply
clicking anywhere in the log lines will do the trick. Then, click on either the [Search] or [Search Again]
button.
If this is your first search, a search dialog is displayed.
© Copyright 2003-2015 C-R Media All Rights Reserved.
Reference
133
Search Dialog
Fill in the text to search for and select any options you wish to use to restrict the search. To search
again, click on the [Search Again] button, which will automatically repeat your last search.
© Copyright 2003-2015 C-R Media All Rights Reserved.
134
5.1.8
XStudio 3
Music Data
You can display song title and artist information on the XStudio broadcast log if you either manually
create or import the information into the music data table. As a log is loaded or refreshed, the music
database is searched for matching cart numbers and if found, the song title and artist are added to the
log record for display purposes.
Music Database Maintenance Display
You can manually create and edit song records, but it is by far easier to import the information and use
the editing functionality in this area only when needed for a quick change or correction. There are utility
functions available, including configuring automatic updates of the music data, to revise the artist and
title information in bulk for appearance purposes, and to export music data from the table.
Importing Music Data
Importing song title and artist information is a two-step process. Because most music scheduling
systems do not allow access to song data directly, you must first export the music library to a specially
formatted file and then use that file when importing.
See the topic on Exporting Data from your Music Scheduling System for details
on exporting song title and artist information from popular music scheduling
systems.
When you have a library file ready for import, click on the [Import Data] button to display the music
system selection dialog, which is used to determine the type of music data file that will be imported.
© Copyright 2003-2015 C-R Media All Rights Reserved.
Reference
135
Choose the type of file you will be importing from the dropdown list of available types and click on the
[OK] button. You'll be prompted to select the file to import and the import process will begin. Should the
Music Database already contain records, you will be prompted to choose whether you wish to append
the imported records to the existing music records or simply replace all existing music records with the
imported information. During the import process, a progress bar is displayed.
Music Import Progress Display
When the import is complete, the imported music data is displayed, ready to be reviewed. If errors
occurred during the import process, a message will appear, offering the option of viewing details of the
errors that occurred. You will also be prompted whether or not to use the import settings to enable
auto-import of music data.
Some music databases may have some duplicate cart numbers. This occurs if
cart numbers are erroneously assigned or sometimes where a cart number is
reused when a song is taken out of the play rotation. Duplicate cart number
handling is different when appending records to existing data versus the
imported data replacing all existing music data.
1) Appending Records. If duplicate carts are found, each instance of the
duplicate updates the music record. The effect is that the information of the
last duplicate found in the source data becomes the content of the music
record.
2) Inserting Records. If duplicate carts are found, only the first record
encountered during the import is placed in the database. All others are
discarded.
Utility Functions
The [Utilities] button provides a dropdown menu containing utility functions for manipulating the music
data. Many music directors have a habit of entering song information in their music scheduling system
© Copyright 2003-2015 C-R Media All Rights Reserved.
136
XStudio 3
as all uppercase text. Others may be inconsistent in the way data is entered. Use the utilities to format
the song title and artist fields either as proper-cased or all uppercase text.
Music Database Utilities Menu
Setup Music Auto-Update
When music is manually imported, you are presented with the option to enable auto-update of changed
source music data. You can use this menu item to change auto-update settings, including enabling or
disabling auto-update. For more information on auto-update of music data, see the topic Setup AutoUpdate Music Data.
Proper-Case Music
Many times, the imported music information will have been entered in capital letters. For instance, a
song title may appear as "THE WAY WE WERE" rather than the more visually attractive "The Way We
Were". Select the Proper-Case Music menu item to update all music records. The first letter of each
word in the song title and artist name fields will be capitalized and all other letters of the word in lower
case.
The process is not perfect. There are a myriad number of possibilities in the
proper case of artist names, for instance. The algorithm that determines
capitalization of a word cannot consider all of the possibilities. It is intended as a
starting point that will take care of the majority of the words. You should look
through the music after running this utility to proof the results.
Uppercase Music
As the name implies, when you select the menu item Convert Music to UPPERCASE, all song titles
and artist names are updated so that all letters are upper-case.
© Copyright 2003-2015 C-R Media All Rights Reserved.
Reference
137
Empty Music Database
Should the need arise, you can remove all music records in the database. Select the Empty Music
Database menu item and after confirming your intent, all song title and artist information is removed
from the database.
Export Music to dcsTools Format
Should the need arise, you can export the music data to a file for use with other dcsTools products that
use song title and artist information. You are prompted for a file name and location. The exported file is
a custom file type usable by other dcsTools applications. The export file contains the cart number,
song title and artist information.
Export Music to CSV File
Selecting this menu option exports the music database information to a generic comma-separated
values (CSV) format that can be used by many different software programs. During the export, you are
prompted for a file name and location. When exporting to this format, only the cart number, song title
and artist fields are written to the CSV file.
Add, Edit, Delete Music Records Manually
Edit a record. Any of the displayed music records can be edited. Click on the item you wish to
edit, then click again or press the [F2] key to begin editing. When you have finished editing,
click on the [Post] button in the data navigator.
Add a record. To add a new music record, press the [Insert] key or click on the Insert button
in the data navigator. When you have filled in the cart number, title and artist information, click
on the [Post] button in the data navigator. The Misc field is optional and is used during import
to timestamp when the record was added or updated.
Delete a record. Select the music record you wish to delete and press the [Delete] key or click
on the Delete button in the data navigator. You will be prompted to confirm the deletion.
5.1.8.1 Exporting Data from your Music Scheduling System
In order to be able to import music information with XStudio, you must export the information from your
music scheduling system to a format that XStudio can understand.
In the cases of Selector and MusicMaster, the exported data will be a specially formatted text file. For
POWERGOLD, the exported data is in binary format.
If you have used Maestro at one time or another and have exported music for
use by that system, the instructions and resulting output file for the popular
music scheduling systems are nearly identical. Music exports created for
Maestro can be imported without modification.
5.1.8.1.1 Exporting MusicMaster
The Windows version of MusicMaster has an export design editor that you can use to create
customized exports for your music library. The design editor includes a feature for importing pre-made
export designs. Rather than having you build the needed export design manually, we've provided a
design template you can import, greatly simplifying the process.
© Copyright 2003-2015 C-R Media All Rights Reserved.
138
XStudio 3
The design template file is named "MusicMaster_CCC_MS2ASC.xml" and is placed in the folder
(directory) where our application is installed. Locate this file and follow the steps outlined below.
If you are using the DOS version of MusicMaster, refer to the the MusicMaster
DOS Export topic for details on exporting your music library instead of these
instructions.
Steps to Load and Use the Export Design
1. Copy the MusicMaster_CCC_MS2ASC.xml file to your MMWin folder.
2. In the MMWin folder, find and open MMExportDesignEditor.exe.
3. Select your database and click Open.
4. Switch the Design Type to Library Export via the drop-down list.
5. Click New. Do not name or adjust the settings on the following screen - just click OK.
6. Click File | Import, select the MusicMaster_CCC_MS2ASC.xml file and click Open.
7. Click File | Save, then File | Exit.
8. In MusicMaster, open the station data and go to Dataset | Library | Export. Here, you'll see the
New CCC MS2ASC export design. Select it, check the categories you wish to export, set your
path and file name (we've set them initially to a default value) and click OK to export the file.
MusicMaster_CCC_MS2ASC.xml Layout
The sample export design template we've provided contains the following:
XMLOptions version="1.0" created="2013-10-30T13:47:55" updated="2013-10-30T13:47:56">
<XDF>
<properties>
<version>101</version>
<name>New CCC MS2ASC</name>
<design_type>200</design_type>
<output_type>1</output_type>
<page_count>3</page_count>
</properties>
<design>
<properties>
<design_version>101</design_version>
<output_type>1</output_type>
<output_path>R:\DCS\aStation</output_path>
<output_file>LIBRARY.ASC</output_file>
</properties>
</design>
<pages>
<page1>
<properties>
<name>Song</name>
<user_name></user_name>
<element_type>220</element_type>
<field_count>40</field_count>
</properties>
<field1>
<name>Fixed Text</name>
<item_id>-10105</item_id>
<data_type>0</data_type>
<properties>
<len>1</len>
<text>@</text>
</properties>
</field1>
<field2>
© Copyright 2003-2015 C-R Media All Rights Reserved.
Reference
<name>Maestro #</name>
<item_id>112</item_id>
<data_type>1</data_type>
<properties>
<comment>DSC #</comment>
</properties>
</field2>
<field3>
<name>Spacer</name>
<item_id>-10102</item_id>
<data_type>0</data_type>
<properties>
<len>2</len>
</properties>
</field3>
<field4>
<name>Artist</name>
<item_id>101</item_id>
<data_type>1</data_type>
<properties>
<len>35</len>
<comment>Artist</comment>
</properties>
</field4>
<field5>
<name>Spacer</name>
<item_id>-10102</item_id>
<data_type>0</data_type>
<properties>
<len>2</len>
</properties>
</field5>
<field6>
<name>Title</name>
<item_id>102</item_id>
<data_type>1</data_type>
<properties>
<len>35</len>
<comment>Title</comment>
</properties>
</field6>
<field7>
<name>Spacer</name>
<item_id>-10102</item_id>
<data_type>0</data_type>
<properties>
</properties>
</field7>
<field8>
<name>Line Break</name>
<item_id>-10103</item_id>
<data_type>0</data_type>
<properties>
</properties>
</field8>
<field9>
<name>Run Time</name>
<item_id>12</item_id>
<data_type>13</data_type>
<properties>
<comment>Run Time</comment>
</properties>
</field9>
<field10>
<name>Fixed Text</name>
<item_id>-10105</item_id>
<data_type>0</data_type>
<properties>
<len>3</len>
<text>.00</text>
</properties>
</field10>
<field11>
<name>Intro</name>
<item_id>105</item_id>
© Copyright 2003-2015 C-R Media All Rights Reserved.
139
140
XStudio 3
<data_type>1</data_type>
<properties>
<len>2</len>
<comment>Intro</comment>
</properties>
</field11>
<field12>
<name>Spacer</name>
<item_id>-10102</item_id>
<data_type>0</data_type>
<properties>
</properties>
</field12>
<field13>
<name>Ending</name>
<item_id>106</item_id>
<data_type>1</data_type>
<properties>
<len>2</len>
<comment>Ending</comment>
</properties>
</field13>
<field14>
<name>Category</name>
<item_id>3</item_id>
<data_type>99</data_type>
<properties>
<comment>Category</comment>
</properties>
</field14>
<field15>
<name>Spacer</name>
<item_id>-10102</item_id>
<data_type>0</data_type>
<properties>
<len>15</len>
</properties>
</field15>
<field16>
<name>Gender</name>
<item_id>108</item_id>
<data_type>34</data_type>
<properties>
<len>2</len>
<comment>Demographics</comment>
</properties>
</field16>
<field17>
<name>Power</name>
<item_id>110</item_id>
<data_type>31</data_type>
<properties>
<len>3</len>
<comment>Sound</comment>
</properties>
</field17>
<field18>
<name>Spacer</name>
<item_id>-10102</item_id>
<data_type>0</data_type>
<properties>
<len>14</len>
</properties>
</field18>
<field19>
<name>Fixed Text</name>
<item_id>-10105</item_id>
<data_type>0</data_type>
<properties>
<text>M12345678901N12345678901</text>
</properties>
</field19>
<field20>
<name>Spacer</name>
<item_id>-10102</item_id>
© Copyright 2003-2015 C-R Media All Rights Reserved.
Reference
<data_type>0</data_type>
<properties>
<len>2</len>
</properties>
</field20>
<field21>
<name>Fixed Text</name>
<item_id>-10105</item_id>
<data_type>0</data_type>
<properties>
<len>1</len>
<text>.</text>
</properties>
</field21>
<field22>
<name>Line Break</name>
<item_id>-10103</item_id>
<data_type>0</data_type>
<properties>
</properties>
</field22>
<field23>
<name>Fixed Text</name>
<item_id>-10105</item_id>
<data_type>0</data_type>
<properties>
<text>M12345678901N12345678901</text>
</properties>
</field23>
<field24>
<name>Fixed Text</name>
<item_id>-10105</item_id>
<data_type>0</data_type>
<properties>
<text>M12345678901N12345678901</text>
</properties>
</field24>
<field25>
<name>Fixed Text</name>
<item_id>-10105</item_id>
<data_type>0</data_type>
<properties>
<text>M12345678901N12345678901</text>
</properties>
</field25>
<field26>
<name>Spacer</name>
<item_id>-10102</item_id>
<data_type>0</data_type>
<properties>
<len>7</len>
</properties>
</field26>
<field27>
<name>Fixed Text</name>
<item_id>-10105</item_id>
<data_type>0</data_type>
<properties>
<len>1</len>
<text>.</text>
</properties>
</field27>
<field28>
<name>Line Break</name>
<item_id>-10103</item_id>
<data_type>0</data_type>
<properties>
</properties>
</field28>
<field29>
<name>Fixed Text</name>
<item_id>-10105</item_id>
<data_type>0</data_type>
<properties>
<text>M12345678901N12345678901</text>
© Copyright 2003-2015 C-R Media All Rights Reserved.
141
142
XStudio 3
</properties>
</field29>
<field30>
<name>Fixed Text</name>
<item_id>-10105</item_id>
<data_type>0</data_type>
<properties>
<text>M12345678901N12345678901</text>
</properties>
</field30>
<field31>
<name>Fixed Text</name>
<item_id>-10105</item_id>
<data_type>0</data_type>
<properties>
<len>24</len>
<text>M12345678901N12345678901</text>
</properties>
</field31>
<field32>
<name>Spacer</name>
<item_id>-10102</item_id>
<data_type>0</data_type>
<properties>
<len>7</len>
</properties>
</field32>
<field33>
<name>Fixed Text</name>
<item_id>-10105</item_id>
<data_type>0</data_type>
<properties>
<len>1</len>
<text>.</text>
</properties>
</field33>
<field34>
<name>Line Break</name>
<item_id>-10103</item_id>
<data_type>0</data_type>
<properties>
</properties>
</field34>
<field35>
<name>Spacer</name>
<item_id>-10102</item_id>
<data_type>0</data_type>
<properties>
<len>79</len>
</properties>
</field35>
<field36>
<name>Fixed Text</name>
<item_id>-10105</item_id>
<data_type>0</data_type>
<properties>
<len>1</len>
<text>.</text>
</properties>
</field36>
<field37>
<name>Line Break</name>
<item_id>-10103</item_id>
<data_type>0</data_type>
<properties>
</properties>
</field37>
<field38>
<name>Spacer</name>
<item_id>-10102</item_id>
<data_type>0</data_type>
<properties>
<len>79</len>
</properties>
</field38>
© Copyright 2003-2015 C-R Media All Rights Reserved.
Reference
143
<field39>
<name>Fixed Text</name>
<item_id>-10105</item_id>
<data_type>0</data_type>
<properties>
<len>1</len>
<text>.</text>
</properties>
</field39>
<field40>
<name>Line Break</name>
<item_id>-10103</item_id>
<data_type>0</data_type>
<properties>
</properties>
</field40>
</page1>
<page2>
<properties>
<name>File Header</name>
<user_name></user_name>
<element_type>201</element_type>
<field_count>0</field_count>
</properties>
</page2>
<page3>
<properties><name>File Footer</name>
<user_name></user_name>
<element_type>211</element_type>
<field_count>0</field_count>
</properties>
</page3>
</pages>
</XDF>
</XMLOptions>
5.1.8.1.1.1 MusicMaster DOS Export
Users of MusicMaster's original DOS program need to generate a file named LIBRARY.ASC with the
MusicMaster MS2ASC utility. The resulting LIBRARY.ASC file will then need to be copied to a location
where XStudio can retrieve it for import. MS2ASC.EXE uses a file that the user creates and saves as
MS2ASC.DEF. This is the same layout used to create a MAESTRO.MDB file. If you have created this
file for Maestro, you can use it for XStudio as well.
MS2ASC.DEF Layout
The typical MS2ASC file contains the following information -- notes in [ ] are for your information and
are not part of the file.
© Copyright 2003-2015 C-R Media All Rights Reserved.
144
XStudio 3
I:\DCS\[Path that you want the LIBRARY.ASC file exported to]
99,@
["99," allows you to enter custom text, in this case we’re starting the file with "@"]
1,1,4 [Cart number, start with the first character in the field and use 4 characters]
99
["99" is a single blank space]
99
2
[Artist Name with no limit to the number of characters]
99
99
3
[Song Title]
99
98
[Carriage Return/Line Feed]
22
[Runtime (mm:ss)]
99,.0 [the following two lines will add ".00" to the end of the Runtime]
99,0
5,1,2 [Intro Time]
99
6,1,2 [Ending Type]
30
[Category Letter Code]
31
[Category File Number]
32
[Complete File Number]
99
99
99
99
99
8,2
[Gender Codes]
10
[Power Codes]
7
[Sound Codes]
77,1,7 [Theme Code 7 (?) beginning with the first though 7th character]
78,1,7 [Theme Code 8 (?) beginning with the first though 7th character]
99,M12345678901N12345678901 . [Note: after the last 1 there are two spaces and a period]
98
99,M12345678901N12345678901
99,M12345678901N12345678901
99,M12345678901N12345678901
. [Note: after the last 1 there are 7 spaces and a period]
98
99,M12345678901N12345678901
99,M12345678901N12345678901
99,M12345678901N12345678901
. [Note: after the last 1 there are 7 spaces and a period]
98
99,
[Custom Text in this case is 79 blank spaces followed by a period ( see below)]
98
99,
.
MusicMaster Song Field ID Numbers
For convenience, here’s a list of published field numbers used by MusicMaster. You may wish to
double-check your MusicMaster documentation to see if there are any recent changes.
ID
Field Description
Length
0
Sound Code or Gender Code Translation
See Notes
1
Cart Number
5
2
Artist Name
35
3
Song Title
35
4
Album Title
64
5
Intro Time
8
6
Ending Type
4
7
Sound Codes
5
© Copyright 2003-2015 C-R Media All Rights Reserved.
Reference
ID
Field Description
Length
8
Gender Codes
5
9
Tempo Codes
3
10
Power Codes
3
11
Like Score
2
12
Burn Score
2
13
Match Field
3
14
Harmonic Song Keys
2
15
First Non-Blank Artist Keyword
6
16
Title TWord
6
17
Disc Number
8
18
Mark Status
1
19
Composer Name
64
20
Publishing Company
64
21
Arranger Name
64
22
Runtime (mm:ss)
5
23
Daypart Codes
7
24
Add Date (mm-dd-yyyy)
10
25
Test Date (mm-dd-yyyy)
10
26
Last Move Date (mm-dd-yyyy)
10
27
Last Move Category
1
28
Plays In Category
5
29
Index Number
6
30
Category Letter Code
1
31
Category File Number (ffff)
4
32
Complete File Number (c/ffff)
6
33
Simulcast Pointer
6
34
Plays in Library
5
35
Content Flags
8
36
Notes Field
10
37
License Codes
10
38
Record Company
10
© Copyright 2003-2015 C-R Media All Rights Reserved.
145
146
XStudio 3
ID
Field Description
Length
39
Record Order Number
10
40
Artist Keyword 1
6
41
Artist Keyword 2
6
42
Artist Keyword 3
6
43
Artist Keyword 4
6
44
Artist Keyword 5
6
50
Air Date (mm-dd-yyyy) (Music Logs Only)
10
51
Air Time (hh:mm:ss 24hr Clock) (Music Logs Only)
8
52
Weekday Code (1-7 Sunday = 1) (Music Logs Only)
1
53
Weekday Text Name (Music Logs Only)
3
54
Running in Seconds
4
55
Runtime (No Leading Zero)
5
56
Packet Status (X of Y)
8
57
Packet Status (PN)
2
58
Category/File Number/Packet (c/ffffPN)
8
60
Chart Position – This Week
2
61
Chart Position – Last Week
2
62
Chart Position – Two Weeks Ago
2
63
Total Weeks on Chart
2
64
Peak Chart Position
2
65
Weeks at Peak Position
2
66
Chart Peak Date (mm-dd-yyyy)
10
67
Year End Ranking
4
68
Chart Debut Date (mm-dd-yyyy)
10
69
Chart Note
8
70
Playlist Rotation
8
71
Theme Code 1
32
72
Theme Code 2
32
73
Theme Code 3
32
74
Theme Code 4
32
75
Theme Code 5
32
© Copyright 2003-2015 C-R Media All Rights Reserved.
Reference
ID
Field Description
Length
76
Theme Code 6
32
77
Theme Code 7
32
78
Theme Code 8
32
79
First Non-Blank Theme Code
32
80
Fixed Trivia Line
64
81
Rotating Trivia Line 1
64
82
Rotating Trivia Line 2
64
83
Rotating Trivia Line 3
64
84
Rotating Trivia Line 4
64
86
Rotating Trivia Line 1 – Kill Date (mm-dd-yyyy)
10
87
Rotating Trivia Line 2 – Kill Date (mm-dd-yyyy)
10
88
Rotating Trivia Line 3 – Kill Date (mm-dd-yyyy)
10
89
Rotating Trivia Line 4 – Kill Date (mm-dd-yyyy)
10
90
Active Trivia Line
64
91
Memo
See Notes
98
Carriage Return/Line Feed
2
99
Blank Space or Custom Text
See Notes
101
Song Rest In Hours
4
102
Auto Move 1 – Date (mm-dd-yyyy)
10
103
Auto Move 2 – Date (mm-dd-yyyy)
10
104
Auto Move 3 – Date (mm-dd-yyyy)
10
105
Auto Move 4 – Date (mm-dd-yyyy)
10
106
Auto Move 1 – Category
1
107
Auto Move 2 – Category
1
108
Auto Move 3 – Category
1
109
Auto Move 4 – Category
1
110
Move History 1 – Date (mm-dd-yyyy)
10
111
Move History 1 – Category
1
112
Move History 2 – Date (mm-dd-yyyy)
10
113
Move History 2 – Category
1
114
Move History 3 – Date (mm-dd-yyyy)
10
© Copyright 2003-2015 C-R Media All Rights Reserved.
147
148
XStudio 3
ID
Field Description
Length
115
Move History 3 – Category
1
Notes
1. Sound And Gender Code Translation Fields. A Sound and Gender Code Translation
Field can be used to specify a particular CD changer or DAT tape machine. This option
converts certain Sound Codes or Gender Codes to text using the following format:
0,[LENGTH],[FIELD][CODE][TEXT],[FIELD][CODE][TEXT], etc...
The output will be left justified in a field of [LENGTH] spaces. [FIELD] should be "S" for
Sound Code or "G" for Gender Code. [CODE] is the actual Sound or Gender Code (A..Z) to
translate. The output will contain [TEXT] whenever [Code] appears in the specified [FIELD].
If a song contains more that one of the specified codes, the output will contain the first
match found. For example, consider this Sound and Gender translation Field:
"0, 5, SACD1, SBCD2, GXCART1, GYCART2"
If the song contains Sound Code A, the output becomes "CD1." If the song contains Sound
Code B, the output is "CS2." If the song contains Gender Code X, the output is "Cart1." If
the song contains Gender Code Y, the output is "CART2." If the song doesn’t contain any of
these codes, the output file will contain five blank spaces.
2. Blank Space or Custom Text File Format.
99
99,[CUSTOM TEXT]
A single blank space will be output
The Custom Text will be output exactly as entered
3. Standard Music Fields. When specifying a field other than 0 or 99, use the following format
in the configuration file to specify only a portion of the field:
[FIELD ID NUMBER],[FIRST CHARACTER],[LENGTH]
[FIRST CHARACTER] and [LENGTH] are optional. If you include them, separate them with
a comma. For example: Use "2" to output the entire Artist Name, "3,1,15" to output only the
first 15 characters of the Song Title, or "50,7,4" to output only characters 7-10 of the Air
Date (which is the year, since the Air Date uses the MM-DD-YYYY format).
5.1.8.1.2 Exporting POWERGOLD
Exporting POWERGOLD information for use by XStudio is straightforward. If you are using
POWERGOLD 2000 or later, follow these steps:
1. From the POWERGOLD 2000 main menu choose File | Database | Export | To
POWERGOLD DOS v7 Song.Dat File.
2. Click [OK] at the message that pops up.
3. In the "Select Export Directory" box, browse to the place where you want the Song.Dat file
to be created and click [OK].
If you are using the DOS version of POWERGOLD, copy the SONG.DAT file located in your
POWERGOLD directory to a location that XStudio can read the file from. Then, import the file as the
section on importing music describes.
© Copyright 2003-2015 C-R Media All Rights Reserved.
Reference
149
5.1.8.1.3 Exporting Selector
Selector™ is a registered trademark of Radio Computing Systems, Inc.
Note: These instructions are a reprint of the Computer Concepts Corporation documentation published
on their web site, dated 9/14/2000. Sections that apply specifically to Maestro operations have been
removed.
Export Setup
The following steps should be taken to successfully export your Selector Database to update your
music inventory:
1. From Selector's main menu choose "Report Generator".
2. Create a new report (example: Billboard)
3. In Song Design Format, Press [F7] for the "Punctuation" Screen.
4. Set up '@' in byte 1 on line 1, then set up '.' in byte 80 on lines 2-6.
Example Selector™ Song Punctuation Display
Punctuation
Line
Column
Length
Font
@
1
1
1
A
.
2
80
1
A
.
3
80
2
A
.
4
80
1
A
.
5
80
1
A
.
6
80
1
A
Note: Font for all parameters must be A.
Save your screen. Select Song Design Format and set up the following:
Line
Col
Length
Description
1
2
4
Cart Number **
1
8
37
Artist
1
45
48
Title
2
1
7
Length of Song (MM:SS.T)
2
8
4
Intro
2
12
2
Ending
2
14
1
Category
2
15
15
Category Name
2
30
2
Role
© Copyright 2003-2015 C-R Media All Rights Reserved.
150
XStudio 3
Line
Col
Length
Description
2
32
1
Mood
2
35
5
Sound Code
2
40
7
Hook In
2
47
7
Hook Out
2
55
24
Monday Dayparting
3
1
24
Tuesday Dayparting
3
25
24
Wednesday Dayparting
3
49
24
Thursday Dayparting
4
1
24
Friday Dayparting
4
25
24
Saturday Dayparting
4
49
24
Sunday Dayparting
5
1
76
Song Notes Line #1
6
1
76
Song Notes Line #2
Note: Cart Number comes from the field chosen by the user to store the 4-digit XStudio, DCS, or
Maestro cart number in, such as cart number or media number. Users may wish to use Media and retain
the CD and Track Numbers in their original Fields.
To Export the Selector.Dat File
1. Go to #8 off the main screen of Selector to report generator and values in the generator.
2. Choose the report you created.
3. Press [F5], and Select All.
4. Press [F9] and #2 to send file to the Print File Manager.
5. Press [F9] again and select Jump to Print File Manager.
6. With your Report Name highlighted at the top of the screen, press [F4]. Now you will see a
gray bar toward the bottom of the screen. This is where you will type your path – an example
is: R:\DCS\KCCC\Selector.dat
7. Press [F2] to copy the report.
The file you create stays in the Print File Manager until they are deleted. For maintenance purposes
you should delete the older files with each export.
Update the Selector.dat file whenever you add songs into Selector.
5.1.8.2 Setup Auto-Update Music Data
Music data can be imported into the XStudio music data table at any time. However, a more
convenient way to handle updated music information is to enable the auto-update feature. When
enabled, XStudio will monitor the music source file for changes and when a change is detected,
automatically refresh the XStudio music data table, thus reducing the effort required to keep things in
© Copyright 2003-2015 C-R Media All Rights Reserved.
Reference
151
sync with your music scheduling system.
When music is manually imported in XStudio, a prompt appears after the successful import, offering to
enable auto-update using the current settings. If you answer "Yes", auto-update will be enabled.
Using the Auto-Update Setup Dialog
Sometimes changes need to be made in the way music data is updated. For instance, if you change
music scheduling systems, the music export file name (the import source file name) may change. You
might also want to disable auto-update.To modify auto-update settings, click on the [Utilities] button to
display the utility menu.
Music Utilities Menu
Select the menu item Setup Music Auto-Update to display the auto-update configuration dialog.
Music Auto-Update Configuration Dialog
Music Auto-Update Properties
Items with a check mark in the REQ column require user entry, while unchecked items have default
values which can optionally be changed.
© Copyright 2003-2015 C-R Media All Rights Reserved.
152
XStudio 3
Property
REQ Description
Enable Automatic Update
If checked, automatic updates are enabled. The default is
unchecked (automatic updates disabled).
Select Music System
Select the music system producing the music data file from
the drop down list.
Source Music Data File
The fully-qualified file name of the source music data file that
XStudio will monitor and use for automatic updates.
Append Records to
Existing Data
Default = unchecked. If checked, when music data is
imported, existing music records in the table are retained.
New records are added, changed records are updated.
Using this option retains any songs that might be in the
music table but do not exist in the music update file.
Proper-case Music after
Import
Default = unchecked. If checked, when music data import is
complete, all records in the master music table are checked
and proper-cased. The first letter of each word in the song
title and artist name fields will be capitalized and all other
letters of the word in lower case.
When finished editing properties, click on the [OK] button to save the new settings. Settings are
verified before being saved and you will be prompted if there is a problem with settings; things like a
missing file name or no music system has been selected. To discard changes, click on the [Cancel]
button.
© Copyright 2003-2015 C-R Media All Rights Reserved.
Reference
5.2
153
Database Reference
The XStudio Database is a collection of files called "tables" and is used to store components of
automation operations, including tasks, actions, resources used by tasks and scheduled events. There
are also tables for song title and artist information (music database) and broadcast log historical
information.
A second database, known as the XStudio Inventory Database, is also used. This database is a
collection of tables used to store current audio inventory information.
5.2.1
Database Files Location
As a default, XStudio database files are located in a folder immediately under the XStudio installation
folder. The folder is named "Data" and is automatically created when XStudio is launched for the very
first time.
A number of files are created in the Data folder when XStudio is first launched; these consist of the
tables and support files that comprise the database.
Database files, referred to as the XStudio Database, are owned exclusively by XStudio as a default;
when XStudio is running, no other application is allowed access to these files. Any attempts to open,
copy or delete these files will be denied by the operating system, as they are already opened
exclusively by XStudio.
You can make the data available to other applications by setting the Allow Remote Administration
option in XStudio preferences. When Remote Administration is enabled, applications like XStudio
Administration can be used to remotely update the database.
Files in the Data folder should never be deleted or otherwise modified, as loss
of XStudio functionality or corrupted data will result, causing XStudio to behave
unpredictably.
When XStudio is not running, the database files can be copied, if desired, for archiving, cloning or
backup purposes.
5.2.2
Database Tables
The XStudio database is a collection of tables, stored on-disk as one file per table. This section
documents tables that are a part of the database, including technical information on fields contained in
each table, their type and usage.
All tables are binary data files having a file extension of "NX1". Files are created and maintained using
NexusDB, created by Nexus Database Systems Pty Ltd. NexusDB is a fast, flexible, reliable database
engine embedded in XStudio and supplied royalty-free to the end-user. There's also the option to run
NexusDB as a stand-alone server, implementing true multi-user, client/server database operations.
5.2.2.1 Actions Table
The Actions table contains information about all defined Actions. Its on-disk name is: Actions.nx1
Actions Table Field Definitions
The fields contained in the Actions table, including field type and size (if applicable).
© Copyright 2003-2015 C-R Media All Rights Reserved.
154
XStudio 3
Field Name
Type
Size Description
ActionID
AutoInc
ActionName
String
RelayNo
Integer
<Not used, for future expansion>
ListID
Integer
<Not used, for future expansion>
Data
BLOB
Contains the list of Tasks, in order, used in the Action.
Each time an Action record is created, a unique ID value
is automatically assigned by the system. This value is
used to identify the Action and is not user-modifiable.
30 The user-assigned name for the Action.
RecCreateDate Date/Time
The date and time the record was created.
RecEditDate
Date/Time
The date and time the record was last edited.
RecEditBy
String
30 The user who last edited the record.
5.2.2.2 Events Table
The Events table contains information about scheduled events. Its on-disk name is: Events.nx1
Events Table Field Definitions
The fields contained in the Events table, including field type and size (if applicable).
Field Name
Type
EventID
AutoInc
Each time an Event record is created, a unique ID value
is automatically assigned by the system. This value is
used to identify the Event and is not user-modifiable.
EventStation
Integer
If assigned, the work station to which this event is
assigned.
EventTime
Time
The scheduled time to perform the Event.
EventDescription String
Size Description
30 The user-assigned description (name) of the event.
EventEnabled
Boolean
A True/False flag telling the host system whether or not
the Event is enabled and can be run. The default value
is True.
EventBegDate
Date
The first date on which the Event is valid to run.
EventEndDate
Date
The last date on which the Event is valid to run.
EventActionID
Integer
The ID number of the Action to perform when the Event
is executed.
Data
BLOB
Contains information on valid modes, days and time
ranges in which the event can be run. These values are
in addition to the start and end dates.
RecCreateDate Date/Time
The date and time the record was created.
RecEditDate
Date/Time
The date and time the record was last edited.
RecEditBy
String
30 The user who last edited the record.
© Copyright 2003-2015 C-R Media All Rights Reserved.
Reference
155
5.2.2.3 External Devices Table
The External Devices table contains information about audio switchers used in the system. Its on-disk
name is: ExtDevices.nx1
External Devices Table Field Definitions
The fields contained in the External Devices table, including field type and size (if applicable).
Field Name
Type
Size Description
DeviceID
AutoInc
Each time an External Device record is created, a
unique ID value is automatically assigned by the system.
This value is used to identify the device and is not usermodifiable.
DevicePort
Integer
The COM port number assigned to the device, if
applicable. Allowable values are 0..8. Zero means
unassigned, the values 1 through 8 are the assigned
COM port number.
Device Port numbers are interpreted by
the host application and displayed in a
user-friendly way.
DeviceName
String
DeviceType
Integer
30 The user-assigned name for the device.
The device type, stored as a number.
Device Type values are interpreted by
the host application and displayed in a
user-friendly way as a name identifying
the manufacturer and model of the
device.
Data
BLOB
LockOut
Byte Array
HostWrkStn
Integer
Contains a map of the device resources, including
channels, input relays, output relays, Actions assigned
to input relays and labels for each of the device
resources.
32 Contains a list of input relay lock-out values in seconds,
if applicable. The default value for each input relay is
zero.
The ID of the work station to which the resource is
assigned.
RecCreateDate Date/Time
The date and time the record was created.
RecEditDate
Date/Time
The date and time the record was last edited.
RecEditBy
String
30 The user who last edited the record.
5.2.2.4 Log Data Table
The Log Data table contains information about logs, including snapshots of log status and log splicing
operations. Its on-disk name is: LogData.nx1
© Copyright 2003-2015 C-R Media All Rights Reserved.
156
XStudio 3
Log Data Table Field Definitions
The fields contained in the Log Data table, including field type and size (if applicable).
Field Name
Type
Size Description
ID
AutoInc
Each time a Log Data record is created, a unique ID
value is automatically assigned by the system. This
value is used to identify the data record and is not usermodifiable.
DataType
Integer
Defines the type of Log Data contained in the record log snapshot or log splice.
Data Type numbers are interpreted by
the host application and displayed in a
user-friendly way.
ActTime
Date/Time
The activity time (a time stamp) of what time the log
snapshot or log splice operation occurred.
LogDate
Date
The date of the log that was snapshot or spliced.
Data01
BLOB
If the record is a log snapshot, contains log state
information at the time of the snapshot. If the record is a
log splice record, contains the original log.
Data02
BLOB
If the record is a log splice record, this field contains the
log retrieved from disk for the splice operation (the new
log).
RecCreateDate Date/Time
The date and time the record was created.
RecEditDate
Date/Time
The date and time the record was last edited.
RecEditBy
String
30 The user who last edited the record.
5.2.2.5 Music Data Table
The Music Data table contains song title and artist information, typically imported from a music
scheduling system. Its on-disk name is: Music.nx1
Music Data Table Field Definitions
The fields contained in the Music Data table, including field type and size (if applicable).
Field Name
Type
Size Description
ID
AutoInc
Each time a Music Data record is created, a unique ID
value is automatically assigned by the system. This
value is used to identify the record and is not usermodifiable.
StationID
Integer
The work station to which this record is assigned.
CartNo
String
8
The cart number of the song record.
© Copyright 2003-2015 C-R Media All Rights Reserved.
Reference
Field Name
Type
Title
String
70 The title of the song.
Artist
String
70 The song's artist.
Misc
String
70 A miscellaneous information field.
Data01
BLOB
157
Size Description
<Not used, for future expansion>
RecCreateDate Date/Time
The date and time the record was created.
RecEditDate
Date/Time
The date and time the record was last edited.
RecEditBy
String
30 The user who last edited the record.
5.2.2.6 System Data Table
The System Data table contains records that are used by the application only. It's on-disk name is:
xsSysData.nx1
System Data Field Definitions
The fields contained in the System Data table, including field type and size (if applicable).
Field Name
Type
ItemName
String
ItemNumber
Integer
ItemText
String
Size Description
20 The name of the system data record. The value must be
unique.
A numeric value that may be associated with the item.
64 A text value that may be associated with the item.
ItemTimeStamp Date/Time
ItemNote
String
A date and time value that may be associated with the
item.
100 A text note containing information about the item.
RecCreateDate Date/Time
The date and time the record was created.
RecEditDate
Date/Time
The date and time the record was last edited.
RecEditBy
String
30 The user who last edited the record.
5.2.2.7 Tasks Table
The Tasks table contains information about Tasks. Its on-disk name is: Tasks.nx1
Tasks Table Field Definitions
The fields contained in the Tasks table, including field type and size (if applicable).
Field Name
Type
TaskID
AutoInc
© Copyright 2003-2015 C-R Media All Rights Reserved.
Size Description
Each time a Task record is created, a unique ID value is
automatically assigned by the system. This value is
used to identify the Task and is not user-modifiable.
158
XStudio 3
Field Name
Type
TaskName
String
TaskType
Integer
Size Description
30 The user-assigned name of the Task.
The type of task stored in the record, as an integer
value.
Task Type numbers are interpreted by
the host application and displayed in a
user-friendly way.
Data
BLOB
Contains the Task specifics, including valid modes, days
and times along with Task-specific properties.
TaskInfo
BLOB Memo
Contains Task properties, expressed as text. This field
is used by the host application when generating Task
property reports.
RecCreateDate Date/Time
The date and time the record was created.
RecEditDate
Date/Time
The date and time the record was last edited.
RecEditBy
String
30 The user who last edited the record.
5.2.2.8 Work Stations Table
The Work Stations table contains information about defined host work stations. Its on-disk name is:
WorkStns.nx1
Work Stations Table Field Definitions
The fields contained in the Work Stations table, including field type and size (if applicable).
5.2.3
Field Name
Type
WrkStnID
AutoInc
WrkStnName
String
Size Description
Each time a Work Station record is created, a unique ID
value is automatically assigned by the system. This
value is used to identify the Work Station and is not
user-modifiable.
50 The user-assigned name for the work station.
RecCreateDate Date/Time
The date and time the record was created.
RecEditDate
Date/Time
The date and time the record was last edited.
RecEditBy
String
30 The user who last edited the record.
Database Sharing
Database files, referred to as the XStudio Database, are owned exclusively by XStudio as a default;
when XStudio is running, no other application is allowed access to these files. Any attempts to open,
copy or delete these files will be denied by the operating system, as they are already opened
exclusively by XStudio.
Making the database available to other applications, called "sharing," can be accomplished in two
distinct ways. One method is to enable the XStudio Allow Remote Administration property, which
© Copyright 2003-2015 C-R Media All Rights Reserved.
Reference
159
causes XStudio to function as a database server. The other method is to use a separate stand-alone
database server application, which implements a client/server relationship between XStudio and the
database and makes the database available to other utility applications as well.
If you set up XStudio to operate using a remote client/server database model,
the local database is not used and any settings applicable to the local database,
including allowing remote access, are disabled.
Database Sharing by Allowing Other Applications to Connect to XStudio
The easiest and most convenient method of sharing database information with another application is to
enable the Allow Remote Administration property in XStudio. Essentially, XStudio becomes a database
server in addition to its other duties.
When XStudio is functioning as a database server, other utility applications designed for use with
XStudio can connect to and view or modify the database depending on the utility application. The utility
might be run on the same PC or might be connecting from some other PC. Consult the utility
application software documentation for details on how to access the database hosted by XStudio.
Database Sharing Using the Client/Server Model
To implement database sharing using the traditional client/server model, you need to install and
configure a stand-alone database server application, typically on a PC other than the one running
XStudio. Once the database server application is running successfully, you need to modify the XStudio
database properties to have XStudio use the remote database server. For additional information on
using the client/server model, see the topic on Using a Remote Database.
The necessary stand-alone database server software for implementing a
centralized database is not included in the XStudio installation package. If you
wish to use a centralized database, contact your vendor for information on
obtaining the database server software, along with its requirements for use.
Effects of Database Sharing
Sharing of the XStudio database has minimal effects on the operation of XStudio and users need not
change how they do things when working with XStudio. There are some possible side effects of
database sharing to be aware of, though.
Performance
Performance of XStudio can be affected when the database is shared, in the following ways:
1. If XStudio is functioning as a database server in addition to its other duties, application
response time could be a bit slower if one or more utility applications are connected and
performing database-intensive tasks. This occurs because XStudio has to divide its
attention between normal operations and serving the database requests of connected client
applications.
2. If XStudio is connecting to a remote database server and network (LAN) traffic is extremely
high, application response time could be slower as a result of the the high network traffic
impeding retrieval of data from the database server.
© Copyright 2003-2015 C-R Media All Rights Reserved.
160
XStudio 3
Changing Data
In most cases modification of data, whether it occurs within XStudio or is a result of a client utility
application making changes, is transparent and automatically handled by XStudio. If a Task is updated,
for instance, the next time the Task is used in an Action, the new information is used regardless of
whether the change was made within XStudio or made with a utility application connecting remotely.
However, if a remote utility application is re-importing the music library, for instance, and XStudio
needs to retrieve song title and artist information, the cart may not be found if the import is in progress
at the time of the lookup.
5.2.4
Inventory Manager Database
The XStudio Inventory Manager (InvMgr) Database is separate from the XStudio application
database. Current audio inventory information is stored in this database and information is
automatically updated as the on-disk inventory of available audio files changes.
5.2.4.1 InvMgr Files Location
As a default, XStudio Inventory Database files are located in a folder immediately under the XStudio
installation folder. The folder is named "InvData" and is automatically created when XStudio is
launched for the very first time.
A number of files are created in the InvData folder when XStudio is first launched; these consist of the
tables and support files that comprise the database.
Inventory database files, referred to as the XStudio Inventory Database, are owned exclusively by
XStudio as a default; when XStudio is running, no other application is allowed access to these files.
Any attempts to open, copy or delete these files will be denied by the operating system, as they are
already opened exclusively by XStudio.
Files in the InvData folder should never be deleted or otherwise modified, as
loss of XStudio functionality or corrupted data will result, causing XStudio to
behave unpredictably.
You can make the inventory data available to other applications by setting the Allow Remote Access
option in XStudio preferences.
When XStudio is not running, the database files can be copied, if desired, for archiving, cloning or
backup purposes.
5.2.4.2 InvMgr Database Tables
The XStudio inventory manager database is a collection of tables, stored on-disk as one file per table.
This section documents tables that are a part of the database, including technical information on fields
contained in each table, their type and usage.
All tables are binary data files having a file extension of "NX1". Files are created and maintained using
NexusDB, created by Nexus Database Systems Pty Ltd. NexusDB is a fast, flexible, reliable database
engine embedded in XStudio and supplied royalty-free to the end-user. There's also the option to run
NexusDB as a stand-alone server, implementing true multi-user, client/server database operations.
© Copyright 2003-2015 C-R Media All Rights Reserved.
Reference
161
5.2.4.2.1 Inventory Data Table
The Inventory Data table contains all audio file inventory information. It's on-disk name is: InvData.nx1
Inventory Data Field Definitions
The fields contained in the System Data table, including field type and size (if applicable).
Field Name
Type
Size Description
FilePath
String
300 The path to the inventory item. Path may be expressed
either as a drive letter or using UNC naming
conventions.
FileName
String
30 The name of the audio file, including the extension.
CartNo
String
10 The cart number (ID) of the inventory item.
FileDate_UTC
Date/Time
The date/time value of the last modification to the audio
file.
FileSize
Integer
The size of the audio file, in bytes.
DAF_Header
BLOB
This field contains a binary copy of the audio file header.
Approximate Record Size: 2701 bytes
5.2.4.2.2 System Data Table
The System Data table contains records that are used by the application only. It's on-disk name is:
SysData.nx1
System Data Field Definitions
The fields contained in the System Data table, including field type and size (if applicable).
Field Name
Type
ItemName
String
ItemNumber
Integer
ItemText
String
ItemTimeStamp Date/Time
ItemNote
String
Size Description
20 The name of the system data record. The value must be
unique.
A numeric value that may be associated with the item.
64 A text value that may be associated with the item.
A date and time value that may be associated with the
item.
100 A text note containing information about the item.
RecCreateDate Date/Time
The date and time the record was created.
RecEditDate
Date/Time
The date and time the record was last edited.
RecEditBy
String
30 The user who last edited the record.
Approximate Record Size: 306 bytes
© Copyright 2003-2015 C-R Media All Rights Reserved.
162
XStudio 3
5.2.4.3 Sharing the InvMgr Database
Inventory database files, referred to as the XStudio Inventory Database, are owned exclusively by
XStudio as a default; when XStudio is running, no other application is allowed access to these files.
Any attempts to open, copy or delete these files will be denied by the operating system, as they are
already opened exclusively by XStudio.
Making the database available to other applications, called "sharing," can be accomplished in two
distinct ways. One method is to enable the XStudio Allow Remote Access property in the Inventory
Manager Options section of Preferences, which causes XStudio to function as a database server.
The other method is to use a separate stand-alone database server application, which implements a
client/server relationship between XStudio and the database and makes the database available to
other utility applications as well.
Inventory Database Sharing by Allowing Other Applications to Connect
to XStudio
The easiest and most convenient method of sharing database information with another application is to
enable the Allow Remote Access property in XStudio. Essentially, XStudio becomes a database server
in addition to its other duties.
When XStudio is functioning as a database server, other utility applications designed for use with
XStudio can connect to and view or modify the database depending on the utility application. The utility
might be run on the same PC or might be connecting from some other PC. Consult the utility
application software documentation for details on how to access the database hosted by XStudio.
Effects of Inventory Database Sharing
Sharing of the XStudio inventory database has minimal effects on the operation of XStudio and users
need not change how they do things when working with XStudio. There are some possible side effects
of database sharing to be aware of, though.
Performance
Performance of XStudio can be affected when the database is shared, in the following ways:
1. If XStudio is functioning as a database server in addition to its other duties, application
response time could be a bit slower if one or more utility applications are connected and
performing database-intensive tasks. This occurs because XStudio has to divide its
attention between normal operations and serving the database requests of connected
client applications.
2. When XStudio is functioning as a database server, clients connect via TCP and depending
what client tasks are being performed, network traffic may increase significantly for short
periods of time. This could cause temporary slowdowns in activities that use the network
connection.
© Copyright 2003-2015 C-R Media All Rights Reserved.
Reference
5.3
163
Data Navigators
Several areas in XStudio make use of so-called "data navigators". Essentially, a data navigator is an
organized set of buttons that provides an easy-to-use interface for navigating around in displayed data
like the log, station definitions, cart categories, and music databases. In addition to navigation, some of
the navigators include buttons to add (insert), edit, & delete items.
Two example navigators are shown here – there are two because the "state" (availability) of buttons
will vary depending on the current task. For instance, if you are at the beginning of a list of Task
records, the navigator buttons for moving backwards through the list are disabled – at least, until you
move away from the beginning of the list.
Depending upon the area of XStudio in which you’re working, some of the navigator buttons depicted
are not visible because the functionality they provide is not allowed.
© Copyright 2003-2015 C-R Media All Rights Reserved.
164
5.4
XStudio 3
Keyboard Shortcuts
A number of keyboard shortcuts are implemented in XStudio. Availability of some shortcuts varies
depending on the main display control that is active at a given moment.
The following tables document keyboard shortcuts that are available, starting with global shortcuts and
continuing with shortcuts available only in certain controls within XStudio.
Global Shortcuts
These shortcut keys are active anywhere on the main display. It does not matter which control on the
main display is active.
Shortcut
Action
[F1]
Displays context-sensitive help, if available, for the active control. This
keystroke applies to all displayed windows and dialogs in XStudio.
[F10]
Toggles the [Auto] (Auto-Segue) button on and off. Has the effect of
enabling or disabling automatic sequencing of audio playback from the
log.
[F11]
Displays the Log Search dialog. See the topic on Searching a Log for
details on using the search dialog.
[F12]
Search Again. Repeats the last search on the log, starting from the most
recent successful match. No dialog is displayed.
[Ctrl-1]
Deck 1 Play. The effect is the same as clicking on the Channel 1 (Deck 1)
[Play] button. XStudio plays the item on the log marked as Next-To-Play.
The Next-To-Play item is highlighted on the log, using a reverse color
scheme and the text Next=> in the Status Info column.
[Ctrl-2]
Deck 2 Play. The effect is the same as clicking on the Channel 2 (Deck 2)
[Play] button. XStudio will either start playing the Next-To-Play item on the
log or the next item in the Audio Clipboard, depending on the state of the
deck's Playback Source button.
[Ctrl-3]
Deck 3 Play. The effect is the same as clicking on the Channel 3 (Deck 3)
[Play] button. XStudio will either start playing the Next-To-Play item on the
log or the next item in the Audio Clipboard, depending on the state of the
deck's Playback Source button.
[Ctrl-4]
Deck 4 Play. The effect is the same as clicking on the Channel 4 (Deck 4)
[Play] button. XStudio will either start playing the Next-To-Play item on the
log or the next item in the Audio Clipboard, depending on the state of the
deck's Playback Source button.
[Ctrl-H]
Toggles the Cart Wall visibility on and off.
[Ctrl-I]
Toggles the inventory display visibility on and off.
[Ctrl-M]
Toggles the Music Search Dialog visibility on and off.
[Ctrl-O]
Open a log. Displays the Open Log Dialog. The Open Log dialog is used
to manually open (load) a log into XStudio.
[Ctrl-P]
Print Log. Displays the Print Log Dialog.
[Ctrl-V]
Validate Log. Validates the current log and displays the results. See the
© Copyright 2003-2015 C-R Media All Rights Reserved.
Reference
Shortcut
165
Action
topic on Log Validation for more information.
[Ctrl-X]
Exit XStudio. You are prompted to confirm that you want to close down
XStudio and if the host audio engine is XEngine, given the option to close
it as well.
[Tab]
[Shift-Tab]
The tab key. Moves from one control to another on the main display. You
will be cycled through the log display, filters, inventory and hourly totals.
[Tab] moves forward, [Shift-Tab] moves backward.
Mouse Actions
[Right-Click]
If the control has a context pop-up menu, the pop-up menu is displayed. If
there is no pop-up menu for the control, context-sensitive help is
displayed.
Log Control Shortcuts
When the broadcast log display control is active on the main display, a number of keyboard shortcuts
are available in addition to the global shortcuts.
Shortcut
Action
[F2]
Jump to Log Time. Displays a dialog to enter a time to move to. The Hour
Totals list can also be used to move to a specific hour.
[F3]
Edit log item. Displays the appropriate log item edit dialog for the selected
log item.
[Ctrl-F3]
Copies the selected spot record to the spot clipboard for use in pasting
the item into the log.
Note: Only spot (commercial) records can be copied to the clipboard.
[F4]
Jump to the next Directive. Locates the next Directive on the log, starting
from the currently selected log item.
[Shift-F4]
Jump to the previous Directive. Locates the previous Directive on the log,
starting from the currently-selected log item.
[F5]
If a time approximate directive is selected on the log, marks the directive
as the "active" directive. For all other records, the keystroke is ignored.
[F7]
Sets the Next-To-Play item on the log without user confirmation.
[F8]
Jump to the next Open Avail. Locates the next open spot availability on
the log, starting from the currently-selected log item.
[Shift-F8]
Jump to the previous Open Avail. Locates the previous open spot
availability on the log, starting from the currently-selected log item.
[Ins] [Insert]
Insert a new log item (record). Displays the Insert Log Item dialog.
[Ctrl-Ins]
[Ctrl-Insert]
Paste spot record. Pastes a previously copied audio item from the spot
clipboard into the log at the selected log record position. If the spot
clipboard is empty, nothing happens.
© Copyright 2003-2015 C-R Media All Rights Reserved.
166
XStudio 3
Shortcut
Action
[Del] [Delete]
Delete a log item. Deletes the selected log item after user confirmation.
[UpArrow]
[DnArrow]
Move up or down one item on the log.
[LeftArrow]
[RightArrow]
Scroll left or right on the current row of the log. Has the same effect as
using the log's horizontal scroll bar.
[PgUp] [PgDn]
Pages through the log, moving one page up or one page down.
[Ctrl-Home]
Move to the beginning of the log.
[Ctrl-End]
Move to the end of the log.
Mouse Actions
[Double-Click]
Sets the Next-To-Play item on the log after user confirmation. Doubleclicking on a log item has the same effect as the [F7] keystroke except
you are asked to confirm your action.
[Right-Click]
Displays the log pop-up context menu, which provides a number of
options including adding, editing and deleting log items.
Log Item Edit Dialogs
These shortcuts are available in all of the log item edit displays.
Shortcut
Action
[F1]
Context-sensitive help for the selected field.
[Enter]
Move to the next field or button in the dialog.
[Tab],
[Shift-Tab]
Move from one control to another in the dialog. [Tab] moves forward,
[Shift-Tab] moves backward.
Mouse Actions
[Right-Click]
Displays a field edit menu, typically Cut, Copy and Paste. Not all fields in
the edit dialogs support cut, copy or paste, depending on the field type.
Inventory Control Shortcuts
When the inventory list control is active on the main display, a few keyboard shortcuts are available in
addition to the global shortcuts.
Shortcut
Action
[Ctrl-A]
Adds the selected inventory item to the Audio Clipboard.
[Del] [Delete]
Delete a log item. Deletes the selected log item after user confirmation.
[UpArrow]
[DnArrow]
Move up or down one item in the inventory list.
[LeftArrow]
Scroll left or right on the current row of the inventory list, if applicable. Has
© Copyright 2003-2015 C-R Media All Rights Reserved.
Reference
167
Shortcut
Action
[RightArrow]
the same effect as using the list's horizontal scroll bar, if visible.
[PgUp] [PgDn]
Pages through the inventory list, moving one page up or one page down.
[Home]
Move to the beginning of the inventory list.
[End]
Move to the end of the inventory list.
Mouse Actions
[Right-Click]
Displays the inventory list pop-up context menu, which provides a number
of options including immediate play of the selected inventory item, adding
the selected item to the Audio Clipboard, forcing a manual refresh of the
inventory, and printing the inventory list.
© Copyright 2003-2015 C-R Media All Rights Reserved.
168
5.5
XStudio 3
Log Directives
Log Directives are a special key component of the broadcast log (schedule). Log Directives serve a
number of purposes:
They provide specific instructions to XStudio regarding program execution. Examples
include marking the commercial break that will play next in Satellite mode, causing an
XStudio Action to execute at a specific log time, and causing XStudio to play audio at a
specific time.
They serve as visual markers, separating logical groups of program content in addition to
normal log items like program titles and log notes.
They are used in calculating content length for audio elements associated with the Log
Directive.
They are used in calculating the hourly audio content totals.
There are several types of Log Directives, each with a specific purpose that relates to program
execution. This topic outlines the types of Directives that can be used with XStudio.
XStudio processes Log Directives in different ways, depending on the mode of
operation at the moment the directive is executed. In some cases, the
directives are ignored. Review the description of each directive for details on
how modes affect processing of the directive.
Some Log Directive types can also contain directive "keys" or "modifiers". These are special characters
added to the directive description field, typically in the first character position, that affect the directive's
meaning and behavior. For clarity, these items are referred to as a directive key.
Directive Types and Directive Keys
Log Directive types are not visible on the XStudio log display as a default. Directive keys, which are a
part of the directive description, are visible as a default. See the topic on Customizing Log Column
Visibility for details on how to make directive types visible on the log.
Log Directive Types and Keys
For information on creating and editing Log Directives within XStudio, see the topics on Editing a Log,
Load Directive, Load Window, Execute Function and Play Cart Directive.
The table below includes base information on available Log Directive types and keys along with links to
additional details on each. The characters contained in the Log column of the table indicate what is
displayed on the XStudio log during operation. In the case of directive types, the information is
displayed in the Dir Type column. Directive keys appear in the Description column.
Name
Log Purpose
Directive Types
Load Required
LR Load Required directives designate breaks that must be covered
© Copyright 2003-2015 C-R Media All Rights Reserved.
Reference
Name
169
Log Purpose
in Satellite mode operations. Satellite-delivered formats will often
have at least a few times during the day or hour that must include
locally inserted programming, typically commercial breaks.
Load Optional
LS Load Optional directives designate breaks that are optional in
nature in Satellite mode operations. Satellite-delivered formats
generally have a number times during an hour that can optionally
be preempted by locally-inserted programming, typically
commercial breaks. If the station chooses not to use the allotted
break, the programming service "covers" the break with content.
Load Play
LP Load Play directives are used to start playing audio at a specific
log time. They are valid only during Satellite mode operations. If
XStudio is in another mode of operation at the time of the
directive execution, immediate playback is ignored and the
directive is handled like a Load Optional directive.
If you have previously used a DCS or Maestro
system, note that you should not use a Load
Play directive with the time-approximate or
cast-off Directive Key in Satellite mode, as
might have been done with these other systems.
Instead, use standard directives in XStudio's
Automation mode.
Load Window
LW The Load Window directive is used to update the XStudio Current
Voice value. Assign the Relay Number value as 99.
Execute Function
CR Execute Function directives are used to initiate an XStudio Action
at the specified log time.
Play Cart
PC Play Cart Directives are used to cause XStudio to play a specific
audio item (cart) at the directive time. It is valid only in Satellite
mode; in all other modes, the directive is treated as though it is a
normal cart and played in sequence with other carts in a nontime-specific way.
Directive Keys - Except for Current Voice, keys must be placed as the first character of
the Description!
Time Offset
:
The colon character. Log Directives are whole-minute based. Use
the colon character to "offset" the directive execution time by a
certain number of seconds ranging from 1 to 59. Valid in all
modes.
Time-Approximate
~
The tilde character. Used in Satellite mode only to disable timespecific execution of the directive, making it sequence-oriented.
This approach is used for special events programming like sports
broadcasts, where breaks are not predictable time-wise. In
modes other than Satellite mode, all load directive types (Load
Required, Load Optional, Load Play) are treated as timeapproximate (sequence-oriented) in XStudio and do not need a
Time Approximate directive key.
Cast-Off
$
The dollar sign character. Causes XStudio to "cast-off" or skip
over unplayed audio items on the log, setting the Next-To-Play
© Copyright 2003-2015 C-R Media All Rights Reserved.
170
XStudio 3
Name
Log Purpose
item as the first audio item (cart) following the directive. Also
referred to as "Soft Sync". Valid in Satellite and Automation
modes only, ignored in all other modes.
Current Voice
$
The dollar sign character, located at any position in the
Description except the first character position. When used with
the Load Window directive, the two characters following the dollar
sign become the current voice value. Valid in all modes.
Hard Sync
!
The exclamation point character. Causes XStudio to stop all
playing audio on the primary output channel (the one processing
the log) and immediately begin playing the first audio element
(cart) on the log following the directive. Valid in Automation mode
only, ignored in all other modes.
Suspend Auto-Segue
^
The caret character. Causes XStudio to turn off the [Auto] button,
disabling auto-segue of the log. Valid in Automation mode only,
ignored in all other modes.
Resume Auto-Segue
@ The "at sign" character. Causes XStudio to turn on the [Auto]
button, enabling auto-segue of the log. Valid in Automation mode
only, ignored in all other modes.
Load Required Directive (LR)
The Load Required directive is used primarily in Satellite mode to indicate a commercial break that
must be covered locally. The directive needs to be activated prior to the earliest expected signal from
the program supplier to execute the break. As an example, if the program supplier's format calls for the
break at 20 minutes past the hour and the break might float 5 minutes either way, the directive time
should be no later than 14 minutes past the hour. It should be positioned no earlier than a minute past
the preceding break's latest possible execution time. When XStudio gets the signal to play the break, it
is evaluated to see if there is any content in the break. If so, XStudio does two things:
1. Starts playing the first audio item on the log following the directive. Playback of the item
occurs regardless of where the XStudio Next-To-Play marker is on the log. In Satellite
mode, the active directive, noted with text ActD=>, always controls what's next to be played
when playback is initiated via an XStudio Action.
2. Advises the running Action of the total length of the break. The Action then waits the length
of the break before performing the next Task in the Action list.
If there are no audio items (carts) on the log, XStudio passes a message to the running Action that
there is nothing to play and the next Task in the Action list is executed immediately. The effect is that if
in the Action you had updated an audio switcher to turn off the program service channel just prior to the
play command and the task following the play command is to restore the program service channel to
air, the two switcher updates (before and after the break) occur within milliseconds of one another,
keeping the program service on the air.
In other modes of operation, the Load Required directive comes into play only if the directive contains a
directive key and the key is valid for the current operating mode.
XStudio treats Load Required and Load Optional directives in exactly the
same way.
If there are no audio items associated with the directive (meaning no carts
© Copyright 2003-2015 C-R Media All Rights Reserved.
Reference
171
between the directive and the next directive), XStudio will skip the break entirely
in Satellite mode regardless of the directive type.
If there is at least one audio item associated with the directive, XStudio will play
the break in Satellite mode. You must ensure that you have enough audio
elements to "fill" the break - if the scheduled break length is 3 minutes, you
must have 3 minutes of content scheduled on the log. There is no automatic
backfill of audio to meet the required length.
Load Optional Directive (LS)
The Load Optional directive is used primarily in Satellite mode to indicate a commercial break that can
optionally be used by the local station or, if there are no commercials, skipped and the program service
kept on the air.
The behavior of XStudio in terms of handling this directive is the same as the Load Required directive
handling.
Load Play Directive (LP)
The Load Play directive has special meaning in Satellite mode only. If XStudio is in Satellite mode
when the directive is activated, the first audio item (cart) on the log following the directive begins
playing immediately, followed by any other audio items on the log up to the next log directive.
If you have previously used a DCS or Maestro system, note that you should
not use a Load Play directive with the time-approximate or cast-off
Directive Key in Satellite mode, as might have been done with these other
systems. Instead, use standard directives in XStudio's Automation mode.
In all other modes of operation, the Load Play directive is handled in the same way as the Load
Optional directive.
Load Window Directive (LW)
The Load Window directive is used to set the Current Voice value in XStudio. This value is used in cart
numbers using the cart macro "##".
To update the Current Voice value using this directive, you must enter text in the directive Description
field somewhere after the first character. The "$" character is used to designate the location of the new
voice value. For instance, to change the Current Voice value to "BJ", enter the following:
Bill Jones $BJ
Notice that the new voice value is designated with a "$" character followed by the two-character value,
which can be either numbers or letters.
You should not use other documented macro characters when setting the
Current Voice value, as they will produce unpredictable and likely unwanted
results. XStudio translates the two characters following the "$" symbol literally
when updating the Current Voice property via the Load Window directive.
The Load Window directive is active in all modes of operation.
© Copyright 2003-2015 C-R Media All Rights Reserved.
172
XStudio 3
Execute Function Directive (CR)
The Execute Function directive is used to execute an XStudio Action at a specific log time. This
directive is valid for Satellite and Automation modes only; it is ignored in all other modes.
Play Cart Directive (PC)
The Play Cart directive is used to play a specific audio item (cart) at the directive log time. It is valid
only in Satellite mode; in all other modes, the directive is treated as though it is a normal cart record on
the log and played in sequence with other carts in a non-time-specific way.
Time Offset Directive Key (:xx)
The Time Offset directive key is used to make a directive's execution (activation) time something other
than an exact hour and minute. If you have a directive scheduled at 2:42 PM on the log and want it to
be activated at 2:42:30 PM, enter the colon character in the first character of the directive Description
field, followed by the two-digit value for the number of seconds to "offset" from the minute, i.e., enter
:30 followed by whatever description you wish. The time offset value must be two digits following the
colon or your results will be unpredictable.
Time Approximate Directive Key (~)
The Time Approximate directive key is intended for use in Satellite mode only, as a way of
making load directive types (Load Required and Load Optional) sequence-oriented rather than timedriven. For more information on how to use time approximate directives in Satellite mode, see the
topic Satellite Programming - Special Events.
Cast-Off Directive Key ($)
The Cast-Off directive key is used in XStudio to perform what is known as a "soft sync". When the
directive is activated, it causes XStudio to "cast-off" or skip over unplayed audio items on the log,
setting the Next-To-Play item as the first audio item (cart) following the directive. When the currently
playing cart reaches EOM (Aux Mark), the audio item immediately following the directive is played. The
effect is to synchronize log playback close to the directive time, a technique that keeps XStudio close
to real time in terms of program execution.
When a directive containing the Cast-Off key is executed and the XStudio NextTo-Play item on the log is already beyond the log time of the directive, the CastOff key is ignored.
To create a Cast-Off key, enter a "$" (dollar sign) as the very first character of the directive's
Description field.
The Cast-Off directive key is valid in Satellite and Automation modes only and is ignored in all other
modes.
Current Voice Directive Key ($)
The Current Voice directive key is used in combination with the Load Window directive to set the
current announcer voice value. See the Load Window directive description for details on using this key.
The Current Voice directive key is valid in all modes of operation.
© Copyright 2003-2015 C-R Media All Rights Reserved.
Reference
173
Hard Sync Directive Key (!)
The Hard Sync directive key is used to perform an immediate synchronization of XStudio audio
playback to a specific log time. When a directive containing the Hard Sync key is activated, XStudio
stops any audio playing on the primary playback channel (channel 1) immediately and begins playing
the item on the log immediately following the directive. The effect is an abrupt stop of playing audio and
an immediate start of the next audio item, achieving an immediate synchronization of audio playback
with the log.
When a directive containing the Hard Sync key is executed and the XStudio
Next-To-Play item on the log is already beyond the log time of the directive, the
Hard Sync key is ignored.
To create a Hard Sync key, enter an "!" as the very first character of the directive's Description field.
The Hard Sync directive key is valid in Automation mode only and is ignored in all other modes.
Suspend Auto-Segue Directive Key (^)
The Suspend Auto-Segue directive key is used to disable auto-segue playback from the log. When a
directive containing this key is activated, XStudio turns off (disables) the [Auto] button on the channel 1
transport. No other action is taken. The effect is that if XStudio is currently playing a cart, it will not
automatically sequence to the Next-To-Play item on the log and play it when the cart reaches EOM
(Aux Mark). The playing cart will finish and XStudio will be idle until either a user or an Action restarts
audio playback.
To create a Suspend Auto-Segue key, enter a "^" (caret) as the very first character of the directive's
Description field.
The Suspend Auto-Segue key is valid in Automation mode only and is ignored in all other modes.
Resume Auto-Segue Directive Key (@)
The Resume Auto-Segue directive key is used to re-enable auto-segue playback from the log. When a
directive containing this key is activated, XStudio turns on (enables) the [Auto] button on the channel 1
transport. No other action is taken. The effect is that audio playback from the log will be autosequenced when a cart playing from the log reaches EOM (Aux Mark).
Resume Auto-Segue does not cause audio to start playing. If XStudio is
not playing audio when the Resume Auto-Segue key is executed, no playback
will occur until started by a user or by an Action. If audio is playing when the
Resume Auto-Segue key is executed and the audio source is the log, the NextTo-Play item on the log will be played at EOM (Aux Mark) of the playing item.
To create a Resume Auto-Segue key, enter the "@" (at sign) character as the very first character in the
directive's description field.
The Resume Auto-Segue key is valid in Automation mode only and is ignored in all other modes.
© Copyright 2003-2015 C-R Media All Rights Reserved.
174
5.6
XStudio 3
Operating Modes
XStudio features four (4) distinct modes of operation:
Emergency
Live
Automation
Satellite
The "mode" that XStudio is operating under at a given moment affects its behavior relating to things
like whether or not it will play through log directives, what will happen when the end of a log is reached
and there is no subsequent log available, whether or not certain log directives will be executed,
whether or not a Task will be executed and whether or not a Scheduled Event will execute, among
other things.
The current XStudio Mode can be changed on-the-fly at any time. The end-user can manually change
modes and the operating mode can be changed using a Set Mode automation Task which is executed
as a part of an Action. You can also set the default mode of operation in Preferences, which is the
mode XStudio will operate in when the program is started.
This topic provides an overview of each of the available modes of operation and highlights session
properties and features that are either enabled or disabled for a mode.
Emergency Mode
The emergency mode of operation is intended for situations where XStudio is being used as an
emergency fall back system. Often, an emergency log, containing generic undated program content,
has been created and will be the only log used for this scenario. An emergency log might contain only a
few hours of content, unlike standard daily logs, which will generally contain a full 24 hours worth of
content.
When operating in Emergency Mode, XStudio works only with the currently loaded log, if any, and does
not attempt to load the next day's log when the end of the current log is reached.
Affected Session Properties
When XStudio transitions to Emergency mode, log handling and audio playback options are affected
as shown:
Option/Functionality
Change Description
Auto-Segue
The Auto-Segue state (enabled/disabled) is not changed. If
you wish to ensure Auto-Segue of audio is enabled and setting
Emergency mode is a part of an Action, you may wish to include
a Set Auto-Segue Task in the Action.
Play Through Directives
Enabled. Regardless of the previous state of the Play Through
Directives property, it is enabled.
Wrap Log Option
The Wrap Log Option state is not changed. However, the
menu item to change the option is made available for user
changes.
Log Directives
The Load Window directive is processed; all others are
ignored, including any directive keys. XStudio does continue
to track active and next directives.
Actions/Tasks
Actions can be initiated with input relays, hot buttons or
scheduled events only, as Log Directives are ignored. When an
© Copyright 2003-2015 C-R Media All Rights Reserved.
Reference
Option/Functionality
175
Change Description
Action is processed, only Tasks that are valid for Emergency
mode are processed. Tasks not valid in Emergency mode are
skipped.
In addition, log selection tabs (Today/Tomorrow) are hidden as this mode of operation only uses the
current log. Additional menu items for manually opening a log are made available.
Live Mode
Live mode places more responsibility on the user than other modes of operation. Essentially, XStudio
won't automatically do much on your behalf, but rather depends on the operator to manually run the
system.
Affected Session Properties
When XStudio transitions to Live mode, log handling and audio playback options are affected as
shown:
Option/Functionality
Change Description
Auto-Segue
The Auto-Segue state (enabled/disabled) is not changed.
Play Through Directives
Enabled. Regardless of the previous state of the Play Through
Directives property, it is enabled.
Wrap Log Option
The Wrap Log Option state is not changed. However, the
menu item to change the option is made available for user
changes.
Log Directives
The Load Window directive is processed; all others are
ignored, including any directive keys. XStudio does continue
to track active and next directives.
Actions/Tasks
Actions can be initiated with input relays, hot buttons or
scheduled events only, as Log Directives are ignored. When an
Action is processed, only Tasks that are valid for Live mode are
processed. Tasks not valid in Live mode are skipped.
In addition, log selection tabs (Today/Tomorrow) are restored to their last state, either hidden or
shown. Additional menu items for controlling the visibility of the log selection tabs, enabling or disabling
the Log Wrap Option and manually opening a log are made available.
Automation Mode
Automation mode is typically used when a station is delivering most of its on-air content from
prerecorded carts using XStudio to play the carts. Usually, this means you are merging music log
information from your music scheduling system and commercial content from your traffic system. In
Automation mode, XStudio follows the merged log, playing all carts in sequence. Exceptions are
missing and, if enabled, out-of-date audio.
Affected Session Properties
When XStudio transitions to Automation mode, log handling and audio playback options are affected
as shown:
© Copyright 2003-2015 C-R Media All Rights Reserved.
176
XStudio 3
Option/Functionality
Change Description
Auto-Segue
The Auto-Segue state (enabled/disabled) is not changed.
Play Through Directives
Enabled. Regardless of the previous state of the Play Through
Directives property, it is enabled.
Wrap Log Option
The Wrap Log Option state is not changed. However, in
Automation mode XStudio will automatically wrap around to the
beginning of the current log if the next-day log is unavailable
when needed. The idea is that if XStudio is operating in
Automation mode, it is unlikely that anyone would be around to
correct the problem and it would be better to continue playback
of audio than to finish the last item on the log and be idle.
Log Directives
Execute Function and Load Window directives are processed.
Load Required, Load Optional and Load Play directives are
processed for directive keys only.
Actions/Tasks
All methods of initiating an Action are valid, including input
relays, hot buttons, Log Directives and scheduled events. When
an Action is processed, only Tasks that are valid for Automation
mode are processed. Tasks not valid in Automation mode are
skipped.
In addition, log selection tabs (Today/Tomorrow) are restored to their last state, either hidden or
shown. Additional menu items for controlling the visibility of the log selection tabs and enabling or
disabling the Log Wrap Option are made available.
Satellite Mode
Satellite mode is used when a majority of the on-air content is received via satellite or similar delivery
method and the station's main responsibility is to play commercial breaks and coordinate when the
satellite-delivered programming is "on-air". For instance, the program supplier feeds music that is
placed on the air for a period of time, then sends a signal that it's time to insert a commercial break of
some length. At this point, it becomes the job of XStudio to ensure that the satellite feed is taken off the
air by controlling channels on an audio switcher and to start playing the appropriate commercials from
the log. At the end of the local commercial break, XStudio restores the satellite feed to the air, again by
controlling channels on an audio switcher.
Affected Session Properties
When XStudio transitions to Satellite mode, log handling and audio playback options are affected as
shown:
Option/Functionality
Change Description
Auto-Segue
The Auto-Segue state (enabled/disabled) is not changed. If
you wish to ensure Auto-Segue of audio is enabled and setting
Satellite mode is a part of an Action, you may wish to include a
Set Auto-Segue Task in the Action.
Play Through Directives
Disabled. Regardless of the previous state of the Play Through
Directives property, it is disabled.
Wrap Log Option
The Wrap Log Option state is not changed. However, in
Satellite mode XStudio will automatically wrap around to the
© Copyright 2003-2015 C-R Media All Rights Reserved.
Reference
Option/Functionality
177
Change Description
beginning of the current log if the next-day log is unavailable
when needed. The idea is that if XStudio is operating in Satellite
mode, it is unlikely that anyone would be around to correct the
problem and it would be better to continue to cover local breaks,
etc, than to allow periods of dead air.
Log Directives
All Log Directives are processed. This includes any directive
keys, as appropriate.
Actions/Tasks
All methods of initiating an Action are valid, including input
relays, hot buttons, Log Directives and scheduled events. When
an Action is processed, only Tasks that are valid for Satellite
mode are processed. Tasks not valid in Satellite mode are
skipped.
In addition, log selection tabs (Today/Tomorrow) are restored to their last state, either hidden or
shown.
© Copyright 2003-2015 C-R Media All Rights Reserved.
178
5.7
XStudio 3
Programming XStudio
Developing your station's air sound is a creative process, requiring a strong sense of what your
potential listeners will be attracted to, along with some sound judgment. Once you determine what the
"sound" or "format" of the station will be, it's a matter of explaining it to those who will execute the steps
needed to achieve that "sound."
Unless you are starting a new radio station, you probably already have a program format which outlines
the general sequence and positioning of various audio elements, are creating daily broadcast logs
(program schedules) which provide the specifics of execution for a given day, and either staff people or
an automation system of some sort is interpreting this information to produce your on-air product.
For purposes of this discussion, we refer to "Programming" as explaining to XStudio how you want
things done to produce the desired on-air product. In most cases, you already know what you want
XStudio to do - it's a matter of telling XStudio what you want done and when.
In order for XStudio to execute your format properly, you need to complete a few steps:
Update Station Format Clocks. If you already have formats in your music and traffic
scheduling systems, they need to be reviewed and perhaps updated with specific
instructions for XStudio. Such changes may include placing Log Directives in the formats.
Assign Audio Switcher Inputs and Outputs. If XStudio will be controlling an audio
switcher and you will be switching among audio sources, you will need to create an external
resource record and assign it to XStudio.
Create XStudio Tasks and Actions. If XStudio will be performing automated tasks such as
controlling an audio switcher, starting playback of a break or playing specific jingles, the
appropriate Tasks need to be created and assigned to Actions. Subsequently, the Actions
will be connected to a specific input relay on an audio switcher, become a scheduled event,
connected to a hot button or placed on the log for execution.
Produce a daily log. The log needs to have the appropriate content and special XStudio
commands known as Log Directives. Producing a daily log may be as simple as exporting
the log from your traffic system or may involve using LogMerge to combine (merge) logs
exported from your music scheduling and traffic systems to produce the finished on-air
schedule. Most popular music scheduling and traffic systems have export routines to convert
their logs to our generic log format.
dcsTools makes available a number of optional programs and utilities that can be used to accomplish
these and other tasks. See the topic on Companion Programs & Utilities for a additional information.
How does it all tie together?
First and foremost, the broadcast log (program schedule) dictates what audio will be played during a
given day. It is important that the log have all audio content, correctly identified by cart number,
scheduled to play, as well as a general sense of when it is to play.
If you are operating your station as a live operation, with a live announcer running all air shifts, there's
not much more to do than get the log organized properly and available for XStudio to load from disk as
needed. The on-air personality then simply uses XStudio as an on-demand playback device. In fact,
the log becomes more a guide, as the personality can choose to play or not play scheduled items,
move the items around on the schedule, and play other audio not on the log in an ad hoc, on-demand
way.
The reality of today's radio, though, is that it's likely one or more air shifts during the day or overnight
will be some form of "walk-away" programming, where there's nobody in the control room and XStudio
needs to assume the complete responsibility of controlling your air sound. This is when XStudio
operating modes, log directives, audio switching control and Actions come into play.
© Copyright 2003-2015 C-R Media All Rights Reserved.
Reference
179
These "walk-away" or "automated" times are generally organized in one of two ways:
1. All program content that is to be aired is present on the log and is played by XStudio. This is
commonly referred to as "local automation". In this scenario, XStudio will play log content
from a starting point on the log in a sequential manner. Periodic adjustments for overscheduled content may be made, using so-called "hard sync" and "soft sync" methods,
which are driven by the log.
2. Program content - music or talk show content - is delivered to the station via satellite and at
certain times throughout an hour the station is signaled to insert local audio content; typically
commercials, local weather and local news, for a specific amount of time. This means that
the satellite program feed needs to be taken off the air, the correct local content played and
then, the satellite program feed needs to be restored to the air. In addition, the local station
may be called upon to play jingles or liners on-demand based on a signal from the program
service. This is often referred to as "satellite automation." This approach requires XStudio
to respond in a non-sequential, asynchronous way to outside stimuli, typically as a result of
an input relay.
As you might guess, these two scenarios need to be handled quite differently by XStudio, which is one
of the reasons multiple operating modes are available to customize the behavior of XStudio for a
particular type of automated performance.
Perhaps the best way to understand how all the pieces tie together is to look at specific examples.
5.7.1
Satellite Automation Programming Example
This example shows how to "program" XStudio for satellite-delivered programming. It is a simple
example that assumes the station will use a single satellite-delivered programming service all hours of
the day, seven days a week and that the XStudio default operating mode is Satellite. You may wish to
review the Program Start Options for XStudio, paying particular attention to the property settings for
Mode at Startup and Load Today's Log at Startup.
We'll also describe how you can suspend automated programming to run a live air shift.
To program satellite automation for XStudio, there are three jobs to do:
Tell XStudio how and when to play ad hoc audio items when signaled by the programming
service. These items include audio generally described by most programming services as
liners, jingles and station ID's. They can occur at almost any time during a given hour.
Tell XStudio how to handle local commercial breaks. The breaks will be signaled by the
programming service and unlike the ad hoc items, will generally occur within a relatively
small window of time 3 - 4 times per hour.
Create a broadcast log for XStudio that contains the needed instructions (Log Directives)
regarding local breaks, length of the break and the audio items to be played for each break.
If a station is using satellite programming exclusively, the broadcast log is typically created
with a traffic system and exported directly for use with XStudio as the only content the station
needs to put on the log is the local insert material - commercials, promo announcements,
PSA's and the like. The majority of the program content, whether it is music or talk
programming, is supplied by the service provider in real time.
The Program Service Clock
Each satellite programming service will generally provide one or more format clocks that visually
outline in a general way what program elements occur and when, including information about specific
signals sent (closures) by the service for commercial breaks, playback of liners, etc. The example
clock shown is taken from a well-known service, paired down to just the essentials and marked up for
this example.
© Copyright 2003-2015 C-R Media All Rights Reserved.
180
XStudio 3
Example Satellite Programming Format Clock
By examining the clock, you can see that there are four (4) sets of functionality that we have to handle.
Three (3) of them require the local station to play a single audio item (cart) in response to a signal - the
Legal ID, Return Liner and Image Liner. The fourth is a commercial break which occurs four (4) times
an hour and requires local playback of audio for varying amounts of time.
Assign an Audio Switcher
In order for XStudio to execute this format successfully, an audio switcher must be used so XStudio
can receive the programming service signals and control the audio that appears on the air. If you have
not created an audio switcher record in the automation setup area and assigned the switcher to
XStudio, review the topics on adding a switcher resource and assigning a switcher to XStudio.
You must have an audio switcher defined before continuing on with this example, as it will be needed
when we are creating Tasks to control which audio appears on the air.
For this example, we will assume that you have an audio switcher installed and
configured and that the satellite programming service audio is connected to the
switcher on input channel 1. We'll also assume that the primary XStudio
playback channel is connected to the switcher on input channel 7.
© Copyright 2003-2015 C-R Media All Rights Reserved.
Reference
181
The Legal ID
In our example format, the Legal ID is called once per hour, near the top of the hour. The programming
service sends a unique closure, so we know that whenever this closure comes, we need to play the
Legal ID. Here are the steps needed:
1. Create an Update Switcher task that will be used to make sure the switcher audio input
channel to which XStudio playback audio is connected gets on the air. In the update
switcher dialog, select the correct audio switcher and make sure row 1, channel 7 is set to
the "On" position. Change the Valid Modes option to be Satellite mode only (uncheck all
others). Name the task anything you wish that's meaningful to you (we'll use "Ch 7 On") and
save the new task.
2. Create a Start Play task that will play a specific cart number. For our example, we'll use cart
number "ID01". In the Start Play task dialog, uncheck the "Play from Log" property and use
the [Add Cart] button to add the cart number "ID01". Change the Valid Modes option to be
Satellite mode only (uncheck all others). Name the task "Legal ID" and save the new task.
3. Create a new Action. Name the action "CRM Legal ID". Select the task "Ch 7 On" in the
available tasks table and drag it into the Action Task List. Then select the task "Legal ID"
and drag it into the Action Task List. There should be two items in the list and they should be
in the order "Ch 7 On", "Legal ID". XStudio executes tasks in an Action in the list order and
we want to be sure that the XStudio audio playback channel on the switcher is on the air
before beginning playback of the cart ID01.
4. Assign the new "CRM Legal ID" Action to the corresponding Relay Input on the audio
switcher. This in effect "connects" the Action to the satellite service's closure.
The effect of these steps is that every time the satellite programming service sends their legal ID
closure, so long as XStudio is in Satellite mode, here's what happens:
XStudio locates the Action assigned for the legal ID closure, in this case the Action named
"CRM Legal ID".
The first task in the Action, "Ch 7 On", causes XStudio to make sure that the switcher's input
channel 7 is turned on. No other open or closed input channels are affected.
The next (and last) task in the Action, "Legal ID", causes XStudio to play back the cart
numbered "ID01".
None of these steps taken by XStudio involve the log, affect anything else that might be on the air at
the time or any other audio XStudio is playing.
The Return Liner
The Return Liner in our example is very similar to the Legal ID. Differences are that the Return Liner
may occur several times an hour, and the particular audio item (cart) we want to play is different. In
fact, we're going to reuse one of the Tasks we created from the Legal ID. The steps required:
1. Create a new Start Play task just like step two in the Legal ID. Use a different cart number,
"RL01". Name the Task "Return Liner" and save the task.
2. Create a new Action. Name the action "CRM Return Liner". Select the task "Ch 7 On" in the
available tasks table and drag it into the Action Task List. Then select the task "Return
Liner" and drag it into the Action Task List. There should be two items in the list and they
should be in the order "Ch 7 On", "Return Liner". XStudio executes tasks in an Action in the
list order and we want to be sure that the audio channel on the switcher is on before
beginning playback of the cart RL01. Notice we've simply reused the Update Switcher task
we created for the Legal ID, since we needed to achieve the same thing.
© Copyright 2003-2015 C-R Media All Rights Reserved.
182
XStudio 3
3. Assign the new "CRM Return Liner" Action to the corresponding Relay Input on the audio
switcher. This in effect "connects" the Action to the satellite service's closure.
Like the Legal ID, the effect of these steps is that every time the satellite programming service sends
their Return Liner closure, so long as XStudio is in Satellite mode, XStudio makes sure the correct
audio input channel is "On" and plays the cart RL01.
Again, none of these steps taken by XStudio involve the log, affect anything else that might be on the
air at the time or any other audio XStudio is playing.
The Image Liner
By now, you probably know what you need to do since the Image Liner is similar to the Legal ID and
Return Liner, save with the exception of the cart number. Here are the steps:
1. Create a new Start Play task just like step two in the Legal ID. Use a different cart number,
"IL01". Name the Task "Image Liner" and save the task.
2. Create a new Action. Name the action "CRM Image Liner". Select the task "Ch 7 On" in the
available tasks table and drag it into the Action Task List. Then select the task "Image Liner"
and drag it into the Action Task List. There should be two items in the list and they should be
in the order "Ch 7 On", "Image Liner". XStudio executes tasks in an Action in the list order
and we want to be sure that the audio channel on the switcher is on before beginning
playback of the cart IL01. Notice we've simply reused the Update Switcher task we created
for the Legal ID, since we needed to achieve the same thing.
3. Assign the new "CRM Image Liner" Action to the corresponding Relay Input on the audio
switcher. This in effect "connects" the Action to the satellite service's closure.
Like the Legal ID and Return Liner, the effect of these steps is that every time the satellite
programming service sends their Image Liner closure, so long as XStudio is in Satellite mode,
XStudio makes sure the correct audio input channel is "On" and plays the cart IL01.
As with the Legal ID and Return Liner, none of these steps taken by XStudio involve the log, affect
anything else that might be on the air at the time or any other audio XStudio is playing.
The Commercial Break
Handling the example format's commercial break is quite different from the other functionality we've
programmed for XStudio so far. For one thing, it involves the log. Handling a break also requires we
take the program service audio off the air while playing the break, then restore it to air following
completion of the local break. For the commercial break to work correctly, we need to create an Action
that handles the audio switching and starts audio playback of the break, plus we need to ensure the
correct commercial break is played from the log.
Create the Commercial Break Action
Follow these steps to create the Action for the local commercial break:
1. Create a new Update Switcher Task. Name the task "CRM Local Breakaway". In the
Updated Switcher dialog, select the correct audio switcher. Turn row 1, channel 7 "On". Turn
all other channels on row 1 "Off". Change the Valid Modes option to be Satellite mode only
(uncheck all others). Save ([Apply]) the task. This task will be used to take the satellite
programming service off the air and ensure that the primary playback channel for XStudio is
on the air. Further, it ensures that no matter what, the only audio that will go to air is coming
from XStudio.
2. Create a new Start Play task. Name the task "Play Local Break". Make sure the Play from
Log property is checked (the default). Change the Valid Modes option to be Satellite mode
© Copyright 2003-2015 C-R Media All Rights Reserved.
Reference
183
only (uncheck all others). Save ([Apply]) the task. This task will be used to signal XStudio to
play the audio items on the log that correspond to the break.
3. Create a new Update Switcher Task. Name the task "CRM Return to Sat". In the Updated
Switcher dialog, select the correct audio switcher. Turn row 1, channel 1 "On" (the
programming service channel). Change the Valid Modes option to be Satellite mode only
(uncheck all others). Save ([Apply]) the task. This task will be used to put the satellite
programming service audio back on the air after completion of the local commercial break.
Notice that for our example we didn't change the status of any other switcher input
channels.
4. Create a new Action. Name the action "CRM Commercial Break". Drag the tasks "CRM Local
Breakaway", "Play Local Break" and "CRM Return to Sat" into the Action Task List from the
available tasks table, in order. XStudio executes tasks in an Action in the list order, so we want
to be sure that only the XStudio playback channel is on the air, play the commercial break audio
and finally, switch the satellite programming service back on the air.
5. Assign the new "CRM Commercial Break" Action to the corresponding Relay Input on the audio
switcher. This in effect "connects" the Action to the satellite service's closure.
You've probably figured out by now that when XStudio executes an Action, it performs the Tasks in the
list in order, one right after the other, until all Tasks in the list have been performed. You might be
wondering how we get XStudio to wait long enough for all the commercials to play before switching
back to the satellite programming service in this example.
The answer lies in the broadcast log construction and how XStudio handles a Start Play task when the
task calls for playing audio from the log and the current operating mode is Satellite. Essentially,
XStudio uses the log to communicate to the running Action the length of the commercial break and the
Action automatically waits that long before performing the final Task in our example.
Commercial Break Log Format
The broadcast log (program schedule) has to be structured in such a way that at the time the satellite
program service sends a signal for the local commercial break, XStudio knows which set of
commercials (audio items) to play and the required length of the break. Additionally, the log determines
whether or not XStudio actually plays a break or, because there are no commercials to play, in effect
skips the break altogether, keeping the satellite program service on the air.
The key log element in all of this is the Log Directive. Specifically in our example, a Load Required
directive is used. In our sample clock, there are a number of local breaks. We will focus on the break
that the format clock indicates will occur at 20 minutes past the hour. Here's what needs to be done for
20-past local commercial break:
1. Position the Load Required directive on the log. Most satellite programming services do
not signal all local breaks at the specific time listed on the format clock. Instead, they are
taken within a "window" of time, typically within plus or minus 5 minutes of the target time. In
our example, this means the earliest the service will signal the break is 15 minutes past the
hour, the latest would be 25 minutes past the hour. So, our Load Required directive needs
to be placed at 14 minutes past the hour, one minute in advance of the earliest time the
break will be signaled. When the PC clock hits 14-past, XStudio will mark the directive as
"active", meaning that from that time forward (until another log directive becomes active),
when the program service signals a break, it is the content associated with this directive that
will be played.
2. Set the break length. The Load Required directive has a field for entry for the length of the
break. In our example, the 20-past break is 3 minutes (3:00).
3. Fill the break with audio content. Basically, this means that you need to have items on the
log immediately following the Load Required directive that add up to 3 minutes worth of
playback time. All audio items on the log, beginning with the Load Required directive and
© Copyright 2003-2015 C-R Media All Rights Reserved.
184
XStudio 3
continuing until the next log directive is found, are considered to be a part of the break. In
our example, this means the audio items are associated with the 20-past break.
XStudio treats Load Required and Load Optional directives in exactly the
same way.
If there are no audio items associated with the directive (meaning no carts
between the directive and the next directive), XStudio will skip the break entirely
in Satellite mode regardless of the directive type.
If there is at least one audio item associated with the directive, XStudio will play
the break in Satellite mode. You must ensure that you have enough audio
elements to "fill" the break - if the scheduled break length is 3 minutes, you
must have 3 minutes of content scheduled on the log. There is no automatic
backfill of audio to meet the required length.
For our example, the XStudio log would look similar to the screen capture shown.
Example Satellite break, as it appears in XStudio
Commercial Break Execution
Now that everything is set up, here's what happens when the satellite programming service signals a
commercial break sometime between 3:15 PM and 3:25 PM using our example Action and log:
XStudio locates the Action assigned to the commercial break closure, in this case the Action
named "CRM Commercial Break".
The first task in the Action's task list turns all channels on the "to-air" audio switcher row off
except the XStudio playback channel, which is turned on.
When XStudio receives notice from the running Action that we are to play from the log, it
locates the active directive (3:14 PM in our example) and checks to see if there are any
audio items associated with the directive. If so, the length of the break is communicated to
the running Action, which then waits for the length of the break before continuing to execute
the next task in the list. Meanwhile, XStudio starts audio playback of the first log item
following the directive (the Chevron spot in our example). As each audio item ends and
signals EOM, the next item is played, until all items in the break have played. In Satellite
© Copyright 2003-2015 C-R Media All Rights Reserved.
Reference
185
mode, XStudio will not cross over a log directive to continue playing, so only the audio items
on the log between the active directive and the next one on the log are played. During this
time, the Action is waiting until the break length time expires.
At 3 minutes since the audio playback started (based on our example break length), the last
task in the Action task list is executed, updating the audio switcher to restore the satellite
programming service channel back on the air.
If a break on the log is empty (contains no audio items), no wait time for the
break is communicated to the running Action and the next task in the list is
executed immediately. In our example, this would mean that the satellite
programming service audio channel on the switcher would be turned off, then
back on within just a few milliseconds. The effect from a listener point of view is
that the programming service stayed on the air.
Because the local break length is controlled by the log, only one Action needed to be defined for our
example, even though example format clock we used had different lengths for each break. As long as
the log directive for each break had the correct length, we can use the same Action for all breaks in all
hours, which simplifies programming for satellite automation.
Getting Things Started
When you are running satellite automation exclusively (as in our example), once you have produced a
working daily log and set up the needed Actions, there's nothing to do to get the ball rolling as all
activity is controlled by the satellite programming service.
In our example, XStudio starts up in Satellite mode and loads the daily log. So, when XStudio has
completed its startup process, the correct log is loaded and the operating mode is correct. From there,
it's a matter of waiting for the programming service to signal what it wants done.
Suspending Satellite Automation Manually
In our example, the radio station is running satellite automation 24 hours a day, 7 days a week. But
what if we want to prevent XStudio from handling the Actions we have programmed for a period of
time, say to run a 4-hour live show? In our example - and in many other cases - it's a simple process.
You can suspend automatic response to the program service signals by simply changing the XStudio
operating mode to something other than Satellite. Use the main menu item Options | Operation Mode
and select a different mode, like Live mode.
As soon as the mode is changed to something other than Satellite, the Actions we created will behave
differently. For instance, if the Return Liner signal arrives from the programming service, XStudio will
locate the Action named "CRM Return Liner" and begin executing its list of tasks, as before. However,
since every Task in the list is valid only during Satellite mode, each task is ignored. Thus, no switcher
update occurs and XStudio does not play the cart RL01 (the two tasks in the Action).
XStudio does make note of receipt of the signal from the programming service in the application event
log and adds a record to the daily audit report data file.
When the live show is done, use the main menu Options | Operation Mode to select Satellite mode.
XStudio will again process signals from the program service as normal.
5.7.1.1 Satellite Programming - Special Events
Special events programming while operating in Satellite mode might include satellite-delivered sports
broadcasts, music specials like count-down shows or any other satellite-delivered programming that
varies from normal operations. This example assumes you are familiar with and have constructed all
© Copyright 2003-2015 C-R Media All Rights Reserved.
186
XStudio 3
the needed elements for your normal satellite programming operations.
The basic changes needed to transition to special event programming from "normal" programming in
Satellite mode and eventually resume normal programming include:
Changing how XStudio responds to relay closures during the time special programming is
airing.
Setting up Actions to handle the special event's join, local commercial break and program
end signals. Depending on the type of program, there may be additional requirements.
Revising the log to reflect the correct number and length of breaks to be used for the special
program.
Revising log directives so that local commercial breaks are handled strictly in sequence
rather than being driven by time.
Restoring normal operations at the conclusion of a special event program.
To make things as simple as possible for this example, the special event
program we'll be working with is just one hour in length. When broadcasting a
football game, for instance, it is likely the event would last up to 3 or more
hours. The principals of setting up and executing the programming are the
same, though. For longer events, there are just more commercial breaks and
other requirements, like joining the game and finishing up the game, are the
same as in our example.
Transitioning to a Special Event Program
When running satellite-delivered programming, there are normally a number of relay closures signaled
by the programming service to do such things as play a liner, play a station ID, and play a commercial
break to name a few. To transition to our example special program, we'll assume that a relay closure
will be used to start the event, signaled by the program provider. If no such signal is available, you
could perform the transition (or join) using a log directive or a scheduled event.
To join the special program, we need to open the correct channel on an audio switcher, disable
response to relay closures for our regular programming, and make active relay closures that will be
used to signal commercial breaks and and the end of the event. Here are the steps for our example:
1. Create an Update Switcher task to open the correct audio channel used for the event.
2. Create a Remap Input Relays task, which has the effect of "unhooking" relay closures you don't
want to respond to during the event and connecting Actions to input relays so you do respond to
the special program's relay closures. See step 5 for information on the special event relay closures
- you may want to create those items ahead of time so you don't have to go back to this task item
and revise it.
3. Create an Action that contains the two tasks described in steps 1 & 2.
4. Attach the Action created in step 3 to the input relay that will start the event. Note that we're
attaching the start event Action to the default switcher input relay mapping. It is done this way since
the default switcher input relay mapping will be in effect when the special event start is signaled.
5. Create any needed Tasks and Actions to handle things that will happen during the special event.
Typically, there would be an Action to perform the breaks and an Action to resume normal
programming at the end of the event as a minimum. You might also have a requirement for a
station ID or audio bumpers. Any Actions that are to be active and signaled by the program service
will need to be attached to the correct input relays in the Remap Input Relays task created in step
© Copyright 2003-2015 C-R Media All Rights Reserved.
Reference
187
2. In our example, your Action to resume normal programming will include a second Remap Input
Relays task which restores the default input relay mapping to the switcher.
Now, we're ready to join the special program when the program start is signaled by the provider. When
program start is signaled, the Action created in step 4 above will be executed. The program's audio
channel will be opened on the switcher and all normal relay closures will be inactive and just the
special event relay closures will be responded to by XStudio.
Revising the Log
The main difference between normal programming and special event programming is how the log is
constructed. Special events like sports broadcasts present a challenge in automated execution
because the timing of commercial breaks is not predictable. The timing of local breaks is dictated by
the flow of the game and they could occur at intermittent intervals. However, most events of this kind
do have a fixed number of breaks that will be taken during the course of the event and the breaks will
occur in order.
In order to tell XStudio that breaks are not time-sensitive, we use time approximate load directives for
the in-event commercial breaks, as shown in our example log.
Special Event Log with Time Approximate Directives
In our example, the special event begins at 4:00 PM. The log has a standard load directive at that time,
so at 4:00 PM, the first break of the special program becomes the "active" directive (active break). At
this point, we will have received the start event signal from the programming service and the program
is one the air. XStudio is positioned on the log for the first break and is awaiting the break relay closure.
You'll notice the next 3 directives on the log are time approximate directives and that the first of them is
marked as the "NxtA" (next time approximate) directive. The 5:00 PM directive is a standard load
directive - it's at that time we'll be returning to normal programming in our example.
When the first break is called for by the program provider, the 4:00 PM break in our example is played.
At that point, XStudio marks the 4:10 PM time approximate directive as the "active" directive - meaning
it will be the break played when the next relay closure for a break arrives. Unlike normal programming
using standard load directives, though, XStudio "locks" onto this directive and will not move from it until
the break plays. This means the break could com as late as 4:25 PM and unlike normal programming,
the "locked" break will play even though there's a directive at 4:20 PM. In effect, once XStudio starts
processing time approximate directives, the breaks are now played sequentially without regard for the
© Copyright 2003-2015 C-R Media All Rights Reserved.
188
XStudio 3
time.
In our example, for instance, all three of the time approximate breaks could be called in the first 15
minutes of the hour or the last 15 minutes of the hour and all would be performed in sequence.
While all breaks in our example are of the same length, they could be different with no difference in
how XStudio performs them. The key in that case is to match the lengths of the breaks in sequence to
what the program provider will be doing.
Resuming Normal Satellite Programming
In our example, we handled a 1-hour program. You'll see on the example log that at 5:00 PM, we have
a normal load directive (not a time approximate directive). The effect of this directive is that at 5:00 PM,
regardless of where we are in terms of the playback of time approximate breaks, XStudio makes this
directive the "active" directive. In short, our log is back to normal.
The program service sends its program end relay closure at the end of the event. In our example, that
closure comes at 4:59:50. When XStudio detects the closure, it performs the end program Action you
defined earlier, which in our example includes playing a 10-second station ID, a Remap Input Relays
task that restores responsiveness your default relay closures, and an Update Switcher task that puts
our normal program service back on the air.
5.7.2
Local Automation Programming Example
This example shows how to "program" XStudio for local automation. Local automation generally means
that all content to be aired is placed on the broadcast log (schedule) and that XStudio is responsible for
playing the audio from the log without user intervention.
For this example, we'll assume the station is programming a music format that it is locally automated
all hours of the day, seven days a week, and that the XStudio default operating mode is Automation.
You may wish to review the Program Start Options for XStudio, paying particular attention to the
property settings for Mode at Startup, Load Today's Log at Startup, and Play Log on Startup.
We'll also describe how you can suspend local automation to run a live air shift.
Unlike running satellite automation, which was described in another programming example, running
local automation with XStudio does not require use of an audio switcher unless you have special
requirements or are running a mixed format, operating some hours of the day in local automation,
others in satellite automation.
Constructing the Log
The key to running local automation successfully lies in constructing the broadcast log (program
schedule). You can construct a log directly within XStudio or with one of our log editing tools. However,
the most common method of constructing the log is to use a music scheduling system to create the
music portion (plus fixed audio items like jingles, etc.), use a traffic system to create the commercial
portion (commercials, scheduled promo's, etc.) and use our LogMerge utility software to combine or
"merge" the two logs into a finished log that XStudio executes.
For this example, we are going to concentrate on the finished log and what it should contain rather than
the mechanics of putting together the music and commercial logs. The combining or "merging" of the
two dissimilar logs is covered in the LogMerge documentation and is not as complicated as it might
sound. Once you get everything set up for the combining process, it takes very little time on a daily
basis to produce a finished log for XStudio.
Here are some guidelines for a log to be used in local automation:
We recommend that you use the music scheduling system and the log you export from it as
the "master" log, placing everything you need to execute your format on the music log with
© Copyright 2003-2015 C-R Media All Rights Reserved.
Reference
189
the exception of commercial content, which would come from the traffic system. This allows
the music and programming departments to control program flow, using the commercial log
generated by the traffic system to fill in the commercial content only.
There should be a Log Directive at the beginning of each hour, as a minimum. In a music
format, this directive would typically be inserted in the music scheduling system format clock
as the first element of the hour. Log Directives serve as markers in local automation. Placing
one at the beginning of each hour makes the log more easily understood in the control room,
and ensures that hourly content totals displayed in XStudio and our log editing software are
accurate for a given hour. We suggest you use a Load Required directive for this purpose.
The music content should be over-scheduled. How much and where in a given hour
depends on the probability of being short on commercial content for an hour, the station
format and your own judgment. The general idea is that you want enough music content for
the hour to cover all eventualities, including missing or out-of-date commercials, a light
commercial load that can occur on some days of the week, and any other factors specific to
your station. The positioning of "throw-away" songs on the log is dependent on the format
you've constructed for the station. We'll cover how you can skip the extra songs that you've
used to "cover" for missing content or a light commercial load later in this topic, under the
heading Staying "In Sync".
The desired end result is a log that contains all audio content you want XStudio to play, in sequence.
Additionally, the log needs to contain any synchronization (updating to time) commands that you feel
might be needed.
Getting Things Started
Now that we've produced a daily log that contains the things we need, it's fairly simple to get XStudio
started running local automation. Unlike running satellite programming, though, you do need to actually
start playing audio at the right point in the log. There are two scenarios to consider - what happens
when XStudio is started (the program is launched) and initiating local automation when XStudio is
already running.
1. XStudio is already running. We'll assume that nothing is now playing. Since the program
is already running and the log is ready for use, locate the audio item on the log closest to
current time. Mark the log item as the Next-To-Play item. Ensure that current operating
mode is Automation by using the main menu Options | Operation Mode to select
Automation mode. Click on the Deck 1 [Play] button to start the marked cart.
2. Startup of XStudio. Assuming the Program Start Options are set to Mode at Startup =
Automation, Load Today's Log at Startup is checked (yes) and Play Log on Startup is
checked (yes), there's nothing you need do. XStudio will load the current-day log during the
startup process, locate the log item closest to current time and begin playing that item
automatically. If the Play Log on Startup is not checked (no), then follow the instructions in
the first scenario (scenario 1) when XStudio has completed its startup process.
In either scenario, once XStudio begins playing audio, you need do nothing more.
Staying "In Sync"
As a log is executed during the day, it is likely that you will end up with a bit of content drift - you might
be playing the third-to-last element logged for the 2 PM hour, for instance, at 3:00:00 PM. If nothing is
done, XStudio will play the last two elements of the hour before playing the first element of the 3 PM
hour, which you'd intended play at the top of the hour. This can cause the sound of the station to be
slightly off compared to what your painstakingly crafted format intended.
The usual cause is that you had a couple of extra songs scheduled in a hour to cover what you thought
might be a shortage of commercial content, for instance. But the full commercial load was there, so the
© Copyright 2003-2015 C-R Media All Rights Reserved.
190
XStudio 3
two extra songs (in our example) are not needed.
XStudio provides the means to get back on track - get synchronized with the clock - either in a nonintrusive way or a rather abrupt way. These methods are referred to as a "Soft Sync" and "Hard Sync",
respectively. Both methods are driven by the log using a Directive Key added to a standard log
directive.
In the following examples, we show how to place a single synchronization
command on the log for a given hour. There is not a limitation on this technique
- you can place as many synchronization commands as are needed on the log.
Using the Soft-Sync Method
The Soft-Sync method is the most commonly used method of synchronization because it is not
noticeable to the listener. To force a soft synchronization, modify a log directive that appears on the log
(has a log time) at the time you want the synchronization to occur, or add a new Load Required
directive with the desired log time. Add a Cast-Off directive key to the directive. As viewed in XStudio,
the log appears similar to the example shown.
Soft-Sync directive key, as it appears in XStudio
In our example, when the clock reaches 3:00:00 PM, XStudio detects the synchronization key and sets
the Next-To-Play marker to the first element following the directive. The effect is that XStudio skips
over any remaining unplayed audio for the preceding hour and when the audio currently playing
reaches EOM, it starts playing the first audio item following the directive. Since this occurs when the
currently playing audio finishes, the actual start time of the next audio will vary with the remaining play
time of the active audio. Thus the term "Soft-Sync", which means we got "close" rather than exact.
Refer to the definition of Soft-Sync and the Cast-Off directive key documentation for additional
information.
Using the Hard-Sync Method
As the name implies, the Hard-Sync method of synchronizing playback to a particular time is an abrupt
method, but it is more exact. Like the soft synchronization method, hard synchronization is driven
adding a directive key to a log directive. Change an existing directive or create a new one for the
specific time you want the synchronization to occur. Add a Hard Sync directive key to the directive. As
viewed in XStudio, the log appears similar to the example shown.
© Copyright 2003-2015 C-R Media All Rights Reserved.
Reference
191
Hard-Sync directive key, as it appears in XStudio
In our example, when the clock reaches 3:00:00 PM, XStudio detects the synchronization key and sets
the Next-To-Play marker to the first element following the directive, as with the soft synchronization
method. However, in hard synchronization, XStudio stops all audio playing on the primary
playback channel (channel 1) and immediately starts playing the first audio item following the
directive on the log. The synchronization is immediate and abrupt, hence the term "Hard Sync". Since
XStudio begins playing the next audio item on the log immediately rather than waiting for EOM of the
currently playing item, synchronization of the scheduled air play time with the clock is very close,
generally within a few milliseconds.
Refer to the definition of Hard-Sync and the Hard Sync directive key documentation for additional
information.
Suspending Local Automation Manually
In our example, the radio station is running local automation 24 hours a day, 7 days a week. But what if
we want to run a 4-hour live show? In our example - and in many other cases - it's a simple process.
You can suspend local automation by simply changing the XStudio operating mode to something other
than Automation. Use the main menu item Options | Operation Mode and select Live mode.
As soon as the mode is changed to Live, XStudio will no longer perform the synchronization
commands we described earlier. It will continue to play the log until you interrupt playback in some way
and take control of playback. For instance, you may simply turn auto-segue off (turn off the [Auto]
button on the primary transport) and wait until the currently playing audio finishes. At that point, it's all
up to you. Running a live shift when you normally run local automation is pretty simple, since the log
probably contains all content you need to play back - plus you have the flexibility to move items around
and do the normal things you might do during a live show, like taking phone calls and putting them on
the air, etc.
When the live show is done, use the main menu Options | Operation Mode to select Automation
mode. Start playing an audio item from the log and XStudio will continue from there, playing the log in
sequence. Any synchronization commands on the log are again active.
© Copyright 2003-2015 C-R Media All Rights Reserved.
192
5.8
XStudio 3
Task Reference
Tasks are a core component of XStudio automated execution. Each task does only one specific thing,
unlike some systems where multiple actions are taken within a single task. This approach allows for
greater flexibility, as tasks can be reused easily without concerns about side effects of anything done in
addition to performing the basic task.
Tasks are combined with other tasks to form what is known as an Action, which is simply an ordered
list of tasks. When an Action is run, its list of tasks is performed, in order. Actions can be initiated in
several ways, including associating the action with an audio switcher input relay, as a scheduled event,
as a log directive, using a hot button or as an action embedded in a cart play.
Available Tasks
XStudio supports a number of different types of tasks, each with a specific purpose. The table below
lists available tasks along with a short description of each. Use the links to review detailed information
on a specific task type.
Task Type (Alphabetical)
Description
Banner Message
Display a text message in the XStudio Message Center dialog.
Remap Input Relays
Change or reset input relay mapping for an audio switcher.
Send Control Command
Send a control command to an external device via the external
control port (serial port).
Set Auto-Segue
Set log Auto-Segue on or off.
Set Clock
Sets the system clock to the specified minute and second of an
hour.
Set Mode
Sets the operating mode of the system, e.g, Emergency,
Automation.
Set Voice
Sets the global voice number of the system, used in conversion
of the ## macro characters.
© Copyright 2003-2015 C-R Media All Rights Reserved.
Reference
5.8.1
193
Task Type (Alphabetical)
Description
Start Play
Start playback of audio from the log or from a list of carts (audio
files).
Stop Play
Stop play of audio on a selected channel, either by channel or by
cart number.
Switcher Fade
Fade a single channel, up or down, on a selected audio switcher.
Only a few audio switchers support this feature.
System Backup
Backup system database files and optionally, XStudio preference
and settings files.
Timer
Delay task execution a specified amount of time. Effectively a
"wait" command.
Update DOut
Pulse a single DOut on a selected switcher. Not all devices
support DOut pulsing.
Update Switcher
Turn on or off input channels for a specific audio switcher.
Use Existing Action
Use an existing Action as a Task. In effect, "nests" an action
within an action.
Properties Common to All Tasks
There are two kinds of properties common to all tasks - a Task Name, which appears on the main
page of the task dialog, and a set of execution control properties.
Task Main Page Properties
The Task Name property is common to all tasks and appears as the first edit field on a task's main
window, as shown. All tasks must be named (non-blank).
Task Name maximum length is 30 characters
The task name is used for reference purposes to help you identify what the task is used for. A task can
be named anything you like, up to a limit of 30 characters, and should be meaningful to you. The task
name does not have to be unique, but it is recommended, as the name is displayed in lists, etc, and if
the names are unique, there's less chance of confusion.
Task Advanced Properties (Mode/Days)
All tasks provide a set of properties to control whether or not the task will be executed at run time.
These properties include:
System Operating Mode
Day of Week
© Copyright 2003-2015 C-R Media All Rights Reserved.
194
XStudio 3
Time of Day (Day Part or Hour Part)
Access these properties from any task dialog with the [Mode/Days] button.
The Advanced Properties allow you to set conditions that must be met for the
task to be performed. Note that all conditions must be met for the task to
execute.
Default Advanced Properties Settings
Valid Modes
At least one mode must be selected for a task to be valid. You will not be allowed to apply changes to a
task until one or more modes are selected.
Valid Days
At least one day must be selected for a task to be valid. You will not be allowed to apply changes to a
task until one or more days is selected.
© Copyright 2003-2015 C-R Media All Rights Reserved.
Reference
195
Valid Hours / Hour Parts
When determining whether a task is valid for execution, you can limit valid times of the day to either a
contiguous time range (sometimes called a Day Part) or a specified range of minutes within a specified
range of hours, called Hour Parts.
An hour range is simple to understand - there's a beginning time and an ending time, and if the task
execution attempt occurs within that time range, it is considered valid and executes. The default value
for the time of day property is 00:00:00 through 23:59:59, which means the entire day. You can use this
type of range to allow a task to execute, for example, between 4:00 PM and 5:59:00 PM only.
An hour part range is a bit more complex. As shown in the example, you set beginning and ending
hours and separately, beginning and ending minutes within each of the valid hours.
Advanced Properties Settings using Hour Parts
In the example, the beginning hour is 3 AM and the ending hour is 4 AM. The beginning and ending
minute values are 10 and 20, respectively. In short, this time restriction means that the task will
execute only in the following time ranges:
3:10:00 - 3:20:59 AM (note the seconds values)
4:10:00 - 4:20:59 AM (note the seconds values)
Using hour parts allows you to refine a task's valid execution time to only certain minute ranges within
specified hour ranges, providing a very flexible means of controlling task execution times.
More About Start Minute and End Minute Values
When using Hour Parts to set the valid times a task can run, you may have noticed there is no
provision for a seconds value, as there is in the standard Hours entries. In task validation, they are
handled in the following way:
Start Minute - the seconds value is zero, i.e. 10:00
End Minute - the seconds value is 59, i.e. 20:59
This means that if we set a valid minutes range within an hour to 10 through 20, it actually is 10:00
© Copyright 2003-2015 C-R Media All Rights Reserved.
196
XStudio 3
through 20:59. In this example if you did not want the task to execute beyond 20 minutes past the hour,
you could set the End Minute value to 19, which would allow the task to execute from 10:00 through
19:59, thus excluding the 20:00 past the hour time.
© Copyright 2003-2015 C-R Media All Rights Reserved.
Reference
5.8.2
197
Banner Message Task
The Banner Message task is used to display user-defined text in the XStudio Message Center. This
task can be used to inform operators of system status changes, special events that might be currently
airing and "reminder" messages.
Banner Message Properties
Items with a check mark in the REQ column require user entry, while unchecked items have default
values which can optionally be changed.
Property
REQ Description
Task Name
The user-friendly name of the task. See Common
Properties for more information.
Banner Message Text
The text that will appear in the XStudio Message Center
when the task is executed. Text length is not limited, but
longer messages may not display completely depending
on the user-adjusted size of the Message Center display
panel. Text should be the minimum necessary to convey
the intent of the message.
Background Color
This property sets the XStudio Message Center
background color when this task's message is displayed.
Text Color
This property sets the the XStudio Message Center text
color when this task's message is displayed.
Duration
Default value: 00:00:00.000. This property determines
whether or not the banner message will be automatically
cleared after a certain period of time. If the value is nonzero, the message will be cleared automatically after the
entered time value, in hours, minutes and seconds, has
elapsed, starting from the time the message is displayed.
© Copyright 2003-2015 C-R Media All Rights Reserved.
198
XStudio 3
Property
Blink Text
REQ Description
Default: Unchecked. If checked, the message text will be
blink on and off when displayed in the XStudio Message
Center.
Text displayed in the Message Center remains until replaced by another Banner Message task, the
duration of the message (if greater than zero) has elapsed, or an operator manually clears the
message from the Message Center.
© Copyright 2003-2015 C-R Media All Rights Reserved.
Reference
5.8.3
199
Remap Input Relays Task
The Remap Input Relays task is used to change or reset input relay mapping for an audio switcher.
This task is useful for situations where you may wish to disable (or "unhook") input relay actions used
for normal programming, replace them with a different set of actions enabled (or "hooked") to input
relays for a special event, and later restore the "default" input relay mapping when programming
returns to normal.
Remap Input Relays - Selecting the Switcher
When remapping or restoring input relays with this task, any input relay lock-out
values originally assigned to the resource are not changed.
Remap Input Relays Properties
Items with a check mark in the REQ column require user entry, while unchecked items have default
values which can optionally be changed.
Property
REQ Description
Task Name
The user-friendly name of the task. See Common Properties for
more information.
Switcher Resource
Select the audio switcher that will be used for this task from the
drop down list. When a device is selected, the appropriate number
of input relays and their labels are displayed in the relay map table.
If the selected device does not have input relays, you are
prompted to select a different device from the list.
Remap / Reset
Select the radio button item appropriate for what you want to
accomplish. The default selection is "Remap Input Relays", which
allows you to select each available input relay and associate an
Action with it. If the "Restore Input Relay Defaults" radio button
© Copyright 2003-2015 C-R Media All Rights Reserved.
200
XStudio 3
Property
REQ Description
item is selected, the Relay Map Table is disabled and when the
task is executed, the selected device's original input relay mapping
is restored.
Relay Map Table
Displayed input relays for the selected device are listed, initially
with no Actions assigned to any of the input relays. Select the
desired input relay and either [Double-Click] on the item or
[Right-Click] and select the menu item "Assign Action ..." to
display an Action selection dialog.
Remap Input Relays - Device Selected
Assigning Actions to Input Relays
When a switcher resource has been selected and the device's input relay list is displayed, you can
begin assigning Actions to the input relays. The easiest way is to locate the input relay you want to
assign by scrolling through the list.
© Copyright 2003-2015 C-R Media All Rights Reserved.
Reference
201
Selecting an Input Relay to Remap
To assign an Action to an input relay, [Double-Click] on the input relay to display the Assign Action to
Relay Input dialog. Alternatively, you can [Right-Click] on the selected input relay and select the
menu item "Assign Action ..." to display an Action selection dialog.
Selecting an Action to assign
When you have completed all of the input relays that need to be mapped, click on the [Apply] button to
save the task. A sample of a completed assignments is shown here.
© Copyright 2003-2015 C-R Media All Rights Reserved.
202
XStudio 3
Remap Input Relays complete.
To disable all input relays for the device, select the "Remap Input Relays"
option and do not assign an Action to any of the available input relays. When
the task is executed, it will essentially "unhook" all relays.
Clearing (Removing) an Action from an Input Relay
If you wish to remove an Action assigned to an input relay, [Right-Click] on the input relay to be
changed and select the pop-up menu item "Clear Action..." The Action associated with the selected
input relay will be removed.
Assign / Clear Action Pop-up Menu
Restore Input Relay Mapping
To restore the selected switcher resource's default input relay mapping, select the "Restore Input
Relay Defaults" radio button item in the Remap / Reset option group. The Relay Map Table is
disabled, as it will not be used. Click on the [Apply] button to save the task.
© Copyright 2003-2015 C-R Media All Rights Reserved.
Reference
Restore Default Input Relay Mapping
When this task is executed with the Restore Input Relay Defaults option, the switcher resource's
original input relay settings are restored from the device's resource record.
© Copyright 2003-2015 C-R Media All Rights Reserved.
203
204
5.8.4
XStudio 3
Send Control Command Task
The Send Control Command task is used to send a string of data to an external device for purposes of
controlling the device or causing it to take some action. The data string can be sent as pure text or as
binary information. This is a send-data-only task; any information returned by the device is ignored.
When creating a new Send Control Command task, the dialog is initially displayed similar to the
example shown here, with its default property settings.
Send Control Command Properties
Items with a check mark in the REQ column require user entry, while unchecked items have default
values which can optionally be changed.
Property
REQ Description
Task Name
The user-friendly name of the task. See Common Properties for
more information.
Command String
The characters, including optional control codes, that are to be
sent to the external device.
Send Text As-Is
If this property is checked, the data sent will be exactly as
displayed in the Command String field. Control codes are
represented as "<xxx>" in the Command String field, if inserted,
and are normally interpreted to their binary value (Decimal 0..31)
when the command string is sent. As an example, if the "ACK"
value (Decimal 6) needs to be sent, it is represented in the
Command String as "<ACK>" and at send time, the decimal byte
value 6 is sent. If this property is checked, what will be sent
instead is "<ACK>" as plain text, which is 5 bytes, ie, the displayed
text of the Command String with no interpretation.
Append <CR>
When this property is checked (the default), a Carriage Return
(Decimal 13, Hex 0D) is appended to the Command String when
© Copyright 2003-2015 C-R Media All Rights Reserved.
Reference
Property
205
REQ Description
sent to the external device.
Append <LF>
When this property is checked, a Line Feed (Decimal 10, Hex OA)
is appended to the Command String when sent to the external
device.
When both Append <CR> and Append <LF> are checked, they are appended
to the Command String in conventional order - Carriage Return followed by Line
Feed. If you need to reverse this order, use the [Insert Control Code] button to
insert them manually directly into the Command String and uncheck both of
these properties.
Inserting Control Codes in the Command String
Control codes are defined as Decimal values 0 through 31 and as the name implies, are traditionally
used for special "control" characteristics of a device receiving the Command String. Control codes
might be used to mark the beginning or end of a command sequence, for instance.
Control codes can be placed anywhere in the Command String field, either by correctly typing the
control code representation or using a pop-up control code selection dialog. Place the cursor in the
position in the Command String field where you want to insert a control code and click on the [Insert
Control Code] button.
Control code insertion dialog
Select the control code you wish to place in the Command String and click on the [Insert] button. The
control code representation will be inserted at the cursor position.
Send Command Examples
When you have finished setting the Send External Command properties, the displayed information will
appear similar to the examples shown here, with the command string previewed in either Hex or
Control Code mode. Click on the [Apply] button to save your changes.
© Copyright 2003-2015 C-R Media All Rights Reserved.
206
XStudio 3
Command String preview in Hex
Command String preview in Control Codes
© Copyright 2003-2015 C-R Media All Rights Reserved.
Reference
5.8.5
207
Set Auto-Segue Task
The Set Auto-Segue task is used to set the auto-segue state of the host application on or off. The autosegue state controls automatic sequencing of audio playback from the broadcast log, If the auto-segue
state is On, sequencing from one log item to the next occurs automatically when the item's Aux Mark
(EOM) is signalled. If auto-segue state is Off, automatic sequencing does not occur.
Auto-Segue Properties
Items with a check mark in the REQ column require user entry, while unchecked items have default
values which can optionally be changed.
Property
REQ Description
Task Name
The user-friendly name of the task. See Common Properties for
more information.
Auto-Segue State
Set the property to On or Off.
© Copyright 2003-2015 C-R Media All Rights Reserved.
208
5.8.6
XStudio 3
Set Clock Task
The Set Clock task is used to reset the time on the host PC, typically signaled by an external source
such as a fixed-time relay (closure) from a satellite programming service. When this task is executed,
the minutes and seconds of the hour are set. You can control how much adjustment is allowed with the
Allowed Drift property.
Set Clock Properties
Items with a check mark in the REQ column require user entry, while unchecked items have default
values which can optionally be changed.
Property
REQ Description
Task Name
The user-friendly name of the task. See Common Properties for
more information.
Minutes
The minute value of the hour that is set when this task is executed.
Seconds
The seconds value of the hour that is set when this task is
executed.
Allowed Drift
The amount of time, expressed in plus or minus minutes from the
target time, that will be used to decide if the clock is updated. For
instance, if the target time is 59:45 and the Allowed Drift is 3
minutes (the default), the clock would only be updated if the PC's
clock time falls within 56:45 to 02:45 of the next hour. In this
example, the clock would only be reset if it had drifted no more
than 3 minutes either way from the target time. If the PC clock's
current time falls outside the Allowed Drift window when the task is
executed, the clock is not updated.
© Copyright 2003-2015 C-R Media All Rights Reserved.
Reference
5.8.7
209
Set Mode (Operating Mode) Task
The Set Mode (Set Operating Mode) task is used to set the current operating mode of the system.
There are 4 modes from which to choose:
Emergency
Live
Automation
Satellite
The operating mode affects how the system reacts to things like log directives, input relays and a
number of other events that occur. This task is most often used when transitioning to and from satellite
programming.
Set Mode Properties
Items with a check mark in the REQ column require user entry, while unchecked items have default
values which can optionally be changed.
Property
REQ Description
Task Name
The user-friendly name of the task. See Common Properties for
more information.
Operating Type
Select the appropriate mode item from the dropdown list. The
default is "Automation".
© Copyright 2003-2015 C-R Media All Rights Reserved.
210
5.8.8
XStudio 3
Set Voice Task
The Set Voice task is typically used in conjunction with satellite programming. Programming services
will often provide liners, splitters, etc, done by the program hosts. These liners are then signaled by the
programming service at various times. As the host changes, the custom liners, etc, need to change as
well.
Rather than creating many different tasks that play different cart numbers, you can use this task to set
a 2-character value for the so-called "voice number". Then, you can create a single liner playback task,
for instance, that uses the current voice number to dynamically determine what cart number to play.
The macro characters "##" (pound sign twice) are used for this purpose in cart numbers. For instance,
if the current voice number is "14" (shown here), then a liner cart play with a cart number of "LI##"
would become "LI14" when called for playback.
Set Voice Properties
Items with a check mark in the REQ column require user entry, while unchecked items have default
values which can optionally be changed.
Property
REQ Description
Task Name
The user-friendly name of the task. See Common Properties for
more information.
Voice
Enter the 2 characters that the global voice number is to become.
You must use 2 characters and they can be in the range 0..9 and
A..Z.
© Copyright 2003-2015 C-R Media All Rights Reserved.
Reference
5.8.9
211
Start Play Task
The Start Play task is used to begin playing items on the log - like a commercial break - or to play a
specified cart (audio item) to a specific play channel. The most common uses of the Start Play task are
to initiate a local commercial break in satellite programming, or to play a jingle, liner, or splitter as a
part of satellite programming.
Start Play task for playing from the log
Start Play Properties
Items with a check mark in the REQ column require user entry, while unchecked items have default
values which can optionally be changed.
Property
REQ Description
Task Name
The user-friendly name of the task. See Common Properties for
more information.
Play From Log
Check this item to play items from the program log. If checked, no
other properties need be set except for the Task Name.
Cart Rotation List
When the Play From Log property is not checked, this list is
enabled for adding and deleting specific cart numbers to play. The
list must contain a minimum of one cart number. To manage the
list contents, use the [Add Cart] and [Delete Cart] buttons. Cart
number macro characters can be used as a part of the cart
number. When multiple cart numbers are placed in the list, the
items are rotated when the task is executed multiple times while
XStudio is running. At program start-up, the first item in the list is
used the first time the task is executed and subsequent execution
of the task uses the next item in the list and so on.
Play Channel
Select the play channel (1-4) on which items from the cart list will
be played. This item is enabled only if the Play From Log property
is not checked.
© Copyright 2003-2015 C-R Media All Rights Reserved.
212
XStudio 3
Start Play from the Log
If a Start Play from the log task is used in an action list and the current operating mode is Satellite, do
not use a Timer task to delay the action list execution until the end of the break. In Satellite mode, the
length of the break is picked up from the break log directive and passed back to the action list,
signaling the action to "wait" the logged break length before continuing on to the next item in the action
list.
If the mode of operation is something other than Satellite mode, the action list item following a Start
Play task, if any, is executed immediately.
Start Play Using the Cart Rotation List
When playback is to be a specific cart, uncheck the Play From Log property, which enables play
channel selection and the controls to add and delete cart numbers in the Cart List, as shown.
Start Play task for playing carts from a list
Individual cart plays are most often used for satellite programming inserts - liners, jingles, etc. To add
cart numbers to the list, click on the [Add Cart] button or use the [Insert] key. To remove a cart
number from the list, select the item and click on the [Delete Cart] button or use the [Delete] key. You
can use cart macro characters in the cart numbers. When a task using the Rotation List is executed for
the first time, XStudio adds the task to its Relay Queue Manager, which handles rotating the list of
carts. For more information, see the topic Using the XStudio Relay Queue Maintenance Dialog.
© Copyright 2003-2015 C-R Media All Rights Reserved.
Reference
213
5.8.9.1 Using Cart Macro Characters
To use cart number macro characters, enter the appropriate macro as a part of the cart number.
Supported Cart Number Macro Characters
Macro Usage
##
Current Voice Number (2-character string)
Whenever these characters are encountered in a cart number, they are replaced by
the current global Voice Number value.
Note: You must always use two characters for defining a voice number and always
use the ## (pound sign, pound sign) designation when entering the Current Voice
Number macro.
%
Current Day of Week (1=Monday .. 7=Sunday)
This character is replaced by the numeric value for the current day of the week.
^
Current Hour (12-hour format)
Hours 1 through 9 = 1..9, 10 = A, 11 = B, 12 = C
Note: Because this is a 12-hour format, the current hour value used when
substituting for this macro character can occur twice during the day. For instance the
10 AM and 10 PM hours will return the same value - "A".
@
Nearest Hour (12-hour format)
If current minute of the hour >= 30, then the returned hour value is incremented by
1.
Note: Because this is a 12-hour format, the current hour value used when
substituting for this macro character can occur twice during the day. For instance the
10 AM and 10 PM hours will return the same value - "A".
=
Current Hour (24-hour format)
Hours 0 (midnight) through 9 = 0..9, 10 = A, 11 = B, 12 (noon) = C, 13 (1 PM) = D
through 23 (11 PM) = N
Using this macro character format, there are no duplicates throughout the day.
+
Nearest Hour (24-hour format)
If current minute of the hour >= 30, then the returned hour value is incremented by
1.
Hours 0 (midnight) through 9 = 0..9, 10 = A, 11 = B, 12 (noon) = C, 13 (1 PM) = D
through 23 (11 PM) = N
Using this macro character format, there are no duplicates throughout the day.
Day of Week Values
The day of week macro character returns a numeric value, based on the current day of the week.
© Copyright 2003-2015 C-R Media All Rights Reserved.
214
XStudio 3
Values returned are shown in this table.
Day
Value
Monday
1
Tuesday
2
Wednesday
3
Thursday
4
Friday
5
Saturday
6
Sunday
7
Hour of Day Values
Hour of Day macro characters will return different one-character values, depending on the specific
macro character used. The main differences occur between any 12-hour format and any 24-hour
format. Values returned by each format type are listed in this table.
Hour of Day 12-Hour Format 24-Hour Format
Midnight
C
0
1 AM
1
1
2 AM
2
2
3 AM
3
3
4 AM
4
4
5 AM
5
5
6 AM
6
6
7 AM
7
7
8 AM
8
8
9 AM
9
9
10 AM
A
A
11 AM
B
B
Noon
C
C
1 PM
1
D
2 PM
2
E
3 PM
3
F
4 PM
4
G
5 PM
5
H
6 PM
6
I
© Copyright 2003-2015 C-R Media All Rights Reserved.
Reference
Hour of Day 12-Hour Format 24-Hour Format
7 PM
7
J
8 PM
8
K
9 PM
9
L
10 PM
A
M
11 PM
B
N
© Copyright 2003-2015 C-R Media All Rights Reserved.
215
216
XStudio 3
5.8.10 Stop Play Task
The Stop Play task is used to stop playing audio - either audio playing on a specific channel or a
specific cart number.
Stop Play Properties
Items with a check mark in the REQ column require user entry, while unchecked items have default
values which can optionally be changed.
Property
REQ Description
Task Name
The user-friendly name of the task. See Common Properties for
more information.
Play Channel
The channel on which to stop audio. The default is channel 1.
When stopping play on a specific channel, all carts playing on
the selected channel are stopped.
Stop a Specific Cart
If checked, the Stop Play task will attempt to stop a specific cart
number playing on any channel. If more than one of the specified
cart number is playing, only the first one found is stopped.
Cart Number
The cart number to stop if Stop a Specific Cart is checked. This
field is disabled unless the Stop a Specific Cart property is
checked. The cart number must be 4 characters long.
Stopping Audio on a Specific Channel
To stop audio playing on a specific channel, make sure the Stop a Specific Cart item is unchecked (the
default) and select the channel number you wish to stop. The sample task dialog above is an example
of using the Stop Play task targeted to a specific channel.
© Copyright 2003-2015 C-R Media All Rights Reserved.
Reference
217
When a specific channel is selected, all carts playing on the selected
channel are stopped. The Stop Play task is commonly used when transitioning
from local automated programming to satellite programming and, after
switching to the satellite program service, it is desirable to stop all carts that
might be playing. Since the possibility exists that more than one audio item
might be playing in this situation - for instance, audio overlap when finishing one
item and starting another - it's desirable to stop all items on the selected
playback channel.
Stopping a Specific Cart (Audio File)
To stop play of a specific cart number, check the Stop a Specific Cart property and enter the cart
number you wish to stop. The cart number must be 4 characters in length.
When stopping a specific cart, an attempt to stop the specified cart number
playing on any playback channel is made. If more than one of the specified
cart number is playing, only the first one found is stopped. Should multiple carts
of the same number be playing, the first one found and thus stopped would
typically be the one that started playing first, regardless of play back channel.
© Copyright 2003-2015 C-R Media All Rights Reserved.
218
XStudio 3
5.8.11 Switcher Fade Task
The Switcher Fade task is used to fade audio on a selected channel, either a fade up or fade down.
Currently, the only switchers that support this task are the Broadcast Tools ACS
8.2 family of audio switchers and the Broadcast Tools ADMS 44.22. The fade
duration is controlled by the switcher's fade settings.
Switcher Fade Properties
Items with a check mark in the REQ column require user entry, while unchecked items have default
values which can optionally be changed.
Property
REQ Description
Task Name
The user-friendly name of the task. See Common Properties for
more information.
Switcher Resource
Select the audio switcher that will be used for this task from the
dropdown list.
If the switcher you select does not support input
channel fade, you will be advised to select a
different switcher. Task information cannot be
saved (applied) until a device that supports this
task is selected. If you do not have a switcher that
supports channel fade, click on the [Cancel] button
to abort the task.
Fade Audio Up
This property determines the audio fade direction. If checked,
audio is faded up; if unchecked the audio is faded down. The
default value is unchecked.
© Copyright 2003-2015 C-R Media All Rights Reserved.
Reference
Property
Channel to Fade
219
REQ Description
Select the number of the audio channel to fade. Use the [Show
Map] button to display a list of channel labels for the selected
switcher.
Show Map Dialog
The [Show Map] button displays the input and output channel labels as they are assigned to the
switcher resource. It is used as a reference when selecting a channel to fade.
The channel list can be printed, saved to a file or copied to the Windows clipboard using a pop-up
menu that appears when you [Right-Click] on the channel list.
© Copyright 2003-2015 C-R Media All Rights Reserved.
220
XStudio 3
5.8.12 System Backup Task
The System Backup task is used to perform a backup of the XStudio system database files and
optionally, other XStudio preference and settings files.
Audio inventory database files are not backed up with this task. The audio
inventory database is automatically maintained and will be rebuilt automatically
if needed.
The backed-up files can be used to manually restore database tables, preferences and settings if
needed.
System Backup Properties
Items with a check mark in the REQ column require user entry, while unchecked items have default
values which can optionally be changed.
Property
REQ Description
Task Name
The user-friendly name of the task. See Common
Properties for more information.
Backup Target Folder
This property controls where backup files are placed. The
location can be on the local PC or on another PC in the
local area network using a UNC path. If the selected
backup type is "Daily", the folder becomes the "base"
folder, under which daily folders are created. The
selected base backup folder must exist - it will not be
created when running this task.
© Copyright 2003-2015 C-R Media All Rights Reserved.
Reference
Property
221
REQ Description
The Backup Target Folder must be set
up from the point-of-view (POV) of
XStudio and the logged in user must
have read and write privileges in the
Backup Target Folder. If these conditions
are not met, the backup task will fail.
Backup Type
The selected type dictates where backed-up files are
located. If the "Single" option is selected, backup files are
located directly in the Backup Target Folder. If the "Daily"
option is selected, backup files are placed in folders
directly under the Backup Target Folder, one for each day
of the week. "Daily" option folders are automatically
created as needed and are named "01_Monday",
"02_Tuesday" and so on through "07_Sunday".
Backup Non-Database
System Files
If checked, preference files, settings files and other
selected files located in the application folder are backed
up. Hot button files located in the XStudio folder are
included in the backup. If not checked, only system
database files are backed up.
Zip Backed-up Files
If checked, backed-up files are moved to a zip file to
reduce disk space consumed by the backup files. The zip
file is will be located in the Backup Target Folder specified
by this task.
Each time the System Backup task is run, previous backup files in the target folder are replaced. For
the "Single" backup type, only one set of backup files exists at any one time.When the "Daily" backup
type is selected, as many as seven (7) sets of backup files are retained, one for each day of the week.
As noted earlier in the properties description, daily backup types are stored in individual day folders
located under the Backup Target Folder.
© Copyright 2003-2015 C-R Media All Rights Reserved.
222
XStudio 3
5.8.13 Timer Task
The Timer task is essentially a "delay" or "wait" command. When a timer task is executed in a running
Action, the Action "waits" for the timer duration before moving on to the next task in the action list.
If a Start Play from the log task is used in an action list and the current
operating mode is Satellite, do not use a Timer task to delay the action list
execution until the end of the break. In Satellite mode, the length of the break is
picked up from the break log directive and passed back to the action list,
signaling the action to "wait" the logged break length before continuing on to the
next item in the action list.
If the mode of operation is something other than Satellite mode, the action list
item following a Start Play task, if any, is executed immediately.
Timer tasks have a resolution of 1/100th of a second. The maximum length allowed for a timer task is
23:59:59.990 - 23 hours, 59 minutes, 59 seconds, 990 milliseconds (99 centiseconds).
Example 2-minute Timer task
Timer Properties
Items with a check mark in the REQ column require user entry, while unchecked items have default
values which can optionally be changed.
Property
REQ Description
Task Name
The user-friendly name of the task. See Common Properties for
more information.
Timer Duration
The time to "wait" before an Action moves on to the next task in its
list. Time entry is in hours, minutes, seconds and hundredths of a
second. Internally, the timer duration is stored as milliseconds and
during data entry, the last digit (a zero) is automatically filled in.
© Copyright 2003-2015 C-R Media All Rights Reserved.
Reference
Property
REQ Description
Maximum timer length is 23:59:59:990.
© Copyright 2003-2015 C-R Media All Rights Reserved.
223
224
XStudio 3
5.8.14 Update DOut Task
The Update DOut task is used to send an outbound relay pulse from an audio switcher that supports
this functionality. The relay pulse might be used to turn on a light or start some other device.
Some audio switchers support additional outbound relay functionality, including
toggling the relay on (closed) and holding it on (closed). This task supports
pulse output only. The duration of the pulse is controlled by the audio switcher
settings. Pulse duration is typically one second or less, with most switchers
supporting a range from ~100 milliseconds up to ~9.9 seconds
Selecting the switcher resource for a DOut
Update DOut Properties
Items with a check mark in the REQ column require user entry, while unchecked items have default
values which can optionally be changed.
Property
REQ Description
Task Name
The user-friendly name of the task. See Common Properties for
more information.
Switcher Resource
Select the audio switcher that will be used for this task from the
dropdown list.
If the switcher you select does not support DOut's,
you will be advised to select a different switcher.
Task information cannot be saved (applied) until a
device that supports this task is selected. If you do
not have a switcher that supports DOut's, click on
the [Cancel] button to abort the task.
© Copyright 2003-2015 C-R Media All Rights Reserved.
Reference
Property
DOut to Pulse
225
REQ Description
This property sets the specific DOut to pulse. As the value is
changed, the selected DOut description is displayed, as shown in
the example.
Show Map Dialog
The [Show Map] button displays the DOut identification labels as they are assigned to the switcher
resource. It is used as a reference when selecting a DOut to pulse.
The DOut label list can be printed, saved to a file or copied to the Windows clipboard using a pop-up
menu that appears when you [Right-Click] on the displayed list.
© Copyright 2003-2015 C-R Media All Rights Reserved.
226
XStudio 3
5.8.15 Update Switcher Task
The Update Switcher task is used to set channel states on an audio switcher. Channels can be
explicitly turned on and off or left alone in their current state. You must set at least one channel on or
off for the task to be valid. Changes cannot be saved until at least one channel is turned on or off.
Update Switcher - selecting the audio switcher
Update Switcher Properties
Items with a check mark in the REQ column require user entry, while unchecked items have default
values which can optionally be changed.
Property
REQ Description
Task Name
The user-friendly name of the task. See Common Properties for
more information.
Switcher Resource
Select the audio switcher that will be used for this task from the
dropdown list. When selected, the appropriate number of channels
and rows of channels is updated in the switcher settings panel.
Switcher Settings
Set individual channels off, on, or "no change". At least one
channel must be set on or off for the task to be valid.
Displayed channel buttons can have one of three states, which are
shown above. In order of display, the states are channel off,
channel on, and do not set channel state, which means no change
to existing settings for this channel when the task is executed.
Entire rows can be toggled on or off and the row state cleared to
no change using a pop-up menu (shown below). Float your mouse
over the row you wish to change and [Right-Click] to display the
menu.
© Copyright 2003-2015 C-R Media All Rights Reserved.
Reference
227
Update Switcher task - change entire row pop-up menu displayed
Show Map Dialog
The [Show Map] button displays the input and output channel labels as they are assigned to the
switcher resource. It is used as a reference when setting a channel's state.
The channel list can be printed, saved to a file or copied to the Windows clipboard using a pop-up
menu that appears when you [Right-Click] on the channel list.
Example 16x4 Switcher Dialog
This dialog demonstrates the appearance of the Update Switcher dialog when a 16x4 (16 input
channels, 4 output rows) switcher is being updated.
© Copyright 2003-2015 C-R Media All Rights Reserved.
228
XStudio 3
Example 16x4 Update Switcher Dialog
© Copyright 2003-2015 C-R Media All Rights Reserved.
Reference
229
5.8.16 Use Existing Action Task
The Use Existing Action task is used to "nest" an Action within a running Action's task list. As this task
is about to be executed in an action task list, it is checked like any other task to see if it is valid for the
current mode of operation, day of week and time of day. If this criteria is not met, the entire action
referenced by this task is skipped.
Selecting an Action for the Use Existing Action task
Use Existing Action Properties
Items with a check mark in the REQ column require user entry, while unchecked items have default
values which can optionally be changed.
Property
REQ Description
Task Name
The user-friendly name of the task. See Common Properties for
more information.
Selected Action
Select the Action that will be performed when this task is executed
and all execution criteria for the task are met. See the section on
Advanced Task Properties, which explains how you can control
whether or not the action begins execution.
Once this task has been validated as OK to execute at run-time, each task
within the selected action is validated as well, as a normal task would be. It is
possible, then, that while an action launched with this task executes, not all of
its own member tasks would execute.
Use Existing Action Task Flow
When this task is executed at run-time, the assigned action's task list is executed only if this task's
Advanced Properties permit. If this task fails validation, the entire action is skipped.
© Copyright 2003-2015 C-R Media All Rights Reserved.
230
XStudio 3
If this task passes validation, then the assigned action's list of tasks is performed, in order, subject to
each individual member task being validated. When the assigned action's task list has been
completed, any other tasks contained in the master action list following this task are validated and
performed. The flow diagram shown displays graphically the order of execution.
As you might deduce by looking at the diagram, it is possible to further "nest" actions by placing a Use
Existing Action tasks in an Action already being used as a nested action. In fact, you could go several
layers deep, although perhaps with some level of confusion when the nesting gets more than 3 or 4
layers deep.
More commonly, you might use several Use Existing Action tasks in a master Action, with each nested
action's execution being controlled by the Advanced Properties settings for the task - in other words,
maybe only one of 5 nested actions would actually be performed when the master action executes.
© Copyright 2003-2015 C-R Media All Rights Reserved.
Reference
5.9
231
Using the Audio Clipboard
The XStudio audio clipboard is located immediately below the main display playback decks and to the
right of the log. The clipboard is used to create a list of carts for ad hoc playback on decks 2, 3 and 4.
XStudio Audio Clipboard
You can place items in the clipboard from the log or from the audio inventory list. The order of items in
the audio clipboard can be controlled by dragging the items up or down in the list. The width of the
clipboard is controlled using the splitter control that separates the log and audio clipboard. The audio
clipboard can also be completely hidden (collapsed) if desired.
Adding Carts to the Clipboard
Audio items (carts) can be added to the clipboard from either the audio inventory list, the log or the
music search dialog. Select an item and press and hold down the [Left] mouse button. Drag the item to
the clipboard and drop it. The item is added to the clipboard list at the point it was dropped.
In addition to drag-and-drop, you can add items to the clipboard from the inventory list by selecting an
item and pressing the [Ctrl-A] keyboard shortcut or with the inventory pop-up menu.
Playing Carts from the Clipboard
There are a number of ways to play carts (audio items) from the clipboard. You can use the deck 2, 3
© Copyright 2003-2015 C-R Media All Rights Reserved.
232
XStudio 3
& 4 [Play] buttons, deck 2, 3 & 4 (if enabled) remote starts, deck 2, 3 & 4 keyboard remote start
shortcuts, and by dragging a clipboard item onto any playback deck and dropping it.
When you use a [Play] button or remote start method, the top item in the clipboard is played on the
selected playback deck and the clipboard item is removed.
To play items from the clipboard, the playback deck source must be set to the
clipboard ([Que]). For more information, see the topic on using playback decks
2,3 & 4.
You can play any item in the clipboard on any deck by selecting the item, dragging it to a playback
deck and dropping it. The item will be played immediately and removed from the audio clipboard.
Arranging Carts in the Clipboard
To reorder items in the audio clipboard, select an item, press and hold the [Left] mouse button, and
drag the item to its new location in the list.
Removing Carts from the Clipboard
To remove a cart from the audio clipboard, select the item and press the [Del] (delete) key. The
selected item is removed without confirmation.
Hiding the Clipboard
The audio clipboard can be hidden, if desired. The section of the main display that contains the
clipboard has an adjacent splitter control that allows you to resize the clipboard width and entirely hide
or show the section.
Audio Clipboard Splitter
© Copyright 2003-2015 C-R Media All Rights Reserved.
Reference
233
To toggle the visibility of the audio clipboard, click on the splitter control. If the clipboard is visible, it will
be hidden. If hidden, the clipboard will become visible.
To change the width of the clipboard display, press and hold the [Left] mouse button on the splitter
control, then move the mouse left or right to increase or decrease the width.
If you adjust the width of the audio clipboard or collapse it completely to hide it,
the changes also affect the Next Event and Running Actions display panels.
© Copyright 2003-2015 C-R Media All Rights Reserved.
234
5.10
XStudio 3
Using the Cart Distribution/Include List Panel
Audio files used by XStudio contain a distribution list that historically has been used to determine
whether or not a given audio work station is permitted to use the file in DCS and Maestro systems.
While XStudio does not enforce this restriction during playback of audio, the distribution list can be
used to control whether or not carts (audio files) are displayed in inventory lists and/or included in any
inventory lists that XStudio creates and makes available for other applications to use.
The cart distribution list is displayed when you wish to change these settings in Preferences on the
Audio Properties page.
Distribution/Include List Edit Panel
Usage is simple - checked "nodes" or "stations" are included, unchecked nodes are not.
Customizing Work Station Names
To make it easier to identify audio work stations in a station’s broadcast facility, the text for each work
station name in the list can be edited. [Double-Click] on the item in the list whose name you wish to
edit. A dialog appears, allowing you to make changes. When you’re finished editing the name, click on
the dialog’s [OK] button to save the changes.
Work stations in the list are sorted in node number order. The 1st name in the
list corresponds to node number 1 (or zero – 0 – under the covers in DCS and
Maestro).
© Copyright 2003-2015 C-R Media All Rights Reserved.
Reference
5.11
235
Using the Cart Mask Edit Panel
Some portions of XStudio require the entry of cart masks for one purpose or another. When cart
masks need to be added, edited or deleted, the Cart Mask Edit Panel is displayed.
The panel is intended to make the tasks associated with cart mask maintenance easier and more
foolproof with buttons for adding, editing and deleting cart masks.
Add Mask Button
When the Add Mask button is clicked, a dialog appears for entry of the new cart mask. The entered
mask is validated to ensure it meets cart mask rules before being accepted and added to the cart
mask list.
Edit Mask Button
To edit a cart mask in the list, select the item to be edited and click on the Edit Mask button. The mask
text appears in a dialog for editing. The revisions are validated to ensure the changes meet cart mask
rules before being accepted.
Delete Mask Button
To delete a cart mask in the list, select the item to be deleted and click on the Delete Mask button. The
selected cart mask is immediately removed from the list.
Close Cart Mask Edit Panel Button
Click when finished editing cart masks to close the panel and update the cart mask field contents.
5.11.1 Cart Masks Explained
Cart masks are used to identify carts (audio files) that might be grouped together. A cart mask must be
exactly 4 (four) characters in length. Mask entry dialogs will not allow entries that are too short and will
not accept more than 4 characters entered.
The "?" (question mark) or the "*" (asterisk) characters are "wildcards", meaning a letter or number is
valid in its position in the mask. The "?" and "*" characters can be used interchangeably as they have
the same meaning in cart mask evaluation. A third wildcard that can be used is the "#" (pound sign)
character. When used in a cart mask, only numbers (0 through 9) are valid in its position in the mask.
These are the only wildcard characters allowed for a cart mask - all other characters will be interpreted
literally.
Valid characters for a cart mask, besides the "?" (question mark), "*" (asterisk) and "#" (pound sign)
include the letters A .. Z, the numbers 0 .. 9 and the characters "{", "}" and "!" (exclamation).
A valid cart mask will include one or more "?", "*", or "#" characters (although it doesn't have to) and
© Copyright 2003-2015 C-R Media All Rights Reserved.
236
XStudio 3
other letters or numbers that match up with cart types that you wish to have grouped together.
Examples of valid cart mask include:
Mask
Result
C???
Carts beginning with the letter "C" and any 2nd, 3rd and 4th character will be
included.
PR??
Carts with the first two characters of "PR" and any 3rd and 4th character will be
included.
?R??
Carts with any first character, a second character of "R" and any 3rd and 4th
characters will be included.
Z?A?
Carts with a first character of "Z", any 2nd character, a third character of "A" and
any 4th character will be included.
VT##
Carts with the first two characters of "VT" and a number in the 3rd and 4th
characters will be included.
C***
Carts beginning with the letter "C" and any 2nd, 3rd and 4th character will be
included.
C??#
Carts beginning with the letter "C", containing any character in the 2nd and 3rd
positions, and a number (0 through 9) in the 4th position will be included.
####
Only carts with a number (0 through 9) in each character position will be included.
A cart mask of "????" or "****" (or any combination of the two wild card
characters) is the same as saying "any cart number is valid", which means all
carts would match such a mask.
Combining a number of cart masks for use in a cart category will group all carts that meet at least one
of the cart masks. For instance, you could have a filter called "R Carts" that has 4 cart masks - "R???",
"?R??", "??R?" and "???R". The result of using this cart filter would be that every cart in the inventory
that has the letter "R" in any character position (1st, 2nd, 3rd or 4th) would be a match.
© Copyright 2003-2015 C-R Media All Rights Reserved.
Reference
5.12
237
Using the Color Customization Dialog
The Color Customization Dialog is a standard Windows dialog for selecting and/or creating colors,
similar to the example shown.
Color Customization Dialog (expanded)
All of the standard methods for creating custom colors are available in this dialog. You can visually
create a color by clicking on the color spectrum display, then moving the gradient marker, or you can
manually enter a color value as a set of numbers, either based on the RGB values or Hue, Saturation,
and Luminescence values.
If you find that you are consistently using a particular custom color, you may wish to write down the
RGB values for that color to make it easier the next time you want to duplicate it. You can also add a
newly created color to the "custom colors" panel, but remember these settings are not persistent
between sessions - if you exit the software, the custom color is not saved.
© Copyright 2003-2015 C-R Media All Rights Reserved.
238
5.13
XStudio 3
Using a Remote Database
As a default, XStudio creates and maintains a local database with complete control over it. No other
applications are allowed access to the data or to the files that comprise the database unless you
explicitly allow remote access to the local database for remote administration of the automation data
using XStudio Admin.
A second option available is to use a centralized, remote database server typically located on another
PC. This option requires a stand-alone database server application be installed, configured and
available to XStudio.
The necessary stand-alone database server software for implementing a
centralized database is not included in the XStudio installation package. If you
wish to use a centralized database, contact your vendor for information on
obtaining the database server software, along with its requirements for use.
5.13.1 Database Server List Maintenance
If you will be connecting XStudio to a remote database - one that is not the local database XStudio
creates and maintains as a default - you can use the database server list maintenance dialog to locate
the server (if physically on your LAN) or create a manual entry for the server.
When initially opened with no defined remote database servers, the server list maintenance display will
look similar to the example shown.
Default Server List Maintenance Dialog with no Defined Servers
There are two ways to define servers - retrieve a list of available servers from you local area network,
and manually add a server that either does not appear on the local area network or is at a remote
© Copyright 2003-2015 C-R Media All Rights Reserved.
Reference
239
location.
Retrieve Servers Available on the Local Area Network
If the database servers you will be maintaining are on your local area network, use the [Get Srvr List]
button, which broadcasts a message asking for available servers to respond. In order for the broadcast
messaging to work, certain TCP/IP ports must be available for use and not blocked by a firewall. After
broadcasting a message across your local area network and waiting a few moments for responses
from active database servers, all found servers are added to the database server list.
In the example display shown, one of the servers has also been designated the "Default Server." This
means that when XStudio is launched, the selected server is the one that XStudio will initially log in to
and use if you have the Use Remote Database property enabled.
Manually Add Servers to the Server List
If a local database server cannot be found or if you need to connect to a database server outside your
local area network, you can manually add the server using the [Add Server] button, which displays a
dialog for entering the server name.
© Copyright 2003-2015 C-R Media All Rights Reserved.
240
XStudio 3
Enter in the server name and click the [OK] button to add it to the server list. The correct entry format
for manually adding a server is in the format "Name@Address", where the "Name" portion is whatever
the name assigned by the host application is, the "Address" portion is the IP address or resolvable
network path, and the "@" symbol separates the two.
Example Server Name Entries
Server names can be entered in any of these formats:
Entry Syntax
Description
[email protected]
Standard IP address notation.
XStudio_KCRM@KCRM_ControlRoom
Machine Name notation - local area network
only!
[email protected]
Internet domain name notation.
User Name and Password
As a default, the XStudio database does not require a user name and password to gain access.
However, should the remote database server require a valid user name and password, you can enter
the information in the Login User Name field. When you select this field, a dialog appears.
Enter the required user name and password - note the password is entered twice for validation. If the
password entries do not match, you will be prompted to reenter them.
When the server list is saved, the user name and password are included. Future logins to the selected
© Copyright 2003-2015 C-R Media All Rights Reserved.
Reference
241
database server will have the user name and password entered automatically for you, avoiding a
prompt to manually enter them.
© Copyright 2003-2015 C-R Media All Rights Reserved.
242
XStudio 3
5.13.2 TCP/IP Port Information
In order for XStudio to communicate with a remote database server, certain TCP/IP ports must be
available for use and not blocked by a firewall. This applies to both the XStudio PC and the PC
running the database server application. If you launch XStudio and see a Windows message similar
to the following, you either need to tell Windows to unblock the port or manually unblock the port.
Database Communication Ports
Only one TCP port is used for database communications and is the only required port. The default port
number is: 16000.
If you are accessing a remote database server somewhere outside of your local area network (LAN),
this is the only port that needs to be available and unblocked. Ports referred to in the section on
broadcast ports are only useful on a local area network.
Broadcast Ports
The automatic retrieval of remote database server names is dependent on being able to broadcast a
request for available servers to respond, and being able to receive their responses.
Broadcasts use as a default UDP ports 16000 (for requests) and 16001 (for responses). If you want to
be able to retrieve a list of available remote database servers automatically, both of these ports need to
be available and unblocked.
Default Port Usage Table
Use this table as a reference if manually configuring port blocking exceptions.
Port Type
Port Number
Usage
TCP
16000
Database communications. This is the only required port.
UDP
16000
Used to broadcast requests for available database servers.
Useful only on the local area network.
UDP
16001
Used to receive broadcast replies from available database
© Copyright 2003-2015 C-R Media All Rights Reserved.
Reference
Port Type
Port Number
Usage
servers. Useful only on the local area network.
© Copyright 2003-2015 C-R Media All Rights Reserved.
243
244
5.14
XStudio 3
Using the XStudio Cart Wall
The XStudio Cart Wall displays 300 programmable hot buttons in 10 pages (tabs), each containing 30
buttons, in a pop-up window that can be positioned and sized as desired. Buttons can be programmed
to play audio, execute an XStudio Action or if connected to a host Maestro or DCS system, execute a
host-system-defined function.
XStudio Cart Wall
Cart Wall Features
The XStudio Cart Wall has been designed to be as flexible and easy-to-use as possible. Key features
include:
Drag and drop button configuration. Drag audio items from the log or inventory and
drop on a button.
User-controlled size and position. The Cart Wall window can be sized as large as
desired and can be placed on a second monitor (if available). Position and size
settings are restored the next time XStudio is launched.
User-defined page (tab) labels, font size and bold text attribute.
User-defined button font, font size and bold text attribute.
User-defined default playback deck.
© Copyright 2003-2015 C-R Media All Rights Reserved.
Reference
245
Automatic button color scheme for playback buttons. Drag an item from the XStudio
log or inventory list and if the cart number falls within any of the defined Cart
Categories, the category colors are automatically applied to the button.
The Hot Button Configuration dialog allows user to apply last-used color
combinations or a user-defined default color combination.
A Clear Page button that allows users to clear (reset) an entire page of buttons with
a single mouse click.
Unlimited "sets" of buttons. Users can create as many named sets of 300 buttons as
desired, each set with its own button page labels, button font type, font size, bold text
attribute and default playback deck.
For additional information on configuring buttons, see the information on configuring a hot button.
5.14.1 Controlling the Cart Wall Size & Position
When the XStudio Cart Wall is initially displayed, it is positioned over the upper-right portion of the
main display and is sized to a minimum length and width.
To Change Cart Wall Size
You can resize the dialog by floating the mouse cursor over any border or corner of the dialog so the
cursor shape changes to the standard sizer type. Then [Left-Click] and hold the button down. Drag the
side or corner you've attached to until the dialog size meets your needs. Buttons will automatically
resize when you release the mouse button.
To Move Cart Wall Dialog
To move the Cart Wall dialog, [Left-Click] on the title bar of the window and hold the button down.
Drag the window to the location of your choosing. If more than one monitor is available, you can drag
the dialog to another monitor.
The XStudio Cart Wall current size, position and monitor number are stored
when the application is closed and restored the next time XStudio is launched.
5.14.2 Hot Button Toolbars
The XStudio Cart Wall dialog contains several toolbars which are used to change appearance and
provide functionality.
All toolbars can be moved to a different docking location, floated or hidden completely. Additionally,
individual buttons can be shown or hidden based on your preferences. Initially, the Hot Button Files,
Settings and Utilities toolbars are displayed, similar to the example shown here.
Default Toolbars
The Settings toolbar controls the visibility of the Button Settings and Tab Settings toolbars. When
depressed, these button cause the associated toolbar to be displayed similar to the example shown.
© Copyright 2003-2015 C-R Media All Rights Reserved.
246
XStudio 3
All Hot Button Toolbars
Each toolbar has a quick customize button displayed at the end of a docked toolbar and on the caption
title of a floating toolbar. Clicking on the quick customize button activates a popup menu which
contains a list of buttons on that toolbar. You can select the ones you wish to display and uncheck the
ones you want to hide.
All the toolbars are gone - how do I get them back?
Since each toolbar can be hidden, it's possible you might at some point hide them all. At that point, it
might not be readily apparent how to restore one or more toolbars to visibility.
To restore one one or more hidden toolbars to visibility, position the mouse cursor over a page name
tab and [Right-Click]. A pop-up menu will appear similar to the one shown.
Popup Menu to Display/Hide Toolbars
Select the Toolbars menu item, which folds out to display available toolbars. Check the bars you wish
displayed. If you want to reset the toolbars to the application default location and visibility, select the
menu item Reset Toolbars to Default.
5.14.3 Adjusting Button Settings
Global button settings, including a font name, font size and bold text attribute, can be adjusted using
the Button Settings toolbar.
Button Settings Toobar
Using this toolbar, you can adjust various button properties for the currently-loaded button set.
Available buttons and their usage are outlined in the table below.
Button
Usage
Font
Select a font from the drop-down list of available fonts. All
buttons are immediately updated.
© Copyright 2003-2015 C-R Media All Rights Reserved.
Reference
247
Button
Usage
Size
Select one of the available font sizes from the drop-down list.
The text size of all buttons is immediately updated.
Bold Attribute
Click to toggle bold text on and off. All buttons are immediately
updated.
Playback Deck
Select one of the playback decks available in the drop-down list
to set the default playback deck for the current button set.
Buttons currently configured are unaffected. All buttons not
configured are immediately updated to reflect the new default
playback deck.
Button settings properties are unique to each button settings file and are restored each time the button
set is reloaded.
5.14.4 Adjusting Page (Tab) Settings
Settings for the page identifiers (tabs) can be adjusted using the Tab Settings toolbar. You can control
the font size and bold text attribute as well as change page titles.
Tab Settings Toolbar
Available buttons and their usage are outlined in the table below.
Button
Usage
Size
Select one of the available font sizes from the drop-down list.
The text size of all page titles are immediately updated.
Bold Attribute
Click to toggle bold title text on and off. All page titles are
immediately updated.
Rename
Use this button to rename the currently-select page (tab). A
dialog is displayed containing the current title text. Edit as
desired and click on the [OK] button to save the changes.
Tab settings properties are unique to each button settings file and are restored each time the button
set is reloaded.
5.14.5 Clearing an Entire Page of Buttons
You can can remove (or "clear") the contents of an entire page of buttons using the Utilities toolbar
[Clear Page] button.
Select the page you want to clear and click on the [Clear Page] button. You'll be prompted to confirm
that you wish to remove ("clear") all buttons on the selected page.
© Copyright 2003-2015 C-R Media All Rights Reserved.
248
XStudio 3
Clearing a page cannot be undone. Make sure you really want to remove all
buttons' configuration info on the page and that the selected page is really the
one you want to clear.
Clearing an entire page has the same effect as if you cleared each button one-by-one. It resets every
button on the selected page to the default "not configured" properties. Button colors are changed to the
default background and text colors and all cart numbers, descriptions and other text are removed from
the buttons.
5.14.6 Working with Hot Button File Sets
XStudio stores its Cart Wall button configurations in "sets" (files) that can be loaded on-demand. Each
button configuration file (set) contains the following information:
The name of the font to be used for buttons
The button font size
The button font bold attribute
The default playback deck to be used when configuring buttons
The page (tab) font size
The page (tab) font bold attribute
Properties for each button that has been configured - this could be as few as one
button or as many as 300 buttons
The current button file (set) is remembered each time XStudio closes and restored the next time
XStudio is launched.
XStudio initially assigns a default button file name which is used if you simply
begin programming buttons without assigning a particular name. If you choose
not to create additional sets of buttons, this file (button set) will be used
exclusively. As a default, all button files have a file extension of .btn.
Managing Button Sets
To create a new button file set, open an existing set or save the current set under a different name,
use the Hot Button Files toolbar, which appears similar to the example shown.
Hot Button Files Toolbar
© Copyright 2003-2015 C-R Media All Rights Reserved.
Reference
249
Available buttons and their usage are outlined in the table below.
Button
Usage
Open
This button displays an open file dialog listing available button
files in the current folder. You can navigate to other folders as
needed to locate previously-saved button sets.
Recent
This button displays a list of the most recently opened button
sets. Select an item from the list to immediately open it.
If the selected button file no longer exists, you will be prompted
to confirm whether or not the button file name should be
removed from the recently-opened list.
Save As
This button displays a save file dialog that allows you to enter a
new name under which to save the current button settings. In
effect, using Save As "clones" the current button file.
New
This button creates a new, empty button file under a name you
choose. The default values for the button font name, font size,
bold attribute and default playback deck number are stored,
along with the default tab font size and bold attribute.
A button file containing configuration information for all buttons will consume approximately 45KB of
disk space.
© Copyright 2003-2015 C-R Media All Rights Reserved.
250
5.15
XStudio 3
Using the XStudio Clock & Backtimer
The XStudio clock is a floating window used to display the current time in either military or standard
AM/PM time formats. In addition, the XStudio Backtimer display can be enabled.
XStudio Clock
The clock is disabled (hidden) as a default and does not display the very first
time XStudio is launched. When XStudio is closed, the clock state (shown/
hidden, position, colors and size) is recorded and restored the next time
XStudio is started.
Showing or Hiding the Clock Display
To show or hide the clock, select the main menu item View | Show Clock. The menu item is checked
when the clock is displayed.
The menu item acts as a toggle, alternately hiding and displaying the clock. The clock state is stored
on program exit and restored on program startup.
© Copyright 2003-2015 C-R Media All Rights Reserved.
Reference
251
Changing the Clock Appearance
You can modify the clock appearance, including the time display type, size of the text, text color and
background color. To do so, [Right-Click] on the clock time text to display the clock properties menu.
Select the item you wish to change. Depending on the item you choose, the change will either be made
immediately or you'll be prompted to make an option selection. Review details of each menu item for
the clock display in the following table.
Menu Item
Description
Show Backtimer
When checked, the XStudio Backtimer is enabled and visible.
Because the backtimer is an integral part
of the clock display, if the clock is hidden,
so is the backtimer information
Military Time
Toggles the time display between standard AM/PM and military
time.
Enlarge
Displays a submenu for enlarging the display size of the clock,
the backtimer or both.
Clock Text (+)
When selected, the text size of the displayed time is made
larger, up to a maximum of 54 points. The text size can also be
enlarged using the [UpArrow] and [+] keys on the numeric
keypad when the window is active.
Backtimer Text (Ctrl +)
When selected, the text size of the backtimer text is made larger,
up to a maximum of 54 points. The text size can also be
enlarged using the [Ctrl-UpArrow] and [Ctrl-+] keys on the
numeric keypad when the window is active.
Both (Shift +)
When selected, the text size of both displayed time and
backtimer are made larger, up to a maximum of 54 points. The
text size can also be enlarged using the [Shift-UpArrow] and
[Shift-+] keys on the numeric keypad when the window is active.
Reduce
Clock Text (-)
Displays a submenu for reducing the display size of the clock,
the backtimer or both.
When selected, the text size of the displayed time is made
smaller, down to a minimum of 13 points. The text size can also
© Copyright 2003-2015 C-R Media All Rights Reserved.
252
XStudio 3
Menu Item
Description
be reduced using the [DnArrow] and [-] keys on the numeric
keypad when the window is active.
Backtimer Text (Ctrl -)
When selected, the text size of the backtimer text is made
smaller, down to a minimum of 13 points. The text size can also
be reduced using the [Ctrl-DnArrow] and [Ctrl -] keys on the
numeric keypad when the window is active.
Both (Shift -)
When selected, the text size of both displayed time and
backtimer text are made smaller, down to a minimum of 13
points. The text size can also be reduced using the [ShiftDnArrow] and [Shift -] keys on the numeric keypad when the
window is active.
Change Text Color
Displays a color customization dialog to choose the color of the
clock's time text.
Change Background Color
Displays a color customization dialog to choose the color of the
clock's background.
Reset Colors to Default
Resets the clock's time text and background color to XStudio
defaults.
Close
Hides the XStudio clock and backtimer (if enabled).
5.15.1 About the XStudio Backtimer
The XStudio Backtimer is a tool to help determine how much audio content remains to be played in the
current hour versus how much time is left in the hour. Comparing these values produces an "over/
under" time value that can be used as a reference in making on-the-fly adjustments. If XStudio is short
of content, a negative value is displayed and if long, a positive value is displayed. The backtimer
assumes that all log content remaining in a given hour and present in the audio inventory will be played
to completion.
The backtimer is a part of the floating clock window and can be either enabled (visible) or disabled
(hidden). When enabled, the clock display appears similar to the example shown.
XStudio Clock with Backtimer Enabled
The backtimer display can be enabled or disabled in either of two ways: a) Use the clock's pop-up
menu; or b) Use the XStudio main menu item View | Show Backtimer.
© Copyright 2003-2015 C-R Media All Rights Reserved.
Reference
253
Because the backtimer is an integral part of the clock display, if the backtimer is
shown, the clock display is also forced to a visible state. When hiding the
backtimer, though, the clock remains visible unless explicitly hidden.
How the Backtimer Works
To arrive at the over/under value, the remaining air play time of any item playing in Deck 1 (the on-air
channel) is summed with amount of content remaining in a given hour, starting with the "Next-to-Play"
item on the log.
Backtimer starting point for remaining log content
The remaining content total is compared with the time left in the hour (top of the next hour less current
clock time) to produce the over/under value displayed in the backtimer. If remaining content to play is
less than the amount of time remaining in the hour, a negative (-) value is displayed. If remaining
content to play is greater than the amount of time remaining in the hour, a positive (+) value is
displayed.
For best results, the log should contain a non-audio item (Directive, Program
Title, Log Note) at the top of each hour to clearly mark the start of an hour. If
the first non-audio element in a given hour is at a later time, audio elements
intended for the hour end up being a part of the preceding hour, which could
distort the backtimer value.
Backtimer resolution is one second, with each audio item rounded to the nearest second.
© Copyright 2003-2015 C-R Media All Rights Reserved.
254
XStudio 3
Backtimer Notes
Here are some additional points of interest that apply to the XStudio Backtimer:
1. When calculating the remaining playable log content, it is always calculated forward from the
current "Next-to-Play" position on the log to the end of the current actual clock hour. If the Nextto-Play item is in a previous hour, remaining content is the sum of playable items between Next-toPlay and the end of the current hour on the log. If Next-to-Play is an hour beyond the current hour,
as might happen when starting a log item for the 3:00 PM hour at 2:59 PM, the remaining current
hour log content value is zero.
2. Only items playing in Deck 1 are used in backtimer calculations. Items that might be played ad-hoc
on Decks 2, 3, or 4 are not used in calculations.
3. To be included in the remaining playable log content, the log item must be present in the audio
inventory. Missing audio is not included in calculations.
4. if Enforce Cart Dates (in Preferences) is enabled, then in addition to being in the inventory, the log
item must also be valid for today’s date to be included in calculations.
5. Hourly time calculations look strictly at log content for a given hour without regard for Hard Sync or
Cast-Off (Soft Sync) directives. The calculation assumes that all playable content will be played to
completion.
6. If multiple items are playing on Deck 1, only the last-started element is used in the calculation.
7. If the Display Countdown to Aux Mark option (in Preferences) is not enabled (the default), the
backtimer value will have a tendency to change a bit even though the log has not changed. This is
particularly true when XStudio is transitioning from one item to another. The backtimer value is
based on calculations to the Aux Mark, so when transitioning from one audio item to another, the
backtimer value will decrease slightly (the difference between the Aux Mark and actual audio end)
and then increase slightly - the difference between the Aux Mark and actual audio end of the new
item. Depending on the audio item currently playing the backtimer value could be off by several
seconds. To increase accuracy, turn the Display Countdown to Aux Mark item (in Preferences) on
(checked).
8. The maximum calculated hourly length is 23:59:59 (essentially one day). If calculations produce a
greater value, errors will occur.
9. If no log is present, the backtimer will display remaining time in the hour minus any item playing on
Deck 1.
© Copyright 2003-2015 C-R Media All Rights Reserved.
Reference
5.16
255
Using the XStudio Intro Countdown Timer
Using the XStudio Intro Countdown Timer is optional and depends on the log having intro times
included in the music items. Intro times are generally provided via a music scheduling system's
exported music log, but can be entered directly by editing a log item. The intro time value is located in
the log record's Type Code field.
Enabling the Intro Countdown Timer
To enable and make visible the Intro Countdown Timer, select the menu item View | Show
Countdown Timer. Checking the item enables and displays the timer, unchecking hides the timer and
either disables or temporarily hides the timer, depending on timer options.
When the Intro Countdown Timer has been enabled, each time a log item with a valid intro time is
played, the timer is activated. The countdown begins with the log intro value and counts down each
second to zero.
The intro countdown timer is hidden as a default and does not display the very
first time XStudio is launched. When XStudio is closed, the countdown timer's
state (shown/hidden and screen position ) is recorded and restored the next
time XStudio is started.
Using the Intro Countdown Timer
As the Intro Countdown Timer is running, it counts time down each second. As the remaining time gets
closer to zero, the timer color changes, similar to the examples shown.
Intro Count Down Timer Color Changes
The countdown finishes at zero and either remains visible or is automatically hidden, depending on
timer options.
© Copyright 2003-2015 C-R Media All Rights Reserved.
256
XStudio 3
Intro Countdown Timer Options Menu
You can change the size of the countdown timer dialog and enable or disable its auto-hide feature by
using the dialog's popup menu. [Right-Click] on the Intro Countdown Timer dialog to display the
options menu.
Intro Countdown Timer
Pop-Up Options Menu
Menu Item
Description
Enlarge Size
When selected, the text size of the displayed time is made
larger, up to a maximum of 120 points. The text size can also be
enlarged using the [UpArrow] and [+] keys on the numeric
keypad when the window is active.
Reduce Size
When selected, the text size of the displayed time is made
smaller, down to a minimum of 23 points. The text size can also
be reduced using the [DnArrow] and [-] keys on the numeric
keypad when the window is active.
Hide When Inactive
When this item is checked, the countdown timer will be hidden
when the countdown reaches zero. The dialog will remain hidden
until a log element containing a valid intro time value is played
and is then redisplayed.
© Copyright 2003-2015 C-R Media All Rights Reserved.
Reference
5.17
257
Using the XStudio Message Center
The XStudio Message Center is a floating dialog used to display text messages that originate from the
execution of a Banner Message task. When this task type is executed, the XStudio Message Center
dialog is automatically shown.
The Message Center background and text colors, duration of the message and whether or not text
blinks are controlled by the Banner Message task properties. The width, height and screen position of
the Message Center dialog is managed by the user.
The Message Center dialog can be manually shown or hidden by the user with the XStudio main menu
item View | Show Message Center.
Manually showing or hiding the Message Center dialog does not affect the message contents.
Message Center Size and Position
The Message Center size (width and height) and screen location can be adjusted to suit your
preferences. To adjust the width and height, [Left-Click] and hold the mouse button down while
dragging one of the Message Center borders. To position the Message Center, [Left-Click] and hold
the mouse button down on the title bar to drag the Message Center dialog to the desired location.
When the Message Center dialog is re-sized, the message text (if any) size is automatically adjusted to
fit the new height and width of the text panel.
Message Center Menu Options
The Message Center has a pop-up menu that can be used to modify its behavior. [Right-Click] on the
Message Center text panel to display the pop-up menu.
© Copyright 2003-2015 C-R Media All Rights Reserved.
258
XStudio 3
Menu Item
Description
Auto-Hide on Message
Expiration
Click on this menu item to toggle whether or not the Message
Center hides itself when a message that has an assigned
duration expires. If the menu item is checked, the auto-hide
feature is enabled. The default is to not hide the Message Center
when a message expires (unchecked).
Clear Current Message
Select this menu item to manually clear the current message.
Print History
Select this menu item to print the Message Center history list.
The history list is sent to the default printer.
Save History to File
Select this menu item to save the Message Center history list to
a file. You will be prompted for a file name.
Reset Colors to Default
This menu item changes the message background and text color
to the system default. On receipt of the next message, the
background color and text color may be changed based on the
Banner Message task properties.
Close
Select this menu item to hide the Message Center dialog. The
current message, if any, is unaffected.
Message Center History
When new messages are processed in the XStudio Message Center, the existing message (if present)
is added to a history list. The history list contains the ten (10) most-recent messages that have been
displayed in the Message Center. To view the history, click on the [Show History] link at the lower-leftcorner of the Message Center. The Message Center dialog will expand to display the history.
© Copyright 2003-2015 C-R Media All Rights Reserved.
Reference
259
To hide the history list, click on the [Hide History] link at the lower-left-corner of the Message Center
text panel.
The Message Center history list can be printed or saved to a file if desired. Refer to the previous
section on Message Center Menu Options for additional information.
© Copyright 2003-2015 C-R Media All Rights Reserved.
260
5.18
XStudio 3
Using the XStudio Music Search Dialog
The Music Search Dialog is a tool for quickly finding songs by cart number, song title or artist. Partial
match searches and a set of filtering and grouping functions are built in.
Music information displayed in this dialog comes from the XStudio music data
table, which is normally created by importing song information from a music
scheduling system export. If the music data table is empty, the dialog does not
display. See the topic on Music Data for information on exporting from a music
scheduling system and importing into XStudio.
To display the Music Search Dialog, select the menu item View | Show Music Search Dialog or use
the shortcut key [Ctrl-M].
At first launch, all current song data is loaded from the music table. The display is automatically
refreshed if the music data changes.
The upper portion of the display contains edit boxes and controls for searching the music. Searches
allow you to enter partial text, select the column to search, search for text starting at the beginning of
the field or anywhere in the field. You can also search backward, if desired.
Once located, songs can be dragged onto the log, onto a hot button or into the audio clipboard. [LeftClick].on the song and hold the mouse button down. Drag the item to the desired target and release
the mouse button to drop the song.
Song information is displayed in tabular format - rows of information, each containing columns of
individual record fields (Cart Number, Title, Artist). The display of records can be manipulated in a
number of different ways to organize or limit information that is shown. Information can be sorted,
grouped and filtered for ease of working with or finding specific songs. Additionally, individual columns
in the table can be moved and resized to suit your needs.
For more information on working with tabular data displays in XStudio, see the
topic on Common Table Display Functionality.
As a default, the music information is sorted by Cart Number in ascending order. You can change the
sort order by clicking on a column header (e.g., "Title" column). Clicking on the column header a
second time sorts the column in descending order.
© Copyright 2003-2015 C-R Media All Rights Reserved.
Reference
261
XStudio Music Search Dialog
Finding Songs Using the Search Panel
The most common way of locating a particular song is to use the search panel, located at the top of the
dialog. Enter a portion of the title or artist you're looking for, select the column (Cart Number, Title,
Artist) in which to look from the drop-down list of columns and select the search option (either search
from beginning of field or anywhere in the field). Click on the [Search] button. The first song matching
the text you entered will be located. To find the next matching song, click on the [Again] button.
You can use the keyboard shortcuts [F11] and [F12] to search and search
again, respectively.
Finding Songs Using Incremental Searches
You can also search of a cart number, title or artist using what's known as incremental searching. Click
on a cart number, title or artist and start typing. As you type, the display scrolls to a matching record.
Typed characters are matched from the beginning of the field.
© Copyright 2003-2015 C-R Media All Rights Reserved.
262
XStudio 3
Finding Songs Using Quick Filter
The Quick Filter is a convenient way of locating all songs matching your search text. Once you've
entered the text to search for, selected the column to search and set search options, click on the
[Filter] button. Filtering is activated and only those songs matching your search text are displayed, as
shown.
Songs filtered by Artist
When you use the Quick Filter, the display indicates that filtering is active, as shown above. You can
temporarily disable the search by clicking on the check box in the filter panel at the bottom of the
display. To refine your filter, click on the [Customize] button, which displays a custom filter dialog that
offers additional flexibility in filtering song information. To cancel a filter and redisplay all songs, click on
the [X] button in the filter panel.
© Copyright 2003-2015 C-R Media All Rights Reserved.
Reference
263
Grouping Songs by Artist
Grouping songs by Artist is a handy feature that organizes songs by artist and presents you with a
display similar to the example shown. Grouping by Artist is useful if you're looking for a song by a
particular artist and want to know what titles are available.
Songs grouped by Artist
To group music by Artist, [Left-Click] on the Artist column header and hold the mouse button down.
Drag the header into the group panel immediately above the displayed data. To remove grouping,
[Left-Click] n the Artist header in the group panel and hold down the mouse button. Drag the header
over the displayed information (the cursor changes to an "X") and drop it by releasing the mouse
button.
Additional Music Search Dialog Notes
1. Grouping and filtering can be used in combination. For instance, you could filter songs that contain
the word "love" in the title, then group the result by artist. The order in which you group and filter is
not important - the result will be the same.
2. Up to 15 previous search text entries are remembered and available in the Search Text drop-down
list.
3. If you change column widths or re-order the columns, the settings are saved when XStudio closes
and restored the next time XStudio is launched.
4. If you use the custom filter dialog to create more complex filters, they can be saved and re-used at
a later date. The custom filter dialog has a [Save As] and an [Open] button for this purpose.
Creating complex filters is beyond the scope of this document but experimenting with filters has no
© Copyright 2003-2015 C-R Media All Rights Reserved.
264
XStudio 3
negative effects as filtering does not change the underlying music data - filtering merely changes
which songs are displayed.
© Copyright 2003-2015 C-R Media All Rights Reserved.
Reference
5.19
265
Using the XStudio Relay Queue Maintenance Dialog
When a Start Play Task that uses a Cart Rotation List is executed for the first time, XStudio invisibly
adds the task to its relay queue manager. The relay queue manager is responsible for rotating the
items in the Cart Rotation List for those tasks that have multiple cart numbers assigned to the list.
When the task is executed a second and subsequent times while XStudio is running, cart number
rotation occurs. Carts that are missing or out-of-date (if Enforce Cart Dates is enabled) are skipped.
When XStudio is closed, the relay queue manager discards all items in the queue. When XStudio is
started again, the relay queue manager will be empty and each Start Play Task using the Cart Rotation
List will start with the first item in the list. As these types of tasks are executed, they are added to the
relay queue manager.
Sometimes, you might need to modify a particular task's rotation list or change the item that will be
next-to-play when the task is next executed. For instance, there might be a weather event in the area
and you want to add an announcement to run every other time a liner is called by your satellite
programming service. The Relay Queue Maintenance Dialog is used for this purpose - temporarily
adding or removing carts in the relay queue for a given task.
Only tasks that have been executed at least once during the current XStudio
session will appear in the active relay queue items list and be available for
maintenance. For any tasks that have not yet executed, you can edit the master
task record in the Automation Database Maintenance dialog if you wish to
change the cart rotation list. However, unlike changes made in the Relay Queue
Maintenance Dialog, which are in effect only until XStudio is restarted, changing
the master task record is considered a permanent change.
Tasks of this type are most often associated with Satellite mode operations and the cart numbers in
the Cart Rotation List often contain cart macro characters, including the Current Voice (also known as
Voice Number). For this reason, you can also use the Relay Queue Maintenance Dialog to change the
Current Voice value on-the-fly rather than with the normal methods (using a log Directive or Set Voice
task).
To display the Relay Queue Maintenance Dialog, select the XStudio main menu item View |
Automation Info | Relay Queue Maintenance. The dialog will be similar to the example shown.
© Copyright 2003-2015 C-R Media All Rights Reserved.
266
XStudio 3
Relay Queue Maintenance Dialog
Changing the Current Voice Value
To modify the XStudio global Current Voice value, select the "Current Voice" field and type in the 2character voice value you want to become the new Current Voice. The new value will be updated in
XStudio when you close the dialog by clicking on the [OK] button. To discard the changes you made to
the Current Voice field, click on the [Cancel] button, which closes the dialog with saving the change.
Removing (Deleting) an Active Relay Queue Item
Items that appear in the Active Relay Queue Items list are Start Play tasks that use a Cart Rotation List
and have been executed at least once since XStudio was last started. The list of items is managed by
XStudio's relay queue manager while XStudio is running. Once an item is added to the relay queue
manager list, the cart rotation list and next-to-play properties are not updated from the tasks database
table even if the underlying task is modified in the Automation Database Maintenance dialog.
© Copyright 2003-2015 C-R Media All Rights Reserved.
Reference
267
Active Relay Queue Items
There might be a circumstance where you would like to remove the an item from the managed list - for
instance, if you have significantly modified the rotation list in the task and essentially want to "start
over" with the cart rotation list.
To remove an active relay queue item from the list, select the item in the list and click on the [-]
(Delete) button on the data navigator located at the bottom of the list. You can also use the [Delete]
key. After prompting to confirm that you want to remove it, XStudio removes the item from the list of
active relay queue items. This does not remove the task from the Tasks database table , the item
is removed only from the active items list.
The next time the deleted task item is executed by XStudio, the first cart
number in its rotation list will be played and the task item will be added back to
the list of active relay queue items.
Refreshing the Active Relay Queue Items List
Active relay queue items are added dynamically by XStudio as a task is run for the first time. An item
could be added to the list while you are viewing and modifying other relay queue items. You can
refresh the list to see any new additions since you opened the dialog by clicking on the [Refresh Data]
button on the data navigator located at the bottom of the list. Float your mouse cursor over the buttons
to display the button's functionality in text form. If you have unsaved changes to a relay queue item,
you are prompted to confirm the changes can be discarded (or cancel the refresh) before the list is
actually refreshed.
Modifying Active Relay Queue Items
Start Play tasks that use the Cart Rotation List and have been executed at least once during the
current XStudio session are visible in the Relay Queue Maintenance Dialog. The dialog displays a list
of the active items that includes the unique Task ID and Task Name.
To change the rotation list or Next-to-Play of an item, select the item in the Active Relay Queue Items
panel, as shown.
© Copyright 2003-2015 C-R Media All Rights Reserved.
268
XStudio 3
Active Relay Queue Item Selected
As a queue item is selected, the Queue Item Properties panel is updated and displays the task's
Rotation List and the item that is Next-to-Play in the rotation. The Queue Items Properties panel is
where changes to the selected item are made.
Changes made to a relay queue item are in effect for the current XStudio
session only. When XStudio is closed and restarted, all tasks are returned to
their default next-to-play value and cart rotation lists.
Modification
Instructions
Change Next-to-Play
The cart number that is next up to be played is identified by its
position in the list. To change the Next-to-Play in Rotation
property, select the cart number in the list ([Left-Click]) that you
want to play the next time the task is executed and click on the
[Set Next-to-Play] button.
Add Cart to Rotation List
To add a cart to the rotation list, click on the [Add Cart to List]
button or press the [Insert] key and enter the cart number. Cart
numbers can contain cart macro characters.
Delete Cart from Rotation ListTo remove a cart from the Rotation List, select the cart number
and click on the [Delete Cart from List] button or press the
[Delete] key. You are prompted to confirm the deletion.
Edit a Cart Number
To edit (change) a cart number in the rotation list, select the cart
number and [Double-Click] on it or click on the [Edit Cart]
button.
Re-order the Rotation List
To change the order of carts in the Rotation List, use the mouse
to select a cart number, hold the mouse button down, drag it to a
new position in the list and release the mouse button.
Save Item Property Changes Whenever a change is made to the selected relay queue item,
the [Save Changes] button is enabled. Click on this button to
save the item changes.
© Copyright 2003-2015 C-R Media All Rights Reserved.
Reference
269
If changes have been made to a relay queue item and you attempt to select a
different relay queue item, you will be prompted that there are unsaved changes
and given the opportunity to save them, abandon the changes or cancel the
selection of another relay queue item.
Closing the Relay Queue Maintenance Dialog
To close the dialog, click on the [OK] or [Cancel] button. When using the [Cancel] button to close the
dialog, any changes made to the Current Voice value and any pending edits to a relay queue item are
abandoned without a warning. If the [OK] button is used to close the dialog and there are pending
changes to a relay queue item, you will be prompted to confirm that you wish to close without saving
those changes. Closing this dialog using the [OK] button updates the Current Voice property in XStudio
if it has been changed.
© Copyright 2003-2015 C-R Media All Rights Reserved.
270
5.20
XStudio 3
Using the XStudio Switcher Status Dialog
When you are using an audio switcher with XStudio, you can optionally display a status dialog that
shows you the status of each of audio channels. Each time XStudio makes a change, the status
display is updated. The status display is a floating window that can be moved around to your preferred
position. It's size is fixed, based on the active audio switcher's number of audio input channels and
audio output rows.
XStudio Switcher Status
The switcher status dialog is hidden as a default and does not display the very
first time XStudio is launched. When XStudio is closed, the switcher status
dialog's state (shown/hidden and screen position ) is recorded and restored the
next time XStudio is started.
Showing or Hiding the Switcher Status Dialog
Use the main menu item View | Automation Info | Display Switcher Status to show or hide the
switcher status dialog.
The menu item acts as a toggle, alternately hiding and displaying the switcher status dialog. The dialog
state is stored on program exit and restored on program startup.
Switcher Status Options Menu
You can refresh the switcher status data and enable the channel on/off toggle functionality by using the
dialog's pop-up menu. [Right-Click] on the switcher status dialog to display the options menu.
© Copyright 2003-2015 C-R Media All Rights Reserved.
Reference
271
Switcher Status Pop-up Options
Menu
Menu Item
Description
Refresh Channel Status
When selected, XStudio forces the audio switcher to re-send
audio channel status data, thus updating the display. This is
useful if you have manually changed a channel on the switcher
by selecting the channel on the hardware itself.
Enable Channel On/Off
Toggle
When this item is checked, toggling any of the displayed audio
channels is enabled. You can turn on or turn off a given audio
channel by clicking on it. If the channel was on, it is turned off
and vice-versa. This item is unchecked as a default to prevent
unintended channel toggling. If you wish to use this dialog to
toggle channels on and off, you must re-enable (check) this item
each time XStudio is launched.
© Copyright 2003-2015 C-R Media All Rights Reserved.
272
5.21
XStudio 3
XEngine Reference
As a default, XStudio is supplied with XEngine, an audio playback engine that handles the actual
playback of audio files. This separates the task of playing audio from the main application, which
manages which audio items to play and when they are to be played or stopped, along with coordinating
automated activity.
In fact, if you close XStudio while audio is playing and do not close XEngine, the audio will continue to
play until playback is completed. This provides the flexibility to close XStudio for one reason or another,
then restart the program before XEngine has completed playing whatever was playing when you closed
XStudio.
Generally, you need not be concerned with XEngine under normal use of XStudio. However, there may
be occasions where you need to work with XEngine directly. This section covers particulars on
launching XEngine, the XEngine user interface, and a history of revisions to the audio engine.
5.21.1 XEngine Configuration
There is nothing specific to configure within XEngine. XStudio supplies needed settings, including
setting the location of audio to be played, whether or not to play out-dated audio files, and the audio
devices to use for playback.
If you make changes in the XStudio Preferences dialog that affect XEngine and
save the changes while XEngine is running, it will detect most changes and
update immediately. The exception is that if you change the TCP/IP port values,
you will need to restart XEngine for the changes to take effect.
For additional information, see the topic on Audio Properties.
© Copyright 2003-2015 C-R Media All Rights Reserved.
Reference
273
5.21.2 Using XEngine
Under most circumstances, you will not interact with XEngine. XEngine functions as an audio server
engine, processing commands from another application. The client application, in this case XStudio,
communicates directly via TCP/IP, issuing audio playback and stop play commands as needed or
initiated by the end-user.
You do, however, need to ensure that XEngine is running so that it can service the requests of the
client. The XStudio installation program generally creates a desktop link and will optionally include
XEngine in the Start | Programs | Startup menu so that XEngine is automatically launched when a
user logs in to Windows. If XEngine is not running, follow the steps below to start the program.
Launching XEngine
To start XEngine, locate the appropriate desktop shortcut or menu item, typically located in the Start |
Programs | XStudio folder. XEngine will start and you may briefly see a "flash" on the screen as
XEngine starts and immediately minimizes itself on the task bar.
If you have installed the apt-X™ option, you may also see another dialog during
the start-up process. This is the apt-X license display, indicating that you are
using the encoder in EVALUATION mode. You can use the apt-X decoder for
10 days before you need to purchase a license to continue using the decoder.
For details on apt-X registration, see the apt-X Encoder Registration topic.
When XEngine is ready to run, you will notice an item has been added to the Task Bar.
XEngine Task Bar Icon
Normally, checking to see that XEngine is running - by inspecting the Task Bar for the program icon is all you need to be concerned with. The rest of this topic covers items that provide a bit more
information, including the XEngine user interface and menus.
© Copyright 2003-2015 C-R Media All Rights Reserved.
274
XStudio 3
XEngine User Interface
As mentioned, XEngine normally hides itself from the user, displaying only an icon on the Task Bar.
You can, though, display the user interface if desired. To do so, [Double-Click] on the XEngine Task
Bar icon.
XEngine User Interface
The main display, shown above, contains just a few key components, including basic information on
any audio currently playing and a VU meter for each stream of audio being played. Here's an overview
of the key components:
Title Bar. The title bar contains information on the last command issued by the client
application, showing the path and audio file name.
Menu Button. The menu button is used to pop-up a system menu that includes an item to
close (shut down) XEngine. See the section on the XEngine Main Menu for additional
information on available menu choices.
TCP/IP Communications Status. Text near the upper-right side of the display shows the
TCP/IP communications status.
Channel Status Panels. Each of the three available channels has a panel containing the
cart number, audio type, Stereo/Mon indicator and VU meter for each of the three (3)
streams supported for each channel.
XEngine Main Menu
To access the XEngine main menu, click on the [Menu] button. The main menu is displayed, similar to
the example shown.
© Copyright 2003-2015 C-R Media All Rights Reserved.
Reference
275
XEngine Main
Menu
The table below provides details on each of the main menu items.
Menu Item
Description
Open TCPIP
This item opens the specific TCP/IP port assigned to XEngine for
communications with XStudio. Under normal circumstances, the
communications port is automatically opened, but should a port conflict occur
and you correct the conflict, you can use this menu item to try to reopen
communications.
Close TCPIP
This item closes the assigned TCP/IP port. If you close the port,
communications with XStudio is terminated and XEngine will no longer
respond to playback commands.
Help
Displays the XEngine help file.
About
This item displays XEngine version information along with operating system
information. You can also use the About screen to check whether or not apt-X
is installed and available. If apt-X is available, the APT and apt-X logos are
displayed.
Exit
Exits (shuts down) XEngine. To ensure that XEngine doesn't inadvertently get
shut down, this is the only way you can close the program. Standard
methods, like clicking on the application close button (the "X" at the right end
of the title bar) or using the Windows [Alt-F4] keystroke, are disabled to
prevent inadvertent closure.
When you exit XStudio, you can also cause XEngine to close,
if desired, by answering "Yes" to the prompt asking if you wish
to close the audio engine.
XEngine Stream Menu
When XEngine is playing an audio file, a stream menu is enabled for the channel on which the audio is
being played. To access the menu, float the mouse cursor over one of the cart numbers displayed and
[Right-Click] to popup the menu.
XEngine Stream
Menu
© Copyright 2003-2015 C-R Media All Rights Reserved.
276
XStudio 3
As you can see from the example shown, the menu contains items for stopping the play of each of the
three (3) audio streams supported for each channel. To stop a particular cart, select the menu item
corresponding to the stream being used to play the cart. In each channel panel, stream numbers are
ordered top to bottom - 1, 2 & 3.
5.21.3 What's New in XEngine
This section documents changes and enhancements to XEngine by version number.
Version 3.0.0.15 (Single-Instance)
1. Enhancement. Detection of actions embedded in carts has been added.
2. Fix. Certain carts created with version 1.4 audio file headers would contain an audible "tick" at the
beginning of playback.
Version 3.0.0.8 (Single-Instance)
1. Enhancement. Automatic music fade functionality has been added. If enabled, audio matching the
defined music cart category will be faded a user-specified amount and duration.
2. Enhancement. The number of audio buffers used by XEngine is now user-modifiable.
3. Fix. The countdown of remaining play time for large audio files (> 60+ minutes) was incorrect.
4. Fix. Playback countdown on deck 4 displayed erroneous values.
Version 3.0.0.2 (Single-Instance)
1. Enhancement. A fourth (4th) playback has been added. Like playbacks 1-3, it can handle up to
three (3) streams of audio simultaneously.
© Copyright 2003-2015 C-R Media All Rights Reserved.
Troubleshooting
Part
VI
278
XStudio 3
XStudio has been designed to be as trouble-free as possible and has been thoroughly tested.
However, not every usage scenario can be anticipated. This section is intended as a starting point for
diagnosing and solving problems but should not be viewed as an all-encompassing source of problem
resolution.
If the difficulty you’re experiencing is not covered here, contact the dealer who provided you with
XStudio first. Alternatively, you can contact dcsTools.com - see the topic on Technical Support.
Application Bugs or Errors
Bugs and errors generally fall into one of two categories - a bug, which is the application not doing
something as you might have predicted it would, or an error, which is the failure of the application to
run or perform a specific task altogether.
If you find a bug, report it. Every effort is made to ensure XStudio performs as expected, but there may
be circumstances that were not predicted in the development of the software. See the section on
Technical Support for information on reporting a bug.
If you encounter an error, you will get an error message indicating a severe failure and XStudio may
terminate. Provisions are made to "catch" such errors and log the error information to a file in the
XStudio application directory. The filename is XStudio.elf. Again, report any application errors you
encounter. You may be asked to send the appropriate log file for analysis.
Basic Troubleshooting Steps
Before getting too far down the road in trying to find your problem, check these items to be sure your
environment for running XStudio is correct and functioning properly:
1. Make sure your PC (the one on which you are running XStudio) meets the minimum
hardware requirements for this application. See the section on system requirements for
more information.
2. Make sure your PC is functioning properly. This is a broad statement, but suffice it to say
that if your PC is suffering from "blue-screens" or is "locking up" for no apparent reason, the
PC may be a part of the problem.
3. Ensure that the pathways to retrieving log files, and, if applicable, inventory files and audio
files, are correct and "reachable" from your PC. If you are retrieving files from a LAN (local
area network), make sure you are correctly connected to the LAN and can "see" the host file
server.
4. Make sure that XEngine is started and running if you are using XStudio as a stand-alone
playback system. XEngine must be launched separate from XStudio and appears as a tray
icon in the Windows task bar when running.
5. If you are using a host DCS or Maestro as the host audio engine, ensure that the host
system is running.
6. Make sure that you have a default printer assigned in your operating system. Some
functions in XStudio might fail if you have no printers defined. These problems may at first
seem unrelated to printing. Some of the dialogs in XStudio offer print capability and
automatically check for a printer when the dialog is opened. Log Validation and Log Printing
are examples.
If you feel that the absence of a printer is causing your problem and do not have
or do not want a printer assigned to the PC running XStudio, one solution is to
add a standard file printing device to the system. This software-only solution
ensures that XStudio finds a "printer" when needed. Refer to your Windows
© Copyright 2003-2015 C-R Media All Rights Reserved.
Troubleshooting
279
documentation for adding such a printer (actually, print driver) and configuring it
properly. A commonly-used print driver is the Microsoft XPS Document Writer,
which is available as a default on operating systems from Windows XP forward.
7. Make sure that you have adequate hard disk storage for files XStudio generates. XStudio
can generate a significant amount of event data as system performance and actions are
tracked throughout the day. As a default, XStudio keeps 14 days worth of daily event logs
(as does XEngine) and the files can approach 3 MB in size or larger for each day's event
log. Database files can also be significant in size. Depending on the number and types of
audio files you are playing and whether or not they are located on a local drive, you may find
that you are running short of disk space.
6.1
Audio Playback Problems
If you are having trouble with audio playback and are using XEngine as the host audio server, here are
some items to check:
1. If audio files you are attempting to play back are apt-X™ files, make sure you have installed
and licensed the apt-X support files. XEngine will play PCM (linear) and MPEG-2 files
without additional software, but apt-X files require additional software that must be licensed.
See the section on Installing XStudio for further details on making sure you have apt-X
functionality installed.
2. Make sure the audio path is set properly in preferences and that the location is accessible to
the PC. You may have that path set correctly but not have privileges in the designated
folder. If you have the Generate and Use Local Inventory option set and do not have at
least Read privileges in the audio folder, the XStudio inventory list will be empty, too.
3. Make sure that you have the proper audio output devices selected and that it is present in
the system. This sort of problem most commonly shows up when using a PCMCIA or USB
sound card as the playback output device and the device has been removed or
disconnected.
4. If audio appears to be playing, but you cannot hear it, check to ensure that you have
connected speakers or the external mixer to the correct audio output port(s) or jack(s) on
your PC.
5. If audio levels are too low or too high, either change the software volume setting on your PC
or adjust the gain level on your external mixer.
6. If you are getting unwanted sounds during playback, it is likely that the audio output device
you have selected for XStudio is the same device being used by Windows for "system
sounds". To prevent this, turn off sounds associated with Windows events in the Audio
Properties | Sounds section of the OS.
7. If the audio is a LAN server, ensure that you have enough data bandwidth on the LAN to
support direct playback from the server. This problem most commonly manifests itself as
what is referred to as "audio skip" or audio "drop-out". Check to be sure that some other
application on some other PC is not "hogging" all of the network bandwidth. If your audio
library consists of mostly PCM (linear) files, this will create a larger network load than either
MPEG or apt-X audio. This problem can be mitigated by increasing the number of audio
buffers used by XEngine in Preferences on the Audio Properties page.
© Copyright 2003-2015 C-R Media All Rights Reserved.
280
6.2
XStudio 3
AV When Starting or Stopping XStudio
If you are running XStudio as standard user (one without administrative privileges), under certain
circumstances you might get an error when starting up or closing down XStudio. An error message
similar to the example shown may appear.
Note part of the example error text refers to being "Unable to create the file...". This error typically
means that the logged-on user does not have sufficient read and write privileges in the folder where
XStudio is installed. In order to use XStudio, the logged-on user must have privileges to read, write and
create files in this folder.
When XStudio starts up, some data files in the application folder are created or if present, updated.
Similarly, when XStudio is running or in the process of being shut down, preference settings are
updated. If the logged-on user does not have sufficient rights in the folder, errors of this type will occur.
To correct the problem, the system administrator must add the needed privileges for the user or a
group the user is a member of. In Windows XP or Windows 7, [Right-Click] on the XStudio folder and
selecting the "Security" tab. Modify a listed group or add a specific user with the appropriate privileges.
The Security tab is displayed by default in Windows 7. However, in Windows
XP, the tab is not displayed as a default. To display the Security tab in Windows
XP, follow the steps outlined below.
Displaying a folder's Security tab in Windows XP
If the "Security" tab does not appear in Windows XP, you can make it visible by opening Folder Options
in Control Panel.
a) Click Start, point to Settings, and then click Control Panel.
b) Click Appearance and Themes, and then click Folder Options.
c) On the View tab, under Advanced Settings, clear (uncheck) the "Use simple file sharing
[Recommended]" item.
d) Click on the [Apply] button.
You can alternatively use the Windows Explorer Tools | Folder Options... menu item to access the
View tab settings.
6.3
Problems Connecting to the Host Audio Engine
When using XStudio, you most commonly will be using the supplied XEngine audio engine, which is
installed at the same time you install XStudio. However, XStudio also supports using either a DCS or a
Maestro system as the host audio engine using our rcServer software to serve as an interpreter/
converter of the standard serial data control offered by these systems. This section covers the basics
© Copyright 2003-2015 C-R Media All Rights Reserved.
Troubleshooting
281
of troubleshooting XStudio connection and communications problems for each type of host.
6.3.1
XStudio Fails to Connect to XEngine
Here are the main items to check when XStudio complains that it cannot connect to XEngine:
1. Ensure that XEngine is running on the host PC. Check the task bar for the XEngine icon or
launch Task Manager to see if XEngine is listed as a running task.
2. If both applications, XStudio and XEngine, are running on the same PC and XEngine is
running but XStudio cannot connect, it may indicate that another application has control of
the default TCP/IP ports the applications use to communicate. You can modify the default
ports by opening Preferences and selecting the Audio Properties tab. The ports can be
changed in the Host Audio Engine Connection section.
If you change the TCP/IP ports, you will have to close XEngine and
restart it for the changes to take effect.
3. If both applications, XStudio and XEngine, are running on the same PC, open Preferences
and select the Audio Properties tab. Check that the IP address in the Host Audio Engine
Connection section is “127.0.0.1”. If it has been changed from the default, reenter this value.
4. If XStudio and XEngine are running on different PC’s, a firewall may be preventing
communications on the ports being used. You may have to consult with your LAN
administrator to determine this.
6.3.2
XStudio Fails to Connect to DCS or Maestro
If you are using XStudio to control a DCS or Maestro system via our rcServer software, there are
several items to check as the control connection between XStudio and the DCS or Maestro system has
more components.
1. Starting at the DCS or Maestro end of the connection, first ensure that serial remote control
is enabled and configured properly. See your DCS or Maestro documentation for details.
The rcServer documentation also contains details on setting up these two systems.
2. Ensure the serial cable connecting the DCS or Maestro unit to the rcServer software PC is
correctly wired (null-modem configuration) and connected to the correct COM ports on both
ends.
3. Check your rcServer configuration to be sure you have the correct COM port selected and
that the TCP/IP port settings are matched with those of XStudio.
4. Ensure that rcServer is running.
5. If both applications, XStudio and rcServer, are running on the same PC and rcServer is running
but XStudio cannot connect, it may indicate that another application has control of the default
TCP/IP ports the applications use to communicate. You can modify the default ports by opening
Preferences and selecting the Audio Properties tab. The ports can be changed in the Host Audio
Engine Connection section.
If you change the TCP/IP ports, you will also have to modify the port
settings in rcServer to match the new settings in XStudio.
6. If both applications, XStudio and rcServer, are running on the same PC, open Preferences
and select the Audio Properties tab. Check that the IP address in the Host Audio Engine
© Copyright 2003-2015 C-R Media All Rights Reserved.
282
XStudio 3
Connection section is “127.0.0.1”. If it has been changed from the default, reenter this value.
7. If XStudio and rcServer are running on different PC’s, a firewall may be preventing
communications on the ports being used. You may have to consult with your LAN
administrator to determine this.
© Copyright 2003-2015 C-R Media All Rights Reserved.
Troubleshooting
6.4
283
Remote Database Problems
If you are using a centralized database server instead of the default local database, you may encounter
problems with connecting to the database or encounter performance problems. This section covers the
most common issues encountered.
You should also review the Using a Remote Database topic, which covers basic information on TCP/IP
ports used for the remote database and the correct naming conventions for assigning a remote
database server.
6.4.1
Problems Connecting to the Remote Database
If you experience difficulties connecting to the remote database you wish to maintain, it is likely that
one or more of the following issues are affecting the connection.
The remote database identity is incorrect
If the remote server address was manually entered, it might not have been entered correctly. There are
three distinct parts to the identity - a name, a separator (the "@" symbol), and the address. Of these,
the separator and address are the key elements. For more information on creating remote database
names (identities), see the topic on manually adding servers to the server list.
The database port number is incorrect
The port normally used (default port) to connect to a remote database is 16000. However, XStudio
supports user-defined port numbers for this connection, so you need to ensure the port you've
assigned for the remote database connection matches the remote database server port that has been
assigned.
The remote PC cannot be reached via TCP/IP
In order for XStudio to connect to a remote database server, it must be able to reach the host PC via
TCP/IP.
If the server address you are trying to reach uses an IP address or internet domain name, ensure that
you have a "route" to the host PC by attempting to "ping" the remote PC. Use the "address" element of
the remote database server identity as the address to ping.
If the server address you're trying to reach uses a machine name notation, ensure that you can browse
to the named machine (the name used in the "address" portion of the remote database identity) using
Network Neighborhood or File Explorer.
Access to the remote PC is blocked
If you are certain that the remote server identity is correct and that you can reach the remote PC,
ensure that both the PC running XStudio and the PC running the host application (and database
server) have port 16000 available for use and unblocked. See the topic on TCP/IP Port Information for
details on all ports used for database communications between XStudio and the host application.
6.4.2
Slow Database Performance
Database performance, meaning how quickly displays are updated and how long it takes to retrieve
information, is generally most affected when using XStudio to access a remote database not located
on your local area network (LAN).
Performance is directly affected by available bandwidth (data flow capacity) between you and the
© Copyright 2003-2015 C-R Media All Rights Reserved.
284
XStudio 3
remote database PC. The lower the bandwidth, the more time it takes to get the data from the remote
database server and the longer it takes for the display to be updated.
While there is no substitute for bandwidth, performance problems can be mitigated somewhat when
working with a remote database that is not on your local area network.
The host database server normally sends requested information as it resides in the database tables,
but can be instructed to "compress" the requested data before sending it to XStudio. Using
compression, more data can be sent in the same bandwidth, although at the cost of the time it takes to
compress the information on the server end and subsequently decompress the information at the
receiver end.
Using data compression when communicating with remote database servers
located on your local area network may actually reduce performance. If all host
application databases you are maintaining are located on your in-house LAN,
data compression is not recommended.
Implementing Data Compression
You can enable data compression in XStudio Preferences by setting the database property Data
Compression.
You must exit and restart XStudio for changes in the data compression setting
to take effect.
Refer to the table for an explanation of available data compression settings.
Value Meaning
0
No Compression. This is the default value and means XStudio will not request
compressed data from the database server.
1
Fastest Zip Compression.
2
Fast Zip Compression.
3
Fast Zip Compression.
4
Medium Zip Compression.
5
Medium Zip Compression.
6
Medium Zip Compression.
7
High Zip Compression.
8
High Zip Compression.
9
Highest Zip Compression.
10
RLE Compression.
You'll notice there are several "flavors" of zip compression, which provide a balance between speed of
compression and size of the compressed data. You can experiment with various settings to see which
achieves the greatest satisfaction.
© Copyright 2003-2015 C-R Media All Rights Reserved.
Troubleshooting
6.5
285
Session Properties
During operation, XStudio keeps track of a number of bits of information, called session properties,
that affect program execution. Session properties include such things as the current station that
XStudio is operating as, the current voice number (used in cart macros), certain preferences that might
change on the fly, playback channel states, log dates and file names, active and next-to-activate log
directives, and audio switcher information, including assigned input relays and lockout values.
This information can be useful for determining the cause of problems or to assist in determining
XStudio's current "state."
You can view a session properties report on-screen, add the current property information to the
XStudio event log, or save the property information to a file of your choosing. To review the session
properties, select the main menu item Help | Troubleshooting | Session Properties. Then, select the
menu item corresponding to what you want to do with the session properties report.
The example display shown is the result of choosing the menu option View Session Info.
XStudio Session Properties Report
When displayed, the report can be searched, scrolled and archived to a file if desired. It is organized in
sections containing related information.
Keep in mind that a session property report reflects the "state" of XStudio at the
moment the report is generated. Property values can change only milliseconds
later, depending on system activity.
© Copyright 2003-2015 C-R Media All Rights Reserved.
286
6.6
XStudio 3
Using Application Event Logs
XStudio documents its actions by writing information to a set of daily event logs, which are
automatically maintained for a user-specified number of days. Event logs are text files containing a
time stamp for each line of information (record) and descriptive text about what happened or what was
done by XStudio.
Event logs are very useful in troubleshooting problems or simply trying to determine why XStudio
performed in a certain way. As a default, event logs are retained for 14 days, but you can change the
number of days and the amount of detail XStudio stores in the event log. Refer to the topic on Event
Logging Properties in the Configuration chapter for information on adjusting the number of days and
detail level.
Event log information is separate from and in addition to the standard audit
report data that XStudio maintains for each day. Audit report data documents
mainly significant activity that might be used for reconciling a log, whereas the
event logs contain a lot more information about the details of operations. Event
logs are stored in the XStudio application folder; the audit report files are stored
in the same folder as a station's log files.
Viewing Current-Day Event Logs
You can at any time review the current-day event logs within XStudio. Select the menu item Help |
Troubleshooting | View Event Log for the XStudio application event log or select the menu item
Help | Troubleshooting | View Inventory Manager Log for the inventory database manager's
events.
The event log view can be resized as desired and includes search capability along with standard
scrolling and keyboard navigation of the event details.
© Copyright 2003-2015 C-R Media All Rights Reserved.
Troubleshooting
287
Reviewing Event Logs Outside of XStudio
Since XStudio event logs are text files, you can use virtually any text editor or text file viewer to review
the information for any of the available event log files, which are stored in the XStudio application folder
using a naming conventions of:
yyyymmdd_XStudio_EventLog.txt (main application event log)
yyyymmdd_InvMgr_EventLog.txt (InvMgr event log)
yyyymmdd_InvMgr_MaintThread_EventLog.txt (InvMgr maintenance thread event log)
yyyymmdd_XEngine_EventLog.dmp (XEngine event log)
The "yyyy" is the year, "mm" is the month and "dd" is the day of the month for which the event log was
created.
A handy alternative to using a standard text editor is our custom Event Log Viewer application, which
provides enhanced features for sorting, grouping and filtering of event log data. Visit our web site for
details on downloading and using this free utility.
6.7
Vista, Windows 7 & WIndows 8 Notes
With the introduction of Windows Vista and subsequently the release of Windows 7 and Windows 8
and other later operating systems, Microsoft added a significant amount of additional security to these
operating systems.
Generally referred to as UAC (User Account Control), the sum of these changes dramatically affect
named users who might be categorized as "standard" or "general" users. Areas that previously had
been quite open, allowing these users to modify, create and delete items like files and registry entries
are now protected as default. Users with standard rights and privileges on these systems are now as a
default prevented from making changes in such areas as the Program Files folder, the Windows folder
and in the Windows registry area known as HKEY_LOCAL_MACHINE.
XStudio does not use the Windows registry during normal operations. The only
information stored in the registry is created when installing XStudio and is used
if you later decide to remove the software from the system.
In addition, Microsoft published numerous guidelines and usage information regarding these changes.
Some of the guidelines would cause applications who require the end-user to be able to modify
preference settings, etc., to place files in several locations on the PC. While these changes do
enhance the overall security of the operating system, having files and information for a specific
application spread all over the system in places not intuitive or easy to find creates a significant support
burden for IT managers and the application vendor.
Over the years, we have chosen to try to keep all of our application's files, including those that store
preferences, files containing run-time information like exception logging and activity detail, and small
database files, in one location for ease in troubleshooting and housekeeping.
For these reasons, our applications are generally placed in a folder other than the Microsoftrecommended Program Files folder. As a default, these other folders historically have been "wide
open" in the sense that any user could read, write and modify files.
However, depending on how tightly-secured a system is when running Vista or a later operating
system, issues may arise that relate to user rights. The following points may assist you in locating
problems with XStudio when running one of these operating systems and the user reporting issues
does not have administrative privileges.
1. Make sure that user having trouble with XStudio has read, write, modify and delete
privileges in the folder in which XStudio is installed. These privileges might be assigned to
© Copyright 2003-2015 C-R Media All Rights Reserved.
288
XStudio 3
an individual user but more commonly are assigned to a user group of which the user is a
member.
2. If you are placing files in a location other than the XStudio folder, file locations that are set
up in the Preferences area, ensure that the named user has read, write, modify and delete
privileges in that folder location.
3. One way that some issues can be overcome is to modify any XStudio shortcuts to cause the
application to be run under administrator privileges. [Right-Click] on the shortcut and select
the menu item "Run as Administrator". A negative of this approach is that the end-user will
more than likely have to enter an administrative password, which defeats the concept of
administrative security as you'd have to provide the user with the password.
Another approach some people use is to disable UAC. While this action more or less
returns user accounts to the sort of status they had in previous versions of Windows, this
too defeats the idea of enhanced operating system security.
4. If an application uses the registry, particularly the portion known as
HKEY_LOCAL_MACHINE, you may have to extend rights to specific keys that the
application modifies or creates during normal usage. In order to add permissions to the
registry, you will need to use regedt32.exe, the extended registry editor.
In order to extend additional privileges to a user or user group, either in the file
system or registry, you need be be logged on to the operating system as an
administrator.
apt-X™ Issues
The apt-X encoder/decoder uses a software protection scheme that can be tricky to get working under
Vista and later operating systems. A hidden file is created by the software, generally placed in either
the Windows directory or the root folder of the boot-up drive. Additionally, registry entries are created
and maintained in several places in the Windows registry, many of which are normally restricted in in
later operating systems.
When setting up XStudio, the apt-X installation, registration, etc., is done by a user with administrative
privileges, so no problems occur initially. However, as soon as a user with "normal" privileges tries to
use apt-X, errors occur because the underlying apt-X security system is trying to make changes in
these prohibited areas.
Networking and Mapped Drives
In Windows XP and prior operating systems, it is a fairly common practice to "map" shared server
drives or shared drives on other PC's to a drive letter. Mapped drive letters have been viewed as easier
to work with and the network connection to the drive is persistent so long as the mapping is not
removed by the user.
In Vista and up, however, the behavior is not the same. While you can map network shares and have
them restored each time you log in, these operating systems automatically disconnect the mapping
after a period of inactivity. As a default, the disconnect occurs after 15 minutes or so. This can
present problems to applications accessing data on mapped drives in these operating systems
because of the amount of time it takes the operating system to reconnect after it has autodisconnected. During the time the operating system is reconnecting, any attempt to read a file or
contents of a folder are rejected and the error most commonly seen includes the words "file not found".
If you using Vista or later to run XStudio, we recommend you use UNC paths if you are accessing logs,
audio files, exported music data or anything else that is located on a shared network drive.
© Copyright 2003-2015 C-R Media All Rights Reserved.
Troubleshooting
6.8
289
XStudio "Hangs" on Shutdown
Under certain circumstances, XStudio may appear to "hang" when shutting down. The main dialog will
disappear and it will appear as though XStudio has closed. However, CPU utilization may reach 99%
(on single processor PC's) and if you look at the "Processes" page in Task Manager, you find XStudio
listed with a very high CPU value.
This problem is almost always caused by insufficient user rights in the XStudio folder. During the
shutdown process, XStudio attempts to write a number of preference settings and data files and
depending on the host operating system, no error message displays.
If this occurs, the only option available is to use Task Manager to end the XStudio process. Note that
all information that XStudio was attempting to save on exit does not get saved.
To correct the problem, the system administrator must add the needed privileges for the user or a
group the user is a member of. For more information, see the topic on AV's when starting or stopping
XStudio.
© Copyright 2003-2015 C-R Media All Rights Reserved.
290
XStudio 3
This page intentionally blank.
Contacting dcsTools.com
Part
VII
292
XStudio 3
If you need to contact dcsTools.com, you can do so using one of the following methods. We are here
to help, so do not hesitate to communicate with us when needed.
Mailing Address
C-R Media
8494 Saratoga Lane
Eden Prairie, MN 55347
USA
Telephone Information
Sales and Technical Support can be reached from 9:00 AM to 5:00 PM, U.S Central Time.
Voice: 952-949-9450
FAX: 952-949-9448
Email Information
To contact us via email, use our on-line contact form. If you wish to use a standard email client, send
correspondence to: [email protected].
Technical Support
To contact technical support for our products, use the telephone numbers or email information
provided above. You can also send an on-line product-specific email.
Web Site
Visit our web site for information on product updates and other products we offer.
http://www.dcsTools.com
© Copyright 2003-2015 C-R Media All Rights Reserved.
Appendices
Part
VIII
294
8.1
XStudio 3
Registration
XStudio requires a valid registration code to enable full use of the product. If you have purchased
XStudio, you should have received a registration code or instructions on how to obtain your registration
code with your installation materials. The registration code contains the product serial number and is
unique to each PC on which XStudio is installed.
If no registration code is entered or available, you will be able to run XStudio for a limited amount of
time each time the program is started. Until XStudio is registered, some features and functionality that
should not affect your evaluation of the product are disabled, including, but not limited to, being unable
to save an edited log or print a log.
If you have purchased the optional apt-X™ decoder, you will also have to register this software, as the
vendor has a separate registration process.
Preparing to Register XStudio
In order to obtain a valid registration key, the name of the host PC and a custom machine ID is
required. Select the menu item Help | Get Machine ID for Registration.
A dialog is displayed, providing your PC's name and the ID. You can either write both down or use the
[Copy to Clipboard] button and paste the information into an email or other document. Provide this
information to your vendor to obtain the registration key.
XStudio Machine ID Dialog
© Copyright 2003-2015 C-R Media All Rights Reserved.
Appendices
295
Registering XStudio
Register XStudio by selecting Help | Register from the main menu. You'll be presented with a dialog
similar to the following:
XStudio Registration Dialog
Enter the company name and/or call letters in the "Licensed To" field. Then, enter the code you were
supplied with in the "Registration Code" field. If you received the registration code electronically, you
may use standard Windows cut and paste methods to paste the code in the field. After entering the
information, click on the [Save] button to save the information.
After you have completed registration initially, if you redisplay this dialog, your registration specifics will
be displayed in the Registration Information panel. You can also see your registration information in the
About dialog from XStudio's main menu.
If you wish to change your company name and/or call letters at a later date, you
will need to re-enter the registration code.
apt-X Encoder Registration (Optional Product)
If you have the apt-X encoder software installed with a product, you must register this software module
separately. The encoder software is machine-specific. This software can only be registered after it’s
installed on the PC.
When first installed, the apt-X encoder will pop up a trial run dialog when the host application is run.
The dialog includes the option to register the software. The dialog will be similar in appearance to the
sample below:
© Copyright 2003-2015 C-R Media All Rights Reserved.
296
XStudio 3
To get the registration process started, copy both the MID and Site Code information displayed on the
trial dialog. You can use a mouse to select and copy each of the two codes to the Windows clipboard,
if you wish, to avoid handwriting the information.
Both the MID and Site Code need to be sent to your supplier so the registration unlock code can be
generated.
The apt-X registration dialog normally closes after several seconds if no action
is taken by the user. To keep the dialog from closing while you copy down the
needed information, select the "Unlock Application" radio button, which
prevents the dialog from closing.
Soft apt-X™ Registration Step-by-Step
1. To register, select the “Unlock Application” radio button when the apt-X registration dialog is
displayed. This stops the dialog from disappearing after a few seconds, giving you the time to write
down both the MID Code and the Site Code, which appear across the top of the display.
2. When you have written down both codes, select the “Enter Application” radio button and click on
the [Continue] button.
3. E-mail the Mid Code and Site Code information you’ve written down to your supplier, or
alternatively, use our on-line product-specific contact form. To better identify your request, write
“Soft apt-X Registration” in the Subject line of your e-mail.
4. You will receive by return e-mail the necessary Init Code to register the apt-X software. You will
also receive a Remove Code, which may be needed at a later time. Be sure to keep both of these
© Copyright 2003-2015 C-R Media All Rights Reserved.
Appendices
297
codes for future use.
5. When you receive the Init Code, launch the application that uses the apt-X software. The apt-X
dialog will again appear. Select the “Unlock Application” radio button and enter the Init Code you
received. Click on the [Continue] button. The registration information is recorded and the apt-X
software is now registered.
If you decide to move the software that uses apt-X and the apt-X encoder
software to another machine or substantial changes occur on the PC running
with the apt-X software, the apt-X registration will have to transferred or
updated. In order to do so, you will need the Remove Code. Be sure you have
saved both the Init Code and the Remove Code in a safe place!
© Copyright 2003-2015 C-R Media All Rights Reserved.
298
8.2
XStudio 3
System Backup and Restore
As XStudio is running, a significant number of database tables, preference and settings files are being
created, updated and maintained. These files contain the key elements of your system setup and
operating information. As such, a total loss of some or all of the files - as might occur if the host PC
fails - can leave you with the formidable task of rebuilding your system configuration manually.
To help prevent having to rebuild the system from scratch, XStudio has a task (System Backup) that
can be executed on a manual or scheduled basis (just like any other XStudio task). The backup
operation occurs in the background and does not affect XStudio operations.
When executed, the XStudio system database tables are backed up to a target location defined in the
task. Optionally, XStudio preference and settings files, including hot button configuration files, can be
backed up. The task also has a option to zip the backed-up files to save disk storage space.
Setting Up a System Backup
Setting up a system backup is fairly simple. There are just a few basic steps:
1. Create a System Backup task. A key property of the task is the Backup Target Folder - the
location where backed-up files will be placed. The files could be located on the XStudio PC,
but a better choice might be a server on your local area network (LAN). That way, if the
XStudio PC fails, you will still have access to the backup files.
2. Create an XStudio Action that contains the System Backup task.
3. Determine when and how you want the backup Action to execute. To have the backup
execute on a regularly-scheduled basis, you could create a Scheduled Event and decide
what day(s) of the week and time to perform the backup. Typically, a good time to do a
backup is sometime overnight like 3:20 AM. If you are located in a time zone that uses
Daylight Savings Time, avoid the 1:00 AM to 3:00 AM time period to prevent either doubling
up or skipping of a scheduled backup.
You can perform a backup on-demand by assigning the backup Action to a hot button.
What is Backed Up?
When a system backup is performed, XStudio system database files are always backed up. For
additional information on the database tables that are backed up, see the Database Reference topic.
Audio inventory database files are not backed up when doing a system backup.
The audio inventory database is automatically maintained by XStudio and will
be rebuilt automatically if needed.
If the "backup non-database system files option" is enabled, the following file types are backed up from
the XStudio application folder only:
1. Preference files. These files have a file extension of ".ini" and include the main XStudio
preferences file (XStudio.ini), which contains your registration information, and the audio
engine preferences file. For details on information contained in the XStudio.ini file, see the
topic Preferences File Documentation.
2. Settings files. These files have a file extension of ".dat" and include music dialog settings
and Cart Wall settings.
3. Log display and cart mask configuration files you may have saved. These files have a file
extension of ".?cf".
© Copyright 2003-2015 C-R Media All Rights Reserved.
Appendices
299
4. Hot button file sets. These files have a file extension of ".btn".
5. Exported station information files. These files have a file extension of ".stns".
Refer to the List of Files topic for details on specific file names in this group of file types.
When backing up non-database systems files, only those files located in the
XStudio application folder are backed up. For instance, if you have placed hot
button files in another location, they will not be backed up.
Restoring Backed-Up Files
Restoring backed-up XStudio system database and/or settings files is a manual
process. XStudio must not be running at the time you restore any of the
backed-up files or your restoration of files will fail. In most cases, when
restoring backed-up files you will be overwriting an existing XStudio file of the
same name.
To restore some or all of the backed-up files, locate the folder in which the backup data is stored. If
your backup was configured for daily backups, you may have as many as seven (7) sets of backup
files, one for each day of the week. The daily backup sets are located in individual folders under the
base backup folder. If you have multiple backups, you will need to decide which group of files to use,
typically the most recent.
Backup files may have been zipped to a single file as part of the backup task (if so configured). You
need to have a utility to unzip the backup. Recent Windows operating systems typically have support
for zip files built-in, but you may wish to use another utility if you have a preference. If the backup you
wish to use is zipped, you should unzip the files to a temporary location as an initial step.
Backup files are grouped together without regard to the folder location they originated from and fall into
two (2) categories; a) database files, and b) preference and settings files. Database files will always be
present in a backup while the preference and settings files are optionally included when you create the
System Backup task. The two groups of files are handled differently in the restore process, as outlined
in the following sections.
Restoring System Database Files
System database files all have a file extension of ".nx1". As a general rule, database files should be
restored as a complete set of files as most files are tables that are related to one another (a relational
database). Further, XStudio will fail to operate correctly if a partial set of database files is present at
launch of the program. See the Database Reference topic for a list of the files that make up the system
database.
Restoring the database files is a matter of copying all of them to the XStudio system database folder.
Typically, this is a folder named "Data" located under the XStudio application folder. During the copy
process, it is likely you will be overwriting files that already exist in the folder, replacing the contents
with the backed-up content.
There are two (2) database files that can be restored individually if needed.
They are "Music.nx1" (the imported music database) and "LogData.nx1" (an
archive of log snapshots and log changes). These tables are not related to any
other tables in the system database and can thus be safely restored individually
if needed.
© Copyright 2003-2015 C-R Media All Rights Reserved.
300
XStudio 3
Restoring Preference and Settings Files
All backed-up preference and settings files originated from the XStudio application folder and must be
restored to that same folder. The application folder is determined by the user during the installation of
XStudio.
Backed-up preference and settings files are not interrelated, so you can selectively restore these files
depending on your needs. See the section on what is backed up for information on each of the file
types that are a part of this group.
Using a Backup to Clone XStudio
If you are in the process of installing XStudio in multiple control rooms or are adding another XStudio to
your operation, you may wish to use an XStudio backup to speed up the process of setup. This might
be desirable if you have created a large number of Tasks and Actions and want to do the same things
in another XStudio installation. The steps to take are as follows:
1. Install and launch XStudio on your new control room PC. At first launch, XStudio will
automatically create a new system database. Initially, all database tables are empty.
2. Close down XStudio.
3. Copy all but two (2) of the backup system database files to your new installation's "Data"
folder. The files to exclude are "Music.nx1" and "LogData.nx1". The effect of this step is to
have all defined Tasks, Actions, scheduled events and audio switcher definitions from the
backup now a part of the new system. You skip the two files mentioned because it's likely
you'd be using different music for the new system and you'd want the archive of log
snapshots and changes to be empty to start.
4. Optionally, copy selected preference and settings files to the new installation's application
folder. Refer to to the what is backed up section for information on which files you might
want to use.
5. Restart XStudio, register the software and complete the system setup.
© Copyright 2003-2015 C-R Media All Rights Reserved.
Appendices
8.3
301
Remote Start Interface
If you wish to use the remote starts feature of XStudio, you need to have an available game port
(joystick port) on the PC on which XStudio is running. Furthermore, you will need to wire a connector
using the diagram provided here. XStudio uses the associated buttons 1, 2, 3 and optionally, 4, to
remote start carts in its respective cart decks (Deck 1, Deck 2, Deck 3, Deck 4). The push buttons
used could be either a console remote start or a custom-made set of normally open push buttons.
Button 4 can be used for triggering an action that executes in case of an emergency (the default) or for
Deck 4 remote start. The button 4 usage is determined in Preferences.
Set Game Port to 2-axis, 4 button
You need to be sure that the game port on the XStudio PC is enabled and set to 2-axis, 4-button
operation. You may need to install the joystick port driver.
© Copyright 2003-2015 C-R Media All Rights Reserved.
302
8.4
XStudio 3
Companion Programs & Utilities
In addition to the core functionality for audio playback that XStudio provides, there are a number of
separate software programs and utilities available for use with XStudio. These programs offer
functionality that may or may not be required by a particular station operation; thus they are made
available separately so a station can pick and choose only the additions that are needed.
Available software is listed alphabetically along with a brief description of functionality and usage.
Complete information on these programs is available at our web site.
Product/Utility
Description/Usage
crWebBB
A web billboard posting and RDS/RBDS message encoder. It is
used to generate song title and artist information, along with
optional custom messages, for use in posting "What's Playing
Now" information to the web or transmitting that information to an
RDS encoder.
dcsTools Utility Pack
Free utility programs for review and analysis of XStudio and
other dcsTools products' event log files, along with an ini file
editor.
ezSuite,
ezAudit,
ezEdit
These programs provide log creation and editing along with audit
reporting and log reconcile, depending on the specific product. It
might be desirable to be able to edit a log at a user's desktop
rather than in-studio, for instance. Audit reporting is useful in
determining what actually happened during a broadcast day.
iDAF
A utility for analyzing and reporting audio inventory information.
LogMerge
A utility for merging (combining) separate traffic and music logs
generated by most popular radio traffic and music scheduling
systems. LogMerge includes instructions on setting up source
log exports for most popular music scheduling and traffic
systems.
rcServer
A utility that converts serial remote control data from a DCS or
Maestro system to TCP/IP for use when XStudio is controlling
the DCS or Maestro.
XChange
A desktop file conversion utility that converts .WAV, .MP2 and
.MP3 audio files to .DAF files for use with XStudio.
XStudio Admin
A free utility for maintaining the automation database remotely.
XPlay
A desktop .DAF audio player suitable for use in auditioning audio
for customers or internal use.
XStudio Recorder
An auto-recorder used to capture program content for use with
XStudio, DCS™ and Maestro™ systems. Automatic recordings
can be initiated by a relay received from the program service or
they can be scheduled using XStudio Recorder's built-in event
scheduling system.
XStudio Voice Tracker
A utility for creating "voice tracks" for automated programming.
Features either rehearsed or cold tracking for multiple stations.
Can be used locally or from a remote site.
© Copyright 2003-2015 C-R Media All Rights Reserved.
Appendices
8.5
303
Using XStudio with DCS or Maestro
XStudio can be used to control a host DCS or Maestro system via these products' serial remote control
interface. The effect of such a configuration is that the DCS or Maestro unit becomes the XStudio
audio engine, replacing the use of the standard XEngine audio engine.
XStudio uses TCP/IP to communicate with the host audio engine and both DCS and Maestro use serial
data. To convert TCP/IP to serial and vice versa, dcsTools' rcServer is used. rcServer essentially
converts the data both ways and once installed and set up, the process is transparent to both XStudio
and the host DCS or Maestro. Visit our web site for more information on rcServer.
When you are using a DCS or Maestro as the host audio engine, playback
channel 1 on the host unit will be used for log playback and channels 2 and 3
map to the DCS or Maestro channels of the same number, as applicable. Note
that not all DCS and Maestro units have three discrete audio channels
available. If the host unit has just two, only Decks 1 and 2 will be functional.
For instructions on configuring the DCS or Maestro serial port for remote control, refer to the product
documentation or to the rcServer documentation, which also explains how to set these systems up for
remote control.
© Copyright 2003-2015 C-R Media All Rights Reserved.
304
8.6
XStudio 3
List of Files
When XStudio is installed, a number of files are placed on your computer. As XStudio is used, other
files are generated, as outlined in this topic.
Long file names are word-wrapped to a second line to save space. References
to folder locations on your system are abbreviated, as follows:
Abbreviation
Folder Location
AppDir
= The application folder where XStudio was installed.
LogDir
= A given station's source log folder.
XStudio Core Files
These are the files that are placed on your system when XStudio is installed, listed alphabetically.
File Name
Location
Description
_XStudio_Default_Log_
Display_Colors.lcf
AppDir
A file containing the default color
combinations used for non-audio log item
display. This file can be imported to restore
default settings. See the User Interface
Settings section on Importing & Exporting
Font and Color Information.
_XStudio_Sample_
CartCategories.ccf
AppDir
A sample file containing cart masks and
color combinations. Can be used as a basis
for creating your own Cart Categories.
_XStudio_Sample_Log_
Display_Properties.lcf
AppDir
A sample file containing an alternate color
combination set for non-audio log item
display. See the User Interface Settings
section on Importing & Exporting Font and
Color Information.
aptX100.dll
AppDir
apt-X decoding module. Installed only if
apt-X option is selected.
mmmpeg32.dll
AppDir
MPEG decoding module.
pcgw32.dll
AppDir
apt-X decoding support module. Installed
only if apt-X option is selected.
XEngine.cnt
AppDir
The XEngine help contents file.
XEngine.exe
AppDir
The XEngine program.
XEngine.hlp
AppDir
The XEngine help file.
XStudio.chm
AppDir
The XStudio help file.
XStudio.exe
AppDir
The XStudio program.
© Copyright 2003-2015 C-R Media All Rights Reserved.
Appendices
305
Files Created by XStudio
These files are created and maintained by XStudio as a part of daily operations or as a result of
updates to the software.
File Name
Location
Description
_Pending_AR.dat
AppDir
A data file containing pending audit
records. This file is created when XStudio
is closed and there are items that have not
yet completed playback.
yyyymmdd_InvMgr_EventLog.txt AppDir
Daily Inventory Manager event log file. As
a default, a rolling 14 days are retained.
See the topic on Using Application Event
Logs for additional information.
yyyymmdd_InvMgr_MaintThread
_EventLog.txt
Daily Inventory Manager maintenance
thread event file. As a default, a rolling 14
days are retained. See the topic on Using
Application Event Logs for additional
information.
yyyymmdd_XEngine_EventLog. AppDir
dmp
Daily XEngine event log file. As a default, a
rolling 14 days are retained. See the topic
on Using Application Event Logs for
additional information.
yyyymmdd_XStudio_
EventLog.Txt
AppDir
Daily XStudio event log file. As a default, a
rolling 14 days are retained. See the topic
on Using Application Event Logs for
additional information.
Backup_
yyyy-mm-dd-hh-mm-ss
FOLDER
During a software update, folders with this
naming convention may be created. The
folders contain backups of all files prior to
the update, including files in folders located
under the main installation directory. In
most cases, the user is prompted whether
or not to backup before proceeding with an
update.
cminvXS.dat
AppDir
If XStudio is automatically generating its
own inventory information, this file contains
the inventory data.
dxMusicSearchSettings.dat
AppDir
Music Search Dialog settings file.
MusicImport_EventLog.Txt
AppDir
If music data (song title and artist) is
imported into XStudio, this file contains
information on the import status, including
records that failed to import.
XEngine.ini
AppDir
The XEngine preferences file. Settings are
automatically maintained by XStudio.
xsBtnBarSettings.dat
AppDir
Cart Wall dialog settings file.
xsHotButtons.btn
AppDir
The default Cart Wall button file.
© Copyright 2003-2015 C-R Media All Rights Reserved.
306
XStudio 3
File Name
Location
Description
XStudio.ini
AppDir
The XStudio preferences file.
Actions.nx1
AppDir\Data
The Actions table.
Events.nx1
AppDir\Data
The Scheduled Events table.
ExtDevices.nx1
AppDir\Data
The external devices (audio switcher) table.
LogData.nx1
AppDir\Data
The Log Data table containing log snapshot
and splice information.
Music.nx1
AppDir\Data
The Music table containing song title and
artist information.
nxTrans.cfg
AppDir\Data
A database transaction tracking file.
Tasks.nx1
AppDir\Data
The Tasks table.
WrkStns.nx1
AppDir\Data
The Work Stations table.
xsSysData.nx1
AppDir\Data
System Data table.
$SQL$xxxx.nx1
AppDir\InvData Inventory Database SQL system files.
InvData.nx1
AppDir\InvData Inventory Database audio inventory table.
SysData.nx1
AppDir\InvData Inventory Database System Data table.
Database Files
Audit/Log Files
mmddyyxx.adt
LogDir
Audit data files, one for each log date for
each station. XStudio automatically creates
and maintains these files. The file naming
convention matches the log file name for
the date with the exception that the
extension is .ADT.
mmddyyxx.log
LogDir
Log (program schedule) files. These files
may be created using XStudio, but are
generally created by another application.
See the Generic Log File Specification
topic for details on file naming conventions
and file structure.
AppDir
User-defined hot button sets (files) for use
with Cart Wall.
*.ccf
AppDir
Cart Category Files. Files with this
extension are created when a user exports
cart categories from Preferences.
*.lcf
AppDir
Log Color Files. Files with this extension
are created when a user exports log colors
and font information from Preferences.
Hot Button File Sets
*.btn
Miscellaneous Files
© Copyright 2003-2015 C-R Media All Rights Reserved.
Appendices
307
File Name
Location
Description
*.stns
AppDir
Station info files. Files with this extension
are created when a user exports station
information from Preferences.
Some XStudio installations include additional documentation files. These files
are typically PDF files and are placed in the application folder. Additional
documentation files may include an on-disk Operations Manual and Quick Start
Guide.
© Copyright 2003-2015 C-R Media All Rights Reserved.
308
8.7
XStudio 3
Preferences File Documentation
XStudio application settings are stored in a file named XStudio.ini, a Windows ini file. The settings are
maintained automatically. However, should you for some reason need to make manual changes to
XStudio settings, you can open the settings file using Notepad or some other editor that works with
standard text files or is especially used for Windows ini files.
The following information documents XStudio ini file sections and parameters (Key/Value pairs). Refer
to the Ini File Structure section for information on ini file structures in general. Sections and property
names are listed alphabetically but typically will not appear in the file in the order listed.
[AdminUI] Section
Property
Description
FormState
Automation Setup dialog form state.
Height
Height of the Automation Setup dialog.
Left
The left side position of the Automation Setup dialog.
MonitorNum
The target monitor number on which the Automation Setup
dialog is displayed.
Top
The top position of the Automation Setup dialog.
Width
The width of the Automation Setup dialog.
[AudioPrefs] Section
Property
Description
AutoSegue
The state of the [Auto] button when XStudio is exited.
When restarted, the state at exit is restored but may be
overridden based on other saved settings.
Deck2LogEnable
Determines at startup whether Deck 2 uses the log or audio
clipboard as a playback source.
Deck3LogEnable
Determines at startup whether Deck 3 uses the log or audio
clipboard as a playback source.
Deck4LogEnable
Determines at startup whether Deck 4 uses the log or audio
clipboard as a playback source.
PlayThruDirectives
Determines whether XStudio will play through Directives on
a log or stop automatic sequencing when a Directive is
encountered. This setting may be overridden based on
other saved settings.
QueueWidth
The display width, in pixels, of the audio clipboard.
ShowDayTabs
Determines whether the Today and Tomorrow tabs are
visible to enable toggling between the log for today's date
and the log for tomorrow's date.
ShowDeck2
Determines whether playback deck 2 is visible.
ShowDeck3
Determines whether playback deck 3 is visible.
© Copyright 2003-2015 C-R Media All Rights Reserved.
Appendices
Property
Description
ShowDeck4
Determines whether playback deck 4 is visible.
ShowQueue2
Determines whether the audio clipboard is visible.
WrapLog
Determines whether or not XStudio will replay the current
log if the end of the log is reached. This setting is
overridden based on the current operating mode.
309
[Bxxx] Sections
These sections contain configuration information for hot buttons. There is a section for each button,
with the xxx indicating the button number.
Property
Description
ActionID
The id number of an action if the button is assigned to
execute an Action.
ActionType
If a button is assigned to execute an Action, determines
whether the type of action is an XStudio Action or a DCS/
Maestro function.
BGColor
The button's displayed background color.
Caption
The text that appears on the button.
CartNo
The text of the cart number to play or function name to
execute.
FGColor
The button's text color.
IsFunction
Determines whether the button is a playback assignment or
Action execution.
PlayChannel
If the button is assigned to play an audio cart, designates
the playback channel.
[BLF] Section
This section contains information regarding the opening and saving of binary log files. Binary versions
of the on-air log can be opened and saved to disk in the Automation Setup | Log Data area. See the
topic covering the Log Status Dialog for additional information.
Property
Description
LastOpenFolder
Stores the last folder location from which a binary log file
was opened.
LastSaveFolder
Stores the last folder location to which a binary log file was
saved.
[Cart Masks] Section
This section contains the specifics on defined Cart Categories, which are used in displayed log colors
and for filtering cart numbers (audio files).
© Copyright 2003-2015 C-R Media All Rights Reserved.
310
XStudio 3
Property
Description
Count
The number of defined cart categories
BkColorxx
The background color that will used on the log for carts
matching the category.
Colorxx
The text color that will be used on the log for carts
matching the category.
Masksxx
A comma-separated list of cart masks that comprise the
category.
Namexx
The user-assigned name of the category. The name is
used to identify the category when displayed in drop-down
lists.
[ClockDlg] Section
This section contains settings associated with the XStudio clock dialog, including size, position and
colors.
Property
Description
BackTimeShow
Determines whether or not the back-time status information
will be displayed.
BackTimeTextSize
The font size of the back-time status text.
BGColor
The background color for the clock.
Left
The left side position of the clock on-screen.
MilTime
Determines whether the time is displayed as military time
(24-hour clock) or standard AM/PM time (12-hour clock).
MonitorNum
The monitor number on which the clock was last displayed.
ShowClock
If True, the clock is displayed on-screen.
TextColor
The text color for the time display.
TextSize
The font size of the displayed time.
Top
The top position of the clock on-screen.
[Colors] Section
This section contains settings for the background and text colors of non-audio log items and display
font settings for the log. Also included are display colors for inventory list items for expired and futuredated carts. These properties are maintained in Preferences | User Interface.
Property
Description
DirectiveBG
Background color of Directive log items.
DirectiveFG
Text color of Directive log items.
ExpBG
Background color of expired carts in inventory lists.
© Copyright 2003-2015 C-R Media All Rights Reserved.
Appendices
Property
Description
ExpFG
Text color of expired carts in inventory lists.
FutBG
Background color of future-dated carts in inventory lists.
FutFG
Text color of future-dated carts in inventory lists.
LogFontBold
If True, all text on the log is displayed as bold.
LogFontName
The name of the font used in the log display.
LogFontSize
The log text size.
LogNoteBG
Background color of Log Note log items.
LogNoteFG
Text color of Log Note log items.
ProbCartBG
Background color of "problem cart" log items - items
missing or out-of-date.
ProbCartBold
If True, all "problem carts" are displayed in bold text.
ProbCartFG
Text color of "problem cart" log items - items missing or
out-of-date.
ProgTitleBG
Background color of Program Title log items.
ProgTitleFG
Text color of Log Note log items.
311
[CountDownClock01] Section
This section contains settings associated with the XStudio intro countdown timer dialog, including
position and behavior.
Property
Description
Enabled
If True, the intro countdown clock is used where applicable.
HideInactive
If True, the intro countdown clock is displayed only when in
use, actively counting down an intro time. All other times, it
is hidden.
Left
The left side position of the intro countdown clock onscreen.
MonitorNum
The monitor number on which the intro countdown clock
was last displayed.
TextSize
The font size of the displayed countdown time.
Top
The top position of the countdown clock on-screen.
wasVisible
If True, the intro countdown timer was visible when XStudio
was last closed and will be restored that way when XStudio
is next started.
[Database] Section
This section contains database parameters, including whether the database is local or remote and
access properties. These properties are maintained in Preferences | General.
© Copyright 2003-2015 C-R Media All Rights Reserved.
312
XStudio 3
Property
Description
AllowRemoteConnections
If True, a local database can be administered remotely.
ClientDataCompression
If the database is remote, this value determines the level of
data compression used when communicating with the
remote database server.
DefRemSrvrPassword
The password, if required, used to login to a remote
database server. The password value is encrypted.
DefRemSrvrUserName
The user name, if required, used to login to a remote
database server.
DefRemoteServer
The name and IP address of the default remote server, if
applicable.
DefRemoteServerCompression Data compression setting for the default remote server.
The default is no compression.
DefRemoteServerPort
The port number to use when connecting to the default
remote server.
DefRemSrvrIsSecure
If True, the default remote server is using a secure (data
scrambled) TCP connection.
DefRemSrvrSecureKey
If DefRemSrvrIsSecure (above) is True, this key contains
the security key required to make a secured connection.
The key value is encrypted.
LocalDBPath
Fully-qualified path to the local database, if applicable.
LocalServerName
A user-assigned name to the local database server within
XStudio. It is used to identify a XStudio installation.
LocalServerPort
If AllowRemoteConnections is True, the port number on
which to allow remote connections.
TempStoragePath
Fully-qualified path for temporary storage used by the
XStudio built-in database engine.
UseRemoteServer
If True, XStudio will attempt to connect to a remote
database server at startup, beginning with the default
server designated in this section.
[DBServerList] Section
If multiple remote database servers are defined, this section contains a list of the defined servers.
These properties are maintained via Database Server List Maintenance.
Property
Description
RemSrvrCompression_xx
Data compression setting for the remote server. The
default is no compression.
RemSrvrIsSecure_xx
True if the server uses a secure (scrambled) TCP
connection.
RemSrvrPassword_xx
The remote server password, if required. This value is
encrypted.
© Copyright 2003-2015 C-R Media All Rights Reserved.
Appendices
313
Property
Description
RemSrvrSecureKey_xx
The remote server security key, if applicable. This value is
encrypted.
RemSrvrUserName_xx
The remote server user name, if required.
RemoteServer_xx
The remote server name and IP address.
RemoteServerPort_xx
The remote server port number.
ServerCount
The count of defined remote servers.
[dxMusicSearchDlg_MRU] Section
This section contains properties associated with the most recent searches conducted in the Music
Search Dialog.
Property
Description
Count
The number recent searches recorded.
ST_xx
The search text used.
[dxMusicSearchDlg_UI] Section
This section contains properties associated with the Music Search Dialog. Additional properties relating
to the display grid, such as column order and width, are stored in a separate file. See the List of Files
topic for the associated file name.
Property
Description
BackwardSearch
If True, searches are in reverse (before current record).
Default is False.
FieldIdx
The index of the column last used for searches.
Height
The height of the Music Search Dialog.
Left
The left-edge position of the Music Search Dialog (in
pixels).
MonitorNum
The monitor number on which the Music Search Dialog is
displayed.
SearchAnyWhere
If True, music searches look for matching data anywhere in
the field. If False, searches look for matching characters at
the beginning of the field.
SearchText
The text last used for a search.
Top
The top-edge position of the Music Search Dialog.
Width
The width (in pixels) of the Music Search Dialog.
[ExternalControl] Section
This section contains properties associated with the external control port. See the section on setting
© Copyright 2003-2015 C-R Media All Rights Reserved.
314
XStudio 3
up External Control Port properties for additional information.
Property
Description
BaudRate
The COM port baud rate for the external control port.
COMPort
The COM port number used for external control.
Enabled
If True, the external control COM port is opened and
available for use by Tasks that send data via this port.
[FileViewDlg] Section
A number of text file viewing dialogs use the properties in this section. Examples include the
application event log, source traffic log viewer and current system properties viewer. The properties
control how searches are executed within the viewer.
Property
Description
CaseSensitive
If True, searches are case-sensitive.
GlobalSearch
If True, searches are global instead of beginning from the
current cursor position.
SearchBackwards
If True, searches work backwards from the current cursor
position.
SearchStr
The last text used for a search.
ShowSearch
If True, the viewer's built-in search controls are displayed.
[General] Section
This section contains general XStudio settings and properties, including registration information.
Property
Description
AudioSwitcher
The unique ID number of XStudio's assigned audio
switcher. The value is zero if a switcher is not assigned.
AudioSwitcherName
The user-entered audio switcher description.
AutoSegueAutoEnable
If True, when a user starts playing audio from the log on
channel 1, the [Auto] button (auto-segue button) will
automatically be enabled if the user had temporarily
disabled auto-segue for some reason.
DefaultMode
The default XStudio operating mode, expressed as a
number.
DefaultStation
The name of the default station, if defined.
DefaultStationGUID
The unique ID of the default station, if defined.
EmergencyActionID
The unique ID number of an Action that will be used in
Emergency mode as a response to triggering the
"emergency relay" in XStudio, which is a part of the remote
start interface. The value is zero if an Action is not
© Copyright 2003-2015 C-R Media All Rights Reserved.
Appendices
Property
315
Description
assigned.
EmergencyActionName
The user-entered name of the defined emergency Action.
EventLogDetail
The default level of detail that will be kept in the XStudio
application event log, expressed as a number.
LengthCheck
When validating a log, this value determines the allowable
variance between the logged length and the actual length
of an audio cart.
Licensed To
The name of the person or business to whom XStudio is
licensed.
LoadLogAtStartup
If True, XStudio will attempt to load the today-dated log for
the defined default station.
PlayLogOnStart
If True, XStudio will begin playing the log after starting up,
beginning with the element closest to current time. This
setting is ignored if the startup operating mode is Satellite.
Registration
The registration key for XStudio.
SecEnb
If True, users must enter a password to access and change
property settings in Preferences.
SecPwd
If security is enabled for access to Preferences, this value
is the password in encrypted form.
StartupActionID
The unique ID of the Action to be performed at system
startup, if assigned. The value is zero if an Action is not
assigned.
StartupActionName
The user-assigned name of the Action that is performed at
startup, if assigned.
StartAudioEngine
If True, XStudio will check to see if XEngine is running at
start-up. If not, XStudio will attempt to start XEngine.
[HotButtonDialog]
This section contains settings for the XStudio Cart Wall and hot buttons, including default button colors
and default playback deck.
Property
Description
ButtonFile
The current default button configuration file. This file will be
loaded at program startup, if applicable.
Default_Btn_BG_Color
The default hot button background color.
Default_Btn_FG_Color
The default hot button foreground (text) color.
Default_Deck
The default playback deck for hot buttons. This value is
used whenever a button is being set up and was previously
not configured.
Enabled
If True, the Cart Wall dialog is initialized at system startup
© Copyright 2003-2015 C-R Media All Rights Reserved.
316
XStudio 3
Property
Description
and is displayed or hidden based on user preference.
Height
The height of the XStudio Cart Wall window.
Last_Btn_BG_Color
The last background color used when configuring a hot
button, if different from the default background color.
Last_Btn_FG_Color
The last foreground (text) color used when configuring a
hot button, if different from the default foreground color.
LastFolder
The last folder used to open a hot button configuration file.
Left
The left-edge position of the Cart Wall window.
MonitorNum
The monitor number on which the Cart Wall dialog is
displayed. This value is saved when XStudio is closed and
restored the next time it is launched.
Top
The top-edge position of the Cart Wall window.
wasVisible
If True, the Cart Wall was visible when XStudio was last
closed and will be restored that way when XStudio is next
started.
Width
The width (in pixels) of the Cart Wall window.
[HotButtonMRU]
This section contains a list of the most-recently-used hot button configuration files.
Property
Description
Count
The count of recently-used button files contained in this
section.
MRUxx
The fully-qualified path and file name of a recently-used hot
button configuration file.
[InvMgrDatabase]
This section contains properties for the Inventory Manager Database.
Property
Description
AllowRemoteConnections
If True, InvMgr-aware applications can utilize data
contained in the Inventory Manager Database.
LocalServerName
If remote connections to the Inventory Manager Database
are allowed, the name by which the database will be
identified.
LocalServerPort
The port number that InvMgr-aware applications will user to
connect to the database.
© Copyright 2003-2015 C-R Media All Rights Reserved.
Appendices
317
[LogSearchDlg] Section
This section controls default or last-used properties for searching the log.
Property
Description
Type
The last search type performed (cart number or
description), expressed as a number.
[LogSearchMRU] Section
This section contains property settings for the search dialog used when reviewing log snapshots.
Property
Description
BackwardSearch
If True, searches will proceed backwards from the current
log item.
Count
The count of the number of most-recently-used search
items.
FieldIdx
The field index of the column most recently searched.
LookFor
The current search text
STxx
Recently used search text.
SearchAnywhere
If True, the searched text can be anywhere in the field. If
False, a match is looked for only at the beginning of the
field.
[MainTableColMap] and [TomorrowTableColMap] Sections
These sections contain the display column order and widths for the current and next-day logs. See the
topic on Changing Log Appearance for more information.
Property
Description
Count
The number of columns displayed on the log.
CCxx
The caption for the column
CHxx
If True, the column is hidden from the user's view.
CNxx
The unique column ID, which identifies the what is
displayed in the column.
CWxx
The width of the column, in pixels.
[MainUI] Section
This section contains properties that control the size, location and appearance of the XStudio main
display.
© Copyright 2003-2015 C-R Media All Rights Reserved.
318
XStudio 3
Property
Description
CopyLogDescToTitle
If True, the contents of the Description field of non-music
items on the log are copied to the Title field in order to
enable hiding the standard Description field.
CopyInvDescToLogDesc
If True, the Description field of non-music items on the log
use the matching cart's inventory description instead of the
original log record's description.
CopyInvLenToLogLen
If True, the Length field on the uses the matching cart's
inventory AuxMark length instead of the original log value.
Height
The height of the XStudio main display.
HoursFontSize
The font size of the contents of the Hour Totals list on the
main display.
HoursSplit
The location of the splitter between the Hour Totals/Hot
Buttons controls and the log. This value determines the
width of the controls.
InvDblClick
If True, [Double-Click] on an inventory list item causes
immediate playback.
InvFontName
The name of the font used in the main inventory list.
InvFontSize
The main inventory list text size.
InvSortCol
The index of the field last used for sorting the inventory list.
InvView
The name of the last-used inventory view.
Left
The left-edge position of the main display.
MainSplit
The location of the splitter between the log and inventory
list. This setting determines the relative size of each
control.
MonitorNum
The monitor number on which XStudio is to run. This value
is saved when XStudio is closed and restored the next time
it is launched.
NBLeftPage
This value represents whether the Hour Totals or Hot
Buttons are selected and visible to the user.
ShowAMPMTime
If True, log times are displayed in AM/PM format.
ShowCartStatus
If True, out-of-date and missing carts are highlighted on the
log.
ShowInventory
If True, the inventory list is visible. If False, the list is
hidden.
ShowSpotTimes
Determines the type of spot (cart) time value that is
displayed. See the section on changing the log appearance
for details.
ShowToolBar
If True, the main display tool bar is displayed. If False, it is
hidden.
State
The state of the main display when last closed (normal,
maximized).
© Copyright 2003-2015 C-R Media All Rights Reserved.
Appendices
Property
Description
Top
The top-edge position of the main display.
Width
The width (in pixels) of the main display.
319
[MusicData] Section
This section contains information relating to music database import and export. See the topic on Music
Data for more information.
Property
Description
AutoUpdateAppendRecords
If True, when automatically updating music data, the
source data is appended to existing data. The effect is
records in the database but not in the new source data file
are retained, changed records are updated, and new
records are added to the database.
AutoUpdateEnabled
If True, automatic updates to the music database occur.
AutoUpdateFileName
The fully-qualified name of the source music data file to be
used for automatic music database updates.
AutoUpdateImportType
The source music data type used in automatic music data
updates.
AutoUpdateProperCaseMusic
If True, when the music database has been automatically
updated, the database is scanned and song title and artist
fields are converted to "proper-case". This option is used
when source music data information is all upper-case, for
instance.
LastCMRExportFolder
The last folder used to export music data (song title &
artist) in dcsTools Generic Format (*.CMR).
LastCSVExportFolder
The last folder used to export music data (song title &
artist) in comma-separated values (*.CSV) format.
LastImpFolder
The last folder used to import music data.
LastImpType
The last music data import type.
LastMusicDataUpdate
The date and time of the last music database update,
expressed as Real number. This value is updated when
music is imported manually, automatically or the user edits
database records.
LastMusicSourceFileDate
The date and time stamp of the source music data file last
processed in an automatic update. The value is expressed
as a Real number.
[OpenDlg] Section
This section contains properties relating to Open Log dialog.
© Copyright 2003-2015 C-R Media All Rights Reserved.
320
XStudio 3
Property
Description
EnableDoubleClick
If True, [Double-Click] on a calendar date opens the log
for that date, if present.
[Params] Section
This section contains system parameters and properties relating to audio file handling and inventory
generation. These properties are maintained in Preferences | Audio Properties.
Property
Description
AppLogMaxDays
The number of days to retain XStudio daily application
event logs.
AudioBuffers
The number of audio buffers the audio engine uses during
operation. The default is 30.
CopyCMInvFileTo
A copy of the locally-generated XStudio inventory file is
made to this location, if present.
DCSAudioDir
The primary folder location of audio files.
DCSAudioDir2
The optional secondary (or backup) location of audio files.
DefSiteNames
A comma-separated list of node names used in identifying
cart (audio file) distribution.
EnforceCartDates
If True, XStudio will not play out-of-date audio.
FadeRate
When Music Fade is enabled, the rate of fade. Valid values
are 100 to 32000. Default is 1000. The higher the value, the
faster content is faded.
FileScanInterval
The interval, in seconds, between checks XStudio makes
to see if there have been audio file changes when the
primary audio folder is a network drive.
GenLocalInv
If True, XStudio generates and maintains its own audio
inventory list.
InvCopyNodes
A comma-separated list of node numbers to include when
making a copy of the local inventory to another location.
This setting is for future use and not presently used.
LocalInvNodes
A comma-separated list of node numbers to be included
when generating an inventory list for use within XStudio.
This has the effect of reducing the items displayed to the
end-user.
MasterDACGain
The audio engine master gain. Default value is zero (0).
Allowable range is -60 to +6.
MusicCarts
A comma-separated list of cart masks that comprise the
"Music" cart category. Matching carts (audio files) are faded
at Aux Mark if Music Fade is enabled.
OutPutDevName
The Windows device name of the primary playback
channel (1) for Deck 1.
© Copyright 2003-2015 C-R Media All Rights Reserved.
Appendices
321
Property
Description
OutPutDevName2
The Windows device name of playback channel 2 (Deck 2).
OutPutDevName3
The Windows device name of playback channel 3 (Deck 3).
OutPutDevName4
The Windows device name of playback channel 4 (Deck 4).
OutPutDevice
The Windows device number of the primary playback
channel (channel 1) for Deck 1.
OutPutDevice2
The Windows device number for playback channel 2 (Deck
2).
OutPutDevice3
The Windows device number for playback channel 3 (Deck
3).
OutPutDevice4
The Windows device number for playback channel 4 (Deck
4).
ShowTimeToAuxMark
If True, remaining airplay times are displayed relative to the
Aux Mark instead of the end of audio. When enabled, the
countdown reaches zero on deck displays at the Aux Mark.
The default is False.
SilenceTrim
When True, any silence at the beginning of PCM audio files
is trimmed during playback.
UseFunctionCarts
If True, an Action embedded in a cart is executed at
playback.
UseMusicFade
If True, all carts (audio items) matching the "Music" cart
category are faded at the Aux Mark.
[RemoteStart] Section
This section contains properties that control the XStudio remote start functionality. These properties
are maintained in Preferences | Audio Properties.
Property
Description
Enabled
If True, remote starts are enabled for playback decks and
the emergency action relay. The the Remote Start Interface
topic for details on setting up the hardware for remote
starts.
RSBtn4Usage
Stores the assignment of Button 4 of the Remote Start
Interface. 0 = Emergency Relay, 1 = Remote Start for Deck
4.
RSDebounce
Duration, in milliseconds, that will be used in determining
whether to process a remote start button-press. Prevents
"double-firing".
RSInterval
The remote start polling frequency, in milliseconds.
SuppressRemoteStart
When True, if the playback deck for which the remote start
was pressed is already playing audio and the deck
playback source is the log, the remote start will be
suppressed (ignored). Valid for Live Mode only.
© Copyright 2003-2015 C-R Media All Rights Reserved.
322
XStudio 3
[Stations] Section
This section contains information for Stations defined for program execution in XStudio. Station
information is maintained in Preferences | Stations.
Property
Description
Count
The number of defined stations.
InvFile_xx
If an external audio inventory file is used for a station, this
entry contains the fully-qualified path and file name.
LogPath_xx
The folder location of program logs for the defined station.
StnGUID_xx
The unique ID of the defined station.
StnID_xx
The call letters of the defined station.
StnName_xx
The user-assigned station name. The name is presented in
selection lists where a station needs to be selected.
StnNo_xx
The program log station number for the defined station.
Typically would be a value like "S1".
UseInv_xx
If True, an external inventory file is used for the XStudio
inventory display. This property is automatically overridden
if the Generate and Use Local Inventory property is set
True.
[SwitcherStatusDlg] Section
This section contains properties that control whether or not the audio switcher status window is
displayed and if so, it's on-screen location.
Property
Description
Left
The left-edge location of the audio switcher dialog.
MonitorNum
The monitor on which the audio switcher dialog was last
displayed.
ShowAtStart
If True, the audio switcher status window is displayed when
XStudio starts.
Top
The top-edge location of the audio switcher dialog.
[TCPIP] Section
This section contains properties used in communicating with the XEngine audio engine. These
properties are maintained in Preferences | Audio Properties.
Property
Description
EventLogging
If True, a separate event log is generated and maintained
for communications activities between XStudio and
XEngine.
IPAddress
The IP address of the audio engine (XEngine). If located on
© Copyright 2003-2015 C-R Media All Rights Reserved.
Appendices
Property
Description
the same PC as XStudio, the address is 127.0.0.1.
ListenPort
The TCP/IP port is used for control and response
communications with the audio server engine (XEngine).
UserName
A user-assigned name that identifies XStudio to the host
audio engine.
XfrPort
A TCP/IP port reserved for transferring file data between
XStudio and XEngine and is not presently used. It is for
future expansion.
[ValidateCCCLog] Section
This section contains general properties for Log Validation.
Property
Description
Height
The height of the Log Validation window.
Width
The width of the Log Validation window.
[ValidateColumns.xxxxx] Sections
These sections contain column widths for each of the Log Validation "views".
Property
Description
1..8
The width of the numbered column.
[xsInv.xxxxx] Sections
These sections contain the column widths for each of the main display inventory "views".
Property
Description
0..6
The width of the numbered column.
[xsLogGridExport] Section
This section contains properties about performed logs exported from the Log Status dialog.
Property
Description
ExcelExpandGroups
Determines whether or log data exported to the Excel
format includes hidden grouped information.
ExcelSaveAll
Determines whether all or just selected log records are
exported to Excel format.
HTMLExpandGroups
Determines whether or log data exported to the HTML
format includes hidden grouped information.
© Copyright 2003-2015 C-R Media All Rights Reserved.
323
324
XStudio 3
Property
Description
HTMLSaveAll
Determines whether all or just selected log records are
exported to HTML format.
LastExcelFile
The path and file name of the last file exported to the Excel
format.
LastHTMLFile
The path and file name of the last file exported to the HTML
format.
LastTextFile
The path and file name of the last file exported to the Text
format.
LastXMLFile
The path and file name of the last file exported to the XML
format.
TextExpandGroups
Determines whether or log data exported to the Text format
includes hidden grouped information.
TextSaveAll
Determines whether all or just selected log records are
exported to Text format.
XMLExpandGroups
Determines whether or log data exported to the XML format
includes hidden grouped information.
XMLSaveAll
Determines whether all or just selected log records are
exported to XML format.
[xsMessageBannerI] Section
This section contains properties associated with the XStudio Message Center.
Property
Description
AutoHideOnExpire
If True, the XStudio Message Center automatically hides
when a message expires.
ClientHeight
The height of the Message Center dialog.
ClientWidth
The width (in pixels) of the Message Center dialog.
Left
The left-edge position of the Message Center dialog (in
pixels).
MonitorNum
The monitor number on which the Message Center dialog
is displayed.
Top
The top-edge position of the Message Center dialog.
Ini File Structure Information
For those who might be unfamiliar with the INI file origins and structure, this sections covers some
basics of what INI files are and how they are constructed.
Note: Portions from Wikipedia, the free encyclopedia.
© Copyright 2003-2015 C-R Media All Rights Reserved.
Appendices
325
Definition
An initialization file, or INI file, is a configuration file that contains configuration data for Microsoft
Windows based applications.
Starting with Windows 95, the INI file format was superseded but not entirely replaced by a registry
database in Microsoft operating systems. Recently, XML became a popular choice for encoding
configuration, as well as other kinds of data for many applications, but INI format is still in widespread
use.
Although made popular by Windows, INI files can be used on any system thanks to its flexibility. It
allows a program to store configuration data, which can then be easily parsed and changed.
File Format
A typical INI file might look like this:
[Section1]
; some comment on section1
var1=abc
var2=451
[Section2]
; another comment
var1=123
var2=dfg
Format Elements
The elements of the INI file format:
Sections: Section declarations start with '[' and end with ']' as in [Section1] and [Section2] above.
Parameters: The "var1 = abc" above is an example of a parameter. Parameters are made up of a
key ('var1'), equals sign ('='), and a value ('abc'). For this reason, they are also known as key/value
pairs or simply items.
Comments: All the lines starting with a semicolon (';') are assumed to be comments, and are
ignored.
© Copyright 2003-2015 C-R Media All Rights Reserved.
326
8.8
XStudio 3
Generic Log File Specification
The Generic Log File Specification documents the file naming convention and record structure for logs
created for use with XStudio.
This specification was originally published by Computer Concepts Corporation,
Lenexa, KS in 1989 and updated to version 1.5 in October 1991. The
specification was released to all interested parties, including traffic system
vendors and music scheduling system vendors.
This document (the one you are reading) is referred to as:
dcsTools Generic Log File Specification Version 1.6 (Updated 6/28/2010)
It updates and corrects errors in version 1.5 of the specification published by
Computer Concepts Corporation.
Log File Structure
The Generic Log File is made up of 69-byte records terminated with a Carriage Return (byte 68) and
Line Feed (byte 69).
The first record in the file is an informational record (ID Record) not displayed in XStudio.
All other records include a time field of 4 characters representing military time in hours and minutes, on
which the file is sorted. In addition, Commercial Records contain a seconds value field. The time field,
including the seconds value field where applicable, must be a unique value for each record, in the
range of 00:00:00 to 23:59:59. The log has a maximum of 86,400 records, based on unique time
values with one-second resolution.
The original Computer Concepts specification document indicated that the
maximum number of records for a log file is 1441. While this number is correct
when considering the number of minutes in a day (1440) plus one ID Record, in
reality the actual maximum number of records is 86,400 when you consider
Commercial Records that contain a seconds value.
Each log file represents one (1) day of programming, 24 hours in length, beginning at midnight and
finishing at 11:59:59 PM.
It is not required that a log file contain content for all hours of the day (i.e. records with time fields
starting at midnight and ending at 11:59 PM), but the log must not contain content for more than one
day. As an example, if the station for which the log is prepared operates between 5 AM and 8 PM only,
it is perfectly acceptable that the log file contains content for those hours only.
A typical log, viewed in a standard text editor, might look similar to the example fragment:
I
WXST-FM
D0000LR00300
Load Required Brk
C0000:01T004DIET COKE/Q:Diet Coke!
00059CM
C0000:02T010VERNE & BUBBA'S DONUT
00049CM
C0000:03T110DoubleTree
00058CM
D0020LR00400
Load Required Brk
C0020:01T118Get Well Games
00059CM
C0020:02T120DENTYNE/reg or sugarfree 00029CM
Additional information regarding what the host system expects to see in the finished generic log is
contained in the topic Generic Log Construction Guidelines.
© Copyright 2003-2015 C-R Media All Rights Reserved.
Appendices
327
Log File Name
Log files are named in such a way as to provide for one unique file for each day of each year for each
station. This allows usage of a single file folder location for all stations in a multi-station environment.
Log file names have the form MMDDYYxx.LOG, where:
MM
= Month (01-12)
DD
= Day (01-31)
YY
= Year (00-99)
xx
= Station Number (any 2 characters in 0..9, A..Z)
.LOG = The log file extension
Generic Record Type
All records have a record type value in byte 1 of the record. Bytes 2-67 will vary in format, depending
on the record type. All records terminate with a Carriage Return/Line Feed combination in bytes 68 and
69.
Bytes
Len
Description
Possible Values
01
1
Record Type
B = Blank Line
C = Commercial
D = Directive
I = ID Record
L = Log Note
P = Program Title
02-67
66
< Format depends on record type >
68-69
2
CR/LF
Total
69
Carriage Return/Line Feed
Record Type Conventions
All record types defined are presented in tabular form and include the byte positions for each field,
length of each field, a description of the field and possible values for the field. Here are the conventions
used in documenting record types:
All fields in a record are fixed-length. If the field is not completely filled with information, it
must be padded with space characters (Decimal 32, Hex 20) to the full length of the field to
ensure correct byte alignment. Unless otherwise noted, all fields are left-justified.
In the possible values column, text marked in BOLD are acceptable field vales; all other text
is descriptive in nature.
The terms Blanks and Blank are used in the possible values column to identify fields or
reserved areas of the record that are to be populated with the space character (Decimal 32,
Hex 20).
© Copyright 2003-2015 C-R Media All Rights Reserved.
328
XStudio 3
Original versions of Computer Concepts Corporation documentation specified
some fields should be "padded with nulls," meaning using the null character
(Decimal 0, Hex 00) to fill unused byte positions at the end of the field. Over
time, the accepted method became filling the unused byte positions with the
space character (Decimal 32, Hex 20).
The term Freeform is used in the possible values column to indicate that the field value can
be standard text of your choosing (i.e. freeform) up to the maximum length of the field.
Some fields in the Commercial Record are noted in the possible values column as Filled in
by system or <Not Used>. These fields should be output filled with blanks (Decimal 32,
Hex 20).
8.8.1
ID Record Type
One and only one (1) ID Record must be placed as the first record in a log file.
Bytes
Len
Description
Possible Values
01
1
Record Type
I = ID Record
02-12
11
<Reserved>
Blanks
13-19
7
Station ID
XXXX-XM
20-67
48
<Reserved>
Blanks
68-69
2
CR/LF
Carriage Return/Line Feed
Total
69
© Copyright 2003-2015 C-R Media All Rights Reserved.
Appendices
8.8.2
Commercial Record Type
The commercial record type is used to identify audio items that appear on the log.
Bytes
Len
Description
Possible Values
01
1
Record Type
C = Commercial
02-05
4
Time in HHMM format
0000 - 2359
06-08
3
Seconds in :SS format
:00 - :59 (see Guidelines for additional info)
09-12
4
Cart Number
4 alphanumeric characters
13-36
24
Log Description
Freeform
37-38
2
Commercial Play Priority
Freeform
39-43
5
Length in MMMSS
00000 - 99959 (Right-Justified)
44-47
4
Commercial Type
Has evolved to freeform. Original suggested
types include:
AGR - Agriculture
CM - Commercial
EDIT - Editorial
EDUC - Educational
E - Entertainment
I - Instructional
N - News
O - Other
PA - Public Affairs
POL - Political
PRO - Promotional
PSA - Public Service Ann.
R - Religious
S - Sports
48-53
6
Customer Number
Freeform
54
1
Position Flag
F = 1st in break
L = Last in break
Blank = not fixed
55
1
Make Good Flag
<Not Used>
56-59
4
Product Code
Freeform
60-67
8
Time Aired
<Not Used>
68-69
2
CR/LF
Carriage Return/Line Feed
Total
69
© Copyright 2003-2015 C-R Media All Rights Reserved.
329
330
8.8.3
XStudio 3
Directive Record Type
The directive record type is used to communicate special directions to XStudio, hence the term
"directive". There are six (6) specific directives, each with its own record format.
Base Directive Record Type
The first 7 bytes of a directive record are formatted in three (3) fields, as shown. The remaining 62
bytes differ based on the value of the Directive Type field (bytes 6 & 7).
Bytes
Len
Description
Possible Values
01
1
Record Type
D = Directive
02-05
4
Time in HHMM format
0000 - 2359
06-07
2
Directive Type
CR - Close Relay
LW - Load Window
LP - Load Play Stopset
LR - Load Required Stopset
LS - Load Optional Stopset
PC - Play Cart
08-67
60
Directive Type
dependent
See individual directive types
68-69
2
CR/LF
Carriage Return/Line Feed
Total
69
Close Relay Directive
This type of directive is used to execute an XStudio Action.
Bytes
Len
Description
Possible Values
01
1
Record Type
D = Directive
02-05
4
Time in HHMM format
0000 - 2359
06-07
2
Directive Type
CR - Close Relay
08-11
4
Relay Number
0001-9999
12-31
20
<Reserved>
Blanks
32-61
30
Description
Freeform
62-67
6
<Reserved>
Blanks
68-69
2
CR/LF
Carriage Return/Line Feed
Total
69
Load Window Directive
This directive is used to update the XStudio Current Voice session property.
© Copyright 2003-2015 C-R Media All Rights Reserved.
Appendices
Bytes
Len
Description
Possible Values
01
1
Record Type
D = Directive
02-05
4
Time in HHMM format
0000 - 2359
06-07
2
Directive Type
LW - Load Window
08-11
4
Relay Number
99 (Current Voice)
12-31
20
<Reserved>
Blanks
32-61
30
Description
Freeform
62-67
6
<Reserved>
Blanks
68-69
2
CR/LF
Carriage Return/Line Feed
Total
69
331
Load Stopset Directive
These directive types are the most commonly used of the directives. They are used to mark break
positions and duration. Note there are three (3) types, all with the same record format.
Bytes
Len
Description
Possible Values
01
1
Record Type
D = Directive
02-05
4
Time in HHMM format
0000 - 2359
06-07
2
Directive Type
LP - Load Play Stopset
LR - Load Required Stopset
LS - Load Optional Stopset
08-12
5
Length in MMMSS
00000 - 99959 (Right-Justified)
13-31
19
<Reserved>
Blanks
32-60
29
Description
Freeform
61-67
7
<Reserved>
Blanks
68-69
2
CR/LF
Carriage Return/Line Feed
Total
69
Play Cart Directive
This directive is used to place an audio item in the log that is not normally scheduled by a music or
traffic system.
Bytes
Len
Description
Possible Values
01
1
Record Type
D = Directive
02-05
4
Time in HHMM format
0000 - 2359
© Copyright 2003-2015 C-R Media All Rights Reserved.
332
XStudio 3
Bytes
Len
Description
Possible Values
06-07
2
Directive Type
PC - Play Cart
08-12
5
Length in MMMSS
00000 - 99959 (Right-Justified)
13-16
4
Cart Number
4 alphanumeric characters
17-20
4
Commercial Type
Same as Commercial Record
21-27
7
<Reserved>
Blanks
28-31
4
Product Code
Freeform
32-60
29
Description
Freeform
61-66
6
Customer Number
Freeform
67
1
<Reserved>
Blank
68-69
2
CR/LF
Carriage Return/Line Feed
Total
69
© Copyright 2003-2015 C-R Media All Rights Reserved.
Appendices
8.8.4
333
Program Title Record Type
The program title record type is used to identify programs on the log.
Bytes
8.8.5
Len
Description
Possible Values
01
1
Record Type
P = Program Title
02-05
4
Time in HHMM format
0000 - 2359
06-36
31
Description
Freeform
37-41
5
Length in MMMSS
00000 - 99959 (Right-Justified)
42-43
2
<Reserved>
Blanks
44-47
4
Program Title Type
Same as Commercial Record Commercial Type
48-67
20
<Reserved>
Blanks
68-69
2
CR/LF
Carriage Return/Line Feed
Total
69
Log Note Record Type
As the name implies, the log note record type is used for placing notes on the log.
Bytes
8.8.6
Len
Description
Possible Values
01
1
Record Type
P = Program Title
02-05
4
Time in HHMM format
0000 - 2359
06-29
24
Log Note
Freeform
30-67
38
<Reserved>
Blanks
68-69
2
CR/LF
Carriage Return/Line Feed
Total
69
Blank Record Type
The blank record type was not originally documented by Computer Concepts Corporation. It has been
used, though, since the early 1990's.
Bytes
Len
Description
Possible Values
01
1
Record Type
B = Blank Line
02-67
67
<Reserved>
Blanks
68-69
2
CR/LF
Carriage Return/Line Feed
Total
69
© Copyright 2003-2015 C-R Media All Rights Reserved.
334
8.8.7
XStudio 3
Generic Log Construction Guidelines
In order for the generic log to be properly executed by the host audio system, certain guidelines need
to be followed in constructing and/or exporting the log. This topic provides basic guidelines intended to
ensure that the generic log executes properly on the host system.
The original specification published by Computer Concepts Corporation,
Lenexa, KS, did not include log construction guidelines. This content is provided
to minimize pitfalls that might be encountered in constructing and/or exporting a
generic log for use by the host audio system.
Each Log Must Contain an ID Record
The first record in the generic log file must be an informational record (ID Record) in order to be
considered valid. If the ID Record is not present, the log will not be processed by the host audio
system.
Audio Items (Spots, Music etc) Must be "Anchored"
When loading the generic log, the host audio system uses non-audio log records as anchor points for
the the audio items. Typically, a Directive record type is used, but Program Title and Log Note records
can also be used. The host system groups the audio items following the anchor as a sequence based
on the anchor item's time value. Consider the following fragment of a generic log file:
...
D0020LR00400
Load Required Brk <== "Anchor Point"
C0020:01T118Get Well Games
00059CM
C0020:02T120DENTYNE/reg or sugarfree 00029CM
D0100LR00300
Load Required Brk <== "Anchor Point"
C0100:01T004DIET COKE/Q:Diet Coke!
00059CM
C0100:02T010VERNE & BUBBA'S DONUT
00049CM
C0100:03T110DoubleTree
00058CM
...
As you can see in the fragment, a Directive is scheduled at 00:20 (12:20 AM). The following audio
items (commercials in this case) have the same starting times in terms of hour and minute (12:20 AM)
and contain a seconds value. The two commercials in the example are "anchored" to the Directive.
The next grouping is at 01:00 (1:00 AM). The host system typically creates "spacing" so the visual
representation of the log appears similar to an original paper log document.
This concept of anchoring is particularly important if the host system is running satellite automation.
The Directive "anchors" have the effect of grouping the breaks (stopsets) for playback when the
programming service signals a local breakaway.
In live programming segments, using one of the record types that serves as a content anchor assists in
making the log visualization on the host system easier to use.
Audio Items (Spots, Music etc) Must be Written in One-Second
Increments
While it may be counterintuitive, audio items following an anchor item in the generic log need to be
incremented by one second for each item following the Directive, Program Title or Log Note. The main
reason for this requirement is to maximize the number of elements a log contains.
Since the generic log structure uses the time values as unique record identifiers, incrementing by one
second increases the number of records that can be contained within the generic log substantially.
Review the generic log file fragment to see how this construction appears in the file:
© Copyright 2003-2015 C-R Media All Rights Reserved.
Appendices
...
D0020LR00400
Load Required Brk
C0020:01T118Get Well Games
00059CM
C0020:02T120DENTYNE/reg or sugarfree 00029CM
C0020:03T010VERNE & BUBBA'S DONUT
00049CM...
...
<==
<==
<==
<==
335
"Anchor Point"
Item incremented 1 second
Item incremented 1 second
Item incremented 1 second
Simply passing a traffic or music scheduling system "log time" through to the generic log file is the
most common pitfall encountered when constructing and/or exporting a log. If the log times are not
adjusted and properly incremented, the results on the host audio system are unpredictable.
XStudio compensates for this problem when opening a log by automatically adjusting the times to meet
the log file specification. If there is a problem making the adjustments, XStudio will warn the end-user
of the problems.
© Copyright 2003-2015 C-R Media All Rights Reserved.
336
8.9
XStudio 3
Audit File Specification
The Generic Audit File Specification documents the file naming convention and record structure for
audit data files created by XStudio.
This specification was originally published by Computer Concepts Corporation,
Lenexa, KS in 1989 and updated to version 1.6 in October 1992. The
specification was released to all interested parties, including traffic system
vendors and music scheduling system vendors.
This document (the one you are reading) is referred to as:
dcsTools Audit File Specification Version 1.7 (Updated 12/17/2012)
It updates version 1.6 of the specification published by Computer Concepts
Corporation, including later additions to audit transaction types and status
codes, along with items unique to dcsTools products.
Audit File Name
Audit files are named in such a way as to provide for one unique file for each day of each year for each
station. This allows usage of a single file folder location all stations in a multi-station environment.
Audit file names have the form MMDDYYxx.ADT, where:
MM
= Month (01-12)
DD
= Day (01-31)
YY
= Year (00-99)
xx
= Station Number (any 2 characters in 0..9, A..Z)
.ADT = The audit file extension
Audit File Structure
The audit file data is stored in binary format as a group of records. Each record has a fixed length
segment followed by a fixed number of variable length fields.
Where possible, descriptive names that match the originally-published
specification have been retained. New types added use naming conventions
similar to the original documentation.
© Copyright 2003-2015 C-R Media All Rights Reserved.
Appendices
8.9.1
337
Fixed Length Segment
The fixed length segment of an audit record includes information about when the event occurred, the
type of event, the length of the event, and status of the event. The table describes the structure and
field usage.
Field
Data Type (C)
Description
eventTime
time_t
The time the event occurred. "time_t"
is Microsoft's C compiler v6.0A
definition of the number of seconds
since 00:00:00 January 1, 1970. It is
a 4-byte signed integer.
txnType
auditTxnTypeEtyp
An enumerated type that describes
the type of transaction. See the topic
Transaction Types for details.
logTime
time_t
If applicable, the log time of the
event. Otherwise, the value will be
zero. "time_t" is Microsoft's C
compiler v6.0A definition of the
number of seconds since 00:00:00
January 1, 1970. It is a 4-byte signed
integer.
length
long
The event length in centiseconds. A
length of 30.05 seconds is expressed
as 3005. If the event has no
applicable length, the value will be
zero.
status
audtTxnStatEtyp
An enumerated type that describes
the status of the transaction. See the
the topic Status Types for details.
seqNum
Byte
If the event relates to the play of a
multi-cut cart, this field contains the
cut rotation sequence number.
Otherwise, the value will be zero.
The eventTime and logTime field values are stored by the audio delivery
system based on the Pacific Time Zone. When calculating the actual event time
and log time, the actual time zone in which the record was created by the audio
delivery system needs to be taken into account in order to arrive at the correct
date and time value.
© Copyright 2003-2015 C-R Media All Rights Reserved.
338
XStudio 3
8.9.1.1 Transaction Types
The transaction type variable is an enumerated type. Transaction type codes describe the type of
activity the audio delivery system is engaged in or the base type of a problem the system encountered.
Enumerated
Transaction Type
Displayed
Transaction Code
(Action)
Meaning
AUDIT_PLAY
PlayCart
A cart (audio file) is played.
LOAD_WINDOW
LdRelayQ
A "relay queue" is being loaded. This
differs from the standard "queue" and
happens as the result of a function
(action) executing.
LOAD_STOP_SET_REQ LdRqdBrk
A Required Break is loaded into the
queue.
LOAD_STOP_SET
LdBreak
An Optional Break is loaded into the
queue.
CANCEL_Q_ELEMENT
DelFromQ
Items were deleted from the "queue".
AUDIT_RECORD
RcrdCart
A cart (audio file) is being recorded.
FILLER_SELECTION
FillCart
A fill cart is played as an automated
function. These occur when DCS or
Maestro automatically adds content to a
break in Satellite mode, most typically.
SILENCE_INSERTED
Silence
Silence has been inserted to "spread" a
break of a specified length.
SET_AUTO_ON
AutoOn
Automation mode has been turned on.
SET_AUTO_OFF
Auto Off
Automation mode has been turned off.
RELAY_EVENT
RelayOn
A relay was turned on by XStudio, DCS
or Maestro.
REMOTE_PLAY
RmtPlay
A cart is played via remote control.
REMOTE_QUEUE
RmtQ
The queue has been activated/
deactivated via remote control.
REMOTE_HALT
RmtHalt
A playing cart has been halted via
remote control.
EOMB
EOMBegin
The End-of-Message is beginning.
Corresponds to the Aux mark on a cart.
EOME
EOMEnd
The End-of-Message is complete.
Corresponds to the end of the cart.
MSG_XMIT_TO_SW
PcToSw
Communications from the XStudio,
DCS or Maestro unit to an audio
switcher.
MSG_RCV_FROM_SW
SwToPc
Communications from an audio
switcher to the XStudio, DCS or
Maestro unit.
© Copyright 2003-2015 C-R Media All Rights Reserved.
Appendices
339
Enumerated
Transaction Type
Displayed
Transaction Code
(Action)
Meaning
DCS_STARTED
DCSBegin
DCS or Maestro is starting up.
DCS_EXITED
DCSEnd
DCS or Maestro closed.
TT_DATE_FRAME
DateErr
A date error has occurred.
TT_NEW_CFG
cfgChngd
The DCS or Maestro configuration has
been changed.
LogChngd*
A change has occurred in the broadcast
log. The log was manually-edited in
XStudio or updated automatically as a
result of the source log changing.
dcsTools-Specific
TT_LOG_CHANGE
© Copyright 2003-2015 C-R Media All Rights Reserved.
340
XStudio 3
8.9.1.2 Status Types
The status type variable is an enumerated type. Status codes provide documentation of what
happened with a particular transaction initiated by the audio delivery system, generally reporting either
success of the system action or the reason for failure of the action.
Enumerated Status Type
Displayed Status
Code
Meaning
TXN_STARTED
TXN_STARTED
An action has started that
may have several
components who's action
results are unknown at the
start of the sequence.
COMPLETED
ok
The action completed
successfully.
NOT_COMPLETED
NOT_COMPLETED
The action was not
completed.
CANCELLED
CANCELED
The action was canceled typically, this would refer to
the playing of a cart.
IGNORED
IGNORED
The action was ignored. This
status code is most often
associated with an audio
switcher input relay.
TIMED_OUT
TIMED_OUT
The action could not be
completed in the allocated
time.
TS_DATE_CONFLICT
Date Conflict
A cart could not be queued or
played because it was out-ofdate for the date the action
was attempted.
BREAK_MISSED
Break Missed
Typically seen when items on
the log are queued but not
played before the next log
directive clears them from the
queue. Most often seen when
running in satellite mode of
operation.
TS_MANUAL_FORCE
ManuallyForced
A cart was not valid for the
date, but was forced to the
play line or queue by the
operator.
TS_REC_FAIL_CH_IN_USE
FailRecChInUse
A recording failed because
the record channel was
already in use.
TS_REC_FAIL_MALLOC_ERR
FailMallocErr
The action failed because of
a memory allocation error.
Most often seen with DCS
units.
© Copyright 2003-2015 C-R Media All Rights Reserved.
Appendices
341
Enumerated Status Type
Displayed Status
Code
Meaning
TS_REC_FAIL_CART_ON_PLINE
FailCartOnPLin
The action, usually a
recording, failed because the
cart was on a play line at the
time the action was
attempted.
TS_REC_FAIL_CART_IN_QUE
FailCartInQue
The action, usually a
recording, failed because the
cart was in the queue at the
time the action was
requested.
TS_REC_FAIL_CART_EXISTS
FailCartExists
The action failed because the
cart already exists. Typically,
this is seen when a recording
is to be made and the
recording function has been
set to NOT overwrite the cart
if it already exists.
TS_REC_FAIL_DISK_FULL
Fail Disk Full
The action failed because the
target hard was full. Typically,
this code appears when a
recording is being made and
the system runs out of hard
disk space.
TS_REC_AUTO_START
RecAutoStarted
A recording action has
started with AutoStart option
set.
TS_REC_START_NOW
RecStartedNow
A recording actually began at
the time indicated. An record
action with AutoStart might
have been "armed" several
seconds (or even minutes)
ago, but this is the time the
recording actually began.
TS_REC_APTX_NA
Rec Aptx N/A
A recording action failed
because the data reduction
method for the recording was
apt-X and apt-X data
reduction was not available
on the DCS or Maestro unit
attempting the recording.
TS_REC_MANUAL_STOP
RecManualStop
A recording was manually
stopped.
TS_REC_AUTO_STOP
RecAutoStop
A recording was
automatically stopped based
on a maximum recording
length.
TS_REC_RELAY_STOP
RecRelayStop
A recording was stopped
© Copyright 2003-2015 C-R Media All Rights Reserved.
342
XStudio 3
Enumerated Status Type
Displayed Status
Code
Meaning
based on an input relay
received.
TS_REC_FAIL_BAD_CARTNUM
FailBadCartNum
The action failed because of
a bad cart number.
TS_PAUSED
Play Paused
A cart play was paused.
TS_REC_PAUSED
RecPaused
A recording was paused.
TS_REC_RESUMED
RecResumed
A recording was resumed
from a paused state.
TS_REC_REMOTE_STOP
RecRemoteStop
A recording was stopped by
remote control, using
Computer Concepts'
published control protocol.
TS_REC_MPEG_NA
Rec MPEG N/A
A recording action failed
because the data reduction
method for the recording was
ISO-MPEG and ISO-MPEG
data reduction was not
available on the DCS or
Maestro unit attempting the
recording.
TS_REC_FAIL_NO_ACCESS
FailNoAccess
The action failed because
DCS or Maestro did not have
access to a required
resource.
TS_REC_FAIL_CART_IN_RCW
FailCartInRCW
A recording failed because
the cart was already in the
recording control window.
TS_CART_MISSING
Cart Missing
An action failed because a
specified cart number was
missing.
TS_LOG_ADD
AddLogItem*
An item was added to the
active log in XStudio.
TS_LOG_DEL
DelLogItem*
An active log item was
deleted within XStudio.
TS_LOG_EDIT
EditLogItem*
An active log item was edited
within XStudio.
TS_LOG_SPLICE
LogSplice*
An updated log on disk was
spliced into the active
XStudio log.
dcsTools-Specific
© Copyright 2003-2015 C-R Media All Rights Reserved.
Appendices
8.9.2
343
Variable Length Segment
The variable length segment of the audit record includes 6 ASCII fields delimited by a byte having a
value of 0xFF (decimal 255). The table below lists the field order and their possible lengths.
Field
Data Type
Description
cartNumber
AnsiChar [ 8 ]
The cart number field. If the
transaction involves a cart (audio
item), the cart number will be in this
field. Otherwise, the field will be
empty.
custNum
AnsiChar [ 7 ]
Customer number field. If the
transaction involves a log item and
a customer number was included in
the log, that value appears in this
field. Otherwise, the field will be
empty.
description
AnsiChar [ 25 ]
Description field. If the transaction
involves a cart (audio item), the
description of the item appears in
this field. If the transaction is of
another type, text appearing in this
field could be a decoded switcher
message or information about an
automated function or action.
agencyTapeNum
AnsiChar [ 16 ]
Agency tape number field. If the
transaction involved a log item and
an agency number was included in
the log, that value appears in this
field. Otherwise, the field would
include raw switcher data for an
audio switcher transaction or be
empty.
swicherMsg
AnsiChar [ 11 ]
Switcher message field. If the
transaction involves an audio
switcher, the data in this field
represents the switcher command
type and result.
windowName
AnsiChar [ 14 ] (Original)
AnsiChar [ 30 ] (dcsTools)
Window name field. Originally 14
characters in length, expanded to
30 for dcsTools products. If the
transaction involves an automation
function or action, its name appears
in this field. For XStudio, if the
transaction involves a log item, the
unique log record ID appears in this
field. Otherwise, the field is empty.
All text stored in the variable length segment of the audit record is ANSI text. This convention has been
retained for compatibility across all audio delivery systems that write records described in this
document.
© Copyright 2003-2015 C-R Media All Rights Reserved.
344
8.10
XStudio 3
Revision History
This topic contains historical information on changes, enhancements and corrections to XStudio by
version number and date. For the most recent changes and enhancements, see the What's New topic.
Version 3.3.2.435 - 03/27/2014
1. Enhancement. Preference properties for controlling the font type and size used in the main
display's inventory list have been added. These settings can be changed on the User Interface tab
in Preferences.
2. Enhancement. A new task, Banner Message, has been added along with a new floating dialog
(the XStudio Message Center). This task can be used to advise operators of changes in system
configuration (for a ballgame, for instance) or anything else that might be needed to get the
attention of the operator.
3. Enhancement. A new task, System Backup, has been added. The backup operation occurs in the
background and does not affect XStudio operations. When the task is executed, the XStudio
system database tables are backed up to a target location defined in the task. Optionally, XStudio
preference and settings files, including hot button configuration files, can be backed up. The task
also has a option to zip the backed-up files to save disk storage space. See the System Backup
and Restore topic in the appendices for more detailed information on setting up a system backup,
what is backed up and how to restore backed-up files.
4. Enhancement. Station configuration information can now be exported and imported in
Preferences.
5. Enhancement. Additional detail information is now logged to the XStudio event log when a user
changes the Next-to-Play item manually via the log's pop-up menu, [F7] keystroke and [DoubleClick] on a log item. The cart number and log description are now logged to help better identify
which item on the log the user set as Next-to-Play.
6. Enhancement. The XStudio manual, supplied in PDF format, has been optimized for duplex
printing.
7. Fix. Under certain circumstances, an error could occur some time after a user performed a [RightClick] on the log to display the log's pop-up menu. This action could set up a future AV when the
log was updated and the new log had fewer items than it did when the user popped up the menu.
The error was handled by XStudio and did not affect operations, but was annoying. Additional
checks are now made before attempting to access the log record the user [Right-Clicked] on to
prevent this error in the future.
8. Fix. When starting XStudio, the comparison between the on-disk log and log snapshot time
stamps were not being handled properly. This led to unneeded splicing of content from the on-disk
log.
Version 3.3.0.385 - 01/22/2013
1. Enhancement. A new task type, Remap Input Relays, has been added. This task allows you to
replace the input relay mapping for a selected audio switcher device with a completely different set
of Actions assigned to available input relays. This task can also be used to restore the original
"default" relay mapping for a device.
2. Enhancement. The Start Play task dialog has been updated to support drag and drop re-ordering
of the Cart Rotation List. A Macro Help button has also been added to assist in adding cart
numbers containing macro characters to the Cart Rotation List.
3. Enhancement. Handling of Start Play tasks that use the Cart Rotation List has been updated to
fully support rotation of multiple cart numbers, including checking the inventory (if available) for
© Copyright 2003-2015 C-R Media All Rights Reserved.
Appendices
345
missing and, if applicable, out-of-date carts.
4. Enhancement. A new Relay Queue Maintenance dialog has been added. The dialog displays all
active Start Play tasks that use a Cart Rotation List. Cart rotations can be modified by adding,
editing and deleting cart numbers in the rotation. The Next-to-Play property can also be modified.
Changes made are active until XStudio is restarted. Users can also change the Current Voice
setting manually in this dialog. See the topic on Using the XStudio Relay Queue Maintenance
Dialog for more information.
5. Enhancement. Time-Approximate Directive handling in Satellite Mode has been implemented to
support automated sports broadcasts and similar events where breaks are sequence-sensitive
rather than time sensitive. The log now distinguishes between and displays the next fixed time
directive (NxtU =>) and time-approximate directive (NxtA =>). Users can manually mark the next
time-approximate directive to be used to handle situations where XStudio needs to be
synchronized with the next network break event. An example of how to use this functionality is
discussed in the Satellite Programming - Special Events topic.
6. Enhancement. Functionality to execute an Action at the start of playback for a specific cart has
been implemented. This feature can be enabled or disabled in Preferences and is disabled as a
default. For additional information, review the Embed an Action in a Cart topic.
7. Enhancement. At start-up, XStudio now scans the log from midnight to current time and will
update the Current Voice property if any Set Voice directives are found.
8. Enhancement. A menu item has been added to optionally display the inventory AuxMark length in
the log Length field (View | Log Display | Use Inventory Length on Logs). When enabled,
displayed log items will have the matching cart's inventory AuxMark length value instead of the
original log length value. Note this feature is display-only, the underlying log is not changed.
9. Enhancement. An cart's (audio item's) Agency field information is now passed to the audit data
file for reporting purposes.
10. Enhancement. You can now clear an entire page of hot buttons in the Cart Wall dialog. A toolbar
button or pop-up menu item can be used to reset all hot buttons on a selected page to an
unassigned state.
11. Enhancement. XStudio now detects Windows 8 and Windows Server 2012 operating systems
and adjusts its display accordingly.
12. Enhancement. When an updated log is detected and is being merged (spliced) with the active log,
if no matching directives are found on the active log and the new log has content at times beyond
the active log's last log record, XStudio will scan the later times on the updated log and merge
(splice) the new content if there is a valid directive at a later time on the updated log.
13. Enhancement. Documentation has been updated to include additional information about the
XStudio audit data file structure. See the topic Audit File Specification for additional information.
14. Change. When monitoring for files that might have changed, XStudio now tracks changes based
on UTC time. This approach reduces the possibility of a change incorrectly being detected in
circumstances where XStudio is operating in a time zone that uses DST.
15. Fix. When a user attempted to register XStudio by copying and pasting the registration key into the
registration dialog, the registration key would be invalid because the user inadvertently copied
leading spaces instead of just the registration key text. Now, any extraneous spaces are removed
when the user pastes the registration key into the dialog. Additional feedback is provided when
manually entering a registration key that is not the correct length, which can occur if a character is
missed in typing or if copying only a portion of the registration key and pasting it.
16. Fix. Saving an edited Action in the Automation Setup dialog would occasionally be done
incorrectly, resulting in the wrong Action being updated. The problem could occur if the user began
editing an Action and while editing, another Action was executed by XStudio. XStudio now double© Copyright 2003-2015 C-R Media All Rights Reserved.
346
XStudio 3
checks to be sure the correct Action is being updated and display an error message if the update
cannot be performed.
17. Fix. Very occasionally, when XStudio was creating a temporary file to store information for display,
the temporary file was not correctly created and the information would not be displayed. The
problem has been corrected.
Version 3.2.0.330 - 09/01/2012
1. Enhancement. A hourly content back-timer has been added, integrated with the clock display. The
XStudio Backtimer is a tool to help determine how much audio content remains to be played in the
current hour versus how much time is left in the hour. Comparing these values produces an "over/
under" time value that can be used as a reference in making on-the-fly adjustments. If XStudio is
short of content, a negative value is displayed and if long, a positive value is displayed. See the
topic About the XStudio Backtimer for more detailed information.
2. Enhancement. A Music Search Dialog has been added. It can be used to search the imported
music database for song titles, artist names and cart numbers. A selected song can be dragged
directly from the dialog to the log, any cart deck (for immediate play), the audio clipboard and hot
buttons. Features include grouping by artist, incremental search, filtering of data, saving filter
criteria for later use, most recent search words and more. See the topic on Using the XStudio
Music Search Dialog for more information.
3. Enhancement. The ability to automatically update the XStudio music table has been added. When
enabled, XStudio will check for changes in the source music data file and when a change is
detected, automatically update the music table. When music data is first imported, the user is
offered the option of enabling auto-update. Update settings can also be maintained in the
Automation Setup dialog. See the topic on Configuring Music Auto-Update for more information.
4. Enhancement. Music Fade capability has been added. When enabled, audio items in the "Music"
cart category are faded at Aux Mark by XEngine at a user-defined rate. Music Fade applies to all
carts that in the "Music" category on all channels.
5. Enhancement. A new audio inventory manager has been introduced to replace the original
inventory generation module. The XStudio Inventory Manager (InvMgr) stores data in a custom
database. Performance is significantly better than previous implementations. While the initial
inventory generation time (when XStudio is first started and an audio folder is assigned) is about
the same as previously, subsequent updates to the inventory (adds, edits and deletes) is
significantly faster. In addition, InvMgr-aware applications can connect to the inventory manager
database to retrieve inventory information, if remote access is enabled in Preferences.
6. Enhancement. You can now choose whether the countdown of remaining air play time displayed
in the playback decks is shown as the time to end-of-audio (the default) or shown as time to Aux
Mark. The behavior is controlled by settings in the Audio Engine Properties area in Preferences.
7. Enhancement. Advanced Properties for XEngine have been added to Preferences. You can
control the number of audio buffers used by XEngine, set the master gain for all audio played and
enable automatic silence trim from the beginning of PCM audio files.
8. Enhancement. Log display times can now be shown as AM/PM times if desired. As a default,
XStudio, continues to display log times in military format. To enable AM/PM time display, use the
main menu item View | Log Display | Show Log Time as AM/PM. When enabled, printed logs
also reflect AM/PM times.
9. Enhancement. The Broadcast Tools ADMS 44.22 audio switcher has been added to the list of
supported resources.
10. Enhancement. When XStudio is launched and a current-day log is not found for the default
station, an emergency log, if available, is loaded. XStudio now additionally periodically checks the
availability of the current-day log when using an emergency log and if the log becomes available,
© Copyright 2003-2015 C-R Media All Rights Reserved.
Appendices
347
will offer to load it. As a default, if the user does not respond to the offer, the current-day log is
automatically loaded and spliced with the emergency log. This new behavior occurs only in Live,
Satellite and Automation modes of operation.
11. Enhancement. A menu item has been added to optionally display the inventory description in the
log description field (View | Log Display | Use Inventory Description on Logs). When enabled,
displayed log items will have the matching cart's inventory description instead of the original log
description. If imported music data is being used, this setting is ignored for carts matching the
"Music" cart category. Note this feature is display-only, the underlying log is not changed. As a
result, searching the log on the Description field may have unpredictable results if the log
description and inventory description are completely different - i.e., characters in the search string
are present in the log description but not the inventory description or vice-versa.
12. Enhancement. A menu item has been added for opening an emergency log (File | Open an
Emergency Log). This option is available in all operating modes and is intended for use in a
situation where no logs exist for a station, an on-air situation has developed that requires
completely different content, or XStudio is being used as a backup system and the user needs a
custom emergency log.
13. Enhancement. Displaying file open and save dialogs has been updated to correct problems with
multi-monitor systems (and some newer operating systems) displaying these dialogs in the wrong
position or on the wrong monitor.
14. Enhancement. A log pop-up menu item has been added that provides the ability to quickly jump to
the log record currently selected by the user whether it's within view or not. The item is available on
the current-day log (Today Log) only and displays the log description of the user-selected log
record. The feature is useful in situations where XStudio has scrolled the user-selected log record
out of view as a result of making sure the currently-playing item is in-view on the log display.
15. Enhancement. Copying of inventory files to the secondary location (if enabled) is now retried
several times before notifying the user the copy has failed. If another program has locked the file
that is to be replaced, multiple attempts to copy the file increase the chance of success as the file
may be released by the other program while XStudiois retrying the copy operation.
16. Enhancement. In previous versions of XStudio, when starting and the option to load the currentday log at startup was turned off, XStudio made no attempt to load inventory information. Now, if
the option to generate & use local inventory (Preferences | Audio Properties) is turned on, XStudio
will load and display current inventory information.
17. Change. The behavior of context-sensitive help has been changed so that when [Right-Click] of
the mouse is used, the "What's This" pop-up menu no longer appears if there is no context help
available for the control over which the mouse is located. When the context button on the toolbar
or menu item Help | What's This Help is clicked and the user subsequently clicks on a control that
has no help, the message indicating there is no help available is no longer displayed. Instead, the
mouse cursor simply returns to its normal shape without displaying any message.
18. Fix. Carts (audio items) with a length or Aux Mark value greater than ~60:15 (60 minutes, 15
seconds) were displayed as being much shorter. Long carts now display correctly.
19. Fix. If a user changed the log font size, the second row of the log display did not increase its height
to display the text in its entirety. This occurred in both the current-day and next-day logs. The
height of that specific row had been inadvertently set to a fixed height. It is now dynamic like all
other rows of the log.
20. Fix. When in Satellite mode and late-day breaks on the current-day log were empty, XStudio would
incorrectly transition to the next-day log. XStudio now correctly waits until the active break directive
requires transitioning the log.
21. Fix. When a Load Play directive on the log was processed in Satellite mode, break boundaries
were not being respected and XStudio would play content intended for the next directive. XStudio
© Copyright 2003-2015 C-R Media All Rights Reserved.
348
XStudio 3
no longer executes the Load Play directive if the break has no audio content.
22. Fix. If the Preferences property to duplicate the log description to the song title field was enabled,
but the music table was empty, copying did not occur. Now, the standard log description is copied
to the song title field in any case if the property is enabled.
23. Fix. The sort order of music data in the Automation Setup dialog (sorted by cart number) was
different than the order displayed in the inventory list. The sort orders are now the same.
24. Fix. When editing an external resource, the previously-visible selected item was not being restored
to visibility properly.
25. Fix. When the last element of a log is a Directive, the "busy" cursor would persist when the log was
loaded or edited and the last segment length of the log, the one associated with the last Directive,
would not be displayed on the log. This condition has been corrected.
26. Fix. When using a Broadcast Tools 16x4 audio switcher, manual channel updates from the
switcher status display panel were not working correctly on output rows 3 and 4. This has been
corrected.
27. Fix. When closing XStudio, the possibility existed users might encounter an AV. This bug has been
corrected.
Version 3.0.0.210 - 03/23/2011 (Initial Release of Version 3)
1. Enhancement. A 4th playback deck has been added. Deck 4 behaves in the same way as Decks
2 & 3. It can be hidden or shown, you can use the audio clipboard or log as a source, and it can be
the be target of drag and drop operations or hot buttons. The keyboard shortcut [Ctrl-4] can be
used to start play (see the topic on keyboard shortcuts) and you can optionally assign a remote
start button (see Preferences and the topic on the Remote Start Interface).
2. Enhancement. The Automation Setup dialog's size, position and host monitor number (for multimonitor systems) information is now saved on exit and the dialog's previous position, size and
monitor location are restored the next time it is opened.
3. Fix. When playback decks 2 or 3 had more than one item playing and the 1st item finished, there
was a momentary flicker on the deck.
4. Fix. When assigning audio channels to a playback deck in Preferences, the change was not
effective unless the user moved off the selection list. Now, changes are reflected immediately.
© Copyright 2003-2015 C-R Media All Rights Reserved.
Glossary of Terms
Part
IX
350
XStudio 3
The XStudio documentation includes some words, terms, abbreviations or perhaps industry-specific
"jargon" that may not be meaningful or perfectly clear to you. The table includes entries that may need
additional explanation or definition, listed alphabetically.
Term
Meaning
.DAF or DAF
Refers to the generic type of audio file supported by XStudio. This
type of file was originally created by Computer Concepts Corporation,
Lenexa, KS, and is the file name extension used by the DCS and
Maestro audio systems, also created and sold by Computer
Concepts. DAF files consist of a small "header" that contains a
description, start and end dates for the audio, distribution
information, and a digital Aux Mark among other things.
apt-X
Refers to a loss-less audio encoding (data reduction) method and
one of the types of audio files supported for playback in XStudio. The
apt-X name is trademarked.
Audio Clipboard
Refers to the control on the XStudio main display used for
constructing a list of audio items to play on an ad hoc basis. See the
topic on Using the Audio Clipboard for more information.
Auto-Segue
Also [Auto] button on primary playback channel. Refers to
automatically sequencing audio items (carts) on the broadcast log,
moving from one item to the next as Aux Mark or EOM of playing
item is reached. Auto-Segue is enabled when the [Auto] button is
down, disabled when the button is up.
Automatic Backfill
Refers to a technique of automatically adding audio content to a
satellite programming break to meet the required length of the break
when the scheduled content on the log sums to less time than the
required length. XStudio does not offer this feature.
Aux Mark
Refers to a digital "mark" on an audio file, similar to traditional
secondary tones on broadcast tape decks, either reel-to-reel and
tape cartridge types. This mark is used to signal the beginning of the
end of audio playback. It is used as a trigger point to begin playing
another audio item, if applicable. This results in overlap of audio - the
remaining portion of the audio that is finishing plus the beginning of
the newly-started audio item are mixed 1-to-1 to ensure a smooth
sound with no dead air.
Break
Shorthand for "commercial break" or "stopset". The term is most
often used when referring to commercial content played back ondemand as part of a satellite-driven format. The term has over time
been broadened to refer to a group of audio elements (carts) played
in sequence, where the content might not necessarily be just
commercials.
Cart
Refers to an audio file, also called an audio item. The term originated
with the introduction of tape cartridge machines in radio. These
cartridges, similar in appearance to 8-track tape cartridges, were
referred to in shorthand as a "cart". Prior to the introduction of
computer-based hard-disk audio delivery systems such as XStudio,
tape cartridge machines were ubiquitous in radio stations and the
© Copyright 2003-2015 C-R Media All Rights Reserved.
Glossary of Terms
Term
351
Meaning
main means of playing non-music audio content to air. Usage of the
term has persisted, particularly among veteran broadcasters who
were active in radio during the time tape cartridge playback
machines were used extensively in radio stations.
Centisecond
A unit of time equal to 0.01 seconds (hundredth of a second).
Closure
Also known as a "Cue". Refers to a signal, typically a contact
closure, sent by satellite programming services to indicate to the
station that some task needs to be performed. Services generally
send a number of different "closures" or "cues" that identify which
task is to be performed locally. There might be, for instance, a
unique closure to signal the station to insert a local commercial
break, a different closure to signal the station to play a liner, and yet
another closure to signal the station to play a legal ID.
Cart Number
Refers to the identity of an audio file. A cart number is the file name
of the audio file without the file extension. In the time period that tape
cartridges ("carts") were used extensively in radio, the conventional
method for identifying a particular cartridge and its contents was to
place an ID number of some kind on the cartridge label. Typically,
the ID number was around 4 characters in length, which was a
convenient size to accommodate placing both the ID and a short text
description of the audio on the tape cartridge label.
CMINV??.DAT
Refers to an audio inventory data file. The file is formatted to a
specification published by Computer Concepts Corporation, Lenexa,
KS. The file contains information about .DAF audio files, including
the cart number, start and end dates, length and Aux Mark.
Current Voice
Also known as "announcer voice" or "voice number". Refers to a 2character value representing a pair of digits that might be used in a
cart number. Cart numbers that use the Current Voice value contain
the "##" cart macro characters as part of the cart number. As an
example, at playback time the cart number "ID##" becomes "ID88" if
the Current Voice value is "88". The Current Voice value can be set
with a task (Set Voice Task) or from the log using the Load Window
directive.
Deck,
Playback Deck
These terms refers to an audio playback display control. May also be
referred to as a Transport or Transport Control. A deck contains
buttons to control audio playback for the selected deck, a status
LED, and display fields for remaining play time, cart number and a
description of the audio item playing. See the topic on Audio
Playback for additional information and screen shots.
Deck Playback
Source
Refers to buttons on XStudio decks (channels) 2 and 3 transports.
The deck's playback source can be either the Audio Clipboard (the
default) or the Log, depending on the state of the button.
Directive
Also known as a Log Directive. Refers to a special type of log
(broadcast schedule) record that is used to affect the behavior of
© Copyright 2003-2015 C-R Media All Rights Reserved.
352
XStudio 3
Term
Meaning
XStudio. See the topic on Log Directives for additional details.
Directive Key
Directive Modifier
These terms refer to special characters added to a Log Directive that
affect the directive's meaning and behavior. Typically, the special
character is placed in the first character position of the directive's
description field. For more information, review the Log Directives
topic.
EOM
An abbreviation for End-of-Message. Refers to a signal from the host
audio engine that playback of a particular audio item (cart) is about to
finish. See the synonym Aux Mark for additional details.
Hard Sync
Refers to a method of immediate synchronization of XStudio audio
playback to a specific log time. A Hard Sync is initiated with a log
directive key and when executed, all playing audio on the primary
playback channel is halted followed by immediate playback of the
first audio item on the log following the directive.
Hot Button
Refers to a programmable button that when clicked, executes an
instant playback of specified audio or executes an XStudio Action.
Input Relay
Also known as a "Relay Input". Refers to a wiring connection on a
device, typically an audio switcher, that receives a closure from
another external device, typically a satellite receiver. Audio switcher
manufacturers may also refer to this connection as a "PIP" (Parallel
Input Port) or "GPI" (General Purpose Input). When a mechanical
closure is received by the device, the event is communicated to
XStudio via serial data sent by the device.
InvMgr
A short-hand reference to the XStudio Inventory Manager.
Log
A broadcast schedule of events, ordered by time. A log normally
contains a complete single day's schedule of audio items to be
played, along with notes to the end-user and special items called Log
Directives that affect the behavior of XStudio.
Log Directive
Also known as a Directive.
Log Splicing
Refers to the technique of updating a current-day XStudio log
(program schedule) by retaining log content prior to the current log
execution point and merging ("splicing") the new, updated log content
starting just after the current log execution point. This mechanism
retains already performed content as it was when performed while
updating the rest of the log day to reflect the new changes.
Mode
Refers to the operating mode of XStudio. See the topic on Operating
Modes for details on the operating modes supported by XStudio
along with an explanation of their usage.
MPEG
Refers to MPEG-1 Audio Layer II (MP2, sometimes incorrectly
called Musicam), an audio codec defined by ISO/IEC 11172-3. While
MP3 is much more popular for PC and internet applications, MP2
© Copyright 2003-2015 C-R Media All Rights Reserved.
Glossary of Terms
Term
353
Meaning
remains a dominant standard for audio broadcasting. MPEG is a
"lossy" audio coding standard. MPEG is one of the types of audio
files supported for playback in XStudio. (Portions from Wikipedia, the
free encyclopedia)
Next-To-Play
Refers to an audio item on the log (broadcast schedule) that is
marked as the next item that will be played, either when XStudio is
automatically sequencing playback or when the user manually starts
playback from the log.
Operating Mode
Also known as Mode.
PCM
Also known as "linear". Refers to an uncompressed, lossless
storage method for audio. Uncompressed audio files are quite large
in size but are considered "pure" and high quality, high fidelity audio.
When disk storage space is not an issue and best quality audio is
required, PCM storage is often used. PCM is one of the types of
audio files supported for playback in XStudio. (Portions from
Wikipedia, the free encyclopedia)
Property,
Properties
Refers to a single "setting" or a group of "settings" in XStudio. The
term is used throughout this documentation to define settings or
"states" for XStudio that affect how the software operates.
Relay Input
See Input Relay. The terms are synonymous.
Relay Queue
Manager
Refers to XStudio's internal mechanism for rotating carts (audio
items) in a Start Play task that uses a Cart Rotation List.
Remote Start
Refers to a method of starting playback of audio on a specific deck in
XStudio using an external mechanical device such as the channel-on
button on a broadcast console.
Session Properties
Refers to a group of settings that control XStudio behavior and
document its state of operation. See the topic on Session Properties
for additional information.
Soft Sync
Refers to a method of synchronizing XStudio audio playback to a
specific log time in a non-abrupt way. Soft Sync is executed as a part
of a log directive containing a Cast-Off directive key. When executed,
XEngine skips any unplayed audio items on the log located prior to
the directive and sets the Next-To-Play marker as the first audio
element following the directive.
Stopset
Refers to a "commercial break". The term has its origins in music
formats where the music is considered of primary importance and
playback of a set (group) of commercials "stops" the format.
Transport,
Transport Control
For purposes of XStudio documentation, a transport control is
synonymous with Deck or Playback Deck.
Voice Number
Synonymous with Current Voice.
© Copyright 2003-2015 C-R Media All Rights Reserved.
354
XStudio 3
Term
Meaning
Wrap Log
Refers to a playback option and XStudio behavior when the end of a
currently executing log is encountered and there are no more audio
items on the log. Depending on the operating mode and whether or
not a valid next-day log exists, XStudio will "wrap around" the log - go
back to the first audio item on the current log - and continue playing
audio, generally a better alternative than stoppage of audio playback.
© Copyright 2003-2015 C-R Media All Rights Reserved.
Index
Index
-AActions 114
Appendices
Backup and Restore 298
Companion Programs 302
List of Files 304
Preferences File Documentation 308
Registration 294
Remote Start Interface 301
Revision History 344
Using XStudio with DCS or Maestro 303
Utilities 302
Application "Hangs" on Shutdown 289
apt-X 295
Audio Engine Properties 37
Audio Inventory 87
Audio Outputs, Selecting 34
Audio Path 32
Audio Playback
Decks 2 & 3 53
From the Log 52
Hot Buttons 56
Keyboard Start 55
Options 55
Remote Start 54
Using Deck Transports 52
Audio Settings 32
Audio Switcher 106
Audio Switcher Status 270
Automation Setup
Action Edit Dialog 116
Actions 114
Common Functionality 98
Embedding an Action in a Cart 117
Event Properties Dialog 124
External Resources 106
Input Relay Lock-Out 112
Log Data 126
Log Splice Dialog 131
Log Status Dialog 127
Music Data 134
Scheduled Events 123
Tasks 120
© Copyright 2003-2015 C-R Media All Rights Reserved.
Work Stations 105
Auto-Segue Task 207
Auto-Segue, Defined 350
Auto-Update Music 150
Aux Mark 350
AV at startup 280
-BBacking up XStudio 298
Backtimer Display 252
Backtimer, About 252
Banner Message Task 197
-CCart Category Properties 40
Cart Macro Characters 213
Cart Masks
Editing 235
Explained 235
Cart Wall 57
Position 245
Size 245
Cart Wall, Using 244
Changes, Enhancements, Updates
Clock
Backtimer 252
Using the XStudio Clock 250
Clock Display 250
Clock Task 208
Cloning XStudio 298
Color Cusomization Dialog 237
Configuration
Audio Engine 37
Audio Output Selection 34
Audio Properties 32
Audio Settings 32
Cart Categories 39
Cart Categoy Properties 40
Countdown to Aux Mark 32
Database Properties 23
Default Station 30
Event Logging Properties 25
General Settings 20
General UI 43
Host Audio Engine 37
11
355
356
XStudio 3
Configuration
Inventory Font 45
Inventory Font Size 45
Inventory Generation 33
Log Display 43
Log Font 43
Music Fade 32
Overview 20
Remote Start 36
Security 46
Stations 27, 28, 29
UI General 43
User Interface Settings 43
Contacting dcsTools.com
Mailing Address 292
Sales 292
Tech Support 292
Web Site 292
Copyrights 8
Countdown Timer 255
Countdown to Aux Mark 37
Current Voice 350
Current Voice, Changing Manually
Telephone Numbers 292
Default Station 30
Definition of Terms Used (Glossary)
Directive 351
Directive Keys, Log 169
Directive, Log 168
Documentation
Generic Log File 326
Preferences File 308
DOut, Update 224
Drive Mapping 287
350
-EEditing Cart Masks 235
Embedded Cart Action 117
Emergency Log 92
End-Of-Message 352
Enforce Cart Dates 32
EOM 352
Error when starting XStudio 280
Event Logging Properties 25
Events, Scheduled 123
Exporting
Cart Categories 42
Log Color Information 45
Exporting Music 137
External Control Command 204
External Control Port 23
External Resources 106
265
-DData Navigator 98, 105, 163
Database
Data Navigators 163
File Location 153
Maintaining the Automation Database
Reference 153
Remote Database 238
Sharing 158
Tables 153
Database Properties 23
Database Tables
Actions 153
Events 154
External Devices 155
Log Data 155
Music Data 156
Tasks 157
Work Stations 158
DCS, Using XStudio with 303
dcsTools.com
Address 292
Email Address 292
98
-FFade Switcher Channel
Features 9
218
-GGeneric Log File Specification
Blank Record Type 333
Commercial Record Type 329
Directive Record Type 330
ID Record Type 328
Log Note Record Type 333
Overview 326
Program Title Record Type 333
Glossary
© Copyright 2003-2015 C-R Media All Rights Reserved.
Index
Glossary
.DAF 350
apt-X 350
Audio Clipboard 350
Automatic Backfill 350
Auto-Segue 350
Aux Mark 350
Break 350
Broadcast Log 352
Cart 350
Cart Number 351
Centisecond 351
Closure 351
CMINV??.DAT 351
Commercial Break 350
Cue 351
Current Voice 351
DAF 350
Deck 351
Deck Playback Source 351
Directive 351
Directive Key 352
Directive Modifier 352
EOM 352
Hard Sync 352
Input Relay 352
Inventory Manager 352
InvMgr 352
Log 352
Log Directive 351
Log Splicing 352
Mode 352
MPEG 352
Next-To-Play 353
Operating Mode 352
PCM 353
Playback Deck 351
Playback Deck, Source 351
Properties 353
Property 353
Relay Input 352
Relay Queue Manager 353
Schedule, Broadcast 352
Session Properties 353
Soft Sync 353
Splicing, Log 352
Stopset 350
Voice Number 351
© Copyright 2003-2015 C-R Media All Rights Reserved.
Wrap Log
354
-HHardware Requirements 16
Host Audio Engine Properties 37
Hot Buttons
Button File Sets 248
Button Settings 246
Cart Wall 244
Clear Page 247
Clearing, Erasing 57
Configuring 57
Properties 59
Tab (Page) Settings 247
Toolbars 245
Using 57
-IImporting
Cart Categories 42
Log Color Information 45
Music Data 134
Installing 17
Interface, Remote Start 301
Intro 255
Inventory Display Properties 45
Inventory Generation Properties 33
Inventory Manager Options 34
Inventory, Using 87
InvMgr Options 34
-KKey Features 9
Key, Directive 352
Keyboard Shortcuts 98, 164
Global 164
-LLicense Agreement 12
List of Database Servers
Lists, Printing 105
Local Automation 188
Log
238
357
358
XStudio 3
Log
Appearance, Changing 81
Edit Dialogs 68
Editing a Log 65
Emergency Log 92
Opening a Log 63
Printing 90
Saving a Log 81
Searching 86
Validating a Log 93
Log Data
Log Splice 131
Log Status 127
Log Directive Keys 169
Log Directives 168
Log Display Properties 43
Log Editing
Blank Line Dialog 74
Common Dialog Functionality 69
Copy Commercials 86
Execute Function (Action) Dialog 77
Inserting an Open Avail 78
Load Directive Dialog 76
Load Window Dialog 77
Log Note Dialog 78
Paste Commercials 86
Play Cart Dialog 79
Program Title Dialog 80
Saving a Log 81
Spot Dialog 74
Using the Inventory 87
Log Font Property 43
Log Validation 93
-MMacro Characters, Cart 213
Maestro, Using XStudio with 303
Maintain Database Server List 238
Managing Relay Queue Items 265
Manually adding a database server 239
Manually Set the Current Voice 265
Mapped Drives 287
Message Center 257
Mode 352
Mode / Days Properties 193
Mode Task 209
Modes, Operating 174
Modifier, Directive 352
Music
Auto-Update 150
Exporting from Music Scheduling Systems 137
Exporting MusicMaster Songs (DOS) 143
Exporting MusicMaster Songs (Windows) 137
Exporting POWERGOLD Songs 148
Exporting Selector Songs 149
Importing 134
Music Fade 37
Music Search Dialog 260
MusicMaster 137, 143
-NNavigator, Data 98, 105, 163
Netware 17
Next-To-Play
Defined 353
Setting 52
Novell Netware 17
-OOperating Mode 352
Operating Modes 174
Operation, XStudio
Audio Playback 51
Hot Buttons 57
Launching XStudio 48
Log Editing 63
Log Validation 63
Main Display 50
Maintaining the Automation Database
98
-PPlay Through Directives 55
Playback Options 55
POWERGOLD 148
Preferences
Audio Output Selection 34
Audio Properties 32
Cart Categories 39
Countdown to Aux Mark 32
File Documentation 308
General Settings 20
© Copyright 2003-2015 C-R Media All Rights Reserved.
Index
Preferences
Music Fade 32
Overview 20
Stations 27
User Interface Settings 43
Printing Lists 105
Printing Logs 90
Problems
Audio Playback 279
Connecting to host audio engine 280
Remote Database 283
Shutdown 280, 289
Startup 280
Programming XStudio 178
Properties
Audio Engine 37
Audio Output Selection 34
Audio Settings 32
Audio Switcher 22
Cart Category 40
Database 23
Default Station 30
Event Logging 25
External Control Port 23
General UI 43
Host Audio Engine 37
Hot Buttons 59
Inventory Display Font 45
Inventory Display Font Size 45
Inventory Generation 33
Log Display 43
Log Font 43
Program Start Options 21
Remote Start 36
Security 46
Stations 28, 29
UI General 43
Properties Common to All Tasks 193
Properties, Advanced Task 193
-RReference
Audio Clipboard 231
Audio Switcher Dialog 270
Backtimer 252
Cart Distribution Panel 234
Cart Mask Edit Panel 235
© Copyright 2003-2015 C-R Media All Rights Reserved.
Cart Masks 235
Color Customization Dialog 237
Data Navigators 163
Database 153
Directive Keys, Log 169
Intro Countdown Timer 255
Keyboard Shortcuts 164
Local Automation Programming 188
Log Directive Keys 169
Log Directives 168
Message Center 257
Music Search Dialog 260
Operating Modes 174
Programming XStudio 178
Quick Links 98
Relay Queue Mainteance Dialog 265
Satellite Automation Programming 179
Tasks 192
Using a Remote Database 238
Using Cart Wall 244
Using the XStudio Clock 250
XEngine 272
Registration
apt-X 295
XStudio 294
Relay Queue Maintenance Dialog 265
Relay Queue Manager 353
Remap Input Relays Task 199
Remote Database Reference 238
Remote Start
Audio Playback 54
Interface 301
Properties 36
Removing 17
Restoring XStudio files 298
-SSatellite Automation Programming 179
Scheduled Events 123
Searching a Log 86
Searching Music 260
Security Properties 46
Select Audio Outputs 34
Selector 149
Send External Control Command Task 204
Server List, Database
Add server manually 239
359
360
XStudio 3
Set Voice 210
Start Play 211
Stop Play 216
Switcher Fade 218
System Backup 220
Timer Task 222
Update DOut 224
Update Switcher 226
Use Existing Action 229
Timer 255
Timer Task 222
Trademarks
apt-X 8
DCS 8
Maestro 8
Windows 8
Troubleshooting 278
Application Event Logs 286
Audio Playback 279
AV at shutdown 280
AV at startup 280
Connecting to the host audio engine 280
Remote Database 283
Session Properties 285
Vista 287
Windows 7 287
Windows 7, 8 & Vista Notes 287
Windows 8 287
XStudio "Hangs" on Shutdown 289
Server List, Database
Automatic list retrieval 238
Maintaining 238
Set Auto-Segue Task 207
Set Clock Task 208
Set Mode Task 209
Set Operating Mode Task 209
Set Voice Task 210
Setting the Default Station 30
Shortcuts, Keyboard 164
Shutdown Problems 289
Specification
Generic Log File 326
Start Play Task 211
Startup AV 280
Startup Options 21
Station Properties 28, 29
Stop Play Task 216
Switcher Fade Task 218
Switcher Status 270
Switcher Update Task 226
System Backup Task 220
System Requirements 16
-TTables, Database
Actions 153
Events 154
External Devices 155
Location of Files 153
Log Data 155
Music Data 156
Tasks 157
Work Stations 158
Task Reference 192
Tasks
Action, Use 229
Advanced 193
Banner Message 197
Common Properties 193
Create, Edit, Delete 120
Remap Input Relays 199
Send External Control Command
Set Auto-Segue 207
Set Clock 208
Set Mode 209
Set Operating Mode 209
-U-
204
UAC 287
Uninstalling 17
Update DOut Task 224
Update Switcher Task 226
Upgrade Instructions 17
Upgrading 17
Use Existing Action Tasks 229
Use Inventory Descriptions on Log 39
User Account Control 287
Using the Relay Queue Maintenance Dialog
Using the XStudio Message Center 257
Using XEngine 273
Using XStudio with DCS or Maestro 303
265
© Copyright 2003-2015 C-R Media All Rights Reserved.
Index
-VValidating a Log 93
Vista 287
Voice Number 350
-WWarranty 12
Welcome 8
What's New in XEngine
What's New in XStudio
Windows 7 287
Windows 8 287
Windows Vista 287
Wrap Log Option 55
276
11
-XXEngine
Reference 272
XEngine Configuration
272
© Copyright 2003-2015 C-R Media All Rights Reserved.
361
© Copyright 2003-2015 C-R Media All Rights Reserved.