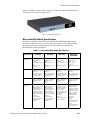
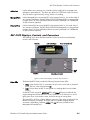
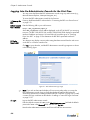
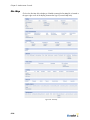
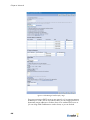
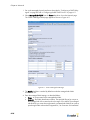
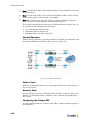
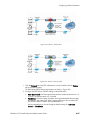
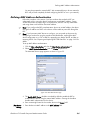
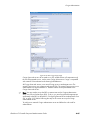
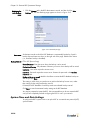
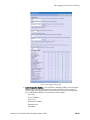
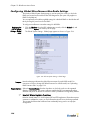
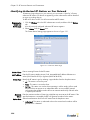
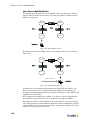
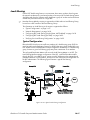
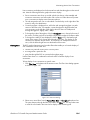
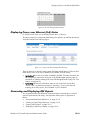
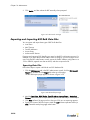
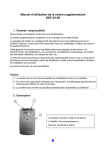
1
BlueSecure™ Controller Setup and Administration Guide Software Release Version: 6.5 Document Version: 6.5 Bluesocket, Inc. 10 North Avenue Burlington, MA 01803 USA +1 781-328-0888 http://www.bluesocket.com Copyright Notice Copyright © 2001- 2009 Bluesocket, Inc. All rights reserved. No part of this document may be reproduced in any form or by any means, electronic or manual, including photocopying without the written permission of Bluesocket, Inc. The products described in this document may be protected by one or more U.S. patents, foreign patents, or pending patents. This document is provided “as is” without warranty of any kind, either express or implied, including, but not limited to, the implied warranties of merchantability, fitness for a particular purpose, or non-infringement. This publication could include technical inaccuracies or typographical errors. Changes are periodically added to the information herein; these changes will be incorporated in new editions of the document. Bluesocket inc. may make improvements or changes in the products or the programs described in this document at any time. Publication Date: December 4, 2009 Trademarks Bluesocket, The Bluesocket Logo, Secure Mobility, BlueView, BlueSecure, DynamicRF, HighDataDensity and CellularLAN are trademarks or registered trademarks of Bluesocket, Inc. Bluetooth is a trademark owned by Bluetooth SIG, Inc., U.S.A. and is licensed to Bluesocket, Inc. All other trademarks, trade names and company names referenced herein are used for identification purposes only and are the property of their respective owners. ii Caution: This product contains a lithium battery. There is a danger of explosion if the battery is incorrectly replaced. The battery should only be replaced by the BlueSecure™ Controller manufacturer and only with same or equivalent type recommended by the battery's manufacturer. Dispose of unused batteries according to the battery manufacturer's instructions. Contents Figures ........................................................................................ x Tables ....................................................................................... xiv About This Guide Audience ..........................................................................................xv Document Organization ......................................................................xv Notational Conventions .................................................................... xvii Related Documentation ..................................................................... xvii Terminology .................................................................................... xvii Chapter 1 An Overview of the BlueSecure Controller An Introduction to the BlueSecure WLAN Solution ................................ 1-2 User Authentication ....................................................................... 1-2 RADIUS Accounting and Hotspot Support ........................................ 1-2 Role-based Authorization ............................................................... 1-3 Remote Management .................................................................... 1-3 Scalability.................................................................................... 1-3 Intrusion Detection and Worm Protection ......................................... 1-3 BlueSecure Access Points ............................................................... 1-3 RF Management ........................................................................... 1-4 RF Intrusion Detection/RF Containment ............................................ 1-4 VoIP Protocols/VoWLAN Support ................................................... 1-5 Secure Mobility® MatriX ............................................................... 1-5 The BlueSecure WLAN Solution End-user Experience ............................ 1-5 Transparent Authentication............................................................. 1-5 Web-based User Logins................................................................. 1-6 BlueSecure Controller Models ............................................................ 1-7 Bluesocket BSC-2200/3200/5200 ................................................ 1-7 Bluesocket BSC-2100 .................................................................... 1-8 Bluesocket BSC-1200 .................................................................... 1-8 Bluesocket BSC-600 ...................................................................... 1-8 Bluesocket BSC Model Specifications .............................................. 1-9 Typical BlueSecure WLAN Solution Network Configurations................ 1-10 Single BSC Configuration ............................................................ 1-10 Multiple BSCs............................................................................. 1-11 Failover BSCs............................................................................. 1-11 Chapter 2 Installation Overview of the Installation Procedure ................................................ 2-2 Safety Precautions ............................................................................ 2-2 BSC-2200/3200/5200 Displays, Controls, and Connectors................. 2-4 BlueSecure™ Controller Setup and Administration Guide iii Contents BSC-2100 Displays, Controls, and Connectors .................................... 2-5 BSC-1200 Displays, Controls, and Connectors .................................... 2-6 BSC-600 Controls and Connectors ..................................................... 2-8 Preparing Your Network ................................................................... 2-9 Environmental, Rack, Space, and Power Requirements........................ 2-10 Mounting the BlueSecure Controller Chassis ...................................... 2-10 BSC-600/BSC-1200 Desktop Mounting ........................................ 2-10 BSC-2100 and BSC-2200/3200/5200 Desktop Mounting ............. 2-11 Rack-mounting the BlueSecure Controller........................................ 2-12 Connecting the BlueSecure Controller to Your Network ....................... 2-13 Connecting the BSC to its Power Source............................................ 2-13 Powering Down Your BSC ............................................................... 2-14 Enabling Power over Ethernet on the BSC-600 and BSC-1200 ............. 2-14 LED Run Time Mode for BSC-600 and BSC-1200 ............................... 2-15 Basic POE LED Functionality for BSC-600 and BSC-1200 .................... 2-15 Chapter 3 Administrator Console Logging Into the Administrator Console for the First Time ....................... 3-2 Logging Out of the Administrator Console........................................ 3-3 Using and Managing Administrator Accounts ...................................... 3-3 Adding a New Administrator Account ............................................. 3-4 Changing an Administrator Password.............................................. 3-5 Changing Your Login Password ...................................................... 3-6 Deleting Administrator Accounts ..................................................... 3-6 Installing the Bluesocket SSL Certificate ............................................... 3-6 An Overview of the Tabs on the Console............................................. 3-8 Read-only Pages (Replication Nodes only) ....................................... 3-9 Obtaining Online Help ..................................................................... 3-9 Site Map ....................................................................................... 3-10 Error Checking on Page Forms......................................................... 3-11 Using Command Buttons and Icons................................................... 3-11 Sorting and Filtering Table Data....................................................... 3-12 Customizing the Presentation of Table Data ....................................... 3-12 Paging Through Data...................................................................... 3-13 Console Fonts ................................................................................ 3-13 Downloading Administrator Console Data ......................................... 3-14 Entering IP Addresses and Fully Qualified Domain Names .................. 3-14 Restarting the BSC to Activate Configuration Information ..................... 3-15 Chapter 4 Networks Defining the BSC Protected Physical Interface....................................... 4-2 Creating a VLAN on the Protected Side (Optional)............................ 4-5 Configuring a Protected Virtual Interface (Optional) .......................... 4-7 Configuring the BSC Managed Interface ............................................. 4-7 Configuring Wireless Client IP Address Assignment .......................... 4-9 Creating a VLAN on the Managed Side of Your Network ................ 4-17 Configuring a Managed Remote Subnet ........................................ 4-19 Configuring a Managed Virtual Interface....................................... 4-23 Configuring the Admin Interface....................................................... 4-24 Configuring Failover Parameters ...................................................... 4-25 Normal Operation ...................................................................... 4-26 Failover State ............................................................................. 4-26 iv Contents Recovery State............................................................................ 4-26 Configuring the Primary BSC........................................................ 4-26 Completing the Failover Setup ...................................................... 4-28 Configuring Static Routes ................................................................ 4-28 Configuring Multicast Routing .......................................................... 4-30 Configuring AppleTalk Routing ........................................................ 4-31 AppleTalk Networks: Key Concepts .............................................. 4-31 Configuration Procedure .............................................................. 4-33 Chapter 5 Authentication Using Internal Database Local BSC User Authentication ........................................................... 5-2 Creating/Editing/Deleting a Local User Account .................................. 5-2 Defining MAC Address Authentication ................................................ 5-5 Chapter 6 Authentication Using External Servers An Overview of External User Authentication ....................................... 6-2 RADIUS Authentication...................................................................... 6-2 LDAP/Active Directory Authentication ................................................. 6-6 SIP2 Authentication ........................................................................ 6-10 NTLM Authentication ...................................................................... 6-12 Transparent NTLM Authentication..................................................... 6-14 Transparent 802.1x Authentication................................................... 6-17 The BSC Internal 802.1x Authentication Server .................................. 6-19 Kerberos Authentication .................................................................. 6-23 Cosign Authentication..................................................................... 6-24 Pubcookie Authentication ................................................................ 6-27 CAS Authentication ........................................................................ 6-30 iPass Client Authentication............................................................... 6-32 Transparent Certificate Authentication............................................... 6-32 Testing an External Authentication Server .......................................... 6-34 Chapter 7 RADIUS Accounting Defining a RADIUS Accounting Server ................................................ 7-2 Attributes Sent to External RADIUS Accounting Server by BSC................ 7-3 Chapter 8 Roles and Role Elements Defining User Roles to Enforce Network Usage Policies......................... 8-2 An Overview of Roles ....................................................................... 8-2 An Example of Role-based Authorization............................................. 8-2 Role Inheritance ............................................................................... 8-3 Defining a Role ................................................................................ 8-4 Modifying a Role ........................................................................... 8-10 Creating Role Elements ................................................................... 8-10 Creating Destinations and Destination Groups ................................... 8-10 Creating a Single Device Destination ............................................ 8-11 Creating a Network Space Destination.......................................... 8-12 Creating Destination Groups ........................................................ 8-12 Creating Network Services and Services Groups................................ 8-13 Creating a Network Service ......................................................... 8-14 Creating Network Service Groups ................................................ 8-16 Creating Schedules and Schedule Groups ......................................... 8-17 BlueSecure™ Controller Setup and Administration Guide v Contents Creating a Schedule ................................................................... 8-17 Creating Schedule Groups ........................................................... 8-19 Creating Locations and Location Groups ........................................... 8-19 Creating a User Location ............................................................. 8-20 Creating User Location Groups..................................................... 8-20 Chapter 9 Voice Over WLAN Support Configuring General VoWLAN Settings .............................................. 9-2 Configuring Vendor-specific IP Phone Support...................................... 9-2 Configuring VoWLAN QoS ............................................................... 9-3 Chapter 10 General BSC Operational Settings HTTP Server Settings ....................................................................... 10-2 Intrusion Detection System ............................................................... 10-5 Configuration Procedure .............................................................. 10-7 SNMP Agent ................................................................................. 10-8 Automatic Backup of the BSC Database ............................................ 10-9 System Time and Date Settings....................................................... 10-10 Mail Server Access ....................................................................... 10-11 Public Access Networks ................................................................ 10-12 Event Logging and Connection Tracking.......................................... 10-14 Threshold Values .......................................................................... 10-17 Domain Name System (DNS) Settings ............................................. 10-18 Digital Certificates ........................................................................ 10-20 Overview................................................................................. 10-20 How the BSC Uses Certificates ................................................... 10-20 Configuring External Server Authentication Over SSL .................... 10-21 Requesting and Installing an IPSec Authentication Certificate.......... 10-22 Miscellaneous BSC Options........................................................... 10-24 Chapter 11 Web Logins Customizing the User Login Page ..................................................... 11-2 The Appearance of the User Login Page ........................................ 11-2 Customizing the Login Form and HTML Body of Login Page ............. 11-3 Customizing the Right Side of the User Login Page.......................... 11-6 Redirecting Clients to an External Server for Authentication ............ 11-10 Configuring Hotspot Account Generation..................................... 11-10 Uploading Image/Media Files for the User Login Page ..................... 11-17 Translating User Login Pages ......................................................... 11-18 Defining a User Login Page Language ......................................... 11-20 Editing a User Login Page Language ........................................... 11-22 Installing a Custom SSL Login Certificate ......................................... 11-22 Requesting a Certificate............................................................. 11-23 Uploading a Replacement SSL Certificate You Already Have.......... 11-25 Recovering the Private Key......................................................... 11-26 Renewing a Custom SSL Certificate ............................................. 11-27 Installing a Wildcard (*) SSL Certificate on Multiple BSCs.............. 11-28 Chapter 12 BlueSecure Access Points Overview ...................................................................................... 12-2 RF Management ......................................................................... 12-3 vi Contents RF Intrusion Detection/RF Containment .......................................... 12-3 Deploying BSAPs on the Same Layer-2 Subnet as the BSC ................... 12-3 Deploying BSAPs with Layer-3 Connectivity to the BSC........................ 12-4 How a BSAP Discovers BSCs ........................................................... 12-5 How a BSAP Selects a Home BSC .................................................... 12-6 Uploading BSAP Firmware Files ....................................................... 12-6 Configuring Global Miscellaneous Non-Radio Settings........................ 12-8 Configuring Global Radio Settings ................................................. 12-10 802.11b/g/n Radio Configuration............................................. 12-10 802.11a/n Radio Configuration ................................................ 12-18 Editing Settings for an Individual BSAP............................................ 12-19 Creating SSIDs............................................................................. 12-20 BSAP Authentication Options ..................................................... 12-20 BSAP Data Encryption Options ................................................... 12-21 SSID Configuration Procedure .................................................... 12-22 Creating BSAPs............................................................................ 12-24 Enabling BSAP Service.................................................................. 12-26 Displaying Configured BSAPs ........................................................ 12-29 Chapter 13 RF Intrusion Detection and Containment Identifying Authorized RF Stations on Your Network ........................... 13-2 Configuring RF Alarms .................................................................... 13-3 Configuring Manual Containment .................................................... 13-6 Configuring Autocontainment........................................................... 13-6 Chapter 14 Secure Mobility® MatriX An Overview of the Secure Mobility MatriX ....................................... 14-2 Reasons for Deploying a Secure Mobility MatriX ............................ 14-2 General Configuration Procedure ................................................. 14-3 Secure Mobility® ........................................................................... 14-3 How Secure Mobility Works ........................................................ 14-4 Network Requirements................................................................. 14-5 Step 1: Designate and Set Up the Mobility Node List Master............ 14-6 Step 2: Create a List of Nodes ..................................................... 14-7 Step 3: Set Up Secure Mobility® on the Nodes .............................. 14-8 Step 4: Restart Services on the Mobility Master and All Nodes ......... 14-9 Tracking Secure Mobility Status .................................................... 14-9 Enabling VLAN Roaming Across LSG BSCs .................................. 14-10 Replication .................................................................................. 14-10 A Comparison of Standard and Cascaded Replication .................. 14-11 Step 1: Set Up Replication on the Master..................................... 14-12 Step 2: Create a List of Replication Nodes on Master.................... 14-12 Step 3: Set Up Replication on the Nodes ..................................... 14-13 Step 4: Set Up Cascaded Replication (More than Ten BSCs) .......... 14-14 Step 5: Restart Services on the Master and All Nodes ................... 14-15 Configuring a Replication Override............................................. 14-15 Tracking Replication Status ........................................................ 14-16 Load Sharing ............................................................................... 14-17 Typical Configuration ................................................................ 14-17 Network Requirements............................................................... 14-18 Configuring BSC Load Sharing (Single Subnet, NAT Enabled)........ 14-18 Configuring BSC Load Sharing (No NAT) .................................... 14-22 BlueSecure™ Controller Setup and Administration Guide vii Contents Verifying Your Load Sharing Configuration .................................. 14-23 Chapter 15 Status Monitoring Active User Connections ................................................. 15-2 Displaying Active User Status ....................................................... 15-2 Forcing a User Logout ................................................................. 15-3 Monitoring a User’s IDS Status ..................................................... 15-3 Monitoring Connected Access Points ............................................. 15-4 Monitoring RF IDS Alarms ............................................................ 15-6 Monitoring Devices in RF Autocontainment..................................... 15-7 Monitoring User Connections Graphically...................................... 15-7 Viewing the BSC Event Log............................................................ 15-10 Displaying a BSC Status Summary.................................................. 15-11 Displaying BSC Secure Mobility® Status ......................................... 15-12 Displaying Load Sharing Status ...................................................... 15-12 Displaying Power over Ethernet (PoE) Status..................................... 15-13 Generating and Displaying BSC Reports ......................................... 15-13 Using Pre-defined Report Definitions ............................................ 15-14 Creating a Custom Report Definition ........................................... 15-14 Creating a BSC Report .............................................................. 15-15 Displaying or Delivering a Report ............................................... 15-16 Performing Standard Network Diagnostic Tests ................................ 15-17 Capturing Network Traffic Data ..................................................... 15-20 Chapter 16 Maintenance Restarting, Rebooting, and Shutting Down the BSC............................. 16-2 Configuration Backup and Restore.................................................... 16-2 Backup ...................................................................................... 16-3 Restore ...................................................................................... 16-3 Show Tech ................................................................................. 16-4 Resetting the BSC to its Default Settings ......................................... 16-4 Save DHCP Leases...................................................................... 16-5 Export Firewall Policies ................................................................ 16-5 Export BSAP-1840 Licenses.......................................................... 16-6 Upgrading to a New Version of Runtime Software.............................. 16-6 Upgrading a Single BSC Network ................................................ 16-6 Upgrading Multiple BSCs in a Replication Configuration ................. 16-7 Upgrading a Failover BSC Configuration....................................... 16-8 Software Patches............................................................................ 16-8 Installing a Patch ........................................................................ 16-8 Uninstalling a Patch .................................................................... 16-9 Switching Between BSC Runtime Software Versions ............................ 16-9 Exporting and Importing BSC Bulk Data Files ................................... 16-10 Exporting Data Files .................................................................. 16-10 Importing Data Files .................................................................. 16-11 Exporting BSC Log Records ........................................................... 16-12 Licenses ...................................................................................... 16-12 BlueProtect ............................................................................... 16-13 BSC ........................................................................................ 16-13 BSAP 1840.............................................................................. 16-14 Appendix A An Overview of Virtual LANs viii Contents LANs vs. VLANs ............................................................................... A-2 Tagging Formats .............................................................................. A-2 The Bluesocket BSC VLAN Implementation........................................... A-2 Pass-Through VLANs ..................................................................... A-3 Termination VLANs ....................................................................... A-3 Initiation/Switched VLANs ............................................................. A-4 Enforcing Network Usage Policies with VLANs..................................... A-5 Appendix B Provisioning Network DHCP Servers to Support BSAPs Overview ........................................................................................ B-2 Provisioning a Microsoft DHCP Server ................................................ B-2 Provisioning an Internet Systems Consortium (ISC) DHCP Server ............. B-6 Configuring a Cisco IOS DHCP Server................................................ B-7 Appendix C Endpoint Scanning Overview ........................................................................................ C-2 About Rules ..................................................................................... C-2 Client Browser Requirements.............................................................. C-3 Java Agent ...................................................................................... C-3 Agent Platform Support.................................................................. C-3 Applet Loader Page ...................................................................... C-4 Entering BlueProtect License on the BSC’s Manage License Page ............ C-4 Configuring Landing Page Text .......................................................... C-4 Creating a BlueProtect Policy ............................................................. C-5 Remediation .................................................................................... C-8 Assigning a BlueProtect Policy to a User Role ....................................... C-9 Mobility Matrix ................................................................................ C-9 Client Examples ............................................................................... C-9 Appendix D Serial Port Access to Essential Functions Listing of Accessible Functions............................................................ D-2 Access Procedure ............................................................................. D-2 Appendix E Contacting Bluesocket, Inc. Obtaining Technical Support ............................................................. E-2 Contacting Bluesocket Customer Support............................................. E-2 BlueSecure™ Controller Setup and Administration Guide ix Contents Figures Figures x Figure Figure Figure Figure Figure Figure Figure Figure Figure Figure Figure Figure Figure Figure Figure Figure Figure Figure Figure Figure Figure Figure Figure Figure Figure Figure Figure Figure Figure Figure Figure Figure Figure Figure Figure Figure Figure Figure Figure Figure Figure Figure Figure Figure Figure Figure Figure Figure Figure Figure Figure x 1-1: 1-2: 1-3: 1-4: 1-5: 1-6: 1-7: 1-8: 1-9: 1-10: 2-1: 2-2: 2-3: 2-4: 2-5: 2-6: 2-7: 2-8: 2-9: 3-1: 3-2: 3-3: 3-4: 3-5: 3-6: 3-7: 3-8: 3-9: 3-10: 4-1: 4-2: 4-3: 4-4: 4-5: 4-6: 4-7: 4-8: 4-9: 4-10: 4-11: 4-12: 4-13: 4-14: 4-15: 4-16: 4-17: 4-18: 4-19: 4-20: 4-21: 4-22: The Role of the Bluesocket BSC in a Wireless LAN ............................ 1-2 The Bluesocket Secure Mobility MatriX Architecture........................... 1-5 A Sample BSC User Login Page...................................................... 1-6 Bluesocket BSC-5200 .................................................................... 1-7 Bluesocket BSC-2100 .................................................................... 1-8 Bluesocket BSC-1200 .................................................................... 1-8 Bluesocket BSC-600 ...................................................................... 1-9 Failover BSCs............................................................................. 1-11 Failover within a BSC Pair ........................................................... 1-12 Recovery of the Failed BSC .......................................................... 1-12 BSC-2200/3200/5200 Displays, Controls, and Connectors ............. 2-4 BSC-2100 Displays, Controls, and Connectors ................................. 2-5 BSC-1200 Displays, Controls, and Connectors ................................. 2-7 BSC-600 LEDs, Controls, and Connectors ........................................ 2-8 Attaching a Rubber Pad to a BSC-2100/5200 Bumper ................... 2-11 Attaching the BSC-2100/5200 Chassis Desktop Bumper................. 2-11 Attaching the BSC-2100/5200 Chassis Cap ................................. 2-12 Attaching the Mounting Brackets to the BSC Chassis ....................... 2-12 Location of BSC-600 PoE Power Supply Connector ......................... 2-15 BSC Administrator Login Page ........................................................ 3-2 The BSC Administrator Console ...................................................... 3-3 New Admin User Page.................................................................. 3-5 Changing Your Login Password ...................................................... 3-6 Security Certificate Alert ................................................................ 3-7 SSL Certificate Dialog.................................................................... 3-7 Navigating the Administrator Console ............................................. 3-8 Site Map ................................................................................... 3-10 Customizing the Presentation of Table Data.................................... 3-13 Using the Pop Up List Feature ....................................................... 3-15 Edit Protected Interface (eth0) Page ................................................. 4-2 Link Aggregation Interfaces on the BSC-5200 .................................. 4-5 Create a Protected VLAN Page....................................................... 4-6 Create a Protected Virtual Interface Page ......................................... 4-7 Edit Managed Interface (eth1) Page ................................................ 4-8 Completed DHCP Relay Options................................................... 4-10 Enabling the BSC DHCP Server .................................................... 4-12 DHCP Settings for Managed Interface (eth1) Page .......................... 4-13 Fixed IP Address Assignments for Wireless Clients .......................... 4-16 NAT Settings for Managed Interface Page ..................................... 4-17 Create a Managed VLAN Page.................................................... 4-18 A Sample Managed Remote Subnet .............................................. 4-19 Create a Managed Remote Subnet Page ....................................... 4-20 DHCP Settings for New Managed Remote Subnet Page................... 4-21 Create a Managed Virtual Interface Page ...................................... 4-23 Edit Admin Interface Page............................................................ 4-25 Failover - Normal State................................................................ 4-26 Failover - Failover State ............................................................... 4-27 Failover - Recovery State.............................................................. 4-27 Edit Failover (Eth2) Page.............................................................. 4-28 Sample BSC Routing Table........................................................... 4-29 Create a Static Route Entry........................................................... 4-29 Contents Figure Figure Figure Figure Figure Figure Figure Figure Figure Figure Figure Figure Figure Figure Figure Figure Figure Figure Figure Figure Figure Figure Figure Figure Figure Figure Figure Figure Figure Figure Figure Figure Figure Figure Figure Figure Figure Figure Figure Figure Figure Figure Figure Figure Figure Figure Figure Figure Figure Figure Figure Figure Figure Figure 4-23: 4-24: 4-25: 5-1: 5-2: 6-1: 6-2: 6-3: 6-4: 6-5: 6-6: 6-7: 6-8: 6-9: 6-10: 6-11: 6-12: 6-13: 6-14: 7-1: 8-1: 8-2: 8-3: 8-4: 8-6: 8-7: 8-8: 8-9: 8-10: 8-5: 8-11: 8-12: 8-13: 8-14: 8-15: 8-16: 8-17: 8-18: 8-19: 9-1: 9-2: 10-1: 10-2: 10-3: 10-4: 10-5: 10-6: 10-7: 10-8: 10-9: 10-10: 10-11: 10-12: 10-13: Admin Interface in Network Routing Table ..................................... 4-30 Enabling Multicast Routing ........................................................... 4-31 Enabling AppleTalk Routing ......................................................... 4-33 New Local User Page.................................................................... 5-3 New MAC Device Page ................................................................ 5-5 New RADIUS Server Page ............................................................. 6-3 New LDAP/Active Directory Server Page ......................................... 6-7 New SIP2 Server Page ................................................................ 6-11 New NTLM Server Page .............................................................. 6-12 New Transparent NTLM Windows Server Page .............................. 6-15 User Authentication in an 802.1x Environment ............................... 6-17 New Transparent 802.1x Server Page .......................................... 6-18 Edit the Local 802.1x Server Page ................................................ 6-20 New Kerberos Server Page .......................................................... 6-23 New Cosign Server Page ............................................................ 6-25 New Pubcookie Server Page ........................................................ 6-28 New CAS Server Page ................................................................ 6-30 Enabling Transparent Certificate Authentication .............................. 6-33 External Authentication Server Test Page........................................ 6-35 New RADIUS Accounting Page ...................................................... 7-2 Role-based Authorization for a Registered User ................................ 8-3 Role-based Authorization for an Unregistered User ........................... 8-3 Create a Role Page....................................................................... 8-5 Enabling Machine Authentication on Windows Zero-Config Supplicant8-7 Mapping Role Placement Based on Username .................................. 8-8 Successful Machine Authentication.................................................. 8-8 Successful User Login .................................................................... 8-8 Failed User Login because Machine Authentication Failed ................. 8-8 Log Message upon Failure ............................................................. 8-8 Enabling Prerequisite Machine Authentication Role ........................... 8-8 Create a (Destination) Host Page .................................................. 8-11 Create a (Destination) Network Page ............................................ 8-12 Create a (Destination) Group Page ............................................... 8-13 Create a Service Page................................................................. 8-15 Create a (Service) Group Page..................................................... 8-17 Create a Schedule Page .............................................................. 8-18 Create a (Schedule) Group Page .................................................. 8-19 Create a User Location Page ........................................................ 8-20 Create a (Location) Group Page ................................................... 8-21 VoWLAN General Settings Page .................................................... 9-2 IP Phones Settings Page ................................................................. 9-2 HTTP Settings Page ..................................................................... 10-2 BSC IDS Host State Model ........................................................... 10-6 Intrusion Detection System Settings Page ........................................ 10-8 SNMP Settings Page ................................................................... 10-9 Auto Backups Page ................................................................... 10-10 BSC Time Settings Page............................................................. 10-11 BSC Email Settings Page............................................................ 10-12 Public Access Settings Page ....................................................... 10-12 Logging Settings Page ............................................................... 10-15 Thresholds Page ....................................................................... 10-17 DNS Proxy Page....................................................................... 10-19 Certificate Management Page .................................................... 10-21 IPSec Certificate Signing Request Generation Page ....................... 10-23 BlueSecure™ Controller Setup and Administration Guide xi Contents Figure Figure Figure Figure Figure Figure Figure Figure Figure Figure Figure Figure Figure Figure Figure Figure Figure Figure Figure Figure Figure Figure Figure Figure Figure Figure Figure Figure Figure Figure Figure Figure Figure Figure Figure Figure Figure Figure Figure Figure Figure Figure Figure Figure Figure Figure Figure Figure Figure Figure Figure Figure Figure Figure xii 10-14: 10-15: 11-1: 11-2: 11-3: 11-4: 11-5: 11-6: 11-7: 11-8: 11-9: 11-10: 11-11: 11-12: 11-13: 11-14: 11-15: 11-16: 11-17: 12-1: 12-2: 12-3: 12-4: 12-5: 12-6: 12-7: 12-8: 12-9: 12-10: 12-11: 12-12: 13-1: 13-2: 13-3: 13-4: 14-1: 14-2: 14-3: 14-5: 14-4: 14-6: 14-8: 14-7: 14-9: 14-10: 14-11: 14-12: 14-13: 14-15: 14-14: 14-16: 14-17: 14-18: 14-19: IPSec CSR Generated Page........................................................ 10-23 Miscellaneous Settings Page ...................................................... 10-24 Default User Login Page .............................................................. 11-2 Elements of the User Login Page You Can Customize ...................... 11-3 Create New Custom Login Page ................................................... 11-4 Custom Login Page - Edit HTML .................................................... 11-7 Custom Login Page - Edit Redirection........................................... 11-10 Create New Account Link .......................................................... 11-11 Sample Account Selections Page ................................................ 11-12 Hotspot Account Generation Page .............................................. 11-14 Friends and Family Freespot....................................................... 11-16 Guest DNA .............................................................................. 11-17 File Uploads Page..................................................................... 11-18 Create a User Login Page Language Page ................................... 11-20 SSL Certificate Generation Page ................................................. 11-23 SSL CSR Generated Page .......................................................... 11-24 Uploaded Certificate ................................................................. 11-25 Certificate Management Page .................................................... 11-25 SSL Certificate Generation Page ................................................. 11-27 BSAPs Automatically Discover BSCs Across L2/L3 Networks ............ 12-2 Deploying BSAPs on the Same Layer-2 Subnet as the BSC ............... 12-4 Deploying BSAPs Across a Routed Network ................................... 12-4 AP Firmware Page ...................................................................... 12-6 Edit AP Firmware Page ................................................................ 12-7 Edit AP System Settings - Global Page ........................................... 12-8 Edit 802.11b/g/n Settings - Global Page ................................... 12-13 Edit 802.11a/n Settings - Global Page ....................................... 12-18 Create new SSID Page .............................................................. 12-22 Create New AP Page ................................................................ 12-25 Enable BSAP Service Page......................................................... 12-26 Configured BSAPs Page ............................................................ 12-29 Create new Station Page ............................................................. 13-2 Configured BSAP Sensor Alarms................................................... 13-5 Alarm Configuration Page ........................................................... 13-6 Autocontainment Configuration Page ............................................ 13-7 The Bluesocket Secure Mobility MatriX Architecture......................... 14-2 Secure Mobility: Phase 1 ............................................................. 14-4 Secure Mobility: Phase 2 ............................................................. 14-4 Secure Mobility: Phase 4 ............................................................. 14-5 Secure Mobility: Phase 3 ............................................................. 14-5 BSC Interface Requirements for Secure Mobility® ........................... 14-6 Edit the Secure Mobility Node Page.............................................. 14-7 BSC Secure Mobility Setup Page .................................................. 14-7 BSC Secure Mobility Setup Page .................................................. 14-8 Standard and Cascaded Replication Configurations ..................... 14-11 Configuring Replication on the Master BSC.................................. 14-12 Create a Node Page................................................................. 14-13 Configuring Replication on a Node BSC ..................................... 14-14 BSC Replicated Data Override Page ........................................... 14-15 Configuring a Replication Master/Node...................................... 14-15 A Typical Load Sharing Configuration ......................................... 14-17 Load Sharing Nodes Page ......................................................... 14-19 Defining LSG Member Settings ................................................... 14-20 Configuring Load Sharing on the Master ..................................... 14-21 Contents Figure Figure Figure Figure Figure Figure Figure Figure Figure Figure Figure Figure Figure Figure Figure Figure Figure Figure Figure Figure Figure Figure Figure Figure Figure Figure Figure Figure Figure Figure Figure Figure Figure Figure Figure Figure Figure Figure Figure Figure Figure Figure Figure Figure Figure Figure Figure Figure Figure Figure Figure Figure Figure Figure 14-20: 14-21: 14-22: 14-25: 14-26: 14-23: 14-24: 15-1: 15-2: 15-3: 15-4: 15-6: 15-5: 15-7: 15-8: 15-9: 15-10: 15-11: 15-12: 15-13: 15-14: 15-15: 15-16: 16-1: 16-2: 16-3: 16-4: 16-5: 16-6: 16-7: 16-8: 16-9: 16-10: 16-11: 16-12: 16-13: A-1: A-2: A-3: A-4: B-1: B-3: B-2: B-4: B-5: B-6: B-7: B-8: B-9: C-1: C-2: C-3: C-4: D-1: Configuring Load Sharing on a Node ......................................... 14-22 Verifying the Protected Interface Address Settings ......................... 14-24 Load Sharing Setup on the Load Sharing Master........................... 14-24 Status Summary for an Operational LSG...................................... 14-25 Status Summary for a Load Sharing Failover Event ........................ 14-25 Load Sharing Setup on the Load Sharing Node ............................ 14-25 Verifying the Load Sharing Failover Event .................................... 14-25 Active Connections Page ............................................................. 15-2 Monitoring Connected Access Points ............................................. 15-4 Displaying Detailed Access Point Information ................................. 15-5 Received Sensor Alarms .............................................................. 15-6 A Sample Graphical Monitor Display............................................ 15-8 Contained Devices Page.............................................................. 15-8 Filter Users Dialog....................................................................... 15-9 BSC Event Log Page.................................................................. 15-10 BSC Summary Page .................................................................. 15-11 Load Sharing Status Summary .................................................... 15-13 Power over Ethernet (PoE) Status Summary ................................... 15-13 Create a Report Definition Page ................................................. 15-14 Create a Report Page................................................................ 15-15 Reports Page............................................................................ 15-16 Task Execution Menu Page ........................................................ 15-18 Traffic Capture Page ................................................................. 15-20 BSC Restart Page ........................................................................ 16-2 BSC Configuration Backup and Restore Page (Backup).................... 16-3 BSC Configuration Backup and Restore Page (Restore) .................... 16-4 Restore Default Settings Dialog ..................................................... 16-5 BSC Update Page....................................................................... 16-7 Manage Patches for BSC Page ..................................................... 16-9 BSC Switch Tool Page ............................................................... 16-10 BSC Bulk Export Page ............................................................... 16-10 BSC Bulk Export Page ............................................................... 16-11 Confirm Import Page ................................................................. 16-11 BSC Log Record Export Page ..................................................... 16-12 Manage Licenses page.............................................................. 16-13 BSAP 1840 Possible Models ...................................................... 16-14 Sample VLANs ............................................................................. A-2 A Pass-through VLAN .................................................................... A-3 A Termination VLAN ..................................................................... A-3 An Initiation VLAN ........................................................................ A-4 Deploying BSAPs Across a Routed Network ..................................... B-2 Entering DHCP Vendor Class Information......................................... B-3 Defining the BSAP Vendor Class ..................................................... B-3 The BSAP Vendor Class is Now Listed ............................................. B-4 The Predefined Options and Values Dialog ...................................... B-4 The Option Type Dialog ................................................................ B-4 Configuring Scope Options............................................................ B-5 The Scope Options Dialog ............................................................. B-5 The Defined Scope Option............................................................. B-6 HTTP Settings Page - BlueProtect Endpoint Scanning .......................... C-5 Edit BlueProtect Policy ................................................................... C-7 Client Display when Required Products Not Installed ....................... C-10 Overriding a Client Role .............................................................. C-10 Recommended Null-modem Serial Cable Pinout................................ D-3 BlueSecure™ Controller Setup and Administration Guide xiii Contents Tables Table Table Table Table Table Table Table Table Table Table Table xiv 1-1: 2-1: 2-2: 3-1: 3-2: 3-3: 3-4: 7-1: 11-1: 13-1: 15-1: Bluesocket BSC Model Specifications .............................................. 1-9 BSC-1200 Status LEDs ................................................................... 2-7 BSC-600 Status LEDs ..................................................................... 2-8 Administrator Console Command Buttons and Icons ........................ 3-11 Sorting and Filtering Administrator Console Table Data ................... 3-12 Administrator Console Page Controls ............................................ 3-13 Administrator Console Font Controls.............................................. 3-13 RADIUS Accounting Attributes Sent from the BSC .............................. 7-3 Required Authorize.net Settings .................................................. 11-12 BSAP Sensor Alarms ................................................................... 13-3 Report Display and Delivery Icons............................................... 15-17 About This Guide The BlueSecure™ Controller Setup and Administration Guide provides complete instructions for installing, powering up, configuring, and managing the BlueSecure Controller. This section introduces the document and describes: • Audience • Document Organization • Notational Conventions • Related Documentation • Terminology Audience The BlueSecure™ Controller Setup and Administration Guide is written for network administrators who will physically install and power up the BlueSecure Controller (BSC), and then use its HTML-based administrator interface to configure the Controller for use in their network. We assume our audience is knowledgeable of and has experience administering switches, routers, or similar computer hardware. Document Organization The information in this guide is organized as follows: • Chapter 1, "An Overview of the BlueSecure Controller", describes BlueSecure Controller features and functions and provides an overview of how the Controller can be used to secure and manage 802.11 wireless networks. • Chapter 2, "Installation", provides complete procedures for mounting the BlueSecure Controller, connecting the Controller to your network, and powering up the Controller. • Chapter 3, "Administrator Console", gives an overview of the BlueSecure Controller’s HTML-based administrator console and its use to configure and monitor a BlueSecure Controller. • Chapter 4, "Networks", discusses the BSC Protected Physical Interface, the BSC Managed Interface, failover parameters, static routes, multicast routing, and AppleTalk routing. • Chapter 5, "Authentication Using Internal Database", discusses using the BSC's internal database for user authentication and authenticating and assigning a role using media access control (MAC) addresses for wireless devices do not support login via web browser. It also describes creating, editing, and deleting local user accounts. • Chapter 6, "Authentication Using External Servers", discusses iPass client authentication, RADIUS authentication, LDAP/active directory BlueSecure™ Controller Setup and Administration Guide xv About This Guide authentication, NTLM authentication, transparent NTLM authentication, transparent 802.1x authentication, the BSC internal 802.1x authentication server, Kerberos authentication, cosign authentication, pubcookie authentication, CAS authentication, transparent certificate authentication, and testing an external authentication server. xvi • Chapter 7, "RADIUS Accounting", discusses how to set up RADIUS accounting, used to record network activity and statistics including tracking user logins. It also discusses the attributes sent to an external RADIUS accounting server by the BSC. • Chapter 8, "Roles and Role Elements", discusses defining user roles to enforce network usage policies, role-based authorization, role inheritance, defining/ modifying a role, and creating role elements, destinations, network services, schedules, and locations. • Chapter 9, "Voice Over WLAN Support", discusses general VoWLAN settings, vendor-specific IP phone support, and VoWLAN QoS. • Chapter 10, "General BSC Operational Settings", discusses HTTP server settings, intrusion detection system, the SNMP agent, automatic backup of the BSC database, system time and date settings, public access networks, mail server access, event logging and connection tracking, threshold values, domain name system (DNS) settings, and miscellaneous BSC options. • Chapter 11, "Web Logins", discusses customizing the user login page, translating user login pages, installing a custom SSL login certificate, and configuring hotspot account generation. • Chapter 12, "BlueSecure Access Points", discusses deploying BSAPs on the same layer-2 subnet as the BSC, deploying BSAPs with layer-3, connectivity to the BSC, how a BSAP discovers BSCs, how a BSAP selects a home BSC, uploading BSAP firmware files, configuring global miscellaneous non-radio settings, configuring global radio settings, editing settings for an individual BSAP, creating SSIDs, creating BSAPs, enabling BSAP service, and displaying configured BSAPs. • Chapter 13, "RF Intrusion Detection and Containment", discusses identifying authorized RF stations on your network, configuring RF alarms, and configuring autocontainment. • Chapter 14, "Secure Mobility® MatriX", provides complete procedures for configuring multiple BlueSecure Controllers for use in relatively larger networks that may be segmented in different subnets and physical locations. Setup and use of Bluesocket’s Replication, Load Sharing, and Secure Mobility® features for multipleBSC networks are described. • Chapter 15, "Status", provides procedures for performing common network administration tasks such as: monitoring user activity and connection status, viewing the Controller’s summary log, exporting Controller database information, performing standard network diagnostics, and managing user accounts. • Chapter 16, "Maintenance", describes how to perform common system software administrative tasks such as: restarting Controller services, backing up and restoring the Controller database, upgrading the system software to a new version, installing or removing system software patches, customizing the user login page, installing a custom secure sockets layer (SSL) certificate for user login, and hotspot account generation (i.e., end user credit card billing services). • Appendix A, "An Overview of Virtual LANs," describes the BlueSecure Controller implementation of virtual LANs (VLANs) on both the managed and protected sides of the network. • Appendix B, "Provisioning Network DHCP Servers to Support BSAPs," provides procedures for configuring the DHCP servers on your network to send BSC IP addresses to BSAPs using DHCP vendor-specific option 43. • Appendix C, "Endpoint Scanning," provides procedures for configuring endpoint scanning on the BCS using the fully integrated Check Point Integrity Clientless Security product. • Appendix D, "Serial Port Access to Essential Functions," describes how to use the serial port to access essential functions if you misplace a password or experience an ISP service outage. • Appendix E, "Contacting Bluesocket, Inc.," describes how to contact Bluesocket for additional product information or support. Notational Conventions This guide uses the following notational conventions to convey information: ) Note: Notes call attention to important information. Caution: Cautionary statements call attention to a condition that could result in the loss of data, damage to equipment, or physical injury. Italic text indicates emphasis or highlights the titles of books used in cross-references. Monospace text represents information displayed on the local BlueSecure Controller command console or on other computer displays. Bold monospace text represents information that you enter at the BlueSecure Controller command console or at other computer terminals. Related Documentation Please refer to these other related documents for information about your BlueSecure Controller: • BlueSecure Controller Quick Start Guide - Refer to this document included with your • BlueView™ Management System User Guide - Refer to this document for procedures • BlueSecure Access Point 1500 Installation Guide - Refer to this document included • BlueSecure Access Point 1540 Installation Guide - Refer to this document included • BlueSecure Intrusion Protection System Centralized Sensor Installation Guide - Refer to this document included with your BIPS Centralized Sensor distribution for instructions on physically installing the sensor, connecting it to your network, and configuring it with an IP address. BSC distribution for a concise overview of how to get up and running quickly with your BSC. to manage the BlueSecure Controllers installed on your network from a remote central location using the Bluesocket BlueView Management System. with your BSAP distribution for a concise overview of how to get up and running quickly with the Bluesocket BlueSecure 1500 Access Point. with your BSAP distribution for a concise overview of how to get up and running quickly with the Bluesocket BlueSecure 1540 Access Point. Terminology For brevity, we use the term BSC to refer to the BlueSecure Controller product family as a whole, unless reference to a specific model is required. We use the term BSAP to refer to the BlueSecure Access Point product family as a whole, unless reference to a specific model is required. BlueSecure™ Controller Setup and Administration Guide xvii About This Guide A Glossary is included in this document that defines many terms and acronyms associated with the BlueSecure Controller, the BlueSecure Access Point, and wireless networks. xviii 1 An Overview of the BlueSecure Controller This chapter introduces you to the BlueSecure family of Controllers and Access Points: • An Introduction to the BlueSecure WLAN Solution • The BlueSecure WLAN Solution End-user Experience • BlueSecure Controller Models • Typical BlueSecure WLAN Solution Network Configurations BlueSecure™ Controller Setup and Administration Guide 1-1 Chapter 1: An Overview of the BlueSecure Controller An Introduction to the BlueSecure WLAN Solution The BlueSecure Controller (BSC) product family—BSC-600, BSC-1200, BSC-2100, and BSC-2200/3200/5200 —provides a single scalable solution to the security, Quality of Service (QoS), and WLAN management issues facing institutions, enterprises, and service providers who deploy 802.11-based wireless networks. The BSC hardware resides between the Wireless LAN (WLAN) access points and the wired LAN, and requires no changes to the existing wired LAN or user client software as shown in Figure 1-1. BlueSecure 1500/1540 802.11 a/b/g/n Access Point Firewall Campus/Corporate Network Third-party 802.11a/b/g/n AP BlueSecure Controller Internet Existing LAN Wiring Switch/Hub BlueSecure 1500/1540 802.11 a/b/g/n Access Point LDAP/RADIUS/Kerberos/ Windows Domain Authentication Server Managed Side (WLAN) Protected Side (LAN) Figure 1-1: The Role of the Bluesocket BSC in a Wireless LAN The BSC mediates access between the wireless access points (i.e, the managed side of the network) and the enterprise network or Internet (i.e., the protected side of the network). Two BSCs may be coupled to provide failover operation, and multiple BSCs may be installed for large sites with higher data density requirements. User Authentication To verify the identity of a user, the BSC uses authentication. The user submits a username and password, or other credential from his or her wireless device. The BSC checks its internal user database or other authentication server in turn for a valid match. Upon successful authentication, the BSC grants the user access to the network. If the BSC cannot authenticate the user, the user is denied network access. If 802.1x Transparent or NTLM/Transparent Windows authentication is available on the network, the BSC passively monitors the connection and then transparently authenticates the user into a role without the need for the user to first log into the BSC. The BSC supports use of multiple authentication methods simultaneously. RADIUS Accounting and Hotspot Support Bluesocket allows accounting of bandwidth usage and the option for enterprises to manage fee-based services to generate new sources of income “from the air.” Along with support of RADIUS accounting to track access and usage statistics, the BlueSecure Controllers can also direct appropriate users to secured “walled-garden” access areas, via web pages customized to each location or customer. 1-2 An Introduction to the BlueSecure WLAN Solution Thus, unregistered users can be directed to a secured site to be granted free access or to sign up for “pay-for-use” services online. The BlueSecure Controller provides a hotspot account generation feature that enables you to link an existing online billing/payment transaction account to the BSC so as to allow your wireless end users to purchase and set up their own wireless network access accounts using a credit card. These end user hotspot accounts can be set up to provide hourly, daily, weekly, or monthly wireless access, or to provide unlimited access for a specified duration. Also, you can link each access rate plan to a Role to allow you to control what/when/where/ and how fast the end user can connect to sites. Role-based Authorization After the user is authenticated, the BSC uses role-based authorization to define which network resources and destinations in the enterprise the user may access, the bandwidth he or she may use, and whether a secure tunneling protocol such as IPSec or PPTP is required for the user connection. You, as network administrator, implement role-based authorization by defining roles to enforce network usage policies and then assigning the appropriate role to the user. Remote Management Ease-of-use is a key feature of the BlueSecure Controller. Configuration is achieved through an intuitive secure HTML-based administrator console that enables you to configure the BlueSecure Controller and Access Points using any standard web browser. Additionally, the BlueSecure Controller supports SNMP and xml_rpc based APIs, allowing management via Bluesocket’s BlueView Management System as well as by third-party platforms such as HP OpenView, CA Unicenter, and Tivoli NetView. Scalability As your wireless LAN grows, Bluesocket’s BlueSecure WLAN solution can grow with you. Through Bluesocket’s single component solution, increasing your WLAN is as easy as adding BlueSecure Controllers and Access Points. Because all models of BlueSecure Controllers are interoperable, they can be linked together, providing access for hundreds or even thousands of users. Further, network availability is ensured as all models support the use of a second Controller configured for reduncandy operation. Intrusion Detection and Worm Protection The BlueSecure Controller provides a configurable Intrusion Detection System (IDS) that monitors Wi-Fi users’ data to detect malicious traffic based on the users’ actual behavior without requiring any client-side software. This enables you to automatically block network access to hackers or worm-infected users even for “zero-day” attacks well before traditional signature-based tools have updates available. BlueSecure Access Points Bluesocket manufactures a line of a next-generation, smart access points (APs) that works in conjunction with BlueSecure Controllers for enterprise wireless LAN (WLAN) deployments. BlueSecure Access Points (BSAPs) feature dual radios supporting 802.11a/ b/g/n in a plenum-rated housing with fixed omni-directional antennas (BSAP-1500) or optional external antennas (BSAP-1540). BlueSecure™ Controller Setup and Administration Guide 1-3 Chapter 1: An Overview of the BlueSecure Controller BSAPs are simple to configure (“zero touch”) and require only minimal provisioning to make them fully operational on a WLAN secured and managed by a BlueSecure Controller. BSAPs can be directly attached to any existing Layer-2 or Layer-3 Ethernet switch and communicate with the BSC across any subnet boundary. Once the BSAP has discovered and established Layer-2 or Layer-3 communication with its home (i.e., host) BlueSecure Controller, advanced configuration and provisioning may be applied either to individual BSAPs or globally across the entire WLAN using the BSC’s web-based Administrator Console. Additionally, BlueSecure Access Points provide client load balancing, call admission control, “over the air” QoS, and fast roaming (802.11i key caching) to ensure the WLAN will support low latency applications such as VoIP. You can configure BSAPs to function as access points or RF sensors. The BSC manages and configures BSAPs operating in AP-only mode, dual mode (AP and/sensor mode), or sensor-only mode, and uses BSAPs operating in sensor mode to perform RF intrusion detection as described in“RF Intrusion Detection/RF Containment” on page 1-4. RF Management To overcome the various sources of RF noise and interference, and user loads that can impede the performance of access points on your WLAN, the BSC incorporates “DynamicRF™” functionality for use with BlueSecure Access Points. Using its DynamicRF functionality, the BSC adjusts the radio channel and power settings of BSAPs under its control, whenever the BSC detects any non-optimal environmental conditions such as: • general interference or noise • co-channel interference introduced by a neighboring AP • loss of connectivity to a BSAP • poor wireless client characteristics (low RSSIs, multiple failures or retries, etc.) • high user load You can enable the DynamicRF functionality on a global basis for all BlueSecure Access Points connected to a BSC or you can selectively enable/disable DynamicRF on a perBSAP basis. RF Intrusion Detection/RF Containment The BSC detects and protects against rogue devices, ad-hoc networks, and a large number of WLAN Denial of Service (DoS) and spoofing attacks. The BSC provides RF intrusion detection by analyzing the data collected from its BSAPs operating in dual AP/sensor mode or sensor-only mode to detect attacks, vulnerabilities, and rogue devices in the RF space. Should a rogue AP or client be discovered, the BSC configures the BSAP nearest the rogue device to initiate containment using 802.11 de-authentication and/or disassociation messages. Up to five BSAPs can participate in the containment if range permits. The BSAPs participating in the rogue containment remain online for wireless access during the containment period. All RF IDS alarms issued by a BSAP automatically generate a corresponding SNMP trap message and syslog message. 1-4 The BlueSecure WLAN Solution End-user Experience VoIP Protocols/VoWLAN Support You can configure the BSC to support Voice-over-WLAN (VoWLAN) phones by enabling VoIP protocols such as H.323, Session Initiation Protocol (SIP), and Cisco Signaling Connection Control Part (SCCP) for stateful inspection by the BSC. Additionally, you can configure vendor-specific IP phones (Polycom, Cisco, Skype, and Vocera), and systemlevel QoS for voice traffic. Secure Mobility® MatriX Where multiple BlueSecure Controllers are deployed across multiple WLANs, Bluesocket provides centralized management and control through its Secure Mobility MatriX architecture, as illustrated in the following figure. The BlueSecure Controllers comprising the MatriX communicate with each other in real time enabling seamless secure roaming, policy enforcement, configuration replication, load sharing, and high availability. Figure 1-2: The Bluesocket Secure Mobility MatriX Architecture The BlueSecure WLAN Solution End-user Experience As with the introduction of any new technology to your network, it is important to understand how the end-user population uses and experiences the technology. The enduser experience of the BlueSecure Controller WLAN solution largely depends on the authentication method(s) you enable, seamless secure roaming across multiple WLAN and the reliable, low latency RF environment supported by the BlueSecure Access Points. The BlueSecure Controller can support multiple authentication methods simultaneously. Transparent Authentication With some authentication methods the BlueSecure Controller is transparent to the user. These methods include transparent NTLM, transparent 802.1x, and MAC-based authentication. A transparent domain authentication means that the wireless user authentication process is no different than that on a wired user. The BlueSecure Controller is intelligent and identifies users who are trying to log into the domain and dynamically communicates with the domain controllers defined in the Bluesocket BSC configuration. If successful, the user is not only logged into the domain but is also placed into a role in the BlueSecure Controller based on which domain controller the user authenticated against, or some user attribute returned by Active Directory. BlueSecure™ Controller Setup and Administration Guide 1-5 Chapter 1: An Overview of the BlueSecure Controller Web-based User Logins When leveraging the BSC's native authentication directory, or an external RADIUS or LDAP server, a user typically authenticates via an SSL login page returned to the user when he or she launches a web browser. The following figure shows a sample user login page. Figure 1-3: A Sample BSC User Login Page Customizing the User Login Page You can customize the BSC user login page using standard HTML to create the look, feel, or branding desired. Many BSC administrators also include instructions, usage/policy statements and tech support information on the login page. Typically, the login page provides a username and password text box for “registered users” and possibly a “guest login” text box. Bluesocket provides default user login prompts in fourteen languages: Catalan, Chinese (Simplified), Chinese (Traditional), Czech, Dutch, English, French, German, Italian, Japanese, Korean, Portuguese, Spanish, and Swedish. You can also supply your own login prompt translations in other languages including Asian languages requiring multi-byte character sets. You can create multiple custom user login pages to display for each possible user location (i.e., physical interface, VLAN, or remote subnet) in your network. The UnRegistered Role To enable use of web-based user logins, the BlueSecure Controller provides a default “unregistered” role. The un-registered role is a special role into which users/devices are placed after they get their IP address. The un-registered role only allows DNS outgoing (from the wireless-to-wired direction in the stateful firewall). DNS is allowed so that users can launch their browsers and make HTTP requests. The BlueSecure Controller intercepts this web page request and returns the customized user login page. Until a user logs in, he or she will not be granted any access to the network. Once the user authenticates, he or she is placed into a role. Guest or Visitor Access You may require the ability to allow guests or visitors to your school/workplace to be able to access the Internet or other network resources. For example, guest access may be required for customers, partners, or consultants who visit your facility. The BlueSecure Controller provides an optional “guest” role that you can enable to meet this requirement. If you enable the guest role, a “guest login” box appears on the user login page. To login as a guest, a user need only provide his or her e-mail address. The guest role is a role like any other, so it determines bandwidth, encryption and restricted access for the user. But the guest role is unique in that the user need not exist as 1-6 BlueSecure Controller Models a user on any authentication server. Typically, guest roles are configured to allocate only a small amount of bandwidth. This prevents guests from adversely affecting the level of service for the employees of the organization. In addition, the guest role does not require encryption, blocks access to the private campus/corporate network, and only allows access to the Internet, so a guest can surf the web, or check e-mail. BlueSecure Controller Models The Bluesocket BSC is available in the following models: • Bluesocket BSC-2200/3200/5200 • Bluesocket BSC-2100 • Bluesocket BSC-1200 • Bluesocket BSC-600 Bluesocket BSC-2200/3200/5200 For larger enterprises requiring higher throughput and centralized WLAN management and control, the BlueSecure 2200/3200/5200 provide a core infrastructure platform supporting up to 400/1500/4000 active users and 50/100/150 Access Points respectively. Figure 1-4: Bluesocket BSC-5200 The Bluesocket BSC-5200 BlueSecure Controller offers a open systems, enterprise-class WLAN solution to the administration, management, interoperability, quality of service (QoS) and security issues facing large enterprises deploying wireless LANs. The Bluesocket BSC-5200 BlueSecure Controller is a high performance, WLAN infrastructure platform typically deployed at the core or the distribution layer of the network to aggregate WLAN traffic from existing edge switches. Expressly designed for large enterprise WLAN rollouts, it easily conforms into existing wired and wireless networks, allowing enhanced policy-based deployments. Bluesocket's BSC-5200 is a flexible platform providing intelligent 802.1q VLAN tagging, mobility, and dynamic hardware-based WLAN traffic optimization. Equipped with 4 Data 10/100/1000 Gigabit copper or fiber network interfaces, a Gigabit failover interface and a separate 10/100/1000 Admin port, the BSC-5200 supports existing network infrastructure and communicates with other BlueSecure Controllers in a Secure BlueSecure™ Controller Setup and Administration Guide 1-7 Chapter 1: An Overview of the BlueSecure Controller Mobility® MatriX WLAN deployment, providing centralized management and control of configuration and policy updates across the enterprise. Bluesocket BSC-2100 The BSC-2100 BlueSecure Controller is designed for larger organizations with higher throughput user/density needs. The BSC-2100 provides hardware-based encryption acceleration and gigabit network connectivity (both fiber and copper interfaces). The Bluesocket BSC-2100 supports up to 400 simultaneous users. Figure 1-5: Bluesocket BSC-2100 Bluesocket BSC-1200 The BSC-1200 BlueSecure Controller is designed to support entire office floors or buildings with up to 200 users. Figure 1-6: Bluesocket BSC-1200 Bluesocket BSC-600 Optimized for branch/remote offices, the BSC-600 BlueSecure Controller features a compact 1U form factor, supports rack-mount or desktop operation, provides four frontpanel 10/100 Fast Ethernet Mbps ports for direct connection of WLAN access points, and secures and manages up to 64 active users. An 802.3af Power-over-Ethernet (PoE) 1-8 BlueSecure Controller Models option is available to support direct connection of PoE access points like the BlueSecure 1500 Access Point via the front-panel ports. Figure 1-7: Bluesocket BSC-600 Bluesocket BSC Model Specifications All products in the Bluesocket BSC family share the same HTML-based administrator console and software functions, and vary only in the number of users supported, data throughput, form factor, and network ports. The following table summarizes the Bluesocket BSC model specifications. Table 1-1: Bluesocket BSC Model Specifications Specification BSC-2200/ 3200/5200 BSC-600 BSC-1200 BSC-2100 Physical dimensions 1U enclosure Width: 380 mm (15 in) Depth: 290 mm (11.5 in) Height: 44.5 mm (1.75 in) 1U enclosure Width: 380mm (15 in) Depth: 290 mm (11.5 in) Height: 44.5 mm (1.75 in) 2U enclosure Width: 445 mm (17.5 in) Depth: 450mm (17.7 in) Height: 89 mm (3.5 in) 2U enclosure Width: 445 mm (17.5 in) Depth: 450mm (17.7 in) Height: 89 mm (3.5 in) Environmental Operating Temperature: 10 to 35 Operating Temperature: 10 to 35 Operating Temperature: 10 to 35 Operating Temperature: 10 to 35 degrees C (50 to 95 degrees F) Humidity: 40 to 80%, non-condensing degrees C (50 to 95 degrees F) Humidity: 40 to 80%, non-condensing degrees C (50 to 95 degrees F) Humidity: 40 to 80%, non-condensing degrees C (50 to 95 degrees F) Humidity: 40 to 80%, non-condensing Power 220 Watt, dualsensing, 110/240 V, 50/60 Hz power supply 220 Watt, dualsensing, 110/240 V, 50/60 Hz power supply 200 Watt, dualsensing, 110/240 V, 50/60 Hz power supply 350 Watt, dualsensing, 110/240 V, 50/60 Hz power supply Network interfaces Managed Interface: Four 10/100/1000 Mbps/802.3af copper Ethernet frontpanel interfaces Protected Interface: One 10/100/1000 Mbps copper Ethernet interface. Managed Interface: Four 10/100/1000 Mbps/802.3af copper Ethernet frontpanel interfaces Protected Interface: One 10/100/1000 Mbps copper Ethernet interface. Managed & Protected: Standard - 10/100/ 1000 Mbps copper Ethernet interfaces Optional - Either interface (or both) can be 1000BaseSX fiber with SC-type connector 4 GbE Interfaces (Managed Interface, Protected Interface and two for link agg.) Standard - 10/100/ 1000 Mbps copper Ethernet interfaces Optional - Can be 1000BaseSX fiber with SC-type connector Failover/Admin: Failover/Admin: One 10/100 Mbps copper Ethernet interface One 10/100 Mbps copper Ethernet interface Failover: 10/100 Mbps copper Ethernet interface Failover: 10/100/1000 Mbps copper Ethernet Admin: 10/100/1000 Mbps copper Ethernet BlueSecure™ Controller Setup and Administration Guide 1-9 Chapter 1: An Overview of the BlueSecure Controller Typical BlueSecure WLAN Solution Network Configurations Typically, you will install and configure Bluesocket BSCs in one of the following network configurations: • single BSC configuration • multiple BSC configuration • failover BSC configuration Single BSC Configuration This chapter provides complete procedures for configuring a single BSC for use in a small network such as a workgroup. Additionally, instructions are given for configuring a pair of BSCs for failover operation. The chapter includes: Complete the following steps to configure a single BSC network: 1. Access the BSC administrator console as described in “Logging Into the Administrator Console for the First Time” on page 3-2. 2. Configure the BSC’s protected interface to enable the BSC to communicate with the protected (i.e., wired) side of your network by following the steps listed in “Defining the BSC Protected Physical Interface” on page 4-2. 3. Configure the BSC’s managed interface to enable the BSC to communicate with the managed (i.e., wireless) side of your network by following the procedure given in “Configuring the BSC Managed Interface” on page 4-7. 4. To create the elements that will comprise the roles you will assign to users: a) Create host and network destinations and destination groups for BSC users. You can then enable or deny user access to these destinations based on the user’s assigned role. See “Creating Destinations and Destination Groups” on page 810. b) Define network services and service groups as described in “Creating Network Services and Services Groups” on page 8-13. These defined services provide network services for your BSC users over and above the BSC’s default services. c) Optional. Create schedules that define when users may access BSC and network resources (see“Creating Schedules and Schedule Groups” on page 8-17). d) Optional. Define user locations and location groups specifying the location of users on the managed side of the network. Network usage policies can be enforced based on a user’s location. User locations are identified by their associated VLAN ID. See “Creating Locations and Location Groups” on page 819 for information about defining user locations. 5. Define user roles that enforce network usage policies as detailed in “Defining User Roles to Enforce Network Usage Policies” on page 8-2. Setting up role-based authorization is one of the most important aspects of BSC configuration. 6. Optional. Define a RADIUS accounting server to record network activity and statistics by following the procedure given in “RADIUS Accounting” on page 7-1. 7. Define how BSC users are authenticated and assign a role to each user as follows: 1-10 • When using the BSC’s internal database for authentication, create local users and assign each to a role (see “Local BSC User Authentication” on page 5-2). • If you are using an external server for user authentication, you must define the authentication server name, address, and rules used to assign roles to users. See “Authentication Using External Servers” on page 6-1 for details. • If your BSC users have wireless devices that do not support browser-based or transparent Windows or 802.1x login access, set up MAC address Typical BlueSecure WLAN Solution Network Configurations authentication for those devices by following the steps listed in “Defining MAC Address Authentication” on page 5-5. 8. Optional. Configure the following options as required for your BSC network: • When setting up authentication via LDAP/Active Directory over SSL; Cosign, Pubcookie, or CAS authentication over SSL; or via an IPSec tunnel that uses digital certificates for authentication, install the certificates on the BSC (see “Configuring External Server Authentication Over SSL” on page 9-14). • If you are using two BSCs to achieve failover operation, configure the BSC failover parameters listed in “Configuring Failover Parameters” on page 4-25. • You can configure static routes for any network device that is not included in the BSC routing table as described in “Configuring Static Routes” on page 4-28. • You can configure the BSC to support multicast routing using Distance Vector Multicast Routing Protocol (DVMRP) or Protocol-Independent Multicast-Sparse Mode (PIM-SM) as described in “Configuring Multicast Routing” on page 4-30. • You can configure the BSC to support AppleTalk as described in “Configuring AppleTalk Routing” on page 4-31. • Modify the BSC HTTP parameters and other general BSC configuration settings as described beginning in “General BSC Operational Settings” on page 10-1. 9. Optional. If you have BSAPs installed, configure the BSC to manage and communicate with them as described in “BlueSecure Access Points” on page 12-1. Multiple BSCs Install and use multiple BSCs for larger networks, such as those that are segmented into different floors, subnets, or buildings. Refer to Chapter 2, "Installation," for information on mounting and network connection procedures. After completing the physical connections, refer to Chapter 14, "Secure Mobility® MatriX," for procedures to configure multiple BSCs in a Secure Mobility® Matrix to achieve features such as configuration replication, secure subnet roaming, and load balancing. ) Note: We recommend that you use the BlueView™ Management System to manage multiple WLAN deployments that use six or more BlueSecure Controllers. BVMS provides centralized configuration, policy-management, and monitoring capabilities to facilitate rapid configuration and remote management of multi-site WLAN deployments. Failover BSCs Enterprise Network Normal Operation BSC-A Primary (Active) PWR DISK Power Reset Ethernet WG-2100 Wireless Gateway 7x 8x 9x 1x 2x 3x 10x 11x 12x 7x 8x 9x 4x 5x 6x 1x 2x 3x 10x 11x 12x 4x 5x 6x Switch Failover Ports C POWERFAULT DATA ALARM 7 8 9101112 A 12 3456 A B Switch/ Hub PWR DISK Power Reset WG-2100 Wireless Gateway Wireless Access Points BSC-B Secondary (Standby) Managed Side Protected Side Figure 1-8: Failover BSCs BlueSecure™ Controller Setup and Administration Guide 1-11 Chapter 1: An Overview of the BlueSecure Controller Within either single- or multiple-BSC networks, you can set up pairs of redundant BSCs (must be the same model) to achieve fault tolerance as shown in Figure 1-8. Within a failover configuration, the primary BSC is active and the secondary BSC is idle. Failover is initiated when the primary and secondary BSCs are unable to contact each other via the failover port. Typically, this is due to a failure of the primary BSC. Disconnecting the managed or protected interface cable will cause a failover. ) Note: When failover occurs, users with an IPSec connection will need to restart their tunnel. However, network availability is maintained during failover. Enterprise Network Failover BSC-A Failed PWR DISK Power Reset WG-2100 Wireless Gateway Ethernet Switch 7x 8x 9x 10x 11x 12x 7x 8x 9x 10x 11x 12x 1x 2x 3x 4x 5x 6x 1x 2x 3x 4x 5x 6x Failover Ports C POWERFAULT DATA ALARM 7 8 9 101112 A 1234 56 A B Switch/ Hub PWR DISK Power Wireless Access Points Reset WG-2100 Wireless Gateway BSC-B Takes Over as Primary (Active) Managed Side Protected Side Figure 1-9: Failover within a BSC Pair When the secondary BSC takes over, its role changes and it functions as the primary. If the original primary recovers (see figure below), it becomes the secondary. Therefore, no manual intervention is needed to “reset” roles when the original primary BSC recovers. BSC mounting and network connection procedures are provided in Chapter 2, "Installation." After completing the physical connections, follow the single BSC network configuration instructions given in “Single BSC Configuration” on page 1-10 (the failover BSC configuration procedure is identical to that described for single-BSC networks). No software configuration of the secondary BSC is required; any changes in software settings are automatically propagated to the secondary BSC from the primary BSC. Enterprise Network Recovery BSC-A Secondary (Standby) PWR DISK Power Reset Ethernet WG-2100 Wireless Gateway 7x 8x 9x 1x 2x 3x 10x 11x 12x 7x 8x 9x 4x 5x 6x 1x 2x 3x 10x 11x 12x 4x 5x 6x Switch Failover Ports C POWERFAULT DATA ALARM 7 8 9101112 A 12 3456 A B Switch/ Hub PWR DISK Power Wireless Access Points Reset WG-2100 Wireless Gateway BSC-B Primary (Active) Managed Side Protected Side Figure 1-10: Recovery of the Failed BSC 1-12 2 Installation This chapter provides complete installation procedures for the BlueSecure family of Controllers and includes: • Overview of the Installation Procedure • Safety Precautions • BSC-2200/3200/5200 Displays, Controls, and Connectors • BSC-2100 Displays, Controls, and Connectors • BSC-1200 Displays, Controls, and Connectors • BSC-600 Controls and Connectors • Preparing Your Network • Environmental, Rack, Space, and Power Requirements • Mounting the BlueSecure Controller Chassis • Connecting the BlueSecure Controller to Your Network • Connecting the BSC to its Power Source • Powering Down Your BSC • Enabling Power over Ethernet on the BSC-600 and BSC-1200 • LED Run Time Mode for BSC-600 and BSC-1200 • Basic POE LED Functionality for BSC-600 and BSC-1200 BlueSecure™ Controller Setup and Administration Guide 2-1 Chapter 2: Installation Overview of the Installation Procedure You must complete the following steps to install the Bluesocket BSC: 1. Prior to beginning the installation procedure, familiarize yourself with the safety considerations listed started in “Safety Precautions” on page 2-2. 2. Familiarize yourself with the BSC front- and rear-panels as described starting in “BSC- 2200/3200/5200 Displays, Controls, and Connectors” on page 2-4. 3. Ensure that you have completed the prerequisite steps listed in “BSC-600 Controls and Connectors” on page 2-8 to prepare your network before attempting to install and connect the BlueSecure Controller. 4. Evaluate your site and select a suitable location in which to install the Bluesocket BSC. The selected installation location must meet the environmental, rack, and power requirements listed in “Environmental, Rack, Space, and Power Requirements” on page 2-10. 5. Mount the BSC chassis in the selected installation location as described in “Mounting the BlueSecure Controller Chassis” on page 2-10. 6. Connect the BSC to your network by connecting cables to: • establish a link to the protected side of the network • establish a link to the managed side of the network • optionally establish a link to another Bluesocket BSC for failover operation. Connecting the BSC to your network is detailed in “Connecting the BlueSecure Controller to Your Network” on page 2-13. 7. Connect the BSC to an appropriate AC power source and power it up as described in “Connecting the BSC to its Power Source” on page 2-13. 8. Optional. Enable Power over Ethernet support on the BSC-600’s four front-panel Managed ports by following the procedure given in “Enabling Power over Ethernet on the BSC-600 and BSC-1200” on page 2-14. Safety Precautions The Bluesocket BSC has been listed by Underwriters Laboratories (UL) and is shipped from the factory in a safe condition. This section provides information and procedures that must be followed to ensure safe installation and operation of the Bluesocket BSC. Caution: Observe the following precautions when installing or servicing the BSC: • The power supply in the Bluesocket BSC chassis may produce safety extra low voltage (SELV) or low voltage energy hazards that can cause physical injury. Never remove the BSC chassis cover to access any of the components inside the chassis. • Observe and follow service markings and labels on the BSC equipment. Access and service BSC equipment only as instructed in your Bluesocket user documentation. • If any of the following conditions occur, disconnect the BSC equipment from all power sources, and contact Bluesocket, Inc.: • 2-2 - the equipment power cable or connector is damaged - an object has fallen into the equipment - the equipment has been exposed to water Keep the Bluesocket BSC away from radiators and heat sources. Do not block the ventilation holes in the Bluesocket BSC chassis. Safety Precautions Precautions for Rack-mounted Equipment • Do not allow liquid to enter the Bluesocket BSC chassis, and do not operate the system in a wet environment. If the Bluesocket BSC gets wet, contact Bluesocket. • Do not push any objects into the BSC chassis vents or openings. Doing so can result in fire or electrical shock. • Connect the Bluesocket BSC to the correct external power source as indicated on the electrical ratings label. Consult Bluesocket, Inc. if you are not sure of the power required to operate the equipment in your locale. • Use only approved power cable(s). If you have not been provided with power cables for your Bluesocket BSC, purchase ones that are approved for use in your country. • To help protect the Bluesocket BSC components from sudden transient increases or decreases in electrical power, use a surge suppressor, line conditioner, or uninterruptible power supply (UPS). • Position Bluesocket BSC cables and power cords carefully so that nothing rests on them; route cables and power cords so they cannot be stepped on or tripped over. Observe the following precautions when installing the BSC in an equipment rack: • Always load the rack from the bottom up, and load the heaviest item in the rack first. • Ensure the equipment rack is fixed in place. • Extend only one component at a time from the rack. • Do not overload the AC supply branch circuit that provides power to the rack. The total rack load should not exceed 80 percent of the branch circuit rating. • Ensure that proper airflow is provided to components in the rack. • Do not step on or rest weight on a BSC installed in the rack. BlueSecure™ Controller Setup and Administration Guide 2-3 Chapter 2: Installation BSC-2200/3200/5200 Displays, Controls, and Connectors The following figure shows the Bluesocket BSC-5200 front and rear panel displays, controls, and connectors. Figure 2-1: BSC-2200/3200/5200 Displays, Controls, and Connectors Status LEDs The Bluesocket BSC-2200/3200/5200 provides the following front-panel status LEDs: • PWR - Lights when the BSC is connected to an AC power source and its rear-panel power switch is in the closed position (|). • DISK - Flickers when the BSC is writing data to or reading data from non-volatile memory. LCD The BSC provides a 2x16 character, liquid crystal display (LCD) to display the IP address configured for its protected interface. Power Control If the BSC is running and you press the front-panel Power button, the BSC will stop all active services after a slight delay. After all services are shutdown, the BSC executes its normal power-down sequence and shuts off completely. Restart Control If the BSC is running and you press the front-panel Restart button, the BSC will stop and then restart all active services automatically. In approximately 30 to 60 seconds after you have pressed the Restart button, the LCD display will indicate that BSC services have restarted. Serial Port The BSC provides a serial port equipped with a DB-9, male connector to support local console configuration of the BSC. Normally, you will never use the BSC serial port. You should configure the BSC via its serial interface only in the rare event that you lose access to the BSC’s web interface due to an Internet service outage. The BSC serial interface supports only a subset of the BSC’s configurable parameters. See “Serial Port Access to Essential Functions” on page D-1 for details about accessing the BSC serial interface. Fail Over Port Use the Fail Over port to connect the BSC to another BSC via Ethernet for failover operation. The Fail Over port is equipped with a copper, RJ-45 10/100/1000 Mbps Ethernet connector. Use a crossover cable with no switches or hubs in between to connect the two failover BSCs directly together. Configuration of the BSC for failover operation is described in “Configuring Failover Parameters” on page 4-25. 2-4 BSC-2100 Displays, Controls, and Connectors Admin Port Use the Admin port to manage your controller without needing to be connected to the managed or protected ports. The admin port allows for HTTPS access and SSH access. This port doesn’t support mobility, routing, VLANs or firewalling. Managed Ports Use the Managed Port to connect the BSC to the managed side (i.e., the wireless side) of your network via Ethernet. The BSC-2200/3200/5200 Managed Port is equipped with a copper, RJ-45 10/100/1000 Mbps Ethernet connector (standard) or a 1000BaseSX SC-style connector (optional). Protected Ports Use the Protected Port to connect the BSC to the protected side (i.e., the wired side) of your network via Ethernet. The BSC-2200/3200/5200 Managed Port is equipped with a copper, RJ-45 10/100/1000 Mbps Ethernet connector (standard) or a 1000BaseSX SC-style connector (optional). BSC-2100 Displays, Controls, and Connectors The following figure shows the Bluesocket BSC-2100 front and rear panel displays, controls, and connectors. Status LEDs Liquid Crystal Display Power and Reset Controls Activity/ Link LEDs Speed LEDs Serial Port Network Connectivity Ports Figure 2-2: BSC-2100 Displays, Controls, and Connectors Status LEDs The Bluesocket BSC-2100 provides the following front-panel status LEDs: • PWR - Lights when the BSC is connected to an AC power source and its rear-panel power switch is in the closed position (|). • DISK - Flickers when the BSC is writing data to or reading data from non-volatile memory. On the BSC-2100 rear-panel, ACT/LINK LEDs and Speed LEDs are provided for the copper Managed and Protected Ports. The ACT/LINK LED is off when there is no link, lights green when a link condition exists, and blinks during an activity phase The Speed LED is off for a 10 Mbps Ethernet connection, lights green to indicate a Fast Ethernet connection (100 Mbps), and lights yellow to indicate a Gigabit Ethernet connection (1000 Mbps). Separate Activity and Link LEDs are provided for fibre Managed and Protected Ports. BlueSecure™ Controller Setup and Administration Guide 2-5 Chapter 2: Installation LCD The BSC provides a 2x16 character, liquid crystal display (LCD) to display the IP address configured for its protected interface. Power Control If the BSC is running and you press the front-panel Power button, the BSC will stop all active services after a slight delay. After all services are shut down, the BSC executes its normal power-down sequence and shuts off completely. Reset Control Press the Reset button to perform a hard reset of the BSC-2100. However, we recommend that you use the Reset button only if the BSC does not respond after you have tried to power it down using either the Power button or the BSC’s software shutdown function. Serial Port The BSC provides a serial port equipped with a DB-9, male connector to support local console configuration of the BSC. Normally, you will never use the BSC serial port. You should configure the BSC via its serial interface only in the rare event that you lose access to the BSC’s web interface due to an Internet service outage. The BSC serial interface supports only a subset of the BSC’s configurable parameters. See “Serial Port Access to Essential Functions” on page D-1 for details about accessing the BSC serial interface. Fail Over Port Use the Fail Over port to connect the BSC to another BSC via Ethernet for failover operation. The Fail Over port is equipped with a copper, RJ-45 10/100 Mbps Ethernet connector. Use a crossover cable with no switches or hubs in between to connect the two failover BSCs directly together. Configuration of the BSC for failover operation is described in “Configuring Failover Parameters” on page 4-25. Managed Port Use the Managed Port to connect the BSC to the managed side (i.e., the wireless side) of your network via Ethernet. The BSC-2100 Managed Port is equipped with a copper, RJ45 10/100/1000 Mbps Ethernet connector (standard) or a 1000BaseSX SC-style connector (optional). Protected Port Use the Protected Port to connect the BSC to the protected side (i.e., the wired side) of your network via Ethernet. The BSC-2100 Managed Port is equipped with a copper, RJ45 10/100/1000 Mbps Ethernet connector (standard) or a 1000BaseSX SC-style connector (optional). BSC-1200 Displays, Controls, and Connectors The following figure shows the Bluesocket BSC-1200 front panel displays, controls, and connectors. 2-6 BSC-1200 Displays, Controls, and Connectors Figure 2-3: BSC-1200 Displays, Controls, and Connectors Status LEDs The following table summarizes the status indicated by the Bluesocket BSC-1200 BlueSecure Controller light emitting diodes (LEDs). Table 2-1: BSC-1200 Status LEDs LED 100/Status Link/Activity System Lights to indicate the BSC system is running and its CPU is active. Flickers when the BSC is writing data to or reading data from non-volatile memory. Protected Lights to indicate that the BSC Protected Port is connected to a Fast Ethernet (100 Mbps) network. Lights when a valid link has been established on the Ethernet cable connected to the Protected Port. Flickers when data is received on the Protected Port. Managed Lights to indicate that the BSC Managed Port is connected to a Fast Ethernet (100 Mbps) network. Lights when a valid link has been established on the Ethernet cable connected to the Managed Port. Flickers when data is received on the Managed Port. Fail Over Lights to indicate that the BSC Fail Over Port is connected to another BSC via Fast Ethernet (100 Mbps). Lights when a valid link has been established on the Ethernet cable connected to the Fail Over Port. Flickers when data is received on the Fail Over Port. On/Off POWER Lights when the BSC is connected to an AC power source and its rear-panel power switch is in the ON position (|). LCD The BSC provides a 2x16 character liquid crystal display (LCD) to display the IP address configured for its protected interface. Shutdown/ Restart Control If the BSC is running and you press the front-panel Shutdown/Restart button, the BSC will stop all active services after a slight delay. When all BSC services are shutdown, the message Bluesocket Stopped appears on the LCD display. To power down the BSC-1200 while the Bluesocket Stopped message is displayed, set the rear panel power switch to the OFF(O) position. To restart the BSC-1200 while the Bluesocket Stopped message is displayed, press the front-panel Shutdown/Restart button a second time.The BSC services will restart again after a slight delay. In approximately 30 to 60 seconds, the LCD display indicates that BSC services have re-started. Serial Port The BSC provides a serial port equipped with a DB-9, male connector to support local console configuration of the BSC. Normally, you will never use the BSC serial port. You should configure the BSC via its serial interface only in the rare event that you lose access to the BSC’s web interface due to an Internet service outage. The BSC serial interface supports only a subset of the BSC’s configurable parameters. See “Serial Port Access to Essential Functions” on page D-1 for details about accessing the BSC serial interface. Fail Over Port Use the Fail Over port to connect the BSC to another BSC via Ethernet for failover operation. The Fail Over port is equipped with a copper, RJ-45 10/100 Mbps Ethernet connector. Use a straight through cable with no switches or hubs in between to connect the two failover BSCs directly together. Configuration of the BSC for failover operation is described in “Configuring Failover Parameters” on page 4-25. BlueSecure™ Controller Setup and Administration Guide 2-7 Chapter 2: Installation Admin Port Use the Admin port to manage your controller without needing to be connected to the managed or protected ports. The admin port allows for HTTPS access and SSH access. This port doesn’t support mobility, routing, VLANs or firewalling. To enable the Admin port on the BSC-1200, the failover port must be disabled. Managed Port Use the Managed Port to connect the BSC to the managed side (i.e., the wireless side) of your network via Ethernet. The BSC-1200 Managed Port is equipped with a copper, RJ45 10/100 Mbps Ethernet connector. Protected Port Use the Protected Port to connect the BSC to the protected side (i.e., the wired side) of your network via Ethernet. The BSC-1200 Protected Port is equipped with a copper, RJ-45 10/100 Mbps Ethernet connector. BSC-600 Controls and Connectors The following figure illustrates the Bluesocket BSC-600 front-panel LEDs, controls, and connectors. Status LEDs Network Connectivity Ports On/Off & Restart Controls Serial Port Figure 2-4: BSC-600 LEDs, Controls, and Connectors Status LEDs The following table summarizes the status indicated by the Bluesocket BSC-600 BlueSecure Controller light emitting diodes (LEDs). Table 2-2: BSC-600 Status LEDs LED 2-8 Color Description Power Blue Indicates that the unit is powered up. This LED is tied to the system power supply and is not under software control Fault Amber This is a dual purpose indicator under software control. Its primary function is to indicate that a fault has occurred in either at boot or run time. This LED will also indicate (blink) that a push button event (power down or restart) has been sensed and is being serviced. Activity Green This is a dual purpose indicator under software control. Its primary function is to indicate system activity, i.e. managed 10/100/1000 Ethernet traffic between the processor’s MAC1 interface and the on board Layer II switch. This LED will also be used to display boot codes. System Green This is a dual purpose indicator under software control. Its primary function is to indicate system status. This LED will also be used to display boot codes. Media Green This is a dual purpose indicator under software control. Its primary function is to indicate read and write activity to the system’s storage Flash. This LED will also be used to display boot codes. Test Green This indicator is under software control. Its primary function is to indicate that the system is executing a functional test. PoE Enabled (1-4) Green This indicator is under software control. Its primary function is to indicate that the corresponding managed port is POE enabled. Preparing Your Network Table 2-2: BSC-600 Status LEDs LED PoE Activity (1-4) On/Off Control Color Green Description This indicator is under software control. Its primary function is to indicate that the corresponding managed port is delivering POE power. Connect the BSC-600 to its power source, and then press the On/Off button to power up the BlueSecure Controller. If the BSC is running and you press the front-panel On/Off button, the BSC will stop all active services and the BSC will completely shut down. Restart Control Press the Restart button to stop services running on the BSC. The BSC services will restart again after a slight delay (in approximately 30 to 60 seconds). Serial Port The BSC provides a serial port equipped with a DB-9, male connector to support local console configuration of the BSC. Normally, you will only use the BSC-600 serial port to determine its protected interface port IP address. The BSC-600 serial interface also supports a subset of the BSC’s configurable parameters. See “Powering Down Your BSC” on page 2-14 for details about connecting a console to the BSC-600’s serial port and accessing the BSC serial interface in. Fail Over Port Use the Fail Over port to connect the BSC to another BSC via Ethernet for failover operation. The Fail Over port is equipped with a copper, RJ-45 10/100 Mbps Ethernet connector. Use a straight through cable with no switches or hubs in between to connect the two failover BSCs directly together. Configuration of the BSC for failover operation is described in “Configuring Failover Parameters” on page 4-24. Admin Port Use the Admin port to manage your controller without needing to be connected to the managed or protected ports. The admin port allows for HTTPS access and SSH access. This port doesn’t support mobility, routing, VLANs or firewalling. To enable the Admin port on the BSC-600, the failover port must be disabled. Managed Ports Use the four front-panel Managed Ports to connect the BSC-600 to the managed side (i.e., the wireless side) of your network via Ethernet. Each BSC-600 Managed Port is equipped with a copper, RJ-45 10/100 Mbps Fast Ethernet connector. Protected Port Use the Protected Port to connect the BSC to the protected side (i.e., the wired side) of your network via Ethernet. The BSC-600 Protected Port is equipped with a copper, RJ-45 10/100 Mbps Fast Ethernet connector. Preparing Your Network Verify the following before attempting to install and connect your BlueSecure Controller: • You have installed and configured your access points (APs) to enable wireless access to your network.You will connect the BSC to the APs either directly, or via a hub or switch to manage how wireless users access your network. • Ensure that your third-party vendor APs reside on a switched layer-two network with no path to the APs other than via the Bluesocket BSC. BSAPs can be directly attached to any existing Layer-2 or Layer-3 Ethernet switch and communicate with the BSC across any subnet boundary. • Ensure that your wireless devices (laptops, PDAs, etc.) can associate/connect to your network APs. To enable the wireless devices to connect the APs, the wireless devices and APs should use matching Service Set Identifiers (SSIDs). BlueSecure™ Controller Setup and Administration Guide 2-9 Chapter 2: Installation • Ensure that your wireless devices (laptops, PDAs, etc.) are configured to receive IP addresses via DHCP. • Ensure that you have an Ethernet connection to your corporate/campus network. You will connect the BSC to your corporate/campus network to protect the network resources from unauthorized use. Environmental, Rack, Space, and Power Requirements Follow these guidelines when selecting an installation location for the BlueSecure Controller. Environmental Ensure that the BSC installation site: 1. Has on operating Temperature of 50 to 95° F (10 to 35° C. 2. Has an operating Humidity of 40 to 80% non-condensing. 3. Is free of dust and moisture. Rack Ensure that the two-post, 19-inch equipment rack in which you install the Bluesocket BSC: 1. Conforms to the ANSI/EIA-310-D-92 specifications. 2. Is fixed in place. 3. Has an open back and open front to allow the BSC to cool adequately. 4. Has front and side stabilizers installed. Space Ensure that you have adequate rack space to install the Bluesocket BSC: 1. The Bluesocket BSC-600 and BSC-1200 BlueSecure Controllers occupy 1.75 inches/ 44 mm (1U) of vertical rack space. 2. The Bluesocket BSC-2100 and BSC-2200/3200/5200 BlueSecure Controllers occupy 3.50 inches/89 mm (2U) of vertical rack space. 3. There is at least 15 inches/381 mm of clearance in front of and behind the rack. This space is required to connect and disconnect network cables. AC Power Ensure that the BlueSecure Controller AC power source meets the following specifications: 1. AC input voltage: dedicated, grounded, single-phase circuit 100 to 240 VAC 2. AC frequency: 50 to 60 Hz. Mounting the BlueSecure Controller Chassis You may install and operate the Bluesocket BSC either resting on a desktop, or mounted to a two-post equipment rack. Follow one of the two procedures below for desktop mounting, depending on your BSC model. The instructions for rack-mounting are the same for all models. ) • BSC-600/BSC-1200 Desktop Mounting • BSC-2100 and BSC-2200/3200/5200 Desktop Mounting • Rack-mounting the BlueSecure Controller Note: The BSC is cooled from ventilation holes located on the sides of its chassis and on its front and back panels. Ensure that these vents remain free of obstruction while the BSC is operating on the desktop. BSC-600/BSC-1200 Desktop Mounting To mount the BlueSecure BSC-600 or BSC-1200 Controllers on a desktop: 2-10 Mounting the BlueSecure Controller Chassis 1. Choose a level, stable desktop that will support the weight of the BSC. 2. Install one of the four supplied self-adhesive rubber feet in each corner on the bottom of the BSC chassis. Install the rubber feet to prevent the BSC chassis from slipping on the desktop. After mounting the BSC chassis on the desktop, connect the BSC to your network as described in “Connecting the BlueSecure Controller to Your Network” on page 2-13, and then power up the BSC by following the procedure given in “Connecting the BSC to its Power Source” on page 2-13. BSC-2100 and BSC-2200/3200/5200 Desktop Mounting To mount the Bluesocket BSC-2100 or the BSC-2200/3200/5200 Controllers on a desktop: 1. Choose a level, stable desktop that will support the weight of the BSC. 2. Install a rubber pad on each of the four desktop bumpers as shown in Figure 2-5. Figure 2-5: Attaching a Rubber Pad to a BSC-2100/5200 Bumper 3. Install each of the BSC’s four desktop bumpers as shown in Figure 2-6. Figure 2-6: Attaching the BSC-2100/5200 Chassis Desktop Bumper Snap the bumpers into the BSC chassis to prevent the chassis from slipping on the desktop and to enhance its appearance. 4. Install the BSC chassis cap as shown in Figure 2-7. The cap enhances the appearance of the BSC chassis while resting on the desktop. After mounting the BSC chassis on the desktop, connect the BSC to your network as described in “Connecting the BlueSecure Controller to Your Network” on page 2-13, and then power up the BSC by following the procedure given in “Connecting the BSC to its Power Source” on page 2-13. BlueSecure™ Controller Setup and Administration Guide 2-11 Chapter 2: Installation Figure 2-7: Attaching the BSC-2100/5200 Chassis Cap Rack-mounting the BlueSecure Controller You may install the Bluesocket BSC in any two-post equipment rack or cabinet that conforms to ANSI/EIA-310-D-92 specifications. ) Note: The BSC should not have desktop feet, bumpers, or a chassis cap installed when mounted in an equipment rack. If these are installed, remove them prior to rack-mounting. Follow these steps to mount the Bluesocket BSC in a two-post equipment rack: 1. Using a #2 Phillips-head screwdriver and the eight supplied #8-32 Phillips-head screws, attach the mounting brackets to the sides of the BSC chassis as shown in Figure 2-8. ) Note: Connect the mounting brackets only to the front of the BSC-600 or BSC-1200 chassis. You can attach the mounting brackets to either the front or rear of the BSC2100, BSC-2200/3200/5200 chassis depending on the cable access you prefer. 2. Position the BSC in your equipment rack. 3. Secure the BSC’s mounting brackets to the rack rails using the appropriate hardware. Figure 2-8: Attaching the Mounting Brackets to the BSC Chassis After rack-mounting the BSC chassis, connect the BSC to your network as described in “Connecting the BlueSecure Controller to Your Network” on page 2-13, and then power 2-12 Connecting the BlueSecure Controller to Your Network up the BSC by following the procedure given in “Connecting the BSC to its Power Source” on page 2-13. Connecting the BlueSecure Controller to Your Network After you have mounted the BSC chassis in place, you must: • connect the BSC to the protected (i.e, wired) side of your network • connect the BSC to the managed (i.e., the wireless) side of your network Additionally, if you are using the BSC-1200, BSC-2100, BSC-2200/3200/5200 failover capabilities, you must connect the BSC to a second BSC. Follows these steps to connect the BSC to your network: 1. Connect the Protected Port (eth0) on the BSC to the wired side of your network. If you are connecting a single BSC to an Ethernet switch or hub, use a straightthrough cable. Optional. If you are setting up a failover configuration, you must connect the Protected Ports on both BSCs to an Ethernet “Y” connector or to an Ethernet hub/ switch. Next, you must run a single Ethernet cable from the Ethernet “Y” connector or hub/switch to the wired side of the network. 2. Connect the Managed Port (eth1) on the BSC to the wireless side of your network. If you are connecting to an Ethernet switch or hub, use a straight-through cable. If you are connecting directly to a wireless access point, use a cross-over cable. You can use all four Managed Ports to connect the BSC-600 or the BSC-1200 to the wireless side of your network. Optional. If you are setting up a failover configuration, you must connect the Managed Ports on both the Primary and Secondary BSCs to an Ethernet “Y” connector or to an Ethernet hub/switch. Next, you must run a single Ethernet cable from the Ethernet “Y” connector or hub/switch to the wireless side of the network. 3. Optional. If you are setting up a failover configuration, interconnect the Failover Ports (eth2) on the two BSCs. Interconnect the Failover ports of each BSC directly using a cross-over cable with no hubs or switches between the two interconnected BSCs. Connecting the BSC to its Power Source A power cord is supplied with the BSC to connect it to an AC power source. Ensure that the supplied power cord is rated for the AC power available at your location. Follow these steps when connecting the BSC to an AC power source: 1. Ensure the AC power switch located on the BSC rear panel is in the OFF (O) position. 2. Connect the female end of the supplied power cord to the power receptacle located on the rear panel of the BSC. 3. Connect the male end of the BSC power cord to an AC power source meeting the following specifications: • AC input voltage: dedicated, grounded, single-phase circuit 100 to 240 VAC • AC frequency: 50 to 60 Hz. 4. Switch the AC power switch located on the BSC rear panel to the ON position (|). BlueSecure Controller models BSC-1200 power up. You must complete step 5 to power up the BSC-2100 and BSC-2200/3200/5200. BlueSecure™ Controller Setup and Administration Guide 2-13 Chapter 2: Installation 5. (BSC-600, BSC-2100, and BSC-2200/3200/5200 only). Press the Power button on front panel. As the BSC powers up, its cooling fans run and its status LEDs light. If the BSC is the only BSC in a single BSC configuration, or the primary BSC in a failover configuration, the LCD on its front panel shows boot-up sequence messages, DHCP status, Boot Up Information and IP address status. After the bootup is complete, the BSC LCD shows the IP address for the protected interface. Note the IP address displayed on the BSC’s front-panel LCD. You will need to know this IP address to access the BSC administrator console as described in Chapter 3, "Administrator Console." If the BSC is the secondary BSC in a failover configuration, its LCD on the front panel indicates Standby mode and shows a graphic display of each heartbeat received from the primary BSC. See “Configuring Failover Parameters” on page 4-25 for information on configuring the BSC’s heartbeat parameters in a failover configuration. Powering Down Your BSC You should always power down the BSC using its software shutdown feature as described in Chapter 7. Caution: Never use the BSC-2100’s front-panel Reset button or rear-panel power switch to power down the BlueSecure Controller. Likewise, never use the BSC-2200/3200/5200’s rear-panel power switch to power down the BlueSecure Controller. Failing to power down the BSC using its software shutdown function or the shutdown procedure listed below may render the BSC un-bootable. Use the following procedure to power down a BSC using its hardware controls. The procedure is the same for BSC-600, BSC-1200, BSC-2100, and BSC-2200/3200/5200 BlueSecure Controllers: 1. Press the front-panel Power button. 2. The BSC will stop all active services after a slight delay. After all services are shut down, the BSC executes its normal power-down sequence and shuts off. Enabling Power over Ethernet on the BSC-600 and BSC-1200 ) Note: In addition to the instructions in this section, it is also necessary to software enable PoE, as explained in “Port settings” on page 4-11. By default, the ports used for PoE are software disabled. An IEEE 802.3af Power-over-Ethernet (PoE) option is available for model BSC-600/1200 BlueSecure Controllers. This option enables direct connection of PoE-enabled WLAN access points, like the BlueSecure 1500 Access Point, to the four Managed Ports on the BSC-600/1200 front panel. If you have ordered the PoE option for your BSC-600/1200, a PoE power supply is included with your BSC-600/1200 distribution. This power supply has the following specifications: ) 2-14 • Input Voltage: 85 to 246 VAC • Input Frequency: 47 to 63 Hz. • Output: 48 VDC ± 2% • Operating Temperature: 0 to 70o C Note: The BSC-600/1200 PoE option should be used only for intra-building circuits. LED Run Time Mode for BSC-600 and BSC-1200 Follow these steps to enable IEEE 802.3af Power-over-Ethernet support on the four frontpanel BSC-600/1200 Controller Managed ports: 1. Connect the PoE power supply included in your BSC-600/1200 distribution to a grounded, 85 to 246 VAC power source. 2. Connect the PoE power supply’s three-pin connector to the mating connector located on the back of the BSC-600/1200’s chassis as shown in Figure 2-9. Power over Ethernet Power Supply Connector Figure 2-9: Location of BSC-600 PoE Power Supply Connector 3. Power up the BSC-600/1200 Controller by following the procedure given in “Connecting the BSC to its Power Source” on page 2-13. The BSC-600/1200 is now capable of supplying power to 802.3af Power-over-Ethernetcapable devices, such as the BlueSecure 1500 Access Point, directly connected to its four front-panel Managed ports. LED Run Time Mode for BSC-600 and BSC-1200 The system status LEDs are arranged on the left side of the BSC-1200 front panel as follows: • Power (blue), Activity (green), System(green) • Fault (amber), Media (green), Test(green) The run time state of the status LEDs shall be as follows: • “Fault” LED shall be set to OFF. • “Activity” LED shall blink when system activity is sensed. • “Media” LED shall blink when onboard storage Flash activity is sensed. • “System” LED shall be set to ON to indicate that system status is good. • “Test” LED shall be set to OFF to indicate that the system is in run time mode. The “Fault” LED shall also be used for a visual indication that one of the BSC-1200’s two front panel pushbuttons has been pushed and sensed by software. “Fault” shall be set to blink when either the ON/OFF or RESTART button has been sensed, and shall continue to blink until the system powers OFF or resets. Basic POE LED Functionality for BSC-600 and BSC-1200 POE enabled: • OFF - port disabled from GUI • ON steady - port enabled from GUI (blink is not used) POE activity • OFF: No POE brick, or port disabled from GUI. • ON blinking: Port enabled, but AP not getting power from BSC (or unplugged). • ON steady: Port getting power from BSC. BlueSecure™ Controller Setup and Administration Guide 2-15 Chapter 2: Installation The fault light will be lit for a few seconds after an AP is disconnected. 2-16 3 Administrator Console The BlueSecure Controller provides an intuitive, easy-to-use, administrator console that you can access using any web browser. The administrator console enables you to configure the BSC for use in your network and perform general BSC administrative tasks. This chapter presents an overview of the BSC administrator console and includes: • Logging Into the Administrator Console for the First Time • Using and Managing Administrator Accounts • Obtaining Online Help • Installing the Bluesocket SSL Certificate • An Overview of the Tabs on the Console • Using Command Buttons and Icons • Sorting and Filtering Table Data • Customizing the Presentation of Table Data • Paging Through Data • Console Fonts • Downloading Administrator Console Data • Entering IP Addresses and Fully Qualified Domain Names • Restarting the BSC to Activate Configuration Information • Logging Out of the Administrator Console BlueSecure™ Controller Setup and Administration Guide 3-1 Chapter 3: Administrator Console Logging Into the Administrator Console for the First Time You may access the Bluesocket BSC administrator console using any web browser (e.g., Microsoft Internet Explorer, Netscape Navigator, etc.). To access the BSC administrator console for the first time: 1. Power-up the BSC Power-up the Bluesocket BSC as described in “Connecting the BSC to its Power Source” on page 2-13. 2. Enter Console URL in Browser Enter the following URL in your web browser: https://BSC_IP_Address/admin.pl where BSC_IP_Address is the IP address displayed on the LCD of the BSC you are trying to access. The BSC-1200, BSC-2100, and BSC-2200/3200/5200 displays its protected interface IP address upon startup. You must follow the procedure given in “Powering Down Your BSC” on page 2-14 to determine the BSC-600’s protected interface IP address. 3. Dismiss Security Alert Your browser may display a security alert stating that data received from the web server on the BSC is not from a trusted source. Click Yes to ignore the alert, and the BSC administrator console login appears as shown in the following figure. Figure 3-1: BSC Administrator Login Page ) 4. Log in Note: If you wish to eliminate the display of future security alerts when you access the BSC administrator console, then you must download and install the Bluesocket SSL certificate as described in “Installing the Bluesocket SSL Certificate” on page 3-6 or install a custom SSL login certificate as described in “Installing a Custom SSL Login Certificate” on page 11-22. Log into the BSC administrator console. Enter the default username of admin in the Administrator username field and the default password of blue in the Password field, and then click Log in >. Note that the Administrator username and Password fields are case-sensitive. 3-2 Using and Managing Administrator Accounts 5. Acknowledge License Agreement A dialog appears displaying the Bluesocket End User License Agreement. Read and acknowledge the license agreement, and then close the dialog. 6. Change Password Change your password when prompted to do so. Enter the default password in the Password field, your new password in the New Password and Re-Enter New Password fields, and then click Log in >. The Bluesocket BSC administrator console appears as shown in Figure 3-2. Figure 3-2: The BSC Administrator Console ) Note: Be sure to store your BSC admin account password in a safe location. You will not be able to log into the BSC administrator console without it. If you should forget or lose your password, you must access the BSC serial port as described in “Serial Port Access to Essential Functions” on page D-1 and then issue the admin password recovery command to reset the default admin account to its default password. Logging Out of the Administrator Console After you finish configuring the BSC, you can log out from any console page by clicking the Sign Out link that appears at the top of the page. Using and Managing Administrator Accounts After you have logged into the BSC administrator console for the first time, installed the Bluesocket SSL Certificate on your web browser host, and changed the password associated with the default admin account, subsequent logins use one of the following two pre-defined administrator accounts: • admin - enables you to view and change all BSC setup parameters. BlueSecure™ Controller Setup and Administration Guide 3-3 Chapter 3: Administrator Console • monitor - enables you to view but not change current BSC parameter settings. The default password for the monitor account is blue. If you are setting up or changing a BSC configuration, you can log into the administrator console using the pre-defined admin account. Note that the Admin login page also has a link by which you can log in as an end user. You can also manage administrator accounts by: • Adding a New Administrator Account • Changing an Administrator Password • Changing Your Login Password • Deleting Administrator Accounts Adding a New Administrator Account In addition to the default administrator accounts, admin and monitor, you can define additional administrator accounts, each with their own login, password, and access rights to specific BSC functions. To add a new administrator account: 1. Click the User authentication tab in the BSC administrator console, and then click the Administrative User tab. 2. Select Administrative User from the Create drop-down list on the User authentication page. The New admin page appears as shown in Figure 3-3. 3. Mark the Enable user checkbox to make the account available to the administrator. Clearing the checkbox makes the account unavailable for login. 4. Enter the administrator's login name in the Name field. 5. Optional. Enter the administrator’s e-mail address in the Email address field. 6. Enter the administrator’s password in the New password field, and then re-enter it in the Confirm new password field. 7. Define the administrator’s access to BSC functions: Mark the Full radio button to grant the administrator write access to all BSC functions. Mark the No Access radio button to deny the administrator access to specific BSC functions. Mark the Read only radio button to grant the administrator read-only access to all BSC functions. Mark the Select All radio button to toggle all the radio buttons in a given column. 8. Optional. Mark the Allow admin to access using SNMP checkbox to grant the administrator access to SNMP v3. Note that SNMP v3 requires a user ID and password, rather than a community string, to make SNMP requests. 9. Optional. Enter a meaningful description of the administrator and their assigned write access to functions in the Notes field. 10. Optional. Mark the Allow admin to access using the API checkbox to grant the administrator access using the API. 11. Click Save to save the administrator information to the BSC database, or click Save and Create Another to continue creating administrator accounts. 3-4 Using and Managing Administrator Accounts Figure 3-3: New Admin User Page Changing an Administrator Password To change the password for an administrator account: 1. Click the User authentication tab in the BSC administrator console, and then click the Administrative User tab. 2. Click the icon for the administrator whose password you wish to change. The Edit the admin user page appears. 3. Mark the Change Password? checkbox and then enter the new password and password confirmation in the fields provided. 4. Click Save to store the modified administrator information to the BSC database. BlueSecure™ Controller Setup and Administration Guide 3-5 Chapter 3: Administrator Console Changing Your Login Password For security purposes, we recommend that you periodically change the password you use to access the BSC administrator console. Also, be sure to change the password assigned to the predefined admin and monitor accounts. Be sure you record your account username and password in a safe location that you can easily access. You cannot access the BSC administrator console without a valid username and password. To change your login password: 1. Click Change Password on the BSC administrator console login page. The login page expands to enable you to change your password as shown in Figure 3-4. Figure 3-4: Changing Your Login Password 2. Enter your username in the Administrator username field and your current password in the Password field. Note that all login page fields are case-sensitive. 3. Enter your new password in the New Password field, and then enter it again in the Re-Enter New Password field. 4. Click Log in > to log into the BSC administrator console using your new password. Deleting Administrator Accounts To delete a user or administrator account from the wireless network you can either: • Click the Delete button when the account is displayed in the Edit the local user or Edit the admin user pages. Click the icon for the account in the Local Users or Administrative Users pages. Installing the Bluesocket SSL Certificate When accessing the administrator or user login page, you or your users may receive a security alert as shown in Figure 3-5. This alert indicates that data received from the web server on the BSC is not from a trusted source. You can prevent the display of this security alert when you log into the BSC administrator console by downloading the Bluesocket secure sockets layer (SSL) login certificate to the computer on which you are running your web browser. 3-6 Installing the Bluesocket SSL Certificate Figure 3-5: Security Certificate Alert ) Note: As an alternative to installing the Bluesocket SSL certificate, you can acquire an SSL login certificate from another CA provider, and then upload the certificate to the BSC. See “Installing a Custom SSL Login Certificate” on page 11-22 for information about installing a custom SSL login certificate. To download the Bluesocket SSL login certificate to your web browser host: 1. Click View Certificate in the Security Certificate Alert dialog. Alternatively, click Did you get an SSL warning? from the BSC Administrator or User Login Page, and then click Open from the file download dialog. The Certificate dialog appears as shown in Figure 3-6. Figure 3-6: SSL Certificate Dialog 2. Click Install Certificate and then follow the instructions that appear in your web browser to download and install the Bluesocket SSL certificate on your web browser host. BlueSecure™ Controller Setup and Administration Guide 3-7 Chapter 3: Administrator Console An Overview of the Tabs on the Console Information in the BSC administrator console is presented as a series of tabbed pages as shown in Figure 3-7. Check to Select Item Font Controls Main Page Sub Page Selected Item Commands Download Page Data Column Heading (Click to Sort) Logout Display Menu Hierarchy Current User ID Page Instructions Column Data Filter Context Sensitive Help Customize Table Data Figure 3-7: Navigating the Administrator Console Each main page has multiple tabbed sub pages that enable you to view and enter BSC configuration data. Access the following administrator console main pages to configure, monitor, and manage the BSC: Status Monitor the current state of the BSC by displaying information about active user connections, viewing log files, displaying a system summary, generating reports, performing basic system and network connectivity diagnostics, and monitoring system resource use. User Authentication Configure local, administrator, local 802.1x, and externally authenticated BSC users, and devices authenticated by their MAC address. User Roles Create roles that enforce network usage policies including what BSC services and network destinations a user may access and when. Also define the following elements that comprise a role: 3-8 - Services - Configure BSC services (HTTP, SNMP,TELNET, etc.) and service groups to which BSC users have access. - Destinations - Configure destinations (i.e., networks and hosts) to which BSC users have access. - Schedules - Create schedules that define when users can access BSC and network resources. - Locations - Define user locations and location groups specifying the location of access points on the managed side of the network. Network policies can be enforced based on a user’s location. Also, locations can be logically organized into virtual LANs (VLANs). Obtaining Online Help Voice Configure how voice traffic is passed through and managed by the BlueSecure Controller, and enable support for specific models of IP phones. General Perform general BSC administrative tasks such as: configuring the HTTP server, enabling and configuring the Integrity Clientless Security endpoint scanning functionality, configuring the Intrusion Detection System (IDS), configuring the SNMP agent, scheduling automatic backups of the BSC database, setting the BSC system time, defining BSC logging, configuring public access, specifying system resource thresholds, defining DNS hostname resolution for hosts accessing the BSC, and other miscellaneous administrative tasks. Web Logins Define the appearance of the default and custom BSC login screens including colors, font size, graphics, language, and layout. Also, manage the SSL certificates used to authenticate web logins to the BSC and configure hotspot account generation (i.e., credit card billing services). Network Configure the BSC managed, protected, and failover network interfaces. Also, define virtual LANs static routes, multicast routing, managed-side remote subnets, and AppleTalk routing. Wireless Configure wireless devices that are connected to the BSC by creating BSAP and SSID configurations; defining BSAP hostname, location, and radio settings; uploading BSAP firmware files; and enabling BSAP service. Additionally, configure RF IDS settings by identifying authorized RF stations on your network and defining RF conditions for which to generate alarms. Mobility MatriX Configure a system of multiple BSCs for centralized management that enables multiple BSCs to communicate, auto-replicate configuration data, share traffic loads, and support subnet roaming via Bluesocket’s Secure Mobility® feature. Maintenance Perform BSC system software maintenance tasks such as: restarting services; backing up or restoring the system software; upgrading the system software; installing a patch; switching between versions of system software; exporting BSC system configurations or log file records to a disk file; exporting/importing IP addresses, MAC addresses, or local user definitions in bulk; and managing licenses. ) Note: Some of these pages will automatically refresh their display, and display a countdown refresh timer, so that up-to-date BSC information is always displayed. You will be logged out of the administrator console automatically after 60 minutes of inactivity. Read-only Pages (Replication Nodes only) If you have configured the Replication or Load Sharing features of the BSC Secure Mobility MatriX as described in Chapter 5, you will notice that some page links on the Replication Nodes are italicized. These italicized page links indicate that these pages are read-only. To edit the configuration settings for these pages, you must log into the Replication Master and then propagate the changes to Replication Nodes. See “Replication” on page 14-10 for more details. Also, if you log into the BSC administrator console using the monitor account or an administrator account with read-only privileges, the administrator pages will be labeled “Read only access” and you will not be able to make or save any configuration changes. Obtaining Online Help If you need assistance configuring your BSC, refer to the BlueSecure™ Controller Setup and Administration Guide included with your BSC shipment. You can access an Adobe Acrobat version of this document from any administrator console page simply by clicking on the Help link that appears at the top of the page. BlueSecure™ Controller Setup and Administration Guide 3-9 Chapter 3: Administrator Console Site Map Click on the Site Map link to display a clickable site map (the Site Map link is located in the upper right corner of the display, between the Sign in/out and Help links): Figure 3-8: Site Map 3-10 Error Checking on Page Forms Error Checking on Page Forms Required form elements are marked with a blue bounding box. Once a user enters a value and moves to the next form element on the page, the system validates the previous form element. If the element does not meet predefined validation criteria, the validation fails and the input field is demarcated by a red bounding box. Fields that have passed validation are demarcated by a green bounding box. After the user submits the form, for example by clicking the Save button, the system performs the same validation on each form element and reports any errors. In many of the BSC administrator console pages, you are prompted to enter individual IP addresses, address ranges, address/netmask pairs, or fully qualified domain names in various fields. When the address is for an external machine, the system will attempt to verify the address by pinging the machine. If the ping is unsuccessful, the system displays the message “The address could not be reached”. Using Command Buttons and Icons Command buttons are located along the top and bottom of BSC administrator console pages that have data entry fields. The command icons are located in the Action column of each table row on a page. Each table row represents a single database record. Mark the corresponding checkbox to select a table row for use with a command button. The following table describes the most commonly used BSC administrator console command buttons and icons. Table 3-1: Administrator Console Command Buttons and Icons Command Button or Icon Click to ... Store the information on the page to the BSC database. Store the information on the page to the BSC database and then enable creation of another record of the same type. Display the previously visited page (without saving the data entered on the current page). Display the next subpage on the current page. Reset all data entry fields on the page to their previous setting. Remove the currently displayed record from the BSC database. Also, delete the selected database record(s) from the displayed table. Enable the selected database record(s). Disable the selected database record(s). Quarantine the selected device. Unquarantine the selected device. Delete the BSC database record displayed in the corresponding table row. BlueSecure™ Controller Setup and Administration Guide 3-11 Chapter 3: Administrator Console Table 3-1: Administrator Console Command Buttons and Icons Command Button or Icon Click to ... Edit the BSC database record displayed in the corresponding table row. Log out the BSC user listed in the corresponding table row. Display the report listed in the corresponding table row. Display the graph listed in the corresponding table row. Download the report listed in the corresponding table row. Send the report listed in the corresponding table row to the e-mail address configured in the report definition. Sorting and Filtering Table Data The following table describes use of the column heading links and drop-down filters to sort and filter a table of records on a BSC administrator console page. Table 3-2: Sorting and Filtering Administrator Console Table Data Table Control Column Heading Link Click to ... Sort a table of records in ascending or descending order based upon the data contained in this column. Clicking a column heading link also toggles the sort order. The arrow next to the link indicates the current sort order (Up = Ascending, Down = Descending). Filter a table of records based upon the selected column value or initial alphabetic character. To clear the filter restriction for a specific column, select All from the drop-down list for that column. Column Filter Customizing the Presentation of Table Data You can customize how BSC database tables are displayed by specifying which columns to include and in which order these columns are presented. To customize the presentation of BSC database table data: 1. Click the customize link that appears above the table on the right side of the page. The List customization page appears as shown in Figure 3-9. 2. Optional. Click Defaults to display the default presentation of the BSC database table data. By default, all table columns are displayed unsorted and unfiltered. 3. Move table columns you wish to display to the Selected Items pane. Select the column(s) you wish to display and then click Add highlighted items. Click Add all items in list to display all table columns. To move a single item between columns, you can also just double-click on the item. 4. Remove table columns you wish to hide from the Selected Items pane. 3-12 Paging Through Data Figure 3-9: Customizing the Presentation of Table Data Select the column(s) you wish to hide and then click Remove highlighted items. Click Remove all items in list to hide all table columns. 5. Specify column order by ordering the columns in the Selected Items pane. The top column represents the first (i.e. left-most) column in the table. Select a column and then click the up or down arrow to change its relative position within the table. 6. Click OK when you have finished customizing the presentation of table data. Paging Through Data Page controls are only available when a list of records spans multiple pages. Use the controls to navigate quickly through pages and to constrain the number of records displayed on a page. The page controls are located just above the column heading links on the right side of the page. Table 3-3: Administrator Console Page Controls Page Control Click to ... Display the next or previous page of records. Display the selected page. Specify number of rows displayed on each page. Console Fonts Use the font controls located at the bottom each administrator console page to control the appearance of administrator console fonts as summarized in the following table. Table 3-4: Administrator Console Font Controls Font Control Click to ... Toggle between Serif and Sans serif screen typeface. BlueSecure™ Controller Setup and Administration Guide 3-13 Chapter 3: Administrator Console Table 3-4: Administrator Console Font Controls Font Control Click to ... Increase or decrease screen text point size. Downloading Administrator Console Data You can download the administrator console page data you are currently viewing from the BSC to your computer or another computer to which you have network connectivity. You can save download page data to a CSV (comma separated values) or an HTML file. To download the BSC administrator console page data displayed in your web browser: 1. Click the download link that appears at the bottom of the administrator console page. 2. Click the appropriate link to download the page data as a CSV formatted file or an HTML formatted file. You are prompted to open or save the file. 3. Save the file to your computer or a computer to which you network connectivity. Entering IP Addresses and Fully Qualified Domain Names In many of the BSC administrator console pages, you are prompted to enter individual IP addresses, address ranges, address/netmask pairs, or fully qualified domain names in various fields. On some pages, for example when setting up external authentication servers, the system attempts to verify the address by pinging the machine, displaying the message “The address could not be reached” if the ping is unsuccessful. You can enter this information manually, or you can simply click the See networks… or See hosts… links next to the data entry field and then select the appropriate network or host addresses or Fully Qualified Domain Names (FQDNs) from a pop up list. To take advantage of the network or host pop up lists, you must first use the Destinations function to create the list of addresses or FQDNs. See “Creating Destinations and Destination Groups” on page 8-10 for more information. The following figure shows an example of a Network Assignment popup window for protected interface addresses that appears when the See networks... link is selected. After clicking the See networks… link, you would mark the appropriate radio button for the netmask/IP address pair and then click OK to populate the address fields on the page. You would follow a similar procedure when selecting hosts from a pop up list. 3-14 Restarting the BSC to Activate Configuration Information Figure 3-10: Using the Pop Up List Feature Restarting the BSC to Activate Configuration Information After entering new or updated BSC parameter values on an administrator console page, you normally click Save (or Save and Create Another) to save the configuration data to the BSC database. These saved settings take effect immediately and remain in effect even if you log out of the administrator console and start a new session. However, settings for some functions are not fully activated until you restart certain BSC services or reboot the BSC itself. In these cases, a prompt message will appear at the top of each page with a click here link that performs the required action. You must click this link after completing all of the setup tasks to ensure that the new BSC settings take effect. If you are using the BSC replication feature and make configuration changes, you may be prompted to click a link to restart the Replication Nodes so that the changes take effect. See “Replication” on page 14-10 for information on replicating data on multiple BSCs. Restarting the BSC means that services running on the BSC are stopped and then restarted without interrupting power, dropping user connections or restarting the OS. Rebooting the BSC means that the BSC is powered off and all user connections are dropped, and then the BSC is powered back on and its OS is restarted. ) Note: When you reboot the BSC, all connections are dropped and you must re-login to the administrator console. BlueSecure™ Controller Setup and Administration Guide 3-15 Chapter 3: Administrator Console 3-16 4 Networks This chapter coves the following topics: • Defining the BSC Protected Physical Interface • Configuring the BSC Managed Interface • Configuring the Admin Interface • Configuring Failover Parameters • Configuring Static Routes • Configuring Multicast Routing • Configuring AppleTalk Routing BlueSecure™ Controller Setup and Administration Guide 4-1 Chapter 4: Networks Defining the BSC Protected Physical Interface You must configure the BSC to communicate with the protected (i.e., wired) side of your network. The protected side of your network includes your enterprise servers and resources. Specify the following sections as required and click Save to store the information to the BSC database. You may be prompted to restart the BSC. We recommend that you do not restart the BSC until you have completely finished configuring the BSC for use in your network.Any parameter changes you have made are displayed in the Current Status panel after you click the link to restart the BSC. Displaying the “Edit Protected interface (eth0)” page Click the Network tab in the BSC administrator console, and then click the Protected tab. The Edit Protected interface (eth0) page appears as shown in Figure 4-1. Figure 4-1: Edit Protected Interface (eth0) Page The current settings for the BSC protected interface are listed in the Current status panel of the page. Click Fill Up to enter the current live data for IP/Netmask/Gateway/DNS into the form. This is particularly useful when converting from DHCP-assigned to static addresses. 4-2 Defining the BSC Protected Physical Interface Obtain IP settings from a DHCP server for the interface Not Using DHCP. If you are assigning IP settings manually: 1. Clear the Obtain IP settings from a DHCP server for the interface checkbox. 2. Enter default IP settings for the interface as explained in Fallback IP Settings. Using DHCP. if you are using a DHCP server on the protected side of the network to dynamically assign IP settings 1. Mark the Obtain IP settings from a DHCP server for the interface checkbox. 2. DHCP timeout - Maximum time in seconds between a client request and the client acknowledgement of a response to that request from the DHCP server. Note: Even if you are using dynamic host configuration protocol (DHCP) to dynamically assign IP settings, we recommend that you mark the Show fallback IP settings checkbox and enter default IP settings for the interface as explained in Fallback IP Settings. These defaults will become the fallback settings for the BSC protected interface if DHCP should fail for any reason. Fallback IP Settings These default IP settings for the interface will become the fallback settings for the BSC protected interface if DHCP should fail for any reason: IP Address - Enter the IP address of the BSC protected interface in four-byte dotted-decimal format. Netmask - Enter a subnet mask specifying which bits in the IP address correspond to the network address and which bits correspond to the subnet portion of the address. Gateway - Enter the IP address of the host serving as the BSC protected interface’s IP gateway. Primary DNS - Enter the IP address of the primary domain name system (DNS) server. Secondary DNS - Optional. Enter the IP address of the secondary domain name system (DNS) server. Default Domain - Optional. Enter the domain name to append to a hostname when its domain is not specified. For example, if the hostname myhost is received, and the default domain is widgetsrus.com, then the fully qualified domain name becomes myhost.widgetsrus.com. Hostname Network settings for the protected physical interface Optional. Enter the hostname for the BSC. Leaving the Hostname blank means that a hostname is not sent to the Dynamic DNS service. Enable multicast for this interface - Mark this checkbox to enable use of distance vector multicast routing protocol (DVMRP or PIM-SM) for this interface. You must enable this if you have one or more protected VLANs that use multicast. Force proxy ARP for this interface - Mark this checkbox to enable the BSC to force use of proxy address resolution protocol (ARP) for traffic directed to clients behind the protected interface. If this checkbox is cleared, the BSC determines whether the network setup requires proxy ARP. You should enable this option only when the protected interface and the managed interface reside within the same IP subnet. Enable Multiple ISP - Mark this checkbox to ena le support for Redundant Internet Uplinks (ISPs) across a single protected interface cable for Load Balancing and High Availability. A hotspot can take advantage of multiple internet uplinks to provide billing customers with guaranteed internet access, even if one internet link is lost. This requires configuring a protected VLAN for the secondary interface, and configuring the protected physical BlueSecure™ Controller Setup and Administration Guide 4-3 Chapter 4: Networks interface as a trunk port. One ISP should be reachable from the protected physical interface and one from the protected VLAN. 1. Protected Physical Egress VLAN: Enter the VLAN id for the secondary interface to share traffic 2. Configure ISP1 “Ping Address”: Enter the IP to ping to determine if the primary (protected physical) route is alive. If the ping fails, then the BSC will switch to using the VLAN interface. 3. Configure ISP2 “Ping Address”: Enter the IP to ping to determine if the secondary (protected VLAN) route is alive. If the ping fails, then the BSC will switch to using the protected interface. 4. Configure “Ping Interval”: Time in minutes to monitor the link status. The BSC will check the link status of the protected physical and protected VLAN during each interval. ) Note: If you are using DHCP for the protected interfaces, you should configure both Protected Physical and VLAN DNS Servers under the Managed Interface DHCP servers ) Note: Mobility and Loadsharing are not supported with this feature. Port settings By default, the BSC's physical interfaces automatically negotiate bit rate and duplex type for connections. However, if required, you can specify the following: Interface speed and duplex type - Max indicates the highest speed supported by an interface (for example, the BSC-2100 protected interface supports a speed of1000 Mbps maximum). Link Aggregation ) Select extra interfaces to bond to this interface, i.e. combine physical network links into a single logical link. Link Aggregation has the following benefits: • Increased Bandwidth: Capacity is higher then an individual link alone. • Higher Availability: Failure of any single component link will not disrupt communication; data flow is maintained and the failure is transparent to end-user. Note: Before configuring, you need to remove the sticker that covers the link aggregation ports. You should also set up the Admin port, which will make it easier to configure link aggregation if link is lost (See “Configuring the Admin Interface” on page 4-24). 1. Specify a bonding mode, as determined by the make and model of your switch (applies globally to all interfaces, i.e. all VLANs and all managed interfaces): 4-4 • IEEE 802.3ad Dynamic link aggregation. Creates aggregation groups that share the same speed and duplex settings. Utilizes all interfaces in the active aggregator according to the 802.3ad specification. The BSC transmit hash policy is layer 3 + layer 4. The switch must support IEEE 802.3ad dynamic trunking using LACP (802.3ad mode must be enabled on most switches). • Round-robin policy (for older switches): Transmit packets in sequential order from the first available interface through the last. This mode provides load balancing and fault tolerance. Requires fixed port trunking on the switch. • Adaptive load balancing: Outgoing traffic is distributed according to the current load (computed relative to the speed) on each interface and receive load balancing is achieved by ARP negotiation. Offers increased network bandwidth by allowing transmission and reception over multiple ports to multiple destination addresses, and also incorporates Adapter Fault Tolerance. Only the primary receives incoming traffic. Only the primary transmits broadcasts/multicasts and nonrouted protocols. The software load balances transmissions based on Destination Address, and can be used with any switch. Defining the BSC Protected Physical Interface 2. Physically configure links, choosing one of the following configurations: • Top/Down – The protected physical port and the E2 interface are one trunk. The managed physical port and the E1 interface are one trunk. This logically groups the ports together on the same NIC. • Crisscross - The protected physical port and the E1 interface are one trunk. The managed physical port and the E2 interface are one trunk. This puts the second interface on a different NIC, protecting against NIC failure – if the NIC fails, then protected and managed interfaces continue to work The following diagram shows the layout of interfaces on the rear panel of the 5200. Figure 4-2: Link Aggregation Interfaces on the BSC-5200 The current link status is displayed on the right side of the page: Up means all are up and Down means all are down. If the status is mixed, the first status listed is the managed/ protected interface, and the second status listed is E1/E2. Creating a VLAN on the Protected Side (Optional) You can create one or more virtual LANs on the protected side of your network. A VLAN is a logical grouping of nodes within a LAN. The nodes in a VLAN do not have to be physically connected to the same switch or hub to communicate with each other. You might want to create VLANs on the protected side of your network to define different groups of enterprise hosts and resources to which to route traffic from BSC users based on their assigned role. For example, if you create a “guest” role, you might want to route guest traffic away from the enterprise network backbone to a lower bandwidth Internet connection. You could accomplish this by creating a VLAN on the protected side of your network and then tagging all data from users assigned the role of “guest” with that protected-side VLAN ID. See “Defining a Role” on page 8-4 for more information about tagging user data based on the user’s assigned role. See Appendix A, "An Overview of Virtual LANs," for more information about the use of VLANs on Bluesocket BSC networks. Displaying the “Create a Protected VLAN” page Select Protected-side VLAN from the Create drop-down list on the Network page. The “Create a Protected VLAN” page appears as shown in Figure 4-3. Specify the following sections as required and click Save to save the protected-side VLAN settings to the BSC database or Save and create another to keep defining protected-side VLANs. Any parameter changes you have made are displayed in the Current Status panel after you click the link to restart the BSC. We recommend that you do not restart the BSC until you have completely finished configuring the BSC for use in your network. BlueSecure™ Controller Setup and Administration Guide 4-5 Chapter 4: Networks VLAN Settings 1. Ensure you have set up the protected physical interface as described in “Defining the BSC Protected Physical Interface” on page 4-2. 2. The Enable checkbox is marked by default to make the protected VLAN available. 3. Enter the protected VLAN settings, as described below: Interface Settings • Name - A unique name for the protected-side VLAN. • VLAN ID - The VLAN identification number. The specified ID must be unique on the protected side of the network and in the range of 2 to 4094. The protectedside VLAN ID you create here might match a managed-side VLAN ID to create a pass-through VLAN as described in Appendix A, "An Overview of Virtual LANs." • VLAN Type - The type of VLAN to create. Currently the IEEE 802.1q VLAN standard is the only VLAN type supported. 1. Ensure you have set up the protected physical interface as described in “Defining the BSC Protected Physical Interface” on page 4-2. 2. The remaining protected-side VLAN parameter settings are common to the protected physical interface. Configure these parameters as described in “Defining the BSC Protected Physical Interface” on page 4-2. You must enable multicast on the Protected Interface if you have one or more protected VLANs that use multicast. Figure 4-3: Create a Protected VLAN Page 4-6 Configuring the BSC Managed Interface Configuring a Protected Virtual Interface (Optional) This is an advanced BSC configuration feature that enables you to set up a protected-side virtual interface for protected-side resources that would benefit from being on a subnet that differs from the BSC protected physical or VLAN interfaces. For example, you might want to isolate protected side components from wireless users by isolating them on different subnets so as to make it more difficult for the users to find and gain unauthorized access. Displaying the “Create a Protected Virtual Interface” page 1. Click the Network tab in the administrator console, and then click the Protected tab. 2. Select Protected-side Virtual Interface from the Create drop-down list. The Create a Protected Virtual Interface page appears as shown in Figure 4-4. Figure 4-4: Create a Protected Virtual Interface Page Specify the following sections as required and then click Save to save the Protected Virtual Interface settings to the BSC database, or Save and create another to continue creating protected virtual interfaces. You might be prompted to restart the BSC. We recommend that you do not restart the BSC until you have completely finished configuring the BSC for use in your network. Protected Virtual Interface Settings Interface Settings Enable - This checkbox is marked by default to make the protected virtual interface available. Clearing the checkbox makes the protected virtual interface unavailable. Name - Enter a unique name for the protected virtual interface. IP address - Enter the IP address of the protected virtual interface. Netmask - Enter the subnet mask for the protected virtual interface IP address. Configuring the BSC Managed Interface You must configure the BSC to communicate with the managed (i.e., wireless) side of your network. The managed side of your network includes all wireless and wired clients attempting to access resources on the protected side of the network via the BSC. Configuring the BSC managed interface requires that you: • Define how the BSC assigns IP addresses to wireless clients: - Configure the BSC to relay all client DHCP requests to a DHCP server running on the protected side of the network and return the IP address, DNS, and other options to the client from the server (i.e. configure as a relay agent). BlueSecure™ Controller Setup and Administration Guide 4-7 Chapter 4: Networks Figure 4-5: Edit Managed Interface (eth1) Page - 4-8 If you are not running a DHCP server on your network, or if you want to conserve IP addresses or “hide” users on a private IP subnet, you can configure the BSC to dynamically assign addresses to wireless clients via its resident DHCP server or you can assign fixed IP addresses to wireless clients, or you can do both. Configuring the BSC Managed Interface It is possible to configure client addressing on the managed side of the network for both dynamic and fixed assignment. However, if both assignment modes are configured, the wireless client’s fixed IP address always takes precedence. • Optionally define one or more virtual LANs (VLANs) on the managed side • Optionally define a managed remote subnet for those network configurations where the wireless network is not directly connected to the BSC managed interface (on some IP subnet) but instead is accessible only across a routed network • Optionally configure a managed virtual interface for special networking topologies or applications that cannot communicate directly with the BSC managed physical interface, VLAN, or managed remote subnet Configuring Wireless Client IP Address Assignment Configuring the BSC managed interface requires that you define how the BSC assigns IP addresses to wireless clients on the managed side of the network. You can opt to: • Configure the BSC to behave as a DHCP relay agent whereby the BSC relays all client DHCP requests to a DHCP server running on the protected side of the network and returns the IP address, DNS, and other options to the client from the server. • If you are not running a DHCP server, you can either set the BSC to dynamically assign addresses to wireless clients via its resident DHCP server, or you can assign fixed IP addresses to wireless clients, or you can do both. It is possible to configure client addressing on the managed side of the network for both dynamic and fixed assignment. However, if both IP address assignment modes are configured, the fixed IP address always takes precedence. Procedures to configure these wireless client IP address assignment options are provided in the sections that follow. Configuring a DHCP Relay Agent To configure the BSC to use a DHCP relay agent to pass DHCP requests to an external DHCP server on the protected side of the network and assign IP addresses to wireless clients on the managed side of the network: Displaying the Edit Managed interface page 1. Click the Network tab in the administrator console, and then click the Managed tab. 2. To display the Edit Managed interface (eth1) page for the first time, click the Interface link at the top of the page. Subsequently, click the pencil icon. The current settings for the BSC managed interface are listed in the Current status panel of the page. Specify the following sections as required and click Save to save the managed interface settings to the BSC database. You might be prompted to restart the BSC. We recommend that you do not restart the BSC until you have completely finished configuring the BSC for use in your network. Enable DHCP relay? By default, DHCP relay is disabled. Mark this checkbox to enable DHCP relay. DHCP servers Enter the IP address or fully qualified domain name of each DHCP server in your network, separated by commas. ) Note: The entered DHCP servers should reside on the protected side of your network. To broadcast a DHCP request to any DHCP server, leave the DHCP servers field blank. The following figure shows an example of the Edit Managed interface (eth1) page with the DHCP relay options configured. BlueSecure™ Controller Setup and Administration Guide 4-9 Chapter 4: Networks This checkbox marked by default List DHCP Servers Figure 4-6: Completed DHCP Relay Options ) IP Address & Netmask Note: You must assign a fixed address to the managed interface. To assign a fixed IP address to the managed interface, complete these two fields: Enter the IP Address of the BSC managed interface in four-byte, dotted-decimal format; and enter the Netmask (subnet mask) specifying which bits in the IP address correspond to the network address and which bits correspond to the subnet portion of the address. Obtain IP settings from a DHCP server for the interface To assign the managed interface IP address dynamically via DHCP, mark this checkbox. NAT the addresses to the protected interface address Mark this checkbox to activate Network Address Translation (NAT) to map all client IP addresses on the managed side to the IP address of the BSC protected interface. Clear this checkbox to disable NAT. ) You can then enter an optional timeout value in the DHCP timeout field. Note: If the BSC managed IP subnet is different from the protected IP subnet and NAT is not enabled, then you must configure static routes on your network routers to reach the managed network. These static routes would point to the BSC’s protected interface as their next “hop.” See “Configuring the BSC to Assign Fixed IP Addresses” on page 4-14 for more information about mapping an individual wireless client IP address to a specific device IP address on the protected side. Enable multicast for this interface ) Mark this checkbox to enable use of distance vector multicast routing protocol (DVMRP or PIM-SM) for this interface. You must enable this if you have one or more managed VLANs that use multicast. Note: When multicast is enabled on an interface, all clients on that interface can send/ receive multicast traffic without bandwidth or firewall restrictions. Force proxy ARP for this interface Mark this checkbox to enable the BSC to force proxy address resolution protocol (ARP) for traffic directed to clients behind the protected interface. If this checkbox is cleared, the BSC determines whether the network setup requires proxy ARP. You should enable this option only when the protected interface and the managed interface reside within the same IP subnet. Strict MAC enforcement of IP addresses Mark the checkbox to prevent IP spoofing (users with a different MAC addressing being able to takeover IP address using ARP poisoning). The BSC will use static ARP entries for all clients on that VLAN. Note that the BSC will always use static ARP entries for the following cases, regardless of the checkbox value: Spectralink/Polycom Phones; if Mobility is enabled; MAC device authentication. Default Role If not specified, the default role for any interface is the Un-Registered role. In some environments, you may want all connections on a VLAN to go directly into a Role. To do 4-10 Configuring the BSC Managed Interface so, select the default user role from the Default role drop-down list. The selected default role is the role the BSC assigns the user if none of rules is true. Port settings Ignore link down error on this interface Mark this checkbox if all BSAPs are connected to the protected interface to prevent failover and the logging of managed interface link down errors (Not applicable on the BSC-600). Speed/Duplex - By default, the BSC's physical interfaces automatically negotiate bit rate and duplex type for connections. However, if required, you can specify interface speed and duplex type on each of the four front-panel managed interface ports. Max indicates the highest speed supported by an interface (for example, the BSC-2100 protected interface supports a speed of1000 Mbps maximum). Power Over Ethernet - If you have a BSC-600/1200 Controller model supporting the Power over Ethernet (PoE) option, you can selectively enable/disable the PoE option on each of the four front-panel managed interface ports. Select Enable to enable connection of IEEE 802.3af-compliant access points, and select Disable to disable PoE support on a port. The POE Status, either Powered or Unpowered, is shown on the right side of the page in the Current Status area. ) Note: Deprecated as of Release 6.1 is the drop-down choice Extended, formerly used to enable Cisco model 350, 1100, and 1200 access points. If one of these Cisco models is in use, it cannot be powered using PoE, but must instead be connected to an external power supply. The BSC only supports IEEE 802.3afcompliant access points. ) Note: The BSC-600 PoE option should only be used for intra-building circuits. Display MTU - (This field is only available by contacting customer support). Set the Maximum Transmission Unit for this interface, the size (in bytes) of the largest packet. The default is1500, the largest allowed by Ethernet at the network layer (and hence most of the Internet). Certain legacy networks require a lower MTU setting. Specify which login page to display to users logging into the BSC on the managed interface—the default user login page or a customized page you have defined. See “Customizing the User Login Page” on page 11-2 for more information about creating a customized user login page. Configuring the BSC DHCP Server You can use both dynamic (via DHCP) and fixed IP addressing for wireless clients. The addressing methods are not mutually exclusive. See “Configuring the BSC to Assign Fixed IP Addresses” on page 4-14 for more information on configuring the BSC to assign fixed IP addresses to wireless clients. To run a DHCP server on the BSC to assign IP addresses to wireless clients on the managed side of the network: 1. Click the Network tab in the administrator console, and then click the Managed tab. 2. Click the Interface link at the top of the page. The Edit Managed interface (eth1) page appears. 3. Clear the Enable DHCP Relay? checkbox. 4. Enter the IP and netmask addresses of the BSC managed physical interface 5. Mark the Run DHCP Server checkbox. The following figure shows an example of the Edit Managed interface (eth1) page with the BSC DHCP server options configured. 6. Configure the following options as appropriate for your network: BlueSecure™ Controller Setup and Administration Guide 4-11 Chapter 4: Networks Clear this Checkbox Mark this Checkbox Figure 4-7: Enabling the BSC DHCP Server NAT the addresses to the protected interface address ) Mark this checkbox to activate Network Address Translation (NAT) to map all client IP addresses on the managed side to the IP address of the BSC protected interface. Clear this checkbox to disable NAT. Note: If the BSC managed IP subnet is different from the protected IP subnet and NAT is not enabled, then you must configure static routes on your network routers to reach the managed network. These static routes would point to the BSC’s protected interface as their next “hop.” See “Configuring the BSC to Assign Fixed IP Addresses” on page 4-14 for information about mapping an individual wireless client IP address to a specific device IP address on the protected side. Enable multicast for this interface Mark this checkbox to enable use of distance vector multicast routing protocol (DVMRP or PIM-SM) for this interface. Force proxy ARP for this interface Mark this checkbox to enable the BSC to force proxy address resolution protocol (ARP) for traffic directed to clients behind the protected interface. You should enable this option only when the protected interface and the managed interface reside within the same IP subnet. If this checkbox is cleared, the BSC determines whether the network setup requires proxy ARP. Port settings Display By default, the BSC's physical interfaces automatically negotiate bit rate and duplex type for connections. However, if required, you can specify interface speed and duplex type here. Max indicates the highest speed supported by an interface (for example, the BSC2100 protected interface supports a speed of1000 Mbps maximum). Specify which login page to display to users logging into the BSC on the managed interface—the default user login page or a customized page you have defined. See “Customizing the User Login Page” on page 11-2 for information about creating a customized user login page. 7. Click Save to save the settings to the BSC database. 8. Click the DHCP Server link at the top of the page.The DHCP settings for managed interface (eth1) page appears as shown in Figure 4-8. 9. Configure the BSC DHCP server settings, as appropriate for your network: Address range to dynamically assign 4-12 Optional. Enter range of addresses that DHCP can assign within a network address space from first to last, such as 192.168.162.20 to 192.168.162.50. Leaving this field blank means that DHCP can assign any addresses within the subnet defined by the IP address and Netmask fields on the Edit managed interface (eth1) page. Configuring the BSC Managed Interface Address range to exclude Optional. If you have IP addresses that are reserved for particular devices and do want these addresses available for DHCP assignment, then enter the range of addresses to exclude from first to last, such as 192.168.162.22 to 192.168.162.27. If you have individual IP addresses to exclude, then enter in the From fields only. Netbios name server Optional. If Microsoft Windows name resolution is needed, this setting specifies the IP address of the Windows Internet Naming Service (WINS) server. DNS domain name Enter the domain name to append to a hostname when its domain is not specified. For example, if the hostname myhost is received, and the default domain is widgetsrus.com, then the fully qualified domain name becomes myhost.widgetsrus.com. Primary DNS IP address or fully qualified domain name of the primary DNS server. Leave this field blank to use the system default(s) from the protected interface. Secondary DNS Default lease Maximum lease Optional. IP address or fully qualified domain name of the secondary DNS server. Maximum time in seconds that an IP address is granted to a client. Elapsed time in seconds before the client can request another lease of an IP address assigned by the DHCP server. Figure 4-8: DHCP Settings for Managed Interface (eth1) Page BlueSecure™ Controller Setup and Administration Guide 4-13 Chapter 4: Networks Dynamic DNS Mechanism by which the DNS server learns the assigned IP address and fully qualified domain name of a wireless client. There are three options: • Ad Hoc - DNS server looks for a valid host name as specified in the FQDN option and in the client hostname option sent by the client. If this information is available, the DNS server updates its records with the client's hostname. If not, the server will not have a host name for the client, and cannot do a DNS update. If there is already a record with the same hostname in the DNS server as submitted by the client, no update occurs. This prevents a client from spoofing an existing network server. Upon expiration of the client's lease or receipt of a DHCPRELEASE message from the client, the DHCP server removes the client's records from the DNS database. • Interim - Same as the Ad Hoc option except the client is allowed to communicate directly with the DNS server to update records. This mode should be used with care, because there is no mediation or checking of information supplied by the client. • Disabled - No DNS update occurs. Other clients on the network will be unable to locate this client using DNS. 10. Optional. Configure Advanced DHCP Custom Options for the DHCP server running on the BSC as follows. Option (predefined) Select the predefined DHCP server option you wish to configure from the Option drop-down menu. The Name, Code, and Data Type fields are automatically filled for all predefined DHCP server options. Option (custom) You can select custom from the Option menu if you wish to define your own DHCP server option. Optional. If defining your own custom DHCP server option, you must enter a meaningful name for the option in the Name field, enter the numeric code associated with the option in the Code field, and select the option’s datatype from the Data Type menu. Value Enter the Value to which to set the predefined or custom DHCP server option. The entered value must correspond to the datatype selected for the option. Repeat (specifying Option and Value) for each DHCP server option you wish to configure. Click Row Management... if you need to add rows to support additional DHCP server options. 11. Click Save to save the settings to the BSC database. You might be prompted to restart the BSC. We recommend that you do not restart the BSC until you have completely finished configuring the BSC for use in your network. Configuring the BSC to Assign Fixed IP Addresses You can use both dynamic (via DHCP) and fixed IP addressing for clients. The addressing methods are not mutually exclusive. See “Configuring the BSC DHCP Server” on page 411 for information about running a DHCP server on the BSC to assign IP addresses to the wireless clients dynamically. A device must be added to the BSC’s internal connection table and assigned a role before its traffic can transit the BSC firewall. You must assign a fixed IP address to any device that is not receiving its IP address via DHCP to add that device to the BSC connection table. 4-14 Configuring the BSC Managed Interface Use the Fixed IP address assignments table ( as shown in Figure 4-9), to manage devices that require fixed IP addresses (e.g., access points and bar code scanners) on the managed side of the BSC network. ) Note: If you have many fixed IP address users to configure, you can speed up the process by configuring a few users using the procedure described below, exporting the fixed IP address configuration to a .CSV or XML file, appending new data to the file, and then reimporting the file. See “Exporting and Importing BSC Bulk Data Files” on page 16-10 for details. Alternatively, if you have many devices on the managed side with fixed IP addresses, you can use the IP Range assignments table on the Edit Managed Interface page to enter the known IP address range for these devices. The BSC will learn the device’s MAC address, add it to the BSC connection table, and authenticate the user/device into a role as it receives traffic from the device. The advantage to using the IP Range assignments table versus doing a bulk static IP address import is that device IP addresses entered via the IP Range assignments method are not added to the BSC connection table until traffic is received from the user/device which is less burdensome to BSC resources than adding devices to the BSC Connection table in bulk. Follow these steps to set up a managed network using fixed IP addressing for clients: 1. Click the Network tab in the BSC administrator console, and then the Managed tab. The list of configured managed interfaces appears. Click the to the Managed physical interface. icon corresponding 2. Click the Interface link at the top of the page. The Edit Managed interface (eth1) page appears (see Figure 4-7). 3. Enter the following information for each wireless client to which you are assigning a fixed IP address: • MAC address - Media Access Control (MAC) hardware address of the wireless client's NIC card. Required setting. Enter colons (:) or dashes (-) as delimiters between the number pairs comprising the MAC address. • IP address - IP address you are assigning to the wireless client. Required setting if you cannot provide the wireless client host name. • Host name - Host name of the wireless client. • Role - Select one of the following role assignment options for this wireless client: - Authenticate - The BSC user login page is displayed and the wireless client is automatically assigned the role associated with his or her user ID after logging in. - Specific Role - If you select a specific role from the list of available roles, login authentication is bypassed and the wireless client immediately gains access to those network assets defined for the selected role. No roles are available in this option unless you first define them. See “Defining a Role” on page 8-4 for information on creating roles (or see the Create… option described next). - Create… - Opens up a window that enables you to create a new role. After you save the role, you are returned to Edit Managed Interface page where you can select the newly created role from the drop-down list. See “Defining User Roles to Enforce Network Usage Policies” on page 8-2 for complete information about roles and how they are created. BlueSecure™ Controller Setup and Administration Guide 4-15 Chapter 4: Networks ) Note: Use care when choosing a specific role rather than Authenticate. The Specific Role option allows network transmission via MAC addresses, which is inherently less secure than the Authenticate option. The following figure shows an example of fixed IP address assignments on the Edit Managed interface page. Specify Role for Wireless Client Click to Manage Rows Figure 4-9: Fixed IP Address Assignments for Wireless Clients 4. Optional. Edit the Fixed IP address assignments by selecting one of the following commands from the Row Management drop-down list: • Clear this row • Delete this row • Insert a row • Append rows... To remove a fixed IP address assignment from the BSC database, you must clear the MAC address, IP address, and Host name for that client before saving the information. 5. Optional. Using the IP Range Assignments table, define role assignments for devices/ users that have been assigned static IP addresses as they connect to the BSC on the managed interface. Enter a range of IP addresses using the From and To fields. 6. Click Save to save the settings to the BSC database. You might be prompted to restart the BSC. We recommend that you do not restart the BSC until you have completely finished configuring the BSC for use in your network. Configuring One-to-one Network Address Translation Standard NAT, as described in “Configuring One-to-one Network Address Translation” on page 4-16, maps every IP address on the managed side to one address on the protected side. However, in some cases you might want to map certain addresses on the managed side to specific addresses on the protected side, rather than to a single protected side address. One-to-one NAT is typically used to manage devices such as wireless access points from a management station on the protected side without the need to add static routes to the LAN router table. To set up one-to-one NAT, you need to provide the protected-to-managed side address mappings as follows: 1. Click the Network tab in the BSC administrator console, and then the Managed tab. The list of configured managed interfaces appears. Click the to the Managed physical interface. icon corresponding 2. Click the One-to-One NAT link at the top of the page.The NAT Settings for Managed interface (eth1) page appears as shown in Figure 4-10. 4-16 Configuring the BSC Managed Interface Figure 4-10: NAT Settings for Managed Interface Page 3. Supply the following information for each managed side-to-protected side address mappings: • Protected address - Enter a free (i.e., unused) address from the BSC’s protected interface subnet. • Managed address - Enter the managed side IP address of the wireless client or access point. We recommend that you use an address in the range 10.0.0.0 to 10.255.255.255 or 192.168.0.0 to 192.168.255.255 as these are not assigned addresses and are not routed by the Internet. 4. Optional. Edit the Static NAT assignments by selecting one of the following commands from the Row Management drop-down list: • Clear this row • Delete this row • Insert a row • Append rows... To remove a static NAT assignment from the BSC database, you must clear the entered data for that client before saving the information. 5. Click Save to save the settings to the BSC database. You might be prompted to restart the BSC.We recommend that you do not restart the BSC until you have completely finished configuring the BSC for use in your network. Creating a VLAN on the Managed Side of Your Network You can create one or more virtual LANs on the managed side of your network. A VLAN is a logical grouping of nodes within a LAN. The nodes in a VLAN do not have to be physically connected to the same switch or hub to communicate with each other. You can create VLANs on the managed side of your network to define different groups of wireless clients or access points from which to route traffic to certain network locations. For example, for a given managed-side VLAN, you can configure the BSC to either pass data through to the protected side of your network with a VLAN ID or to strip the VLAN ID out on the managed side before passing the data through to the protected side. See Appendix A, "An Overview of Virtual LANs," for more information about the use of VLANs on Bluesocket BSC networks. To set up a VLAN on the managed side of your network: BlueSecure™ Controller Setup and Administration Guide 4-17 Chapter 4: Networks 1. Set up the managed physical interface as described in “Configuring a DHCP Relay Agent” on page 4-9 and in “Configuring the BSC DHCP Server” on page 4-11. 2. Select Managed-side VLAN from the Create drop-down list on the Network page. The Create a Managed VLAN page appears as shown in Figure 4-11. Figure 4-11: Create a Managed VLAN Page 3. The Enable checkbox is marked by default to make the managed-side VLAN available for use. 4. Enter the managed VLAN settings, as described below: 4-18 • Name - A unique name for the managed-side VLAN. • VLAN ID - The VLAN identification number. The specified ID must be unique on the managed side of the network and in the range of 2 to 4094. The managedside VLAN ID you create here might match a protected-side VLAN ID to create a pass-through VLAN as described in Appendix A, "An Overview of Virtual LANs." Configuring the BSC Managed Interface • VLAN Type - The type of VLAN to create. Currently the IEEE 802.1q VLAN standard is the only VLAN type supported. Automatically Add Location Element for this VLAN - Checked by default. Automatically create/edit a Location when the VLAN itself is changed. If a Location does not exist, the Location is created with this VLAN ID, using the same name as the Managed VLAN. If a matching Location exists with the original VLAN ID, a new Location is not created; instead, the VLAN ID is updated to this VLAN ID. If the BSC is a Replication Node, the checkbox is disabled, because the BSC uses Locations, not the interfaces themselves, to support separate network topologies within a replication matrix. Changes to locations cannot break replication and should be propagated on a master. 5. The remaining managed-side VLAN parameter settings are common to the managed physical interface. Configure these parameters as described in the previous sections starting in “Configuring Wireless Client IP Address Assignment” on page 4-9. You must enable multicast on the Managed Interface if you have one or more managed VLANs that use multicast. 6. Click Save to save the managed-side VLAN settings to the BSC database or Save and create another to continue creating managed-side VLANs. You might be prompted to restart the BSC. We recommend that you do not restart the BSC until you have completely finished configuring the BSC for use in your network. Configuring a Managed Remote Subnet In most BSC configurations, the wireless network is directly connected to either the physical or VLAN interface on the managed side. However, in some cases, the wireless network is not directly connected to the interface but instead is only accessible across a routed network. For example, it might be more cost-effective in some public access environments to route several small wireless LANs back through a WAN to a centrally located BSC, rather than install a BSC at each wireless LAN site. In this network configuration, known as a managed remote subnet, the local wireless subnet employs a router that is configured for DHCP relay, forwarding “IP Helper”, etc. The BSC will use DHCP to hand out IP addresses to clients on the remote wireless networks. The following figure illustrates a managed-side remote subnet. Remote Site HQ/Home Site Bluesocket BSC WAN or VPN POWERFAULT DATA ALARM Router PWR Router APs DISK Power HS1 HS2 OK1 OK2 PS POWERFAULT DATA ALARM 1 2 3 4 5 6 7 8 9101112 COLACTSTA- Reset CONSOLE WG-2100 Wireless Gateway Switch Managed Side Protected Side Figure 4-12: A Sample Managed Remote Subnet To set up a managed remote subnet: 1. Click the Network tab, and then click the Managed tab. BlueSecure™ Controller Setup and Administration Guide 4-19 Chapter 4: Networks 2. Select Managed-side Remote Subnet from the Create drop-down list on the Network page. The Create a Managed Remote Subnet page appears as shown in Figure 413. Figure 4-13: Create a Managed Remote Subnet Page 3. The Enable checkbox is marked by default to make the managed remote subnet available to wireless clients. Clearing the checkbox makes the managed remote subnet unavailable. 4. Complete the following options below. 4-20 • Name - Enter a unique name for the managed remote subnet, e.g., SatelliteOffice1 or RemoteOffice1, etc. • Gateway IP address for BSC to reach remote subnet - Enter the IP address of the router on the managed side of the network to which the BSC will send traffic destined for the managed remote subnet. The router address is required because the managed remote subnet is not connected to the BSC directly. • Default gateway IP address for remote clients to reach the BSC - When handing out addresses to wireless clients via DHCP, the BSC must include the default gateway IP address that wireless clients will use to reach the BSC. This is the IP address of the local router at the managed remote subnet. Configuring the BSC Managed Interface • Netmask of Remote Subnet - When handing out addresses to wireless clients via DHCP, the BSC must include the clients' netmask address. This is the netmask address that is assigned to clients on the managed remote subnet. • Additional IP addresses that DHCP relay packets can be sourced from - Used only for HSRP, put all the physical router addresses here (a comma separated list of additional DHCP relay endpoints). • NAT the addresses to the protected interface address - Mark this checkbox to map all client IP addresses on the managed remote subnet to the IP address of the BSC protected interface. If this checkbox is cleared, NAT is disabled. Substitute IP address for remote clients NAT - If you have marked the preceding NAT checkbox, and you want remote subnets to use a substitute NAT IP instead of protected interface address, enter the substitute NAT IP in this field. This allows you to determine the point of origin for traffic originating in a remote subnet. 5. Optional. Using the IP Range Assignments table, define role assignments for devices/ users that have been assigned static IP addresses as they connect to the BSC on the managed remote subnet. Enter a range of IP addresses using the From and To fields. 6. Optional. Using the Custom User Login drop-down menu, specify which login page to display to users logging into the BSC on the managed remote subnet—the default user login page or a customized page you have defined. See “Customizing the User Login Page” on page 11-2 to learn how to create a customized user login page. 7. Click Save to save the settings to the BSC database. Click Save and create another to continue creating Managed Remote Subnets. Click Next to set up the DHCP parameters on the DHCP settings for new Managed Remote Subnet page as shown in Figure 4-14. Figure 4-14: DHCP Settings for New Managed Remote Subnet Page a) Configure the BSC DHCP server settings, as appropriate for your network: BlueSecure™ Controller Setup and Administration Guide 4-21 Chapter 4: Networks • Address range to dynamically assign - Optional. Enter range of addresses that DHCP can assign within a network address space from first to last, such as 192.168.162.20 to 192.168.162.50. Leaving this field blank means that DHCP can assign any addresses within the subnet defined by the IP address and Netmask fields on the Edit managed interface (eth1) page. b) • Netbios name server - Optional setting. If Microsoft Windows name resolution is needed, this specifies the IP address of the Windows Internet Naming Service (WINS) server. • DNS domain name - Domain name to be appended if the client uses a client ID that is not fully qualified. For example, if the client ID is myhost and the default DNS domain name is widgetsrus.com, then the fully qualified name becomes myhost.widgetsrus.com. • Primary DNS - IP address or fully qualified domain name of the primary DNS server. Leave this blank to use the system default(s). • Secondary DNS - Optional setting. IP address or fully qualified domain name of the secondary DNS server. • Default lease - Maximum time in seconds that an IP address is granted to a client. • Maximum lease - Elapsed time in seconds before the client can request another lease of an IP address assigned by the DHCP server. • Dynamic DNS - Mechanism by which the DNS server learns the assigned IP address and fully qualified domain name of a wireless client. There are three options: - Ad Hoc - DNS server looks for a valid host name as specified in the FQDN option and in the client host-name option sent by the client. If this information is available, the DNS server updates its records with the client's host name. If not, the server will not have a host name for the client, and cannot do a DNS update. If there is already a record with the same host name in the DNS server as submitted by the client, no update occurs. This prevents spoofing by a client of an existing network server. Upon expiration of the client's lease or receipt of a DHCPRELEASE message from the client, the DHCP server removes the client's records from the DNS database. - Interim - Same as Ad Hoc except the client is allowed to communicate directly with the DNS server to update records. This mode should be used with care, because there is no mediation or checking of information supplied by the client. - Disabled - No DNS update occurs. Other clients on the network will be unable to locate this client. Optional. Configure Advanced DHCP Custom Options for the DHCP server running on the BSC as follows: • Select the predefined DHCP server option you wish to configure from the Option drop-down menu. The Name, Code, and Data Type fields are automatically filled for all predefined DHCP server options. You can select custom from the Option menu if you wish to define your own DHCP server option. • 4-22 Optional. If defining your own custom DHCP server option, you must enter a meaningful name for the option in the Name field, enter the numeric code Configuring the BSC Managed Interface associated with the option in the Code field, and select the option’s datatype from the Data Type menu. • Enter the value to which to set the predefined or custom DHCP server option in the Value field. The entered value must correspond to the datatype selected for the option. • c) Repeat the above steps for each DHCP server option you wish to configure. Click Save to save the DHCP settings for the managed remote subnet. 8. Configure the local router in the managed remote subnet for DHCP relay, with the BSC's managed physical interface IP address listed as the DHCP server. 9. Ensure that devices between the BSC and the managed remote subnet do not NAT any of the clients because the BSC uses dynamically assigned IP addresses to identify wireless clients. Configuring a Managed Virtual Interface This is an advanced BSC configuration feature that enables you to set up a managed-side virtual interface for special networking topologies or applications that would benefit from being on a subnet that differs from the BSC managed physical or VLAN interfaces. For example, you might want to isolate access points from wireless users by isolating them on different subnets so as to make it more difficult for the users to “find” the access points and gain unauthorized access. To set up a managed virtual interface: 1. Click the Network tab in the BSC administrator console, and then the Managed tab. 2. Select Managed-side Virtual Interface from the Create drop-down list on the Network page. The Create a Managed Virtual Interface page appears as shown in Figure 415. Figure 4-15: Create a Managed Virtual Interface Page BlueSecure™ Controller Setup and Administration Guide 4-23 Chapter 4: Networks 3. The Enable checkbox is marked by default to make the managed virtual interface available to wireless clients. Clearing the checkbox makes the managed virtual interface unavailable. 4. Complete the following options as appropriate for your network. • Name - Enter a unique name for the managed virtual interface. • VLAN ID - The VLAN identification number. The specified ID must be unique and in the range of 2 to 4094. Enter 0 to indicate no VLAN. • Automatically add Location Element for this VLAN - • IP address - Enter the IP address of the managed virtual interface. • Netmask - Enter the subnet mask for the managed virtual interface IP address. • NAT the addresses to the protected interface address - Mark this checkbox to map all client IP addresses on the managed remote subnet to the IP address of the BSC protected interface. If this checkbox is cleared, NAT is disabled. 5. Optional. Using the IP Range Assignments table, define role assignments for devices/ users that have static IP addresses as they connect to the BSC on the managed virtual interface. You can enter a range of IP addresses using the From and To fields. 6. Click Save to save the Managed Virtual Interface settings to the BSC database, or Save and create another to continue creating managed virtual interfaces. You might be prompted to restart the BSC. We recommend that you do not restart the BSC until you have completely finished configuring the BSC for use in your network. Configuring the Admin Interface A new physical ethernet port on the BSC-2200/3200/5200 allows admin access to the BSC without needing to be on the Managed or Protected network. The main purpose of the Admin port is to provide out of band management for the BSC. In addition, the BSC can be configured to send certain outbound protocols to the admin port. On the BSC-600 and BSC-1200, no physical interface is present, but you can use the Failover interface, disabling the failover feature on the port. The default IP address of the admin port is 10.1.1.1. To connect to the admin port, configure a static IP of 10.1.1.2 on your laptop. This Admin interface only supports the following inbound protocols: SNMP, HTTPS, PING, and SSHD. Outbound traffic is possible from the Admin Interface for the following protocols: SNMP Traps, Syslog, Radius, LDAP, other non-transparent authentication servers. To configure outbound traffic, a Static Route must be added pointing to the server. BVMS can also reside beyond to the admin interface, but it too must have a static route pointing to it. See “Configuring Static Routes” on page 4-28. Recommended tools: • Web Browser for HTTPS access. • SSH Client to test SSHD access. • MIB browser, or BVMS, to test SNMP. To configure the BSC to communicate with the ADMIN side of your network. 1. Click the Network tab in the BSC administrator console, and click the Admin tab. The Edit Admin Interface (eth3) page appears as shown in Figure 4-16. 2. Mark the Enable checkbox to make the Admin interface available to administrators. The Enable checkbox is marked by default on the BSC-2200/3200/5200. Clearing the checkbox makes the Admin port unavailable. Enabling the admin port on the BSC-600 and BSC-1200 disables the failover feature. 4-24 Configuring Failover Parameters Figure 4-16: Edit Admin Interface Page 3. Gateway: Allows connectivity to the Admin port through the IP cloud (for example, through the IP Router). The NOC station can now be several IP hops away. Having a separate Admin Gateway also allows the Admin IP address to reside on the same IP network (subnet) as the Protected IP address. Leave empty if you do not want the admin port routed to remote networks. Configuring Failover Parameters See “Failover BSCs” on page 1-11 for background information about fail-over operation of the BSC. Two BlueSecure Controllers can be configured to provide high-availability redundancy using the failover mode. In a failover configuration, a primary BSC is connected to a secondary BSC via the Failover interface. The secondary BSC monitors a periodic heartbeat signal on the primary. If the secondary does not detect a certain number of heartbeats from the primary in a specified amount of time, failover occurs and the secondary assumes all the functions of the primary. The primary heartbeat signal will cease when the primary BSC: loses link status on the managed or protected interface; loses power abruptly; is shutdown gracefully; exceeds a pre-set threshold; crashes due to a software defect. Disconnecting the managed or protected interface cable will cause a failover. The secondary BlueSecure Controller becomes active with the same MAC addresses, the same IP addresses, the same software and patches, the same configuration and the active connections table as the primary BlueSecure Controller. Failover supports redundant layer 2 switches on both managed and protected interfaces. The controllers can be installed in different rooms, buildings and/or data centers. ) Note: For best results, the BSCs should be the same platform and must be running the same revision of system software with the same installed software patches. It is possible to run failover between mixed BSC platforms. If this is necessary, then match Controllers as best you can based on user and BSAP counts. For network planning and design, contact your Bluesocket representative. BlueSecure™ Controller Setup and Administration Guide 4-25 Chapter 4: Networks ) Note: On a BSC-600 or BSC-1200, the admin interface must be disabled in order to use the failover feature. ) Note: On a BSC-600 or BSC-1200, a normal CAT-5E ethernet cable is used to connect the two failover ports (a crossover cable is not needed). ) Note: When failover occurs, users with an IPSec connection will need to restart their tunnel. However, network availability is maintained during failover. The connection between failover ports must be a dedicated physical or logical one. You can choose one of the following connection options: • Cross cable between both controllers • Dedicated switches for failover only • Dedicated VLAN for the failover ports only Normal Operation Within a failover configuration, the primary BlueSecure Controller is normally active and the secondary BlueSecure Controller is idle, as shown in Figure 4-17. Figure 4-17: Failover - Normal State Failover State When the secondary BSC takes over, its role changes and it functions as the primary, as shown in Figure 4-18. Recovery State If the original primary recovers, it then becomes the secondary, as shown in Figure 4-19. Therefore, no manual intervention is needed to “reset” roles when the original primary BSC recovers. Configuring the Primary BSC To configure the parameters for a failover configuration, complete the following steps on the primary BSC: 4-26 Configuring Failover Parameters Figure 4-18: Failover - Failover State Figure 4-19: Failover - Recovery State 1. Click the Network tab in the BSC administrator console, and then click the Failover tab on the Network page. The Edit Failover (Eth2) settings page appears as shown in Figure 4-20. 2. Configure the BSC failover interface settings as described below: • Heart beat interval- Enter the expected time between heartbeats (minimum is 0.5 seconds). The default interval is 5.0 seconds • Failed beats - Enter the number of failed or missing heartbeats that the secondary must detect in the primary BSC before triggering failover to the secondary BSC. The default number of failed or missing heartbeats is 3. We recommend that you do not change the default settings for Heart beat interval or Failed Beats. BlueSecure™ Controller Setup and Administration Guide 4-27 Chapter 4: Networks Figure 4-20: Edit Failover (Eth2) Page • ) Primary machine identifier - Enter the MAC address of the primary BSC. In the event of a failover, this entry is used to identify the primary BSC for the administrator, because the rest of the configuration parameters are identical on both primary and secondary. Note: Click the This device link to automatically fill in the Primary machine identifier field with the MAC address of the BSC to which you are connected. 3. Click Save to store the failover settings to the BSC database. A BSC heartbeat is one to two seconds in duration, so using the default failover settings of 3 failed beats and a heart beat interval of 5.0 seconds means that it would take approximately 15-20 seconds before failover occurs. Completing the Failover Setup Before completing this procedure, ensure that: • the primary BSC has been fully configured as desired and is powered up • the secondary BSC is powered off • you have the proper cable, a straight through cable for the BSC 1200 and an Ethernet crossover cable for all other BSC models. To complete the failover setup between the primary BSC and the secondary BSC: 1. Connect the Ethernet cable between the Failover port on the primary BSC and the Failover port on the secondary BSC. 2. Power up the secondary BSC. The secondary BSC will download its configuration from the primary BSC and then enter standby mode. No other configuration is necessary on the secondary BSC. ) Note: Occasionally, when the failover BSC is rebooting, you might see "Sync Failures" messages on the LCD of the failover BSC. This message does not indicate a problem and can be safely ignored, unless it persists for longer than five minutes, in which case you should contact your Customer Service Representative. Configuring Static Routes The BSC automatically builds and maintains its own internal routing table to keep track of gateway addresses and interfaces used to reach network and host destinations. To display the BSC's internal routing table, click the Network tab in the administrator console, and then click the Routing Table tab on the Network page. The BSC Routing table appears as shown in Figure 4-21. 4-28 Configuring Static Routes Figure 4-21: Sample BSC Routing Table To enable outbound administrator traffic from the Admin interface, a static route must be configured. This is required because the BSC has a separate routing table for the Admin interface than the rest of the box. Rarely, you may need to add a static route to a special network destination that is not normally included in the routing table. Caution: This is an advanced BSC configuration function. Do not add static routes unless you have a thorough understanding of network and routing concepts. To add a static route to the BSC routing table: 1. Click the Network tab in the BSC administrator console, and then click the Routing Table tab on the Network page. 2. Select Static Route Entry from the Create drop-down list on the Network page. The Create a static route entry page appears as shown in Figure 4-22. Figure 4-22: Create a Static Route Entry 3. Enter the IP address of the destination network in the Route Destination field. BlueSecure™ Controller Setup and Administration Guide 4-29 Chapter 4: Networks 4. Enter the IP address of the gateway through which traffic is routed to the destination network in the Route Gateway field. This gateway must be on the same subnet as the IP address of the specified Interface. 5. Enter a bit mask that specifies the bits in the IP address that correspond to the network address and to the subnet portion of the destination network IP address. 6. Specify the BSC interface through which traffic is routed to the destination network. For outbound traffic out the Admin interface, select Admin. 7. Click Save to store the static route settings to the BSC database. You may be prompted to restart the BSC. We recommend that you do not restart the BSC until you have completely finished configuring the BSC for use in your network. When you create an Admin interface route it will always appear highlighted in yellow, as shown in Figure 4-23. This means that the routing is done in a separate table, and is only used for traffic originating at the BSC. No traffic from clients will reach the Admin interface, even if it is designated for that IP range. Figure 4-23: Admin Interface in Network Routing Table Configuring Multicast Routing You may configure the BSC to support multicast routing using Distance Vector Multicast Routing Protocol (DVMRP) or Protocol Independent Multicast-Sparse Mode (PIM-SM). You must enable multicast on two BSC network interfaces before configuring multicast routing support. To enable the BSC to route multicast traffic: 1. Click the Network tab in the BSC administrator console, and then click the Multicast tab on the Network page. The Edit Multicast settings page appears as shown in Figure 4-24. 2. Mark the radio button identifying the multicast protocol you wish to support: • DVMRP - Distance Vector Multicast Routing Protocol • PIM-SM - Protocol Independent Multicast-Sparse Mode 3. Enter address of the multicast group to which clients join to receive the multicast data in the Group address field. The multicast group address should be a Class D IP address in the range 224.0.0.0 through 239.255.255.255. 4. Enter a network mask for the entered group address in the Netmask field. 5. When configuring the BSC to support PIM-SM, enter the IP address of the Rendezvous Point in the RP address field. The Rendezvous Point maintains a table of multicast sources and group information. 4-30 Configuring AppleTalk Routing Figure 4-24: Enabling Multicast Routing You can configure a default Rendezvous Point for group address “224.0.0.0” with a network mask of “240.0.0.0.” 6. Repeat steps 1 to 4 for each multicast group for which you wish to route multicast traffic through the BSC. 7. Click Save to store the multicast routing settings to the BSC database. You may be prompted to restart the BSC. We recommend that you do not restart the BSC until you have completely finished configuring the BSC for use in your network. Configuring AppleTalk Routing The BSC system software supports the ability to route AppleTalk protocol traffic through the BSC. AppleTalk routing on the BSC supports Datagram Delivery Protocol (DDP) packets over Ethernet using EtherTalk. This functionality is not available on the BSC-600 or BSC-1200. AppleTalk Networks: Key Concepts Because AppleTalk networks differ from PC networks, you must consider some special concepts and issues when you set up an AppleTalk network including: • AppleTalk Routers and Internetworks • Phase 1 vs. Phase 2 AppleTalk Networks • Routing Information AppleTalk Routers and Internets The first concept you need to understand is the internetwork. Most large AppleTalk networks are not single physical networks in which all computers are attached to the same network cabling system. Instead, they are internetworks, which are multiple smaller physical networks connected by routers. Routers maintain a map of the physical networks on the internet and forward data received from one physical network to other physical networks. Routers are necessary so that computers on different physical networks can communicate with one another. They also reduce network traffic on the internet by isolating the physical networks. In other words, routers only send data that is usable by a network. Some routers on the network are seed routers. A seed router initializes and broadcasts routing information about one or more physical networks. This information tells routers BlueSecure™ Controller Setup and Administration Guide 4-31 Chapter 4: Networks where to send each packet of data. Each physical network must have one or more seed routers that broadcast the routing information for that network. Not all routers must be seed routers. Routers that are not seed routers maintain a map of the physical networks on the internet and forward data to the correct physical network. Seed routers perform these functions too, but they also initialize the routing information, such as network numbers and zone lists, for one or more physical networks Phase 1 vs. Phase 2 Networks There are two types of AppleTalk networks: Phase 1 and Phase 2. AppleTalk Phase 1 was the original AppleTalk protocol architecture designed to support networking for small workgroups. Phase 1 could only support a single physical network that had just one network number and one zone. AppleTalk Phase 2 enhances the routing and naming services of AppleTalk. This means improved network traffic and better router selection. You can now create AppleTalk networks that support more than 254 nodes and have multiple zones. You must use Phase 2 to run Services for Macintosh. Routing Information AppleTalk routing information includes: • A network number or network range associated with each physical network • The zone name or zone list associated with each physical network • The default zone for the network (if the network has multiple zones) The network number or network range is the address or range of addresses assigned to the network. A network number is unique and identifies a particular AppleTalk physical network. By keeping track of network numbers and network ranges, routers can send incoming data to the correct physical network. A network number can be any number from 1 through 65,279. LocalTalk networks can have only a single network number; EtherTalk, TokenTalk and FDDI networks can have network ranges. A zone is a logical grouping that simplifies browsing the network for resources, such as servers and printers. It is similar to a domain in Windows NT Server networking, as far as browsing is concerned. In LocalTalk networks, each physical network can be associated with only one zone. However, for EtherTalk, TokenTalk, or FDDI, you have more flexibility in assigning zones. Each EtherTalk, TokenTalk, or FDDI network can have one or more zones associated with it, and each zone can include servers and printers on one or more physical networks. This allows you to group servers and printers logically into zones so that users can easily locate and access the servers and printers, no matter what physical networks they are on. Each Macintosh client on the network is assigned to a single zone. However, each client can access servers and printers in any zone on the network. Zones make accessing network resources simpler for users. When users use the Chooser to view the network, they see only the resources in a single zone at a time, preventing them from having to navigate through huge numbers of resources on large networks to find the resources that they need. You can put the clients, servers, and printers used by a single group into a single zone so that users will see only the resources they typically use but will still be able to access resources in other zones when required. A zone list includes all the zones associated with that network. One of these zones is the network's default zone, to which the Macintosh clients on that network are assigned by default. Users can configure the client to be in a different zone, however. 4-32 Configuring AppleTalk Routing Configuration Procedure You must enable at least two BSC interfaces to support AppleTalk routing. If there is no other seed router, a managed side interface should be configured as a seed router. A protected side interface should be configured as a non-seed router. You can enable AppleTalk routing globally for all roles on the BSC or only for selected roles. To enable the BSC to route AppleTalk traffic: 1. Click the Network tab in the BSC administrator console, and then click the AppleTalk tab on the Network page. The Edit AppleTalk settings page appears as shown in Figure 4-25. Figure 4-25: Enabling AppleTalk Routing 2. Mark the Enable AppleTalk checkbox to enable AppleTalk routing on the BSC. 3. Optional. Mark the AARP proxy checkbox to enable an AppleTalk Address Resolution Protocol proxy on the BSC. Enable this option only if your MAC clients have trouble communicating through the BSC. 4. Configure AppleTalk routing for each of the BSC’s physical and virtual interfaces as follows: ) Note: A seed router assigns AppleTalk addresses much like a DHCP server. If there is no seed router on the protected network, the protected network must be seeded and include a proper zone.The managed side will almost always be seeded (unless a seed router exists there too) and include a proper zone. For an explanation of the difference between a seed port and a non-seed port on an AppleTalk router, refer to http://docs.info.apple.com/article.html?artnum=21034&coll=ap. a) Select an option from the Routing drop-down menu: • Off - AppleTalk routing is disabled on this interface. • Auto - Configures a non-seed interface. Select this option for protected side interfaces. • Seed - Configures a seed interface. Select this option for managed side interfaces. BlueSecure™ Controller Setup and Administration Guide 4-33 Chapter 4: Networks b) Specify what version of AppleTalk is to be supported, Phase 1 or Phase 2, by selecting an option from the Phase menu. c) For seed interfaces, assign a range of network addresses to assign to the interface by entering a valid range in the Net Begin and Net End fields, e.g., 20301 - 20310, or assign a single unique address to the interface using the Address field. Leave the Net Begin, Net End, and Address fields blank for auto, i.e., non-seed interfaces. d) Specify the zone associated with the interface by entering the zone name in the Zones field. If multiple zones are associated with the interface, you must enter them as a colon (:) separated list. 5. Specify for which roles AppleTalk routing is enabled. By default, AppleTalk routing is enabled for all roles. You may enable AppleTalk only for selected roles by marking the Only Allow Access In Selected Roles checkbox, and then selecting one or more roles from the list box. Use the CTRL key to select multiple roles from the list box. 6. Click Save to store the AppleTalk routing settings to the BSC database. You may be prompted to restart the BSC. We recommend that you do not restart the BSC until you have completely finished configuring the BSC for use in your network. After you have configured AppleTalk routing on the BSC, you can return to the Edit AppleTalk settings page to display a log of the AppleTalk routing daemon as it runs on the BSC. The daemon log provides both basic daemon statistics and troubleshooting information. 4-34 5 Authentication Using Internal Database Follow the procedures given in this chapter if: • You are using the BSC's internal database for user authentication. We refer to users who are authenticated against the BSC’s internal database as “local” or “native” BSC users. • You have wireless devices that the BSC can authenticate only by using their device media access control (MAC) address. Certain wireless devices do not support login via web browser; the BSC can only authenticate and assign them a role based on their MAC address. This chapter covers the following topics: • Local BSC User Authentication • Creating/Editing/Deleting a Local User Account • Defining MAC Address Authentication Refer to Chapter 6, "Authentication Using External Servers," for procedures to configure RADIUS, LDAP/Active Directory, External NTLM, Transparent NTLM Windows, or Transparent 802.1x, Kerberos, Cosign, Pubcookie, or Central Authentication Service (CAS) user authentication. Refer to “The BSC Internal 802.1x Authentication Server” on page 6-19 for information about configuring the 802.1x authentication server running on the BSC to terminate TTLS (Tunneled Transport Layer Security Protocol), PEAP (Protected Extensible Authentication Protocol) and FAST (Flexible Authentication via Secure Tunneling Protocol) when used to pass inner authentication credentials through an encrypted tunnel. BlueSecure™ Controller Setup and Administration Guide 5-1 Chapter 5: Authentication Using Internal Database Local BSC User Authentication You can create local users and assign each to a previously defined role. User credentials are authenticated against the BSC's internal user database. You can assign many users to the same role, but you can assign only one role to a specific user. You can configure the BSC to support enterprise guest access by defining local user accounts and assigning them to the BSC’s default guest role. Configuring guest access in this way enables you to set the following limitations on guests who access your enterprise network: ) • when the guest user account is activated and expired • the network bandwidth the guest can use • the network services the guest can access (only DNS and HTTP/S by default) Note: If you have many local users to configure, you can speed up the process by configuring a few users using the procedure described below, exporting the local user configuration to a .CSV or XML file, appending new data to the file, and then reimporting the file. See “Exporting and Importing BSC Bulk Data Files” on page 16-10 for details. In general, the local user authentication will proceed as follows: 1. The wireless device associates with an access point on the managed network and obtains an IP address from the BlueSecure Controller. 2. The BlueSecure Controller adds the device MAC address and IP address to its active connections table and assigns the device to the unregistered role. The unregistered role allows DNS traffic from the managed network to transit the BSC firewall and reach the protected network. 3. The user launches a web browser on the wireless device. The wireless device web browser uses DNS to resolve the hostname portion of the home page to an IP address. The wireless device web browser uses HTTP to access a web page. 4. The BlueSecure Controller intercepts the HTTP traffic and redirects the wireless device web browser to the BlueSecure Controller user login page. The user of the wireless device is prompted to login as a registered user with a username and password. 5. The BlueSecure Controller authenticates the user of the wireless device against its local user database using the user-supplied credentials. 6. The BSC places the wireless device into a role once the user is successfully authenticated. The wireless device web browser is then able to access and display the contents of the requested web page. 7. The BlueSecure Controller can use internal log files or RADIUS to provide accounting of the wireless device’s activities. Creating/Editing/Deleting a Local User Account To create local BSC users and assign them roles: 1. Click the User authentication tab in the BSC administrator console, then click the Local Users tab. 2. To delete a user account from the wireless network you can either: • Click the icon for the account in the Local Users page. • Click the Delete button when the account is displayed in the Edit the local user page. 3. To create a new account, select Local User from the Create drop-down list on the User Authentication page. The New local user page appears as shown in Figure 5-1. 5-2 Creating/Editing/Deleting a Local User Account Figure 5-1: New Local User Page 4. To edit an existing user account, click the icon corresponding to the user whose password you wish to change.The “Edit the local user” page appears; refer to the figure below for the New local user page, since the Edit page is identical. 5. Mark the Enable user radio button to make the user account available for use. Alternatively, mark the Enable user on the specific date, and then specify the date on which to activate the local user account if you wish to defer activation of the account to a future time. 6. Enter the user’s name in the Name field. User settings 1. Select a role from the Role drop-down list to assign to the user. See “Defining User Roles to Enforce Network Usage Policies” on page 8-2 to define a new role available for selection in the drop-down list. Alternatively, you can select the Create… option to open a window that enables you to define a new role. After you save the role information, you are returned to the New Local User page where you can select the role from the drop-down list. 2. Optional. If the user is connecting to the BSC using IPSec, then enter the user’s e-mail address in the E-mail address field. 3. Optional. If the user is connecting to the BSC using a Windows 2000 IPSec client, enter the IP address of the Windows 2000 IPSec client in the Fixed IP field. 4. Optional. Limit the number of concurrent active login sessions the user can open to the BSC by entering a value in the Active Sessions field. The default value is 1 (0 indicates an unlimited number of sessions). BlueSecure™ Controller Setup and Administration Guide 5-3 Chapter 5: Authentication Using Internal Database 5. To enable RADIUS accounting for this user, select the name of the external RADIUS accounting server from the Accounting server drop-down list. See Chapter 7, "RADIUS Accounting," to configure a new RADIUS accounting server for selection in the drop-down list. Alternatively, you can select the Create… option to open a window that enables you to configure a new RADIUS accounting server. After you save the server information, you are returned to the New local user page where you can select the RADIUS accounting server from the drop-down list. Password Maintenance 1. Enter the password with which the user is to log into the BSC in the Password field. Re-enter this password in the Confirm password field. 2. Optional. Mark the Force a password change on next login? checkbox to force the user to change his password the next time he logs into the BSC. The checkbox is cleared automatically after the password change occurs. Expire User Optional. Configure user account expiration settings. Specify either After login or On a specific date: • • After login effectively limits the user to a single login to the network. Specify one of the following: - Logout and disable - Log the user out of the network and disable the user account. This option enables you to later re-enable the user account. - Logout and delete - Log the user out of the network and delete the user account from the BSC database. - Specify the duration of the user’s single login by entering the duration value in the Lifetime Minutes field. On a specific date: a) b) Select one of the following options from the drop-down menu: • Never – The user account never expires. This is the default setting. • On the specific date and disable – The user account expires on the specified date and is disabled. If the user is logged in at the specified expiration time, he remains so. An administrator can re-enable the user account after expiration. • On the specific date and disable and logout – The user account expires on the specified date and is disabled. If the user is logged in at the specified expiration time, he is logged out. An administrator can re-enable the user account after expiration. • On the specific date and delete – The user account expires on the specified date and is deleted from the BSC database. If the user is logged in at the specified expiration time, he remains so. • On the specific date and delete and logout – The user account expires on the specified date and is deleted from the BSC database. If the user is logged in at the specified expiration time, he is logged out. Specify when the user account is to expire from the drop-down menu. Possible settings are: Date shown below, 1 Hour, 12 Hours, 1 Day, 1 Week, 1 Month, and 1 Year. If you specify Date shown below, then set the Year, Month, Day, Minute and Hour at which the user account is to expire. 3. Optional. Enter a meaningful description for the local user in the Notes field. 4. Click Save to store the information to the BSC database or Save and create another to continue to create local users. 5-4 Defining MAC Address Authentication You may be prompted to restart the BSC. We recommend that you do not restart the BSC until you have completely finished configuring the BSC for use in your network.) Defining MAC Address Authentication Follow the procedure in this section if you have wireless devices that the BSC can authenticate only by using their device media access control (MAC) address. Certain wireless devices do not support login via web browser; the BSC can only authenticate and assign them a role based on their MAC address. ) Note: If you configure the BSC to authenticate a device via its MAC address, the device must get its IP address via DHCP or the device will be unable to pass traffic through the BSC. ) Note: If you have many MAC devices to configure, you can speed up the process by configuring a few devices using the procedure described below, exporting the MAC device configuration to a .CSV or XML file, appending new data to the file, and then reimporting the file. See “Exporting and Importing BSC Bulk Data Files” on page 16-10 for details. To set up MAC address authentication: 1. Click the User authentication tab, then the Mac Device authentication tab. 2. Select MAC Device Authentication from the Create drop-down list. The New MAC device page appears as shown in Figure 5-2. Figure 5-2: New MAC Device Page 3. The Enable MAC Device checkbox is marked by default to enable the BSC to authenticate this device using the entered MAC address. Clearing the checkbox disables MAC authentication for this device. 4. Enter a meaningful name for the wireless device in the Name field. Mac device settings 1. Enter the device’s MAC address in the MAC address field. BlueSecure™ Controller Setup and Administration Guide 5-5 Chapter 5: Authentication Using Internal Database Acceptable MAC address delimiters are colons (00:03:4a:3b:4F:02) or hyphens (00-03-4a-3b-4F-02). The % wildcard character is supported in place of any alphanumeric field in the MAC Address. The '%' character will match any character. You need exactly one '%' for each character you are matching. This allows admins to configure a MAC address range. For example, to put Polycom phones starting with the OUI of 00:90:7a into a determined role, use the MAC address '00:90:7a:%%:%%:%%'. You cannot place a Wildcard MAC address into permanent quarantine, but you can place the Wildcard MAC range into a limited/no access role. 2. Select a role from the Role drop-down list to assign to the user who logs in using the wireless device. See “Defining User Roles to Enforce Network Usage Policies” on page 8-2 to define a new role available for selection in the drop-down list. Alternatively, you can select the Create… option to open a window that enables you to define a new role. After you save the role information, you are returned to the New Local User page where you can select the role from the drop-down list. IDS Device Maintenance 3. Define how the BSC Intrusion Detection System (IDS) described in “Intrusion Detection System” on page 10-5 treats this MAC device by marking one of the following radio buttons: • Normal device - This MAC device is subject to defined IDS rules. • Permanently put this MAC in quarantine - All traffic sent from this MAC address is blocked. You should select this option if you suspect the device is used in a denial-of-service attack or is otherwise disrupting normal network traffic. 1. Optional. Configure MAC device expiration settings. a) Select one of the following options from the Expire device drop-down menu: Never – The user account never expires. This is the default setting. On the specific date and disable – The MAC device expires on the specified date and is disabled. If the device is logged in at the specified expiration time, it remains so. An administrator may re-enable the MAC device after expiration. On the specific date and disable and logout – The MAC device expires on the specified date and is disabled. If the device is logged in at the specified expiration time, it is logged out. An administrator may re-enable the MAC device after expiration. On the specific date and delete – The MAC device expires on the specified date and is deleted from the BSC database. If the device is logged in at the specified expiration time, it remains so. On the specific date and delete and logout – The MAC device expires on the specified date and is deleted from the BSC database. If the device is logged in at the specified expiration time, it is logged out. b) Specify when the device is to expire. Possible settings are: Date shown below, 1 Hour, 12 Hours, 1 Day, 1 Week, 1 Month, and 1 Year. If you specify Date shown below, then set the Year, Month, Day, Minute and Hour at which the MAC device is to expire. Notes (Optional). Enter a meaningful description for the MAC address-authenticated wireless device in the Notes field. Click Save to store the information to the BSC database or Save and create another to continue to define MAC address-authenticated devices. 5-6 Defining MAC Address Authentication You may be prompted to restart the BSC. We recommend that you do not restart the BSC until you have completely finished configuring the BSC for use in your network. BlueSecure™ Controller Setup and Administration Guide 5-7 Chapter 5: Authentication Using Internal Database 5-8 6 Authentication Using External Servers Follow the procedures given in this chapter if you are using an external server for user authentication. This chapter covers the following topics: • An Overview of External User Authentication • iPass Client Authentication • RADIUS Authentication • LDAP/Active Directory Authentication • SIP2 Authentication • NTLM Authentication • Transparent NTLM Authentication • Transparent 802.1x Authentication • The BSC Internal 802.1x Authentication Server • Kerberos Authentication • Cosign Authentication • Pubcookie Authentication • CAS Authentication • Transparent Certificate Authentication • Testing an External Authentication Server For information on authenticating against the BSC’s internal database refer to: • “Local BSC User Authentication” on page 5-2 for procedures to define users who are authenticated against the BSC’s internal database • “Defining MAC Address Authentication” on page 5-5 if you have wireless devices that the BSC can authenticate only by using their device media access control (MAC) address. BlueSecure™ Controller Setup and Administration Guide 6-1 Chapter 6: Authentication Using External Servers An Overview of External User Authentication In external server user authentication, an external server contains rules (attributes and values linked by logical operators) that are checked sequentially as defined. If a rule evaluates as true, the authenticating user is assigned the BSC role specified in the rule and checking ends. If no rule is true in RADIUS, LDAP/Active Directory, External NTLM, or Transparent 802.1x authentication, then the user is assigned the role you have specified as the Default role. For Transparent NTLM Windows authentication, you have a choice of default options. External server authentication is most useful when you already have a large authentication database and don't want to manually add each user to the BSC user database. Furthermore, you can create attributes on the external server that map directly to BSC roles. For example, you can create a RADIUS attribute called JobType with values of Engineer, Technician, and Accountant that correspond to equivalent roles in the BSC. A user presenting a JobType RADIUS attribute with a value of Engineering is assigned the Engineering role in the BSC. In general, the external authentication will proceed as follows: 1. The wireless device associates with an access point on the managed network and obtains an IP address from the BlueSecure Controller. 2. The BlueSecure Controller adds the device MAC address and IP address to its active connections table and assigns the device to the unregistered role. The unregistered role allows DNS traffic from the managed network to transit the BSC firewall and reach the protected network. 3. The user launches a web browser on the wireless device. The wireless device web browser uses DNS to resolve the hostname portion of the home page to an IP address. The wireless device web browser uses HTTP to access a web page. 4. The BlueSecure Controller intercepts the HTTP traffic and redirects the wireless device web browser to the BlueSecure Controller user login page. The user of the wireless device is prompted to login as a registered user with a username and password. 5. The BlueSecure Controller authenticates the user of the wireless device against an external authentication server using the user-supplied credentials. 6. The BSC places the wireless device into a role once the user is successfully authenticated. The wireless device web browser is then able to access and display the contents of the requested web page. 7. The BlueSecure Controller can use internal log files or RADIUS to provide accounting of the wireless device’s activities. See “Testing an External Authentication Server” on page 6-34 for information about testing a newly configured external authentication server. RADIUS Authentication The BlueSecure Controller works with any standard RADIUS server. The BlueSecure Controller must be configured on the RADIUS server as a network access server (NAS) with a shared secret before the RADIUS server will communicate with the BlueSecure Controller. RADIUS authentication can use the IANA assigned port of 1812 or the well known port of 1645. Roles are automatically assigned based upon the attributes configured on the RADIUS server. The dynamic role assignment logic operates on a first match basis. If there is no match, the user will be assigned to the default role. The default role can also be used when dynamic role assignment is not configured. 6-2 RADIUS Authentication Figure 6-1: New RADIUS Server Page To configure an external RADIUS authentication server and define the rules used for authentication: Displaying the New RADIUS server page Enable server Click the User authentication tab in the BSC administrator console, and then select External RADIUS Authentication from the Create drop-down list on the User authentication page. The New RADIUS server page appears as shown in Figure 6-1. The Enable checkbox is marked by default to make the server available for user authentication. BlueSecure™ Controller Setup and Administration Guide 6-3 Chapter 6: Authentication Using External Servers Name Enter a meaningful name for the external RADIUS authentication server. ) Note: As described in the previous section, if you wish to authenticate iPass clients who attempt to log into the BSC, you must include the word “iPass” in the name you assign to the external RADIUS authentication server. For example, if you enter “iPass Authentication Server” in the Name field, the BSC will attempt to authenticate iPass clients, along with other BSC users, against the external RADIUS authentication server. Precedence Optional. If you are setting up multiple external RADIUS authentication servers and need to establish the order in which the BSC checks the servers for user authentication, select the server's priority from the Precedence drop-down list. Note that 1 means the server is checked first. The precedence you configure here does not apply to Transparent NTLM Windows logins, Transparent 802.1x logins, or local users in the BSC database, because these authentication schemes are always checked first. If you set a Precedence for a server that is the same as that set for a previously configured server, the previous server's Precedence, and that of all servers having a lower configured precedence, is incremented by 1. For example, if server A already has a Precedence of 1 and server B's is 2 and you then set server C's to 1, server A's Precedence becomes 2 and server B's becomes 3. RADIUS Server Settings 1. Enter the server's IP address or fully qualified domain name in the Server address field. 2. Enter the server’s port number in the Port field. 3. Enter the known secret shared between the BSC and the RADIUS authentication server in the Shared secret field, and then confirm the shared secret by entering it in the Confirm shared secret field. 4. Enter the number of seconds by which the RADIUS server must respond to the BSC’s query before the request times out in the Timeout field.You must enter a value greater than zero in this field. NAS Identifier Optional. Enter a Network Access Server identifier string used to access the RADIUS server in the NAS Identifier field. When left blank, the BSC sends its configured host name as the NAS identifier. ) Note: Make sure you leave the NAS Identifier field blank when using replication so that a common NAS Identifier is not copied to all nodes. Otherwise, when using RADIUS Accounting, the entries in the RADIUS log will show a common NAS identifier for all replicated nodes, making it impossible to determine the specific server that initiated the RADIUS request. NAC Integration Mark the Enable MAC Address Authentication checkbox to enable the BSC, upon seeing a MAC address from a user device, authenticate that MAC address against a RADIUS authentication server for role placement. The BSC will supply the device MAC address as the username and password for RADIUS authentication. If the MAC address RADIUS authentication fails, then the user remains in the unregistered role and must authenticate via other methods (user login page, NTLM, etc.). Mark the Enable BlueSocketRole Vendor Attribute checkbox to allow role placement using the Bluesocket RADIUS vendor attribute (vendor code 9967 attribute 100 type string). This is used by a NAS server to override the user's role, specifically for BVMS Guest Manager and 3rd party NAC integration. Accounting 6-4 To enable RADIUS accounting for this server, select the name of the external RADIUS accounting server from the Accounting server drop-down list. RADIUS Authentication See “RADIUS Accounting” on page 7-1 to configure a new RADIUS accounting server for selection in the drop-down list. Alternatively, you can select the Create… option to open a window that enables you to configure a new RADIUS accounting server. After you save the server information, you are returned to the New RADIUS server page where you can select the RADIUS accounting server from the drop-down list. Mapping RADIUS attributes to roles 1. Define the rules to determine if the user is authenticated. For each rule: a) Enter the appropriate RADIUS attribute in the Attribute field. b) Select the appropriate logic operator (equal to, not equal to, starts with, ends with, contains, or [is a role]) from the Logic drop-down list. c) Enter the appropriate value to check against the specified attribute in the Value field. d) Select the role to assign to the user if the rule evaluates as true and the user is authenticated from the Role drop-down list. See “Defining User Roles to Enforce Network Usage Policies” on page 8-2to define a new role available for selection in the drop-down list. Alternatively, you can select the Create New… option to open a window that enables you to define a new role. After you save the role information, you are returned to the New RADIUS server page where you can select the role from the drop-down list. 2. Optional. Use the commands included in the Row Management drop-down list to change the order of rules, add new blank rules, clear rule data, or delete a rule, etc. Remember, the BSC evaluates rules in the order in which they are listed here on the New RADIUS server page. 3. Select the default user role from the Default role drop-down list. The selected default role is the role the BSC assigns the user if none of rules is true. Access Control Lists Optional. Return the MAC and IP addresses stored on the RADIUS server’s access control lists for the user authenticated into this role. To return a list of MAC addresses allowed for this user, enter the appropriate RADIUS server attribute in the MAC ACL Attribute field (case-sensitive). To allow this user to be authenticated from any MAC address, in the access control list on the RADIUS server, enter the string “exception” instead of a MAC address for this user. Use commas as delimiters when entering multiple attributes. The format of the MAC address is 00:00:00:... To return a list of IP addresses allowed for this user, enter the appropriate RADIUS server attribute in the IP ACL Attribute field. To allow this user to be authenticated from any IP address, in the access control list on the RADIUS server, enter the string “exception” instead of an IP address for this user. Post Login Optional. Enter a Redirect URL Attribute to specify a URL to which the user should be redirected. Note that there are two other places in the UI in which redirection can be specified. The user is redirected to one of the following URLs (if specified) in the order of precedence listed: 1. The Redirect URL Attribute field on either the RADIUS page or the LDAP page accessed on the User Authentication tab. (See “RADIUS Authentication” on page 6-2 and “LDAP/Active Directory Authentication” on page 6-6.) 2. The URL Redirect field on the Edit Role page (“Defining a Role” on page 8-4). BlueSecure™ Controller Setup and Administration Guide 6-5 Chapter 6: Authentication Using External Servers 3. The Default Redirect URL field on the General HTTP Settings page (see “HTTP Server Settings” on page 10-2). ) Note: If the user is assigned a role on the Edit Role page with Thank You HTML text specified, the browser displays the Thank You page and no redirection occurs. The user can click on the link to go the URL, but they are not automatically redirected to that link. Location Optional. Specify the user location from which the RADIUS authentication request must originate by selecting a defined user location from the Location drop-down menu. If a user location is specified, the RADIUS authentication request will not be attempted if the request does not come from that location. Notes Optional. Enter a meaningful description for the external RADIUS authentication server in the Notes field. Saving the Settings Click Save to store the information to the BSC database or Save and create another to continue to define external RADIUS authentication servers. You may be prompted to restart the BSC. We recommend that you do not restart the BSC until you have completely finished configuring the BSC for use in your network. LDAP/Active Directory Authentication ) Note: You may need to set up the BSC to communicate with an LDAP/Active Directory authentication server over Secure Sockets Layer (SSL). To do so, you must first upload the appropriate certificate(s) to the BSC as described in “Configuring External Server Authentication Over SSL” on page 10-21before following the steps in this section to set up the an LDAP/Active Directory authentication server. LDAP uses a database schema to store user information and authentication credentials. The database uses a hierarchical tree structure with a root at the base of the tree and branches as the top of the tree. Objects in the tree are classified based upon the LDAP schema. dc= domain container or domain controller cn= common name ou=organizational unit The base entry specifies the level of the tree where the BlueSecure Controller starts to look at the database. The base entry field value should specify a level low enough in the tree to allow the BlueSecure Controller to search for all the user credentials at or above the level of the base entry. The unique ID attribute field specifies the unique identifier that is used to distinguish each user record in the LDAP database. userid is a common unique identifier that is use by many LDAP servers. The Microsoft Active Directory Server LDAP implementation uses sAMAccountName as the unique identifier. The BlueSecure Controller must bind to the LDAP server to look up the user in the LDAP database. The BlueSecure Controller can use anonymous binding when it is supported by the LDAP server. The LDAP user is used to bind to LDAP servers that do not support anonymous binding. The LDAP user field must contain the distinguished name of the LDAP user. An LDAP distinguished name is equivalent to a DNS fully qualified domain name or a disk operating system explicit directory path. The Microsoft Active Directory Server LDAP implementation does not support anonymous binding. Dynamic role assignment parses the LDAP attributes to determine which role a user should be assigned to. The dynamic role assignment logic operates on a first match basis. If there is no match, the user will be assigned to the default role. The default role can also be used when dynamic role assignment is not configured. 6-6 LDAP/Active Directory Authentication Figure 6-2: New LDAP/Active Directory Server Page To configure an external LDAP/Active Directory authentication server and define the rules used for authentication: BlueSecure™ Controller Setup and Administration Guide 6-7 Chapter 6: Authentication Using External Servers Displaying the New LDAP/ active directory server page Enable server Name Precedence 1. Click the User authentication tab in the BSC administrator console. 2. Select External LDAP/Active Directory Authentication from the Create drop-down list on the User authentication page. The New LDAP/active directory server page appears as shown in Figure 6-2. The Enable checkbox is marked by default to make the server available for user authentication. Enter a meaningful name for the external LDAP/active directory authentication server. Optional. If you are setting up multiple external LDAP/active directory authentication servers and need to establish the order in which the BSC checks the servers for user authentication, select the server's priority from the Precedence drop-down list. Note that 1 means the server is checked first. The precedence you configure does not apply to Transparent NTLM Windows logins, Transparent 802.1x logins, or local users in the BSC database, because these authentication schemes are always checked first. If you set a Precedence for a server that is the same as that set for a previously configured server, the previous server's Precedence, and that of all servers having a lower configured precedence, is incremented by 1. For example, if server A already has a Precedence of 1 and server B's is 2 and you then set server C's to 1, server A's Precedence becomes 2 and server B's becomes 3. LDAP/Active Directory server settings 1. Server address: Enter the server's IP address or fully qualified domain name. 2. Port: Enter the server’s port number. 3. Require SSL?: Mark this checkbox to set up digital certificate authentication between the BSC and the server via Secure Sockets Layer (SSL). If you plan to use LDAP/Active Directory over SSL, see “Configuring External Server Authentication Over SSL” on page 10-21 for detailed instructions on how to upload the appropriate certificate to the BSC and configure the certificate parameters. After you have uploaded the digital certificate to the BSC, return to this procedure to complete the remaining steps. 4. Configure the following LDAP parameters: • Base entry - Enter the base name entry, for example, cn=Users,dc=acme,dc=com. This entry serves as the starting point for the search in the server database. • Unique ID attribute - Enter a unique server database search attribute, e.g. uid. • LDAP user and LDAP password - Enter the LDAP/active directory account identifiers in the LDAP user and LDAP password fields.Re-enter the password in the Confirm LDAP password field. • LDAP Filters - Optional. Enter LDAP Filters to apply to entries within the specified scope of the search, e.g., objectClass=Person. You can use a filter on any property of an object. All entered filters are case sensitive and must follow the syntax specified in RFC1960. 5. LDAP Search Credentials: Specify what user credentials the LDAP search uses. Accounting 6-8 • User Login Information: Mark this radio button to search the LDAP/Active Directory server for the user using the information entered when the user logs in. This is the default setting. • LDAP User: Alternatively, mark this radio button to search the LDAP/Active Directory server for the user using the information you have defined on this page. To enable RADIUS accounting for this server, select the name of the external RADIUS accounting server from the Accounting server drop-down list. See “RADIUS Accounting” LDAP/Active Directory Authentication on page 7-1 to configure a new RADIUS accounting server for selection in the drop-down list. Alternatively, you can select the Create… option to open a window that enables you to configure a new RADIUS accounting server. After you save the server information, you are returned to the New LDAP/Active directory server page where you can select the RADIUS accounting server from the drop-down list. Mapping LDAP/ Active Directory attributes to roles 1. Define the rules to determine if the user is authenticated.For each rule: a) Enter the appropriate LDAP attribute in the Attribute field. b) Select the appropriate logic operator (equal to, not equal to, starts with, ends with, contains, or [is a role]) from the Logic drop-down list. c) Enter the appropriate Value to check against the specified attribute. d) Select the role to assign to the user if the rule evaluates as true and the user is authenticated from the Role drop-down list. See “Defining User Roles to Enforce Network Usage Policies” on page 8-2 to define a new role available for selection in the drop-down list. Alternatively, you can select the Create New… option to open a window that enables you to define a new role. After you save the role information, you are returned to the New LDAP/Active Directory page where you can select the role from the drop-down list. 2. Optional. Use the commands included in the Row Management drop-down list to change the order of rules, add new blank rules, clear rule data, or delete a rule, etc. Remember, the BSC evaluates rules in the order in which they are listed here on the New LDAP/Active Directory server page. 3. Select the default user role from the Default role drop-down list. The selected default role is the role the BSC assigns the user if none of rules is true. Access Control Lists Optional. Return the MAC and IP addresses stored on the LDAP/Active Directory server’s access control lists for the user authenticated into this role. To return a list of MAC addresses allowed for this user, enter the appropriate LDAP server attribute in the MAC ACL Attribute field. To allow this user to be authenticated from any MAC address, in the access control list on the RADIUS server, enter the string “exception” instead of a MAC address for this user. The entered attribute must be complete with consideration given to case. Use commas as delimiters when entering multiple attributes. The format of the MAC address is 00:00:00:. To return a list of IP addresses allowed for this user, enter the appropriate LDAP server attribute in the IP ACL Attribute field. To allow this user to be authenticated from any IP address, in the access control list on the RADIUS server, enter the string “exception” instead of an IP address for this user. Post Login Optional. Enter a Redirect URL Attribute to specify a URL to which a user is redirected. There are two other places in the UI in which redirection can be specified. The user is redirected to one of the following URLs (if specified) in the order of precedence listed: 1. The Redirect URL Attribute field on either the RADIUS page or the LDAP page accessed on the User Authentication tab. (See “RADIUS Authentication” on page 6-2 and “LDAP/Active Directory Authentication” on page 6-6.) 2. The URL Redirect field on the Edit Role page (“Defining a Role” on page 8-4). 3. The Default Redirect URL field on the General HTTP Settings page (see “HTTP Server Settings” on page 10-2). ) Note: If the user is assigned a role on the Edit Role page with the Thank You HTML text specified, the browser displays the Thank You page and no redirection to a URL occurs. BlueSecure™ Controller Setup and Administration Guide 6-9 Chapter 6: Authentication Using External Servers The user can click on the link to go the URL, but they are not automatically redirected to that link. Location Notes Saving the settings Optional. Specify the user location from which the LDAP/active directory authentication request must originate by selecting a defined user location from the Location drop-down menu. If a user location is specified, the authentication request will not be attempted if the request does not come from that location. Optional. Enter a meaningful description for the external LDAP/active directory authentication server in the Notes field. Click Save to store the information to the BSC database or Save and create another to continue to define LDAP/active directory authentication servers. You may be prompted to restart the BSC. We recommend that you do not restart the BSC until you have completely finished configuring the BSC for use in your network. SIP2 Authentication SIP2 (Standard Interface Protocol) is used for exchanging circulation data between libraries. Orignally created by 3M, SIP2 is now used by many systems and products, used to communicate between devices. 6-10 SIP2 Authentication Figure 6-3: New SIP2 Server Page Displaying the New SIP2 server page Enable server Name Precedence 1. Click the User authentication tab in the BSC administrator console. 2. Select External SIP2 Authentication from the Create drop-down list on the User authentication page. The New SIP2 server page appears as shown in Figure 6-2. The Enable checkbox is marked by default to make the server available for user authentication. Enter a meaningful name for the external SIP2 authentication server. Optional. If you are setting up multiple SIP2 authentication servers and need to establish the order in which the BSC checks the servers for user authentication, select the server's priority from the Precedence drop-down list. Note that 1 means the server is checked first. The precedence you configure here does not apply to Transparent NTLM Windows logins, Transparent 802.1x logins, or local users in the BSC database, because these authentication schemes are always checked first. If you set a Precedence for a server that is the same as that set for a previously configured server, the previous server's Precedence, and that of all servers having a lower configured precedence, is incremented by 1. For example, if server A already has a Precedence of 1 and server B's is 2 and you then set server C's to 1, server A's Precedence becomes 2 and server B's becomes 3. SIP2 server settings 1. Server address: Enter the server's IP address or fully qualified domain name. 2. Port: Enter the server’s port number. 3. Validate PIN/password: Mark this checkbox to validate the patron’s credentials. 4. Enable CP Location Code: Mark this checkbox to enforce patron location, i.e. restrict the patron to a specific library. 5. Server Username and Server Password: Enter the server login credentials.Re-enter the password in the Confirm password field. Accounting To enable RADIUS accounting for this server, select the name of the external RADIUS accounting server from the Accounting server drop-down list. See “RADIUS Accounting” on page 7-1 to configure a new RADIUS accounting server for selection in the drop-down list. Alternatively, you can select the Create… option to open a window that enables you to configure a new RADIUS accounting server. After you save the server information, you are returned to the New SIP2 server page where you can select the RADIUS accounting server from the drop-down list. Mapping SIP2 attributes to roles 1. Define the rules to determine if the user is authenticated.For each rule: a) Enter the appropriate SIP2 attribute in the Attribute field. b) Select the appropriate logic operator (equal to, not equal to, starts with, ends with, contains, or [is a role]) from the Logic drop-down list. c) Enter the appropriate value to check against the specified attribute in the Value field. d) Select the role to assign to the user if the rule evaluates as true and the user is authenticated from the Role drop-down list. See “Defining User Roles to Enforce Network Usage Policies” on page 8-2 to define a new role available for selection in the drop-down list. BlueSecure™ Controller Setup and Administration Guide 6-11 Chapter 6: Authentication Using External Servers Alternatively, you can select the Create … option to open a window that enables you to define a new role. After you save the role information, you are returned to the SIP2 page where you can select the role from the drop-down list. 2. Optional. Use the commands included in the Row Management drop-down list to change the order of rules, add new blank rules, clear rule data, or delete a rule, etc. Remember, the BSC evaluates rules in the order in which they are listed here on the New SIP2 server page. 3. Select the user’s Default role from the drop-down. The selected default role is the role the BSC assigns the user if none of rules is true. Alternatively, select the defaut user role using the rules configured for the selected LDAP/Active Directory authentication server by selecting from the or using LDAP/Active Directory server dropdown. Location Notes Saving the settings Optional. Specify the user location from which the SIP2 authentication request must originate by selecting a defined user location from the Location drop-down menu. If a user location is specified, the authentication request will not be attempted if the request does not come from that location. Optional. Enter a meaningful description for the SIP2 server in the Notes field. Click Save to store the information to the BSC database or Save and create another to continue to define SIP2 servers. You may be prompted to restart the BSC. We recommend that you do not restart the BSC until you have completely finished configuring the BSC for use in your network. NTLM Authentication NTLM (NT LAN Manager) is an authentication protocol that is used by all members of the Windows NT family of products. Figure 6-4: New NTLM Server Page To configure an external NTLM authentication server and define the rules used for authentication: 6-12 NTLM Authentication Displaying the New NTLM server page 1. Click the User authentication tab in the BSC administrator console. 2. Select External NTLM Authentication from the Create drop-down list on the User authentication page. The New NTLM server page appears as shown in Figure 6-4. Enable server Name Precedence The Enable checkbox is marked by default to make the server available for user authentication. Enter a meaningful name for the external NTLM authentication server. Optional. If you are setting up multiple external NTLM authentication servers and need to establish the order in which the BSC checks the servers for user authentication, select the server's priority from the Precedence drop-down list. Note that 1 means the server is checked first. The precedence you configure here does not apply to Transparent NTLM Windows logins, Transparent 802.1x logins, or local users in the BSC database, because these authentication schemes are always checked first. If you set a Precedence for a server that is the same as that set for a previously configured server, the previous server's Precedence, and that of all servers having a lower configured precedence, is incremented by 1. For example, if server A already has a Precedence of 1 and server B's is 2 and you then set server C's to 1, server A's Precedence becomes 2 and server B's becomes 3.. NTLM Server Settings 1. Optional. Enter the Windows NT domain in which the Windows client has membership in the Domain Name field. 2. Enter the external NTLM authentication server’s primary domain controller hostname in the Primary Domain Controller by Host Name field. Enter the hostname only, do not enter the host’s fully qualified domain name. 3. Enter the external NTLM authentication server’s secondary domain controller hostname in the Secondary Domain Controller by Host Name field. Enter the hostname only, do not enter the host’s fully qualified domain name. Accounting To enable RADIUS accounting for this server, select the name of the external RADIUS accounting server from the Accounting server drop-down list. See “RADIUS Accounting” on page 7-1 to configure a new RADIUS accounting server for selection in the drop-down list. Alternatively, you can select the Create… option to open a window that enables you to configure a new RADIUS accounting server. After you save the server information, you are returned to the New RADIUS server page where you can select the RADIUS accounting server from the drop-down list. Mapping NTLM attributes to roles 1. Define the rules to determine if the user is authenticated.For each rule: a) Enter the appropriate NTLM attribute in the Attribute field. b) Select the appropriate Logic operator (equal to, not equal to, starts with, ends with, contains, or [is a role]) from the drop-down list. c) Value - Enter the appropriate value to check against the specified attribute. d) Select the Role to assign to the user if the rule evaluates as true and the user is authenticated from the drop-down list. See “Defining User Roles to Enforce Network Usage Policies” on page 8-2to define a new role available for selection in the drop-down list. Alternatively, you can select the Create New… option to open a window that enables you to define a new role. After you save the role information, you are BlueSecure™ Controller Setup and Administration Guide 6-13 Chapter 6: Authentication Using External Servers returned to the New NTLM server page where you can select the role from the drop-down list. 2. Optional. Use the commands included in the Row Management drop-down list to change the order of rules, add new blank rules, clear rule data, or delete a rule, etc. Remember, the BSC evaluates rules in the order in which they are listed here on the New NTLM server page. Default role Location Notes Saving the settings The selected default role is the role the BSC assigns the user if none of rules is true. Optional. Specify the user location from which the NTLM authentication request must originate by selecting a defined user location from the drop-down menu. If a user location is specified, the authentication request will not be attempted if the request does not come from that location. Optional. Enter a meaningful description for the external NTLM authentication server. Click Save to store the information to the BSC database or Save and create another to continue to define external NTLM authentication servers. You may be prompted to restart the BSC. We recommend that you do not restart the BSC until you have completely finished configuring the BSC for use in your network. Transparent NTLM Authentication Transparent NTLM (NT LanMan) is an authentication process that enables users to log into the NTLM server transparently (e.g., by using user information passed to another application). To configure an external Transparent NTLM Windows authentication server and define the rules used for authentication: 6-14 Transparent NTLM Authentication Figure 6-5: New Transparent NTLM Windows Server Page Displaying the New Transparent NTLM Windows server page Enable server Name Transparent NTLM Windows server settings 1. Click the User authentication tab in the BSC administrator console. 2. Select Transparent NTLM Windows Authentication from the Create drop-down list on the User authentication page. The New Transparent NTLM Windows server page appears as shown in Figure 6-5. The Enable checkbox is marked by default to make the server available for user authentication. Enter a meaningful name for the Transparent NTLM Windows authentication server. 1. Domain Name (Optional): Enter the Windows NT domain in which the Windows client has membership. 2. Domain Controllers: Enter the IP address of each NT domain controller. 3. MSRPC Ports: Enter the server ports that are opened to domain controllers for remote procedure call (RPC) traffic. Use a hyphen to designate a port range and use a comma between each port or port range entry. For example, to specify ports 1024 through 2000 and also port 2003, enter 10242000,2003. Leaving this field blank automatically designates ports 1024 through 65535 as the MSRPC ports. BlueSecure™ Controller Setup and Administration Guide 6-15 Chapter 6: Authentication Using External Servers 4. NTLM username to ignore (Optional): Enter any generic, client-supplied NTLM login ID that should be ignored in the field. Some clients send additional credentials after authenticating via NTLM. For example, SMS clients will authenticate to another network device using a generic username having the prefix SMSClient_. To avoid seeing this generic, client-supplied name in the BSC Active Connections screen instead of the client’s normal username, use this field to specify the text to ignore if your clients send an additional login this way. By default, the BSC addresses this problem for SMS clients and no entry is needed. Accounting To enable RADIUS accounting for this server, select the name of the external RADIUS accounting server from the Accounting server drop-down list. See “RADIUS Accounting” on page 7-1 to configure a new RADIUS accounting server for selection in the drop-down list. Alternatively, you can select the Create… option to open a window that enables you to configure a new RADIUS accounting server. After you save the server information, you are returned to the New RADIUS server page where you can select the RADIUS accounting server from the drop-down list. Mapping Transparent NTLM Windows attributes to roles 1. Define the rules to determine if the user is authenticated.For each rule: a) Enter the appropriate Transparent NTLM Windows attribute in the Attribute field. b) Select the appropriate logic operator (equal to, not equal to, starts with, ends with, contains, or [is a role]) from the Logic drop-down list. c) Enter the appropriate Value to check against the specified attribute. d) Select the role to assign to the user if the rule evaluates as true and the user is authenticated from the Role drop-down list. See “Defining User Roles to Enforce Network Usage Policies” on page 8-2 to define a new role available for selection in the drop-down list. Alternatively, you can select the Create New… option to open a window that enables you to define a new role. After you save the role information, you are returned to the New Transparent NTLM Windows server page where you can select the role from the drop-down list. 2. Optional. Use the commands included in the Row Management drop-down list to change the order of rules, add new blank rules, clear rule data, or delete a rule, etc. Remember, the BSC evaluates rules in the order in which they are listed here on the New Transparent NTLM Windows server page. 3. Select the default user role from the Default role drop-down list. The selected default role is the role the BSC assigns the user if none of rules is true. Alternatively, select an LDAP/Active Directory authentication server from the Using LDAP/Active Directory Server drop-down list to resume rules checking using the rules configured for the selected LDAP/Active Directory authentication server. Location Notes Saving the settings 6-16 Optional. Specify the user location from which the transparent NTLM authentication request must originate by selecting a defined user location from the Location drop-down menu. If a user location is specified, the authentication request will not be attempted if the request does not come from that location. Optional. Enter a meaningful description for the external Transparent NTLM authentication server in the Notes field. Click Save to store the information to the BSC database or Save and create another to continue to define external Transparent NTLM Windows authentication servers. You may be prompted to restart the BSC. We recommend that you do not restart the BSC until you have completely finished configuring the BSC for use in your network. Transparent 802.1x Authentication Transparent 802.1x Authentication 802.1x is an IEEE standard that enables authentication and key management for LANs. Although originally designed as a port authentication scheme for wired networks, it has recently been applied to address some security issues surrounding wireless LANs. 802.1x uses the Extensible Authentication Protocol (EAP) as a framework for authentication, allowing it to leverage a variety of existing EAP methods and authentication servers. If you configure the BSC to support Transparent 802.1x authentication, the BSC monitors the exchange between the user/wireless access point and the 802.1x RADIUS server. The BSC then transparently authenticates the user into a role without the need for the user to first log into the BSC. Sequence of Events In Transparent 802.1x authentication, the BSC monitors the exchange between the user/ wireless access point and the 802.1x RADIUS server. The BSC then transparently authenticates the user into a role without the need for the user to first log into the BSC. The following figure illustrates how a wireless user is authenticated in an 802.1x environment. 1. 2. 5. PWR 3. 4. DISK Power Reset WG-2100 Wireless Gateway 802.1x Client (Supplicant) Access Point Bluesocket BSC Authentication Server Figure 6-6: User Authentication in an 802.1x Environment The figure illustrates this sequence of events associated with 802.1x user authentication: 1. The wireless client associates with an access point. 2. The access point blocks all traffic from the client except 802.1x/EAP traffic. 3. EAP traffic is passed to the server for authentication. 4. The user is authenticated and receives a per user/per session WEP (or WPA) key for encrypting data as it passes through the wireless link. 5. The BSC receives the 802.1x user authentication and assigns the user a role. ) Note: Some Transparent 802.1x authentication methods use rapid re-keying to change the WEP key at regular intervals. This makes decoding the key more difficult. EAP methods supported The BSC's implementation of Transparent 802.1x authentication supports the following 802.1x EAP methods: • MD5 (Message Digest 5) • Cisco-LEAP (Lightweight Extensible Authentication Protocol) • EAP-TLS (Extensible Authentication Protocol - Transport Layer Security) • PEAP - (Protected Extensible Authentication Protocol) • TTLS - (Tunneled Transparent Layer Security) To configure an external Transparent 802.1x authentication server and define the rules used for authentication: BlueSecure™ Controller Setup and Administration Guide 6-17 Chapter 6: Authentication Using External Servers Figure 6-7: New Transparent 802.1x Server Page New Transparent 802.1x server page Enable server Name Transparent 802.1X server settings Accounting 1. Click the User authentication tab in the BSC administrator console. 2. Select Transparent 802.1x Authentication from the Create drop-down list on the User authentication page. The New Transparent 802.1x server page appears as shown in Figure 6-7. The Enable checkbox is checked to make the server available for user authentication. Enter a meaningful name for the Transparent 802.1x authentication server. Server address: Enter the server's IP address or fully qualified domain name. Port: Enter the server’s port number. To enable RADIUS accounting for this server, select the name of the external RADIUS accounting server from the Accounting server drop-down list. See “RADIUS Accounting” on page 7-1 to configure a new RADIUS accounting server for selection in the drop-down list. Alternatively, you can select the Create… option to open a window that enables you to configure a new RADIUS accounting server. After you save the server information, you are returned to the New Transparent 802.1X server page where you can select the RADIUS accounting server from the drop-down list. Mapping Transparent 802.1X attributes to roles 6-18 1. Define the rules to determine if the user is authenticated.For each rule: a) Enter the appropriate Transparent 802.1x attribute in the Attribute field. The following attributes are available for matching: • Login Name - Use for LEAP or MD5 EAP methods only. • Common Name - Use for TLS EAP methods only. This is the common name contained in the user's TLS certificate. • Email Address - Use for TLS EAP methods only. This is the email name which may be contained in the user's TLS certificate. The BSC Internal 802.1x Authentication Server • RFC822 - Use for TLS EAP methods only. This is the Subject Alternative Name (RFC822) which may be contained in the user's TLS certificate. • You can also enter RADIUS attributes here for matching. b) Select the appropriate logic operator (equal to, not equal to, starts with, ends with, contains, or [is a role]) from the Logic drop-down list. c) Enter the appropriate Value to check against the specified attribute. d) Select the role to assign to the user if the rule evaluates as true and the user is authenticated from the Role drop-down list. See “Defining User Roles to Enforce Network Usage Policies” on page 8-2 to define a new role available for selection in the drop-down list. Alternatively, you can select the Create New… option to open a window that enables you to define a new role. After you save the role information, you are returned to the Transparent 802.1X server page where you can select the role from the drop-down list. 2. Optional. Use the commands included in the Row Management drop-down list to change the order of rules, add new blank rules, clear rule data, or delete a rule, etc. Remember, the BSC evaluates rules in the order in which they are listed here on the New Transparent 802.1X server page. 3. Select the default user role from the Default role drop-down list. The selected default role is the role the BSC assigns the user if none of rules is true. Alternatively, select an LDAP/Active Directory authentication server from the Using LDAP/Active Directory Server drop-down list to resume rules checking using the rules configured for the selected LDAP/Active Directory authentication server. Location Notes Saving the settings Optional. Specify the user location from which the Transparent 802.1X authentication request must originate by selecting a defined user location from the Location drop-down menu. If a user location is specified, the authentication request will not be attempted if the request does not come from that location. Optional. Enter a meaningful description for the Transparent 802.1X authentication server in the Notes field. Click Save to store the information to the BSC database or Save and create another to continue to define external Transparent 802.1x authentication servers. You may be prompted to restart the BSC. We recommend that you do not restart the BSC until you have completely finished configuring the BSC for use in your network. The BSC Internal 802.1x Authentication Server 802.1x is an IEEE standard that enables authentication and key management for LANs. Although originally designed as a port authentication scheme for wired networks, it has recently been applied to address some of the security issues surrounding wireless LANs. 802.1x uses the Extensible Authentication Protocol (EAP) as a framework for authentication, allowing it to leverage a variety of existing EAP methods and authentication servers. TTLS (Tunneled Transport Layer Security Protocol), PEAP (Protected Extensible Authentication Protocol) and FAST (Flexible Authentication via Secure Tunneling Protocol) pass inner authentication credentials through an encrypted tunnel. Thus, the outer protocol (PEAP/TTLS/FAST) must first be terminated by the BSC’s 802.1x authentication server in order for the BSC to learn the user’s identity for role placement. Both PEAP and TTLS support a wide range of inner authentication protocols such as MSCHAPv2, PAP, and Tokens. When using 802.1x with PEAP or TTLS, Access Points should be configured with the BSC as their RADIUS server. The BSC will then terminate the PEAP BlueSecure™ Controller Setup and Administration Guide 6-19 Chapter 6: Authentication Using External Servers Figure 6-8: Edit the Local 802.1x Server Page 6-20 The BSC Internal 802.1x Authentication Server or TTLS Protocol and pass the inner authentication protocol on to an external RADIUS server or the BSC’s own local user database for user authentication. To configure the BSC’s Internal 802.1x Authentication Server: Edit the Local 802.1X Authentication server page 1. Click the User authentication tab in the BSC administrator console. Local 802.1X Authentication server settings 1. Enable server: The Enable checkbox is marked by default to make the server ) 2. Click the Internal 802.1x Authentication tab on the Users page.The Edit the Local 802.1X Authentication server page appears as shown in Figure 6-8. available for user authentication. 2. Port: Enter the Port number on which the BSC will listen for 802.1x requests from APs. Note: Your access points must be configured with the BSC as their RADIUS server and send requests on the same port number that you enter here. 3. AP Shared Secret: Enter the Shared Secret the AP uses to send 802.1x requests. 4. Confirm: Re-enter the Shared Secret. External RADIUS Server Settings Optional. Complete this step only if you are going to pass the inner authentication protocols to an External RADIUS Server for authentication. 1. Enter the RADIUS address (IP) of the RADIUS server. If the field is blank, the protected IP address of the BSC is assumed for Internal 802.1x configuration. 2. Enter the External RADIUS Server Port number to which to send authentications requests in the Port field. 3. Enter the Shared Secret the External RADIUS Server uses for communication in the Shared Secret field. Re-enter the Shared secret in the Confirm field. Backup RADIUS Server Settings Optional. Enter Backup RADIUS Server Settings only if you have configured an External RADIUS Server for authentication in the previous step and you have a backup RADIUS server to which you are going to pass the inner authentication protocols should the primary RADIUS server fail or otherwise lose communications with the BSC. 1. Enter the IP address of the RADIUS server in the RADIUS address field. If blank, the protected IP address of the BSC is assumed for Internal 802.1x configuration. 2. Enter the External RADIUS Server Port number to which to send authentications requests in the Port field. 3. Enter the Shared Secret the External RADIUS Server uses for communication in the Shared Secret field. Re-enter the Shared secret in the Confirm field. LDAP Settings Optional. In most cases, using 802.1x authentication requires a RADIUS server (e.g. Cisco ACS, Funk, Microsoft Active Directory with IAS). However, if your organization has LDAP authentication deployed and does not wish to alter it’s authentication methodology, select the Authenticate Against Local Users radio button to indicate that 802.1x Authentication should be performed against an LDAP database. Selecting this radio button also requires that you specify LDAP settings: 1. Check the Use LDAP instead of BSC Local DB checkbox. 2. Select the LDAP server to authenticate against from the drop-down, or select Create to go to the New LDAP/Active Directory server page. 3. Enter the LDAP Password Attribute Name.To authenticate against an LDAP server, the Bluesocket Controller relies on a readable attribute containing the MD4 hash of the user’s password; it will not authenticate if the LDAP server stores the user password in clear text. Several LDAP servers, such as OpenLDAP, support such an attribute by default (OpenLDAP uses the ntpassword attribute). BlueSecure™ Controller Setup and Administration Guide 6-21 Chapter 6: Authentication Using External Servers 4. Many other LDAP servers (e.g. Windows 2000/2003 Server Active Directory LDAP server) are not designed store the user password in an MD4 hashed format. This necessitates the manual or automated conversion of the user password from clear text to an MD4 hash. 5. Make sure you mark the Remove Realm Name checkbox if the domain name is included in username. Enable EAP methods Mark the radio buttons corresponding to the protocols (TTLS EAP, PAP, CHAP, MSCHAP or MSCHAP2; PEAP or FAST) you wish to use. Inner authentication protocols can be proxied to the External RADIUS Server or authenticated by using the local user database on the BSC. Force Reauthentication Optional. Enter the period of time (in seconds) after which TTLS, PEAP, or FAST clients must re-authenticate in the Session Limit field. The default settings is 1200 seconds (i.e., 20 minutes). Session Resumption (Fast Reconnect) 1. Optional. Mark the Enable TLS session-resumption checkbox to utilize fast reconnect. Authentication Settings Optional. Mark the Remove the realm from username checkbox if usernames include the realm information(i.e. domain name) and you wish to remove this before querying the local database. For example, [email protected] would become jsmith. Accounting To enable RADIUS accounting for this server, select the name of the external RADIUS accounting server from the Accounting server drop-down list. See “RADIUS Accounting” on page 7-1 to configure a new RADIUS accounting server for selection in the drop-down list. Alternatively, you can select the Create… option to open a window that enables you to configure a new RADIUS accounting server. After you save the server information, you are returned to the New RADIUS server page where you can select the RADIUS accounting server from the drop-down list. Mapping Local 802.1X Authentication attributes to roles 2. Enter the period of time (in hours) the BSC is to keep user session information in cache for fast reconnects in the Session Cache Timeout field. 1. Define the rules to determine if the user is authenticated. For each rule: a) Enter the appropriate Local 802.1X attribute in the Attribute field. b) Select the appropriate logic operator (equal to, not equal to, starts with, ends with, or contains) from the Logic drop-down list. c) Enter the appropriate Value to check against the specified attribute. d) Select the role to assign to the user if the rule evaluates as true and the user is authenticated from the Role drop-down list. 2. Optional. Use the commands included in the Row Management drop-down list to change the order of rules, add new blank rules, clear rule data, or delete a rule, etc. Remember, the BSC evaluates rules in the order in which they are listed here on the Local 802.1X Authentication server page. 3. Select a default user role from the Default role drop-down list drop-down list. The selected default role is the role the BSC assigns the user if none of rules are true. Alternatively, select an LDAP/Active Directory authentication server from the Using LDAP/Active Directory Server drop-down list to resume rules checking using the rules configured for the selected LDAP/Active Directory authentication server. Location Notes 6-22 Optional. Specify the user location from which the local 802.1x authentication request must originate by selecting a defined user location from the Location drop-down menu. If a user location is specified, the authentication request will not be attempted if the request does not come from that location. Optional. Enter a description for the internal BSC 802.1X authentication server. Kerberos Authentication Saving the settings Click Save to store the information to the BSC database. You may be prompted to restart the BSC. We recommend that you do not restart the BSC until you have completely finished configuring the BSC for use in your network. Kerberos Authentication Kerberos is a network authentication protocol that was created by MIT as a solution to network security problems. The Kerberos protocol uses strong cryptography so that a client can prove its identity to a server (and vice versa) across an insecure network connection. After a client and server have used Kerberos to prove their identity, they can also encrypt all of their communications to assure privacy and data integrity as they go about their business. Figure 6-9: New Kerberos Server Page To configure an external Kerberos authentication server and define authentication rules: Displaying the New Kerberos server page Enable server Name Precedence Kerberos server settings 1. Click the User authentication tab in the BSC administrator console. 2. Select External Kerberos Authentication from the Create drop-down list. The New Kerberos server page appears as shown in Figure 6-9. The Enable checkbox is marked to make the server available for user authentication. Enter a meaningful name for the external Kerberos authentication server. Select a priority from the drop-down list.1 means the server is checked first. The precedence you configure here does not apply to Transparent NTLM Windows logins, Transparent 802.1x logins, or local users in the BSC database, because these authentication schemes are always checked first. 1. KDC address: Enter the Kerberos Domain Controller’s IP address or DNS name. 2. Enter number on which the KDC communicates in the Port field. BlueSecure™ Controller Setup and Administration Guide 6-23 Chapter 6: Authentication Using External Servers The Port number should be 88, the value assigned to Kerberos by the Internet Assigned Number Authority. 3. Enter the Kerberos realm name in the Realm Name field. In Kerberos, realm names are case sensitive. While it is strongly encouraged that all realm names be uppercase, this recommendation has not been adopted by all sites. Accounting To enable RADIUS accounting for this server, select the name of the external RADIUS accounting server from the Accounting server drop-down list. See “RADIUS Accounting” on page 7-1 to configure a new RADIUS accounting server for selection in the drop-down list. Alternatively, you can select the Create… option to open a window that enables you to configure a new RADIUS accounting server. After you save the server information, you are returned to the New Kerberos server page where you can select the RADIUS accounting server from the drop-down list. Mapping Kerberos attributes to roles 1. Define the rules to determine if the user is authenticated.For each rule: a) Enter the appropriate Kerberos attribute in the Attribute field. b) Select the appropriate logic operator (equal to, not equal to, starts with, ends with, contains, or [is a role]) from the Logic drop-down list. c) Enter the appropriate Value to check against the specified attribute. d) Select the role to assign to the user if the rule evaluates as true and the user is authenticated from the Role drop-down list. See “Defining User Roles to Enforce Network Usage Policies” on page 8-2 to define a new role available for selection in the drop-down list. Alternatively, select the Create New… option to open a window that enables you to define a new role. After you save the role information, you are returned to the New Kerberos server page where you can select the role from the drop-down list. 2. Optional. Use the commands included in the Row Management drop-down list to change the order of rules, add new blank rules, clear rule data, or delete a rule, etc. Remember, the BSC evaluates rules in the order in which they are listed here on the New Kerberos server page. 3. Select the default user role from the Default role drop-down list. The selected default role is the role the BSC assigns the user if none of rules is true. Location Optional. Specify the user location from which the Kerberos authentication request must originate by selecting a defined user location from the drop-down menu. If a user location is specified, the authentication request will not be attempted if the request does not come from that location. Notes Optional. Enter a meaningful description for the external Kerberos authentication server. Saving the settings Click Save to store the information to the BSC database or Save and create another to continue to define external Kerberos authentication servers. You may be prompted to restart the BSC. We recommend that you do not restart the BSC until you have completely finished configuring the BSC for use in your network. Cosign Authentication Cosign (“Cookie Signer”) is a web-based single-sign on system developed by the University of Michigan Web Services team. Cosign sessions have both idle and hard timeouts. Users can log out of all Cosignenabled web services by visiting a single URL. 6-24 Cosign Authentication Figure 6-10: New Cosign Server Page Cosign client web servers do not need to run SSL; sniffed cookies will compromise only the non-SSL-protected service, not the entire Cosign infrastructure. Cosign is compatible with common SSL accelerators and clustering load balancers. All Cosign client web servers use a central Cosign server to authenticate users. The central Cosign server runs a daemon and several CGIs. The central Cosign server in turn authenticates users against Kerberos 5. Kerberos tickets can be passed back to the Cosign client web servers. ) Note: You may need to set up the BSC to communicate with a Cosign authentication server over Secure Sockets Layer (SSL). To do so, you must first upload the appropriate certificate(s) to the BSC as described in “Configuring External Server Authentication Over SSL” on page 10-21 before following the steps in this section to set up the Cosign authentication server. To configure an external Cosign authentication server and define the rules used for authentication: BlueSecure™ Controller Setup and Administration Guide 6-25 Chapter 6: Authentication Using External Servers Displaying the New Cosign server page 1. Click the User authentication tab in the BSC administrator console. 2. Select External Cosign Authentication from the Create drop-down list on the User authentication page. The New Cosign server page appears as shown in Figure 6-10. Enable server The Enable checkbox is marked by default to make the server available for user authentication.Name Enter a meaningful name for the external Cosign authentication server. Precedence Cosign server settings Select a priority from the drop-down list. 1. Cosign login only (Optional): Mark this checkbox to present users with the Cosign login screen. Leave this option unchecked to present users with a customized login screen. 2. Service name: Enter a descriptive service name for the Cosign server. 3. Redirect URL: Enter the redirect URL for the Cosign server. 4. Error Redirect URL: Enter the error redirect URL for the Cosign server. 5. Logout URL (Optional): Enter the complete logout URL for the Cosign server. 6. Check Client IP Address? (Optional): Mark this checkbox to verify user addresses. Leave this option unchecked if you are running NAT on the BSC. 7. Server address: Enter the Cosign server’s IP address or DNS name. 8. Port: Enter number on which the Cosign server communicates. The default value is 6663. 9. BSC SSL client certificate: Select the digital certificate the BSC is to present to SSL clients for mutual authentication from the drop-down menu. 10. Trusted CA certificates: Add the trusted certificate authority certificate(s) the BSC is to use from the Available CA certificates list. ) Note: See “Digital Certificates” on page 10-20 for information about uploading digital certificates to the BSC. Accounting To enable RADIUS accounting for this server, select the name of the external RADIUS accounting server from the Accounting server drop-down list. See “RADIUS Accounting” on page 7-1 to configure a new RADIUS accounting server for selection in the drop-down list. Alternatively, you can select the Create… option to open a window that enables you to configure a new RADIUS accounting server. After you save the server information, you are returned to the New Cosign server page where you can select the RADIUS accounting server from the drop-down list. Mapping Cosign attributes to roles 1. Define the rules to determine if the user is authenticated.For each rule: a) Enter the appropriate Cosign attribute in the Attribute field. b) Select the appropriate logic operator (equal to, not equal to, starts with, ends with, contains, or [is a role]) from the Logic drop-down list. c) Enter the appropriate value to check against the specified attribute in the Value field. d) Select the role to assign to the user if the rule evaluates as true and the user is authenticated from the Role drop-down list. See “Defining User Roles to Enforce Network Usage Policies” on page 8-2 to define a new role available for selection in the drop-down list. 6-26 Pubcookie Authentication Alternatively, you can select the Create New… option to open a window that enables you to define a new role. After you save the role information, you are returned to the New Cosign server page where you can select the role from the drop-down list. 2. Optional. Use the commands included in the Row Management drop-down list to change the order of rules, add new blank rules, clear rule data, or delete a rule, etc. Remember, the BSC evaluates rules in the order in which they are listed here on the New Cosign server page. 3. Select the default user role from the Default role drop-down list. The selected default role is the role the BSC assigns the user if none of rules is true. Alternatively, select an LDAP/Active Directory authentication server from the Using LDAP/Active Directory Server drop-down list to resume rules checking using the rules configured for the selected LDAP/Active Directory authentication server. Location Optional. Specify the user location from which the Cosign authentication request must originate by selecting a defined user location from the drop-down menu. If a user location is specified, the authentication request will not be attempted if the request does not come from that location. Notes Optional. Enter a meaningful description for the external Cosign authentication server. Saving the settings Click Save to store the information to the BSC database or Save and create another to continue to define external Kerberos authentication servers. You may be prompted to restart the BSC. We recommend that you do not restart the BSC until you have completely finished configuring the BSC for use in your network. Pubcookie Authentication Pubcookie is a mechanism for centralized user authentication. Note that Pubcookie does not handle authorization; it will only assert that a User ID and corresponding password have been entered correctly. Because Pubcookie is centralized, it allows the user to authenticate once for several applications. The authentication remains valid for up to eight hours. Pubcookie consists of a standalone login server and modules for common web server platforms like Apache and Microsoft IIS. Together, these components can turn existing authentication services (like Kerberos, LDAP, or NIS) into a solution for single sign-on authentication to websites throughout an institution. ) Note: You may need to set up the BSC to communicate with a Pubcookie authentication server over Secure Sockets Layer (SSL). To do so, you must first upload the appropriate certificate(s) to the BSC as described in “Configuring External Server Authentication Over SSL” on page 10-21before following the steps in this section to set up the Pubcookie authentication server. To configure an external Pubcookie authentication server and define the rules used for authentication: BlueSecure™ Controller Setup and Administration Guide 6-27 Chapter 6: Authentication Using External Servers Figure 6-11: New Pubcookie Server Page Displaying the New Pubcookie server page 1. Click the User authentication tab in the BSC administrator console. 2. Select External Pubcookie Authentication from the Create drop-down list on the User authentication page. The New Pubcookie server page appears as shown in Figure 6-11. Enable server Name Pubcookie server settings The Enable checkbox is marked by default to make the server available for user authentication. Enter a meaningful name for the external Pubcookie authentication server. 1. Pubcookie login only (Optional): Mark this checkbox to present users with the Pubcookie login screen. Leave this option unchecked to present users with a customized login screen. 2. Login URL: Enter the complete URL of the login server for the Pubcookie server. 3. Logout URL: Enter the complete logout URL for the Pubcookie server. 4. Enterprise Domain: Enter the domain name (starting with dot) that contains both the login server and the BSC. 6-28 Pubcookie Authentication 5. Key server address: Enter the Pubcookie key server IP address. 6. Port: Enter port on which the Pubcookie key server is communicating. The default value is 2222. 7. BSC SSL client certificate: Select the digital certificate to use to validate cookies from the login server from the drop-down menu. 8. Trusted CA certificates: Add the trusted certificate authority certificate(s) the BSC is to use from the Available CA certificates list. ) Note: See “Digital Certificates” on page 10-20 for information about uploading digital certificates to the BSC. Accounting To enable RADIUS accounting for this server, select the name of the external RADIUS accounting server from the Accounting server drop-down list. See “RADIUS Accounting” on page 7-1 to configure a new RADIUS accounting server for selection in the drop-down list. Alternatively, you can select the Create… option to open a window that enables you to configure a new RADIUS accounting server. After you save the server information, you are returned to the New Pubcookie server page where you can select the RADIUS accounting server from the drop-down list. Mapping Pubcookie attributes to roles 1. Define the rules to determine if the user is authenticated.For each rule: a) Enter the appropriate Pubcookie attribute in the Attribute field. b) Select the appropriate logic operator (equal to, not equal to, starts with, ends with, contains, or [is a role]) from the Logic drop-down list. c) Enter the appropriate value to check against the specified attribute in the Value field. d) Select the role to assign to the user if the rule evaluates as true and the user is authenticated from the Role drop-down list. See “Defining User Roles to Enforce Network Usage Policies” on page 8-2 to define a new role available for selection in the drop-down list. Alternatively, you can select the Create New… option to open a window that enables you to define a new role. After you save the role information, you are returned to the New Pubcookie server page where you can select the role from the drop-down list. 2. Optional. Use the commands included in the Row Management drop-down list to change the order of rules, add new blank rules, clear rule data, or delete a rule, etc. Remember, the BSC evaluates rules in the order in which they are listed here on the New Pubcookie server page. 3. Select the default user role from the Default role drop-down list. The selected default role is the role the BSC assigns the user if none of rules is true. Alternatively, select an LDAP/Active Directory authentication server from the Using LDAP/Active Directory Server drop-down list to resume rules checking using the rules configured for the selected LDAP/Active Directory authentication server. Location Optional. Specify the user location from which the Pubcookie authentication request must originate by selecting a defined user location from the drop-down menu. If a user location is specified, the authentication request will not be attempted if the request does not come from that location. Notes Optional. Enter a meaningful description for the external Pubcookie authentication server. Saving the settings Click Save to store the information to the BSC database or Save and create another to continue to define external Kerberos authentication servers. BlueSecure™ Controller Setup and Administration Guide 6-29 Chapter 6: Authentication Using External Servers You may be prompted to restart the BSC. We recommend that you do not restart the BSC until you have completely finished configuring the BSC for use in your network. CAS Authentication The Central Authentication Server (CAS) is designed as a standalone web application to: facilitate single sign-on across multiple web applications and core services that aren't necessarily web-based but have a web front end, provide trusted and untrusted services, authenticate users without having access to their passwords, simplify procedures that applications must follow to perform authentication, and localize actual (“primary”) authentication to a single web application. Figure 6-12: New CAS Server Page The Central Authentication Server (CAS) is designed as a standalone web application. It is currently implemented as several Java servlets and runs through an HTTPS server. It is accessed through three URLs, the login URL, the validation URL, and the optional logout URL. To use the central authentication service, an application redirects its users, or simply creates a hyperlink, to the login URL. If authentication is successful, the CAS creates a long, random number, called a “ticket.” It then associates this ticket with the user who successfully authenticated and the service to which the user was trying to authenticate. 6-30 CAS Authentication Once primary authentication is complete, the CAS redirects the user's browser back to the application from which it came adding the ticket as a request parameter. The application service just needs to validate the ticket once it receives it. It does so by passing it as the ticket parameter to the validation URL. Users can log out using the optional logout URL. ) Note: You may need to set up the BSC to communicate with a CAS authentication server over Secure Sockets Layer (SSL). To do so, you must first upload the appropriate certificate(s) to the BSC as described in “Configuring External Server Authentication Over SSL” on page 10-21 before following the steps in this section to set up the CAS authentication server. To configure an external CAS authentication server and define the rules used for authentication: Displaying the New CAS server page 1. Click the User authentication tab in the BSC administrator console. 2. Select External CAS Authentication from the Create drop-down list on the User authentication page. The New CAS server page appears as shown in Figure 6-12. Enable server Name CAS server settings The Enable checkbox is marked by default to make the server available for user authentication. Enter a meaningful name for the external CAS authentication server. 1. CAS login only (Optional): Mark this checkbox to present users with the CAS login screen. Leave this option unchecked to present users with a customized login screen. 2. Login URL: Enter the complete URL of the login server for the CAS server. 3. Logout URL: Enter the complete logout URL for the CAS server. 4. Server address: Enter the CAS key server IP address. 5. Port: Enter port on which the CAS key server is communicating. The default value is 443. 6. Enter the CAS server validation URL in the Validate URL field. 7. Trusted CA certificates: Add the trusted certificate authority certificate(s) the BSC is to use from the Available CA certificates list. ) Note: See “Digital Certificates” on page 10-20 for information about uploading digital certificates to the BSC. Accounting To enable RADIUS accounting for this server, select the name of the external RADIUS accounting server from the Accounting server drop-down list. See “RADIUS Accounting” on page 7-1 to configure a new RADIUS accounting server for selection in the drop-down list. Alternatively, you can select the Create… option to open a window that enables you to configure a new RADIUS accounting server. After you save the server information, you are returned to the New CAS server page where you can select the RADIUS accounting server from the drop-down list. Mapping CAS attributes to roles 1. Define the rules to determine if the user is authenticated.For each rule: a) Enter the appropriate CAS attribute in the Attribute field. b) Select the appropriate logic operator (equal to, not equal to, starts with, ends with, contains, or [is a role]) from the Logic drop-down list. BlueSecure™ Controller Setup and Administration Guide 6-31 Chapter 6: Authentication Using External Servers c) Enter the appropriate value to check against the specified attribute in the Value field. d) Select the role to assign to the user if the rule evaluates as true and the user is authenticated from the Role drop-down list. See “Defining User Roles to Enforce Network Usage Policies” on page 8-2 to define a new role available for selection in the drop-down list. Alternatively, you can select the Create New… option to open a window that enables you to define a new role. After you save the role information, you are returned to the New CAS server page where you can select the role from the drop-down list. 2. Optional. Use the commands included in the Row Management drop-down list to change the order of rules, add new blank rules, clear rule data, or delete a rule, etc. Remember, the BSC evaluates rules in the order in which they are listed here on the New CAS server page. 3. Select the default user role from the Default role drop-down list. The selected default role is the role the BSC assigns the user if none of rules is true. Alternatively, select an LDAP/Active Directory authentication server from the Using LDAP/Active Directory Server drop-down list to resume rules checking using the rules configured for the selected LDAP/Active Directory authentication server. Location Notes Saving the settings Optional. Specify the user location from which the CAS authentication request must originate by selecting a defined user location from the drop-down menu. If a user location is specified, the authentication request will not be attempted if the request does not come from that location. Optional. Enter a meaningful description for the external CAS authentication server. Click Save to store the information to the BSC database or Save and create another to continue to define external CAS authentication servers. You may be prompted to restart the BSC. We recommend that you do not restart the BSC until you have completely finished configuring the BSC for use in your network. iPass Client Authentication iPass, Inc. has created a virtual network of thousands of Wi-Fi hotspots deployed in airports, hotels, coffee shops and other public locations. Users who wish to access an iPass hotspot must run iPass client software on their wireless device. The Bluesocket BSC is iPass-client aware. iPass clients may attempt to log into any BSC. The BSC will attempt to authenticate an iPass client against an external RADIUS server that has been configured on the BSC with the word “iPass” in its Name. Note that “iPass” must spelled using the case shown. If an external RADIUS server with the word “iPass” in its Name has not been configured on the BSC, the BSC will not allow the iPass client to log in. See “RADIUS Authentication” on page 6-2 for details about configuring an external RADIUS server to authenticate BSC users including iPass clients. Transparent Certificate Authentication Wireless clients setting up an IPSec tunnel to the BSC can use a digital certificate to authenticate the tunnel. You can configure the BSC to transparently authenticate users directly into a role based on the presented certificate or to parse the certificate for specified data and then use this data to transparently authenticate the user against an external LDAP server. 6-32 Transparent Certificate Authentication Figure 6-13: Enabling Transparent Certificate Authentication To configure transparent certificate authentication: Displaying the New Transparent Certificate server page Enable server Name 1. Click the User authentication tab in the BSC administrator console. 2. Select Transparent Certificate Authentication from the Create drop-down list on the User authentication page. The New Transparent Certificate server page appears as shown in Figure 6-13. The Enable checkbox is marked by default to make the server available for user authentication. Enter a meaningful name for the transparent certificate authentication server. Precedence Optional. If you are setting up multiple external authentication servers and need to establish the order in which the BSC checks the servers for user authentication, select the server's priority from the drop-down list. Accounting To enable RADIUS accounting for this server, select the name of the external RADIUS accounting server from the Accounting server drop-down list. See “RADIUS Accounting” on page 7-1 to configure a new RADIUS accounting server for selection in the drop-down list. Alternatively, you can select the Create… option to open a window that enables you to configure a new RADIUS accounting server. After you save the server information, you are returned to the New Transparent Certificate server page where you can select the RADIUS accounting server from the drop-down list. BlueSecure™ Controller Setup and Administration Guide 6-33 Chapter 6: Authentication Using External Servers Mapping Transparent Certificate attributes to roles 3. Define the rules to determine if the user is authenticated.For each rule: a) Enter the appropriate digital certificate attribute in the Attribute field. b) Select the appropriate logic operator (equal to, not equal to, starts with, ends with, contains, or [is a role]) from the Logic drop-down list. c) Enter the appropriate value to check against the specified attribute in the Value field. d) Select the role to assign to the user if the rule evaluates as true and the user is authenticated from the Role drop-down list. See “Defining User Roles to Enforce Network Usage Policies” on page 8-2 to define a new role available for selection in the drop-down list. Alternatively, you can select the Create New… option to open a window that enables you to define a new role. After you save the role information, you are returned to the transparent certificate server page where you can select the role from the drop-down list. 4. Optional. Use the commands included in the Row Management drop-down list to change the order of rules, add new blank rules, clear rule data, or delete a rule, etc. Remember, the BSC evaluates rules in the order in which they are listed here on the transparent certificate server page. 5. Select the default user role from the Default role drop-down list. The selected default role is the role the BSC assigns the user if none of rules is true. Alternatively, select an LDAP/Active Directory authentication server from the Using LDAP/Active Directory Server drop-down list to resume rules checking using the rules configured for the selected LDAP/Active Directory authentication server. If you select an external LDAP/Active Directory Server to authenticate the user against, specify what data is to be parsed from the certificate for authentication. Enter a certificate attribute in the Unique ID attribute for LDAP field, or enter a certificate regular expression in the Unique ID regular expression for LDAP field. Location Notes Saving the settings Optional. Specify the user location from which the transparent certificate authentication request must originate by selecting a defined user location from the drop-down menu. If a user location is specified, the authentication request will not be attempted if the request does not come from that location. Optional. Enter a meaningful description for the external transparent certificate authentication server. Click Save to store the information to the BSC database or Save and create another to continue to define external transparent certificate authentication servers. You may be prompted to restart the BSC. We recommend that you do not restart the BSC until you have completely finished configuring the BSC for use in your network. Testing an External Authentication Server After you have finished configuring external authentication servers the BSC is to use, you may use a simple test mechanism built into the BSC administrator console to test basic communications between the BSC and the external authentication server. To test communications between the BSC and an external authentication server: 1. Click the User authentication tab in the BSC administrator console. 2. Click the Authentication Servers tab, Authentication Test. The External Authentication Test page appears as shown in Figure 6-14. 3. Enter a valid user name to access the server in the User name field. 6-34 Testing an External Authentication Server Figure 6-14: External Authentication Server Test Page 4. Enter the password associated with the entered user name in the Password field. 5. Select the external authentication server you wish to communicate with from the External server drop-down menu. 6. Optional. Select a configured VLAN from the User location drop-down menu if you wish to test user authentication from a particular location. 7. Click Submit. The results of the authentication test will be deemed successful of failed. The attributes and values returned with a successful authentication are displayed. BlueSecure™ Controller Setup and Administration Guide 6-35 Chapter 6: Authentication Using External Servers 6-36 7 RADIUS Accounting Remote authentication dial-in user service (RADIUS) software includes both an accounting server and an authentication server. You use a RADIUS accounting server to record network activity and statistics including tracking user logins. To set up RADIUS accounting, you: (1) Define a new RADIUS accounting server. Once defined, it is added to the table on the Accounting Servers tab; (2) Associate the RADIUS accounting server with specific users or external authentication servers. You complete this second step when you create or modify users and external authentication servers, as described in “Local BSC User Authentication” on page 5-2 and Chapter 6, "Authentication Using External Servers," respectively. This chapter covers the following topics: ) • Defining a RADIUS Accounting Server • Attributes Sent to External RADIUS Accounting Server by BSC Note: You can use a RADIUS authentication server to verify the identity of wireless clients trying to access the BSC network. Refer to “RADIUS Authentication” on page 6-2 for information on setting up a RADIUS authentication server. BlueSecure™ Controller Setup and Administration Guide 7-1 Chapter 7: RADIUS Accounting Defining a RADIUS Accounting Server To define a new RADIUS accounting server: 1. Click the User Authentication, Authentication Servers tab. 2. Select External RADIUS Accounting from the Create drop-down list on the User authentication page. The New RADIUS Accounting page appears as shown in Figure 7-1. Figure 7-1: New RADIUS Accounting Page 3. The Enable server checkbox is marked by default to make the external server available for RADIUS accounting activity. Clearing the checkbox makes the server unavailable. 4. Enter a meaningful name for the external RADIUS accounting server in the Name field. 5. Enter the external RADIUS accounting server's IP address or fully qualified domain name in the Server address field. 6. Enter the port number for the RADIUS accounting server in the Port field. 7. Enter the known secret shared between the BSC and the RADIUS accounting server in the Shared secret field, and then re-enter this shared secret in the Confirm Shared Secret field. 8. Enter the time (in seconds) by which the RADIUS accounting server must respond to the BSC request before the request times out in the Timeout field. 9. Optional. Mark the Enable Interim Accounting Records checkbox to enable the use of Interim RADIUS accounting records. You must then specify how frequently to generate the interim accounting records by entering an interval value in seconds in the Update Interval field. 10. Optional. Enter a meaningful description for the external RADIUS accounting server in the Notes field. 11. Click Save to store the information to the BSC database or Save and create another to continue to define external RADIUS accounting servers. 7-2 Attributes Sent to External RADIUS Accounting Server by BSC You might be prompted to restart the BSC. We recommend that you do not restart the BSC until you have completely finished configuring the BSC for use in your network. Attributes Sent to External RADIUS Accounting Server by BSC The following table describes the attributes that the BSC sends to the external RADIUS accounting server. Table 7-1: RADIUS Accounting Attributes Sent from the BSC Attribute Description Acct-Authentic The method by which the user is authenticated: 1 = RADIUS 2 = Local 3 = Remote (all other external authentication methods) Acct-Input-Octets The number of octets received by the client over the wireless network since the client logged into the BSC. This attribute is only present in Accounting-Request records of the ACCT_STOP status type. Acct-Input-Packets The number of packets received by the client over the wireless network since the client logged into the BSC. This attribute is only present in Accounting-Request records of the ACCT_STOP status type. Acct-Output-Octets The number of octets sent by the client over the wireless network since the client logged into the BSC. This attribute is only present in Accounting-Request records of the ACCT_STOP status type. Acct-Output-Packets The number of packets sent by the client over the wireless network since the client logged into the BSC. This attribute is only present in Accounting-Request records of the ACCT_STOP status type. Acct-Session-ID A unique account identifier to expedite matching of accounting records. The account identifier maps to the connection ID that is stored in the BSC connection table. This identifier is only unique to a specific NAS-Identifier (see the NAS-Identifier attribute below). Acct-Session-Time The elapsed time in seconds that the client is logged in to the BSC. The BSC sends this attribute only with the ACCT_STOP status type. Acct-Status-Type The client device's current accounting status. Possible statuses include ACCT_START and ACCT_STOP. The BSC sends an ACCT_START frame to the accounting server when a client successfully authenticates through any supported external authentication server that has been configured to send accounting statistics to this RADIUS accounting server. When using a RADIUS or LDAP/Active Directory server for authentication, the BSC sends an ACCT_STOP frame to the accounting server when a client logs out of the BSC. When using a Transparent NTLM Windows server for authentication, ACCT_STOP messages are only sent when the user shuts off their computer. Simply logging out of the domain does not send an ACCT_STOP message. Bluesocketap The hostname, or MAC-address if no hostname is given, of the AP the user is on at the time of the accounting event. Called-Station-ID MAC address of the BSC Protected Interface Calling-Station-Id MAC address of the client device. Framed-IP-Address IP address of the client device. NAS-Identifier Host name of the BSC protected interface. NAS-IP-Address IP address of the BSC protected interface. User-Name User name that the BSC uses to authenticate the user. BlueSecure™ Controller Setup and Administration Guide 7-3 Chapter 7: RADIUS Accounting 7-4 8 Roles and Role Elements This chapter describes the use of roles and role elements on the BSC: • Defining User Roles to Enforce Network Usage Policies • An Overview of Roles • An Example of Role-based Authorization • Role Inheritance • Defining a Role • Modifying a Role • Creating Role Elements • Creating Destinations and Destination Groups • Creating Network Services and Services Groups • Creating Schedules and Schedule Groups • Creating Locations and Location Groups BlueSecure™ Controller Setup and Administration Guide 8-1 Chapter 8: Roles and Role Elements Defining User Roles to Enforce Network Usage Policies The BSC uses role-based authorization to define which network resources and destinations in the enterprise a user can access, the bandwidth he or she can use, and whether a secure tunneling protocol such as IPSec or PPTP is required for the connection. You implement role-based authorization by defining roles to enforce network usage policies and then assigning the appropriate role to each BSC user. Defining roles is one of the more important aspects of the BSC configuration process. An Overview of Roles A role consists of one or more network usage policies that are evaluated in the numeric order that you specify when you create or edit the role. Each network usage policy consists of the following elements: • Action - Allow or Deny. • Service - A defined network service such as HTTPS or Telnet. • Direction - The direction of initiation of a network connection from the perspective of the BSC, which is on the managed side of the network. Possible directions are Outgoing, Incoming, or Both Ways. • Destination - A resource or group of resources in the enterprise network. • Schedule and Location - These are optional parameters that restrict enforcement of the policy to certain date/time periods or user locations. In addition to defining access to network resources via policies, a role can specify the quality-of-service (QoS) to be granted to data traffic generated by the user assigned the role. After defining roles, you must assign them to your BSC users.When a user logs onto the BSC, he or she is granted access to network resources subject to the network usage policies defined in his or her assigned role. For a given user connecting to the BSC and requesting access to network resources, the BSC evaluates the policies defined for the user’s assigned role, and if the elements listed in the first network usage policy match those requested by the user, the action specified in the policy is taken and checking ends. Otherwise, the BSC checks each policy in turn until all the policies defined for the role have been evaluated. If no network usage policy in the role matches the user request, the BSC blocks the user traffic. An Example of Role-based Authorization In the simplest case, there are two types of users—those either known or unknown to the BSC. An example of each type of user is presented in this example. For the purposes of this example, users known to the BSC are assigned the Engineering role and users unknown to the BSC can be configured to login and use a Guest role. Registered users can gain access to assets in the enterprise network but only subject to the conditions of the role assigned to them. For example, management might want to prevent Engineering from sending traffic to or receiving traffic from the corporate finance department's server as illustrated in the following figure. Users not registered with the BSC can be assigned a Guest role, which you can set up to grant them access to e-mail and web-based services outside the enterprise, but prevent them from accessing the enterprise network. Typically, QoS for the Guest role is set to a low value, such as 128 or 256 Kbps. This prevents Guest users from dominating bandwidth at the expense of enterprise users. the following figure illustrates the network access available to an unregistered user assigned the Guest role in our example. 8-2 Role Inheritance Managed Side Protected Side Internet Finance Bluesocket BSC PWR HTTP, HTTPS, POP3, and SMTP DISK Power Reset WG-2100 Wireless Gat eway Firewall User with Engineering Role Assigned = Access Blocked Enterprise Network Figure 8-1: Role-based Authorization for a Registered User Managed Side Protected Side Internet Finance Bluesocket BSC PWR HTTP, HTTPS, and POP3 DISK Power Reset WG -2100 Wireless Gateway Firewall User with Guest Role Assigned = Access Blocked Enterprise Network Figure 8-2: Role-based Authorization for an Unregistered User You can configure the BSC to support enterprise guest access by defining local user accounts and assigning them to the BSC’s default guest role. Configuring guest access in this way enables you to set the following limitations on guests who access your enterprise network: • when the guest user account is activated and expired • the network bandwidth the guest can use • the network services the guest can access (only DNS and HTTP/S by default) See “Local BSC User Authentication” on page 5-2 for information about configuring local user accounts. Role Inheritance Everyone in an organization shares certain access privileges. For example, all employees likely have access to cafeteria facilities but only a few have the key code that unlocks the computer room. Role inheritance allows you to map these access privileges to your unique organizational structure. Commonly held privileges constitute the base role X. When defining a more restrictive role Y, you can specify the base role as a default set of privileges that is available (i.e., inherited from role X) if none of the policies in role Y match the requested service, destination, or direction of traffic. Use of role inheritance provides two significant advantages: BlueSecure™ Controller Setup and Administration Guide 8-3 Chapter 8: Roles and Role Elements • It reduces the number of administrative changes you need to make to roles. If you need to make changes to the base role, you need only to change that one role. All roles that inherit the base role will also inherit the changes you have made. • It reduces the chance of administrative error by allowing you to change one role rather than each and every role that inherits it. As part of the role definition procedure, you can specify which role, if any, should be inherited by the role you are defining. Defining a Role Define roles to permit or deny wireless clients access to device or network destinations and services from certain logical locations over specified time periods. You can also define the following for each user to whom the role is assigned: • amount of bandwidth available for the connection • tunneling protocol that is used for the connection • relative priority of traffic during periods of BSC congestion • DSCP marking of packets to establish forwarding priorities • VLAN tagging to route user traffic to a specific VLAN on the protected side of the network To define a role: Displaying the Create a role page 8-4 1. Click the User Roles tab in the BSC administrator console. 2. Select Role from the Create drop-down list on the Roles page. The Create a role page appears as shown in Figure 8-3. Defining a Role Figure 8-3: Create a Role Page Name Bandwidth Enter a meaningful name for the role. Typically, this will be the name of a user group or department for which you are setting up access privileges, such as Engineering. Define the bandwidth for incoming/outgoing traffic generated by users assigned this role. 1. Bandwidth allocation - Enter a bandwidth value, and then select the appropriate data rate from the drop-down list. For no bandwidth restrictions, leave this field blank. Select the appropriate bandwidth allocation option: • Total for role - All users logged in with this role share the entered bandwidth. For example, if 1 Mbps is specified and there are 10 users, then all users share the bandwidth up to 1 Mbps maximum. BlueSecure™ Controller Setup and Administration Guide 8-5 Chapter 8: Roles and Role Elements • Per user - Each user logged in with this role can transmit the entire bandwidth. For example, if 1 Mbps is specified, then each user is allocated 1 Mbps maximum, regardless of the number of users. 2. Priority - You can configure role- and network service-based traffic priorities. If the BSC experiences network congestion, High priority traffic takes precedence over other traffic. If Override with per service setting? is marked, the BSC uses the priority setting configured for the network service to enforce the policy, regardless of the setting in the role. If the network service does not have a priority setting, the BSC uses the priority setting in the role. See “Creating a Network Service” on page 8-14 to learn about configuring network service-based priority settings. 3. DSCP Value - The BSC can use DSCP marking to mark or change the mark of incoming/outgoing packet traffic. This allows other devices in the network that are configured for Differentiated Services (DiffServ) to enforce a specific QoS level based on the priority of the DSCP mark in each packet header. Unchanged means there is either no DSCP marking or the BSC will not alter the marking value. If the Override with per service setting? checkbox is marked, the BSC uses the DSCP marking setting configured for the network service to enforce the policy, regardless of the setting in the role. If the network service does not have a DSCP setting, the BSC uses the DSCP setting in the role. See “Creating a Network Service” on page 8-14 for information about configuring network service-based DSCP settings. Policies 1. Select Allow or Deny from the Action drop-down list to specify whether to allow or deny access to the network service, destination, and network traffic direction listed in this policy for the user(s) assigned to this role. 2. Select the specific network service or service group, and destination or destination group from the Service and Destination drop-down lists to which to provide or deny access using this policy. You can also select Any from the drop-down list to provide or deny access to any service or destination. To create a network service, destination, or group other than those available for selection in the drop-down list, see “Creating Network Services and Services Groups” on page 8-13 or “Creating Destinations and Destination Groups” on page 8-10. Alternatively, you can select the Create… option from the drop-down list to open up a window that enables you to create up a new network service or destination. After you save the information, you are returned to the Create a Role page where you can select the network service or destination from the drop-down list. 3. Select the direction of initiation of the network connection for which you will allow or deny access from the Direction drop-down list. The direction is referenced from the perspective of the BSC, which is on the managed side of the wireless network. Outgoing means that network connections can only be made from the managed side to services/destinations on the protected side. Incoming means the opposite. Both ways allows for bi-directional traffic flow. 4. Select the schedule or schedule group, if any, that defines when this policy is in effect from the Schedule drop-down list. Schedules are date and time periods. You can also select Any (any period). Alternatively, as with network services and destinations, you can select the Create… option to define a new schedule or group. See “Creating Schedules and Schedule Groups” on page 8-17 for information about configuring a schedule or group. 5. Select the user's logical location or location group, if any, for which this policy is in effect from the Location drop-down list. The BSC uses VLANs to represent these logical user locations. You can select Any for any logical location. 8-6 Defining a Role Alternatively, as with network services, destinations, and schedules, you can use the Create… option to define a new user location or group.To set up a location or group, see “Creating Locations and Location Groups” on page 8-19. 6. Optional. Use the commands included in the Row Management drop-down list to change the order of policies, add new blank policy records, clear policy data, or delete a policy, etc. Remember, the BSC evaluates policies in the order in which they are listed here on the role definition page. 7. Enable role inheritance for this role by selecting a role from the Inherit from role drop- down list. After the BSC has checked each policy, it is possible that a requested network service (or service group), destination (or destination group), direction, schedule (or schedule group), and location (or location group) might not match any of the criteria specified. Enable role inheritance to continue checking policies in another existing role for a match. As with network services, destinations, schedules, locations, and groups, you can use the Create… option in the drop-down list to define a new inherited role. See “Role Inheritance” on page 8-3 for more information. Enforce Machine Authentication Role Two-Factor Authentication: Before 6.5, machine and user authentication were two separate processes. Users could skip the machine authentication, and still be authenticated against the domain based on the user credentials. From a security perspective, allowing users to only authenticate from domain machines adds an extra layer of security. Even if a password is compromised, a would-be thief or attacker could not gain access to the network unless a domain device was also stolen. BSC Implementation: With machine authentication the successfully authenticated endpoint will show in the connection table as "host/machine_name.domain_name" placed into a designated role for domain machines. If the BSC sees a successful user authentication, the BSC checks if this PC was already in the designated "domain machines" role. If it was, the PC will get the correct User role. If not, the user will get Unregistered Role. The BSC requires the user of Transparent 802.1x with machine authentication as the user must directly authenticate the machine to the Radius server. Client Configuration: The client should configure 802.1x normally, then click the following box under the Wireless Properties: Figure 8-4: Enabling Machine Authentication on Windows Zero-Config Supplicant BSC Configuration 1. Create a Domain Machines Role – this is the role to place a device authenticated via machine 2. Create a Corporate Role – this is the role to place the machine device into after user auth 3. Configure the Corporate Role to require the user to be in the Machine Role before login: BlueSecure™ Controller Setup and Administration Guide 8-7 Chapter 8: Roles and Role Elements Figure 8-5: Enabling Prerequisite Machine Authentication Role 4. Configure the Transparent 802.1x server to do role placement based on the username: Figure 8-6: Mapping Role Placement Based on Username In this case the Domain is ENG, so anything starting with ENG is a valid user. More granular policies can be applied based on the setup. Successful Login Example: Machine logs in, then User is allowed to log in: Figure 8-7: Successful Machine Authentication Figure 8-8: Successful User Login Failed Login Example: The User Logs in without machine authentication and a log message is generated: Figure 8-9: Failed User Login because Machine Authentication Failed Figure 8-10: Log Message upon Failure VLAN Tag 8-8 Optional. Select a VLAN from the VLAN Tag drop-down list to configure the BSC to tag all outgoing traffic from users assigned this role with the selected VLAN ID. This effectively Defining a Role routes all tagged traffic to the protected-side VLAN and is useful if you want to limit the access of VLAN members to certain network assets defined for the role. To use the VLAN tagging functionality, you must first set up a protected-side VLAN. See “Creating a VLAN on the Protected Side (Optional)” on page 4-5 for more information. Alternatively, as with network services, destinations, schedules, locations, and groups, you can select the Create… option in the drop-down list to define a new VLAN. BlueProtect Endpoint Scanning Optional. If you have purchased the BlueProtect Scanning functionality for the BSC, then you should configure at what frequency user devices are scanned for users who are authenticated into the role. Enable BlueProtect scanning for the role by specifying the frequency at which a user authenticated into the role will have his or her device scanned by selecting an option from the BlueProtect Scanning drop-down menu. Possible scan frequency settings are: • Disabled • Once a day • Once a week • Once a month • Every 45 days • Every 90 days ) Note: In the unregistered role, the only valid options are Every time and Disabled. This means that the user will be scanned every time they authenticate to an AP, before they enter their login or credit card information. ) Note: If BlueProtect is disabled, the only option available in the drop-down is Disabled. Choose a BlueProtect Policy to scan a user against. This allows an administrator to have a different policy for students than for teachers. Proxy Redirect (Optional) If you want to redirect web traffic to your existing web proxy server without forcing users to enter proxy information in their web browser setup, you can do this by entering data in the Proxy Server and Http ports fields. You must configure your proxy server to support Transparent Proxy. Not all proxy servers support this capability, so please consult your proxy server documentation on transparent proxy setup. Proxy Server: Enter the IP address and port of the HTTP proxy server to which to redirect traffic. For example, 191.168.10.2:8080, would be a valid entry. Http ports: Enter a comma separated list of http ports from which the BSC is to redirect traffic via the specified proxy server. Typically, port 80 is used; note that HTTPS (port 443) is an encrypted protocol and cannot be transparently proxied. Perform transparent proxy request translation: Check this checkbox to enable the internal transparent proxy to intercept normal web traffic (port 80) and convert it to a proxy packet destined for the customer’s existing proxy server (Microsoft ISA for example). This feature allows administrators to force wireless traffic through their proxy servers without making configuration changes to each user’s web browser or changing their existing proxy server. Post login URL Redirect (Optional): To redirect any wireless user assigned to this role to a specific URL after login, enter the URL. Note that there are two other places in the UI in which redirection can be specified. The user is redirected to one of the following URLs in the order of precedence listed: BlueSecure™ Controller Setup and Administration Guide 8-9 Chapter 8: Roles and Role Elements 1. The Redirect URL Attribute field on either the RADIUS page or the LDAP page accessed on the User Authentication tab. (See “RADIUS Authentication” on page 6-2 and “LDAP/Active Directory Authentication” on page 6-6.) 2. The URL Redirect field on the Edit Role page.(“Defining a Role” on page 8-4) 3. The Default Redirect URL field on the General HTTP Settings page. (See “HTTP Server Settings” on page 10-2.) Thank you HTML: Enter any HTML code to disable URL redirection after login. The HTML is displayed in a standard Thank You page when users assigned to this role log in. After the Thank You page is displayed, the user can click on the link to go the URL, but they are not automatically redirected to that link. Use the Thank You page HTML option to display a custom message or system alert to users, rather than allow them to immediately access a URL. Notes Saving the settings Optional. Enter a meaningful description for the role. Click Save to store the information to the BSC database or Save and create another to continue to create user roles. You might be prompted to restart the BSC. We recommend that you do not restart the BSC until you have completely finished configuring the BSC for use in your network. Modifying a Role To modify an existing user role: 1. Click the User Roles, Roles tab in the BSC administrator console. 2. Click the icon next to the role you wish to edit. 3. Change any role settings as needed as described starting in “Defining a Role” on page 8-4. 4. Click Save to store the information to the BSC database. You might be prompted to restart the BSC. We recommend that you do not restart the BSC until you have completely finished configuring the BSC for use in your network. Creating Role Elements Before creating roles and assigning them to your BSC users, create the following elements that comprise a role: • destinations - Create the destinations (i.e., hosts, devices, network addresses) that the users can potentially access as described in “Creating Destinations and Destination Groups” on page 8-10. • network services - Define the network services that users can access, i.e. the services that can be passed through the BSC as described in “Creating Network Services and Services Groups” on page 8-13. • schedules - Optionally create schedules that restrict data traffic from users to specified periods of time as described in “Creating Schedules and Schedule Groups” on page 8-17. • locations - Optionally define locations (using VLANs) that specify the location of users on the managed side of the network as described in “Creating Locations and Location Groups” on page 8-19. Creating Destinations and Destination Groups Before you create roles and assign them to your BSC users, you need to define the destinations that the users can potentially access. A destination can be defined as: a 8-10 Creating Destinations and Destination Groups single device within the network; all the devices reachable within a network address space After defining destinations, you can organize them into destination groups. Typically, the destinations in a group are physically or logically related in some way. Using destination groups can streamline role administration, by enabling you to apply one network usage policy to the entire destination group rather than creating a separate policy for each individual destination.See “Defining User Roles to Enforce Network Usage Policies” on page 8-2 for information on defining roles and network usage policies. • Creating a Single Device Destination • Creating a Network Space Destination Creating a Single Device Destination To set up a destination for a single device on a network: 1. Click the User Roles tab in the BSC administrator console, and then click the Destinations tab. 2. Select Destination Host from the Create drop-down list on the Destinations page. The Create a host page appears as shown in Figure 8-11. 3. Enter a meaningful name for the destination device in the Name field. The name defaults to the value in the Address field (for networks the address includes the netmask). 4. Enter the device’s fully qualified domain name or IP address in the Address field. 5. Optional. Enter additional descriptive information about the device or its intended use in the Notes field. Figure 8-11: Create a (Destination) Host Page 6. Mark the Invert this destination checkbox to define all devices but this host. 7. Skip this destination in client bandwidth calculations: Use when you are not tracking bandwidth on specific areas. For example, you might want to track bandwidth usage just for Internet usage, and not intranet usage, if you are charging for this service. 8. Click Save to store the information or Save and create another to continue defining host destinations. BlueSecure™ Controller Setup and Administration Guide 8-11 Chapter 8: Roles and Role Elements You might be prompted to restart the BSC. We recommend that you do not restart the BSC until you have completely finished configuring the BSC for use in your network. Creating a Network Space Destination To set up a destination for all devices in a given network address space: 1. Click the User Roles tab in the BSC administrator console, and then click the Destinations tab. 2. Select Destination Network from the Create drop-down list on the Destinations page. The Create a network page appears as shown in Figure 8-12. Figure 8-12: Create a (Destination) Network Page 3. Enter a meaningful name for the destination device network in the Name field. 4. Enter the device network’s IP address in dotted-decimal format in the Address field. 5. Enter a bit mask in the Netmask field specifying which bits in the IP address correspond to the network address and which bits correspond to the subnet portion of the address. 6. Mark the Invert this destination checkbox to define all devices but those on this network. 7. Optional. Enter additional descriptive information about the network on which the devices reside in the Notes field. 8. Click Save to store the information or Save and create another to continue defining network destinations. You might be prompted to restart the BSC. We recommend that you do not restart the BSC until you have completely finished configuring the BSC for use in your network. Creating Destination Groups Create groups of devices to enable you to easily provide or deny access to multiple network devices based on a user’s assigned role. Typically, the destinations in a group are physically or logically related in some way. To set up a destination group: 1. Click the User Roles tab in the BSC administrator console, and then click the Destinations tab. 8-12 Creating Network Services and Services Groups 2. Select Destination Group from the Create drop-down list on the Destinations page. The Create a (destination) group page appears as shown in Figure 8-13. Figure 8-13: Create a (Destination) Group Page 3. Enter a meaningful name for the device group in the Name field. 4. Select one or more destinations from the Available Items list to include in the destination group and then click Add highlighted items. The selected destinations are added to the Selected Items list. To add all available destinations to the destination group, simply click Add all items in list. 5. Optional. Click Remove highlighted items or Remove all items in list to remove destinations from the group. 6. Click Save to store the information to the BSC database or Save and create another to continue defining destination groups. You might be prompted to restart the BSC. We recommend that you do not restart the BSC until you have completely finished configuring the BSC for use in your network. Creating Network Services and Services Groups The BSC includes a set of common pre-defined network services that users can access, i.e., that can be passed through the BSC, if permitted by the role to which the users are assigned. Here is a partial list of network services already included to the BSC database: • DNS - Domain Name System • Exchange-TCP - Connection to mail server over TCP • Exchange-UDP - Connection to mail server over UDP • FTP - File transfer protocol • GRE - Generic routing encapsulation • HTTP - Hypertext transport protocol • HTTPS - Hypertext transport protocol, secure • ICMP - Internet control message protocol • IMAP - Internet message access protocol • KERBEROS - Symmetric key cryptography authentication system BlueSecure™ Controller Setup and Administration Guide 8-13 Chapter 8: Roles and Role Elements ) • LDAP - Lightweight directory access protocol • H.323 - ITU-T standard for sending voice (audio) and video using IP on a LAN without QoS • TFTP - Trivial File Transfer Protocol • NTP - Network Time Protocol • SNMP - Simple Network Management Protocol Note: The standard network services available on the BSC might change in future releases of the BSC system software. You can modify existing BSC network service settings or add services that are not included in this list. You can set QoS parameters for traffic priority and differentiated services code point (DSCP) marking in a network service, and include that service in network usage policies when defining a role. An override option in the role determines whether the traffic priority and DSCP marking settings in a policy's network service take precedence over the corresponding settings in the role. You can also globally block or apply bandwidth limits to specific services known to be used in denial-of-service (DoS) attacks that can originate from the introduction of new Internet worms. This service blocking/limiting capability enables you to stop a flood of network traffic before it adversely affects your protected network. If a large number of virus-infected hosts reside on your network, then they can generate high volumes of traffic that can in turn cause high CPU usage and traffic drops on network equipment including BlueSecure Controllers.You can combat the effects of DoSs and viruses by applying the DoS bandwidth limitations to affected network services. Additionally, you can permit or deny specific services to users who are in the BSC Intrusion Detection System’s Blocked State. After defining services, you can organize them into service groups. Using service groups can streamline role administration, by enabling you to apply one network usage policy to the entire service group rather than creating a separate policy for each individual network service. See “Defining User Roles to Enforce Network Usage Policies” on page 8-2 for more information on defining roles and network usage policies. Creating a Network Service To add a network service, do the following: Displaying the Create a Service page 1. Click the User Roles tab in the BSC administrator console, and then click the Services tab. 2. Select Service from the Create drop-down list on the Services page. The Create a service page appears as shown in Figure 8-14. 8-14 Creating Network Services and Services Groups Figure 8-14: Create a Service Page Name Service Settings Enter a meaningful name for the network service. Define the service settings as appropriate for your network. Protocol - Specify whether the network service supports TCP, UDP, both TCP/UDP, ICMP, or some Other protocol. Port - Enter the port number(s) used by TCP, UDP, or both TCP/UDP protocols. Use a hyphen to designate a port range and use a comma between each port or port range entry. For example, to specify ports 1024 through 2000 and also port 2003, enter 1024-2000,2003. Protocol Number - If you have specified Other for the network service protocol, the Port field changes to Protocol Number. Enter the appropriate protocol number. For example, if you wanted to create a service for IPSec encrypted data using ESP (encapsulated security payload), you would enter protocol number 50. Quality of Service Optional. Define the QoS, i.e., traffic priority level and DSCP marking for the service. Enable QoS for this Service - Mark this checkbox to apply Priority and DSCP settings to this network service. Clear this checkbox to enable the priority and DSCP marking settings defined in the user role to take precedence over any such settings defined for the network service. BlueSecure™ Controller Setup and Administration Guide 8-15 Chapter 8: Roles and Role Elements Incoming/Outgoing Priority - You can configure a priority for traffic coming into the BSC or going out from the BSC via this network service. If the BSC experiences network congestion, High priority traffic takes precedence over Medium and Low priority traffic. You can also configure role-based traffic priority. An override option in the role configuration determines whether the priority setting in a policy's network service takes precedence over the priority setting in the role. See “Defining User Roles to Enforce Network Usage Policies” on page 8-2 for information about role configuration. ) Note: Incoming traffic is defined to be Protected-to-Managed while outgoing traffic is defined to be Managed-to-Protected. Incoming/Outgoing DSCP Value - The BSC can use differentiated services code point (DSCP) marking to mark or change the mark of incoming or outgoing packet traffic via this network service. This allows other devices in the network that are configured for Differentiated Services (DiffServ) to enforce a specific QoS level based on the priority of the DSCP mark in each packet header. Unchanged means there is either no DSCP marking or the BSC will not alter the marking value. You can also configure role-based DSCP marking. An override option in the role determines whether the DSCP marking setting in a policy's network service takes precedence over the DSCP setting in the role. See “Defining User Roles to Enforce Network Usage Policies” on page 8-2 for more information about role configuration. Denial of Service Optional. If your network is experiencing a Denial-of-Service (DoS) attack or has a large number of virus-infected hosts resident on it, then configure the BSC Denial of Service (DoS) settings to limit or disable affected network services. The DoS can be caused by malicious users or Internet worms/viruses. To limit the bandwidth for a service, mark the Limit checkbox and then enter the maximum bandwidth allotted to the service in the Packets per second field. Entering a bandwidth of zero (0) completely blocks the service. Be sure to apply the bandwidth limitations in all directions (protected-to-managed, managed-to-protected, and into the BSC) as appropriate for your network. Intrusion Detection Specify access to the network service to users in the BSC Intrusion Detection System’s Blocked State by marking one of the following radio buttons: Normal - The service is allowed or denied as specified by the blocked user’s IDS role. Exclude - Allow users in the Blocked State to access this network service regardless of their role’s settings, i.e. the service will not be subject to IDS. Block - Deny users in the Blocked State access to this network service regardless of their role’s settings. Saving the Settings Click Save to store the information to the BSC database or Save and create another to continue defining network services. You might be prompted to restart the BSC. We recommend that you do not restart the BSC until you have completely finished configuring the BSC for use in your network. Creating Network Service Groups Create groups of network services to enable you to easily provide or deny access to multiple network services based on a user’s assigned role. To create a network service group: 8-16 Creating Schedules and Schedule Groups 1. Click the User Roles tab in the BSC administrator console, and then click the Services tab. 2. Select Service from the Create drop-down list on the Services page. The Create a (service) group page appears as shown in Figure 8-15. Figure 8-15: Create a (Service) Group Page 3. Enter a meaningful name for the network service group in the Name field. 4. Select one or more network services from the Available Items list to include in the service group and then click Add highlighted items (to move a single item between columns, you can also just double-click on the item). The selected services are added to the Selected Items list. To add all available services to the service group, simply click Add all items in list. 5. Optional. Click Remove highlighted items or Remove all items in list to remove services from the group. 6. Click Save to store the information to the BSC database or Save and create another to continue defining service groups. You might be prompted to restart the BSC. We recommend that you do not restart the BSC until you have completely finished configuring the BSC for use in your network. Creating Schedules and Schedule Groups When defining a user role, you can create network usage policies that allow data traffic from that user on the BSC only during certain time periods or schedules. For example, you can create a schedule called “Work Week” that permits traffic only on Monday through Friday from 9 AM to 5 PM. After you create a schedule, you can select it when defining a policy in a role as described in “Defining a Role” on page 8-4. After defining schedules, you can organize them into schedule groups. Using schedule groups can streamline role administration, by enabling you to apply one policy to the entire schedule group rather than creating a separate policy for each individual schedule. See “Defining User Roles to Enforce Network Usage Policies” on page 8-2 for more on defining roles and network usage policies. Creating a Schedule To set up a schedule, do the following: BlueSecure™ Controller Setup and Administration Guide 8-17 Chapter 8: Roles and Role Elements 1. Click the User Roles tab in the BSC administrator console, and then click the Schedules tab. 2. Select Schedule from the Create drop-down list on the Schedules page. The Create a schedule page appears as shown in Figure 8-16. 3. Enter a meaningful name for the schedule in the Name field. 4. Using the data entry fields and controls on the Create a schedule page, define the effective times or time range, and dates or date range for the schedule. ) Note: Clear the pm checkbox to designate time as AM, when defining the schedule’s effective time. Figure 8-16: Create a Schedule Page 8-18 Creating Locations and Location Groups 5. Click Save to store the information to the BSC database or Save and create another to continue defining service groups. You might be prompted to restart the BSC. We recommend that you do not restart the BSC until you have completely finished configuring the BSC for use in your network. Creating Schedule Groups Create groups of schedules to enable you to easily accept or deny traffic from a BSC user based on the schedule group associated with the user’s assigned role. To create a schedule group: 1. Click the User Roles tab in the BSC administrator console, and then click the Schedules tab. 2. Select Schedule Group from the Create drop-down list on the Schedules page. The Create a (schedule) group page appears as shown in Figure 8-17. Figure 8-17: Create a (Schedule) Group Page 3. Enter a meaningful name for the schedule group in the Name field. 4. Select one or more schedules from the Available Items list to include in the schedule group and then click Add highlighted items. The selected schedules are added to the Selected Items list. To add all available schedules to the group, click Add all items in list. 5. Optional. Click Remove highlighted items or Remove all items in list to remove schedules from the group. 6. Click Save to store the information to the BSC database or Save and create another to continue defining schedule groups. You might be prompted to restart the BSC. We recommend that you do not restart the BSC until you have completely finished configuring the BSC for use in your network. Creating Locations and Location Groups When defining a role, you can create network usage policies based on the logical location from which a user connects to the wireless network. The BSC uses VLANs to logically represent these locations. BlueSecure™ Controller Setup and Administration Guide 8-19 Chapter 8: Roles and Role Elements For example, you might have defined “VLAN 15” that includes all access points on the shop floor. You can then create a location called Shop Floor that maps VLAN 15 to the location. After you create the location, you can then select it from the drop-down list when defining a network usage policy in a role. For example, you can create a policy that allows Telnet sessions only when the user is connected to the BSC from an access point in the Shop Floor (VLAN 15) location. ) Note: For more information on setting up VLANs, see “Creating a VLAN on the Protected Side (Optional)” on page 4-5 and “Creating a VLAN on the Managed Side of Your Network” on page 4-17. After defining locations, you can organize them into location groups. Using location groups can streamline role administration, by enabling you to apply one policy to the entire location group rather than creating a separate policy for each individual location. See “Defining User Roles to Enforce Network Usage Policies” on page 8-2 for more on defining roles and network usage policies. Creating a User Location To define a user location: 1. Click the User Roles tab in the BSC administrator console, and then click the Locations tab. 2. Select User Location from the Create drop-down list on the Schedules page. The Create a location page appears as shown in Figure 8-18. 3. Enter a meaningful name for the user location in the Name field. Defaults to the value in the VLAN ID field. Figure 8-18: Create a User Location Page 4. Enter the VLAN ID that identifies the user’s logical location In the VLAN ID field. 5. Click Save to store the information to the BSC database or Save and create another to continue defining user locations. You might be prompted to restart the BSC. We recommend that you do not restart the BSC until you have completely finished configuring the BSC for use in your network. Creating User Location Groups Create groups of user locations to enable you to easily enforce network usage policies based on the user locations associated with a user’s assigned role. To create a location group: 8-20 Creating Locations and Location Groups 1. Click the User Roles tab in the BSC administrator console, and then click the Locations tab. 2. Select Location Group from the Create drop-down list on the Schedules page. The Create a (location) group page appears as shown in Figure 8-19. Figure 8-19: Create a (Location) Group Page 3. Enter a meaningful name for the location group in the Name field. 4. Select one or more locations from the Available Items list to include in the location group and then click Add highlighted items. The selected locations are added to the Selected Items list. To add all available locations to the location group, simply click Add all items in list. 5. Optional. Click Remove highlighted items or Remove all items in list to remove locations from the group. 6. Click Save to store the information to the BSC database or Save and create another to continue defining location groups. You might be prompted to restart the BSC. We recommend that you do not restart the BSC until you have completely finished configuring the BSC for use in your network. BlueSecure™ Controller Setup and Administration Guide 8-21 Chapter 8: Roles and Role Elements 8-22 9 Voice Over WLAN Support More and more organizations are now using IP phones that pass voice traffic over WLANs to make use of an existing 802.11 infrastructure for voice traffic as well as data traffic. BlueSecure Controller system software release 5.2 (and higher) enables you to pass IP phone voice traffic through the BSC by providing support of widely used voice over IP protocols (SIP and H.323), vendor-specific IP phone configuration (Polycom/Avaya, Cisco, Skype, and Vocera), and system-level QoS for voice traffic. By default, IP phone users are authenticated into the IP Phones role. You can configure specific network policies for this role as appropriate for voice traffic on your WLAN. This chapter provides complete procedures for your configuring Voice over WLAN (VoWLAN) support on the BSC, covering the following topics: • Configuring General VoWLAN Settings • Configuring Vendor-specific IP Phone Support • Configuring VoWLAN QoS BlueSecure™ Controller Setup and Administration Guide 9-1 Chapter 9: Voice Over WLAN Support Configuring General VoWLAN Settings Click the Voice tab in the BSC administrator console, and then click the General tab. The VoWLAN General Settings page appears as shown in Figure 9-1. Figure 9-1: VoWLAN General Settings Page 1. Mark the Prioritize Voice and Video Traffic checkbox to prioritize this traffic over the other background traffic to improve QoS. See “Configuring VoWLAN QoS” on page 9-3 for details on QoS. 2. Mark the Enable H323 Voice Protocol checkbox to enable the BSC to pass H.323 protocol voice traffic. 3. Mark the Enable SIP Voice Protocol checkbox to enable the BSC to pass Session Initiation Protocol (SIP) voice traffic. • Enable SIP Outbound Proxy Service? - Mark this checkbox to support incoming calls in a NAT environment. 4. Click Save to save the general VoWLAN settings to the BSC database. Configuring Vendor-specific IP Phone Support To configure BSC support for specific models of IP phones: Displaying the IP Phones Settings page 1. Click the Voice tab in the BSC administrator console, and then click the IP Phones tab. The IP Phones Settings page appears as shown in Figure 9-2. Figure 9-2: IP Phones Settings Page 9-2 Configuring VoWLAN QoS Polycom/Avaya IP phone settings Mark the Enable support for Polycom/Avaya IP phones checkbox if your wireless clients are passing Polycom/Avaya IP phone traffic through the BSC and configure the following settings: Polycom/Avaya gateway IP address or hostname - Enter one or more IP addresses/ hostnames of the Polycom gateway(s) on your network as a comma delimited list Polycom/Avaya SVP server IP address or hostname - Enter one or more IP addresses/ hostnames of the Polycom Voice Priority (SVP) server(s) on your network as a comma delimited list. Note: If you are using the BSC Replication feature, make sure that for each replicated node, you override the replicated gateway and server IP addresses for Polycom/Avaya. See “Configuring a Replication Override” on page 14-15. Cisco IP Phone Settings Mark the Enable support for Cisco IP phones checkbox if your wireless clients are passing Cisco IP phone traffic through the BSC. Vocera Badges Settings Mark the Enable support for Vocera Badges checkbox if your wireless clients are passing Vocera IP phone traffic through the BSC, and then enter the IP address/hostname of the Vocera server on your network in the Vocera server IP address or hostname field. Policy settings Select the Role into which IP phone users are authenticated from the drop-down. By default, IP phone users are authenticated into the IP Phones role. See “Defining User Roles to Enforce Network Usage Policies” on page 8-2 for information about configuring a role to enforce network usage policies for the IP Phones role. Saving the settings Click Save to save the IP phone settings to the BSC database. Configuring VoWLAN QoS To configure QoS to reduce network delay, jitter, errors, lost, and retransmitted packets: 1. Make sure that the Prioritize Voice and Video Traffic checkbox is marked on the VoWLAN General Settings Page (displayed by clicking the Voice tab and then the General tab). 2. Specify an SSID for Voice traffic. Click the Wireless tab, click the SSID tab, and then either (a) select SSID from the Create drop-down menu to display the Create new SSID Page or (b) select the pencil icon next to an existing SSID to display the Edit SSID page. On either the Edit SSID page or the Create SSID page, select Voice from the Default QoS for SSID drop-down menu. 3. Enable call admission control for a single BSAP or for all BSAPs. For all BSAPs, click the Wireless tab, click the Global tab, and then click the System link at the top of the page to display the Edit AP System Settings - Global Page (see “Configuring Global Miscellaneous Non-Radio Settings” on page 12-8). For a single AP, click the Wireless tab, click the AP tab, and then click the pencil icon next to an AP to display the Edit AP System Settings page (See “Editing Settings for an Individual BSAP” on page 1219))or select AP from the Create drop-down to display the Create New AP Page (see “Creating BSAPs” on page 12-24). a) Mark the Enable WMM and Voice Call Admission Control? checkbox. b) Enter the maximum number of Voice Sessions per BSAP. c) Enter the maximum number of Video Sessions per BSAP. BlueSecure™ Controller Setup and Administration Guide 9-3 Chapter 9: Voice Over WLAN Support 9-4 10 General BSC Operational Settings You may modify the following BSC protocols and functions using the settings found on the General page in the BSC administrator console: • HTTP Server Settings • Intrusion Detection System • SNMP Agent • Automatic Backup of the BSC Database • System Time and Date Settings • Mail Server Access • Public Access Networks • Event Logging and Connection Tracking • Threshold Values • Domain Name System (DNS) Settings • Requesting and Installing an IPSec Authentication Certificate • Miscellaneous BSC Options BlueSecure™ Controller Setup and Administration Guide 10-1 Chapter 10: General BSC Operational Settings HTTP Server Settings To modify the BSC HTTP server settings: Displaying the HTTP Settings page 1. Click the General tab in the BSC administrator console, and then click the HTTP tab. The HTTP Settings page appears as shown in Figure 10-1. Figure 10-1: HTTP Settings Page 10-2 HTTP Server Settings Login Redirects Comma separated list of HTTP/proxy ports to monitor - Enter HTTP and HTTP proxy port(s) that the BSC monitors. The BSC monitors the port(s) for all unregistered users and, if it sees a request, it redirects the user to the login page. Specify ports using the commadelimited format. Default value: 80. Port of HTTP redirection for user login - Enter the port through which the BSC sends a redirect response to the user to redirect their browser to the BSC login page. Default value: 8080. Redirect to hostname - This setting is important if you are using a custom SSL digital certificate for the user login page, rather than the default Bluesocket SSL certificate. Many digital certificate providers issue web server certificates that reference the requester's host name rather than an IP address. If you enable this option, enter the hostname/IP address of the BSC into your network’s DNS so that it resolves properly. If the SSL certificate you are using for login is host name-based, mark this checkbox and also ensure that the host name is registered in your organization's DNS. If the SSL certificate is IP address-based, clear this checkbox. Default value: hostname- based. For more on setting up custom SSL user login certificates, see “Installing a Custom SSL Login Certificate” on page 11-22. Automatic redirect enabled - Mark this checkbox to redirect users to the URL specified in the Default redirect URL setting (below). Note that there are two other places in the UI in which redirection can be specified. The user is redirected to one of the following URLs (if specified) in the order of precedence listed: ) • The Redirect URL Attribute field on either the RADIUS page or the LDAP page accessed on the User Authentication tab. (See “RADIUS Authentication” on page 6-2 and “LDAP/Active Directory Authentication” on page 6-6.) • The URL Redirect field on the Edit Role page (“Defining a Role” on page 8-4). • The Default Redirect URL field on the General HTTP Settings page. (See “HTTP Server Settings” on page 10-2 Note: If the user is assigned a role on the Edit Role page with the Thank You HTML text specified, the browser displays the Thank You page and no redirection to a URL occurs. The user can click on the link to go the URL, but they are not automatically redirected to that link. Default redirect URL - URL where the user is redirected if the Automatic Redirect Enabled setting is checked. Default value: http://www.bluesocket.com. Pause in seconds before redirecting user after login - Enter the delay in seconds before a user is redirected to a requested URL. Setting is valid only when Automatic Redirect Enabled setting is checked. Default value: 1 second. Seconds a client is allowed to hold the web server - Defaults to 300 seconds. Any value greater than 0 is accepted. Times per second a client can access a specific page - This limits the number of times per second a client will be redirected when accessing a site like http://www.google.com/ maps or http://www.google.com/mail Times per second a client can access a specific host - This limits the number of times per second a client will be redirected when accessing a site like http://www.google.com BlueSecure™ Controller Setup and Administration Guide 10-3 Chapter 10: General BSC Operational Settings Root CA URL - URL where the certificate authority (CA) credential is stored. Your browser can use the CA to establish that the BSC web server is a trusted source for data. Default value: https://secure.bluesocket.com/root-ca-2.crt Admin Login Options Admin web server port - Use to block admin access at the interface level. The default port is 443. If the value is different than 443, the web server will listen on the new port and deny access via port 443 to the admin entry points. For example, if you specify port 8083, admin access is available at https://IP:8083/admin.pl. Admin Access Allow Control List - Limits administrator login page access (and administrator web browser functions) to those clients with IP addresses that are listed here. You can also list partial addresses to indicate an entire address space. Use a comma between each single address or address space. Default value: all (no IP address restrictions). Example 1: To admit IP address 10.1.1.1 only, enter 10.1.1.1 Example 2: To admit IP addresses 10.1.1.1 and 10.1.1.3 only, enter 10.1.1.1,10.1.1.3 Example 3: To admit all IP addresses in 10.1.1.0 through 10.1.1.255, enter 10.1.1. Caution: Be careful about the values you enter for this option, as it is possible to block administrative access to the BSC if you enter incorrect information. Disable access to the BSC API - Mark this checkbox to disable access to and use of the BSC application programming interface. Default Language Language code and Character set - Specify the language for the BSC’s console. The default language is English with a character code of en and a set of ISO-8859-1. The BSC provides multi-byte character set support to enable the use of Asian languages. Catalan, Chinese (Simplified), Chinese (Traditional), Czech, Dutch, English, French, German, Italian, Japanese, Korean, Portuguese, Spanish, and Swedish. Possible language code and character set settings are: ) 10-4 • Catalan (ca/ISO-8859-1) • Chinese-Simplified (zh-CN/GB2312) • Chinese-Traditional (zh-TW/Big5) • Czech (UTF-8) • Dutch (UTF-8) • English (en/ISO-8859-1) • French (fr/ISO-8859-1) • German (de/ISO-8859-1) • Italian (it/ISO-8859-1) • Japanese (ja/EUC-JP) • Korean (ko/EUC-KR) • Portuguese (pt/ISO-8859-1) • Spanish (es/ISO-8859-1) • Swedish (sv/ISO-8859-1) Note: The BSC will save configuration data using the character set you specify here, so for example, if enable a Chinese character set, LDAP data from the BSC will be sent in Chinese. Intrusion Detection System BlueProtect Endpoint Scanning Optional. Enable BlueProtect Endpoint Scanning support as described in Appendix C, "Endpoint Scanning." BlueProtect cannot be disabled if existing roles require BlueProtect. Saving the settings Click Save to save the HTTP server settings to the BSC database. You may be prompted to restart the BSC. We recommend that you do not restart the BSC until you have completely finished configuring the BSC for use in your network. Intrusion Detection System The BSC provides an administrator-configurable Intrusion Detection System (IDS) to defend itself and the network it is protecting from intruders, worms, and other targeted attacks. By using the BSC IDS, you can: • monitor all traffic into and through the BSC for possible intrusion • isolate and classify the type of an intrusion • alert, log, and report an intrusion • configure and monitor the IDS using the standard BSC administrator console The BSC IDS detects and protects your network against many forms of intrusion, including: • a flood of packets on one or more ports using one or more IP addresses • sniffing, network mapping, ping flooding, port scanning, tcp-session oriented attacks. • noise generators • users infected with Internet worms that scan or flood the network, and impact network performance negatively The BSC IDS functions by examining all packets passing through it from the managed side of the network and determining if this traffic falls within the boundaries of normal traffic. These boundaries of normal traffic are defined and configured by BSC administrators. As the BSC IDS examines user traffic, it deducts any signature of an attack to identify the type of attack and then takes appropriate action. Based on incoming traffic and configured traffic boundaries, the IDS transitions user hosts on the managed side using the state model represented in the following figure. The possible IDS host states shown in the preceding figure are described as follows. BlueSecure™ Controller Setup and Administration Guide 10-5 Chapter 10: General BSC Operational Settings Normal Blocked Pre-monitoring Monitoring Figure 10-2: BSC IDS Host State Model Normal State By default, a user host will start in the Normal State unless or otherwise blocked. The administrator-configurable parameter Maximum Number of Firewall Sessions per user is used to define the bounds of normal traffic. If a user host exceeds this maximum, i.e., if it tries to make too many connections to the BSC, the IDS records a violation for the host. If the host’s violation count exceeds the Violation Threshold setting, the IDS transitions the host’s state to Pre-monitoring. Pre-monitoring State In this state the IDS tracks the host’s violations of the Violation Threshold setting. If the host accrues more violations than specified in the Max Number of Violations setting, the IDS transitions the host to the Monitoring State. If the host does not exceed the Max Number of Violations within the period of time specified by the Pre-monitoring Timeout setting, the IDS returns the host to the Normal State. Monitoring State If a host progresses all the way from the Normal to the Monitoring state, there is a high probability that it may be involved in some abnormal activity. While a host is in this state, the IDS blocks all problematic host ports immediately, identifies the type of attack, and takes additional actions as necessary. The possible necessary actions include blocking traffic on one or more additional host ports, or blocking all traffic from the host. A user accessing the BSC via a host in the Monitoring state will be redirected to the URL specified by the URL to redirect detected devices setting. If the BSC IDS does not detect any further abnormal activity from the host, the IDS will transition the host back to the Premonitoring State. A host in the Monitoring state is able to send normal traffic on all ports with the exception of those ports that have been blocked. All dropped packets are tallied. The BSC IDS will transition the host from the Monitoring State to the Blocked State once the number of ports specified in the Ports to block before entering Blocked State setting are blocked, or if the host continues to make too many connection attempts. If the Ports to block before entering Blocked State setting is set to zero, the IDS will immediately transition the host from the Monitoring state to the Blocked state. Blocked State 10-6 Once a user host enters into this state, the MAC of the host is noted and the blocked user is placed into the Administrator-selected IDS role. You may select only a single IDS role for users in the Blocked State. There are two default IDS roles from which to select— Monitoring Mode (allow all traffic) or Quarantined (deny all traffic). You may customize Intrusion Detection System these roles or create your own IDS role to assign to blocked users. Note that the Monitoring Mode role is designed to be used only for test purposes as you tweak the BSC IDS settings for your network. The blocked host is allowed to get a DHCP address but, only administrator intervention can transition the host back to the Normal State. Finally, you may specific a URL to which to redirect blocked users.Typically, you will want to redirect a blocked user to a web page that informs them of their blocked status and offers information and links (e.g., to download virus protection software) to possibly remedy the situation. A host transitions to the Blocked State either dynamically via the BSC IDS or if an Administrator adds the host to the blocked list manually. See “Monitoring a User’s IDS Status” on page 15-3 for information about monitoring user host IDS states and activity, and the actions you may take to block or un-block hosts manually. See “Defining MAC Address Authentication” on page 5-5 for information about blocking and unblocking a device configured for MAC authentication. See “Creating Network Services and Services Groups” on page 8-13 for information about enabling or disabling access to a network service for blocked users. Configuration Procedure To configure the BSC Intrusion Detection System: Displaying the Intrusion Detection page 1. Click the General tab in the BSC administrator console, and then click the IDS tab. The Intrusion Detection page appears as shown in Figure 10-3. BlueSecure™ Controller Setup and Administration Guide 10-7 Chapter 10: General BSC Operational Settings Figure 10-3: Intrusion Detection System Settings Page Enable IDS Mark this checkbox to activate the BSC Intrusion Detection System. Thresholds Violation Threshold: Enter the maximum number of violations a user host may accrue in the Normal State. The default setting is 20. If a host exceeds the configured threshold, the BSC IDS moves the host to the Pre-monitoring State. Max Number of Violations: Enter the maximum number of violations a user host may accrue while in the Pre-monitoring state. The default setting is five. If a host exceeds the configured maximum, the BSC IDS moves the host to the Monitoring State. Ports to block before entering Blocked State: Enter the number of blocked ports a host must accrue before the BSC IDS transitions the host from the Monitoring state to the Blocked State. User Settings Select the Role into which users in the Blocked State will transition from the drop-down list. There are two default IDS roles from which to select—Monitoring Mode (allow all traffic) or Quarantined (deny all traffic). You may customize these roles or create your own IDS role to assign to blocked users as described in “Defining User Roles to Enforce Network Usage Policies” on page 8-2. Timeouts Enter the maximum number of seconds a user host may spend in the Pre-monitoring State without accruing the configured maximum number of violation in the Pre-Monitoring Timeout field. The default setting is 300 seconds. If the host does not accrue the configured maximum number of pre-monitoring violations within this configured period, the BSC IDS returns the user host to the Normal State. Note that the Monitoring Mode role is designed to be used for test purposes as you adjust the BSC IDS settings. Enter the seconds to block a user host’s ports in the Blocked State Timeout field. The default setting is 0—a user host’s ports will remain blocked until explicitly unblocked by a BSC Administrator. If a value is entered other than 0, the user’s ports will remain blocked until the specified period of time has elapsed. Redirect Saving the settings Enter the URL to redirect blocked users to in the URL to redirect detected devices field. Typically, you will want to redirect a blocked user to a web page that informs them of their blocked status and offers information and links (e.g., to download virus protection software) to possibly remedy the situation. Click Save to save the IDS settings to the BSC database. You may be prompted to restart the BSC. We recommend that you do not restart the BSC until you have completely finished configuring the BSC for use in your network. See “Monitoring a User’s IDS Status” on page 15-3 for information about monitoring user host IDS states and activity, and the actions you may take to block or un-block hosts manually. See “Defining MAC Address Authentication” on page 5-5 for information about blocking and unblocking a device configured for MAC authentication. SNMP Agent To modify the settings for the BSC SNMP agent: Displaying the SNMP Settings page 10-8 1. Click the General tab in the BSC administrator console, and then click the SNMP Agent tab. The SNMP Settings page appears as shown in Figure 10-4. Automatic Backup of the BSC Database Figure 10-4: SNMP Settings Page SNMP Agent Start the selected version of SNMP agent (v2c, v3, or both) on the BSC, or shut down the agent. To enable administrator access to SNMP v3, which requires a user ID and password, see “Adding a New Administrator Account” on page 3-4 of this guide. Default value: Off (SNMP agent shut down). Read-Only Community String Enter and confirm the SNMP v2c community string that enables a remote device to retrieve read-only SNMP information from the BSC. Read-Write Community String Enter and confirm the SNMP v2c community string that enables a remote device to read SNMP information from and modify SNMP settings on the BSC. System Location and System Contact Optional comment fields for the physical location and contact information for the BSC. SNMP Trap Management SNMP Management station IP address - To enable SNMP traps, enter the IP address of the SNMP management station(s) (i.e., trap host(s)), one per row. Community string - To enable SNMP traps, enter the community string for each SNMP management station. Row Management - To clear row data, delete a row, or insert or append blank rows to the end of the SNMP Trap management table, select the appropriate command from the Row Management drop-down list. To remove an SNMP management station from the database, clear all of the data from the appropriate row before storing the information. Saving the settings Click Save to save the SNMP agent settings to the BSC database. You may be prompted to restart the BSC. We recommend that you do not restart the BSC until you have completely finished configuring the BSC for use in your network. Automatic Backup of the BSC Database To configure the BSC to automatically backup its configuration files to a specified computer via FTP or SCP: BlueSecure™ Controller Setup and Administration Guide 10-9 Chapter 10: General BSC Operational Settings Displaying the Auto Backups page 1. Click the General tab in the BSC administrator console, and then click the Auto Backups tab. The Auto Backups page appears as shown in Figure 10-5. Figure 10-5: Auto Backups Page Recurrence Backup Method Set the time interval at which the BSC database is automatically backed up. Specific backup days and times are shown on the right side of the page. Default value: Never (i.e., automatic backup is disabled). FTP or SCP (Secure Copy) Server hostname - Enter the server where the backup is to be stored. Destination directory - Full pathname of directory on server where backup will be stored. Username - User name required to access server. Password - Password required to access server. Re-enter the password in the Confirm Password field. Backup to the server now? - Mark this checkbox to initiate the BSC database backup as soon as you click Save. This setting is useful when you need to test or perform the backup function now, rather than waiting for the configured backup interval. If cleared, the BSC database is backed up at the next selected backup interval. Click Save to save the automatic backup settings to the BSC database. You may be prompted to restart the BSC. We recommend that you do not restart the BSC until you have completely finished configuring the BSC for use in your network. System Time and Date Settings To configure the BSC’s system clock or set up the BSC to use network time protocol (NTP) synchronization: 10-10 Mail Server Access Displaying the BSC Time Settings page 1. Click the General tab in the BSC administrator console, and then click the Time tab. The BSC Time Settings page appears as shown in Figure 10-6. Figure 10-6: BSC Time Settings Page System settings Change the current time zone, date, or time on the BSC. Tme entries in 24-hour format (HHMMSS). To prevent manual update of date or time, leave the date or time fields blank, respectively. Default values: America/New_York time zone and factory time/date setting. NTP settings Synchronize: You can set the frequency of NTP synchronization to either hourly, daily, weekly, or monthly. Whenever NTP performs an update, it overrides the current BSC time and date setting. Default value: Never (i.e., no NTP synchronization is used). List of NTP servers: Enter Network Time Protocol (NTP) server(s) to set the date and time on the BSC. When specifying more than one server, use a comma-delimited list of either IP addresses or fully qualified domain names. Query the NTP server now? - If this checkbox is marked and you click Update, the specified NTP server(s) is checked immediately and the BSC's date and time settings are updated, if necessary. This option is useful when you need to update the BSC time settings now, rather than waiting for the selected NTP update interval. If cleared, the BSC date and time settings are updated at the next selected NTP update interval. Updating the settings Click Update to update the BSC system time as specified and to save the configured time settings to the BSC database. You may be prompted to restart the BSC. We recommend that you do not restart the BSC until you have completely finished configuring the BSC for use in your network. Mail Server Access In order for the BSC to mail reports (see “Creating a BSC Report” on page 15-15) and to send email receipts upon hotspot user account activation (see “Configuring Hotspot Account Generation” on page 11-10), it needs to access a mail server. Use the General BlueSecure™ Controller Setup and Administration Guide 10-11 Chapter 10: General BSC Operational Settings tab, Email tab to configure the BSC to login to your mail server securely. You can either specify the SMTP authentication method (Login, PLANE, CRAM-MD5) and, optionally, a user name and password. 1. Click the General tab in the BSC administrator console, and then click the Email tab. The BSC Email Settings page appears as shown in Figure 10-7. Figure 10-7: BSC Email Settings Page 2. SMTP Server: Enter the mail server hostname or IP address. 3. SMTP Port. Enter the mail server port. Defaults to 25. 4. SMTP Authentication method: Choose an authentication method (Login, PLANE, CRAM-MD5). Defaults to None. 5. SMTP Username: Optionally, specify the username to authenticate with the mail server. 6. SMTP Password. Optionally, specify a password to authenticate with the mail server. 7. Return Address. Enter the sender email address. Public Access Networks To configure the BSC for use in a public access wireless networks, such as found in hotels and airports: Displaying the Public Access Settings page 1. Click the General tab in the BSC administrator console, and then click the Public Access tab. The Public Access Settings page appears as shown in Figure 10-8. Figure 10-8: Public Access Settings Page 10-12 Public Access Networks Address of mail server for SMTP port redirection In some public access wireless networks, to prevent spamming, ISPs do not allow email to be sent via their default mail server if the user is not a member of that network. The network administrator for such a network may designate a special SMTP server for this purpose, but this requires that users change their SMTP IP address and other settings. This BSC setting allows you to specify the IP address or hostname of the SMTP server (or leave it blank for no SMTP redirection). When the BSC sees SMTP traffic, it will redirect it to the SMTP server at the specified IP address and the user's email will be routed appropriately. No changes to email settings by the user are required. ) Allow access from clients with fixed IP addresses Note: You must disable any extended SMTP (ESMTP) features on the mail server where the traffic will be redirected. ESMTP requires extended features such as username/ password authentication that users would not have. Users logging into a public access wireless network may have fixed IP settings already configured by their corporate office. Accessing the wireless network would require users to re-configure their clients for DHCP address assignment. If this checkbox is marked, the BSC handles any user's fixed IP address and allows the user to access the network and attempt login without re-configuration of client-side IP addressing. If cleared, the BSC assumes that users in public access WLANs are using DHCP. Default value: Disabled. This feature works on the physical managed interface and on managed side VLANs. Saving the settings Click Save to save the public access settings to the BSC database. You may be prompted to restart the BSC. We recommend that you do not restart the BSC until you have completely finished configuring the BSC for use in your network. BlueSecure™ Controller Setup and Administration Guide 10-13 Chapter 10: General BSC Operational Settings Event Logging and Connection Tracking The BSC provides two types of logging facilities: • Event logging - The BSC records BSC-related events such as configuration changes, activity in secure tunnels, and number of logged in users. You can direct log output to the event log page (described in “Viewing the BSC Event Log” on page 15-10) or up to two syslog servers. Some events are logged only when a certain threshold value is reached. See “Threshold Values” on page 10-17 for more information. • Format of Log Entries Connection tracking - In addition to event logging, the BSC records information from all user TCP/UDP connections, such as source IP, destination IP, and timestamps.You can direct this log output only to a syslog server. This can be the same as your normal syslog server (on the same or different facility), or a separate syslog server. Warning: Connection tracking sends a record of all network connections to syslog which can result in a large number of log messages and impact BSC performance. Only use if all network connection information needs to be logged for auditing purposes. Log entries sent to a syslog server will have the general format: time connection first seen, current time, protocol, state, source addr, source port, dest addr, dest port, type, code, id, user, TTL where: Displaying the Logging Settings page Log Records • timestamp is an ASCII string in format of mmddyyyyhhmmss • protocols are TCP, UDP and ICMP • time connection first seen, state, user and TTL have meaning only to TCP • type, code, and id only have meaning to ICMP • if the user cannot be determined (as with UDP), “none” is the user name 1. Click the General tab in the BSC administrator console, and then click the Logging tab. The Logging Settings page appears as shown in Figure 10-9. Configure the BSC logging settings as appropriate: • Maximum number of log entries to keep - Specify the maximum number of entries (lines) permitted in the BSC event log. Default value: 5000. • Number of log entries to delete when reaching maximum - Number of event log entries to automatically delete when the number specified in Maximum number of log entries to keep is reached. Default value: 1000. • • To delete all of the log entries, click Logs in the Status page and then click the Purge all logs button at the bottom of the page. • IP or FQDN of remote syslog server - Enter the IP address(es) or fully qualified domain name(s) of up to two syslog server(s) here to log BSC events data. Multiple syslog server IP addresses or FQDNs must be separated by commas. • Facility of remote syslog server - Enables you to specify the facility level to send to the syslog server on all BSC event syslog messages. Default value: local0. • Maximum log level to send remote syslog server - Determines the detail level of BSC event logging. For example, Debug records all events, whereas Emergency only records the most severe events. Default value: Error events. Configure the BSC’s connection tracking settings. 10-14 Event Logging and Connection Tracking Figure 10-9: Logging Settings Page • Enable Connection Tracking - If this checkbox is marked, the BSC sends information about all user TCP/UDP connections to the server specified in the IP or name of remote syslog server setting (see previous description). Connection tracking allows you to audit detailed data on user connections. Data includes: - User name - Source IP address - Source port - Destination IP address - Destination port - Time stamp BlueSecure™ Controller Setup and Administration Guide 10-15 Chapter 10: General BSC Operational Settings If cleared, no connection tracking data is logged. Default value: Disabled. ) Application Logging Note: Connection tracking can potentially generate a large amount of data, proportional to the number of users and WLAN traffic. • IP address or FQDN of remote connection tracking syslog server - Enter the IP address(es) or fully qualified domain name(s) of up to two syslog server(s) here to log connection tracking data. • Facility of remote connection tracking syslog server - Enables you to specify the facility level to send to the syslog server(s) on connection tracking syslog messages. Default value: local0. • Maximum severity to send RF IDS alarms to syslog - Determines which alarms should be forwarded to the syslog. The default is None. The possible values are None, Informational, Warning, or Severe. Mark the radio buttons to control the detail level of event logging to be generated for each BSC process or function. For example, select Critical to record Critical, Alert, and Emergency level events and exclude the rest. BSC System - System events such as memory, CPU and disk space. BSC Processes - Specific process (such as HTTP and SNMP) starts and stops. BSC Configuration - Configuration changes made to the BSC. User Tracking - Total number of users logged into the BSC. Database - BSC internal database activity. Firewall - Activity concerning setup or changes to the BSC firewall. PPTP Tunneling - Activity of PPTP tunnels. L2TP Tunneling - Activity of L2TP/IPSec tunnels. PPTP/L2TP Authentication - Authentication process for PPTP or L2TP/IPSec. IKE Authentication - Internet key exchange (IKE) authentication portion of IPSec. DHCP Server - DHCP activity of the BSC's DHCP server. DHCP Relay Server - DHCP activity of DHCP relay server. Web Server - Activity of the BSC's login/admin web server. Generic LDAP/RADIUS Auth - Authentication activity of LDAP/Active Directory or RADIUS servers. Windows Transparent Auth - Authentication activity when using a Windows Transparent login. 802.1x Authentication - Authentication activity when using 802.1x authentication. Mobility - Secure Mobility® activity. Connection Manager Daemon - User connection activity. Intrusion Detection - Intrusion Detection System (IDS) activity. Power over Ethernet - BSC-600 only. Bluesocket Access Points - BSAP 1500 activity. Saving the settings 10-16 Click Save to save the log settings to the BSC database. You may be prompted to restart the BSC. We recommend that you do not restart the BSC until you have completely finished configuring the BSC for use in your network. Threshold Values Threshold Values You can specify threshold values that trigger the output of certain event log messages, SNMP traps, or a BSC failover. For those values expressed as a percent, the BSC generates an event log message, SNMP trap, or BSC shutdown/failover if the specified percentage is met or exceeded. For boolean threshold values (such as Link Down), select Yes to generate an event log message or SNMP trap if this event occurs or No to disable the threshold: ) Note: To enable use of SNMP traps to monitor the BSC, you must enable the SNMP agent on the BSC as described in “SNMP Agent” on page 10-8 and configure SNMP trap generation as described in this section. To define BSC threshold values: Displaying the Thresholds page 1. Click the General tab in the BSC administrator console, and then click the Thresholds tab. The Thresholds page appears as shown in Figure 10-10. Figure 10-10: Thresholds Page High Memory Swap % of memory swap space used in BSC. High Average CPU % of CPU usage in BSC. High Disk Usage % of disk usage in BSC. Link Down Either the managed or protected physical interface no longer functions (due to a cable cut or other problem with the link). ) ) Link Up Note: You can also configure this threshold to trigger a BSC failover. Note: This does not apply to the managed side of the BSC-1200, which has an internal switch and always maintains link. Either the managed or protected physical interface resumes normal operation. BlueSecure™ Controller Setup and Administration Guide 10-17 Chapter 10: General BSC Operational Settings Warm Start Cold Start Config Change A restart of BSC services. A complete reboot of BSC. Any change to the BSC configuration. Failed User Login A user login fails. SNMP Auth Failure BSC receives an SNMP message with an incorrect community string. Failover General Failure Saving the settings BSC goes into failover mode. A BSC failure occurs, other than that specified elsewhere in this table. Click Save to save the threshold value settings to the BSC database. You may be prompted to restart the BSC. We recommend that you do not restart the BSC until you have completely finished configuring the BSC for use in your network. Domain Name System (DNS) Settings The BSC DNS settings serves these main purposes: Displaying the DNS proxy page 10-18 • DNS Proxy - By default, wireless clients can see and access any DNS server addresses configured on the protected interface. Enabling DNS Proxy overrides the DNS information provided to the wireless clients with the IP address of the BSC's managed interface and receives and forwards all DNS requests as appropriate. • Answer failed DNS queries - Enabling this option means the BSC answers all DNS requests for any user who is not logged into the network. If a user enters a valid DNS name or URL, the BSC serves the user login page and then redirects the user to his requested destination after he has logged into the network. If a user enters an invalid DNS name or URL, the BSC serves the user login page and then displays the appropriate warnings/errors after the user has logged into the network. Enabling this option allows the BSC to redirect a higher percentage of users trying to access the network. • Redirection and local resolution of DNS requests - For access to certain BSC functions, such as user login, logout, administrator login, and secure tunneling protocols (IPSec, L2TP/IPSec, and PPTP), you can specify a single DNS address for each hostname that maps to that function. The BSC forwards each DNS request to the specified managed or protected interface for name resolution. This is particularly useful when configuring secure tunnel endpoints in large multi-BSC networks. You only need to maintain a single DNS entry for each endpoint instead of tracking and configuring the endpoint's IP address for each BSC in the network. 1. Click the General tab in the BSC administrator console, and then click the DNS tab. The DNS proxy page appears as shown in Figure 10-11. Domain Name System (DNS) Settings Figure 10-11: DNS Proxy Page Managed-side DNS proxy Enable DNS Proxy? - If this checkbox is marked, wireless clients are provided with a DNS entry containing the IP address of the BSC's managed interface. All DNS requests are proxied (i.e., received and forwarded) by the managed interface to internal DNS servers on the protected side. If cleared, wireless clients are provided with protected-side DNS entries. Default value: Disabled. Answer failed DNS queries? - If this checkbox is marked, the BSC answers all DNS requests for any user who is not logged into the network. If a user enters a valid DNS name or URL, the BSC serves the user login page and then redirects the user to his requested destination after he has logged into the network. If a user enters an invalid DNS name or URL, the BSC serves the user login page and then displays the appropriate warnings/errors after the user has logged into the network. Enabling this option allows the BSC to redirect a higher percentage of users trying to access the network. If this checkbox is cleared, the BSC will not serve the user login page to a user who has entered an invalid DNS name or URL. Default value: Disabled. Local DNS Name Resolution Enable DNS resolution for local domain names? - If this checkbox is marked, the BSC intercepts all DNS requests to resolve host names for the user login page, administrator login page, logout function, and secure tunnel services and redirects them to the host name and interface specified in Hostname and Interface (see setting below). If cleared, no DNS internal BSC redirection occurs for these names. Default value: Disabled. ) Note: The domain name should be different than that used by your organization, to ensure that only requests for internal network resources are intercepted by the BSC. Service Type: Specify the host names you want the BSC to resolve and the interface to which DNS requests are redirected for user login page, administrator login page, logout function, and secure tunnel services. You can configure the following redirections: • login - User login page at the specified host name and interface. Default host name: login. Default interface: Protected. • logout - Logout function at the specified host name and interface. Default host name: logout. Default interface: Protected. BlueSecure™ Controller Setup and Administration Guide 10-19 Chapter 10: General BSC Operational Settings • admin - Administrator login page at the specified host name and interface. Default host name: admin. Default interface: Protected. • secure - PSec, L2TP/IPSec, or PPTP tunnel endpoint at the specified host name and interface. Default host name: secure Default interface: Protected. Local Domain Name for local host: Domain name space for those host names you want to resolve locally (i.e. Enable DNS resolution for local domain names? is marked). Example: If you specify wireless.net, the BSC intercepts all DNS requests to xxx.wireless.net, where xxx is one of the host names listed in the Hostname column (see setting below). Saving the settings Click Save to save the DNS option settings to the BSC database. You may be prompted to restart the BSC. We recommend that you do not restart the BSC until you have completely finished configuring the BSC for use in your network. Digital Certificates This section covers the following topics: • Overview • How the BSC Uses Certificates • Configuring External Server Authentication Over SSL • Requesting and Installing an IPSec Authentication Certificate Overview A digital certificate is similar to an electronic document, signed by a trusted source, that identifies the source presenting it. A simple analogy is a passport: it contains information about the holder and is signed by a third party (in this case, a government) whom you trust as the issuer. There are three types of digital certificates: • Trusted Certificate Authority (CA) - A digital certificate that has been signed by the CA and resides on the server with which the BSC will communicate. The CA may be either a commercially available certificate authority, such as VeriSign, or proprietary. This certificate is also known as the root CA. • Trusted Server - A digital certificate that has not been signed by a CA and resides on the server with which the BSC will communicate. • Client - A digital certificate issued to a client. The client must present this certificate to the server before the server can grant the client's requests (such as setting up a tunnel). This certificate may be either commercially available or proprietary. How the BSC Uses Certificates The BSC uses digital certificates in two ways: • 10-20 LDAP/Active Directory, Cosign, Pubcookie, or CAS authentication over SSL - Some authentication servers require SSL to ensure the privacy of data as it passes between the BSC and the authentication server. To set up the SSL session, the BSC must first be sure that the other partner (such as the LDAP/Active Directory server) is not an imposter. The BSC must either have a copy of the authentication server certificate (in a list of certificates for “trusted servers”), or the BSC must trust the root CA (trusted CA) who signed the certificate used by the LDAP server. In some cases, the authentication server may also require mutual authentication (whereby the server presents a certificate to the BSC and the BSC presents a certificate to the server). Digital Certificates • ) BSC secure web login page (SSL) - As with any secure web page (SSL), the web server presents a certificate to authenticate itself with the wireless client. The BSC's secure web user and administrator login pages contain a default Bluesocket SSL digital certificate, which is pre-installed on the BSC and cannot be edited or deleted by the client. For more on login page authentication and how to install the Bluesocket SSL certificate, see “Installing the Bluesocket SSL Certificate” on page 3-6. Alternatively, you can acquire an SSL login certificate from another provider and upload the certificate to the BSC. For more information on uploading an SSL login certificate from another provider, see “Installing a Custom SSL Login Certificate” on page 11-22. Note: Many clients (such as the MSIE7 Web browser) give a warning, or perhaps even block access, if the partner presents a certificate that specifies a web address for a Certificate Revocation List (CRL), and the client is unable to access that web address to see whether the certificate has been listed as revoked, or no longer valid. See “Uploading a Replacement SSL Certificate You Already Have” on page 11-25for a description of CRLs and certificates. Configuring External Server Authentication Over SSL To configure the BSC to authenticate with an external LDAP/Active Directory, Cosign, Pubcookie, or CAS server over SSL: Copy certificate to local computer 1. Copy the external authentication server certificate to your local computer. Usually, this is either the authentication server digital certificate or the root CA who signed the server digital certificate. ) Note: If the authentication server requires mutual authentication, use your Public Key Infrastructure (PKI) to create a certificate in PKCS#12 format to load onto the BSC. The BSC will present this certificate when performing mutual authentication. Upload certificate to BSC 2. Click the General tab in the BSC administrator console, click the Certificates tab, and then click the Manage link at the top of the page. The Certificate Management page appears as shown in Figure 10-12. Figure 10-12: Certificate Management Page 3. Mark the View certificate type radio button for the certificate type to be uploaded. Typically, you should select either the Trusted server (the LDAP/Active Directory authentication server digital certificate) or the Trusted CA (the root CA who signed BlueSecure™ Controller Setup and Administration Guide 10-21 Chapter 10: General BSC Operational Settings the server digital certificate). If you are using mutual authentication, mark the BSC Client Certificate radio button for the PKCS#12 certificate. 4. Click Browse to enter the pathname where the certificate file resides on your local computer in the Upload new certificate field. 5. Click Upload to upload the certificate file to the BSC from your computer. The Installed Certificates list box now lists the name of the uploaded certificate, and the contents of the certificate appear on the right side of the page. Create/Modify external authentication server 6. Now either create a new external authentication server or modify an existing one by clicking the Authentication Servers tab on the User authentication page, and then clicking the icon corresponding to the server you wish to modify. See Chapter 6, "Authentication Using External Servers," for details. 7. On the create external authentication server page, do one of the following: • • ) If you uploaded the trusted server certificate to the BSC, select it from the Trusted server certificate drop-down list. If a trusted server certificate is not required, leave this field blank. If you uploaded the trusted CA, select the trusted CA in the Available CA certificates list box, and then click the Add button to move it to the Trusted CA certificates list box. If a trusted CA is not required, leave this field blank. Note: You can also use the Del button to remove selected Trusted CA certificates from the Trusted CA certificates box. • If you uploaded the BSC client certificate in PKCS#12 format (mutual authentication), select the appropriate certificate from the BSC client certificate drop-down list. If mutual authentication is not required, leave this field blank. 8. Finish configuring the external authentication server, and then click Save to store the server settings. Requesting and Installing an IPSec Authentication Certificate Wireless clients setting up an IPSec tunnel to the BSC can use digital certificates to authenticate the tunnel. When using digital certificates, the IPSec client presents the user's certificate and the BSC presents its own certificate to perform mutual authentication. To authenticate an IPSec tunnel, the BSC must have both a copy of the root CA (trusted CA) who signed the client's certificate and its own IPSec authentication certificate to present to the client. To request and install a copy of the authentication certificate to present to IPSec clients for mutual authentication: 1. Click the General tab in the administrator console, click the Certificates tab, and then click the Generate link at the top of the page. The IPSec certificate signing request generation page appears as shown in Figure 10-13. 2. Enter your geographic, organizational, and addressing information in the appropriate fields on the IPSec certificate signing request generation page. Note that entering a Company Name is optional. 3. Click Process to create the CSR, which is displayed on the right side of the page. The CSR generated page appears as shown in Figure 10-14. To delete a CSR and start over, click Delete CSR of the left side of the page. 4. In the scroll box containing the CSR text, highlight the entire text of the CSR and then copy and paste it into the appropriate space on your certificate provider's CSR web request form. Complete any remaining steps required by the certificate provider to request the certificate. 10-22 Digital Certificates Figure 10-13: IPSec Certificate Signing Request Generation Page Figure 10-14: IPSec CSR Generated Page 5. When the provider returns the signed certificate, upload it to the BSC: a) Click the General tab in the administrator console, click the Certificates tab, and then click the Generate link at the top of the page. The CSR generated page appears as shown in Figure 10-14. b) Mark the Select uploaded cert as IPsec server certificate to enable the certificate you just generated to be used to authenticate IPSec clients attempting to establish a tunnel to the BSC. c) Click Browse, locate the certificate you downloaded from your provider on your computer, and then click Upload Cert to upload this certificate to the BSC and enable it as the IPSec authentication certificate. BlueSecure™ Controller Setup and Administration Guide 10-23 Chapter 10: General BSC Operational Settings Miscellaneous BSC Options Use the Miscellaneous page in the administrator console to configure miscellaneous BSC options including. Displaying the Miscellaneous settings page To configure miscellaneous BSC options: Click the General tab in the BSC administrator console, and then click the Miscellaneous tab. The Miscellaneous settings page appears as shown in Figure 10-15. Figure 10-15: Miscellaneous Settings Page Connection Tracking ) Time in seconds before idle connection are timed out - Idle connections will be dropped once the idle connection time out has been reached. Idle connections will not be dropped if this value is set to zero.This value must equal or exceed the DHCP lease time when the BSC DHCP server is enabled.This value should be set to 60 seconds or greater. The default value is 600 seconds. Note: Idle users with static IP addresses (i.e. no traffic, no DHCP renew), even though connected, will be dropped once the time out has been reached. Time in minutes between updating internal status - Time interval at which the BSC collects status data on its internal systems and processes and updates the throughput statistics on 10-24 Miscellaneous BSC Options the Active Connections page (see “Monitoring Active User Connections” on page 15-2 for more information). Default value: 5 minutes. UI Access Point Tracking Time in seconds between refreshing status pages - Time interval at which the BSC refreshes the Status pages with the latest status data. Default value: 30 seconds. Read-only SNMP community string for all access points - SNMP community string used to access SNMP information on the wireless access points. Default value: public. Time in minutes between checking access points - Time interval at which the BSC checks the status of wireless access points. Default value: 0 - access point checking is disabled. Starting and Ending IP address for checking access points - Limits the APs polled to the specified IP addresses. Cisco Discovery Protocol Passthrough Cisco Discovery Protocol (CDP) is a media- and protocol-independent protocol (implemented via Layer 2 broadcast) that runs on all Cisco-manufactured equipment including routers, bridges, access and communication servers, and switches. Using CDP, you can display information about the Cisco devices directly connected to that BSC. In addition, CDP detects native VLAN and port duplex mismatches. Network management applications can retrieve the device type and SNMP-agent address of directly connected Cisco devices using CDP. This feature enables network management applications to discover Cisco devices that are neighbors of already known devices, in particular, neighbors that are running lower-layer, transparent protocols. CDP runs on all media that support SubNetwork Access Protocol (SNAP). CDP runs over the data link layer only. Cisco devices never forward CDP packets. When new CDP information is received, Cisco devices discard old information. As you may have Cisco equipment installed in your network on both the managed and protected sides of the BSC, Bluesocket allows you to configure the BSC to pass CDP traffic through from the managed side to the protected side and from the protected side through to the managed side. After configuring CDP passthrough and enabling use of the CDP “show” feature on the BSC, you can connect to the BSC administrator console and display information about Cisco devices directly connected to that BSC, as described in “Performing Standard Network Diagnostic Tests” on page 15-17. Enable CDP passthrough from managed to protected interface? - If checked, any CDP packet received on the BSC managed interface (eth1) will be transmitted out the BSC protected interface (eth0). Enable CDP passthrough from protected to managed interface? - If checked, any CDP packets received on the BSC protected interface (eth0) are transmitted out the BSC managed interface (eth1). Enable show Cisco CDP Neighbors? - Mark this radio to enable the “show” feature of Cisco CDP. After configuring CDP passthrough and enabling use of the CDP “show” feature on the BSC, you can connect to the BSC administrator console and display information about Cisco devices directly connected to that BSC, as described in “Performing Standard Network Diagnostic Tests” on page 15-17. Diagnostics Allow remote diagnostics via SSHv2? - If checked, Bluesocket service personnel can reach the BSC via SSHv2 to perform remote diagnostics. Default value: Enabled. If cleared, remote access via SSHv2 is disabled. BlueSecure™ Controller Setup and Administration Guide 10-25 Chapter 10: General BSC Operational Settings Serial Console Access Allow access via serial port? - By default, administrators are allowed to access a subset of the BSC’s functionality by connecting a console to the BSC’s serial port as described in Appendix D, "Serial Port Access to Essential Functions." Unmark the Allow access via serial port? checkbox to disable serial port access. ICMP Allow ICMP to protected Interface? - By default, Internet Control Message Protocol traffic (i.e., “ping” traffic) is allowed to pass from the managed network through the BSC to the protected network. Unmark this checkbox to disable ping traffic from the managed network to the protected network. Saving the settings 10-26 Click Save to save the miscellaneous option settings to the BSC database. You may be prompted to restart the BSC. We recommend that you do not restart the BSC until you have completely finished configuring the BSC for use in your network. 11 Web Logins This chapter covers the following topics: • • • • Customizing the User Login Page • The Appearance of the User Login Page • Customizing the Login Form and HTML Body of Login Page • Customizing the Right Side of the User Login Page • Redirecting Clients to an External Server for Authentication • Configuring Hotspot Account Generation Uploading Image/Media Files for the User Login Page Translating User Login Pages • Defining a User Login Page Language • Editing a User Login Page Language Installing a Custom SSL Login Certificate • Requesting a Certificate • Uploading a Replacement SSL Certificate You Already Have • Recovering the Private Key • Renewing a Custom SSL Certificate BlueSecure™ Controller Setup and Administration Guide 11-1 Chapter 11: Web Logins Customizing the User Login Page You can customize the appearance of the web page that users see at login to maintain your organization’s brand identity and to control which login features to expose. This section is organized as follows: • “The Appearance of the User Login Page” on page 11-2 • “Customizing the Login Form and HTML Body of Login Page” on page 11-3 • “Customizing the Right Side of the User Login Page” on page 11-6 • “Redirecting Clients to an External Server for Authentication” on page 11-10 • “Configuring Hotspot Account Generation” on page 11-10 The Appearance of the User Login Page There are two main sections of the user login page as shown in Figure 11-1: • Login form - provides your customer logo (if any), user and guest login area, and links such as Change Password. • HTML custom code and images - provides any custom HTML code and images that you have uploaded to the BSC to customize the page. Login Form Custom HTML Code Figure 11-1: Default User Login Page 11-2 Customizing the User Login Page The default user login page along with the page elements that can be customized are shown in the following figure. Define Window Title Specify: HTML page background, foreground (text), and link colors Add Custom Logo and Specify Number of Pixels to add Above Logo Guests Area - Specify background color, foreground (text) color, and placement above or below Users area. Users Area - Specify background color, foreground (text) color, and placement above or below Guests area. Links Area - Specify background color and foreground (text) color. Specify side margins around Guests, Users, and Links areas. Choose White or Black “Powered By” Logo Display or suppress vertical bar between Login form and custom HTML panes, and login form background color. Figure 11-2: Elements of the User Login Page You Can Customize You can enable the display of a custom user login page by editing the BSC managed interface settings as described in “Display” on page 4-11, the managed VLAN settings as described in“Creating a VLAN on the Managed Side of Your Network” on page 4-17, or the managed remote subnet settings described in “Configuring a Managed Remote Subnet” on page 4-19. Customizing the Login Form and HTML Body of Login Page To customize the login form and define the overall HTML body parameters used on the user login page: ) Note: At any time, you can click the User Login Page link on the right side of the page to display the user login page as it is currently defined. ) Note: When specifying colors, you can either enter the color’s hexadecimal designation or click the <P link to select a color from the color palette. Displaying the Create New Custom Login Page 1. Click the Web Logins tab in the administrator console, and then select the Login Screens tab. Click the icon corresponding to the default login page. 2. Click the Login Form link at the top of the page. The Edit Custom Login - Default page displays as shown in Figure 11-4. BlueSecure™ Controller Setup and Administration Guide 11-3 Chapter 11: Web Logins Figure 11-3: Create New Custom Login Page 11-4 Customizing the User Login Page Name Login Options Enter a meaningful name for the custom user login page you are defining. Allow user logins - If this checkbox is marked, the BSC login page displays the Registered Users login area, which enables registered users to log in to the wireless network. Default value: Enabled. If cleared, the Registered Users login area is not displayed on the BSC login page. Allow guest logins - If this checkbox is marked, the BSC login page displays the Guests login area, which allows Guest users to log in to the wireless network. Default value: Enabled. If cleared, the Guests login area is not displayed. Authenticated Guests will show “Guest” as their authentication server on the Active Connections page (see “Displaying Active User Status” on page 15-2.) Guest Role - You can configure a distinct guest role for each custom login. For example, you might want to establish multiple Guest roles to support multiple sites. The role assigned to the guest login defaults to the Guest role, but you can select a different role or create a new role. Logout popup enabled - If this checkbox is marked, a small popup window with a link that a user can click to log out of a wireless network session is displayed in the user's browser after confirmation of login. The user can and should use this popup to unambiguously log out of the BSC. Default value: Enabled. External server choice enabled - If this checkbox is marked, the user can select the external authentication server from a drop-down list at login. If cleared, the BSC automatically attempts user authentication through the defined list of external authentication servers, using precedence. For more on precedence, see “LDAP/ Active Directory Authentication” on page 6-6 of this guide. Default value: Disabled. Password change choice enabled - Display a link on the BSC login page that enables users to change their password. Changing a password is only effective for users that authenticate through the BSC internal user database. Default value: Enabled. If cleared, the Change Password link is not displayed. Suppressing this link is useful if a user authenticates through an external authentication server, because these users cannot change external authentication server passwords from the BSC login page. Language change choice - If this checkbox is marked, the BSC login page displays a link that allows users to change the language used in labels on the left side of the login page. If cleared, the Change Language link is not displayed. Default value: Disabled. Login help button enabled - If this checkbox is marked, the BSC login page displays a Help link that allows users to access the default login help page. Default value: Enabled. If cleared, the Help link is not displayed. Suppressing this link is useful if an administrator wants users to access login help only on their own custom login page. Login install CA button enabled - If this checkbox is marked, the BSC login page displays an Install CA Certificate link. This allows you to install the Bluesocket SSL certificate, a credential that your browser subsequently uses to verify that the web server is a trusted source for data. Default value: Enabled. Terms of Service URL - URL to which user is redirected when he clicks on the link text listed in the Terms of service text field. The web page to which the user is redirected should list restrictions and other terms associated with the service your organization is providing. Login Access Enter the number of Login attempts to allow the user to make and the Number of minutes to wait once the user has failed to login after making the indicated number of attempts. BlueSecure™ Controller Setup and Administration Guide 11-5 Chapter 11: Web Logins The Number of active sessions per username/authentication type applies to External Server Authentication methods only. HTML body Sets the overall appearance of the HTML code area on the right side of user login page: • Window title text • Background color and foreground (text) color • Colors of the HTML links, active links, and visited links To upload image files and enter HTML code for the right side of the login page, see “Uploading Image/Media Files for the User Login Page” on page 11-17 and “Customizing the Right Side of the User Login Page” on page 11-6. Logos Login form Form colors Form spacing Notes Saving the settings Specify the logos that are to appear on the user login page. • Top left logo - Add a custom logo to the top of login form. Files are available for selection in this menu only if you upload files to the BSC as described in “Uploading Image/Media Files for the User Login Page” on page 11-17. • Powered-By logo - Display the “Powered by Bluesocket” logo with a black background or a white background. To suppress the display of the Powered-By logo, select the empty option and uncheck “Enable complete customization of the login screen”. • Enable complete customization of the login screen - Mark this checkbox to eliminate the left side bar on the login page. Sets the following for the login form on the left side of the login page: • Top login form - Specify whether the Users area appears above/below Guests area. • Font size - Size of text labels displayed on the form. • Default Language - Specify the default language used for labels on the form. Set the foreground (text) and background colors for the Users, Guests, and Links areas in the login form on the left side of the login page. Also sets the overall background color. Sets the following margins and lines in the login form on the left side of the login page: • Pixels above the top left logo - Spacing in pixels above custom logo, if uploaded. • Pixels to the left and right of the form boxes - Spacing in pixels between the left and right edges of the Users, Guests, and Links areas and the edge of the login form. • Display middle line between the two sides - Mark this checkbox to insert a thin vertical rule between the login form and the HTML code area on the login page. Optional. Enter notes about the custom user login page. Click Save to store the information to the BSC database or Save and create another to continue defining custom user login pages. The mock-up of the login form on the right side of the GUI Customization page is now refreshed with the new settings. To re-display the entire user login page with the new settings, click the User Login Page link. Customizing the Right Side of the User Login Page Any HTML code and any uploaded images that you reference in the code are displayed on the right side of the login page. All uploaded image/media files are listed as links on the right side of the page. Click a link to view the contents of the file. After customizing, to re-display the entire user login page with the new HTML code and settings, click the User Login Page link. To enter the HTML code and set related parameters: 11-6 Customizing the User Login Page Displaying the GUI Customization Page 1. Click the Web Logins tab in the administrator console, click the Login Screens tab, and then click the icon that corresponds to the user login page you wish to edit. 2. Click the HTML Text link at the top of the page. The Edit HTML for custom login - Default page appears as shown in Figure 11-4. Figure 11-4: Custom Login Page - Edit HTML BlueSecure™ Controller Setup and Administration Guide 11-7 Chapter 11: Web Logins Spacing Specify the remaining spacing options, if necessary: Pixels between the form and the customized HTML - Spacing in pixels between the login form on the left side of the login page and the left margin of the HTML code. Default: 40. Pixels between the top and the customized HTML - Spacing in pixels between the top of the login page (below the window title bar) and the top margin of the HTML code. Default: 60. Total width allocated for the HTML - Overall width in pixels of the HTML lines. The default value is: * (i.e., the maximum available width in HTML code area of login page). HTML Type your custom HTML code directly in the HTML field or cut and paste the code from your HTML editor. Note the following when writing the HTML code: • Use only standard HTML formatting tags that are included within the body of an HTML document. Do not include <html>, <title>, <meta>, or <body> tags in your HTML code. Do not include any HTML header information. • The default BSC user login page includes the following DOCTYPE declaration: • <!DOCTYPE html PUBLIC "-//W3C//DTD XHTML 1.0 Strict//EN"> • This DOCTYPE declaration causes web browsers to display the page using standards mode. Any HTML code that you add to the BSC user login page must follow XHTML 1.0 strict standards, or the user login page will not display properly. For example, if you add HTML elements that are not nested properly, then your browser may crash when you attempt to view the customized BSC user login page. • All HTML code you enter will be placed inside an HTML table cell. • When referencing image/media files in the IMG SRC tag, the file path must be relative to the local directory. For example: <IMG SRC="local/myicon.gif"> • The following tags are replaced with the actual values for the connection: <!--BSC_DESTINATION--> original client web request destination <!--BSC_SOURCE--> client's IP <!--BSC_MAC--> client's MAC <!--BSC_AP--> MAC of client's AP <!--BSC_AP_NAME--> hostname of the client's AP <!--BSC_SSID--> client's SSID <!--BSC_CONTROLLER--> BSC hostname if available, if not, then the Protected side IP <!--HOSTNAME--> BSC_CONTROLLER, except with https:// in front <!--BSC_VLAN--> Managed VLAN of the client <!--USERS--> the USERS login form (i.e. username/password) - used to put the login form wherever you want it (say the right of the page) <!--GUESTS--> the GUEST login form (i.e. email address) - used to put the login form wherever you want it (say the middle of the page) <!--ADVANCED--> the BILLING form - used to put the billing form wherever you want it (say the bottom of the page) <!--LINKS--> links to download root cert and/or other links that would normally show on the left side <!--LANGUAGE--> the language support drop down <!--REMOTEADDR--> the client IP Saving the settings 11-8 Click Save to store the custom HTML information to the BSC database. Customizing the User Login Page Example Here is a test page for testing all custom variables. Create a custom web page and insert the following for the HTML: <style type="text/css"> <!-li { background-repeat:no-repeat; } h1 { font-weight:bold; font-size:medium; padding:0; margin:0; } h2 { font-size:small; font-weight:normal; padding:0; margin:0; } h5 { font-size:small; text-align:right; vertical-align: 50%; white-space: nowrap; padding:0; margin:0; } h6 { font-size:small; font-weight:normal; color:red; padding:0; margin:0; } input { display:block; } --> </style> <br><!--BSC_DESTINATION-->: original client web request <br><!--BSC_SOURCE-->: client's IP <br><!--BSC_MAC-->: client's MAC <br><!--BSC_AP-->: MAC of client's AP <br><!--BSC_AP_NAME-->: hostname of the client's AP <br><!--BSC_SSID-->: client's SSID <br><!--BSC_CONTROLLER-->: BSC hostname or Protected side IP <br><!--HOSTNAME-->: like BSC_CONTROLLER, except with https:// in front <br><!--BSC_VLAN-->: Managed VLAN of the client <br><!--USERS-->: the USERS login form (i.e. username/password) - used to put the login form wherever you want it (say the right of the page) <br><!--GUESTS-->: the GUEST login form (i.e. email address) - used to put the login form wherever you want it (say the middle of the page) <br><!--ADVANCED-->: the BILLING form - used to put the billing form wherever you want it (say the bottom of the page) <br><!--LINKS-->: are links to download root cert and/or other links that would normally show on the left side <br><!--LANGUAGE-->: is the language support drop down <br><!--REMOTEADDR-->: is the client IP BlueSecure™ Controller Setup and Administration Guide 11-9 Chapter 11: Web Logins Redirecting Clients to an External Server for Authentication Complete the “Edit redirection for custom login Default” page to redirect clients to an external server for authentication. ) Note: The external authentication server must be reachable from the managed network. To enter the HTML code and set related parameters: 1. Click the Web Logins tab in the administrator console, click the Login Screens tab, and then click the icon that corresponds to the user login page you wish to edit. 2. Click the Redirection link at the top of the page. The GUI customization page appears as shown in Figure 11-5. Figure 11-5: Custom Login Page - Edit Redirection 3. Mark the Redirect clients to an external URL checkbox. 4. Enter Redirection Parameter Keys as necessary. You must enter at least the Controller IP Address, since the external server must notify the controller when login succeeds using a URL of the form: https://BSC_IP/login.pl?which_form=reg&source=CLIENT_IP&bs_name=NAME&bs_password=PASSWORD Configuring Hotspot Account Generation BSC provides a hotspot account generation feature that enables you to link a credit card processing provider to a BlueSecure Controller, enabling your wireless end users to purchase and set up their own wireless network access accounts using a credit card. You can configure hotspot account generation for each custom login page. These end user hotspot accounts can be set up to provide hourly, daily, weekly, or monthly wireless access, or to provide unlimited access for a specified duration. Also, you can link each access rate plan to a Role to allow you to control what/when/where/and how fast the end user can connect to sites. 11-10 Customizing the User Login Page Currently Micros-Fidelio Opera 4 PMS, Authorize.net SIM, Authorize.net AIM, and CyberSource are the four billing/payment transaction account providers that work with the BSC hotspot account generation feature. Free guest accounts are also created using the Hotspot Account generation feature. Prior to 6.5, Bluesocket supported three main (free) guest access methods: • Enter any email address on the login screen • Create a free hotspot account (entering any username/password) • Having a Front-Desk person use Windows GuestManager or BVMS to create the account. The problem with method 1 and 2 is that they do not verify the user – a fake email address could be entered or a real email address that is an anonymous account. The problem with method 3 is that there is manual involvement from the front-desk person. Guests and IT Staff are looking for something easier. Two hotspot account generation methods exist in 6.5: Friend and Family Freespot; and Guest-DNA. For details on configuring Hotspot Account Generation, refer to the following sections: • “The User Login Screen with Create HotSpot Account Link” on page 11-11. • “Performing Setup with Credit Card Processing Provider” on page 11-12. • “Enabling Users to Create Hotspot Accounts” on page 11-14. The User Login Screen with Create HotSpot Account Link When you enable the hotspot account generation feature, a new link, Create New Account, is added to the user login screen as shown in Figure 11-6. Create New Account Link Figure 11-6: Create New Account Link This link leads users to a web page (see Figure 11-7) where they choose which wireless access rate plan they want to purchase and create the account’s name and password (the BlueSecure™ Controller Setup and Administration Guide 11-11 Chapter 11: Web Logins BSC uses the email address internally as the account name, different from the user’s credit card account name). Figure 11-7: Sample Account Selections Page After the user creates his or her access account, a confirmation page is displayed to allow the user to see the total cost for access and confirm previous selections. These confirmed account selections are then submitted to the online billing/payment transaction company, and the transaction is completed. After the transaction is complete, the user is redirected back to the BSC user login page where he is automatically logged into the network. If there is an error on the billing page, the user is instead redirected back to the account creation page and the error will be displayed. The user can then start the transaction process over again. A successful transaction automatically creates a local user within the BSC database that has the Expire Logout and Delete time set to match the purchased access time. The notes field for the local user provides the following useful information about the access plan the user purchased: • First Name Last Name @ Zip code • Transaction Id • Authorization Code • Plan • Duration Performing Setup with Credit Card Processing Provider Authorize.net SIM Log in to authorize.net, select Account --> Settings to display the Settings page. The following Authorize.Net Settings are required: Table 11-1: Required Authorize.net Settings Name Virtual Terminal 11-12 Value N/A Customizing the User Login Page Table 11-1: Required Authorize.net Settings Name Payment Form:Color Settings Any value Payment Form:Header Any value Payment Form:Form Fields:First Name Mark all three checkboxes: View; Edit; and Required Payment Form:Form Fields:Last Name Mark all three checkboxes: View; Edit; and Required Payment Form:Form Fields:Zip Code Mark all three checkboxes: View; Edit; and Required Payment Form:Form Fields:Email Authorize.net AIM Value Mark just the “View” checkbox. Payment Form:Form Fields:Footer Any value Upload Transaction Files N/A Transaction Version 3 or 3.1 Response/Receipt URLs • 'Add URL' https//BSC_HOSTNAME/login.pl or https// BSC_IP/login.pl for each BSC you want. • Leave two defaults as is. Silent Post URL N/A Email Receipt • Check to enable emails • Add whatever text desired Receipt Page:Receipt Method • The Default Receipt Link field can be left blank. • Select POST • Enter the Receipt Link text, which displays in a button on the receipt page, e.g. "Click here to continue." Receipt Page:Header N/A Receipt Page:Footer N/A Relay Response N/A Direct Response N/A. Optional in 5.3. Card Code Verification Leave blank Test Mode For testing... Password Required Mode Mark the 'Require Password for ALL Transactions' checkbox. API Login ID and Transaction Key Enter a transaction key (and save on Hotspot Account Generation page) Address Verification Up to merchant MD5-Hash Enter a hash key (and save on Hotspot Account Generation page under 'Receipt Key') Enable WebLink? Keep Off Transaction Cut-Off Time Up to merchant QuickBooks? Download Report Settings Up to merchant Time Zone • Enter the time zone. • If BSCs are in multiple time zones, either have separate a.net accounts, or fake it on the Controllers. The following setup is required to use the test mode: BlueSecure™ Controller Setup and Administration Guide 11-13 Chapter 11: Web Logins CyberSource • On the BSC side, set “Server Address” to test.authorize.net and check off (turn on) “Enable test mode” • On the Authorize.net Merchant Interface, switch account to test mode by going to Account Settings --> Test Mode To setup a hotspot account to be billed through CyberSource, a merchant id and a private key is required on the Edit Hotspot Account Generation for custom login page. The private key must be downloaded from the CyberSource Business Center: 1. Go to https://ebc.cybersource.com/ebc/login/Login.do 2. Log in by entering the account credentials. 3. Once logged in, click on Account Management in the menu on the left. 4. Click Transaction Security Keys in the submenu. A new page will be loaded with the title of Transaction Security Keys. 5. Click on the button labelled Generate Key and follow the instructions. 6. When the key is successfully uploaded to a BSC, the Hotspot Account Generation page will contain the following message in the Key Upload section. Key exists, serial number is 153333333333333333 The serial number should be the same as the one in the CyberSource Business Center. Micros-Fidelio PMS To setup a hotspot account to be billed through Micros-Fidelio PMS, the Opera 4 server must be licensed to work with Bluesocket products. Contact your MicrosFidelio sales representative to purchase a license. Enabling Users to Create Hotspot Accounts Figure 11-8: Hotspot Account Generation Page In order for end-users to be able to create an account they can use to access the Internet using a hotspot account, you need to enable and configure the hotspot account generation feature. ) 11-14 Note: If Hotspot Account Generation is used in an environment that has BSC Replication enabled, the feature should only be enabled on the Replication Master. Hotspot Account Generation on a Replication Node will be denied. Customizing the User Login Page Displaying the Hotspot Account Generation Page 1. Click the Web Logins tab in the administrator console, select the pencil icon to Edit Enable users to create their own local accounts? Mark the checkbox. Plans the Default Wireless Network Log In, and then click the Hotspot Account Generation tab. The Edit Hotspot Account Generation for custom login page appears as shown in Figure 11-8. 1. Select a plan from one or more of the drop downs. Your selections determine the wireless access rate plan(s) that are presented to end users on the account selections web page. Complete the following for each selected wireless access rate plan: a) Enter the Name of the plan. This text is displayed on the selections page. b) Enter the Multiplier. A Multiplier is a way to allow an end user to specify plans that expire after a multiple of some number of hours/days/weeks. Plans expire at (Plan * Multiplier) units from the date of creation. For example, if a user sets Plan to Daily and Multiplier to 5, the account expires in 5 days. c) Enter the Rate charged for the plan. This text is displayed on the selections page. A rate of 0 indicates a free account. d) Enter the Max number of units (hours, days, etc.) for which a user may purchase the plan. e) Select the Role into which the plan user is authenticated 2. To present an unlimited option to the user, mark the Unlimited checkbox, select the ending year from the drop down in the Max column, and then select the month and day from the adjacent drop downs. Billing Service Authorize.net (SIM): 3. Mark the radio button of your online billing/payment transaction account provider: Authorize.net (SIM), Authorize.net AIM, or CyberSource. Enter the credentials the BSC requires to access your credit card processing provider account: Account Login ID, Transaction Key, and Receipt Key. Transaction URL - Enter the URL to which users will be redirected when setting up their account, for example: https://secure.authorize.net/gateway/transact2.dll Response URL - If your BSC’s protected IP address cannot be reached via the Internet or its hostname is not publicly accessible, enter a URL that Authorize.net can use to notify this BlueSecure Controller of the transaction result. For example: https://152.210.198.81/login.pl In addition, port forwarding should be enabled on your firewall. Forward port 443 from your outside IP address (the Response URL) to the BSC's Protected IP address. Only allow connections from Authorize.net. ) Note: If the Response URL is not externally reachable, you can override this requirement by marking the Enable receipt page on transaction server checkbox. Enable receipt page on transaction server - Mark this checkbox if you want a receipt page to be displayed to the end user instead of immediately returning them to the login screen. If marked, the Response URL does not need to be externally reachable. The same BlueSecure™ Controller Setup and Administration Guide 11-15 Chapter 11: Web Logins Response URL must be configured in the Merchant Interface.This will also cause error checking responses to be displayed directly on the transaction form. Authorize.net AIM: Enter the credentials the BSC requires to access your credit card processing provider account: Account Login ID and Transaction Key. Server Address - Enter the host name to which users will be redirected when setting up their account, for example, secure.authorize.net. Enable test mode - Turn on to enable test mode. CyberSource Merchant ID - Enter id used to login to the CyberSource control panel. Key upload - Enter the key acquired from CyberSource Account Management. Enable test mode - Turn on to enable test mode. Micros-Fidelio Opera 4 PMS To setup a hotspot account to be billed through Micros-Fidelio Opera 4 PMS, a server address and TCP/IP port number are required. These will be the IP address address and the port number of the Opera 4 PMS server. Serial connections to the PMS Server are not currently supported. Email receipts to the end users are not currently supported. Unlike other Billing protocols, the BSC maintains a persistent connection to the Opera 4 server. After you configure Micros-Fidelio and click save, you can test the connection. Click the test connectivity button and the current server state will be shown. If the server is not connected, check your IP connectivity, or restart the BSC. Credit Card Options Require card security code: Force the user to enter the security code that appears on the credit card, commonly a 3-4 digit number. Intelligent Credit Card Detection: Detect the user’s credit card type based on the card number. Enabling this eliminates the need for the user to select a Credit Card on the billing page. Accepted Credit Cards: Mark one or more of the checkboxes to determine which credit cards the user can select. Friends and Family Freespot This method involves having another person create the guest account. But rather than a member of the IT Staff or Front Desk person, this is any person that has an Active Directory or other authentication server (LDAP or Radius) account. The user sponsors the other user, creating a username and password for the new user, and confirms the account by entering their username and password. The system checks the username/password and creates the user if the authentication succeeds. To set this up, go to Hotspot Account Generation and select the authentication server as the Billing Method: Figure 11-9: Friends and Family Freespot Friends and Family Freespot 11-16 The guest creates an account tied to an email address. But in this method, the guest is verified (like a DNA test), by sending the account password to the guest’s email account. This prevents the user from entering a fake email address. To prevent the user from Uploading Image/Media Files for the User Login Page entering an anonymous email account (like [email protected]), the BSC allows the option to exclude public email providers (yahoo, gmail). To configure this, go to Hotspot Account Generation and set auto-generate password, and exclude public-email providers. Then setup the email receipt that the guest will receive. Be sure to also configure outbound SMTP settings under General->Email as the email will be sent to your SMTP server: Figure 11-10: Guest DNA Required Information Mark either the ZIP Code Only or Complete Address radio button to determine what type of address information the end user is required to enter. Email Settings Mark the Send email receipt checkbox to send email receipts to the end user when their hotspot account is activated. (You must also specify your mail server settings on the General tab, Email tab. See “Mail Server Access” on page 10-11) Local User Settings Active Sessions: Enter the maximum number of web access sessions allowed by your online billing/payment transaction account provider. The default is 1 access session. If you enter a number other than 1, then the customer will be able to log in that many devices or users simultaneously for one payment. Entering 0 will allow the customer to login in an unlimited number of devices or users for one payment. Accounting Server: Specify the RADIUS Accounting Server to which the user’s login/ logout/usage information should be sent. If no Accounting Server is available in the dropdown, select Create to display the New RADIUS Accounting server page. See Chapter 7, "RADIUS Accounting," for details on how to create a new RADIUS accounting server. Saving the settings Click Save to store the hotspot account generation feature settings to the BSC database. Uploading Image/Media Files for the User Login Page You can upload up to 10 MB of images or other media files to customize the appearance of the user login page. There are two kinds of image/media files used: • Logo and Logout Popup - The logout popup is a small popup window that, if enabled, appears on the login page with a link that allows a user to log out of the network (see “HTTP Server Settings” on page 10-2 for more information). To maintain the dimensions of the login form, it is recommended that you size the logo and logout popup images to no greater than 133 x 64 pixels and 205 x 49 pixels, respectively. BlueSecure™ Controller Setup and Administration Guide 11-17 Chapter 11: Web Logins The topleftlogo file can be any GIF, JPEG or PNG file with a recommended size of 133x64 pixels. • Normal - All other image and media files. You can reference these files in HTML code for your custom login page. To upload image/media files for use on the user login page: ) Displaying the File Uploads Page Note: You can click the User Login Page link on the right side of the page to display the user login page as it is currently defined. 1. Click the Web Logins tab in the administrator console, and then the File Uploads tab. The File uploads page appears as shown in Figure 11-11. Figure 11-11: File Uploads Page Logout popup image To designate a logout popup image file: 1. Mark the Logout popup image.This automatically populates the Filename for the uploaded image text box with the pre-defined file name, popupLogo.gif for the logout popup. Do not change the file name. 2. Enter the name of the logo or logout popup image file you are uploading from your computer in the Local file field. The local file name will be changed to the pre-defined file name described in Step 1. Normal image/ media file To designate a normal image or media file: 1. Mark the Normal image/media for customization radio button. 2. Enter a file name in the Filename for the uploaded image field. This will be the new file name of the uploaded file as stored on the BSC. 3. Enter the name of the file to upload from your computer. Uploading the file Click Upload to upload the file as specified. All uploaded image/media files are listed as links on the right side of the page. Click a link to view the contents of the file, or click the icon to delete an uploaded file. Translating User Login Pages You may select any of the following languages when customizing a user login page, so that the user login page prompts and field labels appear in that language (country code/ character set): 11-18 • Catalan (ca/ISO-8859-1) • Chinese-Simplified (zh-CN/GB2312) Translating User Login Pages • Chinese-Traditional (zh-TW/Big5) • Czech (UTF-8) • Dutch (UTF-8) • English (en/ISO-8859-1) • French (fr/ISO-8859-1) • German (de/ISO-8859-1) • Italian (it/ISO-8859-1) • Japanese (ja/EUC-JP) • Korean (ko/EUC-KR) • Portuguese (pt/ISO-8859-1) • Spanish (es/ISO-8859-1) • Swedish (sv/ISO-8859-1) You can add to the list of supported languages by providing user login page translations in additional languages. BlueSecure™ Controller Setup and Administration Guide 11-19 Chapter 11: Web Logins Defining a User Login Page Language Displaying the Create a User Login Page Figure 11-12: Create a User Login Page Language Page 11-20 Translating User Login Pages To define a new user login page language: 1. Click the Web Logins tab in the administrator console, and then click the Languages tab. 2. Select Language from the Create menu. The Create new language page appears (see Figure 11-12). Language Setup Define how the language is represented in the BSC administrator console: Note that the Enable checkbox is marked by default. 1. Enter the name of the language in English in the English name field. 2. Enter a two-character code for the language in the Language code field. We recommend that you use the standard two-letter Internet country code to represent the language.For example, the country code for Germany is DE. 3. Enter the ISO code for the character set in the Character set field. The BSC supports use of multi-byte character sets for Asian languages. ) Note: In addition to specifying the character code and character set values for the language here, you must also set the BSC’s default http server language to match as described in “HTTP Server Settings” on page 10-2. 4. Enter the name of the language in its native language in the Native name field. Registered Users Translations Guests Translations Links translations Logout Translations Provide translations for the following field labels appearing in the Registered Users section of the user login page: • Title • User Name • Password • New Password • Re-Enter New Password • Language Selection • Authentication Server • Login Button Provide translations for the following field labels appearing in the Guests section of the user login page: • Title • Email Address • Login Button Provide translations for the following links that may appear (if configured) on the user login page: • Change Password • Change Language • Personal Digital Certificate • Install CA Certificate • Localization • Help Provide translations for the following text associated with the user logout pop-up window: • Alert - Translate the message that appears when a user attempts to close the logout window. BlueSecure™ Controller Setup and Administration Guide 11-21 Chapter 11: Web Logins Hotspot Sign-up Saving the settings • Thank-You page - Enter any HTML code to disable URL redirection after login. The HTML is displayed in a standard Thank You page when users assigned to this role log in. • Pop-up Link - Enter the text for the logout link, e.g. Click to Logout. Provide translations for text associated with the credit card billing pages: Signup for, Hours, Days, Weeks, Months, First Name, Last Name, Card Type, Card Number, Card Expiration, Card Expiration Hint, Card Security Code, Card Security Code Hint, Address, City, State, Country, Zip Code, Zip Code Hint, Proceed button, Checkout button, Cancel button, Hotspot Sign-up Confirmation, Email, Name, Description, Total Amount. Click Save to store the user login page language settings to the BSC database, or click Save and create another to continue defining user login page languages. Editing a User Login Page Language To edit a defined user login page language: 1. Click the Web Logins tab in the administrator console, and then click the Languages tab. 2. Click the icon corresponding to user login page language you wish to edit. The Edit a user login page language page ( as shown in Figure 11-12) appears. 3. Modify the user login page translations as appropriate. 4. Click Save to store the user login page language settings to the BSC database. Installing a Custom SSL Login Certificate When users access the login page, they may receive a security warning, such as one that data received from the web server on the BSC is not from a trusted source. On some browsers, such as Microsoft Internet Explorer Version 7 or later, the security settings in the user’s browser may even block login access to the BSC. To eliminate these problems, users must install the root certificate for Bluesocket’s CA Service as one of the “trusted CAs”. A CA is a Certification Authority, that verifies certain information, and then issues a digital certificate that “certifies” that the information has been verified. The CA identifies itself with a “root certificate”, where the CA certifies information about who they are themselves To install the root certificate for Bluesocket’s CA Service: 1. Click the Install CA Certificate link as described in “Installing the Bluesocket SSL Certificate” on page 3-6. 2. Follow the steps indicated by the browser to install the default Bluesocket SSL certificate. This root certificate is a credential that the browser subsequently uses to verify that the web server is a trusted source for data The Web SSL certificate is the certificate the BSC uses to identify itself. The root certificate is needed by the browser, in order to verify the Web SSL certificate used by the BSC – that is why the user needs to install the Bluesocket CA root certificate before logging in. However, in some cases, you may want to replace the Bluesocket SSL server certificate with one from another CA organization, such as VeriSign or Entrust, whose root certificate is already installed on the user’s browser. This eliminates the need for users to install the root certificate for the Bluesocket CA service The procedure for obtaining and setting up a custom SSL login certificate varies, depending on whether you need to request a certificate from a certificate provider or you already possess the certificate, as explained in the following sections: 11-22 Installing a Custom SSL Login Certificate • “Requesting a Certificate” on page 11-23. • “Uploading a Replacement SSL Certificate You Already Have” on page 11-25. Requesting a Certificate If you do not have a replacement certificate, you need to issue a certificate signature request (CSR) to the certificate provider who will return a signed certificate. You can then upload the certificate to the BSC. Displaying the SSL Certificate Generation Page Certificate Request 1. Click the Web Logins tab in the administrator console, and then click the SSL Certificate tab. The SSL certificate generation page appears. 2. Select the Renewal Setup link. Enter your geographic, organizational, and addressing information in the appropriate fields. Note that entering a Company Name is optional. Key upload PKCS #12 SSL Certificate Example Do not enter data in the Private key field. Do not mark the Use an uploaded PKCS #12 certificate checkbox. The following figure shows a sample SSL Certificate Generation page: Figure 11-13: SSL Certificate Generation Page Click Process to create the CSR 3. Click Process to create the CSR, which is displayed on the right side of the page. BlueSecure™ Controller Setup and Administration Guide 11-23 Chapter 11: Web Logins The CSR generated page appears as shown in Figure 11-14. Figure 11-14: SSL CSR Generated Page To delete a CSR and start over, click Delete CSR of the left side of the page. Save a copy of the private key 4. When you generate the CSR, a private key is also created on the BSC. When a Copy CSR to provider’s web site 5. In the scroll box containing the CSR text, highlight the entire text of the CSR and then Upload returned certificate to BSC browser and the BSC negotiate an SSL connection, the BSC uses this key. The SSL connection cannot function without it. Therefore, you should save a copy of the private key on your computer, so that you can recover it later if necessary. To save the private key, click Download Key at the bottom of the page. copy and paste it into the appropriate space on your certificate provider's CSR web request form. Complete any remaining steps required by the certificate provider to request the certificate. When the CA returns a file with the signed certificate, upload the file to the BSC: 1. Click the Web Logins tab in the administrator console, and then click the SSL Certificate tab. The SSL Certificate Generation page appears. 2. Click Browse, locate the downloaded certificate file on your computer, and then click Upload Cert to upload it to the BSC and enable it as the login page certificate. The page redisplays as shown in Figure 11-15. 3. If you also have an optional chain certificate, upload it when prompted. (Some CAs use a “chain” of certificates, rather than just one root certificate.) 4. 4.Many providers issue certificates that certify the host name of the Web server, rather than an IP address. If your certificate is host-name-based, you must ensure that: 11-24 • The Redirect to hostname checkbox is checked on the HTTP settings page. For more information on configuring HTTP options, see “HTTP Server Settings” on page 10-2. • The host name is registered in your organization's DNS table. Installing a Custom SSL Login Certificate • The host name is the same one you entered in your Certificate Signing Request. Figure 11-15: Uploaded Certificate Uploading a Replacement SSL Certificate You Already Have Digital certificates are only valid until a certain date. If your Web SSL certificate has expired, you must replace it – otherwise, user’s trying to log in may get a security warning, or even be blocked from logging in. If you already have a replacement PKCS #12 certificate, upload it to the BSC and then enable it as the new login page certificate. Follow these steps to upload a replacement certificate you already have: 1. Click the General tab in the administrator console, and then click the Certificates tab. The Certificate Management page appears as shown in Figure 11-16. Figure 11-16: Certificate Management Page BlueSecure™ Controller Setup and Administration Guide 11-25 Chapter 11: Web Logins 2. Upload the certificate as follows: a) Mark the BSC Client Certificate radio button. b) Click Browse, locate the file for the new certificate on your computer, and then click Upload to upload it to the BSC. 3. Click the Web Logins tab in the administrator console, and then click the SSL Certificate tab. The SSL Certificate Generation page appears. 4. Mark the Use an uploaded PKCS #12 certificate checkbox on the SSL Certificate Generation page. In the Select certificate for Login drop-down list, choose the certificate you uploaded earlier. There is no need to complete the remaining text boxes in this page. 5. Click Process to store the information and enable the PKCS #12 certificate as the login page certificate. 6. Many providers issue certificates that certify the requester's host name rather than an IP address. If your certificate is host name-based, you must ensure that: ) • The Redirect to hostname checkbox is checked in HTTP settings in the General tab. For more information on this option, see “HTTP Server Settings” on page 102. • The host name is registered in your organization's DNS table. Special note about Certificate Revocation Lists Some CAs put additional information into the certificates they issue, supplying the URL for a Certificate Revocation List (CRL), which lists those certificates the CA has decided not to certify any more. (This may happen, for example, for a web site that has been found to install malicious software – the CA may decide not to vouch for the information about that web server any more.) If you use a certificate from a CA that publishes a Certificate Revocation List on the web, there will be a URL address for the CRL in the root certificate, or the Web SSL certificate, or in one of the chain certificates. You can see this address if you view the certificate using the BSC option or other software. If you use a certificate from a CA who uses CRLs, you will need to change the settings for the “unregistered” role and all other roles to allow access to this special CRL. Otherwise, some browsers may block users from logging in. Recovering the Private Key When you submit a CSR to a certificate provider, a private key for the certificate is also generated and stored on the BSC. If the private key is lost or corrupted for any reason, the certificate will no longer work. For that reason, it is good practice to either back up the BSC database (as described in “Backup” on page 16-3) or download the private key to your computer (as described on page 11-24) so that you can upload the “known good” key to the BSC later. To recover a previously saved or downloaded private key: 1. Click the Web Logins tab in the administrator console, and then click the SSL Certificate tab. 11-26 Installing a Custom SSL Login Certificate The SSL Certificate Generation page appears as shown in Figure 11-17. Figure 11-17: SSL Certificate Generation Page 2. Click Browse in the Key Upload section to locate the private key on your computer. 3. Click Process to upload the key to the BSC. Renewing a Custom SSL Certificate A custom SSL login certificate is only valid for a finite period of time. To renew it, you would normally need to delete the certificate on the BSC, then submit another CSR request and wait until the provider issues a new certificate. However, the BSC allows you to submit a request for a new certificate without deleting the current one. Upon receipt, you can then switch to the new certificate without any downtime. The procedure for renewing a certificate is the effectively the same as that described in “Installing a Custom SSL Login Certificate” on page 11-22. Note that after you upload the new certificate, you must click Switch! to activate the new certificate. To renew a custom SSL certificate: 1. Click the Web Logins tab in the administrator console, then click the SSL Certificate tab, then click Renewal Setup. The SSL Certificate Generation page appears (see Figure 11-13). 2. Follow the procedure given in the section entitled “Installing a Custom SSL Login Certificate” on page 11-22. 3. Click Switch! after you have uploaded the new certificate to the BSC to activate the new certificate. BlueSecure™ Controller Setup and Administration Guide 11-27 Chapter 11: Web Logins Installing a Wildcard (*) SSL Certificate on Multiple BSCs Before installing a wildcard SSL certificate on multiple BSCs, you first need to obtain and install a new SSL Certificate on the first BSC, as explained in “Installing a Custom SSL Login Certificate” on page 11-22. ) Note: If your new Certificate does not work as expected, please make sure that for each BSC: the hostname is unique; the domain matches the SSL Certificate; the hostname is in your DNS server and resolves to the Protected address of each BSC; Redirect to Hostname is checked on the General HTTP tab. To install a wildcard SSL certificate on multiple BSCs: 1. On the first BSC, click the Web Logins tab in the administrator console, then click the SSL Certificate tab, then click Current. 2. Scroll to the bottom of the page. 3. Click on Download Key and save the .key file. You will need this .key file for each BSC on which you want to install the Certificate. 4. For each BSC, repeat the following steps: a) Click the Web Logins tab in the administrator console, then click the SSL Certificate tab, and then click the Renewal Setup link. b) If there is an existing Certificate displayed on the Renewal Setup page, click Delete Cert, then click Delete Key. c) Scroll down, click Browse and select the .key file that you downloaded from the first BSC. d) Click Process. The page updates. e) Click Browse and select the .crt file that you received from the CA. f) Click Process. g) Click Switch!. The page will redisplay in one of these two ways: • The page looks as if you haven't uploaded the .key and .crt files yet. This will be the case if there was no Certificate installed on this BSC to begin with. • The page will look unchanged. Upon examining the Certificate displayed, however, you can see that the displayed Certificate is actually the old Certificate that you are replacing. Both conditions are correct, as the page labeled Current will now have the Certificate you just loaded. 11-28 h) Click the Current link to verify your new Certificate is indeed now shown as the Current Certificate on the Current page. i) Click the Click here link to apply the changes and activate the “Current” Certificate for this BSC. 12 BlueSecure Access Points This chapter covers the following topics: • Overview • Deploying BSAPs on the Same Layer-2 Subnet as the BSC • Deploying BSAPs with Layer-3 Connectivity to the BSC • How a BSAP Discovers BSCs • How a BSAP Selects a Home BSC • Uploading BSAP Firmware Files • Configuring Global Miscellaneous Non-Radio Settings • Configuring Global Radio Settings • Editing Settings for an Individual BSAP • Creating SSIDs • Creating BSAPs • Enabling BSAP Service • Displaying Configured BSAPs BlueSecure™ Controller Setup and Administration Guide 12-1 Chapter 12: BlueSecure Access Points Overview Bluesocket manufactures a line of next-generation “thin” access points that work in conjunction with BlueSecure Controllers for enterprise wireless LAN (WLAN) deployments. All BlueSecure Access Points (BSAPs) feature dual radios supporting 802.11a/b/g. There are seven BSAP models: the BSAP1800, an 802.11n dual radio AP with second generation MIMO antenna technology, supporting the 802.3af power standard and a single port PoE solution; the BSAP-1700, the first enterprise-class AP to use MIMO technology, achieving 30% better range coverage, with a single or dual radio configuration; the BSAP-1600, an outdoor wireless bridge/AP that utilizes 802.11a to support a point-to-point or point-to-multipoint building-to-building bridge function, while simultaneously using 802.11b/g to support wireless connection for outdoor user access; the BSAP-1500, which uses fixed omni-directional antennas; the BSAP-1540 which supports external antennas; and the Wi-Jack Duo, a high performance, dual band Access Point that mounts in a wall outlet; the BSAP-1840, an 802.11n dual radio AP supporting the 802.3af power standard and a single port PoE solution and which is licenseupgradeable from a/b/g only to 802.11n. BlueSecure Access Points are completely plug and play, requiring no manual configuration. The BSAPs can be directly attached to any existing Ethernet switch or IP router and across any subnet boundary. Once connected, BSAPs “auto-configure” by associating with a BlueSecure controller. The BlueSecure Controller automatically configures each BSAP based on policies and configuration set by the administrator and communicates with the BSC across any subnet boundary. Advanced configuration and provisioning may be applied globally across the entire WLAN or to individual BSAPs, using the BSC’s web-based Administrator Console. Figure 12-1: BSAPs Automatically Discover BSCs Across L2/L3 Networks Once a BlueSecure Access Point has downloaded its configuration from its home BSC, the BSAP and the BSC will establish a layer 3 tunnel through which all wireless client traffic received by the BSAP will pass for the application of policy by the BSC. Additionally, BlueSecure Access Points provide client load balancing and 802.11i preauthentication to ensure the WLAN will support low latency applications such as VoIP. You can configure BSAPs to function as access points or RF sensors. The BSC manages and configures BSAPs operating in AP-only mode, AP/sensor mode, or sensor-only mode, and uses BSAPs operating in sensor to perform RF intrusion detection and containment as described in “RF Intrusion Detection/RF Containment” on page 12-3. ) 12-2 Note: Only BlueSecure Controllers running system software version 5.0 or higher can manage and configure BlueSecure Access Points. Deploying BSAPs on the Same Layer-2 Subnet as the BSC ) Note: Connect only the recommended number of BSAPs to a BSC: RF Management To overcome the various sources of RF noise and interference, and user loads that can impede the performance of access points on your WLAN, the BSC incorporates “DynamicRF™” functionality for use with BlueSecure Access Points. Using its Dynamic RF functionality, the BSC adjusts the radio channel and power settings of BSAPs under its control, whenever the BSC detects any non-optimal environmental conditions such as: • general interference or noise • co-channel interference introduced by a neighboring AP • loss of connectivity to a BSAP • poor wireless client characteristics (low RSSIs, multiple failures or retries, etc.) • high user load You can enable the Dynamic RF functionality on a global basis for all BlueSecure Access Points connected to a BSC or selectively enable Dynamic RF on a per-BSAP basis. RF Intrusion Detection/RF Containment The BSC detects and protects against rogue devices, ad-hoc networks, and a large number of WLAN Denial of Service (DoS) and spoofing attacks. The BSC provides RF intrusion detection by analyzing the data collected from its BSAPs operating in sensor-only mode to detect attacks, vulnerabilities, and rogue devices in the RF space. Should a rogue AP or client be discovered, the BSC configures the BSAP nearest the rogue device to initiate containment using 802.11 de-authentication and/or disassociation messages. Up to five BSAPs can participate in the containment if range permits. The BSAPs participating in the RF containment remain online for wireless access during the containment period. All RF IDS alarms issued by a BSAP automatically generate a corresponding SNMP trap message and syslog message. Deploying BSAPs on the Same Layer-2 Subnet as the BSC The deployment prerequisites for BSAPs are: • BSAP IP Address - Each BSAP requires a unique IP address. • Host BlueSecure Controller IP Address - Each BSAP requires the IP address of the home BSC to which it will connect and obtain its software image and configuration. If the BSAPs are on the same subnet as the home BlueSecure Controller as shown in Figure 12-2, you can run a DHCP server on the BSC to manage IP address assignment to BSAPs. In this scenario, the BSC must be the only DHCP server for the subnet. Alternatively, you can configure the BlueSecure Controller to run a DHCP relay agent to relay DHCP communications between the BSAPs and a DHCP server on your network. When you run a DHCP server or a DHCP relay agent on the BSC to assign IP addresses to BSAPs on the managed side, the BSC will also pass its IP address to the BSAPs automatically using vendor-specific option 43. In this way, the BSAPs will learn the home BSC to which they should connect. BlueSecure™ Controller Setup and Administration Guide 12-3 Chapter 12: BlueSecure Access Points Run a DHCP Server or a DHCP Server Relay Agent on the BSC BSAPs will Automatically Discover and Communicate with their Home BSC Figure 12-2: Deploying BSAPs on the Same Layer-2 Subnet as the BSC See “Configuring the BSC DHCP Server” on page 4-11 for information about running a DHCP server on the BSC. See “Configuring a DHCP Relay Agent” on page 4-9 for information about running a DHCP relay agent on the BSC. In this deployment scenario, simply connect and power on the BSAPs. They will automatically discover and communicate with their home BSC. Deploying BSAPs with Layer-3 Connectivity to the BSC The deployment prerequisites for BSAPs are: • BSAP IP Address - Each BSAP requires a unique IP address. • Host BlueSecure Controller IP Address - Each BSAP also needs the IP address of the home BSC to which it will connect and from which it will obtain its software image and configuration. You can deploy BSAPs on a routed network with Layer-3 connectivity to the BSC as shown in Figure 12-3. BSAPs Receive their IP Addresses from Network DHCP Server BSAPs Receive Home BSC IP Address Using DHCP Option 43 or DNS Network DHCP Server Network DNS Server Figure 12-3: Deploying BSAPs Across a Routed Network In this deployment scenario, you must ensure that each BSAP is able to communicate with the BSC across the routed network by verifying that: • 12-4 there are no NAT devices between the BSAPs and the BSC How a BSAP Discovers BSCs • Protocol 97 and TCP/UDP Port 33333 traffic is allowed between BSAPs and the BSC Each BSAP will receive its IP address from your existing network DHCP server. The BSAP also needs the IP address of the home BSC to which it will connect and from which it will obtain its software image and configuration. You can provide the home BSC IP address to a BSAP using one of the following methods: • DHCP Server Option 43 - You can manually configure the DHCP server on your network to send BSC IP addresses to BSAPs using DHCP vendor-specific option 43. In DHCP requests sent from the BSAP, the BSAP uses option 60 Vendor class identifier with a value of BlueSecure.AP1500 to identify itself to the DHCP server. Refer to the documentation supplied with your DHCP server when configuring vendorspecific option 43. Also, refer to Appendix B, “Configuring DHCP Server Option 43” for examples of how vendor-specific option 43 may be configured on DHCP servers. • DNS Server Configuration - BSAPs are factory configured with apdiscovery as the DNS hostname. You can configure a DNS server on your network with an entry for apdiscovery with the home BSC Controller IP address as the resolution. To configure this, add a NAME record to the DNS server for apdiscovery (at the domain server that the BSAP will receive). Point this name to one or more BSC IP addresses (managed, protected or VLAN depending on the network configuration). So for example, if there are two BSCs (192.168.100.23 and 192.168.100.28), and the domain is customer.com, add two NAME records to customer.com, for the name apdiscovery.customer.com. One should resolve to 192.168.100.23 and one to 192.168.100.28. PTR (i.e., pointer) records are not needed for this portion of discovery. How a BSAP Discovers BSCs The process that a BSAP uses to discover and connect to its home BSC is two phase: • the BSAP discovers the BSCs to which it may connect • the BSAP selects one of these discovered BSCs as its home BSC There are five methods that a BSAP may use to discover a BlueSecure Controller to which it may connect: 1. The BSAP will connect to the BSC IP address that has been manually configured using the BSAP CLI. See the BlueSecure Access Point Installation Guide for details about using the CLI to manually configure the BSAP’s network settings. 2. The BSAP will connect to the BSC IP address that it has stored in memory from its last successful BSC discovery. 3. The BSAP will query the last BSC that assigned it a DHCP address. You can run a DHCP server or a DHCP relay agent on the BSC to assign IP addresses to BSAPs on the managed side. 4. The BSAP will connect to the BSC IP address that it has received via DHCP vendor option 43 field sent from a network DHCP server to specify one or more BSC IP addresses. 5. The BSAP will use a DNS request to a DNS central server to learn, by name, about one or more BSCs configured with the home BSC Controller IP address as the resolution for apdiscovery (the default BSAP DNS hostname). The above order lists the precedence that is used for BSC discovery by a BSAP. If one discovery method fails to work, then the next is tried. BlueSecure™ Controller Setup and Administration Guide 12-5 Chapter 12: BlueSecure Access Points How a BSAP Selects a Home BSC When a BSAP discovers multiple BSCs to which it may connect, it uses the following methods to select the home BSC to which it should connect: 1. If the BSAP has a BSC IP address that has been manually configured using its CLI or in the case where the BSAP has the IP address of the BSC that last assigned it a DHCP address (discovery methods #1 and #3), the BSAP queries the BSC to determine if the BSC is answering discovery requests. If it is, then the discovery process finishes. The BSAP takes no other action as it has discovered its home BSC. 2. If the BSAP has the BSC IP address of its last successful discovery stored in memory, the BSAP has received multiple BSC IP addresses from a network DHCP server via Option 43, or the BSAP has learned the IP address of one or more BSCs via DNS look up (discovery methods #2, #4, and #5), two selection methods are used: a) The BSAP MAC Address is located in each BSC’s available list. If a BSC replies that the MAC is home to the BSC, then the BSAP always associates to that BSC. b) If the BSAP has not established a home BSC anywhere (i.e., it is new to the network), then a load balancing algorithm is used among the available BSCs to determine a home BSC for the BSAP. Uploading BSAP Firmware Files For each of the BSAP models, you specify a default and an alternative firmware image files. The default is automatically downloaded by BlueSecure Access Points after the BSAPs have connected to the BSC for management and configuration. A BSAP will automatically download and run a firmware file if the selected firmware is different than the currently running version. You can specify the alternative firmware image file for individual BSAPs as required. To upload BlueSecure Access Point firmware image files to the BlueSecure Controller: 1. Click the Wireless tab in the BSC administrator console, and then click the Firmware tab.The AP Firmware page appears as shown in Figure 12-4. Figure 12-4: AP Firmware Page To select the default firmware used by a particular BSAP model, click the pencil icon for that BSAP model. The Edit AP Firmware page for that model appears. Each BSAP 12-6 Uploading BSAP Firmware Files model can have one Default firmware and one Alternative firmware. If set, the Default firmware will be applied to any newly discovered BSAPs. ) Note: Select the icon to transfer all BSAPs back to the Default firmware and flag them for Upgrade. 2. For example, if you select the pencil icon for the BSAP 1800, the Edit AP Firmware page appears as shown in Figure 12-5. Figure 12-5: Edit AP Firmware Page 3. Select either the Local file or Remote Location radio button. In most instances, because the firmware files are large, you will not want them locally on the BSC, but instead on an external TFTP server. The TFTP server must be addressable from the network on which the APs reside. ) Note: TFTP based upgrades are available on BSAPs running version 6.3.0-1 or later. 4. For local files, click Browse... and select the BSAP firmware image file to upload. For remote files, enter the filename and fully qualified domain name of the TFTP server. BSAP firmware image files end with a file extension of .BIDP. 5. Click Save to save the BSAP firmware settings to the BSC database. 6. To manually force BSAPs to download the new firmware, navigate to the Wireless AP page, mark the checkbox for the BSAPs, and then click Apply. 7. To force a particular BSAP to use the Alternative Firmware, click the pencil icon for that BSAP on the Wireless AP page, to display the Edit AP System Settings page, and then and select the Alternative Firmware radio button. To apply the firmware, click the “AP” tab, choose which APs should be upgraded and click “Apply” to upgrade the APs. BlueSecure™ Controller Setup and Administration Guide 12-7 Chapter 12: BlueSecure Access Points Configuring Global Miscellaneous Non-Radio Settings The Wireless Global System Settings page is used to specify the country in which the BSAPs are located and to enable remote SSH diagnostics (this option only applies to BSAP-15x0 platforms). You can optionally override these global settings for individual BSAPs on the Wireless AP tab by clicking the pencil icon for the BSAP. To configure miscellaneous non-radio settings for all BSAPs: Displaying the Edit AP System Settings - Global page 1. Click the Wireless tab in the BSC administrator console, click the Global tab, and then click the System link at the top of the page. The Edit AP System Settings - Global page appears as shown in Figure 12-6. Figure 12-6: Edit AP System Settings - Global Page Firmware Region Options ) 12-8 Note that the page indicates the global firmware status for each BSAP model. For instructions on how to change the default firmware for a BSAP model, see “Uploading BSAP Firmware Files” on page 12-6. Select the Country/Region from the drop-down in which the radio is to be operated. (Default: United States). The country selection enables the BSC to automatically adjust channels and power on the APs to conform to what is permitted in the regulatory domain. Important: Wireless Regulatory Compliance Based on United States FCC and European DFS and ETSI regulations, Bluesocket requires customers to validate the country in which Bluesocket Access Points are being operated. This prevents the Bluesocket hardware from accidentally being used in an improper configuration. Configuring Global Miscellaneous Non-Radio Settings The Bluesocket Sales team maps customers to their country of operation, and each customer is issued an authorization code, which can be found in the Salesforce.com account. When the BSC is started for the first time, the country on the Wireless Global page is set to “No Country Set”. While the BSC is in this state, all Radios will be disabled on all Bluesocket Access Points. The administrator must set the country to the proper country and then enter the corresponding authorization code. The Bluesocket Sales team has mapped customers to their country of operation. Each customer has been issued a country authorization code, which is found in the Salesforce.com account. Go to http:// support.bluesocket.com/my-profile.htm and find the 8 digit code listed under “Country Authentication Code.” If the authorization code does not match the proper country, then an error is given. If the code is valid for the country, then the BSC is permanently set to that country code and cannot be changed (even with a configuration restore, database re-initialization, or an upgrade). The GUI will only show the chosen country and you will not be allowed to change the country. The Country Code is then applied to all BSAPs connected to the BSC. Allowed channels and power levels are determined by the country and the platform. For example, the BSAP-1700 does not support channels 36-48, regardless of country code. If you are using Failover, you should set the country code on each BSC independently. Alternatively you can wait for the first failover event, which will also set the country code. If you are using Wireless Replication, you can do one of three things: • Disable Wireless Replication and set the country on each BSC independently. • Enable the replication mesh, and then set the country on the master. This will permanently push the country and authorization code to all BSCs in the mesh. • Set the country on one BSC, and then take a replication snapshot. This will permanently write the country to the BSC taking the snapshot. In no case is Failover or Wireless Replication supported with BSCs provisioned in different countries. If you are not using Bluesocket Access Points, it is not required to set the Country. To hide the red warnings in the GUI, uncheck the Enable AP Service checkbox on the Wireless Service page. If you experience issues with setting the country, contact Customer Support or your Sales Representative. Diagnostics Wi-Jack Duo Options Mark the Allow remote diagnostics checkbox to allow Bluesocket service personnel to reach the BSAP via SSH to perform remote diagnostics. There are three Wi-Jack Duo settings: Speed and duplex type - By default, the Wi-Jack Duo’s physical interface automatically negotiates bit rate and duplex type for connection. However, if required, you can specify the Speed and duplex type: Auto indicates auto-negotiate, otherwise you can set the speed and duplex. Enable LED - Mark the Enable LED checkbox to Enable the Wi-Jack LED once it is connected to BSC. During normal operation, the WiJack blue status LED blinks briefly once every 30 seconds. To disable the LED, uncheck the box. The default is disabled. BlueSecure™ Controller Setup and Administration Guide 12-9 Chapter 12: BlueSecure Access Points Enable Front User Port - Mark the Enable Front User Port checkbox to enable the front ethernet port on the Wi-Jack w/ Jack. To disable the port, uncheck the box. The default is enabled. Saving the settings Click Save to save the global BSAP settings to the BSC database. You may be prompted to restart the BSC. We recommend that you do not restart the BSC until you have completely finished configuring the BSC for use in your network. Configuring Global Radio Settings BlueSecure Access Points are equipped with 802.11a/n and 802.11b/g/n radios (the “a/n” notation refers to the 5Ghz radio and the “b/g/n” notation refers to the 2.4Ghz radio. This notation is used throughout this section as a common notation even though all BSAPs are not equipped with 11n radios). Generally, the default settings for these radios work in most installations, but complete radio configuration procedures are provided below if you need to modify the BSAP 802.11a/n or 802.11b/g/n radio settings for your environment: ) • “802.11b/g/n Radio Configuration” on page 12-10. • “802.11a/n Radio Configuration” on page 12-18. Note: The radio channel settings for BSAPs are limited by local regulations, which determine the number of channels that are available. 802.11b/g/n Radio Configuration Displaying the Edit 802.11b/ g/n Settings Global page 1. Click the Wireless tab in the BSC administrator console, click the Global tab, and then click the 802.11b/g/n link at the top of the page. The Edit 802.11b/g/n Settings - Global page appears as shown in Figure 12-7. 2. Mark the Enable 802.11b/g/n Radio checkbox at the top of the page to enable the 802.11b/g/n radio in the BSAP. Operational Mode Set the BSAP’s operational mode by selecting one of the following options: • AP Mode - BSAP provides standard wireless client access. • Sensor Mode - BSAP performs RF scanning to detect WLAN intrusion, attack, or vulnerability. • Dual (AP/Sensor) Mode - BSAP alternates between access point and RF sensor operation on a continual basis with less than 5% degradation in performance to associated clients. ) Note: On BSAP-1800s with external antennas, the 11a radio is configurable for 11b/g, 11a, or both wireless modes when the operational mode is Sensor Mode. 802.11a is selectable only in AP Mode. Wireless Mode and Rate 1. Select 802.11b/g/n, 802.11b, or 802.11g/n from the Wireless Mode drop-down menu. The default is 802.11b/g/n. If you select b/g/n, b/g will be pushed to BSAPs that are not 11n capable. 2. Select the BSAP’s data Minimum Transmit Rate from the drop-down menu. Select the No Minimum setting to enable the BSAP to determine and use its optimal transmit rate. (Default: No Minimum). The minimum rate is specified to prevent clients from connecting to the APs at rates below the minimum rate, which allows the AP to only operate at higher rates. The rates that are selectable depend on the wireless mode selected. For BSAP-1800s, the available rates are dicatated by the Channel Bandwidth setting (see BSAP-1700 and BSAP-1800 MIMO Settings). 12-10 Configuring Global Radio Settings 3. Select the Sensor Frequency Band in which to scan (BSAP-1800s with external antennas only). This determines which bands the BSAP will sense when it is scanning. It takes less time to scan all the channels when you limit the BSAP to a single band. Channel Options The Auto Channel Select checkbox only provides an auto mode on the global tab since selecting channel on a global basis is not recommended. When multiple BSAPs are deployed in the same area, set the channel on neighboring BSAPs at least five channels apart to avoid interference with each other. For example, in the United States you can deploy up to three BSAPs in the same area (e.g., channels 1, 6, 11). Maximum Transmit Power Adjust the power of the radio signals transmitted from the BSAP by selecting a transmission power level from the drop-down menu. The higher the transmission power, the farther the transmission range. Power selection is not just a trade off between coverage area and maximum supported clients. You also have to ensure that high-power signals do not interfere with the operation of other radio devices in the service area. (Default: 100% transmission power for the selected country/ region) You can also adjust the transmission power level settings using the (+) and (-) buttons to the right of the drop-down menu. BlueSecure™ Controller Setup and Administration Guide 12-11 Chapter 12: BlueSecure Access Points 12-12 Configuring Global Radio Settings Figure 12-7: Edit 802.11b/g/n Settings - Global Page Advanced Settings for the 802.11b/g/n Radio Mark the Display Advanced Settings checkbox to specify the following: • Beacon Interval -- Enter the rate in milliseconds at which beacon signals are transmitted from the BSAP. The beacon signals allow wireless clients to maintain contact with the BSAP. They may also carry power-management information. (Default: 200 milliseconds) • Fragmentation Threshold -- Enter the maximum length (in bytes) of the frame, beyond which payload must be broken up (fragmented) into two or more frames. (Range: 256-2346 bytes, Default: 2346 bytes) Collisions occur more often for long frames because sending them occupies the channel for a longer period of time, increasing the chance that another station will transmit and cause collision. Reducing Fragmentation Threshold results in shorter frames that “busy” the channel for shorter periods, reducing packet error rate and resulting retransmissions. However, shorter frames also increase overhead, degrading maximum possible throughput, so adjusting this parameter means striking a good balance between error rate and throughput. • RTS Threshold -- Set the packet size threshold at which a Request to Send (RTS) signal must be sent to a receiving station prior to the sending station starting communications. (Range: 256-2346 bytes: Default: 2346 bytes) The BSAP sends RTS frames to a receiving station to negotiate the sending of data. After receiving an RTS frame, the station sends a CTS (clear to send) frame to notify the sending station that it can start sending data. If the RTS threshold is set to 0, the BSAP never sends RTS signals. If set to 2347, the BSAP always sends RTS signals. If set to any other value, and the packet size equals or exceeds the RTS threshold, the RTS/CTS (Request to Send /Clear to Send) mechanism will be enabled. The BSAPs contending for the medium may not be aware of each other. The RTS/CTS mechanism can solve this “Hidden Node Problem.” • DTIM -- Enter the number of beacon internals at which stations in sleep mode must wake up to receive broadcast/multicast transmissions. (Range: 1-255 beacons; Default: 1 beacon) Delivery Traffic Indication Map (DTIM) interval, it indicates how often the MAC layer forwards broadcast/multicast traffic, which is necessary to wake up stations that are using Power Save mode. The default value of 2 indicates that the BSAP will save all broadcast/multicast frames for the Basic Service Set (BSS) and forward them after every second beacon. Using smaller DTIM intervals delivers broadcast/multicast frames in a more timely manner, causing stations in Power Save mode to wake up more often and drain power faster. Using higher DTIM values reduces the power used by stations in Power Save mode, but delays the transmission of broadcast/multicast frames. Antenna Options 1. Specify the Antenna Type by marking the appropriate radio button (BSAP-15x0 platforms only): • Internal - The BSAP uses its fixed omni antennas for communications. • External - The BSAP uses connected external antennas for communications. External antennas are available only for model BSAP-1540s. A BSAP-1500 will always use its fixed antennas for communications regardless of the configured antenna type. Selecting External disables antenna diversity controls, since only antenna B is used. BlueSecure™ Controller Setup and Administration Guide 12-13 Chapter 12: BlueSecure Access Points 2. Mark the Antenna Diversity radio button to specify whether the antenna is automatically selected based on best signal reception (i.e., Diversity mode), or is fixed to use one of the BSAP’s antennas, A or B. (Default: Diversity mode is enabled). 3. Mark the Antenna Mode radio button to specify whether 3 Antennas or 1 Antenna is used. This is available on a per radio basis, globally or per each individual AP. Customers using a DAS (Distributed Antenna System) will connect a single external antenna to the BSAP-1840s. ) Note: In order to use this feature, the BSAP-1840 must have an 802.11n license. Note: If a single antenna is selected for the BSAP-1840, be sure to plug the antenna into the R-SMA connection labeled “1” on the AP. Note: While it is possible to configure this feature for the BSAP-1800, it is only recommended during advanced debugging, as choosing a single antenna will force the AP to use a single internal antenna element. Note: With a single antenna, the AP is limited to a single spatial stream and therefore, the maximum transmit rate for a 20 MHz 802.11n client is 65 Mbit/sec. The maximum transmit rate for a 40 Mhz 802.11n client is 130 Mbit/sec. See the following table for more detailed rate information. Note: 802.11n rates were removed from the minimum transmit rate selection because a non-11n client cannot connect to an 802.11n rate. This table shows the possible client data rates in various configurations. This table reflects “pure mode” rates. For mix-mode, add corresponding rates - e.g. B/G mode supports all rates in 11B and 11G rows. 40MHz mode implies 20MHz mode hence rates in 20MHz column is added to 40MHz rates (if different). 12-14 Operating Mode Channel Mode: 20 MHz Single Stream Channel Mode: 20 MHz Double Stream Channel Mode: 40 MHz Single Stream 11A 6Mbps 9Mbps 12Mbps 18Mbps 24Mbps 36Mbps 48Mbps 54Mbps 6Mbps 9Mbps 12Mbps 18Mbps 24Mbps 36Mbps 48Mbps 54Mbps 6Mbps 9Mbps 12Mbps 18Mbps 24Mbps 36Mbps 48Mbps 54Mbps 6Mbps 9Mbps 12Mbps 18Mbps 24Mbps 36Mbps 48Mbps 54Mbps 11B 1 Mbps 2 Mbps 5.5Mbps 11Mbps 1 Mbps 2 Mbps 5.5Mbps 11Mbps 1 Mbps 2 Mbps 5.5Mbps 11Mbps 1 Mbps 2 Mbps 5.5Mbps 11Mbps 11G 6Mbps 9Mbps 12Mbps 18Mbps 24Mbps 36Mbps 48Mbps 54Mbps 6Mbps 9Mbps 12Mbps 18Mbps 24Mbps 36Mbps 48Mbps 54Mbps 6Mbps 9Mbps 12Mbps 18Mbps 24Mbps 36Mbps 48Mbps 54Mbps 6Mbps 9Mbps 12Mbps 18Mbps 24Mbps 36Mbps 48Mbps 54Mbps Channel Mode: 40 MHz Double Stream Configuring Global Radio Settings 11N Load Balancing 6.5Mbps 13Mbps 19.5Mbps 26Mbps 39Mbps 52Mbps 58.5Mbps 65Mbps 6.5Mbps 13Mbps 19.5Mbps 26Mbps 39Mbps 52Mbps 58.5Mbps 65Mbps 78Mbps 104Mbps 117Mbps 130Mbps 13.5Mbps 27Mbps 40.5Mbps 54Mbps 81Mbps 108Mbps 121.5Mbps 135Mbps 150Mbps 13.5Mbps 27Mbps 40.5Mbps 54Mbps 81Mbps 108Mbps 121.5Mbps 135Mbps 150Mbps 162Mbps 216Mbps 243Mbps 270Mbps 300Mbps Enter the Average user count per AP, which is the average number of wireless devices that may associate any BSAP before the BSC balances the client load among the BSAPs. Valid values for this setting are: • BSAP-1500 and BSAP-1540: 1-56 • Other AP models: 1-64 Enforcement: Select the relative strength of each BSAPs’ enforcement of the specified average AP client count QoS Settings • Low: BSAP rejects a client device once before allowing it to associate. • Medium: BSAP rejects a client device up to three times before allowing it to associate. • High: BSAP rejects a client device up to five times before allowing it to associate. • Always Reject: Hard cap the number of users on an individual AP. Optional. Enable system-level QoS on the BSAP for voice and video traffic. (See “Configuring VoWLAN QoS” on page 9-3 for background information on VoIP.): 1. To enable WMM settings, mark the Enable WMM and Voice Call Admission Control? checkbox. 2. Mark the Enable SVP checkbox to enable Polycom/Avaya Voice Protocol(SVP). Admission Control Settings If WMM is enabled you can specify the following: 1. Enter the maximum number of voice clients that may associate to the BSAP in the Voice Sessions field. 2. Enter the maximum number of video clients that may associate to the BSAP in the Video Sessions field. The above maximum voice and video sessions settings affect only SSIDs that have voice and video QoS enabled. See “Creating SSIDs” on page 12-20 for information about creating/editing BSAP SSIDs. Note that a BSAP’s system-level QoS and the Wi-Fi multimedia QoS that you enable for voice and video SSIDs are complementary. We recommend that you enable both QoS methods when passing voice or video traffic on the BSAP. BSAP-1700 and BSAP-1800 MIMO Settings For BSAP-1700s and BSAP-1800s (MIMO), specify the following: 1. BSAP1700: MIMO Compression Mode: (Requires a special client adapter) Data frames are compressed by hardware, which can increase data throughput. A special MIMO client is required for this feature. • 0 = Disabled BlueSecure™ Controller Setup and Administration Guide 12-15 Chapter 12: BlueSecure Access Points • 1 = Enabled 2. BSAP1700: MIMO Network Density: Network Density refers to how many wireless networks are deployed in your surroundings. This setting provides a mechanism to tell the AP how noisy to expect the environment so the AP can then adjust its noise threshold accordingly. The settings are subjective (i.e. there is no static range of devices associated with the settings high, medium, and low) and might require some experimentation to determine the optimal setting. A site survey should help determine the network density in your environment. Note that adjusting the network density affects transmit power and overall system performance. 3. BSAP1700: Adaptive Channel Expansion (Requires a special client adapter) Provides increased data rates by increasing the RF bandwidth from 20 MHz to 40 MHz by combining adjacent channels. Adaptive Channel Expansion/Channel Bandwidth enables the following rates --48, 72, 84, 96, 144, 160, 168, 192, 216, 240 Mbps. Here is an example of the channel usage in ACE: - primary and secondary channels are separated by 4 channels. • 1 is primary, 5 is secondary • 6 is primary, 2 is secondary • 7 is primary, 11 is secondary • 11 is primary, 7 is secondary • 9 is primary, 13 is secondary (Europe/countries that support channel 13) The BSAP automatically determines the secondary channel based on channel set in the UI. If you enable auto channel selection, the BSAP first determines the primary through an auto channel selection algorithm and then sets the secondary 4 channels away. Before you enable this feature, make sure that the channels are available in your RF network. Otherwise, you could experience degraded performance with MIMO Concatenation Mode/Packet Aggregation. All 20Mhz traffic and the management frames are always sent on the primary channel. • 0 = Disabled • 1 = Enabled • 2 = Enable if no legacy BSS (i.e. no legacy AP detected) • 3 = Enabled if no legacy device (i.e. no legacy station is detected) 4. BSAP1700: MIMO Concatenation Mode: Used to transmit multiple data packets in a single 802.11 frame, without any delay. 5. BSAP1800: Channel Bandwidth: Provides increased data rates by increasing the RF bandwidth from 20 MHz to 40 MHz by combining adjacent channels. Channel Bandwidth enables the following rates up to 300Mhz. 6. BSAP1800: Packet Aggregation (Aggreation of Protocol Data Units AMPDU): Used to transmit multiple data packets in a single 802.11 frame, without renegotiating for the medium. ) 12-16 Performance Tip: For optimal 802.11n performance/throughput, ensure the following: • Use 802.11n client devices. • Enable Voice Call Admission Control. • Enable Channel Bandwidth (40MHz). • Enable Packet Aggregation. • Use an Open or AES SSID (not WEP or TKIP). Configuring Global Radio Settings Saving the settings 7. Click Save to save the BSAP radio settings to the BSC database You may be prompted to restart the BSC. We recommend that you do not restart the BSC until you have completely finished configuring the BSC for use in your network. BlueSecure™ Controller Setup and Administration Guide 12-17 Chapter 12: BlueSecure Access Points 802.11a/n Radio Configuration See “802.11b/g/n Radio Configuration” on page 12-10 for settings not described here. Displaying Edit 802.11a/n Settings - Global Click the Wireless Global tab, and then click the 802.11a/n link at the top of the page. Figure 12-8: Edit 802.11a/n Settings - Global Page 12-18 Editing Settings for an Individual BSAP Operational Mode Wireless Mode and Rate Select one of the following from the drop-down menu to determine whether the BSAPs will act as Access Points, as RF sensors, or as both: • AP Mode - BSAP provides standard wireless client access. • Sensor Mode - Perform RF scanning to detect WLAN intrusion, attack, or vulnerability. • Dual (AP/Sensor) Mode - BSAP alternates between access point and RF sensor operation on a continual basis. • Wireless Mode - Select 802.11a/n or 802.11a, or 802.11n from the drop-down menu. The default is 802.11a/n. If you select a/n, or n, 802.11a will be pushed to BSAPs that are not 11n capable. In normal mode, the BSAP provides a channel bandwidth of 20 MHz, and supports the maximum number of channels permitted by local regulations (e.g., 11 channels for the United States). • Minimum Transmit Rate - Select the BSAP’s data Minimum Transmit Rate from the drop-down menu. Select the No Minimum setting to enable the BSAP to determine and use its optimal transmit rate. (Default: No Minimum). The minimum rate is specified to prevent clients from connecting to the APs at rates below the minimum rate, which allows the AP to only operate at higher rates. . The rates that are selectable depend on the wireless mode selected. For BSAP-1800s, the available rates are dicatated by the Channel Bandwidth setting. BSAP1700 Only:SSID Select an SSID from the drop-down (the BSAP-1700 allows just one SSID for “a” radio). Saving the settings Click Save to save the BSAP radio settings to the BSC database. You may be prompted to restart the BSC. We recommend that you do not restart the BSC until you have completely finished configuring the BSC for use in your network. Editing Settings for an Individual BSAP In general, you should edit settings globally for all BSAPs on the Wireless Global tab as explained in “Configuring Global Radio Settings” on page 12-10. If you do need to change a particular setting for an individual BSAP, however, you can do so on the Wireless AP tab by selecting the pencil icon for the AP, and then clicking the System link, 802.11b/g/n link, or the 802.11a/n link. The most common reasons for editing an individual BSAP are to specify alternative firmware or to define the SSID a single BSAP should use. To change any other setting for an individual BSAP, refer to the explanation of how to configure that setting globally in “Configuring Global Radio Settings” on page 12-10. Note: When you override a field set globally for all BSAPs on an individual BSAP, the field changes color from blue to white to indicate an override. 1. To indicate that an individual BSAP should use the alternative firmware, select the System link and then mark the Alternative Firmware radio button. (See “Uploading BSAP Firmware Files” on page 12-6 for information on specifying the path for the alternative firmware file). 2. To Define the SSIDs a single BSAP is to use, select the 802.11b/g/n link or the 802.11a/n link, and then select an option from the SSID Settings menu: • Use default SSIDs - The BSAP will use only the default SSIDs. • Exclude selected SSIDs - The BSAP will use only those SSIDs not selected in the Select SSID picklist. BlueSecure™ Controller Setup and Administration Guide 12-19 Chapter 12: BlueSecure Access Points • ) Only Use Selected SSIDs - The BSAP will use only those SSIDs selected in the Select SSID picklist. Note: Only one SSID is supported on the BSAP-1700’s 11a radio. Creating SSIDs As part of the BSAP configuration, you can create a pool of Service Set Identifiers (SSIDs) that you can assign to BSAPs (maximum of 8 per radio). By assigning multiple SSIDs to a particular radio, the radio is virtualized and each SSID can have a unique security profile and also be mapped to a unique VLAN. As part of the SSID configuration, you must define how wireless clients connecting to the BSAP are to be authenticated and how data transmitted from the BSAP is to be encrypted. • See “BSAP Authentication Options” on page 12-20. • See “BSAP Data Encryption Options” on page 12-21. • See “SSID Configuration Procedure” on page 12-22. BSAP Authentication Options Possible BSAP authentication options are: Open System Shared Key WPA SSIDs are configured by default as “open system. ” In this mode, no 802.11 authentication is performed before a client connects to the AP. Also, if no cipher is selected, all packets from an open system SSID are transmitted as clear text. If WEP is selected, the client’s traffic is encrypted using WEP. Sets the BSAP to use WEP shared keys meaning that before a client connects to the AP, the client must authenticate by properly deciphering a challenge text from the AP using the shared static WEP key. If this option is selected, you must configure at least one WEP key on the BSAP and all clients. Wi-Fi Protected Access (WPA) provides improved data encryption that was largely missing in WEP. WPA uses the following security mechanisms. • Temporal Key Integrity Protocol (TKIP). TKIP provides data encryption enhancements including per-packet key hashing (i.e., changing the encryption key on each packet), a message integrity check, an extended initialization vector with sequencing rules, and a re-keying mechanism. • Enterprise-level User Authentication via 802.1x and EAP - To strengthen user authentication, WPA uses 802.1x and the Extensible Authentication Protocol (EAP). Used together, these protocols provide strong user authentication via a central RADIUS authentication server that authenticates each user on the network before they join it. WPA also employs “mutual authentication” to prevent a wireless client from accidentally joining a rogue network. Clients are authenticated using 802.1x via a RADIUS server. Each client has to be WPAenabled or support 802.1x client software. A RADIUS server must also be configured and be available in the wired network. Keys are generated for each wireless client associating with the BSAP. These keys are regenerated periodically, and also each time the wireless client is re-authenticated. WPA-PSK 12-20 For enterprise deployment, WPA requires a RADIUS authentication server to be configured on the wired network. However, for small office networks that may not have the resources to configure and maintain a RADIUS server, WPA provides a simple operating mode that uses just a pre-shared password for network access. The Pre-Shared Key mode uses a common password for user authentication that is manually entered on Creating SSIDs the BSAP and all wireless clients. The PSK mode uses either TKIP or AES for packet encryption and key management as WPA in the enterprise, providing a robust and manageable alternative for small networks.When the WPA mode is set to “pre-sharedkey,” the key must first be generated and distributed to all wireless clients before they can successfully associate with the BSAP. WPA2 Wi-Fi Protected Access 2 (WPA2) is the second generation of WPA security and is based on the final IEEE 802.11i amendment to the 802.11 standard. Clients are authenticated using 802.1x via a RADIUS server. Each client has to be WPA2enabled or support 802.1x client software. A RADIUS server must also be configured and be available in the wired network. Keys are generated for each wireless client associating with the BSAP. These keys are regenerated periodically, and also each time the wireless client is re-authenticated. WPA2-PSK WPA + WPA2 WPA-PSK + WPA2-PSK The Pre-Shared Key mode uses a common password for user authentication that is manually entered on the BSAP and all wireless clients. The PSK mode uses either TKIP or AES for packet encryption and key management as WPA in the enterprise, providing a robust and manageable alternative for small networks.When the WPA2 mode is set to “pre-shared-key,” the key must first be generated and distributed to all wireless clients before they can successfully associate with the BSAP. Use both WPA and WPA2 authentication as described above. Use both WPA-PSK and WPA2-PSK authentication as described above. BSAP Data Encryption Options Possible BSAP data encryption options are: WEP (This option cannot be used with 802.11n when connecting at rates above 54Mhz). Wired Equivalent Privacy (WEP) WEP provides a basic level of security, preventing unauthorized access to the network and encrypting data transmitted between wireless clients and the BSAP. WEP uses static shared keys (fixed-length hexadecimal or alphanumeric strings) that are manually distributed to clients wanting to use the network. WEP is the security protocol initially specified in the IEEE 802.11 standard for wireless communications. Unfortunately, WEP has been found to be seriously flawed and cannot be recommended for a high level of network security. Setting up shared keys enables the basic IEEE 802.11 Wired Equivalent Privacy (WEP) on the BSAP to prevent unauthorized access to the network. If you choose to use WEP shared keys instead of an open system, be sure to define at least one static WEP key for user authentication and data encryption. Also, be sure that the WEP shared keys are the same for each client in the wireless network. AES-OCB Advanced Encryption Standard - Offset Code Book (AES-OCB). This new encryption standard is a version of the AES standard recently adopted by the U.S. government as the replacement for 3DES. WPA specifies AES encryption as an optional alternative to TKIP and WEP. AES provides very strong encryption using a completely different ciphering algorithm to TKIP and WEP. The developing IEEE 802.11i wireless security standard has specified AES as an eventual replacement for TKIP and WEP. However, because of the difference in ciphering algorithms, AES requires new hardware support in client network cards that is currently not widely available. AES-CCM AES-CCM mode is the combination of Cipher Block Chaining Counter mode (CBC-CTR mode) and CBC Message Authenticity Check (CBC-MAC). The functions are combined to provide encryption and message integrity in one solution. BlueSecure™ Controller Setup and Administration Guide 12-21 Chapter 12: BlueSecure Access Points TKIP (This option cannot be used with 802.11n when connecting at rates above 54Mhz). Temporal Key Integrity Protocol (TKIP): WPA specifies the TKIP data encryption method to replace WEP. TKIP avoids the problems of WEP static keys by dynamically changing data encryption keys. TKIP starts with a master (temporal) key for each user session and then mathematically generates other keys to encrypt each data packet. TKIP provides further data encryption enhancements by including a message integrity check for each packet and a re-keying mechanism, which periodically changes the master key. SSID Configuration Procedure Figure 12-9: Create new SSID Page To create an SSID for assignment to a BSAP: Displaying the Create new SSID page Enable by default... 1. Click the Wireless tab, click the SSID tab, and then select SSID from the Create drop- down menu. The Create new SSID page appears as shown in Figure 12-9. The Enable by default on the b/g/n radio checkbox is marked by default to enable this SSID for radio b/g/n. The Enable by default on the a radio checkbox is marked by default to enable this SSID for radio a. General Settings 12-22 • Name - The name of the SSID. This is useful for mapping the same SSID to different configurations and APs. The name must be unique. • SSID -- Enter the Service Set Identifier that all wireless clients must use to associate with the BSAP. Creating SSIDs The SSID is case sensitive and can consist of up to 32 alphanumeric characters. The SSID does not need to be unique. The same SSID can exist with different attributes (e.g. VLAN) on different access points. To configure this, use a different name with the same SSID and then override the access points with the desired named SSID. • VLAN -- Optional. Enter a VLAN identifier. Entering a VLAN ID enables VLAN tagging support on the BSAP. If enabled, the BSAP will tag traffic passing from wireless clients to the BSC with the VLAN ID (0 means no VLAN, Range 2 to 4095). Broadcast SSID Optional. The Enable checkbox is marked by default to broadcast the BSAP’s SSID. When enabled, the BSAP will include its SSID in beacon messages, and it will respond to probe requests from clients that do not include the correct SSID. You can disable this option to hide the BSAP’s SSID to prevent access to clients without a pre-configured SSID. (Default: Enabled, i.e. the BSAP’s SSID is broadcast in the clear) Edge-to-Edge If Edge-to-Edge is enabled, wireless traffic will not be tunneled through the BSC. This can compromise security and should be used with caution. Client to client traffic will not be blocked Standby SSID Mark to indicate that this SSID should be enabled when AP’s connectivity to the BSC is lost. SSIDs that require a dependency on the controller (i.e. tunneled SSIDs or 802.1x based SSIDs cannot be used as a Standby SSID). Security Types 1. Define how the BSAP is to authenticate users by selecting an authentication method from the Authentication Type drop-down menu. Possible BSAP authentication methods are: • Open System • Shared Key • WPA (Wi-Fi Protected Access) • WPA-PSK (Wi-Fi Protected Access with Pre-Shared Key) • WPA2 (Wi-Fi Protected Access 2) • WPA2-PSK (Wi-Fi Protected Access 2 with Pre-Shared Key) • WPA+WPA2 • WPA-PSK+WPA2+PSK See “BSAP Authentication Options” on page 12-20 for descriptions of these options. 2. Define how data transmitted from the BSAP is to be encrypted by selecting a data encryption method from the Cipher Type menu. Possible BSAP data encryption methods are: • WEP (Wired Equivalent Privacy) • AES-CCM (Advanced Encryption Standard - in Counter with CBC-MAC) • CKIP (Cisco Key Integrity Protocol) • TKIP (Temporal Key Integrity Protocol) See “BSAP Data Encryption Options” on page 12-21 for descriptions of these options. For Shared Key Authentication only If you have configured Shared Key authentication, then you must define the WEP shared keys the BSAP is to use. 1. Select the key length from the WEP Key Size drop-down menu. 2. Note that the same size of encryption key must be supported on all wireless clients. (11b/g/n: 64/128 Bits; 11a/n: 64/128/152 Bits) BlueSecure™ Controller Setup and Administration Guide 12-23 Chapter 12: BlueSecure Access Points 3. Enter keys as 10 hexadecimal digits (0 to 9 and A to F) for 64 bit keys, 26 hexadecimal digits for 128 bit keys, or 32 hexadecimal digits for 152 bit keys. Be sure to specify a default key (0 to 3) when entering 64-bit keys. WPA or WPA2 Authentication only If you have configured WPA or WPA2 authentication, then you must configure access to the RADIUS authentication server that is to authenticate each user on the network before the user is able to join it. 1. Enter IP address or fully qualified domain name of the RADIUS server in the Address field. ) Note: If using Internal 802.1X authentication, provide the BSC’s protected side IP address. 2. Enter the RADIUS server’s port number in the Port field. 3. Enter the known secret shared between the BSAP and the RADIUS authentication server in the Secret field, and then confirm the shared secret by entering it in the Confirm secret field. 4. Mark the Enable 802.11i preauth bit checkbox to enable clients to pre-authenticate via 802.1x to another BSAP while associated to an existing BSAP. WPA-PSK or WPA2-PSK Authentication only If you have configured WPA-PSK or WPA2-PSK authentication, then you must configure the key that all wireless clients will use to communicate with the BSAP. 1. Enter the interval in minutes at which the WPA group key is to be regenerated in the Group Rekey Time field. 2. Enter the WPA pre-shared key in the Passphrase field, and then enter the same pre- shared key in the Confirm passphrase field. 3. Enter a key as an easy-to-remember string of letters and numbers. The string must be from 8 to 63 characters and can include spaces. QoS Settings Mark the DSCP or 802.1p radio button to prioritize packets according to their DSCP code point setting. Enable WMM and Voice Call Admission Control must be enabled on the Radio (see “QoS Settings” on page 12-15), and the clients must be WMM capable. Mark the Access Category radio button to assign a specific priority (e.g. Video or Voice) to all downlink packets for clients associated with this SSID. "Enable WMM and Voice Call Admission Control" must be enabled on the Radio (“QoS Settings” on page 12-15). The client does not have to be WMM capable. This is useful for a Voice SSID for legacy clients that do not support WMM. This checkbox has no effect if "Enable WMM and Voice Call Admission Control" is disabled. Saving the settings Click Save to save the BSAP SSID settings to the BSC database. You may be prompted to restart the BSC. We recommend that you do not restart the BSC until you have completely finished configuring the BSC for use in your network. Creating BSAPs You can uniquely identify and create a configuration for each of the BSAPs that is currently connected to the BSC or will be connected to the BSC. BSAPs are uniquely identified by their MAC addresses along with optional hostname and location identifiers you supply. Note that fields that have default settings carried over from the Global AP System Settings page (see “Configuring Global Miscellaneous Non-Radio Settings” on page 12-8) have a dark blue background. To create a BlueSecure Access Point: 12-24 Creating BSAPs Displaying the Create new AP page Enable AP MAC Click the Wireless tab in the BSC administrator console, click the AP tab, and then select an AP model from the Create drop-down menu.The Create New AP page appears with the fields required for the BSAP model you are creating, for example the BSAP-1800 as as shown in Figure 12-10. The Enable AP check box is marked by default to enable the BSAP configuration. Enter the MAC address of the BSAP. You’ll find the BSAP’s MAC address listed on a label on the bottom of its chassis. Hostname Location Optional. Enter a unique hostname for the AP. Optional. Enter a location for the AP. . Figure 12-10: Create New AP Page Firmware Select one of the radio buttons: • Default Firmware: Use the default firmware. • Alternative Firmware: Use the alternative firmware. • Do Not Upgrade: Use the existing firmware on the AP, not the default or alternative firmware. The locations of the default and alternative firmware are specified on the Wireless Firmware page (see “Uploading BSAP Firmware Files” on page 12-6). If a firmware is selected, and the AP has a version mismatch, it will automatically be upgraded to the selected revision. If no AP firmware is available, the AP will not be upgraded. BlueSecure™ Controller Setup and Administration Guide 12-25 Chapter 12: BlueSecure Access Points Display Diagnostics Saving the settings Specify which login page to display to users logging into the BSC on the managed interface via this BSAP from the drop-down menu. Select Normal to use the location- or VLAN-based login page or select a customized page you have defined. See “Customizing the User Login Page” on page 11-2 for information about creating a customized user login page. Mark the Allow remote diagnostics checkbox to allow Bluesocket service personnel to reach the BSAP via SSH to perform remote diagnostics (Optional – this only applies to the BSAP-15x0 platform). Click Save to save the BSAP settings to the BSC database. You may be prompted to restart the BSC. We recommend that you do not restart the BSC until you have completely finished configuring the BSC for use in your network. Enabling BSAP Service You must enable BSAP service to allow BSAPs to communicate with the BSC over a secure connection for management purposes. To enable BSAP service: Displaying the AP Service page Click the Wireless tab in the BSC administrator console, and then click the Service tab. The AP Service page appears as shown in Figure 12-11. Figure 12-11: Enable BSAP Service Page Enable AP Service The Enable AP Service checkbox is marked by default to enable the BSC to communicate with and manage BSAPs over a secure connection. Role applied to connected APs Select the role from the drop-down. This role will be automatically applied to connected APs. If services are required, the role will automatically be adjusted. Allow new connections from Specify what BSAPs are allowed to connect to the BSC by selecting one of the following options from the drop-down menu: 12-26 • None - BSAPs are unable to connect to the BSC. You must change this setting to one of the two options listed below to enable the BSC to manage BSAPs. Enabling BSAP Service • Configured APs - The BSC accepts connections from only those BSAPs that have a configuration on the BSC. This is the recommended setting. • Any AP - This is the default setting. The BSC issues certificates to any BSAP. Selecting this option may pose a security risk to your network. ) Note: This feature is only for out-of-the-box access points that have not been previously attached to a BSC and received a certificate. This feature is designed to prevent a malicious third party from connecting an access point to your network, not to prevent one of your own access points from connecting. Time in minutes between checking BlueSecure APs Enter the frequency at which the BSC is to check connections to BSAPs. The default value is ten minutes. Entering zero disables the BSAP connection check. The setting also defines the frequency at which the BSC performs Dynamic RF updates to the BSAPs. Dynamic RF Configuration of BlueSecure APs Specify how the BSC is to manage and configure RF power and channel settings for BSAPs under its control by selecting one of the following options from the drop-down menu: • Disabled - The BSC’s Dynamic RF capabilities are disabled. BSAP RF power and channel settings must be manually configured. • Set Once and Hold - The BSC configures the RF power and channel settings for the BSAPs under its control once to achieve optimal RF performance and then maintains these settings. You must manually configure any changes to the initial RF power and channel settings that are set by the BSC. • Continuous - The BSC continuously evaluates the BSAPs’ RF environment and modifies the BSAPs’ RF power and channel settings as needed to achieve optimal RF performance. ) Note: When a BSAP boots in Set Once and Hold mode, if there is no channel set, then the BSAP will enter Channel Scanning mode. Channel Scanning will beacon an SSID (ChannelScanning) that is secure and doesn't service clients. This SSID is used for other APs to detect the new APs and new APs to detect each other. Depending on the country, the BSAP will cycle through a set of three channels on each radio. The result is that new (and existing) APs will see the new AP and it will see them. ) Note: The BSAP-1700 does not support dual mode or Dynamic RF, only Set Once and Hold. ) Note: You can enable Dynamic RF and still optionally set a BSAP’s channel setting. The BSC will not alter a BSAP’s channel setting via Dynamic RF if the BSAP’s Auto Channel Select is disabled. BG Channel List Advanced Settings for Dynamic RF Specify the channels to which the BSC may set a BSAP’s 802.11b/g/n radio by selecting one of the following options from the drop-down menu: • 1, 6, 11 - provides a five-channel separation that reduces the chance of co-channel interference. • 1, 7, 13 - recommended channel settings for European/Asian deployments. Optional. Mark the checkbox to modify any of the following advanced BSAP Dynamic RF configuration settings: • Enable Dynamic Power - Mark/unmark this checkbox to enable/disable the BSC to dynamically change the power settings of BSAPs under its control to achieve optimal RF performance. • Dynamic RF Calibration Time - Time in minutes to run in dual mode to calibrate Dynamic RF. The larger the deployment, the greater the time period required. The default is 60 minutes. BlueSecure™ Controller Setup and Administration Guide 12-27 Chapter 12: BlueSecure Access Points Saving the Settings 12-28 • Autochannel BG - Mark/unmark this checkbox to enable/disable the BSC to dynamically change the 802.11b/g/n channel settings of BSAPs under its control to achieve optimal RF performance. • Autochannel A - Mark/unmark this checkbox to enable/disable the BSC to dynamically change the 802.11a/n channel settings of BSAPs under its control to achieve optimal RF performance. • A Channel List - Enter the list of channels to which the BSC may set a BSAP’s 802.11a/n radio. Any channels that are illegal for the radio’s configured country designation are ignored. Enter Country to allow all legal channels for the radio’s configured country. See “Configuring Global Miscellaneous Non-Radio Settings” on page 12-8 for information about configuring the BSAP’s 802.11a/n radio’s country designation. • Holddown Timer - Specify the time (in seconds) the BSC waits before adjusting the RF power and channel settings of the BSAPs under its control when a BSAP is connected to or disconnected from the BSC. The default setting is 300 seconds—five minutes. • Signal Inertia - dBm value with which the BSC pads the current channel’s signal strength reading to avoid channel flapping—an unstable situation where the BSAP continually changes its channel to avoid co-channel interference. • Percentage of MIMO Clients in the Network: Administrator's estimate for the percentage of wireless client devices using MIMO cards. When Dynamic RF is doing channel and power calculations, this percentage is used to balance the secondary channels. • Power Threshold Index - Index value that enables the BSC to set the RF power of BSAPs under its control relative to the RF power levels detected in the ambient RF environment. Higher threshold index values enable the BSC to increase the BSAPs’ power settings correspondingly. Typical index settings range from 45 to 120. • Only consider Bluesocket APs associated to the controller when doing power calculations: Mark this checkbox to have Dynamic RF ignore Third Party APs when performing power calculations. This is useful in crowded RF environments, such as densely populated metropolitan areas. • Only consider Bluesocket APs associated to the controller when doing channel calculations: Mark this checkbox to have Dynamic RF ignore Third Party APs when performing channel calculations. This is useful in crowded RF environments, such as densely populated metropolitan areas. • Minimum RSSI Signal to Count BSAP as Adjacent: Adjust the value to filter out low signal adjacencies. In a dense environment, it's possible that BSAPs detect distant BSAPs at low signals and also impact the channelization. • Minimum RSSI Signal to Count 3rd party AP as Adjacent: Adjust the value to deprioritize the signal of 3rd party APs when calculating channels. By giving a minimum RSSI, you can ignore low and distant signals while still accounting for close adjacent APs. • Give weight to existing BSAP channels: Mark this box to use the stored channel as a cached value when running the algorithm. This provides additional stability in the algorithm. • Number of predictive algorithm runs: Adjust the value to internally run the RF algorithm more times to be sure the channels are stable Click Save to save the BSAP settings to the BSC database. You may be prompted to restart the BSC. We recommend that you do not restart the BSC until you have completely finished configuring the BSC for use in your network. Displaying Configured BSAPs Displaying Configured BSAPs After you have created BSAPs as described in “Creating BSAPs” on page 12-24 and as BSAPs come online and connect to the BSC, you can view their status on the Wireless AP tab. The tab presents a table that provides the following information about BSAPs that will connect to the BSC (i.e., BSAPs for which you have created configurations) and BSAPs that are currently connected to the BSC. ) Displaying the Wireless AP tab Note: You can review additional status information about BSAPs as well as APs from vendors other than Bluesocket by clicking the Status tab followed by the Active Connections tab, and then clicking the APs link at the top of the page. See “Monitoring Connected Access Points” on page 15-4 for details. Click the Wireless tab in the BSC administrator console, and then click the AP tab, for example as shown in Figure 12-12. Figure 12-12: Configured BSAPs Page Using the page controls In addition to viewing BSAP status, you can perform the following actions from the BSAP status page: • Click or to enable or disable selected BSAPs. Disabling an AP, shuts off its 802.11a/n and 802.11bg radios. • Click to disable selected BSAPs and then delete their configuration from the BSC database. You can also delete a single BSAP by clicking the icon that corresponds to it. • Click the icon for a BSAP to edit its configuration. After editing or choosing new firmware for the BSAP, click to push out the modified configuration or new firmware to the BSAP. • Click to reboot the BSAP and restart its radios. Generally, you won’t need to reboot the BSAP unless it is in a hung state. • Click • Click to reset the Dynamic RF values of the selected APs. During calibration, BSAPs are run in Dynamic RF/Dual Mode for a configurable time (60 minutes by default), enabling the BSAPs to “sense” the RF environment and adjust channel and power settings so that there are not channel conflicts or power overlap with adjacent APs. A Calibration ETA column is added to the AP table that indicates the estimated time calibration will be completed. After the calibration is complete, the BSAPs are set back to AP mode (if originally was configured for AP mode), Dynamic RF is disabled on the BSC, and the final settings are locked in. The default calibration time period, along with several other Dynamic RF settings, is configurable on the AP Service page, as explained in “Advanced Settings for Dynamic RF” on page 12-27. Click to stop calibration. to reset the BSAP to its default settings. BlueSecure™ Controller Setup and Administration Guide 12-29 Chapter 12: BlueSecure Access Points • ) Enabled MAC Radio MAC Hostname Location Status Active Error Hardware Firmware ) Click to accept all the DynamicRF recommendations for channel and power.The configuration will be saved to the database, and then applied to the individual access point. Note: The BSAP-1700 does not support dual mode or Dynamic RF, only Set Once and Hold. A BSAP is enabled when it has connected to the BSC and has downloaded its configuration (either global settings or specific configuration). The downloaded configuration must be set to enable the BSAP’s radios. Additionally, BSAP service must be enabled on the BSC itself to enable BSAPs. The BSAP’s unique Media Access Control (MAC) address displayed six pairs of hexadecimal numbers. The MAC address of the BSAP’s 802.11bg radio is listed if the BSAP has been polled successfully since the last BSC reboot. To calculate the MAC address of the 802.11a/n radio, add one to the b/g/n MAC address. The BSAP’s configured hostname. The BSAP’s configured location. The BSAP’s current status. Possible values are: • disabled - The BSAP has been administratively disabled. • modified - The BSAP configuration on the BSC has been modified. • updating - The BSAP is loading a new configuration from the BSC. • up2date - The BSAP has loaded and is running its configuration stored on the BSC. • busy - The BSAP is temporarily unable to report its status to the BSC due to system activity. This BSAP is connected to BSC, has downloaded its configuration, and is online as source of wireless data traffic to the BSC. The BSAP has reported an error condition. BSAP model (BSAP-1500, BSAP-1540, BSAP-1700, BSAP-1800, and Wi-Jack Duo.) The BSAP’s firmware version number. Note: If you have selected but not yet upgraded to a new version of the firmware (either globally for all APs or for an individual AP), the Firmware column shows two firmware versions: the currently running firmware is displayed in black and the upgrade firmware is displayed in red. This indicates that there is a mismatch between what is running and what should be running. In addition, the following hint is displayed: “Firmware shown in red is the active firmware. AP requires upgrade.” Note: If you need to upgrade APs that are currently at 6.2 or earlier, you cannot use TFTP to do so. TFTP is supported only at 6.3 or later. Message ) 12-30 Optimal Dynamic RF Note: Sometimes when the channel is shown, a secondary channel is also shown, for example (BG=11+7). The second channel is the MIMO secondary channel and is used by 802.11n capable client devices. 13 RF Intrusion Detection and Containment The BSC detects and protects against rogue devices, ad-hoc networks, and a large number of WLAN Denial of Service (DoS) and spoofing attacks. The BSC provides RF intrusion detection by analyzing the data collected from its BSAPs operating in dual AP/sensor mode or sensor-only mode to detect attacks, vulnerabilities, and rogue devices in the RF space. Should a rogue AP or client be discovered, the BSC configures the BSAP nearest the rogue device to initiate containment using 802.11 de-authentication and/or disassociation messages. Up to five BSAPs can participate in the containment if range permits. The BSAPs participating in the RF containment remain online for wireless access during the containment period. All RF IDS alarms issued by a BSAP automatically generate a corresponding SNMP trap message and syslog message. This chapter provides complete procedures for your configuring RF intrusion and containment on the BSC and includes: • Identifying Authorized RF Stations on Your Network • Configuring RF Alarms • Configuring Manual Containment • Configuring Autocontainment BlueSecure™ Controller Setup and Administration Guide 13-1 Chapter 13: RF Intrusion Detection and Containment Identifying Authorized RF Stations on Your Network To better track rogue devices on your network, you can create a “white list” of known authorized RF stations. RF devices not appearing on the authorized list will be identified as rogue or intruding devices. To add an RF device to BSC’s list of known authorized RF stations: Displaying the Create new Station page 1. Click the Wireless tab in the BSC administrator console, and then click the Stations tab. A list of previously configured authorized RF stations appears. 2. Select Station from the Create menu. The Create Station Settings page appears as shown in Figure 13-1. Figure 13-1: Create new Station Page Station Name Enter a meaningful name for the RF station. MAC address Enter the RF station’s Media Access Code. Acceptable MAC address delimiters are colons (00:03:4a:3b:4F:02) or hyphens (00-03-4a-3b-4F-02). Station Type Maximum Clients Station State Identify the RF station’s type by selecting a type identifier from the drop-down menu: • AP - This station is an access point. • Client - This station is a wireless client. • Ad Hoc - This station is a wireless client operating in ad hoc mode. Ad hoc mode allows the client to operate in an independent basic service set (IBSS) network configuration that enables wireless devices to communicate directly with each other in a peer-to-peer manner. Enter the maximum number of clients (up to 64) that may associate to the RF station. If the specified maximum is exceeded, the BSC will generate an alarm for the station. Select the authorization level for the RF station from the drop-down menu: • 13-2 Authorized - This station is authorized to be on the network and no alarms will be generated if it is detected. Configuring RF Alarms Saving the settings • Rogue - This station is not authorized to be on the network and an alarm will be generated if it is detected. • Neighbor - This station is not part of the internal network, but is always present. • Unknown - The origin and or identity of this station is unknown at this time. Click Save to save the RF station settings to the BSC database. Configuring RF Alarms By default, the BSC is configured to issue alarms on over 22 different WLAN security threats detected by BSAPs (operating in sensor mode) under its control. You can configure how the BSC processes these alarms by selectively disabling alarms and setting the severity level associated with the alarm. Available Sensor Alarms ) The following table describes the BSAP sensor alarms that are configurable with this release of the BSC system software. The Mode column is interpreted as follows: S indicates this alert is only reliable in sensor mode; D indicates the alert is reliable in dual and sensor mode Note: When an AP is in AP-only mode, only the following alarms will be generated and only during the SetOnceAndHold or Calibrate Dynamic RF periods: Rogue AP, Rogue AdHoc Client, WEP Disabled, Rogue Client, Client Association Change, Client Limit, Authorized AP Down, Rogue Client to AP, Client to Rogue AP. Table 13-1: BSAP Sensor Alarms Alarm Description Dual/ Sensor Mode AirJack Attack Airjack is a toolset that allows attackers to inject fake 802.11 packets in order to gain network access or create a DoS attack. Informationalrmation on the tool and its variant (wlan-jack, monkey-jack, essidjack, cracker-jack) can be found here: http://sourceforge.net/projects/airjack/ S AP Broadcasting Multiple SSID The AP is broadcasting multiple SSIDs. This can indicate a spoof attempt S AP Channel Change The Access Point has changed channels. D AP Denied Association An authorized AP denied an association request from client. D AP Denied Authentication An authorized AP denied client access due to authentication failure. D AP Down The AP is down. S AP in WDS Mode AP is operating in WDS (bridge) mode. D AP Low Signal Strength An AP with low signal strength is detected by BAP sensor. S AP Overloaded An overloaded AP refuses new clients from associating with it. D AP Restarted The AP has restarted. S AP SSID Changed An AP has changed its SSID, if this was not authorized then there is a possible spoof in progress. D ASLEAP Attack ASLEAP is a tool that exploits a weakness in CISCO proprietary LEAP protocol. S Authorized AP Down An authorized Access Point can no longer be heard by the sensor. This may indicate that the AP has failed or been Removed from service. D Broadcast Attack Many attacks use broadcast disassociate or deauthenticate frames to disconnect all users on the network, either to redirect them to a fake network or to cause a Denial of Service attack or disclose a cloaked SSID. S Client Association Change Client has changed its association to a different Access Point. This might be due to a Rogue AP in the vicinity. D BlueSecure™ Controller Setup and Administration Guide 13-3 Chapter 13: RF Intrusion Detection and Containment Table 13-1: BSAP Sensor Alarms Alarm Description Dual/ Sensor Mode Client BSSID Changed Mobile station has changed its BSSID. D Client Limit Maximum client limit per AP has been reached. Could be due to a MAC spoofing client or real network density increase. D Client Rate Support Mismatch Specified mandatory data rate in Probe Request does not match with the values advertised by the AP. D Client To Rogue AP An authorized client is connected to a rogue AP. D Deauthentication Flood An attacker is conducting a Denial of Service (DoS) attack by flooding the network with 802.11 deauthentication frames in an attempt to disconnect users from Access Points. This can result in a Denial of Service (DoS) attack S Disassociation Traffic This alarm indicates that a client is continuing to send traffic within 10 seconds of being disassociated from an AP. S Duration Attack An attacker sends 802.11 frame with 0xFF in the duration field. This forces other mobile nodes in the range to wait till the value reaches zero. If the attacker sends continuous packets with huge durations, it prevents other nodes from operating for a long time, results in an Denial-of-Service attack. S EAPOL ID Flood Attacker tries to bring down an AP by consuming the EAP Identifier space (0-255). S EAPOL Logoff Storm An attacker floods the air with EAPOL logoff frames. It may result in Denial of Service to all legitimate stations. S EAPOL Spoofed Failure Spoofed EAP failure messages detected. S EAPOL Spoofed Success Spoofed EAP success messages detected. S EAPOL Start Storm Attacker floods air with EAPOL start frames; may result in Denial of Service to all legitimate stations. S Fata-Jack Attack A Fata-jack device sends an authentication failure packet to a mobile node to prevent the client from getting any WLAN services. S Invalid Deauthentication Code Unknown deauthentication reason code. Some access points and drivers can not handle improper reason codes. D Invalid Disconnect Code Unknown disassociation reason code. Some access points and drivers can not handle improper reason codes. D Invalid Probe Response An Access Point has responded to a client probe with a 0-length SSID, which is an invalid response which has been shown to create a fatal error with some client cards. This could be a faulty AP or an attacker specifically crafting the packet to disrupt the network. D Link Test Some Lucent/Orinoco/Proxim/Agere products provide link testing capability which could use network bandwidth. D MSF Broadcom Exploit MSF-style poisoned exploit packet for Broadcom drivers, this can be used for client hijacking. D MSF D-Link Exploit MSF-style poisoned 802.11 rate field in beacon for D-Link driver, this can be used for client hijacking. D MSF Netgear Exploit MSF-style poisoned 802.11 over-sized options beacon for Netgear driver attack, this can be used for client hijacking. S Netstumbler Probe Netstumbler is a wireless network scanning tool available for download at: http:// www.netstumbler.com. This could be the precursor to a more serious attack D Network Probe A Client is probing the network looking for a wireless AP, but is not connecting. Many wireless cards and operating systems (i.e. Windows XP) do this by default in an attempt to automatically find Access Points, but this could be an operational issue indicating a misconfigured client because it cannot associate D Possible AP Spoof A BSS timestamp mismatch in beacon or probe frames is likely to indicate an attempt to spoof the BSSID or SSID of an AP. S Rogue Client A rogue client has been detected. D Rogue Client To AP A rogue client is connected to an authorized AP. D 13-4 Configuring RF Alarms Table 13-1: BSAP Sensor Alarms Alarm Description Dual/ Sensor Mode Rogue AP A Rogue AP has been detected. Check that this is not a newly installed Access Point or an AP belonging to a nearby organization. D Rogue Ad-Hoc Client A rogue client in Ad-Hoc mode has been detected. D SSID too long SSID length exceeds 32 bytes which is larger than allowed by the 802.11 standard. This is indicative of a SSID handling exploit. D Wellenreiter Probe Wellenreiter is a wireless network scanning tool available for download at: http:// www.wellenreiter.net/. D WEP Disabled An AP is not using WEP encryption. D Configuration Procedure 1. Click the Wireless tab in the BSC administrator console, and then click the RF Alarms tab. The list of configured sensor alarms appears as shown in Figure 13-2. Figure 13-2: Configured BSAP Sensor Alarms 2. Click 3. Click or to enable or disable the selected alarm(s). to edit the severity level associated with the corresponding alarm. The Alarm Configuration page appears, for example as shown in Figure 13-3. 4. Specify the severity level you wish to associate with the alarm by selecting an option from the Severity drop-down menu: BlueSecure™ Controller Setup and Administration Guide 13-5 Chapter 13: RF Intrusion Detection and Containment • Severe - This is the highest alert level and is usually associated with a WLAN intrusion, e.g., a broadcast attack. • Warning - This alert level is usually associated with a security vulnerability, e.g., a client association change. • Informational - This alert level is usually associated with a change in network operational status, e.g., an authorized AP is down. Figure 13-3: Alarm Configuration Page 5. Click Save to save the alarm configuration settings to the BSC database. Configuring Manual Containment You can configure the BSC to automatically block (contain) rogue RF devices operating within range of the BSAPs on your WLAN. If you manually contain a rogue AP or client, the BSC configures the BSAPs nearest the rogue device to initiate containment using 802.11 de-authentication and/or disassociation messages. Up to five BSAPs can participate in the containment if range permits. These BSAPs remain online for wireless access during the containment period. Configuring Autocontainment You can configure the BSC to automatically block, i.e., contain rogue RF devices operating within range of the BSAPs on your WLAN. If you enable the BSC’s autocontainment feature and a rogue AP or client is detected within your protected airspace, the BSC configures the BSAP nearest the rogue device to initiate containment using 802.11 de-authentication and/or disassociation messages. Up to five BSAPs can participate in the containment if range permits. These BSAPs remain online for wireless access during the containment period. To configure the BSC’s RF autocontainment feature: 1. Click the Wireless tab in the BSC administrator console, and then click the Auto Containment tab. The Autocontainment Configuration page appears as shown in Figure 13-4. 13-6 Configuring Autocontainment Figure 13-4: Autocontainment Configuration Page 2. Mark the Enable Autocontainment checkbox to enable RF autocontainment. 3. Enter the duration (in minutes) that the BSC will perform active containment on the rogue device in the Autocontainment Duration field. 4. Click Save to save the autocontainment settings to the BSC database. See “Monitoring Devices in RF Autocontainment” on page 15-7 for information about displaying a list of devices currently in active containment. BlueSecure™ Controller Setup and Administration Guide 13-7 Chapter 13: RF Intrusion Detection and Containment 13-8 14 Secure Mobility® MatriX This chapter provides procedures for configuring a large-scale wireless network that requires two or more BlueSecure Controllers. The term Security Mobility MatriX refers to three functional areas: Secure Mobility, Replication, and Load Sharing. This chapter is organized as follows: • • • • An Overview of the Secure Mobility MatriX - Reasons for Deploying a Secure Mobility MatriX - General Configuration Procedure Secure Mobility® - How Secure Mobility Works - Network Requirements - Step 1: Designate and Set Up the Mobility Node List Master - Step 2: Create a List of Nodes - Step 3: Set Up Secure Mobility® on the Nodes - Step 4: Restart Services on the Mobility Master and All Nodes - Tracking Secure Mobility Status - Enabling VLAN Roaming Across LSG BSCs Replication - A Comparison of Standard and Cascaded Replication - Step 1: Set Up Replication on the Master - Step 2: Create a List of Replication Nodes on Master - Step 3: Set Up Replication on the Nodes - Step 4: Set Up Cascaded Replication (More than Ten BSCs) - Configuring a Replication Override - Tracking Replication Status Load Sharing - Typical Configuration - Network Requirements - Configuring BSC Load Sharing (Single Subnet, NAT Enabled) - Configuring BSC Load Sharing (No NAT) - Verifying Your Load Sharing Configuration BlueSecure™ Controller Setup and Administration Guide 14-1 Chapter 14: Secure Mobility® MatriX An Overview of the Secure Mobility MatriX Where multiple BlueSecure Controllers are deployed across multiple WLANs, Bluesocket provides centralized management and control through its Secure Mobility MatriX architecture, as shown in the following figure. Figure 14-1: The Bluesocket Secure Mobility MatriX Architecture The multiple BlueSecure Controllers comprising the MatriX communicate with each other in real time enabling seamless secure roaming, policy enforcement, configuration replication, and load sharing. • “Reasons for Deploying a Secure Mobility MatriX” on page 14-2. • “General Configuration Procedure” on page 14-3. Reasons for Deploying a Secure Mobility MatriX A multiple-BSC Secure Mobility MatriX configuration is designed to support large-scale wireless networks that require two or more BSCs (not including the secondary BSCs required for failover operation). You may need to implement a multiple-BSC network configuration for many reasons including: 14-2 • A single BSC may not be sufficient to handle network throughput for a large organization. • Your network configuration may be divided into different floors, subnets, buildings, etc. It may be logically easier to organize, configure, and administer one BSC per physical network division. • You wish to take advantage of the BSC replication feature to simplify the task of configuring and administering multiple BSCs. • You wish to use the BSC load sharing feature in environments such as classrooms or airport terminals where many wireless clients log onto the network simultaneously via a limited number of access points. • You wish to support user roaming to allow a user to remain seamlessly connected to the wireless network without the need for re-authentication when associating to an access point connected to a different BSC. The Bluesocket BSC implements user roaming using its Secure Mobility® feature. Secure Mobility® General Configuration Procedure Follow these high-level steps to configure a multiple-BSC Secure Mobility MatriX: 1. Configure the BSC Secure Mobility feature to enable seamless secure user roaming across subnets in your network. • An overview of the Secure Mobility feature is given in “Secure Mobility®” on page 14-3. • See “Step 1: Designate and Set Up the Mobility Node List Master” on page 14-6 for detailed Secure Mobility feature configuration instructions. 2. Configure the BSC replication feature to enable the BSCs comprising your network to share configuration data. • An overview of the BSC replication feature is given in “Replication” on page 1410. • See “Step 1: Set Up Replication on the Master” on page 14-12 for detailed replication feature configuration instructions. 3. Optional. Configure the BSC load sharing feature on groups of up to six BSCs within in your network. All BSCs configured to support the BSC load sharing feature must first have the BSC replication feature configured. • • An overview of the BSC load sharing feature is given in “Load Sharing” on page 14-17. For detailed load sharing feature configuration instructions, see: - “Configuring BSC Load Sharing (Single Subnet, NAT Enabled)” on page 1418. - “Configuring BSC Load Sharing (No NAT)” on page 14-22. Secure Mobility® When wireless network users cross a subnet boundary, they are usually forced to get a new IP address and re-authenticate to the network. This is analogous to re-dialing a cell phone call every time you connect to a new cell tower. In a truly mobile workplace, this approach is impractical. Bluesocket's patent-pending Secure Mobility® technology allows users of mobile devices to connect securely to any wireless network that uses a BSC, moving freely between offices, buildings, and floors without the need to re-authenticate as they roam from subnet to subnet. Bluesocket's Secure Mobility is unique because it does not require any end-user software to enable roaming and maintain a secure IPSec tunnel, even when the user crosses subnet boundaries. The information on Secure Mobility in this section is organized as follows: • “How Secure Mobility Works” on page 14-4. • “Network Requirements” on page 14-5. • “Step 1: Designate and Set Up the Mobility Node List Master” on page 14-6. • “Step 2: Create a List of Nodes” on page 14-7 • “Step 3: Set Up Secure Mobility® on the Nodes” on page 14-8. • “Step 4: Restart Services on the Mobility Master and All Nodes” on page 14-9 • “Tracking Secure Mobility Status” on page 14-9. • “Enabling VLAN Roaming Across LSG BSCs” on page 14-10. BlueSecure™ Controller Setup and Administration Guide 14-3 Chapter 14: Secure Mobility® MatriX How Secure Mobility Works The following figure illustrates how Secure Mobility works. For simplicity, two wireless networks and one mobile user are shown. In practice, the number of mobile users and WLANs is much greater. Subnet 1 BSC - A Subnet 2 P O W E R FA UL T DA T A A L A R M Router P WR PW R DI SK Po w er D IS K R es e t P o w er W G -2 1 0 0 W ir e le s s G a te w a y R e set W G -2 1 0 0 W ire le s s G a t e w a y BSC - B W LAN 2 W LAN 1 Mobile User Figure 14-2: Secure Mobility: Phase 1 The mobile user connects to WLAN 1 as he or she normally would, with or without an IPSec tunnel. Subnet 1 Subnet 2 P O W E R FA UL T DA T A A L A R M Router BSC - A P WR PW R DI SK Po w er D IS K R es e t P o w er W G -2 1 0 0 W ir e le s s G a te w a y R e set W G -2 1 0 0 W ire le s s G a t e w a y BSC - B W LAN 2 W LAN 1 User Moves to Subnet 2 Mobile User Figure 14-3: Secure Mobility: Phase 2 The mobile user now moves through the enterprise and associates with WLAN 2 ( as shown in Figure 14-3), which is on a separate subnet. Without Secure Mobility, this connection would be dropped and the user would be forced to get a new IP address and re-authenticate to the network. BSC B senses the new mobile user on WLAN 2 ( as shown in Figure 14-4) and checks with other BSCs on the network. The user is identified as roaming from WLAN 1. The mobile user's traffic is redirected back to their original BSC A ( as shown in Figure 14-5), allowing the user to roam seamlessly without the need to re-authenticate or acquire a new IP address. This is done without the need for client software and allows the user to maintain their secure IPSec tunnel, if used. 14-4 Secure Mobility® Subnet 1 Subnet 2 P O W E R FA U L T D A T A A L A R M Router BSC - A P WR DI SK PW R Po w e r D IS K R e se t Po w er W G -2 100 W ir eles s G atew ay R e se t W G - 210 0 W ire le ss G a te way BSCs Communicate to See if User was on a Different Subnet Originally BSC - B BSC - B Detects New User from BSC - A W LAN 2 W LAN 1 Mobile User Figure 14-4: Secure Mobility: Phase 3 A single BSC in the Secure Mobility configuration is configured as the Mobility Node List Master. The Mobility Node List Master maintains the status of all BSCs participating in the Secure Mobility configuration. Subnet 1 Subnet 2 P O W E R FA U L T D A T A A L A R M Router BSC - A P WR DI SK PW R Po w er D IS K R e se t P ower W G - 210 0 W ir eles s G atew ay W LAN 1 R e se t W G -21 00 W ire le ss G at ew a y Traffic is Re-directed, Allowing User to Move Seamlessly Between WLANs without the Need to Re-authenticate BSC - B W LAN 2 Mobile User Figure 14-5: Secure Mobility: Phase 4 Network Requirements To effectively implement Secure Mobility, you must make sure that your network and mobile environment meet the following conditions: • When mobile users roam, their traffic is redirected back to the user's original BSC. Therefore, if there is a router or firewall between BSCs, ensure that GRE (Protocol 47) and HTTPS traffic (TCP Port 443) is allowed to pass between the BSCs. • Mobile users should remain in radio contact with an access point while roaming. If radio contact is lost briefly (i.e. moving out of range of an access point), the mobile device will not require re-authentication when it returns to the coverage area of the wireless network so long as its connection timeout has not expired (see “Miscellaneous BSC Options” on page 10-24). • Each BSC's managed interface should be on a different subnet. Additionally, each BSC's protected interface that is connected to a router should be on a different BlueSecure™ Controller Setup and Administration Guide 14-5 Chapter 14: Secure Mobility® MatriX subnet. BSC protected interfaces that are not connected to a router may be on the same subnet. The following figure illustrates the subnet requirements for the BSC managed and protected interfaces to enable use of Secure Mobility® in a multipleBSC network. BSC Managed Interfaces BSC Protected Interfaces Bluesocket BSC Subnet A PWR DISK Power Reset WG-2100 Wireless Gateway Subnet C Router Bluesocket BSC Subnet B PWR DISK Power Reset Subnet D WG-2100 Wireless Gateway Bluesocket BSC Subnet A PWR DISK Power Reset Subnet C WG-2100 Wireless Gateway Bluesocket BSC Subnet B PWR DISK Power Reset Subnet C WG-2100 Wireless Gateway Figure 14-6: BSC Interface Requirements for Secure Mobility® Step 1: Designate and Set Up the Mobility Node List Master You should follow the procedure listed below if you are setting up a Secure Mobility configuration on a multiple-BSC network containing between two and fifty BSCs (not including any secondary BSCs in a failover setup). ) Note: In v4 (and later) of the BSC system software, the Replication and Secure Mobility features are completely independent of each other. You may configure the replication feature on a BSC that is configured to support Secure Mobility, but this feature is not required for Secure Mobility. You do need to configure the Replication Master and the Secure Mobility Node List Master to be the same BSC. To set up Secure Mobility® on the Mobility Node List Master BSC: 1. Click the Mobility MatriX tab in the BSC administrator console, and then click the Secure Mobility® Setup tab on the Mobility MatriX page. The BSC Secure Mobility Setup page appears as shown in Figure 14-7. 2. Mark the Enable Secure Mobility checkbox to enable Secure Mobility on the Secure Mobility Node List Master. 3. Enter a text string in the Secure Mobility mesh key field. The mesh key is a common, shared password that you provide for all BSCs participating in the Secure Mobility setup. The BSCs exchange the key when 14-6 Secure Mobility® Figure 14-7: BSC Secure Mobility Setup Page communicating with each other, thus providing an extra layer of security. The key can be any text string you choose, as long as it is the same for all BSCs in the Secure Mobility configuration. 4. Re-enter the Secure Mobility mesh key in the Confirm field. 5. Set the BSC role to Secure Mobility Node List Master by marking the Act as a master and transmit mobility node list to the mobility nodes radio button. 6. Click Save to save the BSC Secure Mobility settings to the BSC database. Do not restart the BSC until instructed to do so at the end of this procedure. Step 2: Create a List of Nodes You now need to create a list of Nodes on the Secure Mobility Node List Master BSC. 1. Select Secure Mobility Node from the Create drop-down list. The Create a Secure Mobility node page appears as shown in Figure 14-8. Figure 14-8: Edit the Secure Mobility Node Page 2. Complete the following steps for each Secure Mobility Node BSC: BlueSecure™ Controller Setup and Administration Guide 14-7 Chapter 14: Secure Mobility® MatriX a) Enter the IP address of the protected interface on the Node and an optional description in the fields provided. b) Note that the Enable Secure Mobility node checkbox is marked by default to enable secure mobility on this node. c) Click Save to store the information or Save and create another to continue defining mobility node BSCs. 3. Click the Secure Mobility Nodes tab on the Mobility MatriX page to review the list of configured nodes. If any Node BSCs are missing, add them by following the above steps. Step 3: Set Up Secure Mobility® on the Nodes To configure Secure Mobility® on each Node BSC: 1. Click the Mobility MatriX tab in the BSC administrator console, and then click the Secure Mobility Setup tab on the Mobility MatriX page. The BSC Secure Mobility setup page appears as shown in Figure 14-9. Figure 14-9: BSC Secure Mobility Setup Page 2. Mark the Enable Secure Mobility checkbox to enable Secure Mobility on the Mobility Node. 3. Set the BSC role to Secure Mobility Node by marking the Act as a mobility node and receive the mobility node list from a central master? radio button. 4. Enter the protected interface IP address of the Secure Mobility Node List Master BSC in the Master IP Address field. 5. Mark the Acquire initial Security Mobility Node List from Master checkbox to acquire the latest snapshot of the node list from the Nodelist Master. 6. Enter a text string in the Secure Mobility mesh key field. The mesh key is a common, shared password that you provide for all BSCs participating in the Secure Mobility setup. The BSCs exchange the key when communicating with each other, thus providing an extra layer of security. The key can 14-8 Secure Mobility® be any text string you choose, as long as it is the same for all BSCs in the Secure Mobility configuration. 7. Re-enter the Secure Mobility mesh key in the Confirm field. 8. Click Save to save the BSC Secure Mobility settings to the BSC database. Do not restart the BSC until instructed to do so at the end of this procedure. Step 4: Restart Services on the Mobility Master and All Nodes Click the click here link in the Restart message on the Secure Mobility Node List Master and all of the Secure Mobility Nodes to restart each BSC. When the services restart, all Secure Mobility status information in the Secure Mobility Node List is automatically uploaded to the Nodes. Tracking Secure Mobility Status You can track the status of the Secure Mobility configuration from the Node List Master and any Node. The are two means of tracking Secure Mobility status. You can click Mobility MatriX/ Secure Mobility Setup to display the following status information on the Node List Master: • Total enabled nodes - Number of nodes that have been enabled. Nodes are enabled via the Enable node checkbox on the Edit the Secure Mobility node page. • Synchronized nodes - Number of Secure Mobility Nodes that have received the latest Secure Mobility update from the Node List Master. • Unsynchronized Nodes - Number of Secure Mobility Nodes that have not received the latest Secure Mobility list update from the Node List Master. • Nodes that did not respond to queries - Number of Nodes that have not responded to a status request from the Node List Master. • Nodes that did not acknowledge the receipt of changes - Number of Nodes that requested a Secure Mobility list update but did not confirm that it was received. • ID of last distributed update - Internal ID of Secure Mobility update that was most recently distributed. • Number of undistributed updates - Count of updates to distribute from Secure Mobility Master to Nodes. Clicking Mobility MatriX/Secure Mobility Setup from a Secure Mobility Node will display the latest communication exchange between the Node and the Master. For example: Current Status with the Master: Last Secure Mobility Log ID sent by the master: 14 Last message sent back to the master: [New Snapshot] You can also click Mobility MatriX/Secure Mobility Nodes from a Secure Mobility Master or Node to display a tabular listing of BSCs comprising the Secure Mobility configuration. The displayed information includes: • Actions - Edit the BSC’s Secure Mobility configuration or delete the BSC. • Enabled - Is Secure Mobility enabled on the BSC? Yes or no. • Address - IP address of Secure Mobility Node or Master. • Model - BlueSecure Controller model number, e.g. BSC-2100. • Version - System software version the BSC is running. • Recent Status - Lists any error message returned from a Node following receipt of “heartbeat” query from the Master. BlueSecure™ Controller Setup and Administration Guide 14-9 Chapter 14: Secure Mobility® MatriX • Last Update - ID of last status update. • Last Update Message - Last message concerning Secure Mobility configuration update. • Last Requested Update - ID or update last requested by Node. Enabling VLAN Roaming Across LSG BSCs To enable users to roam between BSC managed interfaces within the same LSG, configure the following Secure Mobility settings on each LSG member BSC: 1. Click the Mobility MatriX tab in the BSC administrator console, and then click the Secure Mobility Setup tab. The Secure Mobility Setup page appears. 2. Enable Secure Mobility on each node in the LSG. 3. Enter a Secure Mobility Mesh Key on each node. 4. Enable the Do not send or receive Secure Mobility Node List configurations changes option on each node. ) Note: Do not create any nodes in the Secure Mobility Nodes list. Leave the list empty. Replication ) Note: In v4 (and later) of the BSC system software, the Replication and Secure Mobility features are completely independent of each other. You do need to configure the Replication Master and the Secure Mobility Node List Master to be the same BSC. When you configure the BSC replication feature, one BSC is designated as the Replication Master and up to 50 other BSCs are Replication Nodes. All Authentication, Roles and General configuration settings in the Replication Master are shared in real time with the Replication Nodes. This means that, other than configuring the protected and managed interfaces, little additional setup is required for the Replication Node BSCs. Any initial setup information or subsequent changes are propagated to the Nodes from the Replication Master. The major benefit of replication is that you only need to perform substantial configuration and administrative changes on the Replication Master and not on each BSC in your network. If you need to change Authentication, Roles, or General configuration setting on the Replication Nodes, you will be unable to do so; these functions are set to read-only on the Replication Nodes, even for BSC administrators. You can make changes to these functions only on the BSC designated as the Replication Master. The information on Replication in the section is organized as follows: • “A Comparison of Standard and Cascaded Replication” on page 14-11. • “Step 1: Set Up Replication on the Master” on page 14-12. • “Step 2: Create a List of Replication Nodes on Master” on page 14-12. • “Step 3: Set Up Replication on the Nodes” on page 14-13. • “Step 4: Set Up Cascaded Replication (More than Ten BSCs)” on page 14-14. • “Step 5: Restart Services on the Master and All Nodes” on page 14-15. • “Configuring a Replication Override” on page 14-15. • “Tracking Replication Status” on page 14-16. Note: You must ensure that HTTPS traffic (TCP Port 443) is allowed to pass between the BSCs in the replication configuration. 14-10 Replication A Comparison of Standard and Cascaded Replication In addition to the standard replication configuration described above, v4 (and later) of the BSC system software also supports a cascaded replication configuration. The following figure illustrates a standard BSC replication configuration and a cascaded BSC replication configuration. Standard Replication Configuration Replication Master PW R D IS K P ower Res et W G-210 0 Wire less Gatewa y BSC A Replication Nodes PW R DIS K P WR P ower PW R D ISK Res et Power W G- 2100 W ire less Gateway D ISK Res et Power W G-210 0 W ireless Gatewa y BSC B Res et WG- 2100 Wir eless Gateway BSC C BSC D Cascaded Replication Configuration Replication Master PW R D IS K P ower Res et W G-210 0 Wire less Gatewa y BSC E Replication Master/Node Replication Nodes PW R DIS K P WR P ower PW R D ISK Res et Power W G- 2100 W ire less Gateway D ISK Res et Power W G-210 0 W ireless Gatewa y BSC G BSC F Res et WG- 2100 Wir eless Gateway BSC H Replication Nodes P WR PW R D ISK P ower D ISK Res et WG- 2100 Wirele ss Gateway BSC I Power Res et WG-2 100 Wir eless Gate way BSC J Figure 14-10: Standard and Cascaded Replication Configurations In a standard replication configuration, all Replication Nodes receive their configuration from a single Replication Master. For example, in the preceding figure, Nodes BSC B, BSC C, and BSC D all receive their configuration from BSC A. We recommend that you use a standard replication configuration for networks of up to ten BSCs. In a cascaded replication configuration, a BSC that is configured to act as a Replication Node for a Replication Master is also configured to act as a Replication Master for other Replication Nodes. For example, in the preceding figure, Nodes BSC F, BSC G, and BSC H all receive their configuration from BSC E, while Nodes BSC I and BSC J receive their configurations from the combination Master/Node BSC F. You may configure as many combination Replication Master/Node BSCs as required to support your network. The cascaded configuration scales the replication feature by preventing a single BSC from being overrun with configuration requests. We recommend that you use a cascaded replication configuration for networks of more than ten BSCs. You should configure your network such that no more than ten BSCs receive their configurations from the same Replication Master. BlueSecure™ Controller Setup and Administration Guide 14-11 Chapter 14: Secure Mobility® MatriX Step 1: Set Up Replication on the Master Select one BSC as the Replication Master. You can also set up a secondary BSC in a failover configuration with the Replication Master. You can configure VLANs as well To set up replication on the Master BSC: 1. Click the Mobility MatriX tab in the BSC administrator console, and then click the Replication Setup tab. The Replication Setup page appears as shown in Figure 14-11. Figure 14-11: Configuring Replication on the Master BSC 2. Set the BSC role to Replication Master by marking the Act as a master and transmit configuration settings to the replication nodes checkbox. 3. Enter a text string in the Replication mesh key field. The mesh key is a common, shared password that you provide for all BSCs participating in the replication setup. The BSCs exchange the key when communicating with each other, thus providing an extra layer of security. The key can be any text string you choose, as long as it is the same for all BSCs participating in the replication setup. 4. Re-enter the Replication mesh key in the Confirm field. 5. Ensure that the Act as a replication node and receive edits from a central master? checkbox is cleared. 6. Click Save to save the BSC Replication settings to the BSC database. Do not restart the BSC until instructed to do so at the end of this procedure. Step 2: Create a List of Replication Nodes on Master 1. On the Master BSC, you now must create a list of Replication Nodes that are to receive configuration updates. Select Replication node from the Create drop-down list. The Create a replication node page appears as shown in Figure 14-12. 2. Complete the following steps to define each Replication Node BSC on this Master: 14-12 a) Enter either the IP address of the protected interface on the Replication Node and an optional description in the fields provided. b) The Enable node checkbox is marked by default to enable replication on this node. c) Click Save to store the information or Save and create another to continue defining Replication Node BSCs. Replication Figure 14-12: Create a Node Page d) Optional. If you are configuring the replication feature to support a Load Sharing Group, you must take the additional step of adding the Replication Master as a Replication Node by following steps a to c. This is only required if you are using the BSC Load Sharing Feature. 3. Click the Replication Nodes tab on the Mobility MatriX page to review the list of configured nodes. If any Replication Node BSCs are missing, add them by following the above steps. Step 3: Set Up Replication on the Nodes ) Note: For each Replication Node, make sure that you have connected the network ports, set up the protected interface, set up the managed interface, and set up any VLANs (if desired) for each Replication Node, as described in the appropriate sections of Chapter 4. ) Note: You can also set up a secondary BSC in a failover configuration with any of the Replication Nodes. No additional configuration is required on the Replication Nodes beyond what is described in this chapter. To configure replication on each Node BSC: 1. Click the Mobility MatriX tab in the BSC administrator console, and then click the Replication Setup tab to display the Replication Setup page. Set the BSC role to Replication Node by marking the Act as a replication node and receive edits from a central master? checkbox. The Replication Setup page expands to reveal the Replicated Data section, as shown in Figure 14-13. By default, only the settings on the first four tabs of the UI (User Authentication, User Roles, Voice, and General) are replicated. Optionally, mark the “Web Logins” and/ or the Wireless checkboxes to replicate the data on those tabs also. 2. Enter the protected interface IP address of the Replication Master in the Master IP address field. This is the BSC from which the BSC Node will receive configuration updates. 3. Enter a text string in the Replication mesh key field. The mesh key is a common, shared password that you provide for all BSCs participating in the replication setup. The BSCs exchange the key when communicating with each other, thus providing an extra layer of security. The key can be any text string you choose, as long as it is the same for all BSCs in the replication setup. 4. Re-enter the Replication mesh key in the Confirm field. BlueSecure™ Controller Setup and Administration Guide 14-13 Chapter 14: Secure Mobility® MatriX Figure 14-13: Configuring Replication on a Node BSC 5. Mark the Acquire a snapshot from the master? checkbox to configure the Replication Node to upload the database snapshot file that is generated on the Replication Master. The upload occurs when you restart the Replication Nodes, later in this procedure. 6. Click Save to store the information to the BSC database. Step 4: Set Up Cascaded Replication (More than Ten BSCs) Version 4 and later of the BSC system software supports a cascaded replication configuration as shown in Figure 14-10. In the cascaded configuration, a BSC that is configured to act as a Replication Node for a Replication Master is also configured to act as a Replication Master for other Replication Nodes. We recommend that you use a cascaded replication configuration for networks of more than ten BSCs (your network should be configured such that no more than ten BSCs receive their configurations from the same Replication Master). To reconfigure a Node as a combination Replication Master/Node: 1. Click the Mobility MatriX tab in the BSC administrator console, and then click the Replication Setup tab as shown in Figure 14-14. 2. Mark the Act as a master and transmit configuration settings to the replication nodes? checkbox. 3. Do not modify any of the existing Replication Node settings. 4. Click Save to save the BSC Replication settings to the BSC database. 5. Set up the list of nodes that should receive their settings from this combination Replication Master/Node, as explained in “Step 2: Create a List of Replication Nodes on Master” on page 14-12. 14-14 Replication Figure 14-14: Configuring a Replication Master/Node 6. Do not restart the BSC until instructed to do so at the end of this procedure. Step 5: Restart Services on the Master and All Nodes To restart each BSC, click the click here link in the Restart message on the Replication Master, on all of the Replication Nodes, and on any combination Master/Node BSC if using cascaded replication. When the services restart, all setup information in the Replication Master snapshot is automatically uploaded to the Replication Nodes. Configuring a Replication Override To configure a replication override, log into each BSC in your Secure Mobility MatriX via the administrator console and complete the following steps: 1. Click the Mobility MatriX tab in the BSC administrator console, click the Replication Setup tab on the Mobility MatriX page, and then click the Node Override link at the top of the page. The Replicated Data Override page appears as shown in Figure 1415. Figure 14-15: BSC Replicated Data Override Page BlueSecure™ Controller Setup and Administration Guide 14-15 Chapter 14: Secure Mobility® MatriX 2. If you are supporting VoIP, make sure that you override the replicated IP addresses for the SpectraLink/Avaya gateway and SVP server. See “Configuring Vendor-specific IP Phone Support” on page 9-2 for VoIP details. 3. Click Save to save the BSC Replication Override settings to the BSC database. 4. Restart the BSC to enable the replication override. Tracking Replication Status You can track the status of the replication configuration from the Replication Master and any Replication Node. There are two means of tracking replication status. You can click Mobility MatriX/ Replication Setup to display the following status information on the Replication Master: • Total enabled nodes - Number of nodes that have been enabled. Nodes are enabled via the Enable node checkbox on the Edit the replication node page. • Synchronized nodes - Number of Replication Nodes that have received the latest replication update from the Master. • Unsynchronized Nodes - Number of Replication Nodes that have not received the latest replication update from the Master. • Unresponsive Nodes - Number of Nodes that have not responded to a status request from the Master. • Nodes that did not acknowledge the receipt of changes - Number of Nodes that requested a replication update but did not confirm that it was received. • ID of last distributed update - Internal ID of replication update that was most recently distributed. • Number of undistributed updates - Count of updates to distribute from Replication Master to Nodes. Clicking Mobility MatriX/Replication Setup from a Replication Node will display the latest communication exchange between the Node and the Master. For example: Current Status with the Master: Last API Log ID sent by the master: 14 Last message sent back to the master: [New Snapshot] You can also click Mobility MatriX/Replication Nodes from a Replication Master or Node to display a tabular listing of BSCs comprising the replication configuration. The displayed information includes: 14-16 • Actions - Edit the BSC’s replication configuration or delete the BSC from the replication configuration. • Enabled - Is replication enabled on the BSC? Yes or no. • Address - IP address of Replication Node or Master. • Model - BlueSecure Controller model number, e.g. BSC-2100. • Version - System software version the BSC is running. • Recent Status - Lists any error message returned from a Node following receipt of “heartbeat” query from the Master. • Last Update - ID of last status update. • Last Update Message - Last message concerning replication configuration update. • Last Requested Update - ID or update last requested by Node. Load Sharing Load Sharing Use the BSC load sharing feature in environments where many wireless clients log onto the network simultaneously via a limited number of access points.The load sharing feature should be used when the collective traffic load from a group of wireless and wired clients exceeds the performance limits of a single BSC. ) Note that Secure Mobility roaming is supported on VLANs within a Load Sharing Group, but not from a BSC outside of the Load Sharing Group. The information on Load Sharing in the section is organized as follows: • “Typical Configuration” on page 14-17. • “Network Requirements” on page 14-18. • “Configuring BSC Load Sharing (Single Subnet, NAT Enabled)” on page 14-18. • “Configuring BSC Load Sharing (No NAT)” on page 14-22. • “Verifying Your Load Sharing Configuration” on page 14-23. Typical Configuration Bluesocket BSCs that share user traffic are members of a load sharing group (LSG).You must first configure the Replication feature for all BSCs that are to have membership in an LSG. All BSCs in the local Replication setup are eligible for membership in a load sharing group, however a given load sharing group may have a maximum of six members. The configured Replication Master will act as the Load Sharing Master in an LSG. The Load Sharing Master manages configuration of the LSG, controls all broadcast traffic through the LSG, runs a DHCP server, assigns virtual IP addresses to the managed and protected interfaces of LSG members, and serves as the central point-of-configuration for the BSC administrator. The following figure illustrates a typical load sharing configuration. Load Sharing Master Managed Side BSC1 PWR Protected Side PWR DISK Power Reset WG-2100 Wireless Gateway Firewall DISK Power Reset Power Reset Power Reset WG-2100 Wireless Gateway BSC2 Switch Switch PWR Internet DISK WG-2100 Wireless Gateway BSC3 PWR DISK WG-2100 Wireless Gateway Load Sharing Nodes Load Sharing Group Protected Corporate/Campus Network Switch for all BSC Failover Port Connections Keep Alive and State Information is Shared over BSC Failover Ports Figure 14-16: A Typical Load Sharing Configuration BlueSecure™ Controller Setup and Administration Guide 14-17 Chapter 14: Secure Mobility® MatriX Network Requirements Ensure that your BSC network meets the following requirements before you configure the BSC load sharing feature on up to six BSCs in a load sharing group. • We recommend that you assign a fixed IP address to the protected interface for each BSC in the load sharing group (LSG) because during a load sharing failover event, the interface state might change such as to conflict with the DHCP client. • You may connect the managed side and the protected side of the BSCs to a switch. • We recommend that all BSCs in an LSG have a single subnet on the managed side, a different single subnet on the protected side, and be running NAT. If you wish to configure load sharing on BSCs that have multiple subnets on the managed side with NAT disabled, then you must follow the guidelines given in “Configuring BSC Load Sharing (No NAT)” on page 14-22. • Some load sharing information is replicated (like the load sharing nodes and virtual addresses), but you should mirror the “physical” (including VLAN) interface settings on LSG members so that the only differences between the BSCs are their IP addresses. All the other physical interface settings should be identical. • The Load Sharing Master must serve as the DHCP server for all managed side clients. • You must first configure the Replication feature for all BSCs that are to have membership in an LSG. • All BSCs in the local Replication setup are eligible for membership in a load sharing group, however a given LSG may have a maximum of six members. • Be sure to include the Replication Master in the Replication Nodes list when configuring Replication. • The configured Replication Master acts as the Load Sharing Master in an LSG. The Load Sharing Master manages configuration of the LSG, controls all broadcast traffic through the LSG, runs a DHCP server to assign IP addresses to the managed and protected interfaces of LSG members, and is the point-of-configuration for the BSC administrator. ) Note: Secure Mobility roaming is supported on VLANs within a Load Sharing Group, but not from a BSC outside of the Load Sharing Group. • All BSC failover ports in the LSG must be interconnected. Use a switch when connecting three or more LSG members. You may use a crossover cable to connect the failover ports directly in a two-member LSG for all BSC models except the BSC1200; For the BSC-1200, you must use a straight-through cable. Do not inter-connect the failover ports of the BSCs in the LSG until load sharing has been configured and enabled on the Load Sharing Master. BSCs in the LSG share Keep Alive and State Information over the BSC Failover Ports. During a LSG failover event, the BSC with the lowest node ID will take over for the failed BSC by updating its own network settings and those of the clients that were assigned to the failed BSC. If the LS master fails, the adjacent node in the LSG will take over DHCP responsibilities. For DHCP redundancy to work within the LSG, the DHCP server must be enabled on all LS nodes, and all nodes must have the same DHCP configuration. Configuring BSC Load Sharing (Single Subnet, NAT Enabled) To configure the BSC load sharing feature (using single subnet mode with NAT enabled), you must first set up a standard replication configuration as described starting in “Step 1: Set Up Replication on the Master” on page 14-12. You can then configure the load 14-18 Load Sharing sharing feature on up to six members of the local replication configuration including the Replication Master by following these steps. ) Note: Before configuring LoadSharing or performing the following three stepes, create all the VLANs that you wish to use on all LoadSharing Nodes. If a VLAN exists on one node, it must exist on all boxes with the same VLAN id. 1. Define the IDs and virtual network addresses to be assigned to members of the load sharing group on the Load Sharing Master. 2. Configure and enable load sharing on the Load Sharing Master (i.e., the Replication Master) and then connect its failover port to the failover switch. 3. Connect each Load Sharing Node BSC to the switch that interconnects the BSC failover ports and then configure load sharing on each Load Sharing Node. Each of these steps is described in detail in the sections that follow. Step 1: Define the IDs and virtual network addresses to be assigned to members of the load sharing group. On the Load Sharing Master (i.e., the Replication Master), follow these steps to define the load sharing group members: 1. Click the Mobility MatriX tab in the BSC administrator console, and then click the Load Sharing Nodes tab. The Load Sharing Nodes page appears. Note that the first three VLANs (if any) are shown in this tab. They are listed from left to right in groups of three colums (managed address, managed netmask, protected address). The super text above the columns for a VLAN indicates the VLAN name and grouping. For example: Figure 14-17: Load Sharing Nodes Page 2. Complete the following steps for each BSC that is to have membership in the load sharing group: a) Click the edit. icon that corresponds to the LSG member settings that you wish to The Edit a load sharing entry page appears, as shown in Figure 14-18. When you initially set up the LSG, we recommend that you proceed in numeric order by ID and that you map the settings associated with ID 1 to the Load Sharing Master. BlueSecure™ Controller Setup and Administration Guide 14-19 Chapter 14: Secure Mobility® MatriX Figure 14-18: Defining LSG Member Settings b) Select a weight (1 to 5) from the Weight drop-down menu to assign the LSG member. A low weight (e.g. 1) means that the LSG member is less likely to be selected to service client traffic.A high weight means the LSG member is more likely to be selected. c) Enter the Load Sharing IP virtual address to assign the LSG member’s managed interface in the Managed side virtual address field. This address should not match the IP address you have configured for the BSC’s physical managed interface (eth1), but it must be on the same subnet as the BSC’s physical managed interface (eth1). For example, if the configured managed port physical address is 192.168.0.1/ 24, then you could configure the Load Sharing IP virtual address to be 192.168.0.2, or 192.168.0.11, but not 192.168.1.1. ) Warning: Do not configure the IP virtual address to match the BSC’s physical managed interface; if you do, the BSC will be unreachable after restart. d) Enter a subnet mask in the Managed side netmask to specify the bits in the Load Sharing IP address that correspond to network address and those that correspond to the subnet portion. This netmask must be set the same as the physical managed port’s netmask, since they both must be in the same subnet. e) Enter the Load Sharing IP virtual address to assign the LSG member’s protected interface in the Protected side virtual address field. This address should not match the IP address you have configured for the BSC’s physical protected interface (eth0), but it must be on the same subnet as the BSC’s physical protected interface (eth0). f) If the LSG member is communicating over VLANs on the managed side, the VLANs will appear in the list of configurable interfaces. You must configure virtual IP addresses for all VLANs: • 14-20 Enter the Load Sharing IP virtual address to assign the LSG member’s managed VLAN interface in the Managed side virtual address field. Load Sharing • Enter a subnet mask in the Managed side netmask that specifies which bits in the Load Sharing virtual IP address correspond to network address and which bits correspond to the subnet portion of the address. This netmask must match the corresponding VLAN’s netmask. • Optional. If using the same protected-side VLAN, then enter the Load Sharing IP virtual address to assign the LSG member’s protected interface in the Protected side virtual address field. 3. Click Save to store the Load Sharing Group member settings to the BSC database. Step 2: Configure Load Sharing on the Load Sharing Master. Follow these steps to configure the load sharing feature on the Load Sharing Master (i.e., the Replication Master): 1. Click the Mobility MatriX tab in the BSC administrator console, and then click the Load Sharing Setup tab. The Edit Load Sharing Configuration page appears as shown in Figure 14-19: Figure 14-19: Configuring Load Sharing on the Master 2. Mark the Enabled radio button to enable load sharing on the Load Sharing Master. 3. Mark the ID radio button that corresponds to the load sharing ID for the Load Sharing Master. Again, we recommend that you assign ID 1 to the Load Sharing Master. 4. Specify the Load sharing method that is to be used: NAT enabled for Managed Interfaces or NAT disabled for Managed Interfaces. ) Note: See “Configuring BSC Load Sharing (No NAT)” on page 14-22 for guidelines on using the NAT disabled for Managed Interfaces load sharing method. 5. Click Save to store the Load Sharing settings to the BSC database. 6. Restart the BSC so that its load sharing configuration takes effect. 7. Connect the Load Sharing Master’s failover port to the failover switch using a straight- through cable. Step 3: Configure Load Sharing on the Load Sharing Nodes. Follow these steps to configure the load sharing feature on each Load Sharing Node: 1. Connect the Load Sharing Node BSC’s failover port to the failover switch using a straight-through cable. 2. Click the Mobility MatriX tab in the BSC administrator console, and then click the Load Sharing Setup tab. The Edit Load Sharing Configuration page appears as shown in Figure 14-20: 3. Mark the Enable checkbox to enable load sharing on the Load Sharing Node. BlueSecure™ Controller Setup and Administration Guide 14-21 Chapter 14: Secure Mobility® MatriX Figure 14-20: Configuring Load Sharing on a Node 4. Mark the ID radio button that corresponds to the load sharing ID for the Load Sharing Node. 5. Specify the Load sharing method that is to be used: NAT enabled for Managed Interfaces or NAT disabled for Managed Interfaces. Note: This procedure demonstrates configuration of the Single Subnet load sharing method. See “Configuring BSC Load Sharing (No NAT)” on page 14-22 for information about configuring the Multiple Subnet, No NAT load sharing method. 6. Click Save to store the Load Sharing settings to the BSC database. 7. Restart the BSC so that its load sharing configuration takes effect. Configuring BSC Load Sharing (No NAT) When running with NAT enabled, client traffic in and out traverses the assigned Load Sharing BSC. When NAT is disabled, each LSG node must be assigned a unique subnet or returning traffic will only be routed through the Load Sharing Master. In addition to assigning unique subnets, static routes for these subnets must be added to the local router. Some sample settings for configuring Load Sharing with NAT disabled are provided below. These samples show settings for the managed interface. Each VLAN interface must be set up in the same way. Address Settings Consider the case where you wish to configure Load Sharing for a LSG with three members across a managed subnet of 192.168.160.0/24. First, configure the physical managed interface for each LSG BSC (under the Network tab). These physical addresses are not subnetted. 1. 192.168.160.1/24 (netmask=255.255.255.0) 2. 192.168.160.65/24 (netmask=255.255.255.0) 3. 192.168.160.129/24 (netmask=255.255.255.0) Next, configure the virtual addresses for each LSG BSC under the Load Share Nodes tab. These addresses are subnetted. 1. 192.168.160.2/26 (netmask=255.255.255.192) 2. 192.168.160.66/26 (netmask=255.255.255.192) 3. 192.168.160.130/26 (netmask=255.255.255.192) Note that the 192.168.160.192/26 subnet is not used. 14-22 Load Sharing You must allocate physical and virtual address carefully according to the subnets you have chosen. Each node's assigned virtual address and physical address must be located in the same subnet. 1. physical=192.168.160.1/24 virtual=192.168.160.2/26 2. physical=192.168.160.65/24 virtual=192.168.160.66/26 3. physical=192.168.160.129/24 virtual=192.168.160.130/26 Note here we use the /24 subnet for all physical addresses and the /26 subnet for the virtual addresses. The BSC DHCP server will give out subnet-masks based on the configured virtual address, while the physical subnet is needed for failover. Address Ranges Do not use a DHCP range with Load Sharing. Instead, use the DHCP exclusion list. All physical and virtual addresses assigned to the LSG BSCs are excluded automatically. When configuring DHCP ranges, it's better to exclude the addresses you don't want. If inclusion is the only option, be careful you don't overlap with the virtual or physical IPs. In either case, you need to configure the exclusion/inclusion range on each BSC, in case that BSC takes over as the primary BSC (i.e. the BSC running DHCP server). For more information on address ranges, refer to “Networks” on page 4-1. Verifying Your Load Sharing Configuration Here is some additional information to help you verify that your load sharing configuration is set up properly. Network Interface Settings After you have configured a BSC as a member of a Load Sharing Group, you will see its virtual managed and protected addresses displayed as the currently used addresses when you look at its physical interface settings. Consider BSC2 from our sample set up. If we display its protected interface settings, we’ll see the configured virtual load sharing address displayed as its current protected interface address as shown in Figure 14-21. Active Connections When you view the Status/Active Connections/All Connections page on a BSC that is a member of a Load Sharing Group, you will see connections to all BSCs in the Load Sharing Group listed. For example, if we view the active connections page on BSC2 in our sample Load Sharing Group, we will also see the active connections to BSC1 and BSC3 listed. Load Sharing Status You can view a BSC’s load sharing status by displaying the Mobility MatriX/Load Sharing Setup page. For simplicity, we’ll consider the example of a two-BSC Load Sharing Group. If we look at the load sharing setup on the Load Sharing Master, we’ll see a screen similar to this: If we look at the load sharing setup on the Load Sharing Node, the screen might look as shown in Figure 14-23. Now if a load sharing failover event occurs at the Node, i.e. if its Managed, Protected or Failover interface goes down, then the Load Sharing Master will reassign the Node’s virtual interfaces to another BSC in the group (in this case to itself). We can verify this by looking at the Load Sharing Setup page on the Load Sharing Master as shown in Figure 14-24. BlueSecure™ Controller Setup and Administration Guide 14-23 Chapter 14: Secure Mobility® MatriX Physical Protected Interface Address Virtual Loadsharing Protected Interface Setting Figure 14-21: Verifying the Protected Interface Address Settings Figure 14-22: Load Sharing Setup on the Load Sharing Master In the event of a down interface on a Load Sharing Group member, the Load Sharing Master will reassign the traffic load to another member of the group almost instantaneously. If an interface on the Load Sharing Master itself goes down, then all connections to the Load Sharing Master are transferred to another BSC in the group, this BSC runs a DHCP server to service user connections, and all current connections to the Node BSCs are maintained. 14-24 Load Sharing Figure 14-23: Load Sharing Setup on the Load Sharing Node Figure 14-24: Verifying the Load Sharing Failover Event Load Sharing Status Summary You can also display a quick visual snapshot of your configured Load Sharing Group by clicking Status/Summary, and then clicking the Loadsharing link at the top of the page. The status summary for a three-node Load Sharing Group that is up and fully operational would look similar to this: Figure 14-25: Status Summary for an Operational LSG The sample status summary shown in the following figure indicates that Load Sharing Node 2 has failed over to Load Sharing Node 1. Figure 14-26: Status Summary for a Load Sharing Failover Event BlueSecure™ Controller Setup and Administration Guide 14-25 Chapter 14: Secure Mobility® MatriX 14-26 15 Status This chapter covers the following topics: • Monitoring Active User Connections • Viewing the BSC Event Log • Displaying a BSC Status Summary • Displaying BSC Secure Mobility® Status • Displaying Load Sharing Status • Displaying Power over Ethernet (PoE) Status • Generating and Displaying BSC Reports • Performing Standard Network Diagnostic Tests • Capturing Network Traffic Data BlueSecure™ Controller Setup and Administration Guide 15-1 Chapter 15: Status Monitoring Active User Connections You can monitor and display active user connection status and other user information, such as IP address, assigned role, and throughput statistics, in both text and graphical formats. The information in this section is organized as follows: • “Displaying Active User Status” on page 15-2. • “Forcing a User Logout” on page 15-3. • “Monitoring a User’s IDS Status” on page 15-3. • “Monitoring Connected Access Points” on page 15-4 • “Monitoring RF IDS Alarms” on page 15-6. • “Monitoring Devices in RF Autocontainment” on page 15-7. • “Monitoring User Connections Graphically” on page 15-7. Displaying Active User Status To view connection information for users logged onto the BSC: Displaying the Status Active Connections tab Click the Status tab in the BSC administrator console, click the Active Connections tab, and then click the All Connections link. The Active Connections table appears as shown in Figure 15-1. Figure 15-1: Active Connections Page Table Columns 15-2 The table displays the following for each user connected to the BCS: • Name - User's login name. Brackets around a hostname indicate fixed, i.e., static DHCP entries. • Address - IP address of the user’s wireless device • MAC address - Hardware (MAC) address of the wireless device's NIC card Monitoring Active User Connections • Role - Role assigned to this connection. To change a user’s role, mark that user’s checkbox and then select the new role from the Override Role dropdown. • Authentication - Authentication type (Local = BSC user database) • Current/Average Kbps - Current and average data throughput in kilobytes per second (Kbps) • Start Time - Start date and time of the connection session. • Connection Count - (Hidden by default) A mechanism to find heavy usage applications that might put a strain on the controller, such as point-to-point applications that can use hundreds, and in some cases thousands, of TCP connections. Note that In the Role column, a bold underlined role indicates a secure connection. Positioning the mouse pointer over the role indicates its secure connection type (i.e., IPSec, PPTP, or L2TP/IPSec). PSec, PPTP, or L2TP/IPSec Users Each active IPSec, PPTP, or L2TP/IPSec user is represented by two rows. The top row is the original connection and looks similar to other non-secure connections. The bottom row describes the secure tunnel connection. One asterisk (*) denotes the IP address of the secure tunnel. Two asterisks (**) denote a Transparent NTLM Windows login waiting for the secure tunnel to become active. Sorting and Filtering the Table You can use column data filters to limit the display of active user connections to selected user Names, Roles, or session Start times within certain time periods such as Today or Last Month. Additionally, you can sort the displayed data by clicking a column heading link. The displayed data is sorted in ascending or descending order based on the data contained in the column. The Rows per page control restricts the number of rows displayed per page for easy viewing. Forcing a User Logout To log out a user and terminate their connection to the BSC: 1. Click the Status tab in the BSC administrator console, click the Active Connections tab, and then click the All Connections link. The Active Connections page appears (see Figure 15-1) 2. Click the user’s icon in the Actions column. The BSC logs out the selected user and drops the user’s connection. Monitoring a User’s IDS Status The BSC provides an administrator-configurable Intrusion Detection System (IDS) to defend itself and the network it is protecting from intruders, worms, and other targeted attacks. See “Intrusion Detection System” on page 10-5 for complete information about configuring the BSC IDS. If you have configured the BSC IDS, you can track the IDS status of each user connected to the BSC. Click the Status tab in the BSC administrator console, click the Active Connections tab, and then click the IDS link to display the following fields of information: • Name - User's login name - brackets indicate a static DHCP entry. • Address - IP address of the user’s wireless device. • MAC address - Hardware address of the wireless device's NIC card. • Role - Role assigned to this connection. • IDS State - IDS-designated state for user host. Possible states are: Normal, Premonitoring, Monitoring, and Blocked. See “Intrusion Detection System” on page 10-5 for a complete description of these states. BlueSecure™ Controller Setup and Administration Guide 15-3 Chapter 15: Status • Packets Dropped - Count of packets dropped due to blocked port(s). • Port N - Count of packets dropped on this blocked port. • Start Time - Start date and time of the connection session. Monitoring Connected Access Points To enable the BSC to monitor the status of connected access points, you must configure the access point tracking parameters listed on the General/Misc page in the BSC administrator console. See “Displaying the Miscellaneous settings page” on page 10-24 for a complete description of these parameters. Displaying Active Connections table Click the Status tab in the BSC administrator console, click the Active Connections tab, and then click the APs link to display a table listing users connected to the BSC’s access points as shown in Figure 15-2. Figure 15-2: Monitoring Connected Access Points Table Column Descriptions The access point table includes the following fields of information: View Details link Click the icon in the Action column to display detailed information about the access point as shown in Figure 15-3. Note: APs that are down or are in an “unknown” state are listed using a red, italicized typeface. In particular, the detailed view provides more information about wireless clients that are associated to the access point and about adjacent access points. 15-4 • Delete Checkbox - Mark one or more checkboxes and then select the Delete button to delete all specified APs. • Name - Name assigned to access point. • Address - IP address of the access point. • MAC address - Hardware (MAC) address of the access point. • Associations - BSC users who have associated to the access point. • State - Up, down, or unknown. • Vendor - Vendor who manufactured the AP (model number if available). • Info - Software version running on the access point. Monitoring Active User Connections Figure 15-3: Displaying Detailed Access Point Information If you are monitoring BlueSecure Access Points connected to and configured by the BSC, then the following additional fields of status information are displayed: BlueSecure™ Controller Setup and Administration Guide 15-5 Chapter 15: Status • Associations - Wireless clients that have associated to the BSAP. Click (+) to expand the list of associations or (-) to collapse the list. • Count - Number of associations to the BSAP. • Channel - Channel on which BSAP’s 802.11a/n and 802.11b/g/n radios are operating. • Tx Power - Transmission power settings for the BSAP 802.11a/n and 802.11b/g/n radios. • ESSID - Extended Service Set Identifier used to identify wireless clients associated to the BSAP. • Security - Configured security (WEP, WPA, etc.) associated with the BSAP’s SSID. • Type - BAP, i.e., BlueSecure Access Point. • Adjacent APs - MAC address of APs within range of the BSAP. Click (+) to expand the list of associations or (-) to collapse the list. • Adjacent Count - Number of APs within range of the BSAP. • Self Channel Load - Indicates the cumulative mean percent load saturation of the current radio channel by clients connected to this AP. • Other Channel Load - Indicates the cumulative mean percent load saturation of the current radio channel by clients connected to other APs but on the same channel. • Non 802.11 Interference - The number of seconds since significant non-802.11 interference was detected (e.g. microwave oven interference). Monitoring RF IDS Alarms Click the Status tab in the BSC administrator console, click the Active Connections tab, and then click the RF IDS link to list the alarms received from BSAPs operating in Sensor mode connected to the BSC. The RF IDS Alarms page appears as shown in Figure 15-4 Figure 15-4: Received Sensor Alarms The following information is provided about received alarms: ) 15-6 Note: An alarm is listed just once, regardless of the number of sensors that have detected this alert. Any alarm detected by more than one sensor has a plus icon next to each of the visible Sensor (MAC|IP|Location) fields. Clicking on any of these plus icons expands to the complete list of sensors on all visible columns for that alarm. If any of the Sensor Mac, Monitoring Active User Connections Sensor IP or Sensor Location columns are visible, the column headers also have a global expansion button (a plus icon). Clicking on this icon expands all sensor mac columns. • Action - Click the pencil icon to display the Create a New Station page. Click the green light icon to initiate active containment on the corresponding device. Click the lock icon to stop active containment on the corresponding device. See “Configuring Autocontainment” on page 13-6 for information about configuring active containment on the BSC. • Name - Name of WLAN vulnerability responsible for alarm. See Table 13-1 in “Configuring RF Alarms” on page 13-3 for a description of BAPS Sensor alarms. • Severity - The configured severity level for the alarm: - Severe - This is the highest alert level and is usually associated with a WLAN intrusion, e.g., a broadcast attack. - Warning - This alert level is usually associated with a security vulnerability, e.g., a client association change. - Informational - This alert level is usually associated with a change in network operational status, e.g., an authorized AP is down. • Location - The location of the sensor detecting the alarm. This is the same location specified in the Edit AP dialog. • First Seen- The date and time the alarm was first received. • Last Seen - The date and time the alarm was most recently received (this column not displayed by default). • Device - MAC address of RF device associated with alarm. • Sensor IP/MAC - IP address or MAC address of BAPS Sensor that issued the alarm. • Contain Status - Device containment status, 1—contained or 0—not contained. Click on a column heading to sort the list of received alarms. Click to acknowledge the selected alarm(s), click to unacknowledge the selected alarm(s), and to delete the selected alarm(s). Monitoring Devices in RF Autocontainment Click the Status tab in the BSC administrator console, click the Active Connections tab, and then click the Contained Devices link to list the rogue wireless devices that are in active containment by the BSC or that were previously in containment. The Contained Devices page appears as shown in Figure 15-5: The following information is provided about contained devices: • Action - Click the key icon to initiate active containment on the corresponding device. Click the lock icon to stop active containment on the corresponding device. See “Configuring Autocontainment” on page 13-6 for information about configuring active containment on the BSC. • Device MAC - MAC address of contained RF device. • Sensor MAC - MAC address of BAPS Sensor that detected the rogue device. • Containment Start Time - The date and time the BSC began to contain the device. • Duration - Period of time device was in RF containment. Click Unblock all Contained devices to purge the entire list of contained devices. Monitoring User Connections Graphically The BSC administrator console provides a graphical monitoring tool that enables you to track user activity on the BSC graphically. BlueSecure™ Controller Setup and Administration Guide 15-7 Chapter 15: Status Figure 15-5: Contained Devices Page You must have the Macromedia Flash (Version 6 or later) browser plug-in installed and a VBScript-enabled browser [e.g., Microsoft Internet Explorer] to use the graphical monitoring tool. You can download and install the latest Macromedia Flash browser plugin by visiting http://www.macromedia.com/go/getflashplayer. To display connection information for users in graphical form: Click the Status tab in the BSC administrator console, and then click the Monitor tab. The Monitor page appears as shown in Figure 15-6: Figure 15-6: A Sample Graphical Monitor Display 15-8 Monitoring Active User Connections User connections are displayed on the horizontal axis and data throughput on the vertical axis. Note the following about the graphical monitor display: Filtering Users • Secure connections are shown as a solid cylinder (not shown in the example) and non-secure connections as a hollow tube with a center rod. Place the mouse pointer over a connection to display more information about it. • The role assigned to each user is color-coded. Consult the key on the right side of the screen for easy role identification. • Current throughput is displayed in a solid color and average throughput in a paler version of the same color. For example, current throughput for the bluesocket.com user connection on the left side of the graphic above is about 4.75 Mbps and average throughput is slightly under 1 Mbps. • To change the scale of throughput, click the Throughput icons in the top left corner of the screen. Click the grey bars to modify the displayed throughput from kbps to Mbs. • To change the number of users displayed, click the Users icons in the bottom right corner of the screen. Click a larger bar to display more users. The display of user connections is limited to ten per screen. To see previous or subsequent screens of users, click the left and right arrows at the bottom of the screen. The BSC graphical monitoring tool provides filters that enable you to limit the display of user connections to those users who: • connect to a particular access point or access points • are assigned to a particular role • pass data through the BSC at a particular throughput range Use the filters alone or in combination with each other to limit the display of user connections. To limit display of user connections to specific users: 1. Click Filter Users at the bottom of the monitor screen. The Filter Users dialog appears as shown in Figure 15-7. Figure 15-7: Filter Users Dialog 2. Select one or more filters from the Access Point, Role, or Throughput drop-down lists. The users that pass through the filters are listed in the Users list. You may select some or all of the users listed in the Users list for display in the monitoring tool. BlueSecure™ Controller Setup and Administration Guide 15-9 Chapter 15: Status 3. Click Filter to apply the filters you have defined. The Filter Users dialog closes and the graphical monitoring tool is refreshed to display only those user connections that pass through the filters you have defined. You may edit or turn off the filters you have defined by clicking on the appropriate link at the bottom of the graphical monitoring tool screen. Viewing the BSC Event Log The BSC maintains a log file of significant events. Tp display the log, click the Status tab in the BSC administrator console, and then click the Logs tab.The Event Log page appears, for example as shown in Figure 15-8. Figure 15-8: BSC Event Log Page Table Columns Page Controls 15-10 The following information is displayed for each event in the log file: • # - Event log message number. • Time - Start date and time of the event. • Level - Type of event message. Warning and Error messages signal possible system malfunctions. Emergency and Critical indicate potentially more serious failures. Notice and Info messages display higher level events such as user login/logout times or the addition or modification of user information. • Application - BSC application that generated the event, such as Database, DHCP Server, or PPTP Tunneling. • Function - Function within a BSC application that generated the event. Examples of functions within the BSC System application are CPU, MEMORY, and interface. • Operation - Operation within an application's function that generated the event. Examples of operations in the BSC System application's System function are bandwidth, failover, and status. • Name - Device or user name. • Message - Description of the event, such as Login admin user #1 Full access at 208.192.100.113 as role #0. Screen filters restrict the display of events to selected Levels, Applications, Functions, or Operations. You can also filter display of events on start times within certain time periods such as Today or Last Month. Additionally, you can filter displayed events by the initial alphanumeric character of Name or Message. To filter events by a string of initial Displaying a BSC Status Summary alphanumeric characters in event descriptions, choose Search from the Message dropdown list and enter the string. The Rows per page control restricts the number of rows displayed per log page for easy viewing. The Page number drop-down list, next link, and prior link allow quick navigation through the log. To delete all of the log entries, click Purge all logs at the bottom of the screen. Additionally, you can set options to automatically delete a specified number of log entries when the log reaches a certain size. See “Event Logging and Connection Tracking” on page 10-14 for details. Displaying a BSC Status Summary To display a summary of the BSC’s current status (BSC users, connections, interfaces and DHCP configuration), click the Status tab, click the Summary tab, and then click the Summary link at the top of the page to display the BSC summary page. For example, the summary page for the BSC-1200 appears as shown in Figure 15-9. To view a summary of Secure Mobility®-enabled connections, click the Mobility link at the top of the page. Figure 15-9: BSC Summary Page BlueSecure™ Controller Setup and Administration Guide 15-11 Chapter 15: Status Displaying BSC Secure Mobility® Status If you have configured the BSC Secure Mobility feature to enable users to roam across subnets seamlessly (See “Step 1: Designate and Set Up the Mobility Node List Master” on page 14-6 for setup details), you can display status information about a users’ roaming status. To display BSC Secure Mobility status information: Click the Status tab in the BSC administrator console, click the Summary tab, and then click the Secure Mobility link at the top of the page. The BSC Secure Mobility summary page displays the following information about use of the BSC Secure Mobility feature on your network: • Status - Secure Mobility status of BSC. Possible values are: - INIT - BSC is initializing its Secure Mobility setup with a remote BSC. - SETUP - BSC is setting up a Secure Mobility communication tunnel with a remote BSC. - TUNNELUP - BSC has established a Secure Mobility communication tunnel to a remote BSC. - TUNNELFIN - Communication tunnel setup to remote Secure Mobility partner has been completed. - OPERATIONAL - BSC’s Secure Mobility setup is operational. - FAILED - BSC’s Secure Mobility communications with a remote BSC have failed. • StartIP - Protected interface IP address of BSC to which you are connected. • EndIP - Protected interface IP address of remote BSC with which this BSC is attempting to establish a communication tunnel. • StartTunnelIP - IP address of BSC on which communications tunnel was initiated.The IP address will be unique to the Secure Mobility MatriX in which this BSC has membership. • EndTunnelIP - IP address of remote BSC on which communications tunnel was terminated. • RX Packets - Count of “heartbeat” packets received at this BSC. The BSC exchanges pings with its remote Secure Mobility partner. • TX Packets - Count of “heartbeat” packets transmitted to remote Secure Mobility partner BSC. • RX RPCs - Count of Remote Procedure Calls received at this BSC from its remote Secure Mobility partner BSC. • TX RPCs - Count of Remote Procedure Calls transmitted to remote Secure Mobility partner BSC. Displaying Load Sharing Status You can also display a quick visual snapshot of your configured Load Sharing Group by clicking Status/Summary, and then clicking the Loadsharing link at the top of the page. The status summary for a three-node Load Sharing Group that is up and fully operational would look similar to the following figure. 15-12 Displaying Power over Ethernet (PoE) Status Figure 15-10: Load Sharing Status Summary Displaying Power over Ethernet (PoE) Status For the BSC 600/1200, you can display the PoE status, as shown in The status summary for a three-node Load Sharing Group that is up and fully operational would look similar to the following figure. Figure 15-11: Power over Ethernet (PoE) Status Summary There are two lines in the PoE Summary page, PoE State and PoE Activity. These two lines match the LED rows on the front of the BSC, PoE Enabled, and PoE Activity. • PoE Enabled shows one of two states, Disabled or Enabled. (The state is based on the PoE configuration specified on each port on the Edit Managed interface page; for information on software enabling PoE on the Edit Managed interface page, see “Port settings” on page 4-12). • PoE Activity indicates one of the three states as seen via the PoE Activity LED's: “Power” if AP is connected and powered, “Searching” if port is set active and searching for an AP to power, and “Disabled” if port is disabled. Generating and Displaying BSC Reports You can generate either pre-defined or customized reports summarizing your wireless network’s performance and activity. The information about reports is organized as follows: • “Using Pre-defined Report Definitions” on page 15-14. • “Creating a Custom Report Definition” on page 15-14. • “Creating a BSC Report” on page 15-15. • “Displaying or Delivering a Report” on page 15-16. BlueSecure™ Controller Setup and Administration Guide 15-13 Chapter 15: Status Using Pre-defined Report Definitions The following pre-defined report definitions are available to generate your BSC report: • Total Users - Total number of users. • Bandwidth usage by user - Bandwidth consumed by each user. • System bandwidth usage - Total BSC throughput. • System performance - System performance statistics. • Total logins by user - Number of logins by each user. • User Session Statistics - All data available for user logout. • Hotspot Account Creation - All new accounts within specified time period. • Hotspot Daily Revenue - Measures ROI of the wireless infrastructure. Creating a Custom Report Definition To create your own report definition: 1. Click the Status tab in the BSC administrator console, and then click the Reports tab in the BSC administrator console. 2. Select Report Definition from the Create drop-down list. The Create a report definition page appears as shown in Figure 15-12. Figure 15-12: Create a Report Definition Page 3. Define the report options as appropriate: ) 15-14 • Name - Name for report definition. • Application - BSC application from which to collect data, such as DHCP Server or User Tracking. • Function - Function within the selected application from which to collect data. Examples in the User Tracking application are user, admin, and remote. • Operation - Operation within the selected function from which to collect data. Examples of operations in the admin function of the User Tracking application are login and password change. Note: Not all application functions provide operations for selection. • Keyword1 - Restricts collected data to that which contains a specific keyword in logged messages. Note: This filters on whole words only. For example, a keyword band would not find messages containing the word bandwidth. • Keyword2 - Restricts collected data to that which contains both Keyword1 AND Keyword2 in logged messages. Generating and Displaying BSC Reports • Log Level - Restricts collected data to records of a specified log level or higher in severity. For example, if you choose Critical, the BSC only collects data from records that have a Critical, Alert, or Emergency log level. 4. Click Save to save the report definition to the BSC database or Save and create another to continue creating report definitions. Creating a BSC Report To set the report format, time period, and delivery options and create the report: 1. Click the Status tab in the BSC administrator console, and then click the Reports tab in the BSC administrator console. 2. Select Report from the Create drop-down list. The Create report page appears as shown in Figure 15-13. Figure 15-13: Create a Report Page 3. Configure the report settings as appropriate: • Report name - Name for report. • Report definition name - Name of either the built-in or customized report definition for the collected data. • Reporting interval -- Date and time span of data records to include in the report.Typically, you will want to set up recurring reports that are automatically delivered. To do this, select one of the options from the Time Period drop down. The schedule for recurrent delivery is as follows: • Today/Yesterday: Deliver the report every day after midnight. • This week/Last week: Deliver the report Saturday night after midnight. • This month/Last month: Deliver the first day of the month after midnight. • This year: Deliver the report the first day of the year after midnight. BlueSecure™ Controller Setup and Administration Guide 15-15 Chapter 15: Status Alternatively, you can generate a report for a specific time period. To do so, select Specific Time Period from the drop down and then indicate the Start Time and End Time. The ending date and time you select is also the date/time that the report is automatically delivered via the selected delivery options. • Output format - Output format of the report: Text, CSV, or XML. • Report Delivery Options FTP Delivery: For report delivery to an FTP server, check FTP delivery and enter the appropriate information including the username and password for FTP server access. The Destination path must start and end with directory delimiters (typically, the / or \ characters) appropriate for the specified FTP host Email Delivery: For report delivery via email, check Email delivery and enter email server and one or more addresses separated by semi-colons. If the Default Domain is specified on the Network Protected tab, the “from address” for the email will be Controller.IpAddress@DefaultDomain. where IpAddress is the IP address of the Controller and DefaultDomain is the domain from which the email originates. Otherwise, the from address will be Controller@IpAddress. ) Note: To enable the BSC to send emails, you must specify your mail server settings on the General Email tab. See “Mail Server Access” on page 10-11. 4. Minutes after end time for delivery - Allows you to stagger the delivery of reports if you think your FTP server might not be able to handle the load. 5. Click Save to create the report, or Save and Create Another to continue creating. The report is automatically delivered via the methods you specified, at the Ending Date and Time you selected in the reporting interval. You can also manually deliver the report at any time, as described in the next section. Displaying or Delivering a Report After you create the report, it is available for selection in the Reports section of the Reports page as shown in Figure 15-14. Predefined report definitions appear first in the list and cannot be edited. In this figure, there is just one user specified report definition, “User Login Report Def.” Figure 15-14: Reports Page You can either display the report content in graphical or tabular format directly in your web browser or deliver it as an email message, FTP transfer, or local file download, using the delivery and output format settings you specified when creating the report. 15-16 Performing Standard Network Diagnostic Tests To specify display or delivery of the report, click the appropriate icon in the Action column next to the name of the report. The following table summarizes the report icons. Table 15-1: Report Display and Delivery Icons Icon Click to ... Display the report listed in the corresponding table row. Display the graph listed in the corresponding table row. Download the report listed in the corresponding table row. Send the report listed in the corresponding table row to the e-mail address configured in the report definition. Performing Standard Network Diagnostic Tests The BSC administrator console enables you to access several standard network diagnostic tests directly from your web browser. BlueSecure™ Controller Setup and Administration Guide 15-17 Chapter 15: Status Figure 15-15: Task Execution Menu Page Displaying the Task Execution Menu Click the Status tab in the BSC administrator console, click the Diagnostics tab, and then click the System link at the top of the page. The Task execution menu page appears as shown in Figure 15-15. Ping Use the standard Packet InterNet Groper utility to determine if the BSC can reach a specified IP address over a specified network interface. Provide an IP address or fully qualified domain name for the target host and specify the originating Ethernet port on the BSC. Select Any to let the Controller decide based on routes. Traceroute Use the standard TCP/IP utility to determine the route packets are taking from the BSC to a specified host over a specified interface. Provide an IP address or fully qualified domain name for the target host and specify the originating Ethernet port on the BSC: Select Any to let the Controller decide based on routes. Reset BlueProtect Cached Client Scans Reset all client BlueProtect Scanning Intervals. To force a client re-scan, log the client. 15-18 Performing Standard Network Diagnostic Tests Purge DHCP leases Mark this checkbox to purge existing IP addresses leased by the DHCP server. Enabling this option means that clients might receive different IP addresses when issued by the DHCP server. Netstat List statistics about the network including socket status, interfaces that have been autoconfigured, memory statistics, etc. The Genmask column refers to the Netmask. The heading uses the following codes: Proto (TCP, UDP, or ICMP), Recv-Q, Send-Q (packet counters) Local_Address (IP and Port), Foreign_Address (IP and Port), and State. ARP Displays the BSC's address resolution protocol (ARP) table.The ARP table lists the mapping of Layer 2 physical addresses to Layer 3 IP addresses for all of the hosts that the computer has learned about through ARP. Show Processes List the status (IS running/NOT running/IS disabled) of all BSC processes. A process that is not running has likely failed and should be restarted under Maintenance Restart Services. A process that is disabled can be enabled through the GUI configuration. Show Cisco CDP Neighbors Displays information about Cisco devices connected directly to the BSC. You must have configured Cisco Discovery Protocol (CDP) passthrough and enabled the CDP “show” feature on the BSC, as described in “Cisco Discovery Protocol Passthrough” on page 1025 before executing this test. High TCP Connection Counts Show IP Addresses with more than 50 connections. A mechanism to find heavy usage applications that might put a strain on the controller, such as point-to-point applications that can use hundreds, and in some cases thousands, of TCP connections. Show Network Interface Parameters Show the output of ifconfig, useful when remote console access is not available, for example for a remote site. Show BSAP Channel Summary Shows a summary of AP channels, grouped by unique BG and A channel. Show BSAP Power Summary Shows a summary of AP power, grouped by unique BG and A power. Show BSAP Hardware Summary Shows a group count of each AP hardware and firmware version. Callhome to Bluesocket Mark this radio button to specify a Port number for Callhome connection to the support server. The result is that an ssh port is opened back to the support IP address. Only one user can log onto the support servers through this tunnel at any one time. Contact your Support Representative for details prior to connecting. Under normal circumstances, there is no tunnel to the support server and the status text on the Diagnostics page will report the Call Home Status Connectivity as “Not Connected,” and the Task Execution Menu page will display with the radio button “Callhome to Bluesocket”. Upon a successful connection, the status text on the Diagnostics page reports the Call Home Status Connectivity as “Connected on <port>”, and the radio button on the Task Menu changes from “Callhome to Bluesocket” to “Disconnect”. Executing the test ) Click Process to execute the selected test. Test results are displayed on the right side of the screen. Note: It may take several minutes for results from the traceroute test to appear, especially if devices cannot be reached. BlueSecure™ Controller Setup and Administration Guide 15-19 Chapter 15: Status Capturing Network Traffic Data The BSC allows you to capture network traffic data on any of its physical or VLAN interfaces, filter the packets using specified criteria, and then save the data as a file. You can then either display the data file on screen or import the file into any network analyzer program, such as Ethereal or TCP Dump. To capture BSC network traffic: 1. Click the Status tab in the BSC administrator console, click the Diagnostics tab, and then click the Traffic Capture link at the top of the page. The Traffic capture page appears as shown in Figure 15-16. Figure 15-16: Traffic Capture Page 2. Configure the following traffic capture options as appropriate: • File Name - Name for the traffic capture file. The BSC appends a .DMP extension to the saved file name when you stop the capture operation. • Ethernet interface - BSC physical or VLAN interface from which to capture packet data. • Filter - Restrict the type of packets captured to provide more meaningful results. You can filter packets by a selected protocol and source or destination IP, netmask, and MAC addresses. • Number of Records - Specify the maximum number of packets to capture. Use this setting to prevent excessive file size. 3. Click the Start button to start capturing traffic data. ) Note: You can run multiple traffic captures simultaneously. The in-process traffic capture is listed as a job file in the Job Control drop-down list using a name string such as 3162 tcpdump -i eth0 -c 100 -w prot.dmp, where the filename you specified with the .DMP extension appended appears at the end of the string. 4. Optional. To stop capturing data at any point, choose the name of the file from the Job Control drop-down list and then click Stop. 5. To display or download the contents of the traffic capture file, select the name of the .DMP file from the Choose file drop-down list, mark the Download radio button, and then click the Submit button. You are prompted whether you wish to save or display the file. 15-20 Capturing Network Traffic Data 6. Optional. To delete a traffic capture file, select the name of the file from the Choose File drop-down list, mark the Delete radio button, and then click the Submit button. BlueSecure™ Controller Setup and Administration Guide 15-21 Chapter 15: Status 15-22 16 Maintenance This chapter covers the following topics: • Restarting, Rebooting, and Shutting Down the BSC • Configuration Backup and Restore • Backup • Restore • Show Tech • Resetting the BSC to its Default Settings • Save DHCP Leases • Export Firewall Policies • Export BSAP-1840 Licenses • Upgrading to a New Version of Runtime Software • Software Patches • Switching Between BSC Runtime Software Versions • Exporting and Importing BSC Bulk Data Files • Exporting BSC Log Records • Licenses • BSAP 1840 BlueSecure™ Controller Setup and Administration Guide 16-1 Chapter 16: Maintenance Restarting, Rebooting, and Shutting Down the BSC Many configuration settings in the BSC do not take effect until you restart certain BSC services or reboot the BSC. Where a restart of service(s) or a reboot is needed to effect configuration changes, a message is displayed in the administrator console that includes a click here link. Click the link, and the BSC will perform whatever action is required. Additionally, you may need to restart BSC services, reboot the BSC, or shut down the BSC manually for other system maintenance reasons. As a matter of definition, restarting the BSC means that services running on the BSC are stopped and then restarted without interrupting power, dropping user connections or restarting the OS. Rebooting the BSC means that the BSC is powered off and all user connections are dropped, and then the BSC is powered back on and its OS is restarted. To restart BSC services, reboot the BSC, or shut down the BSC manually: 1. Click the Maintenance tab, and then click Restart Services. The BSC restart page appears as shown in Figure 16-1. Figure 16-1: BSC Restart Page 2. Select the appropriate BSC action by marking one of the following radio buttons: • Restart All Services - Restarts all BSC services, but does not reboot the BSC. • Reboot BSC - xxxx and Shutdown BSC - xxxx - Reboots and shuts down the BSC, respectively. • Advanced - If checked, you can choose a single service to restart. • Now - Perform the selected action immediately. • At a Specified Time - Perform the selected at the specified date and time. Use the Year, Month, Day, Hour, and Minute drop-down lists to specify the date and time. 3. Click Submit to perform the BSC action immediately or at the specified time. Configuration Backup and Restore The Configuration Backup and Restore page supports the following: 16-2 • Backup • Restore • Show Tech • Resetting the BSC to its Default Settings • Save DHCP Leases Configuration Backup and Restore Backup All BSC configuration information is stored in its internal database. We strongly recommended that you routinely back up the database, so that you can restore the original settings if the current database becomes corrupted or unusable. You can also configure the BSC to back up its database automatically to an external host via FTP or SCP. See “Automatic Backup of the BSC Database” on page 10-9 for details. To back up the BSC database: 1. Click the Maintenance tab and then click Configuration Backup/Restore. The BSC configuration backup and restore page appears as shown in Figure 16-2. Figure 16-2: BSC Configuration Backup and Restore Page (Backup) 2. Mark the Backup radio button, and then click Save. A dialog appears prompting you to open or save the file. 3. Select Save, and then specify a directory location on your computer. The BSC database file is downloaded and saved with a .BLUE file extension. Caution: Never directly edit the BSC database backup file, as doing so will corrupt the file.The backup file is around 1MB in size and can easily be mailed to Bluesocket Customer Support if required. Restore To restore the BSC database from a configuration backup file: BlueSecure™ Controller Setup and Administration Guide 16-3 Chapter 16: Maintenance 1. Click the Maintenance tab and then click Configuration Backup/Restore. The BSC configuration backup and restore page appears as shown in Figure 16-3. Figure 16-3: BSC Configuration Backup and Restore Page (Restore) 2. Mark the Restore radio button. 3. Enter the pathname of the .BLUE database file in the Configuration to restore field. 4. Click Restore to upload the database to the BSC to which you are connected. After the database has been restored from the backup file, a dialog appears prompting you to restart the BSC. 5. Click the click here link to perform the BSC restart. The restored configuration will not take effect until you restart the BSC. Show Tech If you encounter trouble configuring your BlueSecure Controller, you may contact Bluesocket customer support for assistance (See Appendix B for Customer Support contact information). Your Bluesocket customer support representative may ask you to send him a debug file that contains your BSC’s configuration along with troubleshooting information. To create a BSC debug file: 1. Click the Maintenance tab and then click Configuration Backup/Restore. The BSC configuration backup and restore page appears. 2. Mark the Show_Tech radio button, and then click Save. A dialog appears prompting you to open or save the file. 3. Select Save, and then specify a directory location on your computer to which to store the file. The BSC database file is downloaded and saved with a .DEBUG file extension. Caution: Never directly edit the BSC debug file, as doing so will corrupt the file. The debug file is around 1MB in size and can easily be mailed to Bluesocket Customer Support. Resetting the BSC to its Default Settings You can reset the BSC to its default configuration via the administrator console. Note that, resetting the BSC to its default values also resets the default admin account to a password of blue and deletes all other BSC administrator accounts. 16-4 Configuration Backup and Restore To reset all BSC configuration settings back to their default values: 1. Click the Maintenance tab and then click Configuration Backup/Restore. The BSC configuration backup and restore page appears. 2. Mark the Reset to default settings radio button, and then click Reset. You are prompted to confirm your intention to restore the BSC’s default settings as shown in Figure 16-4. Figure 16-4: Restore Default Settings Dialog 3. Click OK. The BSC reboots. Upon completion of the reboot, all BSC configuration settings are reset to their default values. Save DHCP Leases If you run the BSC’s DHCP server to assign IP addresses to wireless clients on the managed side of your network, you can create and download a file listing historical MAC/IP DHCP lease information. The DHCP lease file is a semicolon delimited text file listing: IP address, client MAC address, hostname, lease start time, and lease end time. To create a DHCP lease file: 1. Click the Maintenance tab in the BSC administrator console, and then click Configuration Backup/Restore. The BSC configuration backup and restore page appears. 2. Mark the Save DHCP leases radio button, and then click Save. A dialog appears prompting you to open or save the file. 3. Select Save, and then specify a directory location on your computer in which to store the file. The BSC DHCP lease file is downloaded and saved with the default filename of dhcpd.leases.txt. Export Firewall Policies The aim of this feature is to allow people to verify the firewall configuration of a BSC without having to install it on a controller. This is performed allowing the BSC to export a text version of the firewall configuration. The file is CSV format. Here is an example: role_name;role_id;action;protocol;port;direction;ip;schedule;VLAN Un-registered;1;Allow;TCP;53;Outgoing;0.0.0.0/0;Any;Any; Un-registered;1;Allow;UDP;53;Outgoing;0.0.0.0/0;Any;Any; BlueSecure™ Controller Setup and Administration Guide 16-5 Chapter 16: Maintenance Un-registered;1;Allow;Any;Any;Outgoing;192.168.100.18/ 255.255.255.255;Any;Any; Un-registered;1;Allow;Any;Any;Outgoing;abc.go.com/ 255.255.255.255;Any;Any; Un-registered;1;Allow;Any;Any;Outgoing;www.google.com/ 255.255.255.255;Any;Any; Guest;2;Allow;TCP;53;Outgoing;0.0.0.0/0;Any;Any; Guest;2;Allow;UDP;53;Outgoing;0.0.0.0/0;Any;Any; Guest;2;Allow;Any;Any;Outgoing;0.0.0.0/0;Any;Any; Export BSAP-1840 Licenses This exports the list of BSAP-1840 802.11n licenses on the BSC. Upgrading to a New Version of Runtime Software The BSC contains two runtime software images, A and B. One runtime image is active and the other image is in standby mode. When Bluesocket releases a new runtime version of BSC software, you will need to upload it to the BSC machine. When you upload a new runtime image, that image becomes the new active image and the old image becomes the standby image. This section is organized as follows: • Upgrading a Single BSC Network • Upgrading Multiple BSCs in a Replication Configuration Upgrading a Single BSC Network The BSC contains two runtime software images, A and B. One runtime image is active and the other image is in standby mode. When you upload a new runtime image, the runtime image that was active becomes the standby image, and the uploaded runtime image becomes the new active image. ) Note: Be sure you know the password for the admin account before upgrading the BSC to a new software image. After uploading the new software image to the BSC, you will be able to login to the BSC administrator console using only the default admin administrator account. To install a new runtime image on a single BSC network: 1. Copy the new BSC software image file to the computer on which you are running your web browser. 2. Back up your BSC database as described in “Backup” on page 16-3. 16-6 Upgrading to a New Version of Runtime Software 3. After the database is backed up, click the Maintenance tab in the BSC administrator console, and then click Upgrade to display the BSC update page, for example as shown in Figure 16-5. Figure 16-5: BSC Update Page The current active image, either A or B, is shown in boldface on the right side of the page. 4. Enter the pathname of the new runtime image you wish to load onto the BSC. 5. Optional. Mark the Maintain Current Configuration checkbox to maintain the current database configuration while loading the new system software image. When performing a downgrade, the current configuration will be automatically maintained. The system will require a reboot when the image upload is complete. If this checkbox is not marked, you will need to restore the database manually and then reboot the BSC after the runtime image uploads. 6. Click Upgrade to upload the runtime image to the BSC. The size of the image is approximately 60 Mb, so the process may take some time to complete. If for any reason the upload is interrupted or cancelled, you must repeat this step. If problems are found with the new image, you can use the BSC Switch feature to return to your previous system software version. A progress bar displays on the page. Once the upgrade has started, you can move away from the page and come back for status. The upgrade buttons are disabled for all admins when an upgrade is taking place. During the upgrade, an upgrade log is shown whenever the log is available. The log file includes a timestamp on each step in the upgrade process, so that you can see how the upgrade has been progressing, and verify that it completed. Upgrading Multiple BSCs in a Replication Configuration To install a new runtime image across multiple BSCs in a replication configuration: 1. Back up the BSC database on all BSCs. See “Backup” on page 16-3 for instructions. Use a name for each backup file that associates it with the appropriate machine, because you will need to restore the files to each machine later. 2. Upgrade each BSC with the new BSC runtime image: a) Click the Maintenance tab in the Administrator console, and then click Upgrade. b) Mark the Maintain Current Configuration checkbox. c) Enter the pathname for the new runtime image. d) Click the Upgrade button. BlueSecure™ Controller Setup and Administration Guide 16-7 Chapter 16: Maintenance e) Restart services on each BSC you have upgraded. 3. Re-configure each original Node BSC as a Node and configure it to receive a snapshot from the Replication Master: a) Click the Mobility MatriX tab in the Administrator console, and then click Replication Setup. b) Clear the Act as a Master and transmit configuration settings to the replication nodes? checkbox and then mark the Act as a Master and transmit configuration settings to the replication nodes? checkbox. c) Mark the Acquire a snapshot from the master checkbox. d) Click Save. 4. First, restart services on all Replication Nodes, and then restart services on the Replication Master. 5. Verify that all changes on the Master BSC are propagated to the Replication Nodes. Upgrading a Failover BSC Configuration To install a new runtime image on a failover BSC configuration: 1. Upgrade the primary machine with the new BSC runtime image. 2. The primary BSC will automatically install the new BSC runtime image on the secondary machine. When prompted, restart the BSCs to activate the upgraded software on the primary and secondary machines. Software Patches Bluesocket may occasionally release small software fixes, known as patches, which you will need to install on the BSC. These are not the same as BSC runtime software upgrades, which usually involve major changes in functionality or performance. Also, unlike upgrades, patches do not overwrite the entire current runtime software image, but only those files in the image that have changed. This section contains the following topics: • Installing a Patch • Uninstalling a Patch Installing a Patch ) Note: Although a backup of the BSC database is always recommended, it is not a prerequisite for installing a patch To install a BSC software patch: 1. Click the Maintenance tab in the administrator console, and then click Patch. 16-8 Switching Between BSC Runtime Software Versions The Manage Patches for BSC page appears as shown in Figure 16-6. Figure 16-6: Manage Patches for BSC Page Any previously installed patches are listed in the Installed Patches listbox. 2. Use the Browse button to enter the pathname where the patch file resides on your local computer in the Upload new patch field. 3. Click Install Patch to install the patch on the BSC. The Installed Patches listbox will list the name of the patch when the installation is complete. To view patch information, such as release number and date, highlight the patch in the box, and then click View. ) Note: Patches do not take effect until the BSC is rebooted. Uninstalling a Patch You may need to uninstall a patch if it doesn’t provide the functionality updates you need for your BSC. To uninstall a patch: 1. Click the Maintenance tab in the administrator console, and then click Patch. The Manage Patches for BSC page appears as shown in Figure 16-6. 2. Select the patch that you want to uninstall in the Installed Patches listbox. 3. Click Uninstall to remove the patch from the BSC. Switching Between BSC Runtime Software Versions It is possible to switch between the currently active and standby versions of the BSC runtime image. For example, if you find there is a problem with a recently uploaded runtime image, use this function to switch back to the standby image. To switch between software runtime images: 1. Click the Maintenance tab in the administrator console, and then click Switch. The BSC Switch Tool page appears as shown in Figure 16-7. The current active runtime image, either A or B, is shown in boldface on the right side of the page. 2. In the Destination panel, mark the radio button corresponding to the image, either A or B, that you want to switch to. BlueSecure™ Controller Setup and Administration Guide 16-9 Chapter 16: Maintenance 3. Click Switch, and then reboot the BSC manually when prompted. Figure 16-7: BSC Switch Tool Page Exporting and Importing BSC Bulk Data Files You can export and import these types of BSC bulk data files: • Local Users • MAC Devices • Fixed IP Addresses • Access Points • Authorized RF Stations Exporting and importing BSC data files can speed up the BSC configuration process. For example, if you have many fixed IP address users to configure, you can configure a few users using the BSC administrator console, export the fixed IP address configuration to a .CSV or XML file, append new data to the file, and then re-import the file. Exporting Data Files Follow these steps to export a bulk local user BSC database file: 1. Click the Maintenance tab in the BSC administrator console, click the Bulk Import/ Export tab, and then click the Export link at the top of the page. The BSC Bulk export page appears as shown in Figure 16-8. Figure 16-8: BSC Bulk Export Page 2. Mark the Local User, MAC Device, Fixed IP address, Access Points or Authorized Stations radio button that corresponds to the type of bulk data file you wish to export. 3. Click Next. A Data File page specific to the type of file you are exporting appears. 4. Specify the format of the file to export. Mark the CSV (comma separated values) or XML (Extensible markup language) radio button. 16-10 Exporting and Importing BSC Bulk Data Files 5. Select the local data fields to export by marking the checkbox. It is good practice to export all or all configured data fields. Never omit a configured data field. 6. Click Export, and then specify where to save the file on your computer. Importing Data Files ) Note: The presence/absence of the ID column in the import data determines whether the existing records are overridden or added to the existing records. For example, if you want to make two Controllers work the same, or set up a Controller to match the data in another Controller (such as when the two Controllers are being controlled by an RPC API application), then make sure that the ID value is in the import data. This will result in the import unconditionally overwriting any record that uses the same ID value, and any new records will have exactly that ID value. Alternatively, if there is no ID value in the import data, then every record is added as an additional (new) record and the Controller creates the ID value. For example, you would leave the ID value blank in the import data if you wanted to add additional local users. To import a BSC bulk local user, MAC device, or fixed IP address data file that is stored in a comma-delimited (CSV) or an Extensible Markup Language (XML) format: 1. Click the Maintenance tab in the BSC administrator console, click the Bulk Import/ Export tab, and then click the Import link at the top of the page. The BSC Bulk import page appears as shown in Figure 16-9. Figure 16-9: BSC Bulk Export Page 2. Mark the Local User, MAC Device, Fixed IP address, Access Points or Authorized Stations radio button that corresponds to the type of bulk data file you wish to import. 3. Click the Browse button and then select the .XML or .CSV file you wish to import. 4. Click Upload to import the selected file to the BSC. The Confirm Import page appears, enabling you to import data selectively from the file. For example, the confirm page might look as shown in Figure 16-10. Figure 16-10: Confirm Import Page 5. Mark the checkboxes adjacent to the data rows and columns you wish to import, and then click Save. BlueSecure™ Controller Setup and Administration Guide 16-11 Chapter 16: Maintenance ) Note: When importing values, the BSC shows the values before it adds them to the configuration information. It will give you warnings about any records it cannot accept because they would conflict with the data in existing records (such as two records with the same MAC address or user name). You can edit the values to correct problems before they are finally added. The new records are not actually added until you confirm them. Exporting BSC Log Records Use Log Record Export to export the contents of the BSC event log to CSV format for record keeping. You can either export all logged events or a specified number of them. To export BSC log records: 1. Click the Maintenance tab and then click the Log Record Export tab. The BSC log record export page appears as shown in Figure 16-11. Figure 16-11: BSC Log Record Export Page 2. Mark the All Records radio button to export all logged events, or mark the n records radio button along with the Previous 1000 Records, Previous 2000 Records, or Previous 3000 Records radio button to export that number of the most recently logged events. 3. Click Export.You are then prompted to display or save the file. 4. Click Save to the save the CSV-formatted file. Licenses This section explains licensing for: • BlueProtect • BSC • BSAP 1840 Licensing is configured on the Manage Licenses page. To display this page, click the Maintenance tab and then click Licenses. For example: 16-12 Licenses Figure 16-12: Manage Licenses page BlueProtect The license is supplied by Bluesocket as part of your BlueSecure Controller distribution if you have purchased the endpoint scanning option. ) Note: A unique BlueProtect license is required for all Controllers even if in a load sharing or mobility mesh. To enter your Bluesocket BlueProtect unlock license: 1. Click the Maintenance tab, and then click the Licenses tab. 2. In the BlueProtect EndPoint Scanning section, enter your License. 3. Click Save Licenses to save the license information to the BSC database.The page updates to display the link “click here to proceed to enable and configure endpoint scanning”. Click the link to display the General HTTP Settings page. Continue the configuration of BlueProtect as explained in “Configuring Landing Page Text” on page C-4 BSC Each BSC has a hard limit to the number of logged in users. This is determined based on the hardware model. For example the BSC-600 supports 64 logged in users. When the BSC counts users, it counts the number of logged in users (not the number of total users). Note also that Bluesocket Access Points, which are on the managed side and logged into the “Access Point Services” role, are not counted. So a BSC-600 could have 64 users and 8 Bluesocket Access Points. To install licenses for BSC software subsystems: 1. Click the Maintenance tab and then click Licenses. 2. On the BSC Manage Licenses page, enter the BSC User License and then click Reset BlueSecure™ Controller Setup and Administration Guide 16-13 Chapter 16: Maintenance BSAP 1840 When purchasing BSAP-1840 APs, there are three SKUs: two hardware SKUs (same hardware, different serial numbers) and one 11n license SKU. They are: • BSAP-1840-000-00-0 - 802.11abg with 11n upgrade option • BSAP-1840-11N-00-0 – 802.11abgn • BSAP-1840-LIC-11N-0 – Upgrade license to 11n If you purchase the 802.11abgn model, then the BSAP-1840 will appear as an ABGN AP in the UI, and no manual intervention is needed. If you purchase the 802.11abg model, then the AP will appear as an ABG AP in the UI, and you can manually load a license to transition the BSAP to 802.11n. To view the serial number for each Access Point (assuming it is not already shown), go to the Wireless tab and the AP list view and click “Customize” and choose the Serial Number field. Here is how the UI will show each of the three AP models – the BOLD AP is a licensed 802.11n AP: Figure 16-13: BSAP 1840 Possible Models The 802.11n license is tied to the serial number of the Access Point. Thus to license the APs, the serial number must be sent to Bluesocket, who will then generate the licenses for these APs. One option is to enter the serial numbers by hand into a text file or email and send that in. Fortunately the BSC has an easier method, allowing the Administrator to connect the APs to the BSC, and then have the BSC generate the list of serial numbers in an email request. To do this, follow these steps: 1. Connect all BSAP-1840s to the BSC – they should all show bold in the Access Point UI. 2. Go to Maintenance->Licenses 3. Click “BSAP-1840 802.11n License Request” 4. This will open your email client and populate an email with the serial number of all connected BSAP-1840 (abg) APs. 5. If there are APs you do not wish to request licenses for, delete those serial numbers from the email. 6. Send this email to [email protected] 7. You will receive a license file from Bluesocket containing the serial number and then a license key for each AP. Double check this against your own list. 8. Go to Maintenance->Licenses 9. Upload the license file under “BSAP-1840 AP License” 10. The APs will be licensed and immediately convert to full-blown 11n APs. If you lose the license file or are unsure which APs are licensed, licenses can be exported, under Maintenance->Config Backup/Restore->Export BSAP-1840 Licenses. Multi-box Configurations 16-14 Because the license is tied to the serial number of the BSAP, the license file can be uploaded to each node in a mobility, N+1 or load-sharing mesh. Thus, you should upload the license file containing all BSAP-1840 licenses to each node in the mesh. For Licenses failover, the license file is automatically copied between the primary and failover box, so in the event of a failover, the BSAP-1840s will remain licensed. BlueSecure™ Controller Setup and Administration Guide 16-15 Chapter 16: Maintenance 16-16 A An Overview of Virtual LANs The Bluesocket BSC supports multiple VLANs on both the managed and protected sides of the network. This appendix presents an overview of VLANs and their implementation in the BSC, and includes: • LANs vs. VLANs • Tagging Formats • The Bluesocket BSC VLAN Implementation • Enforcing Network Usage Policies with VLANs BlueSecure™ Controller Setup and Administration Guide A-1 Appendix A: LANs vs. VLANs A LAN is a broadcast domain composed of hubs, switches, or bridges that are physically wired to each other and to multiple nodes and hosts. Typically, hosts within one LAN can communicate directly with each other, but inter-LAN communication requires one or more routers depending on the complexity of the network. Use of routers increases the possibility of network traffic delays and gaps in security. VLANs allow you to divide a network into logical subnets without modifying the underlying physical structure of the network, thus minimizing the latency and security problems associated with additional routers or gateways. You define VLAN members by assigning an identical VLAN ID to each node in the group. The nodes do not have to be physically connected to the same switch or hub. For example, as shown in Figure A-1, VLAN ID 1 contains three nodes from Switch A and one node from Switch B. Similarly, VLAN ID 2 contains nodes that are not all connected to the same switch. Router ISO C CSS YT EMS Po we rS up l y0 Po we rS up l y1 D S Cat yl st 8500SER IES Swtci h Processor LAN Backbone Switch C Switch A Switch B VLAN-1 VLAN-3 VLAN-2 Figure A-1: Sample VLANs By creating VLANs in your network, you can enable a single switch or hub to support more subnets than the number of available physical ports on the switch or hub would otherwise allow. Tagging Formats A VLAN port can forward traffic entering from a physical LAN or from another node in the VLAN depending on the tagging format a packet supports. A VLAN port can receive and forward frames with these tagging formats: • untagged - regular Ethernet frame • VLAN-tagged - frame containing a four-byte VLAN ID The Bluesocket BSC VLAN Implementation On the BSC, each defined VLAN interface is bound to either the protected or managed physical interface. Each VLAN sharing the same physical interface must have a unique ID A-2 number. VLAN interfaces support all of the authentication types and services supported by the physical interfaces. On the BSC, you can set up these types of VLANs: • Pass-Through VLANs • Termination VLANs • Initiation/Switched VLANs Pass-Through VLANs Pass-through VLANs on the BSC receive 802.1q-tagged packets from one physical interface (typically the managed side) and forward them with the same tag to the outgoing physical interface (protected side). To create pass-through VLANs, you must assign the same ID number to VLANs on both the managed and protected sides, as shown in Figure A-2.The managed and protected VLANs can be on the same or different subnets, in the same way the managed and protected physical intefaces can be on the same or different subnets.. Tagged VLAN ID 2 BlueSecure Controller Ethernet MAC Frame 7x 8x 9x 1x 2x 3x 10x 11x 12x 7x 8x 9x 4x 5x 6x 1x 2x 3x 10x 11x 12x 4x 5x 6x VLAN 2 C 7 8 9 101112 A 1 2 34 56 A B Switch Access Point Tag PWR DISK Power Reset WG-2100 Wireless Gateway Protected Network VLAN 2 MAC Frame Tag Untagged VLAN MAC Frame Tagged VLAN ID 2 Managed Side Protected Side Figure A-2: A Pass-through VLAN See “Creating a VLAN on the Protected Side (Optional)” on page 4-5 for information on creating a VLAN on the protected interface. See “Creating a VLAN on the Managed Side of Your Network” on page 4-17 for information on creating a VLAN on the managed interface. Termination VLANs Termination VLANs on the BSC receive 802.1q-tagged packets from the managed side and forward them with no tag to the protected side. However, unlike pass-through VLANs, there is no VLAN with the same ID on the protected side. This causes all traffic for the VLAN to terminate on the managed side of the BSC, as shown in Figure A-3. No VLAN ID 2 traffic to Protected Network Tagged VLAN ID 2 BlueSecure Controller Ethernet MAC Frame Access Point 7x 8x 9x 1x 2x 3x 10x 11x 12x 7x 8x 9x 4x 5x 6x 1x 2x 3x 10x 11x 12x 4x 5x 6x VLAN 2 C 7 8 9101112 A 1 2 34 5 6 A B Switch Tag PWR Protected Network DISK Power Reset WG-2100 Wireless Gateway MAC Frame MAC Frame Untagged VLAN Untagged VLAN ID 2 Managed Side Protected Side Figure A-3: A Termination VLAN BlueSecure™ Controller Setup and Administration Guide A-3 Appendix A: To configure a termination VLAN properly, do not configure a VLAN interface on the protected side with a VLAN ID that corresponds to a VLAN interface on the managed side. Initiation/Switched VLANs With initiation or switched VLANs on the BSC, VLAN tags are added to packets exiting the BSC on the protected side based on the user’s Role. Knowing that each user authenticates into a Role on the BSC, you may configure Roles on the BSC to automatically tag packets exiting the BSC with a particular VLAN ID. This capability enables you to route traffic from particular users to particular VLANs on the protected side. The following figure illustrates use of an Initiation VLAN on the Bluesocket BSC. Untagged VLAN BlueSecure Controller Ethernet MAC Frame Access Point 7x 8x 9x 1x 2x 3x 10x 11x 12x 7x 8x 9x 4x 5x 6x 1x 2x 3x 10x 11x 12x 4x 5x 6x User Role C 7 8 9101112 A 1 2 34 5 6 A B Switch VLAN 2 P WR Protected Network DISK Power Reset WG-2100 Wireless Gateway MAC Frame Untagged VLAN VLAN 3 Tag MAC Frame Tagged VLAN VLAN ID N Managed Side Protected Side Figure A-4: An Initiation VLAN Initiation and switched VLAN are identical except that for switched VLANs there is an input VLAN on the managed side. This VLAN is not the same ID as the one going out the protected side. In the case of the same VLAN ID coming in and going out, no role-based tagging is required. See “Pass-Through VLANs” on page A-3. ) Note: Since Roles on the BSC are made up of a set of policies governing network usage (including network services), packets entering the BSC from a particular user may leave with different VLAN IDs (VLAN tags) based on the network service the user is using on the managed side at that point in time. See “Creating a VLAN on the Protected Side (Optional)” on page 4-5 for information about creating VLANs on the protected interface. See “Defining a Role” on page 8-4 for information about adding VLAN tagging to Roles. In summary, create: A-4 • VLAN interfaces on both the managed and protected sides with the same VLAN ID to cause the VLAN traffic to pass-through the BSC • a VLAN on the managed side with no corresponding VLAN on the protected side to terminate VLAN traffic on the BSC • VLAN interfaces on the protected side and configure VLAN tagging within a Role to cause user traffic to initiate the VLANs from the BSC Enforcing Network Usage Policies with VLANs Enforcing Network Usage Policies with VLANs In addition to configuring Roles to perform VLAN tagging, you can use VLAN IDs to determine policy enforcement within a Role (the managed side VLAN ID that is used within the policy). When defining a role, you can create network usage policies based on the logical location from which a user connects to the wireless network. The BSC uses VLANs to logically represent these locations. For example, you may have defined “VLAN 15” that includes all access points on the shop floor. You can then create a location called Shop Floor that maps VLAN 15 to the location. After you create the location, you can then select it from the drop-down list when defining a network usage policy in a Role. For example, you can create a policy that allows Telnet sessions only when the user is connected to the BSC from an access point in the Shop Floor (VLAN 15) location. See “Creating Locations and Location Groups” on page 8-19 for the procedure to create user locations on the BSC. Refer to “Defining User Roles to Enforce Network Usage Policies” on page 8-2 for information about defining Roles on the BSC. BlueSecure™ Controller Setup and Administration Guide A-5 Appendix A: A-6 B Provisioning Network DHCP Servers to Support BSAPs The BSAP needs the IP address of the home BSC to which it will connect and from which it will obtain its software image and configuration. You can provide the home BSC IP address to a BSAP by manually configuring the DHCP server on your network to send BSC IP addresses to BSAPs using DHCP vendorspecific option 43. This appendix provides an overview of provisioning network DHCP servers to support BSAPs and includes: • Overview • Provisioning a Microsoft DHCP Server • Provisioning an Internet Systems Consortium (ISC) DHCP Server • Configuring a Cisco IOS DHCP Server BlueSecure™ Controller Setup and Administration Guide B-1 Appendix B: Overview You can deploy BSAPs on a routed network with Layer-3 connectivity to the BSC as shown in the following figure. BSAPs Receive their IP Addresses from Network DHCP Server BSAPs Receive Home BSC IP Address Using DHCP Option 43 or DNS Network DHCP Server Network DNS Server Figure B-1: Deploying BSAPs Across a Routed Network In this deployment scenario, you must ensure that each BSAP is able to communicate with the BSC across the routed network by verifying that: • there are no NAT devices between the BSAPs and the BSC • Protocol 97 and TCP/UDP Port 3333 traffic is allowed between BSAPs and the BSC Each BSAP will receive its IP address from your existing network DHCP server. The BSAP also needs the IP address of the home BSC to which it will connect and from which it will obtain its software image and configuration. You can provide the home BSC IP address to a BSAP by manually configuring the DHCP server on your network to send BSC IP addresses to BSAPs using DHCP vendor-specific option 43. In DHCP requests sent from the BSAP, the BSAP uses option 60 Vendor class identifier with a value of BlueSecure.AP1500 to identify itself to the DHCP server. The following sections provide examples of how you may configure vendor-specific option 43 on the following DHCP servers: • Provisioning a Microsoft DHCP Server • Provisioning an Internet Systems Consortium (ISC) DHCP Server Provisioning a Microsoft DHCP Server To provision a Microsoft DHCP Server to pass the IP address of one or more BSCs to a BSAP using DHCP Option 43 (Vendor Specific Information), you must complete these three steps: 1. Define the Vendor Class. 2. Set a value for predefined option 43. 3. Configure the Option for the BSAP DHCP address scope. Define the Vendor Class Define the vendor class by making the DHCP server aware of the vendor class BlueSecure.AP1500. 1. Access the Microsoft DHCP server management window, right click on the DHCP server in the navigation tree, and select Define Vendor Classes… For example: B-2 Figure B-2: Defining the BSAP Vendor Class The DHCP Vendor Classes dialog appears. 2. Click Add... and the New Class dialog appears, for example. Figure B-3: Entering DHCP Vendor Class Information 3. Enter a meaningful Display name and Description, and then enter the string (BlueSecure.AP1500) that the DHCP client on the BSAP will send to the DHCP server. Click below in the ASCII section, and type the string BlueSecure.AP1500. The Hexadecimal string will be created automatically. BlueSecure™ Controller Setup and Administration Guide B-3 Appendix B: 4. Click OK to close the New Class dialog. You will see that the BSAP vendor class is listed in the DHCP Vendor Classes dialog, for example: Figure B-4: The BSAP Vendor Class is Now Listed Set a value for predefined option 43 1. Right click on the DHCP server in the navigation tree, and then select Set Predefined Options…. The Predefined Options and Values dialog appears as shown in Figure B-5. Figure B-5: The Predefined Options and Values Dialog 2. Select BlueSecure.AP1500 from the Option Class drop-down menu. 3. Click Add.... The Option Type dialog appears as shown in Figure B-6. Figure B-6: The Option Type Dialog B-4 4. In the Option Type dialog: a) Enter a descriptive name in the Name field. b) Select Encapsulated for the Data type. c) Enter 127 for the Code Value. d) Enter a meaningful description in the Description field. e) Click OK to return to the Predefined Options and Values dialog. 5. Click OK to finish the definition of Options and Values. Configure the Option for the BSAP DHCP address scope 1. Right click on the DHCP server in the navigation tree, and then select New Scope… to define the BSAP IP address scope. 2. After you have created the scope, right-click on Scope Options in the navigation tree to configure the Options. Figure B-7: Configuring Scope Options The Scope Options dialog appears, for example: Figure B-8: The Scope Options Dialog 3. Click the Advanced tab, and then select BlueSecure.AP1500 from the Vendor class drop-down menu. The predefined option is listed as an available option. 4. In the ASCII text field, enter the IP addresses of the BSCs (separated by a comma or semicolon) to which the BSAPs defined in the address scope are to connect. Be sure to delete the leading period that is pre-inserted in the field. BlueSecure™ Controller Setup and Administration Guide B-5 Appendix B: ) Note: If you wish to prioritize certain BSCs to connect to, a failover option is allowed in the IP separated list. By prepending the letter F to the IP address, it designates that BSC as a failover BSC. Only if the primary BSC(s) fail, will the AP associate to the failover BSC(s). This provides N+1 redundancy. In the following example, 192.168.100.25 is the failover BSC: option 43 "192.168.100.23,192.168.100.98,F192.168.100.25 " 5. Click Apply to complete the scope option configuration. The defined scope option now appears, for example: Figure B-9: The Defined Scope Option The BSAPs will connect to one of the BSCs defined in the vendor option. Provisioning an Internet Systems Consortium (ISC) DHCP Server To setup an ISC server on your network to send the DHCP Vendor option, you must first match the identifier, then add the option: if option vendor-class-identifier = "BlueSecure.AP1500" { option vendor-encapsulated-options 7F:0D:31:39:32:2E:31:36:38:2E:31:36:30:2E :31; } 31 is hex for 1, 39 for 9, so the above string reads: 127 (vendor), 13 (length), then 192.168.160.1. The hexadecimal string is assembled as a sequence of the TLV values for the Option 43 sub-option: Type + Length + Value. Type is always the sub-option code 0x7f (decimal 127). Length is the number of controller Protected IP addresses times 4 in hex. Value is the IP address of the controller listed sequentially in hex. B-6 More than one BSC IP address can be specified, separated by commas or semi-colons. The length (up to 255) can contain up to 15 IP addresses. The following example shows two BSC IP addresses (192.168.160.1 and 40.4.4.1) - 2C is a comma: if option vendor-class-identifier = "BlueSecure.AP1500" { option vendor-encapsulated-options 7F:16:31:39:32:2E:31:36:38:2E:31:36:30:2E :31:2C:34:30:2E:34:2E:34:2E:31; } Configuring a Cisco IOS DHCP Server The Cisco IOS DHCP server only allows Option 43 definitions for one device type for each DHCP address pool, so only one AP type can be supported for each DHCP address pool. Complete these steps in order to configure DHCP Option 43 for BSAPs in the embedded Cisco IOS DHCP server: 1. Enter configuration mode at the Cisco IOS command line interface (CLI). 2. Create the DHCP pool, which includes the necessary parameters, such as the default router and server name. This is an example DHCP scope: ip dhcp pool <pool name> network <ip network> <netmask> default-router <default-router IP address> dns-server <dns server IP address> 3. Add the Option 60 line with this syntax: option 60 ascii "BlueSecure.AP1500" 4. Add the Option 43 line with this syntax: option 43 hex <hexadecimal string> The hexadecimal string is assembled as a sequence of the TLV values for the Option 43 sub-option: Type + Length + Value. Type is always the sub-option code 0x7f (decimal 127). Length is the number of controller Protected IP addresses times 4 in hex. Value is the IP address of the controller listed sequentially in hex. For example, suppose there are two controllers with protected interface IP addresses, 192.168.10.5 and 192.168.10.20. The type is 0x7f. The length is 2 * 4 = 8 = 0x08. The IP addresses translate to c0a80a05 (192.168.10.5) and c0a80a14 (192.168.10.20). When the string is assembled, it yields 7f08c0a80a05c0a80a14. The Cisco IOS command that is added to the DHCP scope is: option 43 hex 7f08c0a80a05c0a80a14 BlueSecure™ Controller Setup and Administration Guide B-7 Appendix B: B-8 C Endpoint Scanning BlueProtect ensures that a client device is a trusted end-point by performing a scan of the client device to verify that the device is running the proper administrator-specified security applications before allowing the device onto the network. This release of the Bluesocket BSC system software fully integrates BlueProtect. You can first use the BlueProtect functionality to verify that a user attempting to access your network is doing so from a trusted end-point and then use the standard Bluesocket BSC functionality to provide the proper network access and policy management based on the user’s credentials. This appendix provides complete procedures for configuring endpoint scanning via BlueProtect on the BlueSecure Controller and includes: • Overview • About Rules • Client Browser Requirements • Java Agent • Entering BlueProtect License on the BSC’s Manage License Page • Configuring Landing Page Text • Creating a BlueProtect Policy • Remediation • Assigning a BlueProtect Policy to a User Role • Mobility Matrix • Client Examples BlueSecure™ Controller Setup and Administration Guide C-1 Appendix C: Endpoint Scanning Overview A “trusted end-point” refers to a client device that has been verified to be free of worm or virus infection and confirmed to be running virus detection software or firewall software to protect it against future attacks or infections. Increasingly, as a matter of policy, network administrators will allow only trusted end-points onto their networks. Version 6.4 (and later) of the Bluesocket BSC system software fully integrates BlueProtect. BlueProtect requires no pre-installed software on endpoint computers, other than a supported web browser. Network administrators can first use the BlueProtect functionality to verify that a user attempting to access their network is doing so from a trusted end-point and then use the standard Bluesocket BSC functionality to provide the proper network access and policy management based on the user’s credentials. Once you have configured the BlueProtect settings as described in this chapter, a webbased user login will proceed as follows: 1. The user logs in via the user login page as normal. 2. The BSC authenticates the user into a role. 3. Based on the settings configured for the user’s role, the user may be redirected to the BlueProtect scan page and his or her device is scanned. 4. The user is redirected to the scan page until his or her device passes the scan. About Rules BlueProtect supports the following types of rules, which are used to specify conditions, action, and remediation resources: Firewall rules Firewall rules specify the following: • Which firewalls you require endpoint users to have (Integrity client or ZoneAlarm, CA, BlackICE, Outpost, Norton, Kerio, WindowsXP, or McAfee). • Which action BlueProtect will take if endpoint users don't have the firewall. • What information and resources will be available to users to help them get the firewall. Anti-virus Rules Anti-virus rules specify which anti-virus applications endpoint computers must have to gain access to your network. For your convenience, anti-virus enforcement rules are preconfigured with supported anti-virus providers: Agnitum Ltd., AhnLab Inc., America Online Inc., Anonymizer Inc., Authentium Inc., AVG Technologies, Bell, BellSouth, BellSouth Internet Security Anti-Spyware, Sécurité Internet d'affaires Anti-espion, Check Point Inc, Computer Associates International Inc., EarthLink Inc., F-Secure Corp., FaceTime Communications Inc., Grisoft Inc., iS3 Inc., Javacool Software LLC, Kingsoft Corp., Lavasoft Inc., McAfee Inc., MicroSmarts LLC, Microsoft Corp., Omniquad, Panda Software, PC Tools Software, Prevx Ltd., Radialpoint Inc., Safer Networking Ltd., Sereniti Inc., SOFTWIN, Sunbelt Software, Symantec Corp., Trend Micro Inc., VCOM, Verizon, Webroot Software Inc., Yahoo! Inc., Zone Labs LLC. Anti-Spyware Rules Anti-virus rules specify which anti-virus applications endpoint computers must have to gain access to your network. For your convenience, anti-virus enforcement rules are preconfigured with supported anti-virus providers. Registry Checking Support BlueProtect can now scan the registry for keys. When entering the registry entry, you must include the entire path and the key (separated by a backslash). The system then translates it. For example, if you enter the key: HKEY_LOCAL_MACHINE\SOFTWARE\Microsoft\Active Setup\Install Check\IE40 The system will look for the registry folder/path: C-2 Client Browser Requirements HKEY_LOCAL_MACHINE\SOFTWARE\Microsoft\Active Setup\Install Check And the existence of the key: IE40 Registry key checks must end with a value name, and path checking is not supported. Only DWORD, String, and Expanded Strings are supported. Expanded strings are treated as regular strings. File Checking and Process Support BlueProtect can now scan the system for a file on the disk, or a running process. For a file, enter the full path, like “C:\Windows\cmd.exe”. For a process, enter just the name, like “notepad.exe”. Peer to Peer (P2P) Detection Support BlueProtect can now scan the system for Peer to Peer applications that are both installed and/or running. By clicking “Check All” all P2P applications can be detected and blocked. Note that Skype is a Peer to Peer application, so consider removing that from the list unless you really want to block it. Patch Detection Support BlueProtect can now scan the system for patch applications that ensure the client has autoupdates and has installed the latest patches. Choose Microsoft Windows AutomaticUpdate to trigger based on the built-in Microsoft client. Client Browser Requirements • Supported Operating Systems and Browsers • Windows (2000, 2003, XP, Vista, Windows7) • Internet Explorer ( 5.5 or greater) • Firefox (1.5 or greater) • Google Chrome (requires Java version 6, update 12 or later) • RPM Based Linux Distributions (RedHat Enterprise 4 and 5, Fedora Core 5 and up) and Debian Linux Distributions (Ubuntu 6.10+) • OSX 10.3 and up (PowerPC and Intel) • • Firefox (1.5 or greater) • Safari • Firefox The Java Agent now shows the Operating System tab during scan. Java Agent The scan of endpoint computers using BlueProtect is accomplished by an agent deployed to the client as a Java applet. Agent Platform Support The Agent is compatible with Sun Java 1.4.2 or equivalent and newer. Java 1.4.2 or newer must be installed on the client or the client will be prompted to download When a Vista client has protected mode enabled, they will be scanned (assuming Java is installed), but be aware of the following: 1. Be sure to click yes to all the certificates and pop-ups. 2. If it's still not working, enable Intranet non-protected mode. 3. If it's still not working, add the BSC protected IP to the list of trusted sites. 4. If prompted, enter your password and/or allow privileges to the web browser. BlueSecure™ Controller Setup and Administration Guide C-3 Appendix C: Endpoint Scanning Applet Loader Page The Applet Loader Page has two responsibilities. 1. The page gracefully handles non-compatible environments. Minimum non-compatible environments which should be covered are as follows: • Missing Java • • Applet Launch page opens a new browser window to Sun Java Installation page Unsupported Operating Systems (globally allowed or denied based on network configuration) • iPhone/iPod • Windows Mobile • PocketPC • Blackberry • Symbian • MAC OS 9 The Webstart deployment relies on a similar mechanism. The installer deployment is bundled with a JRE, and only installs on adequate operating systems. 2. The page accepts and forwards the user’s Target Destination. A user redirected from his target destination and sent to this page. The loader page, agent, and policy Validator forward this URL across all communications so the user can be passed through once the user is determined to be compliant with the policy. Entering BlueProtect License on the BSC’s Manage License Page Before you can access and use BlueProtect on the BlueSecure Controller, you must enter your License Key in the BCS administrator console. See “Licenses” on page 16-12 for details. Configuring Landing Page Text 1. To configure Landing Page text, select the General tab, HTTP Settings tab and scroll to the bottom of the HTTP Settings page, as shown in Figure C-1. 2. Mark the Enable BlueProtect checkbox. 3. Make any required changes to the Landing page text. For example: • C-4 Change the URL from which the client device can download Java. Creating a BlueProtect Policy Figure C-1: HTTP Settings Page - BlueProtect Endpoint Scanning ) Note: Any URL that appears in this window will be automatically allowed for clients in the Unregistered role. This allows a client to download Java. By default, a link is provided for Windows clients. If you are supporting MAC OS X or Linux clients, add the appropriate Java download URLs. • Add any specific text for your network such as the email address of the network administrator • Specify in text form all remediation sites. You can also add links to download local copies of anti-virus software. • Specify exactly the client software that is required. For example if you require Symantec anti-virus, indicate this in landing text so that clients that fails the virus scan will know what software they need. 4. Mark the Deny Non-Supported Clients checkbox to deny access to non-supported users and redirect them to the landing page. For example, if you mark this checkbox, IPhones will not be allowed to connect to your network. 5. Mark the Enable auto-update capability checkbox to check for updates nightly. 6. Click Save. Creating a BlueProtect Policy 1. Select the User Roles tab, BlueProtect Policies tab. ) Note: If you do not have a BlueProtect license, the BlueProtect Policies tab is not visible and a link is provided for you to get a license. 2. Select BlueProtect Policy from the Create drop-down. The General section of the Edit BlueProtect policy page is displayed. (The page is used to configure General, Antivirus, Antispyware, and Firewall settings.) 3. On the Edit BlueProtect policy page, enter the policy Name and Description. 4. In the Remediation message field, enter the message to display to the user when the scan of the client device fails. BlueSecure™ Controller Setup and Administration Guide C-5 Appendix C: Endpoint Scanning 5. Select the Save button. 6. To configure Antivirus, Antispyware, or Firewall settings, click the link for your platform at the left of the page. For example, the Edit BlueProtect policy page redisplays as shown in Figure C-2 when you click the Antivirus Windows link: 7. Mark the Enable Antivirus Category checkbox 8. In the Select Products scrolling list, mark the checkbox for the product you want BlueProtect to verify is installed on the wireless client. 9. In the Real Time Protection section: a) Select Yes from the Enable RTP checks drop-down list to make sure the application is not just installed, but running also. b) From the If RTP is Disabled drop-down, select the action that should occur if Real Time Protection is disabled on the client: Restrict user to block the user from accessing your web site or Warn user to notify the user but allow them to access your web site. c) Enable or Disable Auto-Remediation to force BlueProtect to enable real time protection automatically on the client if it is currently disabled. If you disable Auto-Remediation, the user is prompted to perform manual remediation. 10. The remaining three sections on the page, Data File Time, Data File Signature, and Last Scan time, are used to warn/restrict the user if the Virus Definition Time, Virus Definition Signature, and Last Scan Time, respectively, are too old. The difference between Data File Time and Data File Signature is that the latter is applicable to specific products like Kaspersky which use virus definition signature as a counter for viruses. Select Yes/No to warn/restrict the user, enter the number of days/revisions in the text field, and Disable/Enable Auto Remediation. If the number of days/revisions has been exceeded, then the user will be prompted to update the software. If Auto Remediation is enabled, the system will automatically attempt to update the software. C-6 Creating a BlueProtect Policy Figure C-2: Edit BlueProtect Policy BlueSecure™ Controller Setup and Administration Guide C-7 Appendix C: Endpoint Scanning Remediation When an endpoint fails the security policy scan, the administrator can block the endpoint until it is in compliance. The endpoint has two means to address this: • Auto-remediation • Manual remediation AutoRemediation If auto-remediation is enabled and the endpoint fails to scan, a FixAll button will appear on the Java Applet. When this is clicked, the Applet will attempt to fix the scan failures. This could included auto-updating Anti-Virus definitions or enabling a Firewall. Manual Remediation If auto-remediation is disabled, then the endpoint is forced to manually address the scan failures. This could involve enabling a Firewall by hand or installing an Anti-Spyware program. Zero Config Remediation A Walled Garden is a hole in the unregistered role to allow clients to reach certain web sites without having to authenticate. Because an endpoint is not authenticated until it passes a scan, the client has the same policy as the Unregistered role. When scanning is enabled, the BlueSecure controller will intelligently open the minimum amount of destination IPs in the Unregistered role to allow endpoints to reach remediation sites. For example, if the administrator requires McAfee antivirus, then www.mcafee.com is allowed in the Unregistered role, but other sites, like www.avira.com are not. If you're using a local site for anti-virus updates and other definitions, the holes in the Unregistered role can be removed by de-selecting the GUI checkbox Enable Zero Config Remediation. BlueProtectReme diation Role Support As of 6.5, the BSC now supports an optional Remediation Role for client scanning. The following guidelines pertain to this role 1. To enable the role, create a role called "BlueProtectRemediation" - it must match that name and case. 2. (Optionally) Inherit the role from the "Unregistered" Role (or replicate the policies you wish to allow). 3. (Though it is harmless), do not enable BlueProtect scanning for the "BlueProtectRemediation" role itself. Continue to Enable scanning on the client’s target role. 4. By default, all the normal remediation sites will be allowed in this role and not the Unregistered role. 5. There are two possible firewall policies/approaches to this role: • Only allow specific intranet and internet sites that are deemed necessary for remediation • Allow the internet but block intranet sites 6. A client in the remediation role will be allowed to browse to any site allowed in the role. If the site is blocked or not allowed, the client will be redirected to the Java Agent and rescanned. 7. If you allow all Web Traffic in the Remediation Role, then a client can fail a scan, but browse the web forever. So be sure to restrict the role down to just the sites you want a non-compliant client to reach. 8. In 6.5, proxy servers (either hardcoded in the client, or as a part of the Remediation role) aren’t supported. This is because the firewall must know the real destination of HTTP requests to filter them appropriately. The Remediation Role is useful to allow administrators an extra level of security, while restricting the Unregistered Role to only authentication. Once users are authenticated, the sites they can reach are now governed by the Remediation Role. This prevents a user C-8 Assigning a BlueProtect Policy to a User Role without credentials from getting to Remediation sites (which could be internet sites or internal resources). Assigning a BlueProtect Policy to a User Role You need to edit user roles on the BSC to enable/disable BlueProtect scanning for each role and to specify the frequency at which users authenticated into that role will have their devices scanned. Click the User Roles, Roles tab from any BSC administrator console page, and repeat the following steps for each role on the BSC for which you wish to enable BlueProtect scanning: 1. Click the icon corresponding to role you wish to edit. 2. Enable BlueProtect scanning for the role by specifying the frequency at which a user authenticated into the role will have his or her device scanned by selecting an option from the BlueProtect Endpoint Scanning drop-down menu. Possible scan frequency settings are: • Every Time • Once a day • Once a week • Once a month • Every 45 days • Every 90 days 3. From the BlueProtect Policy drop-down list, select the name of the security policy you want to apply to this role (the policy must have already been configured as explained in “Creating a BlueProtect Policy” on page C-5).A role can only use one policy, but a single policy can be applied to many roles. 4. Click Save to store the role settings to the BSC database. Mobility Matrix For a Mobility Matrix, note the following: • Every node must have a BlueProtect license • In case of replication/load sharing, the security policies can only be created in the master. • In failover, licenses are needed on both the master and the failover controller. • On each node that has a license, go to Replication Setup page, select Replication Node checkbox, and then select Acquire a snapshot from the master, to push out the BlueProtect policy to the nodes. Client Examples This following figure shows what the display on the client looks like if the security products specified by the BlueProtect policy for that user are not installed: If a client can't pass a BlueProtect scan, the admin could allow the user into a different role and bypass BlueProtect. An admin could use the Admin Override feature to change the role of the user. The admin should create another similar role with BlueProtect disabled, and then move the effected user into that role using the Admin Override feature, as shown in Figure C-4. BlueSecure™ Controller Setup and Administration Guide C-9 Appendix C: Endpoint Scanning Figure C-3: Client Display when Required Products Not Installed Figure C-4: Overriding a Client Role C-10 D Serial Port Access to Essential Functions On a rare occasion, you may temporarily lose access to the BSC's web browser interface due to a misplaced password or an ISP service outage. In this case, the BSC provides serial port access to essential functions via the serial port. This chapter covers the following topics: • Listing of Accessible Functions • Access Procedure BlueSecure™ Controller Setup and Administration Guide D-1 Appendix D: Listing of Accessible Functions • 1) dbinit - Restore all values in the BSC back to their defaults. • 2) ifconfig - Show the NIC settings for the protected, managed, or failover interface. • 3) processes - Show a list of all running processes. • 4) restart - Restart the BSC software. • 5) switch - Switch to the alternate runtime software image. You must subsequently issue the reboot command for the switch to take effect. • 6) reboot - Reboot the BSC machine. • 7) specials - [Reserved for Bluesocket use only]. • 8) clean - Delete older event logs. This is useful when disk usage is high. • 9) exit - Exit the serial port session. • a) admin password recovery: Set the default admin account to its default password. • i) interface: Set the BSC’s protected interface address. Type i followed by IP, Netmask, then gateway for fixed ip. For example: i 192.168.100.30 255.255.252.0 192.168.100.1 Type i followed by the word 'dhcp' for dhcp. For example: i dhcp ) Warning: If you make a mistake and need to erase what you’ve typed, most serial programs do not take backspace characters. Instead use CTRL-U to erase the entire line and then reenter the entire line. Access Procedure ) Note: Before beginning the procedure listed below, verify that the option to access the BSC via its serial port is enabled in the BSC administrator console as described in “Miscellaneous BSC Options” on page 10-24. To access the BSC serial port functions: 1. Connect a nine-pin null-modem serial cable between the nine-pin serial port on the back of the BSC and your laptop computer. 2. Run a terminal emulation program on your laptop computer configured with the following settings: • Port - COM1 • bps - 9600 • Data bits - 8 • Stop bits - 1 • Parity - None • Flow control - None 3. Initiate the connection to the BSC. 4. Enter the following password at the displayed password prompt: wg1000s A menu appears listing the commands described above. 5. Enter a command number/letter at the prompt, or exit the serial port session. D-2 L R DB-9 Female DB-9 Female Pin Connections L-SH R-SH L-1 L-7, R-8 L-2 R-3 L-3 R-2 L-4 R-6 L-5 R-5 L-6 R-4 L-8 R-1, R-7 Use the above cable for RS-232 asynchronous communications between the BSC and a laptop computer. In this cable, Request-to-Send (RTS, pin 7) asserts the Carrier Detect (pin 1) on the same side and the Clear-to-Send (CTS, pin 8) on the other side of the cable. Figure D-1: Recommended Null-modem Serial Cable Pinout BlueSecure™ Controller Setup and Administration Guide D-3 Appendix D: D-4 E Contacting Bluesocket, Inc. This appendix provides complete information for contacting Bluesocket customer support personnel and includes: • Obtaining Technical Support • Contacting Bluesocket Customer Support BlueSecure™ Controller Setup and Administration Guide E-1 Appendix E: Obtaining Technical Support Bluesocket is committed to providing complete technical support to its customers. If you have a question concerning your Bluesocket products, refer to the technical documentation, including release notes, supplied with your distribution. You should be able to find the answer to your question in these documents. If you need further assistance, please first contact your authorized Bluesocket value-added reseller from whom you purchased your products. Your Bluesocket reseller is familiar with you and your particular installation, and has technical support staff ready to assist you. Contacting Bluesocket Customer Support If you require further assistance, and you are a BLUE STANDARD or BLUE PREMIUM service contract customer, you can reach our support department directly using the following information: • e-mail:[email protected] • telephone: In the US, dial toll-free 1-866-633-3358 and then press 2 at the prompt to reach Bluesocket customer support personnel from 8:00 a.m. to 6:00 p.m. eastern time. From locations outside of the US, dial +1-781-328-0888 and then press 2 at the prompt to reach Bluesocket customer support personnel. Live telephone support is available 24 hours per day, 7 days a week for BLUE PREMIUM customers. E-2 • Internet: http://www.bluesocket.com • postal mail: Bluesocket, Inc. 10 North Avenue Burlington, MA 01803 USA Glossary ! 802.11 x - A series of IEEE specifications for LANs, currently 802.11b, 802.11a, and 802.11g. Using any one of these extensions to the 802.11 standard permits wireless communication between a client and an access point or between two clients. The various specifications govern transmission speeds and radio frequencies as well as fall-back rates and other characteristics. The upcoming standard 802.11i will provide additional security specific to WLANs, and 802.11e will address quality of service. 802.3af - An IEEE standard known as Power over Ethernet (PoE), which provides up to 12.95 watts of power (48 volts) over the same Category 5 cable that delivers standard 10/100/1000Mb Ethernet service. A Access code control - Decision-making process that determines if a user's request for access is granted. Access point (AP) - A device that serves as a communications hub for wireless clients and provides a connection to a wired LAN. Ad hoc - A peer-to-peer connection mode in which wireless PC Cards communicate directly with one another. AES (Advanced Encryption Standard) - A federal information-processing standard, supporting 128-, 192-, and 256-bit keys. ARP (Address Resolution Protocol) - A method for finding a host's Ethernet address from its Internet address. The sender broadcasts an ARP packet containing the Internet address of another host and waits for it (or some other host) to send back its Ethernet address. You can configure the BSC to support proxy ARP for traffic directed to clients behind its protected interface. API (Application Programming Interface) - Bluesocket provides a set of remote procedure call (RPC) functions as an application programming interface (API) in its BlueSecure Controller (BSC) system software. By utilizing this API, you can create a custom application to configure, manage, and monitor a Bluesocket BSC. All Bluesocket API calls are made using hypertext transport protocol, secure (HTTPS) as the transport and extensible markup language (XML-RPC) for encoding. Association - When a Client exchanges packets with an Access Point; in Adhoc mode, when two Clients exchange packets with each other. BlueSecure™ Controller Setup and Administration Guide Glossary-1 Glossary Authentication - Process whereby the identity of a person or process is verified. The BSC authenticates users by matching submitted user credentials against its internal database and an external RADIUS or LDAP/Active Directory server. Authorization - Process whereby the network resources, enterprise destinations, and bandwidth a user can access are defined. You can implement authorization in the BSC by assigning a role to each user. Authorized Station - An authorized station is an Access Point or client station that the you know about. B Bluetooth - A specification for short-range radio links between mobile computers, mobile phones, digital cameras, and other portable devices. BSC - The abbreviation BSC refers to all models of the BlueSecure Controller product family. C CAS (Central Authentication Service) - CAS is an authentication method developed at Yale that enables single sign-on across multiple web applications. Channel - 802.11 radios operate on multiple different channels. Each country is allocated a set of channels that it can use. Client - A wireless device that connects to the WLAN via an access point. A client is typically a laptop or desktop PC, but also can be a PDA, phone, or printer with an 802.11 network adaptor. COSIGN authentication - An open source project originally designed to provide the University of Michigan with a secure single sign-on web authentication system. D DHCP (Dynamic Host Configuration Protocol) - You may configure the Bluesocket BSC to dynamically assign IP addresses to wireless clients by running a DHCP server on the BSC or by running a DHCP relay agent on the protected side of the network. Digital Certificate - A digital certificate is a statement signed by an independent and trusted third party testifying to the identify of an organization or individual. A digital certificate is issued by a certification authority It contains the subject name, a serial number, expiration dates, a copy of the certificate holder's public key (used for encrypting messages and digital signatures), and the digital signature of the certificateissuing authority so that a recipient can verify that the certificate is real. The BSC supports digital certificate authentication. DNS (Domain Name System) - A general-purpose distributed, replicated, data query service chiefly used for translating hostnames into Internet addresses. The BSC runs a DNS service. DSCP (Differentiated Services Code Point) - You can set QoS parameters for traffic priority and differentiated services code point (DSCP) marking for a BSC network service. E EAP (Extensible Authentication Protocol) - An authentication protocol that supports multiple authentication methods, such as Kerberos, passwords, or smart cards. Glossary-2 Glossary EAP-FAST (EAP-Flexible Authentication via Secure Tunneling) - A publicly accessible IEEE 802.1X EAP type developed by Cisco Systems and supported by the BSC. EAP-FAST uses symmetric key algorithms to achieve a tunneled authentication process. Encryption - Scrambling data so that only the authorized recipient can read it. Usually a key is needed to decrypt the data. ESSID (Extended Service Set Identifier) - A type of unique identifier applied to both the AP and the wireless PC Card that is attached to each packet. This allows the AP to recognize each wireless client and its traffic. H H.323 - A protocol standard for multimedia communications. H.323 was designed to support VoIP and other real-time transfer of audio and video data over packet networks. The standard involves several protocols each handling specific details of Internet telephony. HTTPS (HyperText Transmission Protocol, Secure) - A variant of HTTP used for handling secure transactions. HTTPS is a unique protocol that is simply SSL underneath HTTP. You need to use “https://” for HTTP URLs that use SSL, whereas you use “http://” for HTTP URLs without SSL. The default “https” port number is 443, as assigned by the Internet Assigned Numbers Authority. I IEEE (Institute of Electrical and Electronics Engineers) - An organization involved in setting computing and communications standards. IDS (Intrusion Detection System) - The Bluesocket BSC provides an administratorconfigurable Intrusion Detection System (IDS) to defend itself and the network it is protecting from intruders, worms, and other targeted attacks. IPSec (IP Secure) - A protocol that provides security for transmission of sensitive information over unprotected networks such as the Internet. IPsec acts at the network layer, protecting and authenticating IP packets between participating peer devices. K Kerberos - An authentication system enabling protected communication over an open network using a unique key called a ticket. L L2TP (Layer 2 Tunneling Protocol) - An IETF standard protocol for creating Virtual Private Networks. L2TP is an open standard with mutli-vendor interoperability and acceptance. You can configure the Bluesocket BSC to support L2TP over IPSec such that IPSec secures the traffic and L2TP provides both a tunnel and authentication between the wireless client and the BSC. LDAP (Lightweight Directory Access Protocol) - LDAP defines a relatively simple protocol for updating and searching directories running over TCP/IP. An LDAP directory entry is a collection of attributes with a name, called a distinguished name (DN). The DN refers to the entry unambiguously. Each of the entry's attributes has a type and one or more values. M MAC (Media Access Control) address - A hard-wired address applied at the factory. It uniquely identifies network hardware, such as a wireless PC Card, on a LAN or WAN. BlueSecure™ Controller Setup and Administration Guide Glossary-3 Glossary Managed Remote Subnet - A BSC network configuration in which the local wireless subnet uses a router that does not use NAT and the BSC uses DHCP to assign IP addresses to wireless clients on the managed side of the network. Managed Side - The segment of the network containing wireless clients and wireless access points. The BlueSecure Controller manages use, quality of service, and security on this side of the network. Managed Virtual Interface - BSC configuration used for special networking topologies or applications that cannot communicate directly with the managed physical interface, managed-side VLAN, or managed remote subnet. N NAT (Network Address Translation) - You may use NAT to map all client IP addresses on the managed side to the IP address of the BSC protected interface. NIST (National Institute of Standards and Technology) - NIST's Computer Security Division is charged with improving the security of information systems. NTLM (NT LanMan) - NTLM (NT LanMan) is an authentication process that’s used by all members of the Windows NT family of products. You can configure the BSC to support NTLM and Transparent NTLM user authentication. O OFDM (Orthogonal Frequency Division Multiplexing) - A modulation technique for transmitting large amounts of digital data over radio waves. 802.11a uses OFDM, as will 802.11g. P Pass-through VLAN - Pass-through VLANs on the BSC receive 802.1q-tagged packets from one physical interface (typically the managed side) and forward them with the same tag to the outgoing physical interface (protected side). PEAP (Protected Extensible Authentication Protocol) - Authentication protocol developed by Cisco, Microsoft and RSA Security, Inc. PEAP uses a certificate approach to authentication where a user's identity is verified by a digital certificate. Preamble - A preliminary signal transmitted over a WLAN to control signal detection and clock synchronization. PPTP (Point-to-Point Tunneling Protocol) - A tunneling protocol for connecting Windows NT clients and servers over Remote Access Services (RAS). PPTP can be used to create a Virtual Private Network between computers running NT. It is an extension of PPP sponsored by Microsoft. Protected side - Internet or enterprise network. The BlueSecure Controller protects this segment of the network from unauthorized use or access. Pubcookie authentication - Pubcookie is an open-source package for intra-institutional single-sign-on end-user web authentication. Q QoS - The performance properties of a network service, possibly including throughput, transit delay, priority. 802.11 and Bluetooth-based networks allow packets or streams to include QoS requirements. Glossary-4 Glossary R RADIUS (Remote Authentication Dial-In User Service) - An authentication and accounting system that verifies users' credentials and grants access to requested resources. RC4 - An encryption algorithm designed at RSA Laboratories; specifically, a stream cipher of pseudo-random bytes that is used in WEP encryption. Rogue - A rogue station is one that you have not authorized for operation. Rogue stations, particularly Access Points, often do not conform to WLAN security policies, which enables an open, insecure interface to an organization's network from outside the physically controlled facility. Role - A role is a collection of network usage policies that you define to specify which network resources and destinations in the enterprise a user may access, the bandwidth he or she may use, and whether a secure tunneling protocol such as IPSec or PPTP is required for the user connection. RSSI - Received Signal Strength Indication. S Shared key - An encryption key known only to the receiver and sender of data. SIP (Session Initiation Protocol) - A text-based signaling protocol, similar to HTTP and SMTP, for initiating interactive communication sessions between users. Such sessions include voice, video, chat, interactive games, and virtual reality. SNMP (Simple Network Management Protocol) - You can run an SNMPv2 or SNMPv3 agent on the BSC to allow you to manage the BSC remotely using standard SNMP applications such as HP OpenView. SSID - Service Set Identifier. An SSID unique identifies a session between an Access Point and a wireless PC Card. The SSID is attached to each packet of data transmitted between the Access Point and client. The SSID is considered a WLAN’s name. SSL (Secure Sockets Layer) - A protocol that provides encrypted communications on the Internet. SSL is layered beneath application protocols such as HTTP, SMTP, and Telnet, and is layered above the connection protocol TCP/IP. SSL is used by the HTTPS access method. T Termination VLAN - Termination VLANs on the BSC receive 802.1q-tagged packets from the managed side and forward them with no tag to the protected side. This causes all traffic for the VLAN to terminate on the managed side of the BSC. TTLS - (Tunneled Transport Layer Security protocol) - Protocol providing secure encryption and authentication for wireless clients. W WEP (Wired Equivalent Privacy) - A security standard established for wireless LAN technology. It has proved less secure than initially believed. V VLAN (Virtual Local Area Network) - A logical grouping of two or more nodes which are not necessarily on the same physical network segment but which share the same IP network number. See also Termination VLAN and Pass-through VLAN. BlueSecure™ Controller Setup and Administration Guide Glossary-5 Glossary Glossary-6 Index Symbols .BLUE file 16-3, 16-4 .DEBUG file 16-4 .DMP file 15-20 Numerics 802.11i preauthentication, enabling for an SSID 12-24 802.1x authentication server, configuring the BSC’s 6-21 802.1x authentication server, running the BSC’s internal 6-19 802.1x authentication, configuring 6-17 802.3af PoE support, enabling on the BSC-600 2-14, 4-11 A AARP proxy 4-33 AC power requirements 2-10 AC power, connect the BSC to 2-13 Access points defining SNMP communications with 10-25 monitoring 10-25, 15-4 preparing for use with the BSC 2-9 Accounting attributes sent from the BSC 7-3 Accounting server, configuring a RADIUS 7-1 ACT/LINK LEDs, BSC-2100 2-5 Active sessions per user, limiting 5-3 Active user connections, monitoring 15-2 Address resolution protocol (ARP), enabling BSC use of 4-3 Admin Access Allow Control List 10-4 Admin default administrator account 3-3 Administrator access, limiting by IP address 10-4 Administrator account adding a new 3-4 default username and password 3-2 Administrator account, deleting 3-6 Administrator console logging into for the first time 3-2 logging out of 3-3 Administrator password, changing 3-5 Advanced DHCP Custom Options 4-14, 4-22 After login 5-4 Allow admin to access using SNMP 3-4 Allow guest logins 11-5 BlueSecure™ Controller Setup and Administration Guide Index-1 Index Allow ICMP to protected Interface? 10-26 Allow user logins 11-5 Answer failed DNS queries? 10-19 Antenna type, configuring fixed or external for BSAPs 12-13 AP mode, configuring the BSAP for 12-10 AppleTalk routing, configuring 4-31 Application programming interface (API), disabling the BSC 10-4 ARP utility, executing from the administrator console 15-19 Asian language support, configuring 10-4, 11-21 Authenticating users against CAS authentication server 6-30 Cosign authentication server 6-24 digital certificates 6-33 external authentication server 6-1 Kerberos authentication server 6-23 LDAP/Active Directory server 6-6 local BSC database 5-2 NTLM authentication server 6-12 Pubcookie authentication server 6-27 RADIUS authentication server 6-2 their MAC addresses 5-5 transparent 802.1x authentication 6-17 Transparent NTLM Windows authentication server 6-14 Authenticating users against BSC internal 802.1x authentication server 6-19 Authentications, testing 6-34 Authorize.net AIM, online billing/transaction service 11-11 Authorize.net SIM, online billing/transaction service 11-11 Automatic redirect enabled 10-3 Average user count per AP 12-15 B Back button, using 3-11 Backing up the BSC database 16-3, 16-4 Backups, configuring automatic BSC database 10-9 Bandwidth allocation, defining for a role 8-5 Billing configuration page 11-15 Blocked State Timeout 10-8 Blocked state, IDS 10-6 BlueProtect license key, entering C-4 BlueProtect Scanning 8-9 BlueProtect, configuring support for C-1 BlueSecure Access Points (BSAPs) configuring alarms from 13-3 data encryption options 12-21 limiting client connections to 12-15 monitoring 12-29, 15-4 monitoring connected 15-5 overview of 1-3, 12-2 uploading firmware files for 12-6 BlueSecure Controller connecting to remotely 3-2 installation procedures 2-1 introduction to 1-2 Index-2 Index models 1-7 network configurations 1-10 specifications 1-9 Bluesocket SSL certificate, installing 3-6 Bluesocket stopped message 2-7 Bluesocket, contacting E-2 Brackets, mounting 2-12 BSAP service, enabling on the BSC 12-26 BSC-1200 1-8 BSC-2100 1-8 BSC-5200 1-7 BSC-600 1-8 Bulk data files, importing/exporting 16-10 C Capturing network traffic data 15-20 CAS authentication, configuring 6-30 Certificate management page 10-21 Certificate signature request (CSR) 11-23 Change Password 3-6 Character set 10-4 Chassis cap, installing on the BSC-2100 2-11 Cipher Type 12-23 Cisco Discovery Protocol (CDP) about 10-25 configuring passthrough of on the BSC 10-24 Cisco IP phone traffic, passing through the BSC 9-3 Cisco-LEAP, configuring support of 6-17 Client certificate 10-20 Client device, scanning C-2 Column filter 3-12 Column heading link 3-12 Command buttons and icons, using 3-11 Community string, defining for access points 10-25 Community strings, defining the BSC’s for SNMP v2 10-9 Configuration to restore 16-4 Connection tracking, configuring 10-14 Connections user, tracking in log files 10-15 Cosign authentication over SSL, configuring 6-25 Cosign authentication, configuring 6-24 Country/Region, defining a BSAP’s 12-8 Creating service groups 8-13 Credit card billing, configuring 1-3, 11-10 Customizing table data display 3-12 Customizing the user login page 11-2 CyberSource, online billing/transaction service 11-11 D Data encryption options for BSAPs 12-21 Database restoring from backup file 16-3 Database backups, configuring automatic 10-9 Database record, deleting 3-11 BlueSecure™ Controller Setup and Administration Guide Index-3 Index Date setting, configuring the BSC’s 10-10 Debug file, creating 16-4 Debugging the BSC 16-4 Default gateway IP address for remote clients to reach the BSC 4-20 Default redirect URL 10-3 Defaults, resetting all BSC parameters to 16-4, D-2 Delete button, using 3-11 Deleting administrator or user accounts 3-6 Deleting user accounts 5-2 Denial of Service (DoS) attack, combating 8-14, 8-16 Desktop bumpers, installing on BSC-2100 chassis 2-11 Destination groups, creating 8-10 Destinations page 3-8 Destinations, creating 8-10 DHCP lease file, creating 16-5 DHCP relay agent, configuring use of 4-9 DHCP server options, setting custom 4-14, 4-22 DHCP server, running on the BSC 4-11 DHCP server, using to assign IP addresses to BSAPs 12-5, B-2 DHCP servers 4-9 DHCP, configuring the BSC to use 4-3 Diagnostic tests, running from the BSC administrator console 15-17 Digital certificate authentication, configuring 10-20 Digital certificate transparent authentication, configuring 6-33 Digital certificate, uploading to the BSC 10-22, 10-23 Disable button, using 3-11 Disable the API 10-4 Discovery process, BSAP finding BSCs 12-5 Display, liquid crystal 2-4, 2-6, 2-7 Displaying a custom user login page 4-11, 4-12, 4-21, 12-26 Distance vector multicast routing protocol (DVMRP) 4-3, 4-10, 4-12 Distance Vector Multicast Routing Protocol (DVMRP), configuring support for 4-30 DNS proxy, enabling 10-19 DNS queries, answering failed 10-19 DNS, using to enable BSAPs to discover BSCs 12-5 Domain name system (DNS) settings, configuring for the BSC 10-18 Downloading administrator console data 3-14 DSCP marking, enabling for network service 8-16 DTIM 12-13 Dual (AP/sensor) mode, configuring the BSAP for 12-10, 12-19 Dynamic RF overview of 12-3 E EAP-TLS, configuring support of 6-17 E-mail report delivery 15-16 Enable 802.11i preauth bit 12-24 Enable button, using 3-11 Enable Enable Enable Enable Enable Index-4 CDP passthrough from managed to protected interface? 10-25 CDP passthrough from protected to managed interface? 10-25 Connection Tracking 10-15 DHCP relay? 4-9 MAC Address Authentication 6-4 Index Enable MAC Device 5-5 Enable QoS for this Service 8-15 Enable show Cisco CDP Neighbors? 10-25 Enable SIP Outbound Proxy Service? 9-2 Endpoint scanning, configuring support for C-1 Enforcement 12-15 Enterprise guest access, configuring 5-2, 8-3 Envelope icon, using 3-12 Environmental requirements for the BSC 2-10 Event levels, descriptions of 10-16 Event log, viewing 15-10 Event logging, configuring 10-14 Expire device 5-6 Exporting database files 16-10 Exporting log records 16-12 External antennas, configuring use of for BSAP-1540s 12-13 External antennas, configuring use of on BSAP-1540s 12-13 External authentication over SSL, configuring 10-21 External authentication server, testing BSC communications to 6-34 External RADIUS Accounting 7-2 External server choice enabled 11-5 External user authentication, configuring 6-2 Eyeglasses icon, using 3-12 F Fail over port connecting to 2-13 description 2-4, 2-6, 2-7 Failover configuring 4-25 description of 1-12 FAST, terminating on the BSC 6-19 Filtering administrator console data 3-12 Filtering table data 3-12 Firmware file, uploading a BSAP’s 12-6 Fixed IP address assignment, configuring 4-15 Fixed IP addresses, importing in bulk 16-11 Fonts, specifying for administrator console 3-13 Force proxy ARP for this interface 4-3, 4-10, 4-12 Forcing a user to logout 15-3 G Gateway IP address for BSC to reach remote subnet 4-20 General page 3-9 Glasses icon, using 3-12 Graceful shutdown, performing 2-14 Graph icon, using 3-12 Graphically monitoring user connections 15-7 Guest access, configuring 5-2, 8-3 Guest logins, enabling 11-5 H H.323 protocol, passing through the BSC 9-2 BlueSecure™ Controller Setup and Administration Guide Index-5 Index H.323 protocol, running as a BSC network service 8-14 Heart beat 4-27 Help button, enabling on the user login page 11-5 Home BSC, how a BSAP selects 12-6 Hostname redirection 10-3 Hotspot account generation feature, enabling 1-3, 11-10 HTML, customizing on the user login page 11-6 HTML-based administrator console 3-2 HTTP proxy server, using with the BSC 10-3 HTTP server settings, modifying the BSC’s 10-2 Humidity, operating 2-10 I Ignore link down error on this interface 4-11 Images, uploading to the BSC 11-17 Incoming/Outgoing DSCP Value 8-6, 8-16 Incoming/Outgoing Priority 8-6, 8-16 Inherit from role 8-7 Inheritance, role 8-3 Initiation VLANs A-4 Install CA Certificate 3-7 Installation location, selecting 2-10 Installation procedures connecting the BSC to your network 2-13 mounting the BSC chassis 2-10 overview of 2-2 safety considerations 2-2 selecting an installation location 2-10 Internet Control Message Protocol traffic, enabling/disabling 10-26 Intrusion Detection System (IDS), configuring 10-5 Intrusions, protecting against 10-5 Invert this destination 8-11, 8-12 IP ACL Attribute 6-5 IP address assigning to the managed interface 4-10 assigning to the protected interface 4-3 IP address, assigning to a BSAP 12-3, 12-5, B-2 IP addresses, assigning to wireless clients 4-9 IP of mail server for SMTP port redirection 10-13 IP phones, configuring support for 9-3 IP Range Assignments 4-16, 4-21, 4-24 iPass client authentication 6-4, 6-32 IPSec certificate, requesting from certificate provider 10-22 Italicized page links, meaning of 3-9 J Job Control 15-20 K Kerberos authentication, configuring 6-23 Key server address 6-29, 6-31 Index-6 Index L Language code 10-4 Languages, changing on the user login page 11-5 LCD 2-4, 2-6, 2-7 LDAP/Active Directory authentication over SSL, configuring 6-6, 6-31 LDAP/Active directory authentication server, configuring 6-6 LEDs BSC-1200 2-7 BSC-1200/BSC-1200 SOE 2-8 BSC-2100 2-5 BSC-5200 2-4 License, entering your BlueProtect C-4 Lifetime Minutes 5-4 Load balancing clients on a BSAP 12-15 Load sharing configuring 14-18 network requirements for 14-18 overview of feature 14-17 Local users, creating 5-2 Local users, importing bulk configuration data 16-11 Location groups, creating 8-19 Locations page 3-8 Locations, creating 8-19 Log out user icon, using 3-12 Log records, exporting 16-12 Logging, configuring BSC 10-14 Login install CA button enabled 11-5 Login page administrator 3-2 overview of 1-6 specifying by user location 4-11, 4-12, 4-21, 12-26 specifying which to display 4-11, 4-12, 4-21, 12-26 Login page, customizing the user 11-2 Logout popup enabled 11-5 Logs exporting 16-12 format of syslog entries 10-14 purging 15-11 viewing 15-10 M MAC ACL Attribute 6-5 MAC MAC MAC MAC address authentication, configuring 5-5 address RADIUS authentication, enabling 6-4 device configurations, importing in bulk 16-11 device, expiration settings 5-6 Maintain Current Configuration 16-7 Maintenance page 3-9 Managed interface, configuring 4-7 Managed port connecting to 2-13 description 2-5, 2-6, 2-8, 2-9 Managed remote subnet, configuring 4-19 BlueSecure™ Controller Setup and Administration Guide Index-7 Index Managed side of the network 1-2 Managed virtual interface, configuring 4-23 MatriX, secure mobility general configuration procedure 14-3 overview of 1-5, 14-2 reasons for deploying 14-2 MD5, configuring support of 6-17 Media files, uploading to the BSC 11-17 Miscellaneous BSC options, configuring 10-24 Mobility MatriX page 3-9 Monitor administrator account 3-4 Monitoring access points 15-4 Monitoring BSAPs 12-29, 15-4 Monitoring mode role for IDS 10-8 Monitoring state, IDS 10-6 Mounting procedures two-post rack 2-12 Multicast routing, configuring support for 4-30 Multicast services, enabling 4-3, 4-10, 4-12 Multiple BSC network description of 1-11 upgrading system software in replication configuration 16-7 N NAT the addresses to the protected interface address 4-10, 4-12, 4-21, 4-24 Netbios name server 4-13, 4-22 Netstat, executing from the administrator console 15-19 Network address translation (NAT), configuring use of 4-10, 4-12 Network diagnostic tests, running from the BSC administrator console 15-17 Network page 3-9 Network services, creating 8-13 Network space destination, creating 8-12 Network time protocol (NTP) synchronization, configuring 10-10 Network traffic data, capturing 15-20 Nodes, designating BSCs as Replication 14-12 Nodes, designating BSCs as Secure Mobility 14-7 Normal image/media for customization 11-18 Normal state, IDS 10-6 NTLM authentication, configuring 6-12 NTLM username to ignore 6-16 Null-modem cable, serial port connection D-2 O Obtain IP settings from a DHCP server for the interface 4-3, 4-10 ON/OFF control, front-panel 2-9 One-to-one network address translation (NAT), configuring 4-16 Online help, displaying 3-9 Operating humidity 2-10 Operating temperature 2-10 Operational mode, setting the BSAP’s 12-10 Operational settings, modifying the BSC’s 10-1 Override with per service setting? 8-6 Index-8 Index P Page controls, using 3-13 Pass-through VLANs A-3 Password administrator account 3-2 changing 3-6 Password change choice enabled 11-5 Password change, forcing a user 5-4 Password, changing an administrator’s 3-5 Password, recovering lost or forgotten administrator account 3-3, D-2 Patch installing a system software patch 16-8 removing an installed system software patch 16-9 PEAP, configuring support of 6-17 PEAP, terminating on the BSC 6-19 Pencil icon, using 3-12 Permanently put this MAC in quarantine 5-6 Phase 1 and 2 AppleTalk networks 4-32 Ping traffic, enabling/disabling 10-26 Ping, executing from the administrator console 15-18 Policies, defining enforcement within roles 8-6 Port of HTTP redirection for user login 10-3 Ports to block before entering Blocked State 10-8 Power control, BSC-2100 2-6 Power control, BSC-5200 2-4 Power control, front-panel 2-9 Power source requirements 2-10 Powering down the BSC 2-14 Powering up the BSC 2-13 Power-over-Ethernet (PoE) support, enabling on the BSC-600 2-14, 4-11 Preauthentication, enabling 802.11i 12-24 Pre-monitoring state, IDS 10-6 Pre-Monitoring Timeout 10-8 Primary machine identifier 4-28 Private key downloading CSR 11-24 recovering CSR 11-26 Processes, displaying the status of all BSC 15-19 Protected Extensible Authentication Protocol, terminating on the BSC 6-19 Protected interface, configuring 4-2 Protected port 2-8, 2-9 connecting to 2-13 description 2-5, 2-6 Protected side of the network 1-2 Protected virtual interface, configuring 4-7 Protected-side VLAN 4-5 Protocol-Independent Multicast-Sparse Mode (PIM-SM), configuring support for 4-30 Proxy address resolution protocol, configuring use of 4-3, 4-10, 4-12 Proxy HTTP server, using with the BSC 10-3 Proxy, enabling DNS 10-18 Pubcookie authentication over SSL, configuring 6-27 Pubcookie authentication, configuring 6-27 Public access wireless networks, configuring the BSC for use in 10-12 BlueSecure™ Controller Setup and Administration Guide Index-9 Index Q Quality of service (QoS), defining for a network service 8-15 Quarantined role for IDS 10-8 Question mark (?) link 3-9 R Rack requirements 2-10 Rack-mounting procedures 2-12 Radio settings, configuring 12-10 RADIUS accounting attributes sent from the BSC 7-3 configuring use of 7-1 description of 1-2 RADIUS authentication server configuring use of 6-3 defining server precedence 6-4 enabling MAC address RADIUS authentication 6-4 Read-only pages, in the administrator console 3-9 Realm Name 6-24 Rebooting the BSC 16-2 Redirect to hostname 10-3 Redirect URL 6-26 Related Documentation 1-xvii Remote diagnostics, enabling via SSHv2 10-25 Remote management of the BSC 1-3 Remove Realm Name 6-22 Replication configuring on the node BSCs 14-13 overview of feature 14-10 standard vs. cascaded configuration 14-11 Replication configuration, upgrading system software on all BSCs in 16-7 Replication mesh key 14-12, 14-13 Reports creating a custom report definition 15-14 displaying and delivering 15-16 emailing 3-12 generating and displaying 15-13 using a pre-defined report definition 15-14 Require SSL? 6-8 Reset button, using 3-11 Reset control, BSC-2100 2-6 Resetting all configuration settings to their default values 16-4, D-2 Restart control, BSC-5200 2-4 Restart control, front-panel 2-9 Restarting the BSC 16-2 Restarting the BSC to activate the configuration 3-15 Restoring the BSC database from a backup file 16-3 RF containment overview 1-4 RF IDS configuring the BSAP in sensor mode 12-10, 12-19 overview 1-4 RF Management 12-3 Index-10 Index RFC822 6-19 Rogue, identifying an RF station as 13-3 Role elements, creating 8-10 Role inheritance 8-3 Role-based authorization configuring 8-2 description of 1-3 example of 8-2 Roles defining 8-4 modifying 8-10 Root CA URL 10-4 Routing table, displaying the BSC’s 4-28 Rubber feet, connecting to the BSC chassis 2-10 S Safety considerations when installing the BSC 2-2 Save and create another button, using 3-11 Save button, using 3-11 Scalability features of the BSC 1-3 Scanning a client device with BlueProtect C-2 Schedule groups, creating 8-17 Schedules page 3-8 Schedules, creating 8-17 Secure Mobility MatriX general configuration procedure 14-3 overview of 1-5, 14-2 reasons for deploying 14-2 Secure Mobility mesh key 14-6, 14-8 Secure Mobility™ BSC interface subnet requirements 14-5 overview of 14-3 viewing status of setup 15-12 Security alert, preventing display of 3-6 See hosts… link, using 3-14 See networks… link, using 3-14 Sensor mode, configuring the BSAP for 12-10, 12-19 Serial port description 2-4, 2-6, 2-7, 2-9 enabling/disabling administrator access to 10-26 Services page 3-8 Services, creating network 8-13 Session Initiation Protocol (SIP), passing through the BSC 9-2 Show Cisco CDP Neighbors 15-19 Show fallback IP settings? 4-3 Show Processes 15-19 Shutdown/reset control, BSC-1200 2-7 Shutting down the BSC 2-14, 16-2 Single BSC network upgrading system software on 16-6 SMTP port redirection 10-13 SNMP agent, configuring the BSC’s 10-8 SNMP Management station IP address 10-9 BlueSecure™ Controller Setup and Administration Guide Index-11 Index Sorting administrator console data 3-12 Sorting table data 3-12 Space requirements 2-10 Specifications for the BSC 1-9 Specifications, BSC 1-9 Spectralink IP phone traffic, passing through the BSC 9-3 Speed LEDs, BSC-2100 2-5 SSIDs, creating 12-20 SSL certificate installing a custom login 11-22 installing Bluesocket 3-6 renewing 11-27 requesting from certificate provider 11-23 uploading a replacement 11-25 SSL, defining external authentication over 10-21 SSL, requiring for LDAP/Active Directory authentication 6-8 Static routes, configuring for the BSC 4-28 Status page 3-8 Strict MAC enforcement of fixed IP addresses 4-10 Summary information, viewing 15-11 Support, obtaining technical E-2 Syslog message format 10-14 System software installing and uninstalling patches 16-8 switching between runtime versions 16-9 upgrading to a new version 16-6 T Table data customizing the presentation of 3-12 sorting and filtering 3-12 Tagging data traffic with a VLAN ID 8-8 Tagging formats A-2 Technical support, obtaining E-2 Temperature, operating 2-10 Terminal emulation program settings to access BSC serial port D-2 Termination VLANs A-3 Terms of service, displaying for users 11-5 TFTP, running as a BSC service 8-14 Thank you HTML 8-10 Threshold values, defining 10-17 Time setting, configuring the BSC’s 10-10 Traceroute, executing from the administrator console 15-18 Transaction key 11-15 Transaction URL 11-15, 11-16 Transparent 802.1x authentication configuring 6-17 Transparent Certificate Authentication 6-33 Transparent certificate authentication 6-33 Transparent NTLM authentication, configuring 6-14 Transparent NTLM Windows Authentication 6-15 Trap host, specifying 10-9 Traps, enabling SNMP 10-9 Index-12 Index Trash can icon, using 3-11 Troubleshooting your BSC’s configuration 16-4 Trusted certificate authority (CA) certificate 10-20 Trusted server certificate 10-20 TTLS, configuring support of 6-17 TTLS, terminating on the BSC 6-19 Tunneled Transport Layer Security Protocol, terminating on the BSC 6-19 U Upload Cert 10-23 URL Redirect 8-9 URL to redirect detected devices 10-8 URL, to connect to BSC 3-2 Use an uploaded PKCS #12 certificate 11-26 User access, disabling on a specified date 5-4 User account deleting 5-2 User account expiration settings 5-4 User authentication configuring internal 6-1 configuring local 5-2 description of 1-2 User Authentication page 3-8 User connections, monitoring 15-2 User location, specifying originating for CAS authentication requests 6-32 User location, specifying originating for Cosign authentication requests 6-27 User location, specifying originating for Kerberos authentication requests 6-24 User location, specifying originating for LDAP active directory authentication requests 610, 6-12 User location, specifying originating for local 802.1X authentication requests 6-22 User location, specifying originating for NTLM authentication requests 6-14 User location, specifying originating for Pubcookie authentication requests 6-29 User location, specifying originating for RADIUS authentication requests 6-6 User location, specifying originating for transparent certificate authentication requests 634 User location, specifying originating for Transparent NTLM authentication requests 6-16 User location, specifying originating forTransparent 802.1X authentication requests 6-19 User login pages customizing 11-2 overview of 1-6 User logout, forcing a 15-3 User Roles page 3-8 User roles, defining 8-2 User, logging out 3-12 Username for administrator account 3-2 V Virtual interface, creating on the protected side 4-7 Viruses, combating 8-14, 8-16 VLAN ID 4-6, 4-18, 8-20 VLAN tagging, enabling within a role 8-8 VLANs creating on the managed side 4-17 BlueSecure™ Controller Setup and Administration Guide Index-13 Index creating on the protected side 4-5 initiation A-4 overview of A-1 pass-through A-3 termination A-3 Vocera IP phone traffic, passing through the BSC 9-3 Voice Over WLAN support, configuring 9-1 Voice page 3-9 VoIP Protocol Support 1-5 VoIP, configuring network services to support 8-14 W Web Logins page 3-9 Web page, directing users to after login 8-9 Windows Internet naming service (WINS) server 4-13 Wireless client IP address assignment, configuring 4-9 Wireless page 3-9 Worms, combating 8-14, 8-16 Index-14