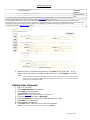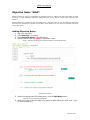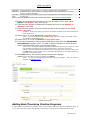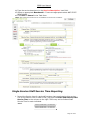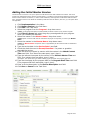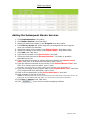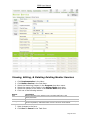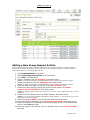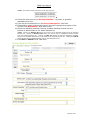
1
Performance Based
Prevention System
(PBPS)
Complete User Manual
March 2010
Edition 1.4
http://www.kithost.net/wa
KIT Solutions, LLC© 2010
5700 Corporate Dr.
Pittsburgh, PA 15237
[email protected]
Page 1 of 97
Table of Contents
Getting Started............................................................................................. 5
Introduction ............................................................................................ 5
PBPS Basics ............................................................................................ 5
Access to the PBPS................................................................................... 5
Recommended Computer Settings .............................................................. 6
Navigating in PBPS ................................................................................... 6
Basic Layout............................................................................................ 6
Some Task Pane Options ....................................................................... 6
Data Fields & Buttons ............................................................................... 7
Three Levels of Organization Accounts ........................................................ 7
Connecting to the System ......................................................................... 8
Changing Your Password ........................................................................... 9
Managing User Accounts .............................................................................. 9
Creating New User Accounts ...................................................................... 9
Editing User Accounts ..............................................................................10
Permissions............................................................................................11
Changing Staff Permissions by Changing Title (Job Classification)...............11
Custom Staff Permissions by Modifying from Title ....................................13
Subcontractors .......................................................................................13
Managing Organization IDs - County & Tribe ............................................. 14
To View the Organization Information ........................................................14
To Edit the Organization Information..........................................................14
Planning ..................................................................................................... 15
Risk & Protective Factors ..........................................................................15
Adding Risk & Protective Factors ...........................................................15
Goals ....................................................................................................16
Planning Objectives With *NEW* Objective Writer........................................16
Adding Objectives ...............................................................................16
Editing Objectives ...............................................................................18
Objective Notes *NEW* ...........................................................................19
Adding Objective Notes ........................................................................19
Editing Objective Notes ........................................................................20
Removing Objective Notes....................................................................21
Programs ................................................................................................... 22
Adding Innovative/Other Programs ............................................................22
Adding Best/Promising Practice Programs ...................................................23
Adding Matching Funds ............................................................................26
Creating a Group and Adding it to a Program ..............................................27
Editing Group Already Added to a Program .................................................29
Program Reporting Status Page.................................................................30
Changing the Status of a Program .........................................................31
Adding a Note.....................................................................................31
Viewing and/or editing an Existing Note..................................................32
Viewing the Compliance of a Program ....................................................33
Services ..................................................................................................... 34
Adding Participants..................................................................................34
Editing Participants..................................................................................35
Deleting Participants................................................................................35
Encrypting Participants’ Names .................................................................35
Adding a New Single Service.....................................................................36
Single Service Staff Service Time Reporting ................................................37
Single Service Demographics Time Reporting ..............................................38
Using the Copy Service Button ..............................................................39
Page 2 of 97
Table of Contents
Deleting a Single Service......................................................................39
Creating a Group and Adding it to a Program ..............................................40
Adding a New Recurring Service Series ......................................................42
Recurring Service Staff Service Time Reporting .......................................44
Recurring Service Attendance Reporting .................................................45
Using the Copy Service Button ..............................................................45
Deleting a Recurring Service .................................................................46
Community Based Coordination (CBC) .......................................................46
Creating a CBC Group ..........................................................................46
Quarterly Reporting – Community Capacity.............................................47
Quarterly Reporting – Environmental Strategies ......................................48
Quarterly Reporting – Funding ..............................................................49
Quarterly Reporting – Media .................................................................50
Copy CBC Button ................................................................................51
Mentoring................................................................................................... 52
Registering Mentors.................................................................................52
Registering Mentees ................................................................................53
Creating the Mentor/Mentee Match ............................................................55
Adding the Initial Mentor Service ...............................................................56
Adding the Subsequent Mentor Services .....................................................57
Viewing, Editing, & Deleting Existing Mentor Services ...................................58
Adding a New Group-Support Activity ........................................................59
Adding a New Group-Match Activity ...........................................................61
Mentoring Surveys ..................................................................................64
Match Closure.........................................................................................65
Mentoring Program Design .......................................................................67
Reports ...................................................................................................... 68
Monitor/Analysis .....................................................................................68
Service, County, DBHR Report, or Outcomes ...............................................69
Using the Reporting Window .....................................................................69
Evaluation .................................................................................................. 70
Individual Assessments ............................................................................70
Booster Assessments ...............................................................................71
Knowledge Base ......................................................................................... 72
Web Resources .......................................................................................72
Administration ........................................................................................... 72
Editing Organization Information ...............................................................72
Staff......................................................................................................73
Creating New User Accounts .................................................................73
Editing User Accounts ..........................................................................74
Administrative Time.................................................................................74
Recording Administrative Time ..............................................................74
Editing Recorded Administrative Time ....................................................75
Delete Recorded Administrative Time .....................................................76
Change Password ....................................................................................76
Exporting Data .......................................................................................76
Transfer Tool.............................................................................................. 78
Client Transfer Tool .................................................................................78
Client Status Tool....................................................................................79
Mentor Transfer Tool ...............................................................................80
Mentor Status Tool ..................................................................................80
Program/Transfer Tool .............................................................................81
Training...................................................................................................... 82
Page 3 of 97
Table of Contents
Adding a Training Report..........................................................................82
Viewing an Existing Training Report ...........................................................83
Support ...................................................................................................... 83
Search ........................................................................................................ 84
Choose from All ......................................................................................84
Or Select a Filter .....................................................................................84
Spell Check................................................................................................. 86
Index Table Printouts................................................................................. 87
Index of Risk and Protective Factors ..........................................................87
Index of Services ....................................................................................88
Index of Service Population ......................................................................94
State Benchmarks ...................................................................................95
Default Permissions for Titles (Job Classifications) in PBPS ............................97
Page 4 of 97
PBPS User Manual
Getting Started
Introduction
Welcome to Washington State’s Performance Based Prevention System (PBPS) brought
to you by Washington State’s Department of Social Health Services (DSHS) Division of
Alcohol and Substance Abuse (DBHR) in cooperation with Kit Solutions, Inc©. The PBPS
was developed to be responsive to DSHS, legislative, and public inquires regarding
those who are participating in publicly funded prevention activities. PBPS also provides
information to DBHR and its providers regarding the effectiveness of programs in
preventing alcohol, tobacco, and other drug misuse and abuse across the State of
Washington. The PBPS provides automated reporting and service tracking for contract
accountability and monitoring. The team that developed the PBPS with KIT Solutions,
Inc©, was comprised of DBHR Prevention and MIS section employees, including DBHR’s
Regional Prevention Managers. The more data that we collect now, the better situation
we will be in the future when we request increased funding for our programs and
services.
You, as a user, play an integral role in this process. DBHR continues to update the PBPS
so that it may become second nature to you and not detract from your hands-on
prevention duties.
We encourage program enhancing suggestions and will work
diligently to see that requests are considered, honored, and implemented into the
system.
As you may already know, DBHR’s Regional Prevention Managers (RPMs) are your direct
connection to questions about the PBPS. Please inform them of any suggestions or
difficulties that you may have.
PBPS Basics
The PBPS is a web-based system that requires an internet connection to access. As a
result, the apparent performance (speed) of the system may be slow due to your
internet connection. The faster the connection (high speed), the faster PBPS will be; the
slower the connection (dialup modem) the slower PBPS will be. Please take this into
consideration and we appreciate your patience.
Access to the PBPS
The PBPS is located at: www.kithost.net/wa
Your User ID, Password, and Organization ID will be given to you by your organization’s
administrator. Please retain this information and do not share it with others.
Page 5 of 97
PBPS User Manual
Recommended Computer Settings
Screen Resolution
1024 x 768 pixels or larger
If your screen resolution is smaller (ex: 800 x 600 pixels), everything on the screen will
appear larger. But, if you use 800 x 600 pixels, then you will have to scroll more both up &
down and left & right to access all the data fields.
Web Browser
Microsoft Internet Explorer (IE)
Currently Mozilla Firefox, Netscape, AOL, MSN and other browsers are not supported by
PBPS. They may function, but not to design specifications. We recommend users have the
latest version of IE installed on their computer along with the updates provided by Microsoft
(which are released periodically).
Also, IE needs to be configured to allow “cookies”. If do not know how to check for this,
contact your PC technician for assistance.
Pop-Up Blockers
Disabled (or configured for exceptions)
Modern computer security technology and usability features development have lead to popup blocking. Although this new feature of internet browsers, toolbars and other 3rd party
managing software blocks hazardous and annoying pop-ups, sites like PBPS require pop ups
to function. If your pop-up blocker is enabled, then there is a possibility that PBPS may not
function or appear properly. You should either disable the pop-up blockers while using the
PBPS (while remembering to enable it, if desired, when not in PBPS) or create exceptions for
the pop-up blocker. This is cumbersome, but may be easier than making exceptions to the
pop-up blocker. If you have technical questions, please see your PC technician.
Navigating in PBPS
Entering data into PBPS can be made easier by using the “Tab” key on the keyboard.
The tab key advances the cursor to the next data field. You can also go from the
current field to the previous field by holding “Shift” and pressing “Tab” (Shift+Tab).
You can also navigate through the fields by using the mouse.
To select multiple data items at one time, hold the control (Ctrl) key and left click the
mouse.
Basic Layout
Once you get into the PBPS most of the screens have the same format. They all have a
Menu bar across the top. The Sub-Menu is only displayed once an item in the Menu has
been selected (clicked).
*Note: sometimes when you select a different menu tab the entire screen does not refresh, however, the
Sub-Menu always does.
Some Task Pane Options
Search
Find a particular recordi (entry) based on search criteria that you determine
with aims of a particular result (ex: Service. Program. Staff member, etc.)
Page 6 of 97
PBPS User Manual
Add
Edit
Cancel
Save
Delete
Print
Help
Creates a (blank) new record of the displayed type in the Menu and SubMenu. This new record is immediately ready for modification.
Unlocks the currently displayed form for editing.
Appears after ‘Edit’ or ‘Add’ is selected. Aborts changes (including
additions or modifications) made to the displayed form.
Commits changes made to the displayed form.
Removes the record(s) (or all the data on displayed forms).
A pop-up window opens with the current form displayed, gives you a choice
of to what format (PDF, Excel, Word) you would like to export it and
displays in that format in the appropriate application. If you want to print
(button).
it, then you also must tell the program ‘ctrl+p’, File->Print, or
Displays a pop-up with an online version of the PBPS User Manual.
i: A record is a technical term for the set of collected data organized or grouped around particular
theme.
*Example: a program record, staff record, participant record
Data Fields & Buttons
In the PBPS there are several fields, boxes and buttons that are used to collect and
store data.
Type
Text Field
(aka ‘Text Box)
Drop Down Menu
(aka Pull Down Menu)
Buttons
Radio Button
Check Boxes
Red*
Black
Spell Check
Preview / Description
(fill in the blank)
(select one)
Selected
Not selected
Selected
Not Selected
Red bold text with asterisk denotes a required
field
Black text denotes a suggested but optional field
It does not matter in which order that you populate the above fields, but if a required
field is not populated and you try to save the form, you will receive a message that
informs you of the field vacant of data and will not be able to move to a different form
until that field has data.
Three Levels of Organization Accounts
Within the PBPS, there are three types of Organization Accounts: State, County/Tribe,
and Service Provider (Subcontractor). Each of these Organization Accounts has different
functions and abilities. There may be items in this manual that do not specifically apply
to your organization.
Page 7 of 97
PBPS User Manual
Connecting to the System
The PBPS is split into a Demo and a Live Site. The Demo Site should be used to train
new users and to experiment with data and input. The client data from the Live Site is
not available in the demo site.
Demo Site
Live Site
http://demo.kithost.net/wa2003demo/pLogin.aspx
www.kithost.net/wa
*Note: Since we are currently preparing for the next biennium and the two biennium’s data are handled
separately. Choose the biennium that is appropriate for your usage.
After choosing a particular biennium, please type the appropriate information in the
following fields:
*Note: Your User ID, Password and Organization ID will be given to you by your organization’s
administrator. Please retain this information and do not share it with others.
Page 8 of 97
PBPS User Manual
Changing Your Password
The default account for Counties and Tribes is:
Username
Password
admin
pass
Since we use this default convention for every default account, we encourage you to change your password
upon initial log-in to protect and secure your data.
1. Click Administration in the menu.
2. Click Change Password in the Sub-Menu.
3. Fill in the appropriate fields.
*Note: if your ‘New Password’ and ‘Re-enter New Password’ are not identical, the system will
not accept them and you will be asked to re-enter the two. Take special care when typing
these two fields.
4. When finished, click the Submit Change button.
Managing User Accounts
Since the admin account is the only account automatically created in the system, you should create a new
User ID and Password for yourself and others that will be using the system in your organization.
Creating New User Accounts
1.
2.
3.
4.
Log-in to the PBPS.
Click Administration in the Menu.
Click Staff in the Sub-Menu.
Click Add in the Task Pane.
The table below shows the available fields.
*Note: Red text and Asterisk denote required fields.
Login
Information
User ID*i
Password*
General
Information
Salutation*
First Name*
Last Name*
Title*ii
Status*
Second Language
Background Checked?iii
Demographic
Information
Birth Date*
Gender*
Race*
Ethnicity*
Education
Information
Contact
Information
Degree
Vocational Education
Field of Study
Work Phone*
Work Phone Ext
Email*
Work Address
Work City
Work State
Work Zip Code
Page 9 of 97
PBPS User Manual
Sub Contractoriv
Alternate
Address
Second Phone
Fax
i: User IDs should use the following convention: LastName,FirstInitial,MiddleInitial (ex: John Q. Smith = SmithJQ)
ii: Refers to job classification. Please see the section on permissions before continuing.
iii: In accordance with RCW 43.20A.710, RCW43.43.832, RCW 74.34 and RCW71A.10.020, all contractors, subcontractors or
volunteers who have unsupervised access to children or vulnerable adults are required to have a background check, and all persons
convicted of crimes listed in RCW 43.43.830 and RCW 43.43.842 are prohibited from having access to those clients.
iv: Please reference the Sub Contractor section
(Partial Screen Shot)
5. When the form is accurate and complete, click Save in the Task Pane. If you
decide not to not save any changes made to this form, click Cancel in the Task
Pane.
*Note: If there is a required field that does not contain data and you try to save, you will
receive an error message (displaying the problem and the field). You will then have an
opportunity to populate the field.
Editing User Accounts
1.
2.
3.
4.
Log-in to the PBPS.
Click Administration in the Menu.
Click Staff in the Sub-Menu.
Click Search in the Task Pane
5.
6.
7.
8.
9.
Click the radio button next to Show All.
Click the Select button to the left of the desired user name.
Click Edit in the Task Pane.
Make changes to the form.
Click Save in the Task Pane to commit your changes.
*Note: See Searching for help on using the search feature.
*Note: If you do not want to save your changes, click Cancel.
Page 10 of 97
PBPS User Manual
Permissions
Permissions control the access level of a particular user. There may be some data that you may not want a
user to either have access to view or to edit. In order to restrict usage, you need to assign permissions to the
users. This can be done in two different methods. The first is to use the recommended (and default) access
level assigned to a particular title (which is a mandatory field in the Staff Information form relating to the job
classification of the employee). The second is to manually configure the permissions based on a case by case
basis.
At this point, you should determine what level of permission (or access rights) to the system that you want to
grant to this particular user. Please see the Permissions Table for a complete list of formulated access rights
to the system.
Changing Staff Permissions by Changing Title (Job Classification)
1.
2.
3.
4.
Log-in to the PBPS.
Click Administration in the Menu.
Click Staff in the Sub-Menu.
Click Search in the Task Pane
*Note: See Searching for help on using the search feature.
5. Click the radio button next to Show All.
6. Click the Select button to the left of the desired user name.
7. Click Edit in the Task Pane.
8. Reference the permissions table to determine level of access.
9. Make a selection from the Title* drop down menu.
10. Click Save in the Task Pane to commit your changes.
*Note: If you do not want to save your changes, click Cancel.
Page 11 of 97
PBPS User Manual
(Partial Screen Shot)
Page 12 of 97
PBPS User Manual
Custom Staff Permissions by Modifying from Title
1.
2.
3.
4.
Log-in to the PBPS.
Click Administration in the Menu.
Click Staff in the Sub-Menu.
Click Search in the Task Pane
*Note: See Searching for help on using the search feature.
5. Click the radio button next to Show All.
6. Click the Select button to the left of the desired user name.
7. Reference the permissions table to determine desired level of access.
It may be easier to change the Title* field to more closely reflect the desired custom
permissions so that you don’t have to manually set each field. In order to do this: Click Edit
in the task pane. Make a selection from the Title* drop down menu. Click Save in the Task
Pane to commit your changes. If you do not want to save any changes made to this form,
click Cancel in the Task Pane.
8. Click the Permission button in the upper right section of the form.
9. Click the Edit in the task pane.
10. Select the appropriate permission level in the down boxes next to each Menu
section
11. Click Save in the Task Pane to commit your changes.
*Note: If you do not want to save your changes, click Cancel.
12. Click Back to return to the Staff Information form.
Subcontractors
Users at the Service Provider Level (subcontractor level), have the option of linking the participant
identification directly to the user that created them, to insure participant confidentiality from other users.
An example may be a contracting agency that has multiple staff members who serve different school districts.
One of their school districts may require complete participant confidentiality. By selecting Administration in
the Menu, Staff in the Sub-Menu, the Staff Information form appears. Checking the “Subcontractor” check
box in the form ensures that the participant record (including personal information) can only be viewed by the
user that created it.
*Note: A County or Tribe can only view the participant records of which that County or Tribe is the service
provider (no subcontractor). In other words, County, Tribe, and State Levels are prohibited from viewing
the participant records (including personal information) created by Subcontractors
Subcontractors must verify the application of this option with
their county prevention specialist before configuring this feature.
Page 13 of 97
PBPS User Manual
Managing Organization IDs - County & Tribe
The Organization ID that you used to sign into PBPS is associated with the County or
Tribe for whom you work. When the Organization ID was created, some contact
information may have been added to the account. Please review this for accuracy.
To View the Organization Information
1. Log-in to the PBPS.
2. Click Administration in the Menu.
3. Click Organization in the Sub-Menu.
To Edit the Organization Information
1. Click Edit in the Task Pane.
2. Make changes to the form.
3. Click Save in the Task Pane to commit your changes.
*Note: If you do not want to save your changes, click Cancel.
*Note: The County or Tribe Names and IDs can only be changed by Kit Solutions, Inc. through PBPS. If you
notice an error in one of these, please submit a request through Support section of the Menu. This will open
up another browser window. Click the Contact Kit link, fill in the appropriate information, and click the
Submit button to have it changed.
Page 14 of 97
PBPS User Manual
Planning
Risk & Protective Factors
All of the goals, objectives, programs, and services you provide should be linked to the prioritized Risk &
Protective Factors from your Needs Assessment. In the Risk and Protective Factors Targeted* field, Risk
factors have a (R) in front of the factor name and Protective Factors have a (P) in front of the factor name.
Adding Risk & Protective Factors
1.
2.
3.
4.
5.
Log-in to the PBPS.
Click Planning in the Menu.
Click Factor Planning in the Sub-Menu.
Click Edit in the Task Pane.
Click the appropriate factor for your organization from the “All risk and Protective
Factors Lists”. (You can select multiple factors by holding the control key while
clicking [ctrl+click])
6. Click the “Up Arrow” button to move the selected factors to the “Risk and
Protective Factors Targeted*” field.
*Note: If you accidentally make a Factor Targeted, select the erroneous Targeted Factor and
click the down arrow. This removes the Factor from the Targeted field.
7. Review the Risk and Protected Factors in the “Risk and Protected Factors
Targeted*” field.
8. Click Save in the Task Pane to commit your changes.
*Note: If you do not want to save your changes, click Cancel.
Page 15 of 97
PBPS User Manual
Goals
Once you have determined the Risk and/or Protective Factors, the PBPS automatically generates (a) Goal(s)
based on the chosen Factor(s). The next step is to add objectives that will aid in the fulfillment of the
generated Goal(s).
*Note: An objective can be assigned to only one Goal, but a Goal may have many objectives.
Planning Objectives With *NEW* Objective Writer
A new feature of the 2005-2007 PBPS is the Objective writer. This was designed to make the objectives easier
to compose while ensuring the inclusion of the pertinent information. The Objective Writer was also designed
to aid in analysis and reporting by using “key terms”.
Adding Objectives
1.
2.
3.
4.
5.
Log-in to the PBPS.
Click Planning in the Menu.
Click Goals/Objectives in the Sub-Menu.
Click Add in the Task Pane.
Select a Factor* from the Factor drop down menu.
*Note: The factors that appear in the Factor drop down menu result from the process of
Planning - Factor. The system generated Goal will be displayed.
6. Select an Outcome* from the list displayed by clicking Select to the right of the
objective.
*Note: The available outcomes to choose from are specific to each Factor. If the outcome
that you desire is not in the drop down list, choose Other. When you choose other, the
screen will refresh and an “Outcome Other” text field will appear. Type your desired
outcome here.
7. Select a Link* (or preposition) from the Link 1 drop down menu.
*Note: The link (or preposition) connects the Outcome to the Target Group.
8. Select the Target Group* from the Target Group drop down menu.
*Note: If the Target Group that you desire is not in the drop down list, choose Other.
When you choose other, the screen will refresh and a “Target Group Other” text field will
appear. Type your desired outcome here.
9. Select a Link* (or preposition) from the Link 2 drop down menu.
*Note: The link (or preposition) connects the Target Group to the location.
10. In the Location* field enter the geopolitical area in which you anticipate the
change to occur.
*Examples: Clark County, Olympia School District, Kent Police Department
11. In the Amount* field input a quantitative estimate of anticipated change.
12. Enter an estimate of anticipated change in the optional Change Amount box.
13. Click the Show Objective String button.
*Note: This will refresh the page and display the sentence [outcome] [link] [target group]
[link] [location] under the Show Objective String button for review. If you want to make
changes to the displayed sentence, change the appropriate fields. Click the Refresh
Objective String button to preview objective.
Page 16 of 97
PBPS User Manual
(Partial Screen Shot)
14. Click Save in the Task Pane to commit your changes.
*Note: If you do not want to save your changes, click Cancel.
**Note: Once the objective has been saved, it will appear at the bottom of the table of other
objectives associated with that factor.
15. Click the Submit button to submit the associated objective for approval by your
Regional Prevention Manager (RPM).
*Note: The RPM will accept the objective or contact you with recommendations for editing
and resubmission. You will receive an email from the PBPS when the RPM accepts your
objective. At this point you can continue to develop your program.
**Note: Once the Objective is submitted, it cannot be edited. Please check that the
objective is complete and accurate.
16. Once you have submitted the objective a pop-up will appear. Click OK to submit
or Cancel to not.
*Note: If you clicked OK then you will receive another pop-up reporting the status of the
submission (success or fail). Click OK. Notice the absence of the Submit button next to the
recently submitted objective. Also, the text above the data field containing the objective
now reads “Under review by DBHR!” when before submission it read “You can edit this
objective!”.
Page 17 of 97
PBPS User Manual
Editing Objectives
1.
2.
3.
4.
Log-in to the PBPS.
Click Planning in the Menu.
Click Goals/Objectives in the Sub-Menu.
Select a Factor* from the Factor drop down menu.
*Note: The factors that appear in the Factor drop down menu result from the process of
Planning - Factor. The Goal Description changes when a different factor is selected from the
drop down menu.
5. Click Edit in the Task Pane.
6. Click the Edit button next to the objective that you wish to modify.
*Note: If the Edit button is not present next to the objective, the objective is not available
for editing. If this objective needs to be modified, contact your Regional Prevention Manager
(RPM).
7. Make changes to the form.
8. Click the Refresh Objective String button.
*Note: This will refresh the page and display the sentence [outcome] [link] [target group]
[link] [location] under the Show Objective String button for review. If you want to make
changes to the displayed sentence, change the appropriate fields and click the Refresh
Objective String button.
9. Click Save in the Task Pane to commit your changes.
*Note: If you do not want to save your changes, click Cancel.
*Note: Once the objective has been saved, it will appear at the bottom of the list of other
objectives associated with that factor.
10. Click the Submit button to submit the associated objective for approval by your
Regional Prevention Manager (RPM).
*Note: The RPM will later accept the objective or contact you with recommendations for
editing and resubmission. You will receive and email from the PBPS when RPM accepts your
objective at which point you can continue to develop your program.
**Note: Once the Objective is submitted, it cannot be edited. Please check that the
objective is complete and accurate.
11. Once you have submitted the objective a pop up will appear. Click OK for submit
or Cancel to not.
*Note: If you clicked OK then you will receive another pop up reporting the status of the
submission (success or fail). Click OK. Notice the absence of the Submit button next the
recently submitted objective. Also, the text above the data field containing the objective
now reads “Under review by DBHR!” when before submission it read “You can edit this
objective!”.
Page 18 of 97
PBPS User Manual
Objective Notes *NEW*
Objective Notes are meant to compliment the Objective Writer by enabling prevention specialists to clarify
questions or supply additional information about objectives for the RPM to review before approving that
objective.
Objective Notes are organized by their associated Factor. Objective Notes can only be attached to Objectives
that have been already been entered into the PBPS. Each objective can only have one attached note which
can be later edited.
Adding Objective Notes
1.
2.
3.
4.
Log-in to the PBPS.
Click Planning in the Menu.
Click Objective Notes in the Sub-Menu.
Select a factor from the Factor* drop down menu.
*Note: This step will display the Goal Descriptions of the selected factor.
(Partial Screen Shot)
5. Under the appropriate Goal Description, click the Add Note button.
*Note: A new text data field will appear.
6. Write your note in the text data field [where it reads Place new note here… (Up
to 999 characters!)].
Page 19 of 97
PBPS User Manual
7. Click Save next to the comment box to commit your changes.
*Note: If you do not want to save your changes, click Cancel.
Editing Objective Notes
1.
2.
3.
4.
Log-in to the PBPS.
Click Planning in the Menu.
Click Objective Notes in the Sub-Menu.
Select from the Factor* drop down menu a factor that you desire to address.
*Note: The Goal Descriptions of the selected factor will be displayed.
5. Click the Edit button next to the Objective Note.
6. Make your changes to the text data field.
7. Click Save next to the comment box to commit your changes.
*Note: If you do not want to save your changes, click Cancel.
Page 20 of 97
PBPS User Manual
Removing Objective Notes
1.
2.
3.
4.
Log-in to the PBPS.
Click Planning in the Menu.
Click Objective Notes in the Sub-Menu.
Select from the Factor* drop down menu a factor that you desire to address.
*Note: This step will display the Goal Descriptions of the selected factor.
5. Click the Remove button next to the Objective Note.
*Note: The following message will appear:
6. Click OK if you want to remove the Objective Note. Click Cancel if you do not
want to delete the Objective Note.
Page 21 of 97
PBPS User Manual
Programs
Programs are implemented with the intention that they will result in a specific objective. That objective is
associated to a goal that is tied to a particular risk or protective factor. The program you select is the means
by which you address risk and/or protective factor(s) in your community. Objectives must be entered into the
PBPS and accepted by DBHR before programs can be created.
Programs have to be accepted by DBHR. Once a program is accepted by DBHR, it cannot be edited without
contacting your RPM.
Adding Innovative/Other Programs
1.
2.
3.
4.
5.
6.
Log-in to the PBPS.
Click Planning in the Menu.
Click Programs in the Sub-Menu.
Click Add in the Task Pane.
Click the radio button selecting Innovative/Other.
Open the Objectives* list by clicking the down arrow next to the objective box
and Select one.
*Note: The objectives displayed in the Objective drop down menu are the ones that you
have entered into the system. You may have several programs addressing a particular
objective, but you may only have one objective associated with each program.
7. Type the program name in the Program Name* field.
8. Type the description in the Description* field.
9. Select the funding source from the Funding Sources* drop down menu.
Type
SAPT Block Grant
State General
Underage Drinking (OJJDP)
Description
DBHR Prevention funds
Other State funds
RUaD Funds
10. Type the funding amount from the funding source chosen above in the Funding
Amount ($)* data field.
*Note: The Matching Amount ($) is only added after the program has been saved and
you have completed the Matching Funds section.
11. Select the Fund Type* from the drop down menu.
12. Select the target population(s) of the program from the DBHR Population*
drop down menu.
*Note: By selecting a DBHR Population the title of the group is added to the data field below
the drop down menu. If you erroneously added a population and want to remove it, select
that population in the data field and click the arrow pointing up to remove it.
13. Select the (Institute of Medicine) IOM Model Type from the IOM Model Type*
drop down menu.
Type
Universal
Selective
Indicated
Description
Strategies targeted to the general public or a whole population group that has not been
identified on the basis of individual risk.
Universal Direct: Interventions directly serve an identifiable group of participants but who
have not been identified on the basis of individual risk (e.g. school curriculum, after school
program, parenting class)
Universal Indirect: Interventions support population-based programs and strategies,
including the provision of information.
Strategies target subset of the total population that is deemed to be at risk.
Strategies are designed to prevent the onset of substance abuse in individuals who do not
meet DSM-IV criteria for addiction, but who are showing early danger signs.
14. Select the implementation type from the Implementation Type* drop down
menu.
Type
Description
Page 22 of 97
PBPS User Manual
Replication
Adaptation
Implementation of a Best Practice or promising approach with no modifications.
Implementation of a Best Practice or promising approach with modifications to curriculum,
delivery, or target population.
Innovation A program that is not a Best Practice or promising approach on the WestCAPT website.
Other
Anything else.
Western Center for Applied Prevention Technologies (WestCAPT) – http://casat.unr.edu/westcapt/
15. Unless the program will not have any service activities for 30+ days, select
Active in the Status* drop down menu.
16. Type the total number of sessions the program will have in the Number of
Sessions* text field.
17. Type the total number of hours of direct service for this program in the Total
Hours* text field.
*Example: If there are twenty occurrences of half hour sessions, then the total number of
hours would be ten.
18. Select yes or no in the Mentoring* drop down menu.
*Note: If you do not select Yes in the Mentoring* drop down menu, this program will not
be available in the mentoring form.
19. Select yes or no in the CTI Research* drop down menu.
20. If you have Assessment Instruments to add select those from the Assessment
Instruments drop down menu. In order to add the selection in the drop down
menu to the data field below, click the Apply button.
*Note: If you erroneously added an Assessment Instrument and want to remove it, select
that Assessment Instrument in the data field and click the “up arrow” to remove it.
**Note: Once the Assessment Instrument has been selected in the drop down menu, click
the Info button to preview the survey instrument administered to the target audience to
review drop down menu choice.
21. Click Save next to the comment box to commit your changes.
*Note: If you do not want to save your changes, click Cancel.
*Note: You can only add Matching Funds after saving the program.
program, add Matching Funds.
After you save the
(Partial Screen Shot)
Adding Best/Promising Practice Programs
In some Best/Promising Practice programs, some of the following data fields may be automatically filled. If
so, you are encouraged, unless under special circumstances, to leave these auto-filled data fields alone.
Page 23 of 97
PBPS User Manual
1.
2.
3.
4.
5.
6.
Log-in to the PBPS.
Click Planning in the Menu.
Click Programs in the Sub-Menu.
Click Add in the Task Pane.
Click the radio button selecting Best/Promising Practice.
Select the objective that the program will address from the Objective* drop
down menu.
*Note: The objectives displayed in the Objective drop down menu are the ones that you
have entered into the system. You may have several programs addressing a particular
objective, but you may only have one objective associated with each program.
7. Select the Science Based program type from the Science Based drop down
menu.
Type
Best Practice
Promising Approach
Description
Considered a best practice on the WestCAPT website.
Considered a promising approach on the WestCAPT website
8. Select the program you are going to implement in the drop down menu next to
the right of the Science Based drop down menu.
*Note: For more information about WestCAPT and types of programs, click the INFO button.
This will create a pop-up window displaying the WestCAPT website.
9. Click the Apply button.
*Note: The Description* field is automatically filled in based on the WestCAPT website.
10. Select the funding source from the Choose Funds* drop down menu.
Type
SAPT Block Grant
State General
Underage Drinking (OJJDP)
Description
DBHR Prevention funds
Other State funds
RUaD Funds
11. Type the funding amount from the funding source chosen above in the Funding
Amount ($)* data field.
*Note: The Matching Amount ($) is only added after the program has been saved and
you have completed the Matching Funds section.
12. Select the target population(s) of the program from the DBHR Population*
drop down menu.
*Note: By selecting a DBHR Population the title of the group is added to the data field below
the drop down menu. If you erroneously added a population and want to remove it, select
that population in the data field and click the arrow pointing up to remove it.
13. Select the target population(s) of the program from the DBHR Population*
drop down menu.
14. Select the (Institute of Medicine) IOM Model Type from the IOM Model Type*
drop down menu.
Type
Universal
Selective
Indicated
Description
Strategies targeted to the general public or a whole population group that has not been
identified on the basis of individual risk.
Universal Direct: Interventions directly serve an identifiable group of participants but who
have not been identified on the basis of individual risk (e.g. school curriculum, after school
program, parenting class)
Universal Indirect: Interventions support population-based programs and strategies,
including the provision of information.
Strategies target subset of the total population that is deemed to be at risk.
Strategies are designed to prevent the onset of substance abuse in individuals who do not
meet DSM-IV criteria for addiction, but who are showing early danger signs.
15. Select the implementation type from the Implementation Type* drop down
menu.
Page 24 of 97
PBPS User Manual
Type
Replication
Adaptation
Description
Implementation of a best practice or promising approach with no modifications.
Implementation of a best practice or promising approach with modifications to curriculum,
delivery, or target population.
Innovation A program that is not a best practice or promising approach on the WestCAPT website.
Other
Anything else.
Western Center for Applied Prevention Technologies (WestCAPT) – http://casat.unr.edu/westcapt/
16. Unless the program will not have any service activities for 30+ days, select
Active in the Status* drop down menu.
17. Type the total number of sessions the program will have in the Number of
Sessions* text field.
18. Type the total number of hours of direct service for this program in the Total
Hours* text field.
*Example: If there are twenty occurrences of half hour sessions, then the total number of
hours would be ten.
19. Select yes or no in the Mentoring* drop down menu.
*Note: If you do not select Yes in the Mentoring* drop down menu, this program will not
be available in the mentoring form.
20. Select yes or no in the CTI Research* drop down menu.
21. If you have Assessment Instruments to add select those from the Assessment
Instruments drop down menu. In order to add the selection in the drop down
menu to the data field below, click the Apply button.
*Note: If you erroneously added an Assessment Instrument and want to remove it, select
that Assessment Instrument in the data field and click the arrow pointing up to remove it.
**Note: Once the Assessment Instrument has been selected in the drop down menu, click
the Info button to preview the survey instrument administered to the target audience to
review drop down menu choice.
22. Click Save in the task pane to commit your changes.
*Note: If you do not want to save your changes, click Cancel.
*Note: You can only add Matching Funds after saving the program.
program, add Matching Funds.
After you save the
Page 25 of 97
PBPS User Manual
(Partial Screen Shot)
Adding Matching Funds
Adding Matching Funds can only be done after a program has been saved.
1.
2.
3.
4.
5.
Log-in to the PBPS.
Click Planning in the Menu.
Click Programs in the Sub-Menu.
Click Add in the Task Pane.
Scroll down to the bottom of the page and across from Matching Funds click
the Add button.
6. Type the name of the Matching Funds in the Matching Funds text field. Type
the dollar amount in the Matching Amount ($).
7. Click Save in the task pane to commit your changes.
*Note: If you do not want to save your changes, click Cancel.
*Note: By saving the Matching Funds the Matching Amount ($) data field below the
Funding Amount ($) in the top half of the form which was and will continue to be locked
from editing.
Page 26 of 97
PBPS User Manual
Creating a Group and Adding it to a Program
In the PBPS, group management was designed to make Recurring Services (see Services) easy to track and
record. To each Recurring Service, a program and group must be associated. Each group is composed of
designated participants upon which the service will be performed. So, when you associate a Recurring Service
with a group, all the members of that group are associated with the Recurring Service. Groups can be
modified on the fly - a participant can be added at any time or removed only if the service has not
commenced. When adding a new participant to the PBPS you may assign them to particular groups.
1.
2.
3.
4.
5.
Log-in to the PBPS.
Click Planning in the Menu.
Click Programs in the Sub-Menu.
Click the radio button next to Show All.
Find the program to which you would like to add a group and click the Select
button.
6. Click the Add, Edit or View Groups button at the top of the page.
Page 27 of 97
PBPS User Manual
7. Click Add in the Task Pane.
8. Type a unique and descriptive Group Name in the Group Name* text field.
*Note: No two groups may share the same name.
9. If desired, select participants from the Participant List and click the buttons to
add or remove participants from the Participant List. You do not have to add
participants to the group at this time.
*Note: Clicking the single arrow < or > will move only the selected participant into or out of
your group. If you want every participant in the participant list added use the << button. If
you want every participant removed from your group, use the >> button.
**Note: If you want a participant who has not yet been added to the PBPS (not present in
the Participant List) to be added to this group and subsequently the Recurring Service, you
may do so when you add the Participant to the PBPS.
Page 28 of 97
PBPS User Manual
10. Click Save in the task pane to commit your changes.
*Note: If you do not want to save your changes, click Cancel.
*Note: Notice how the newly created group now appears in the Existing Groups drop down
menu.
Editing Group Already Added to a Program
1. Log-in to the PBPS.
Page 29 of 97
PBPS User Manual
2.
3.
4.
5.
Click Planning in the Menu.
Click Program in the Sub-Menu.
Click the radio button next to Show All.
Find the program to which you would like to add a service and click the Select
button.
6. Click the Add, Edit or View Groups button.
7. Click Edit in the Task Pane.
8. Click the arrow buttons to move the participants from the Selected Participant
Group and the Participant List.
*Note: Clicking the single arrow < or > will move only the selected participant into or out of
your group. If you want every participant in the participant list added use the << button. If
you want every participant removed from your group, use the >> button.
**Note: If you want a participant who has not yet been added to the PBPS (not present in
the Participant List) to be added to this group and subsequently the Recurring Service, you
may do so when you add the Participant to the PBPS.
***Note: Groups do not need to be populated to be attached to Recurring Services.
9. Click Save in the task pane to commit your changes.
*Note: If you do not want to save your changes, click Cancel.
Program Reporting Status Page
To
1.
2.
3.
View programs at the Program Status Page:
Click Planning in the Menu.
Click Program Status link in the Sub-Menu.
Find the program and the month of which you desire to check the status.
a. If the corresponding cell has a check, then the program is Active.
b. If the corresponding cell doesn’t have a check, then the program is
Inactive.
Page 30 of 97
PBPS User Manual
Changing the Status of a Program
1.
2.
3.
4.
Click Planning in the Menu.
Click the Program Status in the Sub-Menu.
Click Edit in the Task Pane
Find the program and the month of which you desire to check the status and
click the check box to mark with a check (Active) or remove the Check
(Inactive).
*Note: If you cannot make or release a check mark on the page, you have skipped step 3. You must
click Edit in the task pane before you can make changes to the grid.
5. Click Save in the Task Pane.
Adding a Note
You can add a note to the grid for your tracking purposes or as communications to your
RPM.
**Example, say your iteration of Project Alert was scheduled to begin on Mar 30 and meet every
Thursday there after for 12 sessions. However, the session did not begin that night due to a conflict in
meeting location and had to be pushed back until April 6. In order to communicate that to your RPM and
justify why it was that the program was marked Active, but no services were recorded, you could create a
Note. In that note you could explain the reason why the program did not start and therefore why you
changed the status from Active to Inactive for the month of March.
When a note is added to a program, a small green N appears in the column of the month chosen in the note
creation. This way, you can easily see the notes that are attached to the program and month. For instructions
on how to view the note, see Viewing an Existing Note.
1. Click Planning in the Menu.
2. Click the Program Status in the Sub-Menu.
3. Click [Add Note] next to the desired program.
*Note: A pop-up window will appear. If you have pop-ups disabled, you will not see the note window:
Page 31 of 97
PBPS User Manual
4.
5.
6.
7.
Select the appropriate year from the Year: drop down menu.
Select the appropriate Month from the Month: drop down menu.
Type your message to your RPM in the Notes: text field.
Click the Save button.
*Note: The window will close upon the click of Save or Cancel.
*Note: A small green N will appear in the column of the month chose in the note creation after you
click save.
Viewing and/or editing an Existing Note
1. Click Planning in the Menu.
2. Click the Program Status in the Sub-Menu.
3. Click the small green ‘N’ of the desired program and month to view the note.
*Note: A pop-up window will appear. If you have pop-ups disabled, you will not
see the note window:
*Note: You can modify and save the note by making changes and clicking the
save button, after which the window will close.
Page 32 of 97
PBPS User Manual
Viewing the Compliance of a Program
1.
2.
3.
4.
Click Planning in the Menu.
Click the Program Status in the Sub-Menu.
Scroll down to the bottom of the page to view the Compliance Row.
RPM Compliance Override – This refers to a program that was initially out of
compliance, but services were eventually entered. The RPM sets the statues to
YES. The Compliant row will still remain NO, since this is locked down at midnight
(or 11:59pm) on the night of the 15th on the following reporting month.
5. Svc. Reporting on Inactive Prog.? – This reflects that a service was reported on
an Inactive program. Although not technically out of compliance, services should
be reported onActive programs only. This is allowed if older services needed to
be entered in at a later date.
Here are the rules/definitions for the Compliance Row:
A Program is…
In Compliance if:
a. Status is Active and services are recorded
b. Status is Inactive and services are not recorded
Out of Compliance if:
a. Status is Active and services are not recorded
The preceding is summarized in the following table:
Status
Active
Services
Not recorded
Compliance
No
Active
Inactive
Recorded
Not Recorded
Yes
Yes
Page 33 of 97
PBPS User Manual
Services
The PBPS distinguishes services as either being single or recurring. A single service is a service that is a
singular event intended for a particular target population. A recurring service is a service that is performed as
a part of a series (multiple sessions) for the same target population of all the sessions in the series.
*Examples: Single – An assembly at a local school presented by a motivational speaker.
*Examples: Recurring – An eight week series of classes on the effects of drugs held at the local
community center.
*Note: Before proceeding, you must have already created groups. See the section Creating a Group
and Adding it to a Program.
Adding Participants
In the PBPS, the participants are the attendants of services that are used to track certain data (attendance,
progress, demographics, etc.), used to generate reports by DBHR, counties, tribes and service providers.
1.
2.
3.
4.
Click Implementation in the Menu.
Click Participant in the Sub-Menu.
Click Add in the Task Pane.
Enter participant. Categories with yellow boxes are mandatory fields; the blue
boxes are optional information.
5. Click Yes or No in the Mentoring* field. You may enter Mentee information in
this menu or in the mentoring module menu.
6. Check the CTI box if the participant is in the Children’s Transition Initiative
program.
7. Select a group from the Available Program—Groups data field.
8.
*Note: If you haven’t created a Group to add participants into, go to the Creating a Group and
Adding it to a Program section.
*Note: You may also create a Group first, and then assign the participants to the group after all
participants have been entered into the system. This may save time by not performing the additional
group steps below if you have a large amount of participants to enter.
Click the Up Arrow (^) button to assign selected group.
*Note: If you make a mistake, click the erroneous Assigned Program—Group and click the Down
Arrow ( ) button to remove group assignment.
9. Click Save or Cancel in the Task Pane.
(Partial Screen Shot)
Page 34 of 97
PBPS User Manual
Editing Participants
1.
2.
3.
4.
5.
Click Implementation in the Menu.
Click Participant in the Sub-Menu.
Click Edit in the Task Pane
Make changes to the form.
Click Save or Cancel in the Task Pane.
Deleting Participants
*Note: You may not delete a participant that is already used in a service or in a Mentoring program.
1.
2.
3.
4.
5.
6.
Click Implementation in the Menu.
Click Participant in the Sub-Menu.
Click Search in the Task Pane
Click the Select button for the appropriate participant.
Click the Delete button in the Task Pane.
Confirm the delete request.
Encrypting Participants’ Names
By encrypting the participant name, the PBPS strips the name from the participant record and assigns an
unidentifiable number (which becomes their ID) that is used to manage the participant within the PBPS.
Encryption is important in order ensure client confidentiality and to handle the participants who withhold their
name. You can only encrypt a participant’s name after the participant has been added and saved into the
PBPS.
*NOTE: ONCE A PARTICIPANT’S NAME IS ENCRYPTED,
IT CANNOT BE UNDONE (IT IS PERMANENT).
1.
2.
3.
4.
5.
6.
Click
Click
Click
Click
Click
Click
Implementation in the Menu.
Participant in the Sub-Menu.
Search in the Task Pane.
the Select button for the appropriate participant.
the Encrypt Participant Name button.
OK at the dialog box that appears.
*Note: This is your last opportunity to abort. If you click OK, then the changes cannot be reversed.
**Note: After clicking OK and after the form refreshes, notice how the First Name and the Last
Name are randomly generated number.
***Note: The birth date does not become encrypted.
Page 35 of 97
PBPS User Manual
Adding a New Single Service
1.
2.
3.
4.
Click Implementation in the Menu.
Click Singe Service in the Sub-Menu.
Click Add in the Task Pane.
Select a program from the Program Name* drop down menu.
*Note: the Program Description will automatically be filled in based on the chosen Program.
*Note: The Objective Name and Objective Description will automatically be filled in based on the
chosen Program.
5. Enter the actual date of the service (mm/dd/yy) in the Service Date* field.
6. Select the School District location where the event will take place in the Service
Location* drop down menu.
Category and
7. Select the actual Service Location either from the
and Step-1.)
Locations drop down menus and continue, or click on
To provide a different Address and click Validate to match address against
Google’s address dictionary, or Step-2.) If you receive the message “Address
was not found. Correct address and click Validate again or click Accept” the
address doesn’t match address Google’s address dictionary, but if you know the
address to be true (and it may be a new address not updated in Google’s
dictionary), click the Accept button to continue.
8. Select the CSAP Category from the CSAP Category drop down menu.
9. Select the Service Code from the Service Code* drop down menu.
*Note: the Count Method will automatically be filled in based on the chosen Service Code.
10. Select the Service Population* from the Service Population* drop down menu.
11. Enter the number of units being counted (that appear in the Count Method data
field) in the Count* text field.
12. Enter the length of the Single Service (hours in decimal form) in the Session
Length* text field.
*Note: The Session Length should not include planning time.
2 Hours 15 Minutes = 2.25 Hours
2 Hours 30 Minutes = 2.50 Hours
2 Hours 45 Minutes = 2.75 Hours
13. Enter a descriptive name of the group in the Group Name* text field.
*Note: After the Single Service form is saved, the Group Name will appear in future Single Service
forms under the drop down menu Choose Existing Groups.
Page 36 of 97
PBPS User Manual
14. Type the service description in the Service Description* text field.
15. Select an appropriate Benchmark*. If none are appropriate select NOT STATE
BENCHMARK.
16. Click Save or Cancel in the Task Pane.
*Note: After saving the Single Service, the Staff Service Time form will appear.
Single Service Staff Service Time Reporting
1. Record the Service time for each staff member that contributed to this service.
You do not need to click on Add or Edit, just type the Direct and Indirect Staff
Service Time in the columns to the right. There may not be Indirect Staff
Service Time for each individual.
*Note:
2 Hours 15 Minutes = 2.25 Hours
2 Hours 30 Minutes = 2.50 Hours
2 Hours 45 Minutes = 2.75 Hours
Page 37 of 97
PBPS User Manual
**Note: Direct Service Time is the same as the session length.
***Note: Indirect Service Time is the time that went into planning, preparing, coordinating, and
reporting the service; basically the total time minus the session length.
2. Click the Save button when finished, and you will automatically go to the
Service Demographics reporting screen.
Single Service Demographics Time Reporting
1. Record the Service Demographics for each Single Service entry. You do not
need to click on Add or Edit, just enter the demographic information in each
category. The total for each demographic category must match the count on the
Single Service Screen.
Page 38 of 97
PBPS User Manual
2. Click the Save button when finished.
3. Click the Return to Service button if you wish to add another Single Service.
*Note: Since the service has been added to the PBPS, you can now duplicate the service for future
repetitions by clicking the Copy Service button so that you do not enter each service entry again.
You will be forced to give a new Servcice Date* and Session Length*, while having an opportunity
to change the other fields as well.
Using the Copy Service Button
1.
2.
3.
4.
5.
6.
Click the Implementation tab in the Menu Bar.
Click the Single Service in the Sub-Menu
Click Search in the Task Pane
Click Select to choose the entry to copy
Click the Copy Service tab
Complete entries in:
a. Service Date
b. Session Length
c. Count if Changed
7. Click Save
8. Continue Staff Service Time and Single Service Demographics entry.
Deleting a Single Service
1.
2.
3.
4.
5.
6.
Click the Implementation tab in the Menu bar.
Click the Single Service in the Sub-Menu.
Click Search in the Task Pane.
Click the Select to choose the service to delete.
Click the Delete button in the Task Pane.
Confirm the Delete request.
Page 39 of 97
PBPS User Manual
Creating a Group and Adding it to a Program
In the PBPS, group management was designed to make Recurring Services easy to track and record. To each
Recurring Service, a program and group must be associated. Each group is composed of designated
participants upon which the service will be performed. So, when you associate a Recurring Service with a
group, all the participants of that group are associated with the Recurring Service. Groups can be modified on
the fly - a participant can be added at any time or removed only if the service has not commenced. When
adding a new participant to the PBPS you may assign them to particular groups.
1.
2.
3.
4.
Click
Click
Click
Click
Planning in the Menu.
the Program link in the Sub-Menu
the Select button to the program to which you would like to add a group.
the Add, Edit or View Groups button.
5. Click Add in the Task Pane.
Page 40 of 97
PBPS User Manual
6. Type a unique and descriptive Group Name in the Group Name* text field.
*Note: No two groups may share the same name.
7. Select participants from the Participant List and click the buttons to add or
remove participants from the Participant List. You do not have to add participants
to the group at this time.
*Note: Clicking the single arrow up or down will move only the selected participant into or out of
your group. If you want every participant in the participant list added use the double up arrow. If you
want every participant removed from your group, use the double down arrow.
*Note: If you want a participant who has not yet been added to the PBPS (not present in
the Participant List) to be added to this group, you may do so after you add the
Participant in the Participant Screen.
8. Click Save or Cancel in the Task Pane.
*Note: Notice below how the newly created group now appears in the Selected
Participant Group drop down menu.
Page 41 of 97
PBPS User Manual
9. Check the box, Data Entry Completed – Group Closed, only if you have
completed the program and the last service session has been entered. When you
check this box the Group will not display on the Groups drop down for the
program you are using; i.e. no need to see Groups in a list if you are finished
with them. ALSO, check this box if you wish to run an Outcome Report.
10. Check the box, All Surveys Entered For This Group, if you wish to run an
Outcome Report but haven’t completed providing program services for this
Group. You will still be able to continue entering services for this Group.
Example: Perhaps this is a long term program and you wish to conduct a Post
Test survey half way through the program, and then finish with a Follow-Up
survey upon completion of the program.
Adding a New Recurring Service Series
By adding a new recurring service series, you also add the first session. Subsequent sessions use the
information entered in the steps below and therefore require less time to input than the first session.
*Note: You must have a Program Group with participants created before proceeding. Refer to the
previous section, Creating a Group and Adding it to a Program.
1.
2.
3.
4.
Click Implementation in the Menu.
Click Recurring Service in the Sub-Menu.
Click Add in the Task Pane.
Select a program from the Program Name* drop down menu.
*Note: The Program Description will automatically be filled in based on the chosen Program.
**Note: The Objective and Objective Description may also be filled in based on the chosen Program.
5. Select the group name from the Group* drop down menu.
6. Enter the actual date of service (mm/dd/yy) in the Service Date* field.
7. Select the School District location where the service will take place in the
Service Location* drop down menu.
Category and
8. Select the actual Service Location either from the
and Step-1.)
Locations drop down menus and continue, or click on
To provide a different Address and click Validate to match address against
Google’s address dictionary, or Step-2.) If you receive the message “Address
was not found. Correct address and click Validate again or click Accept” the
address doesn’t match address Google’s address dictionary, but if you know the
Page 42 of 97
PBPS User Manual
address to be true (and it may be a new address not updated in Google’s
dictionary), click the Accept button to continue.
9. Select the CSAP Category from the CSAP Category* drop down menu.
10. Select the Service Code from the Service Code* drop down menu.
11. Select the Service Population* from the Service Population* drop down menu.
12. Enter the length of the Recurring Service (hours in decimal form) in the Session
Length* text field.
*Note: The Session Length should not include planning time.
2 Hours 15 Minutes = 2.25 Hours
2 Hours 30 Minutes = 2.50 Hours
2 Hours 45 Minutes = 2.75 Hours
13. Enter a service description in the Service Description* text field.
14. Select an appropriate Benchmark. If none are appropriate select NOT STATE
BENCHMARK.
15. Click Save or Cancel in the Task Pane.
*Note: After saving the Recurring Service, the Staff Service Time form will automatically display.
Check the box, Data Entry Completed – Group Closed, only if you have
completed the program and the last service session has been entered. When you
check this box the Group will not display on the Groups drop down for the
program you are using; i.e. no need to see Groups in a list if you are finished
with them. ALSO, check this box if you wish to run an Outcome Report.
17. Check the box, All Surveys Entered For This Group, if you wish to run an
Outcome Report but haven’t completed providing program services for this
Group. You will still be able to continue entering services for this Group.
Example: Perhaps this is a long term program and you wish to conduct a Post
Test survey half way through the program, and then finish with a Follow-Up
survey upon completion of the program.
16.
Page 43 of 97
PBPS User Manual
Recurring Service Staff Service Time Reporting
1. Record the Service time for each staff member that contributed to this service. You do not
need to click on Add or Edit, just type the Direct and Indirect Staff Service Time in the
columns to the right. There may not be Indirect Staff Service Time for each individual.
*Note:
2 Hours 15 Minutes = 2.25 Hours
2 Hours 30 Minutes = 2.50 Hours
2 Hours 45 Minutes = 2.75 Hours
*Note: Direct Service Time is the same as the session length.
*Note: Indirect Service Time is the time that went into planning, preparing, coordinating,
and reporting the service; basically the total time minus the session length.
2. Click the Save button when finished, and you will automatically go to the
Attendance reporting screen.
Page 44 of 97
PBPS User Manual
Recurring Service Attendance Reporting
1. You do not need to click on Add or Edit, just make changes if necessary and click
Save. Attendance defaults to YES, and Completion defaults to Ongoing.
2. You may add existing Participants from your Group list with the Add Existing
Participant To Attendance drop down.
3. The SET ATTENDANCE TO: and SET COMPLETION TO: buttons allow complete
toggling of the Attendance and Completion status that is displayed. Example; an
after school drop-in program may have more participants that do not attend
routinely, than those that do attend. This feature allows you to set the
Attendance to NO for all participants and only change the YES cells that did
attend, thus saving time.
4. Select the Yes or No in the Attendance drop down menu for changes if any.
5. Select Ongoing, Complete, or Withdrew in the Completion drop down menu if
changes are needed.
6. Click Save or Cancel in the Task Pane.
7. If you want to add a participant, click Register Participant button.
8. Click the Return to Service button if you wish to add additional service entries.
Using the Copy Service Button
1. Click the Implementation tab in the Menu Bar.
Page 45 of 97
PBPS User Manual
2.
3.
4.
5.
6.
Click the Recurring Service in the Sub-Menu
Click Search in the Task Pane
Click Select to choose the entry to copy
Click the Copy Service tab
Complete entries in:
a. Service Date
b. Session Length
c. Count if Changed
7. Click Save
8. Continue Staff Service Time and Single Service Demographics entry.
Deleting a Recurring Service
1.
2.
3.
4.
5.
6.
Click the Implementation tab in the Menu bar.
Click the Recurring Service in the Sub-Menu.
Click Search in the Task Pane.
Click the Select to choose the service to delete.
Click the Delete button in the Task Pane.
Confirm the Delete request.
Community Based Coordination (CBC)
The CBC portion of the PBPS was designed to record activities (that are not Services) performed by County
Prevention Specialists that build the capacity and/or resources in a community. An example of this is
prevention specialist who needs to document their time writing grants to earn money for the community.
CBCs are required to report to DBHR for at least one category each and every quarter.
Creating a CBC Group
1.
2.
3.
4.
5.
6.
Log-in to the PBPS.
Click Implementation in the Menu.
Click Community Coordination in the Sub-Menu.
Click the CBC Group button.
Click Add in the Task Pane.
Type a unique group name in the Group Name* text field.
*Note: No two groups may share the same name.
7. Select a service population from the Service Population* drop down menu.
8. Click Save in the task pane to commit your changes.
*Note: If you do not want to save your changes, click Cancel.
*Note: The newly saved group will appear in the CBC group table.
9. Click Return in the task pane to go to the CBC form.
Page 46 of 97
PBPS User Manual
(Partial Screen Shot)
Quarterly Reporting – Community Capacity
*Note: You must create CBC groups before you can report quarterly.
1.
2.
3.
4.
Log-in to the PBPS.
Click Implementation in the Menu.
Click Community Coordination in the Sub-Menu.
Select the appropriate reporting period from the Reporting Quarter* drop down
menu.
5. Select Community Capacity from the Reporting Category* drop down menu.
6. Select the appropriate service code from the Service Code* drop down menu.
*Note: See Index of Services.
7. Click Add in the Task Pane.
8. Select the appropriate group from the CBC Group* drop down menu.
9. Type in the number of units being counted (that appear in the Count Method
data field) in the Count* text field.
*Note: the Count Method will automatically be filled in based on the chosen Service Code.
10. Type the length of time (hours in decimal form) spent in performing this category
task in the Total Length* text field.
*Note:
2 Hours 15 Minutes = 2.25 Hours
2 Hours 30 Minutes = 2.50 Hours
2 Hours 45 Minutes = 2.75 Hours
11. Type a description of the service in the Service Description text field.
12. Type a description of the benefits of the session in the Describe the benefits or
value of this work text field.
13. Click Save in the task pane to commit your changes.
*Note: If you do not want to save your changes, click Cancel.
Page 47 of 97
PBPS User Manual
(Partial Screen Shot)
Quarterly Reporting – Environmental Strategies
*Note: You must create CBC groups before you can report quarterly.
1.
2.
3.
4.
Log-in to the PBPS.
Click Implementation in the Menu.
Click Community Coordination in the Sub-Menu.
Select the appropriate reporting period from the Reporting Quarter* drop down
menu.
5. Select Environmental Strategies from the Reporting Category* drop down
menu.
6. Select the appropriate service code from the Service Code* drop down menu.
*Note: See Index of Services.
7. Click Add in the Task Pane.
8. Select the appropriate group from the CBC Group* drop down menu.
9. Type in the number of units being counted (that appear in the Count Method
data field) in the Count* text field.
*Note: the Count Method will automatically be filled in based on the chosen Service Code.
10. Type the length of time (hours in decimal form) spent in performing this category
task in the Total Length* text field.
*Note:
2 Hours 15 Minutes = 2.25 Hours
2 Hours 30 Minutes = 2.50 Hours
2 Hours 45 Minutes = 2.75 Hours
11. Type a description of the service in the Service Description text field.
12. Type a description of the benefits of the session in the Describe the benefits or
value of this work text field.
13. Click Save in the task pane to commit your changes.
*Note: If you do not want to save your changes, click Cancel.
Page 48 of 97
PBPS User Manual
(Partial Screen Shots)
Quarterly Reporting – Funding
*Note: You must create CBC groups before you can report quarterly.
1.
2.
3.
4.
Log-in to the PBPS.
Click Implementation in the Menu.
Click Community Coordination in the Sub-Menu.
Select the appropriate reporting period from the Reporting Quarter* drop down
menu.
5. Select Community Capacity from the Reporting Category* drop down menu.
6. Select the appropriate service code from the Service Code* drop down menu.
*Note: See Index of Services.
7. Click Add in the Task Pane.
8. Select the appropriate group from the CBC Group* drop down menu.
9. Type in the number of units being counted (that appear in the Count Method
data field) in the Count* text field.
*Note: the Count Method will automatically be filled in based on the chosen Service Code.
10. Type the length of time (hours in decimal form) spent in performing this category
task in the Total Length* text field.
*Note:
2 Hours 15 Minutes = 2.25 Hours
2 Hours 30 Minutes = 2.50 Hours
2 Hours 45 Minutes = 2.75 Hours
11. Type a description of the service in the Service Description text field.
12. Type a description of the benefits of the session in the Describe the benefits or
value of this work text field.
13. Click Save in the task pane to commit your changes.
*Note: If you do not want to save your changes, click Cancel.
14. Type the title of the grant or donation in the Grant/Donation Title text field.
15. Type the amount of funding received by the above specified grant or donation in
the Grant/Donation $ Received text field.
16. Type the amount of funding that your country/tribe is contributing to this
program in the $ Value Matched text field.
17. Check the checkbox next to Is your agency the Fiscal Agent? if it is true.
18. Type a description of the funding source in the Grant/Donation Partner text
field.
Page 49 of 97
PBPS User Manual
(Partial Screen Shot)
Quarterly Reporting – Media
*Note: You must create CBC groups before you can report quarterly.
1.
2.
3.
4.
Log-in to the PBPS.
Click Implementation in the Menu.
Click Community Coordination in the Sub-Menu.
Select the appropriate reporting period from the Reporting Quarter* drop down
menu.
5. Select Community Capacity from the Reporting Category* drop down menu.
6. Select the appropriate service code from the Service Code* drop down menu.
*Note: See Index of Services.
7. Click Add in the Task Pane.
8. Select the appropriate group from the CBC Group* drop down menu.
9. Type in the number of units being counted (that appear in the Count Method
data field) in the Count* text field.
*Note: the Count Method will automatically be filled in based on the chosen Service Code.
10. Type the length of time (hours in decimal form) spent in performing this category
task in the Total Length* text field.
*Note:
2 Hours 15 Minutes = 2.25 Hours
2 Hours 30 Minutes = 2.50 Hours
2 Hours 45 Minutes = 2.75 Hours
11. Type a description of the service in the Service Description text field.
12. Type a description of the benefits of the session in the Describe the benefits or
value of this work text field.
13. Type the media type used in the Type of Media Used text field.
14. Type the number of days the media campaign ran in the Number of Days text
field.
15. Type the estimated number of people the media campaign reached in the
Number of Days text field.
16. Type the number of days the media campaign ran in the Number of People
Reached text field.
Page 50 of 97
PBPS User Manual
17. Type the estimated cost of the media campaign in the Estimated $ Value text
field.
18. Click Save in the task pane to commit your changes.
*Note: If you do not want to save your changes, click Cancel.
(Partial Screen Shot)
Copy CBC Button
Once the CBC has been added to the PBPS, you can now duplicate the CBC for future repetitions by clicking
the Copy CBC button so that you do not enter the CBC again into the PBPS. You will be forced to change the
CBC Group*, while having an opportunity to change the other fields as well.
*Note: This is very similar to the Single Service “Copy Service Button” (See Services).
1.
2.
3.
4.
Log-in to the PBPS.
Click Implementation in the Menu.
Click Community Coordination in the Sub-Menu.
Select the appropriate reporting period from the Reporting Quarter* drop down
menu.
5. Select the appropriate reporting category from the Reporting Category* drop
down menu.
6. Select the appropriate service code from the Service Code* drop down menu.
*Note: See Index of Services.
7. Click the Copy CBC button.
8. Make changes to the form.
9. Click Save in the task pane to commit your changes.
*Note: If you do not want to save your changes, click Cancel.
1.
2.
3.
4.
5.
6.
- OR Log-in to the PBPS.
Click Implementation in the Menu.
Click Community Coordination in the Sub-Menu.
Click Search in the Task Pane.
Click Show All or select the search criteria.
Click the Select button for the desired quarter.
Page 51 of 97
PBPS User Manual
7. Click the Copy CBC button.
8. Make changes to the form.
9. Click Save in the task pane to commit your changes.
*Note: If you do not want to save your changes, click Cancel.
Mentoring
Before any mentoring services can be recorded, you must
•
Register Mentors
•
Register Mentees (if they are not already participants in the PBPS.)
*Note: If the Mentee is already a registered participant, then you need to select Yes in the
Mentoring* drop down menu in the participant screen. See Editing Participants)
•
Create the Mentor/Mentee Match
Mentoring Services are divided into three categories.
Type
Mentor Services
Group-Support
Activities
Group-Match
Activities
Description
Records any one-to-one services, including the actual Mentor-Mentee match time,
or program staff time with the Mentee, Mentor or Mentee’s family.
Records any supportive activities that occur with groups of Mentors or Mentees,
such as group orientations, trainings, or mentor support groups.
Records other types of group activities, usually with groups of Mentors and Mentees
together, such as group recreational activities.
Registering Mentors
1.
2.
3.
4.
Click Implementation tab in the Menu.
Click Register Mentors link in the Sub-Menu.
Click Add in the Task Pane.
Make changes to the form.
*Note: Mentoring research has shown that mentoring is more effective when the Mentors receive
mentor training prior to being matched to their mentee.
5. Click Save or Cancel in the Task Pane.
Page 52 of 97
PBPS User Manual
Registering Mentees
Mentees should be registered in the Register Mentee screen only if they are not already registered participants
in the PBPS. All mentees are participants, but not all participants are mentees. Please check the Participant
List (using the search feature) to confirm the mentee is not already registered as a participant.
*Note: If the mentee is already a registered participant, then you need to select Yes in the Mentoring* drop
down menu in the participant screen. See Editing Participants.)
1.
2.
3.
4.
5.
6.
Click Implementation in the Menu.
Click Register Mentee in the Sub-Menu.
Click Add in the Task Pane.
Make changes to the form.
Select a group from the Available Program-Groups data field.
*Note: The programs that appear in the Assigned Program-Groups data field are those programs
that have selected Yes to the Mentoring* drop down menu in the program screen.
**Note: If your program does not appear here, then you need to select Yes in the Mentoring* drop
down menu in the program screen (see Adding Innovative/Other Programs). If you are a Direct
Services Provider and Yes is not labeled in the program screen, see your County Prevention
Specialists.
Click the Up Arrow (^) button to assign selected group.
*Note: If you make a mistake, click the erroneous Assigned Program-Group and click the Down
Arrow ( ) button to remove group assignment.
7. Click Save or Cancel in the Task Pane.
Page 53 of 97
PBPS User Manual
Page 54 of 97
PBPS User Manual
Creating the Mentor/Mentee Match
A unique id number is given to each mentor/mentee match (including rematches). A mentee can only
have one mentor while a mentor can have multiple mentees. If a mentor/mentee match does not work
you must close a match before the mentee can be re-matched to a new mentor. In all matches, the
primary reference point is the mentor (and the secondary is the mentee).
*Note: If you are trying to search for a match, you will need to select the mentor first, and then the
matched mentees will appear.
1.
2.
3.
4.
Click Implementation in the Menu.
Click Mentor Match in the Sub-Menu.
Click Add in the Task Pane.
Select a program from the Program* drop down menu.
*Note: The Program* drop down menu is populated by programs that have the category
“Mentoring”. This setting is apart of the Adding Innovative/Other Programs or Adding Best/Promising
Programs.
**Note: The Program Description will be automatically filled in by the PBPS based on the Program
chosen.
5. Select a mentor from the Mentor Name* drop down menu.
6. Select a mentee from the Mentee Name* drop down menu.
*Note: Only the available (not yet matched) menetees will appear in the mentee drop down menu.
*Note: If your mentee does not appear here, then you need to select Yes in the Mentoring* drop
down menu in the Participant screen (see Editing Participants).
7. Select from the Existing Group you created when you registered your mentee,
or enter a New Group name if none was created.
8. Type the date the mentee (and, if applicable, mentees family) received training
in the Mentee pre-Match Orientation*.
9. Type the date the mentor and mentee met for the first time in the Date of first
Match Meeting*.
10. Click the Yes radio button for Re-Match* if the mentee is being Re-Matched.
11. Click Save or Cancel in the Task Pane.
12. Click
if you wish to continue assigning matches.
Page 55 of 97
PBPS User Manual
Adding the Initial Mentor Service
The Mentor Service screen is set up to capture all individual service data related to the match. This could
include case management work with the mentees family, or problem-solving meetings between program staff
and the mentor without the mentee, or other similar variations, that might not include actual match contact
time. The Mentor Service Time fields are mandatory fields and must be filled in, but zero (0) is an option when
not applicable.
1.
2.
3.
4.
Click Implementation in the Menu.
Click Mentor Service in the Sub-Menu.
Click Add in the Task Pane.
Select the program from the Program* drop down menu.
*Note: the Program Description will automatically be filled in based on the chosen Program.
5. Click Filter by Group and select the group you assigned with your program
when you created your Mentees.
6. Select the mentor in the Mentor Name* drop down menu.
*Note: Expect a screens shift with the Task Pane staying at the top after you select your Mentor
Name.
7. Select the mentee in the Mentee Name* drop down menu.
*Note: The Mentee Name* drop down menu is populated by all the mentees that are attached to
the mentor.
8. Type the service date in the Service Date* text field.
9. Check the check box next to Parent/Guardian* if a parent or guardian
attended the service.
10. Type the direct time spent by mentor with the mentee in the Match Contact
Time text field. If no direct time was spent, type 0 (zero).
11. Type the indirect time spent by the mentor in the Indirect Mentor Time text
field. If no indirect time was spent, type 0 (zero).
*Examples: time spent driving to match meeting, time spent with the program staff, etc.
12. Type the time spent by the program staff in the Program Staff Time text field.
If no program staff time was spent, type 0 (zero).
13. Enter a service description in the Service Description text field.
14. Click Save or Cancel in the Task Pane.
Page 56 of 97
PBPS User Manual
Adding the Subsequent Mentor Services
1.
2.
3.
4.
Click Implementation in the Menu.
Click Mentor Service in the Sub-Menu.
Select the Mentoring Program in the Program drop down menu.
Click Filter by Group and select the group you assigned with your program
when you created your Mentees.
5. Select the mentor of the match in the Mentor Name* drop down menu.
6. Select the mentee of the match in the Mentee Name* drop down menu.
7. Click Add in the Task Pane
8. Type the service date in the Service Date* text field.
9. Check the check box next to Parent/Guardian* if a parent or guardian
attended the service.
10. Type the direct time spent by mentor with the mentee in the Match Contact
Time* text field. If no direct time was spent, type 0 (zero).
11. Type the indirect time spent by the mentor in the Indirect Mentor Time* text
field. If no indirect time was spent, type 0 (zero).
*Examples: time spent driving to match meeting, time spent with the program staff, etc.
12. Type the time spent by the program staff in the Program Staff Time* text field.
If no program staff time was spent, type 0 (zero).
13. Enter a service description in the Service Description* text field.
14. Make changes to the rest of the form.
*Note: The following fields will only need to be entered in this initial setup of the mentor service. IN
subsequent service additions with this match, you will not have to fill out this information.
15. Click Save or Cancel in the Task Pane.
16. Click
if you wish to continue assigning matches.
Page 57 of 97
PBPS User Manual
Viewing, Editing, & Deleting Existing Mentor Services
1.
2.
3.
4.
5.
6.
Click Implementation in the Menu.
Click Mentor Service in the Sub-Menu.
Select the Mentoring Program in the Program drop down menu.
Select the mentor of the match in the Mentor Name drop down.
Select the mentee of the match in the Mentee Name drop down.
Click one of the following buttons:
Button
Edit
Delete
Change Details
Description
Change Contact Time, Indirect Time, Program Staff Time, and
Parent/Guardian
Deletes the Record
Objective, Obj. Description, Service Location, CSAP Category, Service Code,
Service Population, and Benchmark of all the services of the match.
7. Make changes to the form.
8. Click Save or Cancel in the Task Pane.
Page 58 of 97
PBPS User Manual
Adding a New Group-Support Activity
Group support activities are group events that offer support for mentors or mentees or mentees’ families.
Such events are Mentee Orientations, Mentor Trainings, or Group Support Meetings. Time spent between a
mentor and mentee is not a Group-Support Activity.
1.
2.
3.
4.
Click Implementation in the Menu.
Click Group-Support Activities in the Sub-Menu.
Click Add in the Task Pane.
Select a program from the Program* drop down menu.
*Note: The Program Description will automatically be filled in based on the chosen Program.
5. Select and objective from the Objective* drop down menu.
*Note: An Objective Description will automatically be filled in based on the chosen Objective.
6. Enter the date (mm/dd/yy) of service in the Service Date* field.
7. Select the school district in which the event will take place in the Event
Location by School District* drop down menu.
*Note: If multiple school districts are served by one event, use the district that has the most
attendants.
8. Select the CSAP Category from the CSAP Category drop down menu.
*Note: If you select the Information Dissemination CSAP Category, a Type drop down menu will
appear after the screen refreshes.
9. Select the Service Code* from the Service Code drop down menu.
10. Select the Service Population from the Service Population* drop down menu.
11. Enter the number of units being counted (that appear in the Count Method data
field) in the Count text field.
12. Enter the length of the activity (hours in decimal form) in the Session Length*
text field.
Page 59 of 97
PBPS User Manual
*Note: The Session Length should not include planning time.
2 Hours 15 Minutes = 2.25 Hours
2 Hours 30 Minutes = 2.50 Hours
2 Hours 45 Minutes = 2.75 Hours
13. Check the check box next to Parent/Guardian* if a parent or guardian
attended the service.
14. Type the service description in the Service Description* text field.
15. If applicable, select a benchmark that will be used to gauge the progress of the
service in the Benchmark* drop down menu.
16. Select the attending mentees from the Available Mentees list and click the
buttons to add mentees to the Select Mentees list.
*Note: Clicking the Remove All button will remove all the Selected Mentees from the Selected
Mentees list. Clicking the Remove One button will remove only the highlighted selected mentee
from the Selected Mentees list. Clicking the Add One button will add the highlighted Available
Mentee in the Available Mentees list will be added to the Selected Mentees list. Clicking the Add All
button will add all the Available Mentees into the Selected Mentees list.
17. Click Save or Cancel in the Task Pane.
Page 60 of 97
PBPS User Manual
Adding a New Group-Match Activity
Group Match-Activities are coordinated by prevention specialists that gather a group of mentors and their
mentees to attend recreational activities. Water park trips and laser tag outings are examples of Group-Match
Activities.
1.
2.
3.
4.
Click Implementation in the Menu.
Click Group-Match Activities in the Sub-Menu.
Click Add in the Task Pane.
Select a program from the Program* drop down menu.
*Note: the Program Description will automatically be filled in based on the chosen Program.
5. Select and objective from the Objective* drop down menu.
*Note: An Objective Description will automatically be filled in based on the chosen Objective.
6. Type the date (mm/dd/yy) of service in the Service Date* field.
7. Select the school district in which the event will take place in the Event
Location by School District* drop down menu.
*Note: If multiple school districts are served by one event, use the district that has the most
attendants.
8. Select the CSAP Category from the CSAP Category drop down menu.
*Note: If you select the Information Dissemination CSAP Category, a Type drop down menu will
appear after the screen refreshes.
9. Select the Service Code from the Service Code* drop down menu.
*Note: See Index of Services.
10. Enter the length of the Single Service (hours in decimal form) in the Session
Length* text field.
*Note: The Session Length should not include planning time.
2 Hours 15 Minutes = 2.25 Hours
2 Hours 30 Minutes = 2.50 Hours
2 Hours 45 Minutes = 2.75 Hours
11. Check the check box next to Parent/Guardian* if the mentees parent(s) or
guardian(s) attended the service.
Page 61 of 97
PBPS User Manual
12. Type the service description in the Service Description* text field.
13. If applicable, select a benchmark that will be used to gauge the progress of the
service in the Benchmark* drop down menu.
14. Select the attending mentees from the Available Mentees list and click the
buttons to add mentees to the Select Mentees list.
*Note: Clicking the Remove All button will remove all the Selected Mentees from the Selected
Mentees list. Clicking the Remove One button will remove only the highlighted selected mentee
from the Selected Mentees list. Clicking the Add One button will add the highlighted Available
Mentee in the Available Mentees list will be added to the Selected Mentees list. Clicking the Add All
button will add all the Available Mentees into the Selected Mentees list.
15. Click Save or Cancel in the Task Pane.
Page 62 of 97
PBPS User Manual
Page 63 of 97
PBPS User Manual
Mentoring Surveys
The Mentoring surveys available in the PBPS are designed to capture data related to quality mentoring
programs as defined by the National Mentoring Center http://www.nwrel.org/mentoring/. Below is a sample of
surveys not necessarily required by DBHR, but refer to your contract to determine which surveys are required:
Type
Mentee Risk Profile
(NEW) Pre/Post
Mentee Pre-test
Mentor Support
Tracking
Mentee Post-Test
School Success
Report
Description
This is a pilot tool designed for CTI to be completed by program staff to
determine if a mentee faces multiple risks.
To be completed by the Mentee prior to the delivery of services, along with
the DBHR required Pre-Test (PPG). This Pre-Test will be compared later to a
Post-Test at the end of the match.
To be completed by the Mentor midway in the match relationship, ideally 6
months after initial match. This tool is designed to check the quality of the
match support from the mentors perspective and inform program staff
accordingly.
To be completed by the mentee upon the closure of the match, or at 12
month intervals if the match continues long-term, along with the DBHR
required Post-Test (PPG). Responses are compared with the Mentee Pre-Test
to assess changes.
To be completed along the same time points as the Mentee Pre- (baseline),
Follow-up, Interim and Post-Test Surveys; the School Success Report is
designed to capture changes in the Mentees school behavior during their
involvement in the program.
1.
2.
3.
4.
5.
6.
7.
8.
Click Implementation in the Menu.
Click Mentoring Surveys in the Sub-Menu.
Select the program from the Select Program drop down menu.
Select the desired survey from the Mentoring Survey drop down menu.
Select the mentor from the Select Mentor drop down menu.
Select the mentee from the Select Mentee drop down menu.
Type the date (mm/dd/yy) in the Survey Date text field.
Check the Confidential box if you want to administer the survey to a participant
on the computer or lab setting.
*Note: After you click new and once the survey has been completed by pressing
done, the PBPS will automatically Log Out so that the participant cannot view any
other parts of the PBPS.
9. Click New in the task pane.
*Note: The PPG survey will be displayed.
10. Answer the questions with the participant’s responses.
*Note: Navigate through the survey using the buttons at the top and bottom of the form. If the
navigation buttons are not active, then there is only one page of the form.
11. Press Enter or click DONE when complete.
12. Click OK when asked to save the survey if you would like to save the changes.
Click Cancel when asked to save the survey if you would like to abort the
changes.
Page 64 of 97
PBPS User Manual
Match Closure
Mentor/Mentee matches that come to an end should be documented in the PBPS. Since the PBPS will not
allow one mentee to be matched to more than one mentor (simultaneously), you will have to enter the match
closure in the PBPS before creating a new mentor/mentee match with that mentee. Once the match is closed,
you will not be able to input any data for that match. You should enter all data into a match before closing it.
1.
2.
3.
4.
5.
6.
7.
Click Implementation in the Menu.
Click Match Closure in the Sub-Menu.
Click Add in the Task Pane.
Select the program from the Select Program* drop down menu.
Select the mentor from the Mentor Name* drop down menu.
Select the mentee from the Mentee Name* drop down menu.
Type the last contact date between the mentor/mentee in the Date of Last
Match Meeting* text field.
8. Click the radio button next to the reason to indicate the Reason for Match
Closure*.
9. Click the radio button next to the persons to indicate who attended the Closure
Meeting*.
10. Finish the remaining services categories by clicking the radio buttons to indicate
other services the mentee received during the match, if any.
11. If there were other services provided to the mentee, type a description in the
Other* text field and click the Yes radio button.
12. Click Save or Cancel in the Task Pane.
Page 65 of 97
PBPS User Manual
Page 66 of 97
PBPS User Manual
Mentoring Program Design
1. The following survey is to be completed by the service provider before the
mentoring sessions begin. This may be a requirement of your contract so refer to
your contract for guidance.
Page 67 of 97
PBPS User Manual
Reports
There are five types of reports that are available in the PBPS.
Monitor/Analysis
Service
County
DBHR
Instrument
Outcome
Reports performed by Service Providers to review services offered.
Special reports specifically requested by certain counties that are offered to all
counties/tribes in hopes that they may be beneficial to all.
Reports that DBHR needed that are offered to all counties/tribes in hopes that they may
be beneficial to all.
Pre-Tests and Post-Tests available for download, copy, and administration to
participants.
Results of the Pre-Tests and Post-Tests taken by participants.
Monitor/Analysis
1. Log-in to the PBPS.
2. Click Reports in the Menu.
3. Click Monitor/Analysis in the Sub-Menu.
4. Select the region from the Region List drop down menu.
5. Select the organization from the Organization List drop down menu.
6. Select the biennium from the Biennium drop down menu.
7. Select the federal category from the Federal Category drop down menu.
8. Select the target population from the Target Population drop down menu.
9. Select the location from the Location drop down menu.
10. Select the objective from the Objective drop down menu.
11. Select the service code from the Service Code drop down menu.
*Note: See Index of Services.
12. Click the radio button next to choose either Single Events or Recurring
Events.
13. Click the Show Report button.
*Note: A new window will appear housing the report. See Using the Reporting Window.
Page 68 of 97
PBPS User Manual
Service, County, DBHR Report, or Outcomes
1. Log-in to the PBPS.
2. Click Reports in the Menu.
3. Click the desired type of report (Service, County, DBHR Report, or
Outcomes) in the Sub-Menu.
*Note: The Service, DBHR Report and Outcome Reports have similar forms. The specific
data in each form is not the same, but all the questions/specifications are. After selecting
the category from the Choose Category drop down menu, the form will refresh and reveal
more options.
4. Select the desired topic from the Topic drop down menu.
5. Click the Show Report button when finished entering the specifications of the
report.
*Note: A new window will appear housing the report. See Using the Reporting Window.
Using the Reporting Window
If you are viewing a large report (multiple pages) it may be quickest and easiest to view after it has
been exported into a PDF or similar format and then viewed in the appropriate application.
1. Use the navigation buttons to view different pages of a multiage report.
2. If you would like to export the report to view in another program, click the drop
down menu in the upper left corner of the screen and select the export format.
Click the Download button to export.
*Note: Once the file is exported, you can view and print the report.
exported files.
You can only print
Page 69 of 97
PBPS User Manual
Evaluation
At the beginning and end of each service, the participants may be given a pre-test and post-test to monitor
the success of the curriculum. These test results are entered into the PBPS and reports are generated by the
PBPS. The reports can be viewed in the Reports portion of the PBPS.
*Note: Pre and Post tests are required for each participant of which you would like to evaluate.
Individual Assessments
This evaluation marks the progress of attitude and habits of each participant in a particular group.
1. Log-in to the PBPS.
2. Click Evaluation in the Menu.
3. Click Individual Assessment from the Sub-Menu.
4. Select the program from the Program drop down menu.
5. Select the group from the Group drop down menu.
6. Select the participant from the Participant drop down menu.
7. Select the instrument from the Instrument drop down menu.
8. Select the type from the Survey Type drop down menu.
9. Type the date (mm/dd/yy) in the Survey Date text field.
10. Click New in the task pane.
*Note: The PPG survey will be displayed.
11. Answer the questions with the participant’s response.
*Note: Navigate through the survey using the buttons at the top and bottom of the form. If
the navigation buttons are not active, then there is only one page of the form.
12. Press Enter or click DONE when complete.
13. Click OK when asked to save the survey if you would like to save the changes.
Click Cancel when asked to save the survey if you would like to abort the
changes.
Page 70 of 97
PBPS User Manual
Booster Assessments
Booster Assessments are a special type of assessment designed to collect data from a former participant who
is no longer associated with a Recurring Service choice or circumstance. The Booster Assessment normally
occurs years after the service was performed (similar to a follow up survey). The data is entered for that
participant only, not the entire group. The data is associated with the participant by choosing the participant
from his/her former group.
1.
2.
3.
4.
5.
6.
7.
8.
9.
Log -in to the PBPS.
Click Evaluation in the Menu.
Click Booster Assessment from the Sub-Menu.
Select the program from the Select Program drop down menu.
Select the instrument from the Survey Instrument drop down menu.
Select the participant from the Select Participant drop down menu.
Select the type from the Survey Type drop down menu.
Type the date (mm/dd/yy) in the Survey Date text field.
Click New in the task pane.
*Note: The PPG survey will be displayed.
10. Answer the questions with the participant’s response.
*Note: Navigate through the survey using the buttons at the top and bottom of the form. If
the navigation buttons are not active, then there is only one page of the form.
11. Press Enter or click DONE when complete.
12. Click OK when asked to save the survey if you would like to save the changes.
Click Cancel when asked to save the survey if you would like to abort the
changes.
Page 71 of 97
PBPS User Manual
Knowledge Base
For more information about the prevention field, browse here.
Web Resources
1.
2.
3.
4.
5.
6.
Log-in to the PBPS.
Click Knowledge Base in the Menu.
Click Web Resources in the Sub-Menu.
Select a category from the Choose Category drop down menu.
Click the desired item in the Web Source List.
Click the link next to Web Site to be taken to the selected website.
Administration
Editing Organization Information
1.
2.
3.
4.
5.
6.
Log-in to the PBPS.
Click Administration in the Menu.
Click Organization in the Sub-Menu.
Click Edit in the Task Pane.
Make changes to the form.
Click Save in the task pane to commit your changes.
*Note: If you do not want to save your changes, click Cancel.
Page 72 of 97
PBPS User Manual
Staff
Creating New User Accounts
1.
2.
3.
4.
Log-in to the PBPS.
Click Administration in the Menu.
Click Staff in the Sub-Menu.
Click Add in the Task Pane.
The table below shows the available fields.
*Note: Red text and Asterisk denote required fields.
Login
Information
User ID*i
Password*
General
Information
Demographic
Information
Salutation*
First Name*
Birth Date*
Gender*
Last Name*
Title*ii
Status*
Second Language
Background Checked?iii
Race*
Ethnicity*
Education
Information
Degree
Vocational
Education
Field of Study
Contact
Information
Work Phone*
Work Phone Ext
Email*
Work Address
Work City
Work State
Work Zip Code
Alternate Address
Second Phone
Fax
i: User IDs should use the following convention: LastName,FirstInitial,MiddleInitial (ex: John Q. Smith = SmithJQ)
ii: Refers to job classification. Please see the section on permissions before continuing.
iii: In accordance with RCW 43.20A.710, RCW43.43.832, RCW 74.34 and RCW71A.10.020, all contractors, subcontractors or
Page 73 of 97
PBPS User Manual
volunteers who have unsupervised access to children or vulnerable adults are required to have a background check, and all
persons convicted of crimes listed in RCW 43.43.830 and RCW 43.43.842 are prohibited from having access to those clients.
Editing User Accounts
1.
2.
3.
4.
5.
6.
7.
8.
9.
Log-in to the PBPS.
Click Administration in the Menu.
Click Staff in the Sub-Menu.
Click Search in the Task Pane.
Click Show All or choose filters from the Advanced Search tab and click GO.
Click the Select button for the appropriate staff member.
Click Edit in the Task Pane.
Make changes to the form.
Click Save in the task pane to commit your changes.
*Note: If you do not want to save your changes, click Cancel.
(Partial Screen Shot)
Administrative Time
Recording Administrative Time
1.
2.
3.
4.
5.
6.
7.
Log-in to the PBPS.
Click Administration in the Menu.
Click Admin Time in the Sub-Menu.
Select the staff in the Staff Name drop down menu.
Click Add in the Task Pane.
Type the date (mm/dd/yy) in the Date text field.
Type the duration (hours in decimal form) in the Hours text field.
2 Hours 15 Minutes = 2.25 Hours
Page 74 of 97
PBPS User Manual
2 Hours 30 Minutes = 2.50 Hours
2 Hours 45 Minutes = 2.75 Hours
8. Select the type of work in the Category drop down menu.
9. Click Save in the task pane to commit your changes.
*Note: If you do not want to save your changes, click Cancel.
Editing Recorded Administrative Time
1.
2.
3.
4.
5.
6.
7.
8.
Log-in to the PBPS.
Click Administration in the Menu.
Click Administrative Time in the Sub-Menu.
Select the staff in the Staff Name drop down menu.
Click Edit in the Task Pane.
Click Edit button in the table corresponding to the desired entry to modify.
Type the date (mm/dd/yy) in the Date text field.
Type the duration (hours in decimal form) in the Hours text field.
Page 75 of 97
PBPS User Manual
2 Hours 15 Minutes = 2.25 Hours
2 Hours 30 Minutes = 2.50 Hours
2 Hours 45 Minutes = 2.75 Hours
9. Select the type of work in the Category drop down menu.
10. Click the Update button in the table to commit your changes. If you do not
want to save any changes made to this form, click the Cancel button in the
table.
*Note: You cannot delete the entry by clicking the Delete button.
message.
You will get an error
11. Click Back in the Task Pane.
Delete Recorded Administrative Time
1.
2.
3.
4.
5.
6.
7.
Log-in to the PBPS.
Click Administration in the Menu.
Click Administrative Time in the Sub-Menu.
Select the staff in the Staff Name drop down menu.
Click Edit in the Task Pane.
Click Delete button in the table corresponding to the desired entry to remove.
Click Back in the Task Pane.
Change Password
1.
2.
3.
4.
Log-in to the PBPS.
Click Administration in the Menu.
Click Change Password in the Sub-Menu.
Fill in the appropriate fields.
*Note: if your ‘New Password’ and ‘Re-enter New Password’ are not identical, the system will
not accept them and you will be asked to re-enter the two. Take special care when typing
these two fields.
5. When finished, click the Submit button.
*Note: Once the password has been changed, it is effective immediately. So, if you were to
log out of the PBPS following the change, then try to log back in, you would have to use the
new password.
Exporting Data
Counties, Tribes and Providers can export all their data entered into the PBPS in its raw form which will enable
them to create customized evaluations based on desired criteria.
Page 76 of 97
PBPS User Manual
Refer to the Data Dictionary (see Support) for more information about the exported file format and
conventions. The recommended file export format is Access2000.
1.
2.
3.
4.
5.
Log-in to the PBPS.
Click Administration in the Menu.
Click Data Export in the Sub-Menu.
Select the program format from the Export To: drop down menu.
Select the period from which you would like to export data in the Time Period
drop down menu.
6. If you would like to narrow the chosen range, type the specific dates within the
period in the Start Date and End Date text fields.
7. Select desired the data filters.
8. Click the Generate button.
9. Click the Download button.
10. Click the Save button.
11. Choose a place to save the file. Click Save.
*Note: If you do not want to save, click Cancel.
(Partial Screen Shot)
Page 77 of 97
PBPS User Manual
Transfer Tool
Client Transfer Tool
This tool was created to migrate participants from the 03-05 PBPS into the 05-07 PBPS so that the Counties,
Tribes and Providers would not have to re-input all the participants (including all of their information).
1.
2.
3.
4.
5.
Log-in to the PBPS.
Click Transfer Tool in the Menu.
Click Client Status/Transfer Tool in the Sub-Menu.
Click the radio button next to Transfer in Update:*.
Click the radio button next to desired sorting method (Scrolling or Non-Scrolling).
*Note: If you select Individual, it will list all the participants entered into the 03-05
Biennium in your agency (County/Tribe). Selecting Individual may be slower than selecting
Program Group. To transfer participants from a specific program group, select Program
Group. Then, select the program name from the Program:* drop down menu and group
from the Group:* drop down menu.
**Note: You may want to change the amount of rows that are displayed in the table. To do
that, type the desired number of rows to be displayed in the Row Count text field and click
the Set button.
6. Click Edit in the Task Pane.
7. Click the Transfer check box corresponding to the participant that you want
transferred into the 05-07 PBPS.
*Note: You can sort the table by the clicking the column headings of the table.
**Note: If you want to transfer the majority of the participants in the table, you may want
to select Transfer in the Set All Clients To: drop down menu and click the Set All On This
Page button. That way, the entire table will have checks in the Transfer Check boxes. Then
you can uncheck those participants that you do not want to transfer into the 05-07 PBPS.
**** PLEASE DO NOT JUST TRANSFER ALL YOUR PARTICIPANTS ****
**** ONLY TRANSFER THOSE THAT WILL CONTINUE PREVENTION IN 05-07 ****
**** THE SPEED OF THE PBPS IS CORRELATED TO THE NUMBER OF PARTICIPANTS IN THE SYSTEM ****
8. Click Save in the task pane to commit your changes.
*Note: If you do not want to save your changes, click Cancel.
9. Click OK at the dialog box that appears to continue, or click Cancel if you do not
want to transfer participants.
*Note: This is your last opportunity to abort. If you click OK, then the changes cannot be
reversed.
**Note: The selected participant(s) will be moved into the 05-07 system. The “Was
Transferred” value will become YES and the row of the participant will be shaded gray.
(Partial Screen Shot)
Page 78 of 97
PBPS User Manual
Client Status Tool
This tool was created to allow the Counties, Tribes, and Providers to check the active or inactive status of
the participants (including mentees), either sorted by group or an extensive list. This tool will also enable
the user to change the active or inactive status of the participant. Before this tool was created, a
participant, once given inactive status, would not appear in the system (because only active participants
are displayed), but would still be in the system. Providers would then enter the participant again, and
there would be a duplicated. Now, providers can use the Client Status Tool to view all the entered
participants, active or inactive and change their status.
1.
2.
3.
4.
5.
Log-in to the PBPS.
Click Transfer Tool in the Menu.
Click Client Status/Transfer Tool in the Sub-Menu.
Click the radio button next to Status in Update:*.
Click the radio button next to desired sorting method (Scrolling or Non-Scrolling).
*Note: If you select Individual, it will list all the participants in your agency (County/Tribe).
Selecting Individual may be slow. If you select Program Group you will need to select a
program from the Program:* drop down menu and group from the Group:* drop down
menu.
**Note: You may want to change the amount of rows that are displayed in the table. To do
that, type the desired number of rows to be displayed in the Row Count text field and click
the Set button.
6. Click Edit in the Task Pane.
7. Click the Active Status check box corresponding to the participant of which you
want change the status.
*Note: You can sort the table by the clicking the column headings of the table.
**Note: If you want to make active the majority of the participants in the table, you may
want to select Active in the Set All Clients To: drop down menu and click the Set All On
This Page button. That way, the entire table will have checks in the Active Status check
boxes. Then you can uncheck those participants that you do not want to make active.
8. Click Save in the task pane to commit your changes.
*Note: If you do not want to save your changes, click Cancel.
9. Click OK at the dialog box that appears to continue, or click Cancel if you do not
want to make your modification.
Page 79 of 97
PBPS User Manual
Mentor Transfer Tool
This tool was created to migrate mentors from the 03-05 PBPS into the 05-07 PBPS so that the Counties,
Tribes and Providers would not have to re-input all the mentors (including all of their information).
1.
2.
3.
4.
5.
6.
Log-in to the PBPS.
Click Transfer Tool in the Menu.
Click Mentor Status/Transfer Tool in the Sub-Menu.
Click the radio button next to Transfer in Update:*.
Click Edit in the Task Pane.
Click the Transfer check box corresponding to the mentor that you want
transferred into the 05-07 PBPS.
*Note: You can sort the table by the clicking the column headings of the table.
**Note: If you want to transfer the majority of the participants in the table, you may want
to select Transfer in the Set All Mentors To: drop down menu and click the Set All On
This Page button. That way, the entire table will have checks in the Transfer Check boxes.
Then you can uncheck those participants that you do not want to transfer into the 05-07
PBPS.
7. Click Save in the task pane to commit your changes.
*Note: If you do not want to save your changes, click Cancel.
8. Click OK at the dialog box that appears to continue, or click Cancel if you do not
want to transfer participants.
*Note: This is your last opportunity to abort. If you click OK, then the changes cannot be
reversed.
**Note: The selected mentor(s) will be moved into the 05-07 system.
The “Was
Transferred” value will become YES and the row of the participant will be shaded gray.
Mentor Status Tool
This tool was created to allow the Counties, Tribes, and Providers to check the active or inactive status of
the mentors, either sorted by group or an extensive list. This tool will also enable the user to change the
active or inactive status of the participant. Before this tool was created, a mentor, once given inactive
status, would not appear in the system (because only active mentors are displayed), but would still be in
the system. Providers would then enter the mentor again, and there would be a duplicated. Now,
providers can use the Mentor Status Tool to view all the entered mentors, active or inactive and change
their status.
1.
2.
3.
4.
5.
Log-in to the PBPS.
Click Transfer Tool in the Menu.
Click Mentor Status/Transfer Tool in the Sub-Menu.
Click the radio button next to Status in Update:*.
Click Edit in the Task Pane.
Page 80 of 97
PBPS User Manual
6. Click the Active Status check box corresponding to the mentor of which you
want change the status.
*Note: You can sort the table by the clicking the column headings of the table.
**Note: If you want to make active the majority of the participants in the table, you may
want to select Active in the Set All Mentors To: drop down menu and click the Set All On
This Page button. That way, the entire table will have checks in the Active Status check
boxes. Then you can uncheck those mentors that you do not want to transfer into the 05-07
PBPS.
7. Click Save in the task pane to commit your changes.
*Note: If you do not want to save your changes, click Cancel.
8. Click OK at the dialog box that appears to continue, or click Cancel if you do not
want to make your modification.
Program/Transfer Tool
This module allows the user to transfer programs from last biennium to this fiscal year.
1. Log into the PBPS
2. Click Transfer Tool in the Menu.
3. Click Program/Transfer Tool from the Sub-menu.
4. Click the
button from the left toolbar.
5. Select Transfer or Don’t Transfer from the Set All Programs To field.
6. To indicate that all programs need transferred, click the
button.
7. To indicate that only selected programs need transferred, select the box next to
the individual program in the list.
8. Click the
button from the left toolbar.
*Note: To exit this screen without saving any of the changes you have made,
click Cancel.
Once your programs are transferred they will be grayed out and no further
actions can be made to them. If you didn’t move all programs across, you may
return here later if you wish to move more programs across.
Page 81 of 97
PBPS User Manual
Training
Training refers to the CPTS dollars that must only be used to support training of staff or providers in Best
Practices or Promising Approaches (evidence based programs) or practices, or to increase capacity to
implement Best Practices or Promising Approaches. ‘Increasing Capacity’ includes grant writing, board,
community organizing, and volunteer recruitment training. Funds shall not be used to support employee
wages, benefits, or program implementation.
Adding a Training Report
1.
2.
3.
4.
5.
6.
Log-in to the PBPS.
Click Capacity in the Menu.
Click Training Report in the Sub-Menu.
Click Add in the Task Pane.
Type the name of the training session in the Title of Training* text field.
Type the date of the training in the Date of Training* text field.
*Note: The Date of Training will be used to find and view a particular training event report.
7. Make changes to the form.
8. Click Save in the task pane to commit your changes.
*Note: If you do not want to save your changes, click Cancel.
Page 82 of 97
PBPS User Manual
Viewing an Existing Training Report
1. Log-in to the PBPS.
2. Click Capacity in the Menu.
3. Click Training Report in the Sub-Menu.
*Note: All existing training reports are cataloged in either the Existing Titles drop down
menu or the Existing Training Dates drop down menu.
4. Select which organization’s training reports you would like to view from the
Organization* drop down menu.
5. Select an existing training series from the Existing Titles drop down menu.
6. Select a particular training event from the Existing Training Dates drop down
menu.
*Note: The screen will refresh and display the training report. If you would like to modify
the report, click Edit in the Task Pane. If you would like to add a new report, click Add in
the Task Pane.
Support
In Support, you will find additional information about how to contact Kit Solutions, Inc©, the Washington State
PBPS, an online version of this manual, Request Reports, or view frequently asked questions.
To get to the Data Dictionary, click Manual and then WA Data Dictionary.
Page 83 of 97
PBPS User Manual
Search
Use the search button to find an existing record. Depending on which form you are in, there may be an option
to search. The search feature is always relative to that form. So say you in the Programs form and you click
search, you will be searching for a program. Once found, you can either view or edit that queried object. The
search button is located in the Task Pane.
Choose from All
1. Log-in to the PBPS.
2. Click Search in the Task Pane.
3. If you would like to search for a particular type of entry, select it from the
Choose Search Category drop down menu.
*Note: The default is All Categories, which is the slowest and most complete search yielding
the most results. For this reason you may want to specify a category to limit the number of
results.
4. If you want a complete list of the records of the specified Search Category, select
Choose From All.
5. Click the Select button to view the program.
*Note: Once viewing the program, you can edit the program clicking Edit from the Task
Pane. You can delete the program if no services have been administered. You can Search
again. You can do something else.
Or Select a Filter
1. Log-in to the PBPS.
2. Click Search in the Task Pane.
3. If you would like to search for a particular type of entry, select it from the
Choose Search Category drop down menu.
*Note: The default is All categories, which is the slowest and most exhaustive search
yielding the most results. For this reason you may want to specify a category to limit the
number of results.
**Note: If you specified a Search Category, then the Filter A is not available (it is the same
as the Search Category).
Page 84 of 97
PBPS User Manual
4. Select Or Select a Filter to limit the results of the search.
5. If you did not specify a Search Category, select a filter from the drop down menu
of the first set of filters (a).
6. If desired, select a second filter from the drop down menu of the second set of
filters (b).
7. Type a value into the third filter text field (c) (this is the criteria that you are
searching for).
*Example: If you are searching for a May 25, 2005, use ‘05/25/05’ without the quotes.
**Example: If you are searching for occurrence of a word, put that word into the text field
(c).
8. Click the Select button to view the program.
*Note: Once viewing the program, you can edit the program clicking Edit from the Task
Pane.
Page 85 of 97
PBPS User Manual
Spell Check
At various times in the PBPS, you will have the opportunity to click the Spell Check
button. The spell check combs through the text data fields and reports anything that
looks like a typo.
*Note: At any time, you can exit the spell check by clicking the Close button.
1. Click the Spell Check button.
*Note: If there are misspelled words, you will have the opportunity to change them.
**Note: If all the words are spelled correctly, a pop up notification will appear saying the
spell check is complete. Click OK.
2. Review the “Problem Word”.
3. If the “Problem Word” is spelled correctly, click Ignore.
*Note: If the problem word is spelled correctly and it is used repeatedly in the form, click
the Ignore All button.
4. If the “Problem Word” is not spelled correctly, select an alternative from the
Suggestions: drop down menu and click the Change button.
*Note: If the proper word is not displayed in the Suggestions drop down menu go to the
next step.
**Note: If there are multiple identically misspelled words, you can change all of them by
clicking the Change All button.
5. If the proper word is not displayed in the Suggestions: drop down menu, type
the proper word in the Change To: text field and click the Change button.
6. A pop up notification will appear when the spell check is complete. Click OK.
*Note: The spell check window will close automatically when you click OK.
Page 86 of 97
PBPS User Manual
Index Table Printouts
Index of Risk and Protective Factors
Factor
Domain
Community
Community
Community
Community
Community
Factor
Type
Protective
Protective
Protective
Protective
Risk
Community
Risk
Community
Community
Community
Community
Family
Family
Family
Family
Family
Risk
Risk
Risk
Risk
Protective
Protective
Risk
Risk
Risk
Family
Risk
Peer
Peer
Peer
Peer
Peer
Peer
Peer
School
School
School
School
School
Protective
Protective
Protective
Risk
Risk
Risk
Risk
Protective
Protective
Risk
Risk
Risk
Factor Name
Support Activities
Community: Healthy Beliefs and Clear Standards
Community: Bonding (opportunity, skills, and recognition)
Organizing Activities
Availability of Drugs
Community Laws and Norms Favorable to Drug Use, Firearms
& Crimes
Media Portrayals of Violence
Transitions and Mobility
Low Neighborhood Attachment & Community Disorganization
Extreme Economic Deprivation
Family: Healthy Beliefs and Clear Standards
Family: Bonding (opportunity, skills, and recognition)
Family History of Problem Behavior
Family Management Problems
Family Conflict
Favorable Parental Attitudes & Involvement in the Problem
Behavior
Peer: Bonding (opportunity, skills, and recognition)
Peer: Healthy Beliefs and Clear Standards
Social Skills
Friends Who Engage in the Problem Behavior
Favorable Attitudes Toward the Problem Behavior
Early Initiation of the Problem Behavior
Rebelliousness
School: Healthy Beliefs and Clear Standards
School: Bonding (opportunity, skills, and recognition)
Early and Persistent Antisocial Behavior
Academic Failure Beginning in the Late Elementary School
Lack of Commitment to School
Page 87 of 97
PBPS User Manual
Index of Services
Service
Code
STA01
STA02
Service Type
Alcohol and Drug-free
Dances and Parties (one
time basis)
Alcohol-and Drug-free
Dances and Parties
(recurring basis)
STA03
Community Drop-In Centers
STA04
Community Drop-In Center
Activities
STA05
Community Drop-in Center
Activities
STA06
Community Services
STA07
Youth/Adult Leadership
Functions (One-time basis)
STA08
Youth/Adult Leadership
Functions (Recurring basis)
STC01
STC02
Accessing Services and
Funding
Assessing Community Needs
Count Method
Count
Code
Alcohol and drug-free dances and parties are counted in the data set as a
single prevention service (Service Type Code=STA01).
S
Alcohol and drug-free dances and parties are counted in the data set as a
recurring prevention service if they occur on a routine, regular basis
(Service Type Code=STA02). Record the service population.
The number of community drop-in centers is counted in the data set once
at the beginning of the year as a single prevention service.
Activities conducted at the community drop-in center are counted in the
data set as a single prevention service. Count the number of attendees.
Record the service population.
Activities conducted at the community drop-in center are counted in the
data set as a single prevention service (Use Service Type Code STA04). If
the service meets the definition of recurring, count as a recurring
prevention service (use Service Type Code STA05). Record the service
population and the demographics.
Community Services are counted in the data set as single prevention
services. Count the number of attendees that participated in the event, not
the recipient of the event (i.e., count the number of youth repairing the
buildings, not the number of buildings repaired). Record the service
population.
Youth/adult leadership services are counted in the data set as a single
prevention service (Service Type Code=STA06)
Youth/adult leadership services are counted in the data set as a recurring
prevention service (Service Type Code=STA07) if they occur on a routine
basis. Record the service population.
Accessing services and funding activities are counted in the data as single
prevention services. Record the service population.
Assessing community needs are counted in the data set as the number of
R
S
S
R
S
S
R
S
S
Page 88 of 97
PBPS User Manual
Service
Code
Service Type
STC03
Community and Volunteer
Services
STC04
Formal Community Teams
STC05
Community Team Activities
STC06
Training Services
STC07
Training Services
STC08
Technical Assistance
STC09
Technical assistance
STC10
Systematic Planning
Count
Code
Count Method
needs assessments conducted. Count as a single prevention service when
it is completed. Record the service population.
Community and volunteer training services are counted in the data set as a
single prevention service. Count the number of attendees who completed
the training. Record the service population.
Community team services are counted only once in the data set as single
prevention services when the team is formed.
Community team activities are counted in the data set as single prevention
services and are recorded as the number of sponsored events.
Training services are counted in the data set by the agency or individual
who conducted the training. Count as a single prevention service (use
Service Type Code STC06). If the service meets the definition of recurring,
count as a recurring prevention service (use Service Type Code STC07).
Record the service population and demographics.
Training services are counted in the data set by the agency or individual
who conducted the training. Count as a single prevention service (use
Service Type Code STC06). If the service meets the definition of recurring,
count as a recurring prevention service (use Service Type Code STC07).
Record the service population and demographics
Technical assistance services are counted in the data set as single
prevention services (use Service Type Code STC08). If the service meets
the definition or recurring, count as a recurring prevention service (use
Service Type Code STC09). NOTE: Attendance at professional meetings is
not recorded in the data set. Record the service population and the
demographics.
The count should be one for each plan developed.
S
S
S
S
R
S
R
S
Page 89 of 97
PBPS User Manual
Service
Code
Service Type
Count Method
STE01
Children of Substance
Abusers (COSA) Groups
STE02
Classroom Educational
Services
COSA educational groups are counted in the data set as recurring
prevention services. Service Type Code=STE01.
Classroom educational services are counted in the data set as recurring
prevention services. Service Type Code=STE02. NOTE: A one-time
presentation should be counted as a speaking engagement.
Education services for youth groups are counted in the data set as
recurring prevention services. Service Type Code=STE03.
Parenting/family management services are counted in the data set as
recurring prevention services. Service Type Code=STE04.
Peer leader/helper programs are counted in the data set as recurring
prevention services. Service Type Code=STE05.
Small group sessions are counted in the data set as recurring prevention
services. Service Type Code=STE06.
A clearinghouse/information resource center is counted in the data set only
once usually at the beginning of the reporting year. Categorize as a single
prevention service. Use Service Type Code STN01. Record the service
population as SP99 (not applicable).
Health fairs are counted in the data set as a single prevention service. Use
Service Type Code STN02. Record the service population.
Health promotion services are counted in the data set as single prevention
services. Service Type Code=STN03. Record the service population.
Materials development services are counted each time a new document (or
PSA) is developed and is ready for dissemination or use. It is counted as
the number of original documents (or PSAs) developed. Count as a single
prevention service. Record the service population.
Materials development services are counted each time a new document (or
PSA) is developed and is ready for dissemination or use. It is counted as
the number of original documents (or PSAs) developed. Count as a single
prevention service. Record the service population.
Materials development services are counted each time a new document (or
PSA) is developed and is ready for dissemination or use. It is counted as
the number of original documents (or PSAs) developed. Count as a single
STE03
STE04
Education Services for Youth
Groups
Parenting/Family
Management Services
STE05
Peer Leader/Helper Programs
STE06
Small Group Sessions
STN01
Clearinghouse/Information
Resource Center
STN02
Health Fair
STN03
Health Promotion
STN04
Audiovisual Material
Development
STN05
Printed Material
Development
STN06
Curriculum Development
Count
Code
R
R
R
R
R
R
S
S
S
S
S
S
Page 90 of 97
PBPS User Manual
Service
Code
Service Type
STN07
Newsletter Development
STN08
Public Service
Announcement (PSA)
Development
STN09
Resource Directory
Development
STN10
STN11
Audiovisual Material
Dissemination
Printed Material
Dissemination
STN12
Curriculum Dissemination
STN13
Newsletter Dissemination
STN14
STN15
STN16
Public Service
Announcement
Dissemination
Resource Directory
Dissemination
Media Campaigns
Dissemination
Count
Code
Count Method
prevention service. Record the service population.
Materials development services are counted each time a new document (or
PSA) is developed and is ready for dissemination or use. It is counted as
the number of original documents (or PSAs) developed. Count as a single
prevention service. Record the service population.
Materials development services are counted each time a new document (or
PSA) is developed and is ready for dissemination or use. It is counted as
the number of original documents (or PSAs) developed. Count as a single
prevention service. Record the service population.
Materials development services are counted each time a new document (or
PSA) is developed and is ready for dissemination or use. It is counted as
the number of original documents (or PSAs) developed. Count as a single
prevention service. Record the service population.
Materials dissemination services are counted in the data set as the quantity
of items disseminated.
Materials dissemination services are counted in the data set as the quantity
of items disseminated.
Materials dissemination services are counted in the data set as the quantity
of items disseminated.
Materials dissemination services are counted in the data set as the quantity
of items disseminated.
PSAs are only counted once-when the PSA airs for the first time. Count as
a single prevention service. Record the service population
Materials dissemination services are counted in the data set as the quantity
of items disseminated.
Media campaigns are counted once in the data set when the campaign has
been distributed to the vendor who will promote it (e.g., when the ads are
printed in the paper or the store owner puts up the signs). Count as a
single prevention service. Use Service Type Code STN16. Record the
service population.
S
S
S
S
S
S
S
S
S
S
Page 91 of 97
PBPS User Manual
Service
Code
Service Type
STN17
Speaking Engagements
STN18
Telephone Information
Services
STP01
Employee Assistance
Programs (One-time basis)
STP02
Employee Assistance
Programs (Recurring basis)
STP03
Student Assistance Programs
(One-time basis)
STP04
Student Assistance Programs
(Recurring basis)
STP05
DUI/DWI/MIP Programs
STP06
Prevention Assessment and
Referral Services
STV01
Environmental Consultation
to Communities
STV02
Preventing underage sale of
tobacco and tobacco
Products-Synar Amendment
Count
Code
Count Method
Speaking engagements are counted in the data set as single prevention
services. Use Service Type Code STN17. Record the service population.
Telephone information lines are counted in the data set as the total
number of calls received during the month. Count as a single prevention
service. Service Type Code=STN18. Record the service population.
Employee assistance programs are counted in the data set as single
prevention services (Service Type Code=STP01), or if they occur on a
routine basis, count as a recurring prevention service (Service Type
Code=STP02). Record the service population.
Employee assistance programs are counted in the data set as single
prevention services (Service Type Code=STP01), or if they occur on a
routine basis, count as a recurring prevention service (Service Type
Code=STP02). Record the service population.
Student assistance programs are counted in the data set as recurring
prevention services. (Service Type Code=STP03). Record the service
population.
If the service meets the definition of recurring, count as a recurring
prevention service (use Service Type Code STP04).
DUI/DWI/MIP programs are counted in the data set as recurring prevention
services. Use Service Type Code STP05. Record the service population as
People Using Substances (Service Population Code SP16).
Prevention assessment and referral services are counted in the data set as
single prevention services. Use Service Type Code STO06. Record the
service population
Environmental technical assistance to communities is counted in the data
set as a single prevention service. Use Service Type Code STV01. Record
the service population.
Preventing underage sale of tobacco and tobacco products activities is
counted in the data set as a single prevention service (e.g., conducting
compliance activities). Use Service Type Code STV02. Record the Service
Population. If the service meets the definition of recurring (e.g., 6 week
vendor education), count as a recurring prevention service (use Service
Type Code STV02R.
S
S
S
R
S
R
R
S
S
S
Page 92 of 97
PBPS User Manual
Service
Code
Service Type
STV03
Preventing Underage
Alcoholic Beverage Sales
STV04
Establishing ATOD-Free
Policies
STV05
Changing Environmental
Codes, Ordinances,
Regulations and Legislation
STV06
Public Policy Efforts
Count
Code
Count Method
Preventing underage alcoholic beverage sales activities is counted in the
data set as a single prevention service. Use Service Type Code STV03.
Record the service population. If the service meets the definition of
recurring, count as a recurring prevention services (use Service Type Code
STV03R).
Establishing ATOD-free policies activities is counted in the data set as a
single prevention service. Use Service Type Code STV04. Record the
service population. If the service meets the definition or recurring, count as
a recurring prevention services (use Service Type Code STV04R).
Changing environmental codes, ordinances, regulations, or other legislation
is counted in the data set as a single prevention service. Use Service Type
Code STV05. Record the service population. If the service meets the
definition of recurring, count as a recurring prevention service (use Service
Type Code STV05R).
Public policy change activities are counted in the data set when the
campaign is completed. Count as a single prevention service. Use Service
Type Code STV06. Record the service population.
S
S
S
S
Page 93 of 97
PBPS User Manual
Index of Service Population
Service Population Code
Service Population Description
SP01
SP02
SP03
SP04
SP05
SP06
SP07
SP08
SP09
SP10
SP11
SP12
SP13
SP14
SP15
SP16
SP17
SP18
SP19
Business and Industry
Civic Groups/Coalitions
College Students
(COSAs) Children Substance Abusers
Delinquent/Violent Youth
Economically Disadvantaged Youth/Adults
Older Adults
Government/Elected Officials
Elementary School Students
General Population
Health Professionals
High School Students
Homeless/Runaway Youth
Middle/Jr. High School Students
Parents/Families
People Using Substances
People with Disabilities
People with Mental Health Problems
Physically/Emotionally Abused People
Pregnant Females/Women of Childbearing
Age
Preschool Students
Prevention/Treatment Professionals
Religious Groups
School Dropouts
Teachers/Administrators/Counselors
Youth/Minors
Law Enforcement/Military
Gays/Lesbians
Other
Not Applicable
SP20
SP21
SP22
SP23
SP24
SP25
SP26
SP27
SP28
SP98
SP99
Page 94 of 97
PBPS User Manual
State Benchmarks
Number
1.
2.
3.
4.
5.
6.
7.
8.
9.
10.
11.
12.
13a.
13b.
13c.
13d.
13e.
14.
15a.
15b.
15c.
15d.
16a.
16b.
16c.
16d.
17a.
Description
Reduce alcohol-related motor vehicle crash deaths
Reduce illicit drug-related deaths, alcohol, and tobacco
Reduce the number of young people in Grades 9 through 12 who reported that they rode, during the previous 30 days,
with a driver who had been drinking alcohol
Increase the percentage of students reporting that they feel safe in school
Reduce the percentage of youth at risk because they do not perceive communities as having strong laws and norms against
substance use
Improve bonding and strong attachment to family. (Data for this objective are available for limited communities in the
state, not a representative sample.)
Increase opportunities for pro-social involvement of youth in their community.
Increase rewards for pro-social involvement in the community.
Improve academic achievement for all students.
Reduce the percentage of students at risk due to low commitment to school.
Reduce the number of truant students defined as students who have five unexcused absences in a month or ten unexcused
absences in a year.
Increase high school completion rate.
Reduce the proportion of youth reporting use during the past 30 days of alcoholic beverages
Reduce the proportion of youth reporting use during the past 30 days of marijuana
Reduce the proportion of youth reporting use during the past 30 days of any illicit drug (includes marijuana)
Reduce the proportion of youth reporting use during the past 30 days of cigarettes
Reduce the proportion of youth reporting use during the past 30 days of smokeless tobacco
Reduce back to 1990 levels, the proportion of youth reporting binge drinking during the past two weeks
Reduce the proportion of (college age), 18- to 24-year-olds reporting sometime in their lives binge drinking
Reduce the proportion of (college age), 18- to 24-year-olds reporting sometime in their lives use of marijuana
Reduce the proportion of (college age), 18- to 24-year-olds reporting sometime in their lives use of any illicit drug
Reduce the proportion of (college age), 18- to 24-year-olds reporting sometime in their lives use of cigarettes
Increase abstinence by pregnant women any use in the past month
Increase abstinence by pregnant women binge drinking
Increase abstinence by pregnant women illicit drugs
Increase abstinence by pregnant women cigarette smoking
Increase the percentage of youth who perceive the harmfulness of smoking one or more packs a day
Page 95 of 97
PBPS User Manual
Number
17b.
17c.
18a.
18b.
18c.
Description
Increase
Increase
Increase
Increase
Increase
the
the
the
the
the
percentage of youth who perceive the harmfulness of regular binge drinking
percentage of youth who perceive the harmfulness of regular marijuana use
average age of first use of all substances to age 16 alcohol
average age of first use of all substances to age 16 tobacco
average age of first use of all substances to age 16 marijuana
Page 96 of 97
PBPS User Manual
Default Permissions for Titles (Job Classifications) in PBPS
County
Coordinator
Prevention
Specialist
Contractor
Consultant
Volunteer
Program
Aide
Intern
Full
Full
Full
Full
Full
Full
Read
None
Write
Read
None
Write
Read
None
Write
Read
none
Write
Read
None
Write
Full
Full
Full
Full
Full
Read
Full
Read
None
None
Read
None
None
None
Full
Full
Full
Full
Full
Full
Full
Full
Write
None
Write
Write
Write
None
Write
Write
Write
None
Write
Write
Write
None
Write
Write
Write
None
Write
Write
Full
Full
Full
Full
Read
Read
Read
Read
Read
Read
Read
Read
None
None
Full
Full
Full
Full
Full
Full
Full
Full
Full
Full
Full
Full
Full
Full
Full
Full
Full
Full
Full
Full
Full
Full
Full
Full
Full
None
None
None
None
Full
None
None
None
None
Full
Full
Full
Full
Full
Full
Full
Full
Full
Full
Full
Full
Full
Full
Full
Write
Full
Full
Full
Full
Write
Full
Full
Full
Full
Write
Full
Full
Full
Full
Write
Full
Full
Full
Full
Write
Administration
Organization
Staff Info
Admin Time
Evaluation
Individual Assessment
Program
Activities
Data Collection Forms
Participant
Single Service
Recurring Service
Planning
Factor Planning
Goal/Objective
Coalition
Org Registration
Member Registration
Meetings
Coalition Report
Assessment
Reports
Monitor/Analysis
Service
Administration
DBHR Review
CBC/CPTS
None
Read
Write
Full
The
The
The
The
user
user
user
user
has No Access to forms. The menu buttons will appear but will not function (“grayed” out).
will only be able to view the data. Consequently the user will not be able to add, edit or delete anything
will be able to view the data and add or edit the forms. The user cannot delete the forms
has full administration rights to the forms. Thus this person can view, add, edit, and delete the forms.
Page 97 of 97