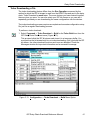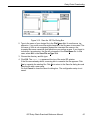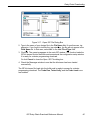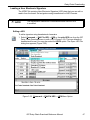
1
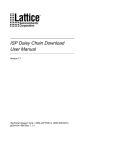
ISP Daisy Chain Download
Reference Manual
Version 5.0
Technical Support Line: 1-800-LATTICE or (408) 428-6414
pDS4104 -RM Rev 5.0
Copyright
This document may not, in whole or part, be copied, photocopied, reproduced,
translated, or reduced to any electronic medium or machine-readable form without
prior written consent from Lattice Semiconductor Corporation (LSC).
The software described in this manual is copyrighted and all rights are reserved by
Lattice Semiconductor Corporation. Information in this document is subject to change
without notice.
The distribution and sale of this product is intended for the use of the original
purchaser only and for use only on the computer system specified. Lawful users of
this product are hereby licensed only to read the programs on the disks, cassettes, or
tapes from their medium into the memory of a computer solely for the purpose of
executing them. Unauthorized copying, duplicating, selling, or otherwise distributing
this product is a violation of the law.
Trademarks
The following trademarks are recognized by Lattice Semiconductor Corporation:
Generic Array Logic, ISP, ispATE, ispCODE, ispDOWNLOAD, ispGDS, ispGDX,
ispJTAG, ispStarter, ispSTREAM, Latch-Lock, pDS+, RAL, RFT, and Twin GLB are
trademarks of Lattice Semiconductor Corporation.
E2CMOS, GAL, ispGAL, ispLSI, pDS, pLSI, Silicon Forest, and UltraMOS are
registered trademarks of Lattice Semiconductor Corporation.
Microsoft, Windows, and MS-DOS are registered trademarks of Microsoft
Corporation.
IBM is a registered trademark of International Business Machines Corporation.
Lattice Semiconductor Corporation
5555 NE Moore Court
Hillsboro, OR 97124
(503) 681-0118
January 1997
ISP Daisy Chain Download Reference Manual
2
Limited Warranty
Lattice Semiconductor Corporation warrants the original purchaser that the Lattice
Semiconductor software shall be free from defects in material and workmanship for a
period of ninety days from the date of purchase. If a defect covered by this limited
warranty occurs during this 90-day warranty period, Lattice Semiconductor will repair
or replace the component part at its option free of charge.
This limited warranty does not apply if the defects have been caused by negligence,
accident, unreasonable or unintended use, modification, or any causes not related to
defective materials or workmanship.
To receive service during the ninety-day warranty period, contact Lattice
Semiconductor at:
Phone: 1-800-LATTICE
Fax: (408) 944-8450
E-mail: [email protected]
If the Lattice Semiconductor support personnel are unable to solve your problem over
the phone, we will provide you with instructions on returning your defective software
to us. The cost of returning the software to the Lattice Semiconductor Service Center
shall be paid by the purchaser.
Limitations on Warranty
Any applicable implied warranties, including warranties of merchantability and fitness
for a particular purpose, are hereby limited to ninety days from the date of purchase
and are subject to the conditions set forth herein. In no event shall Lattice
Semiconductor Corporation be liable for consequential or incidental damages
resulting from the breach of any expressed or implied warranties.
Purchaser’s sole remedy for any cause whatsoever, regardless of the form of action,
shall be limited to the price paid to Lattice Semiconductor for the ISP Daisy Chain
software.
The provisions of this limited warranty are valid in the United States only. Some states
do not allow limitations on how long an implied warranty lasts, or exclusion of
consequential or incidental damages, so the above limitation or exclusion may not
apply to you.
This warranty provides you with specific legal rights. You may have other rights which
vary from state to state.
ISP Daisy Chain Download Reference Manual
3
Table Of Contents
Preface . . . . . . . . . . . . . . . . . . . . . . . . . . . . . . . . . . . . . . . . . . . . . . . . . . . . . . . . . . . . . . . . . . . . 6
Purpose of this Reference Manual. . . . . . . . . . . . . . . . . . . . . . . . . . . . . . . . . . . . . . . . . . . . . . .
What is in this Reference Manual . . . . . . . . . . . . . . . . . . . . . . . . . . . . . . . . . . . . . . . . . . . . . . .
Where to Look for Information . . . . . . . . . . . . . . . . . . . . . . . . . . . . . . . . . . . . . . . . . . . . . . . . . .
Documentation Conventions . . . . . . . . . . . . . . . . . . . . . . . . . . . . . . . . . . . . . . . . . . . . . . . . . . .
Mouse Terminology . . . . . . . . . . . . . . . . . . . . . . . . . . . . . . . . . . . . . . . . . . . . . . . . . . . . . . .
Related Documentation . . . . . . . . . . . . . . . . . . . . . . . . . . . . . . . . . . . . . . . . . . . . . . . . . . . . . . .
7
7
7
8
9
9
Chapter 1 Introduction . . . . . . . . . . . . . . . . . . . . . . . . . . . . . . . . . . . . . . . . . . . . . . . . . . . 10
System Requirements . . . . . . . . . . . . . . . . . . . . . . . . . . . . . . . . . . . . . . . . . . . . . . . . . . . . . . .
Hardware . . . . . . . . . . . . . . . . . . . . . . . . . . . . . . . . . . . . . . . . . . . . . . . . . . . . . . . . . . . . . .
Installation Procedure . . . . . . . . . . . . . . . . . . . . . . . . . . . . . . . . . . . . . . . . . . . . . . . . . . . . . . .
ispDS Installation . . . . . . . . . . . . . . . . . . . . . . . . . . . . . . . . . . . . . . . . . . . . . . . . . . . . .
ispDS+ Installation . . . . . . . . . . . . . . . . . . . . . . . . . . . . . . . . . . . . . . . . . . . . . . . . . . . .
Stand-alone Installation. . . . . . . . . . . . . . . . . . . . . . . . . . . . . . . . . . . . . . . . . . . . . . . . .
Getting Help . . . . . . . . . . . . . . . . . . . . . . . . . . . . . . . . . . . . . . . . . . . . . . . . . . . . . . . . . . . . . . .
Readme File . . . . . . . . . . . . . . . . . . . . . . . . . . . . . . . . . . . . . . . . . . . . . . . . . . . . . . . . .
Technical Support . . . . . . . . . . . . . . . . . . . . . . . . . . . . . . . . . . . . . . . . . . . . . . . . . . . . .
Software Support . . . . . . . . . . . . . . . . . . . . . . . . . . . . . . . . . . . . . . . . . . . . . . . . . . . . . . . . . . .
Software Update Service . . . . . . . . . . . . . . . . . . . . . . . . . . . . . . . . . . . . . . . . . . . . . . . . . .
Customer Hotline . . . . . . . . . . . . . . . . . . . . . . . . . . . . . . . . . . . . . . . . . . . . . . . . . . . . . . . .
10
10
11
11
12
12
13
13
13
14
14
14
Chapter 2 ISP Daisy Chain Download Overview . . . . . . . . . . . . . . . . . . . . . . . . . . . 15
Software Design Flow . . . . . . . . . . . . . . . . . . . . . . . . . . . . . . . . . . . . . . . . . . . . . . . . . . . . . . .
Programming Features . . . . . . . . . . . . . . . . . . . . . . . . . . . . . . . . . . . . . . . . . . . . . . . . . . . . . .
Security Feature . . . . . . . . . . . . . . . . . . . . . . . . . . . . . . . . . . . . . . . . . . . . . . . . . . . . . . . . .
ISP Download Support. . . . . . . . . . . . . . . . . . . . . . . . . . . . . . . . . . . . . . . . . . . . . . . . . . . . . . .
16
16
21
22
Chapter 3 Device Programming . . . . . . . . . . . . . . . . . . . . . . . . . . . . . . . . . . . . . . . . . . 23
Programming ISP Devices. . . . . . . . . . . . . . . . . . . . . . . . . . . . . . . . . . . . . . . . . . . . . . . . . . . .
Using a PC . . . . . . . . . . . . . . . . . . . . . . . . . . . . . . . . . . . . . . . . . . . . . . . . . . . . . . . . . . . . .
Using Third-Party Programmers. . . . . . . . . . . . . . . . . . . . . . . . . . . . . . . . . . . . . . . . . . . . .
Daisy Chain Downloading . . . . . . . . . . . . . . . . . . . . . . . . . . . . . . . . . . . . . . . . . . . . . . . . . . . .
Creating a New Configuration . . . . . . . . . . . . . . . . . . . . . . . . . . . . . . . . . . . . . . . . . . . . . .
Configuring an ISP chain using ispLSI devices. . . . . . . . . . . . . . . . . . . . . . . . . . . . . . .
Configuring an ispJTAG chain with ispLSI devices and non-LSC JTAG devices . . . . .
Configuring a mixed ISP and ispJTAG chain . . . . . . . . . . . . . . . . . . . . . . . . . . . . . . . .
Verifying a Configuration Setup . . . . . . . . . . . . . . . . . . . . . . . . . . . . . . . . . . . . . . . . . . . . .
ISP Daisy Chain Download Reference Manual
24
24
26
27
29
29
33
36
39
4
Downloading a File . . . . . . . . . . . . . . . . . . . . . . . . . . . . . . . . . . . . . . . . . . . . . . . . . . . . . . .
Turbo Downloading a File. . . . . . . . . . . . . . . . . . . . . . . . . . . . . . . . . . . . . . . . . . . . . . . . . .
Saving a Bit Stream . . . . . . . . . . . . . . . . . . . . . . . . . . . . . . . . . . . . . . . . . . . . . . . . . . .
Loading a Bit Stream. . . . . . . . . . . . . . . . . . . . . . . . . . . . . . . . . . . . . . . . . . . . . . . . . . .
Verifying a Bit Stream . . . . . . . . . . . . . . . . . . . . . . . . . . . . . . . . . . . . . . . . . . . . . . . . . .
Loading a User Electronic Signature . . . . . . . . . . . . . . . . . . . . . . . . . . . . . . . . . . . . . . . . .
Editing a UES . . . . . . . . . . . . . . . . . . . . . . . . . . . . . . . . . . . . . . . . . . . . . . . . . . . . . . . .
Scanning the Board for the UES . . . . . . . . . . . . . . . . . . . . . . . . . . . . . . . . . . . . . . . . . .
Using ATE Vectors . . . . . . . . . . . . . . . . . . . . . . . . . . . . . . . . . . . . . . . . . . . . . . . . . . . . . . .
Simulating ATE Functions . . . . . . . . . . . . . . . . . . . . . . . . . . . . . . . . . . . . . . . . . . . . . . . . .
Saving a New Download Configuration . . . . . . . . . . . . . . . . . . . . . . . . . . . . . . . . . . . . . . .
Opening a Configuration. . . . . . . . . . . . . . . . . . . . . . . . . . . . . . . . . . . . . . . . . . . . . . . . . . .
Detecting a Configuration . . . . . . . . . . . . . . . . . . . . . . . . . . . . . . . . . . . . . . . . . . . . . . . . . .
Detecting a Mixed Chain . . . . . . . . . . . . . . . . . . . . . . . . . . . . . . . . . . . . . . . . . . . . . . . . . .
Changing the Port. . . . . . . . . . . . . . . . . . . . . . . . . . . . . . . . . . . . . . . . . . . . . . . . . . . . . . . .
Exiting the Program . . . . . . . . . . . . . . . . . . . . . . . . . . . . . . . . . . . . . . . . . . . . . . . . . . . . . .
ISP Daisy Chain Download Reference Manual
40
41
42
44
46
47
47
49
51
55
56
57
57
58
60
61
5
Preface
This preface contains sections about the following information:
■
■
■
■
■
Purpose of this reference manual
What is in this reference manual
Where to look for information
Documentation conventions
Other related documentation
ISP Daisy Chain Download Reference Manual
6
Purpose of this Reference Manual
Purpose of this Reference Manual
This reference manual describes the capabilities and use of the in-system
programmable Large Scale Integration (ispLSI®) circuit download software and
procedures. It serves as a primary learning guide for downloading the JEDEC files
with the configuration setup (.dld) files to programmable devices.
This reference manual is intended for use by design engineers who are knowledgable
in system design and architecture and in the use of design programs. This manual
contains information to guide you through the download process, using a single
device or multiple devices daisy-chained together in-system in PC Windows®
environments.
What is in this Reference Manual
This reference manual contains the following information and procedural tasks:
■
■
■
■
■
■
■
■
■
■
ISP Daisy Chain Download (ispDCD) software structure
ISP Daisy Chain Download setup procedures
Managing ISP Daisy Chain Download files
Working with the Graphic User Interface (GUI)
Setting a User Electronic Signature (UES)
Device programming
Daisy-chaining multiple devices
Turbo downloading
Generating ATE Vector Files
Simulating ATE Functions
Where to Look for Information
Chapter 1, Introduction – Provides an introduction to the manual and gives the
installation procedure for the ISP Daisy Chain Download software.
Chapter 2, ISP Daisy Chain Download Overview – Provides an overview of the
download process using the ISP Daisy Chain Download software.
Chapter 3, Device Programming – Illustrates in detail how to perform device
programming using the Lattice Semiconductor ISP Daisy Chain Download system
software tool.
ISP Daisy Chain Download Reference Manual
7
Documentation Conventions
Documentation Conventions
The table below lists the documentation conventions used in this reference manual.
Convention
Definition and Usage
Italics
Italicized text represents variable input. For example:
design.dld
This means you must replace design with the file name that
you used for all the files relevant to your design.
Valuable information may be italicized for emphasis.
Book titles appear in italics. The beginning of a procedure
also appears in italics. For example:
To create a new configuration:
Bold
Valuable information may be boldfaced for emphasis.
Commands are shown in boldface. For example:
1. Select Command ⇒ Turbo Download ⇒ Build from the
ISP Daisy Chain Download menu.
Courier
Font
Monospaced (Courier) font indicates file and directory names
and text that the system displays. For example:
The C:\DDOWNLD\EXE subdirectory contains...
Bold
Courier
Bold Courier font indicates text you type in response to
system prompts. For example:
C:> dld <path_name><file_name>
|...|
Vertical bars indicate options that are mutually exclusive; you
can select only one. For example:
OK|Cancel
“Quotes”
Titles of chapters or sections in chapters in this reference
manual are shown in quotation marks. For example:
See Chapter 2, “ISP Daisy Chain Download Overview.”
✍ NOTE
Indicates a special note.
▲ CAUTION
Indicates a situation that could cause loss of data or
other problems.
❖ TIP
Indicates a special hint that makes using the software easier.
⇒
Indicates a menu option leading to a submenu option. For
example:
Command ⇒ Turbo Download ⇒ Build
ISP Daisy Chain Download Reference Manual
8
Related Documentation
Mouse Terminology
The following conventions are used throughout this manual to describe 3-button
mouse techniques.
Term
Definition
Select
Highlight text and/or an option
in a menu or dialog box using
the mouse.
Press
Hold down a mouse button.
Click
Press and release the specified
mouse button – once.
Double-click
Quickly press and release the
specified mouse button – twice.
Related Documentation
■
■
■
■
■
■
■
pLSI and ispLSI Development System User Manual
pLSI and ispLSI Development System Reference Manual
ISP Manual
ispDS+User Manual
Lattice Semiconductor Data Book
ispDS Design Manager User Manual
ispDS Getting Started Manual
ISP Daisy Chain Download Reference Manual
9
Chapter 1
Introduction
This chapter provides an introduction to the ISP Daisy Chain Download (ispDCD)
system hardware and software requirements, installation procedure, and how to get
help. The Lattice Semiconductor Corporation (LSC) ISP Daisy Chain Download
software supports the Microsoft Windows (3.1, 95, NT) environment.
System Requirements
To run the ISP Daisy Chain Download software you need a system comprised of the
following hardware and software.
Hardware
■
■
■
■
■
■
■
■
IBM® PC-AT™ 386/486 or higher
1 serial port
1 parallel port
8 MB RAM
Approximately 500 KB of disk space for ISP Daisy Chain Download software
EGA/VGA display (VGA is recommended)
CD-ROM drive
Mouse, Microsoft Windows compatible
ISP Daisy Chain Download Reference Manual
10
Installation Procedure
Installation Procedure
The ISP Daisy Chain Download software setup program requires Microsoft
Windows 3.1 (running in 386 enhanced mode), Windows NT, or Windows 95 to be
installed on the system. The following procedure automatically installs the ISP Daisy
Chain Download (ispDCD) software, version 5.0, under the Microsoft Windows
environment.
To set up the ISP Daisy Chain Download software:
Insert the auto-install CD into the drive and select File ⇒ Run from the Program
Manager menu. Enter the following command at the prompt:
cd_drive:setup
The install program checks for any existing LSC ispDS or ispDS+ software. At this
point, depending on which LSC software you are using, set the correct installation
path corresponding to where you loaded the LSC software executables. The following
subsections outline three possibilities:
■
■
■
ispDS Installation
ispDS+ Installation
Stand-alone Installation
ispDS Installation
Install ISP Daisy Chain Download version 5.0 in the same directory as the ispDS
software. Make certain the wdownld.sdn device information file is copied there. For
example, during the installation procedure, use the following path at the prompt:
C:\ispds_install_path\
1. The program responds with a series of screens to guide you through the
installation process. Follow the instructions on the screen.
2. The install program automatically includes the ispDCD icon in the current LSC
group in the Windows Program Manager.
ISP Daisy Chain Download Reference Manual
11
Installation Procedure
ispDS+ Installation
Install the ISP Daisy Chain Download version 5.0 in the directory that contains the
ispDS+ executables for all LSC Windows-based applications. Make certain the
wdownld.sdn device information file is copied there also. For example, during the
installation procedure, use the following path at the prompt:
C:\pdsplus_install_path\bin
1. The program responds with a series of screens to guide you through the
installation process. Follow the instructions on the screen.
2. The install program automatically creates an LSC group in the Windows Program
Manager; it contains the ispDCD icon.
Stand-alone Installation
At the installation prompt:
1. Specify any location you choose for the ispDCD software.
2. The install program automatically creates an LSC group in the Windows Program
Manager; it contains the ispDCD icon.
ISP Daisy Chain Download Reference Manual
12
Getting Help
Getting Help
In most cases, this manual will answer many of your questions. However, Lattice
Semiconductor Corporation provides assistance should you have further questions
about using the ISP Daisy Chain Download software.
Readme File
To access the readme file:
1. Go to the Windows Program Manager.
2. Select the Lattice Semiconductor Group to display the icons (Figure 1-1).
Figure 1-1. The Lattice Semiconductor Group
3. Select the ispDCD Readme icon.
Technical Support
Before contacting Lattice Semiconductor Technical Support, take a moment to review
the following information for possible answers or solutions.
1. Check to see if the hardware meets the minimum system requirements listed
under the “System Requirements” section.
2. Consult the Lattice Semiconductor documentation. It will answer most of your
questions.
3. Verify that the hardware and peripherals are set up according to their respective
documentation and that all cable connections are secure.
4. Verify that the proper installation of Microsoft Windows is running in enhanced
mode.
ISP Daisy Chain Download Reference Manual
13
Software Support
Software Support
Software Update Service
You will receive free software updates for one year when you fill out and return to
Lattice Semiconductor the License File/Registration Form included with your
software. Extended maintenance agreements are available for purchase. Please
contact your local Lattice Semiconductor Sales Representative for additional
information.
Customer Hotline
If you have any questions or problems with this software, please call the Lattice
Semiconductor Applications Hotline at 1-800-LATTICE (1-800-528-8423) or
(408) 428-6414. The Hotline is available Monday through Friday from 8:00 AM to 5:00
PM, Pacific Time. Or, send e-mail to [email protected].
Information Need
Customer Resource
USA & Canada
Other Locations
Telephone Hotline
1-800-LATTICE
(408) 428-6414
Fax
(408) 944-8450
ispLSI/pLSI
Bulletin Board System
(408) 428-6417
Applications Support
E-mail
[email protected]
FTP Site
http://www.latticesemi.com/ftp/index.html
World Wide Web
http://www.latticesemi.com
Telephone Hotline
1-888-ISP-PLDS
Fax
(503) 681-3037
GAL/ispGAL/ispGDS
Bulletin Board System
(503) 693-0215
Applications Support
E-mail
[email protected]
FTP Site
http://www.latticesemi.com/ftp/index.html
World Wide Web
http://www.latticesemi.com
Telephone Hotline
1-800-327-8425
Fax
(503) 681-3037
E-mail
[email protected]
FTP Site
http://www.latticesemi.com/ftp/index.html
Literature
ISP Daisy Chain Download Reference Manual
(503) 681-0118
(503) 681-0118
14
Chapter 2
ISP Daisy Chain Download Overview
The ISP Daisy Chain Download (ispDCD) software is a comprehensive design
download package for the Lattice Semiconductor ISP device families. The ispDCD
software provides an efficient method of programming the LSC devices using JEDEC
files generated from any compatible software tool. This complete device
programming tool helps you to quickly and easily program your devices with your
designs.
The ISP Daisy Chain Download software features the following:
■
■
■
■
■
■
■
■
■
■
■
■
■
■
■
Supports the Microsoft Windows 3.1, NT, or 95 design environments
JEDEC file transfer via a download cable directly from your system
JEDEC file transfer to a third-party programmer
Detection and identification of as many as 64 devices at once
Easy set-up menus for multiple ports
Simple device configuration menus
Single ISP device programming
Multiple ISP device daisy chain programming
Mixed chain downloading including JTAG device recognition
Turbo downloading of daisy-chained devices
ispSTREAMTM bit building, saving and loading
Boundary Scan Description Language (BSDL) recognition
UES (User Electronic Signature) reading and coding
ATE vector file generation and simulation support
Online help
ISP Daisy Chain Download Reference Manual
15
Software Design Flow
Software Design Flow
The ISP Daisy Chain Download software uses any JEDEC file in ASCII format to
program, in-system (on the board), a device or multiple devices. The “board” can be
one device programmer or it can be inside your CPU on the board itself which
requires no external programmer. ISP Daisy Chain Download also recognizes mixed
chains with non-LSC JTAG compatible devices.
Once you attach the cables, the ISP Daisy Chain Download software can identify the
number of devices you wish to program and be ready to accept your instructions for
which files (designs) you want to load onto which device(s). For additional information
on how to port the device programmers, see the isp Engineering Kit Hardware
Assembly Manual, Model 100.
Programming Features
The object of the ISP Daisy Chain Download software is to program ISP devices with
your designs on a board (or in system). In-system programming is advantageous
because it alleviates the necessity of programming on a device programmer and
mounting, plugging, and socketing the devices; it avoids the risk of bent or broken
pins from handling. The devices can be programmed again and again depending on
your system needs. Also, you can set the security bit to ON or OFF so the device
cannot be read once it is programmed.
You can quickly choose the port setup with a pull-down menu. Use the Configuration
Setup window to provide the device type, the JEDEC file you want to load onto each
particular device, and the operation (e.g., Program & Verify, Checksum) you want to
perform for each device. Once you supply the setup information, you should check
your setup to identify any errors and resolve them prior to downloading. Then
download the design files onto the appropriate devices as specified.
The ISP Daisy Chain Download software is very easy to use and provides you with a
quick and comprehensive analysis of your device programming directions. One
screen accesses everything you need to download all the devices.
ISP Daisy Chain Download Reference Manual
16
Programming Features
Figure 2-1 illustrates a typical block diagram of multiple ISP devices cascaded
together. The example shows the ISP aspects such as identifying the devices in the
daisy chain, shifting commands, bypassing devices, and executing commands.
SDO
SDI
5-Wire ISP Interface
MODE
SCLK
ispEN
ispLSI
1000/E
2000
ispGAL
ispGDS
22V10
22
ispLSI
3000
6000
Figure 2-1. Multiple ISP Interface
ISP Daisy Chain Download Reference Manual
17
Programming Features
Figure 2-2 illustrates a typical block diagram of multiple ispLSI devices connected to
the 5-wire ispJTAG interface.
TDO
TDI
5-Wire ispJTAG Interface
TMS
TCK
ispEN
ispLSI
2128V
ispLSI
2128V
ispLSI
2032V
ispLSI
2032V
Figure 2-2. Multiple ispJTAG Interface
ISP Daisy Chain Download Reference Manual
18
Programming Features
TDO
4-Wire ispJTAG Interface
TDI
TMS
TCK
VCC
or NC
ispEN
ispLSI
3256A
VCC
or NC
VCC
or NC
ispEN
ispEN
ispLSI
3256E
ispLSI
3000*
6000
ispLSI
2000V
ispEN
NC = no connect
* Except ispLSI 3256
Figure 2-3. ispJTAG Chain Interface
Figure 2-3 illustrates a typical block diagram of multiple ispLSI devices connected to
the 4-wire ispJTAG interface. Figure 2-4 illustrates a typical block diagram of multiple
ispLSI devices connected to the 5-wire (ISP and ispJTAG) mixed interface. The
ispDOWNLOAD Cable v2.0 is requried for the mixed interface.
ISP Daisy Chain Download Reference Manual
19
Programming Features
SDO/TDO
5-Wire ISP and ispJTAG Mixed Interface
SDI/TDI
MODE/TMS
SCLK/TCK
VCC
or NC
ispEN
ispEN
ispLSI
1000/E
2000
ispLSI
1000/E
2000
ispLSI
2000V
ispLSI
3000*
6000
ispEN
NC = no connect
* Except ispLSI 3256
Figure 2-4. Multiple Mixed Chain Interface
ISP Daisy Chain Download Reference Manual
20
Programming Features
Security Feature
The ispLSI and ispGAL22V10 devices contain a security bit that enables or disables
program verification. If the security bit is enabled, the device program cannot be read,
thus preventing unauthorized access to your design.
When you use the LSC ispDS+ software, check the Security check box in the Device
Options section of the Device Selection dialog box. Alternately, you can control the
security bit through the SECURITY Device Control Option in a Parameter File. The
security feature defaults to SECURITY OFF. See the ispDS+ User Manual for details
on how to set the security bit.
When you use the LSC ispDS software, you control the security bit by including the
following PARAM statement in the LHDL file:
PARAM SECURITY ON|OFF
Refer to the LHDL Reference Manual for details.
When you use the LSC pDS software, you control the security bit through the Design
Manager window Design ⇒ Fuse Map command or the Fuse icon. The Fuse Map
Options window contains Security On/Off buttons you set for each JEDEC file. See
the pLSI and ispLSI Development System User Manual for instructions on how to set
the security bit.
ISP Daisy Chain Download Reference Manual
21
ISP Download Support
ISP Download Support
There are three ways to program Lattice Semiconductor ISP devices:
■
■
■
In-system without removing them from the circuit board
The isp Engineering Kit
A third-party programmer
Before you can program devices using the ISP Daisy Chain Download software, you
must first have a JEDEC-format ASCII file to download onto a programmable device.
When you invoke the download program, the ISP Daisy Chain Download software
windows appear. Figure 2-5 shows the parent windows. Use the pull-down menus or
the tool bar icons to perform the various functions needed to supply the JEDEC files
to the specific devices. The Messages window is part of the parent ISP Daisy Chain
Download window and remains on the screen at all times. It displays all the system
messages and prints them to the screen for your convenience. You cannot minimize it
or close it, but you can resize it.
Figure 2-5. ISP Daisy Chain Download
ISP Daisy Chain Download Reference Manual
22
Chapter 3
Device Programming
This chapter contains the ISP Daisy Chain Downloading procedure and is organized
into the following sections:
■
■
Programming ISP Devices
Windows Downloading
There are two methods you can use to program ISP devices. One method sends a
JEDEC file to a third-party programmer. The second method is to send a JEDEC file
via an ispDOWNLOADTM cable directly from your system to a device. This chapter
contains information about the following:
■
■
Options for programming a device using in-system programming (ISP) for ISP
devices already installed on a printed circuit board
Programming a device using industry-standard, third-party PLD programmers
For additional information about using a device programmer for the PC, see the
isp Engineering Kit Hardware Assembly Manual, Model 100. For additional
information about how to program multiple ISP devices in a daisy-chained
configuration as well as general ISP interface and unique programming features of
each ISP device, see the Lattice Semiconductor Data Book.
ISP Daisy Chain Download Reference Manual
23
Programming ISP Devices
Programming ISP Devices
Using a PC
To program ISP devices in-system, you can either use the isp Engineering Kit Model
100 or implement the ISP algorithm for your own system and the ISP Daisy Chain
Download software.
The isp Engineering Kit Model 100 contains the following:
■
■
■
■
■
■
Universal Programming Module
25-pin parallel port adapter
ispDOWNLOAD cable
System cable
Power supply converter (110VAC/9VDC @ 200 mA) – North America and Asia
only
isp Engineering Kit Hardware Assembly Manual, Model 100
A socket adapter, which is purchased separately, is required if you want to program
the ISP devices directly on the programming module. A unique socket adapter board
is available for each package type. An ISP sample is included with each socket
adapter board. Table 3-1 shows a partial list of the socket adapters now available
from Lattice Semiconductor.
A 5-volt to 3-volt converter (part number pDS4102-3/5ADP), purchased separately, is
required if programming 3.3-volt ispLSI devices. Table 3-1 distinguishes which
devices require this converter.
ISP Daisy Chain Download Reference Manual
24
Programming ISP Devices
Table 3-1. Socket Adapter Boards
Socket Adapter
Part Number
Pins
Device
Type
Package
Type
pDS4102-J44
44
ispLSI 1016
ispLSI 2032
ispLSI 2032LV/V*
PLCC
pDS4102-T44
44
ispLSI 1016
ispLSI 1016E
ispLSI 2032
ispLSI 2032LV/V*
TQFP
pDS4102-J68
68
ispLSI 1024
PLCC
pDS4102-J84
84
ispLSI 1032
PLCC
pDS4102-T100
100
ispLSI 1032
ispLSI 1032E
ispLSI 2064
TQFP
pDS4102-Q120
120
ispLSI 1048
PQFP
pDS4102-Q128
128
ispLSI 1048C
ispLSI 1048E
ispLSI 2096
PQFP
pDS4102-T176
176
ispLSI 2128
TQFP
pDS4102-M160
160
ispLSI 2128
ispLSI 3256/A
MQFP
pDS4102-T176/2128V
176
ispLSI 2128V*
TQFP
pDS4102-J84/2064V
84
ispLSI 2128V*
PLCC
pDS4102-T100/2128V
100
ispLSI 2128V*
TQFP
pDS4102-M208
208
ispLSI 6192
MQFP
pDS4102-M240
240
ispLSI 3192
MQFP
pDS4102-M304
304
ispLSI 3256E
MQFP
* The 5-volt to 3-volt converter must be purchased separately and used in
conjunction with the socket adapter to program these 3.3-volt devices.
The part number for the isp Engineering Kit Model 100 is pDS4102-PM. To order the
kit or socket adapters, contact a Lattice Semiconductor Sales Representative. The
isp Engineering Kit Model 100 is also offered in a European edition featuring AC
Power Supply Converter compatibility. Order part number pDS4102E-PM for use in
Europe.
ISP Daisy Chain Download Reference Manual
25
Programming ISP Devices
Using Third-Party Programmers
Refer to the documentation for the particular programmer you are using to download
the JEDEC file. Table lists LSC-qualified, third-party device programmers for the ISP
families.
Table 3-2. LSC-Qualified Programmers
✍ NOTE
Vendor
Model
Advin Systems
Pilot GL/GCE, Pilot
U40/U84/U168/U256
BP Microsystems
CP/PLD-1128, BP-1200
Data I/O
2900, 3900, ChipLab, Unisite 40,
Unisite 48, Autosite
Logical Devices
Allpro 32/40, Allpro 88
SMS
Microsystems
Sprint Expert
Stag
ZL30/A/B, System 3000, Quasar
1040/1084, Eclipse
System General
Turpro-1/FX, Turpro-1
High pin-count socket adapters are available from Emulation Technology.
For a complete listing of certified third-party PLD programmers that support the ISP
families, please contact the Lattice Semiconductor Literature Department at
1-800-327-8425 and request a copy of the Lattice Semiconductor Programming
Tools.
ISP Daisy Chain Download Reference Manual
26
Daisy Chain Downloading
Daisy Chain Downloading
Lattice Semiconductor high-density ISP devices have an advanced feature that
allows you to program and reprogram the parts in-system without removing them.
This feature eliminates using sockets for these devices, and avoids the common
reliability problems associated with sockets. In-system programming can be done
with an ispDOWNLOAD cable from the computer to the target device.
The software first scans to determine if there is a download cable connected to the
device. If an ispDOWNLOAD cable is not attached, an alert appears in the Messages
window. When you invoke the download program, the ISP Daisy Chain Download
window appears (Figure 3-1).
Figure 3-1. ISP Daisy Chain Download Window
The menu banner contains File, Configuration, Command, and Help pull-down
options. Each menu option will be discussed briefly in the following sections.
ISP Daisy Chain Download Reference Manual
27
Daisy Chain Downloading
The File menu contains the following options:
■
■
■
■
■
New – Creates a new configuration setup
Open – Opens a previously saved configuration setup
Save – Saves a named configuration setup
Save As – Names and saves a configuration setup
Exit – Exits the ISP Daisy Chain Download program
The Configuration menu contains the following options:
■
■
■
Port Assignment – Sets the parallel port(s) for the download configuration
Scan Board – Scans the board and detects the configuration setup of an ISP
chain or an ispJTAG chain
Scan Mixed Chain – Scans the board and detects the configuration setup of both
an ISP chain and an ispJTAG chain on the same board.
The ISP Daisy Chain Download software can detect the default port assignment if
you have the cables connected properly when you start the program. Use the
Configuration ⇒ Port Assignment menu option to reset the port.
The Command menu enables you to verify or download a configuration in the
following ways:
■
■
■
■
■
■
■
■
Command ⇒ Check Configuration Setup
Command ⇒ Run Operation
Command ⇒ Turbo Download
Command ⇒ Edit File UES
Command ⇒ Display Board UES
Command ⇒ Display ispJTAG UES of Mixed Chain
Command ⇒ Generate ATE Vectors
Command ⇒ Simulate ATE Testing
Command ⇒ Check Configuration Setup verifies your setup once you set up the
configuration properly. It is best to run the Check Configuration Setup operation
before you download to check that your JEDEC device files are loading onto the
correct devices, but that operation is optional. Command ⇒ Run Operation
executes the non-turbo downloading procedure. Your design files are programmed
onto the devices to your specification. For more information about daisy-chaining your
devices, see the Lattice Semiconductor Data Book.
The Help menu contains the following options:
■
■
■
Index – Lists the available topics
Using Help – Tells you how to use Windows Help
About ISP Download – Gives the version number of the ISP Daisy Chain
Download software
ISP Daisy Chain Download Reference Manual
28
Daisy Chain Downloading
Creating a New Configuration
ISP Daisy Chain Download has three separate methods to create a download
configuration. The following sections will detail the procedure to: generate a new
configuration for an ISP chain or an ispJTAG chain using ispLSI devices; generate a
new configuration for ispJTAG chain with ispLSI devices and non-LSC JTAG devices;
and generate a new configuration for a mixed ISP and ispJTAG chain.
Configuring an ISP chain using ispLSI devices
1. Select File ⇒ New or click the New icon from the ISP Daisy Chain Download
menu (Figure 3-2). The New Configuration dialog box appears (Figure 3-3).
Figure 3-2. File ⇒ New Menu Option
ISP Daisy Chain Download Reference Manual
29
Daisy Chain Downloading
This dialog box allows you to set the number of devices you want to program (the
default is 1). The limit is 64. If you use the download cable (part number
pDS4102-DL), we recommend that you configure no more than eight ISP devices
in a daisy chain. If you choose a number greater than 64, a dialog box appears
prompting you to re-enter a valid number of devices.
Figure 3-3. New Configuration Dialog Box
2. Enter a number in the device field, click OK to execute, and the New Configuration
Setup window appears (Figure 3-4). The scroll arrows and box appear to the right
of the Status column if you choose a number greater than five. The default device
is the ispLSI1016.
Figure 3-4. New Configuration Setup Dialog Box
ISP Daisy Chain Download Reference Manual
30
Daisy Chain Downloading
The Configuration Setup dialog box includes the following features and options:
■
■
■
■
■
■
Comment Box – Allows you to enter a comment (up to 256 characters in length)
about the .dld file.
Index Number – Gives the order of the devices identified. As many as five are
displayed per screen. This column is not editable.
Device – Gives the device(s) identified. Use the pull-down arrow to select the
device type when creating a configuration.
File – Displays the file name (.jed). Choose Browse to locate a file or enter the file
name in the field.
Operation – Lists the function to perform for each file. The default is Program &
Verify. The Operation options include the following:
• Program & Verify – Performs a download of the design pattern, then verifies
the chip program (device pattern) with the original .jed file to ensure the device
was programmed correctly. The file name must be specified.
• Verify – Compares the chip program (device pattern) with the specified .jed
file.
• Checksum – Computes the check sum value of the chip and sends the
information to the Status field for the corresponding device.
• Read & Save – Reads the chip program and writes it into the specified JEDEC
file. The file name must be specified. If the file name already exists, a dialog
box appears asking if you want to replace the existing file.
• Erase – Erases the chip program and the security fuse for the device you
specify.
• No Operation – Indicates that no operation will be performed for that device.
Status – Shows the success factor after running a download procedure. The
possibilities of results include the following:
• Pass
• Fail
• Hexadecimal Value
• Done
• NA (not applicable)
The Status column displays NA until you execute the ISP Daisy Chain Download
software for the configuration setup.
ISP Daisy Chain Download Reference Manual
31
Daisy Chain Downloading
3. Select the device type in the Device field. Use the arrow button to activate the pulldown menu (Figure 3-5).
Figure 3-5. Device Pull-down Menu
4. Enter the file name or select Browse to find a file. If you choose browse, the
Browse JEDEC File dialog box appears (Figure 3-6). Use the scroll down arrow
keys to scroll through the lists. Make sure your choices are highlighted and
choose OK. The Browse dialog box closes and the .jed file name that you chose
appears in the Configuration Setup dialog box for that device.
Figure 3-6. Browse JEDEC File Dialog Box
ISP Daisy Chain Download Reference Manual
32
Daisy Chain Downloading
5. Select the Operation (Figure 3-7). Use the arrow button to activate the pull-down
menu.
Figure 3-7. Operation Selection Options
Configuring an ispJTAG chain with ispLSI devices and non-LSC JTAG devices
1. Select File ⇒ New or click the New icon from the ISP Daisy Chain Download
menu just as you did to configure an ISP chain. The New Configuration dialog box
appears to allow you to set the number of devices you want to program. The limit
is 64.
2. Enter a number in the device field, click OK to execute, and the New Configuration
Setup dialog box appears (Figure 3-4). The scroll arrows and box appear to the
right of the Status column if you chose a number greater than five. The default
device is the ispLSI1016.
ISP Daisy Chain Download Reference Manual
33
Daisy Chain Downloading
The New Configuration Setup dialog box includes the following features and options
for configuring an ispJTAG chain with ispLSI and non-LSC devices:
■
■
■
■
✍ NOTE
Index Number – Gives the order of the devices identified. As many as five are
displayed per screen. This column is not editable.
Device – Gives the device(s) identified. Use the pull-down arrow to select the
device type when creating a configuration.
• JTAG – Denotes non-LSC JTAG-compatible device.
• CHAIN-M – Provides a separator for a mixed chain of devices.
File – Displays the file name (.jed). Choose Browse to locate a file or enter the file
name in the field.
Operation – Lists the function to perform for each file. The default is Program &
Verify. Operation options include the following:
• Program & Verify – Performs a download of the design pattern, then verifies
the chip program (device pattern) with the original .jed file to ensure the device
was programmed correctly. The file name must be specified.
• Verify – Compares the chip program (device pattern) with the specified .jed
file.
• Checksum – Computes the check sum value of the chip and sends the
information to the Status field for the corresponding device.
• Read & Save – Reads the chip program and writes it into the specified JEDEC
file. The file name must be specified. If the file name already exists, a dialog
box appears asking if you want to replace the existing file.
• Erase – Erases the chip program and the security fuse for the device you
specify.
• No Operation – Indicates that no operation will be performed for that device.
• JTAG Program & Verify – Performs a download of the design pattern, then
verifies the chip program (device pattern) with the original .jed file to ensure
the JTAG device was programmed correctly. File name must be specified.
• JTAG Verify – Compares the chip program (device pattern) with the specified
.jed file.
• JTAG No Operation – Indicates that no operation will be performed for that
JTAG device. It is the only option for a non-LSC JTAG device.
JTAG operations will only appear in the Operation pull-down menu
if the device is ispJTAG programmable. JTAG operations must be
used when the configuration is set up for an ispJTAG chain.
ISP Daisy Chain Download Reference Manual
34
Daisy Chain Downloading
Status – Shows the success factor after running a download procedure. The
possibilities of results include the following:
• Pass
• Fail
• Hexadecimal Value
• Done
• NA (not applicable). The JTAG devices will remain NA throughout your
download procedure.
The Status column displays NA until you execute the ISP Daisy Chain Download
software for the configuration setup.
■ Instruction Bits– Shows the Instruction register bit length of the JTAG device. An
“all 1s” instruction is sent to non-LSC JTAG devices to put them in bypass mode
on all operations.
3. Select the device type in the Device field. Use the arrow button to activate the pulldown menu. If an ispJTAG device is chosen, a corresponding JTAG operation
must be used.
4. Enter the file name or select Browse to find a file. Make sure your choice is
highlighted and choose OK. The Browse dialog box closes and the file name you
chose appears in the Configuration Setup dialog box for that device (Figure 3-8).
■
Figure 3-8. An ispJTAG Chain and JTAG Device Selected
ISP Daisy Chain Download Reference Manual
35
Daisy Chain Downloading
Configuring a mixed ISP and ispJTAG chain
1. Select File ⇒ New or click the New icon from the ISP Daisy Chain Download
window. The New Configuration dialog box appears to allow you to set the number
of devices you want to program. The limit is 64. When configuring a mixed chain,
set the number in the New Configuration dialog box to one more than the number
of devices on your board to provide room for the mixed chain marker. You must
have the 2.0 version of the download cable to configure a mixed chain.
2. Enter the total chip count in the ISP chain and the ispJTAG chain plus one for the
chain separator (CHAIN-M) in the device field. Click OK, and the New
Configuration Setup window appears. The scroll arrows and box appear to the
right of the Status column if you choose a number greater than five. The default
device is the ispLSI1016.
The New Configuration Setup dialog box includes the following features and options
for configuring a mixed ISP and ispJTAG chain:
■
■
■
■
Index Number – Gives the order of the devices identified. As many as five are
displayed per screen. This column is not editable.
Device – Gives the device(s) identified. Use the pull-down arrow to select the
device type when creating a configuration.
• JTAG – Denotes an non-LSC device.
• CHAIN-M – Provides a separator for a mixed chain of devices.
File – Displays the file name (.jed). Choose Browse to locate a file or enter the file
name in the field. If the position is used for a mixed chain marker, this field is filled
with NEW CHAIN and is not editable.
Operation – Lists the function to perform for each file. The default is Program &
Verify. If the position is used for a mixed chain marker, this field is filled with an a
pound sign (#) and is not editable. The Operation options include the following:
• Program & Verify – Performs a download of the design pattern, then verifies
the chip program (device pattern) with the original .jed file to ensure the device
was programmed correctly. The file name must be specified.
• Verify – Compares the chip program (device pattern) with the specified .jed
file.
• Checksum – Computes the check sum value of the chip and sends the
information to the Status field for the corresponding device.
• Read & Save – Reads the chip program and writes it into the specified JEDEC
file. The file name must be specified. If the file name already exists, a dialog
box appears asking if you want to replace the existing file.
• Erase – Erases the chip program and the security fuse for the device you
specify.
• No Operation – Indicates that no operation will be performed for that device.
• JTAG Program & Verify – Performs a download of the design pattern, then
verifies the chip program (device pattern) with the original .jed file to ensure
the JTAG device was programmed correctly. File name must be specified.
ISP Daisy Chain Download Reference Manual
36
Daisy Chain Downloading
• JTAG Verify – Compares the chip program (device pattern) with the specified
.jed file.
• JTAG No Operation – Indicates that no operation will be performed for that
JTAG device. It is the only option for a non-LSC JTAG device.
✍
NOTE
JTAG operations will only appear in the Operation pull-down menu
if the device is ispJTAG programmable. A JTAG operation must be
used if the device is both ISP and ispJTAG programmable when the
configuration is set up for a mixed chain.
Status – Shows the success factor after running a download procedure. The
Status column displays NA until you execute the ISP Daisy Chain Download
software for the configuration setup.
3. Select the device type in the Device field. Use the arrow to activate the pull-down
menu. Your configuration must have at least the first (Index 1) position filled with
an ispLSI device and there must be a CHAIN-M marker placed to separated JTAG
devices from ispLSI devices.
4. Enter the file name or select Browse to find a file (Figure 3-9). Use the arrow
button to scroll through the lists. Make sure your choices are highlighted and
choose OK. The Browse dialog box closes and the file name that you chose
appears in the Configuration Setup dialog box for that device.
■
Figure 3-9. Browse JEDEC File Dialog Box
ISP Daisy Chain Download Reference Manual
37
Daisy Chain Downloading
5. Select the ISP or ispJTAG Operation (Figure 3-10). Use the arrow button to
activate the pull-down menu.
Figure 3-10. ispLSI and ispJTAG Operation Selection Options
When constructing a mixed chain, the Lattice Semiconductor ISP chain must come
first. The mixed chain marker must be placed after the ISP chain and before the JTAG
chain.
For the ISP chain, the first or last device of the chain cannot be a dual ISP/JTAG
device, an ispGDS device, or a GAL device. A dual device is one that can be
programmed in Lattice Semiconductor ISP or ispJTAG. These devices have the
expanded Operation combo box.
ISP Daisy Chain Download Reference Manual
38
Daisy Chain Downloading
Verifying a Configuration Setup
Once you enter all the specific information for each device, you should check your
configuration to identify any errors before downloading.
✍
NOTE
The Command ⇒ Run Operation command will also run a verification
. you setup prior to downloading each file to your specifications.
of
To check a configuration setup:
1. Select Command ⇒ Check Configuration Setup or click the Check icon from
the ISP Daisy Chain Download menu (Figure 3-11).
❖
TIP
You can use Command ⇒ Check Configuration Setup to assure that you
have all the information selected and the devices ported properly. This is
particularly helpful if you do not want to download to a device until later.
Figure 3-11. Command ⇒ Check Configuration Setup Menu Option
ISP Daisy Chain Download Reference Manual
39
Daisy Chain Downloading
2. Check the Messages window and make any necessary corrections.
The Messages window is a clipboard for the log file created every time you perform
either a Command ⇒ Check Configuration Setup or a Command ⇒ Run
Operation. Access the log file by typing downld.log from any text editor. The log
file does not append itself; it only records the last function performed.
Downloading a File
To download a file:
1. Select Command ⇒ Run Operation or click the Run icon from the ISP Daisy
Chain Download menu to program the device with your design file (Figure 3-12).
Figure 3-12. Command ⇒ Run Operation Menu Option
The software verifies that the configuration setup files and .jed files are compatible
and performs the operation that you specified in the Operation field for each device.
Check the Messages window for a successful notice.
ISP Daisy Chain Download Reference Manual
40
Daisy Chain Downloading
Turbo Downloading a File
The turbo downloading feature differs from the Run Operation command by the
method in which the ISP bit stream is read from the JEDEC files and sent to the daisy
chain. Turbo Download is much faster. The more devices you have chained together,
the more time you save. You can also retain your ISP bit stream so you can use it
repeatedly provided you are downloading the same configuration onto the devices.
The turbo downloading process requires a complete and accurate configuration setup
file, just like a regular downloading process.
To perform a turbo download:
1. Select Command ⇒ Turbo Download ⇒ Build or the Turbo Build icon from the
ISP Daisy Chain Download menu (Figure 3-13).
This process builds the ISP bit stream and stores it in a temporary buffer. You
must perform the bit stream build to run turbo downloading. Until you build the ISP
bit stream, the other download functions and icons are disabled. Check the
Messages window for important information and a successful message.
Figure 3-13. Configuration ⇒ Turbo Download ⇒ Build Menu Option
ISP Daisy Chain Download Reference Manual
41
Daisy Chain Downloading
2. Select Command ⇒ Turbo Download ⇒ Run Turbo Download or the Turbo
Run icon from the ISP Daisy Chain Download menu. This function checks the
configuration setup file then downloads the ISP bit stream to the devices. The
Message window reports that the software is checking your configuration setup for
each device.
Saving a Bit Stream
If you want to retain an ISP bit stream, you can save it to a file.
To save an ISP bit stream:
1. Select Command ⇒ Turbo Download ⇒ Save ISP File or the Turbo Save icon
from the ISP Daisy Chain Download menu (Figure 3-14). The Save As .ISP File
dialog box appears (Figure 3-15).
Figure 3-14. Command ⇒ Turbo Download ⇒ Save ISP File Menu Item
ISP Daisy Chain Download Reference Manual
42
Daisy Chain Downloading
Figure 3-15. Save As .ISP File Dialog Box
2. Type in the name of your design file in the File Name field. It must have a .isp
extension. If you enter more than eight characters, the file name is truncated. The
full name of a file is not recognized against the truncated file name so the
truncated file name overwrites itself each time you perform a save. If you forget to
include the .isp extension, the file will not appear in the Field Name list. In that
case, select ALL in the Save File as Type field.
3. Choose the directory and file type.
4. Click OK. The name.isp appears at the top of the main ISP window.
If the file name already exists, a warning box to overwrite the file appears. Click
Yes to overwrite the existing file. Click No to return to the Save As dialog box and
save the file with a new name.
Or click Cancel to close the Save As dialog box. The configuration setup is not
saved.
ISP Daisy Chain Download Reference Manual
43
Daisy Chain Downloading
Loading a Bit Stream
If you previously saved an ISP bit stream, you can access it and you will not need to
rebuild the ISP bit stream. This function retrieves a named .isp file and loads it into
the buffer for downloading.
To load an ISP bit stream:
1. Select Command ⇒ Turbo Download ⇒ Load ISP File or the Turbo Load icon
from the ISP Daisy Chain Download menu (Figure 3-16). The Open .ISP File
dialog box appears (Figure 3-17).
Figure 3-16. Command ⇒ Turbo Download ⇒ Load ISP File Menu Item
ISP Daisy Chain Download Reference Manual
44
Daisy Chain Downloading
Figure 3-17. Open .ISP File Dialog Box
2. Type in the name of your design file in the File Name field. It must have an .isp
extension. If you forgot to include the .isp extension, the file will not appear in the
Field Name list. In that case, select ALL in the List File of Type field.
3. Click OK. The name.isp appears in the main ISP window. This function loads the
ISP bit stream file into the buffer and reconstructs the configuration setup window.
It is ready for a device programming download.
Or click Cancel to close the Open .ISP File dialog box.
4. Check the Messages window to see that the bit stream has been loaded
successfully.
The ISP bit stream file loads into the buffer and is ready to access for a device
programming download. The Turbo Run, Turbo Verify, and the Turbo Load icons
are enabled.
ISP Daisy Chain Download Reference Manual
45
Daisy Chain Downloading
Verifying a Bit Stream
When you verify an ISP bit stream, the software checks the stream against the
devices to verify that the .dld file (configuration setup) is present and accurate. If you
have not performed a download, the verification process will fail because the stream
is not present on the devices and cannot be verified.
To verify the ISP bit stream:
1. Select Command ⇒ Turbo Download ⇒ Build or the Turbo Build icon from the
ISP Daisy Chain Download menu.
Or:
Select Command ⇒ Turbo Download ⇒ Load ISP File or the Turbo Load icon
from the ISP Daisy Chain Download menu. The Open .ISP File dialog box
appears. Choose a .isp file. Click OK.
2. Select Command ⇒ Turbo Download ⇒ Verify or the Turbo Verify icon from
the ISP Daisy Chain Download menu (Figure 3-18).
Figure 3-18. Command ⇒ Turbo Download ⇒ Verify Menu Item
3. Check the Messages window. It should list each device by index number, type,
and state that the configuration setup check passed.
ISP Daisy Chain Download Reference Manual
46
Daisy Chain Downloading
Loading a User Electronic Signature
The JEDEC file contains User Electronic Signature (UES) data that you can edit or
read in from the board. Set a signature using hexadecimal or ASCII formats.
✍ NOTE
The transmission checksum is recalculated each time the UES
is modified.
Editing a UES
To edit a signature using hexadecimal characters:
1. Select Command ⇒ Edit File UES ⇒ HEX or the write UES icon from the ISP
Daisy Chain Download menu to edit a UES (Figure 3-19). The icon defaults to
hexadecimal format. You may also select the ASCII option. The Open .JED File
dialog box appears (Figure 3-20).
Figure 3-19. Command ⇒ Edit File UES ⇒ HEX Menu Option
ISP Daisy Chain Download Reference Manual
47
Daisy Chain Downloading
Figure 3-20. Open .JED File Dialog Box
2. Select a .jed file. Click OK. The UES dialog box appears (Figure 3-21).
Figure 3-21. JEDEC File with UES Dialog Box
3. Type in the signature using only hexadecimal characters (0-9 and A-F). The Digit
edit position field helps you while you are typing in the signature. Click UPDATE.
The UES Write Successful dialog box appears (Figure 3-22) telling you the
signature was saved in the .jed file. Remember, the signature is only embedded
on the device after you perform a download.
If you select the Close button before you press UPDATE, the dialog box closes
and the new signature is not saved to the .jed file.
Figure 3-22. UES Write Successful Dialog Box
ISP Daisy Chain Download Reference Manual
48
Daisy Chain Downloading
Editing a UES in ASCII format works exactly the same way, only you input any
printable character – except the control characters. The default ASCII signature for a
file is ..................... (the dot character).
Scanning the Board for the UES
To read the signature from the chip:
1. Select Command ⇒ Display Board UES ⇒ HEX or the read UES icon from the
ISP Daisy Chain Download menu (Figure 3-23). This function performs a scan for
the UES on the board. The icon defaults to hexadecimal format. You may also
select the ASCII option. The Display Board UES dialog box appears
(Figure 3-24).
Figure 3-23. Command ⇒ Display Board UES ⇒ HEX Menu Option
If your board has a mixed chain, the Command ⇒ Display ispJTAG UES of Mixed
Chain menu option is available to display the UES of the JTAG chain. You may select
either ASCII or HEX format.
ISP Daisy Chain Download Reference Manual
49
Daisy Chain Downloading
Figure 3-24. Display Board UES Dialog Box
You cannot edit the signatures on the devices with this box. This command only
allows you to view the signature that you already downloaded onto the devices. If
you have not downloaded a personal signature onto your devices, the default data
will appear in the signature field.
The Close button terminates the Display Board UES dialog box and function.
✍
NOTE
The default signature for low-density devices is 0. The default
signature for high-density devices is F in hexadecimal format.
2. Check the Messages window to confirm the scan function of the devices was
successful.
Displaying a UES in ASCII format works exactly the same way, except that you see
the signature in ASCII characters.
ISP Daisy Chain Download Reference Manual
50
Daisy Chain Downloading
Using ATE Vectors
You can use automatic test equipment (ATE) to program and verify ISP devices,
instead of using stand-alone device programmers. Since you can customize your ISP
device configurations specifically for board-level testing, you can enhance the
testability of your product. Any ATE programming solution requires a JEDEC file, and
a method to translate the JEDEC file into signals on the ISP interface driven by the
ATE. The following two methods are available for performing this translation:
■
■
Create test vectors to program the devices using a translation tool from Lattice
Semiconductor
Write an ATE program language
This section discusses how to use test vectors. For complete information on how to
configure the ATE with Lattice Semiconductor software and devices, see “ATE
Programming of Devices” in the Lattice Semiconductor ISP Manual. Table 3-3 shows
the current LSC-supported testers.
✍ NOTE
You must have an ISP bit stream file to create ATE vectors.
Table 3-3. LSC-Supported Testers
Company
Model
Hewlett Packard
All testers including:
Models 3060, 3065, 3070, 3073
GenRad
GR228X/e Series
Teradyne
Z1800 Series & Z8000 Series–Vector
Processor Option must be installed
ISP Daisy Chain Download Reference Manual
51
Daisy Chain Downloading
To generate ATE vectors:
Select Command ⇒ Generate ATE Vectors or the ATE icon from the ISP Daisy
Chain Download menu bar (Figure 3-25). The ATE Vector File Options dialog box
appears (Figure 3-26).
Figure 3-25. Command ⇒ Generate ATE Vectors Menu Item
Figure 3-26. ATE Vector File Options Dialog Box
ISP Daisy Chain Download Reference Manual
52
Daisy Chain Downloading
The following information explains each menu option:
■
■
■
■
■
■
■
■
■
■
Tester Type – Includes the Lattice Semiconductor supported and compatible
testers currently available.
Short Pulse – For temporary test programming, the Short Pulse option cuts
programming time. It is not guaranteed for permanent download to your device.
Maximum Vector/File – Includes the maximum number of vectors allowed in each
vector file. This data can be obtained from the ATE vendor. A default setting of 0
builds one ispVECTOR file.
Output File Base – Includes the file name base (six characters or less) that will be
appended incrementally by the ATE generation process. For example, if you enter
“vec” as the base name and 128 files are created, the file names will appear as
vec0, vec1, vec2, etc. The dot extension depends on the ATE vendor.
Header File Name – Includes the file name (if the file is located in your current
directory) or full path (if the file is located in another directory) for the header data
that you type in any text editor file. The header data can include the author name,
the type of configuration setup that this header will appear with, pin definitions,
signal names, timing information, etc. The ispDCD software will affix this header
data to the head of each ATE vector file it generates.
Split File without Initialization – Allows the vector files to be split according to size
to save vector size. Pull down resistors on ispEN, MODE and SCLK are
mandatory to use this option.
Disable Post Bulk Erase Verify – Determines if the post bulk erase verify vectors
will be generated in each vector file. By checking this box, fewer vectors are
generated and the file sizes are smaller. However, post bulk erase verify vectors
help to confirm that the device is erased properly.
Source File – Includes the ISP bit stream file name you will use to create the ATE
vector files. This file must be an ISP bit stream file. If you are unsure of the file
name, click Browse for a selection. The file name must be eight characters or
fewer, otherwise it is truncated.
Cycle Time – Includes the cycle time data if you are using a Hewlett Packard 3065
tester. Waits are implemented in repeat loops. The number of times a vector is
repeated in the loop is determined by the vector cycle time. ispDCD will calculate
the correct number of times to go through the loop; however, it is critical that you
specify the correct cycle time in your header file. The ATE generation process
does not read the header to determine timing delays. Specify the cycle time in
microseconds. Filling in this field is optional.
GenRad Config File – Includes the file name that is inserted after the header file
for GenRad testers. Filling in this field is optional.
ISP Daisy Chain Download Reference Manual
53
Daisy Chain Downloading
The following steps provide an example of how to fill out the ATE Vector File Options
Dialog box.
1. Select the tester type with the Tester Type pull-down menu. This field must be set
according to the ATE you are using. Select ispVECTOR.
2. Type in a .isp file name in the Source File field or click Browse. The Open .ISP
File dialog box appears (Figure 3-17). Once you select a file, the path appears in
the Source File field. Type ate2.isp
3. Enter a number in the Maximum Vectors/File field. Obtain a valid number range
from the ATE specifications for whichever tester type you are using. For the
example leave this at the default value of 0.
4. Enter a file base name in the Output File Base field. Type vec.
5. Enter a name in the Header File Name field. Type head (Figure 3-27).
Figure 3-27. Filling in the ATE Vector File Options Dialog Box
6. Click the check box to disable the post bulk erase verify feature.
7. Click the check box to disable the split file feature.
8. Click OK. Check the Messages window for a successful notice and to determine
how many files were generated.
▲
CAUTION
Do not use the Short Pulse option when programming the final
pattern into your devices.
You can open and edit the vector files using any text editor. The vector files now
include markers that delineate the beginning of each device and the end of the chain.
These help to isolate pins for troubleshooting. The dot extensions for vector files are
determined by which type of ATE you used.
ISP Daisy Chain Download Reference Manual
54
Daisy Chain Downloading
Simulating ATE Functions
Using your PC, you can simulate ATE tester functions. By simulating the test vector
files, you insure that the test vector files will program correctly. Using a parallel port,
the simulation downloads the vectors from the ispVECTOR files to your devices.
The following items are the ATE Download Simulation options:
■
■
■
■
Type of ATE File – Includes the type of ATE vector file you will simulate. Lattice
Semiconductor supports the ispVECTOR file type as well as several third-party
testers. The ispVECTOR files have a .tst extension.
Find Time Only – Calculates the time that the dowloading process will take. When
this option is used, full simulation will not take place.
Base File Name of ATE File – Includes the base file name of the vector files you
want to simulate. Enter a name that is six characters or fewer. The ispDCD
software assumes your vector file is located in your current working directory.
Type in the same base file name that you used in the Output File Base field (vec).
Number of Files – Includes the number of files into which the ispVECTOR file was
split. The number of files is determined during the Command ⇒ Generate ATE
function. Check the Messages window for the number of files. There is no
limitation to the number of files.
To simulate ATE vectors:
1. Select Command ⇒ Simulate ATE Testing or the ATE SIM icon from the ISP
Daisy Chain Download menu. The ATE Download Simulation dialog box appears
(Figure 3-28).
Figure 3-28. ATE Download Simulation Dialog Box
2.
3.
4.
5.
6.
Select a file type from the Type of ATE File drop box.
Click to disable the Find Time Only option.
Enter the base file name in the Base File Name of ATE File field.
Specify the number of files in the Number of Files field. There is no limit.
Click OK. Check the Messages window for a successful notice.
ISP Daisy Chain Download Reference Manual
55
Daisy Chain Downloading
Saving a New Download Configuration
Once you set all the parameters for the configuration, save it.
To save a new download configuration:
1. Select File ⇒ Save As or click the Save icon from the ISP Daisy Chain Download
menu (Figure 3-29). The standard Save As dialog box appears.
2. Type in the name of your design file in the File Name field. It must have a .dld
extension. If you enter more than eight characters, the file name is truncated. The
full name of a file is not recognized against the truncated file name so the
truncated file name overwrites itself each time you perform a save.
3. Choose the directory and file type.
4. Click OK. The name.dld appears in the main ISP window.
If the file name already exists, a warning box to overwrite the file appears. Click
Yes to overwrite the existing file. Click No to return to the Save As dialog box and
save the file with a new name.
Click Cancel to close the Save As dialog box. The configuration setup is not
saved.
Figure 3-29. File ⇒ Save As Menu Option
ISP Daisy Chain Download Reference Manual
56
Daisy Chain Downloading
Opening a Configuration
To open a configuration:
1. Select File ⇒ Open or click the Open icon in the ispDCD menu. The standard
Open dialog box appears.
2. Click OK to execute or Cancel to close the dialog box.
Detecting a Configuration
If you want the software to identify all the devices available for programming,
regardless of how you have them ported or mounted, use the Configuration ⇒ Scan
Board command. This command detects all the available ISP devices and lists their
order and device type. Once the ispDCD software identifies this information,
complete the process by filling in the .jed file names and choosing the Operation for
each device, exactly like the new configuration procedure beginning on page 28.
To identify the ispLSI devices in an ISP chain or ispJTAG chain automatically:
Select Configuration ⇒ Scan Board or click the Scan icon from the ISP Daisy
Chain Download menu (Figure 3-30). If you connected more than 64 devices to the
board, an alert appears in the Messages window. The ispDCD software can only
detect and read up to 64 devices per file. Otherwise, the Scan Board Configuration
Setup window appears with the Index and Device fields filled.
Figure 3-30. Configuration ⇒ Scan Board Menu Option
ISP Daisy Chain Download Reference Manual
57
Daisy Chain Downloading
To automatically identify a ispJTAG chain with ispLSI devices and non-LSC JTAG
devices:
The procedure is exactly the same as if the chain contains only ispLSI devices.
However, if the non-LSC JTAG devices contain a non-JTAG compliant capture-IR
pattern, the scan will fail. Follow the procedures for creating a new configuration
beginning on page 29.
Detecting a Mixed Chain
If you want the software to scan a mixed chain configuration setup, use the
Configuration ⇒ Scan Mixed Chain command. This command scans the ISP chain
and the JTAG chain, and displays both chains in the configuration menu with a mixed
chain marker between them. Once the ispDCD software identifies this information,
complete the process by filling in the .jed file names and choosing the operation for
each ISP-programmable device.
To automatically identify the ISP devices:
1. Select Configuration ⇒ Scan Mixed Chain (Figure 3-31). The ispDCD software
detects the presence of JTAG devices and the Scan Board Configuration Setup
window appears (Figure 3-31). A mixed chain marker in the list separates the
ISP-programmable devices from JTAG devices.
Figure 3-31. Configuration ⇒ Scan Mixed Chain Menu Option
ISP Daisy Chain Download Reference Manual
58
Daisy Chain Downloading
Figure 3-32. Scan Board Configuration With a Mixed Chain
2. Enter the File name or select Browse to find a file for the JEDEC files. Make sure
your choices are highlighted and choose OK. The Browse dialog box closes and
the .jed file name you chose appears in the Scan Board Configuration Setup
dialog box for that device. The mixed chain marker and JTAG device will not have
File or Operation options.
3. Select the Operation for the devices. The Operation options are defined starting
on page 31.
ISP Daisy Chain Download Reference Manual
59
Daisy Chain Downloading
Changing the Port
When you launch the ispDCD software with the cables properly connected, it
identifies the first port it detects. This menu allows you to change the port setup to
accommodate your porting needs.
To change the port setup:
1. Select Configuration ⇒ Port Assignment from the ispDCD menu. The Port
Assignment dialog box appears (Figure 3-33).
Figure 3-33. Port Assignment Dialog Box
2. Use the pull-down arrow to select a port. Make sure your choice is highlighted. It
appears in the top of the box.
3. Click OK to execute your changes or Cancel to close the box with no changes.
If the cable is not connected or cannot be detected, an error message displays in
the Messages window (Figure 3-34).
Figure 3-34. No Cable Connected Error Message
ISP Daisy Chain Download Reference Manual
60
Daisy Chain Downloading
If the cable is connected properly, but the power is not on, a message is displayed
(Figure 3-35).
Figure 3-35. No Power Error Message
Exiting the Program
To quit the ISP Daisy Chain Download software:
1. Select File ⇒ Exit from the ISP Daisy Chain Download menu (Figure 3-36). The
Save Configuration Setup dialog box appears (Figure 3-37), if you have not saved
this file.
2. Click Yes to save the changes and exit the ISP Daisy Chain Download program.
Click No to exit without saving the changes. If you created a new configuration
and did not name it, the standard Save As dialog box appears. Fill in the fields and
click OK to save the new configuration and exit the ISP Daisy Chain Download
software.
Figure 3-36. File ⇒ Exit Menu Option
ISP Daisy Chain Download Reference Manual
61
Daisy Chain Downloading
Figure 3-37. Save Configuration Setup Dialog Box
ISP Daisy Chain Download Reference Manual
62
Index
A
Instruction Bits 35
JTAG 36
JTAG Device 34
Operation 31, 34, 36
Status 31, 35, 37
Configuration, mixed chain setup
Index Number 36
Configuring
Mixed chain 36
Customer Hotline 14
Adapters
socket 25
ASCII
characters allowed 49
UES displaying 50
UES editing 49
B
Bit stream
building 41
Board
socket adapter 25
Browse 34
Build
ISP bit stream 41
turbo download 46
D
C
CHAIN-M
Configuration Setup 34, 36
Changing the port setup 60
Check Configuration Setup
Command menu option 28
Checksum for download 31, 34, 36
Command menu option
Check Configuration Setup 28
Display Board UES 28
Display ispJTAG UES of Mixed Chain 28
Edit File UES 28
Generate ATE Vectors 28
Run Operation 28
Simulate ATE Testing 28
Turbo Download 28
Command, Run Operation 40
Comment Box 31
Configuration menu option
Port Assignment 28
Scan Board 28
Scan Mixed Chain 28
Configuration Setup
CHAIN-M 34, 36
Device 31, 34, 36
File 31, 34, 36
Index Number 31, 34
Detecting a configuration
scanning 57, 58
scanning a mixed chain 58
Device
Configuration Setup 34, 36
Configuration setup 31
security feature 21
Device programming 40
Display Board UES
Command menu option 28
Display ispJTAG UES of Mixed Chain
Command menu option 28
Downld.log
report file 40
Download
Checksum 31, 34, 36
Erase 31, 34, 36
exiting 61
JTAG No Op 37
JTAG Program & Verify 36
JTAG Verify 37
No Operation 31, 34, 36
Program & Verify 31, 34, 36
Read & Save 31, 34, 36
turbo 41
Verify 31, 34, 36
Download operation 40
Downloading programmers 26
Downloading, turbo 41
E
Edit File UES
Command menu option 28
ISP Daisy Chain Download Reference Manual
63
Index
Editing
UES in ASCII 49
UES in hex 47
Equipment
download 26
Erase for download 31, 34, 36
Exit
File menu option 28
Exiting download application 61
F
File
Configuration Setup 34, 36
Configuration setup 31
report
downld.log 40
File menu option
Exit 28
New 28
Open 28
Save 28
Save As 28
G
Generate ATE Vectors
Command menu option 28
H
Hardware requirements 10
Help 14
Hexadecimal
characters allowed 48
UES displaying 49
UES editing 47, 48
Hotline 14
I
Index Number
Configuration Setup 34
Configuration setup 31
Configuration, mixed chain setup 36
Instruction Bits
Configuration setup 35
ISP bit stream
build 41
loading 44
Program & Verify 42
saving 42
verify 46
ISP chain configuration, creating 29
isp Engineering Kit Model 100 24
ispJTAG chain configuration, creating 29
ispJTAG chain, configuring 33
ispLSI and ispJTAG chain
configuring 36
ispLSI and non-LSC devices, configuring 33
J
JTAG
Configuration setup 36
JTAG Device
Configuration setup 34
JTAG No Operation 37
JTAG Verify 37
K
Kit
isp Engineering, Model 100 24
L
Log file, downld.log 40
M
Messages window 22
Mixed chain configuring 36
Model 100, isp Engineering Kit 24
N
New
File menu option 28
New configuration, creating 29
No Operation 36
O
Open
File menu option 28
Opening
a .dld file 57
Operation
Configuration Setup 34, 36
Configuration setup 31
Operation option
Checksum 31, 34, 36
Erase 31, 34, 36
JTAG No Op 37
JTAG Program and Verify 36
JTAG Verify 37
No Operation 31, 34, 36
Program and Verify 31, 34, 36
Read & Save 31, 34, 36
Verify 36
P
Perform download 40
ISP Daisy Chain Download Reference Manual
64
Index
Port Assignment
Configuration menu option 28, 60
Programmer adapters 25
Programmers, LSC-qualified 26
Programming
In-System 27
R
Report file
downld.log 40
Requirements
system hardware/software 10
Run Operation
Command menu option 28
Run Turbo Download 42
S
Save
File menu option 28
Save As
File menu option 28
Saving a configuration 56
Scan Board
Configuration menu option 28
Scan Mixed Chain
Configuration menu option 28
Security feature
device 21
Service
Hotline 14
software update 14
Signature
user electronic in ASCII 50
user electronic in hexadecimal 49
Simulate ATE Testing
Command menu option 28
Socket adapters 25
Software, updates 14
Status
Configuration Setup 37
Configuration setup 31, 35
System
hardware/software requirements 10
Save ISP File 42
Turbo Downloading 41
Turbo Save 42
U
UES
ASCII characters allowed 49
displaying in ASCII 50
displaying in hexadecimal 49
edit ASCII 49
edit in hexadecimal 48
hexadecimal characters allowed 48
User Electronic Signature Editor 47
V
Verify
Operation 36
Operation option
Verify 31, 34
Verify bit stream 46
T
Technical support 13
Turbo Daisy Chain
Downloading 41
Turbo Download
Command menu option 28
Load ISP File 44
Run 42
ISP Daisy Chain Download Reference Manual
65