1
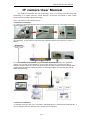
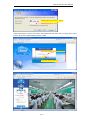
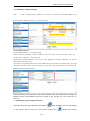
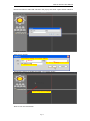
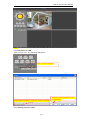
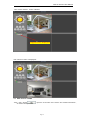
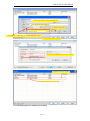
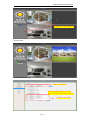
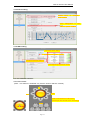
P2P IPCAM User Manual (For Windows OS) P2P IP camera User Manua IP camera User Manual Our products penetrate the P2P technology, such as computer plug and play with networking so it makes Telecom, China Netcom, 3G smooth exchange of visits, which achieve Internet Interworking ideal target. Note: The picture is for reference only. 1.Hardware Installation ●1.1 Open the package and take the ip cam and accessories out, First install the ipcam wireless antenna ●1.2 Fix the ip camera, insert one end of the network cable to the camera tail Ethernet card interface, on the other end of the RJ45 network interface connected to a router or switch.. ●1.3 The software of IP Camera support windows XP/Vista/windows7 etc. operation system, Pls use the power adapter to connect the DC5V port on the back of the ip camera. Plug the other end to an electrical outlet. Check the card's power indicator light (yellow) and the network indicator (green) is working properly, the camera pan and tilt rotate automatically.. 2 .Software Installation ●2.1Please insert CD into your computer's CD-ROM driver, it will operate automatically, if not, pls double click the “autorun.exe” ,the file can be opened. Page 2 P2P IP camera User Manua Mouse over the icon will be prompted Click “search.exe”, Follow the tips , LAN tool is installed into the system and generated on the desktop“IP Camera Search " ●2.2 Search the device and login The LAN run search tools "IP Camera Search", the program will find the network cameras and displays the search to the IP address, port number, the name. If WIFI wireless connected, it will display the IP address of the wireless. As shown, 1.Check the DHCP to obtain an IP 2.Manually rewrite the IP parameters Port name To select Basic information can change the parameters, click Set to save the changes ●and enter the IP address directly open the login authentication page (for example, enter: http://192.168.1.122: 81 )to open the login screen as shown below shown, Page 3 P2P IP camera User Manua default login user name:admin Default password :none ●After entering the correct user name and password and click "OK" to open the monitor screen click on the appropriate browser model. 2.First need to install special Activx control 3.Click 1 Select the operating language Page 4 P2P IP camera User Manua ●2.3 Wireless network settings Tick in the " wireless LAN " behind . You want to connect to and select SSID , the input selection SSID password , as shown below: 2 . Selected list router 1. Click the Search button 3 . Enter the wireless network password ●2.4 DDNS settings ipcam(DDNS built-in)no need settings Select service providers: Please select a server of the service provider, such as : dyndns.org、3322.org、365home.org Application domain address: Fill in the user application domain address, as shown below:(Demo.dyndns.org) User name and password: fill in the the DDNS account number and password, if you use the ipcam domain name, you can find the username and password in the camera tab: DDNS account and password. Extranet landing camera simply in the browser address bar and transportation equipment DDNS domain name address plus port number of the camera you can access the IP camera ! 3. Installation plug-and-play software● Install the plug and play software DeviceClient ,After installed, the icon will display on the screen, click to open it to view. Click ”Devices list” Page 5 ,Double-click search P2P IP camera User Manua camera ID Online to add LAN camera in the pop-up box click "Open search interface 3.1 Add cameras ·Enter an ID number The factory default user name :admin The factory default password: blank 1 . Fill device ID number ·Dragged the device to display box after you type the ID ect. 2.Please drag cam into Display ·Now we can see it as below. Page 6 P2P IP camera User Manua Note: The camera can be in the LAN or WAN, but it must be connected to the Internet ! 3.2 Add camera in LAN ·Click "Device List " , the following dialog box : Click on the list of devices External network equipment Click LAN equipment Click to open the search interface 3.2.1 Adding camera in LAN Page 7 the Add button P2P IP camera User Manua · Double-click the camera ID search to add LANcamera after click "Open search interface 2 .Double-click the camera IP 1. Click search Free device naming The default user 3. Click OK 3.2.2 LAN equipment successfully added To add LAN equipment successfully close the window Page 8 P2P IP camera User Manua ·Turn off the window , return interface Dragged into the display box The monitor screen is displayed : 3.3 Add camera in WAN ·Click " Add " button as shown below process : , input the ID number of the device and related information , Page 9 P2P IP camera User Manua 2. Enter the device name (optional fill ) 3. Enter the user name 6. Complete click OK 4. Fill in the device ID number 5. Equipment selection of 3000.000pixels JPEG 1. Click on the list of devices Device select H264 million pixel stream 6. Finally, close the window Add a good remote device table 3.3.1 Remotely device is added successfully Page 10 P2P IP camera User Manua Dragged into the display box View all video : 3.3.2 MaillBox settings Send emaill address Send emaill Box is SMTP User name Send emaill password is SMTP password Recipient emaill adress Page 11 P2P IP camera User Manua 3.3.3 Alarm setting Smailler values of sensitivity more sensitive Check settings,alam to send maill to a specific maillBox 3.3.4 WIFI setting 2 Click the search button 1.check local area wireless network 4.Enter the wireless password 3.Corresponding to choice of routers 3.4 The interface function 3.4.1 PTZ control ( Note : This feature is available only with the head of effective models ) Up Right Left Click on the direction of the arrow , Camera pan and tilt will move accordingly Down centered Page 12 P2P IP camera User Manua Description (from left to right) : 1. Up and down cruise 2. right and left cruise 3. Left reversed 4. Upside down 5. Alarm switch is closed 6. Alarm switch opens 3.4.2 Video control Function Description: 1. On / Off monitor voice 2. On / Off intercom 3. Video 4. photo 5. Close the video window 6. Multi-device Centralized monitoring Click screen button to select the picture displayed on the same screen Page 13