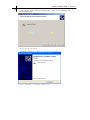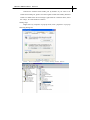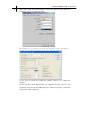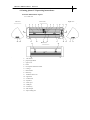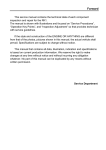
1
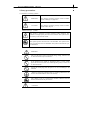
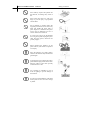
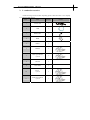
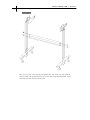
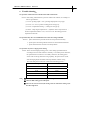
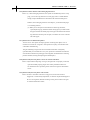
PCUT CS SERIES USER’S
MANUAL
1
Remarks
1. When using COM port to output, set the baud rate of
the software to 38.4K, or 38400.
2. When you are using NODE 1501 CS630 model with Flexi Starter8.6,
please select "CS630G" in Flexi software,not "CS630".
Note: if settings are not correct, the machine will not work.
PCUT CS SERIES USER’S
2
MANUAL
Table of Contents
Remarks ……………………………………………………………....................................1
Table of contents……………………………………………………...................................2
1. Safety precautions ………………………………………………....................................3
2. Standard accessories………………………………………………..................................5
3. Installation…………………………………………………………………………….....7
3.1 Installation and connection……………………………………......................................7
3.2 Install cutting tool…………………………………………………...............................8
3.3 USB interface setup……………………………………………....................................9
4.
Operating instructions………………………………………......................................13
4.1 Name and functions of parts ………………………………..........................…............13
4.2 Basic Operation………………………………………………….................……..........14
4.3 Operation instruction………………………………………… ............................…......17
4.4 Detail Operation………………………………………………...................……….......18
4.5 Drag knife off-setting …………………………………….…………......................…..21
4.6 Technical Features………………………………………………………………….......22
5. Trouble shooting ……………………………………………………….........................23
6. Cutting pressure Speed Units…………………………………………......................... 27
PCUT CS SERIES USER’S
MANUAL
3
1.Satety precautions
1.1 Definition of warning symbols
WARNING
Any improper operation possibly results in hazard
of life or damage of equipment..
CAUTION
Any improper operation possibly results in hazard
of life or other objects.
Definition of sign
symbols
The symbol is prepared to arouse operator’s highly attention. The
symbols in triangle specify the cases to be attentive. The symbol in the
left warns you of electronic shock.
The symbol specifies the activities to be forbidden. The symbol in the
circle specifies the acts to be forbidden. The symbol in the left tells you
no detachment.
WARNING
Don’t use the power source not meeting rating voltage, otherwise fire
or electronic shock may be resulted in.
If the machine gives smoke or unpleasing smell, or noise sounds
please do not use it in such case, continuing using it may result in fire
or electronic shock
Do not put out the plug when the power is on to avoid damage to the
machine.
Make sure electrical grounding when it is working. Otherwise it will
electric shock and machine can’t work normally.
Don’t detach, repair or reconstruct the machine, otherwise fire and
electric, hazard of life may be result in.
CAUTION
CREACUT SERIES USER’S
MANUAL
Safety precautions
4
Don’t leak any liquid or drop metal into
the machine, such things may result in
fire.
Don’t touch the knife top with your
finger to prevent injury or perspiration
of knife head.
Do not damage or random replace the
supplied power cable, do not excessively
bend, pull, bundle the power cable or
place weight on it. Otherwise the power
source may be damaged even fire or
electric shock is thus incurred.
If you are not going to use the machine
for a long time, please unplug the power
cable from the replace, otherwise fire
possibly happen.
When operating the machine, do not
place either of your hands on capstan to
avoid injury.
Place the machine on a stable surface,
otherwise the machine may fall therefore
get damaged.
To unplug the power cable from replace,
please hold the plug instead of the cable.
Strongly pulling of the cable possibly
result in electric or fire.
Any operating is forbidden in case of
storm or lighting to prevent damage of
the machine.
In order to avoid the damage of the main
board, please do not move the carriage
by hand!
-
PCUT CS SERIES USER’S
MANUAL
5
2. S tandard accessories
Check following accessories after unpacking, please contact the seller or our company
if you find anything missing.
Item:
Parts
Quantity
1
Power card
1
2
USB
1
3
Blade hoder
1
4
Blade
3
5
Basket
1
6
Manual
1
7
Flexi sign software
(optional)
1
8
SD card
1
9
Card-reader
1
10
11
Artcut
(optional)
PLTD raw software
(optional)
1
1
Picture
CREACUT SERIES USER’S
MANUAL
6
12. Leg frame
Take out every party of the stand from the packing box, turn on the party bag, install the
stand according to the illustrational showing. Lay the cutter on the stand after install, aim at
and install spiral shell, then lock with the screw.
CREACUT SERIES USER’S
MANUAL
7
3.Installation
3.1 Installation and connections
WARNING
Make sure machine is grounded, otherwise electric shock or
mechanic default is possibly resulted in.
Don’t use the power source not meeting rating voltage using the
wrong power source may result in fire or electric shock.
Don’t pull out the plug when the
power is on to avoid damage to the
machine.
Place the machine on a stable
surface, otherwise the machine
may fall therefore get damaged.
3.1.1 Place the cutter in a plane and roomy place
3.1.2 Connect signal cable to usb port of the computer host.
3.1.3 Place the bracket behind the host, ensure it is parallel to the host.
3.1.4
Check power and voltage, whether it is grounded, do not connect to
power until all are in a good condition
CREACUT SERIES USER’S
MANUAL
8
3.2 Installation cutting tool
CAUTION
Don’t touch the knife top with your
finger prevent injury.
3.2.1
Fit cutter into rotary tool, the knife are as shown in following drawings:
(front view)
(disassembly view)
Knife adjusting screw
3.2.2
media.
knife
knife sheath
Adjustment the protruding length of the knife top as required for specific cutting
Correct
3.2.3
knife handle
too long
protruding
length of knife
(1)Loosen the screw Of tool carrier
(2)Assembly the tool with knife into the tool carrier
(3)When the tool is in appropriate position, screw
it and fix the screw.
too short
protruding
length of knife
CREACUT SERIES USER’S
MANUAL
9
3.3 USB interface setup
3.3.1 Insert the drive CD into the computer, find and open the folder which the
drive in , double click the
display as follows:
file, the computer will
After the driver installation, Windows shut automatically.
3.3.2. Connect the plotter to the computer with USB cable , then start the plotter,
computer will show the following dialog box:
3.3.3. From the new hardware installation wizard, select "Install from a list or specific
location" then click "Next"
CREACUT SERIES USER’S
10
MANUAL
3.3.4. Choose “Install software automatically”, click “next”, computer will
show the following:
Driver being installed,
After the driver installation, computers will show the following dialog box:
Click “finish”, withdraw dialog box.
CREACUT SERIES USER’S
MANUAL
11
USB driver installed with COM3 port by default .If you want to set
COM1 and COM2 port, please close the original COM1 and COM2, (Selected
COM1 or COM2 in the device manager ,right-click for a shortcut menu, select
the "stop"), to avoid hardware conflicts.
Setting steps:
Right click "my computer" to pop-up menu, click " properties " to pop-up
following dialog box:
Click "device manager" to
popup dialog boxes below:
CREACUT SERIES USER’S
12
MANUAL
Right-click “USB Serial Port(COM3)”, and on the shortcut menu, click the"
properties ",will show following dialog
The parameters is consistent with the diagram, click “Advanced”,
in the popup window parameter are set same as diagram.
If you want to change the COM Port number, choose it in "COM Port
Number.”
In each operation of the thermal dial, it is suggested choosing "don't use this
equipment (stop)"first in the USB port usage in the device manager , enable this
setting when using equipment.
CREACUT SERIES USER’S
MANUAL
4 .Cutting plotter CS Operating instructions:
13
4.1 name and function of parts
4.1.1 front view
Left view
Front view
Back view
1、 left cabinet
2、 paperweight wheel
3、 upper cover
4、 beam
5、 tooth profile transmission belt
6、 Carriage
7、 Knife holder
8、 Knife clip
9、 Holder fixture screw
10、right shell
11、LCD Screen
12、keyboard
13、serials port
14、USB port
15、control key
16、SD card port
17、Paper cutting slot
18、Paper going bearing Right view
19、Slider
20、Back(main board, power
supply inside)
21、Glide
22、power switch
23、power socket
24、Handle of paperweight
wheel
CREACUT SERIES USER’S
MANUAL
14
4.1.3
Control panel
1、knife raising button
2、knife drop button
3、paper withdrawal button.
4、host reset
5、leftward button
6、paper feeding button
7、value+
8、systemic parameter setting
button
9、pause
10、value11、enter button
12、exit
13、rightward button
14、online/offline button
4.2
Basic operating
CAUTION
When switching on the
Power, make sure your hands and other
articles are out Of reach of such running
parts as main shaft and slider to prevent
injury
4.2.1
turn on machine
4.2.1.1 Check whether the power is in OFF position
4.2.1.2 Plug the cable the receptacle of the host power source, press the power on/off
on the left.
CREACUT SERIES USER’S
MANUAL
15
4.2.1.3
LCD in the control panel is ON and displays the initializing process of the
host and shows following information:
Creation
CS - 630
Initializing
VER : 2 . 01
....
Creation
ONline
4.2.1.4
4.2.2
When the initializing is over, the machine is in online state and connectable
with the computer to be operable.
Install the cutting media
This machine is suitable not only for single-sheet media, but also a roll of media.
4.2.2.1 Press down the handle of paperweight wheel behind the machine to raise the
paperweight wheel.
4.2.2.2
Insert the media into the space between paperweight wheel and main shaft,
and pull out the media to appropriate length from the front of the host.
Using roll of media
Pulling it out to required length
Using single sheet of media
Cutting required length from paper roll
CREACUT SERIES USER’S
MANUAL
16
4.2.2.3 Adjust horizontal position of paperweight
wheel according to width of paper. a distance
of minimum 1-10CM is set between paperweight wheel and paper edge to ensure good
running of paper。
4.2.2.4 Raise two handles of paperweight wheel, to
make paperweight wheel down to press paper。
4.2.3 Trial run (adjusting knife press and tool)
CAUTION
Do not touch the knife top with your finger to
prevent injury.
Quality of knife immediately relates to cutting precision and life of machine. To
better your work, please use the standard knives we confirm, but not those with poor
quality.
4.2.3.1
Press
ON LINE
button to make the machine in off-line state.
Creation
X = 0000
Y = 0000
4.2.3.2
4.2.3.3
While in off-line state, press PAUSE twice, the machine will automatically
cut a small square from the media.
Take off the square, if you fail, the square need to be further cut, because the
press is low or the protruding length of knife top is too short; If the base paper
is pierced through, it signifies that the protruding length of knife top is too
long and the press is too big. Adjust the protruding length of knife top and
knife press according to result of trial run and the description of tool
installation.
4.2.3.4
Under off-line state, press
continuously, When the LCD showed
Creation
Set Parameters ?
Esc or Enter
,Press
,then press
,LCD
Creation
Force = 123
+ OR -
showed
Press
“+”or“-”
to adjust the knife pressure。for common
materials the knife press value ranges from 100 to 255 (Please refer to the table knife
pressure control).
CREACUT SERIES USER’S
4.3
MANUAL
17
Operating instructions
4.3.1
On-line / off-line
When the cutter starts reset, it becomes in online state. Press ON LINE to
switch between online and off-line state. When computer transmits information to the
cutting plotter, the cutting plotter must be in online state. However, when setting
parameters for the machine or operating it by hand, you should set it in off-line state.
The LCD will display the following information:
Creation
OnLine
Online state
Creation
X = 0000
Y = 0000
4.3.2
Offline state
Moving knife top
While off-line, press“
When pressing “
” buttons to move the slider leftward or rightward。
” buttons the main shaft will rotate forward or backward, and the
step value of “ X, Y” in the LCD will change accordingly:
Creation
X = 365
Y = 150
4.3.3 Setting origin of plotting
When move the knife top to the starting position, press the origin setting button“ ”,
the values of“X, Y” will be set as 0 , the setting of new origin is completed. The machine
will start plotting from the new origin.
Creation
X = 365
Y = 150
Press“
”.The values of“x,y”axis will be
Creation
X = 0000
Y = 0000
Relational map between absolute origin and arbitrary
relative origin.
CREACUT SERIES USER’S
MANUAL
18
4.3.4
Raising knife, dropping knife
While in off-line state, press DN button, the knife will fall, then press UP button to
raise the knife
4.4 Detailed operation
(When the LCD show“?”or“yes=enter no=esc”, you can press ENTER in order
to start the operation, or
press ESC to quit.)
4.4.1:Save and copy of 2D image
1.1:Do a 2D image in the drawing software
1.2:Saved as .PLT.(NOTE:System can only recognize the file format .PLT)
1.3:Copy the .PLT to the SD card, don’t put in a file folder.
1.4:Input the SD card to the reader area.
4.4.2:Perform the image in the SD card while offline:
Creation
X = 0000
Y = 0000
、press
For example, When the LCD show:
、LCD
Creation
Execute File ?
Esc or Enter
will
show :
、 press
be
in
next
menu 、
Creation
Inde : 1
Name : 11
Size : 34
(“Inde” stand for the serial no of the files, “Name” stand for
the name of the file, “Size” stand for the size of the file)、press
press ESC to quit.
If there are many files in the SD card, when LCD
to perform current files,
Creation
Inde : 1
Name : 11
Size : 34
,press“+”or“-”to choose other files.
show:
4.4.3:Set and save the parameters。
Creation
X = 0000
Y = 0000
When LCD show:
、continuously press
、when
Creation
Set Parameters ?
Esc or Enter
show:
、press
to be next menu、for example LCD
CREACUT SERIES USER’S
MANUAL
19
Creation
Speed = 200
+ OR -
、it shows current cutting and moving
will show:
to save the speed parameter, Use
speed、press“+”or“-”to adjust the speed、press
high speed to cut big character and image, low speed to cut fine and small character and
image. When high speed, there maybe serrated lines, it is not problem, lower the speed, it
will disappear.
Creation
Force = 123
+ OR -
Press
、When LCD show:
、it is current knife
pressure、press“+”or“-”to adjust knife pressure、press
to save the knife pressure.
4.4.4:Additional function
Creation
X = 0000
Y = 0000
When LCD show :
、 Press
、 LCD show :
Creation
Other Function ?
Esc or Enter
、 press
to be in the menu 、 LCD show :
Creation
Set Def . Params ?
Esc or Enter
、(initialize the parameter)press
parameter to the value of the factory.
to initialize the
Creation
Auto Working ?
Esc or Enter
Press
、When LCD show:
press
to start auto-check.
、(machine auto-check)
Creation
Install USB ?
Esc or Enter
、When LCD show:
Press
confirm.
、Input USB,press
to
Creation
Y Cut Length:
12365463
、When LCD show:
press
the machine cutted.
、It stand for the total length
CREACUT SERIES USER’S
MANUAL
20
4.4.5. How to set the distance from the pen to the red eye:
When the LCD display
Creation
X = 0000
Y = 0000
, then press the”func botton”
Creation
Set Parameters ?
Esc or Enter
continuously, until the LCD display
,press the”enter” botton, the
Creation
Speed = 200
+ OR -
LCD display
LCD display
,then press the”func botton” continuously until the
, Take a clean paper,and fix it with the roller, make a clear
black dots on the paper by the pen on the carriage, then move the red dot to the center of the
black point by the four arrow keys. Save the distance from the pen to the red dot by pressing
the
enter
button.
the
Creation
X = 0000
Y = 0000
display
method
of
testing
the
setting
accuracy:
when
LCD
, push down the pen to make a black dots, and then
press”enter”keys, the red eye will automatically move to the center of the black dots, If it is
out of focus, please re-set it using the above method.
4.4.6.How to use the red eye:
Red eye will be on when the blade go down,and be off when blade go up. It will be
always on when cutter is working ,will be off when cutter finish the work.
If you need to exchange the location of the red dot and the blade, only in the serial port you
can use the red eye’s position function only in the serial port. Press the “Clear button” in the
middle
displays
of
the
direction
keys
when
cutter
is
in
work
state.the
, then press ”enter” button, the carrige will
move to the red dot position, you can exit by pressing "ESC" key.
LCD
will
automatically
CREACUT SERIES USER’S
MANUAL
21
4.5 Drag knife off- setting:
If the cutting is not closed , please use the off setting function in the software(please refer to
the software manual for more details)
Figure below:
No off set
with off- set
If the right angel is not cut correctly, please use Angle sharp compensation function in the
software. (The compensation value should be set according to the actual error)
the knife
Correct
no
(Please select high precision output
enough
over
when use the compensation function)
CREACUT SERIES USER’S
MANUAL
22
4.6 Technical features
Model
Bracket and paper
feeding mode
Main board
Control panel
Driver
orientation
NODE 1501 CS630
NODE 1501 CS1200
M bracket or Stand(optional)
Stand
32-bit ARM7 CPU , I Mb , High-speed CACHE memory
Over-head,2x8LiquidCrysaal Display,14-button touch thin-film keyboard
High torque motor ,PWM ,micro-step driver
Delimitation system ,random origin setup ,10 group origin in memory
Maximum paper Feed
width
730mm
1300mm
Maximum cutting width
635mm
1205mm
Maximum cutting speed
500mm/s
Maximum cutting length
20000mm
Maximum cutting thickness
1mm
Knife pressure
50-600g(digital adjustment)
Mechanism precision
0.05mm
Repeatable precision
<+-0.1mm
Type of tool
Tungsten knife
Type of plot pen
All types Diameter 11.4mm plotter pen
Plotting instruction
Compatible DM/PL,HP/GL
Interface USB
USB/COM/SD Card
Power source
AC110V /240V±10%,50Hz
Power consumption
Operating environment
External size
Transporting weight
<100W
<120W
Temperature:+5°-+35°, humidity 30%-70%
1045*330*440mm
1593*330*440mm
18Kg
33Kg
CREACUT SERIES USER’S
MANUAL
23
5.
Trouble shooting:
5.1 Question: will the characters smaller than 1CM be deformed?
Answer: when cutting small characters, please set offset in the software, for example, in”
Artcut” sign software:
(1). Click“plotting output”once, a plotting output picture will pop up。
(2). Click“set”once, a picture of setting plotter will pop up。
(3). Click“compensation setting”, a dialog box will pop up。
(4). Select“sharp-angle compensation”, adjust the value to required level。。
For the compensation within 0.1-0.7, we set it to 0.25. The cutting speed are
required lower than 20.
5.2 Question: Why there is an additional stroke when the cutting is finished.
Answer: 1. please check if the tip of blade can be moved up and down flexibly.
2. please replace the cutting software if there are some abnormal characters.
3. please check if the files need to be cut has problems
5.3 Question: why there is zigzag in the cutting.
Answer: PCUT motor has high speed big power, so the cutting speed should be set
according to the size of the character. Generally, to cut small precise characters ,
the speed shall not exceed 40. to cut ordinary characters, the cutting speed
50-60 is OK. If cut big characters in large quantity, the speed can be 70,180,
while the zigzag maybe inevitable as the step distance of motor is long.
The relationship between the size of characters and cutting speed is :
Size of the figure(mm)
SPEED
<10
10-20
10-30
30
30-50
40-50
50-500
60
>500
400-500
Note: ① 25mm letter can only be used 300-speed cutting.
② reflective film cutting speed <300 speed.
③ when use the Artcut software,the closing value for 5mm letter:closing1.1,set
the offset angle 0.45.
CREACUT SERIES USER’S
24
MANUAL
5.4 Question: why the paper deviate when it run in high speed.
Answer: the bracket that supply the paper shall be completely parallel to paper roller.
in order to avoid the resistance come from the big roll of materials, please loosen
the paper firstly before the cutting is conducted. . For the machines with four
paperweight wheels, if the cutter are cutting big characters to-and-fro , please
just put down the two side paper roller.
Unequal abrasion of the roller may cause the paper drift. Please change the roller
if the abrasion is serious.
5.5 Question: why does lock up happens in the cutting output?
Answer:(1). If the input voltage is too low (150V), the plotter will restart and lock up.
(2). If the pressure jamming is too high, lock up may happen,
please use
regulated power source。
5.6 Question: Why does user feel tingle when touch the machine?
Answer: Maybe the power supply are not grounded, make sure central line of the
power source are grounded。
5.7 Question: why there will be sharp-angle raised from the artwork ?
Answer: (1). The blade go out from the holder too long, please adjust the blade head
To the required length.
(2). If the blade is abraded, replace it please。
5.8 Question: why does the plotter cut a line firstly when it do the cutting?
Answer: if the last cutting order is stopped incorrectly, it will not be cleared from the
cutter memory, the cutting order are still in the machine. Resolution turn off
the machine and start it again.
5.9 Question: No LCD display or a black squares displayed?
Answer: (1).if LCD no display, check whether the power supply work well。
(2). If there is black square on the LCD, please check the power supply, If the
power supply work well please contact service center.
5.10 Question: why some of the cutting can not close?
Answer: because the blade is eccentric knife with heliocentric. Resolution,
set“closing compensation”in the software. For example: in Artcut:
(1). Click“plotting output”once, a plotting output picture will pop up。
(2). Click“set”once, a picture of setting plotter will pop up。
CREACUT SERIES USER’S
MANUAL
25
(3). Click“compensation setting” a dialog box will pop up。
(4). Select closing compensation, adjust the value to required level,
generally the value is set to be 0.5。5.11
5.11.Question: Why some part of characters is missed in the cutting?
Answer:(1). Check if the presses value of the machine is correct or not.
(2). Reinstall the software。
(3). Check the head of the blade.
(4). If the problem is still not resolved, please contact service center。
5.12 Question: why the machine always in low-speed ?
Answer: Because paper sensor failed to detect the front of the paper. Make sure the
paper sensor was covered by the front of the paper then test the it again.
5.13 Question: why cutting depth dose not equal?
Answer: in order to protect the blade, the PCUT blade cushion is made of soft PVC.
Afer long period using, there will be a scratch on the cushion, which make the
cushion not smooth, please replace the cushion, if the abrasion of the cushion is
not serious, add the blade pressure to (120-150) as per the instruction in 3.2.2,
this will help to resolve the problem temporarily
5.14 Question: why the cutter stop working during the cutting?
Answer:(1). Check whether the plotter is properly connected with computer. PCUT is
connected with COM1 or COM2 of computer; check whether the set ports
are conformed to those connected。
(2). Check whether the plotter is in online state, namely whether the LCD
displays“ON LINE”。
(3). Check whether the encryption card of software is properly. If not please
turn off the power and reinstall it. Check driving program of the plotter
is for PCUT series。
5.15 Question: why can not the instant-glue be taken off?
Answer: (1). Perform trial run prior output, adjust press to appropriate level.
(2). Check whether the knife is used too long, or whether the knife top is
broken. For new ones the nick is thin in the instant-glue, while for old
ones the nick is thick and impressive. To resolve it replace it with a new
knife。
CREACUT SERIES USER’S
MANUAL
26
5.16 Question: what is attentive when cutting big characters?
Answer: (1). When cutting big characters, the system can automatically How to setup
page, you can cut a big character in several pages, but it is notable that the
setting of output width shall be conformed to the width of instant-glue in
addition, when cutting big characters and output it, you should widen pages
or set seaming distance。
(2). When you use the special wide machine to cut the big characters,
especiallythe long big characters Before cutting input, you shall instead
the paper firstlook careful the paper if the paper deviates then deviate the
big characters intosome pouts to input, it can make sure it won’t deviate
and waste paper。
5.17 Question: how to maintain the plotter?
Answer: PCUT series plotter all employ upscale oil bearing from Japan, no oil is
needed even it works for a long time. After operation everyday, clean the dust with
soft brush.Troubleshooting .
The glue remaining in engine base can be cleaned with alcohol. If frequently
operatedin dusty environment above two years, please have maintenance technicians
clean the dust in machine. If plotting precision degrades, the maintenance of running
partsare desirable (firming and replacing the abraded parts)。
5.18 Question: Why does the plotter is out of our control sometimes?
Answer: maybe while transporting or using it, the signal line is improperly connected,
open the machine properly plug all lines. If the problem still fails to be
solved after the above operation, please contact local agent or maintenance
center。
5.19 Question: Why does the plotter come to halt?
Answer: because it encounters vibrate for a long period, or has been used for a
longperiod, or is affected by temperature, so dielectric displacement happen to
he servo driving board, therefore resulting in halt, please contact local agent
or customer maintenance center。
CREACUT SERIES USER’S
MANUAL
27
6.Cutting pressure Speed Units
Cutting pressure is displayed on the machine with unit of gram(g)
Speed is displayed with unit of millimeter/second (mm/s)
Ver1.1