1
Owner's Manual
Manual Del Propietario
Vacuum Cleaner
Aspiradora
116.28614
116.28615
Model, Modelo
IMPORTANT
Before returning this productFor replacement parts, please contact:
Sears Parts and Repair Center
(1=800-488=1222)
Anytime, day or night
(U.S.A.. only)
For any other is.sue,please contact:
Vacuum Cleaner Help Line
(1-877-531-7321)
8:00am-5:00pm EST, M_F
(USoA, and Canada)
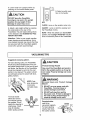
CAUTION:
Read and follow all
safety and operating
instructions before first
use of this producL
Sears, Roebuck
www.sears.com
and Co., Hoffman
CUIDADO:
Lea y siga todas tas
instrucciones de operaci6n
y seguridad antes del uso de
este product&
Estates,
Part No. C01ZDHFOOU00-KC01ZDHFZOU0
HewA
IL 60179 U.S.A.
Printed in Mexico
Impreso en M6xico
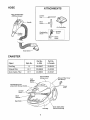
Canister
Before Using '(our New
Vacuum Cleaner
...................
2
Packing List ........................
Kenmore Vacuum Cleaner Warranty
2
.... 3
Important
Safety Instructions
............
Parts and Features
.....................
4
5-6
Assembly
Instructions
...............
Pet PowerMate ® Storage .................
7-8
8
Operating
Instructions
.................
How to Start .............................
Care
..........................
PowerMate e Care .....................
15
15
t6
16
17
Belt Changing and Agitator Cleaning ,, 17-18
Light Bulb Changing ..................
18
Agitator Servicing ...................
19
9
9
Vacuuming Tips ......................
Attachments ..............................
Attachment Use Table ..................
10
11
I2
Troubleshooting
.......................
Master Protection Agreements
Notes .....................................
Suggested Pile Height Settings ........
Performance Features .................
How Your Vacuum Cleaner Works .........
I3
13
14
Requesting
Or Service
Please read this guide, It will help you assemble
cleaner in the safest and most effective way.
15
Bag Changing ........................
Cleaning Exterior and Attachments
.....
Motor Safety Filter Changing ..........
Exhaust Filter Changing ..................
Assistance
.....................
........
20
21
22
Back Cover
and operate your new Kenmore vacuum
For more information about vacuum cleaner care and operation, call your nearest Sears store_
You will need the complete model and serial numbers when requesting information. Your vacuum cleaner's model and serial numbers are located on the Model and Serial Number Plate°
Use the space below to record the model number and serial number of your new Kenmore
vacuum cleaner,
Model No.
Serial No..
Date of Purchase
Keep this book and your sales check (receipt) in a safe place for future reference.
PACKING LIST
'four KENMORE
nents assembled
VACUUM
CLEANER
separately
is packaged
with the following
parts and compo-
in the carton:
I
Canister
Vacuum
1
1
1
1
Power-Mate ®
Hose Assembly
Floor Brush*
Crevice Tool*
Cleaner
1
Combination
1
1
1
1
Telescoping Wand
Pet Power-Mate ®
Owner's Manual
Parts List
Each of the above assemblies are shown in detail inside
*These items are found under the Tool Cover,
Brush*
the repair parts list.
One"fear Limited Warranty
When assembled,operatedand maintainedaccordingto all instructionssuppliedwith
the product,if this vacuumcleanerfails dueto a defectin materialor workmanshipwithin
oneyearfrom the date of purchase,returnit to anySearsstore,SearsParts& Repair
Centeror other Kenmoreoutletforfree repair,
if this vacuumcleaneris usedfor otherthan privatefamilypurposes,this warranty
appliesforonly 90 daysfromthe date of purchase.
This warranty
covers only defects
in material
and workmanship.
pay for:
1_ Expendable items that can wear out from normal
filters, belts, light bulbs, and bags.
2.
A service technician
maintenance.
to instruct
the user in correct
3. A service technician to clean or maintain this
4. Damage to or failure of this product if it is not
according to all instructions supplied with the
5.. Damage to or failure of this product resulting
6.
7.
other than its intended purpose.
Damage to or failure of this product
use, including
product
Sears
will NOT
but not limited to
assembly,
operation
or
product.
assembled, operated or maintained
producL
from accident, abuse, misuse or use for
caused by the use of detergents,
cleaners,
chemicals or utensils other than those recommended
in all instructions supplied with
the product.
Damage to or failure of parts or systems resulting from unauthorized
modifications
made to this product.
Disclaimer
of implied
warranties;
limitation
of remedies
Customer's
sole and exclusive remedy under this limited warranty shall be product repair
as provided herein.. Implied warranties, including warranties of merchantability
or fitness
for a particular purpose, are limited to one year or the shortest period allowed by law.
Sears shall not be liable for incidental or consequential
damages_ Some states and
provinces do not allow the exclusion or limitation of incidental or consequential
damages,
or limitations on the duration of implied warranties of merchantability
or fitness, so these
exclusions
or limitations
This warranty
Canada.
applies
may not apply to you.
only while this vacuum
This warranty gives you specific
vary from state to state.
cleaner
is used in the United States and
legal rights, and you may also have other rights which
Sears, Roebuck and Co°, Hoffman Estates, IL 60179
Sears Canada Inc., Toronto, Ontario, Canada MSB 2B8
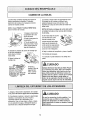
Read all instructions in this manual before assembling or using your vacuum cleaner,
WARNI
G
Your safety is important
to us. To reduce the risk of fire, electrical
shock,
injury to persons
or damage when usin 9 your vacuum cleaner, follow basic
safe_y precautions
including
the following:
Use your vacuum cleaner only as
described in this manual° Use only with
Sears recommended attachments,.
Use extra care when cleaning on stairs. Do
not put on chairs, tables, etc. Keep on
floor.
Disconnect electrical supply before
servicing or cleaning out brush area.
Failure to do so could result in electrical
shock or brush suddenly starting_
Do not leave vacuum cleaner when
plugged ino Unplug from outlet when not in
use and before servicing
Do not use vacuum cleaner to pick up
flammable or combustible liquids (gasoline,
cleaning fluids, perfumes, etco), or use in
areas where they may be present. The
fumes from these substances can create a
fire hazard or explosion.
Do not pick up anything that is burning or
smoking, such as cigarettes, matches, or
hot ashes°
To reduce the risk of electrical shock - Do
not use outdoors or on wet surfaces.
Do not use vacuum cleaner without dust
bag andlor fillers in place,,
Do not alfow to be used as a toy Close
attention is necessary when used by or
near children,
Always change the dust bag after
vacuuming carpet cleaners or freshener,
powders and fine dust. These products clog
the bag, reduce airflow and can cause the
bag to bursL Failure to change bag could
cause permanent damage to the vacuum
cleaner_
Do not use with damaged cord or plug. If
vacuum cleaner is not working as it should,
has been dropped, damaged, left outdoors,
or dropped into water, return it to a Sears
Service Center
Do not pull or carry by cord, use cord as a
handle, close door on cord, or pull cord
around sharp edges or corners. Do not run
vacuum cleaner over cord. Keep cord away
from heated surfaces.
Do not use the vacuum cleaner to pick up
sharp hard objects, small toys, pins, paper
clips, etc. They may damage the vacuum
cleaner or dust bag.
Do not operate vacuum cleaner without the
exhaust filter or exhaust filter door in place
(If applicable)_
The hose contains electrical wires Do not
use when damaged, cut, or punctured_
Replace if cut or worn. Do not pick up
sharp objects.
Do not unplug by puliing on cord. To
unplug, grasp the plug, not the cord.
Do not handle plug or vacuum cleaner with
wet hands.
Do not put any objects into openings,
Do not use with any opening blocked; keep
free of dust, lint, hair and anything that may
reduce airflow
Always turn off and unplug the vacuum
cleaner before connecting or disconnecting
either hose, HandFMate Jr,® (if applicable),
or nozzle
Keep hair, loose clothing, fingers, and all
parts of body away from openings and
moving parts_
Hold plug when rewinding onto cord reelo
Do not allow plug to whip when rewinding
You are responsible for making sure that
your vacuum cleaner is not used by anyone
unable to operate it properly.
Turn off all controls before unplugging.
SAVE TH
E iNSTRUCTiONS
Proper assembly and safe use of your vacuum cleaner are your responsibilities.
Your vacuum cleaner is intended for Household
use. Read this Owner's Manual
carefully for important
use and safety information.
This guide contains safety
statements under warning and caution symbols°
4
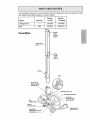
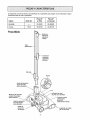
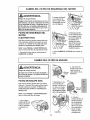
it is importantto knowyourvacuumcleaner'spartsandfeaturesto ensureits properandsafe
userReviewthesebeforeusingyourvacuumcleaner,
Object
HeadlightBulb
Belt
StyleNo.
PartNo.
in USA
PartNo.
in Canada
....
CB*3
20-5240
20-5218
20-40600
20-40118
Handle
Quick
Release
Button
PowerMate
Telescoping
Wand
Wand
Length
Adjust
Button
Flange
Belt
Wand Quick
Release Pedal
(Not Shown)
and Lens
Pile Height Indicator
Protector/Belt
Reset Button
Pile
Height
Handle
Release Pedal
Cleaner
(Not Shown)
PowerMate
Model/Serial Number
(On Bottom)
5
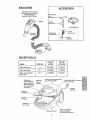
HOSE
ATTACHMENTS
3-Way OnlOff Switch
(OfflFIoorlCarpet)
Crevice
Tool _.
Handle
Floor
Brush
Pet Po _werMate
I
t
'1
Combination
Brush
_
Dusting
Brush
_,
I
€
|
I
f
_
t
Fabric
Brush
Hose Swivel
CANISTER
Part No.
Part No.
Style No.
in USA
in Canada
Q
20-50557
20-50410
Exhaust Filter
EF-1
20-86889
20-40324
Motor Safety Filter
CF-I
20-86883
20-40321
Object
Dust Bag
Cord
Pet PowerMate
Storage cover
Exhaust
Filter Cover
(Not Shown)
_
Cord
\
Motor Safety Filter
Dust Bag
(Behind Dust Bag)
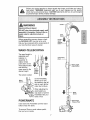
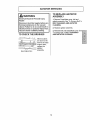
Please pay special attention to these hazard alert boxes, and follow any instructions given. WARNING statements alert you to such dangers as fire, electric
shock, burns and personal injury, CAUTION statements alert you to such dangers
as personal injury and/or property damage.
WARNING
Electrical
Shock
Hazard
DO NOT plug into electrical supply until
assembly is complete.
Failure to do so
could result in electrical shock or
injury.
Before assembling vacuum cleaner, check
the PACKING LIST. Use this list to verify
that you have received all the components of
your new Kenmore vacuum cleaner.
i_?&
Lock
Button
Handle
Quick
Release
Button
-o
_jl
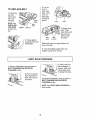
WAND-TELESCOPING
The wand length is
requires no
assembly. To
adjustable
and
adjust, simply
push down on the
Telescoping
Wand
__2
wand,
ju,
and slide the bo.oo
upper wand to the
desired height
Wand
'_J"*'-Keep
Hand
-- Wand Length
"1 Adjust Buiton
Above
This
Tab
Length
Adjust
Button
u
m
The swivel, located
Wand
on the PowerMate,
allows you to turn
the handle to the left
side to reach farther
under low furniture.
When adjusting the
wand length you
may have to hold the
PowerMate with your
hand or foot,
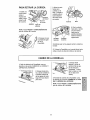
POVVERMATE
insert wand into PowerMate until the wand
button snaps into peace.
To remove: Step on wand release pedal,
then pull up on wands..
N
U
=_---__
Wand
Button
Release
}uick
Pedal
__
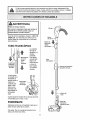
CANISTER
1, Open the canister hood,,
2. Check to see that the dust bag is property installed. See BAG CHANGING for
instructions.,
3. Check to see that the motor safety filter is
properly installed, See MOTOR SAFETY
FILTER CHANGING for instructions.,
HOOD AND TOOL
STORAGE COVER
HOSE
1. Line up the hose
latch tab and notch
in canister hood
and insert hose
into canister until it
snaps in place.
To remove: Lift
hose latch tab
Hose
Latch
Tab
Notch
upward and pull up
on hose_
It is normal for the canister hood and tool
storage cover to come off when opened further than needed. Line up the hinge slots,
insert the hinges into the slots, and close
the hood and tool storage cover to reinstaE
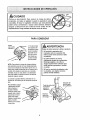
CAUTION
Never open canister hood with the tool
storage cover open. This will help to
prevent damage from occurring
to the
canister
hood and/or tool storage cover.
Handle
2. Insert handle
into wand until
lock button
snaps in place
Be sure hose
is not twisted.
Lock
Button
To remove:
Press handle
Handle
Quick
quick release
button and pull
up on handle_
To store:
Disconnect
hose from wands and
canister to prevent stress on hose during
storage° Store hose in a loosely coiled
position so the hose covering is not
stressed.
This canister is equipped with an on-board
storage area for a Pet PowerMate
attachment.
To Install:
Open the Pet PowerMate storage cover.
Insert the Pet PowerMate, press down into
place, and close the lid securely.
To Remove:
Open the storage cover. Remove Pet
PowerMate from the storage area and use
as needed (see ATTACHMENTS
and
ATTACHMENT USE TABLE)°
Pet PowerMate
Storage
/
Cover
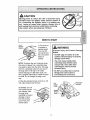
CAUTION
Moving partsl To reduce the risk of personal
injury,
DO NOT touch the agitator
when vacuum
cleaner is
on. Contacting
the agitator
while it is rotating
can
cut,
bruise or cause other injuries.
Always
turn of
and 1Jnplug from electrical
outlet before servicing.
Use caution when operating
near children.
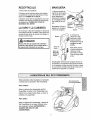
HOW TO START
Cord
Rewind
Button _
1, Pull cord out
WARNING
_
desired length_
The cord will
not rewind until
of canister
the
cord rewind
to
button is
pushed,
NOTE: To reduce the risk of electric shock,
this vacuum cleaner has a polarized plug;
one blade is wider than the other, This plug
will fit in a polarized outlet only one way, If
the plug does not fit fully in the outlet,
reverse the plug if it still does not fit, contact a qualified electrician to install the proper outleL Do not change the plug in any
way,
Personal
Hazard
Injury
and Product
• DO NOT plug in if switch is in ON
position. Personal injury or property
damage could result.
• The cord moves rapidly when
rewinding. Keep children away
and provide a clear path when
rewinding the cord to prevent
personal injury.
• DO NOT use outlets above counters.
Damage from cord to items in
surrounding area could occur.
2. Plug the polarized power cord into a 120
Volt outlet located near the floor,
__
Height
To rewind:
Turn off
the plug while
rewinding to prevent
damage or injury
from the moving
cord. Push cord
rewind button.
_
Pedal -__
Handle(_,.
and unplug the vacuum cleaner. Hold
Rpeeled_se._
_
-,_
Damage
U[_
"_U
I {'TK"'
ile Height
Indicator
3. Lower wand from upright position by
]ressing on the handle release pedal°
5. Select a switch position on the handle.
CAUTnON
ARPET
DO NOT leave the PowerMate
running in one spot in the upright
position for any length of time.
Damage to carpet may occur.
u
::
OFF
FLOOR - turns on the canister motor onlyo
++.++_+.
+++_++.++o+++++
CARPET - turns on both the canister and
the PowerMate motors+
4, Select a pile height setting by pressing
the small pedal on the rear of the
PowerMate+ The pile height setting shows
on the indicator+ See SUGGESTED PILE
HEIGHT SETTINGS.
NOTE -When
this switch is in the FLOOR
position, the headlight DOES NOT function
since no electricity flows to the PowerMate+
Attention:
Refer to your carpet manufacturers cleaning recommendations+ Some
more delicate carpets may require that they
be vacuumed with the PowerMate agitator
turned off to prevent carpet damage+
I
VACUUMING TIPS
Suggested
sweeping
pattern.
CAUTION
For best cleaning action, the PowerMate
should be pushed straight away from you
and pulled straight back. At the end of each
pull stroke, the direction of the PowerMate
should be changed to point into the next
section to be cleaned. This pattern should
be continued across the carpet with slow,
gliding motions°
Product
Damage Hazard
Use care if the PowerMate
and wand is
left in the upright position as it may tip
over easily. Property damage can occur
if tipped.
WARNING
NOTE: Fast,
jerky strokes do
not provide
complete cleaning.
Personal
Hazard
Injury
and Product
Damage
=
• DO NOT run over power cord with
PowerMate.
Personal injury or
product damage could result.
DO NOT pull plug from wall by
the power cord. If there is damage to
the cord or plug, personal injury or
property damage could result.
The hose swivel
allows the hose to
turn without moving
the canister. This is
Carpeted stairs
need to be
helpful for cleaning in
small areas. Check
hose for twisting
before pulling canister.
vacuumed regularly+
For best cleaning
results, fully close
the suction control.
10
Suction
The stair grip located
on the caster will aid
WARNING
Personal
Injury
in preventing the
canister from
Hazard
slipping when used
on stairs (see
PERFORMANCE
It may fall, causing personal injury or
Use care if canister is placed on stairs.
propert y damage.
.........
FEATURES),
CAUTION
Product
Damage
NOTE: Be sure the canister is resting
securely on the stairs and the caster is in a
locked position before using_
Hazard
Do not pull on the hose to move the
canister from one stair to the next,
For best cleaning results, keep the
airflow passage open_ Check each
assembly area in HOWYOURVACUUM
CLEANER WORKS occasionally for clogso
Turn off and unplug vacuum cleaner
from outlet before checking_
When finished cleaning in one area
use the handle grip on the canister to
move the vacuum cleaner to a new
location
for further
cleaning.
1
ATTACHMENTS
ATTACHMENTS ON HANDLE
NOTE: If the
PowerMate is
attached, turn
vacuum cleaRer off before
removing handle from
wands.
NOTE:
To assemble
Dusting
Brush
dusting brush
insert the fabric
brush into the
dusting brush
nozzle and press
into place,
Button--_
Lock
Hand/e
Quick
Retease--_
\
Fabric
Brush
1. Press handle quick
release button
To remove,
press latch
and lift out°
and pull up on
handle.
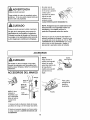
CAUTION
Latch
DO NOT attach or remove handle or
wands while vacuum cleaner is ON,
This could cause sparking
the electrical contacts.
and damage
2. Slide attachments
firmly on handle as
needed. See ATTACHMENT USE TABLE
It
.......................
_:'_._!,
_i_'_;_
_,._._,
....
_
_Z:,_;_;,
_:__'_!i
ATTAC HMENTS ON WAN D
remove
wand from
3. Put attachments on wand
as needed. See
ATTACHMENT
USE TABLE.
lim
1.To
PowerMate,
IJl
lock wand in
straight*up
position,
Wand
, Quick
Release
Pedal
2. Press wand quick
release pedal with foot
and pull the wand
straight up and out of
PowerMate,
ATTACHMENT USE TABLE
CLEANING AREA
Between
ATTACHMENT
Combination
brush
Furniture 1 Cushions 1
brush
Fabric
Dusting I@_
brush
Crevice tool
4
4
4
4
4
Floor brush
_
PowerMate
L:_
Drapes1
Stairs
Bare
Floors
Carpeted
Floors/Rugs
Waits
4
4
4
/
42
i
4
#
........... i ..........
Handi-Mate Jr22
4
4
Pet PowerMate 3,4
4
4
! *LAlways clean attachments before using on fabrics,
2, 3-way OnlOff switch should be in FLOOR position,
3, Some Models; Handi-mate Jr,® and Pet PowerMate attachment
with the products,
4o Pet PowerMate can only be used on the hose handleo
12
instructions are included
J
SUGGESTED PILE HEIGHT SETTINGS
HI - Shag, deep pile, or scatter rugs.
For best deep down cleaning, use the XLO
setting° However, you may need to raise the
height to make some jobs easier, such as
scatter rugs and some deep pile carpets,
and to prevent the vacuum cleaner from
shutting off, Suggested settings are:
MED - Medium to deep pile.
LO - Low to medium pile,
XLO - Most carpets and bare floors.
PERFORMANCE FEATURES
_LJL
_
OVERLOAD PROTECTOR
I
!
I II Uil[!,ll! iii ....
!!,! L_!U _!,,,,,, ,,,
WARNING
The PowerMate has Overload Protector/
built-in protection
Bert Reset Button
against motor and
belt damage should
the agitator jam. If
the agitator slows
down or stops, the
overload protector
shuts off the PowerMate. The canister motor
will continue to run.
Personal Injury Hazard
Always turn off and unplug the
vacuum cleaner before cleaning the
agitator area as agitator may
suddenly restart, Failure to do so
can result in personal injury.
PERFORMANCE INDICATOR
To correct problem: Turn off and unplug
vacuum cleaner, remove obstruction, then
press BELT RESET button° A ball point
pen may be required.
When
the vacuum
cleaner is running
with normal airflow,
the light on the
performance
indicator is off. The
If the problem persists,
have the
vacuum cleaner serviced
by a Sears or
other qualified
service agent.
_.._
/--"
Performance
_'/___tndlcator
_"..._
light comes on
whenever the
airflow becomes blocked. If that occurs,
check the disposable dust bag, motor
safety fi_ter and other possible clog
locations shown in HOW YOUR VACUUM
CLEANER WORKS.
EDGE CLEANER
Active brush edge
cleaners are on both
sides of the
PowerMate. Guide
either side of the
PowerMate along
base-boards or next to
furniture to help
remove dirt trapped at
carpet edges.
To correct problem:
SHOOTING table.
See the TROUBLE-
NOTE: The light may come on when using
certain attachments, due to reduced airflow
through attachment.
13
SUCTION
POWERMATE STORAGE
CONTROL
The suction
control atlows
you to change
the vacuum
suction for
different fabrics
The wand has a "U" shaped
flange that slides into
the "U" shaped slot on
the canister,
"_
suction
Suction
The flange allows the
wands and PowerMate
to be stored with the
canister to conserve
and carpet
weights. Opening the control decreases
suction for draperies and lightweight rugs,
while closing the control increases suction
for upholsteries and carpets.
storage space. The
canister must be
stored on end for this
feature to be used_
THERMALPROTECTOR
To attach the PowerMate, it must be in the
flat position as shown in the illustration. Use
the handle release pedal to place it in this
position.
This vacuum cleaner has a thermal
protector which automatically trips to protect
the vacuum cleaner from overheating° If a
clog prevents the normal flow of air to the
motor, the thermal protector turns the
motor off automatically
This allows the
motor to cool in order to prevent possible
damage to the vacuum cleaner.
The wand will slip out of the slot as it is lifted
up for use and will slide into the slot as it is
lowered for storage.
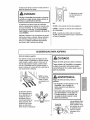
STAIR GRIP
During normal operation while the canister is
in the horizontal position, the caster wheel
rotates freely 360 °
To correct problem: Turn the vacuum
cleaner off and unplug the power cord
from the outlet to allow the vacuum
The Stair Grip
feature allows
the caster
wheel to lock in
cleaner to cool and the thermal protector
to reset. Check for and remove clogs, if
necessary.
Also check and replace any
clogged filters. Wait approximately
thirty (30) minutes and plug the vacuum
cleaner in and turn back on to see if the
motor
protector
position when
the vacuum
cleaner is
rotated 25 °
has reset.
from horizontal into a vertical position in
order for the canister to rest on stairs
HOW YOUR VACUUM CLEANER WORKS
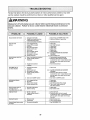
!
The vacuum cleaner creates suction that
picks up dirt° Rapidly moving air carries the
dirt to the dust bag through the airflow passages_ The dust bag lets the air pass
through, while it traps the dirt.
For best cleaning results, keep the airflow passage open Check the starred
areas occasionally for clogs. Turn off
and unplug vacuum cleaner from
outlet before checking.
Motor
Safety
Filter
.
14
\
Exhaust
Filter
BAG CHANGING
7. The red bag mount will flip forward after
removing bag This will prevent the hood
from closing until a new bag is installed.
For best cleaning results, the dust bag
should be changed often° The electronic
performance indicator will come on when
the bag needs to be changed or the airflow
is blocked
NOTE: See PARTS AND FEATURES
Note:
DO NOT bend or crease the middle
of the cardboard when installing
into the bag mount slots,
_r
Bag Number
the bag
8. Rotate red bag
mount down and
install bag into slots
per illustration,
pushing down until
the cardboard tab
1. Turn off and
unplug vacuum
cleaner from walt
outlet°
2. Remove hose
from canister,
locks into position
and the holes align.
Tuck the bag
securely into the bag cavity so that none of it
is able to be pinched by the hood,
3. Pull hood
release out and up,
then lift canister
hood°
9. Close and latch canister hood.
4. Disengage
cardboard tab from
10. Reinstall hose
red bag mount by
pulling away and
lifting up
11. Plug cord into wall outlet,
CAUTION
5. Pull bag out
of the red bag
mount.
MotorY/_/
,ter
I
ii ii ii /ii/i/
NEVER REUSE A DUST BAG. Very fine
materials, such as carpet freshener,
face powder, fine dust, plaster, soot,
new carpet lint, etc. can clog the bag
and cause it to burst before it is full and
6. Check the
motor safety
filter and
Mount
may cause damage to vacuum cleaner
motor. Change bag more often when
vacuuming
these materials.
replace, if
necessary.
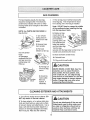
CLEANING EXTERIOR AND ATTACHMENTS
i. Turn off and unplug vacuum cleaner. DO
NOT drip water on vacuum cleaner,
CAUTION
2. To clean exterior, or to reduce static electricity and dust build-up, wipe outer surface
of vacuum cleaner and attachments_ Use a
clean, soft cloth that has been dipped in a
solution of mild liquid detergent and water,
then wrung dry. Wipe dry after cleaning,
Do not use attachments if they are wet.
Attachments
used in dirty areas, such
as under a refrigerator,
should not be
used on other surfaces until they are
washed. They could leave marks.
15
MOTOR SAFETY FILTER CHANGING
]
WARNING
Electrical
Shock Hazard
2, Lift the rubber
Turn off and unplug vacuum cleaner
from electrical outlet, Do not operate
the vacuum cleaner without the motor
retainer and pull out
motor safety filter as
shown.,
safety filter, Be sure the filter is dry and
properly installed to prevent motor
failure and/or electrical shock,
........
,,,,,,,,,,,,,,
,
,
,
,
,
,
3. Replace the filter,
white side out, facing
the dust bag, by sliding
it back into place under
the ribs in the bag
cavity, Tuck filter in so
that it fits completely
under the rubber
retainer.
MOTOR SAFETY FILTER
ELECTROSTATIC
This filter must be replaced when dirty.. It
should be replaced regularly depending on
use conditions.
The filter CANNOT be
washed
ability.
as it will lose its dust trapping
NOTE: See PARTS AND FEATURES
Motor Safety Filter number.
for
4. Replace the bag as outlined in the BAG
CHANGING section°
1. Remove the bag as outlined in the BAG
CHANGING section,,
EXHAUST FILTER CHANGING
........................................
,
,
, ,
,
,
WARNING
Fire and!or
Electrical
2. Pull the exhaust
Shock Hazard
Filter
Do not operate with a clogged exhaust
filter or without the exhaust filter or
exhaust filter cover installed°
EXHAUST
HEPA
cartridge° Place
the new filter into
the canister with
the foam seal
The exhaust filter cartridge must be
replaced when dirty. Replace the filter when
the entire surface area is covered evenly°
The filter CANNOT be washed as it will
Filter
facing towards
the canister,
ability.
NOTE: See PARTS AND FEATURES
Exhaust Flter number,
filter up and out
from the rear of
the canister°
3. Replace the
exhaust filter
FILTER
lose its dust trapping
I
for
4, Replace the
exhaust filter cover
by placing the two
tabs on the filter
cover into the slots
on the canister and
1. Pull out and
up on the
exhaust filter
cover to remove
from the
rotate into place until
it snaps closed,,
canister and lay
aside.
Tabs
16
Alwaysfollowall safetyprecautionswhenperformingmaintenanceto the PowerMate,
WARNING
Electrical
Shock Or Personal
Disconnect
electrical supply
Failure to do so could result
suddenly starting.
Injury
Hazard
before performing
in electrical shock
BELT CHANGING
maintenance
to the vacuum cleaner.
or personal injury from vacuum cleaner
AND AGITATOR CLEANING
TO REMOVE BELT
TO CLEAN AGITATOR:
NOTE:
cy high
vacuum
cleaned
t. Turn PowerMate
upside down.
2. Unscrew the
In order to keep cleaning efficienand to prevent damage to your
cleaner, theagitator
must be
every time the belt is changed.
The agitator must also be cleaned according to the following schedule:
two (2) PowerMate
cover screws.
3. "Parn
Vacuum
Cleaner
HEAVY
-
Use
Clean Agitator
every week
(used daily)
PowerMate right
side up, Press
handle release
MODERATE
pedal and lower
the swivel. Lift
LIGHT -
-
every month
(used 2-3 times/week)
every 2 months
(used 1 timetweek)
Side
Latch
rear latches up.
R ear
Latches
IMPORTANT
Disconnect
vacuum cleaner from
electrical outlet. Check and remove hair,
string and lint build-up frequently in the
PowerMate agitator and end cap areas,
grasp
the sides
and
4o
To remove
cover,
pull out.
Remove any dirt or debris in the belt path
area or in the brush roller area,
Carefully remove any string or debris
located on the agitator or end caps,
5. Lift agitator
assembly out
and remove
worn belt.
AGITATOR
ASSEMBLY
End Cap
/
_ End Cap
6. Check and clean end cap areas. See
AGITATOR ASSEMBLY for picture of
complete agitator assembly.
Brush
17
Unit
End Cap _
3. Line up
front of
cover and
base, Rest
cover on
front edge
of base as
shown.
TO REPLACE BELT
!. install new
belt over
motor drive,
then over
Motor
Drive
belt path°
NOTE: See
PARTS AND
FEATURES
for Belt humhero
Cover
Base
Path
Agitator
End Cap
4, Rotate cover
i {__._
_
Side
Latch
2, Place agitator
assembly back into
PowerMate.
Rear
Latches
back,, Press
cover firmly until
side and rear
latches snap
into place,
Make sure there is no gap between the
cover and base°
5. Turn PowerMate upside down and
replace two (2) cover screws,
I
1
LIGHT BULB CHANGING
--'-'_Push
1. Remove PowerMate cover as shown in
BELT CHANGING AND AGITATOR
CLEANING section,
in
l!
._,/-&,_'_:___
And Turn L-_
3. Push in and turn
replace,
Bulb must
bulb clockwise,
to
15 Watts( 130 Volts)°
not be higher than
2. Push in and turn
bulb counterclockwise, then pull out
to remove,,
4. Reinstall PowerMate cover as shown in
BELT CHANGING AND AGITATOR
CLEANING section,
NOTE: See PARTS AND FEATURES
bulb number,,
18
for
J
AGITATOR SERVICING
TO REPLACE AGITATOR
ASSEMBLY
_WARNING
Electrical Shock Or Personal
Hazard
Injury
1, Remove PowerMate cover, belt and
agitator assembly_ See "To Remove Belt" in
BELT CHANGING AND AGITATOR
CLEANING°
Disconnect electrical supply before performing maintenance to the vacuum
cleaner. Failure to do so could result in
electrical shock or personal injury from
vacuum cleaner suddenly starting°
2. Replace agitator assembly,
3. Reinstall belt and PowerMate
TO CHECK THE BRUSHES
When brushes
support bars,
worn tot he
replace the
level of the base
agitator
£__are
Base
Support
Bars
cover, See
"To replace belt" in BELT CHANGING
AND AGITATOR CLEANING,,
assembly,
19
@
Review this table to find do-it-yourself
solutions for minor performance
service needed, should be performed
by a Sears or other qualified
problems. Any other
service agent.
,AWARNING
Always
vacuum
injury.
turn off and unplug vacuum cleaner before performing
maintenance
to the
cleaner.
Failure to do so could result in electrical
shock or personal
Vacuum cleanerwon't start.
Poor Jobof dirt
pick-up
Vacuum cleanerstarts but
shuts off
1, Unpluggedat wattoutlet.
2. Trippedcircuitbreakertblewnfuse
alhousehold
set;Ice
panel
3, Loosehose electrical connections,
1.
2.
3,
45.,
6,
7.
8,
9.
10.
1, Plug In flrmly_ push ON/OFF switch Io ON
2 Reset circuit breaker or replace fuse
3. Reconnecthose ends,
1,
2
3.
4.
5,
6.
7,
8&B
Change bag
Clear airflowpassages
Change filters
Adjust setting
Adjust conlrol
Replacehose
Change agitator,
See BELTCHANGFNGAND AGITATOR
CLEANING
10. Close and latchhood.
Full or clogged dust beg
Clogged afrifow passages
Dirty fillers
Wrong pits heighl selling
Suctioncontrol
isopen.
Hole inhose
Worn PowerMate agitator
Worn or broken boll
Dirty agftalor or end caps
Canister hood open_
1, Hose or hood electrical connections
2. Tripped overload prolector in
I. Checkcor.'mclions,
moonnedDoseends.
2 Removeany items thatmay be caught
orjammed, then reset, lfvacuum ctoanerstarts
and slopsagain, cleanagilalor andend caps,
thenreset
3, Reset thermalprotector
PowerMale,
3o Trippedthermalproloctor
in canister.
PowerMatewilt not
run when attached,
I_ PowetMate connections
1, Plug in firmly
unplugged
2, Worn or broken belt,
See BELT CHANGING AND AGITATOR
CLEANING
Remove any items that may be caught
or jammed, than reset If vacuum cfeaner starls
and stops again, clean agilator and end caps,
then reset
Dirty agilalor or end cope
4, Tripped overload protector in
PowerMate.,
3.
5. Switch not in CARPETposiflon
5. Move switchtoCARPET posilion
Performanceindicator
activates,
1_
2,
3.
4.,
t,
2,
3,
4,
Vacuum cleaner picksup
moveablerugs .orPowerMals pushestoo herd.
I, Wrongpile height selling
2, Suctiontoo strong,,
1o Adjusl selling,
2. Open suclion contro!,
Light Won'i work'i...........
I, Burnedout lightbulb,
2 Trippedoverloadprotectorin
PowerMale
I, Changeiighi bulb
2. Removeany items thai may be caughl
or Jammed,thenresel If vacuumcleanerslams
andslops again, cleanagitator andendcaps.
thenreseL
Cordwon't rewind,
t. Dirtypower cord.
2. Cordjarnrn.e
d.
Vacuum cleanerleavesmarks
on carpeL
Full or cloggeddusl bag
Dirly fillers
Blockedairflow passage
Certain ettechmanltools
.
I. Wrongvacuumingpattern.
Changebag
Changenllers
Clear blockagefrom attilowpassage
This ts normal Light shouldgo off
when toolts removed.
I. Clean the powercord
2, Pulfoul cordand rewind,
1, SeeVACUUMINGTIPS
2O
Master Protection Agreements
Congratulations oft making a srnartpurchase_ Your new Kenmore® product is designed and manufactured for years of dependable operation_ But like all products, it may require preventive maintenance or repair from time to time° That's when having a Master Protection Agreement can save you
money and aggravation,
The Master Protection Agreement also helps extend the life of your new product_ Here's what the
Agreement* includes:
[]
Parts and labor needed to help keep products operating properly under normal use, not just
defects. Our coverage goes well beyond the product warranty, No deductibles, no functional
failure excluded from coverage-- real protection°
[]
Expert service by a force of more than 10,000 authorized Sears service technicians,
means someone you can trust will be working on your product.
[]
Unlimited
want us.
[]
"No-lemon" guarantee - replacement of your covered product If four or more product failures
occur within twelve months.
[]
Product replacement
[]
Annual Preventive
[]
Fast help by phone - we call it Rapid Resolution - phone support from a Sears representative on all products. Think of us as a "talking owner's manual,"
[]
Power surge protection against electrical damage due to power fluctuations.
[]
$250 Food Loss Protection annually for any food spoilage that is the result of mechanical failure of any covered refrigerator or freezer.
[]
Rental reimbursement
[]
I0% discount off the regular price of any non-covered repair service and related installed
parts,
service calls and nationwide
which
service, as often as you want us, whenever you
if your covered product can't be fixed.
Maintenance Check at your request-
no extra charge,
if repair of your covered product takes longer than promised.
Once you purchase the Agreement, a simple phone call is all that it takes for you to schedute service.You can calf anytime day or night, or schedule a service appointment online.
The Master Protection Agreement is a risk free purchase. If you cancel for any reason during the
product warranty period, we will provide a full refund Or, a prorated refund anytime after the product
warranty period expires. Purchase your Master Protection Agreement todayl
Some limitations and exclusions apply° For prices and additional information in the U,S,A,
call 1.800.827.6655,
* Coverage In Canada varies on some Items. For full details call Sears Canada at 1-800-3616665,
Sears
Installation
Service
For Sears professional irTstallation of home appliances, garage door openers, water heaters, and
other major home items, in the U,S.A_ or Canada call 1-800-4-MY-HOME®.
21
22
Antes de usar su aspiradora nueva ......
Listade embalaje ...................
Garantia de la aspiradora de Kenmore.,
1
1
2
Instrucciones
importantes
seguridad ......................
3
Cuidado det recept_culo
..............
Cambio de la bolsa ................
Limpieza del exterior y de los accesorios ,,, 14
Cambio del filtro de seguridad det motor
, 15
Cambio del filtro de escape ..............
15
de
Piezas y caracteristicas .............
Instrucciones
de
ensamble
.....................
4-5
Cuidado
7
8
8
Sugerencias para aspirar ................
Accesorios .........................
Cuadro de uso de los accesorios .......
9
I0
11
Sugerencias sobre el ajuste de nivel de
pe!o de la affombra ...................
Caracteristicas de rendimiento ..........
12
12
Funcionamiento de su aspiradora ..........
13
de la PowerMate _ ............
Cambio de la correa y limpieza
del agitador ........................
Cambio de la bombitla ......................
Cuidado del agitador .......................
6-7
Almacenaje del Pet PowerMate ® .......
Instrucciones
de operacibn
..............
Para comenzar ......................
14
14
16
16-17
17
18
Reconocimiento de problemas
..........
19
Acuerdos
maestros
de proteccibn
,, 20
Notas ............................
21
Informacion de
asistencia o servicio
......
Cubierta Posterior
Por favor lea esta guia que te ayudara a ensambfary operar su aspiradora nueva de Kenmore en una manera
m&s segura y efectiva.
Para mas informaci6n acerca del cuidado y operaci6n de esla aspirador, flame a su tienda Sears mas cercana
Cuando pregunte por informaci6n usted necesitar_ el numero completo de serie y modelo de la aspiradora que
est& Iocalizado en la placa de los nQmerosde mode!o y serie
Use el espacio de abajo para registrar el numero de modeto y serie para su nueva aspiradora de Kenmore
Numero de Modelo
Numero de Serie
Fecha de Compra
Mantenga este tibro y su recibo en un lugar seguro para futuras referencias,
LISTA DE EMBALAJE
Su ASPIRADOR
KENMORE
se empaca
con las siguientes
piezas y componentes
pot
separado:
1
1
1
1
I
Recept&cuto
Power-Mate ®
Manguera
Cepillo para pisos*
Herramienta
para
hendiduras*
1 Cepillo para combinaci6n*
1 Tubo telesc6pico
t Pet Power-Mate ®
1 Manual del propietario
1 Lista de partes
Cada uno de estos ensambles
es mostrado
reparaciSn,
*Estos articulos
bajo la cubierta
se encuentran
detalladamente
en _a lista de piezas para
de almacenamiento
para accesorios,
Garantia limitada de un aSo
Si esta aspiradorafalla por un defectoen sus materialeso fabricaci6nen el periodode
un aSodesde la fechade compra,cuandose instala,manejay mantienesiguiendo
todas las instruccionesincluidascon el producto,devu@lvala
a cualquiertiendaSears,
SearsParts& RepairCenter(Centrode Reparacionesy PiezasSears)o a otro
distribuidorKenmoreparaquereparenel aparatode formagratuita
Siesta aspiradorase utiliza paraotrosfines que no seauso familiarprivado,esta
garantiaes validasolamentedurante90 dias desde la fechade compra,
Esta garantia
cubre exclusivamente
los defectos
de materiales
y fabricacibn.
Sears NO pagara;
t. Los elementos desechables
que puedan desgastarse
con un uso normal, incluyendo
sin car_cter excluyente, filtros, correas, lamparas y bolsas.
2. Un t@cnico del servicio t@cnico para que enseSe al usuario a instalar, manejar o
3.
4.
mantener correctamente
el producto.
Un t@cnico del servicio t@cnico para limpiar
o mantener
este producto.
5.
DaSos o averia de este producto
siguiendo todas las instrucciones
DaRos o averia de este producto
si no se ha instalado, manejado o mantenido
incluidas con el producto.
originados por accidente, abuso, uso incorrecto
6.
uso del producto para otros fines distintos de los indicados
DaSos o averia de este producto causados por el uso de detergentes,
o
limpiadores,
productos quimicos o utensilios diferentes a los recomendados
en todas las
instrucciones
que se incluyen con el producto.
7o Danos o averia de las piezas o sistemas causados por modificaciones
no
autorizadas
que se hayan hecho a este producto.
Limitaci6n
de responsabilidad
de las garantias implicitas; limitaci6n de remedios
_1 unico y exclusivo remedio del cliente bajo esta garantla limitada sera la reparaci6n del
producto
segun
Io indicado
en este documento.
Las garantias
implicitas,
incluyendo
garantias de comerciabilidad
o idoneidad para un prop6sito especifico, se
aSo o el periodo mas corto permitido por la ley_ Sears no sera responsable
incidentales
ni consecuenciales.
Algunos estados o provincias no permiten
o iimitaci6n de da5os incidentales o consecuenciales,
ni limitaciones
en la
las garantias impticitas de comerciabilidad
o idoneidad,
limitaciones
podrian no aplicar en su caso.
por io que estas exclusiones
Esta garantia
Canada.
se utiliza en Estados
aplica
solamente
cuando
esta aspiradora
Esta garantia te otorga derechos legales especificos,
derechos que varian en funci6n de cada estado.
o
Unidos o
y usted podria tener otros
Sears, Roebuck and Co., Hoffman Estates, IL 60179
Sears Canada Inc.,Toronto,
Ontario, Canada M5B 2B8
las
limitan a un
por dafios
la exclusi6n
duracibn de
Lea las instrucciones
en este manual antes
de armar o usar su aspirador.
ADVERTENCIA
Su seguridad
es muy importante pare nosotros.
Pare reducir el riesgo de incendio,.
cheque el_ctrico,
lesibn corporal
o daEos al utilizar su aspiradora,
actQe de acuerdo
con precauciones
b&sicas de seguridad,
entre elias:
Use su aspiradora Unicamente en la forma
descrita en este manual.. Use Enicamente con
accesorios recomendados per Sears.
Desconecte el cord6n el_ctrico antes de
componer o timpiar el _rea del cepitlo. De Io
contrario, et cepilto podria arrancar de forma
imprevista o podria producirse un cheque
el_ctrico.
Apague todos los controles antes de
desenchufar_
Tonga cuidado especial al utilizar la
aspiradora en escatones_. No la coloque sobre
stiles, mesas, etc_ Mant_ngala en el piso.
No abandone la aspiradora cuando est_
conectada. Descon6ctela cuando no la est_
usando y antes de darle servicio.
No use la aspiradora pare aspirer liquidos
inflamabtes o combustibles (gasolina, ltquidos
para limpieza, perfumes, etc.) ni la use en
lugares donde _stos podrfan ester presentes.
Los vapores de estas sustancias pueden crear
un peligro de incendio o explosi6n.
Pare reducir el riesgo de cheque electrico, no
use su aspiradora al aire libre ni sobre
superficies mojadas.
No levante ninguna cosa que se est_
quemando o emitiendo humo, come
cigarriilos, cerillos o cenizas calientes.
No permita que sea utilizada come juguete,
Se requiere tener mayor cuidado cuando sea
utitizada en la proximidad de ni_os o per
nifios.
No use la aspiradora sin toner instalada la
boise para potvo ylo los filtros.
No use la aspiradora si el cord6n o el enchufe
est&n dafiados. Si la aspiradora no est&
funcionando adecuadamente o si se ha
dejado caer, est_ daSada, se ha dejado
expuesta a la tntemperie o se ha dejado caer
en agua, devu61vala a un Centre de servicio
de Sears.
No jale ni transporte la aspiradora per el
cord6n; no use el cord6n come mango; no
cierre puertas sobre el cord6n; no jale el
cord6n sobre rebordes agudos ni esquinas.
No pase la aspiradora sobre el cord6n°
Mantenga et cord6n alejado de superficies
calientes.
No desconecie la aspiradora tirando del
cord6n el_ctrico Pare desconectarla, jale el
enchufe, no el cord6n..
No toque la aspiradora
manes mojadas.
ni el enchufe con los
No coteque objetos en los abeduras,
No utilice la aspiradora si alguna abertura
est_ bloqueada; mant_ngala libre de polvo,
pelusa, cabellos y cualquiera cosa que podria
disminuir el flujo de aire_
Mantenga el cabello, rope suelta, dodos y
todas las partes del cuerpo alejados de las
aberturas y piezas mec_nicas.
GUARDE
Cambie slernpre la boisa para polvo despu_s
de aspirer limpiadores de aifombras o
desodorantes, taicos y pelves lines+ Estos
productos atascan la botsa, reducen el flujo de
aire y pueden causer que 6sta se rompa_ Si
no cambia la bolsa podrla ocastonar dose
permanente a la aspiradorao
No use la aspiradora para levanlar objetos
agudos, juguetes pequer_os, alfileres,
sujetapapeles, etco Podrlan daSar la
aspiradora o la boise pare polvo,
No epere sin el filtro de escape ni la cubierta
del filtro de escape instalados.
La manguera contiene cables electricos. No
la use cuando est_ daSada, corrode, o
perforada_ Reemplace si est_ cortada o
desgastada.. No levante objetos afilados.
Siempre apagu_ y desconecte la aspiradora
antes de conectar o desconectar la manguera,
Handi-Mate Jr,@ (si aplicable), o la boquilla
Sujete el enchufe con la mane al enrollar el
cord6n et6ctrico, Para desconectada, jale el
enchufe, no el cord6n
_2N
Usted es responsable de asegurar que su
aspiradora no sea utilizada per ninguna
persona que no pueda manejarla
correctamente.
ESTAS INSTRUCCIONES
El armado y use seguro de su aspiradora
son su responsabilidad, Esta aspiradora
ha side
diseSada exclusivamente
pare use dom_stico. La aspiradora deber_ almacenarse
en un lugar
seco yen
el interioro Lea este Manual del pro.p_ietario detenidamente,
pues contiene
informaci6n
!mportante
sobre ' seguridad
y use< Esta guia contiene
informaci6n
sobre
seguriaad de_)ajo ae simooios ae aaver_encia cuidado,
i
i
i
i
i
J
J
i
Hill
illll
i
illlnl
Es importante conocer las piezas y caracteristicas
Examinelas antes de usar su aspiradora,
de su aspiradora para asegurar su uso adecuado y seguro
Pieza NO
Objeto
Pieza No
Estilo Noo
en EUA
en Canada.
.....
20-5240
20-40600
CB-3
20-5218
20-40118
Bombilla
Correa
PowerMate
I
Bot6n de
liberaci6n
r_pida del
mango
n
i
Tubo
telesc6pico
Contro! de
extensi6n
adjustable
de/tubo
Reborde\%_[
Correa
Pedal de fiberaci6n
r_pida det tubo
(No se muestra)_
Luz
Ndmeros de serie del
modelo PowerMate
indicador de nivel
de peto de la affombra
/F_ I_.
/_j_
_
Pedal de selecci6n
de nivel de pelo
de ta alfombra
'_
\\
N I,
rotector contra
sobrecargas
Bot6n de
_'_
restauraci6n "Reset"
Pedal de
liberaci6n
del mango
_
4
"_"_
Limpiador de orillas
(No se muestra)
MANGUERA
ACCESORiOS
lnterruptor de encendido/
apagado de tres posiciones
(Off/Floor/Carpet)
(Apagado/Piso/A/fombra)
Herrarnfenta
3ara
_endiduras-----_
Mango
Cepillo
para pisos
Pet PowerMate
Dispositivo
giratorio de
la manguera
RECEPT, ,CULO
Pieza N°
Pieza No
Estilo No,
en EUA
en Canad_
Bolsa para polvo
Q
20-50557
20-504 I0
Filtro de escape
EF-1
20-86889
20-40324
Filtro de seguridad
del motor
CF-t
20-86883
2040321
Objeto
Cubierta de
almacenamiento
para accesorios
Bot6n de
cordSn
e!_ctrico
Cubierta de almacenamiento
para Pet PowerMate
(Almacenamiento
para accesorios
en dentro)
/
/
Cubierta det filtro de escape
(No es muestra)
Cord6n
el#ctrico
Tapa del
Pestitlo
de la tapa
Sujetador
de la botsa
Bolsa para potvo
5
Filtro de seguridad
del motor (Detrhs
de la bolsa para polvo)
informaci6n
le alertar_
delalenciSn
peligro de
fuego,recuadros
cheques con
el6ctricos,
quemadas
y tesiones Cuidado:
Per favor ponga
especial
a _stos
aferta de
riesgo Advertencia:
Este
Esta informaci6n le alertara de peligros come lesiones y daSosde propiedad.
........................
!
IPeligro de cheque el_ctrico
INo conecte la aspiradora hasta que termine de
larmarla. De Io contrario podria causar un
Manl
Ichoque el6ctrico o lesi6n corporal.
r,
Antes de armar la aspiradora, cheque la LISTA DE
EMBALAJE. Use esta lista para verificar que ha
recibido todas las componentes de su nueva aspiradora Kenmore.
Bot6n
de cierre
Bot6n de _
liberaci6n V
l
TUBe TELESCOPlCO
La extensiOn
ajustable y no
requiere
del tube es
1_.
ase
.
Control de
extensi6n
adjustable
del tube
esta
leng#eta
_p,
'11
Para ajuslar,
empuje hacia
abajo en el
botOndel tube
y mueva el
tube superior
_" i__--r --Control
L
a la posiciOn
deseada.
La parle gimloria, situada en el
PowerMate, le
permite mover el
mango a la
izquierda para
pasar la aspiradora a una
extensiSnm_s
larga debajo de
los muebles
bajos.
V
= ajustable
I oJL----Botdn
U
t.bo
de extensi6n
del tube
del
Cuando ajuste la fongitud de la vara hay que lener
el PowerMatecon la mane o el pie.
POWERMATE
lntroduzca los tubes en la PowerMate hasta que el
botSndel tube quede fijo en posici6nr
Para quitar: Pise en el pedal de liberaciOnde los
tubes y jale estos hacia arriba,
liberaci6n
r_pida del tube
RECEPT, CULO
MANGUERA
1. Abra la tapa dei recept_culo,,
1. Aiinee la pestaSa de
sujeci6n de la manguera
y la ranura de [a cubierta del recept,_culoe
introduzca Famanguera
en el recept&culo hasta
que quede f{ja en posici6n
2. Examine que la bofsa para poIvo este instalada
correctamente Consuite las instrucciones de instalaci6n en la GAMBle DE LA BOLSA.
3. Examine que el fittro de seguridad del motor este
instaladocorrectamenteoConsulte las instrucciones
de instalaciSnen CAMBIO DEL FILTRO DE
SEGURIDAD DEL MOTOR,
LA TAPA Y LA CUBIERTA
Es normal que ta tapa del recept&cutose desprenda
al ser abierta m_s de Io necesario, Para cotocar nuevamente la tapa, alinee fas ranuras de ta bisagra, insertefas y cierre ia tapa.
Para refirar: Levante el
pestillo de la manguera
y tire de la manguera.
de
manguera
Ranura
2. Introduzca el
mango en el tube
hasta que e] bot6n
quede en posiciSn,
Asegi_rese de que la
manguera no est_
torcidao
CUIDADO
Nunca debe abrir la capucha del contenedor
estando la tapa abierta. Asi se evitar_ daSes a
lacaPucha del contenedor y/o a ta tapa.
Pesta_a
sujeciSn
dela
Bot6n
de
BorOn de
liberaci6n
r_pida
de/
Para retirar: Optima
el bot6n de liberaci6n
r_pida dei mango
para iiberar el mango
y tiredel mango hacia
arriba.
Para Guardar: Desconecte la manguera del tube de
la aspiradoray el recept_cuto para prevenir la tensi6n
en la manguera mientras se guarda_Guarde la magua
en una posici6n enroliaday fioja de tal manera que la
cubierta de la manguera no se estres6,
Est& aspiradora esta equipada con almac6n
a bordo para el accesorio Pet PowerMateo
Para instalar:
Abra la cubierta de almacenaje del Pet
PowerMate. Inserte el Pet PowerMate, presi6nelo en su lugar hacia abajo, y cierre la
cubierta con seguridad
Para quitar:
Abra la cubierta de almacenaje. Levante el
Pet PowerMate de su lugar utilice!o come
sea necesario (v_ase ACCESORIOS
y
CUADRO DE use DE LOS
ACCESORtOS).
Almacenamiento
para Pet PowerMate
CUIDADO
IPartes en movimientol
Para reducir el rlesgo de daSos
corporales, no toque el agttador cuando la aspiradora est_
encendida. El tocar el agitador mlentras que est_ glrando
puede cortar, contusionar o causar otras lesiones. Siempre
apague y desconecte
del tomacorrlente
antes de dar
mantenimtento. Tenga cuidado al aspirar cerca de niSos.
PARA COMENZAR
Bot6n
de! cord6n
, ADVERTENCIA
1. Tire del cord6n
para sacarlo del
recept&cufo hasta
tener ta longitud
deseada El cord6n no se enrollar_ hasta que
optima el bol0n
para enroltarto
Peligro de lesi6n personal y daSo al producto
NO enchufe la aspiradora si el
interrupter est,_ en la posici6n ON,
Podria causar ]esi6n personal o daSo
al producto.
El cord6n el_ctrico se mueve
r_pidamente durante el enroilamiento.
Mantenga atejados a los niSos y
asegure espacio libre suficiente para
evitar lesiones personales al enrollar
el cord6n.
NOTA: Para reducir el riesgo de cheque el_clrico,
esta aspiradora cuenta con una clavija polarizada,
uno de los contactos es m_s ancho que el otro+La
clavija s61opuede introducirse de una manera en el
enchufe Si la ciavija no cabe bien en e! enchufe,
invi6rtala.Si aun no cabe, llame a un electricista
para que instate un enchufe correcto. No altere la
clavija de ntngunamanerao
NO use los enchufes Iocalizados sobre
los muebles. Los objetos cercanos
podrian resultar daSados_
2. Conecte el cord6n el0ctrico polarizado en un
enchufede 120 voltios que se encuentre cerca del
piso.
fndicador
Para enmllar: apague
y desconecle la aspiradora Sujete el
enchufe mientras
enrolta el cord6n para
impedir da_,oo lesi6n
corporal per el movimiento del cord6n,
Oprima el control para
bot6n el cord6n
el6ctrico con la mane
o con el pie,
Pedal de selecci6n
de nivel de
pelode la
atfombra_
Pedal de
liberaci6n
det mango-_--_-
8
de
nivel de pele
de la affombra
3. Baje el tube desde la posici6n vertical pisando e]
_edal de liberaci6ndel mango,,
5. Seleccione una posici6n det interrupteren
el mango,
CUIDADO
f--i'
NO deje ia PowerMate funcionando en posicibn
vertical en un lugar durante ningun espacio de
tiempo: se puede dafter la alfombrao
OFF
4oSeleccione una altura de pelode la alfombra
usando el pedal pequefio ubicado en la parle posterior de la PowerMate El nivel de pelo la alfombra
se muestra en el indicador, Consulte SUGERENClAS SOBRE EL AJUSTE DE NIVEL DE PELO DE
LA ALFOMBRA
FLOOR - s61oenciende et motor del recept_culo
CARPET - enciende los motores del receptaculo y
de la PowerMate,
NOTA - Cuando este control est& en la posici6n
FLOOR, el farol no funciona porque la electricidad
no fluye al PowerMate.
Atenci6n: Refi_rase a tas recomendaciones del fabricante para limpiar su atfombra Algunas alfombras
m,_sdelicadas pueden requerir et use de la aspiradora con ei agitador PowerMatedesconectado
para prevenir que la alfombra sea daEada
SUGERENCIAS PARA ASPIRAR
Estilo de limpieza sugerido_
CUIDADO
Pare obtener la meier acci6n de limpieza se recomienda empujar la PowerMateen direcciEn directamente opuesta a usted y jalarla en linea recta,,AI
final de cada pasada de regreso, cambie la direcci6n de la PowerMatehacia la siguiente secci6n a
limpiar, Contint3easi a trav_sde toda fa alfombra de
una manera lenta y deslizante.
Peligro de lesi6n personal y da5o al producto
Tenga cuidado si el PowerMatey la manguera
se dejan en posicibn vertical pues pueden
caerse f_cilmente. Si se voltean puede causar
dafio de propiedad,
L, L,,,J,
,.L,,,
NOTA: las pasades r&pidas y jalonadas no Iogran
una limpieza completa,
,,,L,L'I"J,,
ADVERTENCIA
Peligro de lesi6n personal y dafio al
)roducto
No atropelle et cord6n et6ctrico con la
PowerMate. Hay un peligro de
lesi6n corporal o unos daEos de
poseslones.
No tire del cord6n el_ctrico de la pared
pars desenchufarlo, Si hay danes en
el cord6n el_ctrico o el enchufe, hay
un peligro de lesl6n corporal o unos
defies de posesiones,
El dispositivo giratorio
de la manguera permite que _sta gire sin necesidad de mover el
recept&culo, Esto es
rnuy 0til para limpiar en
areas pequeEas,Asegurese de que la manguera no este torcida
antes de jaiar el recept_cuto
Control
de
aspiraci6n
9
F--_
Los escalones alfombrados requieren limpieza peri6dica Cierre
per complete el control
de aspiraci6n pare
Iograr los mejores
resultados de limpieza
El sost6n para la
esca]era esta situado
en el cuerpo y ayudar&
a evitar que la
aspiradora se deslice
cuando se est,'_
utilizado en las
{ ADVERTENCIA
iPeltgro de lesi6n personal
Tenga culdado si coloca el recept_cuto sobre
escalones. Si se cae, podria causar lesibn personal o dafio a la propieda&
escaferas (v6ase
CARACTERiSTICAS DE RENDIMIENTO)
CUIDADO
NOTA: Aseg_rese que la aspiradora est_
descansando con seguridad sobre las
escaleras y el echador est& en la
posicibn bloqueada antes de usarla,
Peligro de lesi6n personal y daSo al producto
No jale de ta manguera para mover la
aspiradora de un escalbn al siguiente.
Cuando termine de iimpiar un &tea use
la manija en la aspiradora para moverla
a otro lugar para continuar la timpieza.
I
Mantenga el paso de aire abierto para Iograr los
mejores resultades de limpieza. Examine de vez
en cuando cada una de ias _.reasde uni6n en FUNCIONAMIENTO DE SU ASPIRADORA para asegurarse de que no est_n bloqueadas. Apague y
desconecte la aspiradora antes de revisarla,
ACCESORIOS
NOTA:
Para montar el
CUIDADO
cepillo para sacudir
inserte et cepillo
para telas dentro de
la boquilla del
cepilto para sacudir
presione en su
lugaro
NO instale ni retire el mango ni los tubos
cuando la aspiradora est6 encendida. Esto
podria causar chispas y dafiar los contactos
el_ctricos.
ACCESORIOS DEL MANGO
%',_i
F_--_-_
Cepillo
Cepiflo
para tetas
Para quitar,
pestillo y
presionar el
levantarse,
NOTA: Si tiene
instaladala
PowerMate, apague la aspiradora
antes de quitar el
mango de los
tubos
Pestillo
Tubo
telesco "
io Optima el bot6n de liberaci6n r&pida del mango
para liberar et mango y tire del mango hacia arriba
2_Deslice el accesorio deseado con firmeza sobre
el mango, Consulte la CUADRO DE USO DE LOS
ACCESORIOS
10
ACCESORIOS DEL TUBO
1. Para retirar los
tubos de la
PowerMate.cof6quelos en la
posiciSn vertical
de btoqueo
3oColoque el
accesor[o deseado sobre el
tubo, Consulte
la CUADRO DE
USO DE LOS
ACCESORIOS
Pedal de
iu iberaci6n
r_ptda del
2. Pise et pedal de
liberaciOnr_pida del
tuboy tire del tubo
hacia arfiba para
desprender]o de la
PowerMate,
No es necesario retirar
el enchufe y cordSn
el_ctrlco de ta
PowerMate para usar
los accesorios del
tubo
bo
CUADRO DE USO DE LOS ACCESORIOS
AREA A LltVIPIAR
Muebles
t
ACCESORIO
Cepillo para _'_
Cepi!to para sacudir
._
comDinaci6n Cepillo
_¢_
para telas I_
Herramienta
para hendiduras
Entre.
cojlnes
1
Pisos
Pisos
Corttnas
1 Escalonesdescubiertos
alfombradost
Alfombras
4
4
./
4
4
Pa'i::
.....
v'
4
Cepilto para pisos
_2
PowerMate
Handi.Mate Jr.® 2
Pet PDwerMate 3, 4
_..
4
,(
V'
v'
4
2
........
1, Siempre limpie los accesorios antes de usar sobre telas,
2, El interruptor de 3 posiciones debe estar en la posiciSn FLOOR (PISO),
3.
La Handi-Mate Jr." y la Pet PowerMate incluyensus propias instrucciones
para uso de accesorios,
4o La Pet PowerMatesolo pude ser utilizada en el mango de la manguera,
11
WAF
SUGERENCIAS SOBRE EL AJUSTE DE NIVEL DE PELO DE LA ALFOMBRAJ
Personal InjL
Use el ajuste XLO (bajo) para obtener la mejor limpieza a fondo_Pot otra parle, quiz_s se requiera elevar el nivet para facilitar algunas tareas, como por
ejemplo cuando se trata de tapetes y atgunas alfombras de pete largo, y para impedir que ia aspiradora
se apague. Se sugieren los siguientes ajustes:
HI - Pelo muy largo y suelto, tapetes, alfornbras
muy acojinadas
Use care if c
it may fail, c_
property dar
MED - Peto mediano a largo.
LO - Pelo corto a mediano.
CAL
XLO - La mayoria de las alfombras y pisos
descubiertos
Product
l
CARACTERJSTICAS DE RENDIMIENTO
PROTECTOR CONTRA
SOBRECARGAS
J
ADVERTENCIA
Do not pull €
canister fror
When finish_
use the ham
move the va
location for
,
La PowerMatecuem
ta con protecciSn
Bot6n de
incorporada contra
dafio del motor y la
correa en caso de
atascamiento del
agitador_Si el
agitador funciona
m_s despacio o
para, el protector de
sobrecarga para la PowerMate.El motor del recept&culo continuar_ funcionando.
Peligro de lesiones personales
Siempre apague y desconecte la aspiradora
antes de limpiar las _reas det agitador ya que
6stos podrian arrancar de manera imprevista.
El no hacerlo, podria resultar en lesiones
personales,
INDICADOR DE RENDIMIENTO
/ndicadorde
rendimiento
Para corregir el problema:Apague y desconecte la
aspiradora, limpie la obstrucci6n, y despu6s
presione el bot6n de BELT RESET (protector de
sobrecarga). Puede necesitar un bollgrafo..
_..._
Cuando la aspiradora
estOfuncionando con
eEindicadorde
rendimiento
est_
l flujo normal
de aire,
apagado Se enciende
deluzcuandoe,
aire es obstruido.
_
,a
flujo
'
Si esto sucede, revise
la bolsa para polvo, el filtro de seguridad del motor y
otros ]ugares posibles pot residuos de basurao
V_ase FUNCIONAMIENTO DE SU ASPIRADORA.
__"_
Si el problema persiste, busque un t_cnico
catiftcado que haga el servicio de la aspiradora.
LIMPIADOR DE ORILLAS
Active los cepitlos limpiadotes de odllas a cada
lado de ta PowerMate.
Pase la PowerMatejunto
alas paredes o junto a los
muebles para ayudar a
eliminarla tierra acumulada en las oriIlas de la
alfombra.
Dan
,=,,
[
ATTACHM
NOTE: If the
PowerMate is
attached, turn
vacuum clean
er off before
removing han
die from
wands.
1. Press handle quick
release buttor
and pull up or
handle.
Para corregir el problema: Vease el diagrama
RECONOCINIIENTODE PROBLEMA&
Nota: Es posible que la ]uz encienda al usar los
accesorios porque el flujo de aire es reducido por los
accesorios.
12
CAL
DO NOT atta
wands while
This could c
the electrica
TAPA Y ALMACENAMIENTO
PARA PowerMate
CONTROL DE ASPIRACION
El control de aspiraci6n le permite cambiar ta
potencia de aspiraci6n de la aspF
radora depenaspiraci6n
aspiracl6n
diendo del grosot de fa telao atfombra. La aspiraci6n se disminuye, para limpiar cortinas y tapetes ligeros, abriendo
ei control; para aspirar muebles y alfombras, et control debe cerrarse para aumentar la aspiraci6n
El tube tiene un reborde en forma de "U" se
desliza dentro en una
ranura en forma de "U"
de ia aspiradora
La ranura permite almacenar !ostubes y la
PowerMate con el tube
para economizar el espacio requerido para
su almacenamiento,
Para usar esta caractedstica es necesario afmacenar el recept_culo en forma vertical.
PROTECTOR TERMAL
Esta aspiradora tiene un protector termal que
se ajusta autom_ticamente para proteger a ta
aspiradora del sobrecalentamiento, St una
obstruccibn impide el flu]o normal de aire al
motor, el protector termal apaga el motor
autom&ticamente para permitir que el motor se
enfrle a fin de evitar postbles daSos a la
aspiradora.
La PowerMate debe estar en la posici6n liana come
seve en et diagram& Use el mango dei pedal de
liberaci6n para moverla a esta posici6n.
Et tube se safe de la ranura al ser levantado para
usarlo y se desliza dentro de _sta al bajarto para almacenarlo
Para corregir el problema: Apague la
aspiradora y desenchufe el cord6n del
tomacorriente para permttir que la aspiradora
se enfde y que el protector termal se reajuste.
Busque y saque ias obstrucctones, sl es
necesarlo. Examine tambi_n y
reemplacetltmple cualquier filtro obstrutdo.
Espere aproximadamente
trelnta (30)
mlnutos y enchufe la asptradora y volt_ela
para ver si el protector del motor se ha
reajustado. El protector del motor no se
reajustar,_ si no se ha apagado la aspfradora
aun cuando la aspiradora se haya enfriado,
FUNCIONAMIENTO
SOSTEN PAPA LA ESCALERA
Durante ra operaci6n normal de la aspiradora
mientras que esta en la posici6n horizontal, las
ruedas del cuerpo
giren libremente
360",
La caracteristica
del Sost_n para
la Escalera
permite que las
ruedas del cuerpo
se traben en posici6n
cuando la aspiradora gira 25 ° de una posici6n
horizontal a vertical para que la aspiradora
descanse con seguridad sobre Easescaleras,
DE SU ASPIRADORA
La aspiradora crea succi6n o aspiraci6n que fevanta
la tierra.La tierra es imputsadaa trav_s de las vias
/J _.-_
de flujo aire hasta la bolsa per una r_pida corriente
/i/,f
de aire La bolsa para polvo permite el flujo de aire, ////
pero atrapa la tierra.
Z7
Para lograr los mejores resuttados de limpieza, ,/oozily
"
mantenga abiertas las vias de aire. Examine ._._/"
peri6dicamente las _reas indicadas con
_,,_/"
asteriscos para asegurarse de que no
,,,_"
est_n bfoqueadas,Apague y
/f//_
desconecte la aspiradora del recep- J//"
t_culo antes de revisarta, r,_-_
_
13
t
/
_
_i
Filtro de
seguridad
de! motor
Filtro de
La bolsa debe cambiarse seguido para 1ograrlos
mejores resu]tados de limpieza, El indicador
electr6nico de la botsa o de manguera enciende
cuando se necesita cambiar,
7. Examine y Eimpieel filtro de seguridad del motor,
El montaje rojo de la bolsa se inclinar&hacia
adelante despu6s de que retire la botsa, Esto
impedir_ que ta tapa se cierre antes de instaiar una
bolsa nueva,
NOTA: V6ase PIEZAS Y CARACTERiSTICAS
para el n_mero de la bolsa
NOTA: NO doble ni pliegue el centre del cart6n
al tnstalar la bolsa en las ranuras del montaje
de la bolsa.
1. Apague y desconecte
la aspiradora de la clavija de la pared.
2. Quite la manguera de
la aspiradora,
3, Tire del pestillo de la
tapa hacia fuera y hacia
arriba; luego levante la
tapa del recept&culo.
parala bolsa roja y para
_.,__
insertar la bolsa en tas
ranurasempuje hacia abajo
basraque las lengOetasde
cart6n encierren seguramente
en las posiciones apropiadas
come se ve en el diagrama,
4. Destrabe la pestafia de cart6n del montaje rojo
de la boLsaempujando
hacia afuera y tirando
hacia arriba.
\
5_Saque la bolsa del
montaje rojo,
"
9_Baje ia cubierta del recept&culoy cierre el pestil]o
!0, Reinstale la manguerao
tl. Conecte el cord6n el6ctricoen la clavija de la
pared.,
\
,,1. iJ .....................
L,
:::_
_:.
CUIDADO
Filtro de
,-.
seguridad/
del motor,
6oRevisey
cambie el filtrode
seguridad der
motor, cuando
sea necesario.
NUNCA REUTILICE UNA BOLSA PARA POLVO,
Los materiales muy fines, tales come desodorantes para alfombras, talco facial, polvo fine,
yeso, hollin, pelusa de alfombras nuevas, etc.,
pueden atascar la botsa y causar que se rompa
antes de que est_ Ilena y puede daSar el
motor de la aspiradora. Cambte la bolsa m&s
seguido cuando aspire este ripe de materialeso
i. Apague y desconecte la aspiradora de la clavija
de la pared° NO chorree agua sobre la aspiradora,
CUIDADO
2. Para limpiar el exterior o reducir la electricidad
est&tica y acumulaci0n de polvo, limpie la
superficie exterior de la aspiradora y los
accesorioso Use un trapo suave y limpio, m6jelo
en una soluci6n de agua y detergente ]iquido, y
exprimalo seco, SOquela despuOs de limpiar.
No use los accesorios si est_n mojados. Los
accesorios que se utilicen en _reas sucias,
debajo det refrigerador, no deben usarse en
otras superficies sin antes ser lavados, Podrian
dejar marcas°
i
14
,H
, H ,, ,
,
....................
_z=
f
CAMBIO DEL FILTRO DE SEGURIDAD DEL MOTOR
_ADVERTENCIA
2. Levanteel dispositivo de retenci6n de
goma y saque el flltro
de seguridad come se
ve en el diagrama
Petigro de cheque el_ctrico
Apague y desconecte la aspiradora de la corri.
ente et_ctrtca. No opere la asplradora sin et filtro de seguridad del motor, Aseg_lresede que
el filtro est_ seco e instalado adecuadamente
para tmpedir que el motor fatle y/o que se produzca un cheque el_ctrico,
1
Dispositivo de
retencl_n de goma
"/iIlIll
FILTRO DE SEGURIDAD DEL
MOTOR
3, Reemplaceel fltro
con la superficie branca
en su campo de vista
per correr[o debajo de
tas costllas en la
cavidad de la bolsa
Meta el filro para que
quepa per complete
debajo del dispositivo de
retenci6n de goma
ELECTROSTATICO
Este filro se tiene que cambiar cuando est_ sucio,
Debe cambiarse peri6dicamente seg_Jnlas condiciones de use, El filtro no se puede lavar pues
perderia su capacidad para atrapar polvo,
Dispositivo de
retention de goma
NOTA:V#ase PIEZAS y CARACTERiSTICAS
para el nimero del fittro de seguridad del motor,
4, V_ase CAMBIO DE LA BOLSA para cambiar la
bolsa,
1, Para quitar la boisa, siga las instrucciones en
CAMBIO DE LA BOLSA
CAMBIO DEL FILTRO DE ESCAPE
1
2o Jate ef filtro de
escape hacia arriba y
hacia fuera de la
parte posteriorde la
aspiradora,
_ADVERTENCIA
Peligro de cheque el_ctrico
de
No opere con un fittro de escape bloqueado o
sin el filtro de escape o la cubierta del fittro de
escape instalados,
escape
FILTRO DE ESCAPE HEPA
3oReemplace el cartucho del fitro de!
escape Coloque el lltro nuevo en la aspiradora con el lade
de esponja en direccibn a la aspiradora.
Este cartucho de{ fltro escape tieneque cambiar
est_ sucio Cambie e{ fttro cuando el &rea superficial este cubierta per complete, El filtro no se
puede iavar pues perderia su capacidad para
atrapar polvo,
NOTA: V_ase PIEZAS Y CARACTERiSTICAS
para el numero dei fltro de escape,
1, Jate y suba la
cubierta dei fltro de
escapepara quitarla de la aspiradora
y col6quela a un
lade.
\
Leng_etas
15
4, Monte la
cubierta def fttro de
escape colocando
fas dos lengietas
en la cubierta del
filro en las ranuras
de ta aspiradora y
gire en su lugar
hasta que cierre
compietamente
Stempre deber&n seguirse todas las precauciones de seguddad antes de efectuar mantenimiento a
la PowerMate,
ADVERTENCIA
Pellgro de choque e!_ctrico o lesi6n corporal
Desconecte la unidad antes de efectuar mantenimlento a su asptradora, De to contrario podria
producirse un choque el6ctrico o causar lesibn corporal si la aspiradora arranca de manera imprevista.
CAMBIO DE LA CORREA Y LIMPIEZA DEL AGITADOR
PARA RETIRAR LA CORREA
3, Coroque ta
PowerMate en ta
posiciSn vertical,
Apriete el pedal del
mango de liberaci6n y baje la
articulaciSn giratoria, Levante los
pestitios traseros
LIMPIEZA DEL AGITADOR
I. Coloque la
PowerMate con ta
parte inferiorhacia
arriba
NOTA: Para mantener una alta efictencia de
Iimpieza y evitar el daSo a la aspiradora, h_.a.y
_ue limDiar_[agitador carla vez que se_cambia.
la co[lea,
2, Quite losdos (2)
tornillosen la cubierta
de la PowerMate.
Tambi_n hay que limpiar el agitador seg,bn e!
siguiente horario:
Pestillos
iaterales
El use de la
as__s_ptrado
ra
Limpie el
agitador
Frecuente (usada diariamente)
Moderado (usada 2 o 3 veces
por semana)
cada semana
cada mes
cada 2 meses
Ligero (usada 1 vez por semana)
Pest#los
traseros
IMPORTANTE
Desconecte la aspiradora, Examine frecuentemente er cepilfo y las _reas de soporte deFmismo
de fa PowerMate y eiimine todo cabello, hilo y
pelusa acumulada
ta, agarre
4oPara
quitar
loslades
la cubiery
tire afuera
Retire todo indicio de basura o suctedad de la
zona de la correa y del rodfllo del cepitloo
Con cuidado quite las tapas y quite el hilo o
los restos ubicados en el agitador, o en los
soportes del cepillo,
ENSAMBLE
& Levante la
unidad del agF
tadory quite la
correa gastada,
DEL AGITADOR
Rufa de
/a correa-
_ extremo
apa de/
_a de!
extremo
& Examine y ]impie las _reas de tapa de] extremo..
En la ENSAMBLE DEL AGITADOR se proporciona
una ilustraciSn de todo el ensamble del agitador,
Unldad
cepillo
16
del
Tapa del
extrerno -
PARA RETIRAR LA CORREA
3_Alinee la parte
frontal de la
cubierta con la
base Coloque la
cub[erta sobre el
borde delantero
de la base como
se muestra.
1. Instale una
correa nueva
sobre e[
impulsor del
motor y tuego
sobre la ruta
de la correa
Base
Agitador Tapadel
extremo
NOTA:V_ase PIEZAS Y CARACTERiSTICAS
para el nt]mero de la correa
2. Coloque otra vez
la unidad del agitador en ia
PowerMate.
Pestillos
laterales
Pestitlos
traseros
4. Gire [a cubierta
hada atr&s, Apriete
con poca fueFza
hasta que los
pestitios laterales y
traseras encierren
seguramente
CerciSrese que no hay espacio entre [a cubierta y
la base,
5. Coloque la PowerMate con la parte inferior hacia
arriba e inserte los dos (2) torni[!os en la cubierta
I
CAMBIO DE LA BOMBILLA
t
Empujehacia
adentro y gire
14Quite fa cubierta de la PowerMate como se
describe en [a secci6n CAMBIO DE LA CORREA Y
LIMP1EZADEL AGITADOR,
Empuje
hacia
adentro
y gire
2. Empuje hacia adentroy gire la bombilla en
el sentido contrario al
de las agujas del re]oj,
luego tire hacia afuera
para sacar_
3. Empuje hacia
adentro y gire en el
sentido at de las agujas del re[oj para
reemptazar, La bombi[la no debe ser m&s
de 15 vatios (130
voltios),
4_Reinstale [a cubierta de la PowerMate como
se describe en la seccibn CAMBIO DE LA CORREAY LIMPIEZA DEL AGITADOR
NOTA:V_ase PIEZAS y CARAGTERISTlCAS
para el numero de la bombiIla,
17
[
CUIDADO DEL AGITADOR
PARA CAMBIAR EL AGITADOR
_ADVERTENCIA
I. Retire la cubierta, correa y ensamble del agitador
de la PowerMateConsulte "Para retirar la correa"
bajo CAMBIO DE LA CORREAY LIMPIEZA DEL
AGITADOE
Peligro de choque et6ctrico o lesi6n corporal
Desconecte la unidad antes de efectuar el
mantenimlento
a su aspiradora. De fo contrario podria producirse un choque el6ctrico o
causar lesi6n corporal si la aspiradora arranca
de manera imprevtsta.
2. Reemplaceel agitado_
3. Cambie fa correa, el ensamble del agitador, la cubierta de la PowerMate, la bombilia y ]a cubierta de
]a bombittaoConsulte "Para cambiar la correa" bajo
CAMBIO DE LA CORREAY LIMPIEZA DEL
AGITADORo
PARA REVlSAR LA UNIDAD DEL
AGITADOR
Cuando est6n gastadoslos cepilios ar
nivet de las barras
de soporte en la
base, cambie la
unidadder agitador,
Barra de soporte
de ta base
H_
R_
18
Revise este recuadro para encontrar soluciones a problemas que puede corregir usted mismo, Cua[quier otro
servicio debeser realizado per SEARS u otto agente de servtcio calificado,
,
,
,,,,
,, ,,,,
,,, ,,,,
,,,,,,,,,, ,,,
,.................
• ................................._,_L, _L'_'L"L'L''"L'_'
.....
ADVERTENCIA
Apague y desconecte la aspiradora antes de efectuar el mantentmiento a su aspiradora,
lo contrario podria producirse un cheque el_ctrico o causar lesibn corporal.
Le asp|fedora no _rr_nc&,
1
Eat_ desconedada
2, Cortactrcuilos bolado o fusibfo quemado
en el tablarode sarvlctode la residencb
3. Conexiones el6clrtcas do la maoguera
suelIas,
No asplra
satIsfnclor]amento
I.
2.
3_
4.
5,
8
7.
8
9.
10.
La aaptradera arranca,
peru so apaga,
2
de ta lapa
Pm{eclorcenffa s`obrecargas`
de {a
PowerMale botado
&, Prolector Iermal bolado
on e__acapl_culo.
L, Pow_;M,t_
,0 i,,:io,,
t,, Conecie bien. optima s`elecforde encendido/
apagadoala pos`icten
ON
2, Restablezcael codacSrcuitas`
o cambie el
{ustbte
3, Vuelva a coneclar tos exlremos` de la manguera
I,
Balsa pare polvo liana o atascada
Vtas`de flute_Jea#e a_as`cadas`
2.
Fit{ros sucios
3,
4.
Ajuste inters'acrede nivet de paio de
la alfombra
Conffol de asp_rack_nabledo
5,
Manguera mla,
6.,
Agi[ador de la PowerMale deegaslados
7,
B & 9=,
Correa dasgasladao role
Agilador o tapes de los exlremos de es`t_ns`ucios`
Tape dal recepl_cub ab;arta.
10.
1, Co.extenes`
el_emcas`
de='_"_anguara
o
De
Cambie la boIs`a.
Llmpie ]as v{as de fiujode aide
Cambte los, fiIlros
Ajuste el ntvel
Ajuste e! central
Cambiela manguera
Cambte el egJlader
Consulle CAMBIO DE LA CORREA Y LtMPIEZA
eEL AGITADOR
Cierre bIen la tap&
'L Examinetas conextonesel_clriCas, vuelvaa ..........
conectarIce extremes`de {a manguera
2 Reti_'acualquier ebje[o a_Dtadeo atascade.
luego testablezce Slta asplrado_ra
arranca pore
se vuefve a epagat, limp_eel agilador y _as
tapas de {ca extremes, luege res[ablezea
3
Reslabiezoa prelecterlarmal
Cone_,a
_ie.i
...............
1,
2.
3.
4_
Cenexienes de la PowerMa_edes`conecladas`
Coffee desgastada e fete
Agilador o rapes de exffemos _sten s`ucios`
Pro{actor centres`ebrecargasde ia
PowerMale bolado
5
El tnterrupto_r
no eat&en la posIclSnCARPET
&
Penga el inlerruptor ala pesiclen CARPET
E1 Indtcador de rendfmtente
functona
i.
2
3
4
Bels`apara polvo _lanae eras`cede
Fi_lras`sucios
Vies`de _ujo de eke a{as`cadas
Clerics accesodos
1,
2,
3,
4,
Camble la balsa
C=zmbielos fitlree,
Desbloquee las vies`de fluje de aire
Este es normal Ef lndicedor debesar normal
la asptradora ]evanla tapetes o
es dtfic)! empujar _aPewmMate.
1- Ajuste Ineorreclade nivelde polode la affambra
2 Asptract_a domes`lade pelen{e
1 Ajus`tee{ nfvel.
2, Abra el centralde as`pi_acibn
La _uzno func_ena
1 gomb_lla {undida
2, Protector contra aeb_ecargasde la
PowatMatebolade
1. Cambie la bembilla
2. Relirecualquier ebjetoalerada e alescado,
luege _'es`lablezcaSi la aspiradora arrance pore
se vueivea apagar, limpte el agitador y tas
lapas`de exlrem'as de _sle, luego reslablezca.
Et cotd6n no Be enrolla
t Corden el_clr_cosucie
2. Cerden alaacado
I
2
La aepiradera deJameccas
an la e{rombra,
I.
1. Con_l{e SUGERENCIAS PARA ASPIRAR ....
cuando eat& |net_l=tda.
2&3
4,
Consulle CAMBIO DE LA CORRF.:AY LIMPIEZA
DEL AGITADOR
Retire cualquierobjetea|orade o atas`cado_
_uegorestabtezca SI la aspiradoraarrancape_o
s`e rue{re a apagar, limple el agilader y las
lapes de los extremes, luege res{ab_ezca
cuandela he_Tamie£la es`l_,qu}tada_
EsUlode ltmpieza {ncerrecta.....................................
19
LImpleel corden el_ctrica
Tire dot cordeny despu_e anrellelo
Acuerdos
Maestros
de Protecci6n
_nhorabuena per hacer una cornpra intelLgerTte.Su nuevo producto Kenmore® est_ diser_ado y fabricado para ofrecerle afios de funcionamiento confiable. Pero al igual qua todos los productos pueden
precisar un mantenimIento preventivo o alguna reparaci6n de vez en cuando. Por este motivo, tenet
un Acuerdo Maestro de Protecci6n puede ahorrarle dinero e inconvenfentes.
El Acuerdo Maestro de Protecci6n tambi_n le ayuda a prolongar ta vida util de su nuevo producto_ A
continuaci6n indicamos lo que el Acuerdo* incluye:
[]
Partes y mano de obra necesarios para ayudar a qua estos productos functonen correctamente
bajo condicionales normales de uso, no simplemente defectos. Nuestra cobertura va mucho
m_s all_ de la garantia del producto. Ning0n deducible, ninguna averla funcional queda excluida de la cobertura- protecci6n real.
[]
Servicio experto ofrecido por una lista de m&s de I0.000 t_cnicos autorizados del servlcio
t_cnico de Sears, Io qua significa qua alguien en quien usted puede confiar estar_ trabajando
en su producto.
[]
N_3mero ilimitado de Ilamadas al servlcio t6cnico y servlcio
como usted nos Io solicite, sin lmportar donde est&
I_
Garantia seria de sustltuci6n dei producto. La sustituci6n de su producto cubierto si se producen cuatro o m&s aver{as en doce meses.
[]
Sustituct6n
del producto
en toda la nacl6n, tan continuo
per otto nuevo si su producto cubierto no puede repararse
[]
Revtsl6n y mantenimiento
[]
Ayuda r&ptda por tel_fono - Nosotros to llamamos Resoluci6n r&pida. Soporte telefSnico de
un representante de Sears en todos tos productos, Piense en nosotros como un "manuat del
usuado parlante",
anual preventtvo
siempre que 1o desee y sin cargo alguno,
Protecct6n contra subtdas de tensl6n que provoquen daSos el6ctricos causados por las fluctuaciones de la corriente.
[]
$250 de protecci6n contra la p6rdlda de alimentos anualmente en caso de que se estropee
algQn alimento como resuttado de una averla mec&nica de cualquier congetador o refrigerador
cubierto.
[]
Reembolso dei alquiler
do,
[]
10% de descuento en el precto regular de cualquier servicio de reparaci6n no cubierto y de las
piezas instaladas relacionadaso
si la reparaci6n de su producto cubierto toma m&s ttempo del prometi-
Una vez que compre el Acuerdo, s61o bastar& una simple Iramada telef6nica para que pueda programar un servicio_ Puede Ilamar a cualquier hora del dfa o de la noche, o concertar una cita de servicio
en linea.
El Acuerdo maestro de protecci6n es una compra libre de riesgos. Si por cualquier raz6n cancela
durante el periodo de garant{a del producto, le devolveremos todo el dinero. O, un reembolso prorrateado despu_s del periodo de vencimiento de la garantiao fCompre su Acuerdo maestro hoyl
Apllcan algunas Ilmitaclones
al 1-800-827-6655.
y exclustones. Para prectos y m_s informacl6n
* La cobertura en Canadb varia en algunos articutos.
Sears Canad_ al 1-800-361-6665o
Servicio
de instalacibn
en EE.UU., Ilame
Para obtener todos los detalles, Ilame a
de Sears
Para la instalaci6n profesional por parte de Sears de electrodom_sticos, abridores de puertas de garajes, calentadores de agua y otros articulos principales para el hogar, en EE.UU_ o Canad& llame al
1-800-4-MY-HOME®,
2O
2I
Get it fixed, at your home or ours!
Your
For expert troubleshooting
www.manage
Home
and home solutions
advice:
myhome.corn
For repairin your home - of all major brand appliances,
lawn and garden equipment, or heating and cooling systems,
no matter who made it, no matter who sold it!
For the replacement parts, accessories and
owner's manuals that you need to do-it-yourself
For Sears professional installation of home appliances
and items like garage door openers and water heaters
1-800-4-MY-HOME®
call an!time,, dayornight
(1-800-469-4663)
www.sears.corn
(U.S.A. and Canada)
www.sears.ca
Our
Home
For repair of carry-in items like vacuums, lawn equipment,
and electronics, call anytime for the location of the nearest
Sears Parts & Repair Service Center
1-800-488-1222
(U.S,Ao)
www.sears.com
To purchase a protection agreement
1-800.827.6655
(U.S,Ao)
Para pedir servicio de reparaci6n
a domicitio, y para ordenar piezas:
1-BBB-SU-HOGAR®
(I-888-784-6427)
1-800-469-4663
(Canada)
www.sears.ca
on a product serviced by Sears:
1-800-361-6665(Canada)
Au Canada pour service en frangais:
1.800.LE.FOYER_,_c
(1-800.533-6937)
www.searsoca
S@.@w,,g
© SearsBrands,LLC
@RegisteredTrademarkf -rMTrademark I sMService Mark of Sears Brands.LLC
@Marca Regislradaf "r,_Marcade F_bricat s_ Marca de Servicio de Sears Brands, LLC
MCMarquede commercef MOMarque d6pos_e de Sears Brands, LLC