1
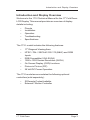
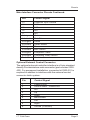
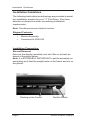
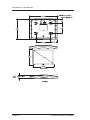
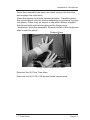
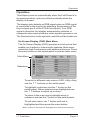
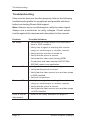
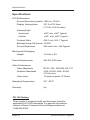
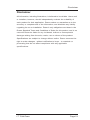
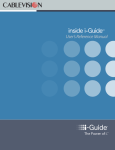
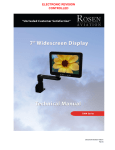
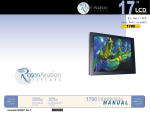
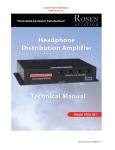
17
www.
rosenaviation
.com
OEM SALES
CORPORATE OFFICE
DEALER & OPERATOR SALES
8 Shackleford Plaza,
Suite 201
Little Rock, AR 72211
1-888-523-7523
Fax (501) 225-1015
1020 Owen Loop South
Eugene, OR 97402
1-888-668-4955
Fax (541) 342-4912
1121 Warren Ave, Suite 240
Downers Grove, IL 60515
1-800-859-5058
Fax (630) 963-4405
Document # 9003050 Rev C
9003050
1710
Compliant to DO-160D
Fold Down
Model Number
DISPLAY
1710
www.
rosenaviation
.com
Table of Contents
Introduction and Display Overview................... 3
Pinouts ................................................................ 4
Main Interface Connector .............................................. 4
Optional External Control Connector ............................. 5
Installation Guidelines........................................ 6
Operation .......................................................... 13
Main Menu ................................................................. 13
Picture Submenu ........................................................ 14
On Screen Display (OSD) Submenu ........................... 14
Utility Submenu .......................................................... 15
Auto Submenu ........................................................... 15
Exit Submenu ............................................................ 15
Troubleshooting ............................................... 16
Technical Support ............................................ 17
Specifications ................................................... 18
DO-160 Testing .......................................................... 18
Disclaimer ......................................................... 19
17” Fold Down
Page 1
1020 Owen Loop South
Eugene, OR 97402
541-342-3802
www.rosenaviation.com
Introduction and Display Overview
Introduction and Display Overview
Welcome to the 1710 Technical Manual for the 17" Fold Down
LCD Display. This manual provides an overview of display
details including:
•
•
•
•
•
Pinouts
Installation
Operation
Troubleshooting
Specifications
The 1710 model includes the following features:
•
•
•
•
•
•
•
17" Diagonal Viewing Area
NTSC / PAL / SECAM / RS-170 (B&W) and RGB
Inputs
RGB Compatible (VGA-SXGA)
1280 x 1024 Screen Resolution (SXGA)
On Screen Display (OSD) functions
Picture in Picture (PIP)
28 Volt DC Power Operation
The 1710 model accommodates the following optional
controllers (sold separately):
•
•
IR Remote Codes Available
External 7-Button Controller
17” Fold Down
Page 3
Pinouts
Pinouts
Pinout descriptions are provided to assist in the wiring
process. Pay close attention to the pinout information while
completing wiring connections.
Warning!
This display is for entertainment
purposes only! Connect to noncritical
power bus.
Main Interface Connector
The input connector on this monitor is a 21WA4 Male Combo
D-subminiature with 17 size 20 contacts (standard density Dsub) and four Size 8 coaxial contacts, mounting in a size 4 Dsubminiature shell. The following table provides detailed pinout
information for the main interface connector.
Mating connector (included): Rosen Connector Kit 0300-030
MATING CONNECTOR LOADING VIEW
Pin
Control Signal
1
28V Return
2
+28V
3
N/C
4
N/C
5
N/C
6
RGB/Video Select Switch (TTL)
7
Status Output (TTL)
8
HSync
9
VSync
10
28V Return
11
+28V
12
N/C
Page 4
Rosen Aviation Displays
Pinouts
Main Interface Connector Pinouts Continued:
Pin
Control Signal
13
Computer Sync Ground
14
N/C
15
N/C
16
N/C
17
N/C
A1-signal
Red
A1-shield
Red Return
A2-signal
Green
A2-shield
Green Return
A3-signal
Blue
A3-shield
Blue Return
A4-signal
Composite Video
A4-shield
Composite Video Return
Back Shell
Chassis Ground
Optional External Control Connector
The optional external controller interface is a 9-pin standard
density D-subminiature male connector (part number 0300402). For permanent installation, connector kit 0300-031 is
required in addition to interface with the external control
connector latch system.
Pin
Control Signal
1
Power On/Off
2
Source Select - Locked Out
3
N/C
4
Up
5
Down
6
Menu/Select
7
Left
8
Right
9
Ground (Common)
17” Fold Down
Page 5
Installation Guidelines
Installation Guidelines
The following instructions and drawings are provided to assist
the installation process for your 17” Fold Down. Pay close
attention to dimensions when considering installation
requirements.
Note: The dimensions are listed in inches.
Shipped Contents:
•
•
Monitor Assembly
Connector Kit 0300-030
Installation Preparation:
Shroud Removal
Remove the display assembly and set it flat on its back as
shown in the photo below:
Note: It is EXTREMELY IMPORTANT to set the assembly on
something such that the weight rests on the frame and not on
the plastic.
Resting on the Frame
Page 6
Not the Plastic
Rosen Aviation Displays
Installation Guidelines
Open the display to its fully-open position (about 160 degrees),
and then turn it on its side (or turn it over) to press out the (2)
pine tree clips where shown below. Save the clips for
reassembly.
clip locations
Leave the display opened, set the assembly on its back, and
remove the (4) 8-32 x 3/8 socket-head cap screws (4) corner
locations (see below). Save the screws for reassembly.
Note: It is EXTREMELY IMPORTANT to set the assembly on
something such that the weight rests on the frame and not on
the plastic.
17” Fold Down
Page 7
Installation Guidelines
Release the clip features by pulling back on the hinge region
of the shroud where shown below.
With the display still in its fully-opened position, carefully lift
the shroud off of the frame assembly. Pull back with your
fingers to release the doghouse clips, and lift as shown in the
photo below. Do not stress the outer edge of the enclosure, lift
only as shown below.
WARNING! Do not force the shroud on or off the frame
assembly. This delicate piece of plastic must be handled with
extreme care.
Use the following drawings to assist in mounting the 17” Fold
Down assembly.
Note: Ensure that the connecting harness from the aircraft will
be accessible to plug into after the assembly is mounted.
Page 8
Rosen Aviation Displays
Installation Guidelines
The following drawings are also available through Rosen’s
website at www.rosenaviation.com.
Listed dimensions are in inches.
17” Fold Down
Page 9
Installation Guidelines
Page 10
Rosen Aviation Displays
Installation Guidelines
Once the assembly has been mounted, plug in the harness
and engage the side latch.
Open the display to its fully-opened position. Carefully place
the shroud back onto the frame assembly by pressing it gently
into place. Press only as shown in the photo below; support
the shroud with one hand and press the hinge cover
“doghouse” onto the assembly. Ensure that all of the doghouse
clips snap into place.
Support Here
Gently Press Doghouse Here
Reinsert the (2) Pine Tree clips.
Replace the (4) 8-32 x 3/8 socket-head cap screws.
17” Fold Down
Page 11
Installation Guidelines
Adjusting the Rotation Stop:
The rotation stop may be adjusted to any position from 135
degrees to 180 degrees from stowed. It may be necessary to
adjust the rotation stop such that the display does not open
far enough to make contact with an obstruction.
There are two 6-32 socket head cap screws that need to be
loosened to adjust the rotation stop; one at each end of the
hinge (see photo below). Open the Fold Down to its fullyopened position (or as far as possible per obstruction), loosen
the two 6-32 socket head cap screws, position the Fold Down
to the desired rotation-stop location and retighten the 6-32
screws (torque to approximately 9 inch/lbs).
Note: Use a 7/64” Hex Key to loosen and tighten the 6-32
socket head cap screws.
Page 12
Rosen Aviation Displays
Operation
Operation
This Display turns on automatically when the Fold Down is in
its opened position, and turns off automatically when the
display is stowed.
The display auto-detects an RGB signal when an RGB signal
is connected to the monitor by detecting the presence of the
Hsync signal (pin 8 of the 21WA4 connector). If no RGB
signal is detected, the display automatically switches to
composite video input whether a video signal is present or not.
The Source button on the optional controller will be locked out.
On Screen Display (OSD) Main Menu
The On Screen Display (OSD) provides a set of menus that
enable you to adjust or view monitor features. Main menu
selections lead to submenus with additional choices. Press
the menu button on the switch panel to see the main menu.
Main Menu
Submenus
To switch to different main menus (OSD, Utility, Auto)
use the 34 buttons on the switch panel.
To highlight a submenu use the 6button on the
switch panel. When submenus are highlighted use
the 34buttons to adjust up or down.
To return to the main menu highlight return in
submenu and use the4button on the switch panel.
To exit main menu use 4button until exit is
highlighted and then press the menu button.
Note: It takes 5 seconds for changes to be stored into memory
17” Fold Down
Page 13
Operation
Picture Submenu
Menu Option
Description
Brightness
Picture Brightness
Contrast
Picture Contrast
Phase
Removes Noise in RGB Mode.
Frequency
Adjusts the Picture Width in RGB
Mode
H Position
Horizontal Position Adjustment
V Position
Vertical Position Adjustment
Sharpness
Picture Sharpness
Return
Returns to Main Menu
Note: Phase, Frequency, H Position, and V Position only
appear in RGB Mode.
OSD Submenu
Menu Option
Description
H Position
OSD Horizontal Position
V Position
OSD Vertical Position
OSD Time Out
Time in Which OSD Turns Off if
Left Alone
Return
Returns to Main Menu
Page 14
Rosen Aviation Displays
Operation
Utility Submenu
Menu Option
Description
Freeze Frame
Freezes Picture Frame
Reset
Factory Reset to Default Settings
Color Temperature
Color Adjustment in RGB
Mode Only
Information
Monitor Info
Return
Returns to Main Menu
Auto Submenu
Menu Option
Auto
Description
Automatically Adjusts Image Size
in RGB Mode
Exit Submenu
Menu Option
Exit
Description
Exits OSD
Hot Keys
Hot keys are a quick way of adjusting brightness,
contrast, PIP, and the scaling modes. To activate the
hot keys simply use the 56buttons on the switch
panel to cycle through these modes.
Scaling mode: The scaling mode will adjust the
picture depending on the type of formatted DVD disc
you are using.
Note: If picture looks stretched, adjust the scaling mode.
Picture in Picture: The small screen in the upper left
hand corner will display composite video when in RGB
mode.
17” Fold Down
Page 15
Troubleshooting
Troubleshooting
If the monitor does not function properly, refer to the following
troubleshooting table for symptoms and possible solutions
before contacting Rosen field support.
Note: Always use an oscilloscope to verify the video signal.
Always use a multimeter to verify voltages. Check actual
results against the requirements described in this manual.
Problem
Possible Solutions
No Video
• Verify that the video source is on and has a
tape or DVD installed.
• Verify that a signal is reaching the monitor
using an oscilloscope or another monitor.
• Verify that the monitor is turned on.
• Verify that the pinout is correct.
• Verify that the video input (Analog RGB/
Composite) and video standard (NTSC/PAL/
SECAM) match your application.
Screen is Black • Verify that the monitor is receiving power.
• Verify that the pinout is correct.
• Verify that the video source is on and has a tape
or DVD installed.
• Verify all connections.
Screen is Blue
• Verify that a signal is reaching the monitor
using an oscilloscope or another monitor.
• Verify that the pinout is correct.
• Verify that the video source is on and has a tape
or DVD installed.
Color is Out of
• Refer to the Utility Submenu on page 15.
Adjustment
Page 16
Rosen Aviation Displays
Troubleshooting
Problem
Possible Solutions
Image Flickers
• Verify that the signal cable is secure.
• Verify that the vertical frame frequency is 75 Hz
or less. If using the monitor with a PC in
Windows, change the Display Control Panel to
60 Hz to achieve the best performance.
Image is
distorted
• Verify pinouts.
• Verify that a signal is reaching the monitor
using an oscilloscope or another monitor.
• Examine the monitor for pinched or damaged
cables.
Cleaning Display
The LCD should be cleaned with a lens grade tissue for
cleaning optical surfaces and isopropyl alcohol.
The Display’s external plastic surfaces may be
damaged by certain harsh, abrasive or staining
chemicals. Avoid exposure to such chemicals.
Should an external surface be exposed to such
chemicals, promptly clean the surface with a sponge
and soapy water.
Technical Support
For technical support or to order parts, contact
Rosen Aviation Displays at: 888-668-4955
or visit us at: www.rosenaviation.com
17” Fold Down
Page 17
Specifications
Specifications
LCD Performance
Screen Resolution (pixels) 1280 w x 1024 h
Display Viewing Area
337.9 x 270.3mm
(13.30 x 10.64 inches)
Viewing Angle
Horizontal
±80º min, ±85º Typical
Vertical
±80º min, ±85º Typical
Contrast Ratio
400:1 min, 500:1 Typical
Backlight Lamp Life (hours) 50,000
Screen Brightness
200 cd/m2 min, 250 Typical
Mechanical Packaging
Weight
Power Requirements
Video Performance
Video Standards
Graphics Standards
Video input
14.4 lbs ± 5%
28V DC 40W max.
NTSC, PAL, SECAM, RS-170
VGA, SVGA, XGA, SXGA
(75 Hz max)
1V peak-to-peak, 75 Ohms
Operating Temperature
0ºC - 50ºC
Warranty
2yr
DO-160 Testing
This monitor is compliant with and has been tested to
applicable DO-160D standards. For specific information
contact a Rosen Customer Service Representative at
1.888.668.4955.
Page 18
Rosen Aviation Displays
Disclaimer
Disclaimer
All information, including illustrations, is believed to be reliable. Users and/
or installers, however, should independently evaluate the suitability of
each product for their application. Rosen makes no warranties as to the
accuracy or completeness of the information, and disclaims any liability
regarding its use or installation. Rosen’s only obligations are those in the
Rosen Standard Terms and Conditions of Sales for this product, and in no
case will Rosen be liable for any incidental, indirect or consequential
damages arising from the sale, resale, use or misuse of the product.
Specifications are subject to change without notice. Rosen reserves the
right to make changes - without notification to buyer - to materials or
processing that do not affect compliance with any applicable
specifications.
17” Fold Down
Page 19