1
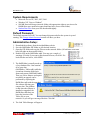
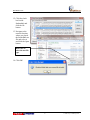
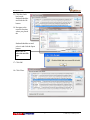
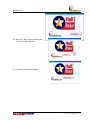
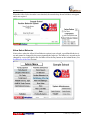
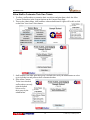
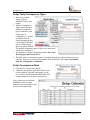
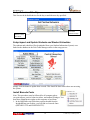
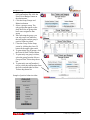
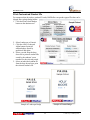
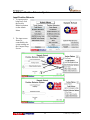
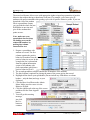
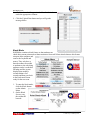
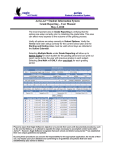
HallWalker 2012
Setup and Operations Manual
HallWalker 2012
HallWalker
Table of Contents
System Requirements................................................................................................................... 4
Default Password: ........................................................................................................................ 4
Administrative Setup: ................................................................................................................. 4
Campus Setup .......................................................................................................................... 9
User Setup ................................................................................................................................ 9
Setup User Groups ................................................................................................................. 10
Setup Bell Schedule ............................................................................................................... 10
Customizing the System Settings........................................................................................... 11
Use Name (system-wide setting) ....................................................................................... 11
Use Consequence Date ...................................................................................................... 12
Use Times .......................................................................................................................... 13
Allow Select Awarder ........................................................................................................ 13
Allow Select Behavior ....................................................................................................... 14
Allow Staff to Customize Their Own Tickets ................................................................... 16
Setup Tardy Consequence Types ........................................................................................... 17
Setup Consequence Dates ...................................................................................................... 17
Setup Tardy Consequences .................................................................................................... 18
Setup Positive Behavior List .................................................................................................. 18
Setup Behavior of the Day ..................................................................................................... 19
Setup Import and Update Students and Student Schedules ................................................... 19
Install Barcode Fonts ............................................................................................................. 19
Print Customized Behavior Tickets ....................................................................................... 20
Print Customized Student IDs ................................................................................................ 22
Setup HallWalker Store ......................................................................................................... 23
Change Admin Password ....................................................................................................... 23
System Maintenance .................................................................................................................. 24
Compact and Repair ............................................................................................................... 24
System Concurrent User Limitations ..................................................................................... 24
Data Protection....................................................................................................................... 24
Database Architecture ........................................................................................................ 24
Close HallWalker ............................................................................................................... 24
Backups .............................................................................................................................. 24
Operations and User Manual ..................................................................................................... 25
HallWalker Tardy System...................................................................................................... 25
Record a Tardy................................................................................................................... 25
Tardy Reports..................................................................................................................... 25
Tardy Consequence Attendance ........................................................................................ 26
Fix Tardy............................................................................................................................ 27
Tardy Export ...................................................................................................................... 27
Add External Consequences .............................................................................................. 28
2
© 2009 Larry J. McHaney, Ph.D.
HallWalker 2012
HallWalker Positive Behavior System................................................................................... 29
Input Positive Behavior...................................................................................................... 29
Positive Behavior Reports.................................................................................................. 31
Fix Behavior....................................................................................................................... 31
Use HallWalker Store ........................................................................................................ 32
Mass Load .......................................................................................................................... 33
Kiosk Mode........................................................................................................................ 34
3
© 2009 Larry J. McHaney, Ph.D.
HallWalker 2012
System Requirements
•
•
•
•
Microsoft Access XP, 2003, 2007, 2010
Windows XP, Vista, or Window7
100 MB Network Storage (network folder with appropriate rights to run Access for
HalkWalker users-student accounts should not have access to this folder).
Student Data Files from your SIS downloaded nightly
Default Password:
The default password is PASS. You can change this password after the system is up and
running. The Change Admin Password section will show you how.
Administrative Setup:
1. Download the software from the insightfuldata website.
2. Save the HallWalker.ZIP folder to your desired location.
3. Open the ZIP folder and copy the files out to the network folder. (All software users must
have full rights to the network folder).
4. Double-click on the HallWalker.mbd. You may get a couple of
warnings: If it asks if you want to block unsafe macros, click NO. If it
looks like the one below, click OPEN.
5. The HallWalker is actually made up
of two database files. One contains
all of your data
(HallWalker_Tables.mdb) while the
second one contains all the logic,
forms and reports (HallWalker.mdb).
That way if new features and reports
are added, an upgrade can be
performed by replacing the
HallWalker.mdb with the upgraded
file without affecting your
campus data. The problem
is that when the software is
installed or upgraded, the
HallWalker.mdb does not
know the location of the
Tables file on your
network. So you will get a message like this: Click OK.
6. The Link Table Manager will appear.
4
© 2009 Larry J. McHaney, Ph.D.
HallWalker 2012
7. First select the Always prompt for new location check box on the bottom left of the
window.
8. Click the Select All button.
9. Unselect the StudentInfo, and Studentschedules tables. (You will notice these tables have
different icons.)
10. Navigate to the network
location where you placed
the HalwalkerTables.mdb
and select it and click the
Open button.
11. Click OK
5
© 2009 Larry J. McHaney, Ph.D.
HallWalker 2012
12. Click the check
box beside
StudentInfo and
click the Ok
button.
13. Navigate to the
network location
where you placed
the StudentInfo.txt
file and select it
and click the Open
button.
Make sure to
select the text file
type.
14. Click OK.
6
© 2009 Larry J. McHaney, Ph.D.
HallWalker 2012
15. Click the check
box beside
StudentSchedules
and click the Ok
button.
16. Navigate to the
network location
where you placed
the
StudentSchedules.txt and
select it and click the Open
button.
Make sure to
select the text file
type.
17. Click OK.
18. Click Close.
7
© 2009 Larry J. McHaney, Ph.D.
HallWalker 2012
19. Click the Setup Wizard Button.
20. Enter the 3 digit campus number and
click the Continue Button.
21. Click the Campus Setup Button.
8
© 2009 Larry J. McHaney, Ph.D.
HallWalker 2012
Campus Setup
The reset date is the
date you want to
start a new tardy
warning period and
positive point totals.
22. The campus setup menu will appear. Fill in the blanks to customize the software for your
campus.
User Setup
1. Click the Setup Users button to create user accounts and security levels for faculty and
staff.
2. Fill in the user
name, Security
Level and
Windows user
name for all users.
The security level
determines the
screens to which
the user will have
access.
Grade and alpha start and
3. Give yourself
end entries determine the
scope of on screen and
rights to all
printed reports.
Allows this person
functions by
to print excused
checking all the
tardy passes.
boxes.
9
© 2009 Larry J. McHaney, Ph.D.
HallWalker 2012
Setup User Groups
1. Select a user group for each user. You can create any number
of groups but each user can only be in one group at a time.
2. To create or edit a user group, Click the Add/Edit User Groups
button.
3. Add or edit any number of groups, then close the User Group
window.
4. The groups will now show in the dropdown list beside each user on
the user setup screen.
5. To delete a group, click on the box to the left of the group name and
press delete on your keyboard.
Setup Bell Schedule
1. Close the user setup screen and on the Campus Setup Menu, click
the Setup Bell Schedule button.
2. Bell schedules can be set like the examples below. The
3. Campuses using a block
time should be the time set for the tardy bell for each
schedule must list each date
class period. The Day determines the block day (i.e. A
that on the school calendar
days, B days, or blank for both days. Special bell
and if it is an A day or B
schedules can also be added (ie pep rally day, early
day. If your campus uses a
release,
straight schedule, all days
will be A days. The check
boxes will be explained in
the section Setting up
Tardy Consequence
Types.
Regular Straight Schedule
A-B Block
Calendar
10
© 2009 Larry J. McHaney, Ph.D.
HallWalker 2012
Customizing the System Settings
System settings on the Campus Setup page control functions
within Hallwalker.
Use Name (system-wide setting)
Student tardies and positive behaviors can be entered into the software three different ways. If
students at the campus wear ID badges with their ID numbers in a barcode format, you may
choose to use barcode readers to scan in student ID. ID numbers can also be input using a
keyboard. The use name checkbox customizes both the tardy and positive behavior screens to
allow last name input.
When Use name is unchecked, the
student ID must be entered.
When the Use Name setting is
checked, student (by last name) can be
selected from the dropdown list on
both the tardy and positive behavior
input screens.
11
© 2009 Larry J. McHaney, Ph.D.
HallWalker 2012
Use Consequence Date
If the Use Consequence Date option is checked, HallWalker will assign students to
consequences for tardies on specific dates. Most campuses don’t want students to be assigned
consequences on the same day as they have a tardy. To give the campus time to communicate
with parents, you can set the date on the tardy input screen (before entering the first tardy of
the day) select the future date you want consequences assigned.
When the Use Consequence Date option is not selected, consequences for tardies are not given
specific dates and the Set Consequence Date drop down does not appear on the tardy input
screen.
12
© 2009 Larry J. McHaney, Ph.D.
HallWalker 2012
Use Times
These three check boxes on the Campus Setup screen are used to customize functions in the
software.
The first, "Use Times"
customizes the positive
behavior screen and adds the
Times box
The Times box is used by campuses
that handout coupons or "behavior
bucks" to students throughout the day,
then have a time and location to trade
them in or have them recorded on the
system. When a student turns in more
than one coupon, the receiver enters
the number of coupons and then
scans or inputs the student ID number.
Allow Select Awarder
When the Allow Select Awarder option is selected on the campus setup screen, it allows the
operator to select the name of the person who awarded the positive behavior points and it is a
required field.
13
© 2009 Larry J. McHaney, Ph.D.
HallWalker 2012
When the Allow Select Awarder is not checked, the awarder drop down field does not appear
and is not required.
Allow Select Behavior
Notice above when the Allow Select Behavior option is not selected, a predefined behavior is
set and cannot be changed by the person inputting the behavior. The behavior is set and can be
changed by a user with rights to the Set Behavior on the Day button on the Admin Menu. (See
Set Behavior of the Day Section)
14
© 2009 Larry J. McHaney, Ph.D.
HallWalker 2012
When the Allow Select Behavior option is selected, the behavior input screen now contains a
required field where the operator may select the positive behavior from the list, type or scan in
the behavior number as shown below.
15
© 2009 Larry J. McHaney, Ph.D.
HallWalker 2012
Allow Staff to Customize Their Own Tickets
1. To allow a staff member to customize their own tickets and print them, check the Allow
Custom Tickets box in the System Options on the Campus Setup Page.
2. Then on the Admin Menu, staff members without administrative rights will be able to click
on the Print Your Own Tickets button.
3. Staff members can either print their group’s default ticket set by the administrator or select
up to six behaviors and print out their customized tickets.
4. If the Allow Custom
Ticket is not checked,
staff members can only
print the default
tickets set for
their group by the
administrator.
16
© 2009 Larry J. McHaney, Ph.D.
HallWalker 2012
Setup Tardy Consequence Types
1. Back at the Admin
Menu, click the
Add/Edit Conseq Type
button.
2. Add the Consequence
Name or description. A
different consequence
type is needed for each
unique type of
consequence i.e. D-Hall
is different from InSchool Suspension. But
a 30 minute D-Hall may
not be a different type
than a 60 minute D-Hall.
The quantity in minutes, hours or days is set on the next
screen to be configured.
3. The Number is a unique identifying number. Note: that
Warning type must always be 0.
4. The Max Load is to maximum number of students that can serve this consequence at any
one time. This may be a limit on the number desks in D-Hall or ISS. Note: a maximum
load of 0 is designated as unlimited.
Setup Consequence Dates
1. Click the Set Conseq. Dates button.
2. Under the consequence type, check all the boxes
beside each date when the consequence can be
served. These are the dates that HallWalker will
assign students to serve these consequences.
Note: If dates are not checked,
HallWalker will not assign
students to the consequences and
will not record their tardy.
17
© 2009 Larry J. McHaney, Ph.D.
HallWalker 2012
Setup Tardy Consequences
This consequence requires
attendance (D-Hall, ISS, etc.)
1. From the admin
menu, click the
Add/Edit Tardy
Conseq. button.
The Conseq. ID is an
automatically number field.
Warning must be ID 0.
Fill in the consequence name.
Select the Conseq. Type
This column is the number of tardies at which a
student will start receiving this consequence.
How much time is each unit
The number of units (0-3)
(example 2 days of D-Hall)
The number of hall
passes to print (0-3).
Include this consequence
with the exported data.
Setup Positive Behavior List
1. From the admin menu, click the Positive Behavior List button.
The Positive Behavior ID is an
automatically number field.
Name of behavior
18
Point value of
the behavior.
© 2009 Larry J. McHaney, Ph.D.
HallWalker 2012
Setup Behavior of the Day
This list sets the default behavior for the day or until the next day specified.
Set the date for
the default
behavior to begin.
Select the
behavior number
from the list.
Setup Import and Update Students and Student Schedules
The students and schedules (files downloaded from your Student Information System) were
linked to the database in the Link Table Manager earlier in the setup process.
Simply click the button to update these records. This should be done when others are not using
the system.
Install Barcode Fonts
Note: This procedure must be followed for all computer where
you print reports, positive behavior tickets, and student ID badges. You
must have administrative rights to this computer to load fonts.
1. In the HallWalker.zip folder that you downloaded from the
InsightfulData.com website, you will find two barcode fonts
(FRE30F9X.TTF and FREE3OF9.TTF).
19
© 2009 Larry J. McHaney, Ph.D.
HallWalker 2012
2. Open the control panel by
clicking the start menu and
then click Control Panel.
3. Click on the Fonts icon to
open the fonts folder.
4. With the two windows open
side-by-side, drag and drop
the two font icons from the
zipped folder into the fonts
folder.
Print Customized Behavior Tickets
20
© 2009 Larry J. McHaney, Ph.D.
HallWalker 2012
1. To print positive behavior
ticket and student IDs, click the
PrintTickets/Badges button on
the admin menu.
2. Click the Setup Groups and
Behaviors button.
3. Select a group to setup. The
only groups that appear on the
drop down list are groups that
have users assigned to that
group.
4. After selecting the group, you
can select up to six behaviors
that will appear on that group’s
positive behavior tickets.
5. Close the Group Ticket Setup
screen by clicking the close (X)
button in the upper right corner.
6. To print tickets for all groups, click
the Print All Staff Tickets button.
7. To print only one group’s tickets,
select the group from the Select a
Group to Print Tickets drop down
list.
8. To print only one staff member’s
tickets, select the staff member from
the Select an Individual to Print
Tickets drop down list.
Sample of positive behavior ticket.
21
© 2009 Larry J. McHaney, Ph.D.
HallWalker 2012
Print Customized Student IDs
For campuses that do not have student ID cards, HallWalker can produce paper IDs that can be
slipped into a plastic badge holder.
1. Click the PrintTickets/Badges
button on the admin menu.
2. Select Landscape or Portrait.
3. Click the All by Grade and
Alpha button to print all
student badges sorted by
gradelevel and alpha.
4. Select a period from the drop
down list to print all student IDs
sorted by the students’ room
numbers for the selected period.
5. Select an individual student ID
from the drop down list to print
the selected student’s ID.
Sample of Landscape Badge
Sample of Portrait Badge
22
© 2009 Larry J. McHaney, Ph.D.
HallWalker 2012
Setup HallWalker Store
HallWalker features a store to
help manage students’ points and
purchases.
1. To setup the store, click on
the Store Setup button on the
Admin Menu.
2. Add items to the store by
entering a description of the
item. Note: the Item ID is
filled in automatically by
HallWalker.
3. Enter the point value or cost
for the item.
4. You can make items active or inactive by checking the
Active Item check box. If an item is inactive, it will not
show up in the store to purchase. You may want to
reactivate is later.
Change Admin Password
The default admin password
is pass.
1. Click the Change Admin
Password button.
2. Enter the current password, the new password
and re-enter the new password and click the Submit button.
23
© 2009 Larry J. McHaney, Ph.D.
HallWalker 2012
System Maintenance
Compact and Repair
Periodically (about once per week) you will want to run a Compact and Repair on the database.
The purpose of this operation is to clean up the database and make it run faster and more
efficiently. This must be done when no other station has HallWalker open.
1. When no one else has the database open, click the Add-Ins tab at the top of the screen.
2. Click Compact & Repair Database.
3. The screen will go blank
while it is processing and then
the databse will reopen and be
ready to use.
System Concurrent User Limitations
Microsoft Access databases are fairly robust but they do have practical limitations. The speed
of the database operations depends on several factors including: speed and RAM on the
computer being used, network speed and current traffic, and the number of users on the
database at one time. While Microsoft Access has a theoretical concurrent user limit of 255, a
practical limit is probably closer to 15.
Data Protection
Database Architecture
To protect all your data, HallWalker is actually made up of two databases: HallWalker.mdb
and HallWalkerTables.mdb. All campus data is stored in the HallWalkerTables.mdb.
Close HallWalker
To avoid database corruption and help keep HallWalker running as fast a possible, whenever
HallWalker is not in use close the application completely. Never leave the database up and
running over night. Database corruption can occur if a computer goes to sleep or hibernate as a
part of energy management while HallWalker is running. Make sure HallWalker is closed
before closing the lid of a laptop.
Backups
Database corruption, accidental deletion or other errors are always a possibility with computer
software. Make sure your technology department is including the contents of HallWalker
folder in their normal network backup routine. For extra protection, you can also backup the
HallWalkerTables.mdb to other media periodically.
24
© 2009 Larry J. McHaney, Ph.D.
HallWalker 2012
Operations and User Manual
HallWalker Tardy System
Record a Tardy
1. To start recording tardies, click the Hallwalker button on the Admin Menu.
The Excused button
is a right given on the
user setup screen
Depending on your
settings, you will
either select a
student by name or
scan the student ID.
2. Enter the student ID number or name and click continue to record the tardy.
Tardy Reports
1. Click on the Tardy
Reports button on
the Admin Menu.
Reports buttons with
one or more lines on
their right that lead to
list boxes require input
from the list box(es).
25
© 2009 Larry J. McHaney, Ph.D.
HallWalker 2012
Tardy Consequence Attendance
Users must have rights in the user setup to use this feature and take attendance.
1. To take attendance
for consequences,
click on the Tardy
Attendance button on
the Admin Menu.
2. Select the
consequence type
from the drop down
list.
3. Note the three tabs.
When the
Consequence type is
selected, the general
attendance tab shows all
students who need to serve
this type of consequence on
any date.
4. Clicking the Specific Date
Attendance tab filters the
data to list only students who
must serve the consequence
type selected and on the date
selected.
5. To take attendance using
either tab, click to remove
the check mark associated
with the student who has served the consequence. When the
box is unchecked, the current date is automatically entered in
the DateCons column.
6. If a student is not in attendance for
the consequence, the student can be
reassigned a new consequence date
using the Reassign Date tab. Make
sure the consequence type and date
are selected. Find the student on the
list and select a new date for the
student from the Date Sched drop
down list.
7. You can then print out a notice for
the student to let them know when
the new date for the consequence
has been set.
26
© 2009 Larry J. McHaney, Ph.D.
HallWalker 2012
Fix Tardy
The fix tardy feature allows a
user (with permission – given
on the user setup screen) to
delete a tardy from the system.
1. Click on the Fix Tardy
button from the Admin
Menu.
2. Select a date when the
tardy occurred. A list of
student tardies will appear.
3. Find the tardy you want to
delete and click the delete
button
to it’s left.
Tardy Export
The tardy export feature
allows the user with rights
to export tardy and
consequence data to an
Excel spreadsheet format.
1. Click on the Tardy
Export button from the
Admin Menu.
2. To get a list of tardies,
select a Tardy Date
from the tardy drop
down list and click the
Export Tardies for Date
Above button.
3. To export a list of
students who need to
serve a consequence for a
specified date, select the date from the Select a Consequence Date from the drop down list
on the right and click the button below it.
27
© 2009 Larry J. McHaney, Ph.D.
HallWalker 2012
Add External Consequences
Since there is a limited number of students that can serve some types of consequences at the
same time based on room
size or supervision,
HallWalker allows
administrators to enter
consequences such as DHalls for discipline
violations other than
tardies. This keeps all the
consequence attendance
records in one place and
keeps the rooms from
being over booked.
Note: The maximum
limit of students in a
consequence type at one time
is set on the Add/Edit Conseq
Type screen.
1. To add an external
consequence, click the
Add External Conseq.
Button on the Admin
Menu.
2. Select the student name
or input the student ID
(based on your system settings).
3. Select the consequence from the drop down list.
4. Select a date from the drop down list.
5. Enter any note desired.
6. You can print a notice for the student by clicking on the printer button.
28
© 2009 Larry J. McHaney, Ph.D.
HallWalker 2012
HallWalker Positive Behavior System
Input Positive Behavior
1. To input positive
behaviors, click
the Positive
Behaviors button
on the Admin
Menu.
2. The input screen
format is
controlled by the
system settings on
the Campus Setup
Screen.
29
© 2009 Larry J. McHaney, Ph.D.
HallWalker 2012
Feature
If Checked
User Name
User name must be input in drop down list.
Use Times
Allow Select
Awarded
Allow Select
Behavior
An input box appears to enter the number of times to
multiply the point value. Example: a student earns 10
tickets. This feature allows the operator to input the
data only once but give input a 10 in the Times box
before entering the student ID. The student would
receive credit for all 10 tickets at once.
The name of the staff member must be selected from
the drop down list.
The operator must select the behavior from the drop
down list.
If Not Checked
User ID must be entered either
manual or from barcode scanner.
The Times input box does not
appear.
The Awarding Teacher input list does
not appear.
The preset behavior of the day and
point value are set cannot be
changed by the operator.
Note: when entering positive behaviors, the student ID or name must always be the last data
you enter.
3. If the Show Student Account After
Scan box is checked, the student’s
total points screen will be displayed
after the positive behavior has been
entered.
30
© 2009 Larry J. McHaney, Ph.D.
HallWalker 2012
Positive Behavior Reports
1. To view reports,
click on the Points
Reports button on
the Admin Menu.
Fix Behavior
1. If an error is made entering
a positive behavior, user
with appropriate rights can
delete entry using the Fix
Behavior screen.
2. Select the date from the
drop down list.
3. Find the entry click the
delete button beside it.
31
© 2009 Larry J. McHaney, Ph.D.
HallWalker 2012
Use HallWalker Store
1. To use the store, click the
Store button on the Admin
Menu.
2. Select the student name or
input the student ID
(depends on the system
settings from the Campus
Setup Menu.
3. Select the item ID from the
drop down list. Only items
that the student can afford
will appear on the list.
4. You can add more entries
below the first if the student is
purchasing more than one item. You can
also delete an erroneous entry with the
delete button.
32
© 2009 Larry J. McHaney, Ph.D.
HallWalker 2012
Mass Load
The mass load features allows users with appropriate rights to input large quantities of positive
behavior data without having to hand enter each item. For example, you want to give all
students with perfect attendance this grading cycle with 10 positive behavior points. If you can
download a list of the student
IDs in a spreadsheet format,
you can load the whole list into
HallWalker at one time and
give all the students their
points at once.
Note: make sure your
spreadsheet does not drop
the leading zeros on the
student ID numbers by
making that column
formatted for text.
1. Prepare a spreadsheet with
students to reward. The first
column contains the positive
behavior ID number from the
positive behavior screen. In this
example the list is a download
from the student information
system of all students with
perfect attendance which has a
positive behavior ID of 8.
2. The second spreadsheet column contains the ID numbers of the students.
3. The third column is optional for placing the name of the person giving the reward.
4. Highlight all the data in your spreadsheet (Do not include any field names or column
headers – only the data) and copy to your
clipboard.
5. Click the Mass Load Data on the Admin
Menu. Makes sure the cursor is in the
Behavior ID field.
6. Click the Add-Ins tab at the top of the screen
and then click the Paste Append
button.
7. You will get this warning
message,
just click
the Yes
button to
continue.
33
© 2009 Larry J. McHaney, Ph.D.
HallWalker 2012
8. All of the data should appear in the Mass Load window
under the appropriate columns.
9. Click the Upload Data button and you will get the
message below.
Kiosk Mode
HallWalker contains a kiosk feature so that students can
check their current point totals without assistance from staff. Most schools that use this feature
setup an older computer and
remove the keyboard and
mouse. They only have a
barcode scanner accessible
to students so the only thing
students can do is scan their
ID badge and the system
displays that student’s
account balance for 5
seconds and then goes back
to the kiosk main screen
ready for the next scan.
1. To enter the kiosk mode,
click the Kiosk button
on the Admin
Menu.
2. On the Kiosk
Screen, scan
the student ID
barcode.
34
© 2009 Larry J. McHaney, Ph.D.