1
MY VISUAL DATABASE
A Simple Solution for Creating Databases
You can quickly create a
complete application
User's Manual
Copyright © 2002-2015 Drive Software Company.
All Rights Reserved.
2
What is My Visual Database ?
My Visual Database, (please, call me MVD), is a simple development environment
databases. Without the help of specialists and programming skills, you will create a
Windows application databases. It can be as simple telephone directory and accounting
system in your business. You can even create much more complex applications. It is also
possible to use on a network, that's to say the power of this tool.
The result of your work will be a Windows application that does not require
installation and third-party components and the ability to work directly from USB Flash
drive.
If we consider its usability and the main features that it comes with, My Visual
DataBase provides with a completely visual development environment that enables you
to customize and manipulate databases, tables and forms the way you want.
And bonus, MVB generates Windows application (.EXE). that does not require
installation and third-party components.
MVD has been coded with Delphi XE3 (Embarcadero ®). Those who have already
coded in Delphi or in C++ (Borland) will not be disoriented : very closed GUI, the same
syntax, the same simplicity.
3
THE DIFFERENT VERSIONS
MY VISUAL DATABASE
MVB 1.49 (29.01.2015)
It is now possible to send SMS (only towards Russia, Belarus and Ukraine via
http://turbosms.ua) (29/01/2015).
It is now possible to send SMS towards any country (via http://clickatell.com)
(29.01.2015)
Occasion is given to see database diagram. (For now only in reading).
Added function MessageDlgTimeOut (Dialog with Timer).
MVB 1.48 (30.11.2014)
New method BestFitRow for component TableGrid.
Now possible to add new fields in a database without lost any data previously entered.
Now possible to create or to move tables in the database without lots any data
previously entered.
Now possible to edit any existing field in tables of the database without lost any
data previously entered.
TableGrid component has a new property : dbLimit (to limit amount of data in
TableGrid). Ex : Form1.TableGrid1.dbLimit := 1000;
Form1.TableGrid1.dbLimit := 0;
MVB 1.47 (13.11.2014)
Added a new property CopyTo for "Save image in database" component
Added a new method dbSQLExecute for ComboBox component
Added a new property NumbersOnly for TextBox component
Added ability to search on calculated fields
Added custom sorting for Search button
Other minor changes
Improved script editor
MVB 1.46 (27.10.2014)
Added sound functions
Added function for for selecting folder
Added function for working with system registry
Available compiled variant of script file
Added property dbInitialDir for component DBFile
Added custom sorting for Report button
Fixed some errors
MVB 1.45 (13.10.2014)
Added ability to select multiple components in the form designer
Added a new property CopyTo for DBFile component
Added many new features to the script
Other minor changes
MVB 1.44 (24.09.2014)
Added OnChange event for TableGrid
Added function for script SaveFileFromDataBase
Added methods BeginUpdate and EndUpdate for TableGrid
Added ability to search by month and year in DataTimePicker
Added other functions for script
Finished several bugfixes
4
MVB 1.43 (26.08.2014)
Notification about error location in the script
New functions for the script
Fixed case insensitive search functionality
Other small changes and improvements
MVB 1.42 (24.07.2014)
Added ability to create report without using SQL query
Improved navigation through forms for projects with large amount of forms
Added several new functions to the script
MVB 1.41 (21.06.2014)
New functions added to the script
Added properties and methods of components
Bug fixes
MVB 1.40 (20.05.2014)
Added script (Pascal).
Fixed some bugs.
MVB 1.39 (08.05.2014)
Small changes and improvements
MVB 1.38 (16.04.2014)
Calculated footer in TableGrid.
Consecutive numbering in the TableGrid.
Sorting in TableGrid
MVB 1.37 (08.04.2014)
More convenient object inspector
Highlighting in SQL syntax
Other minor improvements
MVB 1.36 (20.03.2014)
Saving to database links to the file or folder
Incremental (instant) search
Fixed some bugs
MVB 1.35 (04.02.2014)
Linked lists.
TableName property in ComboBox replaced ForeignKey.
Able to refer to a dictionary a few times from a single table.
Other minor improvements and bug fixes.
MVB 1.31 (25.02.2014)
Input masks for TextBox
New property ReadOnly for TextBox and Memo
New filter for TextBox %s%
Automatic detection of links in a TextBox
Other minor improvements and bug fixes
MVB 1.30 (12.02.2014)
Calculated fields
Expression editor for calculated fields, and SQL queries
New type of field: Real
Search on grids (Ctrl+F). Other minor additions
5
MVB 1.26 (28.01.2014)
Sizable forms
Export reports to: Word, Excel, PDF, HTML, OpenOffice, JPEG, TIFF
Fixed some bugs
Other minor additions
MVB 1.25 (20.01.2014)
Opportunity for ComboBox to specify multiple fields, example: {field1}, {field2}.
For "TextBox" and "Memo" added parametr "DefaulValue"
Drag and Drop for Tab with forms
Icons for buttons
Many other improvements
MVB 1.21 (14.11.2013)
Added the ability to embed SQL query data from visual components
Fixed some bugs
MVB 1.2 (7.10.2013)
Ability to work with the database via the LAN
Report Designer
New type of action for a button (SQL query)
Search terms (=, <,>) for components Edit
Fixed some bugs
MVB 1.0 (09.10.2013)
First version.
6
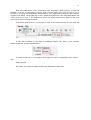
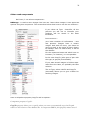
THE INTERFACE OF MVD
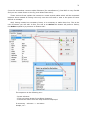
When you throw MVD, you see the interface, reduced to its simplest expression :
an empty working sheet with a lot of buttons waiting you use them.
Let us detail every present object on this screenshot.
On the top, stands the menu bar with 4 items : File - Project - Forum - Help
- menu File :
New Project : Launches with a new project.
Open Project : Opens an existing project.
Save : Saves a new or existing project.
Save As... : Saves a project under another name.
Close : Closes the work.
Exit : Closes the application.
If you click on Close or Exit with a current work, you will get a message box to save it
before exit.
7
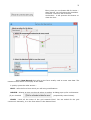
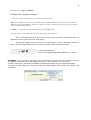
- Menu Project :
Only one command : Run.
Its role is to launch your project to test it.
- Menu Forum :
Send you to internet site of DriveSoft, specially the page of Forum which is very
interesting to read (DriveSoft proposes many relevant answers to users' questions).
Five themes are opened :
-
General : Questions about MVD in general.
SQL Queries : questions about SQL (MVD uses SQL language for queries).
Script : Question about the key point of MVD.
Reports : how to set up a report for your databases.
Data Migration : Assistance with data migration/data conversion issues.
Another item :
- Users database projects : full projects proposed by users of MVD.
Last item :
- Russian : for Russian users of MVD.
To use forum, English language is the best. DriveSoft is very present to answer.
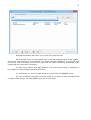
- Menu Help :
Help : (in English) about many functions of
MVD. Help in French is also available.
Video lessons : One video to lean step by
step how to create a phonebook.
About : How to join DriveSoft. Also to
enter licence for MVD.
8
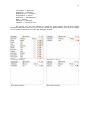
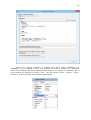
The Tools Bar :
Under the Menu Bar stands the Tools Bar with 23 buttons. here is their own role :
Allows to open an existing project.
Also available from Menu File.
To save the current project.
Also available from Menu File (Hotkey : Ctrl + S)
To run (test) current project.
If this project is new, a dialog box asks you to save it before.
This button allows you to use a script. It's a Delphi language which allows to add
more functions to your project. To deactivate it, press it again.
Used to add a new form to your project. In Delphi language, a form is a working
sheet on which you add many components.
Allows to delete the current form. A confirmation box is displayed before
deleting.
This arrow button gets back control over others components. It deactivates a
component previously selected.
Label component. Allows to set a static text on the form (i.e. : Name, Title and
so on).
Button component.
Used to get an action (Save, Quit, Show and others ...).
Textbox component. Allows to seize textual information.
Suits to enter information in a database.
Memo component. Used to seize multilines texts.
Combo box component. Displays a list which contains all the records of the table
Matched fields of a database.
Checkbox component. Used to display and look for logical information from
database. Boolean value (True or False).
DateTimePicker component. To look for and display information about dates and
hours.
Allows to save image in the Database.
Allows to save a file in the database, authorizing its opening or its export.
Calendar component. Used to enter or to search information about dates.
TableGrid component. Allows to extract and to display information of a search
about dates.
Counter component. It allocates automatically a serial number to the new
record.
Panel component. It is a container without any reactivity. Its role is to contain
other components (label, calendar, grid ....).
Groupbox component. Without any special functions. It too can contains other
components.
PageControl component. No special functions. It is used as container to other
components (using Tabs).
9
Image component. No any special functions. Used to set up interface and to
contain specially pictures.
Let's go ahead with other elements. Under tools bar, you that:
Two "work plans" on which you will develop all your applications.
- Tab Database Tables :
On this plan, you will create all the necessary tables for your projects.
You can see a button named "+New Table". With it, you will create one (or more) tables
according to your project
- Tab Form1 :
On this plan, you will set up the interface(s) of your application. You can add as many
forms as necessary.
To add a new form, click
.
To remove a useless form,
click
.
Nothing more simple.
At least, on the left of work plan, two parts :
On called Structure, with two tabs : Controls and Forms :
Here, you see the Form1. All new forms created later will follow this one.
If you click on Controls tab, you will se that :
10
Here , I've placed a button on Form1. Tab Controls will display all others components you
will place (labels, Textbox, Combobox, grid and so on).
Under block Structure, you see another block with many information. It' called Object
Inspector. Here you have all information about a component placed on the forms. (In this
example, they concern component Button1 [1 because it the first button. Another button
will become Button2 and so on]).
So, I know
properties :
all
about
Button1
It caption (Button1 or Save or
Exit...)
Icon or not icon
Its name
Its positions (left and top in relation
to the form on which it is placed)
Its dimensions (width and height)
Other information : see Help file
about each component.
For Action property, we shall see
later what hides behind. It is very
important according to what you
want to do.
Last thing before to go ahead with a full application :
With MVD, the first form to appear on screen is the first one placed immediately to
the right of Database Tables tab.
Let's imagine that you want launch your application with a splash screen (like any
professional app.) and if this splash screen stands on Form_Splash, you have only to do
a drag-and-drop with Form_Splash Tab on the right of Database tables Tab. And you
application will first open with your splash screen.
11
Now, let's talk about a very interesting (and important) MVD function. I want say
SCRIPT. It is not a compulsory function, but it would really it's a pity be not to use it
because it will give more flexibility and wealth to your applications (playing with colours,
juggling with dates, using SQL and so on). People accustomed to the language Pascal will
not be grieving to use it. For beginners, there are many examples on MVD Forum near
Dmitry and others confirmed users.
To activate this function, it's enough to click on the fourth button on the tools bar
:
A new Tab is added on the right of Database Tables Tab. Also, if you consider
Object Inspector, a new tab appeared :
To remove this tab, it is enough to click again on it and it disappears from others
tab.
Really simple.
Activated, this tab will always stand after Database Tables Tab.
12
HOW TO CREATE YOUR APPLICATION WITH MVD
Well, after this visit of the tools of MVD, let us turn to serious matters (although
well to know the tools with which we are going to work is very serious affair also).
Here, we are going to show how to create a basic application without complexity.
It's only a kind of skeleton on which afterward you can put some flesh so that your
application suits in what you expect from it.
Let us begin with a less classic example : a Home Inventory which will manage all
your private properties. Useful to present to your insurer in case ... What I do not wish
you !
Below, you can see all the forms created for this application. There is a lot : but
they are useful because they will illustrate the necessity of connecting tables between
them. No concern, they build up themselves very easily.
(In Pascal language, a form constitutes the interface (or part of the interface) of
an application on which we are going to place components chosen since the pallet of
components. That is we build visually our own interface).
First of all, to work with a database application, we have to build our(s) table(s)
for storing data.
I always say :
BEFORE BEGINNING TO USE MVD, PLEASE, TAKE A PIECE OF PAPER AND A PENCIL (and
perhaps a cup full of coffee) !!!!
It is also true with Delphi, Lazarus, Visual Basic, C++ and others.
Take time to plan what data you want display, how they will be presented. A field
could call it an other one (here it is the case...). A well thought conception facilitates all
the rest. If along the way you want to modify your table, it can become the galley. With
first versions of MVD, if you modified fields, you lost all dated them entries. With last
versions (since 1.48, it is not true any more).
Another crucial question : One and only one database or several others ?
With only one, it's possible but with the time, it's growing and growing in the point
to reach a disproportionate size. While by multiplying tables we reach a reasonable size
and a flexibility and a speed of execution. I say nothing when it is a question of making
transfers for others users. And if a crash arises ....
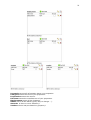
Well, we shall decide to create many tables. In our example, eight tables were
created : Inventaire (the main because it contains main data - I keep this name because
I'm French and in English, Inventaire is called Inventory), Categorie, Emplacement,
Proprietaire, Fabricant, Etat, Garantie and Vendeur. In English it would give :
13
Inventaire -> Inventory
Categorie -> Category
Emplacement -> Location
Proprietaire -> Owner
Fabricant -> Manufacturer
Etat -> Status
Garantie -> Warranty
Vendeur -> Purchase from
Of course, you are not obliged to create all these tables and all their fields.
Eliminate what does not suit to you. It has needed me approximately two hours to design
and to create everything. It is the big strength of MVD.
14
Inventaire stores all information about your properties.
Categorie stores the kind of your properties.
Proprietaire stores the owners.
Fabricant stores the manufacturer of your properties.
Emplacement stores all the locations.
Status stores all the status (good, bad, to change ...).
Garantie is there or not a warranty ?
Vendeur where was purchased my property ?
15
A word about this checkbox : The table is dictionary. What does it mean ? It is
difficult to explain without getting lost in too many considerations. Let's say that a
dictionary allows to make faster searches by means of collections and values contained in
arrays.
If you don't need Garantie or Vendeur tables, don't use it. You can delete them by
clicking on the symbol, on the right of the pencil. A confirmation dialog appears. Do the
same to eliminate any field. Really easy !
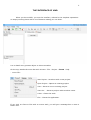
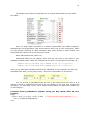
To create a new table, click on this button
This window is called :
You have to enter the name of your base(s).
To illustrate this purpose, I've created a new
table called Weight.
One unique field called
Weight. On the right, you
can chose type of field
(here, I chose Text)
The checkbox Not Null :
If checked, this field
cannot be empty, you
have to enter an
information.
The red cross is used to
delete the field. On cross
for each field entered.
About field types, I let you consult any book about each value. It would take too
many time to explain each one here. Some are very obvious. Here, I would have to
choose Real or Integer but as I shall make no calculation with it, I've chosen Text as
Field Type.
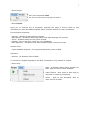
Two of them are interesting
for us when I click on :
: RelationShip and Calculated Field.
We will discuss about them further
16
The Relation type allows to associate one or several tables with the main table.
See below :
Here, our main table Inventaire is in relation (associated) with tables Categorie,
Emplacement and Proprietaire (and others that we don't see on the screenshot). When
you will perform searches on table Inventaire with items stored in others tables, this
relationship will retrieve all occurrences you needs.
About Calculated Field, what is it ?
Calculated fields let you display values that do not exist in any table in your
database. Instead these values are computed at run time. You will have to use SQL as :
(SELECT choice.name FROM choice WHERE choice.id = id_choice1)
(SELECT choice.name FROM choice WHERE choice.id = id_choice2)
then you can add these calculated fields to the TableGrid. In our example, we don't use
calculated field. Well, you're going to say : But there is calculation on the Form1 :
Yes, it's a kind of calculated field, but not in the sense which we give it. It is
exactly to avoid a calculated field which will not appear in the grid that I made this
calculation. To avoid SQL, here I use a simple script (Thanks to Dmitry who helped me
on this subject) :
procedure Form1_OnKeyDown (Sender: string; var Key: Word; Shift, Alt, Ctrl:
boolean);
begin
if (Key = ord('.')) or (key = ord(',')) then // I can use the Decimal separator (. or ,)
Key := ord(DecimalSeparator);
end;
17
procedure Form1_Edit6_OnChange (Sender: string);
Var a,b,c : real;
begin
a := 0;
b := 0;
if (ValidFloat(Form1.Edit11.Text)) and (ValidFloat(Form1.Edit6.Text)) then
// Check of the validity of the seized value
begin
a := StrToFloat(Form1.Edit11.Text);
// Nominal value of the product
// Number of elements (Quantity)
b := StrToFloat(Form1.Edit6.text);
end;
c := a * b;
// We multiply nominal value * number of products
//We display the total sum
Form1.Edit12.Text := FloatToStr(c);
end;
Here, I've not used any calculated field and if I want, I can put in any requests
grids the calculation.
18
CREATING THE INTERFACE OF THE APPLICATION
Well, once our tables created, it's time to set up the interface which will display
data. Here, it is an affair of choice and tastes. We can show from the beginning a splash
screen (as professional applications) or attack by the main part (the one does not
prevent the other one), MVD allows all the options. Here, we shall get straight to the
point.
When launching, this application displays a grid listing all properties already
entered. At botton, 8 buttons are ready to work for you.
ADD : to enter a new property
EDIT : to edit a selected property from the grid
DELETE : to eliminate a property from the grid (and the base). Asks a confirmation.
EXCEL : allows you to send this grid towards an Excel worksheet.
SEARCHES : to perform all kinds of searches.
PRINT BASES : allows you to print all the base.
ABOUT : (not essential). For get information about the developer(s).
EXIT : Good bye !, you leave application. Asks (or not) a confirmation.
You can obviously add or modify any button according to your needs. But get to
the point : the users of your application will probably want to use it as quickly as possible. Always the same advice : plan with paper and pencil before coding.
19
To get this page, here is the mode design :
All components on this page (form) have been selected from the pallet described above.
Each of these component is modifiable from Object Inspector (Name, Font, Height
Anchors,...). From time to time, click on Run Project button (green arrow) to test the
appearance and to modify it if necessary.
When I spoke of planning you project, I implied among others the design of all the
forms which will be used in your application, until the most modest.
Let's go ahead. Below, this is the form called by the button ADD. A form in which I put
all fields (declared in the bases) to enter any data.
20
This is the form to declare new manufacturers :
I am not going to post all the forms, my application in account 15. The principle is the
same : a form for any need. In this case, any form corresponds to a table defined earlier
21
(here this screenshot concerns table Fabricant (for manufacturer)). But MVD is very flexible
and you can create forms on the fly (and delete them also).
These various forms explain the interest to create several tables which will be connected
between them instead of having it the only one who will swell in time in the point of future
difficult to manage.
Well, having created our necessary forms, it is necessary to make them live. This is the
role of buttons you will add. In fact, the role is an Action this button will perform. Below,
the Action implied by a pressure on button Add :
The sequence is the following one :
- I press a button.
- I click on button Action from Object Inspector
- I choose an action from the drop-down list displayed.
In summary : a button --> an Action.
Simple, no ?
22
Last thing for this part :
After choosing an action, you are asked to choose what form will be used :
Where from the interest to define in advance all the forms of your application.
But remember, you need an extra form, no hesitation, you can create it on the fly.
To pursue with this illustration, this action New Record asks the form
frm_Fabricant. (Think of giving relevant names to your forms). Here is this form :
Last action for this form. I press button Save. The Object Inspector proposes as
Action Save Record.
Here is the logical sequence of movements.
Always simple, isn't it ?
23
Every time you use button OK for Action :
Save Record, you will notice this checkbox.
Checked : the form will be closed.
Unchecked : it will prevent this button to
close the form
Action New Record thus calls up the form usually used to enter new data. The
interest of this action is to empty all the fields.
I quickly quote the other actions :
EDIT : calls the form from which you will bring modifications.
DELETE : deletes an item on the grid where it applies. A dialog pops up for confirmation.
(if you checked
proposed by action Delete).
EXCEL : send all the items of the grid towards Excel. You are asked for the grid
concerned. Generally, it on the form where is the button Excel.
24
Well. EDIT, DELETE and EXCEL are commands very simple to understand. No
literature ! I send back to you to the supplied MVD examples.
Next Action is very useful. It is interested in the requests. Here, the button is
called SEARCHES. As usual you call the drop-down list of the actions. But this time, you have
two choices for that :
The first (Search) performs very simple request (I use it frequently and it's very
efficient).
The second (SQL Query) is more complex but is also effective.
I will show first.
Generally, in my applications, when requests concern numerous fields, I use a
special form which groups all the researches. It is not compulsory, each makes for the idea.
In passing, you will notice that there is no button Exit. But how to close this form
? For the fun, I click on the Prof (I place a hand point as cursor and a Hint to help users).
25
The code is simple. Between last Begin ... End (Script mist be activated), I put this code :
Begin
.....
Form_Requetes.Image8.Cursor := crHandPoint; // Cursor for image of the Prof
// Yes you can show a hint
Form_Requetes.Image8.ShowHint := True;
Form_Requetes.Image8.Hint
:= 'Cliquer sur le Prof pour quitter'; // Text of the
hint
.......
End.
Well. Let us close the bracket.
Let's suppose I want to find a manufacturer. I click button in front of 'a
manufacturer'. This form is called :
It has been created as each other form. The process is well known. I've placed
only three components ; a combo box (which will retrieve from the base Fabricant connected
in main base Inventaire), a grid (which will display the found occurrences) and four buttons
well known (we have already used them). No mystery !
Edit will display a selected item on a form.
Excel : all items in the grid will be opened in a spreadsheet Excel.
Exit : will close this form.
The button which makes all the job is the one of the top (Find). Clicked, it calls
Actions list from which you will choose SEARCH. Then this form above will be shown. From
this form, you will finalize your request
26
Let's detail every step :
1 - Action : SEARCH or SQL QUERY. Here, my request concerns only in one field, so a
simple SEARCH will be enough. A combo box will contain the manufacturer I'm looking for.
2 - I select ComboBox1 from the components list. With green arrowe, I place it on the
right.
3 - I select the base on which to make the request.
4 - I select all fields I want to see as result of the request (similar, with green arrow).
5 - Possibly I choose a sense of sorting (ASC or DSC).
6 - I choose the grid to display result (That of the form).
7 - I don't forget to press OK to make warm the cauldron.
As an example, I'm looking for Nikon as a manufacturer. Combobox1 shows all
the present manufacturers in the base Inventaire (via its link with the base Fabricant). The
result is very speed because I created several tables which are less heavy each to consult. If
a single table had contained all the information, the time would have been longer.
Below, a screenshot for the result. Nice, isn't it ?
27
Pressing Exit button will return you on the form with the Prof.
On next page, there is a screenshot from a request performed from a SQL QUERY.
As you see, the structure is more complex. If a simple research [SEARCH] is only made with
the mouse, here everything is hand-made (and with the head). No secret, knowledge of the
syntax SQL are more than a necessity.
I would not go farther with SQL SEARCH. I let you consult books or websites on
this subject or read examples provided with MVD.
To summarize, for a very simple research on one field, use SEARCH action.
For very complexes requests one many fields, if you have to play with date fields
or really heavy things, only SQL QUERY will come to your help.
28
When your request concerns a TextBox field, after filling TableName and
FieldName, you can specify a filter. Very practical to make a request on a character
string. The dropdown list shows operators and filter(%) on a piece of characters. So, if
you're looking for matches for string "love", you will retrieve "lover", "gloves", "lovely"
and so on. It does not take into account capital letters.
29
Other used components
On Form1, I use others components :
DBImage : is used to store images. But how can I store those images ? Here again two
options using this component. This screenshot below show how to use the two manners :
Il you chose as Type : StoreFile, all the
pictures you will use to illustrate your
products will be stored in the base
Inventaire.
Inconvenience :
your base contains all information : text
and pictures. Images have a certain
weight. And with the time, your base be
going to swell in the point of future heavy
to manage. And if a crash arises, it will be
the disaster.
For the important bases and which have to
increase (i.e. libraries), it is not possible.
In this case CopyTo (who goes of pair with
the type) is grayed (Inaccessible).
If you want stored images in folders separated from the base, it's probably the best
solution.
The as Type, select LinkFile and CopyTo
(activated) allows you to give a folder for
stocking images.
Here is Help about property CopyTo and its options :
Component property: CopyTo
CopyTo property allows you to specify where you want to automatically copy the file path
relative to the location of the database file. A component DBFile, this property makes sense if
30
the properties Type is LinkFile.
Possible values properties CopyTo:
\ - The file will be automatically copied to the database file.
files - In the folder location of the database file, a folder is created files, where the files will be
automatically copied folder is allowed to specify a chain, for example files\docs, the data folder
will be created automatically.
c:\files\ - Automatic file will be copied to the specified folder.
If the property is left blank, the file is automatically copied will not.
This is the best solution to secure your base and to avoid the inconveniences of a
dramatic crash in which you lose everything.
In case the image does not need to be modified by user (it illustrates simply an
item), you can deactivate those three pop-up buttons with this simple script :
To hide those buttons :
Form_Accueil.DBImage1.dbShowButtons := False;
GroupBox : very useful if you have many information to show and if you don't have an
overloaded page which becomes difficult to read. In our example, only two Tabs.
To add a new page, select the GroupBox component and click right to choose New Page.
To delete a Tab, select the concerned tab and press Delete (only when you design your
interface).
31
DBFILE : used to store any kind of file (.doc, pdf, html ...). In our example, we have put
three DBFILE : one for invoice of the product, a second for manual and a third for what you
want.
If I click on the diskette on the right (and Open File), the file will be read by the
application known from Windows for the given format (here a PDF file).
Another function : open website of the manufacturer. Very simple; I use a TextBox (I fill
fields TableName and FieldName), I put a button (customized or not).
Behind a pressure of the button, there is a simple script :
OpenURL(Form1.Edit1.Text);
You can even declare an EditMask from Object Inspector. Be careful, if you make
a Copy/Paste from a navigator, the http:// will probably be added (you will have two
http://).
32
CREATE A REPORT
Last thing : From MVD, you can generate reports you can export under numerous
formats : Excel, Word, PDF, HTML, open them with OpenOffice or see them as pictures (JPG
and TIFF). You can produce extractions with a professional feeling (with your logo,
personalized layout).
Rather than to describe here the stages one by one, I send back to you to a small
tutorial prepared by DriveSoft and how to reach there very easily.
It's called 'How to create report with My Visual Database' and you can find it by
this link :
http://myvisualdatabase.com/forum/viewtopic.php?id=4
and all files for that stand here :
http://myvisualdatabase.com/forum/myfil … report.zip
-----------------------
Well. I hope this brief manual will more still tempt you to continue with MVB. It's
really a nice tool for those who want to create quality (database) applications without being
for all that professional developers.
Thanks to DriveSoft to propose us such a tool which as it grows up, bring of news
functions which to put it in equalities with other rival software which are gas plants.