1
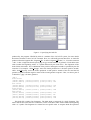
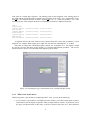
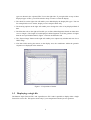
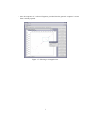
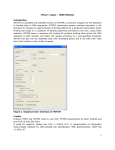
VisCHAINER
User Manual and Tutorial
Asem Othman and Mohamed I. Abouelhoda 1
July 25, 2008
1
University of Ulm, Faculty of Computer Science,
[email protected].
James-Franck-Ring, D-89081 Ulm.
Email:
1.1 Introduction
The program VisCHAINER was developed to visualize the output of the program CHAINER. This
output contains chains of fragments (similar regions among two or multiple genomic sequences). A
chain of fragments corresponds to a similar region among the compared sequences. For more discussion about the idea of chaining, see the CHAINER manual and the references therein. Nevertheless,
the user can display his comparison data produced by other programs, provided that the input formats
are consistent. The current version of VisCHAINER displays 2D plots. Each plot is a projection of the
comparison w.r.t. two genomes. This is because the fragments from multiple genomes can be regarded
as rectangles in a higher dimensional space. For portability, the program VisCHAINER is written in
Java.
1.2 Installing the program
First, check that Java of version 1.4 or newer is properly installed in your system. Second, decompress the VisCHAINER package using gzip/tar utilities (or zip program for window into the directory
“Vischainer”. This directory contains the following:
• One shell script for Unix/Linux called vischainer.sh, and the batch file vischainer.bat
for windows. From these scripts, you can change the amount of memory available for the Java
virtual machine, by modifying the number next to the “-Xmx” argument.
• Three “.jar” library files needed for our program.
• The directory “VisChainerSrc” containing the source files.
• The directory demoTestData comtaining demo test data.
It is recommended that you re-compile the program from Vischainer directory by typing the following
(do not break the command line):
javac -classpath ./VisChainerSrc/:./biojava-1.4.jar:./bytecode-0.92.jar:
./looks-2.0.4.jar ./VisChainerSrc/VisChainerMain.java
1.3 Starting the program
The program VisCHAINER is called through the shell script vischainer.sh for Unix/Linux and
the batch file vischainer.bat for Windows. A starting window then appears to specify under
which operating system the program will run; see Figure 1.1. This is to avoid incompatibility and
assure smooth run.
Figure 1.1: The starting window specifying which OS is in use.
After choosing the operating system, the main window will appear. It contains three menu items:
File, Look&Feel, and Help, see Figure 1.2.
1
• The File menu item enables the user to open a new session, open a saved session, or store a current session. A session here means a comparative genomics task. Each session is independent
from other sessions. The rationale behind supporting multiple sessions is to enable the user to
display different comparisons of different species and have a clear overview of all of them.
• The Look&Feel menu item enables the user to change the global theme of the program.
• The Help menu item will display information about the program.
Figure 1.2: The program main window.
1.4 Displaying the whole comparison results
When choosing “open all files in multiple genomes”, you will be asked to enter an information file
(called also log file). This file contains information about the number of genomes, their lengths, and
the names of the files containing the projections to be visualized. It is assumed that these files are
stored in the same directory; see Figure 1.3. The info file is automatically generated by CoCoNUT,
and it has the following format (usually with extension .info).
3 1059944 1250783 1087285
fragment.mm.ppp
fragment.mm.ppm
fragment.mm.pmp
fragment.mm.pmm
After specifying the info file, the user will be asked to display either fragments, chains, compact
chains, or clusters; see Figure 1.4. Figure 1.5 shows the displayed chain files in the demo data set.
The time needed to open these files is displayed in the console on the right. All these files were
2
Figure 1.3: Specifying the info file.
produced by the program CHAINER, which is a module of the CoCoNUT system; for more details
about these formats see the CoCoNUT manual. Here, we will briefly present these files. A chain file
produced from the fragment file “fragment file” is called “fragment file.chn”; i.e., it has the extension
“.chn”. It has a single-line header specifying its type and the number of genomes. Each chain starts
with a header line beginning with a “#” symbol followed by the chain score. The fragments of the
chain follow afterwards. The combination of the positive and negative strands is specified by the file
extension. For example, “chain file.ppp” stores the chains produced w.r.t. the three positive strands,
while “chain file.pmp” stores the chains produced w.r.tthe positive strands of the first and the last
genomic sequences and the negative strand of the second genomic sequence. Here, we show a part of
a chain file (“.ppp”) for three genomes.
>CHA 3
#1449.000000
[998481,998497]
[998457,998473]
#571.000000
[989954,989970]
[989930,989945]
#1638.000000
[984323,984413]
#828.000000
[982921,982935]
[982877,982896]
[982769,982788]
[982708,982724]
[1156278,1156294] [273931,273947] 836
[1156254,1156270] [273907,273923] 1991
[1147806,1147822] [265457,265473] 2143
[1147783,1147798] [265433,265448] 164
[1142027,1142117] [259825,259915] 2344
[1140632,1140646]
[1140588,1140607]
[1140480,1140499]
[1140419,1140435]
[258426,258440]
[258382,258401]
[258274,258293]
[258213,258229]
2173
940
1089
1148
This chain file contains four fragments. The third chain is composed of a single fragment. The
cluster file has the same format as a chain file, where each cluster starts with a header line beginning
with a “#” symbol. The fragments in a cluster have no specific order. A compact chain file represents
3
each chain as a single large fragment. The starting points of this fragment is the starting point of
the chain and the end point of the fragment is the end point of the chain. For a fragment file “fragment file”, the compact chain file is called “fragment file.ccn”; i.e., it has the extension “.ccn”. The
following is part of the compact chain file corresponding to the above displayed chain file.
>CHA 3
#1449.000000
[998457,998497]
#571.000000
[989930,989970]
#1638.000000
[984323,984413]
#828.000000
[982708,982935]
[1156254,1156294] [273907,273947]
[1147783,1147822] [265433,265473]
[1142027,1142117] [259825,259915]
[1140419,1140646] [258213,258440]
A fragment file has the same format as the compact chain file, where the coordinates of each
fragment or a compact chain require just a single line after the line containing the “#” symbol.
Note that for chain files containing negative strands, the coordinates w.r.t. the negative strand
are not the real ones but these are the output of a certain transformation procedure. The reverse
transformation is done in VisCHAINER when displaying these chains.
Figure 1.4: Choosing the type of information to be visualized in this session.
1.4.1 What to do in this state?
While being in the “open all files of multiple genomes” state, you can do the following:
• If you click the “open all files of multiple genomes” button, you will be asked again to choose
which kind of files to display (fragments, chain, compact chain or cluster). If you choose a new
file type, not chosen before in this state, it will be overlaid in the same view. These different
4
types are shown in the “Opened Files” list on the right side. If you right-click on any of these
displayed types of files, you will be asked to keep or remove it from the display.
• The check list on the right side will enable you to hide/display the display file types. You can
for example hide reverse chains, display reverse compact chains only.
• The drawing options on the right will enable you to change the color of any displayed kind of
data.
• The filteration tab on the right will enable you to filter chains/fragments based on either their
score or length. (The length of each displayed chains/fragments in all the genomes is higher
than the user specified threshold.) Figure 1.6 shows the filteration tab.
• The “Export Image” button on the right will enable you to capture any window and store it as a
JPEG image.
• Note that while moving the mouse on the display area, the coordinates within the genomic
sequences are displayed in the status bar.
Figure 1.5: Projections of chains
1.5 Displaying a single file
The buttons “Open Forward File” and “Open Reverse File” make it possible to display either a single
forward or reverse file. This option works only if your comparison includes just two genomes.
5
Figure 1.6: Filteration tab
1.6 Selection and Zooming
If you draw a rectangle by using the left-click button, you will be asked, when the mouse stops moving,
to choose one of the following actions; see Figure 1.7.
• Zooming in/out by a certain ratio.
• Zooming just the selected area.
• Reset zooming.
• Selecting and displaying the fragments/chains in the rectangular area. By displaying (compact)
chains, only those (compact) chains lying completely within the selection area will be displayed.
It is not possible to select while opening mix of chain, fragment, and compact chain files. That
is, the selection works if you open a single type. Figure 1.8 shows the selected chains. The
window contains information about the fragments of the chain, the chain score, and the file it
comes from. If sequence files are already opened, then a double-click on a fragment will display
its nucleotide sequence (in the opened genomic sequences) on the right side of the window. A
sequence is opened by clicking the button “open Sequence file” on the session menu. If some
sequences were not opened, an error message will be displayed. In Figure 1.8, we opened only
a single sequence (its name is displayed in the list “Sequence Files” on the right). Therefore,
only the nucleotide sequence (of the selected fragment) in this sequence is displayed. On the
window of selected fragments, you can do the following:
– save the selected fragments in separate file in CHAINER format.
– call extra commands to run external programs. The output will be displayed in the console.
6
– store the sequence of a selected fragment, provided that the genomic sequence it stems
from is already opened.
Figure 1.7: Selecting a rectangular area.
7
Figure 1.8: Displaying the chains within the rectangular area.
8