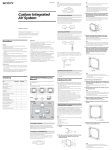
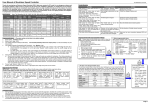
1
Introduction to the
Astrometric Telescope
Control System
For SkyWalker1i on Custom Telescope Mounts
Copyright 2002 Astrometric Instruments, Inc.
last revision date: 16-Oct-2002
Please read this document first
This document can be ordered as Astrometric Instruments’ part DOC-03E
Introduction to the Astrometric Telescope Control System for SkyWalker1i on Custom Telescope Mounts
2
Introduction to the Astrometric Telescope Control System for SkyWalker1i on Custom Telescope Mounts
Introduction
This document provides an introduction to, and installation instructions for, the Astrometric
Telescope Control System (ATCS) on custom telescope mounts. The version of ATCS
covered in this document is our SkyWalker1i product. SkyWalker1i is an integrated telescope
control system based on our SkyWalker1 Telescope Motor and Accessory Controller. The
contents of this document are as follows:
♦ This introduction.
♦ Brief overview of ATCS: components and function.
♦ SkyWalker1i installation instructions.
Much additional detail on the operation of ATCS is provided in the following two documents:
1. “SkyGuide User's Manual”.
2. “SkyWalker1 Owner's Manual”.
There are several important steps in installing the SkyWalker1i system components and
important notes on using ATCS. These are highlighted in this document as follows:
Important: Please read important notes.
The user should be very careful to read, understand and follow these important notes.
Otherwise, sub-par operation or even damage to your hardware can result.
Two important definitions are needed at this point:
♦ SkyWalker mode: when ATCS is being used without an attached PC it is being
used in SkyWalker mode.
♦ System mode: when ATCS is being used with a Windows 95/98/ME PC running
our SkyGuide telescope control system software it is being used in System mode.
The specifics of SkyWalker mode and System mode are provided in the next section.
If ATCS is to be used in SkyWalker mode, then read the “SkyWalker1 Owner’s Manual”
next. There is no need to read the “SkyWalker1 Owner’s Manual” if ATCS is not used in
SkyWalker mode since all typical SkyWalker1 installation details and setup are provided in this
document.
Important: If ATCS is to be used in System mode then be sure to read at least Chapter 1
(“Introduction”) and Chapter 2 (“Running SkyGuide for the first time”) in the “SkyGuide User’s
Manual”.
3
Introduction to the Astrometric Telescope Control System for SkyWalker1i on Custom Telescope Mounts
Brief overview of ATCS: components and function
ATCS allows for controlling all operations of a telescope “system”. The current version of
ATCS has evolved from over a decade of development and use of telescope control systems.
We believe that it is the most capable telescope control system available to amateurs today.
We have taken great effort to include useful features and user-friendly interface to these
features. Additionally, dedicated and patient “beta” testers have used ATCS throughout its
development. We are indebted to these folks!
The major components of ATCS are briefly described in this section. More (and up to date)
detail can be found at our web site: www.astrometric.com.
SkyWalker and SkyGuide:
The hub of Astrometric Instruments’ Telescope Control System (ATCS) is the SkyWalker
Telescope Motor and Accessory Controller. Together with its handpaddle, SkyWalker is a
standalone telescope controller or, when used with a PC running our SkyGuide Telescope
Control System software, a complete and full-featured telescope control system.
ATCS provides two levels of functionality: SkyWalker mode and System mode.
♦ In SkyWalker mode, the control system operates without the need for an attached
PC. SkyWalker operates autonomously as a versatile telescope and accessory
controller. High speed slew, four user selectable pan and slow motion rates, and
five tracking rates for equatorial mounts are supported. Numerous telescope
control functions (electric focus control, autoguider correction, reticle illumination
etc.) are also available.
SkyWalker mode requires a SkyWalker and high performance motors adapted to a
telescope. Astrometric Instruments provides the SkyWalker1i system that provides
the motors, power supplies, and all the cabling necessary to use SkyWalker on
custom telescope mounts.
SkyWalker mode does not provide GoTo capability, nor interface to Planetarium
software, nor a plethora of other features provided by SkyGuide (requiring a PC
running Windows 95/98/ME).
♦ In System mode, the control system operates attached to a PC running our
SkyGuide Telescope Control System Software (for Windows95/98/ME).
Functionality increases dramatically with features such as automatic GoTo
(coordinate, Planet or over 16000 deep sky objects), optical encoder support
allowing for manual movement, joystick control and control from one of the many
commercial or shareware planetarium programs available today running on the same
or remote PC.
System Mode requires a Pentium-120 (or better) PC, one communications port
(RS232) and the Microsoft Windows95/98/ME operating system.
4
Introduction to the Astrometric Telescope Control System for SkyWalker1i on Custom Telescope Mounts
Upgrades:
Functional upgrades are continuously made to ATCS.
New features, user’s
suggestions/requests and bug fixes require this. These functional upgrades primarily involve
SkyGuide however from time to time it may be necessary to upgrade the “firmware” (i.e.
embedded software) in SkyWalker. As a customer of Astrometric Instruments, upgrades to
SkyGuide are available free of charge from our web site at www.astrometric.com. Upgrades
to SkyWaker’s firmware are available at cost. Visit our website to see if an upgrade is
available.
Documentation upgrades are available as PDF files to be viewed with (the free) Adobe Acrobat
Reader v4.0 or later. Registered users can request PDF documentation files by sending an
email request to [email protected] or down load copies directly from our
documentation support page: www.astrometric.com/support/support_manuals.html.
What do I do now?
After reading the next section on installing the SkyWalker1i system please proceed as follows:
1. If use of ATCS in SkyWalker mode is planned then read the “SkyWalker1
Owner’s Manual”. It is anticipated that many installations will never use ATCS in
SkyWalker mode. In this case reading the “SkyWalker-Servo Owner’s Manual” is
optional.
2. Before using ATCS in System mode it is recommended that the “SkyGuide User’s
Manual” is read. Since the “SkyGuide User’s Manual” is rather voluminous, and
since you probably want to start using ATCS as soon as possible, we have written
the first two chapters to cover installation and use in an introductory way.
Important: Please read at least the first two chapters of the “SkyGuide User’s
Manual” before using ATCS for more than the installation testing described at the
end of this document.
5
Introduction to the Astrometric Telescope Control System for SkyWalker1i on Custom Telescope Mounts
Installation of SkyWalker1i
This section describes how to install and test the components of Astrometric Instruments’
SkyWalker1 Telescope Control System when purchased with Pittman servomotors and
separate servo drivers. This system includes a SkyWalker1 Telescope and Accessory
Controller, two servo drivers, two Pittman servomotors (with integral gearboxes) and necessary
cabling. Optionally, Astrometric Instruments can provide suitable power supplies (such as our
APS-150 or APS-230 power supplies) for SkyWalker1 and the servo drivers. When
purchased as a whole, this system is called SkyWalker1i.
Note: do not attempt this installation unless you are adept at handling electronic components!
Misconnections can damage the servomotors, servomotor encoders, servo drivers,
SkyWalker1 or power supplies.
For each telescope axis, follow these installation steps:
Mount the servomotors and servo drivers
Important Notes:
♦ The RA and Dec servomotors are separately labeled. They should not be swapped
since Astrometric Instruments has pre-tuned the motor/driver pairs.
♦ The electrical connections to the servo driver should be made firmly. Any
“looseness” in the connection can lead to erratic behavior. It is advised that the
wires be individually, and gently, pulled to check for firm connection.
♦ Do not power-up any of the electronics until all of the connections are complete,
otherwise loose wires can short to each other, or other conductive objects, and
cause damage to the system.
Mount the servomotor to a metal surface that provides some amount of heat sinking. The
motor’s continuous torque rating is limited by how much heat can be dissipated. If the motor is
attached to a metal surface, that will carry away the heat, then the motor can be safely driven
within the load limits set by the servo driver electronics.
Mount the servo driver on a metal (preferably “heat sinking”) surface near the servomotor. The
driver will not dissipate much power however it can get quite hot if not mounted on metal. It is
important to mount the servo driver so that it is protected from the elements. For example, it
should never be allowed to have dew condense on it.
Servo driver functions
The servo driver (see figure 1) is composed of two components: the actual (3rd party) servo
driver electronics and Astrometric Instrument’s Axial Support Module (ASM).
6
Introduction to the Astrometric Telescope Control System for SkyWalker1i on Custom Telescope Mounts
Figure 1
The servo driver is capable of delivering up to 20 amps to a brush-type DC servomotor. It
accepts step and direction signals from SkyWalker (which are forwarded through the ASM
module for convenient modular plug connection).
The ASM provides the following functions:
♦ Modular jack connection for the cable from SkyWalker1 and for the optional
GearIndex cable (that allows for permanent gear periodic error correction).
♦ A push-button switch that allows the system to override a HardLimit condition.
This circuit also provides (red) LED indication of the HardLimit condition and a 2pin/0.100” header for the HardLimit and Ground connection.
♦ Current-limiting circuitry. Servomotors typically have two current limits that are of
importance: a) the maximum transient current that the motor can accept without
damage to itself or its gearbox (i.e. due to excessive torque) and b) the maximum
current that the motor can accept continuously without overheating.
The servo driver contains circuitry that prevents violation of the transient rating.
The ASM module contains “integrator” circuitry that prevents violation of the
continuous current rating. If/when the continuous current rating is exceeded the
servo driver is reset for 5 seconds.
♦ Motor load indication. The orange LED will light when the motor load exceeds the
threshold set by the continuous current “integrator” circuit mentioned in the previous
7
Introduction to the Astrometric Telescope Control System for SkyWalker1i on Custom Telescope Mounts
bullet. Note: the orange LED can flicker on, or even light up nearly continuously,
without the continuous current limit circuitry resetting the drive. This is normal
behavior. The orange LED is only an indication that the motor load is approaching
the continuous integrator limit. The limit will not be tripped without 10 to 20
seconds of high load.
Better annotation of the components of the ASM module is provided in figure 2.
Figure 2
The function of each ASM component is:
♦ SkyWalker1 connection: provides direct 6-wire modular connection to
SkyWalker1. Connections include +5v, Gnd, Step, Dir, GearIndex, and
HardLimit.
♦ GearIndex input: this accepts a 4-wire modular cable from Astrometric Instrument’s
standard GearIndex sensor board.
♦ HardLimit connector: a 2-pin/0.100” connection for HardLimit switches. Supplied
with a shorting jumper pre-installed. It is recommended that the shorting
jumper be replaced with connection to a suitable HardLimit switch. The
section below entitled “HardLimit Switch” and the “SkyWalker Owner’s Manual”
provide more detail.
♦ HardLimit override button and LED. In the event of a HardLimit condition, the
HardLimit (red) LED will light. An override button is provided to clear the
HardLimit condition as long as the button is depressed.
8
Introduction to the Astrometric Telescope Control System for SkyWalker1i on Custom Telescope Mounts
♦ Step/Dir and Reset outputs: connect from the ASM to the servo driver and “relay”
the appropriate signals from SkyWalker1, and the ASM’s on-board current limit
circuitry, to the servo driver.
♦ HighLoad LED.
♦ Current sensing wires from servo driver.
Important: do not change the adjustment of the Gain, Damp and especially the Limit
potentiometers on the servo driver. They are properly adjusted prior to shipment.
Wire-up the servomotor and servo driver
Refer to figure 1 for assistance with the following electrical connections.
Note: be very careful since some servo driver text (for example “+18 TO 80 VDC” and
“POWER GROUND”) will be partial obscured by the ASM.
If you purchased the servomotors and servo drivers at the same time then your system has been
shipped with the connections between these components already made (as an example of
correct hook-up). You may wish to keep these initial connections or not, depending on your
installation details (e.g. you may need to separate the motor/driver for mounting).
Connect power to the servo driver:
♦ Positive supply voltage (red wire) to “+18 TO 80 VDC”
♦ Ground (black wire) to “POWER GROUND”
Note: standard cabling shipped with this system provides a heavy (18guage) connection
through each cable (i.e. the RA and Dec) for power to the servo drivers. The positive power
lead is red, or has a red band around it at the motor end. The negative power lead is black at
both ends.
If you are using an APS-150 or APS-230 power supply provided by Astrometric Instruments
you simply need to plug the two connectors at the end of the cable (one for servo driver power
and the other for SkyWalker1 power) into the matching receptacles on the power supply. The
SkyWalker1 power is a 2.5mm barrel connector and the servo driver power is a keyed CPC
connector. It is not possible to mis-plugin the APS connectors.
If you are using a separate servo driver power supply (i.e. not an APS unit) then you will need
to make the following connections to the power supply:
♦ Connect the red/fused positive power leads (both RA and Dec) to the positive
terminal on the power supply.
♦ Connect the black negative power leads (both RA and Dec) to the negative terminal
on the power supply.
Note: the separate power supplies provided by Astrometric Instruments should be mounted
“under cover” to protect from human exposure and to protect from moisture (e.g. heavy dew).
For these separate power supplies, Astrometric Instruments does not provide a line cord to
9
Introduction to the Astrometric Telescope Control System for SkyWalker1i on Custom Telescope Mounts
connect the power supply to an AC source. For separate power supplies, all connections to
AC power are the responsibility of the customer.
Connect the servomotor to the servo driver (if not already done so) as follows:
Motor
ARM- connection
ARM+ connection
5.9:1 gearbox GM9000 series
Red wire
Black wire
5.9:1 gearbox GM14000 series
Black wire
Red wire
19.7:1 gearbox
Black wire
Red wire
Note: when setting-up the SkyGuide telescope control system software it will be necessary to
set the number of motor “steps” per sky revolution. This value is derived by multiplying the total
gear reduction between motor shaft and the sky by the number of steps per motor shaft
revolution. The number of steps per motor shaft revolution is as follows for the 5.9:1 and
19.7:1 gearboxes:
Motor
number of steps per motor shaft revolution
5.9:1 gearbox
11794.8717
19.7:1 gearbox
39316.2393
Connect the servo encoder to servo driver (if not already done so) as follows:
♦ Black wire to “ENC-”
♦ Red wire to “ENC+”
♦ Yellow wire to “PHASE A”
♦ Blue wire to “PHASE B”
Connect SkyWalker1 motor cable to servo driver. The motor cable wire coming from
SkyWalker1 is a 6-wire flat “modular” cable. The end of this simply needs to be plugged into
the 6-pin modular connector on the ASM.
The HardLimit switch
What is the HardLimit switch? It is a customer-supplied and customer-installed normally closed
switch that should be mounted so that it opens in the event of telescope movement past “hard”
limits. The HardLimit connections are inputs that must be pulled to signal ground in order for
SkyWalker’s drive signals to be active. Normally-closed series-connected mechanical limit
switches placed on the telescope must be used to pull the HardLimit inputs to signal ground for
ordinary operation. These HardLimit switches must be placed to protect against telescope
movement beyond safety or mechanical limits. When a HardLimit switch is opened (or the
connection from the HardLimit input to signal ground is broken for any reason), the Step and
Dir outputs are disabled.
10
Introduction to the Astrometric Telescope Control System for SkyWalker1i on Custom Telescope Mounts
To use a HardLimit switch with SkyWalker1i simply connect it so that in normal/safe telescope
positions it shorts the two pins of the 2-pin/0.100” header on the ASM. One pin is the
HardLimit pin and the other is signal ground. A jumper is supplied installed across these pins to
facilitate initial testing of the system. Remove this jumper and install a HardLimit switch
prior to operating the system post-installation.
In the event of a HardLimit condition, the red LED on the ASM will light. When in HardLimit
the motor drivers are inactive. If the HardLimit condition cannot be cleared by manually moving
the telescope out of HardLimit then the push button switch next to the HardLimit LED can be
used to disable the HardLimit for as long as it is depressed.
Mount and make necessary connections to SkyWalker1
SkyWalker1 is provided with mounting holes (6-32) on the back of the enclosure. It is very
important that only nylon (i.e. non-conductive) screws be used in these holes. Conductive
screws could short to SkyWalker1’s internal circuit board. SkyWalker1 is shipped with two
nylon screws installed in these holes.
Make the following connections to SkyWalker1:
1. Connect 12 VDC to SkyWalker1 through its power cable (into the “Pwr” port).
2. Connect the RA and Dec motor cables into the “RA” and “DEC” ports.
3. Connect the RS232 serial cable from the PC (DB9) to SkyWalker1 “Com” port.
4. Connect the HP1 handpaddle to the HP port.
5. Connect (optional) optical encoder cable (8-pin modular plug with two 4-wire
cables) into the Enc port.
6. Install SkyGuide per the instructions in chapter 1 of the “SkyGuide User’s Manual”
and set-up SkyGuide per the instructions in chapter 4 of that document.
Testing
1. Verify that SkyWalker1’s Sys/SW switch is in the Sys (i.e. System-mode) position.
2. Turn-on SkyWalker1
3. Turn-on the servo drivers. Note: the FAULT LEDs will light for 5 to 10 seconds
and then should go out.
4. Start SkyGuide on the PC.
5. Enter Land mode.
6. From the handpaddle, try left/right/up/down to verify “view” motion.
7. Enter slew-mode (Slew button on handpaddle) and try left/right/up/down to verify
“slew” motion.
11
Introduction to the Astrometric Telescope Control System for SkyWalker1i on Custom Telescope Mounts
Installation is complete!
Congratulations! SkyWalker1i installation is now complete.
If ATCS is to be used in SkyWalker mode then proceed to read the “Operation in SkyWalker
mode” section of the “SkyWalker1 Owner’s Manual”.
If ATCS is to be used in System mode then be sure to read at least chapter 1 (“Introduction”),
chapter 2 (“Getting Started with SkyGuide”) and chapter 3 (“Start-up Settings”) in the
“SkyGuide User’s Manual”.
Note: System mode operation is a superset of SkyWalker mode operation therefore the
“SkyGuide User’s Manual” supercedes all operational information in the “SkyWalker1 Owner’s
Manual”.
12