1
J74 Progressive - User Manual
Page 1 of 52
J74 Progressive
A tool set for Chord Progression and Harmonic Editing
J74 Progressive - User Manual
Page 2 of 52
Table of Contents
How to install and start up J74 Progressive .................................................................................................3
Background: What is a chord progression anyway? ....................................................................................4
The Diatonic Method ...................................................................................................................................4
The Chord Progression Editor ......................................................................................................................6
The Main window of the Chord Progression Editor .....................................................................................7
The Chord Progression Matrix view .............................................................................................................9
The Chord Modifiers: the [modifiers] matrix in the Chord Progression Matrix view..................................12
The Chord Modifiers: example of chord extensions / alteration ...............................................................13
The Chord Modifiers: forcing a chord to be a Major or a Minor chord (borrowed chords)........................14
Voicing by chord extension and alteration.................................................................................................16
Default inversions and the [Octave] range.................................................................................................16
The Inversion Row (custom chord inversions)............................................................................................17
Specifying custom chord shapes.................................................................................................................18
Sequencing and editing operations on progressions..................................................................................20
The Chord Explorer.....................................................................................................................................21
The Chord Explorer: visualizing Chord Tension...........................................................................................22
The Chord Explorer: forcing a chord root ..................................................................................................25
The Circle of Fifth View: visualization and navigation of the diatonic modes.............................................26
The Arpeggio Editor....................................................................................................................................27
Live Mode...................................................................................................................................................30
Utilities.......................................................................................................................................................31
The ChordDetect utility..............................................................................................................................31
Possibilities for making Presets and/or Saving your Progressions ...........................................................31
Chord and Bass progressions combining J74 Progressive and J74 BassLine plug-ins..................................32
The Clip Modifier Tool(s)............................................................................................................................33
The Clip Modifier: Harmonize section........................................................................................................34
The Clip Modifier: Humanize section..........................................................................................................38
The Clip Modifier: Groove section..............................................................................................................39
The Clip Modifier: Modify section..............................................................................................................40
The MIDI Clip Analyzer Tool........................................................................................................................41
The Audio Analyzer Tool.............................................................................................................................43
Auto / Manual mode..................................................................................................................................44
Input Only / Audition mode........................................................................................................................44
The Analyzer Controls window...................................................................................................................45
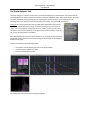
The Spectrogram window...........................................................................................................................46
The Filter window.......................................................................................................................................47
Tips for detection.......................................................................................................................................47
Appendix 1 - Chord Explorer MIDI Custom Mappings................................................................................49
J74 Progressive - User Manual
Page 3 of 52
How to install and start up J74 Progressive
J74 Progressive is a set of plug-in's for for chord progression making and harmonic editing in Ableton Live. It
requires a Max for Live license to run and it will run properly only in Ableton Live 9 or higher (older versions of Live,
such as Live 8, are not supported). Installation of the tool set is extremely easy: just unzip the download pack and
copy the files to your computer hard drive.
To start it up drop the plug-in device (.amxd) you like to use in the Ableton Live liveset. In the specific you can:
• Drop “J74 Progressive.amxd” on any MIDI track
• Drop “J74 AudioAnalyzer.amxd” on any Audio track.
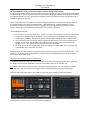
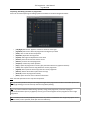
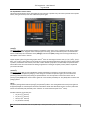
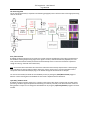
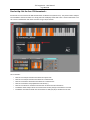
The “J74 Progressive.amxd” plug-in
The “J74 Progressive.amxd” plug-in provides three MIDI tools in a single device:
• The MIDI Clip Chord Progression Editor
• The MIDI Clip Modifier
• The MIDI Clip Analyzer
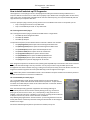
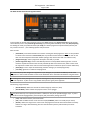
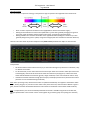
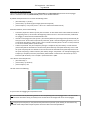
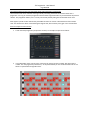
To open the tools (views) use the device buttons on the little "docked" user interface:
• The [Clip Progression] button opens the Chord Progression Editor tool
• The [Edit Progression] button opens its Chord Progression Matrix view
• The [Chord Explorer] button opens the Chord Explorer view
• The [Circle of Fifths] button opens the Circle of Fifths view
• The [Progression Chart] button opens a reference chart
• The [Clip Modifier] button opens the MIDI Clip Modifier tool
• The [Clip Analysis] button opens the MIDI Clip Analyzer tool
• The [Help] button opens the help pages for all the tools
Note: Progressive operates on the Session view (meaning that only MIDI Clips in the Session view can be created or
edited). This limitation though is not very restrictive: it is very easy to make a copy of a MIDI clip from the
Arrangement view into the Session view (e.g. just drag it over and you are done), work in the Session view with J74
Progressive and then copy back the results (new MIDI clips) in the Arrangement view again.
Note: A little utility called “J74 ChordDetect.amxd” is also included in the pack. This little tool is useful if you like to
visualize the chord names in real time on a MIDI track.
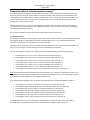
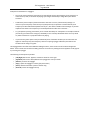
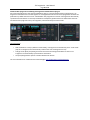
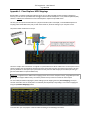
The “J74 AudioAnalyzer.amxd” plug-in
The “J74 AudioAnalyzer.amxd” plug-in provides tools for real time audio analysis,
detecting notes, chords and scales in the audio material it processes. To open the tool
use either the “Audio Analyzer” button or the “Device Activator” on the little "docked"
user interface in Live Track view.
Note: the audio processing operation is applied to the incoming audio signal
independently from the fact that audio is actually flowing or not (e.g. the source is
playing or not, the track is on “mute”, etc.). Consequently, as long as the device is
enabled, it consumes CPU cycles. Therefore in case you are not using the device but like
to keep it in the Live set, use the “Device Activator” to disable it.
Only disabling the plugin with the “Device Activator” (or removing the device from the
liveset) will save the unnecessary CPU load. Closing the windows will not be enough to
disable its CPU usage!
We will now walk through the features of all the tools included, one by one.
J74 Progressive - User Manual
Page 4 of 52
Background: What is a chord progression anyway?
A Chord progression is in essence a sequence of musical chords. In music composition the interplay between the
chords of a progression can be used to achieve a sense of movement and change: some chord combinations will
sound uplifting, some somber, others troubled. In western "pop" music a “song” typically builds on sections, such
as verse and chorus, which are no other than chord progressions. In this context a chord progression works by
building up the landscape for a melody.
But chord progressions are not just random sequences of chords, in the same way as a melody is not a random
sequence of notes. To work musically a chord progression needs to evolve on and around a scale, establishing (or
contradicting) something related to it.
But, are there methods for defining what works well and what not? Well, yes there are.
The Diatonic Method
One fundamental method to build scales (e.g. modes) and chords, as used in western music, is the diatonic method.
Among other things, the method defines the rules for building, given a scale, a set of chords with very strong
harmonic relationship to their originating scale and with each other.
Without going into the details of theory, just think of the diatonic method as the set of rules for chord making: you
have a scale, you apply the method and you get seven chords working nicely together.
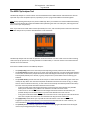
Consider for example the C Major scale. Applying the diatonic method would give the following chord set:
•
•
•
•
•
•
•
Chord Degree 1 (I): C major, C-E-G (= triad from the first note in the scale, C).
Chord Degree 2 (II): D minor, D-F-A (= triad from the second note in the scale, D).
Chord Degree 3 (III): E minor, E-G-B (= triad from the third note in the scale, E).
Chord Degree 4 (IV): F major, F-A-C (= triad from the fourth note in the scale, F).
Chord Degree 5 (V): G major, G-B-D (= triad from the fifth note in the scale, G).
Chord Degree 6 (VI): A minor, A-C-E (= triad from the sixth note in the scale, A).
Chord Degree 7 (VII): B diminished, B-D-F (= triad from the seventh note in the scale, B).
Note: please observe the fact that chords are given here a degree name. The degree is defined by the order (in the
originating scale) of the note they are built from. The degree based naming is one of the very few things you need
to remember for quickly finding your way through J74 Progressive!
If we instead pickup a Gb Minor scale, the diatonic method would result in a completely different chord set:
•
•
•
•
•
•
•
Chord Degree 1 (I): Gb minor, Gb-A-Db (= triad from the first note in the scale, Gb).
Chord Degree 2 (II): Ab diminished, Ab-B-D (= triad from the second note in the scale, Ab).
Chord Degree 3 (III): A major, A-Db-E (= triad from the third note in the scale, A).
Chord Degree 4 (IV): B minor, B-D-Gb (= triad from the fourth note in the scale, B).
Chord Degree 5 (V): Db minor, Db-E-Ab (= triad from the fifth note in the scale, Db).
Chord Degree 6 (VI): D major, D-Gb-A (= triad from the sixth note in the scale, D).
Chord Degree 7 (VII): E major, E-Ab-B (= triad from the seventh note in the scale, E).
If you do not practice it a lot, this may be quite a difficult thing to remember or find out when you need to...
But do not worry: fortunately, you won't have to remember all this. Progressive will do it for you.
J74 Progressive - User Manual
Page 5 of 52
On top of the foundations given by the diatonic method, many other useful techniques are known in the context of
harmony making. Many of those techniques are built in in J74 Progressive and are ready to use to add emphasis
and twist to your creations.
Chord extensions: sevenths, added tone and suspended chords
While many popular chord progressions are based just on simple triads, some more sophistication can be added by
using extensions and alterations, with chords of more than three (typically four) notes. The techniques to extend or
alter a chord may be a bit difficult to remember and master as well. Also in this case Progressive can come to aid:
modifying a triad into a seventh, an added or a suspended chord is just one click away.
Borrowed Chords and Accidentals
Further level of sophistication can be achieved by adding a harmonic twist to the progression, somehow
contradicting the originally selected scale and creating an element of surprise to the chord sequence (a chord you
wouldn't expect, not part of the scale, but which works right at the right spot). A technique which often results
effective for this purpose is the use of borrowed chords. A borrowed chord is a chord which is, indeed, borrowed
from another scale or mode. For instance a chord which in the originally selected scale would be a minor can be
effectively be substituted by a major in the same tonic and add a strong element of contrast. Also this is possible in
Progressive.
Inversions, arpeggio's, groove, swing, real-time testing and more
Progressive also allows you to manipulate your chord sequence by choosing the inversion type, creating an
arpeggio based on the chords, modify timing rhythmically and more. And it can also help while creating, by giving
you the possibility of testing changes before applying them into the final progression.
No more digressions!
So Progressive can help you applying these techniques effectively to create and modify chord progressions, even
starting with useful preset progressions. But presets are not necessary the point to end the journey: from the initial
selections onwards, it's all creativity and experimentation, based on a user interface as simple as the one of a
sequencer, while still holding on the foundations given by some of the most effective techniques in music
composition.
Now that you have a background of what Progressive is all about, let's have a look to the Chord Progression Editor
interface and its functionality.
J74 Progressive - User Manual
Page 6 of 52
The Chord Progression Editor
The Chord Progression Editor is a tool for building chord progressions. The devices parts of this tool work using
internal modeling and can generate extremely realistic results very quickly, results provided in the form of standard
MIDI clips, ready for use in your Ableton Live project.
The work-flow of the Chord Progression Editor is very simple: you select a scale and work on your sequence of
chords. You can start from different points: a preset progression for instance. Or you can program an original
progression straight into the editor. In alternative you can come up with ideas by trying things out and even
improvising, using the Chord Explorer or the Live Mode (more on these later).
Once you defined a useful progression, you can then go all the depth into editing and tweaking of many details,
adapting the way chords are performed (inversions and extensions), choosing the playing style (straight chords,
arpeggios, or hybrids forms, such as striking the chords of a guitar or as syncopated arpeggios) or adding variation
to dynamics (timing and velocity) and notes (skip, spread).
Once you produced your results as new MIDI clips, you can use them directly in your project. If you like you can
even manipulate the results further, using the Clip Modifier tool, which is good for adding a specific rhythmic flavor
(groove, swing) or for radical pitch and timing transformations (the Clip Modifier is presented later in this
document).
The user interface and the controls of the Chord Progression Editor
The user interface of the Chord Progression Editor is divided in three sections: the first section is the Main View
window which is used to set all the fundamental, common parameters. The second section, the Chord Progression
Matrix, is used for the in-depth sequencing and editing of the progression. The Third window, the Arpeggio Editor,
zooms into the details of the arpeggio technique in use. An additional window is dedicated to the Chord Explorer.
J74 Progressive - User Manual
Page 7 of 52
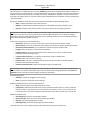
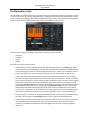
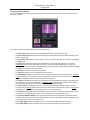
The Main window of the Chord Progression Editor
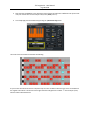
In this window you find the most important controls: the [Scale] settings, the [Progression Type] presets and the
control buttons, such as the [Create Progression Clip] for producing the final MIDI clip result, the [Start/Stop Clip]
for auditing the result just produced and the [I'm Lucky] for random progression experimentation (which by the
way can be a lot of fun...). The following explains each parameter.
Main controls:
•
•
•
•
•
[Scale Menu]: select Root and Scale to be used for creating the chord progression. Note: it is also possible
to edit the scale and create a custom scale (with any number of notes between 2 and 7). For this use the
little one-octave keyboard of the Main window (change, add, remove notes with C as reference root).
[Progression Type]: select a progression example to start with, if you like
[Create Progression Clip]: create a new MIDI Clip with the currently edited Chord Progression. In select
mode the clip will be created on the currently selected Clip Slot of Live Session view, while in track mode
the clip will be created on the next slot of the track Progressive is hosted into (more on these modes later)
[Start/Stop]: starts or stops the selected clip (useful for testing a just created progression)
[I'm Lucky]: generates a random chord progression
Tip: Essentially the [Create Progression Clip] button is your final goal, as it produces the MIDI clip result of the
progression. In select mode remember to click on the destination slot in the Session View before using the button.
Tip: Although not exactly the approach a composer would agree on, the [I'm Lucky] button can be an unexpected
source of inspiration. Try this out as it may produce stuff you won't get by linear approach.
Chord timing, range and mode:
•
•
[Chords Interval]: defines the interval for chords changes (in measures / bars)
[Chords Mode]: define if chords are played at once or as an arpeggio
Tip: the [Chord Interval] is an important parameter. It influences many of the possible arpeggio styles. Try this in
combination with the Arpeggio Editor [Time Compress] and [Time Values] settings (see next).
•
•
•
[Low]: adds the chord tonic, two octaves down
[7th]: adds an additional note on the 7th interval (the [modifiers] matrix can modify this per chord)
[Octave]: defines the range for the notes used in the progression and also how chords will be inverted by
default. The range is defined starting from the note selected in [Octave] and extends up for twelve
semitones.
J74 Progressive - User Manual
Page 8 of 52
The [7th] option, if set ON, allows you to use the [modifiers] matrix in the Chord Progression Matrix to change the
type of chord on a per chord basis. The 7th is the default chord type (if [7th] is ON), but several alternatives become
available: a chord can be turned into a 9 th (Add9), 11th (7Sus4) , 13th (Sixth) or reduced to a triad; a chord can also
be forced to be a Major, Minor or any other custom shape independently from the diatonic rules (for accidentals or
“borrowed chords”).
Besides the [modifiers] matrix other chord note variations are possible using the following options:
• [Skip]: randomly skips notes in the chord main triad
• [Skip(7)]: randomly skips the added 7th (if present) or the added notes by the [modifier] matrix
• [Spread]: randomly moves some notes one octave up or down from the settings of [Octave].
Tip: [Spread] can add even a melodic component to the part. To get an idea just duplicate the same sequence of
chords or even just the same chord a few times (in the Chord Progression Matrix you can do this by using the
[Duplicate] action) and enable [Spread]. The chords, even if repeated, will be plot each time differently with the
high notes producing little melodic evolutions.
Note timing and dynamics can be modified using:
• [Start Delay]: affects the start time of each note. A value of 0.00 ms assures perfect starting.
• [Start Variation]: can be set to fixed (Start Delay applied to each note) or variable (random fluctuations)
• [Start Delay Variation Amount]: (in ms) defines the fluctuation range in variable mode.
• [Length]: affects the duration of each note (in beats/4ths).
• [Length Variation]: can be set to fixed (the duration is fixed for each note) or variable (random
fluctuations around the Length value).
• [Length Variation Amount]: (in ms) defines the fluctuation range in variable mode.
• [Velocity]: affects the note velocity (0-127).
• [Velocity mode]: can be set to fixed (the velocity is the same for each note) or variable (random
fluctuations around the Velocity value).
• [Velocity Variation Amount]: defines the fluctuation range in variable mode.
Tip: activating velocity, length and timing variations (eventually in combination with [Spread] and [Skip] options)
you can achieve very realistic performance styles. Look for instance to the settings produced by the [Auto] and
[AutoArp] presets. These preset (auto)configure exactly those parameters.
Auto settings (presets):
• [AutoArp]: a preset for arpeggio common settings
• [Auto]: a preset for humanized common settings
Additional buttons (placed on top of the little keyboard):
• [help]: opens the help summary document for the device.
• [select/track]: defines how the location for the next created clip will be chosen. In "select" mode (the
default) the clip is created on the slot currently selected in Live Session view. In "track" mode clips are
created only in the track where Progressive is placed and each new clip is created on the next clip slot.
Additional window launch:
• [Chord Explorer]: opens the Chord Explorer window
• [Custom Chords]: opens the Custom Chord configuration window
• [Edit Arp]: opens the Arpeggio Editor window
• [Edit Progression]: opens the Chord Progression Matrix window
The latter will take us to the in-depth tweaking, which will be the next thing we will look into.
J74 Progressive - User Manual
Page 9 of 52
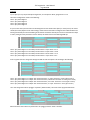
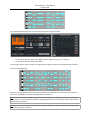
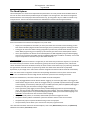
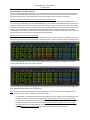
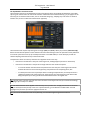
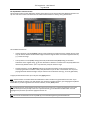
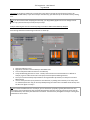
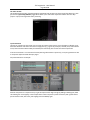
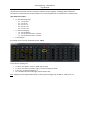
The Chord Progression Matrix view
The Chord Progression Matrix is the place where you program your own chord progression, as indeed a sequence
of chords in order of time. As you can see in the picture, where a yellow dot is placed a chord is inserted.
•
•
•
On the horizontal axis you define when the chord is placed in time (time between 1 and 16, the time
unit defined by the [Chord Interval] in the Main window).
On the vertical axis you define which chord degree will be inserted (degrees 1 to 7 refer to the
naming introduced in the previous background explanation)
A special value for a chord is the empty chord or rest interval. An empty chord can be inserted by
adding a dot on the grayed-out row set below the row for chord degree {1 - I}) and named [empty].
Tip: By combining actual chords (degree 1 to 7) with empty chords (rest intervals) you can manipulate the
(otherwise fixed) chord interval, adding emphasis to the progression pace (see examples further on).
Tip: You can also try combinations of chords before producing any clips. Two approaches are possible for this:
•
•
Using the Chord Explorer window, where all the chords Progressive can use for the selected scale are
arranged per degree and modifier type, you can manually check how chords will sound together.
Using Live Mode ([Live] = ON, in the Chord Progression Matrix), you can use the Chord Progression Matrix
in real time. Progressive will send out chords on the fly (without a clip). A few limitations to the available
features apply in this case (see Live Mode section, later on in this document).
Besides the matrix for the chord sequence, on the bottom section of this window, you can find a second matrix: the
[modifier] matrix. This section allows per-chord alteration/extension (modifying the behavior of the [7th] option)
and chords forcing into majors, minors or custom chords (outside the rules of diatonic method). Using this you can
add additional complexity to the chord progression, on a chord by chord basis. More on this in a few paragraphs.
J74 Progressive - User Manual
Page 10 of 52
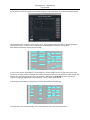
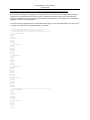
Examples
1) Let's pick up a very simple example to begin with, as in the picture above, progression 1-5-6-4.
The matrix configuration results in the following:
Time 1: play chord degree 1
Time 2: play chord degree 5
Time 3: play chord degree 6
Time 4: play chord degree 4
As you can see what you select here are chord degrees and not chords names (like C) or notes (C-E-B). The actual
chords (and notes) depend on the scale settings, chord interval and mode as configured in the Main window and
will be generated by the internal modeling of the diatonic method as done by the tool. If we would select C Major
as scale, leaving all other parameters to their default, this would result in the following MIDI clip:
Time 1: play chord degree 1 in the C Major scale which is C major chord = C-E-G
Time 2: play chord degree 5 in the C Major scale which is G major chord = G-B-D
Time 3: play chord degree 6 in the C Major scale which is A minor chord = A-C-E
Time 4: play chord degree 4 in the C Major scale which is F major chord = F-A-C
So far so good. Now let's change the settings and add 7th and Low options. This would give the following:
Time 1: play chord degree 1 in C Major with 7th and low tonic, a C major 7th chord = C-E-G-B (plus a low C)
Time 2: play chord degree 5 in C Major with 7th and low tonic, G dominant 7th chord = G-B-D-F (plus a low G)
Time 3: play chord degree 6 in C Major with 7th and low tonic, an A minor 7th chord = A-C-E-G (plus a low A)
Time 4: play chord degree 4 in C Major with 7th and low tonic, a F major 7th chord = F-A-C-E (plus a low F)
Let's now change the mode to arpeggio "arp-down" (Main window). The result of the clip generated will be:
Where the same notes above are performed in an arpeggio, with the "down" direction.
J74 Progressive - User Manual
Page 11 of 52
2) Let's now have a look to a slightly more complex example, using empty chords as rest intervals between chords.
The example shows a sequence 1-rest-5-rest-6-2-4-rest. This progression will extend across eight bars (being the
[Chord Interval] set to 1, indeed 1 bar) and produce the following MIDI clip (relevant settings in the
Main Window include Low and 7th both turned ON):
As you can see the first chord (degree 1), second (degree 5) and last (degree 4) have a longer interval due to the
presence of an empty chord (rest) behind them. Please also observe the fact that by default the chord duration will
extend "over" (any) following empty chord. This behavior is defined by the [hold empty] switch in the Chord
Progression Matrix (a toggle switch in the left/bottom corner), which is ON by default.
If we change the [hold empty] setting to OFF, the result would become the following:
As you can see in this case ([hold empty] = OFF) actual chords do not extend over empty chords.
J74 Progressive - User Manual
Page 12 of 52
The Chord Modifiers: the [modifiers] matrix in the Chord Progression Matrix view
As you have seen the [7th] option on the Main window allows you to add to the chords an additional note at the
seventh interval in the scale. By default, when the [7th] option in set ON all the chords in the progression will
become seventh chords (or just 7th).
This behavior can be modified on a per chord basis using the [modifier] matrix. In this way you can fine tune the
progression by altering/extending each chord and/or forcing its shape independently from the standard diatonic
method rules.
The [modifier] matrix is the matrix on the bottom section of the window and is active only if the [7th] option is set
to ON. In this matrix you can see six rows. You place dots in a given column to modify the type for the chord
inserted at the corresponding time slot of the Chord Progression Matrix.
The first four rows affect the chord “extension” and “alteration”: inserting a modifier on one of these first four
rows will alter/extend the harmonic flavor of that chord (or reduced it to a triad).
The fifth and sixth rows, instead, are used to “force the shape” of a chord: inserting a modifier on one of these rows
will force the chord type to become either a Major (Custom1) or a Minor (Custom2) chord independently from the
rules of the diatonic method. This allows you to add accidentals and/or borrowed chords into your progression.
In detail, the following happens for each dot you place (or leave empty):
•
•
•
•
•
•
•
If you leave a column empty (= no dot), no change is made to the default [7th] behavior on that chord. The
chord will be played as a 7th and with a shape derived from the diatonic method rules.
If you set a dot on the [7 >> 9] row, the chord will be played as a 9th chord (actually an Add9 chord, due to
the four note system adopted by Progressive – see next for an explanation on how this is done).
If you set a dot on the [7 >> 11] row, the chord will be played as a 11th chord (actually a 7 Sus4 chord, due
to the mentioned four note / inversion system).
If you set a dot on the [7 >> 13] row, the chord will be played as a 13th chord (actually an Sixth chord, due
to the mentioned four note / inversion system).
If you set a dot on the [7 mute] row, the chord will be played as a simple triad of three notes (same as if
the [7th] option was disabled for that chord).
If you set a dot on the [>Major] (or [>Custom1]) row, the chord will be forced to become a Major chord (or
a custom chord, if configured), independently from the diatonic method rules.
If you set a dot on the [>Minor] (or [>Custom2]) row, the chord will be forced to become a Minor chord
(or a custom chord, if configured), independently from the diatonic method rules.
J74 Progressive - User Manual
Page 13 of 52
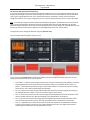
The Chord Modifiers: example of chord extensions / alteration
Let's pick up again the example of the previous paragraphs about the [modifier] matrix.
In the specific you can see that:
•
•
At Time 3 a dot is added on the [7 >> 9] row. The chord will be modified to be a 9th (Add9) chord.
At Time 6 a dot is added on the [7 >> 13] row. The chord will be modified to be a 13th (Sixth) chord.
Here the result of the MIDI clip built by using the setup in the previous picture:
•
•
•
•
•
•
•
•
Time 1: play chord degree 1 in C Major as a 7th chord: a C major 7th chord = C-E-G-B (plus a low C). There
is in fact no dot applied to the corresponding column of the [modifier] matrix.
Time 2: rest (the previous chord in hold down)
Time 3: play chord degree 5 in C Major, but as a 9th (actually an Add9) chord: G Add 2 = G-A-B-D (plus a
low G). On the third time slot (column) indeed there is a dot on the [7 >> 9] row. The chord is therefore
modified to be a 9th chord (Add9, due to the inversion and note omission system of Progressive).
Time 4: rest (the previous chord in hold down)
Time 5: play chord degree 6 in C Major as a 7th chord: an A minor 7th chord = A-C-E-G (plus a low A). No
dot applied to the corresponding column of the [modifier] matrix.
Time 6: play chord degree 2 in C Major as a 13th chord: an D minor 13th (actually a Sixth) chord = D-F-A-B
(plus a low D). On this time slot (column) there is a dot on the [7 >> 13] row. The chord is therefore
modified to be a 13th chord (Sixth, due to the inversion and note omission system of Progressive).
Time 7: play chord degree 4 in C Major as a 7th chord: a F major 7th chord = F-A-C-E (plus a low F). No dot
applied to the corresponding column of the [modifier] matrix.
Time 8: rest (the previous chord in hold down)
Tip: use the Chord Explorer to have a preview of what the extension/alteration sounds like, before applying it.
J74 Progressive - User Manual
Page 14 of 52
The Chord Modifiers: forcing a chord to be a Major or a Minor chord (borrowed chords)
In regards to the diatonic method, the progressions you can generate with the just reviewed tools could be defined
as “absolutely pure”. They fit to perfection into the selected scale. While this perfection is still the basic foundation
for traditional harmony (as a very good source material for further experimentation) it may not reach the level of
emphasis or pathos you are up to.
In fact several techniques are possible in harmony for adding “imperfections” (and therefore interest) to the mix.
A common example is the idea of “borrowed chords”. A borrowed chord (or modal interchange) is a chord
borrowed from another key with the same tonic. It provides variety through contrasting scales (e.g. major vs
minors). With Progressive it is possible to add this kind of twist to your progression.
The possible approaches are:
1.
2.
3.
You can force a chord to become a major , a minor or a custom chord regardless of the rules of the diatonic
method. This is possible using the [modifiers] matrix, as described in this paragraph, and eventually by
combining the [modifiers] matrix with the [Custom Chord] configuration view, which is explained later.
You can select a portion of a clip (for instance a chord) and “harmonize it” (selectively transpose it) into
another scale or mode. This approach is described later in this document when introducing the Clip
Modifier. This is a more refined approach to scale and modal interchange.
Of course you can edit the resulting MIDI clip by hand editing in Live MIDI editor. The fact of producing
standard MIDI clips is in this case very handy.
While leaving the last method out of scope to this document (and inviting you for the second to look further in the
document - see chapter about the Clip Modifier), we will now focus on the possibilities given by the [modifiers]
matrix Major/Minor chord “force”.
How to use the [modifiers] matrix for chord forcing
As mentioned the fifth and sixth row of the [modifiers] matrix in the Chord Progression Matrix allow you to force
the shape of a chord into the Major (dot on the fifth row) or Minor shape (dot on the sixth row).
Note: By default the Major and Minor shapes , associated to the fifth and sixth rows, use a Major7 and Minor7
extension shape. This can be customized using the [Custom Chord] configuration view, as described later.
Let's start with a progression with no such modifier in place (no dot on the fifth or sixth row is present):
The progression (2-3-6-rest-2-3-6-1) results in the following MIDI clip:
J74 Progressive - User Manual
Page 15 of 52
Let's now duplicate the progression and make a few changes to the last two chords:
•
•
On Time 15 we force the chord to be a Major. We also change it to have an 11 th extension.
On Time 16 we force the chord to be a Minor.
These changes results in notes “outside” the original scale (a C Major) and quite a noticeable harmonic emphasis.
Here the resulting MIDI Clip:
Needless to say, the [modifier] matrix (eventually combined with configuration of [Custom Chords] as explained
later in this manual) offers lots of fine tuning possibility for variations.
Tip: The main commands on the Chord Progression Matrix window, such as duplicate, undo, copy etc. also apply
to this matrix. The only exception is the Shift Up and Shift Down which are not enabled (it does not make sense to
rotate among chord types ).
Tip: both chord [modifier] extensions and chord forcing are available in Live Mode for quick sketching. See further
in this document about Live Mode.
J74 Progressive - User Manual
Page 16 of 52
Voicing by chord extension and alteration
In Progressive chords of maximum five notes are supported (four for the actual chord, plus an additional note for
the low tonic, if added by the [Low] option). In theory this maximum amount of notes limits extension, which
requires in some cases more notes than the maximum available. Anyway, by applying voicing and note omission,
the [modifier] section of Progressive still gives a useful form of chord extension and alteration.
In particular:
•
•
•
•
For a 7th the full “7th” (four notes) extension is provided: 1 - 3 - 5 – 7
For a 9th, instead of the theoretic 1 - 3 - 5 – 7 – 9 you get 1 - 3 - 2 – 5. This is the result of two adaptations:
the replacement of the 9 with the 2 (harmonically somehow equivalent, as 2 and 9 both refer to the same
note in the scale, only 9 being one octave up from the 2) and by omitting the 7 (as only four notes, apart
from the low tonic, are possible). This results in a chord form (alteration) known as Add9.
For a 11th you have 1 - 4 - 5 – 7, with a somehow similar approach: the omission of the 3 (dissonant with
the 4 and therefore practically always omitted) and of the 2, resulting in the 7 Sus4 chord form.
For a 13th you have 1 - 3 - 5 – 6, with 4, 2 and 7 being omitted and resulting in the so called Sixth chord.
Other constraints of the [modifiers] matrix:
•
•
•
The first four rows are mutually exclusive. A chord can be either a 7th, 9th, 11th, 13th (and their actual
alterations explained above) or a triad, but not more than one at the same time. You can therefore place
only one dot (or none) across the first four rows for each column. The last dot placed overrules the others.
The last two rows are also mutually exclusive in respect of each other. A chord may have only one shape:
the one automatically derived by the diatonic method (= no dot on fifth and sixth row), the forced-Major
one (dot on the fifth row) or the forced-Minor one (dot on the sixth row). Consequently you can place (for
each column / time slot) only one dot (or none) across the last two rows (again the last placed wins).
It is possible though to make combinations between settings of the first four rows and settings of the last
two rows: a chord may be forced to be a Minor (dot on the sixth row) and extended as a 9th chord (dot on
the first row). Any combination is allowed, as long as it fits the rules just described (side note: you actually
do not have to worry about this. The [modifiers] matrix will only allow valid combinations).
Default inversions and the [Octave] range
As mentioned the [Octave] parameter defines the range for the basic notes used in the progression and defines
how chords will be inverted by default. The range is defined starting from the note selected in [Octave] and extends
up for twelve semitones.
A couple of examples:
•
•
An [Octave] parameter set to C3 means the range used for the chord notes (apart from the Low tonic) will
be C3 to B3. Chords will be automatically inverted within this range. So a D Minor chord (D – F – A – C) will
be plot as C3 - D3 – F3 – A3, with the last C inverted (in the down direction).
An [Octave] parameter set to F3 means the range used for the chord notes (apart from the Low tonic) will
be F3 to G#4. Chords will be automatically inverted within this range. So a D Minor chord (D – F – A – C)
will be plot as F3 – A3 - C4 – D4, first inversion in up direction.
Tip: the default inversion chosen by Progressive can be changed, if you like. To do this you use the [Inversion row]
on the Chord Progression Matrix and specify per chord which inversion to use. See next for the [Inversion row].
Tip: if the [Spread] option is set to ON, the chords will extend across three octaves (+/- 1 octave from the selected
value in [Octave]). This can introduce new voicing forms of the chords for potentially interesting new results.
J74 Progressive - User Manual
Page 17 of 52
The Inversion Row (custom chord inversions)
As you may already know, the same chord can be played in different ways. You can start from the tonic and go up
(the classic root shape) or rotate the chord, starting from another note in the chord. While the chord remains the
same, it gets a slightly different taste. This is called chord inversion. Sometimes it may be useful to be able to
change the inversions. That's why in Progressive you can, if you like, specify which inversion to use for each chord.
Note: as mentioned, Progressive inverts chords automatically and by default. The default inversions are chosen in
such a way that the equivalent performance remains contained within the pitch range defined by the [Octave]
parameter (twelve semitones). This is just one of the ways performers can play chords: this is actually the form that
requires the least movement of your fingers across the keyboard (notes are close to each other).
In Progressive you can change this behavior using the [Inversion row].
Here an example and a description on how to use it.
As you can see the [Inversion row] is placed in the middle of the Chord Progression Matrix and shows, for each
chord, what Progressive will do in terms of inversion:
•
•
•
•
•
The symbol “-” indicates that the plugin will choose the inversion automatically (as by default). The chosen
shape will depend from the actual chord and the [Octave] setting. In the example above we have a D
Minor 7th chord. With the [Octave] starting at C3, the chord is laid out as C3-D3-F3-A3, which is actually a
third inversion. This is chosen automatically by Progressive.
The “0” imposes to the chord the root shape (shape which starts from the tonic and goes up in pitch). In
the example above the D Minor 7th chord is set in Root shape as D3-F3-A3-C4.
The “1” causes the first inversion to be used (moving down the keyboard the third note of the basic triad,
which is the fifth intervals). This gives the following in the example above: A2-C3-D3-F3
The “2” gives the second inversion (moving down the keyboard the third and second notes of the basic
triad, the fifth and the third intervals). This gives the following in the example above: F2-A2-C3-D3
The “3” is applicable only to chords of four notes and starts the chord from the added fourth note (the
seventh in the example): C3-D3-F3-A3. This is often called third inversion. This shape was actually the
shape Progressive would have chosen by default in this case.
J74 Progressive - User Manual
Page 18 of 52
Specifying custom chord shapes
By default the forced to Major and forced to Minor options of the [modifier] matrix adopt a diatonic method for
chord extension, as forced chords are extended using perfect fifths intervals of a corresponding major or minor
scale (in such a way the resulting chord becomes the root chord of the corresponding scale).
To make it more concrete, let's consider a C Minor scale (C, D, Eb, F, G, Ab, Bb) and suppose degree 1 to be forced
to Major. The resulting forced chord, if extended, would be:
A Major 7th (if no dot is placed on first four rows of [modifier] matrix), C Major7 chord: C E G B
An Add9 (“7 >> 9” selected in the [modifier] matrix), C Add9 chord: C D E G
A Major 7 Sus4 (“7 >> 11” selected in the [modifier] matrix), C Major7 Suspended 4 chord: C F G B
A Major 6 (sixth) (“7 >> 13” selected in the [modifier] matrix), C Major6 chord: C E G A
A Major triad (“7 mute” selected in the [modifier] matrix), C Major chord: C E G
•
•
•
•
•
In Progressive this default behavior can be modified. To do this you can use the Custom Chord configuration view.
You can open this view from the Main Progression View, using the [Custom Chords] button (see below picture).
The Custom Chord configuration view presents a left and a right section, with two chord shapes:
The first shape, Custom Chord 1, is linked tot the force to major option (fifth row) on the [modifier] matrix
and is configured by default with a Major7 shape
The second shape, Custom Chord 2, is linked to the force to minor option (sixth row) on the [modifier]
matrix and is configured by default to a Minor7 shape.
•
•
You can modify these shapes in two ways:
•
•
By hand, clicking on the little one octave piano keyboard and selecting up to four notes, as you like.
By using the [Chord Menu] (located below the little piano keyboard) and selecting one of the shapes in
the list.
Note: You can quickly go back to the default Major7 or Minor7 shapes by using the respective [Reset] buttons.
J74 Progressive - User Manual
Page 19 of 52
Example of Custom Chords
As an example we will change Custom Chord 1 into a Dominant 7 th shape and Custom Chord 2 into a Major-Minor
7th shape. In both cases we will do it by selecting the shape name from the corresponding menu.
This is what we get:
As you can see the shape of both chords has been changed.
If we now look into the Chord Progression Matrix view you can notice that the names for the last two rows of the
[modifier matrix] have been modified into >Custom1 and >Custom2, to signify a custom shape is in use:
If we now take the case of the Custom Chord 1 shape, extensions using a Dominant 7 th shape will result into:
•
•
•
•
•
A Dominant 7th (no dot on first four rows of [modifier] matrix), a C 7 chord: C E G Bb
An Add9 (“7 >> 9” selected in the [modifier] matrix), a C Add9 chord: C D E G
A (Dominant) 7 Sus4 (“7 >> 11” selected in the [modifier] matrix), a C Major7 Suspended 4 chord: C F G Bb
A Major 6 (sixth) (“7 >> 13” selected in the [modifier] matrix), a C Major6 chord: C E G A
A Major triad (“7 mute” selected in the [modifier] matrix), in the example a C Major chord: C E G
Tip: Custom chord shapes and custom chord forced tonic (root) can be freely combined. Also notice that the
Chord Explorer will reflect your customizations and always show the available chords (and related tension).
J74 Progressive - User Manual
Page 20 of 52
Sequencing and editing operations on progressions
Here a list of all the sequencing and editing operations available on the Chord Progression Matrix:
•
•
•
•
•
•
•
•
•
•
•
•
•
•
[Left/Right] Shift arrows: Applies a rotation to the left or to the right
[Up/Down] Shift arrows: Move the progression one degree up or down
[Undo]: does an undo of the last operation
[Duplicate]: duplicates the Progression
[Expand]: shifts right and duplicates the first chord
[Shorten]: shifts left and removes the first chord
[Reverse]: reverses the chord progression
[Compact]: removes any chord repetition
[Copy]: copies the progression in memory (for paste action like Insert, Append or Restore)
[Insert]: does a paste of the last copy before the current progression
[Append]: does a paste of the last copy after the current progression
[Restore]: deletes all and does a paste of the last copy
[Clear All]: erases the progression entirely
[Chart]: opens the Chart view as reference information
Note: the Undo operation reverts only the last operation.
Tip: Try the Shift operations! They do not change the length of the progression but alter its movement (in the case
of left/right shifting) or even its nature (in the case of up/down) shifting.
Tip: a very useful combination while editing, specially if using preset progression, id the use of [Copy] in
conjunction with either [Insert] or [Append]. This way you can chain together several progressions into a longer
progression.
Tip: as already mentioned the [Duplicate] command is very useful in combination with the [Spread] option turned
on. The chords, even if repeated, will be plot each time differently.
J74 Progressive - User Manual
Page 21 of 52
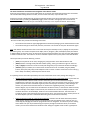
The Chord Explorer
The Chord Explorer is a tool for chord exploration and performance. The tool provides all the available chords in
the scale as well as all the chords possible through the modifiers rules in Progressive. The chords are assigned to
dedicated buttons and can be played and combined on the fly, by using pads or keys on a MIDI a controller or by
using the mouse. The tool can be launched from the docked device and from Chord Progression Editor.
Here a few situations for which the Chord Explorer may result useful:
•
•
•
Define your chord palette to work with: you can try the chords in free format to find something you like.
Note the chords down (degree number and chord type) and try to build a progression starting from here.
Looking for the next chord: while creating a progression you often ask yourself which could be the next
chord. While programming you can quickly try the chords by just click on their Chord Explorer buttons.
Jam to find inspiration: the buttons on the Chord Explorer are MIDI mappable (using Live MIDI mapping)
and can even respond to input MIDI notes (if the [MIDI On/Off] toggle is enabled - see below). You can this
way use a keyboard or controller and jam with chords hands-on.
The chord buttons
The Chord Explorer presents the chords in a logical way: on the vertical axis you have the degrees (1 to 7) while on
the horizontal axis you have the various chord options, given by the rules of the [modifier] matrix, with the left
section of buttons focused on the diatonic chords, the center section on forced to major (or [Custom1]) chords and
the right section on forced to minor (or [Custom 2]) chords. The chords notes and names are populated
dynamically. If you change root or scale names and notes assigned to the buttons will be refreshed automatically.
Note: if no chord name is assigned to a button the corresponding chord does not fit any of the common chord
shapes. This is related to the fact that a high level of dissonance is present in the resulting set of notes.
Besides the chord buttons, a few other controls are available on the Chord Explorer:
•
•
•
•
•
•
The [T/M] toggle defines how the buttons behave: toggle (T) or momentary (M) mode. If you trigger the
chord buttons using the mouse, leave this to toggle mode (T). If you MIDI map the buttons using Live MIDI
or KEY mapping, use momentary mode (M). If you use MIDI input notes (when the [MIDI On/Off] toggle is
enabled, see next) you can leave this setting to toggle mode (T).
At the right of the [T/M] toggle you can find the [Load New Mappings] button and [Preset Mappings]
menu. They can be used to load different MIDI note input mappings. The [Preset Mappings] offers some
presets for popular options. The [Load New Mappings] button allows you to load custom mappings. See
Appendix 1 for instructions on how to create custom mappings.
The [MIDI On/Off] selector, if turned ON, enables MIDI input notes to trigger the chords.
The [Show Tension] enables visualization of the chord harmonic tension in the current context.
The [Show CoF] opens a separate window focusing on the Circle of Fifths
The [Force Root] column allows you to overrule the root (tonic) of forced chords.
Let's now look at the other controls of the Chord Explorer, such as the [Show Tension] function, the [Show CoF]
additional view and the [Force Root] column.
J74 Progressive - User Manual
Page 22 of 52
The Chord Explorer: visualizing Chord Tension
When adding variations, such as using forced major or minor chords, it can be useful to know in advance how much
a given choice would depart from the current scale (and from the related diatonic set of chords): a characteristic
known in harmony as “Tension”.
What is Tension?
Tension is a characteristic of a chord within a specific context (e.g. a selected scale). Tension creates intensity and
emphasis, somehow departing from the expected movement of chords belonging purely to the selected scale (the
diatonic chords). In practice it is the result of adding some level of dissonance into the mix.
One approach to tension is to apply chord extension within the diatonic boundaries, within a single chord itself (that
is: add or modify the notes in the chord while still using notes belonging to the same scale). Seventh chords for
instance add just a little level of tension as the extra note, a perfect fifth away from the third in the triad, is still
quite consonant with the rest of the chord (it is a series of fifths). Suspended chords instead create more tension,
as this type of chord is unresolved (it has no third) and creates a form of relative dissonance between the notes.
Tip: for chord extensions and alteration in Progressive, look at the extension options in the [modifier] matrix.
Another approach to tension, usually with a more substantial effect, is to introduce chords with notes outside the
selected scale, creating dissonance between chords. This is for instance the effect of introducing borrowed chords,
chords which originally come from another mode or scale. This often translates into forcing a chord which was
originally a minor into major or viceversa. If overdone this approach can result in excessively dramatic passages or
even fall into a cliché (think about all the pop ballads in the 80's raising the entire progression of one full tone
towards the end of the song...). But if done sparsely it can end up creating a lush progression.
Tip: for borrowed (forced) chords in Progressive, look at force to major/minor options in the [modifier] matrix.
Is it possible to measure the tension level of chord? How to know in advance what effect a change would have?
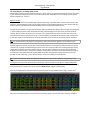
In Progressive a simple method is available for this: using colors to visualize the level of tension a chord would have
in the context of the selected scale. This is what the [Show Tension] toggle, if enabled, does.
Here the example of layout the Chord Explorer gets with [Show Tension] enabled, while using a C Major scale:
The colors are used to show the level of tension associated to chords. Let's see now how to interpret this layout.
J74 Progressive - User Manual
Page 23 of 52
How the Tension color of a chord is defined
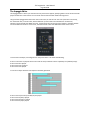
The tension (color) is defined by using the Circle of Fifths. For what Progressive is concerned, the circle is used here
to show the relationship between the chords and to measure the chord tension.
Tip: explaining the logic behind the Circle of Fifths goes far beyond the scope of this manual. If you are interested
and like to know more, just search on the Internet and you'll be surprised by how many explanations, discussions
and articles are available on the topic. Anyway, if you just like to explore it, you can have a look to the Circle of
Fifth view available in Progressive, as explained later in this manual.
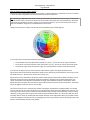
Taking into reference the C Major scale we will have the following Circle of Fifths diagram:
In our context the Circle of Fifth provides this information:
•
•
•
On the middle circle, with capital notes symbols (C, G, D, etc.), you see the root of major triad chords.
On the inner circle, with lowercase notes symbols (Am, Em, etc.), you see the root of minor triad chords.
On the outer ring it shows the harmonic region for a chord (within the context of the selected scale).
If you look at the diagram you can notice a portion called Diatonic region. This region spreads the three
upper/central sections and includes the diatonic chords (majors and minors) associated to the scale: majors are on
the middle circle (C, F, G) and minors on the inner circle (D, A, E).
When we force one of the diatonic chords into another chord type (for instance from G Major to G Minor), we are
effectively moving away from the Diatonic region and temporary changing scale (for the duration of the new
chord). The position of the destination chord after forcing (in this example the location of the G Minor chord)
defines how much we depart from the diatonic region and therefore the level of tension we introduce. The further
we go, the highest the level of tension we introduce.
The musical reason for this is related to the number of mutations (and therefore accidentals) which are needed,
from the current scale to a new scale which has as root chord the selected new chord. Moving one section on the
circle requires one mutation (one accidental, which would be a flat if moving counterclockwise, a sharp if moving
clockwise); moving two sections requires two mutations (two accidentals) and so on. The Circle of Fifth can tell us
also which flats or sharps are needed, but that exceeds the intent of this explanation. What you just need to know
is that J74 Progressive calculates this for you (although you can see it by yourself if you like, by looking at the Circle
of Fifths view enabled by the [Show CoF] option).
J74 Progressive - User Manual
Page 24 of 52
The color scheme
The colors follow a “spectrum of energy or temperature” logic to represent the magnitude of the tension level:
•
•
•
Green is used to represents the lowest tension (applicable to chords in the Diatonic region).
Moving counterclockwise increases tension (adds flats b's), with colors gradually changing from green to
cyan, blue, purple and finally red (the highest tension level), to signify the increased tension.
Moving clockwise also increases tension but on the opposite direction (adding #'s instead of b's). Colors
gradually change from green to yellow, orange and red again (this time reached from the other direction).
These are the colors shown by the Chord Explorer with [Show Tension] enabled and C Major as selected scale:
Interpretation:
•
•
•
All chords marked in Green add no tension (or just the tension level given by extension or alteration). They
are diatonic to the scale.
For forced chords you can notice that some forced-to-major chords are marked in Yellow (for instance the
second degree), while some forced-to-minor chords are marked in Cyan (degree 5). In both cases these
chords will add limited level of tension (give by a single accidental, as one note outside the scale is used).
Instead forced chords marked in Orange (forced majors) and Purple (forced minors) will add more tension
(with two or more accidentals being introduced).
Note: when you change scale, chords tension colors are updated automatically. This applies to the diatonic modes
(major, dorian, phrygian, etc.) but also to more exotic scales (in the latter case, while the idea of Diatonic region is
gone, tension can still be calculated based based on the number of accidentals a forced chord would introduce).
Note: a complementary view on the relationships between the chords is available using the Circle of Fifth view,
which is explained later in this manual. Use the views together to get a better grasp on why things are what they
are....
J74 Progressive - User Manual
Page 25 of 52
The Chord Explorer: forcing a chord root
The [Force Root] column (on the right side of the Chord Explorer) allows you to overrule the root (tonic) of forced
chords. As we explained Progressive allows you to introduce chords outside the rules of the diatonic method by
using the [modifier] matrix. The [Force Root] can be used to change the root of those forced chords.
Use case: introduce a chord having as root a note outside the selected scale
Let's make a use case example to make this application clearer. Let's suppose C Major is the selected scale. In a
major scale the seventh degree is always a diminished chord, a chord which is often difficult to use as it has quite a
dissonant character (dissonant from the perspective of the chord itself, not of the scale). If we look at the Circle of
Fifth from the previous paragraph, we would notice that a possible alternative, one just one section away from the
diatonic region, would be to use a Bb Major chord (a chord with only one accidental, the Bb tonic note itself).
Anyway Bb is not one of the notes in the scale. The feature described in this section points exactly to this case: the
idea of using chords with root (tonic) note outside of the selected scale.
Forcing a chord root note, while forcing chords
If you open the Chord Explorer you will notice on the right end a column with note names. By default these notes
match the degrees (notes) of the selected scale. These are the notes used as root (tonic) note for all forced chords.
As you would expect by now, these notes can be changed. Following our example, we change the root of the
seventh degree from B to Bb, as in the picture below:
As you can see the Bb note becomes highlighted in red (signifying the root for the forced chord on this degree has
been changed from the default of the selected scale).
Note: changing the root note applies only to forced chords (dots on fifth or sixth row of the [modifier] matrix).
So, if you force the root note of a degree, this would be the effect:
•
•
•
If a yellow dot is inserted on the fifth row of the [modifier] matrix for a degree, the corresponding forced
to Major (or forced to Custom1) chord will have the selected forced root note from this note column
If a yellow dot is inserted on the sixth row of the [modifier] matrix for a degree, the corresponding forced
to Minor (or forced to Custom2) chord will have the selected forced root note from this note column
If no dot is inserted on the fifth and sixth rows of the [modifier] matrix for a degree, the diatonic chord
with the original root note will be used (ignoring the forced root from this note column)
J74 Progressive - User Manual
Page 26 of 52
The Circle of Fifth View: visualization and navigation of the diatonic modes
Among its many properties, the Circle of Fifths allows you to visualize the relationship between notes and chords.
This is useful while making decisions on what, in terms of chord variation, may work well or not.
Progressive provides a dedicated Circle of Fifths visualization window: from the Chord Explorer you can open the
Circle of Fifths View by enabling the [Show CoF] toggle, which is located in the right/top corner of the Chord
Explorer (the Main Window will be open automatically in this case, as it is required for the CoF View to work).
The Circle of Fifth View provides the following information:
•
•
The location of the Diatonic region (highlighted with a white box) belonging to the selected diatonic mode.
The location and type of chords and, therefore, how close or far chords are they from the Diatonic region.
Note: with diatonic modes literature refers to the scales derived from the Major scale, by shifting the root position
(the starting note). The modes correspond to the Major, Dorian, Phrygian, Lydian, Mixolydian, Minor (aka Aeolian
or Natural Minor) and Locrian scales. As these scales are derived from the Major scale, they are often addressed to
as modes instead of scales. The modes are of course available as options of the [scale] menu in the Main Window.
The tool provides you with the following controls:
•
•
•
•
[Root] to transpose the circle notes, changing the [root] parameter in the Main window as well.
[Mode] buttons to change mode (and Main window [scale]), moving to a different region on the circle.
[Left] or [Right] to rotate the root of the circle (and change the [root] on the Main window accordingly).
[Relative] option, if enabled, for a relative move of mode on the circle: if enabled, using the [Mode]
buttons, both [root] and [scale] will be adapted in order to select a relative mode of the current scale (e.g
from C Major to A Minor), which keeps the note set intact.
As a planning tool the information provided by the Circle of Fifth View can be useful, among other things, to:
•
Identify which forced chord or forced root option could work well for a borrowed chord. If you look at the
circle (and selected a diatonic mode as scale to work with) you can visualize the Diatonic Region,
highlighted by a white box. This region shows you the native major chords (outer circle) and minor chords
(inner circle) for the scale. Outside this region lay other chords (majors and minors), which although not
diatonic, may work well as borrowed chords. For instance the neighboring chords, just outside the
Diatonic Region, may work well as one-off substitutes of diatonic chords, as their tension will be relatively
low. For example, with C Major as selected scale, this would be the case of the D Major or B Minor in the
clockwise direction or of the Bb Major, G Minor in the counterclockwise direction. This information is
actually the same as the information give by the tension colors, as shown by the [Show Tension] feature of
the Chord Explorer (tension is indeed calculated using the Circle of Fifths as reference).
•
Select an alternative mode for a shift of the progression. Instead of one-off chord substitutes (isolated
chord changes, leaving all other chords in the progression intact and diatonic to the scale) you can try a
modal shift, by changing the mode the progression evolves on altogether. For instance if you are working
with a Minor scale you may find interesting to temporary change the mode into Dorian, as the Dorian
mode is just one sector distant from the Minor mode. Going for neighbor modes is often a good option.
J74 Progressive - User Manual
Page 27 of 52
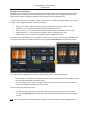
The Arpeggio Editor
The Arpeggio Editor is where you customize the way each chord is played, specifying which note in the chord will be
played at what time in the interval. You can launch the tool from the Main window of Progressive.
The grid of the Arpeggio Editor shows the notes in the chord, in order of time: the Tonic (root note in the chord),
the 3rd and the 5th, in case of triads, and the added 7th (or note used in the selected form of extension /
alteration) and eventually the added Low tonic, if respectively the [7th] and the [Low] options in the Main window
are turned ON. Each column is a time event, somehow similar to how Live MIDI editor shows notes in time.
To start with an example, see configuration in the picture above. This shows the following:
At time 1 two notes are played: the Low tonic and the 7th (or whatever notes is implied by the [modifier] setup).
At time 2 the 5th is played.
At time 3 the Tonic is played.
At time 4 the 3rd is played.
In case of a C Major chord this note sequence would be generated:
At time 1 the C1 (Low tonic) and B3 (7th) are played
At time 2 the G3 (5th) is played.
At time 3 the C3 (tonic) is played.
At time 4 the E3 (3rd) is played.
J74 Progressive - User Manual
Page 28 of 52
Note Timing in the Arpeggio Editor
Time events are defined by the setting of the [Time Values] and [Time Compress] parameter on the Arpeggio
Editor in combination with the [Chord Interval] value as set in the Main Window.
By default these parameters are set to be the following values:
•
•
•
[Chord Interval] = 1 (in bars)
[Time Values] = {0 25 50 75} (percentages of the Chord Interval)
[Time Compress] = 1.0 (a ratio, from 0. = 0% to 1.0 = 100% of the Chord Interval)
With these defaults, we have the following:
•
•
•
Chords are played at a distance of 1 bar from each other. In other words the first Chord will be inserted at
the beginning of bar 1, the second at the beginning of bar 2 and so on. This also means that, if defined as
an arpeggio, a chord must be articulated within 1 bar.
Intervals in an arpeggio are 1/4th of a bar. [Time Values] define the percentage of the [Chord Interval] for
each time event. So the values of {0 25 50 75} mean that Time1 is the exact beginning of the bar, Time 2 is
at 25% of the bar (which is 1/4th of 1 bar), Time 3 is at 50% of the bar (which is at the ½ of 1 bar) and Time
4 is at 75% of the bar (which is 3/4th of 1 bar).
Cadence is quantized. The [Time Compress] setting is a modifier of the [Time Values]. It means that the
[Time Values] will be calculated on a fraction of the [Chord Interval]. If the [Chord Interval] is set to 1 and
the [Time Compress] left to its default of 1.0 note time intervals would be exact (quantized). But if we set
the [Time Compress] to a lower ratio the [Time Values] will get "compressed". For example changing [Time
Compress] to 0.5 (50%) means the [Time Values] will be halved: so while Time 1 still remains 0, Time 2
becomes 1/8th of the bar, Time 3 is 2/8th = 1/4th and Time 4 is 3/8th.
Let's take the same example with:
• [Chord Interval] = 1
• [Time Values] = {0 25 50 75}
• [Time Compress] = 0.5
This will result in the following:
As you can see the arpeggio gets compressed in time.
Tip: you can omit notes by deselecting the dot on the corresponding row in the Arpeggio editor. This can also be
used to create alternative voicing to chords (even if the chords are left straight and not set to an arpeggio).
Tip: using the [Time Compress] in conjunction with [Chord Interval] and the [Time Values] you can achieve very
powerful results and produce complex rhythmic structures. Next some of the possibilities.
J74 Progressive - User Manual
Page 29 of 52
Examples of combinations in arpeggio's:
•
You can for instance keep the [Time Values] to their defaults and try decreasing the [Time Compress]. At
values like 0.75, 0.66, 0.5 and 0.33 the playing style changes dramatically to things like triplets based
structures.
•
Combine the [Time Compress] fractional numbers with their "inverse" [Chord Interval] settings. For
instance a [Time Compress] of 0.33 on top of a [Chord Interval] of 1 produces a similar effect of [Time
Compress] of 0.66 combined with [Chord Interval] of ½, but with the double of chord changes. If you then
duplicate each chord in the sequence you essentially double the effect in the same bar....
•
Try syncopation by having [Time Values] set to emulate little delays or anticipation. For example instead of
{0 25 50 75} you could set the timing to {0 20 60 80} or even unevenly distributed values such as {0 26 49
77} which emulates an a syncopated cadence in playing.
•
If you select the guitar option in the [Chords Mode] menu of the Main window you can notice that this
applies an extremely low [Time Compress] value to an uprising arpeggio. Effectively this achieves the
emulation of the strings of a guitar.
The Arpeggio Editor also offers some additional editing functions, similar to the ones of the Chord Progression
Matrix. These controls can be useful for adding variation: for instance try shifting the chord up/down or left/right or
try reversing the arpeggio.
The following are the operation possible:
•
•
•
•
•
•
[Left/Right] Shift arrows: Applies a rotation to the left or to the right
[Up/Down] Shift arrows: Moves/Rotates the arpeggio one note up or down
[Reverse]: reverses the arpeggio
[Copy]: copies the arpeggio in memory (for paste action)
[Paste]: deletes all and does a paste of the last copy
[Clear All]: erases the arpeggio entirely
J74 Progressive - User Manual
Page 30 of 52
Live Mode
While the main goal of Progressive is to be a MIDI editor for chord progressions, the tool offers also an alternative
mode of operation for quick sketching: Live Mode. Live Mode is enabled if you set the [Live] toggle of the Chord
Progression Matrix to ON (it is OFF by default). In this case the window will also change to a dark-red background.
What is Live Mode?
In Live Mode you can work with your progression on the fly. Instead of producing results into clips, Live Mode
sequences your chords in real-time. In this mode Progressive generates notes from within the docked device in the
track (any input note to Progressive will be silently dropped). In this mode changes in the Chord Progression Matrix
are applied immediately. This can speed up your creative process.
Limitations:
Due to its on the fly nature, less degree of manipulation is possible in this mode. The following limitations apply:
•
•
No Note variations: Start Delay, Start Variation, Length and Length variation as well as Velocity Variation
are not available. Only the [Velocity] fixed setting is supported.
No inversion editing, chords will be inverted automatically by Progressive, the [inversion row] is disabled.
Note: while Low, Spread, Skip and Arpeggio Editing are supported in Live mode you may find minor differences
(specially on Spread and Arpeggio voicing) between Live mode and the MIDI clip creation. This is due to the limited
control possible in Live mode real time operation.
Live Mode can be useful in many ways, for instance in the following context:
•
•
The creative stage of building a progression. You are building your progression and are not completely sure
of which chords will be part of it, of which order to use, or you are trying out modifiers for extensions and
borrowed chords. In all these cases you can benefit from the directness of Live Mode.
Live Performance. You are improvising live, you defined just the root and scale to work with and would just
like to jam using the Chord Progression Matrix as a sequencer of chords in harmony with your context.
Tip: you can also combine the use of the Chord Explorer and of Live Mode together. For instance use Live Mode to
trigger the basic progression and Chord Explorer buttons to add variations. You may want to record MIDI on a Live
MIDI track in this case.
J74 Progressive - User Manual
Page 31 of 52
The Clip Modifier Tool(s)
The Clip Modifier is a multifunctional tool. It provides functions for harmonization (selective transposition of notes
in a clip or portion of it, for harmonic editing purposes), for adding humanized fluctuation (adds dynamics in both
velocity and timing), for adding groove (rhythmic adaptation of timing) and for note transformation (manipulation
of time and pitch, such as rotation of pitch within a clip or redistribution of notes in time).
The tool works on MIDI clips, applying transformations to them and has four sections:
•
•
•
•
Harmonize
Humanize
Groove
Modify
All sections share some common features:
•
Undo: Each time you make a change you can undo it directly within the tool. The [Undo] button always
reverts to the state of the original clip. In fact this offers unlimited undo possibilities, independently from
how many changes you made. So you can wildly process the clip (e.g. testing it to very different scales or
grooves) and always revert back to the original with one click. Live standard undo can also be used.
•
Commit: the modifications of the different sections are by default mutually exclusive. So if you apply
Harmonization and then Humanization, the result would be only the last operation. Anyway it is possible
to use “destructive editing” if you like to apply multiple modifications on the same clip. For this to happen
you will need to commit the first set of changes before applying the next. This is possible by manually
pressing the [Commit to Clip] button (on the top of the device). If you like you can make this automatic: on
the right/bottom of the device there is a toggle called [Commit:Manual/Auto]. If set this to Auto each
change will be committed automatically (the internal [Undo] function is disabled in this case, while of
course you can use Ableton Live own undo function, outside Progressive). If you set this to Manual it will
apply only the last operation and require manual commit to apply the next, as previously explained.
•
On the fly testing: Any function can be applied while playing, which is a useful way to immediately check
the results. You can also use the [Start/Stop] button to start or stop the currently selected clip.
•
Full Clip or Selected notes: Any operation can be performed on the entire clip or on a specific selection of
notes. To apply the function on the entire clip, just select (click onto) the clip to edit. For a specific
selection, go into Ableton Live MIDI editor view and highlights only the notes you which to apply the
function on.
J74 Progressive - User Manual
Page 32 of 52
The Clip Modifier: Harmonize section
The Harmonize section (on the left/bottom portion of the device) offers the possibility of adaptation of any MIDI
clip to a given musical scale. The tool can be useful for radical harmonic transformations (e.g. if you apply it on the
entire clip) or for selective little touches, such as modal interchange (e.g. adapting only a few notes or chords to
another scale, for the so called “borrowed chords” approach).
The Harmonize tool requires only settings for the target [Root] and [Scale]. When you press the [Harmonize Clip]
button the tool will transpose the notes which do not fit the selected target scale. The operation can be performed
on a subset of the notes in the clip (if manually select them in Live MIDI editor) or to the full clip if you did not
selected anything other than the clip in the Session View.
Transposition is done on a note-by-note basis. The algorithm works in this way:
•
If the note in the selection is also part of the target scale, nothing happens (the note is maintained).
•
If the note in the selection is not part of the target scale the note will be transposed:
◦
In a normal situation the note will be transposed to the next note part of the target scale with the
smallest distance from note of the original clip, with preference for transposing down, but...
◦
If a subsequent note in the clip overlaps with the resulting transposed note, the transpose action is
changed to another note of the target scale, either given by the note having the same distance but
being transposed up or having the second smallest distance from the original note.
Tip: The tool works at its best if the clip scale root is the same as the target scale root (for instance harmonizing /
adapting a clip in C Major to C Minor).
Tip: Harmonize function can be applied to the entire clip or to a portion of it. To apply the function on the entire
clip, just select (click onto) the clip to edit. For a specific selection, go into Ableton Live MIDI editor view and
highlights only the notes you which to apply the function on.
Tip: you can use the Harmonize tool on any MIDI clip, even outside Progressive generated material!
J74 Progressive - User Manual
Page 33 of 52
Here an example. The original clip is in the B minor scale {Db Eb F Gb Ab A B}, as shown here.
We select the B Dorian scale from the [Scale] settings. This scale is composed of the following notes: {Db D E Gb Ab
A B}. As you can notice, this scale only differs from the clip's original scale in two notes: D instead of Eb and E
instead of F. By applying the transposition the result will be a clip with identical notes, times and velocities but
having any F transposed to E and any Eb transposed to D.
Tip: if your clip has two scales, select only the portion of the clip (in the clip select the area of interest) to
harmonize only that selected section.
Tip: You can use the Harmonize tool in creative ways, for instance you can create harmonic variations of the same
clip (applying the changes on the whole clip or on parts of it).
J74 Progressive - User Manual
Page 34 of 52
Using the Harmonize tool to insert borrowed chords and accidentals in a progression
The Harmonize tool can be useful for inserting musically interesting accidentals or borrowed chords into a
progression. Let's say you created a progression with the Chord Progression Editor as just described in the previous
sections. This progression will be “pure” as it only uses chords perfectly fitting into the selected source scale.
Now suppose you like to add a harmonically noticeable variation: for instance a borrowed chord from another
scale. This will have the effect of contradicting the original scale, but eventually it may give a nice musical effect.
Here an example on how to do this:
1.
Create the initial progression (see previous sections). For example a simple one as follows:
2.
In Live MIDI editor select only the notes of the chord (or chords) you like to modify. We choose chord
number 14 in the progression (a G Minor 7th). In the picture below you can see the selected notes in Live
editor as reported with the light blue color.
J74 Progressive - User Manual
Page 35 of 52
3.
Now open the Clip Modifier. In the Harmonize section (on the left side) select a different scale (in the same
root). For instance let's use the C Major scale (on the [Scale] menu's).
4.
Let's finally apply the harmonization by pressing the [Harmonize Clip] button.
The result of the harmonization would be the following:
As you can see the Harmonize tool has transposed only one note: the A#3 has become a A3. This is an accidental to
the original scale C Minor. The chord at time 14 gets therefore changed from a G Minor 7 th into a G Major 7/Sus2,
which is indeed a borrowed chord.
J74 Progressive - User Manual
Page 36 of 52
The Clip Modifier: Humanize section
The Humanize section (on the right/center portion of the device) can be used to add some additional dynamics to a
clip. The tools in this section can add a form of randomized fluctuation to velocity, timing and duration.
The available functions are:
•
Velocity Dynamics: use the [Velocity] setting to add a fluctuation component to the original velocity of the
clip. The amount defines the fluctuation range around the original values. Fluctuation is applied randomly
(+/-) within the range.
•
Time Dynamics: use the [Time] setting (eventually combined with the [Grid] setting) to introduce
fluctuation on the original timing. In this case fluctuation is based on a random feed. The [Grid] defines the
reference (by default within a 1/16th slot) while the [Time] the variance range.
•
Duration Dynamics: use the [Duration] settings to introduce fluctuation on the original duration. It is
normally a good idea to combine it with [Time] fluctuation if you are after a more human feel. If you are
playing with leads and bass though it may be useful to use the duration alone (e.g. for some glide effect).
To apply the Humanize function you must press the [Apply] button.
Note: the fluctuations are random based and underwater random numbers are generated for each note. If you
change the controls for velocity, time and duration you retain these random numbers, just changing the amplitude
of the effect. If you like to generate new random numbers, use the [Seed] button.
Tip: Humanize function can be applied to the entire clip or to a portion of it. To apply the function on the entire
clip, just select (click onto) the clip to edit. For a specific selection, go into Ableton Live MIDI editor view and
highlights only the notes you which to apply the function on.
Tip: you can use the Humanize tool on any MIDI clip, even outside Progressive generated material!
J74 Progressive - User Manual
Page 37 of 52
The Clip Modifier: Groove section
The Groove Section allows you to manipulate the note timing in a rhythmic way. The section provides two separate
effects, Swing and Groove, each with a different rhythmic goal.
[Swing%]
The Swing effect adds incremental anticipation or hesitation to the notes. This is a powerful tool for giving a clipan
unusual, funky cadence. Negative values anticipate the note timing, positive values delay them. The incremental
nature is defined by the combination of the [Swing%] value and the [Base] setting and can easily provide ways to
add triplets or 32nd notes in the mix.
Useful rhythmic values for generating triplets and 32nd notes are the integer fractions such as: 1/4 (+/-25%), 1/3 (+/33%), 1/2 (+/-50%). These values can be quickly set up using the little box below the [Swing%] control. Other [Swing
%] values, unrelated to such fractions, will create a more unusual syncopation. As mentioned, an important factor
which affects how the incremental time shifting is applied is the setting of the [Base] control, which is explained
just a few lines below.
[Groove%]
The Groove effect adds per note independent random anticipation or hesitation. The overall result has a more
random emphasis compared to [Swing%], as the timing has a random component. Again you can combine the
[Groove%] values with the [Base] setting as explained below. It is also important to notice that in the case of
[Groove%] the [Seed] button can be used to generate a new random probability set. The [Seed] does not affect the
[Swing%] effect.
[Base]
The [Base] setting affects both the [Swing%] and [Groove%] effects. This setting defines the area for the effects to
be applied/looped on. Essentially this influences which beats will be less affected (and more "on beat") and which
will be more effected (and potentially more “off beat” or moved towards triplets or 32 nd notes).
Possible values for [Time Base] are:
• 4n (or a 1/4th interval)
• 2n (or a 1/2th interval)
• 2dot (or 3/4th interval)
• 1n (or full bar interval)
Tip: you can use the Groove tool on any MIDI clip. It works particularly well on drum based MIDI clips!
J74 Progressive - User Manual
Page 38 of 52
The Clip Modifier: Modify section
The Modify section adds a few special functions to manipulate note pitch and timing creatively.
You may be already be aware that Ableton Live Clip view already knows some function manipulation function. You
can find them in the Clip “Notes Box”, like the one in the picture below:
Ableton Live built in functions for MIDI processing are:
•
•
•
•
•
Double/Half Tempo
Reverse (time and pitch)
Invert (pitch only, vertically)
Legato
Duplicate Loop functions.
The Modify section adds the following extra MIDI processing functions:
•
Pitch Shifting (Left / Right & Down / Up): this function retains the timing in the clip but affects the pitch of
the note events. In the Left / Right case pitch is shifted to the previous / next note event in time of the
original clip. In the Down / Up case pitch is shifted to the previous / next note pitch in the selected scale.
Try adding a clip modified by shifting Left or Right after a few repetitions of the original clip or try the shift
Down / Up function on a clip with a melody or solo to hear the effect by yourself.
•
Pitch Distribution: the [Distribute] function (somehow opposite of the previous one) takes a clip and
redistributes its notes (same pitches) using new timing. Two parameters are available to influence the time
distribution:
◦ [Bars], which defines the area (in bars, indeed) for collecting notes and doing the redistribution. The
redistribution will restart at each [Bars] specified interval.
◦ [Grid], which defines the resolution of the interval used for the notes
•
Grid Split: this function “splits” the notes in the selected clip based on the grid length as defined by the
[Grid] parameter. This function can be useful to split long, hold notes or chords into rhythmical repetitions.
In particular this can produce interesting results if combined (after clip commit) with other functions: for
instance the results of a [Grid Split] can be processed through a [Swing%], [Groove%], [Pitch] Rotation or
[Distribute] to produce rhythmical changes or even harmonic rhythm.
Tip: you can use the Modify tool on any MIDI clip, even outside Progressive generated material!
J74 Progressive - User Manual
Page 39 of 52
Other utilities for progressions editing
The ChordDetect utility
Included in the pack is also a little utility called “J74 ChordDetect.amxd”. This tool can be useful if you like to
visualize chord names, as being played on a MIDI track.
In the picture above the “J74 ChordDetect.amxd” is used with Progressive set in Live mode, as a way to show the
chords while testing the progression (the picture was taken while a live part was being played on a guitar).
Possibilities for making Presets and/or Saving your Progressions
If you save the Progressive device as part of your liveset, all its
settings will be saved with the project. This way it is possible to continue
experimenting with progressions and arpeggios by simply reloading the
liveset.
It is also possible to create presets of Progressive. In this case use
Live native preset saving capability: by pressing the little save
button on the top/right title bar of the device (in Live's track) you
will create a preset in the form of a .adv file. You can drop this
preset any time you need and get the Progressive settings back.
It is of course also possible to re-use MIDI clips created by
Progressive through various projects. This is actually the simplest
way to create your own database of material. To do this use Live browser,
and look inside a saved project for clips. Drag and drop
the clips wherever you like.
Next we will look into the Clip Modifier. This tool can be used for additional processing on the MIDI clips you
created with the Chord Progression Editor but also for processing any MIDI clip you like to modify (MIDI clips
created by any mean, like things you recorded through performance or imported otherwise into Ableton Live).
J74 Progressive - User Manual
Page 40 of 52
Chord and Bass progressions combining J74 Progressive and J74 BassLine plug-ins
Part of the J74 product line is the separate J74 BassLine plug-in, a tool specialized in bass line progressions. J74
Progressive and J74 BassLine can work together as an integrated environment for chord progressions and bass-line
production. By default the tools work in “Linked Mode” with progressions created in J74 Progressive automatically
synchronized to J74 BassLine. In this setup J74 BassLine consequently produces bass-lines which follow the scale
and chords of the progression set by J74 Progressive, with harmonically consistent results.
Important Notes:
•
•
•
With J74 BassLine in use (by default in Linked mode), J74 Progressive is automatically set to "Track mode"
(clips of J74 Progressive are automatically created in the track J74 Progressive is into).
Changes to the [Root] and [Scale] parameters and to the Chord Progression Matrix as done in J74
Progressive are automatically synchronized to J74 BassLine.
The [Start/Stop] buttons operate in tandem between the devices.
For more information on J74 BassLine check the web page: http://fabriziopoce.com/bassline.html
J74 Progressive - User Manual
Page 41 of 52
The MIDI Clip Analyzer Tool
The MIDI Clip Analyzer is a tool for instant scale and chord detection of MIDI material. Scale detection is often an
important step in the composition process, especially if you are trying to blend different material together.
Note: Strictly speaking the Analyzer only works on MIDI clips. But if you combine Live's Audio-to-MIDI functionality
you can use it to blend audio samples with MIDI material (detecting the scale in an audio part, and using this scale
for the rest of your composition).
Note: if you need to work with audio material (eventually from a live, real-time feed) have a look to the alternative
J74 Audio Analyzer device, which is described further in this document.
The MIDI Clip Analyzer has two mode of operation: Scales and Chords. In "Scales" mode it tries to find a matching
scale to the clip (or portion of it, as being selected in Live MIDI editor). In "Chords" mode it tries to determine the
chord of the current selection.
Here all the available controls in the MIDI Clip Analyzer:
•
•
•
•
•
The [Analyze Clip] button starts the analysis of the clip being currently selected in the Session view.
The [Scales/Chords] switches allows you to switch the mode of operation. In Scales mode ([Scales/Chords]
set to Scales, the dark color) analysis will look for scales matching the selected clip or clip portion. If set to
Chords ([Scales/Chords] set to Chords, in green), Analyzer will try to find which chord is matching your
selection.
The [Possible Scales] provides the result of the analysis. In Scales mode this would be a guess of the scale
used by the clip. Often more than one Root/Scale combination will fit the same notes set (e.g. a C Major
and a A minor use identical note sets), as such scales are harmonically interrelated (modes of each other).
The menu color will provide information about the time of match:
◦ If there is a Scale match and enough information is present to guess the Scale Root, the [Possible
Scales] menu would be in gray and the scale selected in the menu the exact match.
◦ If there is one or more Scale matches but not enough information to detect the Scale Root, the
[Possible Scales] menu would be yellow. Any of the scales identifies the same note set.
◦ If the guess include Scales which is a super-set of the the note set in the clip (the scale includes all the
notes in the clip but also other notes not contained in the clip) the menu will be blue.
The [Apply Scale] button allows you to spread the scale information to the other tools in the J74
Progressive set (and also to HarmoTools, a free real-time harmonization tool set in the J74 family - for
more information: http://www.fabriziopoce.com/download.html ).
The [Refresh] button at the top / right corner is useful for collecting again information from the clip (for
instance if you changed the portion being selected).
J74 Progressive - User Manual
Page 42 of 52
Important: If you wish to analyze only a section of the clip, select in the clip the area of interest (notes to be
selected in Live MIDI editor). If you wish to analyze the entire clip, just select the clip in the Session view by clicking
on it.
Tip: if you do not find a match analyzing the entire clip, your clip probably apples one or more change of scale.
Select only a portion of the clip to study the clips in steps.
Example: detecting the scale of an audio clip using Live Audio-to-MIDI and the MIDI Clip Analyzer
Here the logic work flow for detecting a scale from an audio clip:
1.
2.
3.
4.
5.
6.
Open the audio clip in Live
Right Click, and select "Convert Melody to New MIDI Track"
Let Live analyze the audio and convert it to a MIDI clip
Verify the MIDI clip generated is "clean". Usually if the material is not well recorded or it is difficult to
analyze (e.g. this is often the case of a vocal part) a few false positive will be generated.
Once your converted melody responds well to the original audio clip material, use Analyzer as usual on
MIDI material
If to few notes (less than 6) are present for scale detection, try adding notes manually. If too many notes
are collected (more than 7-8) you are still probably having some false note in the MIDI converted clip. Look
for false note again as in step 4.
Tip: if the material is difficult for Live to analyze, you can still clean it up quickly. Typically false notes have very
low velocity, and can therefore be easily manually deleted (select the notes using the velocity bar under the clip,
in Live MIDI editor). Also check pitch detection in transients: sometime if the pitch glides live will put a wrong note
in between to correct notes.
J74 Progressive - User Manual
Page 43 of 52
The Audio Analyzer Tool
The Audio Analyzer is a tool for real-time note, scale and chord detection in audio material. The tool analyzes the
incoming signal in the frequency domain to find the harmonic fundamentals which define musical notes. This way it
can detect and display notes (showing them on a Spectrogram window as well as on a live display) and, by
collecting notes, it can perform scale and chord analysis in a similar way as the MIDI Clip Analyzer.
Important: The tool processes the incoming audio signal independently from the fact
that audio is actually flowing or not (e.g. the source is playing or not, the track is on
“mute”, etc.). Consequently, as long as the device is enabled, it consumes CPU cycles.
Therefore in case you are temporary not using the device but like to keep it in the Live
set, use the “Device Activator” to disable it.
Only disabling the plug-in with the “Device Activator” (or removing the device from the
liveset) will save the unnecessary CPU load. Closing the windows will not be enough to
disable its CPU usage!
The tool is composed of three floating windows:
•
•
•
The Analyzer Controls window (top / left in the picture below)
The Spectrogram window (top / right)
The Filter window (bottom / left)
We will describe each of these in the following paragraphs.
J74 Progressive - User Manual
Page 44 of 52
The Processing Chain
For the sake of explanation (as required in the following paragraphs) here a reference chart of the signal processing
chain of the device:
Auto / Manual mode
By default the device operates in Auto mode. This involves automatic amplification of the ingress signal based on
the feedback of the signal processing stages: if the signal is too low, it will be automatically amplified; if it is too
loud, it will be attenuated. Similarly the device also automatically clears its note cache if it detects a potential
change of scale (e.g. collected notes exceed nine).
Note: on full tracks Auto mode works at its best if the material has been already compressed to a relatively high
level of loudness (as done usually by modern mastering). If this is not the case, it may be a good idea to add a
compressor before the Audio Analyzer plug-in. See further through this document for an example.
You can exit Auto mode (and avoid this auto feedback process) by setting the [Auto/Manual mode] toggle to
Manual. In the Processing Chain the feedback of Auto mode is depicted with the dotted line.
Input Only / Audition mode
By default the ingress signal is passed “Dry” in output as the intent of this device is analysis and not audio output
processing. Therefore ingress amplification and filtering are used only internally in the device with the results not
being passed in output. You can change this default behavior by using the [Input Only/Audition] toggle in the Filter
window.
J74 Progressive - User Manual
Page 45 of 52
The Analyzer Controls window
This is the window where you define how the tool performs its analysis as well as where notes, chords and scale
results are provided.
Let's view the controls available, starting from the left/upper side:
•
•
•
•
•
•
•
•
•
•
•
•
•
•
The [View Filter] button opens the Filter window (which shows the ingress filter stage)
The [View Spectrogram] button opens the Spectrogram window (which shows the detected notes on the
frequency spectrum)
The [Input Filter Type] defines the type of filter used in the ingress processing chain. The filter is by default
a 12dB high pass.
The [Input] dial controls the ingress signal amplification. In Auto mode this parameter is controlled
automatically by the device. If the signal is too low, it will be automatically amplified; if it is too loud,
attenuated. This behavior can be modified by setting the mode to Manual (with the [Auto/Manual] toggle)
The [Gain] dial defines the Filter gain amount
The [Cutoff] dial defines the Filter cutoff frequency
The [Gain] dial defines the Filter peak (Q/resonance) amount
The [Threshold] dial defines the minimum level a frequency band must have to be detected as a note ON
event. By default this is set to 50%, a reference gating value. Values lower than 50% will result in potential
false notes, although a shorter detection latency may be achieved.
The [Release] dial defines the level (in inverse proportion to the [Threshold] value) that a frequency band
must decrease to in order to be detected as a note OFF event. By default this is 100% (the same value as
the [Threshold]). Higher values allow the note OFF event to be retained longer.
The [Live Display] has a display only function. It shows (on the little piano keyboard) which notes are
currently active (in yellow), which notes have been collected so far (statistics history cache, in purple) and
if applicable any detected chord (as composed by the currently active notes)
The [Run/Freeze] toggle can be used to freeze the result view (value = Freeze). The freeze option can be
useful to focus on a specific event in time. To let the collection run again use value = Run
The [Scale and Statistics Display] is the larger piano keyboard area (just below the [View Spectrogram]
button) and shows the notes of the last detected scale. If statistics are enabled (which is the default case)
it also reports the number of hits of each note.
The [Possible Major] reports the Major Scale (if any) which is defined by the collected notes
The [Possible Minor] reports the Minor Scale (if any) which is defined by the collected notes
J74 Progressive - User Manual
Page 46 of 52
•
•
•
•
•
•
•
The [Possible Alternative (Modes)] menu collects all the possible scales matching the collected set of
notes. It may include many scales, as complete matches (e.g. the diatonic modes of the same collected
note set) or scales which are a super-set of the current set of collected notes (a partial match).
The [Apply] button allows you to spread the scale information to the other tools in the J74 Progressive set
(and also to HarmoTools, a free real-time harmonization tool set in the J74 family - for more information:
http://www.fabriziopoce.com/download.html ).
The [Guess] button let's you try a partial match (guess) on the collected note set.
The [Clear] button restarts the audio and note collection engine
The [Statistics] toggle enables/disables the display of note statistics in the [Scale and Statistics Display]
The [Auto/Manual] toggle changes the mode of operation between Auto (the default mode) and Manual.
In Auto mode the device performs automatic ingress signal normalization and note cache clearing.
The [Normal/Extended] toggles the scale detection between the “Normal” set of scales (the most
common, including the diatonic modes, the common minor scales and the pentatonic scales) and the
“Extended” set of scales (which includes more exotic scale references).
The Spectrogram window
This window shows the detected notes in the frequency spectrum domain.
•
•
•
The [ON/OFF] little toggle switch on the right side activates/deactivates the Frequency Spectrum for the
incoming signal. This is useful for visual feedback of the signal level and the nature of the spectrum
involved.
The [Threshold red bar] controls the same parameter as the [Threshold] in the Analyzer Controls window,
although it offers the possibility of visually matching the threshold value to the the level of the incoming
signal (the spectrum levels are consistent with the level you assign to the threshold used for detection)
The [Brightness] number box (at the right/bottom corner) allows you to add or reduce the brightness of
the bars representing the detected musical notes
The notes detected are shown with different colors to facilitate visual recognition:
•
•
•
The A notes are presented with the Red/Purple color
The BCDEF notes are presented with the Magenta/Purple color
The notes corresponding to the piano black keys are presented with the Dark/Purple color
J74 Progressive - User Manual
Page 47 of 52
The Filter window
This window shows the Filter frequency diagram (amplitude) and the spectrum of the signal (after filtering). It also
presents the [Input Only/Audition] toggle which allows you to switch the output of the device from the “Dry”
(output = input) to the signal after Filter processing.
Tips for detection
The plug-in, if working in Auto mode, tries to match the volume of the input to a level of loudness sufficient to get
harmonics detection. This works at its best on single parts (e.g. a guitar or piano part, isolated) and, if full tracks are
used, if the material has been already normalized (read: mastered), with a limiter and some compression.
If the source material is a un-mastered full track (with large fluctuations in dynamics), it may be a good idea to add
a compressor before the Audio Analyzer plug-in.
See picture below for an example:
With the compressor it is important to try to get the output volume high enough (by adding a Makeup gain) while
still avoiding too much clipping. In the example above a Glue compressor (native Live device) with “gentle limiter”
preset has been used, with no EQ, soft clipping and some Makeup gain.
J74 Progressive - User Manual
Page 48 of 52
One last tip: Get the free J74 Harmotools...
HarmoTools is a set of devices for MIDI harmonization for Ableton Live (Max for Live). They can be used to adapt in
real-time MIDI to chords and scales or to simply discover and display chords and scales. It can be used within a Live
set or even in collaboration with other musicians using a TCP/IP network.
The set includes:
•
•
•
•
•
•
•
Max for Live analyzer and Harmonize based on input chords
Max for Live analyzer and Harmonize based on a selected scale
Max for Live diatonic chord Harmonize based on a selected scale
Max for Live diatonic auto-populated rack of chords (*)
Max for Live add-on for network communication of chord and scale information
Standalone chord analyzer which can communicate via OSC (TCP/IP) to the Max for Live tools
Standalone scale selector which can communicate via OSC (TCP/IP) to the Max for Live tools
J74 Progressive - User Manual
Page 49 of 52
Appendix 1 - Chord Explorer MIDI Mappings
Besides MIDI or computer-keyboard mappings (which you can add using MIDI and KEY mapping standard Live
feature) you can also use input MIDI notes to trigger chords of the Chord Explorer. In fact, when the [MIDI On/Off]
selector is enabled, the chord buttons of the Chord Explorer respond to input MIDI notes.
This way you can map the chord buttons to a physical controller (like a Launchpad, a standard MIDI keyboard or
anything which sends MIDI notes) and jam with them hands-on, while not looking at your computer screen.
The picture below visualizes this concept:
The idea is simple: each chord button is mapped to a specific MIDI note. When a MIDI note is received (see arrow in
yellow) it triggers the corresponding chord and the notes of that chord are sent in output (arrow in blue). This way
you can jam hands on and capture your performance directly from the MIDI output (use Live MIDI I/O routing to
get and record MIDI on a separate MIDI track).
Important: as opposed to Live MIDI or KEY mapping (and of course to the computer mouse), using MIDI input note
mappings does support MIDI velocity. The velocity used for the input note is used for the chord output.
You can modify the default mappings by either loading a preset mapping from the [Preset Mapping] menu (for
common controllers such as Launchpad or a traditional piano keyboard) or by loading a new custom mapping file
using the [Load New Mappings] button.
To do the latter you must prepare a text file edited according to the following instructions.
J74 Progressive - User Manual
Page 50 of 52
The text file for the custom must be a simple list of button-to-note mappings. A mapping defines indeed the
association of a chord button of the Chord Explorer to an incoming MIDI note. The definitions are made this way:
{XYZ} {MIDI note number}
•
•
•
X is the chord shape type
◦ X 1 : 1 is for triad
◦ X 2 : 2 is for 7th
◦ X 3 : 3 is for >>9
◦ X 4 : 4 is for >>11
◦ X 5 : 5 is for >>13
Y is the chord category:
◦ Y 0 : 0 is for diatonic
◦ Y 1 : 1 is for forced to major / custom1
◦ Y 2 : 2 is for forced to major / custom1
Z is the degree
An example of line in the file would look like this: 312 61
In this case the mapping says:
•
•
•
•
X is set to 3 to signify a >>9 (9th or Add9) type of shape
Y is set to 1 to refer to a forced to major / custom1 category of chords
Z is set to 2 to represent degree nr. 2
61 is the MIDI note which will trigger the chord (61 is C#3)
Note: mappings do not support MIDI velocity or other type of messages (such as MIDI CC, MIDI sysex, etc.).
J74 Progressive - User Manual
Page 51 of 52
Default Mappings and full mapping example (directly comaptible with the Novation Launchpad)
Here an example of MIDI input mappings for the Chord Explorer. The values used here actually reflect the default
settings of J74 ProgressiveSE, built-in when the device is loaded. These settings match the note generated by a
Novation Launchpad. A text file example with these definitions is provided in the “J74 Progressive - Chord Explorer
Mappings” included in the download pack.
To create your own mappings edit the provided Launchpad example so that it matches the MIDI notes used by your
controller. In the definitions change only the MIDI note numbers.
// ******************************************************
// Lines starting with this sign are comments.
// ******************************************************
// Diatonic Triads
101 0
102 16
103 32
104 48
105 64
106 80
107 96
// Diatonic 7th
201 1
202 17
203 33
204 49
205 65
206 81
207 97
// Diatonic >>9
301 2
302 18
303 34
304 50
305 66
306 82
307 98
// Diatonic >>11
401 3
402 19
403 35
404 51
405 67
406 83
407 99
// Diatonic >>13
501 8
502 24
503 40
504 56
505 72
506 88
507 104
// ******************************************************
// Custom1 Triads
111 4
112 20
113 36
114 52
115 68
116 84
117 100
// Custom1 7th
211 5
212 21
213 37
214 53
215 69
J74 Progressive - User Manual
Page 52 of 52
216 85
217 101
// Custom1 >>9
311 9
312 25
313 41
314 57
315 73
316 89
317 105
// Custom1 >>11
411 10
412 26
413 42
414 58
415 74
416 90
417 106
// Custom1 >>13
511 11
512 27
513 43
514 59
515 75
516 91
517 107
// ******************************************************
// Custom2 Triads
121 6
122 22
123 38
124 54
125 70
126 86
127 102
// Custom2 7th
221 7
222 23
223 39
224 55
225 71
226 87
227 103
// Custom2 >>9
321 12
322 28
323 44
324 60
325 76
326 92
327 108
// Custom2 >>11
421 13
422 29
423 45
424 61
425 77
426 93
427 109
// Custom2 >>13
521 14
522 30
523 46
524 62
525 78
526 94
527 110
Issues and Questions
In case of issues please contact: info [at] fabriziopoce.com