1
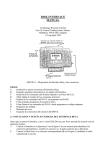
Avant User Manual 2.0 Index 1. Product Data................................................................................. 1 1.1 Federal Communication Commission Interference Statement ................................ 1 1.2 FCC Caution.............................................................................................................. 1 1.3 Declaration of Conformity ........................................................................................ 1 2. Identifying the parts...................................................................... 3 2.1 Buttons & ports ....................................................................................................... 3 2.1.1 Front View ............................................................................................................................... 3 2.1.2 Rear View ................................................................................................................................ 5 3. Getting started .............................................................................. 6 3.1 Charging .................................................................................................................. 6 3.2 Battery Maintenance ............................................................................................... 6 3.3 Powering on your device ......................................................................................... 7 3.4 Screen saver mode and Sleep mode ...................................................................... 7 3.4.1 Screen saver mode ................................................................................................................. 7 3.4.2 Sleep mode ............................................................................................................................. 8 3.5 Inserting a MicroSD Card......................................................................................... 8 3.6 Browsing files from a MicroSD card ........................................................................ 9 4. Operating the device .................................................................. 11 4.1 Using the touch screen ......................................................................................... 11 4.1.1 Flip ....................................................................................................................................... 11 4.2 Screen orientation ................................................................................................. 12 4.3 Using the on-screen keypad ................................................................................. 12 5. Using the main menu .................................................................. 13 Book list mode .................................................................................................................................. 14 Bookmark mode ................................................................................................................................ 14 Image mode ...................................................................................................................................... 14 Audio mode ....................................................................................................................................... 14 Browser/ Shop................................................................................................................................... 14 Settings mode ................................................................................................................................... 14 6. Book list mode ............................................................................ 16 6.1 Using the sub-menu .............................................................................................. 16 6.2 Sorting books ........................................................................................................ 17 6.3 Reading a book ..................................................................................................... 18 6.4 Selecting a Reading Mode..................................................................................... 18 6.5 Zooming the contents ........................................................................................... 19 6.6 Adding a bookmark or a note to a page............................................................... 20 6.6.1 Adding a Bookmark .............................................................................................................. 20 6.7 Adding a note ........................................................................................................ 20 6.8 Viewing Bookmarks and Notes ............................................................................. 21 6.9 Deleting Bookmarks or Notes ............................................................................... 22 6.9.1 Deleting Bookmarks ............................................................................................................. 22 6.9.2 Deleting or Modifying Notes ................................................................................................. 22 6.10 Looking Up Words.............................................................................................. 22 6.11 Searching Words ................................................................................................ 22 6.12 Activating Power Saving Mode .......................................................................... 23 6.13 Displaying table of contents .............................................................................. 23 6.14 Displaying Book Information ............................................................................. 24 7. Bookmark Mode ......................................................................... 25 8. Image Mode ................................................................................ 26 8.1 Setting the slideshow options ............................................................................... 26 8.2 Playing back a slideshow ...................................................................................... 27 8.3 Zooming the image ............................................................................................... 28 9. 9.1 Audio Mode ................................................................................. 29 Using the control panel top lay back audio files ................................................... 29 9.1.1 Playback Control................................................................................................................... 30 9.1.2 Play Mode Control ................................................................................................................ 30 9.1.3 Volume Control ..................................................................................................................... 30 10. Internet Mode ............................................................................. 31 10.1 Connecting to a Wi-Fi Network........................................................................... 31 10.2 Accessing a Web Page....................................................................................... 34 10.3 Browsing a Web Page........................................................................................ 35 10.3.1 Downloading a File ........................................................................................................... 35 11. Setting Mode............................................................................... 36 11.1 Orientation ......................................................................................................... 36 11.2 Wi-Fi Setting ....................................................................................................... 36 11.3 Languages ......................................................................................................... 36 11.4 Current date and time........................................................................................ 37 11.5 Time Zone .......................................................................................................... 37 11.6 Screen Saver...................................................................................................... 37 11.7 Power Saving ..................................................................................................... 38 11.8 Advanced Setting ............................................................................................... 38 11.8.1 Update firmware............................................................................................................... 38 11.8.2 Restore Defaults .............................................................................................................. 39 11.8.3 Device information ........................................................................................................... 39 11.8.4 Screen protector or screen saver .................................................................................... 39 11.8.5 Authorize device .............................................................................................................. 39 12. File manager Mode ..................................................................... 42 12.1 Delete files ......................................................................................................... 42 12.2 Copy files............................................................................................................ 43 12.3 Rename files ...................................................................................................... 43 13. Troubleshooting.......................................................................... 46 14. Maintenance ............................................................................... 47 14.1 Cleaning ............................................................................................................. 47 14.2 Security .............................................................................................................. 47 15. Technical Specification................................................................ 48 Dimensions........................................................................................................................ 48 Supported file formats ...................................................................................................... 48 Screen ............................................................................................................................... 48 Battery .............................................................................................................................. 48 Memory ............................................................................................................................. 48 Processor .......................................................................................................................... 48 Connectivity ....................................................................................................................... 48 Connections ...................................................................................................................... 48 Operating temperature ..................................................................................................... 49 System functions ............................................................................................................... 49 16. Warranty...................................................................................... 50 16.1 Warranty coverage............................................................................................. 50 16.2 Invalidity of Warranty ......................................................................................... 50 1. Product Data 1.1 Federal Communication Commission Interference Statement This equipment has been tested and found to comply with the limits for a Class B digital device, pursuant to Part 15 of the FCC Rules. These limits are designed to provide reasonable protection against harmful interference in a residential installation. This equipment generates, uses and can radiate radio frequency energy and, if not installed and used in accordance with the instructions, may cause harmful interference to radio communications. However, there is no guarantee that interference will not occur in a particular installation. If this equipment does cause harmful interference to radio or television reception, which can be determined by turning the equipment off and on, the user is encouraged to try to correct the interference by one of the following measures: • • • • Reorient or relocate the receiving antenna. Increase the separation between the equipment and receiver. Connect the equipment into an outlet on a circuit different from that to which the receiver is connected. Consult the dealer or an experienced radio/TV technician for help. For product available in the USA/Canada market, only channel 1~11 can be operated. Selection of other channels is not possible. 1.2 FCC Caution Any changes or modifications not expressly approved by the party responsible for compliance could void the user’s authority to operate this equipment. This device complies with Part 15 of the FCC Rules. Operation is subject to the following two conditions: (1) This device may not cause harmful interference, and (2) this device must accept any interference received, including interference that may cause undesired operation. This device and its antenna(s) must not be co-located or operating in conjunction with any other antenna or transmitter. 1.3 Declaration of Conformity This product is in compliance with the essential requirements and other relevant provisions of Directive 2004/08/EC and 1999/5/EC: European Standard ETSI EN 300 328 V1.7.1 (2006-10), EN 301 489-1 V1.8.1 (2008-04), EN 301 489-17 V1.3.2 (2008-04), EN55022:2006 Class B, EN61000-3-2:2006, EN61000-3-3:1995/A1:2001/A2:2005 and N55024:1998/A1:2001/A2:2003 (IEC 61000-4-2:Edition 1.2:2001-04, IEC61000-4-3:Edition 2.1:2002-09, IEC61000-4-4:Second edition:2004-07, IEC61000-4-5:Edition 1.1:2001-04, IEC 61000-4-6:Edition 2.1:2004-11, 1 IEC61000-4-8:Edition 1.1:2001-03, IEC 61000-4-11:Second Edition:2004-03) and Australian Standard AS/NZS CISPR 22:2006 Class B. This device is a 2.4 GHz wideband transmission system (transceiver), intended for use in all EU member states and EFTA countries, except in France where restrictive use applies. This device may not be used for setting up outdoor radio links in France and in some areas the RF output power may be limited to 10 mW EIRP in the frequency range of 2454-2483.5 MHz. For detailed information the end-user should contact the national spectrum authority in France. 2 2. Identifying the parts Thank you for choosing bq Avant. Before using this product, please read this User Manual carefully. 2.1 Buttons & ports 2.1.1 Front View 1. Power switch Slide and hold the power switch for 5 seconds, and then release it to turn on the device. To turn it off, slide this switch and then tap . To enter Sleep mode, slide this switch at any time and tap slide this switch again. . To disable Sleep mode, 3 2. Micro USB port Allows you to connect the device to a computer so the files can be transferred from your computer to the device, and vice versa. Uses to charge the battery of your device. 3. Memory card slot Insert a MicroSD/microSDHC card into the memory card slot to access book/image/audio files stored on the card. 4. Headphone Jack Insert your headphone connector into this jack to listen to the audio files through the headphones. 5. Touch Screen Displays information and allows you to perform operations via different gestures. 6. Menu button In Book list, Image or Audio modes, press this button to display the sub-menu. Indicator: When tapping anywhere on the touch screen, this indicator lights on. 7. Volume control button Press this button to display the volume control bar. Press to adjust the volume. 8. Search button Searches for a particular Word used in a book 9. Refresh button Reloads the current page to remove after-images after reading many pages continuously. 10. Previous/Volume down button 4 Returns to the previous page/item or turns the volume down. 11. Return button Returns to the last viewed page or the main menu on the Home screen. 12. Next/Volume up Button Proceeds to the next page/item or turns the volume up. 2.1.2 Rear View 13. Reset Button Use a pointed object, such as a pin, to push against this button to reset your device when it does not respond to any operations. 14. Speakers Built-in speakers for playing sounds. Press and then to adjust the volume of the speakers. 5 3. Getting started 3.1 Charging Your device is only partially charged when first unpacked. Charge the battery before using the device. Nota: For the first time use, charge the device for 8 hours for its optimal performance. You can charge the device by connecting it to a computer. After the battery is fully charged (around 4 hours), the battery full icon appears on the screen. Remove the power adapter and the cable from both the power outlet and the device. The status of the battery power is displayed on the top right corner of the screen. Battery is charging Battery full Battery Status (the few bar son the battery icon, the lower the battery power remains) Battery is depleted. Charge the battery inmediately 3.2 Battery Maintenance This device contains a built-in Li-Polymer rechargeable battery. The capacity of the battery will reduce each time it is charged/depleted. However, you can still try to prolong the battery’s lifetime by following the suggestions below: • • • Use the device at least once a week. Charge the battery regularly and fully. Never leave the battery fully discharged for a long time. Always keep the device and the battery away from heat. If the device will only work when the power adapter is connected, contact your local dealer to replace the battery. Do not try to replace the battery by yourself. Any attempt to disassemble the device may cause damages to the device or result in personal injuries. 6 3.3 Powering on your device Slide and hold the power switch for 5 seconds, and then release it to turn on the device. A start-up screen appears before entering the main menu on the Home screen. To turn off your device slide the power switch and then tap off. to turn the device Note: From 2.0 version onwards, when your Avant is turned off you will see on screen the following message "Please take good care of your device, avoid knocks". This is the normal turned off screen. It doesn't mean that your device is damage in any way, it won't affect the performance of your screen and there is no battery consumption. 3.4 Screen saver mode and Sleep mode 3.4.1 Screen saver mode 7 Your device enters Screen Saver mode when idled for a period of time. Tap anywhere on the screen to return to the currently-viewed page. To set up the time duration before entering Screen Saver mode, go to Settings 3.4.2 > Screen Saver. Sleep mode Your device enters Sleep mode after idled in Screen Saver mode for 3 minutes, or you can slide the power switch at any time and tap To disable Sleep mode, slide the power switch to enter Sleep mode. again. Note: Do not leave the device in Sleep mode for more than 2 weeks as this may cause screen burn-in (permanent image retention caused by still picture displayed for an extended period of time) that cannot be recovered. 3.5 Inserting a MicroSD Card Insert the entire MicroSD card into the MicroSD card slot until it locks into place. Ensure that the card’s metal contacts face downwards. To remove the MicroSD card, press on the MicroSD card to release the card. 8 Supported memory card types: MicroSD/microSDHC 3.6 Browsing files from a MicroSD card You can use the device to browse or play back your personal book/image/audio files stored on a MicroSD card. 1. Insert a MicroSD card into your device’s MicroSD card slot with the metal contacts facing downwards. 2. Insert the micro USB cable’s micro USB connector into the device’s micro USB port. 3. Insert the cable’s USB connector into a computer’s USB port. Tap when prompted to use the device as a mass storage. The MicroSD card inserted into your device will be recognized by your computer as a removable drive (Windows systems). 4. On the computer, copy desired book/image/audio files from another drive/folder to the removable drive. Warning: Do not remove the MicroSD card from the device or break the USB connection while copying files. 5. When done, remove the cable safely from both the device and the computer. The copied files will be recognized and re-arranged accordingly under Book list/Image/Audio modes. 6. Go to Book list, Image or Audio modes to read books, view images or listen to audio files you just copied. 9 Note: Do not remove the MicroSD card from your device at any time if you want the device to keep track of the bookmarks/notes added in your book files. 10 4. Operating the device To operate the device, follow the On-Screen Display (OSD) menus and the tool bars on the sides to complete the tasks. Most of the operations can be done using the touch screen, while some basic functions or hidden menus can be operated through the buttons. 4.1 Using the touch screen Use your finger to touch the surface of the touch screen to select an item or perform a function. 4.1.1 Flip When in Book list or Image mode, place your finger on the left or upper side of the touch screen and gently drag your finger to the right or lower side to turn a page forward or view the next image. To turn to the previous page or view the previous image, flip in the opposite direction. 11 Note: The (b) flipping method is not available when viewing images. 4.2 Screen orientation For optimal viewing experience, you can set the screen orientation to change automatically to portrait or landscape view depending on how you hold the device. Select Setting > Orientation > Auto 4.3 Using the on-screen keypad Tap the letter buttons on the on-screen keypad to enter your desired texts. Switch between upper/lower cases. Switch among number/ symbol input methods. Delete a character. Switch among different input methods. Insert a line feed 12 5. Using the main menu Upon powering on the device, you will enter the main menu on the Home screen. • • To select a desired mode, tap its icon. To return to the main menu at any time, press the Return button repeatedly. • If at least one book is read, the last-read book title will be shown on the main menu. Tap or the book title to continue reading. 13 The main functions of your device are scheduled under 6 modes, including: Book list, Bookmark, Image, Audio, Internet and Settings. Refer to the below table for a summary of what the device can do in each mode. Book list mode Support multiple formats: .txt, .epub, .html, .pdf, .fb2. Look up words in the pre-installed English to Spanish Add bookmarks or notes while reading. Bookmark mode View the pages with your bookmarks or notes. Image mode Support multiple formats: .jpg, .png, .bmp. Audio mode Play back music, speeches or audio books in compatible formats. Browser/ Shop Access the Internet and download playable files from web pages through a Wi-Fi connected network. Settings mode Sets up Wi-Fi connection, screen saver interval and other device-related settings, such as OSD language and date/time. 14 Please note, in order to access a menu, you must press on the menu's icon and to go to the Main Menu you have to press and hold on . 15 6. Book list mode Tap to enter Book list mode and the Book list appears on the screen. The contents stored in the internal memory as well as on the inserted MicroSD card will both be shown on the Book list. Note: added. . will only appear in the Book list after bookmarks or note are Sorting options Last read book. Appears only when one book is read. File source, vook name and author Tap>> to continue reading. Appears when the vook has bookmarks or notes. Current sorting method Reading status bar Current/total page number Show/hide the complete menu 6.1 Using the sub-menu When reading a book, press the Menu button to display the sub-menu. 16 Icono Descripción Add notes Add bookmarks Go to the bookmark/note list in a book Look up words in the pre-installed dictionary Display the book information Jump to a specific page Display the book’s table of contents Select a Reading mode Enable Power Saving mode 6.2 Sorting books Tap to select sorting options of the Book list. You can sort books by download date, title, author and publication date. The Book list will be re-arranged by your selected sorting method. 17 6.3 Reading a book Tap the title of a desired book in the Book list. The first or last-read page of the book will appear on the screen. Tap to read the book in full screen. To turn the pages: 1. Press or use your finger to turn the pages. 2. Press the Menu button to open the sub-menu. 3. Tap and enter the desired page you want to read by tapping the on-screen number buttons. 4. Tap to confirm inputs and jump to the selected page. When finished reading, press to close and leave the book. Your device will remember your last read page of the book and display your reading status bar on the Book list. 6.4 Selecting a Reading Mode You can select a page layout to best suit your reading needs. (Supported file format: .pdf) 1. When reading a book, press the Menu button to open the sub-menu and tap 2. Select a desired reading mode: 18 . a. : Fit to Page (single page at a time) b. : Continuous (continuous pages) c. : Reflow (reformatting and separating texts from graphics) 5. When done, tap to confirm selection. 6.5 Zooming the contents To active the zoom, follow these instructions: 1. 2. 3. 4. When reading a book, tap to zoom in on the current page. Tap repeatedly to adjust the zooming ratio. Tap to move to the particular part you want to see. To view the close-up in full screen, tap . Or, tap to return to the current page in its original size. Please keep in mind that the zoom acts depending on the type of reading mode currently activated: Adjust to page: With this option the size of the characters and the images increase but they do not readjust to the screen. Increasing the size, parts of the text will be hidden in the margins of the screen. To be able to read it, touch the arrows as previously indicated. 19 Continuous reading: With this option the size of the lines readjusts in vertically but not in horizontally. Reflow: With this option, even when increasing the size of text or images, they stay adjusted to the screen. 6.6 Adding a bookmark or a note to a page You can add a bookmark or write a note on the page you may constantly refer to. When reading a book, press the Menu button 6.6.1 Tap to open the sub-menu. Adding a Bookmark to add a bookmark to the current page. The page will be marked by . 6.7 Adding a note 1. Tap to add a note to the current page. 2. Enter the contents by tapping the letter buttons on the on-screen keypad. 3. When done, tap to confirm inputs. The page will be marked by . 20 6.8 Viewing Bookmarks and Notes To view the bookmarks and notes added to the book, press the Menu button the sub-menu and tap to open . The pages with bookmarks or notes will appear in a list. Display options of the pages with bookmarks or notes Contents of notes added to the pages Preview contents of the pages with bookmarks 21 Tap to select display options of the bookmark/note list, including show bookmarks by page, show notes only or show all items. To read the contents in full screen, tap the desired item. 6.9 Deleting Bookmarks or Notes 6.9.1 Deleting Bookmarks 1. Turn to the page with the bookmark you want to delete. 2. Press the Menu button 6.9.2 and tap to remove it from the page Deleting or Modifying Notes 1. Turn to the page with the note you want to delete or modify. 2. Tap to open the note-editing box. 3. To modify the note, tap When done, tap to open and use the onscreen keypad for text editing. to confirm inputs. To delete the note, tap . Note: To view only the pages with bookmarks or notes from books on the Book list, go to Bookmark mode 6.10 Looking Up Words The device provides a pre-installed English to Spanish dictionary that allows you to view the definitions of words when reading a book. 1. When reading a book, press the Menu button to open the sub-menu. 2. Tap to display the Word Lookup box. 3. Tap a word and its lookup result appears in the Lookup box. 4. When done, tap to leave. 6.11 Searching Words The device allows you to search for a particular word used in a book. 1. When reading a book, press the Search button to open the Keyword Search box. 22 2. Enter a word using the on-screen keypad. 3. When done, tap and its search results appear in a list of sentences containing the searched word and their page numbers. Press to go through the list, if available. 4. To read the complete contents of this page, tap the desired sentence/page number, or press to leave the Search Results page. 6.12 Activating Power Saving Mode When reading books, you can enable Power Saving mode to last longer of your reading time. However, the speed of turning pages will slow down. 1. When reading a book, press the Menu button 2. Tap to open the sub-menu. to enable Power Saving mode and the of the screen. To disable Power Saving mode, tap icon appears on the top right corner . Note: ● ● When Power Saving mode is enabled, certain functions will become limited or unavailable: o The screen orientation is fixed to Portrait view only. o The Refresh / Volume control buttons are disabled. When below functions are operated, Power Saving mode will become disabled: The device is connected to power or to a computer. The device is connected to a Wi-Fi network. o The device is playing an audio file. o o 6.13 Displaying table of contents You can view a book’s table of contents (TOC) before starting to read the contents. 1. When reading a book, press the Menu 2. Tap button to open the sub-menu. . The book’s TOC is re-arranged in a list of chapters and topics with corresponding page numbers to the left. Press and tap a desired item to jump to its corresponding page. to go through pages 23 Note: This function is available only when the book contains a TOC created with hyperlinks. 6.14 Displaying Book Information 1. When reading a book, press the Menu 2. Tap button to open the sub-menu. to display the book’s basic information, such as the file name, author and file date. 24 7. Bookmark Mode The Bookmark list contains all the bookmarks and notes you’ve added to all the books on your Book list. Tap to enter Bookmark mode and the Bookmark list appears on the screen. Note: Only books that contain bookmarks or notes will appear on the Bookmark list. Sorting options of the book list Numbers of bookmarks and notes added to the book Tap a book to view the pages with bookmarks and notes. Tap to select display options of the bookmark/note list. You can show bookmarks by page, show notes only or show all items. To read the contents in full screen, tap the desired item. Display options of the pages with bookmarks or notes Contents of notes added to the pages Preview contents of the pages with bookmarks 25 8. Image Mode Tap to enter Image mode and the Image list appears on the screen. The images stored in the internal memory as well as on the inserted MicroSD card will both be shown on the Image list, arranging in folder order. Tap file’s last modified/ download time. to sort the Image list by file name or by the Sets up slideshow playback options Starts a slideshow Sorting options of the image list Current sorting method The thumbnail of the image Press full screen. Image file name and its last modified/download time to go through pages of images, if available. Tap a desired image to view it in 8.1 Setting the slideshow options 1. On the Image list page, tap 2. Tap 3. Tap to display the slideshow setting options. to set the slideshow interval. to enable slideshow playback repetition and background music. 4. Tap playback. 5. When done, press and select an audio file as the background music during slideshow to go back to the Image list page. 26 8.2 Playing back a slideshow You can view images on the Image list as a slideshow in 2 ways. • In Image mode, tap • When viewing an image in full screen, press the Menu sub-menu. Tap to start a slideshow of all the images in the Image list. button to open the to start a slideshow from the current image. During a slideshow, you can still adjust the time interval between slides. Tap anywhere on the touch screen to pause slideshow playback and display the toolbar. When you’re done with the settings, tap to resume slideshow playback. Adjust time interval between slides. Starts a slideshow from the current image. Zooms in/out on the current image. Returns to the single image view. 27 8.3 Zooming the image 1. When viewing an image in full screen, press the Menu sub-menu. 2. Tap button to open the to zoom in on the current image. 3. Tap 4. Tap repeatedly to adjust the zooming ratio. to move to the particular part you want to view Starts a slideshow from the current image. Adjusts the zooming ratio of the image. 5. To view the image in its original size, tap return to the Image list. repeatedly until disappears, or press to 28 9. Audio Mode Tap to enter Audio mode and the Track list appears on the screen. The audio files stored in the internal memory as well as on the inserted MicroSD card will both be shown on the Track list, arranging in folder order. Tap last-modified/download time. to sort the Audio list by file name or by the file’s Press to go through pages of audio files, if available, and tap a desired track to start playback. To stop playback, tap the current playback track again. Sorting options of the Audio list Appears when playback of this track starts. Current sorting method Taps to display the track information. Certain texts may not be shown correctly. 9.1 Using the control panel top lay back audio files Playback control panel Playback control Play mode control Volume control 29 9.1.1 • Playback Control Tap to select a desired track and tap • During playback, tap 9.1.2 Play Mode Control to start playback. to pause/stop playback. • Tap repeatedly to select a desired play mode: one track only once, one track repeatedly or all tracks repeatedly. • Tap • Tap 9.1.3 repeatedly to disable/enable playback in random order. repeatedly to select to play back one track/all tracks once only. Volume Control • Tap • Tap to turn the volume down/up. to mute the sound. Tap it again to resume normal playback. 30 10. Internet Mode Tap to access the Internet and download playable files. Before logging on to the Internet, you need to connect the device to a Wi-Fi network first. 10.1 Connecting to a Wi-Fi Network 1. Tap to enter Settings mode. 2. Tap Wi-Fi Setting to enter the Wi-Fi setting page. 3. Tap to turn the Wi-Fi on. The device scans for available wireless networks. The network names (SSID) and security settings of discovered Wi-Fi networks display in a list. Tap to set up its network setting. Wi-Fi network list Wi-Fi signal strength This Wi-Fi network is secured a. If your desired network is in the list, continue to Step 4. b. If your desired network is not in the list, tap 31 Text input box Tap to select the security type of your desired Wi-Fi network. Tap the text input box and enter the name and password, if needed, for the network using the onscreen keypad. When done, tap to confirm inputs. If the hidden network is discovered, its name will be added onto the Wi-Fi network list with its signal strength displayed as . 4. If your desired Wi-Fi network is not secured, you can: a. Tap the desired Wi-Fi network to start connection. b. Tap the Setup icon next to your desired Wi-Fi network. Its network name and network setting information then appears on the screen. Configure the initial IP address in the following ways: DHCP (Dynamic Host Configuration Protocol): the device automatically obtains an IP address from the DHCP server. Static IP: Assigns a set of IP address, Subnet Mask, IP address of the gateway router and IP address of the DNS server. Tap the number input box and use the on-screen keypad to enter its figures. When done, tap to confirm inputs. To save the inputs, tap 32 Number input box When done, tap to confirm connection. 5. If your selected network is secured, you will be requested to enter its password. Use the keypad to enter the password, and tap to confirm inputs and start connection. 6. After the device connects successfully to the Internet, an icon appears next to the connected network. The icon also appears on the top right corner of the screen indicating the current Wi-Fi signal strength. 33 7. Tap to enter Internet mode. The default web site list then appears on the screen. Tap a link to enter its web site. Now you are ready to access the Internet. 10.2 Accessing a Web Page Upon entering Internet mode, the default web site list appears on the screen. You can tap to visit a web site directly, or enter a URL for a web site to view by yourself. 1. Tap the URL input box. 2. Use the on-screen keypad to enter the URL for your desired web site. When done, tap to confirm inputs. URL input box 3. After a few seconds, the web page appears on the screen. 34 10.3 Browsing a Web Page Scroll 1. To view the complete content of the web page, tap the scroll bar on the sides to move through the page. 2. To go to the previous or next web page, tap Back or Forward. To stop loading or to reload the current page, tap Stop or Reload. To zoom in or out the current page, tap Zoom in or Zoom out. 3. To enter texts when browsing a web page, for example, keywords for a search box, tap the text input box to display the on-screen keypad. Use the keypad for text inputs. 4. To navigate the hyperlinks on the web page, directly tap the hyperlinks, shown mostly as underlined words. 10.3.1 Downloading a File To save or download a playable file from a web page, tap the “Save”, “Download” or similar buttons or links. The downloaded file will be stored and re-arranged accordingly under Book list/Image/Audio modes. Note: The device can only download playable files from the Internet. 35 11. Setting Mode Settings mode allows you to set up Wi-Fi connection, screen saver time interval and other device-related information, such as OSD language and date/time. Tap to enter Settings mode. Tap to select an option. 11.1 Orientation Sets the screen orientation to portrait view, landscape view or to switch between two views automatically depending on how you hold the device. • Auto: • Portrait: • Landscape: 11.2 Wi-Fi Setting Enables Wi-Fi. Refer to “Connecting to a Wi-Fi Network” for detailed operations 11.3 Languages Selects your local OSD language. 36 11.4 Current date and time Sets up your local date and time. Downloaded files will be saved according to the date and time set on your device. To adjust the date, tap . Tap the year/month/date columns to be adjusted and tap to adjust the figures. To adjust the time, tap . Tap the hour/minute columns to be adjusted and tap to adjust the figures. When done, tap changes, tap to save selection and leave the setting. To leave without saving any . 11.5 Time Zone With this option you can select the time zone of your bq device. First choose the Continent, then the city of your location. To scroll in between cities, please use the buttons. . 11.6 Screen Saver Sets up the time duration before entering Screen Saver mode. 37 Tap to turn on this function and tap a desired time duration. 11.7 Power Saving Enables Power Saving mode which functions only when reading a book. Refer to “Activating Power Saving Mode” for detailed operations. 11.8 Advanced Setting 11.8.1 Update firmware Before starting with the update make a safety copy of your e-readers contents and make sure that the battery is completely charged. Update like this: 1. Download the compresses folder that contains the firmware from the web page www.bqreaders.com 2. De-compress the files from the folder and copy them to a MicroSD card. It’s important that the folder qdutil is saved in the root of the card with all its contents. 3. Put the card in the device. 11.8.1.1 Software update: 1. Access Settings through the menu and press the option Advanced settings then FW upgrade and press to start the update. 2. Once the process has finished the message “Download. SW Upgrade Success” will appear on the screen. 3. Slide the on/off button to the right to start the device. The update process has now finalized. 11.8.1.2 Hardware update: 1. Press the button and the button simultaneously while you turn the device on. 2. Let go of the buttons once the firmware starts to install 3. Once the installation has finished turn on the device. For more information, download the manual “How to update OS” at: www.bqreaders.com/file/Avant/Avant_Actualizar_Firmware.pdf. 38 Note: The firmware updates are provided by the manufacturer of the device to improve its functionality but the installation is always made under the responsibility of the user and is in no case obligatory. 11.8.2 Restore Defaults Restores your device to factory default settings. However, your bookmarks/notes and device settings will be lost. Perform necessary backup actions, for example, taking notes on a paper, before restoring your device. 11.8.3 Device information With this option you can consult information about your bq like the device ID, the Mac address, internal and external memory, the u-boot and kernel version etc. 11.8.4 Screen protector or screen saver The screen saver activates when your bq hasn’t been used for a while. Whit this option you can adjust the time to 5, 10 or 30 minutes. You can also activate and deactivate the function. 11.8.5 Authorize device In order to activate your device, first you have to be connected to the internet. If your bq is not connected, when you select this option the message will appear on screen "Wi-Fi is off. Please press [ON] to turn on Wi-Fi. Press ON. Once you are connected to the Internet (for more information regarding Internet connection, see chapter 9 “Internet”) you can choose to authenticate if you already have an Adobe ID or create a new account. You can create an account using your device, however we recommend for your own comfort to use a PC or laptop. To create an Adobe Digital Editions account, please follow the next steps: 1. Go to: www.adobe.com/cfusion/membership/index.cfm 2. Click on Create an Adobe account 39 3. Fill the requested information and press Continue. 4. If all the information was filled out correctly, you will see the following screen: If you already have an Adobe account and you wish to purchase a book, please follow the next steps: 1. Enter your ID and password and press on Activate device. 2. To continue, go to your favorite on-line shop to purchase your e-book. Once the purchase is done, the download will start automatically and it will be saved in your bq Avant. The following message will be shown: “Your book is being downloaded, when finished it will be available on the book list!” 3. When the download is complete, the next screen will appear: 40 " Your book is available on the book list!" 4. Tap to confirm. 5. Go to Book list to start reading. 41 12. File manager Mode The File manager allows you to delete files, rename and/or copy files to/from the internal memory and your MicroSD card. To open the File manager, please follow the next steps: 1. Tap the Settings icon. 2. In the next screen, tap . Select file’s location Shows the location of the files Folders/files Page number / number of pages. Tap the number to open the page To go back to the first level of the list, tap and then tap “Go back to root” Note: Files downloaded from the internet can only be accessed from your device and you will not be able to move them to your PC. 12.1 Delete files In order to delete files, please follow the next steps: 1. Choose the location of the file you wish to delete: Internal / SD Card /My collection. 2. Tap and then “Delete Mode” 42 3. From the file list or inside the folder, select one or more files and then tap “OK”. Tap the tick box to select the file/folder you wish to delete 12.2 Copy files. To copy files, please follow the next steps: 1. Select “SD Card” 2. Tap icon> and then “CopyMode” 3. Select the files you wish to copy and tap “OK”. The files selected will be copied in the internal memory of the device. Note: The “Copy” function is only available to copy files from the SD card to the internal memory. 12.3 Rename files To rename files, please follow the next steps: 1. Select any location: Internal/Tarjeta SD/ My collection. 2. Tap and then “RenameMode”. 3. Select the file you wish to rename and tap “OK”. 4. Use the keyboard to change the name and tap to confirm. 43 You can import your personal book/image/audio files from your computer to the device for playback needs. 1. Insert the micro USB cable’s micro USB connector into the device’s micro USB port. 2. Insert the cable’s USB connector into your computer’s USB port. 3. Tap when prompted to use the device as a mass storage. The device will now be recognized by your computer as a removable drive (Windows systems). 44 4. On the computer, copy desired book/image/audio files from another drive/folder to the removable drive. Warning: Do not break the USB connection while copying files. 5. When done, remove the cable safely from both the device and the computer. The copied files will be recognized and arranged accordingly under Book list/ Image/Audio modes. 45 13. Troubleshooting Problem: The screen contains after-images left from the last-viewed page or photo. Solution: Reading many pages continuously at one time may cause such permanent image retention. To remove after-images, press the Refresh button to reload the current page. To avoid such effect from happening, do not leave a still picture or page displayed for an extended period of time. Problem: The device does not respond to any operations. Solution: • • An internal error may occur. Use a pointed object, such as a pin, to push against the Reset button to reset your device. The battery is depleted. Charge the device first. Problem: Your computer does not detect your device when connected. Solution: • • Check if the micro USB cable is connected firmly onto both the device and your computer in the correct way. Remove the micro USB cable, and then reconnect the device onto your computer using the micro USB cable. Problem: Your image or audio files are not sorted by file name or by time. Solution: Your image or audio files will automatically be sorted by folder first, and then you can select to sort the files by file name or by the file’s last modified/download time. In other words, your image or audio files are listed according to the following sorting order: folder> filename, or folder> time. 46 14. Maintenance 14.1 Cleaning Before cleaning the device please turn it off and disconnect all cables. Make sure that the screen is completely dry before you connect the cables and turn the device back on again. Please use a soft, clean cloth that doesn’t leave textile residue to eliminate dust and dirt from damaging the screen. • • Screen: use a soft, clean and lint-free cloth to eliminate dust and dirt from damaging the screen. For fingerprints and stains use a cloth with a soft cleaning product. Case: To clean the case use a dampened cloth with a gentle cleaning product. Please rinse the cloth with water and clean the case again to eliminate residues. 14.2 Security To reduce the risk of electrical shocks follow all the safety instructions: • • • • • • Never leave the case open and turn the device off before cleaning it. Do not spill liquid in or on the reader. If the device gets wet do not try to repair it yourself. Please contact the technical service so that they can revise it before you turn it back on. Don’t introduce any objects in the four edges of the screen. Use environmentally friendly products and do not manipulate during extreme environmental conditions. Be aware of direct and indirect hits to the screen as they can cause irreparable damage to the screen or cause malfunctions of the device. Keep the reader away from dust, sand and dirt. 47 15. Technical Specification Specifications are subject to change without prior notice. Dimensions • • Size: 168 mm x 124 mm x 8,5 mm Weight: 195 g. Supported file formats • • • • Text: .pdf, .epub, .txt, .html, .fb2. Image: .bmp, .jpg, . png Audio: .mp3 Adobe mobile and Adobe DRM Screen • • • Capacitive touch screen (AUO + SipiX) Size: 6” Resolution: 600 x 800, 167 ppp, 16 grey levels Battery • • • • • Li-on 1530 mAh Duration: 8.000 pages LED of battery charge. Program for battery savings. Low battery warning. Memory • • 2 GB extensible with Micro SD card. Memory distribution: 400 MB for OS. 1600 MB for storage. Processor • • Samsung S3C2416 ARM9 400 MHz Plataform: Linux UI Engine QTV Connectivity • • Wi-Fi b/g 802.11 b/g MicroUSB 2.0 Connections • • 3,5 mm jack for earphones MicroSD slot 48 Operating temperature • • Optimal operating temperature: 0ºC~35ºC Standby temperature: -20ºC~55ºC System functions • • • • • Wi-FI signal indicator Screensaver Suspension mode Acceleromater (movement sensor) Languages available: English, Spanish, French, German, traditional and simplified Chinese, Japanese and Korean 49 16. Warranty 16.1 Warranty coverage 1. 2. 3. The warranty has duration of 2 years starting from delivery. It guarantees conformity of the product in accordance with its assigned use. During the warranty period, we will fix, free of charge, any operational defect arising from manufacture by repairing, replacing parts or providing a new device, provided that the option chosen is viable and is not economically disproportionate in our judgment. To opt for a repair, the owner must employ the services of a technical service center authorized by the manufacturer. For any other solution, the owner must contact the retail outlet. 16.2 Invalidity of Warranty This warranty shall not be valid in the following cases: defects or failures caused by accident, misuse or improper use of the product, improper handing of the product by unauthorized persons, deterioration of the product caused be external agents, poor maintenance or use of replacement parts that are no manufacturer originals. Further, this warranty shall not cover breakdowns or non-operation caused by incorrect voltages or electrical facilities. This warranty shall not cover: breakage of the screen or aesthetic parts claims for breakage after the first use. The technical service shall not be liable for any loss of data or information on the devices sent and shall bear no responsibility to back up said information, as devices shall be delivered blank and with the original factory content. 50