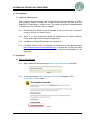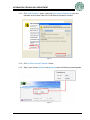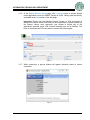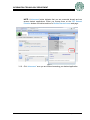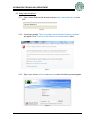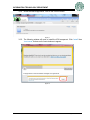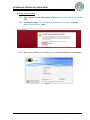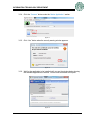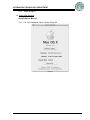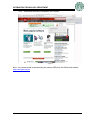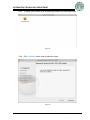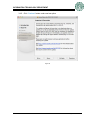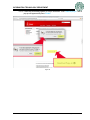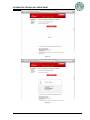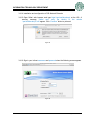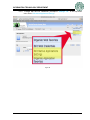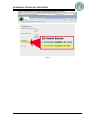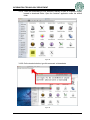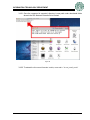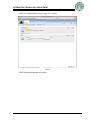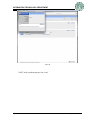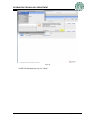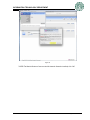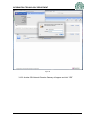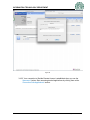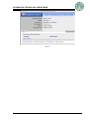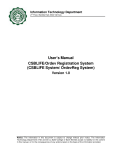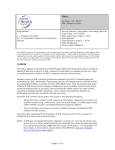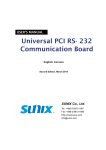
1
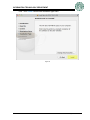
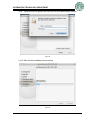
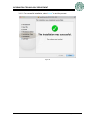
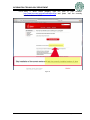
Information
Technology Department
nd
2 Floor, Benilde Hall, 2544 Taft Avenue Manila Philippines 1004
User’s Manual
Benilde Remote Access
Version 1.0
Notice: The information in this document is subject to change without prior notice. The Information
Technology Department (ITD) and De La Salle-College of Saint Benilde accept no liability for the content
in this manual, or for the consequences of any actions taken on the basis of the information provided.
INFORMATION TECHNOLOGY DEPARTMENT
Version
Number
Date
1.0
August 2012
Prepared by
_________________
Rolando Mag-ampo
_________________
Mauro Mangahas Jr.
<Project or System Title>
Noted by
_____________________
Emerson Siscar
External Operations Head
Version 1.0
Approved by
______________________
Ricson Singson Que
IT Manager
Page 2 of 41
INFORMATION TECHNOLOGY DEPARTMENT
Table of Contents
Document Version History .................................................................................................... 4
1
Definition of Terms ................................................. Error! Bookmark not defined.
2
Pre-requisites......................................................... Error! Bookmark not defined.
3
Browser ................................................................. Error! Bookmark not defined.
1.
Firefox
2.
Internet Explorer
3.
Safari
User's Manual Benilde Remote Access
Version 1.0
Page 3 of 41
INFORMATION TECHNOLOGY DEPARTMENT
Document Version History
Date
Version
<Project or System Title>
Description
Version 1.0
Author
Page 4 of 41
INFORMATION TECHNOLOGY DEPARTMENT
1. Definition of Terms
1.1. Infonet Account – ITD provided login credential/s to gain access to the DLS-CSB
network and online resources
1.2. Virtual Private Network or VPN - is a technology for using the Internet or another
intermediate network to connect computers to isolated remote
computer networks that would otherwise be inaccessible. A VPN
provides security so that traffic sent through the VPN connection stays
isolated from other computers on the intermediate network. VPNs can
connect individual users to a remote network or connect multiple
networks together.
1.3. CheckPoint – The software provider of the Virtual Private Network solution
1.4. Benilde Remote Access – The DLS-CSB name for Virtual Private Network facility
1.5. Native Applications – are home-grown applications that provide facility to students,
faculty or employees to accomplish specific computing requirement
1.6. Benilde Mail Account – is a different login credentials to access the email facility using
Google provided system.
Prepared by:
Approved by:
Noted by:
[Name]
[Position]
[Name]
[Position]
[Name]
[Position]
Date:
Date:
Date:
<Project or System Title>
Version 1.0
Page 5 of 41
INFORMATION TECHNOLOGY DEPARTMENT
2. Pre-requisites
2.1. Installation Requirements
Some components are required in order for Benilde Remote Access software or VPN to
work properly. Directly installing the remote access software will also help you
determine if a component is missing or not. The system will prompt a message asking
to install Active X or Java first if none is installed.
2.1.1. Ensure that your Infonet Account is activated. (Please proceed to the IT Department
to apply or activate your Infonet account)
2.1.2. Active X or Java components should be installed first for Internet Explorer,
Firefox and Google Chrome browsers respectively.
2.1.3. Uninstall any existing VPN software (ex. aventail, etc.)
2.1.4. For Safari, firefox and chrome browsers, we recommend running java test first at
http://www.java.com/en/download/testjava.jsp to ensure that you have the latest
java version. If none is installed, you can also download the application on the
same site.
3. Procedures
3.1. Using Firefox Browser
3.1.1. Open Firefox web browser and type https://vpn.benilde.edu.ph at the URL.
Figure 1
3.1.2. A warning message “This Connection is Untrusted” will appear. Click “I
Understand the Risks” option.
Figure 2
User's Manual Benilde Remote Access
Version 1.0
Page 6 of 41
INFORMATION TECHNOLOGY DEPARTMENT
3.1.3. Click “Add Exception” option. Verify that https://vpn.benilde.edu.ph is the one
indicated at the location field of the “Add Security Exception” window.
Figure 3
3.1.4. Click “Confirm Security Exception” button.
3.1.5. Sign in your Infonet username and password when the following screen appears.
Figure 4
User's Manual Benilde Remote Access
Version 1.0
Page 7 of 41
INFORMATION TECHNOLOGY DEPARTMENT
3.1.6. At the Benilde Remote Access page, click “connect” button to access desired
native application/s such as: SISREP, Payslip or OLPS. Library portal are directly
accessible at the web section of the web page.
Important: Please note that Benilde Remote Access or VPN connection is
designed for secure remote connection to the organization’s internal network via
the internet. Hence, once connected, your access is limited only to the
applications provided under VPN. Internet browsing may not be feasible. You
have to disconnect the VPN connection to access the internet again.
Figure 5
3.1.7. While connecting, a pop-up window will appear indicating status of secure
connection.
Figure 6
User's Manual Benilde Remote Access
Version 1.0
Page 8 of 41
INFORMATION TECHNOLOGY DEPARTMENT
NOTE: A disconnect button indicates that you are connected already and can
access desired applications. Either you access them at the SSL Network
Extender window or minimize and turn to Benilde Remote Access web page.
Figure 7
3.1.8. Click “disconnect” once you are finished accessing your desired application.
User's Manual Benilde Remote Access
Version 1.0
Page 9 of 41
INFORMATION TECHNOLOGY DEPARTMENT
3.2. Using Internet Explorer
3.2.1. Open Internet Explorer web browser and type https://vpn.benilde.edu.ph at the
URL.
Figure 8
3.2.2. A warning message “There is a problem with this website’s security certificate”
will appear. Click “Continue to this website (not recommended)” option.
Figure 9
3.2.3. Sign in your Infonet username and password when the following screen appears.
Figure 10
User's Manual Benilde Remote Access
Version 1.0
Page 10 of 41
INFORMATION TECHNOLOGY DEPARTMENT
3.2.4. Under the Native Application, click on the Connect button
Figure 11
3.2.5. The following window will open to install the VPN component. Click “install” then
“trust server” buttons on the next windows to appear.
Figure 12
User's Manual Benilde Remote Access
Version 1.0
Page 11 of 41
INFORMATION TECHNOLOGY DEPARTMENT
Figure 13
3.2.6. Click “Allow” button when Internet Explorer Security window appear
Figure 14
3.2.7. Wait until the connection process is finished. Just click allow access in any
succeeding security alert windows that will appear until you get connected. One
indication that you are connected is when you see the “disconnect” button at the
SSL Network Extender window.
3.2.8. See page 8.
User's Manual Benilde Remote Access
Version 1.0
Page 12 of 41
INFORMATION TECHNOLOGY DEPARTMENT
3.3. Using Google Chrome
3.3.1. Open Google Chrome web browser and type https://vpn.benilde.edu.ph at the
URL.
3.3.2. A warning message “The site’s security certificate is not trusted!” will appear.
Click “Proceed anyway” option.
Figure 15
3.3.3. Sign in your Infonet username and password when the following screen appears.
Figure 16
User's Manual Benilde Remote Access
Version 1.0
Page 13 of 41
INFORMATION TECHNOLOGY DEPARTMENT
3.3.4. Click the “Connect” button under the “Native Application” section.
Figure 17
3.3.5. Click “Yes” button when the security warning window appears.
Figure 18
3.3.6. Wait for the application to be installed until you see the window below showing
the available applications to access. You are now connected at this point.
Figure 19
User's Manual Benilde Remote Access
Version 1.0
Page 14 of 41
INFORMATION TECHNOLOGY DEPARTMENT
3.3.7. Same as page 8.
3.4. Using Safari Browser
Using Safari on Mac OS
3.4.1. For JAVA installation check version of Mac OS
Figure 20
User's Manual Benilde Remote Access
Version 1.0
Page 15 of 41
INFORMATION TECHNOLOGY DEPARTMENT
3.4.2. Search and download a compatible JAVA version
Figure 21
Note : It is recommended to download the java runtime (JRE) from the official Java website,
http://www.java.com/en/
User's Manual Benilde Remote Access
Version 1.0
Page 16 of 41
INFORMATION TECHNOLOGY DEPARTMENT
3.4.3. To install JAVA, double click the package located in the downloads folder
Figure 22
3.4.4. Click “Continue” button under introduction menu.
Figure 23
User's Manual Benilde Remote Access
Version 1.0
Page 17 of 41
INFORMATION TECHNOLOGY DEPARTMENT
3.4.5. Click “Continue” button under read me option
Figure 24
User's Manual Benilde Remote Access
Version 1.0
Page 18 of 41
INFORMATION TECHNOLOGY DEPARTMENT
3.4.6. Click “Continue” button under license option
Figure 25
3.4.7. A pop-up menu will appear and select “Agree”
Figure 26
User's Manual Benilde Remote Access
Version 1.0
Page 19 of 41
INFORMATION TECHNOLOGY DEPARTMENT
3.4.8. Click “Install” button under installation type menu
Figure 27
User's Manual Benilde Remote Access
Version 1.0
Page 20 of 41
INFORMATION TECHNOLOGY DEPARTMENT
3.4.9. A pop-up menu will appear and must input the local administrator account
Figure 28
3.4.10. Wait until the installation process is done
Figure 29
User's Manual Benilde Remote Access
Version 1.0
Page 21 of 41
INFORMATION TECHNOLOGY DEPARTMENT
3.4.11. For successful installation, select “close” to end the process.
Figure 30
User's Manual Benilde Remote Access
Version 1.0
Page 22 of 41
INFORMATION TECHNOLOGY DEPARTMENT
3.4.12. Verify if JAVA works properly, type this path to your browser:
http://www.java.com/en/download/testjava.jsp and press “test the currently
installed version of JAVA”
Figure 31
User's Manual Benilde Remote Access
Version 1.0
Page 23 of 41
INFORMATION TECHNOLOGY DEPARTMENT
3.4.13. Follow the succeeding figures for JAVA verification. Click “Inactive plug-in” then a
pop-up will appear and press “Enable”
Figure 33
User's Manual Benilde Remote Access
Version 1.0
Page 24 of 41
INFORMATION TECHNOLOGY DEPARTMENT
Figure 34
Figure 35
User's Manual Benilde Remote Access
Version 1.0
Page 25 of 41
INFORMATION TECHNOLOGY DEPARTMENT
3.4.14. Installation and configuration of SSL Network Extender
3.4.15. Open Safari web browser and type https://vpn.benilde.edu.ph at the URL. A
warning message “Safari can’t verify the identity of the website
“vpn.benilde.edu.ph” will appear. Click “Continue” button to proceed.
Figure 34
3.4.16. Sign in your Infonet username and password when the following screen appears.
Figure 35
User's Manual Benilde Remote Access
Version 1.0
Page 26 of 41
INFORMATION TECHNOLOGY DEPARTMENT
3.4.17. To begin with the SSL installation, proceed to “Settings Tab”. In the drop down
menu select “Edit Native Applications Settings”
Figure 36
User's Manual Benilde Remote Access
Version 1.0
Page 27 of 41
INFORMATION TECHNOLOGY DEPARTMENT
3.4.18. Another page will appear and download SSL Network Extender
Figure 37
User's Manual Benilde Remote Access
Version 1.0
Page 28 of 41
INFORMATION TECHNOLOGY DEPARTMENT
3.4.19. Once the downloading of SSL Network Extender for Mac is completed usually
located in downloads folder. Open the “terminal” application under the utilities
folder.
Figure 38
3.4.20. On the terminal window, type this command: cd downloads.
Figure 39
User's Manual Benilde Remote Access
Version 1.0
Page 29 of 41
INFORMATION TECHNOLOGY DEPARTMENT
3.4.21. Once the command is executed, directory is now path under downloads folder
wherein the SSL Network Extender file is located.
Figure 40
3.4.22. To extract the SSL network Extender installer, command is: “sh snx_install_osx.sh”
User's Manual Benilde Remote Access
Version 1.0
Page 30 of 41
INFORMATION TECHNOLOGY DEPARTMENT
Figure 41
3.4.23. A pop-up will appear then use local administrators account
Figure 42
User's Manual Benilde Remote Access
Version 1.0
Page 31 of 41
INFORMATION TECHNOLOGY DEPARTMENT
Figure 43
3.4.24. For connection testing, Type the VPN page: http://vpn.benilde.edu.ph and select
“continue”
Figure 44
User's Manual Benilde Remote Access
Version 1.0
Page 32 of 41
INFORMATION TECHNOLOGY DEPARTMENT
3.4.25. In the Benilde Remote Access page, Click “connect”
Figure 44
3.4.26. SSL Network Extender will pop-out
User's Manual Benilde Remote Access
Version 1.0
Page 33 of 41
INFORMATION TECHNOLOGY DEPARTMENT
Figure 45
3.4.27. Verify certificate pop-up, click “trust”
User's Manual Benilde Remote Access
Version 1.0
Page 34 of 41
INFORMATION TECHNOLOGY DEPARTMENT
Figure 45
3.4.28. For the Applet pop-up, click “Allow”
User's Manual Benilde Remote Access
Version 1.0
Page 35 of 41
INFORMATION TECHNOLOGY DEPARTMENT
Figure 46
3.4.29. In the Check Point Deployment Agent pop-up, select “Trust Server”
User's Manual Benilde Remote Access
Version 1.0
Page 36 of 41
INFORMATION TECHNOLOGY DEPARTMENT
Figure 47
3.4.30. For the Verification of new version SSL Network Extender installed, click “OK”
User's Manual Benilde Remote Access
Version 1.0
Page 37 of 41
INFORMATION TECHNOLOGY DEPARTMENT
Figure 48
3.4.31. In the installation authentication, use local administrators account.
User's Manual Benilde Remote Access
Version 1.0
Page 38 of 41
INFORMATION TECHNOLOGY DEPARTMENT
Figure 49
3.4.32. Another SSL Network Extender Gateway will appear and click “YES”
User's Manual Benilde Remote Access
Version 1.0
Page 39 of 41
INFORMATION TECHNOLOGY DEPARTMENT
Figure 50
3.4.33. Your connection to Benilde Remote Access is established when you see the
“disconnect“ button. Start accessing desired applications by clicking them at the
“Connection Safe Applications” section.
User's Manual Benilde Remote Access
Version 1.0
Page 40 of 41
INFORMATION TECHNOLOGY DEPARTMENT
Figure 51
User's Manual Benilde Remote Access
Version 1.0
Page 41 of 41