1
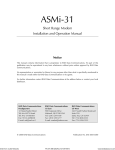
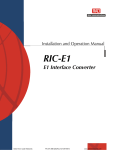
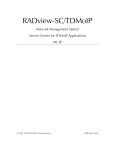
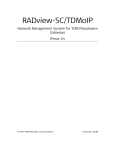
Order from: Cutter Networks
Installation and Operation Manual
VC-6
6-Channel PCM
Voice Module
MEGAPLEX-2100 MODULE
Ph:727-398-5252/Fax:727-397-9610
www.bestdatasource.com
MEGAPLEX-2100 MODULE
VC-6
6-Channel PCM Voice Module
Installation and Operation Manual
Notice
This manual contains information that is proprietary to RAD Data Communications. No part of this
publication may be reproduced in any form whatsoever without prior written approval by RAD Data
Communications.
No representation or warranties for fitness for any purpose other than what is specifically mentioned in
this manual is made either by RAD Data Communications or its agents.
For further information contact RAD Data Communications at the address below or contact your local
distributor.
International Headquarters
RAD Data Communications Ltd.
U.S. Headquarters
RAD Data Communications Inc.
24 Raoul Wallenberg St.
Tel Aviv 69719 Israel
Tel: 972-3-6458181
Fax: 972-3-6498250
E-mail: [email protected]
900 Corporate Drive
Mahwah, NJ 07430 USA
Tel: (201) 529-1100
Toll free: 1-800-444-7234
Fax: (201) 529-5777
E-mail: [email protected]
© 2000 RAD Data Communications
Order from: Cutter Networks
Ph:727-398-5252/Fax:727-397-9610
Publication No. 764-224-09/00
www.bestdatasource.com
Quick Start Guide
If you are familiar with the VC-6 module, use this guide to prepare it for operation.
Preliminary Preparations
VC-6/FXS and VC-6/FXO modules do not require any internal settings.
For VC-6/E&M modules, select the required signaling mode referring to figure
below.
Type I
Type II
Type III
SSDC5
SW1
ON
ON
ON
OFF
SW2 SW3
ON ON
OFF ON
ON ON
OFF OFF
ON
SW1
SW2
OFF
SW3
Connecting the Cables
Order from: Cutter Networks
Insert the VC-6 module in the assigned slot of the Megaplex enclosure and then
connect voice channels as follows:
•
VC-6/E&M modules – use an adapter cable to connect the voice channels to
the module TELCO connector.
•
VC-6/FXS and VC-6/FXO modules – connect the voice channels directly to the
module RJ-11 connectors.
Connect the -48 VDC external feed voltage, if required.
1
Ph:727-398-5252/Fax:727-397-9610
www.bestdatasource.com
VC-6 Installation and Operation Manual
Quick Start Guide
Configuring the Module
Configure the VC-6 module and channel parameters, and assign a main link
timeslot to each connected channel. The configuration parameters and the
allowed range of values are listed below.
Parameter
Range of Values
Module Parameters
WIRES NUM
4-WIRES
2-WIRES
CODING
a LAW
u LAW
SIGNALING
T1 Links:
RBMF SIGNALING
ROBBED BIT FRAME
NO SIGNALING
E1 Links:
CAS
RBMF SIGNALING
ROBBED BIT FRAME
NO SIGNALING
PROFILE
1
2
OUT-OF-SERVICE
IDLE-BUSY
BUSY-IDLE
FORCED-IDLE
FORCED-BUSY
TDM LINK
Channel Parameters
CONNECT
YES
NO
TRANSMIT LEVEL
VC-6/E&M
+8 dBm to -17 dBm
VC-6/FXS
+8 dBm to -13 dBm
VC-6/FXO
+7 dBm to -18 dBm
RECEIVE LEVEL
VC-6/E&M
+2 dBm to -23 dBm
VC-6/FXS
+2 dBm to -17 dBm
VC-6/FXO
+2 dBm to -23 dBm
OPERATION MODE
BIDIRECTIONAL
UNIDIRECTIONAL
BROADCAST
2
Order from: Cutter Networks
Ph:727-398-5252/Fax:727-397-9610
www.bestdatasource.com
Contents
Chapter 1. Introduction
1.1 Overview .......................................................................................................... 1-1
Versions...................................................................................................................1-1
VC-6/E&M Modules.................................................................................................1-2
VC-6/FXS and VC-6/FXO Modules ...........................................................................1-3
1.2 Physical Description .......................................................................................... 1-6
1.3 Functional Description ...................................................................................... 1-7
Audio Performance..................................................................................................1-7
Support for Unidirectional and Broadcast Applications .............................................1-7
Handling Of Signaling Information .........................................................................1-10
Timeslot Assignment ..............................................................................................1-13
Management .........................................................................................................1-13
Test and Diagnostic Capabilities .............................................................................1-13
1.4 Technical Specifications .................................................................................. 1-14
Chapter 2. Module Installation and Setup
2.1 General............................................................................................................. 2-1
2.2 Module Setup ................................................................................................... 2-1
VC-6/E&M ...............................................................................................................2-1
2.3 Module Installation ........................................................................................... 2-4
Connecting the Voice Channels ...............................................................................2-4
Connecting the External -48 VDC Voltage ................................................................2-4
2.4 Normal Indications............................................................................................ 2-5
Chapter 3. Configuration Instructions
3.1 Configuring VC-6 Module ................................................................................. 3-1
Configuring Module Parameters ...............................................................................3-1
Configuring Channel Parameters ..............................................................................3-3
Assigning the Timeslots ............................................................................................3-4
Chapter 4. Alarms and Diagnostics
4.1 General............................................................................................................. 4-1
4.2 Alarm Messages................................................................................................. 4-1
4.3 Diagnostics........................................................................................................ 4-2
Local Loop...............................................................................................................4-2
Remote Loop...........................................................................................................4-3
Tone Injection .........................................................................................................4-4
4.4 Troubleshooting Instructions ............................................................................. 4-5
Recommended Test Sequence .................................................................................4-5
Appendix A. Connector Data
A.1 VC-6/E&M Connector .......................................................................................A-1
A.2 VC-6/FXS and VC-6/FXO Connector..................................................................A-2
A.3 DC POWER IN Connector ................................................................................A-2
Appendix B. Operation with FCD-E1M and FCD-T1M
B.1 Configuration Parameters .................................................................................. B-1
B.2 Alarm Messages................................................................................................. B-2
VC-6 Installation and Operation Manual
Order from: Cutter Networks
i
Ph:727-398-5252/Fax:727-397-9610
www.bestdatasource.com
Table of Contents
List of Figures
1-1.
1-2.
1-3.
1-4.
1-5.
1-6.
1-7.
Typical Basic Application for VC-6/E&M Modules...................................................... 1-2
Typical OPX Application for VC-6/FXO and VC-6/FXS Modules ................................. 1-4
Typical PLAR Application for VC-6/FXS Modules ....................................................... 1-5
Typical PSTN Application for VC-6/FXO Modules...................................................... 1-5
VC-6 Module Panels.................................................................................................. 1-6
Typical Unidirectional Application for VC-6 Modules ................................................ 1-8
Typical Bidirectional Application for VC-6/E&M Modules .......................................... 1-9
2-1. VC-6/E&M Module, Internal Settings ......................................................................... 2-2
2-2. Equivalent Signaling Circuits ...................................................................................... 2-3
3-1. Selection of Transmit and Receive Levels................................................................... 3-4
4-1. Local Loop, Signal Path ............................................................................................. 4-3
4-2. Remote Loop, Signal Path.......................................................................................... 4-4
4-3. Test Tone Injection Path ............................................................................................ 4-5
List of Tables
1-1.
1-2.
1-3.
1-4.
1-5.
1-6.
1-7.
1-8.
VC-6 Module Interface Type ..................................................................................... 1-1
VC-6/E&M Panel Components .................................................................................. 1-6
VC-6/FXS Panel Components .................................................................................... 1-6
VC-6/FXO Panel Components ................................................................................... 1-7
Signaling Types........................................................................................................ 1-11
Signaling Profiles for E1 Main Links with CAS Signaling ............................................ 1-12
Signaling Profiles for T1 Main Links with Robbed Bit Multiframe Signaling ............... 1-12
Signaling Profiles for T1 and E1 Main Links with Robbed Bit Frame Signaling........... 1-12
2-1. Selection of E&M Signaling Mode.............................................................................. 2-2
3-1. VC-6 Modules, General Parameters........................................................................... 3-1
3-2. VC-6 Modules, Channel Parameters .......................................................................... 3-3
4-1. VC-6 Alarm Messages ................................................................................................ 4-1
A-1. VC-6/E&M Module, TELCO Connector Pin Assignment.............................................A-1
A-2. RJ-11 Connector Wiring ............................................................................................A-2
A-3. DC POWER IN Connector Pin Assignment................................................................A-2
B-1. FCD Module Parameters ............................................................................................ B-1
B-2. FCD Channel Parameters ........................................................................................... B-2
B-3. FCD Alarm Messages.................................................................................................. B-2
VC-6 Installation and Operation Manual
ii
Order from: Cutter Networks
Ph:727-398-5252/Fax:727-397-9610
www.bestdatasource.com
Chapter 1
Introduction
1.1 Overview
This manual describes the technical characteristics, applications, installation, and
operation of the VC-6 family of 6-channel voice interface modules for the
Megaplex-2100/2104 Modular E1/T1 Multiplexer Systems.
The VC-6 modules provide six voice channels, using toll-quality 64 kbps PCM
voice encoding in compliance with ITU-T Rec. G.711 and AT&T Pub. 43801, and
offer flexible configuration of the signaling format. The modules provide high
density: for example, a single Megaplex-2100 enclosure can carry up to 60 PCM
voice channels over two E1 links (or up to 48 channels over two T1 links), thereby
replacing two E1 PCM channel banks; and one compact Megaplex-2104 enclosure
can carry 24 PCM voice channels over a T1 or E1 link.
Versions
Order from: Cutter Networks
The VC-6 family includes three module versions, which differ in interface type.
Table 1-1 lists the main characteristics of the VC-6 modules.
Table 1-1. VC-6 Module Interface Type
Version
Analog Interface & Signaling Mode
Channel Connector
VC-6/E&M
2-wire/4-wire, E&M signaling
50-pin TELCO connector
on module panel
VC-6/FXS
2-wire, loop-start signaling
Six RJ-11 connectors on
the front panel
VC-6/FXO
2-wire, loop-start signaling
Six RJ-11 connectors on
the front panel
Note
In this manual, the generic term VC-6 is used when the information is applicable to
all of the module versions, and the term Megaplex is used when the information is
applicable for both the Megaplex-2100 and Megaplex-2104 versions. The complete
designation is used only for information applicable to a specific version.
Overview
Ph:727-398-5252/Fax:727-397-9610
1-1
www.bestdatasource.com
VC-6 Installation and Operation Manual
Chapter 1 Introduction
VC-6/E&M Modules
The VC-6/E&M module has user-selectable 2-wire or 4-wire analog interface, and
E&M signaling. The interface type (2-wire or 4-wire) is simultaneously selected for
all the channels. All the six channels are terminated in a single 50-pin TELCO
connector. RAD offers an adapter cable, CBL-VC16, terminated in six RJ-45 male
connectors for direct connection of user's equipment.
The VC-6/E&M module supports four types of E&M signaling: RS-464 types I, II, III
and V (British Telecom SSDC5):
•
RS-464 Type I signaling is supported without an external power supply.
•
RS-464 Type II, III and V (BT SSDC5) signaling standards are supported by
means of the internal -12 VDC power supply of the chassis. The -12 VDC
voltage is suitable for most PBX systems. However, for full support of the
RS-464 Type II, III and V (BT SSDC5) signaling standards, a -48 VDC signaling
voltage is required.
To connect the -48 VDC, the VC-6/E&M must be ordered with an optional
3-pin connector on the module panel. See Connecting the External -48 VDC
Voltage in Chapter 2 for the details on VDC power sources and connection
methods.
Figure 1-1 shows a typical basic application for VC-6/E&M modules. In this
application the VC-6 modules operate in the normal (bidirectional) mode. VC-6
modules support additional modes (unidirectional or broadcast), explained in the
following sections.
VC-6/E&M
PBX
4-wire
6 Tie
Lines
MEGAPLEX-2100
VC-6/E&M
PBX
4-wire
6 Tie
Lines
MEGAPLEX-2100
Figure 1-1. Typical Basic Application for VC-6/E&M Modules
1-2
Order from: Cutter Networks
Overview
Ph:727-398-5252/Fax:727-397-9610
www.bestdatasource.com
VC-6 Installation and Operation Manual
Chapter 1 Introduction
VC-6/FXS and VC-6/FXO Modules
Order from: Cutter Networks
The VC-6/FXS and VC-6/FXO modules are used to connect regular telephone sets
(and other equipment with similar interface characteristics) to central office and
PBX extension lines.
•
Note
The VC-6/FXS module has 2-wire analog interfaces and FXS loop-start
signaling, for direct connection to subscriber telephone sets. The module
requires -48 VDC for subscriber feed voltage, which is supplied via a standard
internal voltage connector from the chassis voltage distribution bus (see
Connecting the External -48 VDC Voltage in Chapter 2 for the details).
For subscriber feed voltage, VC-6/FXS modules can operate with any VDC input
between -20 VDC to -56 VDC. This will be sufficient for supporting most
applications. However, using input less than the nominal -48 VDC will shorten the
range of the loop span. For example, -24 VDC input will only support loop spans
which do not exceed 1 km.
•
The VC-6/FXO module has 2-wire analog interfaces and FXO loop-start
signaling, for direct connection to PBX extension lines.
In general, VC-6/FXS and VC-6/FXO modules are intended for operation in a link,
with the VC-6/FXO module on the central office/PBX side, and the VC-6/FXS
module on the subscriber side, however VC-6/FXS modules can also operate in a
link with E&M modules. The six channels of the VC-6/FXS and VC-6/FXO modules
terminate in six RJ-11 female connectors, for direct connection of user's
equipment.
In a typical application one VC-6/FXO module is used in a link with a VC-6/FXS
module to provide an off-premises extension (OPX), as shown in Figure 1-2. This
configuration permits the connection of a remote telephone as an extension of a
PBX. The remote telephone then becomes a regular local PBX subscriber, which
can be dialed by other subscribers using standard procedures, and can also dial
any other PBX subscriber.
Overview
Ph:727-398-5252/Fax:727-397-9610
1-3
www.bestdatasource.com
VC-6 Installation and Operation Manual
Chapter 1 Introduction
PBX
VC-6/FXO
Extension Lines
MEGAPLEX-2100
VC-6/FXS
MEGAPLEX-2100
RINGER-2000
Figure 1-2. Typical OPX Application for VC-6/FXO and VC-6/FXS Modules
Another application, which requires only VC-6/FXS modules, is the private line
with automatic ringdown (PLAR), or “hot-line”, applications. In PLAR or “hot-line”
applications six telephone sets are connected to the channels of two VC-6/FXS
modules installed in two different Megaplex units connected in a link, as shown in
Figure 1-3.
Each pair of local/remote telephones can then communicate via the Megaplex link
without dialing: when one telephone goes off-hook, the other telephone rings.
1-4
Order from: Cutter Networks
Overview
Ph:727-398-5252/Fax:727-397-9610
www.bestdatasource.com
VC-6 Installation and Operation Manual
Order from: Cutter Networks
Chapter 1 Introduction
VC-6/FXS
MEGAPLEX-2100
VC-6/FXS
RINGER-2000
MEGAPLEX-2100
RINGER-2000
Figure 1-3. Typical PLAR Application for VC-6/FXS Modules
Due to flexible signaling configuration capabilities, the VC-6/FXS and VC-6/FXO
modules can also be used in links ending in the public switched telephone
network (PSTN), such as the typical application shown in Figure 1-4. In this
application, PSTN subscribers can dial directly to the subscribers connected to the
VC-6/FXS module installed in the Megaplex unit.
PBX
VC-6/FXO
Extension Lines
Trunk Line
Public Switched
Telephone Network
(PSTN)
Subscriber
MEGAPLEX-2100
Figure 1-4. Typical PSTN Application for VC-6/FXO Modules
Overview
Ph:727-398-5252/Fax:727-397-9610
1-5
www.bestdatasource.com
VC-6 Installation and Operation Manual
Chapter 1 Introduction
1.2 Physical Description
Figure 1-5 shows the panels of the VC-6 modules. Table 1-2, Table 1-3, and
Table 1-4 explain the functions of the components located on the module panels.
Figure 1-5. VC-6 Module Panels
Table 1-2. VC-6/E&M Panel Components
Item
Description
DC POWER IN Connector
(optional)
3-pin connector for external -48 VDC signaling voltage.
Connector pin assignments are given in Appendix A.
M Indicator (per channel)
On when the M line of the corresponding channel is off-hook (channel in
use).
E Indicator (per channel)
On when the E line of the corresponding channel is off-hook (channel in use).
TELCO Connector
50-pin TELCO connector, for connection of voice channels.
Connector pin assignments are given in Appendix A.
Table 1-3. VC-6/FXS Panel Components
Item
Description
REM CALL Indicator
(per channel)
On when a call initiated by the remote subscriber is being handled by the
corresponding channel (channel is busy).
LOC O.H Indicator
(per channel)
On when the local subscriber of the corresponding channel is off-hook (busy).
Channel Connector
(per channel)
RJ-11 connector for connection to the channel.
Connector pin assignments are given in Appendix A.
1-6
Order from: Cutter Networks
Physical Description
Ph:727-398-5252/Fax:727-397-9610
www.bestdatasource.com
VC-6 Installation and Operation Manual
Chapter 1 Introduction
Table 1-4. VC-6/FXO Panel Components
Item
Description
REM O.H Indicator
(per channel)
On when the remote subscriber of the corresponding channel is off-hook
(busy).
RING Indicator
(per channel)
On when ringing is received on the corresponding channel.
Channel Connector
(per channel)
RJ-11 connector for connection to the channel.
Connector pin assignments are given in Appendix A.
1.3 Functional Description
Audio Performance
All the VC-6 modules provide six high-quality voice channels (the functional
difference between the various modules being in the signaling interface and
mode). The analog interface for the VC-6/E&M version can be selected by the user
(2-wire or 4-wire); for the other versions, a 2-wire interface is used.
Voice encoding, for all module versions, is toll-quality 64 kbps PCM in compliance
with ITU-T Rec. G.711 and AT&T Pub. 43801. The user can select the
companding law, µ-law or A-law, in accordance with system requirements. To
increase application flexibility, the nominal audio transmit and receive levels of all
the module versions can be adjusted over a wide range.
Due to the high quality audio reproduction, DTMF signaling is transparently
transferred, in-band. Therefore, the user can use DTMF signaling as usual, e.g., can
operate the telephone set keypad to access voice mail systems, interactive systems,
etc. In addition, the VC-6 versions are offered with several signaling interfaces, that
is, in the method used to interchange signaling between the local equipment
connected to a module channel and the channel interface, in accordance with the
applicable standards.
The VC-6 modules require one aggregate timeslot per voice channel. The
maximum number of VC-6 modules that can be installed in one Megaplex-2100
enclosure is 10, corresponding to a maximum of 60 PCM voice channels per
enclosure for a dual-link E1 system. For a dual-link T1 system, a maximum of 48
PCM channels is available per enclosure.
The maximum number of modules in a Megaplex-2104 enclosure is 4,
corresponding to 24 PCM channels. The nominal input and output levels are
individually adjustable in a wide range, enabling easy integration in all
environments.
Support for Unidirectional and Broadcast Applications
Order from: Cutter Networks
In addition to the normal mode of operation, the VC-6 modules support the
unidirectional and broadcasting modes. These modes can be used in
Megaplex-2100 and Megaplex-2104 units equipped with two main link modules,
operating in the dual-link mode.
Functional Description
Ph:727-398-5252/Fax:727-397-9610
1-7
www.bestdatasource.com
VC-6 Installation and Operation Manual
Chapter 1 Introduction
Note
The unidirectional and broadcasting modes are supported only by software
release 3.5 and higher. If necessary, contact RAD Technical Support Department for
upgrade information.
Unidirectional Mode Applications
The unidirectional mode, supported by the VC-6/E&M modules, enables a user at
a central location to send messages to users connected to remote
Megaplex-2100/2104 units (simplex communication), while using only one main
link timeslot. In this mode, any message is simultaneously heard by all the
unidirectional users, but none of them can answer. This capability is achieved by
separating the handling of the receive and transmit paths in the timeslot assigned
for the unidirectional channels, as shown by the dashed lines within the
Megaplex-2100 unit at location B in Figure 1-6.
Figure 1-6 shows a simple system configuration. The figure shows only one
Megaplex-2100 unit (location B) with a VC-6 channel configured for the
unidirectional mode and assigned a timeslot on link A, but the number of such
units is not limited.
Location A
Location C
VC-6
(Bidirectional Mode)
VC-6
(Bidirectional Mode)
Location B
MEGAPLEX-2100
MEGAPLEX-2100
MEGAPLEX-2100
VC-6
(Unidirectional
Mode)
(Receive Only)
Figure 1-6. Typical Unidirectional Application for VC-6 Modules
In the application shown in Figure 1-6, the user at the central location (A) is
connected to a VC-6 channel configured for operation in the normal mode. The
timeslot assigned to user A is routed to the desired main link, and the channels of
the other users (e.g., at location B) are configured for the unidirectional mode, and
routed to the same timeslot on the main link connected to the Megaplex-2100 at
location A (e.g., to link A).
•
1-8
Order from: Cutter Networks
In the forward path (from location A), the timeslot assigned to the VC-6
channel configured for unidirectional operation is automatically bypassed to
the timeslot with the same number on link B, and in addition is routed to the
receive path of the unidirectional channel. Therefore, the transmit signal of
user A is relayed to the following units, and the user B hears user A.
Functional Description
Ph:727-398-5252/Fax:727-397-9610
www.bestdatasource.com
VC-6 Installation and Operation Manual
Order from: Cutter Networks
Chapter 1 Introduction
In the reverse path (to location A), the timeslot is always bypassed from link B
to link A. To prevent interference from the unidirectional channel, its transmit
path is always disconnected from the main link timeslots (at location B, no
information is inserted in the timeslot bypassed from link B to link A), and user
B cannot speak with any other user.
•
In addition to letting all the users attached to unidirectional channels receive its
messages, the user can also communicate in the full duplex mode with one
additional user, configured for operation in the normal mode (this is illustrated by
the user at location C).
Broadcast Mode Applications
The broadcast mode, supported by VC-6/E&M and VC-6/FXS modules, enables a
user at a central location to communicate full duplex with several users connected
to remote Megaplex-2100/2104 units (simplex communication), while using only
one main link timeslot. As in the unidirectional mode, any message from user A
can be simultaneously heard by all the broadcast mode users, but at any time only
one of these users can be heard by user A.
The broadcast mode is supported only by the VC-6/E&M and VC-6/FXS modules,
and the signaling mode used in the system must be "robbed-bit-frame", because in
the "robbed-bit-frame" mode the voice channel signaling information is carried
within its payload timeslot.
The broadcast capability is achieved by separating the handling of the receive and
transmit paths in the timeslot assigned for the broadcast channels, as shown by the
dashed lines within the Megaplex-2100 units in Figure 1-7.
Location A
Location Y
VC-6
(Bidirectional Mode)
VC-6
(Bidirectional Mode)
Location X
Location B
MEGAPLEX-2100
MEGAPLEX-2100
VC-6
(Broadcast
Mode)
VC-6
(Broadcast
Mode)
Figure 1-7. Typical Bidirectional Application for VC-6/E&M Modules
Figure 1-7 shows a basic system configuration. The figure shows only two
Megaplex-2100 units (locations B and X), each with a VC-6 channel configured for
the broadcast mode and assigned a timeslot on link A, but the number of such
units is not limited.
Functional Description
Ph:727-398-5252/Fax:727-397-9610
1-9
www.bestdatasource.com
VC-6 Installation and Operation Manual
Chapter 1 Introduction
In the application shown in Figure 1-7, the handling of the signals generated by
user A is similar to that for the unidirectional mode described above. The
difference is that each broadcast user can insert its signal in the receive timeslot of
link A (instead of the signal bypassed from link B): the change in routing is
controlled by the M signal for VC-6/E&M modules, or by the off-hook/on-hook
detector for VC-6/FXS modules:
•
When the M signal is not active (idle, or on-hook, state), the receive timeslot is
bypassed from link B to link A, and continues toward user A.
•
When the M signal is active (off-hook state), the receive timeslot of link B is
disconnected from link A, and the transmit path of the local broadcast user is
connected to link A.
Thus, user A can request any user to answer, and that user can lift the handset and
connect to user A. At any time, only one user can speak with user A (if more than
one user answers, only the user closer to location A will actually be heard).
Handling Of Signaling Information
The VC-6 modules offer flexible configuration of signaling mode and signaling
format, down to the level of the individual bits in the channel signaling information
word.
Transfer of Signaling Information
The VC-6 modules have four operating modes with respect to signaling:
•
Channel-Associated Signaling (CAS) transmitted in timeslot 16, compatible
with ITU-T Rec. G.704. This mode is available on VC-6 modules installed in
systems using E1 main links, and therefore is generally used with A-law
companding, in accordance with the applicable E1 standards. CAS can be
used only when the main link framing format is G732S.
•
In-band “Robbed Bit Multiframe” (RBMF) signaling transfer.
•
1-10
Order from: Cutter Networks
à
For VC-6 modules installed in systems using T1 main links, this method is
compatible with ITU-T Rec. G.704 and AT&T Pub. 43801, and is generally
used with µ-law companding, in accordance with the applicable T1
standards.
à
For VC-6 modules installed in systems using E1 main links, a proprietary
method is used, which allows the transmission of signaling with minimal
audio quality degradation. However, this method requires multiframe
synchronization, and therefore cannot be used when the E1 main link
framing is G.732N.
Proprietary “Robbed Bit Frame” (RBF) signaling, applicable for both A-law and
µ-law encoding, which avoids the need for multiframe synchronization. This
method allocates the least significant bit of each channel to its own signaling
information. Therefore, signaling is transparently transferred within the timeslot
carrying the encoded audio signal, but because PCM encoding is effectively
done with 7-bit resolution, there is a slight decrease in transmission quality.
This proprietary method allows the transmission of 31 voice channels by a
Megaplex system with E1 links, even when using G.732N framing.
Functional Description
Ph:727-398-5252/Fax:727-397-9610
www.bestdatasource.com
VC-6 Installation and Operation Manual
•
Chapter 1 Introduction
No Signaling (E&M modules only). No signaling information is transmitted, and
therefore it is suitable for applications which do not need end-to-end signaling,
or can use only in-band signaling, e.g., DTMF.
For your convenience, Table 1-5 lists the signaling types supported in the various
main link framing modes:
•
OK means that the corresponding type is the type specified by the applicable
standards.
•
Warning means that the corresponding type is supported, but is not in
accordance with the applicable standards, and therefore can only be used
when Megaplex systems are located at both ends of the link. In this case, the
system generates a warning message.
•
Error means that the corresponding type is not supported. In this case, the
system generates an error message.
Table 1-5. Signaling Types
Signaling Type
No Signaling
Robbed Bit Multiframe (RBMF)
CAS
Robbed Bit Frame (RBF)
Order from: Cutter Networks
E1 Main Link
T1 Main Link
G732S
G732N
ESF
SF (D4)
OK
OK
OK
OK
Warning
Error
OK
OK
OK
Error
Error
Error
Warning
OK
Warning
Warning
Signaling Formats (Profiles)
The format of the signaling information generated by VC-6 modules can be
selected by the user in accordance with the application requirements.
The signaling information of each channel is carried by means of up to four bits
(signaling bits), designated by the applicable standards as bits A, B, C, and D. The
number of bits actually available for carrying signaling information, and the data
rate at which signaling information can be transferred depend on the main link
type (E1 or T1), and the framing mode being used. Refer to the System Installation
and Operation Manual for the additional information.
The format of the signaling information is defined by specifying a profile. The
profile defines the information carried by each signaling bit transmitted by the
module channel, and the signaling bit read by the receive path (normally, the bits
at both ends of a link are used in a similar way, however the signaling mechanism
of the VC-6 modules provides flexibility in the selection of the received bit). Two
profiles are currently supported:
•
Profile 1 is intended for use when two VC-6/E&M modules are connected in a
link (a typical application of this type is shown in Figure 1-1), when an FXS
module is connected in a link with an FXO module (a typical OPX application
of this type is shown in Figure 1-2); when an E&M module is connected in a
link with an FXS or FXO module; or when two VC-6/FXS modules are
connected in a link (a typical PLAR application of this type is shown in
Figure 1-3).
Functional Description
Ph:727-398-5252/Fax:727-397-9610
1-11
www.bestdatasource.com
VC-6 Installation and Operation Manual
Chapter 1 Introduction
Profile 2 is used to enable connection of VC-6/FXO or VC-6/FXS modules to
T1 trunks ending in the PSTN (a typical application of this type is shown in
Figure 1-4), however VC-6/FXO modules using profile 2 can also be connected
to VC-6/FXS modules using profile 2.
•
Profile 2 is not supported by VC-6/E&M modules.
For your convenience, Table 1-6, Table 1-7, and Table 1-8 show the functions of
the signaling bits in each profile for the various main link types and framing
methods. Note that the signaling information generated by VC-6 modules is
actually carried by one bit.
Table 1-6. Signaling Profiles for E1 Main Links with CAS Signaling
Tx Signaling
Profile
Profile 1
Rx Signaling
Tx A Bit
Tx B Bit
Tx C Bit
Tx D Bit
E Lead
M Lead
Forced to 1
Forced to 0
Forced to 1
Rx A Bit
Table 1-7. Signaling Profiles for T1 Main Links with Robbed Bit Multiframe Signaling
Tx Signaling
Profile
Rx Signaling
Tx A Bit
Tx B Bit
Tx C Bit
Tx D Bit
E Lead
M Lead
M Lead
M Lead
M Lead
Rx A Bit
Profile 2 - FXO module
Forced to 0
M Lead inverted
Forced to 0
M Lead
inverted
Rx A Bit
Profile 2 - FXS module
M Lead
Forced to 1
M Lead
Forced to 1
Profile 1
Note
Rx B inverted
When using D4 (SF) framing, only the A and B bits are available. When using ESF
framing, the receive signaling information is actually taken from two bits (A and B,
or B and D).
Table 1-8. Signaling Profiles for T1 and E1 Main Links with Robbed Bit Frame Signaling
Note
Profile
Tx LS Bit
Rx E Lead
Profile 1
M Lead
Rx A Bit
Profile 2
M Lead inverted
Rx A inverted
In the transmit path, the state of the M lead is inserted in the least significant bit of
each timeslot. At the receive side, the state of the E lead is read at the following
intervals:
• T1 links – once every 12 frames (500 samples per second).
• E1 link with G732S framing – once per multiframe (500 samples per second).
• E1 link with G732N framing – every frame (8000 samples per second).
1-12
Order from: Cutter Networks
Functional Description
Ph:727-398-5252/Fax:727-397-9610
www.bestdatasource.com
VC-6 Installation and Operation Manual
Chapter 1 Introduction
OOS Signaling
In case the communication between modules located in different Megaplex units
fails, e.g., because loss of synchronization, etc., it is necessary to control the state
of the signaling information at the two ends of the link. This activity, called
out-of-service (OOS) signaling, can be selected in accordance with the specific
application requirements, on a per-channel basis.
•
The OOS signaling options supported by the VC-6/E&M modules are as
follows:
à
Signaling forced to the idle state for the duration of the out-of-service
condition (forced-idle).
à
Signaling forced to the busy state for the duration of the out-of-service
condition (forced-busy).
à
Signaling forced to the idle state for 2.5 seconds, and then changed to the
busy state for the remaining duration of the out-of-service condition
(idle-busy).
à
Signaling forced to the busy state for 2.5 seconds, and then changed to the
idle state for the remaining duration of the out-of-service condition
(busy-idle).
•
The OOS signaling options supported by the VC-6/FXO modules are
forced-idle and forced-busy.
•
The VC-6/FXS modules support only the forced-idle option.
Timeslot Assignment
The VC-6 modules require one main link timeslot per voice channel, and provide
the data in a DS-0 compatible format, permitting voice channel switching in a
DACS based system.
The Megaplex systems enables the user to select the main link module that will
carry the VC-6 channels. Moreover, the user can select, for each VC-6 channel,
the main link timeslot assigned to the channel in the corresponding T1 or E1 main
link frame.
Management
All the operating parameters are controlled by means of the system management,
except for the E&M signaling type of the VC-6/E&M module.
Test and Diagnostic Capabilities
Order from: Cutter Networks
The VC-6 module automatically performs self-test upon power-up and during
normal operation.
For diagnostics purposes, each module channel has indicators that indicate its
state, e.g., the state of the E and M lines for the VC-6/E&M version, and thus
enable the user to check for proper response to the state of its telephone set or
equipment.
Functional Description
Ph:727-398-5252/Fax:727-397-9610
1-13
www.bestdatasource.com
VC-6 Installation and Operation Manual
Chapter 1 Introduction
The diagnostic features include:
•
Local digital loopback towards local analog side.
•
Remote analog loopback towards remote side.
•
1 kHz, 0 dBm0, tone injection towards remote side on one channel at a time.
Using this function in conjunction with the loopback functions enables the
user to check rapidly and efficiently the local equipment and its connection to
the module channel.
The user can request that a loopback (or the test tone injection) is automatically
deactivated after a user-selected interval, thereby reducing the management
workload during system troubleshooting.
1.4 Technical Specifications
Number of Channels
Six
Bandwidth
Requirements
64 kbps (one timeslot) per enabled channel
Voice Digitizing
Analog Interface
Modulation
Technique
PCM (per ITU-T Rec. G.711 and
AT&T Pub. 43801)
Companding
µ-law or A-law (software-selectable)
Line Type
VC-6/E&M: 4-wire or 2-wire
(software-selectable)
VC-6/FXS, VC-6/FXO: 2-wire
Analog Parameters
ITU-T
Recommendations
4-wire operation: ITU-T Rec. G.712, G.714
Nominal Level
0 dBm
Nominal Impedance
600Ω
Return Loss
(at 300 to 3400 Hz)
Better than 20 dB
Frequency Response
(ref: 1020 Hz)
Nominal Levels
(software-selectable)
±0.5 dB, at 300 to 3400 Hz
2-wire operation: ITU-T Rec. G.713
E&M:
TX: +8 to -17 dBm
RX: +2 to -23 dBm
FXS:
TX: +8 to -13 dBm
RX+2 to -17 dBm
FXO:
TX: +7 to -18 dBm
+2 to -23 dBm
Steps: 1 dB (±0.5 dB), nominal
1-14
Order from: Cutter Networks
Technical Specifications
Ph:727-398-5252/Fax:727-397-9610
www.bestdatasource.com
VC-6 Installation and Operation Manual
Signaling
Chapter 1 Introduction
Signal to Total
Distortion (8-bit PCM
encoding)
ITU-T Rec. G.712, G.713 Method 2:
Idle Channel Noise
Better than -65 dBm0 (+20 dBrnc)
Transformer Isolation
1500 Vrms
VC-6/E&M
EIA RS-464 Type I
0 to -30 dBm0: better than 33 dB
+3 to -45 dBm0: better than 22 dB
EIA RS-464 Type II, III, and V (British
Telecom SSDC5) using -12 VDC in place of
-48 VDC
Note: For full support of Types II, III, and V
(SSDC5) signaling standards, a -48 VDC supply is
required, which is supplied via an optional 3-pin
connector on the module panel.
VC-6/FXS
Signaling method: Loop-start
Loop Start Signaling
Characteristics
(with Ringer)
On-hook/off-hook threshold:
• 3V to 80% of feed voltage between TIP
and RING in off-hook state
• More than 83% of feed voltage between
TIP and RING in on-hook state
Feed current: 22 mA ±10%
Ringer: 86 VRMS (when providing 4 REN or
less) to 45 VRMS (when providing 12 REN
max), 20 Hz (±10%);
Overload protected, 1 sec ON, 3 sec OFF
VC-6/FXO
Signaling method: Loop-start
DC Impedance
Off-hook: 100Ω at 100 mA feed, 230Ω at
25 mA feed
On-hook: above 1 MΩ
Ring Detector
20 kΩ at 20 Hz, 70 VRMS
Detection: At least 20 VRMS, 17 Hz–25 Hz
No detection: Maximum 5 VRMS
End-to-end Signaling
Order from: Cutter Networks
T1
Robbed Bit Multiframe signaling:
667 samples per second with SF (D4);
333 samples per second with ESF
Robbed Bit Frame (proprietary) signaling:
8000 samples per second
Technical Specifications
Ph:727-398-5252/Fax:727-397-9610
1-15
www.bestdatasource.com
VC-6 Installation and Operation Manual
Chapter 1 Introduction
E1
Channel Associated Signaling
per ITU-T G.704 para. 3.3.32
Robbed Bit Multiframe signaling for up to
31 PCM channels on E1 link (proprietary for
E1): 500 samples per second
Robbed Bit Frame (proprietary) signaling:
8000 samples per second
Diagnostics
• Local digital loopback
• Remote analog loopback
• 1 kHz, 0 dBm0 test tone injection toward
remote end (one channel at a time)
Indicators
Connectors
VC-6/E&M
E-lead, M-lead indicators per channel
VC-6/FXS
Remote call and local off-hook indicators
per channel
VC-6/FXO
Ring and remote off-hook indicators per
channel
VC-6/E&M
50-pin TELCO connector for all channels
Optional: 3-pin connector on module panel
for external -48 VDC voltage
VC-6/FXS, VC-6/FXO
Configuration
1-16
Order from: Cutter Networks
6-pin RJ-11 connector per channel
Programmable via the system management
Technical Specifications
Ph:727-398-5252/Fax:727-397-9610
www.bestdatasource.com
Chapter 2
Module Installation and
Setup
2.1 General
This chapter provides installation and operation instructions for the various
versions of VC-6 modules. The information presented in this chapter supplements
the general installation and operation instructions contained in the
Megaplex-2100 System Installation and Operation Manual.
Warning
Note
Before performing any internal settings, adjustment, maintenance, or repairs,
first disconnect all the cables from the module, and then remove the module
from the Megaplex enclosure.
No internal settings, adjustment, maintenance, and repairs may be performed
by either the operator or the user; such activities may be performed only by a
skilled technician who is aware of the hazards involved.
Always observe standard safety precautions during installation, operation, and
maintenance of this product.
The VC-6 modules contain components sensitive to electrostatic discharge (ESD). To
prevent ESD damage, always hold the module by its sides, and do not touch the
module components or connectors.
2.2 Module Setup
VC-6/E&M
Order from: Cutter Networks
The VC-6/E&M module version has several internal switches, that are used to
select the signaling mode. The signaling mode is simultaneously selected for all the
channels. Figure 2-1 identifies the positions of these switches. Figure 2-2 shows the
equivalent signaling circuits for the different signaling modes.
Module Setup
Ph:727-398-5252/Fax:727-397-9610
2-1
www.bestdatasource.com
VC-6 Installation and Operation Manual
Chapter 2 Module Installation and Setup
SW1
ON
ON
ON
OFF
Type I
Type II
Type III
SSDC5
SW2 SW3
ON ON
OFF ON
ON ON
OFF OFF
ON
SW1
SW2
OFF
SW3
Figure 2-1. VC-6/E&M Module, Internal Settings
Table 2-1 lists the required switch settings.
Table 2-1. Selection of E&M Signaling Mode
Signaling Mode
Switch SW1
Switch SW2
Switch SW3
RS-464 Type I
ON
ON
ON
RS-464 Type II
ON
OFF
ON
RS-464 Type III
ON
ON
ON
RS-464 Type V
OFF
OFF
OFF
BT SSDC5
OFF
OFF
OFF
The VC-6/E&M module signaling mode is factory-set to EIA RS-464 Type V
(BT SSDC5) signaling.
2-2
Order from: Cutter Networks
Module Setup
Ph:727-398-5252/Fax:727-397-9610
www.bestdatasource.com
VC-6 Installation and Operation Manual
Order from: Cutter Networks
Chapter 2 Module Installation and Setup
E&M
Interface
PABX
Condition
M Lead
- 48VDC
On-Hook
Off-Hook
M
E
GND
- 48VDC
Open
GND
E Lead
- 48VDC
A. RS-464 Type I
E&M
Interface
PABX
Condition
M Lead
SB Lead
On-Hook
Off-Hook
M/SB
E/SG
Open
- 48VDC
Open
GND
M/SB
E/SG
Open
- 48VDC
Open
GND
- 48VDC
E Lead
- 48VDC
SG Lead
B. RS-464 Type II
E&M
Interface
PABX
Condition
M Lead
SB Lead
On-Hook
Off-Hook
- 48VDC
E Lead
- 48VDC
SG Lead
C. RS-464 Type III
E&M
Interface
PABX
Condition
M Lead
- 48VDC
- 48VDC
On-Hook
Off-Hook
M
E
Open
GND
Open
GND
E Lead
LEGEND
D. RS-464 Type V, SSDC5
= Signaling Detector Circuit
Figure 2-2. Equivalent Signaling Circuits
Note
The VC-6/FXS and VC-6/FXO module versions do not include any internal user
jumpers. All their functions are programmable.
Module Setup
Ph:727-398-5252/Fax:727-397-9610
2-3
www.bestdatasource.com
VC-6 Installation and Operation Manual
Chapter 2 Module Installation and Setup
2.3 Module Installation
Insert the module in the assigned I/O slot of the Megaplex chassis. The module can
be installed in an operating chassis (hot insertion), in this case, the module starts
operating immediately.
Connecting the Voice Channels
For the VC-6/E&M module, all the voice channels are available on the single
TELCO 50-pin connector. Connector pin assignment is described in Appendix A.
You may either connect a cable prepared in accordance with Appendix A to the
TELCO connector of the module, or use an adapter cable for direct connection to
the equipment using the voice channels. A suitable cable, designated CBL-VC16, is
available as an option from RAD: this cable has a mating TELCO 50-pin connector
for connection to the module, and six RJ-45 male connectors (one for each
channel) for direct connection to the user's equipment. Cable length is 1.5m (5 ft).
For the VC-6/FXO and VC-6/FXS modules, each voice channel terminates in a
separate 6-pin RJ-11 female connector. Connector pin assignment is described in
Appendix A.
Connecting the External -48 VDC Voltage
The external -48 VDC feed voltage can be supplied to the VC-6/E&M and
VC-6/FXS modules from the following sources:
• Internal DC voltage distribution (VC-6/FXS only) – the modules receive the
required voltage internally via the chassis voltage distribution bus. The chassis
receives the DC voltages from an appropriate DC power supply, installed
Ringer-2100R/3000R module (Megaplex-2100), or built-in ringer option
(Megaplex-2104 only). No external cable connections are required.
Note
•
Internal DC voltage distribution via external connection to chassis (VC-6/FXS
only) – the modules receive the required voltage internally via the chassis
voltage distribution bus as in the method above. The chassis receives the feed
voltage externally (for example, from a Ringer module/standalone unit) via a
cable connected to the dedicated 3-pin RINGER-IN connector on the chassis
power supply panel (Megaplex-2100 only).
•
External connection to module (VC-6/E&M ordered with dedicated
DC POWER IN connector only) – the modules receive the optional external
-48 VDC from a Ringer via a cable connected directly to the 3-pin connector
on the module panel.
For subscriber feed voltage, VC-6/FXS modules can operate with any VDC input
between -20 VDC to -56 VDC. This will be sufficient for supporting most
applications. However, using input less than the nominal -48 VDC will shorten the
range of the loop span. For example, -24 VDC input will only support loop spans
which do not exceed 1 km.
RAD offers variety of Ringer standalone units and modules, which provide the
required VDC power for the Megaplex modules. Refer to appropriate Ringer
Installation and Operation Manual for details.
2-4
Order from: Cutter Networks
Module Installation
Ph:727-398-5252/Fax:727-397-9610
www.bestdatasource.com
VC-6 Installation and Operation Manual
Order from: Cutter Networks
Caution
Chapter 2 Module Installation and Setup
Since an external voltage source can supply voltage even when the Megaplex is
not operating, observe the following precautions:
Always turn off the external -48 VDC source, e.g., Ringer-2000, before the
Megaplex enclosure is turned off.
Never connect external -48 VDC voltages to modules installed in a Megaplex
enclosure if it is not operating.
Do not connect/disconnect the Ringer-2000 while it is operating.
2.4 Normal Indications
The module starts operating as soon as it is plugged into an operating Megaplex
enclosure. During normal operation, the two indicators of each channel indicate
the channel activity:
•
For VC-6/E&M channels, the E and M indicators indicate the activity on the
signaling leads of the corresponding channel.
•
For VC-6/FXO channels, the RING indicator lights when ringing is received
from the local switch or PBX on the corresponding channel, and the REM O.H
indicator lights when the remote subscriber is in the off-hook state.
•
For VC-6/FXS channels, the REM CALL indicator lights when a call initiated by
the subscriber connected to the remote side is being handled by the
corresponding channel, and the LOC O.H indicator lights when the local
subscriber is in the off-hook state.
Normal Indications
Ph:727-398-5252/Fax:727-397-9610
2-5
www.bestdatasource.com
VC-6 Installation and Operation Manual
Chapter 2 Module Installation and Setup
2-6
Order from: Cutter Networks
Normal Indications
Ph:727-398-5252/Fax:727-397-9610
www.bestdatasource.com
Chapter 3
Configuration Instructions
This chapter provides information on the configuration parameters of the VC-6
modules. The configuration activities required to select the desired values of these
parameters are performed by means of the management system used to control
the Megaplex systems:
•
Supervision terminal or Telnet (refer to the System Installation and Operation
Manual), or
•
A network management system, e.g., the RADview network management
system (refer to the RADview User's Manual for instructions).
3.1 Configuring VC-6 Module
You must configure the VC-6 module and channel parameters. Additionally, you
must assign a main link timeslot to each connected channel.
Configuring Module Parameters
Table 3-1 explains the general programmable VC-6 module parameters, and their
range of values.
Table 3-1. VC-6 Modules, General Parameters
Parameter
WIRES NUM
Description
Specifies the interface to be used by the voice channels:
4-WIRES
2-WIRES
CODING
Order from: Cutter Networks
4-wire interface, available only for the VC-6/E&M module
2-wire interface
Specifies the companding law to be used by the voice channels:
a LAW
u LAW
A-law coding, intended for use on E1 links
µ-law coding, intended for use on T1 links
Configuring VC-6 Module
Ph:727-398-5252/Fax:727-397-9610
3-1
www.bestdatasource.com
VC-6 Installation and Operation Manual
Chapter 3 Configuration Instructions
Table 3-1. VC-6 Modules, General Parameters (Cont.)
Parameter
SIGNALING
Description
This field specifies the end-to-end signaling transfer method. The signaling transfer
options depend on the type of main link module installed in the Megaplex enclosure:
For T1 interface modules (e.g., ML-T1):
RBMF SIGNALING Robbed Bit Multiframe signaling in accordance with AT&T
Pub 43801
ROBBED BIT FRAME
Proprietary “robbed bit” signaling method that does not require
multiframe synchronization (7-bit PCM with channel signaling
carried by the eighth bit of each channel)
NO SIGNALING
Channel signaling is not transferred (valid only for VC-6/E&M). If you
select this option for other modules, a MODULE HW/SW CONFIG
MISMATCH alarm message will be generated.
For E1 interface modules (e.g., ML-E1):
Channel-Associated Signaling in accordance with ITU-T Rec. G.704
CAS
RBMF SIGNALING Robbed Bit signaling using proprietary method that requires
multiframe synchronization
PROFILE
ROBBED BIT FRAME
Proprietary “robbed bit” signaling method that does not require
multiframe synchronization (7-bit PCM with channel signaling carried
by the eighth bit of each channel).
NO SIGNALING
Channel signaling is not transferred (valid only for VC-6/E&M). If you
select this option for other modules, a MODULE HW/SW CONFIG
MISMATCH alarm message will be generated.
Specifies the signaling profile (refer to Handling Of Signaling Information in Chapter 1 for
details).
1
Signaling profile 1
2
Signaling profile 2 (not supported by the VC-6/E&M modules)
OUT-OF-SERVICE Specifies the state of the E lead of an out-of-service channel, as appears to the PBX.
SIGNALING
IDLE-BUSY
Signaling held at on-hook state (IDLE) for 2.5 seconds, followed by
off-hook state (BUSY) for the duration of the out-of-service condition
BUSY-IDLE
Signaling held at off-hook state (BUSY) for 2.5 seconds, followed by
on-hook state (IDLE) for the duration of the out-of-service condition
FORCED-IDLE
Signaling held at on-hook state (IDLE) for the duration of the
out-of-service condition
FORCED-BUSY
Signaling held at off-hook state (BUSY) for the duration of the
out-of-service condition
All values are available for VC-6/E&M modules. For VC-6/FXO modules only
FORCED-IDLE or FORCED-BUSY values are available. VC-6/FXS modules support only
FORCED-IDLE signaling.
TDM LINK
3-2
Order from: Cutter Networks
Selects the main link to which the module will be connected. The main link is specified
by indicating the number of the I/O slot in which the desired main link module is
installed.
Configuring VC-6 Module
Ph:727-398-5252/Fax:727-397-9610
www.bestdatasource.com
VC-6 Installation and Operation Manual
Chapter 3 Configuration Instructions
Configuring Channel Parameters
Table 3-2 explains the programmable parameters of the VC-6 channels, and their
range of values.
Table 3-2. VC-6 Modules, Channel Parameters
Parameter
Function
Values
Configuration Guidelines
CONNECT
Determines whether
the channel is
connected to the
main link.
YES: The channel is connected.
When the channel is
disconnected you can still
program the desired parameters,
so the channel will be ready to
operate when needed.
Selects the nominal
input level of the
transmit path.
The input level can be set in
1 dB increments in the following
ranges:
TRANSMIT
LEVEL
NO: The channel is disconnected.
Select the transmit level to match
the transmission level point
(TLP-transmit) of the equipment
connected to the channel.
E&M:+8 dBm to -17 dBm
FXS: +8 dBm to -13 dBm
FXO:+7 dBm to -18 dBm
Figure 3-1 explains how to
determine the required level
setting.
Note: The application of an input signal at the nominal transmit level results in 0 dBm digital level, and a far-end
output signal equal to the far-end nominal receive level.
RECEIVE
LEVEL
Selects the nominal
input level of the
receive path.
Select the receive level to match
the TLP-receive of the equipment
connected to the channel (see
Figure 3-1).
The output level can be set in
1 dB increments in the following
ranges:
E&M: +2 dBm to -23 dBm
FXS: +2 dBm to -17 dBm
FXO: +2 dBm to -23 dBm
OPERATION
MODE
Order from: Cutter Networks
Selects the operating BIDIRECTIONAL: Normal
mode of the channel. (point-to-point) mode.
UNIDIRECTIONAL: Channel
operates in the unidirectional mode.
In this mode, it can only receive the
signals carried by the assigned
timeslot, but cannot transmit. The
mode is available only for VC-6/E&M
modules.
Refer to Support for
Unidirectional and Broadcast
Applications in Chapter 1 for
details.
BROADCAST: Channel operates in
the bidirectional mode. In this
mode, the channel receives the
signals carried by the assigned
timeslot, and will transmit only when
the M input is active. The mode is
available only for VC-6/E&M and
VC-6/FXS modules.
Configuring VC-6 Module
Ph:727-398-5252/Fax:727-397-9610
3-3
www.bestdatasource.com
VC-6 Installation and Operation Manual
Chapter 3 Configuration Instructions
VC-6 Channel
Transmit TLP:
-16 dB
T
Transmit
Input Circuit
R
Nominal Level
= 0 dBm
Adjust Level to -16 dBm
Receive TLP:
-2 dB
T1
R1
Signal
Processor
Receive
Output Circuit
Adjust Level to -2 dBm
Figure 3-1. Selection of Transmit and Receive Levels
Assigning the Timeslots
After performing the configuration of the individual module channels, it is
necessary to assign a main link timeslot to each connected channel, as explained
in the System Installation and Operation Manual.
3-4
Order from: Cutter Networks
Configuring VC-6 Module
Ph:727-398-5252/Fax:727-397-9610
www.bestdatasource.com
Chapter 4
Alarms and Diagnostics
4.1 General
This chapter provides information on the alarms generated by the VC-6 modules,
and instructions for using the module-specific diagnostic functions. The diagnostic
information presented in this chapter supplements the general Megaplex-2100
diagnostics operation instructions contained in the System Installation and
Operation Manual.
4.2 Alarm Messages
Table 4-1 lists the alarm messages generated by the VC-6 module, specifies their
type, and explains their interpretation.
Table 4-1. VC-6 Alarm Messages
Code
Message
Type
Interpretation
021
MODULE WAS REMOVED
Event
The module has been taken out of its slot.
022
MODULE WAS INSERTED
Event
The module has been inserted.
023
MODULE RESET OCCURRED
Event
The module has been automatically reset.
024
MODULE INIT ERROR/
HARDWARE FAILURE
State
Module initialization, performed upon turn-on or
module insertion, has failed, or a hardware
malfunction has been detected in this module.
025
NOT PROGRAMMED
MODULE
State
(Minor)
The module that has been read from the Megaplex
unit is not programmed in the active database.
026
PROGRAMMED/INSTALL
MODULE MISMATCH
State
The module that has been read from the Megaplex
unit does not match the module programmed in the
active database.
028
MODULE HW/SW CONFIG
MISWATCH
State
The signaling transfer option selected by the user is not
supported by the module.
029
NOT SUPPORTED
SOFTWARE VER
State
The VC-6 module includes an old software version
that differs from the version expected by the CL
module.
Order from: Cutter Networks
Alarm Messages
Ph:727-398-5252/Fax:727-397-9610
4-1
www.bestdatasource.com
VC-6 Installation and Operation Manual
Chapter 4 Alarms and Diagnostics
Table 4-1. VC-6 Alarm Messages (Cont.)
Code
Message
Type
Interpretation
160
COMBO FAILURE IN CH1
COMBO FAILURE IN CH2
COMBO FAILURE IN CH3
COMBO FAILURE IN CH4
COMBO FAILURE IN CH5
COMBO FAILURE IN CH6
State
The COMBO of the specified channel failed. This state
is often reported because of a transient fault. If the
fault state persists, the module must be repaired as
soon as possible.
4.3 Diagnostics
The VC-6 modules have a complete set of test loops that includes local and
remote loops on each channel. In addition, the VC-6 modules have provisions for
the digital injection of a test tone towards the remote subscriber. This tone is sent
instead of the local transmit signal, and provides a controlled test signal that allows
rapid testing: the tone should be received by the remote subscriber at the nominal
receive level, and should be heard loudly and clearly.
When a test or loopback is activated, the user can also specify the time it remains
active: the range is 1 through 30 minutes, in 1-minute steps. After the specified
time, the test or loopback is automatically deactivated, thereby reducing the
management workload during system troubleshooting. The default selection is
continuous connection, that is, the test or loopback remain active until canceled
by a user's command. The following sections describe the available diagnostic
activities.
Local Loop
The local loop is a digital loop performed at the digital output of the each channel
COMBO, by returning the transmit signal of the channel in the same timeslot of
the receive path. The transmit signal is still sent to the remote Megaplex unit. The
loop signal path is shown in Figure 4-1.
4-2
Order from: Cutter Networks
Diagnostics
Ph:727-398-5252/Fax:727-397-9610
www.bestdatasource.com
VC-6 Installation and Operation Manual
Channel 1
..
..
User or
Test
Equipment
Channel 5
Chapter 4 Alarms and Diagnostics
..
..
.
..
..
.
..
..
.
VC-6
VC-6
I/O Modules
I/O Modules
Local
Unit
User or
Test
Equipment
Remote
Unit
System
Management
Figure 4-1. Local Loop, Signal Path
Remote Loop
Order from: Cutter Networks
The remote loop is an analog loop performed at the analog output of the channel
COMBO, by returning the analog receive signal of the channel to the input of the
transmit path. The receive signal remains connected to the local user, and can be
received by user. While the loop is connected, the remote voice channel should
receive its own signal, e.g., a strong sidetone should be heard in the earpiece if the
channel is connected to a telephone set. The loop signal path is shown in
Figure 4-2.
Diagnostics
Ph:727-398-5252/Fax:727-397-9610
4-3
www.bestdatasource.com
VC-6 Installation and Operation Manual
Chapter 4 Alarms and Diagnostics
Channel 1
..
..
User or
Test
Equipment
Channel 5
..
..
.
..
..
.
..
..
.
VC-6
VC-6
I/O Modules
I/O Modules
Local
Unit
User or
Test
Equipment
Remote
Unit
System
Management
Figure 4-2. Remote Loop, Signal Path
Tone Injection
The test tone is a data sequence repeating at a rate of 1 kHz. This data sequence is
identical to the data sequence that would have been generated if a 1-kHz signal
having a nominal level of 1 mW (0 dBm0) were applied to the input of the
channel codec.
The tone is injected to the local transmit path multiplexer, instead of the transmit
signal of the channel. The signal received from the other end remains connected
to the local subscriber.
The tone can be injected to only one channel at a time.
Figure 4-3 shows the signal path.
4-4
Order from: Cutter Networks
Diagnostics
Ph:727-398-5252/Fax:727-397-9610
www.bestdatasource.com
VC-6 Installation and Operation Manual
Chapter 4 Alarms and Diagnostics
..
..
.
Channel 1
..
..
User or
Test
Equipment
..
..
.
Channel 5
..
..
.
Test
~ Tone
VC-6
VC-6
I/O Modules
I/O Modules
Local
Unit
User or
Test
Equipment
Remote
Unit
System
Management
Figure 4-3. Test Tone Injection Path
4.4 Troubleshooting Instructions
Recommended Test Sequence
Order from: Cutter Networks
The test tone injection function and the loops available on the VC-6 module
provide a rapid and efficient way to identify the general location of a fault at either
of the two VC-6 modules connected in a link, in the external equipment, or in the
connections to the channels.
If a complaint is received from one of the subscribers connected to the VC-6
channels, first activate the VC-6 local test loop at the side where the complaint is
received from. The local subscriber must receive its own signal.
If the signal is not received, the problem is at the local end:
•
Check the connections to the subscriber equipment.
•
Replace the local VC-6 module.
If the local subscriber receives its own signal when the local loop is activated,
activate test tone injection toward the complaining subscriber. If the subscriber
receives the test tone, the problem is probably in the connections at the remote
side (the side that sends the tone). You can check the computer path of the remote
module channel by activating the remote loopback and the tone injection toward
the remote subscriber, and checking that the local subscriber receives the test
tone.
If the problem is not corrected, the procedure must be repeated at the other side
of the link. Deactivate the local loop and activate the remote loop on the remote
Megaplex unit.
Troubleshooting Instructions
Ph:727-398-5252/Fax:727-397-9610
4-5
www.bestdatasource.com
VC-6 Installation and Operation Manual
Chapter 4 Alarms and Diagnostics
4-6
Order from: Cutter Networks
Troubleshooting Instructions
Ph:727-398-5252/Fax:727-397-9610
www.bestdatasource.com
Appendix A
Connector Data
A.1 VC-6/E&M Connector
The VC-6/E&M modules have a female 50-pin TELCO connector wired in
accordance with Table A-1. Table A-1 also details the pin assignment of the
CBL-VC16 cable, which is used to adapt between the module’s single TELCO
connector and six RJ-45 male connectors.
Table A-1. VC-6/E&M Module, TELCO Connector Pin Assignment
Channel
1
2
3
4
5
6
Order from: Cutter Networks
TELCO
Connector Pin
CBL-VC16 RJ-45
Pin
1
2
3
4
7
8
1
2
Signaling Ground (SG)
E-lead
Signaling Battery (SB)
M-lead
26
27
28
29
4
5
3
6
R-IN
4-wire RX in
T-IN
R1-OUT 2-wire line;
T1-OUT 4-wire TX out
5
6
7
8
7
8
1
2
Signaling Ground (SG)
E-lead
Signaling Battery (SB)
M-lead, 30
30
31
32
33
4
5
3
6
R-IN
4-wire RX in
T-IN
R1-OUT 2-wire line;
T1-OUT 4-wire TX out
9
10
11
12
7
8
1
2
Signaling Ground (SG)
E-lead
Signaling Battery (SB)
M-lead, 30
34
35
36
37
4
5
3
6
R-IN
4-wire RX in
T-IN
R1-OUT 2-wire line;
T1-OUT 4-wire TX out
13
14
15
16
7
8
1
2
Signaling Ground (SG)
E-lead
Signaling Battery (SB)
M-lead, 30
38
39
40
41
4
5
3
6
R-IN
4-wire RX in
T-IN
R1-OUT 2-wire line;
T1-OUT 4-wire TX out
17
18
19
20
7
8
1
2
Signaling Ground (SG)
E-lead
Signaling Battery (SB)
M-lead, 30
42
43
44
45
4
5
3
6
R-IN
4-wire RX in
T-IN
R1-OUT 2-wire line;
T1-OUT 4-wire TX out
21
22
23
24
7
8
1
2
Signaling Ground (SG)
E-lead
Signaling Battery (SB)
M-lead, 30
46
47
48
49
4
5
3
6
R-IN
4-wire RX in
T-IN
R1-OUT 2-wire line;
T1-OUT 4-wire TX out
Notes
Function
TELCO
CBL-VC16 RJ-45
Connector Pin
Pin
•
Pin 25 is connected to the internal signal ground.
•
Pin 50 is not connected.
Function
VC-6/E&M Connector
Ph:727-398-5252/Fax:727-397-9610
A-1
www.bestdatasource.com
VC-6 Installation and Operation Manual
Appendix A Connector Data
A.2 VC-6/FXS and VC-6/FXO Connector
Table A-2 lists the wiring of the RJ-11 connectors used for the VC-6/FXS and
VC-6/FXO modules.
Table A-2. RJ-11 Connector Wiring
Pin
Function
1,2
Not connected
3
Ring
4
Tip
5,6
Not connected
A.3 DC POWER IN Connector
Table A-3 lists the functions of the pins in the optional DC POWER IN connector
available for VC-6/E&M modules.
Table A-3. DC POWER IN Connector Pin Assignment
A-2
Order from: Cutter Networks
Pin
Function
1
Ground
2
Not connected
3
-48 VDC
DC POWER IN Connector
Ph:727-398-5252/Fax:727-397-9610
www.bestdatasource.com
Order from: Cutter Networks
Appendix B
Operation with FCD-E1M
and FCD-T1M
Operation of the VC-6 module with FCD-E1M and FCD-T1M is generally
similar to its operation with the Megaplex-2100 family of modular E1/T1
multiplexer systems, as explained in this manual. The differences are seen in
the following two areas:
•
Configuration parameters
•
Alarm messages
This appendix identifies and lists these differences only. For a full description
of the configuration parameters and alarm messages, refer to the
Configuration Instructions and Alarm Messages sections in this manual.
B.1 Configuration Parameters
Table B-1 indicates the difference in the module parameters when operating
with FCD-E1M and FCD-T1M.
Table B-2 indicates the difference in the channel parameters when operating
with FCD-E1M and FCD-T1M.
Table B-1. FCD Module Parameters
Parameter
FCD Difference
WIRES NUM
No change
CODING
No change
SIGNALING
No change
PROFILE
Not applicable
OUT-OF-SERVICE
SIGNALING
No change
TDM LINK
Not applicable
18/09/00 8:05 PM
Configuration Parameters
Ph:727-398-5252/Fax:727-397-9610
B-1
www.bestdatasource.com
VC-6 Installation and Operation Manual
Appendix B Operation with FCD-E1M and FCD-T1M
Table B-2. FCD Channel Parameters
Parameter
FCD Difference
CONNECT
No change
TRANSMIT LEVEL
No change
RECEIVE LEVEL
No change
OPERATION MODE
Not applicable
B.2 Alarm Messages
Table B-3 indicates the difference in the alarm messages when operating
with FCD-E1M and FCD-T1M.
Table B-3. FCD Alarm Messages
MP Code
B-2
Order from: Cutter Networks
Difference
FCD Code
FCD Type
021
59
Major
022
58
Major
023
52
Major
024
57
Major
025
Not applicable
026
62
Major
028
61
Major
029
Not applicable
Alarm Messages
18/09/00 8:05 PM
Ph:727-398-5252/Fax:727-397-9610
www.bestdatasource.com
24 Raoul Wallenberg St., Tel Aviv 69719, Israel
Tel: +972-3-6458181, Fax: +972-3-6483331, +972-3-6498250
E-mail: [email protected], Web site: http://www.rad.com
Customer Response Form
RAD Data Communications would like your help in improving its product documentation.
Please complete and return this form by mail or by fax or send us an e-mail with your
comments.
Thank you for your assistance!
Manual Name: ______________________________________________________________
Publication Number: __________________________________________________________
Please grade the manual according to the following factors:
Installation instructions
Operating instructions
Manual organization
Illustrations
The manual as a whole
Excellent
Good
Fair
Poor
Very Poor
❒
❒
❒
❒
❒
❒
❒
❒
❒
❒
❒
❒
❒
❒
❒
❒
❒
❒
❒
❒
❒
❒
❒
❒
❒
What did you like about the manual?
___________________________________________________________________________
___________________________________________________________________________
___________________________________________________________________________
___________________________________________________________________________
___________________________________________________________________________
Order from: Cutter Networks
1
Ph:727-398-5252/Fax:727-397-9610
www.bestdatasource.com
Error Report
Type of Error(s)
❒
Incompatibility with product
or Problem(s):
❒
Difficulty in understanding text
❒
Regulatory information (Safety, Compliance, Warnings, etc.)
❒
Difficulty in finding needed information
❒
Missing information
❒
Illogical flow of information
❒
Style (spelling, grammar, references, etc.)
❒
Appearance
❒
Other _________
Please list the exact page numbers with the error(s), detail the errors you found (information missing,
unclear or inadequately explained, etc.) and attach the page to your fax, if necessary.
_________________________________________________________________________________________
_________________________________________________________________________________________
_________________________________________________________________________________________
_________________________________________________________________________________________
Please add any comments or suggestions you may have.
_________________________________________________________________________________________
_________________________________________________________________________________________
_________________________________________________________________________________________
You are:
❒
Distributor
❒
End user
❒
VAR
❒
Other ________________________
Who is your distributor?
_______________________________
Your name and company: ___________________________________________________________
Job title: __________________________________________________________________________
Address: __________________________________________________________________________
Direct telephone number and extension: _______________________________________________
Fax number: ______________________________________________________________________
E-mail: _____________________________________________________________________
Order from: Cutter Networks
2
Ph:727-398-5252/Fax:727-397-9610
www.bestdatasource.com
Order from: Cutter Networks
www.rad.com
INTERNATIONAL HEADQUARTERS:
24 Raoul Wallenberg Street, Tel Aviv 69719, Israel, Tel: 972-3-6458181
Fax: 972-3-6498250, 972-3-6474436, Email: [email protected]
U.S. HEADQUARTERS:
900 Corporate Drive, Mahwah, N.J. 07430, Tel: (201) 529-1100
Toll Free: 1-800-444-7234, Fax: (201) 529-5777, Email: [email protected]
Ph:727-398-5252/Fax:727-397-9610
www.bestdatasource.com