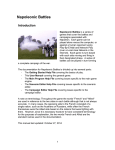
1
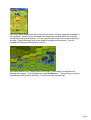
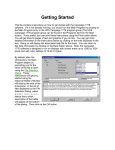
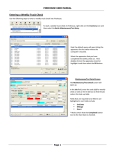
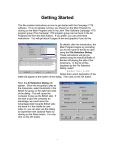
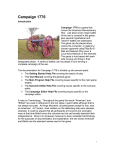
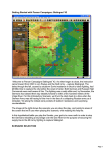
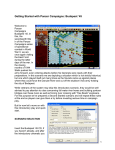
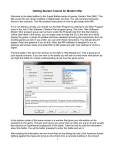
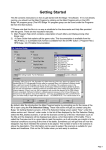
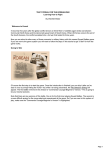
Getting Started This file contains instructions on how to get started with the Campaign Eckmuhl software. If it is not already running, you should run the Main Program by clicking on the Main Program entry in the HPS Campaign Eckmuhl program group (The HPS Campaign Eckmuhl program group can be found in the Programs list from the Start button). If you prefer, you can print these instructions using the Print button above. You will get about 8 pages of text and graphics if you do this. You can get more detailed information in the instructions below by clicking on the links displayed in the text. Doing so will display the associated help file for this topic. You can return to this help information by clicking on the Back button above. Note: the Campaign Eckmuhl software is designed to run on displays with screen areas up to 1280 by 1024 pixels and with color settings of 16-bit or higher. By default, after the introduction, the Main Program begins by prompting you for the name of the file to open using the File Selection Dialog. These instructions will get you started using the historical Battle of Teugn-Hausen playing the side of the French. In the list of files displayed by the File Selection Dialog, select 00_started.scn. Notice that a short description of the battle will appear at the bottom of the dialog. Then click on the OK button. Page 1 Next, the A/I Selection Dialog will appear. Since we are going to play as the French, select Automatic in the Austrian A/I group on the right hand side of the dialog. This will cause the computer to play as the Austrian side. If we want to give the computer an advantage, we could move the Advantage slider towards Austrian side, but leave it in the middle for now. Later on, you can also use this dialog to experiment with Optional Rules by clicking on the Rules button. For now, click on the OK button. The Teugn-Hausen battlefield will be drawn on the screen and in the middle of the screen, the Phase Dialog will appear. Note: click anywhere in the dialog picture to close the dialog. The middle portion of the map is displayed and you will see some Austrian forces, your enemy in this battle, drawn on the map. It would be good at this point to get an overview by referring to the Jump Map. Find the Jump Map button in the toolbar at the top of screen and click on it. Page 2 The Jump Dialog displays the entire map with the portion currently visible surrounded by a red rectangle. Austrian forces are displayed using brown squares while French forces are displayed using blue squares. You see that you have forces on your side at the top of the map. Using the mouse, click in the middle of the group of blue forces. This will redisplay the map about the point you click on. You should now see your French forces on the map. In the middle, you should see a flashing red hexagon. This indicates the current Hot Spot hex. Trying clicking on various locations around the map at this point. This will move the Hot Spot hex. Page 3 When the current Hot Spot contains forces, then a list of these forces is displayed on the left-hand side of the screen in the Unit List display. In this example, you see that the Hot Spot contains the leader Lorencez and the infantry battalion 1 Bn/3 Ligne Regt. Notice that you can click on any entry in the Unit List and that entry becomes Selected (highlighted). When you want to move or fire a unit, it must first be Selected either by clicking on the entry in the Unit List or, alternatively, you can select all forces in the Hot Spot by double clicking on the map. Clicking on a Selected entry will toggle it back to the un-Selected state. Now on to the attack! We will start by moving forward with some units. Select some of your units by double-clicking on their location, then with the right-mouse button, click an adjacent hex so that the units move forward. If you get a beep when you try this, look for Page 4 an error message at the bottom of the screen and then try again. Notice that you can right-click in successive adjacent hexes thus moving the selected units several hexes and that as you move your units, arrows mark their movement on the map. Note: try to find the leader BG Berthezene and advance him and the unit with him 3 hexes forward as shown in the illustration. If you do this, then you will be able to fire this unit later in the turn. While you are moving, you may be fired upon by the enemy. This Defensive Fire occurs randomly and is under the control of the computer. If you see a Fire Report dialog such as this, click OK and continue your turn. Bring forward several of your units so you are making a good advance. You will notice that your infantry units are in Column formation. This is a good formation for attacking as it keeps your units together and organized during the advance. There are several other formation types such as Line formation, which is a good defensive formation given its higher firepower abilities, and Square formation, which is good for defending against enemy cavalry charges. As you become a more advanced Napoleonic player, you will also want to learn how to make the best use of Skirmishers which can be used to protect your forces from the enemy. During your turn, you can take the opportunity to fire on the enemy using Offensive Fire. To do this, you will need to be in Fire Mode. You can toggle from Move Mode to Fire Mode by holding down the Ctrl (Control) key. Alternatively, you can toggle to Fire Mode by pressing the mode button. There are a number of factors that affect the ability to fire, including your distance from the enemy and your formation, but there is an easy way of telling if you have something more Page 5 to do in Move or Fire mode. The Next Stack button will relocate the Hot Spot hex to a location where there are units with something to do in the current mode. If you advanced your forces far enough, in particular the unit with the leader Berthezene, then you should be able to fire back. Select the firing stack by double clicking on the hex. This will highlight the units in that hex. Having done this, then hold down the Ctrl key and right-click on the target hex. In the case of Berthezene and the unit with him, there should be an enemy unit adjacent to their location that you can fire on. If you only get a beep when you attempt to fire, look at the bottom of the screen for any error message and try again. When you fire at the enemy unit, you will get a Fire Report showing the results of the fire. This will tell you how effective your fire was and the casualties you are causing the enemy. You can also take the opportunity to attack the enemy’s location and possibly occupy it by Meleeing. If you advanced with Berthezene and the infantry unit, you should be able to perform a melee against the adjacent Austrian unit. The easiest way of initiating the Page 6 Melee is to double click on the attacking stack, then while holding down the mouse button, drag the mouse into the defending location and release it. This should result in a dialog showing you the status of the current Melee. If you find this drag-and-drop method to be tricky to perform, then an alternative way to initiate the Melee is to: 1. Right click in the defending hex. 2. Select the attacking units and use the Add to Melee entry from the Melee Menu to add them to the attack. Once you have established the Melee, you then resolve it using the Resolve Melee entry from the Melee Menu. This should then give you a report of the melee results and if you were successful in taking the defending location. After you’ve completed your turn, it is time to advance the turn. Find the Next Turn button on the toolbar and click it. At this point you should be prompted to save your game to a battle file. You can use the default filename provided and simply click on the Save button. You should then see the Phase Dialog again, showing that it is the Austrian Turn and you should click anywhere in the picture to close the dialog. It is now the Austrian Turn. Since the Austrians are controlled by the A/I, then you should get some reaction from them in terms of firing and other actions. These actions are reported to you in the A/I Action Dialog in the lower right-hand corner of the screen. Click Step after each action to advance the A/I to the next step. If you get comfortable with what the A/I is doing and want to speed things up, you can click on Run and the A/I will run continuously until it is done for this phase. At this point, you know quite a bit about how to fight a Napoleonic battle. You can move your forces, fire at the enemy, and melee against their positions. The three major issues Page 7 not covered so far are: 1. Skirmishers – you use these to screen your forces from the enemy. 2. Cavalry Charges – you use this mode to effectively attack the enemy using your cavalry. 3. Squares – you use this formation to protect yourself against enemy cavalry charges. You can read about these in detail in the Users Manual. For now, you can effectively continue the battle with what you now know. Your goal in this battle is to capture the enemy Objectives while avoiding excessive losses in doing so. You can use the Victory entry in the Info Menu to display the Victory Dialog that reports the current victory level to you. You can also use the Objectives entry of the Info Menu to display a list of the Objectives, their point value, and their current owner. Feel free to save the current battle and come back to it at a later time if you want to browse other features of the game, or continue the current battle to its conclusion. To get more information, see the following help files: User Manual Main Program Help File Scenario Editor Help File Campaign Editor Help File Page 8