1
A TROFF Tutorial
Brian W. Kernighan
Bell Laboratories
Murray Hill, New Jersey 07974
ABSTRACT
troff is a text-formatting program for driving the Graphic Systems phototypesetter on the UNIX† and GCOS operating systems. This device is capable of producing high quality text; this paper is an example of troff output.
The phototypesetter itself normally runs with four fonts, containing roman, italic
and bold letters (as on this page), a full greek alphabet, and a substantial number of
special characters and mathematical symbols. Characters can be printed in a range of
sizes, and placed anywhere on the page.
troff allows the user full control over fonts, sizes, and character positions, as
well as the usual features of a formatter — right-margin justification, automatic hyphenation, page titling and numbering, and so on. It also provides macros, arithmetic variables and operations, and conditional testing, for complicated formatting tasks.
This document is an introduction to the most basic use of troff. It presents just
enough information to enable the user to do simple formatting tasks like making viewgraphs, and to make incremental changes to existing packages of troff commands. In
most respects, the UNIX formatter nroff is identical to troff, so this document also
serves as a tutorial on nroff.
August 4, 1978
_______________
†UNIX is a Trademark of Bell Laboratories.
A TROFF Tutorial
Brian W. Kernighan
Bell Laboratories
Murray Hill, New Jersey 07974
1. Introduction
troff [1] is a text-formatting program, written
by J. F. Ossanna, for producing high-quality printed
output from the phototypesetter on the UNIX and
GCOS operating systems. This document is an example of troff output.
The single most important rule of using troff is
not to use it directly, but through some intermediary.
In many ways, troff resembles an assembly language
— a remarkably powerful and flexible one — but
nonetheless such that many operations must be
specified at a level of detail and in a form that is too
hard for most people to use effectively.
For two special applications, there are programs that provide an interface to troff for the majority of users. eqn [2] provides an easy to learn
language for typesetting mathematics; the eqn user
need know no troff whatsoever to typeset mathematics. tbl [3] provides the same convenience for producing tables of arbitrary complexity.
For producing straight text (which may well
contain mathematics or tables), there are a number of
‘macro packages’ that define formatting rules and
operations for specific styles of documents, and
reduce the amount of direct contact with troff. In
particular, the ‘– ms’ [4] and PWB/MM [5] packages
for Bell Labs internal memoranda and external papers
provide most of the facilities needed for a wide range
of document preparation. (This memo was prepared
with ‘– ms’.) There are also packages for viewgraphs,
for simulating the older roff formatters on UNIX and
GCOS, and for other special applications. Typically
you will find these packages easier to use than troff
once you get beyond the most trivial operations; you
should always consider them first.
In the few cases where existing packages don’t
do the whole job, the solution is not to write an
entirely new set of troff instructions from scratch, but
to make small changes to adapt packages that already
exist.
In accordance with this philosophy of letting
someone else do the work, the part of troff described
here is only a small part of the whole, although it
tries to concentrate on the more useful parts. In any
case, there is no attempt to be complete. Rather, the
emphasis is on showing how to do simple things, and
how to make incremental changes to what already
exists. The contents of the remaining sections are:
2.
3.
4.
5.
6.
7.
8.
9.
10.
11.
12.
13.
14.
Point sizes and line spacing
Fonts and special characters
Indents and line length
Tabs
Local motions: Drawing lines and characters
Strings
Introduction to macros
Titles, pages and numbering
Number registers and arithmetic
Macros with arguments
Conditionals
Environments
Diversions
Appendix: Typesetter character set
The troff described here is the C-language version
running on UNIX at Murray Hill, as documented in
[1].
To use troff you have to prepare not only the
actual text you want printed, but some information
that tells how you want it printed. (Readers who use
roff will find the approach familiar.) For troff the
text and the formatting information are often
intertwined quite intimately. Most commands to troff
are placed on a line separate from the text itself,
beginning with a period (one command per line). For
example,
Some text.
.ps 14
Some more text.
will change the ‘point size’, that is, the size of the
letters being printed, to ‘14 point’ (one point is 1/72
inch) like this:
Some text.
Some more text.
Occasionally, though, something special occurs
in the middle of a line — to produce
-2-
Area = πr 2
you have to type
Area = \(∗p\fIr\fR\ \s8\u2\d\s0
(which we will explain shortly). The backslash character \ is used to introduce troff commands and special characters within a line of text.
2. Point Sizes; Line Spacing
As mentioned above, the command .ps sets the
point size. One point is 1/72 inch, so 6-point characters are at most 1/12 inch high, and 36-point characters are 1⁄2 inch. There are 15 point sizes, listed
below.
6 point: Pack my box with five dozen liquor jugs.
7 point: Pack my box with five dozen liquor jugs.
8 point: Pack my box with five dozen liquor jugs.
9 point: Pack my box with five dozen liquor jugs.
10 point: Pack my box with five dozen liquor
11 point: Pack my box with five dozen
12 point: Pack my box with five dozen
14 point: Pack my box with five
16 point 18 point
22 24
28
20 point
36
If the number after .ps is not one of these legal
sizes, it is rounded up to the next valid value, with a
maximum of 36. If no number follows .ps
.ps, troff
reverts to the previous size, whatever it was. troff
begins with point size 10, which is usually fine. This
document is in 9 point.
The point size can also be changed in the middle of a line or even a word with the in-line command \s
\s. To produce
UNIX
runs on a
PDP-11/45
The other parameter that determines what the
type looks like is the spacing between lines, which is
set independently of the point size. Vertical spacing
is measured from the bottom of one line to the bottom of the next. The command to control vertical
spacing is .vs
.vs. For running text, it is usually best to
set the vertical spacing about 20% bigger than the
character size. For example, so far in this document,
we have used ‘‘9 on 11’’, that is,
.ps 9
.vs 11p
If we changed to
.ps 9
.vs 9p
the running text would look like this. After a few
lines, you will agree it looks a little cramped. The
right vertical spacing is partly a matter of taste,
depending on how much text you want to squeeze
into a given space, and partly a matter of traditional
printing style. By default, troff uses 10 on 12.
Point size and vertical spacing
make a substantial difference in the
amount of text per square inch. This is
12 on 14.
Point size and vertical spacing make a substantial difference in the
amount of text per square inch. For example, 10 on 12 uses about twice as much
space as 7 on 8. This is 6 on 7, which is even smaller. It packs a lot more
words per line, but you can go blind trying to read it.
When used without arguments, .ps and .vs
revert to the previous size and vertical spacing respectively.
The command .sp is used to get extra vertical
space. Unadorned, it gives you one extra blank line
(one .vs
.vs, whatever that has been set to). Typically,
that’s more or less than you want, so .sp can be followed by information about how much space you
want —
.sp 2i
means ‘two inches of vertical space’.
type
\s8UNIX\s10 runs on a \s8PDP-\s1011/45
As above, \s should be followed by a legal point size,
except that \s0 causes the size to revert to its previous
value. Notice that \s1011 can be understood correctly
as ‘size 10, followed by an 11’, if the size is legal,
but not otherwise. Be cautious with similar constructions.
Relative size changes are also legal and useful:
\s– 2UNIX\s+2
temporarily decreases the size, whatever it is, by two
points, then restores it. Relative size changes have
the advantage that the size difference is independent
of the starting size of the document. The amount of
the relative change is restricted to a single digit.
.sp 2p
means ‘two points of vertical space’; and
.sp 2
means ‘two vertical spaces’ — two of whatever .vs is
set to (this can also be made explicit with .sp 2v
2v);
troff also understands decimal fractions in most
places, so
.sp 1.5i
is a space of 1.5 inches. These same scale factors
can be used after .vs to define line spacing, and in
fact after most commands that deal with physical
dimensions.
-3-
It should be noted that all size numbers are
converted internally to ‘machine units’, which are
1/432 inch (1/6 point). For most purposes, this is
enough resolution that you don’t have to worry about
the accuracy of the representation. The situation is
not quite so good vertically, where resolution is 1/144
inch (1/2 point).
3. Fonts and Special Characters
troff and the typesetter allow four different
fonts at any one time. Normally three fonts (Times
roman, italic and bold) and one collection of special
characters are permanently mounted.
abcdefghijklmnopqrstuvwxyz 0123456789
ABCDEFGHIJKLMNOPQRSTUVWXYZ
abcdefghijklmnopqrstuvwxyz 0123456789
ABCDEFGHIJKLMNOPQRSTUVWXYZ
abcdefghijklmnopqrstuvwxyz 0123456789
ABCDEFGHIJKLMNOPQRSTUVWXYZ
The greek, mathematical symbols and miscellany of
the special font are listed in Appendix A.
troff prints in roman unless told otherwise. To
switch into bold, use the .ft command
.ft B
and for italics,
.ft I
To return to roman, use .ft R
R; to return to the previous font, whatever it was, use either .ft P or just .ft
.ft.
The ‘underline’ command
.ul
causes the next input line to print in italics. .ul can
be followed by a count to indicate that more than one
line is to be italicized.
Fonts can also be changed within a line or
word with the in-line command \f
\f:
boldface text
is produced by
\fBbold\fIface\fR text
If you want to do this so the previous font, whatever
it was, is left undisturbed, insert extra \fP commands,
like this:
\fBbold\fP\fIface\fP\fR text\fP
Because only the immediately previous font is
remembered, you have to restore the previous font
after each change or you can lose it. The same is
true of .ps and .vs when used without an argument.
There are other fonts available besides the
standard set, although you can still use only four at
any given time. The command .fp tells troff what
fonts are physically mounted on the typesetter:
.fp 3 H
says that the Helvetica font is mounted on position 3.
(For a complete list of fonts and what they look like,
see the troff manual.) Appropriate .fp commands
should appear at the beginning of your document if
you do not use the standard fonts.
It is possible to make a document relatively
independent of the actual fonts used to print it by
using font numbers instead of names; for example, \f3
and .ft˜3 mean ‘whatever font is mounted at position
3’, and thus work for any setting. Normal settings
are roman font on 1, italic on 2, bold on 3, and special on 4.
There is also a way to get ‘synthetic’ bold
fonts by overstriking letters with a slight offset. Look
at the .bd command in [1].
Special characters have four-character names
beginning with \(
\(, and they may be inserted anywhere. For example,
⁄4 + 1⁄2 = 3⁄4
1
is produced by
\(14 + \(12 = \(34
In particular, greek letters are all of the form \(∗– ,
where – is an upper or lower case roman letter reminiscent of the greek. Thus to get
Σ(α×β) → ∞
in bare troff we have to type
\(∗S(\(∗a\(mu\(∗b) \(−> \(if
That line is unscrambled as follows:
\(∗S
(
\(∗a
\(mu
\(∗b
)
\(−>
\(if
Σ
(
α
×
β
)
→
∞
A complete list of these special names occurs in
Appendix A.
In eqn [2] the same effect can be achieved
with the input
SIGMA ( alpha times beta ) – > inf
which is less concise, but clearer to the uninitiated.
Notice that each four-character name is a single character as far as troff is concerned — the
‘translate’ command
.tr \(mi\(em
is perfectly clear, meaning
-4-
.tr −—
that is, to translate − into —.
Some characters are automatically translated
into others: grave ` and acute ´ accents (apostrophes) become open and close single quotes ‘˜’; the
combination of ‘‘...’’ is generally preferable to the
double quotes "...". Similarly a typed minus sign
becomes a hyphen -. To print an explicit – sign, use
\\-. To get a backslash printed, use \e
\e.
4. Indents and Line Lengths
troff starts with a line length of 6.5 inches, too
wide for 81⁄2 ×11 paper. To reset the line length, use
the .ll command, as in
.ll 6i
As with .sp
.sp, the actual length can be specified in
several ways; inches are probably the most intuitive.
The maximum line length provided by the
typesetter is 7.5 inches, by the way. To use the full
width, you will have to reset the default physical left
margin (‘‘page offset’’), which is normally slightly
less than one inch from the left edge of the paper.
This is done by the .po command.
.po 0
sets the offset as far to the left as it will go.
The indent command .in causes the left margin
to be indented by some specified amount from the
page offset. If we use .in to move the left margin in,
and .ll to move the right margin to the left, we can
make offset blocks of text:
.in 0.3i
.ll −0.3i
text to be set into a block
.ll +0.3i
.in −0.3i
will create a block that looks like this:
Pater noster qui est in caelis sanctificetur
nomen tuum; adveniat regnum tuum; fiat
voluntas tua, sicut in caelo, et in terra. ...
Amen.
Notice the use of ‘+’ and ‘−’ to specify the amount of
change. These change the previous setting by the
specified amount, rather than just overriding it. The
distinction is quite important: .ll +1i makes lines one
inch longer; .ll 1i makes them one inch long.
With .in
.in, .ll and .po
.po, the previous value is used
if no argument is specified.
To indent a single line, use the ‘temporary
indent’ command .ti
.ti. For example, all paragraphs in
this memo effectively begin with the command
.ti 3
Three of what? The default unit for .ti
.ti, as for most
horizontally oriented commands (.ll
.ll, .in
.in, .po
.po), is ems;
an em is roughly the width of the letter ‘m’ in the
current point size. (Precisely, a em in size p is p
points.) Although inches are usually clearer than ems
to people who don’t set type for a living, ems have a
place: they are a measure of size that is proportional
to the current point size. If you want to make text
that keeps its proportions regardless of point size, you
should use ems for all dimensions. Ems can be
specified as scale factors directly, as in .ti 2.5m
2.5m.
Lines can also be indented negatively if the
indent is already positive:
.ti −0.3i
causes the next line to be moved back three tenths of
an inch. Thus to make a decorative initial capital, we
indent the whole paragraph, then move the letter ‘P’
back with a .ti command:
ater noster qui est in caelis
sanctificetur nomen tuum; adveniat
regnum tuum; fiat voluntas tua, sicut
in caelo, et in terra. ... Amen.
P
Of course, there is also some trickery to make the ‘P’
bigger (just a ‘\s36P\s0’), and to move it down from
its normal position (see the section on local motions).
5. Tabs
Tabs (the ASCII ‘horizontal tab’ character) can
be used to produce output in columns, or to set the
horizontal position of output. Typically tabs are used
only in unfilled text. Tab stops are set by default
every half inch from the current indent, but can be
changed by the .ta command. To set stops every
inch, for example,
.ta 1i 2i 3i 4i 5i 6i
Unfortunately the stops are left-justified only
(as on a typewriter), so lining up columns of rightjustified numbers can be painful. If you have many
numbers, or if you need more complicated table layout, don’t use troff directly; use the tbl program
described in [3].
For a handful of numeric columns, you can do
it this way: Precede every number by enough blanks
to make it line up when typed.
.nf
.ta 1i 2i 3i
1 tab
2 tab
3
40 tab 50 tab 60
700 tab 800 tab 900
.fi
Then change each leading blank into the string \0
\0.
This is a character that does not print, but that has the
-5-
same width as a digit. When printed, this will produce
1
40
700
2
50
800
3
60
900
It is also possible to fill up tabbed-over space
with some character other than blanks by setting the
‘tab replacement character’ with the .tc command:
.ta 1.5i 2.5i
.tc \(ru
(\(ru is "_")
Name tab Age tab
produces
Name ___________________ Age ___________
To reset the tab replacement character to a blank, use
.tc with no argument. (Lines can also be drawn with
the \l command, described in Section 6.)
troff also provides a very general mechanism
called ‘fields’ for setting up complicated columns.
(This is used by tbl). We will not go into it in this
paper.
6. Local Motions: Drawing lines and characters
Remember ‘Area = πr2’ and the big ‘P’ in the
.in +0.6i
(move paragraph in)
.ll – 0.3i
(shorten lines)
.ti – 0.3i
(move P back)
\v´2´\s36P\s0\v´– 2´ater noster qui est
in caelis ...
A minus sign causes upward motion, while no sign or
a plus sign means down the page. Thus \v′– 2′ causes
an upward vertical motion of two line spaces.
There are many other ways to specify the
amount of motion —
\v´0.1i´
\v´3p´
\v´– 0.5m´
and so on are all legal. Notice that the scale specifier
i or p or m goes inside the quotes. Any character can
be used in place of the quotes; this is also true of all
other troff commands described in this section.
Since troff does not take within-the-line vertical motions into account when figuring out where it is
on the page, output lines can have unexpected positions if the left and right ends aren’t at the same vertical position. Thus \v
\v, like \u and \d
\d, should always
balance upward vertical motion in a line with the
same amount in the downward direction.
Paternoster. How are they done? troff provides a
host of commands for placing characters of any size
at any place. You can use them to draw special characters or to tune your output for a particular appearance. Most of these commands are straightforward,
but messy to read and tough to type correctly.
Arbitrary horizontal motions are also available
— \h is quite analogous to \v
\v, except that the default
scale factor is ems instead of line spaces. As an
example,
If you won’t use eqn, subscripts and superscripts are most easily done with the half-line local
motions \u and \d
\d. To go back up the page half a
point-size, insert a \u at the desired place; to go
down, insert a \d
\d. (\u
\u and \d should always be used in
pairs, as explained below.) Thus
causes a backwards motion of a tenth of an inch. As
a practical matter, consider printing the mathematical
symbol ‘>>’. The default spacing is too wide, so eqn
replaces this by
Area = \(∗pr\u2\d
produces
Area = πr2
To make the ‘2’ smaller, bracket it with \s– 2...\s0
2...\s0.
Since \u and \d refer to the current point size, be sure
to put them either both inside or both outside the size
changes, or you will get an unbalanced vertical
motion.
Sometimes the space given by \u and \d isn’t
the right amount. The \v command can be used to
request an arbitrary amount of vertical motion. The
in-line command
\v´(amount)´
causes motion up or down the page by the amount
specified in ‘(amount)’. For example, to move the ‘P’
down, we used
\h´– 0.1i´
>\h´– 0.3m´>
to produce >>.
Frequently \h is used with the ‘width function’
\w to generate motions equal to the width of some
character string. The construction
\w´thing´
is a number equal to the width of ‘thing’ in machine
units (1/432 inch). All troff computations are ultimately done in these units. To move horizontally the
width of an ‘x’, we can say
\h´\w´x´u´
As we mentioned above, the default scale factor for
all horizontal dimensions is m
m, ems, so here we must
have the u for machine units, or the motion produced
will be far too large. troff is quite happy with the
nested quotes, by the way, so long as you don’t leave
any out.
As a live example of this kind of construction,
all of the command names in the text, like .sp
.sp, were
-6-
done by overstriking with a slight offset. The commands for .sp are
.sp\h´– \w´.sp´u´\h´1u´.sp
That is, put out ‘.sp’, move left by the width of ‘.sp’,
move right 1 unit, and print ‘.sp’ again. (Of course
there is a way to avoid typing that much input for
each command name, which we will discuss in Section 11.)
There are also several special-purpose troff
commands for local motion. We have already seen
\0
\0, which is an unpaddable white space of the same
width as a digit. ‘Unpaddable’ means that it will
never be widened or split across a line by line
justification and filling. There is also \\(blank), which
is an unpaddable character the width of a space, \ ,
which is half that width, \ˆ
\ˆ, which is one quarter of
the width of a space, and \&
\&, which has zero width.
(This last one is useful, for example, in entering a
text line which would otherwise begin with a ‘.’.)
The command \o
\o, used like
\o´set of characters´
causes (up to 9) characters to be overstruck, centered
on the widest. This is nice for accents, as in
syst\o"e\(ga"me t\o"e\(aa"l\o"e\(aa"phonique
which makes
système téléphonique
The accents are \(ga and \(aa
\(aa, or \` and \´
\´; remember
that each is just one character to troff.
You can make your own overstrikes with
another special convention, \z
\z, the zero-motion command. \zx suppresses the normal horizontal motion
after printing the single character xx, so another character can be laid on top of it. Although sizes can be
changed within \o
\o, it centers the characters on the
widest, and there can be no horizontal or vertical
motions, so \z may be the only way to get what you
want:
\s+6\z,\v´−0.25m´.\v´0.25m´\s0
‘0.25m’ is an empirical constant.
A more ornate overstrike is given by the bracketing function \b
\b, which piles up characters vertically,
centered on the current baseline. Thus we can get big
brackets, constructing them with piled-up smaller
pieces:
x
by typing in only this:
.sp
\b′\(lt\(lk\(lb′ \b′\(lc\(lf′ x \b′\(rc\(rf′ \b′\(rt\(rk\(rb′
troff also provides a convenient facility for
drawing horizontal and vertical lines of arbitrary
length with arbitrary characters. \l′1i′ draws a line
one inch long, like this: ________________ . The
length can be followed by the character to use if the _
isn’t appropriate; \l′0.5i.′ draws a half-inch line of
dots: ................ The construction \L is entirely
analogous, except that it draws a vertical line instead
of horizontal.
7. Strings
Obviously if a paper contains a large number
of occurrences of an acute accent over a letter ‘e’,
typing \o"e\´" for each é would be a great nuisance.
Fortunately, troff provides a way in which you
can store an arbitrary collection of text in a ‘string’,
and thereafter use the string name as a shorthand for
its contents. Strings are one of several troff mechanisms whose judicious use lets you type a document
with less effort and organize it so that extensive format changes can be made with few editing changes.
A reference to a string is replaced by whatever
text the string was defined as. Strings are defined
with the command .ds
.ds. The line
.ds e \o"e\´"
defines the string e to have the value \o"e\´"
is produced by
.sp 2
\s8\z\(sq\s14\z\(sq\s22\z\(sq\s36\(sq
The .sp is needed to leave room for the result.
As another example, an extra-heavy semicolon
that looks like
.,
instead of ; or
;
can be constructed with a big comma and a big
period above it:
String names may be either one or two characters long, and are referred to by \∗x for one character
names or \∗(xy for two character names. Thus to get
téléphone, given the definition of the string e as
above, we can say t\∗el\∗ephone.
If a string must begin with blanks, define it as
.ds xx "
text
The double quote signals the beginning of the
definition. There is no trailing quote; the end of the
line terminates the string.
A string may actually be several lines long; if
troff encounters a \ at the end of any line, it is
thrown away and the next line added to the current
-7-
one. So you can make a long string simply by ending each line but the last with a backslash:
.ds xx this \
is a very \
long string
Strings may be defined in terms of other
strings, or even in terms of themselves; we will discuss some of these possibilities later.
8. Introduction to Macros
Before we can go much further in troff, we
need to learn a bit about the macro facility. In its
simplest form, a macro is just a shorthand notation
quite similar to a string. Suppose we want every
paragraph to start in exactly the same way — with a
space and a temporary indent of two ems:
.sp
.ti +2m
Then to save typing, we would like to collapse these
into one shorthand line, a troff ‘command’ like
.PP
that would be treated by troff exactly as
.sp
.ti +2m
.PP is called a macro. The way we tell troff what
.PP means is to define it with the .de command:
.de PP
.sp
.ti +2m
..
The first line names the macro (we used ‘.PP
.PP’ for
‘paragraph’, and upper case so it wouldn’t conflict
with any name that troff might already know about).
The last line .. marks the end of the definition. In
between is the text, which is simply inserted whenever troff sees the ‘command’ or macro call
.PP
A macro can contain any mixture of text and formatting commands.
.de PP
.sp 2p
.ti +3m
.ft R
..
\" paragraph macro
and the change takes effect everywhere we used .PP
.PP.
\" is a troff command that causes the rest of
the line to be ignored. We use it here to add comments to the macro definition (a wise idea once
definitions get complicated).
As another example of macros, consider these
two which start and end a block of offset, unfilled
text, like most of the examples in this paper:
.de BS
.sp
.nf
.in +0.3i
..
.de BE
.sp
.fi
.in −0.3i
..
\" start indented block
\" end indented block
Now we can surround text like
Copy to
John Doe
Richard Roberts
Stanley Smith
by the commands .BS and .BE
.BE, and it will come out
as it did above. Notice that we indented by .in +0.3i
instead of .in 0.3i
0.3i. This way we can nest our uses of
.BS and BE to get blocks within blocks.
If later on we decide that the indent should be
0.5i, then it is only necessary to change the
definitions of .BS and .BE
.BE, not the whole paper.
9. Titles, Pages and Numbering
This is an area where things get tougher,
because nothing is done for you automatically. Of
necessity, some of this section is a cookbook, to be
copied literally until you get some experience.
The definition of .PP has to precede its first
use; undefined macros are simply ignored. Names are
restricted to one or two characters.
Suppose you want a title at the top of each
page, saying just
Using macros for commonly occurring
sequences of commands is critically important. Not
only does it save typing, but it makes later changes
much easier. Suppose we decide that the paragraph
indent is too small, the vertical space is much too big,
and roman font should be forced. Instead of changing the whole document, we need only change the
definition of .PP to something like
In roff, one can say
˜˜˜˜left top
center top
right top˜˜˜˜
.he ´left top´center top´right top´
.fo ´left bottom´center bottom´right bottom´
to get headers and footers automatically on every
page. Alas, this doesn’t work in troff, a serious hardship for the novice. Instead you have to do a lot of
specification.
You have to say what the actual title is (easy);
when to print it (easy enough); and what to do at and
-8-
around the title line (harder). Taking these in reverse
order, first we define a macro .NP (for ‘new page’) to
process titles and the like at the end of one page and
the beginning of the next:
.de NP
′bp
′sp 0.5i
.tl ´left top´center top´right top´
′sp 0.3i
..
To make sure we’re at the top of a page, we issue a
‘begin page’ command ′bp
′bp, which causes a skip to
top-of-page (we’ll explain the ′ shortly). Then we
space down half an inch, print the title (the use of .tl
should be self explanatory; later we will discuss
parameterizing the titles), space another 0.3 inches,
and we’re done.
To ask for .NP at the bottom of each page, we
have to say something like ‘when the text is within an
inch of the bottom of the page, start the processing
for a new page.’ This is done with a ‘when’ command .wh
.wh:
.wh – 1i NP
(No ‘.’ is used before NP; this is simply the name of
a macro, not a macro call.) The minus sign means
‘measure up from the bottom of the page’, so ‘– 1i’
means ‘one inch from the bottom’.
The .wh command appears in the input outside
the definition of .NP
.NP; typically the input would be
.de NP
...
..
.wh – 1i NP
Now what happens? As text is actually being
output, troff keeps track of its vertical position on the
page, and after a line is printed within one inch from
the bottom, the .NP macro is activated. (In the jargon, the .wh command sets a trap at the specified
place, which is ‘sprung’ when that point is passed.)
.NP causes a skip to the top of the next page (that’s
what the ′bp was for), then prints the title with the
appropriate margins.
Why ′bp and ′sp instead of .bp and .sp
.sp? The
answer is that .sp and .bp
.bp, like several other commands, cause a break to take place. That is, all the
input text collected but not yet printed is flushed out
as soon as possible, and the next input line is
guaranteed to start a new line of output. If we had
used .sp or .bp in the .NP macro, this would cause a
break in the middle of the current output line when a
new page is started. The effect would be to print the
left-over part of that line at the top of the page, followed by the next input line on a new output line.
This is not what we want. Using ′ instead of . for a
command tells troff that no break is to take place —
the output line currently being filled should not be
forced out before the space or new page.
The list of commands that cause a break is
short and natural:
.bp
.br
.ce
.fi
.nf
.sp
.in
.ti
All others cause no break, regardless of whether you
use a . or a ′′. If you really need a break, add a .br
command at the appropriate place.
One other thing to beware of — if you’re
changing fonts or point sizes a lot, you may find that
if you cross a page boundary in an unexpected font or
size, your titles come out in that size and font instead
of what you intended. Furthermore, the length of a
title is independent of the current line length, so titles
will come out at the default length of 6.5 inches
unless you change it, which is done with the .lt command.
There are several ways to fix the problems of
point sizes and fonts in titles. For the simplest applications, we can change .NP to set the proper size and
font for the title, then restore the previous values, like
this:
.de NP
′bp
′sp 0.5i
.ft R
\" set title font to roman
.ps 10
\" and size to 10 point
.lt 6i
\" and length to 6 inches
.tl ´left´center´right´
.ps
\" revert to previous size
.ft P
\" and to previous font
′sp 0.3i
..
This version of .NP does not work if the fields
in the .tl command contain size or font changes. To
cope with that requires troff’s ‘environment’ mechanism, which we will discuss in Section 13.
To get a footer at the bottom of a page, you
can modify .NP so it does some processing before the
′bp command, or split the job into a footer macro
invoked at the bottom margin and a header macro
invoked at the top of the page. These variations are
left as exercises.
Output page numbers are computed automatically as each page is produced (starting at 1), but no
numbers are printed unless you ask for them explicitly. To get page numbers printed, include the character % in the .tl line at the position where you want
the number to appear. For example
.tl ´´- % -´´
centers the page number inside hyphens, as on this
page. You can set the page number at any time with
either .bp nn, which immediately starts a new page
-9-
numbered nn, or with .pn nn, which sets the page
number for the next page but doesn’t cause a skip to
the new page. Again, .bp +n sets the page number to
n more than its current value; .bp means .bp +1
+1.
10. Number Registers and Arithmetic
troff has a facility for doing arithmetic, and for
defining and using variables with numeric values,
called number registers. Number registers, like
strings and macros, can be useful in setting up a
document so it is easy to change later. And of course
they serve for any sort of arithmetic computation.
Like strings, number registers have one or two
character names. They are set by the .nr command,
and are referenced anywhere by \nx (one character
name) or \n(xy (two character name).
There are quite a few pre-defined number
registers maintained by troff, among them % for the
current page number; nl for the current vertical position on the page; dy
dy, mo and yr for the current day,
month and year; and .s and .f for the current size and
font. (The font is a number from 1 to 4.) Any of
these can be used in computations like any other
register, but some, like .s and .f
.f, cannot be changed
with .nr
.nr.
As an example of the use of number registers,
in the – ms macro package [4], most significant
parameters are defined in terms of the values of a
handful of number registers. These include the point
size for text, the vertical spacing, and the line and
title lengths. To set the point size and vertical spacing for the following paragraphs, for example, a user
may say
.nr PS 9
.nr VS 11
The paragraph macro .PP is defined (roughly) as follows:
.de PP
.ps \\n(PS
.vs \\n(VSp
.ft R
.sp 0.5v
.ti +3m
..
\"
\"
\"
\"
reset size
spacing
font
half a line
This sets the font to Roman and the point size and
line spacing to whatever values are stored in the
number registers PS and VS
VS.
Why are there two backslashes? This is the
eternal problem of how to quote a quote. When troff
originally reads the macro definition, it peels off one
backslash to see what’s coming next. To ensure that
another is left in the definition when the macro is
used, we have to put in two backslashes in the
definition. If only one backslash is used, point size
and vertical spacing will be frozen at the time the
macro is defined, not when it is used.
Protecting by an extra layer of backslashes is
only needed for \n
\n, \∗
\∗, \$ (which we haven’t come to
yet), and \ itself. Things like \s
\s, \f
\f, \h
\h, \v
\v, and so on
do not need an extra backslash, since they are converted by troff to an internal code immediately upon
being seen.
Arithmetic expressions can appear anywhere
that a number is expected. As a trivial example,
.nr PS \\n(PS– 2
decrements PS by 2. Expressions can use the arithmetic operators +, – , ∗, /, % (mod), the relational
operators >, >=, <, <=, =, and != (not equal), and
parentheses.
Although the arithmetic we have done so far
has been straightforward, more complicated things are
somewhat tricky. First, number registers hold only
integers. troff arithmetic uses truncating integer division, just like Fortran. Second, in the absence of
parentheses, evaluation is done left-to-right without
any operator precedence (including relational operators). Thus
7∗– 4+3/13
becomes ‘– 1’. Number registers can occur anywhere
in an expression, and so can scale indicators like pp, ii,
m
m, and so on (but no spaces). Although integer division causes truncation, each number and its scale
indicator is converted to machine units (1/432 inch)
before any arithmetic is done, so 1i/2u evaluates to
0.5i correctly.
The scale indicator u often has to appear when
you wouldn’t expect it — in particular, when arithmetic is being done in a context that implies horizontal or vertical dimensions. For example,
.ll 7/2i
would seem obvious enough — 31⁄2 inches. Sorry.
Remember that the default units for horizontal parameters like .ll are ems. That’s really ‘7 ems / 2
inches’, and when translated into machine units, it
becomes zero. How about
.ll 7i/2
Sorry, still no good — the ‘2’ is ‘2 ems’, so ‘7i/2’ is
small, although not zero. You must use
.ll 7i/2u
So again, a safe rule is to attach a scale indicator to
every number, even constants.
For arithmetic done within a .nr command,
there is no implication of horizontal or vertical
dimension, so the default units are ‘units’, and 7i/2
and 7i/2u mean the same thing. Thus
.nr ll 7i/2
.ll \\n(llu
- 10 -
does just what you want, so long as you don’t forget
the u on the .ll command.
The \h and \w commands need no extra backslash, as
we discussed above. The \& is there in case the
argument begins with a period.
11. Macros with arguments
The next step is to define macros that can
change from one use to the next according to parameters supplied as arguments. To make this work, we
need two things: first, when we define the macro, we
have to indicate that some parts of it will be provided
as arguments when the macro is called. Then when
the macro is called we have to provide actual arguments to be plugged into the definition.
Let us illustrate by defining a macro .SM that
will print its argument two points smaller than the
surrounding text. That is, the macro call
.SM TROFF
will produce TROFF.
The definition of .SM is
.de SM
\s– 2\\$1\s+2
..
Within a macro definition, the symbol \\$n refers to
the nnth argument that the macro was called with.
Thus \\$1 is the string to be placed in a smaller point
size when .SM is called.
As a slightly more complicated version, the
following definition of .SM permits optional second
and third arguments that will be printed in the normal
size:
.de SM
\\$3\s– 2\\$1\s+2\\$2
..
Arguments not provided when the macro is called are
treated as empty, so
.SM TROFF ),
produces TROFF), while
.SM TROFF ). (
produces (TROFF). It is convenient to reverse the
order of arguments because trailing punctuation is
much more common than leading.
Two backslashes are needed with the \\$n commands, though, to protect one of them when the
macro is being defined. Perhaps a second example
will make this clearer. Consider a macro called .SH
which produces section headings rather like those in
this paper, with the sections numbered automatically,
and the title in bold in a smaller size. The use is
.SH "Section title ..."
(If the argument to a macro is to contain blanks, then
it must be surrounded by double quotes, unlike a
string, where only one leading quote is permitted.)
Here is the definition of the .SH macro:
.nr SH 0
\" initialize section number
.de SH
.sp 0.3i
.ft B
.nr SH \\n(SH+1
\" increment number
.ps \\n(PS– 1 \" decrease PS
\\n(SH. \\$1 \" number. title
.ps \\n(PS
\" restore PS
.sp 0.3i
.ft R
..
The section number is kept in number register SH,
which is incremented each time just before it is used.
(A number register may have the same name as a
macro without conflict but a string may not.)
We used \\n(SH instead of \n(SH and \\n(PS
instead of \n(PS
\n(PS. If we had used \n(SH
\n(SH, we would get
the value of the register at the time the macro was
defined, not at the time it was used. If that’s what
you want, fine, but not here. Similarly, by using
\\n(PS
\\n(PS, we get the point size at the time the macro is
called.
As an example that does not involve numbers,
recall our .NP macro which had a
.tl ´left´center´right´
By the way, the number of arguments that a
macro was called with is available in number register
.$
.$.
We could make these into parameters by using
instead
The following macro .BD is the one used to
make the ‘bold roman’ we have been using for troff
command names in text. It combines horizontal
motions, width computations, and argument rearrangement.
so the title comes from three strings called LT, CT
and RT. If these are empty, then the title will be a
blank line. Normally CT would be set with something like
.de BD
\&\\$3\f1\\$1\h´– \w´\\$1´u+1u´\\$1\fP\\$2
..
.tl ´\\∗(LT´\\∗(CT´\\∗(RT´
.ds CT - % to give just the page number between hyphens (as on
the top of this page), but a user could supply private
definitions for any of the strings.
- 11 -
Finally, string comparisons may be made in an
12. Conditionals
Suppose we want the .SH macro to leave two
extra inches of space just before section 1, but
nowhere else. The cleanest way to do that is to test
inside the .SH macro whether the section number is
1, and add some space if it is. The .if command provides the conditional test that we can add just before
the heading line is output:
.if \\n(SH=1 .sp 2i
.if ´string1´string2´ stuff
does ‘stuff’ if string1 is the same as string2. The
character separating the strings can be anything reasonable that is not contained in either string. The
strings themselves can reference strings with \∗
\∗, arguments with \$
\$, and so on.
\" first section only
The condition after the .if can be any arithmetic or logical expression. If the condition is logically true, or arithmetically greater than zero, the rest
of the line is treated as if it were text — here a command. If the condition is false, or zero or negative,
the rest of the line is skipped.
It is possible to do more than one command if
a condition is true. Suppose several operations are to
be done before section 1. One possibility is to define
a macro .S1 and invoke it if we are about to do section 1 (as determined by an .if
.if).
.de S1
--- processing for section 1 --..
.de SH
...
.if \\n(SH=1 .S1
...
..
An alternate way is to use the extended form
of the .if
.if, like this:
.if \\n(SH=1 \{--- processing
for section 1 ----\}
The braces \{ and \} must occur in the positions
shown or you will get unexpected extra lines in your
output. troff also provides an ‘if-else’ construction,
which we will not go into here.
A condition can be negated by preceding it
with !!; we get the same effect as above (but less
clearly) by using
.if !\\n(SH>1 .S1
There are a handful of other conditions that
can be tested with .if
.if. For example, is the current
page even or odd?
.if e .tl ´´even page title´´
.if o .tl ´´odd page title´´
gives facing pages different titles when used inside an
appropriate new page macro.
Two other conditions are t and nn, which tell
you whether the formatter is troff or nroff.
.if t troff stuff ...
.if n nroff stuff ...
.if
.if:
13. Environments
As we mentioned, there is a potential problem
when going across a page boundary: parameters like
size and font for a page title may well be different
from those in effect in the text when the page boundary occurs. troff provides a very general way to
deal with this and similar situations. There are three
‘environments’, each of which has independently settable versions of many of the parameters associated
with processing, including size, font, line and title
lengths, fill/nofill mode, tab stops, and even partially
collected lines. Thus the titling problem may be
readily solved by processing the main text in one
environment and titles in a separate one with its own
suitable parameters.
The command .ev n shifts to environment nn; n
must be 0, 1 or 2. The command .ev with no argument returns to the previous environment. Environment names are maintained in a stack, so calls for
different environments may be nested and unwound
consistently.
Suppose we say that the main text is processed
in environment 0, which is where troff begins by
default. Then we can modify the new page macro
.NP to process titles in environment 1 like this:
.de NP
.ev 1
\" shift to new environment
.lt 6i
\" set parameters here
.ft R
.ps 10
... any other processing ...
.ev
\" return to previous environment
..
It is also possible to initialize the parameters for an
environment outside the .NP macro, but the version
shown keeps all the processing in one place and is
thus easier to understand and change.
14. Diversions
There are numerous occasions in page layout
when it is necessary to store some text for a period of
time without actually printing it. Footnotes are the
most obvious example: the text of the footnote usually appears in the input well before the place on the
page where it is to be printed is reached. In fact, the
place where it is output normally depends on how big
it is, which implies that there must be a way to pro-
- 12 -
cess the footnote at least enough to decide its size
without printing it.
troff provides a mechanism called a diversion
for doing this processing. Any part of the output may
be diverted into a macro instead of being printed, and
then at some convenient time the macro may be put
back into the input.
The command .di xy begins a diversion — all
subsequent output is collected into the macro xy until
the command .di with no arguments is encountered.
This terminates the diversion. The processed text is
available at any time thereafter, simply by giving the
command
teach everything about diversions, but to sketch out
enough that you can read existing macro packages
with some comprehension.
Acknowledgements
I am deeply indebted to J. F. Ossanna, the
author of troff, for his repeated patient explanations
of fine points, and for his continuing willingness to
adapt troff to make other uses easier. I am also
grateful to Jim Blinn, Ted Dolotta, Doug McIlroy,
Mike Lesk and Joel Sturman for helpful comments on
this paper.
References
.xy
The vertical size of the last finished diversion is contained in the built-in number register dn
dn.
As a simple example, suppose we want to
implement a ‘keep-release’ operation, so that text
between the commands .KS and .KE will not be split
across a page boundary (as for a figure or table).
Clearly, when a .KS is encountered, we have to begin
diverting the output so we can find out how big it is.
Then when a .KE is seen, we decide whether the
diverted text will fit on the current page, and print it
either there if it fits, or at the top of the next page if
it doesn’t. So:
.de KS
.br
.ev 1
.fi
.di XX
..
\"
\"
\"
\"
\"
start keep
start fresh line
collect in new environment
make it filled text
collect in XX
.de KE
\" end keep
.br
\" get last partial line
.di
\" end diversion
.if \\n(dn>=\\n(.t .bp \" bp if doesn´t fit
.nf
\" bring it back in no-fill
.XX
\" text
.ev
\" return to normal environment
..
Recall that number register nl is the current position
on the output page. Since output was being diverted,
this remains at its value when the diversion started.
dn is the amount of text in the diversion; .t (another
built-in register) is the distance to the next trap,
which we assume is at the bottom margin of the page.
If the diversion is large enough to go past the trap,
the .if is satisfied, and a .bp is issued. In either case,
the diverted output is then brought back with .XX
.XX. It
is essential to bring it back in no-fill mode so troff
will do no further processing on it.
This is not the most general keep-release, nor
is it robust in the face of all conceivable inputs, but it
would require more space than we have here to write
it in full generality. This section is not intended to
[1]
J. F. Ossanna, NROFF/TROFF User’s Manual,
Bell Laboratories Computing Science Technical
Report 54, 1976.
[2]
B. W. Kernighan, A System for Typesetting
Mathematics — User’s Guide (Second Edition),
Bell Laboratories Computing Science Technical
Report 17, 1977.
[3]
M. E. Lesk, TBL — A Program to Format
Tables, Bell Laboratories Computing Science
Technical Report 49, 1976.
[4]
M. E. Lesk, Typing Documents on UNIX, Bell
Laboratories, 1978.
[5]
J. R. Mashey and D. W. Smith, PWB/MM —
Programmer’s Workbench Memorandum Macros, Bell Laboratories internal memorandum.
- 13 -
Appendix A: Phototypesetter Character Set
These characters exist in roman, italic, and bold. To get the one on the left, type the four-character name on the
right.
ff
_
\(ff
\(ru
\(co
\(rg
fi
—
˚
•
\(fi
\(em
\(de
\(bu
fl \(fl
ffi \(Fi
1
⁄4 \(14
⁄2 \(12
† \(dg
′ \(fm
\(sq
- \(hy
(In bold, \(sq is .)
ffl \(Fl
⁄4 \(34
¢ \(ct
1
3
The following are special-font characters:
+
=
≠
∼
→
∫
⊂
⊆
´
§
∗
−
≡
±
∼
−
←
∂
⊃
⊇
`
‡
|
\(pl
\(eq
\(!=
\(ap
\(->
\(is
\(sb
\(ib
\(aa
\(sc
\(lt
\(lb
\(lk
\(br
\(∗∗
×
≥
¬
∝
↑
∞
∪
∈
\(mi
\(==
\(+\(˜=
\(<\(pd
\(sp
\(ip
\(ga
\(dd
\(rt
\(rb
\(rk
\(or
÷
≤
⁄
∇
↓
√
∩
∅
\(mu
\(>=
\(no
\(pt
\(ua
\(if
\(cu
\(mo
\(ci
\(lh
\(lc
\(lf
\(bv
\(ul
_
ς
\(di
\(<=
\(sl
\(gr
\(da
\(sr
\(ca
\(es
\(bs
\(rh
\(rc
\(rf
\(ts
\(rn
These four characters also have two-character names. The ´ is the apostrophe on terminals; the ` is the other quote
mark.
´
\´
`
−
\`
_
\−
\_
These characters exist only on the special font, but they do not have four-character names:
"
{
}
<
>
˜
ˆ
\
#
@
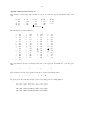
For greek, precede the roman letter by \(∗ to get the corresponding greek; for example, \(∗a is α.
a b g d e z y h i k l mn c o p r s t u f x qw
α β γ δ ε ζ η θ ι κ λ µ ν ξ ο π ρ σ τ υ φ χψω
A B G D E Z Y H I K L MN C O P R S T U F X QW
Α Β Γ ∆ Ε Ζ Η Θ Ι Κ ΛΜΝ Ξ Ο Π Ρ Σ Τ Υ Φ Χ ΨΩ