1
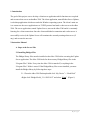
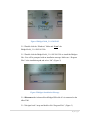
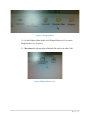
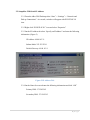
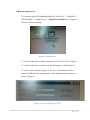
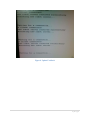
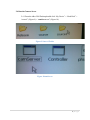
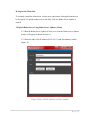
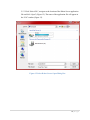
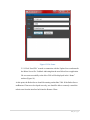
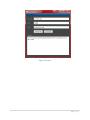
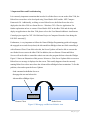
Robotic Arm Remote Control
Maintenance User Manual
Arnold Fernandez
Victor Fernandez
Instructor: JanuszZalewski
CEN 4935 Senior Software Engineering Project
Florida Gulf Coast University
10501 FGCU Blvd, South
Fort Myers, FL 33965-6565
Spring 2013
Version #4
Submission Date: April 18, 2013
1. Introduction
The goal of this project was to develop a client/server application which functions are to upload
and execute robot servers on theeBox 2300. The client application, named Robot Server Updater,
is a desktop application which runs under the Windows operating system. The client’s main use
is to connect to the server application over TCP/IP protocol and send a robot server to the eBox
2300. The server application, named Update Server, runs on the eBox 2300 and it is constantly
listening for a client connection. Once the client established a connection and a robot server is
successfully received, the Update Server will terminate the currently running robot server (if
any), and execute the new one.
2.Instruction Manual
A. Steps at the Server Side
2.1 Installing Phidget Files
The Phidget library files must be installed on the eBox 2300 before executing the Update
Server application. The eBox 2300 looks for the necessary Phidget library files in the
“Program Files” folder. Every time the eBox 2300 is turned off, everything in the
“Program Files” folder is erased. If the Phidgetlibrary files are not installed, you must
install the Phidget library by following these steps:
2.1.1 From the eBox 2300 Desktop double click “My Device” > “Hard Disk”
>Right click “Phidget21x86_2.1.6.20121015” and select “Copy”. (Figure 1)
2|Page
Figure 1Phidget21x86_2.1.6.20121015
2.1.2 Double click the “Windows” folder and “Paste” the
Phidget21x86_2.1.6.20121015 file.
2.1.3 Double click the Phidget21x86_2.1.6.20121015 file to install the Phidgets
files. You will be prompted with an installation message. Make sure “\Program
Files” is the installation path and select “Ok”. (Figure 2)
Figure 2Phidgets Installation Message 2.1.4 Disconnect the AdvancedServoPhidgetUSB cable if it is connected to the
eBox 2300.
2.1.5 Navigate back 2 steps and double click “Program Files”. (Figure 3)
3|Page
Figure 3 Program Files
2.1.6 In the Phidgets folder double click PhidgetWebservice21 to run the
PhidgetWebservice. (Figure 4)
2.1.7 Reconnect the AdvancedServoPhidgetUSB cable to the eBox 2300.
Figure 4PhidgetWebservice
4|Page
2.2 SetupeBox 2300 Static IP Address
2.2.1 From the eBox 2300 Desktop select “Start” > “Settings” > “Network and
Dial-up Connections”. As a result, a window will appear with PCI-RTL81391
icon.
2.2.2 Right click “PCI-RTL81391” icon and select “Properties”
2.2.3 On the IP Address tab select “Specify an IP address” and enter the following
information. (Figure 5)
IP Address: 69.88.163.31
Subnet Mask: 255.255.255.0
Default Gateway: 69.88.163.1
Figure 5 IP Address Tab
2.2.4 On the Name Servers tab enter the following information and click “OK”
Primary DNS: 172.28.254.2
Secondary DNS: 172.28.254.3
5|Page
2.3Run the Update Server
2.3.1 From the eBox 2300 Desktop double click “My Device” > “Hard Disk” >
“My Documents” >“Update Server” >“UpdateServerWindow.exe” (Figure 6).
The server will start running.
Figure 6UpdateServer
2.3.2 In the Update Server window enter the Server IP: 69.88.163.31 (Figure 7)
2.3.3 In the Update Server window enter the listening port: 16888 (Figure 7)
2.3.4 Click “Start Listening” (Figure 7). The server will wait until a client
connects. Feedback of the update process will be displayed on the Console, as
shown in Figure 8
Figure 7 Start Listening for Clients
6|Page
Figure 8 Update Feedback
7|Page
2.4 Run the Camera Server
2.4.1 From the eBox 2300 Desktop double click “My Device” > “Hard Disk” >
“source1” (Figure 9) > “camServer.exe” (Figure 10).
Figure 9 Source1 Folder
Figure 10camServer
8|Page
B. Steps at the Client Side
To remotely control the robotic arm, a robot server and remote client application have to
be developed. To upload arobot server to the eBox 2300, the Robot Server Updater is
needed.
2.5Upload Robot Server Using Robot Server Updater (Client)
2.5.1 Run the Robot Server Updater (Client), as a result the Robot Server Updater
window will appear as shown in Figure 11.
2.5.2 Enter the eBox 2300 IP address (69.88.163.31) and Port number (16888)
(Figure 11).
Figure 11eBox 2300 IP Address and Port Number
9|Page
2.5.3 Click “Select File”, navigate to the location of the Robot Server application
file and click “Open” (Figure 12). The name of the application file will appear in
the “File” textbox (Figure 13).
Figure 12 Select Robot Server Open Dialog Box
10 | P a g e
Figure 13 File Name
2.5.4 Click “Send File” to make a connection with the Update Server and transfer
the Robot Server file. Feedback indicating that the new Robot Server application
file was sent successfully to the eBox 2300 will be displayed in the “Status”
textbox (Figure 14).
At this point, the Robot Server should be running on theeBox 2300. If the Robot Server
andRemote Client were developed correctly, one should be able to remotely control the
robotic arm from the interface built into the Remote Client.
11 | P a g e
Figure 14 Status
12 | P a g e
3. Important Hints and Troubleshooting
It is extremely important to mention that in order for a Robot Server to run on the eBox 2300, the
Robot Server must have to be developed using Visual Studio 2005 and the .NET Compact
Framework 2.0. Additionally, to debug or test a Robot Server, the Robot Server has to be
deployed to the eBox 2300 as a Smart Device – Windows CE 5.0 Device Application. For
further explanation on how to connect Visual Studio 2005 to the eBox 2300 and develop and
deploy an application to the eBox 2300 please refer to the User Manual inRobotic Arm Remote
Control project report for CNT 4104 Software Project in Computer Networks class during the
Fall 2012 semester[1].
Furthermore, is very important to follow the General Phidget Programming guide to disengage
the engaged servos and close(release) the AdvancedServoPhidget when one finish controlling it
with a Remote Client. If one fails to do this, the Server Updater will not be able to execute the
new Robot Servers sent to the eBox 2300. In addition, the new Remote Clients and Robot
Servers will not be able to control the robotic arm since the program did not release the Phidget.
Figure 15 shows an illustration of this process. Moreover, if the Server Updater fails to execute a
Robot Server a message is displayed on the screen. This usually happens when the currently
running Robot Server does not release the AdvancedServoPhidget before termination. To fix this
problem, close and reopen the Server Updater.
Send command to theRobot Server to
disengage the arm and release the
AdvancedServoPhidget object.
\
Release Arm
Remote Client
Robot Server
Figure 15 Disengage and Release Robotic Arm
13 | P a g e
If the camera is not showing images, make sure that the camera server is running. If the camera
server is running and the images from the camera server are still not visible, then something
might be wrong with port 1888 (camServer listens at this port) or the camera USB cable is not
connected to the eBox 2300. If the robotic arm does not move, something might be wrong with
port 17888 (Robot Server developed listens at this port) or the robotic arm USB cable is not
connected to the eBox 2300.
14 | P a g e
4. Further Development
The Robot Server Updater (client) does not support any type of authentication. The lack of
authentication may cause trouble if several users want to upload a robot server to the eBox 2300
at the same time. To solve this problem, the project could be expanded in several ways:
1. Make the client web-based:
The Robot Server Updater (client) should be rewritten to be web-based, preferably using
Microsoft .Net framework. In addition, some sort of authentication should be used to
prevent multiple users from using the client at the same time. The Server Updater may
need to be modified in order to work with a web-based client.
2. Expand current client to support password authentication:
A password input field could be added to the Robot Server Updater. The client needs to
verify that the password is correct before sending a robot server to the eBox 2300. The
correct password should be stored somewhere accessible by the Robot Server Updater,
for instance, a database.
15 | P a g e
5. References
[1] A. Fernandez and V. Fernandez, "Robotic Arm Remote Control," November 29, 2012.
16 | P a g e