1
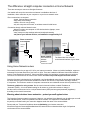
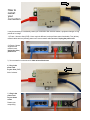
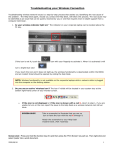
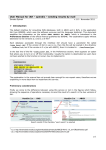
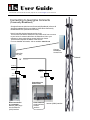
User Guide
1 Church Street, Unit 6, Keswick ON, L4P 3E9, (905) 476-1011, email: [email protected], web: www.ils.net
Connecting to Georgina Connects
(Community Broadband)
Georgina Connects (also know as Community Broadband) refers to all
wireless broadband services provided by South Shore Community
Broadband and ILS (Internet Lake Simcoe).
Here is how this wireless Internet service works:
The Access Point and the Subscriber Unit create a link from our tower
to your house. A network cable from the Subscriber Unit to your
computer or home router brings access inside your house.
This document explains the basics of the service.
For more detailed information, visit our website: www.ils.net
.
Community
Broadband
Access Point
Subscriber
Unit (SU)
Internet
or
outdoors
indoors
J-box
(POE)
outdoors
indoors
J-box
(POE)
Connection to a
home router:
Direct connection
to a computer:
Network cable plugs
into the Ethernet
(LAN) interface
Home network:
wired interfaces,
wireless
interface
Internet (WAN) interface
The difference: straight computer connection or Home Network
There are two ways to connect to Georgina Connects:
Our installer will set up the connection to whatever is available at the time of
installation, direct connection to your computer or to your home network router.
Direct connection to a computer:
- simple, fast low latency connection
- easy setup, basic settings
- reliable, not much can go wrong
- only one computer can connect, no wireless network inside house
Connection through a Home Network router:
- allows more than one computer or Wifi wireless device (laptops, smart
phones) to connect
- many routers can drop settings and need occasional resetting
- not part of your Internet service, not installed or supported by ILS
Direct connection
to a computer
network
cables
network
cables
J-box
(POE)
Home network:
wired interfaces,
wireless
interface
J-box
(POE)
The Subscriber Unit connects
to the Internet interface of your router
Using Home Network routers
The monthly service fee you pay to ILS is for your Internet connection. It does not include installation, support or
maintenance of private networks of your home or office. There are hundreds of different Home/Office network
routers. Even between the dozens of Linksys and Dlink models, the interfaces, prompts and terms used vary.
The source for instructions is the router's user manual. ILS does not provide support for these devices.
Georgina Connects is designed to be an affordable, very fast broadband connection for homes and small offices.
We have different types of connections available for medium size offices or corporations with large numbers
of computers. The maximum number of computers connected to one residential account is three (business: five).
The basic guideline for using routers: Set the router's Internet interface to obtain IP address to
Automatic (DHCP) – this is the default setting for all routers so you should not have to change it.
Set the router's wireless service for a unique Network name (SSID) and encrypted password (keyphrase)
according to the router's instructions.
Warning about wireless home networks – protect yourself against crime
The Georgina Connects network is protected. However, your wireless Home Network may be wide open to credit
card and identity theft, access for predators and other criminals. It is important to understand that
any activity committed under your connection happens under the name of the account holder.
Please read your Terms and Conditions about re-distributing your internet connection.
All traffic through the CommunityBroadband and ILS networks are monitored and the origin of all packets
can be traced to the account holder.
Your computer's network settings
All computer operating systems, Windows, MacOS,
Linux, have DHCP as the default network setting.
Starting September 2011, this is also the default setting for
all types of Georgina Connects connections.
Window XP: Control Panel > Network Connections >
Local Area Network > (right click) Properties >
Internet Protocol TCP/IP > Properties
Windows Vista Home Premium: Control Panel >
Network and Sharing Centre >
Manage Network Connections > Local Area Network
> (select) Internet Protocol Version 4 (TCP/IPv4) >
Properties
Windows 7: Control Panel > Network and Sharing Centre
> Change Adapter Settings > (right click) Local Area
Connection > (select) Properties > Internet Protocol
Version 4 (TCP/IPv4) > Properties
MacOS: System Preferences > Network > (highlight)
Built-in-ethernet > Configure > TCP/IP > Configure Ipv4
> Using DHCP
Your router's network settings
All routers have the right setting – DHCP – as their
factory default setting. However, if it was at some
point changed to Static IP or something else, you
can change it back to default.
Connect to your Linksys router with a web browser:
http://192.168.1.1/
Username: admin password: admin
Change (if necessary) Internet Connection Type:
Automatic Configuration – DHCP
Connect to your Dlink router with a web browser:
http://192.168.0.1/
Username: admin
no password
Change (if necessary) Internet
Connection Type:
Dynamic IP ( DHCP)
Above: Linksys Below: Dlink – interfaces vary from model to model
After changes: Save Settings
> power off / power on
Dlink
If you cannot access your router,
reset it to it's factory
settings by inserting and holding
a sharp object to its RESET hole
for 20 seconds while the router
is turned on.
How to
restart
your
connection
It may be necessary to occasionally restart your connection after extreme weather, equipment changes or long
periods of no usage.
1.) Picture 1 shows a Jbox (POE). Yours may look different, but they all have same functionality. Two (thicker)
network cables and one (thinner) power cord. Leave network cables attached. Unplug the power cord.
2.) Picture 2 shows
a typical home
network router.
Unplug the (thin)
power cord.
3.) Your connection is now turned off. Wait at least 20 minutes.
4.) Plug in the
power cord
to your Jbox (POE)
Wait 2 minutes.
5.) Plug in the
power cord
to your home
router.
Restart your
computer(s).
Using email
When you subscribe to Internet connectivity through ILS, you automatically get a free mail account
and free use of the ILS mail servers.
Your ILS mail is free, and you can choose to use it or not to use it.
There are other free mail services that you may want to use: Hotmail, Gmail, Qmail, YahooMail, all work
well with connectivity through ILS. If you use a mail service other than ILS, please notify [email protected]
of your non-ILS email address, so you still receive your invoices and other important notices from ILS.
Using ILS WebMail
The easiest way to access your ILS mail account is through our home page. Start a web browser, go to
http://www.ils.net/ and click the MAIL button on the upper left corner. You come to the login page.
Type in your username - not email address - just username in lower case letters, no spaces or extra
characters. Then the password.
The ILS webmail window opens up. On the left you see the different folders, the first one being INBOX.
WebMail opens in INBOX. In the middle of the window, you see messages that have arrived for you.
To read a message, click on the message itself. To get back to the INBOX, click "Message list". Mark
messages by checking the little box in front of them, from the right click "Delete".
If there are no messages, it says "this folder is empty".
To send a mail: click compose, a new window opens up. Easy. Type in the receivers email address
in the To: field, add a subject then the message itself to the text area. When you are done, click "Send".
Deleted messages are not really deleted. They are stored in the "Trash" folder, just in case.
Keep the Trash and other folders trimmed. Delete all unwanted mail from your folders as often as possible
because once the quota is reached, mail stops working.
Note that the mail folders are in our server, not in your computer. Below each message, you have the option
"to download this as a file" to your own computer. This is very important, the mail folders are for temporary
keeping only. ILS takes no responsibility of mail left in the ILS mail server.
You can access your ILS Webmail from anywhere, any computer that is connected to the Internet and has a
working web browser in it. The Webmail is great for those who get a few messages per day, mostly text based mail.
If you want to send and receive attachments, and handle a large number of messages, you should use a
mail program installed in your computer (see below).
Mail Program (Windows Live Mail, Thunderbird) Settings
There are dozens of different free mail programs available for Windows, Mac and Linux. The most
common ones already installed are: Windows XP: Outlook Express Windows Vista: Windows Mail
Windows 7: Windows Live Mail Mac OS: Mac Mail Linux: Thunderbird, Evolution
The settings needed for all mail programs are the same:
Username (account), password, Incoming (POP3 or IMAP) mail server, Outgoing (SMTP) mail server.
Incoming (POP3 or IMAP) mail server:
Server name: mail.ils.net
Port: 110 (POP3) or 143 (IMAP)
Security: none
Authentication: clear text password
Outgoing (SMTP) mail server:
Server Name: mail.ils.net
Port: 25
Security: none
Authentication: no authentication
The ILS Incoming mail server will allow you to check your mail from any computer (non-ILS-connectivity).
If you are not sure whether to use POP3 or IMAP, use POP3.
The ILS Outgoing mail server will allow only ILS connected machines to send mail. Example: Your iPhone
when connected to your ILS based home WiFi network can send mail. When it is connected through its
Telus or Bell 3G celllular, it has to use Telus or Bell Outgoing mail server.