1
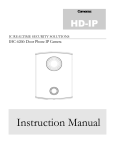
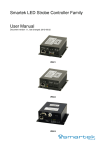
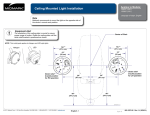
Industries, Inc.
User’s Manual: SIGMA
Control Center
A full function controller:
Powerful, intelligent, and easy to use
Corporate Office:
550 Elizabeth Street Waukesha, WI 53186
800-234-7205 / 262-896-7205 Fax: 262-896-7099
Western Regional Office:
5748 East Shields Avenue #101, Fresno, CA 93727
888-285-0366 / 559-292-5382 Fax: 559-291-0463
Southeast Regional Office: 1441 SW 10th Avenue Unit 202, Pompano Beach, FL 33069
800-327-4346 / 954-785-5540 Fax: 954-785-5014
Canadian Office:
1081 Meyerside Drive, Units 1 & 2, Mississauga, Ontario L5T 1M4
877-730-7010 / 905-795-7913 Fax: 905-795-7905
Web Site:
www.ariesindustries.com
970162A 11/10
550 Elizabeth St. Waukesha, WI 53186
1-800-234-7205
ariesindustries.com
970162A
11/10
Page 0
Industries, Inc.
Table of Contents
970162A 11/10
Feature Summary
2
Introduction
3
Getting Started
Safe and Proper Operation
4
4
Overview – All You May Need to Know
5
The Command Center
6
Lights Control
7
Transporter Controls
Direction Change
8
8
Cable Reel Controls
Direction Change
9
9
Audio Commentary
9
Maintenance
10
Back Panel Info
Video Connect
11
12
550 Elizabeth St. Waukesha, WI 53186
1-800-234-7205
ariesindustries.com
Page 1
Industries, Inc.
Feature Summary
•
•
•
•
•
•
•
•
Modular, fault tolerant design for easy and economical maintenance
2 X Buffed Aux Video Outputs
All-in-one power supply and controls for lights, transporter, video camera, and (cable reels Optional)
Optional integrated 10.4” LCD flat panel monitor
Standard 19” rack mount format 6U high
Digital volt and amp meter for accurate system output readings
Intelligent safety lock-outs to prevent damage to transporter clutch and cable reel transmissions
Built-in microphone for live audio commentary during inspection
970162A 11/10
550 Elizabeth St. Waukesha, WI 53186
1-800-234-7205
ariesindustries.com
Page 2
Industries, Inc.
Introduction
Congratulations on your purchase of the SIGMA Control Center from Aries! This unit has many functions which will
empower you to complete even the most difficult of inspections.
If you are generally at home with electronics, video and screen writers (or video titlers, or video character
generators, as they are sometimes called) then follow the installation instructions, read the section “All
You May Need to Know” for general information, then look for parts in this manual that are offset like this
paragraph – they denote the “advanced user” sections, and contain information on special facilities that
allow you to customize your unit to best suit your requirements!
The SIGMA control center you have purchased has a modular design that allows it to be used either in a truck mounted
system, or in a Pathfinder Portable Mainline Inspection System such as the Pathfinder. This manual is applicable to both
applications.
970162A 11/10
550 Elizabeth St. Waukesha, WI 53186
1-800-234-7205
ariesindustries.com
Page 3
Industries, Inc.
Getting Started
Safe and Proper Operation
The purpose of this section of the manual is to ensure that you have a safe operating environment for yourself, as well as
for your SIGMA control unit.
o
Make sure that your SIGMA unit is properly bolted down and
secured if it is installed in an inspection van. A moving vehicle
can mean that unsecured loads will shift.
o
Plug your SIGMA unit into a power source that is stable and
not overloaded. Failure to do so can result in electrical
damage.
o
Ensure that all power controls are in the off position, and all of
the control knobs are turned fully counter clockwise in the
OFF position before turning the SIGMA unit’s power on.
o
It’s important to familiarize yourself with all the various
controls as shown on the following pages before operation.
Plug your SIGMA unit ONLY
into stable power sources.
Your SIGMA unit contains NO
user serviceable parts. Repairs
are to be performed only by
Aries service personnel.
970162A 11/10
550 Elizabeth St. Waukesha, WI 53186
o
o
Please use within the maximum operating parameters of the
SIGMA control unit – 240VAC (50HZ) @ 8 Amps.
o
Always replace fuses with appropriate size and type specified
– refer to fuse replacement section
o
This unit contains NO user serviceable parts. Any attempt to
service your unit by yourself will void your warranty, and
may result in personal injury.
o
This unit produces high output voltages and currents, and
should not be modified or used for any other purpose other
than which it was designed.
Before turning on the SIGMA controller, make sure all cable
connectors are secure and plugged in; i.e. transporter, camera,
cable reels, etc.
1-800-234-7205
ariesindustries.com
Page 4
Industries, Inc.
Overview – All You May Need To Know
SIGMA Front Panel Overview
Audio
Microphone
Digital Volt /Amp
Display
SIGMA operation
controls
Power Switch
970162A 11/10
Monitor Menu
Buttons
Front Fuse Panel
Camera Joystick and
TR3200 & TR3400
Not displayed in
photo
550 Elizabeth St. Waukesha, WI 53186
1-800-234-7205
ariesindustries.com
Page 5
Industries, Inc.
The Command Center
This is the main control center for your SIGMA unit.
Voltage Output Display
Amperage Output Display
Volt/Amp Meter Display
Red – Transporter
Yellow – Lights
Green - Camera
Lights Power
ON/OFF Button
Lights Intensity Knob
Transporter Direction
Select Button
Transporter Speed Knob
Transporter
ON/OFF Button
Cable Reel Direction
Select Button
Cable Reel Speed Knob
Cable Reel
IN/OUT Direction
Button
Volt/Amp Meter
Display Select Button
970162A 11/10
Camera Power
ON/OFF Button
550 Elizabeth St. Waukesha, WI 53186
1-800-234-7205
ariesindustries.com
Page 6
Industries, Inc.
Lights Control
•
Ensure that you have a light head properly connected to
your inspection system. NOTE: with the Aries series of
cameras with internal lighting (pan and tilt series)
external light heads are not necessarily required.
•
Ensure that light intensity control knob is fully turned
counter clockwise (in the off position)
•
Press the meter select button (lower left hand) to illuminate the YELLOW led just below the voltage and current displays –
this displays the lights voltage and amp output.
•
Press the Light power ON/OFF button. NOTE: note when power is present, the button will illuminate green. In addition, your
voltage display will show approximately 5 volts.
•
SLOWLY turn up the light intensity knob while monitoring light brightness and current draw. If using an
Aries LED lighthead, no particular current setting is required – Aries LED lightheads have internal current limiting.
If using an Aries lighthead with incandescent lamps, care must be taken to not apply a voltage resulting in excessive current
to the lighthead as lamp failure will occur. See table below for lightheads and maximum allowed currents.
Camera Model
ST700/710
ST700/710 with LH82 Large Lighthead
PE1000 Series P&T Camera
With Standard [P/N 750604] Lamps
PE1000 Series P&T Camera
With High Intensity Lighthead LH436
PE3000/PE3100 Series P&T Camera
Max Current
1.2 Amps
1.5 Amps
1.2 Amps
2.3 Amps
1.2 Amps
NOTE: In practice, the maximum current will not be necessary to provide adequate lighting. Simply adjust the
light intensity knob until image is adequately lit while taking care to not exceed the maximum current.
After the desired light level has been selected for your lighting system, it is now safe to change the volt/amp meter
display selection.
•
Turning your lights off
o Rotate the knob counter clockwise, then press the power switch off.
970162A 11/10
550 Elizabeth St. Waukesha, WI 53186
1-800-234-7205
ariesindustries.com
Page 7
Industries, Inc.
Transporter Controls
Transporter Control
•
Ensure that you have a transporter properly connected to
your inspection system.
•
Ensure that transporter intensity control knob is fully
turned counter clockwise (in the off position)
•
Press the meter select button (lower left hand) to illuminate the RED led just below the voltage and current displays – this
displays the transporter voltage and amp output.
•
Select the transporter direction of operation (FORWARD/REVERSE). To do this press the transporter direction select button.
NOTE: when switch is illuminated RED, your transporter is in the REVERSE direction. Please note that the SIGMA
controller unit defaults to the forward direction at main power up. For use with TR3200, TR3300, and TR3400 use only the
forward setting as the direction is set but the hand controller.
•
Press the transporter power ON/OFF button. NOTE: note when power is present, the button will illuminate green. In addition,
your voltage display will show approximately 5 volts.
•
SLOWLY turn up the transporter speed control knob to the desired operating speed. NOTE: Prolonged excessive current
(more than 2 AMPS) can damage transporter motors.
•
After the desired voltage and amp rating has been selected for your transporter system, it is now safe to change the volt/amp
meter display selection. However it is a good idea to monitor your transporter ampere reading to ensure safe operation.
Direction change
•
Rotate the transporter control knob counter clockwise, and press the power on/off button. Your transporter will now be in the
OFF position (button is NOT illuminated). It is now SAFE to press the direction change button if a direction change is
desired. Return to step one in the above list to have your transporter travel in the opposite direction.
•
NOTE: direction reversal button is interlocked with transporter on/off button and will prevent direction change while power
button in engaged.
970162A 11/10
550 Elizabeth St. Waukesha, WI 53186
1-800-234-7205
ariesindustries.com
Page 8
Industries, Inc.
Cable Reel Controls (optional items)
•
Ensure that your cable reel is properly connected to
your inspection system.
•
Ensure that cable reel speed control knob is fully turned
counter clockwise (in the off position)
•
Select the transporter direction of operation (OUT/IN) to do this press the video cable direction select button. NOTE:
when switch is illuminated RED, your cable reel is in the OUT direction. Please note that the SIGMA controller unit
defaults to the IN direction at main power up.
•
Press the cable reel power ON/OFF button. NOTE: note when power is present, the button will illuminate green. In
addition, your voltage display will show approximately 5 volts.
•
SLOWLY turn up the cable reel speed control knob to the desired operating speed.
Direction change
•
Rotate the cable reel control knob counter clockwise, and press the power on/off button. Your cable reel will now be in
the OFF position (button is NOT illuminated). It is now SAFE to press the direction change button if a direction change
is desired. Return to step one in the above list to have your cable reel travel in the opposite direction.
•
NOTE: direction reversal button is interlocked with cable reel on/off button and will prevent direction change while
power button in engaged.
Audio Commentary
To activate the audio microphone, simply press and HOLD the button located below the audio microphone on the front panel
of your SIGMA. As long as you hold the button down, whatever you say into the microphone will be recorded onto your
VHS tape recording or DVD recording.
970162A 11/10
550 Elizabeth St. Waukesha, WI 53186
1-800-234-7205
ariesindustries.com
Page 9
Industries, Inc.
Maintenance
970162A 11/10
550 Elizabeth St. Waukesha, WI 53186
1-800-234-7205
ariesindustries.com
Page 10
Industries, Inc.
Back Panel
Counter O/P to Aries VD and
VL Series Overlays
Input from Cable reel
Audio and Video connections
Foot Pedal
For TR3200 and Pathfinder
systems set to “local” to
bypass foot pedal switch
970162A 11/10
550 Elizabeth St. Waukesha, WI 53186
1-800-234-7205
ariesindustries.com
Page 11
Industries, Inc.
Back Panel
The Sigma features two “Buffer Aux Video Outputs” that can be used for a number of display options such
as:
•
•
•
•
•
2nd Video display
Output to a Computer based video recording system
Output to a Computer based inspection software
PVR
2nd DVD or VCR
Note the “Video Output” must be looped back to the “Internal Monitor Input” to have the “buffered Aux
Video Outputs” active even if your Sigma is not equipped with an internal monitor. The arrows illustrate
the connection path for the Audio and Video signal flow.
Note: There may be a short disruption in the video image on the internal monitor while switching between
cameras on dual camera systems. E.g. (LETS, Pathfinder, and Thermal View). This is due to the monitor
having to re-sync with the video signal. This dropout will not appear on the recorded video.
970162A 11/10
550 Elizabeth St. Waukesha, 53186
1-800-234-7205
ariesindustries.com
12