1
HelpNDoc User Manual
IBE Software
Copyright © 2015 by IBE Software. All Rights Reserved.
HelpNDoc User Manual
Table of contents
Welcome to HelpNDoc ........................................................................................ 6
Getting started with HelpNDoc ......................................................................... 6
Introduction ...................................................................................................... 6
About HelpNDoc ............................................................................................ 6
System requirements ...................................................................................... 7
Getting help .................................................................................................. 7
HelpNDoc editions .......................................................................................... 8
HelpNDoc license agreement ........................................................................... 8
What's new in HelpNDoc 4 ............................................................................ 11
How to buy HelpNDoc .................................................................................. 12
Overview of the user interface ........................................................................... 12
File menu .................................................................................................... 13
Ribbon tabs ................................................................................................. 14
Styles editor ................................................................................................ 15
Find and replace window ............................................................................... 16
Options window ........................................................................................... 17
Quick start guides ............................................................................................ 19
Launching HelpNDoc .................................................................................... 19
Create a new project ..................................................................................... 19
Adding topics .............................................................................................. 19
Setting up topic content ................................................................................ 19
Generating documentation ............................................................................ 20
Writing documentation ...................................................................................... 20
Create a new project ..................................................................................... 20
Open an existing project ............................................................................... 21
Import other formats .................................................................................... 21
Project options ............................................................................................. 21
Date and time format settings .................................................................... 22
Managing the table of contents ...................................................................... 24
Create topics ............................................................................................ 24
Delete topics ............................................................................................ 25
Rename topics ......................................................................................... 25
Change topic properties ............................................................................ 25
Move topics ............................................................................................. 27
Using the topic editor ................................................................................... 27
Topic kind ............................................................................................... 27
2 / 90
HelpNDoc User Manual
Headers and footers ................................................................................. 28
Working with hyperlinks ............................................................................ 28
Link to a specific topic ........................................................................... 28
Link to a relative topic ........................................................................... 29
Link to an Internet or e-mail address ...................................................... 30
Link to a file ........................................................................................ 31
Working with styles .................................................................................. 31
Working with tables .................................................................................. 32
Working with pictures ............................................................................... 32
Working with the image map editor ............................................................ 32
Using the library .......................................................................................... 33
Using the keywords editor ............................................................................. 34
Manage keyword association ...................................................................... 35
Using the spell checker ................................................................................. 36
Publishing documentation ................................................................................. 36
Advanced usages ............................................................................................. 37
Keyboard shortcuts ....................................................................................... 37
Keyboard auto-completion ......................................................................... 39
Conditional content generation ...................................................................... 40
Analyzing a project ....................................................................................... 42
Analyzing hyperlinks ................................................................................. 42
Analyzing library items ............................................................................. 43
Analyzing keywords .................................................................................. 45
Working with templates ................................................................................ 46
Using the template editor .......................................................................... 46
HTML based templates .......................................................................... 47
General settings ............................................................................... 48
Variables ......................................................................................... 48
Script files ....................................................................................... 49
Assets ............................................................................................. 50
Word and PDF templates ....................................................................... 51
Low-level template details ......................................................................... 52
Best practices ....................................................................................... 52
Template configuration file .................................................................... 54
Template inheritance ............................................................................ 54
Code templates .................................................................................... 55
CHM and HTML templates ..................................................................... 55
Handle the generated topic links ........................................................ 56
3 / 90
HelpNDoc User Manual
Methods available in templates ........................................................... 56
Generate multiple files from a single template file ................................ 56
Template variables ........................................................................... 56
Samples .............................................................................................. 58
Building a single page HTML template ................................................ 59
Use index.html as the default HTML page ............................................ 62
Usage from the command line ....................................................................... 63
CHM files and programming languages ........................................................... 64
Delphi integration ..................................................................................... 64
Java integration ....................................................................................... 65
Microsoft Access integration ...................................................................... 65
Visual Basic integration ............................................................................. 65
Customize default project styles ..................................................................... 65
Using the Script Editor .................................................................................. 66
HelpNDoc API methods ............................................................................ 66
FAQ and troubleshooting .................................................................................. 85
Help compilers ............................................................................................. 85
What compilers of libraries do I need to install? ........................................... 85
Installing the Microsoft HTML Help Compiler displays a warning message? ..... 86
CHM and HTML help ..................................................................................... 86
The CHM viewer indicates that the page cannot be displayed ......................... 86
CHM content is not displayed after Internet Explorer update .......................... 86
Despite modifying the navigation pane's width the CHM file is not updated ..... 87
The search feature is not working in the CHM documentation ........................ 87
Google Chrome shows an error when searching HTML documentation ........... 88
The HTML help is broken when hosted by CloudFlare ................................... 88
PDF documentation ...................................................................................... 88
Adobe Reader won't print with "drawing error" message ............................... 88
Sales and license information ......................................................................... 89
What is HelpNDoc's update policy? ............................................................. 89
How much does HelpNDoc costs ................................................................ 89
Do you provide a discounted Educational license ? ....................................... 89
Do you provide a government license ? ...................................................... 89
I need a special license: site license or global license? .................................. 89
What kind of payment devises and currencies do you accept? ........................ 89
How can I request a written quote before ordering? ..................................... 90
Miscellaneous ............................................................................................... 90
HelpNDoc download problem .................................................................... 90
4 / 90
HelpNDoc User Manual
Doc or DocX files can't be imported ............................................................ 90
Some panels are missing or HelpNDoc's Window is hidden ........................... 90
5 / 90
HelpNDoc User Manual
Welcome to HelpNDoc
HelpNDoc is an easy to use yet powerful and intuitive help authoring environment which provides
a clear and efficient user interface to build the most amazing CHM help files, WEB based
documentation, PDF and Word documents as well as ePub and Kindle eBooks from a single
source without worrying about the inner working of help file generation.
This help documentation is designed so you can quickly learn HelpNDoc as a new user or
enhance your knowledge as a regular user.
Getting started with HelpNDoc
New to HelpNDoc
·
Read the Introduction section to know more about HelpNDoc, its different editions and
system requirements.
·
Follow the Quick Start Guides to familiarize yourself with the processes of creating and
generating your documentations.
Regular user of older HelpNDoc versions
·
Read the What's new in HelpNDoc 4 section to have a quick look at major changes.
·
Run through the Quick Start Guides to familiarize yourself with the new version.
Introduction
·
About HelpNDoc
·
System requirements
·
Getting help
·
HelpNDoc editions
·
HelpNDoc license agreement
·
What's new in HelpNDoc 4
·
How to buy HelpNDoc
About HelpNDoc
HelpNDoc is an easy to use yet powerful and intuitive help authoring environment.
HelpNDoc provides a clear and efficient user interface to build the most amazing CHM help
files, WEB based documentation, PDF and Word documents as well as ePub and Kindle
eBooks from a single source without worrying about the inner working of help file generation. You
6 / 90
HelpNDoc User Manual
just have to enter or import your documentation in the built-in word processor and hit the
"Compile" button to obtain a fully functional help file which looks exactly as you designed it.
Forget about bloated user interfaces and incomprehensible tools. HelpNDoc has been
engineered to provide the most advanced functionalities in their simplest form: creating and
maintaining HTML help files, Word and PDF documentation is usually a painful process but
thanks to HelpNDoc you may surprise yourself enjoying it!
You know how to use your favorite word processor, so you already know how to use HelpNDoc:
it's that easy! Add to that many powerful features such as live spell checking in a fully WYSIWYG
(What You See Is What You Get) environment and you'll begin to imagine how fast and easy it
will be for you to create your next help file and how professional it will look like.
System requirements
HelpNDoc's recommended system configuration includes:
·
Windows XP, Windows Vista, Windows 7, Windows 8 or Windows 10
·
512MB of RAM
·
80MB of free disk space
·
1024x768 screen resolution or higher
·
Help Compiler: Microsoft HTML Help Workshop
·
MobiPocket/Kindle Compiler: Amazon KindleGen
Getting help
This help file can either be viewed on-line or off-line when installed with HelpNDoc. You can
obtain the latest version as well as other formats of this help file on line at http://
www.helpndoc.com/online-help
Off-line access
The off-line help file is part of the HelpNDoc installation. To launch it, either press the F1 key or
click the help button at the top right of HelpNDoc's main windows.
On-line access
To access and view the most recent HelpNDoc's help file on-line, launch a web browser to the
following URL: http://www.helpndoc.com/sites/default/files/documentation/html/index.html
7 / 90
HelpNDoc User Manual
Printing the help file
Alternatively, you can download and print a PDF or Word version of HelpNDoc's documentation
from the following URL: http://www.helpndoc.com/online-help
HelpNDoc editions
Three editions of HelpNDoc are available based on your needs:
·
HelpNDoc Professional Edition: Fully functional licensed edition, which can export bannerfree CHM, HTML, Word and PDF documentation;
·
HelpNDoc Standard Edition: Fully functional licensed edition, which can export banner-free
CHM and HTML documentation only;
·
HelpNDoc Personal Edition: This edition is completely free for personal use only and adds a
small banner at the bottom of all the generated documentation formats;
HelpNDoc Professional Edition
·
Can be used for commercial purposes;
·
Exports to all the formats handled by HelpNDoc without any banner;
·
No spy-ware, viruses or any kind of malware;
HelpNDoc Standard Edition
·
Can be used for commercial purposes;
·
Exports to CHM and HTML formats without any banner;
·
Exports to PDF, Word, ePub and Kindle eBooks with a small banner at the bottom of the
generated documents;
·
No spy-ware, viruses or any kind of malware;
HelpNDoc Personal Edition
·
Can't be used for commercial purposes or in exchange of any kind of compensation;
·
Exports to all the formats handled by HelpNDoc with a small banner at the bottom of the
generated documents;
·
No spy-ware, viruses or any kind of malware;
IBE SOFTWARE HelpNDoc End User License Agreement
IMPORTANT: THIS SOFTWARE END USER LICENSE AGREEMENT (“EULA”) IS A LEGAL
AGREEMENT BETWEEN YOU AND IBE SOFTWARE. READ IT CAREFULLY BEFORE
COMPLETING THE INSTALLATION PROCESS AND USING THE SOFTWARE. IT PROVIDES
A LICENSE TO USE THE SOFTWARE AND CONTAINS WARRANTY INFORMATION AND
LIABILITY DISCLAIMERS. BY INSTALLING AND USING THE SOFTWARE, YOU ARE
CONFIRMING YOUR ACCEPTANCE OF THE SOFTWARE AND AGREEING TO BECOME
BOUND BY THE TERMS OF THIS AGREEMENT. IF YOU DO NOT AGREE TO BE BOUND BY
8 / 90
HelpNDoc User Manual
THESE TERMS, THEN SELECT THE "CANCEL" BUTTON. DO NOT INSTALL THE
SOFTWARE AND RETURN THE SOFTWARE TO YOUR PLACE OF PURCHASE FOR A
FULL REFUND.
THIS EULA SHALL APPLY ONLY TO THE SOFTWARE SUPPLIED BY IBE SOFTWARE
HEREWITH REGARDLESS OF WHETHER OTHER SOFTWARE IS REFERRED TO OR
DESCRIBED HEREIN.
DEFINITIONS
(a) "HelpNDoc" and "Software" refers to IBE Software's HelpNDoc program, in each case,
supplied by IBE Software herewith, and corresponding documentation, associated media, and
online or electronic documentation.
(b) "IBE Software" means IBE Software.
(c) "Free Version" or "Freeware Version" or "Freeware Edition" or "Personal Edition" means a
free version of the Software for personal use only, so identified, to be used only for non-profit
projects. The Free Version is fully functional, without restrictions of any kind but may contain
messages in the end product stating that they have been created using the Free Version of the
Software.
(d) "Registered Version" means a version which has been bought to IBE Software.
(e) "Educational Version" means a version which has been bought to IBE Software by an
educational institution and may only be provided to students and employees of the institution.
The Educational Version may have limited functionalities and/or usage restrictions.
LIABILITY DISCLAIMER
THE HELPNDOC PROGRAM IS DISTRIBUTED "AS IS". NO WARRANTY OF ANY KIND IS
EXPRESSED OR IMPLIED. YOU USE IT AT YOUR OWN RISK. NEITHER THE AUTHORS
NOR IBE SOFTWARE WILL BE LIABLE FOR DATA LOSS, DAMAGES AND LOSS OF
PROFITS OR ANY OTHER KIND OF LOSS WHILE USING OR MISUSING THIS SOFTWARE.
RESTRICTIONS
You may not use, copy, emulate, clone, rent, lease, sell, modify, decompile, disassemble,
otherwise reverse engineer, or transfer any version of the Software, or any subset of it, except
as provided for in this agreement. Any such unauthorized use shall result in immediate and
automatic termination of this license and may result in criminal and/or civil prosecution.
FOR HELPNDOC FREE VERSION ONLY
(a) Any Help File or associated intermediate files generated by HelpNDoc Free Version MUST
NOT be used for, or in relation with, any commercial or business purpose, whether "for profit" or
"not for profit". Any work performed or produced as a result of use of this Software cannot be
performed or produced for the benefit of other parties for a fee, compensation or any other
reimbursement or remuneration.
(b) The HelpNDoc Free version may be freely distributed, with exceptions noted below, provided
the distribution package is not modified in ANY WAY.
(c) The HelpNDoc Free version may not be distributed inside of any other software package
9 / 90
HelpNDoc User Manual
without written permission of IBE Software.
(d) The HelpNDoc Free version allows the user to publish its work according to the license
agreement, but nor IBE Software nor any member of the company can be held liable for the
content of the publication.
FOR HELPNDOC REGISTERED VERSION ONLY
(a) Single-User (per seat) Licenses: You may install and use the Software on a single computer
to design, develop, and test the Software's output. Installation on a second computer, such as a
laptop and a desktop computer, is permitted if it is guaranteed that you are the exclusive user of
both computers.
(b) Multiple-User (floating) Licenses: You may install and use the enclosed Software on a server
to design, develop, and test the Software's output. Use of the Software is limited by the number
of floating licenses owned. Only one user per floating license owned may use the software at the
same time.
(c) The HelpNDoc Registered version allows the registered user to publish its work according to
the license agreement, but nor IBE Software nor any member of the company can be held liable
for the content of the publication.
(d) The HelpNDoc Registered version guaranties to the registered user free updates for a whole
version cycle and for at least 12 (twelve) months.
FOR HELPNDOC EDUCATIONAL VERSION ONLY
(a) You may install and use the Software on a single computer; OR install and store the
Software on a storage device, such as a network server, used only to install the Software on
your other computers over an internal network, provided you have a license for each separate
computer on which the Software is installed and run. A license for the Software may not be
shared, installed or used concurrently on different computers.
(b) The Software may be used on a single computer solely for individual and personal
"technology enthusiast" purposes, personal education and study (including educational-related
research), or administrative use in support of the educational institution. It may not be used for
any commercial or business purpose, whether "for profit" or "not for profit." Any work performed
or produced as a result of use of this Software cannot be performed or produced for the benefit
of other parties for a fee, compensation or any other reimbursement or remuneration.
(c) The HelpNDoc Educational version allows the registered user to publish its work according to
the license agreement, but nor IBE Software nor any member of the company can be held liable
for the content of the publication.
(d) The HelpNDoc Educational version guaranties to the registered user free updates for a whole
version cycle and for at least 12 (twelve) months.
TERMS
This license is effective until terminated. You may terminate it by destroying the program, the
documentation and copies thereof. This license will also terminate if you fail to comply with any
terms or conditions of this agreement. You agree upon such termination to destroy all copies of
the program and of the documentation, or return them to the author.
10 / 90
HelpNDoc User Manual
OTHER RIGHTS AND RESTRICTIONS
All other rights and restrictions not specifically granted in this license are reserved by authors.
What's new in HelpNDoc 4
Redesigned style system
Styles are now more robust and trustworthy. They can hierarchically inherit from parents and
override only some settings. They can be loaded, saved, and a custom set of style can be
defined for all new projects. Hyperlinks will also use styles for easier and faster project-wide
updates. HelpNDoc 4 also provides a style inspector to analyze edited content. Note: migrating
an older project to HelpNDoc 4 will migrate the styles but might desynchronize some content
attached to styles.
Native DocX generation
HelpNDoc's Word output can now generate native Word DocX files instead of RTF files. This
leads to better looking and smaller Word files.
Custom cover page, headers and footers
Word and PDF documentation formats can now contain fully customized cover pages, headers
and footers with advanced features such as specific headers and footers for first or even pages.
Advanced Word and PDF template editor
No need to manually tailor the template.info file to customize the Word and PDF templates: the
new template editor provides a visual and intuitive way to customize the look and feel of the
generated Word and PDF files.
New "Snippet" library item
Create rich text snippets in the library item and re-use them throughout the project: the item will
be replaced at generation time by the content of the snippet as set up in the library. Modifying the
snippet within the library will automatically update all topics using it.
Automate your documentation creation process with the script editor
The new script editor embedded in HelpNDoc can help automate documentation creation and
enhancements by providing multiple advanced functions to manage any part of an HelpNDoc
project. Scripts can be saved and re-used for different projects.
Rewritten the HTML search engine
The search engine used by the HTML documentation format is now smarter and can find parts
of words, rank results and understand excluded words, prefixed with the "-" character.
Import within the currently open project
When importing a file or folder, it is not required to create a new project anymore: HelpNDoc can
use the currently open project to add additional topics.
11 / 90
HelpNDoc User Manual
Various enhancements and fixes
Pasting topics with pictures between instances of HelpNDoc won't remove the pictures
anymore; Smarter Help ID generation; Better generation for all documentation formats; Refined
user interface... are some of the many enhancements and fixes implemented in HelpNDoc 4.
How to buy HelpNDoc
HelpNDoc can be purchased worldwide, either online or offline, and paid using various payment
methods (Credit Cards, Check, PayPal…) and currencies (US Dollars, Euros…). As soon as
the transaction is complete, you will receive instructions on how to obtain the full version of
HelpNDoc.
To get more information on the order process and purchase HelpNDoc, launch your webbrowser to the HelpNDoc store page at http://www.helpndoc.com/store
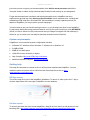
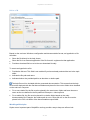
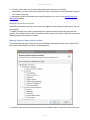
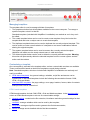
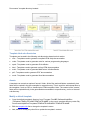
Overview of the user interface
1. File menu
·
Manage projects: create new, open existing, save...
·
Access to recent projects and places
·
Access the application options
·
Access to help and resources on HelpNDoc
·
Exit the application
2. Quick access tool-bar
·
Access to frequently used actions such as "Save project", "Undo" and "Redo"
3. Ribbon tool-bar
12 / 90
HelpNDoc User Manual
·
Contains all actions available within HelpNDoc
·
Can be minimized to provide greater documentation editing screen estate
4. Table of contents
·
Define and manage the topics hierarchy for the currently opened project
·
Root topic is the project topic, used to view and modify project settings
·
Selecting a topic will display its associated content for editing
5. Topic editor
·
Used to edit the selected topic's content
·
Setup the topic's source and behavior
6. Library
·
Define and manage the multimedia and reusable items such as images, movies, snippets,
included documents...
·
Add items to topics
7. Keywords editor
·
Define and manage the keywords hierarchy for the currently opened project
·
Associate keywords with individual topics
8. Status bar
·
Get stats about your documentation
·
Manage dictionaries and spell checker options
·
Get information about keyboard status
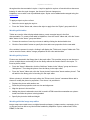
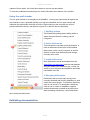
File menu
13 / 90
HelpNDoc User Manual
The HelpNDoc's file menu can be displayed by clicking the "File" button at the top left of the main
window. It is used to:
1. "Save" or "Save as" a project
2. Create a new project or open an existing one
3. Import an existing CHM file
4. Close the currently opened project
5. Access to recent projects and locations
6. Access help and product information
7. Access the options dialog and exit the application
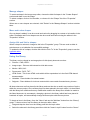
Ribbon tabs
Presentation
The HelpNDoc's ribbon tabs are located at the top of the main window and provide all the
features available within HelpNDoc in a categorized fashion. The ribbon tabs parts are:
1. The main tabs - They are always visible and are used for the most important actions
2. The tabs groups - When a tab is selected, it will display actions grouped by similar purpose
3. Contextual tabs - Those tabs are only shown when needed. For example, the "Picture Tools"
tab is only visible when a picture is selected
The Home tab
This tab provides access to the basic actions:
·
Generate the documentation and change the project options
14 / 90
HelpNDoc User Manual
·
Manage the table of contents and topic properties
·
Manage the keywords hierarchy and association
·
Manage the library
The Write tab
This tab gives access to actions needed to manage and format the topic editor's content:
·
Copy and paste text
·
Manage font and paragraph properties
·
Use and manage styles
·
Find and replace
The Insert tab
This tab provides access to inserting and importing actions:
·
Insert a picture, movie, document, HTML code or variable
·
Insert a table, symbol, horizontal line or page break
·
Insert or Edit an hyperlink or anchor
The Tools tab
Access to various tools to manage HelpNDoc or the currently opened project:
·
Edit and run scripts
·
Vacuum the project
·
Edit Word and PDF templates
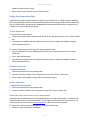
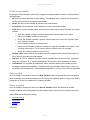
Styles editor
15 / 90
HelpNDoc User Manual
The style editor is where style are created, customized and organized. The styles editor can be
accessed via the arrow at the bottom right part of the "Styles" group in the "Write" ribbon tab.
Each style added in the style editor can be used throughout the project to format texts,
paragraphs and links. Styles inherit from their parents any properties they do not explicitly define.
1. The style hierarchy shows a list of all the existing styles and their parents. A style can be
selected to be edited. Styles can be added, deleted, imported and exported via the buttons
bellow.
2. Common style properties include the name, kind of style (text, paragraph or both) and
inheritance information.
3. Use the "Edit" links to access to customization dialogs for font, hyperlink, paragraph, border
and background. Use the "Reset" button to reset to default.
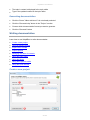
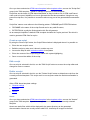
Find and replace window
16 / 90
HelpNDoc User Manual
Access the find and replace window
The find and replace window can be accessed using either:
·
The "Find and replace" button in the "Editing" group of HelpNDoc's "Write" ribbon tab
·
The CTRL-F keyboard shortcut
How to use it
Use the find and replace window to look for text items within the current topic or entire project
and optionally replace found occurences by another text or library item.
The parts of the find and replace dialog are:
1. Find scope - Define the scope of the search options. Only in the current document or in the
entire project
2. Find text - What text should be searched
3. Replace with - Specify the text or library item to use as a replacement for the found text
4. Options - Specify the search options. Match case will find the specified text with the exact
same case as it has been written. Match whole word will only search for a complete word.
Search forward will specify whether to search forward (from top to bottom) or backward
(from bottom to top)
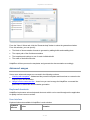
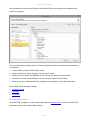
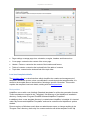
Options window
17 / 90
HelpNDoc User Manual
HelpNDoc's options can be customized by using the "File" menu then "Options" button. This
shows the options window with various sections.
General Settings
·
Application language: choose HelpNDoc's user interface language. This requires a restart of
HelpNDoc.
·
Load and display RSS news: keep up-to-date with latest news about HelpNDoc as the RSS
feed will be displayed in HelpNDoc's welcome page. This may trigger a Windows firewall
warning as this requires Internet Access.
·
Show ruler: displays or hide a ruler at the top of the topic editor for greater control over
paragraph indentation, tabs and table cell sizes.
·
Clear history: clears the recent projects and folder history.
Compilers
To generate some documentation formats, HelpNDoc requires external compilers. This section
can be used to setup their path and download them.
Custom paths
Use this section to define the default custom path HelpNDoc will use.
·
Default output path: define the default path where project output will be generated when no
18 / 90
HelpNDoc User Manual
path is defined. Default is "My Documents\HelpNDoc\Output".
·
Dictionaries path: define the path where custom dictionaries are stored. Default is "My
Documents\HelpNDoc\Dictionaries".
·
Projects path: define the path where projects are opened from or saved to the first time.
Default is "My Documents\HelpNDoc\Projects".
·
Styles path: define the path where the default project styles is placed. See Customize default
project styles to learn more. Default is "My Documents\HelpNDoc\Styles".
·
Templates path: define the path where custom templates are located. Default is "My
Documents\HelpNDoc\Templates".
Quick start guides
Quickly getting started with HelpNDoc:
·
Launching HelpNDoc
·
Create a new project
·
Adding topics
·
Settings up topic content
·
Generating documentation
Launching HelpNDoc
·
Locate the HelpNDoc 4 shortcut on the desktop or Windows start menu
·
Double click the shortcut in the desktop or single click it in the Windows start menu
Create a new project
·
Click the "File" menu
·
Click the "New project" menu item
·
Enter a project title, language and initial table of contents
·
Click the "OK" button
·
Alternatively, click the "Create empty project" button to create a new blank project
Adding topics
·
Click the "Home" ribbon tab item if it is not already selected
·
In the "Topic" section, click the "Add a topic" button
·
The new topic's title is made editable, enter a custom title if needed and press enter
Setting up topic content
·
Click the topic to be edited in the "table of contents"
19 / 90
HelpNDoc User Manual
·
The topic's content is displayed in the topic editor
·
Type in the updated content in the topic editor
Generating documentation
·
Click the "Home" ribbon tab item if it is not already selected
·
Click the "Generate help" button in the "Project" section
·
Choose which documentation format you want to generate
·
Click the "Generate" button
Writing documentation
Learn how to use HelpNDoc to write documentation:
·
Create a new project
·
Open an existing project
·
Import other formats
·
Project options
·
Managing the table of contents
·
Using the topic editor
·
Using the library
·
Using the keywords editor
·
Using the spell checker
Create a new project
20 / 90
HelpNDoc User Manual
To create a new project, use the "File" menu and click the "New project" button. This will open
the new project wizard dialog. The various parts of this dialog are:
1. Project title: specify the title of the new project
2. Project language: specify the main language of the project
3. Optionally specify an initial table of contents: use the TAB key to create the hierarchy
4. Import the table of contents from an existing CHM project
5. Quickly create a new empty project without any items in the table of contents
Open an existing project
To open an existing project in HelpNDoc. Either:
·
Use the "File" menu, click the "Open project" button and choose the existing project to open
·
Use the "File" menu, click the "Recent projects" tab and choose a project which has been
opened recently
·
Double click on an HelpNDoc project file in the Windows explorer
Import other formats
HelpNDoc can import existing CHM help files. There are two ways to exploit those files:
·
To only import the table of contents, create a new project and in the new project wizard
dialog, click the "import from existing project" link to import the table of contents of a specific
CHM file;
·
To import the whole content of the CHM file, use the "File" menu, click the "Import" button and
choose the file to import. This will create a new project with all the contents that could be
imported from that CHM file.
Project options
Each project is saved with its own set of configuration options, which include all the project
settings such as copyright, author, and language information.
Access project options
The project options panel can be accessed either by:
·
Selecting the "Home" ribbon tab and clicking the "Project options" button in the "Project"
group
·
Or selecting the project topic in the table of contents, which is the root of all topics and the
very first on in the list
General settings
·
Project settings: Various informations about the project such as the project title or author
information. Some of these options may be exported to the final documentation.
·
Language settings: Specify the project's language and character set.
21 / 90
HelpNDoc User Manual
·
Automated settings: Automatically generate the topic's help ids with the captions.
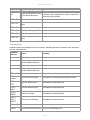
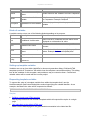
Date and time format settings
Some system variables available in an HelpNDoc project can output current date and time
information. The following variables are available and will be replaced by the current date and
time value at generation time:
Variable name
Meaning
Current Date/Time
Display the current date and time
Date
Display the current date, short format
Date - long
Display the current date, long format
Day
Display the current day, short format
Day - long
Display the current day, long format
Month
Display the current month, short format
Month - long
Display the current day, long format
Time
Display the current time, short format
Time - long
Display the current time, long format
Year
Display the current year, short format
Year - long
Display the current year, long format
Customizing the formats
By default, the date and time variables are displayed based on the project's language settings. It
is possible to customize the format for each of those system variables using the "Date / Time
format options" dialog.
To show the date and time customization dialog: from the "Home" ribbon tab, click "Project
options" then "Customize" next to "Date / Time format" in the "Language settings". The following
table explains the various specifiers which can be used when formatting date and time settings:
Specifier
Displays
d
Displays the day as a number without a leading zero (1-31)
dd
Displays the day as a number with a leading zero (01-31)
ddd
Displays the day as an abbreviation (Sun-Sat) using the translated
strings according to project language
dddd
Displays the day as a full name (Sunday-Saturday) using the
translated strings according to project language
ddddd
Displays the date using the format given by Windows' short date
format
22 / 90
HelpNDoc User Manual
dddddd
Displays the date using the format given by Windows' long date
format
e
Displays the year in the current period/era as a number without a
leading zero (Japanese, Korean, and Taiwanese locales only)
ee
Displays the year in the current period/era as a number with a
leading zero (Japanese, Korean, and Taiwanese locales only)
g
Displays the period/era as an abbreviation (Japanese and
Taiwanese locales only)
gg
Displays the period/era as a full name (Japanese and Taiwanese
locales only)
m
Displays the month as a number without a leading zero (1-12). If the
m specifier immediately follows an h or hh specifier, the minute
rather than the month is displayed
mm
Displays the month as a number with a leading zero (01-12). If the
mm specifier immediately follows an h or hh specifier, the minute
rather than the month is displayed
mmm
Displays the month as an abbreviation (Jan-Dec) using the
translated strings according to project language
mmmm
Displays the month as a full name (January-December) using the
translated strings according to project language
yy
Displays the year as a two-digit number (00-99)
yyyy
Displays the year as a four-digit number (0000-9999)
h
Displays the hour without a leading zero (0-23)
hh
Displays the hour with a leading zero (00-23)
n
Displays the minute without a leading zero (0-59)
nn
Displays the minute with a leading zero (00-59)
s
Displays the second without a leading zero (0-59)
ss
Displays the second with a leading zero (00-59)
z
Displays the millisecond without a leading zero (0-999)
zzz
Displays the millisecond with a leading zero (000-999)
t
Displays the time using the format given by Windows' short time
format
tt
Displays the time using the format given by Windows' long time
format
am/pm
Uses the 12-hour clock for the preceding h or hh specifier, and
displays 'am' for any hour before noon, and 'pm' for any hour after
noon. The am/pm specifier can use lower, upper, or mixed case,
and the result is displayed accordingly
23 / 90
HelpNDoc User Manual
a/p
Uses the 12-hour clock for the preceding h or hh specifier, and
displays 'a' for any hour before noon, and 'p' for any hour after noon.
The a/p specifier can use lower, upper, or mixed case, and the
result is displayed accordingly
ampm
Uses the 12-hour clock for the preceding h or hh specifier, and
displays the contents of the AM Symbol Windows setting for any
hour before noon, and the contents of the PM Symbol Windows
setting for any hour after noon
/
Displays the date separator character given by Windows settings
:
Displays the time separator character given by Windows settings
'xx'/"xx"
Characters enclosed in single or double quotation marks are
displayed as such, and do not affect formatting
Managing the table of contents
Managing the table of contents:
·
Create topics
·
Delete topics
·
Rename topics
·
Change topic properties
·
Move topics
Create topics
Creating a new topic in an opened project can be achieved via two ways:
·
Select the "Home" ribbon tab then click the upper part of the "Add topic" button
·
Right click on any existing topic in the table of contents (including the project topic) and click
the left part of the "Add topic" menu item
By default, a new topic is added at the bottom of the table of contents and becomes the last topic
overall. HelpNDoc can optionally create a new topic at the following positions:
·
Before the currently selected topic
·
After the currently selected topic
·
As a child of the currently selected topic
·
As the last topic overall (Default behavior)
These actions are available from a sub-menu which can be accessed via the following ways:
·
Select the "Home" ribbon tab then click the arrow on the bottom part of the "Add topic" button
·
Right click on any existing topic in the table of contents (including the project topic) and hover
the arrow on the right part of the "Add topic" menu item
24 / 90
HelpNDoc User Manual
When a new topic is created, its title will become selected and editable for easier modification: it
becomes faster to create multiple topics and rename them.
Delete topics
Deleting an existing topic can be achieved via two ways:
·
Select the "Home" ribbon tab then click the "Delete topic" button after a topic has been
selected in the table of contents
·
Right click on any existing topic in the table of contents to open the topic management menu
then choose "Delete topic"
A word of caution: Deleting a topic containing children will also delete its children. When a topic
is deleted, its associated content is also deleted. Library items used by the topics and keywords
linked with the topic are not deleted.
Rename topics
The topic's title as displayed in the table of contents can be changed using one of the following
ways:
·
Right click on the topic and select "Rename"
·
Select the topic then hit the "F2" keyboard shortcut
·
Select the topic then go to the "Home" tab then click the "Rename" button in the "Table of
contents" section
Change topic properties
Topic icon
The topic icon is displayed before the topic title in the table of contents. By default, topics
containing children will be given a book icon, whereas topic without child will be given a note
icon. To change the icon for each individual topic:
·
Select the "Home" ribbon tab, then click the "Topic properties" item and choose the new topic
icon
·
Right click on any existing topic in the table of contents to open the topic management menu
then choose the new topic icon
Topic kind
Each individual topic in HelpNDoc can be either:
·
A normal topic - This is a standard topic where new content can be entered in the topic editor
·
An empty topic - No content will be entered in that topic and will make it a chapter topic
·
An URL topic - This topic will show an external URL instead of the content
·
An external included file - The file specified will be included at compilation time in the content
of the topic
25 / 90
HelpNDoc User Manual
To change the topic's kind:
·
Select the "Home" ribbon tab, then click the "Topic properties" then "Topic kind" item and
choose the topic kind
·
Right click on any existing topic in the table of contents to open the topic management menu
then go to the "Topic kind" item to choose the topic kind
·
At the top of the topic editor, click the "Change..." link to choose the topic kind
Help ID
This is one of the most important part of a topic when using the generated documentation. The
help ID is a unique alpha-numeric identifier used to locate the topic. This ID will be used to name
individual HTML files in the generated HTML documentation, and can be used to open that
specific topic from any programming language in the CHM documentation.
To change a topic's Help ID:
·
Select the "Home" ribbon tab, then click the "Topic properties" item and enter the new Help
ID
·
Right click on any existing topic in the table of contents to open the topic management menu
then enter the new Help ID
Note: The Help ID can only contain alpha-numeric characters. HelpNDoc will ensure this rule by
automatically removing any unwanted characters (such as spaces) from the input.
Help Context
The help context is a numeric value which is unique to each topic. It can be used to uniquely
identify a topic, or open a specific CHM topic using Windows APIs.
To change a topic's Help context:
·
Select the "Home" ribbon tab, then click the "Topic properties" item and enter the new Help
context
·
Right click on any existing topic in the table of contents to open the topic management menu
then enter the new Help context
Topic Header
The topic header is a simple text which is usually displayed as the title of the topic. By default,
HelpNDoc will use the topic title as the header, but it can be configured to either:
·
Hide the header - No header will be displayed for that topic
·
Display a custom text - A custom text can be specified as the header of that topic.
To change a topic's header:
·
Select the "Home" ribbon tab, then click the "Topic properties" then "Topic header" item and
choose the topic header
26 / 90
HelpNDoc User Manual
·
Right click on any existing topic in the table of contents to open the topic management menu
then go to the "Topic header" item to choose the topic header
·
At the top of the topic editor, click the topic header link to choose the topic header
Topic Footer
The topic footer is a simple text which is usually displayed at the bottom of the topic. By default,
HelpNDoc will use the project copyright as the footer, but it can be configured to either:
·
Hide the footer - No footer will be displayed for that topic
·
Display a custom text - A custom text can be specified as the footer of that topic.
To change a topic's footer:
·
Select the "Home" ribbon tab, then click the "Topic properties" then "Topic footer" item and
choose the topic footer
·
Right click on any existing topic in the table of contents to open the topic management menu
then go to the "Topic footer" item to choose the topic footer
·
At the top of the topic editor, click the topic footer link to choose the topic footer
Move topics
Topics are managed as a tree-structure from the table of contents. A topic can contain any
number of children topics which itself can contain any number of children topics and so on. Also
topics are not sorted in any way in the table of contents so they can freely be positioned. To
move a topic in the table of contents:
·
Select the topic then from the "Home" ribbon tab, choose one of the move topic action: move
up, move down, move left, move right
·
Right click on the topic to move then from "Move topic" menu item, choose one of the action
·
Drag and drop the topic to the desired position by clicking and holding it, moving the mouse,
then release the mouse button where needed
Note: The project topic can't be move. It is always the root of all the topics available in the
project.
Using the topic editor
The topic editor is where each topic's content and properties are defined.
Topic kind
Kinds of topics
A topic can be of different kind. When first created in HelpNDoc, the topic is a normal topic with
content. The different topic kinds are:
·
Normal topic - This is the default topic kind where text, tables, library items... can be added in
the topic's content
27 / 90
HelpNDoc User Manual
·
Empty topic - This is a topic without any content of any kind attached to it
·
Show external URL - The topic will show the specified URL when shown in supported
documentation formats
·
Include external file - The specified file will be included as the topic's content when the
documentation is generated
Changing a topic's kind
Changing the kind of a specific topic can be done by either:
·
Right-click the topic in the table of contents and choose a new topic kind
·
Change the current topic's kind by clicking the "Change" link at the topic of the topic editor
Headers and footers
Each topic can have a specific header and footer. By default, the topic header is set to display
the topic's title as defined in the table of contents and the topic footer is set to display the project
copyright. This can be changed to:
·
Hide the header / footer - Do not display anything for that topic
·
Display custom header / footer - Specify the text to use for that header / footer
To change the header and footer for a specific topic, either:
·
Click in the header and footer links at the top of the topic editor and choose the new option
·
Right click on the topic and change its header and footer options.
Working with hyperlinks
The text contained in a normal topic with content can contain hyperlinks. Those links will redirect
the reader to the specific element they link to. To create an hyperlink:
·
Select the text to transform to an hyperlink
·
Select the "Insert" tab and click the "Insert / Edit hyperlink" in the "Links" panel (Keyboard
shortcut: CTRL+L)
·
Specify the links' attributes
An hyperlink can link to:
·
A specific topic: the specified topic will be shown
·
A relative topic: the relative topic, based on the currently viewed one, will be shown
·
An Internet or e-mail address: the Internet page will be shown or a new e-mail will be created
·
A file: the specified file will be shown or downloaded
Link to a specific topic
28 / 90
HelpNDoc User Manual
Linking to a specific topic will allow the end-user to navigate to that particular topic by clicking the
link. To create a link to a specific topic:
1. Provide the link text. This field is not enabled if you have already selected the text in the topic
editor
2. Choose which topic to link to by selecting it in the hierarchy
3. Optionally choose the topic's anchor to link to
Link to a relative topic
Creating a relative link, or navigation link, will provide a way to link to a topic relative to the current
29 / 90
HelpNDoc User Manual
one. HelpNDoc can create navigation links to:
·
Default topic - The topic which has been set as the default one in the project options
·
First topic - The very first topic in the table of contents
·
Last topic - The very last topic in the table of contents
·
Parent topic - The parent topic of the topic containing the link
·
Previous topic - The topic just before the one containing the link. If "Sibling topic only" is
checked, it will link to the previous topic at the exact same hierarchy level
·
Next topic - The topic just after the one containing the link. If "Sibling topic only" is checked, it
will link to the previous topic at the exact same hierarchy level
To create a navigation link:
1. Provide the link text. This field is not enabled if you have already selected the text in the topic
editor
2. Choose what kind of navigation link to create
3. For previous and next topics, specify whether to link to a sibling topic or not
Link to an Internet or e-mail address
Create a link to an Internet or e-mail address by:
1. Provide the link text. This field is not enabled if you have already selected the text in the topic
editor
2. For an Internet link, specify the URL and whether this link should open in a new window or
not
3. For an e-mail address, specify the e-mail address and optionally a subject for the e-mail to
send
30 / 90
HelpNDoc User Manual
Link to a file
Based on the end-user Windows configuration and documentation format, an hyperlink to a file
will either:
·
Show the file directly in the help viewer
·
Show the file in an external application if the file format is registered to that application
·
Provide a download file box to let the user download it locally
To create an hyperlink to a file:
1. Provide the link text. This field is not enabled if you have already selected the text in the topic
editor
2. Indicate the file path and name
3. Indicate whether the provided path is an absolute or relative path
The help file won't be included with the generated documentation. This means that the help
file must be deployed with the final documentation and placed in the correct folder when installed
on the end-user computer:
·
For a non-relative file: the file must be placed in the exact same folder and have the same
name as the one defined in the file path field. Example: c:\doc\myfile.txt
·
For a relative file: the file must be placed in a relative folder based on the main
documentation file. Example: the relative path is set to "file\myfile.txt" so the file must be
placed in the "file" sub-folder of the documentation output folder
Working with styles
Styles are an important part of HelpNDoc as they provide a way to keep an uniform look
31 / 90
HelpNDoc User Manual
throughout the documentation's topics. A style is applied to a piece of text which then becomes
linked to it: when the style changes, the format of the text changes too.
HelpNDoc comes with a set of predefined styles. Styles can be added and managed using the
styles editor.
To apply a style to a piece of text:
·
Select the text to apply the style to
·
From the "Write" ribbon tab, choose the style to apply from the "Styles" group and click it
Working with tables
Tables are used to either display tabular data or create complex layout in the final
documentation. To create a new table in HelpNDoc, from the "Insert" ribbon tab, click the "Insert
table" button in the "Items" group and either:
·
Choose the number of rows by columns to add by clicking the desired table size
·
Click the "Insert table" button to specify the size and some properties for the new table
Once a table is present in a topic, clicking it will display the "Table tools, Layout" ribbon tab. This
can be used to create, delete, change properties for the cells and the table.
Working with pictures
Pictures are inserted in the library then in the topic editor. This provides a way to use the same
picture multiple times and modify it from the library without the need to find it in the topics. To
insert a picture, either:
·
From the "Home" ribbon tab, click the "Add item" button in the "Library" group and choose
"Add picture". Then drag the picture from the library in the topic editor
·
From the "Insert" ribbon tab, click the "Insert picture" button then "Insert another picture". This
will add it to the library prior to inserting it in the topic editor
When a picture is clicked in the topic editor, the "Picture tools, format" contextual ribbon tab is
shown to modify the picture's properties. From there, it is possible to:
·
Replace the picture with another one
·
Reset the picture properties such as size and alignment
·
Align the picture in the text flow
·
Adding the picture's alternative text: this is used in HTML based documentation as a placeholder text while the picture is being loaded
·
Specify the picture's width and height
Working with the image map editor
Image maps can contain one or multiple interactive shapes. A shape can be a rectangle, circle
or polygon and can link to any kind of links handled by HelpNDoc: topics, relative links, URLs,
EMails, or file links.
32 / 90
HelpNDoc User Manual
Manage shapes
To create a shape in the image map editor, choose the kind of shapes in the "Create Shapes"
section and draw it over the image.
To select a shape, click on it in the editor, or choose it in the "Shape" list of the "Properties"
section.
When one or more shapes are selected, click "Delete" in the "Manage Shapes" section to delete
them.
Move and resize shapes
Once a shape is added, it can be moved and resized by dragging its content or its handles in the
editor. Rectangle and Circle shapes can also be moved and resized using the editors in the
"Properties" section.
Assign title and link to shapes
When a shape is selected, change its title in the "Properties" group. Title are used as hints in
web-browser or as indication for accessibility settings.
To update the link of a shape, click the link next the "Link To" in the "Properties" group to use the
hyperlink editor.
Using the library
The library can be viewed as a storage place for third-party elements such as:
·
Pictures - PNG, JPEG...
·
Image maps - Pictures with interactive click-able zones
·
Movies - MOV, AVI...
·
Documents - DOC, TXT...
·
HTML Code - This is raw HTML code which will be exported as-is in the final HTML based
documentation
·
Variables - Place-holders for textual content
·
Snippets - Place-holders for rich text content which can contain formated texts, pictures...
All those elements are first placed in the library and can then be re-used in any number of topics
within the current project. Once a library item has been placed in the topic editor, it is then linked
with the library item and therefore any modification made to the library item will also be made to
the linked elements. As an example, changing a picture in the library which has been placed in
hundreds of topics, will automatically change all those topics with the new picture.
To insert an item in the library, from the "Home" tab use the "Add item" button from the "Library"
group. To insert an item from the library to the topic editor, either:
·
Drag and drop the item from the Library panel into the topic editor
·
Select the element in the library panel then click the "Insert in topic" button from the "Home"
33 / 90
HelpNDoc User Manual
ribbon bar and "Library" group
·
Right click the element and choose "Insert in topic"
Using the keywords editor
Keywords are words or short sentences used to tag or index one or multiple topics. HelpNDoc
offers the possibility to define a keyword hierarchy where each keyword can be associated with
one or multiple topics. Keywords are alphabetically and hierarchically ordered: a keyword can
contain one or more children keywords.
Create keywords
To create a first-level keyword:
·
Create the top part of the "Add keyword" button in the "Keywords" group of the "Home" ribbon
tab
·
The keyword is added in the list ready to be named: enter a name and validate using the
Enter keyboard shortcut
To create a child keyword, first select the parent keyword then:
·
Click the bottom part of the "Add keyword" button in the "Keywords" group of the "Home"
ribbon tab
·
Click "Add child keyword"
·
The keyword is added in the list ready to be named: enter a name and validate using the
Enter keyboard shortcut
Rename keywords
To rename a keyword:
·
Select the keyword in the keywords panel
·
Click the "Rename" button in the "Keywords" group of the "Home" ribbon tab
·
Enter a name and validate using the Enter keyboard shortcut
Delete keywords
To delete obsolete keywords:
·
Select the keyword in the keywords panel
·
Click the "Delete" button in the "Keywords" group of the "Home" ribbon tab
Associate with topics and remove association
Keywords with checked boxes are associated with the currently selected topic. Keywords with
unchecked boxes are not associated with it. They might be associated with other topics or not
used anymore: you can use the project analyzer to check for unused keywords.
To associate / remove association between a keyword with a topic:
·
Select the topic in the table of contents
34 / 90
HelpNDoc User Manual
·
Click the check-box in front of the desired keyword to check or un-check it
·
Alternatively, you can use the "Associate with topic" check button in the "Keywords" group of
the "Home" ribbon tab
To manage the topics associated with a specific keyword, you can use the Manage keyword
association window.
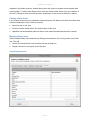
Manage keyword association
Keywords' association with the current topic can rapidly be done using the check-box in front of
the keyword.
To rapidly manage every topics associated with a specific keyword, select the keyword then
click the "Associated topics" button in the "Keywords" group of the "Home" ribbon tab to open the
"Manage keyword association" window.
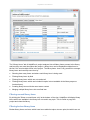
Manage keyword association window
This window lists all topics within the project and adds a checked box before the caption of the
topics associated with the currently selected keyword.
To associate the currently selected keywords with additional topics, check the boxes before the
35 / 90
HelpNDoc User Manual
caption of those topics. Un-check those boxes to remove the association.
To save the modified associated topic list, hit the OK button at the bottom of the window.
Using the spell checker
The live spell checker is an integral part of HelpNDoc, covering any input made throughout the
user interface: once a potential spelling error has been identified, the live spell checker will
underline the problematic word with a red line. Right clicking on the word will give a list of
possible alternative words, and options to ignore it or add it to the user dictionary.
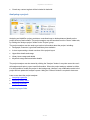
1. Spelling options
This shows the spelling options dialog which is
where the spell checker's settings can be
configured.
2. Active dictionaries
This indicates the currently active dictionaries. A
click on that button shows a list of all installed
dictionaries on the current computer as well as
options to install new dictionaries and change
currently active ones.
3. Install dictionaries
New dictionaries can be downloaded from the
OpenOffice.org extensions web-site and installed
using this dialog: just browse for the *.oxt file you
saved on your computer and HelpNDoc will install
it and add it to the list
4. Managing dictionaries
Dictionaries with a check mark are the ones
currently activated and used by HelpNDoc to spell
check the current project. To activate a dictionary,
click on it to check it. To deactivate a dictionary,
click on it to un-check it. HelpNDoc supports
multiple dictionaries activated at the same time:
when activating a dictionary, it won't deactivate
the currently activated ones.
Publishing documentation
36 / 90
HelpNDoc User Manual
From the "Home" ribbon tab, click the "Generate help" button to show the generation window.
From this window, you can specify:
·
The kinds of documentation formats to generate by adding builds and enabling them
·
The output path of the final documentation
·
The template and settings to use for each individual build
·
The order of the build execution
HelpNDoc will then process the templates and generate the documentation accordingly.
Advanced usages
Some more advanced usages are covered in the following sections:
·
Working with templates - Understand the powerful templates and learn how to customize the
output of your documentation
·
Usage from the command line - Learn how you can leverage the HelpNDoc command line
parameters to automate documentation generation
Keyboard shortcuts
HelpNDoc implements various keyboard shortcuts which can be used throughout the application
to rapidly execute common actions.
User interface
Keyboard shortcuts available in HelpNDoc's main window.
Keyboard
Shortcut
Action
Remarks
37 / 90
HelpNDoc User Manual
F1
Display the program help
ALT
Press and release the shortcuts indicated to go to
Show the keyboard shortcut
next step. As an example ALT, then H, then O will
for the ribbon elements
show the project options
CTRL + F1
Minimize / restore the ribbon
CTRL + F2
Focus the table of contents
panel
CTRL + F3
Focus the topic editor panel
CTRL + F4
Focus the library panel
CTRL + F5
Focus the keywords panel
CTRL + F6
Focus the search result
panel
Tree controls
Keyboard shortcuts available for all tree controls, including the table of contents tree, the library
tree, the keywords tree.
Keyboard
Shortcut
Action
+
Expand the current node
*
Expand the current node
and its children hierarchy
-
Collapse the current node
/
Collapse the current node
and its children hierarchy
CTRL + UP
Move the element up
Not available in the library and keywords trees
CTRL +
DOWN
Move the element down
Not available in the library and keywords trees
CTRL +
LEFT
Move the element left
Not available in the library tree
CTRL +
RIGHT
Move the element right
Not available in the library tree
CTRL +
INSERT
Create a new item
Not available in the library tree
CTRL +
SHIFT +
INSERT
Create a new child item
Not available in the library tree
Remarks
CTRL + DEL Delete the item
SPACE
Associate the keyword with Only for the keywords tree
38 / 90
HelpNDoc User Manual
the topic
Topic Editor
Keyboard shortcuts available when editing a topic.
Keyboard
Shortcut
Action
CTRL + A
Select all the content
CTRL + C
Copy the selected content
CTRL + V
Paste the content
CTRL + L
Create / Edit hyperlink
CTRL +
SPACE
Display the auto-completion Used to quickly create hyperlinks, insert library
dialog
items...
SHIFT +
CTRL + N
Apply the Normal style to
selection
Remarks
Select some text to rapidly create an hyperlink or
nothing to create a new blank one
ALT + SHIFT Apply the previous heading
+ LEFT
level style to selection
ALT + SHIFT Apply the next heading level
+ RIGHT
style to selection
CTRL + ALT Apply the heading level 0 to
+ 0...9
9 style to selection
Keyboard auto-completion
When writing documentation, the user interface might become a distraction and could slow
down the writing process, in particular when adding special and non-textual elements in the topic
editor. That's why HelpNDoc provides the CTRL+SPACE auto-completion keyboard shortcut to
speed up the writing process.
39 / 90
HelpNDoc User Manual
To show the auto-completion dialog, hit the CTRL+SPACE keyboard shortcut in the topic editor.
The following actions are then available:
·
Enter any text in the filter field to filter the list and show only relevant items
·
Use the Up and Down keyboard keys to select the desired item
·
Use the Enter keyboard key (or click the item) to insert that item
·
Use the Escape keyboard key (or click the close button) to discard the dialog
The auto-completion dialog is context sensitive. It's action depends on the content at position of
the cursor in the topic editor.
Link to a topic
·
When used after a space character or at the start of a new line, it will provide a list of all
available topics to link to
·
When used within or right after a word, it will use that word as the filter. E.g. typing "help"
then CTRL+SPACE will filter all topics containing the text "help"
·
After selecting the topic in the list, a link with its caption will be inserted in the topic editor
Insert a library item
·
When used right after the "!" character, it will display a list of all available library items
·
When used within or right after a word starting with the "!" character, it will use that word as a
filter for the library item
·
After selecting a library item in the list, it will be inserted in the topic editor
Conditional content generation
40 / 90
HelpNDoc User Manual
By default, all topics and content created in an HelpNDoc project will be generated in every builds
and documentation formats. It is possible to conditionally generate topics and content using build
tags and conditions:
·
Build tags represent unique identifiers which can be associated with a topic or a part of a
topic
·
Conditions are instructions indicating whether a section is included or not based on specific
tags
Conditional topic generation
A topic can be included or not in specific builds based on build kind and build tags. By default a
topic is included in all builds. To choose which build will include a topic, select the topic in the
table of contents then:
·
From the "Home" ribbon tab, click "Topic properties", then "Include in builds" and select each
build kind and custom tag that applies
·
Or right click on the topic and choose options in the "Include in builds" popup menu
Conditional content generation
HelpNDoc provides an easy way to define sections (parts of topics) which will only be included in
specific builds using conditional sections. Those logical statements (If, Else, End) can be
inserted within a topic using the "Insert" ribbon tab.
Using the "Insert conditional operation" dialog box, choose between one of the operations:
·
IF: Start of a conditional section. The content written after this operation will be included only
if the tags are included (IF) or not included (IF NOT) in the current build;
·
ELSE: Will negate any previous IF operation. As an example, if the previous IF operation
included "CHM and HTML", the ELSE operation will included everything but those;
·
END: Will close the open conditional sections. Any content written after an END statement
will be included in every builds without any condition.
Define custom tags
To define custom tags, you can either:
·
Right click on a topic, hover "Included in builds" then click "Manage build tags"
·
From the "Generate help" window, select a build and click "customize" if the "Included tags"
is not visible" then click "Manage tags"
Associate tags with builds
Each build can include one or more custom tag. To add custom tags to a specific build:
·
Click the top part of the "Generate help" button in the "Home" ribbon tab
·
Select a build
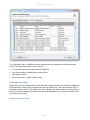
·
Click "Customize" if the "Included tags" tab is not already visible
·
Select the "Included tags" tab
41 / 90
HelpNDoc User Manual
·
Check any custom tag that will be included in that build
Analyzing a project
Analyzing an HelpNDoc project provides a centralized way to obtain advanced details on the
project structure and content. The project analyzer can be launched from the "Home" ribbon tab,
by clicking the "Analyze project" button in the "Project" group.
The project analyzer can be used to get various information about the project, including:
·
Paragraph, character, hyper-links and library item statistics
·
A chart representing a visual overview of the project layout
·
Hyper-links details and usage
·
Library items usage and details
·
Keywords usage and association details
The project analyzer can be started by clicking the "Analyze" button: it may take some time as it
will analyze each topic to report useful information. When the project analyzer window is visible,
it is still possible to modify the project in the background. However, any modification made to the
project will not update the analyzer reports: hitting the "Refresh" button is required in that case.
Learn more about the project analyzer:
·
Analyzing hyperlinks
·
Analyzing library items
·
Analyzing keywords
Analyzing hyperlinks
42 / 90
HelpNDoc User Manual
The "Hyperlinks" tab of HelpNDoc's project analyzer lists all hyperlinks found throughout the
project. The hyperlink analyzer can be used to:
·
List all links used in the project and their properties
·
Spot links pointing to deleted topic (broken links)
·
Spot duplicate links
·
Filter links by kind, caption, target or topic
Filtering broken links
Broken links point to a specific topic which has been deleted since the link creation. HelpNDoc's
project analyzer makes it easy to spot broken links by clicking the "Show broken items only" at
the bottom of the window. This will filter the view to display only broken links. By clicking a link in
the view, the topic containing the link will be shown in HelpNDoc's main window so that the link
can easily be corrected.
Analyzing library items
43 / 90
HelpNDoc User Manual
The "Library items" tab of HelpNDoc's project analyzer lists all library items present in the library,
and how they are used throughout the project: a library item can be displayed multiple times in
the list if it is used multiple times in the project. The library items view is very powerful to manage
library items and can help save time by:
·
Showing how many times and where each library item is being used
·
Filtering library items by kind
·
Filtering library items which are not used at all
·
Filtering library items which are included in topics but not available in the library anymore
(broken items)
·
Locating library items with the exact same content
·
Merging multiple library items into one final item
Filtering unused library items
By clicking the "Show un-used items only" at the bottom of the view, HelpNDoc will display library
items which are available in the library but not used in any topic. This is useful to purge the
project and clean the library.
Filtering broken library items
Broken library items are items which have been added to topics at some point, but which are not
44 / 90
HelpNDoc User Manual
available in the library anymore: broken library items will result in a broken documentation with
missing parts. To view broken library items, click the "Show broken items only" at the bottom of
the view. Clicking an item will show the topic containing it so that it can be deleted or replace.
Finding similar items
If you suspect some items are duplicates within the library, this feature will check all of them and
select the duplicates. Here is how to proceed:
·
Select an item in the view
·
Click the "Select similar items" link at the bottom of the view
·
HelpNDoc will automatically select all items of the same kind and with the same content
Merging library items
Select multiple library items and click the "Merge selected items" link to merge them into a final
one. This will:
·
Delete all selected items from the library except the final one
·
Replace all items in the topics by the final one
Analyzing keywords
45 / 90
HelpNDoc User Manual
The "Keywords" tab of the project analyzer lists all keywords available in the current project with
the number of associated topics. The keywords analyzer can be used to:
·
Get a representation of keyword usage within the project: spot rarely used or overused
keywords easily
·
Spot broken keywords which are not associated with any topic
·
Manage topics associated with a specific keyword using the Manage keyword association
window.
Filtering unused keywords
To filter the list and see only keywords with no associated topics, click the "Show un-used items
only".
It is possible to delete those keywords by selecting them and hitting the delete keyboard
shortcut. Warning: it will delete their children keywords too.
It is also possible to associate them with some topics using the manage associated topics link.
Manage associated topics
When a keyword is selected, click the "Manage associated topics" link to show the window and
check each topic which needs to be associated with that keyword.
Working with templates
HelpNDoc includes two very powerful template systems which are used to fine-tune the look of
the generated documentations: HelpNDoc will read the selected template's instructions prior to
generating the documentation, and will adapt the generated output based on those instructions.
The two parts of the template system are:
·
The CHM, HTML, ePub, Kindle and Code template system which can control almost all
aspects of the documentation generation for those formats. It is based on the Pascal
programming language which is interpreted to define how the documentation is generated;
·
The Word and PDF template system which can control the page size, covers, headers and
footers, layout and headings appearances.
Using the template editor is the recommended way to manage and customize templates. It is
also possible to manually alter the template files: read the low-level details about templates for
such cases.
Using the template editor
The easiest way to manage templates is by using the template editor. The template editor can
be used to create, rename, modify and delete all kinds of templates.
It can be accessed using the "Template Editor" button from the "Templates" group in
HelpNDoc's "Home" ribbon tab.
46 / 90
HelpNDoc User Manual
Managing templates
The template editor is used to manage all kinds of templates:
1. The template selection lists all templates available on the current computer. To manage a
specific template, select it in that list.
Standard templates (included with HelpNDoc's installation) are marked as such: they can't
be edited;
2. The create template button can be used to create a new template of any kind: select the
template kind and enter a unique name to create that template;
3. The duplicate template button can be used to duplicate the currently selected template. This
can be useful to create a small variation of a template or test some modifications without
altering the original template;
4. The rename template button can be used to rename the currently selected template.
HelpNDoc will make sure the newly entered name is valid and unique;
5. The delete template button can be used to delete the currently selected template. Warning:
this action will permanently delete the selected template from the current system and this
action can't be undone.
Customizing a template
Once a template is selected in the template editor, various customizable sections are available.
Those sections differ based on the kind of templates currently being selected.
Note: Standard templates, which are included with HelpNDoc's installation are read-only and
can't be modified.
·
HTML based templates: the general settings, variables, script files and assets can be
customized. HTML based templates include the following documentation formats: CHM,
HTML, ePub and Kindle;
·
Word and PDF templates: the page settings, cover page, headers, footers, table of contents
and topic titles can be customized.
HTML based templates
HTML based templates include CHM, HTML, ePub and Kindle templates. In the template editor,
select an HTML based template to access its customizable settings:
·
General settings: customize the file extension, inheritance and other general settings for that
template;
·
Variables: manage variables which can be used by the template;
·
Script files: manage script files used to generate the final documentation;
·
Assets: manage assets bundled with the final documentation
47 / 90
HelpNDoc User Manual
General settings
Once you have selected an HTML based template in the template editor, access the "General
settings" group in the "Edit template..." panel to manage the following settings for that template:
·
Default file extension: indicates the extension which will be suggested by HelpNDoc when
you create a new build using that template;
·
Inherits from: templates can inherit from other templates and override only specific settings,
scripts and assets. Select the parent template here if needed. See: Template inheritance
·
Link settings: define how internal links will be generated by HelpNDoc. See: Handle the
generated topic links
Other HTML based template settings:
·
Variables
·
Script files
·
Assets
Variables
Once you have selected an HTML based template in the template editor, access the "Variables"
group in the "Edit template..." panel to manage variables which can be used by this template.
When a variable is defined for a template, it can easily be customized from the build window for
each build using that template, and scripts from this template can easily access its customized
value to act upon it.
48 / 90
HelpNDoc User Manual
Create a new variable
By using the "New Variable" button, the "manage a template variable" window is shown with the
following fields:
·
Id: specify a unique identifier for that variable. This identifier will be used in the script files to
access the customized content for that variable
·
Name: the name of the variable as shown in the build window
·
Description: the description of the variable as shown in the build window
·
Kind: the kind of the variable which will provide a simpler way to specify its value in the build
window.
o Bool: the variable contains a boolean value which can be either true or false
o Color: the variable contains a color value
o Enum: the variable contains a specific value chosen from one of the "Options" field
(see "Options" bellow)
o Int: the variable contains an integer value
o Libpicture: the variable contains a reference to a picture available in the library of the
currently open project. This is used to select an eBook cover for example
o String: the variable contains a piece of text
·
Default value: when needed, the variable can have a default value which will be used if no
other value is entered in the build window
·
Options: for "Enum" variables, provides a list of available items to choose from, separated
using the | character. E.g. "value1|value2|value3" will provide a choice between 3 values
·
Translations: it is possible to translate the name and description of the variable to other
languages supported by HelpNDoc. If needed, enter the translated values here so they can
be stored in the template files, and displayed if HelpNDoc is set up in one of those languages
Edit a variable
Once a variable is selected in the list, the Edit Variable button will display the same window as
when creating a new variable is shown (see "Create a new variable" above). Only the "Id" field is
grayed out as it can't be modified for an existing variable.
Delete a variable
Once a variable is selected in the list, the Delete Variable button will delete that variable.
Deleted variables won't be displayed in build settings anymore and can't be used by script files.
Other HTML based template settings:
·
General settings
·
Script files
·
Assets
Script files
49 / 90
HelpNDoc User Manual
Once you have selected an HTML based template in the template editor, access the "Script files"
group in the "Edit template..." panel to manage script files for this templates.
Script files are the heart of HTML based templates as they include a mix of HTML and Pascal
code used to instruct HelpNDoc on how to generate the final documentation. Using those very
powerful script files, it is possible to customize almost any part of the generated documentation
files.
Script files' names must adhere to the following pattern: FILENAME.pas.EXTENTION where:
·
FILENAME is the name of the script file and can be any valid file name;
·
EXTENTION is usually the final extension this file will generate.
As an example HelpNDoc's default HTML template includes the "topics.pas.html" file which is
used to generate HTML files for topics.
Create a new script
By using the "New Script" button, the Script Editor window is displayed where it is possible to:
·
Enter the new script's name
·
Build the script to make sure it doesn't contain any error
·
Access the help file with methods available in templates
·
Enter the content of the script using an editor with syntax highlighting
·
Save or cancel the edition of the script
Edit a script
Once a script is selected in the list, use the "Edit Script" button to access the script editor and
change its name or content.
Delete a script
Once a script is selected in the list, use the "Delete Script" button to delete that script from the
currently selected template. This script won't be run anymore when the final documentation is
generated.
Other HTML based template settings:
·
General settings
·
Variables
·
Assets
Assets
Once you have selected an HTML based template in the template editor, access the "Assets"
group in the "Edit template..." panel to manage assets bundled with the currently selected
template.
Assets are static files which will be deployed in the same directory as the generated
documentation. Assets are usually used to add CSS, JavaScript or Images to the final
50 / 90
HelpNDoc User Manual
documentation but they are not limited to those kind of files: any file type can be added as an
asset to a template.
The assets hierarchy displays a list of all assets bundled with the currently selected template. It
is possible to:
·
Create folders using the "New folder" button
·
Import new files as assets using the "Import asset" button
·
Rename the currently selected folder or asset using the "Rename asset" button
·
Delete the currently selected folder or asset using the "Delete asset" button
·
Move an asset to a different folder by dragging it and dropping it to the desired location
Other HTML based template settings:
·
General settings
·
Variables
·
Script files
Word and PDF templates
Word and PDF templates can be customized using the template editor. Select a Word or PDF
template to access its customizable settings:
51 / 90
HelpNDoc User Manual
·
Page settings: manage page size, orientation, margins, headers and footers sizes
·
Cover page: customize the content of the cover page
·
Header / Footers: customize the content of the headers and footers
·
Table of contents: customize the look and feel of the table of contents
·
Topic titles: customize the look and feel of the topic titles
Low-level template details
The template editor is a visual interface which simplifies the creation and management of
templates. Behind the scenes, when a modification is made through the template editor, it is
stored to the template files on the hard drive, following a specific convention. This section
explains the template's low-level details, starting with the best practices.
Best practices
HelpNDoc comes with a set of default (Standard) templates for all the documentation formats.
Those templates are located in the "Templates" sub-directory of the HelpNDoc's installation
directory, usually under "Program Files\IBE Software\HelpNDoc\Templates".
In addition to that, a user template directory is created when HelpNDoc is installed. It is located
under "My Documents\HelpNDoc\Templates" and can be customized in HelpNDoc's options
window.
Recent versions of Windows won't allow non-administrator users to change anything in the
"Program Files" directory, that's why it is recommended to edit all the templates in the "My
52 / 90
HelpNDoc User Manual
Documents" template directory instead.
Template kind sub-directories
Templates are located in the following sub-directories based on their action:
·
chm - Templates used to generate compiled HTML Help documentation
·
code - Templates used to generate code for various programming languages
·
epub - Templates used to generate ePub eBooks
·
html - Templates used to generate on-line HTML documentation
·
mobi - Templates used to generate MobiPocket / Kindle eBooks
·
pdf - Templates used to generate PDF documentation
·
word - Templates used to generate Word documentation
Assets
A template can contain an optional "assets" folder. All the files and sub-folders contained in that
folder will be copied in the documentation's output directory. This is useful to add external files to
the templates, such as CSS or JavaScript to HTML templates. Note: The content of the "assets"
folder will be copied directly in the generated documentation's output directory, not in an "assets"
sub-directory.
Modify a default template
·
Copy the default template's directory from "Program Files\IBE Software\HelpNDoc
\Templates\TEMPLATE-KIND\TEMPLATE-NAME" to the user's template directory under "My
Documents\HelpNDoc\Templates\TEMPLATE-KIND\NEW-TEMPLATE-NAME
·
Edit the template.info file to change the template's name
·
Add, delete or modify any other file to update the template's content
53 / 90
HelpNDoc User Manual
Template configuration file
The template.info file is a standard INI file located in all the templates folders and is used to
specify basic informations on that template such as the name, category and extension.
The template.info file requires a "config" section with the following values:
·
name - defines the name of the template as shown in the project options and help generation
dialog
·
category - defines the category of the template and used to combine code templates in the
quick generation popup menu
·
extension - defines the extension of the main file which will be generated by this template
Sample template.info file
The following template.info file describes a sample CHM template:
[config]
name=Sample CHM template
category=CHM Documentation
extension=chm
Template inheritance
As mentioned in the best practices, it is not advised to modify the default templates provided with
HelpNDoc usually located in the "program files" directory. Furthermore, some templates might
need only subtle changes to a subset of the files to suit the requirements. That's why HelpNDoc
introduces the template inheritance concept where a template can "inherit" from a parent
template, thus using all its template files, and only override the required files.
Inheriting from a parent template
From the final children template, just add the "inherits" key in the template.info file's "config"
section and mention the parent template's name as the value. As an example:
[config]
name=Child template
category=HTML Documentation
extension=html
inherits=Default HTML Template
This configuration file instructs HelpNDoc to use the template named "Default HTML Template"
as the parent template. Only template files from the same documentation format can be used as
a parent template.
Overriding a template file
To change the content of a file, just place a file with the same name in the same directory within
the child template. HelpNDoc will use this file instead of the on from the parent template. As an
example, if the parent template contains the file "index.pas.html" it is possible to override this file
by creating a file named "index.pas.html" in the child template's folder with alternative content.
54 / 90
HelpNDoc User Manual
How is it working
At generation time, HelpNDoc reads the template selected for the project. If that template inherits
from a parent template, HelpNDoc will first generate a new temporary template as follows:
1. The parent template's entire content is copied into a temporary folder;
2. The child template (the one selected for the documentation generation) is copied over this
parent template, replacing any duplicate file if required;
3. The template.info files are merged to preserve the sections and keys from both templates,
and override the duplicate ones using the child template's data.
Limitations
Some limitations apply to the template inheritance feature:
·
It is not possible to inherit from a template from a different documentation format: an HTML
template can't inherit from a CHM template and a Word template can't inherit from a PDF
template for example;
·
It is not possible to remove files from the original template, just add or override existing files
Code templates
Code templates are very similar to CHM and HTML templates except for the fact that they usually
won't need access to the topic's contents and can't access to their HTML content. Here are the
steps involved to create a code template:
·
Create a new folder under "My Documents\HelpNDoc\Templates\Code" with the name of the
new template
·
Create a new template.info file in that template folder and add the required name, category
and extension
·
Create a new file containing the ".pas" text before the extension. As an example, we will
create a "sample.pas.txt" file. Only files containing the ".pas" text will be interpreted by
HelpNDoc
·
Add sample code to that template
In HelpNDoc, the new code template will appear in the "Code Generation" category of the
"Generate help" popup menu in the "Project" section of the "Home" ribbon tab.
CHM and HTML templates
The CHM and HTML template system can be used to tailor the output for HTML-based
documentation generation. The template system is very similar to the code template but can
also access the topic's HTML content. To learn how to create a new HTML template, see the
"Building a single page HTML template" topic. Also learn how to:
·
Handle the generated topic links
·
Methods available in templates
·
Generate multiple files from a single template file
·
Template variables
55 / 90
HelpNDoc User Manual
Handle the generated topic links
HelpNDoc will automatically generate links to topics and anchors for you. By default, it assumes
that topics will be generated in a file called "%helpid%.html" where "%helpid%" is the value of the
help id of that topic. However, this is not always the case so HelpNDoc provides a way of
customizing the format of the generated topic and anchor links. They can be modified in the
"config" section of the template.info file. Here is a sample:
linkformattopic=#%helpid%
linkformatanchor=#%anchorname%
The possible variables to be used in the topic and anchors link formats are:
·
%topicid% - The internal HelpNDoc's managed unique topic id
·
%helpid% - The topic's help id value
·
%anchorname% - The name of the anchor as specified in HelpNDoc, is any
Methods available in templates
HTML and CHM templates can leverage various methods to get information or manipulate the
currently opened project. See methods available in the HelpNDoc API.
Generate multiple files from a single template file
When interpreting a template file, HelpNDoc will automatically save the printed content to the
documentation's output directory and use the template file name, without the ".pas" part. For
example, the "topics.pas.html" file will be interpreted and the result will be written in the
"topics.html" file.
As it isn't possible nor sane to create a template file for every single file HelpNDoc has to
generate, the template system has a special property to switch the file currently being written.
The code required to do that is:
HndGeneratorInfo.CurrentFile := 'my-new-file.html';
When the template system interprets that line, it will automatically output any further content to
the file specified, in the documentation's output directory. This trick is used by the CHM and
HTML templates to output each individual topics into their own HTML file:
// Loop through each topics
for nCurTopic := 0 to length(aTopicList) - 1 do
begin
// Change the current output
HndGeneratorInfo.CurrentFile := aTopicList[nCurTopic].HelpId + '.html';
// Write the content of the topic to that file
// ...
end;
Template variables
CHM and HTML templates can define template variables in the template.info file. Those variables
56 / 90
HelpNDoc User Manual
will be presented in a user-friendly way in the documentation generation dialog and will be saved
within the project file. The template can request for user-defined values and act upon them to
customize itself based on user input. Possible template variables usages include:
·
Making a section optional. This is done in the default CHM and HTML templates with the
breadcrumbs line which can be hidden from generated documentation
·
Customizing the documentation appearance. In the HTML template, it is possible to specify a
base color, an icon set, default tree expansion status...
·
Provide localized texts. The default HTML template defines the captions for the "Index",
"Search" and "Content" tabs as variables so that it is possible to translate them from within
HelpNDoc
Defining template variables
Template variables are defined as sections in the template.info file. Those sections' name must
begin with the var_ keyword followed by a unique variable identifier. Let's consider the following
sample variable section:
[var_BaseColor]
name=Base color
kind=color
default=#EFEFEF
description=Customize the documentation's base color.
This defines a new variable with the following information:
·
Identifier is BaseColor
·
Name is Base color
·
Kind is color
·
Default value is #EFEFEF
·
Description is Customize the documentation's base color.
This will be displayed in the HelpNDoc template settings dialog as follows:
Variables section attributes
The following attributes should be defined in a variable sections:
Attribute
Description
Remarks
name
Name of the variable
Will be displayed to identify the variable in the
settings dialog
kind
Kind of variable
Can be bool, color, enum, int, string. See kinds of
57 / 90
HelpNDoc User Manual
variables
default
Choose between multiple
values
Default value for this variable if not set in HelpNDoc
values
Possible values for this
variable
Only for enum variables, using the pipe character
as a separator. Example: "blue|red"
description
Explanation for this variable
Will be displayed to explain the purpose of this
variable
Kinds of variables
A variable can be set as one of the following kinds depending on its purpose:
Kind
Description
Remarks
bool
Conditional Yes/No value
Often used for a conditional section which will be
displayed or not based on its value
color
Standard color value
Can be used to define the color of a specific
element
enum
Choose between multiple
values
Use the "values" attribute to specify the possible
values. Example: "values=chm|folder|vista"
int
Integer value
string
Character, word or
sentences
Setting-up template variables
Variables are set-up from within HelpNDoc's document generation dialog. CHM and HTML
templates provide a "Customize" link which show the template customization dialog. This dialog
lists all the variables for this template, and provides a way to customize them. Customized
variable values will be saved with the current project.
Requesting template variables
To request the value of a template variable from within the template itself, use the
HndGeneratorInfo.GetCustomSettingValue method specifying the variable identifier. As an
example, the BaseColor value will be requested as follows:
HndGeneratorInfo.GetCustomSettingValue('BaseColor');
Samples
·
Building a single page HTML template
Step by step tutorial on how to build a template which will output all the topics in a single
page
·
Use index.html as the default HTML page
Make sure the default page for the generated documentation is the index.html file
58 / 90
HelpNDoc User Manual
Building a single page HTML template
In this section, we will create a new HTML template from scratch. This template will create a
single-page HTML documentation where all the topics are grouped on that single page. The final
version of this template is installed with HelpNDoc and can be found in the "My Documents
\HelpNDoc\Templates\html\SinglePage" directory.
Template directory
First we need to create a directory for the new template. Custom templates are located in the
"My Documents\HelpNDoc\Templates" directory. As we are creating an HTML template which
we'll call "SinglePage", we will create the following directory for our new template: "My
Documents\HelpNDoc\Templates\html\SinglePage".
The template.info file
Each template must include a "template.info" file with basic template information. Let's create
one in the template directory with the following content:
[config]
name=Single page HTML template
extension=html
Template code file
It's time to go to the heart of our template by creating a new file which will contain the code to
instruct HelpNDoc on how to generate our HTML file. To be interpreted by HelpNDoc, the file
must contain the ".pas" text before its extension, which means it will contain Pascal code. So
let's create a file named "index.pas.html" in the template directory and edit using any text editor.
Any text which is added to that file will be written as is in the final output, except if it is included in
the <% %> tags, which are used to insert special instruction code. The steps involved to create
the initial code are:
·
Instruct the template system to output the HTML file BOM (Byte Order Mark). This is only
necessary for HTML files in Internet Explorer on Window with some languages (1)
·
Instruct the template to output to the user defined file as we are only generating a single file
(2)
So the "index.pas.html" file now contains:
<%
begin
// 1. Output BOM for HTML UTF8 files
HndGeneratorInfo.BOMOutput := True;
// 2. Instruct the generator to generate the desired output file
HndGeneratorInfo.CurrentFile := ExtractFileName(HndGeneratorInfo.OutputFile);
%>
<html>
<head>
</head>
<body>
Sample HTML Code
</body>
59 / 90
HelpNDoc User Manual
</html>
<%
end.
%>
Get the topics list
Templates have access to a number of functions, objects and variables to help them generate
an output. We first need to get a list of topics available in the current project. To do so, we create
a new variable before the "begin" keyword and request the topic list (3). The "index.pas.html" file
now contains:
<%
// Variable declarations
var
// List of topics available in the current project
aTopicList: THndTopicsInfoArray;
begin
// 1. Output BOM for HTML UTF8 files
HndGeneratorInfo.BOMOutput := True;
// 2. Instruct the generator to generate the desired output file
HndGeneratorInfo.CurrentFile := ExtractFileName(HndGeneratorInfo.OutputFile);
// 3. Get the list of topics available
aTopicList := HndTopics.GetTopicList(False);
%>
<html>
<head>
</head>
<body>
Sample HTML Code
</body>
</html>
<%
end.
%>
Output the topics' content
Now that we have a list of topics, we can output their content by looping through that list. The
steps involved are:
·
Create an iteration variable (4) - This variable will be used by the loop
·
Loop through the topics (5) - The topics are treated one by one in that loop
·
Notify the template system about the current topic being generated (6) - The template
system can't know which topic is currently treated, that's why we notify it using the
HndGeneratorInfo object
·
Output the topic content (7) - We ask for the HTML content of the topic and we output it
The "index.pas.html" file now contains:
<%
// Variable declarations
var
60 / 90
HelpNDoc User Manual
// List of topics available in the current project
aTopicList: THndTopicsInfoArray;
// 4. Current topic index
nCurTopic: Integer;
// Main program
begin
// 1. Output BOM for HTML UTF8 files
HndGeneratorInfo.BOMOutput := True;
// 2. Instruct the generator to generate the desired output file
HndGeneratorInfo.CurrentFile := ExtractFileName(HndGeneratorInfo.OutputFile);
// 3. Get the list of topics available
aTopicList := HndTopics.GetTopicList(False);
%>
<html>
<head>
</head>
<body>
<%
// 5. Loop through all the topics
for nCurTopic := 0 to length(aTopicList) - 1 do
begin
// 6. Notify about the topic being generated
HndGeneratorInfo.CurrentTopic := aTopicList[nCurTopic].id;
// 7. Output the topic content
print(HndTopics.GetTopicContentAsHtml(HndGeneratorInfo.CurrentTopic));
end;
%>
</body>
</html>
<%
end.
%>
Add the titles
The template now display the whole content of all the topics in a single page. However, no title is
displayed. Let's add the topic titles before the topics as well as an HTML anchor to be able to link
to that topic later on. The steps involved are:
·
Declare a new variable nTopicLevel (8) - This variable will be used to get the level of the topic
and output the correct HTML heading to the topic title
·
Output an HTML anchor (9) - This anchor will be used to link to that specific topics
afterwards
·
Get the topic level (10) - We request the level of the current topic so we can output the
correct HTML heading
·
Output the topic title (11) - We can now correctly output the title of the topic
Between steps (6) and (7) we now add the following lines in the "index.pas.html" file:
// 9. Add an anchor to be able to link to that topic
printf('<a name="%s"></a>', [aTopicList[nCurTopic].helpid]);
// 10. Get the topic level
nTopicLevel := HndTopics.GetTopicLevel(HndGeneratorInfo.CurrentTopic);
// 11. Add the topic title
printf('<h%d>%s</h%d>', [nTopicLevel,
61 / 90
HelpNDoc User Manual
HndTopics.GetTopicHeaderTextCalculated(HndGeneratorInfo.CurrentTopic), nTopicLevel]);
Adding some style
The output now contains all the content from our documentation but it doesn't look like what
we've designed in HelpNDoc. That's due to the fact that we didn't add any style coming from
HelpNDoc. This can be done in a single step, by requesting for the style content and adding it
into the HTML's head section (12). To do so, we add the following lines in the "<head>" section
of the "index.pas.html" file:
<style type="text/css">
<%
// 12. Output global CSS content
print(HndProjects.GetProjectCssContent());
%>
</style>
Fixing the links
The output looks as we designed it now but links to topics are not working correctly. This is due
to the fact that by default, HelpNDoc assumes that each topic will be generated in its own file
which will be named "%helpid%.html" where "%helpid%" is the help id of that topic, as explained
in the "Handle the generated topic links" topic. This can be customized: to change this default
behavior, we need to edit the template.info file and add the following key/values in the config
section. They define the format for topic links and anchor links:
linkformattopic=#%helpid%
linkformatanchor=#%anchorname%
Final touches
As we have seen, the possibilities are endless: we could add some custom-made CSS file in the
assets folder to customize the HTML headings, add the title of the project, the copyright,
completely modify the look and feel of our web-page, split it in sections... Some of those ideas
are added in the final sample file which is installed with HelpNDoc and can be found in the "My
Documents\HelpNDoc\Templates\html\SinglePage" directory.
Use index.html as the default HTML page
The Default HTML template is using the output file name as the default index file for the HTML
documentation generation. A few modifications to the template can alter this behavior and force
HelpNDoc to generate an index.html file as the default index file.
Prior to doing any change to the default template, always make a copy in the personal template
folder and work on that copy.
Modify the index.pas.html file
This is the index file which we'd like to export to "index.html". By default, HelpNDoc would have
exported it as it uses the file name without the ".pas" part but we specifically instruct HelpNDoc
to use another file name with the following line:
62 / 90
HelpNDoc User Manual
HndGeneratorInfo.CurrentFile := ExtractFileName(HndGeneratorInfo.OutputFile);
To alter this behavior, just comment or remove the line from the template. Now HelpNDoc will
generate an index.html file automatically.
Fix the topics redirections in topics.pas.html
When a topic is called directly by its URL, it has a built-in mechanism to redirect to the index file
so that the table of contents is shown. As we have renamed the index file, we need to change
the behavior of the topics.pas.html file and change the following line:
top.location.href = "<% print(ExtractFileName(HndGeneratorInfo.OutputFile)); %>?" +
sTopicId
to:
top.location.href = "index.html?" + sTopicId
That's all. Now HelpNDoc will generate an HTML documentation which will automatically use the
index.html file as the default index file.
Usage from the command line
HelpNDoc handles various command line parameters to be able to update and generate
documentation without user interface. This is useful to integrate the documentation generation
process with an automated build process for example. HelpNDoc's command line options use
the syntax "hnd4.exe [FileName] [Parameters]" where [FileName] is the optional HND file to be
processed and the parameters are described bellow. When run using the command line
parameters bellow, HelpNDoc won't show any user interface except for a DOS prompt window.
Command line help
At any time, use the "hnd4.exe /?" command line to get help on the various command line
syntax and parameters.
Command line parameters
·
/g - Generate the HelpNDoc "FileName" using project's settings
·
/b=[value] - Override the list of build to generate from the project (Semi-colon separated list
of built)
·
/v[name]=[value] - Set the [value] of variable [name] or create a new variable named [name]
·
/silent - Silent mode: no user input required. Useful for automated build processes to avoid
user interaction
·
/l=[value] - Output the generation log to the specified file
Command line examples
63 / 90
HelpNDoc User Manual
The following is a simple example of a possible use of the HelpNDoc's command line options:
> hnd4.exe myHelp.hnd /g
This translates to: generate the file "myHelp.hnd" according to the settings saved in that file.
> hnd4.exe myHelp.hnd /g /l=c:\log\hnd-log.txt
This translates to: generate the file "myHelp.hnd" according to the settings saved in that file and
save the log to the file "c:\log\hnd-log.txt"
> hnd4.exe myHelp.hnd /g /b="Build chm documentation";"Build pdf documentation" /
vMyVariable=MyValue
This translates to: generate the file "myHelp.hnd" by using the builds named "Build chm
documentation" and "Build pdf documentation" and modify or declare the variable "MyVariable"
with the value "MyValue".
CHM files and programming languages
HelpNDoc generates standard Windows CHM help files which can be opened from any
Windows application. The following section explains how to open CHM help files using various
programming languages. This includes:
·
Delphi integration
·
Java integration
·
Visual Basic integration
Delphi integration
Opening a CHM help file from a Delphi program
Courtesy of The Helpware Group, the Delphi HH Kit is a free download for Delphi 2/3/4/5/6/7... It
consists of two units and a document file. The first unit is a port of the C++ header file
"HtmlHelp.h". The second one is a library of HTML help related functions. Two versions exists
based on the Delphi compiler capabilities:
·
Download "The Kit" version 2.1 - Size: 32KB, 3-Dec-2009
o - Unicode version now compatible with Delphi 6/7/... Delphi 2010.
o - HH_Funcs.pas utility now compiles under D2010. Ansi and Unicode versions of
funcs.
o - HH.pas - HTMLHelp() function defaults to either Ansi or Unicode depending on the
version of Delphi.
·
Download "The Kit" version 1.09 - Size: 32KB, 27-Aug-2008
64 / 90
HelpNDoc User Manual
o - Ansi version for Delphi 2/3/4/5/6/...
o - Fix bug with Windows Vista compatibility.
o - Updated D6OnHelpFix.pas to fix small memory leak on shutdown.
Java integration
Opening a CHM help file from a Java program
Courtesy of Daniel Whitworth, the following Java code assumes the CHM help file is located in
the same directory as the program being run:
File file = new File("help.chm");
try
{
Runtime.getRuntime().exec("HH.EXE ms-its:" + file.getAbsolutePath() + "::/
TOPIC_ID.html");
} catch (IOException e1)
{
e1.printStackTrace();
}
The highlighted parts should be customized according to your needs:
·
help.chm: This is the CHM help file you would like to open
·
TOPIC_ID: This is the topic ID you would like to open
Microsoft Access integration
Opening a CHM help file from Microsoft Access
You can find a detailed PDF document here, courtesy Dave Liske.
Visual Basic integration
Opening a CHM help file from a Visual Basic program
Courtesy of David E. Liske, the HTML help VB class is a free download for Visual Basic 5/6. It
includes the source code and the documentation on how to use it.
Download HTML Help VB Class (Version: 3.0h, Size: 80 KB)
Customize default project styles
It is possible to create and save a set of customized default styles which will be used by default
each time a new project is started. Here is a step by step guide on how to achieve that:
1. Create a customized set of styles using the styles editor
2. At the bottom of the styles editor, click "export..."
3. Styles must be exported to your home HelpNDoc folder, which is "My Documents\HelpNDoc
\Styles\default.hns" by default and can be customized in the Options window.
For now on, each time a new project is created, the set of styles defined in this file will be loaded
and available for that project.
65 / 90
HelpNDoc User Manual
Using the Script Editor
The script editor provides a way to use a programming language, based on the Pascal syntax, to
automate HelpNDoc. Almost everything in HelpNDoc can be automated, from project creation to
library management. See methods available in the HelpNDoc API.
HelpNDoc API methods
The HelpNDoc API is based on the Pascal programming language. The following list describes
the methods available via the HelpNDoc API. As an example for the ClearDictionaries method, it
can be used as follows: HndDictionaries.ClearDictionaries;
List of objects
·
HndBuilds
·
HndBuildsEx
·
HndBuildTags
·
HndBuildTagsEx
·
HndDictionaries
·
HndEditor
·
HndEditorHelper
·
HndGeneratorInfo
·
HndMeta
·
HndJsSearchEngine
·
HndKeywords
·
HndLibraryItems
·
HndLibraryItemsCache
·
HndProjects
·
HndProjectsMeta
·
HndStyles
·
HndTemplates
·
HndTemplatesEx
·
HndTopics
·
HndTopicsEx
·
HndTopicsKeywords
·
HndTopicsMeta
HndBuilds
Properties and methods for Builds
function CreateBuild: string;
Create a new build.
66 / 90
HelpNDoc User Manual
procedure DeleteAllBuilds;
Delete all builds for the current project.
procedure DeleteBuild(const aBuildId: string);
Delete a specific build.
function GetBuildCustomValue(const aBuildId, aKey: string; const aDefaultValue: string =
''): string;
Get a custom value for that build.
function GetBuildCustomValueAsBool(const aBuildId, aKey: string; const aDefaultValue:
Boolean = False): Boolean;
Get a custom value for that build as a boolean.
function GetBuildCustomValueAsInt(const aBuildId, aKey: string;
Returns a custom value for that build as an integer.
function GetBuildCustomValueAsList(const aBuildId, aKey: string; const aDefaultValue:
TStringList = nil): TStringList;
Returns a custom value for that build as a list.
function GetBuildEnabled(const aBuildId: string): Boolean;
Returns true if a build is enabled.
function GetBuildFirstOfKind(const aBuildKind: string): string;
Returns the first build of the specified kind.
function GetBuildKind(const aBuildId: string): string;
Returns the kind of the build (CHM, HTML...).
function GetBuildList: THndBuildInfoArray;
Get a list of all builds in the project.
function GetBuildName(const aBuildId: string): string;
Returns the name of a specific build.
function GetBuildNext(const aBuildId: string): string;
Get the next build.
function GetBuildOrder(const aBuildId: string): Integer;
Returns the order of a specific build.
function GetBuildOutput(const aBuildId: string): string;
Returns the output path/file of a build.
function GetBuildPrevious(const aBuildId: string): string;
Returns the previous build.
function GetBuildTemplate(const aBuildId: string): string;
Returns the template used by this build.
procedure MoveBuildAfter(const aBuildId, aAfterBuildId: string);
Move a build after another one.
67 / 90
HelpNDoc User Manual
procedure MoveBuildBefore(const aBuildId, aBeforeBuildId: string);
Move a build before another one.
procedure SetBuildCustomValue(const aBuildId, aKey, aValue: string);
Set a custom key/value pair for that build.
procedure SetBuildCustomValueAsBool(const aBuildId, aKey: string; const aValue: Boolean);
Set a custom key/value pair for that build as Boolean.
procedure SetBuildCustomValueAsInt(const aBuildId, aKey: string; const aValue: Integer);
Set a custom key/value pair for that build as Integer.
procedure SetBuildCustomValueAsList(const aBuildId, aKey: string; const aValue:
TStringList);
Set a custom key/value pair for that build as List.
procedure SetBuildEnabled(const aBuildId: string; const aIsEnabled: Boolean);
Set the enabled state for a build.
procedure SetBuildKind(const aBuildId, aBuildKind: string);
Sets the kind of the build (CHM, HTML...).
procedure SetBuildName(const aBuildId, aName: string);
Set the name of a specific build.
procedure SetBuildOutput(const aBuildId, aOutput: string);
Set the output path/file of a build.
procedure SetBuildTemplate(const aBuildId, aTemplateName: string);
Set the template used by this build.
HndBuildsEx
function GetBuildTemplateOrDefault(const aBuildId: string): string;
Returns the template for a specific build or the default template for this build kind.
function GetChmButtonVisibilityHex: string;
Return the CHM button visibility as an hexadecimal string.
function GetChmNavigationPaneStyleHex: string;
Returns the CHM navigation pane style as an Hexadecimal string.
function GetValidBuildOutput(const aBuildId, aBuildOutput: string): string;
Returns a build output which is not empty.
HndBuildTags
procedure AddTag(aTag: string);
Add a tag to the list of possible tags.
procedure ClearTagList;
Clear the list of tags for this project.
procedure DeleteTag(const aTag: string);
68 / 90
HelpNDoc User Manual
Delete a specific tag.
function GetTagListAll: TStringList;
Returns a list of all system and custom tags.
function GetTagListCustom: TStringList;
Get a list of custom tags.
function GetTagListSystem: TStringList;
Get a list of system tags.
HndBuildTagsEx
procedure ConditionAdd(aCondition: string; var aConditionList: TStringList);
Add condition to the list.
procedure ConditionInvert(var aConditionList: TStringList);
Invert condition in the list.
function ConditionRemove(aCondition: string; var aConditionList: TStringList): Boolean;
Remove condition from the list.
procedure ConditionReset(var aConditionList: TStringList);
Reset condition list.
function IsTopicIncludedInBuild(const aTopicId, aBuildId: string): Boolean;
Returns true if a topic can be included in the specified build (including correct build tags).
procedure TopicTagAdd(const aTopicId, aTag: string);
Associate a tag with this topic.
procedure TopicTagClear(const aTopicId: string);
Remove all tags associated with this topic.
procedure TopicTagDelete(const aTopicId, aTag: string);
Delete a tag associated with the topic.
procedure TopicTagInvert(const aTopicId, aTag: string);
Invert the tag status of this topic.
HndDictionaries
procedure ClearDictionaries;
Clears the loaded dictionaries list and disable the spell checker component.
procedure DisableAllDictionaries;
Disable all the dictionaries.
function EnableDictionaries(const aLocalIdList: TStringList; const DisabledOthers:
Boolean = True): Boolean;
Enable a list of dictionaries. Disable the other ones if needed.
function EnableDictionary(const aLocaleId: Cardinal; const DisabledOthers: Boolean =
True): Boolean;
69 / 90
HelpNDoc User Manual
Enable the specific dictionary and disables others if asked.
function GetActiveDictionariesCount: Integer;
Returns the number of currently active dictionaries.
function GetActiveDictionariesList: THndDictionaryInfoArray;
Returns the list of currently active dictionaries.
function GetDictionariesCount: Integer;
Get the number of dictionaries.
function GetDictionariesList: THndDictionaryInfoArray;
Get a list of dictionaries.
function GetDictionaryInfo(const aLocalId: Cardinal): THndDictionaryInfo;
Returns information about the specific locale.
function InstallOOoDictionay(const aFileName: string): Boolean;
Installs a new OpenOffice.org dictionary.
procedure NotifyActiveDictionariesChange(Sender: TObject; const SaveToProject: Boolean =
True);
Notifies every listener the dictionary list has been updated.
procedure PauseLiveSpell;
Pause live spell in all possible controls.
function ReloadDictionaries: Boolean;
Reload the dictionary list from the disk.
procedure SaveActiveDictionariesToProject;
Save the currently active dictionaries to the currently open project.
procedure SwitchDictionaryStatus(const aLocalId: Cardinal);
If dictionary is enable, then disable it and vice-versa.
procedure UpdateLiveSpell;
Resume the live spell after it has been paused.
HndEditor
procedure UpdateStylesFromTemplate(const anEditor: TObject);
Update the styles of the editor based on the template
procedure ApplyStyleToSelection(const anEditor: TObject; const aStyleId: Integer);
Apply the specified style to the selection.
procedure Clear(const anEditor: TObject);
Clears the content of the specified editor.
function CreateTemporaryEditor: TObject;
Creates a new temporary editor.
function CreateTemporaryReportHelper: TObject;
70 / 90
HelpNDoc User Manual
Create a new temporary report helper.
function CreateTemporaryViewer: TObject;
Creates a new temporary viewer.
procedure DestroyTemporaryEditor(const anEditor: TObject);
Destroys a previously created temporary editor.
procedure DestroyTemporaryReportHelper(const aReportHelper: TObject);
Destroys a previously created temporary report helper.
procedure DestroyTemporaryViewer(const aViewer: TObject);
Destroys a previously created temporary viewer.
function GetAnchorList(const anEditor: TObject): TStringList;
Retrieves the list of anchors in the specified editor.
function GetContentAsHtml(const anEditor: TObject; out aCssContent: string): string;
Returns the editor content as HTML.
procedure GetContentAsStream(const anEditor: TObject; aStream: TMemoryStream);
Returns the editor content as Stream.
function GetContentAsText(const anEditor: TObject): string;
Returns the editor content as text.
function GetCurrentAnchorName(const anEditor: TObject): string;
Returns the name of the current checkpoint or an empty string if there isn't any.
function GetCurrentItem(const anEditor: TObject): TObject;
Returns the currently selected item.
function GetCurrentPictureAltText(const anEditor: TObject): string;
Return the currently selected picture's alternative text.
function GetCurrentPictureBackColor(const anEditor: TObject): TColor;
Returns the background color of the currently selected picture.
function GetCurrentPictureHeight(const anEditor: TObject): Integer;
Returns the currently selected picture's height.
function GetCurrentPictureMarginLeftRight(const anEditor: TObject): Integer;
Get the current picture left/right margins.
function GetCurrentPictureMarginTopBottom(const anEditor: TObject): Integer;
Get the current picture top/bottom margins.
function GetCurrentPicturePadding(const anEditor: TObject): Integer;
Get the current picture padding.
function GetCurrentPictureVAlign(const anEditor: TObject): THndVAlign;
Return the currently selected picture's vertical alignment.
function GetCurrentPictureWidth(const anEditor: TObject): Integer;
71 / 90
HelpNDoc User Manual
Returns the currently selected picture's width.
procedure InsertAnchorBeforeCurrentItem(const anEditor: TObject; const aName: string);
Inserts a checkpoint at the current cursor position.
procedure InsertCondition(const anEditor: TObject; const anOperation, aCondition:
string);
Insert a condition item at the current cursor position.
function InsertFile(anEditor: TObject; aFile: string): Boolean;
Inserts a file in the editor.
function InsertFileFromLibraryItem(const anEditor: TObject; const aLibraryItem: string):
Boolean;
Insert the content of the library item.
procedure InsertHyperLinkToTopicId(const anEditor: TObject; const aText, aLinkedTopicId:
string);
Inserts an hyperlink to a specific topic ID using the topic's caption.
procedure InsertPageBreakBeforeCurrentItem(const anEditor: TObject);
Inserts a page break at the current cursor position.
function InsertStream(const anEditor: TObject; const aStream: TStream): Boolean;
Insert the content of the specified stream in the specified editor.
procedure InsertTopicContent(const anEditor: TObject; const aTopicId: string);
Insert the content of the specified topic in the specified editor.
procedure MoveCaretTo(anEditor: TObject; X, Y: Integer);
Move the specified editor's caret to another location.
procedure MoveCarretToEnd(const anEditor: TObject);
Move the specified editor's caret to the end.
procedure ProcessConditionalsForCurrentBuild(const anEditor: TObject);
Removes any conditional items based on current build setting.
procedure RemoveCurrentAnchor(const anEditor: TObject);
Remove the current checkpoint in the specified Editor.
function ReplaceLibraryItems(const anEditor: TObject): Boolean;
Replace the library items by their actual content.
procedure SetAsTopicContent(const anEditor: TObject; const aTopicId: string);
Set the specific topic's content as the current editor's content.
function SetContent(const anEditor: TObject; const aContentStream: TStream): Boolean;
Set the content from a stream.
procedure SetCurrentCellsAlignment(const anEditor: TObject; const anHVAlignment:
THndHVAlignment);
Sets the currently selected cells horizontal and vertical alignment.
72 / 90
HelpNDoc User Manual
procedure SetCurrentPictureAltText(const anEditor: TObject; const anAltText: string);
Set the currently selected picture's alternative text.
procedure SetCurrentPictureBackColor(const anEditor: TObject; const aColor: TColor);
Set the currently selected picture's background color.
procedure SetCurrentPictureHeight(const anEditor: TObject; const aNewHeight: Integer;
Defines the currently selected picture's height.
procedure SetCurrentPictureMarginLeftRight(const anEditor: TObject; const aNewMargin:
Integer);
Set the currently selected picture's left/right margins.
procedure SetCurrentPictureMarginTopBottom(const anEditor: TObject; const aNewMargin:
Integer);
Set the currently selected picture's top/bottom margins.
procedure SetCurrentPicturePadding(const anEditor: TObject; const aNewSpacing: Integer);
Set the currently selected picture's padding.
procedure SetCurrentPictureVAlign(const anEditor: TObject; const aNewVAlign: THndVAlign);
Defines the currently selected picture's vertical alignment.
procedure SetCurrentPictureWidth(const anEditor: TObject; const aNewWidth: Integer;
Defines the currently selected picture's width.
procedure TogglePageBreak(const anEditor: TObject);
Create or remove the current page break.
procedure UpdateLibraryItem(const anEditor: TObject; anItemId: string);
Update a library item's visual appearance in the editor.
HndEditorHelper
function GetHyperlinkDetailedTextFromString(const aString: string): string;
Returns a detailed text from an hyperlink string.
function GetHyperlinkInfoFromString(const aString: string): THndHyperlinkInfo;
Extract the hyperlink information from a string.
procedure GetHyperlinkTargetExtraFromString(const aString: string; var Target, Extras:
string);
Returns the Target and Extra values from hyperlink data.
procedure ImportImagesToLibrary(const anEditor: TObject);
Import the images to library.
function SetHyperlinkInfoToString(const anHyperLinkInfo: THndHyperlinkInfo): string;
Constructs a string based in hyperlink info.
procedure SetupEditorProperties(const anEditor: TObject);
Defines default editor properties and events.
HndGeneratorInfo
73 / 90
HelpNDoc User Manual
function GetCustomSettingValue(const aCustomSetting: string): Variant;
Returns the user-defined value of a custom setting.
property AssetsList: TStringList read FAssetsList write FAssetsList;
List of assets files from the template.
property CurrentBuildId: string read FCurrentBuildId write FCurrentBuildId;
Current build Id being executed.
property CurrentTopic: string read FCurrentTopic write SetCurrentTopic;
Current topic ID which is being worked on.
property GeneratedFiles: TStringList read FGeneratedFiles write FGeneratedFiles;
List of files that have been generated so far.
property TemplateInfo: THndTemplateInfo read FTemplateInfo write FTemplateInfo;
Information about the currently used template.
HndMeta
function GetItemMetaRawValue(const aKey: string): WideString; override;
Returns the raw IROStrings value for the property of the specified item.
procedure SetItemMetaRawValue(const aKey: string; const aRawValue: WideString); override;
Assign a raw value to a specific key.
HndJsSearchEngine
procedure AddSearchData(const aSearchData, aAssociatedTopicId: string);
Add search data and associate it to a specific topic.
procedure ClearSearchData;
Clear the current search data.
function GetJsData: string;
Get the Javascript search data.
HndKeywords
Array of minimal keyword information
function CreateKeyword: string;
Create a new keyword. The new keyword will be placed at the bottom of the list.
procedure DeleteAllKeywords;
Delete all the keywords in the project, except the root project keyword.
function DeleteKeyword(const aKeywordId: string): Boolean;
Delete a specific keyword and its children.
function GenerateUniqueCaption(const aBaseCaption, aParentId: string; const
aFilteredItems: array of string): string;
Generates a unique caption within the specified parent.
function GetKeywordByCaption(aCaption, aParentId: string): string;
74 / 90
HelpNDoc User Manual
Returns the ID of the keyword with the specified case-insensitive caption with the specified
parent.
function GetKeywordCaption(const aKeywordId: string): string;
Get the caption of a specific keyword.
function GetKeywordDirectChildrenCount(const aKeywordId: string): Integer;
Returns the number of children for the speicified keyword.
function GetKeywordDirectChildrenList(const aParentId: string): THndKeywordsInfoArray;
Returns a list of all the children keywords.
function GetKeywordLevel(const aKeywordId: string): Integer;
Returns the level of the specified keyword.
function GetKeywordList(const aIncludingProjectKeyword: Boolean = False):
THndKeywordsInfoArray;
Returns a list of all the keywords.
function GetKeywordNext(const aKeywordId: string): string;
Get the next keyword in line. Could be a child or the next keyword.
function GetKeywordNextSibbling(const aKeywordId: string): string;
Returns the next sibbling of a specific keyword.
function GetKeywordParent(const aKeywordId: string): string;
Returns the parent keyword of a specific keyword.
function GetKeywordPreviousSibbling(const aKeywordId: string): string;
Get the previous sibbling keyword.
function GetProjectKeyword: string;
Returns the root project keyword.
function MoveKeyword(const aKeywordId, aReferencedKeywordId: string; const oAttachMode:
THndKeywordsAttachMode): Boolean;
Move the keyword to a new position in reference to nReferencedKeywordsId.
function MoveKeywordLeft(const aKeywordId: string): Boolean;
Move the specific keyword left in the hierarchy.
function MoveKeywordRight(const aKeywordId: string): Boolean;
Move the specific keyword right in the hierarchy.
procedure SetCurrentKeyword(const aKeywordId: string);
Set the DB pointer to the specified keyword.
function SetKeywordCaption(const aKeywordId, sNewCaption: string): string;
Defines the specific keyword' caption.
HndLibraryItems
Array of minimal library item information
function CreateItem: string;
75 / 90
HelpNDoc User Manual
Creates a new unspecified item to the library.
function DeleteItem(const anItemId: string): Boolean;
Delete a specific library item.
function GetItemByCaption(const aCaption: string): string;
Returns the item with the given caption.
function GetItemCaption(const anItemId: string): string;
Gets the caption of a specific item.
function GetItemContent(const anItemId: string): TMemoryStream;
Get the content of the item as a stream. Caller must free the stream after using it.
function GetItemContentAsText(const anItemId: string): string;
Get the content of an item as a text.
function GetItemContentChecksum(const anItemId: string): string;
Returns the checksum (MD5) of a library item content. Useful for comparison purposes.
function GetItemExtension(const anItemId: string): string;
Get the item's file extension.
function GetItemKind(const anItemId: string): Integer;
Gets the kind of the specific item.
function GetItemList(aIncludingKinds: array of Integer): THndLibraryItemsInfoArray;
Returns a list of items filtered by aIncludingKinds.
function GetItemParent(const anItemId: string): string;
Returns the parent item of a specific item.
function GetItemSource(const anItemId: string): Integer;
Gets the source of a specific library item.
function GetItemsWithSameContent(const anItemId: string; const aFilteredItems: array of
string): THndLibraryItemsInfoArray;
Returns the items with the same content as the specified one.
function GetItemUrlFile(const anItemId: string): string;
Sets the URL File of a specified library item.
function GetItemUrlFileAbsolute(const anItemId: string): string;
Gets the URL of a specified library item: use project path if relative.
function GetItemUrlLink(const anItemId: string): string;
Sets the URL Link of a specified library item.
function GetProjectItem: string;
Returns the root project library item.
function MoveItem(const anItemId, aReferencedItemId: string; const oAttachMode:
THndLibraryItemAttachMode): Boolean;
Move the library item to a new position in reference to aReferencedItemId.
76 / 90
HelpNDoc User Manual
function SetItemCaption(const anItemId, aCaption: string): string;
Sets the caption of a specific item.
function SetItemContent(const anItemId: string; const aContent: TStream): Boolean;
Sets the content stream of a specified item.
function SetItemContentFromFile(const anItemId, aContentFile: string): Boolean;
Set the content of the item from an existing file.
function SetItemContentFromText(const anItemId, aContentText: string): Boolean;
Sets the content as text of a specific item.
function SetItemExtension(const anItemId, anExtension: string): Boolean;
Set the item's file extension.
function SetItemKind(const anItemId: string; const aKind: Integer): Boolean;
Sets the kind of a specific item.
function SetItemSource(const anItemId: string; const aSource: Integer): Boolean;
Sets the source of a specific library item.
function SetItemUrlFile(const anItemId, anUrlFile: string): Boolean;
Sets the URL File of a specified library item.
function SetItemUrlLink(const anItemId, anUrlLink: string): Boolean;
Sets the URL Link of a specified library item.
HndLibraryItemsCache
procedure AddOrInvalidateItem(anItemId: string);
Add an item to the cache or invalidate it.
procedure DeleteItem(anItemId: string);
Delete an item from the cache.
function GenerateUniqueCaption(const aBaseCaption: string; const aFilteredItems: array of
string): string;
Generates a unique caption amongst all cached items.
function GetItemFromCache(anItemId: string): THndLibraryItemsCacheInfo;
Get item cache info.
procedure Invalidate;
Invalidate all the items from the cache.
procedure InvalidateVariables;
Invalidate the variable values based on user changes.
HndProjects
procedure SetProjectName(const aProjectName: string);
Defines the project name.
procedure CloseProject;
77 / 90
HelpNDoc User Manual
Closes the currently openned project.
function CopyProject(const aNewProjectName: string; const OpenNewOne: Boolean): Boolean;
Copy the project to a new location and open the new one if needed.
function DeleteProject: Boolean;
Physically delete the currently openned project.
function GetProjectAuthor: string;
Returns the author of the project.
function GetProjectBusy: Boolean;
Project is currently busy: creating, loading or closing.
function GetProjectCharset: Integer;
Returns the project current charset.
function GetProjectCharsetAsHtml: string;
Returns the project current charset as HTML charset value.
function GetProjectClosing: Boolean;
Project is currently closing.
function GetProjectComment: string;
Return the current project's comment.
function GetProjectCopyright: string;
Returns the project copyright.
function GetProjectCreating: Boolean;
Project is currently being created.
function GetProjectCssContent: string;
Returns the CSS content of the current project. Can only be returned when generating an HTML
related format.
function GetProjectId: string;
Returns the currently open project id.
function GetProjectLanguage: Integer;
Returns the project current language.
function GetProjectLanguageCode: string;
Returns the project language code (eg: en-us)
function GetProjectModified: Boolean;
Indicates whether or no the current project has been modified since last save.
function GetProjectName: string;
Returns the current project name (or file name).
function GetProjectNeverSaved: Boolean;
Indicates whether the project as already been saved or not.
78 / 90
HelpNDoc User Manual
function GetProjectOpenning: Boolean;
Returns True if the project is currently openning.
function GetProjectSummary: string;
Returns the project summary.
function GetProjectTitle: string;
Gets the title of the specified project.
function GetProjectVersion: string;
Return the current project's version number.
function MoveProject(const aNewProjectName: string): Boolean;
Move the project to a new location.
function NewProject(const aProjectName: string = ''): string;
Creates a new project and returns its unique id.
function OpenProject(const aProjectName: string): string;
Open an existing project and returns its unique id.
procedure SaveProject;
Saves the project to a file.
procedure SetProjectAuthor(const anAuthor: string);
Defines the project author.
procedure SetProjectCharset(const aCharSet: Integer);
Defines the project charset.
procedure SetProjectComment(const aComment: string);
Set the current project comment.
procedure SetProjectCopyright(const aCopyrightValue: string);
Defines the project copyright.
procedure SetProjectLanguage(const aLanguage: Integer);
Defines the project language.
procedure SetProjectModified(const IsModified: Boolean = True);
Mark the current project as being modified since last save.
procedure SetProjectNeverSaved(const IsProjectNeverSaved: Boolean = True);
Mark the project as being never saved.
procedure SetProjectSummary(const aSummary: string);
Set the project summary.
procedure SetProjectTitle(const aProjectTitle: string);
Sets the title of the specified project.
procedure SetProjectVersion(const aProjectVersion: string);
Sets the version of the current project.
79 / 90
HelpNDoc User Manual
function VacuumProject: Boolean;
Clean the project and lower its file size by removing unneeded information.
HndProjectsMeta
function GetItemMetaRawValue(const aKey: string): WideString; override;
Returns the raw IROStrings value for the property of the specified item.
procedure SetItemMetaRawValue(const aKey: string; const aRawValue: WideString); override;
Assign a raw value to a specific key.
HndStyles
procedure LoadFromProject(aRVStyle: TRVStyle);
Load the style templates from the project.
procedure NotifyStyleTemplatesChange(Sender: TObject);
Notify sbuscribers that the style list has changed.
procedure ResetStyleTemplates(aRVStyle: TRVStyle; doNotify: Boolean = True);
Reset the style templates by loading the default.hns styles file.
procedure SaveToProject(aRVStyle: TRVStyle);
Save the content of the style template to the project.
HndTemplates
function GetTemplateKindList: TStringDynArray;
Returns a list of template kinds available on the system: 'html', 'chm'...
function GetDefaultTemplateFor(const aTemplateKind: string): THndTemplateInfo;
Get the default template info for the specified kind.
function GetTemplateCategoryHierarchy: THndTemplateHierarchyArray;
Returns the full category hierarchy of available templates.
function GetTemplateFromName(const aTemplateName, aTemplateKind: string):
THndTemplateInfo;
Returns a specific template based on its name and kind.
function GetTemplateList: THndTemplateInfoArray;
Returns a list of available templates on specified kind, or all kinds if none specified.
procedure UpdateTemplateList;
Retrieves the templates from the hard drive.
HndTemplatesEx
function CopyAndMergeTemplateToFolder(const aTemplateInfo: THndTemplateInfo; const
aFolder: string): Boolean;
Copy the template to the specific folder, merging its info file with existing template in that folder.
function GetTemplateInfoFromPath(const aTemplatePath: string): THndTemplateInfo;
Get template info from its path.
80 / 90
HelpNDoc User Manual
function GetTemplateKindFromPath(const aTemplatePath: string): string;
Returns the kind of template available at the speicified path.
function GetTemplateRawNameFromPath(aTemplatePath: string): string;
Returns the template directory name from path.
HndTopics
Create, edit and manage topics within the current project.
procedure CopyTopicToClipboard(const aTopicId: string; const isCut: Boolean);
Copy the specified topic to clipboard.
procedure CreateMultipleTopics(const aTopicList: TStrings; const aParentTopic: string =
'';
Creates multiple child topics of the specified parent based on a tabular lists.
function CreateTopic: string;
Create a new topic. The topic will be placed at the bottom of the topic list.
procedure DeleteAllTopics;
Delete all the topics in the project, except the parent topic.
function DeleteTopic(const aTopicId: string): Boolean;
Delete a specific topic and its children. Project topic can't be deleted.
function GenerateUniqueHelpContext(const aBaseHelpContext: Integer; const
aFilteredTopics: array of string): Integer;
Generates a unique help context among all the topics except the filtered ones.
function GenerateUniqueHelpId(const aBaseHelpId: string; const aFilteredTopics: array of
string): string;
Generates a unique help id among all the topics except the filtered ones.
function GetCurrentTopic: string;
Returns the ID of the currently edited topic.
function GetProjectTopic: string;
Returns the root project topic.
function GetTopicCaption(const aTopicId: string): string;
Get the caption of a specific topic.
function GetTopicContent(const aTopicId: string): TMemoryStream;
Returns the content of the specified topic.
function GetTopicContentAsHtml(const aTopicId: string): string;
Get the topic's content as HTML. Only available when generating an HTML related
documentation.
function GetTopicCount: Integer;
Returns the number of topics available in the current project.
function GetTopicCreationDateTime(const aTopicId: string): TDateTime;
Returns the date and time when the topics was created.
81 / 90
HelpNDoc User Manual
function GetTopicDirectChildrenCount(const aParentId: string): Integer;
Returns the number of direct children a topic has.
function GetTopicDirectChildrenCountVisible(const aParentId: string): Integer;
Returns the number of direct visible children a topic has.
function GetTopicDirectChildrenList(const aParentId: string): THndTopicsInfoArray;
Returns a list of direct children of the specified topic.
function GetTopicDirectChildrenListVisible(const aParentId: string): THndTopicsInfoArray;
Returns a list of direct visible children of the specified topic.
function GetTopicFirst: string;
Returns the first topic in the project.
function GetTopicFooterKind(const aTopicId: string): Integer;
Returns the topic's kind of footer text: normal, custom, hidden.
function GetTopicFooterText(const aTopicId: string): string;
Returns the custom topic footer text.
function GetTopicFooterTextCalculated(const aTopicId: string): string;
Returns the footer text based on the header kind: project caption, custom text or empty text for
hidden footer.
function GetTopicHeaderKind(const aTopicId: string): Integer;
Returns the topic's kind of header text: normal, custom, hidden.
function GetTopicHeaderText(const aTopicId: string): string;
Returns the custom topic header text.
function GetTopicHeaderTextCalculated(const aTopicId: string): string;
Returns the header text based on the header kind: topic title, custom text or empty text for hidden
header.
function GetTopicHelpContext(const aTopicId: string): Integer;
Get a specific topic's help context.
function GetTopicHelpId(const aTopicId: string): string;
Get a specific topic's help id.
function GetTopicIconIndex(const aTopicId: string): Integer;
Get the icon index for a specific topic.
function GetTopicIndex(const aTopicId: string; const isZeroBased: Boolean = True):
Integer;
Returns the index of the topic from its parent.
function GetTopicIndexHierarchy(const aTopicId: string; const isZeroBased: Boolean =
True): THndIntegerArray;
Returns an array representing the topic's index hierarchy. Ex: [1,0,3,4] for 1.0.3.4.
function GetTopicIsVisible(const aTopicId: string; const isIncludingParents: Boolean =
True): Boolean;
82 / 90
HelpNDoc User Manual
Returns True if a topic is visible False otherwise.
function GetTopicKind(const aTopicId: string): Integer;
Returns the kind of the specific topic.
function GetTopicLast: string;
Returns the last topic in the project.
function GetTopicLevel(const aTopicId: string): Integer;
Returns the level of the specified topic.
function GetTopicList(const aIncludingProjectTopic: Boolean = False):
THndTopicsInfoArray;
Returns a list of topics and their associated ID as object.
function GetTopicListVisible(const aIncludingProjectTopic: Boolean = False):
THndTopicsInfoArray;
Returns a list of visible topics and their associated ID as object.
function GetTopicModificationDateTime(const aTopicId: string): TDateTime;
Returns the date and time when the topic was last modified.
function GetTopicNext(const aTopicId: string): string;
Get the next topic in line. Could be a child or a sibling topic.
function GetTopicNextSibbling(const aTopicId: string): string;
Get the next sibling topic.
function GetTopicNextSibblingVisible(const aTopicId: string): string;
Returns the next visible sibling topic.
function GetTopicNextVisible(const aTopicId: string): string;
Returns the next visible topic.
function GetTopicOrder(const aTopicId: string): Integer;
Returns the order of the topic based on sibling topics.
function GetTopicParent(const aTopicId: string): string;
Returns the parent topic of a topic.
function GetTopicPrevious(const aTopicId: string): string;
Returns a list of topics and their associated ID as object.
function GetTopicPreviousSibbling(const aTopicId: string): string;
Get the previous sibling topic.
function GetTopicPreviousSibblingVisible(const aTopicId: string): string;
Returns the previous visible sibling topic.
function GetTopicPreviousVisible(const aTopicId: string): string;
Returns the previous visible topic.
function GetTopicUrlFile(const aTopicId: string): string;
Returns the topic's URL file property.
83 / 90
HelpNDoc User Manual
function GetTopicUrlLink(const aTopicId: string): string;
Returns the topic's URL link property.
function MoveTopic(const aTopicId, aReferencedTopicId: string; const oAttachMode:
THndTopicsAttachMode): Boolean;
Move the topic to a new position in reference to nReferencedTopicsId.
function MoveTopicDown(const aTopicId: string): Boolean;
Move the specific topic bellow the next sibling.
function MoveTopicLeft(const aTopicId: string): Boolean;
Move the specific topic left in the hierarchy.
function MoveTopicRight(const aTopicId: string): Boolean;
Move the specific topic right in the hierarchy.
function MoveTopicUp(const aTopicId: string): Boolean;
Move the specific topic above the previous sibling.
procedure PasteTopicFromClipboard(aParentId: string);
Paste the topic from clipboard as a child of the parent specified or as a child of the project topic.
function SetCurrentTopic(const aTopicId: string): Boolean;
Defines the currently selected topic.
procedure SetTopicCaption(const aTopicId, sNewCaption: string);
Defines the specific topic's caption.
procedure SetTopicContent(const aTopicId: string; const aContentStream: TStream);
Set the topic's content.
procedure SetTopicFooterKind(const aTopicId: string; const aFooterKind: Integer);
Sets the topic footer kind.
function SetTopicFooterText(const aTopicId, aFooterText: string): string;
Sets the custom text for the topic footer.
procedure SetTopicHeaderKind(const aTopicId: string; const anHeaderKind: Integer);
Sets the topic header kind.
function SetTopicHeaderText(const aTopicId, anHeaderText: string): string;
Sets the custom text for the topic header.
function SetTopicHelpContext(const aTopicId: string; const aHelpContext: Integer):
Integer;
Set a specific topic's help context. Returns the corrected context.
function SetTopicHelpId(const aTopicId, aHelpId: string): string;
Set a specific topic's help id. Returns the corrected string.
procedure SetTopicIconIndex(const aTopicId: string; const nIconIndex: Integer);
Set the icon index of a specific topic.
procedure SetTopicIsVisible(const aTopicId: string; const isVisible: Boolean);
84 / 90
HelpNDoc User Manual
Set the visibility for the topic
function SetTopicKind(const aTopicId: string; const aNewKind: Integer): Integer;
Set the topic kind (1: normal; 2: empty; 3: Link to URL; 4: Link to file)
procedure SetTopicUrlFile(const aTopicId, anUrlFile: string);
Set the topic's URL file.
procedure SetTopicUrlLink(const aTopicId, anUrlLink: string);
Set the topic's URL link.
HndTopicsEx
procedure SynchronizeAllHelpIds;
Overwrite all topic's help Ids based on caption.
HndTopicsKeywords
function AreTopicAndKeywordAssociated(const aTopicId, aKeywordId: string): Boolean;
Indicates wether the specified topic and keyword are associated.
function AssociateTopicWithKeyword(const aTopicId, aKeywordId: string): Boolean;
Link a specific topic to a specific keyword.
function DissociateTopicFromKeyword(const aTopicId, aKeywordId: string): Boolean;
Remove the association between the specified topic and keyword.
function GetKeywordsAssociatedWithTopic(const aTopicId: string): TStringDynArray;
Get a list of keyword Ids associated with a specific topic.
function GetTopicsAssociatedWithKeyword(const aKeywordId: string): TStringDynArray;
Get a list of topic Ids associated with a specific keyword.
HndTopicsMeta
function GetItemMetaRawValue(const anItemId, aKey: string): WideString; override;
Returns the raw IROStrings value for the property of the specified item.
procedure SetItemMetaRawValue(const anItemId, aKey: string; const aRawValue: WideString);
override;
Assign a raw value to a specific key.
FAQ and troubleshooting
Presents a list of Frequently Asked Questions (FAQ) as well as troubleshooting information.
Help compilers
FAQ and troubleshooting about Help compilers.
What compilers of libraries do I need to install?
85 / 90
HelpNDoc User Manual
HelpNDoc can generate the PDF, Word and HTML documentation by itself. However, to
generate a CHM documentation, you will need to download and install the Microsoft HTML Help
Compiler.
Installing the Microsoft HTML Help Compiler displays a warning message?
Symptoms
When installing the Microsoft HTML Help Compiler on recent operating systems, you can receive
a warning message saying that "This computer already has a newer version of HTML Help".
Solutions
·
Discard the message as your system already has a valid and up-to-date help viewer. The
compiler has correctly been installed despite of this message.
CHM and HTML help
FAQ and troubleshooting about CHM and HTML help.
The CHM viewer indicates that the page cannot be displayed
Symptoms
When viewing your CHM documentation, Microsoft's HTML Help Viewer is showing an error page
saying either that:
·
"The action has been canceled"
·
"The page cannot be displayed"
Solutions
·
Make sure your help file is not accessed from a network path or via a mapped networked
drive. Try to copy the file locally and launch it again;
·
Make sure your help file isn't in a path with symbols such as "#" (sharp). Once again, try to
copy it locally before launching it;
·
In some cases, you can have access to an "unblock" button in the properties page of the
help file. Right click on the file then go to its properties and click the "unblock" button. This
button is not available in all systems though.
CHM content is not displayed after Internet Explorer update
86 / 90
HelpNDoc User Manual
Symptoms
After an Internet Explorer update, when viewing your CHM documentation, Microsoft's HTML Help
Viewer isn't showing anything in the topic's contents.
Solutions
The update process might have caused problems with some files registration. You can try to
register them manually from the Start / Run prompt by entering each of these commands:
·
regsvr32 %systemroot%\system32\hhctrl.ocx <press the enter key>
·
regsvr32 %systemroot%\system32\itss.dll <press the enter key>
Despite modifying the navigation pane's width the CHM file is not updated
Symptoms
You change the navigation tab's width in the HelpNDoc's projects settings but when opening the
CHM file, nothing has changed.
Solutions
The Microsoft HTML help viewer stores the help window's size and position for each individual
help file as soon as it has been launched. Modifying the help settings after that won't have any
effect as the help viewer will only read local configuration for that help file and ignore the file's
settings set up using HelpNDoc.
A solution would be to erase the help viewer's configuration file, but be warned that this file
contains all the configuration made to all the help files viewed on the system. So deleting this file
will delete the configuration options for all the other files too.
This file is usually located there: C:\Users\%username%\AppData\Roaming\Microsoft\HTML
Help\hh.dat where %username% is your Windows user name.
The search feature is not working in the CHM documentation
Symptoms
When trying to search within the CHM documentation, no results are found.
Solutions
·
In your HelpNDoc project, click "Project options" in the "Home" ribbon tab and make sure the
project language and charset are correct
·
Make sure you are using a Windows installation setup with the same language as your
HelpNDoc's project language
·
Click the top part of the "Generate Help" button in the "Home" ribbon tab to access the
"Generate documentation" dialog, then select your CHM build in the list on the left, then click
"customize" if the "Template settings" tab is not already visible on the right, then check the
option "Use project charset for topics"
·
Generate the CHM documentation again
87 / 90
HelpNDoc User Manual
Google Chrome shows an error when searching HTML documentation
Symptoms
When viewing a local (not uploaded to a server) HTML documentation, Google Chrome will show
an error when trying to search within the documentation.
Solutions
HelpNDoc's HTML documentation generated using the default HTML template uses an AJAX call
to retrieve the search data. This provides faster loading times for the overall documentation.
However, when the HTML documentation is viewed locally, using the file:// protocol, Google
Chrome will not allow the AJAX call.
·
To work around this limitation, Chrome can be launched with the "--allow-file-access-fromfiles" command line switch. As an example, run:
o chrome.exe --allow-file-access-from-files
·
Another possible solution is to serve the local documentation via a server such as Apache or
IIS, and therefore viewing your documentation using the http:// protocol. Google Chrome
won't have the same restriction in that particular case.
The HTML help is broken when hosted by CloudFlare
Symptoms
We are hosting our HTML documentation produced by HelpNDoc on the CloudFlare CDN but it
appears broken with various JavaScript errors.
Solutions
CloudFlare's Rocket Loader technology rewrites part of your HTML to provide faster loading
which can break some JavaScript. The solutions are:
·
Turn off Rocker Loader in the Performance Settings of CloudFlare. See: Why is JavaScript
or jQuery not working on my site?
·
Write a custom HTML template and disable Rocket Loader for some scripts. See: How can I
have Rocket Loader ignore my script(s) in Automatic Mode?
PDF documentation
FAQ and troubleshooting PDF documentation.
Adobe Reader won't print with "drawing error" message
Symptoms
Printing a PDF document using Adobe PDF reader fails with the message saying "Drawing
Error".
Solutions
Try updating the Adobe PDF Reader software to the latest version. It can be downloaded freely
88 / 90
HelpNDoc User Manual
from Adobe's servers
Sales and license information
FAQ and troubleshooting about sales and license information.
What is HelpNDoc's update policy?
By purchasing one of the full versions of HelpNDoc, you are entitled for free updates for a full
version cycle with a one year safety period. This means that, no matter what, you will benefit
from one year of free updates. And if by the end of that year we haven't reached a full version
cycle - for example if you buy version 4.0, a full version cycle will go up to version 5.0 included you will still get free updates until that version cycle has been reached.
How much does HelpNDoc costs
Some factors influence the price of HelpNDoc:
·
The HelpNDoc edition acquired: Standard Edition or Professional Edition
·
The number of licenses needed: Volume discounts are available as well as Site and Global
licenses
·
Whether you need a named (per-seat) or floating (concurrent) user license
·
Whether HelpNDoc will be used for Educational or Governmental purposes
The most up-to-date prices are available from the HelpNDoc Store.
Do you provide a discounted Educational license ?
We do offer Educational discounts. Please contact us to receive further details.
Do you provide a government license ?
We do offer Governmental discounts. Please contact us to receive further details.
I need a special license: site license or global license?
Site license provide an unlimited number of licenses for a single location in the world. World
license provide an unlimited number of licenses for multiple locations throughout the world.
HelpNDoc can be licensed site-wide or world-wide. Please contact us to receive further details.
What kind of payment devises and currencies do you accept?
We use Share-It! as our payment handling partner. They are globally known for their security and
efficiency in payment processing. They accept many currencies including US dollars, Euros,
British pound, Australian dollar, Japanese yen, Canadian dollar, Swiss franc, Russian rouble,
Brasilian real, Norwegian krona, Swedish krona, Polish zloty, Chinese renminbi yuan, Taiwan
dollar, Indian rupee. You can pay using various payment methods including credit card, paypal,
wire-transfer, check and cash. To learn more about Share-It! and the ordering options, visit the
Share-It! FAQ section.
89 / 90
HelpNDoc User Manual
How can I request a written quote before ordering?
You can obtain a written quote from Share-It! by filling the following form: http://ccc.shareit.com/
ccc/quote.html
Make sure to mention the desired HelpNDoc Edition as well as product ID:
·
HelpNDoc Professional Edition named license product ID is 300316750
·
HelpNDoc Professional Edition floating license product ID is 300460470
·
HelpNDoc Standard Edition named license product ID is 300001096
·
HelpNDoc Standard Edition floating license product ID is 300460471
Miscellaneous
Miscellaneous FAQ and troubleshooting.
HelpNDoc download problem
Symptoms
You downloaded the HelpNDoc installation program but can't launch it.
Solutions
·
Check that the installation program's extension is correctly set as an .EXE file. Some
programs such as CA Security Software can rename downloaded .EXE files to .EFW
Doc or DocX files can't be imported
To import Microsoft Word *.doc or *.docx files, the free "Microsoft Office Compatibility Pack for
Word, Excel, and PowerPoint File Formats" must be installed on the system. It is automatically
installed with some older versions of Microsoft Office but not with the latest versions. It can be
downloaded from Microsoft's web-site at http://www.microsoft.com/en-us/download/
confirmation.aspx?id=3
Some panels are missing or HelpNDoc's Window is hidden
Symptoms
When launching HelpNDoc, either the main window can't be seen or some panels are missing.
Solutions
Use the "/reset" command line option to reset HelpNDoc's layout:
·
Use the WINDOWS + R command shortcut to open the Run panel
·
Indicate HelpNDoc's installation path with the /reset option. Usually it is "c:\program files\IBE
Software\HelpNDoc 4\hnd4.exe /reset"
·
Hit OK
·
Restart HelpNDoc normally
90 / 90