1
• SAFETY PRECAUTIONS •
(Always read these instructions before using this equipment.)
Before using this product, please read this manual and the relevant manuals introduced in this manual
carefully and pay full attention to safety to handle the product correctly.
The instructions given in this manual are concerned with this product. For the safety instructions of the
programmable controller system, please read the CPU module user's manual.
In this manual, the safety instructions are ranked as " ! WARNING" and " ! CAUTION".
! WARNING
Indicates that incorrect handling may cause hazardous conditions,
resulting in death or severe injury.
! CAUTION
Indicates that incorrect handling may cause hazardous conditions,
resulting in minor or moderate injury or property damage.
Note that the ! CAUTION level may lead to serious consequences according to the circumstances.
Always follow the instructions of both levels because they are important to personal safety.
Observe the precautions of both levels because they are important for personal and system safety.
Please save this manual in a convenient place so that you can refer to it and always forward it to the end
user.
[Design Instructions]
!
WARNING
• Build an interlock circuit outside the PLC system to ensure that the whole system always works
safely when changing the data of the running PLC or controlling the PLC status from the
personal computer.
In addition, be sure to incorporate the corrective action into the system to deal with the
communication error due to the poor cable connection while operating the PLC CPU online from
the peripheral device.
[Operating Precautions]
!
CAUTION
• Read the manual carefully and confirm the safety before connecting a personal computer with
the running CPU module to perform the online operation (especially forced output and operating
status change).
Misoperation may cause the machine damage or accidents.
A-1
A-1
• CONDITIONS OF USE FOR THE PRODUCT •
(1) Mitsubishi programmable controller ("the PRODUCT") shall be used in conditions;
i) where any problem, fault or failure occurring in the PRODUCT, if any, shall not lead to any major or
serious accident; and
ii) where the backup and fail-safe function are systematically or automatically provided outside of the
PRODUCT for the case of any problem, fault or failure occurring in the PRODUCT.
(2) The PRODUCT has been designed and manufactured for the purpose of being used in general
industries.
MITSUBISHI SHALL HAVE NO RESPONSIBILITY OR LIABILITY (INCLUDING, BUT NOT LIMITED
TO ANY AND ALL RESPONSIBILITY OR LIABILITY BASED ON CONTRACT, WARRANTY, TORT,
PRODUCT LIABILITY) FOR ANY INJURY OR DEATH TO PERSONS OR LOSS OR DAMAGE TO
PROPERTY CAUSED BY the PRODUCT THAT ARE OPERATED OR USED IN APPLICATION NOT
INTENDED OR EXCLUDED BY INSTRUCTIONS, PRECAUTIONS, OR WARNING CONTAINED IN
MITSUBISHI'S USER, INSTRUCTION AND/OR SAFETY MANUALS, TECHNICAL BULLETINS AND
GUIDELINES FOR the PRODUCT.
("Prohibited Application")
Prohibited Applications include, but not limited to, the use of the PRODUCT in;
y Nuclear Power Plants and any other power plants operated by Power companies, and/or any other
cases in which the public could be affected if any problem or fault occurs in the PRODUCT.
y Railway companies or Public service purposes, and/or any other cases in which establishment of a
special quality assurance system is required by the Purchaser or End User.
y Aircraft or Aerospace, Medical applications, Train equipment, transport equipment such as Elevator
and Escalator, Incineration and Fuel devices, Vehicles, Manned transportation, Equipment for
Recreation and Amusement, and Safety devices, handling of Nuclear or Hazardous Materials or
Chemicals, Mining and Drilling, and/or other applications where there is a significant risk of injury to
the public or property.
Notwithstanding the above, restrictions Mitsubishi may in its sole discretion, authorize use of the
PRODUCT in one or more of the Prohibited Applications, provided that the usage of the PRODUCT is
limited only for the specific applications agreed to by Mitsubishi and provided further that no special
quality assurance or fail-safe, redundant or other safety features which exceed the general
specifications of the PRODUCTs are required. For details, please contact the Mitsubishi
representative in your region.
A-2
A-2
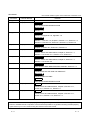
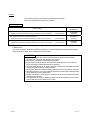
REVISIONS
* The manual number is given on the bottom left of the back cover.
Print Date
* Manual Number
Aug., 2002
SH (NA)-080347E-A
Dec., 2003
SH (NA)-080347E-B
Revision
First edition
Addition
SOFTWARE USER REGISTRATION
Correction
Section 3.1.2
Aug., 2004
SH (NA)-080347E-C
Addition
Section 6.6, Appendix 1.8, Appendix 1.9
Correction
Section 1.1, Section 1.2, Chapter 2, Section 3.1.1, Section 3.1.3,
Section 6.1, Section 6.2, Section 6.3, Section 6.4, Section 6.5
Sep., 2005
SH (NA)-080347E-D
Correction
Chapter 2, Section 6.1, Section 6.2, Section 6.3
Oct., 2007
SH (NA)-080347E-E
Addition
Generic Terms and Abbreviations, Chapter 2, Section 3.1.1,
Section 3.1.2, Section 3.1.3, Section 3.1.4, Section 3.2
May, 2008
SH (NA)-080347E-F
Correction
Generic Terms and Abbreviations, Chapter 2, Section 3.1.1,
Section 3.1.2, Section 3.2
Jun., 2009
SH (NA)-080347E-G
Correction
SOFTWARE USER REGISTRATION, Manuals, Section 3.1.2
Dec., 2009
SH (NA)-080347E-H
Addition
CONDITIONS OF USE FOR THE PRODUCT
Correction
SAFETY PRECAUTIONS
Deletions
SOFTWARE USER REGISTRATION
May, 2010
SH (NA)-080347E-I
Addition
Generic Terms and Abbreviations, Chapter 2, Section 3.1.1,
Section 3.1.2, Section 3.2 , Section 6.1
May, 2011
SH (NA)-080347E-J
Addition
Generic Terms and Abbreviations, Chapter 2, Section 3.1.1,
Section 3.1.2, Section 3.1.3, Section 3.1.4
Japanese Manual Version SH-080345-J
This manual confers no industrial property rights or any rights of any other kind, nor does it confer any patent
licenses. Mitsubishi Electric Corporation cannot be held responsible for any problems involving industrial property
rights which may occur as a result of using the contents noted in this manual.
© 2002 MITSUBISHI ELECTRIC CORPORATION
A-3
A-3
INTRODUCTION
Thank you for choosing the Mitsubishi Integrated FA Software MELSOFT series.
Read this manual and make sure you understand the functions and performance of MELSOFT series
thoroughly in advance to ensure correct use.
CONTENTS
SAFETY PRECAUTIONS................................................................................................................................ACONDITIONS OF USE FOR THE PRODUCT ...............................................................................................AREVISIONS ......................................................................................................................................................ACONTENTS......................................................................................................................................................AManuals ............................................................................................................................................................AGeneric Terms and Abbreviations ...................................................................................................................ADefinitions of Terms .........................................................................................................................................A1 OVERVIEW
1
2
3
4
6
7
8
1- 1 to 1- 2
1.1 What Is MX Sheet? .................................................................................................................................... 1- 1
1.2 Functions Explained in This Manual.......................................................................................................... 1- 2
2 OPERATING ENVIRONMENT
2- 1 to 2- 2
3 INSTALLATION AND UNINSTALLATION
3- 1 to 3- 24
3.1 Installation .................................................................................................................................................. 3- 1
3.1.1 Installation precautions ....................................................................................................................... 3- 1
3.1.2 Installation............................................................................................................................................ 3- 7
3.1.3 Installation check................................................................................................................................. 3-16
3.1.4 Manual add-in registration .................................................................................................................. 3-17
3.2 Uninstallation.............................................................................................................................................. 3-21
4 SYSTEM CONFIGURATION USED IN THIS MANUAL
4- 1 to 4- 2
5 MX Sheet OPERATION PROCEDURE
5- 1 to 5- 2
6 OPERATING MX Sheet
6- 1 to 6-29
6.1 Logging ...................................................................................................................................................... 6- 1
6.2 Monitor ...................................................................................................................................................... 6-11
6.3 Data Write................................................................................................................................................... 6-16
6.4 Automatic Save .......................................................................................................................................... 6-21
6.5 Automatic Print ........................................................................................................................................... 6-26
6.6 Using the Button......................................................................................................................................... 6-28
A-4
A-4
APPENDICES
APP- 1 to APP- 7
Appendix 1 Useful Functions of MX Sheet.................................................................................................APPAppendix 1.1 Alarm summary.................................................................................................................APPAppendix 1.2 Comment display ..............................................................................................................APPAppendix 1.3 Device trigger ....................................................................................................................APPAppendix 1.4 Handshake ........................................................................................................................APPAppendix 1.5 CSV logging ......................................................................................................................APPAppendix 1.6 Automatic Communication Startup Setting ......................................................................APPAppendix 1.7 Data conversion function ..................................................................................................APPAppendix 1.8 Protect MX Sheet setting..................................................................................................APPAppendix 1.9 Error log setting.................................................................................................................APP-
A-5
A-5
1
1
2
2
3
4
4
5
6
7
Manuals
The following manuals are relevant to this software package.
Refer to the table when ordering the manuals.
Relevant Manuals
Manual Number
(Model Code)
Manual Name
MX Sheet Version 1 Operating Manual
Explains the operation procedures, setting and operation methods of MX Sheet.
(Sold separately)
SH-080348E
(13JU35)
(Sold separately)
SH-0800271
(13JU32)
(Sold separately)
SH-080272
(13JF66)
MX Component Version 3 Operating Manual
Explains the setting and operation methods of each utility on MX Component.
MX Component Version 3 Programming Manual
Explains the programming procedures, details and error codes for ACT control.
Note: The MX Sheet Version 1 Operating Manual is stored on CD-ROM of the corresponding software package
in PDF format.
Any of the manuals is available separately in printed form. Please indicate its manual number (model
code) in the above table, when ordering the printed manual.
NOTICES
• We don't guarantee the commercially-available Windows-based software
products that have been introduced in this manual.
• We hold the copyrights of this software package.
• No part of this manual may be transcribed or duplicated in any form without
prior permission by Mitsubishi Electric Corporation.
• We have attempted to cover all the revisions of software and hardware, but this
manual may not contain the latest revisions.
• We assume that one software package will be used on one personal computer.
• We permit the user to use this software package (including this manual) based
on the Software License Agreement.
• We are not liable for consequences or influences due to this software package
(including this manual).
• The specifications of this software package and the descriptions in this manual
may be altered in future without prior notice.
A-6
A-6
Generic Terms and Abbreviations
Unless otherwise stated, this manual uses the following abbreviations and terms for
the explanation of MX Sheet.
Generic Term/Abbreviation
MX Sheet
IBM-PC/AT compatible
PC CPU module
Personal computer
MX Component
R
Windows 7
Description
Generic product name for product types SW1D5C-SHEET-E and SW1D5C-SHEET-EA.
-EA indicates a volume license product.
Abbreviation of the IBM PC/AT or its compatible personal computer
Abbreviation of the MELSEC-Q series corresponding PC CPU module
(CONTEC CO., LTD.).
Generic term of PC CPU module and IBM-PC/AT compatible Personal computer.
Generic product name for product types SW3D5C-ACT-E and SW3D5C-ACT-EA.
-EA indicates a volume license product.
R
R
Microsoft Windows 7 Starter Operating System,
R
R
Microsoft Windows 7 Home Premium Operating System,
R
R
Microsoft Windows 7 Professional Operating System,
R
R
Microsoft Windows 7 Ultimate Operating System and
R
R
Microsoft Windows 7 Enterprise Operating System.
R
Note that the 32-bit version is designated as "32-bit Windows 7", and the 64-bit version
R
is designated as "64-bit Windows 7".
R
Windows Vista
R
R
R
Windows XP
A-7
R
Generic term of Microsoft Windows Vista Home Basic Operating System,
R
R
Microsoft Windows Vista Home Premium Operating System,
R
R
Microsoft Windows Vista Business Operating System,
R
R
Microsoft Windows Vista Ultimate Operating System and
R
R
Microsoft Windows Vista Enterprise Operating System.
R
Generic term of Microsoft Windows XP Professional Operating System and
R
R
Microsoft Windows XP Home Edition Operating System.
A-7
Definitions of Terms
The terms used in this manual have the following meanings and definitions.
(1)
Logical station number
A number assigned to the group of data that is integrated from the connection
target information required for communication within the Communication Setup
Utility.
Personal computer
Serial (COM1)
Q02HCPU
Baud rate transmission control
Time-out period
Connection target information on up to CPU to communicate with is combined into one data,
to which logical station number is assigned.
(2)
A-8
1 shot communication
This function executes the function set to the selected cell area at any timing.
A-8
MEMO
A-9
A-9
1 OVERVIEW
MELSOFT
1 OVERVIEW
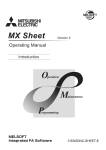
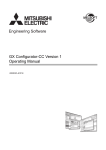
1 1.1 What Is MX Sheet?
MX Sheet is a communication support software package that enables device data
collection by simple program-less setting using Excel.
This manual explains the basic using methods of MX Sheet.
For details, refer to the MX Sheet Version 1 Operating Manual.
Logging function, monitor function
Write function
Automatic print function
Alarm summary function
Comment display function
Automatic save function
Excel book file
HTML file
CSV file
Error log setting function
Protect MX Sheet
setting function
Create button function
MX Sheet
PLC CPU
1-1
1-1
1 OVERVIEW
MELSOFT
1.2 Functions Explained in This Manual
1
This manual explains the following MX Sheet functions.
(1) Logging function (refer to Section 6.1)
This function accumulates the device data collected from the PLC as a history in
the cell area selected on an Excel sheet.
Device data are accumulated
as history.
(2) Monitor function (refer to Section 6.2)
This function displays the device data collected from the PLC in the cell area
selected on an Excel sheet.
PLC device data are displayed
on Excel.
PLC CPU
(3) Write function (refer to Section 6.3)
This function writes the values entered on an Excel sheet to PLC devices.
Values entered on Excel are
written to PLC devices.
PLC CPU
(4) Automatic save function (refer to Section 6.4)
This function saves the Excel book automatically, when the specified device is
triggered at the specified time.
(5) Automatic print function (refer to Section 6.5)
This function prints the Excel book or specified Excel sheets automatically, when
the specified device is triggered at the specified time.
(6) Create button function (refer to Section 6.6)
This function executes each of the Start Communication, End Communication
and 1 Shot Communication functions by merely clicking the corresponding button
created from Create Button.
1-2
1-2
2 OPERATING ENVIRONMENT
MELSOFT
2 OPERATING ENVIRONMENT
The following table indicates the operating environment of MX Sheet.
Item
Description
IBM PC/AT
2
Computer
1
Pentium 200MHz or higher* IBM PC/AT compatible personal computer installed with
compatible
R
2
applicable OS*
personal
computer
PC CPU module
MELSEC-Q series compatible PC CPU module (CONTEC CO., LTD.)
4
Required memory
64MB or more*
Hard disk free space
100MB or more
Disk drive
CD-ROM disk drive
Display
Resolution 1024 × 768 pixels or higher
Microsoft Windows 98 Operating System (English version),
R
R
Microsoft Windows Millennium Edition Operating System (English version),
R
R
3
Microsoft Windows NT Workstation Operating System Version 4.0 (English version) * ,
R
R
Microsoft Windows 2000 Professional Operating System (English version),
R
R
Microsoft Windows XP Professional Operating System (English version),
R
R
Microsoft Windows XP Home Edition Operating System (English version),
R
R
Microsoft Windows Vista Home Basic Operating System (English version),
R
R
Microsoft Windows Vista Home Premium Operating System (English version),
R
OS
R
Microsoft Windows Vista Business Operating System (English version),
R
R
Microsoft Windows Vista Ultimate Operating System (English version),
R
R
Microsoft Windows Vista Enterprise Operating System (English version) ,
R
R
Microsoft Windows 7 Starter Operating System (English version),
R
R
Microsoft Windows 7 Home Premium Operating System (English version),
R
R
Microsoft Windows 7 Professional Operating System (English version),
R
R
Microsoft Windows 7 Ultimate Operating System (English version) or
R
R
Microsoft Windows 7 Enterprise Operating System (English version).
R
R
Microsoft Excel 2000 (English version), Microsoft Excel 2002 (English version),
R
Required
5
R
6
Microsoft Excel 2003 (English version), Microsoft Excel 2007 (English version)* , or
Excel *
R
Software
R
7
32-bit Microsoft Excel 2010 (English version)*
R
8
MX Component*
MX Component version 3.01B or later
*1: A Pentium 300MHz processor or higher is recommended when using Windows XP and 1GHz processor or higher is
R
R
recommended when using Windows Vista or Windows 7.
R
R
*2: This product does not work with a multiprocessor IBM-PC/AT-compatible personal computer, because the driver is not
compatible with it.
*3: Service Pack 3 or more is needed when using Windows NT Workstation 4.0.
R
*4: 128MB or more is recommended for Windows XP, 1GB or more is recommended for Windows Vista and 32-bit
R
R
Windows 7, and 2GB or more is recommended for 64-bit Windows 7.
R
R
*5: Excel sheets created in the English environment can be used in the English environment only. They cannot be used in
the other environment.
*6: Windows XP Service Pack 2 or later is required for Microsoft Excel 2007.
R
2-1
R
2-1
2 OPERATING ENVIRONMENT
MELSOFT
*7: For 32-bit Microsoft Excel 2010, Windows XP Service Pack 3, Windows Vista Service Pack 1 or higher, or
R
R
R
Windows 7 or later is required.
R
64-bit Microsoft Excel 2010 is not supported.
R
*8: When executing the Communication Setup Utility with administrator authority from Excel, MX Component Version
3.12N or later is required.
POINT
(1) When Windows XP, Windows Vista or Windows 7 is used, the following
new functions cannot be used.
If any of the following new functions is used, this product may not operate
normally.
Start of application in Windows compatible mode
Fast user switching
Remote desktop
Big fonts (Details setting of Screen properties)
64-bit Windows XP and 64-bit Windows Vista are not supported.
(2) When Windows 7 is used, the following new functions cannot be used.
Windows XP Mode
Windows Touch
(3) When MX Sheet is tried to be installed on the personal computer where 64-bit
Microsoft Excel 2010 has been installed, the following error message appears.
R
R
R
R
R
R
R
R
(4) When MX Sheet is installed, 64-bit Microsoft Excel 2010 is installed and
started, then an add-in is installed, the following error message appears.
R
To use MX Sheet, install 32-bit Microsoft Excel 2010.
R
2-2
2-2
2
3 INSTALLATION AND UNINSTALLATION
MELSOFT
3 INSTALLATION AND UNINSTALLATION
This chapter explains the installation and uninstallation procedures of MX Sheet.
The screens used in this chapter are those of the Microsoft Windows XP
Professional Operating System.
Though they differ slightly from those of the other OSes, refer to REMARK and
perform operations.
R
R
3.1 Installation
3
This section explains MX Sheet installation.
3.1.1 Installation precautions
(1) Precautions on the OS
Log on as the user who has the Administrator attributes, when any of the
following OSes is used.
Microsoft
Microsoft
Microsoft
Microsoft
Microsoft
Microsoft
Microsoft
Microsoft
Microsoft
Microsoft
Microsoft
Microsoft
Microsoft
Microsoft
3-1
R
R
R
R
R
R
R
R
R
R
R
R
R
R
Windows NT Workstation Operating System Version 4.0
Windows 2000 Professional Operating System
Windows XP Professional Operating System
Windows XP Home Edition Operating System
Windows Vista Home Basic Operating System
Windows Vista Home Premium Operating System
Windows Vista Business Operating System
Windows Vista Ultimate Operating System
Windows Vista Enterprise Operating System
Windows 7 Starter Operating System
Windows 7 Home Premium Operating System
Windows 7 Professional Operating System
Windows 7 Ultimate Operating System
Windows 7 Enterprise Operating System
R
R
R
R
R
R
R
R
R
R
R
R
R
R
3-1
3 INSTALLATION AND UNINSTALLATION
MELSOFT
(2) Software confirmation
Make sure that the following software programs have been installed in the
personal computer where MX Sheet will be installed.
MX Component Version 3.01B or later
Microsoft Excel 2000 or later
R
(3) Precautions on using Microsoft Excel 2007 or later
R
Installing Visual Basic for Applications (hereafter, abbreviated as VBA) is
required for Microsoft Office 2007 or later.
If not installed, the following error message appears when add-in is registered at
MX Sheet installation, and MX Sheet cannot be used.
R
3-2
3-2
3
3 INSTALLATION AND UNINSTALLATION
MELSOFT
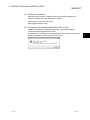
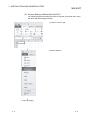
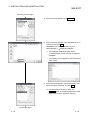
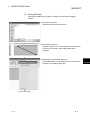
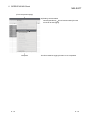
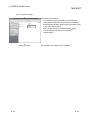
(4) Security Setting of Microsoft Excel 2007
R
The following explains the setting procedure of required Trust Center when using
MX Sheet with Microsoft Excel 2007.
R
1) Click [Office button].
2) Click Excel Options .
(To the next page)
3-3
3-3
3 INSTALLATION AND UNINSTALLATION
MELSOFT
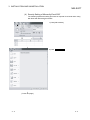
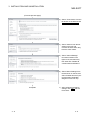
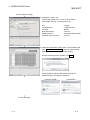
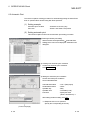
(From the previous page)
3) Select "Trust Center" from the
list shown on the left and click
Trust Center Settings….
4) Select "Add-ins" from the list
shown on the left, and
uncheck the items when they
have the check marks.
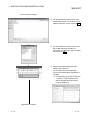
5) Select "Macro Settings" from
the list shown on the left, and
select "Enable all macros (not
recommended; potentially
dangerous code can run)".
6) Select "Active X Settings"
from the list shown on the left,
and select "Enables all
controls without restrictions
and without prompting (not
recommended; potentially
dangerous controls can run)".
Complete!
3-4
7) After completing all settings,
close Excel 2007.
3-4
3 INSTALLATION AND UNINSTALLATION
MELSOFT
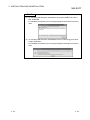
(5) Security Setting of Microsoft Excel 2010
R
The following explains the setting procedure of required Trust Center when using
MX Sheet with Microsoft Excel 2010.
R
1) Click the <<File>> tab.
2) Select "Options".
(To the next page)
3-5
3-5
3 INSTALLATION AND UNINSTALLATION
MELSOFT
(From the previous page)
3) Select "Trust Center" from the
list shown on the left and click
Trust Center Settings….
4) Select "Add-ins" from the list
shown on the left, and
uncheck the items when they
have the check marks.
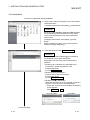
5) Select "ActiveX Settings"
from the list shown in the
figure to left, and select any
item other than "Disable all
controls without notification".
6) Select "Macro Settings" from
the list shown on the left, and
select "Enable all macros (not
recommended; potentially
dangerous code can run)".
Complete!
3-6
7) After configuring the above
settings, click OK , and exit
Excel 2010.
3-6
3 INSTALLATION AND UNINSTALLATION
MELSOFT
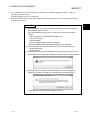
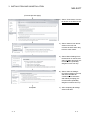
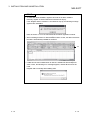
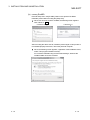
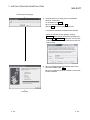
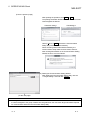
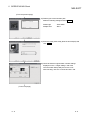
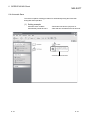
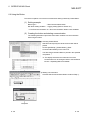
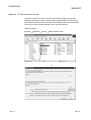
3.1.2 Installation
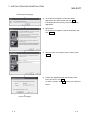
(1) Installing the product
1) Start Windows after powering on the personal
computer.
R
2) Start Explorer and click the drive in which the
CD-ROM has been inserted.
Double-click "SETUP.exe".
To display Explorer, right-click [Start] and select
[Explorer].
* When user account control is enabled, the
following screen appears.
Click "Allow" or Yes .
R
< Windows Vista >
R
< Windows 7>
If the left message appears, click OK , install MX
Sheet, and then install MX Component.
If the left message appears, click Cancel ,
uninstall MX Sheet, and then reinstall it.
If the left message appears, operate as instructed
in (a) of "(2) When message appears at start of
installation".
After the operation is complete, restart installation
operation.
If the left screen appears, operate as instructed in
(b) of "(2) When message appears at start of
installation".
After the operation is complete, restart installation
operation.
(To the next page)
3-7
3-7
3 INSTALLATION AND UNINSTALLATION
MELSOFT
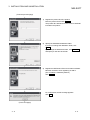
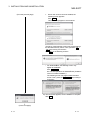
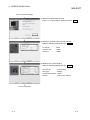
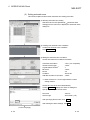
(From the previous page)
3) As the left screen appears, make sure that all
applications have been closed and click OK .
If the applications are running, close all the running
applications.
4) Setup starts.
As the left screen appears, read the information and
click Next> .
5) Enter the name and company name, and then click
Next> .
6) Confirm the registered name and company name.
If they are correct, click Yes .
To make a change, click No to return to the previous
screen.
(To the next page)
3-8
3-8
3 INSTALLATION AND UNINSTALLATION
MELSOFT
(From the previous page)
7) Register the product ID of the product.
Enter the product ID and click Next> .
The product ID is described on the "License certificate"
included in the product.
8) Specify the installation destination folder.
If you do not change the destination folder, click
Next> .
If you change the destination folder, click Browse…
and specify a new drive and folder.
9) Register the MX Sheet to Excel as an add-in software.
Mark the checkbox, when registering an add-in.
(The checkbox is marked by default.)
Click Next> .
For confirmation, the left message appears.
Click OK .
(To the next page)
3-9
3-9
3 INSTALLATION AND UNINSTALLATION
MELSOFT
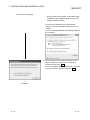
POINT
• To make MX Sheet available, register it to Excel as an add-in software.
Normally, register an add-in software as instructed in step 9).
If the "Register add-in checkbox" is unmarked in step 9), the following message
appears after installation.
Refer to Section 3.1.4 for the manual MX Sheet add-in registration method.
• When installing an add-in for Microsoft Excel 2007 or later, the add-in that hides
the tabs is automatically installed for the Excel.
R
Tab
• If VBA has not been installed when an add-in is installed for Microsoft Excel
2007 or later, the following error message appears, and MX Sheet cannot be
used.
Register add-in manually after installing VBA.
R
3 - 10
3 - 10
3 INSTALLATION AND UNINSTALLATION
(From the previous page)
MELSOFT
•
When user account control is enabled, the
following screen appears.
Click Install .
This screen may appear in several times.
The either of the following screens may appear behind
the Windows Security screen. Then, press the Alt +
Tab keys to bring it to the front.
Click OK on the following screens.
* For Windows XP, the following screen may
appear at installation.
Click Continue .
We checked operations in Windows XP (Problems
never occur after installation.)
The following screen may appear behind another
screen. Then, press the Alt + Tab keys to bring it
to the front.
R
R
10) The left screen appears, when installation is complete.
Click OK .
(To the next page)
3 - 11
3 - 11
3 INSTALLATION AND UNINSTALLATION
MELSOFT
(From the previous page)
* When the left screen appears on Windows Vista ,
regardless of the installation result, choose "This
program installed correctly".
R
Do not choose "Reinstall using recommended
settings", because the installer installs an incorrect
module.
If choose, reinstall MX Sheet with following POINT on
the next page.
11) When making a restart, make sure that the "Yes, I
want to restart my computer now." checkbox is
marked, and then click OK .
When not making a restart, mark the "No, I will restart
my computer later." checkbox, and click OK .
Complete!
3 - 12
3 - 12
3 INSTALLATION AND UNINSTALLATION
MELSOFT
POINT
Note the following instructions when the installer is started from the hard disk drive
of the personal computer for which Windows Vista has been installed.
R
If the "Program Compatibility Assistant" screen appears after the installation, select
"This program installed correctly".
If "Reinstall using recommended settings" is selected by mistake, 'Windows XP SP2
compatibility mode' is set automatically.
Disable the 'Windows XP SP2 compatibility mode' by following the procedure
described below, and perform the reinstallation.
1. Right-click on the setup.exe icon of the installation target in the Windows
explorer, and open the "setup Properties" screen.
2. Select the <<Compatibility>> tab and click Show settings for all users .
3. Uncheck the "Run this program in compatibility mode for:" check box of
compatibility mode in the <<Compatibility for all users>> tab and click OK .
4. Click OK on the "setup Properties" screen.
Uncheck the check box.
3 - 13
3 - 13
3 INSTALLATION AND UNINSTALLATION
MELSOFT
(2) When message appears at start of installation
When starting the installation of this product, the "This package is not in proper
operating environment" message appears, disabling normal completion of
installation.
In such a case, close all applications and perform the (a) or (b) operation.
(a) Installing dcom95.exe or Axdist.exe
Execute dcom95.exe or Axdist.exe provided for MX Sheet.
Install MX Sheet after executing the exe file and restarting the personal
computer.
Execute the exe file on the corresponding operating system as follows.
OS
Microsoft Windows 98 Operating System
R
R
Microsoft Windows NT Workstation Operating System Version 4.0
R
R
File name
dcom95.exe
Axdist.exe
Axdist.exe
(Dcom95.exe and Axdist.exe are in the [Update] folder on CD-ROM.)
3 - 14
3 - 14
3 INSTALLATION AND UNINSTALLATION
MELSOFT
(b) Installing EnvMEL
Execute Setup.exe in the [EnvMEL] folder on this product CD-ROM.
Install this product after executing the [Setup.exe].
: When user account control is enabled, the following screen appears.
Click "Allow" or Yes .
< Windows Vista >
R
< Windows 7 >
R
After executing the above exe file, install the product again. If this product is
not installed properly at this time, reboot the personal computer.
When the following screen appears, regardless of the installation result,
select "This program installed correctly".
Do not select "Reinstall using recommended settings", because the
installer installs an incorrect module.
3 - 15
3 - 15
3 INSTALLATION AND UNINSTALLATION
MELSOFT
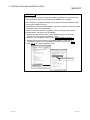
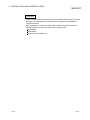
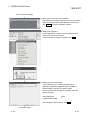
3.1.3 Installation check
Check whether MX Sheet has been installed normally or not as follows.
(1) Start Excel.
(2) If the [MX Sheet] item has been added to the menu bar, MX Sheet
has been installed normally.
< Microsoft Excel 2003 or earlier>
R
MX Sheet icons and menu are displayed.
< Microsoft Excel 2007 or later >
R
MX Sheet icons and menu are displayed.
POINT
(1) If the following screen appears during installation, [MX Sheet] is not registered
to the menu bar.
Register MX Sheet as an add-in software manually.
(2) If the "Register add-in" is not marked in the "Select add-in" dialog box in step 9)
of Section 3.1.2, the [MX Sheet] menu will not be registered to the menu bar.
Register MX Sheet as an add-in software manually after installation.
Refer to Section 3.1.4 for the manual add-in registration method.
3 - 16
3 - 16
3 INSTALLATION AND UNINSTALLATION
MELSOFT
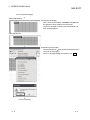
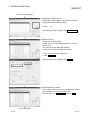
3.1.4 Manual add-in registration
[MX Sheet] menu will not be registered to Excel if "Register add-in" is not marked in
"Select add-in" dialog in step 9) of Section 3.1.2. during installation.
Add-in registration is required to use MX Sheet.
Register MX Sheet as an add-in software in the following procedure.
1) Start Excel.
2) Choose [Tools] [Add-Ins] from the menu bar to
1
display the "Add-Ins" dialog box. *
*1: For Microsoft Excel 2007 or later, follow 2) –1 and
2) –2.
R
2) –1 Select [Office button]
[Excel Options].
2)- 2 The "Excel Options" screen appears. Select
[Add-Ins], change the item in "Manage" to
[Excel Add-ins], and click Go… .
(To the next page)
3 - 17
3 - 17
3 INSTALLATION AND UNINSTALLATION
MELSOFT
(From the previous page)
3) As the left screen appears, click Browse….
4) As the left screen appears, enter "MXShMenu.xla" in
"File name" and click OK .
"MXShMenu.xla" has been stored into [User1
specified folder* ] [Sheet] at installation.
*1: The installation destination folder will be
"C:\Melsec\Sheet" if it has not been changed at
installation.
* The following screen appears in Microsoft Excel
2007 or later.
R
5) As the left screen appears, make sure that the "MX
2
Sheet" checkbox is marked, and click OK . *
*2: For Microsoft Excel 2007 or later, click
Browse... again, and install the add-in that hides
the tabs for Excel by operations 6) and 7).
R
(To the next page)
3 - 18
3 - 18
3 INSTALLATION AND UNINSTALLATION
MELSOFT
(From the previous page)
6) For Microsoft Excel 2007 or later, enter
"MXShRibbon.xlam" in "File name" on the
displayed "Browse" screen, and click OK .
R
7) For Microsoft Excel 2007 or later, check
that "Additional MX Sheet Add-in" is
selected on the displayed "Add-Ins" dialog
box, and click OK .
R
8) Make sure that [MX Sheet] has been
1
added to the menu bar. *
The icon buttons are also displayed.
This means manual add-in registration is
complete.
*1: For Microsoft Excel 2007 or later, the
<< Add-Ins >> tab is added on the
ribbon, and [MX Sheet] group and
icons are added to it.
R
Registration complete!
3 - 19
3 - 19
3 INSTALLATION AND UNINSTALLATION
MELSOFT
POINT
(1) To manually install the add-in "MXShMenu.xla" for Microsoft Excel 2007 or
later, install VBA.
If not installed, the following error message appears and MX Sheet cannot be
used.
R
(2) To manually install the add-in "MXShRibbon.xlam" for Microsoft Excel 2007
or later, install VBA.
If not installed, the following error message appears and MX Sheet cannot be
used.
R
3 - 20
3 - 20
3 INSTALLATION AND UNINSTALLATION
MELSOFT
3.2 Uninstallation
This section explains MX Sheet unistallation.
1) Select "Add or Remove Programs" from Control Panel
and double-click it.
To display Control Panel, select [Start] [Control Panel].
REMARK
When any of Windows 98, Windows NT Workstation
4.0 and Windows 2000 Professional is used, select
"Add or Remove Programs" from Control Panel and
double-click it.
To display Control Panel, select [Start] [Control
Panel].
Select "Uninstall a program" on the Control Panel in
Windows Vista or Windows 7.
R
R
R
R
R
2) Select MX Sheet and click Change/Remove .
REMARK
The left screen is that of Windows XP Professional.
The displayed screen varies with the OS.
Depending on the used OS, perform the following
operation.
R
< Windows 98 or Windows NT Workstation 4.0 >
(a) Click the <<Install and Remove>> tab.
(b) Select MX Sheet.
(c) Click Add/Remove .
R
R
< Windows 2000 Professional >
(a) Click "Add or Remove Programs".
(b) Select MX Sheet.
(c) Click Change/Remove .
R
< Windows Vista or Window 7>
Select "MX Component" on the "Uninstall or change a
program" screen, and click "Uninstall/Change”.
R
R
* When user account control is enabled, the following
screen appears.
Click Continue or Yes .
< Windows Vista
R
>
< Windows 7 >
R
(To the next page)
3 - 21
3 - 21
3 INSTALLATION AND UNINSTALLATION
MELSOFT
(From the previous page)
3) The dialog asks if you really want to uninstall MX
Sheet for confirmation.
To uninstall it, click Yes .
When not uninstalling it, click No .
Clicking No returns to the previous screen.
* Components indicate the installed icons and files.
* When the following screen appears, clicking
No to All deletes MX Sheet software package only.
Clicking Yes , Yes To All deletes the common files
of Windows-based MELSOFT software and may not
start normally.
4) When a message appears and shows that the files
have been deleted, click OK .
Be sure to restart the personal computer, if some files
remain undeleted.
Complete!
3 - 22
3 - 22
3 INSTALLATION AND UNINSTALLATION
MELSOFT
REMARK
When uninstallation is executed using any of the following OSes, MX Sheet remains
displayed in the application list of "Add or Remove Programs" if uninstallation is
completed normally.
After uninstallation is completed, restart "Add or Remove Programs" and check
whether MX Sheet has been removed from the application list.
Windows 98
Windows Me
Windows NT Workstation 4.0
R
R
R
3 - 23
3 - 23
3 INSTALLATION AND UNINSTALLATION
MELSOFT
MEMO
3 - 24
3 - 24
4 SYSTEM CONFIGURATION USED IN THIS MANUAL
MELSOFT
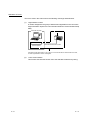
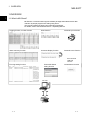
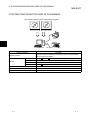
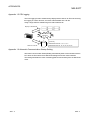
4 SYSTEM CONFIGURATION USED IN THIS MANUAL
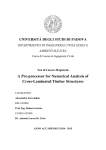
This manual explains system configuration as follows:
MX Sheet
MX Component
Printer
4
COM1
Personal computer
RS- 232
System Equipment
Description
Personal computer that satisfies the operating environment of MX Sheet.
Personal computer
Software
PLC CPU
Refer to Chapter 2 for details.
OS
Microsoft Windows XP Professional Operating System (English version)
MX Sheet
MX Sheet Version 1
MX Component
MX Component Version 3.01B
Excel
Microsoft Excel 2002 (English version)
R
R
R
PLC CPU
Q02HCPU
RS-232 cable
QC30R2 (Connect to COM1 on personal computer side.)
Printer
Printer compliant with the personal computer specifications.
4-1
4-1
4 SYSTEM CONFIGURATION USED IN THIS MANUAL
MELSOFT
MEMO
4
4-2
4-2
5 MX Sheet OPERATION PROCEDURE
MELSOFT
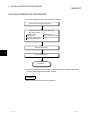
5 MX Sheet OPERATION PROCEDURE
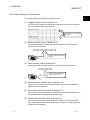
This chapter explains the MX Sheet operation procedure.
Start Excel and save the Excel book. *1
Select the function to be used, and make
MX Sheet settings.
Logging function
Write function
Comment display function
Automatic print function
Monitor function
Alarm summary function
Automatic save function
Start communication.
5
End communication.
Completion
*1: Be sure to save the Excel book before making the MX Sheet settings. MX Sheet
cannot be set unless the Excel book is saved.
REMARK
Refer to the Excel manual for Excel operation.
5-1
5-1
5 MX Sheet OPERATION PROCEDURE
MELSOFT
MEMO
5
5-2
5-2
6 OPERATING MX Sheet
MELSOFT
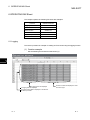
6 OPERATING MX Sheet
This chapter explains the following functions with examples.
Function
Reference Section
Logging function
Section 6.1
Monitor function
Section 6.2
Write function
Section 6.3
Automatic save function
Section 6.4
Automatic print function
Section 6.5
Create button function
Section 6.6
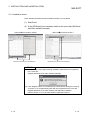
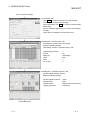
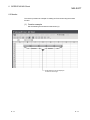
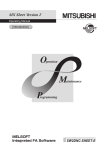
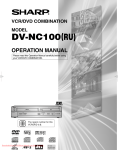
6.1 Logging
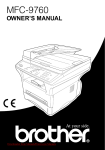
This section provides an example of creating an Excel sheet using the logging function.
(1) Creation example
Set the following Excel sheet as instructed in (2).
6
Logging times are displayed.
10 logging data are displayed.
The latest logging data is displayed on the last line.
Scrolled up in order.
6-1
D0 to D4 contents are displayed in order
from left to right.
6-1
6 OPERATING MX Sheet
MELSOFT
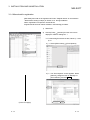
(2) Setting MX Sheet
This section explains the procedure of creating an Excel sheet for logging
function.
1) Saving the Excel book
Start Excel and save the Excel book.
2) Specifying the cell area
Drag the cell (B2 to G11 in this example) on the left screen
to specify the cell area in which logging data will be
displayed.
3) Displaying the "Cell Setting" dialog box
Choose [MX Sheet] [Cell Setting] from the menu bar to
display the "Cell Setting" dialog box.
(To the next page)
6-2
6-2
6
6 OPERATING MX Sheet
MELSOFT
(From the previous page)
4) Setting the <<Use>> tab
Set the setting items of the <<Use>> tab as follows:
After setting, click the <<Access Data>> tab.
Use
Cell Area Name
Cell Area
New data location
Display Contents
Operation when cell is full
: Logging
: Logging function
: B2:G11
: Last Line
: Add date and time details
: To scroll
5) Setting the logical station number of the <<Access Data>> tab
Click Communication Settings to start the Communication
Setup Utility for setting the logical station number.
When the following screen appears, click Yes .
When logging on without administrator authority, the
password input screen appears as follows
< Windows Vista >
R
< Windows 7>
R
(To the next page)
6-3
6-3
6 OPERATING MX Sheet
MELSOFT
(From the previous page)
After inputting the password, click Yes or OK .
The privilege escalation allowance screen on User Account
Control appears as follows.
< Windows Vista >
R
< Windows 7>
R
Clicking "Allow" or Yes executes the Communication
Setup Utility with administrator authority.
When executing without administrator authority, the
Communication Setup data can be checked, however,
when clicking finish button on the Communication Setting
Wizard, the error occurs as follows.
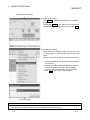
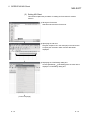
6) Starting the Communication Setting Wizard
After starting the Communication Setup Utility, click the
<<Target Setting>> tab and click Wizard .
(To the next page)
TERM
What is logical station?
A number assigned to the group of data that is integrated from the connection target information required
for communication within the Communication Setup Utility.
6-4
6-4
6 OPERATING MX Sheet
MELSOFT
(From the previous page)
7) Setting the logical station number
Enter "1" in "Logical station number" and click Next> .
8) Setting the personal computer side interface
Make the following settings and click Next> .
PC side I/F
Connect port
Time out
: Serial
: COM1
: 10000
9) Setting the PLC side interface
Make the following settings and click Next> .
PLC side I/F
CPU type
Transmission speed
Control
: CPU module
: Q02(H)
: 19200
: DTR or RTS Control
(To the next page)
6-5
6-5
6 OPERATING MX Sheet
MELSOFT
(From the previous page)
10) Selecting the communication path
Make the following settings and click Next> .
Station type
Multiple CPU
: Host station
: None
11) Enter any word (CPU COM_Q02H in this example) and
click Finish .
12) Check whether the logical station number settings
displayed on the <<Target setting>> tab of the
Communication Setup Utility are correct or not.
After checking, click the <<Connection test>> tab.
(To the next page)
6-6
6-6
6 OPERATING MX Sheet
MELSOFT
(From the previous page)
13) Connection test
Click Test to make sure that the PLC and personal
computer are normally communicating.
After confirmation, click Exit to close the Communication
Setup Utility.
An error message appears if they are not communicating
normally.
Check the error definition and remove the error.
14) Setting the <<Access Data>> tab
Set the device of which data to be logged.
Make the following settings.
After setting, click the <<Operation time>> tab.
Logical Station Number
Device
Data type
Value
Zoom
No. of cells
:1
: D0
: 16bit integer
: DEC
:1
:5
15) Setting the <<Operation Interval>> tab
Set the logging operation interval.
Make the following settings.
Set the Operation Interval
Operation day
Operation time
Logging Time Zone
: Check
: Daily
: Regular interval (5 seconds)
: Log Always
(To the next page)
6-7
6-7
6 OPERATING MX Sheet
MELSOFT
(From the previous page)
16) Applying the settings
Click Apply to enable the settings of the "Cell Setting"
dialog box.
After clicking Apply , check that the cell area has been
registered as shown on the left screen, and click OK .
17) Checking the settings
Check whether the settings in steps 1) to 16) are correct
or not by using the 1 shot communication function of MX
Sheet.
Make 1 shot communication in the following procedure.
1. Choose [MX Sheet] [1 Shot Communication] from
the menu bar.
2. As the "1 Shot Communication" dialog box appears,
select the cell area name set in step 4) (logging
function in this example) as the "Cell Area Name".
3. Click OK to start 1 shot communication.
(To the next page)
TERM
What is 1 shot communication?
This function executes the function set to the selected cell area at any timing.
6-8
6-8
6 OPERATING MX Sheet
MELSOFT
(From the previous page)
<Before adjustment>
18) Adjusting the display
After 1 shot communication, "########" is displayed in
the date/time cell as shown on the left screen.
Adjust the cell width of Column B so that the date and
time can be displayed.
<After adjustment>
19) Starting communication
Choose [MX Sheet] [Start Communication] from the
menu bar to start logging.
As the confirmation dialog box appears, click Yes .
(To the next page)
6-9
6-9
6 OPERATING MX Sheet
MELSOFT
(From the previous page)
20) Ending communication
Choose [MX Sheet] [End Communication] from the
menu bar to end logging.
Complete!
6 - 10
The Excel sheet for logging function is now completed.
6 - 10
6 OPERATING MX Sheet
MELSOFT
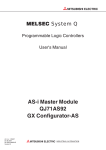
6.2 Monitor
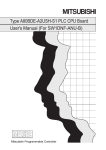
This section provides an example of creating an Excel sheet using the monitor
function.
(1) Creation example
Set the following Excel sheet as instructed in (2).
Access data D0 to D4 are displayed
in order from left to right .
6 - 11
6 - 11
6 OPERATING MX Sheet
MELSOFT
(2) Setting MX Sheet
This section explains the procedure of creating an Excel sheet for monitor
function.
1) Saving the Excel book
Start Excel and save the Excel book.
2) Specifying the cell area
Drag the cell (B2 to F2 in this example) on the left screen
to specify the cell area in which monitor data will be
displayed.
3) Displaying the "Cell Setting" dialog box
Choose [MX Sheet] [Cell Setting] from the menu bar to
display the "Cell Setting" dialog box.
(To the next page)
6 - 12
6 - 12
6 OPERATING MX Sheet
MELSOFT
(From the previous page)
4) Setting the <<Use>> tab
Set the setting items of the <<Use>> tab as follows:
After setting, click the <<Access Data>> tab.
Use
Cell Area Name
Cell Area
Cell Display Direction
: Monitor
: Monitor function
: B2:F2
: Left to Right
5) Setting the <<Access Data>> tab
Set the device of which data to be monitored.
Make the following settings.
After setting, click the <<Operation Interval>> tab.
*1
Logical Station Number
Device
Data type
Value
Zoom
No. of cells
:1
: D0
: 16bit integer
: DEC
:1
:5
*1: Refer to Section 6.1 for the logical station number
setting method.
6) Setting the <<Operation Interval>> tab
Set the monitor operation interval.
Make the following settings.
Set the Operation Interval
Operation day
Operation time
: Check
: Daily
: Regular interval (5 seconds)
(To the next page)
6 - 13
6 - 13
6 OPERATING MX Sheet
MELSOFT
(From the previous page)
7) Applying the settings
Click Apply to enable the settings of the "Cell Setting"
dialog box.
After clicking Apply , check that the cell area has been
registered as shown on the left screen, and click OK .
8) Checking the settings
Check whether the settings in steps 1) to 7) are correct or
not by using the 1 shot communication function of MX
Sheet.
Make 1 shot communication in the following procedure.
1. Choose [MX Sheet] [1 Shot Communication] from the
menu bar.
2. As the "1 Shot Communication" dialog box appears,
select the cell area name set in step 4) (monitor function
in this example) as the "Cell Area Name".
3. Click OK to start 1 shot communication.
(To the next page)
6 - 14
6 - 14
6 OPERATING MX Sheet
MELSOFT
(From the previous page)
9) Starting communication
Choose [MX Sheet] [Start Communication] from the
menu bar to start monitor.
As the confirmation dialog box appears, click Yes .
10) Ending communication
Choose [MX Sheet] [End Communication] from the
menu bar to exit monitor.
After ending the communication, delete the monitor data.
Complete!
6 - 15
The Excel sheet for monitor function is now completed.
6 - 15
6 OPERATING MX Sheet
MELSOFT
6.3 Data Write
This section provides an example of creating an Excel sheet using the write function.
(1) Creation example
Set the following Excel sheet as instructed in (2).
Enter values to be written to D0 - D2 in order from left to right.
6 - 16
6 - 16
6 OPERATING MX Sheet
MELSOFT
(2) Setting MX Sheet
This section explains the procedure of creating an Excel sheet for monitor
function.
1) Saving the Excel book
Start Excel and save the Excel book.
2) Specifying the cell area
Drag the cell (B2 to D2 in this example) on the left screen
to specify the cell area in which written data will be
entered.
3) Displaying the "Cell Setting" dialog box
Choose [MX Sheet] [Cell Setting] from the menu bar to
display the "Cell Setting" dialog box.
(To the next page)
6 - 17
6 - 17
6 OPERATING MX Sheet
MELSOFT
(From the previous page)
4) Setting the <<Use>> tab
Set the setting items of the <<Use>> tab as follows:
After setting, click the <<Access Data>> tab.
Use
Cell Area Name
Cell Area
Cell Display Direction
: Write
: Write function
: B2:D2
: Left to Right
5) Setting the <<Access Data>> tab
Set the device where data will be written.
Make the following settings.
After setting, click the <<Operation Interval>> tab.
*1
Logical Station Number
Device
Data type
Value
Zoom
No. of cells
:1
: D0
: 16bit integer
: DEC
:1
:3
*1: Refer to Section 6.1 for the logical station number
setting method.
6) Setting the <<Operation Interval>> tab
Set the write operation interval.
Make the following settings.
Set the Operation Interval
Operation day
Operation time
: Check
: Daily
: Regular interval (5 seconds)
(To the next page)
6 - 18
6 - 18
6 OPERATING MX Sheet
MELSOFT
(From the previous page)
7) Applying the settings
Click Apply to enable the settings of the "Cell Setting"
dialog box.
After clicking Apply , check that the cell area has been
registered as shown on the left screen, and click OK .
8) Starting communication
Choose [MX Sheet] [Start Communication] from the
menu bar to start writing.
As the confirmation dialog box appears, click Yes .
(To the next page)
6 - 19
6 - 19
6 OPERATING MX Sheet
MELSOFT
(From the previous page)
9) Entering the written values
Enter the values to be written to devices into the cell area
specified in step 2).
Cell B2
: 1 (value to be written to D0)
Cell C2
: 2 (value to be written to D1)
Cell D2
: 3 (value to be written to D2)
Make sure that the data on Excel are written to the PLC
devices.
10) Ending communication
Choose [MX Sheet] [End Communication] from the
menu bar to end writing.
Complete!
6 - 20
The Excel sheet for write function is now completed.
6 - 20
6 OPERATING MX Sheet
MELSOFT
6.4 Automatic Save
This section explains a setting procedure for automatically saving the Excel book
during MX Sheet operation.
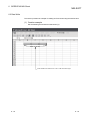
(1) Setting example
Automatic save condition
Automatically saved file name
: Saved when the device (Y0) turns on.
: Date and time are added to the file auto.xls.
Automatically saved Excel file
6 - 21
6 - 21
6 OPERATING MX Sheet
MELSOFT
(2) Setting automatic save
This section explains an Excel book automatic save setting procedure.
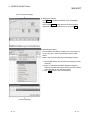
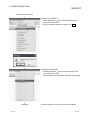
1) Selecting automatic save setting
Start Excel and choose [MX Sheet] [Automatic Save
Setting] from the menu bar to display the "Automatic Save"
dialog box.
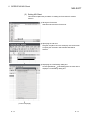
2) Creating new automatic save conditions
Create new automatic save conditions.
Click Create New .
3) Setting the automatic save conditions
Set the automatic save conditions as follows:
Automatic Save Name
Set the Device trigger
*1
Logical Station Number
Bit device
Device
Condition
Add date and time to File name
: Line 1 (Lot completion)
: Check
:1
: Check
: Y0
: When ON
: Check
*1: Refer to Section 6.1 for the logical station number
setting method.
Set the file name to be saved automatically.
Clicking Browse... displays the "Save As" dialog box.
Specify any save place and file name.
File name
Save as type
: auto.xls
: Excel book (*.xls)
After specifying the file name, click Save .
After making the above settings, click OK .
(To the next page)
6 - 22
6 - 22
6 OPERATING MX Sheet
MELSOFT
(From the previous page)
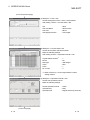
4) Specifying the automatic save conditions
After making sure that the automatic save name has been
added to the list and the Enable filed has a check mark,
click Close to close the Automatic save list.
5) Starting communication
Choose [MX Sheet] [Start Communication] from the
menu bar to start communication.
As the confirmation dialog box appears, click Yes .
6) Starting the PLC Monitor Utility
From the [Start] menu, choose [All Programs]
[MELSOFT Application] [MX Component] [PLC
Monitor Utility] to start the PLC Monitor Utility.
As the "Transfer setting" dialog box appears, make the
following settings.
Utility setting type
Logical station number
: Check
:1
After making the above settings, click OK .
(To the next page)
6 - 23
6 - 23
6 OPERATING MX Sheet
MELSOFT
(From the previous page)
7) Specifying the monitor device
Choose the <<Device Batch>> tab of the PLC Monitor
Utility and make the following setting.
Device
: Y0
After making the above settings, click Start monitor .
8) Writing to device
Change the Y0 device status.
Double-click the monitor display area of the <<Device
Batch>> tab.
The "Write to Device" dialog box appears.
Forcibly turn on Y0 in the following procedure.
1. Type "Y0" in "Device" in "Bit Device".
2. Click Force ON .
After making the above settings, click Close .
9) Checking the device status
The Y0 device status has been changed as set in step 8).
Check whether it has been changed or not.
After checking, click Stop monitor and then Exit .
(To the next page)
6 - 24
6 - 24
6 OPERATING MX Sheet
MELSOFT
(From the previous page)
10) Checking the saved file
The operation in step 8) activates the automatic save
setting function and saves the Excel book automatically.
Start Explorer and check whether the file specified in step
3) has been saved correctly.
After checking the file, choose [MX Sheet] [End
Communication] from the menu bar to end
communication.
Setting complete!
6 - 25
The automatic save setting is now completed.
6 - 25
6 OPERATING MX Sheet
MELSOFT
6.5 Automatic Print
This section explains a setting procedure for automatically printing the whole Excel
book or specified Excel sheets during MX Sheet operation.
(1) Setting example
Automatic print condition
Print area
: Printed at 17:00 every day.
: Sheet 1 and Sheet 3 are printed.
(2) Setting automatic print
This section explains an Excel sheet automatic print setting procedure.
1) Selecting automatic print setting
Start Excel and choose [MX Sheet] [Automatic Print
Setting] on the menu bar to display the "Automatic Print"
dialog box.
2) Creating new automatic print conditions
Create new automatic print conditions.
Click Create New .
3) Setting the automatic print conditions
Set the automatic print conditions.
Set as indicated below.
Automatic Print Name
Set the date and time
Operation day
Operation time
Print Area
: Line 1 (Daily report)
: Check
: Daily
: Time table (17:00)
: Specify the sheet
(Sheet 1 and Sheet 3) *1
After making the above setting, click OK .
*1: Multiple sheets can be specified.
Specify the corresponding sheet only.
(To the next page)
6 - 26
6 - 26
6 OPERATING MX Sheet
MELSOFT
(From the previous page)
4) Specifying the automatic print conditions
After making sure that the automatic print name has been
added to the list and the Enable filed has a check mark,
click Close to close the Automatic print list.
Setting complete!
POINT
If multiple printers are set within the personal computer, the default printer (set
within [My Computer] [Printers]) is used to print the Excel sheet, when "Automatic
Print" setting is selected.
6 - 27
6 - 27
6 OPERATING MX Sheet
MELSOFT
6.6 Using the Button
This section explains a convenient communication starting method by Create Button.
(1) Setting example
1
Button type*
: Start Communication button
MX Sheet setting condition : Logging setting (Refer to Section 6.1)
*1: The End Communication or 1 Shot Communication button is also available.
(2) Creating the button and starting communication
The following describes a procedure from button creation to a communication
start using the button.
1) Choosing Create Button
Start Excel and specify the cell where the button will be
placed.
Choose [MX Sheet] - [Create Button] - [Start
Communication Button] on the menu bar.
The Start Communication Button is placed in the specified
2
cell position. *
*2: The display characters and character font of the
created button can be changed. Refer to the MX Sheet
Version 1 Operating Manual for details.
2) Starting communication
Click the Start Communication Button created in Step 1).
Complete!
6 - 28
6 - 28
6 OPERATING MX Sheet
MELSOFT
MEMO
6 - 29
6 - 29
APPENDICES
MELSOFT
APPENDICES
Appendix 1 Useful Functions of MX Sheet
In addition to the functions explained in this manual (Chapter 6), MX Sheet has useful
functions. This section provides the outlines and brief explanations of the functions.
For more details, refer to the MX Sheet Version 1 Operating Manual.
Appendix 1.1 Alarm summary
The alarm summary function converts the ON/OFF information into the corresponding
alarm comment character strings and accumulates them on an Excel sheet as an
alarm history.
The followings are available by specifying in advance when the alarm history reaches
the last line.
Scrolling
Printing Excel sheet
Saving Excel book
The line operation ratio and other conditions can be checked easily by accumulating
the alarm data history.
Alarm data are accumulated as
bit devices turn on/off.
APP
APP - 1
APP - 1
APPENDICES
MELSOFT
Appendix 1.2 Comment display
The comment display function converts a bit device value or word device value into the
corresponding comment character strings and displays them on an Excel sheet. (A
comment is displayed according to the change of device value.)
In the following example, the upper and lower limit values are set for a device so that
the corresponding warning message will appear when the device value falls outside
the range.
Temperature
rise
Temperature
fall
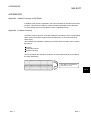
Appendix 1.3 Device trigger
The device trigger function sets the device condition for device data collection/write,
and collects or writes the device data when the set device condition holds.
<Collecting/Writing device data while bit device is on>
Collecting/Writing
device data
Collecting/Writing
device data
ON
OFF
Target functions
APP
Logging
Monitor
Write
Alarm summary
Comment display
Automatic save
Automatic print
APP - 2
APP - 2
APPENDICES
MELSOFT
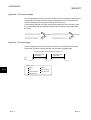
Appendix 1.4 Handshake
Setting a handshake between the PLC and personal computer ensures the device data
collection/write.
The handshake function determines whether to send data or not, based on the send
request and receive response signals exchanged between the personal computer and
PLC, before data updating.
When handshake begins with PLC side request
Responding device
on the PC side
Device data
collection/write
Requesting device
on the PLC side
When handshake begins with PC side request
Requesting device
on the PC side
Device data
collection/write
Responding device
on the PLC side
APP - 3
APP - 3
APPENDICES
MELSOFT
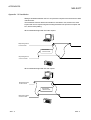
Appendix 1.5 CSV logging
The CSV logging function simultaneously displays device data on an Excel sheet using
the logging or monitor function, and saves collected data as a CSV file.
Using a single CSV file enables long-term data collection file.
Display on Excel sheet
Simultaneous
execution!
[CSV file]
2002/05/04 08:00:00, 0, 0, 0, 0, 0, 0
Save into CSV file
2002/05/04 08:00:10, 10, 20, 30, 40, 50, 60
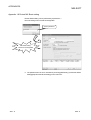
Appendix 1.6 Automatic Communication Startup Setting
Automatic Communication Startup Setting automatically starts communication with the
PLC when the Excel book where MX Sheet settings have been made is started.
This setting eliminates the need of selecting [Start Communication] from the MX Sheet
menu.
APP - 4
APP - 4
APPENDICES
MELSOFT
Appendix 1.7 Data conversion function
The data conversion function converts the communication settings of MX Links
(SW3D5F-CSKP-E) and various settings of MX Chart (SW3D5F-OLEX-E) into the
logical station number of MX Component and cell settings of MX Sheet, respectively.
This function ensures efficient utilization of the conventional assets.
<Starting method>
[Explorer]
APP - 5
[MELSEC]
[Sheet]
[MXComShConv.exe]
APP - 5
APPENDICES
MELSOFT
Appendix 1.8 Protect MX Sheet setting
1
The MX Sheet setting can be protected by a password. *
The user settings can be made unchangeable.
Set the password.
MX Sheet setting
becomes unchangeable!
*1: The password can be set or cancelled by choosing [MX Sheet] - [Protect MX Sheet
setting]/[Unprotect MX Sheet setting] on the menu bar.
APP - 6
APP - 6
APPENDICES
MELSOFT
Appendix 1.9 Error log setting
When communication is started, an Error Log sheet that indicates the communication
status of MX Sheet is created, and the communication status, error information and
corrective actions are output.
To this Error Log sheet, the following error log setting can be made by Option setting.
(1) Setting the error log types to be output
The error log types (Information, Warning, Error) to be output can be specified.
(Setting for outputting all error log)
(2) Automatic Error Log sheet display change setting
At error occurrence, the Error Log sheet displayed can be automatically changed.
Communication error
occurrence
Error Log sheet is displayed.
(Automatic display change)
(3) Error log clear setting at communication start
At the start of communication, the error log can be cleared.
APP - 7
APP - 7
Microsoft, Windows and Windows NT are registered trademarks of Microsoft Corporation in the United
States and other countries.
Pentium is a registered trademark of Intel Corporation in the United States and other countries.
Other company and product names herein are either trademarks of registered trademarks of their respective
owners.
SH (NA)-080347E-J