1
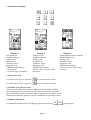
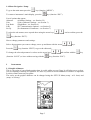
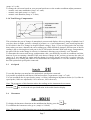
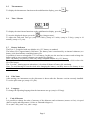
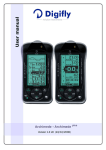
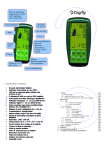
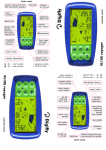
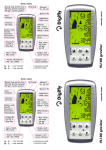
USER MANUAL
Rev. 1.2 Firmware 28
Page 1
Congratulations
Thank you for choosing Digifly!
You have purchased a high technology instrument designed expressly for free flight. The multiple
functions and flight data it provides effectively make this an on board computer. Learning to use this
instrument will make your flying easier in terms of performance and safety. It will enable you to improve
your flying technique and make piloting decisions more quickly, thanks to the comprehensive flight
information that is provided. This may be reinforced with the ability to download and analyze your flight
data afterwards. Our designers can foresee future software developments, so the software at the heart of
this instrument can be updated at any time via the Internet using the optional Digifly PC cable.
Digifly International Guarantee
Dear Customer,
Thank you for purchasing this Digifly product which has been designed and manufactured to the highest
quality standards. Digifly warrants this product to be free from defects in materials and workmanship for
3 years from the date of purchase.
The Digifly guarantee applies provided the product is handled properly for its intended use, in accordance
with its operating instructions and upon presentation of the original invoice or cash receipt, indicating the
date of purchase, dealer’s name, model and serial number of the instrument. The customer is however,
responsible for any transportation costs. The unit must be securely packaged for return.
The Digifly guarantee may not apply if:
- The documents have been altered in any way or made illegible;
- Repairs or product modifications and alterations have been executed by unauthorized person or service;
- Damage is caused by accidents including but not limited to lightning, water or fire, misuse or neglect.
Digifly assumes no responsibility for special, incidental, punitive or consequential damages, or loss of
use. If your Digifly product is not working correctly or is defective, please contact your Digifly dealer. In
order to avoid unnecessary inconvenience, we advise you to read the operating instructions carefully
before contacting your dealer.
Digifly Europe s.r.l.
Via Stradelli Guelfi 53
40138 Bologna - Italia
Tel. +39 051 533777
Internet: www.digifly.com
E-Mail: [email protected]
Page 2
INDEX
Standard and Optional Accessories
1. Keyboard and Display
1.1 Power On / Power Off
1.2 Normal / Long Key Pressure
1.3 Display Adjustment
1.4 Menu Navigation / Setup
Pag.
Pag.
Pag.
Pag.
Pag.
4
4
4
4
5
2. Instruments
2.1 Graphic Altimeter
2.2 Altimeters
2.3 Variometer
2.3.1 Superfast Vario
2.3.2 Intellivario
2.3.3 Analogue Vario
2.3.4 Integrator Vario
2.3.5 Acoustic Vario
2.3.6 Total Energy Compensation
2.3 Air Speed
2.4 Barometer
2.5 Thermometer
2.6 Time / Chrono
2.7 Battery Indicator
2.8 Pilot Name
2.9 Language
Pag.
Pag.
Pag.
Pag.
Pag.
Pag.
Pag.
Pag.
Pag.
Pag.
Pag.
Pag.
Pag.
Pag.
Pag.
Pag.
Pag.
5
6
6
6
6
6
6
6
6
7
7
7
8
8
8
8
8
3. Unit of Measure
Pag. 8
4. Log Book
Pag. 9
5. PC Link
Pag. 9
6. Technical Features
Pag. 10
7. Set Up Menu (Parameter Table)
Pag. 11
Standard and Optional Accessories
The Flyer 2 has the following accessories as standard:
Protective Case
Leg Strap
One AA Battery
Optional accessories:
PC cable to allow download of flight data & to obtain software updates from the Internet.
Page 3
1. Keyboard and Display
Display 1
Full display of:
Graphic altimeter
Analog vario
Altimeter A1
Altimeter A2/A3
Integrator vario
2 Multifunction displays:
- Chrono, time
- air speed, temp., barometer
Display 2
Display 3
Display 2 with:
Graphic altimeter
Analog vario
Altimeter A1
Altimeter A2/A3
Integrator vario
Multifunction display:
Chrono, time, air speed, temp.,
barometer
Simple display (large numerals)
Digital altimeter A1
Analog vario
Altimeter A2/A3
Integrator vario
Multifunction display:
Chrono, time, air speed, temp.,
barometer
1.1 Power On / Off
To switch on the Flyer 2, press the
key at least for 4 seconds.
To switch off the Flyer 2, press the
key at least for 4 seconds.
1.2 Normal / Long Key Pressure
The key pressure used on the Flyer 2 influences the functions available.
For a long key pressure, you must keep the button pressed for 2 seconds.
For a normal key pressure, the button must be pressed for less than a second.
When not specified, the pressure has to be considered as a normal pressure.
1.3 Display Adjustment
To change the contrast of the LCD display, press the arrow keys
Page 4
,
(long pressure).
1.4 Menu Navigation / Setup
To go to the main menu press the
key (function “MENU”).
To return to instrument’s main display, press the
key (function “ESC”).
List of options that appear:
Altimeter
(Altimeter Settings – see Section 2.2)
Unit
(Unit of Measure Settings – see Section 3)
Log Book
(Flight Data – see Section 4 )
Link
(PC Communication Options – see Section 5)
Set Up
(Set Instrument’s Parameters – see Section 7)
To select the sub menus, move up and down using the arrow keys
,
, and to confirm, press the
key (function “ENT”).
How to change parameters and settings:
Select the parameter you want to change, move up and down with the arrow
Press the
keys.
key (function “EDIT”) to go to the edit mode.
To change the selected parameter’s values use the arrow keys
(function “SAVE”) or leave without saving with the
2
,
,
and confirm with the
key
key (function “ESC”).
Instruments
2.1 Graphic Altimeter
This is a live plot of your altitude against time, it scrolls whilst you are flying. It will help you to see how
you are climbing or turning in a thermal. It is also very useful in weak conditions in which it is important
to achieve flatter turns on your glider.
The scales on the graphic altimeter can be changed using the SET UP Menu (setup \ n.19 barx) and
(setup \ n.20 bary).
Page 5
2.2 Altimeters
3 barometric altimeters are shown.
To zero the displayed altimeter (only A2 or A3) press the
key (long pressure).
All 3 altimeters can be adjusted.
How to adjust altimeters.
Go to Altimeter menu “ALTIMETER”
To select which altimeter (A1, A2, A3) you want to adjust, move up and down using the arrow keys
,
, and press the
key (function “EDIT”).
To adjust the altimeter value use the arrow keys
“SAVE”) or leave without saving with the
,
and confirm with the
key (function
key (function “ESC”).
In menu “ALTIMETER” to set again all three altimeter to standard parameter (1.013,02 mb),
press
2.3
key (long pressure). A confirmation yes/no is requested.
Variometers
2.3.1 Superfast Vario
The Flyer 2 has a very fast pressure sensor and an excellent data acquisition system that allows the
instrument to perform as a very fast and accurate vario (updated 20 times a second).
To adjust superfast vario value use the arrow keys
,
(default parameter 35).
2.3.2 Intellivario
This is a revolutionary system designed by Digifly which is based on the use of a sophisticated digital
filters. Is immune to radio interference. All the variometric functions are subject to these filters.
2.3.3 Analog Vario
This shows the instantaneous vario reading. This information is shown on the analogue display on the left
of the screen by a bar graph, indicating lift or sink.
Pressing the
scale.
key (long pressure), the vario scale can be adjusted to display a 1, 2, 4, 6, 8, or 10 m/s
2.3.4 Integrator Vario
This shows the integrated (average) vario data on the screen. Or rather, a slowed down version of the
instantaneous reading. This value is adjustable as it can be delayed or immediate. If you set it to a low
value, its value will be close to the instantaneous reading. Normally this is the most common setting. It
can also be used for example to see if the rate of lift or sink is improving or getting worse. If the
integrator vario reading over a number of seconds is higher than the actual reading, it means that you are
doing worse than before. You can use it to help you find the core of the thermal. You can change the
integration interval by setting parameter (setup \ n. 6 inte) between 0 and 60 seconds.
2.3.5 Acoustic Vario
Indicates the instantaneous values of the vario with a modulated tone. The volume is adjustable over three
levels pressing the
key. You can set the threshold level for lift, (setup \ n.1 v-up), and for sink,
Page 6
(setup \ n.2 v-dw).
To change the vario tone based on your personal preference or the weather conditions adjust parameter:
- acoustic vario tone modulation (setup \ n.3 soun).
- acoustic vario pitch (setup \ n. 4 pitc)
- acoustic vario duration (setup \ n. 5 dura)
2.3.6 Total Energy Compensation
This calculates the rate of change of atmospheric pressure and displays this as a change of altitude; but if
you slow down in flight, you have a change of pressure, so a “non-compensated” vario would register this
as lift which is due to a change in airspeed (kinetic energy). Now, if you are flying quite fast and slow
down when you enter a thermal, the vario reading gets a little difficult to interpret, because part of the lift
reading is due to slowing down, and part is due to lift from the thermal. With total energy compensation,
the part of lift due to the change in velocity is eliminated, allowing you to identify “real” thermals.
To determine the correct total energy compensation value, you should fly in calm air conditions and slow
down as if you are entering a thermal. If the vario shows a change in lift, you have to increase the value of
(setup \ n. 8 tec) and then try again until the change in velocity doesn’t record lift. A typical value for
hang gliders is 65. Setting this value to zero deactivates the compensation. To use this function, you must
have the optional air speed probe connected.
2.3
Air Speed
To use this function you must have the optional air speed probe connected.
It is possible to adjust the stall alarm visual and acoustic via parameter (setup \ n.7 stal).
You can recalibrate the air speed probe (setup \ n.9 kias), indicating an adjustment factor (in %) of the air
speed probe (100%=no adjustment, 110%=increase , 90%=decrease).
Note: The wrong use of this function makes the readings on the instrument less accurate.
Press the
2.4
key to select the air speed indication in the multi function display.
Barometer
To display the barometer function on the multifunction display, press the
To recalibrate the barometer value go to (setup\ n. 10 kbar).
key.
Note: The wrong use of this function may create less accurate readings of the barometer & altimeters.
Page 7
2.5
Thermometer
To display the thermometer function on the multifunction display, press the
2.6
key .
Time / Chrono
To display the time/chrono functions on the multifunction display, press the
key .
To zero the displayed chrono, press the
key (long pressure).
To adjust the Date and Time go (setup\ n.11 hour), (setup\ n.12 min), (setup\ n.13 day), (setup\ n.14
month), (setup\ n.15 year).
2.7
Battery Indicator
The Flyer 2 is supplied with one alkaline AA 1.5V battery as standard.
The battery life is approximately 200 hours. The battery state is monitored by an internal voltmeter (see
battery icon) that indicates remaining battery life.
Is possible to insert a rechargeable 1.2V AA battery. In this case the user has to remove and recharge the
battery with its own external recharger (not supplied by Digifly).
Note: The battery icon starts at 100% only using a standard alkaline AA 1.5V battery.
Battery life can be influenced by use in extreme conditions such as cold and humidity, which reduces the
life of the battery.
The “Low bat” warning appears when there is less than 20 hours of battery life remaining.
Note: To avoid having to reset the clock after changing the battery, carefully insert a new battery in less
than 60 seconds.
2.8
Pilot Name
After turning your instrument on, the pilot name is shown after the firmware version currently installed.
To set the pilot name go (setup\ n.21 pilo).
2.9
Language
To change the operating language that the instrument uses go (setup\ n.22 lang).
3
Unit of Measure
It is possible to change the units of measure of the altimeters and variometers (meters or feet), air speed
(km/h or mph) and temperature (Celsius or Fahrenheit degrees).
Go to (unit \ alti), (unit \ ias), (unit \ temp).
Page 8
4
Log Book
Flight data can be recorded (up to 50 flights).
Every flight recorded includes the following information:
-
Take off date and time, duration of flight and total gain of altitude.
Minimum and maximum values of altimeter A1, vario and air speed.
Go to Log book menu “LOG BOOK”
A list of all recorded flights with take off date and time is displayed. First flight is latest one.
To select which flight you want to display, move up and down using the arrow keys
press the
, and
key (function “ENT”).
To scroll in to others flight use the arrow keys
Press
,
,
.
key (function “ESC”) to go back to previous menu.
AUTOMATIC START RECORD MODE
As standard the flight recorder is in automatic start record mode (setup\ n.16 autr).
In the automatic start record mode, the recorder will start on take off provided there is a change in height
of 2 meters in less then 4 seconds). The flight recorder will stop when the instrument is turned off.
In the automatic start record mode it is possible to change these two parameters. The change in meters
(setup\ n.17 r-mt) and seconds (setup\ n.18 r-ti) required for the Flyer 2 to automatically start recording a
flight.
ALWAYS RECORD MODE
In the always records mode (setup\ n.16 autr) the flight recorder starts recording when the instrument is
turned on and stops when the instrument is turned off.
MANUAL RECORD MODE
In the manual record mode (setup\ n.16 autr) you may manually start and stop the flight recorder by
pressing the
key (long pressure).
To cancel all flights. In log book menu, press
A confirmation yes/no is requested.
key (long pressure).
5
PC Link
The software on your Flyer 2 (firmware) can be updated as new releases are made available by Digifly.
This will allow your flyer 2 to be kept up to date with new functions and improvements.
Software may be downloaded from the Digifly web site & installed using the optional PC cable.
In the menu PC link is also possible to download your flight data to your PC.
Page 9
6
Technical Features
Graphic altimeter
3 Altimeters from –9999 to + 19999 mt (from –9999 to 29527 ft) with adjustable QNH
Pressure adjustment on each altimeter
Superfast vario
Vario with dynamic filter ' IntelliVario’
Adjustable vario sensitivity
Acoustic vario with adjustable levels, volume and tone
Analogue vario +/- 12 m/s (2400 ft/min)
Digital vario +/- 25 m/s (5000 ft/min)
Vario integrator adjustable 0 to 60 sec
Total energy compensation (with optional air speed probe)
Input for optional air speed probe 150 km/h (93 mph) with user calibration
Adjustable stall alarm visual and acoustic (with optional air speed probe)
Barometer ( range 300 to 1200 mB ) with user calibration
Thermometer (range -30°C to +70°C) (range -22 °F to +158 °F)
Constant battery monitoring
Date and time, chronometer, flight timer
Flight recorder up to 50 flights
Auto start recorder function
Adjustable units of measure
High resolution graphic LCD display 128 x 64 pixels
Contrast adjustment
PC connection (high speed up to 115kbps)
Updateable software from Internet using optional PC cable
Only one AA battery required (1.2V or 1.5V)
AA rechargeable battery compatibility
Battery life 200 hours
Dimensions (H x L x D) 144mm x 72mm x 25mm
Weight (with battery) 145g
The instrument is supplied with: leg strap and protective case & AA battery
3 years warranty
Page 10
7
Set Up Menu (parameter table)
The following is a list of parameters that can be adjusted.
For each parameter you can see the range of values, factory setting (default) and the unit of measure.
Menu parameter -> SETUP
n
Name Description
Range
Default
Unit
1
2
3
4
5
6
7
8
9
10
11
12
13
14
15
16
17
18
19
20
21
22
0 - 25
0 - 25
low/med/high/ultra
20 - 80
low/med/high
0 - 60
0 - 150
0 - 100
50 - 200
+/- 200
0 - 23
0 - 59
1 – 31
1 – 12
0 – 99
manual/always/auto
1 - 30
1 - 30
0.3 - 60
0.3 - 100
6 letters
IT/UK/D/F/E
0.05
3.5
ultra
50
high
0
0
0
100
0
---------------auto
2
4
1
0.3
---UK
m/s
m/s
---%
---sec
km/h
%
%
mB
hour
minute
day
month
year
---mt
sec/pixels
sec/pixels
mt
-------
Menu parameter -> UNIT
n
Name Description
Options
Default
1
2
3
mt or ft
km/h or mph
°C or °F
mt
km/h
°C
v-up
v-dw
soun
pitc
dura
inte
stal
tec
kias
kbar
hour
min
day
month
year
autr
r-ds
r-ti
barx
bary
pilo
lang
alti
ias
temp
vario lift setting
vario sink setting
vario tone
pitch acoustic vario
acoustic vario duration
vario integrator
stall alarm level
total energy compen.
air speed calibration
barometer calibration
hours
minutes
day
month
year
autorecorder
autorec. meters
autorec. seconds
graphic altimeter x
graphic altimeter y
pilot name
language
altimeter - vario
air speed
temperature
Page 11