1
1
A Division
of the Setpoint Technology Group
A user manual detailing the various options in the NetCheck software package. (Version 5)
PINETOWN
GAUTENG
TEL (031) 7005460
FAX (031) 7005471
Int Dialing Code (27) (31)
Support: Prinda Narasi
TEL (011) 3926322
FAX (011) 3926340
Int Dialing Code (27) (11)
Support: Devi Armugam
MANAGING DIRECTOR:
Neil Robinson BSc (Hons)
1
NetCheck User Manual
Contents
Page
1. Introduction to NetCheck
2. Installing NetCheck
3. Using NetCheck for the first time
3
4
5
3.1
3.2
Viewing the Data
Customizing the NetCheck Views
4. Daily actions
5. NetCheck Oil Sample Reports
5.1
5.2
5.3
Customizing NetCheck Oil Sample Reports
Printing Individual Oil Sample Reports for a known
Sample Number
Printing Oil Sample Reports for a range of components
or where the Sample Number in not known
6. Other NetCheck Reports
6.1
6.2
6.3
6.4
6.5
6.6
6.7
6.8
Filter / RPD Reports
Due Submissions
Latest Feedback
Unreceived Samples
Unreceived Feedback
Equipment Enquiry
Component Enquiry
Sample Enquiry
7. Sample Submissions and Feedback Capture
7.1
7.2
Configuring the NetCheck software to Email
Submission and Feedback forms to Wearcheck
Printing, Completing and Emailing a Submit form
Printing, Completing and Emailing a Feedback form
7.3
8. Searching the Database
8.1
8.2
8.3
8.4
Searching for an Equipment
Searching for a Sample
Searching for a Sample's History
Searching for Unactioned Critical/Urgent/Borderline Samples
9. Charts
9.1
9.2
13
26
26
33
37
47
47
51
54
55
57
58
61
64
67
67
68
75
78
78
79
80
81
82
Trend Analysis Chart
Problem Overview Chart
10. Making Changes and/or Manipulating the Data
11. Disaster Recovery
11.1
11.2
11.3
6
7
Repair Database
Backup Database
Restore Database
82
85
88
93
93
94
96
2
1.
Introduction to NetCheck
NetCheck is a distributed database browser application, which allows the customer to receive quickly and store their
part of the Wearcheck database on their own computer. This data can be viewed, analyzed and printed in many
different ways.
What are the basic requirements for NetCheck?
•
•
•
•
•
•
•
Pentium Processor.
32 MB of RAM.
50 MB free hard drive space.
Windows 95, 98, NT or 2000.
800x600 screen size.
Ink Jet or Laser printer.
Email address.
Benefits of NetCheck
•
•
•
•
•
•
•
Speeds up the delivery of reports.
Improves the reliability of report delivery.
Automates the basic oil sampling administration.
Allows the customer to generate his or her own customized reports.
Allows the customer to store their sample data electronically.
Allows the customer to find samples and other items quickly.
Allows the customer to graph test results and customize these reports.
3
2.
Installing NetCheck
The program is mailed as attachments to email. There are normally six emails marked as NetCheck Install 1 of 6, 2
of 6, 3 of 6, 4 of 6, 5 of 6 and 6 of 6.
When the emails are opened (normally by double clicking them), 1 of 6 will have an attached file called setup1.exe.
This file must be copied to an installation folder. To do this first open Windows explorer, then create a folder called
“install\netcheck\release” on the C: drive. For installing on other drives refer to custom install procedures.
Open the received email and then save the attached file to this folder.
Warning: do not change any file names.
Repeat this procedure with the attached files on 2 of 6, 3 of 6, 4 of 6, 5 of 6 and 6 of 6. In email 6 of 6 there should
be several attached files, save all of these files.
Once all files have been copied, run the file called “setup.bat” by double clicking it in explorer. This will first
uncompress the setup files into a new “temp” folder and then it will run the NetCheck Install Wizard.
The NetCheck Install Wizard will install the program onto the PC. It has two options, typical or custom.
Typical:
This will make a standard installation onto the C: drive of the PC. It should be used for a first time
installation on a PC.
Custom:
This option should be used if any changes need to be made to the standard installation; i.e. you need to
change the drive letter to be used for a Network installation
Warning: ensure that no other programs are running when installing the NetCheck
program. If the operating system is NT, log in as Administrator before installing.
Once the program has been installed you will need to reboot the PC before running the program.
The user needs to manually set two parameters within the NetCheck program:
1. Load the NetCheck program and close the “Update Database” dialogue box.
2. Click on “Options” on the menu bar and choose “Database”.
3. Update the “Email updates directory” to show the pathname to the NetCheck directory and click on "OK".
4. Click on “Options” on the menu bar and choose “Reports”. Then choose the Form Report” tab.
5. Set the maximum number of samples under the “Sample Enquiry” heading to the desired number and click on
"OK".
Make a back up of the Install files after the installation has completed successfully. It may become necessary to
reinstall the program if Windows is reinstalled or upgraded.
To create a short cut to NetCheck on your desktop, click the right mouse button on an open area of
the desktop and choose “ new short cut” option on the pop up menu. Then select the browser
button; select the NetCheck folder, then the folder called “bin”. Select the file Netcheck.exe. Click
the Next button, enter NetCheck as a name for the shortcut and then click the Finish button. A
new icon called NetCheck will appear on your desktop.
4
3.
Using NetCheck for the First Time
After you have received your Installation emails, your database with all the previous sample history will be emailed
to you. These files, depending on the size of your database on the Wearcheck computer may be very large. Once
these files have been received, daily transactions (including the latest sample diagnosis) will be emailed to you twice
a day. All the emails containing database information will have a subject of Wearcheck Data. Attached to each email
will be the file containing the actual data. These files are compressed to prevent unlawful access to your data and can
only be used after they have been read into your copy of NetCheck. It is the responsibility of the user to check that a
minimum of two emails per day is received from Wearcheck. If less than two emails are received, the NetCheck
support personnel at Wearcheck should be informed immediately.
To read a “Wearcheck Data” file into NetCheck follow the procedure below:
1. Open the “Wearcheck Data” email file in your email program.
2. Save the ATTACHED file to your NetCheck folder. Warning: Do not save files to the “history” folder.
3. Start the NetCheck program.
4. The “Update Database” dialog Box will be displayed. This is used to read the e-mail data into the NetCheck
database.
1
2
3
4
5
6
1.
2.
3.
4.
5.
6.
5.
6.
Dialog box for uncompressing received data files. This box always appears when the program is first started. It can also be displayed
manually, by selecting update from the Database drop down menu.
NetCheck folder selected, showing latest saved data emails.
Sub-folders to the NetCheck folder. Never save files from an email into these folders. Once a data file is read into the database it is stored in
the history folder. This can be used as an emergency backup of sample data.
List of email data files. (These are the “attachment” files that were saved when the e-mails were read). These files now need to be read into
the database. If no files are listed here, and attachments were in fact saved before, check that the files were saved to the correct folder in the
email program and that the correct folder is selected as above (point 2).
Progress indicator. This indicates each file’s progress as it is read into the database. The bar will move from left to right as each file is read
into the database. The number of times that the bar will move from left to right equals the number of files received. If a file takes a long time
to process it could be a large history file or a large-scale change in database information you have requested (e.g. changing all the oil
descriptions). These may run over night to allow the update to complete.
Error log. Any errors that occur during an update will be logged here and the type of error will be recorded in the second column. Any errors
other than a “user cancelled update error” should be reported to Wearcheck’s support staff.
To process the received email files, click on the “OK” button. Once all files have been processed, an information
box will appear, summarizing the results of the data update. Click on the “OK” button.
The “Update Database” dialogue box can then be closed by clicking on the “Close” button. Depending on the
Options\Database settings, the following two information boxes may be displayed.
5
7.
8.
Re-Sample Dates: Click on “OK” to enable the database to utilize the latest received information to update the
re-sample dates.
New Components: This will inform the user of the number of new components that had been received during the
latest update.
1. Viewing the Data
The NetCheck view allows the user to customize the visibility of the available views to suit their current working
conditions and requirements.
1
2
3
4
5
6
1.
2.
3.
4.
5.
6.
View Menu Item: The views can be turned on or off by selecting them in the drop down menu. For most
purposes the chart and Report view can be turned off, this will allow more space to view data. The Report view
will be turned on automatically when any report is run.
Tree view: This view shows how the data is stored in the database. The data is stored in a hierarchy, starting
with the customer codes (these are used to separate different people in the same company who look after
different machines). Under each customer code are its different sites. Next, the equipment registered for each
particular site is listed. Then all the components registered for each piece of equipment are listed and under each
component is a listing of its samples. If any filters or RPD’s have been done on the chosen component, these are
listed with a “Filters” heading at the end of the samples listing. Each branch of the tree view can be opened or
collapsed by double clicking its heading.
List view: This displays information on what has been selected in the Tree view. When a heading is selected in
the tree view the information stored below is listed in the List view. This information can be viewed, exported or
printed from this view. However, it is better to do this from one of the report options were the data has been
formatted to make it easier to read.
Report view: This displays the results of any report that has been run in a tabular form. These can then be
viewed, exported or printed.
Chart view: Used to graph test results or problem overview.
Update view: This option refreshes the currently active view so that any changes to the database are reflected in
the view.
6
2. Customizing the NetCheck Views
By selecting “View…” from the drop down Options menu, the user can customize the ordering, available columns,
search results displays, update mode, etc in the various views.
Select “View…” from the
drop down Options menu.
On the “General” tab, the user can stipulate whether Non Sample & Filter data should be ordered alphabetically or
according to date. The user can also specify whether the selected ordering should be done in ascending or descending
order.
General tab
Non sample & filter data ordering:
Alphabetical, Ascending.
Non sample & filter data ordering:
Alphabetical, Descending.
7
The user can also stipulate whether Samples & Filters should be ordered alphabetically or according to date and can
specify whether the selected ordering should be done in ascending or descending order.
General tab
Samples & filters ordering:
Date, Ascending.
Samples & filters ordering:
Alphabetical, Ascending.
Samples &
filters
ordering:
Date,
Descending
.
8
Finally, the user can select not to display “scrapped” equipment and their components in the Tree and List views by
activating “Hide scrapped equipment and components” on the "General" tab.
General tab
Function not activated – resulting
in “scrapped” equipment being
listed in the Tree and List views.
Function activated – resulting in
“scrapped” equipment not being
listed in the Tree and List views.
The user can further customize the Tree view by indicating whether the Branch name or the Branch global ID should
be displayed. This is done on the "Tree View" tab.
Tree View tab
Branch name activated
9
Tree View tab
Branch global ID activated
On the "List View" tab, the user can select to update the List view only on selected Tree view items or on expanded
Tree view items.
List View tab
The List view will only be populated with the details of the item
in the Tree view if that item had been expanded (by double
clicking on it) in the Tree view.
List View tab
The List view will be populated with the details of the item
selected (by highlighting or single clicking it) in the Tree view.
10
The user can also specify whether all available columns or only the basic columns should be displayed in the List
view by selecting the appropriate setting on the "List View" tab.
List View tab
Only the basic columns will be displayed in the List view.
List View tab
All columns will be displayed in the List view.
NOTE: the ‘All Columns’ setting will slow the selection and display times down dramatically. It is
therefore recommended that the user specifies ‘Basic Columns’ as the default setting.
On the "Search View" tab, the user can indicate where results from searches must be displayed. Such results can be
displayed in the Tree and List view, or in the Report view, or in the Tree, List and the Report views.
11
Search View tab
Results of Search displayed in the Tree and List views.
Search View tab
Results of Search displayed in the Report view.
Search View tab
Results of Search displayed in the Tree, List and Report
views.
12
4.
Daily Actions
The NetCheck user should do the following on a daily basis:
1.
Check email
Wearcheck generates files to email to NetCheck users twice a day from Monday to Friday and once on a
Saturday. These files include the daily transactions done to your database at Wearcheck, for example
diagnosis of current samples, equipment and component updates, etc. All the emails containing database
information will have a subject of Wearcheck Data. Attached to each email will be the file containing the
actual data.
NOTE: It is the responsibility of the user to check that a minimum of two emails per day is received
from Wearcheck. In doing so, the user can ensure that no emailed data is lost between Wearcheck,
the respective Service Providers and the NetCheck end user. If less that two email are received, the
NetCheck support personnel at Wearcheck should be informed immediately.
2.
Save the received Attachments in the NetCheck folder
Open the “Wearcheck Data” emails in your email program. Save the files attached to each email in the
NetCheck folder of the PC. The procedure to save attachments is dictated by the email package used by the
user. As each email package is different, the user must familiarize himself/herself with the package and
ensure that he/she knows how to save attachments to emails.
NOTE: Do not save the entire “Wearcheck Data” email, only the attached file of each email.
3.
Update your NetCheck database with the received data files
Start the NetCheck program. The “Update Database” Dialog Box will be displayed. (Refer CHAPTER 3:
Using NetCheck for the First Time for more details regarding this dialog box). The email attachments that
you have saved will be listed under the NetCheck folder. Click on the “OK” button to process these files
and in doing so; update your database with the latest information available.
Once all files have been processed, an information box will appear, summarizing the results of the data
update. Click on the “OK” button.
“Information” box displaying
the number of data files
received and processed as well
as the number of Update Errors
that occurred (should there
have been any).
Click “OK” to close the
information box.
Click on “Close” to close
the “Update Database” box.
The “Update Database” dialogue box can then be closed by clicking on the “Close” button.
13
Depending on the Options\Database settings, the following information boxes may be displayed:
Re-Sample Dates:
Click on “OK” to enable the
database to utilize the latest
received information to update the
re-sample dates.
New Components:
This will inform the user of the
number of new components that had
been received during the latest
update
Re-Sample Dates:
This will inform the user that the
updating of re-sample dates has
been completed.
4.
Print the Reports based on the samples that were added to the database with the last update.
The following reports are all based on the received samples where the user has not yet acknowledged receipt
of the results:
* Latest Samples
* Unactioned Normal Samples
* Unactioned Abnormal Samples
* Unactioned Feedback Report
The printing of the reports are optional, but the user is strongly advised to print at least the Unactioned
Abnormal Samples as these samples indicated a problem with the component that was sampled and/or with
the details that were submitted with the sample and this should be addressed.
A. Latest Samples
This report helps the customer to see which diagnosed samples were last added to the database. The report
finds all the diagnosed samples from the last time the database was updated and displays the sample’s
location, number, severity, problem category, sample status, date sampled, date received, and date reported
in a report table.
PLEASE NOTE: This report should not be used to print daily reports. If the last emails that were read in
were empty (i.e. they contained no new sample results), then this menu option will select the previous batch
of sample results that were received, resulting in duplicate reports being printed.
14
To generate a listing of the Latest Samples, click on the "Latest Updated Samples Report" button on the
"Hot Key" button bar.
"Hot Key" Button bar.
"Hot Key" to generate "Latest
updated samples report" listing.
Alternatively, the same listing can be generated by selecting the "Latest Samples" option from the drop
down Report/List menu.
Select "Latest Samples" from the
drop down Report/List menu.
The samples from the last update will be selected. An information box summarizing the number of critical,
urgent, borderline and normal samples as well as the total number of samples received will be displayed. In
the Report view, the details regarding these samples will be listed.
Information box with
summary of samples
received during the last
update
Details regarding the
latest samples update
in the Report view
Click on “OK” to
close information
box
15
There are two ways of printing the “Latest Sample” report table:
1.
2.
Right click on the report. Then select the “Print” option on the pop up menu.
Ensure that the Report view is the active view by clicking on it. Then select “Print Report”
on the drop down Database menu.
B. Unactioned Normal Samples
This Report option finds all the diagnosed samples that have a status of “Diagnosed” and a problem
category of “NORMAL” and displays the sample’s location, number, severity, problem category, date
sampled, date received and date reported to the customer in a report table.
This listing of "Unactioned Normal Samples" can be generated by clicking on the "Unactioned Normal
Samples Report" button on the "Hot Key" button bar.
"Hot Key" Button bar.
"Hot Key" to generate "Unactioned
Normal Samples" listing.
Alternatively, selecting the "Unactioned Normal Samples" option from the drop down Report/List menu can
generate the same listing.
Select “Unactioned Normal Samples"
from the drop down Report/List menu
The samples with a problem category of “NORMAL” and a status of “Diagnosed” will be selected. An
information box summarizing the number of Unactioned Normal Samples will be displayed. In the Report
view the details regarding these samples will be listed.
16
Information box
displaying the
total number of
Unactioned
Normal Samples
Details regarding
these samples in
the Report view
Click on “OK” to
close information
box
The user needs to change the status of these samples to “Actioned” to indicate to the NetCheck package that
receipt of these samples have been acknowledged. This change of status will then remove these samples
from the “Unactioned Normal Samples” report. The status of these samples can be changed in two ways:
1. By printing the Sample report for each of the samples or
2. By manually forcing the status of the samples to change to “Actioned”.
If the user is interested in having a sample printout of “NORMAL” samples, then the first option must be
chosen. However, if he/she is not interested in printing “NORMAL” samples, the second option can be
chosen. Alternatively, this report must never be run.
1.
Changing the status by Printing the reports:
The user can specify which type of report must be the default report to be printed for Unactioned
Normal Samples”. This can be done by selecting the “Options/Report” drop down menu. Then
select the “Custom reports” tab and specify the default report (Concise form, Sample form,
Enquiry form).
Once the user has closed the information box by clicking on “OK” a Sample report (as selected
above), of the first Unactioned Normal sample will be generated. Click on “Print All” to print all
the reports selected. Once these reports have been printed, their status will automatically be
changed to “Actioned".
17
Click on “OK” to close the
information box and generate the
Sample reports of the Unactioned
Normal samples.
Click on “Print All” to print all the
Unactioned Normal samples and thus
change their status to “Actioned”.
Enquiry form
Concise form
Sample form
2.
Manually forcing the status to change without Printing the reports:
When the first sample report is generated and displayed, click on “Close”.
Click on "Close" to
close the report down.
18
Highlight the first sample displayed in the Report view and then right click on the Report view.
Select the “Status" option on the pop up menu.
Right click in the Report view
and select “Status” on the pop
up menu.
An information box will be displayed, showing the first sample in the Report view with its status.
Use the scroll bar next to the status window and select “Actioned”. Click on “Update All” and
when the update is completed, close the information box.
Scroll down at the Status
window and select a status of
“Actioned".
Click on “Update All” to change
the status of all the selected
samples to “Actioned”.
Click on “Close” to close the
Information box.
The samples that were originally selected will now have a status of “Actioned”.
C. Unactioned Abnormal Samples
This Report option finds all the diagnosed samples that have a status of “Diagnosed” and a problem
category different from “NORMAL” and displays the sample’s location, number, severity, problem category,
date sampled, date received and date reported to the customer in a report table.
This listing of "Unactioned Abnormal Samples" can be generated by clicking on the "Unactioned Abnormal
Samples Report" button on the "Hot Key" button bar.
"Hot Key" Button bar.
"Hot Key" to generate "Unactioned
Abnormal Samples" listing.
19
Aternatively, the same listing can be generated by selecting the “Unactioned Abnormal Samples" option
from the drop down Report/List menu.
Select "Unactioned Abnormal
Samples" from the drop down
Report/List menu.
The samples with a problem category different from “NORMAL” and a status of “Diagnosed” will be
selected. An information box summarizing the number of Unactioned Abnormal Samples will be displayed.
In the Report view the details regarding these samples will be listed.
Information box
displaying the total
number of Unactioned
Abnormal Samples.
Details regarding
these samples in the
Report view
Click on “OK” to close
information box
The user needs to change the status of these samples to “Actioned” to indicate to the NetCheck package that
receipt of these samples have been acknowledged. This change of status will then remove these samples
from the “Unactioned Abnormal Samples” report. The status of these samples can be changed in two ways:
1. By printing the Sample report for each of the samples or
2. By manually forcing the status of the samples to change to “Actioned”.
If the user is interested in having a sample printout of “ABNORMAL” samples, then the first option must be
chosen. However, if he/she is not interested in printing “ABNORMAL” samples, the second option must be
chosen. It is, however, strongly advised that these reports be printed as the problems indicated by them
need to be investigated and action taken to solve them.
20
1.
Changing the status by Printing the reports:
The user can specify which type of report must be the default report to be printed for Unactioned
Abnormal Samples”. This can be done by selecting the “Options/Report” drop down menu. Then
select the “Custom report” tab and specify the default report (Concise form, Sample form, Enquiry
form).
Once the user has closed the information box by clicking on “OK” a Sample report (as selected
above), of the first Unactioned Abnormal sample will be generated. Click on “Print All” to print all
the reports selected. Once these reports have been printed, their status will automatically be
changed to “Actioned".
Click on “OK” to close the
information box and generate the
Sample reports of the Unactioned
Abnormal samples.
Click on “Print All” to print all the
Unactioned Abnormal samples and
thus change their status to
“Actioned”.
Sample form
Enquiry form
Concise form
21
2.
Manually forcing the status to change without Printing the reports (NOT recommended):
When the first sample report is generated and displayed, click on “Close”.
Click on "Close" to
close the report down.
Highlight the first sample displayed in the Report view and then right click on the Report view.
Select the “Status" option on the pop up menu.
Right click in the
Report view and select
“Status” on the pop up
menu.
An information box will be displayed, showing the first sample in the Report view with its status.
Use the scroll bar next to the status window and select “Actioned”. Click on “Update All” and
when the update is completed, close the information box.
Scroll down at the Status
window and select a status of
“Actioned".
Click on “Update All” to
change the status of all the
selected samples to “Actioned”.
Click on “Close” to close the
information box.
The samples that were originally selected will now have a status of “Actioned”.
22
D. Unactioned Feedback Report
This Report option finds all the samples that have a status of “Actioned” and a severity different from
“NORMAL” and displays the sample’s location, number, severity, date sampled, date received and date
reported to the customer in a report table. The purpose of this report is to locate samples where feedback is
required but where the Feedback reports have not yet been printed. Once the Feedback Form has been
printed for a sample, the status of the sample automatically changes to “Acknowledged”.
The "Unactioned Feedback" listing can be generated by clicking on the "Unactioned Feedback Report"
button on the "Hot Key" button bar.
"Hot Key" Button bar.
"Hot Key" to generate "Unactioned
Feedback Report" listing.
Alternatively, the same listing can be generated by selecting the “Unactioned Feedback" option from the
drop down Report/List menu.
Select "Unactioned Feedback"
from the drop down Report/List
menu.
The samples requiring feedback but where the Feedback report has not yet been printed will be selected. An
information box summarizing the number of Unactioned Feedback will be displayed. In the Report view the
details regarding these samples will be listed.
Information box displaying
the total number of
Unactioned Feedback
Click on “OK” to
close information box
Details regarding these
samples in the Report view
23
The user needs to change the status of these samples to “Acknowledged” to indicate to the NetCheck
package that the Feedback reports for these samples have been printed. This change of status will then
remove these samples from the “Unactioned Feedback” report. The status of these samples can be changed
in two ways:
1. By printing the Feedback report for each of the samples or
2. By manually forcing the status of the samples to change to “Acknowledged”.
Note: the Monthly report generated by Wearcheck reflects the percentage feedback returned. If
the NetCheck user does not print the Feedback reports, he/she must ensure that sample
Feedback is returned to Wearcheck in some other format.
1.
Changing the status by Printing the Feedback reports:
Once the user has closed the information box by clicking on “OK” a Feedback report of the first
Unactioned Feedback sample will be generated. Click on “Print All” to print all the Feedback
reports selected. Once these reports have been printed, their status will automatically be changed
to “Acknowledged".
Click on “OK” to close the information
box and generate the Feedback Reports.
Click on “Print All” to print all the
Unactioned Feedbacks and thus
change their status to “Acknowledged”.
2.
Manually forcing the status to change without Printing the feedback reports:
When the first Feedback report is generated and displayed, click on “Close”.
Click on "Close" to
close the report down.
24
Highlight the first sample displayed in the Report view and then right click on the Report view.
Select the “Status" option on the pop up menu.
Right click in the Report
view and select “Status”
on the pop up menu.
An information box will be displayed, showing the first sample in the Report view with its status.
Use the scroll bar next to the status window and select “Acknowledged”. Click on “Update All”
and when the update is completed, close the information box.
Scroll down at the Status
window and select a status
of "Acknowledged"
Click on “Update All” to
change the status of all the
selected samples to
“Acknowledged”.
Click on “Close” to close the
information box.
The samples that were originally selected will now have a status of “Acknowledged”.
25
5.
NetCheck Oil Sample Reports
The NetCheck Reports menu and Hot Key button bar allow the user to generate, print and customize Oil Sample
reports. Individual reports can be printed by entering the Sample number. The user can also print the reports for a
selection of Samples by first selecting the appropriate numbers and then generating the reports based on this listing.
There are three types of Oil Sample reports that can be printed. The three types of reports are:
1. a detailed report showing the last five samples with pre-determined graphs
2. a text report showing as many samples as required.
3. a concise report containing the basic details of a sample in a one page format. This report is specifically
aimed at the Industrial sector.
1. Customizing NetCheck Oil Sample Reports
1.1.
DETAILED SAMPLE REPORTS (Settings & Outlay)
The detailed sample report consists of four pages. The user can manipulate the outlay of the report so that the printed
report is reduced to two or three pages only. The user can also specify if these reports should be printed using
simplex or duplex mode.
To manipulate the print settings of the Detailed Sample report, select "Report…" from the drop down Options menu.
Select "Reports…" from the drop
down Options menu.
To reduce the printed sample report by one page, select the "Form Reports" tab on this menu. Activate the "Include
graphs on test result page" prompt in this dialogue box.
Select the "Form Reports" tab
on the Reports… menu.
Click to activate the inclusion of
graphs on the test results page.
This will reduce the printed
report by 1 page. Click on "OK"
to save the setting.
26
To specify whether reports should be printed using simplex or duplex mode, select the "Printing" tab on the
Report… menu. Click to activate the preferred type of printing. If duplex printing is chosen, also indicate whether
you want the binding edge to be the long or the short side of the paper. (Note: duplex printing is dependant on the
actual printer’s duplex capabilities)
Select the "Printing" tab on the
Reports… menu.
Click on either "Simplex" or "Duplex"
to select the preferred type of printing.
If duplex is chosen, indicate where the
binding edge must be.
Click on "OK" to save these settings
for future use.
The number of printed pages can further be reduced by indicating on the actual displayed Sample report that no blank
pages must be printed.
To further reduce printed pages, activate
the option to "Skip Blank Pages" by
clicking on it.
Once these settings have been flagged, the software will utilize them whenever the user selects to print a Detailed
Sample Report.
When displayed, the Detailed Sample Report always consists of four pages. Page one displays the diagnosis, page
two the test results, page three the graphs and page four MPE images (should there be any).
27
To print the displayed
sample report
To print all the selected
sample reports
When a sample report
is printed, only those
pages checked in this
checkbox group will
be printed.
“Skip
blanks” will exclude
the MPE image page if
there are no images for
the last 5 samples.
Tabs to select the
section of the sample
report to be displayed
Scroll bar to scroll
up and down the
displayed report
By scrolling down
the history samples
can be displayed
28
Tabs to select
the different
sections
of
the Sample
report.
1.2.
TEXT SAMPLE REPORTS (Settings & Outlay)
This report can be used to print the complete history of a component or of all components on a specific piece of
equipment. The number of history samples included in this report, is determined by the stipulated maximum number
of samples.
The first time that the user uses this option, he/she must stipulate the maximum number of samples that should be
printed for each component. The number entered will then be used as the default number of samples to be printed in
all future text reports, until the user changes the maximum number again.
This maximum number is entered by selecting “Report…” on the “Options” drop down menu and then selecting the
“Form Reports” tab.
Select Report… on the
Options drop down
menu.
Select the “Form Reports” tab. A dialogue box will show the default values used in reporting. The maximum
29
number of samples to be printed for each component must be entered and saved by clicking on the “OK” button.
Enter the maximum number of
samples to be printed for each
component
Click on “OK” to save the setting
as a default.
Once the default for maximum sample history has been entered and saved, the actual text sample report can be
generated.
To print the
displayed
sample report
To print all the
selected
sample reports
Scroll bar to
scroll up and
down
the
displayed
report
By scrolling
down
the
laboratory
results,
diagnosis and
feedback can
be displayed
30
1.3.
CONCISE SAMPLE REPORTS (Settings & Outlay)
This report can be used to print a single page report that contains the basic details of the last 5 samples of a
component. The concise report is specifically aimed at Industrial customers. The user is only allowed to manipulate
the formatting of Feedback on this report by specifying that it must be capitalized.
This can be done by selecting “Report…” on the “Options” drop down menu and then selecting the “Form Reports”
tab.
Select Report… on the
Options drop down
menu.
To capitalize the Feedback on the Concise Sample report, click on the “Capitalize feedback” prompt and then on
“OK” to save this setting.
Click on the “Capitalize feedback” prompt to
ensure that all entered Feedback print in
uppercase on the Concise Sample report.
Click on “OK” to save this setting.
…and have all Feedback capitalized on the
Concise Sample report.
31
The Concise Sample report can now be generated. The user can use the scroll bar to move up and down the displayed
report page and can print the report by using the various “Print” buttons.
To print the displayed
concise sample report.
To print all the selected
concise sample reports
Scroll bar to scroll up
and down the
displayed Concise
report.
By scrolling down, the
rest of the laboratory
results, the current
diagnosis and the
historical diagnosis of
the previous 4 samples
can be displayed
32
2. Printing Individual NetCheck Oil Sample Reports (Known Sample Number)
There are several ways to print a Detailed, Text or Concise sample report.
2.1.
PRINTING A DETAILED SAMPLE REPORT for a known Sample Number
Click on the "Sample Form Report" button on the "Hot Key" button bar.
"Hot Key" Button bar.
"Hot Key" to generate "Sample Form
Report".
Alternatively, select “Sample…” from the drop down Report/Form menu.
Select “Sample…” from the
drop down Report/Form
menu.
A dialog box will open. Enter the required sample number and click on “OK”
Enter the sample number that must
be printed.
NetCheck will then display the Detailed Sample report of the selected sample. This report is formatted and can be
manipulated as described in section 1.1.
These reports consist of four sections: the diagnosis, the test results, the wear graphs and the MPE images. (At the
moment, MPE images are only available to Industrial customers who are buying the ABB 2 kit). These sections can
be selected by clicking on the required tab at the bottom of the screen. The user can use the scroll bar to move up and
down a displayed page. Clicking on the Print button will print the displayed Sample report.
33
To print the displayed
sample report
Tabs to select the
section of the sample
report to be displayed
Scroll bar to scroll
up and down the
displayed report
By scrolling down
the history samples
can be displayed
2.2.
PRINTING A TEXT SAMPLE REPORT for a known Sample Number
Click on the "Sample Enquiry Form Report" button on the "Hot Key" button bar.
"Hot Key" Button bar.
"Hot Key" to generate "Sample Enquiry
Form Report".
Alternatively, select “Sample Enquiry…” from the drop down Report/Form menu.
Select “Sample Enquiry…”
from
the
drop
down
Report/Form menu.
34
A dialog box will open. Enter the required sample number and click on “OK”
Enter the sample number that must
be printed.
NetCheck will then display the Text Sample report of the selected sample. This report is formatted and can be
manipulated as described in section 1.2.
The Text Sample report includes the submission details, laboratory results, diagnosis and feedback of the selected
sample history. The user can use the scroll bar to move up and down a displayed page. Clicking on the Print button
will print the individual report displayed.
To print the
displayed sample
report
Scroll bar to scroll
up and down the
displayed report
By scrolling down
the laboratory
results, diagnosis
and feedback can be
displayed
2.3.
PRINTING A CONCISE SAMPLE REPORT for a known Sample Number
Click on the "Concise Sample Form Report" button on the "Hot Key" button bar.
"Hot Key" Button bar.
"Hot Key" to generate "Concise
Sample Form Report".
35
Alternatively, select “Concise Sample…” from the drop down Report/Form menu.
Select “Concise Sample…” from
the drop down Report/Form
menu.
A dialog box will open. Enter the required sample number and click on “OK”
Enter the sample number that must
be printed.
NetCheck will then display the Concise Sample report of the selected sample. This report is formatted and can be
manipulated as described in section 1.3.
The user can use the scroll bar to move up and down the displayed report page. The Concise
Sample Report includes the submission details, the laboratory results and the diagnosis of the
selected sample and its 4 historical samples. If the selected sample was an ABB 2 kit, the Concise
Report will also display the MPE image for the latest sample. Clicking on the Print button will
print the individual Concise report displayed.
To print the displayed
concise sample report.
Scroll bar to scroll
up and down the
displayed Concise
report.
By scrolling down,
the rest of the
laboratory
results,
the current diagnosis
and the historical
diagnosis of the
previous 4 samples
can be displayed
36
3. Printing NetCheck Oil Sample Reports (for a Range of components or where the Sample
Number is not known)
There are several ways to print Detailed, Text or Concise sample reports for a selected range of equipment and
components. If the user does not know the sample number for a specific component, he/she can use this same method
to print the latest Sample report for a specific component
To print the Latest Sample report for a specific component or for a range of selected components, the user will utilize
the “Latest Sample…” option on the drop down Report/Enquiry menu. This enquiry option can be associated with
any one of the three types of Oil Sample reports. Before the user uses it, he/she must indicate which type of Oil
Sample report must be generated.
To do this, select the “Options/Report” drop down menu. Then select the “Custom reports” tab and specify the
default report (Concise form, Sample form, Enquiry form).
Select the “Custom Reports” tab on the
Options/Report drop down menu
Indicate which type of report must be
generated when the “Latest Sample…”
Enquiry report is run.
Click on “OK” to save this report type
association.
3.1.
PRINTING A DETAILED SAMPLE REPORT where the sample number is not
known or where a range of reports needs to be printed.
To print a Detailed Sample report, the user needs to associate the “Latest Sample…” report with the “Sample Form”
on the "Custom Reports" tab on the drop down "Options/Report" menu.
When the user does not know the last sample number on a specific component, he/she can print a sample report for
this component by first selecting the specific component. To do this selection, either drill down to the component in
the Tree view or search for the equipment and then drill down to the correct component. Highlight the actual
component record in the Tree view.
37
Then select “Latest Sample…” from the drop down Report/Enquiry menu.
Select the correct component by
highlighting it in the Tree view.
Then select “Latest Sample…”
from the drop down
Report/Enquiry menu.
A dialog box will then open showing what will be selected for reporting. All items selected by the user when drilling
down in the Tree view will be filled in on the dialog box. These ‘filled in’ fields will limit the selection to the criteria
as stated in the fields. All other items will be left blank which will result in no limitations on those fields.
Click "OK" if
information is
correct. If
information is
incorrect, click
Cancel and reselect
in the tree view
The Branch, Site,
Equipment and
Component data is
filled in as these
were selected
when drilling
down in the Tree
view.
No other selection
criteria will be
used as all other
fields have been
left blank.
38
In the example above, the Latest Sample report will print for the Engine of Equipment DT70 which is registered
under the site KIMBERLEY for the Branch A B C Plant Hire.
If the user wants to print the Latest Sample report for a selection of Equipment and Components, he/she can do so by
manipulating the drilling down in the Tree view and by completing the blank fields and tick boxes in the dialog box
to comply with his/her selection criteria.
To print, for example, the Latest Oil Samples reports for the following
selection criteria:
1. All Actionable samples (Severity other than NORMAL)
2. received since 31.12.1998 on
3. all Engines on
4. Caterpillar G140 machines
5. registered under the Site PRETORIA
6. for the Branch A B C Plant Hire
the dialog box will have to be completed as follows:
6
5
4
3
2
1
This will then result in a Detailed Sample report being generated on all the latest samples within this selection of
components.
39
A Detailed Oil sample report will be
generated on all the latest samples
within the selection
Click on “Print All” to print all the
selected Latest Sample reports.
The selection of samples meeting
the user’s criteria will be listed in
the Report view.
3.2.
PRINTING A TEXT SAMPLE REPORT where the sample number is not known or
where a range of reports needs to be printed.
To print a Text Sample report, the user needs to associate the “Latest Sample…” report with the “Enquiry Form” on
the "Custom Reports" tab on the drop down "Options/Report" menu.
When the user does not know the last sample number on a specific component, he/she can print a sample report for
this component by first selecting the specific component. To do this selection, either drill down to the component in
the Tree view or search for the equipment and then drill down to the correct component. Highlight the actual
component record in the Tree view.
40
Then select “Latest Sample…” from the drop down Report/Enquiry menu.
Select the correct component by
highlighting it in the Tree view.
Then select “Latest Sample…”
from the drop down
Report/Enquiry menu.
A dialog box will then open showing what will be selected for reporting. All items selected by the user when drilling
down in the Tree view will be filled in on the dialog box. These ‘filled in’ fields will limit the selection to the criteria
as stated in the fields. All other items will be left blank which will result in no limitations on those fields.
Click "OK" if
information is
correct. If
information is
incorrect, click
Cancel and reselect
in the tree view
The Branch, Site,
Equipment and
Component data is
filled in. as these
were selected
when drilling
down in the Tree
view.
No other selection
criteria will be
used as all other
fields have been
left blank.
41
In the example above, the Latest Sample report will print for the Engine of Equipment DT70 which is registered
under the site KIMBERLEY for the Branch A B C Plant Hire.
If the user wants to print the Latest Sample report for a selection of Equipment and Components, he/she can do so by
manipulating the drilling down in the Tree view and by completing the blank fields in the dialog box to comply with
his/her selection criteria.
To print, for example, the Latest Oil Samples reports for the following
selection criteria:
1. All Actionable samples (Severity other than NORMAL)
2. received since 31.12.1998 on
3. all Engines on
4. Caterpillar G140 machines
5. registered under the Site PRETORIA
6. for the Branch A B C Plant Hire
the dialog box will have to be completed as follows:
6
5
4
3
2
1
This will then result in a Text Sample report being generated on all the latest samples within this selection of
components.
42
A Text Oil sample report will be
generated on all the latest samples
within the selection
Click on “Print All” to print all the
selected Latest Sample reports.
The selection of samples meeting
the user’s criteria will be listed in
the Report view.
3.3.
PRINTING A CONCISE SAMPLE REPORT where the sample number is not
known or where a range of reports needs to be printed.
To print a Concise Sample report, the user needs to associate the “Latest Sample…” report with the “Concise Form”
on the "Custom Reports" tab on the drop down "Options/Report" menu.
When the user does not know the last sample number on a specific component, he/she can print a sample report for
this component by first selecting the specific component. To do this selection, either drill down to the component in
the Tree view or search for the equipment and then drill down to the correct component. Highlight the actual
component record in the Tree view.
43
Then select “Latest Sample…” from the drop down Report/Enquiry menu.
Select the correct component by
highlighting it in the Tree view.
Then select “Latest Sample…”
from the drop down
Report/Enquiry menu.
A dialog box will then open showing what will be selected for reporting. All items selected by the user when drilling
down in the Tree view will be filled in on the dialog box. These ‘filled in’ fields will limit the selection to the criteria
as stated in the fields. All other items will be left blank which will result in no limitations on those fields.
Click "OK" if
information is
correct. If
information is
incorrect, click
Cancel and reselect
in the tree view
The Branch, Site,
Equipment and
Component data is
filled in as these
were selected
when drilling
down in the Tree
view.
No other selection
criteria will be
used as all other
fields have been
left blank.
44
In the example above, the Latest Sample report will print for the Engine of Equipment DT70 which is registered
under the site KIMBERLEY for the Branch A B C Plant Hire.
If the user wants to print the Latest Sample report for a selection of Equipment and Components, he/she can do so by
manipulating the drilling down in the Tree view and by completing the blank fields in the dialog box to comply with
his/her selection criteria.
To print, for example, the Latest Oil Samples reports for the following
selection criteria:
1. All Actionable samples (Severity other than NORMAL)
2. received since 31.12.1998 on
3. all Engines on
4. Caterpillar G140 machines
5. registered under the Site PRETORIA
6. for the Branch A B C Plant Hire
the dialog box will have to be completed as follows:
6
5
4
3
2
1
This will then result in a Concise Sample report being generated on all the latest samples within this selection of
components.
45
A Detailed Oil sample report will be
generated on all the latest samples
within the selection
Click on “Print All” to print all the
selected Latest Sample reports.
The selection of samples meeting
the user’s criteria will be listed in
the Report view.
46
6.
Other NetCheck Reports
The most frequently used NetCheck reports are the Oil Sample Reports (covered in sections 4 and 5). However, there
are several other reports and enquiries that can be also be viewed or printed from the NetCheck software.
1. Filter / RPD Reports
Individual as well as a range of Filter or RPD reports can be printed by selecting “Filter Enquiry…” from the
Report/Form drop down menu. This report has a single printable text page.
1.1.
Printing an Individual Filter/RPD report
To print an individual text filter report of a known filter/RPD number, select "Filter Enquiry…" from the drop down
Report/Form menu.
Select "Filter Enquiry…" from the
drop down Report/Form menu.
A dialog box will open. Enter the required filter/RPD number and click on "OK".
Enter the filter/RPD number
that must be printed.
NetCheck will then display the text report of the selected filter/RPD. The report includes the submission details,
laboratory results, diagnosis and feedback of the filter/RPD history. The user can use the scroll bar to move up and
down the displayed page. Clicking on the print button will print the report displayed.
To print the displayed
filter/RPD report
Scroll bar to scroll up and
down the displayed report
By scrolling down the
laboratory results,
diagnosis and feedback
can be displayed
47
To print an individual text filter report of a filter/RPD where the number is not known to the user, first select the
equipment and then the component in the Tree view. All the oil samples for the selected equipment and component
will be listed. At the bottom of the Oil sample listing, will be a folder called “Filters…". Double click on this folder
to display a listing of the filter/RPD numbers for the selected component. Select the first filter in the List view.
Folder containing the
filters/RPD’s for the
selected component
List of filters/RPD’s for
the component
Then select “Filter Enquiry…” from the drop down Report/Form menu.
Select "Filter Enquiry…" from the
drop down Report/Form menu.
The program will then display the text Filter report of the selected filter/RPD number. The report includes the
submission details, laboratory results, diagnosis and feedback of the filter/RPD history. The user can use the scroll
bar to move up and down the displayed page. Clicking on the Print button can print the report displayed.
To print the displayed
filter/RPD report
Scroll bar to scroll up and
down the displayed report
By scrolling down the
laboratory results,
diagnosis and feedback
can be displayed
48
1.2.
Printing a Range of Filter/RPD reports
The user can also print the filter/RPD reports for a selected range of components. To do this, the range of
components must first be selected. To do this selection, drill down to the required level in the Tree view. Then select
the "Filter…" option from the drop down Report/Enquiry menu.
Select "Filter" from the drop down
Report/Enquiry menu
A dialog box will open showing what will be selected for reporting. All items selected by the user when drilling
down in the Tree view will be filled in on the dialog box. These ‘filled in’ fields will limit the selection to the criteria
as stated in the fields. All other items will be left blank which will result in no limitations on those fields. If the user
wants to narrow down the selection criteria even further, he/she can do so by closing the dialog box and drilling
down further in the Tree view. Alternatively, the user can manipulate the fields on the dialogue box itself by
entering, selecting and specifying information in the various 'criteria' boxes.
To print, for example, the filter/RPD reports for the following
selection criteria:
1. All filters/RPDs taken on
TRANSMISSIONs
2. registered under the Sites from PRETORIA
to W/SHOP
3. for the Branch A B C Plant Hire
3
2
1
49
This will then result in listing of filters/RPDs meeting the selection criteria in the Report view. To print this range of
filters/RPDs, select "Filter Enquiry…" from the drop down Report/Form menu. Once the first text filter report has
been generated and displayed, click on "Print All". All the selected filters/RPDs will then be spooled to the printer.
Select "Filter Enquiry…"
from the Report/Form drop
down menu
Details of the filters/RPDs
meeting the selection criteria
in the Report view.
Click on "Print All" to print
filter/RPD reports for all the
filters/RPDs in the selected
range
50
2. Due Submissions
This report finds all components that are due for their next oil sample from the current date up to and including the
Submission Period. It displays the component’s location, name, make & model, SMR, SMR Units and next sample
date.
The report is based on the next sample date, which in turn is determined from the recommended re-sample interval
(RRI) and the daily average SMR for each component. Once this date has been calculated, the “Submission Period”
is taken into account. All samples that are due on the current date, or within the next number of days as stipulated in
the “Submission Period” will be included in the “Due Submissions” listing.
The “Submission Period” is the maximum period of time allowed, from the current date, for a component to be
considered due for an oil sample submission and thus enables the workshop to plan oil sampling. The customer can
change the “Submission Period”, to suit his/her company’s needs, by selecting the “Report…” option on the drop
down “Options” menu. Then select the “General” tab on this window, enter the required number of days for the
“Submission Period” and click on “OK” to save this setting.
Select "Report"
from the Options
drop down menu.
Then select the
"General" tab.
Enter the required
"Submission Period"
and save this setting by
clicking on "OK".
The default “Submission Period” is fourteen days. (This setting will include all components that are due for oil
sampling on the current day as well as components due within the next 14 days). However, sampling scheduling
procedures are particular to each customer. To make the “Due Submissions” report more useful, the customer should
change the “Submission Period” days to the number of days, they need to know in advance, when a component is
due for sampling.
Once the customer has customized the “Submission Period” for his/her particular company, the report also depends
on one other setting. If the “Auto update next sample date” option is chosen in the “Option/Database” menu item
dialog, then the next sample date is automatically set after each database update.
51
By choosing the “Auto update next
sample date” in the Options/Database
dialog box, the next sample date is set
automatically after each update.
If this option is not chosen, then all new components are selected in the “Due Submissions” report and the user has
the opportunity to change the calculated “Next Sample Date” in the “Submit Form” report.
Select “Due Submissions” from the drop down Report/List menu.
Select "Due Submissions" from the
drop down Report/List menu.
NetCheck will then generate a report listing of all the components that are due for sampling. This listing will include
the location, component name, make & model, SMR, SMR units and the next sample date.
First, an information box will be displayed, showing the total number of “Due Submissions” found while the
components due to be sampled and submitted, are listed in the Report view.
Information box with total number of
“Due Submissions” found. Click “OK”
to close information box.
When this information box is closed, NetCheck’s next action depends on the settings chosen by the user. If the “Auto
generate form reports” option is chosen in the “Options/Report/Custom Reports” menu item dialog, then NetCheck
automatically generates the “Submit Form” for the “Due Submissions” components.
52
By choosing the "Auto generate form reports"
in the Option/Report/Custom Report dialog
box, the "Submit form" for the selected due
components is automatically generated.
The user can then update the “Due Submissions” by entering the required valid sample number and sampling details.
The submission forms can then be printed and the forms and oil samples can be sent to Wearcheck for analysis. (For
more details on completing these forms, see the section “Printing and / or Completing a Submit Form”).
Alternatively, the submission can be sent electronically to Wearcheck by clicking on the “Email” button. This
electronic submission, will then await the physical arrival of the sample at the laboratory.
53
When the “Submit Form” is closed, the “Due Submission” components are listed in the Report view.
Listing of “Due
Submissions”
If the “Auto generate form reports” option is not chosen in the “Options/Report/Custom Reports” menu item dialog,
then NetCheck will not generate the “Submit Form”. In this instance, the “Due Submission” components are listed in
the Report view as soon as the information box is closed.
There are two ways of printing the Due Submissions report listed in the Report view:
1.
2.
Right click on the report. Then select the “Print” option on the pop up menu.
Ensure that the Report view is the active view by clicking on it. Then select “Print Report” on the
drop down Database menu.
3. Latest Feedback
This report helps the customer to see which sample feedbacks were last added to the database. The report finds all
the samples with feedback from the last time the database was updated and displays the sample’s location, number,
severity, status, date sampled, date received and date reported in a report table.
Select “Latest Feedback” from the drop down Report/List menu.
Select “Latest Feedback” from
the drop down Report/List
menu.
54
NetCheck will then generate a report listing of all the feedbacks that were received during the last database update.
First, an information box will be displayed, showing the total number of feedbacks found in the last update.
Information
box
with total number
of
“Feedback”
received.
Click
“OK” to close
information box.
The relevant samples
are displayed in the
Report view.
There are two ways of printing the Latest Feedback report:
1.
2.
Right click on the report. Then select the “Print” option on the pop up menu.
Ensure that the Report view is the active view by clicking on it. Then select “Print Report” on the
drop down Database menu.
4. Unreceived Samples
This report finds all samples that still have a status setting of “Submitted” or “Transit” after the “Diagnose Period”
has elapsed. The “Unreceived Samples” report thus helps the customer to identify samples that have been held-up or
have gone missing.
Only samples that have been submitted using the NetCheck software (i.e. a “Submit Form” has been completed and
either printed or emailed to Wearcheck) will be interrogated for this report.
The “Diagnose Period” is the maximum period of time allowed from the date the sample was taken to the date of
receiving a sample diagnosis. The customer can change the “Diagnose Period”, to suit his/her company’s needs, by
selecting the “Options/Report” menu item. The select the “General” tab, change the “Diagnose Period” and click
on “OK” to save the new Diagnose Period setting.
Select "Report"
from the Options
drop down menu.
Then select the
"General" tab.
Enter the required
"Diagnosis Period" and
save this setting by
clicking on "OK".
55
The default “Diagnose Period” is seven days. However, the time taken between taking a sample and receiving its
diagnosis, is particular to each customer due to the delivery distance and method of both the sample bottles and the
sample reports. To make reports based on the “Diagnose Period” more useful, the customer should change the
“Diagnose Period” days, to the average number of days their samples take between date sampled and receiving a
diagnosis.
Once the customer has customized the “Diagnose Period” for his/her particular company, the “Unreceived Samples”
report can be run. Select “Unreceived Samples” from the drop down Report/List menu.
Select "Unreceived Samples" from the
drop down Report/List menu.
All samples exceeding the stipulated “Diagnose Period” will then be selected. First an information box will be
displayed, showing the total number of “Unreceived Samples” found. Once this box is closed, the “Unreceived
Samples” are listed in the Report view, showing the sample number, its location and the date submitted.
Information box with total number of
“Unreceived Samples” found. Click “OK”
to close information box.
Listing of
“Unreceived
Samples”
There are two ways of printing the Unreceived Samples report listed in the Report view:
1.
2.
Right click on the report. Then select the “Print” option on the pop up menu.
Ensure that the Report view is the active view by clicking on it. Then select “Print Report” on the
drop down Database menu.
These “Unreceived Samples” can then be queried with Wearcheck support staff to establish why the sample’s
diagnoses were not yet updated on the customer’s database.
56
5. Unreceived Feedback
This report helps the customer to identify samples that still require a report of actions taken, to be sent to Wearcheck.
The diagnosis of these samples requested feedback from the customer, but Wearcheck has not yet received the
feedback with which to update the global database. It can also help the customer to identify problems that are taking
a long time to resolve as the relevant dates are displayed and printed.
Note: The samples listed in this report will be reflected on the customer’s
Monthly Report, generated by Wearcheck, as “Outstanding Feedback”.
Once Wearcheck has captured the feedback, sent in by the customer, onto the global database, that particular
sample’s status will be changed to “Feedback Received” and the sample will no longer be reflected in this report
listing.
To generate the listing, select “Unreceived Feedback" from the drop down Report/List menu.
Select "Unreceived Feedback" from
the Report/List drop down menu.
NetCheck will then generate a report listing of all the samples that meet the above criteria. First, an information box
will be displayed, showing the total number of samples found in the database that is lacking feedback.
Information box
with total number
on "Unreceived
Feedback". Click
on "OK" to close
the information
box.
The relevant samples
are displayed in the
Report view.
There are two ways of printing the Unreceived Feedback report:
1.
2.
Right click on the report. Then select the “Print” option on the pop up menu.
Ensure that the Report view is the active view by clicking on it. Then select “Print Report” on the
drop down Database menu.
57
6. Equipment Enquiry
This report lists the Location, Branch, Site, Equipment Name, Make & Model, Alternate ID, Serial/Registration
Number, Current SMR (Service Meter Reading), SMR Unit and SMR Date on a user determined selection of
equipment.
The selection can be done on the branch/depot, site, equipment name, make & model and the Current SMR Date
level.
The Branch, Site and Equipment name item selection boxes can be completed by drilling down in the Tree view
before opening the Enquiry report.
Branch/Depot and Site pre-selected
by drilling down in the tree view
before running the “Equipment
Enquiry” report.
To activate the Equipment Enquiry report, select “Equipment…” from the drop down Report/Enquiry menu.
Select “Equipment…” from the
drop down Report/Enquiry menu.
Branch and Site item
selection boxes automatically
completed with data as
selected in Tree view.
Alternatively, the user can open the Enquiry report without drilling down first and can then manually complete all
item selection boxes. The Make & Model and Date item selection boxes can never be pre-selected and must always
be manually completed by the user.
58
Selection criteria can be
specified on the Branch, Site,
Equipment name, Make &
Model and Current SMR Date
levels.
If the user does not preselect a Branch, Site or
Equipment by drilling down
in the Tree view, all the
item selection boxes will be
left blank.
The user can manually
complete these boxes to
enforce selection criteria.
Alternatively, the boxes can
be left blank to indicate that
no selection criteria should
be used on that level.
The user can further manipulate the selection criteria by manually indicating whether the data in the selection box
should be Included or Excluded from the selection. The user can also indicate whether the data in the selection box
must be used as an exact match (List), as a partial match (Like) or as a range (Range). If a Range selection is
specified, the dialog box will load a “From…" and a “To…” input box that can be completed.
To assist the user and to avoid spelling discrepancies, the user has been provided with selection drop down boxes at
some of the item selection boxes. Criteria, as found on the actual database, can then be highlighted and selected from
these drop down boxes.
By clicking on the appropriate “Order by” tick box, the user can indicate the criteria that must be used when
ordering the selected data.
The
“Include/Exclude”
and
“List/Like/Range” options enable
the user to further manipulate the
selection criteria.
To avoid spelling discrepancies,
use the selection drop down
boxes (where provided) to select
the appropriate selection criteria
from the actual database
The ordering of the selected data
can be manipulated by clicking
on the preferred “Order by” tick
box.
If a Range selection is specified,
the dialog box will load a
“From…” and a “To…” input
box that can be completed.
59
In the example below, the following will be selected:
1. All Equipment names
2. With a Make & Model = CATERPILLAR 140G
3. With a Current SMR date of between 01.01.1999 and 31.12.1999
4. Registered under the site MTUNZINI
5. Under the Branch A B C Plant Hire
5
4
1
2
3
This will result in all the equipment meeting the selection
criteria being listed in the Report view.
There are two ways of printing the Equipment Enquiry report:
1.
2.
Right click on the report. Then select the “Print” option on the pop up menu.
Ensure that the Report view is the active view by clicking on it. Then select “Print Report” on the drop
down Database menu.
60
7. Component Enquiry
This report lists the Location, Branch name, Site name, Serial number, Equipment make & model, Component
Name, Oil brand and grade, Oil capacity, Current SMR (Service Meter Reading), SMR Unit, SMR Date, Severity
Code, Problems diagnosed, Oil drain date, Oil drain SMR, Oil drain interval, Period oil in service, Oil additive,
Radiator additive, Next sample date and Maintenance on a user determined selection of components.
The selection can be done on the branch/depot, site, equipment, equipment make & model, component, component
make &model, oil in use, oil drain interval, date, problem and severity level.
The Branch, Site, Equipment name and Component item selection boxes can be completed by drilling down in the
Tree view before opening the Enquiry report.
Branch/Depot and Site pre-selected
by drilling down in the tree view
before running the “Component
Enquiry” report.
To activate the Component Enquiry report, select “Component…” from the drop down Report/Enquiry menu.
Select “Component…” from the
drop down Report/Enquiry menu.
Branch and Site item
selection boxes automatically
completed with data as
selected in Tree view.
Alternatively, the user can open the Enquiry report without drilling down first and can then manually complete all
item selection boxes. The Equipment and Component Make & Model, Oil in Use, Oil Drain Interval, Date, Problem
and Severity item selection boxes can never be pre-selected and must always be manually completed by the user.
61
Selection criteria can be
specified on the Branch, Site,
Equipment name, Make &
Model, Component, Comp
Make & Model, Oil in Use, Oil
Drain Interval, Date, Problems
and Severity levels.
If the user does not preselect a Branch, Site,
Equipment or Component
by drilling down in the Tree
view, all the item selection
boxes will be left blank.
The user can manually
complete these boxes to
enforce selection criteria.
Alternatively, the boxes can
be left blank to indicate that
no selection criteria should
be used on that level.
The user can further manipulate the selection criteria by manually indicating whether the data in the selection box
should be Included or Excluded from the selection. The user can also indicate whether the data in the selection box
must be used as an exact match (List), as a partial match (Like) or as a range (Range). If a Range selection is
specified, the dialog box will load a “From…" and a “To…” input box that can be completed.
To assist the user and to avoid spelling discrepancies, the user has been provided with selection drop down boxes at
some of the item selection boxes. Criteria, as found on the actual database, can then be highlighted and selected from
these drop down boxes.
By clicking on the appropriate “Order by” tick box, the user can indicate the criteria that must be used when
ordering the selected data.
The
“Include/Exclude”
and
“List/Like/Range” options enable
the user to further manipulate the
selection criteria.
To avoid spelling discrepancies,
use the selection drop down
boxes (where provided) to select
the appropriate selection criteria
from the actual database
The ordering of the selected data
can be manipulated by clicking
on the preferred “Order by” tick
box.
If a Range selection is specified,
the dialog box will load a
“From…” and a “To…” input
box that can be completed.
62
In the example below, the following will be selected:
1. All components excluding Engines
2. Where the Period Oil in Use ranges between 0 and 500 units
3. And where the Problem category was not FUEL
4. And where the Severity = BORDERLINE
5. On all Equipment names
6. With a Make & Model = CATERPILLAR 140G
7. Registered under the site MTUNZINI
8. Under the Branch A B C Plant Hire
8
7
5
6
1
2
3
4
This will result in all the components meeting the selection
criteria being listed in the Report view.
There are two ways of printing the Component Enquiry report:
1.
2.
Right click on the report. Then select the “Print” option on the pop up menu.
Ensure that the Report view is the active view by clicking on it. Then select “Print Report” on the
drop down Database menu.
63
8. Sample Enquiry
This report lists the Location (Branch, Site, Equipment, Component, etc.), the Submission (SMR, Oil Changed, etc.),
the Laboratory results (Fe, Ag, etc.), the Interpretation (Severity, Problems, etc.) and the Date Trail (Dates Sampled,
Reported, etc.) on a user determined selection of components.
The selection can be done on the branch/depot, site, equipment, equipment make & model, component, component
make & model, oil in use, oil drain interval, range and specifics of dates, type of problem and severity level.
The Branch, Site, Equipment name and Component item selection boxes can be completed by drilling down in the
Tree view before opening the Enquiry report.
Branch/Depot and Site pre-selected
by drilling down in the tree view
before running the “Sample
Enquiry” report.
To activate the Sample Enquiry report, select “Sample…” from the drop down Report/Enquiry menu.
Select “Sample…” from the drop
down Report/Enquiry menu.
Branch and Site item
selection boxes automatically
completed with data as
selected in Tree view.
Alternatively, the user can open the Enquiry report without drilling down first and can then manually complete all
these item selection boxes. The Equipment and Component Make & Model, Oil in Use, Oil Drain Interval, Type and
Range of Dates, Problem and Severity item selection boxes can never be pre-selected and must always be manually
completed by the user.
64
Selection criteria can be
specified on the Branch, Site,
Equipment name, Make &
Model, Component, Comp
Make & Model, Oil in Use,
Oil Drain Interval, Type of
Date, Date Range, Problems
and Severity levels.
If the user does not pre-select
a Branch, Site, Equipment or
Component by drilling down
in the Tree view, all the item
selection boxes will be left
blank.
The user can manually
complete these boxes to
enforce selection criteria.
Alternatively, the boxes can
be left blank to indicate that
no selection criteria should be
used on that level.
The user can further manipulate the selection criteria by manually indicating whether the data in the selection box
should be Included or Excluded from the selection. The user can also indicate whether the data in the selection box
must be used as an exact match (List), as a partial match (Like) or as a range (Range). If a Range selection is
specified, the dialog box will load a “From…" and a “To…” input box that can be completed.
To assist the user and to avoid spelling discrepancies, the user has been provided with selection drop down boxes at
some of the item selection boxes. Criteria, as found on the actual database, can then be highlighted and selected from
these drop down boxes.
By clicking on the appropriate “Order by” tick box, the user can indicate the criteria that must be used when
ordering the selected data.
The
“Include/Exclude”
and
“List/Like/Range” options enable
the user to further manipulate the
selection criteria.
To avoid spelling discrepancies,
use the selection drop down
boxes (where provided) to select
the appropriate selection criteria
from the actual database
The ordering of the selected data
can be manipulated by clicking
on the preferred “Order by” tick
box.
If a Range selection is specified,
the dialog box will load a
“From…” and a “To…” input
box that can be completed.
65
In the example below, the following will be selected:
1. All Samples with a Sampled date between 01.01.1996 and 31.12.1999
2. That had a severity other than NORMAL
3. And where the Period Oil in Use ranged between 0 and 300 units
4. On all ENGINEs
5. Registered to any Equipment names
6. Where the Equipment had a Make & Model = CATERPILLAR 140G
7. And were registered under the site MTUNZINI
8. Under the Branch A B C Plant Hire
8
7
5
6
4
3
1
2
This will result in all the equipment meeting the selection
criteria being listed in the Report view.
There are two ways of printing the Sample Enquiry report:
1.
Right click on the report. Then select the “Print” option on the pop up menu.
2.
Ensure that the Report view is the active view by clicking on it. Then select “Print Report” on the
drop down Database menu.
66
7.
Sample Submission and Feedback Capture
The user can complete Sample Submission and Feedback forms electronically. These forms can then be printed and
faxed or posted to Wearcheck. Alternatively, these forms can be sent to Wearcheck electronically, provided that the
user’s email package supports SMTP or MAPI protocol as a default protocol.
1. Configuring the NetCheck software to email Submission and Feedback forms to
Wearcheck
Should the user prefer to email Feedback and Submission details to Wearcheck, the necessary details of the "Email"
settings on the "Options/Report…" menu must be completed.
Select "Reports" from the
drop down Options menu.
Then select the "Email" tab on this menu. The user must complete the “From Name” and “From Email address”
section. The user must also indicate whether they are going to use SMTP or MAPI protocol in sending these emails
to Wearcheck. This is done by selecting the appropriate Server Type. (Please also ensure that your email package is
set to use this protocol as the default standard.) If SMTP protocol is selected, the user must also complete the SMTP
Host Name or IP address in this dialogue box. These details must be obtained from the user's IT department.
Note: Do not change the “Port:” or “Timeout (sec):” details. The
“UserID:” section MUST be left blank.
Select the Email tab on the drop
down Report menu.
Enter the user's own name and Email
address.
Indicate whether SMTP or MAPI
protocol must be used to send the email.
If SMTP protocol is chosen, enter the user's
SMTP Host Name or IP address. This must
be obtained from the user's IT department.
Click "OK" to save these entered settings.
67
2. Printing, Completing and Emailing a Submit Form
The NetCheck “Submit” form is the same as the submission form that is received with every sample bottle purchased.
This form enables the user to capture sample details needed by the Diagnostic department in order to interpret the
laboratory results of a sample. The “Submit” form can be printed and given to the workshop to manually complete or
the form can electronically be completed. Once the “Submit” form has been completed, it must be sent to Wearcheck
to be captured on the global database.
Note: The information on the “Submit” form is crucial for the correct diagnosis of a sample. Therefore, the
“Submit” form with the completed information must reach the laboratory either before the physical oil
sample reaches the laboratory; or else it must accompany the physical sample to the laboratory.
The completed Submit form can be posted or faxed to Wearcheck for capturing, or the electronic Submission can be
emailed to Wearcheck.
By electronically completing the submission data and emailing it to Wearcheck, the user ensures that the data
accompanying the sample is correct and relevant.
When generating Submission forms, the user should aim to automatically load as much information as is possible
from the database and to restrict manual entries to data that cannot be loaded from the database. This will eliminate
discrepancies and duplications.
The user can achieve this by:
a) Selecting the Component before opening up the Submit form OR
b) Selecting just the Branch from the List View, loading the Submit form and then utilizing the Drop Down boxes
next to the various input prompts to select the Site, Equipment and Component. (In this order)
A) Selecting the Component before opening up the Submit form.
Drill down in the Tree view until the relevant component is displayed in the List view. Select the component from
which the sample has been taken in the List view. The submission forms can also be generated on components in the
active Report view by running for instance the “Due Submissions” report.
Component selected in
the active List view.
The submission form
will be generated for
this component.
Component selected in
the active Report view
after running the "Due
Submissions" report.
The submission form
will be generated for
this component.
68
Once the component(s) have been selected, select “Submit…” from the drop down Report/Form menu.
Select "Submit…" from the drop
down Report/Form menu
Component selected in the List
view.
NetCheck will then display the “Submit” form. The following details are automatically filled in for the selected
component:
Next Sample Date
Branch Code
Vehicle, Fleet or Plant Number
Site
Component Type
Registration or Serial Number
The Branch Code, Vehicle/Fleet/Plant
Number, Registration/Serial Number,
Site and Component Type of the
component selected in the Active List
or Report view is automatically filled
in.
B) Selecting just the Branch from the List view and selecting the rest of the sample location details from the
drop down boxes at the input prompts on the "Submit" form
Select the Branch code in the List view. Then select “Submit…” from the drop down Report/Form menu.
Select "Submit…" from the
Report/Form drop down menu.
Branch code selected in the List
view.
69
NetCheck will then display the “Submit” form. The selected Branch Code will be automatically filled in. The user
can then select the appropriate Site, Vehicle/Fleet/Plant Number and Component by utilizing the drop down boxes
next to these input prompts. Click on the arrow to activate the drop down box and select the appropriate data by
double clicking on it. NetCheck will then load the selected data from the database.
The selected Branch
code is automatically
loaded
The Site, Vehicle/ Fleet/
Plant Number and
Component can next be
selected from the
database by using the
drop down boxes at
these input prompts.
When using the drop down boxes on the Submit form, the user should always first select the Site. When opening the
Site drop down box, all sites registered for the pre-selected Branch code will be displayed. Click on the applicable
site to load it in the Submit form.
The Sites registered under the preselected Branch is displayed in the Site
drop down box
Next, open the drop down box at the Vehicle/Fleet/Plant number prompt. All equipment registered for the selected
Branch and Site will be displayed. Click on the applicable equipment to load it in the Submit form.
The Equipment registered under the preselected Branch and the Site selected
from the drop down site box is displayed
in the Equipment drop down box
70
Then open the drop down box at the Component prompt. All components registered for the selected Equipment
registered at the selected Branch and Site will be displayed. Click on the applicable component to load it in the
Submit form.
All components registered under the preselected Branch, and the Site and
Equipment selected from their drop down
boxes are listed in the Component drop
down box.
Once the Branch, Site, Equipment and Component has been selected, the following details will automatically be
loaded on the Submit form (provided that they have been captured onto the database before):
Registration or Serial number
Customer Name
Chassis Make & Model
Component Make & Model
Address Details
Oil Brand & Grade
Brand of Oil Additive (if applicable) Oil Capacity
Brand of Radiator Additive (if applicable)
The relevant data, as found on the
NetCheck database, is automatically
loaded once the user has selected the
Branch, Site, Equipment and Component.
Should these existing details on the component be incorrect, the user can manually overwrite them. When the
submission is then sent to Wearcheck, the new data will be captured onto the Wearcheck database and both
Wearcheck's and the user's databases will be updated with the new information.
The “Next Sample Date” is automatically determined from the current day’s date in combination with the
recommended resample interval (RRI) and the average daily SMR change for the selected component. However, the
user can change the “Next Sample Date” manually before pressing the “Next", “Close", "Print" or "Email" buttons if
the calculated date does not tally with their sampling schedule.
Next, the user must complete the following details for each new sample to be sent to the laboratory:
Sample Number & Check digits
Date Sampled
Service Meter Reading
Period Oil has been in Use
Oil Consumption
Has this oil been Drained?
Have oil Filters been changed?
71
Note: The “Sample Number” must be checked against the bottle number before attaching this
form to the bottle or emailing it to Wearcheck. The Check digits must also be entered. These digits
prevent incorrect sample number entries as incorrect numbers are rejected.
If an incorrect sample number has been entered, the following warning message will be displayed:
If Oil is ONLY drained when a sample is taken, the user can also make use of the "Oil in Use" calculation button.
This button will only be active if a Service Meter Reading has been supplied for both the current and the previous
sample.
NOTE: This calculation of the period that the oil has been in use is based on the assumption that no
oil drain has occurred between oil samples!
If oil is drained between oil samples, the user must manually calculate the period it has been in use
and the "Oil in Use" button should not be used.
The "Oil in Use" button will subtract the previous oil sample SMR from the current oil sample SMR. Therefore, the
button can not be used if a Service Meter has been changed as this will result in a negative Period Oil in Use figure.
If applicable, the user should also supply the following details:
Service Meter Reading when Component was Overhauled or Replaced
Any Comment or Special circumstances that must be taken into account when analyzing the sample
The Job Number
72
Fill the Sample Number in. This
number must correspond with
the sample bottle number. Also
enter the 2 Check digits. This
will prevent typing errors when
the sample number is entered.
When the “Next” button is
clicked, the next component in
the active view is loaded into
the “Submit” form.
“Print” will print the current
“Submit Form” with all its
entered details. “Print All” will
print the “Submit Forms” with
the loaded details for all the
components in the Active view.
The "Email" button will email the
entered submission detail to
Wearcheck.
If Oil Drains ONLY take place
when oil samples are taken, the
"Oil in Use" calculation button
can be used to calculate the
period the oil has been in use.
These fields must be completed
for every sample submission.
Only complete these fields if
applicable.
If the Branch, Site, Equipment
and Component have been
selected and loaded from the
database, these details will
automatically
be
loaded.
Complete
these
details
manually only if the loaded
information needs to be altered
or if it is missing.
Use the scroll bar to move up
and down the “Submit”. form
Once the submissions have been completed and printed, the forms must be sent to Wearcheck to be captured onto the
global database. These forms must either accompany the physical samples to the laboratory, or must reach the
laboratory before the physical samples.
73
NetCheck users can also Email the electronically captured submission details to Wearcheck by clicking on the
"Email" button.
Click on the "Email" button to
email the completed submission
to Wearcheck.
If the Email details on the "Options/Report" menu have been completed correctly and the email server is using the
applicable standard protocol, the entered submission will then be emailed to Wearcheck. An information box will be
displayed, confirming the electronic posting of the submission.
Confirmation that the entered submission had
electronically been posted. Click "OK".
74
3. Printing, Completing and Emailing a Feedback Form
The Feedback form enables the user to print a form with a dialog box where the workshop can enter what they have
done to address the problem identified with the sample/filter analysis. The form also includes the actual diagnosis
and the relevant sampling details. The user must complete the Feedback form. This can be done manually, by
printing the form and then completing the relevant sections, or the relevant sections can be completed electronically
by typing the feedback in or by pasting it from the Feedback list. Once this form has been completed, it must be
returned to Wearcheck so that the user’s global database on the Wearcheck computer can be updated with the
feedback. Once Wearcheck has updated the global database with the feedback details, the sample’s status will be
changed to “Feedback Received”.
The completed Feedback form can be posted or faxed to Wearcheck for capturing, or the Feedback can be emailed to
Wearcheck.
To print a Feedback form, click on the "Feedback Form Report" button on the "Hot Key" button bar.
"Hot Key" Button bar.
"Hot Key" to generate "Feedback
Form Report".
Alternatively, select "Feedback…" from the drop down Report/Form menu.
Select
“Feedback
Form
Report“ from the drop down
Report/Form menu.
If a sample or filter record has been selected in the active list or in the Report view (for instance after the user ran the
Unactioned Feedback Report), then the Feedback report for this sample number will automatically be loaded and
displayed.
Sample selected in the Active Report view
Feedback form for the selected sample.
75
However, if no selection has been made, a dialog box will open. The user must enter the sample/filter number for
which the Feedback report needs to be printed in the edit box.
No selection was made in the active List or
Report view. User must enter the sample number.
Once the sample number has been entered, click on
“OK” to generate the Feedback report.
NetCheck will then display the requested Feedback Form.
When the “Next” button is
clicked,
the
sample
number dialog box is
displayed. The user can
then enter another sample
number or if the first
number was taken from an
active List or Report view,
the next number in the
listing will be loaded.
Prints the current
displayed “Feedback
Report”.
Prints
the
current
displayed
“Feedback
Report” as well as
feedback reports for all
other samples listed in
the active view.
Emails the entered
feedback to
Wearcheck
Scroll bar to scroll up and
down the displayed report
By scrolling down the
Remarks, Action Taken,
Date, SMR and Name
section of the Feedback
report can be displayed
76
The user can also use this option to capture the actual feedback. To do this, the “Action Taken”, “Date” and “SMR”
sections of the form must be completed. The “Action Taken” section can be completed by typing in the feedback
and/or by pasting feedback codes taken from the Feedback List.
The “Feedback List”
dialog box containing
the feedback statements.
To open the “Feedback
List” dialog box.
Highlight the statement
to be added to the
“Action Taken” section
and click on “Paste”.
The user can also add
their own frequently used
feedback
statements.
These can then in future
be pasted into the “Action
Taken” section.
Once the feedback has been entered, the user can print and post or fax the form to Wearcheck, or the user can Email
the feedback to Wearcheck by clicking on the "Email" button.
Click on the "Email" button to email
the entered feedback to Wearcheck.
If the Email details on the "Options/Report" menu have been completed correctly and the email server is using the
applicable standard protocol, the entered feedback will then be emailed to Wearcheck. An information box will be
displayed, confirming the electronic posting of the feedback.
Confirmation that the entered feedback had
electronically been posted. Click "OK".
77
8.
Searching the Database
Some of the reports described within the "NetCheck Oil Sample Reports" and the "NetCheck Other Reports"
chapters, require the user to first drill down in the Tree view to highlight the equipment/component/sample that the
report must be based on. This can of course be problematic if the user does not know where the equipment is
registered on the database. However, NetCheck also has a search function that can be utilized to locate an equipment
or sample number in the database. The search function can also be used to locate historical data.
1. Searching for an Equipment
To search for the exact location of a particular piece of equipment, click on the "Find Equipment" button on the "Hot
Key" button bar.
"Hot Key" Button bar.
"Hot Key" to "Find Equipment" on
the NetCheck database.
Alternatively, select “Equipment…” from the drop down Search/Find menu.
Select “Equipment …” from the drop
down Search/Find menu.
A dialogue box will be displayed. The user must then complete the Equipment name in the ID box. Should the user
choose to enter the Alternate ID in this box, he/she also needs to flag the ID type below to indicate that an Alternate
ID had been entered and must be searched for. Then click on "OK".
Enter the Equipment name or the
Alternate ID that must be located.
If an Alternate ID has been entered,
flag the "Alternate ID" as the ID
Type by clicking on it.
Click on “OK” to start the search
78
NetCheck will then search the database for the Equipment name or Alternate ID (depending on which ID Type had
been flagged) that was entered. As soon as the entered equipment has been located, its location will be indicated in
the Tree view while its components will be displayed in the List view.
Components of the
located Equipment
displayed in the List
view.
Location of the
equipment displayed
in the Tree view.
2. Searching for a Sample
To search for the exact location of a particular sample, click on the "Find Sample" button on the "Hot Key" button
bar.
"Hot Key" Button bar.
"Hot Key" to "Find Samples" on
the NetCheck database.
Alternatively, select “Sample…” from the drop down Search/Find menu.
Select "Sample…" from the drop down
Search/Find menu.
79
A dialogue box will be displayed. Type in the Sample number to be located and click on "OK".
Type in the Sample number to
be located and click on "OK".
NetCheck will then search the database for the entered Sample number. As soon as the entered Sample has been
located, its location will be indicated in the Tree view while its details will be displayed in the List view.
Sample Details in the List view.
Location of the entered Sample
number in the Tree view.
3. Searching for a Sample's History
The historical data associated with a specific sample listed in the Report view, can easily be located by first clicking
on the specific sample in the Report view and then utilizing the "History" button on the "Hot Key" button bar.
"Hot Key" Button bar.
"Hot Key" to find "History" data
for the sample selected in the
Report view
Sample selected in the Report view.
80
Alternatively, click on the sample in the Report view and then select “History” from the drop down Search/Find
menu.
Select "History" from the
Search/Find drop down menu.
Sample selected in the Report view.
NetCheck will then locate the sample and its history in the Tree view and will list the details of the historical samples
in the List view.
Selected sample's location
in the Tree view.
Selected sample's historical
details in the List view.
Selected sample in the
Report view
4. Searching for Unactioned Critical/Urgent/Borderline Samples
These three options will search for all unactioned Critical / Urgent / Borderline samples and will move the Tree and
List view selections to the first record in the search.
Selecting “Critical” / “Urgent” /
“Borderline” from the drop
down Search/Samples menu, will
locate the first Critical / Urgent /
Borderline sample that still has a
status of Unactioned and will
move the Tree and List view to
this sample.
81
9.
Charts
NetCheck enables the user to plot 2 types of graphs based on the data available in the database:
A trend analysis chart and
A problem overview chart.
1. Trend analysis Chart
The Chart Trend Analysis menu item plots a multi-series line graph using the chart profile. The graph can be
customized by using the buttons in the chart views profile panel.
To plot the actual Trend Analysis chart, the user must first select a Sample from the Component that must be plotted
in either the Active List or the Active Report view.
Select the sample for
which the Trend Analysis
chart must be plotted in
the Active List or Active
Report view.
Next, the Trend Analysis chart can be activated by clicking on "Analysis Trend" on the "Hot Key" button bar, or by
selecting "Trend Analysis" from the drop down Chart menu.
Select "Analysis Trend" from the Hot
Key button bar
OR
Select "Trend Analysis" from the Chart
drop down menu.
The Trend Analysis chart will be plotted in the Chart view. The "Default" profile will be used and a line graph of the
Iron, Period Oil in Service and Viscosity at 40° Celsius will be plotted for all samples on the same component as the
selected sample.
Trend Analysis
line graph based on
the Default profile.
82
The user can manipulate the Trend Analysis graph in several ways:
A) Scale
The user can select whether the chart must be plotted using a "Log scale" and/or a "Rate scale" by clicking on the
selected scale on the Profile panel.
Chart utilizing a
Log Scale.
Chart utilizing a
Rate Scale.
The user can manipulate the rate scale of the chart. The rate scale will convert the test values (Y-values) into a rate of
value per x revolutions/hours/kilometers/miles. In order for this rate to be calculated correctly the period oil/filter in
service must be entered correctly for every sample/filter included in the trend. If the period oil/filter in service is
empty, then the Y-value is set to zero (0). All zero value points need to be investigated further to determine if they
represent valid or unknown rates by checking the period oil/filter in service values for that sample.
To manipulate the rate scale of the Trend analysis line graph, select "Chart…" from the drop down Options menu,
enter the new preferred rate scales per unit and click on "OK" to save these new rate scales.
Select "Chart…" from the drop down
Options menu.
Enter the preferred "rate scale per
units" that must be used.
Click on "OK" to save the new rate scale
B) Multiple Components
To plot multiple Components on the same line chart, plot the first component. Then click on the "Multiple
Components" tick box on the Profile panel. Next select the other component that must be plotted and highlight a
sample from this component in the active Report or List view. Click on the "Analysis Trend" button on the Hot Key
83
button bar or select "Trend Analysis" from the drop down Chart menu. The second Component's trend analysis will
be plotted on the same chart as the first component.
Plot the chart for the first component
Click on "Multiple
Components" on the
Profile panel.
Select
the
second
Component, Highlight a
sample from it in the
active List or Report
view.
Click on the "Analysis Trend" Hot Key.
The second Components Trend Analysis
graph will be plotted on the same chart
as the first without overwriting it.
84
C) Profile sets with specified elements to be plotted
The user can also create his/her own profiles that must be plotted. First decide on a name for the new set of graphs
that must be profiled and enter this as the Profile name.
Then indicate which elements must be plotted for this new Profile by clicking on the elements' tick boxes. Click on
"Save" to save the new Profile set. This profile set can be used in future by selecting it when plotting charts.
Name of the new Profile.
Elements to be included
when plotting the new
Profile
Chart plotted using the
new Profile
Click on "Save" to save the
new Profile for future use.
D) Date Range
The user can also include a Date Range selection when plotting the Analysis Trend chart. Enter a Start and End date
in the "Date From" and "Date To" prompts on the Profile panel. Only the samples meeting this specified Date range
will be plotted.
Only the 3 samples
meeting the Date range
selection criteria are
plotted in the chart.
Date Range selection.
2. Problem Overview Chart
The Chart Problem Overview menu item plots a pie graph using the components/samples Problems Diagnosed field
values in the currently active List/Report view. The Problem Overview chart summarizes the Problem categories
identified of all samples from a selected Component. These Problem categories are then plotted in a pie graph as a
percentage of the total number of problems for that Component.
85
To plot the actual Problem Overview chart, the user must first select a Sample from the Component that must be
plotted in either the Active List or the Active Report view.
Select the sample for
which
the
Problem
Overview chart must be
plotted in the Active List
or Active Report view.
Next, the Problem Overview chart can be activated by clicking on "Problem Overview" on the "Hot Key" button bar,
or by selecting "Problem Overview" from the drop down Chart menu.
Select "Problem Overview" from the
Hot Key button bar
OR
Select "Problem Overview" from the
Chart drop down menu.
The Problem Overview chart will be plotted in the Chart view.
Problem Overview pie
graph for the selected
Component.
86
The user can see the actual number of a particular problem in relation to the total number of problems for that
Component by left clicking on that segment of the pie chart.
Left click on a segment to see the actual
number of that particular Problem in
relation to the total number of Problem
categories for that Component.
Graphs can be printed in 2 ways:
1. Right click on the displayed graph in the Graph view
and then click on the pop up “Print” dialogue box.
Print
2. Ensure that the Graph view is the active view by
clicking on it. Then select “Print Chart” from the drop
down Database menu.
87
10.
Making Changes and/or manipulating the Data
NetCheck allows the user to change and manipulate data in the local database. These changes/manipulations can be
made by using the facilities on the drop down Edit menu.
NOTE: These changes are restricted to the local database and will not be reflected on
Wearcheck’s global database. A future data email from Wearcheck can therefore also undo the
local change. For a change to the database to be permanent, Wearcheck should be requested to
do the change. This change done to the global database will then be emailed to the local
database and both databases will reflect the change.
1.
Copy
Highlight the text that needs to be copied. Then select “Copy” from the drop down Edit menu. This
command is only enabled when there is text available to copy. Only the currently selected text is copied to
the clipboard. No object copying is supported. In other words, you cannot copy a record or chart using this
menu item.
Highlight the text to be
copied. Then select “Copy”
from the drop down Edit
menu.
The copied text can then be
pasted in another application
such as Notepad.
This command is most commonly used by customers to copy the sample's diagnosis displayed in the Sample Enquiry
form. The copied diagnosis is then pasted into work orders.
88
2.
Copy Record
This menu option is only enabled when a record is selected. The currently selected record and its column
headings are copied to the clipboard as comma delimited text strings. This text can be pasted to any
windows application that can handle text. Some applications, like Excel, will automatically format the
comma-delimited text into columns.
Highlight a record and then select
“Copy” from the drop down
Edit/Local Data/Record menu.
This will copy the selected record
as a comma delimited text string to
the clipboard.
3.
Delete Record
This menu option is only enabled when a record is selected. The currently selected record is deleted as well
as all other records belonging to the selected record. That is, if a site is deleted, then all equipment,
components, samples and filters belonging to that site will be deleted as well.
Individual sample and filter records cannot be deleted. If the user wants to delete an individual sample or
filter, he/she will have to delete the component that the sample or filter belongs to. This will have the effect
that all other samples and filters belonging to that component will also be deleted.
WARNING: Be very careful about what you delete as there is no way to get the
information back without contacting Wearcheck and requesting that the data be
resent.
89
First, select the record that should be deleted
Highlight the record to be
deleted in the Tree view.
Then select “Delete” from
the drop down Edit/Local
Data/Record menu.
Once the “Delete” option on the drop down Edit/Local Data/Record menu has been chosen, NetCheck will
display an information box confirming the deletion.
Information box confirming the deletion.
Click on “Yes” to delete the selected
record or click on “No” to abort.
Depending on whether the user has clicked on “Yes” or on “No” an information box will be displayed
confirming that deletion took place or did not take place.
"No" was clicked and
deletion did not take place.
"Yes" was clicked and
deletion took place
90
4.
Update Location
This menu option is only enabled when a record is selected. The currently selected record’s location field is
updated with a location value, which is determined from the record's position in the hierarchy of the tree
view.
When an equipment, component, sample or filter is transferred on the global database at Wearcheck, the
transfer is directed to the NetCheck database with the next email sent. When the user then updates his/her
database with the email in the "Update Database" program, the record's new location will automatically be
updated in the hierarchical Tree view. However, the record's displayed location in the List and Report views
are not updated and will still reflect the original location. The user can manually correct this displayed
location in the List and Report views, by highlighting the record in the view and selecting "Update
Location" from the drop down Edit menu. This will then change the record's displayed location to its actual
location in the hierarchical Tree view.
Highlight sample, and then select "Location" from
the drop down Edit/Local Data/Sample/Update
menu.
This updates the sample's displayed location.
Before this action, the sample does not
display a location in the Report view.
5.
Status
This menu option is only enabled when a sample or filter record is the selected item in the List or Report
view. To select a sample or filter in the List view, drill down in the Tree view until the samples or filters are
displayed in the List view. Then select the desired sample or filter by highlighting it in the List view. To
select a sample or filter in the Report view, generate the appropriate report first and then highlight the
desired sample or filter in the Report view.
A sample or filter’s status is an indication of the sample/filter’s progress through the process of originally
capturing the sampling details till the final reporting of actions to solve identified problems. The status is
used to trigger customer actions like printing of reports, responding to diagnoses, etc. The status is also
used to identify which samples to include in certain reports such as “Unreceived Feedback”.
A sample/filter’s status can automatically be changed by certain events taking place, such as the printing of
received reports or the interpretation and diagnosis of the laboratory results. The user can also manually
change a sample/filter’s status by selecting it and using the “Status…” option on the drop down Edit/Local
Data/Sample menu. NetCheck restricts the user’s manual changing of status by forcing the user to select a
status from a drop down list in which only the appropriate choice of status will be listed.
Only the appropriate statuses are
listed in the drop down list when the
user manually wants to change a
sample or filter status.
Click on “Save” to activate the
change of status.
91
Flow Diagram explaining Sample/Filter Status Changes
SUBMITTED / TRANSIT
The details relating to the sample/filter have been captured but the
sample/filter has not yet physically arrived at the Laboratory.
RECEIVED
The sample/filter has physically arrived in the Laboratory.
(This status will be used in future NetCheck releases.)
DIAGNOSED
The sample/filter has been analyzed and the
results were all normal (no action required).
DIAGNOSED
The sample/filter has been analyzed and the
results indicated a problem (action required).
ACTIONED
The NetCheck user has acknowledged receipt
of the diagnosed sample. This can be done by
printing the Unactioned Normal Samples or
by manually changing the status of these
samples to “Actioned”.
ACTIONED
The NetCheck user has acknowledged receipt
of the diagnosed sample. This can be done by
printing the Unactioned Abnormal Samples or
by manually changing the status of these
samples to “Actioned”.
ACKNOWLEDGED
The NetCheck user has acknowledged that
Wearcheck requested feedback on the sample.
This can be done by printing the sample’s
Feedback Form or by manually changing the
status of these samples to “Acknowledged”.
FEEDBACK RECEIVED
The customer sent in feedback, on actions taken to rectify the
identified problem, to Wearcheck. This feedback has been
captured on the global database.
NO FEEDBACK RECEIVED
The NetCheck user cannot find any feedback for a
sample to sent to Wearcheck and does not want this
sample to appear on the “Unreceived Feedback”
report. He/she can manually change the status of this
sample to “No Feedback Received”. It must be noted
however, that this is a local status change only, and
that the sample will still appear on the customer’s
Monthly report as Outstanding Feedback.
NOTE: * The status indicated in shaded blocks, are reflected on the local database only, and is
not updated on the global Wearcheck database.
* The NetCheck user should aim to have all “NORMAL” samples at the Actioned
status and all “NON-NORMAL” samples at the Feedback Received status.
92
11.
Disaster Recovery
NetCheck has several “Disaster Recovery” options. These can be found on the drop down “Tools/Database” menu
and include:
• A tool to repair the database if and when database corruptions occur
• A tool to make a backup of the NetCheck database
• A tool to restore a previously made backup.
1.
Repair Database
Sometimes, due to unforeseen circumstances, database corruptions occur. This can, for instance, happen
when the Network or PC goes down whilst the user is busy updating received data email files. Typical error
messages indicating database corruption are, for example, “index out of date” and “blob” errors.
When the user encounters these error messages, the database can be repaired by selecting “Repair” from the
drop down Tools/Database menu.
Select “Repair” from the drop
down Tools/Database menu.
The “Repair All” button is automatically assumed and activated when this option is chosen and the software
will immediately attempt to repair the database.
The "Repair All" button is
automatically assumed and
activated.
The "Results" panel shows
each table’s repair and
verification results.
The “Status” panel shows the
repair progress for each table.
Once the database has been successfully repaired, the repair tool will automatically close and restart the
NetCheck application. If the repair fails in any way, the user is given the option to automatically restore the
database from backup. It is strongly recommended that the user accept this option when presented with it.
However, a database can only be restored from backup if such a backup has in fact previously been made!
93
2.
Backup Database
The user can only utilize the restore tool if the database has previously been backed up. The backup tool
allows the user to make a backup copy of the NetCheck database from and to any hard drive.
NOTE: It is recommended that the user backup to a LAN file server harddrive
which itself is backed up by the user’s IT department on a regular basis. The
NetCheck backup tool is for quick recovery purposes only and should not replace
scheduled IT backups made on removable media such as tape streamers.
To set the backup option for your NetCheck database, first select “Database…” from the Options drop
down menu and then select the “Backup” tab.
Select “Database” from the drop
down Options menu.
Select the “Backup” tab.
If NetCheck should automatically
be backed up, check the “Auto
backup” checkbox and
enter the interval
backups in days.
of
these
The directory to which the database
will be backed up.
Click on “OK” to save these settings.
The user can set NetCheck to automatically backup the database periodically by checking the auto backup
option and setting the period in days.
The default setting will make a backup of NetCheck in the …..\NetCheck\Database\Backup folder.
However, it is highly recommended that the user change this path so that NetCheck is backed up to a
directory on the LAN based file server which itself is backed up regularly by the user’s IT department.
Save the entered settings by clicking on “OK”.
If the user checked the “Auto backup” checkbox, the database can be backed up when the software prompts
the user to do so. (The frequency of this prompting depends on the number of days entered by the user).
This “Backup Prompt” will be displayed when the user exists the NetCheck software. The user can then
allow the backup to take place by clicking on “Yes” when asked to confirm that the backup can take place.
If the user clicks on “No” at this prompt, NetCheck will close without the backup taking place.
94
Prompt for Backup to take
place. (Displayed at entered
interval, when NetCheck is
exited)
Click on “Yes” to activate
backup, or on “No” to bypass
backup.
Alternatively, the NetCheck database can be backed up at any time by selecting “Backup” from the drop
down Tools/Database menu.
Select “Backup” from the
drop down Tools/Database
menu.
The “Backup Prompt” will next be displayed and the user can start the backup by clicking on “Yes” when
asked to confirm that the backup can take place. If the user clicks on “No” at this prompt, the backup will
be aborted.
If the user clicked on “Yes” the NetCheck database will be backed up to the folder as indicated in the
“Backup” dialogue box in the “Options/Database” menu. When the backup has been completed, an
information box will be displayed, informing the user that the backup has been successful.
Information box informing the user of
the successful completion of the backup.
Closing this Information box will restart the NetCheck software.
95
3.
Restore Database
If a NetCheck database cannot be repaired by using the Repair Database Tool, the user can use the Restore
Tool to restore the NetCheck database to a working copy. (Provided that the database has in fact been
backed up before!)
To restore the database, select “Restore” from the drop down Tools/Database menu.
Select “Restore” from the
drop down Tools/Database
menu.
NetCheck will then display a dialogue box asking for confirmation that a restore must take place.
Click on “Yes” to activate the
Restore function.
The user can abort the restore and restart NetCheck by clicking on “No” or can go ahead to restore a
previously backed up copy of NetCheck by clicking on “Yes”.
Once the database has been restored, the software will display an information box indicating the status.
Information box indicating
that the database has
successfully been restored.
Upon closing the Information box, the restored NetCheck will start up. The user must then update NetCheck
with whatever update files are in the “Update database” dialogue box to complete the restore of the
database to the most current data available.
96
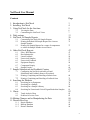
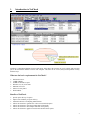
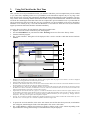
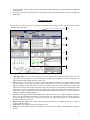
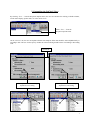
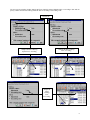
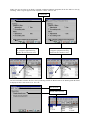
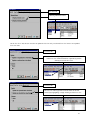
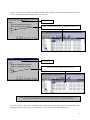
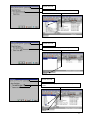
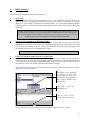
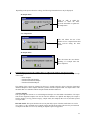
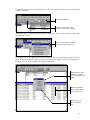
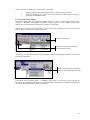
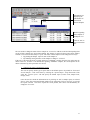
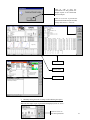
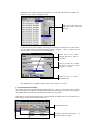
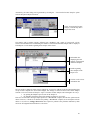
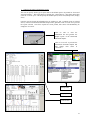

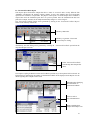
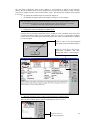
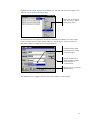
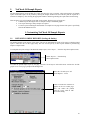
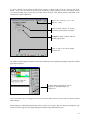
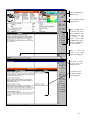
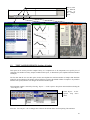
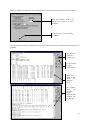
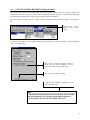
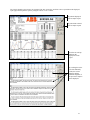
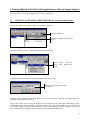
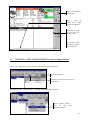
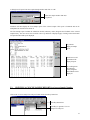

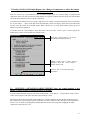
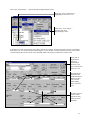
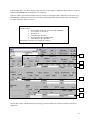
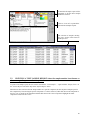
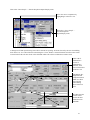
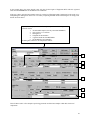
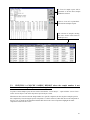
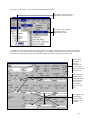
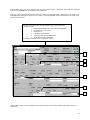
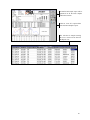
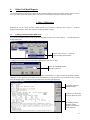
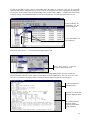
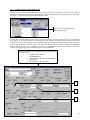
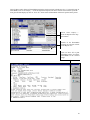
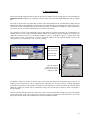
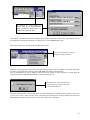
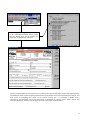
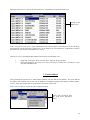
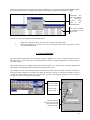
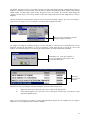
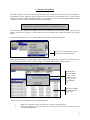
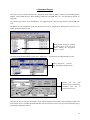
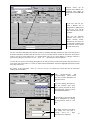
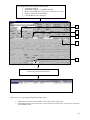
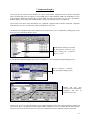
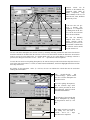
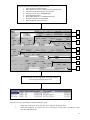
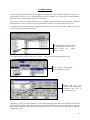
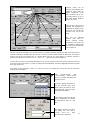
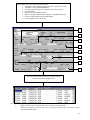
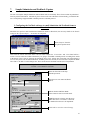
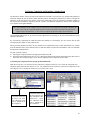

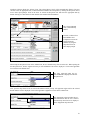
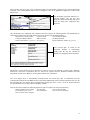

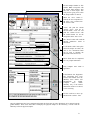
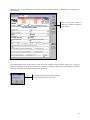
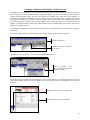
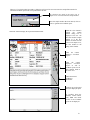
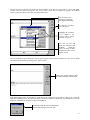
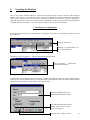
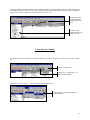
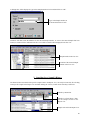
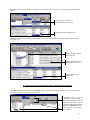
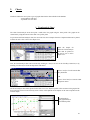
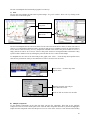
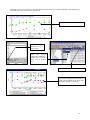
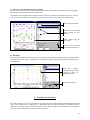
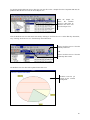
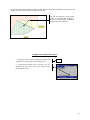
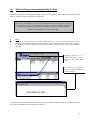
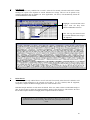
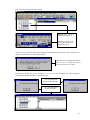
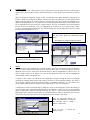
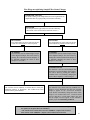

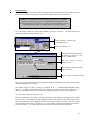
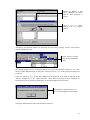
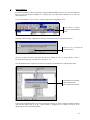
![[Product Name] Service Manual](http://vs1.manualzilla.com/store/data/006035113_1-0289c4c9f962713aa5c1b10dc8f42975-150x150.png)