1
A
GUIDE
TO
ExamBuilder
™
A MathWriter™ 2.0 Module for Building Examinations
Version 1.0
J. Robert Cooke
E. Ted Sobel
(Click topic)
Keyboard Commands
Copyright
Preface
Contents
(PDF Version Dec 9, 1996)
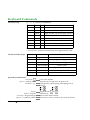
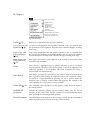
Keyboard Commands
(←, →, ↑, or ↓ with key combination)
Arrow Key Usage
Result
Command Option S h i f t
Moves insertion point a line or a character*
Cmd
Scrolls window large amount
Option
Begin/end line; top/bottom page, then doc.
Shift
Cmd
Option
Cmd
Cmd
Extends Selection small amount
Scrolls window small amount**
Shift
Move between cells in a matrix/table
Option Shift
Extends Selection large amount
Option Shift
<NotUsed>
*Arrow keys (← → ↑↓) alone.
** Cmd Option ↓ scrolls document window down approximately 1 line
Vertical Scroll Bar Usage
Key
Mouse
Result
Drag Scroll Box
Scroll arbitrary amounts
Click Arrow
Scroll large amount (approx 8 lines)
Click Arrow
Scroll small amount (approx 1 line)
Click Scroll Bar
Scroll 1 screen
Cmd
Click Scroll Bar
Top of Next/Prev Page*
Option
Click Scroll Bar
Top of Next/Prev Header*
Option
Cmd Option Click Scroll Bar Advance to top of Next/Prev Page Body*
*To scroll through lecture note screens
Special Key Combinations:1
Command +
Can’t select sublines.
Option + scroll up/down
Command + [ ] ; '
Option
Option + drag tab
Command + drag left margin
Option + symbol in palettes
1
Command ≡
10 pixel scroll, as opposed to 80 pixel scroll.
Corresponds to superscripting/subscripting tools as
follows:
[=
]=
;=
'=
Toggles between
and
.
Smooth drag.
Doesn't move indent marker.
Vertical bar; always extends to the limits of the line.
ExamBuilder and MathWriter Keyboard Commands
EB1
Command ( )
Select All
Bold (style)
Copy
Transfer From Doc
Build Exam
MW2
MW2
Key
Command ( )
Command Shift
A
Select All
Copy Ruler & Format
B
Bold
C
Copy
Copy As Picture
D
Calc Prev ∫ or | Size
Paste Style
E
Auto Math
F
Find/Replace
Copy Format
G
Find Next
Paste Format
H
Replace Selection
I
Italic
Italic
J
New (cell) Before
Paragraph Format
Delete Row
K
New (cell) After
Line Spacing
Delete Column
L
Long Summary
Lower Diacritical
M
Switch To MathWriterNew Entry Entry From ClipboardCopy Memo
N
New Book
New Entry From Selection
Paste Memo
O
Open Book
Open
Column Before
P
Plain
Plain or Print*
Column After
Q
Quit (EB)
Quit
Row Before
R
Raise Diacritical
Copy Ruler
S
Short Summary
Save
Copy Style
T
Transfer To Doc
Print or Plain*
Paste Ruler
U
Underline
Underline
V
Paste
Paste
Paste In Context
W
Close
Row After
X
Cut
Cut
Y
Other Styles
Z
Undo
Undo
Paste Ruler & Format
1-9,0 (New Questions)
•Template Categories
` (~)
Hide/Show Ruler
= (+)
Next (question)
Larger Size (on menu)
- (_)
Previous (question)
Smaller Size (on menu)
Soft Hyphen
, (<)
First (question)
Style 1
. (>)
Last (question)
Style 2
/ (?)
Entire Question
Help
\ (|)
Last Style
; (:)
•Center Subscript
Math Editor
‘ (“)
•Right Subscript
TextEditor
[ ({)
•Center Superscript
Character Editor
] (})
•Right Superscript
Sidebar Editor
Tab
Tools Window
Return
•Same as Enter key
Space
•Toggle Greek
MW2
Command Option
Auto Bracket
Number equation
Insert footnote
Italicize Greek
Auto Operator Spacing
Revision Tracking
Auto Use Symbol Font
1 Pt. Larger Size
1 Pt. Smaller Size
* Use the supplied Command Key Switcher to exchange the Print and Plain assignments.
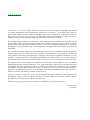
Corporate Testing Services
A Division of Wadsworth, Inc.
Programs (including screens) and Manuals Copyright © 1991 by Cooke Publications, Ltd.
Published by Wadsworth, Inc.
ALL RIGHTS RESERVED. No part of this Guide may be reproduced, stored in a retrieval system, or transcribed, in
any form or by any means—electronic, mechanical, photocopying, recording, or
otherwise—without the prior written permission of the publisher, Wadsworth, Inc., Belmont, California 94002.
Created and printed in the United States of America
10 9 8 7 6 5 4 3 2 1
ISBN 0-534-15828-5
Software License Notice
The software described in this Guide is furnished under a license agreement. For single users the license is printed on
the disk envelope and is an extension of this copyright page. Network or site licenses must be executed separately. The
software described herein may be used or copied only in accordance with the terms of the appropriate license.
Trademark information
Apple Computer Inc.: Finder, ImageWriter, LaserWriter, MultiFinder; Cooke Publications, Ltd.: ExamBuilder,
MathWriter
Manager: Vicki Sawyer Roberts
Supervisor: Valary Cruz
Technical Support: Gregory S. Hill
Manuscript Editor: Phyllis Larimore
Cover Design: Katherine Minerva
The Guide was written and formatted entirely in MathWriter™ and output on a Linotronic™ 300 Imagesetter.
The special version of MathWriter included in the ExamBuilder system is licensed
for use only as the host for the ExamBuilder Module.
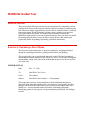
P R E F A C E
ExamBuilder™ is a tool for using a data base of questions to create and print examinations. The tedium
of creating examinations can be dramatically reduced with ExamBuilder, even making the creation of
practice tests simple. The easy creation of multiple versions of an examination is particularly useful for
large classes and allows tests to be given in classrooms and lecture halls during regular class hours,
without resorting to evening testing when multiple classrooms become available.
The functional specifications for ExamBuilder were prepared by Vicki Roberts and Greg Hill. David
Cassel, Edith Cassel, and Steven Holzner shared their extensive experience with a program of similar
purpose used in teaching large introductory physics courses. They suggested features such as the log file
the question cross-reference file, and an inactive-question designator. We also benefited from advice by
James Mass.
The ExamBuilder design emphasizes ease of learning and ease of use. It addresses a broad spectrum of
users by supporting any combination of text, graphics, and mathematics in the questions. Perhaps the
most significant innovation demonstrated in its design is the concept of modular extensions to a host
program. A module represents a substantial generalization of a desk accessory: 1) it is self installing, 2)
it can modify directly the active document of the host, and 3) it can access the internal code of the host.
This approach has several important consequences. The module can be smaller in size. The features
supported by the host can be expanded post facto. Only those features required by a particular user need
be installed. The host application provides a familiar environment and provides a path of upward
compatibility with the more feature-rich versions of the host for power users. From the developer’s
perspective it dramatically increases code reusability and reduces maintenance tasks. We hope this is
the first of a family of modular extensions to MathWriter.
Of the beta testers we especially wish to thank Greg Hill and Steven Holzner for their patience and
thoroughness. Nancy Cooke provided criticisms of the early drafts of this Guide. Phyllis Larimore
provided much valuable advice and editorial assistance.
We hope you enjoy using ExamBuilder and that it contributes to your teaching efforts!
J. Robert Cooke
E. Ted Sobel
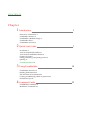
CONTENTS
Chapter
1 Introduction
1
Illustrative Examination 1
ExamBuilder Features 2
ExamBuilder’s Modular Design 4
ExamBuilder Files 5
ExamBuilder Structure 6
2 Quick Start Guide
7
Installation 7
Activate ExamBuilder/MW2.0 8
Activate the ExamBuilder Module 8
Creating an Exam 9
Editing, formatting, and printing exams 16
Quitting 17
ExamBuilder Menus 18
3 Using ExamBuilder
19
ExamBuilder Structure 19
Building Examinations 26
Edit and Print an Examination 46
Creating and Modifying a Book of Questions 46
Performance Tips 54
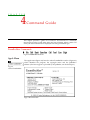
4 Command Guide
ExamBuilder Commands 55
MathWriter Commands 64
55
C H A P
T E R
1
Introduction
For a brief overview of how ExamBuilder works, see the last section of this
chapter, ExamBuilder structure. To get started building exams immediately,
use the Quick Start Guide, chapter 2.
Testing to measure success in meeting educational objectives is a wellestablished part of the formal educational process. Many publishers provide
resource materials, such as printed collections of test items, to supplement their
textbooks. To use these materials you must select questions that reflect your
emphases, edit them if necessary, and then produce a handwritten or typed
copy for duplication.
ExamBuilder™ expedites this process in several ways. First, ExamBuilder
utilizes collections of publisher-supplied test questions stored in a computer file
called question files or “books”. You can visually inspect the questions and
transfer those of your choice into an examination file. Alternatively, you can
instruct ExamBuilder to assemble or “to build” the exam after you made all your
selections or to select questions randomly according to criteria you specify. You
can edit individual questions and format of the exam. All these options allow
you to completely circumvent the manual transcription process and its
accompanying errors.
ExamBuilder automatically numbers the questions transferred into your examination file and totals their point values. Pages are numbered automatically.
Questions can include text, graphics, and even mathematical expressions. And
professional quality laser-printing is supported.
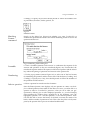
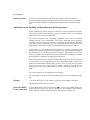
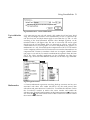
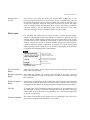
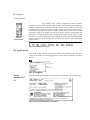
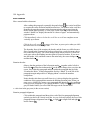
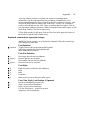
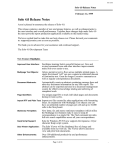
Illustrative Examination
To make the discussion more concrete we include an ExamBuilder-created
sample examination (Figure 1.1) to illustrate each of the seven question types
supported—free form/essay, fill-in-the-blank, true/false, multiple-choice,
matching, scenario, and composite. In this example the answers are printed
immediately after each question, rather than at the end of the document or
separately. The header with date and page-numbering was created
automatically using a word-processor template document. The questions were
2
Chapter 1
numbered automatically, and the total point count was also inserted
automatically. An actual exam, of course, would be unlikely to contain such a
mixture of question types.
Name
Section
May 15, 1993
Total Points: 30
1 . Points: 5
[Free Form/Essay]
In twenty-five words or less, describe the impact of computers on the field of theoretical physics.
Answer: The impact has been very large…
2 . Points: 2
[Fill In The Blank]
In the world of__________________animals, the giraffe is the tallest.
Answer: large
3 . Points: 1
[True/False]
The field of Mathematics is involved in the study of people named Matthew.
Answer: False
4 . Points: 3
[Multiple Choice]
Of the following five possibilities, which is the fastest computer?
a. IBM PC Jr. b. Tandy TRS-80 c. Macintosh IIfx d. Apple II+ e. Macintosh 512
Answer: c.
5 . Points: 5
[Matching]
Match the following five actors with the movies they starred in.
1. Meryl Streep
a. Dead Poet’s Society
2. Ronald Reagan
b. Barbarella
3. Robin Williams
c. Mask
4. Cher
d. Bed Time For Bonzo
5.Jane Fonda
e. Sophie’s Choice
Answers: e. d. a. c. b.
6 . Points: 4
[Scenario]
If a = 1, b = 2, c = 3, d = 4, and e = 5, then
6a. Points: 2 [Scenario-Free Form/Essay]
What is the sum of a, b, c, d, and e?
Answer: a + b + c + d + e = 15
6b. Points: 2 [Scenario-Free Form/Essay]
What is d − e equal to?
Answer: d − e = −1
7 . Points: 10
[Composite]
If a = 0, b = 10, c = 100, and d = 50, then
7a. Points: 7 [Composite-Free Form/Essay]
What is e = a . b . c . d ?
Answer: e = 0
7b. Points: 3 [Composite-Free Form/Essay]
What is e / 0?
Answer: e/0 = undefined
Page 1 of 1
Figure 1.1 A sample examination illustrating question types
ExamBuilder Features
In general terms, there are three methods of creating an exam with ExamBuilder. First, as discussed, you can select displayed questions from a question bank
and immediately transfer them into the test document. Second, you can select a
Overview
3
group of questions from a question bank and ask ExamBuilder to “automatically” generate an exam for you. The third option is a more completely
automatic exam generating process: ExamBuilder randomly selects questions
from question banks using criteria you specify. This approach is especially
attractive when you create multiple versions of an examination.
ExamBuilder can scramble the order of the questions in a generated exam and
can even scramble the order of response alternatives for multiple-choice and
matching questions. (Individual response alternatives, such as “none of the
above,” can be exempted from scrambling.) The questions are numbered automatically and ExamBuilder can compute and print the total point value for
all questions if requested.
ExamBuilder stores the answer for each question and, when prompted, generates answer keys, even when questions and response items are scrambled. Answers can be printed with each question, at the end of the examination, in individual files, or in a composite format when multiple versions are generated.
Because the options for generating examinations are so numerous, ExamBuilder
provides macro files called “Build Choices” with which to reconstruct frequently used combinations of conditions. For example, if you normally use multiple-choice tests with a specific numbering format and a specific page arrangement, use Build Choices to quickly create that set of configuration
conditions. Additional customization is provided by exam template files to be
discussed later.
When requested, ExamBuilder provides a usage log to indicate which test questions are used on each version of an examination. This log file permits you to
edit or improve individual questions in the question file and then to create new
examinations using the same set of questions. In addition, you can generate a list
of the examinations on which each question appears: a cross-reference (”xref”)
list. If you subsequently discover a deficiency or ambiguity in a particular
question, you can consult the xref file to know immediately which versions of
your exam are affected.
ExamBuilder allows you to use the considerable editing and formatting tools
that are available in MathWriter for modifying and printing examinations.
You can modify examinations—both content and format—that were generated
from supplied question banks just as if you had typed them yourself. As just
mentioned, you can also edit the entries in a question file. Using ExamBuilder
you can create files of questions and answers or easily select questions from
already created question files to form custom exams. Each question is entered
and stored in one of the seven formats—free form/essay, fill-in-the-blank,
true/false, multiple-choice, matching, scenario, or composite.
When you are choosing questions, ExamBuilder allows you to display the questions in either detailed or summary form. You can also rearrange the display
4
Chapter 1
order of the questions on the screen according to a number of descriptive attributes such as point value, topic, or chapter. To make question selection easier,
each question also has various descriptive attributes associated with it, such as
topic, objective difficulty, point value, and so on.
ExamBuilder’s Modular Design
Because ExamBuilder is the first of a new class of software, a few comments
about its organization are in order. ExamBuilder is a specialized data base
program designed specifically to store, retrieve, and print arbitrary collections
of the seven most common types of examination questions. In addition, the
formatting, editing, and printing features of a word processor are also needed.
To produce this hybrid software we created and introduced the concept of
“modules”—an innovation that provides many benefits for the user and
developer.
Because ExamBuilder is a module, you have immediate access to the minimal
word-processing features required to edit, format, and print the exams you
build. If your needs expand, you can simply replace the word-processing host
supplied with ExamBuilder with a more powerful version of the same word
processor. For example, you can have access to spell checking, hyphenation, a
thesaurus, automatic revision tracking, an interactive glossary, and so on. A
family of modules is expected to extend the scope of the word processor in many
directions and thereby enhance the support available for building exams.
The original Macintosh system design included “desk accessories”. We extended
this concept in four ways: First, a module is designed to interact directly with
only one application, making a translation for compatibility with the clipboard unnecessary. Second, a module is self-linking to the host at startup.
Third, since a module is application-specific, it can manipulate the host’s active file directly. In this case, ExamBuilder is designed to insert questions directly into the host’s active file. Fourth, a module can also access some code
within the host thereby avoiding duplication of code. This allows ExamBuilder, for example, to automatically numbers the questions in the exam file using
the equation numbering code of its host.
ExamBuilder is a modular extension of the technical word-processing software
MathWriter. Because of the special relationship between the two packages,
you have access to the powerful formatting, graphics, and equation-building
features of the MathWriter system, most of which are included in ExamBuilder/MW2.
You cannot activate the ExamBuilder Module by double-clicking its icon. You
must activate it from the Modules command on the Windows menu of its host.
Overview
5
A reduced-feature of MathWriter is the host of ExamBuilder, and is named
ExamBuilder/MW2.0. This host system produces exam files which are MathWriter documents and, therefore, are fully compatible with the Educational
and Professional versions of MathWriter. Note: If you are allergic to mathematics and don’t require MathWriter’s special mathematical features, just
leave them hidden.
ExamBuilder Files
Exam file
1. Question
2. Question
3. Question
Question file
Book
Bank
Question
Cell
Cell
Question
Cell
Cell
Cell
Bank
Question
Cell
Cell
Question
Cell
Cell
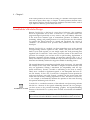
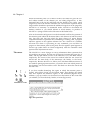
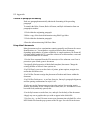
Figure 1.2
Building an Exam
Free Form/Essay
Fill In The Blank
True/False
Multiple Choice
Matching
Scenario
Composite
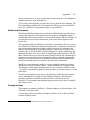
Figure 1.3
Initial templates
Exam questions are stored in a named ExamBuilder question file that is referred
to as a book because the collection of test items is often drawn from a companion
textbook. Related items within a book are grouped into an arbitrary number of
banks that correspond to chapters, sections, or topics having some logical
relationship. Banks contain an arbitrary number of questions or test items that
you either select individually or allow ExamBuilder to select randomly. The
subparts of a question are called cells and all cells of a question are transferred
into the exam file if the question is selected.
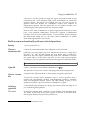
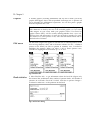
Test items can contain text, mathematics, and graphics, making ExamBuilder
useful in a broad range of disciplines. Each question, when shown in detail,
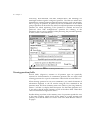
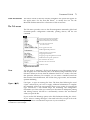
includes information in the following descriptive fields (Figure 1.4): book and
bank, number of questions in the active question bank, check box for manual
selection, question type, check box for inactive status, difficulty rating,
description of topic, chapter or section, objective, and point value. A book file is
disk-based so its size is limited only by the available disk space, not available
RAM.
There is a template structure for each question type. When you select a question
template, ExamBuilder produces one of the forms shown in Figure 1.3. When a
free-form/essay question template is selected, ExamBuilder creates rectangular
regions the width of the window for the question and answer. The height adjusts automatically to accommodate the contents. Fill-in-the-blank question
templates provide space before and after a blank of user-specified length.
Multiple blanks can be created. True/false questions have “radio buttons” for
entering the answer. Multiple-choice questions can have any number of response
cells, although initially the template has only one. A matching question template provides space for a general question and an arbitrary number of itemanswer pairs. Scenario and composite questions can have an arbitrary number of
related questions of the previous five types. A scenario question consists of
several linked questions that share an introductory statement, and they can
include graphics and background materials. Composite questions have an introductory statement, but unlike scenario questions, the linked composite questions are considered interdependent and are, therefore, treated as a sequential,
unbreakable set.
6
Chapter 1
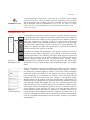
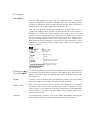
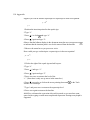
ExamBuilder stores each exam question and answer as a single record in a question file, usually referred to as a “book.” Each record contains space for a few
descriptive fields, that are common to every question, as illustrated by the
multiple-choice example in Figure 1.? These include: topic, chapter/section
reference, objective, point value, difficulty level, and whether the question is
currently active, i.e., available for selection.
A question can be of arbitrary length and can contain
text or a graphic (which in turn might include text or
mathematics). A multiple-choice or matching
question can include an arbitrary number of
alternative responses. A check mark identifies the
correct response.
Figure 1.4 Multiple-choice question
ExamBuilder Structure
MW
EB
Exam
file
Questions
file
Figure 1.5 Data
flow relationships
There are two parts to the ExamBuilder system: ExamBuilder/MW2.0, the host
word processor, and ExamBuilder Module, the data base manager; each part
has its own file type: exam files and question files, respectively. The ExamBuilder Module is the part of the system that allows you to select questions
from a question file and transfer them into an exam, or to generate an exam with
randomly selected questions. ExamBuilder /MW2.0 manipulates the generated
exam; it edits, formats and prints your exams.
The question files are data base files and the exams are word-processor files.
The Module creates the exams; it takes data base questions and forms the
exams. The word processor is the engine of the entire system and allows you to
enter and exit the ExamBuilder Module, add graphics and mathematical
expressions to your questions, and format, save, and print exam files.
For the sake of brevity and clarity, hereinafter ExamBuilder/MW2.0 will be
referred to as MW (alias MathWriter™2.0). ExamBuilder 1.0 Module will be
referred to as EB (alias ExamBuilder). Together these constitute the
ExamBuilder system.
C H A P
T E R
2
Quick Start Guide
This chapter provides an abbreviated tutorial introduction to creating exams
with ExamBuilder. In this quick start guide we assume that you are familiar
with the Macintosh interface. If you are not or need a refresher on icons, buttons,
check boxes, pull-down and pop-up menus, mouse usage, and so on, refer to your
Macintosh user’s manual.
Installation
ExamBuilder requires System 6.0.2 or higher, is compatible with System 7.0,
and is MultiFinder compatible.The Times font must be available to your system.
Also required is the modified version of the Adobe Symbol font; it has been
merged with MW2. If your system already contains the Apple-supplied Symbol
font, remove it with the Font/DA Mover; although Apple’s Symbol font works,
it contains some peculiarities that have been altered in the supplied version.
To conserve space, remove unnecessary files, fonts, desk accessories, and INITS.
Create and name a folder on your hard disk, and then copy all the files you
received into the folder. Remember to store the original disks in a safe
place. Use the original diskettes only as backup. The ExamBuilder
Module, MathWriter Help and Exam.def files must either be in the same
folder with ExamBuilder/MW2.0 or in the system folder. The EB
Demo.book file can be placed anywhere. When activated the first time a
“MathWriter Pref” and an “ExamBuilder Prefs” file will be created
automatically and placed in the system folder.
Allocate RAM
Fig 2.1 File icons
Because MW2 retains its open documents in RAM, you must allocate space
for both MW2 and its open documents during this first session. While at
the Finder level, single-click the ExamBuilder/MW2 icon, select Get Info from
the File menu, and assign as much as your system supports, preferably 2000K or
more, for Application Memory Size, and click the close box. If you have only 1
megabyte of RAM, you must use the Finder, rather than the MultiFinder.
Quick Start Guide
8
Activate ExamBuilder/MW2.0
The first step in using ExamBuilder is to activate the word processor.
1. Double-click on the ExamBuilder/MW2.0 icon (not the ExamBuilder Module
icon).
At startup the word processor automatically locates the Exam.def file, the
help file, and ExamBuilder Module. Because this is your first use of the word
processor the system creates a “MathWriter Pref” file in the System folder.
If you wish additional background on the use of the word processor, access the
online help from the Windows menu, or experiment with the tutorial exercises
1 - 4 to learn to scroll, create paragraphs, move text, edit headers, print files,
and format text, graphics, and mathematics.
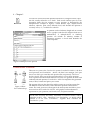
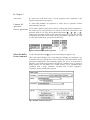
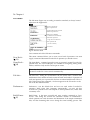
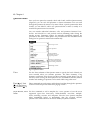
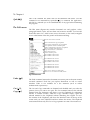
2. Select Exam.def from the New submenu (Figure 2.2). This file has been
configured for this purpose. Note: Use “Save As...” with MW2 Default File
type to create and save your own startup files in the system folder.
Fig 2.2 Select a formatted file and ExamBuilder Module
Activate the ExamBuilder Module
1. Select ExamBuilder™ from the Modules submenu on the Windows pull-down
menu (Figure 2.2), or use the equivalent key command:
Option 1.
Note: Because ExamBuilder is a module, rather than an application, you
cannot double-click on it to effect startup.
Because this is also your first use of ExamBuilder, the system creates an
“ExamBuilder Prefs” file and places it in the system folder to save your
customization preferences.
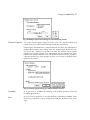
Notice (Figure 2.3) that the menu bar now contains menus pertinent to the
management of question files.
Fig 2.3 Menu bar changes
2. Use the Open Book command on the File menu to gain access to the questions
in the file EB Demo.book). The set of questions that you see in this file are
those of one question bank in the larger “book” file. (See the section
Quick Start Guide
9
“ExamBuilder files” in chapter 1, for more information.) To access other
question banks in this “book,” pull down the Banks menu and select one from
among those listed at the bottom of the menu (after the Sort By command).
Notice that the active question bank has a check by its name in the Banks
menu.
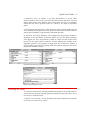
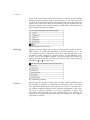
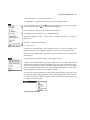
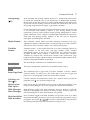
3. Switch among the three views of the questions in this question bank using the
View submenu of the Questions menu. There are three levels of detail to choose
among, Short Summary, Long Summary, and Entire Question.
In the Short and Long Summary views (Figure 2.4) the question number is
displayed at the left border of the item. When you use the Entire Question
view (Figure 2.5), only one question is visible at a time, and the vertical scroll
bar box on the right of the ExamBuilder window indicates the number of the
displayed question. If the question is larger than the ExamBuilder window, a
second vertical scroll bar for scrolling within the question appears to the left of
the question number scroll bar.
Fig 2.4 Short and Long Summary views
Fig 2.5 Entire Question view
Creating an Exam
To create an exam, start by choosing UnMark All Questions on the Edit menu to
assure that no previously selected questions remain selected. Then select one of
four ways to create the exam:
1. Manual Exam Building Choose questions and transfer them into an exam file
(a MathWriter file) one-at-a-time.
Quick Start Guide 10
2. Automatic Exam Building with User-Selected Questions
Select all the questions you want transferred into one or more exams (MathWriter files), then let
ExamBuilder transfer them into the word processor document, number them, etc.
3. Automatic Exam Building with Randomly Selected Questions Select the
question banks you want questions drawn from and the question selection criteria
and let ExamBuilder create as many exams as you need—one per file.
4. Automatic Exam Building with Questions Identified from a Log File
Select
the same questions utilized in a previous session, after question editing. This is
really a re-building option.
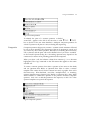
When you choose to create an exam automatically (“build” an exam) you will
be presented with a number of choices about exactly how you want the process to
take place. These include such questions as which question banks to draw from,
how the questions should be numbered, whether to create an answer key, and
what the file name of an exam should be. You have the option of saving all the
settings you select as a set of “Build Choices” so that creating the same type of
exam another time can be as simple as (1) selecting the Build Choices and (2)
clicking the Build button.
Manual exam building
1. If the EB window is active, return to the MW window. To do this either click
on a portion of a MW window if one is visible or select Switch To MathWriter
on the File menu (or press
M).
2. Select Exam.def from the New submenu of the File menu. This creates a copy
of the template file previously configured to receive questions. (The question
numbering variable was established in this exam file using Variables Format
on the MW Format menu and uniformly spaced tabs were established after
double-clicking on the ruler.) Position the insertion point to indicate the
destination location of the question to be transferred into this window by EB.
3. Switch to the EB module by clicking on any visible portion of its window or
select “ExamBuilder™” from the Modules submenu of the Window menu (or
press
option 1 since this is the first and only module listed).
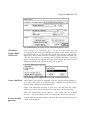
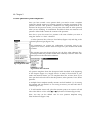
4. Adjust the settings as needed in the Transfer Options (Questions menu) dialog
box (Figure 2.6).
a) Check Font, Size, and/or Style if you wish to maintain those features
assigned to the question rather than having them change to match the typeface
adjacent to the insertion point in the exam document.
b) Select the content to be transferred: Questions and/or Answers. If answers are
to be included, also specify a placement—After Each Question or At End of
Document.
Quick Start Guide 11
Fig 2.6 Manual transfer options
c) Decide whether you want the point count for each question displayed.
d) Select Transfer All As Pictures (Faster) to preserve the layout and style of
the stored question by leaving the question in PICT (graphics) format. This also
speeds the transfer considerably. If this option is not checked, the question is
reconstituted in the exam document character-by-character. This provides
greater editing and formatting flexibility after the exam is created.
5. Click the OK button to implement your choices.
6. Only if you will be selecting multiple choice questions:
a) Select Multiple Choice Format... on the Question menu.
b) Decide whether you want EB to scramble the multiple choice alternatives,
and select a numbering format for the alternatives.
c) Click the OK button to implement your choices.
7. Only if you will be selecting matching questions, select Matching Format...
from the Question menu:
a) Decide whether to scramble the questions and answers.
b) Select numbering formats for the questions and answers.
c) Click the OK button to implement your choices.
8. Scroll through the list to select questions. When using a summary view, click
to highlight the desired question; when using the Entire Question view the
currently visible question is selected de facto. Note: Use the View submenu of
the Question menu to select the desired level of displayed detail. EB’s interface allows you to select what you see, rather than by a list of numbers.
Quick Start Guide 12
9. To transfer the selected question, click on the transfer icon
at the
bottom of the EB window or choose Transfer To Document from the Questions
menu (or
T) to copy the question into the exam document (at the insertion
point). The question will be numbered automatically. Note: You assign the
numbering format using the Variables Format command on the Format menu of
MW.
10. Repeat steps 8-9 as needed to select and transfer additional questions into
the exam.
11. EB places the questions in the MW document that was active when you
entered EB. To look at your exam, edit it and print it, select “Switch To
MathWriter” on the EB File menu, type
M, or click on a visible portion of the
exam document. See the instructions at the end of this section, under “Editing,
Formatting, and Printing an Exam.”
Automatic exam building with user-selected questions
When you build an exam automatically, you must specify one of the three
categories of destination files for the exam—Current Document, MathWriter
Default File Format, or Default File. The destination choice is made in EB in
step 9d below, but you must prepare the receiving MW file earlier.
1. If the EB window is active, return to the MW window. To do this either click
on a portion of the desired window if visible or select “Switch To MathWriter”
on the File menu (or press
M).
2. In anticipation of using “Current Document” as the EB destination, select
Exam.def from the New submenu of the File menu. This creates a copy of the
template previously configured to receive questions and supplied with
ExamBuilder. Position the insertion point to indicate the precise destination of
the question to be transferred into this window by ExamBuilder.
3. Switch to EB by clicking on any visible portion of the EB window or select
“ExamBuilder™” from the Modules submenu of the MW Window menu (or press
option 1 since this is the first and only module listed).
4. Open the EB file of questions using the Open Book command on the File menu.
In this exercise open the file EB Demo.book supplied with ExamBuilder. Note:
The “.book” appendage on the file name is a convenient, but optional, way to
identify the file.
5. As explained in chapter 1, the questions in the EB Book have organized into
logical groupings called Banks. The EB window displays the name of the file
(or book) and the name of the subgroup (or bank) just below its title bar. If “EB
Demo.book: Samples” is not shown there, select Samples from the Bank menu.
Quick Start Guide 13
6. Using the View submenu of the Question menu, select the view of the
questions having the appropriate level of detail—Short Summary, Long
Summary, or Entire Question. The keyboard equivalents are
S,
L, and
?,
respectively.
7. To assure that your choices are not interspersed with previous selections, use
UnMark All Questions on the Edit menu.
8. Scroll through the list of questions and mark those you wish to use. These
marked questions are transferred by EB in a later step. The marking procedure
differs slightly depending upon the question view.
8a) In the Short and Long Summary views the check mark is displayed in the
box at the left edge of the window that displays the question number. Click in
this box to select (or deselect) that question.
8b) In the Entire Question view click in the square box at the top-left corner of
the question to select (or deselect) it.
An exam can be built using marked questions from one or more banks. If
appropriate, repeat steps 7 and 8 for all other banks.
After selecting all the questions to be used, proceed to the next step.
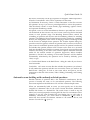
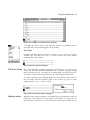
9. Click on the Build Exam... command in the File menu (or use
E) and adjust
as required any of the pop-up menus and check boxes. (See chapter 3 for more
details on the choices you have when building an exam.)
Fig 2.7 Build Exam dialog box
9a) Customize: The Customize category should read “No Set of Build Choices
Selected.” This option permits you to save and to recall all choices made in this
large dialog box.
Quick Start Guide 14
9b) Source: If necessary use the pop-up menus to designate “Marked Questions”
from the “Current Bank” as the source of questions for this exam.
9c) Destination: If necessary, choose “Current Document” as the file to receive
the questions. In step 2 you chose a preconfigured file to receive the questions.
That file already contains a course header, page numbering, typeface choices,
and a question numbering variable.
9d) Special: Access to several miscellaneous features is provided here. You will
use the defaults in this exercise. You can of course create a log file for this build
session to track question usage. The Matching Format button controls the
scrambling of questions and answers and the numbering scheme for matching
questions. The Multiple Choice Format button provides controls for scrambling
answers, the arrangement of the choices on the page, and the numbering format
for the choices for multiple-choice questions. The Transfer Options dialog box
provides control for typeface, inclusion of questions and/or answers, inclusion of
point counts for individual questions and the total for all questions transferred,
and whether the question remains in PICT format on the exam or is converted
back into editable format. With the exception of total point count and file name
extension, this dialog is the same as the Transfer Option command discussed
earlier for the manual transfer of questions (Figure 2.6). When Scramble
Questions is checked, the ordering of the marked questions will be shuffled
automatically. Alternatively, the questions can be sorted by difficulty, point
value, or type.
10. Click the Build button in the Build Exam... dialog box after all your choices
have been made.
ExamBuilder will create an exam file that includes the questions you selected.
It will number the questions and take into account the choices you made in the
Build Exam... dialog box. To look at your exam, edit it, and print it, see the
instructions at the end of this section, under “Editing, Formatting, and Printing
an Exam.”
Automatic exam building with randomly selected questions
Random selection of questions adds a few additional considerations, but the
process is basically the same as for user-selected questions. The following
discussion emphasizes the differences. We will also create multiple exams.
When you automatically build an exam, you must specify one of the three
categories of destination files for the exam—Current Document, MathWriter
Default File Format, or a Default File. The actual choice is made in step 9d
below, but you must prepare the receiving MW file first. For convenience in this
example we use the same Exam.def file used before, but we will select it
differently. Alternatively, you could return to MathWriter ( M), create a
master file that contains the elements common to all exams in the set, and
return to ExamBuilder ( option 1).
Quick Start Guide 15
1. Open the EB file of questions using the Open Book command on the File menu.
In this exercise open the supplied EB Demo.book. Note: The “.book” appendage
on the file name is a convenient, but optional, way to identify the file.
2. Click on the Build Exam... command in the File menu (or use
E) and adjust
the pop-up menus and check boxes as instructed below to match Figure 2.8. (See
chapter 3 for more details on the choices you have when building an exam.)
Fig 2.8 Build Exam dialog box
9a) Customize: The Customize category should read “No Set of Build Choices
Selected.” This option permits you to save and to recall all choices made in this
large dialog box.
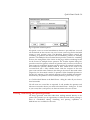
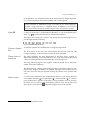
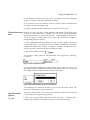
9b) Source: Use the pop-up menus to designate “Random Questions” and click
“Select” (Figure 2.8) to create selection criteria for questions for this exam
(Figure 2.9).
Click “New” (Figure 2.9) to create each selection criterion panel. Use the popup menus to select a Question Bank (a subset of the book), the question category
(all questions, difficulty level, point value, or question type) and the number of
questions you wish selected from this category. The total number of questions in
this category is supplied automatically.
To create additional selection criteria repeat these steps.
9c) Destination: Choose Default File... as the prototype file to be copied and
used to receive the questions. Choose a preconfigured file (in this example use
Exam.def in the system folder or in the folder with EB) to receive the questions.
That file already contains a course header, page numbering, typeface choices,
and a formatted question numbering variable. Supply a family name, e.g., Demo
Exam, (Figure 2.9), a sequence numbering format, and, optionally, a name to
append to identify this as a test or answer file.
Quick Start Guide 16
Fig 2.9 Question selection panels
9d) Special: Access to several miscellaneous features is provided here. You will
use the defaults in this exercise. You can of course create a log file for this build
session to track question usage. The Matching Format button controls the
scrambling of questions and answers and the numbering scheme for matching
questions. The Multiple Choice Format button provides controls for scrambling
answers, the arrangement of the choices on the page, and the numbering format
for the choices for multiple-choice questions. The Transfer Options dialog box
provides control for typeface, inclusion of questions and/or answers, inclusion of
point counts for individual questions and the total for all questions transferred,
and whether the question should remain in PICT format on the exam or be
converted back into a fully editable format. With the exception of the total
point count and file name extension, this dialog is the same as discussed earlier
(Figure 2.6) for the manual transfer of questions. When Scramble Questions is
checked, the ordering of the marked questions will be shuffled automatically.
Alternatively, the questions can be sorted by difficulty, point value, or type.
10. Click the Build button in the Build Exam... dialog box after all your choices
have been made.
EB will create two exam files as requested. It will number the questions and
take into account the choices you made in the Build Exam... dialog box. To look
at your exam, edit it, and print it, see the instructions in the next section.
Editing, formatting, and printing exams
EB always generates exam files rather than sending material directly to the
printer. This provides you an opportunity to refine the exam before printing it.
Most of considerable editing, formatting and printing capabilities of
MathWriter are available for this task.
Quick Start Guide 17
1. Choose “Switch To MathWriter” from the EB File menu or click on the Close
box to return to MW for final editing, formatting, and printing.
2. Refer to the second half of chapter 4 and to the MW Exercises file tutorial for
a brief guide to using the text editing and formatting features of the MW.
You may need to provide tabbing for text alignment. At this point you have
complete editing and formatting control unless you chose to transfer questions as
PICTs, in which case you traded speed for some editing control.
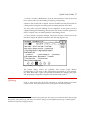
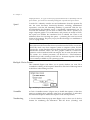
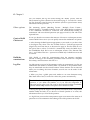
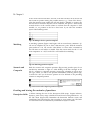
3. If your printer is properly attached, selected in Chooser1, select Print on the
File menu, adjust the options as needed, and click OK (Figure 2.10).
Fig 2.10 MW print dialog box
The printer dialog choices are probably clear except “Paper Motion
Configuration.” If you click on the configuration appropriate to your situation,
the “Print Both Sides” option will provide instructions for changing the paper
and the printing will produce output in the normal reading order.
Quitting
If EB is active click Quit on the EB File menu or click the close box to return
control to MW. Then to end the session, click Quit in the MW File menu.
1
If the original MW template was not formatted for this printer type, select Page Layout on the File menu, click the Page
Setup button, select printer type, and click to close the two dialogs. If you changed the printer type, scroll through the
document to inspect any changes produced.
18 Chapter 2
ExamBuilder menus
Create or delete
cells within a
question
Create a question file
Open a question file
Identify structure
of cell
Question file statistics and lock
Global font preferences
Identify the answer cell and if
position change is allowed
Dialog box for building
examinations automatically
Arrangement of choices as a
paragraph or in columns
Audit trail of question
usage and cross-references
Print question file
(not an exam file)
A sample list
of fonts
currently
selectable
Exit control
Undo last command
Standard tools for
interaction with
the clipboard.
Applies to text,
graphics, cells, and
questions.
Global command to
Mark/UnMark all questions
Erase receiving document
Count points currently in doc
Create, rename, and
delete sets or related
questions within a book
Font sizes
available to
EB. Sizes in
outline
style are in
system.
Sizes in
pixel
increments
up to 127
are
selectable.
Sort the questions in this bank
by category for easier selection
Select question
banks in this book
Select scope of view
Locate questions
Create and delete
templates for seven
types of questions
Transfer text and pictures
to and from the question
file according to defaults
Numbering formats
Selectable
font styles
C H A P
T E R
3
Using ExamBuilder
ExamBuilder Structure
The ExamBuilder Module is a specialized data base designed to store and to
retrieve examination questions and to facilitate their selection and placement
to form actual examinations. MathWriter hosts the data base by providing an
editing, formatting and printing environment for examinations produced by EB.
This chapter provides step-by-step instructions for performing the various
exam-building tasks, including the creation and use of files of questions.
Books and banks
ExamBuilder stores data in files called “books” because a collection of questions
and answers often, but not necessarily, coincides with the contents of a specific
textbook. A book usually includes chapters or sections of more limited scope. In
EB this subgrouping is treated as a question bank, or more simply as a bank and
is a group of questions with a common focus. A book usually contains multiple
banks. Note: With this same structure you can create an alternative organization—a file for each chapter and a bank for sections or topics.
Using this nomenclature you can instruct EB to randomly select questions from a
specific bank or from all banks in the book when creating multiple forms of an
examination. This makes it easy for you to create examinations that have
variants of a question. For example, you can ask each student to compute the
mean and standard deviation for different sets of numbers. Access to the answers
of old exams will not allow the student to fake comprehension of an underlying
concept. EB can be instructed to select randomly a specified number of equivalent
questions from within a bank and to produce as many different examination
versions as desired. Of course EB can also automatically produce the corresponding answer sheets, as well as study versions of the examinations (with
answers) for distribution to the students, if desired.
Questions
A question is the smallest logical unit within a bank. In traditional nomenclature, a question constitutes a record. Figure 3.1 displays the format of a freeform question—one of seven classes of questions. Five of these classes (free-
20
Chapter 3
form/essay, fill-in-the-blank, true/false, multiple-choice, and matching) are
meaningful without regard to contiguous questions. The other two utilize interdependencies: scenario questions require that some sequence, such as an introduction to a group of questions, be preserved, but any combination of the related
group of questions can be used in any order; but composite questions are multipart
questions for which sequencing of the questions is essential and must be
preserved. Note: With multiple-choice questions the ordering of the
alternative choices can be scrambled, while preserving the prescribed positions
of some, such as “none of the above.”
Fig 3.1 ExamBuilder window in entire question view
Viewing question fields
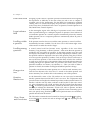
Several fields (Figure 3.1) common to all question types are specifically
reserved for characterizations of examination questions that are useful when
selecting questions for a specific examination. These fields are listed Table 3.1.
When selecting questions for use in an examination, you control the amount of
information displayed in the EB window using the View command on the
Question menu. The Short Summary (items 1-4 in Table 3.1), the Long Summary
(items 1-7 in Table 3.1) display these descriptors. Use the Entire Question view
to see and to edit the actual questions as well as the above fields. These three
views are illustrated in Figures 2.4 and 2.5.
Double-clicking anywhere on the summary view of a question expands the view
of the entire question, which reveals all the details of a single question and
permits you to edit the fields. Let’s review each of the fields listed in Table 3.?
on page 9.
Using ExamBuilder 21
Table 3.1 Characterization of common fields
Category
Explanation
1. Question Type
See previous paragraph
2. Point Value
Importance or weight
3. Difficulty
Easy, medium, or hard
4. Topic
Subject matter category
5. Chapter/Section Textbook reference
6. Objective
Performance criteria
7. Inactive
Temporary exclusion of question
Question fields
Six of the descriptive fields (2-7 in Table 3.1) can be modified when viewed in
the entire question view, and then only if the file is unlocked (see the File Info
command of the File menu in chapter 4).
Selection field
If checked, the box at the top left corner of the window in any view “marks”
questions to be used in building an examination. Click in the question number
rectangle on the left side of summary views or in the square box at the top left
corner of entire question views (Figure 3.1) to mark (or unmark) a specific question. Note: Use EB’s Build command on the File menu to effect the transfer of
the marked questions into an examination file in RAM.
Inactive question If you wish to suspend usage of a particular item in the question file, check the
Inactive box. When inactive, the question is shaded in the summary views. An
field
inactive question is excluded from selection when you are building an
examination automatically. For example, use this feature if you do not wish to
cover a certain topic this term or if the test item contains an ambiguity or is
otherwise unsuitable; simply check the inactive box to retire the item until you
decide to re-enable it. If you attempt to use this question when creating an
examination manually, you will be asked to approve the action.
Difficulty field
Use the pop-up menu at the top-right (Figure 3.1) to assign a difficulty level
(Easy, Medium, Hard) to characterize a test item. This field can be used when
selecting questions randomly, sorting items for ease of selection from the screen
display, and when sorting the order of questions when building automatically.
Topic field
The topic field contains a description of the subject covered in this question. You
can use keywords or phrases. Use the Bank/Sort command to establish viewing
order by topic.
This field identifies the relevant textbook topic and citation. This free-form
entry can include section, page, or other references to sources. Use the Bank/Sort
command to establish viewing order.
Chapter/Section
field
Objective field
This field identifies the goals or performance criteria relevant to this question.
Use the Bank/Sort command to establish viewing order.
22
Chapter 3
Point value field
Assigning a point value to a question provides a numerical basis for recognizing
the importance or difficulty of the item when you take a test or compute a
weighted score for the examination. Use the Bank/Sort command to establish
viewing order. To transfer and display the point value of individual questions
in the exam, select “Individual Point Count” in Question/Transfer Options or in
File/Build Exam/Transfer Options.
Scope indicator
field
A thin rectangular region at the left edge of a question in each view is shaded
when a question belongs to a multipart sequence of questions. Note: Selection of
a continuation question in a scenario sequence automatically selects the common
header question, but in a composite question it automatically selects all parts of
the sequence too.
Scrolling within
a question
If the question window does not reveal the entire question, a vertical scroll bar
automatically becomes available. Use the Grow box at the bottom-right corner
of the window to make the window larger.
Scrolling among
questions
A second vertical scroll bar becomes active, regardless of the view—Short
Summary, Long Summary, or Entire Question— when more than one question is
included in the active bank of questions. In the entire question view the scroll
box displays the number of the question currently displayed (in summary views
the question number is displayed to the left of the question). Drag the scroll box
to locate a specific question by number. Click on the up or down scroll arrow to
move to the next question, or click in the scroll bar above or below the scroll box
to scroll up or down in steps of 10 questions. Menu and keyboard equivalents for
scrolling through the question bank are provided (see inside covers). Note:
Questions numbers are relative, not absolute, i.e., when you add or delete a
question in a bank, the number of all higher-numbered questions change.
Change-view
icon
To quickly switch from the entire question view to the last used summary view,
click the icon adjacent to the Grow box. To switch to the entire question view
from a summary view, double-click on the summary view of the question.
Question
transfer icon
At the bottom-left corner of the EB window are two icons used to manually
transfer questions between MW and EB and vice versa. The EB Question menu
provides mouse and keyboard command equivalents to these transfer buttons. To
transfer a selection into EB, make a selection in MW, make EB the active window, select a destination cell or field, and then click the Transfer From Document
icon . To transfer a question into MW, position the insertion point in the exam
document to identify the destination, switch to EB, select a question, and then
click the Transfer To Document icon
. EB performs certain formatting operations you specify using Transfer Options on the Questions menu as it transfers a
question into the exam document.
Close, Zoom,
and Grow boxes
The EB window contains the usual controls for closing the window
, toggling
its size between its current size and an enlarged size
, and adjusting its size
arbitrarily
.
Using ExamBuilder 23
Question types
Only the bottom portion of the entire question view (Figure 3.1) changes with a
change in question type. There are seven types of question available.
A question can include text, mathematics, and graphics (bit-mapped, object,
and encapsulated PostScript); but since each cell (question or answer) is stored
entirely as either text or as a graphic, EB transforms a composite selection
into a PICT (graphic) when transferring it from the document into a question.
You can type text directly in a cell, but you must create mathematical expressions in MW and then transferred them into a cell of the question template.
Free form/essay
You can change the width of a cell (question or answer) using the Grow box in
the ExamBuilder window. The height of a free-form cell (Figure 3.2) adjusts
automatically to accommodate the typeface, the number of lines of text, and
the height of a picture.
Fig 3.2 Free form/essay question
Fill-in-the-blank
The fill-in-the blank template (Figure 3.3) initially contains four cells: The
first question cell (labeled “Q”) can contain text, a PICT, or can be left blank.
The second cell provides a blank of user-specified length. Click the Length
button to assign the length. The third cell, like the first, is an optional question
cell and can contain text, a PICT, or can be left empty. Optionally, you can add
any number of sets of these three cells. The fourth cell, labeled “A”, contains
the answer.
Fig 3.3 Fill-in-the-blank question
True/false
The true/false example (Figure 3.4) shows a question cell that occupies two
lines. To specify the answer in the second cell, click either the true or the false
button.
Fig 3.4 True/false question
Multiple-choice
Multiple-choice questions (Figure 3.5) contain a question cell and an arbitrary
number of answer cells. To add answer cells, click in an existing one and choose
Cell/New Before or Cell/New After. Click in the second column to identify the
24
Chapter 3
answer with a check mark; only one correct answer is allowed. A bold rectangle
identifies answers that must occupy a special position, i.e., the sequence can not
be varied. To make this designation, place the insertion point in the cell whose
position must remain fixed (even if the remaining cells are shuffled when the
question is added to the exam file) and select Cell/Mixable to remove the check
mark adjacent to that menu command.
Fig 3.5 Multiple choice question
Matching
Matching questions (Figure 3.6) can have a user-specified number of entries.
Each item cell “I” is followed immediately by its correct answer cell “A.” EB
can scramble the order of the items and answers when placing them in the
document in either paragraph or columnar format. To add additional “itemanswer” pairs to the question template, place the insertion point within an
existing pair and choose Cell/New Before or Cell/New After or their keyboard
equivalents,
J or
K, respectively.
Fig 3.6 Matching question
Scenario
Scenario questions (Figure 3.7) begin with an initial, common statement (possibly including text, graphics, and math) that is followed by one or more questions. The number and sequence of the questions is immaterial. All make use of
the common problem statement, but are otherwise independent of each other.
The parts of scenario questions can be any combination of types: freeform/essay, fill-in-the-blank, true/false, multiple-choice, and matching. EB
assures that the common introductory material is included if any of its appended questions is selected.
Using ExamBuilder 25
Fig 3.7 Scenario question
To identify the parts of a scenario question, a shaded
vertical bar appears to the left of the test item. A solid
bar to the left of the test item identifies a multipart composite question for
which EB preserves all parts as a unit, including the sequencing.
Composite
Composite questions (Figure 3.8) contain a common initial statement followed
by one or more questions. The sequencing of the set of questions is crucial; so if
you choose any one of these questions, the entire set, including the introductory
cell, is selected, and the parts will not be shuffled even if you select “scramble”
in the Transfer Options dialog box. Succeeding questions may depend on the
content and/or answer of an preceding question in the composite.
When you select a cell, the leftmost column that contains Q, I, or A becomes
highlighted. The Copy command on the Edit menu then applies to the entire
selected cell.
To create a scenario question, first select a question (if one exists in this bank)
and use Question/New Before or Question/New After to select a scenario
template. This creates the cell for the common text and/or graphic. Next add a
free-form/essay, fill-in-the-blank, true/false, multiple-choice, or matching
question template using Question/New Before or Question/New After. When
asked whether to “Attach this question to the previous Scenario/Composite
question,” click “Yes” to add this question to the sequence, or click “No” if this
question template is not part of the sequence.
Fig 3.8 Composite question
26
Chapter 3
Building Examinations
Having established a vocabulary in the previous section, we can now turn our
attention to the productive use of EB with a question file. In a later section we
discuss techniques for creating a file of new test questions and editing questions
in an existing file. For the moment, we assume that you simply want to use the
book of questions supplied with this ExamBuilder system to create an
examination.
You can select questions individually while viewing them and transfer them
immediately into an exam document for editing and printing. You can also mark
individual questions and then build examinations automatically. ExamBuilder
can produce multiple versions of examinations by shuffling questions and/or the
answer alternatives in multiple-choice and matching questions. Another way to
generate examination variants is to let ExamBuilder select questions randomly
from the various banks of questions according to user-defined criteria.
ExamBuilder can produce a transcript or log of the questions used and
automatically print answers. Chapter 2 presented a cursory introduction to
exam building, but now let us examine in depth the options and possibilities
provided.
Manual exam building
To make these instructions more specific, we refer to the files supplied in the EB
Demo folder.
Startup
1.Activate MW.
Choose a
destination file
2.Select Exam.def from the New submenu.
Entries on the New submenu correspond to the stationery files placed in the
system folder or n the folder with MW. Selecting a name from the New submenu
creates a copy of the stationery file to establish a writing environment. You
create the stationery files using the MW Default File type on the Save As
command. This means that you can preconfigure your choice of paper size,
margins, headers, footers, font, font size, font style, ruler settings, printer type,
and many other conditions. The document can contain formatted text that
identifies your course, the date, space for the student’s name and section, and
even page totals. Exam.def is such a file.
Alternatively, you could simply select New (without selecting from the
submenu) for an unspecialized document and “prepare” it to receive the
questions from the data base — set margins, font, font size, font style,
identifying title and other prefatory materials, etc. Don’t forget to specify tabs
(e.g., fixed at 0.5 inch spacing) and a format for the question numbers. You must
also format the User Category # variable to provide the automatic numbering
Using ExamBuilder 27
of the questions. Use Variables Format on the Format menu to assign the format,
e.g., no character before the question number and a trailing period.
A brief summary of MathWriter usage is provided by the online Help file
available using MathWriter’s Windows menu. In addition, a set of word
processor tutorial exercises in included as part of the ExamBuilder system.
Open EB
3. Select ExamBuilder™ from Windows/Modules 1 or use its keyboard equivalent, e.g.,
1 if EB is the first entry in the Modules submenu.
This opens the ExamBuilder window and changes the menu bar (Figure 3.9) to
provide appropriate commands.
Fig 3.9 ExamBuilder menu bar
Choose a Source
file
4. Open the question file “EB Demo.book” using File/Open Book.
Three views of
questions
The Short Summary, the most abbreviated of the three views, permits an
abbreviated summary of several questions at once. Only one book can be open at
a time, so opening another book automatically closes the open one.
The book opens to the view that existed when the file was used last. File
saving is automatic, so the File menu contains no Save command.
The Long Summary (Figure 3.10) supplies additional detail, but is otherwise
similar to the Short Summary.
The third form for viewing (and editing) questions, the Entire Question view
(Figure 3.10), displays all fields of a question, although some scrolling and/or
use of the Grow box may be required to bring all portions of the question into
view.
Select a view
1
5. Use the View submenu or the keyboard equivalents to cycle among the three
views (Short Summary S, Long Summary
L, Entire Question ?). Alternatively, double-click a question in the Short or Long Summary views to switch to
the entire view. To return to the immediately previous view, use the View submenu again or click the icon
at the bottom right corner of the window.
This notation means select Modules on the Windows menu.
28
Chapter 3
Fig 3.10 Question views (Long Summary and Entire Question)
Examine the
questions
6. Use the scroll bar common to the three views to view all the questions in the
current bank 2. Alternatively, use the Question menu or keyboard commands
[First ( <), Last (
>), Previous ( -), and Next ( +)] to move among the
questions (Figure 3.11). In the entire question view the question number is
displayed in the scroll bar; in the summary views the question number is
displayed near the left margin.
Fig 3.11 Locating a question
You decide the basic structure of the questions and the formatting choices when
you create the question file. The ExamBuilder system provides additional
numbering and placement control as it transfers the questions into the exam
document. Even after the questions are transferred into an exam document,
considerable reformatting capability remains available.
Select format
default settings
7. Before selecting any questions, establish the formatting you want ExamBuilder to apply as you transfer the questions manually from the question file
into the examination document. Three Question menu commands are applicable:
Transfer Options..., Multiple Choice Format..., and Matching Format... .
Transfer Options... command
The font, size, and style of the text of the stored questions can be preserved or
matched automatically with the adjacent characters in the exam.
1. Select Question/Transfer Options to access a dialog box (Figure 3.12).
2
A question file can contain multiple subgroupings, called banks. To view questions in another bank, you must first
select it from the last group of commands on the Bank menu.
Using ExamBuilder 29
Style
2. If you wish to preserve the text attributes of the stored questions being
transferred into the exam document, select those attributes here. The attributes
of text for unchecked categories will be changed to match the adjacent text in
the exam document.
WARNING: Changing the font can produce unexpected results because
characters other than alphabetic and numerals are not the same in all fonts,
do not have standard keyboard assignments, and, therefore, substitutions can
change the meaning of a question.
ExamBuilder preserves the font identification of PICTs transferred into an
exam document. The names of fonts used in PICTs, not just the local font number,
are passed to MW which then converts the name into the local font
identification number.
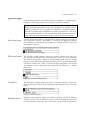
Fig 3.12 Transfer options dialog box
Content
3. Specify the portion of records you want ExamBuilder to transfer—questions
only, answers only, or both questions and answers. If answers are included, use
the pop-up menu (Figure 3.13) to specify whether the answers are to be listed
separately, merged with the questions, or placed in a unified answer key if
multiple exam versions are being produced.
Fig 3.13 Transfer options
Point count
Select this option if you want the ExamBuilder system to place the point value
of each question immediately following the question number. To have EB total
the points of selected questions, use Edit/Insert Point Count AFTER you place
all questions in the exam document because that operation triggers a one-timeonly tally. The tally is taken from the uneditable, hidden memo notes, not the
30
Chapter 3
displayed values, so if you remove any of the hidden notes or manually edit the
point values, you must also manually modify the reported total point count.
Speed
ExamBuilder ordinarily transfers text and mathematics from the question file
into the exam document character-by-character, including mathematical
expressions, such that full formatting flexibility is preserved. With the lowend Macintoshes this flexibility exacts a considerable computational cost. To
overcome this limitation you can elect to transfer each cell in a question as a
single composite graphic. Text, mathematics, and pictures are stored as PICTs;
this option just disables the translation back to editable text. There is an
additional reason for exercising this option — preserving the exact layout and
format of the question. The price you pay for this advantage is a commitment a
priori to a page width.
The ExamBuilder system provides an extension to the standard interface.
These files store the font names for text (even that used in PICTs), not just the
FONT IDs which vary from computer system to computer system, and the
ExamBuilder system translates the font names into the appropriate local font
identification numbers. Hence, the PICT graphics stored in ExamBuilder
questions can be transferred with font integrity into an exam document with
any system. As a further precaution, use MathWriter’s File/Preferences
command to provide a warning if a MathWriter document requires a font that
is not currently available to your operating system.
Multiple Choice Format...
This command (Figure 3.14) allows you to specify whether you want EB to
scramble the ordering of the response alternatives and which numbering format
it should use when forming an exam.
Fig 3.14 Multiple Choice Format
Scramble
4. Check “Scramble Answers” (Figure 3.14) to shuffle the sequence of the alternatives in multiple-choice questions when they are transferred. If unchecked,
the transferred sequence matches the sequence of the stored questions.
Numbering
5. Use the Number Format pop-up menu (Figure 3.15) to select one of the five
formats for numbering the alternatives. Edit the boxes (“Leading” and
Using ExamBuilder 31
“Trailing”) to specify any text that should precede or follow the numbers such
as parentheses, brackets, dashes, periods, etc.
Fig 3.15
Number formats
Matching
Format...
command
Specify in the dialog box (Figure 3.16) whether you want ExamBuilder to
scramble the questions and answers and which numbering format to use for the
questions and answers.
Fig 3.16 Matching format dialog box
Scramble
6. Check “Scramble Questions and Answers” to randomize the sequence of the
answers and questions as they are transferred (Figure 3.16). If unchecked, the
transferred sequence matches the sequence of the stored question and the answer
key utilizes the pairing of questions and answers in the question file.
Numbering
7. Use the pop-up menus (same as Figure 3.15) to select one of the five formats
for numbering the question and the answer lists. Edit the boxes (”Leading” and
“Trailing”) to specify text, if any, that should precede or follow the numbers of
the questions and the answers.
Select a question
8. Select a question for transfer into the document.
Since the Entire Question view displays only one question at a time, it is the de
facto selected question when visible. In the other two views, you must click on a
question to select it. ExamBuilder preserves “what you see is what you get”
operation by allowing you to select displayed questions, i.e., you do not simply
select questions by number from a printed list. In the Summary view the
highlighted question, not a checked question, is the selected question. Note:
Use File/File Info to review the history of the book, its name, the names of its
banks, and the number of questions in each. This is also the place to lock (writeprotect) the question file to prevent accidental modifications.
32
Chapter 3
Transfer a
question
9. Transfer the selected question into the MathWriter document in one of two
ways:
• Click the icon
(at the bottom left corner of the EB window) that depicts
transfer into a document. (The companion icon denotes transfer from a document
and is used when creating the questions, as discussed later.)
•Select Question/Transfer To Document or use the keyboard equivalent
T.
Repeat steps 8 and 9 for each question you wish to transfer manually.
Save the exam
10. Switch to MW (click on the exam document window, select File/Switch To
MathWriter or type
M), save the exam document, perform any additional
formatting desired, save the document again, and then print it.
ExamBuilder can print the book, but MW prints the exams you build. We
recommend that you always save the exam file before printing as a
precautionary measure because exam documents are RAM-resident only until
you create a file.
Multiple choice and matching questions frequently need some manual tabbing
for correct alignment. The editing and printing of exam files is discussed later in
this chapter.
Automatic exam building
In addition to building an examination manually, you can also produce an
examination automatically from questions you select — either by tagging (or
marking) the questions to be used and then letting ExamBuilder transfer copies
of the selected questions into a MathWriter exam document, or by letting
ExamBuilder select questions. Random selection is especially useful when
creating multiple versions of an examination. The formatting options discussed
for manual generation are also available to automatically generated exams.
Automatic exam generation offers several powerful additional capabilities.
The first is the ability to shuffle the order of the marked questions. ExamBuilder can sort the marked questions by difficulty, point value, and question
type. Exam questions can be selected randomly from the book according to userdefined criteria. The selection criteria can be the number of questions from a
Bank, the difficulty level, the point value, and the question type. You can mark
individual questions for exclusion from the selection process.
ExamBuilder can also construct multiple versions of an examination. In its
simplest form this means scrambling the order of the questions on the
examination. Questions can also be sorted by difficulty, by point value, and by
type. Each exam version is stored in a separate MathWriter file.
Using ExamBuilder 33
ExamBuilder can also produce a listing (or log) of the questions used in each
examination and a cross-reference listing of the examinations on which each
question appears. This means, for example, that you can track the use of
questions and later identify the examination versions that included an
inappropriate question. This also means that you can produce another set of
exams using the same questions after they have been edited.
Because of the many combinations of options supported and because you may
have a few preferred combinations, ExamBuilder supports a customization
technique. You can create “Build Choices” to save and later quickly configure
the Build Exam dialog box for the same named combination of options
(File/Build) appropriate to your needs.
Build an exam automatically with user-selected questions
Startup
1. Activate MathWriter.
Choose a
destination file
2. Select an exam template (File/New submenu) such as Exam.def.
Ordinarily you will prepare your own template file and save it using MW’s
File/Save As1 with the MW Default file type before using ExamBuilder.
Recall that such files appear automatically in the New submenu if stored in
the system folder or in the folder with MW. You can create custom templates
according to your own preferences and needs. See page 26 for additional details.
Cross-references will be used extensively in this chapter for brevity.
Open EB
3. Select ExamBuilder from Windows/Modules or use
1.
This opens the ExamBuilder window and changes the menu bar (Figure 3.9 ).
Choose a source
file
4. Open the file, “EB Demo.book” in this example, using File/Open Book.
Selecting
questions
5. Individually select questions by clicking the selection fields (see page 21) as
you scroll through the questions:
The bank
5a. Select the question bank, “Samples”, for this example, from the Bank menu.
The names of the banks in this book appear at the end of the Bank menu.
Selecting one deselects the previously selected one.
1
ExamBuilder provides three alternative ways to extract questions from a
question file automatically—marked (user-designated) questions, randomly
using user-designated selection criteria, and, after editing, re-using a set of
questions selected in a previous session as identified in a log file.
This notation means select Modules on the Windows menu.
34 Chapter 3
The view
5b. Select one of the three views. Use the Question/View command or the
keyboard equivalents (see page 27).
Unmark all
questions
5c. Select Edit/UnMark All Questions to assure that no questions remain
unintentionally selected.
Choose questions 5d. To select a question, bring it into view by scrolling (the question number is in
the scroll box); by using the First, Last, Previous, and Next commands on the
Question menu; or by using the keyboard equivalents ( <,
>,
-, or
+
respectively) and then clicking in the check box (Figure 3.13). The check mark
is displayed in all three views. After selecting the subset of questions you wish
to use in this examination,, proceed to the next step.
Fig 3.13 Unmarked and marked questions
Select the Build
Exam command
6. Select File/Build Exam (
E) to access the dialog box (Figure 3.14).
This is the master dialog box for controlling the building of examinations automatically. Here you specify the source of questions, the file destination of the
generated examination(s), the formatting options, the use of an audit trail of
questions, and whether the questions should be scrambled and/or sorted. In
future sessions you will likely use a “Build Choices” set to reestablish these
conditions with a single command. Consider each of these categories—
Customize, Source, Destination, Special.
Fig 3.14 Build Exam(s) dialog box
Using ExamBuilder 35
Customize
commands
No Build Choices set now exists if this is the first time you have used the
ExamBuilder system. The pop-up menu (Figure 3.15) contains commands to
create a new named set of choices, to rename the currently selected set of
choices, and to delete the currently selected named set of choices. To use this
feature, name and save your frequently used sets of choices; to quickly
reestablish this same combination of Build Dialog choices later, simply select
the set by name; then if desired, edit this configuration and save as a new set.
Fig 3.15 Build set pop-up menu
Source
commands
Questions used on exams may be drawn from the set of user-marked items,
randomly selected from the book according to user-specified criteria, or taken
from a previously used set and reconstituted after some of the questions in the
book have been edited.
Marked questions 7. Since we are creating an examination using the questions selected above in
step 5, select Marked Questions from the source pop-up menu (Figure 3.16); the
other choices, Random Questions and Select Log File..., are discussed later in
this chapter. Make sure that Current Bank (rather than “All Banks”) is selected. To designate another single bank as “current” use the Banks menu.
Fig 3.16 Source of questions pop-up menu
Destination
commands
ExamBuilder transfers all the selected questions into an exam file. You can use
the current MW file if only one exam is to be created. Multiple exams can be
created using copies of the MW startup default file or a user-designated
Default File. The startup file is the file displayed at startup and is designated
using the Preferences dialog box of the File menu. In each case these default
files need to have been configured especially as an exam template. This usually
means placing tabs at fixed intervals, by double-clicking on the ruler, and
formatting a user-defined variable for automatic question numbering using
Variables Format of the Format menu.
You must choose among three categories to designate the destination exam file
(Figure 3.17). In step 2 you anticipated this choice by opening an exam
template, so select current document here.
Fig 3.17 Destination file categories
36 Chapter 3
8. Identify the current MathWriter document by selecting “Current Document”
from the Destination pop-up menu (Figure 3.17). Note: The other possibilities
are to create a user-specified number of files in “MathWriter Default File
Format” with an assigned sequence of names or to use an unopened, user-selected
Default File. These options will be discussed later in this chapter.
Special
commands
This category covers miscellaneous operations performed during the transfer
process: create a listing (log) of questions used, establish the format for
numbering of matching and multiple-choice questions, set typeface
transformation rules, choose whether questions and/or answers, and point counts
are transferred, and whether the questions are transferred as a stream of
editable characters or as PICTs.
9. Set the Special options as follows:
Log
9a. Do not check the box for creating a log file (Figure 3.18); this will be
discussed later. Note: If checked, the options would be New File... and Existing
File....
Fig 3.18 Log option
Matching Format 9b. If you have included matching questions, click the Matching Format...
button (Figure 3.14) to specify whether you want the questions and answers to be
scrambled; specify the question item and answer formats (Figure 3.19). The
“leading” and “trailing” boxes allow you to provide surrounding text or
characters. Five number format choices are provided (Figure 3.19).
Fig 3.19 Matching format dialog box and numbering formats
Multiple-choice
Format
9c. If you have included multiple-choice questions, click the Multiple Choice
Format... button (Figure 3.14) to specify whether you want the answers to be
scrambled (Figure 3.20), to specify the layout arrangement of the answers, and
to specify the numbering format.
Using ExamBuilder 37
Fig 3.20 Multiple choice format dialog box and numbering formats
Transfer Options
9d. Set the transfer options (Figure 3.21) that control the transformations and
content choices you want exercised during examination construction.
Preserving the font attributes is preferred because the choice and placement of
mathematical symbols varies among fonts and changes might distort the content. Check only “questions” to produce an exam. The answers can be printed
separately for scoring purposes or in combination with the questions for distribution to the students after the exam. The unified answer key choice provides a
composite answer key when multiple versions of an exam of multiple-choice
questions are created.
Fig 3.21 Transfer options dialog box and placement of answers
Scramble
9e. If you wish to scramble the ordering of the marked questions, check the
Scramble Questions box.
Sort
9f. If you want ExamBuilder to sort the questions when being assembled, check
the Sort box and select a pop-up category: By Difficulty, By Point Value, or By
Type.
38 Chapter 3
Build an exam
10. Finally, click the Build button at the lower right corner of the Build
Exam(s) dialog box (Figure 3.14), and ExamBuilder constructs the examination
from the marked questions according to the specifications in the Build dialog
box.
Automatic exam building with randomly selected questions
In this example you learn to instruct ExamBuilder to select questions at random,
(optionally) scramble their ordering, and then transfer copies of the selected
questions into exam files automatically.
The random selection and scrambling capabilities are useful for creating
multiple versions of an examination. ExamBuilder randomly selects questions
according to several criteria: by number of questions from each bank, difficulty
level, point value, and question type. You can designate individual questions as
temporarily inactive and, thereby, exclude them from the selection process.
In this section we also demonstrate ExamBuilder’s capacity to produce a log
listing of the questions used in each examination and a cross-reference listing of
the examinations on which each question appears. This means that you can
track any repeated use of questions and later identify the examination versions
that included, for example, an inappropriate question.
There are numerous ways to produce examinations using ExamBuilder. Because
you are likely to have strong preferences for a particular format, ExamBuilder
facilitates customization of the building process. You can create and save build
choices sets that later, when selected, quickly configure ExamBuilder to
generate previously used combinations of “build” options appropriate to your
needs.
All of these options are considered in this example.
The startup process is the same as described for the previous example (see page
26).
Startup
1. Activate MathWriter and select ExamBuilder from Windows/Modules.
This opens the ExamBuilder window.
Select the Build
Exam command
3. Select Build Exam from the File menu ( E) to access the master dialog box
(Figure 3.22) that shows the choices relevant for this example. These choices
have produced a different Build dialog box than shown in Figure 3.14.
Using ExamBuilder 39
Fig 3.22 Build dialog box being used to automatically build an exam
Customize:
Using a Build
Choices set
(This paragraph is for completeness only — do not use Build Choices now.) If
you had previously saved the combination of options in this master dialog box
as a Build Choices set, you could quickly recover these options by selecting that
Build Choice file by name from the “customize” pop-up menu. If desired, you
could use these choices as a starting point for further adaptation. Figure 3.23
shows a multiple choice template as having been selected. The names of userdefined sets appear in the top portion of the pop-up menu.
Fig 3.23 Sample menu of Build Choice sets and set naming dialog box
Create a build set After selecting the options in the Build Exam box (Figure 3.22) appropriate to
your needs, select New Set of Build Choices... (Figure 3.23) from the pop-up
menu to obtain a dialog box for naming the set.
Supply a file name and click New or press return. The file name can contain
spaces, but no colons. For convenience, avoid using an excessively long name.
Note: The “Rename This Set of Choices…” and “Delete This Set of Build
Choices…” options are enabled when an existing build choices set is selected.
Source: random
questions
4. Select Random Questions (Figure 3.22) from the source pop-up menu and a
“Select” button appears.
40 Chapter 3
5. Click the “Select” button (Figure 3.22) to open a window (Figure 3.24) in
which you can create an arbitrary number of selection panels to guide the
random selection process.
Fig 3.24 One illustrative selection panel
6. Click “New” (Figure 3.24) to create a selection panel for this scrolling window (Figure 3.25).
Fig 3.25 A selection panel
6a. Select a Question Bank (such as “Samples” in Figure 3.26) from this book
using the pop-up menu. Note: To select a different book use File/Open Book.
6b. Use another pop-up menu on the panel to specify the category from which
you want to select questions randomly—All Questions, Difficulty Level, Point
Value, and Question Type (Figure 3.26).
6c. Use the category’s companion pop-up menu (when any choice other than All
Questions is selected) to specify an additional qualifier (Figure 3.26).
6d. Specify the number of questions you want to select that meet your conditions.
The maximum number of questions that satisfies the selection criterion is
displayed in white characters on black background to the immediate left of the
dialog box in which you specify the number you want to select (Figure 3.26).
Fig 3.26 Question category
Using ExamBuilder 41
6e. For additional selection sets, click “New” and repeat 6a-6d. All such panels
of sets of conditions will select additional questions.
6f. To remove any sets of conditions, click on a panel to select it and then click
the “Delete” button (see Figure 3.24).
6g. When satisfied with the combination of conditions, Click “OK”.
Destination exam Because you want to be able to create multiple examinations, ExamBuilder must
be able to create exam files as needed. You can choose either MathWriter
files
Default File Format or a specific Default File... as the template for these files.
You must supply a family name for the files and ExamBuilder supplies a
distinguishing sequence number.
7. Select a destination file type using the a pop-up menu (Figure 3.27). If you
choose Default File..., you must also locate a specific template file. The choice
“MathWriter Default File Format” is already a uniquely identified file—the
one you previously selected using File/Preferences in MW.
7a. Specify the number of exams.
7b. Provide a family name for the destination files (Figure 3.27), replacing
“Untitled”.
Fig 3.27 Name destination files
7c. Use the sequence number pop-up menu (Figure 3.27) to specify a one, two, or
three-digit sequence number and a starting value (Figure 3.28); “xxx” means pad
the number on the left when necessary to assure three digits.
Fig 3.28 Sequence number pop-up menu and dialog
An identifying file extension becomes a part of the file name. (Note: The
extension is not limited to three characters.)
Special transfer
options
Log file
The special options allow you to create a log of questions used on each exam and
a cross-reference list organized by question.
1. Click on the Log check-box and choose either New File... or Existing File...
from the pop-up menu. Each option branches to a standard file dialog.
42 Chapter 3
You can examine the log file created during the “Build” process with the
File/Examine Log Files command as discussed on page ??. ExamBuilder creates
log files from the exam file using the markers (stored as special memo notes)
associated with the questions.
Other options
The remaining options (Matching Format..., Multiple Choice Format...,
Transfer Options..., Scramble Questions, Sort ) in the Build dialog are identical
to the commands discussed in connection with automatically building an
examination with user-selected questions (see pages 36 and 37) and will not be
repeated here.
Create a Build
Choices set
In case you decide to reconstruct the same set of choices in a subsequent session,
create a Build Choices set so you can quickly restore this combination of options.
1. After selecting the Build options appropriate to your needs, as you have done
so far (Figure 3.22), select “New Set of Build Choices…” from the pop-up menu
(Figure 3.23) and name the set, as discussed on page 39. The file name can contain spaces, but no colons. ExamBuilder automatically stores the Build Set in
the ExamBuilder Prefs file for use in subsequent sessions. The “Rename This
Set…” and “Delete This Set…” options are enabled only if a Build set exists and
is selected.
Build the
examinations
Click “Build” to create the examination(s) from the questions randomly
selected according to the conditions prescribed. When ExamBuilder completes
the exam(s), control returns to MathWriter.
Log files
Log files preserve a record of the questions used in an examination. Log files are
created from the markers or memos (Table 3.2) attached to the questions when
they are transferred into the exam document. If these markers are not removed
while you are editing the exam document, several uses can be made of this
information:
• When you place a global point total marker in an exam document using
Edit/Insert Point Count, ExamBuilder tallies the points automatically.
ExamBuilder does NOT update the point total if you subsequently add
questions, if you delete the markers, or if you edit the assignment of
individual points in the exam. The count is taken from the hidden, uneditable
question markers only when the total point count command is used.
• The log file reports the origin of the questions used (book, bank, and question
number within the bank). If you discover a flawed question in an exam, this
information allows you to locate the question.
• A log file lets you reuse the same questions again to reconstruct the same set of
questions on each examination after editing some of the questions in the file.
Using ExamBuilder 43
• Using the cross-reference file derived from the log file, you can locate all
versions of the examination that include a specific inappropriate question.
Table 3.2 Marker content
Marker
Line Contents
1
“ExamBuilder™”, module name
2
Book:Bank (Directory ID)
3
Question Number
4
Question Type
5
Point Value
if Multiple Choice:
6-8
6 Question Order
7 Correct Answer
6 Item Order
if Matching:
7 Answer Order
8 Correct Answers
if Matching 1
2
Log file contents
“ExamBuilder™”
Correct Answer for Item
Table 3.3 illustrates the structure of a tab-delimited ExamBuilder log file. The
line numbers have been added for convenience. Each log file can contain any
number of build sessions.
The contents of a log file are taken from question markers. If you delete those
markers, the log file and the total point count will be incorrect. Otherwise, the
removal of the markers does not affect the printed exam.
Line 1 is the session description line; it contains the name of the session, number
of exams, and the date and time the session was started.
Lines 2 and 11: Example1.Test and Example2.Test are the names of the exam
files. ExamBuilder created the file name using a family name “Example”, a
sequence number “1”, and a file extension “.Test”. The number of questions is also
included here. The number of questions per file could vary if you use scenario or
composite questions, since random selection of questions within one of these
groupings often produces the inclusion of other questions.
Lines 3, 5, 7, 9, 12, 14, and 16: The descriptor book:bank gives the origin of the
question. Note that the questions were scrambled in this example session. The
questions were taken from the EB Demo.book, which has two banks (Chapter 2
and Samples)
44 Chapter 3
Lines 4, 6, 8, 10, 13, 15, and 17: These are the question numbers within the book
and bank listed in the preceding lines. If a question is multiple-choice, then the
answer appears in parentheses. If a question involves matching, then the list of
answers appears in parentheses.
Table 3.3 Log File Example
1. Example Session (2 Exams) 2/5/91 10:22 AM
2.
Example1.Test (6 Questions)
3.
EB Demo.Book:Chapter 2
4.
5.
6.
7.
8.
9.
10.
11.
3
EB Demo.Book:Chapter 2
3(b)
EB Demo.Book:Samples
5(c b d e a) 2 1
Example2.Test (6 Questions)
12.
EB Demo.Book:Samples
13.
3 5(d e b c a)
14.
15.
16.
17.
Create a log file
2 (a)
EB Demo.Book:Samples
EB Demo.Book:Chapter 2
3(a) 1(d)
EB Demo.Book:Samples
21
1. Open an exam document in MathWriter.
2. Activate ExamBuilder.
3. Select File/Log Document. A file locating sequence follows (Figure 3.29).
Choose a new or existing log file for the named open document.
Fig 3.29 Name a log file
4. Name this log session (Figure 3.30) and press continue. A log file can contain
multiple log sessions (see Table 3.3).
Using ExamBuilder 45
Fig 3.30 Name the log session within a log file
At this point ExamBuilder constructs a log file by extracting the required data
from the hidden markers (Table 3.2) in the exam file.
Examine log files Let’s review the Log files created either during a Build Exam command or as a
separate action as just discussed.
1. Select Examine Log Files... on the File menu.
2. Open the file “Exam Demo Log.” If desired, click the Log File button
(Figure 3.31) to open yet another log file.
Fig 3.31 Review a log file
Refer to the Appendix for a discussion of the contents of this file. You can
generate two text files using this Log file.
Cross-reference
file
3. Click the Cross Reference... button shown in Figure 3.31.
Text version of
log files
4. Click the Save As Text button to generate a text file of the contents of the log
file. This is a tab-delimited file that can be read by other standard
applications such as a spreadsheet.
This tab-delimited cross-reference file identifies the examinations that
contain each question.
46 Chapter 3
Reconstruct a set
of examinations
In the event you discover a flaw in a question (such as an ambiguity) which has
been used in creating a set of examinations, or a topic not covered in lecture, you
can use the log file to identify the versions affected. A new set of examinations
can be constructed using the old log file and the edited questions.
Use “Select Log File...” from the Build Exam dialog box’s source pop-up menu
after modifying the question or marking it as inactive from the Entire Question
view.
Edit and Print an Examination
ExamBuilder derives much of its power from the editing, formatting, and printing capabilities supplied by its host because the exams are produced as
MathWriter documents. Printing exams, whether they were created manually
or automatically, requires a knowledge of MathWriter operation, so a brief
“Guided Tour” of MathWriter is supplied on the distribution disk. The online
help window also contains a terse summary of the commands.
Ordinarily, you will need to edit the exam very little if you use a template or
default document appropriate to your needs. You may have to adjust the tab
settings and tab text to align it properly, especially if you are using multiple
choice and matching questions that require columnar alignment.
The page numbering variables must be placed in a header or footer. Use of the
variable for total page count lets students quickly determine whether a page is
missing. Three date variables are provided — one variable posts the file
creation date, another reports the current date, which changes each time the
file is opened (and provides a means for reporting automatically the date the
document is printed), and a third, undocumented form that does not vary, but
reports the date you placed the variable in the document. To access this third
form, press the option key while you select the current date variable from the
Palettes menu.
Creating and Modifying a Book of Questions
This section describes how to modify or create a new book of questions. The
capacity for modifying and adding to a publisher-supplied book of questions is
an important aspect of ExamBuilder. We assume that you are familiar with
the process, discussed in the previous section, for creating examinations from an
existing question file.
Creating a
book
We assume that you know the content of the questions, have produced any
required graphics (bit-mapped, object, or encapsulated PostScript), and have
placed them in a Scrapbook. If you have enough memory, the graphics program
and ExamBuilder can both be available under MultiFinder.
Using ExamBuilder 47
1. Start MathWriter and open ExamBuilder.
“No Open Book” appears at the top of an otherwise blank window.
2. Use the File/Open Book (or O) command (Figure 3.?) to open an existing
Book or File/New Book ( N ) to create a new empty one.
For a new file you must provide a name and destination.
2a. Supply a name for the file, e.g., “EB Demo2.book”.
Optionally append “.book” to the name to identify this file as a book of
questions.
2b. Select a disk drive and folder.
Fig 3.32 File menu
2c. Click “Save.”
ExamBuilder automatically saves a question when you scroll to another; you
need not execute a save command explicitly. In fact, no save command exists.
Before you can add questions, you must create and name a bank (a question file
subcategory).
3. Select Bank/New Question Bank... and supply a name.
Fig 3.33 Bank menu
A bank is an internal subset or group of questions used to restrict the random
selection process when creating examinations. As you create each question bank,
ExamBuilder appends its name to the Bank menu (Figure 3.?). To access a bank,
select it by name from this menu; the current bank is indicated by a check mark.
EB also enables the “Rename” and “Delete” options.
ExamBuilder stores the questions in the order assigned during entry; but if you
are using the Long or Short Summary Views, selecting questions may be easier if
you view them with a different display order. Use Bank/Sort By (Figure 3.34)
to change the viewing order.
Fig 3.34 Sort by submenu
48 Chapter 3
Create questions from templates
Once you have created a new question bank, you need to insert a template
within the desired sequence of existing questions a template appropriate to the
question structure. This produces a framework for storage and retrieval. As
discussed in the previous section, you use some of the fields to select questions
when you are “building” an examination. The fields for these are common to all
questions. Other fields contain the contents of the questions.
Since this is your first record, its position is the same whether you insert it
using the “before” or “after” command.
4. Select Question/New After (or New Before) (Figure 3.35) and drag to the
desired question type (Figure 3.36).
An examination can contain any combination of question types in any
sequence. Of course, common sense and respect for your students will dictate
restraint.
The question types are shown in Figure 3.36, the New After submenu. Keyboard equivalents are provided for the more commonly used New After command, but not in the New Before submenu.
Fig 3.35 Question menu
Fig 3.36 New After submenu
All question templates share the descriptive fields described at the beginning
of this chapter (Figure 3.1). Supply data for as many of these fields as your
needs and interests dictate; you can complete them now or later. Note: If you
later open the book and wish to edit this question, select Question/View/Entire
Question.
A multiple-choice template initially contains one field marked “Q” for storing
the question and one marked “A” for storing an answer; you must add cells as
needed (Figure 3.37).
5. To add another answer cell, place the insertion point in an answer cell and
select New Before or New After ( J or K ) from the Cell menu (Figure 3.38).
Note: You may set the default view for new question templates using
Edit/Preferences (Figure 3.44).
Using ExamBuilder 49
Fig 3.37 An example of a multiple-choice question
To identify the correct answer, even when the answers are scrambled, place a
check in the second column (Figure 3.37) by clicking.
Free form
Free-form questions (Figure 3.39) have a single set of “Q” and “A” boxes of
variable size. Use the Grow box to set the width; the height adjusts
automatically to the contents.
Fig 3.38 Cell menu
Fig 3.39 Free form question template
Fill-in-the- blank The fill-in-the-blank template (Figure 3.40) provides two “Q” regions—one
before and one after the embedded blank. For a question having a leading
blank, leave the first “Q” cell empty; for a trailing blank, leave the second “Q”
cell empty. Click on the “Length” button to specify the length of the blank.
To create a question having multiple blanks, use New Before or New After on
the Cell menu with the insertion point in the second “Q” box to create
additional sets of “Q”, “-”, and “A” boxes.
Fig 3.40 Fill in the blank question template
Multiple-choice
Multiple-choice questions (Figure 3.41) initially have one question box and one
answer box. Click within an “A” box and use “New Before” or “New After” on
the Cell menu to add other “A” boxes. Place the insertion point within the cell
50 Chapter 3
of the correct answer and select “Answer” from the Cell menu. If an answer cell
must retain its position among the possible answers, e.g., “None of the above,”
place the insertion point within that cell and deselect “Mixable” to remove the
check mark on the menu adjacent to that command; this places a dark border
around the box in the second column to indicate that the response is NOT
mixable, i.e., its position in the list is fixed even if you select the scramble
option when building exams.
Fig 3.41 Multiple-choice question template
Matching
A matching question (Figure 3.42) begins with an introductory statement “Q”
cell and is completed by one or more “Item-Answer” pairs. With the insertion
point within an “I-A” cell, use the “New Before” or “New After” command on
the Cell menu to add others as needed. Place the correct match for the “I” cell
in its companion “A” cell; ExamBuilder will handle the scrambling.
Fig 3.42 Matching question template
Scenario and
Composite
Both the scenario and composite questions (Figure 3.43) provide space for an
introductory statement. A light or a solid shading in the thin rectangle to the
left of a scenario or composite question, respectively, identifies it as that question type. When you add a new question immediately following either type,
ExamBuilder asks you if the new question is to be attached to the preceding
scenario or composite question.
Fig 3.43 Scenario and composite question templates
Creating and storing the contents of questions
Descriptive fields 1. Before entering the text for the descriptive fields (topic, chapter/selection,
objective, point value), assign a default font and font size using Preferences... on
the File menu (Figure 3.44). Remember the distinction between screen and
LaserWriter fonts and select the font according to your printer type. The builtin LaserWriter fonts are identified by underlines in Style/Text Fonts.
Using ExamBuilder 51
Fig 3.44 Preferences... on the EB File menu
Text within the
cells
2. To enter text in a text only cell, simply click within the cell and type. Word
wrap and cell-height increases occur automatically as text is typed into the
cell. The Font, Size, and Style menus apply to text within the “Q” and “A” cells
according to the usual Macintosh interface rules. Multiple typefaces can be
included within a cell (Figure 3.45). The text in a text-only cell can be typed
directly into the cell and edited. Note: As discussed on page 23, each cell can
contain either text or a PICT graphic. To store a composite of text, graphics, or
mathematics in a cell, EB transforms the composite into a PICT; EB can transfer
such a composite cell stored in PICT format into an exam document either in its
compressed PICT format or translate it back into its original, editable format
(see pages 11, 30, and 52). To transfer a mathematical expression from MW into
EB or any other standard applications via the Clipboard, use Edit/Copy
Other/Copy As Picture rather than the usual Edit/Cut or Edit/Copy command.
Fig 3.45 Typeface menus
Mathematics
3. Create mathematical expressions involving built-up structures and any text
associated with those cells within MathWriter by the usual process, then
select them and paste them into ExamBuilder. To transfer the selection, click in
the ExamBuilder window to make it the active window and transfer the
selection using Transfer From Document on the Question menu (or D). You can
also click the
icon in the bottom corner of the ExamBuilder window to effect
the transfer of the selection.
52 Chapter 3
Graphics
4. Transfer graphics, including mathematics and any text to made a part of the
graphic (bit-mapped, object, and encapsulated PostScript), into a question cell
just as described for mathematical expressions. You can also paste a graphic
from the Clipboard into a cell.
A cell contains either all text or all graphics. Unlike a text cell, a picture
cell’s dimension is fixed by the size of the included graphic; so if you need
wide margins on your exam, make your graphics narrow. Text stored in
graphic format (PICT) will be visually indistinguishable from a text cell.
The Font, Size, and Style menus, of course, do not apply to graphics. To verify
the contents of a cell as picture or text, select the cell and see which item is
checked on the Cell menu.
Edit menu
The Edit menu (Figure 3.46) applies to selected text, to selected questions in the
short or long summary views, and to the entire contents of a cell — whether a
picture or text. When you select a question in summary view, ExamBuilder
highlights the question. When you select a cell in entire question view,
ExamBuilder highlights the associated “Q” or “A” box.
Fig 3.46 Edit menu
Book statistics
5. Select File/File Info... to get information about the book file (Figure 3.47):
the creation date, modification date, number of question banks, and number of
questions in each bank. Check the “Locked” check-box to prevent changes—accidental or otherwise—to the questions in this book.
Fig 3.47 File Info dialog
Using ExamBuilder 53
Print the book
After creating a book of questions, you can print a copy for verification and
archival purposes. ExamBuilder supports both the ImageWriter (Figure 3.48)
and LaserWriter (Figure 3.49). The printing process parallels that for
MathWriter. Each printer type has its own page setup and print dialog. Note:
Normally the exam template will be configured for your printer type; but if
change the printer type with Chooser or change to a different computer having
a different choice, remember to use Page Setup on File/Page Layout of MW to
assure compatibility. If you make this change, scroll through the exam
document to confirm format-readiness for printing.
ImageWriter
Fig 3.48 ImageWriter dialog boxes
LaserWriter
Fig 3.49 LaserWriter dialog boxes
These EB print dialogs behave in the expected manner.
54 Chapter 3
Performance Tips
Enhancing
speed and
performance
MathWriter is remarkably easy to learn and use because the screen image is a
faithful representation of the document to be printed. MathWriter continually
uses all of the currently available information to format the screen, even when
you are creating complicated mathematical expressions. To the maximum
extent possible MathWriter assumes responsibility for the complex formatting
details, freeing you to concentrate on the substance of your examination. This
high level of interactive visual support requires considerable computational
power.
For best performance:
• Transfer exam questions as pictures (text, math, and graphics).
• Use existing RAM effectively: a) Set Application Memory Size to utilize the
available memory using Get Info on the File menu at the MultiFinder level. The
memory allocated is used by MW, your open document, and EB. You should
allocate at least 2000K bytes, although a minimal configuration is 1000
Kilobytes. b) With severe RAM limitations, operate under Finder, rather than
MultiFinder.
• Disable features not currently needed. a ) Use the Black & White setting for
the Monitor using the Control Panel. Color is marginally useful and
significantly impacts speed. b) Toggle the Auto Math features off ( E) when
not entering a mathematical expression.
• Use multiple, smaller documents if the memory utilization indicator on the
status bar exceeds 90%. Also have only necessary documents open simultaneously when RAM is limiting.
• Configure the document window and floating windows to minimize overlap,
thereby reducing complicated screen refreshing.
• When possible, add text at the end of paragraphs to reduce screen refreshing
time.
• Use ExamBuilder Module with the more powerful word processors —
MathWriter/Educational and MathWriter/Professional. Additional features
include: spell-checker, thesaurus, hyphenation, math-science-engineering
dictionary, revision tracking, interactive library, memo notes, sidebars, background pictures, user styles, overview, multiple columns, auto-italics in
mathematical expressions, tab on user-selected character, line numbering, color,
character editor for cropping, sizing, and positioning of graphics, find/replace
for text, typeface, and mathematics, a font table for access to all characters by
mouse, support for additional modular extensions,
C H A P
T E R
4
Command Guide
This chapter provides a guide to ExamBuilder and MathWriter commands,
moving left-to-right to each main menu and top-to-bottom within a menu. For
clarity, all menu commands are displayed here using undimmed type.
ExamBuilder Commands
Fig 4.1 ExamBuilder menu bar
Apple Menu
The Apple menu (Figure 4.2) hosts the About ExamBuilder window (Figure 4.3)
which identifies the program, the copyright notice and the publisher’s
address. (End-user support is provided by the publisher, not the developer.)
Fig 4.2
About ExamBuilder
Fig 4.3 About window
56 Chapter 4
File menu
The file menu (Figure 4.4), according to interface standards, is always located
adjacent to the Apple menu.
Create a question file
Open a question file
Question file statistics and lock
Global font preferences
Dialog box for building
examinations automatically
Audit trail of question
usage and cross-references
Print question file
(not an exam file)
Exit control
Fig 4.4 The File menu
Let’s examine each of the File menu commands.
New Book...
( N)
This menu command allows you to create a new book of questions. You must
supply a name and destination for the file of questions you intend to store.
Open Book...
( O)
The Open Book... command provides access to previously created ExamBuilder
question files. The usual techniques are available for navigating among disks,
folders, and files. Only one file can be open at a time.
Note that the File menu does not contain a Save or Save As... command
because ExamBuilder saves records automatically.
File Info...
The File Info... dialog box characterizes the file (book name, creation date,
modification date, number of banks, names of banks and number of questions in
each) and permits you to protect the file from accidental modification. When a
file is locked using this command, a lock icon appears in the EB window to the
left of the file and bank name.
Preferences...
Preferences... sets the default font and text size used within ExamBuilder
questions. With “Open New Questions Automatically” you may ask that
ExamBuilder present each a new template in entire question view, rather than
a summary view.
Build Exam...
( E)
Build Exam... is the most powerful and most complex command in ExamBuilder. This dialog box controls the automatic creation of examinations—
which questions are used, the nature and destination of the output examination
files, and the formatting that occurs during the exam building process. This
Command Guide 57
command also directs the creation of an audit trail of question usage for
automatically created exams and provides a convenient means for establishing
combinations of frequently used menu options. An alternative, manual approach
to exam building is handled separately.
Log Document...
Log Document... creates a log file for an existing exam file, whether it was
created using the Build command or manually, and whether created in one or in
multiple sessions. However, as discussed on page 42, you must not have deleted
the question markers.
WARNING: The question number is a relative number. If you insert or delete
questions in the bank, the number of all higher numbered questions is
affected. If you must maintain a correspondence between a printed copy of the
questions and a log file, or between a log file (see File/Log File) and answer
keys, add new questions at the end of the bank and simply mark retired
questions as inactive in the full view of the question. of course these changes
can be made only if the file is not locked by the system or using File Info.
Examine Log
Files...
Examine Log Files... allows you to display a log file on-screen, transform it into
an editable text file, and produce a cross-reference index of question usage.
Page Setup...
Page Setup... establishes printer and paper configuration parameters ExamBuilder prints the question file, while MathWriter prints the exams you build.
Before using the Page Setup command, you may need to use Chooser in the
Apple menu to select a different printer type. The Page Setup dialog depends
upon your choice of printer — ImageWriter or LaserWriter.
Print...
In the Print dialog box you select or assign print quality, page range, number of
copies, paper feed, bank, view of the questions, and page breaks.
Switch To
MathWriter
( M)
This command provides mouse and keyboard ( M) access to MathWriter. You
can also click in an inactive MathWriter or ExamBuilder document window to
switch between them.
Quit (
The termination command is always the last command on the File menu. It
closes any open ExamBuilder documents and returns control to MathWriter.
Q)
Edit menu
The Edit menu (Figure 4.5) provides commands for cutting, copying, and pasting
text, graphics, cells and entire questions, as well as some miscellaneous editing
commands.
58 Chapter 4
Undo last command
Standard tools for
interaction with
the clipboard.
Applies to text,
graphics, cells, and
questions.
Global command to
Mark/UnMark all questions
Erase receiving document
Count points currently in doc
Fig 4.5 Edit menu
Undo (
Undo reverses the immediately previous command.
Z)
Cut, Cut Cell, Cut Cut removes a highlighted text or graphics selection, a cell, or a question from
the question file to the Clipboard. The name of the command changes according
Question ( X)
to its usage.
Copy, Copy Cell,
Copy Question
( C)
Copy copies a highlighted text and graphics selection, a cell, or a question from
the ExamBuilder document to the Clipboard BUT does not remove the selection
from the document. The name of the command changes according to its usage.
Paste, Paste Cell,
Paste Question
( V)
Paste copies the contents of the Clipboard to the location of the insertion point
in the data base document.
Clear
Clear removes a highlighted text or graphics selection, a cell, or a question
from the question file window BUT does not place a copy on the Clipboard. The
Clipboard, therefore, is not disturbed. The Undo command can restore a
selection removed unintentionally.
Paste Before
Paste Before provides the equivalent of an insertion point location between
cells or questions when pasting the Clipboard contents. The Clipboard contents
are placed in a region immediately preceding the cell or question where the
insertion point is currently located (rather than replacing the contents of the
cell or question where the insertion point is located).
Select All (
A)
This command selects all objects text and graphics within the active region of
the current window.
UnMark All
Questions
UnMark All Questions globally removes selection marks from any and all
questions in the current bank. Use this command to avoid inadvertent entries
when you build an exam using marked questions.
Clear Document
Clear Document erases the body of the receiving exam file. Use this command to
delete any existing material in the receiving exam document.
Command Guide 59
Insert Point
Count
Insert Point Count tallies the points for all questions CURRENTLY in the
receiving exam document. For a correct count, use this command after you have
transferred all questions into the exam document and placed the insertion point
in the exam document where the total point count is to be placed. The point
count is calculated from the individual point count in the hidden, uneditable
“question markers,” not the individual point counts displayed in the exam
document. See pages 42-43 for additional details on point counts.
Bank menu
Use the Bank menu (Figure 4.6) to create, rename, or delete question banks,
which are subgroupings of questions within an ExamBuilder question file. The
viewing order of a bank during scrolling is also set using this menu. You can also
use this name to select which bank is displayed in the ExamBuilder document
window. A book can contain an arbitrary number of banks and each bank can
contain an arbitrary number of questions. In general, it is a good idea to group
related questions within a bank so you can use the bank grouping in the selection
of questions when building exams automatically.
Create, rename, and
delete sets or related
questions within a book
Sort the questions in this bank
by category for easier selection
Select question
banks in this book
Fig 4.6 Bank menu
New Question
Bank...
After you have opened an ExamBuilder book, use this command to open a new
bank within the open book.
Rename Question This command renames the currently selected bank. If necessary, select the
bank to be renamed from the lower portion of the Bank menu before selecting
Bank...
this command.
Delete Question
Bank
If the bank to be deleted is not the current bank, open the bank to be deleted by
select its name from the Bank menu and then use this command. (This sequence
is suggested by the absence of an ellipsis after the command name on the menu.)
Sort By
To simplify the task of manually selecting questions for an examination, use
this command to specify a particular viewing order of the questions within the
current bank when in the short or long summary view. The actual storage order
in the file is unaffected.
Names of banks
The names of the banks in the current book are appended to the end of this
menu. Select a bank name to make it the active bank.
60 Chapter 4
Question menu
Once you have opened (or created) a book and a bank, with the Question menu
(Figure 4.7) you can view full questions or shorter summaries. You can scroll
through the questions by mouse or by menu. When a specific question has been
located, you can delete it, add a new question before or after it, modify it or
transfer the question into an exam file.
You can transfer individual selections, cells, and questions between ExamBuilder and MathWriter and perform various formatting tasks during the
transfer process. Formatting options for manually transferred questions are
provided in this menu; these options are provided from the File/Build Exam
dialog box for questions transferred automatically.
Select scope of view
Locate questions
Create and delete
templates for seven
types of questions
Transfer text and pictures
to and from the question
file according to defaults
Numbering formats
Fig 4.7 Question menu
View
Use the View submenu of the Question menu to specify the level of detail you
want revealed when you examine questions. The Short Summary, Long
Summary, and Entire View choices provide increasingly greater detail. You can
edit only when in using the entire question view, but manual selection (manual
transfer and marking) of questions can be made while using either view.
First ( <), Last
( >), Previous
( -), Next ( +)
These commands provide mouse and keyboard scrolling through the questions.
Vertical scroll bars provide alternative paging control.
New Before, New Use this command to add a template for a new question of one the seven
supported types—free form/essay, fill-In-the-blank, true/false, multiple
After
choice, matching, scenario, and composite. Place the new question template
either immediately before or immediately after the currently selected
question. New After selections can also be made by keyboard command.
Command Guide 61
Transfer To
Document (
T)
To create an examination in an exam document you must transfer individual
questions (and answers) from a question file. Transfer To Document provides for
the individual, manual transfer of questions you select.
Place the insertion point in the exam document to identify the destination point
for the question transferred before you use the Transfer To Document command
(by mouse or by keyboard). An icon at the base of the EB window provides
alternate access to this command.
To transfer a question, scroll through the question file to locate and select a
question. When in summary view, select a question by clicking on the question;
when using the entire question view, question selection is de facto—the question
in view is automatically selected.
Transferring a question as a graphic preserves its exact format and layout, and
also provides a faster response, which may be important for use on the Plus and
SE computers. It also makes it uneditable, however. The numbering scheme
applied to the alternatives in multiple choice and matching questions during
transfer are discussed below.
Transfer From
Document ( D)
This command transfers a selection from an exam document into a question
template; this command is available by mouse from this menu and from the
keyboard. Text can be entered directly by keyboard and formatted within an
ExamBuilder question template. Mathematical expressions, however, must be
created within MathWriter and transferred into a question as a picture,
possibly grouped with text and graphics. Neither EB nor MW has editing
capability for graphics, but graphics can be brought into a MW document or EB
file via the Clipboard. Transfer From Document is available only when you
make a selection in MathWriter.
Transfer
Options...
This command applies to manual (not automatic) transfer of questions into an
exam document. ExamBuilder can take the typeface of a question from context or
preserve the attributes of the stored question. Questions and/or answers can be
transferred. Answers can be placed at the end of the document, after each
question, or in a unified answer key. The point value for a question can be
transferred with a question.
Multiple Choice
Format...
“Scramble Answers” shuffles the answers for multiple choice questions. [A
similar command in Build Exam applies to automatic building an exam.] Five
item numbering formats, as shown on page 37, are provided.
Matching
Format...
Matching Format allows you to scramble the matching items and answers and to
format the numbering of the items and answers, as shown on page 36.
62 Chapter 4
Cell menu
The cell menu (Figure 4.8) deals with the component parts of questions,
especially multiple-choice questions. Multiple choice and matching questions
can have an arbitrary number of items attached; the first three commands of
this menu allow you to add or delete these appended cells.
Each cell in a question, including the added cells, contains either text or a
graphic. The multiple-choice question cell that contains the correct answer is
identified by a check in the square adjacent to the correct cell in the entire
question view. To identify the answer, either place the insertion point within
the correct answer cell and select Answer on the Cell menu, or simply click in
the second column (adjacent to the correct answer cell). Any multiple choice
items that must not be scrambled, e.g, an item such as “none of the above,” can be
identified as non-mixable. Finally, multiple-choice items can be arranged in
rows or in columns.
Create or delete
cells within a
question
Identify structure
of cell
Identify the answer cell and if
position change is allowed
Arrangement of choices as a
paragraph or in columns
Fig 4.8 Cell menu
New Before ( J), Use these commands to add an arbitrary number of new cells to multiple-choice
New After ( K) and matching questions after creating the base template using Question/New
Before or New After. Place the insertion point within an answer cell to enable
this command.
Delete
To remove a cell in multiple-choice and matching questions, place the insertion
point in the target cell to identify it and then use this command.
Picture, Text
Each ExamBuilder question cell can contain either editable text or a graphic.
The nature of the contents of the currently selected cell is indicated by a check
mark in front of one of these menu selections. Note that text and mathematics
can be treated as a graphic, and even joined with a graphic, before being
transferred into a cell.
Answer
In a multiple-choice question, click in the column immediately following the
item number or select Cell/Answer to identify the (only) correct answer.
Command Guide 63
Mixable
A multiple-choice cell is called mixable if its position can be scrambled or
shuffled. An example of a nonmixable item is “none of the above.”
Arrange Horizontally, Arrange the answer cells in rows or columns with this command.
Arrange Vertically
Font menu
Use the Font menu (Figure 4.9) to assign a font to an existing selection or to
specify the font of subsequently entered text. This list displays the names of
the fonts currently available to the system. Use the Apple-supplied Font/DA
Mover utility to change this list. Utilities such as SuitCase™ II provide a
convenient alternative. User-created screen and LaserWriter fonts can be added
too. Use the supplied Adobe Symbol font to assure well-formed brackets, etc.,
and to preserve the boldface attribute of the Greek symbols.
Fig 4.9 Font menu: A sample list of fonts currently selectable
Size menu
Use the Size menu (Figure 4.10) to assign the font size attribute to existing text
or to specify the size of subsequently entered text. The size entries listed in
outline style are the sizes of the fonts that have stored bitmaps for screen
display; the sizes in plain style are generated from the nearest size that is
included. The generated sizes may appear ragged on the screen, but they print
smoothly on the LaserWriter. Less frequently used font sizes in one pixel (one
point or 1/72 inch) increments are also available .
Fig 4.10 Size menu: Sizes in pixel increments up to 127 are selectable.
64 Chapter 4
Style menu
Use the Style menu (Figure 4.11) to assign the font style attributes to existing
text or to specify the style of subsequently entered text. The plain attribute is
special because it removes any combination of styles. Bold, Italic, Underline,
Outline, and Shadow can be used in any combination. Condense and Expand
removes or adds one pixel between characters, respectively.
Fig 4.11 Style menu
MathWriter Commands
MathWriter provides the editing, formatting, and printing support for
ExamBuilder. To utilize the full power of ExamBuilder you need to understand
the host word processor. If your exams do not include mathematical expressions,
you can safely ignore the discussion of those aspects. The dimmed menu
commands are unavailable in this version.
MathWriter’s Main Screen
The MathWriter screen is remarkably simple (Figure 4.12). The ruler is thin
and is always at the top of the screen, never usurping window space in the body
of the text nor scrolling out of view. You can even remove the ruler using the
Format menu. The tab wells and paragraph alignment controls are at the right
above the vertical scroll bar. At the bottom is the status bar. You can resize,
drag, close, or scroll the document window in the customary Macintosh fashion.
Fig 4.12 MathWriter main screen configured without mathematical tools
Command Guide
Ruler and tabs
65
MathWriter is paragraph-based; you create a paragraph by pressing the return
key. The ruler displays the tab settings for the current paragraph, i.e., the
paragraph with the flashing insertion point. The tab wells at the right of the
document window, just above the vertical scroll bar, contain left, right, center,
and decimal alignment tabs; this placement avoids a reduction in the critical
vertical dimension of the screen, important for displayed equations. Doubleclick in the ruler to select ruler options for uniformly spaced tabs.
To place a tab, drag one from the well and pull it into the text area to decide its
exact placement (or place it directly on the ruler). When released, the tab icon
snaps to the ruler as if attached to a rubber band. To remove a tab, drag it off
the right end of the ruler past the print boundary indicated by shading
on
the ruler. Double-click on a tab in the ruler to open a window for additional
control or to choose a tab leader and alignment symbol.
To obtain left, right, full, and center paragraph alignment, select the
paragraphs and click on the icon. Alignment applies to the paragraph that
contains the blinking insertion point or to multiple paragraphs of selected text.
The usual text selection techniques such as dragging, shift clicking, etc., apply;
however, to identify a paragraph for justification or tab placement, you only
need to place the insertion point within that paragraph.
MathWriter automatically passes the ruler settings from one paragraph to the
next when you press the return key. If you change the ruler settings, a small
ruler icon on the left border of the window identifies ruler changes unless you
use Hide Messages on the Format menu to hide this and other message icons
such as memo notes and sidebar indicators.
The status bar
The status bar at the bottom of the document window (Figure 4.13) contains
information about the position of the insertion point within a mathematical
expression (“Base” in this figure) and the adjacent text. Figure 4.14 shows
examples of the insertion point in mathematical expressions1 and in a table.
With the insertion point adjacent to the “1,” the first up arrow indicates an
exponent placement and the down arrow indicates that the exponent has a
subscript. In the second example the cursor is adjacent to the subscript and the
down arrow indicates this.
Fig 4.13 MathWriter status bar
Fig 4.14 Insertion point position within a mathematical expression
1
The Macintosh user interface standard specifies this command key. If you are accustomed to Command-P for print
rather than plain, refer to the Appendix for reassignment instructions using Cmd Key Switcher.
66 Chapter 4
When the insertion point is in a table or matrix, the status bar gives the row
and column number of the element you are editing (Figure 4.14). A thin
horizontal line at the far left and flush with the bottom of the “Base” panel
(Figure 4.13) shows the fraction of RAM in use. The solid line represents actual
usage and the dotted line represents the additional usage that can be purged by
MathWriter if necessary. As mentioned earlier, MathWriter documents are
memory resident so you should allocate as much memory as possible to
MathWriter (using Get Info on the File menu at the Finder level).
Also on the status bar in Figure 4.13 are the horizontal scroll bar, the position of
the insertion point within the document (line 1 and character 0) and the current
font, font style, and font size (which are plain, Geneva, 12 point). During
computation-intensive operations like reformatting or loading a file, a progress
indicator appears in the typeface indicator box also. MathWriter reformats
off-screen text when it is processing no new commands; you can follow its
progress in the insertion point locator panel. The font typeface panel appears in
inverse type (white letters on black background) when the automatic math
options on the Style menu are in use.
The cursor
The MathWriter cursor changes to convey information about operations that
are possible or in progress. The first row of Figure 4.15 contains the arrow, the Ibeam, and the split I-beam cursors of the Character, Text, and Math Editors,
respectively. The cursors of the second row indicate when the text cursor has
moved into the main body of the manuscript, the header, or the footer,
respectively. Because MathWriter allows you to edit these different sections of
text without opening separate windows, you need to know into which portion of
the document you have moved the cursor. The third row shows the search and
the disk icons.
If you have trouble identifying the region in which the insertion point is
located, select Show Layout on the Format menu. That displays the dotted
lines that separate the different regions of the document (Figure 4.16) In
addition, a pop-up window on the status bar at the bottom of the screen tells
you whether you are in the body, header, or footer (Figure 4.17).
Fig 4.15
MathWriter icons
Fig 4.16 Layout lines
Command Guide
67
Fig 4.17 Pop-up cursor locator
Floating windows
Palettes window
The floating “Palettes” window contains the Greek alphabet and any rows of
symbols from the Palettes pull-down menu that you choose. You can modify,
move, or remove the floating Palettes window (Figure 4.18). It responds to the
shift key for uppercase Greek letters. To place the floating Palettes window on
the screen, select it from the Windows menu. Then click on the name of a row in
the Palettes menu, rather than on the specific symbols, to copy a row of symbols
to the floating window. You can remove a row by clicking on it again in the
Palettes menu. You can reposition the floating Palettes window by placing the
cursor just below its Close box and dragging it.
Fig 4.18 Greek alphabet in the Palette window
Templates
window
Smart Templates2, the templates in this window, format fractions, radicals,
products, summations, integrals, set operators, special structures such as limits,
grouping brackets, vectors and matrices, and tables. Each of the ten icons in the
Templates window (Figure 4.19) contains two to ten options in pop-out menus.
Fig 4.19 Templates window
To use the templates, click on the category icon to unfold the list and drag to
select—just as you do with pull-down menus.
2
You can safely ignore the mathematical tools in MathWriter if you do not require their use.
68 Chapter 4
Alternatively, you can activate these menus from the keyboard. Press and hold
command ( ) and type a numeral key (1–9, use 0 for number 10) to select a menu
(e.g.,
1 is the fraction menu). Then type the numeral displayed adjacent to
the desired icon. If you do this without a pause, the menu does not unfold to
remind you of the choices. Any invalid keystroke aborts the choice.
(MathWriter displays tiny numerals within the specific icons when you use
keyboard access.)
Pop-out menus
1. Of the fraction options ( 1) the first displays the numerator and denominator in the current font size. The second option immediately decreases the font
size for smaller in-line expressions. The third option produces a slanted fraction
line. MathWriter automatically draws the fraction bar long enough to accommodate the length of both the numerator and denominator and automatically
centers the shorter expression. Press enter to move from the numerator to the
denominator. Press return at any time to immediately return to the baseline.
2. Three choices of radicals ( 2) are available. The first is the usual square
root, the second allows you to supply a root, and the third is for long division.
Press enter to move from within the radical to the second entry, the root. Press
enter to leave the structure.
3. The product symbol template (
3) allows you to place limits above and
below the product symbol or to the right of the product symbol to conserve
vertical space for in-line expressions. MathWriter automatically positions the
cursor in the lower portion and reduces the font size. Supply the lower limit,
and press the enter key to move to the upper limit. Supply the upper limit and
press enter to return to the baseline to enter the function. The limits can be of
arbitrary complexity. Use the split I-beam to edit within the limits. Press
enter to move the insertion point to the base level.
4. Like the product symbol template, the summation template ( 4) allows you
to place the limits above and below the symbol or to the right to conserve vertical space for in-line expressions. MathWriter automatically positions the cursor in the lower index and reduces the font size. Supply the lower limit and
press enter to move from the lower limit to the upper limit. Supply the upper
limit and press enter to move to the baseline to supply the function. The limits
of integration can be of arbitrary complexity. Use the split I-beam to edit within the limits. Press enter to move the insertion point to the base level.
5. The integral (
5) can be single, double, or
triple, and you can place the limits either
adjacent to or above the integral sign. Supply the lower limit and press enter to
move to the upper limit. Supply the upper limit and press enter to move to the
baseline, and then supply the integrand. The limits can be of arbitrary
complexity. A contour integral is available. Press return to move the insertion
Command Guide
69
point to the base level; if desired, use the split I-beam tool to edit within the
limits again. To resize the integral for larger integrands, use Calc Prev ∫ or |
Size on the Format menu or
D with the insertion point positioned to the
immediate right of the integrand.
6. The union and intersection operators ( 6) also accept limits. Press
enter to move from the lower to the upper limit and again to move back
to the baseline. Use the split I-beam to edit the limits.
7. The special function menu (
7)
contains constructs that include
expressions centered below the operator name. Press enter to return to the
baseline. Use the split I-beam to edit the limits.
8. Grouping brackets ( 8) include multiple rows
grouped on the left or right with braces, brackets,
parentheses, and angle symbols. Use the split I-beam to edit within the
structure. Press return to change rows and tab to change columns.
9. Vectors and matrices( 9) can have an
arbitrary number of rows and columns.
MathWriter provides various enclosing symbols. Use the tab key to change or
create columns. Press return to change or create rows. MathWriter automatically formats the matrix as you type each keystroke. Use the split I-beam from
the Tools window to edit inside a cell or within an expression inside the cell.
Click inside a cell to outline it with a box (Figure 4.20). Click outside the structure or select the I-beam tool to return to normal typing. Click on the appropriate box in Matrix Format on the Format menu to specify the placement, line
thickness and pattern, justification within cells or elements, and row and column spacing of cells.
To modify the format of previously typed expressions,
simply select the expression before using the Matrix
Format command. To add or delete a row or column,
select a cell within that row or column and then use
Fig 4.20
Insert or Delete from the Edit menu.
Edit inside structures
10. The last menu produces tables ( 0). You can box the entire table or each
cell individually. MathWriter treats tables as matrices with additional
horizontal and vertical rules. Click on the appropriate box in Matrix Format on
the Format menu to specify the placement, line thickness and pattern,
justification within cells or elements, and row and column spacing of cells. To
modify the format of previously typed expressions, simply select the expression
before using the Matrix Format command. Use the split I-beam from the Tools
window to edit a cell (outlined with a dotted box when you click within a cell)
or an expression within the cell. Click outside the structure to return to normal
typing. Press option to temporarily change from an I-beam to a split I-beam.
70 Chapter 4
Tools window
Fig 4.21
Tools window
The floating Tools window (Figure 4.21) serves multiple
purposes. Use the split I-beam cursor to place the insertion point inside an
existing mathematical structure. The full I-beam allows you to place the
insertion point in ordinary text. The small, vertical, up and down arrows move
the insertion point above or below a symbol, reduce the font size, and center the
subsequent input. The slanted up and down arrows position superscripts and
subscripts. Clicking the bottom icon is equivalent to pressing the enter key and
will move you out of superscript or subscript mode and back to the baseline or to
the level on which the insertion point was before you clicked on the slanted up
or down arrow.
Fig 4.22 MathWriter menu bar
The Apple menu
The Apple menu contains information about the application and provides
access to the desk accessories (Figure 4.23). Use the Font/DA Mover to modify
the list.
Title page
information
Desk
Accessories
Fig 4.23 The
About
MathWriter™
2.0
menu
Notice that sales and support are provided by the publisher, not the developer.
Fig 4.24 The About MathWriter 2.0 window
Command Guide
Desk Accessories
71
The names of desk accessories currently available to the system also appear on
the Apple menu. Use the Font/DA Mover 3 to modify this list. See the
Macintosh Utilities manual for a discussion of desk accessories.
The File menu
The File menu provides access to the file management commands, global and
document-specific configuration commands, printing choices, and the exit
command.
Create new documents from templates
Open existing MW exam documents
Close the active MW exam document
Save active exam document
in various formats
Insert a graphic from disk
Establish global MW preferences
Characterize the active document
Assign page characteristics
Assign page usage throughout the document
Establish document specific preferences
Not available in this version
Print the active exam document
Terminate session
Fig 4.25 The File menu
You can create a “stationery” file for each distinctive type of document you use
and designate one of the stationery files as the default, using Preferences on the
File menu. When you choose from the submenu MathWriter creates a file from
that particular stationery. For example, you can create a standard exam form
that includes class identification, the current date, page counter, and automatic
question numbering.
New
Open... (
O)
Use Open... to open an existing file. Note: The three dots following the word
“Open” indicate that you have to supply additional information to complete
the command. A File Type pop-up menu allows you to screen for a specific file
type. MathWriter’s own format keeps the formatting and configuration
information you chose when you created your document for subsequent printing
and editing sessions. MathWriter automatically restores this environment
when you open the file.
If you use the File Warnings option in the File/Preferences dialog box, MathWriter issues a warning message if a font used in the file you open is not avail-
3
4
Skip this discussion of templates if you do not use mathematical expressions in your examinations.
Or SuitCase™ II, for example.
72 Chapter 4
able to your system. If a PICT graphic displays correctly in the originating
MathWriter file, it will display correctly when opened on another computer
having the required fonts installed. In contrast with conventional Macintosh
word processors, MathWriter preserves file integrity, even when transmitted
by network to a different computer, provided identical font files are used, since
the font names, not just local font identification numbers are used.
Close (
W)
To close the active file, use this command or click in the Close box at the topleft corner of the active window. If you have made changes since the last save,
MathWriter gives you an opportunity to save a permanent copy of the document
in a file. Remember the RAM-resident copy will be lost unless you save it as a
file!
Save (
S)
Save makes a disk copy of the active window document using the previously
assigned file name and path. If you have a power failure, the computer will
lose the memory-resident copy, so save your document frequently. We
recommend using Auto save and Auto backup from Doc Preferences in the File
menu. During a file-save operation the Auto backup command retains the
previous version of the file by appending “.backup” to its name before making a
new copy. If a “.backup” file already exists, MathWriter replaces it with the
new “.backup” file. This approach assures that the two, and only two, most
recent copies are preserved.
MathWriter does not compute the size of a file before executing the save
command. Therefore, if insufficient disk space is available to save a complete
copy, the partial file (and the older copy) will be deleted and you will be
prompted to insert a disk with sufficient space. Save a copy IMMEDIATELY.
Save As...
The Save As... command is similar in function to Save except that a window
appears on the screen in which you can type a name for the file. This window
also offers a pop-up list of allowable file types.
MathWriter™ 2.0 This format preserves your complete document and all document-specific
configuration information. Always save a copy in this format; other formats
format
may not preserve all the information needed to resume editing.
MathWriter
Default File
The MathWriter Default File selection saves your MathWriter document
configuration, placing it in the New submenu (on the File Menu) if saved in the
system folder. This becomes “stationery.”
TEXT file
Virtually every word processor can read or translate the TEXT file type. When
MathWriter or any other word processor reads such a file, the file may not look
on screen as it looked originally because TEXT preserves only limited
formatting information. In particular, the character formatting (font, size, and
style) and graphics are not preserved.
Command Guide
73
Save a Copy...
Save a Copy... allows you to save a snapshot of the current file, including the
changes since the last save, under a different name, different file type, and
different disk. It leaves you in the file (under the previous name) in which you
were working before executing the command, however. This distinguishes it
from Save As....
Import Graphics
File...
Import Graphics File... allows MathWriter to read graphics directly from a
file, without the need for the application in which you created the graphic.
Preferences...
Preferences... allows you set global defaults to configure MathWriter for your
needs. In contrast with document-specific conditions set in Doc Preferences,
Preferences... lets you establish a default configuration for the primary startup
file and for the New command on the File menu. Your choices are stored in the
“MathWriter Pref” file in the system folder.
An Auto Screen Refresh option provides supplemental, timed screen refreshing.
Use
option Z for supplemental manual redrawing of the entire screen. A file
warning option provides advisory messages and lists missing fonts when you
open a file to assure file content integrity. The enable/disable status of
automatic file saving is also noted when files are being opened.
Doc Info...
In the Doc Info... window you see that MathWriter automatically tracks the
number of sessions, the creation date, the date last modified, and the size of
your document file. The Abstract/Notes box lets you jot down notes about the
file.
Page Layout...
The Page Layout... command on the File menu controls the page layout specifications for the document. A portrait illustrates your choices of columns,
margins, etc. MathWriter measures the margins from the physical edges of the
paper, not the edge of the print area. Page Setup lets you set paper size,
reduction percentage, orientation, font substitution, text smoothing, graphics
smoothing, and faster bitmap printing.
Doc Layout...
Doc Layout... of the File menu allows you to specify the placement of headers,
footers, footnotes, and endnotes throughout the document by clicking on icons.
Doc Preferences... Doc Preferences... offers a variety of options for your document. Styles 1 and 2
enable you to create and assign style combinations with a keystroke. Auto save
and Auto backup are provided.
Overview...
The Overview command is not available in this version.
Print...(
Depending upon the choice of printer you made in the Chooser (Apple menu),
when you click Print on the File menu, different choices exist. If your file has
previously been set up for one printer and you choose the other, click Page Layout (File menu) and then click in the Page Setup box before printing. In general,
you should choose a printer type before composing your document because your
choice of fonts and sizing of graphics and equations may be affected.
T) 1
74 Chapter 4
Quit (
Q)
This is the standard last menu item on the Macintosh File menu. Use this
command or its command key equivalent Q to terminate the application.
MathWriter reminds you to save modified files of any type before terminating
the program.
The Edit menu
The Edit menu (Figure 4.26) transfers formatted text and graphics, rulers,
paragraph formats, styles, and text from one location to another. To access the
entire Edit menu on a small screen, move the mouse to the small, triangular
arrow at the bottom of the first portion of the menu and drag.
Reverse action of last command
Remove selection and copy to clipboard
Do not remove selection but copy to clipboard
Paste clipboard contents at insertion point
Remove selection but do not place on clipboard
Select everything within this region
Copy ruler, format, etc., without text
Paste ruler, format, etc.
Scroll to insertion point
Not available in this version
Not available in this version
Not available in this version
Not available in this version
Not available in this version
Not available in this version
Not available in this version
Not available in this version
Add a row or column to a table/matrix
Remove a row or column from table/matrix
Fig 4.26 Edit menu
Undo (
Z)
Cut ( X),
Copy ( C)
The Undo command restores the document to its status prior to the most recently
executed command. Undo lets you explore alternatives as well as correct
mistakes. Undo is not available for a few situations (such as within
mathematical expressions).
The Cut and Copy commands are dimmed and disabled until you select the
portion of text you want to act upon. The Cut command removes the selected
material from the document and places it on the Clipboard for subsequent
transfer to another location, while the Copy command simply copies the
selected material to the Clipboard without disturbing the original. To view
the contents of the Clipboard, pull down the Windows menu at the top of the
screen until you reach Clipboard and then release the mouse. The Clipboard
stores material from only one Cut or Copy operation at a time. Clear removes a
Command Guide
75
selection, but does not affect the Clipboard. The Clipboard remains intact even
after you exit MathWriter, allowing you to transfer material to another
application.
Paste (
Paste inserts into the document at the insertion point material previously cut or
copied to the Clipboard.
V)
Clear removes a selection from a document without placing a copy of that
selection on the Clipboard. It is equivalent to pressing the d e l e t e key. Use this
command to remove large blocks of text when memory is limited.
Clear
Select All (
A)
Select All selects all of the material in that portion of your document (either
the body, header, footer, footnote, sidebar, memo, etc., identified in the pop-up
menu at the insertion point locator in the status bar) that contains the insertion
point.
Copy Other
Unlike Cut, Copy, and Paste, which apply to the combination of types of
textual and graphic material within a selection, you can choose various types
of formatting information such as Ruler, Format, Ruler and Format, Style, and
Picture and copy them using Copy Other. Copy Ruler, Copy Format, and Copy
Ruler and Format relate to the paragraph containing the blinking insertion
point. Copy As Picture (
s h i f t [ ) turns the selected material into a PICT
format graphic element and places it on the clipboard. Use this command if you
wish to transfer an equation to another application.
Paste Other
Paste Other, which complements Copy Other, pastes the information you
retrieved with Copy Other into the document at the location of the insertion
point.
Show Selection
Show Selection scrolls to the paragraph containing the blinking insertion point
of the active window.
Revise Selection
Revision tracking is not available in this version.
UnRevise Selection
Revision tracking is not available in this version.
Find/Replace...
Find/Replace is not available in this version.
Find Next
Find/Replace is not available in this version.
Replace Selection
Find/Replace is not available in this version.
Check Spelling...
Spell-checking is not available in this version.
Thesaurus...
The Thesaurus command is not available in this version.
Hyphenation...
The Hyphenations command is not available in this version.
76 Chapter 4
Insert and Delete add or delete a row or column of a table or matrix that
contains the insertion point. Use the Math Editor to place the insertion point
within a table.
Insert, Delete
The Format menu
The Format menu (Figure 4.11) contains such commands as paragraph formatting, matrix formatting, and automatic numbering formatting. The basic unit
of organization in MathWriter is the paragraph—created when you press the
return key. The ruler always remains at the top of the window and never scrolls
out of view. If desired, you can hide the Ruler.
Display/Hide Ruler
Select unit of measurement
Borders, spacing, page breaks for paragraphs
Generalized line spacing
Matrix/table spacing and formatting
Numbering format (page, question, date, etc.)
Not available in this version
Not available in this version
Manual page break (see Para. Format too)
Calculates height of integral
and absolute value
Display boundaries
Display message icons in left margin
Display formatting characters
Hide pictures for scrolling speed
Fig 4.11 Format menu
Hide Ruler
Show Ruler (
`)
Hide Ruler toggles with Show Ruler. The Ruler displays the formatting
information for the paragraph that contains the blinking insertion point.
When you select the Hide Ruler command, the tab and justification controls
from the vertical scroll bar disappear too.
Ruler Options
Ruler Options lets you choose a ruler measured in inches, centimeters, or points.
Paragraph
Format... (
To change the format of a paragraph, place the cursor within that paragraph
to select it. You can shade paragraphs, place lines (borders) along the sides of
paragraphs, and set the vertical spacing before and after paragraphs. In this
window you can also link paragraphs, begin a new page with a particular
paragraph, or prohibit a paragraph split over a page break. Use the Page
break before option to force the text that immediately follows the insertion
point to appear on the first line of the following page. No icon is associated
with Page break before. Use this dialog box to verify the existence of or to
remove it.
J)
Command Guide
Line Spacing...
( K)
77
With Automatic line spacing enabled, MathWriter automatically spaces lines
to include the maximum size of such expressions as mathematical equations.
Mostly fixed means that MathWriter allows simple subscripts and superscripts
to protrude into the “leading” between the lines. The Fixed choice lets you set
the spacing using four buttons: Single, 1-1 2, Double, and Other.
Use automatic line spacing while composing a manuscript when you do not want
to be concerned with making a choice. If your writing includes in-line
expressions, you may wish to modify the line spacing subsequently to achieve
greater uniformity. Never compose variable-height mathematical expressions
with fixed line spacing because portions of the line may be displayed
improperly and inadequately refreshed.
Matrix Format...
This command controls matrix and table formatting. Placement, Line type,
alignment of elements within the matrix, and the spacing of rows and columns is
selected here. MW reformats a matrix with each input keystroke.
Variables
Format...
Variables Format... on the Format menu lets you select formatting options for
such variables as the date, time, and page number. These variables
automatically appear in the text in the form that you choose here. Show
Invisibles (Format menu) displays a dotted box around these variables.
Variables for creation date, current date, creation time, current time, page
number, number of pages, equation number, sub-equation number, equation crossreference, and question number are provided.
Insert Memo
The Insert Memo command is not available in this version.
Insert Column
Break
The Insert Column Break command is not available in this version.
Insert Page Break This command forces a page break. Use Show Invisibles to locate a hidden
character marker. To remove one, click to the right of it (at top of page) and
press d e l e t e . See Paragraph Format for an alternative method.
Calc Prev ∫ or |
Size ( D)
Use this command to automatically size the ∫ or | symbols. After you enter the
integrand, press
D to resize the integral sign.
Show Layout/
Hide Layout
Show Layout toggles with Hide Layout to reveal or hide the boundaries of the
headers, footers, margins, etc. Cursor changes also indicate the boundaries.
Hide Messages/
Show Messages
Hide Messages toggles with Show Messages, and they display or hide the
markers for paragraph ruler changes in the left margin. You may adjust the
File/Print dialog box to allow these markers to be printed.
Show Invisibles/ Show Invisibles toggles with Hide Invisibles and provides access to or hides
the hidden formatting characters, such as tabs, line breaks, page breaks, end of
Hide Invisibles
paragraphs, and spaces (
). To remove these markers, click just before
the next character (NOT just after the marker) and press d e l e t e .
78 Chapter 4
Hide Pictures/
Show Pictures
Hide Pictures toggles with Show Pictures and suppresses or produces the
display of pasted graphics in order to produce faster scrolling. A rectangular
placeholder preserves the page layout.
The Palettes menu
The Palettes menu (Figure 4.12) displays all of the symbols from the Symbol
font except the Greek alphabet, which is available when you click on the
Palettes window (Windows menu). In addition, the Greek alphabet is
immediately accessible from the keyboard. Press
spacebar to toggle between
the current font and the Greek alphabet. Pull down the Palettes menu and move
the cursor among the items in the window. The name of the character on which
you place the cursor appears in the row at the bottom of the window. Click on a
character to insert it into your document.
Fig 4.12 Palettes menu
You can copy any of these rows in the Palettes menu to the Palettes window.
First select the Palettes window (Windows menu). This places the Greek
alphabet at the bottom of the screen. Then pull down the Palettes menu and
select Geometry. The Geometry row of characters appears at the bottom of the
screen with the Greek alphabet. To remove Geometry from the screen, select it
again from the Palettes menu. MathWriter marks each row that you copy to
the Palettes window with a check.
The Diac menu
When you place the cursor immediately to the right of an alphabetical
character, the diacritics on the top row of the Diac menu (Figure 4.13) become
available. Note that the name of the diacritic on which you place the cursor
appears in the row at the bottom of the window. Click to assign a diacritical
mark to a character in the text. Use the Raise and Lower commands to adjust
the height of these diacritical marks. Use Remove to remove a diacritic. Select
one or more characters to enable the remaining operators. MathWriter
automatically stretches these overbars, underbars, grouping brackets, etc., as
needed. Use the split I-beam to edit within the structure. The Raise, Lower,
and Remove commands apply to the structures while selected.
Command Guide
79
Fig 4.13 Diacritical menu
The Style Menu
The Style menu (Figure 4.14) contains menus for assigning fonts (typeface
families), sizes, and styles.
Assign font family
Assign a font size
Assign a font style
Toggle to and from Greek
Increase font size (also use with option)
Decrease font size (also use with option)
Select user-defined
typeface combinations
Revert to previous typeface combination
Enable Auto Math Options
Select combination of options
Not available in this version
Not available in this version
Not available in this version
Fig 4.14 Style menu
Text Fonts
The Text Fonts command provides access to a submenu that contains a list of
fonts (Figure 4.15). The list depends upon those fonts currently available to the
system. The laser fonts available to the LaserWriter Plus are underlined. If you
press the option key while selecting text fonts, each font name appears in its
respective style (Figure 4.?).
Fig 4.15 Text Font submenu and fonts listed using own font
80 Chapter 4
MathWriter identifies the fonts internally by name, not just by ID numbers.
When you open a file, MathWriter warns you if the entire set of fonts used in
the document is unavailable to the operating system. MathWriter extends this
machine independence to include any PICT graphics pasted into a MathWriter
document.
Text Sizes
The Text Sizes submenu lists the sizes (Figure 4.16) and shows various standard
font sizes. The outlined sizes identify the fonts with actual bitmaps available
to the system. The system must create the other sizes, which will appear
ragged on the screen and on ImageWriter output, but not on LaserWriter output.
Macintosh System 7.0 addresses this problem.
Fig 4.16 Text Sizes submenu
Text Style
The standard Text Styles (Plain, Bold, Italic, Underline, Outline, Shadow,
Condense, and Extend) are available from this submenu (Figure 4.17). When you
select Plain, all other styles are overridden.
Fig 4.17 Text Style submenu
MathWriter has an enhanced set of Other Styles... (Figures 4.17 and 4.18).
When processing the additional information needed for a color monitor,
MathWriter will perform more slowly. To disable the color output, use the
Monitor command in the Control Panel (on the Apple Menu).
Command Guide
81
Fig 4.18 Other Styles
Because the Greek alphabet is so widely used in mathematics, science, and
engineering, a dedicated menu command and key command for rapid access are
provided. The Greek command is disabled by a selection from the text font
submenu. For rapid changes, both the mouse and keyboard commands toggle
between Greek (on the Symbol font) and the last font in use. The Last Style
command on this menu plays the same role for all other fonts.
Greek
( spacebar)
Larger Size ( +), Because one changes font size so frequently when typing mathematics, Mathsupplies special menu and keyboard commands for changing font size.
Smaller Size ( - Writer
You can easily step through the font sizes on the font size menu using these key)
Style 1 (
Style 2 (
board commands. When used with the option key ( option + and
option -),
these commands make smaller changes—one point steps, rather than cycling
through the sizes on the menu.
Use Style 1 and Style 2 let you apply two of your own style combinations. First,
use the Doc Preferences...command to create these custom style combinations.
(File menu).
<),
>)
Last Style (
Auto Math (
Auto Math
Options...
\)
E)
The Last Style command provides a quick return to the immediate past style.
This feature is especially useful when you must toggle between two styles, such
as the frequent use of boldface notation for vectors and scalars.
The next group of commands provides for automatic handling of two routine
tasks associated with typing mathematics. Click on Auto Math Options... and
select the options you want from the open window. Then, clicking on Auto Math
(not just selecting the options) enables those choices. While composing a
manuscript, use
E to toggle on and off the combination of features selected
using Auto Math Options.
Auto Math Options include auto-bracket sizing (see Figure 4.19), and automatic
replacement of arithmetic operators with the corresponding, better-formed
characters from the Symbol font. For example, the plus sign in the Times font is
larger than the Symbol plus sign.
82 Chapter 4
When Auto Math is enabled, MathWriter automatically sizes brackets as you
form an expression. If Auto Math is inactive while you create an expression, you
can select an existing expression and then choose Auto Math,
E, to size the
expression automatically.
1+x
)
1 − x 2
1−
Fig 4.19 Parentheses typed without and with auto-sizing
(
1+x
x2
The typeface indicator in the status bar at the bottom-right corner of the
document window appears in inverse when Auto Math is active. If you turn this
feature off, MathWriter runs faster.
Italics Exception
List...
Metrics...
The Italics Exception List command is not available in this version.
User Styles...
The User Styles command is not available in this version.
The Metrics command is not available in this version.
The Windows menu
The Windows menu (Figure 4.20) provides access to various windows—Tools,
Templates, Palettes, Modules, Clipboard, Help, and any open document
window. You can arrange the windows of the open documents for convenient
access. The use of the Tools, Templates, and Palettes windows is discussed in
detail at the beginning of this chapter.
Arrange exam document windows
Show/Hide the Editors and
subscript/superscript tools
Show/Hide the mathematical templates
Show/Hide the Greek alphabet
Typing aid not available in this version
Interactive Library (glossary)
not available in this version
Activate the ExamBuilder Module
Show/Hide the Clipboard window
Show/Hide the online Help
List/Select the open documents
Fig 4.20 The Windows menu
Command Guide
Clean Up
Windows
83
Clean Up Windows “stacks” the document windows with a slight offset that
makes the multiple filenames partially visible and allows you to make any
file active by clicking within its window.
The floating windows (Templates, Palettes, and Tools) can remain active
while a document window is active. To completely remove these windows,
either click their Close boxes or reselect the window from the Windows menu.
Scrolling will be faster if the floating windows do not obscure the document
window, which would require the screen to be redrawn more often.
Tools Window
The Tools Window selection (command tab) displays or hides the floating
Tools window (Figure 4.21). If you reposition the Tools window, MathWriter
retains the new location of the window even if you temporarily remove the
window.
Type
tab ( ∆) to bring the Tools window (Figure 4.21) to the foreground.
(We use ∆ in the menu to denote the tab key.)
Fig 4.21 Tools Window
Tools
The Tools submenu provides menu access to two editors:
• Text Editor, identified by the traditional I-beam cursor
• Math Editor, identified by a split I-beam cursor and used for editing
within mathematical expressions
Two editors are not available in this version of MW:
• Character Editor, identified by an arrow cursor and used for moving
characters
• Sidebar Editor, identified by the “+” cursor, is not available in this
version.
You can reach these tools from the Tools window or from the keyboard.
Templates Window
Fig 4.22 Templates Window
See the previous discussion of the Template Window on pages 67-69.
Palettes Window The Palettes window (Figure 4.23) contains the Greek alphabet. Click on
one of the letters of the alphabet to “type it.” The character appears in
your text at the location of the blinking insertion point. You can add palettes
from the Palettes menu at the top of the screen. Pull down the Palettes menu
84 Chapter 4
row name and release. This places that row of symbols at the bottom of the
screen for easier access. To remove that row, pull down the Palettes menu and
click on that row name again.
Fig 4.23 Palettes windows
Font Table Window
The Font Table, which provides mouse access to every character, is not
available in this version.
Library Window
Library
The Library and Library Window commands (an interactive glossary) are not
available in this version.
Modules
The Modules submenu provides access to modular extensions of MathWriter. You
can extend the scope of MathWriter by adding modules. This first module, diskbased ExamBuilder, can interact with the data structure of the active, RAMbased exam document, make calls to code within MathWriter (such as question
numbering), and use MathWriter for formatting and output.
To add a module, simply place it in the system folder or in the same folder
with MathWriter. MathWriter locates and incorporates such modules when
you next open the application. To remove a module, exit from MathWriter and
remove the module from its folder.
Clipboard
The Clipboard command on the Windows menu provides diagnostic access to the
contents of the Clipboard used to transfer text and graphics between
applications or from one location to another within a document. The
mathematical expression in Figure 4.24 is shown as a PICT file because it was
placed there using Copy As Picture (Copy Other submenu) on the Edit menu.
Fig 4.24 Clipboard window
Help (
?)
(Names of Open
Documents)
The Help window supplies online hints on the use of MathWriter features.
Scroll through the list or select a topic to go directly to a specific topic.
The final entries on the Windows menu are the names of open documents. Either
click on an exposed portion of a document window or select it here by name to
make it the front window on the screen. This version of MathWriter is
arbitrarily limited to two open documents.
MathWriter Guided Tour
About the Exercises
The exercises that follow present step-by-step instructions for completing various
common tasks. Some of the steps are numbered and are essential to completing the
task. Others are simply suggestions for practice and are indicated with a • at the left
text margin.Again, do not begin until you have made a working copy and have
safely stored the master disks. The Symbol font is installed as part of the
MathWriter application. If you wish to print MathWriter files, you must also install
the appropriate print driver, select the driver using Chooser, and connect and
prepare the printer for printing. Optionally, print these instructions.
Exercise 1: Reviewing a Short Memo
This first exercise describes how to open an existing file, navigating through a
document, exploring the interface, printing the document, and quitting.
This exercise asks you to read through and work on the following hypothetical
memorandum from the authors to new MathWriter users. As you move through the
memorandum, which is the same in the manual and on the screen, the text will tell
you what to do.
MEMORANDUM
Date:
Nov. 15, 1990
To:
MathWriter New Users
From:
The Authors
Subject:
MathWriter basic features — a first glimpse
We assume that you have a basic familiarity with the Macintosh interface as
described in the materials supplied with your computer. Consequently, this first
glimpse will describe the basic features you need to perform simple tasks with
MathWriter—moving around within a document, formatting paragraphs,
identifying typefaces, moving text, saving and printing a document, and ending a
session.
108 Appendix
Basic features
Move around within a document
After reading this paragraph, repeatedly drag and release
the vertical scroll box
to examine the entire document and then return here. The number in the scroll box
identifies the page that appears in the document window when you release the
mouse button. More precisely, it is the page visible at the top of the document
window! MathWriter displays documents as “sheets of paper” and automatically
paginates them.
Click immediately above or below the scroll box to scroll one complete screen
vertically up or down.
Click in the scroll arrows
to move a few lines, or press option when you click
the scroll arrow to scroll a single line.
The boundary lines of the margins, the header, and the footer are visible because
Show Layout in the Format menu has been selected (as a result, the menu choice
now reads Hide Layout). The cursor changes shape when you move it from one
work space where the blinking insertion point is located to another. If you move
into the header, click, and then return to the main body, the cursor changes to
and then back to .
Examine the ruler
Observe that the positions of the left margin marker (together with a left tab it
looks like ) and first line indent marker on the Ruler change when you place the
cursor, first within this paragraph and then within the paragraph that precedes,
“Examine the Ruler.” In this paragraph the first line “indent” is to the left of the
paragraph margin and produces a “hanging indent” to make the numbers
conspicuous.
Notice that the ruler does not scroll from view; it always displays the particular
conditions of the paragraph that contains the blinking insertion point. When you
press return, MathWriter creates a new paragraph that inherits the ruler conditions
of the previous paragraph. If you change the Ruler, a ruler icon
appears in the
gray left border unless you select Hide Messages on the Format menu.
← ruler icon in the gray area (in the screen version)
Examine paragraph alignment
Click within this paragraph and then select each of the four paragraph alignment
symbols just above the vertical scroll bar. As you click each symbol, the text of this
paragraph changes alignment from left , to right , to aligned left and right ,
and to centered .
Appendix
109
To place horizontal tabs on the ruler, drag them from the supply above the
paragraph alignment icons. To remove a tab from the ruler, drag it past the right
margin marker on the Ruler. Drag the symbol to reposition a tab. Click on the next
blank line (paragraph) to see
on the ruler.
Examine the status bar
Click inside the following words: “Click Here.” Notice that the status bar at the
foot of the window indicates the typeface, in this case bold. Also, observe that
MathWriter reports in the status bar the line number (measured from the beginning
of the document) and character position (measured from the first character on that
line) of the blinking insertion point.
Edit a footer in-context
Scroll if necessary and look at the contents of the footer. In the right corner find the
word “(more)“ and click between left parenthesis and the word “more.” Then type
“Continue for” to see how footers are edited. Backspace to correct any typing
errors. If you backspace too far, the word “(more)“ may jump to the beginning of
the line. With the cursor placed right before the “m” in “more” press tab to restore
the word to its original position.
Cut, Copy, and Paste
To observe editing with Cut, Copy, and Paste in the Edit menu, follow the
instructions to change the sentence below from “Please move this word” to “Move
this word, please.”
“Please move this word.”
Select Please using the mouse or using the arrow keys and shift key. With X cut
it from the text and with V paste it after word (or use the Cut and Paste selections
in the Edit menu). Then complete the editing by changing capitalization and
punctuation.
Select Clipboard from the Windows menu to see a copy of the word Please placed
there by the cut command. Click the Clipboard Close box (top-left corner) to close
it.
Save the document
If this file were not locked, you could use Save on the File menu to save your
document. However, you can rename the file and save a copy of the entire exercise
in MathWriter format if you select Save As… from the File menu.
Print a copy of this document
To print the document, click on the Chooser command in the Apple menu. The
110 Appendix
name of your printer should appear in the box User Name. If not, select Print from
the File menu, make the selections necessary, and click OK in the print dialog box.
Summary
So far you have learned to:
•Scroll within a document and move the insertion point
•Locate headers and footers and edit them
•Create and format paragraphs (first line indent, tabs, leaders, and paragraph
alignment)
•Locate the position of the insertion point and identify the typeface of the adjacent
character to the left
•Cut, copy, and paste text
•Save and print a document
To end this and other MathWriter sessions, select Quit from the File menu.
The Exercise 1 file is write-protected, so exit without saving when prompted.
You may continue this guided tour:
Exercise 2: Input Tools
Word processors contribute a great deal to the task of perfecting a manuscript. In
fact, this may be the important contribution a word processor makes to the writing
process.
MathWriter supports both mouse and keyboard input for most commands. By
pointing and clicking the mouse, the novice or infrequent user can easily and
quickly use MathWriter without having to memorize commands. On the other hand,
the experienced or power user will appreciate the speed afforded by keyboard
commands. Whatever your level of experience, you can mix these approaches as
you wish.
Online help
We hope that MathWriter’s interface is sufficiently intuitive that you can work with
minimal prompting. For those times when prompts would be useful, use the Help
window as described here.
1.Select Help from the Windows menu (
?).
Appendix
111
The Help window presents a scrollable list of topics, including general
information, step-by-step instructions for performing common tasks, and a
menu/command summary. Select a topic from the list, scrolling if necessary, and
click on the Help button or double-click on the topic. Use the « or » buttons to
scroll to adjacent help screens, click Topics to return to the list of topics, click in
your document window to return to it while leaving the Help window open, or click
in the Help window Close box to put it away.
2.If the Help window is still open, click the Close box in the upper left corner of
the window to put the Help window away.
Keyboard commands for type style changes
spacebar
+
option +
option P
B
I
U
Y
\
<
>
MathWriter has an extensive set of keyboard commands. Those that control type
style changes are listed here.
Font Selection
Toggles between the current font and the Symbol
font (which contains the Greek alphabet and
other mathematical symbols)
Font Size Selection
Next larger font size on size submenu
Increase font size by one point
Next smaller font size on size submenu
Decrease font size by one point
Font Style
Plain (and removes all other style attributes)
Bold
Italic
Underline
Other styles (access to numerous other styles)
Font, Size, Style, Justification, Alignment
Revert to immediately previous style
Style 1 of user-selected attributes
Style 2 of user-selected attributes
Use Doc Preferences... in the File menu to
assign user-selected attributes.
112 Appendix
Transfer of paragraph formatting
Each new paragraph automatically inherits the formatting of the preceding
paragraph.
To transfer the Ruler, Format, Ruler & Format, and Style information from one
paragraph to another:
1.Click within the originating paragraph
2.Make a copy of the desired information using Edit/Copy Other
3.Click within the destination paragraph
4.Paste the information using Edit/Paste Other
Using default documents
Many documents such as examinations contain repeatedly used formats for course
identifications, etc. You might have a preferred font for these documents,
depending upon esthetics or printer availability. A sample stationery file Exam.def
is include with ExamBuilder. To speed the creation of such documents, create and
use skeletal default files as follows.
1.Use the New command from the File menu (not a New submenu even if one is
present) to open a blank, generic document.
2.Assign all global properties of this default (template) document. Change the
existing defaults as desired. Some options are:
•Use File/Page Layout to set the choice of printer, printer options, margin sizes,
and header and footer sizes.
•Use File/Doc Format to assign the placement of headers and footers within the
document.
•Use File/Doc Preferences... to set font, font size, font style, paragraph alignment,
and line spacing combinations for styles 1 & 2.
•If relevant, use the Format menu to assign ruler options, line spacing, matrix
formats, and formats for the variables such as date, time, etc. ExamBuilder works
best with fixed (uniformly-spaced) tabs.
•Use the Style menu to set the font, size, and style for the body of the document.
•Supply any text or graphics that you wish to appear in the default file.
3.Use Save As... on the File menu to turn your document into a default file; select
MW Default File from the pop-up menu as the file type. Save the file in the same
Appendix
113
folder with MathWriter or in the system folder so that MathWriter can immediately
add this name to the New submenu list.1
To use copies of this template you need only select it from the New submenu. The
file is immediately added to the New submenu list. When you select a default file
from New, MathWriter automatically makes a copy of that file.
Palettes and Diac menus
The Palettes and Diacriticals menus are always available. Palettes provides mouse
access to the characters of the Symbol font (except the Greek alphabet, which is
available from the Palettes window), a few special characters, and the Variables. As
you drag the cursor over the Palettes menu, your current choice appears on the
bottom row.
The Variables include the following: creation date, current date (which you can use
in a default file to obtain the current date automatically), creation time, current time,
page number and total number of pages (which can appear only in headers and
footers), equation numbers, subequation numbers, textual cross-reference to an
equation, one set of user-defined variables analogous to equation numbering, and
document file name. You can use these to dynamically number questions. The file
name variable allows you to insert the name of the file into the text automatically so
you can more easily maintain the correspondence between printed output and the
MathWriter file used to print it. The file name variable provides the identification
needed to match the answer key with the versions of the examinations.
MathWriter treats a dynamic variable as a single, uneditable entity whose format
and style are set with Variables Format... on the Format menu. (The name of the
user-defined variable and its starting number are also set using Variables Format...
.) MathWriter automatically updates existing variables as you insert, delete, cut, and
paste them.
The Diac menu supplies mouse access to the diacritical marks when the insertion
point is immediately to the right of some alphabetic character. The horizontal
grouping symbols are available only when you have selected one or more
characters. To edit within a horizontal grouping, press the option key to obtain the
split I-beam cursor.
Floating windows
The properties common to MathWriter’s floating windows are discussed here; refer
to Exercise 5 for more detail.
1.Select each of the four windows (Templates, Palettes, Tools, and Font Table)
from the Windows menu.
1
If no default files are present, the New command will not contain a submenu.
114 Appendix
2.Place the cursor in the gray region adjacent to the Close box of each and move to
a convenient location.
3.Explore each menu. Click on the I-beam in the Tools window to be sure that you
are in text editing mode when you complete this.
4.Remove the floating windows by reselecting them in the Windows menu or
clicking in their Close boxes.
Auto save
We recommend that you set the automatic file saving feature on Doc Preferences...
of the File menu as insurance against file loss. The minor delay caused by Auto
save can offset the inconvenience of retyping. The Auto backup command, also
enabled on Doc Preferences..., preserves the immediate past copy of your
document for even better protection.
We STRONGLY recommend that you use these protection features when
composing original material at the keyboard.
Summary
In this exercise you have learned to use input aids to:
•use online help
•change typeface characteristics
•transfer rulers and other formatting from one paragraph to another
•create reusable default or template files (stationery)
•configure MathWriter for your particular needs
•use the floating windows
•enable the Auto saving feature to protect your files.
Exercise 3: Graphics
MathWriter supports the mixing of graphics such as pictures and figures with text.
It can also import mathematical expressions as graphics, but a far more powerful
approach to writing mathematics is described in Exercise 4. In addition to handling
traditional bitmapped and PICT file types such as those created by MacPaint® and
MacDraw®, MathWriter can also handle encapsulated PostScript files such as those
created by Adobe Illustrator® or Mathematica®. It reads these graphics files
directly as well as by using the usual transfer via the Clipboard.
Appendix
115
Fig.1 A Mathematica-created picture
MathWriter can resize, crop, and position these graphics. It treats a graphic as a tall
character within a line of text. You can also apply various border designs and
background patterns to sidebars.
Place a graphic
in a line of text
1.To move a copy of the MathWriter icon from the above line, select it using the Ibeam cursor and copy it to the Clipboard using Copy on the Edit menu or C.
(You could also use the Scrapbook or another application to place the graphic on the
Clipboard.)
2.Place the insertion point at the destination location, somewhere in the document.
3.Use Paste Picture from the Edit menu to transfer the picture into the active
MathWriter document.
4.Select the Character Editor by either clicking the arrow tool in the Tools window,
selecting it from the Tools submenu of the Windows menu, or typing shift [.
The cursor will change into an arrow.
5.Click on the graphic to select it. A rectangular frame with square “handles” at the
corners forms around the graphic.
6.To resize the selected graphic, use Scale Picture... in the Edit menu (now
changed because the Character Editor tool was chosen) or drag one of the handles.
To preserve the width-to-height ratio, press the option key while dragging a handle.
7.To crop the selected graphic, press
proportionally, press both option and
while dragging a handle. To crop all sides
while dragging a handle.
116 Appendix
8.To reposition the graphic vertically, select it, release the mouse button, and then
drag it.
To adjust the vertical position of any text character use the Character Editor as
described in step 8.
Summary
In this exercise you mixed graphics and text within a document, and you learned:
•To place graphics within a line of text.
•To resize and crop graphics.
MathWriter allows you to import graphics directly from a file, including high
resolution, encapsulated PostScript files.
For a discussion of MathWriter’s treatment of mathematical expressions, continue
on to Exercise 4.
Exercise 4: Mathematics
In this exercise you learn to type two-dimensional mathematical expressions and to
number equations automatically.
Mathematical expression editor
Preparing to write mathematics
Before we examine math writing features, you need to configure the MathWriter
environment for these activities. If the Templates, Palettes, and Tools floating
windows are not visible, select them from the Windows menu and drag them to a
convenient working location.
The Templates window behaves as if it were a vertical menu bar; press on a
template category and drag to select a specific template. Alternatively, you may type
command ( ) and the row number followed by the column number of a specific
template. For example, 2 and 1 selects the square root. If you pause before
typing the column number, the selection menu pops out to prompt you. Typing
other than one of the valid numerals aborts the command.
Exercises
Use the following instructions to explore the auto-formatting templates that were
used to create the equation that follows step 4. Use the space that follows the
equation as a place to experiment.
1.Select the root template by mouse (from the Templates pop-out menu) or by
Appendix
117
keyboard ( 1 and 1) from the Templates window. The insertion point is
positioned to receive the argument.
2.Type “(1 + sin x)”. The root symbol expands automatically.
3.Press enter (not return) to exit the root.
Create
(1 + sin x) .
Type here:
If you make a mistake or wish to modify the expression, press option to obtain the
split I-beam cursor to edit within the auto-formatting structure and click within the
expression. You could also select the split I-beam from the Tools window or Tools
submenu (Windows menu).
Suppose you wanted to square the sine term. Edit the expression below.
Edit this
(1 + sin x) to obtain this
Edit this expression.
(1 + sin2 x)
(1 + sin x)
4.Option click within the mathematical expression immediately after “sin.” This
positions the insertion point in the square root structure.
5.Press ] or click on the arrow
in the Tools window (Windows menu)
pointing diagonally upwards (just below the I-beam tool) to create a superscript.
This changes the vertical position of the insertion point and decreases the font size.
6.Type the exponent and press enter (not return).
7.Press enter to terminate the superscript entry.
Because this superscript structure is nested within the square root structure, you
must press enter again to reach the baseline and recover the I-beam cursor of the
text editor. Alternatively, you could press return at any point to reach the baseline
immediately. This use of nested operations illustrates the general procedure for
constructing a mathematical expression of arbitrary complexity.
118 Appendix
Suppose you wish to attach a superscript to a superscript as in the next equation.
y = ex
2
y=
1.Position the insertion point after the equals sign.
2.Type “e”.
3.Press
] or click
and type “x”.
4.Press
] again and type “2“.
Observe that the leftmost display in the document status bar uses two up arrows
to indicate that the insertion point is two levels removed from the baseline.
5.Observe the status bar as you press enter twice.
How would you type a subscript to a superscript, as in the next equation?
2
y1 = ex 1
y1 =
1.Click to the right of the equals sign and add a space.
2.Type “e”.
3.Press
] and type “x”.
4.Press
] again and type “2”.
5.Press enter once to return to the level of the
“x”. (Now there is only one up arrow in the status bar.)
6.Press apostrophe or click on the arrow pointing downward
window for a subscript.
in the Tools
7.Type 1 and press enter to return to the superscript level.
8.Press enter again to return to the baseline.
MathWriter reformats the expression after each keystroke so you need not count
spaces before typing even the most complicated expression. Nesting to any depth is
supported.
Appendix
119
Remember to option click to place the insertion point within the expression.
Suppose you wish to type the error function that appears frequently in probability
theory and heat conduction problems:
erf (x) =
2
π
∫
x
e−ξ dξ
2
0
erf (x) =
In each example, position the insertion point without reminder.
1.To create a fraction, choose the first fraction template ( 1 followed by 1 for the
first template row and the second template column, or use the mouse). The second
fraction template automatically reduces the font size.
2.Type “2” for the numerator and press enter to move to the denominator.
Always supply the numerator before the denominator. By using nesting, you can
create numerators and denominators of arbitrary complexity.
3.Select the square root symbol (
2 and 1).
4.Click on π in the Palettes window.
Use the mouse to select “π” from the Palettes window or type spacebar to toggle
to the Greek alphabet, now noted in the status bar; type p to get pi; and then type
spacebar to toggle back to the previous font. The Greek alphabet is taken from the
Symbol font; the characters have a mnemonic arrangement, “a” for α, “b” for β,
etc. But if you cannot locate a character, use the Key Caps desk accessory or the
Font Table window.
5.Press enter once to leave the root template and a second time to reach the baseline.
To avoid your having to scroll, the sidebar is repeated here.
erf (x) =
erf (x) =
2
π
2
π
∫
∫
x
e−ξ dξ
2
0
x
0
1.Select the single integral template with the mouse or type
5 and 1.
2.Type “0”, the lower limit of integration. (It could be any arbitrary expression.)
120 Appendix
3.Press enter to move to the upper limit of integration and type “x”.
4.Press enter to return to the baseline.
Use option click if you need to edit either limit.
5.Complete the integrand as in the previous example.
Close this file and open the file “Exercise 5b” to continue.
Here is another practice example.
4 V0 ∞
1
(2n+1) π x
V=
exp [-κ(2n+1)2 π 2 t / L2 ] sin
π
(2n+1)
L
∑
[1]
n=0
As with the integral example in the previous example, use enter to move from the
lower to the upper limit. The down-scaled infinity symbol is an idiosyncrasy of the
Symbol font; use option click to select it with the split I-beam and increase its font
size with + or Text Size on the Style menu.
Try the next example with the special functions that have an argument centered
below them. Use 7 or click on ƒ the Templates floating window to access the
limit template. Get the “→” from the Palettes menu.
lim
x→0
1 − cos x
sin x
cos x 1
=
lim
=
lim
=
2
x → 0 2x
x→0 2
x2
[2]
The Cut and Paste operations on the Edit menu apply to mathematical expressions,
even when you use the Math Editor cursor. In this way you can frequently avoid
retyping built-up expressions such as xlim
.
→0
MathWriter automatically groups rows of expressions with a stretchable symbol as
in the following exercise. Use the Palettes menu (or 8 and 1) and the Greek
alphabet on the Palettes window (Windows menu) for the special symbols. Use
return to create a new row.
Appendix
121
x, x ≥ 0
y = x ≡
[3]
−x,
x
<
0
If you are using the Apple, rather than the Adobe, version of the Symbol screen
font, the large brace in the above expression will be truncated, but it will print
correctly in LaserWriter output. (Use Calc Prev ∫ or | Size or D to size the
absolute value symbol from the Palettes menu to fit an expression; use the Character
Editor to stretch it to an arbitrary size.)
MathWriter automatically formats matrices and other two-dimensional arrays. In
order to create self-sizing parentheses for a tall fraction:
1.Pull down the Style menu to Auto Math Options… and release the mouse. A
pop−out menu appears.
2.Click on Auto−bracket sizing if it is not checked and click OK. (This includes the
auto-sizing feature in the set to be enabled in step 3.)
3.Now click on Auto Math in the Style menu (or press E). This activates those
items you have checked in the Auto Math Options window.
In general, activate Auto Math only while you are typing an equation and then
toggle this feature off with E to reduce the computational load.
E
[D] =
1 − µ2
[4]
Type here→[D] =
4.To complete equation [4], type an ordinary left parenthesis, select the fraction
template ( 1 and 1), supply the numerator, press enter, type the denominator,
press enter, and then type a “)”.
5.Complete the expression below by adding the matrix.
122 Appendix
E
[D] =
1 − µ2
1 µ
µ 1
0 0
0
0
1−µ
2
[5]
E
[D] =
1 − µ2
6.To construct an array of any number of rows and columns just select the
appropriate construct from the Templates window, in this case vectors and matrices
(the next to last row on the Templates window), and create the elements. The first
element corresponds to row one, column one.
7.Press tab to move to the next column (or to create the next column) in the same
row.
8.Press return to move to the next row (or to create the next row) in the same
column.
9.To move into an existing cell, use option click with the mouse or shift with the
arrow keys.
MathWriter reformats the array as you type. Use Matrix Format... in the Format
menu to set placement, line type, justification, and spacing of cells.
Pull down the Format menu to Matrix Format and release the mouse to view the
formatting possibilities.
Any changes made in the Matrix Format when a matrix is selected apply to that
matrix only; any changes made when no matrix is selected apply to all future matrix
input.
As a final exercise, reproduce the following table.
a11
1+x
1-x 2
123.456
Text
∑4i=0 (1/i 2 )
Appendix
123
1. Use 0 and 2 to activate the table template. Create rows and columns just as in
the matrix example. Use “0” for row “10”.
The cells of a table can contain numbers, text, graphics, or mathematical
expressions. Use Matrix Format... in the Format menu to change the defaults.
When the insertion point is within a cell, you can insert or delete a row or column
using Insert and Delete on the Edit menu.
Remember, option click to edit within a cell. The status bar indicates the row and
column of the insertion point.
Technical support
In addition to the need for writing equations, technical writing places other special
demands on a word processor. The increased complexity of input due to the
enlarged set of fonts and symbols, font sizes, and font styles was discussed in
Exercise 3. Now we will explain several other features of special importance.
Automatic numbering
Numbering equations and cross referencing them in the text is an important feature
for writing math. Suppose you decide to assign a number to the first equation.
Equation [1] then would become equation [2]. Without MathWriter’s automatic
numbering, you would have to find and increase all succeeding equation numbers
and all cross-references to them in the text and elsewhere. MathWriter handles this
task automatically. Even if you use cut and paste operations to edit your
manuscript, MathWriter updates the numbering and linkages correctly. This
assumes, of course, that you move both an equation and its associated equation
number together.
Warning: If you remove an equation number which is linked to a cross- reference
variable, the cross-reference number is no longer meaningful and is changed to a
“?”.
n
f(z) = ∑∞
n = -∞ α n (z - z 0 ) , r1 < | z - z 0 | < r2
where α n =
1
2πi
∫
C
f(ζ) dζ
(ζ - z0 )n+1
, n = 0, ± 1, ± 2, …,
[6]
124 Appendix
and the integral along C is taken in the positive direction.
Find the Laurent series expansion, in powers of z, for the function
1
f(z) = (z-1)(z-3) .
Observe that f(z) is analytic for all values of z such that 1 < |z| < 3. We may find the
α n 's of [6] by using the following device. [Pennisi, et al., Elements of Complex
variables]
To add the equation number to the first equation, follow these steps:
1.Drag a right tab
near the right margin.
3.Place the insertion point immediately to the right of the first equation, verify that
you placed a tab near the right margin, and inspect the ruler. If necessary, add a
right tab.
We centered the equation at the ruler position by a center tab. To avoid a contradiction, NEVER
use centered paragraph alignment and a tab to number equations.
4. Press tab to position the insertion point at the right margin, and select equation
number
from the last row of the Palettes menu. (As you drag the cursor over
each icon its name appears on the bottom row of the menu.) When you release the
mouse button, MathWriter automatically calculates and assigns the equation
number.
The new equation becomes number [6], the original equation becomes number [7],
and MathWriter updates the cross-reference to the original equation in the last
paragraph of text, too.
The program handles subequation numbering in an analogous manner. It numbers
multiple parts of any equation, but you have to identify the linked variable by
number, by relative number, or by pointing.
With Variables Format... in the Format menu you can assign such things as the
variable style, format, and style of enclosing brackets for equation numbers.
MathWriter automatically updates all variables of this type throughout the document
if you change any of the choices in Variables Format... (Format menu). You cannot
edit these variables placed within the document as you would other character
strings; you can only make changes using Variables Format... .
uSelect Show Invisibles from the Format menu to locate the dynamic variables
identified by dotted boxes and Hide Invisibles to conceal them.
Automatic numbering of other entities such as questions is also possible. In
addition, you can re-define this set of dynamic variables for other items, and
Appendix
125
MathWriter will automatically track them.
To create a “questions” user-defined category, follow these steps:
1.Select Variables Format... in the Format menu, and click Rename.
2.Assign a variable name, e.g., Questions, and select it in the scrolling window.
3.Select a numbering scheme; decide on no leading bracket and a trailing period;
assign a starting number and delete the category label (e.g., select and press delete).
Click OK. MathWriter adds this name to the icon.
4.Drag the mouse over the user-defined category on the Palettes menu to verify that
the program has assigned the new name.
5. Select and adjust the parameters for the subquestion and question reference
variables.
This completes the guided tour. Close this file and begin experimenting.