1
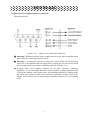
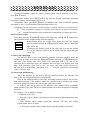
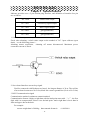
XK3190-A24 Weighing Indicator Controller Users' Manual version 1.00 This product accords with china national standard GB-T 7724-2008 Menu Chapter 1 Technical Parameter…………………………………………….1 Chapter 2 Connection ………………………………………………………2 (1).Weighing indicator front side function instruction and back side function instruction. (2). Load cell & weighing indicator connection Chapter 3 Operation Instruction…………………………………………4 (1). Function of keys (2) .Power operation (3). Zero operation (4). Tare operation (5). Parameter setting (6). Alarm count value (7). Unit weight save, recall and delete. (8). Counting operation. (9). Counting accumulation, accumulate clear and accumulate display (10) Preset gross weight. (11) Inner code checking (12) Unit weight optimized Chapter 4 Optional Function ....…….……………………………..……..10 Chapter 5 Information Tips ….…………………………………………..12 Chapter 6 Guide for Battery……...…………………………..…………..13 Chapter 7 Maintenance and Attention ………………………………..14 Addenda How to reduce the tolerance …..…...………...………...…….16 Dear user: Please read this manual before using. XK3190-A24 Chapter 1 Technical Parameters 1.model: XK3190-A24 weighing indicator 2.accuracy: static state, class Ⅲ, n=3000 ∑—Δ 3.a/d conversion theory: 4.interior resolution: 5.sampling speed: 10 million yard 80 6.signal excitation voltage: times/second DC +5v input signal range:-14 mV ~19mV 1 ~ 4 pcs 7.signal source: (four-wire) 350 Ω resistance strain gauge load cell 8.display(white led back light):18 digits LCD,digit height 0.56 inch,six-state indication. weight value display:six-digit LCD(including denotation digit) unit weight display: six-digit LCD quantity display: 9.keyboard: six-digit LCD adopts 4×5 membrane keyboard 10. power supply: (1). AC220V,50Hz (2). with 6V/4AH rechargeable battery,which could countinues100 hours while working with single load cell and back light is off. 11.fuse : 500mA 12.warm-up time: 15 minutes 13.working temperature: 0~40℃ 14.relative humidity: ≤85%rh 15.store up temperature: -25℃~55℃ 16.external dimensions: 260*190*170 17.net weight: (mm3) (with battery) about 2kg 18.communication interface(optional):RS232 connect with computer, transmission distance≤15 meter 19.score board interface(optional): interface, transmission distance ≤30 meter current loop connect with our score board -1- XK3190-A24 Chapter 2 Connection 1. Weighing indicator front side and back side function instruction (picture 2 - 1 ) front side function instruction (picture 2 - 2 ) back side function instruction -2- XK3190-A24 2. Signal source & weighing indicator connection Wiring instruction:: (picture 2-3 ) signal source connection instruction ▲ !warning::Weighing indicator power supply must be cut off when install the signal source and wire connecting must be correct . ▲ !warning :To ensure the system is working fine , please fix the 9 pin D style plug with screw to the indicator after the signal source wiring, the user can not insert and pull out plug at discretion, and it is forbidden while the indicator is on . ▲ ! Signal source and weighing indicator are all static electricity sensitivity equipment,so user must adopt anti-static electricity when weighing indicator works. To avoid the damage of the signal source and weighing indicator by lighting strike and insure the operator's safety and correlative equipment working well in the thunder storm season, the user must adopts credibility measures to avoid lighting strike. -3- XK3190-A24 Chapter 3 Operation Instruction 1、Button function: (1).Single button function: 1)【Zero】:After press this button , it make the current weighing value back to zero in the current manual zero range, "zero" indicate light on, or else is of no effect. 2)【Tare】:After press this button, it makes current stable weighing value(must above the zero position) tared as the gross weight,“tare”indicate light on. In the zero position, press "tare" button, clear the gross weight, back to the gross weight display state. "Tare" indicate light symbol off. 3) 【M+】:After press this button, it make the current quantity accumulate calculate to under the count state. And the unit weight display show accumulate times. Quantity display show accumulate quantities and the "accumulate" indicate symbol on,and the accumulate quantity over 999999,the quantity display show “ oUEr ”, it is means accumulate data overflow. 4)【MC】:Clear accumulate times, quantity. "Accumulate" indicate symbol off. 5) 【Clear】:This button is used for clear the unit weight input to unit weight display and unit weight saved. 6) 【·Value】:Decimal point of unit weight input, fixed value setting function button. It will come into fix value setting state once press this button in normal working state. 7) 【Quantity】:Sampling data setting ”confirm” button, parameter setting work as “confirm” button . Note: This button function is【Quantity setting】. 【Quantity】 for short! 8) 【Unit w】:Count unit weight setting “confirm” button, parameter setting work as “exit” button . 9) 【F1】:Unit weight save. 10)【F2】:Recall unit weight save 11)【0-9】:Number button. 2. Composite function: Press "quantity" for seconds and then press second button to come into composite function. 【Quantity】+【0】 Enter/ exit inner code state 【Quantity】+【MC】 Enter indicator function parameter setting function 【Quantity】+【Tare】 Enter indicator pre-set gross weight -4- XK3190-A24 function 2. Turn on indicator (warm up time 15-30 minutes) Turn on the indicator power on/off button, It display “888888” and then come into stroke self-checking , at last the indicator come into count state. The first time use battery, ensure charge the battery enough time. 3. Zero operation When the indicator gross weight data in the zero range, press "zero" button. This can make indicator data back to zero. When there is tare, the indicator will clear the tare automatic when user does the zero operation. 4.Tare operation When the weighing data of the weighing indicator is stable, not negative number and also not in zero position, press "tare" can do the tare operation and the tare indicate light is on. If the indicator is in zero position and already have tare weight, press "tare" will exit the net weight display state, net weight will clear to zero, and the tare indicate light off. 5 Indicator system parameter setting XK3190-A24 system parameter mainly including indicator back light setting, fix value alarm setting ,communication baud rate setting and so on. Setting step are as follows: Operation 1 2 Display 【Quantity】+【MC】 [ press together,come [ into system setting [ state. Back light setting [bL press【1】 [ press 【 Quantity 】 [ confirm Note *] *] Enter the system parameter setting. ] Back light setting: Input parameter range 0~3. 0- without backlight ] 1- gross weight is zero, back light *] turn off 15 seconds later. ] 2- net weight is zero,back light turn off 15 seconds later. 3- back light turn on always. for example:1 -5- XK3190-A24 Operation Display Note Fixed value alarm setting: x Need buzzer ring when alarming 0-yes,1-no y Only alarming under stable state 0-no,1-yes 3 Fixed value alarm [Lt ] z When it is alarming? input 0~3: setting : 0-quantity is less than or equal to Press【0】【1】【1】 [ XYZ] lower limit. Press 【 Quantity 】 [ ] 1-quantity is more than lower limit confirm and less than or equal to upper limit. 2-quantity is more than upper limit. 3 - quantity less than or equal to lower limit or more than upper limit. for example:011 4 Communication baud [bAUd ] Communication baud rate setting: rate setting: Input parameter 0~3. Press【0】 [ *] 0- 600; 1- 1200; Press 【 Quantity 】 [ ] 2- 2400; 3- 4800. confirm [ ****** ] 5 Back to working state normal [ ******] [ ******] -6- The indicator works as above parameter setting. XK3190-A24 6. Fixed value count alarming: Fixed value alarming includes single point alarming and two dot (lower and upper limit ) fixed value alarming. Single alarming: use fixed value lower limit, upper limit setting is 0. Alarming mode setting is 0 or 2. Lower and upper limit alarming: use lower and upper limit, upper limit value must be bigger than the lower limit value. Lower limit setting method: Step Operation 1 Press 【 · value 】 button, Enter into fix value lower limit setting 2 Display [ Note *****] [ *****] [ ] Press 【 1 】【 0 】【 0 】 [LLLLLLL] 【0】 press【Quantity】 [ ******] button confirm and [ ] exit. Press 【 · value 】, you can switch between lower limit setting and upper limit setting ; Press【Quantity】,confirm and exit. Fixed value lower limit setting: Press number button, input the lower limit value. For example:1000 Upper limit setting method: Step Operation 1 Press 【 · value 】 button, Enter into fixed value upper setting. Display [ Note *****] [ *****] [ ] 2 Press 【 · value 】 [LLLLLLL] button, [ ******] Enter into fixed value [ ] upper limit setting 3 Press 【 2 】【 0 】【 0 】 [HHHHHHH] 【0】 [ ******] Press【Quantity】button [ ] confirm and exit. Press 【 · value 】, you can switch between lower limit setting and upper limit setting ; Press【Quantity】,confirm and exit. Fixed value upper limit setting: Press number button, input the upper limit value. For example:2000 Note 1: no matter which value setting for upper limit, the fixed value function will be forbidden if the lower limit fixed value setting is "0". alarming Note 2: no matter which alarming method was chosen it will not alarm if the quantity is 0. -7- XK3190-A24 7 Count operation: There are three methods to get unit weight : (1)Sampling:firstly put some count samples on the platform, when the weighing data is stable, input the real quantity of the sample on the platform by number button, and then press 【Quantity】 to confirm. You can start the counting after the indicator calculates the unit weight as the sample quantity set. (display in the unit weight). (2)Unit weight input method :input the unit weight of the goods you want to count, and then press 【Unit w】 to confirm, then you can start the counting . (3)Unit weight re-call method:recall the unit weight that indicator saved , operation details check the next chapter . note (count operation): (1) Unit weight unit is (g), the decimal digits of the unit weight is 1 digit more than weight. (2) When calculate unit weight by sampling, sample quantity can not be too small, or else will influence the precision. The recommend quantity is above 50. If input sampling quantity is less than 50, it means quantity is not enough and the indication light will be on. (3) when input data not include decimal digit, after data input 3 seconds and the user still not press 【Quantity】or【Unit w】to confirm, the indicator will take the input data as the sample quantity , and calculate unit weight and start the count automatically. (4) If quantity data is negative number, quantity display will be 0; If the unit weight is less than 0.25 of the division, the indicator will judge the unit weight is not enough, and the unit weight is not enough indicate light is on.; if the unit weight (calculate by quantity setting) is less than 0.025 of the division, the indicator will display “Err 10”, it means unit weight is too small, and the count precision is not stable, and the setting is without any effects. 8 Saving, re-calling and clearing of the unit weight: This function is used for counting goods are stable, and the count frequency is high. 1)Unit weight saving::when get the unit weight by quantity setting or input manually, press 【F1】 button, indicator display SAUE 0 0 Now input the serial number of the saved unit weight.(0~9).For example saving with number "9",press【9】button,and the unit weight blank will display “[ ----- ]”and back to working state 1second later, and unit weight saving finished. The indicator can store maximum 10 unit weight. 2)Re-call of unit weight:if there is saved unit in indicator,press【F2】button, indicator display LoAd 0 0 Now input the save serial number (0~9) of the re-call unit weight, such as re-call“9”, press 【9】button, and unit weight display blank will display “[ ----- ]”, and indicator back to common working state, and now indicator will count as the re-call unit weight . 3)Clearance of saved unit weight:press【F1】or【F2】button,then press【Clear】button,and indicator will clear all the saved unit weight . -8- XK3190-A24 9. Quantity accumulation, accumulated display and accumulated clear operation. Quantity accumulate: when the "stable" symbol appear and the quantity is not zero , press【M+】button. Accumulate display: press【M+】button, the indicator display accumulate times and accumulate quantity when quantity display is 0 . Accumulate clear: press【MC】button, accumulate times and accumulate quantity clear(back to zero) , and accumulate indication light will be off. Accumulate run out: maximum accumulated quantity is 999999;maximum accumulate times is 255;when accumulate quantity or accumulate times runs out, the indicator will display “oF”,remind accumulation runs out and this accumulation is without any effect. 10. Preset tare weight. Firstly keep pressing 【Quantity】button, at the same time, press【Tare】 button enter into operation of tare weight setting, indicator displays: Remind input preset tare weight value. Input the preset tare weight PrESEt value by number button, press【Quantity】confirm, and tare indication 0 light will be on. 0 If indicator has already stayed in tare state, and if preset tare weight set is 0, the indicator will exit the tare state, and tare indication light will be off. 11. Inner code checking: Xk3190-a24, there’s inner code checking function. Operation method: under the weighing state, firstly keep pressing 【Quantity】,at the same time, press【0】button enter into inner code display state, now "inner code" indication light is on; and do the operation above mentioned again, the indicator will exit inner code display state, and inner code indication light will be off. the inner code and outside division of XK3190-A24 corresponding relationship is 20:1,it means 1 division corresponding value is 20 inner code. 12. unit weight optimization: When the indicator get the unit weight by sampling method, the indicator will start-up the unit weight optimization automatically. Base on the sample quantity of last time, the added quantity reach 10 and no more than sample quantity, if the weight is stable, the indicator will re-calculate unit weight by current quantity to achieve the unit weight optimization effect. In order to raise the precision of the indicator, users should choose reasonable added quantity every time. The less of added quantity each time, the higher of sampling precision. For example:the weighing is 1000pcs 1. Sampling 50pcs first. 2. Then place 30pcs samples, the indicator will start unit weight optimization after it is stable. 3. Place another 50pcs sample again; the indicator will start unit weight Optimization after it is stable. 4. Then place around 100pcs sample again, until the quantity reach 1000. -9- XK3190-A24 Chapter 4 Optional Function Indicator provides user a 5 pin aviation plug interface, and definition of interface feet pin are as follows: No. 1 foot switch value output No. 2 foot current loop signal output No. 3 foot RS232 signal output No. 4 foot gnd (ground line) No. 5 foot gnd (ground line) 1. Switch value output Fixed value alarming,switch value output as the method of "OC "open collector (open drain).(as the following picture). Alarming means connection ; alarming off means disconnected. Maximum power connection current is 50mA. 2. Score board interface current loop signal. Used for connected with Yaohua score board , the longest distance is 30 m. The red line of score board connects to No.2 foot, black line connect ground line (No.4 or No 5 foot) 3. RS232 communication signal Communication method: continuous transmit method. Communication format: 8 digits weight data with decimal point starts with “=”, the first digit with 0 as compensation if there is no decimal point. And weight data is lower data in front and upper data at the back. For example: current weight data is 200.0kg,data transmit format is: =0.002000 - 10 - XK3190-A24 current weight data is -200.0kg,data transmit format is: =0.00200 - current weight data is 2000 kg,data transmit format is: = 00020000 current weight data is -2000kg,data transmit format is:= 0002000- - 11 - XK3190-A24 Chapter 5 Information Tips Information display [Err 05] [ ******] [ ******] Information meanings Solution Load cell problem Problem usually is caused by load cell; please check the connection line between the indicator and load cell. 1.If indicator without calibration , please re-calibration. [Err 03] [ ******] [ ******] Weight data over loading 2.Reduce the weight on the platform and make the indicator work in the reasonable capacity. 3.Re-setting full loading capacity of the indicator. 1.Heighten indicator measuring accuracy or use load cell with reasonable capacity and accuracy. [Err 10] [ ******] [ ******] Unit weight is seriously inadequate. [Err 13] [ ******] [ ******] Calibration parameter setting mistake [Err 11] [ ******] [ ******] Analog signal generated by calibration load weight is too weak Select smaller capacity or larger sensitivity output load cell. [Err 15] [ ******] [ ******] Full capacity setting parameter is too small. Set full capacity parameter as a data over 100. 2.Reduce sample data when quantity setting or add sampling quantity. - 12 - Please setting parameter in the parameter range followed as user's manual. XK3190-A24 Chapter 6 Guide for battery 1. When ac 220 v is connected, then the battery will be charged automatically, and the ac power light will be on. Warning: the line connect with battery can not be connect in reverse (red line is "+", the black line is "-", otherwise the indicator will be damaged. Please ensure the battery is fully charged when you use it for the first time 2. The battery volume indicate light display the real time of remain volume, when it is 1 digit left means low battery, the user should charge the battery as soon as possible . When it is show empty, it is means the battery volume used up and the indicator will power off automatic in few seconds to protect the indicator. The user should turn off the indicator immediately and charge the battery as soon as possible. 3. The first time charge for the battery is 24 hours as recommended to ensure the battery work safely and stable. 4. It is better to charge the battery as long as the battery is low to avoid the damage and to shorten the battery life while it is in the long period of low voltage. Each charge time should be over 12 hours as recommended. The battery should be charged once every 2 months in the condition of long time storage in warehouse to make up the low battery caused by self-consumption and to prevent from battery damage and extend the battery life. Notice: the charge time above mentioned is ac 220v, if the voltage is lower than 220v, the charge time need to be longer. - 13 - XK3190-A24 Chapter 7 Maintenance and attention 1.To guarantee its clarity and service life, the indicator shouldn’t be placed directly under sunshine and should be set in the plain space. 2.It is not suitable to place the indicator in the dusty and vibration environment and also avoid using in the moist environment. 3.Signal source and weighing indicator should be reliably connected, and system should be well grounding. It should be far away with strong electric field, strong magnetic field. Load cell and indicator should be far away with strong corrosive, inflammable, explosive object. Do not use under inflammable gas or inflammable steam; do not use under pressure container canning system. Lightning frequent areas, it must be installed reliable lightning arrester, to ensure operators safety and prevent damage of instruments and relevant equipment due to lightning. ▲! Signal source and indicator are static sensitive equipments, when using must earnestly adopt anti-static measure. It is prohibited in measuring device for welding operation or other strong electric field operation; in thunderstorms season, we must implement the reliable lightning-protection measures to prevent signal source and the indicator damage caused by lightning strike, ensure operators safety of weighing equipment and related equipment safety operation. 4. Never use strong solvents (e.g., benzene, nitro class oil) to clean the housing. 5. Liquid or electricity conducting particles should not be poured into the indicator, in case the indicator damage and electric shock. 6. You should cut off power supply of indicator and relevant device before you pull-in and out the connecting cable of indicator and external device. You should cut off power supply before pull-in and out connecting cable of signal source. 7. Output interfaces of indicator must be strictly in accordance to the user's manual, you should not alter any connection. If there is failure when using the indicator, you should immediately unplug it, and send to manufacturers for repair. Ordinary non-professional manufacturers should not repair it to avoid bigger damage. 8. Company advice for customers: start to use our indicator after test. The company is only responsible for the quality of indicator, the biggest compensation is not more than twice of indicator value, the company is not responsible failure of the whole system. 9. The built-in battery is consumable, which does not belong to the warranty scope. ▲! In order to prolong the battery service life, ensure fully charging before using. If indicator has not been used for a long time, it must be charged every two months, every time 20 to 25 hours. (Note: must be charged 20 to 25 hours when the backlight and indicator are off,) ▲! When moving or installing the indicator, you must carefully move it and avoid - 14 - XK3190-A24 strong vibration, impact or bump in order to avoid electrode in the battery being shorted and damaged 10. Since invoice date, the indicator has a one-year free repair period. If any non-artificially failure happens under regular using conditions within this period, the user can send the indicator with its guarantee card (of the correct number) back to our service station or supplier for repair. The indicator shouldn’t be open without authorization, otherwise free guarantee will be cancelled - 15 - Addenda Method to avoid counting tolerance Environmental factors Place the scale in the stable environment without vibration. Avoid air current from air conditioner or the opening gate, window. Avoid the direct sunlight. Ensure stability of power supply. Avoid the static disturbance and do not use plastic container if possible. Operator factors Before place the container to carry on the sampling, ensure that the counting scale is at the zero position, press "zero" if necessary. If place container on the platform for long time, please press "tare" button to tare again before sampling. Avoid using the container whose size is bigger than the platform because its bigger surface size is easily influenced by the air current, this will influence the accuracy and the time for stable. Place the container in the middle of the platform if possible. Ensure data stable before tare or sampling. Sampling quantity above 50 will be better Counting in turn to trigger the unit weight optimization function Irregular factors Select more sampling quantity Adopt unit weight optimization function Adopt separate sampling for products which produced by different machine. Adopt separate sampling for different batch of products - 16 -