1
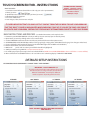
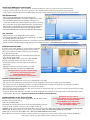
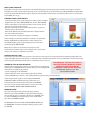
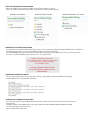
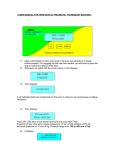
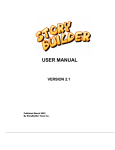
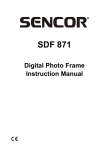
TOUCH SCREEN EDITOR
Pro-Series Touch LCD
Interactive Advertising Display
User Manual
Please read the instruction carefully before connecting, operating and adjusting the product. And keep
this manual for further reference.
PRO-SERIES TOUCH ADVERTISING DISPLAY
** TOUCH SCREEN EDITOR MANUAL **
TABLE OF CONTENTS
º What you Need ------------------------------------------º Basic Instructions and Process -----------------------º Detailed Instructions ------------------------------------ Set Start/End Coordinates ------------------------ Saving your Working File and Folders --------- Add Opening Video -------------------------------- Add Title JPEG --------------------------------------- Creating Touch Positions ------------------------- Mapping a Touch Position ------------------------ Giving Commands to the Touch Position ---- Multi-Layer Structure ------------------------------ Creating a Multi-Layer Project ------------------ Mapping the Last Layer --------------------------- Linking to a File in Place of Folder -------------- Important Note -------------------------------------- Files and Structures that you Create ----------- Changing “Title JPEG” to MPEG Video --------- Sample XML Document Created --------------- Loading Files to Compact Flash Card ----------
Page 1
Page 1
Page 1
Page 1
Page 2
Page 2
Page 2
Page 2
Page 2
Page 2
Page 3
Page 3
Page 3
Page 3
Page 3
Page 4
Page 4
Page 4
Page 4
TOUCH SCREEN EDITOR - INSTRUCTIONS
WHAT YOU NEED
1 - Touch Kit Creator Software (Provided on a CD or by your sales representative)
a. TPanel_V1.0.exe
b. qtintf.dll (must be in the same directory as TPanel_V1.0.exe)
2 - Windows Based PC Computer
3 - Pro-Series TOUCH LCD
4 - Your images, videos, decision tree and plan.
FORMAT VIDEOS/IMAGES
IMAGES - 1024X768 <200 kb
VIDEOS: MPEG4-Xvid/Divx (.avi)
720 x 480 resolution
3000 kpbs / 25 fps
IT IS VERY IMPORTANT THAT YOU ONLY USE THE “SAVE AS” FROM THE FILE MENU TO SAVE YOUR WORK AND
THAT THE “ROOT” FOLDER IS HIGHLIGHTED WHEN CHOOSING “SAVE AS”. IF YOU USE THE SAVE, SAVE PROJECT
OR ICON TO SAVE YOUR WORK, CERTAIN FILE TYPES MAY NOT BE TRANSFERED CORRECTLY AND CAUSE ERRORS.
BASIC INSTRUCTIONS AND PROCESS - See detailed instructions and samples below
1 - Determine your DECISION TREE (this is how you will lay out your content, layers and touch points)
2 - Open TPanel_V1.0.exe by clicking on the icon as noted above
3 - Set the START/END coordinates for the size LCD you purchased (choose under options menu)
4 - Add OPEN VIDEO and TITLE JPEG (Open Video can be jpeg image or mpeg video, TITLE JPEG must be jpeg *Can change to video later)
5 - Create a Folder for each Touch Point desired on the TITLE JPEG (right click on ROOT and “add folder”) .
6 - Rename Each Folder ( 8 characters maximum)
7 - MAP touch
points and set actions (parent folder should be highlighted)
8 - SAVE your work by using SAVE AS (see important note above)
9 - For multi-layer project repeat steps above on individual folders (NOTE: Do not ADD OPEN VIDEO to these sub-folders - creates conflicts)
10- Move all files from inside ROOT folder to a CF card and insert in advertising display * THEN TEST YOUR WORK
DETAILED SETUP INSTRUCTIONS
SET START/END TOUCH COORDINATES * CHOOSE “TOOLS” THEN “OPTIONS”
IMPORTANT ** MUST COMPLETE 1ST
You must set the Touch Kit Creator Software for use with
the LCD size you are using. To do this you will choose
TOOLS then OPTIONS . You will put in different
numbers/options depending which size LCD.
7” TOUCH
10.4” TOUCH
12” TOUCH
NOTE: YOU MUST DO THIS EVERYTIME YOU MAKE A
NEW PROJECT!
22” TOUCH
SAVING YOUR WORKING FILE AND FOLDERS
* Choose FILE, then SAVE AS - only use SAVE AS as noted previously or errors can occur when using certain file types.
* Choose a name and place to save your work on your PC - should a folder strictly for this project to avoid confusion.
* 2 Files will be automatically created - A ROOT Folder where all your files will be located and a .tpj file which is the project file.
ADD OPENING VIDEO
- Right Click on the ROOT folder located on the top left
- Select ADD OPENING VIDEO (select JPEG or MPEG to place here)
This is the default opening file to be displayed - Think of it as a
“screensaver” and the user will touch anywhere on this menu to move
from “screensaver” to the TITLE JPEG descibed next. This file location
will ONLY show in the DEFAULT PLAY FILE located on the bottom left
of the Touch Screen Editor and you will not view it in the window.
* ONLY ADD OPENING VIDEO TO ROOT FOLDER NOT SUB-FOLDERS *
ADD TITLE JPEG
- Right Click again on the ROOT folder on the top left
- Select ADD TITLE JPEG (this file must be a JPEG image - we will go
over changing this to a video later).
This file will be displayed on then LCD after the “screensaver” screen is touched from the previous step.
This file should be your main category page with options for the client to choose. ** You must limit your options to 99 positions.
CREATING TOUCH POSTIONS
In order to map a touch position(s), you must have completed
the previous steps. In the following sample, we are going to
only show (3) options to click on. However, you can map up
to 99 options if you desire.
- Highlight the ROOT Folder (your TITLE JPEG will be displayed
in the window on the right)
- Right Click the ROOT Folder - Then choose ADD FOLDER
(you will repeat this step for each options you have)
- We will add (3) folders since we only have (3) options to
choose from.
- Highlight each folder and rename them as you wish
(YOU MUST LIMIT THIS FILE TO TO (8) CHARACTERS)
YOU SHOULD ADD A “TITLE JPEG” TO EACH FOLDER.
THIS “TITLE JPEG” WILL BE DISPLAYED AFTER
COMPLETING THE NEXT STEPS **
* DO NOT ADD “OPEN VIDEO” TO SUB-FOLDERS
MAPPING A TOUCH POSITION
- Highlight the ROOT Folder (you will see your TITLE JPEG file on the right
- Take your curser and click on the image that you placed, dragging a window over a position you want to define.
- Once drawn, you cannot change this position. You will need to delete the window and repeat. You can delete the window by
highlighting and using the LARGE RED X in the menu bar to delete.
- Once you have drawn your window over the place you want, we will proceed to give it a command to take action when this position
(area) is touched on the LCD screen.
- In order to give this window (area) a function, you will first highlight it by clicking on it. From this point we will work with the menu
on the bottom. This includes: (Type/Folder Name/Interval/Repeat Time/Mode/Back)
IMPORTANT: YOU MUST CREATE
GIVING COMMANDS TO THE TOUCH POSITION
AT
LEAST
ONE
LINK ON THE LAST LAYER SUB-FOLDER
With the individually mapped window highlighted, The following options
“TITLE JPEG” OR IT CAN CREATE ERRORS.
should be selected in the menu.
WE RECOMMEND A “BACK BUTTON”.
TYPE: GO TO SUB-FOLDER
HIGHLIGHT THE MAPPING, CHOOSE “TYPE”
FILE NAME: (use the drop down menu and select the FOLDER you want to
AND “GO TO PARENT FOLDER”
access when this position is touched - you created these above)
INTERVAL: (how many seconds do you want this file to stay on the screen?) * NOTE: THIS IS NOT USED WHEN WORKING ON FOLDERS
REPEAT TIME: (how many times do you want it to repeat?) NOTE: THIS IS NOT USED WHEN WORKING ON FOLDERS
MODE: (this is a transition affect) NOTE: THIS IS NOT USED WHEN WORKING ON FOLDERS
BACK: What do you want it to do when complete (options are return to the current image or return to the beginning -ROOT file).
** Repeat this step for any other windows (touch points) you want to create.
MULTI-LAYER STRUCTURE
Each folder level represents a layer. A layer is the depth of the project, meaning how many levels the user will go in search for
information. In order to make a multi-layer project, you should repeat the steps listed above for adding FOLDERS and TITLE JPEGs
to each sub-folder. We will take the previous structure and expand the make a deeper “mulit-layer” project. There is no limitation
to how DEEP you can go.
CREATING A MULTI-LAYER PROJECT.
- Start by having the basic set-up complete as in the previous examples.
- Right Click on one of the SUB-FOLDERS, then choose, ADD FOLDER.
- Add as many folders as you will have options on the screen (we are
going to use only (2) for this sample)
- Rename each folder to represent what this position is. (you must
limit the name to (8) characters.
- Add a TITLE JPEG to each sub-folder (this will be displayed when
the user touches this posItion..
- Map each position and give the mapping a command.
In this example, we added (2) sub-folders under the 1st layer folder.
We then highlighted the orginal folder in order to display our
TITLE JPEG category page, created mapping areas and created
commands (go to SUB-FOLDER).
When the user clicks on one of these mapped areas, they
will be taken to another layer or a last image file. This is your choice
and you can create more sub-folders if needed.
MAPPING THE LAST LAYER
The last layer can come whenever you choose. You may have only chosen one single layer from the beginning making this very
simple. Any which way you choose, this is an important step as it finalized the project. It is very important to end the project layer
system using the following method. If this is not followed, errors can occur.
EACH AND EVERY “TITLE JPEG” MUST HAVE AT
LEAST ONE MAPPING LINKING TO A “FOLDER”.
LINKING TO A FILE IN PLACE OF FOLDER
ON THE LAST LAYER SUB-FOLDER WE
If you decide to end you layer structure, you may choose to simply link to
RECOMMEND A “BACK BUTTON”. HIGHLIGHT
a FILE in place of FOLDER. When you link to a FILE, you can no longer MAP
and create more depth of your project.
THE MAPPING, CHOOSE “TYPE” AND
- Create a mapping on the TITLE JPEG
“GO TO PARENT FOLDER”
- Under TYPE in the menu, choose FILE (in place of sub-folder)
- Next to FOLDER name, click the ... box and find the file you want to play and select this file.
In the example on the right, we have mapped “CHOOSING
THE RIGHT FLOOR” and linked it to play a FILE (in this case
it will play the video at the address listed next to FILE NAME.
Since you are now using the FILE option, you can now use the
options INTERVAL, REPEAT TIMES, MODE AND BACK.
IMPORTANT NOTE
The note on the right is key to ending the layer structure.
Whenever you use the FOLDER as a layer, this folders mapping
must contain at least (1) map that is directed at a “FOLDER”. Since
it is the last FOLDER, we recommend you create back button,
then direct to “PARENT FOLDER”.
The Back Button shown is linked to GO TO PARENT FOLDER, per
our IMPORTANT note above referring to linking at least (1) link
to a FOLDER.
FILES AND STRUCTURES THAT YOU CREATE
- When you “SAVE AS”, the Touch Screen Editor creates files and folders on your PC.
- These are samples of what the files look like on your PC after creating the file structure.
ORIGINAL FILE/FOLDERS
INSIDE THE “ROOT” FOLDER
INSIDE SUB-FOLDERS - LAST LAYER
CHANGING “TITLE JPEG” TO MPEG VIDEO
- If you prefer to have the TITLE JPEG animated, you must 1st have a screenshot, follow the ADD TITLE JPEG and use a JPEG. Then
you MAP that jpeg image so as to place the TOUCH positions and set the commands.
- You must MANUALY change the name of the file in the XML document to play the MPEG video when a postion is touched.
- You can use any TEXT EDITOR program to change this - See sample below.
Simply change the file name listed.
<title=”xxxxxxxxxx.jpg”> change to the video that
you wish to play. e.g <title-”xxxx.mpg”>
Then SAVE this .txt file.
** YOU MUST MANUALLY MOVE THE MPG
FILE TO THE CORRECT FOLDER FOR THIS TO
WORK PROPERLY
SAMPLE XML DOCUMENT CREATED
- This was created during the process of pointing a clicking , adding folders, adding TITLE JPEGs and mapping.
- Each FOLDER contains a separate XML document
LOADING FILES TO COMPACT FLASH CARD
- You must load ALL files inside the ROOT folder to the compact flash card and insert this into the LCD for the unit to
work properly.
- Do NOT include the actual ROOT folder or the .tpj file. ONLY ALL FILES LOCATED INSIDE THE “ROOT” FOLDER.
- Insert Compact Flash Card into the LCD.
- Turn on LCD and TEST, TEST, TEST!