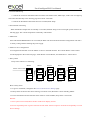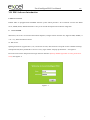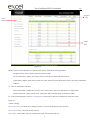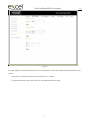
1
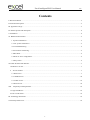
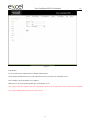
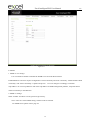
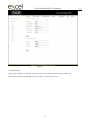
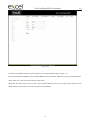
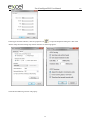
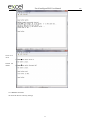
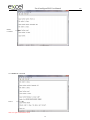
Excel Intelligent PDU User Manual
Vertical (Excel Intelligent PDU)
User Manual
1
A/0
Excel Intelligent PDU User Manual
A/0
Contents
I. PDU Introduction.........................................................................................................................................................3
II. Function Description.................................................................................................................................................. 3
III. Application range...................................................................................................................................................... 3
IV. Product picture and description.................................................................................................................................4
V. Installation.................................................................................................................................................................. 4
VI. Hardware Introduction..............................................................................................................................................5
1. System initialization............................................................................................................................................5
2. View system information.................................................................................................................................... 5
3.Overload Monitoring........................................................................................................................................... 6
4. Environment monitoring.....................................................................................................................................6
5. PDU Reset...........................................................................................................................................................6
6. Master or slave configuration............................................................................................................................. 6
7. Daisy-Chain.........................................................................................................................................................6
VII. PDU Software Introduction.....................................................................................................................................7
1.Software overview................................................................................................................................................... 7
2. Access method......................................................................................................................................................7
2.1 Web access........................................................................................................................................................ 7
2.2. SNMP Access.................................................................................................................................................32
2.3. Telnet Access..................................................................................................................................................41
2.4 Serial access.................................................................................................................................................... 47
VIII.
Frequently Asked Questions............................................................................................................................. 53
1. Forget IP address?................................................................................................................................................. 53
2. Fail to send email?................................................................................................................................................ 53
IX. Technology Parameters...........................................................................................................................................53
X. Warranty and Service............................................................................................................................................... 55
2
Excel Intelligent PDU User Manual
A/0
I. PDU Introduction
The EXCEL PDU(Network Power Manager) is a network manageable device that provides power monitoring,
controlling and managements to many equipments in the rack cabinet of data center all over the world through
LAN or WAN. For meeting with the restrictions and requirements in different environment, EXCEL PDU supplies
many connection methods that user can manage it through its Web interface(HTTP or HTTPS), Serial connection,
Telnet or SNMP.
II. Function Description
1.
Monitoring function: monitor the current, voltage, power (kW) and energy consumption (kWh), environment
status like temperature, humidity, smoke, door and water leakage via IP and local LCD screen.
2.
Controlling function: switch on/off individual outlet, set the interval of sequential power on/off
3.
Keeping the former state: keep the former state of each outlet after resetting.
4.
User-defined alarm: use can set the threshold of current, temperature and humidity.
5.
System default alarm: receive warning when thresholds of current, temperature and humidity are exceeded.
6.
Alarm methods: Alarming information will be shown on LCD screen and PDU buzzer beeps, the problem
value flashes on web interface and PC buzzer alarms, automatically send e-mail to system administrator,
SNMP sends Trap alerts.
7.
Daisy-chain: suggest daisy-chain at most 5 units (Master unit included)
8.
User management: user rights configurable. Added new user can be distributed into different user groups with
different rights. User group rights are editable.
9.
Access method: Web interface, HTTP, HTTPS, SNMP (v1 / v2c / v3), Telnet and Serial console.
10. Support multi-user operation system and software update.
III. Application range
1.
PDU can be applied to server rack, network cabinet etc.
2.
Outlet type and number (12, 14, 16,20, 24) can be selected according to the actual needs.
3.
Meets RoHS directive, applicable for 110~220VAC, 380VAC power supply, can meet customers’ requirements
all over the world.
3
Excel Intelligent PDU User Manual
IV. Product picture and description
1
2
1. Power cord
3
2. Brackets
3. Wire terminal box
4. LCD screen
5
11
12
13
14
6
15
4
5. DOWN button: go to the next page
7
8
9
6. UP button: go to the previous page
17
10
7. RUN indicator
8. 1600imp/kWh Energy pulse indicator
16
9. RESET button: reset to factory default configuration
10. WIFI port
18
19
11. 10/100M Ethernet connector
12. Serial port
13. IN: for daisy-chain
14. OUT: for daisy-chain
15. T/H1: temperature and humidity sensor port 1
16. T/H2: temperature and humidity sensor port 2
17. Alarm: for audible and visual alarm
20
18. Outlet LED indicator
19. Anti-fall device
20. Outlets
V. Installation
Vertical-mounting (0U)
4
A/0
Excel Intelligent PDU User Manual
A/0
VI. Hardware Introduction
1. System initialization
PDU beeps when it’s switched on and the beep stops after 3 seconds. Then the LCD screen is lighted with the
following home page information displayed:
Type:Vertical(D)
192.168.1.163
Version:1.0.0
M⁄S:Master
Note: Type: Vertical(D) is the product series and it differ from actual product.
192.168.1.163 is the factory default IP.
Version: 1.0.0 is the firmware version.
M/S: show the device state Master or Slave (Slave 1- 4)
2. View system information
Press DOWN or UP button to check the device status. To view page 2, press DOWN button:
U:214 V
I:00.0 A
P:0.000 KW
E:000013.1 KWH
PF:0.00
Press DOWN button again to view sensor status on page 3:
T1: ---
H1: ---
T2: ---
H2: ---
T3: ---
H3: ---
T4: ---
H4 :---
Current monitoring per outlet from page 4 to end page
Output1: 00.0 A
Output2: 00.0 A
Output3: 00.0 A
Output4: 00.0 A
5
Excel Intelligent PDU User Manual
A/0
3.Overload Monitoring
3.1. When the current of individual outlet exceed the user-defined value, PDU beeps; LCD screen will light up
and switch automatically to the alarming page and current value flash
3.2. When the threshold of total load current is exceeded, PDU beeps
4. Environment monitoring
When threshold of temperature or humidity is exceeded, the PDU beeps, LCD screen light up and switch to the
alarming page. The current temperature or humidity value flashes.
5. PDU Reset
Press and hold the RESET button for 6 seconds,the PDU will restart itself and network configuration will return
to factory setting without affecting the power supply
6. Master or slave configuration
To configurate the the PDU to be the Master or Slave in the Web interface. The current Master or Slave status
will be displayed in the LCD home page, “M/S: Master” means Master, and “M/S:Slave1” means Slave 1
7. Daisy-Chain
Daisy-chain schema is as following:
Master
Slave1
Slave2
Slave3
Slave4
IN
IN
IN
OUT
OUT
WAN / LAN Cable
NET
IN
OUT
OUT
OUT
PDU1
PDU2
PDU3
PDU4
PDU5
How to daisy-chain
7.1 Log on to each PDU, configurate the work mode on Device Manage page.
7.2 Daisy-chain all devices like above drawing, from OUT to IN, Maximum 5 units including Master.
7.3 Access the Master and check all the status of Slaves. If all readable, daisy-chain is successful.
Remark:
1. Once system runs normal,about 10s later LCD screen display normal
2. Device sequential power on,power off interval time about 30s.Do not power on/off device frequentlly to avoid
device damage.
6
Excel Intelligent PDU User Manual
A/0
VII. PDU Software Introduction
1.Software overview
EXCEL PDU is equipped with embedded software system which provides a lot of network services like WED
server, SNMP, Telnet, SMTP and NTP. It’s easy to do second development and software integration.
2.
Access method
Web based, can access via browsers like Internet Explorer, Google Chrome and Fire fox; supports WIFI, SNMP (v1
/ v2c / v3), Telnet and Serial console.
2.1 Web access
Opening IE browser (support IE 6.0, 7.0, 8.0 and 9.0 versions; other browsers except IE are not available currently)
and input the IP (factory default IP is 192.168.1.163), login window will pop up like below,See figure1-1.
Fill in the correct name and password to login the main interface (Factory default login name is excel, password is
excel). See figure1-2
Figure1-1
7
Excel Intelligent PDU User Manual
A/0
Navigation
menu
Device
information
Output
status
Figure 1-2
Mainly 3 parts on main interface: Navigation menu, Device information and Output status.
Navigation menu: show company logo and function menus.
Device information: display device name, device series, device status and function level.
Output status: display output name, on/off state. From the Device select drop down menu to check the information
of Slaves.
2.1.1 Device information and status
Device information includes device name, device series, device status and function level. Output status
includes total load, voltage, power factor, total power (kW) and total energy consumption (kWh).
2.1.2. Device Management: Click Device Management from menu to do basic configuration of the device like
Figure 1-3
A. Basic settings
Work mode setting: set the device as Master or Slave (1-4) from the drop down menu and save.
Device name setting: name the devices and save.
Power delay: set the delay of power on and power off (0~254 seconds) and save.
8
Excel Intelligent PDU User Manual
A/0
Figure 1-3
B. Outlet settings: Click Outlet setting from device management to name each outlet and set the threshold of load
current.
Outlet name: To change the outlet name and click save to complete
Set the threshold of the each outlet: enter the user-defined threshold to alarm
9
Excel Intelligent PDU User Manual
Figure 1-3-1
C. Sensor settings: set the threshold of temperature, humidity
10
A/0
Excel Intelligent PDU User Manual
Figure 1-3-2
D. Outlet control: switch on/off or reboot outlets.
11
A/0
Excel Intelligent PDU User Manual
Figure1-3-3
E. Energy settings: check the energy consumption and reset to 0.
12
A/0
Excel Intelligent PDU User Manual
Figure1-3-4
F. System command tools: show system information; download update tool to remotely update the software
provided;download MIB file and user manual; restart the software or restore to factory default configuration.
13
A/0
Excel Intelligent PDU User Manual
Figure1-3-5
2.1.3 User Management: configure user access rights and security settings
14
A/0
Excel Intelligent PDU User Manual
A/0
Figure1-4
A. User settings: fill in user name, password, email address and phone number, then click “Add” to add the new
user; select the user, modify the relative information and then click “Modify” to modify the user information; select
the user and click “Delete” to delete the user.
B. User Group Settings: fill in user group name and then click “Save” to add the new user group; select one group
and click the following permissions to configure the rights.
15
Excel Intelligent PDU User Manual
A/0
Figure1-4-1
C. Outlet Permission
“Outlet Permission ” interface is mainly used to delete and edit outlet right.Select one user group and click the
following outputs to configure the rights.
16
Excel Intelligent PDU User Manual
Figure1-4-2
2.1.4 Network Settings
A. Network mode: Manual or automatic acquisition. See figure 1-5
17
A/0
Excel Intelligent PDU User Manual
A/0
Figure1-5
1. Manual setting:
IP:192.168.1.163(factory default IP);
Subnet mask:255.255.255.0
Gateway:192.168.1.1
DNS: default as 0.0.0.0;Should fill in correct DNS to ensure the email send out.
Note: please restart the software after the modification of network settings.
2. Automatic acquisition:
Select Automatic acquisition and click “Save”, then restart the software, device will get the IP automatically. IP can
be viewed on LCD.
18
Excel Intelligent PDU User Manual
Figure 1-6
B. WIFI Settings:
Insert the wireless network card into the USB port
1. WIFI Signal Searching:
Click “Search Network” to find all the wireless network nearby.
2. Enable WIFI: select enable, fill in SSID and password and save.
3.WIFI network settings
Network mode can be manual or automatic acquisition
Manually settings as below:
IP Address: Set the WIFI IP in the LAN like 192.168.1.191
Subnet Mask: correspond to IP address like
Gateway: correspond to IP address like
255.255.255.0
192.168.1.1
DNS: default DNS is 0.0.0.0
automatic acquisition
19
A/0
Excel Intelligent PDU User Manual
A/0
Fill out the WIFI connection settings and save, select the automatic acquisition from the drop-down list of
WIFI network settings and save. Then restart the device and system will acquire the IP address within the LAN and
the address can be viewed from the LCD screen.
Figure 1-7
C. HTTP: fill in the correct HTTP port and save; under normal work mode, the default port is 80.
SSL Mode Port: default as 443.
Note: please restart the software after the modification of HTTP settings.
20
Excel Intelligent PDU User Manual
A/0
Figure 1-8
D. RADIUS
User can choose basic authentication or Radius authentication.
Select Radius authentication, device will authenticate the user account from the Radius server.
Server address: fill in the Radius server address.
Shared secret: fill in the required public key of the Radius server.
Note: please restart the software after the configuration. Then fill in the requested account and password of Radius
server, after authentication, user can access the device.
21
Excel Intelligent PDU User Manual
A/0
Figure1-8-1
E. SNMP
1. SNMP v1/v2c settings:
User can decide to Enable or Disable the SNMP access from the Web interface.
Enable SNMP V1 and V2C requires configuration of read community and write community. And the default “Read
community” and “Write community ”is public and private.
User can change it accordingly to situation.
Trap address: can set 2 trap addresses. Fill in the trap address of SNMP management platform, Trap information
will be sent directly to the addresses.
2. SNMP v3 settings:
Select “Enable” and fill in account, password, private key.
Note: After save of the SNMP setting, software must be restarted.
For SNMP access please refer to page 24.
22
Excel Intelligent PDU User Manual
Figure 1-9
F. Telnet Settings:
Telnet: select “Enable” or “Disable” and save, make sure to restart the software after modification.
Fill in Telnet account and password as shown in figure 1-10, Telnet port is 23.
23
A/0
Excel Intelligent PDU User Manual
A/0
Figure 1-10
G. SMTP: Click SMTP from the network setting tap to enter the SMTP setting as figure 1-11.
Fill in the parameters of SMTP service including SMTP account, password, SMTP server, port and authentication
mode. After save, must restart the software to take effect.
SMTP test: fill in the receiver account, click “Test” and then check the test receiver account. If test email received,
SMTP setting is successful; if not received, please reset the SMTP.
24
Excel Intelligent PDU User Manual
A/0
Figure 1-11
H. NTP Settings: Click NTP as shown figure 1-12 from network setting tap
Local time is the present time of the device server.
To enable or Disable the NTP service and click Save. Then restart the device.
Enable NTP, fill in the NTP server, port and select time zone, click “Save”.
Click “Synchronization”, device will update to the local system time according to the the current time zone and
date from the internet
User-defined setting: must disable the NTP firstly and then fill in the date and time.
25
Excel Intelligent PDU User Manual
Figure 1-12
I. SYSLOG: fill in the SYSLOG server IP address as shown in figure 1-13
26
A/0
Excel Intelligent PDU User Manual
A/0
Figure 1-13
Note: SYSLOG contain the system start, service mistake during operation and command mistake information. After
save the SYSLOG server address, restart the software to take effect.
2.1.5 Data Graphing
Select device and check the relative information in the past 24 hours including total power (kW), current
(ampere), voltage, average temperature and humidity as illustrated in figure 1-14
27
Excel Intelligent PDU User Manual
Figure 1-14
2.1.6 Logs
Click Logs to the logs interface as shown in figure 1-15, it contains events, history data and every data.
A. Logs Record: show the operation time, log type, user name and log details.
Memory capacity 100M.
1. To view the data:
Jump : enter the page you want to view and logs will switch over to the exact page.
Page turning: by click Next or Previous to view the logs
2. Delete the logs:
Click the delete logs, device will return the confirmation and click OK to delete all the logs.
28
A/0
Excel Intelligent PDU User Manual
Figure 1-15
B. History Data: select the date, device and information type (total power, voltage, power, temperature and
humidity) want to view, and then click “View” to see the history data.
Figure 1-16 shows the voltage status of 24 hours
29
A/0
Excel Intelligent PDU User Manual
A/0
Figure 1-16
C. Energy Record: select the device, start and end date, and click “View”, system will show the accumulated kWh
value on the two date and calculate the kWh value during that period as shown in figure 1-17
30
Excel Intelligent PDU User Manual
Figure 1-17
2.1.7 Restart
restart the software , restore to factory default configuration, or quit the software system.
31
A/0
Excel Intelligent PDU User Manual
A/0
Figure 1-18
2.2. SNMP Access
This software support SNMP V1, V2C and V3, a MIB file can be provided at customer’s request. User can
view the power information and environment status and receive the alarming from the device.
After enable the SNMP function from Web interface. A SNMP management software is required to be
installed.
Please refer to the OID table as below:
OID
Description
PDUSlave X
1.3.6.1.4.1.30966.5.X
Device X
slave X Name
1.3.6.1.4.1.30966.5.X.1.1
Name of device X
slave X Type
1.3.6.1.4.1.30966.5.X.1.2
Type of device X
slave X Line One
1.3.6.1.4.1.30966.5.X.1.3
Phase one of device X
slave X Line One Power
1.3.6.1.4.1.30966.5.X.1.3.1
Power of phase one of device X
slave X Line One PF
1.3.6.1.4.1.30966.5.X.1.3.2
Power factor of the phase one of device X
slave X Line One Energy
1.3.6.1.4.1.30966.5.X.1.3.3
Energy of phase one of device X
slave X Line One Current
1.3.6.1.4.1.30966.5.X.1.3.4
Current of phase one of device X
slave X Line One Voltage
1.3.6.1.4.1.30966.5.X.1.3.5
voltage of phase one of device X
32
Excel Intelligent PDU User Manual
A/0
slave X Line One Current
Min
1.3.6.1.4.1.30966.5.X.1.3.6
Minimum Current of phase one of device X
slave X Line One Current
Max
1.3.6.1.4.1.30966.5.X.1.3.7
Maximum Current of phase one of device X
slave X Line One Voltage
Min
1.3.6.1.4.1.30966.5.X.1.3.8
Minimum voltage of phase one of device X
slave X Line One Voltage
Max
1.3.6.1.4.1.30966.5.X.1.3.9
Maximum voltage of phase one of device X
slave X Line Two
1.3.6.1.4.1.30966.5.X.1.4
Phase two of device X
slave X Line Two Power
1.3.6.1.4.1.30966.5.X.1.4.1
Power of phase two of device X
slave X Line Two PF
1.3.6.1.4.1.30966.5.X.1.4.2
Power factor of the phase two of device X
slave X Line Two Energy
1.3.6.1.4.1.30966.5.X.1.4.3
Energy of phase two of device X
slave X Line Two Current
1.3.6.1.4.1.30966.5.X.1.4.4
Current of phase two of device X
slave X Line Two Voltage
1.3.6.1.4.1.30966.5.X.1.4.5
voltage of phase two of device X
slave X Line Two Current
Min
1.3.6.1.4.1.30966.5.X.1.4.6
Minimum Current of phase two of device X
slave X Line Two Current
Max
1.3.6.1.4.1.30966.5.X.1.4.7
Maximum Current of phase two of device X
slave X Line Two Voltage
Min
1.3.6.1.4.1.30966.5.X.1.4.8
Minimum voltage of phase two of device X
slave X Line Two Voltage
Max
1.3.6.1.4.1.30966.5.X.1.4.9
Maximum voltage of phase two of device X
slave X Line Three
1.3.6.1.4.1.30966.5.X.1.5
Phase three of device X
slave X Line Three Power
1.3.6.1.4.1.30966.5.X.1.5.1
Power of phase three of device X
slave X Line Three PF
1.3.6.1.4.1.30966.5.X.1.5.2
Power factor of the phase three of device X
slave X Line Three Energy
1.3.6.1.4.1.30966.5.X.1.5.3
Energy of phase three of device X
slave X Line Three Current
1.3.6.1.4.1.30966.5.X.1.5.4
Current of phase three of device X
slave X Line Three Voltage
1.3.6.1.4.1.30966.5.X.1.5.5
voltage of phase three of device X
slave X Line Three Current
Min
1.3.6.1.4.1.30966.5.X.1.5.6
Minimum Current of phase three of device X
slave X Line Three Current
Max
1.3.6.1.4.1.30966.5.X.1.5.7
Maximum Current of phase three of device X
slave X Line Three Voltage
Min
1.3.6.1.4.1.30966.5.X.1.5.8
Minimum voltage of phase three of device X
slave X Line Three Voltage
Max
1.3.6.1.4.1.30966.5.X.1.5.9
Maximum voltage of phase three of device X
slave X TempHum
1.3.6.1.4.1.30966.5.X.1.6
The temperature and humidity of device X
slave X Temp
1.3.6.1.4.1.30966.5.X.1.6.1
The temperature of device X
slave X Hum
1.3.6.1.4.1.30966.5.X.1.6.2
The humidity of device X
slave X Temp Min
1.3.6.1.4.1.30966.5.X.1.6.3
The Minimum value of the temperature of
device X
slave X Temp Max
1.3.6.1.4.1.30966.5.X.1.6.4
The Maximum value of the temperature of
device X
slave X Hum Min
1.3.6.1.4.1.30966.5.X.1.6.5
The Minimum value of the humidity of
device X
slave X Hum Max
1.3.6.1.4.1.30966.5.X.1.6.6
The Maximum value of the humidity of
33
Excel Intelligent PDU User Manual
device X
slave X Output Number
1.3.6.1.4.1.30966.5.X.1.7
The outlet quantity of device X
slave X Output Name
1.3.6.1.4.1.30966.5.X.1.8
The outlet name of device X
slave X Output Name
One
1.3.6.1.4.1.30966.5.X.1.8.1
The name of outlet 1 of device X
slave X Output Name
Two
1.3.6.1.4.1.30966.5.X.1.8.2
The name of outlet 2 of device X
slave X Output Name
Three
1.3.6.1.4.1.30966.5.X.1.8.3
The name of outlet 3 of device X
slave X Output Name
Four
1.3.6.1.4.1.30966.5.X.1.8.4
The name of outlet 4 of device X
slave X Output Name
Five
1.3.6.1.4.1.30966.5.X.1.8.5
The name of outlet 5 of device X
slave X Output Name
Six
1.3.6.1.4.1.30966.5.X.1.8.6
The name of outlet 6 of device X
slave X Output Name
Seven
1.3.6.1.4.1.30966.5.X.1.8.7
The name of outlet 7 of device X
slave X Output Name
Eight
1.3.6.1.4.1.30966.5.X.1.8.8
The name of outlet 8 of device X
slave X Output Name
Nine
1.3.6.1.4.1.30966.5.X.1.8.9
The name of outlet 9 of device X
slave X Output Name
Ten
1.3.6.1.4.1.30966.5.X.1.8.1
0
The name of outlet 10 of device X
slave X Output Name
Eleven
1.3.6.1.4.1.30966.5.X.1.8.1
1
The name of outlet 11 of device X
slave X Output Name
Twelve
1.3.6.1.4.1.30966.5.X.1.8.1
2
The name of outlet 12 of device X
slave X Output Name
Thriteen
1.3.6.1.4.1.30966.5.X.1.8.1
3
The name of outlet 13 of device X
slave X Output Name
Fourteen
1.3.6.1.4.1.30966.5.X.1.8.1
4
The name of outlet 14 of device X
slave X Output Name
Fifteen
1.3.6.1.4.1.30966.5.X.1.8.1
5
The name of outlet 15 of device X
slave X Output Name
Sixteen
1.3.6.1.4.1.30966.5.X.1.8.1
6
The name of outlet 16 of device X
slave X Output Name
Seventeen
1.3.6.1.4.1.30966.5.X.1.8.1
7
The name of outlet 17 of device X
slave X Output Name
Eighteen
1.3.6.1.4.1.30966.5.X.1.8.1
8
The name of outlet 18 of device X
slave X Output Name
Nineteen
1.3.6.1.4.1.30966.5.X.1.8.1
9
The name of outlet 19 of device X
slave X Output Name
Twenty
1.3.6.1.4.1.30966.5.X.1.8.2
0
The name of outlet 20 of device X
slave X Output Name
TwentyOne
1.3.6.1.4.1.30966.5.X.1.8.2
1
The name of outlet 21 of device X
slave X Output Name
1.3.6.1.4.1.30966.5.X.1.8.2
The name of outlet 22 of device X
34
A/0
Excel Intelligent PDU User Manual
TwentyTwo
2
slave X Output Name
TwentyThree
1.3.6.1.4.1.30966.5.X.1.8.2
3
The name of outlet 23 of device X
slave X Output Name TwentyFour
1.3.6.1.4.1.30966.5.X.1.8.2
4
The name of outlet 24 of device X
slave X Output Status
1.3.6.1.4.1.30966.5.X.1.9
The outlet status of device X
slave X Output Status
One
1.3.6.1.4.1.30966.5.X.1.9.1
The outlet 1 status of device X
slave X Output Status
Two
1.3.6.1.4.1.30966.5.X.1.9.2
The outlet 2 status of device X
slave X Output Status
Three
1.3.6.1.4.1.30966.5.X.1.9.3
The outlet 3 status of device X
slave X Output Status
Four
1.3.6.1.4.1.30966.5.X.1.9.4
The outlet 4 status of device X
slave X Output Status
Five
1.3.6.1.4.1.30966.5.X.1.9.5
The outlet 5 status of device X
slave X Output Status
Six
1.3.6.1.4.1.30966.5.X.1.9.6
The outlet 6 status of device X
slave X Output Status
Seven
1.3.6.1.4.1.30966.5.X.1.9.7
The outlet 7 status of device X
slave X Output Status
Eight
1.3.6.1.4.1.30966.5.X.1.9.8
The outlet 8 status of device X
slave X Output Status
Nine
1.3.6.1.4.1.30966.5.X.1.9.9
The outlet 9 status of device X
slave X Output Status
Ten
1.3.6.1.4.1.30966.5.X.1.9.1
0
The outlet 10status of device X
slave X Output Status
Eleven
1.3.6.1.4.1.30966.5.X.1.9.1
1
The outlet 11 status of device X
slave X Output Status
Twelve
1.3.6.1.4.1.30966.5.X.1.9.1
2
The outlet 12 status of device X
slave X Output Status
Thriteen
1.3.6.1.4.1.30966.5.X.1.9.1
3
The outlet 13 status of device X
slave X Output Status
Fourteen
1.3.6.1.4.1.30966.5.X.1.9.1
4
The outlet 14 status of device X
slave X Output Status
Fifteen
1.3.6.1.4.1.30966.5.X.1.9.1
5
The outlet 15 status of device X
slave X Output Status
Sixteen
1.3.6.1.4.1.30966.5.X.1.9.1
6
The outlet 16 status of device X
slave X Output Status
Seventeen
1.3.6.1.4.1.30966.5.X.1.9.1
7
The outlet 17 status of device X
slave X Output Status
Eighteen
1.3.6.1.4.1.30966.5.X.1.9.1
8
The outlet 18 status of device X
slave X Output Status
Nineteen
1.3.6.1.4.1.30966.5.X.1.9.1
9
The outlet 19 status of device X
slave X Output Status
Twenty
1.3.6.1.4.1.30966.5.X.1.9.2
0
The outlet 20 status of device X
35
A/0
Excel Intelligent PDU User Manual
slave X Output Status
TwentyOne
1.3.6.1.4.1.30966.5.X.1.9.2
1
The outlet 21 status of device X
slave X Output Status
TwentyTwo
1.3.6.1.4.1.30966.5.X.1.9.2
2
The outlet 22 status of device X
slave X Output Status
TwentyThree
1.3.6.1.4.1.30966.5.X.1.9.2
3
The outlet 23 status of device X
slave X Output Status
TwentyFour
1.3.6.1.4.1.30966.5.X.1.9.2
4
The outlet 24 status of device X
slave X Output Current
1.3.6.1.4.1.30966.5.X.1.10
The outlet current of device X
slave X Output Current
One
1.3.6.1.4.1.30966.5.X.1.10.
1
The current of outlet 1 of device X
slave X Output Current
Two
1.3.6.1.4.1.30966.5.X.1.10.
2
The current of outlet 2 of device X
slave X Output Current
Three
1.3.6.1.4.1.30966.5.X.1.10.
3
The current of outlet 3 of device X
slave X Output Current
Four
1.3.6.1.4.1.30966.5.X.1.10.
4
The current of outlet 4 of device X
slave X Output Current
Five
1.3.6.1.4.1.30966.5.X.1.10.
5
The current of outlet 5 of device X
slave X Output Current
Six
1.3.6.1.4.1.30966.5.X.1.10.
6
The current of outlet 6 of device X
slave X Output Current
Seven
1.3.6.1.4.1.30966.5.X.1.10.
7
The current of outlet 7 of device X
slave X Output Current
Eight
1.3.6.1.4.1.30966.5.X.1.10.
8
The current of outlet 8 of device X
slave X Output Current
Nine
1.3.6.1.4.1.30966.5.X.1.10.
9
The current of outlet 9 of device X
slave X Output Current
Ten
1.3.6.1.4.1.30966.5.X.1.10.
10
The current of outlet 10 of device X
slave X Output Current
Eleven
1.3.6.1.4.1.30966.5.X.1.10.
11
The current of outlet 11 of device X
slave X Output Current
Twelve
1.3.6.1.4.1.30966.5.X.1.10.
12
The current of outlet 12 of device X
slave X Output Current
Thriteen
1.3.6.1.4.1.30966.5.X.1.10.
13
The current of outlet 13 of device X
slave X Output Current
Fourteen
1.3.6.1.4.1.30966.5.X.1.10.
14
The current of outlet 14 of device X
slave X Output Current
Fifteen
1.3.6.1.4.1.30966.5.X.1.10.
15
The current of outlet 15 of device X
slave X Output Current
Sixteen
1.3.6.1.4.1.30966.5.X.1.10.
16
The current of outlet 16 of device X
slave X Output Current
Seventeen
1.3.6.1.4.1.30966.5.X.1.10.
17
The current of outlet 17 of device X
slave X Output Current
Eighteen
1.3.6.1.4.1.30966.5.X.1.10.
18
The current of outlet 18 of device X
slave X Output Current
1.3.6.1.4.1.30966.5.X.1.10.
The current of outlet 19 of device X
36
A/0
Excel Intelligent PDU User Manual
Nineteen
A/0
19
slave X Output Current
Twenty
1.3.6.1.4.1.30966.5.X.1.10.
20
The current of outlet 20 of device X
slave X Output Current
TwentyOne
1.3.6.1.4.1.30966.5.X.1.10.
21
The current of outlet 21 of device X
slave X Output Current
TwentyTwo
1.3.6.1.4.1.30966.5.X.1.10.
22
The current of outlet 22 of device X
slave X Output Current
TwentyThree
1.3.6.1.4.1.30966.5.X.1.10.
23
The current of outlet 23 of device X
slave X Output Current
TwentyFour
1.3.6.1.4.1.30966.5.X.1.10.
24
The current of outlet 24 of device X
slave X Output Current Min
1.3.6.1.4.1.30966.5.X.1.11
The outlet Minimum current of device X
slave X Output Current Min
One
1.3.6.1.4.1.30966.5.X.1.11.
1
The Minimum current of outlet 1 of device X
slave X Output Current Min
Two
1.3.6.1.4.1.30966.5.X.1.11.
2
The Minimum current of outlet 2 of device X
slave X Output Current Min
Three
1.3.6.1.4.1.30966.5.X.1.11.
3
The Minimum current of outlet 3 of device X
slave X Output Current Min
Four
1.3.6.1.4.1.30966.5.X.1.11.
4
The Minimum current of outlet 4 of device X
slave X Output Current Min
Five
1.3.6.1.4.1.30966.5.X.1.11.
5
The Minimum current of outlet 5 of device X
slave X Output Current Min
Six
1.3.6.1.4.1.30966.5.X.1.11.
6
The Minimum current of outlet 6 of device X
slave X Output Current Min
Seven
1.3.6.1.4.1.30966.5.X.1.11.
7
The Minimum current of outlet 7 of device X
slave X Output Current Min
Eight
1.3.6.1.4.1.30966.5.X.1.11.
8
The Minimum current of outlet 8 of device X
slave X Output Current Min
Nine
1.3.6.1.4.1.30966.5.X.1.11.
9
The Minimum current of outlet 9 of device X
slave X Output Current Min
Ten
1.3.6.1.4.1.30966.5.X.1.11.
10
The Minimum current of outlet 10 of device
X
slave X Output Current Min
Eleven
1.3.6.1.4.1.30966.5.X.1.11.
11
The Minimum current of outlet 11 of device
X
slave X Output Current Min
Twelve
1.3.6.1.4.1.30966.5.X.1.11.
12
The Minimum current of outlet 12 of device
X
slave X Output Current Min
Thriteen
1.3.6.1.4.1.30966.5.X.1.11.
13
The Minimum current of outlet 13 of device
X
slave X Output Current Min
Fourteen
1.3.6.1.4.1.30966.5.X.1.11.
14
The Minimum current of outlet 14 of device
X
slave X Output Current Min
Fifteen
1.3.6.1.4.1.30966.5.X.1.11.
15
The Minimum current of outlet 15 of device
X
slave X Output Current Min
Sixteen
1.3.6.1.4.1.30966.5.X.1.11.
16
The Minimum current of outlet 16 of device
X
slave X Output Current Min
Seventeen
1.3.6.1.4.1.30966.5.X.1.11.
17
The Minimum current of outlet 17 of device
X
37
Excel Intelligent PDU User Manual
A/0
slave X Output Current Min
Eighteen
1.3.6.1.4.1.30966.5.X.1.11.
18
The Minimum current of outlet 18 of device
X
slave X Output Current Min
Nineteen
1.3.6.1.4.1.30966.5.X.1.11.
19
The Minimum current of outlet 19 of device
X
slave X Output Current Min
Twenty
1.3.6.1.4.1.30966.5.X.1.11.
20
The Minimum current of outlet 20 of device
X
slave X Output Current Min
TwentyOne
1.3.6.1.4.1.30966.5.X.1.11.
21
The Minimum current of outlet 21 of device
X
slave X Output Current Min
TwentyTwo
1.3.6.1.4.1.30966.5.X.1.11.
22
The Minimum current of outlet 22 of device
X
slave X Output Current Min
TwentyThree
1.3.6.1.4.1.30966.5.X.1.11.
23
The Minimum current of outlet 23 of device
X
slave X Output Current Min
TwentyFour
1.3.6.1.4.1.30966.5.X.1.11.
24
The Minimum current of outlet 24 of device
X
slave X Output Current Max
1.3.6.1.4.1.30966.5.X.1.12
The Minimum outlet current of device X
slave X Output Current Max
One
1.3.6.1.4.1.30966.5.X.1.12.
1
The Maximum current of outlet 1 of device
X
slave X Output Current Max
Two
1.3.6.1.4.1.30966.5.X.1.12.
2
The Maximum current of outlet 2 of device
X
slave X Output Current Max
Three
1.3.6.1.4.1.30966.5.X.1.12.
3
The Maximum current of outlet 3 of device
X
slave X Output Current Max
Four
1.3.6.1.4.1.30966.5.X.1.12.
4
The Maximum current of outlet 4 of device
X
slave X Output Current Max Five
1.3.6.1.4.1.30966.5.X.1.12.
5
The Maximum current of outlet 5 of device
X
slave X Output Current Max
Six
1.3.6.1.4.1.30966.5.X.1.12.
6
The Maximum current of outlet 6 of device
X
slave X Output Current Max
Seven
1.3.6.1.4.1.30966.5.X.1.12.
7
The Maximum current of outlet 7 of device
X
slave X Output Current Max
Eight
1.3.6.1.4.1.30966.5.X.1.12.
8
The Maximum current of outlet 8 of device
X
slave X Output Current Max
Nine
1.3.6.1.4.1.30966.5.X.1.12.
9
The Maximum current of outlet 9 of device
X
slave X Output Current Max
Ten
1.3.6.1.4.1.30966.5.X.1.12.
10
The Maximum current of outlet 10 of device
X
slave X Output Current Max
Eleven
1.3.6.1.4.1.30966.5.X.1.12.
11
The Maximum current of outlet 11 of device
X
slave X Output Current Max
Twelve
1.3.6.1.4.1.30966.5.X.1.12.
12
The Maximum current of outlet 12 of device
X
slave X Output Current Max
Thriteen
1.3.6.1.4.1.30966.5.X.1.12.
13
The Maximum current of outlet 13 of device
X
slave X Output Current Max
Fourteen
1.3.6.1.4.1.30966.5.X.1.12.
14
The Maximum current of outlet 14 of device
X
slave X Output Current Max
Fifteen
1.3.6.1.4.1.30966.5.X.1.12.
15
The Maximum current of outlet 15 of device
X
slave X Output Current Max
1.3.6.1.4.1.30966.5.X.1.12.
The Maximum current of outlet 16 of device
38
Excel Intelligent PDU User Manual
A/0
Sixteen
16
X
slave X Output Current Max
Seventeen
1.3.6.1.4.1.30966.5.X.1.12.
17
The Maximum current of outlet 17 of device
X
slave X Output Current Max
Eighteen
1.3.6.1.4.1.30966.5.X.1.12.
18
The Maximum current of outlet 18 of device
X
slave X Output Current Max
Nineteen
1.3.6.1.4.1.30966.5.X.1.12.
19
The Maximum current of outlet 19 of device
X
slave X Output Current Max
Twenty
1.3.6.1.4.1.30966.5.X.1.12.
20
The Maximum current of outlet 20 of device
X
slave X Output Current Max
TwentyOne
1.3.6.1.4.1.30966.5.X.1.12.
21
The Maximum current of outlet 21 of device
X
slave X Output Current Max
TwentyTwo
1.3.6.1.4.1.30966.5.X.1.12.
22
The Maximum current of outlet 22 of device
X
slave X Output Current Max
TwentyThree
1.3.6.1.4.1.30966.5.X.1.12.
23
The Maximum current of outlet 23 of device
X
slave X Output Current Max
TwentyFour
1.3.6.1.4.1.30966.5.X.1.12.
24
The Maximum current of outlet 24 of device
X
slave X Output Current Energy
1.3.6.1.4.1.30966.5.X.1.13
The energy of device X
slave X Output Current Energy
One
1.3.6.1.4.1.30966.5.X.1.13.
1
The energy of outlet 1 of device X
slave X Output Current Energy
Two
1.3.6.1.4.1.30966.5.X.1.13.
2
The energy of outlet 2 of device X
slave X Output Current Energy
Three
1.3.6.1.4.1.30966.5.X.1.13.
3
The energy of outlet 3 of device X
slave X Output Current Energy
Four
1.3.6.1.4.1.30966.5.X.1.13.
4
The energy of outlet 4 of device X
slave X Output Current Energy
Five
1.3.6.1.4.1.30966.5.X.1.13.
5
The energy of outlet 5 of device X
slave X Output Current Energy
Six
1.3.6.1.4.1.30966.5.X.1.13.
6
The energy of outlet 6 of device X
slave X Output Current Energy
Seven
1.3.6.1.4.1.30966.5.X.1.13.
7
The energy of outlet 7 of device X
slave X Output Current Energy
Eight
1.3.6.1.4.1.30966.5.X.1.13.
8
The energy of outlet 8 of device X
slave X Output Current Energy
Nine
1.3.6.1.4.1.30966.5.X.1.13.
9
The energy of outlet 9 of device X
slave X Output Current Energy
Ten
1.3.6.1.4.1.30966.5.X.1.13.
10
The energy of outlet 10 of device X
slave X Output Current Energy
Eleven
1.3.6.1.4.1.30966.5.X.1.13.
11
The energy of outlet 11 of device X
slave X Output Current Energy
Twelve
1.3.6.1.4.1.30966.5.X.1.13.
12
The energy of outlet 12 of device X
slave X Output Current Energy
Thriteen
1.3.6.1.4.1.30966.5.X.1.13.
13
The energy of outlet 13 of device X
slave X Output Current Energy
Fourteen
1.3.6.1.4.1.30966.5.X.1.13.
14
The energy of outlet 14 of device X
39
Excel Intelligent PDU User Manual
slave X Output Current Energy
Fifteen
1.3.6.1.4.1.30966.5.X.1.13.
15
The energy of outlet 15 of device X
slave X Output Current Energy
Sixteen
1.3.6.1.4.1.30966.5.X.1.13.
16
The energy of outlet 16 of device X
slave X Output Current Energy
Seventeen
1.3.6.1.4.1.30966.5.X.1.13.
17
The energy of outlet 17 of device X
slave X Output Current Energy
Eighteen
1.3.6.1.4.1.30966.5.X.1.13.
18
The energy of outlet 18 of device X
slave X Output Current Energy
Nineteen
1.3.6.1.4.1.30966.5.X.1.13.
19
The energy of outlet 19 of device X
slave X Output Current Energy
Twenty
1.3.6.1.4.1.30966.5.X.1.13.
20
The energy of outlet 20 of device X
slave X Output Current Energy
TwentyOne
1.3.6.1.4.1.30966.5.X.1.13.
21
The energy of outlet 21 of device X
slave X Output Current Energy
TwentyTwo
1.3.6.1.4.1.30966.5.X.1.13.
22
The energy of outlet 22 of device X
slave X Output Current Energy
TwentyThree
1.3.6.1.4.1.30966.5.X.1.13.
23
The energy of outlet 23 of device X
slave X Output Current Energy
TwentyFour
1.3.6.1.4.1.30966.5.X.1.13.
24
The energy of outlet 24 of device X
2.2.5. To view the device and sensor status by table format via SNMPc software
Menu
Description
PDU Device xx
Device xx
Slave xx line xx
Phase xx of device xx
Slave xx line xx Power
Power of phase xx of device xx
Slave xx line xx PF
Power Factor of phase xx of device xx
Slave xx line xx Energy
Energy of phase xx of device xx
Slave xx line xx Current
Current of phase xx of device xx
Slave xx line xx Voltage
Voltage of phase xx of device xx
Slave xx line xx Current MIN
The Minimum current of phase xx of device xx
Slave xx line xx Current Max
The Maximum current of phase xx of device xx
Slave xx line xx Voltage Min
The Minimum voltage of phase xx of device xx
Slave xx line xx Voltage Max
The Maximum voltage of phase xx of device xx
Slave xx temp
The temperature of device xx
Slave xx hum
The humidity of device xx
Slave xx temp Min
The Minimum temperature value of device xx
Slave xx temp Max
The Maximum temperature value of device xx
40
A/0
Excel Intelligent PDU User Manual
Slave xx hum Min
The Minimum humidity value of device xx
Slave xx hum Max
The Maximum humidity value of device xx
Slave xx output name xx
The outlet name of outlet xx of device xx
Slave xx output status xx
The on/off status of outlet xx of device xx
Slave xx output current xx
The current of outlet xx of device xx
Slave xx output current Min xx
The Minimum current of outlet xx of device xx
Slave xx output current Max xx
The Maximum current of outlet xx of device
Slave xx output current Energy xx
The energy of outlet xx of device xx
Slave xx name
The name of device xx
Slave xx Type
The type of device xx
Slave xx output number
The outlet quantity of device xx
A/0
2.3. Telnet Access
The device supports Telnet access, after enter the username and password, user can remotely monitor and
management the device. Telnet access support daisy-chain as well to enable the user to manage up to 5 devices.
2.3.1. To open the Telnet client
by Start→ Run command→enter “Telnet” in the input box and
click OK
2.3.2. Enter the IP address as illustrated in figure 2-4
Figure 2-4
Enter the the username and password, interface as shown in figure 2-5 will pop up:
41
Excel Intelligent PDU User Manual
Figure 2-5
2.3.3 . “STATUS” command
Input “STATUS” command to view the individual outlet status (including current, on/off state, Max. and Min.
current value, kW and kWh) and the overall status (including total current, voltage, kW and kWh).
Command line format: STATUS 【index】
【operation】as illustrated in figure 2-6:
Figure 2-6
【index】:device mode(0-9, 0 is master,1-9 is slave)
;
【operation】
:view the device information, details as below:
【operation】
Description
42
A/0
Excel Intelligent PDU User Manual
For example:
Total
command line---status 0 total:
0 means the Master(1-4 means Slave 1
to Slave 4), total means the overall status, the above figure shown after
input “status 0 total”
For example:
Output
command line---status 0 output1:
0 means the Master(1-4 means
Slave 1 to Slave 4), output1 means the status of first outlet, the above
figure will be displayed after input “status 0 output1”
2.3.4 “SWITCH” command
Switch command enable the user to switch on/off the individual outlet or the complete device
Command format: SWITCH 【index】【operation】
【action】as shown in figure 2-7
43
A/0
Excel Intelligent PDU User Manual
Figure 2-7
【index】:device mode(0-9, 0 is master,1-9 is slave)
;
【operation】
:view the device information, details as below:
【action】
:on/off.
【operation】
Description
ALL
Command line---switch 0 all off means to swith off the complete device of
the Master
44
A/0
Excel Intelligent PDU User Manual
Output
Command line---switch 0 output1 on means to swith on the first outlet of
the Master
2.3.5 Reboot command: to restart to device as shown in figure 2-8
Figure 2-8
After press Enter key, following interface will show up as figure 2-9-1
45
A/0
Excel Intelligent PDU User Manual
Figure 2-9-1
2.3.7 QUIT command to quit the telnet client as shown in figure 2-9-2/ 2-9-3
Figure 2-9-2
46
A/0
Excel Intelligent PDU User Manual
Figure 2-9-3
2.4 Serial access
To access the device via Hyper Terminal with provided cable from EXCEL.
Select Start→All Programs→Accessories→Communications→Hyper Terminal to enter the Hyper Terminal
window to establish a new connection the system displays the Connection Description dialog box as below:
Enter the Name of the new connection and click OK.
47
A/0
Excel Intelligent PDU User Manual
A/0
Then the system display the Connect to dialog box, Select the serial port which the cable is connected form
Connect using drop-down list.
Click OK to go to the port properties setting dialog box as show below. Set the bits per second to 9600, data bits to
8, parity check to None, stop bits to 1 and Flow control to None as following figure. Then Click OK to enter the
Hyper Terminal interface.
48
Excel Intelligent PDU User Manual
In the Hyper Terminal interface, click the properties icon
to open the Properties dialog box. Then click
ASCLL Setup from the Settings tap and tick the items as following figures:
Click OK and following window will pop up:
49
A/0
Excel Intelligent PDU User Manual
Serial command includes STARUS, SWITCH, RESET and REBOOT.
2.4.1 STATUS command
The command line is the same as Telnet, please refer to Telnet status command for details
2.4.2 SWTICH command: Refer to the following figures
50
A/0
Excel Intelligent PDU User Manual
Switch on all
outlets
Switch off
outlet 1
2.4.3 RESET command
To retore the device to factory settings.
51
A/0
Excel Intelligent PDU User Manual
RESET
Command
2.4.4 REBOOT command
Reboot
Note: No quit command for serial
52
A/0
Excel Intelligent PDU User Manual
VIII.
A/0
Frequently Asked Questions
1. Forget IP address?
A: check on the LCD screen, the first page displays the IP address.
2. Fail to send email?
A:1) Check and confirm the device connected to network and the network works normally.
2) Check DNS configuration and confirm whether it is successful.
3) Check and confirm POP, SMTP sever is correct and the same as the sender mailbox sever. Please confirm
SMTP port is correct.
3. Lost IP
A. Press and hold the RESET button for 6 seconds, Release the RESET button when the device buzz, the device
will restart.
IX. Technology Parameters
Performance parameter
No
1
Technical parameter
Rated input
110/220VAC
voltage
380V~
Rated input plug
IEC60309 standard
Input
50/60HZ;
50/60 Hz;
16A:3×2.5mm²
32A:3×6.0mm²;
3×16A:5×2.5mm²
3×32A:5×6.0mm²
Cable specification
2
3
Output
Control ports
Cable length
3M
Max. load current
16A, 32A
Socket standard
IEC320 C13, C19
Socket quantity
12, 16, 20, 24
Plug locker
C13 sockets equipped with C14 plug locker
Rated output
voltage
110/220VAC
Rated outlet
current
10A, 16A
Max. load current
16A, 32A
Net port
1×RJ45
53
50/60HZ
Excel Intelligent PDU User Manual
Daisy chain port
2×RJ45
Software update port
1×RJ45
Temperature &
4×RJ11 at most(optional)
humidity port
4
Display
Smoke sensor port
1 × RJ11(optional)
Water sensor port
1 × RJ11(optional)
Door sensor port
2 × RJ11(optional)
Working state
1×LED
Power pulse
1×LED
IP Address, M/S
PDU state,
LCD screen(Resolution: 128×64)
measurement
value, alarm state
Full-scale:16A/32A,Accuracy:±1%+0.2
Resolution:200mA, Response:400ms
Full-scale:25A, Accuracy:±1%+0.1,
resolution:100mA, Response:400ms
5
Load current
display
technology
requirement
6
Temperature/h
umidity
Technology
requirement
Humidity
Accuracy:±5%RH,
X2×66.6×44.4mm
Product size
Product size
(L×W×H)
Mounting hole
X3
Color
Black
Installation bracket
1 set
7
8
Case color
Total current
Individual load
current
Working rang: -40℃ ~ +100℃
Temperature
Accuracy:±1℃,Response: 4s
Response: 400ms
Network
2M, blue
connection wire
9
Fittings
Daisy-chain
2M, yellow
connection wire
User manual
1 set (CD)
Temperature/humidity sensor
10
Optional
fittings
Sensor
Smoke sensor
Door sensor
54
A/0
Excel Intelligent PDU User Manual
A/0
Water logging sensor
11
Environment
12
ROHS
Working
temperature
0℃~55℃;
Relative humidity
10~90%;
Compliance
X. Warranty and Service
The PDU warrants to be free for repairing in two years from the date of purchasing. During this period, our
obligation is limited to repair, replace or return to our company for repair. If the product has been beyond the
warrant for repairing time or it has been damaged by accident, negligence or misapplication, you should pay some
repair charge.
The above warranty does not apply to the following situation:
1、 The damage caused by customers’ incorrect or inadequate repair;
2、 The damage caused by unauthorized modification or misusing;
3、 The damage caused by using out of the product allowed environment.
Repairing Notice:
1、 If you want to return the product for repair, please make sure it packed in the bandbox or carton. The damage
caused during the transportation is not warranted to repair.
2、 Please give a brief description of the repairing product about the problem and its operating process.
3、 The customer should pay for the returning freight, all the tariffs and taxes.
4、 Please write down your name, address and the telephone number by which we can contact you at anytime.
55