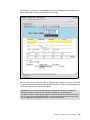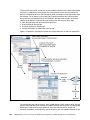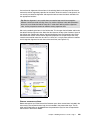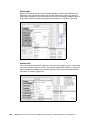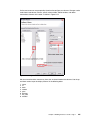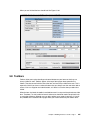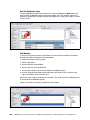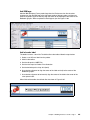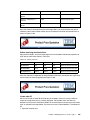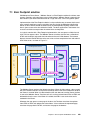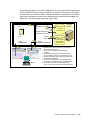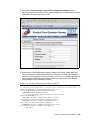
1
Front cover IBM Workplace Forms 2.6 Guide to Building and Integrating a Sample Workplace Forms Application Designing with XForms Model Features and functionality Integration Philip Monson Ed Dussourd Cayce Marston Andreas A. Richter George Poirier Manny Santana ibm.com/redbooks International Technical Support Organization IBM Workplace Forms 2.6: Guide to Building and Integrating a Sample Workplace Forms Application May 2007 SG24-7388-00 Note: Before using this information and the product it supports, read the information in “Notices” on page xi. First Edition (May 2007) This edition applies to Version 2.6.1 of IBM Workplace Forms. © Copyright International Business Machines Corporation 2007. All rights reserved. Note to U.S. Government Users Restricted Rights -- Use, duplication or disclosure restricted by GSA ADP Schedule Contract with IBM Corp. Contents Notices . . . . . . . . . . . . . . . . . . . . . . . . . . . . . . . . . . . . . . . . . . . . . . . . . . . . . . . . . . . . . . . . . xi Trademarks . . . . . . . . . . . . . . . . . . . . . . . . . . . . . . . . . . . . . . . . . . . . . . . . . . . . . . . . . . . . . . xii Preface . . . . . . . . . . . . . . . . . . . . . . . . . . . . . . . . . . . . . . . . . . . . . . . . . . . . . . . . . . . . . . . . The team that wrote this book . . . . . . . . . . . . . . . . . . . . . . . . . . . . . . . . . . . . . . . . . . . . . . . Become a published author . . . . . . . . . . . . . . . . . . . . . . . . . . . . . . . . . . . . . . . . . . . . . . . . . Comments welcome. . . . . . . . . . . . . . . . . . . . . . . . . . . . . . . . . . . . . . . . . . . . . . . . . . . . . . . xiii xiii xiv xiv Chapter 1. Introduction to IBM Workplace Forms . . . . . . . . . . . . . . . . . . . . . . . . . . . . . . 1 1.1 What is a form . . . . . . . . . . . . . . . . . . . . . . . . . . . . . . . . . . . . . . . . . . . . . . . . . . . . . . . . . 3 1.1.1 Form as a front-end to a business process. . . . . . . . . . . . . . . . . . . . . . . . . . . . . . . 3 1.1.2 Electronic forms: XML intelligent documents . . . . . . . . . . . . . . . . . . . . . . . . . . . . . 4 1.1.3 Forms marketplace . . . . . . . . . . . . . . . . . . . . . . . . . . . . . . . . . . . . . . . . . . . . . . . . . 5 1.2 Overview of IBM Workplace Forms. . . . . . . . . . . . . . . . . . . . . . . . . . . . . . . . . . . . . . . . . 6 1.2.1 Value proposition . . . . . . . . . . . . . . . . . . . . . . . . . . . . . . . . . . . . . . . . . . . . . . . . . . 8 1.2.2 Product positioning . . . . . . . . . . . . . . . . . . . . . . . . . . . . . . . . . . . . . . . . . . . . . . . . 10 1.3 Innovation based on standards: XForms and XFDL . . . . . . . . . . . . . . . . . . . . . . . . . . . 11 1.3.1 W3C XForms and IBM Workplace Forms . . . . . . . . . . . . . . . . . . . . . . . . . . . . . . . 13 1.3.2 XForms + XFDL in alignment with SOA . . . . . . . . . . . . . . . . . . . . . . . . . . . . . . . . 14 1.3.3 Sample solutions. . . . . . . . . . . . . . . . . . . . . . . . . . . . . . . . . . . . . . . . . . . . . . . . . . 15 1.3.4 Banking and regulated industries . . . . . . . . . . . . . . . . . . . . . . . . . . . . . . . . . . . . . 16 1.3.5 Proven eForm technology . . . . . . . . . . . . . . . . . . . . . . . . . . . . . . . . . . . . . . . . . . . 16 1.4 Summary . . . . . . . . . . . . . . . . . . . . . . . . . . . . . . . . . . . . . . . . . . . . . . . . . . . . . . . . . . . . 17 Chapter 2. Features and functionality . . . . . . . . . . . . . . . . . . . . . . . . . . . . . . . . . . . . . . . 2.1 Forms document model . . . . . . . . . . . . . . . . . . . . . . . . . . . . . . . . . . . . . . . . . . . . . . . . 2.1.1 Extensible Forms Description Language (XFDL) . . . . . . . . . . . . . . . . . . . . . . . . . 2.1.2 Workplace Forms component technology. . . . . . . . . . . . . . . . . . . . . . . . . . . . . . . 2.1.3 XForms Model. . . . . . . . . . . . . . . . . . . . . . . . . . . . . . . . . . . . . . . . . . . . . . . . . . . . 2.2 Installing the software . . . . . . . . . . . . . . . . . . . . . . . . . . . . . . . . . . . . . . . . . . . . . . . . . . 2.2.1 Installing the Designer . . . . . . . . . . . . . . . . . . . . . . . . . . . . . . . . . . . . . . . . . . . . . 2.2.2 Installing the Viewer . . . . . . . . . . . . . . . . . . . . . . . . . . . . . . . . . . . . . . . . . . . . . . . 2.3 Introduction to the Designer . . . . . . . . . . . . . . . . . . . . . . . . . . . . . . . . . . . . . . . . . . . . . 2.3.1 Launch the Designer . . . . . . . . . . . . . . . . . . . . . . . . . . . . . . . . . . . . . . . . . . . . . . . 2.3.2 Brief overview of Eclipse . . . . . . . . . . . . . . . . . . . . . . . . . . . . . . . . . . . . . . . . . . . . 2.3.3 Terminology for working in Eclipse . . . . . . . . . . . . . . . . . . . . . . . . . . . . . . . . . . . . 2.3.4 Role-based perspectives . . . . . . . . . . . . . . . . . . . . . . . . . . . . . . . . . . . . . . . . . . . 2.3.5 Main panels. . . . . . . . . . . . . . . . . . . . . . . . . . . . . . . . . . . . . . . . . . . . . . . . . . . . . . 2.3.6 Views . . . . . . . . . . . . . . . . . . . . . . . . . . . . . . . . . . . . . . . . . . . . . . . . . . . . . . . . . . 2.4 Form Design basics . . . . . . . . . . . . . . . . . . . . . . . . . . . . . . . . . . . . . . . . . . . . . . . . . . . 2.4.1 Create a new form . . . . . . . . . . . . . . . . . . . . . . . . . . . . . . . . . . . . . . . . . . . . . . . . 2.4.2 Add items . . . . . . . . . . . . . . . . . . . . . . . . . . . . . . . . . . . . . . . . . . . . . . . . . . . . . . . 2.4.3 XForms support . . . . . . . . . . . . . . . . . . . . . . . . . . . . . . . . . . . . . . . . . . . . . . . . . . 2.4.4 Define item properties . . . . . . . . . . . . . . . . . . . . . . . . . . . . . . . . . . . . . . . . . . . . . . 2.4.5 Layout form items . . . . . . . . . . . . . . . . . . . . . . . . . . . . . . . . . . . . . . . . . . . . . . . . . 2.5 Add a toolbar . . . . . . . . . . . . . . . . . . . . . . . . . . . . . . . . . . . . . . . . . . . . . . . . . . . . . . . . . 2.5.1 Adding a toolbar to a page . . . . . . . . . . . . . . . . . . . . . . . . . . . . . . . . . . . . . . . . . . 2.5.2 Adding items to a toolbar . . . . . . . . . . . . . . . . . . . . . . . . . . . . . . . . . . . . . . . . . . . 2.6 Add computes . . . . . . . . . . . . . . . . . . . . . . . . . . . . . . . . . . . . . . . . . . . . . . . . . . . . . . . . © Copyright IBM Corp. 2007. All rights reserved. 19 20 20 23 24 27 27 28 29 30 34 35 37 39 45 51 51 57 59 70 74 83 83 85 89 iii 2.6.1 References . . . . . . . . . . . . . . . . . . . . . . . . . . . . . . . . . . . . . . . . . . . . . . . . . . . . . . 90 2.6.2 Computes . . . . . . . . . . . . . . . . . . . . . . . . . . . . . . . . . . . . . . . . . . . . . . . . . . . . . . . 93 2.6.3 Operators and the order of operations . . . . . . . . . . . . . . . . . . . . . . . . . . . . . . . . . 94 2.6.4 Creating a field calculation . . . . . . . . . . . . . . . . . . . . . . . . . . . . . . . . . . . . . . . . . . 96 2.7 Signature buttons . . . . . . . . . . . . . . . . . . . . . . . . . . . . . . . . . . . . . . . . . . . . . . . . . . . . 108 2.7.1 Overview . . . . . . . . . . . . . . . . . . . . . . . . . . . . . . . . . . . . . . . . . . . . . . . . . . . . . . . 108 2.7.2 Signature types . . . . . . . . . . . . . . . . . . . . . . . . . . . . . . . . . . . . . . . . . . . . . . . . . . 109 2.7.3 Digital signatures . . . . . . . . . . . . . . . . . . . . . . . . . . . . . . . . . . . . . . . . . . . . . . . . 110 2.7.4 Signature filters . . . . . . . . . . . . . . . . . . . . . . . . . . . . . . . . . . . . . . . . . . . . . . . . . . 111 2.7.5 Creating multiple signatures . . . . . . . . . . . . . . . . . . . . . . . . . . . . . . . . . . . . . . . . 112 2.7.6 Create a Clickwrap signature button . . . . . . . . . . . . . . . . . . . . . . . . . . . . . . . . . . 112 2.8 Workplace Forms Viewer . . . . . . . . . . . . . . . . . . . . . . . . . . . . . . . . . . . . . . . . . . . . . . 125 2.8.1 Introduction . . . . . . . . . . . . . . . . . . . . . . . . . . . . . . . . . . . . . . . . . . . . . . . . . . . . . 125 2.8.2 Viewer modes . . . . . . . . . . . . . . . . . . . . . . . . . . . . . . . . . . . . . . . . . . . . . . . . . . . 126 2.8.3 Toolbar buttons . . . . . . . . . . . . . . . . . . . . . . . . . . . . . . . . . . . . . . . . . . . . . . . . . . 126 2.8.4 Input validation . . . . . . . . . . . . . . . . . . . . . . . . . . . . . . . . . . . . . . . . . . . . . . . . . . 127 2.8.5 Recognizing mandatory items. . . . . . . . . . . . . . . . . . . . . . . . . . . . . . . . . . . . . . . 129 2.8.6 Completing Formatted fields . . . . . . . . . . . . . . . . . . . . . . . . . . . . . . . . . . . . . . . . 130 2.8.7 Turning on help messages . . . . . . . . . . . . . . . . . . . . . . . . . . . . . . . . . . . . . . . . . 131 2.8.8 Opening the Viewer help form . . . . . . . . . . . . . . . . . . . . . . . . . . . . . . . . . . . . . . 131 iv Chapter 3. XForms . . . . . . . . . . . . . . . . . . . . . . . . . . . . . . . . . . . . . . . . . . . . . . . . . . . . . 3.1 Introduction to XForms . . . . . . . . . . . . . . . . . . . . . . . . . . . . . . . . . . . . . . . . . . . . . . . . 3.2 XForms and SOA . . . . . . . . . . . . . . . . . . . . . . . . . . . . . . . . . . . . . . . . . . . . . . . . . . . . 3.3 What is XForms. . . . . . . . . . . . . . . . . . . . . . . . . . . . . . . . . . . . . . . . . . . . . . . . . . . . . . 3.4 Why support XForms . . . . . . . . . . . . . . . . . . . . . . . . . . . . . . . . . . . . . . . . . . . . . . . . . 3.5 Understanding the XForms Model . . . . . . . . . . . . . . . . . . . . . . . . . . . . . . . . . . . . . . . 3.5.1 XForms data instances . . . . . . . . . . . . . . . . . . . . . . . . . . . . . . . . . . . . . . . . . . . . 3.5.2 Node . . . . . . . . . . . . . . . . . . . . . . . . . . . . . . . . . . . . . . . . . . . . . . . . . . . . . . . . . . 3.6 What is new to IBM Workplace Forms with XForms support . . . . . . . . . . . . . . . . . . . 3.6.1 XForms items . . . . . . . . . . . . . . . . . . . . . . . . . . . . . . . . . . . . . . . . . . . . . . . . . . . 3.6.2 XForms event handlers . . . . . . . . . . . . . . . . . . . . . . . . . . . . . . . . . . . . . . . . . . . . 3.6.3 XForms functions . . . . . . . . . . . . . . . . . . . . . . . . . . . . . . . . . . . . . . . . . . . . . . . . 3.6.4 XForms device independence . . . . . . . . . . . . . . . . . . . . . . . . . . . . . . . . . . . . . . 3.7 Workplace Forms: XForms and XFDL . . . . . . . . . . . . . . . . . . . . . . . . . . . . . . . . . . . . 3.7.1 XForms versus XML Data Model . . . . . . . . . . . . . . . . . . . . . . . . . . . . . . . . . . . . 3.8 The XForms Model . . . . . . . . . . . . . . . . . . . . . . . . . . . . . . . . . . . . . . . . . . . . . . . . . . . 3.8.1 XPath - what it is . . . . . . . . . . . . . . . . . . . . . . . . . . . . . . . . . . . . . . . . . . . . . . . . . 3.9 Processing e-forms with XForms objects . . . . . . . . . . . . . . . . . . . . . . . . . . . . . . . . . . 133 134 134 136 137 137 138 138 140 140 141 141 142 144 144 146 147 148 Chapter 4. Approaches to integrating Workplace Forms . . . . . . . . . . . . . . . . . . . . . . 4.1 Integration: what this means within the context of Workplace Forms . . . . . . . . . . . . . 4.2 Workplace Forms document model and straight-through integration . . . . . . . . . . . . . 4.2.1 The Workplace Forms document model . . . . . . . . . . . . . . . . . . . . . . . . . . . . . . . 4.2.2 Support for arbitrary XML instances . . . . . . . . . . . . . . . . . . . . . . . . . . . . . . . . . . 4.2.3 Straight-through integration . . . . . . . . . . . . . . . . . . . . . . . . . . . . . . . . . . . . . . . . 4.3 Aspects of integrating Workplace Forms . . . . . . . . . . . . . . . . . . . . . . . . . . . . . . . . . . 4.3.1 User interface (UI) integration . . . . . . . . . . . . . . . . . . . . . . . . . . . . . . . . . . . . . . . 4.3.2 Data integration. . . . . . . . . . . . . . . . . . . . . . . . . . . . . . . . . . . . . . . . . . . . . . . . . . 4.3.3 Process integration . . . . . . . . . . . . . . . . . . . . . . . . . . . . . . . . . . . . . . . . . . . . . . . 4.3.4 Security context integration. . . . . . . . . . . . . . . . . . . . . . . . . . . . . . . . . . . . . . . . . 4.3.5 Client-side device/hardware integration . . . . . . . . . . . . . . . . . . . . . . . . . . . . . . . 4.4 Integration points summary . . . . . . . . . . . . . . . . . . . . . . . . . . . . . . . . . . . . . . . . . . . . . 151 152 153 153 154 155 155 155 163 168 169 169 170 IBM Workplace Forms 2.6: Guide to Building and Integrating a Sample Workplace Forms Application 4.5 Partitioning of features and functionality . . . . . . . . . . . . . . . . . . . . . . . . . . . . . . . . . . . 170 4.6 Introduction to actual integration scenarios. . . . . . . . . . . . . . . . . . . . . . . . . . . . . . . . . 171 Chapter 5. Building the base scenario: stage 1 . . . . . . . . . . . . . . . . . . . . . . . . . . . . . . 5.1 Introduction to the scenario . . . . . . . . . . . . . . . . . . . . . . . . . . . . . . . . . . . . . . . . . . . . . 5.1.1 Review from an end-user perspective. . . . . . . . . . . . . . . . . . . . . . . . . . . . . . . . . 5.2 Building stage 1. . . . . . . . . . . . . . . . . . . . . . . . . . . . . . . . . . . . . . . . . . . . . . . . . . . . . . 5.2.1 Analyzing the original paper-based form. . . . . . . . . . . . . . . . . . . . . . . . . . . . . . . 5.2.2 Form data . . . . . . . . . . . . . . . . . . . . . . . . . . . . . . . . . . . . . . . . . . . . . . . . . . . . . . 5.2.3 Business forms . . . . . . . . . . . . . . . . . . . . . . . . . . . . . . . . . . . . . . . . . . . . . . . . . . 5.2.4 User interface . . . . . . . . . . . . . . . . . . . . . . . . . . . . . . . . . . . . . . . . . . . . . . . . . . . 5.3 Possible starting points for creating a form . . . . . . . . . . . . . . . . . . . . . . . . . . . . . . . . . 5.3.1 Designing a form from scratch . . . . . . . . . . . . . . . . . . . . . . . . . . . . . . . . . . . . . . 5.3.2 Using a form template . . . . . . . . . . . . . . . . . . . . . . . . . . . . . . . . . . . . . . . . . . . . . 5.3.3 Using scanned paper forms . . . . . . . . . . . . . . . . . . . . . . . . . . . . . . . . . . . . . . . . 5.3.4 Using Texcel FormBridge to convert an existing format . . . . . . . . . . . . . . . . . . . 5.3.5 Upgrading an earlier form . . . . . . . . . . . . . . . . . . . . . . . . . . . . . . . . . . . . . . . . . . 5.4 Defining our XForms Model . . . . . . . . . . . . . . . . . . . . . . . . . . . . . . . . . . . . . . . . . . . . 5.4.1 The XForms Model . . . . . . . . . . . . . . . . . . . . . . . . . . . . . . . . . . . . . . . . . . . . . . . 5.4.2 XForms data instances . . . . . . . . . . . . . . . . . . . . . . . . . . . . . . . . . . . . . . . . . . . . 5.4.3 XForms nodes. . . . . . . . . . . . . . . . . . . . . . . . . . . . . . . . . . . . . . . . . . . . . . . . . . . 5.4.4 Creating the instance . . . . . . . . . . . . . . . . . . . . . . . . . . . . . . . . . . . . . . . . . . . . . 5.5 Create the stage1 form . . . . . . . . . . . . . . . . . . . . . . . . . . . . . . . . . . . . . . . . . . . . . . . . 5.5.1 Create a new form with XForms support. . . . . . . . . . . . . . . . . . . . . . . . . . . . . . . 5.5.2 Add XForms Model instance data . . . . . . . . . . . . . . . . . . . . . . . . . . . . . . . . . . . . 5.5.3 Create the form template . . . . . . . . . . . . . . . . . . . . . . . . . . . . . . . . . . . . . . . . . . 5.5.4 Create a Resource page . . . . . . . . . . . . . . . . . . . . . . . . . . . . . . . . . . . . . . . . . . . 5.6 Add layout items to the template page . . . . . . . . . . . . . . . . . . . . . . . . . . . . . . . . . . . . 5.6.1 Basic method . . . . . . . . . . . . . . . . . . . . . . . . . . . . . . . . . . . . . . . . . . . . . . . . . . . 5.6.2 Define references (XPath) . . . . . . . . . . . . . . . . . . . . . . . . . . . . . . . . . . . . . . . . . 5.6.3 XForms Model method . . . . . . . . . . . . . . . . . . . . . . . . . . . . . . . . . . . . . . . . . . . . 5.6.4 Create dynamic XForms table. . . . . . . . . . . . . . . . . . . . . . . . . . . . . . . . . . . . . . . 5.6.5 Add advanced items to table. . . . . . . . . . . . . . . . . . . . . . . . . . . . . . . . . . . . . . . . 5.6.6 Add XForms Model binds . . . . . . . . . . . . . . . . . . . . . . . . . . . . . . . . . . . . . . . . . . 5.6.7 File attachment section . . . . . . . . . . . . . . . . . . . . . . . . . . . . . . . . . . . . . . . . . . . . 5.6.8 Signature section of form . . . . . . . . . . . . . . . . . . . . . . . . . . . . . . . . . . . . . . . . . . 5.7 Enhancing the form . . . . . . . . . . . . . . . . . . . . . . . . . . . . . . . . . . . . . . . . . . . . . . . . . . . 5.7.1 Remove the form template . . . . . . . . . . . . . . . . . . . . . . . . . . . . . . . . . . . . . . . . . 5.7.2 Distinguishing sections of the form . . . . . . . . . . . . . . . . . . . . . . . . . . . . . . . . . . . 5.8 Toolbars . . . . . . . . . . . . . . . . . . . . . . . . . . . . . . . . . . . . . . . . . . . . . . . . . . . . . . . . . . . 5.8.1 Tips on setting up your toolbar . . . . . . . . . . . . . . . . . . . . . . . . . . . . . . . . . . . . . . 5.8.2 Create a toolbar . . . . . . . . . . . . . . . . . . . . . . . . . . . . . . . . . . . . . . . . . . . . . . . . . 5.8.3 Add branding. . . . . . . . . . . . . . . . . . . . . . . . . . . . . . . . . . . . . . . . . . . . . . . . . . . . 5.8.4 Add form controls . . . . . . . . . . . . . . . . . . . . . . . . . . . . . . . . . . . . . . . . . . . . . . . . 5.8.5 Create toolbar object. . . . . . . . . . . . . . . . . . . . . . . . . . . . . . . . . . . . . . . . . . . . . . 5.9 Creating the layout for the wizard pages. . . . . . . . . . . . . . . . . . . . . . . . . . . . . . . . . . . 5.9.1 Considerations in advance . . . . . . . . . . . . . . . . . . . . . . . . . . . . . . . . . . . . . . . . . 5.9.2 Preview of Wizard page . . . . . . . . . . . . . . . . . . . . . . . . . . . . . . . . . . . . . . . . . . . 5.9.3 Wizard template . . . . . . . . . . . . . . . . . . . . . . . . . . . . . . . . . . . . . . . . . . . . . . . . . 5.9.4 Copy items from Page1 . . . . . . . . . . . . . . . . . . . . . . . . . . . . . . . . . . . . . . . . . . . 5.10 Add signatures and business logic to the form . . . . . . . . . . . . . . . . . . . . . . . . . . . . . 5.10.1 Clickwrap signatures . . . . . . . . . . . . . . . . . . . . . . . . . . . . . . . . . . . . . . . . . . . . . 5.10.2 Signature filters . . . . . . . . . . . . . . . . . . . . . . . . . . . . . . . . . . . . . . . . . . . . . . . . . 173 174 174 178 180 181 182 183 187 187 188 188 189 190 190 191 191 191 193 196 196 199 205 208 211 211 219 226 231 239 249 260 275 278 278 280 287 288 288 289 292 300 304 304 306 309 310 312 312 313 Contents v vi 5.10.3 Define the Clickwrap signature buttons. . . . . . . . . . . . . . . . . . . . . . . . . . . . . . . 5.10.4 Business logic . . . . . . . . . . . . . . . . . . . . . . . . . . . . . . . . . . . . . . . . . . . . . . . . . . 5.11 Building the servlet . . . . . . . . . . . . . . . . . . . . . . . . . . . . . . . . . . . . . . . . . . . . . . . . . . 5.11.1 Where we are in the process: building stage 1 of the base scenario . . . . . . . . 5.11.2 Basic servlet methods . . . . . . . . . . . . . . . . . . . . . . . . . . . . . . . . . . . . . . . . . . . . 5.11.3 Servlet code skeleton . . . . . . . . . . . . . . . . . . . . . . . . . . . . . . . . . . . . . . . . . . . . 5.11.4 Creating a template repository and form storage structure. . . . . . . . . . . . . . . . 5.11.5 Servlet interaction for forms processing . . . . . . . . . . . . . . . . . . . . . . . . . . . . . . 5.11.6 Accessing a form through the Workplace Forms API . . . . . . . . . . . . . . . . . . . . 5.11.7 Extraction of form data . . . . . . . . . . . . . . . . . . . . . . . . . . . . . . . . . . . . . . . . . . . 5.11.8 Signature validation . . . . . . . . . . . . . . . . . . . . . . . . . . . . . . . . . . . . . . . . . . . . . 5.11.9 Form storage to local file system . . . . . . . . . . . . . . . . . . . . . . . . . . . . . . . . . . . 5.11.10 Servlet doGet method for application navigation . . . . . . . . . . . . . . . . . . . . . . 5.12 Creating JSPs . . . . . . . . . . . . . . . . . . . . . . . . . . . . . . . . . . . . . . . . . . . . . . . . . . . . . . 5.12.1 Where we are in the process: building stage 1 of the base scenario . . . . . . . . 5.12.2 Form template listing. . . . . . . . . . . . . . . . . . . . . . . . . . . . . . . . . . . . . . . . . . . . . 5.12.3 Approved form listing . . . . . . . . . . . . . . . . . . . . . . . . . . . . . . . . . . . . . . . . . . . . 315 322 325 325 325 327 334 335 336 339 348 349 350 353 353 365 366 Chapter 6. Building the base scenario: stage 2 . . . . . . . . . . . . . . . . . . . . . . . . . . . . . . 6.1 Overview of steps: building stage 2 of the base scenario . . . . . . . . . . . . . . . . . . . . . . 6.2 Data storage to DB2 . . . . . . . . . . . . . . . . . . . . . . . . . . . . . . . . . . . . . . . . . . . . . . . . . . 6.2.1 Installing DB2 Server . . . . . . . . . . . . . . . . . . . . . . . . . . . . . . . . . . . . . . . . . . . . . 6.2.2 Creating tables . . . . . . . . . . . . . . . . . . . . . . . . . . . . . . . . . . . . . . . . . . . . . . . . . . 6.2.3 Populating tables . . . . . . . . . . . . . . . . . . . . . . . . . . . . . . . . . . . . . . . . . . . . . . . . 6.2.4 Installing DB2 clients on development clients and servers . . . . . . . . . . . . . . . . . 6.2.5 Developing the data access layer (DB2). . . . . . . . . . . . . . . . . . . . . . . . . . . . . . . 6.3 Form data access using XForms submissions . . . . . . . . . . . . . . . . . . . . . . . . . . . . . . 6.4 Form development for XForms submissions. . . . . . . . . . . . . . . . . . . . . . . . . . . . . . . . 6.4.1 Where we are in the process of building stage 2 of the base scenario. . . . . . . . 6.4.2 Development of XForms submissions in the form. . . . . . . . . . . . . . . . . . . . . . . . 6.4.3 Creating actions to activate the submission . . . . . . . . . . . . . . . . . . . . . . . . . . . . 6.4.4 Discussion of advanced aspects of using XForms submissions. . . . . . . . . . . . . 6.4.5 J2EE development for XForms submissions . . . . . . . . . . . . . . . . . . . . . . . . . . . 6.4.6 XForms submission runtime . . . . . . . . . . . . . . . . . . . . . . . . . . . . . . . . . . . . . . . . 6.5 Servlet access to form data. . . . . . . . . . . . . . . . . . . . . . . . . . . . . . . . . . . . . . . . . . . . . 6.5.1 Where we are in the process: building stage 2 of the base scenario . . . . . . . . . 6.5.2 Servlet access to form data (prepopulation/data retrieval) . . . . . . . . . . . . . . . . . 6.5.3 Form prepopulation . . . . . . . . . . . . . . . . . . . . . . . . . . . . . . . . . . . . . . . . . . . . . . . 6.5.4 Extraction of form data and storage of entire form . . . . . . . . . . . . . . . . . . . . . . . 6.5.5 Reading form data from DB2 . . . . . . . . . . . . . . . . . . . . . . . . . . . . . . . . . . . . . . . 6.6 Adjustments to JSPs for stage 2 . . . . . . . . . . . . . . . . . . . . . . . . . . . . . . . . . . . . . . . . . 6.6.1 Where we are in the process: building stage 2 of the base scenario . . . . . . . . . 6.6.2 Modifying the index.jsp . . . . . . . . . . . . . . . . . . . . . . . . . . . . . . . . . . . . . . . . . . . . 6.6.3 Creating a JSP to view DB2 data . . . . . . . . . . . . . . . . . . . . . . . . . . . . . . . . . . . . 6.7 Workflow . . . . . . . . . . . . . . . . . . . . . . . . . . . . . . . . . . . . . . . . . . . . . . . . . . . . . . . . . . . 6.7.1 Where we are in the process: building stage 2 of the base scenario . . . . . . . . . 6.7.2 Approval workflow . . . . . . . . . . . . . . . . . . . . . . . . . . . . . . . . . . . . . . . . . . . . . . . . 367 368 368 369 370 374 378 378 390 391 392 392 397 410 410 418 420 421 421 422 426 431 435 435 436 437 441 442 443 Chapter 7. Zero Footprint with Webform Server . . . . . . . . . . . . . . . . . . . . . . . . . . . . . 7.1 Zero Footprint solution . . . . . . . . . . . . . . . . . . . . . . . . . . . . . . . . . . . . . . . . . . . . . . . . 7.2 Form design delta . . . . . . . . . . . . . . . . . . . . . . . . . . . . . . . . . . . . . . . . . . . . . . . . . . . . 7.3 Differences between Webform Server and Workplace Forms Viewer . . . . . . . . . . . . 7.4 Web services with Workplace Forms 2.6 solution. . . . . . . . . . . . . . . . . . . . . . . . . . . . 447 449 452 455 459 IBM Workplace Forms 2.6: Guide to Building and Integrating a Sample Workplace Forms Application 7.5 The sample applications . . . . . . . . . . . . . . . . . . . . . . . . . . . . . . . . . . . . . . . . . . . . . . . 462 7.6 Servlet/portlet required . . . . . . . . . . . . . . . . . . . . . . . . . . . . . . . . . . . . . . . . . . . . . . . . 467 7.7 Solving a common Webform Server upgrade problem . . . . . . . . . . . . . . . . . . . . . . . . 468 Chapter 8. Integration with IBM DB2 Content Manager. . . . . . . . . . . . . . . . . . . . . . . . 8.1 Overview . . . . . . . . . . . . . . . . . . . . . . . . . . . . . . . . . . . . . . . . . . . . . . . . . . . . . . . . . . . 8.2 Basic design of Content Manager integration . . . . . . . . . . . . . . . . . . . . . . . . . . . . . . . 8.3 Integrating the sales quote sample with DB2 Content Manager . . . . . . . . . . . . . . . . . 8.3.1 Create attributes and item types . . . . . . . . . . . . . . . . . . . . . . . . . . . . . . . . . . . . . 8.3.2 Add the CM integration in the form . . . . . . . . . . . . . . . . . . . . . . . . . . . . . . . . . . . 8.3.3 Servlet-to-servlet communication . . . . . . . . . . . . . . . . . . . . . . . . . . . . . . . . . . . . 8.3.4 Test the form integration with CM . . . . . . . . . . . . . . . . . . . . . . . . . . . . . . . . . . . . 471 472 474 477 477 484 486 488 Chapter 9. Lotus Domino integration . . . . . . . . . . . . . . . . . . . . . . . . . . . . . . . . . . . . . . 493 9.1 Introduction to integration of Domino and Workplace Forms . . . . . . . . . . . . . . . . . . . 494 9.1.1 How the two technologies can complement each other . . . . . . . . . . . . . . . . . . . 494 9.1.2 Workplace Forms and Lotus Notes and Domino integration scenarios . . . . . . . 495 9.2 Overview and objective of Domino integration . . . . . . . . . . . . . . . . . . . . . . . . . . . . . . 495 9.3 Environment overview . . . . . . . . . . . . . . . . . . . . . . . . . . . . . . . . . . . . . . . . . . . . . . . . . 496 9.4 Setting up the Domino environment . . . . . . . . . . . . . . . . . . . . . . . . . . . . . . . . . . . . . . 500 9.5 Foundation of Domino development . . . . . . . . . . . . . . . . . . . . . . . . . . . . . . . . . . . . . . 501 9.5.1 Repository database . . . . . . . . . . . . . . . . . . . . . . . . . . . . . . . . . . . . . . . . . . . . . . 502 9.5.2 XForms submissions. . . . . . . . . . . . . . . . . . . . . . . . . . . . . . . . . . . . . . . . . . . . . . 503 9.5.3 Creating an XForms submission agent . . . . . . . . . . . . . . . . . . . . . . . . . . . . . . . . 505 9.6 Scenario 1 - Domino integration for Web-enabled applications using Forms Viewer browser plug-in . . . . . . . . . . . . . . . . . . . . . . . . . . . . . . . . . . . . . . . . . . . . . . . . . . . . . . 513 9.6.1 Template database: components to create a new form from template . . . . . . . . 514 9.6.2 Template form . . . . . . . . . . . . . . . . . . . . . . . . . . . . . . . . . . . . . . . . . . . . . . . . . . . 516 9.6.3 Template database: receiving submitted forms in Domino . . . . . . . . . . . . . . . . . 551 9.7 Scenario 2 - integrating Forms Viewer with Notes Client - overview and objective . . 573 9.8 Scenario 2 - environment overview . . . . . . . . . . . . . . . . . . . . . . . . . . . . . . . . . . . . . . . 575 9.8.1 Client prerequisites . . . . . . . . . . . . . . . . . . . . . . . . . . . . . . . . . . . . . . . . . . . . . . . 576 9.8.2 Server prerequisites . . . . . . . . . . . . . . . . . . . . . . . . . . . . . . . . . . . . . . . . . . . . . . 576 9.9 Scenario 2 - setting up the Domino environment . . . . . . . . . . . . . . . . . . . . . . . . . . . . 576 9.9.1 Client installation . . . . . . . . . . . . . . . . . . . . . . . . . . . . . . . . . . . . . . . . . . . . . . . . . 576 9.9.2 Server installation . . . . . . . . . . . . . . . . . . . . . . . . . . . . . . . . . . . . . . . . . . . . . . . . 577 9.10 Scenario 2 - Domino development . . . . . . . . . . . . . . . . . . . . . . . . . . . . . . . . . . . . . . 578 9.10.1 Scenario 2.1 - local form handling with Viewer and Lotus script, with Notes client locked . . . . . . . . . . . . . . . . . . . . . . . . . . . . . . . . . . . . . . . . . . . . . . . . . . . . . . . . . 579 9.10.2 Scenario 2.2 - local form handling with Viewer and LotusScript, with Notes client released . . . . . . . . . . . . . . . . . . . . . . . . . . . . . . . . . . . . . . . . . . . . . . . . . . . . . . . 589 9.10.3 Use Case 2.3 - local form handling with Viewer using Java API for prepopulation and value extraction . . . . . . . . . . . . . . . . . . . . . . . . . . . . . . . . . . . . . . . . . . . . . . 594 9.11 Scenario 3 - Domino integration using HTTP submissions for completed forms . . . 606 9.11.1 Scenario 3 - server installation . . . . . . . . . . . . . . . . . . . . . . . . . . . . . . . . . . . . . 609 9.11.2 Use case 3.1 - Notes Client/Forms Viewer based initiation, server-based submission . . . . . . . . . . . . . . . . . . . . . . . . . . . . . . . . . . . . . . . . . . . . . . . . . . . . . 609 9.11.3 Use case 3.2 - Notes Client using Webform Server . . . . . . . . . . . . . . . . . . . . . 612 9.12 Domino Forms Integration - solution considerations . . . . . . . . . . . . . . . . . . . . . . . . . 626 9.12.1 Document handling in the Domino application . . . . . . . . . . . . . . . . . . . . . . . . . 627 9.12.2 Language considerations (LotusScript versus Java versus LS2J) . . . . . . . . . . 627 9.12.3 Notes client behavior (locked versus unlocked client) . . . . . . . . . . . . . . . . . . . 627 9.12.4 Application-side validation after form submission . . . . . . . . . . . . . . . . . . . . . . . 628 Contents vii 9.12.5 Automatic file upload. . . . . . . . . . . . . . . . . . . . . . . . . . . . . . . . . . . . . . . . . . . . . 629 9.12.6 Document save in the Webform server environment . . . . . . . . . . . . . . . . . . . . 629 9.12.7 Character set . . . . . . . . . . . . . . . . . . . . . . . . . . . . . . . . . . . . . . . . . . . . . . . . . . 630 Chapter 10. Workplace Forms and WebSphere Portal fundamentals . . . . . . . . . . . . 10.1 Defining integration of Workplace Forms and portal . . . . . . . . . . . . . . . . . . . . . . . . . 10.2 Key concepts. . . . . . . . . . . . . . . . . . . . . . . . . . . . . . . . . . . . . . . . . . . . . . . . . . . . . . . 10.3 Workplace Forms sample portlets. . . . . . . . . . . . . . . . . . . . . . . . . . . . . . . . . . . . . . . 10.4 Options for displaying Workplace Forms in portal. . . . . . . . . . . . . . . . . . . . . . . . . . . 10.5 Hello World example: embedded Viewer approach . . . . . . . . . . . . . . . . . . . . . . . . . 10.6 Hello World example: Zero Footprint forms in portal. . . . . . . . . . . . . . . . . . . . . . . . . 10.7 Managing use of rich versus Zero Footprint forms . . . . . . . . . . . . . . . . . . . . . . . . . . 10.7.1 Detecting the presence of the Workplace Forms Viewer . . . . . . . . . . . . . . . . . 10.7.2 Forcing delivery of HTML or XML forms . . . . . . . . . . . . . . . . . . . . . . . . . . . . . . 10.8 Keeping form submissions in-context . . . . . . . . . . . . . . . . . . . . . . . . . . . . . . . . . . . . 10.9 Inter-portlet communication. . . . . . . . . . . . . . . . . . . . . . . . . . . . . . . . . . . . . . . . . . . . 631 632 632 634 636 637 640 641 641 642 642 644 Appendix A. Upgrading Version 2.5 forms . . . . . . . . . . . . . . . . . . . . . . . . . . . . . . . . . . Differences between Designer 2.5 and 2.6 . . . . . . . . . . . . . . . . . . . . . . . . . . . . . . . . . . . . Upgrading forms . . . . . . . . . . . . . . . . . . . . . . . . . . . . . . . . . . . . . . . . . . . . . . . . . . . . . . Background . . . . . . . . . . . . . . . . . . . . . . . . . . . . . . . . . . . . . . . . . . . . . . . . . . . . . . . . . . . . Upgrading the form from the previous book . . . . . . . . . . . . . . . . . . . . . . . . . . . . . . . . . . . . Preview the upgraded form . . . . . . . . . . . . . . . . . . . . . . . . . . . . . . . . . . . . . . . . . . . . . . . . 645 646 646 647 648 653 Appendix B. Writing Form extensions - IFX . . . . . . . . . . . . . . . . . . . . . . . . . . . . . . . . . Function Call Interface overview . . . . . . . . . . . . . . . . . . . . . . . . . . . . . . . . . . . . . . . . . . . . Creating Function Call Interface extensions . . . . . . . . . . . . . . . . . . . . . . . . . . . . . . . . . . . The extension class . . . . . . . . . . . . . . . . . . . . . . . . . . . . . . . . . . . . . . . . . . . . . . . . . . . The FunctionCall class . . . . . . . . . . . . . . . . . . . . . . . . . . . . . . . . . . . . . . . . . . . . . . . . . The MANIFEST.fm file . . . . . . . . . . . . . . . . . . . . . . . . . . . . . . . . . . . . . . . . . . . . . . . . . Deploying Function Call Interface extensions . . . . . . . . . . . . . . . . . . . . . . . . . . . . . . . . . . Calling Function Call Interface Extensions in XFDL computes . . . . . . . . . . . . . . . . . . . . . Debugging Function Call Interface extensions. . . . . . . . . . . . . . . . . . . . . . . . . . . . . . . . . . Debugging API/FCI extension loading . . . . . . . . . . . . . . . . . . . . . . . . . . . . . . . . . . . . . Debugging Java code running inside a built IFX using Eclipse/RAD6 . . . . . . . . . . . . . Additional resources for IFX/FCI extension . . . . . . . . . . . . . . . . . . . . . . . . . . . . . . . . . . . . 661 662 663 663 664 667 668 669 669 670 671 672 Appendix C. Web services . . . . . . . . . . . . . . . . . . . . . . . . . . . . . . . . . . . . . . . . . . . . . . . Web services integration . . . . . . . . . . . . . . . . . . . . . . . . . . . . . . . . . . . . . . . . . . . . . . . . . . Common scenario for Web services in Forms . . . . . . . . . . . . . . . . . . . . . . . . . . . . . . . . . . Web service development . . . . . . . . . . . . . . . . . . . . . . . . . . . . . . . . . . . . . . . . . . . . . . . . . Web service runtime . . . . . . . . . . . . . . . . . . . . . . . . . . . . . . . . . . . . . . . . . . . . . . . . . . . . . Implementing Web services in XForms . . . . . . . . . . . . . . . . . . . . . . . . . . . . . . . . . . . . . . . 673 674 674 676 680 686 Appendix D. Additional material . . . . . . . . . . . . . . . . . . . . . . . . . . . . . . . . . . . . . . . . . . 693 Locating the Web material . . . . . . . . . . . . . . . . . . . . . . . . . . . . . . . . . . . . . . . . . . . . . . . . . 693 Using the Web material . . . . . . . . . . . . . . . . . . . . . . . . . . . . . . . . . . . . . . . . . . . . . . . . . . . 693 Related publications . . . . . . . . . . . . . . . . . . . . . . . . . . . . . . . . . . . . . . . . . . . . . . . . . . . . IBM Redbooks . . . . . . . . . . . . . . . . . . . . . . . . . . . . . . . . . . . . . . . . . . . . . . . . . . . . . . . . . . Other publications . . . . . . . . . . . . . . . . . . . . . . . . . . . . . . . . . . . . . . . . . . . . . . . . . . . . . . . Online resources . . . . . . . . . . . . . . . . . . . . . . . . . . . . . . . . . . . . . . . . . . . . . . . . . . . . . . . . How to get IBM Redbooks . . . . . . . . . . . . . . . . . . . . . . . . . . . . . . . . . . . . . . . . . . . . . . . . . Help from IBM . . . . . . . . . . . . . . . . . . . . . . . . . . . . . . . . . . . . . . . . . . . . . . . . . . . . . . . . . . viii IBM Workplace Forms 2.6: Guide to Building and Integrating a Sample Workplace Forms Application 697 697 697 697 698 698 Index . . . . . . . . . . . . . . . . . . . . . . . . . . . . . . . . . . . . . . . . . . . . . . . . . . . . . . . . . . . . . . . . . 699 Contents ix x IBM Workplace Forms 2.6: Guide to Building and Integrating a Sample Workplace Forms Application Notices This information was developed for products and services offered in the U.S.A. IBM may not offer the products, services, or features discussed in this document in other countries. Consult your local IBM representative for information on the products and services currently available in your area. Any reference to an IBM product, program, or service is not intended to state or imply that only that IBM product, program, or service may be used. Any functionally equivalent product, program, or service that does not infringe any IBM intellectual property right may be used instead. However, it is the user's responsibility to evaluate and verify the operation of any non-IBM product, program, or service. IBM may have patents or pending patent applications covering subject matter described in this document. The furnishing of this document does not give you any license to these patents. You can send license inquiries, in writing, to: IBM Director of Licensing, IBM Corporation, North Castle Drive, Armonk, NY 10504-1785 U.S.A. The following paragraph does not apply to the United Kingdom or any other country where such provisions are inconsistent with local law: INTERNATIONAL BUSINESS MACHINES CORPORATION PROVIDES THIS PUBLICATION "AS IS" WITHOUT WARRANTY OF ANY KIND, EITHER EXPRESS OR IMPLIED, INCLUDING, BUT NOT LIMITED TO, THE IMPLIED WARRANTIES OF NON-INFRINGEMENT, MERCHANTABILITY OR FITNESS FOR A PARTICULAR PURPOSE. Some states do not allow disclaimer of express or implied warranties in certain transactions, therefore, this statement may not apply to you. This information could include technical inaccuracies or typographical errors. Changes are periodically made to the information herein; these changes will be incorporated in new editions of the publication. IBM may make improvements and/or changes in the product(s) and/or the program(s) described in this publication at any time without notice. Any references in this information to non-IBM Web sites are provided for convenience only and do not in any manner serve as an endorsement of those Web sites. The materials at those Web sites are not part of the materials for this IBM product and use of those Web sites is at your own risk. IBM may use or distribute any of the information you supply in any way it believes appropriate without incurring any obligation to you. Information concerning non-IBM products was obtained from the suppliers of those products, their published announcements or other publicly available sources. IBM has not tested those products and cannot confirm the accuracy of performance, compatibility or any other claims related to non-IBM products. Questions on the capabilities of non-IBM products should be addressed to the suppliers of those products. This information contains examples of data and reports used in daily business operations. To illustrate them as completely as possible, the examples include the names of individuals, companies, brands, and products. All of these names are fictitious and any similarity to the names and addresses used by an actual business enterprise is entirely coincidental. COPYRIGHT LICENSE: This information contains sample application programs in source language, which illustrate programming techniques on various operating platforms. You may copy, modify, and distribute these sample programs in any form without payment to IBM, for the purposes of developing, using, marketing or distributing application programs conforming to the application programming interface for the operating platform for which the sample programs are written. These examples have not been thoroughly tested under all conditions. IBM, therefore, cannot guarantee or imply reliability, serviceability, or function of these programs. © Copyright IBM Corp. 2007. All rights reserved. xi Trademarks The following terms are trademarks of the International Business Machines Corporation in the United States, other countries, or both: Redbooks (logo) ® developerWorks® Domino® DB2 Universal Database™ DB2® Footprint® IBM® Lotus Notes® Lotus® MVS™ Notes® Rational® Redbooks® Tivoli® WebSphere® Workplace™ Workplace Forms™ Workplace Managed Client™ The following terms are trademarks of other companies: SAP, and SAP logos are trademarks or registered trademarks of SAP AG in Germany and in several other countries. Andreas, Adobe, and Portable Document Format (PDF) are either registered trademarks or trademarks of Adobe Systems Incorporated in the United States, other countries, or both. Java, JavaScript, JDBC, JSP, JVM, J2EE, and all Java-based trademarks are trademarks of Sun Microsystems, Inc. in the United States, other countries, or both. ActiveX, Expression, Internet Explorer, Microsoft, Verdana, Windows Server, Windows, and the Windows logo are trademarks of Microsoft Corporation in the United States, other countries, or both. Linux is a trademark of Linus Torvalds in the United States, other countries, or both. Texcel and FormBridge are registered trademarks of Texcel Systems, Inc.in the United States and other countries. Other company, product, or service names may be trademarks or service marks of others. xii IBM Workplace Forms 2.6: Guide to Building and Integrating a Sample Workplace Forms Application Preface This IBM® Redbooks® publication describes the features and functionality of Workplace™ Forms 2.6 and each of its component products. After introducing the products and providing an overview of features and functionality, we discuss the underlying product architecture and address the concept of integration. To help potential users, architects, and developers better understand how to develop and implement a forms application, we introduce a specific scenario based on a sales quotation approval application. Using this base scenario as a foundation, we describe in detail how to build an application that captures data in a form, then applies specific business logic and workflow to gain approval for a specific product sales quotation. Throughout the scenario we build upon the complexity of the application and introduce increasing integration points with other data systems. Ultimately, we demonstrate how an IBM Workplace Forms™ application can integrate with WebSphere® Portal, IBM DB2® Content Manager, and Lotus® Domino®. The team that wrote this book This book was produced by a team of specialists from around the world working at the International Technical Support Organization, Cambridge Center. Philip Monson is a Project Leader at the ITSO Lotus Center in Cambridge, MA. Phil has been with Lotus/IBM for 16 years, joining the company when the early versions of Notes were rolled out for internal use. He has served in management, technical, and consulting roles in the IT, Sales, and Development organizations. Cayce Marston is a Senior IT Specialist within the IBM Worldwide Technical Sales team. He joined IBM as part of the PureEdge Solutions acquisition in mid-2005, where he held the position of Solutions Engineering Manager. Prior to joining PureEdge, Cayce worked as a consultant and software architect in the telecom and financial services industries. His areas of expertise include Workplace Forms, XForms, systems integration, and SOA. Cayce has authored a range of forms-related publications including the whitepaper "Extending SOA with XForms” and the IBM Redbooks publicaiton IBM Workplace Forms: Guide to Building and Integrating a Sample Workplace Forms Application, and he recently co-authored the second edition of Programming Portlets. Andreas A. Richter is a system architect working in IBM Software Service for Lotus (ISSL) since 1999, specifically for the IOT Europe North East division. He primarily leads Domino-based application development projects, Lotus Workfow projects, and integration projects with SAP® HR data in large accounts. Beginning in 2004, he started to focus on J2EE™ application development (IBM Workplace, Workplace Managed Client™, Workplace designer, Bowstreet Portlet Factory). Since November 2005, he has been concentrating on IBM Workplace Forms while continuing to also engage in Domino projects. George Poirier is member of the World Wide Technical Sales team for Workplace Forms and Workplace Learning. He has been with IBM for 30 years. As an employee of IBM, his roles have included seven years in Worldwide Technical Sales, a Systems Architect for the Lotus Professional Services (ISSL), and an MVS™ Technical Support Specialist in IBM Dallas System Center. George has developed and delivered several Learning deepdive enablement sessions. © Copyright IBM Corp. 2007. All rights reserved. xiii Manny Santana is a Technical Specialist with IBM Australia's Software Group Services, and is based in Sydney. He currently performs consultancy and technical work for major clients in A/NZ, and has over 10 years of experience in development, deployment, and support of various internal IBM applications in the GWA and GNA environments. He received a Bachelor of Science degree from the University of Sydney, and is an IBM Certified Advanced Application Developer - Lotus Notes® and Domino 7. Manny co-authored the Lotus Domino 7 Application Development Redpaper. Edward Dussourd is a member of the Eastern Regional SWAT team in the United States. He has worked for IBM for more than eight years in various roles as a Technical Specialist, providing software, services, education, and consulting solutions to business partners and customers. For the majority of his career he has specialized in e-learning offerings from IBM. Late in 2005, Ed transitioned to the IBM Workplace Forms solution offerings as a Senior Technical Specialist. Thanks to the following people for their contributions to this project: Paul A. Chan, Worldwide Director, Forms Marketing, IBM Software Group, Lotus, IBM, Victoria, BC Canada Bob Levy, Workplace Product Management, IBM Software Group, Lotus, IBM, Cambridge, MA Steve Shewchuk, Workplace Forms Enablement, IBM Software Group, Lotus, IBM, Victoria, BC Canada Eric Dunn, Workplace Forms Enablement, IBM Software Group, Lotus, IBM, Victoria, BC Canada Become a published author Join us for a two- to six-week residency program! Help write an IBM Redbooks publication dealing with specific products or solutions, while getting hands-on experience with leading-edge technologies. You'll have the opportunity to team with IBM technical professionals, Business Partners, and Clients. Your efforts will help increase product acceptance and customer satisfaction. As a bonus, you'll develop a network of contacts in IBM development labs, and increase your productivity and marketability. Find out more about the residency program, browse the residency index, and apply online at: ibm.com/redbooks/residencies.html Comments welcome Your comments are important to us! We want our Redbooks to be as helpful as possible. Send us your comments about this or other Redbooks in one of the following ways: Use the online Contact us review form found at: ibm.com/redbooks xiv IBM Workplace Forms 2.6: Guide to Building and Integrating a Sample Workplace Forms Application Send your comments in an e-mail to: [email protected] Mail your comments to: IBM Corporation, International Technical Support Organization Dept. HYTD Mail Station P099 2455 South Road Poughkeepsie, NY 12601-5400 Preface xv xvi IBM Workplace Forms 2.6: Guide to Building and Integrating a Sample Workplace Forms Application 1 Chapter 1. Introduction to IBM Workplace Forms IBM Workplace Forms unlocks the enterprise value of information currently trapped within paper forms by dramatically improving the access to accurate and timely information by people and systems. IBM Workplace Forms enables organizations to streamline core processes and compliance-oriented operations, resulting in reduced costs and improved service levels to customers, suppliers, partners, and employees. By incorporating IBM Workplace Forms into your organization, and converting from paper-based forms to electronic forms, IBM Workplace Forms provides a security-rich, dynamic, and intelligent front-end to your organization’s business processes. The IBM Workplace Forms product family consists of a server, designer, and client viewer that together enable the creation, deployment, and streamlining of XML Forms-based processes. By leveraging open standards to integrate an intelligent user interface with high-value back-end systems, IBM Workplace Forms provides public and private sector organizations across many industries with security-rich forms that leverage existing resources and systems to help better serve customers and increase operational efficiency. This book describes the features and functionality of Workplace Forms and each of its component products. After introducing the products and providing an overview of features and functionality, the underlying product architecture and integration techniques are described. To help potential users, architects, and developers better understand how to develop and implement a forms application, a specific business scenario based on a sales quotation approval application is implemented. Using this base scenario as a foundation, the process of building an application that captures data in a form, then the application of specific business logic and workflow to gain approval for the product sales quotation is described in detail. Throughout the scenario, we build upon the complexity of the application and introduce increasing integration points with other data systems. Ultimately, an IBM Workplace Forms application that integrates with WebSphere Portal, IBM DB2 Content Manager, and Lotus Domino is described. © Copyright IBM Corp. 2007. All rights reserved. 1 Note: While the examples in this book use IBM products, the integration examples and approaches can be applied to a wide variety of databases, content management, document management, portal, and workflow systems due to the implementation of open standards architecture of Workplace Forms. Which specific version of IBM Workplace Forms does this book apply to? This book has been written with the intent of showing IBM Workplace Forms Release 2.6.1. The concepts and value proposition in this introduction chapter apply to both Release 2.5 and Release 2.6.1. Release of 2.6 of Workplace Forms provides full support for the XForms standard. All specific features and functions reviewed in Chapter 2, “Features and functionality” on page 19, refer specifically to Release 2.6. All specific examples shown and used when building the sample scenario application are based on the codebase for IBM Workplace Forms Release 2.6.1. 2 IBM Workplace Forms 2.6: Guide to Building and Integrating a Sample Workplace Forms Application 1.1 What is a form As a foundation to discuss the benefits and specific features and technology of IBM Workplace Forms, it is important to first establish a common understanding of the term form. For the context of this product, the following is the definition of a form: a blank document or template to be filled in by the user. The form serves a structured mechanism to capture data. A form frequently initiates a transaction or business process and often becomes the record of the transaction being stored in a system of record. In the most traditional sense, forms have been largely paper based. In this book, the benefits of electronic forms and the ability to process and reuse the data captured in forms is examined. We demonstrate how an XForms-enabled eForm is more than just a form. It is a dynamic user interface that captures structured data at the front-end of the business process and enables a rich user experience. 1.1.1 Form as a front-end to a business process Given the information-intensive nature of business, both documents and forms are essential components in driving and supporting all types of processes. These include processes and procedures, regulatory requirements and compliance issues, and inter-agency/inter-departmental and constituent/customer communications. Document types range from spreadsheets to engineering drawings to Web information. They can come from desktop users or output from back-end systems such as ERP, CRM, content management, and legacy systems. Why are documents so critical? They are a necessary and ubiquitous part of business. In many cases, they are the end product of a service (a business permit or an insurance policy, for example). Documents are familiar, readily available in paper or online forms, and deliver high levels of visual quality. Documents meet regulatory or compliance requirements that often dictate a document’s precise look and feel (insurance policies, tax forms, permits, and so on). Documents are universally accepted: they can be used offline. Forms are also a critical part of business processes and procedural transactions. Filling out forms (from business permits to filing taxes) is familiar to anyone who has dealt with government agencies. Forms are used to capture information from individuals and organizations. Much of this information ends up in core IT systems. While the form is a structured mechanism to capture data, much of the business value lies in how the data is processed once it has been entered. The form acts as a UI for entering the data, and is commonly a starting point for a business process. For example, one of your customers might fill out a paper form to open a new account. Once that form is completed and passed to the correct department, the process of creating that account begins. This concept is fundamental to understanding and appreciating the business value of electronic forms. A form is a front-end to a process. Ultimately, IBM Workplace Forms provides a solution that goes beyond merely converting paper-based forms to electronic forms. The real value is the ability to integrate people, information, and processes. Chapter 1. Introduction to IBM Workplace Forms 3 Key concept: A form is a mechanism for capturing data and represents a front-end to a business process. 1.1.2 Electronic forms: XML intelligent documents When considering the benefits that result from evolving toward electronic forms and XML intelligent documents, there are several levels of integration to be considered. The extent to which electronic forms (eForms) have been fully integrated into an organization’s business processes impacts the level of value and return on investment (ROI) from the implementation of electronic form processing. As shown in Figure 1-1, you can look at eForms from a content-centric view or a process-centric view. The entry point or level 1 is the Print and Fill form. For example, you might download a form from the Web, print it, fill it out, and then mail or fax it in for processing. There is some value with this (namely, the company provided the user or customer with the form from a Web site versus having to mail them a copy), but this is just the prelude to what is possible. At this level, the back-end processing of the form has not changed. Only the delivery method has been improved. e-Forms Spectrum ProcessCentric Gartner: • "e-forms based on XML architecture will become the standard for web- based form input and document delivery by 2006" Value and ROI 5 • "Enterprises are seeking electronic process enablers, not just forms on the web" 4 Enterprise Content/ Process Management ...Store, Process and Preserve ($154.00 Savings per Form** ContentCentric 3 2 1 Fill & Print Print & Fill Fill, (Sign) & Submit ($97.00 Savings per Form** ($16.25 Savings per Form* ($14.00 Savings per Form* Print & Read Figure 1-1 Spectrum of eForm integration As you go up the value curve, you will start to realize a larger return on your investment, and it can grow exponentially when you start to cross into the process spectrum. For example, level 3 represents an environment in which you allow the user or customer to fill out an electronic form, optionally sign it, and submit it for back-end processing. Tremendous investments are being made to put paper processing online, and use automation to do more of the work. A Fill and Submit type of an eForm (level 3) is an excellent example of this capability. The other levels of eForms processing (level 4 and level 5) are extensions to the fill and submit example, where you are truly adding an electronic workflow to the form once it has 4 IBM Workplace Forms 2.6: Guide to Building and Integrating a Sample Workplace Forms Application been submitted. Approvals for anything from purchase orders to human resources greatly enhance the Forms application. Finally, at level 5, you make the content (the form) part of an Enterprise Content Management (ECM) environment. In this case, you allow for re-use of the form or content in other applications or part of a larger overall storage strategy. An example of this might be a customer folder concept, where the eForm is one piece of content in the overall electronic customer folder. The form at this stage becomes legal documents of record and represent the entire transaction process. Finally, the value of implementing electronic forms can be viewed in the following terms: Meeting customer and partner demands – Faster, easier access to online forms and services – Consistent experience across programs and delivery channels Increasing operational efficiencies – Automated paper processes – Integrated services delivery – Hard dollar savings with accelerated ROI Ensuring security – – – – Protecting customer/partner privacy Controlling access Ensuring content integrity Authenticating people and processes The degree to which your organization can leverage these benefits depends upon where you are in the spectrum of integrating eForms. 1.1.3 Forms marketplace According to industry analysts, eForms represent a $500M market, with the following notable points: XML-enabled eForms will double in use as a standard enterprise document format. By 2009, 25% of enterprises will use XML-based document processes. From IDC and Gartner - Forms comprise 80–85% of business processes, which makes it the most pervasive document enabling business organizations to automate processes. An XML-enabled eForm is more than just a form. It is a dynamic user interface that captures structured data at the front-end of the business process, and enables a rich user experience: – It enforces business rules and validates data at the glass. – It is a computation engine without server refresh. – It provides a secure transaction captured in a standard data model with digital signatures. – It functions offline and online — thin or rich client. – It is a storable and retrievable document object that can traverse a business process. Chapter 1. Introduction to IBM Workplace Forms 5 Figure 1-2 illustrates the positioning of IBM Workplace Forms relative to other forms implementations. In terms of both enterprise value and functionality, Workplace Forms ranks the highest due to its advanced functionality, ability to integrate with and drive business processes, and its ability to meet regulatory compliance requirements. Alternatively, competitors such as Microsoft® and Adobe® provide proprietary forms solutions at the bottom of the middle tier. eForms – Competitive Map Functionality Enterprise Value Form Opportunity High Business Process Automation IBM Workplace Forms • Enterprise Process Forms • Fully Integrated • Security-Rich, Auditable • XML & Open standards ex: ACORD eForms standardized on IBM eForms Market Low • Simple Forms • Proprietary Adobe/Microsoft eForms is a subset of a larger business process automation opportunity Figure 1-2 Positioning of IBM Workplace Forms 1.2 Overview of IBM Workplace Forms The IBM Workplace Forms suite includes the following products: IBM Workplace Forms Viewer IBM Workplace Forms Designer IBM Workplace Forms Server Together, these tools allow you to create, fill, and submit forms, and integrate those forms with your back-end processes. Ultimately, IBM Workplace Forms tools work together to make each of the functions possible (creation, submission, and integration with other data systems) and can be used to create an end-to-end solution. 6 IBM Workplace Forms 2.6: Guide to Building and Integrating a Sample Workplace Forms Application Figure 1-3 illustrates a conceptual overview of how the products work together within the context of a complete Web-based forms application. Corporate Web Server Users Portal Forms Portlet Forms Forms Workplace Forms™ Server-API Workplace Forms™ Viewer Workflow Forms Database Workplace Forms™ Designer Figure 1-3 Conceptual overview of Workplace Forms Figure 1-4 on page 8 illustrates a more in-depth view of how IBM Workplace Forms works with other products in the IBM Software portfolio. IBM Workplace Forms Viewer is a feature-rich desktop application used to view, fill, sign, submit, and route eForms, and is able to function on the desktop or within a browser. It enables full connectivity with real-time integration using many integration techniques. The open standards framework of IBM Workplace Forms enables Workplace Forms Viewer to operate in portal or stand-alone environments, in online or offline modes, and as a plug-in for thin or rich-client browsers. IBM Workplace Forms Designer is an easy-to-use WYSIWYG eForm design environment that supports the drag-and-drop creation of precision forms with an open and accessible XML-schema-derived data model. IBM Workplace Forms Designer leverages open standards to deliver advanced forms-based business process automation solutions that integrate seamlessly across lines of business applications and IT infrastructure. IBM Workplace Forms Server suite enables the creation and delivery of XML Forms applications. It provides a common, open interface to enable integration of eForms data with server-side applications using industry-standard XML schemas. IBM Workplace Forms Webform Server delivers a true Zero Footprint solution by providing eForms to external users quickly and efficiently within a browser without requiring additional downloads or plug-ins. IBM Workplace Forms Webform Server provides a low administration solution for data-capture requirements while supporting precise viewing and printing, automated validation, and the security and compliance capabilities of XML eForms. Chapter 1. Introduction to IBM Workplace Forms 7 Servers Internet/Intranet Rich Client PC SSL Deploy IBM Workplace Forms Viewer XFDL Form Browser Only PC Workflow Systems Web Server Corporate Firewall/Proxy Browsers with WF Viewer Internet Deployment Server Oracle SQL Server DB2 Data M Applications Customer Application 3rd Party APIs WF Webform Server Servlet Class WF API SSL Web Server Document M Applications IBM FileNet BroadVision HTML Handler Browsers Webform Server Emulator Webform Server Designer PC WF Designer Intranet Figure 1-4 Architecture of Workplace Forms 1.2.1 Value proposition In this section we highlight key value points where IBM Workplace Forms can benefit your organization. IBM Workplace Forms allows your organization to more efficiently and effectively integrate people, information, and processes. Starting with the traditional paper-based forms: Workplace Forms unlocks the value trapped in paper forms. Workplace Forms then makes this information more accessible. Workplace Forms helps manage the information and associated processes more efficiently. IBM Workplace Forms enables you to extract value from paper-based data. This ensures: Accurate information: data you can rely on Data and schema validation provided at the client and server levels using business logic that understands business process, data types, and schema requirements. Business impact: ensures accurate data required by all systems that touch the data or are involved in the business process. No expensive downstream re-work. Ensures that business can process data efficiently. 8 IBM Workplace Forms 2.6: Guide to Building and Integrating a Sample Workplace Forms Application Timeliness of data: enabling the right data at the right time On demand data capture from employees, customers, suppliers, and partners. Captures information as required by real-time processes, and uses business rules and Web services to get the right data at the right time. Business impact: the right data at the right time. This enables straight-through processing by capturing all necessary data as required to optimize a business process. Enhanced user productivity: role-based personalization Business logic is used to create personalized role-based wizards that can work online or offline to dramatically decrease the time required for each participant in a forms-based process. Business impact: Users have a personalized form-filling experience to minimize data capture tasks and maximize productivity. Leading forms technology: next generation online forms Best in class technology standards support include Web 2.0 (Ajax) for powerful browser-based forms experience: XForms — the only W3C approved standard for the next generation of Internet forms. XML, XML Schema, and Web services are all supported since Workplace Forms was designed from the ground up to support online forms. Business impact: best forms technology on the market built on common open standards. Enterprise accessibility of data: leveraging information across the enterprise Interoperable forms based on Open Standards (XML, XML Schema, XForms). Forms operate across various workflow, repository, portal, collaboration, and document management systems. Thin server architecture that supports J2EE and .NET implementations ensures high performance and throughput that can be easily scaled and grow with the customer's needs. The largest forms customers in the world use Workplace Forms. Business impact: Forms that work across system, division, and corporate boundaries provide business flexibility to enable and extend forms-based processes to create an On Demand business. Flexible and rapid deployment: rich or thin client options Rich client, thin (browser), or hybrid solutions provide flexibility of deployment for customers that require offline, online, and varying process or deployment requirements. Design once render many paradigm. Fast deployment using robust migration tools (from static formats such as PDF) and an Eclipse design tool that can create reusable form components. Business impact: flexibility to deploy for any process that spans organizations and diverse customer process requirements. Rapid time-to-value. Proven references. Managing information and processes more efficiently: lower operating costs Workplace Forms supports role-based workflows with flexible support for document and data driven workflows and support for complex process flows that can involve multiple and overlapping authorizations and signatures. Business impact: Workplace Forms enables straight-through processing and optimization of forms-based processes to reduce costs and decrease process cycle times. Best of breed compliance document: a robust transactional record A Workplace Form acts as a document throughout the life cycle of a process — from initiation to archiving a record of the transaction. Based on declarative business rules that avoid document integrity issues associated with scripting languages where digital signatures are used. Chapter 1. Introduction to IBM Workplace Forms 9 Business impact: no separate paper or imaged copies required to document a transaction or compliance of a process. Transactional document for Service Oriented Architecture (SOA): the business process document for SOA – Workplace Forms uses a thin architecture that ensures high performance while adding an intelligent document that adds business process rules. Leverage Web service support in the Workplace Forms client and add the process rules that add unique knowledge to XML schemas to drive process automation. Business impact: a process-aware document that instantiates and drives process improvement. – Workplace Forms enable the customer to implement process automation in a straight-forward and effective way. By exploiting the key technology in Workplace Forms, you are placed on an on ramp to SOA. Business Impact: This enables effective innovation that improves ROI and the implementation of SOA. 1.2.2 Product positioning IBM Workplace Forms builds upon the value of the IBM Software portfolio. Advanced eForms are a critical component of industry solutions due to their broad applicability to a variety of business processes. IBM Workplace Forms serves as a common front end to many different products within the IBM Software Portfolio (Figure 1-5). Off-Line Rich Client WebSphere Portal Mobile eForm Domino/Notes eForm eForm eForm Workplace Collaboration Services Browser IBM Content Manager WBI, WebSphere, etc., etc. Workplace Forms Figure 1-5 How Workplace Forms builds upon existing IBM Software products Workplace Forms: Provides a market-leading business process automation framework composed of products, partnerships, and services to create, manage, and deploy XML Forms-based processes. This addresses customer demand for increased efficiencies in business process management. 10 IBM Workplace Forms 2.6: Guide to Building and Integrating a Sample Workplace Forms Application Helps to further drive Open Standards, especially XForms, a key open industry standard that IBM supports. Workplace Forms also supports Java™, XML, and Eclipse technology. This accelerates adoption of open industry standards (such as XML and XForms) to ensure that business information is not locked in a proprietary format. Delivers high-value industry solutions. This fulfills customer demand for industry-specific applications to replace manual forms. Leverages complementary technology. Workplace Forms is a logical extension to the extensive forms-based application development business in Lotus Notes. Additionally, it complements Lotus Domino and IBM Workplace solutions for risk and compliance management. 1.3 Innovation based on standards: XForms and XFDL Workplace Forms is built upon proven, standards-based technology, including XForms and Extensible Forms Description Language (XFDL). As Web-based electronic forms have become more ubiquitous, XForms has emerged as the W3C specification for Web forms to overcome limitations with HTML Forms. The design goals of XForms meet the shortcomings of HTML forms point for point: Excellent XML integration (including XML Schema). Provide commonly requested features in a declarative way, including calculation and validation. Device independent, yet still useful on desktop browsers. Strong separation of purpose from presentation. Universal accessibility. Chapter 1. Introduction to IBM Workplace Forms 11 XForms enables eForms that can be used with a wide variety of platforms, including desktop computers, handhelds, information appliances, and even paper. For example, as displayed in Figure 1-6, we might use rich, XFDL-based forms on our laptop, however, WML may prove more suitable for a PDA or mobile phone. XForms controls are intended to abstract data access sufficiently to allow skinning of views with a variety of host languages. Figure 1-6 Conceptual diagram showing XForms Model skinned by different host languages Important: W3C XForms is an open standard for forms on the Web that builds on the syntax of XML data schemas. It provides the necessary rules and user interface abstraction to enable a forms data processing model that ensures interoperability for customers and partners, and that speeds time-to-market and reduces costs. XForms: business benefits and customer value The W3C XForms standard provides the following major benefits to customers: Standardization at a technology and industry transaction level enables interoperable B2B processes. Standardization of a forms data processing model enables reusable components that integrate with SOA, enabling faster time-to-market with lower form application deployment and maintenance costs. This standardization is accomplished in the following ways: XForms supports existing industry schemas. XForms can extend industry data schemas to support forms processing rule. XForms provides standards organizations with a more complete form definition to enable industry participants with a faster time-to-market and a greater level of interoperability. Ultimately, this results in the following business benefits: Enables application interoperability: XForms are available on any device, in any language, for any able or impaired person, and in any role within a business process. Enables industry transactional standards: XForms supports industry schemas along with transactional rules/UI. 12 IBM Workplace Forms 2.6: Guide to Building and Integrating a Sample Workplace Forms Application Lowers application development costs: XForms enables reusable form components with multiple client deployment options. Enhances and complements SOA: XForms provides a forms data processing model and supports active content using declarative rules and Web services. 1.3.1 W3C XForms and IBM Workplace Forms Extensible Forms Description Language (XFDL), developed by UWI.Com and Tim Bray, is an application of XML that allows organizations to move their paper-based forms systems to the Internet while maintaining the necessary attributes of paper-based transaction records. XFDL is designed for implementation in business-to-business electronic commerce and intra-organizational information transactions.1 XFDL is a highly structured XML protocol designed specifically to solve the problems associated with digitally representing paper forms on the Internet. The features of the language include support for a high-precision interface, fine-grained computations and integrated input validation, multiple overlapping digital signatures, and legally binding transaction records. What XFDL adds to XForms The benefits include: Document-centricity. XFDL stores the data in the document, creating a single record. Precision layout and printing. Can faithfully reproduce paper forms. Wizard-based, dynamic forms. Can guide the user through filling process, change on the fly, and reduce errors. Broad support for signatures. Locks both the XFDL presentation and the XForms data. Extension points for integration with other technologies. Can embed .jar files in the form to extend the functionality. What XForms add to XFDL The benefits include: New items Table, pane, checkgroup/radiogroup, slider XForms event handlers Value-changed, read-only, read/write, submit-error, and so on XForms functions Boolean-from-string, avg, min, max Device independence Common XML Data Model Workplace Forms gives a common XML Data Model (based on the W3C XForms standard) that can work in heterogeneous IT environments. These are common in most organizations that can combine diverse J2EE, .NET, legacy, CRM, ERP, HRMS, Content, Document, and Workflow environments. Also, this common XForms Model within Workplace Forms provides the ultimate flexibility in providing personalized, role-based views of this data for improved user productivity (wizard is an example of this). This common XForms Model also allows for 1 XFDL: Creating Electronic Commerce Transaction Records Using XML: Barclay T. Blair and John Boyer http://www8.org/w8-papers/4d-electronic/xfdl/xfdl.html Chapter 1. Introduction to IBM Workplace Forms 13 multiple system views or schemas necessary for straight through processing of this same data as required for back-end integration. 1.3.2 XForms + XFDL in alignment with SOA In addition to standardizing an eForm document model, XForms technology has excellent alignment with both the principles and technical requisites of service-oriented architectures (SOA). XFDL + XForms provides Workplace forms with an enabler for service oriented eForm solutions, while strong technical alignment also reduces barriers. At a functional level, one often sees a similar set of activities occur throughout different forms applications and forms-based processes. Let us consider some of the most common interactions that take place in Web and portal eForm applications. Standard interactions in eForm applications include: Server-side form prepopulation, that is, the merging of an empty form template with data.Submission of a form into a Content Management (CM) system at various stages of a process or workflow Submission of a completed, signed form to a Record Management System as a transaction record at the conclusion of a process Presentation of a form to users on laptops (mobile computers), tablet, or handheld devices both in online and offline modes Storage of form data into a database (often for reporting or for use by other systems) Transmission of form data into one or more Line-of- Business (LOB) systems Validation of digital signatures as part of an approval process 14 IBM Workplace Forms 2.6: Guide to Building and Integrating a Sample Workplace Forms Application Figure 1-7 provides a representative example of how eForm application functionality can be effectively used within the business tier of a larger Web application. An Example Service Oriented eForms Web Application Record Manager Authentication Authentication Service Service LDAP Form Form Versioning Versioning Service Service Adapter Adapter Content Manager LOB LOB System System Related Related Service Service Adapter Adapter Application Tier Form Form Submission Submission Service Service Adapter Adapter Client Tier Service Service Oriented Oriented Portal Portal Application Application Database Adapter Adapter Web Web Browser Browser Showing Showing eForm eForm Service Service Oriented Oriented Web Web Application Application Adapter Adapter Desktop Desktop eForm eForm Application Application Form Form Template Template Pre-Population Pre-Population Service Service Line-ofBusiness System Business Tier Integration Tier Data and Line-OfBusiness Systems Figure 1-7 Example service-oriented eForms Web application As you can see, a number of the services within the business tier are encapsulations of specific form application-related functionality, designed for reuse across multiple applications. 1.3.3 Sample solutions The flexibility of the IBM Workplace Forms tools allow you to create solutions for any form-based process. The example scenario used for building the sample application in this book is intentionally kept generic, illustrating aspects of a Workplace Forms application that apply to businesses across many industries, as well as illustrating concepts and benefits that apply to both small or larger organizations. The following summaries discuss possible industry-specific solutions that you can create using these tools. Government program registration Government agencies often need to enroll the general public in a variety of programs. In these cases, the government tries to serve a large and diverse population with various levels of computer knowledge and Internet connectivity. The Webform Server component of the Workplace Forms suite offers the perfect solution for these situations. Users can log onto a central Web site and complete a registration form using only their Web browser. This saves them from having to download and install Workplace Forms Viewer, which can be intimidating for some users and time consuming over low bandwidths. Chapter 1. Introduction to IBM Workplace Forms 15 Additionally, while it is not possible to issue a digital certificate to each citizen, you can use Clickwrap signatures to capture some information about the user and confirm approval. Clickwrap signatures simulate the click to accept process that is common on many Web sites today, and add a measure of security to the form. They can also can include information about the user, such as a pass phrase, that you can use later to identify them. 1.3.4 Banking and regulated industries Banking and other regulated industries must comply with a variety of government regulations, and must be able to produce reliable audit trails to demonstrate their compliance. In these cases, records must be maintained for many years, and those records must be secure. Workplace Forms supports a wide range of digital signature technologies ranging from simple authenticated password acceptance to biometric (retinal scans, fingerprint readers) and PKI certificates. Once a form is signed, the signature makes the form tamper evident. This means that if any of the information in the form is changed, the signature itself breaks, indicating that it can no longer be trusted. Furthermore, Workplace Forms provides the ability to sign a form template that indicates whether anyone has tampered with the template itself. Finally, most digital signature technologies reliably identify the signer. These features combine to create reliable records: you can identify who signed each form, and you can easily judge whether the form has been changed in any way. Additionally, the forms themselves are written to comply with open standards promoting interoperability and reducing the total cost of ownership through support of standards such as XML, XForms, JSR-168/170, and so on. Workplace Forms also uses a native XML document type that future proofs archival records of forms so that organizations can feel confident that forms records and the data contained within can be recovered within the necessary retention and record keeping requirements. Secured communications Some organizations may require more than just signatures to secure their forms. This is sometimes the case due to privacy laws or other legal requirements that insist that the forms themselves cannot be viewed by other people. In these cases, signature technology falls short, because while it will reveal tampering with a form, it does not prevent simple viewing. Using the Workplace Server API, you can create an extension for Workplace Forms Viewer that will encrypt each form before it is sent. The server that processes the forms can then use the API to decrypt the form once it is safely behind a firewall. The form is encrypted before it leaves the user’s computer. If it is intercepted during transmission, or copied from a public server, it is completely unreadable. However, once it is safely behind a firewall, it can be decrypted and processed with ease. This encryption capability allows organizations the flexibility to provides differing levels of encryption as appropriate to the application or individual form and allows this to be updated as new encryption standards come into the market. 1.3.5 Proven eForm technology While the name of this product includes IBM Workplace (intended to reinforce the integration with other Workplace products in the IBM Software portfolio), IBM Workplace Forms is based on proven technology from PureEdge solutions, acquired by IBM in 2005. The product has evolved over more than a decade of improvements, based on input from several hundred customers. Beginning with a solid foundation of eForm technology from PureEdge Solutions — a leading provider of secure standards-based eForm solutions for automating business 16 IBM Workplace Forms 2.6: Guide to Building and Integrating a Sample Workplace Forms Application processes — coupled with IBM experience and customer base, Workplace Forms products provide a valuable addition to the IBM software portfolio and enhances IBM market leadership in providing industry-specific eForms solutions. Key industries where Workplace Forms have been implemented include government, insurance, banking, manufacturing, and health care. One of the most compelling customer examples is the U.S. Army, which selected Workplace Forms over the competition for what Gartner Group calls the largest eForms implementation in the world. The Army’s Forms Management Content Program (FCMP) involves the automation of their inventory of 100,000 forms used by 1.4 million personnel worldwide. Estimated cost savings of this forms implementation surpasses $1.3M annually. The Army forms program integrates Workplace Forms with CM in a portal environment. The primary reasons that the Army chose Workplace Forms over the competition included: sectional signing within a form, ability to generate a wizard-like interface, and offline use. The Land and Property Programs, Corporate Registries of Service Nova Scotia records and manages all of Nova Scotia’s land ownership and interest records and provides online access to them from anywhere in the world. The Workplace Forms solution that they implemented reduces transaction time for most locations from up to seven days to just one business day. It also improves rejection rate from 15% to 3% by reducing errors associated with the submitters’ manual data entry. This process minimizes trips to the agency’s offices and reliance on expensive courier services. A government council in the United Kingdom expects to save £300,000 per year using IBM Workplace Forms software to consolidate information from multiple disparate data sources. The Workplace Forms application enables their social care practitioners to share data within the county's various agencies in a structured, standardized format. When patient data is gathered by one agency, the Workplace Forms software enables the agency to share that information with key business applications within the county, enabling access by multiple practitioners and external agencies. The solution also enables Oxfordshire County Council to keep a record of the data distribution process, in compliance with county regulatory requirements. 1.4 Summary This book provides both an overview of the features and functionality of IBM Workplace Forms, while also providing a specific sample application scenario. After clarifying the features of the product and defining the options for integration, the remainder of the book, beginning with Chapter 5, “Building the base scenario: stage 1” on page 173, helps you gain hands-on experience building a sample Forms-based application. Using this sample application as a foundation, we then discuss integration options with WebSphere Portal, IBM DB2 Content Manager, and Domino. Chapter 1. Introduction to IBM Workplace Forms 17 18 IBM Workplace Forms 2.6: Guide to Building and Integrating a Sample Workplace Forms Application 2 Chapter 2. Features and functionality This chapter provides an overview of the features and functionality of the components that make up IBM Workplace Forms. The chapter begins with an introduction to the Workplace Forms document model and an overview of the Workplace Forms component technology. Working from this foundation, it then discusses functionality of the components, including: Forms document model Installing the software Introduction to the Designer Form Design basics Add a toolbar Add computes Signature buttons Workplace Forms Viewer © Copyright IBM Corp. 2007. All rights reserved. 19 2.1 Forms document model Workplace Forms is built upon proven, standards-based technology, including Extensible Forms Description Language (XFDL) and XForms. XFDL is a highly structured XML protocol designed specifically to solve the body of problems associated with digitally representing paper forms. XForms is not only about data collection, it is also about improving the user experience and making form design quicker and system integration easier. In this section we explore the following topics: Extensible Forms Description Language (XFDL) Workplace Forms component technology XForms Model 2.1.1 Extensible Forms Description Language (XFDL) In this section we cover the following topics: Overview Capabilities XFDL features XFDL advantages Overview From 1993 to 1998, PureEdge Solutions (since acquired by IBM) developed the Universal Forms Description Language (UFDL). Extensible Forms Description Language (XFDL) is the result of developing an XML syntax for UFDL, which is used to describe complex, intelligent business forms. XFDL allows the creation of powerful, complex forms that integrate with server-side applications such as workflow solutions, databases, and security structures. The latest version of the XFDL specification is Version 7, which was first released with IBM Workplace Forms 2.6 in September of 2006. Capabilities Unlike most XML derivatives, XFDL is a programming language that is smart enough to make decisions, handle arithmetic, and respond to user input. As XFDL directs users through the form interface, it is capable of performing calculations and providing error detection/correction on the fly. The computations needed for digital form functionality are built into each XFDL document, allowing it to function nomadically. See Figure 2-1. Figure 2-1 XFDL capabilities XFDL is a tagged language, written as plain text. This means that you must use both opening and closing tags that are wrapped by angle brackets. Opening tags indicate the start of a 20 IBM Workplace Forms 2.6: Guide to Building and Integrating a Sample Workplace Forms Application specific form element. Closing tags, marked with a slash before the tag name, indicate the end of that description. Opening and closing tags surround information that describes a specific element of your form. For example, the following tags identify the form as XFDL and also give the namespaces used, and must appear at the beginning of the form (Example 2-1). Example 2-1 XFDL form tag <?xml version="1.0" encoding="ISO-8859-1"?> <XFDL xmlns="http://www.PureEdge.com/XFDL/6.5" xmlns:custom="http://www.PureEdge.com/XFDL/Custom" xmlns:xfdl="http://www.PureEdge.com/ XFDL/6.5"> ...Form Data... </XFDL> Example 2-2 shows the declaration of a date of birth display item. Looking at the XFDL source code for this item we can see all of its presentation properties, such as location, format, and font information, as well as a compute that determines that the item is visible only if the user selects yes in response to a question on the same page. Example 2-2 XFDL display item <combobox sid="DateofBirth"> <itemlocation> <x>34</x> <y>50</y> </itemlocation> <value></value> <label>Date of Birth</label> <format> <datatype>date</datatype> <constraints> <mandatory>off</mandatory> </constraints> <presentation> <calendar>gregorian</calendar> <style>long</style> </presentation> </format> <help>dateOfBirthHelp1</help> <justify>right</justify> <border>on</border> <visible compute=" 
 PAGE1.RADIOYes.value == 'on' 
 ? ('on') 
 : 'off' 
 ">on</visible> <fontinfo> <fontname>Arial</fontname> <size>8</size> </fontinfo> <active>on</active> </combobox> Chapter 2. Features and functionality 21 XFDL features XFDL is a high-level computer language that provides the following features: Represents forms as a single object without dependencies on externally defined entities Is written in human-readable plain text Is publicly available as a W3C note (allowing you to create your own Viewer, Designer, and even APIs because all of the information is readily available) Provides a syntax for in-line mathematical and conditional expressions Permits the enclosure of an arbitrary size and number of base-64 encoded binary files (allowing attachment and conversion of external files such as photo identification, word processor documents, spreadsheets, and so on) Offers precision layout needed to represent and print near pixel perfect recreations of paper-based forms Facilitates server-side processing via client-side input validation and formatting Permits extensibility including custom items, options, and external code functions Offers comprehensive digital signature support including: – – – – Capture of the whole context of a business transaction Multiple signatures Different signers of (possibly overlapping) portions of a form Freezing computations on signed portions of a form One of the most impressive features of the XFDL solution is that it provides full non-repudiation and auditability by storing the form template, data, internal logic, and file attachments in a single file that can be digitally signed. Each form is a single text file containing standard XML syntax, as shown in Figure 2-2. Figure 2-2 Single file contains all Forms components in XFDL document XFDL advantages The advantages of XFDL and the benefits to the XForms specification include: Document-centricity. XFDL stores data in the document along with attachments, layout design, and form logic, creating a single record. Provides precision layout and printing. 22 IBM Workplace Forms 2.6: Guide to Building and Integrating a Sample Workplace Forms Application Can faithfully reproduce paper forms. Allows for the creation of wizard-based dynamic forms that can guide the user through the process of filling in and completing the form, changing on the fly, and reducing the number of errors. Has broad support for signatures. Locks both the XFDL components and the XForms data. Extension points for integration with other technologies. For example, you can embed JAR files in the form to extend functionality that would otherwise not be available. A public copy of the XFDL specification can be found here: http://publibfp.boulder.ibm.com/epubs/pdf/22915350.pdf 2.1.2 Workplace Forms component technology Although a paper form is composed of paper and ink, its structure and content is made up of graphics and text. For example, a certain form may be three pages long and printed on grey paper. It also contains a number of carefully positioned labels and fields, and has different font colors for titles and text. A document replicates these elements electronically. Documents are composed of five types of elements: Form The form itself. Every form has exactly one form element. Its purpose is to identify the code as an XFDL form. Page Every form contains at least one page. Pages control the background appearance of your form and contain your form items in much the same way paper pages do. Item The objects that appear on the page and make up the form content. These include fields, labels, and buttons. Option The elements that describe the appearance and actions of items. You can use options to set an item’s color and font, or set the defaults for a print button. Argument Arguments contain the settings used by options. For example, arguments store the three numbers that make up an RGB value, such as 255, 255, and 255. Chapter 2. Features and functionality 23 Another important concept to understand is that these elements are composed in a node structure that is the logical representation of the XFDL e-form. The tree is built as the form is read and defines the build order. Nodes of the same type always reside at the same level of the tree. XFDL elements must have a scope identifier, or SID, that uniquely identifies an element within the scope of its logical parent. Figure 2-3 illustrates the node structure. • Form level, Single node Form • Page level, Minimum of two pages Page Page Item Item Item Option Option Option – Global page and visible page Argument • Item level, Minimum of two items – Global item and XFDL item Option Argument • Option level, Unlimited number – Modify item (font, bgcolor) • Argument level, Unlimited number, and levels – Store settings for options (rgb settings for bgcolor) Figure 2-3 Logical representation of form structure 2.1.3 XForms Model Complex business forms cannot easily be represented with Hypertext Markup Language (HTML). As Web-based electronic forms have become more ubiquitous, XForms has emerged as a W3C specification for electronic forms to overcome limitations with HTML Forms. The XForms specification is a predefined set of tags, elements, and attributes that provides an extensible means to include richer, more dynamic forms than HTML documents, while at the same time making it faster and easier to create electronic forms. Where HTML forms are created from elements that intermingle presentation and content, forms with XForms support differentiate a form’s view into its presentation and purpose. XForms enables you to declare data items and structure separate from any set of widgets used to display the data values. Therefore, a form written with XForms can be written once and displayed in optimal ways on several different platforms. The XForms Model represents the form's content and is composed of a form's data instance and logic components. The form's data is contained within one or more instances. The data instance is defined within the model. Example 2-3 shows an XForms instance declaration that includes all the data necessary to process an order. This example will be used in the form scenario of this book. Example 2-3 XForms Instance <!-- Order Data. Information about this specific order including approvals and timestamps.--> <xforms:instance id="FormOrderData" xmlns=""> <FormOrderData> <ID></ID> <CustomerID></CustomerID> <Amount></Amount> <Discount></Discount> <SubmitterID></SubmitterID> <State></State> <CreationDate></CreationDate> 24 IBM Workplace Forms 2.6: Guide to Building and Integrating a Sample Workplace Forms Application <CompletionDate></CompletionDate> <Owner></Owner> <Version></Version> <Approver1></Approver1> <AppovalDate1></AppovalDate1> <Approver1Comment></Approver1Comment> <Approver2></Approver2> <AppovalDate2></AppovalDate2> <Approver2Comment></Approver2Comment> <Cost></Cost> </FormOrderData> </xforms:instance> Example 2-3 on page 24 represents all of the information that is passed to the back end and any temporary storage that is needed within the model. XForms defines the means for binding these data items to the display widgets separately from the declaration of the data mode itself. Example 2-4 shows an XForms input field named “Savings” that has been bound to the discount data element using an XPath value for the reference (or “ref”). This bind dictates that the display field Savings will always show the value of the discount element contained in the instance, and conversely that any changes to the display field Savings will be captured as the value for the discount element. Example 2-4 Bind to data item <field sid="Savings"> <xforms:input bind="CostSavings" ref="instance('FormOrderData')/Discount"> <xforms:label></xforms:label> </xforms:input> <scrollhoriz>wordwrap</scrollhoriz> <itemlocation> <width>70</width> <before>FIELD1</before> </itemlocation> <format> <datatype>currency</datatype> </format> <readonly>on</readonly> <justify>right</justify> </field> Notice also that there is a bind, “CostSavings”, associated with this display element “Savings”. It is an XForms bind used to calculate the value of the data element and is part of the XForms Model, not the display item. It is a prime example of how the model can function independently of the display. Binds, dependencies, and constraints The form's logic components define its behavior. An XForms Model can define how it behaves when data is submitted, set initial values, and more. These logic components are defined with event handlers, data bindings, and submission information. You can bind values to instance data in XForms in two ways: data can be made dependent on other data, or it can be bound to input provided by the user. Chapter 2. Features and functionality 25 Example 2-5 shows a XForms bind. If there are values, then it calculates the total price of the order based on the sum of each subtotal value contained in the rows of a table. Otherwise it sets the cost to zero. Example 2-5 XForms bind <xforms:bind calculate=" 
 if(instance('OrderTableRowData')/Row/line/subtotal='', '0', 
 sum(instance('OrderTableRowData')/Row/line/subtotal)) " id="PriceTotal 
 " nodeset="instance('FormOrderData')/Cost 
 "></xforms:bind> One of the nice things about XForms is how much control it gives you over how the form is processed. For example, XForms exposes a tremendous number of events for which you can trap and perform specific actions. Figure 2-4 shows the model used for the form scenario used in this book. Notice that it includes not just instance declarations, but also submissions, binds, and other actions. Figure 2-4 XForms Model See Chapter 3, “XForms” on page 133, for more detail on XForms. 26 IBM Workplace Forms 2.6: Guide to Building and Integrating a Sample Workplace Forms Application 2.2 Installing the software In this section we explore the following topics: Installing the Designer Installing the Viewer Introduction Form authors use the Designer to create forms. In addition to easy item placement, alignment, and configuration, the Designer allows easy access to the underlying source code of forms, enabling the designers to include complex logic and calculations. The Designer works in tandem with the IBM Workplace Forms Viewer, which is now available inside the design environment. Download the software As stated previously, you must install both the IBM Workplace Forms Designer and the IBM Workplace Forms Viewer in order to create and view forms. If you do not already have the client tools installed, then you may obtain an evaluation copy that will provide you with a 60-day trial version of the tools. Use the link below to obtain the software: http://www-128.ibm.com/developerworks/downloads/wp/wpforms/ 2.2.1 Installing the Designer The system requirements are: Supported operating systems – Microsoft Windows® 2000 with Service Pack 4 – Microsoft Windows XP with Service Pack 1 or 2 Minimum hardware requirements – – – – Processor: 1 GHz RAM: 1 GB Disk space: 500 MB Display resolution: 1024 x 768 in 16-bit color Recommended hardware requirements – – – – Processor: 2 GHz RAM: 2 GB Disk space: 500 MB Display resolution: 1280 x 1024 in 16-bit color Recommended software requirements You must install Workplace Forms Viewer 2.6 in order to preview forms in Workplace Forms Designer 2.6. Java The Workplace Forms Designer installer will install the IBM JVM™ 5.0. Eclipse The Workplace Forms Designer installer will install Eclipse 3.1.1. To install the Designer: 1. Copy the installation program to your computer. Chapter 2. Features and functionality 27 Important: Review the system requirements above before beginning the Designer installation. 2. Double-click the installation program to launch it. 3. The installer will step you through the installation. Be sure to: a. Click Next at the Welcome page. b. Accept the license agreement when prompted. c. Specify the installation directory, or accept the default path for the installation (C:\Program Files\IBM\Workplace Forms\Designer\2.6). d. The next screen will show summary information. Validate your path and the free space requirements (262.8 MB). Click Install to begin installation of the software. 4. Upon completion a summary screen will load. Review this information and click Finish to exit the installer. 2.2.2 Installing the Viewer The system requirements are: Supported operating systems – Microsoft Windows 2000 with Service Pack 4 – Microsoft Windows XP with Service Pack 1 or 2 Hardware requirements – – – – Processor: 500 MHz RAM: 256 MB Disk space: 200 MB Display resolution: 800 x 600 in 16-bit color Supported Web browsers Workplace Forms Viewer can run stand-alone or within one of the following Web browsers: – Internet Explorer® 6.0 with Service Pack 1 on supported versions of Microsoft Windows (see supported operating systems above) – Internet Explorer 5.5 with Service Pack 2 on supported versions of Microsoft Windows (see supported operating systems above) – Internet Explorer 6.0 on Microsoft Windows XP with Service Pack 2 – Firefox 1.5 on supported versions of Microsoft Windows (see supported operating systems above) Java The Workplace Forms Viewer installer will install the required IBM JVM 1.4.2. If you are deploying Workplace Forms Viewer to end-user machines via Workplace Forms Server - Deployment Server, the end-user machine must have the Sun or IBM JVM 1.3.1 or a later version up to JVM 5.0. Forms This version of Workplace Forms Viewer can be used with: – Forms written in XFDL Version 7.0 with or without XForms 1.0 (including international forms) 28 IBM Workplace Forms 2.6: Guide to Building and Integrating a Sample Workplace Forms Application – Forms written in XFDL Version 5.0 to 6.5 Supported third-party products (optional) This version of the Workplace Forms Viewer is compatible with the following third-party products: – – – – MSAA-compliant screen readers, such as JAWS, Windows-Eyes, or Narrator Interlink ePad Signature hardware with Version 6.22 drivers Topaz electronic signature hardware with Version 3.61 drivers Any signature capture device compliant with WinTab Version 1.1 Supported terminal services (optional) This version of Workplace Forms Viewer is compatible with the following terminal services: Windows Server® 2003 Terminal Services (set to 16-bit color or later) To install the Viewer: 1. Copy the installation program to your computer. Important: Review the system requirements above before beginning the Viewer installation. 2. Go to the location where the installation files have been copied. Notice there are three executables. Those files are described in Table 2-1. For this installation we use WFViewer_261_Win32.exe to conduct a standard installation with language selection. Table 2-1 Workplace Forms Viewer installation files File name Purpose WFViewer_261_Win32.exe Language select version of the installer WFViewer_261_Win32_EN.exe English-only version of installer WFViewer_261_Win32_NOJVM.exe Language select version of the installer without a JAVA Virtual Machine (JVM) included 3. Double-click the installation program WFViewer_261_Win32.exe to begin. 4. Choose Setup Language using the drop-down box. 5. Wait while the installer is prepared. 6. The installer will step you through the installation. Be sure to: a. Click Next on the Welcome screen. b. Accept the license agreement when prompted and click Next. c. Specify the installation directory or accept the default path for the installation (C:\Program Files\IBM\Workplace Forms\Viewer\2.6). d. The installation parameters are now complete. Click Install to continue, or Back to review or change any of your installation settings. 2.3 Introduction to the Designer As with earlier versions of the IBM Workplace Forms Designer, Version 2.6.1 is a drag-and-drop design tool that allows form designers to create highly detailed, powerful XFDL forms with XForms support. However, with Release 2.6.1 the development environment has Chapter 2. Features and functionality 29 been migrated to the Eclipse Platform. This is a model-driven design environment with advanced layout functionality that allows component reuse, dynamic tables, and a run-time preview. In this section we explore the following topics: Launch the Designer Brief overview of Eclipse Terminology for working in Eclipse Role-based perspectives Main panels Views 2.3.1 Launch the Designer When you first start the Designer, there are some initial configurations that need to be completed. In this section we walk you through this initial setup. Once you have installed both client tools, you can access the Designer from the Windows Start menu by selecting Start → All Programs → IBM Workplace Forms Designer 2.6 → IBM Workplace Forms Designer. Note: To launch the viewer separately select Start → All Programs → IBM Workplace Forms Designer 2.6 → IBM Workplace Forms Viewer 2.6. First, you are prompted to select a workspace. The workspace is the folder where the Eclipse Platform stores your projects. You can have multiple workspaces for any number of projects. This is an important concept in the new Designer because it allows you and your team to easily manage not just the form file, but all files associated with a project such as a WSDL, graphics, and so on. For the purposes of this book, we use the default location: C:\Documents and Settings\Administrator\workspace Then select the option to use this location as the default. See Figure 2-5. Figure 2-5 Workspace Launcher 30 IBM Workplace Forms 2.6: Guide to Building and Integrating a Sample Workplace Forms Application Here we enter a parent folder to store the form, and give the form a name. We enter Redbook for the folder, and SampleTemplate for the form name, as shown in Figure 2-6. Figure 2-6 New Workplace Form Chapter 2. Features and functionality 31 The Welcome page loads, as shown in Figure 2-7. Click the Create Form icon to create a new Workplace Form. The New Workplace Form popup window is shown. Figure 2-7 Welcome page Next you are prompted to Choose a template. This is a new feature in Version 2.6.1 that lets the form author get a jump start on creating a new form. Also, these templates can be a great resource to show form designers how to create different types of forms. There are eight new templates to choose from: Default Empty From - XFDL Default Empty Form - XForms Horizontal Tabbed Toolbar Vertical Tabbed Toolbar Attachment Popup Toolbar Striped Toolbar Styled Button Toolbar Three Color Banner Tip: You can create your own templates and previews in the Workplace Forms Designer to be used by you and your form design team, just as the development team has done with the out-of-the-box solution. 32 IBM Workplace Forms 2.6: Guide to Building and Integrating a Sample Workplace Forms Application By default, an empty XFDL form template is highlighted and a preview is shown in the space below. Take a minute to look through the other eight templates and notice the previews as you go. For this book, we select the Vertical Tabbed Toolbar. See Figure 2-8. Figure 2-8 Choose Template Chapter 2. Features and functionality 33 One more panel appears, asking if you would like to switch to the Design perspective. Select the option to remember your decision and click Yes. We discuss the concept of perspectives in more detail later. The Designer now opens fully with your SampleTemplate.xfdl form loaded on the canvas, as shown in Figure 2-9. Figure 2-9 Default view In the next section we introduce you to the new Eclipse Platform for the IBM Workplace Forms Designer. 2.3.2 Brief overview of Eclipse The Eclipse Platform builds confidence and trust by providing the source code for the platform. Software developers are tired of integrating tools and trying to deconstruct how to make tools work together in an environment. Making the Eclipse Platform an open source initiative enables tool developers to do the same and to not only contribute new plug-ins but to also help improve the existing platform. Users of Eclipse-based offerings benefit from: Access to research and knowledge from the entire Eclipse ecosystem. Higher-quality software that comes under scrutiny from the eyes of the open source community. The ability to reuse skills because of the consistent Eclipse interface. 34 IBM Workplace Forms 2.6: Guide to Building and Integrating a Sample Workplace Forms Application Java technology developers using Eclipse benefit from: A world-class Java IDE Native look and feel across platform Easy extensions to Java tooling Developers of Eclipse tools benefit from: A portable and customizable platform Seamless tool integration An end-to-end solution IBM is the originator of the Eclipse Platform. The platform began development by Object Technology International in 1998 (a subsidiary of IBM purchased in 1996, now known as the IBM Ottawa Lab) to address the problems raised by customers that dealt with the cohesiveness of IBM software tooling. Customers complained that IBM tooling looked like it came from different companies and did not work together. In 2001, IBM established the Eclipse consortium and gave the gift of Eclipse to the open source community. The goal was to let the open source community control the code and let the consortium deal with commercial relations. There were nine initial members of the consortium, which included IBM partners and competitors. IBM continued to nurture the evolution of the platform by funding various programs like Eclipse innovation grants and sponsoring Eclipse code camps. The platform was developed using an open source model through an open source license where anyone is welcome to participate. IBM wanted more serious commitment from vendors, but vendors perceived the Eclipse consortium as IBM-controlled and were reluctant to make a strategic commitment while IBM was in control. To resolve these problems, IBM relinquished any control. With the support of many companies, the Eclipse Foundation was formed in 2004 as a not-for-profit organization with a dedicated professional staff. Today, IBM is committed to Eclipse more than ever and takes an active part in the Eclipse Foundation as a strategic member. Furthermore, IBM has more developers contributing to Eclipse than any other vendor. Essential to the success of the Eclipse Platform are three intertwined communities: Committers: An open, active, inclusive community of committers responsible for developing official Eclipse tooling. An example group of committers is the Eclipse Web Tools Platform project team. Plug-in developers: A community that exists outside the committer community that extends the platform to create useful tooling. Eclipse Plug-in Central contains a large sampling of plug-in developers. Users: A community composed of people who use the tooling developed by committers and plug-in developers. 2.3.3 Terminology for working in Eclipse An explanation of the following terms will be useful as you begin working in the Eclipse development environment: Workbench Workspace Perspective Chapter 2. Features and functionality 35 The Eclipse development environment (and Eclipse applications) runs inside an environment called a workbench. The workbench is a collection of toolbars, menus, and one or more perspectives. Essentially, you can think of the workbench as the Eclipse Integrated Development Environment (IDE). When starting a new project, you can create a specific profile for a development project, known as a workspace. Eclipse is an open source Integrated Development Environment (IDE) that provides a framework to build rich Java-based applications. It provides application building blocks (UI constructs, runtime, help mechanism, and so on) and an extensible framework for creating Workplace Forms. To learn more about Eclipse and its open source community visit: http://www.eclipse.org/ In the Eclipse IDE, you can associate development profiles (workspaces) to run inside the workbench. Note: For additional resources to better understand Eclipse Development techniques and terminology, refer to the following resources: D'Anjou, Jim; Fairbother, Scott; Kehn, Dan; Kellerman, John; McCarthy, Pat. The Java Developer's Guide to Eclipse. Second Edition. Addison-Wesley. Boston, 2005 Carlson, David. Eclipse Distilled. Addison Wesley Professional. Boston, 2005 Although this new platform provides greater flexibility and power, initially it can be intimidating to users who are not familiar with the Eclipse layout. For many, this environment is very familiar and these users find the transition very comfortable. For those who have not worked with the Eclipse Platform previously, the first impression is that the environment has been geared more toward professional developers, but that is not entirely true. The new Designer was created to provide a role-based forms development platform where teams can work together sharing their individual skills. Team members can tailor their Eclipse perspectives as required to optimize their environment. Authors can work in unique environments that are specific to their individual roles, while working within the Eclipse Project paradigm and leveraging standard Eclipse plug-ins like CVS (a version control tool). These interface layouts are called perspectives. In the IBM Workplace Forms Designer, there are five standard perspectives, all of which can be customized: 36 CVS Repository Exploring Debug Designer Resources (default) Team Synchronizing IBM Workplace Forms 2.6: Guide to Building and Integrating a Sample Workplace Forms Application Furthermore, every one of the perspectives listed above can be modified to include or exclude views. There are a number of different views in the Designer that can be minimized, maximized, rearranged, added, and removed at any time. Figure 2-10 shows a list of these views. Figure 2-10 Designer views 2.3.4 Role-based perspectives Consider the three roles outlined in Table 2-2. Table 2-2 Role-based form development Role Responsibility Business analyst Creates the business rules appropriate to the workflow, and process of the form Data analyst IT developer who might get the XML schemas necessary to integrate with back-end systems Forms designer/professional Designs presentation layer, or form layout Chapter 2. Features and functionality 37 For example, a team member in the role of forms designer/professional may configure her environment to show a simple interface with only the essential tools needed to do her job, as shown in Figure 2-11. Figure 2-11 Forms designer/professional perspective The perspective shown in Figure 2-11 is in fact a customized version of the default resource perspective. 38 IBM Workplace Forms 2.6: Guide to Building and Integrating a Sample Workplace Forms Application At the other end of the spectrum, a data analyst may have a much more robust interface with the many tools necessary to fill their more IT-centric role. In that case, they would likely use the Design perspective, as shown in Figure 2-12. Figure 2-12 Forms data analyst resource perspective This environment is flexible enough to meet the needs for all team members without overwhelming casual designers or limiting functionality for advanced users. 2.3.5 Main panels The Workplace Forms Designer has three main panels that allow form authors to control every aspect of their form from precision layout to complex computes. In this section we cover the following: Design panel The palette Form source Form preview Chapter 2. Features and functionality 39 Design panel Use the Design panel to create and edit the visual components of your forms. The Design panel consists of two parts: The canvas: the area where you design the visual components of your forms The palette: contains the items you can add to the form Figure 2-13 shows the primary interface used by forms, which offers easy item placement, alignment, and configuration. Figure 2-13 Form Design canvas The canvas on the Design tab of the Editor view allows you to place, resize, cut, copy, and paste items here. It only shows one page of your form at a time, but additional pages are accessed by either using the PgUp or PgDn keys, or selecting View → Previous Page or View → Next Page. The canvas offers item layout and arrangement tools, including zoom functionality. The palette The palette is the part of the Editor view that contains all of the user input and layout items, allowing you to select and place items onto the canvas with your mouse. 40 IBM Workplace Forms 2.6: Guide to Building and Integrating a Sample Workplace Forms Application Palette layout The palette’s layout setting controls how the icons and names of the item buttons are displayed in the palette’s libraries. You can choose one of the layout options listed in Table 2-3. Table 2-3 Palette layout Layout Description Columns Icons and names are displayed in two columns. List Icons and names are displayed in a list. Icons only Only the icons are displayed. Details Icons, names, and descriptions are displayed in a list. Note: The palette’s current layout is marked by a check. To change the palette layout right-click the Palette, point to Layout, and then choose the desired layout. To revert to the smaller icon size, clear the check box. Figure 2-14 shows the different layout views of the palette. Figure 2-14 Palette layouts Chapter 2. Features and functionality 41 Libraries Creation tools are grouped within libraries and shown in the palette. The palette contains two default libraries, and one or more optional custom libraries contained within their own drawers. Palette libraries expand or collapse dynamically. If you open a library, other libraries automatically close. If you do not want a library to close, you can pin a library so that it does not collapse when you expand another library. Note: Libraries are sometimes referred to as drawers when shown in the palette. Standard library: contains tools that let you create simple form items Object library: contains tools that let you create complex pre-defined XFDL objects that are composed of several items Custom library: contains tools that you or your team create and want to reuse and maintain Note: If you currently have a form open, you must reopen that form before seeing the changes in the palette. Standard library Figure 2-15 shows the standard item library for XFDL-only items. Figure 2-15 Palette views Input items, such as fields, check boxes, and combo boxes, allow users to enter data. Layout items, such as lines, labels, and boxes, are used to provide visual effects in forms. 42 IBM Workplace Forms 2.6: Guide to Building and Integrating a Sample Workplace Forms Application Object library A new feature available with IBM Workplace Forms Version 2.6.1 is the object library, which contains predefined items and groups of items available for reuse in your form design. Figure 2-16 shows a list of all of the predefined objects that are shipped with the current release. Figure 2-16 Object library The items contained in this library have predefined alignment, constraints, and many other properties. When you select one from the palette and add it to your form, the new items created on your form will inherit all the same properties. Custom library You can create your own custom library containing commonly used items to drag and drop onto your canvas. These saved items or group of items are saved as objects and can then be reused in any forms you are developing. This is useful if you use an item or group of items often and you want to maintain design standards in another form. 1. Click Windows → Preferences to open the Preferences window. 2. In the left column, expand Workplace Forms. 3. Click Form Object Library. 4. Click New to add directories of object items to add to the palette user object library. 5. Browse to the directory of object items that you want to use. Multiple directories can be used from your local drive and shared network computers. 6. Click OK. – If you want to change the order of the object libraries displayed in the palette, click Up and Down. – If you want to remove a directory of object libraries listed in the palette, select the directory and then click Remove. – If you want to restore directories of your object items listed in the palette, click Restore Defaults. Chapter 2. Features and functionality 43 7. Click OK to close the Preference window. Form source The Source Code Editor panel, shown in Figure 2-17, allows users access to the source code. This grants users the opportunity to make changes directly in the code. Figure 2-17 Source editor 44 IBM Workplace Forms 2.6: Guide to Building and Integrating a Sample Workplace Forms Application Form preview Figure 2-18 shows a new panel available in the Designer. This new feature allows the form designer to preview forms without having to launch the viewer as a separate application, making the validation of form appearance, layout, and logic much easier and more efficient. Figure 2-18 Viewer in Designer 2.3.6 Views The Eclipse Workbench interface is comprised of views and the editor pane discussed in the prior section. Chapter 2. Features and functionality 45 A view is a tabbed window that groups similar information together. For example, the Properties view is a context-sensitive view that displays the properties of whatever object is selected in the Designer, the Navigator view lists all of the files and folders associated with your project, and the Enclosures view displays all of the files that are enclosed within the form. See Figure 2-19 for a breakdown of the view components described in this section. Figure 2-19 Components of a view Depending on the design perspective, a view window may appear by itself or tabbed with other views. Many views (like other application windows) have their own unique menus. If available, a down arrow button will be located to the top right of a view's title bar. To open the menu for a view, click that down arrow. Some views even have their own toolbars. You can open and close views, and dock them in different positions in the workbench. Main Designer views This section describes the main Designer views: Navigator view Outline view Properties view Problems view Figure on page 48 Navigator view The Navigator view lists the folders and files in your project, as shown in Figure 2-20. Figure 2-20 Navigator view 46 IBM Workplace Forms 2.6: Guide to Building and Integrating a Sample Workplace Forms Application Using this view, you can open files; copy, move, or create new resources; select resources for importing or exporting; and compare and replace resources. Most of these operations can be accessed by right-clicking in the Navigator view. Outline view The Outline view displays the hierarchical structure of your form, as shown in Figure 2-21. You can expand or contract the outline to see more or less detail in the form. Figure 2-21 Outline view Clicking an item in the Outline view highlights the item on the canvas or in the Source panel, and displays its options in the Properties view. Tip: The Outline view is very useful for accessing non-visible items in a form, such as form and page globals. You can also use the Outline view to move to pages in a multi-page form. The Outline view’s contents and toolbar will vary depending on whether you are working in the Design panel or Source panel. Properties view The Properties view displays the properties you can set for a selected form item or object. The list of properties varies depending on what is selected in the Designer. Figure 2-22 shows a compressed view of the PAGE1 properties. Figure 2-22 Properties view Chapter 2. Features and functionality 47 Problems view The Problems view (shown in Figure 2-23) displays errors, warnings, and other information whenever you check your form or switch from the Source panel to the Design panel. This figure shows two warnings. Figure 2-23 Problems view Table 2-4 provides a description of the types of problems that may be displayed in this view. Table 2-4 Problem types Type Description Errors Errors are problems that make the form impossible to use. The Viewer cannot open forms with these errors. When you receive an error message, you will also be given information about which of the form’s items or settings is causing the problem. Warnings Warnings are reported when the Designer finds an item or property setting that is either incorrect or not part of standard XFDL. For example, the following problem was detected or the referenced item does not exist. The form can be opened with these types of problems. Info General tips and tricks information. Enclosures view You can use the Enclosures view to enclose files within your form. The view is shown in Figure 2-24. Figure 2-24 Enclosures view 48 IBM Workplace Forms 2.6: Guide to Building and Integrating a Sample Workplace Forms Application The type of enclosures are listed in Table 2-5. Table 2-5 Enclosure types Type Details Data The Designer lets you specify which page of your form you can attach a file to. The Data option lets you select the appropriate page. Images or documents to be used with attachment features are added here. For detailed information about adding images, see “Adding an image file to a form” on page 263. For detailed information about attachments, see “Attachments” on page 260. JAR The Designer lets you enclose custom Java modules containing additional form functions. For information about how to develop your own Java modules (.jar files), see the Java API User's Manual. Schema The Designer lets you enclose a schema file in your form. You can then use the enclosed schema to create instances. You can also use an enclosed schema to validate the information in the model. The schema validates all data in the model in the target namespace for that schema. WSDL The Designer lets you enclose a Web Services Definition Language (WSDL) document to your form. Once enclosed, you can use the WSDL to generate an instance. XForms Instances The Designer lets you enclose an XML file that contains an XForms instance. Advanced views The following advanced views are available: Instance view XForms view XML Model view XML Model Instance view Instance view The Instance view is used to define the XML template for the data that will be collected from the form, as shown in Figure 2-25. A data instance can be used to store input values, pre-populate fields with data, or generate list selections. Figure 2-25 Instance view Chapter 2. Features and functionality 49 XForms view The XForms view is used to add XForms support and to manage XForms Models. See Figure 2-26. Figure 2-26 XForms view Once you create an XForms Model, you can use the XForms view to add, edit, or delete the XForms elements such as XForms Models, instances, submissions, binds, and schemas. XML Model view You use the XML Model view to create and manage an XML model. See Figure 2-27. Figure 2-27 XML Model view Note: The XML Model view is not part of the Designer perspective. XML Model Instance view The XML Model Instance view provides a listing of the XML data instances used in your form. Figure 2-28 XML Model Instance view Note: The XML Model Instance view is not part of the Designer perspective. 50 IBM Workplace Forms 2.6: Guide to Building and Integrating a Sample Workplace Forms Application 2.4 Form Design basics In this section we create a new form using a blank canvas to introduce you to some of the most used design functions. The following topics are covered: Create a new form. Add items. XForms support. Define item properties. Layout form items. 2.4.1 Create a new form To introduce you to the Designer we create a simple one-page form used to collect employee information. This exercise is provided to introduce you to as many features of the new Designer as is practical. We will start with a blank XFDL form, add some XFDL items, and later add XForms support. To create the form, expand your Navigator view and then locate a Project folder where you would like to store this form. Right-click the folder and in the pop-up window select New → New Workplace Form. Chapter 2. Features and functionality 51 At the next pop-up window, provide a name for your form. We named ours BlankForm, as shown in Figure 2-29. Notice that the parent folder name is already defined. Figure 2-29 Form name 52 IBM Workplace Forms 2.6: Guide to Building and Integrating a Sample Workplace Forms Application At this point we use a blank XFDL form as our template, so accept the default template, and click Finish, as shown in Figure 2-30. Figure 2-30 Blank XFDL template Chapter 2. Features and functionality 53 An Empty page will be loaded, as shown in Figure 2-31. Figure 2-31 Empty XFDL Form page Notice: The workspace shown in Figure 2-31 has been customized to meet the needs of our Developer. The palette has been moved to the left, the Navigation view has been changed to a fast view, and several other views have been rearranged based on most frequent use. Layout tools Before we start to build our form, we want to add layout tools. The Designer interface provides a number of tools to help you in precisely designing items: Rulers Horizontal and vertical rulers that measure in pixels or inches. You can choose whichever units you prefer. Rulers are useful for creating a clean, symmetrical layout for your form. Grids A grid of uniformly placed dots that are super-imposed on the form to assist you in item placement. You can adjust the spacing of the grid to either pixels or inches. Additionally, the snap-to-grid feature automatically aligns the top left corner of items to the nearest point on the grid. This grid helps you line up items on the form and ensure uniform spacing. 54 IBM Workplace Forms 2.6: Guide to Building and Integrating a Sample Workplace Forms Application Guides Horizontal and vertical lines that you can place throughout the form to ensure that items line up. The top or left side of items placed in the guide automatically snap into alignment along the guide. Guides are useful for creating a clean, symmetrical layout for your form. Add rulers and grids go to the designers Menu bar and select XML Model. Place a check box next to the following items on the View pop-up list: Show Rulers, Show Grids, Snap to Grid, and Show Page Size. The resulting changes will appear in your design canvas, as shown in Figure 2-32. Figure 2-32 Layout tools To add guidelines simply click in the ruler areas where you would like your guidelines to appear. We placed them at 50 for both the horizontal and vertical. If you do not get them exactly right you can slide them to the desired position, or just slide them down to zero to remove them. The next thing we want to do for our form is to define a page size. Page size is normally determined by one or two factors. Sometimes form page size is dictated by the size of the original form, such as the U.S. standard 8.5 X 11. But if you do not need to represent the original form entirely on one e-form page, then it is best to use a more e-friendly size that will allow you to render the entire page on one screen. The still common SVGA (Super VGA) screen resolution of 800x600 pixels is often the best choice. This low resolution setting allows all users to see the entire page without scrolling regardless of the capabilities of video graphics adapter. Chapter 2. Features and functionality 55 Set the page size go to the Properties view for the page, and set the page size attribute to 800;600, as shown in Figure 2-33. Figure 2-33 Set page size The last thing to consider before the addition of items to your form are Global page properties. Defining properties for the Global page of a form will allow the following pages to inherit those properties. For instance, the default font for a form is 8pt Arial, but if you know the form needs to use 9pt Times New Roman for all user interactions, then changing it here can be a major time saver. Also, should you need to change the properties later for an individual form item, or even page, you can just by changing the properties for that item or page. 56 IBM Workplace Forms 2.6: Guide to Building and Integrating a Sample Workplace Forms Application To modify the Global Page properties, go to the Global Page through the form Outline, or just press the PgUp key while your form canvas has focus. Then double-click the Properties view tab to maximize your view, as shown in Figure 2-34. Figure 2-34 Global Page properties As examples we changed the errorcolor to red, the mandatorycolor to yellow, and the font to 9 pt Times New Roman. When finished making your changes, return to page 1 by pressing the PgDn key. In the next section we add items to the form. 2.4.2 Add items The global settings are complete. We can begin to build our form by adding items. We start with an item from the Standard XFDL library. In this section we show how to add a standard item, and an item from the object library. Standard items Object library Chapter 2. Features and functionality 57 Standard items Date picker calendars let the user type a date into a field or use the calendar to select a date, as shown in Figure 2-35. In either case, the date is displayed in the format of your choice. Figure 2-35 Date picker To create a calendar: 1. In the palette, click Date Picker. 2. Click the canvas to insert the calendar, as shown in Figure 2-36. Figure 2-36 Date picker added to form from palette We modify the properties for this item later. At this state we focus solely on adding items to the form and planning our layout. Click the Preview tab located in the lower left-hand corner of your design canvas. The viewer will launch inside the workspace. The date picker is fully functional with a calendar widget. Return to the Design canvas by clicking the Design tab in the lower left-hand corner. 58 IBM Workplace Forms 2.6: Guide to Building and Integrating a Sample Workplace Forms Application Object library The object library contains predefined items and groups of items available for reuse in your form design. As an example lets us add a US Address Block to the form from the palette’s object library. See Figure 2-37. Figure 2-37 Add US Address Block to form Notice that it adds all of the standard information normally needed when requesting a a person’s address and contact information. If you need to customize this block all you need do is add or remove items, or modify properties to meet your needs. Click the Preview tab in the lower left-hand corner of your design canvas. All of the formatting is there as well. Phone number fields require the appropriate format. The state combobox has a list of all fifty states. Also, the First Name, Last Name, and Social Security Number fields are all mandatory. Return to the Design canvas by clicking the Design tab in the lower-left hand corner. 2.4.3 XForms support For our employee information form we would also like to capture educational history. It will require the addition of the following fields: institution name, dates attended (from/to), city, and state. We could create a static table with three rows and five columns, but that may not provide enough rows for every employee, or too many for another. We need something more dynamic, and with the new XForms items we have a quick solution. Chapter 2. Features and functionality 59 By adding XForms support to our form, we can build a XForms Model with a data instance to represent the elements for educational history. Then we can use a wizard to create a dynamic table in our form. This table will allow the addition and removal of rows as needed by the user when the form is launched in the viewer. In this section we complete the following steps: 1. Add XForms support. 2. Create an instance. 3. Create table. Add XForms support The first thing we need to do is add XForms support to our form. In the XForms view right-click the No XForms label and select Add Xforms Support, as shown in Figure 2-38. Figure 2-38 Add XForms support 60 IBM Workplace Forms 2.6: Guide to Building and Integrating a Sample Workplace Forms Application By adding XForms support to the form a default model has been created, and a number of new XForms items have been added to our design palette. See Figure 2-39. Figure 2-39 XForms palette XForms items An XForms item is an XFDL-wrapped user interface (UI) item that you can bind to a node in the data model or trigger an action based on how the user interacts with the form. The method you use to add an XForms item to a page is identical to adding an XFDL item. On the palette you click an XForms item and then click the canvas where you want to place the item. Since the XForms item is wrapped in XFDL, you can use all the XFDL properties (such as itemlocation and appearance) to alter and customize the XForms item as desired. Take a minute to look over the new items in our palette. Several of the items now have their own subset of items. For example, there are now four types of field items: Field (input) Field (TextArea) Field (Secret) Field (non-XForms) Chapter 2. Features and functionality 61 Create an instance Every XForms Model must contain an instance. To add an instance to the model, right-click the default model and select Add Instance, as shown in Figure 2-40. Figure 2-40 Create instance We can now build our instance. In the Instance view, right-click the default element named data and select Add Element, as shown in Figure 2-41. Figure 2-41 Add parent element A new child element will be created and named <data1> by default. To minimize the potential for confusion it is a good practice to be as specific as possible when naming elements. While this new element is highlighted, go to the Properties view and rename its name attribute from data1 to Education. 62 IBM Workplace Forms 2.6: Guide to Building and Integrating a Sample Workplace Forms Application Add five more elements to the education node to represent the educational data we require for our new table. By default these items will be named Education1, Education2, Education 3, Education4, and Education 5. Rename each of these items to specifically represent the columns we need. Use the order shown below: 1. 2. 3. 4. 5. School FromDate ToDate City State When finished, the completed XForms Model instance should look exactly as shown in Figure 2-42. Figure 2-42 Add child data elements Now that our XForms Model is complete let us look at the code view to see how it is represented in the source (Example 2-6). Example 2-6 XForms Model code <xformsmodels> <xforms:model> <xforms:instance id="INSTANCE" xmlns=""> <data> <Education> <School></School> <FromDate></FromDate> <ToDate></ToDate> <City></City> <State></State> </Education> </data> </xforms:instance> </xforms:model> </xformsmodels> Chapter 2. Features and functionality 63 Create table Now we have a model with a well-defined instance that represents our data values. We can build our table using a wizard. In the palette, select Table (Repeat) by Wizard, and place it on your form canvas, as shown in Figure 2-43. Figure 2-43 Add Table (Repeat) by Wizard 64 IBM Workplace Forms 2.6: Guide to Building and Integrating a Sample Workplace Forms Application Select Advanced Setup, as shown in Figure 2-44. Figure 2-44 Select Advanced Setup Chapter 2. Features and functionality 65 Select the Education node of the instance, as shown in Figure 2-45. Figure 2-45 Select instance data 66 IBM Workplace Forms 2.6: Guide to Building and Integrating a Sample Workplace Forms Application Configure columns as shown in Figure 2-46. Be sure to rename FromDate to From and ToDate to To. Figure 2-46 Configure Columns panel Chapter 2. Features and functionality 67 Click Next on the Final Wizard page, rename your table, select the option to Color Alternate Rows, and select the option to Highlight Row when Selected, as shown in Figure 2-47. Figure 2-47 Table Settings panel 68 IBM Workplace Forms 2.6: Guide to Building and Integrating a Sample Workplace Forms Application After navigating a few short menus, the wizard has created a fully functional dynamic table using the variables provided via the wizard interface. If you highlight the XForms pane and go to the source you can see the extensive code that has been generated. In just minutes over 200 lines of working code have been created with computes and calculations — all of which is tied to a XForms Model data instance. See Figure 2-48. Figure 2-48 Table added to form Chapter 2. Features and functionality 69 Click the Preview button to examine the new table. Be sure to click the action buttons to add and remove rows, as shown in Figure 2-49. Figure 2-49 Preview form 2.4.4 Define item properties Item properties can dictate presentation and function of for items. In this section we introduce you to item properties and cover the following topics: Overview Set properties Overview Each item in your form has various properties that control its appearance and behavior (for example, the font of a text label, the action triggered by a button, and so on). By setting item properties, you can control the appearance and behavior of items. Note: What is referred to as a property in the Designer, is referred to as an option in XFDL. 70 IBM Workplace Forms 2.6: Guide to Building and Integrating a Sample Workplace Forms Application You can change these properties and give items new properties via the Properties view. The Properties view has several sections, which we list in Table 2-6. Table 2-6 Properties view Property section Description XForms (Item type) Only available for XForms items. Aside from having XFDL item properties such as a sid, itemlocation, and appearance properties, the XForms item also has a set of XForms properties. It is the XForms properties that define how the XForms item interacts with the form’s data layer. The contents of this section are variable, depending on the type of XForms item added to the form. Typically, it includes at least one reference (XPath) to a specific element of the XForms Model instance. General Properties Sets general characteristics for items. The contents of this section vary, depending on the type of item you are configuring. Typically, it includes any text the item displays, the size setting, toggles for making the item active or inactive, and any specialized information specific to the type of item you have selected. Appearance Properties Allows you to modify an item’s appearance, such as color, visibility, and borders. If you want an item to display an image, you can use the Image section to insert an image into buttons and labels. Sets the style of the text displayed by an item, such as font type, size, and weight. Format Properties Sets how users input information into your form, and how that information is displayed. You can determine data types, set constraints on user input, and set predefined formats in this section. Help Properties Lets you create context-sensitive help for each visible item on a page. When users turn on help mode, help messages appear when the mouse pointer passes over an item with a help message. Allows you to add accessibility messages for users with visual disabilities. Miscellaneous Only available when advanced properties are shown. Allows for the definition or edits to custom attributes and/or options. Signature Only available when working with a button item. You must select Show Advanced Properties to display signature properties. Signature-specific attributes are defined here such as signature type, image, options, filters, and many more. Transmit Only available when working with a button item. You must select Show Advanced Properties to display transmit properties. Transmit-specific attributes include type, filters, references, format, and many others. Attention: For detailed information about all properties, see the Workplace Forms XFDL Specification document: http://www-128.ibm.com/developerworks/workplace/documentation/forms/#5 Or see Appendix B of the Designer User Guide: http://publib.boulder.ibm.com/infocenter/wf/v2r6m1/index.jsp?topic=/com.ibm. help.wf.doc/i_wfd_t_setting_item_properties.html Chapter 2. Features and functionality 71 There are advanced properties that can be very useful when creating forms. To show these items click the down arrow located in the top right corner of the header for the Properties view, and select Show Advanced Properties. Refer to Figure 2-50. Figure 2-50 Show Advanced Properties Let us look at the properties view for an XForms (Input) item. In Figure 2-51 we can see the first level of each section, as described above in Table 2-6 on page 71. Figure 2-51 XForms Item Advanced Properties view 72 IBM Workplace Forms 2.6: Guide to Building and Integrating a Sample Workplace Forms Application Set properties To set item properties: 1. Select the item. Tip: Press and hold the Shift key to select several items on the design canvas and set their common properties to the same values. 2. In the Properties view, click within the field of the property that you want to set. 3. Do either of the following: – For properties that accept text, type the value directly within the field or click the ellipse button (...) within the field to open a text editor. – For properties that accept one of several choices (for example, on/off or left/right/center), click the down arrow button within the field and select the setting. – For other properties (for example, fontinfo or fontcolor) click the ellipse button (...) within the field to open the editor for that type of property (for example, a font selection window or a color selection window). Figure 2-52 shows the default properties on the left for the Data picker item we added to our canvas. Then on the right it shows some changes that we have made. Figure 2-52 Properties view Chapter 2. Features and functionality 73 Make the following changes: In the general section set: – sid = “DatePickerItem” – label = “Hire Date” In the appearance section set: justify =“right” In the format section, go the presentation sub section, and set: style = “long” Preview the form to see the changes. When finished return to the Design canvas. 2.4.5 Layout form items There are many tools that can help you position and arrange items on a page. We covered rules, grids, and guides in “Layout tools” on page 54. In this section we focus on the topics listed below, paying close attention to the differences between relative and absolute methods. Basic layout Aligning items Expanding items Apply alignment rules Basic layout In this section we discuss the basic layout. Build order of items When you insert items onto a page, the order in which they are created plays an important part in how you can position them. As you place items on the page, they form a sequence. The first item you place on the page is the first item in the sequence, the second item you place is the second item in the sequence, and so on. This sequence is called the build order, since it is the order in which you build the form. The build order seldom reflects the order in which the items actually appear on the form, since the items can be moved anywhere once they have been created. When you use relative positioning, you must be aware of this build order. If you position an item, any item that you use as a reference must precede the item you place in the build order. For example, if you created a label, then a field, and then a button, you would be able to position the button in relation to either the field or the label. However, you would not be able to position the label in relation to either of the other items, because those items come after it in the build order. 74 IBM Workplace Forms 2.6: Guide to Building and Integrating a Sample Workplace Forms Application The build order of items on a page is the same as the order in which the items are listed in the Outline view, as shown in Figure 2-53. Figure 2-53 Outline view Selecting items To select an item, click it. A bounding box displays around the item, indicating that you selected it. Alternatively, click the item name in the Outline view. To select multiple items do one of the following: Hold down the Ctrl key and click each item. To select individual items in a group, use the Marquee tool in the palette. Hold down the left mouse button and drag the pointer diagonally on the form to surround the items. To select all of the items on the form at once, click Edit → Select All, or press the Ctrl+a key combination. Moving items To move an item do any of the following: Select the item and drag it. If you want the item to move in one direction only (vertically, horizontally, or diagonally), hold down the Shift key while you drag it. To nudge an item by 1 pixel at a time, select the item and press an arrow key. To nudge an item by the grid spacing, select the item, hold down the Ctrl key, and press an arrow key. In the Properties view, expand General, itemlocation, Location List, and set the x and y values. To undo a move, click Edit → Undo Move Object. Resizing items To resize an item: 1. Select the item. 2. Do one of the following: – Click and drag its edges. – In the Properties view, expand General, itemlocation, and Location List, and set the new values for x and y. Chapter 2. Features and functionality 75 – Nudge or resize items by 1 pixel at a time. i. Press the period key on your keyboard. The cursor changes to a two-way arrow on a side of the item. ii. Move from one edge to another by pressing the period key on your keyboard. iii. Once you have selected a side to resize, use the arrow keys on your keyboard to nudge the size of the item in 1 pixel increments. iv. Press Enter to accept the new size of the item. Aligning items You can align items so that their edges or centers are lined up. There are two types of align: Relative align: changes the position of items so that they align with another item (the reference item) and anchors the items to the reference item. If you later move or resize the reference item, any items anchored to it will automatically move in order to maintain alignment with the reference item. Absolute align: changes the position of items so that they align with another item (the reference item). The items will not automatically move if you later move or resize the reference item. Use relative align when the size or position of items on your form may vary (for example, when your form is receiving data from a database or when sections of your form are created dynamically). Important: Be selective when using relative alignment. While absolute position and expansion values are not recorded, relative position and expansion values are recorded in the itemlocation properties and will remain as part of the item’s properties even if copied or cut, and pasted on another page or location in the form. If the reference item does not exist, then the alignment may fail and will likely need to be updated or removed. To remove relative positioning settings assigned to an item: 1. Select the item you have applied relative positioning to. 2. In the Properties view, expand General, itemlocation and Location List. X and Y properties are listed as well as the assigned relative alignment choices. For example, if you choose Relative Align Below, the alignment type Below is listed under Location List. 3. In the value field adjacent to the alignment property, click An image of a delete. The alignment assignment is deleted. Alignment types You can align items by using the alignment types described in Table 2-7. Table 2-7 Alignment types 76 Type Description Above Moves the items above the reference item (leaving three pixels between each item) and aligns their left edges After Moves the items to the right of the reference item (leaving three pixels between each item) and aligns their top edges Before Moves the items to the left of the reference item (leaving three pixels between each item) and aligns their top edges IBM Workplace Forms 2.6: Guide to Building and Integrating a Sample Workplace Forms Application Type Description Below Moves the items below the reference item (leaving three pixels between each item) and aligns their top edges Top to Bottom Moves the items so their top edges align with the bottom edge of the reference item Top to Center Moves the items so their top edges align with the center of the reference item Top to Top Moves the items so their top edges align with the top edge of the reference item Left to Center Moves the items so their left edges align with the center of the reference item Left to Left Moves the items so their left edges align with the left edge of the reference item Left to Right Moves the items so their left edges align with the right edge of the reference item Right to Center Moves the items so their right edges align with the center of the reference item Right to Left Moves the items so their right edges align with the left edge of the reference item Right to Right Moves the items so their right edges align with the right edge of the reference item Bottom to Bottom Moves the items so their bottom edges align with the bottom edge of the reference item Bottom to Center Moves the items so their bottom edges align with the center of the reference item Bottom to Top Moves the items so their bottom edges align with the top edge of the reference item Center to Bottom Moves the items so their centers align with the bottom edge of the reference item Center to Left Moves the items so their centers align with the left edge of the reference item Center to Right Moves the items so their centers align with the right edge of the reference item Center to Top Moves the items so their centers align with the top edge of the reference item Horizontally Between Moves the reference item horizontally so it is spaced equally between two other items on the form Center to Center Horizontally moves the items horizontally so their centers align with the center of the reference item Vertically Between Moves the reference item vertically so it is spaced equally between two other items on the form Center to Center Vertically moves the items vertically so their centers align with the center of the reference item Important: If you expand items using relative alignment, the reference item must be before the aligned items within the build order. The build order is shown in the Outline view. If necessary, you can change the build order by dragging and dropping a form item from one location to another with in the Outline view. To align items To align items: 1. Select the items to move. Chapter 2. Features and functionality 77 2. Select the reference item (that is, the item that will not move and that the other items will align to). If you align items using relative align, the reference item must be before the aligned items within the build order. 3. Right-click and select an alignment type from Absolute Expand or Relative Expand. Tip: Because relative positioning relies on using other items as points of reference, you will often need to include invisible points of reference in order to put space between your items or position your items exactly where you want them. You can use spacers to create these invisible points of reference and to create space between items on your form. To use spacers as invisible reference points for relative positioning: 1. 2. 3. 4. 5. 6. 7. In the palette, click Spacer. Click the page. Place another item on the page. Hold the Shift key down and select a spacer to use as an reference. Right-click and select Relative Align. Select the modifier to position the spacer item. Click Preview. Once the form is open, notice that the spacer is invisible. Expanding items You can simultaneously resize and align items by expanding them. This is a quick way to resize items so that they line up with other items exactly. For example, you can expand a label to the size of a field by using a right-to-right expansion. This will lengthen the label until it is the same size as the field and align the right edge of the label with the right edge of the field. There are two types of expand: Relative expand: changes the size of items so that they align with another item (the reference item) and anchors the items to the reference item. If you later move or resize the reference item, any items anchored to it will automatically change size in order to maintain alignment with the reference item. Absolute expand: changes the size of items so that they align with another item (the reference item). The items will not automatically change size if you later move or resize the reference item. Expansion types You can simultaneously resize and align items using the expansion types listed in Table 2-8. Table 2-8 Expansion types 78 Type Description Make Same Size Resizes the items to the size of the reference item Make Same Width Resizes the width of the items to match the width of the reference item Make Same Height Expands/contracts the height of the items to the height of the reference item Top to Bottom Expands/contracts the top edge of the items to the bottom edge of the reference item Top to Center Expands/contracts the top edge of the items to the center of the reference item IBM Workplace Forms 2.6: Guide to Building and Integrating a Sample Workplace Forms Application Type Description Top to Top Expands/contracts the top edge of the items to the top edge of the reference item Left to Center Expands/contracts the left edge of the items to the center of the reference item Left to Left Expands/contracts the left edge of the items to the left edge of the reference item Left to Right Expands/contracts the left edge of the items to the right edge of the reference item Right to Center Expands/contracts the right edge of the items to the center of the reference item Right to Left Expands/contracts the right edge of the items to the left edge of the reference item Right to Right Expands/contracts the right edge of the items to the right edge of the reference item Bottom to Bottom Expands/contracts the bottom edge of the items to the bottom edge of the reference item Bottom to Center Expands/contracts the bottom edge of the items to the center of the reference item Bottom to Top Expands/contracts the bottom edge of the items to the top edge of the reference item Important: If you expand items using relative expand, the reference item must be before the expanded items within the build order. The build order is shown in the Outline view. If necessary, you can change the build order by dragging and dropping a form item from one location to another within the Outline view. To expand items To expand items: 1. Select the items to expand. 2. Select the reference item (that is, the item that the other items expand to). 3. Right-click and select an expansion type from Absolute Expand or Relative Expand. You can use both absolute and relative positioning to set an item’s position on a page. Tip: Press and hold the Shift key to select several items on the design canvas to align, or expand them at the same time. Apply alignment rules Open the Employee Information Form in the Workplace Forms Designer. This illustrates alignment rules. First, we relocate the Hire Date combobox below our XForms table. Since this table is dynamic and may expand or shrink, relative alignment is necessary. Follow these steps: 1. Locate the DatePickerItem on the design canvas. 2. Hold down the Ctrl key and click DatePickerItem first. 3. While still holding the Ctrl key, locate and right-click the EDUCATIONTABLE_Pane reference item. Chapter 2. Features and functionality 79 4. Notice that Relative Align Below is not available, as shown in Figure 2-54. Figure 2-54 Relative alignment options restricted 5. Remember that the reference item must be before the items to be aligned in the build order of this form page. a. To change the build order of this item: i. In the Outline view, select an DatePickerItem and drag it up or down in the list. ii. When the cursor is located just above the “vfd_spacer” item in the outline, release the mouse button. 80 IBM Workplace Forms 2.6: Guide to Building and Integrating a Sample Workplace Forms Application b. When finished it should be positioned as shown in Figure 2-55. Figure 2-55 Modify build order 6. Now repeat steps 1–3 in this series. Notice, however, that this time the option to relative align the DatePickerItem below the pane is now available. Select it, as shown in Figure 2-56. Figure 2-56 Relative align below Chapter 2. Features and functionality 81 Notice that the DatePickerItem has been place on the left side of the canvas, directly below the EDUCATIONTABLE_Pane. Preview the form. No matter how many rows that you may add or remove in our table, the hire date always remains exactly below the table. When we look at the code for this item, as shown in Example 2-7, we see that the relative position has been recorded in the item location properties. Example 2-7 XFDL code for relative positioning of an item <itemlocation> <width>151</width> <below>EDUCATIONTABLE_PANE</below> </itemlocation> Now let us position the EDUCATIONTABLE_Pane below the US Address Block. Since the address block object and all of its associated items were added before we created our XForms table, the build order is not an issue. Also, the address block is static, and relative alignment is not necessary. Absolute alignment is all we need. Lastly, this time we use the Outline view instead of the canvas to define our alignment. 1. In the Outline view locate the EDUCATIONTABLE_Pane, and click it. 2. Hold down the Shift key and click the item listed directly above it in the build order. If you have not deviated from the instructions it will be USAddrLine9. Both items should be highlighted. 3. Now right-click either item, and select Absolute Align Below from the list, as shown in Figure 2-57. Figure 2-57 Absolute align below Notice that the EDUCATIONTABLE_Pane has been placed on the left side of the canvas, directly below the USAddrLine9 item. Also notice that the DatePickerItem has maintained its position relative to the pane even though the pane has moved. 82 IBM Workplace Forms 2.6: Guide to Building and Integrating a Sample Workplace Forms Application When we look at the code for this item, as shown in Example 2-8, we see that there is no reference to the alignment in the item location properties. Example 2-8 XFDL code for absolute positioning of an item <itemlocation> <width>100</width> </itemlocation> 2.5 Add a toolbar Toolbars allow you to place headings and control buttons on your forms so that they are always visible for users. Toolbars appear at the top of forms when they are opened in the Viewer, but when the form is printed, the toolbar is omitted, and can therefore be used for items that do not need to be printed, such as control buttons. You can add a toolbar to any page of your form. This toolbar creates an area at the top of the page that will not scroll with the rest of the form, and will always be visible to the user. This is useful if you have a number of buttons that you always want the user to have access to, such as save or submit buttons, or if you have a title that you always want to be visible. Tips on setting up your toolbar: Create a toolbar with all of the necessary buttons, images, and text that you need, then duplicate this toolbar to paste onto each of the additional pages. Make sure that your buttons are set up properly before you start working with them. Decide which buttons you will need, such as a print button, a save button, a submit button, and so on. Then use one button as the basis for aligning all of the others relative to one another on the form. In this section we cover: Adding a toolbar to a page Adding items to a toolbar 2.5.1 Adding a toolbar to a page To add a toolbar to the current page: 1. In the palette, click Toolbar, as shown in Figure 2-58. Figure 2-58 Create toolbar Chapter 2. Features and functionality 83 2. Click the canvas. A toolbar is placed at the top of the page, as shown in Figure 2-59. Figure 2-59 New toolbar has been added to form Tip: When you create a toolbar, the Designer gives it a sid of TOOLBAR and makes it the first item in the build order. Do not change the toolbar's sid or location in the build order. Toolbars must be the first item in the build order. Toolbar color You can change the color of the form’s toolbar to make it stand out from the rest of the form. To change the color of a toolbar: 1. Click a blank area in the tool bar. 2. In the Properties view, expand Appearance. 3. Click the ellipse button (...) within the bgcolor value field. Tip: Instead of using the pop-up window, you can enter a text value in the bgcolor field. For instance, blue, light blue, navy blue, and white. 4. A pop-up window opens, as shown in Figure 2-60. Select a color (we picked navy blue) and click OK. Figure 2-60 Select color 84 IBM Workplace Forms 2.6: Guide to Building and Integrating a Sample Workplace Forms Application 2.5.2 Adding items to a toolbar In this section we enhance our toolbar by adding functional buttons and branding to the toolbar. We cover these subjects in the following sections: Buttons Add image Buttons We need to add three functional buttons to our form. If there were more than one page to our form we would also need to add page navigation items to our form. The toolbar is a good place to position our functional items. Since this is a single page form we are only going to need the following buttons: A print button A done button An e-mail submit button Buttons are the most common way for users to trigger actions. Tip: You can also use cells within a pop-up list, combo box list, or box list to trigger actions. To add user-triggered actions to your XFDL form, you can add buttons that execute a broad range of actions, as listed in Table 2-9. Table 2-9 Actions of buttons within XFDL Action Description cancel Closes the form. If any changes were made to the form since the last save or submit, then the user is told that the form has changed, and is allowed to stop the cancellation. display Allows the user to view one or more attached files. done Submits form data and then closes the form. enclose Allows the user to attach one or more files in the form. extract Allows the user to extract a copy of one or more attachments to disk. link Switches to a different page in the form. print Prints the page or the form, depending on the controls you set up. refresh Refreshes the form. You may want users to refresh a form when viewing the form via Webform Server. remove Allows the user to remove one or more attachments from the form. replace Opens a file from the Internet or the user’s computer and displays it in the current window. saveform Saves the form to the current file. saveas Saves the form, prompting the user for a file name and location. select This is the default type for buttons and cells. For buttons, lets you capture an event in order to run a formula (compute). For example, you can set up a button that, when clicked, calls the duplicate function to duplicate a row of items. For cells in a pop-up list, combo box list, or box list, records the user’s selection. Chapter 2. Features and functionality 85 Action Description signature For buttons only: allows the user to sign the form. submit Submits form data to a server and leaves the form open. Note: For detailed information about button types, see the type option in the Workplace Forms XFDL Specification document. You can place buttons both in the form and in the form’s toolbar. Buttons placed in the toolbar are fully functional, but are not printed as part of the form. Placing eForm-only items, such as e-mail, print, or next page buttons, in a toolbar, allows your form to function as an eForm and a paper form. Add those three button items to our toolbar: 1. In the palette, click the Button (Non-XForms) item, as shown in Figure 2-61. Figure 2-61 Button Non-XForms 2. Click within the toolbar area of the form. Tip: The Designer automatically resizes the toolbar so that the items fit. If you want to increase the size of the toolbar, simply move one of the items in the toolbar down, so that part of it is past the lower edge of the toolbar. The Designer will automatically adjust the size of the toolbar to fit the item. 3. Repeat steps 1 and 2 twice more to add two more buttons to the form. Tip: For similar items you can accelerate form development by first defining the look and feel of an item and then copying and pasting the item as many times as needed. For example, instead of repeating steps 1 and 2 above, you could copy the first button item with the Ctrl+C key combination followed by two Ctrl+V key combinations. Using the Properties view, define the following properties for each button: Button1 – – – – – 86 name = Print type = print Item Location → Location List → x → value = 50 Item Location → Location List → y → value = 50 Item Location → Location List → > width → value = 63 IBM Workplace Forms 2.6: Guide to Building and Integrating a Sample Workplace Forms Application Button2 – – – – name = Done type = done Item Location → Location List → after → > Ref1 → compute = itemprevious Item Location → Location List → width → value = 63 Button3 – name = Submit – type = Submit – Item Location → Location List → after → Ref1 → compute = itemprevious – Item Location → Location List → width → value = 63 – In the URL value field, type a URL with a mailto: format, as shown in Example 2-9. (Note: It should be all one line, and you should substitute valid e-mail addresses.) Example 2-9 “Mailto” code example “mailto:[email protected][email protected]&bcc=user3@ host.domain&subject=Timesheet&body=Form+is+attached” See Figure 2-62 for a image of the Button3 properties. Figure 2-62 Button3 properties Preview the form. Fill in the required fields (first name, last name, and SSN). Once the required fields are filled, test your buttons. Return to the Design Panel when finished. Add image Use images on your forms to give them a unique look. You can use images to add department or corporate logos to the title, customize buttons or labels, or add small images like arrows to help users navigate through your form. Chapter 2. Features and functionality 87 Note: You should consider the type, quantity, and size of the images you include on your forms, as they can make a form larger and therefore slower to transmit, as well as have increased storage requirements. To help keep your images small, most graphics editing applications provide you with the ability to reduce file size by reducing the number of colors, reducing the resolution, altering the compression, changing to either black and white or gray scale. The Designer supports the following image formats: Bitmap (.bmp) Joint Photographic Experts Group (.jpeg) Portable Network Graphics (.png) Graphics Interchange Format (.gif) Sun Raster (.rast) Restriction: The Designer does not support transparency or animation, and only supports the 87a format for .gif graphic formats. The Viewer supports fewer types of JPEG images than the Designer supports. A JPEG image that appears correctly in the Designer may not be displayed in the Viewer. If you plan to use JPEG images in your form, test one image in the Viewer to ensure that the JPEG type is supported. The Designer does not support progressive compression for JPEG images. Before you can add an image to a form or to an item (such as a button or a label), you need to enclose the image as a data file for a specific page in the Enclosures view. Note: The information contained in pages in the Enclosures view does not show you where the enclosure is displayed. It shows you where the actual data resides. Images are stored as data items. When you enclose a file, a data item is created for that specific page. To enclose an image file: 1. In the Enclosures view, select a page under Data. By default, every form has one page named PAGE1. 2. Right-click and select Enclose File, as shown in Figure 2-63. Figure 2-63 Enclose file 3. Browse to the location of the image. 88 IBM Workplace Forms 2.6: Guide to Building and Integrating a Sample Workplace Forms Application 4. Select the IBM Workplace Forms Logo and click Open. You can now add the image directly into the toolbar of your form. Drag the enclosed file to the toolbar and absolute align it after the last button, and then absolute align it again center to center vertically with the same button. When finished it should appear as shown in Figure 2-64. Figure 2-64 Toolbar with Graphic and buttons Note: You can also add an image file to a form by dragging the file from your workspace or Windows Explorer onto the PAGE in the Enclosures view. 2.6 Add computes In workplace forms you can build intelligent dynamic forms by defining built-in logic, calculations, and formulas that dictate form presentation, field values, and even unique form behavior based on user interactions. In XFDL these logical operations are called computes, and with XForms similar computes are applied via binds. In this section we introduce basic concepts needed to create computes and provide simple examples. We go into greater detail on this topic and provide more advanced examples using XForms binds in Chapter 5, “Building the base scenario: stage 1” on page 173. Topics covered in this section include: References Computes Operators and the order of operations Creating a field calculation Chapter 2. Features and functionality 89 2.6.1 References References allow us to refer to other specific items and their options by providing a path, which refers to specific values or content in a form so that you can copy data or build a compute to calculate a result. This means that you can refer to an option anywhere in the form. When you write your own computes you need to understand how to reference other items. Since nearly all computes rely heavily on references, learning to write XFDL references is fundamental to understanding how to build dynamic forms. A reference, like the node structure, has four levels, as introduced in Figure 2-3 on page 24: page, item, option, argument, and occasionally an indirect membership value: page (palette item) The name (for example, the sid) you have given to the page. This is only necessary if the item you are referring to is on a different page. item (palette item) The name (for example, the sid) you have given to the item. This is only necessary if the property that you are referring to is in a different item. option (item property names) What is referred to as a property in the Designer, is referred to as an option in XFDL. argument ([n] or [name]) The position in the array of the array element, if you are referring to a property that is defined by an array. This is either a number or a variable name. -> (the dereference symbol) Represents indirect membership. This is used when the reference is in a list of choices. There are two types of references: Direct reference: refers directly to a specific option anywhere in the form. Look at Example 2-10. To refer to the value of the field firstName1 on page 1 of the employee information form, you would use a direct reference. Example 2-10 Direct reference PAGE1.firstName1.value 5. Indirect reference: refers to a choice made in a list. Consider Example 2-11. To refer to the selected choice in the Combobox list called state, you would use an indirect reference. Example 2-11 Indirect reference PAGE1.state.value->value 90 IBM Workplace Forms 2.6: Guide to Building and Integrating a Sample Workplace Forms Application For the context of this topic it may help to think of each level as containers, where each container is held within its parent, as shown in Figure 2-65. Form Global Page Page1 Item 1 Option Argument 1 Argument 2 Item 2 Option 1 Option 2 Figure 2-65 Logical containers The key to creating your reference is to open all of the containers to get to the one you need. When constructing your reference to the first three levels, the SID of each container is appended together and separated by a period. This is a direct reference and the syntax is shown in Example 2-12. Example 2-12 Direct reference Page1.Item2.Option1 Tip: The SIDs are case sensitive. PAGE1 is not equal to Page1. The syntax changes slightly once we descend to the option container because it is an array of arguments. This is still considered a direct reference, but arguments, within the reference, are denoted by using square brackets, as shown in Example 2-13. Example 2-13 Direct reference of an array value Page1.Item1.Option[Argument1] Chapter 2. Features and functionality 91 XFDL supports an infinite level of arrays. An example of an option that contains an array of arguments is the itemlocation for the print button on the employee information form. Consider the values defined there, as shown in Figure 2-66. Figure 2-66 Print button properties There are five array elements to the itemlocation option. The code for these properties in context of the reference is provided in Example 2-14. Example 2-14 Item location properties code <page sid="PAGE1"> <global sid="global"> <label>PAGE1</label> <designer:pagesize>800;600</designer:pagesize> </global> <toolbar sid="TOOLBAR"> <bgcolor>#ADD8E6</bgcolor> <designer:height>116</designer:height> </toolbar> <button sid="BUTTON1"> <itemlocation> <within>TOOLBAR</within> <x>50</x> <y>50</y> <width>63</width> <height>23</height> </itemlocation> 92 IBM Workplace Forms 2.6: Guide to Building and Integrating a Sample Workplace Forms Application If we wanted to reference the x value of itemlocation properties then we could define the reference as shown in Example 2-15. Example 2-15 Item location reference PAGE1.BUTTON1.itemlocation[2] <!-- by array index as the argument --> Or we could do it this way: PAGE1.BUTTON1.itemlocation[x] <!-- by array element name as the argument --> Tip: To avoid confusion, always use the full path, including Page and item Sid. Note: When defining references for options (properties) such as itemlocation, it is better to use the name value for the argument since the order of array elements in the itemlocaion option can be modified. If the x value were moved up or down in order, the reference to the array index of 2 would now point to some other element. 2.6.2 Computes Formulas, or calculations, enable your form to do mathematical or logical operations quickly. In this section we cover the mathematical computes and conditional computes. Mathematical computes Typically, form designers want to reduce the potential for user errors. You can drastically reduce the potential for mathematical errors by allowing the form to perform all required mathematical computes. You create mathematical formulas by embedding computes in the form. Conditional computes The second type of XFDL compute is the conditional expression, or decision statement. Like mathematical computes, these conditional computes are embedded in the XFDL code, and execute on the computer where the form is running. Computes can send a user to a different page, determine an e-mail address or URL to which a form should be submitted, automatically calculate a compound interest factor, and so on. IF/THEN/Else expressions are used for conditional evaluations. The XFDL syntax for these conditional expressions are written as: “x ? y : z”; Where x is the boolean condition, y is the result if x evaluates to true, and z is the result should x evaluate to false. The expression can be read as: IF x THEN y ELSE z Tip: Once you have all of the visible items on the form, then apply calculations, formatting, and logic. When to use computes Computes are typically used in the following situations: When you need your form to act like a spreadsheet and perform mathematical operations on the values entered by the user. Chapter 2. Features and functionality 93 When you need the form to make a decision based on the values entered by the user. For instance, you may want the dependents section of a form to be made active or inactive based on whether the user has children. When you want to add dynamic elements to your form. Common situations in which computes are used include: Copying information from one field to another Changing the text displayed by an item or setting the value of a field Changing whether an item is active or inactive Changing the URL associated with a button or choice list (for transmitting the form) For detailed information about computes and items, see the Workplace Forms XFDL Specification document. Planning a compute Before you create a compute in your form, review the following: Establish what you want the compute to do. – Do you want the compute to perform basic mathematics, such as add, subtract, divide, or multiply values? – Do you want to use the compute to have your form make decisions based on user input? Establish where the data results will be written. – Will the data be seen by the user in another field on the form? – Will the data be sent to a database, e-mail, or URL? Establish the characteristics of the form, page, and items. For example: The bgcolor property set at the form global level defines the background color of all pages on the form, whereas a bgcolor option set at the item level defines the background color for that specific item. Establish whether you will use a function. Following these guidelines will be of great value to you when designing electronic forms and help you to avoid putting unnecessary effort in form design time. 2.6.3 Operators and the order of operations In order to build a formula you will need to use mathematical and logical operations. To take full advantage of these operators you will also need to understand the order in which they are evaluated. In this section a table is provided that shows the number of operators supported in XFDL and a list of the order in which they are evaluated. You will need to familiarize yourself with these topics. The operators shown in Table 2-10 are available when writing a formula. Table 2-10 Operators 94 Operator Description + Addition (or concatenation, if text) - Subtraction (or negative, if placed in front of an integer) IBM Workplace Forms 2.6: Guide to Building and Integrating a Sample Workplace Forms Application Operator Description * Multiplication / Division ^ Exponentiation % Percentage > Greater than < Less than >= Greater than or equal to <= Less than or equal to != Not equal to && AND and AND || OR or OR ! NOT x?y:z IF x then y else z = Assignment . Structure membership [] Array membership -> Indirect membership Order of operations Operations are evaluated in the following order: 1. 2. 3. 4. 5. 6. 7. 8. Membership Exponentiation Multiplication, division, and unary minus Addition and subtraction Relational (greater than, less than, equal to, and so on) Logical AND Logical OR Logical IF THEN ELSE Also, when defining functions directly in the source code you must be aware of some restricted values and use the escaped version in your code. Table 2-11 shows the most commonly used restricted characters. Table 2-11 Restricted characters Symbol Description Escaped format & Ampersand & ‘ Apostrophe ' < Less than < Chapter 2. Features and functionality 95 Symbol Description Escaped format > Greater than > <CR> Carrage Return 
 2.6.4 Creating a field calculation In this section we discuss two types of field calculations for our employee history form — one that will use the Compute wizard to display the current date automatically, and the second that will calculate yearly salary based on hourly rate and employee type (full time/part time). These topics are covered in the following sections: Displaying the current date automatically Example on page 98 Displaying the current date automatically Unlike paper forms, XFDL forms can perform sophisticated checks and calculations while the user fills out the form. This can prevent mistakes right at the source and provide a high level of comfort while filling out the form. You can set up a field to automatically display the current date when the form opens. To display the current date automatically: 1. Select the DatePickerItem in the employee information form we have been working with. 2. Right-click the item and click Wizards → Compute Wizard, as shown in Figure 2-67. Figure 2-67 Compute wizard 96 IBM Workplace Forms 2.6: Guide to Building and Integrating a Sample Workplace Forms Application 3. From the Property to Set list, click value and click The value is equal to a function, as shown in Figure 2-68. Click Next when finished. Figure 2-68 Set value equal to a function 4. On the next screen click Function. The Function window is displayed. Chapter 2. Features and functionality 97 5. Set the function call to date, as shown in Figure 2-69. Figure 2-69 Function equal to date 6. Click OK and then click Finish. Preview the form. Notice that when the form loads, the Date field is automatically populated with the current date. Calculate yearly salary In this section we create a compute that calculates yearly salary based on the condition of the user interaction. To calculate yearly salary we need to add three more fields to our form. The first is an open field to allow us to enter hourly rate, the second is a drop-down list that shows employee type (full time/part time), and the third and final field needed for this example is a read-only field that displays yearly salary to display the result. 98 IBM Workplace Forms 2.6: Guide to Building and Integrating a Sample Workplace Forms Application Add Hourly Rate field As shown in Figure 2-70, use the drop-down menu in your palette to select and add one Non-XForms field anywhere on the design canvas. This will be our hourly rate field. Figure 2-70 Select Non-XForms Field from palette Since the employee information form we created has a dynamic table, we need to use relative alignment when adding our new items to the form. Relative align the hourly rate field below the DatePickerItem, as shown in Figure 2-71. Figure 2-71 Relative align hourly rate field below date Chapter 2. Features and functionality 99 Next we define the properties for this form. Set the field name to FieldHourlyRate, set the label value to Hourly Rate, set the justify setting to right, and set the datatype format to currency. See Figure 2-72 for help. Figure 2-72 Hourly rate properties Add employee type list Now we can add a Non-XForms List item to the form, as shown in Figure 2-73. This item contains just two choices: full time and part time. Figure 2-73 Select List (Non-XForms) item from palette 100 IBM Workplace Forms 2.6: Guide to Building and Integrating a Sample Workplace Forms Application After placing it on the form, right-click the list item and select Relative Align - After Previous Item, as shown in Figure 2-74. Figure 2-74 Relative align after previous Item To define our choices for this list item we need to add some choices in the form of two cells associated with our list item. Select the Non-XForms Cell item from the palette and then click the list item on the canvas to add a cell to the list. Repeat the steps one more time to add a second cell to the list. This will give us two choices, as shown in Figure 2-75. Figure 2-75 Add cells to list Notice that there are two new items in the form outline: CELL1 and CELL2. Also notice that the list item on the canvas has expanded to allow for the viewing of those items. Next we define the properties for the list item, and the two cells. For the list item, change the label value from LIST1 to Employee Type. Since cell items are not visible on the form canvas, you cannot directly select them. To set the properties for the cell you will have to use the Form Outline view to select them, as shown in Figure 2-76. Figure 2-76 Access cell items via the Outline view Chapter 2. Features and functionality 101 Now that we can get to our new cell items we want to set the sid and the value properties for both of these items, as shown in Figure 2-77. (Cell1 is shown on the left. Cell2 is shown on the right.) Figure 2-77 Cell properties Add Yearly Salary field This is the last item we want to add to the form to complete our example. As shown in previous steps, from the palette select and add a Non-XForms field item anywhere on to the form design canvas. Use relative alignment to place this field after the EmployeeType list item. Finally, define the properties for this item as follows: 102 sid = “FIELDYearlySalary” label = “Yearly Salary” readonly = “on” justify = “right” datatype = ”currency” IBM Workplace Forms 2.6: Guide to Building and Integrating a Sample Workplace Forms Application Figure 2-78 shows these properties as applied in the Designers Properties view. Figure 2-78 Yearly salary field properties Let us align and resize these items a little better now that we have them all on the form. Click the FIELDYearlySalary field and right-click the FIELDHourlyRate field. Select Relative Align - bottom to bottom. Then using the same steps, relative align the Employee Type list item top to top with the Hourly Rate field. To resize all of the items at once, select them all, and then right-click the DatePickerItem, select Absolute Expand - Make Same Width. When finished, the form should look like that shown in Figure 2-79. Figure 2-79 Alignment and resizing of compute items Define the compute There are a number of different approaches we could take here to calculate yearly salary. In this section we use what was learned earlier in this chapter to build the compute manually in the source code. We take you through the logical process step by step and then add the finished logic to the code. The math for this example is simple: (hourly rate) X (employee type) X (52 weeks) = Yearly Salary Chapter 2. Features and functionality 103 Using what we learned from 2.6.1, “References” on page 90, the calculation can be build using a combination of direct and indirect references, as shown in Example 2-16. Tip: If the full path, or reference, to an item is not known, just place your mouse over the item on the design canvas and hold it there until a small window appears. That pop-up will display the reference. Example 2-16 Mathematical compute (PAGE1.FIELDHourlyRate.value * PAGE1.LIST1.value->value) * '52' Tip: The Compute wizard can create simple computes of two values, but cannot write more complex expressions unless you manually define them. However, if you are having difficulty writing a complex compute, then you can use the wizard to show you the simpler components of your compute. If we modify the value option for the yearly salary to include this compute it should work, but we have a problem. Although the rate is a dollar amount and the number of weeks is a fixed value, the employee type is a string. The calculation will fail if we try to use a mathematical operator on a string value. We need to substitute numerical values into our calculation for the selected employee type. If Full Time is selected, we know that they work 40 hours a week, and if Part Time is selected then they work 20 hours a week. Since our list only has two items, that conditional statement is easily represented by an if\then\else statement: If selected list item equals ‘Full Time’ then the hours worked is 40, else the hours worked is 20 The logical expression translates to the XFDL code shown in Example 2-17. Example 2-17 XFDL conditional statement PAGE1.LIST1.value->value == 'Full Time' ? ('40') : '20' We can use this conditional statement to perform our calculation. Using the same logic to include our mathematical expression, it would change to this: If selected list item equals ‘Full Time’ then the yearly salary is calculated by (hourly rate) X (40 hours) X (52 weeks), else the yearly salary is calculated by (hourly rate) X (20 hours) X (52 weeks) The logical expression translates to the XFDL code shown in Example 2-18. Example 2-18 XFDL conditional calculation PAGE1.LIST1.value->value == 'Full Time' 
 ? (PAGE1.FIELDHourlyRate.value * '40') * '52' 
 : (PAGE1.FIELDHourlyRate.value * '20') * '52' Now when this compute is calculated it will substitute numerical values for the string values in our list. 104 IBM Workplace Forms 2.6: Guide to Building and Integrating a Sample Workplace Forms Application To add this code to the FIELDYearlySalary item, complete the following steps: 1. In the Designer, click the FIELDYearlySalary item once. 2. Click the Source tab located at the bottom left-hand corner of the Designer canvas. 3. The source code editor will automatically load to the code associated with the item you selected, saving us the time needed to locate it otherwise. 4. Locate the <value> option for FIELDYearlySalary. 5. Move your cursor to the end of the word ‘value’ and press the Space bar. A predictive text window opens in the editor showing valid code options. See Figure 2-80. Figure 2-80 Predictive text options 6. Select compute by double-clicking the text, or just press the Enter key. The text is automatically added to your code. 7. To complete the syntax for a compute type the equals sign (=) and a double quotation mark (“). Notice that the end quotation mark is automatically added. Chapter 2. Features and functionality 105 8. Place your cursor between the two quotation marks and add the compute exactly as shown in Example 2-18 on page 104. When finished your code should look like that shown in Figure 2-81. Figure 2-81 Calculation added to field 9. Click Ctrl+S to save your changes and check for errors. (By saving your changes the source edits will be compiled. If there are errors they will immediately be found.) 106 IBM Workplace Forms 2.6: Guide to Building and Integrating a Sample Workplace Forms Application The compute is finished. Click the Preview tab located in the bottom left-hand corner of the Source Code editor to check your results. See Figure 2-82. Figure 2-82 Preview of form with new compute set on yearly salary Enter a value for hourly wage, and select an employee type. Notice that the yearly salary field is automatically populated with the calculation of both values. Changes to employee type and hourly rate automatically recalculate as applied. Important: We have taken this approach in this exercise to illustrate the concepts of building computes using references, conditional statements, and mathematical calculations. There are other approaches that we could have taken to resolve this issue. In fact, if a similar issue were encountered in a real design environment then you may likely want to reconsider your approach to using a list box in this manner. Chapter 2. Features and functionality 107 2.7 Signature buttons The ability to provide security to a form is one of IBM Workplace Forms greatest strengths. In this section we provide an introduction to electronic signatures and how to use action buttons to secure a form. Topics covered include: Overview Signature types Digital signatures Signature filters Creating multiple signatures Create a Clickwrap signature button 2.7.1 Overview A user can sign a form by clicking a signature button on the form. You usually design a signature button with some text or a label that indicates its function (for example, Click to Sign). Typically, signature buttons are also larger than other buttons because they have to display the signer’s name after the form is signed. When a user clicks a signature button, the Digital Signature Viewer opens. The Digital Signature Viewer lets users sign forms, verify or delete existing signatures, and view the details of what parts of the form were signed. Users click Sign to sign the form. If they have more than one digital certificate installed on their computer, a dialog box appears, displaying all of the available signatures from which they can choose only one. After the user selects a certificate, the form is signed and the Digital Signature Viewer displays the details of the signature. The user can then return to the form. In the form, the signature button changes to reflect the new signature. Typically, it displays the name and e-mail address of the signer (although this depends on the type of signature engine used). Once a form is signed, the Viewer prevents users from changing any of the signed information. Furthermore, when the user mouses over a signed item on a form, a tooltip indicates that the item is signed and cannot be altered. When a user clicks a signature button, the Viewer automatically creates the following elements on the form: A signer option is added to the signature button. In general, this option contains the signer’s name and e-mail address. However, the value assigned to this option depends on the signature engine that was used to sign the form. A signature item is created on the same page as the signature button. This item is given the name indicated in the button’s signature option, and is used to store the details of the signature. You do not need to create the signature item yourself. The signature item will also include any of the filtering options used in the signature button. A form may require any number of signatures. For example, a purchase order form may have two sections, one for the customer and one for an internal staff member who processes the order. The customer might fill out the first half of the form, and then add a signature that covers that portion of the form. The internal staff member might then review the form, and add a second signature that covers the entire form. 108 IBM Workplace Forms 2.6: Guide to Building and Integrating a Sample Workplace Forms Application Digital signatures have two purposes: Identifying signers Digital signatures affix the signer’s name and e-mail address to the document. Secure documents Digital signatures use encryption algorithms and digital certificates to guarantee form security. When users sign a document, a snapshot of the document is taken and hashed to produce a unique number representing your document. If the document changes, hashing produces a different number. As a result, you can think of a hash as a document’s digital fingerprint, unique and unmistakable. Once a user has signed a form, any alterations to the signed portion of the form breaks the signature. If a malicious user tampers with the form’s XFDL code after it has been signed, the Viewer can detects the change and will warn the next person to view the form that the information cannot be trusted in two ways: An error message will be shown immediately when the form is opened. It will warn that one or more of the form’s digital signatures is invalid. The label on the signature button will be modified to read INVALID. Important: This security measure does not prevent the original signers from making changes to the form. If they wish to make changes, they can simply delete their signatures from the form, modify their entries, and re-sign the form. 2.7.2 Signature types Electronic signature refers to any signature that is created electronically, and it describes a category of technology. Within that category, there are many types of electronic signatures. The Designer supports a number of different signature types (signature engines). When you create a signature button, you must configure it to use a specific signature engine. Table 2-12 provides a list of signature types supported by IBM Workplace Forms with a description. Table 2-12 Electronic signature types Electronic signature type Description Digital signatures Digital signatures are among the most secure electronic signatures. When you use digital signatures, each user is given a digital certificate. They are discussed in great detail in the 2.7.3, “Digital signatures” on page 110. Generic RSA signatures The Generic RSA engine uses a standard encryption algorithm that supports both the Microsoft and Netscape signature engines. The Generic RSA signature uses digital certificates from either your Microsoft Internet Explorer or your Netscape certificate store. Entrust signatures Entrust signatures are a type of digital signature (see 2.7.3, “Digital signatures” on page 110). Entrust signatures let the user sign the form using Entrust certificates. Microsoft CryptoAPI signatures Microsoft CryptoAPI signatures are a type of digital signature (see 2.7.3, “Digital signatures” on page 110). Microsoft CryptoAPI signatures use the Microsoft CryptoAPI signature engine. To use this type of digital signature, it is necessary for the user to obtain a digital certificate. Chapter 2. Features and functionality 109 Electronic signature type Description Netscape signatures Netscape signatures are a type of digital signature (see 2.7.3, “Digital signatures” on page 110). Netscape signatures use the Netscape encryption engine. To use this type of digital signature, it is necessary for the user to obtain a digital certificate. Netscape signatures use certificates located in the user’s Netscape certificate store. Signature Pad signatures Signature pad signatures are a blending of electronic signatures and handwritten signatures. You write your signature on a digital pad that captures your handwriting and converts it into an electronic format. This signature is then added to the form, along with a graphic that shows the handwriting. Thus, Signature Pad signatures provide a familiar feel for the signing process. Silanis signatures Silanis Technology, Inc. provides a signature type that blends a digital signature and a signature pad signature. This means that an image of your signature is captured using a signature pad, but the actual signature is created using a digital certificate. The image of your handwritten signature is then stored as part of the digital signature for later reference. This combines the familiar pen-based signing process with the strength of digital certificates. Clickwrap signatures Clickwrap signatures are electronic signatures that do not require digital certificates. While they still offer a measure of security due to an encryption algorithm, Clickwrap signatures are not security tools. Authenticated Clickwrap signatures Authenticated Clickwrap signatures are a blending of Clickwrap and digital signatures. This enables users to securely sign a form without relying on an extended PKI infrastructure. 2.7.3 Digital signatures Digital signatures are among the most secure electronic signatures. When you use digital signatures, each user is given a digital certificate. This certificate is actually a small file on a disk or on another device, such as a smart card. Each certificate also contains a unique code, and the certificate imprints this code on each signature you create with it. This means that all of your signatures can be traced back to your certificate, and the certificate itself can be traced back to you. In this way, digital signatures identify you through a clear chain of ownership. Workplace Forms supports the following digital signature types: RSA standard signatures These signatures are based on the RSA standard for digital signatures. This is a public standard that is broadly supported by both Public Key Infrastructure (PKI) and browser vendors. Workplace Forms products rely on the security libraries in the Microsoft Internet Explorer and Netscape browsers to provide support for RSA signatures. Entrust signatures These signatures are based on a proprietary standard developed by Entrust, Inc. These signatures are not broadly supported, and require additional software from Entrust. This may take the form of client software or a central server that processes online signature requests. 110 IBM Workplace Forms 2.6: Guide to Building and Integrating a Sample Workplace Forms Application In general, decisions about whether to use RSA signatures or Entrust signatures rely on individual preferences about their comparative strengths and features. When to use digital signatures Digital signatures are best used for controlled groups that require tight security. Remember that each user must receive a certificate, and further that each user must keep that certificate safe from theft and copying. This means that applications for the general public are not normally good candidates for digital signatures unless there is a large body already distributing certificates to the public (such as the government). Digital signatures also incur significant overhead. To issue and track digital signatures, you need a Public Key Infrastructure (PKI), which can be costly and time consuming to maintain. In general, most organizations will not adopt this sort of system unless they have a strong security need (or are mandated through law). For example, military organizations or other government agencies might use digital signatures. 2.7.4 Signature filters Occasionally, you may find that you do not want certain items or options to be signed. You may wish to create different form sections to be signed by different users, or you may want a custom item to continue working after the form is signed. You can accomplish this with signature filters. Signature filters allow you to set which form elements you want to sign. There are two kinds of signature filters: Omit The omit filters let you specify the form elements that you do not want to sign, and ensure that the rest of the form is signed. This filter guarantees that everything in the form is secured, except the form elements that you choose. Keep The keep filters let you specify the form elements that you want to sign, leaving the rest of the form unsigned. This filter only secures the form elements that you choose, leaving the remainder of the form unprotected. Note: Omit filters provide greater security than keep filters. It is good practice to use omit filters rather than keep filters. If you must use a keep filter, use it in conjunction with an omit filter. For example, you might want to omit the items in a “For office use only” section from a user’s signature, but you would secure the location and appearance of these items with a keep filter. Workplace Forms Designer makes it easy to create secure signature filters. It allows you to select specific items that you want to omit from the signature, while automatically retaining item position information. This filter option, which is called signitemrefs, allows you to specify individual items that the signature will omit or keep. For example, you might set the filter to omit BUTTON1 on PAGE1. The Designer also provides an interface that assists you in creating custom signature filters. Custom signature filters allow you to omit or keep specific form elements, such as: Items Specifies the types of items that the signature will omit or keep. For example, you might set the filter to omit all button items from the signature. Chapter 2. Features and functionality 111 Options Specifies the types of options that the signature will omit or keep. For example, you might set the filter to omit all triggeritem options from the signature. Groups Specifies one or more groups, as defined by the group option, that the signature will either omit or keep. This filters any radio buttons or cells belonging to that group, but does not filter list, pop-up, or combo box items. For example, if you had a pop-up containing a cell for each state, you might set the filter to omit the state group, which would omit all cells in that group. Data groups Specifies one or more data groups, as defined by the data group option, that the signature will either omit or keep. This filters data items belonging to that data group, but does not filter any action, button, or cell items. For example, if you had an enclosure button containing references, you might set a filter to omit the references data group, which would omit all data items in that group. 2.7.5 Creating multiple signatures Forms often require multiple signatures. In fact, it is very common for some signatures to endorse other signatures. A combination of signatures is called overlapping signatures. XFDL allows an unlimited number of signatures on a form. The signatures can sign separate and overlapping sections of the form, as well as endorsing other signatures, depending on the signature filters. 2.7.6 Create a Clickwrap signature button In this section we discuss creating a Clickwrap signature button. Creating Clickwrap signatures Clickwrap signatures are electronic signatures that do not require digital certificates. While they offer a measure of security due to an encryption algorithm, Clickwrap signatures are not security tools. Instead, Clickwrap signatures offer a simple method of obtaining electronic evidence of user acceptance to an electronic agreement. The Clickwrap signing ceremony authenticates users through a series of questions and answers, and records the signer’s consent. Clickwrap style agreements are frequently found in licensing agreements and other online transactions. The simplest Clickwrap signing ceremony requests that users click the Accept button to sign a form. However, you can include a number of options in your Clickwrap signing ceremony. For example, you can add company information, the text of your agreement, questions and answers, and echo text. Echo text allows you to designate text that the user must re-type before signing the form. This ensures that the user has read vital information before indicating their agreement. Restriction: A signature button can sign any XFDL, including panes and tables and the data to which their contained controls bind. You cannot place a signature button into a pane or table item's template (that is, the content of the xforms:group, xforms:repeat, or xforms:switch). Although this is possible to do in the Designer, this button will not function correctly in the Viewer. 112 IBM Workplace Forms 2.6: Guide to Building and Integrating a Sample Workplace Forms Application To create a Clickwrap signature button in the employee information form: 1. We still have to keep in mind that the table in our form is dynamic, so we use relative alignment when positioning our button. Since the last few items on the form vary in height we can simplify the process and distinguish the button more clearly if we add a line to the form. a. Add a line to the form. b. Use relative alignment to place our new line below the lowest item on the form - LIST1 (Employee Type). c. Now use absolute expand to make the line equal in width to the main table pane. d. Relative align the left side of the line with the left side of the pane. 2. Select the Button (Non-XForms) item from the palette, as shown in Figure 2-83, and add it to the form. Figure 2-83 Add button to form a. Use relative alignment to position it below our new line. b. Use absolute expansion to make it the same width as the DatePickerItem. 3. Right-click the button and click Wizards → Signature Wizard, as shown in Figure 2-84. Figure 2-84 Access Signature Wizard Chapter 2. Features and functionality 113 Restriction: The wizard does not provide the means to omit advanced elements of a form such as XForms Model instances. The Properties view or the Source editor must be used to define those filters. Step 1 of the Signature Wizard interface The process is: 1. A new window will open presenting you with the first of three pages in the wizard. There are two options here: – The complete form The signature button will sign the entire form. – Parts of the form The signature button will sign part of the form. The wizard is prompting us to specify whether a filter should be included in our signature button. Select Parts of the form to include a filter and click Next, as shown in Figure 2-85. Figure 2-85 Signature Wizard - step 1, page 1 114 IBM Workplace Forms 2.6: Guide to Building and Integrating a Sample Workplace Forms Application 2. On the next screen you will be asked whether you want to configure the signature by defining either items not to sign or items to sign. Since on the previous screen we specified that a filter was required, the wizard now asks what type of filter will be used for the signature button. Select the option for Items not to sign to specify an omit filter and click Next, as shown in Figure 2-86. Figure 2-86 Signature Wizard - step 1, page 2 Chapter 2. Features and functionality 115 3. On the next screen you will be given the opportunity to select whole pages in the form that will not need to be signed. See Figure 2-87. Click Next to continue. Figure 2-87 Signature Wizard - step 1, page 3 Note: Although there are circumstances where excluding an entire page from our signature may be useful, it will not be useful for our single page employee information form. 4. The next page prompts you to filter or omit individual items on the form. There are two approaches we can take here: – You can use the node explorer window to select items from the list shown in the Signed view of the screen and then add them to the Not Signed view on the right using the arrows shown between the two views. – You can use the hand icon to access the form and select items as displayed in the Design canvas. Often this is the easier of the two methods, especially for less advanced form developers. 116 IBM Workplace Forms 2.6: Guide to Building and Integrating a Sample Workplace Forms Application Tips: If you plan to use the hand icon, keep these tips in mind: Hold down the Ctrl key and click to select multiple items on a page. If you inadvertently select an item that you want to sign, click it again to deselect that item. If you plan to use the hand icon to select items in the form, you should maximize the Designer canvas before starting the wizard. Otherwise you have to use the horizontal and vertical slides of the canvas to access all items on the form because the Designer perspective cannot be altered when the hand icon is activated. If you have an especially wide or long form you can show more of the form for the wizard by changing the zoom setting for the form. To zoom in or out you can use the drop-down list in the Designer toolbar, the View option from the menu of the Designer, or the respective key combinations: Ctrl+>, Ctrl+<. Use the node explorer window to locate the FIELDYearlySalary item. Click the item and click the move item button (>) to add it to the list of items to be omitted from the signing ceremony. See Figure 2-88 for details. Figure 2-88 Signature Wizard - step 1, page 4 Step 1 is complete. We now move onto step 2 of the Signature Wizard. Chapter 2. Features and functionality 117 Step 2 of the Signature Wizard The is a single page step. On this page the wizard prompts for the type of signature to be used. Select Clickwrap as the type and click Next, as shown in Figure 2-89. Figure 2-89 Signature Wizard - step 2, page 1 118 IBM Workplace Forms 2.6: Guide to Building and Integrating a Sample Workplace Forms Application Step 3 of the Signature Wizard For this step: 1. The first and only page of step 3 has the most options and is used to set the Clickwrap signature details. The field values entered here will be visible to the form user in the Clickwrap Signature Ceremony window. See Figure 2-90. Figure 2-90 Signature Wizard - step 3, page 1 – Title The title of the signing ceremony. This text describes the signing ceremony, the company, or the title of the agreement. Enter Click Wrap Signature as the title. – Prompt Typically used to explain the signing ceremony to users. Enter Answer the following questions to authenticate... as the prompt. – Main Text Contains the main text of the agreement (for example, the text of a licensing agreement). You can add as much text as necessary to this parameter. The signing ceremony automatically displays scroll bars if the text is longer than the display field. Just as a proof point, enter some text here. (We copied and pasted the first section of the IBM Workplace Forms terms of use information.) – Safeguard Question list section with: • Questions column Lets you prompt the user to ask from one to five questions that help establish the identity of the user. Chapter 2. Features and functionality 119 By default there are three questions that we can add or remove from the list. We use all three. Enter the following questions in the existing fields: What is your employee serial number? What was your first pet’s name? What was your mother’s Maiden Name? • Default Answer column These are the answers to the questions. To pre-populate the answer fields when the user signs the form, enter the answers here. Otherwise, you can leave these fields blank. Leave these fields blank. When you have finished entering all of the values defined above, it should appear as shown in Figure 2-91. Figure 2-91 Signature Wizard complete 2. Click Finish to exit the wizard. Preview the form The basic behavior for our signature button has been created through the use of the wizard. We now have a functional signature button. To test its behavior click the Preview tab located in the bottom left corner of the Designer canvas. Attention: The button label is no longer visible. This is because the wizard logic has replaced the original value/function. We resolve this issue later in this section. 120 IBM Workplace Forms 2.6: Guide to Building and Integrating a Sample Workplace Forms Application When the form loads completely, click the Signature button without filling in any other field values. You will immediately see a warning message, as shown in Figure 2-92. Figure 2-92 Warning message Since this is just a warning, it can be ignored. However, you can design a form so that a signature button cannot be used until all mandatory fields are properly completed. For now click Yes to ignore it. The Digital Signature Viewer will launch, as shown in Figure 2-93. If you click OK then the Digital Signature Viewer will close, and you will be returned to the form. Figure 2-93 Digital Signature Viewer Chapter 2. Features and functionality 121 Click the Sign button to take the next step towards completing the signing process. Another window will open. This is the Click-Wrap Signing Ceremony window. Notice that it shows all of the properties we defined in stage 3 of the Signature Wizard. Take a minute to examine this window and provide answers to the three questions shown in Figure 2-94. Figure 2-94 Click-Wrap Signing Ceremony Click Accept when finished. You will be returned to the Digital Signature Viewer. Notice that the Viewer items have been updated to capture the values returned from the ceremony, as shown in Figure 2-95. Figure 2-95 Return to Signature Viewer 122 IBM Workplace Forms 2.6: Guide to Building and Integrating a Sample Workplace Forms Application Click OK to return to the form preview. Move your mouse over all of the items on the form. Notice that every item except the Read-only Yearly Salary field has been locked, as shown in Figure 2-96. Figure 2-96 Form locked with digital signature Notice also that the signature button now has a label. Where it was blank earlier, it has been updated to reflect the fact that the form has been accepted. Chapter 2. Features and functionality 123 Additional signature button properties There are additional more advanced properties for signature buttons. Like all other items in IBM Workplace Forms, properties for a signature button can be directly seen and modified in the Properties view. Let us look at the advanced signature properties of our button in Figure 2-97. Figure 2-97 Signature button properties Prevent the signature from being removed By default, the user can delete a signature after signing a form. If you want to prevent users from deleting the signature, do the following: 1. Click the Properties view and click the down arrow button. 2. Click Show Advanced Properties. 3. In the Properties view, expand the Signature section. 4. Go to the signformat property. The value there reflects many of the properties that were defined in the wizard screens, as shown in Example 2-19. Example 2-19 signformat properties application/vnd.xfdl;engine="ClickWrap";titleText="Click Wrap Signature";mainPrompt="Answer the following questions to authenticate...";mainText="The following are terms of a legal agreement between you and IBM. By accessing, browsing and/or using this web site, you acknowledge that you have read, understood, and agree... . . 124 IBM Workplace Forms 2.6: Guide to Building and Integrating a Sample Workplace Forms Application . ...";question1Text="What is your employee serial number?";answer1Text="";question2Text="What was your first pet’s name?";answer2Text="";question3Text="What was your mother’s Maiden Name?";answer3Text="" 5. Add the following text to the end of the current signformat value: ;delete="off" After making this change form user will not be able to remove a signature. Once it has been signed, there can be no more changes to any of the items that were not filtered out of the signature process. If you want to customize the signature button further, the following attributes of the signformat property are available in the Advanced view of the button. Using the method described in the prior section, you can modify these properties: echoPrompt: Use this to instruct the user to echo the echoText. Generally, if you include echoText, you might want to include the text: Please type the following phrase to show that you understand and agree to this contract. echoText: This is the actual text that the user should echo, or re-type. For example: I understand the terms of this agreement. buttonPrompt: This is an instruction line that appears above the Accept and Reject buttons. The user must click the Accept button to sign, so the prompt might read: Click Accept to sign this document. The default setting is Click the Accept button to sign. acceptText: sets the text that the Accept button displays. The default text is Accept. rejectText: sets the text that the Reject button displays. The default text is Not Accept. 2.8 Workplace Forms Viewer In this section we cover the following topics: Introduction Viewer modes Toolbar buttons Input validation Recognizing mandatory items Completing Formatted fields Turning on help messages Opening the Viewer help form 2.8.1 Introduction Workplace Forms Viewer is a client-side application that is installed on the end-user’s system. It draws the visual form based on the XFDL source code, which provides a single interface for users to open, review, or complete XFDL forms. One of the most important functions of the view is its ability to enforce and maintain the internal logic of the form. Additionally, the Viewer is interactive. While users complete forms, the Viewer responds to user input. Chapter 2. Features and functionality 125 2.8.2 Viewer modes The Viewer has two modes: Standalone Browser interface Both modes have full online and offline functionality. Figure 2-98 shows the Workplace Forms Viewer interface. Figure 2-98 Workplace Forms Viewer interface 2.8.3 Toolbar buttons There are several toolbar buttons available in the IBM Workplace Forms Viewer. They are shown in Figure 2-99. Figure 2-99 Viewer button list 1 126 IBM Workplace Forms 2.6: Guide to Building and Integrating a Sample Workplace Forms Application The remaining buttons are shown in Figure 2-100. Figure 2-100 Viewer buttons list 2 2.8.4 Input validation The Workplace Forms Viewer can perform real-time consistency checks and formatting of the data entered by the user while the fields in the form are being filled. This assures that the data entered is always in the correct format for its further purpose in a back-end system or application. You can configure the following format properties for the data contained in the fields. See Table 2-13. For more details about the properties shown on the table below, please refer to the Workplace Forms Designer V2.6.1 User’s Guide. Table 2-13 Properties for formatting input data Format Description Data type Specifies what type of input to accept: date_time, currency, float, integer, month, string, time, void, year, date, day_of_week, or day_of_month. Strings For a datatype set to string, set casetype to one of the following: lower, upper, title. Chapter 2. Features and functionality 127 128 Format Description Numbers and currency For a datatype set to integer, float, or currency, set any of the following: groupingseparator - the symbols used to separate groups of numbers. The default for the en_US locale is a comma. negativeindicator - sets the symbols that are used to indicate a negative value. The default for the en_US locale is a minus sign (-). round - determines how values are rounded. Valid settings are floor, ceiling, up, down, and half_even (which is the default value). pad - sets the number of digits to show, regardless of the value. The default is 0 (no padding imposed). padcharacter - sets the character to use for padding. The default for the en_US locale is 0. fractiondigits - sets the number of digits shown after the decimal place. It is only valid for float and currency data types. significantdigits - sets the number of significant digits allowed. pattern - allows you to set a pattern for number and date data types. decimalseparator - defines one or more symbols that are allowed to indicate the decimal place. Dates For a datatype set to date_time, month, year, date, day_of_week. or day_of_month, set style to: numeric, short, medium, long, or full. Constraints on user input XFDL input items can be set up to accept only input formatted within certain constraints. The following is a list of constraints that can be applied to items: checks - This allows you to force the format check to fail, or to ignore all contraints settings. mandatory - The user is required to fill in data before proceeding. range - The entry must fall within the range you specify. length - The number of characters in the entry must fall within the limits you specify. patterns - This allows you to set one or more patters for strings, dates, or numbers that are valid as input. message - This sets the message that is displayed when the input is invalid. template - This allows you to display symbols in the input area before the user enters their data. groupingseparator - This defines one or more symbols that are allowed to separate groups of numbers during input. decimalseparator - This defines one or more symbols that are allowed to indicate the decimal place. IBM Workplace Forms 2.6: Guide to Building and Integrating a Sample Workplace Forms Application As an example, we formatted the price and amount with the following properties, as shown in Figure 2-101: Set the datatype property to currency. In the length property, set the min to 1 and the max to 10. Figure 2-101 Field Format Properties view 2.8.5 Recognizing mandatory items Forms are often used to collect important information. As a result, a form may contain fields or other items that you must complete before saving or submitting a form. If you launch the employee information form you can identify these items by their yellow background color, as shown in Figure 2-102. Figure 2-102 Mandatory items The yellow background disappears as soon as you complete the item. For example, try typing a last name into the Last Name field and then pressing Tab to leave the field. Notice that the field is no longer highlighted, as shown in Example 2-103. Figure 2-103 Fill in Last Name field Chapter 2. Features and functionality 129 If you try to print, save, sign, or submit a form without completing a mandatory item, the Viewer will display a warning message asking you to confirm that you want perform the action without completing the form. See Figure 2-104. Figure 2-104 Warning message If you are printing or saving the form for your own use, click Yes to continue. However, if you are submitting a form to a database, or signing it to indicate your acceptance of the contents, you should make sure that all mandatory items are complete before continuing. 2.8.6 Completing Formatted fields Filling out Workplace Forms is similar to filling out paper forms except that you use the mouse and the keyboard to enter your information. For example, you type text into fields and select check boxes by clicking them with the mouse. On the form, move from item to item by pressing the Tab key or use the mouse to reposition the cursor. Some fields contain special formatting that check to make sure that you are entering the correct information. For example, some fields might only accept dates or numbers. If you return to the employee information form you will notice that there are several formatted fields: Social security number Home phone Work phone Zip code Formatted fields help you to enter the correct information. Take zip code, for example. It requires either a five-digit number, or five digits, a hyphen, and four more digits. If we attempt to enter an obviously wrong value such as five letters, then when we tab out of the field we are immediately notified with the following (see Figure 2-105): The form beeps. The field turns red. A hint box appears with specific information telling you what is required. Zip |asdfa This entry is invalid. Please try again. Enter the Zip Code in either ##### or #####-#### format. City State Figure 2-105 Invalid format The field will only return to normal if you enter a valid zip code. Enter five digits and tab out of the field. The issue has been resolved. 130 IBM Workplace Forms 2.6: Guide to Building and Integrating a Sample Workplace Forms Application 2.8.7 Turning on help messages Many forms contain help messages that aid you in completing the form. They appear as little floating tips when you tab into or click an item with help. For example, Figure 2-106 shows the SSN field. The help provides you with a full description and a symbolic representation of the format required for a Social Security Number. Figure 2-106 Mouse over help Before you can see these helpful tips, you must turn help mode on. You can do this by clicking the Help Mode icon in the Viewer toolbar. If this button is greyed out or unavailable, then the form does not contain any help messages. 2.8.8 Opening the Viewer help form The Viewer help form provides additional help information. It contains a list of keyboard commands that will help you control the Viewer and complete your forms. It also provides accessibility information for people who have difficulty viewing the form. To open the Viewer help form, click the Viewer Help icon. Chapter 2. Features and functionality 131 132 IBM Workplace Forms 2.6: Guide to Building and Integrating a Sample Workplace Forms Application 3 Chapter 3. XForms This chapter provides an overview of the W3C XForms Specification and discusses how it is implemented in IBM Workplace Forms today. Once we have provided a solid overview of the specification, we provide more information about how forms with XForms support are processed and how they can participate in the SOA. In this chapter we consider the following topics: Introduction to XForms What is new to IBM Workplace Forms with XForms support Workplace Forms: XForms and XFDL Processing e-forms with XForms objects XForms and SOA © Copyright IBM Corp. 2007. All rights reserved. 133 3.1 Introduction to XForms The World Wide Web Consortium (W3C) developed the XForms specification as a major revision to Web forms and is considered by many to be the next generation of Web forms. The creation of this specification began in 2000 and was driven by a need to provide more dynamic forms, which could be created more quickly and easily. Additionally, XForms provides the means to create items and data models that can be reused across multiple forms. The technology was six years in development. It first became a W3C recommendation in 2003, and on March 14, 2006, a significant refinement was released — the second edition of the XForms 1.0 specification. IBM, along with other vendors, is a member of the W3C XForms working group that contributes to the development of Version 1.1 of this specification. IBM Workplace Forms 2.6.1 provides support for Version 1.0 with select features from Version 1.1. XML is a common language for representing data processing models. One of the goals of XML is to enable inter-operation of applications by representing data in a standard, human-readable format that is also well suited for processing by a computer. XForms is an XML vocabulary that provides the ability to wrap, or skin, XML data with a processing model, including: Dynamically recalculated computes that express relationships in data and their properties Static constraints expressed via XML schema constructs Dynamic constraints that are automatically rechecked as data changes Parameters for submitting XML data Event-triggered action sequences that manipulate data in response to user actions 3.2 XForms and SOA In this section we discuss XForms and SOA. Enhances and complements SOA Standardization of a forms data processing model enables reusable components that integrate with SOA enabling faster time-to-market with lower form application deployment and maintenance costs. 134 IBM Workplace Forms 2.6: Guide to Building and Integrating a Sample Workplace Forms Application By exploiting the reusability inherent with XForms and the capability of requesting and utilizing services available in enterprise applications, IBM Workplace Forms is a strong participant in SOA architecture. XFDL + XForms provides us with an enabler for service-oriented e-form solutions. Strong technical alignment reduces barriers. See Figure 3-1. Foundational Web Service Technologies WSDL SOAP Namespaces XPath XML XML Schema XForms+XFDL Document URI, HTTP/HTTPS Figure 3-1 XForms and SOA The Workplace Forms Designer helps us by generating much of the markup needed for Enterprise e-forms. Chapter 3. XForms 135 3.3 What is XForms The XForms specification provides a predefined set of tags, elements, and attributes that ease the creation of Web forms. XForms splits a form’s data model, view, and controller. These parts are further decomposed into even finer reusable levels. See Figure 3-2. XForms Model Data Instance Host Language Namespaces XML Schema XPath XML Events XML Figure 3-2 XForms Model The data model part of XForms enables you to declare data items and structure separate from any set of design items that may be used to display the data values such as a text field on a form. Furthermore, XForms defines the means to link these data items to the presentation layer separately from the declaration of the data model itself. Lastly, it provides a declarative means to act upon changes of value with any particular data item defined within the XForms Model. However, XForms is not a stand-alone language. It must be contained inside an XFDL or other presentation layer wrapper or skin that provides detailed presentation information for the form. Furthermore, individual XForms User Interface (UI) elements must be contained by individual items in the presentation layer. 136 IBM Workplace Forms 2.6: Guide to Building and Integrating a Sample Workplace Forms Application 3.4 Why support XForms Many vendors, IBM included, have taken an active role in the XForms specification process and are actively exploring this emerging standard, as shown in Figure 3-3. <?XML... Figure 3-3 xForms data model diagram One reason behind the strength of the XForms community is its broad applicability as a Web technology. XForms defines the core XML data processing asset, whether the data processing needs be simple or complex. It is designed to be connected to numerous host languages like XHTML, SVG, Voice XML, XSL-FO, and even XML vocabularies like XFDL (used on IBM Workplace Forms to provide a secure, high-precision presentation layer for XForms). XForms widgets are abstract in nature, so different platforms can choose to implement them in different ways. For example, while a <radioButton> tag in HTML may have only one presentation across platforms (such as drop-down menu), the <select1> widget in XForms may result in a drop-down menu on a PC browser or a list of radio buttons on a PDA. The purpose of the <select1> control, however, remains the same — it affords a user the ability to select a single element from a set of items. 3.5 Understanding the XForms Model The XForms Model is a block of XML data that contains three core parts that work together to create a complete model: Data instances: Data instances are arbitrary blocks of XML. A data model may contain any number of data instances, and each instance is normally created to serve a particular purpose. Binds: The data layer and the presentation layer are connected by binds. Submissions: Each data instance may have an associated set of submission rules. These rules control how a data instance is transmitted when it is submitted for processing. This is an optional feature, and is only necessary when you want to submit the data instance by itself, without the rest of the form. There are many cases in which you may want to submit Chapter 3. XForms 137 the entire form, and then retrieve the data instance from the form during processing. This is particularly true when you are using signatures on your forms. Note: We recommend that a form contain only one XForms Model, but multiple models are allowed (though they have no ability to interact). 3.5.1 XForms data instances An XForms data instance defines the XML template for the data that will be collected from the form. A data instance can be used to store input values, pre-populate fields with data, or dynamically generate list selections. An XForms Model can have more than one data instance. For example, one data instance can contain user information for a submission while another data instance can contain user preference data. Additionally, you can link each data instance to a button on the form that will trigger the submission of that instance. It is a good idea to create each data instance, along with its associated binds and submission rules following these steps: 1. Create a data instance. The first stage is to create a data instance. In this stage, you model your data instance by adding elements, attributes, and text values to the data instance. 2. Bind the data instance to the form. The second stage is to bind the data instance to the form. This maps individual data elements to one or more user interface items, so that they share data. 3. Set the submission rules. Finally, you must define the submission rules for the instance if you intend to submit the data separately. These rules determine what data is selected and sets other submission-related properties. 3.5.2 Node When working with XForms instances it is important to know the terminology used to describe its elements. The data instance’s elements and attributes are collectively referred to as nodes. Since you will have to bind the form’s user interface items to the various nodes in a data instance, it is important to understand node terminology. 138 IBM Workplace Forms 2.6: Guide to Building and Integrating a Sample Workplace Forms Application Node terminology The data instance shown in Figure 3-4 is used as an example to describe the various node types. Figure 3-4 Instance view in the Designer The node types are: Root node — The root node is the single node that contains all other nodes. You build your data instance by adding elements and attributes to the root node. A data instance can only have one root node. In the example, the root node is <Discounts>. Parent node — The parent node is an element that has other elements added to it. When a parent node contains more than one child element, it is also referred to as a node set. In the example, a parent node is <Values>. Child node — A child node is an element that is added to a parent element. In the example, <percent> is a child node of <Values>. Sibling node — When you add more than one child to a parent, each child node becomes a sibling node. You can add elements to a parent element as children or as siblings. In the example, a sibling node is <percent>. Note: Typically, you would only add a sibling element to the data instance if you forgot to add an element or the model has changed and needs to be updated. Attribute node — You can add attributes to an element. An attribute extends the functionality of an element and is typically used in the following circumstances: – You want to limit the size of data you will be storing. – You have a group of items that you want to present to the user as a list of items. – You want to submit additional data related to the data entered by the user. For example, you could add an attribute to hold a product ID that the user never sees but is submitted when the user picks the product. In the example shown in Figure 3-4, the attribute node was left with the default value of attribute. Note: Node names cannot contain special characters (such as spaces, <, >, &, and so on.) Chapter 3. XForms 139 Node text values A node can also have a text value. Element text value — You can add a text value to a child element. Once you bind an element that has a text value to a user interface item, the text value is displayed to the user in the bound user interface item. Note: Once you add a text value to an element, it can no longer be a parent node. In other words, you cannot add an element to an element that has a text value. Attribute text value — You can add a text value to an attribute. Once you bind an attribute that has a text value to a user interface item property, the text value is what will be submitted as the item’s value property. In the example shown in Figure 3-4 on page 139, the attribute text values are "0.1", "0.2", and "0.3". If "10%" is chosen by a user from the discount list, "0.1" is submitted as the node value instead of "10%". 3.6 What is new to IBM Workplace Forms with XForms support With the introduction of XForms support, new features and functions have been added to IBM Workplace Forms. These include: XForms Items XForms Event Handlers XForms Functions XForms Device Independence 3.6.1 XForms items XForms items are required when you are creating an XFDL form that contains an XForms data model. These items are used to contain XForms constructs that do not normally exist in XFDL, such as tables and checkgroups that automatically repeat elements based on the structure of the data model. XForms items follow the same syntax rules as XFDL items. Below are a few examples. Table This creates a traditional table of repeated items organized into rows. This is accomplished by creating a template row that includes all of the items that should appear in each row. This row is then linked to the XForms data model. Each time a new row is added to the table, the template items are duplicated to create the new row. This occurs when the elements in the data model that are linked to those items are duplicated. This allows the table to expand to any size while ensuring that data for each row in the table is still maintained in the data model. The template row is created within an xforms:repeat option. This option is used to group the items that create the template row, and also links the row to particular portion of the data model. The template items can be configured with any location relative to one another. This means that they need not appear in horizontal succession. The current implementation of the XForms table limits the dynamic expansion of the table to rows, but not columns. 140 IBM Workplace Forms 2.6: Guide to Building and Integrating a Sample Workplace Forms Application Pane A pane is used to contain one of the following: A group of items that can be positioned or made visible as a unit, and that can be given a common border or background. A switch, which allows you to group items into sets, and then display one set of items at a time to the user. Be a logical grouping (for instance, address data). The pane itself can also have a physical appearance, such as a border or a different background color, that visually groups the items for the user. checkgroup Creates a group of check boxes. This is useful if you want to create a list of options and allow the user to select some of them. You can configure a checkgroup to allow only one selection, or to allow the user to select one or more of the choices. If desired, you can also configure a checkgroup to allow the user to select only one choice. Each check box appears as an empty box that is filled with a marker, such as a check mark or an X, when selected. Radio group This creates a group of radio buttons. This is useful if you want to create a list of options from which the user may select only one choice. Each radio button appears as an empty circle that is filled with a marker, such as a dot, when selected. 3.6.2 XForms event handlers XForms event handlers track events in the form, such as a button click or the selection of a particular choice. When these events occur, they are registered by the XForms system. This allows you to create actions that are triggered by these events. For example, you might create an action that is triggered when a particular button is clicked, or when a particular choice in a list is selected. A few examples follow: value-changed This occurs when a value changes in an XForms item (an XFDL item that is linked to the XForms Model). submit-done This occurs when an XForms submission has successfully completed. ready This occurs when the forms viewing application has finished the initial set up of all XForms constructs and is ready for user interaction. submit-error, and so on This occurs when an XForms submission returns an error. 3.6.3 XForms functions A few examples follow. Chapter 3. XForms 141 boolean from string This converts a string to a boolean value. This is useful for converting string content, such as content from an instance data node, to a boolean result, which is required to set some of the properties on data elements, such as relevant and readonly. avg This averages the values for a set of nodes. The strings values of the nodes are converted to numbers, added together, and then divided by the number of nodes. min This determines the minimum value from a set of nodes. The string value of each node is converted to a number, then the minimum value is determined. max This determines the maximum value from a set of nodes. The string value of each node is converted to a number, then the minimum value is determined. 3.6.4 XForms device independence In this section we discuss XForms device independence. Host languages provide presentation layers for XForms views The purpose of the XForms controls is to provide data access views of the model to containing applications. The most obvious view, of course, is a presentation layer for rendering the form to an end user, and the XForms controls can indeed be used directly by a minimalist rendering engine. However, the intent of the XForms design is to allow sufficient abstraction so that XForms forms can be hosted by XML-aware container applications that consume model views and augment them according to application-specific requirements. See Figure 3-5. First name <data> <personalInfo> <firstName>Joe</firstName> <lastName>Smith</lastName> <street>21 Brown Street</street> <city>Victoria</city> <state>British Columbia</state> <country>Canada</country> </personalInfo> </data> Joe Last name Smith Street 21 Brown Street City Victoria State British Columbia Country Canada Figure 3-5 XForms links data to presentation layer At the horizon of the abstraction, model views could be created and used to drive back-end processing of data, for example, workflows or data shredding for databases or content repository metadata. Generally, though, the short-term goal of the XForms view abstraction is to allow it to be skinned by (incorporated into) other host languages in order to meet the many 142 IBM Workplace Forms 2.6: Guide to Building and Integrating a Sample Workplace Forms Application diverse requirements that arise on the World Wide Web. One obvious host language is XHTML, but VoiceXML can be used to satisfy advanced accessibility needs, and WML (or minimalist rendition) can be used on small devices. See Figure 3-6. Figure 3-6 Re-skin one model with one or more presentation layers Presentation Options XFDL XForms Model XHTM WML .. . Other Figure 3-7 A single XForms Model can be linked to several presentation layers XForms controls are intended to abstract data access sufficiently to allow skinning of views with a variety of host languages. For example, while we might use XFDL on our laptop, WML may prove to be more suitable for a PDA or a mobile phone. The host-language provides information about pagination, precision layout, and enhanced features such as attachment handling, digital signatures, and wizard front-ends. Chapter 3. XForms 143 3.7 Workplace Forms: XForms and XFDL XForms defines the core business processing of forms data, not the presentation layer of the form itself, and therefore is designed to be used in conjunction with a variety of other languages that excel at presentation design that can be used depending on need such as XHTML, WML, and XFDL. XForms provides increased interoperability. This allows for standardized forms interoperability with business partners, customers, and suppliers and enables process/value chain integration. ISV application processing interoperability between vendors provides customers with flexibility and choice supporting heterogeneous environments. This interoperability provides faster time-to-market and reduced development costs. XForms embeds forms data processing rules using an open standard. Therefore, standard XForm processors can be used instead of creating custom code for each form. Challenge example: Every bank processing a mortgage form must create custom code to ensure that the hundreds of application rules are processed correctly, such as spousal information. Solution: An XForms mortgage application would embed the rules that describe when spousal information is relevant for applications such as joint mortgage applications only. This standardization facilitates the creation of reusable form components leveraged by industry. Forms Standards enables libraries of reusable standard forms and form components. Financial and insurance industries have found this standardization to be invaluable. There is an inherent value in XForms in providing multi-platform support as well. UI standardization provides a model to support multi-platform, accessibility, localization, and roles within forms. Forms and their data represent the currency of today’s on demand transactions, which require an interoperable, non-proprietary standard for forms and the industry transactions these forms represent. 3.7.1 XForms versus XML Data Model In this section we discuss XForms versus XML Data Model. Benefits of Data Model Whether you are using the XML Data Model or the XForms Model, the benefit of using a data model is the same. It allows the data to be abstracted from the form’s presentation layer as arbitrary XML data structures. These data structures are known as XML data instances. This allows for the data captured in the form to be easily extracted upon submission or replaced for pre-population purposes when the form is served to the user. The XML Data Model In this section we discuss the XML Data Model. Grouping data for interoperability Although XFDL is an XML syntax, it has not provided the ability to easily group data into blocks that would support interoperability. The XML Data Model addresses this problem by allowing form developers to create separate data sets within an XFDL form and to share data between those data sets and regular form elements. 144 IBM Workplace Forms 2.6: Guide to Building and Integrating a Sample Workplace Forms Application Essentially, the XML Data Model is a block of XML that is placed at the beginning of a form, within the global page’s global item, as shown in Example 3-1. Example 3-1 XML Data Model <globalpage sid="global"> <global sid="global"> <xmlmodel> ... XML Data Model ... </xmlmodel> </global> </globalpage> This block of XML allows for arbitrary data, meaning that it can contain any data and can be formatted in any manner. Furthermore, individual elements in the data model can be bound to one or more elements in the form description. This binding causes the elements to share data. If one element is changed, the other elements are updated to mirror that change. This allows you to create a separate block of data within the form, format it any way you like, and bind it to form elements so that data entered by the user is automatically copied to the data model. For example, you could include the block of data that is required by an application (such as a PO system), format the data so that it complies with a specific schema, and then bind that data model to the form description. The result is a block of XML data that can be structured to meet any needs, extracted easily by other applications, and transmitted without the rest of the form. Since the XML Data Model was the predecessor to XForms, there is substantial similarity between the way the XML Data Model and the XForms Data Model are handled. Using Data Model in XML applications The XML Data Model is most useful when integrating eForms with applications that already use XML, especially if those applications already offer XML interfaces. In these cases, you can design forms that submit the XML data directly to the application, and you do not need to program a custom module that extracts the data from the form. Furthermore, you can format the data to match any schema, and validate the data against the schema before submission. Using XML Data Model over XForms The most significant reason to select the XML Data Model over the XForms Model is that currently the development process is easier for the XML Model solution. However, the long term value of using the XForms Data Model, in most cases, will outweigh this added complexity. Using XForms over the XML Data Model XForms may be a better solution than the XML Data Model in the following situations: If the form is mostly tables. If the customer has heavily invested in XML standards and expects to leverage XForms as a standard in the future. If the customer already knows XPath or XForms from work with other products. If the form is to be built from scratch (rather than converted from a previous XFDL version form). If the client has or is prepared to develop a comprehensive XML schema for the form first. If the forms project needs some of the objects provided only when using XForms. Chapter 3. XForms 145 XForms submit allows you to more effectively provide an SOA solution. A live form can submit data to and receive data from any service that speaks XML. This allows for a wide variety of mid-population and lookup scenarios. 3.8 The XForms Model The XForms Model resides at the beginning of a form, inside the form global. It defines the data structure of the form, including: XML data instances XML schemas Business logic (binds, actions/events) Dynamic constraints Submissions rules Each XForms Model contains the following (see Figure 3-8). <xformsmodels> <xforms:model> <xforms:instance xmlns="id='customers'> <customer_data> <name></name> <address> <street></street> <city></city> <prov></prov> <pc></pc> </address> Data Instance <mail_check></mail_check> <mailing_address> <street></street> <city></city> <prov></prov> <pc></pc> </mailing_address> </customer_data> </xforms:instance> XForms Data Model Bind Constraint Submission Data node <xforms:bind nodeset="mailing_address" relevant="boolean-from-string/./mail_check)"/> <xforms:submission action="http://my_server/cgi-bin/submits" id="submit1" includenamespaceprefixes=" method="post"/> </xforms:model> </xformsmodels> Figure 3-8 Sample XForms Data Model The XForms Model contains three core parts that work together to create a complete model. Data instances Data instances are arbitrary blocks of XML. A data model may contain any number of data instances, and each instance is normally created to serve a particular purpose. Binds Binds are used to affect data instances in a variety of ways, rather like setting properties for the data elements. 146 IBM Workplace Forms 2.6: Guide to Building and Integrating a Sample Workplace Forms Application Submission rules Each data instance may have an associated set of submission rules. These rules control how a data instance is transmitted when it is submitted for processing. This is an optional feature, and is only necessary when you want to submit the data instance by itself, without the rest of the form. There are many cases where you may want to submit the entire form, and then retrieve the data instance from the form during processing. This is particularly true when you are using signatures on your forms. The XForms submit is key to enabling the form to effectively participate in the SOA world. This provides the solution to exchange data with disparate services across the enterprise. Adding schemas When adding schemas to your form, you can choose to either embed one or more schema files in the form itself, or refer to external schema files that are saved on the user’s computer. Unlike the XML Data Model, XForms automatically performs schema validation. Therefore, you do not need to use XFDL functions to manually validate the schema. 3.8.1 XPath - what it is XForms uses XPath to address data nodes in binds, express constraints, and specify calculations. Simple XPath expressions resemble file system and directory paths in appearance. Instead of moving through files and folders, XPath expressions move through data nodes. For example, consider the data instance shown in Example 3-2. Example 3-2 Data instance <purchaseOrder> <products> <gadget></gadget> ...other nodes... </products> </purchaseOrder> If you want to refer to the <gadget> node, you would also need to reference its parent nodes. For example: purchaseOrder/products/gadget When you create your data model, its nodes represent all of the elements, attributes, data, and processing instructions that you want to have in the form. Like a file system, these nodes can be represented by a tree. The root element of an instance is the one immediately inside the <xforms:instance> tag. The other elements and attributes form the branches of the tree, while attributes and text values form the leaves. XPath referencing allows you to associate these nodes or nodesets with items displayed in the form, or with binds and properties that calculate values or place limitations on the nodes. Each node has the following properties: Name — the name of the node. For example: <gadget> Value — the data contained in the node. For example: <gadget>7</gadget> Chapter 3. XForms 147 Note that the value may also be empty. Parent — Every node except the root node has a parent. In the following example, <products> is the parent of <gadget>: <products> <gadget></gadget> </products> Children — nodes contained within another node. In the following example, <gadget> is the child of <products>: <products> <gadget></gadget> </products> Position — the location of the node relative to all the other nodes. For example: purchaseOrder/products/gadget Additionally, some nodes have the following properties: Attributes — additional parameters added to the node that extend its functionality. For example: <price currency="USD"></price> Namespaces — Namespace parameters identify a node as being part of a particular namespace. For example, to indicate that the <approvalNumber> node is in the xmlns:finance=”http://example.org/finance” namespace, you would write: <Finance:approvalNumber> 3.9 Processing e-forms with XForms objects XForms is designed to submit only the data in the model. XFDL extends this to support document-centric submission (via HTTP Post). In order to perform this submit, the submission rules must be set: Where the data goes when submitted How the data is sent (get, put, post) The MIME type for the data What to do with the response Whether the XForms Model can update itself Whether the data in the XForms Model can be replaced with response data XForms is designed to submit data from the XForms data model and to ignore the rest of the form, including bindings, presentation, and so on. The result is that data and only data is submitted. 148 IBM Workplace Forms 2.6: Guide to Building and Integrating a Sample Workplace Forms Application Using an XForms submission, you can submit a complete data instance, or a portion of a data instance. You define the root node of the submission (choosing any element in your data instances), and that node and all of its children are submitted, as shown in Figure 3-9. XForms Servlet Steve Shewchuk 127 Alder Lane Victoria British Columbia Canada Form DB Submit Form Workflow Figure 3-9 Submit form and then process data using XForms Chapter 3. XForms 149 You can also set the model to update itself with the response data. This will completely replace a single data instance in your form with the response data. This requires you to model your data so that this sort of replacement makes sense, as shown in Figure 3-10. Servlet XForms Steve Shewchuk Lookup 127 Alder Lane Victoria Personnel DB British Columbia Canada Figure 3-10 Return results based on submitted criteria When the form is presented to the user, the XForms Data Model can be pre-populated with data based on a criteria like: Customer number User ID User role With this XForms implementation, your forms application is now able to submit XML data to any server in the enterprise. The form is enabled to receive an XML response and automatically populate the form with that response. This is truly a SOA solution. 150 IBM Workplace Forms 2.6: Guide to Building and Integrating a Sample Workplace Forms Application 4 Chapter 4. Approaches to integrating Workplace Forms This chapter describes a range of approaches for integrating Workplace Forms into one’s environment. We begin by defining the context of integrations, then describe in greater detail the different levels possible for integration. We consider these topics: Integration: what this means in the context of Workplace Forms Workplace Forms document model and straight-through integration Aspects of integrating Workplace Forms Integration points summary Partitioning of features and functionality © Copyright IBM Corp. 2007. All rights reserved. 151 4.1 Integration: what this means within the context of Workplace Forms Workplace Forms provides a component technology that is based on open standards. The discussion of integration typically depends on the context of the customer scenario, infrastructure, and solution scope. As a level set, the simplest use of Workplace Forms is standalone. You can launch the Workplace Forms Viewer by double-clicking a form on your desktop. This causes the Workplace Forms Viewer to launch as a standalone application and present the form for data entry or viewing (Figure 4-1). Figure 4-1 Baseline example: the Workplace Forms Viewer running standalone as a desktop application 152 IBM Workplace Forms 2.6: Guide to Building and Integrating a Sample Workplace Forms Application The Workplace Forms Viewer installation package provides us with the Workplace Viewer both as a standalone application and as a browser plug-in. Now let us consider the standard means of integrating Workplace Forms. At a high level, there are a number of types of integrations: User interface (UI) integration Data integration Process integration Security context integration Client-side device/hardware integration 4.2 Workplace Forms document model and straight-through integration Insight into the Workplace Forms document model helps us to understand what happens within the form when we prepopulate a form template, enter data, validate signatures, extract data, or interact with a process. 4.2.1 The Workplace Forms document model First, let us examine the high-level components that make up a Workplace Forms document. Workplace Forms are structured XML files that contain a separate data model and user-interface (Figure 4-2). Figure 4-2 Workplace Forms: structured XML files with separate data model and user interface Chapter 4. Approaches to integrating Workplace Forms 153 Figure 4-3 shows a conceptual view of a Workplace Form document model. Rich User Interface Business Logic <XML> Data Instance #1 <XML> Data Instance #2 • Fragments • Validation Logic • Attachments • State Information • Fragments • Validation Logic • Attachments • State Information LOB System #1 Digital Signatures LOB System #2 IBM Workplace eForm "Binds": Data Connectors Figure 4-3 Conceptual view of a Workplace Form document model Figure 4-3 is a conceptual representation of an IBM Workplace Form. The form provides separation of user interface (also referred to as presentation layer) and data model (from 0 → N discrete data instances). In the above example, the form data model consists of two data instances. In practice, the form could contain no data instance at all, or many different data instances. Data instance #1 is used for form prepopulation, while data instance #2 is used for data integration to a line-of-business system. 4.2.2 Support for arbitrary XML instances Support for arbitrary XML instances refers to the fact that you can take an XML schema from any external system (or alternately create your own), generate a compliant XML data instance, then embed that instance into the form. The elements of this instance are related to other aspects of the form by binds, shown in green in Figure 4-3. The form can contain 0 → n instances. 154 IBM Workplace Forms 2.6: Guide to Building and Integrating a Sample Workplace Forms Application 4.2.3 Straight-through integration Straight-through integration refers of the ability of Workplace Forms to produce XML schema compliant data instances without the need for translation. The compliant data instance, or instances, reside within the form. The usefulness of Workplace Forms straight-through integration functionality is enhanced by the ability to integrate data to multiple, disparate systems without requiring any translation. Furthermore, data can be presented in different ways to each system. For example, if an employee number must be eight digits for a green-screen legacy system, and is expected to be 16 digits for a complementary, modern HR system, a single form can contain two different data instances, and populate the data elements within it in different ways, as needed by each system. Once again, no translation external to the form is required. However, the form does have to do some translation within itself. Lastly, notice that in both of the previous two figures, a digital signature is applied to the form as a whole, ensuring that the forms are tamper-evident. A single digital signature applies to all levels according to a set of filters. 4.3 Aspects of integrating Workplace Forms Now that we have covered the basic structure of Workplace Forms, let us drill-down and examine each of the different types of integration in more depth. 4.3.1 User interface (UI) integration In this section we begin our discussion of integration. Chapter 4. Approaches to integrating Workplace Forms 155 Display of Workplace Forms within a Web page We start by illustrating the most straightforward type of integration, namely, a form rendered within the context of a Web page. Figure 4-4 is an example of a pixel-precise traditional form page, suitable for printing. Figure 4-4 Workplace Forms Viewer displaying a form within the Web browser Display of forms to end users within a Web application context is perhaps the most common and basic form of user interface (UI) integration. In Figure 4-4, the Workplace Forms Viewer is running within the browser as a plug-in. Users typically navigate to forms by following links within a company Internet or intranet site. Alternately, HTTP links to Workplace Forms can be provided to users via e-mail, although this involves application-tier integration with an e-mail system or daemon. 156 IBM Workplace Forms 2.6: Guide to Building and Integrating a Sample Workplace Forms Application Figure 4-5 illustrates an example of an interview-style wizard form page. Figure 4-5 The Workplace Forms Viewer displaying another form page within a Web browser Workplace Forms are 100% XML, and have a mime-type of: application/vnd.xfdl For file extensions: .xfd and .xfdl Once you set the mime-type on the server, when you return a Workplace Form from the server, the browser recognizes and launches the Workplace Forms Viewer within the browser as a plug-in. It is important to note that when creating forms applications, standard Web application design considerations apply. Chapter 4. Approaches to integrating Workplace Forms 157 Display of Workplace Forms within a portal page Figure 4-6 shows a Workplace Forms Viewer displaying a mortgage pre-approval form within a portlet. Figure 4-6 The Workplace Forms Viewer displaying a mortgage pre-approval form within a portlet Figure 4-6 illustrates an example of how Workplace Forms can be displayed within a portal application. When delivered via portlets, Workplace Forms can be used as elements of composite portal applications. Inter-portlet communication provides us with a convenient avenue for data-integration, such as form template prepopulation. As an example, one might compose a UI with a client-list JSP™ on the left side of the UI, and an eForm portlet on the right. Selection of a client within the client-list JSP could be used to prepopulate a form template to the right. Zero Footprint display of Workplace Forms In certain situations, it may not be possible or desirable to install the Workplace Forms Viewer onto each user’s computer. Typically, this situation results from: Desktop lockdown — users not having sufficient privileges to install the application Infrequent form users who do not wish to install another program Dial-up or low-bandwidth users who cannot download the Workplace Forms Viewer in a timely manner Version management/upgrade concerns Software licensing considerations 158 IBM Workplace Forms 2.6: Guide to Building and Integrating a Sample Workplace Forms Application Whatever the reason, it may be desirable to provide access to forms without requiring the installation and management of the Workplace Forms Viewer. In this case, the Workplace Forms Webform Server provides us with the ability to translate server-side XFDL documents into HTML and JavaScript™, so that they can be displayed within standard browsers — with no Viewer required. This is called the Zero Footprint® display of Workplace Forms, as shown in Figure 4-7. Attention: Also refer to Chapter 7, “Zero Footprint with Webform Server” on page 447, where we discuss in greater detail the considerations when implementing a Zero Footprint solution using the sample scenario application presented in the book. It is worth noting that the Webform Server does not offer as much overall functionality as the Viewer, particularly in light of signature support. Therefore, the Viewer is still preferable in situations that have high security requirements concerning signatures and document authenticity. Figure 4-7 Rendering of Workplace Form using Zero Footprint option An important note is that on the server-side, Webform Server maintains the complete XFDL form, giving us the previously described benefits of the Workplace Forms for straight-through integration to one or more systems while also enabling end users without the Workplace Forms Viewer. Chapter 4. Approaches to integrating Workplace Forms 159 Display of Workplace Forms within Notes and Domino Notes and Domino provide us with an excellent foundation onto which we can overlay Workplace Forms. Domino extends the Workplace Forms products with a number of benefits: Forms management: – Domino agent reads attached form and displays in Domino view – Domino Forms live (attachments) Document-based workflow: Place Workplace Forms into existing workflow. Use of Domino mail as a transport. Replication/server-side. Encryption. As a supporting technology: Support Workplace Forms with additional Domino content (FAQs, travel polices, and so on). Looking at it from the opposite perspective, Workplace Forms extends the capabilities of Notes/Domino with: Pixel perfect form layout Guided, wizard page front-ends Overlapping digital signatures W3C XForms support Form Extension (FCI/IFX), such as: – Device integration (biometrics, signing tablets, and so on) – Third-party encryption Note: There are several standard models for solutions involving integration of Workplace Forms and Domino. These include the use of Lotus Notes and Domino via: Web client (browser) access + Workplace Forms Viewer. We discuss this in 9.2, “Overview and objective of Domino integration” on page 495. Notes client access + Workplace Forms Viewer. We provide four different scenarios in 9.7, “Scenario 2 - integrating Forms Viewer with Notes Client - overview and objective” on page 573. Notes client access + Zero Footprint Forms (Webform Server). We give an overview of this solution in 9.11, “Scenario 3 - Domino integration using HTTP submissions for completed forms” on page 606. For more detailed discussion and examples refer to Chapter 9, “Lotus Domino integration” on page 493. Below are several example figures showing Workplace Forms being used with Lotus Notes and Domino. 160 IBM Workplace Forms 2.6: Guide to Building and Integrating a Sample Workplace Forms Application Figure 4-8 illustrates a database of Workplace Forms. Figure 4-8 Database containing Workplace Forms Chapter 4. Approaches to integrating Workplace Forms 161 Clicking Fill out a form opens a new form template, as shown in Figure 4-9. Figure 4-9 Workplace Form displayed within Notes/Domino 162 IBM Workplace Forms 2.6: Guide to Building and Integrating a Sample Workplace Forms Application Display of Workplace Forms within Eclipse Figure 4-10 shows an example of a Workplace Form displayed within the Eclipse Platform. Figure 4-10 Example of a Workplace Form displayed within the Eclipse Platform It is also possible to run the Workplace Forms Viewer as a plug-in within Eclipse. As of the 2.6 release, the Workplace Forms Designer is based on the Eclipse Platform. This capability opens up a range of possibilities when one considers deploying forms and the Workplace Forms Viewer within a server-managed client infrastructure. 4.3.2 Data integration Data integration is a broad topic and, depending on your definition of data, it can have a number of meanings. Typically, data refers to information that is inserted, entered into, or extracted from forms. However, from a transactional (content or records management) perspective, the form itself can be considered data. Let us examine the most common data integration scenarios. Chapter 4. Approaches to integrating Workplace Forms 163 Storage of form templates and completed forms Workplace Forms are 100% XML documents. While this may sound obvious, it bears repeating, as the question often arises as to where form templates and completed forms are stored. Since the forms are XML, they are platform independent and can be stored on any file system, to a database, content or records management system. Most commonly, form templates are stored: Within the WebRoot of a Web or portal Application On the Web or portal Server file system On a remote, mounted file-system In DB2, Domino, or another database In Content Manager or Records Manager In portal Document Manager Retrieval of form templates and persistence of completed forms typically occurs in the application tier. In J2EE-based solutions, this occurs in the servlet or portlet. In Notes/Domino applications, this occurs within the application itself. Server-side prepopulation of form templates This is the most common form of prepopulation. At the time of the request for the form template, data is acquired from one or more systems and inserted into the form. The Workplace Forms API provides us with a number of methods/functions that make data insertion easy. At a high level, one can either set individual data elements within the UI or data model, or, more commonly, enclose an entire data instance within a form. If desired, one can prepopulate a form with multiple data instances from different sources. From an end-user perspective, this happens behind-the-scenes. One simply clicks on a link or button to request a new form, and is presented with a prepopulated form (Figure 4-11). Request Blank Form DB Query SQL Database Pre-Populated Form Pre-Population Figure 4-11 High-level example of server-side form template pre-population call flow It is important to note that Workplace Forms based solutions rely on standard Web and portal Application authentication mechanisms to determine user identity and roles. 164 IBM Workplace Forms 2.6: Guide to Building and Integrating a Sample Workplace Forms Application Real-time data ingestion via Web services In some situations, data can be time sensitive, or the form may require results based on calculations and data contained by external systems. In this case, the suggested approach is to make Web service calls from the client-side (Figure 4-12). When designing Workplace Forms, one can embed Web service Definition Language (WSDL) files directly into the form itself and make Web service calls to: Submit/update information via an external service. Obtain data from an external service. Submit data for processing and obtain the result. Initiate or claim a task, or update the state of an existing task (Workflow Integration). Web Service Call DB Query SOAP/HTTPS SQL Database Real-Time Data Figure 4-12 High-level example of client-side Web-service call flow The Workplace Forms Viewer provides us with Web service support, so if you need to interact with a Web service when operating in Zero Footprint mode, then those calls will have to be made from the server side (server-to-service). Attention: Refer to Appendix C, “Web services” on page 673, where we discuss in greater detail the integration of Workplace Forms with Web services, and also show how we implement Web services in XForms. Real-time data ingestion via XForms submissions Real-time data ingestion is typically done using Web services, as mentioned in the previous section. However, an easier method is to use XForms submissions. With XForms submits, we can basically submit XML fragments directly to any server-side process, including very simple servlets that can respond with another XML fragment. This allows us to do Web service like functions without the overhead of the Web service infrastructure (that is, no WSDL requires, no SOAP wrappers, and so on). Chapter 4. Approaches to integrating Workplace Forms 165 Therefore, in some cases it may be better to just code custom servlets to respond to XForms submits. In other cases, you may want services that are broadly available (for example, not just for your forms application) so Web services can cater for that functionality. See Figure 4-13. XForms Submission DB Query XML Fragments SQL Database Real-Time Data Figure 4-13 High-level example of client-side XForms submit call flow Integration of an XML data instance with a line-of-business system Workplace Forms provide us with an excellent means of capturing and validating data for systems that require human input. Many systems provide access via well-defined, XML interfaces, most often described by XML Schema. As touched upon previously, Workplace Forms provides us with an elegant way to provide complete, valid data to such systems. Let us walk through the steps involved in performing this kind of straight-though integration. 1. Create the form (user interface, input validation logic, signatures) using the Workplace Forms Designer. 2. Obtain the XML Schema definition of the system to which we need to provide data. 3. Create a prototypical data instance — an instance that complies with this XML Schema. The Workplace Forms Designer allows you load in a schema, then with a single click create a prototypical instance that reflects that schema. From the Instance view, click the Create a new Instance based on a schema button to create this instance. 4. Using the Workplace Forms Designer, embed this data instance within the form’s data model, providing it with a unique namespace and identifier. 5. Using the dialogs provided in Workplace Forms Designer, create binds between the elements within the data instance, the user interface (fields, comboboxes, and so on), and other data models as needed. The Workplace Forms Designer provides us with a visual (point-and-click) means to relate the UI and data model elements. 6. If desired, enclose the original schema to provide an additional level of validation of this data instance. 7. Save the form and deploy it to your users or into your Web/portal/Domino application. When data is entered into the form by end users, the binds we have defined automatically propagate these values into the data instance that the target system consumes. If a portion of the form is filled out through pre-population, the data is often loaded directly into that data instance. If it is loaded into other data instances, we can again rely on binds to copy the data to the correct instance. In terms of form processing and data integration, the high-level steps are: 1. Receive the form submission (typically HTTP Post or SOAP/HTTP). 2. Validate digital signatures, if desired, to ensure that the form has not been tampered with. 166 IBM Workplace Forms 2.6: Guide to Building and Integrating a Sample Workplace Forms Application 3. Using the Workplace Forms API, call the extractInstance() method to obtain the desired data instance. 4. Connect to the remote system and provide the valid, populated data instance. Integration of multiple XML data instances to separate systems A natural extension of integration to a single system is integration to multiple, disparate systems. Given the fact that Workplace Forms can simultaneously support more than one data instance, and store different representations of the same data in each instance (different date formats, for example, DD/MM/YYYY versus MM/DD/YY), one need only repeat the previously described steps for external XML Schema. To make this more concrete, let us examine a specific example. The insurance industry in the United States of America has formed a group called ACORD that has defined a set of standard messages for insurance data and information processing systems. These messages are numbered and each has a different purpose. Let us take the example of a life insurance policy application form. This form contains three data instances: ACORD 111 compliant instance, used for prepopulating client data ACORD 103 instance, used for integration to underwriting XML Database compliant instance, used for reporting Initially, the form is prepopulated by inserting a completed ACORD 111 instance. The data provided is propagated though to the form UI and the other data instances. As the end users fill out the rest of the form data, this information populates the rest of the required elements within the ACORD 103 and XML Database instance. Once data entry is complete, this form is submitted to the server, signatures are validated, and the data instances are extracted. The ACORD 103 instance is passed along to the underwriting system, and the XML database instance is provided to the database. Chapter 4. Approaches to integrating Workplace Forms 167 It is important to note that quite often the entire form document is also retained as a transaction record that can be audited at a later date if need be. Figure 4-14 shows a high-level example of form data integration to multiple systems, with submission of the completed form. Example: ACORD Insurance Presentation Logic Data 1 ACORD 111 – Pre-population 2 Database Instance - Reporting 3 ACORD 103 - Underwriting Attachments XML Database <XML> Form 1 2 Reporting 3 Client 2 Underwriting Firewall Server 3 Back-end Systems Figure 4-14 High-level example of form data integration to multiple systems Real-time data integration In certain situations, it is desirable to provide (or obtain data) in real time. Client-side Web services provide us with the best means of doing so. However, alternate approaches include round-trip submission of the form to the server, or the use of an IFX to handle socket or stream-based communications with external systems. Client-side Web service integration: The use of Web service calls directly from the form itself. This requires the Workplace Forms Viewer. Server-side Web service integration: This is integration with external Web services in the application tier, typically within a servlet or portlet. These interactions can be performed either at the time of form template request, for prepopulation, part-way though the form filling process, based on an event (such as one pressing a button) within a form that triggers a round-trip submission, or on processing of a completed and submitted form. XForms submission integration: This is integration using XForms submission that allows mid-population using simple servlets without the Web services overhead. 4.3.3 Process integration Workplace Forms provides us with a high degree of flexibility with regards to process integration. This results, in part, from the fact that Workplace Forms is a component technology that is designed to overlay onto existing customer infrastructure investments (application or portal server, workflow, database, content or records management systems, and so on). Additionally, architects have a high-degree of freedom with regard to how much (or little) business logic is built into the form, and how much is managed externally. 168 IBM Workplace Forms 2.6: Guide to Building and Integrating a Sample Workplace Forms Application For enterprise applications, the use of a process-oriented or workflow product is often essential. Examples include, but are not limited to: WebSphere Process Server WebSphere MQ Workflow WebSphere Portal Document Manager Content Manager Workflow From a high-level perspective, there are several standard models for form interactions with process or workflow engines, as explained in the following sections. Initiation of a task or workflow based on form submission or completion In this case, data collected within a Workplace Form is used to initiate or kick-off a new process. Form-based data collection as a human-task within a workflow As part of a human task, data is collected within a form. On submission, the form data is processed, the task state is updated accordingly, and the process continues. Calls to process server for real-time process interaction In some situations, real-time business rule processing is important. One example may be the routing of a form for approval to an individual based on business logic, and role-based task capabilities, using data collected within the form as decision criterion. Web service calls could be made using either the client-side or server-side models that we discussed earlier. 4.3.4 Security context integration Considered at a high-level, forms run within the security context of the user and host environment. For example, if a user launches a form off his desktop, then the form runs with all of the privileges and rights associated with that user’s account on his operating system. If, however, a user accesses a form through his Web browser, then there are several different security implications. First, if the Web site is secured and requires authentication, then the Workplace Forms Viewer runs within the context of the user’s session with the server. Session time-out handling should be taken into account, for example, if one expects users to complete, then submit a lengthy form. Second, local privileges may be restricted based on the sandbox to which the Web browser is restricted. 4.3.5 Client-side device/hardware integration The Workplace Forms Viewer provides us with an extension point that allows us to integrate with a broad range of hardware and systems. This extension interface is called the Function Call Interface (FCI), and individual extensions or extension packages are often referred to as Internet Form Extensions (IFX). IFX also provide black box functions that take input and return output to the form, and can also provide form handling functionality, such as encrypting a form before it is submitted. The FCI Library is a collection of methods for developing custom-built functions that form developers may call from within Workplace Forms. By allowing one to create custom functions, it is possible to extend the capabilities of forms without requiring an upgrade to your forms software. IFX can be installed onto the end user’s systems, or embedded within Workplace Forms. In addition to providing individual functions to form designers, one can also specify how and when the functions are used. For example, it is possible to specify that a function should run when a form opens, when it closes, and so on. Chapter 4. Approaches to integrating Workplace Forms 169 Using C or Java IFX, it is possible to interface with the local file system and device drivers, create socket-based connections, and perform almost any action that you can implement in the programming language that you have selected. Examples of this could include biometric devices and GPS hardware integration. IFX can be used in the Webform Server as well. Once an IFX is running on a Webform Server, form application developers gain a whole new level of architecture possibilities. For example, normally a client machine's Viewer never makes database calls containing confidential data across a firewall. However, if those database calls are made within an IFX that is running on the Webform Server, now it is the actual Translator (which is part of the Webform Server behind the firewall) making those calls, so those database calls are now secure and behind the firewall, and only the results of those calls show up in the form on the client’s machine. For extensive, detailed information about the FCI, refer to the Workplace Forms API documentation (C and Java versions): http://www-128.ibm.com/developerworks/workplace/documentation/forms/ 4.4 Integration points summary To sum up, here are the key integration points for Workplace Forms: The form data model The Workplace Forms Viewer, running as a plug-in within a supported browser or Eclipse The Workplace Form, rendered into HTML within a compliant browser Web services on the client Using XForms submissions The Workplace Forms Viewer FCI/IFX Although it may sound simple, the implications of the first point are significant. The Workplace Forms API gives us the ability to quickly and easily move data into or out of a form’s data model, and because of the support for arbitrary data instances, this gives us broad latitude at design time. For example, we could push attachments into the form data model as part of prepopulation. In a portal environment, we can prepopulate generated URI, used for form submission back to the portlet. Alternately, the data model can enclose BPEL that contains the current state of the form or even logos and branding, depending on the role of the end user/customer who is accessing the form. 4.5 Partitioning of features and functionality Creating standalone forms is one thing, but when designing an overall eForm solution or process, we are faced with numerous design-time trade-offs. As with other projects, a needs assessment or requirements specification is essential to set parameters for partitioning of where specific features or functionality are addressed. For example, using the stateful nature of the form in conjunction with the compute system, it is possible to construct a state-machine based on conditional logic, and to tie it to the data entered into the form. This gives us basic, in-form workflow capabilities to set end-points for routing via e-mail, submission, and so on. Often, however, clients have existing investments in enterprise grade workflow products such as WebSphere Process Server or MQ Workflow, which give us much more robust, centralized capabilities. The use of Workplace Forms in conjunction with these products is both expected and intended. From an architectural perspective, this gives us freedom with regard to how we partition functionality. 170 IBM Workplace Forms 2.6: Guide to Building and Integrating a Sample Workplace Forms Application At one extreme, one can build forms that contain no business logic at all, forms that instead rely on real-time interaction with a process engine for all decisions and state information. At the other extreme, one can create forms that operate independently and contain complex state-machines, managing all aspects of their own behavior and routing. An example of a Workplace Form as a standalone application is the game of BlackJack, shown in Figure 4-15. Figure 4-15 Example of an application - BlackJack - implemented within a Workplace Form When designing the example created for this book, we made the decision to show as much form functionality as possible. As such, we decided to manage all state information within the form itself. If such a solution were implemented in a production environment, we might wish to repartition the solution to move much of the business logic to the application tier (Process Server or Content Manager Workflow, for example). 4.6 Introduction to actual integration scenarios Throughout the remainder of this book, we provide hands-on information about how to build a sample scenario application, beginning first with a standalone J2EE Workplace Forms Chapter 4. Approaches to integrating Workplace Forms 171 application, then illustrating how to integrate this application with WebSphere Portal, Lotus Domino, and IBM DB2 Content Manager. The base scenario application is based on a sales quotation approval application, granting approval for price quotations and discounts for customers. The application has built-in business logic and workflow, determining which quotations and discounts must be granted either manager or director level approval based upon the price of the sale. This sample scenario application is described in much greater detail beginning in 5.1, “Introduction to the scenario” on page 174. 172 IBM Workplace Forms 2.6: Guide to Building and Integrating a Sample Workplace Forms Application 5 Chapter 5. Building the base scenario: stage 1 In this chapter we continue to build on the skills learned in 2.4, “Form Design basics” on page 51, by creating a new form that is the foundation scenario for the remainder of this book. The form depicts a sales quote process that utilizes a workflow solution, and requires signatures from multiple roles. Because this form covers multiple new form design features and requires backend integration, it is built in two stages: stage 1 and state 2. Stage 1: Basic form with dynamic items, binds, and computes Stage 2: Back end system integration (See Chapter 6, “Building the base scenario: stage 2” on page 367.) The base scenario comprises the following components: A form that collects the relevant data A servlet that processes the form Several JSPs to start the sales quote process and to view forms Note: The code used for building this sample scenario application is available for download. For specific information about how to download the sample code, refer to Appendix D, “Additional material” on page 693. Note: All specific examples shown and used when building the sample scenario application are based on the code base for IBM Workplace Forms Release 2.6.1. © Copyright IBM Corp. 2007. All rights reserved. 173 5.1 Introduction to the scenario As we have discussed in the opening chapter, much of the business value from Workplace Forms is realized when converting paper-based forms into electronic forms. This conversion allows a process to be formalized by capturing data through a structured front end (the electronic form) and incorporating formal business logic, business rules, workflow, and security. Ad hoc processes become formalized, the method to capture data becomes consistent, and opportunities for efficiently processing and leveraging this data are exposed. For this book we create a base scenario application that serves as a foundation example throughout the book. The scenario is based on a sales quotation approval application, granting approval for price quotations and discounts for customers. The application has built-in business logic and workflow that determines which quotations and discounts must be granted, and the level of approval required based upon the sale price. In stage 1 we do not integrate with a backend system or do any prepopulation in the form. However, we design the form with an eye towards stage 2 of the form development cycle. For example, we implement a simple workflow of different roles that have to sign the form depending on the total amount of the sales quote. Also upon completion, the user submits the form to a servlet that does further handling of the form such as: Controlling access to the form Saving the form to the file system in dedicated folders according to the workflow Processing the workflow by presenting a workbasket to the respective roles 5.1.1 Review from an end-user perspective This section describes the key parts of the application from an end-user perspective. Note that the application is role based, and the options available for each user are different, depending upon whether they are an employee user (such as a sales person), a manager, or a director. Only managers and directors have the ability to make formal approvals. 174 IBM Workplace Forms 2.6: Guide to Building and Integrating a Sample Workplace Forms Application Upon logging in, the user is presented with choices related to the task she needs to accomplish. The user can either create a new order for a quotation or view the workbasket to view pending required approvals, or any other forms which have been approved or rejected. (See Figure 5-1.) Figure 5-1 Logging in to create a new order From within the sales quotation form template, the end user enters and validates data related to: Sales person information Customer information Product information Chapter 5. Building the base scenario: stage 1 175 Figure 5-2 illustrates the form component pertaining to the sales person data. Note: Sales person data for this form is prepopulated based on user authentication credentials, using data from the corporate directory. Figure 5-2 Sales person data 176 IBM Workplace Forms 2.6: Guide to Building and Integrating a Sample Workplace Forms Application When the users clicks the Customer component of the form (see Figure 5-3), they must select the customer name, and the remaining data fields are populated automatically. Figure 5-3 Customer information - prepopulated via an XForms submission Chapter 5. Building the base scenario: stage 1 177 Finally, the end user can enter information specific to the product (see Figure 5-4). Total pricing is automatically calculated. Figure 5-4 Entering specific data about the product Once the form is completed, it can be submitted for approval. The following business logic is applied to this scenario: $0 → $10,000: pre-approved $10,001 → $50,000: manager approval required $50,001 or higher: director approval required Upon submitting the form, it then routes via workflow to the appropriate work basket for further processing upon approval. Throughout the remainder of this chapter, together with the steps outlined in Chapter 6, “Building the base scenario: stage 2” on page 367, we provide you with step-by-step guidance on how to build this scenario application. 5.2 Building stage 1 In building the electronic forms-based application, the value of converting a paper-based form to an electronic forms application is demonstrated. A two-stage approach is taken. In this chapter we cover stage 1 and provide step-by-step instructions to create an XForms Model driven form with basic interactions. In Chapter 6, “Building the base scenario: stage 2” on 178 IBM Workplace Forms 2.6: Guide to Building and Integrating a Sample Workplace Forms Application page 367, we show more advanced integration capabilities. The diagram in Figure 5-5 provides an overview of the key steps involved in building the base scenario. As you can see in the diagram, this chapter focuses on: 1. Building and designing the form template a. Analyzing the original paper-based form b. Defining our XForms Model c. Creating the layout and input items d. Adding calculations and logic 2. Building the servlet 3. Building the JSPs a. Security access b. Form access Building the Base Scenario – Stage 1 1 Building and Designing Form Template – Designing the layout – Layout and input items – Calculations and logic 2 3 Building the Servlet Building the JSPs – Security Access Level buttons – Forms Access buttons – Adding to the data model Figure 5-5 Overview of major steps involved in building the core base scenario application In this section we cover the following topics: Analyzing the original paper-based form Form data Business forms User interface Chapter 5. Building the base scenario: stage 1 179 5.2.1 Analyzing the original paper-based form The first thing that should be done when approaching the recreation of an existing form as a new e-form is to consider how it will be used and how it might be improved. Figure 5-6 provides us with an image of the original paper-based form that we will convert to an e-form. Figure 5-6 Original paper-based form used for generating a sales quote approval Ultimately, the goal of any form is the proper collection and distribution of information, but keep in mind that the end user is the primary user of your e-form. Workplace Forms provides many features and functions that can be used to enhance the value of any e-form. If there is 180 IBM Workplace Forms 2.6: Guide to Building and Integrating a Sample Workplace Forms Application an opportunity to enhance back-end system integration or improve the end-user experience then it should be taken advantage of. There are three primary components to any form that should be taken into consideration: What data elements will need to be shared with other systems? What process is used to meet the business needs? How should the e-form application be presented to the end user? 5.2.2 Form data Knowing the data integration requirements in advance provides a basis for how the form is developed and can be a huge time saver, especially when you consider what type of data model is used. There are significant design differences between a form that has support for an XForms Model and one that is a pure XFDL form. Adding XForms support to a form allows the designer to use different form items, functions, binds, and computes. We know in advance that the form needs to be able to send and receive information from a DB2 database, and be able to submit the form to different back-end systems. An illustration of possible integration with other systems that we must consider for our form includes WebSphere Portal, Content Manager, and Domino. Detailed discussion of these is provided in subsequent chapters. Figure 5-7 illustrates the sample application within the context of a three-tier architecture. While the basis of this scenario is built using J2EE, different integration techniques/ touchpoints with other products are examined in subsequent chapters. Client Tier Application Tier Data Tier WAS Web Web Browser Browser Showing Showing eForm eForm Submission Submission Servlet Servlet WP WP Forms Forms API API DB2 Zero-footprint Zero-footprint XForms XForms Submissions Submissions Workplace Workplace Forms Forms Viewer Viewer -- In In browser browser -- Standalone, Standalone, off off desktop desktop Notes Notes Client Client Content Manager Domino Server Submission Submission Servlet Servlet WP WP Forms Forms API API Forms Forms Submissions Submissions • Workplace Forms Viewer • Web Browser • WebSphere Application Server • Notes Client • Domino Server • Workplace Forms API Line-ofBusiness System • DB2, DB2 Content Manager • Extensible to LOB Systems Figure 5-7 Illustrating the scope of the sample application within context of a three-tier architecture Chapter 5. Building the base scenario: stage 1 181 5.2.3 Business forms The foundation for the scenario is a paper-based form (illustrated in Figure 5-6 on page 180), which serves as the starting point for creating a sales quote approval. Using the paper-based form, the process for obtaining a sales quote approval goes as follows: 1. The sales representative fills in the basic information such as name, manager, customer name, account number, and information about the product, quantity, and proposed quotation pricing. 2. Once the information is filled in, the form is faxed to a manager for review. The manager reviews the information, verifies the details of the customer account, and then signs approval. a. In many cases, numerous phone calls and e-mail exchanges between the manager and sales representative might be required to discuss details and confirm the proper quotation. b. Once the manager has approved a specific quotation, the signed form is faxed back to the sales representative. 3. If the sales quotation leads to an actual sale, the form is then faxed to a customer service person in the sales department, who then manually enters the information into the main sales and inventory system. As you can imagine, the process for obtaining a sales quotation approval using this paper-based method is considered inefficient and burdensome. Responses and approvals from management could easily be delayed, and the business logic/rules applied for approving specific quotations are not always consistent. By converting this sales quotation approval process from a paper-based form to an electronic form-based application with formal business logic, workflow, and back-end integration with other systems, the entire process can be made much more efficient. 182 IBM Workplace Forms 2.6: Guide to Building and Integrating a Sample Workplace Forms Application Based on the process described above, we can create a logical diagram illustrating the workflow and business logic required for our form. Figure 5-8 shows an overview of the workflow and business logic contained within the application. Form is transferred to Manager's Work Basket Open form in Work Basket Form is transferred to Director's Work Basket Fill out form Form is waiting for Manager approval Approve and submit Form is waiting for Director approval Approved? No Request is rejected Yes Manager approval necessary Director approval necessary Approval Process? No approval required Request is approved Figure 5-8 Overview of workflow for sample application We now know that the following features and functionality of IBM Workplace Forms can be used to provide us with a solution to the workflow and business rule requirements: Approval for quotation and discounts for customers Prepopulation of data: – From servlet via Forms Server API – From XForms submissions Business logic Workflow Signatures Submit to servlet Extract data and store form to DB2 5.2.4 User interface It can be difficult for users to enter complex data into crowded traditional forms, especially if they are unfamiliar with the rules governing the data entry. The end-user experience can be Chapter 5. Building the base scenario: stage 1 183 vastly improved by creating an interface with multiple pages that break out form sections by topic. This approach to form development is often referred to as creating a wizard form. Where traditional e-forms can be crowded and unstructured with little room for user instruction, wizard pages can be used to guide the user through the data entry process in a logical and controlled manner that eliminates redundancy and automatically processes the information collected. Once the data is collected in the e-form application, it can then be processed by form logic, and displayed in the original format of the traditional form in a more concise business-friendly format. The use of wizard pages within IBM Workplace Forms is a common practice used to make the entry of data an easier process. Here are some benefits of using wizard pages: Wizard pages are generally smaller, fit to the screen, and easier to read, with no scrolling required. Page real estate is not an issue, as it can be with some dense traditional forms. They allow the user to enter information once and have it displayed in multiple locations on the traditional form, making data entry more consistent and decreasing the risk of errors. They provide a flexibility that is not present in a traditional form. The ability to add labels to make the form easier to read, expand acronyms, and add code definitions that normally would not fit on a traditional form. If a user does not know the business rules needed to fill in a form, wizard pages can be used to guide them through the process in an intuitive manner. The appearance and formatting of fields on the traditional form can be changed based on user input in wizard pages. For example, fields on the traditional form might be active or not, based on the response entered on a wizard page. This would be especially useful when using Workplace Forms Webform Server, as dynamic updating of the form is only possible through either a page refresh or a page flip. Wizard pages allow for a role-based display of fields. It can be used to walk a user through portions of the form without displaying fields that do not affect him. This allows instructions to be displayed without overcrowding the traditional form. Users can enter multiple values on a wizard page and have the single calculated value based on that input displayed in the traditional form. This can save valuable real estate. (Note that this methodology restricts two-way data transfer between the traditional form and wizard.) Users can select multiple values from a pop-up list on a wizard page and then have only codes representing those values concatenated in a single field on the traditional form. This not only saves real estate on the traditional form, but increases the clarity of the possible selections by providing more information than a code allows. (Note that this methodology restricts two-way data transfer between the traditional form and wizard.) Users can also have multiple wizard page fields concatenated into a single field on the traditional form, again saving form real estate. 184 IBM Workplace Forms 2.6: Guide to Building and Integrating a Sample Workplace Forms Application We know in advance that the original form has to be reproduced, so we have to create one page that represents it as closely as possible without sacrificing functionality. This is often called the form template page. As we examine this original paper-based form, we can see that there is room for improvement. Breaking down the form as shown in Figure 5-9 shows us that there are three primary data entry tables, and two additional sections required to process the form. Figure 5-9 Form breakdown Chapter 5. Building the base scenario: stage 1 185 The three data entry tables are the primary data collection elements of this form and therefore the primary candidates for wizard pages that can be used to instruct the user through the process of completing this form. Even though we could also design wizard pages for the other two sections, it is not necessary since they are simple form elements that are more about form processing and completion than data collection. We keep those sections on the form template page. With this understanding, we know that our form contains four pages: Form template page that represents the original form Sales Information wizard page Customer Information wizard page Product Information, or Order Detail, wizard page Figure 5-10 provides a conceptual overview of the application from an end-user perspective. Figure 5-10 Overview of base scenario application The sales person logs into the system, and is guided through a quick series of forms to enter specific information about the customer and product. Much of the information is prepopulated based on the sales person’s login credentials. Once the sales person has chosen the customer, the product, and the quantity, specific business rules are applied to determine if the 186 IBM Workplace Forms 2.6: Guide to Building and Integrating a Sample Workplace Forms Application quotation can be automatically approved or if a manager or director needs to approve the quotation. Based on the required approvals, the form is routed to the appropriate management approver via an automated workflow. 5.3 Possible starting points for creating a form The Workplace Forms Designer allows form designers to begin form creation in a number of ways: Designing a form from scratch Using a form template Using scanned paper forms Using Texcel FormBridge to convert an existing format Upgrading an earlier form 5.3.1 Designing a form from scratch If the form you are creating has no paper counterpart or appropriate template, you need to start from scratch with a blank screen in the Designer. The layout tools provided rulers, guides, and alignment tools) help ensure that the items on your form are of a consistent size and line up correctly. One of the benefits of starting from scratch is that you can take full advantage of the different item types since you are not constrained by paper-based layout formats. Designing a form from scratch, however, takes a great deal of planning. You should design a form from scratch if: The form requests company-specific information, but no paper counterpart exists. You decide to move away from a paper-based layout paradigm. Pre-existing applications use the form and it needs to fit a certain format. Important: When you design a form from scratch, planning is essential. Forms can become large and complex, and if you do not have a firm plan to work from, you can easily find yourself facing a complete rearrangement near the end of the form design process. Defining the purpose of the form As you begin to plan, the first step is to consider the purpose of the form in detail. You may want to ask the following questions: What information will this form collect? In what order should users enter the information? Does the form need distinct sections? If so, how many? Should the form have more than one page? If so, what should go on each page? What security features are necessary? Should the form support digital signatures? To whom or to where will users submit the form? When the form is loaded, will items need to be updated by a database? Will any user input be submitted to a database? Your answers to these questions dictate how the form looks and acts in the end, and should help you build a list of all of the items that you need to add to the form. Determining your item type needs Once you have a firm list of all of the information that your form needs to collect, you also need to think about how the form collects the information. Different types of information Chapter 5. Building the base scenario: stage 1 187 require different methods of collection. Your form can gather information in different ways by using different input items. Consider each piece of information displayed or collected by the form, and ask the following questions: What type of information will this item collect (numbers, text, “yes” or “no”, and so on)? Can I display necessary requests or instructions in the item? If any items ask the users to make a choice, should the form present the choices as mutually exclusive? If the form presents the choices as a list, should users have the option to type in other selections if none of the list choices fit (combo box)? Make sure that you take other factors into account as you go, such as the need to reformat data, especially if the information gathered by the form is used by other applications. 5.3.2 Using a form template You might want to use an existing sample form that fits your requirements regarding layout, wizard, or functionality to a certain degree as a basis for your forms project. Numerous industry-specific XFDL samples are shipped with the product and are available on the Web. Tip: You have to be careful working with copy and paste of forms objects from other XFDL projects. All the properties and calculations are being copied as well, so that you might run into errors regarding references that are outside of your project. Be sure to make a syntax check of your form in the Workplace Forms Designer and check your source code for undesirable name references. 5.3.3 Using scanned paper forms Form designers may use the Designer to create a form that already has a paper version but with no electronic version available. If this is the case, one way to reproduce the form with Designer is to use a template image. A template image consists of the scanned image of the paper form, saved in.bmp or .jpg format. This image is loaded into the Designer workspace, where the form designer can trace all of the elements of a paper form, reproducing the exact layout, look, and feel of the paper form. If you need to convert a pre-existing paper-only form to an e-form, and you want to maintain the look and feel of the paper version, you may use the template image feature in the Designer. This feature allows you to load a scanned image of a paper form into the Designer and place items on top of their paper counterparts, thereby recreating the layout of the original. Use a template image (scanned paper form) if: You need to duplicate the look and feel of a paper form. The form is very company specific. There is no sample form available, and you want to use the layout of a paper form as a reference. The form is not available in any electronic format, exists only as a paper copy, and the scanned paper form gives poor results when processed with optical character recognition (OCR) software. 188 IBM Workplace Forms 2.6: Guide to Building and Integrating a Sample Workplace Forms Application This process essentially transforms a paper form into an e-form. Because e-forms use a different paradigm from paper, you can improve your transformation by following the tips provided here. Before you start, you may want to think about the following questions: Do I want to use the same item types as the paper form? For instance, if a paper form has a section in which users are meant to check only one choice, you may want to use radio buttons rather than check boxes on the e-forms. Does the form require a toolbar? If the form requires the user to save, print, or submit, you may want to use a toolbar — a non-scrolling region at the top of a form that contains buttons or information that the user may want to use at any time. Toolbars save space because they are not printed and are not considered to be within the margins of the form. Do I want the form to specify user-input constraints for certain items and to provide help messages? These can save space also, since the instructions are hidden until the user tabs into the field or activates the help. Does the form require a signature for it to be considered completed? If so, include a signature button, allowing the user to digitally sign the form. Signing the form in this manner ensures that no changes are made in transit. You can create a signature button the same size as the signature space already provided on the form, but you may need to alter the instructions for signing slightly to prompt the user to click the signature button. 5.3.4 Using Texcel FormBridge to convert an existing format FormBridge, from Texcel Systems, converts forms from PDF, Microsoft Word, and many other sources to Workplace Forms. The converted forms are fully editable in the Designer, just as if they were created by hand. FormBridge preserves the appearance of the original forms and is the fastest way to convert existing forms into Workplace Forms. Use FormBridge to create your form if: You want to duplicate the look and feel of the original form. You want to reuse information from the original form to create wizard pages. The form is available as a file from a software application. The form is available only on paper and gives good results when processed with OCR software. FormBridge features: Offer accurate and precise conversion of the original form layout. Automatically generate fields by analyzing the page layout when converting non-fillable forms. Convert existing fields and field properties (for example, name, data type, help text, and so on) from fillable PDF and other applications such as JetForm and FormFlow. Batch translations can be performed with a single operation. Advantages of using FormBridge: Recreating a form by hand can take days. FormBridge reduces the time to create a form from days to hours. FormBridge eliminates the mistakes and reduces the proofing and cleanup associated with manual forms creation and scanning. It is a true digital conversion. No scanning is required when converting from an electronic file. Chapter 5. Building the base scenario: stage 1 189 FormBridge is easy to use and no specialized forms design experience is required. Conversion of existing form documents can help reduce manual form layout activities and speed time-to-deployment. It is much easier to work with a FormBridge generated form in the Workplace Forms Designer than to start from scratch, especially for a new user. Conversion from paper-only forms can be done with FormBridge by first scanning and processing with OCR software. For more information about FormBridge and to download a FormBridge demonstration, go to: http://www.texcel.com/ibm/ 5.3.5 Upgrading an earlier form You can use the Designer to create and edit forms. Forms created in the Designer are based on XFDL 7.0. To edit a form that is based on an earlier version of XFDL (for example, a form created in an older version of the Designer), you must upgrade the form to XFDL 7.0. Restriction: You can only upgrade forms to IBM Workplace Forms Version 2.6.1 (XFDL 7.0) if the original form was written in XFDL 6.0 or later. Some of the main improvements in Designer 2.6 are: The Designer interface is entirely new. Designer is now based on the Eclipse Platform, and the Designer interface is the Eclipse Workbench. The Designer now supports XFDL 7.0. – You can use Designer to upgrade forms from XFDL 6.x to XFDL 7.0. – The namespace URL for XFDL 7.0 is: http://www.ibm.com/xmlns/prod/XFDL/7.0 The Designer now supports XForms 1.0. The Designer is now available in several different languages and locales. Forms created on Workplace Forms Designer V2.6.1 are based on XFDL 7.0, and this is the version to which existing forms are upgraded. 5.4 Defining our XForms Model We know that we are going to need to design a form that exchanges data with a DB2 database, and have also decided that utilizing the strengths of the XForms Model is the most effective way to accomplish this goal. The best way to approach our new form is to have the XForms instance data available before we begin our form layout. In this section we cover the following topics: 190 The XForms Model XForms data instances XForms nodes Creating the instance IBM Workplace Forms 2.6: Guide to Building and Integrating a Sample Workplace Forms Application 5.4.1 The XForms Model The XForms Model is a block of XML data that contains three core parts that work together to create a complete model: Data instances — Data instances are arbitrary blocks of XML. A data model may contain any number of data instances, and each instance is normally created to serve a particular purpose. For detailed information about XForms data instances, see “XForms data instances”. Binds — The data layer and the presentation layer are connected by binds. For detailed information about XForms binding, see “Add XForms Model binds” on page 249. Submissions — Each data instance may have an associated set of submission rules. These rules control how a data instance is transmitted when it is submitted for processing. This is an optional feature, and is only necessary when you want to submit the data instance by itself, without the rest of the form. There are many cases in which you may want to submit the entire form, and then retrieve the data instance from the form during processing. This is particularly true when you are using signatures on your forms. For detailed information about signatures, see “Signature section of form” on page 275. For detailed information about XForms submissions, see “Form data access using XForms submissions” on page 390. Note: We recommend that a form contain only one XForms Model, but multiple models are allowed (though they have no ability to interact with each other). 5.4.2 XForms data instances An XForms data instance defines the XML template for the data that is collected from the form. A data instance can be used to store input values, pre-populate fields with data, or dynamically generate list selections. An XForms Model can have more than one data instance. For example, one data instance can contain user information for a submission, while another data instance can contain user preference data. Additionally, you can link each data instance to a button on the form that triggers the submission of that instance. It is a good idea to create each data instance, along with its associated binds and submission rules, by following these steps: 1. The first stage is to create a data instance. In this stage, you model your data instance by adding elements, attributes, and text values to the data instance. 2. The second stage is to bind the data instance to the form. This maps individual data elements to one or more user interface items so that they share data. For detailed information about binding see “Add XForms Model binds” on page 249. 3. Finally, you must define the submission rules for the instance if you intend to submit the data separately. These rules determine what data is selected and sets other submission-related properties. For detailed information about submissions see “Form data access using XForms submissions” on page 390. 5.4.3 XForms nodes When working with XForms instances, it is important to know the terminology used to describe its elements. The data instance’s elements and attributes are collectively referred to as nodes. Since you have to bind the form’s user interface items to the various nodes in a data instance, it is important to understand node terminology. Chapter 5. Building the base scenario: stage 1 191 Node terminology The data instance shown in Figure 5-11 is used as an example to describe the various node types. Figure 5-11 Instance view in the Designer The node types are: Root node — The root node is the single node that contains all other nodes. You build your data instance by adding elements and attributes to the root node. A data instance can only have one root node. In the example, the root node is <Discounts>. Parent node — The parent node is an element that has other elements added to it. When a parent node contains more than one child element, it is also referred to as a node set. In the example, a parent node is <Values>. Child node — A child node is an element that is added to a parent element. In the example, <percent> is a child node of <Values>. Sibling node — When you add more than one child to a parent, each child node becomes a sibling node. You can add elements to a parent element as children or as siblings. In the example, a sibling node is <percent>. Note: Typically, you would only add a sibling element to the data instance if you forgot to add an element or the model has changed and needs to be updated. Attribute node — You can add attributes to an element. An attribute extends the functionality of an element and is typically used in the following circumstances: – You want to limit the size of data you are storing. – You have a group of items that you want to present to the user as a list of items. – You want to submit additional data related to the data entered by the user. For example, you could add an attribute to hold a product ID that the user never sees but that is submitted when the user selects the product. In the example shown in Figure 5-11, the attribute node is attribute. Note: Node names cannot contain special characters (such as spaces, <, >, &, and so on). 192 IBM Workplace Forms 2.6: Guide to Building and Integrating a Sample Workplace Forms Application Node text values A node can also have a text value: Element text value — You can add a text value to a child element. Once you bind an element that has a text value to a user interface item, the text value is displayed to the user in the bound user interface item. In the example shown in Figure 5-11 on page 192, the element text values are "0%", "10%", "20%", and "30%”. Note: Once you add a text value to an element, it can no longer be a parent node. In other words, you cannot add an element to an element that has a text value. Attribute text value — You can add a text value to an attribute. Once you bind an attribute that has a text value to a user interface item property, the text value is what will be stored in the referenced XForms instance element for the field as the item’s value property. In the example shown in Figure 5-11 on page 192, the attribute text values are "0", "0.1", "0.2", and "0.3". If "10%" is chosen by a user from the discount list, "0.1" is submitted as the node value instead of "10%". Note: In the pop-up field you will see the values of the item (for example, 10%) when you display the choices list to select a new entry. Having one entry selected, the form will display (and print) the selected text value (for example, 0.1). 5.4.4 Creating the instance There are several different approaches to building our XForms Model instance data: Creating instances from WSDL messages Building XForms data instances through the Designer Defining your instance directly in the source panel Creating instances from WSDL messages Once you have added a WSDL file to your form, you can use its messages to create instances. To create an instance from a WSDL message: 1. In the Instance view, click the WSDL button. This creates a new instance from a WSDL message. The WSDL Message window is displayed, listing the available WSDL messages from which you can create an instance. Note: If your form has more than one XForms Model, you must select the model that you want to add the new WSDL-based instance to. 2. Click the messages that you want to use to create an instance and then click OK. A separate instance is generated for each message you choose. Building XForms data instances through the Designer The Workplace Forms Designer allows the form author to define XForms Models and instances. Through the use of the Instance view, you can build a data instance by adding Chapter 5. Building the base scenario: stage 1 193 elements to it. You can further define your data instance by optionally adding attributes and text values to elements. Adding child elements To add a child element to the parent element: 1. In the Instance view, click the parent element. 2. Right-click and select Add Element. A new element is created beneath the parent element. If the parent already has children, then the new child is added after the existing children. 3. Double-click the new element, name it, and then Enter. Adding sibling elements Adding a sibling element inserts an element before an existing element. Typically, you would only add a sibling element to the data instance if you forgot to add an element or the model has changed and needs to be updated. Note: Siblings can only be added before an existing child element. To add a sibling element: 1. In the Instance view, click a child element. 2. Right-click and select Insert Element Before. A new sibling element is created above the selected child element. 3. Double-click the new element, name it, and press Enter. Adding a text value to an element You add a text value to an element when you want to display a value in a user interface item that is bound to the element. For example, if you want to inform a user that an input field is to be used for typing their last name, you could add a text value of Type your last name here to the <last_name> element. Once the <last_name> element is bound to the input field, the text value appears in the field. To add a text value to an element: 1. In the Instance view, right-click the element that you want to add a text value to. 2. Click Add Text. 3. Double-click text, type the text value, and then press Enter. Note: After you bind the element to an XForms user interface item, the text value appears in the bound user interface item. Adding attributes to an element An attribute extends the functionality of an element. Essentially, an attribute is another tool you can use to model your instance. You can add one or more attributes to an element. If an element has more than one attribute, each attribute must have a unique name. For example, you could add three child elements to a <name> parent element: <first>, <middle>, and <last>. Alternatively, you could add three attributes to a <name> element: first, middle, and last. To add an attribute to an element: 1. In the Instance view, right-click the element that you want to add an attribute to. 2. Click Add Attribute. An attribute is added immediately beneath the element. 194 IBM Workplace Forms 2.6: Guide to Building and Integrating a Sample Workplace Forms Application 3. Double-click the newly added attribute, type a descriptive name for the attribute, and press Enter. 4. To add additional attributes, repeat steps 1 through 3. Adding a value to an attribute When you add a value to an attribute it creates an optional piece of data that is associated with the node. This value can then be submitted. This is helpful when you want to store a truncated value coming from the user interface or to submit information that is associated with the user-selected data such as an internal product code. To add a text value to an attribute: 1. In the Instance view, right-click the attribute that you want to add a text value to and click Edit. 2. Type the text value and then press Enter. When you bind the element to an XForms user interface control, the attribute’s value is what is stored as the element value when a user chooses a value. XPath and nodes XPath referencing lets you bind the node or node set with XForms items in the form or with model item properties that calculate values or place limitations on the nodes. Defining your instance directly in the source panel It is also possible to define your XForms Model instances manually, or to paste XML fragments that define instance data directly into the source panel. All XForms instances must be prefixed with the xforms tag, as shown in Example 5-1. Example 5-1 XForms instance declaration <!-- Discount values between 10 and 30 percent - select percentage, display float integer --> <xforms:instance id="Discount_Values" xmlns=""> <Discounts> <Values> <percent attribute="0">0%</percent> <percent attribute="0.1">10%</percent> <percent attribute="0.2">20%</percent> <percent attribute="0.3">30%</percent> </Values> </Discounts> </xforms:instance> The Discount_Values instance referenced earlier is shown here. When defining an instance like this you must pay close attention to syntax. Fortunately, the Source editor included with the Designer is capable of predictive scripting, which is very helpful when working directly with the code. Note: When you create an XML Model data instance, the instance is prefixed by xforms. For example: xforms:instance ID =instance1 It is important to note that this prefix standard was added to XML Model instances while W3C XForms was in development. It is not the official W3C XForms 1.0 standard. Chapter 5. Building the base scenario: stage 1 195 5.5 Create the stage1 form Throughout these next sections we discuss how to create the initial forms and establish the key design and layout of the forms. We approach the issue in terms of what needs to be done — first, for the traditional form pages, and second, for the subsequent wizard pages. In our sales quote approval sample we use a scanned image as a template for the traditional form page. We then add the items to the page and usually remove the template when we are done designing the traditional form. Attention: To assist you in building this sample application, we provide the image we use for the scanned form. The file Form_Page_scanned_image.jpg can be downloaded from the Additional Materials with the book. See Appendix D, “Additional material” on page 693, for detailed information about how to download the file. The wizard pages are then designed from scratch starting at a blank page. First, we define the layout of the form before we add the items. You may want to sketch the layout on paper before you start building it in the Designer. In this section we cover the following topics: Create a new form with XForms support. Add XForms Model instance data. Create the form template. Create a Resource page. 5.5.1 Create a new form with XForms support The new form includes support for XForms Models. To create the new form follow the steps outlined below. 1. In the Designer, click File → New → New Workplace Forms, which starts a wizard to create the new form. Enter or select the parent folder for the new form, enter the file name of the new form, and click Next to select the template. Note: File → New → New Workplace Form is only available in the Designer perspective. To create a form in any perspective, select File → New → Other and select the Workplace Forms → New Workplace Form wizard. 196 IBM Workplace Forms 2.6: Guide to Building and Integrating a Sample Workplace Forms Application 2. In our example choose Default Empty Form - XForms from the template list and click Finish, as shown in Figure 5-12. Figure 5-12 New Workplace Form wizard Chapter 5. Building the base scenario: stage 1 197 3. The form loads in the Design Perspective, as shown in Figure 5-13. Figure 5-13 Empty XForms page in the Design perspective One of the very first things to consider is the creation of a project folder for the new form. A project folder is the designated file location where all of the form revisions, externally associated file resources, schemas, and just about anything may be stored. To create a new project folder go to the Navigator view in the Designer. Right-click the My Forms Projects folder. In the pop-up select New → New Folder. Provide a name, select a location, and save your new folder. We use 261Redbook as the file name and save the folder to the default location of our workpspace, but the location could just as easily be a network file share (see Figure 5-14). Figure 5-14 New project folder 198 IBM Workplace Forms 2.6: Guide to Building and Integrating a Sample Workplace Forms Application To create the new form right-click the 261Redbook folder and select New → New Workplace Forms. We now have a canvas, a project folder, and all of the necessary XForms and XFDL items necessary to design our form, with one exception. We do not have an XForms Model root instance defined. If we attempt to preview this form without a XForms Model, an error is generated, as shown in Figure 5-15. Figure 5-15 XForms instance error The only way to resolve this error is to create a root node for the XForms instance. Since it is absolutely essential to be able to preview the form design as it is created, this issue needs to be resolved. 5.5.2 Add XForms Model instance data We create multiple XForms instances based on the logical breakdown of the form and our backend system integration needs even though we do not integrate to any backend systems in stage 1. We include the newly defined instances in the form using the steps defined below. XForms Model instances The XForms Model has several instances that serve different purposes. It is provided to us from our backend system administrator in the form of a flat XML file that contains XML fragments. There are 12 instances in our model, as shown in Example 5-2 on page 200. BusinessRuleParameters provides upper and lower thresholds for signature requirements. CustomerIDs - results of backend system query to form a dynamic list of customers IDs based on the information stored there. PositionList is a static list of employee roles used to populate list. InventoryItems - results of backend system query to form a dynamic list of inventory item names based on the information stored there. SelectionInfo - results of backend system query to form a dynamic list of inventory item IDs and customer IDs based on the information stored there. Chapter 5. Building the base scenario: stage 1 199 CustomerDetails will store or show customer details of a backend system query based on customer ID selection. EmployeeDetails will store or show results for employee details. Discount_Values is a static list of available discounts from zero to thirty percent (0–30%). InventoryItemDetails shows the detailed results of a backend system query based on selected inventory item ID. OrderTableRowData used to represent the dynamic table needed to create our form. FormMetaData is used to update and maintain form values necessary to process business rules. FormOrderData captures all salient information captured and calculated in the form for backend system submission. Example 5-2 XForms Model instances <!-- Form Configuration Parameters --> <!-- Business Rule Parameters --> <xforms:instance id="BusinessRuleParameters" xmlns=""> <BusinessRuleParameters> <BusinessRuleParams> <QuoteLevelOneThreshold>10000</QuoteLevelOneThreshold> <QuoteLevelTwoThreshold>50000</QuoteLevelTwoThreshold> </BusinessRuleParams> </BusinessRuleParameters> </xforms:instance> <!--***************************************************************************--> <!--************************ PRE-POPULATED INSTANCES **************************--> <!--***************************************************************************--> <!-- this instance provides the choices list for the customers --> <!-- Customer and Item Selection Info--> <xforms:instance id="" xmlns=""> <> <InventoryItemID></InventoryItemID> <CustomerID></CustomerID> </> </xforms:instance> <!-- this is an instance for the choices list associated with employment positions on Page1 --> <xforms:instance id="PositionList" xmlns=""> <Positions> <Position></Position> </Positions> </xforms:instance> <!-- this instance provides the choices list for the items --> <xforms:instance id="InventoryItems" xmlns=""> <InventoryItems> 200 IBM Workplace Forms 2.6: Guide to Building and Integrating a Sample Workplace Forms Application <InventoryItem></InventoryItem> </InventoryItems> </xforms:instance> <!--***************************************************************************--> <!--************* User / Runtime Populated Instances **************************--> <!--***************************************************************************--> <!-- Customer and Item Selection Info--> <xforms:instance id="SelectionInfo" xmlns=""> <SelectionInfo> <InventoryItemID></InventoryItemID> <CustomerID></CustomerID> </SelectionInfo> </xforms:instance> <!-- Detail data for the Selected Customer --> <xforms:instance id="CustomerDetails" xmlns=""> <CustomerDetails> <Customer> <ID></ID> <Name></Name> <AccountManagerID></AccountManagerID> <Department></Department> <ContactName></ContactName> <ContactPosition></ContactPosition> <ContactEmail></ContactEmail> <ContactPhone></ContactPhone> <CRMNumber></CRMNumber> </Customer> </CustomerDetails> </xforms:instance> <!-- Detail Data for the Indicated Employee (previously FormOrgData)--> <xforms:instance id="EmployeeDetails" xmlns=""> <EmployeeDetails> <Employee> <FirstName></FirstName> <LastName></LastName> <ID></ID> <ContactInfo></ContactInfo> <Manager></Manager> </Employee> </EmployeeDetails> </xforms:instance> <!-- Discount values between 10 and 30 percent - select percentage, display float number --> <xforms:instance id="Discount_Values" xmlns=""> <Discounts> <Values> Chapter 5. Building the base scenario: stage 1 201 <percent attribute="0">0%</percent> <percent attribute="0.1">10%</percent> <percent attribute="0.2">20%</percent> <percent attribute="0.3">30%</percent> </Values> </Discounts> </xforms:instance> <!-- Detail data for the Selected Inventory item --> <xforms:instance id="InventoryItemDetails" xmlns=""> <InventoryItemDetails> <Item> <ID></ID> <Name></Name> <Price></Price> <NumberInStock></NumberInStock> </Item> </InventoryItemDetails> </xforms:instance> <!-- Row Data for the Selected Item --> <xforms:instance id="OrderTableRowData" xmlns=""> <OrderTableRowData> <Row> <line> <id></id> <name></name> <price></price> <stock></stock> <amount></amount> <discount></discount> <line_total></line_total> <subtotal></subtotal> </line> </Row> </OrderTableRowData> </xforms:instance> <!-- Form Meta Data. Some values set at design-time and others are set at runtime. See comments. --> <xforms:instance id="FormMetaData" xmlns=""> <FormMetaData> <FileName></FileName> <!-- Calculated on first submit --> <Version>0</Version> <!-- Populated at design time --> <CreationDate></CreationDate> <!-- Populated at time of request --> <CompletionDate></CompletionDate> <!-- Populated upon final submission --> <State>1</State> <!-- changes based on form status --> <PreviousState>0</PreviousState> <!-- changes based on form status) --> <Owner></Owner> <!-- changes based on form status) --> </FormMetaData> </xforms:instance> 202 IBM Workplace Forms 2.6: Guide to Building and Integrating a Sample Workplace Forms Application <!-- Order Data. timestamps.--> Information about this specific order including approvals and <xforms:instance id="FormOrderData" xmlns=""> <FormOrderData> <ID>10101010</ID> <CustomerID></CustomerID> <Amount>0</Amount> <Discount>0</Discount> <SubmitterID></SubmitterID> <State>1</State> <CreationDate></CreationDate> <CompletionDate></CompletionDate> <Owner></Owner> <Version>0</Version> <Approver1></Approver1> <AppovalDate1></AppovalDate1> <Approver1Comment></Approver1Comment> <Approver2></Approver2> <AppovalDate2></AppovalDate2> <Approver2Comment></Approver2Comment> <Cost></Cost> <StateDisp></StateDisp> <OriginatorRole></OriginatorRole> </FormOrderData> </xforms:instance> After reviewing the instance declarations for errors, the file is imported into our 261Redbook project folder, as shown in Figure 5-16, so that we can access it easily in the Designer and keep all of the project source files together. This is an optional step. Figure 5-16 Import XML file We can open this file in the Designer by double-clicking it from the Navigator view. This allows us to make changes if necessary, and to copy our instances from the flat file to the form. Double-click Now to open the file. Select all of the instances (Ctrl+A) and copy them (Ctrl+C). Chapter 5. Building the base scenario: stage 1 203 Add an instance to the form To do this: 1. Return to the sales quote form. 2. In the Designer, go to the Instance view. 3. Click the plus sign icon to add an instance. 4. Paste the new instances copied earlier directly into the source of the sales quote form. 5. Click the Source tab in the Designer for the sales quote form. 6. Locate the XForms Model declaration. 7. Highlight the default instance just created, as shown in Figure 5-17. Figure 5-17 Highlight default instance 8. Paste the new instances by pressing Ctrl+V while the default instance is still highlighted. All of the new instances are pasted into the source code and are now ready for us to use. 9. Save your changes. There should not be any errors, but if there are, you are immediately notified. 10.Return to the Design perspective and go to the Instance view to validate the successful changes. When finished all of the instances should be shown as in Figure 5-18. Figure 5-18 Instance results 204 IBM Workplace Forms 2.6: Guide to Building and Integrating a Sample Workplace Forms Application Now that we have all of the instances necessary for us to begin designing our form we can proceed. The following sections discuss the first step in building your forms — namely, beginning with the correct layout. 5.5.3 Create the form template The Designer's workspace has a number of features that make it easy to create professional-looking forms quickly. In this section we examine a few of them and explore the workspace. On page 1 we create an e-form representation of the original form by first utilizing a scanned image of the form as a template for the layout of our items to reproduce a near pixel perfect copy. On this page we add functional sections to manage attachments, and capture multiple overlapping signatures. Next we create a resources page to store shared graphics and cells. We then add a toolbar to page 1 with navigational elements to allow the end user to move to other pages. Once everything is properly laid out and functional, we reuse many of these elements to create the wizard pages. The topics covered in this section include: Building the traditional form page Add scanned image to form page Add layout items to the template page Enhancing the form Reviewing the layout for the traditional form page Chapter 5. Building the base scenario: stage 1 205 Building the traditional form page For the traditional form page, you should use a preset page size of the paper format like letter or A4 since this page will typically be used for printing the form. Figure 5-19 shows the scanned image that we created to use as a template for the page. Figure 5-19 Scanned image to be used as a template for the traditional form page Add scanned image to form page To build our form from scratch, we start with the traditional form, and create a near pixel perfect representation of the original form. To do this we apply the scanned image of our form as a background image for the first page of the form document. To create a scanned template for the traditional form page, follow these steps: 1. Scan your paper form and save it in a compatible format (.bmp, .jpg, .ras, .png). It is important that the scanned image be scaled to fit the Designer form area (945x1220 pixels in our case). 206 IBM Workplace Forms 2.6: Guide to Building and Integrating a Sample Workplace Forms Application 2. In the Outline view, expand the page that you want to add a background image to and select Page Global, as shown in Figure 5-20. Figure 5-20 Page Global in the Outline view 3. In the Properties view, expand Appearance. 4. Click within the backgroundimage value field. Type the path and file name for the image (for example, c:\myfile\scanned form.jpg), as shown in Figure 5-21. Press Enter when finished. 5. Click within the backgroundimagealpha value field. Type a value between 0 and 255 to set the transparency of the background image. Zero represents the lightest (invisible) image background, and 255 the darkest. Figure 5-21 Properties view of page with template form image Tip: If the template is too obtrusive in the Designer, adjust the value of the backgroundimagealpha property to a lower number in the Properties view to a setting that is comfortable. For our design environment it is set to 50. 6. Optional: It may be useful to give the first page of the form a specific name (default value is “Page 1”) by entering it in the label property. Using the original paper form name makes the form more recognizable in its new e-form format. Chapter 5. Building the base scenario: stage 1 207 7. If desired, you may also change the background color of your form by updating the value of the bgcolor property under the Appearance category in the Properties view. This background color is not visible until you preview the form or remove the template image. You can also set the font to the most commonly used font on the form. Tip: It is a good idea to decide on the page name, background color, default font, and page size before you begin. While you can change the page properties at any time, setting them after there are items already on the form can cause problems with sizing, appearance, and, if the page name is changed, references from other pages. In Figure 5-22 you can see the see the scanned image as a background template on a traditional page in Workplace Forms Designer. The template now serves as a pattern to precisely position our layout item and imitate the original paper form. The background image is only visible in the Designer. It is not visible in the Viewer and will not print. The form page also has a watermark titled Empty Page that disappears when you add an item to the page. After you have added the layout items to the form page, you should remove the image by clicking the property state indicator to set the value of the backgroundimage property (on the Properties view) to blank. Alternatively, you could set the backgroundimagealpha property to zero (0). Figure 5-22 Traditional form page with scanned image template inserted 5.5.4 Create a Resource page A Resource page can be used to store reusable items that may be referenced on multiple pages in the form. In our form we include such things as the Redbooks and IBM Logo, which 208 IBM Workplace Forms 2.6: Guide to Building and Integrating a Sample Workplace Forms Application is referenced on all of our pages in this form document. This page is never displayed in the Viewer — its sole purpose is to act as a container of sorts for items used by the other pages in this form document. By doing so, it decreases the system resources needed to render our form. Add page To add the page, select a page item from the Designer’s palette and then click Page1 in the Outline view, as shown in Figure 5-23. Figure 5-23 Create Resources page Enclose graphics Next we attach our graphic files as enclosures in the form. To enclose a file, switch to the Enclosures view. If this view or any other view is not currently available, you can add a view to your Designer perspective by selecting Window → Show View → Enclosures, as shown in Figure 5-24. Figure 5-24 Show view Chapter 5. Building the base scenario: stage 1 209 Once in the Enclosure view, expand the Data group, go to the Resources page, and right-click that entry. Select Enclose File from the resulting pop-up window, as shown in Figure 5-25. Figure 5-25 Enclose file Using the Choose File dialog that launches, you can browse to your graphic file location and select it, as shown in Figure 5-26. In this case we select a local Redbooks logo. Figure 5-26 Choose File dialog We then repeat the previous steps to add a second image, the IBM Workplace Forms graphic. The resulting enclosures are shown in Figure 5-27. Figure 5-27 Two enclosures 210 IBM Workplace Forms 2.6: Guide to Building and Integrating a Sample Workplace Forms Application These two graphics can now be referenced throughout the form by other items such as cells used for drop-down lists, and combo boxes. As we continue to develop this form, we may return to the resources page to add additional items. 5.6 Add layout items to the template page There are several approaches that can be taken when creating layout items. The approach selected depends on a number of different factors. Two methods are: The first method we demonstrate is the most basic where we recreate the original form by adding the appropriate items to the form. We use alignment tools to place lines, boxes, labels, and fields onto the form. This can be more labor intensive due to the number of items that have to be created and the need to create the appropriate binds to the XForms Model, but is necessary in some cases. We refer to this as the basic method. The second approach we demonstrate is more advanced and takes advantage of the XForms Model instance definitions that we created earlier. It greatly accelerates design time, provided that the appropriate data instances have been properly defined first. We refer to this as the XForms Model method. To build the layout of the form we cover the following topics: Basic method. Define references (XPath). XForms Model method. Create dynamic XForms table. Add advanced items to table. Add XForms Model binds. File attachment section. Signature section of form. 5.6.1 Basic method This is the most basic approach and requires a bit more work. It is necessary to take this approach if an XForms Model is not needed for a simpler form, or if the XForms Model is not available in advance, which is occasionally true. In this section we cover the following topics: Create sales person. Place lines and boxes. Place labels and fields. Create sales person We illustrate this method by recreating the sales person data section of the original form manually. We then show how it can be bound, or linked, to an XForms Model once the layout is completed. Chapter 5. Building the base scenario: stage 1 211 Rulers, guides, and layout grids When designing any form it is useful to take advantage of the ruler and grid tools available in the Designer. Rulers and guides help you to measure the size and position of items on the form. Rulers and guides are useful for creating a clean, symmetrical layout for your form. The layout grid is an evenly spaced grid of horizontal and vertical lines that is superimposed on the form. Rulers enable you to measure items in inches or pixels. (Rulers appear automatically on the top and left borders of the form when you create a new form.) To show or hide rulers, click View → Show Rulers. Once set on, rulers are displayed in each working session. Guides are thin red lines that you can place directly on the form to help you align items manually. They appear in the Designer, but are not visible when the form is opened in the Viewer. You set up guides to assist in aligning items precisely. – To create a guide: i. Click View → Show Rulers. ii. Click the ruler and drag the guide to the desired position. Note: Guides are not saved after closing the file. Layout Grids help you line up items on the form and ensure uniform spacing. To show or hide the grid, click View → Show Grid. Once turned on, grids are displayed in each working session unless turned off at a later point. Let us turn on the rules and grids first. Using the steps above, turn on the rulers and layout grids. Now let us add guide lines to our form canvas to highlight the edges of the sales person data section: 1. Click the horizontal ruler on the top of our form design canvas and drag the guide to the left-most vertical line of the sales person section of the form. 2. Repeat the process to add a second guide to the horizontal ruler. Align it to the right-most side of the sales person section of the form. 3. Add a guide line to the vertical ruler, aligning it with the top-most line of the sales person section. Repeat the process to add a second guide to the vertical ruler. Align it to the bottom of the sales person data section. Tip: When you place or expand an item on the form directly in-line with the grid lines, the grid lines will turn red. If your text is misaligned then they will remain the default color. 212 IBM Workplace Forms 2.6: Guide to Building and Integrating a Sample Workplace Forms Application When finished it should look like the image shown in Figure 5-28. Figure 5-28 Guide lines Place lines and boxes We begin by placing all of the necessary lines and boxes on our form for the Sales person section, providing us with the layout needed for our labels and fields. Boxes First, we add a box on to the form. We start with a box because it functions as a container for our lines, labels, and fields. Another benefit of using a box here is that it saves us some time by eliminating the need to create vertical lines for the border, and reducing the number of horizontal lines needed by two. (The box provides us with a top and bottom line.) Add a box item to the form. Be sure to align it properly on the grid lines added earlier, as shown in Figure 5-29. Figure 5-29 Add box to the form Chapter 5. Building the base scenario: stage 1 213 If you look back to the original form, notice that the sections of this form are differentiated by the background color (white). Using a box allows us to reproduce it if we like. However, to demonstrate a key property of box items we have decided not to use a background color. Instead, we turn on the transparent property for the box. To do this go to the Properties view of our new box and set the bgcolor → transparent to on, as shown in Figure 5-30. Figure 5-30 Turn on transparency Tip: When adding items to a form that uses an image for your template it is easier to align items on the form if a transparent background is used. Otherwise, items such as boxes can obscure the layout items of the template. Lines Start at the top of the sales person section and place a horizontal line on the form. Do not be concerned about size or left/right alignment at this point. Position the line item on the template line just above First Name. Now use absolute expand to make it the same width as the box, as shown in Figure 5-31. Figure 5-31 Place first horizontal line on the form 214 IBM Workplace Forms 2.6: Guide to Building and Integrating a Sample Workplace Forms Application We are still not concerned about aligning the line to the left or right. Select that line in the canvas and copy it using Ctrl+C. Paste the copy of the line into the form canvas using Ctrl+V. You should paste enough horizontal lines to account for all of the horizontal lines of the sales person section of the form. (There are four more lines needed.) Lay the new lines over the horizontal lines of the layout shown in the template so that all horizontal lines are covered, as shown in Figure 5-32. Figure 5-32 Line up new lines over existing horizontal lines of the template Next use absolute alignment to line up all of the new lines left to left with the box, as shown in Figure 5-33. Figure 5-33 Absolute align left to left the new lines to the box Once you have placed all lines and the box on your form, preview and print the form to check that everything lines up correctly and prints properly. If necessary, repeat the preview, correction, and modification process until you have resolved all problems with the form. Chapter 5. Building the base scenario: stage 1 215 Place labels and fields We add our labels and fields to the form. We are going to show you two methods to accomplish this task. First, we show you how to use the items in the palette to create your labels and fields for the employee section of the form, and then link the fields to the data instances of the XForms Model. Then in the next section we show how to use the XForms Model data instances to create fields and labels with the links in place. Create labels and fields using the palette We begin at the top of the page and work through the sales person section of the form placing labels on the form. Our approach is to create a single label for the first item in the table and get it as close to the original as possible with alignment and font. We then use the Non-XForms label items for this part. As shown in Figure 5-34, click the label menu and select the Non-XForms item, then click the location in your form canvas to insert the item. Figure 5-34 Non-XForms label 216 IBM Workplace Forms 2.6: Guide to Building and Integrating a Sample Workplace Forms Application Try to match font, color, size, and label values as closely as possible. You can then copy that label and reuse it for the other labels in the sales person table. This speeds up the process. The label properties we used are shown in Figure 5-35. Figure 5-35 Label properties When placing your labels for the header it is a good idea to extend the borders of your label to the full size of the existing box shown in the original form template. Making this effort now allows us to differentiate by background color the headers from fields in the table later. Although distinction between columns is not how the original form was created, improving the look and feel should always be considered. It is a way to bring additional value to the form, without deviating too far away from the original design. We show how to improve the layout of this form in 5.7, “Enhancing the form” on page 278. Note: The decision to use relative or absolute alignment can make a significant difference for layout items. Generally speaking, you should only use relative align when the size or position of items on your form may vary (for example, when your form is receiving data from a database or when sections of your form are created dynamically). The same is true of relative expand. Chapter 5. Building the base scenario: stage 1 217 Once you have added the labels to the sales person table it should look like the section shown in Figure 5-36. Figure 5-36 Sales person section Next we add fields to the form. The process is very similar, except this time we select a specific XForms version. Go to your palette and, using the drop-down list for fields, select the Field (Input) item from the list and drop it in your form canvas, as shown in Figure 5-37. This is an important difference because, unlike labels, which do not need to be bound to the XForms Model, we know that ultimately the fields will need to be bound. Figure 5-37 XForms Field (Input) 218 IBM Workplace Forms 2.6: Guide to Building and Integrating a Sample Workplace Forms Application Again, it is a good idea to define the properties and alignment for the first field and then copy and paste it as needed to complete the sales person table. We accept the default values for all of the properties except SID, which we rename to reflect the value that is stored in the field. We then copy that field and paste it four times. Next, we use absolute alignment to place each field after its associated label. The sales person table should look like the image shown in Figure 5-38. Figure 5-38 Sales person section with fields and labels 5.6.2 Define references (XPath) The next step required to complete this section of the form is to link the field items to the data instances, as defined by the XForms Model. This is a critical step. XForms items must be linked to a data instance utilizing an XPath expression. If the XPath expressions are not defined for your XForms items, then the form will not function as designed. In this section we cover the following topics: Data instance Error messages Resolving reference errors Data instance We use the data elements of the EmployeeDetails instance shown in Example 5-3 to bind our items. Example 5-3 EmployeeDetails <!-- Detail Data for the Indicated Employee (previously FormOrgData)--> <xforms:instance id="EmployeeDetails" xmlns=""> <EmployeeDetails> <Employee> <FirstName></FirstName> <LastName></LastName> <ID></ID> <ContactInfo></ContactInfo> <Manager></Manager> </Employee> </EmployeeDetails> </xforms:instance> Note: For more information about references see Chapter 2, “Features and functionality” on page 19. Error messages Fortunately, the Designer catches these errors and warns the form designer immediately in a few ways. Because there are no binds from our XForms Model instances to the XForms Chapter 5. Building the base scenario: stage 1 219 Designer items, several problems have been identified and are listed in the Problems view of our Designer, as shown in Figure 5-39. Figure 5-39 XPath expression is empty In fact, a warning is highlighted in the Properties view for each XForms field. To find out more about the warnings in the Properties view, double-click one of the errors described in the Problems view. A few things happen: First, the XForms item with the problem gains focus on the Design canvas. Second, the outline is highlighted. Third, the Properties view expands to show which field attribute needs to be defined. 220 IBM Workplace Forms 2.6: Guide to Building and Integrating a Sample Workplace Forms Application This is an especially helpful feature because you know not only that there is a problem, but just by double-clicking the warning shown in the Problems view you now know where on the form, where in the outline, and what property needs to be defined to resolve the issue. Figure 5-40 shows all of these items highlighted in red boxes. Figure 5-40 XForms errors highlighted in the Designer perspective Based on what we see here we know that on Page1, there is a XForms field named FIELDeMailAddress with an empty XPath expression that needs to be defined in the item’s Property view in the XForms section for the ref attribute (abbreviation of reference). Resolving reference errors There are several ways to resolve reference errors: Directly edit the source code. Copy the reference. Drag and drop instance. In the following subsections we show how to resolve these issues using all three methods listed above. The method to use is a matter of personal preference and comfort level. There is no right or wrong way to correct reference issues, but as you see later in this section, there are other approaches that can be used that help you to avoid reference issues when designing your forms. Chapter 5. Building the base scenario: stage 1 221 Directly edit the source code Code developers may choose to resolve the issue in the source code for the form by properly defining the reference. Click the Source tab located in the lower left corner of your Design canvas. Since the item with the issue is highlighted on the canvas, the Designer sets focus directly on the associated code in the Source view. When we look at the code shown in Example 5-4 we see that the ref is nil. Example 5-4 Source view of the field declaration with the error <field sid="FIELDeMailAddress"> <xforms:input ref=""> <xforms:label></xforms:label> </xforms:input> <itemlocation> <x>292</x> <y>98</y> <after>LABELFirstName</after> <width>240</width> <alignvertc2c>LABELFirstName</alignvertc2c> <after>LABELeMailAddress</after> </itemlocation> <scrollhoriz>wordwrap</scrollhoriz> Now we can go to the XForms Model definition and identify what the reference should be. Look at the instance code in Example 5-5. Example 5-5 XForms Model instance definition for sales person data <!-- Detail Data for the Indicated Employee (previously FormOrgData)--> <!-- Detail Data for the Indicated Employee (previously FormOrgData)--> <xforms:instance id="EmployeeDetails" xmlns=""> <EmployeeDetails> <Employee> <FirstName></FirstName> <LastName></LastName> <ID></ID> <ContactInfo></ContactInfo> <Manager></Manager> </Employee> </EmployeeDetails> </xforms:instance> We can see here that the data instance for e-mail address is stored in the <ContactInfo> element of the data instance EmployeeDetails instance, in the Employee node. Therefore, our XPath reference definition should be as shown in Example 5-6. Example 5-6 XPath reference definition instance('EmployeeDetails')/Employee/ContactInfo 222 IBM Workplace Forms 2.6: Guide to Building and Integrating a Sample Workplace Forms Application Now we can modify our XForms item definition with the appropriate reference value. In the source view return to our FIELDeMailAddress section. Modify the reference to properly call to the instance data that will be tied to that field, as shown in Example 5-7. Example 5-7 Declare XPath <field sid="FIELDeMailAddress"> <xforms:input ref="instance('EmployeeDetails')/Employee/ContactInfo"> <xforms:label></xforms:label> </xforms:input> <itemlocation> <x>292</x> <y>98</y> <after>LABELFirstName</after> <width>240</width> <alignvertc2c>LABELFirstName</alignvertc2c> <after>LABELeMailAddress</after> </itemlocation> <scrollhoriz>wordwrap</scrollhoriz> </field> Press Ctrl+S to save your changes and recompile your source code. Return to the Design canvas by clicking the Design tab in the lower left-hand corner of your Source editor. When the view refreshes, look at the Field Properties view. Our change is shown. Also, look at the Problems view. The issue for the e-mail instance is resolved. Chapter 5. Building the base scenario: stage 1 223 Copy the reference We now have four other references to resolve. For the First Name field we resolve the reference issue by copying the reference from the Instance view and pasting it into the field’s reference property. Go to the Instance view and locate the first name element in the employee data instance. Then right-click the FirstName data element in the instance and select Copy Reference from the pop-up window, as shown in Figure 5-41. Figure 5-41 Copy reference 224 IBM Workplace Forms 2.6: Guide to Building and Integrating a Sample Workplace Forms Application Click the first name field item in our Design canvas and look at the properties for it. In the Properties view, expand the XForms (Input) section. Notice that the ref property is still highlighted in red. Click the value section next to the ref properties, and press Ctrl+V to paste the reference that we just copied. When finished it should appear as shown in Figure 5-42. Figure 5-42 Paste reference Drag and drop instance That leaves us with just three items left. To resolve these problems we are going to return to the Instance view. Locate the appropriate instance and then drag and drop the instance to the associated field item, as shown in Figure 5-43. This defines the references needed to link the UI elements to the data instances and completes this section. Figure 5-43 Drag and drop instance reference to field item Use any of the three methods just covered to complete the mapping of the sales person section. Chapter 5. Building the base scenario: stage 1 225 5.6.3 XForms Model method As mentioned earlier, using an XForms Model instance to create layout items on the form is a more efficient way to accomplish our goal. It does require a complete XForms Model with all of the necessary instances defined in advance. That is not to say that changes or enhancements cannot be made later. You can always go back and modify the instances. However, you have to be aware of the impact to references, binds, and computes that may be affected. Fortunately, we have our instances in place. In this section we cover the following topics: Data instance Highlighting bound XForms items Drag and drop instance node onto form Resolve missing XForms binds Layout instance items Data instance We use the CustomerDetails instance, as shown in Example 5-8, to create our customer details section of the form. Example 5-8 CustomerDetails instance <!-- Detail data for the Selected Customer --> <xforms:instance id="CustomerDetails" xmlns=""> <CustomerDetails> <Customer> <ID></ID> <Name></Name> <AccountManagerID></AccountManagerID> <Department></Department> <ContactName></ContactName> <ContactPosition></ContactPosition> <ContactEmail></ContactEmail> <ContactPhone></ContactPhone> <CRMNumber></CRMNumber> </Customer> </CustomerDetails> </xforms:instance> Highlighting bound XForms items Before we begin working directly with XForms instances, we discuss some of the tools we can use to identify items and possible issues with XForms binds. You can analyze the XForms items you have in the Design editor to see whether they have been bound. You can do this from the View menu or the Designer’s toolbar: Select View → Highlight Items with XForms Binds. Use this option to highlight XForms items that are associated with XML instance elements. Select View → Highlight Missing XForms Binds. Use this option to highlight XForms items that do not reference XML instance elements. Select View → Turn off Highlight Mode. Use this option to turn off the highlighting for XForms items with or without references. These options rotate through a three-way state change in the View menu. 226 IBM Workplace Forms 2.6: Guide to Building and Integrating a Sample Workplace Forms Application Note: The highlight color can be customized in the Designer’s preferences. Before we begin, we turn on another XForms feature in the Designer. In the Designer Toolbar, locate and turn on the Highlight Missing XForms Binds option, and select it, as shown in Figure 5-44. Figure 5-44 Highlight Missing XForms Binds This highlight feature allows us to more quickly and easily identify any issues that may arise when working directly with the XForms Model instance data. Drag and drop instance node onto form Using the Instance view, drag and drop the <Customer> node onto an empty area of the form, as shown in Figure 5-45. This automatically generates the presentation layer items necessary to represent the <Customer> node. When we look at the object, we see that all of the labels and fields have been created on the form and are contained within an XForms pane of type group. Figure 5-45 Drag and drop the entire customer instance Resolve missing XForms binds Notice that all of the field items are appropriately bound to the XForms Model data elements, but the labels are missing XForms binds. This is not a critical error, so it does not need to be resolved, but if we like it can be resolved quickly by converting the labels to XFDL label items. To convert the items select all of the labels, and then right-click to select Convert Item → Chapter 5. Building the base scenario: stage 1 227 XFDL Label, as shown in Figure 5-46. When finished, the labels are no longer highlighted because XFDL items do not require binds. Figure 5-46 Convert label items to XFDL Layout instance items If we were creating the form without regard for the original forms design, then all we would need to do is add a header to this XForms pane and place the pane next to our sales person section. However, we want to mimic the original layout as closely as possible, so we are going to have to add a header to the pane and reorientate the label and field items as well. We begin by aligning the XForms pane representing our customer section next to the sales person section on the form. We cover the following topics in this subsection: Position pane Change build order and remove relative alignment Remove unnecessary items Resize labels Realign fields Add header Position pane Select the XForms pane, Customer1, with your cursor and drag it over to the grid lines surrounding the sales person section. Notice that when you drag the pane, all of the labels and field items move along with it. That is because the Customer1 pane of type group is in fact a container of those items. Change build order and remove relative alignment When an instance is used to create the items, labels are relative aligned before their associated fields by default. Although this is fine in most cases, it creates an issue for us. We need to align our items to the existing template for the form and the only point of reference 228 IBM Workplace Forms 2.6: Guide to Building and Integrating a Sample Workplace Forms Application that we have for alignment of these items is the existing labels on the template. We have to remove the relative alignment properties for the labels. Since this section is not dynamic, we can actually use absolute alignment and expansion tools to move the labels and fields into the appropriate locations. Tip: Relative alignment is very useful when you need to keep certain items together. However, should you need to realign items, any relative alignment rules defined between items can cause undesired affects. Keep this in mind when defining relative alignment rules, and be prepared to remove or redefine existing alignment rules. We start by reordering the items in the Outline view. This changes the build order and breaks the default relative alignment rules. Move the label items to the top of the Customer1 pane of the Outline view. Remove the relative alignment definitions from the Properties view inside the itemlocation section. Since relative alignment properties are unique to each item, they cannot be removed for more than one item at a time, so it is usually more efficient to reorder and change the alignment for each item at the same time (see Figure 5-47). Figure 5-47 Rearrange Items Remove unnecessary items Before we begin to lay out the items of the Customer pane, there are two items included in the instance that are required for form logic, but not needed in the presentation layer. The ID label and ID field items can be deleted from the presentation layer, but are still required for the instance in the XForms Model. Chapter 5. Building the base scenario: stage 1 229 Resize labels Select all of the remaining labels and set the font properties equal to those defined for the label items in the sales person section, then use your mouse and arrow keys to align the labels over the template. Once all of the labels are in place, use absolute expand to resize all of the labels to the same width as the largest label on the form, as shown in Figure 5-48. Figure 5-48 Make same width Realign fields This is an instance where relative alignment can be useful for designing a form. Even though this is not a dynamic section of our form, using relative alignment here allows us to keep the labels and field items together. Use relatively align after to place the associated fields after their labels, as shown in Figure 5-49. Figure 5-49 Relative align after 230 IBM Workplace Forms 2.6: Guide to Building and Integrating a Sample Workplace Forms Application Add header The last step to complete this process is to add a new non-XForms label to the form for the header of our customer section. Add a new label inside the pane, define the font properties to match that of the sales person section header, and then align it appropriately. Tip: Make the label area the same size (height and width) as the area shown in the form template. This is helpful later when we need to add formatting to the form. When finished the table should look similar to the one shown in Figure 5-50. Figure 5-50 Customer pane complete 5.6.4 Create dynamic XForms table In the original form there is a products table used to enter order details. We recreate it using more advanced functions of the Workplace Forms Designer. There are a number of issues with the original paper-based form that can be overcome: Static number of rows: There are only five rows in the original form. We can make this table dynamic and allow for any number of rows that may be needed so that if a customer wanted to order 10 items we could her them the opportunity to do so without having to put the information on a second form or onto an attached sheet of paper that could be lost. Calculations: The form requires that the sales associate calculate discounts and totals. We can build that logic into the electronic form using computes and binds. List items: There are a couple of fields such as sales item number and name that need to be populated with information contained in backend systems. We can create a predefined list of these items to limit choices and reduce errors. (Later we connect to a backend system to automatically populate these lists when the form loads.) Current stock: One field requires that the total number of sales item available in stock be entered. With a paper-based form, a sales associate would need to identify that value before completing the order so that he did not sell more items than available. We can design the form now using an XForms Model that allows us to later connect directly to the database and automatically populate that field based on the sales item selected. Discount: The available discounts are static values: no discount (0), 10%, 20%, and 30%. Again we can reduce errors and speed completion by providing the end user with a list of these values. Also, by controlling the data input we can ensure that our computes and binds function without error. Chapter 5. Building the base scenario: stage 1 231 We use the OrderTableRowData instance shown in Example 5-9 to build our table. It provides us with a number of child elements, which represent the columns for our table. Example 5-9 OrderTableRowData instance <!-- Row Data for the Selected Item --> <xforms:instance id="OrderTableRowData" xmlns=""> <OrderTableRowData> <Row> <line> <id></id> <name></name> <price></price> <stock></stock> <amount></amount> <discount></discount> <line_total></line_total> <subtotal></subtotal> </line> </Row> </OrderTableRowData> </xforms:instance> Create table A wizard is used to create the table. After we have it in place, lists of items and binds are created. Select the Table (Repeat) by Wizard item from the Designer palette (see Figure 5-51) and place it on your form canvas. Figure 5-51 Create table with wizard 232 IBM Workplace Forms 2.6: Guide to Building and Integrating a Sample Workplace Forms Application A guided wizard interface is launched. On the first screen select Advanced Setup (using existing data), as shown in Figure 5-52. Then click Next. Figure 5-52 Advanced setup On the next screen of the wizard we are prompted to select the instance to be used for the table. Based on the data instances provided to us we know that the OrderTableRowData instance is used. Note: Looking at the instance we can see that it does not contain all of the required fields needed to build our table. That is not a problem. We can modify the table that is generated to include additional fields. Chapter 5. Building the base scenario: stage 1 233 Select the OrderTableRowData instance from the instances shown in the left-hand column, then select the line node, as shown in Figure 5-53. The child elements of the node make up the columns of the table. Click Next. Figure 5-53 Select node 234 IBM Workplace Forms 2.6: Guide to Building and Integrating a Sample Workplace Forms Application On the next screen we are prompted by the wizard to configure our columns. Changes can be made here to reorder our columns, specify column widths, define headers, and add or remove data elements in the table, as shown in Figure 5-54. Figure 5-54 Configure Columns We do not need to add or remove any items, but we should reorder the columns. Use the up and down arrows to put the display columns in the following order: 1. 2. 3. 4. 5. 6. 7. 8. name id stock amount price discount line_total subtotal Chapter 5. Building the base scenario: stage 1 235 Now set the detail properties as shown in Table 5-1, and click Next when done. Table 5-1 Detail properties Element Display as Include header Header Width Show border name Text (Read/Write) Y Item 100 Y id Text (Read/Write) Y Item number 100 Y stock Text (Read/Write) Y # in stock 100 Y amount Text (Read/Write) Y quantity 100 Y price Text (Read/Write) Y price 100 Y discount Text (Read/Write) Y discount 100 Y line_total Text (Read) Y total 100 Y subtotal Text (Read) N (n/a) 10 N The next screen is the last step in the wizard. Provide a unique table name, and set the remaining properties as displayed in Figure 5-55. Click Finish when done. Figure 5-55 Table Settings 236 IBM Workplace Forms 2.6: Guide to Building and Integrating a Sample Workplace Forms Application A new table is added to the form. If you preview the form now you see that it is fully functional. You can add and remove rows, enter values for the fields, and the values stored in the data model (zero) are shown. However, it does not look anything like the template. In order to make it look like the original we have to add a header and format the labels for our columns. Warning messages You may notice in the Problems view that there are two warning messages, as shown in Figure 5-56. Figure 5-56 Warning messages If you look closely you see that these warning messages are associated with the add/remove functions for our action buttons. These are XPath reference errors that are resolved at runtime when the references needed are generated. Do not be concerned by these warning messages. Add table header To add a table header to this table it is best if we insert it into the XForms pane with the sid TABLEORDERDETAILS_PANE. The easiest way to accomplish this insert is via the Outline view. In the Outline view, expand the item list until you locate the TABLEORDERDETAILS_PANE, and expand it. Then in the palette click the Non XForms Label item, and insert it as the first child element of the outline, as shown in Figure 5-57. Figure 5-57 Insert label If you insert it properly the new label item is the first item in the list, and appears as the topmost item on your canvas, as shown in Figure 5-58. Figure 5-58 Label inserted in outline and on canvas in side pane Pixel perfect Generally speaking, the level of effort to reach near pixel perfect duplication of the original form varies. Often it depends on the business requirements of the form. For instance, if this form needs to be submitted to a government agency then the electronic version of the form may need to be an exact duplicate of the traditional paper-based form. Chapter 5. Building the base scenario: stage 1 237 In the example used for this book, the benefits of advanced design functionality is a higher priority than exactly reproducing the layout of the original form. What we gain in functionality with the creation of a dynamic table far outweighs the loss of precision with lining up all of the columns to the template for the sales quotation form. Format column headers We are not going to align all of the column headers to the form template. The business requirements of this form do not justify the level of effort required. We do not completely abandon the template design. Instead, we format the fonts for the labels of the column headers. Use the same settings applied earlier to the field labels as were done in the prior sections of this chapter for the sales person and customer sections. Modify buttons location and format To allow the new table to fit within the page size selected we have to shorten the width. The easiest way to do this is to move the action buttons to the bottom of our table. We need to remove some of the existing relative alignment rules that place the buttons after the table, and apply new relative alignment rules to keep the buttons below the bottom-most row. Align buttons Remove the relative alignment rules defined for the Add row button. Then move the button to the bottom left of the table border, as shown in Figure 5-59. Figure 5-59 Relative align button below border of table Relative aligning the Add row button below the border pane allows us to keep the form within the TABLEORDERSDETAIL_PANE and ensures that it remains below the bottom-most row, and because the Remove row button is relative aligned to remain after the Add row button, we do not have to modify its layout properties. Format buttons Change the value properties for both buttons. Change the Add row button value from the plus sign (+) to the text Add Row, remove the width property for this button under the itemlocation section, and change the font to 9 point Helvetica Bold. Change the Remove row button value from the minus sign (-) to the text Remove Row, remove the width property for this button, and change the font to match the Add row button. 238 IBM Workplace Forms 2.6: Guide to Building and Integrating a Sample Workplace Forms Application The last step is to make both buttons the same size. Use absolute expand to set the Add Row button to the same size as the Remove Row button. Preview the form. When finished the form should look like the one shown in Figure 5-60. Test the new settings by adding and removing a few rows. Make sure that the Add and Remove buttons are moved down or up accordingly. Figure 5-60 Preview form 5.6.5 Add advanced items to table Earlier in this section we discussed options to enhance the form. One way to do this is to use list items to restrict user input. The table has two primary candidates for lists: item and discount. Note: Ultimately these instances are populated by a call to a backend database. Making modifications now does not hinder those later efforts because once the XForms call is made it overwrites the existing data. Create item list We use the Popup (Select1) item to list our data elements and link them to the InventoryItems instance, as shown in Example 5-10. Example 5-10 InventoryItems instance <!-- this instance provides the choices list for the items --> <xforms:instance id="InventoryItems" xmlns=""> <InventoryItems> <InventoryItem></InventoryItem> </InventoryItems> Chapter 5. Building the base scenario: stage 1 239 </xforms:instance> There is only one child element in our instance. To show a list we need more than one. To modify the instance, open the Source editor by clicking the Source tab in the lower left-hand corner of the Designer. Locate the instance in the source code. Tip: To locate specific instances in the source code you can use the Outline view, or conduct a search using Ctrl+F and entering a unique string. Add child elements to instance Modify the instance to include a value for the <InventoryItem>. We enter Nut. Create another child element in the InventoryItems parent node using the same <InventoryItem> tag, and enter a second value. We enter Bolt. Repeat the last step to add a third value, such as Widget. Example 5-11 shows the changes. Save your changes to check for errors, and return to the Design canvas when finished. Example 5-11 Multiple inventory items <!-- this instance provides the choices list for the items --> <xforms:instance id="InventoryItems" xmlns=""> <InventoryItems> <InventoryItem>Nut</InventoryItem> <InventoryItem>Bolt</InventoryItem> <InventoryItem>Widget</InventoryItem> </InventoryItems> </xforms:instance> Add popup item to the table Now that we have updated the instance with three values, when we add our popup item to the form and bind it to our instance it shows three items in the list to select from. Begin by adding the item to the table using the steps outlined below. Since this is a dynamic table we have to be certain that we account for any relative positioning or sizing properties that may exist. 1. Select the Popup (Select1) item from the palette (see Figure 5-61). Figure 5-61 Popup (Select1) item 240 IBM Workplace Forms 2.6: Guide to Building and Integrating a Sample Workplace Forms Application 2. Using the Outline view, place the popup item inside the Row_Group pane as the first item in the list. It must be before the other field items in the build order so that we can maintain the relative positioning rules generated by the wizard, as shown in Figure 5-62. Figure 5-62 Place popup before item1 3. Before we begin setting any relative alignment rules we must define a couple of general properties for the item. a. In the Properties view, click within the sid value field and change it to POPUPSelectProduct, and press Enter to apply our changes. b. Click within the label value field, type Select your Product for the label, and then press Enter. Note: Always define the sid for an item before setting any relative position or sizing values. Changing the sid later may break your relative positioning and sizing settings. 4. Delete the Item1 field in the Row_Group pane from the form (the popup item is going to replace it). 5. Use relative alignment to position the POPUPSelecctProduct item left to left with the item column header - HEADER_LABEL1 item. 6. Absolute expand the HEADER_LABEL1 width to equal that of the POPUPSelecctProduct item. That completes the placement of our new item. Now we need to bind it to our instance. Define instance bind We define our bind properties in the Properties view for the POPUPSelecctProduct item. Notice that there are a number of properties and sections in this section that have been highlighted in red. This is an indication that the XForms binds have not been defined and should be expected. We resolve these issues in the following steps: 1. Since we are connecting the list to a data node set used for the table, we must make sure the default value of on is enabled for the itemset → value property. a. Expand XForms (select1) and itemset. b. Make sure that there is a blue circle for the value under itemset. If it is not there, add it by clicking the empty circle. Chapter 5. Building the base scenario: stage 1 241 c. Enter a period for the ref value or remove the blue circle to disable the ref value, as shown in Figure 5-63. Figure 5-63 itemset enabled 2. While still in the itemset section, click the nodeset value field. Type the XPath of the node that you want to bind the list to: instance('InventoryItems')/InventoryItem (see Figure 5-64). Figure 5-64 Set XPath reference for nodeset property 242 IBM Workplace Forms 2.6: Guide to Building and Integrating a Sample Workplace Forms Application 3. You must now set the property that stores the user’s choice form the list. This popup list is used in place of another field in the table, but we still want the value selected to be stored in the original XForms Model element. We are replacing the name element in the OrderTableRowData instance. Normally the XPath reference would look like that shown in Example 5-12. Example 5-12 XPath reference instance('OrderTableRowData')/Row/line/name Since this is part of a dynamic table, we have to use a relative path to ensure that the value selected in one row does not change the value shown in all of the rows. The relative path for this reference is name, as shown in Figure 5-65. Figure 5-65 XForms reference Chapter 5. Building the base scenario: stage 1 243 Preview the form again. Notice that the popup list has all three items that we identified in the instance. Select one and add a new row. Select another. Notice that it remains unique to each row, as shown in Figure 5-66. Figure 5-66 Working popup list Create discount list We use Popup (Select1) item to list our data elements and link them to an existing data model, Discount_Values. To create the discount list we use many of the same steps and settings as when we created the Item list. We have already explored the details of the Discount_Values instance to be used to populate the values of our list. Example 5-13 shows us the instance itself. For details on this instance refer to 5.4.4, “Creating the instance” on page 193. Example 5-13 Discount_Values <!-- Discount values between 10 and 30 percent - select percentage, display float integer --> <xforms:instance id="Discount_Values" xmlns=""> <Discounts> <Values> <percent attribute="0.1">10%</percent> <percent attribute="0.2">20%</percent> <percent attribute="0.3">30%</percent> </Values> </Discounts> </xforms:instance> 244 IBM Workplace Forms 2.6: Guide to Building and Integrating a Sample Workplace Forms Application One thing that is evidently different about this instance is the declaration of an attribute. We display the percent values to the end user as choices, but submit the real number value to the XForms Model once a user makes a choice. Add popup item to table Since the values for are instance are already defined, when we add our popup item to the form and bind it to our instance it shows four items in the list to select from. Begin by adding the item to the table using the steps outlined below. Since this is a dynamic table we have to be certain that we account for any relative positioning or sizing properties that may exist. 1. Select the Popup (Select1) item from the palette (see Figure 5-67). Figure 5-67 Popup (Select1) item 2. Using the Outline view, place the popup item inside the Row_Group pane as the first item in the list. It must be before the other field items in the build order so that we can maintain the relative positioning rules generated by the wizard, as shown in Figure 5-68. Figure 5-68 Place popup before item5 3. Before setting relative alignment rules we must first define a couple of general properties for the item. a. In the Properties view, click within the sid value field and change it to POPUP_Percent and press Enter to apply our changes. b. Click within the label value field, type zero (0) for the label, and press Enter. Note: Always define the sid for an item before setting any relative position or sizing values. Changing the sid later may break your relative positioning and sizing settings. 4. Delete the Item6 field in the Row_Group pane from the form. (The popup item is going to replace it.) Chapter 5. Building the base scenario: stage 1 245 5. Use a modified relative alignment to position the POPUP_Percent item after Item5, and to place Item7 after POPUP_Percent. Note: When creating this form we encountered an issue when we modified the wizard table to include a list item. Although the layout appeared correct in the designer, when previewed, the alignment for the item following our list item was off. To correct the issue, we used relative alignment to reposition the item that followed the list item pointing directly to the popup field like this: <after>POPUP1</after> in place of the standard positioning as <after compute="itemprevious"></after> created by the designer. 6. Absolute expand the popup width to equal that of the width of the discount column header - HEADER_LABEL6 item. That completes the placement of our new item. Now we need to bind it to our instance. Define instance bind We define our bind properties in the Properties view for the POPUP_Percent item. Notice that there are a number of properties and selections in this section that have been highlighted in red. This is an indication that the XForms binds have not been defined and should be expected. We resolve these issues in the following steps: 1. Since we are connecting the list to a data node set used for the table, you must make sure that the default value of on is enabled for the itemset → value property. a. Expand XForms (select1) and itemset. b. Make sure that there is a blue circle for the value under itemset. If it is not there, add it by clicking the empty circle. c. Enter @attribute for the ref value, as shown in Figure 5-69. Figure 5-69 itemset enabled 246 IBM Workplace Forms 2.6: Guide to Building and Integrating a Sample Workplace Forms Application 2. While still in the itemset section, click the nodeset value field. Type the XPath of the node that you want to bind the list to: instance('Discount_Values')/Values/percent (see Figure 5-70). Figure 5-70 Set XPath reference for nodeset property 3. You must now set the property that stores the user’s choice form the list. This popup list is used in place of another field in the table, but we still want the value selected to be stored in the original XForms Model element. We are replacing the discount element in the OrderTableRowData instance. Normally the XPath reference would look like that shown in Example 5-14. Example 5-14 XPath reference instance('OrderTableRowData')/Row/line/discount Chapter 5. Building the base scenario: stage 1 247 However, since this is part of a dynamic table, we have to use a relative path to ensure that the value selected in one row does not change the value shown in all of the rows. The relative path for this reference is discount, as shown in Figure 5-71. Figure 5-71 XForms reference 248 IBM Workplace Forms 2.6: Guide to Building and Integrating a Sample Workplace Forms Application Preview the form again. Notice that the popup list has all three items we identified in the instance. Select one and add a new row. Select another. Notice that it remains unique to each row, as shown in Figure 5-72. Figure 5-72 Working popup list 5.6.6 Add XForms Model binds We use XForms Model binds to perform the calculations needed in our table. We need to define five binds for our form: A line subtotal equal to price times the quantity ordered Cost savings total of the discounts given Price total equal to the sum of the subtotal of each line Line Total equal to the price times the quantity ordered less the discount Grand total equal to the sum of the total of each line In this section we discuss the following topics: XForms Model binds and XForms bindings Model bind properties Line subtotal Line total Add new pane, fields, and a label to the table Price total Cost savings Grand total Chapter 5. Building the base scenario: stage 1 249 XForms Model binds and XForms bindings There are two types of binds that can be used when creating forms, and they are very different and should not be confused: XForms binding: Binding is a link between the data layer and the form’s user interface (UI) layer. Binding lets you: – Synchronize the data model with the form presentation layer. If the value of one changes, the other linked elements are updated to reflect the changes. – Place constraints, calculations, validations, and limitations on what data the user enters. You can bind UI controls to the data instance using one of two methods: – ref or nodeset — creates a direct link between a UI element and a data element in the XForms instance using an XPath reference – bind — creates an indirect link between a UI element and a data element in the XForms data instance using a model bind XForms Model bind: Once you have created a data instance, you can set the properties of its nodes. This is done using a model bind. You use a model bind to perform special calculations or place limitations on user data. For example, you might want to perform a calculation on a certain node or ensure that supplying certain data is mandatory. Each XForms Model can have one or more associated model binds. Model bind properties Every model bind contains one or more model item properties. These properties describe the way the model bind modifies its associated node. These modifications include determining the value of nodes, their validity, or relevancy. Model bind properties let you: Name the model bind (optional). Determine the node or nodeset that is affected by the model bind (required). Describe the way the model bind effects the element (required). Table 5-2 describes the two general properties for model binds. Table 5-2 General XForms Model bind properties 250 Property Description id Lets you give a globally unique name to your model bind. This property is optional, but necessary if you want to refer to the model bind elsewhere in your form. nodeset Identifies which element is affected by the model bind. It must refer to a node in a data instance. Every model bind is associated with a nodeset, either directly, or in the case of nested binds, through inheritance from a parent bind. IBM Workplace Forms 2.6: Guide to Building and Integrating a Sample Workplace Forms Application Every model bind contains one or more model item properties like those listed in Table 5-3. These properties describe the way the model bind modifies its associated node. These modifications include determining the value of nodes, their validity, or relevancy. Table 5-3 Model item properties Property Description Calculate The calculate property defines a calculation that determines the value of the associated node. It lets you add mathematical formulas and computed logic to your data instance. The essential elements of the calculation are XPath expressions combined with normal mathematical expressions. Constraint The constraint property determines whether an associated node is valid. For example, if you wanted to ensure that a field contains a number higher than 0 but less than 10, you would use constraint to prevent the form from accepting a value that was outside of that range. You can use both relational and logical operators. Relational operators are character sets that describe how one thing relates to another. For example, the greater than and less than signs are relational operators. Logical operators let you create more complex computes with logical or and logical and. Readonly The readonly property determines whether the data in the associated node can be changed. Readonly accepts any XPath expression as its setting, but the result is always converted to either true() or false(). The default value of readonly is false(), as most nodes will accept input from the user. However, if the model bind includes a calculate property, the node automatically has a readonly of true(), as the value of the node will be based on a calculation, and not directly on input from the user. Furthermore, if a node is set to readonly, then all of its child nodes automatically inherit the readonly setting. Relevant The relevant property determines whether a node is displayed to the user or included in XForms submissions. Required The required property determines whether a node requires mandatory user input. Type The type property sets the data node to be a particular data type. We use model binds to perform our table calculations. Line subtotal The first value we need to set is the line subtotal since it provides us with the value necessary for our other calculations. To create the line subtotal model bind complete the following steps: 1. In the XForms view, select the model:FormModel to add the model bind. Chapter 5. Building the base scenario: stage 1 251 2. Right-click and select Create Bind, as shown in Figure 5-73. Figure 5-73 Create model bind 3. In the Properties view, expand the General section. 4. Type a descriptive, unique bind name in the id value, line_subtotal. The id property is optional, but necessary if you want to refer to the bind elsewhere in your form. Note: IDs are only allowed on parent binds. They are not supported on binds nested inside another bind. 5. Expand the Model Item Properties section and in the nodeset property value, type the XPath location of the node set whose elements you want to bind. We want to set the subtotal field on our table. So we use the same reference: “instance('OrderTableRowData')/Row/line/subtotal” Note: The nodeset value identifies which element is affected by the model bind and must refer to a node in a data instance. Every model bind is associated with a node set, either directly, or in the case of nested binds, through inheritance from a parent bind. 6. Now we have to define our calculation. We can use either a full path or a relative path in our calculations for the model binds. The calculation values are shown in Table 5-4. Table 5-4 Calculation values Value Full path Relative path quantity instance('OrderTableRowData')/Row/line/amount ../amount price instance('OrderTableRowData')/Row/line/price ../price To prevent a miscalculation when the form first loads, we check to be sure that the quantity of items and price are not null, and if so we set those values to zero. Otherwise we calculate the quantity of items times the price for each item. We know from prior sections that the resulting calculation is as follows: “if(../amount='' or ../price='', '0', ../amount * ../price)” Enter the above equation in the calculate field of the Model Bind Properties view. 252 IBM Workplace Forms 2.6: Guide to Building and Integrating a Sample Workplace Forms Application When finished, the properties should appear as shown in Figure 5-74. Figure 5-74 line_subtotal model bind properties Preview your form to test your bind. Notice that when you provide values for the quantity column and the price column, the last field on the row is automatically calculated and the value displayed. Line total The line total model bind is not much different from the previous bind, except this time we include the discounted value. Add a new model bind to our XForms Model. Use the properties shown in Table 5-5 to complete the model bind definition. Table 5-5 Line total properties Property Value Description id LineTotal Unique name. nodeset instance('OrderTableRowData')/Row/line/line_total The line total (second to last column). calculate if(../discount='', ../subtotal, (1 - ../discount) * ../subtotal) If the discount value is nil, then set the line total equal to the subtotal. Otherwise, set the line total equal to the subtotal less the discount. Chapter 5. Building the base scenario: stage 1 253 When finished, the properties should look like those shown in Figure 5-75. Figure 5-75 Line total model bind If you preview the form and enter values for quantity, price, and discount, both the line subtotal and line total fields are automatically populated. Add new pane, fields, and a label to the table We need to add three new fields to display the values calculated for the end users: Price Total Savings Total Grand Total These new items are placed inside the Table pane, but below the dynamic rows so the new buttons themselves have to move up or down accordingly. An effective way to accomplish our goal is to place our new buttons, along with the existing buttons, into an XForms pane. Using a pane to contain our items reduces the number of relative alignment rules we need to generate and maintain, as well as provides us with a means to differentiate this area of the form. Add pane Follow the steps below to add a new pane to our table: 1. Select the Pane (Group) item from the palette. 2. Using the Outline view, insert the item as the last item in the list for the TABLEORDERDETAILS_PANE. 3. Leave the pane sid equal to PANE1. 4. Again, using the Outline view, move the Add button and Remove button to the new pane. 5. Use relative alignment to place PANE1 below TABLEORDERDETAILS_TABLE. 6. Use relative expand to resize PANE1 right to right with TABLEORDERDETAILS_TABLE. 7. Preview your form to test the new configuration. Add fields Follow the steps below to add three more fields to the form: 1. Select the Field (Input) item form the form. 2. Place three of those input fields inside PANE1: Field1, Field2, and Field3. 254 IBM Workplace Forms 2.6: Guide to Building and Integrating a Sample Workplace Forms Application 3. Place the first field in the right-most corner of the table, the second field before it, and the third before the second. 4. Make sure that they follow after the Remove button in the build order shown in the outline. 5. Set the properties for Field1, as shown in Table 5-6. Table 5-6 Field1 properties Property Value Description General → sid GRANDTOTAL Unique identifier. Appearance → justify right Right justify contents of field. General → item location → width 100 Equal to the other items in the table. General → item location → alignt2t REMOVE (button item) Use relative alignment to align the top of this field item to the top of the Remove button. General → itemlocation → x 676 Determined by using absolute positioning to line up the right to right of this item with the Item7 item. General → itemlocation → y 362 Determined by using absolute positioning to line up the right to right of this item with the Item7 item. General → readonly on Since this field will be calculated it should be read only. Format → datatype currency Set value to a dollar amount. XForms → ref instance('FormOrderData')/Amount XPath reference to element Cost, of the FormOrderData instance. 6. Set the properties for Field2, as shown in Table 5-7. Table 5-7 Field2 properties Property Value Description General → sid Savings Unique Identifier. Appearance → justify right Right justify contents of field. General → item location → width 100 Equal to the other items in the table. General → readonly on Since this field will be calculated it should be read only. General → itemlocation → before Savings Item will always remain before the savings field value. Format → datatype currency Set value to a dollar amount. XForms → ref instance('FormOrderData')/Discount XPath reference to element Cost, of the FormOrderData instance. Chapter 5. Building the base scenario: stage 1 255 7. Set the properties for Field3, as shown in Table 5-8. Table 5-8 Field3 properties Property Value Description General → sid Cost Unique Identifier. Appearance → justify right Right justify contents of field. General → itemlocation → width 100 Equal to the other items in the table. General → readonly on Since this field will be calculated it should be read only. General → itemlocation → before Savings Item will always remain before the savings field value. Format → datatype currency Set value to a dollar amount. XForms → ref instance('FormOrderData')/Cost XPath reference to element Cost, of the FormOrderData instance. Add label Add a non-XForms label to the form using these steps: 1. Select label (Non-XForms) from your palette. 2. Place the item inside PANE1. 3. Make sure that it is after the Cost field item in the build order. 4. Use the properties shown in Table 5-9 to complete the item properties. Table 5-9 Label properties 256 Property Value Description sid GRANDTOTAL_LABEL1 Unique identifier. value Grand Totals: Visible label value. General → itemlocation → before Cost Use relative alignment to place the label before the first item on the left - Cost field item. Appearance → fontinfo 10 point, Helvetica, Bold Font style to be displayed to end user. Appearance → justify left Left justify the label value on the form. IBM Workplace Forms 2.6: Guide to Building and Integrating a Sample Workplace Forms Application When finished, preview the form. It should look like that shown in Figure 5-76. Figure 5-76 Form with new items added to dynamic table Price total The price total is the first of three binds that use a function. You can use any of the mathematical functions available in IBM Workplace Forms in a calculation for a model bind. Define a new bind using the properties shown in Table 5-10. Table 5-10 Price total properties Property Value Description id PriceTotal Unique name. nodeset instance('FormOrderData')/Cost Update the form order information to show total cost before discount. calculate if(instance('OrderTableRowData')/Row/line/subtotal='', '0', sum(instance('OrderTableRowData')/Row/line/subtotal)) If the subtotal value is nil, then set the subtotal equal to zero (0). Otherwise, set the price total equal to the sum of all subtotal values for every row. Chapter 5. Building the base scenario: stage 1 257 When finished your properties should look like those shown in Figure 5-77. Figure 5-77 Price total model bind Cost savings The cost savings calculation is determined by the total cost minus the total amount charged to a customer. The properties for this bind are shown in Table 5-11. Table 5-11 Cost savings properties Property Value Description id CostSavings Unique name. nodeset instance('FormOrderData')/Discou nt Set the total discount value in the FormOrderData instance. calculate (../Cost - ../Amount) Equal to the total cost less the amount actually charged. When finished your properties should look like those shown in Figure 5-78. Figure 5-78 Cost savings model bind 258 IBM Workplace Forms 2.6: Guide to Building and Integrating a Sample Workplace Forms Application Grand total This bind sets the sum of all of the line total totals and shows the grand total amount to be charged to the customer. Table 5-12 shows the properties that need to be defined. Table 5-12 Grand total properties Property Value Description id GrandTotal Unique name. nodeset instance('FormOrderData')/Amount Set the amount element of the FormOrderData instance. calculate sum(instance('OrderTableRowData')/Row/line/line_total) Sum of all the line total totals. When finished your properties should look like those shown in Figure 5-75 on page 254. Figure 5-79 Line total model bind Chapter 5. Building the base scenario: stage 1 259 This completes the last model bind that we need to define. When finished preview the form to see the results (see Figure 5-80). Notice that the calculations are automatically applied to the values entered into the field, preventing end users from making simple mathematical errors. Figure 5-80 Fully functional model binds in the table 5.6.7 File attachment section The original form has a file attachment area for faxes and supporting documentation. We can recreate this section using electronic file attachments. The IBM Workplace Forms application allows for the inclusion of any file type. In this section we provide the tools necessary to allow users to attach files and supporting documentation. The form keeps a count of the number of attachments, displays an indicator when a file has been attached, and includes attachment buttons, which let users attach files to a form, save attachments to their computer, display attachments, or remove attachments from a form. Attachments An attachment is a separate file that is attached to a form. An attachment can be any office suite file, an HTML document, an image, or any other type of document or file. Attachments are useful in the following situations: Attaching a document to a form so users can easily access and view the document. For example, an insurance application form may have an attached brochure containing detailed information describing the available insurance plans. Allowing users to attach documents to a form. For example, an employment application form may require the user to attach his resume. 260 IBM Workplace Forms 2.6: Guide to Building and Integrating a Sample Workplace Forms Application Attachments are not displayed on the form. Attachments are stored within the actual form, unlike e-mail attachments, which are separate files. After you attach a file to a form, changes to the original file on the user’s computer do not affect the file attached to the form. Attachments are stored in file folders within the form. Before you design a form, plan the folders that you intend to use. For example, if you are creating an employee form, you may want to create two folders: one for performance evaluations and one for the employee’s history. You may also want to limit which folders users can access. During form design, you define these folders as you attach files and set up attachment buttons. Spacing items Because relative positioning relies on using other items as points of reference, you often need to include invisible points of reference in order to put space between your items or position your items exactly where you want them. You can use spacers to create these invisible points of reference and to create space between items on your form. Since the remainder of the items on this form are placed below a dynamic table, spacer items are required between the remaining form sections. For example, suppose that you have a field that is positioned below a label, and you want to put some space between the two items. All you would need to do is create a spacer, position it below the label, and then position the field below the spacer. You can then adjust the size of the spacer so that it keeps the correct amount of space between the other two items. To use spacers as invisible reference points for relative positioning: 1. In the palette, click Spacer, as shown in Figure 5-81. Figure 5-81 Select Spacer item 2. Click the page. 3. Relative align the spacer below the TABLEORDERDETAILS_PANE item. This spacer now acts like a buffer to the next item to be placed on the form. Click Preview. Once the form is open, notice that the spacer is invisible. Create attachment In this section we use a box item to define the area to be used for attachments. Inside this box we include all of the items necessary to manage our attachments. To create the box, follow the steps bellow: 1. Select Box from the palette, as shown in Figure 5-82. Figure 5-82 Select Box item Chapter 5. Building the base scenario: stage 1 261 2. Click the page to place it. 3. Change the sid to AttachmentBox. 4. Place the box item over the template area where the attachment section is shown. 5. Use the template image to size the box so that it is the same height and width of the template. 6. Relative align to place the box below the spacer on the form. Create label We need to place a label in a box to replicate what was there for the original form. To create the label, follow the steps outlined below: 1. Select a Label (Non-XForms) item from the palette. 2. Place it on the form. 3. Define the properties for this item, as shown in Table 5-13. Table 5-13 Label properties Property Value Description General → sid LABELAttachFaxDocuments Unique identifier. General → value Attach fax and/or supporting documents Display value. General → itemlocation → alignt2t AttachmentBox Relative align top to top with the AttachmentBox item. General → itemlocation → alignl2l AttachmentBox Relative align left to left with the AttachmentBox item. Appearance → justify left Ensures that the string will be left justified. Appearance → font 10 Helvetica (Bold) Specifies font type, size, and style. Preview the form. When finished, the new form items should look like those shown in Figure 5-83 and adjust for changes to the products table. Figure 5-83 New attachment box and label 262 IBM Workplace Forms 2.6: Guide to Building and Integrating a Sample Workplace Forms Application Add graphics We want to add some visual indicators that the form has file attachments, otherwise they may be overlooked after the files have been attached to a form. The files we enclose are named: paperclip.bmp FileAttached.gif Tip: It is a good idea to keep all associated files and folders in the same folder of your workspace so that the original files can be referenced if necessary in the future. Also, it makes it easier to add an enclosure by dragging it from your workspace folder to the Enclosures view. Adding an image file to a form Before you can add an image to a form or to an item (such as a button or a label), you need to enclose the image as a data file for a specific page in the Enclosures view. We have already identified the Resource page for all of our enclosures. To enclose the paper clip and the file attached image file: 1. In the Enclosures view, select the Resources page under Data. 2. Right-click and select Enclose File. 3. Browse to the location of the paper clip image file. 4. Select the file and click Open. 5. Drag and drop image files to the AttachmentBox item on your form. Do not be concerned about exact placement on the form at this time. They need to be relative aligned to other form items once they have been added. Note: Unlike XForms panes, box items do not behave as a container and do not resize automatically if items are placed on top. If necessary, resize either the AttachmentBox item or the graphics so that they fit appropriately. We resize the File_Attach_Icon item to width = 87, height = 47. 6. Set the sid for each graphic to Paper_Clip_Icon and File_Attach_Icon, respectively. 7. Repeat the previous six steps to attach the second file. Note: You can also add an image file to a form by dragging the file from your workspace or Windows Explorer onto the PAGE in the Enclosures view. You can now add the image directly onto your form, or to label or button items on your form. When you copy the label or button using an image to another page in the form, the image is referenced to the original file. Note: The information contained in Pages in the Enclosures view does not show you where the enclosure is displayed. It shows you where the actual data resides. Images are stored as data items. When you enclose a file, a data item is created for that specific page. Add buttons In order to attach and manage files in our form we need to add a number of buttons. In this section we cover the following topics: Create attachment buttons. Add Attachment button. Chapter 5. Building the base scenario: stage 1 263 View Attachment button. Remove Attachment button. Save Attachment button. Create attachment buttons Attachment buttons let the user: Attach a file to a form. Display an attachment (a file that is attached to a form). Extract an attachment from a form and save it as a file. Remove an attachment from a folder or from the form. Note: You can use cells, instead of buttons, to let users work with attachments. The procedure for creating attachment cells is similar to the procedure for creating attachment buttons. If your form uses XForms, you can also use the XForms Upload item to let users attach a file to a form. To create an attach, display, extract, or remove button: 1. Select a non-XForms button from the palette, add it to the form, and then select it. 2. In the Properties view, expand the General section. 3. Click in the type value field and click one of the following: – enclose — attaches a file to a form – display — displays an attachment (in an application determined by the attachment’s MIME type) – extract — extracts an attachment and saves it as a file – remove — removes an attachment from a folder (if the attachment belongs to more than one folder) or from the form (if the attachment belongs to only one folder) 4. Expand the datagroup property. 5. Click within the Data Group Refs value field. 6. Click the plus button to add a datagroupref property. 7. In the datagroupref value field, type the name of the folder that you want the action to access. Folder names can include uppercase letters, lowercase letters, numbers, and underscores. For this section we have named our folder Attachments. Note: To allow the action to access additional folders, click within the Data Group Refs value field and click an image of a plus button to add additional datagroupref properties. Otherwise, to set up the button to display, extract, or remove a specific file that is already attached to the form, and set data to the name of the attachment. Restriction: You can use an Enclose button in the preview to attach files to a form. However, the attachments will not be saved with the form when you return to the Design view. To save the attachments with the form, in the Preview panel, click the Save Form button. 264 IBM Workplace Forms 2.6: Guide to Building and Integrating a Sample Workplace Forms Application Add Attachment button Use the instructions provided in “Create attachment buttons” on page 264 to add a button to the form with the following properties as shown in Table 5-14. Table 5-14 Add Attachment button properties Property Value (ref) Description General → sid add_document Unique Identifier. General → value Add Display value. General → type enclose Performs the enclose function. General → datagroup → Data Group Refs → 1:datagroupref Attachments Specifies where the files will be stored in the form. General → itemlocation → > alignl2c LABELAttachFaxDocuments Relative align left to center of LABELAttachFaxDocuments item. General → itemlocation → alignt2b LABELAttachFaxDocuments Relative align top to bottom of the LABELAttachFaxDocuments item. General → itemlocation → height 25 Set height to 25 pixels. General → itemlocation → width 100 Set width to 100 pixels. Appearance → justify center Ensures that the string will be left justified. Appearance → font 8 Helvetica (Bold) Specifies font type, size, and style. View Attachment button Use the instructions provided in “Create attachment buttons” on page 264 to add a button to the form with the properties listed in Table 5-15. Table 5-15 View Attachment button properties Property Value Description General → sid view_document Unique Identifier. General → value View Display value. General → > type display Performs the display function. General → itemlocation → after add_document Relative align after the add_document item. General → itemlocation → height 25 Set height to 25 pixels. General → itemlocation → width 100 Set width to 100 pixels. Appearance → justify center Ensures that the string will be left justified. Appearance → font 8 Helvetica (Bold) Specifies font type, size, and style. Chapter 5. Building the base scenario: stage 1 265 Remove Attachment button Use the instructions provided in “Create attachment buttons” on page 264 to add a button to the form with the properties listed in Table 5-16. Table 5-16 Remove Attachment button properties Property Value Description General → sid remove_document Unique Identifier. General → value Remove Display value. General → type remove Performs the remove function. General → itemlocation → > after view_document Relative align after the view_document item. General → itemlocation → height 25 Set height to 25 pixels. General → itemlocation → width 100 Set width to 100 pixels. Appearance → justify center Ensures that the string will be left justified. Appearance → font 8 Helvetica (Bold) Specifies font type, size, and style. Save Attachment button Use the instructions provided in “Create attachment buttons” on page 264 to add a button to the form with the properties listed in Table 5-17. Table 5-17 Save Attachment button properties Property Value Description General → sid SaveDocumentAs Unique Identifier. General → value Save Display value. General → type save Performs the save function. General → itemlocation → after remove_document Relative align after the remove_document item. General → itemlocation → height 25 Set height to 25 pixels. General → itemlocation → width 100 Set width to 100 pixels. Appearance → justify center Ensures that the string will be left justified. Appearance → font 8 Helvetica (Bold) Specifies font type, size, and style. Add File Attachment Count label To count the number of files that are currently attached to the form we need to add logic to the form, and show the results to the end user. 266 IBM Workplace Forms 2.6: Guide to Building and Integrating a Sample Workplace Forms Application Position paper clip graphic Before we can position this item on the form we need to first position the Paper_Clip_Icon item. Use relative alignment to place the Paper_Clip_Icon item after the SaveDocumentAs button item. Then use relative alignment again to align the Paper_Clip_Icon item vertically center to the center with the SaveDocumentAs button. Create label Add a non-XForms label to the form with the properties listed in Table 5-18. Table 5-18 Label count properties Property Value Description General → sid Attachment_Count_LABEL Unique Identifier. General → value 0 Display zero (0) as value. General → itemlocation → height 32 Set height to 32 pixels. General → itemlocation → width 32 Set width to 32 pixels. General → itemlocation → after Paper_Clip_Icon Relative align after the Paper_Clip_Icon item. General → itemlocation → alignvertc2c Paper_Clip_Icon Relative align vertically center to center with the Paper_Clip_Icon item. Appearance → justify Center Ensures that the string will be left justified. Appearance → font 10 Helvetica (plain) Specifies font type, size, and style. Position file attachment graphic Relative align to place the File_Attach_Icon item after the Attachment_Count_LABEL label item. Then use relative alignment again to align the File_Attach_Icon item vertically center to the center with the Attachment_Count_LABEL label. Create XFDL computes To make the form more interactive we are going to add conditional logic to the items we just created. Since all of the items in this form Attachment section are XFDL items, we use XFDL computes to add the necessary logic. If there are no attachments, then hide the following items: – Paper clip icon – Counter label – File Attached label If there are no attachments, then disable the following items: – View button – Remove button – Save button Chapter 5. Building the base scenario: stage 1 267 Update counter The counter is the key factor in how these items display. First, we create a custom option to check to see when the Attach button or the Remove button is activated. Next we create a conditional statement that checks the custom option and, depending on the value returned, uses an existing XFDL function to count the number of data items present in the attachment folder of the form. In this section we cover the following topics: Define custom option. Add compute to custom option. Create compute. Hide items. Disable buttons. Define custom option We want to create an option that is able to monitor whether the Add or Remove buttons have been activated, and if so we need it to retain a result. The compute wizard can be used to define the custom option needed. Follow the steps below to create the custom option and a compute that does that. 1. Right-click the Attachment_Count_LABEL item in the Designer. 2. Select Wizard → Compute Wizard. 3. When the wizard loads select Create Custom Option, as shown in Figure 5-84. Figure 5-84 Create custom option 268 IBM Workplace Forms 2.6: Guide to Building and Integrating a Sample Workplace Forms Application 4. On the next screen of the wizard, provide a unique name to the custom option. We use attachmentButtonActivatedConcat, as shown in Figure 5-85. Figure 5-85 Designate option name When finished instantiating your custom option, you are returned to the first wizard page. This allows us to apply some logic to our new option. Remain in the wizard, but consider that if we were to exit out of the wizard now and look into the source code we would see the code shown in Example 5-15. Example 5-15 Custom option without a compute <custom:attachmentButtonActivatedConcat></custom:attachmentButtonActivatedConcat> Chapter 5. Building the base scenario: stage 1 269 Add compute to custom option We now need to add some logic to our new option. To do this follow the steps outlined below. Attention: As you go through these steps, pay attention to the window at the bottom of the screen that shows the source code being generated. 1. While still in the wizard, select the The value is set by a calculation of two values option, as shown in Figure 5-86. Click Next. Figure 5-86 Set calculation 2. For the first value, use the drop-down list to select the option to choose an item on the form. 3. A hand pointer is presented. When you click this pointer the wizard temporarily disappear from view and the form, which is underneath, is exposed. 4. Select the Add attachment button. 5. The wizard returns. Immediately to the right of the hand pointer is a list of options for the item selected. 6. Choose activated from the list. 7. Select the plus sign (+) as the function for our calculation. 8. For the second value, use the drop-down list to select the option to choose an item on the form. 270 IBM Workplace Forms 2.6: Guide to Building and Integrating a Sample Workplace Forms Application 9. Again the hand pointer is presented. Click it as before. 10.Select the Remove attachment button. 11.When the wizard returns choose the activated option from the list to the right. When finished your settings should be the same as those shown in Figure 5-87. Figure 5-87 Compute wizard set by calculation of two values 12.Click Finish after comparing your settings to those shown above. You then return to the Designer. 13.In the Properties view of the Attachment_Count_LABEL item, scroll to the bottom to set the value of our new option. 14.Expand the Miscellaneous section. 15.Expand Custom Options and you will see the option we just defined. Chapter 5. Building the base scenario: stage 1 271 16.Set the value equal to offoff, as shown in Figure 5-88. Figure 5-88 Custom option as displayed in the Properties view The complete set of source code for the option we create with the compute is shown is Example 5-16. Example 5-16 Custom option with compute <custom:attachmentButtonActivatedConcat xfdl:compute="add_document.activated 
 + remove_document.activated">offoff</custom:attachmentButtonActivatedConcat> Create compute We apply logic here that calculates the value displayed for the Attachment_Count_LABEL item. Like the previous state, this XFDL compute uses a custom option, except this time we use the Source editor to create it. Use the steps below to create the custom option. 1. While still in the Designer, click the Attachment_Count_LABEL item. 2. Click the Source tab. When the Source editor loads, you are brought directly to the source for the label. 3. In the Source editor enter the following code to create a custom option by entering the following tags: <custom:update></custom:update> 4. Building the conditional statement: a. We use the toggle function to monitor the value of the custom option, attachmentButtonActivatedConcat, which changes with the activation of either the Add or Remove button. b. If a change does occur we use an XFDL function to set the value of our label. Otherwise do nothing or null. c. countDatagroupItems is the function we use. It returns the number of items in a particular data group. The parameter requires the name of the grouped item. Selecting non-grouped items creates a null entry. 272 IBM Workplace Forms 2.6: Guide to Building and Integrating a Sample Workplace Forms Application 5. If we use the logic outlined in step 4 above, then the calculation can be written as shown in Example 5-17. Example 5-17 Custom option with conditional compute <custom:update xfdl:compute="
 ((toggle(custom:attachmentButtonActivatedConcat) == '1') 
 and (custom:attachmentButtonActivatedConcat == 'offoff')) 
 ? (set('value', countDatagroupItems('Attachments'))) 
 : ''"> </custom:update> 6. Insert the XFDL custom option and associated compute code into the source for Attachment_Count_LABEL, as shown in Example 5-18. Example 5-18 Insert custom option <label sid="Attachment_Count_LABEL"> <itemlocation> <width>32</width> <height>32</height> <after>Paper_Clip_Icon</after> <alignvertc2c>Paper_Clip_Icon</alignvertc2c> </itemlocation> <value>0</value> <fontinfo> <fontname>Helvetica</fontname> <size>10</size> </fontinfo> <custom:attachmentButtonActivatedConcat xfdl:compute=" 
 Page1.add_document.activated 
 + Page1.remove_document.activated 
 ">offoff</custom:attachmentButtonActivatedConcat> <custom:update xfdl:compute="
 ((toggle(custom:attachmentButtonActivatedConcat) == '1') 
 and (custom:attachmentButtonActivatedConcat == 'offoff')) 
 ? (set('value', countDatagroupItems('Attachments'))) 
 : ''"> </custom:update> </label> Preview the form to test the counter label. Try adding and removing more than one file. In the next section we use this count to determine what is active or not, and what is hidden or not. Hide items This is a pretty simple compute. Basically, if the value of the Attachment_Count_LABEL is zero (0), then hide items otherwise shown. Example 5-19 shows the XFDL compute. Example 5-19 Conditional statement <visible compute=" 
 Attachment_Count_LABEL.value == '0' ? 'off' 
 : 'on'">off</visible> 
 Chapter 5. Building the base scenario: stage 1 273 Open the Source editor and apply the compute statement to the visible option of the following items: Paper_Clip_Icon Attachment_Count_LABEL File_Attach_Icon Use the search feature in the Source editor (Ctrl+F) to search for the sids shown above to speed up your navigation of the code. Disable buttons This same computation can be applied to the button items on the form that we want to disable. Modify the compute so that it is applied to the active status of the buttons. The updated code is shown in Example 5-20. Example 5-20 Active compute <active compute=" 
 Attachment_Count_LABEL.value == '0' ? 'off' 
 : 'on'">off</active> 
 Open the Source editor and apply compute statements to the visible option of the following buttons: view_document remove_document SaveDocumentAs Use the search feature in the Source editor (Ctrl+F) to search for the sids shown above to speed up your navigation of the code. 274 IBM Workplace Forms 2.6: Guide to Building and Integrating a Sample Workplace Forms Application That completes this section of the form. Preview and test the form. When finished your form should look like that shown in Figure 5-89. Figure 5-89 Preview and test form Preview the form again and test the behavior of the file attachment sections. Make sure that the appropriate items are shown and hidden. Also, test to make sure that the buttons are disabled and enabled based on the number of items attached to the form. Lastly, and possibly most important, make sure that all items in this section are repositioned correctly when you add and remove rows on the product order table above. 5.6.8 Signature section of form In this section we recreate the signature section of the form. Once again we can enhance this section through the use of some of the features and functions of the IBM Workplace Forms Designer. One significant benefit is the addition of multiple overlapping electronic signatures. Later in this chapter we show how to add business logic to the form that dictates required signatures based on form state. In this section we cover the following topics: Layout items Configure POPUP1 Signature buttons Chapter 5. Building the base scenario: stage 1 275 Layout items Since many of the steps necessary to recreate the signature area of our form have already been covered in prior sections of this chapter, in this section we take a different approach. Figure 5-90 shows a selection of all the items required to build the signature section. Using the skills learned earlier in this chapter and in Chapter 2, “Features and functionality” on page 19, recreate the area as shown below. Figure 5-90 Signature section items Tips: To get you started here are some tips: Use non-XForms labels. Use a spacer below the attachment box. Use relative alignment rules when placing the box, buttons, labels, and other items in this section of the form. Always formally name your items before aligning them with relative positioning rules. When laying out the items in the box, it is usually easier to start in the upper left corner with the first label and build off of it. Use a Popup (Select1) XForms item for the list, and leave the default sid (POPUP1). We cover the configuration details later in this section. Use non-XForms Button items for the signature items. We will provide detailed configuration details later in this section. The sids for these items are listed below from top to bottom as placed on the form: – OriginatorSignatureBUTTON – ManagerSignatureBUTTON – OfficerSignatureBUTTON Step-by-step configuration details are provided for the advanced items listed below: 276 POPUP1 OriginatorSignatureBUTTON ManagerSignatureBUTTON OfficerSignatureBUTTON Model binds IBM Workplace Forms 2.6: Guide to Building and Integrating a Sample Workplace Forms Application Configure POPUP1 POPUP1 is an XForms popup that allows only one selection. To configure it we need to bind it to an instance. The instance we use is the PositionList and is shown in Example 5-21. Example 5-21 XForms Instance for POPUP1 <!-- this is an instance for the choices list associated with employment positions on Page1 --> <xforms:instance id="PositionList" xmlns=""> <Positions> <Position>Sales Representative</Position> <Position>Product Manager</Position> <Position>Product Director</Position> </Positions> </xforms:instance> Set the properties for this instance as shown in Table 5-19. Table 5-19 POPUP1 properties Property Value (ref) Description General → sid POPUP1 Unique identifier. General → value Select your position Displayed value to end user before selection. Appearance → justify center Center the text. Appearance → border off Turn off the border. Appearance → fontinfo 8 point, Arial Font size and type. XForms (Select1) → itemset → Value (on) Make sure the circle in the value column is on, or blue. XForms (Select1) → itemset → nodeset instance('PositionList')/Position Specify what elements will be used to populate the list. XForms (Select1) → ref instance('FormOrderData')/OriginatorRole Specify what element will be populated with the selected value. Signature buttons We use non-XForms buttons to create our signatures. At this stage of form development we do not add any signature rules because we have yet to build the entire form and therefore cannot create the necessary filters for the ClickWrap signatures that will be used. For now, just add the buttons to the form and align them appropriately. For more details on signature buttons please see 2.7, “Signature buttons” on page 108. Note: You cannot place a signature button into a pane or table item's template (that is, the content of the xforms:group, xforms:repeat, or xforms:switch). Although it is possible to do in the Designer, this button does not function correctly in the Viewer. However, a signature button can sign any XFDL, including panes and tables and the data to which their contained controls bind. Chapter 5. Building the base scenario: stage 1 277 Preview the form to confirm that all of the settings are correct. When finished it should appear as shown in Figure 5-91. Be sure to test the relative alignment rules for this section by adding and removing lines from the dynamic table on this page. Figure 5-91 Preview signature section 5.7 Enhancing the form Up to this point in the form design process we have been more concerned with form layout and functionality than the look and feel of the form sections that we have created. Since we have completed the representation of the original form we can now enhance the form by adding borders, colors, and navigational objects. 5.7.1 Remove the form template The basic form layout is complete for the original form. We have matched the items as closely as possible to the original form without sacrificing functionality available to us. Although the new form is not a pixel perfect rendition of the original form, what we have gained in form design and functionality is of greater benefit. To remove the form template follow the steps below: 1. In the Designer, go the Outline view. 2. Select the Page Global item under Page1. 278 IBM Workplace Forms 2.6: Guide to Building and Integrating a Sample Workplace Forms Application 3. In the Properties view for this item go to Appearance → backgroundimage, as shown in Figure 5-92. Figure 5-92 Remove form template 4. Turn off the setting by clicking the blue circle once. The circle turns white, and the path to the image file is removed. Chapter 5. Building the base scenario: stage 1 279 5.7.2 Distinguishing sections of the form We have divided the traditional form page into five logical sections, as shown in Figure 5-93: Sales person section Customer section Products section File attachments section Signature and approval section Figure 5-93 Five logical sections of the form You can use different background colors for the boxes to mark up headings and sections of your page. Now that we have duplicated the original format we can enhance it. By making some simple changes to the UI elements we can make this form a little easier to interpret. For each of these sections, we create different boxes that produce a table layout for the labels and fields to be positioned on. Define borders One issue with the current state of the form is that the borders are not visible for all form panes. Go through the form and enable the borders for all of the panes. Be sure to preview the form as you go through the process to monitor your changes. Tip: You can select more than one item at the same time and modify their properties at the same time. For example, you can select all of the headers by holding down the Ctrl key, clicking each item, and setting the desired properties in the Properties view. 280 IBM Workplace Forms 2.6: Guide to Building and Integrating a Sample Workplace Forms Application Make form sections consistent After enabling the border property for all of our headers and panes, we notice a couple of inconsistencies between the sales person and customer details sections (see Figure 5-94). Figure 5-94 Inconsistent look and feel The differences are: The sales person section is enclosed by a box, while the customer details items are contained in an XForms pane. The sales person section has lines separating its rows, while the customer details section does not. Early in the form design process we use two different methods to create these sections — the basic method and the XForms Model Instance method. We do this to demonstrate both methodologies, but now it is an issue for us. To resolve this issue, we can add a pane to the form for the sales person items, and then add lines to the customer details section. Create Pane for Sales Person Section Follow the steps below to replace the box surrounding the sales person section with a new XForms pane: 1. Delete the box. 2. Add an XForms pane of type group to the Outline view just under the page global item of Page1. 3. Change the following properties for the new pane: a. Set the sid of this pane to SalesPane. b. Turn on the border property. 4. Using the Outline view, select all the label and field items (including the header) that represent the sales person section. 5. Drag and drop those items into the SalesPane. 6. Reposition the SalesPane using absolute alignment. a. Absolute align top to top with the CUSTOMER1 pane. b. Absolute align right to left with the CUSTOMER1 pane. Add lines to the Customer1 pane To mimic the design of the SalesPane and the original form layout, we must add lines to the CUSTOMER1 pane. We can copy and paste the lines from the SalesPane into the CUSTOMER1 pane. Chapter 5. Building the base scenario: stage 1 281 Tip: It can be challenging to select lines in the Design canvas. For lines and other small items, it is often easier to use the Outline view to select and modify them. Using the Outline view to select the lines from the SalesPane, copy those items and paste them into the CUSTOMER1 pane. There are three more rows in the customer section, so you have to add two more lines. Reposition those lines as needed so that they line up exactly with the lines from the SalesPane. Important: You may need to realign your labels and fields so that everything is aligned properly. Preview the form to validate your changes. It should look similar to that shown in Figure 5-95. Figure 5-95 Preview of new pane and lines 282 IBM Workplace Forms 2.6: Guide to Building and Integrating a Sample Workplace Forms Application Distinguish form sections We start by distinguishing the sales person grid from the customer grid. You can configure the background colors in the Appearance category of the Properties view by selecting the bgcolor property and clicking the ellipse button (...), as shown in Figure 5-96. A Color dialog appears, and you can choose from a selection of basic colors, or define your own custom color. Figure 5-96 Background color selection of box items Chapter 5. Building the base scenario: stage 1 283 Highlight the pane surrounding the customer section, and go to the Properties view for that pane. Either use the Color dialog box as described above, or change the value of the background color (bkcolor) to #C2D7ED. The result is shown in Figure 5-97. Figure 5-97 Change background color of Customer box 284 IBM Workplace Forms 2.6: Guide to Building and Integrating a Sample Workplace Forms Application Distinguish headers from rows Change the background colors for the sales, customer, and product headers. We can modify the properties for all three items at once. Select all of those headers by holding down the Ctrl key and using your mouse to click the three labels that identify those headers. In the Properties section go the background properties and enter the value #578FBD (see Figure 5-98). Figure 5-98 Change the background color for the table headers Distinguish the table We are going to change the table to highlight a subheader and footer. We can use PANE1, which we created to contain the action buttons and total fields of our table, as the footer, but we need to add another item to the form to be the header. Add subheader to table Follow the steps below to add a subheader to the table: 1. Add a new box to the form using the Outline view to place the item inside the TABLEORDERDETAILS_PANE just below PANE1 in the build order. 2. Set the sid to BOXProductSubHeader. 3. Use absolute expand to set the size of BOXProductSubHeader equal to PANE1. 4. Use relative alignment to position our new box below the LABELProductInfo item. 5. Set the background color for our new subheader and the footer to #C2D7ED. Chapter 5. Building the base scenario: stage 1 285 Preview the form to validate your changes and the positioning of the items in the table. When finished it should look like Figure 5-99. Figure 5-99 Preview changes to table Set page background color The last thing we change on the form page is the background color of the page. Set the background color for this page to this #EFEFEF, as shown in Figure 5-100. Figure 5-100 Make the background image invisible 286 IBM Workplace Forms 2.6: Guide to Building and Integrating a Sample Workplace Forms Application When you are finished the form should look like Figure 5-101. Figure 5-101 Enhanced layout completed 5.8 Toolbars Toolbars allow you to place headings and control buttons on your forms so that they are always visible for users. Toolbars appear at the top of form pages when opened in the Viewer. They do not scroll with the rest of the form and are always visible to the user. This is especially useful if you have a number of buttons that you always want the user to be able to access, such as navigation and submit buttons, or if there is a title that always needs to be visible. When the form is printed, the toolbar is omitted because it is not part of the printed area of the form. Therefore, it is most useful for items that do not or should not need to be printed, such as navigational buttons. Although you can add a toolbar to any page of your form, it is really only needed on the traditional form pages where you would not want to print toolbar items. Chapter 5. Building the base scenario: stage 1 287 In this section we cover the following topics: Tips on setting up your toolbar. Create a toolbar. Add branding. Add form controls. Create toolbar object. 5.8.1 Tips on setting up your toolbar Create a toolbar with all of the necessary buttons, images, and text that you need, then copy the toolbar and paste it onto the other traditional pages. If you want to maintain a consistent look and feel of the toolbar without the overhead on the form wizard pages you can copy all of the items in the toolbar and paste them on the top of the wizard pages. Make sure that your toolbar items are properly configured before you start working with them. For example, decide which buttons you need, such as a Print button, a Save button, a Submit button, and so on. Then use one button as the basis for aligning all the others relative to one another on the form. Restriction: If the toolbar is larger than half the form window, it is necessary to scroll within the toolbar section to see everything it contains. Copying a toolbar from one page to another You can copy a toolbar, including all of the items in the toolbar, to another page. This is useful if you want to use the same toolbar on each page of your form. To copy a toolbar to another page: 1. 2. 3. 4. 5. In the Outline view, expand the page containing the toolbar that you want to copy. Select the toolbar. Right-click and select Copy. Select the page where you want to copy the toolbar. Right-click and click Paste. 5.8.2 Create a toolbar To insert a toolbar on the traditional form page, Page1, select the Toolbar item from the palette, as shown in Figure 5-102, and place it on Page1. Figure 5-102 Select Toolbar from palette 288 IBM Workplace Forms 2.6: Guide to Building and Integrating a Sample Workplace Forms Application The toolbar is automatically placed at the top of Page1, and the previously defined form items have all been pushed down, as shown in Figure 5-103. Figure 5-103 Add toolbar Notice that our toolbar is not much more than empty white space. We need to add navigation buttons, form controls, and corporate branding to it. Navigational items allow the end user to navigate from one page to another when the form is previewed in the Designer or launched independently in the Viewer. We start by adding our branding to the toolbar and later add the following controls: Page navigation pop-up Save form to file system Print form E-mail form Show order ID Page back Page next 5.8.3 Add branding Branding a form is just as important as branding a Web site or software product. Branding is especially important in a toolbar where it allows a company to maintain a presence in the minds of the form’s end users. It reminds those users that their product, solution, or service is benefitting them. Branding is not just limited to logos. It should also include a consistent look and feel — from color selection, to font size and style, as well as a message or slogan. When designing a form, branding should be one of the first considerations. Chapter 5. Building the base scenario: stage 1 289 Add the Redbooks logo To add the Redbooks graphic go the Enclosures view, expand Data and Resources, then drag and drop the Redbooks logo image into the toolbar area. Use absolute alignment to position the image from its center to the left-most border of the sales person table, as shown in Figure 5-104. Figure 5-104 Add Redbooks graphic Add borders To set up and improve the layout of the toolbar, we add a header and footer to the toolbar. Use the steps below to add two boxes to the toolbar: 1. Select the box item from the palette. 2. Add it to the toolbar. 3. Set the sid equal to HeaderBox1. 4. Set the color of the box to #3E6CAA. 5. Use absolute alignment to set the box below the Redbooks graphic. 6. Use the absolute expand tool to extend the right most border so that it is equal to the right-most borders of the Customer table. Repeat the steps to add a second box to the toolbar. The sid for this box is HeaderBox and it is placed above the Redbooks graphic. Figure 5-105 shows the resulting modifications to the toolbar. Figure 5-105 Add header and footer to the toolbar 290 IBM Workplace Forms 2.6: Guide to Building and Integrating a Sample Workplace Forms Application Add IBM logo Add the IBM Workplace Forms product logo from the Enclosures view. Use absolute alignment to align the IBM logo to the right-most border of the top header, and then use absolute alignment again to vertically align the center of the IBM logo to the center of the Redbooks graphic. When completed it should appear just like Figure 5-106. Figure 5-106 Add IBM logo Add a header label The toolbar contains a form title. To add the title to the toolbar follow the steps below: 1. Select a non-XForms label from the palette. 2. Add it to the toolbar. 3. Set the sid equal to LABELTitle. 4. Set the value equal to Product Price Quotation. 5. Set the fontinfo equal to 18 pt Arial (bold). 6. Use absolute alignment to align the center of the label vertically to the center of the Redbooks graphic. 7. Use absolute alignment to horizontally align the center of the label to the center of the sales person label. When finished the toolbar should look like that shown in Figure 5-107. Figure 5-107 Add label to toolbar Chapter 5. Building the base scenario: stage 1 291 5.8.4 Add form controls Now that we have our layout for the toolbar, we can begin adding functionality to it. We need to add two sets of action items to the toolbar: The first set of toolbar items is standard form function buttons and an order identifier. These items include: – – – – – Save Print Email Submit Order ID The second set of items are navigation items. They include: – Next page – Previous page – Drop-down list of pages for direct navigation to any page in the form In this section we cover the follow topics: Add form function controls. Add pages. Add navigation items. Add form function controls First, we add the command buttons that provide standard form functions. As we have done earlier, we create one button, define the look and feel, and then copy that button for reuse in the toolbar. Define the Save button Follow these steps to create the Save button: 1. Select a non-XForms button from the palette. 2. Add it to the toolbar. 3. Define the properties for the Save button, as shown in Table 5-20. Table 5-20 Save button properties 292 Property Value Description General → sid BUTTONSave Unique Identifier. General → value Save Display zero (0) as value. General → type saveform Save current form. General → itemlocation → x → value 332 Set x coordinate. (This value may be different on your form.) General → itemlocation → y → value 100 Set y coordinate. General → itemlocation → alignvertc2c HeaderBox1 Relative align after the HeaderBox1 item. General → Appearance → fontinfo 7 pt Verdana® (bold) Set the font type and size. General → Appearance → justify Center Ensures that the string will be centered. IBM Workplace Forms 2.6: Guide to Building and Integrating a Sample Workplace Forms Application Property Value Description General → Appearance → bgcolor #3E6CAA Default blue for the form. General → Appearance → fontcolor white Set font color to white. General → Appearance → border off Turn off border for the button. Since this button is the template for the remaining buttons, you should preview the form to validate the form’s look and feel. When you are finished the first button should look like that shown in Figure 5-108. Figure 5-108 Add Save button Define remaining function buttons Copy the Save button, and paste three copies of it into the toolbar. Modify the properties for each item to match those shown in Table 5-21. Table 5-21 Button properties sid Value Item name Type Positioning BUTTONPrint Print Print print Absolute after previous item BUTTONeMail Email e-Mail submit Absolute after previous item BUTTONSubmit Submit Submit submit Absolute after previous item Since the alignment is dependent on the build order of the items, preview the form again to be sure that they are correctly applied (see Figure 5-109). Figure 5-109 Additional buttons added to toolbar Create order ID We want to include an order ID field and label in the toolbar so that it is always visible no matter what page of the form is currently displayed. These toolbar items are tied to an element of an instance in the XForms Model. To create these items we use the instance data itself, as outlined in the steps below. The instance we use is FormOrderData. The element is ID. 1. Open the Instance view. Chapter 5. Building the base scenario: stage 1 293 2. Drag and drop the ID element into the toolbar. This automatically creates two items: – A field element - ID1. – A label element - ID_LABEL1, which is relative aligned before ID1. Therefore ID1 is used to position our items in the toolbar. 3. Set the properties for the ID_LABEL1 item equal to those shown in Table 5-22. Table 5-22 ID_LABEL1 properties Property Value Description XForms (output) → label → Text Order ID Displayed value for the label. General → Appearance → fontinfo 7 pt Verdana (bold) Set the font type and size. General → Appearance → bgcolor #3E6CAA Default blue for the form. General → Appearance → fontcolor white Set font color to white. General → Appearance → border off Turn off border for the label. General → Appearance → justify Right Ensures that the string will be right justified. 4. Use absolute alignment to place the ID1 field item before the IBM logo. 5. Use absolute alignment to align the top of the ID1 field item with the top of the BUTTONSubmit item in the toolbar. 6. Resize the width of the ID1 field so that the ID_LABEL1 item appears just after the BUTTONSubmit item. Preview the form to validate your changes. When finished the tool bar should look like that shown in Figure 5-110. Figure 5-110 Order ID label and field added Add pages Before we can properly configure our navigation buttons in the toolbar, we need to add pages to the form. We need three additional form pages for our wizard pages. To add pages to the form select a page item from the palette and add it to the Outline view before PAGE1 in the build order. Set the sids for each page, as follows: Set the sid for the first wizard page to Wizard_Sales_Person_Info. Set the sid for the second wizard page to Wizard_Customer_Info. Set the sid for the second wizard page to Wizard_Order_Info. 294 IBM Workplace Forms 2.6: Guide to Building and Integrating a Sample Workplace Forms Application Define global properties After the three wizard pages are added to the form, open the Properties view for the page global. Note: Page globals specify settings (such as Next and Save Format) and characteristics (like bgcolor) for the page within which they appear. Page globals appear within a global item at the top of each page definition, and apply to the whole page. They can be overridden by option settings within items. Set the page size equal to 800;600 for all. In Figure 5-111 we show these settings for the third wizard page. Figure 5-111 Properties view of wizard page 3 Now that we have completed the addition of all of the pages that are required for the new form document, we can begin defining individual components for each page. Add navigation items With a multiple page form, it is necessary that you provide the end user with a means to navigate between pages. Without navigation items, or business logic to automatically redirect the user from page to page, the end user would only be able to access the first visible page of the form. Chapter 5. Building the base scenario: stage 1 295 Providing navigation between pages To allow the user to move from page to page when viewing your form in the Viewer, you need to add paging controls. You need to make the following decisions about paging in your form: Do you want the user to be able to navigate both forward and backward? Consider whether the user will try to page through the form initially to look at its scope, try to clarify a confusing instruction, or need to fix an error. For example, If the user enters something on page three that invalidates something on page one, the user will need to return to page one to fix the error. Otherwise, the Viewer will not allow the form to be submitted. Do you want to hide pages from the user? You may want to reformat the user's input for storage or printing on hidden pages in the form. Do you want to show different pages to different users, depending on what they enter into the form? You can program the form to decide where the user should go next, depending on what has been entered into the form. Note: If you do this, make sure to consider backward navigation as well. Do you want to direct the input focus to an item that is not the first item on a page? You can program a paging control to direct the input focus to particular items on new pages. Add Previous and Next page buttons To create the page navigation buttons, follow the steps below: 1. In the palette, select a non-XForms Button item. 2. Click in the toolbar to place the button on the page. 3. Set the properties to those shown in Table 5-23. Table 5-23 Previous page button Property Value (ref) Description General → sid Prev_Page_Button Unique Identifier. General → value << Previous Display string for the button. General → type pagedone Switches to a different page in the form. General → itemlocation → after item previous Place item after previous item in the build order. (This should be the ID1 field item.) General → Appearance → fontinfo 7 pt Verdana (bold) Set the font type and size. General → Appearance → justify Center Ensures that the string will be centered. 4. Normally, the name of a page to display would be entered into the URL property for this button. However, for this form a compute is used with two custom options to determine the previous page. For now leave the URL property blank. 296 IBM Workplace Forms 2.6: Guide to Building and Integrating a Sample Workplace Forms Application Tip: To direct the input focus to an item that is not the first item on the page, set url to #PAGE0.ITEM, where PAGE0 is the name of the page to display and ITEM is the name of the item to direct focus to (for example, #PAGE3.FIELD2). 5. Repeat the previous steps to add a second button item to the form. This button is the Next page button. Set the properties for this item equal to those provided in Table 5-24. Table 5-24 Next page button Property Value (ref) Description General → sid Next_Page_Button Unique Identifier. General → value Next >> Display string for the button. General → type pagedone Switches to a different page in the form. General → itemlocation → after item previous Place item after previous item in the build order. (This should be the Prev_Page_Button button item.) General → Appearance → fontinfo 7 pt Verdana (bold) Set the font type and size. General → Appearance → justify Center Ensures that the string will be centered. Define computes for navigation items Instead of defining static values to be used for the Previous and Next buttons on every page, we create a compute that functions in any page on any form. It makes a nice addition to the user object library for reuse in future form development efforts. Previous page compute Define two custom options for the Prev_Page_Button using the steps shown below: 1. Select the Prev_Page_Button in the Designer. 2. Go to the Source editor. 3. Insert the option definitions shown in Example 5-22 into the code for the Prev_Page_Button. Example 5-22 Define custom options <custom:page_prev xfdl:compute=" 
 custom:this_page->pageprevious"> 
 </custom:page_prev> <custom:this_page xfdl:compute=" 
 getReference('','','page') +. '.global'"> 
 </custom:this_page> 4. Replace the URL entry for the button with the compute code shown in Example 5-23. Example 5-23 URL compute <url compute="'#' +. custom:page_prev"></url> 5. Save your changes and return to the Designer. Chapter 5. Building the base scenario: stage 1 297 Next page compute Define two custom options for the Next_Page_Button using the steps shown below: 1. Select Next_Page_Button in the Designer. 2. Go to the Source editor. 3. Insert the option definitions shown in Example 5-24 into the code for the Next_Page_Button. Example 5-24 Define custom options <custom:page_next xfdl:compute=" 
 custom:this_page->pagenext"> 
 </custom:page_next> <custom:this_page xfdl:compute=" 
 getReference('','','page') +. '.global'"> 
 </custom:this_page> 4. Replace the URL entry for the button with the compute code shown in Example 5-25. Example 5-25 URL compute <url compute="'#' +. custom:page_next"></url> 5. Save your changes and return to the Designer. Create combobox for direct page navigation You could also provide paging controls using a popup, combobox, or a list. We use a combobox item to create the navigation item for this form. Add cells to the Resources page To do this: 1. Non-XForms comboboxes use cell items to represent the choices shown in its list. Since the combobox is used for navigation on all four form pages, the cells should be defined on the Resources page so that they do not need to be redefined on all of the form pages. Using the Outline view go to the Resources page. 2. Select a cell (Non-XForms) item from the palette. 3. Add the first cell to the Resources page. 4. Define the properties of the first cell as shown in Table 5-25. Table 5-25 First cell properties Property Value Description sid SalesInfoChoice Unique identifier value Sales Information Displayed value group SelectPage Member to this group type pagedone Switches to a different page in the form url #Wizard_Sales_Person_Info.global Page identifier 5. Add the second cell to the Resources page. 298 IBM Workplace Forms 2.6: Guide to Building and Integrating a Sample Workplace Forms Application 6. Define the properties of the second cell as shown in Table 5-26. Table 5-26 Second cell properties Property Value Description sid CustomerInfoChoice Unique identifier value Customer Information Displayed value group SelectPage Member to this group type pagedone Switches to a different page in the form url #Wizard_Customer_Info.global Page identifier 7. Add the third cell to the form. 8. Define the properties of the third cell as shown in Table 5-27. Table 5-27 Third cell properties Property Value Description sid OrderInfoChoice Unique identifier value Order Info Displayed value group SelectPage Member to this group type pagedone Switches to a different page in the form url #Wizard_Order_Info.global Page identifier 9. Add the fourth cell to the form. 10.Define the properties of the fourth cell as shown in Table 5-25 on page 298. Table 5-28 Fourth cell properties Property Value Description sid TraditionalFormChoice Unique identifier value Traditional Form Displayed value group SelectPage Member to this group type pagedone Switches to a different page in the form url #Page1.global Page identifier Add navigational combobox to Page1 To do this: 1. Select a non-XForms combobox item in the palette. 2. Place the combobox item in the toolbar on Page1. 3. Define the properties for this item as shown in Table 5-29. Table 5-29 Combobox properties Property Value (ref) Description sid COMBOBOXSelectPage Unique identifier. value Go To ... Displayed value. Chapter 5. Building the base scenario: stage 1 299 Property Value (ref) Description group Resources.SelectPage Member to this group. type pagedone Switches to a different page in the form. General → itemlocation → width → value 228 Set width of value. General → itemlocation → alignc2r LABEL1 Align the center of this item with the right of the Redbooks logo. General → itemlocation → alignvertc2c HeaderBox1 Relative align after the HeaderBox1 item. General → Appearance → fontinfo 7 pt Verdana (bold) Set the font type and size. General → Appearance → justify Center Ensures that the string will be centered. General → Appearance → bgcolor #3E6CAA Default blue for the form. General → Appearance → fontcolor white Set font color to white. That completes the design of the toolbar for the form. Preview the form when finished to test the changes that we have made. When finished the toolbar will look similar to that shown in Figure 5-112. Figure 5-112 Toolbar complete 5.8.5 Create toolbar object A toolbar is not required on the wizard pages but we want to maintain a consistent look and feel to our form. The solution is to reuse the items in our toolbar. We could select all of the items in the toolbar and then copy and paste them to all the wizard pages. However, another approach is to create a reusable object that includes all of these items. To create the object follow the steps listed below: 1. Select all of the items in the toolbar. You can use either the Design canvas or the Outline view to select them all. 300 IBM Workplace Forms 2.6: Guide to Building and Integrating a Sample Workplace Forms Application 2. Right-click one of the selected items and choose Export from the list, as shown in Figure 5-113. Figure 5-113 Export toolbar items 3. A window opens, as shown in Figure 5-114. Figure 5-114 Form object export window 4. Provide a path where the object is exported to. 5. Enter RedbookToolbarItems as the form object file name. 6. As an optional step you can also define a unique name and description to be shown in the user object library of the Designer palette. We enter Redbook Toolbar for form object Chapter 5. Building the base scenario: stage 1 301 palette name, and Standard Toolbar for use on the redbook sample form for the Description value. 7. The new object is added to the form palette in the user object library, as shown in Figure 5-115. Figure 5-115 Exported object in palette library 302 IBM Workplace Forms 2.6: Guide to Building and Integrating a Sample Workplace Forms Application Add toolbar object to wizard pages Add the standard navigation and form items to the wizard pages. Using the Outline view go to each of the wizard pages and place the Redbooks toolbar object on the canvas of each page. Position the items at the top of the wizard pages, as shown in Figure 5-116. Figure 5-116 Toolbar items added to wizard page Modify navigation buttons We have built our form with five pages — four visible to the end user and one for common resources that should not be visible when the form is launched. However, if the Previous button is pressed when on the first visible page of the form (Wizard_Sales_Person_Info page), the Resources page is loaded, and the same is true if the Next button is pressed while on the last page of the form (Page1). Aside from the fact that the Resources page offers nothing of use to the end user, it creates an issue for them as well because there are no page navigation items available. In other words, if you navigate to the Resources page you cannot return to the other pages. The solution is to modify the URL values for both of these pages, as shown in Table 5-30. Table 5-30 Modify URL values for navigation buttons Page Navigation button URL Wizard_Sales_Person_Info Prev_Page_Button #Page1 Page1 Next_Page_Button #Wizard_Sales_Person_Info Chapter 5. Building the base scenario: stage 1 303 Preview the form and test the navigational elements of the new items. 5.9 Creating the layout for the wizard pages A wizard page typically gets a resolution of 600x800 pixels. For our form we create three wizard pages to guide the user through the following information areas that are on the traditional form page that we just created: Sales representative Customer information Order information In this section we cover the following topics: Considerations in advance Steps to build the wizard pages Setting up the toolbar Common layout items Adding input items to the wizard pages 5.9.1 Considerations in advance In this section we discuss advance considerations. Best practices for implementing traditional forms and wizard pages A well-designed wizard page makes life easier for your users and helps to ensure that forms are filled out correctly. The following sections take you through some best practices and recommendations to consider as you venture into building the forms. Step 1 Design and implement the traditional form first as we have done. This allows us to copy items from the traditional form to wizard pages after formatting the fields, preserving the format on the wizard pages and the bindings to the XForms Model. Here are some recommendations: Make sure that the field size is the same on the wizard page as on the traditional form and that it can hold the same amount of data proportionally, especially if using different fonts between the traditional form and the wizard page. If the format is different between the traditional form item and the wizard page item, the user may not be able to enter the required amount of data, or data entered on the wizard page may be truncated or invalid on the traditional form. Consider using a resources page to store reusable items that may be referenced on multiple pages in the form. For example, as shown in the layout above, we intend to have a consistent header across the top of all of our wizard pages. We can add those items to the resource page. Step 2 Design the template for your wizard pages. A template typically consists of a page containing a sizing information, a background box (or two if you want a shading effect), a heading, and navigation buttons. 304 IBM Workplace Forms 2.6: Guide to Building and Integrating a Sample Workplace Forms Application By using a template, you ensure that each wizard page has a consistent size, look, and feel. This also makes it much easier for you to create the individual wizard pages since the background and any buttons are done for you, and all you need to do in most cases is copy and paste the items from the traditional form onto your wizard pages. Step 3 Make liberal use of help messages and have areas on the page to display help as opposed to only using tool tip help. As mentioned above, reference the same help message that the traditional form field references for ease of maintenance. To do this, you can set up computes in labels to display the help messages within labels rather than simply as mouse-over tool tips. The best way to implement this is to have a single label item on each wizard page that makes use of the page global focused item option. This is essentially a pointer to whatever item currently has focus. You can then de-reference that item’s help item value, and display that text in the label. Step 4 Use the XForms Model to bind items on wizard pages to fields on the traditional form. The basics of how to use the XML Data Model are covered in the Advanced XFDL documentation (either training guide or document) section titled “XML Data Model.” Using the XForms Model to make a wizard work is relatively easy. You need to create a data instance as part of the XForms Model containing one node for each piece of data that is represented in both the traditional form pages and the wizard. Then when you set up the bindings (you can do this easily in the Designer) you simply create two bindings for each node in the instance — one connecting the data entered in the wizard page and one connecting the data entered in the traditional form page. When the data in one form element changes, the data in the other element linked to that node in the XForms Model Instance is updated as well, so there is no need for computes pushing and pulling data in every form item. Both XForms Models and XFDL have event-driven compute engines that can be used to manipulate a form. The XFDL language has been modified to serve as the presentation layer or skin off the underlying XForms Model. However, there are still several areas where these two implementations overlap each other. While designing a form you may be faced with several situations where you are unsure of which method is most appropriate, XFDL or XForms. A simple rule to follow is that any logic or behavioral effects that are dependant on business rules should be controlled by XForms, where possible. Because XForms is relatively new there will be times when the language does not contain the necessary constructs required to produce a desired result. In these cases it is appropriate to use the functionality of XFDL to supplement XForms. Using XForms over XFDL procedures is also important if you are interested in exporting your XForms Model. Any logic that is defined using XForms binds will be included in the export procedure, which makes it much easier to implement the XForms Model with a different presentation layer (that is, XHTML). Step 5 Break wizard pages down into common or logical sections and have the user enter the data in a logical order. Fields may not appear in an intuitive manner on the traditional form and it may make more sense to the user on the wizard page if the order is changed. Also, it may be effective to group items on the same wizard page when they are required on the traditional form under the same conditions. This wizard page could then be bypassed if the condition is not true and the data is not required. Chapter 5. Building the base scenario: stage 1 305 Tip: Do not overcrowd wizard pages and make them too busy. This defeats the purpose. Step 6 Decide whether your users will be allowed to exit the wizard pages before completing them and to save the data that they have already entered. As an alternative, you may want to give the user the opportunity to bypass the wizard pages altogether. Attention: If you provide the opportunity to bypass the wizard pages, it is a good idea to let the user return to the wizard pages if she wishes. If you have a lot of wizard pages, the user will find it helpful to be returned to the last wizard page she was on rather than to be taken right back to the beginning. In order the achieve this, you need to set a global return-to option in your form that a Back to wizard button can use. This global option should be set whenever a user clicks a button that takes him or her to the traditional form, and should contain the page reference of that button. 5.9.2 Preview of Wizard page The purpose of the wizard pages is to perform a guided interview for the user, which makes it a lot easier and more intuitive to fill out a complex form. The individual wizard pages break up the traditional form page into meaningful parts, and is used to lead the user through the data entry process in a logical and controlled manner. 306 IBM Workplace Forms 2.6: Guide to Building and Integrating a Sample Workplace Forms Application The layout of the wizard pages is typically more graphical and user friendly than the layout of the traditional form pages. Figure 5-117 illustrates one of the wizard pages that we construct. The figure shows the first wizard page of our form, the Wizard_Sales_Person_Info page. Although all of the wizard pages request different information from the person filling in the form, they all have the same look and feel. It is important to always consider providing some consistent elements from page to page to give the user a sense of familiarity. Figure 5-117 Sales representative data Chapter 5. Building the base scenario: stage 1 307 Common layout items In order to provide a consistent look and feel to our wizard pages and reduce form design time, we need to identify any common items that can be reused on all of the wizard pages. If we strip out the data-specific elements from the wizard page, the resulting layout would look like the page illustrated in Figure 5-118. Figure 5-118 Common wizard Items When we break this image down ever further we identify the following form items. A page header with label and divider line (purple). A box to identify the body of the page (yellow). Instructional text areas (blue). Four direct navigation buttons designed to appear as if they were tabs (red). Lines are added to outline the box and active button. Doing this helps to support the appearance of buttons as tabs and provides a visual indicator to the end user. If we design this basic layout using the items just identified then we can export the items collectively as one object for reuse on the other wizard pages. In the next section we do just that when we create the wizard template. 308 IBM Workplace Forms 2.6: Guide to Building and Integrating a Sample Workplace Forms Application 5.9.3 Wizard template In the previous section we identified five primary components that need to be recreated. In this section we add those items to the Wizard_Sales_Person_Info page of the form. Since many of the steps necessary to recreate the wizard template of the form have already been covered in prior sections of this chapter, here we take a different approach. Figure 5-119 shows a clean example of the wizard template. Figure 5-119 Wizard template completed Using the skills learned earlier in this chapter and in Chapter 2, “Features and functionality” on page 19, recreate the area as shown above. Chapter 5. Building the base scenario: stage 1 309 Tips: Here are some tips that may be helpful: Guide lines, rulers, and grids are key to the item layouts. Start building the form the top of our list and work your way down. When building the page header, place the line before the label in the build order. Set the header label background color to white to give the appearance that there are two lines surrounding the label. The main box should precede the navigation buttons in the build order. Look closely at the buttons. The navigation button that directs you to the current page is lighter in color than the other buttons. It has the same background color as the box. This is done to simulate tabs. Use lines to surround the box and the button that would normally navigate to the current page. In fact, it does not even need to be active. Although it may not be apparent now, the use of relative alignment definitions should be used for those lines since the box will likely have to expand or contract in height at least when we add the table to the Wizard_Order_Info page. When defining the navigation buttons, use explicit URL values to call the desired page (see Example 5-26). Example 5-26 Explicit URL value for navigation button <url>#Wizard_Sales_Person_Info.global</url> Use the compute shown in Example 5-27 to define the font color for the navigation buttons. Example 5-27 Fontcolor compute for navigation buttons <fontcolor compute=" 
 (mouseover == 'on' ? '170' : '159') 
 +. ',' +.(mouseover == 'on' ? '51' : '159') 
 +. ',' +.(mouseover == 'on' ? '0' : '159') 
 ">159,159,159</fontcolor> When finished, preview the form to make sure that the layout is precise. These items are used to create the template for the other two wizard pages when you are satisfied. Place wizard template on remaining wizard pages We can select all of these design items for the wizard layout and export them for use as one object. 1. Select items. 2. Export items as one object to our user object library in the Designer palette. 3. Place the wizard template object on each of the remaining wizard pages. The look and feel of the navigation buttons will need to be updated on the other two pages. 5.9.4 Copy items from Page1 Earlier in this chapter we recreated three data sections from the original form: the sales person section, the customer details section, and the order details section. We copy those items from Page1 of the form and place them on the appropriate wizard page. 310 IBM Workplace Forms 2.6: Guide to Building and Integrating a Sample Workplace Forms Application Note: Since the process is exactly the same for each section and respective page we illustrate the necessary steps for the first section and page only. Sales person information page To copy this form section to the Wizard_Sales_Person_Info page follow the steps outlined below: 1. All of the items that make up this form section are now contained in a single pane. Use the Outline view to select the SalesPane item. 2. Right-click and select Copy, as shown in Figure 5-120. Figure 5-120 Copy sales person section 3. Use the Outline view to navigate to the first page of the form, the Wizard_Sales_Person_Info page. 4. After the page loads, right-click anywhere in the design canvas and paste the section on the form, as shown in Figure 5-121. Figure 5-121 Paste sales person pane Chapter 5. Building the base scenario: stage 1 311 5. Reposition the sales pane and all of the items it contains inside the mainBox item between the lines and Instruction labels. 6. Save your changes and preview the form. Repeat the process outlined above for the other two sections and their respective pages. Tips: Here are some tips that may be helpful: Use guide lines, rulers, and grids to position the sections. Remember that spacer items can provide a great solution when positioning items. Remember to use relative positioning for any items on the Wizard_Order_Info page that are positioned lower than the table. Wizard pages are smaller than Page1, therefore you will have to resize the labels and fields of the table so that the table will fit on the smaller page. Take advantage of the relative positioning rules to accelerate the resizing process. Be aware of the references, sids, and relative positioning rules when copying items from one page to another. It is possible to inherit attributes from Page1 that may not be valid on the wizard pages. For example, you must change the sid value for the TABLEORDERDETAILS_TABLE and replace any references to the original sid. Preview you changes and test the functionality of the form as you go. Once you have confirmed that a change is working appropriately be sure to save your changes. At this level of form development it may be more efficient at times to work directly in the Source editor. 5.10 Add signatures and business logic to the form Earlier in the form design process we were not able to complete signature functionality and business logic definitions because the form was incomplete. Now that the we have all of the form items defined and in place we can add these advanced functions to the form. There are three signatures and, depending on the status of the form with regard to the business rules, from one to all three of these signatures may be required. This means that after the first signature we still need some form functionality in order for the remaining signatures, XForms Model Binds, XFDL computes, and form navigation to work. To accomplish this we need to define filters that prevent those form elements from being signed and locked. In this section we outline how to create the signature functions. 5.10.1 Clickwrap signatures Clickwrap signatures are used for this form. Clickwrap signatures are electronic signatures that do not require digital certificates. While they still offer a measure of security due to an encryption algorithm. Clickwrap signatures are not security tools. Instead, Clickwrap signatures offer a simple method of obtaining electronic evidence of user acceptance to an electronic agreement. The Clickwrap signing ceremony authenticates users through a series of questions and answers, and records the signer’s consent. Clickwrap style agreements are frequently found in licensing agreements and other online transactions. Simply put, Clickwrap signatures gather some information about you and then create a signature that contains that information. For example, a Clickwrap signature might prompt you to specify any or all of the following information: Your name. 312 IBM Workplace Forms 2.6: Guide to Building and Integrating a Sample Workplace Forms Application Personal information, such as your mother’s maiden name that can be used to verify your identity. Repeat a statement to show that you agree with the document you are signing. After you provide requested information, it is then included in the signature itself, and cannot be changed unless the signature is completely removed. Clickwrap signatures provide the same tamper proofing as other signatures, but do not identify the signer as reliably as other signature types. However, they also do not require any additional infrastructure, such as a PKI system or Signature Pad hardware. Electronic signatures versus encryption Electronic signatures essentially lock the data on a form so that it is obvious when tampering occurs. Tampering with the signed data causes the signature to break, which lets you know that you should not trust the document. Electronic signatures do not encrypt the data on a form in any way. They do not prevent people from reading the information. In fact, this would defeat the purpose of the signature, which is to indicate agreement with the information provided. Important: If encryption is a concern, you must take other measures, such as implementing SSL security on your Web site, or creating a Viewer extension that encrypts the form before it is submitted. 5.10.2 Signature filters Forms are frequently signed by more than one person. For example, some forms include a For Office Use Only section that requires an additional signature by one of the staff processing the form, in addition to the person submitting the form. In these cases, the office worker must be able to enter more information in the unsigned portion of the form and then add their own signature. The Product Price Quotation form we are creating is very similar. Signature filters specify which parts of the form a particular signature signs. This means that you can create one signature that signs the entire form, or one that only signs the first portion of the form, and then a second signature that signs the second portion of the form. Note: By, default, if you specify a signature button on a form and do not include any signature filters, the entire form is signed. There are certain form items that you should always exclude from signatures. For example, when you click a Submit button, the triggeritem option is automatically set, recording the name of the button that triggered the submission. However, if a signature is applied to the triggeritem option, the Viewer is unable to update the option correctly. In general, you should always exclude the following form elements from a signature: The triggeritem option The coordinates option Any portion of the form that subsequent users will change Subsequent signatures and signature buttons The signature item that stores the information for the signature you are creating. Chapter 5. Building the base scenario: stage 1 313 Types of filtering When creating a signature button that signs part of a form, there are two ways that you can control what the signature button will and will not sign: Keep filtering: Specify the items that the button will sign, leaving the rest of the form unsigned. Omit filtering: Specify the items that the button will not sign, making the rest of the form signed. A form is more secure if you use omit filtering. By omitting only the items that you do not want signed, you ensure that you do not accidentally exclude items that should be signed, and prevent malicious users from adding to the form's contents without breaking the signature. If you use keep filtering, the signature button should only be used to sign another signature that uses omit filtering. Signature filter properties Complex forms frequently require sophisticated filtering that you can set up by editing the following signature properties directly. Signatures can include any number filters. Note: When using signatures, regardless of the signature filters in use, the following rules and guidelines apply: The mimedata option in a signature item is always omitted from the signature that item represents. The mimedata option in a data item that stores a signature image (see the signatureimage option) is always omitted from the signature that image represents. When using signatures you should omit navigational items to allow future users to navigate and review the form. If multiple signatures are included and the form still needs to provide business logic or calculations before the final signature, then they you will need to omit the model binds or form items that include XFDL computes needed to complete the form. Signature filters are applied with an order of precedence so that filter properties are always processed in a consistent manner. A list of signature properties is provided below. The signature wizard allows us to set these properties in a user-friendly interface. The properties can also be defined and modified through the Source editor and the Properties view of the signature button when the advanced properties are shown for that view. Table 5-31 lists the behavior of the filter properties and the order in which the Viewer applies them. Table 5-31 Filter behavior Order Property Behavior if using the omit filter Behavior if using the keep filter 1 signinstance Omits only data in the indicated instance; throws them out. Keeps only data in the indicated instance; throws others out. 2 signnamespa ces Omits only elements and attributes in the namespaces indicated; throws them out. Keeps only elements and attributes in the namespaces indicated; throws others out. 3 signitems Omits only the types listed. Omitted items are not signed. Keeps only the types listed. All other types are not signed. 314 Notes An element is kept if any of its children are kept, even if it is in the wrong namespace. IBM Workplace Forms 2.6: Guide to Building and Integrating a Sample Workplace Forms Application Order Property Behavior if using the omit filter Behavior if using the keep filter Notes 4 signoptions In the items that remain (not omitted by signitems), omits all listed options. Omitted options are not signed. In the items that remain, keeps all indicated options. All other options remain unsigned. 5 signpagerefs Omits the specified pages. Overrides settings in signitems and signoptions. Keeps the specified pages. Respects settings in signitems and signoptions. Omitted pages are not completely deleted. The page sid is preserved. 6 signdatagrou ps and signgroups Omits the items in that group, even if they are of a type that should be kept according to a signitems setting. Keeps the items in that group, even if they are of a type that should not be kept according to a signitems setting. These settings override those in signpagerefs. 7 signitemrefs Omits the specified items and overrides previous settings. Keeps the specified items and overrides previous settings. Respects settings in signoptions. These settings override signitems, signgroups, signpagerefs, and signdatagroups. 8 signoptionrefs Omits the specified options, overriding any previous settings. Keeps the specified options, overriding any previous settings. If the item containing the option has been omitted, that item’s sid and the specified option are preserved. This option’s setting overrides all other filter options. 5.10.3 Define the Clickwrap signature buttons To introduce you to the features available to define and maintain signature buttons we use a few different methods. In the examples below we use the Signature wizard to define the basic settings for our buttons, and then use the Properties view of the Designer to create the signature filters. Attention: When working with the Signature wizard a bug was discovered. It prevented us from using the item picker within the wizard to select multiple items from different pages. Thus, we found that we could only use the wizard for our form when simpler signature filters were required with omissions from a single page, or if we knew the form items well enough that we were comfortable using the node explorer to select our items. Create omit signature button Follow the steps below to define this Clickwrap signature button with omissions. 1. Right-click the Originator’s button on Page1. 2. Select Wizard → Signature Wizard. 3. On the first page you have the opportunity to define a signature that signs the entire form or just parts of the form. For our form, we do not want to sign the entire form. Select Parts of the Form. 4. On the second page we have the opportunity to create an omit or a keep filter. As mentioned earlier, omit filters are more secure. Select Items not to Sign to create an Omit filter. Chapter 5. Building the base scenario: stage 1 315 5. On the third page of the wizard we can select whole page items not to sign. Note: If you choose to omit an entire page you also omit all of the items contained on that page, which are all part of the presentation layer. However, any XForms data instances that may be referenced on that page are not automatically included in that filter. You must filter the data instances specifically. We do not want to exclude any pages from our signatures. Click Next. 6. On the fourth page we have the ability to use the node explorer window to select individual items that we want to exclude from our signature. For the purposes of our example, we are going to manually define these using the Properties view. Click Next to skip this page. 7. The fifth page allows us to specify the type of signature we are going to use. Select Clickwrap and click Next. 8. The sixth and final page allows us to define up to five safe guard questions used to authenticate users, and records the signer’s consent. Our example does not require any safe guard questions. Click Finish to exit the wizard. Create keep signature buttons Follow the steps below to define the last two buttons using keep filters as overlapping filters to our omission signature. 1. Right-click the ManagerSignatureBUTTON item. 2. Select Wizard → Signature Wizard. 3. Select Parts of the form and click Next. 4. Select Items to sig and click Next. We define the filter using the Properties view for this button. 5. Click Next on the following two pages of the wizard. 6. Select Clickwrap for the type of signature and click Finish. 7. Repeat the previous steps for the OfficerSignatureBUTTON item. Define properties for filters In this section we define the filters for the three buttons in our form. The first button, OriginatorSignatureBUTTON, is the most robust so we use it as our example. Define omit filter Follow the instructions below to set the filter properties for this button. 1. Click the OriginatorSignatureBUTTON item in the design canvas. 2. Go to the Properties view for the selected button. 3. By default, the Properties view only shows the most commonly used properties and does not show less commonly used, or advanced, properties. If not shown, click the down arrow menu button in the top right corner of the Properties view and then select Show Advanced Properties. 4. Towards the bottom of the Properties view you see the Signature section in blue text. Expand this view. Notice that some of these options have already been set because we used the wizard to get us started. These options include: – signature: This value is generated by the Signature wizard and it contains a signature and the data necessary to verify the authenticity of a signed form. The signature item contains an encrypted hash value that makes it impossible to modify the form without 316 IBM Workplace Forms 2.6: Guide to Building and Integrating a Sample Workplace Forms Application changing the hash value that the modified form would generate. The value set for our form is OriginatorSignatureBUTTON_SIGNATURE_1826067747, but it will be different for the form you are creating. – signformat: sets the details of the signature, including the mimetype to encode it, the signature engine to create it, and special settings for the signature engine. For our form the signformat is equal to application/vnd.xfdl;engine=ClickWrap. – signoptions: Specifies which types of options are filtered for a particular signature. Filtering options means keeping or omitting all options of a particular type, rather than specific options. By default the following options are omitted when creating any signature type (omit or keep) with the wizard: • triggeritem: Sets in the form globals to identify which action, button, or cell activated a form transmission or cancellation. (Omits navigation and signature buttons from the signature.) • coordinates: records the position of the mouse pointer on an image. – signer: is enabled. Denoted by the blue circle. It is automatically generated and records the identity of the person who signed the form. The setting of the signer option varies according to the engine type used. 5. In addition to the signature options shown above we need to omit the remaining navigational items. Every page of this form includes a combobox item that provides direct navigation to any page in the form via the combobox’s list. The signaitemrefs option allows us to specify individual items to be filtered for a this signature. Follow the steps below to filter these items from the signature. a. Expand the signitemsrefs option in the Signature section of the Properties view. b. The filter type should be set to omit based on our choices in the Signature wizard. c. In the Refs row, use the add (+) action button to add four references for the items we want to omit. d. Enter the references for your buttons. The references for the form we create are listed below: • • • • Wizard_Sales_Person_Info.COMBOBOXSelectPage Wizard_Customer_Info.COMBOBOXSelectPage Wizard_Order_Info.COMBOBOXSelectPage Page1.COMBOBOXSelectPage 6. The only other items we need to exclude from this first signature have to do with the other signature buttons. If we do not exclude these items from the first signature, then the second and third signature buttons would be locked. To omit the other two buttons from this signature follow the steps below: a. Expand the signitemsrefs option in the Signature section of the Properties view. b. The filter type should be set to omit based on our choices in the Signature wizard. c. In the Refs row, use the add (+) action button to add four references for the items we want to omit. d. Enter the references for your buttons. The item references for the form we created are listed below: • • • • Page1.ManagerSignatureBUTTON Page1.OfficerSignatureBUTTON Page1.ManagerSignatureBUTTON_SIGNATURE_1678317263 Page1.OfficerSignatureBUTTON_SIGNATURE_513701861 Chapter 5. Building the base scenario: stage 1 317 When finished the signature properties for the form should look similar to those shown in Figure 5-122. Figure 5-122 Signature properties Define keep filters Since the first signature locks everything on the form except navigational elements and the additional signature buttons, we can use keep filters to sign the remaining items. Use the steps below to define the keep filter for the ManagerSignatureBUTTON item: 1. Expand the signitemsrefs option in the Signature section of the Properties view. 2. The filter type should be set to keep based on our choices in the Signature wizard. 3. In the Refs row, use the add (+) action button to add one reference for the item we want to keep. 4. Enter the references for the OriginatorSignatureBUTTON item. The item reference for the form we created is: Page1.OriginatorSignatureBUTTON 5. Repeat the previous steps to define the keep filter for the OfficerSignatureBUTTON item using Page1.ManagerSignatureBUTTON as the item reference. 318 IBM Workplace Forms 2.6: Guide to Building and Integrating a Sample Workplace Forms Application Active state The Manager and Officer buttons are not always active. The manager signature button should only be active if the originator signature has been provided. Add the following code to the ManagerSignatureBUTTON item in the form: <active compute="OriginatorSignatureBUTTON.signer != '' ? 'on' : 'off'">on</active> The Officer Signature button should only be active if the Manager Signature has been provided. Add the following compute to the active property of the OfficerSignatureBUTTON item in the form: <active compute="ManagerSignatureBUTTON.signer != '' ? 'on' : 'off'">on</active> Update form data When the signatures are provided using the buttons just defined, some basic data needs to be recorded in support of the business logic of the form, and for later backend system integration. Originator signature The key information for this signature, and other form objects, is stored in the Form Meta Data XForms Model instance, as shown in Example 5-28. Example 5-28 Form Meta Data and FormOrderData instances <!-- Form Meta Data. Some values set at design-time and others are set at runtime. See comments. --> <xforms:instance id="FormMetaData" xmlns=""> <FormMetaData> <FileName>SalesOrderDetails</FileName> <!-- Populated at design time --> <Version>0</Version> <!-- Populated at design time --> <CreationDate></CreationDate> <!-- Populated at time of request --> <CompletionDate></CompletionDate> <!-- Populated at submission --> <State>1</State> <!-- Populated during runtime --> <PreviousState>0</PreviousState> <!-- Populated during runtime --> <Owner></Owner> <!-- Populated during runtime --> </FormMetaData> </xforms:instance> ..... <!-- Order Data. Information about this specific order including approvals and timestamps.--> <xforms:instance id="FormOrderData" xmlns=""> <FormOrderData> <ID>10101010</ID> <CustomerID></CustomerID> <Amount>0</Amount> <Discount>0</Discount> <SubmitterID></SubmitterID> <State>1</State> <CreationDate></CreationDate> <CompletionDate></CompletionDate> <Owner></Owner> <Version>0</Version> <Approver1></Approver1> <AppovalDate1></AppovalDate1> <Approver1Comment></Approver1Comment> <Approver2></Approver2> Chapter 5. Building the base scenario: stage 1 319 <AppovalDate2></AppovalDate2> <Approver2Comment></Approver2Comment> <Cost></Cost> <StateDisp></StateDisp> <OriginatorRole></OriginatorRole> </FormOrderData> </xforms:instance> If we look closely at this FormMetaData instance, you can see that each line is commented. The first two elements, file name, and version, are populated at design time. The third and last elements, creation date and owner, are set each time the form is signed. (The other elements are covered later in this chapter.) To set a value for these two elements we need to add a custom compute to the XFDL buttons. The logic we use is as follows. When the originator button is pushed, check to see whether it is signed. (Remember that a signature can be declined or removed using the signature function.) If it is signed, then set the submitter ID value equal to the employee ID, which was provided in the sales person section of the form, and set the creation date equal to the current date. Otherwise, set the submitter ID is equal to nil (‘’). The code sample for this logic is shown in Example 5-29. Example 5-29 Set submitter ID and creation date <!-- Set the value for Approval comment if signed --> <custom:SetSubmitterID xfdl:compute=" 
 toggle(signer) == '1' 
 ? (signer != '' 
 ? (set('SUBMITTERID1.value', 
 get('instance(\'EmployeeDetails\')/Employee/ID', '', 'xforms')) 
 + set('instance(\'FormMetaData\')/Owner', 
 get('instance(\'EmployeeDetails\')/Employee/ID', 
 '', 'xforms'), '', 'xforms') 
 + set('instance(\'FormMetaData\')/CreationDate', 
 date(), '', 'xforms')) 
 : (set('SUBMITTERID1.value', '') 
 ) 
 ) 
 : ''"> </custom:SetSubmitterID> Inspecting this code we can see, we do not set the value for SubmitterID in the FormOrderData instance directly. We apply it to a hidden helper field. This field is bound to the instance element. Example 5-30 Hidden XForms field on PAGE1.SUBMITTERID1 accessed in the first signature button <field sid="SUBMITTERID1"> <xforms:input ref="instance('FormOrderData')/SubmitterID"> <xforms:label></xforms:label> </xforms:input> <scrollhoriz>wordwrap</scrollhoriz> <itemlocation> <x>180</x> <y>845</y> <width>163</width> 320 IBM Workplace Forms 2.6: Guide to Building and Integrating a Sample Workplace Forms Application </itemlocation> <visible>off</visible> <bgcolor>#FF0000</bgcolor> <printvisible>off</printvisible> </field> <label sid="SUBMITTERID_LABEL1"> Approval Level: Product Director Authorized By: Hidden helper fields to calculate form state SubmitterID Approver1Comment Approver2Comment State 1 Figure 5-123 Hidden (red) fields for SubmitterID, approver comments, and form state This is a work around for an actual product limitation. Setting a value directly in an XForms instance using the set xfdl function would not fire an event to run all binds wired to the changed value. So we set a xforms field value referencing the target element in the xforms instance. This will cause the XForms engine to run the related binds. The work around allows us to store the business logic in an xforms bind. Details to the business logic are discussed later in this chapter. For now we can make sure that whenever we change the submitterID field value with a button, the XForms engine will fire all binds relaying on the value behind the SUBMITTERID1 field. Using the values for your form, add the logic represented above to the Originator’s signature button. Manager and officer signatures Additional logic is required by the form logic for the manager and officer signatures. For the purposes of our form and the back-end system integration, we only need to record one value. These two buttons are used primarily as a means to approve sales based on the form thresholds. We record the interaction in the Order Data XForms Model instance (shown in Example 5-31). Example 5-31 Order Data instance <!-- Order Data. timestamps.--> Information about this specific order including approvals and <xforms:instance id="FormOrderData" xmlns=""> <FormOrderData> <ID>10101010</ID> <CustomerID></CustomerID> <Amount>0</Amount> <Discount>0</Discount> <SubmitterID></SubmitterID> <State>1</State> Chapter 5. Building the base scenario: stage 1 321 <CreationDate></CreationDate> <CompletionDate></CompletionDate> <Owner></Owner> <Version>0</Version> <Approver1></Approver1> <AppovalDate1></AppovalDate1> <Approver1Comment></Approver1Comment> <Approver2></Approver2> <AppovalDate2></AppovalDate2> <Approver2Comment></Approver2Comment> <Cost></Cost> <StateDisp></StateDisp> </FormOrderData> </xforms:instance> The logic that is applied to our buttons is the same. We use the Manager Signature button for our example shown in Example 5-32. The logic translates to when the manager signature button is pressed. Check to see if there is a signature. If there is a signature then set the Approver1 comments to OK, or else set it to nil (‘’). Example 5-32 Approval logic <!-- Set the value for Approval comment if signed --> <custom:SetCommentApprover1 xfdl:compute=" 
 toggle(signer) == '1' 
 ? (signer != '' 
 ? set('APPROVER1COMMENT1.value', 'OK') 
 : set('APPROVER1COMMENT1.value', '') 
 ) 
 : ''"> </custom:SetCommentApprover1> The same logic can be used for the Officer Signature button, but be sure to modify it to update the APPROVER2COMMENT1 value instead of APPROVER1COMMENT1. Attention: The FormOrderData instance has additional elements that can be updated at this point, but they are not required for the form logic or system integration. If you would like to update these elements, the previous two code samples can be used to map the values, as shown below: <Approver1> = Manager ID <AppovalDate1> = Current date at time of Manager signature <Approver2> = Officer ID <AppovalDate2> = Current date at time of Officer signature 5.10.4 Business logic There are three signature buttons on Page1 of the form — one for each of the roles (originator (sales person typically), manager of the originator, director level signature). The three signatures allows role-based users to provide approval when needed for the sales quote form. Approval requirements are based on the amount of the sales quote. 322 IBM Workplace Forms 2.6: Guide to Building and Integrating a Sample Workplace Forms Application Quote thresholds There are two thresholds amounts, $10,000.00, and $50,000.00 (see Example 5-33), that are defined in the BusinessRuleParameters of the XForms Model in this form. They are used to determine whether a higher level signature is required to approve the order request. Example 5-33 Upper and lower bounds <!-- Business Rule Parameters --> <xforms:instance id="BusinessRuleParameters" xmlns=""> <BusinessRuleParameters> <BusinessRuleParams> <QuoteLevelOneThreshold>10000</QuoteLevelOneThreshold> <QuoteLevelTwoThreshold>50000</QuoteLevelTwoThreshold> </BusinessRuleParams> </BusinessRuleParameters> </xforms:instance> Define state The business rule parameters for form state are applied in the following manner to define four different form states: State 1: If an originator signature is required, then the form state is one. State 2: If a manager signature is required, then the form state is two. State 3: If an officer signature is required, then the form state is three. State 4: If all required approval is provided, then the form state is four. These states cannot be assigned based on thresholds alone. We must also consider existing signatures. This logic is executed in the form of a model bind, shown in Example 5-34. Consider the checks in place for setting the form state to two. The model bind checks to see whether the originator has signed, but the manager has not, and that the total cost is greater than or equal to the level one threshold. Example 5-34 XForms Model bind - calculate state <!-- business model (calculate the state based on amount, thresholds and existing signatures--> <xforms:bind calculate="
 if(instance('FormOrderData')/SubmitterID = '', 
 '1', 
 if(instance('FormOrderData')/SubmitterID != '' and 
 instance('FormOrderData')/Approver1Comment ='' and 
 instance('FormOrderData')/Amount >= 
 instance('BusinessRuleParameters')/BusinessRuleParams/QuoteLevelOneThreshold , 
 '2', 
 if(instance('FormOrderData')/SubmitterID != '' and 
 instance('FormOrderData')/Approver1Comment !='' and 
 instance('FormOrderData')/Approver2Comment ='' and 
 instance('FormOrderData')/Amount >= 
 instance('BusinessRuleParameters')/BusinessRuleParams/QuoteLevelTwoThreshold, 
 '3', 
 '4'))) 
 " id="calculateState" nodeset="instance('FormOrderData')/State 
 "></xforms:bind> Use the logic shown in Example 5-34 to apply the form logic to your form. Chapter 5. Building the base scenario: stage 1 323 Note: This bind evaluates the form state based on the available signatures. The existence of a signature is detected here based on filled instance elements SubmitterId, Approver1Comment, and Approver2Comment. The related values are set when pressing one of the signature buttons. The buttons set xforms field values referencing the instance elements evaluated in the bind. Setting the values in the instance directly from the button would not activate the created bind. Setting it via an xforms field will do the job. User feedback We need a way to inform the user of the next steps (signatures) required based on form state. To do this we add a new XForms Output Label to the form. The new label is positioned below the attachment section and above the signature section on the right side of the page layout. The we create a bind that checks the state and, based on the state value, returns the appropriate string (see Example 5-35 for details). Note that if no state is set then the feedback is that the form is in draft state. Example 5-35 XForms Model bind - calculate display value <!-- business model (calculate the display value for the current state --> <xforms:bind calculate="
 if(instance('FormOrderData')/State = '1', 'Requires Submitter Signature', 
 if(instance('FormOrderData')/State = '2', 'Requires Manager Signature', 
 if(instance('FormOrderData')/State = '3', 'Requires Director Signature', 
 if(instance('FormOrderData')/State = '4', 'Approved', 
 'Draft')))) 
 " id="setStateDisplayValue 
 " nodeset="instance('FormOrderData')/StateDisp 
 "></xforms:bind> 324 IBM Workplace Forms 2.6: Guide to Building and Integrating a Sample Workplace Forms Application 5.11 Building the servlet In the following section we show you how to build a servlet. 5.11.1 Where we are in the process: building stage 1 of the base scenario Figure 5-124 is intended to provide an overview of the key steps involved in building the base scenario. This focuses on building the form, the servlet, and the JSPs. Building the Base Scenario – Stage 1 1 Building and Designing Form Template 2 3 Building the Servlet Building the JSPs – Designing the layout – Layout and input items – Calculations and logic – Security Access Level buttons – Forms Access buttons – Adding to the data model Figure 5-124 Overview of major steps involved in building the base scenario application Stage 1 presents a standalone form scenario, where the form design does not require any interaction with external data (such as pre-filling it with some instantiation data or interaction with any external data sources during work on the form at the client side). The only interaction of the built application with the form is in the extraction of a form state value after submission. This value decides the directory to store the form in. That way the servlet represents the main business logic of the application. 5.11.2 Basic servlet methods In the basic application, we use a servlet as a Web application. The servlet can be called by a URL submitted by a browser (or any other Web client) and exposes four basic methods to interact with the environment: The init method does basic servlet initiation and initiates the Workplace Forms API for future use. The doGet method is called whenever the client submits a GET request. This is a URL pointing to the servlet. It may contain additional parameters that can be evaluated in the servlet doGet method. This is a convenient way to request different actions from the servlet. Chapter 5. Building the base scenario: stage 1 325 The doPost method is called by any POST request submitted to the servlet. The POST request works like a GET request but receives an additional data stream. In this data stream, Forms Viewer ships the submitted XFDL data. The destroy method cleans up by destroying all necessary objects to free the allocated memory. In our project, we use the actions in Table 5-32 for GET and POST. Table 5-32 List of supported actions in a GET/POST requests 326 Request Parameters Action performed GET action=listTemplates Calls dirlisting1.jsp with the template folder as target. GET action=workbasket Calls dirlisting1.jsp with one of the work folders as target (workbasket, manager approval, director approval) depending on current user role. GET action=listApproved Calls dirlisting1.jsp with the folder with approved forms as target. GET action=listCancelled Calls dirlisting1.jsp with the folder with cancelled forms as target. GET action=setRole&userRole=XXXX Assigns a new user role (simulation of a new login with another user name/password). Called from index1.jsp using the available role buttons (1000 = Employee.... 1031 = Director). GET action=getJSP&jsp=XXXX Requests the servlet to open a new JSP for the browser. This is a convenient method to route navigation from one JSP to another via the servlet as proxy. The servlet can control the parameters passed to every JSP called. The feature is used in navigation buttons on index1.jsp and Home buttons on all other JSPs. POST action=bounceback Submits to the browser the received post data as XML content. This method is useful for tests. It requires a special button in the form with a submit URL containing the assigned parameter (http://servletURL?action=bounceback). POST action=store Retrieves the order state and stores the received POST data to file system in a folder depending on the detected form state (submissions, manager approval, director approval, approved or completed orders). After this, the success1.jsp is called. IBM Workplace Forms 2.6: Guide to Building and Integrating a Sample Workplace Forms Application 5.11.3 Servlet code skeleton To create the new servlet that we use in our scenario: 1. Create a new Dynamic Web Project in Rational® Application Developer Version 6 (RAD6) and a new package. You can name it WPForms261Stage1 or give it any other name of your choice. 2. Right-click the new package and select from the property box New → Other → Web → Servlet, as shown in Figure 5-125. Figure 5-125 New servlet basics 3. Give the servlet a name (in our scenario we use Submissionservet1), disable the Generate an annotated servlet class option, and click Next, as shown in Figure 5-126. Figure 5-126 SubmissionServlet1 - package Chapter 5. Building the base scenario: stage 1 327 4. Assign the newly created package and click Next. (See Figure 5-127.) Figure 5-127 SubmissionServlet1 methods 5. Make sure that all four basic methods (Init, doGet, doPost, and destroy) are selected and click Finish. The servlet comes with the skeleton code, as shown in Example 5-36. Note that the methods are reordered, all comments are deleted to make the example short, and the method SubmissionServlet1() is removed. Example 5-36 New servlet code skeleton package wpFormsRedbook.server; import import import import import import import java.io.IOException; javax.servlet.Servlet; javax.servlet.ServletConfig; javax.servlet.ServletException; javax.servlet.http.HttpServlet; javax.servlet.http.HttpServletRequest; javax.servlet.http.HttpServletResponse; public class SubmissionServlet1 extends HttpServlet implements Servlet { public void init(ServletConfig arg0) throws ServletException { } protected void doGet(HttpServletRequest arg0, HttpServletResponse arg1) throws ServletException, IOException { 328 IBM Workplace Forms 2.6: Guide to Building and Integrating a Sample Workplace Forms Application } protected void doPost(HttpServletRequest arg0, HttpServletResponse arg1) throws ServletException, IOException { } public void destroy() { } } After the creation of the new servlet, an error message is shown in the Problems view. We find that the generated description file is sometimes not accepted. In this case, double-click the Deployment Descriptor file in the project outline and open the Source tab. Search the code for the entries shown in Example 5-37. Example 5-37 Servlet code with description and display-name tags <!-- @generated wpFormsRedbook.server.SubmissionServlet1#web/servlet.wpFormsRedbook.server.SubmissionServle t1 --> <servlet> <description>Form handler for stage 1</description> <display-name>SubmissionServlet1</display-name> <servlet-name>SubmissionServlet1</servlet-name> <servlet-class>wpFormsRedbook.server.SubmissionServlet1</servlet-class> </servlet> After deleting the <description> and <display-name> tags and saving, the errors should be resolved. To prepare the servlet for productive use, we add some external libraries and code for initiation: 1. Add the necessary external jars for the Workplace Forms API. Right-click the project, choose Properties from the context menu, select Java Build Path, and go to the Libraries tab, as shown in Figure 5-128. Figure 5-128 Configure Java build path Chapter 5. Building the base scenario: stage 1 329 2. Click Add External JARs and select in the folder of the installed API [System32]\PureEdge\70\java\classes pe_api.jar and uwi_api.jar (see Figure 5-129). Figure 5-129 Adding external jars 3. Close the property box and open the newly created servlet code file (SubmissionServlet1.java). 4. Add all of the necessary imports. (The concrete imports can vary depending on the additional functionality you plan to implement. Here we reference all classes eventually used in this stage independent of the actual progress of coding. We have, during this time, some warnings about unused imports. Do not worry about this.) Insert the imports shown in Example 5-38. Example 5-38 Init method code sample import import import import java.io.IOException; javax.servlet.ServletException; javax.servlet.http.HttpServletRequest; javax.servlet.http.HttpServletResponse; import import import import import import java.io.ByteArrayOutputStream; java.io.IOException; java.io.InputStream; java.io.PrintWriter; java.util.Date; java.util.Properties; import javax.servlet.RequestDispatcher; import javax.servlet.ServletConfig; 330 IBM Workplace Forms 2.6: Guide to Building and Integrating a Sample Workplace Forms Application import import import import import javax.servlet.ServletContext; javax.servlet.ServletException; javax.servlet.http.HttpServlet; javax.servlet.http.HttpServletRequest; javax.servlet.http.HttpServletResponse; import org.omg.CORBA.Any; import import import import import com.PureEdge.DTK; com.PureEdge.IFSSingleton; com.PureEdge.error.UWIException; com.PureEdge.xfdl.FormNodeP; com.PureEdge.xfdl.XFDL; 5. Now we can start to add class attributes and initiation code. To store folder names mapping to state values and file name prefix for stored forms, we use a folders.properties file, as shown in Example 5-39. Example 5-39 folders.properties file TEMPLATE_FOLDER = \\Redpaper_Demo\\Form_Templates\\ 1=\\Redpaper_Demo\\Form_Templates\\ MANAGER_FOLDER=\\Redpaper_Demo\\Manager_Forms\\ 2=\\Redpaper_Demo\\Manager_Forms\\ DIRECTOR_FOLDER = \\Redpaper_Demo\\Director_Forms\\ 3=\\Redpaper_Demo\\Director_Forms\\ APPROVED_FOLDER = \\Redpaper_Demo\\Approved_Forms\\ 4=\\Redpaper_Demo\\Approved_Forms\\ SALES_REP_FOLDER = \\Redpaper_Demo\\Sales_Rep_Forms\\ 5=\\Redpaper_Demo\\Sales_Rep_Forms\\ CANCELLED_FOLDER = \\Redpaper_Demo\\Cancelled_Forms\\ 6=\\Redpaper_Demo\\Cancelled_Forms\\ FORM_NAME_PREFIX=RedPaperForm 6. Create this file in the WEB-INF folder of the project and start adding class parameters and code to the init method. Insert the initial body code to the created methods, as shown in Example 5-40. Example 5-40 SubmissionServlet1 class with attributes init and destroy method import java.io.IOException; import java.util.Properties; import import import import import import javax.servlet.Servlet; javax.servlet.ServletConfig; javax.servlet.ServletException; javax.servlet.http.HttpServlet; javax.servlet.http.HttpServletRequest; javax.servlet.http.HttpServletResponse; import java.io.InputStream; import java.io.PrintWriter; Chapter 5. Building the base scenario: stage 1 331 import java.util.Date; import javax.servlet.RequestDispatcher; import javax.servlet.ServletContext; import import import import import com.PureEdge.DTK; com.PureEdge.IFSSingleton; com.PureEdge.error.UWIException; com.PureEdge.xfdl.FormNodeP; com.PureEdge.xfdl.XFDL; import wpFormsRedbook.utils.Utils; public class Test extends HttpServlet implements Servlet{ //Form Storage Parameters private Properties props = null; private static String TEMPLATE_FOLDER; private static String MANAGER_FOLDER; private static String DIRECTOR_FOLDER; private static String APPROVED_FOLDER; private static String SALES_REP_FOLDER; private static String CANCELLED_FOLDER; private static String FORM_NAME_PREFIX; //Database Properties private Properties orderProps = null; //Form Meta-Data Related Parameters private final static String METADATA_INSTANCE_ID = "FormMetaData"; private static ServletConfig conf; public void init(ServletConfig config) throws ServletException { conf = config; System.out.println("SubmissionServlet: init(): started"); //Initialize the Workplace Forms API try { DTK.initialize("Forms 2.6.1 Redbook Demo", "1.0.0", "7.0.0"); } catch (UWIException initE) { System.out .println("SubmissionServlet: init(): exception occurred initializing Workplace Forms API: " + initE.toString()); } catch (Exception anE) { System.out .println("SubmissionServlet: init(): exception occurred: " + anE.toString()); } //Read in the properties file for the submission folder names //Read in the properties file for the submission folder names try { ServletContext ctx = config.getServletContext(); //ctx.getRealPath() 332 IBM Workplace Forms 2.6: Guide to Building and Integrating a Sample Workplace Forms Application InputStream inputStream = ctx .getResourceAsStream("/WEB-INF/folders.properties"); props = new java.util.Properties(); props.load(inputStream); TEMPLATE_FOLDER = props.getProperty("TEMPLATE_FOLDER"); MANAGER_FOLDER = props.getProperty("MANAGER_FOLDER"); DIRECTOR_FOLDER = props.getProperty("DIRECTOR_FOLDER"); APPROVED_FOLDER = props.getProperty("APPROVED_FOLDER"); SALES_REP_FOLDER = props.getProperty("SALES_REP_FOLDER"); CANCELLED_FOLDER = props.getProperty("CANCELLED_FOLDER"); FORM_NAME_PREFIX = props.getProperty("FORM_NAME_PREFIX"); } catch (Exception anE) { System.out .println("SubmissionServlet: init(): exception occurred reading properties file: " + anE.toString()); } System.out.println("SubmissionServlet: init(): completed"); } public void destroy() { super.destroy(); } protected void doGet(HttpServletRequest arg0, HttpServletResponse arg1) throws ServletException, IOException { // TODO Auto-generated method stub } protected void doPost(HttpServletRequest arg0, HttpServletResponse arg1) throws ServletException, IOException { // TODO Auto-generated method stub } } There is no forms-specific code except the DTK.initialize statement. It connects us to Workplace Forms API Version 7.0.0. This allows us to access the XFDL form in the code. The application name Forms 2.6.1 Redbook Demo allows us to assign our solution a special version of the Forms API in the PureEdgeAPI.ini file, if this is required. We do not use this feature here, since we do not run applications based on different API versions on our server. We are now prepared to implement the doGet methods (operating in this stage only for navigation) and, later on, the doPost methods that handle the submitted form. Chapter 5. Building the base scenario: stage 1 333 5.11.4 Creating a template repository and form storage structure In stage 1 of the base scenario, we have no other storage medium but the file system (see Figure 5-130). To make it available to the application, we create in the WebContent folder of the project a sub-folder named Redpaper_Demo with subfolders, as named in the supplied folders.properties file: Redpaper_Demo/Form_Templates Redpaper_Demo/Manager_Forms Redpaper_Demo/Director_Forms Redpaper_Demo/Approved_Forms Redpaper_Demo/Sales_Rep_Forms Redpaper_Demo/Cancelled_Forms Figure 5-130 Form storage directory Redpaper_Demo in WebContent folder In the folder Redpaper_Demo/Form_Templates, paste the created forms (see Figure 5-131). To have a real list, we paste some arbitrary forms in the directory as well. The form we use at this stage is named Redbook261_V12_Stage1.xfdl. Figure 5-131 Same forms folder inside the project structure 334 IBM Workplace Forms 2.6: Guide to Building and Integrating a Sample Workplace Forms Application This folder makes up the file storage in the directory <WASRoot>/installedapplications/<applicationName> on the application server. The real paths used for storage differ in the production system and the test server running in RAD6 IDE. The code provided here is valid for both cases, but the code provided in the JSPs to display the file list and generate appropriate links contains some if/then statements to match both environments. For details on this topic, see 5.12, “Creating JSPs” on page 353. 5.11.5 Servlet interaction for forms processing The entry point of the application is index1.jsp. Open the URL http://servername:portname/WPForms261Stage1/index1.jsp in the browser to open the JSP. By selecting the New Order button, dirlisting1.jsp is activated and the list of available templates shows up. This is the starting point in the stage 1 form processing scenario. (See Figure 5-132.) Figure 5-132 Stage 1 form processing scenario Figure 5-132 shows a diagram of a basic form life cycle: 1. dirlisting1.jsp shows a list of all available forms in a file system directory. The directory shown depends on the task to proceed, and in some cases on the employee status selected in the welcome page: – – – – – – New Order: Template directory is shown. Work Basket/Employee: Directory with draft submissions is shown. Work Basket/Manager: Directory with submissions for manager approval is shown. Work Basket/Director: Directory with submissions for director approval is shown. Approved: Directory with finally approved forms is shown. Canceled: Directory with cancelled forms is shown. 2. When one of the links in the file list is clicked, a URL is generated that retrieves the selected form from the file server. At this stage, the application server does not access the form at all on form load. 3. After working on the form, the client submits it using a URL stored in the form. It points to the SubmissionServlet1 and activates the doPost method there. The method receives the Chapter 5. Building the base scenario: stage 1 335 form, extracts some basic values (mainly the form name and state), and creates a form name if the form does not contain a valid name. 4. The SubmissionServlet1/doPost method creates a file name based on the formName and stores the form to the file system. The folder to store the form into is calculated based on the form state. At this stage, the servlet does not really interact with the template or form on opening time. The called JSP exposes a URL enabling the browser to get the template or form from the file system via the HTTP server. The real interaction takes place when a form is submitted. Before we can code it, let us have a brief look at how to use the Workplace Forms API. 5.11.6 Accessing a form through the Workplace Forms API The IBM Workplace Forms Server Application Programmer Interface (API) consists of a collection of programming tools to help you develop applications that can interact with XFDL forms. These tools are available for both C and Java programming environments. An API for COM interface is available as well. The API enables you to access and manipulate forms as structured data types. The API is divided into two libraries: the Form Library and the Function Call Interface (FCI) Library. The Form Library allows you to create applications that: Read and write forms. Retrieve information from form elements. Add cells to certain form items. Insert information into form elements. This is the part of the API (namely, the Form Library) that we focus on in this chapter. The Function Call Interface (FCI) Library provides additional methods that: Create, duplicate, or delete form elements. Manipulate and verify digital signatures. Handle attachments. Create custom functions for use within XFDL forms. For detailed information about the FCI, refer to the Workplace Forms Servers API documentation (C and Java versions): http://www-128.ibm.com/developerworks/workplace/documentation/forms/ The Forms API is used to open a form from stream or file system as a complex tree structure and present a huge number of methods to navigate in the form, read and write data, or read and alter the form structure adding, changing or deleting nodes. In this chapter we focus on basic methods to read and write data. For full information about the Forms API, see the product documentation available at the following URL: http://www-128.ibm.com/developerworks/workplace/documentation/forms/ Refer to the following files: 336 WPForms API Setup Guide (22914850.pdf) WPForms API Java User Manual (22914870.pdf) WPForms API C User Manual (22914860.pdf) WPForms API COM User Manual (22914880.pdf) IBM Workplace Forms 2.6: Guide to Building and Integrating a Sample Workplace Forms Application Accessing form data, in most cases, is done in three steps: 1. Open the form as formNodeP object. This step gives us the root node of the form as a starting point to other actions performed on the node structure. 2. Navigate to the data or structure object we are interested in (the field, the XFDL data instance, a button, an included WSDL file, an attribute, or any other node available in the form). 3. Access to the object (read/write/delete). For each of these tasks, there are multiple methods available. We highly recommend that you consider the notes attached to function descriptions in the manual, since similar navigation and data access methods have different side effects (such as creating new nodes, if the requested node does not exist, or just to raise an error in the same case). Be aware that any changed node structure or data in signed areas of a form will break the signature. A basic API program (shown here as a servlet) accessing a form available as a file may look like Example 5-41. (However, do not enter this code into your sample project. This code is for discussion purposes only.) Example 5-41 Simple sample servlet using XFDL API import java.io.*; //servlet support import javax.servlet.*; import javax.servlet.http.*; //WPForms API references import com.PureEdge.DTK; import com.PureEdge.xfdl.FormNodeP; import com.PureEdge.xfdl.XFDL; import com.PureEdge.IFSSingleton; public class ProcessXFDL extends HttpServlet { private static FormNodeP theForm; //in do post we can read the submitted xfdl file as stream public void doPost(HttpServletRequest request, HttpServletResponse response) throws IOException { ServletOutputStream out = response.getOutputStream(); ServletInputStream theStream = request.getInputStream(); try { DTK.initialize("SimpleFormsTestServlet", "1.0.0", "7.0.0"); XFDL theXFDL; //initialize the API theXFDL = IFSSingleton.getXFDL(); if (theXFDL == null) throw new Exception("Could not find interface"); //get access to the form from stream theForm = theXFDL.readForm(theStream, XFDL.UFL_SERVER_SPEED_FLAGS); //if the form is available as a file, the following code would fit: //theForm = theXFDL.readForm( "mypath/myfile.xfdl", 0); Chapter 5. Building the base scenario: stage 1 337 //now we can work with the form, e.g. retrieve a value of FIELD1 on // PAGE1 String temp = theForm.getLiteralByRefEx(null, "PAGE1.FIELD1.value", 0, null, null); //or get a data instance like this theForm.extractInstance("formData", null, null, "mypath/exp.xml", 0, null, null, null); //or get an XForems instance like this StringWriter sw = new StringWriter(); theForm.extractXFormsInstance(null, "instance(’myInstance’)/innerElement", false, true, null, sw); String retXML = sw.toString(); //or set some additional fields theForm.setLiteralByRefEx(null, "PAGE1.FIELD2.value", 0, null, null, "new value"); //we can save the form to file system or stream theForm.writeForm("mypath/mySavedForm.xfdl", null, 0); //finally we should free up memory theForm.destroy(); } catch (Exception ex) { ex.printStackTrace(); } } // end of method Post } // end of class Attention: There is a limitation of initializing the Forms API only once on a server. As a best practice, create a library containing the initialization statement and avoid subsequent initializations in the applications using the API. After opening the XFDL file or stream, we access the form in three different ways in this example: Accessing nodes directly Writing data to XML data instances Writing data to XForms data instances In this example we use the method getLiteralByRefEx/setLiteralByRefEx by assigning a text value to a node. This function cannot be used to assign complete XML trees, since the assigned text is automatically rendered in XML-compliant encoding (for example, changing < to <). Attention: Using XForms items in the form, we can only access their values through the XForms instance referenced by the item. This is a major change to data stored in XML instances, where the value can be accessed in both ways — via the related XML instance (if there was one) or by accessing the item on the XFDL page directly. 338 IBM Workplace Forms 2.6: Guide to Building and Integrating a Sample Workplace Forms Application Accessing nodes directly can read/alter/delete any node. Using the API method getLiteralByRefEx/setLiteralByRefEx shown in this example, we create new nodes in case the referenced node does not exist. To react in any other way on missing nodes, we can use the code snippets shown in Example 5-42. Example 5-42 Sample coding for missing nodes if ((tempNode = theForm.dereferenceEx(null, "PAGE1.COLORFIELD", 0, FormNodeP.UFL_ITEM_REFERENCE, null)) == null) { throw new UWIException("Could not locate COLORLABEL node."); } tempNode.setLiteralByRefEx(null, "PAGE1.COLORFIELD.VALUE", 0, null, null, "Purple"); Both access methods work fine accessing real field values (as shown in the examples) or other field properties addressable by name. In this book, we mainly use access to the data using read and write operations to XForms instances. 5.11.7 Extraction of form data For form data extraction, three methods are available: Extracting single values using API Extracting data instances or parts of data instances using API Using text parsers to access any stored information There are different insertion points for the extracting code, depending on the way the form is submitted. The Forms Viewer has three basic methods to return a form: Store on a file system. Submit as a mail attachment. Submit as an HTTP POST action. Storing requests to the file system is discussed in 9.7, “Scenario 2 - integrating Forms Viewer with Notes Client - overview and objective” on page 573, and in 9.12, “Domino Forms Integration - solution considerations” on page 626. Submitting by e-mail is out of the scope of this book. The techniques shown here can be applied to all scenarios, depending on the programming languages available in the target system. In our case (using a Web application handling the forms), make sure to submit the completed form in a POST action. Back to the application scenario, we are now ready to code parts of the doPost method responsible for receiving the submitted form and extracting some data. We can get the submitted form, retrieve data, and store it in the database. The following code is a short example of how to access the form data. First, we implement some helper methods in the class: returnText — composes a simple HTML file as an error/message page sent to the browser returnJSP — opens a named JSP in the browser (the method used for success action and for application navigation later on) getFormAsString — returns the form as string; useful for debugging getFormBytes — returns a form as a byte array ready to store in a file getFormValue — gets data in the XFDL form addressed by an item reference setFormValue — writes data in the XFDL form addressed by an item reference allSignaturesAreValid — validates the signatures on a form Chapter 5. Building the base scenario: stage 1 339 All these functions are stored in a static utility class in package wpFormsRedbook.utils. The coding is shown in Example 5-43. Example 5-43 Helper methods for form handling in doPost package wpFormsRedbook.utils; import import import import import import import import import java.io.BufferedOutputStream; java.io.ByteArrayOutputStream; java.io.File; java.io.FileOutputStream; java.io.IOException; java.io.PrintWriter; java.io.StringReader; java.io.StringWriter; java.util.Date; import import import import javax.servlet.RequestDispatcher; javax.servlet.ServletException; javax.servlet.http.HttpServletRequest; javax.servlet.http.HttpServletResponse; import com.PureEdge.error.UWIException; import com.PureEdge.xfdl.FormNodeP; import com.PureEdge.xfdl.XFDL; /** * @author cmarston,arichter * * To change the template for this generated type comment go to * Window - Preferences - Java - Code Generation - Code and Comments */ public class Utils { /** * */ public Utils() { super(); } /** * writes data stored in a byte[] array to a file on file system * * @param outputFileNameAndPath * @param bytes * @throws IOException */ public static void writeBytesToFile(String outputFileNameAndPath, byte[] bytes) throws IOException{ File outputFile = new File(outputFileNameAndPath); FileOutputStream fos = new FileOutputStream(outputFile); BufferedOutputStream bos = new BufferedOutputStream(fos); bos.write(bytes); bos.flush(); bos.close(); } // read the form as byte[] /** 340 IBM Workplace Forms 2.6: Guide to Building and Integrating a Sample Workplace Forms Application * returns an XFDL form as a byte array * * @param theForm * @return * @throws UWIException * @throws IOException */ public static byte[] getFormBytes(FormNodeP theForm) throws UWIException, IOException { ByteArrayOutputStream baos = new ByteArrayOutputStream(); theForm.writeForm(baos, null, 0); baos.flush(); return baos.toByteArray(); } //return any error messages to web client (helper for the time being until we //have an error jsp) public static void returnText(HttpServletResponse response, String outputString, String mimeType) throws IOException { //Set Headers so that the response is not cached response.setStatus(HttpServletResponse.SC_OK); response.setHeader("Pragma", "No-cache"); response.setHeader("Cache-Control", "no-cache"); response.setDateHeader("Expires", new Date().getTime()); response.setHeader("Expires-Absolute", "Thu, 01 Dec 1994 16:00:00 GMT"); response.setContentType(mimeType); System.out .println("SubmissionServlet: writing formString to response OuputStream"); PrintWriter pw = new PrintWriter(response.getOutputStream()); pw.write(outputString); pw.flush(); pw.close(); } //read form as String public static String getFormAsString(FormNodeP theForm) throws UWIException, IOException { ByteArrayOutputStream baos = new ByteArrayOutputStream(); theForm.writeForm(baos, null, 0); baos.flush(); return baos.toString(); } //proxy method calling any jsp identified by jsp file name jspName public static void returnJSP(HttpServletRequest request, HttpServletResponse response, String jspName) throws ServletException, IOException { //Return response page response.setStatus(HttpServletResponse.SC_OK); response.setHeader("Pragma", "No-cache"); response.setHeader("Cache-Control", "no-cache"); response.setDateHeader("Expires", new Date().getTime()); response.setHeader("Expires-Absolute", "Thu, 01 Dec 1994 16:00:00 GMT"); RequestDispatcher view = request.getRequestDispatcher(jspName); view.forward(request, response); System.out.println("SubmissionServlet1: returning response JSP"); } Chapter 5. Building the base scenario: stage 1 341 /** * write 1 log entry * * @param log */ private static void p(String log) { System.out.println(log); } /** * gets data in the xfdl form addressed by an item reference * dependent on the syntax in pathToItem parameter, the code will access an * XFDL item or data in an XForms instance * * @param theForm the xfdl form * @param pathToItempath (or XPath expression) to the item to read * @param returnMode"stripe" will stripe the outer element of the returned instance * all other values will return the value or instance "as is" * @return the value of the item */ public static String getFormValue(FormNodeP theForm, String pathToItem, String returnMode) { String ret = ""; try { if (pathToItem.indexOf("instance('") == 0){ p ("try extraxt XForms instance: " + pathToItem ); //extract from XForms instance StringWriter sw = new StringWriter(); //extract data instance from xfdl as StringWriter theForm.extractXFormsInstance(null, pathToItem ,false, true, null, sw); p(" xforms instance extracted"); //read extracted instance to String ret ret = sw.toString(); if ((!ret.equals("")) && returnMode.equals("stripe")){ ret = ret.substring(ret.indexOf(">")+1, ret.lastIndexOf("<")); } } else { //extract an item value p(" read form item: " + pathToItem); ret = theForm.getLiteralByRefEx(null, pathToItem, 0, null, null); if (ret == null) { p("value not found"); ret = ""; } } } catch (UWIException e) { e.printStackTrace(); } p("getFormValue: " + pathToItem + " mode" + returnMode + "value: '" + ret + "'"); return ret; } /** 342 IBM Workplace Forms 2.6: Guide to Building and Integrating a Sample Workplace Forms Application * sets writes data in the xfdl form addressed by an item reference * dependent on the syntax in pathToItem parameter, the code will access an * XFDL item or data in an XForms instance * * @param theForm * @param pathToItem (XPath expression to an XForms instance or XFDL path) * @param value */ public static void setFormValue(FormNodeP theForm, String pathToItem, String value) { try { if (pathToItem.indexOf("instance('") == 0){ p ("try update XForms instance: " + pathToItem ); String element = pathToItem.substring(pathToItem.lastIndexOf("/")+1, pathToItem.length()); String updateXML = value; if (!element.equals("")){ //we are going to replace an inner element -> add //the element tags!!! if (element.indexOf("[")>0) { element = element.substring(0,element.indexOf("[")); } updateXML = "<" + element + ">" + value + "</" + element + ">"; } p("updateXML:" + updateXML); StringReader r = new StringReader(updateXML); //update data instance from xfdl as stream theForm.updateXFormsInstance(null, pathToItem ,null, r, XFDL.UFL_XFORMS_UPDATE_REPLACE); p(" xforms instance updated"); //String tmp = getFormValue(theForm, pathToItem,""); } else { theForm.setLiteralByRefEx(null, pathToItem, 0, null, null, value); p("setFormValue: " + pathToItem + " -> [" + value + "] - done"); } } catch (UWIException e) { e.printStackTrace(); } return; } /** * check for valid signatures * * @param theForm * @return true or false * @throws Exception */ public static boolean allSignaturesAreValid(FormNodeP theForm) throws Exception { return (theForm.verifyAllSignatures(false) == FormNodeP.UFL_SIGS_OK); } Chapter 5. Building the base scenario: stage 1 343 Create the code for the doPost method (Example 5-44). The basic flow is as follows: 1. Detect the operation evaluating the action parameter. 2. Access the form with the API. 3. Process the action: – Bounceback for debug, or – Normal operation: Extract values. 4. Send a response to the browser. Example 5-44 Form handling in doPost - value extraction public void doPost(HttpServletRequest request, HttpServletResponse response) throws ServletException, IOException { System.out.println("SubmissionServlet: doPost started"); //Initialize member variables String action = null; //Controls the processing action, response from // Servlet XFDL theXFDL = null; //The form FormNodeP theForm = null; //Represents nodes of the XFDL form String formString = null; //String representation of the form. Used for // the 'bounceback' feature. //Form State variables String formState = null; //The current state of the form String previousFormState = null; //The previous state of the form String formName = null; //Used in Stage 1 as the file name when // persisting the form to the file system /** * Processing. * Determine the type of request. Currently supported options include: * * 1) [listTemplates, null] Display 'listTemplates' JSP. This is the * default behavior if no action is specified. * 2) [listForms] Display 'listForms' JSP. * 3) [store] Store form, display 'submissionComplete' JSP. If needed, * the previous version is removed. * 4) [bounceback] For test purposes, returns the form as an text/xml * response page. */ try { action = request.getParameter("action"); if (action== null) action=""; if (action.equalsIgnoreCase("bounceback")) { formString = Utils.getFormAsString(theForm); } else if (action.equalsIgnoreCase("store")) { System.out .println("SubmissionServlet: detected -->store<-- request."); action = "store"; /** * Read in the form */ System.out .println("SubmissionServlet: doPost: reading Form from request InputStream"); theXFDL = IFSSingleton.getXFDL(); //theForm = theXFDL.readForm(request.getInputStream(), XFDL.UFL_SERVER_SPEED_FLAGS); theForm = theXFDL.readForm(request.getInputStream(),0); // Server speed flags //will cause errors on extractXFormsInstance method ... 344 IBM Workplace Forms 2.6: Guide to Building and Integrating a Sample Workplace Forms Application //************************************************* // OK _ HERE WE HAVE ACCESS TO THE FORM // FIRST - WE SHOULD VALIDATE SIGNATURES //************************************************* /** * Implement the business logic - Extract the form State evaluate it */ formState = Utils.getFormValue(theForm,"instance('" + METADATA_INSTANCE_ID + "')/State","stripe"); System.out.println("SubmissionServlet: doPost: FormState by getFormValue: " + formState); if (formState.equals("1")) formState="5"; //these are drafts form sales reps if (formState.equals(""))formState="5"; //unknown states will map to 5 - sales rep forms (drafts) previousFormState = Utils.getFormValue(theForm,"instance('" + METADATA_INSTANCE_ID + "')/PreviousState","stripe"); System.out.println("SubmissionServlet: doPost: PreviousFormState by getFormValue: "+ previousFormState); if (previousFormState.equals("1")) previousFormState="5"; //these are drafts form sales reps if (previousFormState.equals(""))previousFormState="5"; //unknown states will map to 5 - sales rep forms (drafts) //If this is the first submission of a form, set a new filename // into the form formName = Utils.getFormValue(theForm,"instance('" + METADATA_INSTANCE_ID + "')/FileName","stripe"); if (formName == null)formName = ""; if (formName.equals("")) { formName = "" + System.currentTimeMillis(); Utils.setFormValue(theForm,"instance('" + METADATA_INSTANCE_ID + "')/FileName",formName); } System.out.println("PATH: " + request.getServletPath()); formName = FORM_NAME_PREFIX + formName + ".xfdl"; System.out.println("SubmissionServlet: doPost: formName by getFormValue: "+ formName); //printFormToStandardOut(theForm); //********************************************************* // OK _ HERE WE COULD STORE THE FORM - E.G. TO FILE SYSTEM //********************************************************* } else { System.out .println("SubmissionServlet: doPost: specified action parameter value -->" + action + "<-- is not supported. Currently the following are supported” + “[update,store, or blank which defaults to store.]"); Chapter 5. Building the base scenario: stage 1 345 action = "unsupportedaction"; } if (theForm != null) { System.out .println("SubmissionServlet: doPost: calling destroy() on theForm"); theForm.destroy(); } } catch (Exception processingE) { System.out .println("SubmissionServlet: doPost: Exception processing request: " + processingE.toString()); Utils.returnText(response, "SubmissionServlet: doPost: Exception occured: " + processingE.toString(), "text/plain"); return; } /** * Return the appropriate response based on the action variable. <BR> */ try { //Switch based on the specified action if (action.equalsIgnoreCase("store")) { Utils.returnJSP(request, response, "/success1.jsp"); } else if (action.equalsIgnoreCase("update")) { System.out .println("SubmissionServlet: update is not currently implemented"); } else { throw new Exception( "SubmissionServlet: unexpected state, taking no action"); } } catch (Exception anE) { try { if (theForm != null) { theForm.destroy(); } } catch (Exception anotherE) { System.out.println("SubmissionServlet: Nested Exception: " + anotherE.toString()); } response.setContentType("text/html"); PrintWriter out = new PrintWriter(response.getOutputStream()); out.write(anE.toString()); out.flush(); out.close(); System.out.println("SubmissionServlet: Exception: " + anE.toString()); } System.out.println("SubmissionServlet: doPost: completed."); } 346 IBM Workplace Forms 2.6: Guide to Building and Integrating a Sample Workplace Forms Application In the sample code above we can see that there are several tries on the appropriate parameters reading the form: //theForm = theXFDL.readForm(request.getInputStream(),XFDL.UFL_SERVER_SPEED_FLAGS); theForm = theXFDL.readForm(request.getInputStream(),0); // Server speed flags will cause errors on extractXFormsInstance method ... Continuing work on the form by providing more features as prepopulation on form load using XForms submissions and applying signatures, we return to these statements over and over searching for parameters that are able to open any form without knowing the special features utilized in the form or the form state. In the end, we find — with the help of the product support — the following configuration that worked for us in all use cases. See Example 5-45. Example 5-45 Final code to open a form in Forms API used in all scenarios (J2EE + Domino) private static final int READFORM_XFORMS_INIT_ONLY = (XFDL.UFL_SERVER_SPEED_FLAGS & (~XFDL.UFL_XFORMS_OFF) | XFDL.UFL_XFORMS_INITIALIZE_ONLY); FormNodeP theForm = theXFDL.readForm(str,READFORM_XFORMS_INIT_ONLY); StringWriter myWriter = new StringWriter(); Boolean writeRelevant = false; Boolean ignoreFailures = true; theForm.extractXFormsInstance(null, myPathToItem ,writeRelevant, ignoreFailures, null, myWriter); String ret = sw.toString() Here are some explanations to the parameters in readForm and extractXFormsInstance methods. We have these specific conditions in the form (and we believe that these conditions are not really academic only): Signed and unsigned forms XForms submissions fired on form load for prepopulation The parameters for the readForm method are based on the following considerations: 1. As a starting point, we took the parameter set XFDL.UFL_SERVER_SPEED_FLAGS, believing that this should be quite near common requirements made up on opening a form with the API. 2. If signatures were in the form, we ran into errors using this parameter. We found similar errors opening forms with XForms instances having a renamed <data> root element. To overcome this, we turned the XForms engine on reading those forms: XFDL.UFL_SERVER_SPEED_FLAGS & (~XFDL.UFL_XFORMS_OFF). 3. The XFDL form created for stage 2 contained XForms submissions to be activated on form load in the Viewer or Webform server (ev:event="xforms-model-construct-done"). Those submissions run into an error if they are activated while loading the form with the API only. So, opening the form with the API, we had to limit the XForms engine to run only for the first node structure build. (Event xforms-model-construct-done is fired just after the first node structure build.) Stopping the XForms engine after node structure construction can be done by adding the flag XFDL.UFL_XFORMS_INITIALIZE_ONLY. Hence, the final configuration to read a form was: (XFDL.UFL_SERVER_SPEED_FLAGS & (~XFDL.UFL_XFORMS_OFF) | XFDL.UFL_XFORMS_INITIALIZE_ONLY) Chapter 5. Building the base scenario: stage 1 347 Note: Be aware of changes to the defined value for XFDL.UFL_SERVER_SPEED_FLAGS in Forms Versions 2.6 and 2.6.1. To utilize maximum performance, in Version 2.6.1 the XForms engine is turned off in addition to the settings in Version 2.6. So applying the same code to Versions 2.6 and 2.6.1, we can expect deviating results in performance or even in functionality in some cases. The custom flags defined here should work in both Versions 2.6 and 2.6.1. Writing back data to the form with the method updateXFormsInstance, in some cases we should take care to populate the applied changes in the form (including data stored in XML instances and XFDL attributes). This can be done using the method xmlModelUpdate(). This method would activate, for example, an XFDL formula to read a submission URL from an XForms instance and assign the value to an XFDL submit button with the get/set functions. In addition to that, there is a restriction as to what parameters are allowable accessing values in the XForms instances (method extractXFormsInstance, parameters writeRelevant and ignoreFailures) based on the state of how the form was loaded or not (XForms engine on or off). When server speed flags are on in the extractXFormsInstance method, we cannot ask the XForms engine to write only the relevant elements, nor can you ask it to not ignore failures, because the engine has been turned off. Setting these flags incorrectly results in the error message invalid parameters, without detailed information of what was wrong. The code accessing the form values (functions getFormValue and setFormValue) is located in the created Utils class. (Add an import for this class to resolve the errors.) It can read and write both XFDL data objects (for example, addressed with a path like PAGE3.FIELD2.value or global.global.custom:value) and data stored in XForms instances (addressed with an XPath expression like instance(’ExportData’)/CustomerData. In this book, we generally access data stored in the XForms instances. Having the values of interest extracted (for the first stage, these are state, previousState, and formName), we can go on to do more sophisticated actions and store the form. 5.11.8 Signature validation Another interesting action when receiving a form is signature checking. Insert the following code in place of the signature comment (see Example 5-46). Example 5-46 Sample coding for signature checking /** * Validate form signatures. If any signatures are invalid, then * return. TODO: Add a JSP response that indicates tampering. */ if (! Utils.allSignaturesAreValid(theForm)) { System.out .println("SubmissionServlet: doPost: WARNING -- signatures were invalid"); Utils. returnText(response, "Error, one or more signatures were invalid!! Form submission processing halted.","text/plain"); theForm.destroy(); return; } else { System.out.println("SubmissionServlet: doPost: validation OK"); 348 IBM Workplace Forms 2.6: Guide to Building and Integrating a Sample Workplace Forms Application } The code is supported by an additional helper method that we already created in the Utils class. It is pretty simple to detect any changes to signed items. There are other methods available to check the validity of a single signature (verifySignature) or even to read signature validity status on the last signature check to track newly occurred violations (getSignatureVerificationStatus). Attention: There is no method to detect which item was changed in the form with a broken signature, since a signature is basically a hash code including all items to sign in one step. The validation fails if any item is changed. 5.11.9 Form storage to local file system Having all tasks completed, we can store the file to file system. The code provided for now already creates a file name (formName variable). The code to add performs the following actions: Evaluate the form state to determine the target directory to store the form. Store the form. Remove earlier versions of this form in any other directory. (We only want to keep the actual form.) Tip: It is not always necessary to store the form. In some cases it may be the right way to extract only some values and throw the XFDL away. We have already created the file system structure for storage, so we can use it now. Insert the code (shown in Example 5-47) at the right place in the doPost method (see the comment for file storage there). Example 5-47 Status indication, target folder calculation, file storage and clean-up /** * Store the form into the folder indicated by the formState. */ String folderPath = props.getProperty(formState); ServletContext ctx = conf.getServletContext(); String path = ctx.getRealPath(folderPath); Utils.writeBytesToFile(path + formName, Utils.getFormBytes(theForm)); /** * Remove the previous instance of the form. *STAGE 1* * */ if (previousFormState == null) { System.out.println("SubmissionServlet: doPost: FormMetaData: ERROR: PreviousFormState element was null"); } else if (previousFormState.equals(formState)){ System.out.println("No state change"); } else if (previousFormState.equalsIgnoreCase("2") || previousFormState.equalsIgnoreCase("3") || previousFormState.equalsIgnoreCase("5")) { Chapter 5. Building the base scenario: stage 1 349 System.out.println("SubmissionServlet: doPost: FormMetaData: previousFormState [ "+ previousFormState + "] indicates previous file deletion is necessary"); folderPath = props.getProperty(previousFormState); String previousFormPath = ctx.getRealPath(folderPath); File file = new File(previousFormPath + File.separator + formName); System.out.println("Deleting: " + previousFormPath + File.separator + formName); if (!(file == null)) file.delete(); } else { System.out.println("SubmissionServlet: doPost: FormMetaData: PreviousFormState element contained value: " + previousFormState + ", which does not indicate deletion."); } As you can see, the provided code contains the main part of the business logic (storing files according to state). The rest of the application logic is contained in the JSPs offering all application navigation dealing with the doGet method that calls the servlet URL with different action parameters attached. 5.11.10 Servlet doGet method for application navigation The doGet method in stage 1 primarily provides assisting functions. All are not related to the Workplace Forms functionality. This changes in stage 2, when form prepopulation comes into play. For now, we are only doing navigation support and user identity management. To have an easy way for user identification, we decide not to implement server security at this stage. Instead, we provide an application-based security model that passes the employee ID to any call’s (JSP or servlet) doGet method. It is used to set this ID for the session to any of the available employee IDs. Actually, there are no new helper methods to implement, since we do all necessary steps for doPost in the previous section. The servlet accepts the following action parameters: listTemplates — calls dirlisting1.jsp listing the templates directory. workbasket — calls dilisting1.jsp listing one of the folders for sales rep. forms, manager approval, or director approval (forms in state 1, 2, or 3) depending on the user role. listApproved — calls dilisting1.jsp listing approved forms (forms in state 4). listCancelled — calls dilisting1.jsp listing approved forms (forms in state 6). getJSP — navigates just to a dedicated JSP. Each time the servlet activates a JSP, it provides the user context (user ID) and possible other application state data to it. The doGet code is shown in Example 5-48. Example 5-48 Servlet doGet method protected void doGet(HttpServletRequest request, HttpServletResponse response) throws ServletException, IOException { try { /** * Obtain the user identity 350 IBM Workplace Forms 2.6: Guide to Building and Integrating a Sample Workplace Forms Application */ //TODO: Replace this with real user id lookup String userID = null; if (request.getSession().getAttribute("userRole") != null) { userID = (String) request.getSession().getAttribute("userRole"); System.out .println("SubmissionServlet: doGet: request parameter 'userRole' was loaded from Session as: " + userID); } else { System.out .println("SubmissionServlet: doGet: request parameter 'userRole' was not specified, using default value of 1000"); userID = "1000"; } request.setAttribute("userRole", userID); /** * Obtain the type of request from the key=value params and set the * necessary folder into the session */ String action = request.getParameter("action"); if (action == null || action.equalsIgnoreCase("listTemplates")) { System.out .println("SubmissionServlet: doGet: detected -->listTemplates<-- request."); request.setAttribute("FOLDER", TEMPLATE_FOLDER); } else if (action.equalsIgnoreCase("workbasket")) { System.out .println("SubmissionServlet: doGet: detected -->workbasket<-- request."); if (userID.equalsIgnoreCase("1010") || userID.equalsIgnoreCase("1020") || userID.equalsIgnoreCase("1030")) { request.setAttribute("FOLDER", MANAGER_FOLDER); System.out .println("SubmissionServlet: doGet: workbasket: setting folder to: " + MANAGER_FOLDER); } else if (userID.equalsIgnoreCase("1031")) { request.setAttribute("FOLDER", DIRECTOR_FOLDER); System.out .println("SubmissionServlet: doGet: workbasket: setting folder to: " + DIRECTOR_FOLDER); } else { request.setAttribute("FOLDER", SALES_REP_FOLDER); System.out .println("SubmissionServlet: doGet: workbasket: setting folder to: " + SALES_REP_FOLDER); } } else if (action.equalsIgnoreCase("listApproved")) { System.out .println("SubmissionServlet: doGet: detected -->listApproved<-- request."); request.setAttribute("FOLDER", APPROVED_FOLDER); } else if (action.equalsIgnoreCase("getJSP")) { System.out .println("SubmissionServlet: doGet: detected -->getJSP<-- request."); String jsp = request.getParameter("jsp"); if (jsp == null) { Utils.returnText( response, "SubmissionServlet: for getJSP, parameter jsp must not be null.", "text/plain"); Chapter 5. Building the base scenario: stage 1 351 } else { System.out .println("SubmissionServlet: doGet: getJSP: jsp = " + jsp); Utils.returnJSP(request, response, jsp); return; } } else if (action.equalsIgnoreCase("listCancelled")) { System.out .println("SubmissionServlet: doGet: detected -->listCancelled<-- request."); request.setAttribute("FOLDER", CANCELLED_FOLDER); } else if (action.equalsIgnoreCase("setRole")) { System.out .println("SubmissionServlet: doGet: detected -->setRole<-- request."); String userRole = request.getParameter("userRole"); if (userRole == null) { System.out .println("SubmissionServlet: setRole: parameter userRole was null. Defaulting to Employee role, 1000"); request.getSession().setAttribute("userRole", "1000"); } else { System.out .println("SubmissionServlet: setRole: parameter userRole was: " + userRole + ". Storing into session for later use."); request.getSession().setAttribute("userRole", userRole); } request.setAttribute("userRole", userRole); Utils.returnJSP(request, response, "/index1.jsp"); return; } else { System.out .println("SubmissionServlet: doGet: unexpected action param detected: " + action); } /** * Store the foldername into the session for use in the JSP * initial, default state is 1 */ Utils.returnJSP(request, response, "/dirlisting1.jsp"); } catch (Exception doGetE) { System.out .println("SubmissionServlet: doGet: Exception processing request: " + doGetE.toString()); Utils.returnText(response, "SubmissionServlet: doGet: Exception occured: " + doGetE.toString(), "text/plain"); } } This method is strongly related to the JSPs in the application. 352 IBM Workplace Forms 2.6: Guide to Building and Integrating a Sample Workplace Forms Application 5.12 Creating JSPs In the following discussion we show you how to create the JSPs. 5.12.1 Where we are in the process: building stage 1 of the base scenario Figure 5-133 provides an overview of the key steps involved in building the base scenario, which focuses on building the form, the servlet, and the JSPs. Building the Base Scenario – Stage 1 1 Building and Designing Form Template – Designing the layout – Layout and input items – Calculations and logic 2 3 Building the Servlet Building the JSPs – Security Access Level buttons – Forms Access buttons – Adding to the data model Figure 5-133 Overview of major steps involved in building the core base scenario application Java Server Pages (JSPs) allow you to develop dynamic, content-driven Web pages that separate the user interface (UI) from constantly changing data that may be generated from an external source. JSP tags can be combined with HTML to allow you to format the appearance of the content on the Web page. For the example used in this stage of the book, you need to create three JSPs, namely, index1.jsp, dirlisting1.jsp, and success1.jsp. You can use any Web application development tool such as Rational Application Developer (RAD), Eclipse, or DreamWeaver in order to create these JSPs. All of the JSPs contained here are created using RAD, and subsequently all of the figures have a RAD context. index1.jsp The index1.jsp is the main entry point and navigation page for the Web application that your sales team will use as a launching point to access all of the forms that they need to initiate or complete a sale, as well as to see all of the data associated with their customers. Employees, managers, and directors are able to see unique views of all of the forms that are stored on the file system — new orders, any items in their own workbasket that require review and approval, all approved forms, and all forms that have been rejected or cancelled. Chapter 5. Building the base scenario: stage 1 353 Figure 5-134 shows what the final page is going to look like. You can change the HTML layout, stylesheet, and graphics to suit your own taste. The important functionality, however, is contained in the buttons that you see on the page. Figure 5-134 index1.jsp Important: In order to run this Web application on WebSphere Application Server correctly, you need to save all of the JSPs to the root WebContent directory and not in the WEB-INF directory. All graphics and cascaded style-sheets should be stored in a directory called themes, also in the root. 354 IBM Workplace Forms 2.6: Guide to Building and Integrating a Sample Workplace Forms Application The steps are: 1. Using your Web application development tool, create a new JSP file, name it index1.jsp, and save it to the root WebContent directory (Figure 5-135). Figure 5-135 New JSP creation 2. In the <HEAD> section of the JSP file, give the path to the cascaded style-sheet that is used for the page in the <LINK href=”theme/...> section and enter the <TITLE> as Sales Homepage, as shown in Example 5-49. Example 5-49 Coding example (<TITLE> = Sales Homepage) <!DOCTYPE HTML PUBLIC "-//W3C//DTD HTML 4.01 Transitional//EN"> <HTML> <HEAD> <META http-equiv="Content-Type" content="text/html; charset=ISO-8859-1"> <META name="GENERATOR" content="IBM Software Development Platform"> <META http-equiv="Content-Style-Type" content="text/css"> <LINK href="theme/blue.css" rel="stylesheet" type="text/css"> <TITLE>Sales Homepage</TITLE> </HEAD> 3. <In the <BODY> section, create tables to display: – Logo graphics – Security access level buttons – Form access buttons Chapter 5. Building the base scenario: stage 1 355 Logo graphics In Example 5-50 we simply add a table with three columns, with a logo graphic on the left, a header in the middle, and a graphic on the right. Note that all of the graphics are contained in the folder called theme. Example 5-50 Logo graphics <BODY> <!-- Table to display the logo graphics --> <CENTER> <TABLE border="0" cellpadding="2" width="760"> <TBODY> <TR> <TD><IMG border="0" src="theme/redbook_logo.jpg" width="138" height="114" align="left"></TD> <TD align="left"> <H1>FORMS SELECTION</H1> </TD> <TD><IMG border="0" src="theme/Workplace_Forms.jpg" width="158" height="92" align="right"></TD> </TR> </TBODY> </TABLE> </CENTER> Security Access Level buttons This table contains important security access level information in buttons (see Example 5-51) that are to be submitted to the servlet. These, in turn, control the information that is returned and displayed from the other JSPs, which are described later. Each button has a userRole value, and when clicked, submits an action that sets the user credentials in the session and passes this to the servlet. The users from 1000–1002 have the role of employee, user 1010 has the role of manager, and user 1031 has the role of director. We also use the user ID number to prepopulate the form with metadata about the employee from the DB2 database. This includes first name, last name, personnel number, e-mail address, and the manager’s ID. Attention: We decided to implement security in this way, rather than by using a separate login page, to make the demonstration flow more easily. In a real-world scenario, all authentication should pass through a login page that would pass the user credentials to the servlet. Example 5-51 Security access level buttons <CENTER> <%@ page session="false" contentType="text/html" import="java.util.*,java.io.File"%> <% String userID = (String) request.getAttribute("userRole"); if (userID== null) userID="1000"; if (userID.equals("")) userID="1000"; %> <!-- Table to Display Access Level Selection Buttons --> <TABLE width="760"> <TR> 356 IBM Workplace Forms 2.6: Guide to Building and Integrating a Sample Workplace Forms Application <TD colspan="3"> <TABLE> <TR> <TD> <FORM method=get action="SubmissionServlet1"> <INPUT type="submit" value="Employee (1000)"> <INPUT type="hidden" name=action value="setRole"> <INPUT type="hidden" name=userRole value="1000"> </FORM> </TD> <TD width="304"> <FORM method=get action="SubmissionServlet1"> <INPUT type="submit" value="Employee (1001)"> <INPUT type="hidden" name=action value="setRole"> <INPUT type="hidden" name=userRole value="1001"> </FORM> </TD> <TD> <FORM method=get action="SubmissionServlet1"> <INPUT type="submit" value="Employee (1002)"> <INPUT type="hidden" name=action value="setRole"> <INPUT type="hidden" name=userRole value="1002"> </FORM> </TD> <TD> <FORM method=get action="SubmissionServlet1"> <INPUT type="submit" value="Manager (1010)"> <INPUT type="hidden" name=action value="setRole"> <INPUT type="hidden" name=userRole value="1010"> </FORM> </TD> <TD> <FORM method=get action="SubmissionServlet1"> <INPUT type="submit" value="Director (1031)"> <INPUT type="hidden" name=action value="setRole"> <INPUT type="hidden" name=userRole value="1031"> </FORM> </TD> </TR> <TR> <TD colspan="3"><%="Current User Role is: <STRONG>" + userID + "</STRONG>" %></TD></TR> </TABLE> Forms Access buttons The behavior of Forms Access buttons is controlled by the userRole values that are set in the previous step above. If a user does not set his security access role, then the default role that is set is employee. Once the user ID has been set and passed to the dirlisting.jsp by the servlet, the data that is returned when the user clicks any button is dependent on his access level. For example, clicking the Workbasket button displays only the forms that are specific to the user ID. There are four buttons that you need to create: New Orders: This button submits an action with a value of listTemplates to the SubmissionServlet1, which returns all of the new forms stored in a directory on the server file system named Form_Templates. Chapter 5. Building the base scenario: stage 1 357 Workbasket: This button submits an action with a value of workbasket and passes in the userID to the SubmissionServlet1. This returns only the forms that the user has created and submitted. These forms are stored in a directory on the server file system named Sales_Rep_Forms. Approved: This button submits an action with a value of listApproved to the servlet, which returns all of the forms in the Approved_Forms directory that have been approved by the manager or director role. All forms that have a value over $10,000.00 require manager approval, and all forms over $50,000.00 require director approval. Cancelled: This button submits an action with a value of cancelled to the servlet, which returns all of the new forms stored in a directory on the server file system named Cancelled_Forms. These are the forms that have not been approved by the manager or director. We show you how to create these buttons in Example 5-52. Example 5-52 Forms selection <!-- Table to display the Forms Selection --> <TABLE width="760" align="center"> <TR> <TD> <FORM method="get" action="/WPForms261Stage1/SubmissionServlet1"> <INPUT type="submit" value="New Orders"> <INPUT type="hidden" name=action value="listTemplates"> </TD> <TD><FONT size="-2">Use this option to launch a new <A href="/WPForms261Stage1/SubmissionServlet1">sales quote form</A></FONT> </FORM> </TD> </TR> <TR> <TD> <FORM method="get" action="/WPForms261Stage1/SubmissionServlet1"><INPUT type="submit" value="Work Basket"> <INPUT type="hidden" name=action value="workbasket"> <INPUT type="hidden" name=id value="<%=userID%>"> </TD> <TD><FONT size="-2">Use this option to display your current open forms</FONT> </FORM> </TD> </TR> <TR> <TD> <FORM method="get" action="SubmissionServlet1"><INPUT type="submit" value="Approved"> <INPUT type="hidden" name=action value="listApproved"> </TD> <TD><FONT size="-2">Use this option to display your approved forms</FONT> </FORM> </TD> </TR> <TR> <TD> <FORM method=get action="SubmissionServlet1"> <INPUT type="submit" value="Cancelled"> <INPUT type="hidden" name=action value="listCancelled"> </TD> 358 IBM Workplace Forms 2.6: Guide to Building and Integrating a Sample Workplace Forms Application <TD><FONT size="-2">Use this option to show all cancelled forms</FONT> </TD> </FORM> </TD> </TR> <TABLE> </TD> </TR> </TABLE> The JSP shown above (see Example 5-52 on page 358) creates several actions calling the SubmissionServlet1 with additional parameters. To create the appropriate links, we create, for each button, a separate HTML form element containing the necessary parameters. Each input element with type hidden creates a parameter in the URL. Example 5-53 creates a URL like this: http://servername/WPFormsRedbook/SubmissionServlet1?action=action_param_val¶m_ 1_name=add_param_1_val&...¶m_n_name=add_param_n_val Example 5-53 Creating a GET action with additional parameters <FORM method="get" action="/WPFormsRedbook/SubmissionServlet1"> <INPUT type="submit" value="[Button Label]"> <INPUT type="hidden" name=action value="[action_param_val]"> <INPUT type="hidden" name=[param_1_name] value="[add_param_1_val]"> ..... <INPUT type="hidden" name=[param_n_name] value="[add_param_n_val]"> <FONT size="-2">#button description# <A href="/WPFormsRedbook/SubmissionServlet1">sales quote form</A> </FONT> </FORM> dirlisting1.jsp The dirlisting1.jsp is used to display all of the forms that are currently stored on the file system of the server, and it is launched by the servlet. Depending on the button that is clicked on the index1.jsp and which security role is set, the dirlisting1.jsp dynamically updates the forms listed in the folder on the file system for that user. This JSP looks specifically for forms in six folders on the server’s file system, located in the following directory: C:\AppServer\installedApps\vmforms1\WPFormsRedpaper_war.ear\WPFormsRedpaper.war\ Redpaper_Demo\: The the six folders are: Form_Templates Sales_Rep_Forms Approved_Forms Cancelled_Forms Manager_Forms Director_Forms Chapter 5. Building the base scenario: stage 1 359 The steps to create this JSP are: 1. Create a new JSP named dirlisting1.jsp and save it to the root WebContent directory. 2. The contents of the JSP should be as shown in Example 5-54. Example 5-54 dirlisting1.jsp provides links to the available files in an assigned folder in file system <html> <head> <meta http-equiv="Content-Type" content="text/html; charset=ISO-8859-1"> <meta http-equiv="Content-Style-Type" content="text/css"> <link rel="stylesheet" href="theme/blue.css" type="text/css"> <title>IBM Workplace Forms Selection</title> </head> <CENTER> <TABLE border="0" cellpadding="2" width="760"> <TBODY> <TR> <TD><IMG border="0" src="theme/redbook_logo.jpg" width="138" height="114" align="left"></TD> <TD align="left"> <H1>FORMS SELECTION</H1> </TD> <TD><IMG border="0" src="theme/Workplace_Forms.jpg" width="158" height="92" align="right"></TD> </TR> </TBODY> </TABLE> </CENTER> <%@ page session="false" contentType="text/html" import="java.util.*,java.io.File"%> <%String theDir = (String) request.getAttribute("FOLDER"); String prepop = (String) request.getAttribute("PrePop"); String userID = (String) request.getAttribute("userRole"); //prepop will control link behavior if (prepop == null) prepop = "No"; prepop = "Yes"; //The path to the current template, including the template name String servletPath = application.getRealPath(request .getServletPath()); //Remove subdirs including WEB-INF System.out.println("servletPath: " + servletPath); String projectName = "WPFormsRedpaper"; String path = servletPath; String linkPath = ""; if (path.indexOf(java.io.File.separator + "WebContent" + java.io.File.separator) > 0) { path = path.substring(0, path.lastIndexOf("WebContent") - 1); path = path + java.io.File.separator + "WebContent"; linkPath = path.substring(path.indexOf(projectName) - 1, path .lastIndexOf(java.io.File.separator) - 1); linkPath = "/" + projectName + theDir; } else { path = path.substring(0, path .lastIndexOf(java.io.File.separator)); 360 IBM Workplace Forms 2.6: Guide to Building and Integrating a Sample Workplace Forms Application linkPath = "/" + projectName + theDir; } String link=linkPath.replace('\\','/'); if (prepop.equals("Yes")) { link = "/"+projectName +"/" + "SubmissionServlet1" + "?action=prepop&template=" + path + theDir; } //Add relative template path String templatePath = path + theDir; System.out.println("templatePath: " + templatePath); //strip drive if (templatePath.indexOf(":") > 0) templatePath = templatePath .substring( templatePath.indexOf(java.io.File.separator), templatePath.length()); File dir = new File(templatePath); try { if (dir.isDirectory()) { String[] children = dir.list(); }%> <TABLE border="0" width="760" align="center"> <TR> <TD bgcolor="#699ccf"><B>Please select a Form from the Dynamic E-Form Library below</B><BR> </TD> </TR> <TR> <TD>Current Directory is : <STRONG><%=dir.getName()%></STRONG> Current User Role is: <STRONG><%=userID%></STRONG> <P><HR></P> <TABLE border="0"> <%String[] child = dir.list(); for (int i = 0; i < child.length; i++) { File Eform = new File(dir, child[i]);%> <TR> <TD><A href="<%= link + Eform.getName()%>"><%="Template:" + Eform.getName()%></A></TD> </TR> <%} %> <%} catch (Exception ex) { ex.printStackTrace(); } %> </TABLE> </TD> </TR> <TR> <TD align="center"> <FORM method=get action="SubmissionServlet1"> <INPUT type="submit" value="Home"> <INPUT type="hidden" name=action value="getJSP"> <INPUT type="hidden" name=jsp value="index1.jsp"> </FORM> Chapter 5. Building the base scenario: stage 1 361 </TR> </TABLE> <TABLE width="760" align="center"> <tr bgcolor="#699ccf"> <td align="right"><B>...Yet another WTS Production!</B></td> </tr> </TABLE> Adaptive handling of absolute and relative paths to stored XFDL forms A basic concept of this JSP is the adaptive handling of absolute and relative paths to the stored XFDL forms in both the runtime test environment in RAD6 and the production environment in the application server directory structure. The JSP code first detects the path to the servlet rendered from the JSP (Variable servletPath). If this path contains the folder WebContent, we are in the test environment. Otherwise, we are in the deployed Web application. According to the environment detection, the code creates a variable containing the path to the project directory (variable path). Next, it computes the relative path to the template (linkPath) used in the action retrieving the template from the server and the absolute path to the file on file system (variable templatePath). In case of prepopulation (prepop =”Yes”), the original link to the template file is replaced with a URL calling the SubmissionServlet1 with the appropriate parameters (action= ..., template= ....). Created links Table 5-33 illustrates the links generated within dirlisting1.jsp. Table 5-33 Examples for the generated actions in dirlistIing1.jsp (Stage 1) Generated URL RAD6 test environment New form http://localhost:9080/WPFormsRedpaper/WebContent/Redpaper_ Demo/Form_Templates/Redpaper_Forms_Sample_S2_v41.xfdl Open stored form http://localhost:9080/WPFormsRedpaper/WebContent/Redpaper_ Demo/Approved_Forms/Quote_Approval_Form1000143.xfdl Deployed application 362 New form http://vmforms1.cam.itso.ibm.com:10000/WPFormsRedpaper/ Redpaper_Demo/Form_Templates/Redpaper_Forms_Sample_S2_v 41.xfdl Open stored form http://vmforms1.cam.itso.ibm.com:10000/WPFormsRedpaper/ Redpaper_Demo/Approved_Forms/Quote_Approval_Form1000143.x fdl IBM Workplace Forms 2.6: Guide to Building and Integrating a Sample Workplace Forms Application success1.jsp This JSP is used to inform a user that her form has been successfully submitted. The servlet is responsible for launching this form once the user has gone through the steps of filling it out and submitting it for approval. Figure 5-136 is a sample of what the success1.jsp looks like. Figure 5-136 Rendering of success 1.jsp Example 5-55 shows a sample of the code that can go into this JSP. Example 5-55 success1.jsp <!DOCTYPE HTML PUBLIC "-//W3C//DTD HTML 4.01 Transitional//EN"> <HTML> <HEAD> <META http-equiv="Content-Type" content="text/html; charset=ISO-8859-1"> <META name="GENERATOR" content="IBM Software Development Platform"> <META http-equiv="Content-Style-Type" content="text/css"> <LINK href="theme/blue.css" rel="stylesheet" type="text/css"> <TITLE>Success!!</TITLE> </HEAD> <BODY> <CENTER> <TABLE border="0" cellpadding="2" width="760" > <TBODY> <TR> <TD><IMG border="0" src="theme/redbook_logo.jpg" width="138" height="114" align="left"></TD> <TD align="left"><H1 align="center">SUCCESS!</H1></TD> <TD><IMG border="0" src="theme/Workplace_Forms.jpg" width="158" height="92" align="right"></TD> </TR> </TBODY> </TABLE> </CENTER> Chapter 5. Building the base scenario: stage 1 363 <CENTER> Your Form has been submitted successfully!! </CENTER> <P> <TABLE align="center"> <TR> <TD align="center"> <FORM method=get action="SubmissionServlet1"> <INPUT type="submit" value="Home"> <INPUT type="hidden" name=action value="getJSP"> <INPUT type="hidden" name=jsp value="index1.jsp"> </FORM> </TR> </TABLE> <TABLE width="760" align="center"> <tr bgcolor="#699ccf"> <td align="right"><B>...Yet another WTS Production!</B></td> </tr> </TABLE> </HTML> 364 IBM Workplace Forms 2.6: Guide to Building and Integrating a Sample Workplace Forms Application 5.12.2 Form template listing Once a user has selected his role and then selected the button to create a new sales quote order, the dirlisting1.jsp displays a list of the relevant form templates that they are authorized to use. The user can then click one of the links to launch a new form and begin the sales quote order process. Figure 5-137 shows a sample of all of the forms listed in the Form_Templates folder from the file system that a user (employee) is able to see (1000). Figure 5-137 Form template listing using dirlisting1.jsp Chapter 5. Building the base scenario: stage 1 365 5.12.3 Approved form listing The Approved button allows the user to view all forms that have gone through the approval process. Clicking this button utilizes the dirlisting1.jsp, which displays the contents of the Approved_Forms folder. Figure 5-138 shows a sample Approved_Forms listing view. Figure 5-138 Approved form listing view using dirlisting1.jsp 366 IBM Workplace Forms 2.6: Guide to Building and Integrating a Sample Workplace Forms Application 6 Chapter 6. Building the base scenario: stage 2 In this chapter we extend the base J2EE scenario we created in Chapter 4, “Approaches to integrating Workplace Forms” on page 151. We now add a DB2 environment. The reason for this is to take into consideration the potential data growth and subsequent server performance implications when storing a huge amount of large XDFL files on the file system. Storing the forms in DB2 gives you scalability, reliability, and database search capabilities. We describe the following topics: Installing DB2 clients and servers Creating and populating DB2 tables Developing a DB2 data access layer Creating data access functionality for DB2 data using XForms submissions Using the Workplace Forms API Creating JSPs to view DB2 data Note: The code used for building this sample scenario application is available for download. For specific information about how to download the sample code, refer to Appendix D, “Additional material” on page 693. Note: All specific examples shown and used when building the sample scenario application are based on the codebase for IBM Workplace Forms Release 2.6.1. © Copyright IBM Corp. 2007. All rights reserved. 367 6.1 Overview of steps: building stage 2 of the base scenario The diagram in Figure 6-1 is intended to provide an overview of where we are within the key steps involved to build stage 2 of the base scenario. This focuses on adding storage capabilities to DB2, incorporating Web services, modifying the JSPs, and adding an approval workflow. Building the Base Scenario – Stage 2 XForms Submissions DB2 / Data Storage Servlet Access to Forms Adjustments to JSPs – Creating tables – Form development – Form prepopulation – Modifying index1.jsp – Populating tables – Creating actions to activate submissions – J2EE Development – Extraction of form data – Reading form data from DB2 – Creating JSP to view DB2 data Approval Workflow – Designing – Workflow – XForms submissions runtime Figure 6-1 Overview of major steps involved in building stage 2 of base scenario application 6.2 Data storage to DB2 A main topic of stage 2 in building the sample application is moving the leading data storage to a relational database to take advantage of database search capabilities, scalability, and reliability. The following data should be available as SQL data for the project: Basic application parameters (such as business rules) Organization data (such as employee data, manager data) Inventory (such as product description, stock level) Customer registry (such as ID, name, related sales person) Order metadata (such as ID, name, submitting sales person) Order forms (complete XFDL files as CLOB) Counter for new order number Due to the use of large data objects (XFDL files can reach the multiple megabyte size range), we decide to use a separate DB2 table for data storage. For each of the data objects mentioned above, there is one dedicated table holding all available data and one additional table to store the entire amount of submitted forms. The data should be accessed using the Class 2 JDBC™ driver available in the install package. 368 IBM Workplace Forms 2.6: Guide to Building and Integrating a Sample Workplace Forms Application Note: Access to CLOB/BLOB is not a JDBC standard. Nevertheless, the chosen JDBC driver supports these operations. Make sure that your driver/database combination will handle BLOB or CLOB objects when storing templates or submitted filed in a database. Forms containing one ore more megabytes are rarely used, but sometimes required. 6.2.1 Installing DB2 Server All tables are assigned to one single database instance with a standard DB2 set up on a Windows 2003 server machine. We process a standard DB2 UDB 8.2 installation using the following setup parameters (Table 6-1). Table 6-1 DB2 Universal Database™ setup parameters Setup parameter Parameter value Comments Setup type Standard Creates a DB2 instance and all necessary administration utilities (Control Center, command-line processor). Instance name DB2 Default instance name. Instance node name TCP8D534 Generated during setup. Administration user wpsadmin Same user as portal/WebSphere Application Server (WAS) administrator. Administration user password wpsadmin Be careful about user name and password. Setup will create a system account with full administration permissions. Never use any common known (default) passwords in production or sensitive environments here. Maintenance mode Low administration/low performance Arbitrary - keep things simple for this project. Admin notification mode Defer Arbitrary - keep things simple for this project. After setup, we create a new DB2 database (Table 6-2). Table 6-2 DB2 Universal Database setup parameters Setup parameter Parameter value Database name VMFORMS Database alias VMFORMS Comments All database tables necessary for the project are created in this database. Chapter 6. Building the base scenario: stage 2 369 6.2.2 Creating tables The project uses the tables listed in Table 6-3. (For detailed column attributes, see the table setup scripts in Example 6-1 on page 372 and Example 6-2 on page 375.) Table 6-3 DB2 table descriptions Table name Column name WPF_Param Table containing administrative parameters, business rules, and other setup data on a key/value concept. To store numeric and text data, the table contains two parameter value columns dedicated to the two value types. No administration utilities to maintain data in the application. Use DB2 administration tools for data maintenance. Par_Key Key value for parameter lookup. Par_NumValue Numeric parameter value. Par_TextValue Text string assigned to the parameter. WPF_ORG Organization data (employee data and reporting line). No administration utilities to maintain data in the application. Use DB2 administration tools for data maintenance. Org_ID Employee ID (used as key and role identification). Org_FirstName Employee first name. Org_LastName Employee last name. Org_ContactInfo Employee mail address or other contact data. Org_MGR Managers ID - references to the Org_ID of any other employee. WPF_CUST 370 Comments Customer data (name, contact person data, and responsible sales person). No administration utilities to maintain data in the application. Use DB2 administration tools for data maintenance. CUST_ID Customer company ID (unique key for data lookup). CUST_NAME Company name. CUST_AMGR ID of responsible sales person/ Related or column ORG_ID in table WPR_ORG. CUST_CONTACT_NAME Name of contact person on customer site. CUST_CONTACT_POSITION Position of contact person on customer site. CUST_CONTACT_EMAIL E-mail address of contact person on customer site. CUST_CONTACT_PHONE Phone number of contact person on customer site. CUST_CRM_NO ID for the customer in the local CRM system. IBM Workplace Forms 2.6: Guide to Building and Integrating a Sample Workplace Forms Application Table name Column name Comments WPF_ITEMS Product catalog used for product lookup. No administration utilities to maintain data in the application. Use DB2 administration tools for data maintenance. IT_ID Item ID (used for item details lookup). IT_NAME Item name (short item description). IT_PRICE Item price per unit. IT_STOCK Stock availability. WPF_ORDERS Table storing active and archived order metadata - the application reads data for list display/order selection and writes/updates data on form submit. ORD_ID Order ID (unique) used for data lookup. ORD_CUST_ID Customer ID for the related order. ORD_AMOUNT Total order amount. ORD_DISCOUNT Total order discount. ORD_SUBMITTER_ID ID of the sales person creating this order (related to field ORG_ID in table WPF_ORG). ORD_STATE Order state: 1 - new order not processed yet 2 - order waiting for manager approval 3 - order waiting for director approval 4 - completed (finally accepted) order 5 - rejected order waiting for rework 6 - canceled order ORD_CREATION_DATE Order creation date. ORD_COMPLETION_DATE Order completion date. ORD_OWNER ID for the actual owner (sales person) for the owner. Initial the submitting same person (related to field ORG_ID in table WPF_ORG). ORD_VERSION Order version - the version number of the order form used. ORD_APP_1 ID of approving manager (related to field ORG_ID in table WPF_ORG). ORD_APP_DATE_1 Date of manager approval. ORD_APP_COMMENT_ Comment for manager approval. ORD_APP_2 ID of approving director (related to field ORG_ID in table WPF_ORG). ORD_APP_DATE_2 Date of director approval. ORD_APP_COMMENT_2 Comment for director approval. Chapter 6. Building the base scenario: stage 2 371 Table name Column name WPF_ORDXFDL Comments Table storing the entire XFDL form containing detail order information and signing information. Each record related to a corresponding order metadata record stored in table WPF_ORDERS with the same order ID. The application reads data for on form open and writes/updates data on form submit. ORD_ID Order ID (unique) used for data lookup relates to order metadata in table WPF_ORDERS by same ORD_ID. ORD_XFDL CLOB field (1 MB maximum) to store entire XFDL file. WPF_ORDNOCNT Counter for new order numbers. ORD_ID Last used order number - will increase by 1 for each new order. Tip: To avoid multi-megabyte CLOB column definitions used for form storage, the read/write routines could join/split the entire file into smaller blocks stored in consecutive records. This technique could help to overcome database or driver limitations, but would result in a somewhat lower performance in general. Note: There is no DB2-based repository for available XFDL templates in our project. These files could be stored in DB2 similar to the submitted forms. We do not take this approach due to development time limitations. We save time on development for special (template) file upload and maintenance facilities using file system storage as in the stage 1 scenario. At the beginning of the project, these tables are created using the DB2 command-line processor on the server machine with the SQL script given in Example 6-1. Example 6-1 DB2 table creation script connect to ; DROP TABLE DROP TABLE DROP TABLE DROP TABLE DROP TABLE DROP TABLE DROP TABLE WPFORMS user wpsadmin using wpsadmin WPF_PARAM; WPF_ORG; WPF_CUST; WPF_ITEMS; WPF_ORDERS; WPF_ORDXFD; WPF_ORDNOCNT; CREATE TABLE WPF_Param ( Par_Key VARCHAR (20) NOT NULL DEFAULT , Par_NumValue DECIMAL (10,2) , Par_TextValue VARCHAR (100) DEFAULT , PRIMARY KEY (PAR_KEY) ); select * from WPF_Param; 372 IBM Workplace Forms 2.6: Guide to Building and Integrating a Sample Workplace Forms Application CREATE TABLE WPF_ORG ( Org_ID VARCHAR (10) NOT NULL DEFAULT , Org_FirstName VARCHAR (30) NOT NULL DEFAULT , Org_LastName VARCHAR (30) NOT NULL DEFAULT , Org_ContactInfo VARCHAR (100) NOT NULL DEFAULT Org_MGR VARCHAR (10) NOT NULL , PRIMARY KEY (ORG_ID) ); select * from WPF_ORG; , CREATE TABLE WPF_CUST ( CUST_ID VARCHAR (10) NOT NULL DEFAULT , CUST_NAME VARCHAR (30) NOT NULL DEFAULT , CUST_AMGR VARCHAR (10) NOT NULL DEFAULT , CUST_CONTACT_NAME VARCHAR (30) NOT NULL DEFAULT , CUST_CONTACT_POSITION VARCHAR (30) NOT NULL DEFAULT CUST_CONTACT_EMAIL VARCHAR (50) NOT NULL DEFAULT , CUST_CONTACT_PHONE VARCHAR (20) NOT NULL DEFAULT , CUST_CRM_NO VARCHAR (10) NOT NULL DEFAULT , PRIMARY KEY (CUST_ID) ); select * from WPF_CUST; , CREATE TABLE WPF_ITEMS ( IT_ID VARCHAR (10) NOT NULL DEFAULT , IT_NAME VARCHAR (30) NOT NULL DEFAULT , IT_PRICE DECIMAL (10,2) NOT NULL DEFAULT , IT_STOCK INTEGER NOT NULL DEFAULT 0, PRIMARY KEY (IT_ID) ); select * from WPF_ITEMS; CREATE TABLE WPF_ORDERS ( ORD_ID VARCHAR (10) NOT NULL , ORD_CUST_ID VARCHAR (10) DEFAULT '', ORD_AMOUNT DECIMAL (10,2) DEFAULT 0, ORD_DISCOUNT DECIMAL (10,2) DEFAULT 0, ORD_SUBMITTER_ID VARCHAR (10) , ORD_STATE VARCHAR (10) DEFAULT '', ORD_CREATION_DATE DATE , ORD_COMPLETION_DATE DATE , ORD_OWNER VARCHAR (10) DEFAULT '1.0', ORD_VERSION VARCHAR (10) DEFAULT '1.0', ORD_APP_1 VARCHAR (10) DEFAULT '', ORD_APP_DATE_1 DATE , ORD_APP_COMMENT_1 VARCHAR (200) DEFAULT '', ORD_APP_2 VARCHAR (10) DEFAULT '', Chapter 6. Building the base scenario: stage 2 373 ORD_APP_DATE_2 DATE , ORD_APP_COMMENT_2 VARCHAR (200) DEFAULT '', PRIMARY KEY (ORD_ID) ); select * from WPF_ORDERS; CREATE TABLE WPF_ORDXFD ( ORD_ID VARCHAR (10) NOT NULL , ORD_XFDL CLOB (1000000) DEFAULT PRIMARY KEY (ORD_ID) ); select * from WPF_ORDXFD; '', CREATE TABLE WPF_ORDNOCNT ( ORD_ID VARCHAR (10) NOT NULL , PRIMARY KEY (ORD_ID) ); select * from WPF_ORDXFD; SELECT SELECT SELECT SELECT SELECT SELECT SELECT COUNT COUNT COUNT COUNT COUNT COUNT COUNT SELECT SELECT SELECT SELECT SELECT SELECT SELECT * * * * * * * FROM FROM FROM FROM FROM FROM FROM (*) (*) (*) (*) (*) (*) (*) FROM FROM FROM FROM FROM FROM FROM WPF_Param ; WPF_ORG ; WPF_CUST ; WPF_ITEMS ; WPF_ORDERS ; WPF_ORDXFD ; WPF_ORDNOCNT ; WPF_Param ; WPF_ORG ; WPF_CUST ; WPF_ITEMS ; WPF_ORDERS ; WPF_ORDXFD ; WPF_ORDNOCNT ; The script initially deletes all used tables (DROP statements) to have a simple redeployment whenever tables or example data changes. Next, all tables are created (CREATE statements). Finally, all tables are read to have an easy way to see if any error occurred during setup (SELECT statements). Tip: This procedure is really helpful when deploying large database structures with multiple dependencies between tables, views, and stored procedures. The created structure is simple. To keep code, installation, and documentation as simple as possible, we do not set up any relational references or special lookup views inheriting related data. In reality, there are various interdependencies between the data structures, making setup validation a mandatory task. 6.2.3 Populating tables To have a manageable project start, we fill the tables with example data. This makes it easy to design all read-only functionality (Web services, table display JSPs, prepopulation functionality) independent of any data creating modules. These are usually created in more advanced project phases. 374 IBM Workplace Forms 2.6: Guide to Building and Integrating a Sample Workplace Forms Application Initial data population is done using the script shown in Example 6-2 right after table creation. (INSERT statements create one table row, SELECT statements return the inserted data for error detection.) Example 6-2 Example of data prepopulation to DB2 tables INSERT INTO WPF_Param (Par_Key, 'Manager Approval Threshold'); INSERT INTO WPF_Param (Par_Key, 'Director Approval Threshold'); INSERT INTO WPF_Param (Par_Key, 'Rabate 1 in percent'); INSERT INTO WPF_Param (Par_Key, 'Rabate 2 in percent'); INSERT INTO WPF_Param (Par_Key, 'Rabate 3 in percent'); Par_NumValue, Par_TextValue) VALUES ('MgrThreshold', 10000, Par_NumValue, Par_TextValue) VALUES ('DirThreshold', 50000, Par_NumValue, Par_TextValue) VALUES ('Discount_1', 10, Par_NumValue, Par_TextValue) VALUES ('Discount_2', 20, Par_NumValue, Par_TextValue) VALUES ('Discount_3', 30, SELECT * FROM WPF_Param; INSERT INTO WPF_ORG (Org_ID, Org_FirstName, Org_LastName, Org_ContactInfo, Org_MGR) VALUES ('1000', 'Christine', 'Haas', '[email protected]', '1010'); INSERT INTO WPF_ORG (Org_ID, Org_FirstName, Org_LastName, Org_ContactInfo, Org_MGR) VALUES ('1001', 'Michael', 'Thompson', '[email protected]', '1010'); INSERT INTO WPF_ORG (Org_ID, Org_FirstName, Org_LastName, Org_ContactInfo, Org_MGR) VALUES ('1002', 'Sally', 'Kwan', '[email protected]', '1010'); INSERT INTO WPF_ORG (Org_ID, Org_FirstName, Org_LastName, Org_ContactInfo, Org_MGR) VALUES ('1003', 'John', 'Geyer', '[email protected]', '1010'); INSERT INTO WPF_ORG (Org_ID, Org_FirstName, Org_LastName, Org_ContactInfo, Org_MGR) VALUES ('1004', 'Irving', 'Stern', '[email protected]', '1010'); INSERT INTO WPF_ORG (Org_ID, Org_FirstName, Org_LastName, Org_ContactInfo, Org_MGR) VALUES ('1005', 'Eva', 'Pulaski', '[email protected]', '1010'); INSERT INTO WPF_ORG (Org_ID, Org_FirstName, Org_LastName, Org_ContactInfo, Org_MGR) VALUES ('1006', 'Eileen', 'Henderson', '[email protected]', '1010'); INSERT INTO WPF_ORG (Org_ID, Org_FirstName, Org_LastName, Org_ContactInfo, Org_MGR) VALUES ('1007', 'Theodore', 'Spenser', '[email protected]', '1010'); INSERT INTO WPF_ORG (Org_ID, Org_FirstName, Org_LastName, Org_ContactInfo, Org_MGR) VALUES ('1008', 'Vincenzo', 'Lucchessi', '[email protected]', '1010'); INSERT INTO WPF_ORG (Org_ID, Org_FirstName, Org_LastName, Org_ContactInfo, Org_MGR) VALUES ('1009', 'Sean', 'Connell', '[email protected]', '1010'); INSERT INTO WPF_ORG (Org_ID, Org_FirstName, Org_LastName, Org_ContactInfo, Org_MGR) VALUES ('1010', 'Dolores', 'Quintana', '[email protected]', '1031'); INSERT INTO WPF_ORG (Org_ID, Org_FirstName, Org_LastName, Org_ContactInfo, Org_MGR) VALUES ('1011', 'Heather', 'Nicholls', '[email protected]', '1020'); INSERT INTO WPF_ORG (Org_ID, Org_FirstName, Org_LastName, Org_ContactInfo, Org_MGR) VALUES ('1012', 'Bruce', 'Adamson', '[email protected]', '1020'); INSERT INTO WPF_ORG (Org_ID, Org_FirstName, Org_LastName, Org_ContactInfo, Org_MGR) VALUES ('1013', 'Elizabeth', 'Pianka', '[email protected]', '1020'); INSERT INTO WPF_ORG (Org_ID, Org_FirstName, Org_LastName, Org_ContactInfo, Org_MGR) VALUES ('1014', 'Masatoshi', 'Yoshimura', '[email protected]', '1020'); INSERT INTO WPF_ORG (Org_ID, Org_FirstName, Org_LastName, Org_ContactInfo, Org_MGR) VALUES ('1015', 'Marilyn', 'Scoutten', '[email protected]', '1020'); INSERT INTO WPF_ORG (Org_ID, Org_FirstName, Org_LastName, Org_ContactInfo, Org_MGR) VALUES ('1016', 'James', 'Walker', '[email protected]', '1020'); INSERT INTO WPF_ORG (Org_ID, Org_FirstName, Org_LastName, Org_ContactInfo, Org_MGR) VALUES ('1017', 'David', 'Brown', '[email protected]', '1020'); INSERT INTO WPF_ORG (Org_ID, Org_FirstName, Org_LastName, Org_ContactInfo, Org_MGR) VALUES ('1018', 'William', 'Jones', '[email protected]', '1020'); INSERT INTO WPF_ORG (Org_ID, Org_FirstName, Org_LastName, Org_ContactInfo, Org_MGR) VALUES ('1019', 'Jennifer', 'Lutz', '[email protected]', '1020'); Chapter 6. Building the base scenario: stage 2 375 INSERT INTO WPF_ORG (Org_ID, Org_FirstName, Org_LastName, Org_ContactInfo, Org_MGR) VALUES ('1020', 'James', 'Jefferson', '[email protected]', '1031'); INSERT INTO WPF_ORG (Org_ID, Org_FirstName, Org_LastName, Org_ContactInfo, Org_MGR) VALUES ('1021', 'Salvatore', 'Marino', '[email protected]', '1030'); INSERT INTO WPF_ORG (Org_ID, Org_FirstName, Org_LastName, Org_ContactInfo, Org_MGR) VALUES ('1022', 'Daniel', 'Smith', '[email protected]', '1030'); INSERT INTO WPF_ORG (Org_ID, Org_FirstName, Org_LastName, Org_ContactInfo, Org_MGR) VALUES ('1023', 'Sybil', 'Johnson', '[email protected]', '1030'); INSERT INTO WPF_ORG (Org_ID, Org_FirstName, Org_LastName, Org_ContactInfo, Org_MGR) VALUES ('1024', 'Maria', 'Perez', '[email protected]', '1030'); INSERT INTO WPF_ORG (Org_ID, Org_FirstName, Org_LastName, Org_ContactInfo, Org_MGR) VALUES ('1025', 'Ethel', 'Schneider', '[email protected]', '1030'); INSERT INTO WPF_ORG (Org_ID, Org_FirstName, Org_LastName, Org_ContactInfo, Org_MGR) VALUES ('1026', 'John', 'Parker', '[email protected]', '1030'); INSERT INTO WPF_ORG (Org_ID, Org_FirstName, Org_LastName, Org_ContactInfo, Org_MGR) VALUES ('1027', 'Philip', 'Smith', '[email protected]', '1030'); INSERT INTO WPF_ORG (Org_ID, Org_FirstName, Org_LastName, Org_ContactInfo, Org_MGR) VALUES ('1028', 'Maude', 'Setright', '[email protected]', '1030'); INSERT INTO WPF_ORG (Org_ID, Org_FirstName, Org_LastName, Org_ContactInfo, Org_MGR) VALUES ('1029', 'Ramlal', 'Mehta', '[email protected]', '1030'); INSERT INTO WPF_ORG (Org_ID, Org_FirstName, Org_LastName, Org_ContactInfo, Org_MGR) VALUES ('1030', 'Wing', 'Lee', '[email protected]', '1031'); INSERT INTO WPF_ORG (Org_ID, Org_FirstName, Org_LastName, Org_ContactInfo, Org_MGR) VALUES ('1031', 'Jason', 'Gounot', '[email protected]', '1031'); INSERT INTO WPF_ORG (Org_ID, Org_FirstName, Org_LastName, Org_ContactInfo, Org_MGR) VALUES ('wpsadmin', 'Admin', 'Portal&WAS', '[email protected]', '1031'); SELECT * FROM WPF_ORG; INSERT INTO WPF_CUST (CUST_ID, CUST_NAME, CUST_AMGR, CUST_CONTACT_NAME, CUST_CONTACT_POSITION, CUST_CONTACT_EMAIL, CUST_CONTACT_PHONE, CUST_CRM_NO) VALUES ('100000', 'OnDemand Corporation', '1000', 'Jerry Haas', 'AccountMgr', '[email protected]', '+49 89 123-456-78', '200001'); INSERT INTO WPF_CUST (CUST_ID, CUST_NAME, CUST_AMGR, CUST_CONTACT_NAME, CUST_CONTACT_POSITION, CUST_CONTACT_EMAIL, CUST_CONTACT_PHONE, CUST_CRM_NO) VALUES ('100001', 'Workplace Early Adopter Inc', '1000', 'Mary F Thompson', 'DeptMgr', '[email protected]', '1 756-568-123', '200002'); INSERT INTO WPF_CUST (CUST_ID, CUST_NAME, CUST_AMGR, CUST_CONTACT_NAME, CUST_CONTACT_POSITION, CUST_CONTACT_EMAIL, CUST_CONTACT_PHONE, CUST_CRM_NO) VALUES ('100002', 'Portal Application Surfacing', '1001', 'Hiu Kwan', 'Director', '[email protected]', '+43 623-644', '200003'); INSERT INTO WPF_CUST (CUST_ID, CUST_NAME, CUST_AMGR, CUST_CONTACT_NAME, CUST_CONTACT_POSITION, CUST_CONTACT_EMAIL, CUST_CONTACT_PHONE, CUST_CRM_NO) VALUES ('100003', 'Workplace Forms Redpapers Inc', '1001', 'Max Ritter', 'AccountMgr', '[email protected]', '1 756-123-456', '200004'); INSERT INTO WPF_CUST (CUST_ID, CUST_NAME, CUST_AMGR, CUST_CONTACT_NAME, CUST_CONTACT_POSITION, CUST_CONTACT_EMAIL, CUST_CONTACT_PHONE, CUST_CRM_NO) VALUES ('100004', 'Global Security Trust Center Inc', '1001', 'Toni Tester', 'DeptMgr', '[email protected]', '1 756-568-124', '200005'); INSERT INTO WPF_CUST (CUST_ID, CUST_NAME, CUST_AMGR, CUST_CONTACT_NAME, CUST_CONTACT_POSITION, CUST_CONTACT_EMAIL, CUST_CONTACT_PHONE, CUST_CRM_NO) VALUES ('100005', 'Mobile Devices Corporation', '1002', 'Monique Lille', 'Director', '[email protected]', '1 756-568-125', '200006'); SELECT * FROM WPF_CUST; INSERT INTO WPF_ITEMS (IT_ID, IT_NAME, IT_PRICE, IT_STOCK) VALUES ('IT_001', 'Nut', 21.15, 11111); 376 IBM Workplace Forms 2.6: Guide to Building and Integrating a Sample Workplace Forms Application INSERT INTO WPF_ITEMS 22222); INSERT INTO WPF_ITEMS 512.99, 33333); INSERT INTO WPF_ITEMS 12345, 44444); INSERT INTO WPF_ITEMS 5000, 55555); (IT_ID, IT_NAME, IT_PRICE, IT_STOCK) VALUES ('IT_002', 'Bolt', 30.00, (IT_ID, IT_NAME, IT_PRICE, IT_STOCK) VALUES ('IT_003', 'Widget', (IT_ID, IT_NAME, IT_PRICE, IT_STOCK) VALUES ('IT_004', 'Gadget', (IT_ID, IT_NAME, IT_PRICE, IT_STOCK) VALUES ('IT_005', 'Thingy', SELECT * FROM WPF_ITEMS; INSERT INTO WPF_ORDERS (ORD_ID, ORD_CUST_ID, ORD_AMOUNT, ORD_DISCOUNT, ORD_SUBMITTER_ID, ORD_STATE, ORD_CREATION_DATE, ORD_COMPLETION_DATE, ORD_OWNER, ORD_VERSION, ORD_APP_1, ORD_APP_DATE_1, ORD_APP_COMMENT_1, ORD_APP_2, ORD_APP_DATE_2, ORD_APP_COMMENT_2) VALUES ('10000', '100001', 1000, 0, '1000', 'SUBMITTED', '2006-03-01', '9999-12-31', '1000', '01.0', NULL, NULL, '1000', NULL, NULL, NULL); INSERT INTO WPF_ORDERS (ORD_ID, ORD_CUST_ID, ORD_AMOUNT, ORD_DISCOUNT, ORD_SUBMITTER_ID, ORD_STATE, ORD_CREATION_DATE, ORD_COMPLETION_DATE, ORD_OWNER, ORD_VERSION, ORD_APP_1, ORD_APP_DATE_1, ORD_APP_COMMENT_1, ORD_APP_2, ORD_APP_DATE_2, ORD_APP_COMMENT_2) VALUES ('10001', '100002', 2000, 10, '1002', 'APPROVED1', '2006-03-02', '9999-12-31', '1010', '01.0', 'APPROVED', '2006-03-02', '2000', 'APPROVED', NULL, NULL); INSERT INTO WPF_ORDERS (ORD_ID, ORD_CUST_ID, ORD_AMOUNT, ORD_DISCOUNT, ORD_SUBMITTER_ID, ORD_STATE, ORD_CREATION_DATE, ORD_COMPLETION_DATE, ORD_OWNER, ORD_VERSION, ORD_APP_1, ORD_APP_DATE_1, ORD_APP_COMMENT_1, ORD_APP_2, ORD_APP_DATE_2, ORD_APP_COMMENT_2) VALUES ('10002', '100003', 3000, 20, '1021', 'APPROVED2', '2006-03-03', '9999-12-31', '1020', '01.0', 'APPROVED', '2006-03-03', '3000', 'APPROVED', '2006-03-03', NULL); INSERT INTO WPF_ORDERS (ORD_ID, ORD_CUST_ID, ORD_AMOUNT, ORD_DISCOUNT, ORD_SUBMITTER_ID, ORD_STATE, ORD_CREATION_DATE, ORD_COMPLETION_DATE, ORD_OWNER, ORD_VERSION, ORD_APP_1, ORD_APP_DATE_1, ORD_APP_COMMENT_1, ORD_APP_2, ORD_APP_DATE_2, ORD_APP_COMMENT_2) VALUES ('10003', '100002', 4000, 30, '1000', 'COMPLETED', '2006-03-04', '2006-03-17', '1031', '01.0', 'APPROVED', '2006-03-04', NULL, 'APPROVED', '2006-03-04', NULL); INSERT INTO WPF_ORDERS (ORD_ID, ORD_CUST_ID, ORD_AMOUNT, ORD_DISCOUNT, ORD_SUBMITTER_ID, ORD_STATE, ORD_CREATION_DATE, ORD_COMPLETION_DATE, ORD_OWNER, ORD_VERSION, ORD_APP_1, ORD_APP_DATE_1, ORD_APP_COMMENT_1, ORD_APP_2, ORD_APP_DATE_2, ORD_APP_COMMENT_2) VALUES ('10004', '100001', 5000, 0, '1000', 'REJECTED', '2006-03-05', '9999-12-31', '1010', '01.0', 'REJECTED', NULL, NULL, NULL, NULL, NULL); INSERT INTO WPF_ORDERS (ORD_ID, ORD_CUST_ID, ORD_AMOUNT, ORD_DISCOUNT, ORD_SUBMITTER_ID, ORD_STATE, ORD_CREATION_DATE, ORD_COMPLETION_DATE, ORD_OWNER, ORD_VERSION, ORD_APP_1, ORD_APP_DATE_1, ORD_APP_COMMENT_1, ORD_APP_2, ORD_APP_DATE_2, ORD_APP_COMMENT_2) VALUES ('10005', '100002', 6000, 0, '1002', 'CANCELED', '2006-03-06', '9999-12-31', '1010', '01.0', NULL, NULL, NULL, NULL, NULL, NULL); SELECT * FROM WPF_ORDERS; INSERT INSERT INSERT INSERT INSERT INSERT INTO INTO INTO INTO INTO INTO WPF_ORDXFD WPF_ORDXFD WPF_ORDXFD WPF_ORDXFD WPF_ORDXFD WPF_ORDXFD (ORD_ID, (ORD_ID, (ORD_ID, (ORD_ID, (ORD_ID, (ORD_ID, ORD_XFDL) ORD_XFDL) ORD_XFDL) ORD_XFDL) ORD_XFDL) ORD_XFDL) VALUES VALUES VALUES VALUES VALUES VALUES ('10000', ('10001', ('10002', ('10003', ('10004', ('10005', NULL); NULL); NULL); NULL); NULL); NULL); SELECT * FROM WPF_ORDXFD; INSERT INTO WPF_ORDNOCNT (ORD_ID) VALUES ('1000000'); SELECT * FROM WPF_ORDNOCNT; Chapter 6. Building the base scenario: stage 2 377 The available sample data is adjusted to project needs in iterative steps. Each step results in a new table setup and table example data population. The life cycle of this data differs for the various objects: Sample order data (data in Table WPF_ORDERS and WPF_ORDXFDL) is not complete. (We do not store XFDL files as sample data.) After creating the first full orders in stage 2, we delete the initial example data in WPF_ORD table to avoid exceptions when opening orders with missing form data. Organization data, product catalog, and project parameters (Tables WPF_ORG, WPF_ORD, WPF_PARAM) stay unchanged during the project development. Maintenance routines for these tables are out of scope for this project. 6.2.4 Installing DB2 clients on development clients and servers In this section we describe the installation of DB2 clients on the development systems. Development workstations Each developer testing DB2-related code needs to run a DB2 client on the local workstation to work with the JDBC driver used in the project: Servlet development for data prepopulation and data storage on new order or order submit events JSP development showing available order lists based on data stored in DBs Web service provider development Therefore, we install on those workstations a DB2 client and DB2 Control Center to have a convenient setup for the necessary database registration. There are various ways to register the database to the client. We use DB2 Control Center wizards. Make sure to assign the same alias to the database on client registration as used on the server, because the code runs using a fixed server name database and alias to identify the connection. Workstations used for Workplace Forms (XFDL/XForms) development and end-user tests do not need a DB2 client installation. Production servers In a distributed environment, the following servers need to install a DB2 client and register the target database: WebSphere/Tomcat Application Server running the created servlet and JSPs WebSphere/Tomcat Application Server running the Web service provider applications In our project, one server machine handles all server tasks (DB2 Server, Web Service provider, application server, http server). That is why we do not install additional DB2 clients on remote servers in this project. 6.2.5 Developing the data access layer (DB2) To make parallel development of different components possible from start up — without time to develop a sophisticated data model — we decide to make interfaces between parallel tracks as flexible as possible. 378 IBM Workplace Forms 2.6: Guide to Building and Integrating a Sample Workplace Forms Application Two basic assumptions are made: Design interfaces are only based on simple Java data types (String, String[], and String[][]) and XML fragments generated based on DB2 table data. This saves a lot of time, which is usually necessary for modelling interface data objects. No publishing is done on internal DB2 artifacts (table gnomon, column names, queries) outside the DB2 data access layer to reduce impact on any changes in DB2 structures, queries, and so on, on the business logic and presentation layer. These presumptions lead to a simple 2-layer concept for basic data access, resulting in a 2-level Java library (WPFormsDBsConnectionT) with the following functionality: Class DB2Connection for basic DB2 connectivity: – – – – Open connection. Read row data. Insert row data. Update row data. This module is only accessed by the access by modules in DB2ConnectionForms. The available methods, in general, accept input data formed as a valid SQL query and return output as simple strings or string arrays. Class DB2ConnectionForms exposes an easy-to-use and robust interface for business logic modules abstracting from table and field names, and creates for each data object the corresponding read/write operations as dedicated methods. In most of the cases, reading or writing data can be reduced to a one-liner in the higher level application functionality. Procedures for opening and closing the JDBC connection are shown in Example 6-3. Example 6-3 Basic JDBC routines for opening and closing a connection /* * Created on Mar 10, 2006 * * Basic DB2 Connection routines using a level 2 driver * db2java.zip / db2java.jar from DB2 8.2 UDB release */ package forms.cam.itso.ibm.com; import import import import import import java.sql.Connection; java.sql.DriverManager; java.sql.PreparedStatement; java.sql.ResultSet; java.sql.SQLException; java.sql.Statement; /** * @author Andreas Richter ISSL * * application independent db2 calls (NO table and column namens here) * */ public class DB2Connection { /** * Comment for <code>db2con</code> application independent db2 calls (NO * table and column namens) */ //connection ebject Chapter 6. Building the base scenario: stage 2 379 private static Connection db2con; // For local tests set this attribute in the calling code like this: //DB2Connection.env = "LocalTestEnvironment" // For productonnuse specify an empty string public static String env = ""; /* Generic procedures */ /** * create a jdbc connection */ public static void connect() { //set connection credencials String driver = "COM.ibm.db2.jdbc.app.DB2Driver"; //$NON-NLS-1$ String url = Messages.getString("DB2_ulr"); //$NON-NLS-1$ String user = Messages.getString("DB2_username"); //$NON-NLS-1$ String password = Messages.getString("DB2_password"); //$NON-NLS-1$ // overwrite values for local test-environment if (env.equals("LocalTestEnvironment")) { //$NON-NLS-1$ user = "Administrator"; //$NON-NLS-1$ password = "admin"; //$NON-NLS-1$ url = "jdbc:db2:WPFORMS1"; //$NON-NLS-1$ } //initiate connection object db2con = null; try { // Load the DB2 JDBC Type 2 Driver with DriverManager Class.forName(driver); //System.out.println("Driver found: " + driver); //$NON-NLS-1$ } catch (ClassNotFoundException e) { e.printStackTrace(); System.out.println("Driver not found:" + driver); //$NON-NLS-1$ db2con = null; } //open the connection try { db2con = DriverManager.getConnection(url, user, password); //in real life set it to false and use commit method after write // operations db2con.setAutoCommit(true); //System.out.println("Connected: " + url); //$NON-NLS-1$ } catch (SQLException e1) { System.out.println("NOT Connected " + url + " User: " + user //$NON-NLS-1$ //$NON-NLS-2$ + " pw: " + password); //$NON-NLS-1$ e1.printStackTrace(); //try to reconnect if (db2con != null) { try { db2con.close(); db2con = DriverManager.getConnection(url, user, password); db2con.setAutoCommit(true); } catch (SQLException e2) { // TODO Auto-generated catch block 380 IBM Workplace Forms 2.6: Guide to Building and Integrating a Sample Workplace Forms Application System.out.println("no connection: " + url); //$NON-NLS-1$ } } //no connection - clear object db2con = null; } } /** * commit method */ public static void commit() { try { db2con.commit(); } catch (SQLException e) { // TODO Auto-generated catch block e.printStackTrace(); } } /** * close connection */ public static void disconnect() { try { db2con.close(); } catch (SQLException e1) { System.out.println("could not close connection"); } } // Data retrieval routines // ..... } Example 6-4 is an example for the property file we use. Example 6-4 File db2connection.properties DB2_ulr=jdbc:db2:wpforms DB2_username=wpsadmin DB2_password=wpsadmin For read-only connections, we use statement-oriented methods, submitting a query such as: SELECT <variables> FROM <tablename> WHERE <selection criterion> A basic call always looks like Example 6-5. Example 6-5 Example method to read one-column value package forms.cam.itso.ibm.com; import import import import import java.sql.Connection; java.sql.DriverManager; java.sql.PreparedStatement; java.sql.ResultSet; java.sql.SQLException; Chapter 6. Building the base scenario: stage 2 381 import java.sql.Statement; public class DB2Connection { ..... /** * get a specific field from a table row by sql query * * * @param query * valid sql query for read (SELECT ...) * @return field value as String */ public static String getField(String query) { String result = ""; Statement stmt; ResultSet rs = null; //open the connection DB2Connection.connect(); try { //execute query stmt = db2con.createStatement(); // Create a Statement object rs = stmt.executeQuery(query); //read result as string result = ""; try { rs.next(); result = rs.getString(1); // Retrieve rs.close(); // Close the ResultSet stmt.close(); } catch (SQLException e2) { // TODO Auto-generated catch block //e2.printStackTrace(); System.out.println("No results: " + query); result = ""; } } catch (SQLException e) { e.printStackTrace(); result = e.toString(); } finally { //always disconnect DB2Connection.disconnect(); } return result; } .... } 382 IBM Workplace Forms 2.6: Guide to Building and Integrating a Sample Workplace Forms Application Reading and writing Character Large Objects (CLOBs), used to retrieve and store complete XFDL documents, is not contained in the JDBC standard. Nevertheless, it can be done with the chosen JDBC driver. To read CLOBs, we can use the getField method above. To insert and update CLOBS, we use a driver-specific method, which may not work on other drivers (Example 6-6). Example 6-6 Writing/inserting Character Large Objects (CLOBs) /** * * Updates (or inserts) a clob field This method is NOT jdbc standard and * can fail depending on the used driver If the assigned row does not exist, * a new entry is created. If the assigned row exists, the clob is updated * * @param tableName * table name to insert * @param id * id (key field value) * @param id_field * key field name * @param clob * clob value * @param clob_field * field name for clob */ public static void updateCLOB(String tableName, String id, String id_field, String clob, String clob_field) { PreparedStatement stmt; ResultSet rs = null; String query = ""; //connect DB2Connection.connect(); //System.out.println("UPDATE CLOB: " + id); try { //creare query query = "UPDATE " + tableName + " SET (" + clob_field + ") = (?) WHERE " + id_field + " = '" + id + "'"; stmt = db2con.prepareStatement(query); // Create a Statement object //assign clob value stmt.setString(1, clob); //update stmt.execute(); db2con.commit(); //close stmt.close(); } catch (SQLException e) { // TODO Auto-generated catch block e.printStackTrace(); } finally { //close connection DB2Connection.disconnect(); } } To meet forms-specific needs in data prepopulation (assigning multiple values to an XFDL data instance (for example, complete employee data or customer data)), we implement a Chapter 6. Building the base scenario: stage 2 383 generic function (getResultsXML) that returns one or more rows of an SQL table rendered as XML instances. The implemented code is shown in Example 6-7. Example 6-7 Returning data structures as XML instances /** * * execute a query and return data rendered as xml string (convert all data * to string) tag names for data entties are created from column names tag * names for rows are created from tagInstance parameter * * @param query * valid sql query * @param rowElement * tag name for the xml instance to create * @return xml instance like this <rowElement><column1>val </column1> * <column2>val </column2> <column3>val </column3> ... <columnN>val * </columnN> </rowElement> .... <rowElement sid=X> <column1>val * </column1> <column2>val </column2> <column3>val </column3> ... * <columnN>val </columnN> </rowElement> * */ public static String getResultsXML(String query, String rowElement, int maxresults) { Statement stmt; String resultXML = ""; //$NON-NLS-1$ String resultXMLrow = ""; //$NON-NLS-1$ ResultSet rs = null; p("getResultsXML: " + query); int row = 0; p(query); try { // connect connect(); // execute query stmt = db2con.createStatement(); // Create a Statement object rs = stmt.executeQuery(query); // get column number (need for row fetch) int cols = rs.getMetaData().getColumnCount(); rs = stmt.executeQuery(query); // read data and create xml try { while (rs.next() && (row < maxresults)) { // Position the cursor row++; resultXMLrow = ""; //$NON-NLS-1$ for (int col = 0; col < cols; col++) { // add result to row data resultXMLrow = resultXMLrow + createTag( rs.getString(col + 1), rs.getMetaData().getColumnName(col + 1), ""); } // add row to return string if (! rowElement.equals("")){ resultXML = resultXML+ createTag("\n" + resultXMLrow, rowElement, ""); //$NON-NLS-1$ } else { resultXML = resultXML+ resultXMLrow; } } 384 IBM Workplace Forms 2.6: Guide to Building and Integrating a Sample Workplace Forms Application rs.close(); // Close the ResultSet stmt.close(); } catch (SQLException e2) { // TODO Auto-generated catch block e2.printStackTrace(); } } catch (SQLException e) { e.printStackTrace(); } finally { // always colde connection disconnect(); } p("Results: " + resultXML); return resultXML; } /** * * helper method to create an xml tags from a value * * @param tagData * data to include * @param tagName * name of the tag * @param attributes * opt. additional attributes * * @return String containing xml represenatation of the query */ private static String createTag(String tagData, String tagName, String attributes) { String tag = ""; //$NON-NLS-1$ if (attributes.equals("")) { tag = tag + "<" + tagName + ">"; //$NON-NLS-1$ //$NON-NLS-2$ } else { tag = tag + "<" + tagName + " " + attributes + ">"; //$NON-NLS-1$ //$NON-NLS-2$ } tag = tag + tagData; tag = tag + "</" + tagName + ">" + "\n"; //$NON-NLS-1$ //$NON-NLS-2$ //$NON-NLS-3$ return tag; } A call to that method, with the following parameters, returns a string, as shown in Example 6-8: getResultsXML("Select * from WPF_ORG","employee") Example 6-8 Resulting XML fragment for query “"Select * from WPF_ORG"“ <employee> <ORG_ID>1000</ORG_ID> <ORG_FIRSTNAME>Christine</ORG_FIRSTNAME> <ORG_LASTNAME>Haas</ORG_LASTNAME> <ORG_CONTACTINFO>[email protected]</ORG_CONTACTINFO> <ORG_MGR>1010</ORG_MGR> </employee> <employee> <ORG_ID>1001</ORG_ID> <ORG_FIRSTNAME>Michael</ORG_FIRSTNAME> <ORG_LASTNAME>Thompson</ORG_LASTNAME> <ORG_CONTACTINFO>[email protected]</ORG_CONTACTINFO> <ORG_MGR>1010</ORG_MGR> </employee> ..... <employee> Chapter 6. Building the base scenario: stage 2 385 <ORG_ID>wpsadmin</ORG_ID> <ORG_FIRSTNAME>Admin</ORG_FIRSTNAME> <ORG_LASTNAME>Portal&WAS</ORG_LASTNAME> <ORG_CONTACTINFO>[email protected]</ORG_CONTACTINFO> <ORG_MGR>1031</ORG_MGR> </employee> To return choices lists used in pop-up fields, another basic function is used (Example 6-9). Example 6-9 Routine that returns choices lists rendered as XML /** * * execute a query and return data rendered as xml string suitable for choices lists(convert all data * to string) based o n value / alias pairs * * @param query * valid sql query - must return 1 or 2 columns (1st column = display label, 2nd column = ID) * @param rowElement * tag name for the xml instance to create * @param elementName * tag name for the xml instance to create * @return xml instance like this * //<rowElement> * <elem value='id1'>val1</elem> * <elem value='id2'>val2</elem> * <elem value='id3'>val3</elem> * //</rowElement> * */ public static String getChoicesXML(String query, String elementName) { Statement stmt; String resultXML = ""; //$NON-NLS-1$ ResultSet rs = null; p("getChoicesXML: " + query); try { // connect connect(); // execute query stmt = db2con.createStatement(); // Create a Statement object rs = stmt.executeQuery(query); // get column number (need for row fetch) int cols = rs.getMetaData().getColumnCount(); rs = stmt.executeQuery(query); // read data and create xml try { while (rs.next()) { // Position the cursor // add row to return string if (cols == 1){ //resultXML += createTag(rs.getString(1), elementName, "id=\""+ rs.getString(1) + "\"") + "\n"; resultXML += createTag(rs.getString(1), elementName, "") + "\n"; }else { //resultXML += createTag(rs.getString(1) + "[" + rs.getString(1) + "]", elementName, "id=\"" 386 IBM Workplace Forms 2.6: Guide to Building and Integrating a Sample Workplace Forms Application // + rs.getString(1) + "[" + rs.getString(1) + "]" + "\"") // + "\n"; resultXML += createTag(rs.getString(2) + "[" + rs.getString(1) + "]", elementName, "") + "\n"; } } rs.close(); // Close the ResultSet stmt.close(); //resultXML = createTag("\n" + resultXML, rowElement, ""); //$NON-NLS-1$ } catch (SQLException e2) { // TODO Auto-generated catch block e2.printStackTrace(); } } catch (SQLException e) { e.printStackTrace(); } finally { // always colde connection disconnect(); } p("Results: " + resultXML); return resultXML; } The returned XML fragments can easily be surrounded with the necessary tags to meet the XForms standard. We can use them for any data instance updates to the XFDL form using the XFDL API routine theForm.encloseInstance for XML instances or theForm.updateXFormsInstance for XForms instances. See the related code in 5.11.2, “Basic servlet methods” on page 325, that describe the servlet methods. We do not create any data object specific interface classes in this project, since available time and resources do not allow us to do so. This is a good choice in most cases. We miss those dedicated objects only when updating order metadata, but once implemented, the model is not changed. In a real project, the data model and functionality represented by the DB2ConnectionForms library may be extended in the following way: Normalizing data structure (such as separating objects for customer site and customer contact data) Defining data object specific classes represented by interface classes exposing getters, setters, and all object-specific data maintenance methods Enabling commit/rollback for DB2 transactions Providing appropriate data validation and translation methods Adding missing insert/update and write methods After considering the topics above and any possible additional requirements (such as server platform considerations or support for special data types for another project), we can decide to use another driver type than JDBC or to use the driver with other functionality. Chapter 6. Building the base scenario: stage 2 387 The created DB2 interface (class DB2ConnectionForms) exposes the methods in Table 6-4. Table 6-4 Descriptions of data object methods and parameters Data object method Parameters Description emp_id (Employee ID as string) returns String (XML) of emp. data Reads all columns for a selected Employee getEmployeeDataXML employee. Used for prepopulation with submitter data. Called from SubmissionServlet. The function returns an XML fragment with the element names already matched to the required names in the EmployeeDedails xforms instance in the form. Customer Order getOrderData getOrderListEmp writeOrderData readRowXFDL updateRowXFDL 388 order_id (Employee ID as string) returns String [] array of order data Reads all order data details for a given emp_id (Employee ID as string) returns String [] array of cust. data Reads all order data details for a given orderData (all columns as String[]) returns String [] array of cust. data Writes all order metadata extracted from order_id (Order ID as string) returns String [] array of cust. data Reads a complete XFDL form as string. Used to get XFDL form data on form order_id (Order ID as string) returns String [] array of cust. data Writes (insert/update) a complete XFDL order ID. Used: (method not used). Called: (method not used). employee (acting as submitter, manager approver, or director approver). Used for data display in personalized order table. Called in JSP db2listing from servlet inline code. a submitted form. Used to store actual order metadata in a DB2 table. Called in SubmissionServlet when receiving a submitted form containing the data instance FormOrderData. opening in Stage 2. Called in SubmissionServlet on showForm event. Same functionality as getOrderXFDL, but other internal code. form as CLOB. Used to store XFDL form data on form submit in stage 2. Called in SubmissionServlet on submitForm event. IBM Workplace Forms 2.6: Guide to Building and Integrating a Sample Workplace Forms Application Data object method writeOrderXFDL getNewOrderNumber Parameters Description order_id (Order ID as String) returns String [] array of cust. data Writes (insert/update) a complete XFDL returns String containing a new order number Increments the order number in table par_key (Key as string) returns Number value converted to String Reads a numeric parameter value based String with replaces sub strings Helper method replacing substrings in a string. form as CLOB. Used to store XFDL form data on form submit in stage 2. Called in SubmissionServlet on submitForm event. Same functionality as writeRowXFDL, but other internal code. WPF_ORDNOCNT and returns the new number. Used: intended for order number. prepopulation in SubmissionServlet. Called: in SubmissionServlet when creating new orders. Parameters: getParamNumValue on the given key. Used to get prepopulation data (business rules) when creating new forms. Called in SubmissionServlet on createForm event. Inventory: replaceSubString Generic function in DN2Connection: getResultsXML query String containing any valid SQL query instanceTag String defining an XML tag name Reads any data stored in DB2 defined by the incoming query. Used: for data gathering functions in SubmissionSerlet. Called from SubmissionServlet returns String containing the result rendered as an XML instance getResultsXML query String containing any valid SQL query elementName String defining an XML tag name returns String containing the result rendered as an XML instance Reads any data stored in DB2 defined by the incoming query with a limited resultset. Used: creates choices lists as XML fragments useful to make data prepopulation easy be replacing internal data instances in the form with the composed XML instance. Called from Forms Submission module. Chapter 6. Building the base scenario: stage 2 389 Data object method Parameters Description getChoicesXML query String containing any valid SQL query Reads any data stored in DB2 defined by the incoming query with a limited resultset. The returned string looks like this: <elem>value1<elem> <elem>value2<elem> .... <elem>valuex<elem> Used: Creates choices lists as XML fragments useful to make data prepopulation for choices lists easy be replacing internal data instances in the form with the composed XML instance. Called from Forms Submission module. createTag tagData data to include tagName name of the tag attributes opt. additional attributes Creates an XML tag based on an element name, additional attributes, and the contained data. Looks like this: <tagName attributes>tagData</tagName> Note: All functions accepting an ID (user ID, customer ID, order ID) as an input parameter accept both the ID or a string in the format “<arbitrary text>[<ID>]” as an input parameter value. This is a contribution to the behavior of the drop-down box in Workplace Forms. The DB2 layer is the most efficient place to code the data extraction (single function). 6.3 Form data access using XForms submissions In this section we discuss various considerations regarding dynamic data access from an opened form using XForms submissions. There may be the need to retrieve additional data from external data sources while working with the form. There are multiple ways to accomplish this: Use the integrated Web service consumer in the Viewer. Use XForms submissions. Use Custom Function Calls (FCI). Web service integration in Forms 2.6 Designer has significantly changed since Version 2.5. In this project, we could not get the designed Web services that is included in the Version 2.5 book to run with the Forms Designer V2.6. The reason behind this is that there are limitations that are difficult to overcome with the Forms Designer V2.6. However, the results of the Web service implementation can be reviewed in Appendix C, “Web services” on page 673. Knowing this, Version 2.6 opens up a new way to process external data access using XForms submissions, and the decision was made to explore these capabilities. XForms submissions use HTTP messages (GET, POST, or PUT) to transfer XML-compatible data streams in a request/response use case. The initiator submits a request to the server and the server sends a response back. The initiator in our case is either the Forms Viewer or the Webform Server that process the opened form. This works regardless of platform, operating system, and programming languages of both the client and the server, because the used 390 IBM Workplace Forms 2.6: Guide to Building and Integrating a Sample Workplace Forms Application transmission protocol and internal data structure of the request and response are defined in a platform-independent standard (HTTP messages/XML). As such, XForms submissions are very similar to SOAP-based Web services with the following differences: There is no standardized service description. Provider and consumer are coded independently. The only agreed-upon standard between these instances is the message structure for the passed submissions. Nevertheless, we can set up those instances on both sides (client and server), based on a common schema. The data structure transferred in the request/response message can contain arbitrary XML fragments. It is up to the implementation person to make them match his requirements. There is no standard error handling. The good news is that XForms submissions can be handled in the Webform Server as well, which is in contrast to Web services, which cannot be handled in the Webform Server. XForms submission integration targets the used form (implementing the appropriate submissions in the form) and some Web development, which creates a server component able to receive and submit HTTP POST messages. The developed modules are more closely related to the data sources than to the Web application that handles the forms processing. That is why the created server code is not included in the Forms application but is available as a separate stand-alone application ready to run on different servers. XForms supports the ability to submit any portion of the data model to a URL, and to replace a portion of the data model with the return value from that submission. This is similar to a Web services call, in that you can submit data to a server and automatically populate the form with the response. However, with an XForms submission, the message that you send does not need to conform to any particular format, whereas a Web services message must be wrapped with a variety of SOAP tags. This means that an XForms submit can send an arbitrary XML fragment. This allows you to mimic Web services calls so that you can use existing assets but, more importantly, allows you to submit data to any portlet or servlet that expects XML input, regardless of the specific format required. Some constraints have to be considered before implementing XForms submissions: There is no standard encryption for the submitted data available (for example, as SSL). This would be difficult to overcome in form design. There is no standard authentication/authorization available; however, by submitting credentials within the submitted data, this can be resolved in the application layer. Note: These restrictions apply only to the built-in XForms implementation. We can, however, develop XForms submissions and include them as a Java library in a custom IFX extension (written in Java or C). These extensions can be called from XFDL computes as additional function libraries. 6.4 Form development for XForms submissions In this section we discuss how to create the necessary XForms submission and the activating actions in the form, as well as the development of a J2EE application that serves the created XForms submission on server-side by retrieving the requested data from the DB2 back end. Chapter 6. Building the base scenario: stage 2 391 6.4.1 Where we are in the process of building stage 2 of the base scenario Figure 6-2 gives an overview of where we are within the key steps involved to build stage 2 of the base scenario. This focuses on adding storage capabilities to DB2, incorporating XForms submissions, modifying the JSPs, and adding an approval workflow. Building the Base Scenario – Stage 2 DB2 / Data Storage XForms Submissions Servlet Access to Forms Adjustments to JSPs – Creating tables – Form development – Form prepopulation – Modifying index1.jsp – Populating tables – Creating actions to activate submissions – J2EE Development – Extraction of form data – Reading form data from DB2 – Creating JSP to view DB2 data Approval Workflow – Designing – Workflow – XForms submissions runtime Figure 6-2 Overview of major steps involved in building stage 2 of base scenario application 6.4.2 Development of XForms submissions in the form XForms submissions can submit data to external systems, retrieve data form external sources, and copy them to an XForms instance. The development of an XForms submission in the form is performed in four steps: 1. Detect the data instance (or any inner part of it) containing any parameters to submit in the request. 2. Detect the data instance to update with the response. 3. Create the submission and assign the submission attributes (instance to read, instance to update, transfer method). 4. Create one or more actions that activate the submission. Identification of data instances Let us inspect in detail the steps necessary for updating the InventoryItemDetail data instance. This is easily the most complex submission we have in our scenario. The high-level functionality of the component that we need to build is quite straightforward: by clicking one of 392 IBM Workplace Forms 2.6: Guide to Building and Integrating a Sample Workplace Forms Application the item popups in the table shown below and changing the selected item, we expect the component to retrieve the related item data (name, ID, price, and number in stock) from the database and fill the data of the related columns in the selected table row. Figure 6-3 Order table with item selection popups This use case combines two special topics to consider: We use a dynamic URL composed from a deployment-dependent part (URL to the application serving the XForms submission) and a submission-dependent part (the URL parameters specifying the exact type of the XForms submission). We are not operating end-to-end on static references, but on one of the rows in the order table. This means in detail: – We submit additional data to the server (in this case the ID of the item in the selected row). – The submission results must update not the entire table, but only the information stored for the selected row. To compose the submission, we abstract from the table/row problem. The XForms submission operates on static instances for data source and data target. Therefore, in the form, there are two additional instances not bound to any data in the presentation layer. Inspect the instance structure shown in Example 6-10. Example 6-10 SelectionInfo instance containing the selected item ID <!--Item Selection Info--> <xforms:instance id="SelectionInfo" xmlns=""> <SelectionInfo> <InventoryItemID></InventoryItemID> </SelectionInfo> </xforms:instance> <!-- Detail data for the Selected Inventory item --> <xforms:instance id="InventoryItemDetails" xmlns=""> <InventoryItemDetails> <Item> <ID></ID> <Name></Name> <Price></Price> <NumberInStock></NumberInStock> Chapter 6. Building the base scenario: stage 2 393 </Item> </InventoryItemDetails> </xforms:instance> The instance SelectionInfo is supposed to contain the ID of any selected item later on. The instance InventoryItemDetails receives the requested data. To transfer the values from the order table to the SelectionInfo instance and the item data back from InventoryItemDetails instance to the table row, we create dedicated action lists later on. This reduces the complexity of the single objects to create. Let us first build the XForms submission object. The actions to move data and call the submissions are created in the next section. Submission considerations We have determined that the settings listed in Table 6-5 should apply in creating any submissions. Table 6-5 Main submission considerations Setting Available choices Instance (or instance fragment) containing the selection parameter to submit with the XForms submission request XPATH to an XForms instance or any inner element: instance('SelectionInfo')/InventoryItemID Data instance to update with the detail data received in the response Instance ID: We can only update one entire instance, not an inner element only or multiple instances. To do more complex transfers than this, we must store the entire return data in a helper instance and redistribute the data later on, for example, by using actions or binds. Transfer protocol to use post, get, or put. The choices to make depend on the submission purpose. Triggering event The trigger event is not a part of the submission itself. The submission defines only the scenario for the transfer. To invoke it, we need to create an action. There we can decide about the trigger event. URL to use for the submission In the simplest case, we would use a static URL stored in the form. Be aware that there is no single API function to change this value later on. Best practice is to use a dynamic URL stored in an XForms instance. This URL can be updated simply by using the API or a form embedded in an HTML page. This URL exists in an XForms data instance. It should be updated to the actual available Web application address whenever a form is retrieved from a server. Having considered this, we can start to create the XForms submission. 394 IBM Workplace Forms 2.6: Guide to Building and Integrating a Sample Workplace Forms Application Creating an XForms submission To do this: 1. In the Designer, open the XForms view, right-click the model entry containing the target XForms instances (in our case, Model: Default), and select the Create submission entry, as shown in Figure 6-4. Figure 6-4 Creating an XForms submission in XForms view 2. Expand the Properties view for the created submission and assign the attributes shown in Table 6-6. For a detailed explanation of the attributes refer to the XFDL specification 7.0. Table 6-6 Attribute settings for the XForms submission Attribute Setting/explanation General ID Value: GetInventoryDetails We can apply here any unique name. We use that unique name to reference the submission in any action, activating it. Enter a self-explanatory name here. XForms ref Value: instance('SelectionInfo')/InventoryItemID This attribute contains the reference to the data object with any information we want to submit to the server. We use it to send the item ID for which we request detail data. The XPath reference allows us to submit an entire instance or any parts of it. The created data structure depends on the structure included by the XPath reference. In our case, this would be the ID only. You can type the information manually or get it with the Copy Reference method from the instance pane. The instance has the following structure: <xforms:instance id="SelectionInfo" xmlns=""> <SelectionInfo> <InventoryItemID></InventoryItemID> </SelectionInfo> </xforms:instance> XForms action Value: http://anyURLItMustBeHereButHasNoEffectDueToActionrefAttribute Here we must enter a static URL. The URL is used if no dynamic URL is provided. We use a dynamic URL stored in the ConfigurationInfo instance. Nevertheless, any URL must be stored here to avoid validation errors. Take the one above or any other URL. Chapter 6. Building the base scenario: stage 2 395 Attribute Setting/explanation XForms method Value: post There are three choices: get (sends data URL-encoded in the URL as parameters) put (sends data similar to a post stream, but does not expect a response) post (sends data in a post stream able to contain huge data size and expects a response to every request. The response can update an XForms submission. This is what we need) XForms mediatype Value: text/xml Select from the list. The selection should be set up the request header and match the intended submission behavior. XForms replace Value Instance This setting allows us to update a dedicated XForms instance while keeping all other information in the form in place. Selection all would replace the entire form with new content (for example, an HTML response page after a final submit of some form data). Selection none would ignore any response message data. XForms instance Value: InventoryItemDetails Apply here the ID of the instance to replace (this option is valid only if the replace-method is set to instance). We use this instance to store the retrieved data. The action(list) calling the submission must make sure to set the correct item ID in the path instance('SelectionInfo')/InventoryItemID and copy the required data in the selected table row before the submission is called and after the submission response is arrived. XForms actionref Value: concat(instance('ConfigurationInfo')/XFormsSubmissionURL, 'action=getDetails&instanceID=InventoryItemDetails') This is the most complex part of the submission. The attribute is optional and allows overwriting the static submission URL stored in the action attribute with a dynamic URL computed at runtime. Here we can identify the following components: instance('ConfigurationInfo')/XFormsSubmissionURL - the path to the XForms element storing the submission URL - in our case the address of the XForms submission servlet including a question mark (for example, http://vmforms261.cam.itso.ibm.com:10000/WPForms261RedbookXForms/XF ormsSubmissionServlet?). action=getDetails&instanceID=InventoryItemDetails - the URL parameters defining the type of data we request (here the inventory item details). These parameters vary for each submission in our form. concat( ..., ...) - the XPath function to concatenate two strings. The result in our case will be the complete submission URL including the request URL parameters like this: http://vmforms261.cam.itso.ibm.com:10000/WPForms261RedbookXForms/XFor msSubmissionServlet?action=getDetails&instanceID=InventoryItemDetails 3. Once these settings are applied, save the form. 396 IBM Workplace Forms 2.6: Guide to Building and Integrating a Sample Workplace Forms Application In a similar manner, create the other three submissions. The resulting source code is shown in Example 6-11. Example 6-11 Created XFDL code based on the four submissions in the form <xforms:submission action="http://anyURLItMustBeHereButHasNoEffectDueToActionrefAttribute" id="GetInventoryDetails" instance="InventoryItemDetails" mediatype="text/xml" method="post" ref="instance('SelectionInfo')/InventoryItemID" replace="instance" xfdl:actionref="concat(instance('ConfigurationInfo')/XFormsSubmissionURL, 'action=getDetails&instanceID=InventoryItemDetails')"> </xforms:submission> <xforms:submission action="http://anyURLItMustBeHereButHasNoEffectDueToActionrefAttribute" id="GetCustomerChoices" instance="CustomerIDs" mediatype="text/xml" method="post" replace="instance" xfdl:actionref="concat(instance('ConfigurationInfo')/XFormsSubmissionURL, 'action=getChoices&instanceID=CustomerIDs')"> </xforms:submission> <xforms:submission action="http://anyURLItMustBeHereButHasNoEffectDueToActionrefAttribute" id="GetCustomerDetails" instance="CustomerDetails" mediatype="text/xml"method="post" ref="instance('FormOrderData')/CustomerID" replace="instance" xfdl:actionref="concat(instance('ConfigurationInfo')/XFormsSubmissionURL, 'action=getDetails&instanceID=CustomerDetails')"> </xforms:submission> <xforms:submission action="http://anyURLItMustBeHereButHasNoEffectDueToActionrefAttribute" id="GetInventoryChoices" instance="InventoryItems" mediatype="text/xml" method="post" ref="" replace="instance" xfdl:actionref="concat(instance('ConfigurationInfo')/XFormsSubmissionURL, 'action=getChoices&instanceID=InventoryItems')"> </xforms:submission> Note: The two submissions requesting the choices list have no request attributes. This is valid in our case, because we are trying to extract the entire choices list. In a production environment, we should submit here some selection criteria as the item category, a search pattern for the product number, or any other information to reduce the length of the returned item list. Submissions are created. Now let us activate them. 6.4.3 Creating actions to activate the submission Keep in mind that we are now creating a complex action that ensures the updating of the item detail information in one table row based on the item selected in first column of the table. In the XForms specification, there are many events that can trigger an XForms action. For the detail data request, we decide to use an action applied to a field and activated on value change. This produces the desired behavior for the planned operation: Data retrieval only occurs on value change (which produces the best performance). Chapter 6. Building the base scenario: stage 2 397 Operating from a field in the presentation layer, we can determine the currently selected table row. The following steps illustrate how the XForms actions are composed to activate the submissions. 1. Open the form in Designer and select the popup field in the order table. Expand the properties (XForms section) for this item, as shown in Figure 6-5. Figure 6-5 Item popup field in the Wizard_order_info page with empty action parameter 2. In the Properties view, we find an empty action parameter that we are now going to fill in. In the simplest case (acting on fixed data instances and field in the UI), we could add one single action to activate. In our case, we must surround that action with additional functionality to move the selection data from the table row to the selection instance and transfer the response data back to the appropriate row in the table. Since all data visible in the table is stored in an XForms instance, we have to deal with four objects for this transaction. The following instances store the entire table data: The OrderTableRowData instance stores the entire table data in multiple rows. (This is done in stage 1.) The SelectionInfo instance contains the selected item ID. (We will have to make this true.) The InventoryItemDetails instance receives the response with the table detail data. (We must code for this, too.) The repeat with the ID ORDERWIZARDTABLE contained in the table where we are operating in allows us to detect the current table row index. Ensure that the instance structure and the structure for the table conform with each other before starting any coding tasks. The data instances are shown in Example 6-12. Example 6-12 Data instances involved in inventory item detail data update <!--Item Selection Info--> <xforms:instance id="SelectionInfo" xmlns=""> <SelectionInfo> <InventoryItemID></InventoryItemID> </SelectionInfo> </xforms:instance> ....... 398 IBM Workplace Forms 2.6: Guide to Building and Integrating a Sample Workplace Forms Application <!-- Detail data for the Selected Inventory item --> <xforms:instance id="InventoryItemDetails" xmlns=""> <InventoryItemDetails> <Item> <ID></ID> <Name></Name> <Price></Price> <NumberInStock></NumberInStock> </Item> </InventoryItemDetails> </xforms:instance> ......... <!-- Row Data for the Selected Item --> <xforms:instance id="OrderTableRowData" xmlns=""> <OrderTableRowData> <Row> <line> <id></id> <name></name> <price></price> <stock></stock> <amount></amount> <discount></discount> <line_total></line_total> <subtotal></subtotal> </line> </Row> </OrderTableRowData> </xforms:instance> Example 6-13 Table structure in Wizard_order_info page (truncated) <table sid="ORDERWIZARDTABLE_TABLE"> <xforms:repeat id="ORDERWIZARDTABLE" nodeset="instance('OrderTableRowData')/Row/line"> <pane sid="ROW_GROUP"> <xforms:group ref="."> <xforms:label></xforms:label> <popup sid="POPUPSelectProduct"> <xforms:select1 ref="name"> <xforms:label>POPUP1</xforms:label> <xforms:itemset nodeset="instance('InventoryItems')/InventoryItem"> <xforms:label></xforms:label> <xforms:value></xforms:value> </xforms:itemset> <xforms:action></xforms:action> </xforms:select1> <itemlocation> <width>135</width> <x>1</x> </itemlocation> Chapter 6. Building the base scenario: stage 2 399 <value></value> <label>Select your Product</label> <format> <datatype>string</datatype> <constraints> <mandatory>on</mandatory> </constraints> </format> <fontinfo> <fontname>Arial</fontname> <size>7</size> </fontinfo> </popup> ...... Pay attention to the ID of the repeat in the table, shown in Example 6-13 on page 399. We reference it later on to determine the actual selected row in the table. 3. Go back to the Properties view in the Designer. We can now start to create the actions. 4. Click one of the available Actions attributes for the pop-up field and select action from the choices list (scroll down until you can select the action entry), as shown in Figure 6-6. Figure 6-6 Applying action element to the Actions attribute 400 IBM Workplace Forms 2.6: Guide to Building and Integrating a Sample Workplace Forms Application 5. Click the plus (+) button and expand the created structure, as shown in Figure 6-7. This assignment does not process any specific action, but it allows us to assign multiple actions to the object. Figure 6-7 Adding the action element 6. The default event trigger for this field is xforms-value-changed, as shown in Figure 6-8. Select this default value, as this is what we need to use. Figure 6-8 Expanded structure for the created action element Chapter 6. Building the base scenario: stage 2 401 Action to transfer value of selected field to instance We can now start to add our working actions. They are triggered on the event of the created action element (value changed) and executed in top-down order. 1. Add the first action to transfer the value of the selected pop-up field to the SelectionInfo instance. Add one action of type setvalue (similar to the way we add this action to the Actions attribute), click the + button and expand the inner structure to apply settings for data source and target, as shown in Figure 6-9. Figure 6-9 Adding a setvalue action 2. We must apply the settings shown in Table 6-7. The Properties view with the applied settings are shown in Figure 6-10 on page 403. Table 6-7 Properties for setvalue action reading the current item name and ID Attribute Setting/explanation value Value: instance('OrderTableRowData')/Row/line[index(' ORDERWIZARDTABLE')]/name The value attribute contains the reference to the data source. We compose it using the following elements: instance('OrderTableRowData')/Row/line[rowN umber]/name - XPath reference to a name element in the XForms instance containing the table data. The expression for the row number points to the line element that relates to the currently selected row. index('ORDERWIZARDTABLE') - This returns the selected row number in the table. Note: ORDERWIZARDTABLE is the ID of the repeat that we created in stage 1. Assigning IDs to repeats is optional, but it becomes mandatory when we try to detect the selected row. 402 IBM Workplace Forms 2.6: Guide to Building and Integrating a Sample Workplace Forms Application Attribute Setting/explanation ref Value: instance('SelectionInfo')/InventoryItemID This attribute specifies the target to fill with the selected data. Figure 6-10 Applied settings to copy the item selection to the SelectionInfo instance 3. The applied settings should result in the following code applied to the pop-up field. Make sure to have all attributes applied as shown in Example 6-14. Example 6-14 Code created for the first applied action <popup sid="POPUPSelectProduct"> <xforms:select1 ref="name"> <xforms:label>POPUP1</xforms:label> <xforms:itemset nodeset="instance('InventoryItems')/InventoryItem"> <xforms:label></xforms:label> <xforms:value></xforms:value> </xforms:itemset> <xforms:action ev:event="xforms-value-changed"> <xforms:setvalue ref="instance('SelectionInfo')/InventoryItemID" value="instance('OrderTableRowData')/Row/line [index('ORDERWIZARDTABLE')]/name"> </xforms:setvalue> </xforms:action> </xforms:select1> ...... Action to call the XForms submission To do this: 1. Now we add the second action. This action calls the created XForms submission. It should submit the value transferred to the instance('SelectionInfo')/InventoryItemID element and store the received data to the InventoryItemDetails instance. Chapter 6. Building the base scenario: stage 2 403 2. Select the action type send to activate the submission. Click the entry 1 item in the upper level action attribute, select send, and click the + button, as shown in Figure 6-11. Figure 6-11 Adding the second action 3. In this action, apply the submission to activate it. Click the submission value field, as shown in Figure 6-12. Figure 6-12 Select the submission field 4. Select the created submission (GetInventoryDetails) from the list. The result is shown in Figure 6-13. Figure 6-13 Assigned submission to activate 404 IBM Workplace Forms 2.6: Guide to Building and Integrating a Sample Workplace Forms Application This submission submits the value from the SelectionInfo instance to the server and receives the detail data for the assigned item in an XML structure. The server implementation for this submission (we create it in the next section) sends an XML fragment exactly matching the structure of the receiving instance (InventoryItemDetails). The actions to create now have to move the elements from this transfer instance to the elements in the selected table row. The actions are similar to the first created action (type setvalue), but we have changed the data source and target. 5. Add three additional actions to the list and apply the attributes shown in Table 6-8. Table 6-8 Properties for actions copying the item values to the current row in the order table Attribute Setting/explanation first action Move the item ID to the element related to the ID field in the table row. value Value: instance('SelectionInfo')/InventoryItemID The received value for the ID. ref Value: instance('OrderTableRowData')/Row/line [index('ORDERWIZARDTABLE')]/name The received value for the ID. second action Move the item price for the item to the price field in the table row. value Value: instance('InventoryItemDetails')/Item/Price The received value for the price. ref Value: instance('OrderTableRowData')/Row/line[inde x('ORDERWIZARDTABLE')]/price Target Path to the price element in the OrderTableRowData instance. third action Move the item number in stock for the item to the corresponding field in the table row. value Value: instance('InventoryItemDetails')/Item/NumberI nStock The received value for the item number in stock. ref Value: instance('OrderTableRowData')/Row/line[inde x('ORDERWIZARDTABLE')]/stock Target path to the stock element in the OrderTableRowData instance. Chapter 6. Building the base scenario: stage 2 405 6. The actions are now complete. Double check the created code, as shown in Example 6-15, in the Source tab. Example 6-15 Code for created actions <xforms:action ev:event="xforms-value-changed"> <xforms:setvalue ref="instance('SelectionInfo')/InventoryItemID" value="instance('OrderTableRowData')/Row/line [index('ORDERWIZARDTABLE')]/name"> </xforms:setvalue> <xforms:send submission="GetInventoryDetails"></xforms:send>^ <xforms:setvalue ref="instance('OrderTableRowData')/Row/line [index('ORDERWIZARDTABLE')]/price" value="instance('InventoryItemDetails')/Item/Price"> </xforms:setvalue> <xforms:setvalue ref="instance('OrderTableRowData')/Row/line [index('ORDERWIZARDTABLE')]/stock" value="instance('InventoryItemDetails')/Item/NumberInStock"> </xforms:setvalue> <xforms:setvalue ref="instance('OrderTableRowData')/Row/line [index('ORDERWIZARDTABLE')]/id" value="instance('InventoryItemDetails')/Item/ID"> </xforms:setvalue> </xforms:action> Order table Since the order table is available on the summary page as well, we have to create a similar structure for this table. The most efficient way to do it is to follow these steps: 1. Open the form (with the popup field selected) in the Source tab. Select the created XFDL code for all actions (as shown in Example 6-15) and copy it to the corresponding place in the TABLEORDERDETAILS2. 2. Change the repeat ID in the copied XML fragment from ORDERWIZARDTABLE to TABLEORDERDETAILS2. Action to get customer detail data Having the first action list in place, the creation of the other actions is easy. All other actions are single actions, since they can operate on hard-coded XForms references to the data source and target. 406 IBM Workplace Forms 2.6: Guide to Building and Integrating a Sample Workplace Forms Application The action to get customer detail data should be assigned to the appropriate popups for customer selection (available in two places). In each popup create a send action, as shown in Figure 6-14. Figure 6-14 Action to get CustomerDetail data (type send, submission GetCustomerDetails) Actions to retrieve choices lists The last two actions must retrieve the choices lists. We assign the actions to the data model to ensure that the choices lists are in place on form open. The data model provides a different event list. Here we can find events that are triggered on page load, on page destruction, and on error occurrence. Here we must make sure that the actions fire only when the form is opened in Viewer or Webform Server, but not when opening with the API. The API would cause an error because it cannot run submissions. To meet these requirements, we have two corresponding settings: Fire the submissions in the xforms-model-construct-done event (that is, just after the node tree construction is completed but before the user has access to the form). Open the form with the API with flags that have set the XFDL.UFL_XFORMS_INITIALIZE_ONLY flag as discussed in 5.11.7, “Extraction of form data” on page 339. This ensures that the node structure is built (as needed for signature evaluation and some other features), but then the XForms engine is deactivated, so the actions running in xforms-model-construct-done or later do not execute. Chapter 6. Building the base scenario: stage 2 407 Now we show how to create them. 1. Open the XForms pane in Designer, expand the XForms element, and right-click the Default model. Select Action → Create send from the right-click menu, as shown in Figure 6-15. Figure 6-15 Creating an action in the model context 2. This creates a new entry inside the model element list. Expand the list and open the Properties view for the new send action, as shown in Figure 6-16. Figure 6-16 Activating the GetCustomerChoices submission on form load 408 IBM Workplace Forms 2.6: Guide to Building and Integrating a Sample Workplace Forms Application 3. Assign the attributes listed in Table 6-9. Table 6-9 XForms action triggering the prepopulation for customer choices lists Attribute Setting/explanation submission Value: GetCustomerChoices Select this submission from the list. event Value: xforms-model-construct-done There are two events on page load: xforms-model-construct - fired when the engine starts to build the node structure for the first time after page load in the Viewer/webform Server/ Forms API xforms-model-construct-done - fired after the node structure is complete built, but before the user can access the page using the UI. if Value: instance('CustomerIDs')/CustomerID = '' This makes sure that the list is loaded only in a new template (just when the choices list is empty). In the real world, there can be different requirements of when to load the choices list. Be aware that reloading the choices list can result in removing the current selection from the list. Action to load item choices Last but not least, create the action to load the item choices. Apply the settings in Table 6-10. Table 6-10 XForms action triggering the prepopulation for inventory item choices lists Attribute Setting/explanation submission Value: GetInventoryChoices Select this submission from the list. event Value: xforms-model-construct-done if Value: instance('InventoryItems')/InventoryItem = '' This makes sure that the list is loaded only in a new template (just when the choices list is empty). Tip: We can invoke the created submission very easily for multiple controls. For instance, we can add a refresh button performing the appropriate action on the form to load the choices lists manually on demand. This is the last part to make the XForms submissions run in the form. Save the form and prepare for the J2EE coding in RAD/Eclipse. Chapter 6. Building the base scenario: stage 2 409 6.4.4 Discussion of advanced aspects of using XForms submissions XForms submissions — similar to Web services — are useful for real-time form population. Instead of the form being submitted to the server, the server filling in the form data, then returning the form, XForms submission can be called using the XForms actions with the type send. Having no external definition about the available operations and data structure definitions, as we have in the case of Web services with the WSDL document, it is up to the developer to make sure that the server and the client side are dealing with the same operation model and message structures. This is the point of discussion in this section. In a production environment, problems typically arise when XForms submissions in multiple (versioned) forms are used extensively. These can be resolved by following these suggestions: Versioning of XForms submissions would make the application and form administration significantly easier. This can easily be done by passing with the submission in the URL a version number. The serving application can then differentiate between submission invocations expecting slightly different message structures for the same basic function (for example, detail data extraction for a customer ID). Running huge amounts of data-gathering submissions, it can be a good idea not to hard code the submission behavior (running hundreds of XForms submission serving applications after some months of development). The approach could be to write a generic XForms submission solution reading the configuration data for the incoming requests from a database or any other data store. There is no way to include all potential submissions in such a framework, but there is a good chance of serving a majority of the submissions with a generic solution. There is another good aspect of storing information about the available submission services and their message structure in a data source: This repository could serve as a submission library exposing purpose, message structure, and other data of the available submissions to your enterprise environment. The data structures (XForms instances with or without a leading schema), the submissions, and the actions initiating the submissions are defined in the XForms namespace. That way they can be recognized by any external XForms-compatible applications, for example, running on a mobile device. 6.4.5 J2EE development for XForms submissions Finally, we create a special Web application providing the server side for the XForms submissions used in our application. The application consists of a single servlet using the provided DB2Connection module (available as jar file on the server). The application should match the following specifications: Acceptance of HTTP POST messages Method detection exploring URL parameters (action and instance ID) 410 IBM Workplace Forms 2.6: Guide to Building and Integrating a Sample Workplace Forms Application Figure 6-17 illustrates the environment where we plan to implement the XForms submission service for both the J2EE/DB2 environment and the Domino environment. DB2 Server (Inventory, Customer Data) DB2 Client Domino 7.0 Server WAS 6 Domino XFormsSubmission Service J2EE XForms Submission Aplication LS XFormsSubmission Agent 7 XFormsSubmission Servlet 8 6 LotusScript Agent XFormsSubmission Domino Designer 7.0 5 Created Form 3 XForms Model + XForms Submission Workplace Forms Designer 4 XFormsSubmission Servlet App 2 Rational Application Developer 6 1 Back-end defined data source structure Domino Environment J2EE / DB2 Environment Figure 6-17 Architecture of XForms submission design (development road map) We can see in the diagram the following development sequence: 1. We start with the form design, in particular, the definition of the XForms Model containing the data instances (based on the data structure in the external data sources). 2. The next step is the creation of the XForms submission in the form. 3. Based on the defined message structure for request and response (URL parameters + POST data structure), we create the server components (servlet) that are bound to the existing external data sources. 4. The created Web application is deployed to the server. 5. In the Designer Preview tab, we can test the submission by applying the target URLs for the deployed Web application. 6. On the same message structure used in step 3, we create a Domino-based solution for the XForms submission service (in the book, this is a LotusScript agent, but it could be a Java agent or a servlet as well). 7. The created LotusScript agent is deployed to the Domino server. 8. In the Designer Preview tab, we can test the created XForms submission service by applying the target URL for the Domino agent. Chapter 6. Building the base scenario: stage 2 411 Let us focus for now on the J2EE development. We aim to build a server component dealing with the following elements: As shown in Example 6-16, the component must be able to detect URL arguments exploring the request URL. Example 6-16 XForms submission URL requesting detail data for an inventory item http://vmforms261.cam.itso.ibm.com:10000/WPForms261RedbookXForms/XFormsSubmissi onServlet?action=getDetails&instanceID=InventoryItemDetails We require parameter detection exploring the POST data stream, as shown in Example 6-17. Example 6-17 XForms submission POST data containing an additional selection data (Item ID) <InventoryItemID xmlns="" xmlns:custom="http://www.ibm.com/xmlns/prod/XFDL/Custom" xmlns:designer="http://www.ibm.com/xmlns/prod/workplace/forms/designer/2.6" xmlns:ev="http://www.w3.org/2001/xml-events" xmlns:xfdl="http://www.ibm.com/xmlns/prod/XFDL/7.0" xmlns:xforms="http://www.w3.org/2002/xforms" xmlns:xsd="http://www.w3.org/2001/XMLSchema" xmlns:xsi="http://www.w3.org/2001/XMLSchema-instance"> Nut[IT_001] </InventoryItemID> We have to compose a response data structure based on DB2 query resultsets as XML, as shown in Example 6-18. Example 6-18 Example for SQL query and retrieved data using the method getResultsXML Selection: Nut[IT_001] query: SELECT IT_ID, IT_NAME,IT_PRICE, IT_STOCK from WPF_ITEMS WHERE IT_ID ='IT_001' Results: <Item> <IT_ID>IT_001</IT_ID> <IT_NAME>Nut</IT_NAME> <IT_PRICE>21.15</IT_PRICE> <IT_STOCK>11111</IT_STOCK> </Item> Finally, we must submit the response data to the submitter, formatted according to the XForms instance structure, as shown in Example 6-19. The results are to replace the complete inner structure of the instance including the root element. Example 6-19 XForms submission response delivering the detail data for the requested item <InventoryItemDetails> <Item> <ID>IT_001</ID> <Name>Nut</Name> <Price>21.15</Price> <NumberInStock>11111</NumberInStock> </Item> 412 IBM Workplace Forms 2.6: Guide to Building and Integrating a Sample Workplace Forms Application </InventoryItemDetails> For our needs, we need to implement four operation modes, as shown in Table 6-11. Table 6-11 Implementation of four operation modes Action parameter submissionID Request parameters Results getChoices InventoryItems none (return all item IDs) <InventoryItems> <InventoryItem>Nut[IT_001]</InventoryItem> <InventoryItem>Bolt[IT_002]</InventoryItem> <InventoryItem>Widget[IT_003]</InventoryItem> <InventoryItem>Gadget[IT_004]</InventoryItem> <InventoryItem>Thingy[IT_005]</InventoryItem> </InventoryItems> getChoices CustomerIDs none (return all customer IDs) <CustomerIDs> <CustomerID>OnDemand Corporation[100000] </CustomerID> <CustomerID>Workplace Early Adopter Inc[100001] </CustomerID> <CustomerID>Portal Application Surfacing[100002] </CustomerID> <CustomerID>Workplace Forms Redpapers Inc[100003] </CustomerID> <CustomerID>Mobile Devices Corporation[100005] </CustomerID> </CustomerIDs> getDetails InventoryItem Details <InventoryItemID ... >ID</InventoryItemID> <InventoryItemDetails> <Item> <ID>IT_001</ID> <Name>Nut</Name> <Price>21.15</Price> <NumberInStock>11111 </NumberInStock> </Item> </InventoryItemDetails> getDetails CustomerDetai ls <ID .... >CustomerID</ID> <CustomerDetails> <Customer> <ID>123</ID> <Company>CompName</Company> <AccountManagerID>N</AccountManagerID> <Department>Dep</Department> <ContactName>CN</ContactName> <ContactPosition>PC</ContactPosition> <ContactEmail>CE</ContactEmail> <ContactPhone>CP</ContactPhone> <CRMNumber>CR#</CRMNumber> </Customer> </CustomerDetails> The related servlet code is somewhat lengthy but the structure is straightforward. The servlet executes the following steps: 1. Inspect URL parameters and detect the method to execute. 2. Create a query based on the detected operation mode. Chapter 6. Building the base scenario: stage 2 413 3. Transform the resultset data into an XML structure matching the data structure in the XForms instance in the form. 4. Send the complete instance data back to the requestor. The example code for the servlet is shown in Example 6-20. Example 6-20 XFormsSubmission servlet skeleton // @annotations-disabled tagSet="web" package com.ibm.form.redbook2.xFormsSubmissionServlet; import java.io.IOException; import java.io.InputStream; import java.io.PrintWriter; import javax.servlet.ServletException; import javax.servlet.http.HttpServletRequest; import javax.servlet.http.HttpServletResponse; import forms.cam.itso.ibm.com.*; /** * Servlet implementation class for Servlet: XFormsSubmissionServlet */ public class XFormsSubmissionServlet extends javax.servlet.http.HttpServlet implements javax.servlet.Servlet { public XFormsSubmissionServlet() { super(); } public void init() throws ServletException { // TODO Auto-generated method stub super.init(); } protected void doGet(HttpServletRequest request, HttpServletResponse response) throws ServletException, IOException { // we go not accept get requests - send back an error page. response.setContentType("text/html; charset=UTF-8"); String html = "<HTML><BODY><H1>XFormsSubmissionServlet</H1><BR>"; html += "please use post only for this url"; html += "</BODY></HTML>"; PrintWriter output = response.getWriter(); output.write(html); output.flush(); } protected void doPost(HttpServletRequest request, HttpServletResponse response) throws ServletException, IOException { String nl = ""; // set some default values for the case, the request does not //contain these parameters String query = "SELECT ...."; 414 IBM Workplace Forms 2.6: Guide to Building and Integrating a Sample Workplace Forms Application String String String String String xmlRowTag = "row"; xmlElementTag = "cell"; res = ""; responseMessage = ""; selection = ""; String action = request.getParameter("action"); if (action == null) action="<no action specified>"; // we accept 2 actions at this time: getChoices and getDetails String instanceID = request.getParameter("instanceID"); if (instanceID == null) instanceID="<no instanceID specified>"; //we accept only names instance IDs (see the code below) //the combination of action and instanceID parameter will decide //about the DB2 query to exeute and the response message structure. //get the request data to xFormsXML variable //it can contain an additional parameter InputStream in = request.getInputStream(); byte[] b = new byte[in.available()]; in.read(b); String xFormsXML = new String(b); if (action.equalsIgnoreCase("getChoices")) { //here we have to send back a data instance filled with data selected //based on the target instance. //read the corresponding choices from the database //and compose the ersponse structure //******************************************************* // Method dependent code removed here - details see below //******************************************************* } else if (action.equalsIgnoreCase("getDetails")){ //extract the selection parameter from the received XML //in these queries we will extract one additional selection parameter // (ID) from the POST data //******************************************************* // Method dependent code removed here - details see below //******************************************************* } } else { p("no valid parameters: " + request.getQueryString()); throw new ServletException( "Please use the parameter ?action=getChoices or ?action=getDetails"); } //complete the responseMessage to a data instance attaching root element //make here the right choice regarding the node structure in the form. //both purposes below are valid: String xFormsInstance = "<" + instanceID + ">" + responseMessage + "</" + instanceID + ">"; //String xFormsInstance = "<data>" + responseMessage + "</data>"; Chapter 6. Building the base scenario: stage 2 415 //return the choices list as HTTP POST response.setContentType("text/xml; charset=UTF-8"); PrintWriter output = response.getWriter(); output.write(xFormsInstance); output.flush(); output.close(); } } In the code shown in Example 6-20 on page 414, the detailed fragments to handle the different data objects are removed. Inspect them in Example 6-21 and Figure 6-22. Example 6-21 Code snippet that creates the response for choices lists ..... if (action.equalsIgnoreCase("getChoices")) { //here we have to send back a data instance filled with data selected //based on the target instance. Actually we will not inspeck the POST data //for additional selection parameters, but in real life this should be done //e.g. setting maximum response elements or a filter kriterium to the query. //read the corresponding choices from the database //**** put the right values here if (instanceID.equals("CustomerIDs")){ //returns a list of all customers query = "SELECT CUST_ID,CUST_NAME from WPF_CUST"; xmlRowTag = ""; xmlElementTag = "CustomerID"; } else if (instanceID.equals("InventoryItems")){ //returns a list of all items query = "SELECT IT_ID,IT_NAME from WPF_ITEMS"; xmlRowTag = ""; xmlElementTag = "InventoryItem"; } else if (instanceID.equals("anyotherinstanceID")){ //this is a dummy entry for demo purpose query = "SELECT * from TABLE_NAME"; xmlRowTag = "row"; xmlElementTag = "cell"; } //execute the query and get the XML structure back responseMessage = DB2Connection.getChoicesXML(query, xmlElementTag); //message in responseMessage is now ready to attach the root elemen //and send back } ..... Example 6-22 Code snippet that creates the response for detail data requests .... else if (action.equalsIgnoreCase("getDetails")){ //extract the selection parameter from the received XML 416 IBM Workplace Forms 2.6: Guide to Building and Integrating a Sample Workplace Forms Application //in these queries we will extract one additional selection //parameter (ID) //from the POST data if (instanceID.equals("CustomerDetails")){ //returns the detail data for one customer identified by ID //the POST data contains one element like // <ID .......>12345</ID> // or // <ID ......>CustomerName [12345]</ID> selection = extractData(xFormsXML); //return the ID or Name[ID] string if (selection.indexOf("]") > 0) // extracts the ID from //Name[ID] string selection = selection.substring(selection.indexOf("[")+1, selection.length() - 1); //compose the query query = "SELECT CUST_ID,CUST_NAME,CUST_CONTACT_NAME,” + “CUST_CONTACT_EMAIL from WPF_CUST WHERE CUST_ID='" + selection + "'"; xmlRowTag = "Customer"; res = DB2Connection.getResultsXML(query, xmlRowTag, 1); //res contains a String like //<Customer><CUST_ID>111</CUST_ID> .... </Customer> //we must replace the Column Names from the DB2 database with //the element names required by //the XForms instance res = DB2ConnectionForms.replaceSubString(res, "CUST_ID>","ID>"); res = DB2ConnectionForms.replaceSubString(res, "CUST_NAME>","Name>"); res = DB2ConnectionForms.replaceSubString(res, "CUST_CONTACT_NAME>","ContactName>"); responseMessage = DB2ConnectionForms.replaceSubString(res, "CUST_CONTACT_EMAIL>","ContactEmail>"); //message in responseMessage is now ready to attach the root //elemen and send back } else if (instanceID.equals("InventoryItemDetails")){ //returns the detail data for one item identified by ID //the POST data contains one element like // <ID .......>12345</ID> // or // <ID ......>itemName [12345]</ID> selection = extractData(xFormsXML); //return the ID or ItemName[ID] string if (selection.indexOf("]") > 0) // extracts the ID from ItemName[ID] string selection = selection.substring(selection.indexOf("[")+1, selection.length() - 1); //compose the query query = "SELECT IT_ID, IT_NAME,IT_PRICE, IT_STOCK from “ + “WPF_ITEMS WHERE IT_ID ='" + selection + "'"; xmlRowTag = "Item"; //res contains a String like <Item><IT_ID>111</IT_ID> .... </Item> //we must replace the Column Names from the DB2 database with Chapter 6. Building the base scenario: stage 2 417 //the element names required by //the XForms instance res = DB2Connection.getResultsXML(query, xmlRowTag, 1); res = DB2ConnectionForms.replaceSubString(res, "IT_ID>","ID>"); res = DB2ConnectionForms.replaceSubString(res, "IT_NAME>","Name>"); res = DB2ConnectionForms.replaceSubString(res, "IT_PRICE>","Price>"); responseMessage = DB2ConnectionForms.replaceSubString(res, "IT_STOCK>","NumberInStock>"); //message in responseMessage is now ready to attach the root //elemen and send back } else if (instanceID.equals("anyotherinstanceID")){ //dummy case here query = "SELECT * from TABLENAME"; xmlRowTag = "row"; res = DB2Connection.getResultsXML(query, xmlRowTag, 1); res = DB2ConnectionForms.replaceSubString(res, "COL1>","att1>"); res = DB2ConnectionForms.replaceSubString(res, "COL2>","att2>"); res = DB2ConnectionForms.replaceSubString(res, "COL3>","att3>"); } The code utilizes a helper function, as shown in Example 6-23, to extract the request parameter from the submitted XML. Example 6-23 Extracting the contained data for an XML element /** * * helper method to extract the data from a single xml element * like this: <element ..... >data</element> * * @param xmlData * complete xml string (single element) * * @return String containing the extracted value */ static String extractData(String xmlData) { String element = ""; //$NON-NLS-1$ int p1 = xmlData.indexOf(">"); if (p1 < 0) return ""; element = xmlData.substring(p1+1); int p2 = element.indexOf("<"); element = element.substring(0, p2); return element; } 6.4.6 XForms submission runtime Having created all of the components, we can deploy the components to the different systems and run our first test. 418 IBM Workplace Forms 2.6: Guide to Building and Integrating a Sample Workplace Forms Application Figure 6-18 shows the data flow during runtime. XForms submissions are called in our sample form directly after the first form load (reading choices lists for customers and products from the repository) and during work in the form (gathering detail data after selecting a product or customer). For each XForms submission, steps 2 to 7 in the following section are processed. DB2 Server 1 5 Domino 7.0 Server 5 DB2 Client 4 4 WAS 6 Domino XFormsubmission Service XFormsSubmission Application LotusScript Agent XFormsSubmission Servlet 6 3 XForms Submission Implementation 7 XFDL Data 1 6 XForms Submission Implementation 2 XForms Submission 3 7 XFDL Data 2 XForms Submission Workplace Form Workplace Form Workplace Forms Viewer Workplace Forms Viewer Domino Environment J2EE / DB2 Environment Figure 6-18 XForms submission runtime data flow for Viewer-based scenarios Figure 6-18 shows the following steps for both the J2EE/DB2 environment and the Domino environment: 1. Form download (with or without value prepopulation initiated on the server side). 2. XForms submission invocation by an XForms action (on first load or any other form events, like a button clicked, or a value change in a field), including transfer on all input parameters for this request. 3. The submission request is created by the XForms submission implementation in the Forms Viewer target URL. The message structure is based on the submitted XForms instance. J2EE or Domino implementation of XForms submission service receives the request and initiates data retrieval. 4. Data query to target source (DB2 or Domino) coded in the J2EE or Lotus Script classes on the server side. 5. Data retrieval from data source (DB2 or Domino) coded in the J2EE or Lotus Script class on the server side. 6. Response message composition on the server side, decomposition in Forms Viewer XForms submission module. 7. Data storage to the target specified in the initiating XForms submission, replacing one entire XForms data instance with the received XML structure. As a data target to store the response object, XForms submissions can only assign entire XForms instances. The runtime simply replaces the entire node structure of the instance with Chapter 6. Building the base scenario: stage 2 419 the received content. This can lead to unexpected side effects, if the received message does not contain the expected XML structure. For Webform Server environment with Zero Footprint client, XForms submissions work as well. See the data flow in the diagram shown in Figure 6-19. DB2 Server WAS 6 Browser (Zero Footprint) 1 2a 7a Web Appplication using IBMWorkplaceFormsServerServlet 5 DB2 Client 4 WAS 6 XFormsSubmission Application XFormsSubmission Servlet 6 3 XForms Submission Implementation 7 XFDL Data 2 XForms Submission Workplace Form Workplace Forms Webform Server J2EE / DB2 Environment with Zero-Footprint Client (Webform Server) Figure 6-19 XForms submission data flow in a Zero Footprint environment We can observe two differences to the Viewer scenario here: The client invokes the XForms submission using an Ajax call to the Webform Server (Action 2a on the diagram). It does not send the request to the data source directly. Based on the trigger, the Webform Server executes the XForms submission with the assigned URL to the data source (action 3). It evaluates the response according to the submission settings and sends the changed data for the current page back to the client and sends the new data via an Ajax call (action 7a). All other parts of the data flow are exactly the same as in the Viewer-based J2EE scenario, as shown in Figure 6-18 on page 419. Important: The Webform Server Version 2.6.1 still does not support Web service calls. This is one of the reasons why we implement the dynamic data gathering in the form using XForm submissions. They are well implemented in the Viewer and in the server component of Workplace Forms. 6.5 Servlet access to form data In this section we describe how to provide servlet access to the form data. We need this functionality very often for prepopulation and value extraction purpose. 420 IBM Workplace Forms 2.6: Guide to Building and Integrating a Sample Workplace Forms Application 6.5.1 Where we are in the process: building stage 2 of the base scenario Figure 6-20 is an overview of where we are within the key steps involved to build stage 2 of the base scenario. This focuses on adding storage capabilities to DB2, incorporating Web services, modifying the JSPs, and adding an approval workflow. As a starting point, we create a copy in the J2EE project from the servlet (SubmissionServlet1) and all JSPs and give them new names (SubmissionServlet, dirlisting.jsp, and similar). We do this so that we can continue to work on the created code structures without destroying the stage 1 application. Building the Base Scenario – Stage 2 DB2 / Data Storage XForms Submissions Servlet Access to Forms Adjustments to JSPs – Creating tables – Form development – Form prepopulation – Modifying index1.jsp – Populating tables – Creating actions to activate submissions – J2EE Development – Extraction of form data – Reading form data from DB2 – Creating JSP to view DB2 data Approval Workflow – Designing – Workflow – XForms submissions runtime Figure 6-20 Overview of major steps involved in building stage 2 of base scenario application 6.5.2 Servlet access to form data (prepopulation/data retrieval) While XForms submission is a good choice for runtime data exchange during work in a form opened in the Forms viewer, data prepopulation and retrieval is done on the server side before the form is presented to the end user and after a submitted form is received on the server. Both actions are basically an access to the form available as a file or a stream. There are two different access methods: Access through Workplace Forms API Access by text parsing In this book we provide both techniques. In the servlet context, we use API-based methods only. For Domino integration, we discuss the text parsing methods as well. Both scenarios access the form in the form open event (filling a template with initial data on first open) and data extraction on form submit. Some developers may prefer to use a third-party XML parser to interface with their forms. Depending on the parser and the types of tasks to be performed, this may provide some benefits in terms of speed or developer comfort (if the developer has a great deal of experience with XML parsers). Chapter 6. Building the base scenario: stage 2 421 However, the API is able to perform some tasks that are impossible for an XML parser. For example, computes can continue to run in the form (or be activated by the API) while the form is in memory, so any form data that is dependent on continuously evaluated computes will remain accurate. Additionally, since most applications use compressed forms, which cut down transmission speeds and use of disk space dramatically, the API is able to automatically decode Base 64 data and uncompresses forms as it reads them. With an XML parser, you must force it to decode and uncompress the forms to run them. The API also provides methods for verifying and handling digital signatures. Most applications need to verify signatures on the server side, and occasionally even apply signatures on the server. These tasks are virtually impossible to perform without the Workplace Forms API. The API can also encode and decode data items stored such as images, enclosures, and digital signatures. In the case of images and enclosures, this means that using the API it is possible to extract attachments or images from the form and store them separately on the server, or insert attached files into forms as they are sent out to the user. 6.5.3 Form prepopulation In this stage, we provide server-side prepopulation (Figure 6-21) using the Forms API. Server-side form prepopulation takes place before a user opens a form. The engaged module (such as a servlet) takes control over the initial XFDL form (stored form or empty template as file or stream), accesses the internal values (using API or text parsing), and submits the changed XFDL file/stream to the invoking instance (the viewer or any other module requesting the form). Stored Form or Template 1 Form Pre-population Data instances Fields Attributes Text parsing 1 Server In Memory Copy on Server 2 Pre-populated Form in Viewer Figure 6-21 Server-side form prepopulation The basic idea here is to get the original XFDL information (template), transform it by adding external data to the form, and then send it to the client. Assuming an invocation URL fired from the client browser to open a form, in a servlet environment, prepopulation usually occurs 422 IBM Workplace Forms 2.6: Guide to Building and Integrating a Sample Workplace Forms Application in the doGet method. The URL must now point to the servlet (not directly to the stored template on file system) and contain a reference to the chosen template. Form download based on a POST action fired by a browser or another system is handled in the doPost method. This does not occur in our scenario, but it is possible to do so. The coding in Example 6-24 gives a simple example of how prepopulation can be done in the doGet method. Example 6-24 Prepopulation executed in doGet servlet method updating XForms instance INST1 public void doGet(HttpServletRequest request, HttpServletResponse response) throws ServletException, IOException { try { //get the tem plate oath from the request parameter “template=” String formTemplate = request.getParameter("template"); FileInputStream fis = new FileInputStream(formTemplate); XFDL theXFDL = IFSSingleton.getXFDL(); FormNodeP theForm = theXFDL.readForm(fis,READFORM_XFORMS_INIT_ONLY); .... //Set some internal values like this //address the internal element to update using xforms specific pathes. String InstanceXML = “<value1>10000</value1>”; theForm.updateXFormsInstance(null, “instance(’INST1’)/value1” ,null, InstanceXML, XFDL.UFL_XFORMS_UPDATE_REPLACE); ..... //Return the prepopulated form response.setContentType("application/vnd.xfdl"); theForm.writeForm(response.getOutputStream(), null, 0); } catch (Exception doGetE) { System.out.println("SubmissionServlet: doGet: Exception processing request: " + doGetE.toString()); returnText(response,"SubmissionServlet: doGet: Exception occured: " + doGetE.toString(), "text/plain"); { } As discussed in stage 1, it is a best practice to access form data using data instances (as shown in the example above), not field values. Example 6-25 shows how to address a field value synchronized with an XFDL data instance by position or by name. See the following data instance in the XFDL form (even though we are not using XFDL instances in this book). Example 6-25 XFDL structure with the data instance OrderNumber/field ORD_ID to prepopulate <?xml version="1.0" encoding="ISO-8859-1"?> <XFDL xmlns="http://www.PureEdge.com/XFDL/6.5" ..... > <globalpage sid="global"> <global sid="global"> ..... <xmlmodel> <instances> .... <xforms:instance xmlns="" id="OrderNumber"> Chapter 6. Building the base scenario: stage 2 423 <OrderNumber> <ORD_ID></ORD_ID> </OrderNumber> </xforms:instance> </xmlmodel> <global> <globalpage> .... To assign a value to this field ORD_ID in data instance OrderNumber, the code in Example 6-26 can be used (reference by position to the data instance). Example 6-26 Assigning a value (orderNumber) to a form node in a XFDL data instance //theForm contains a reference to the form root node private static void setOrderNumber(FormNodeP theForm) throws UWIException { //get orderNumber from DB2 String orderNumber = DB2ConnectionForms.getNewOrderNumber(); //set ordernumber in data instance theForm.setLiteralByRefEx(null, "global.global.xmlmodel[xfdl:instances][7][null:OrderNumber][null:ORD_ID]", 0, null, null, orderNumber); } The code used is simple, but has one disadvantage: we cannot reference the data instance by name. All data instances have the tag name instance and no SID assigned. They are differentiated by the attribute ID. This attribute cannot be parsed by those methods as setLiteralByRefEx. As a result, we code a relative reference to the object: global.global.xmlmodel[xfdl:instances][7][null:OrderNumber][null:ORD_ID] Here, the part [7] indicates to access the eighth XFDL data instance. Adding or deleting data instances can break this reference. There are at least two ways to overcome this problem. We can use a parsing algorithm to check all data instances in a loop for the required instance ID, detect the instance number, and write back data. This code is not shown here, but is possible to create. The other (and recommended) way is to use a dedicated API function for data instance updates operating with the instance ID as parameter. See the code in Example 6-27. Example 6-27 Updating a data instance directly with an XML fragment private static void setOrderNumber(FormNodeP theForm) throws UWIException { //get db2 data as XML fragment String orderNumberXML = DB2ConnectionForms.getNewOrderNumberXML(); //returns something like “<OrderNumber><ORD_ID>1000016</ORD_ID></OrderNumber>"; //convert the String into a Stream StringReader sr = new StringReader(orderNumberXML) ; // update the instance by name // public void encloseInstance(theInstanceID,theStream,theFlags,theScheme, // theRootReference,theNSNode,replaceNode) theForm.encloseInstance("OrderNumber", sr , 0, null, "[0]", null,true); } 424 IBM Workplace Forms 2.6: Guide to Building and Integrating a Sample Workplace Forms Application The method encloseInstance overwrites an existing element in an instance with a new XML fragment. This makes it easy to update much more complex instances than this in the example. The only restriction for this method is to match exactly the tags in the updated elements to safe all existing bindings to other objects in the form. Be aware of the addressing used in the call. The parameter theRootReference is filled with "[0]" — a pointer to the first node inside the data instance. See Example 6-28 to understand this concept. Example 6-28 XML fragment representing the data instance and the first element <OrderNumber> <xforms:instance xmlns="" id="OrderNumber"> <OrderNumber> <ORD_ID></ORD_ID> </OrderNumber> </xforms:instance> The way this works is as follows: 1. The parameter theInstanceName (filled with the value "OrderNumber") points the update method to the Tag <xforms:instance xmlns="" id="OrderNumber">. 2. The parameter theRootReference filled with "[0]" points to the first inner element — that is, <OrderNumber> in the example. 3. This element and all child elements are updated (overwritten) by the update. We found that when updating the complete instance, including the <xforms:instance> elements would cause namespace problems with the xforms namespace. So the recommended way is to update the root element or any inner elements only. The following code snippets give you an idea of how to use the theRootReference parameter for internal addressing. All the samples below would work (Example 6-29). Example 6-29 Different ways to address data instance objects // set the entire first element in data instance - addressing by position String orderNumberXML = "<OrderNumber><ORD_ID>1000016</ORD_ID></OrderNumber>"; StringReader sr = new StringReader(orderNumberXML) ; theForm.encloseInstance("OrderNumber", sr , 0, null, "[0]", null,true); // set the a named element in data instance - addressing by name String orderNumberXML = "<OrderNumber><ORD_ID>1000016</ORD_ID></OrderNumber>"; StringReader sr = new StringReader(orderNumberXML) ; theForm.encloseInstance("OrderNumber", sr , 0, null, "[0][null:ORD_ID]", null,true); // set the value only - mixed addressing String orderNumberXML = "<ORD_ID>1000016</ORD_ID>"; StringReader sr = new StringReader(orderNumberXML) ; theForm.encloseInstance("OrderNumber", sr , 0, null, "[0][null:ORD_ID]", null,true); // set the value only - addressing by position String orderNumberXML = "<ORD_ID>1000016</ORD_ID>"; StringReader sr = new StringReader(orderNumberXML) ; theForm.encloseInstance("OrderNumber", sr , 0, null, "[0][0]", null,true); Using XForms instances, the reference to any inner elements of the instance is defined by XPath expression. See Example 6-30. Example 6-30 XPath expressions referencing an XForms submission fragment //This will update the entire instance Chapter 6. Building the base scenario: stage 2 425 String InstanceXML = “<data><value1>10000</value1></data>”; theForm.updateXFormsInstance(null, “instance(’INST1’)” ,null, InstanceXML, XFDL.UFL_XFORMS_UPDATE_REPLACE); //This will update the only the inner element named “value1” in the instance String InstanceXML = “<value1>10000</value1>”; theForm.updateXFormsInstance(null, “instance(’INST1’)/value1” ,null, InstanceXML, XFDL.UFL_XFORMS_UPDATE_REPLACE); //This will update the the third element named “elem” in the instance String InstanceXML = “<elem>10000</elem>”; theForm.updateXFormsInstance(null, “instance(’INST1’)/elem[2]” ,null, InstanceXML, XFDL.UFL_XFORMS_UPDATE_REPLACE); Knowing how to prepopulate data, we can explore how to extract data from a submitted form. 6.5.4 Extraction of form data and storage of entire form Extracting data from a form will be done as in the stage 1 doPost method. In stage 2, we: Extract much more data (state changes and order detail data). Complete the extracted data with additional history data (time stamps for approvals and approver IDs). Store the data to DB2. Store the entire form to DB2. The main methods for data extraction stay the same as in stage 1. See the code in the extended scenario for doPost (Example 6-31). There are only a few parts to add for stage 2. You can finish, then search for comments containing: //add for Stage 2 Example 6-31 Extended scenario for doPost public void doPost(HttpServletRequest request, HttpServletResponse response) throws ServletException, IOException { System.out.println("SubmissionServlet: doPost started"); //Initialize member variables String action = null; //Controls the processing action, response from // Servlet XFDL theXFDL = null; //The form FormNodeP theForm = null; //Represents nodes of the XFDL form String formString = null; //String representation of the form. Used for // the 'bounceback' feature. //Form State variables String formState = null; //The current state of the form String previousFormState = null; //The previous state of the form String formName = null; //Used in Stage 1 as the file name when // persisting the form to the file system /** * Processing. <BR> * Determine the type of request. Currently supported options include: * <BR> * 1) [listTemplates, null] Display 'listTemplates' JSP. This is the * default behavior if no action is specified. <BR> 426 IBM Workplace Forms 2.6: Guide to Building and Integrating a Sample Workplace Forms Application * 2) [listForms] Display 'listForms' JSP. <BR> * 3) [store] Store form, display 'submissionComplete' JSP. If needed, * the previous version is removed. <BR> * 4) [bounceback] For test purposes, returns the form as an text/xml * response page. <BR> */ try { action = request.getParameter("action"); if (action== null) action=""; if (action.equalsIgnoreCase("bounceback")) { formString = Utils.getFormAsString(theForm); } else if (action.equalsIgnoreCase("store")) { .......................... .......................... String folderPath = props.getProperty(formState); ServletContext ctx = conf.getServletContext(); String path = ctx.getRealPath(folderPath); Utils.writeBytesToFile(path + formName, Utils.getFormBytes(theForm)); if (previousFormState == null) { System.out.println("SubmissionServlet: doPost: FormMetaData: ” + “ERROR: PreviousFormState element was null"); } else if (previousFormState.equals(formState)){ System.out.println("No state change"); } else if (previousFormState.equalsIgnoreCase("2") || previousFormState.equalsIgnoreCase("3") || previousFormState.equalsIgnoreCase("5")) { System.out.println("SubmissionServlet: doPost: FormMetaData:” + “ previousFormState [ "+ previousFormState + "] indicates previous file deletion is necessary"); folderPath = props.getProperty(previousFormState); String previousFormPath = ctx.getRealPath(folderPath); File file = new File(previousFormPath + File.separator + formName); System.out.println("Deleting: " + previousFormPath + File.separator + formName); if (!(file == null)) file.delete(); } //add for Stage 2 begin ====================== /** * If the form is now approved, store the order information into * DB2, then store the entire form. */ if (Utils.isRedbookForm(theForm)){ if (formState == null) { System.out .println("SubmissionServlet: doPost: ERROR: formState is NULL"); } else if (formState.equalsIgnoreCase("2") || formState.equalsIgnoreCase("3") || formState.equalsIgnoreCase("4") || formState.equalsIgnoreCase("5") || formState.equalsIgnoreCase("6")) { System.out .println("SubmissionServlet: doPost: ORDER APPROVAL DETECTED: " + "extracting order info from form"); String[] orderData = Utils.extractOrderData(theForm, orderProps); Utils.printArray("OrderData", orderData); System.out .println("SubmissionServlet: doPost: ORDER Submission DETECTED: " + Chapter 6. Building the base scenario: stage 2 427 "storing order info into Database"); Utils.writeOrderDatatoDB(orderData); System.out .println("SubmissionServlet: doPost: ORDER Submission DETECTED: " + "completed update of order info into Database."); //TODO: replace hard reference to array index String strXFDL = Utils.getFormAsString(theForm); Utils.writeFormToDB(orderData[0], strXFDL); System.out .println("SubmissionServlet: doPost: ORDER Submission DETECTED: " + "completed storage of XFDL Form into Database."); }//add for Stage 2 end ====================== } } else { System.out .println("SubmissionServlet: doPost: specified action parameter value -->" + action + "<-- is not supported. Currently the following are supported " + "[update, store, or blank which defaults to store.]"); action = "unsupportedaction"; } ........................ ..................... } System.out.println("SubmissionServlet: doPost: completed."); } The new code fragments use some helper functions created for stage 2 in the Utils class. They basically execute the form and handling for DB2. The application in stage 2 stores the files in both the file system and the DB2 database (see method writeFormToDB). The corresponding code for DB2 storage is simple. It just calls the corresponding DB2ConnectionForms method. The method checks for any update or insert operations internally. The key for insert/update procedures is the first element of the orderData array containing the extracted data. 428 IBM Workplace Forms 2.6: Guide to Building and Integrating a Sample Workplace Forms Application After this, the order state stored in DB2 is checked (lastOrderState). If any approvals are detected (new order state 3 or 4), the corresponding history fields are filled (Example 6-32). Example 6-32 Code storing order data and entire form to DB2 /** * write (insert or update) metadate for one order * * @param orderData * String table of all order data (field order must compare to * column order in the table) */ public static void writeOrderDatatoDB(String[] orderData) { DB2ConnectionForms.writeOrderData(orderData); } /** * write (insert or update) the entire form as CLOB to DB2 * * @param orderID * @param theForm as string */ public static void writeFormToDB(String orderID, String theForm) { DB2ConnectionForms.writeOrderXFDL(orderID, theForm); } The way to create an orderData array is straightforward here. We parse the FormOrderData instance using the API for registered field names in the orderdata.properties file in a loop and extract the values using the Utils.getFormValue function. This function extracts the appropriate value from the instance using XPath references like this: instance('FormOrderData)/Amount Code for extracting FormOrderInstance as an XML fragment can be seen in the Domino integration chapter. The working code fragment for the WebSphere Application Server (WAS) servlet is shown in Example 6-33. Example 6-33 Extracting order data and detecting workflow state changes /** * Extracts the order data from the form and creates an array * representation. <BR> * The elements and their order are defined in the order.properties file. * * @param theForm * @param orderProps * @return * @throws UWIException */ public static String[] extractOrderData(FormNodeP theForm, Properties orderProps) throws UWIException { int numElements = (new Integer(orderProps.getProperty("NUM_ELEMENTS"))) .intValue(); System.out .println("SubmissionServlet: extractOrderData: read number of elements “ + “from props file to be: " + numElements); String[] orderData = new String[numElements]; String[] lastOrderData = new String[numElements]; String orderState = "0"; Chapter 6. Building the base scenario: stage 2 429 String lastOrderState = "0"; GregorianCalendar cal = new GregorianCalendar(); for (int i = 0; i < numElements; i++) { //Extract data from the form String propName = "ORDER_ELEMENT_NAME_" + i; System.out.println("SubmissionServlet: extractOrderData: “ + “Constructed property name as: "+ propName); String propValue = orderProps.getProperty(propName); System.out.println("SubmissionServlet: extractOrderData: Lookup returned: "+ propValue); String formValue = Utils.getFormValue(theForm, "instance('" + ORDERDATA_INSTANCE_ID+ "')/" + propValue , "stripe"); if (propValue.equals("CustomerID")) formValue = DB2ConnectionForms.extractID(formValue); orderData[i] = formValue; System.out.println("SubmissionServlet: extractOrderData: Update element [" + i + "] with value [" + orderData[i] + "]"); } // read the state, get last state and check for history fields to write orderState = orderData[5]; lastOrderState = Utils.getFormValue(theForm, "instance('" + METADATA_INSTANCE_ID+ "')/PreviousState" , "stripe"); if (lastOrderState.equals("")) lastOrderState = "0"; System.out.println("lastOrderState: " + lastOrderState); if ((orderState.equals("3") || orderState.equals("4")) && (lastOrderState.equals("2"))) { System.out.println("MGR approval"); orderData[11] = currentDate(); //app date mgr orderData[12] = "accepted by manager"; //comment mamager System.out.println("MGR approval OK"); } else if (orderState.equals("4") && (lastOrderState.equals("3"))) { System.out.println("DIR approval"); orderData[14] = currentDate(); orderData[15] = "accepted by director"; System.out.println("DIR approval OK"); } else if (orderState.equals("4") && (!lastOrderState.equals("4"))) { System.out.println("AUTO approval"); System.out.println("AUTO approval OK"); } if (orderState.equals("4") && (!lastOrderState.equals("4"))) orderData[7] = currentDate(); if (lastOrderState.equals("0")) orderData[6] = currentDate(); return orderData; } /** * gets data in the xfdl form addressed by an item reference * dependent on the syntax in pathToItem parameter, the code will access an * XFDL item or data in an XForms instance * * @param theForm the xfdl form * @param pathToItempath (or XPath expression) to the item to read * @param returnMode"stripe" will stripe the outer element of the * returned instance 430 IBM Workplace Forms 2.6: Guide to Building and Integrating a Sample Workplace Forms Application * all other values will return the value or instance "as is" * @return the value of the item */ public static String getFormValue(FormNodeP theForm, String pathToItem, String returnMode) { String ret = ""; try { if (pathToItem.indexOf("instance('") == 0){ p ("try extraxt XForms instance: " + pathToItem ); //extract from XForms instance StringWriter sw = new StringWriter(); //extract data instance from xfdl as StringWriter theForm.extractXFormsInstance(null, pathToItem ,false, true, null, sw); p(" xforms instance extracted"); //read extracted instance to String ret ret = sw.toString(); if ((!ret.equals("")) && returnMode.equals("stripe")){ ret = ret.substring(ret.indexOf(">")+1, ret.lastIndexOf("<")); } } else { //extract an item value p(" read form item: " + pathToItem); ret = theForm.getLiteralByRefEx(null, pathToItem, 0, null, null); if (ret == null) { p("value not found"); ret = ""; } } } catch (UWIException e) { p ("FAILED to read XForms instance: " + pathToItem ); e.printStackTrace(); } p("getFormValue: " + pathToItem + " mode" + returnMode + "value: '" + ret + "'"); return ret; } For details on the workflow state meanings see 6.7.2, “Approval workflow” on page 443. 6.5.5 Reading form data from DB2 Having at least one form submitted and stored in DB2, we can work on the read procedure to read the form on any subsequent form invocation (such as for an approval or further processing in other applications). The dirlist.jst just exposed a link to the browser pointing to the XFDL file on the file system. Clicking the link, the file is downloaded without any interaction with the servlet. This is going to change, since we will prepopulate some values in this scenario. The place to modify is doGet method. In stage 1, this method does not access the form at all. Now we have to implement an additional action (showForm) with an additional parameter (orderNumber) to retrieve the form and send it to the browser. Chapter 6. Building the base scenario: stage 2 431 The differences from the new order scenario in stage 1 are as follows: The new order scenario reads the template from the file system as in stage 1. We read the submitted form when re-opened from DB2 now. The new order scenario does form data prepopulation. Reopened forms are not changed when they are opened except for setting the submission URL pointing the active servlet. We insert additional code into the doGet method detecting the value “showForm” in the if... else if ... chain evaluation for the action parameter processing form load for re-opened forms previously stored in DB2 (Example 6-34). Example 6-34 Additional code to read XFDL form DB2 and send to the Viewer ..... //insert in ... else if ... chain evaluation for the action parameter //add for Stage 2 begin ====================== } else if (action.equalsIgnoreCase("showForm")) { System.out .println("SubmissionServlet: doGet: detected -->showForm<-- request."); String orderNumber = request.getParameter("orderNumber"); if (orderNumber == null) { Utils.returnText(response, "SubmissionServlet: for showForm, parameter orderNumber “ + “must not be null.", "text/plain"); } else { System.out .println("SubmissionServlet: doGet: showForm: orderNumber = "+ orderNumber); //Load Form From DB String formString = DB2ConnectionForms.readRowXFDL(orderNumber); System.out.println("SubmissionServlet: doGet: showForm: “ + “loaded form from DB2. Length = "+ formString.length()); //Obtain the Form Template XFDL theXFDL = IFSSingleton.getXFDL(); ByteArrayInputStream str = new ByteArrayInputStream(formString.getBytes("UTF-8")); //since we read / write only entirs instances, we can turn server //speed flags on. FormNodeP theForm = theXFDL.readForm(str,READFORM_XFORMS_INIT_ONLY); //FormNodeP theForm = theXFDL.readForm(str,0); str.close(); if (Utils.isRedbookForm(theForm)){ //Set user info and return url in the form String submissonURL = request.getRequestURI()+"?action=store"; Utils.setConfigurationInfo(theForm, userID, (String)request.getAttribute("userRole"), submissonURL, XFormsSubmissionURL); } //Return the pre-populated form Utils.returnForm(response, theForm); //cleanup theForm.destroy(); return; } } else if (action.equalsIgnoreCase("prePop")) { ..... 432 IBM Workplace Forms 2.6: Guide to Building and Integrating a Sample Workplace Forms Application The called returnForm helper method is already used in the prepopulation scenario for new forms from the template. The code assumes a URL to the servlet like this: http://servername:port/servlerPath?action=showForm&orderNumber=XXXXX The inserted code retrieves the order number, reads the for data using the readRowXFDL method, and returns the form to the client. To create suitable URLs, a new JSP is required (db2listing.jsp). It reads DB2 data for all available forms, renders it in a table for browser display, and creates the appropriate links to open the forms. The new method Utils.setConfigurationInfo will update the submission servlet URL, the user name, and the user role in the form on each for open, so the form can be used without changes in different environments. The submission URL will always point back to the servlet sending the form to the client. For this purpose, we have created a dedicated instance in the form, storing for test purposes in design time the URLs of the local J2EE environment. (You will find in this instance the same additional settings used for the Domino scenario later on.) Example 6-35 ConfigurationInfo instance storing environment settings populated on each form open <!-- Form Configuration Parameters --> <xforms:instance id="ConfigurationInfo" xmlns=""> <ConfigurationInfo><XFDLSubmissionURL> http://localhost:9080/WPForms261Stage2/SubmissionServlet?action=store </XFDLSubmissionURL> <XFormsSubmissionURL> http://localhost:9080/WPForms261RedbookXForms/XFormsSubmissionServlet? </XFormsSubmissionURL> <UserName>Test User</UserName> <!-- fill in prepopulation: name of the user working curently on the form --> <UserRole>tester</UserRole> <!-- fill in prepopulation: role of the user working curently on the form --> <InstanceID>FormOrderData</InstanceID> <!-- fill in prepopulation: ID of the xforms instance to retrieve on form submit--> <DominoForm></DominoForm> <!-- fill in prepopulation: form alias of the Domino document to create for submitted forms --> <DbPath></DbPath> <!-- fill in prepopulation: path to Domino database to store submitted forms --> <FormID></FormID> <!-- fill in prepopulation or on first submit: ID of the domino document to store submitted forms --> </ConfigurationInfo> </xforms:instance> The code inserting the environment values utilizes the already shown function Utils.setFormValue. Example 6-36 Java method setting the configuration info instance on from open from the servlet public static void setConfigurationInfo(FormNodeP theForm, String userID, String userRole, String servletURL, String XFormsSubmissionURL) throws UWIException { System.out.println("set user info: " + userID + " role: " + userRole); //Cannot process partial update when server speed flags are set -> update the entire instance Chapter 6. Building the base scenario: stage 2 433 //Utils.setFormValue(theForm, "instance('" + CONFIG_INSTANCE_ID + "')/UserName", userID ); //Utils.setFormValue(theForm, "instance('" + CONFIG_INSTANCE_ID + "')/UserRole", userRole ); String instXML = getFormValue(theForm, "instance('" + CONFIG_INSTANCE_ID + "')", ""); instXML = setXMLElement(instXML, "UserName", userID); instXML = setXMLElement(instXML, "UserRole", userRole); if (! XFormsSubmissionURL.equals("")){ instXML = setXMLElement(instXML, "XFormsSubmissionURL", XFormsSubmissionURL); } if (! servletURL.equals("")){ instXML = setXMLElement(instXML, "XFDLSubmissionURL", servletURL); } System.out.println("New Configuration: " + instXML); setFormValue(theForm, "instance('" + CONFIG_INSTANCE_ID + "')", instXML); System.out.println("SubmissionServlet: doGet: prePop: completed setting current user info into form"); } Developing this part of the application, we found that there are problems updating or even reading parts of an instance with turned server speed flags on in the form object. See the related instruction in the code: FormNodeP theForm = theXFDL.readForm(fis,XFDL.UFL_SERVER_SPEED_FLAGS); The behavior seemed to depend on the inner structure of the data instance, but we could not figure out l the exact conditions for the error messages. There where two possible solutions: Turn server speed flags off or assign custom flags (what might reduce the performance in prepopulation and value extraction, since after each value update, the computing engine would reevaluate all computes in the form). Read and write only complete instances. Initially we took the first approach (turn server speed flags on), since this was easy to do and had only minimal impact to the code already created. Having done so, we found new challenges. The actions activating the Xforms submissions on page load tried to fire already in prepopulation time, when we accessed the form using the API. This results in an error message This function is currently not implemented, and theForm object stayed null. Next we tried the other way. We moved the code to read/write entire submissions only. See the commented code lines in the example above (//Cannot process partial update when server speed flags are set....). Later on we found that forms containing signatures cannot open with server_speed_flags turned off. We got an error here stating Invalid Parameters with no specification of what parameters are wrong. So the final solution was to assign a special set of flags, as shown in Example 6-37. (See details in 5.11.7, “Extraction of form data” on page 339.) Example 6-37 Finally used construction to open XFDL forms private static final int READFORM_XFORMS_INIT_ONLY = (XFDL.UFL_SERVER_SPEED_FLAGS & (~XFDL.UFL_XFORMS_OFF) | XFDL.UFL_XFORMS_INITIALIZE_ONLY); 434 IBM Workplace Forms 2.6: Guide to Building and Integrating a Sample Workplace Forms Application // Load the form XFDL theXFDL = null; theXFDL = IFSSingleton.getXFDL(); p( "IFSSIngelton OK"); if(theXFDL == null) throw new Exception("Could not find interface"); try { //first try as usually - preformance matters FormNodeP theForm = theXFDL.readForm(filePath, READFORM_XFORMS_INIT_ONLY); } catch { System.out.println(“Could not open the form ....”); .... } 6.6 Adjustments to JSPs for stage 2 In this section we explain adjustments to the JSPs for stage 2. 6.6.1 Where we are in the process: building stage 2 of the base scenario Figure 6-22 is an overview of where we are within the key steps involved to build stage 2 of the base scenario. This focuses on adding storage capabilities to DB2, incorporating Web services, modifying the JSPs, and adding an approval workflow. Building the Base Scenario – Stage 2 DB2 / Data Storage XForms Submissions Servlet Access to Forms Adjustments to JSPs – Creating tables – Form development – Form prepopulation – Modifying index1.jsp – Populating tables – Creating actions to activate submissions – J2EE Development – Extraction of form data – Reading form data from DB2 – Creating JSP to view DB2 data Approval Workflow – Designing – Workflow – XForms submissions runtime Figure 6-22 Overview of major steps involved in building stage 2 of base scenario application Chapter 6. Building the base scenario: stage 2 435 6.6.2 Modifying the index.jsp There are two additional buttons that you need to add to the index.jsp in order to connect to DB2: All Orders (DB2): This button submits a request to the db2listing.jsp, which returns all of the orders in the DB2 database. My Orders (DB2): This button submits a request to the db2listing.jsp, which returns only the orders of the user making the request in the DB2 database. Figure 6-23 shows what the final JSP is going to look like. Figure 6-23 index.jsp 436 IBM Workplace Forms 2.6: Guide to Building and Integrating a Sample Workplace Forms Application These are the steps to add these buttons: 1. Open index.jsp using your application development tool. 2. In the HTML for the Forms Access button table, add the code shown in Example 6-38. Example 6-38 Code to add the DB2 buttons <TR> <TD> <FORM method=get action="db2listing.jsp"> <INPUT type="submit" value="All Orders (DB2)"> </TD> <TD><FONT size="-2">Use this option to show all DB2 orders</FONT> </TD> </FORM> </TD> </TR> <TR> <TD> <FORM method=get action="SubmissionServlet"> <INPUT type="submit" value="My Orders (DB2)"> <INPUT type="hidden" name=action value="getJSP"> <INPUT type="hidden" name=jsp value="db2listing.jsp"> </TD> <TD><FONT size="-2">Use this option to show all your orders from DB2</FONT> </TD> </FORM> </TD> </TR> 3. Save the updated file as index.jsp so as to separate this from the original index.jsp. 6.6.3 Creating a JSP to view DB2 data In order to display the data from the DB2 database, you need to create a JSP that reads the data from the tables and creates the output in HTML format. This JSP uses the DB2 Access Layer connector mentioned previously in 5.1.5 to make the queries to the database and to store the form back. The db2listing.jsp has a similar function to the dirlisting1.jsp mentioned in Chapter 4, “Approaches to integrating Workplace Forms” on page 151. The main difference is that the forms in this example are stored in a table in DB2 and not on the file system. This JSP is used two different ways. The first scenario is from the index.jsp where a user has the option to select the button All Orders (DB2). This button does not pass in any userID information to the servlet, and all data from the database is returned. The second time that this JSP is called is from the My Orders (DB2) button. In this case, the userID is passed to the JSP from the servlet, and only those forms that the user has created will be displayed. Chapter 6. Building the base scenario: stage 2 437 Figure 6-24 shows what the All Orders view from the db2listing.jsp looks like. Figure 6-24 All orders from DB2 using db2listing.jsp Note: The values in the STATUS column on the right-hand side of the screen refer to the workflow stage, which we talk about in 6.7.2, “Approval workflow” on page 443. 438 IBM Workplace Forms 2.6: Guide to Building and Integrating a Sample Workplace Forms Application Figure 6-25 shows what the My Orders view from the db2listing.jsp looks like. Figure 6-25 My Orders from DB2 view using db2listing.jsp Follow these steps: 1. Create a new JSP named db2listing.jsp and save it to the WebContent folder on the Web server. 2. Copy the code in Example 6-39 into the JSP. Example 6-39 shows the code to get the tables from DB2 and then create an HTML table with the metadata values and a link to the forms that are stored in the database. 3. Save and close the new JSP. Example 6-39 Code to create db2listing.jsp <html> <head> <meta http-equiv="Content-Type" content="text/html; charset=ISO-8859-1"> <meta http-equiv="Content-Style-Type" content="text/css"> <link rel="stylesheet" href="theme/blue.css" type="text/css"> <title>IBM Workplace Forms Selection</title> </head> <CENTER> <TABLE border="0" cellpadding="2" width="760" > <TBODY> <TR> <TD><IMG border="0" src="theme/redbook_logo.jpg" width="138" height="114" align="left"></TD> <TD align="left"><H1>FORMS SELECTION</H1></TD> <TD><IMG border="0" src="theme/Workplace_Forms.jpg" width="158" height="92" align="right"></TD> </TR> Chapter 6. Building the base scenario: stage 2 439 </TBODY> </TABLE> </CENTER> <%@ page session="false" contentType="text/html" import="java.util.*, java.io.File"%> <!-- import DB2 connection library to make order query DB2ConnectionForms.getOrderListEmp(userID) available --> <%@ page import="forms.cam.itso.ibm.com.DB2ConnectionForms"%> <TABLE border="0" width="760" align="center"> <TR> <TD bgcolor="#699ccf"><B>Please select a Form from the DB2 database below</B><BR> </TD> </TR> <TR> <TD> <% String userID = (String) request.getAttribute("userRole"); if (userID == null) userID = ""; String [][] resArr = DB2ConnectionForms.getOrderListEmp(userID); String html = "Current User Role is: <STRONG>" + userID + "</STRONG><P><HR>"; html = html + "<TABLE cell padding=5>"; String n = "<TD> </TD>"; String projectName = "WPForms261Stage2"; html = html + "<TD><STRONG>ORDER ID</STRONG></TD>"+n+"<TD><STRONG>CUSTOMER</STRONG></TD>"+n+"<TD><STRONG>AMOUNT</STRONG></TD >"+ n; html = html + "<TD><STRONG>OWNER</STRONG></TD>"+n+"<TD><STRONG>DISCOUNT</STRONG></TD>"+n+"<TD><STRONG>STA TUS</STRONG></TD>"; for (int i = 0; i < resArr.length; i++){ html = html + "<TR>"; html = html + "<TD>"; html = html + "<A href=/" + projectName + "/SubmissionServlet?action=showForm&orderNumber=" + resArr[i][0]+"># "+resArr[i][0]+"</A>"; html = html + "</TD>"+n; html = html + "<TD>" + resArr[i][1] + "</TD>"+n; html = html + "<TD>" + resArr[i][2] + "</TD>"+n; html = html + "<TD>" + resArr[i][4] + "</TD>"+n; html = html + "<TD>" + resArr[i][3] + "</TD>"+n; html = html + "<TD>" + resArr[i][5] + "</TD>"; html = html + "</TR>"; } html = html + "</TABLE>"; %> <%=html %> </TD> </TR> <TR> <TD align="center"> <FORM method=get action="SubmissionServlet"> 440 IBM Workplace Forms 2.6: Guide to Building and Integrating a Sample Workplace Forms Application <INPUT type="submit" value="Home"> <INPUT type="hidden" name=action value="getJSP"> <INPUT type="hidden" name=jsp value="index.jsp"> </FORM> </TR> </TABLE> <TABLE width="760" align="center"> <tr bgcolor="#699ccf"> <td align="right"><B>...Yet another WTS Production!</B></td> </tr> </TABLE> Created links Table 6-12 and Table 6-13 illustrate the links generated within dirlisting.jsp and db2listing.jsp. Table 6-12 Examples for the generated actions in dirlisting.jsp (stage 2) Generated URL RAD 6 test environment New form http://localhost:9080/WPFormsRedpaper/SubmissionServlet?action= prepop&template=C:\WEBSPH~1\APPSER~1\installedApps\vmforms1\For ms261Stage2EAR.ear_war.ear\Forms261Stage2EAR.ear.war\Redpaper_D emo\Form_Templates\Redpaper_Forms_Sample_S2_v41.xfdl Open stored form Not available (processed by db2listing.jsp) Deployed application New form http://vmforms261.cam.itso.ibm.com:10000/WPForms261Stage2/Submi ssionServlet?action=prepop&template=C:\ibm\WebSphere\profiles\w p_profile\installedApps\vmfor\Forms261Stage2EAR.ear\WPForms261S tage2.war\Redpaper_Demo\Form_Templates\Simple_Test_Form.xfdl Open stored form Not available (processed by db2listing.jsp) Table 6-13 Examples for the generated actions in db2listing.jsp (stage 2) Generated URL RAD6 test environment New form Not available (processed by dirlisting.jsp) Open stored form http://localhost:9080/Forms261Stage2/SubmissionServlet?action= showForm&orderNumber=1000044 Deployed application new form Not available (processed by dirlisting.jsp) open stored form http://vmforms261.cam.itso.ibm.com:10000/WPForms261Stage2/ SubmissionServlet?action=showForm&orderNumber=1000011 6.7 Workflow In this section we consider the workflow in our sample application. Chapter 6. Building the base scenario: stage 2 441 6.7.1 Where we are in the process: building stage 2 of the base scenario Figure 6-26 is an overview of where we are within the key steps involved to build stage 2 of the base scenario. This focuses on adding storage capabilities to DB2, incorporating Web services, modifying the JSPs, and adding an approval workflow. Building the Base Scenario – Stage 2 DB2 / Data Storage XForms Submissions Servlet Access to Forms Adjustments to JSPs – Creating tables – Form development – Form prepopulation – Modifying index1.jsp – Populating tables – Creating actions to activate submissions – J2EE Development – Extraction of form data – Reading form data from DB2 – Creating JSP to view DB2 data Approval Workflow – Designing – Workflow – XForms submissions runtime Figure 6-26 Overview of major steps involved in building stage 2 of base scenario application 442 IBM Workplace Forms 2.6: Guide to Building and Integrating a Sample Workplace Forms Application 6.7.2 Approval workflow To bring our sample application closer to a real-life scenario, we design an approval workflow that assigns different approval levels to the sales quote according to thresholds or business rules that we prepopulate into the form. Figure 6-27 illustrates an overview of the workflow and business logic contained within the application. Form is transferred to Manager's Work Basket Open form in Work Basket Form is transferred to Director's Work Basket Fill out form Form is waiting for Manager approval Approve and submit Form is waiting for Director approval Approved? No Request is rejected Yes Manager approval necessary Director approval necessary Approval Process? No approval required Request is approved Figure 6-27 Overview of workflow for sample application The workflow is comprised of the following stages: 1. 2. 3. 4. 5. 6. Template (internal state 1) Waiting for manager approval (internal state 2) Waiting for director approval (internal state 3) Approved (internal state 4) Rejected (internal sate 6) Draft (internal state 5) The different approval levels are assigned to three roles of users accessing the form: Requestor Manager level approver Director level approver Chapter 6. Building the base scenario: stage 2 443 Figure 6-28 shows the workflow stages and the basic flow. Requester 1. Template 5. Rejected Requester Manager 2. Waiting for Manager Approval 6. Terminated Requester Director 3. Waiting for Director Approval Flow when Approved Flow when Rejected Requester Manager 4. Approved Director Figure 6-28 Workflow stages, access roles, and basic flow We are doing the workflow processing when a user signs the form. The signature buttons hold different custom computes that set two fields of the form (State and PreviousState) to the appropriate states depending on the business rules. The business rules are also prepopulated by the servlet and have the following rule set: If the total amount of the sales quote is less than $10.000, the form is approved when the requestor signs it. If the total amount is between $10,000 and $50,000, a manager level approval is necessary to approve the quote. If the total amount is greater than $50,000, a sequential signing with manager and director level approval is necessary to approve the quote. The threshold values are stored in a data instance and updated on first form load (when the form is created from the template). 444 IBM Workplace Forms 2.6: Guide to Building and Integrating a Sample Workplace Forms Application Example 6-40 shows the custom compute on the requestor’s signature button to process the form within the workflow. The computes on the other two signature buttons work in the same fashion to control the workflow in the higher stages. When the form is submitted, the servlet reads the values for State and PreviousState from the data instance to store the form in the corresponding folder or workbasket of the respective role that has to take action. Thereby, the control over the workflow remains in the business logic within the form. Example 6-40 Custom compute on the requestor’s signature button to process the form in the workflow <button sid="OriginatorSignatureBUTTON"> <itemlocation> <x>596</x> <y>755</y> <width>255</width> <height>26</height> <after>LABELOriginatorsPosition1</after> <alignvertc2c>LABELOriginatorsPosition1</alignvertc2c> </itemlocation> <value compute="signer=='' ? 'Originator Signature' : signer">Originator Signature</value> <!-- Set the value for Approval comment if signed --> <custom:SetSubmitterID xfdl:compute=" 
 toggle(signer) == '1' 
 ? (signer != '' 
 ? (set('SUBMITTERID1.value', get('instance(\'EmployeeDetails\')/Employee/ID', '', 'xforms')) 
 + set('instance(\'FormMetaData\')/Owner', get('instance(\'EmployeeDetails\')/Employee/ID', '', 'xforms'), '', 'xforms') 
 + set('instance(\'FormMetaData\')/CreationDate', date(), '', 'xforms')
 ) 
 : (set('SUBMITTERID1.value', '') 
 ) 
 ) 
 : ''"> </custom:SetSubmitterID> <type>signature</type> <signature>OriginatorSignatureBUTTON_SIGNATURE_1826067747</signature> <signer></signer> <signformat>application/vnd.xfdl;engine="ClickWrap"</signformat> <size> <width>40</width> <height>1</height> </size> <signitemrefs> <filter>omit</filter> <itemref>Page1.ManagerSignatureBUTTON</itemref> <itemref>Page1.OfficerSignatureBUTTON</itemref> <itemref>Page1.ManagerSignatureBUTTON_SIGNATURE_1678317263</itemref> <itemref>Page1.OfficerSignatureBUTTON_SIGNATURE_513701861</itemref> <itemref>Wizard_Sales_Person_Info.COMBOBOXSelectPage</itemref> <itemref>Wizard_Customer_Info.COMBOBOXSelectPage</itemref> <itemref>Wizard_Order_Info.COMBOBOXSelectPage</itemref> <itemref>Page1.COMBOBOXSelectPage</itemref> </signitemrefs> <signinstance> <filter>omit</filter> <dataref> Chapter 6. Building the base scenario: stage 2 445 <model></model> <ref>instance('ConfigurationInfo')/.</ref> </dataref> <dataref> <model></model> <ref>instance('FormOrderData')/.</ref> </dataref> <dataref> <model></model> <ref>instance('FormMetaData')/.</ref> </dataref> </signinstance> <signoptions> <filter>omit</filter> <optiontype>triggeritem</optiontype> <optiontype>coordinates</optiontype> </signoptions> </button> 446 IBM Workplace Forms 2.6: Guide to Building and Integrating a Sample Workplace Forms Application 7 Chapter 7. Zero Footprint with Webform Server When deploying Workplace Forms applications, the functionality to enable end users to work with forms is provided through one of two possibilities: Using the IBM Workplace Forms Viewer, which is a feature-rich desktop application used to view, fill, sign, submit, and route eForms. The Viewer is able to function on the desktop or within a browser. Alternatively, the IBM Workplace Forms Server – Webform Server can be used. You can provide a Zero Footprint solution that allows users to open, complete, and submit forms using a Web browser. This chapter provides information about the capability of Zero Footprint functionality. (For a complete description of the base scenario, see 5.1, “Introduction to the scenario” on page 174.) When the solution was built for the original Forms Redbooks with Workplace Forms 2.5, the Webform Server could not be used in the final application since Web services were used for data integration. Webform Server 2.5 does not support Web services. The solution described in this document uses Web services as well, but because the application can now use XForms with XForms Submit, it is now possible to use a Zero Footprint solution with Web services. Previously, you were shown how the form is implemented to provide this capability. This chapter provides information about how the Webform Server can be used to provide true Zero Footprint solutions and the considerations required when designing a form-based application. The following is discussed: Webform Server architecture. Webform Server 2.5 to 2.6 differences Forms design considerations for a Zero Footprint solution © Copyright IBM Corp. 2007. All rights reserved. 447 Working with the Webform Server sample servlets/portlets The differences in the user experience when using the Workplace Forms Viewer versus a browser 448 IBM Workplace Forms 2.6: Guide to Building and Integrating a Sample Workplace Forms Application 7.1 Zero Footprint solution IBM Workplace Forms Server – Webform Server is a Zero Footprint solution that allows users to open, complete, and submit forms using a Web browser. Webform Server is generally the best solution if you need to distribute them to a large user base, such as the general public. Implementation of the Zero Footprint solution is also an effective way to ensure that the end users cannot have direct access to your data layer. By placing the Websphere Application Server or Portal Server outside the firewall, only the servlet/portlet requiring access to the data is given access to the data inside the firewall. The forms application in the browser has no access to this data except under the control of the servlet/portlet. In a typical scenario with a Zero Footprint implementation, the user goes to a Web site and clicks a link to request a form. The Webform Server translates that form into a collection of HTML and JavaScript and sends that information to the user’s Web browser. The browser displays the translated HTML form to the user, who can then complete the form and submit it back to the server, as shown in Figure 7-1. Browser Portlet/Application Server Application Server Portlet/Servlet Framework Post DHTML Forwarder XFDL Forms Portlet/Servlet C L I E N T DHTML Access Control Service XFDL request Webform Server Translator Logging Service WPF API XFDL response DHTML DHTML Figure 7-1 The base architecture of the Webform Server The Webform Server performs the following functions. When the client selects a form to work with, the framework sends a small piece of JavaScript back to the client to determine whether the Viewer is installed. When it is determined that the user does not have the Viewer, the form is sent to the Webform Server Translator so that it can be translated from XFDL to HTML and delivered back to the user. If the Viewer is installed, the XFDL is sent to the client and is rendered in the Viewer. Whenever the user goes to a new page in the form, the Translator translates the updates from HTML to XFDL and updates the cached forms. It then retrieves the requested page, translates the page back to HTML, and returns the page to the browser. Chapter 7. Zero Footprint with Webform Server 449 As you can see in Figure 7-1 on page 449, there are several components involved in the Webform Server architecture. Table 7-1 defines these components. Table 7-1 Webform Server component definitions Component Description Portlet/servlet framework Controls and handles the communications between the Translator and the servlet/portlet. XFDL Forms portlet/servlet The portlet or servlet controls the forms application and processes all incoming and outgoing forms. Webform Server Translator The Translator converts forms between XFDL and HTML. Access Control Service Provides fail-over support for the system. The Access Locking Service tracks which users are using which form instances, and ensures that in a clustered environment, the user can fail-over successfully. This is also known as Access Control Server. It runs as an OS service. Logging service The Log Server logs activity for both the Translator and the portlet/servlet. This runs as an OS service. Shared file space This is simply a file area that is used by the Translator to store temporary files. When a form is opened by Webform Server, the original XFDL is stored and maintained in the shared file cache. Ajax Client User e-Mail Portlet/Application Server Application Server Portlet/Servlet Framework Translator Ajax User Event Forwarder Ajax User Event "Running" Form notified of event XFDL Forms Portlet/Servlet C L I E N T Change list retrieved and sorted Form Cache Memory Access Control Service Logging Service WPF API Changes made to HTML Change list (Ajax) Forwarder Change list returned(Ajax) XML change list created Figure 7-2 Webform Server architecture with Ajax 450 IBM Workplace Forms 2.6: Guide to Building and Integrating a Sample Workplace Forms Application With Ajax: 1. Ajax recognizes a user event on the client that requires an update, and sends an update request to the forwarder. 2. The forwarder passes the request through the framework and forwards it to the Translator. 3. The Translator replicates the event in the copy of the XFDL form it is running in memory and retrieves the list of changes that need to be made. 4. The Translator then creates a list of XML changes that are required and sends that list back to the forwarder. 5. The forwarder passes the change list through the framework and back to the client. 6. Ajax updates the HTML form as required. What is Ajax In order to significantly enhance the Zero Footprint user experience, the use of Ajax has been adopted in Webform Server 2.6. Ajax stands for Asynchronous JavaScript and XML. It is the use of the nonstandard XMLHttpRequest() object to communicate with server-side scripts. It can send, as well as receive, information in a variety of formats, including XML, HTML, and even text files. Ajax’s most appealing characteristic, however, is its asynchronous nature, which means that it can do all of this without having to refresh the page. This allows you to update portions of a page based upon user events Ajax is actually implemented using JavaScript. Therefore, JavaScript has to be available in the browser. The two features in question are that you can: Make requests to the server without reloading the page. Parse and work with XML documents. For more information go to: http://developers.sun.com/ajax/documentation/ Because of the Ajax implementation, the user no longer has to click the Refresh button to request that the server perform the re-calculations on the form page. This results in a significantly improved user experience. Zero Footprint considerations Because Webform Server provides a Zero Footprint solution, not all of the logic in a form can be processed on the client side. While the HTML version of the form that is sent to the user can perform many of the calculations and much of the business logic, there are things it cannot do without help from the server. Because of this, the user’s Web browser needs to make calls back to the server when required. These factors mean that the user cannot work with the form offline. Instead, the user must remain connected to the Webform Server to complete the form. However, users can still save forms to their local computer. When the Save button is clicked, the updated information is returned to the Webform Server and translated to XFDL. The XFDL is returned to the browser and is saved locally on the user’s machine as an XDFL document instead of a collection of HTML and JavaScript. This allows users to save work in progress as high-fidelity XFDL for later access. When the XFDL form is opened locally, it is sent to the Webform Server to be translated into HTML and JavaScript and returned to the browser. Chapter 7. Zero Footprint with Webform Server 451 Additionally, if a form has to be printed by the browser user, the user clicks the Print button on the Toolbelt. This sends the form to the Webform Server. Then, using the translated XFDL, the Translator converts the form to a graphic (png) file to preserve the fidelity of the form. This ensures that the form is printed with any print logic and look of the XFDL file preserved. Two of the more compelling reasons to force the use of the Forms Viewer are the extremely limited availability of signature support and client-side Viewer extensions. The Webform Server only supports Click-Wrap signatures. Workplace Forms Viewer extensions (IFXs) are only supported on the server itself (server side). There is a list of other compatibility concerns in 7.3, “Differences between Webform Server and Workplace Forms Viewer” on page 455. 7.2 Form design delta The following figures demonstrate the strong similarity between using the Forms Viewer and a browser with the same form. In Figure 7-3, using the Viewer, the Toolbelt at the top of the form and the Go to wizard graphic are the only two indications that the Viewer is being used. Figure 7-3 The price quotation form with the Viewer 452 IBM Workplace Forms 2.6: Guide to Building and Integrating a Sample Workplace Forms Application With the browser, the functionality available in the Toolbelt is significantly different. Additionally, the Go to wizard graphic is subtly different, as shown in Figure 7-4. Figure 7-4 The price quotation form with the browser These and other Toolbelt functions can be changed in the uvf_settings. Changing the Forms Viewer Toolbelt The ufv_settings determine what Toolbelt icons are available to the user. The ufv_settings option is declared in either the global form or any page global form. As with other options, the global page settings override the global form settings. The ufv_settings option belongs to the XFDL namespace. The option can control one or more features. See Example 7-1. Note: Page settings override the global settings. For example, if you set the validoverlap globally, then set the errorcolor for page one, and then page one does not inherit the validoverlap setting. If you want to add page specific settings to your form, you must repeat the form’s global settings in the settings for that particular page. Example 7-1 Code example of ufv_settings <globalpage sid="global"> <global sid="global"> <ufv_settings> <menu> <save>off</save> <open>off</open> </menu> <ufv_settings> Chapter 7. Zero Footprint with Webform Server 453 </global> The most significant usability differentiator occurs when embedded form calculations exist. The Viewer contains the calculation engine similar to a spreadsheet application. This capability enables instantaneous feedback when a calculation occurs. The browser now has this capability with Ajax. With Forms 2.5, to force the form to perform the calculation, a Refresh Form has to be performed so that the Webform Server can perform and re-render the results of the calculations. The following example from the stage 1 implementation describes this process. Zero Footprint usability improvements When calculations exist in the form, the Viewer performs the functions immediately. In the Widget line in Figure 7-5, when Widget is selected, item number, number in stock, and price are retrieved and displayed automatically. Additionally, when a value is entered into quant, the total and grand total are immediately calculated and displayed. If a discount is applied, the total and grand total are immediately recalculated and displayed. Figure 7-5 Order entry with the Viewer With Webform Server 2.5, using the browser results in a much different user experience. As presented in Figure 7-5, when Widget is selected, no associated data is retrieved. Instead, the Item # field, and so on, remains blank. Additionally, when quantity is entered, no calculations immediately occurs. In this environment, the user has to click a refresh button to cause a refresh with the Webform Server. By default, the refresh button ( ) on the Toolbelt is used to perform this action. With Webform Server 2.6 and Ajax, the user experience is the same as the Forms Viewer. The data is retrieved and the calculations occur when the user tabs to a new field. This significantly improved usability. 454 IBM Workplace Forms 2.6: Guide to Building and Integrating a Sample Workplace Forms Application 7.3 Differences between Webform Server and Workplace Forms Viewer Table 7-2 lists some of the more significant differences between Webform Server and Viewer. Table 7-2 Differences between Webform Server and Viewer Functionality Webform Server Viewer Calendar Widget Not supported. Supported. E-mail Partial support — Users must save forms to their local computer and e-mail them as attachments via e-mail program. Full support. Form version support Version 6.0 and later. Versions 4.4 and later. Inactive cells (cells that have their active option set to off) Internet Explorer - Inactive cells are omitted from lists, comboboxes, and popups. Inactive cells are displayed but are disabled. Mozilla-based browsers — Inactive cells are displayed but are disabled. Rich text fields Not supported. Webform Server converts rich text fields to plain text fields. Supported. Schema XML - Server-side only XForms - Client. Client and server. Screen readers JAWS only. MSAA compliant. Slider Not supported. Supported. Smartfill Not supported. Supported. Spell checking Not supported. Supported. User modification of display or print preferences Not supported. Supported. User modification of display or print preferences Not supported. Supported. Viewer functions, such as fileOpen, messageBox, setCursor, and so on Not supported. Supported. Web services Supported in XForms forms only. Supported in both XFDL and XForms forms. Zoom capability Not supported. Supported. URIs starting with file: Not supported. Supported. Forms design considerations Webform Server allows users to complete and submit forms without the need for any client-side software other than a Web browser. However, in the absence of specialized client-side software, Webform Server cannot support the full-range of functionality that is Chapter 7. Zero Footprint with Webform Server 455 offered by Workplace Forms Viewer. In many cases, these differences in functionality require a different approach to form design. For instance, forms designed for use with the Viewer may include rich text fields and computes that rely on the keypress or mouseover events. However, since neither of these features is supported by Webform Server, these forms would not work in a Webform Server environment. As a general rule, any form that works with Webform Server also works with the Viewer, but the reverse is not true. If you are designing forms for an environment that uses both Webform Server and the Viewer, be sure to restrict the functionality of the forms to those features that Webform Server supports. Designing forms for Webform Server If you are a form designer accustomed to designing forms for the Viewer, it is important that you familiarize yourself with the differences between Webform Server and the Viewer. Some of the differences are simple and have obvious implications, while others are more complex and may require you to adopt different strategies when designing forms. Read the sections below for a quick overview of the primary differences between Webform Server forms and Viewer forms. Action items Webform Server supports actions, but with some limitations. Webform Server instructs the browser to automatically refresh a form whenever the user interacts with the form in certain ways. As a side effect of a refresh, actions items that are set to occur once actually occur each time the form is refreshed. Furthermore, actions that are set to repeat do not work properly. Because of this, we recommend extremely limited use of action items. Appearance of forms Webform Server draws all forms using standard HTML widgets when drawing check boxes, radio buttons, popups, and comboboxes. This may produce a slightly different look when compared to forms displayed in the Viewer. However, this does not change the functionality of the form. We recommend that you test your form in the Viewer and with Webform Server (on all platforms that the form will be viewed on). Attachments Webform Server allows users to attach files to a form in the normal manner. However, users can only attach one file at a time. The attachment dialog does not allow users to multi-select files. This may dictate slightly different form design, since requiring a large number of attachments can be cumbersome for the user. Computing URLs Webform Server assumes that forms are always submitted to the server that is running Webform Server. If forms are submitted to other servers, Webform Server is not able to intercept the form and translate it back into XFDL. For this reason, you must make sure that all computed URLs submit the form to the Webform Server. If you are using Webform Server with portal, do not use computed URLs. Dates While the Viewer allows you to configure your calendar date preferences. Webform Server does not. Webform Server always interprets ambiguous dates as year, month, day. For example, 01/02/03 would be February 3rd, 2001. e-Mailing forms Webform Server does not allow users to e-mail forms. This means that there is no toolbar control for mailing forms, and that buttons configured with an e-mail URL do not work. If you need your users to e-mail forms to each other, they must save the forms locally and send 456 IBM Workplace Forms 2.6: Guide to Building and Integrating a Sample Workplace Forms Application them as attachments to regular e-mails. See IBM Workplace Forms Server — Webform Server Administrator’s Guide for more details. Event model Computes based on the activated, dirtyflag, keypress, and mouseover options do not work under Webform Server. Computes based on the focused and focuseditem options work under Webform Server if the correct settings are modified in the translator.properties file. For detailed information about the translator.properties file, see the IBM Workplace Forms Server - Webform Server Administrator’s Guide. IFX files Webform Server supports IFX files on the server. That is, your form can reference an IFX file that resides on the server. Webform Server does not support IFX files on the user’s computer (client) or IFX files embedded in a form. Lists If a form contains a list (the XFDL list item), and the text within the list is wider than the list box, a horizontal scroll bar is displayed within the list box when the form is viewed in the Viewer. If the form is viewed via Webform Server, the list box does not contain a horizontal scroll bar. Any text that does not fit within the list box is truncated. Locales Webform Server cannot remotely set the user’s locale. The locale viewed by the user is determined by the user’s browser, not the form. Furthermore, if you are using the Viewer with a Webform Server application (for example, using Webform Server to deliver XFDL forms embedded within HTML pages for users that have the Viewer installed on their system), the locale of the Viewer may not be the same as the locale of the form. Webform Server cannot specify the locale of the Viewer. The Viewer’s locale is always determined based on the Viewer preferences. The default locale is the locale of the operating system. Navigating forms The up and down arrow keys do not open popups. Instead, use Alt+up arrow and Alt+down arrow. Once a popup is open you can still use the normal arrow keys to move among the selections. You should also note that pressing the Esc key to leave a popup or combobox does not cancel the last choice the user made before leaving the widget. Although this is the default HTML form response to the ESC key, it is not the default Workplace Forms Viewer response. Users accustomed to using the Viewer will be unfamiliar with this result. When working in a multi-line field, the following cursor keys produce different results than in the Viewer: PgUp scrolls the text up one page. PgDn scrolls the text down one page. Ctrl+PgUp moves the cursor to the beginning of the visible text. Ctrl+PgDn moves the cursor to the end of the visible text. Printing When a user prints a form through Webform Server, the server responds with a print preview that opens in a new window. The user can either print the form from the preview or close the preview and return to the original form. The preview is a PNG image of the form that is generated on the server. This image is generated to a size that is determined by the server configuration. This means that the image is always generated to fit a specific page size, which in turn means that the page size cannot be changed from form to form or page to page. Chapter 7. Zero Footprint with Webform Server 457 Because the PNG image is generated on the server, any fonts used by the form must also reside on the server in order for the form to print correctly. In other words, when designing forms that users may print, make sure that you use fonts that you can make available on the server. Signatures Webform Server allows users to sign forms using Clickwrap signatures, and to verify other types of signatures that have already been applied to the form. However, Webform Server does not allow users to sign forms using any other signature types. This means that signature-based security is limited when using the Webform Server. While Clickwrap signatures prove acceptance of a document, they do not provide the same level of authentication as digital signatures. Instead, the job of properly identifying the user is moved to the Web application, which may use standard authentication measures for logging in users before they work with forms. Type checking and predictive input checking Webform Server does not support predictive input checking. However, Webform Server does support type checking when the user exits a field. For instance, if a field is set to accept phone numbers in the ###-#### format, the user is able to enter any initial value into that field. However, once they shift focus to another item, the field is highlighted as an error if the value does not match the template. Note: Changing the default settings in the Webform Server translator.properties file (for example, setting changeNotificationItems to none) may result in type checking not working as described above. For detailed information about the translator.properties file, see the IBM Workplace Forms Server — Webform Server Administrator’s Guide. URLs Webform Server does not allow users to submit forms to multiple URLs at the same time. Submissions are restricted to a single URL because of potential difficulties when updating the original XFDL form. When Webform Server sends a form to the user, it keeps the original XFDL form on hand. When the HTML form is later submitted, Webform Server updates the XFDL form with the submitted data. However, if two sets of data are submitted, as they would be if you were submitting to two URLs, Webform Server would have difficulty synching both data sets with the original XFDL form. For this reason, multiple URLs are not supported. Note: XFDL 7.0 does not support submissions to multiple URLs. Only older versions of XFDL support submissions to multiple URLs. In other words, you cannot set up an XFDL 7.0 form so that the Viewer submits it to multiple URLs. Viewer settings While the Viewer supports a number of specialized settings through the ufv_settings option, Webform Server ignores all Viewer settings except for the menu, printwithformaterrors, savewithformaterrors, signwithformaterrors, and submitwithformaterrors settings. 458 IBM Workplace Forms 2.6: Guide to Building and Integrating a Sample Workplace Forms Application Of those settings, all of them work exactly as they do in the Viewer, with the exception of the menu setting. This setting supports the toolbar buttons that are specific to Webform Server. Table 7-3 lists those buttons and provides the appropriate tag for each. Table 7-3 Toolbar buttons for Webform Server Icon Description Tag Open Opens a new form open Save Saves the current form save Print Prints the current form print Refresh Refreshes the current page refresh Accessibility Toggles accessibility mode on and off accessibility XForms When creating a form using XForms, the XForms elements are enclosed or skinned within XFDL elements. As a result, Webform Server’s support of XForms is based on Webform Server’s support of the associated XFDL items and options. See the XFDL Specification for details on how XForms elements are skinned by XFDL elements. XForms submissions Webform Server ignores URLs for submissions of type replace=all. In the Viewer, submitting to a URL submits the data to the URL. For example, you can submit data to another application, like a database, using a URL. With Webform Server, submitting to a URL submits the data to the (Webform Server) servlet. This means that if you want to submit data (using replace=all) to another application, you cannot use only a URL submit. You must also retrieve the information from the servlet and direct it to the desired application. Note: To create a submission of type replace=all (the default setting), you must create it within a DOMActivate event. XML Data Model By default, the XML Data Model is updated while the user is filling out the form. However, changing the default settings in the Webform Server translator.properties file (for example, setting changeNotificationItems to none) may result in the XML Data Model not being updated while the user is filling out the form. If so, the user must click an Update button to update all computes in the form, including the XML Data Model. For detailed information about the translator.properties file, see the IBM Workplace Forms Server — Webform Server Administrator’s Guide. 7.4 Web services with Workplace Forms 2.6 solution The Workplace Forms 2.5 Redbooks solution could not include Zero Footprint because Web services is not supported in Webform Server 2.5. This is resolved in Workplace Forms 2.6 because server-side Web services calls can be implemented using XForms submission. XForms submissions In general, on submission, the data goes to the Webform Server. The data is then redirected to the correct URL automatically. Chapter 7. Zero Footprint with Webform Server 459 In the Viewer, submitting to a URL submits the data to the URL. For example, you can submit data to another application, like a database, using a URL. With Webform Server, submitting to a URL submits the data to the Webform Server servlet. If you want to submit data (using replace=all) to another application, you cannot use only a URL submit. You must retrieve the required information using the servlet and direct it to the desired application from the servlet using the correct URL. XFormsSubmission Application (WAS6) XFormsSubmissions for Product Data, Customer Data 3a Webform Server 3a 3 Form Storage 6 Order data retrieval DB2 UDB 8.2 5 1 2 4 Pre-population Employee Data, Environment WAS 6 Portal 6 3 HTML + AJAX Browser without Forms Viewer Plugin Figure 7-6 Application with Webform Server Based on the information in Figure 7-6, the Zero Footprint forms application works in the following manner: 1. A request for a form is made from the modified list sample jsp. 2. A servlet obtains information from DB2 to pre-populate the form. The form is passed to the Webform Server to determine whether the client has a browser installed. (There is a line of code in the Redbooks jsp that forces HTML translation.) The form is translated to HTML by the Webform Server Translator and is sent to the browser. 3. Working in the form, at any state change an AJAX call is sent through the servlet to the Webform Server. On page flip, a new HTML page is rendered and sent to the browser. (3a): In case of called XForms submissions for data gathering, the AJAX call starts an XForms submission on the Webform Server requiring the requested data from the XForms submission handling application on WAS6. This application retrieves the data from the DB2 database and sends it back to the Webform Server. The server updates the internal node structure according the received information and submits any changes back to the browser using AJAX. 4. Selecting a Done button in the HTML page, the Webform Server returns the completed XFDL form to the application servlet. 5. The servlet extracts data from the XFDL file and stores it to the DB2 database. 460 IBM Workplace Forms 2.6: Guide to Building and Integrating a Sample Workplace Forms Application 6. The servlet stores the complete XFDL file to the database. 7. The servlet sends a success page back to the browser. (This step is not visible in Figure 7-6 on page 460.) In the application that has been built for the Redbooks solution, there are changes that had to be made. The first is in the navigation that allows the user navigation to the appropriate set of JSPs (Welcome page, Template lists, submission lists, and others). This is two lines of code change that provide access to the JSPs that are enhanced to support the Zero Footprint solution as well as the Viewer solution. Servlet code changes are also made to enable the jsp to work in a Zero Footprint environment. Example 7-2 provides code snippets that are necessary for this to work. Example 7-2 New import for the Forms Server framework //======================================================================================= new imports WFServer: import com.ibm.form.webform.framework.servlet.IBMWorkplaceFormsServerServlet; import com.ibm.form.webform.framework.servlet.WebformServletResponse; //======================================================================================= //======================================================================================= Stage2: public class SubmissionServlet extends HttpServlet { WFServer: // WF Server - New class definition begin ============== // we extend now IBMWorkplaceFormsServerServlet class public class SubmissionServletWF extends IBMWorkplaceFormsServerServlet { // WF Server - New class definition begin ============== //======================================================================================= . . Code to initialize the new class. WFServer: // WF Server - new class initiation begin ============== // IBMWorkplaceFormsServerServlet cannnot initiate with ServletConfig as parameter //public void init(ServletConfig config) throws ServletException { public void init() throws ServletException { super.init(); conf = super.getServletConfig(); System.out.println("SubmissionServletWF: init(): started"); //Initialize the Workplace Forms API Next we add code, as shown in Example 7-3, to ensure that the Webform Server Translator is forced to send HTML to the client. This is done for testing ease. Example 7-3 Code to force HTML begin ================== String mode = request.getParameter("mode"); //for easy test setup - we assume, we will always work with Zero Footprint in webformserver scenario //remove this line, if you really will detect plugin inatallation this.useHTML(response, true); Chapter 7. Zero Footprint with Webform Server 461 // for WF Server == determine the rendering mode parameter from url end ================== Additionally, a process has to be used to retain user attributes like user ID, department, and so on. To accomplish this, we store the attributes in the session and not in the request. We have to do this in several locations in the code, as shown in Example 7-4. Example 7-4 Store attribute data multiple changes like this to store any attributes in the session, not in the request: Stage2: request.setAttribute("userRole", userID); WFServer: request.setAttribute("userRole", userID); //for WF-Server, we will store all user dependent settings in the session attributes request.getSession().setAttribute("userRole", userID); The rest of the application is no different from the code used in the Viewer solution. The code can be downloaded as described in Appendix D, “Additional material” on page 693. 7.5 The sample applications The Webform Server installation includes servlet samples and portlet samples that you can deploy to your application server or portal server. These samples are designed to demonstrate a simple forms-based application, and include source code that you can review. The samples Both samples present a simple interface that allows you to view the contents of a particular directory on your computer. The sample lists the forms in that directory, and allows you to view any form you select, and submits any form you view. The servlet accomplishes this by first presenting a view of the directory. When you select a form, the form replaces the directory in the browser. When the user submits the form, the directory is again displayed. The portlet sample accomplishes this by using two portlets. The first portlet displays a list of the forms in the directory, while the second portlet displays the selected form. In both samples, users can navigate to a sub-directory that stores submitted forms, and can review the sample code and forms as they like. Particular areas that may be of interest include how globalization was accomplished in the portlet and servlet and how XForms submissions of type __replace=’all’__ is handled in the XForms sample form. Setting up the sample servlet There are two different procedures for setting up the sample servlet, depending on whether you want to run the servlet on the same server as the Translator, or whether you want to run it on a different application server. Running the sample servlet on the Translator server The sample servlet is installed with Webform Server, and automatically runs on the Translator server if you accepted all of the default settings during the installation process. 462 IBM Workplace Forms 2.6: Guide to Building and Integrating a Sample Workplace Forms Application Deploying the sample servlet on a different application server The sample servlet is set up to be run on the same server as the Translator. If you want to run it on a different server, you must: 1. Modify the sample servlet. 2. Deploy the updated WAR file to your application server. 3. Set up the API to work with your application server. Modifying the sample servlet Before you can modify the sample servlet, you must ensure that you have a version of the Java Development Kit installed on your computer. This is used to update the WAR file once you have made changes to the servlet. To modify the sample servlet: 1. Locate the following file: <Webform Server Install Dir>/Samples/Servlet/SampleSrc.zip 2. Unzip the file. 3. In the unzipped directory, locate the following file: WEB-INF/web.xml 4. Open the file in a text editor and update the following init-params: – translatorLocation – logServerName – logServerPort For more information about these parameters, see “Configuring a Servlet” in the Webform Server Administration Manual. 5. Save your changes. 6. Run the createWAR.bat file in the root of the unzipped directory. This creates a new WAR file called Sample.war that contains the sample servlet. Deploying the sample servlet To deploy the sample servlet you must install the WAR file that you just created on your application server. For more information about installing a WAR file, refer to the documentation for the application server you are using. Setting up the API This process varies depending on the application server you are using. Using the sample servlet The sample servlet provides a simple interface for working with forms on a server. Using this application you can: Open a blank form in XFDL or HTML. Submit a completed form. Open a previously submitted form in XFDL or HTML. The following sections explain the functionality of the servlet. Starting the servlet To start the sample servlet, open a browser and go to the following URL: http://<server name>:<port>/Samples (The default is http://localhost:8085/Samples.) Chapter 7. Zero Footprint with Webform Server 463 Note: You must supply the name of the server that is running the sample servlet, as well as the appropriate port number. This loads a welcome page that gives you the option of running the servlet or reviewing the source code used to create it. Once you run the sample, the servlet loads a directory listing of sample forms and displays a list of all of the forms available. Opening a template form Once the sample is running, you see a directory listing that includes all template forms available to the application. The directory listing provides three ways to open a form: Force XFDL — Clicking the Force XFDL icon opens the form as an XFDL document. You must have the Viewer installed to view the document in this manner. Force HTML — Clicking the Force HTML icon opens the form as an HTML document, which is displayed in your Web browser. Click the link — Clicking the link to the form causes the sample application to automatically detect whether you have the Viewer installed. If you do, the form opens as XFDL. Otherwise, the form opens as HTML. While the sample only includes one template form, you can add further forms to the sample by copying forms to the following directory: <Servlet Deployment Dir>\ServletSampleForms Submitting a form When you submit a form to the sample, the form portlet writes your forms to a submissions folder within the forms directory. Opening a submitted form Once you have submitted one or more forms to the sample, the servlet includes a submissions sub-directory in its listing of the available forms. To open a form you have already submitted, simply navigate to this directory (by clicking it) and select the form you want to open. As with the template forms, you can open previously submitted forms as either XFDL or HTML. Deleting a submitted form To delete a form that you have already submitted, you must manually delete the form from the form submissions directory. For example, under Tomcat this directory is: <Servlet Deployment Dir>\ServletSampleForms\submissions Setting up the portlet sample There are two different procedures for setting up the portlet sample, depending on whether you want to run the portlets on the same server as the Translator, or whether you want to run them on a separate portal server. 464 IBM Workplace Forms 2.6: Guide to Building and Integrating a Sample Workplace Forms Application Running the portlet sample on the Translator server’s server The portlet sample is included with Webform Server as a WAR file that contains two portlets. This sample assumes that you are running the Translator server on the same server as the portlet sample, so does not need to be modified. However, before you use the sample, you must install it in your portal server: 1. Locate the WebformSamplePortlet.WAR file in the following directory: <Webform Server Installation Dir>/Samples/Portlet/ 2. Install the WAR file into your portal server. Consult the documentation for your portal software to determine how to do this. 3. Create a page that uses the following portlets: – IBM Workplace Forms Server - Webform Server List Sample. This portlet displays a list of the available forms. – IBM Workplace Forms Server - Webform Server View Sample. This portlet displays the form selected by the user. Once you have created a page with the portlets, you can access that page and use the sample. Deploying the portlet sample on a separate portal server The portlet sample is set up to be run on the same server as the Translator. If you want to run it on a different server, you must: Modify the portlet sample. Deploy the updated WAR file to your portal server. Set up the API to work with your portal server. Modifying the portlet sample To modify the portlet sample: 1. Locate the following file: <Webform Server Install Dir>/Samples/Portlet/WebformPortletSampleSrc.zip 2. Unzip the file. 3. In the unzipped directory, locate the following WEB-INF/portlet.xml file. 4. Open the file in a text editor and update the following init-params: – translatorLocation – logServerName – logServerPort 5. Save your changes. 6. In the unzipped directory, locate the following WEB-INF/web.xml file. 7. Open the file in a text editor and update the following init-params: – TranslatorLocation – LogServerName 8. Save your changes. 9. Run the createWAR.bat file in the root of the unzipped directory. This creates a new WAR file called WebformSamplePortlet.war that contains the portlet sample. Chapter 7. Zero Footprint with Webform Server 465 Deploying the portlet sample To deploy the portlet sample: 1. Ensure that the WebformSamplePortlet.WAR file is available to your portal server. You may need to copy the file to the server that is running your portal server. 2. Install the WAR file into your portal server. Consult the documentation for your portal software to determine how to do this. 3. Create a page that uses the following portlets: – Webform Server Forms List Sample — This portlet displays a list of the available forms. – Webform Server Form Viewer Sample — This portlet displays the form selected by the user. Setting up the API This process varies depending on the application server you are using. Using the portlet sample The portlet provides a simple interface for working with forms on a server. Using this application, you can: Open a blank form in XFDL or HTML. Submit a completed form. Open a previously submitted form in XFDL or HTML. The following sections explain the functionality of the portlet. Starting the portlet sample To start the portlet sample, open the appropriate page in your portal. One portlet displays a list of the available forms, while the other portlet contains nothing. Opening a template form Once the sample is running, you see a directory listing that includes all template forms available to the application. The directory listing provides three ways to open a form: Force XFDL — Clicking the Force XFDL icon opens the form as an XFDL document. You must have the Viewer installed to view the document in this manner. Force HTML — Clicking the Force HTML icon opens the form as an HTML document, which will be displayed in your Web browser. Click the link — Clicking the link to the form causes the sample application to automatically detect whether you have the Viewer installed. If you do, the form opens as XFDL. Otherwise, the form opens as HTML. While the sample only includes one template form, you can add further forms to the sample by copying forms to the following directory: <Portlet Deployment Dir>\SampleForms Submitting a form When you submit a form to the sample, the form portlet writes your forms to a submissions folder within the forms directory. 466 IBM Workplace Forms 2.6: Guide to Building and Integrating a Sample Workplace Forms Application Opening a submitted form Once you have submitted one or more forms to the sample, the list portlet includes a submissions sub-directory in its listing of the available forms. To open a form you have already submitted, simply navigate to this directory (by clicking it) and select the form you want to open. As with the template forms, you can open previously submitted forms as either XFDL or HTML. Deleting a submitted form To delete a form you have already submitted: 1. In the list portlet, navigate to the submissions directory. 2. To the right of the file you want to delete, click X. Note: The forms stored in this directory may be automatically deleted when you restart the portlet. 7.6 Servlet/portlet required In this section we discuss the servlet/portlet required. Creating a servlet If you want to implement your application as a servlet, you must create a special servlet that communicates with the Webform Server. This servlet represents your overall application, and routes forms between the user and the Translator when necessary. The servlet can include any functionality you want. For example, you might create a servlet that not only uses the Translator to provide HTML forms to the user, but that also routes completed forms to the next step in their life cycle. To create this servlet, you must extend the IBMWorkplaceFormsServerServlet class that is provided with Webform Server. This class also provides a number of methods that simplify the process of implementing your servlet. Normal servlet operations Normal operation of the Webform Server assumes that there are two form-related actions the user might take: The user requests a form from the servlet. This is generally a standard GET action that is triggered by clicking a link on a Web page. The user submits a completed form to the servlet through a POST action. This may be either an XFDL form or a form that was previously translated into HTML. In either case, the request is processed through a combination of functionality that is provided by the IBMWorkplaceFormsServerServlet class and code that you write while extending the servlet. Furthermore, the IBMWorkplaceFormsServerServlet class is designed to ignore requests that do not involve XFDL forms. This means that all other operations fall through the framework to your custom code. In general, you must implement a doGet and a doPost method within your servlet to handle the expected form-related scenarios. Chapter 7. Zero Footprint with Webform Server 467 Creating a portlet If you want to implement your application within a portal, you must create one or more portlets that communicate with Webform Server. These portlets represent your overall application, and route forms between the user and the Translator when necessary. The portlets can include any functionality that you want. For example, you might create a portlet that not only uses the Translator to provide HTML forms to the user, but that also routes completed forms to the next step in their life cycle. To create this portlet, you must extend the IBMWorkplaceFormsServerPortlet class that is provided with Webform Server. This class is based on the JSR 168 portlet standard, and also provides a number of methods that simplify the process of implementing your portlet. Note: If you are using XFDL forms in a portlet, your users must have Workplace Forms Viewer 2.5 or later, or a PureEdge-branded Viewer of at least Version 6.2. portlets will not work with earlier versions of the Viewer. Normal portlet operations Normal operation of a portlet with Webform Server assumes that there are two form-related actions the user might take: The user requests a form from the portlet. This is generally done by clicking an action link in the portlet. The user submits a form that is being displayed by the portlet. This may be either an XFDL form or a form that was previously translated into HTML. In either case, the request is processed through a combination of functionality that is provided by the IBMWorkplaceFormsServerPortlet class and code that you write while extending the portlet. Furthermore, the IBMWorkplaceFormsServerPortlet class is designed to ignore requests that do not involve XFDL forms. This means that all other operations will fall through the IBMWorkplaceFormsServerPortlet to your custom code. In general, you must implement a processActionEx and a doViewEx method within your portlet to handle the expected form-related scenario. 7.7 Solving a common Webform Server upgrade problem Upgrading from Webform Server 2.5 to 2.6 presents unusual challenges since the Webform Server now runs as a servlet on WebSphere Application Server. The following is a list of steps that may help you resolve some of the challenges of getting the portlet samples working correctly after this upgrade. Configure WebSphere Portal to access the Forms API To do this: 1. Start server1 (WAS) so that you can access the WAS admin console. 2. Open a browser and use http://hostname:9090/admin to access the WAS Admin Console. 3. Set the WebSphere variables. In the console, expand Environment and choose Manage WebSphere Variables. 4. Change the server scope to WebSphere_Portal by clicking the Browse Servers button, selecting WebSphere_Portal, and clicking OK, and then click Apply → Save → Save (not necessary here). 468 IBM Workplace Forms 2.6: Guide to Building and Integrating a Sample Workplace Forms Application 5. Use the New button to create a new variable. Set the name of the variable to WFS_API_DIR and the value of the variable to the location of the APIs (for example, C:\IBM\WorkplaceForms\Server\2.6\API\redist\msc32). Click Apply → Save → Save. 6. Create another environment variable called WFS_API_LIB_DIR, and set the value to ${WFS_API_DIR}/PureEdge/70/java/classes. Then click Apply → Save → Save. 7. Set the Java process definitions. Open Servers → Application Servers → WebSphere_Portal → Process Definition → Environment Entries. 8. Add the following entries to the PATH property: ;${WFS_API_DIR};${WFS_API_DIR}/PureEdge/70/system Then click Apply → Save → Save. Removed the period (.) from 7.0. 9. Set up the shared libraries. Choose Environment → Shared Libraries. If populated, clear the server field and click Apply. 10.If it exists, remove the old shared library. Check PureEdgeLib and click the Delete button. Click Save → Save. 11.Click New to create a new shared library. Give it the name WFS_API_LIB. Under classpath, provide the following (one per line): – – – – {WFS_API_LIB_DIR}/pe_api.jar {WFS_API_LIB_DIR}/pe_api_native.jar {WFS_API_LIB_DIR}/uwi_api.jar {WFS_API_LIB_DIR}/uwi_api_native.jar 12.Click Apply → Save → Save. 13.Set the server class loader. Open Servers → Application Servers → WebSphere_Portal → Classloader. 14.Select the classloader listed and click Libraries. 15.Remove PureEdgeLib from the list by checking it and clicking Remove. 16.Click Add and select WFS_API_LIB. 17.Click Apply → Save → Save. 18.The WAS server may now be stopped. Configure the portlets To do this: 1. Start the portal server (Start → Programs → IBM WebSphere → Portal Server v5.1 → Start the Server. You may want to add this shortcut to your desktop.) 2. When is it started, access portal with the URL http://forms.ibm.com:9081/wps/portal. Log in as wpsadmin with password passw0rd. 3. Click the Administration link. 4. Go to Portlet Management → Web Modules. 5. Search for PEPortletSample.war and click the trash can icon to uninstall the old version of the portlets. Confirm the deletion. 6. Click the Install button and browse to C:\WebformServer\samples\portlet\WebformPortletSample.war. 7. Click Next. This will list WebformReleaseSample as the portlet application, and Form List Sample portlet and Form View Sample portlet as the portlets. Click Finish. 8. Go to Portal User Interface → Manage Pages. Chapter 7. Zero Footprint with Webform Server 469 9. Click the My Portal page. 10.Click the pencil icon beside the Workplace Forms page. This page is now empty, since we deleted the old portlets. 11.Set the page to single column, and click Add Portlets. Search for portlets that begin with Form. 12.Select FormListSample and FormViewSample to the page and click OK, then click Done. 13.Use the My Portal link at the top right to go back, and click the Workplace Forms page. The list portlet should list one form, and clicking it should open in the Viewer or browser. Note: To add additional forms to the list displayed in the List portlet, store the XFDL files in C:\WebSphere\PortalServer\installedApps\WebformSamplePortlets_PA_1_0_IP.ear\PA_1 _0_IP.war\SampleForms. 470 IBM Workplace Forms 2.6: Guide to Building and Integrating a Sample Workplace Forms Application 8 Chapter 8. Integration with IBM DB2 Content Manager This chapter describes the integration of IBM Workplace Forms with DB2 Content Manager. The automation of forms is often a critical requirement in many Content Manager (CM) installations cross-industry. IBM Workplace Forms can be easily integrated with Content Manager and thereby delivers a high level of synergy. To remain within the context of the sample scenario application described throughout this book, we consider that the Content Manager can ultimately serve as the final repository for signed forms. We provide detailed information about how to integrate Workplace Forms with CM to expand record management capabilities and build complex workflows for development of document-centric applications. When integrating IBM Workplace Forms with CM, you create security-rich front-end transaction records with a streamlined, secure content management infrastructure. Note: The code used for building this sample scenario application is available for download. For specific information about how to download the sample code, refer to Appendix D, “Additional material” on page 693. Note: All specific examples shown and used when building the sample scenario application are based on the codebase for IBM Workplace Forms Release 2.6. © Copyright IBM Corp. 2007. All rights reserved. 471 8.1 Overview Workplace Forms can be stored in Content Manager as items with specific attribute arrays that in turn can be used to store metadata describing the form. Content Manager can serve as a central repository with different purposes and functionalities in regard to eForms: Document management Workflow modelling and processing Data search and retrieval Archive and storage Figure 8-1 gives you a functional overview of the three tiers involved when integrating DB2 Content Manager. DB2 Document Manager Search and Retrieval Client PCs Web Application Server Webform Server Forms Viewer Forms API Viewer Plugin in Browser Servlet HTML in Browser Web Services Archive and Storage Document Management Workflow System Figure 8-1 Three-tier overview of DB2 Content Manager integration 472 IBM Workplace Forms 2.6: Guide to Building and Integrating a Sample Workplace Forms Application The interaction of Workplace Forms with DB2 Content Manager usually follows a specific sequence of steps, as shown in Figure 7-2. 1. User searches CM repository for a specific blank form (template) using Web Application JSP pages using content item attributes. 5. IBM Workplace Forms CM Connector receives the form submission and stores in CM repository. The form is stored and data from within the form is exposed as content item attributes for comprehensive indexing and searching. 2. A list of all content items matching the search is generated and delivered to the HTML eClient for display. Back-end Server Content Manager Web Application Server Client Desktop Local file HTML Internet/Intranet IBM Workplace Forms Viewer HTTP/SSL Corporate Firewall/Proxy Web Browser Web Application JSP Pages Web Application Custom Servlet Template Instance Instance Instance 4. User completes and submits the form. 3. User selects and "opens" a content item. The content item (blank form template) is retrieved and opened within the IBM Workplace Forms Viewer, acting as a standard plug-in to the client browser. Figure 8-2 Typical sequence of steps for Workplace Forms and CM interaction The described CM connector is a custom servlet that performs the interaction with the DB2 CM instance. In the following section we use a sample implementation of a CM Submission servlet that is part of the IBM DB2 Content Manager Demo platform. However, the basic concept and functionality of the servlet described here is applicable to any type of Web application that performs this integration. The typical sequence of steps for the CM integration is: 1. The user searches the CM repository for a specific blank form (template) using Web Application JSP pages using content item attributes. The template forms would likely be stored in CM in this solution. However, in the Redbooks scenario, we have implemented several repository solutions and chose to slightly modify the sample Template List JSP and leave the templates in the file system to reduce the coding effort. 2. A list of all content items matching the search is generated and delivered to the HTML eClient for display. 3. The user selects and opens a content item. The content item (blank form template) is retrieved and opened within the IBM Workplace Forms Viewer, acting as a standard plug-in to the client browser. Chapter 8. Integration with IBM DB2 Content Manager 473 4. The user completes and submits the form. 5. IBM Workplace Forms CM Connector receives the form submission and stores it in the CM repository. The form is stored and data from within the form is exposed as content item attributes for comprehensive indexing and searching. For the scenario we describe in this book, the Content Manager does not serve as a repository for form templates. We extended our example described in the previous chapters by both submitting completed forms to the Content Manager using a Submit button, and by submitting only approved forms to the Content Manager using servlet-to-servlet communication, as described in 8.3.3, “Servlet-to-servlet communication” on page 486. Note: There are several versions of the CM submission servlet available and used in different integration packages. The all rely on the same basic ideas discussed above. The detailed configuration applied in the XFDL form (for example, IDs and element names of the XML or XForms instances to create) and the administration steps to process in Content Manager environment can vary. For these steps, see the installation and administration instructions coming with the integration package you are going to use. We provide here a configuration sample used in a pure CM integration demo sample and a configuration sample used in a Forms 2.6 integration kit for Information Integrator Content Edition (IICE). 8.2 Basic design of Content Manager integration A basic connector to the Content Manager as described here makes it simple for developers to: Store forms as items in Content Manager (with attribute values set based on form data). Retrieve form items from Content Manager. Update existing form items within Content Manager. Figure 8-3 illustrates the basic design of the Forms-CM integration. eForm in Viewer Servlet or Portlet Content Manager eForm in Web Browser CM Connector Figure 8-3 Basic design of Workplace Forms and CM integration On the left is the Workplace Forms Viewer invoked either standalone or from within a Web browser. The form is filled in as needed and then submitted via a Submit button. This causes the servlet (middle section) to be executed, which processes the form, extracting the item type, attributes, and other form data, and stores the entire filled-in form into CM. If the Form Viewer is invoked to display an existing form saved to CM using this servlet, then the stored form is updated. 474 IBM Workplace Forms 2.6: Guide to Building and Integrating a Sample Workplace Forms Application The ContentManagerMetaData instance contains all of the information needed to describe this form’s integration to Content Manager, thus making the form document completely self-describing with regards to how it is stored or represented in Content Manager. We add the instance data model required and bind certain fields in the form to this instance data model. The current servlet provided on the CM Demo Platform has very specific requirements for integration. Specifically, two entities must exist: An invisible field is added to the form for the CM PID (generated when a form is stored in CM) and must be called PID. Example 8-1 shows the syntax required by the servlet (shown here in the form's XML format with our comments added). This is an example of what must be defined in the data instance model. Example 8-1 Data instance model required by the CMSubmission servlet <!-the ID MUST BE CMAttributes --> <xforms:instance xmlns=http://www.PureEdge.com/XFDL/Custom id="CMAttributes"> < !-the ContenManagerMetaData tag is required --> <ContentManagerMetaData> <!-insert the name of the Item Type in CM --> <ItemType>MyForm</ItemType> <!-insert the number of Attributes that will be used --> <NumberItemAttributes>4</NumberItemAttributes> <! - repeating tags occur now as necessary for the number of Attributes --> <!-insert the Attribute Name here --> <ItemAttributeName0>MyFirstAttr</ItemAttributeName0> <!-this will contain the Attribute Value when the form is completed --> <ItemAttributeValue0></ItemAttributeValue0> <ItemAttributeName1>MySecondAttr</ItemAttributeName1> <ItemAttributeValue1>External Wire Transfer Request</ItemAttributeValue1> <ItemAttributeName2>MyThirdAttr</ItemAttributeName2> <ItemAttributeValue2></ItemAttributeValue2> <ItemAttributeName3>MyFourthAttr</ItemAttributeName3> <ItemAttributeValue3></ItemAttributeValue3> <!- the tags above must follow the sequence up to the required number --> <!-PID is a required entry and will be filled in when the form is completed --> <PID></PID> <!-CMUserName will default to icmadmin if not provided here --> <CMUserName>icmadmin</CMUserName> <!-CMUserPassword will default to password if not provided here --> <CMPassword>password</CMPassword> <!-CMLibServerName will default to icmnlsdb if not provided here --> <CMLibServerName>icmnlsdb</CMLibServerName> <!-CMSchemaName will default to SCHEMA=ICMADMIN if not provided here --> <CMSchemaName>SCHEMA=ICMADMINicmadmin</CMSchemaName> <!-ItemMimeType will default to application/vnd.xfdl if not provided here --> <ItemMimeType>application/vnd.xfdl</ItemMimeType> </ContentManagerMetaData> </xforms:instance> The preceding example shows the syntax required by the servlet initial version as provided for Forms 2.5 integration. The tag values (that is, the information between the tag pairs) are just examples in this case. The key information here is The stored instance ID (CMAttributes) The stored item class in CM providing the appropriate meta data configuration (ItemType) Chapter 8. Integration with IBM DB2 Content Manager 475 The data available for extraction stored in element pairs ItemAttributeNameX / ItemAttributeValueX containing the attribute name in CM and the value to assign to the attribute The newer integration assets (for example, the IICE integration sample shown in Example 8-2) are much more flexible. The provided submission servlet (Version 2.x) can accept compressed forms, and accepts much more flexible input data. This results in a slightly more complex structure of the data instances to apply. In the sample below, we can see three different instances to configure in the XFDL form: applicationData instance - This instance is related to an xfdl form internal framework. The goal here is to serve a generic prepopulation and data retrieval engine caring about the submission URL to set on form open and the form state and other workflow-related information to track on form submit. integrator_repo_location instance - This instance provides form-independent information about the target system storing the form on form submit (repository/path/instanceid) containing the target repository ID, the repository-specific unique ID for the stored form, and the ID of the XForms instance to extract on form submission. This makes it possible to serve with the integration framework different target systems using a common submission gateway. Buyer instance - The named instance for data extraction form submission. The data contained in this instance should be reflected in the object meta data in the target system and the update on each form submission. The ID of this instance is declared in the integrator_repo_location instance. The element iice_itemClassName detects the object type (item class) for which we configured the meta data. The other elements contain the meta data to extract. We do not operate with element pairs (name/value) here. The element name must exactly match here the configured meta data attribute name in the target system. The element value is the value to assign. This makes it possible to map complex data structures, as shown for the PO_Lines elements, that can contain data for multiple lines in a table. Example 8-2 Data instance model required by CMSubmission servlet used in IICE integration kit <xforms:model id="model1"> <xforms:instance id="applicationData" xmlns=""> <formData> <Submit_URL> http://localhost:9090/forms_webclient/wfi/service/submit </Submit_URL> <Form_State>1</Form_State> <same_as_billing_check>true</same_as_billing_check> </formData> </xforms:instance> <xforms:instance id="integrator_repo_location" xmlns="http://www.ibm.com/xmlns/prod/workplace/forms/integrator/repo/location/1.0"> <location> <newinstance> <repository>iice-repository</repository> <path> /NOINDEX.A1001001A06F17B70838A48569.A06F17B70838A48569.1000/abcd.xfdl </path> </newinstance> <mapping type="inline"> <instanceid xmlns="http://www.ibm.com/xmlns/prod/workplace/forms/integrator/mapping/inline/1.0"> Buyer </instanceid> 476 IBM Workplace Forms 2.6: Guide to Building and Integrating a Sample Workplace Forms Application </mapping> </location> </xforms:instance> <xforms:instance id="Buyer" xmlns="http://www.ibm.com/xmlns/prod/workplace/forms/integrator/repo/metadata/1.0"> <data> <iice_itemClassName>SamplePO</iice_itemClassName> <Company_Name></Company_Name> <Company_ID></Company_ID> <Contact_Name></Contact_Name> .... <PO_Lines> <PO_Line> <product_ID></product_ID> <quantity></quantity> <line_total></line_total> </PO_Line> </PO_Lines> <SubTotal></SubTotal> <Tax></Tax> <Total></Total> </data> </xforms:instance> </xforms:model> In the next sections we describe how to enhance our existing sales quote application to store the forms along with some meta data attributes in DB2 Content Manager. 8.3 Integrating the sales quote sample with DB2 Content Manager This section describes the configuration steps to process for a submission servlet 1.x type integration. To integrate our sales quote sample application with IBM DB2 Content Manager, we have to perform essentially the following tasks: 1. Create attributes and item types in DB2 Content Manager. 2. Add the CM integration in the form. 3. Enhance our submission servlet to post the form to the Content Manager submission servlet. The necessary steps are described in the next two sections. 8.3.1 Create attributes and item types To create the Content Manager item type and attributes: 1. Start the IBM Content Manager System Administration Client by selecting Start → Programs → IBM DB2 Content Manager Enterprise Edition → System Administration client. a. Log in with the respective user ID and password. Chapter 8. Integration with IBM DB2 Content Manager 477 b. You will see the System Administration Client, as shown in Figure 8-4. Figure 8-4 DB2 Content Manager System Administration Client 478 IBM Workplace Forms 2.6: Guide to Building and Integrating a Sample Workplace Forms Application 2. Create a new item type for the form: a. Expand the Data Modeling tree in the left-hand pane and right-click Item Types. b. Select New. c. You will see the Item Type Properties dialog, as shown in Figure 8-5. Figure 8-5 Item Type Properties dialog 3. On the Definition tab: a. Enter SalesQuote for the name and display name. b. Select Prompt to create as the new version policy attribute. Chapter 8. Integration with IBM DB2 Content Manager 479 4. On the ACL tab (shown in Figure 8-6) select PublicReadACL for Item type access control list (ACL). Figure 8-6 Access Control tab of Item Type Properties dialog 480 IBM Workplace Forms 2.6: Guide to Building and Integrating a Sample Workplace Forms Application 5. On the Attributes tab: a. Click the New Attribute button ( Figure 8-7. ). The New Attribute dialog opens, as seen in Figure 8-7 New Attribute dialog b. Enter the following values: i. ii. iii. iv. v. vi. Name = ORD_ID Display name = Order ID Attribute type = Variable Character Character type = Extended alphanumeric Length Maximum = 50 Click Apply. c. Repeat step b. to add these attributes with the following names and display names: • • • • • • • ORD_SUBMIT_ID - Requestor ID ORD_REQ_NAME - Requestor Name ORD_CUST_ID - Customer ID ORD_CUST_NAME - Customer Name ORD_AMOUNT - Total Amount ORD_DISCOUNT - Discount ORD_STATE - Order State Chapter 8. Integration with IBM DB2 Content Manager 481 d. Now select these eight attributes (use the Ctrl key to make multiple selections) and click the Add > button, as seen in Figure 8-8. Figure 8-8 Attributes tab of the Item Types dialog 482 IBM Workplace Forms 2.6: Guide to Building and Integrating a Sample Workplace Forms Application 6. On the Document Management tab, as seen in Figure 8-9, make the following selections. a. Click Add. The Define Document Management Relations dialog opens, as seen in Figure 8-10. b. Select ICMBASE for the Part Type field. c. Select PublicReadACL for the Access control list field. Click OK. Figure 8-9 Document Management tab of the Item Types dialog Figure 8-10 Define Document Management Relations dialog Chapter 8. Integration with IBM DB2 Content Manager 483 d. Click Add again. e. Select ICMNOTELOG for the Part Type field. f. Click OK and click OK again. The CM item type SalesQuote should appear in the list of item types (right-hand pane). 7. Add the XFDL MIME Type to Content Manager. a. Click the MIME Types entry in the right-hand pane tree. Sort the list Z–A. You should see XFDL near the top. b. Double-click XFDL and you see the properties required: • • • • Name = XFDL Display name = XFDL MIME type = application/vnd/xfdl Suffixes = .xfd c. Click Cancel. 8. Add XFDL MIME type processing for the Client for Windows. a. Start the IBM Content Manager Client for Windows by selecting Start → Programs → IBM DB2 Content Manager Enterprise Edition → Client for Windows. a. Log in with the respective user ID and password. b. Select Options → Preferences → Helper Applications. Scroll to the bottom of the list to find XFDL. This information comes from the library server and does not need to be changed. The client for Windows relies on Windows to launch the correct application (in this case the Workplace Forms Viewer). 9. Add XFDL MIME type processing for the eClient. a. View the file IDMAdminDefaults.properties located at C:\IBM\db2cmv8\CMeClient. b. Search for xfd and you see that a line was added for the XFDL MIME type, that is, application/vnd.xfdl=launch is added to the MIME Type action list of MIME types. 8.3.2 Add the CM integration in the form To be able to store our form in DB2 Content Manager, we have to add some CM-specific items to the form. Open the form in Workplace Forms Designer and perform the following steps to define a data instance model for Content Manager: 1. Create the data instance CMMetaData in the form. Example 8-3 Code listing of data attributes <xforms:instance xmlns="" id="CMMetaData"> <ContentManagerMetaData> <PID></PID> <ItemType>SalesQuote</ItemType> <NumberItemAttributes>8</NumberItemAttributes> <ItemAttributeName0>ORD_ID</ItemAttributeName0> <ItemAttributeValue0></ItemAttributeValue0> <ItemAttributeName1>ORD_CUST_ID</ItemAttributeName1> <ItemAttributeValue1></ItemAttributeValue1> <ItemAttributeName2>ORD_AMOUNT</ItemAttributeName2> <ItemAttributeValue2></ItemAttributeValue2> <ItemAttributeName3>ORD_DISCOUNT</ItemAttributeName3> <ItemAttributeValue3></ItemAttributeValue3> <ItemAttributeName4>ORD_STATE</ItemAttributeName4> 484 IBM Workplace Forms 2.6: Guide to Building and Integrating a Sample Workplace Forms Application <ItemAttributeValue4></ItemAttributeValue4> <ItemAttributeName5>ORD_SUBMIT_ID</ItemAttributeName5> <ItemAttributeValue5></ItemAttributeValue5> <ItemAttributeName6>ORD_REQ_NAME</ItemAttributeName6> <ItemAttributeValue6></ItemAttributeValue6> <ItemAttributeName7>ORD_CUST_NAME</ItemAttributeName7> <ItemAttributeValue7></ItemAttributeValue7> </ContentManagerMetaData> </xforms:instance> 2. Next we bind the fields into the data instance. Be aware that there are ways to mutually synchronize the data in the instance with the data contained in the form. We have already defined an XForms instance containing all of the data provided with the form. We have to make sure that the data available for CM integration is updated at least when the form is submitted. We have to read the data from any already existing XForms instance elements and assign the data to the corresponding ItemAttributeValueX-elements in the CMMetaData instance. This can be done using XForms binds assigned to the model or XFDL formulas using get/set operations fired, for example, in the submit button. 3. Since the data in the instance (at least the PID on first submission and ORD_STATE on each signature change) will alter, we must exclude the CMMetaData instance from the signing procedures. Now we have created the form items, data instance, and bindings for the DB2 Content Manager integration. We test the integration in the following section. Chapter 8. Integration with IBM DB2 Content Manager 485 8.3.3 Servlet-to-servlet communication To integrate the existing submission servlet with the supposed Content Manager environment, we have to enable the SubmissionServlet installed on the WebSphere Application Server (WAS) 5.1 server to submit a received form to Content Manager. The new integration scenario is shown in Figure 8-11. XFormsSubmission Application (WAS6) DB2 UDB 8.2 Content Manager WAS 6 Form/Data Storage Pre-population Employee Data CMSubmissionServlet XFormsSubmissions for Product Data, Customer Data Meta Data Document Browser with Forms Viewer Plugin Figure 8-11 Integration scenario with form submission to Content Manager We add the following code to the WPForms261Stage2 servlet project: Create a new property CMSubmissionUrl to the order.properties file. Here we store the URL to the Content Manager servlet to be able to receive the submitted form. If this property is missing or empty, the SubmissionServlet should work as in stage 2 (assuming that there is no CM integration). Create a new attribute CMSubmissionUrl in the SubmissionServlet class and adopt the init method to fill the attribute with the parameter value from the properties file. Add an extension to the doPost method that submits a received from to Content Manager servlet, if a URL to the servlet is specified. Create an additional generic support function processing a post message used for form submission to CM. Note: To keep the use case consistent with the stage 2 scenario, we choose here to extend the J2EE application storing a received XFDL file in DB2 (as in stage 2) and submitting it in parallel to CM (new). ´This allows us to work with forms stored in the DB2 database and use CM only for archiving (storing in parallel a version of the submitted). In other environments, the choice could be to alter the submission buttons in the provided form to point directly to the installed CMSubmission servlet. 486 IBM Workplace Forms 2.6: Guide to Building and Integrating a Sample Workplace Forms Application Having available the stage 2 SubmissionServlet as prepared in Chapter 6, “Building the base scenario: stage 2” on page 367, we can easily extend the existing code with the lines in Example 8-4 through Example 8-7. Example 8-4 Add a new property to the order.properties file (adjust server name and servlet path #path to Content Manager instance CMSubmissionUrl=http://cmhostname/formdemo/CMSubmissionServlet Example 8-5 Add a new attribute in the SubmissionServlet class // *** CM Integration *** //URL for Content manager integration private static String CMSubmissionUrl; // *** CM Integration *** Example 8-6 Read the property in the init method of SubmissionServlet class // // *** CM Integration *** CMSubmissionUrl = orderProps.getProperty("CMSubmissionUrl"); if (CMSubmissionUrl == null){CMSubmissionUrl = "";} System.out.println("CMSubmissionUrl: "+ CMSubmissionUrl); *** CM Integration *** Example 8-7 Add code submitting the form to CM in the doPost event // // *** CM Integration *** if (formState.equals("4") && (!CMSubmissionUrl.equals(""))) { String url = ""; if (previousFormState.equals("4")) { url = CMSubmissionUrl + "?action=update"; } else { url = CMSubmissionUrl + "?action=store"; } System.out.println("Submitting form to cmdemo: " + url); String respHTML = sendPost(url, strXFDL,"application/vnd.xfdl"); System.out.println("CM sent"); System.out.println(respHTML); } *** CM Integration *** The new supporting method submits a received form to CMSubmissionServlet installed in the Content Manager test environment. CMSubmissionServlet can send a response. We do not analyze it here. A print to System.out logs the successful transmission or any errors (Example 8-8). Example 8-8 Supporting method processing a post request public static String sendPost(String urlStrg, String content, String contentType) throws IOException { URL url; URLConnection urlConn; DataOutputStream printout; BufferedReader in; String result = ""; try { // create URL, open URL connection url = new URL(urlStrg); urlConn = url.openConnection(); // activate input and output, no cache Chapter 8. Integration with IBM DB2 Content Manager 487 urlConn.setDoInput(true); urlConn.setDoOutput(true); urlConn.setUseCaches(false); // set content type urlConn.setRequestProperty("Content-Type", contentType); // Now sent POST mesage. printout = new DataOutputStream(urlConn.getOutputStream()); printout.writeBytes(content); printout.flush(); printout.close(); // Get response String str; in= new BufferedReader(new InputStreamReader(urlConn.getInputStream())); while (null != ((str = in.readLine()))) { result = result + str; System.out.println(str); } in.close(); } catch (MalformedURLException e) { e.printStackTrace(); } return result; } Having these changes applied to the RAD project, we should create a new EAR file and deploy it to the application server. Since there is already an application WPForms261Stage2, we have to update the existing enterprise application with the new EAR file. Note: We choose here the approach to control the submission to Content Manager based on a property stored in the application and the state of the submitted form. There are other valid scenarios as well (application-based only, or alternatively, form-based only). 8.3.4 Test the form integration with CM To test the form integration, we fill out a form and submit it to DB2 Content Manager. Then we use the eClient to search for our form and metadata. Follow these steps to test your form integration with DB2 Content Manager: 1. Be sure that all necessary servers are up and running: – WebSphere Application Server (WAS) server1 (where the servlet is deployed) – Content Manager Resource Manager server c. eClient server 2. Fill in your form using the Workplace Forms Viewer. a. Open the Forms Selection JSP with the URL: http://vmforms261.cam.itso.ibm.com:10000/WPForms261Stage2/ b. Click New Orders. c. Select the forms template you deployed with design changes for the CM integration. (For test purposes, we can added a submission button Store a new Quote in CM pointing to the CMSubmissionServlet in one of the form pages.) d. Fill out the form. e. On the toolbar of the traditional form page, click the button Store a new Quote in CM. 488 IBM Workplace Forms 2.6: Guide to Building and Integrating a Sample Workplace Forms Application You should see the submission confirmation, as shown in Figure 8-12. Figure 8-12 Form submission confirmation 3. Search and display your submitted forms in the DB2 Content Manager eClient. Start the eClient by clicking the desktop icon or using following URL: http://cmhostname:9083/eclient/IDMLogon2.jsp Then log in to DB2 Content Manager with your valid credentials, as shown in Figure 8-13. Figure 8-13 DB2 Content Manager eClient login Chapter 8. Integration with IBM DB2 Content Manager 489 4. Click Search to open the Item Type List, as shown in Figure 8-14. Figure 8-14 DB2 Content Manager eClient home page a. Scroll down and click Sales Quote, as shown in Figure 8-15. Figure 8-15 DB2 Content Manager eClient Item Type List 490 IBM Workplace Forms 2.6: Guide to Building and Integrating a Sample Workplace Forms Application b. Enter an asterisk (*) in the Order ID field and click Search, as shown in Figure 8-16. Figure 8-16 DB2 Content Manager eClient basic search c. The Search Result page should open, as shown in Figure 8-17. Figure 8-17 DB2 Content Manager eClient Search results page The Search results page shows you the submitted forms and the meta data that we specified for the Content Manager integration in a view perspective. To update an existing form, you can click the document icon at the beginning of each row. This opens the form in the Workplace Forms Viewer as a plug-in to your browser. 5. Do the same test using the original submission button in the form. This button submits the form to the extended stage 2 servlet. The servlet should submit a copy of the received from to the CM submission servlet and receive the HTML page shown in Figure 8-12 on page 489 as an HTML response. Chapter 8. Integration with IBM DB2 Content Manager 491 492 IBM Workplace Forms 2.6: Guide to Building and Integrating a Sample Workplace Forms Application 9 Chapter 9. Lotus Domino integration This chapter provides several integration scenarios based on a Domino infrastructure. The first scenario builds upon the same base sample application scenario described in Chapter 5, “Building the base scenario: stage 1” on page 173, and Chapter 6, “Building the base scenario: stage 2” on page 367, but now focuses on leveraging Domino for the back-end data. The second and third scenarios demonstrate how Lotus Notes Client and Domino Server integrate with the Workplace Forms Viewer and the Webform Server, respectively. Note: The code used for building this sample scenario application is available for download. For specific information about how to download the sample code, refer to Appendix D, “Additional material” on page 693. Note: All specific examples shown and used when building the sample scenario application are based on the codebase for IBM Workplace Forms Release 2.6.1. © Copyright IBM Corp. 2007. All rights reserved. 493 9.1 Introduction to integration of Domino and Workplace Forms Before proceeding directly into the technical details of the integration scenarios, we provide a brief overview of the Domino server and examine how each technology (namely, the Domino server and Workplace Forms) can complement the other in the integration scenario. IBM Lotus Domino server provides enterprise-grade collaboration capabilities that can be deployed as a core e-mail and enterprise scheduling infrastructure (IBM Lotus Domino Messaging Server), as a custom application platform (IBM Lotus Domino Utility Server), or both (IBM Lotus Domino Enterprise Server). An integral part of the IBM Workplace family, Lotus Domino server, and its client software options deliver a reliable, security-rich messaging and collaboration environment that helps companies enhance the productivity of people, streamline business processes, and improve overall business responsiveness. One of the key features using Domino is the outstanding offline capabilities of the Notes client (security, distributed disconnected work on local replicas, efficient data replication procedure with the server environment). Besides messaging, calendaring, and scheduling, Domino integrates document management, workflow, collaboration, and database capabilities in one comprehensive product. It can handle both structured information and unstructured information as file attachments, and it adheres to Internet standards and protocols such as HTTP, XML, POP3, IMAP4, MIME, SMTP, DIIOP, and more. It can execute Java, JavaScript, LotusScript, and Notes @Formula language. 9.1.1 How the two technologies can complement each other Domino provides a great starting point to integrate with Forms. We can use: File storage capabilities to store templates and filled-in forms Java to access Workplace Forms API Built-in HTTP service and servlet engine to communicate with a browser client Integrated development environment to build the application How Domino can add value to Workplace Forms Domino can handle XFDL file attachments or mime types, store and exchange them with other systems in multiple ways (mail, Web services, connections to external data sources, access to file system, and so on), and access the content in XFDL files by Java API, built-in XML parsers, and text processing capabilities. This makes it easy to build an application that handles forms, storing them with highly sophisticated access rights to stored forms and extracted data, and attaching collaboration and workflow to form and data handling. Using the offline capabilities of the Notes Client, these applications can work even in a distributed environments with temporarily disconnected clients. How Workplace Forms can add value to Domino In Domino, we can create forms with a visual editor (Domino Designer) for either a rich client (Notes) or a thin client (browser). In a rich client, we can assign nested signatures. What makes it reasonable to use Workplace Forms having those built-in capabilities? Using Forms, we can exchange the templates and completed forms with other systems, including the layout, signatures, and internal processing rules of the form. A Domino document can exchange only its values with other systems, not the processing logic, the layout, or signatures. Furthermore, with Workplace Forms we can integrate with mutual signature methods from authenticated password acceptance to biometric (retinal scans, 494 IBM Workplace Forms 2.6: Guide to Building and Integrating a Sample Workplace Forms Application fingerprint readers) and PKI certificates. And last but not least, we can print out the document in a pixel precise manner. In the scenarios we describe in this chapter, we use the Domino Enterprise Server to host the application, the Notes client for testing and maintenance for supporting data, and the Notes designer to create the code. Finally, we use Domino to work with the form layout and to provide the application navigation. For end-user access to the application, we use the Web browser or the Notes client. 9.1.2 Workplace Forms and Lotus Notes and Domino integration scenarios In this book we present three different scenarios for integrating Workplace Forms with Lotus Notes and Domino: Scenario 1 - Web client (browser) access plus Workplace Forms Viewer as browser plug-in use case Scenario 2 - Notes client access plus Workplace Forms Viewer use cases (three different implementations of the scenario are demonstrated) Scenario 3 - Notes client access plus Zero Footprint Forms (using Webform Server) use case 9.2 Overview and objective of Domino integration In comparison with the J2EE/DB2-based scenario described in the earlier chapters, no other systems are involved here (as long as we do not need the Webform Server to render XFDL pages for a Zero Footprint client). Domino serves the following purposes: Template storage Data storage for employee/product/customer data Data storage for submitted requests and extracted data Application server HTML server to communicate with the client plug-in XForms submission service for the Web services used in the form Recreation of the complete application, including a high standard user interface, is not the goal of this scenario. Instead, we show integration techniques with the Domino environment, based on the same form used in the base J2EE integration scenario. Accordingly, the main focus in this chapter is on the following topics: Show all features used in the J2EE environment, using a completely different application server and back-end storage (prepopulation, XForms submissions, form storage, data extraction). Use the unchanged form created for the J2EE scenario in stage 2 and provide necessary adaptations to the Domino environment during form instantiation. Show new techniques for data prepopulation and data retrieval. Make the scenario almost independent from the used XFDL form. The goal is to define form-specific behavior as configuration parameters related to the provided form. Utilize the offline capabilities of the Notes Client in use cases based on a disconnected form handling. Chapter 9. Lotus Domino integration 495 Second level features (in terms of Forms integration) such as development of the implemented business logic in the J2EE stage 2 chapter, high-end UI design, and full navigation facilities in the application are supported in a limited way only. These features depend highly on building the real application, and have to be remade for each project using the available Domino developer skills. Figure 9-1 illustrates the sample application within the context of a 3-tier architecture. The section outlined with a dashed line illustrates the focus of this integration scenario. Client Tier Application Tier Data Tier WAS Web Web Browser Browser Showing Showing eForm eForm Submission Submission Servlet Servlet WP WP Forms Forms API API DB2 Zero-footprint Zero-footprint XForms XForms Submissions Submissions Content Manager Workplace Workplace Forms Forms Viewer Viewer Domino Server Submission Submission Servlet Servlet -- In In browser browser -- Standalone, Standalone, off off desktop desktop WP WP Forms Forms API API Forms Forms Submissions Submissions Notes Notes Client Client • Workplace Forms Viewer • WebSphere Application Server • Web Browser • Notes Client • Domino Server • Workplace Forms API Line-ofBusiness System • DB2, DB2 Content Manager • Extensible to LOB Systems Figure 9-1 Illustrating the focus of this integration scenario 9.3 Environment overview For Domino integration, we set up an application based on two Domino databases. One database contains the Workplace Forms templates (template database) and stores submitted forms and extracted metadata. This database contains the application UI that the end user accesses with the browser. The other database (repository database) serves as a back-end store for all other data such as customer list, employee data, and product catalog. The template database serves as a Web-enabled application for a browser client and, in scenarios 2 and 3, as an application accessed with the Notes client. If you are working locally, both databases must reside in the data directory of the Notes client using the same path as on the server environment. Because of the wide range of possible integration scenarios with Domino, we should first explore the different aspects of the integration. To substantiate theoretical considerations about possible use cases and their consequences for the end user experience working on the 496 IBM Workplace Forms 2.6: Guide to Building and Integrating a Sample Workplace Forms Application Notes client, we build several different use cases, all bundled in the same application. They are mainly using common helper routines for the basic processing tasks during a Forms editing life cycle, but in certain places the information flow differs, using alternative code structures for the same task (for example, LotusScript or Java and Forms API to access the form) or to change application behavior for the end user. Figure 9-2 shows the variations that can be explored with the available environment. Browser Client + Viewer Plug-in Notes Client Open Notes Document Detach XFDL to FileSystem Prepop Type ? Prepop Java No Client Lock Release Notes Client (Documents remain open) Open Viewer On XFDL File, Edit Form Save to File System (Wait for document close) On Document close reattach XFDL and Extract values (Java or LotusScript) No locked Client Legend: Release Notes Client Close Notes Document Yes Use Viewer? Prepop LotusSrcipt Save XFDL File and reattach to Notes Document Extract Values (Java or LotusScript) Domino Server (Web-enabled DB) Render XFDL as embedded HTML + Create instances for Prepopulation Open Browser with upload page Close Doc Client mode ? Lock Client Open Viewer On XFDL File Lock Client No Uploader Application Upload XFDL to server Open Viewer On XFDL File Edit Form in Browser rendered by WebForm Server Submit XFDL to Domino Servlet Send XFDL to Domino Servlet Edit the Form In Browser Plugin Submit XFDL To Domino Servlet WAS 6.0 Reattach XFDL and Extract values (Java API) Unlock Notes Client Domino Server (Servlet Engine) Save Notes Document Locally or to Domino Server Locked Client HTTP Submit Webform Server Embedded XFDL Notes Client Activity WebSphere App Server Activity Form Access (Prepop/Data Extr.) Domino Server Activity Forms Viewer / Server Activity HTTP Activity Browser Client Activity Figure 9-2 Complete Domino environment use case overview The top line of the diagram shows the end user client type. This client is used to work with the Forms application. The application provides lists of Forms templates and filled forms in the workflow and allows the creation of new forms from a selected template or the opening of existing forms to work with them, for example, in a workflow application. Chapter 9. Lotus Domino integration 497 Below the top line in the diagram, you can see five columns that show the data flow and user interaction for the different use cases. Each use case makes up one column. We put the name of the use case at the bottom of the diagram. Commonly used modules such as the Domino servlet engine are shown in multiple columns. Each column corresponds to a scenario that is presented in this chapter: No locked client column - discussed in scenario 2, use cases 2.2 and 2.3 Locked client column - discussed in scenario 2, use cases 2.1 and 2.3 HTTP Submit column - discussed in scenario 3, use case 3.1 Webform Server column - discussed in scenario 3, use case 3.2 Embedded XFDL column - discussed in scenario 1 The different colors, as shown in the legend at the bottom of the diagram on Figure 9-2 on page 497, indicate the different software components (clients, servers) used to process the different tasks during the life cycle of a Forms editing process. The green boxes show when we are interacting with Forms-relevant data. All of the other components are for some reason necessary to run the application in each of the use cases, but they do not contain Forms-relevant code. Before building this complex environment, let us look at the most relevant decision points at a glance. You can find in the diagram the following decision points: Client type to work with the application – Notes client - for the Notes clients as covered in scenarios 2 and 3. – Web browser - For this client type, we show only one solid implementation, which is covered in scenario 1. Nevertheless, we could create here the same amount of different use cases. Prepopulation and data extraction type (inside the Notes Client flow - Box Prepop Type?) – Prepopulation using LotusScript (no Forms API involved) – Prepopulation using Java API (We assume, for data extraction, that we use the same technique to have consistent use cases.) Behavior of the Notes Client after opening a form (inside the Notes Client flow - Box Client Mode?) – Locked client - We force the end user to finish the work in the form and close the Viewer before he can close the related Notes document or access any other function in the Notes client. – No locked client - The end user can, after opening an form, use the Notes client and utilize any other Notes client functionality. The opened document remains open until the user closes it. – Close Doc - The document is closed immediately after opening the contained form in the Viewer. The end user can use the Notes client and utilize any other Notes functionality. Decision about the rendering engine used for the work in the form (Box Use Viewer?) – Use the Forms Viewer - The Viewer opens up then as a standalone application, not as a browser plug-in. – Use Webform Server - To utilize this, we compose a generic supporting Web application handling the file upload from the client, the browse intersection with Webform server, and the final submission to the Domino servlet. In this chapter we first create the backbone of the application starting with the browser-based use case (named Embedded XFDL in Figure 9-2 on page 497) and then adding, step by step, more functionality to implement the other use cases. 498 IBM Workplace Forms 2.6: Guide to Building and Integrating a Sample Workplace Forms Application A diagram of this basic scenario is shown in Figure 9-3. Domino 7 Template Database Repository Database Pre-population Employee Form Templates Data Submitted Forms + Extracted Data 1 4 Form Submission (Form Reload) 1 2 Employee Data Customer Data Product Data 3 Web Services for Product Data, Customer Data Figure 9-3 Basic usage scenario for Domino integration The end user opens the template database with the browser and can navigate through available views showing links to different XFDL forms (templates, submitted forms for manager or director approval, approved forms, and canceled forms) similar to the J2EE stage 1 scenario, described in Chapter 5, “Building the base scenario: stage 1” on page 173. Accessing this database, the user has to authenticate against the Domino Directory. Creating a new form from a chosen template, the Domino server gathers the employee data based on the user name and prepares this data along with the new order number and the template form for client download. The XFDL form (as in the J2EE scenario described in Chapter 6, “Building the base scenario: stage 2” on page 367) reads product and customer data using an XForms submission service. However, in this chapter, the service runs against a LotusScript agent on the Domino server, not a J2EE application. The client submits the form to the Domino server. The server extracts the desired metadata and stores the form and metadata in a Notes document. This document (metadata and stored form) is updated whenever the contained form is re-opened and re-submitted. This chapter does not contain all of the detailed information necessary to recreate the integration environment. Rather, we refer to the available building blocks and discuss relevant topics. Full application design and sample data is available in Appendix D, “Additional material” on page 693. Chapter 9. Lotus Domino integration 499 The following new integration techniques are discussed in this chapter: Embedding the XFDL form into an HTML page Prepopulation using a script in an HTML page Prepopulation using text parsing Data extraction using API based on entire data instances, not single fields Attention: Using text parsing to interact with the form is a very powerful method because there are nearly no restrictions to the available operations, like having appropriate navigation/data access methods offered by API or setting up correct namespaces to access specific data. Nevertheless, there are some considerations to make before using text parsing: Be aware of the compression state of the form. You may have to uncompress the form before you can access it. XFDL uses base64-gzip encoded compression. The Forms API does compressing/uncompressing in a transparent mode. It is easy to break a form using text parsing when inserting restricted characters. It is easy to break signatures written back to the form. Using the Forms API does not allow a change to signed data or structures. It is very difficult to verify signatures when not using the Forms API. After setting up the system, we discuss the development tasks. 9.4 Setting up the Domino environment The Domino environment is set up in a standard way. We do not describe these steps in detail. Make sure that the following environment is available: Domino Server Version 7.0 or later Servlet support enabled (Domino Servlet Manager) in Domino Directory/server document Tasks running: HTTP, Indexer Workplace Forms API installed Basic authentication enabled on the server (not session authentication) Make sure that you have registered the deployed Workplace Forms API jar files in server notes.ini and the developer client like this: JavaUserClasses=[System32]\PureEdge\70\java\classes\pe_api.jar;[System32]\PureEdge \70\java\classes\uwi_api.jar Using the databases from the Redbooks repository, deploy both databases to the server in the forms directory: forms/WPForms.nsf (Title - WPForms Templates) forms/WPFormsRep.nsf (Title - Repository DB) Sign both databases with an administration ID able to run unrestricted agents and Web services on the server. The ID should have manager rights in the ACL of both databases. 500 IBM Workplace Forms 2.6: Guide to Building and Integrating a Sample Workplace Forms Application Apply the ACL settings listed in Table 9-1 to both databases. Table 9-1 ACL settings for Domino integration Database User/group ACL settings Template database Default Author Anonymous No Access (This will require user authentication.) Default Reader Anonymous Reader (necessary for Web service or XForms submission access to the data) Repository database To make user authentication match with the available employee data, open the repository database and edit/create users. Ensure that the Notes Username field is populated with a valid user name from the Domino Directory, as shown in Figure 9-4. Figure 9-4 Assign valid Notes user names to the employees After completing the form and view design in the repository database, create sample data to populate the database from scratch. 9.5 Foundation of Domino development There are several parts to create for Domino integration. In this section we describe how to build the relevant parts necessary as a foundation for all of the integration scenarios. We use Notes @Formula, LotusScript, and Java languages to create all the necessary code. The development phase contains the following tasks: Creating the necessary static forms and views Creating the XFDLRendering form used to process data prepopulation Creating a servlet that will receive the submitted form (extract data and store form and data) Creating dedicated views with links, creating new documents from the template, or opening existing XFDL forms Chapter 9. Lotus Domino integration 501 Providing XForms submissions needed to supply the product and customer data A main guideline for this chapter is to not write code related to a specific form. Instead, we write code that processes a whole class of templates, which is then parameterized to the needs of a specific form. This is valid for the modules that create forms from templates (and prepopulate them with data) and receive submitted forms for data retrieval and data storage. 9.5.1 Repository database The repository database contains some external data that we access (read) while creating forms or working on forms. There is no sophisticated logic in the database. We compose a few forms to store the data (employees, customers, and items) and some views to list them for lookup purposes. Domino forms All Domino forms used in the repository database (employee data, customer data, and product data) are simple. They store the necessary fields for each data type in the corresponding form. The only relevant field is the Notes Username field in the Employee form. This field is a Names field that picks up user names from the Domino Directory. It needs to be stored in a fully cannonicalized format (such as CN=Andreas® Richter/OU=DEP12/O=ACME) to match the user name available in the session when the user authenticates. Some samples for form design (make sure to match the form name and the field names in your application) are shown in Figure 9-5, Figure 9-6 on page 503, and Figure 9-7 on page 503. Figure 9-5 Customer form 502 IBM Workplace Forms 2.6: Guide to Building and Integrating a Sample Workplace Forms Application Figure 9-6 Employee form Figure 9-7 Item form Views Corresponding maintenance views are created for each form. Each view is sorted by the corresponding ID field on the form. These views are used for the Web services to look up detailed data. In addition, one lookup view for employee data sorted by name is created using the following view selection formula: View (luEmployeesByNotesName) sorted by the Notes Username field, second column shows @Text(@DocumentUniqueID) 9.5.2 XForms submissions There are potentially four XForms submissions identified in the form (see Table 6-11 on page 413) that we must implement (customer list and detail data and product catalog list and detail data). Due to the decision to call all of the submissions using the same URL on the host (and differentiate the operation to execute by exploring the URL parameters and the POST data stream), we must compose a single design element. The implementation could be one of the following: Implementation as a servlet Implementation as a Java-based Web agent Implementation as a LotusScript-based Web agent To keep things easy for Domino developers that are conversant in LotusScript, we do the implementation using LotusScript. Chapter 9. Lotus Domino integration 503 Attention: Taking this decision, you should consider the following aspects: Expecting large request messages containing more than 28 Kbyte, the development of a servlet is mandatory. (The CGI variable implementation for LotusScript and Java agents will cut the message after 30.000 characters.) If you are not sure that the service will eventually run on a Domino server, it may be a good choice to write a servlet. If you need specialized interfaces to the back-end, such as database drivers, the available (and approved) software can have a significant impact to your decision. First we look at the message structure that the already designed XForms submission in the form will serve. Let us repeat here the assumptions made for the submission design (which is taken from Chapter 6, “Building the base scenario: stage 2” on page 367): The component must be able to detect URL arguments exploring the request URL. Example 9-1 XForms submission URL requesting detail data for an inventory item http://vmforms261.cam.itso.ibm.com:10000/WPForms261RedbookXForms/XFormsSubmissionS ervlet?action=getDetails&instanceID=InventoryItemDetails We require parameter detection exploring the POST data stream. Example 9-2 XForms submission POST data containing an additional selection data (Item ID)( <InventoryItemID xmlns="" xmlns:custom="http://www.ibm.com/xmlns/prod/XFDL/Custom" xmlns:designer="http://www.ibm.com/xmlns/prod/workplace/forms/designer/2.6" xmlns:ev="http://www.w3.org/2001/xml-events" xmlns:xfdl="http://www.ibm.com/xmlns/prod/XFDL/7.0" xmlns:xforms="http://www.w3.org/2002/xforms" xmlns:xsd="http://www.w3.org/2001/XMLSchema" xmlns:xsi="http://www.w3.org/2001/XMLSchema-instance"> Nut[IT_001] </InventoryItemID> The response messages must exactly map the data structure of the target instances to update. See Example 9-3. Example 9-3 XForms submission response delivering the detail data for the requested item <InventoryItemDetails> <Item> <ID>IT_001</ID> <Name>Nut</Name> <Price>21.15</Price> <NumberInStock>11111</NumberInStock> </Item> </InventoryItemDetails> There are many ways to create XML structures in LotusScript. We use a straightforward approach, composing these structures using pure LotusScript with no XML parsers. In our scenario, this seems to be the best choice, since we can inspect exactly what we are doing and we do not have to struggle with any limitations of XML parsers. 504 IBM Workplace Forms 2.6: Guide to Building and Integrating a Sample Workplace Forms Application 9.5.3 Creating an XForms submission agent The following steps illustrate how we create a LotusScript agent in the repository database named XFormsSubmission running as a Web agent. 1. Open the database in Domino Designer. Go to the Shared Code/Agents pane, and click the New Agent button. 2. Select the On schedule radio button as the trigger, and click the Schedule... button. 3. Change the target server to Any Server, as shown in Figure 9-8, and click OK. Figure 9-8 Create the agent as scheduled running on any server 4. Switch the agent schedule property to Never and name the agent XFormsSubmission, as shown in Figure 9-9. 5. Click OK, and on the Action pane select LotusScript from the drop-down list. Save the agent. Figure 9-9 Final agent settings as running on schedule/never Chapter 9. Lotus Domino integration 505 6. Apply the basic options and the skeleton code, as shown in Example 9-4. The code reads the necessary CGI variables and extracts the URL parameters. At the end of the code we find the print statements that submit the prepared XML back to the form. Example 9-4 XFormsSubmission agent skeleton code Sub Initialize On Error Goto Errorhandler Dim session As New NotesSession Dim db As NotesDatabase Dim doc As NotesDocument 'context doc containing the CGI variables Dim Dim Dim Dim argsV As Variant'url params as Variant args List As String 'url params as list request As String'post data from incoming request xFormsInstance As String ' post data with the prepared XML ’Instance to be returned 'drill down to the context document storing the CGI variables for ’URL parameters and POST data Set db = session.CurrentDatabase Set doc = session.DocumentContext 'define some default values for the url parameters that we will care about: args("instanceID") = "data" args("action") = "no action provided" 'read all URL parameters into an array argsV = Split(doc.Query_String_decoded(0), "&") Forall a In argsV If Instr(a, "=") > 0 Then args(Strleft(a, "=")) = Strright(a, "=") End If End Forall 'read incoming POST data request = doc.Request_Content(0) 'process '******************************************************************* '*** here goes our code to create - BEGIN '******************************************************************* xFormsInstance = "<TEST></TEST>" '******************************************************************* '*** here goes our code to create - END '******************************************************************* 'return the instance data - set content type and submit it Print "Content-type: text/xml" Print xFormsInstance Exit Sub 506 IBM Workplace Forms 2.6: Guide to Building and Integrating a Sample Workplace Forms Application Errorhandler: Messagebox "Error " & Err() & " in " & Lsi_info(2) & " at line " & Erl() & Chr$(10) & Error$ Print "Content-type: text/xml" Print "<errors>Errors processing this request</errors>" End Sub Restriction: Be aware that the provided code can only read and write small amounts of POST data (maximum of 30 KByte). For reading larger POST data streams, we should develop a servlet. Servlets running on Domino can consume data steams with no restrictions in size. To send back larger data streams, split the complete XML into smaller sections and submit them sequentially as chunks. For more details about chunks, see the section in this chapter that discusses using them when creating the embedded XFDL form. 7. Compose two helper functions inside the agent. These helper functions compose XML elements from a defined name and content or extract the content from a given XML element (stripping the surrounding start and end tags). Example 9-5 Helper functions to create and read XML fragments Function getXMLElement (elementName As String, XML As String) As String 'return the content of the first xml element defined by the element name 'content may be any inner XML or data only On Error Goto Errorhandler Dim strtmp As String If Instr(XML, "<" + elementName + ">" ) > 0 Then 'element without attributes as <name>....</name> strTmp = Strleft(XML, "</" + elementName + ">") strTmp = Strright(strTmp, "<" + elementName + ">") getXMLElement = strtmp Elseif Instr(XML, "<" + elementName + " " ) > 0 Then 'element with attributes as <name id='xxx">....</name> strTmp = Strleft(XML, "</" + elementName + ">") strTmp = Strright(strTmp, "<" + elementName + " ") strTmp = Strright(strTmp, ">" ) getXMLElement = strtmp Else getXMLElement = "" End If Exit Function Errorhandler: Messagebox "Error " & Err() & " in " & Lsi_info(2) & " at line " & Erl() & Chr$(10) & Error$ End Function Function createXMLElement(elementName As String, content As String, attributes As String) As String 'create an XML fragment like Chapter 9. Lotus Domino integration 507 '<element attributes ...> content</element> On Error Goto Errorhandler Dim strTmp As String strTmp = "<" + elementName If attributes <> "" Then strTmp = strTmp + " " + attributes End If strTmp = strTmp + ">" + content + "</" + elementName + ">" createXMLElement = strTmp + Chr$(10) Exit Function Errorhandler: Messagebox "Error " & Err() & " in " & Lsi_info(2) & " at line " & Erl() & Chr$(10) & Error$ End Function 8. Having the skeleton code in place, we can start to code the logic that handles the processing in the agent. In the marked section of the servlet skeleton, the main application logic should detect the different request types (compare with Table 6-11 on page 413). Table 9-2 lists the types we provide in our form. Table 9-2 Request types to serve in XFormsSubmission agent Action parameter submissionID Request parameters Results getChoices InventoryItems none (return all item IDs) <InventoryItems> <InventoryItem>Nut[IT_001]</InventoryItem> <InventoryItem>Bolt[IT_002]</InventoryItem> <InventoryItem>Widget[IT_003]</InventoryItem> <InventoryItem>Gadget[IT_004]</InventoryItem> <InventoryItem>Thingy[IT_005]</InventoryItem> </InventoryItems> getChoices CustomerIDs none (return all customer IDs) <CustomerIDs> <CustomerID>OnDemand Corporation[100000] </CustomerID> <CustomerID>Workplace Early Adopter Inc[100001] </CustomerID> <CustomerID>Portal Application Surfacing[100002] </CustomerID> <CustomerID>Workplace Forms Redpapers Inc[100003] </CustomerID> <CustomerID>Mobile Devices Corporation[100005] </CustomerID> </CustomerIDs> 508 IBM Workplace Forms 2.6: Guide to Building and Integrating a Sample Workplace Forms Application Action parameter submissionID Request parameters Results getDetails InventoryItem Details <InventoryItemID ... >ID</InventoryItemID> <InventoryItemDetails> <Item> <ID>IT_001</ID> <Name>Nut</Name> <Price>21.15</Price> <NumberInStock>11111 </NumberInStock> </Item> </InventoryItemDetails> getDetails CustomerDetai ls <ID .... >CustomerID</ID> <CustomerDetails> <Customer> <ID>123</ID> <Company>CompName</Company> <AccountManagerID>N</AccountManagerID> <Department>Dep</Department> <ContactName>CN</ContactName> <ContactPosition>PC</ContactPosition> <ContactEmail>CE</ContactEmail> <ContactPhone>CP</ContactPhone> <CRMNumber>CR#</CRMNumber> </Customer> </CustomerDetails> The code evaluating the request URL identifies the different request types and exposes the places to insert the request-specific code. Since we have two main types (get lists and get details), we expect to have some really request-specific code and some common code to process for each request class. The code should look like Example 9-6. Example 9-6 Code skeleton that creates the structure for data processing 'process '******************************************************************* '*** here goes our code to create - BEGIN '******************************************************************* Dim instanceID As String 'get the instanceElement name instanceID = args("instanceID") 'first - determine the action Select Case args("action") Case "getChoices" 'we will return complete list of all available objects (formatted as string: name [id]) 'select the corresponding view and return structure Select Case instanceID Case "CustomerIDs" 'insert here the settings for customer list retrieval Case "InventoryItems" 'insert here the settings for item list retrieval End Select 'process the list request - get the view and read all entries Case "getDetails" 'we will return detailed object date for one object Chapter 9. Lotus Domino integration 509 ’specified by the key Select Case instanceID 'select the corresponding view and return structure and create the ’inner XML Case "CustomerDetails" 'insert here the settings for customer detail data retrieval Case "InventoryItemDetails" 'insert here the settings for item detail data retrieval End Select 'complete the detail request Case Else Print "Please use this method only with the parameter action=getDetails or action=getChoices" Exit Sub End Select '******************************************************************* '*** here goes our code to create - END '******************************************************************* 9. Complete the data-gathering code snippets. For each request type, we have do the following steps: a. Define the view for the data lookup. b. Define the key for data lookup. (This is necessary for detail data requests only.) c. Retrieve the data. d. Create an XML structure based on the data and the required tag names for the data instance. e. Finalize the response message (this can be done in some common code lines for all methods). The complete processing code for the list requests looks like Example 9-7. Example 9-7 Code stream to compose choices lists XML structure Case "getChoices" 'we will return complete list of all available objects (formatted as string: name [id]) 'select the corresponding view and return structure Select Case instanceID Case "CustomerIDs" 'insert here the settings for customer list retrieval Set view = db.GetView("Customers") instanceElement ="" 'no input necessary here elementName = "CustomerID" Case "InventoryItems" 'insert here the settings for item list retrieval Set view = db.GetView("Items") instanceElement ="" 'no input necessary here elementName = "InventoryItem" End Select 510 IBM Workplace Forms 2.6: Guide to Building and Integrating a Sample Workplace Forms Application 'process the request - get the view and read all entries ’compose for each found document an entry containing the ’name and the id as this: name [id] Set entrycollection = view.allentries Set entry = entrycollection.GetFirstEntry For ec=0 To (entrycollection.count -1) 'instanceData= instanceData + createXMLElement(elementName, entry.ColumnValues(1) + { [} + entry.ColumnValues(0)+ {]}, {id="} + entry.ColumnValues(1) + { [} + entry.ColumnValues(0)+ {]" }) instanceData= instanceData + createXMLElement(elementName, entry.ColumnValues(1) + { [} + entry.ColumnValues(0)+ {]}, {}) Set entry = entrycollection.GetNextEntry(entry) Next 'attach the envelope (apply the instance id as sourrounding xml element) xFormsInstance = createXMLElement(instanceID, Chr$(10) + instanceData + Chr$(10) , "") For the customer detail data, the corresponding code is more complex, as shown in Example 9-8. Example 9-8 Code stream to compose customer detail data XML structure Select Case instanceID 'select the corresponding view and return structure and create the inner XML Case "CustomerDetails" 'insert here the settings for customer detail data retrieval Set view = db.GetView("Customers") instanceElement ="Customer" 'obtain the key from the request key = getXMLElement("CustomerID", request) If Instr(key, "[") > 0 And Instr(key, "]") > 0 Then key = Strright(Strleft(key, "]"), "[") 'select the document and create the inner XML Set targetDoc = view.GetDocumentByKey(key, True) instanceData= instanceData + createXMLElement("ID", targetDoc.getItemValue("cust_id")(0), "") instanceData= instanceData + createXMLElement("Company", targetDoc.getItemValue("cust_name")(0), "") instanceData= instanceData + createXMLElement("Department", "not available", "") instanceData= instanceData + createXMLElement("AccountManagerID", targetDoc.getItemValue("cust_amgr")(0), "") instanceData= instanceData + createXMLElement("ContactName", targetDoc.getItemValue("cust_contact_name")(0), "") instanceData= instanceData + createXMLElement("ContactPosition", targetDoc.getItemValue("cust_contact_position")(0), "") instanceData= instanceData + createXMLElement("ContactPhone", targetDoc.getItemValue("cust_contact_phone")(0), "") instanceData= instanceData + createXMLElement("ContactEmail", targetDoc.getItemValue("cust_contact_email")(0), "") instanceData= instanceData + createXMLElement("CRMNumber", targetDoc.getItemValue("cust_crm_no")(0), "") Case "InventoryItemDetails" Chapter 9. Lotus Domino integration 511 ....... End Select 'attach the envelope xFormsInstance = createXMLElement(instanceID, Chr$(10)+createXMLElement(instanceElement , Chr$(10) + instanceData + Chr$(10), ""), "") 10.We now have to map the internal names of the data source to the required names of the elements in the XForms submission. This mapping always takes place. Even if we are able to design a data model in the form using identical element names as in the data source, just a simple switch of the data back end to another system (as SAP or DB2) would force the introduction of some mapping later on. With regards to this, a production-ready solution should offer a solution to change this mapping with minimal effort (for example, reading the mapping from some global variables, from a database or profile documents). Look at the code stream for item detail data, as shown in Example 9-9, which shows the mapping. Example 9-9 Code stream to create customer detail data XML structure Case "InventoryItemDetails" 'insert here the settings for item detail data retrieval Set view = db.GetView("Items") instanceElement ="Item" 'obtain the key from the request key = getXMLElement("InventoryItemID", request) If Instr(key, "[") > 0 And Instr(key, "]") > 0 Then key = Strright(Strleft(key, "]"), "[") 'select the document and create the inner XML If key = "" Then key = "IT_001" Set targetDoc = view.GetDocumentByKey(key, True) instanceData= instanceData + createXMLElement("ID", targetDoc.getItemValue("it_id")(0), "") instanceData= instanceData + createXMLElement("Name", targetDoc.getItemValue("it_name")(0), "") instanceData= instanceData + createXMLElement("Price", targetDoc.getItemValue("it_price")(0), "") instanceData= instanceData + createXMLElement("NumberInStock", targetDoc.getItemValue("it_stock")(0), "") End Select 'attach the envelope xFormsInstance = createXMLElement(instanceID, Chr$(10)+createXMLElement(instanceElement , Chr$(10) + instanceData + Chr$(10), ""), "") Case Else ........ 11.Save the agent and have a quick test using the prepared stage 2 form. 512 IBM Workplace Forms 2.6: Guide to Building and Integrating a Sample Workplace Forms Application The following steps illustrate how we can perform this quick test: 1. Have the Domino server with the HTTP task running and apply the matching URL in the ConfigurationInfo XForms data instance of the form (keep in mind that the compute in the form adds the required parameters after the ending &): http://localhost/forms/WPFormsRep.nsf/XFormsSubmission?OpenAgent& 2. Open the form in the Preview tab of Forms Designer. The choices lists should show the available item and customers from the database. Tip: For any debugging tasks, we strongly recommend using an HTTP sniffer tool. You should be able to detect the created URLs, headers, and the POST data to find any errors in the environment. 9.6 Scenario 1 - Domino integration for Web-enabled applications using Forms Viewer browser plug-in Having created the foundation of our Domino development, we can now start to build the Forms-specific parts for the first scenario. Chapter 9. Lotus Domino integration 513 The template database is accessed by a user using a Web browser client. In Figure 9-10 this is the scenario on the right border highlighted with a red box with broken lines. The user has the Forms Viewer plug-in installed on the browser. A Domino server with an activated HTTP service hosts the created databases and runs a submission servlet to receive the submitted forms. Browser Client + Viewer Plug-in Notes Client Open Notes Document Detach XFDL to FileSystem Release Notes Client Close Notes Document Prepop Type ? Prepop Java No Client Lock Release Notes Client (Documents remain open) Open Viewer On XFDL File, Edit Form Save to File System (Wait for document close) On Document close reattach XFDL and Extract values (Java or LotusScript) No locked Client Legend: Yes Use Viewer? Prepop LotusSrcipt Save XFDL File and reattach to Notes Document Extract Values (Java or LotusScript) Domino Server (Web-enabled DB) Render XFDL as embedded HTML + Create instances for Prepopulation Open Browser with upload page Close Doc Client mode ? Lock Notes Client Open Viewer On XFDL File Lock Client No Uploader Application Upload XFDL to server Open Viewer On XFDL File Edit Form in Browser rendered by WebForm Server Submit XFDL to Domino Servlet Send XFDL to Domino Servlet Edit the Form In Browser Plugin Submit XFDL To Domino Servlet WAS 6.0 Reattach XFDL and Extract values (Java API) Unlock Notes Client Domino Server (Servlet Engine) Save Notes Document Locally or to Domino Server Locked Client HTTP Submit Webform Server Embedded XFDL Notes Client Activity WebSphere App Server Activity Form Access (Prepop/Data Extr.) Domino Server Activity Forms Viewer / Server Activity HTTP Activity Browser Client Activity Figure 9-10 Domino environment use case overview - building scenario 1 (Viewer plug-in embedded in HTML page) We start the development by creating a new form in the template database. 9.6.1 Template database: components to create a new form from template The template database has the role of the application database. It contains several correlated design elements, which work together when creating new forms or opening existing forms in the browser. 514 IBM Workplace Forms 2.6: Guide to Building and Integrating a Sample Workplace Forms Application For Form creation in the first (browser client based) scenario, we create the following components: A Domino form to store templates A Domino form to render the HTML page shown to the browser when creating a new request An initiation agent that fills in the rendering form A view that lists all available forms along with suitable links to compose a new XFDL form from the template At least one stored template with prepopulation settings applied to test the created design elements A parameter form and view that stores the necessary application parameters (order count, server URL, and so on) A LotusScript library to contain all complex functions we use The database receives submitted forms as well, so we need an additional Domino form to store submitted forms and at least one lookup view to find the related document on subsequent updates to the submitted XFDL documents, for example, those going through the approval workflow. We create all of these components in the next sections. LotusScript library LibFormsIntegration To keep the functionality for forms integration as long as possible in one single place, we create a LotusScript library named LibFormsIntegration. All the script code used in our application is stored in this script library. The provided forms contain only a reference to this library in the global form settings and simple function calls to the script library wherever more then two lines of code are needed. Apply the following instructions in the options of the library: Option Public Option Declare Save and close the script library. We will return to it many times during the development phase. Chapter 9. Lotus Domino integration 515 Parameter form and view In this section we create one simple Domino form to store application parameters. We use these documents to store the DNS name of the server, using it to create HTTP links, and we store the order number counter that increments on each new order creation. An additional author field has been added (Figure 9-11). Figure 9-11 Parameter Form in template database For lookup and maintenance, create one view sorted by field PAR_KEY (make sure that the fourth column presents the @DocumentUniqueID), as shown in Figure 9-12. Figure 9-12 Parameter lookup view 9.6.2 Template form The template form basically stores the form templates as file attachments in a rich text field. Create a form named FormTemplate, as shown in Figure 9-13. Figure 9-13 Basic fields for template storage The name field should contain a short name for the template. This is the link text that is presented to the end user when creating a new form from the template. This form should not only store the form XFDL template, but also contain additional functionality: It gets a set of fields used to define any prepopulation applied to the template when creating a new form. This makes it possible to run a generic prepopulation module, and prepopulate a different data set on form initiation. It contains the information about the data instance to extract on form submit. 516 IBM Workplace Forms 2.6: Guide to Building and Integrating a Sample Workplace Forms Application It needs to provide a converted version of the original XFDL template that can be easily accessed in the prepopulation step. To convert the attachment, open the PostSave event of the form and insert the code shown in Example 9-10. Example 9-10 Attachment conversion in the PostSave event Sub Postsave(Source As Notesuidocument) 'detach the attachment to temp directory and store it back to bodyInline field as mime type Call client_attachXFDLTemplateInline(source.Document, "Body", "BodyInline") End Sub Create the called procedure in LibFormsIntegration script library, as shown in Example 9-11. Example 9-11 Procedure to convert attachments Sub client_attachXFDLTemplateInline(doc As NotesDocument, sourceFieldName As String, targetFieldName As String) 'detach the attachment to temp directory and store it back to bodyInline field as mime Dim rtitem As NotesRichTextItem Dim filepath As String filepath = file_detachXFDLTemplate(doc , sourceFieldName) 'Read the detached file into inputstream and append to Body richtext field on rendering form Dim stream As NotesStream Set stream = session.CreateStream If Not stream.Open(filepath, "UTF-8") Then Print "Open failed" Exit Sub Else Print "Opened file " + filepath End If If stream.Bytes = 0 Then Print "File has no content" Exit Sub End If 'clear up when updating If doc.HasItem(targetFieldName) Then Set rtitem=doc.getfirstItem(targetFieldName) Call rtitem.remove Set rtitem=doc.CreateRichTextItem(targetFieldName) Else Set rtitem=doc.CreateRichTextItem(targetFieldName) End If 'store new form Call rtitem.appendtext(stream.ReadText()) Chapter 9. Lotus Domino integration 517 Call stream.Close Call doc.Save(True, True) Kill filepath End Sub Function file_detachXFDLTemplate(doc As NotesDocument, fieldname As String) As String 'detaches the attachment containg in a rich text field to file system On Error Goto errorhandler Dim Dim Dim Dim rtitem As NotesRichTextItem body As Variant tmpdir As String filepath As String 'get the body field Set body = doc.GetFirstItem(fieldname) Call body.update 'get temp dir tmpdir = Environ("temp") If tmpdir = "" Then tmpdir = Environ("tmp") If tmpdir = "" Then tmpdir = "c:\temp" Dim sep As String sep = "\" If Instr(tmpdir, "/") > 0 Then sep = "/" Dim fileId As Variant 'get attachment (should be only one!!) Forall att In body.EmbeddedObjects If att.Type = EMBED_ATTACHMENT Then filepath = tmpDir & sep & att.Source 'Print "filepath: " & filepath Call att.ExtractFile(filepath) file_detachXFDLTemplate = filepath Exit Function End If End Forall ex: Exit Function errorhandler: Messagebox "Error: " & Err() & " in " & Lsi_info(2) & " line " & Erl() Messagebox Error$ Resume ex End Function This procedure stores the content of the attachment as plain in-line text to the field BodyInline as a mime type. Mime types can be accessed as streams without first storing the content as a file on the file system, when a new form is created. The Notes client/Domino server can read only mime types and files as streams, not simple attachments. To prevent storing files on the file system on each new form on the server, it is done after deploying a new form on the 518 IBM Workplace Forms 2.6: Guide to Building and Integrating a Sample Workplace Forms Application Notes client on document save. After each attachment update, the procedure rewrites the content in the BodyInline field. To prevent caching in the browser, insert the following code in the form’s HTML header content (Example 9-12). Example 9-12 HTML header code preventing IE6 from caching old content "<META HTTP-EQUIV=\"Pragma\" CONTENT=\"no-cache\">"+ "<META HTTP-EQUIV=\"Expires\" CONTENT=\"-1\">" To configure prepopulation, we must define a framework that fits our needs. In this book, we assume that prepopulation is based, in most cases, on data stored in other Domino documents and that this data corresponds to data instances in the XFDL form. For this purpose, the framework we create does the job. If the scenario changes, the framework should be adjusted. To address a Notes document, we need to define the database and the unique ID of this document. Other combinations are valid as well (such as DB ReplicaID/DocumentReplicaID or Database path/ View Name/sort key), but we stick with using DB path and DocumentUniversalID in our scenario. Knowing the source document, we must define what data (fields) to use for prepopulation of additional information — the data instance name in the XFDL form to prepopulate, the field names to read from the document, and the corresponding element names for these fields in the data instance contained in XFDL form. This information is entered in the same document as the related XFDL template. We configure four fields to store this information (Table 9-3). Table 9-3 Field description for preprocessing information Field name Description prepopSourceDb The path to the database storing the requested information. In our scenario this is the path to the repository database (containing employee data). prepopIDFormula The most tricky functionality. Apply here a valid @Formula to compute the UNIQUE ID of the document in the target database, where we read data for prepopulation. prepopDataInstance Instance name to prepopulate. In our scenario, this is FormOrgData containing employee data. prepopFields List of field names and corresponding element names in the data instance. Multiple lines are possible. A valid entry would be: ORG_FIRSTNAME#FirstName Match exactly the (case sensitive) order and naming in XFDL data instance. prepopOnlyOnFirstOpen Checkbox field. If selected (value = ’1’), this prepopulation should take place only when a form is created from the template (for example, inserting a new ID or creator data). On subsequent form opening, these values should not update anymore. All other settings (with an empty field prepopOnlyOnFirstOpen) should be executed on every form open (for example, supplying the current submission URL or the name and role of the current user). In reality, we can, to prepopulate more than one data instance, create four identical prepopulation sections (for example, in a tabbed table, as shown in Figure 9-14 on page 520). Chapter 9. Lotus Domino integration 519 Figure 9-14 shows two additional tabs. We create these tabs later on. Figure 9-14 Fields defining a document for data prepopulation 520 IBM Workplace Forms 2.6: Guide to Building and Integrating a Sample Workplace Forms Application The field names on tabs 2, 3, and 4 are the same as in tab 1, but contain the suffixes _1, _2, and _3. In runtime, a template document ready to process data instance prepopulation could look like Figure 9-15. Figure 9-15 Configured Template document with data prepopulation settings Often the environment requires additional changes to the provided template, for example, adjusting some static entries in the form (such as URLs contained in the template or even the title or some other information) in the initiation process. To do so, we introduce an additional technique for prepopulation — text parsing. To store search and replace values, we create an additional tab named TextParsing containing one multi-value field (replacements), as shown in Figure 9-16. Figure 9-16 Replacements tab for text parsing Chapter 9. Lotus Domino integration 521 The information stored in this field controls a search/replace module that runs on the form created from the template before it is submitted to the browser. Make sure to apply suitable separators for the field (use an empty line only). We use this field to exchange URLs that originally point to the WebSphere Application Server (WAS)/J2EE environment and make them point to the corresponding Domino end point (Web service end points, submission URL), but we can exchange that with any text fragment contained in the template. A filled-in TextParsing tab is shown in Figure 9-17. Figure 9-17 Replacing target URLs and form title label On the last tab, we create the configuration for data extraction. It contains the ID of the data instance to extract from the form and the Domino form name to create for incoming new forms, as shown in Figure 9-18. Figure 9-18 Data retrieval tab 522 IBM Workplace Forms 2.6: Guide to Building and Integrating a Sample Workplace Forms Application Figure 9-19 is an example for a configured data retrieval operation. Figure 9-19 Configured data retrieval All the prerequisites to write the code that creates a new form from the template are now created: Template storage installed with a template ready to read as a stream Configuration fields for data instance prepopulation setup Configuration for additional test parsing setup Data retrieval configured Let us now define how a new form is created from a template. Creating a new form from template, embedding template in HTML form As in the J2EE scenario, we need a procedure that reads the template and prepares the data for prepopulation. This can be easily done in Domino by calling an agent (either LotusScript or Java) from a URL triggered from the browser client. We take another approach here by triggering a URL that opens a new form in the template database. This form opens upon running an agent that collects the necessary information and then sends an HTML page to the browser containing the new form ready for viewing via the Viewer plug-in. We refer to the agent as the initiation agent. Alternatively, we can create a Java agent, and reuse the main code from the J2EE environment, but let us first show how to make things work using LotusScript. LotusScript can easily access external libraries if they are registered as OLE automation classes. Workplace Forms offers a COM API. Unfortunately, the registration does not show up as automation classes, making it hard to access these classes. Assuming that a non Windows-based operating system is used in the server environment, the COM interface is not available at all, so we should look for other techniques to do the prepopulation. Workplace Forms provides a way to embed an XFDL file into an HTTP page. This is done by registering a Workplace Forms object to the HTML form and including a full XFDL file as a <SCRIPT> element activated by the object. The HTML page can contain additional initiation scripts, which contain prepopulation instructions and data. When the browser opens the HTTP page, the object is initiated (the Viewer pops up). The Viewer renders the contained form and executes all registered scripts from the HTML page before the user can access the page. Chapter 9. Lotus Domino integration 523 The generated HTML page is shown in Example 9-13. Example 9-13 Sample for an embedded XFDL document <BODY> <HTML><BODY> <OBJECT id="Object2" height="2000" width="980" border="1" classid="CLSID:354913B2-7190-49C0-944B-1507C9125367"> <PARAM NAME="XFDLID" VALUE="XFDLData"> <PARAM NAME="instance_1" VALUE="ElementName InstanceId replace [0]"> </OBJECT> <SCRIPT id=ElementName type="application/vnd.xfdl; wrapped=comment"> <!-<DataInstanceX> <FIELD1>val1</FIELD1> <FIELD2>val2</FIELD2> </DataInstanceX> --> </SCRIPT> <SCRIPT language="XFDL" id="XFDLData" type="application/vnd.xfdl; wrapped=comment"> <!-<?xml version="1.0" encoding="ISO-8859-1"?> <XFDL xmlns="http://www.PureEdge.com/XFDL/6.5" .... the full xfdl document is located here .... </XFDL> --> </SCRIPT> <BODY> The page contains the elements listed in Table 9-4. Table 9-4 Element description for an embedded XFDL page 524 <OBJECT> Description <OBJECT > Object element that registers the Viewer class and sets up Viewer behavior with the contained attributes and child elements. ID - arbitrary but unique name in the page. width, height - space allocated in browser by the open Viewer. classid - ID of Viewer activeX control in Windows registry. classid="CLSID:354913B2-719 0-49C0-944B-1507C9125367" parameter in OBJECT element This class ID is reserved for the Forms Viewer (version independent) in the Windows registry. Using other browsers (as Mozilla, or Firefox, apply the attribute type="application/vnd.xfdl" in this place. Working with multiple browser types, apply the following nested object structure: <OBJECT id="ObjectForIE" ... classid="CLSID:354913B2-7190-49C0-944B-1507C9125367"> <PARAM NAME="XFDLID" VALUE="XFDLData"> ...... <!--[if !IE]>--> <OBJECT ID="ObjectForFF" ..... type="application/vnd.xfdl"> <PARAM NAME="XFDLID" VALUE="XFDLData"> .......... </OBJECT> <!--<![endif]--> </OBJECT> IBM Workplace Forms 2.6: Guide to Building and Integrating a Sample Workplace Forms Application <OBJECT> Description <PARAM NAME="XFDLID" VALUE="XFDLData"> Defines the ID of the script element that contains the XFDL form. The value can be anything, as long as the XFDLID and the script ID match. For an XML instance: <PARAM NAME="instance_1" VALUE="ElementName InstanceId replace [0]"> Identifies XML instances or XForms instances inside an HTML page. These instances can be used to modify specified XML instances inside the XFDL form. This information includes: The ID of the new instance to create The ID of the form instance to locate Two additional values may be included: Either replace or append, depending upon whether the new instance data replaces or adds to the original instance data. Note that replace is the default value. The reference within the instance that indicates where the new data should be placed. Note that any namespaces listed in this value resolve relative to the document root. Multiple instance parameters must have sequentially numbered names, starting with 1. For example, instance_1, instance_2, and so on. Be aware that processing will stop at the first missing instance (for example, applying instance_1, instance_2, and instance_4. Only the 2 first instances are recognized by the viewer.). Pay attention to the different structure of the value attribute for XML instances and XForms instances: XML: VALUE="ElementName InstanceId replace [0]" XForms: VALUE="ElementName xforms; replace=instance(’instance_2’)/level0/level1" or For an XForms instance: <PARAM NAME="instance_1" VALUE="ElementName xforms; replace=instance(’instance_ 2’)/level0/level1"> <SCRIPT id=ElementName type="application/vnd.xfdl; wrapped=comment"> <!-<DataInstanceX> <FIELD1>val1</FIELD1> <FIELD2>val2</FIELD2> </DataInstanceX> --> Script containing the data for prepopulation. The data must contain a valid XML instance with the data to insert in the XFDL file. The ID must match the first part of the corresponding parameter with the name Instance_x. Chapter 9. Lotus Domino integration 525 <OBJECT> Description <?xml version="1.0" encoding="ISO-8859-1"?> <XFDL .... </XFDL> Includes the full XFDL file. Note that Mozilla-based browsers require XML fragments smaller than 64 KByte to render the XML properly. Therefore, big forms should be submitted as multiple fragments (named chunks). The required structure of a chunked xml object is stream is: <?xml version="1.0" encoding="ISO-8859-1"?> ..... <SCRIPT ... id=”xxxx” next-chunk=chunk_1> .... </SCRIPT> <SCRIPT ... id=”chunk_1” next-chunk=chunk_2> .... </SCRIPT> <SCRIPT ... id=”chunk_3” next-chunk=chunk_2> .... </SCRIPT> .... <SCRIPT ... id=”chunk_N”> .... </SCRIPT> The last object in the chain does not contain the next-chunk attribute. For a deep dive into forms embedding in an HTML page, see Embedding the Viewer in HTML Web Pages at: http://www.elink.ibmlink.ibm.com/publications/servlet/pbi.wss?CTY=CA&FNC=SRX&PBL= S325-2598 Attention: In this book we do not implement advanced embedding features such as Viewer parking, which is discussed in the product documentation. If you plan to use this feature, make sure to apply, for each opened single form in the Viewer, a different value for the detach_id. Do not copy the sample HTML embedding in a static way to your application. Otherwise you would experience unexpected caching effects. 526 IBM Workplace Forms 2.6: Guide to Building and Integrating a Sample Workplace Forms Application To make the page generic for use with multiple forms, we set up a Domino form containing an HTML skeleton for this data structure. All relevant (or almost all relevant) places containing variable names are dynamically filled in using Domino fields or computed text. The initiation agent inserts the necessary content in the document fields and submits the complete new document as an HTML page to the browser (Figure 9-20). Domino Server 2 Template Form and <HTML> 3 Parsing Settings from Template Document </HTML> Prepop Data 5 Form RenderXFDL 1 6 1 Client Agent RenderXFDLPrepop Template Documents 4 Repository Employee Data Customer Data Product Data 1. Activating a link with template name as parameter opens RenderXFDL Form. 2. On form open, agent RenderXFDLPrepop is activated. 3. Agent RenderXFDLPrepop reads XFDL template form and initiation settings from template document. 4. Agent RenderXFDLPrepop reads prepopulation data from Repository database. 5. Pased XFDL template form and prepopulation data are stored to FenderXFDL form as embedded HTML. 6. RenderXFDL form with embedded information is shown in client Forms Viewer with prepopulated data. Figure 9-20 High-level flow in the Domino new document scenario Chapter 9. Lotus Domino integration 527 Initiation form RenderXFDL We now create the new document form for HTML rendering: 1. Create a form named RenderXFDL and set the content type to HTML (Figure 9-21). Figure 9-21 Form properties - Content Type = HTML 2. Create the following elements on the form (Table 9-5). Table 9-5 RenderXFDL form components Component Description Field Query_String_Decoded Editable, hidden from browser. Contains the decoded query string. This CGI variable contains all parameters from the calling URL (in this case the template to open, like ReadForm&FormName=Redpaper Form&Ind=ARWE-6N2ULV). Static text as Pass-Thru HTML <BODY> <HTML><BODY> First part of XFDL object tag <OBJECT id="Object2" height="2000" width="980" border="1" classid="CLSID:354913B2-7190-49C0-944B-1507C9125367"> <PARAM NAME="XFDLID" VALUE="XFDLData"> The parameters for height, width, and border could be variable too. We use static values here. 528 IBM Workplace Forms 2.6: Guide to Building and Integrating a Sample Workplace Forms Application Component Description The script registration for the first data instance to prepopulate <!-- red lines are hidden, when no prepopulation data available (PrepopulationDocUNID_x="") --> <PARAM NAME="instance_1" VALUE="<Computed Value>"> These lines must be hidden when we do not have a prepopulation. (Apply hide when Formula: PrepopulationDocUNID="") The computed values return the content of field prepopEmbeddingParams. The initiation agent creates this field and fills it with the instance ID of the data instance to prepopulate. We have here identical names for the new instance name and the instance name in the HTML document containing new data. Registration for the other four potential prepopulations (We need one additional instance for generic environment data stored in the instance with the id ConfigurationInfo.) <PARAM NAME="instance_2" VALUE="<Computed Value>"> <PARAM NAME="instance_3" VALUE="<Computed Value>"> <PARAM NAME="instance_4" VALUE="<Computed Value>"> <PARAM NAME="instance_5" VALUE="<Computed Value>"> Hide each line when the corresponding prepopulationUNID is empty. (Apply hide when Formula: PrepopulationDocUNID_x="" where x = 1, 2, 3, or 4.) The computed values return the content of field prepopEmbeddingParams_x. The initiation agent creates this field and fills it with the instance ID of the second, third, or forth data instance to prepopulate. Closing tag for the object </OBJECT> SCRIPT tag containing the instance data for first data instance to prepopulate <SCRIPT id=<Computed Value> type="application/vnd.xfdl; wrapped=comment"> <!-- [RTF Field Prepop]--></SCRIPT> HTML script tag surrounding the field Prepop that contains the instance data for first prepopulation instance. The computed values return the content of field prepopDataInstance. Hide these two lines when we do not have a prepopulation. (Apply hide when formula: PrepopulationDocUNID="") SCRIPT tags containing the instance data for the other 4 data instances to prepopulate <SCRIPT id=<Computed Value> type="application/vnd.xfdl; wrapped=comment"><!--[RTF Field Prepop]--></SCRIPT> <SCRIPT id=<Computed Value> type="application/vnd.xfdl; wrapped=comment"><!-- [RTF Field Prepop_1]--></SCRIPT> <SCRIPT id=<Computed Value> type="application/vnd.xfdl; wrapped=comment"><!-- [RTF Field Prepop_2]--></SCRIPT> <SCRIPT id=<Computed Value> type="application/vnd.xfdl; wrapped=comment"><!-- [RTF Field Prepop_3]--></SCRIPT> <SCRIPT id=<Computed Value> type="application/vnd.xfdl; wrapped=comment"><!-- [RTF Field Prepop_4]--></SCRIPT> <SCRIPT id=<Computed Value> type="application/vnd.xfdl; wrapped=comment"> HTML script tags surrounding the fields Prepop_x that contains the instance data for three other prepopulation instances. The computed values return the content of the corresponding field prepopDataInstance_x. Hide lines when we do not have a prepopulation. (Apply hide when formula: PrepopulationDocUNID_x="" for each line with x 1, 2, 3, or 4.) Chapter 9. Lotus Domino integration 529 Component Description Embedded XFDL form <SCRIPT language="XFDL" id="XFDLData" type="application/vnd.xfdl; wrapped=comment"> <!-- [RTF Field BodyInline] --> </SCRIPT> HTML script tag surrounding BodyInline field that contains the embedded XFDL form as plain text. End tag for Body </BODY> 3. All content on this page, except for the hidden first line containing the field Query_String_Decoded, must be set to Pass-Thru HTML. 4. To support Mozilla and Firefox, we create the embedded objects, as discussed before, as nested objects. 5. Assign a WebQueryOpen agent to the form. Open the WebQueryOpen event and assign the following @Formula: @Command([ToolsRunMacro]; "RenderXFDLPrepop") 530 IBM Workplace Forms 2.6: Guide to Building and Integrating a Sample Workplace Forms Application 6. Save the form. The completed form is shown in Figure 9-22. Figure 9-22 Form RenderXFDLPrepop preparing a embedded XFDL form with prepopulation Tip: The decisions are arbitrary as to what content to render in the form as static text, what content to render as computed text, and what content is available as content of rich text fields. We can, for example, create the whole content as one large character stream containing the embedding information, the prepopulation data, and the XFDL file, and store it to one single rich text field as well. The structure given in this chapter should make the internal structure visible. Chapter 9. Lotus Domino integration 531 Note: Signing a form embedded in an HTML page can cause broken signatures when validating the signature without the embedding page being available at the signing moment. In these cases, you should take care of the options and item types signed by default. To correct this, open the Advanced Group Options tab at the detail page of a signing button in the Forms Designer and adjust the group signing options and item types. Now create the agent that fills in the newly created form with data. Initiation agent RenderXFDLPrepop The initiation agent runs when the form is opened and executes the following actions: Locates the corresponding template document in the database Reads the configuration settings from the document (prepopulation settings, search/replace statements) Computes all necessary fields in this document (set data instance names, create XML structures for instance data) Reads the XFDL form template from the template document Executes the text parsing operation (search/replace) Inserts the reworked (stored as inline mime type) XFDL template in the corresponding field of the new document form The following steps demonstrate how the new initiation agent is created: 1. Create a new agent in the database and name it RenderXFDLPrepop. Make it a LotusScript agent with a runtime target None. 2. Select Run as web user, with restricted operations (this agent performs a lookup of information in other databases). Running as a Web user enables us to read the user name from the session object (Figure 9-23). Figure 9-23 Initiation agent settings 532 IBM Workplace Forms 2.6: Guide to Building and Integrating a Sample Workplace Forms Application 3. Apply the following statements in (Options) and (Declarations) and supporting functions (Example 9-14). Example 9-14 Options init event for initiation agent 'RenderXFDLPrepop: Option Public Option Declare Use "LibFormsIntegration" Const CONSTLIBNAME = "Agent RenderXFDLPrepop" Sub Initialize On Error Goto errorhandler Call web_createEmbeddedXFDLPage() Exit Sub errorhandler: Messagebox "Error: " & Err() & " in " & CONSTLIBNAME & "." & Lsi_info(2) & " line " & Erl() Messagebox Error$ Exit Sub End Sub 4. Create the main routine and several helper methods in the assigned script library. The main routine code, as shown in Example 9-15, goes through the following steps: a. Read the URL parameters to detect, from which template to create a new form. b. Read the form stored as mime type in the template document and execute text parsing on it (procedure web_initialTextParsing). c. Update the XFDL stream with the environment settings (username, submission URL, form to create, and more; procedure forms_prepopLSConfigInfo). This works only on uncompressed forms. d. Create a new document (not stored) based on the form RenderXFDL that we just created, and copy the parsed form into this document (procedure web_writeEmbeddedXFDL). e. Create the XML fragments for the additional data instances (1...4) defined in the template document and the internal data instance for prepopulation (procedure forms_createPrepopInstances) and store them to the created Domino document. Example 9-15 Main routine called from agent RenderXFDL Prepop Sub web_createEmbeddedXFDLPage() On Error Goto errorhandler Dim session As New NotesSession Dim db As NotesDatabase Dim doc As NotesDocument Dim template As NotesDocument Dim View As NotesView Set doc = session.DocumentContext Dim rtitem As Variant Dim Body As NotesRichTextItem Dim username As String Dim formName As String Chapter 9. Lotus Domino integration 533 Dim xfdl As String Dim params As Variant Dim CommandStr As String Set db = session.CurrentDatabase CommandStr = session.DocumentContext.Query_String_Decoded(0) 'ReadForm&FormName=Redpaper Form&Ind=ARWE-6N2ULV userName = session.EffectiveUserName 'Messagebox "params: " & CommandStr params = Split(CommandStr , "&") Forall p In params Messagebox "param: " & p If Instr(p, "FormName=") = 1 Then formName = Strright(p, "=") End Forall 'Find the template document that contains the XFDL attachment based on the title in eForm field Messagebox "get Template: " + formName Set View = db.GetView("Templates (Notes)") Set template=View.GetDocumentByKey(formName) If template Is Nothing Then Messagebox "got NO Template: " + formName Else Messagebox "got Template: " + formName End If 'copy xfdl content to new doc Set body = template.GetFirstItem("BodyInline") xfdl = body.GetUnformattedText 'text parsing if used Call forms_initialTextParsing(xfdl, template) 'set submission url and user name to the form 'this will make sure, in uncompressed forms any call for data will work just on ’forms load.In compressed forms, this function will fail and the config data ’is availabel in the form only 'after reading the embedded instance data (= after form load). Call forms_prepopLSConfigInfo(xfdl , template)Call forms_prepopLSConfigInfo(xfdl , template) 'embed the xfdl as chunks Call web_writeEmbeddedXFDL(xfdl, doc) 'create prepopulation scripts in embedded page including additional fieldss for . ’html embedding (form Embedding param = true) 'create instance data and embedding parameters (param formEmbedding = true) Call forms_createPrepopInstances(doc, template, true) Exit Sub errorhandler: Messagebox "Error: " & Err() & " in " & Lsi_info(2) & " line " & Erl() Messagebox Error$ Exit Sub End Sub After the agent completes, the newly created document is sent to the browser client and shows up as an embedded viewer object in the browser. 534 IBM Workplace Forms 2.6: Guide to Building and Integrating a Sample Workplace Forms Application We do not discuss the other helper routines used by the code in detail. For details download the Notes databases from the Redbooks resources page in Appendix D, “Additional material” on page 693, and inspect the code. Table 9-6 contains a brief overview that shows the modules engaged for this use case. Table 9-6 Functions used to compose the HTML page with embedded XFDL Function/sub Comments web_writeEmbeddedXFDL( xfdl As String, doc As NotesDocument) Copies an XML string (XFDL) in a rich text field (BodyInline). Utilizes splitting the string in chunks. forms_initialTextParsing(xf dl As String, template As NotesDocument) Processes a search/replace in XFDL string based on the parameters found in the template document, field replacements. forms_createPrepopInstanc es(doc As NotesDocument, template As NotesDocument, formEmbedding As Integer) Creates the prepopulation fields in the virtual document used for HTML embedding. Parses the information stored in the prepopulation table in the template document and composes the related fields in the virtual document used for browser embedding. In addition, it creates prepopulation data for the ConfigurationInfo. instance. (This must not be covered in the template document.) forms_prepopLSConfigInfo( xfdl As String, doc As NotesDocument) Dependent on the form type (XForms/XFDL) the function creates an XML structure to update the ConfigurationInfo instance (XForms Model) in the XFDL string OR. Writes entries into the XFDL global.global sections (XFDL documents) for the required environment information. In compressed forms, the function cannot work. forms_prepopLS_updateD ataInstance(form As String, instancePath As String, InstanceData As String) Replace an instance — XFDL instance or XForms instance — with the content found in instanceData parameter. forms_prepop_createInstan ceData(template As NotesDocument, doc As NotesDocument, instanceCounter As Integer, instanceID As String) As String Creates the XML data for one of the data instances to prepopulate in the template document. Reads source information (db, @formula to execute), executes the data query, and composes an XML fragment ready to replace the content of the given instance. forms_prepopLS_createCo nfigInfoInstance(doc As NotesDocument, XFDLID As String) As String Does prepop only, if we really have values (otherwise leave the existing values in the form). For HTTP PostSubmission sample - set submission URL and next URL parameter. xml_getXMLElement (elementName As String, form As String) As String Reads one assigned xml element from an xml structure. xml_setXMLElement(eleme ntName As String, form As String, content As String) Updates one XML element in a XML structure with the given content. If the element name matches some defined names in the global.global section, it creates these elements if they do not exist. Chapter 9. Lotus Domino integration 535 Function/sub Comments xml_createElement(elemen tName As String, elementContent As String, attributes As String) as string Creates one XML element based on element name and content composing the corresponding xml structure as: utils_replaceSubstring(str1 As String, str2 As String, str3 As String) As String Search/replace in a string. utils_getParamT(key As String, db As notesdatabase) As String Reads on parameter value as text from the parameter documents stored in the database. utils_encode(Byval strg As String) As String Simple encoder eliminating special HTML characters. <name attributes>content</name> 5. The agent is ready to run. Note: The created document is never saved. It exists only as an in-memory copy and disappears whenever the session ends. To store a document, we wait for a submission from the browser. The related code is discussed in the next section. Important: In this scenario we use two different prepopulation techniques: text parsing (quick and dirty) and embedded instances in an HTML page updating the inner part of the XFDL page using the Viewer engine. They differ not only in the used technique, but also in the execution time. Text parsing occurs before the Viewer opens the document, so all settings are present when the Viewer constructs the node tree. Prepopulation via embedded instance objects takes place after the Viewer has built the node structure. Any events or calculations executed while building the node structure cannot utilize the information available in the prepared prepopulation XML. Make sure that the form design does not rely on that information. In our case, we update the submission URL to the ConfigurationInfo instance. The information is written to the submit buttons on first node construction. Therefore, the prepopulation via embedded instances occurs too late. That is why we try to update the information additionally using text parsing knowing that this works on uncompressed forms only. We now have to create two more components to make the new form creation possible: A template view for the browser showing available templates with specific URLs At least one template document in the database First, we create the template view. Template (WEB) Prepop view Create a new view in Domino Designer available for browsers only with two columns. Use the following values to create the view: View name: Templates (WEB) prepop View alias: TemplatesPrepop 536 IBM Workplace Forms 2.6: Guide to Building and Integrating a Sample Workplace Forms Application View selection formula: SELECT Form="FormTemplate" Column 1 value: Field PEFormName; plain sort Column 2 value: @Formula _db := @ReplaceSubstring(@Trim(@DbName);"\\";"/"); "<A href=\"/" + _db + "/RenderXFDL" + ?ReadForm&FormName="+@URLEncode("Domino";PEFormName) + "&Ind=" + @Unique + "\">Click here to get a copy of "+PEFormName+"</A>" The second column creates a link like this: http://vmforms261.cam.itso.ibm.com/forms/WPForms.nsf/RenderXFDL?ReadForm&FormName= MyFormTemplate&Ind=VMFS-6NDPF6 The link opens in the template database a new document using the RenderXFDL form. This runs the RenderXFDLPrepop agent to fill the created document with the corresponding values. The parameters specify: The template to use is: (FormName=MyFormTemplate). The Ind parameter changes for each view entry, preventing possible caching on the server. The initiation agent extracts the FormName parameter and creates the appropriate field settings in the RenderXFDL form. Create another view for this form to show the available templates for the Notes client. Hide this view for Web clients. There are no special settings for this view, as shown in Figure 9-24. Figure 9-24 Template view in Notes client Creating a template document The last step before the first test of scenario 1 is to create at least one template document: 1. Open the template database in the Notes client, and go to the Template view. 2. Create a new template document. Choose from the menu Create → FormTemplate. 3. Enter a value in the Name field (such as Forms Integration Template 1). 4. Attach a form template used in J2EE stage 2 (or choose the appropriate form template from the Redbooks resource zip). Chapter 9. Lotus Domino integration 537 5. Enter prepopulation settings for employee data prepopulation, as shown in Figure 9-25. Make sure that the assigned names (instance ID, Notes field names, element names in the data instance) exactly match the names used in the Notes/XFDL template. The assigned formula should find the employee data in the repository database. Figure 9-25 Template name, attachment, and prepopulation for employee data The prepopulation settings on this tab make up an XML fragment for prepopulation, as shown in Example 9-16. Example 9-16 The prepopulation fragment for data instance FormOrgData <Employee> <FirstName>John</FirstName> <LastName>Miller</LastName> <ID>1010</ID> <ContactInfo>[email protected]</ContactInfo> <Manager>1031</Manager> </Employee> 538 IBM Workplace Forms 2.6: Guide to Building and Integrating a Sample Workplace Forms Application 6. Switch to the Data Instance 2 tab and enter the settings shown in Figure 9-26. They increment the order ID parameter and prepare the new order ID XML fragment as shown in Example 9-17. Figure 9-26 Increment order number and create XML fragment for order number prepopulation Settings on this tab create an XML fragment for prepopulation, as shown in Example 9-17. Example 9-17 XML fragment for order number prepopulation <ID>100647</ID> 7. Compare both XML structures for data instance prepopulation with the structure of the XForms data instances in the XFDL template. The root element of the created new content must exactly match the element name addressed in the XPath expression for the data instance to populate. These names and the root element of the created instance data must match, as they are case sensitive (Example 9-18 on page 540). Attention: Replacing a complete XForms instance, have a look at the root element in the XFDL file. Often you will see here the default structure as: <xforms:instance id=”INSTANCE_1”> <data> <element1></element1> ..... <elementn></elementn> </data> </xforms:instance> In this case, the XForms path to replace the instance is: instance(’INSTANCE_1’) The replacing XML fragment should have the <data> element as root element: <data> <element1>value 1</element1> ..... <elementn>value n</elementn> </data> Chapter 9. Lotus Domino integration 539 Example 9-18 XML fragments representing the data instances to prepopulate in XFDL template <xforms:instance id="EmployeeDetails" xmlns=""> <EmployeeDetails> <Employee> <FirstName></FirstName> <LastName></LastName> <ID></ID> <ContactInfo></ContactInfo> <Manager></Manager> </Employee> </EmployeeDetails> </xforms:instance> ..... <xforms:instance id="FormOrderData" xmlns=""> <FormOrderData> <ID></ID> <CustomerID></CustomerID> <Amount></Amount> <Discount></Discount> <SubmitterID></SubmitterID> <State>1</State> <CreationDate></CreationDate> <CompletionDate></CompletionDate> <Owner></Owner> <Version>0</Version> <Approver1></Approver1> <AppovalDate1></AppovalDate1> <Approver1Comment></Approver1Comment> <Approver2></Approver2> <AppovalDate2></AppovalDate2> <Approver2Comment></Approver2Comment> <Cost></Cost> </FormOrderData> </xforms:instance>a> </xforms:instance> 8. Switch to the TextParsing tab and enter all necessary changes there (Figure 9-27). In our example we have no real need to change item in the form. Let us change the form title from Product Price Quotation to whatever you like. Figure 9-27 Text parsing settings 540 IBM Workplace Forms 2.6: Guide to Building and Integrating a Sample Workplace Forms Application 9. Define what data instance to extract. Open the Data retrieval tab and enter the following information. The data extraction functionality is not implemented yet. It will be part of the servlet that we create soon. We apply a simple logic. The servlet should extract all data from one named instance (XML instance or XForms instance) and move the contained data in Notes fields. We assume here that the field names are the same as the element names in the data instance. 10.Assign the instance name FormOrderData, and the Domino form to create is QuotationRequest. Figure 9-28 Data extraction information 11.Save the document. Creating parameter documents Finally, we must create parameter documents containing the environment information for the application. For now, we need one parameter document that stores the URL for the servlet and receives the completed form. 1. Go to the Parameters view and create one parameter document, as shown in Figure 9-29. (Match the parameter name exactly. It is hard coded in the functions updating the ConfigurationInfo instance.) Figure 9-29 Parameter document containing the submission URL Some comments regarding the newly assigned submission URL are: http://vmforms261.cam.itso.ibm.com/servlet/XFDLServlet?action=store&url= http://vmforms261.cam.itso.ibm.com/forms/WPForms.nsf The URL points to a servlet running on the Domino server. We create this servlet in the next section. As a parameter (url=), we pass additional information with the submission action. The servlet uses the URL parameter to determine the next page to display after a successful submission. In the example above, we specify the Template Database default page as a Success URL. Chapter 9. Lotus Domino integration 541 2. Create the XFormsSubmissionURL parameter document, as shown in Figure 9-30. Figure 9-30 XFormsSubmissionURL parameter document The stored URL should match the XFormsSubmissionAgent that we created earlier in this chapter. It is stored in the repository database. We must add to the URL the arguments ?OpenAgent&. This allows the form to add the parameters for the operation to execute (read the choices or detail data for customer or items). 3. Create the last element, an OrderCounter parameter document, as shown in Figure 9-31. Figure 9-31 Ordercounter parameter document 4. Assign any numeric value to the parameter NumValue field. This is the ID for the first form that we create with the application. With each form created from the template, the @Formula on the second prepopulation tab reads the stored value and increments the NumValue field. 5. Allow all authenticated users to increment the OrderCounter parameter (field Document Access contains a wild card or any group for all authenticated users). Now all prerequisites are ready to run the example. 542 IBM Workplace Forms 2.6: Guide to Building and Integrating a Sample Workplace Forms Application Prepopulation test Let us consider the first test. To get more familiar with the created scenario, have a second look at the overview picture (Figure 9-32). Domino Server 2 Template Form and <HTML> 3 Parsing Settings from Template Document </HTML> Prepop Data 5 Form RenderXFDL 1 6 1 Client Agent RenderXFDLPrepop Template Documents 4 Repository Employee Data Customer Data Product Data 1. Activating a link with template name as parameter opens RenderXFDL Form. 2. On form open, agent RenderXFDLPrepop is activated. 3. Agent RenderXFDLPrepop reads XFDL template form and initiation settings from template document. 4. Agent RenderXFDLPrepop reads prepopulation data from Repository database. 5. Pased XFDL template form and prepopulation data are stored to FenderXFDL form as embedded HTML. 6. RenderXFDL form with embedded information is shown in client Forms Viewer with prepopulated data. Figure 9-32 High-level flow in Domino new document scenario Chapter 9. Lotus Domino integration 543 Figure 9-33 provides a more technical view, showing all the main components that we have built so far. Prepopulation Data Repository Database Data Datainstance instance Prepopulation PrepopulationSettings Settings Text Parsing Settings FormTemplate Document Viewer-based Prepopulation in HTML page Data Instances Update on Form Launch <HTML> <OBJECT>...</OBJECT> <SCRIPT> <prepopulationData> ... </prepopulationData> </SCRIPT> Prepop Data as 1 XML Fragment as SCRIPT 2 Server <SCRIPT> Embedding Parsed XFDL as SCRIPT 3 Form </SCRIPT> RenderXFDL </HTML> Client <HTML> 4 <OBJECT ....> <prepopulationData> ... </prepopulationData> <OBJECT ....> </HTML> Client Figure 9-33 Domino prepopulation flow (component details) 544 IBM Workplace Forms 2.6: Guide to Building and Integrating a Sample Workplace Forms Application To start the prepopulation test, follow the steps below. 1. Open the created templatesPrepop view in the template database with a Microsoft Internet Explorer 6 browser and authenticate with one of the created test users in the repository database, as shown in Figure 9-34. 2. Start the application using the browser. Apply any valid URL in your environment to the application. In our test environment this is: http://vmforms261.cam.itso.ibm.com/forms/WPForms.nsf 3. A login prompt should appear, as shown in Figure 9-34. Figure 9-34 Login and default page on the created application 4. After login, the default page shows up, exposing views to explore. Navigate to the Template (WEB) Prepop view, as shown in Figure 9-34. 5. Depending on the entered template documents, there can be other entries in the view. Check the generated links when moving the mouse over one of these links. They should look like our example: http://vmforms261.cam.itso.ibm.com/forms/WPForms.nsf/RenderXFDL?ReadForm&Form Name=Redpaper%20Form%20Stage%201&Ind=VMFS-6NDPF5 6. Make sure that all required components are OK, as shown in Table 9-7. Table 9-7 Components creation Component Description http://vmforms261.cam.itso.ibm.com URL to the Domino server forms/WPForms.nsf Path to template database RenderXFDL?ReadForm Form name RenderXFDL and ReadForm URL command Chapter 9. Lotus Domino integration 545 Component Description FormName=Redpaper%20Form%20Stage%201 Parameter FormName referencing the form name when opening RenderXFDL form Ind=VMFS-6NDPF5 Arbitrary parameter to prevent caching changing for each link in the view 7. Assuming that you created one person in the repository database with your Notes name applied, the information related to this entry should show up, as in Figure 9-35. Figure 9-35 First created form - Sales Person wizard 546 IBM Workplace Forms 2.6: Guide to Building and Integrating a Sample Workplace Forms Application 8. Click the link Click here to get a copy of Forms Integration Template 1 for the document created in this chapter. A new page should pop up and show the Forms Viewer embedded in an HTML page (Figure 9-36). Figure 9-36 Viewer with prepopulated form embedded in an HTML page 9. Notice the small space between the browser’s address bar and the Viewer. Right-click there and review the source code of the page. In summary, the HTML page created for a new form with prepopulation is shown in Example 9-19. This is a snapshot taken with the source preview functionality of the browser. It shows the page on load (just before the contained objects start to execute any action). Example 9-19 Complete HTML page prepopulating an XFDL form <HTML><BODY> <!-- the outer object supports MS IE - the inner object supports Firefox, Mozilla & Co. --> <OBJECT id="XFDLForm" height="2000" width="980" border="1" classid="CLSID:354913B2-7190-49C0-944B-1507C9125367"> <PARAM NAME="XFDLID" VALUE="theForm"> <!-- red lines are hidden, when no prepopulation data available (PrepopulationDocUNID_x="") --> <PARAM NAME="instance_1" VALUE="EmployeeDetails xforms; replace="instance('EmployeeDetails')/Employee""> <PARAM NAME="instance_2" VALUE="FormOrderData xforms; replace="instance('FormOrderData')/ID""> <PARAM NAME="instance_3" VALUE="ConfigurationInfo xforms; replace="instance('ConfigurationInfo')""> <!--[if !IE]>--> Chapter 9. Lotus Domino integration 547 <OBJECT ID="ObjectForFF" height="2000" width="980" border="1" type="application/vnd.xfdl"> <PARAM NAME="XFDLID" VALUE="theForm"> <!-- red lines are hidden, when no prepopulation data available (PrepopulationDocUNID_x="") --> <PARAM NAME="instance_1" VALUE="EmployeeDetails xforms; replace="instance('EmployeeDetails')/Employee""> <PARAM NAME="instance_2" VALUE="FormOrderData xforms; replace="instance('FormOrderData')/ID""> <PARAM NAME="instance_3" VALUE="ConfigurationInfo xforms; replace="instance('ConfigurationInfo')""> </OBJECT> <!--<![endif]--> </OBJECT> <SCRIPT id=EmployeeDetails type="application/vnd.xfdl; wrapped=comment"> <!--<Employee> <FirstName>Admin</FirstName> <LastName>Redbook</LastName> <ID>1004</ID> <ContactInfo>[email protected]</ContactInfo> <Manager>1031</Manager> </Employee>--> </SCRIPT> <SCRIPT id=FormOrderData type="application/vnd.xfdl; wrapped=comment"> <!-- <ID>100670</ID>--> </SCRIPT> <SCRIPT id=ConfigurationInfo type="application/vnd.xfdl; wrapped=comment"> <!-- <ConfigurationInfo> <XFDLSubmissionURL>http://vmforms261.cam.itso.ibm.com/servlet/XFDLServlet?action=store& url=</XFDLSubmissionURL> <XFormsSubmissionURL>http://vmforms261.cam.itso.ibm.com/forms/WPFormsRep.nsf/XFormsSubmissi on?OpenAgent&</XFormsSubmissionURL> <FormID>8174F1CBE3BD07C1C1257243006B5896</FormID> <DbPath>forms\wpforms.nsf</DbPath> <DominoForm>QuotationRequest</DominoForm> <InstanceID>FormOrderData</InstanceID> </ConfigurationInfo>--> </SCRIPT> <SCRIPT language="XFDL" id="theForm" type="application/vnd.xfdl; wrapped=comment; next-chunk=Part1"> <!--<?xml version="1.0" encoding="UTF-8"?> <XFDL xmlns:custom="http://www.ibm.com/xmlns/prod/XFDL/Custom" xmlns:designer="http://www.ibm.com/xmlns/prod/workplace/forms/designer/2.6" xmlns:ev="http://www.w3.org/2001/xml-events" xmlns:xfdl="http://www.ibm.com/xmlns/prod/XFDL/7.0" xmlns:xforms="http://www.w3.org/2002/xforms" xmlns="http://www.ibm.com/xmlns/prod/XFDL/7.0" xmlns:xsd="http://www.w3.org/2001/XMLSchema" xmlns:xsi="http://www.w3.org/2001/XMLSchema-instance"> <globalpage sid="global"> <global sid="global"> <designer:date>20061129</designer:date> <formid> <title></title> <serialnumber>6C5C03FEF93AD7BB:-5F10736E:10F371E2336:-8000</serialnumber> <version>1.0.0</version> </formid> <designer:version>2.6.1.398</designer:version> 548 IBM Workplace Forms 2.6: Guide to Building and Integrating a Sample Workplace Forms Application <xformsmodels> <xforms:model> <!-- Form Configuration Parameters --> <xforms:instance id="ConfigurationInfo" xmlns=""> <ConfigurationInfo> <XFDLSubmissionURL>http://vmforms261.cam.itso.ibm.com/servlet/XFDLServlet?action=store& url=</XFDLSubmissionURL> <XFormsSubmissionURL>http://vmforms261.cam.itso.ibm.com/forms/WPFormsRep.nsf/XFormsSubmissi on?OpenAgent&</XFormsSubmissionURL> <FormID>DBD81B45138A8CC2C125724000101DEF</FormID> <DbPath>forms\wpforms.nsf</DbPath> <DominoForm>QuotationRequest</DominoForm> <InstanceID>FormOrderData</InstanceID> </ConfigurationInfo> </xforms:instance>--> </SCRIPT> <SCRIPT language="XFDL" id="Part1" type="application/vnd.xfdl; wrapped=comment; next-chunk=Part2"> <!-....... <!-- Detail Data for the Indicated Employee (previously FormOrgData)--> <xforms:instance id="EmployeeDetails" xmlns=""> <EmployeeDetails> <Employee> <FirstName></FirstName> <LastName></LastName> <ID></ID> <ContactInfo></ContactInfo> <Manager></Manager> </Employee> </EmployeeDetails> </xforms:instance> ......... </xforms:model> </xformsmodels> </global> </globalpage> <page sid="Wizard_Sales_Person_Info"> <global sid="global"> <label>Wizard_Sales_Person_Info</label> <designer:pagesize>800;600</designer:pagesize> </global> ...... ....... <SCRIPT language="XFDL" id="Part112" type="application/vnd.xfdl; wrapped=comment; next-chunk=Part113"> <!-<mimedata encoding="base64-gzip">H4sIAAAAAAAAAO3Tiz/TiwIA8N/EDOnsYpr343hslFfmkR4kbw61xchjJmMqr5lH6hjT 6JJDZpIR wsbYWcus0LmjLB3vlEbenZOQxIlJ0rn3z7ifz/n+D18PL3cHx8hCwA2QAgAUCoXD4QYGBkgk0tra 2tHR8dSpU97e3mfPng0JCYmKirp48SKJRMrMzMzNzS0sLKTT6Uwms6GhobW1VSAQPH78WCwWDw0N jY+Pz8zMLC4urq2tSaXS7//4x/+DQ8B//e8CANkDHFPgnryabipE1Sy0j1f7JA/6o8pL/ft1vQXw I4R6tnWtc46eHO2DFf8P5xJTr0bbplvG3mVW6NTQvqRG3wMOpOWp5w9Yw3edqcuXiKqRfpWG5Pg5 XhsR3ehvf7rqd7W4c01BTUcH4wTLI7fdnLRX2ZhmjLLWSJ1fP2M1RBDzpoesJW2d6kx9gx9EHvkg KTQcjhspphv99IRWauY+IFyff1Z80IPm+zlJkp1lvXCsErSP1l+jsSFXNYEfaquyhIKDP0VF8LiR wurBjq0VyY2k4UOHrXngYXULhG7HEWHSQpGpnv8J5ntRg+XljaKHwa4xSjAbo7AOfudf5XORe7Q0 Chapter 9. Lotus Domino integration 549 5G+7faUjlv5Z6TvS64oH7eAErY7fVppxKG4a9jFJToljjYJ7ywYScNkQXTYuZ14j6OXPdfMXdMDq 2JqqSGq0lYSmnfp+Pk+fhjDMxwrsJuM1N9NcEjcUjLBgKzHibaHteOzbmw4vHOBp+g2mOriAsPIw z1erkNclKQZNF275WiwZnc+DyU5nwF3en5GPifxULbeR/XmMHn658eVtVgmSUBFb7cV0wb+LKSmD bHrMF5sqm76sSn+ngfGNWGJpoK3wpqFVBFgIAoPVaWYH5x8tQ9wrOGFGrAvPmMB7JPKRc2SARmeQ a+IQzezxEsUodmPjv5eb7/FD4th7PJXU2Rvn7rRXFB8cd1zgdm0tc/KOXdGIboWdYxmnhilyFvkD yxXhl8riMS0UzRYsCNzxnFDZLhwdX20fucKB/jxxgk70IRK/RJRDVN7H+6ypm1hGfQ4hJHQVwkx0 0fGnUrhM2IWYJXScinZjN9owlNCjxGr6VIHmPw97pPzNvKZjfRMbV6Sd9mH9md2B2AUerHsiHGye nDHLqiFIamkWJAipX2voGGnA9u3VI4N2rwsDU655X+DnvsILJ/vOhDWkvPC1XE0ZCzh5mMxjnCVa nDYzzBy51p50DR2xmOEXLRHcnCYzTygO6o6SDoTMvnE7zkl1tWjsNJ6YrVic3kvPXKmyz6BIp0Mm 9zaES0yP4dcfFgrtf0rGfzOTrb1vTmhZ//V2DPcLV9XnS7qrxumHS4znQ/KcJharaGe5WTi0s8IV tpxv+8HLWYg5Fc4j36Ntffy6JpK33P3UM3ZlylX1dP5kJmzX2JKq5P7Dt88vgiLmXP51ErPzkT1Y YT41R3XnunYJ8ta35ln+gYuwXzIfjqpxLLMSytv1TBlLgfmrZZeG1rKYYh9PIl/c8DUSmVRZO/n9 Dw+n5xm5+6jE8+126GzwfkXTg+ki2RGh6BMqgNKpNZ3F9FChO1IArQGRrC6PAmFyqJ6RehCUXPdK gH4S9YFIVsUKUMDgQHvyiUD7gvwT4Rd26FCnJPOQEKWMBWQgUEBJVT97G3o/f+vMnIvYkKWoDM1R S6eAZGoACNu9AOs7e6cwp20WF5OlMAGADRMB0H5ARkM/VHPxoC1V2/iizD59sH4AILOfAqh5jsOk cM3j6vUmCik/Xu0hi5QQFEAB5wwCB2S72WxcHu1RNip7aBHrEiCzH0fZpw+A5C/xS8cLjDcJyH7s zIEb5OZaKaFUXQFnI6N2h2IO4rkoOVBAyrGATVmFL+EoqWLY18S23GuQEDhWMfr0HYqFHIxPHQOp 5kfoWb--> </SCRIPT> <SCRIPT language="XFDL" id="Part113" type="application/vnd.xfdl; wrapped=comment;"> <!--sipLJ5F6BPnUUWxc/2Y0R58G16zLGxigx8TbV0ry3mxFKT/9WF0rtAFevkV2RADph+V7MD H7Ube5R+DpECXgrXreTXpde9w9hM3i6Krx/VINve01Ym9uFta9yO3jIUq6jtQGHGDJMASyvUy5Cr 9mMzrzCNok5ibUoco/KKTabqmTOi34WCa90rbLpXXFd1uWW9DarJ79zyxamgkwM8v4Dq3fpAY3Wd Hkkr/byyOTndqFgAUcjD+3G+0hoYUY/8WhPDON529RZ08SbXwMjT6VVwtkdw76+UaW/cdzNJj8oW j+rXEgkrkPQqtjvoxC7KmVhlz2G3+Mj+S9dtCyYGr7Q/qPmzJfak0+TIra22Rr/LRBSnCvHn6E2J ghgrQli9mQyktAsFh+PTOG9m3m0Ju+S4CVSfqXnNoId9yh8TvpOylabGPOKyS2Lu+Ewv29k7jAss Uh/4TK8mC5NnH8en9zqFryW/7ppwS0jjcBrQ0WuHG2RijzsdifgymXZ3s3ft2l/9s992gv4DfEyg rJ6fRa/22YRHBw/g3JsZ1und0NTEXL1D84ro7R7VId511NRc5Wovir+gs+7uu6BSuf0UAQ6/HZ5z 9tmj7V6rImt/Ef94aegvDAdudFFaS5Sco6kBCAQ4/Q3WC2ml2wkAAA==</mimedata> </data> <spacer sid="vfd_spacer"> <itemlocation> <x>960</x> <y>1260</y> <width>1</width> <height>1</height> </itemlocation> </spacer> </page> </XFDL>--> </SCRIPT> <BODY> </HTML> Be aware of the following aspects of the prepopulation test: Inspect the embedded object for IE with the nested object for Mozilla. Inspect the create prepopulation <PARAM> elements and corresponding <SCRIPT> elements. Search for the chunk information (for demo purpose we reduce the chunk size to 2000 byte). Inspect the ConfigurationInfo instance in the document. All URLs and settings are already in place (due to text parsing in an uncompressed form). Inspect the values for EmployeeDetails in the prepopulation scripts and the form. The values in the form are empty, because the internal computing engine of the Viewer does 550 IBM Workplace Forms 2.6: Guide to Building and Integrating a Sample Workplace Forms Application not process any update scripts after the document load. In the opened browser this information shows up a second after page load. Tip: If there are any errors during the opening of the document, try the following: 1. Make a copy of the template document in the Notes client. 2. Give it a new name (such as TEST). 3. Remove all information from the prepopulation tabs (no data instances to prepopulate, no text parsing). 4. Save the form. 5. Open the TemplatesPrepop view in the browser as before. 6. Do a browser refresh if the new form is not visible. 7. Try to create a new copy from the template in the browser using this new test form. 8. This should work, but if not: a. Inspect the rendered HTML. b. Look for missing or additional fragments. c. Review the RenderXFDL form design and RenderXFDLPrepop agent design to make things work. 9. If this works, add the prepopulation information step-by-step, back to the TEST form document. After completing one prepopulation tab, save the form and try to open it in the browser. The following errors for prepopulation are common: – The @Formula reading the UNID from the source document is not OK or the view used for lookup does not match. Repair this. – Data instance names do not match. Double-check for this. – Field names or element names assigned in the Mapping field are misspelled. Triple check for this. – Make sure the agent has sufficient execution rights and is running as a Web user. (Otherwise we cannot get the user name from the session. Inspect the Domino log). 10.Enter text parsing settings step-by-step. Special characters in the text parsing tab will break the form: a. Enter the available replacements one after another and do a test after each new entry. b. After each new entry, save the form and do a new test in the browser. Finally, after all this troubleshooting, everything should work properly. 9.6.3 Template database: receiving submitted forms in Domino A submitted form is passed to the server as content in POST requests. Domino can receive POST requests by running an agent and retrieving the content using CGI variables. Unfortunately, there are limitations to the size of the information received. A CGI variable can only store messages with up to 30,000 characters. For bigger submits, other techniques must be implemented. Chapter 9. Lotus Domino integration 551 This is the point where a servlet comes into the game. Basically, we have two benefits from using a servlet to receive POST messages: There is an unlimited length for the contained data. Using Java, we can utilize all benefits coming with the Forms API. Figure 9-37 shows the main components engaged in receiving submitted documents. <DataInstance> <f1>xxx</f1> <f2>xxx</f2> </DataInstance> 2 3 Template DB 4 5 Servlet ProcessXFDL 1 6 Submission Document Success URL 7 1 Client Domino Server Template Documents + Request Documents 1. Submission (POST) to ProcessXFDL servlet. 2. Servlet extracts a data instance from submitted XFDL form using Forms API. 3. Servlet runs DXLImporter to create / update corresponding request document in Template DB. 4. Servlet reads request document in Template DB. 5. Servlet inserts / updates XFDL form in request doc. 6. Servlet stores the completed request document back to Template DB. 7. Servlet redirects the client to the target URL contained in submission request. Figure 9-37 Flow on form submission to Domino To build this scenario, we have to create the following components: The receiving servlet named ProcessXFDL, and accordingly the deployment information (servlets.properties file on Domino server) A form in the template database capable of storing the incoming documents along with the extracted metadata (QuotationRequest documents) A maintenance view for these documents A lookup view for the servlet to find the corresponding request document for the incoming XFDL form on the server (if there is any) Now let us build these components. 552 IBM Workplace Forms 2.6: Guide to Building and Integrating a Sample Workplace Forms Application ProcessXFDL servlet receiving incoming XFDL documents Building the servlet can be done using Eclipse, RAD6, or any other Java development environment. The servlet is contained in a single Java file. There is some basic information needed to configure the servlet. This can be done in the servlet.properties file, or it can be read from the incoming XFDL document (or from any other data source). What portion of information comes from what data source depends on the environment and design guides in place. In this book we read from the servlet.properties file: User name and password to access a remote server The field name of where to store the XFDL file as attachment The following information is stored in the ConfigurationInfo instance in the incoming XFDL form: Path to target database Form name to create Document XFDLID to update in subsequent submissions the one and the same form Note: The servlet.properties file can store multiple virtual addresses for the same servlet and assume, for each virtual address, different parameters. This makes it possible to use one generic servlet processing different XFDL forms. Tip: Having a clear decision, the servlet to create will run on the Domino server, and we can think of storing the main servlet configuration in a Domino database as well. The servlet should process the following tasks: Read setup information (init method). Since our setup information is static (stored in the servlet.properties file), we can read it in the init method. – Identify the database, form, and field name to store the request document. – Connect to the database (using user name/password). – Detect the data instance ID to extract from the incoming XFDL form. Receive incoming POST messages (this is done in the doPost method): – Extract the Success URL from the incoming message (URL parameter). – Read the incoming XFDL form. – Extract the ID of the instance from the form. – Extract the assigned data instance from the XFDL file using the Forms API. – Read the custom target parameters. (XFDLID is the key to search for a related request document in the target database.) – Prepare the XML stream for the DXLImporter for document creation/update with the extracted data instance. – Run the DXLImporter to create/update the request document. – Store the received XFDL file to the just-created/updated request document as an attachment. – Submit the Success URL to the browser. Receive GET messages (for debug purposes only). The doGet method submits the settings read from the servlet.properties file rendered in an HTML page. Chapter 9. Lotus Domino integration 553 The full servlet code is given in Example 9-20. For details see the in-line comments. Example 9-20 Listing of full servlet code /** * @version 1.0 * @author Cees Vandewoude, Andreas Richter * @comment Improved simple servlet version for IBM Workplace Forms 2.6.1 Integeration * Redbook */ import import import import import java.io.*; javax.servlet.*; javax.servlet.http.*; lotus.domino.*; java.util.Vector; import import import import import import import com.PureEdge.DTK; com.PureEdge.xfdl.FormNodeP; com.PureEdge.xfdl.XFDL; com.PureEdge.IFSUserData; com.PureEdge.IFSUserDataHolder; com.PureEdge.error.UWIException; com.PureEdge.IFSSingleton; public class ProcessXFDL extends javax.servlet.http.HttpServlet implements javax.servlet.Servlet { // field to store the request String targetField; // file name for the created attachment containing the POST data String fileName; // debug mode (will print to console, if set to "on" static String debugMode; // content type for incoming message. Will be assigned to the mime entity String contentType; // username to create domino session and access target database String userName; String password; // servlet name static String sv; //Custom value for flag parameter in .readForm API call private static final int READFORM_XFORMS_INIT_ONLY = (XFDL.UFL_SERVER_SPEED_FLAGS & (~XFDL.UFL_XFORMS_OFF) | XFDL.UFL_XFORMS_INITIALIZE_ONLY); public void init(ServletConfig config) { // Read servlet configuration parameters try { super.init(config); sv = this.getClass().getName(); //read values from servlets.properties debugMode = config.getInitParameter("debugMode"); if (debugMode == null) 554 IBM Workplace Forms 2.6: Guide to Building and Integrating a Sample Workplace Forms Application debugMode = "on"; if (!(debugMode.equals("on"))) debugMode = "off"; debugOut(" debugMode: '" + debugMode + "'"); targetField = config.getInitParameter("targetField"); if (targetField == null) targetField = "Body"; if (targetField.equals("")) targetField = "Body"; debugOut(" field name for request: '" + targetField + "'"); userName = config.getInitParameter("userName"); if (userName == null) userName = ""; debugOut(" userName: '" + userName + "'"); password = config.getInitParameter("password"); if (password == null) password = ""; debugOut(" password: '" + password + "'"); fileName = config.getInitParameter("fileName"); if (fileName == null) fileName = "post#ID#.txt"; if (fileName.equals("")) fileName = "post#ID#.txt"; debugOut(" file name for POST attachment: '" + fileName + "'"); contentType = config.getInitParameter("contentType"); if (contentType == null) contentType = "text/plain"; if (contentType.equals("")) contentType = "text/plain"; debugOut(" contentType for created attachment: '" + contentType + "'"); System.out.println(sv + " initialized"); } catch (javax.servlet.ServletException e) { e.printStackTrace(); } } public void doGet(HttpServletRequest request, HttpServletResponse response) { //this method is optional for basic servlet functionality in this // context. //we will return only some state information - this option is useful // for debugging try { response.setContentType("text/html"); PrintWriter out = response.getWriter(); out .print(sv + ": The url must be called with a POST action containing a valid XFDL document <BR>"); out .print("A GET request dies not accept any parameters and return the actual servlet state only <BR>"); out.print("<BR>"); Chapter 9. Lotus Domino integration 555 out.print("<BR>"); out.print("<H2>Servlet Status and Statistics Report" + "</H2>"); out.print("ServletClass: " + sv + "<BR>"); out .print("<H3>Session parameters currently set for this web service proxy servlet in servlets.properties</H3>"); out.println(" userName: '" + userName + "'" + "<BR>"); //out.println(" password: '" + password+ "'" + "<BR>"); out.println(" target field: '" + targetField + "'" + "<BR>"); out.println(" attachment file name: '" + fileName + "'" + "<BR>"); out.println(" content type: '" + contentType + "'" + "<BR>"); out.println(" debugMode: '" + debugMode + "'" + "<BR>"); } catch (IOException e) { // Something went wrong. e.printStackTrace(); } } public void doPost(HttpServletRequest request, HttpServletResponse response) throws IOException { // initi params for Forms API FormNodeP theForm = null; String dbPath=""; String dominoForm =""; String instanceID = ""; String nextUrl = ""; DxlImporter importer = null; // values from the calling url (parameters) // url to process, when the transaction is finished response.setContentType("text/html"); ServletOutputStream out = response.getOutputStream(); ServletInputStream theStream = request.getInputStream(); boolean isNew = true; //try to get the next url from the request for client redirection nextUrl = request.getParameter("url"); if (nextUrl == null) nextUrl = ""; debugOut(" next url: '" + nextUrl + "'"); out.println("<HTML><B>Submitting eform</B><BR>"); try { //Initialize Forms API DTK.initialize("WPForms 2.6.1 Integration Redbook", "1.0.0", "7.0.0"); XFDL theXFDL; theXFDL = IFSSingleton.getXFDL(); //get the form in a String debugOut(" read theForm"); // Load the form XFDL theXFDL = null; theXFDL = IFSSingleton.getXFDL(); p( "IFSSIngelton OK"); if(theXFDL == null) throw new Exception("Could not find interface"); try { FormNodeP theForm = theXFDL.readForm(str,READFORM_XFORMS_INIT_ONLY); 556 IBM Workplace Forms 2.6: Guide to Building and Integrating a Sample Workplace Forms Application } catch (UWIException e) { Object[] tokens = { (e.getStackTraceString()) }; String message = MessageFormat.format(pattern, tokens); p( "ERROR: " + message); p( e.toString()); NotesThread.stermThread(); } debugOut(" theForm created"); //get entire form as String String formString = getFormAsString(theForm); debugOut(" form stored to formString"); //here we can read additional xfdl elements like this // form=theForm.getLiteralByRefEx(null,"global.global.custom:dominoForm", // 0, null, null); //read xdfl form id to check, wether we already have the document // in the database String formID = theForm.getLiteralByRefEx(null, "global.global.custom:formid", 0, null, null); if (formID == null) formID = ""; debugOut(" Form ID from global.global.custom:formid: " + formID); if (formID.equals("")) { // may be we got an xforms enabled form -> //read all values from the ConfigurationInfo instance StringWriter sw = new StringWriter(); //try to extract an XForms instance (2.6 compatible) String inst = "instance('ConfigurationInfo')/"; formID = extracXFormstInstance(theForm, inst+"FormID", "FormID"); dbPath = extracXFormstInstance(theForm, inst+"DbPath", "DbPath"); dominoForm = extracXFormstInstance(theForm, inst+"DominoForm", "DominoForm"); instanceID = extracXFormstInstance(theForm, inst+"InstanceID", "InstanceID"); } else { //the form is not xforms enabled -> read the values from global.global section dbPath = theForm.getLiteralByRefEx(null, "global.global.custom:dbpath", 0, null, null); //get the form settings when a new document must be created dominoForm = theForm.getLiteralByRefEx(null, "global.global.custom:dominoform", 0, null, null); //get the data instance to extract data instanceID = theForm.getLiteralByRefEx(null, "global.global.custom:instanceid", 0, null, null); } debugOut("dbPath: "+ dbPath); if (dbPath == null) formID = ""; //ok no dbPath given - try current db if (formID == null) formID = ""; //ok no ID given - we can only insert a new doc debugOut(" Domino Form: " + dominoForm); if (instanceID == null) instanceID = ""; //ok no ID given - we can only insert a new doc Chapter 9. Lotus Domino integration 557 debugOut(" Instance ID: " + instanceID); //prepare piped streams to redirect xfdl data to inputstream PipedOutputStream po = new PipedOutputStream(); PipedInputStream pi = new PipedInputStream(po); //extract data instance from xfdl as stream try{ //try to extract XML instance (2.5 compatible) debugOut ("try extraxt xml instance: " + instanceID ); theForm.extractInstance(instanceID, null, null, po, 0, null, "[0]",null); debugOut(" xml data instance extracted"); } catch (UWIException euwi) { //ok - did not work (instance not found) -> try to extract an // XForms instance (2.6 compatible) try{ String strPath= "instance('" + instanceID + "')"; debugOut ("try extraxt XForms instance: " + strPath ); theForm.extractXFormsInstance(null, strPath ,false, true, null, po); debugOut(" xforms instance extracted"); } catch (UWIException euwi2) { //here we go, if nothing was found System.out.println("======================"); System.out.println("XML Error:"); System.out.println(euwi.getMessage()); System.out.println("XForms Error:"); System.out.println(euwi2.getMessage()); euwi2.printStackTrace(); System.out.println("======================"); out.println("<br>Unable to extract data<br><br>"); if (!nextUrl.equals("")) out.println("<a href=\"" + nextUrl+"\">Return to application home page</a>"); out.println("</body></html>"); return; } } po.flush(); //read extracted instance to String piStr String piStr = getString(pi); debugOut(" stream: " + piStr); //destroy form to free memory theForm.destroy(); debugOut(" form destroyed"); //OK - now we can analyse the extracted data and store the form in // a document try { //set up notes connection NotesThread.sinitThread(); Session s = NotesFactory.createSession(); debugOut(" Notes session created"); Database db = s.getDatabase(null, dbPath); View vw = null; Document doc = null; Document docAtt = null; debugOut(" Notes db found"); //get target db replica ID for DXLImporter String replID = db.getReplicaID(); 558 IBM Workplace Forms 2.6: Guide to Building and Integrating a Sample Workplace Forms Application //search for a document with the assigned formID in the // database String UNID = ""; if (!(formID.equals(""))) { vw = db.getView("AllByXfdlId"); //special server viey by // formID doc = vw.getDocumentByKey(formID, true); if (!(doc == null)) { //we have found a document -> update it UNID = doc.getUniversalID(); isNew = false; //first update the attachment - update after importer // action will destroy the field update createAttachment(doc, fileName, targetField, s, theStream, contentType); doc.save(true); } else { } } // prepare DXLImporter for field update Stream stream = s.createStream(); //createImporterXML composes an xml string for DXLImporter to // insert/update a doc debugOut(" import XML: " + createImporterXML(piStr, dominoForm, replID, UNID)); stream.write(createImporterXML(piStr, dominoForm, replID, UNID) .getBytes()); debugOut(" Stream filled"); importer = s.createDxlImporter(); //this will allow us to insert new documents, ib replica/UNID // does not match importer.setReplicaRequiredForReplaceOrUpdate(false); importer .setDocumentImportOption(DxlImporter.DXLIMPORTOPTION_UPDATE_ELSE_CREATE); debugOut(" DXLImporter created"); //process import / update importer.importDxl(stream, db); debugOut(" document imported/updated"); stream.close(); if (isNew) { //New doc -> find the new document and attach the xfdl file String id = importer.getFirstImportedNoteID(); debugOut(" first node requested: " + id); boolean found = false; docAtt = db.getDocumentByID(id); //may be we created multiple items //this can occure, if the extracted data instance was not OK while ((docAtt != null) && (found == false)) { if (docAtt.getItemValueString("Form").equals(dominoForm)) { found = true; } else { debugOut(" wrong form: " + docAtt.getItemValueString("Form")); id = importer.getNextImportedNoteID(id); debugOut(" next node requested: " + id); docAtt = null; Chapter 9. Lotus Domino integration 559 docAtt = db.getDocumentByID(id); } } } if (docAtt != null) { //Now attach the xfdl file, if we found a new doc debugOut(" node accessed: " + docAtt.getUniversalID()); createAttachment(docAtt, fileName, targetField, s, theStream, contentType); //store the formID to the document to find it for future updates docAtt.replaceItemValue("XFDLID", formID); //docAtt.computeWithForm(true, true); if (docAtt.save(true)) { //out.println("<br>New Document Saved"); //out.println("<br>Thanks for submitting this eform!"); out.println(getRespMessage(nextUrl) ); //doc.recycle(); } else { debugOut(" node not found."); out.println("<br>Unable to save document<br><br>"); if (!nextUrl.equals("")) out.println("<a href=\"" + nextUrl+"\">Return to application home page</a>"); out.println("</body></html>"); } }else { //out.println("<br>Updated Document Saved"); //out.println("<br>Thanks for submitting this eform!"); out.println(getRespMessage(nextUrl) ); } //docAtt.recycle(); vw.recycle(); db.recycle(); s.recycle(); } catch (Exception e) { System.out.println(e.getMessage()); out.println("<br>Runtime Error<br><br>"); out.println(e.getMessage()+"<br><br>"); if (!nextUrl.equals("")) out.println("<a href=\"" + nextUrl+"\">Return to application home page</a>"); out.println("</body></html>"); } } catch (Exception ex) { System.out.println(ex.getMessage()); ex.printStackTrace(); out.println("<br>Runtime Error<br><br>"); out.println(ex.getMessage()+"<br><br>"); if (!nextUrl.equals("")) out.println("<a href=\"" + nextUrl+"\">Return to application home page</a>"); out.println("</body></html>"); } finally { NotesThread.stermThread(); } 560 IBM Workplace Forms 2.6: Guide to Building and Integrating a Sample Workplace Forms Application } // end of method Post //support methods //read xdfl form from PormNodeP as String private static String getFormAsString(FormNodeP theForm) throws UWIException, IOException { ByteArrayOutputStream baos = new ByteArrayOutputStream(); theForm.writeForm(baos, null, 0); baos.flush(); return baos.toString(); } //search and replace Strings private static String replaceSubString(String inputString, String searchString, String replaceString) { int i = inputString.indexOf(searchString); if (i == -1) { return inputString; } String r = ""; r += inputString.substring(0, i) + replaceString; if (i + searchString.length() < inputString.length()) { r += replaceSubString(inputString.substring(i + searchString.length()), searchString, replaceString); } return r; } //creade an xml instance accepted for DXLImporter for insert and update private static String createImporterXML(String piStr, String form, String replID, String UNID) { //this is a quick and dirty code to transform a xfdl data instance //into an DXLImporter compatible xml fragment to insert/updat one dokument //string fragments not needed will set in comments. /* we get this (piStr): <FormOrderData xmlns="" xmlns:cm="http://www.PureEdge.com/idk/ibmcm/1.0" xmlns:custom="http://www.PureEdge.com/XFDL/Custom" xmlns:designer="http://www.PureEdge.com/Designer/6.1" xmlns:pecs="http://www.PureEdge.com/PECustomerService" xmlns:xfdl="http://www.PureEdge.com/XFDL/6.5" xmlns:xforms="http://www.w3.org/2003/xforms"> <ID>100032</ID> <CustomerID></CustomerID> <Amount>2184.00</Amount> <Discount>0</Discount> </FormOrderData> we will return thomething like this: <database version="7.0"> <document form='QuotationRequest' version='7.0' replicaid='C125712B00718095'> <noteinfo noteid='' unid='AFE0838101C7DB16C125713E00205F6F' sequence='' /> <!---> <item name="ID"><text>100032</text></item><!--ID"><text> --> <item name="CustomerID"><text></text></item><!--CustomerID"><text> --> Chapter 9. Lotus Domino integration 561 <item name="Amount"><text>2184.00</text></item><!--Amount"><text> --> <item name="Discount"><text>0</text></item><!--Discount"><text> --> </document> </database> A better method for this would be an XSLT transformation */ //<database> tag String s1 = "<database version=\"7.0\">"; //<document> tag - mandatory use ' - not " as string quotes !!!!!!!!!!!!!!!!!!!!!!!!!!!!!!! //assign the correct db replica id for document update! s1 = s1 + "<document form='" + form + "' version='7.0' replicaid='" + replID + "'>"; //<noteInfo> tag - mandatory use ' - not " as string quotes !!!!!!!!!!!!!!!!!!!!!!!!!!!!!!! //assign the correctdocument UNID id for document update! s1 = s1 + "<noteinfo noteid='' unid='" + UNID + "' sequence='' />"; //comment tag - necessary because in item elements we will begin with "-->" s1 = s1 + "<!--"; //preconfigure end tags String s2 = "--></document></database>"; String instanceXML = piStr; //first - stripe data instance tag / end tag instanceXML = instanceXML.substring(instanceXML.indexOf(">") + 1, instanceXML.length()); instanceXML = instanceXML.substring(0, instanceXML.lastIndexOf("</")); //replace all element end tag brackets </ wih "#endtag1#" instanceXML = replaceSubString(instanceXML, "</", "#endtag1#"); //replace all element brackets > wih "#endtag1#" instanceXML = replaceSubString(instanceXML, ">", "#endtag2#"); //replace all begin brackets < with "--><item name=\"" instanceXML = replaceSubString(instanceXML, "<", "--><item name=\""); //replace all former brackets > with "\"><text>" instanceXML = replaceSubString(instanceXML, "#endtag2#", "\"><text>"); //replace all former end tags </ with "</text></item><!--" instanceXML = replaceSubString(instanceXML, "#endtag1#", "</text></item><!--"); //now ad begin and end tags for database / document instanceXML = s1 + instanceXML + s2; return instanceXML; } //read an input stream to a String private static String getString(PipedInputStream pi) { String piStr = ""; //this will work only for short sring (< 2048 bytes) //longer Strings must be read in a loop try { int rest = 0; byte[] b = new byte[2048]; rest = pi.read(b, 0, 2048); piStr = new String(b); } catch (java.io.IOException e) { e.printStackTrace(); } 562 IBM Workplace Forms 2.6: Guide to Building and Integrating a Sample Workplace Forms Application return piStr; } //create an attachment in a notes document as mime type private static void createAttachment(Document docAtt, String fileName, String targetField, Session session, ServletInputStream servletin, String contentType) throws IOException{ try { servletin.reset(); //make sure, we read full post //Create mime entity // Do not convert MIME to rich text session.setConvertMIME(false); boolean isNew = true; Stream stream = session.createStream(); MIMEEntity body = null; MIMEHeader header = null; // Create parent entity if new doc if (!(docAtt.hasItem(targetField))) { body = docAtt.createMIMEEntity(targetField); header = body.createHeader("Content-Type"); header.setHeaderVal("multipart/mixed"); } else { try { body = docAtt.getMIMEEntity(targetField); header = body.getNthHeader("Content-Type", 1); isNew = false; } catch (Exception em){ // seams not a mime type item -> delete the field and create a mimetype docAtt.removeItem(targetField); body = docAtt.createMIMEEntity(targetField); header = body.createHeader("Content-Type"); header.setHeaderVal("multipart/mixed"); } } //transfer xfdl document into a buffer document int readCounter = 1; byte[] b = new byte[2048]; byte[] bEnd; int numberOfBytesRead = 0; while ((numberOfBytesRead = servletin.read(b, 0, b.length)) != -1) { if (numberOfBytesRead != 2048) {//last part of the message // truncate the buffe after end // of request byte[] bTrunc = new byte[numberOfBytesRead]; for (int i = 0; i < numberOfBytesRead; i++) bTrunc[i] = b[i]; stream.write(bTrunc); } else stream.write(b); readCounter++; } // we will close the stream later on, when all data is processed servletin.reset(); //prepare stream to write into mime entity stream.setPosition(0); //set pointer at the first character/byte Chapter 9. Lotus Domino integration 563 body.setContentFromBytes(stream, contentType, MIMEEntity.ENC_NONE); body.decodeContent(); //now care about file name and other header values String currFileName = fileName; //create file name if (currFileName.indexOf("#ID#") > -1) { java.text.SimpleDateFormat formatter = new java.text.SimpleDateFormat( "yyyy-MM-dd-HH-mm-ss-SSS"); java.util.Date currentTime = new java.util.Date(); String dateString = formatter.format(currentTime); currFileName = currFileName.substring(0, currFileName .indexOf("#ID#")) + dateString + currFileName.substring( currFileName.indexOf("#ID#") + 4, currFileName .length()); dateString = ""; } //write headers if (isNew) { //new -> create headers and set header = body.createHeader("Content-Disposition"); header.setHeaderVal("attachment; filename=" + currFileName); header = body.createHeader("Content-ID"); header.setHeaderVal(currFileName); } else { //update -> get headers and set new file name header = body.getNthHeader("Content-Disposition", 1); header.setHeaderVal("attachment; filename=" + currFileName); header = body.getNthHeader("Content-ID"); header.setHeaderVal(currFileName); } //close the request and save request document docAtt.closeMIMEEntities(true, targetField); stream.close(); docAtt.save(true, true); debugOut("attachment created: " + currFileName); //now clean up request objects and call the agent with the request // doc as context body.recycle(); session.setConvertMIME(true); } catch (lotus.domino.NotesException en) { en.printStackTrace(); } catch (java.io.IOException ei) { ei.printStackTrace(); } } //write a trace lne, if debug mode in on static void debugOut(String str) { if (debugMode.equals("on")) { System.out.println(sv + ": " + str); } } 564 IBM Workplace Forms 2.6: Guide to Building and Integrating a Sample Workplace Forms Application //compose a response message, if there are no errors. //if the call had an url= parameter, redirect to this url static String getRespMessage(String nextUrl) { String respMessage = ""; if (nextUrl.equals("")) { respMessage = "<html><h2>Document processed</h2><B></html>"; } else { respMessage = "<html><head>"; respMessage = respMessage + "<script language=\"JavaScript\">"; respMessage = respMessage +"open(\"" + nextUrl+"\",\"\");"; respMessage = respMessage + "self.focus();self.close();"; respMessage = respMessage + "</script>"; respMessage = respMessage + "</head><body></body></html>"; respMessage = "<html><head></head><body>"; respMessage = respMessage + "<form name=\"f\" action=\"" + nextUrl + "\" method=get></form>"; respMessage = respMessage +"<script language=\"JavaScript\">function s(){document.f.submit();}window.setTimeout(\"s()\",10);</script>"; respMessage = respMessage + "<a href=\"javascript:subm()\">please click here if forwarding does not work in your browser</a>"; respMessage = respMessage + "</body></html>"; } return respMessage; } static String extracXFormstInstance(FormNodeP theForm, String strPath, String element){ String ret = ""; StringWriter sw = new StringWriter(); debugOut ("try extraxt XForms instance: " + strPath +""); try{ theForm.extractXFormsInstance(null, strPath ,false, true, null, sw); ret = sw.toString(); debugOut("Element found: " + ret); ret = getElement(ret, element); } catch (UWIException euwi) {debugOut("Element not found: " + strPath);} return ret; } static String getElement(String xmlin, String elementName){ String xml = xmlin; xml = xml.substring(1,xml.indexOf("</"+elementName+">")); xml = xml.substring(xml.lastIndexOf(">")+1, xml.length()); return xml; } } // end of class The servlet version above must run on a Domino server, since it does not connect remotely to the server. Chapter 9. Lotus Domino integration 565 For connecting remotely to a Domino server, such as using WebSphere Application Server (WAS) as a servlet engine, the Domino session can be initiated as Example 9-21. Example 9-21 Initiating the Domino session //open Domino session //ORBServer is the name of a Domino Server running DIIOP task //if ORBServer is empty we assume we are running on a Domino sever //dbServer is the server name, whete the target db is located //if have additional settings in servlet.properties file for //ORBServer, dbServer, userName and password try { NotesThread.sinitThread(); //very importand - without this all concurrent running sessions will mix up //their domino objects .... if (ORBServer.equals("") || ORBServer.equals("localhost")) { //local session without DIIOP errorMessageDetail = "Error creating local Domino session (may be username or password in” + “servlets.properties not valid)"; session = NotesFactory.createSession("",userName, password); } else { //remote session using DIIOP errorMessageDetail = "Error creating remote Domino session over DIIOP. ORBServer: '" + ORBServer + "' (may be ORBServer, username or password in servlets.properties not valid)"; session = NotesFactory.createSession(ORBServer,userName, password); } if (debugMode.equals("on")) {System.out.println("SID: " + String.valueOf(sessionCallId) + " " + "2. Domino session created - read request message");} if (dbServer.equals("") || dbServer.equals("localhost")) {//get the target databas errorMessageDetail = "target database on localhost not found (insuffitient rights or dbPath in servlets.properties not valid)"; db = session.getDatabase(null, dbPath);} else { errorMessageDetail = "target database on server '" + dbServer + "' not opened (insuffitient rights or dbPath in servlets.properties not valid)"; db = session.getDatabase(dbServer, dbPath);} ..... } catch ( lotus.domino.NotesException en){ en.printStackTrace(); errorMessageText ="ERROR: " + en.id + "ErrorMessage: " + en.text; } finally { NotesThread.stermThread(); } 566 IBM Workplace Forms 2.6: Guide to Building and Integrating a Sample Workplace Forms Application Servlet deployment To deploy the servlet (see Example 9-22), we have to complete three tasks: 1. Compile the servlet into a ProcessXFDL.class file. 2. Copy the class file to the <DominoDataRoot>/Domino/Servlets directory. 3. Copy the following servlets.properties file, as shown in Example 9-22, to the <DominoDataRoot> directory. Example 9-22 The servlet.properties file in Domino server data root ############## beginning of servlets.properties ###################### #assign an alias for each different servlet behavior: servlet.XFDLServlet.code=ProcessXFDL ############## begin Domino Integration servlet parameters###################### #set a behavior for the servlet using the following parameters # specify the following parameters # paramexampledescription # targetFieldname of the target field to create the request file attachment. # This attachment contains the complete POST request data # body Create the attachment in Body field # <empty>if no value is assigned, the field name is "body" # # fileNamespecify any valid file name for the created attachment # place #ID# in the name where a unique ID should be added. # request.txt # incomingPO#ID#.xfdl # # contentTypecontent type for the stored attachment. # Specify and valid content type for mime types # text/plainPlain text # text/xmlxml # text/htmlhtml page # application/xmlxml document # # debugModewill cause the servlet to print debug messages in system console if set to 'on' # on print trace messages # off do not print trace messages # # usernameUsername of a technical user, who can update all relevant documents during value extraction process # # passwordhttp password for this user # process an incoming xfdl (Workplace Forms) document calling a post processing agent (processPO) #anonymous access to the database (no username/password) #generate a standard html return message or open a specified url if url= parameter is set in the post action (no response field declared) servlet.XFDLServlet.initArgs ORBServer=localhost,\ userName=,\ password=,\ targetField=Body,\ fileName=PO#ID#.xfdl,\ contentType=application/xfdl,\ deleteReqDocs=0,\ debugMode=on,\ respMessageType=html Chapter 9. Lotus Domino integration 567 ############## end of servlets.properties ####################### After making changes to the servlet.properties file or the deployed RenderXFDL.class file, the Domino HTTP task must be restarted. On the server console, enter: tell HTTP restart Now we describe the next component to build — the new QuotationRequest form. QuotationRequest form and corresponding views This form should contain a body field to store the submitted XFDL form (named Body, as defined in the servlet.properties file) and some fields containing the detail data extracted from the XFDL form. The field names must match exactly the element names in the extracted data instance (Example 9-23). Example 9-23 Data instance FormOrderData to extract into the request document <xforms:instance id="FormOrderData" xmlns=""> <FormOrderData> <ID></ID> <CustomerID></CustomerID> <Amount></Amount> <Discount></Discount> <SubmitterID></SubmitterID> <State>1</State> <CreationDate></CreationDate> <CompletionDate></CompletionDate> <Owner></Owner> <Version>0</Version> <Approver1></Approver1> <AppovalDate1></AppovalDate1> <Approver1Comment></Approver1Comment> <Approver2></Approver2> <AppovalDate2></AppovalDate2> <Approver2Comment></Approver2Comment> <Cost></Cost> </FormOrderData> </xforms:instance>a> DXLImporter creates all these fields in the request document. Nevertheless, we only design some of them in the form. 568 IBM Workplace Forms 2.6: Guide to Building and Integrating a Sample Workplace Forms Application Create a form in the template DB named QuotationRequest (as defined in the servlets.properties file) and create the necessary fields. The form should look as shown in Figure 9-38. Figure 9-38 Form QuotationRequest To prevent caching in the browser, insert the following code in the form’s HTML header content (Example 9-24). Save the form. Example 9-24 HTML header code preventing IE6 from caching old content "<META HTTP-EQUIV=\"Pragma\" CONTENT=\"no-cache\">"+ "<META HTTP-EQUIV=\"Expires\" CONTENT=\"-1\">" Create a maintenance view, Quotation Requests (All), for the forms, as shown in Figure 9-39. Figure 9-39 Maintenance view for all request documents There are no special requirements for this view. Make one column appear as a link in the browser. Chapter 9. Lotus Domino integration 569 Assign the selection formula: SELECT Form="QuotationRequest" Save the view. Next make three copies of the view and change view title and selection formula as follows (Table 9-8). Table 9-8 Additional quotation requests corresponding to workflow state View title Selection formula Quotation requests (completed) SELECT Form="QuotationRequest" & State = "4" Quotation requests (manager’s approval) SELECT Form="QuotationRequest" & State = "2" Quotation requests (director’s approval) SELECT Form="QuotationRequest" & State = "3" Next we create a lookup view to find the request documents related to the incoming XFDL form. Form lookup view To create a form-independent relationship between an incoming XFDL form and related documents in a Notes database, we need corresponding unique keys in both the Notes document and the XFDL form. It is a good idea to create in each form template a data item containing a unique identifier. This value can be set, for example, when creating new documents from a template. In our scenario, we have a unique order number. We use this order number as this identifier. We can use any other unique identifier as well. Make sure that all incoming XFDL forms to the servlet have the same ID only, when they are related to the same business object. The lookup view to create is simple. Use the following parameters to create the view: View Name: AllByXfdlId (This name is hard coded in the servlet.) Selection Formula: SELECT @Trim(XFDLID) != "" First Column: Field XFDLID, sorted case insensitive Second Column: Formula @Text(@DocumentUniqueID) Compare the related XForms instance element used in the XFDL form. This element is bound to the order number items and receives the value when the order number is applied (Example 9-25). Example 9-25 Element <FormID> in the ConfigurationInfo instance <!-- Form Configuration Parameters --> <xforms:instance id="ConfigurationInfo" xmlns=""> <ConfigurationInfo> <XFDLSubmissionURL>http://vmforms261.......</XFDLSubmissionURL> <XFormsSubmissionURL>http://vmforms.........</XFormsSubmissionURL> <FormID>DBD81B45138A8CC2C125724000101DEF</FormID> <DbPath>forms\wpforms.nsf</DbPath> <DominoForm>QuotationRequest</DominoForm> <InstanceID>FormOrderData</InstanceID> </ConfigurationInfo> </xforms:instance>--> 570 IBM Workplace Forms 2.6: Guide to Building and Integrating a Sample Workplace Forms Application Attention: To utilize the demo application and the created submission servlet with non-XForms XFDL form as well, we look for an XFDL element at the path global.global.custom:formid if we recognize that the processed form is not XForms enabled. Having the form and views in place and the servlet/servlets.properties file deployed on the server, restart the HTTP task and see how it works. Submitting the XFDL form in the Domino environment Perform the following tests. First test Hit the servlet. From your browser, enter: http://vmforms261.cam.itso.ibm.com/servlet/XFDLServlet The following panel should appear (Figure 9-40). Figure 9-40 Servlet test with a GET request displays available settings Next test Create a new quotation request, enter data, and submit it. These are the check points to look for: The order number must be set, and employee data must be filled (prepopulation running). When clicking customer choices or item selection there must be choices available (XForms submissions running, target URLs for the submissions successfully changed by text parsing). When selecting a customer and an item detail, data must appear (detail data XForms submissions running and matching created data instances) Sign the document and remember the order number (make a note of it for reference). Chapter 9. Lotus Domino integration 571 Submit it. The Domino log should show a lot of trace lines related to the form submission (Example 9-26). Example 9-26 Trace lines in Domino log on XFDL form submit 03/31/2006 05:55:00 PM HTTP JVM: ProcessXFDL: next url: 'http://vmforms261.cam.itso.ibm.com/forms/WPForms.nsf' 03/31/2006 05:55:02 PM HTTP JVM: ProcessXFDL: theForm created 03/31/2006 05:55:02 PM HTTP JVM: ProcessXFDL: form stored to formString 03/31/2006 05:55:02 PM HTTP JVM: ProcessXFDL: Form ID: 100103 03/31/2006 05:55:02 PM HTTP JVM: ProcessXFDL: data instance extracted 03/31/2006 05:55:02 PM HTTP JVM: ProcessXFDL: stream: <FormOrderData xmlns="" xmlns:cm="http://www.PureEdge.com/idk/ibmcm/1.0" xmlns:custom="http://www.PureEdge.com/XFDL/Custom" xmlns:designer="http://www.PureEdge.com/Designer/6.1" xmlns:pecs="http://www.PureEdge.com/PECustomerService" xmlns:xfdl="http://www.PureEdge.com/XFDL/6.5" xmlns:xforms="http://www.w3.org/2003/xforms"> <ID>100103</ID> <CustomerID>100003</CustomerID> <Amount>150.00</Amount> <Discount>0</Discount> <SubmitterID>1010</S 03/31/2006 05:55:03 PM HTTP JVM: ProcessXFDL: form destroyed 03/31/2006 05:55:03 PM HTTP JVM: ProcessXFDL: Notes session created 03/31/2006 05:55:03 PM HTTP JVM: ProcessXFDL: Notes db found 03/31/2006 05:55:03 PM HTTP JVM: ProcessXFDL: import XML: <database version="7.0"><document form='QuotationRequest' version='7.0' replicaid='8825714100620266'><noteinfo noteid='' unid='' sequence='' /><!---><item name="ID"><text>100103</text></item><!--ID"><text> --><item name="CustomerID"><text>100003</text></item><!--CustomerID"><text> --><item name="Amount"><text>150.00</text></item><!--Amount"><text> --><item name="Discount"><text>0</text></item><!--Discount"><text> --><item name="Su 03/31/2006 05:55:03 PM HTTP JVM: ProcessXFDL: Stream filled 03/31/2006 05:55:03 PM HTTP JVM: ProcessXFDL: DXLImporter created 03/31/2006 05:55:03 PM HTTP JVM: ProcessXFDL: document imported/updated 03/31/2006 05:55:03 PM HTTP JVM: ProcessXFDL: first node requested: 99A 03/31/2006 05:55:03 PM HTTP JVM: ProcessXFDL: node accessed: 45EA41465C22294588257143000A88A4 03/31/2006 05:55:03 PM HTTP JVM: ProcessXFDL: attachment created: Request2006-03-31-17-55-03-641.xfdl The available views should be displayed as response pages. Navigate to the Quotation Requests (All) view. 572 IBM Workplace Forms 2.6: Guide to Building and Integrating a Sample Workplace Forms Application Find the document with the order number, and open it (Figure 9-41). Figure 9-41 New created request document 9.7 Scenario 2 - integrating Forms Viewer with Notes Client overview and objective Integrating Workplace Forms with the Notes client by using the Forms Viewer is covered in scenario 2. In Appendix D, “Additional material” on page 693, we have a Notes database that contains several integration techniques for Workplace Forms documents with the Notes client. There can be many reasons to integrate Forms and Domino using the Notes Client in contrast to the browser scenario that we do in scenario 1: Notes client integration makes it possible to use Forms in any offline scenario with distributed databases and data replication. This utilizes the strengths of both products in a best manner for customers using Notes client-based applications. The base application may not be Web enabled at all. Web enabling complex Notes applications just for Forms integration is, in most cases, not the way to go because of development costs, the completely changed end-user experience, and the high risk of necessary application migrations. In environments where we use Forms in a Domino-based application without having the Viewer installed on the end-user desktops, Notes client integration makes it possible to work with Forms by using the Webform Server. This use case is the subject of the third scenario. Attention: For the Notes client integration, we simply add an agent, a script library, a button, and code to a script event of the form, which can be done by inserting a generic subform. This way, we can Forms-enable nearly every Notes application without taking high risks, and minimizing the work effort involved. Chapter 9. Lotus Domino integration 573 For now, we discuss the Notes client/Forms Viewer integration on the desktop. There are different aspects of the Notes client integration with the Forms Viewer that we explore: Various initiation techniques (on document open, or using a Notes button) Different technologies used to prepopulate/extract data (using LotusScript, using Forms Java API with a Java agent or LS2J or in a servlet, and so on) Different Notes client behavior (locked or released Notes client during work in the Forms Viewer) There are also various permutations of scenarios for this type of integration. In this book we focus on the following scenarios: Use case 2.1 - Notes client locked during Forms handling, working from a local replica or server based of the Notes database using LotusScript for prepopulation via data extraction Use case 2.2 - Notes client released during Forms handling, working from a local or server based replica of the Notes database using LotusScript for prepopulation via data extraction Use case 2.3 - Notes client locking or released during Forms handling, working from a local or server based replica of the Notes database using Java API for prepopulation via data extraction All of these use cases are built on top of the created Forms integration use case for the Web-enabled application in the previous chapter (scenario 1). We use the same template and QuotationRequest form to store XFDL files and the corresponding metadata. Even the created Forms integration framework (four Instances to prepopulate, one instance to extract data) are unchanged. For the end user (who in some cases will probably be the Forms developer), we see in these use cases one significant difference. Since we are potentially operating offline, the integration cannot use any submissions to the server. Therefore, we use the file system to submit completed forms. The form design should relate to this and offer a Save button to the end user rather than a Submit button (pr a button named Submit that processes a save and close). For these scenarios, we close the Viewer. It asks the end user to save the changes in the form the same way as, for example, operation in a text editor. Important: In the form used for this book, we do not hide or manipulate the Submit button in the form. We do not make use of it in the Notes client. However, we preserve the button in the Designer so that it can be used in use cases that will need submit buttons. 574 IBM Workplace Forms 2.6: Guide to Building and Integrating a Sample Workplace Forms Application 9.8 Scenario 2 - environment overview Scenario 2 covers all Notes Client related use cases that use the Forms Viewer to work in the form and no server components. This scenario covers use cases where we can go totally offline (assuming that the form does not need any communication to external data sources such as Web services or XForms submission services). See Figure 9-42. Browser Client + Viewer Plug-in Notes Client Open Notes Document Detach XFDL to FileSystem Release Notes Client Close Notes Document Prepop Type ? Prepop Java No Client Lock Release Notes Client (Documents remain open) (Wait for document close) Domino Server (Web-enabled DB) Render XFDL as embedded HTML + Create instances for Prepopulation Open Browser with upload page Close Doc Client mode ? Lock Notes Client Save XFDL File and reattach to Notes Document Extract Values (Java or LotusScript) No Uploader Application Upload XFDL to server Open Viewer On XFDL File Edit Form in Browser rendered by WebForm Server Submit XFDL to Domino Servlet Send XFDL to Domino Servlet Edit the Form In Browser Plugin Submit XFDL To Domino Servlet WAS 6.0 Reattach XFDL and Extract values (Java API) On Document close reattach XFDL and Extract values (Java or LotusScript) No locked Client Legend: Use Viewer? Prepop LotusSrcipt Open Viewer On XFDL File Lock Client Open Viewer On XFDL File, Edit Form Save to File System Yes Unlock Notes Client Domino Server (Servlet Engine) Save Notes Document Locally or to Domino Server Locked Client HTTP Submit Webform Server Embedded XFDL Notes Client Activity WebSphere App Server Activity Form Access (Prepop/Data Extr.) Domino Server Activity Forms Viewer / Server Activity HTTP Activity Browser Client Activity Figure 9-42 Domino environment use case overview - building scenario 2 (Notes Client and Forms Viewer integration) The diagram on Figure 9-42 shows how we explore multiple code streams. They are all based on a common form life cycle, but used in three decision points that lead to different solutions. The decisions to make are: How to proceed in the Notes client when a user is editing a form. The different solutions presented below comprise the three use cases: – Locked client - The user must finish the work in the Viewer before he can continue work in the Notes client). This use case is designed to work in local Notes Clients as in server-based databases. Chapter 9. Lotus Domino integration 575 – No locked client - The user can, in parallel, work in the Notes client and in the Forms Viewer. When the user closes the Notes document, the user is asked to finish the work in the form to include the results into the closing document. This use case works offline and online. – The document is closed right after opening the form - The user can work on both the Notes client and the Viewer. The form is not updated by the Notes client when the work is finished, but by a servlet on the server processing the HTTP submission. This use case works online only. We discuss this use case in scenario 3. What techniques can we use for form prepopulation and value extraction? – Use Java API (requires the Forms API instantiation in the Notes client). – Use LotusScript (no additional installation in Notes Client, but no support for compressed forms, signature validation, and other advanced API features). 9.8.1 Client prerequisites The Workplace Forms Viewer must be installed and registered in the Windows registry. Notes client 6.x or 7.x installed. Workplace Forms Java API installed in Notes client. 9.8.2 Server prerequisites To make it work in a strictly offline context, make sure that the provided forms do not require network connection, for example, using Web services or submissions to other applications. The XFDL form built for the J2EE Stage 1 chapter (standalone form) fits this prerequisite. Using the XFDL form from the J2EE scenario stage 2 chapter, we can operate locally on the database, but the Domino server serving the XForms submissions must be available. The databases (template database and repository database) can be stored on the server or the client. The path to the template database must match the paths used in the prepopulation tabs of the sample form (see the @formula for the employee data prepopulation) and the parameter document for the XFormsSubmission URL (stage 2 form only). Note: The scenario 2 and 3 integration techniques are based on the storage of the form as a file attachment (and not an OLE object) in a rich text field of a Notes document — the same way as for the Web client scenario (scenario 1) that we already explored. This allows for the secure long-term storage of the form (as we will always be able to open/detach an attachment, independent of operating system and version of the Notes client). 9.9 Scenario 2 - setting up the Domino environment The following sections highlight the necessary steps for setting up the Domino environment. 9.9.1 Client installation The following steps illustrate what needs to be done to set up a client machine for the various implementations of scenario 2: 1. Install Lotus Notes on the client machine (either Version 6.x or 7.x) or to the Domino server. 2. Install the Workplace Forms Viewer V2.6.1 on the client machine. 576 IBM Workplace Forms 2.6: Guide to Building and Integrating a Sample Workplace Forms Application 3. Install the Workplace Forms API Version 2.6.1 (which is included in the IBM Workplace Forms Server installation package), as recommended in the product documentation, on the client machine. 4. Make the Form API available to the Notes Client. – Copy the jar files from the Workplace Forms API to the <NotesProgramDir>\jvm\lib\ext directory, where <NotesProgramDir> is usually c:\notes. This ensures that Notes will find the files. The the jar files that should be copied are: • • • • pw_api.jar uiw_api.jar pw_api_native.jar uiw_api_native.jar OR – Ensure that the notes.ini file contains the following entry (adjust the path to your Forms API installation path): JavaUserClasses=c:\WIN2K\system32\PureEdge\70\java\classes\pe_api.jar;c:\WIN 2K\system32\PureEdge\70\java\classes\uwi_api.jar; 5. Copy the Notes database to the data directory of the Notes client or create local replicas. 6. Sign the database with a trusted Notes user ID. 7. To test that the client setup is correct, open the Notes database from the Notes client and check the examples, as shown in later sections. 9.9.2 Server installation The following steps illustrate what needs to be done to set up the server machine for the various implementations of the scenario 2 XFDL form for using the server as an XForms submission service. 1. Install Domino Server Version 6.x or 7.x on the server machine. 2. Activate HTTP and the Domino Servlet Engine on the server machine. 3. Copy the Repository Notes database to the server data directory, forms subdirectory. 4. Open the template database (either on the client or the server) and go to the Parameter view. Adjust the parameters for the XForms submission URL to your environment. (The server name should reflect the name of the current server. All other settings can stay unchanged. Double-check the path to the Notes database.) 5. Ensure that the XForms submission agent in the repository database has sufficient rights to run. 6. Restart the Domino server and make sure that the HTTP and servlet engines are running. 7. To test that the server setup is correct, enter the following URL on a browser on a client machine: http://<yourserver>/forms/wpformsrep.nsf/XFormsSubmission Chapter 9. Lotus Domino integration 577 The page shown in Figure 9-43 should appear. Figure 9-43 XFormsSubmission agent response to the test URL 9.10 Scenario 2 - Domino development The following sections are the outlines of the implementation of each scenario that we cover in scenario 2. By implementing the three use cases in this scenario, we cover the following topics: Different initiation techniques Different technologies used to prepopulate and extract data Different client behavior 578 IBM Workplace Forms 2.6: Guide to Building and Integrating a Sample Workplace Forms Application 9.10.1 Scenario 2.1 - local form handling with Viewer and Lotus script, with Notes client locked All the points in the outline are handled by the code behind the use case 2.1 buttons in the template form and the QuotationRequest form, unless otherwise indicated. We plan to create the following life cycle for the XFDL file stored in the document, when a user opens a document containing an XFDL form as attachment, as shown in Figure 9-44. Notes Client Template Database Repository Database Form Templates Prepopulation Employee Data 3 Submitted Forms + Extracted Data Open Notes Document 1 Save Notes Document 8 Employee Data Customer Data Product Data XForms Submissions for Product Data, Customer Data 5 Local File System Notes Client Detach/ prepopulate 2 2 7 Reattach & extract Edit Form in Forms Viewer 4 6 Save & close Figure 9-44 Notes document/XFDL form life cycle in Notes Client/Viewer integration Figure 9-45 on page 580 shows: 1. The user opens the Notes document and clicks the CreateNewFromTemplate... (Use case 2.1) or Edit Attachment - Scenario 2.1 button. 2. The attached XFDL file is detached to a temp directory on the client machine, and the Notes client is locked. 3. The prepopulation of the detached XFDL file is performed using the LotusScript script library. 4. The installation path of the Forms Viewer is detected, and the Viewer is activated and opens the XFDL file in the local file system. 5. The user can now edit the XFDL file in the Viewer. If XForms submissions or Web services are used in the form, the corresponding server is connected. The Notes client is locked all the time, which ensures that the user does not close the related Notes document in the meantime or close down the entire Notes client. 6. Closing the Viewer (do not use the Submit button, use the Save button in the Viewer icon tray or close the Viewer and when prompted to say, choose Yes), the new version of the XFDL file is saved to file system, and control goes back to the Notes client. Chapter 9. Lotus Domino integration 579 7. Once control is given back to the Notes client, the script running on the client side extracts the data from the saved XDFL file in the file system using the LotusScript code and saves the extracted data to the current Notes document. The saved XFDL is re-attached to the Notes document. Control is passed back to the Notes Client (which unlocks the client in the process). 8. The user can now save the new document to the database. Attention: For the New from Template use case, there is one additional step in the button that creates a new Notes document from the template including the attached empty XFDL template. The additional step is to close the template document and to open the newly created QuotationRequest document. The XFDL is detached from the new document here, not from the template. Attention: Keep in mind that when composing a new form from the template, the Notes document is stored in one of the QuotationRequest views, as shown in Figure 9-47 on page 581, and not in the template view. To inspect the saved document, navigate to one of these views. We now go into detail and explore the code behind the attachment handling, prepopulation, and data extraction of the XFDL file for scenario 2.1. There is a substantial amount of code behind this use case that needs to be created. Please refer to Appendix D, “Additional material” on page 693, to download the Notes database to inspect the code in detail. In this section we highlight the most important code fragments only. Scenario 2.1 - Initiating button The initiating button in the template form processes three tasks: Displays a message box about the detailed tasks processed in this use case to set focus on what functionality we are actually exploring, as shown in Figure 9-45. Creates a new copy of the currently opened document, as shown in Figure 9-46 on page 581. Calls the universal XFDL processing routine with the parameters that fit the current use case. Figure 9-45 Button NewFromTemplate in scenario 2.1 and the displayed message box 580 IBM Workplace Forms 2.6: Guide to Building and Integrating a Sample Workplace Forms Application Figure 9-46 The XFDL file stored on local file system opened in the Forms Viewer Figure 9-47 View showing all quotation requests - new requests are added at the bottom Example 9-27 LotusScript code activated by the NewFromTemplate button Sub Click(Source As Button) isFirstOpen = True 'evaluate all prepopulation settings for first open prepopType = "LotusScript" Dim message As String message = "Local form handling ..... .......... Messagebox message,,"Working on XFDL Form Use case 2.1 - Scenario overview" Chapter 9. Lotus Domino integration 581 Dim newDoc As NotesDocument Set newDoc = client_NewFromTemplate() 'client_openXFDLForm(Byval attachmentFieldName As String, prepopType As String, documentHandling As String, useServer As Boolean, docIn As NotesDocument) Call client_openXFDLForm("Body", prepopType, "edit", False, newDoc) End Sub Any called procedures are contained in the script library LibFormsIntegration. Table 9-9 gives the descriptions of the top-level routines called from the user interface. Table 9-9 Main functions called to edit an XFDL attachment 582 Function Description client_NewFromTemplate Functionality: Creates a new Notes document based on the opened template document (called in the template button only, not on subsequent form edits to a filled form). In the new document, the unique IDs of the used template and the own unique ID are stored. All fields are copied from the template to the document. This should be changed for a production implementation (process a clean up) returns a handle to the new document. Parameters - none. IBM Workplace Forms 2.6: Guide to Building and Integrating a Sample Workplace Forms Application Function Description client_openXFDLForm Functionality: Offers a choice list of file attachments (XFDL files) contained in the rich text field with the specified name in order to enable the user to edit the chosen attachment. Once the user closes the application in which the attachment was edited, the updated attachment is stored to the file system. The application to use is determined according to windows registry for the file extension. Parameters: attachmentFieldName As String Field name that stores the contained XFDL attachment to edit applied value: Body prepopType As String This entry defines the used technique for prepopulation and value extraction on the Notes Client. Available values: LotusScript or API. Applied value: LotusScript. In scenario 2 (use case 2.1 and 2.2) we use LotusScript only. documentHandling As String This entry controls the client behavior after the XFDL file is detached. Available values: lock, edit, or close. Applied value: lock. In use case 2.1 we use lock. useServer As Boolean This controls the rendering engine for the XFDL file to use. Available values: false (use Forms Viewer) or true (use Webform server). Applied value: false. The value true is used in use case 3.2 only. docIn As NotesDocument Handle to the document storing the XFDL file. Applied value: newly created document. Basically, the document storing the attachment can be any document in the database. In this document, the code writes the extracted values later on. The QuotationRequest form contains a similar button. This form is intended to store filled forms in the workflow and completed forms. The only difference to the initiating button in the template is the missing call to create a new document (and a changed message box describing the use case). Chapter 9. Lotus Domino integration 583 Inspect the corresponding button in the form, as shown in Figure 9-48. Figure 9-48 Invocation button to edit the XFDL form in Notes Client - use case 2.1 Attention: For the three use cases that we cover in this section, we use buttons to launch the attached XFDL file in the Forms Viewer. To automatically launch the attached form in the Forms Viewer when the Notes document is opened, move the code from the button to the PostOpen event of the form. If the form is configured as such, the document preview in the Notes document is the only way to inspect the Notes document. Using the PostOpen event, the document immediately opens the Forms Viewer before the user can access the document, so you might use the Preview pane in the Notes client to inspect the full Notes document or administer the stored Forms template in the locked client use case. 584 IBM Workplace Forms 2.6: Guide to Building and Integrating a Sample Workplace Forms Application Scenario 2.1 attachment handling for the XFDL file An overview of the most relevant functions used to process the XFDL file stored in the Notes document is given in Table 9-10. These actions cover the following: Detach to the file system before prepopulating. Start the Viewer with the current file. Reattach after value extraction. The procedures listed in Table 9-10 are the kernel routines for these tasks. Table 9-10 Main functions for XFDL file handling Function Description file_detachAndEdit Functionality: Detach a file from a specified item and edit the file in the associated application. Detaches the file from the document Calls the prepopulation Determines the application to start Starts the application Parameters: workdir As String, Temporary directory for file storage. AttName As String, Attachment name (file name stored with the attachment). InItem As String, Name of the rich text field storing the attachment. prepopType As String This entry defines the technique used for prepopulation and value extraction on the Notes Client. Available values: LotusScript or API. Applied value: LotusScript. In scenario 2 (use case 2.1 and 2.2) we use LotusScript only. useServer As Boolean This controls the rendering engine for the XFDL file to use. Available values: false (use Forms Viewer) or true (use Webform server). Applied value: false. The value true is used in use case 3.2 only. documentHandling As String This entry controls the client behavior after the XFDL file is detached. Available values: lock, edit, or close. Applied value: lock, In usecase 2.1 we use lock. doc As NotesDocument Handle to the document storing the attachment. Chapter 9. Lotus Domino integration 585 Function Description os_ShellAndWait Functionality: This starts a new executable in a modal window in the Windows client using Windows API. This locks the calling application down to any use access until the called application is closed. The function is called from the module file_detachAndEdit with the following code: If documentHandling ="lock" Then '// Launch the file with the associated application ’and lock down the client os_ShellAndWait ( <commandstring>") Else '// Launch the file with the associated application result = Shell ( <commandstring>, 1) End If Parameters: RunProg As String Complete path to the called application and the attachment to edit. file_reattachSavedXFD LForm 586 Functionality: Opens the XFDL file as string and attaches it to the target document/target files as mime type. We are using mime types here to be compliant with the attachment storage paradigm used in the submission servlet in scenario 1. Parameters: targetField As String, Name of the field to store the XFDL file. fpath As String, Path to the xfdl file on local file system. doc As NotesDocument Handle to the notesdocument to store the XFDL file. IBM Workplace Forms 2.6: Guide to Building and Integrating a Sample Workplace Forms Application Scenario 2.1 prepopulation The prepopulation for scenario 2.1 is performed by the LotusScript procedures. We create text parsing routines taking similar arguments as the related Forms Java API methods to read and write data instances in the XFDL document. In detail, we are using the following functions to access the XFDL document stored as string in memory stored in LibFormsIntegration for this use case, as shown in Table 9-11. Table 9-11 Main functions called to prepopulate a form using LotusScript Function forms_prepopLS Description Functionality: Processes form prepopulation using LotusScript. Processes the following tasks: It inspects the settings in four prepopulation tabs of the template document and updates the corresponding XML structures for the instances to prepopulate. Processes text parsing in the XFDL file according to any text parsing instructions in the template document. Updates the ConfigurationInfo instance with the current environment settings. Parameters: filePath As String, Path to the XFDL file. doc As NotesDocument, Handle to the document storing the attachment. template As NotesDocument Handle to the template from which the current document was created. forms_prepopLSConfigI nfo Functionality: Dependent on the form type (XForms/XFDL), the function creates an XML structure to 'update the ConfigurationInfo instance (XForms Model) in the XFDL string OR 'writes entries as custom properties to the XFDL global.global section (XFDL documents) for the required environment information. In compressed forms, the function cannot work. The following values are stored to each opened form in this application: XFDLSubmissionURL - For HTTP PostSubmission samples - The target URL pointing to the submission servlet (name ProcessXFDL in the book). XFormsSubmissionURL - For XForms PostSubmissions for data gathering - Set submission URL. formID - For HTTP PostSubmission samples - Set formid from current DocumentUniqueID - This document will be updated when the form is submitted. dbpath - For HTTP PostSubmission samples - Set path to current database - The document will be searched in this DB. dominoForm- For HTTP PostSubmission samples - Set new form for the submitted document. instanceID - The data instance to retrieve on submission. Parameters: xfdl As String, The entire form stored in memory as string. doc As NotesDocument Handle to document storing the corresponding attachment. Chapter 9. Lotus Domino integration 587 Scenario 2.1 data extraction The data extraction from the XFDL file is also performed by the LotusScript routines, as mentioned above. Table 9-12 contains a short description of these routines. Table 9-12 Main functions called to extract data from an XFDL form using LotusScript Function Description forms_extractDataLS Functionality: Reads the form ID and the data instance ID from the submitted form. Next it extracts the assigned data instance as an XML fragment. All inner elements of the data instance are turned into field values and stored to the assigned document. Parameters: xfdl As String, Content of the updated xfdl file. doc As NotesDocument, Handle to the document storing the attachment - Here we paste in the new values. forms_extractDataLS_e xtractInstance Functionality: Searches in the entire XFDL content for the instance ID to extract. Returns the extracted inner XML of the instance. Parameters: xfdl, String containing the entire XFDL form. instanceID String containing the ID of the instance to extract. 588 IBM Workplace Forms 2.6: Guide to Building and Integrating a Sample Workplace Forms Application 9.10.2 Scenario 2.2 - local form handling with Viewer and LotusScript, with Notes client released This use case contains a minor modification of the locked client use case (scenario 2.1). It allows the user to work in the Notes client during editing the XFDL form in another window, as shown in Figure 9-49. Browser Client + Viewer Plug-in Notes Client Open Notes Document Detach XFDL to FileSystem Release Notes Client Close Notes Document Prepop Type ? Prepop Java No Client Lock Release Notes Client (Documents remain open) Open Viewer On XFDL File, Edit Form Save to File System (Wait for document close) On Document close reattach XFDL and Extract values (Java or LotusScript) No locked Client Legend: Yes Use Viewer? Prepop LotusSrcipt Save XFDL File and reattach to Notes Document Extract Values (Java or LotusScript) Domino Server (Web-enabled DB) Render XFDL as embedded HTML + Create instances for Prepopulation Open Browser with upload page Close Doc Client mode ? Lock Notes Client Open Viewer On XFDL File Lock Client No Uploader Application Upload XFDL to server Open Viewer On XFDL File Edit Form in Browser rendered by WebForm Server Submit XFDL to Domino Servlet Send XFDL to Domino Servlet Edit the Form In Browser Plugin Submit XFDL To Domino Servlet WAS 6.0 Reattach XFDL and Extract values (Java API) Unlock Notes Client Domino Server (Servlet Engine) Save Notes Document Locally or to Domino Server Locked Client HTTP Submit Webform Server Embedded XFDL Notes Client Activity WebSphere App Server Activity Form Access (Prepop/Data Extr.) Domino Server Activity Forms Viewer / Server Activity HTTP Activity Browser Client Activity Figure 9-49 Domino environment use case overview - building scenario 2 use case 2.2 (Notes Client and Forms Viewer integration) An unlocked client gives the end user a much better experience, but requires additional work for development: We have to take care of the opened XFDL form in the Viewer. When the user tries to close the Notes document containing the related attachment, we must prompt the user to finish the work in the Viewer. Re-attachment of the new version of the XFDL form now occurs on Notes document close, and not when the Viewer closes. Therefore, we must call the code stream for value extraction and reattaching the XFDL file with an additional procedure. Chapter 9. Lotus Domino integration 589 There are no new requirements to the installation on the Notes client or server. The development for this use case results in the creation of the following objects: One new button that calls the XFDL handling routine with slightly changed parameters triggering the decision point “Client Mode?” marked with a red circle in the environment diagram in Figure 9-49 on page 589. One additional function (client_reattachXFDLForm) that performs value extraction and XFDL reattachment in the QueryClose event of the document. Minor changes to the forms that store the attachments to track the opened XFDL form (if any) and trigger the reattaching routine on document close. The good news is that there are no new or changed requirements to the prepopulation/value extraction routines. This code and the file handling code is reused here. Note: In this scenario, the user can work with the Notes client in parallel with the opened XFDL file in the Viewer. When the Notes document is being closed, the user is asked to finish and save the work on the XFDL file. Next, extract the data from the saved XDFL file in the file system using the Java API agent, and save the extracted data to the current Notes document. Finally, re-attach the saved XFDL file, and save and close the Notes document. We now go into detail and explore the code behind the prepopulation and data extraction of the XFDL file for scenario 2.2. Scenario 2.2 development (Initiating buttons, flow control) We create the new scenario only in the QuotationRequest form. Create a new copy of the button used in use case 2.1, and change the title and the parameter for the client mode from lock to edit, as shown in Figure 9-50. Figure 9-50 New button for use case 2.2 and the corresponding message box to display 590 IBM Workplace Forms 2.6: Guide to Building and Integrating a Sample Workplace Forms Application To take care of opened forms from within the document, we add the following code to the postOpen and QueryClose events of the form, as shown in Example 9-28. Example 9-28 Additional code in form events to track opened XFDL forms Sub Postopen(Source As Notesuidocument) 'clear list of opened attachments stored in the field openedAttachments source.Document.openedAttachment = "" End Sub Sub Querysave(Source As Notesuidocument, Continue As Variant) Call client_reattachXFDLForm("Body", prepopType, continue) End Sub The function called in the QuerySave event is available in the library LibFormsIntegration and contains the code shown in Example 9-29. Example 9-29 Function called in QuerySave event Sub client_reattachXFDLForm(Byval targetField As String, extractType As String, continue As Variant) ’reattaches an opemend XFDL file, if there was one detached On Error Goto errorhandler Dim uidoc As notesuidocument Dim doc As notesdocument Dim fname As String Dim fpath As String Dim answer As Integer Dim message As String Dim ws As New notesuiworkspace 'drill down to the opened doc Set uidoc = ws.currentdocument Set doc = uidoc.document 'any attachments opemend? fpath = doc.openedAttachment(0) If (fpath = "") Then Exit Sub 'no -> nothing to do 'yes - ask to reattach fname = Strrightback(fpath, pathSep) Message = "" Message = Message + "You have edited a file attachment (" + fname + ")." + Chr$(10) + Chr$(10) Message = Message + "To close the document with the new version of the file " Message = Message + "make sure, the file is saved and called application closed." + Chr$(10) + Chr$(10) Message = Message + "If the called application is not closed yet, you can now switch there and finish the work on the attachment, before answering this dialog box." + Chr$(10) + Chr$(10) Message = Message + "Press YES to reattach the edited file in the NEW VERSION" + Chr$(10) Message = Message + "Press NO to close the document with the PREVIOUS VERSION of the file" + Chr$(10) Chapter 9. Lotus Domino integration 591 Message = Message + "Press + Chr$(10) CANCEL, if you do not want to close the document" answer = Messagebox (message, MB_ICONQUESTION + MB_YESNOCANCEL, "Reattach the edited File " + fname) If answer = 7 Then 'no Exit Sub End If If answer = 2 Then 'cancel continue = False Exit Sub End If 'OK - extract values and reattach Call forms_extractData(fpath, doc, extractType) Call file_reattachSavedXFDLForm(targetField, fpath, doc) Call uidoc.reload ex: Exit Sub Errorhandler: Messagebox "Error " & Err() & " in " & Lsi_info(2) & " at line " & Erl() & Chr$(10) & Error$ Resume ex End Sub Now two functions must be implemented to make the use case complete: 1. On clicking the button, we must register the detached file. 2. In the code stream, we must use a different (not just blocking) statement to call the Viewer. We implement both functionalities, as shown in Example 9-30, in LibFormsIntegration. Example 9-30 Functions to handle detached file and Viewer edits Sub client_openXFDLForm(Byval attachmentFieldName As String, prepopType As String, documentHandling As String, useServer As Boolean, docIn As NotesDocument) ..... 'if we will edit the form with no locked client and we are not going to use the server If documentHandling = "edit" Then uidoc.EditMode = True ’open the doc for editing doc.openedAttachment = WorkDir + pathSep + FileName$ ’register the attachment as open Exit Sub End If ....... end sub ...... 592 IBM Workplace Forms 2.6: Guide to Building and Integrating a Sample Workplace Forms Application Function file_detachAndEdit (workdir As String, AttName As String , InItem As String, prepopType As String, useServer As Boolean, documentHandling As String, doc As NotesDocument) As String ..... If documentHandling ="lock" Then os_ShellAndWait ( Cstr ( ExeFile ) & """" & Workdir & pathSep & AttName & """") '// Launch the file with the associated application and lock ’down the client Else result = Shell ( Cstr ( ExeFile ) & " """ & Workdir & pathSep & AttName & """", 1) '// Launch the file with the associated application End If ...... end function Scenario 2.2 is now complete. By opening a submitted form from the QuotationRequests view, we can now open an existing form, edit it, and switch back to the Notes Client. The following message boxes should appear: The standard Notes Client prompt when closing a document, as shown in Figure 9-51. If we choose to save the changes, an application-specific prompt to include the new Forms document version appears, as shown in Figure 9-52. Both message boxes are shown below. Figure 9-51 Standard Notes client prompt on closing an edited Notes document Figure 9-52 Application prompt to finish work on the opened attachment If the Viewer is still open, the user can now finish the work on the form, close the Viewer, navigate back to the Notes client, and continue closing the document (by selecting the Yes button). By answering the second message box with Yes, the routine client_reattachXFDLForm initiates value extraction and includes the new version of the XFDL file into the form. Chapter 9. Lotus Domino integration 593 If Cancel is selected, we stay with the opened Viewer and the opened Notes document. If No, is selected, the Notes document closes with the previous version of the XFDL file included. The work in the opened Viewer is not saved and is lost. 9.10.3 Use Case 2.3 - local form handling with Viewer using Java API for prepopulation and value extraction This use case shows another modification of the existing environment. The end user experience stays exactly the same. We just change the prepopulation and value extraction routines from a LotusScript-based implementation to a Java/Forms API based implementation. The diagram in Figure 9-53 illustrates this use case. Browser Client + Viewer Plug-in Notes Client Open Notes Document Detach XFDL to FileSystem Release Notes Client Close Notes Document Prepop Type ? Prepop Java No Client Lock Release Notes Client (Documents remain open) Open Viewer On XFDL File, Edit Form Save to File System (Wait for document close) On Document close reattach XFDL and Extract values (Java or LotusScript) No locked Client Legend: Yes Use Viewer? Prepop LotusSrcipt Save XFDL File and reattach to Notes Document Extract Values (Java or LotusScript) Domino Server (Web-enabled DB) Render XFDL as embedded HTML + Create instances for Prepopulation Open Browser with upload page Close Doc Client mode ? Lock Notes Client Open Viewer On XFDL File Lock Client No Uploader Application Upload XFDL to server Open Viewer On XFDL File Edit Form in Browser rendered by WebForm Server Submit XFDL to Domino Servlet Send XFDL to Domino Servlet Edit the Form In Browser Plugin Submit XFDL To Domino Servlet WAS 6.0 Reattach XFDL and Extract values (Java API) Unlock Notes Client Domino Server (Servlet Engine) Save Notes Document Locally or to Domino Server Locked Client HTTP Submit Webform Server Embedded XFDL Notes Client Activity WebSphere App Server Activity Form Access (Prepop/Data Extr.) Domino Server Activity Forms Viewer / Server Activity HTTP Activity Browser Client Activity Figure 9-53 Domino environment for Case 2.3 Notes Client and Forms Viewer integration using Java API to access XFDL form Similar to the previous use case, we introduce a new parameter value to the initiating button (prepopType = “API”) and review the related development work. 594 IBM Workplace Forms 2.6: Guide to Building and Integrating a Sample Workplace Forms Application As previously mentioned, the complete code stream for the attachment handling stays the same (including the choices to work with a locked or unlocked Notes Client after opening the XFDL form in the Viewer). The new functionality only affects the value prepopulation and value extraction routines. A Java agent is created to process the same logic. The advantage with this use case is that we can now use the Forms API to access the product in a recommended manner. This use case adds new requirements to the Notes Client installation. If the installation has not been done, proceed with the following steps: 1. Install the Workplace Forms API Version 2.6.1 (which is included in the IBM Workplace Forms Server installation package), as recommended in the product documentation, on the client machine. 2. Make the Form API available to the Notes Client. – Copy the jar files from the Workplace Forms API to the <NotesProgramDir>\jvm\lib\ext directory, where <NotesProgramDir> is usually c:\notes. This ensures that Notes will find the files. The the jar files that should be copied are: • • • • pw_api.jar uiw_api.jar pw_api_native.jar uiw_api_native.jar OR – Ensure that the notes.ini file contains the following entry (adjust the path to your Forms API installation path): JavaUserClasses=c:\WIN2K\system32\PureEdge\70\java\classes\pe_api.jar;c:\WIN 2K\system32\PureEdge\70\java\classes\uwi_api.jar; Scenario 2.3 prepopulation with Forms Java API The prepopulation for scenario 2.3 is done by the script library LibFormsIntegration written in LotusScript that is called by the Edit Attachment - Scenario 2.3 button. Add a new button to the form template that executes the CopyFromNew action with the prepopulation using Java API. The documentHandling parameter can be edit or lock. The code is shown in Example 9-31. Example 9-31 Creating new forms from template using Forms Java API for prepopulation Sub Click(Source As Button) isFirstOpen = True 'evaluate all prepopulation settings for first open prepopType = "API" Dim message As String message = "Local form handling with Viewer and LotusScript: " + Chr$(10) ......... message = message + Chr$(10) message = message + "To 'submit' the form, please close the viewer and choose 'save' option. " + Chr$(10) message = message + "In real world forms handled with this integration scenario should not have an http submit button. " + Chr$(10) Messagebox message,,"Working on XFDL Form - Use Case 2.2 - Scenario overview" Chapter 9. Lotus Domino integration 595 Dim newDoc As NotesDocument Set newDoc = client_NewFromTemplate() 'client_openXFDLForm(Byval attachmentFieldName As String, prepopType As String, documentHandling As String, useServer As Boolean, docIn As NotesDocument) Call client_openXFDLForm("Body", prepopType, "edit", False, newDoc) End Sub Go to the script library LibFormsIntegration and open the script routine forms_prepop. It is called for prepopulation and implements the decision point about the prepopulation code to run depending on the prepopType parameter in the button. If has the following skeleton code with the decision point exposed, as shown in Example 9-32. Example 9-32 forms_prepop function Sub forms_prepop(WorkDir As String, fileName As String, prepopType, doc As NotesDocument) On Error Goto Errorhandler ...... ’set prepop mode to opening document (we will need the settings for data extraction later on) doc.xfdlAccessMode = "prepop" If Instr(prepopType, "API") > 0 Then ’**** here goes our new code for API based prepopulation ..... Elseif Instr(prepopType, "LotusScript") > 0 Then Call forms_prepopLS(WorkDir & pathSep & FileName, doc, template) End If ex: Exit Sub Errorhandler: Messagebox "Error " & Err() & " in " & Lsi_info(2) & " at line " & Erl() & Chr$(10) & Error$ Resume ex End Sub We cannot start a Java code directly from LotusScript, but we can run any agent from the script library. Therefore, the choice is easy: Write a Java agent and call it from this routine. Tip: We explore another solution for this task: prepopulation using Notes/Domino LS2J functionality. This allows the execution of Java libraries directly from LotusScript and sharing common objects with the called Java code. We do not provide the corresponding code sample here, but the results are discussed in 9.12.2, “Language considerations (LotusScript versus Java versus LS2J)” on page 627. However, there is another problem to resolve: Java is not able to execute the definitions of the prepopulation stored in the four prepopulation tabs of the template document containing 596 IBM Workplace Forms 2.6: Guide to Building and Integrating a Sample Workplace Forms Application Notes @Formula expressions. Here the idea is to reuse prepopulation functionality already created for the browser scenario (scenario 1). We use the forms_createPrepopInstances function that creates rich text fields in a document. These fields contain the content of the instances for prepopulation according to the definition in the template document. If the new code runs this function on the current document, the Java agent has to copy the instances into the XFDL document, using the API. This is the way to go forward. The code to call the agent should look like Example 9-33. Example 9-33 Calling a Java agent for XFDL Form prepopulation If Instr(prepopType, "API") > 0 Then 'we assume, all prepopulation settings are contained in the template document. 'this function will create a bunch of fields containing the instances to prepopulate 'create instance data only (param formEmbedding = false) Call forms_createPrepopInstances(doc, template , False) Call doc.Save(True, True) ' write back all changes to the document, so we can read them with form the JAVA agent from the server 'now call Java agent to prepopulate the form. Dim ag As NotesAgent Set ag = doc.parentdatabase.getAgent("(JavaFormsAccessUsingAPI)") If ag.run( doc.NoteID) <> 0 Then Messagebox "Problem! - Pre-population not executed" End If 'cleanup prepopulation data from the form For i = 0 To MaxPrepopInstances fieldSuffix ="" If i <> 0 Then fieldSuffix = "_" & i 'remove prepop item, if any are found in the document While doc.HasItem("Prepop" + fieldSuffix) Call doc.RemoveItem("Prepop" + fieldSuffix) Wend While doc.HasItem("prepopulationPath" + fieldSuffix) Call doc.RemoveItem("prepopulationPath" + fieldSuffix) Wend Next Elseif Instr(prepopType, "LotusScript") > 0 Then Most of the new code is used to clean up the opened document from the fields created during prepopulation. To overcome this, we could use a separate Notes document and delete it later on. This approach is not shown here. Chapter 9. Lotus Domino integration 597 Having the preparation for prepopulaton in place, we must write the Java agent that executes the content transfer into the XFDL file stored on the file system. We decide to create one common agent for prepopulation and value extraction. For now, we inspect the prepopulation part only. We create a Java agent named JavaFormsAccessUsingAPI with the code skeleton shown in Example 9-34. The beginning part of the code shows how to obtain the specific data from the related document, the middle part shows how to initialize the Forms API, and the last part is the business logic (to be created) and the cleanup. Example 9-34 JavaFormsAccessUsingAPI Java agent import import import import import import import import import lotus.domino.*; com.PureEdge.DTK; com.PureEdge.IFSSingleton; com.PureEdge.error.UWIException; com.PureEdge.xfdl.FormNodeP; com.PureEdge.xfdl.XFDL; java.text.MessageFormat; java.net.*; java.io.*; public class JavaAgent extends AgentBase { static String debugMode = "on"; static String sv = "JavaFormsAccessUsingAPI"; static int maxPrepopInstances = 4; //Custom value for flag parameter in .readForm API call private static final int READFORM_XFORMS_INIT_ONLY = (XFDL.UFL_SERVER_SPEED_FLAGS & (~XFDL.UFL_XFORMS_OFF) | XFDL.UFL_XFORMS_INITIALIZE_ONLY); public void NotesMain() { String filePath = ""; String mode = ""; URL u; Database db = null; Document doc = null; try { p( "Start Java Agent"); Session session = getSession(); p( "session OK"); AgentContext agentContext = session.getAgentContext(); db = agentContext.getCurrentDatabase(); p( "db OK"); Agent agent = agentContext.getCurrentAgent(); // Get document used for passing data doc = db.getDocumentByID(agent.getParameterDocID()); p( "doc OK"); filePath = doc.getItemValueString("filePath"); mode = doc.getItemValueString("xfdlAccessMode"); String form = doc.getItemValueString("form"); // initialize the IBM Workplace Forms Server API p( "Start Forms API "); try { 598 IBM Workplace Forms 2.6: Guide to Building and Integrating a Sample Workplace Forms Application DTK.initializeWithLocale("Notes Client Integration", "1.0.0", "7.0.0", null); p( "DTK OK"); } catch (UWIException e) { String pattern = "Failed to initialize IBM Workplace Forms API"; Object[] tokens = { (e.getStackTraceString()) }; String message = MessageFormat.format(pattern, tokens); p( "ERROR: " + message); p( e.toString()); NotesThread.stermThread(); p( "END"); } // Load the form XFDL theXFDL = null; theXFDL = IFSSingleton.getXFDL(); p( "IFSSIngelton OK"); if(theXFDL == null) throw new Exception("Could not find interface"); FormNodeP theForm = theXFDL.readForm(filePath,READFORM_XFORMS_INIT_ONLY); p( "theForm OK"); //***************************************************************** // OK - here we have all prerequisits loaded to start work on XFDL //***************************************************************** //exeute form specific code for prepop and extract if (mode.equals("prepop")) { doPrepop(doc, theForm); theForm.writeForm(filePath, null, 0); p( "writeForm OK"); } if (mode.equals("extract")) { doExtract(doc, theForm, session); p( "extract OK"); } //***************************************************************** // OK - work on XFDL done //***************************************************************** doc.recycle(); db.recycle(); p( "Terminate"); NotesThread.stermThread(); p( "END"); } catch(Exception e) { p( "ERROR: " + e.getMessage()); e.printStackTrace(); p( e.toString()); NotesThread.stermThread(); p( "END"); } } //form specific prepopulation code static void doPrepop(Document doc, FormNodeP theForm) { Chapter 9. Lotus Domino integration 599 p( "prepopulation OK"); return; } //form specific data extraction routine static void doExtract(Document doc, FormNodeP theForm,Session s) { p( "data extraction OK"); return ; } p( "data extraction OK"); } The code that goes into the doPrepop routine is simple. We execute a loop over all instances to prepopulate. If we find the related fields, we call a helper function to populate the instance, as shown in Example 9-35. Example 9-35 doPrepop routine copying the instance content from the Notes document into XFDL file static void doPrepop(Document doc, FormNodeP theForm) { String instanceData = ""; String pathToItem = ""; try { /**************************************************************** * put here your form secific code - BEGIN ****************************************************************/ for (int i = 0; i <= maxPrepopInstances + 1; i++) { //walk through all created prepopulation fields and apply the data if //not empty String suffix = ""; if (i != 0) suffix = "_" + i; if (doc.hasItem("Prepop" + suffix) && doc.hasItem("prepopulationPath" + suffix)) { instanceData = doc.getItemValueString("Prepop" + suffix); RichTextItem prepop = (RichTextItem)doc.getFirstItem("Prepop" + suffix); instanceData = prepop.getFormattedText(false, 10000, 0); pathToItem = doc.getItemValueString("prepopulationPath" + suffix); //System.out.println("Instance " + i + " " + instanceData); //System.out.println("Instance " + i + " " + pathToItem ); if (! pathToItem.equals("")) { if (pathToItem.indexOf("'") > 0){ //this is an XPath - update the XForms instance setFormValue(theForm, pathToItem, instanceData) ; } else { //this is NO XPath - update the XML instance setFormValue(theForm, pathToItem, instanceData) ; } } } 600 IBM Workplace Forms 2.6: Guide to Building and Integrating a Sample Workplace Forms Application } p( "prepopulation OK"); /**************************************************************** * put here your form secific code - END ****************************************************************/ return ; } catch(Exception e) { p( "Error: " + e.getMessage()); e.printStackTrace(); p( e.toString()); NotesThread.stermThread(); p( "ENDE" ); return; } } The helper function setFormValue, as shown in Example 9-36, is taken from the J2EE environment. It can operate on XForms instances and XFDL values. Example 9-36 The helper function setFormValue (re-used from J2EE environment) /** * sets one value in the xfdl form addressed by an item reference * dependent on the syntax in pathToItem parameter, the code will access an * XFDL item or data in an XForms instance * * @param theForm * @param pathToItem (XPath expression to an XForms instance or XFDL path) * @param value */ public static void setFormValue(FormNodeP theForm, String pathToItem, String value) { try { System.out.println("setFormValue" + "==============================================="); System.out.println(pathToItem); System.out.println(value); if (pathToItem.indexOf("instance('") == 0){ String element = ""; if (pathToItem.indexOf("/")>0) pathToItem.substring(pathToItem.lastIndexOf("/")+1, pathToItem.length()); String updateXML = value; if (!element.equals("")){ //we are going to replace an inner element -> add the element tags!!! if (element.indexOf("[")>0) {element = element.substring(0,element.indexOf("["));} updateXML = "<" + element + ">" + value + "</" + element + ">"; } p("updateXML:" + updateXML); StringReader r = new StringReader(updateXML); //update data instance from xfdl as stream Chapter 9. Lotus Domino integration 601 theForm.updateXFormsInstance(null, pathToItem ,null, r, XFDL.UFL_XFORMS_UPDATE_REPLACE); //String tmp = getFormValue(theForm, pathToItem,""); } else { theForm.setLiteralByRefEx(null, pathToItem, 0, null, null, value); p("setFormValue: " + pathToItem + " -> [" + value + "] - done"); } } catch (UWIException e) { p ("FAILED to update XForms instance: " + pathToItem ); e.printStackTrace(); } return; } This completes the development for the Java API based prepopulation. Scenario 2.3 - data extraction Data extraction using the Java API is already done, too, in the submission servlet used in the Domino scenario 1 using the browser client. We reuse the code here. Let us remember the basic idea of value extraction here: extracting the data instance, we get an XML fragment. This fragment gets adopted to fit the data structure of Domino DXLImporter. The importer can create or update any Notes documents with the content of an XML structure, transferring the element values into Domino field values. In a high level this is what we need, but we cannot write to the document currently opened in the end user’s Notes client. Saving the document, the user would overwrite the just retrieved information. So we use a work around: we create a new blank document and let the DXL parser put the values in. After the agent finishes the work, we get control back to the calling LotusScript library. Here we can transfer the values to the document opened in UI and delete the transfer document. Therefore, we have the following development tasks: Create the decision point to branch to Java API, if prepop type is set to API. Create the agent call for the Java Agent and the value transfer from the temporary document into the current document. Create the doExtract routine in the agent reusing the servlet code. Let us start with the new elements in LotusScript library LibFormsIntegration. Glance at the routine forms_extractData shown in Example 9-37. This implements the decision point for data extraction technology to use. The code skeleton is similar to the decision point for form prepopulaton. Example 9-37 Sub forms_extractData decision point Sub forms_extractData( filePath As String, doc As NotesDocument, extractType As String) 'Form data extraction handler run in client environment 'branches to LS data extraction or Java API e