1
European Co-ordination Centre
for Aviation Incident Reporting Systems
ECCAIRS REPORTING SYSTEM
USER MANUAL
Copyright © 1995–2005 Joint Research Centre of the European Commission.
ECCAIRS, the ECCAIRS logo, and the ECCAIRS products refer to a series of software applications developed by
the European Commission in the context of the European Co-ordination Centre for Aviation Incident Reporting
Systems (ECCAIRS). All other trademarks are property of their respective owners. Information contained herein is
subject to change without notice. All rights reserved.
SOFTWARE LICENSE AGREEMENT for ECCAIRS REPORTING SYSTEM
The copyright holders are providing it under the following license agreement. By obtaining, using, and/or
copying this software, you agree that you have read, understood, and will comply with the following terms and
conditions:
This software is provided FREE OF CHARGE to all Civil Aviation Authorities, Aviation Incident Investigation
Bureaus and Aircraft Traffic Management Bureaus of the European Union (EU). Non
-EU organisations are entitled to use this software under the same terms except that these organisations are not
entitled to obtain technical and/or user support.
EU commercial and non-EU commercial organisations are not entitled to use his software except when explicitly
authorized by the European Commission. These organisations must contact the European Commission, the
Joint Research Centre of the European Commission prior to installing and using the software.
Permission to use, copy, and distribute this software and its documentation for any purpose and without fee or
royalty is hereby granted, provided that the full text of this license agreement appears on ALL copies of the
software and documentation.
BECAUSE THIS SOFTWARE IS LICENSED FREE OF CHARGE, THERE IS NO WARRANTY FOR THIS
SOFTWARE, TO THE EXTENT PERMITTED BY APPLICABLE LAW. THE COPYRIGHT HOLDERS AND/OR OTHER
PARTIES PROVIDE THIS SOFTWARE "AS IS" WITHOUT WARRANTY OF ANY KIND, EITHER EXPRESSED OR
IMPLIED, INCLUDING, BUT NOT LIMITED TO, THE IMPLIED WARRANTIES OF MERCHANTABILITY AND
FITNESS FOR A PARTICULAR PURPOSE. THE ENTIRE RISK AS TO THE QUALITY AND PERFORMANCE OF
THIS SOFTWARE IS WITH YOU. SHOULD THIS SOFTWARE PROVE DEFECTIVE, YOU ASSUME THE COST OF
ALL NECESSARY SERVICING, REPAIR OR CORRECTION.
IN NO EVENT, UNLESS REQUIRED BY APPLICABLE LAW, WILL ANY COPYRIGHT HOLDER, OR ANY OTHER
PARTY WHO MAY REDISTRIBUTE THIS SOFTWARE AS PERMITTED ABOVE, BE LIABLE TO YOU FOR
DAMAGES, INCLUDING ANY GENERAL, SPECIAL, INCIDENTAL OR CONSEQUENTIAL DAMAGES ARISING
OUT OF THE USE OR INABILITY TO USE THIS SOFTWARE (INCLUDING BUT NOT LIMITED TO LOSS OF
DATA OR DATA BEING RENDERED INACCURATE OR LOSSES SUSTAINED BY YOU OR THIRD PARTIES OR A
FAILURE OF THIS SOFTWARE TO OPERATE WITH ANY OTHER PROGRAMS), EVEN IF SUCH HOLDER OR
OTHER PARTY HAS BEEN ADVISED OF THE POSSIBILITY OF SUCH DAMAGES.
ECCAIRS on the World Wide Web: http://eccairs-www.jrc.it/
This manual has been printed on October, 2005
iii
CONTENTS
PART 1
ECCAIRS REPORTING SYSTEM
1
2
3
Document conventions............................................. 1-1
ECCAIRS overview ................................................... 2-1
Running ECCAIRS applications......................... 3-1
PART 2
THE ECCAIRS BROWSER
4
5
6
7
8
9
10
Exploring the Browser............................................... 4-1
Customising the Browser .......................................... 5-1
Working with the list of occurrences........................... 6-1
Working with databases ........................................... 7-1
Working with occurrence files ................................... 8-1
Editing occurrences................................................. 9-1
Printing and other utilities................................ 10-1
User Manual – Contents
v
PART 3
THE ECCAIRS GRAPHER
11
12
13
14
Creating graphs with the ECCAIRS Grapher ..... 11-1
Setting the graph properties ............................ 12-1
3D graphs and other functions........................ 13-1
The Data-grid behind the graph ................. 14-1
PART 4
THE ECCAIRS UTILITIES
15
16
17
18
E4F Generator .............................................. 15-1
E4F Loader ................................................... 16-1
Dictionary Browser ......................................... 17-1
Exporter ........................................................ 18-1
At the beginning of each part there is a local detailed Table of Contents.
vi
User Manual
User Manual – Contents
vii
P ART 1
ECCAIRS REPORTING SYSTEM
1.
TITOLO9
1
DOCUMENT CONVENTIONS
Manual organisation............................................................... 1-1
Typographical conventions ...................................................... 1-1
2
ECCAIRS OVERVIEW
ECCAIRS activity ..................................................................... 2-1
ECCAIRS network structure ...................................................... 2-2
ECCAIRS data tools ................................................................ 2-2
Assessment of data collected ................................................... 2-2
Occurrence reporting system ................................................... 2-3
ECCAIRS Browser ................................................................... 2-3
ECCAIRS Grapher .................................................................. 2-4
ECCAIRS Utilities .................................................................... 2-5
ECCAIRS occurrences ............................................................. 2-6
ECCAIRS repositories .............................................................. 2-7
ECCAIRS taxonomy................................................................. 2-8
ECCAIRS topics, sections, attributes and views........................... 2-9
3
R U N N I N G ECCAIRS A P P L I C A T I O N S
The applications suite.............................................................. 3-1
Starting an application ............................................................ 3-2
Changing the logon password ......................................... 3-3
Finding a repository ............................................................... 3-4
PART 1 – Table of Contents
ECCAIRS Reporting System
1
DOCUMENT CONVENTIONS
MANUAL
ORGANISATION
This user manual is organised as a reference to the functions
included in the ECCAIRS Reporting System software. Here and there
we also suggest or demonstrate exemplary actions useful to explore
system capabilities and options. The exemplary data sets and samples
used are not real and this manual is intended only to demonstrate the
usage and user interface of ECCAIRS client software.
Scattered through
all the guided tour
steps there are
ADDITIONAL INFO
BOXES.
Beyond this manual there is the Software Installation Manual, aimed
at the system administrator, and a number of white papers and
technical support documents available on the ECCAIRS web-site.
This manual is divided into several parts, the first introducing the
ECCAIRS Reporting System itself and all the other dealing with its main
applications
and
utilities
(smaller,
auxiliary
applications).
Each chapter within a part is dealing with a specific set of program
features. Chapter numbers are shown in red in the upper-right corner
of each odd (right) page and as first figure of the page number.
Each chapter is in turn divided into sections, organised as a one (rarely
two) page self-standing unit of information.
TYPOGRAPHICAL
CONVENTIONS
The following typographical conventions are used:
Blue and Bold to indicate selections (e.g. buttons or menu or
menu-items), specific (dialog) window names, or simply other
important text to be emphasized.
Mono spaced for file and path names.
Keyboard keys in square brackets, with a plus sign separating
keys that you press simultaneously.
For example: “…press [Ctrl]+[Alt]+[Del] to restart your
computer…”
Arrows (“ ”) to separate ordered selections in menus.
For example: “… select File New form the main window …”.
Document conventions
Info-boxes are
placed either here,
within the left-hand
side grid, or in
coloured boxes
across and along
the right-side
margin line..
They contain notes
on current actions
being described or
hints on alternative
actions to take in
case some options
are not available or
suitable to the user.
They may also host
quick hints on more
functions available
or suggestions for
user self exploration
of program features.
1-1
ECCAIRS Reporting System
2
ECCAIRS OVERVIEW
ECCAIRS
ACTIVITY
To decrease the rate of commercial air traffic accidents the European
Commission has introduced a regulation on occurrence reporting in
civil aviation which collects and disseminates information on aviation
incidents on a European scale so that we can learn from events and
produce a safer transport system.
In individual States, the number of significant occurrences may not be
large enough to give an early indication of a potential serious hazard
or to identify trends. Access to a larger database would certainly
improve the quality of the safety information.
Most aviation authorities in the EU have, in differing ways, collected
information about aviation incidents and accidents. Since these
authorities had proprietary data formats (electronic or paper based)
mutual access to information was almost impossible.
To improve this situation the European Commission started ECCAIRS
(European Co-ordination Centre for Aviation Incident Reporting Systems).
The objective of ECCAIRS is to contribute to aviation safety through
early detection of potentially hazardous situations in an integrated, EU
wide collection of incident and accident reports.
ECCAIRS overview
2-1
PART 1
ECCAIRS
NETWORK STRUCTURE
At the heart of the ECCAIRS network an information system integrates,
disseminates and assesses data and information at European level.
At the other nodes (the national Civil Aviation Authorities and/or
Accident Investigation Bureaus of the EU Member States) data is
collected and assessed locally.
Because of the compatible data-formats Member States can mutually
exchange data on a peer-to-peer basis. Information in the network
remains property of the contributing organisations, also when
integrated in the central database.
ECCAIRS
DATA TOOLS
The ECCAIRS reporting system, a tool made available free of charge,
allows the EU authorities to collect and exchange information on
occurrences in a standardised way. Resources previously invested to
create and maintain local reporting tools, can now instead be
allocated to the analysis of the collected information.
Within the reporting system a graphic tool is provided, allowing to produce
easily, quickly and on-line the most common statistical graphs.
ASSESSMENT
OF DATA COLLECTED
Assessment of the integrated information can be done by all
contributing organisations, following agreed procedures. The coordination of the analysis and the dissemination of the results are
under control of a steering committee. The objective is to arrive at a
reliable and common methodology to assess the development of
aviation safety in the EU. The results can provide information to
national and EU policy makers in the aviation transport domain.
2-2
User Manual
ECCAIRS Reporting System
CHAPTER
OCCURRENCE
REPORTING SYSTEM
The ECCAIRS occurrence reporting system is a set of software
applications that provide together a complete solution to organisations
that want to collect aircraft incidents and accidents (occurrences) in an
ICAO compatible format.
2
The system includes facilities for easy electronic contributions to the
ECCAIRS central office. The reporting system can be made available,
after a translation of its internal dictionary, in any of the official
languages of the European Union.
ECCAIRS 4 is a completely overhauled version of the previous
ECCAIRS 3 reporting system. It is based on a new taxonomy
(ADREP2000), uses new data-formats (XML based), has a new userinterface (tree-structure instead of tabs) and, in addition to the
improved Flight Operation domain, supports now also Air Traffic
Management occurrences.
ECCAIRS BROWSER
Occurrences are entered, modified, viewed and printed with the
ECCAIRS Browser.
Authorities can start exchanging compatible data electronically with
peer organisations and the ECCAIRS central office. Data consistency
and efficiency at the network level is thus guaranteed. EU authorities
are also obliged to report serious incidents and accidents to the
International Civil Aviation Organisation (ICAO) in a standardised
format (ADREP). Because ECCAIRS has adopted ICAO’s ADREP
format, these reports can now be sent electronically without the need
for data conversion.
Occurrences can be stored locally in an ECCAIRS Data Format file and
can be stored in a relational database when the ECCAIRS Browser can
be connected to the database server.
Occurrences are retrieved from the database through queries built by
the users. Queries can be constructed easily without any knowledge of
the used technology (e.g. SQL language).
ECCAIRS overview
2-3
PART 1
Common queries can be stored in libraries, exchanged with other users
and re-executed any time.
ECCAIRS GRAPHER
In addition to the ECCAIRS Browser application there is also an
ECCAIRS Grapher, a graphing tool, which produces easily, quickly and
on-line the most common statistical graphs.
Though the Grapher is not a full featured data-analysis tool, this
application allows to produce a large range of graphs that can
illustrate trends in the occurrence data.
The user can show the relation between 2 or 3 data fields in various
2D or 3D graphs.
Most of the more common graphs can be made in a very simple way.
Graphs can be made visible on the screen or printed in a report.
These graphs are created once and can then be applied to any other
subset of the local or compatible database. The subset of occurrences
to consider in a database can be identified easily with the Query
Builder, which allows a user to compose queries based on a
combination of criteria using any of the ECCAIRS data fields.
Queries and graphs can be stored in files that can be easily exchanged
with other ECCAIRS users.
2-4
User Manual
ECCAIRS Reporting System
CHAPTER
ECCAIRS UTILITIES
A number of other applications, either as tools or for administration,
are also included in ECCAIRS software standard installation:
2
Repository Manager (administration): ECCAIRS 4 uses
repositories, a collection of data objects and rules, to access the
data warehouse (based on a database or a file). The Repository
Manager allows the administrator to manage centrally also all user
specific settings related to security, access methods, database- and
application properties. The use of Repository Manager is described
in ECCAIRS 4 Software Installation Manual.
E4F Generator (tool): This is a utility used to generate
ECCAIRS 4 Data Files (*.E4f) from a repository database. E4F
files contain ECCAIRS occurrences in an XML based format.
E4F files may be used to store, exchange and backup
occurrences in an ECCAIRS repository.
E4F Loader (tool): This is a utility used to load E4F files in a
repository's database. It is also useful for restoring the contents
of a database from E4F backup files. Usage of the E4F Loader
is mandatory when upgrading to a new version of ECCAIRS
and the data format and/or data taxonomy has been changed.
Test ECCAIRS 4 Installation (tool): This utility is used after an
installation to detect possible incompatibilities with specific
Operating System components, which may be not up to date.
Refer to ECCAIRS 4 Software Installation Manual for details.
Dictionary Browser (tool): This utility is an on-line Dictionary that
will help the user understanding the standard (ICAO) nomenclature
and drive him/her little by little when compiling an occurrence. It
gives a quick and complete view of the taxonomy used by
ECCAIRS, i.e. all topics, sections and attributes available.
Exporter (tool): This is a utility used to export subsets of data from
the database in a variety of different formats, respecting the security
profiles for the current user as defined in the repository. Possible
usage include: creation of customised reports, analysis of sub-sets
of information in 3rd party environments, passing information to
users of non compatible systems, etc.
ECCAIRS overview
2-5
PART 1
ECCAIRS
OCCURRENCES
In ECCAIRS an occurrence is any type of accident or incident related to
aviation operations.
The seriousness of an occurrence can range from an event without a
safety effect to a fatal accident.
The local policy of an organisation determines which type of
occurrences are considered reportable and thus should be entered in
the ECCAIRS system. However, in the European Union a Directive on
Occurrence Reporting in Civil Aviation defines what is a reportable
occurrence.
The classification of occurrences in ECCAIRS 4 complies, at the highest
level, with ICAO’s ADREP definitions as defined in Annex 13 of the
ICAO convention.
Though in ECCAIRS the basic data records are called occurrences, in
reality what is stored in the ECCAIRS repository are Occurrence
Reports. Part of the information stored for an occurrence, for example
the narrative and the event tree, is in fact subjective of nature.
For practical reasons the term Occurrence in the ECCAIRS
documentation is normally referring to the Occurrence Report as
stored in the system.
Differently from some other aviation occurrence reporting systems, in
ECCAIRS an occurrence involving multiple aircrafts is only to be
registered once and not as a different occurrence for each aircraft.
An occurrence in ECCAIRS 4 is uniquely identified by the combination
of two attributes: State Reporting and State File Number.
2-6
User Manual
ECCAIRS Reporting System
CHAPTER
ECCAIRS
2
REPOSITORIES
The concept of an ECCAIRS repository has been introduced in
ECCAIRS 4 to distinguish it from the traditional database approach.
The Repository is a place where the manager of an ECCAIRS
information system stores and manages centrally not only all the data
but also all user specific settings related to security, access methods,
database- and application properties.
When a user establishes a connection to a Repository the working
environment and the user privileges, as set by the Repository
administrator in the Repository Manager application, are transferred to
the user’s workstation. Only then he/she is able to access the database
in the Repository. This implies that user specific settings can be
managed centrally and are applied anywhere from which the user
makes the connection.
It is possible to have a Repository without a database. In such a case
the connected user can still access occurrences in an E4F file applying
the settings as defined for the specific Repository but will not be able to
access a database (for this repository).
ECCAIRS overview
2-7
PART 1
ECCAIRS
TAXONOMY
The Taxonomy of ECCAIRS 4 is the catalogue describing what
information can be stored in the ECCAIRS 4 Repository and how this
information is (possibly) encoded in the data fields.
Most of the Attributes of ECCAIRS 4 contain actually numbers that
represent textual descriptions. The user never sees the numbers but
instead sees the descriptions.
This approach facilitates the implementation of nationalised versions,
increases the consistency of the data and reduces the storage
requirements.
ECCAIRS 4 is implementing a very comprehensive catalogue of
terminology and data fields and values, owned by the International
Civil Aviation Organization, which is called the ADREP 2000
taxonomy.
2-8
User Manual
ECCAIRS Reporting System
CHAPTER
ECCAIRS
TOPICS, SECTIONS, ATTRIBUTES
2
AND VIEWS
In ECCAIRS 4 data is collected in hundreds of different Attributes. The
values of these Attributes are stored in the ECCAIRS repository (in the
database). Some Attributes are valid for an Occurrence (like the ‘Date’
the occurrence took place), others instead are valid for a sub-entity of
the occurrence (like the ‘Model’ of an aircraft, in particular when the
occurrence involves two aircrafts).
For visualisation and editing purposes, Attributes are grouped together
in Sections. In the standard ECCAIRS 4 system these Sections are fixed
and cannot be changed by the administrator of the system. An example
of two Attributes grouped together in a section is the ‘Latitude’ and the
‘Longitude’ of the place an occurrence took place (grouped together in
Section ‘Where’).
For navigation purposes Sections can be grouped together in Topics.
Unlike the Sections, Topics can be customised and/or created, by the
administrator of the ECCAIRS repository. All Topics together can form
a hierarchical tree by which the user of the ECCAIRS Browser can
identify the place to look for particular information.
A group of Topics placed in a particular sequence (hierarchical tree)
can be made available to the users of a Repository as a View. Though
the ECCAIRS system comes with two particular Views (one for an
ADREP and one for an ATM representation of the information) an
ECCAIRS 4 administrator can modify or add Views and Topics as
required.
By default two particular Views exist, which do not contain the
navigation tree: the ADREP Preliminary View and the ATM Preliminary
View. These Views do not contain Topics or Sections and the
Administrator of the Repository cannot modify these Views.
It is important to understand that Views and Topics only change the
way the data becomes visible. Occurrences created in any view, can
be looked at in any other View, since the Attributes that contain the
information are always shared.
ECCAIRS overview
2-9
ECCAIRS Reporting System
3
R U N N I N G ECCAIRS A PP L ICA T I ON S
2.
TITOLO9
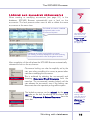
THE
APPLICATIONS SUITE
ECCAIRS software is a suite of main applications (i.e. the ECCAIRS
Browser and the ECCAIRS Grapher), plus a number of auxiliary
applications or Tools.
The rest of this chapter describes the Logon sequence and repository
selection and/or search, which is exactly the same for all the ECCAIRS
applications and tools (except those mentioned in the note box below).
PRE-REQUISITES AND ADMINISTRATIVE TOOLS
The ECCAIRS applications suite can run only after a successful installation
and after the configuration and definition of users and repositories.
The Repository Manager and Test
Eccairs 4 Server Installation (both in
Programs
Eccairs 4
Administration ) are aimed at this
and are described in the ECCAIRS 4
Software
Installation
Manual,
together with all the installation and
configuration instructions for the
ECCAIRS system administrator.
Running ECCAIRS applications
3-1
PART 1
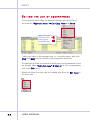
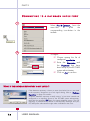
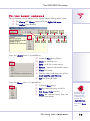
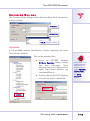
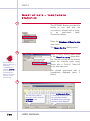
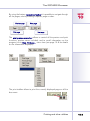
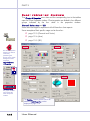
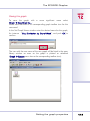
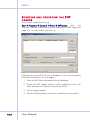
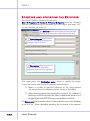
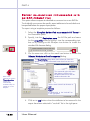
STARTING
AN APPLICATION
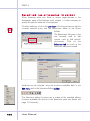
1
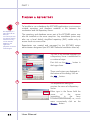
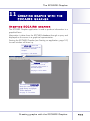
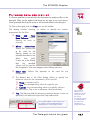
Let us have a look at how to run an
ECCAIRS Application or Utility, for
instance, the ECCAIRS Browser.
From the
select
Programs
Windows Start button
Eccairs 4
Browser.
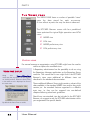
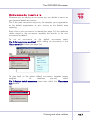
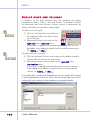
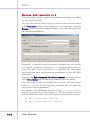
The system proposes a Logon
window.
2
The user must logon by first
choosing among the list of different
repositories configured.
The Repository is a place where all
the data (the occurrences) and all
user specific settings related to
security, access methods, database
and application properties are
stored and managed.
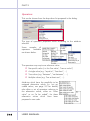
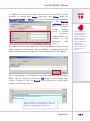
3
To complete the logon type in the
Username and the Password that
have been setup by the ECCAIRS
system administrator and push the
OK button, or type the RETURN key
after the password.
Should the list of
Repositories be
empty, then the
user cannot logon.
Once the user has successfully
logged in the system, the Application
main window shows up.
To add a
repositories follow
the instructions on
page 3-4
(i.e. turn next page).
3-2
User Manual
ECCAIRS Reporting System
CHAPTER
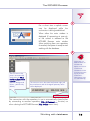
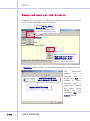
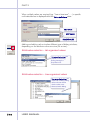
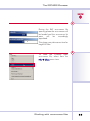
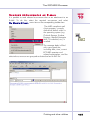
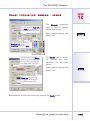
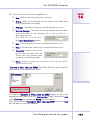
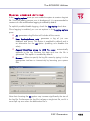
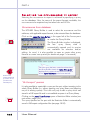
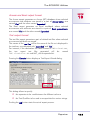
CHANGING
3
THE LOGON PASSWORD
To change the user logon
password, provided this function
has been enabled for this user by
the ECCAIRS Administrator, click
on the More… button in the
Logon form.
1
2
Three new buttons are displayed in
the bottom of the dialog: click on
the Change Pwd button.
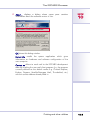
3
In the Change user password
dialog which shows up, type in the
Old password,
then
the
New password and repeat it in the
Confirm new password field.
Click on the OK button to confirm.
The Cancel button discards any
change possibly made.
Running ECCAIRS applications
3-3
PART 1
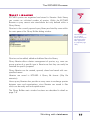
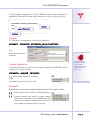
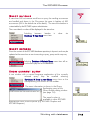
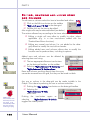
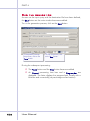
FINDING
A REPOSITORY
1
To be able to use a database the ECCAIRS applications must access a
suitable repository and therefore establish a link between the
workstation and the Repository Server.
The Repository is a
place where all the
data (the
occurrences) and all
user specific settings
related to security,
access methods,
database- and
application
properties are stored
and managed.
The repository and database server part of the ECCAIRS system may
also be installed on the same computer. Any standalone system may
also use a local default simplified repository (E4F) usable only to
access local occurrence files.
Repositories are created and managed by the ECCAIRS system
administrator designated (see ECCAIRS Software Installation Manual).
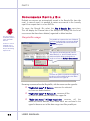
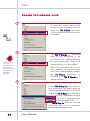
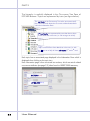
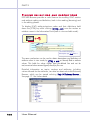
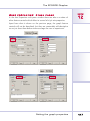
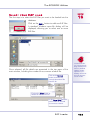
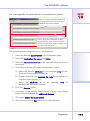
2
The link to the wanted repository on
a Repository Server is established in
a number of steps.
First click on the More… button in
the Logon form.
Three new buttons are displayed in
the bottom of the dialog: click on
the Add… button.
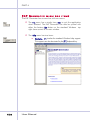
3
The Repositories dialog box
requires the name of a Repository
Server.
Either type in the Server field the
name
of
the
server
(something
in
the
form
DOMAIN\SERVERNAME) or, much
more conveniently click on the
Browse… button.
3-4
User Manual
ECCAIRS Reporting System
CHAPTER
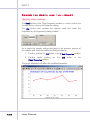
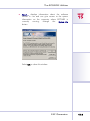
3
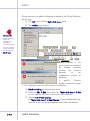
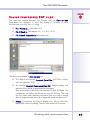
The Find Computer browse box
allows to browse the local
network and select a repository
server
from
the
available
networked computers.
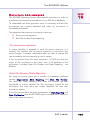
4
Once the computer hosting the
wanted ECCAIRS server is
selected click the OK button to
confirm.
Once a valid Repository Server is
selected, the ECCAIRS Browser will
ask a security password and test
the connection (ask your
administrator for the password ).
5
Click on OK to confirm: if the
password is not correct, then the
dialog is displayed again.
The Repositories dialog box is
displayed again: this time select the
wanted repository from the list of
those available in the Repositories
field and click OK to confirm.
The Logon dialog is displayed again:
this time the newly added repository is
available in the Repository drop-down
list (MY REPOSITORY in the example
shown).
Running ECCAIRS applications
6
Apart from its name,
a repository may
also be given an
Alias.
An alias is
mandatory when
addressing
repositories with the
same name but
hosted on different
servers.
3-5
P ART 2
THE ECCAIRS BROWSER
3.
TITOLO7
4
EXPLORING THE BROWSER
The Browser at a glance .......................................................... 4-1
The Menu Bar ........................................................................ 4-2
The Information pane.............................................................. 4-3
The Views pane ...................................................................... 4-4
Custom views ..................................................................... 4-4
ADREP view........................................................................ 4-5
ADREP Preliminary view ....................................................... 4-5
ATM view ........................................................................... 4-6
ATM Preliminary view .......................................................... 4-6
The Toolbar ........................................................................... 4-7
The Status Bar ........................................................................ 4-7
The Occurrence List pane........................................................ 4-8
Occurrences from files or databases..................................... 4-8
Occurrence List as a self-standing window .......................... 4-10
5
CUSTOMISING THE BROWSER
User-settable options .............................................................. 5-1
Appearance (display) options ................................................... 5-2
Information and Tree pane options....................................... 5-2
Views pane options ............................................................. 5-2
Occurrence List Pane options............................................... 5-3
Specifying colours ............................................................... 5-3
Occurrence List attributes ........................................................ 5-4
Defining the initial sort order of occurrences.......................... 5-5
Selecting display-level of multi-level attribute values ............... 5-5
Deidentifiable attibutes............................................................ 5-6
Events options ........................................................................ 5-7
External-API parameters .......................................................... 5-8
Page printing setup ................................................................. 5-9
PART 2 – Table of Contents
PART 2
6
WORKING WITH THE LIST OF OCCURRENCES
Functions available................................................................. 6-1
Editing the list of occurrences .................................................. 6-2
Deleting occurrences .............................................................. 6-3
Filtering occurrences............................................................... 6-4
Searching for occurrences ....................................................... 6-5
Saving selected occurrences .................................................... 6-5
Saving de-identified occurrences.............................................. 6-6
Printing lists of occurrences...................................................... 6-7
Occurrences Recycle Bin ......................................................... 6-8
Recycle Bin usage ............................................................... 6-8
Recycle Bin usage ............................................................... 6-9
7
WORKING WITH DATABASES
Overview ............................................................................... 7-1
Connecting to a database repository ........................................ 7-2
Saving occurrences into databases........................................... 7-4
Generating occurrence files from the database ......................... 7-4
Locking and releasing occurrences........................................... 7-5
Queries ................................................................................. 7-6
Query libraries ....................................................................... 7-7
Query Builder ........................................................................ 7-8
Query Explanation pane...................................................... 7-8
Editing query libraries ............................................................. 7-9
Creating and editing queries ................................................. 7-10
Criteria ............................................................................ 7-11
Logical operators.............................................................. 7-11
Brackets........................................................................... 7-11
Criterion Builder ................................................................... 7-13
Attributes ......................................................................... 7-13
Operators........................................................................ 7-14
Values (reference values) ................................................... 7-15
Two-values (range) selection.............................................. 7-15
Multi-value selection – list-organised values ........................ 7-16
Multi-value selection – tree-organised values ...................... 7-16
Date-range values grouping functions ................................ 7-17
Run-time specified values – Parameter Queries........................ 7-17
User Manual
The ECCAIRS Browser
Executing and refreshing queries ............................................ 7-18
Query batches...................................................................... 7-19
Query refresh ....................................................................... 7-19
Show current query ............................................................... 7-19
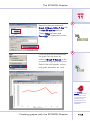
Query by date – year/month statistics ..................................... 7-20
8
WORKING WITH OCCURRENCE FILES
Create a new occurrence file ................................................... 8-1
Opening-closing occurrence files ............................................. 8-2
Saving occurrence files............................................................ 8-4
Saving compressed E4F files .................................................... 8-5
9
EDITING OCCURRENCES
ECCAIRS occurrence structure.................................................. 9-1
Creating new occurrences ....................................................... 9-4
Modifying occurrences ............................................................ 9-5
The occurrence edit window .................................................... 9-6
Specifying attribute values........................................................ 9-8
Direct editing...................................................................... 9-8
Drop-down list.................................................................... 9-8
Multiple selection boxes .......................................................... 9-8
Hierarchical selection boxes................................................. 9-9
Displaying-hiding value explanations .................................... 9-9
Filtering values/explanations in multiple and hierarchical boxes.......... 9-10
Duplicating occurrences ........................................................ 9-11
Occurrence window snapshot ................................................ 9-12
10
PRINTING AND OTHER UTILITIES
Printing functions available .................................................... 10-1
Other utilities ....................................................................... 10-1
Previewing occurrence printouts ............................................. 10-2
Printing occurrences.............................................................. 10-4
Sending occurrences as E-mail............................................... 10-5
Finding definitions and descriptions ........................................ 10-6
Occurrence template ............................................................ 10-7
Help and system info............................................................. 10-8
PART 2 – Table of Contents
The ECCAIRS Browser
4
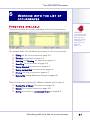
EXPLORING THE BROWSER
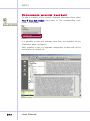
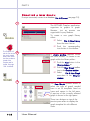
THE BROWSER
AT A GLANCE
The ECCAIRS Browser is the application used to enter, modify, view
and print occurrences (aircraft incidents and accidents).
After starting the ECCAIRS Browser (see page 3-2) its main window will
show up.
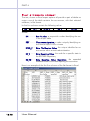
The MENU BAR menus and
menu-items allows to access
most of the functions in
ECCAIRS Browser.
See page 4-2 for details.
The VIEWS PANE
selects a specific
"view" for the data
stored for each
occurrence.
The TOOLBAR offers a quick
visual access to a set of
commonly used functions in
ECCAIRS Browser.
See page 4-7 for details.
See page 4-4.
The INFORMATION PANE is the area
where detailed information about the
occurrence can be viewed.
See page 4-3 for details.
The OCCURRENCE LIST PANE
displays a list of either the results of a
query to the database or the contents
of an E4F (.E4f) file.
See page 4-8 for details.
The STATUS BAR displays summary
information on the current user,
occurrences, time and database
connection status.
See page 4-7 for details.
Exploring the Browser
4-1
PART 2
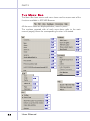
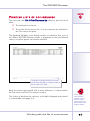
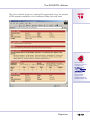
THE MENU BAR
The Menu Bar hosts menus and menu-items used to access most of the
functions available in ECCAIRS Browser.
All the menu-items are displayed below, menu by menu.
The numbers reported side of each menu-items refer to the main
manual page(s) where the corresponding function is illustrated.
7-2
7-8
8-1
7-20
8-2
7-19
8-4
7-8
8-2
7-19
8-4
6-6
6-8
6-7
8-2
9-4
9-12
9-5
6-3
7-5
10-2
10-4
6-2
10-8
6-2
10-8
6-5
10-8
4-7
4-4
4-8
4-9
9-12
5-1
4-2
User Manual
The ECCAIRS Browser
CHAPTER
THE INFORMATION
PANE
The Information pane is the area where detailed information about the
occurrence can be viewed.
4
Another version of the information pane is opened as a self-standing
window when entering edit mode . This latter is editable so that topics
and attribute values can be added or updated (see page 9-1).
By clicking on the left-pane topic icons,
the specific topic information,
organised in sections (pane boxes), is
displayed in the right data pane.
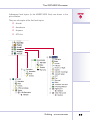
TOPIC-TREE PANE
hosting the topic hierarchy
of the occurrence.
Some other specific
views use instead a
simplified structure,
where a sub-set of
the information is
condensed and
shown in a single
pane
(e.g. ADREP and
ATM preliminary
views).
TOPIC-DATA PANE
hosting the topic data, organised as
attribute values grouped in sections.
The information is structured as a topic hierarchy, where each topic is
represented by an icon on the left sub-pane.
Information related to and determined by any aircraft or ATS unit is
located in the appropriate corresponding hierarchy-tree branch.
In the topic tree:
Separate aircraft branches in the occurrence structure tree may
be used when more aircrafts are involved in an occurrence.
The same applies in case multiple ATS units are involved.
Multiple narratives (i.e. using different languages) may exist
and are displayed as multiple nodes in the occurrence tree.
Exploring the Browser
By default all topic
icons are shown.
Non-empty topics
are marked with
their name in bold.
By setting the Hide
empty sections
option (see page 52) only icons whose
topics contain any
data are displayed.
4-3
PART 2
THE VIEWS
PANE
The VIEWS PANE hosts a number of possible "views"
upon the data stored for each occurrence.
A view reflects a particular way the data is observed.
The ECCAIRS Browser comes with four predefined
views optimised for typical flight operations and ATM
users:
ADREP view
ATM view
ADREP preliminary view
ATM preliminary view.
Custom views
For several reasons an organization using ECCAIRS might have the need to
add to or replace the standard views.
VIEWS PANE DISPLAY
Using
the
Views
Views Pane
menu-item the view pane can be toggled
on (visible) and off. When the Views Pane
is set visible a tick is displayed in front of
the menu-item.
By default the Views Pane is visible.
4-4
A Repository administrator has the possibility to do so using
the Repository Manager application on the Repository Server
machine. This means that a user might find in the ECCAIRS
Browser’s views pane additional or different views not
described in the standard documentation.
These additional/different Views might contain a subset of the
data available in the standard ADREP view and/or they might
contain just the standard Sections organised in a different
topic tree: i.e. they can be mapped into user-defined
chapters following some basic guidelines.
Should any non-standard view be included in the ECCAIRS
Browser, we suggest to ask the ECCAIRS administrator within
your organization for specific details.
User Manual
The ECCAIRS Browser
CHAPTER
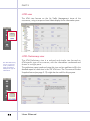
ADREP view
The ADREP view organises and displays the occurrence data according
to the complete ICAO ADREP 2000 taxonomy.
The information pane is composed by a tree and a data display.
ADREP Preliminary view
The ADREP Preliminary view is a reduced and simple view, where the
essential information is condensed and shown in a single pane, to be used
for a quick kind of preliminary report focused on flight operation
occurrences. The preliminary report to be produced using this view can be
used to fill in the detailed report at a later time in the "full" ADREP view. The
Occurrence Window Snapshot feature (see page 9-12) might be useful for
this purpose.
Exploring the Browser
4
The ADREP view
organises the data
according to the
complete ADREP
2000 taxonomy.
The ADREP
Preliminary view is a
quick way to fill a
preliminary report
focused on flight
operations
information.
4-5
PART 2
ATM view
The ATM view focuses on the Air Traffic Management issues of the
occurrence, using a compound tree & data display for the information pane.
The ATM view
focuses on the Air
Traffic Management
issues.
ATM Preliminary view
The ATM Preliminary
view is a quick way
to fill a preliminary
report focused on
ATM specific type of
information.
4-6
The ATM Preliminary view is a reduced and simple view focused on
ATM-specific type of occurrences, with the information condensed and
shown in a single pane.
The preliminary report produced using this view can be used later to fill in the
detailed report at a later time in the "full" ATM view. The Occurrence Window
Snapshot feature (see page 9-12) might also be useful for this purpose.
User Manual
The ECCAIRS Browser
CHAPTER
THE TOOLBAR
The Toolbar offers a quick visual access to a set of commonly used
functions in ECCAIRS Browser. The usage of each icon-button will be
illustrated in this manual when dealing with the functions involved.
4
Stopping the mouse pointer over the toolbar
icons causes the display of a brief description of
the actions-functions associated.
Using the View
Toolbar menu-item the toolbar can be toggled as
visible (default choice) or invisible. A "tick" is displayed in front of the
menu-item currently selected.
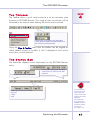
THE STATUS BAR
The Status Bar displays current information on the ECCAIRS Browser
status.
Current user and Current organisation.
Current repository name, Database
connection-icon and Current date
and time
If more than 500
occurrences result
from a query the
“query result” batch
number will also be
displayed.
This is because
query results are
handled by default
in batches of 500
occurrences
(see page 7-19).
Number of occurrences currently:
- selected
- visible
- total
Exploring the Browser
4-7
PART 2
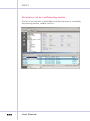
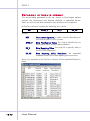
THE OCCURRENCE LIST
PANE
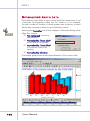
The Occurrence List pane displays a list of either the results of a query to the
database or the contents of an E4F file and can be used to browse, sort, search
or print them. See page 6-1 for available functions on list of occurrences.
Clicking with the mouse on a row selects the corresponding occurrence
and its data is then displayed in the occurrence pane above.
Each occurrence in a row is displayed with a number of “relevant” attributes
columns. The attributes are customisable (see page 5-4).
Clicking on the attribute column headers sorts the occurrence list
accordingly. Clicking toggles between ascending and descending sorting.
Columns are initially pre-sorted according to a customisable set of keys
(see page 5-5).
Occurrences from files or databases
When operating on
E4F file occurrences
the background
colour of the list
pane is yellow.
The list above shows the occurrences included in the E4F file opened,
if any. Switching to the database query results
can be done via menu or toolbar.
The list of
occurrences
resulting from the
database query is
displayed over a
pale blue
background.
4-8
User Manual
The ECCAIRS Browser
The Query Occurrence List will be filled provided that previously:
(1) a database connection has been provided, and
(2) a query has been selected and executed and
(3) the query returned at least one occurrence.
CHAPTER
4
Operating on the occurrence list obtained from a database query or
from an E4F file, is identical, apart two small details.
The first difference concerns the information related to locking of
occurrences in the database when looking at the results of a query
(see page 7-5).
The second difference concerns the initial sort made on the
occurrences, which is made only for the occurrence list from the
database (see page 5-4).
Exploring the Browser
4-9
PART 2
Occurrence List as a self-standing window
The list of occurrences is detachable and then becomes a completely
self-standing window, toolbar inclusive.
4-10
User Manual
The ECCAIRS Browser
To detach the list of occurrences use the
View Detach occurrence list window menu-item or the corresponding
toolbar item in the main window.
CHAPTER
4
The self-standing occurrence list window can be made as large as
needed so that the scrolling list can cover up to the whole desktop
allowing easier browsing of long lists of occurrences.
It also has its own menu and toolbars with functions directly related to
the occurrence list (see page 6-1 and following) and database query
management (see page 7-1 and following).
The detached occurrence list can be re-linked to the main window by
using the corresponding menu or toolbar items.
Exploring the Browser
4-11
The ECCAIRS Browser
5
4.
CUSTOMISING THE BROWSER
TITOLO7
USER-SETTABLE
OPTIONS
The user can control a number of options of
the
ECCAIRS
Browser
by
selecting
View
Options from the menu bar.
An Options dialog window is displayed.
Six different option panes are available through the upper tabs:
APPEARANCE tab-pane, which groups colour options used in all
the ECCAIRS Browser window panes and some other display options
LIST tab-pane, which allows to select attributes displayed in the
columns of the occurrence list pane
Some of the
menu-items and
options (including
the View
Options
menu-item itself)
might be disabled or
not existing
depending on the
configuration set by
the ECCAIRS
Administrator in the
repository manager.
DEIDENTIFIABLE ATTRIBUTES tab-pane, which allows to specify
the attributes to be omitted when saving de-identified occurrences
EVENTS OPTIONS tab-pane, which allows to select the display a
short or detailed description for attributes and values in the event topic
EXTERNAL tab-pane, which allows to specify parameters for
interfacing the ECCAIRS Browser with external proprietary
modules and applications
PAGE SETUP tab-pane, which allows to specify the default
printer and printing margins.
Customising the Browser
5-1
PART 2
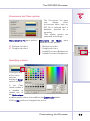
APPEARANCE (DISPLAY)
OPTIONS
The Appearance tab-pane controls the display options, grouped into
sections related to different display windows or panes.
Information and Tree pane options
The ECCAIRS Browser uses different information panes for its two operating modes:
Edit mode and View mode. So their display options are separated accordingly.
Options for the Info pane, separated for Edit and View mode, include
colour choice for:
check-boxes to enable/disable:
Background/Foreground
Control Background /Foreground
Section Title
Control Border
3D-style display
Hide empty sections
Options for the Tree pane include:
colour
choice
for
its
Background and Foreground.
There is also a check-box to
select the display of either all
the possible topics in an
occurrence or (if not checked) only those containing some information.
Views pane options
Options for the Views pane include:
colour
choice
for
its
Background and Foreground.
5-2
User Manual
The ECCAIRS Browser
CHAPTER
Occurrence List Pane options
The Occurrence List pane
may
display
either
occurrences taken from an
E4F file or selected from a
database specified by a
repository.
Their display options are
separated accordingly.
Occurrence List File pane options: Occurrence List Query
(database mode) options:
Background colour
Foreground colour
5
pane
Background colour
Foreground colour
Locked Occurrence Background
Locked Occurrence Foreground
Specifying colours
Clicking on any
of the colour
selectors
displays a Color
control window.
In the Color
control window it
is possible to
choose one of
the Basic colours
or define specific colours to be added to the Custom color palette.
Clicking OK confirms and applies the choice.
Customising the Browser
5-3
PART 2
OCCURRENCE LIST
ATTRIBUTES
The List tab-pane options allow to select which attributes are displayed
as columns in the Occurrence List pane.
Checking the One row per occurrence option
causes occurrences involving two or more
aircrafts to be displayed in a single row.
The check-boxes allow to select the
attributes to be displayed as columns in
the Occurrence List pane (see below).
Here is the list of the attributes (see also side note)which can be
selected as columns in the Occurrence List pane:
The list shown is the
default list after
installation and
initial configuration.
But it might actually
be much smaller, or
even not modifiable
by the users. The
attributes available
are determined by
the ECCAIRS
Administrator.
5-4
State file number
Report identification
State reporting
Occurrence class
State/area
Location
Local date
UTC date
User Manual
Manufacturer/model
Type designator
Aircraft registration
Operator
Operation type
Call sign
Injury level
Fatal, passengers
Fatal, crew total
Total fatalities
Damage Aircraft
Report status
Flight phase
Reporting org.
Report moderator
The ECCAIRS Browser
Defining the initial sort order of occurrences
The user can specify the attributes to be used as sorting keys (three at
most) in the initial display of the Occurrence List pane.
CHAPTER
5
Each attribute can be selected as Primary,
Secondary or Tertiary sorting key.
The correspondent sort order can be also
specified.
Selecting display-level of multi-level attribute values
Some of the attributes have values specified through a tree-hierarchy
(e.g. the Occurrence class attribute shown
here on the left). So there might be
different levels of value specifications.
By default the Occurrence list pane displays the
most detailed (i.e. lowest level) attribute value
specified. It is however possible to define any
specific attribute-value level to display, by rightclicking within the column customisation pane after selecting an attribute.
The specific value-level to
display for each multi-level
valued attribute can be selected.
Customising the Browser
5-5
PART 2
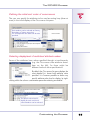
DEIDENTIFIABLE
ATTIBUTES
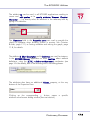
The Deidentifiable attributes tab-pane allows to specify the attributes to
be excluded when saving de-identified occurrences (see page 6-6).
The View Definition drop-down menu
allows to chose the specific view and its
associated hierarchical tree structure.
The contextual right-click menu
also allows to locate in the
left-pane hierarchical view the
attribute selected in the right-pane.
Most of the
attributes in clued in
Filing information
section are
automatically
excluded. They are
greyed out in the
left pane.
Use the 3 central icon-buttons to:
Add,
Remove
Clear
the attribute(s) in the “exclude”
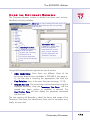
list in the right pane.
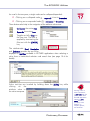
The View Definition drop-down
menu
includes
also
the
TAXONOMY VIEW item. This
displays a list of all the topics and
related attributes occurrence
within
the
ECCAIRS
own
taxonomy.
The ADREP, ATM and any other
possible custom view in ECCAIRS
is build out of sections composed
with the attributes included in the
ECCAIRS own taxonomy.
5-6
User Manual
The ECCAIRS Browser
CHAPTER
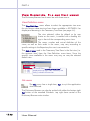
EVENTS
OPTIONS
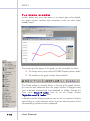
The Events options tab-pane allows to select the display a short or detailed
description for attributes and values used within the events topic.
By default the Detailed description is selected.
5
The choice of display short/detailed descriptions of events is
made separately for the three main display modes:
Viewer (chapters 4 to 7),
Editor (see page 9-6),
Report (see page 10-1).
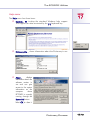
Selecting a Detailed description for attributes and values in the events
topic will produce descriptions like:
Selecting a Short description will instead produce descriptions like:
Customising the Browser
The complete set of
events attribute and
values and related
short and detailed
descriptions can be
looked-up using the
Dictionary Browser
(see page 17-1).
5-7
PART 2
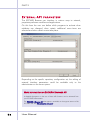
EXTERNAL-API
PARAMETERS
The ECCAIRS Browser can interface in various ways to external,
proprietary software modules and applications.
On this form the user can define which programs to activate when
attributes are changed, when certain additional menu-items are
selected and when certain events take place.
Depending on the specific repository configuration set, the editing of
external interface parameters could be available only to the
administrator on the server system.
MORE INFORMATION ON ECCAIRS BROWSER API
A detailed description on the use of these API functions can be obtained from
your ECCAIRS administrator.
The ECCAIRS 4 Browser API white paper is available on the support section of the
ECCAIRS web site (http://eccairs-www.jrc.it).
5-8
User Manual
The ECCAIRS Browser
CHAPTER
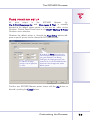
PAGE
5
PRINTING SETUP
All
print
output
in
the
ECCAIRS
Browser
(i.e.
File
Print Occurrence List and Occurrence
Print) is normally
directed to the default system printer, i.e. the one set either via the
Windows Control Panel Printer item or via START Setting
Printer
Windows menu selection.
Whatever the default printer is, through the Page Setup options tabpane a specific printer can be chosen for ECCAIRS Browser.
In addition the page
margins can be specified
(in mm).
By pushing the Setup button the user
can select specific printer/preferences
using the Windows Print dialog.
Changing the target printer this way
works for the current ECCAIRS Browser
session but also changes the system
default printer.
Confirm your ECCAIRS Browser printer choice with the OK button or
discard it pushing the Cancel button.
Customising the Browser
5-9
The ECCAIRS Browser
6
WORKING WITH THE LIST OF
OCCURRENCES
5.
TITOLO7
FUNCTIONS
AVAILABLE
There are a number of functions operating on the list of occurrences.
Note that the
occurrences listed in
the Occurrence List
pane may come
either from an E4F
file (page 8-1) or
from a query to a
database
(page 7-1).
This chapter deals with the following functions on lists of occurrences:
Editing the list of occurrences on page 6-2
Deleting occurrences on page 6-3
Selecting and Filtering occurrences on page 6-4
Searching for occurrences on page 6-5
Saving Selected occurrences on page 6-5
Saving de-identified occurrences on page 6-6
Printing lists of occurrences on page 6-7
Recycle Bin hosting deleted occurrences on page 6-8.
Other functions are introduced in different chapters of this manual:
Display File or Query Occurrence on page 4-8
Detach Occurrence List pane on page 4-8
Saving occurrences in compressed format on page 8-5.
Working with the list of occurrences
6-1
PART 2
EDITING
THE LIST OF OCCURRENCES
The contextual menu offers the standard editing tools for the list of
occurrences: “Right-click menu”
Cut, Copy, Paste and Delete.
Right-click on the
Occurrence List
pane to get its
contextual menu.
Selecting is done in the standard way: i.e. using the mouse, also with
[Ctrl] and [Shift] keys for multiple (not)/contiguous selections.
The selection of all the occurrences in the list pane can be performed in one
go through either “Right-click menu” Select all or the corresponding
item in the Edit menu.
Almost all these functions can be invoked also from the Edit menu in
the menu bar.
6-2
USER MANUAL
The ECCAIRS Browser
CHAPTER
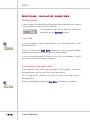
DELETING
OCCURRENCES
6
Deleting the selected occurrence(s) can be performed either by
selecting
Occurrence Delete
in
the
menu bar
or
“Right-click menu”
Delete within the Occurrence List pane.
Right-click on the
Occurrence List
pane to get its
contextual menu.
The occurrence(s) is/are not actually deleted but are moved into the
Occurrence Recycle Bin, so that they can be recovered if needed (see page
6-8). At least this is the default behaviour for the Browser, unless it is
intentionally disabled (see page 6-8).
Working with the list of occurrences
6-3
PART 2
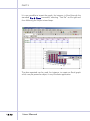
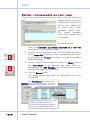
FILTERING
OCCURRENCES
Occurrences in the Occurrence List pane can be filtered, i.e. only
those satisfying some criteria will be displayed.
This is done through the contextual menu (Right-click menu), which is
invoked by right-clicking on an occurrence in the Occurrence List pane.
To display only:
Occurrences with the same/different attribute value as a
reference one.
Click on an attribute column containing the reference value and
choose the “Right-click menu” Filter by selection menu-item.
Conversely
“Right-click menu” Filter excl selection
displays
occurrences with attribute values different from the reference one.
Occurrences possessing a specific attribute value, without
referring to any attribute reference value in the list pane.
First click on any item of the attribute column wanted, then
select “Right-click menu”
Filter by and specify the attribute.
All occurrences: i.e. regain full visibility of the unfiltered
occurrences. Select “Right-click menu”
Remove filter.
The number of occurrences selected, visible
(because of the possible filter applied) and total
are shown in the bottom status bar.
6-4
USER MANUAL
The ECCAIRS Browser
SEARCHING
FOR OCCURRENCES
To search and select an occurrence containing a specific string select:
Edit
CHAPTER
6
Find, from the menu bar, or
“Right-click menu”
Find, in the Occurrence List pane.
Enter the search string in the Search dialog
box displayed and hit OK to search.
Only the first occurrence matching the string
is found and selected, if any.
To find and select the next matching occurrence, use:
Edit
Find Next from the menu bar, or
“Right-click menu”
SAVING
Find Next, in the Occurrence List pane.
SELECTED OCCURRENCES
It is possible to send selected occurrences, either to an E-Mail address,
to an E4F file or to a database.
To do this, select the required occurrences
and select File Send to menu-item, and
the target in the sub-menu:
E-mail... (see page 10-5)
File ...
Database (see page 7-4).
If File is selected, a standard Windows
browse dialog is displayed to choose the target file and folder.
The file can also be saved in compressed format (see page 8-5).
Working with the list of occurrences
Refer to page 8-1
for details on E4F
files.
6-5
PART 2
SAVING
DE-IDENTIFIED OCCURRENCES
File Send deidentified to menu-item allows to export de-identified
occurrences into a new E4F file.
This means that a number of specific export attributes will be left out during
the save phase.
The selected occurrences, properly
de-identified, can be saved in
different places, according to the
specific the sub-menu-item selected:
E-mail...
(see page 10-5 for details)
File ...
In case File is selected, a standard Windows browse dialog is displayed
to choose the target file and folder. The file can also be saved in
compressed format (see page 8-5).
The attributes to be excluded for de-identification are set in the
View
Options menu-item, Deidentifiable attributes tab-pane,
described on page 5-6.
6-6
USER MANUAL
The ECCAIRS Browser
CHAPTER
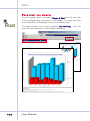
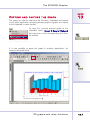
PRINTING
LISTS OF OCCURRENCES
The menu bar item File
either:
Print Occurrence List allows to print the list of
6
The selected occurrences
The whole of occurrence list, if no occurrences are selected in
the Occurrence List pane.
The standard Windows print dialog window is invoked so that, even if
the default ECCAIRS Browser printer is proposed as the pre-selected
choice, any other printer can also be selected.
The printout includes all the occurrences
(or all those selected) in a layout similar to
the occurrence list itself.
Each occurrence gets printed with its main attributes, i.e. those listed in
the first columns of the Occurrence List pane.
The choice of attributes for columns, to be both displayed and printed,
is customisable (see page 5-4).
Working with the list of occurrences
If there are too
many attributes
selected, some of
them will not be
printed, because of
the limited print line
length available.
6-7
PART 2
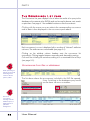
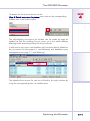
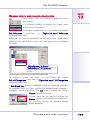
OCCURRENCES RECYCLE BIN
Deleted occurrences are automatically stored in the Recycle Bin (see side
note). In case of need, it is possible to restore occurrences in the currently
open file or export them in a new E4F file.
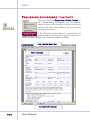
To open the Recycle Bin select the File Recycle Bin menu-item.
This will display the General tab of the Recycle Bin dialog with the list of
occurrences that have been deleted, organised in delete batches.
The Recycle Bin is
enabled by default
within ECCAIRS
Browser.
Recycle Bin usage
However it can be
disabled and reenabled within the
Recycle bin dialog
Options tab.
It is possible to customise the view of deleted
occurrences by selecting occurrences deleted
Between a defined time interval rather than
All in the View pane.
The upper list (white background) lists the
delete-batches, i.e. the list of delete actions
performed (each delete involved either a
single occurrence or Multiple Occurrences).
The lower list (yellow or pale-blue background)
lists the occurrences deleted within the deletebatch selected in the upper list.
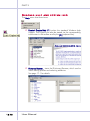
Removing occurrences from the Recycle Bin, with the mouse over the upper list:
“Right-click menu”
Remove removes the selected
occurrences-delete batches.
“Right-click menu”
Remove All removes all the
occurrence-delete batches listed in the upper list.
“Right-click menu”
Empty recycle bin removes all the
delete-occurrence batches, even those which are not listed in the
upper list because out of the date-range view-filter possibly set.
6-8
USER MANUAL
The ECCAIRS Browser
Clicking on a specific delete-batch in the upper list causes the related
delete-batch occurrence(s) data to show up in the lower list.
CHAPTER
6
Both the delete-batches in the upper list and the delete-batch occurrences in
the lower list can be sorted by clicking onto the column headers.
To restore selected occurrence(s), select in the lower pane either:
“Right-click menu”
Append to current file, if the occurrence
was deleted from the currently open E4F file, or
“Right-click menu”
Send to Database, if the occurrence was
deleted from the currently open database
“Right-click menu”
Export, to export them in a new E4F file.
Recycle Bin usage
The Recycle Bin behaviour is customisable through its Options tab.
The Warn when size reaches field allows to define a threshold,
expressed in MByte(s), which will trigger a warning message to
the user, prompting her/him to “purge the Recycle Bin”.
The When purging keep last field specifies the time-range of “lastdeleted” occurrences to be preserved when purging the Recycle Bin.
The Purge now button purges the Recycle Bin on user-demand.
The Enabled check-box allows to disable/enable The Recycle
Bin. The Recycle Bin is enabled by default.
Working with the list of occurrences
6-9
The ECCAIRS Browser
7
6.
WORKING WITH DATABASES
TITOLO7
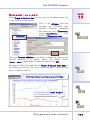
OVERVIEW
The ECCAIRS Browser can both work on occurrences stored into
databases or files. This chapter deals with ECCAIRS Browser operation
on databases.
The first part is about basic operations needed to deal with databases,
i.e. connecting to the database, locking and unlocking of occurrences
(to manage concurrent editing access to the same occurrence) and
saving occurrences into the database.
The second half of this chapter is about the core database access
method: the query and its related tool, the Query Builder.
The ECCAIRS Query Builder is an integrated tool where queries and
query
libraries
are
created,
edited
and
managed.
It provides the user facilities to build queries without any need to be a
database expert.
The ECCAIRS Query Builder, described here in detail for ECCAIRS
Browser application, is also used in other ECCAIRS applications and
utilities which need to modify, create or execute queries on the
database.
Working with databases
7-1
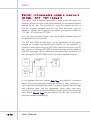
PART 2
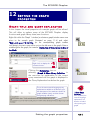
CONNECTING
TO A DATABASE REPOSITORY
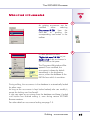
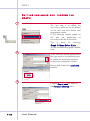
1
Select File
Connect... from the
menu bar
or
push
the
corresponding icon-button in the
toolbar.
2
To logon:
Choose among the list of
configured repositories
Enter the Username and
the Password that have
been setup by the ECCAIRS
system administrator
Click on OK to confirm.
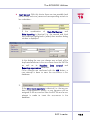
WHAT IF THE DATABASE REPOSITORY IS NOT LISTED ?
If the database repository is known to exists (see below) but it is not listed
in the repository drop-down list of the logon dialog, refer to “Finding a
Repository” on page 3-3 to add it.
A specific database repository actually exists if it has been created and
configured on a repository server by the ECCAIRS system administrator.
Note that the repository E4F does not support database access. The E4F
repository is pre-defined by default in the Repository Manager and your
ECCAIRS system administrator might make it available to the users.
7-2
USER MANUAL
The ECCAIRS Browser
CHAPTER
7
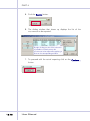
3
For a short time a splash screen
may be displayed while the
connection is being established.
When either the main window is
displayed (if connecting at start-up),
or the control is released to the
ECCAIRS Browser main window
(when switching from one repository
to another) the system is ready to start
working with the database.
4
Connecting to a
database does not
automatically
display occurrences.
The Occurrence List
pane is automatically
switched to the Show
the Query Occurrence
List View mode
(different background
colour - pale blue by
default).
To extract/list
information into the
occurrence list pane
a query must be
created and
executed (see page
7-6 and following).
The connect icon in the status bar (bottom right) will
be turned active and the changed repository name
will be displayed.
The connection with the repository in use is automatically closed either
by connecting to another repository (File
Connect ... function) or
when closing the ECCAIRS Browser (File
Exit menu-item).
Working with databases
7-3
PART 2
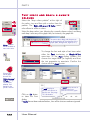
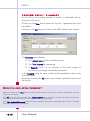
SAVING
OCCURRENCES INTO DATABASES
Importing occurrences into the database is achieved most conveniently
using the E4F Loader (see page 16-1), a stand-alone ECCAIRS utility.
The E4F Loader offers the most suitable options and capabilities for
importing occurrences into the database.
However, it is also possible to use the ECCAIRS Browser to save
occurrences selected in the Occurrence List pane, for instance loaded
from an E4F file, in a database repository.
To do this, first select the required occurrences and then the
File
Send to
Database menu-item.
The File
Send to
Database
menu-item is
enabled only if the
Occurrence List
pane displays
occurrences from a
file (i.e. yellow
Occurrence List
pane, by default).
You can use
View
Show the
File Occurrence List
or the
corresponding icon
to switch to File
Occurrence display.
A consistency check is performed
on the occurrences before
inserting them into the database
and, if any error is detected, a
suitable report is displayed.
GENERATING
OCCURRENCE FILES FROM THE
DATABASE
Conversely, although the E4 Generator (see page 15-1 and/or Exporter (see
page 17-12) ECCAIRS utilities are the suitable tools for exporting occurrences
into files, the ECCAIRS Browser also offer the File Send to File function,
which allows to create an E4F file out of selected occurrences originated from
a database query or even from another E4F file (see page 8-4 and 6-5).
7-4
USER MANUAL
The ECCAIRS Browser
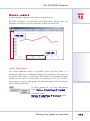
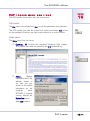
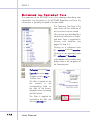
LOCKING
AND RELEASING OCCURRENCES
When creating or modifying occurrences (see page 9-1) in the
database, ECCAIRS Browser automatically puts a lock on the
occurrence. The lock prevents other users to edit or delete the same
occurrence at the same time.
The locked occurrence is marked
by a special colour in the
Occurrence List pane.
CHAPTER
7
The colours used to
mark the lock can
be customised in the
Appearance tab of
the View
Options
dialog window
(see page 5-3).
Positioning the mouse over locked occurrences
(no clicking ) a tool-tip displays the user who is locking
the occurrence and the initial locking date and time.
After completion of the edit phase the ECCAIRS Browser automatically
releases the lock on the occurrence.
Occurrence locking can also be explicitly set by the
user, even when no editing is in course, to prevent other
users from modifying the occurrence.
This is achieved by selecting the occurrence(s) and
choosing Occurrence Lock Occurrence from the
menu bar. The occurrence(s) remains locked until the
user releases the occurrence, even if the locking user
disconnects from the repository or logs off the system.
The locked occurrence can be released, by the same
user who put the lock, by selecting the occurrence and
choosing Occurrence Release Occurrence from the
menu bar.
Working with databases
A different lockmarking colour is
used when the lock
has been put by a
different user, and
hence cannot be
released by the
current user.
7-5
PART 2
QUERIES
Queries are commands sent to the ECCAIRS database server to
identify a set of occurrences from the database based on a criterion or
a number of logically combined criteria.
The basic building block of a query is a criterion. A criterion is a
requirement for a particular occurrence attribute (e.g. visibility).
Visibility. less than 50 m
Any of the attributes can be used to build a criterion.
The ECCAIRS
Browser provides the
user facilities to
build criteria
(see page 7-13)
and queries
(see page 7-8) with
ease, without any
need to be a
database expert.
Criteria can be combined logically by AND and OR operators, and
brackets can be used to indicate grouping.
{
Precipitation intensity. equal to Heavy
and
Visibility. less than 50 m
}
Parametrical queries are also supported: i.e. the value(s) of the
attribute are not defined at design time but rather at run-time. When
running the query the user is prompted with a dialog box to provide the
actual value(s) of the attribute for the particular execution of the
parameter query.
{
Injury severity level. equal to (Value to Ask)
}
ECCAIRS queries are organised and stored in libraries, which can
contain an unlimited number of queries. In the ECCAIRS Browser a
query cannot exist stand-alone but only defined within a Query library
(see page 7-7).
Query libraries and queries are created, edited and managed via the
Query Builder dialog window (see page 7-8).
7-6
USER MANUAL
The ECCAIRS Browser
QUERY
CHAPTER
LIBRARIES
ECCAIRS queries are organised and stored in libraries. Each library
can contain an unlimited number of queries. Within the ECCAIRS
Browser a query cannot exist stand-alone but only defined within a
Query library.
7
Queries in the currently opened query library are listed by name within
the main pane of the Query Builder dialog window.
Stand-alone queries
(i.e. not within
Query Libraries) can
instead exist within
other applications
(e.g. Exporter page.
18-4).
Queries can be added, edited and deleted from the library.
Query libraries allow a better management of queries, e.g. users can
group queries of a specific type in libraries so that they can easily be
retrieved for specific purposes.
Query libraries can be created, opened, closed and saved with userspecified names.
Libraries are saved in ECCAIRS 4 Query file format (.E4q file
extension).
Hence query libraries also provide an easy mean to exchange queries
between users and organisations, since libraries are stored in files
which can be easily sent and copied across.
The Query Builder main window functions are described in detail on
page 7-8.
Working with databases
7-7
PART 2
QUERY BUILDER
Selecting Database
Build Query... from the menu bar or the
corresponding icon-button in the toolbar the Query Builder dialog
window will be displayed.
QUERY BUILDER MENU BAR AND TOOLBAR
QUERY LIBRARY EDITING PANE
QUERY EXECUTION AND CONTROL PANE
QUERY EXPLANATION PANE
If a query library has been previously opened, it is automatically re-opened.
Alternatively a new empty library is implicitly created and opened.
The menus and toolbar items allow to perform:
Query library editing: see page 7-9
Query editing: see page 7-10
Query execution: see page 7-18.
Query Explanation pane
The Query Explanation pane displays a natural language explanation
of the currently selected query. The same information can be shown,
without having the Query Builder dialog open, by selecting the
Database
Show current Query menu-item of the main Browser
window (see page 7-19).
7-8
USER MANUAL
The ECCAIRS Browser
CHAPTER
EDITING
QUERY LIBRARIES
Query libraries can be edited in the Query Library Editing pane using:
7
The Library and Query menus and the Right-click menu
The toolbar icon-buttons.
From the Library menu it is possible to:
Create a New query library
Open an existing one
Save it with the current name
Save as… saves it with another name
Close the library
Directly select and open any of the
most recently used libraries
Exit the Query Builder.
From the Query menu, it is possible to:
Create a New query
Edit the selected query in the list
Cut, Copy, Paste a query
Delete the selected query from the
current query library.
Working with databases
By right-clicking in
the Query Library
Editing pane the
contextual menu is
invoked. The
“Right-click-menu”
has the same menuitems as the Query
menu.
7-9
PART 2
CREATING
AND EDITING QUERIES
Creation of new queries or editing of existing ones can be achieved
within the Query Builder main window by:
Selecting Query
New or
Query
Edit menu-items
(this latter requires previous
selection of an existing query).
Right-clicking within the query pane:
“Right-click-menu”
New or
“Right-click-menu”
Edit
(this latter requires previous
selection of an existing query).
A Restrictions editing window, i.e. the query editing main window, shows up.
RESTRICTIONS EDITOR
MENU BAR AND TOOLBAR
QUERY DEFINITION PANE
7-10
USER MANUAL
The
Restrictions
window
has
a
menu bar (with a
single menu: Edit), a
toolbar, a Query
Definition pane (a
white pane hosting
the query being
edited) plus the
"standard" OK and
Cancel buttons.
The ECCAIRS Browser
In the sample snapshot of a Query Definition pane shown below it is
possible to identify the three basic elements of which a query is built:
CHAPTER
7
{
Precipitation intensity. equal to Heavy
and
Criteria
Visibility.Logical
less than
50 m
Operators
}
Brackets
Criteria
A Criterion is an expression involving 3 elements :
ATTRIBUTE OPERATOR REFERENCE_VALUE/FUNCTION
e.g.
State/Area equal-to
Andorra
Logical operators
A Logical Operator is one of the 2 logical operators AND/OR used to
connect 2 or more criteria:
For details on the
facilities available
when building
criteria see Criterion
Builder window on
page 7-13.
CRITERION AND/OR CRITERION
e.g. State/Area equal-to Andorra
AND
Local date equal-to Current Year
Brackets
Brackets are used to group logical expressions to build complex criteria:
{ } - curly brackets are used for normal grouping.
[ ] - square brackets are used to group criteria
referring to a specific item of multiple-ones, for
instance to a specific aircraft when more than
one aircraft is involved in an occurrence.
Working with databases
7-11
PART 2
Query elements are added, deleted and edited in the Query Definition
pane using:
The Edit menu and the Right-click menu items
The toolbar icon-buttons.
EDITING TIPS
Double-clicking a
left bracket
collapses and
expands the
contained elements.
The query content
can be completely
cleared selecting
Edit
Clear
menu-item.
Possible errors in the
query syntax are indicated
by
suitable
message
windows (for instance
because
of
an
unbalanced number of
brackets).
A
specific
Criterion
Builder window (see page
7-13), helping the user to build criteria, is invoked by:
Double-clicking on an existing criterion
Selecting Edit
Edit menu-item (or “Right-click menu”
or even toolbar edit icon) when focus is on a criterion
Edit
Selecting Edit Add Criterion
(or “Right-click menu” Add Criterion or even toolbar add icon)
when the focus is on a logical operator or on after a left bracket.
7-12
USER MANUAL
The ECCAIRS Browser
CHAPTER
CRITERION BUILDER
The Criterion Builder dialog window allows to define the 3 elements for
a query criterion:
7
ATTRIBUTE
OPERATOR
VALUE (reference value)
Attributes
A full qualified attribute identification involves specifying the triplet
Topic-Section-Attribute.
This can be entered either:
Using the ECCAIRS standard
Attribute Selection dialog window
(see
also
side-note).
Once
selected, both the Id field and the
triplet Topic-Section-Attribute get
completed/filled-in.
Entering directly the ICAO Attribute
Id numerical code in the Id field.
Working with databases
More options for the
ECCAIRS standard
Attribute Selection
dialog window are
given in Specifying
attribute values,
page 9-8, within
the Editing
occurrences
chapter).
7-13
PART 2
Operators
This can be chosen from the drop-down list proposed in the dialog.
The type of operators proposed varies according to the attribute
selected.
Some
samples
of
operators
available
are shown below.
The operators may require as reference value:
No specific value (i.e. the "has value", “has no value”)
A single value (e.g. “equal to”, “less than”, …)
Two values (e.g. “between”, “not between”, …)
Multiple values (e.g. “has at least one”, …).
Attributes which have the possibility to be
assigned alternative values (i.e. not yet
coded values, see page 9-9 for details)
also allow a set of operators referring to
the alternative values, either as “other
value” or as “to be coded”, for those
alternative values which have been
proposed a new code.
7-14
USER MANUAL
The ECCAIRS Browser
CHAPTER
Values (reference values)
The value definitions box allows to specify the reference value for the
attribute and operator chosen by:
7
Entering a free (unconstrained) value in an field box
Choosing a value from a drop-down list
See side box for
measurement unit issues.
Choosing a value from a hierarchical selection and search
dialog window (see page 9-8 for details).
Clicking with the
mouse right-button
on any attribute
measurement unit
will display a set of
alternate units
available..
ECCAIRS also
performs unit
conversion
calculations if the
measurement unit is
changed after a
numerical value has
been entered in the
field box.
Two-values (range) selection
If two reference
values are required
(e.g.
“between”,
“not between”, …)
the Value definitions
pane is modified to
host them.
Working with databases
7-15
PART 2
When multiple values are required (e.g. “has at least one”, …) a specific
multi-selection box is displayed within the Value definitions pane.
ADD VALUE
EDIT VALUE
REMOVE VALUE
Adding and editing values invokes different type of dialog windows,
depending on the attribute values structure (list or tree):
Multi-value selection – list-organised values
List-organised values are
chosen via a floating
dialog hosting the
drop-down list.
Multi-value selection – tree-organised values
Tree-organised values are
chosen via a floating dialog
with an edit icon-button
which invokes a treeselection/search dialog.
7-16
USER MANUAL
The ECCAIRS Browser
Date-range values grouping functions
A special case in the specification of date(s), which offers a Function
check-box that gives access to a drop-down list of commonly used
grouping functions to express date ranges.
CHAPTER
7
Run-time specified values – Parameter Queries
Alternatively, and for each of the above cases, by selecting the
Ask later check-box the user will be prompted to enter the reference
value each time the associated query is executed.
This mode is also sometimes referred to as “parameter-query”.
Working with databases
7-17
PART 2
EXECUTING
AND REFRESHING QUERIES
To execute a query:
Select the query to be executed with the mouse (single click)
and then push the OK button
Alternatively, just double-click directly on the query to be
executed.
Double-clicking on a
query name executes the
query and closes the
Query Builder window.
The Count button checks how many
occurrences match the current query
criteria, without closing the Query Builder
window.
The resulting number is displayed in the
field above the Count button.
The OK button executes
the query and closes the
Query Builder window.
The Cancel button closes
the Query Builder without
executing a query.
The Query Builder window closes and, after the execution of the query
on the database, the occurrences matching the query criterion/criteria
are shown into the Occurrence List pane.
The Count function, invoked by the Count button (see its caption in the
picture above), does not close the Query Builder window, as the query
Execution instead does.
Therefore the Count button can be suitably used to test a query before
actually executing it.
7-18
USER MANUAL
The ECCAIRS Browser
CHAPTER
QUERY
BATCHES
If more than 500 occurrences result from a query, the resulting occurrences
are handled and shown in the Occurrence List pane in batches of 500
occurrences (500 is the default size of the batch). The size of the batches is
customisable by the ECCAIRS system administrator.
7
The current batch number will be displayed in the status bar.
Switching
Database
QUERY
between
batches
is
Next Batch menu-item.
done
via
REFRESH
Since the content of the ECCAIRS database repository is dynamic and may be
updated at the same time a user is executing a query, query results may vary.
Selecting Database Refresh Query menu-item will rerun the last query ran on the database.
SHOW
CURRENT QUERY
A text window with a natural language explanation of the currently
selected query may be recalled selecting
Database
Show current Query menu-item or the
corresponding icon-button on the toolbar.
The same information is shown in the Query
Explanation pane of the
Query Builder dialog window
(see page 7-8).
The same function is
available in other ECCAIRS
applications which involve queries (e.g. ECCAIRS Grapher and
ECCAIRS Exporter).
Working with databases
7-19
PART 2
QUERY
BY DATE
–
YEAR/MONTH
STATISTICS
1
The ECCAIRS Brower provides the
facility to sort and plot the
occurrences, selected with a query,
in
an
year/month
table.
Proceed as follows:
Select the Database
menu-item.
Query by date
The Query by date dialog opens.
2
Select a query among those listed
in the Based on query drop-down
list. The list includes all the queries
within the currently open query
library plus a “built-in” Select All
query (see side note).
The first choice of
the drop-down list, a
blank field,
corresponds to a
“default” select-all
query “built-in” the
year/month plot
itself (i.e. not taken
from the current
query library).
The related year/month plot is
immediately displayed (point 3
below).
3
The date to be used for
the query can be either the
Local date or the
UTC date.
7-20
USER MANUAL
Select Include empty dates to
include also occurrences with
an empty date attribute.
An additional row, with empty
year label, will be displayed.
The ECCAIRS Browser
Pushing the Query details button displays a dialog with a natural
language explanation of the currently selected query.
CHAPTER
7
4
Clicking on a specific cell (i.e. on a specific month and year
combination) and then clicking on the OK button, the related
occurrences are loaded into the Browser occurrence list pane.
Working with databases
5
7-21
The ECCAIRS Browser
8
WORKING WITH OCCURRENCE
FILES
7.
TITOLO7
CREATE
A NEW OCCURRENCE FILE
Occurrence files contain any number of ECCAIRS 4 occurrences in an
encoded format. They have an .E4f extension and so we normally
mention them as E4F files in this manual.
To save disk space
occurrence files can
be saved in a
compressed format
(see page 8-5).
The compressed
format will not
however affect
positively the system
performance.
The number of occurrences in an E4F file is limited only by the capacity of
your workstation. Occurrences usually have a size between 10 and 50
kBytes. 1000 occurrences will take up as an average 30 MBytes of disk
space. So for performance and maintainability reasons it is suggested to
limit an E4F file to approximately 1000 occurrences. To do so one could
create E4F files that cover a specific time frame like a year or a month.
To create a new occurrence file
select the File
New menu-item
or the corresponding icon-button
in the toolbar.
1
2
This will bring up the standard file
selection dialog window to specify
the location and name of the
occurrence file to create.
Working with occurrence files
8-1
PART 2
OPENING-CLOSING
1
OCCURRENCE FILES
To open an existing occurrence file,
select File
Open from the
menu bar or the equivalent iconbutton in the toolbar.
This will bring up the standard file
selection dialog to specify the
location and name of the file to
open (with .E4f extension).
2
To directly re-open any of the most
recently used files, select it from
those listed in the bottom part of
the File menu.
An E4F file can also be opened by
double clicking onto its name in any
Windows explorer view (e.g. browsing
the files from "My Computer" icon).
See picture below.
3
8-2
User Manual
The ECCAIRS Browser
CHAPTER
8
4
During the E4F occurrence file
opening phase the occurrences will
be loaded and the occurrence list
pane
will
be
accordingly
populated.
This phase may take some time for
large E4F files.
To close the currently open
occurrence file, select from the
File
Close menu-item.
Working with occurrence files
5
8-3
PART 2
SAVING
OCCURRENCE FILES
1
To save the occurrences in the
currently open occurrence file just
select the File
Save menu-item
or the corresponding icon-button in
the toolbar.
2
The File Save as ... menu-item
saves all the occurrences in the
occurrence list to a different file from
the one currently open. There is no
corresponding icon in the toolbar.
If errors occur on
saving the
occurrences on file
a log message
window with actions,
warning and error
messages is
displayed.
When the occurrence list has not
been modified, e.g. no occurrences
have been added/deleted/modified,
the File
Save menu-item is
disabled, while File Save as ... is
always enabled.
3
Also the File Send to function allows to
save occurrences. The option sends the
currently selected occurrences (i.e. not all,
as does the File Save menu-item) either
to a file, a database (see page
7-4) or as an attachment to an
E-Mail (see page 10-4).
The File Send to option can be used
when only some of the occurrences
loaded need to be saved on file.
8-4
User Manual
The ECCAIRS Browser
CHAPTER
SAVING
COMPRESSED
E4F
FILES
The user can choose between two formats with the Save as type
drop-down list whenever a save file dialog is invoked to save
occurrences in an E4F file, i.e. using:
File
Save as ... (see page 8-4)
File
Send to (see pages 6-5, 7-4, 8-4, 10-5)
File
Send deidentified to (see page 6-6).
8
The choices available in Save as type are:
The default file format Eccairs 4 Data Files (E4F files, ending
with the extension .E4f).
By choosing Eccairs 4 Compressed Data Files instead (ending with
extension .E4z), the file is compressed to save space.
Each occurrences usually has a size between 10 and 50 kBytes. The
compression can reduce the file size as much as 10 times. This may
turn out useful when attaching occurrence files to e-mail or saving
them to a space-limited device (e.g. floppy-disk, small pen-drives, etc.).
All files just removes the filter to display only .E4f or .E4z files,
respectively, within the dialog. The file is still saved in E4F format.
Working with occurrence files
8-5
The ECCAIRS Browser
9
8.
EDITING
OCCURRENCES
TITOLO7
ECCAIRS
OCCURRENCE STRUCTURE
In ECCAIRS 4 occurrence data is collected in hundreds of different
Attributes. Some Attributes are valid for an Occurrence (like the ‘Date’
the occurrence took place), others instead are valid for a sub-entity of
the occurrence (like the ‘Model’ of an aircraft, in particular when the
occurrence involves two aircrafts).
For visualisation and editing purposes, Attributes are grouped together
in Sections. An example of two Attributes grouped together in a section
is the ‘Latitude’ and the ‘Longitude’ of the place an occurrence took
place (grouped together in Section ‘Where’).
For navigation purposes Sections can be grouped together in Topics.
A group of Topics placed in a particular sequence (hierarchical tree)
can be made available to the users of a Repository as a View.
Though the ECCAIRS system comes with a set of "standard" views (see
page 4-4) an ECCAIRS 4 administrator can modify or add Views as
required. Topics can also be customised and/or created by the
administrator.
Sections, and the related Attributes, are instead fixed in the standard
ECCAIRS 4 system and cannot be changed by the administrator.
All Topics together can form a hierarchical tree by which the user of
the ECCAIRS Browser can identify the place to look for particular
information.
To sum up, we can say that Occurrences are described in ECCAIRS 4
by a hierarchical collection of topics, sections and attributes.
Editing occurrences
9-1
PART 2
The hierarchy is explicitly displayed in the Occurrence Tree Pane of
ECCAIRS Browser. Topics are represented by icons (see figure below).
The root topic of the Occurrence Tree is the occurrence itself,
that, when selected, shows the Occurrence Identification data
within the Information Pane.
1st level topics are represented by icons that do not have
further branches in the tree (i.e. with no sign on its left).
Topic icons that have furter branches in the tree (i.e. with
the + sign on its left) will have sub-topics (2nd and nth level
topics)
Each topic has an associated page displayed in the Information Pane which is
displayed when clicking on the topic icon.
Each information page is then structured into sections, which are sets of related
occurrence attributes (see page 2-9) taken from the ADREP 2000 taxonomy.
SECTIONS (red)
ATTRIBUTES (blue)
9-2
User Manual
The ECCAIRS Browser
Subsequent level topics (in the ADREP 2000 View) are shown in the
picture below.
CHAPTER
9
They are sub-topics of the first-level topics:
Aircraft
Aerodrome
Airspace
ATS Unit.
Editing occurrences
9-3
PART 2
CREATING
NEW OCCURRENCES
1
2
A new occurrence can be created
by
either
selecting
Occurrence
New
from the
menu bar
or
pushing
the
corresponding icon-button in the
toolbar.
This creates a new occurrence in the working environment, i.e. in a
temporary space (not yet in your current file or database-repository)
and opens a separate Occurrence Edit window.
The newly created occurrence will
contain some default attribute
values, if any have been defined
(see page 10-7).
See page 9-6 for details on the Occurrence Edit window.
9-4
User Manual
The ECCAIRS Browser
MODIFYING
CHAPTER
OCCURRENCES
9
An existing occurrence can be
modified
either
selecting
Occurrence
Edit
from
the
menu bar
or
pushing
the
corresponding icon-button in the
toolbar.
It is also possible to select
“Right-click menu” Edit or just
double-click on an occurrence in
the Occurrence List pane.
1
2
The Occurrence Edit window will be
opened. Once modified, the
occurrence is always by default
stored back in the originating
source, either the database or the
E4F file from which it was taken.
During editing, the occurrence in the database is automatically locked
for other users.
As long as the occurrence is kept locked nobody else can modify it,
except the locking user him/herself.
A user can open an occurrence from the database and keep it locked
until he/she has finished editing it, even during various ECCAIRS
Browser sessions.
For other details on occurrence locking see page 7-5.
Editing occurrences
9-5
PART 2
THE
OCCURRENCE EDIT WINDOW
1
An Occurrence Edit window is
opened both when creating a new
occurrence and when editing an
existing one.
A new occurrence
may already contain
default attribute
values, if any has
been defined and
saved as template
(see page 10-7).
The Occurrence Edit window is
based on the Info pane of the main
ECCAIRS Browser window.
However, it is a separate
independent window and thus coexist with the main window.
2
To fill in data for an occurrence
first define the first level topics by:
Selecting the top (root)
Occurrence node,
The user can also
set ECCAIRS
Browser to show all
the nodes in the
topic tree, also if
empty
(see page 5-2).
Then choosing the topic to
be
added
from
the
right-click menu.
3
To add further level topics to a 1st
level one, select it and again
choose the topic to be added from
the right-click menu.
Once the occurrence-tree leaves
are reached, it is possible to fill in
attributes within the sections of the
Info pane. Refer to the “Specifying
attribute” section on page 9-8 for
details.
9-6
User Manual
The ECCAIRS Browser
The File menu in the Occurrence Edit menu bar allows to:
Save the data entered so far
with the occurrences currently
in the Occurrence List pane.
CHAPTER
9
Set and Restore default
occurrence content (template):
see page 10-7.
Send to
E-mail…,
being edited.
File… or
database the occurrence
Check for duplicate occurrences. The check can be performed when
editing occurrences stored in a database. A check on duplicate State
File Number and State Reporting attributes is in any case made when
saving the edited occurrence back in the database.
The Occurrence Edit
window has a
different default
background and
colour scheme, to
distinguish it from
the browse-Info
Pane of the main
Browser window.
The View menu in the Occurrence Edit menu bar allows to:
Copy data window (take a snapshot), exactly as
with the Information Pane in the main window.
Toolbar: toggle on/off toolbar visibility.
Options: to customise display properties of the
Occurrence Edit (and other) ECCAIRS windows and panes in
particular its colour scheme (see page 5-2). The same functions are
available in the main window View Options menu-item.
Most of the functions in
the two menus are
available also in the
toolbar.
MINIMUM NUMBER OF ATTRIBUTES REQUIRED
The minimum number of attributes that need to be filled to be able to save the occurre
in the File Information section within the main (root - occurrence) occurrence-tree node
State Reporting
State File Number
Reporting Organization.
If any of them is missing an error message is issued on saving/exiting.
Editing occurrences
9-7
PART 2
SPECIFYING
ATTRIBUTE VALUES
There are different ways to fill in occurrences attributes:
Direct editing
Data type errors are
notified to the user
by removing the
incorrect input data
and issuing an
alarm sound
(bell sound).
Unit conversion
calculations are
performed if the
measurement unit
is changed after a
numerical value
has been entered.
The user types in the value needed,
terminated by the [RETURN] key, of
by moving to another attribute
either with the [TAB] key or by
moving the mouse pointer.
Clicking
with
the
mouse
right-button on any attribute
measurement unit will display a set
of alternate units available.
Drop-down list
The user chooses from one of the
predefined
attribute
values
proposed in a drop-down list.
Also ICAO
attribute/section
codes and their
definitions can be
displayed.
Just hold down the
[CTRL] key while
clicking onto the
section/attribute
name in the
Information pane.
See page 10-6 for
details.
Multiple selection boxes
When more than one attribute
value may be specified, ECCAIRS
proposes a box (dialog window)
where the user can add and
remove attributes values to a
selection list-pane (on the right).
There are also a value explanation
and a value filter facilities, which are
described on pages 9-9 and 9-10.
9-8
User Manual
The ECCAIRS Browser
CHAPTER
Hierarchical selection boxes
When suitable, ECCAIRS proposes a hierarchical selection box, with
display filter capabilities, where the user can either:
FIND
9
ATTRIBUTE VALUE BY BROWSING
Clicking on the right button opens
the hierarchy navigation window.
Clicking on a collapsed node
expands it into its branches.
Clicking on an expanded node
collapses its branches.
SPECIFY
The hierarchy
navigation window is
also opened if the
user types any text in
the attribute field.
The text is
automatically placed
in the filter field at the
bottom of the window
(see page 9-10).
AN ALTERNATIVE VALUE
If the value wanted is not included
in the predefined multi-level value
tree, in some cases a specific
alternative value may be entered
using the Alternative Value tab.
Displaying-hiding value explanations
Multiple and Hierarchical selection dialogs have the Explanation button
at their left-bottom edge to toggle on/off display of value explanations.
Editing occurrences
Ticking the The
value entered can
be proposed as new
code check-box
allow to propose the
value entered to be
included as new
standard code.
9-9
PART 2
Filtering values/explanations in multiple and hierarchical boxes
Multiple and Hierarchical selection dialogs allows to filter displayed
values using the rightmost button at their bottom edge, Filter On/Off.
FILTER
VALUES
To filter values by a specific word
click on the Filter On/Off button: a
filter text field will appear on its left.
Had the user typed any text in the
attribute field of the editing pane, the
filter would be toggled on and the text
would be copied in the filter field.
Type in the filter field the word, or
part of it, to be used as a display
filter, followed by the [ENTER] key.
Type [ENTER] after
the filter-word to
run the filter.
Only branches/lines in which one of
the values contains the specified text
are now displayed.
The first occurrence of the filterword found is automatically
selected.
FILTER
VALUES AND EXPLANATIONS
If the Explanation button has also
been pressed the filter will operate
also on the short and detailed
descriptions.
So if the filter-word is found among
the explanations, the corresponding
value branch/line will be displayed
also if the value itself does not
contain the filter-word.
9-10
User Manual
The ECCAIRS Browser
CHAPTER
DUPLICATING
OCCURRENCES
9
A copy of an occurrence can be created selecting the occurrence to be copied
in
the
Occurrence
List
pane
and
then
either
Occurrence Duplicate Occurrence menu-item in the main ECCAIRS
Browser window, or the pushing the corresponding icon-button in the toolbar.
ECCAIRS creates a new occurrence, containing exactly the same
attributes as the original (see the exceptions below), and opens the
Occurrence Edit window on it.
In the duplicate occurrence the State File
Number attribute-field is cleared since this
is supposed to be a unique identifier for
each occurrence, and needs to be set to a
new value.
Editing occurrences
In the duplicate
occurrence the
Management topic
does not get
anything
inherited/copied
from the “source”
occurrence, as this
is a new occurrence
with his own
management
history.
In particular the
Date report created
and the Report last
modified attributes
in the Occurrence
Report section are
set to the date and
time when the
duplication has
been performed.
9-11
PART 2
OCCURRENCE
WINDOW SNAPSHOT
To take a snapshot of the currently displayed Information Pane select
View
Copy data window menu-item, or the corresponding iconbutton in the toolbar.
It is possible to take and manage more than one snapshot of any
Information pane, at pleasure.
Each snapshot is kept in a separate independent window and can be
moved around, resized, etc.
9-12
User Manual
The ECCAIRS Browser
For instance the snapshot feature can be used to display an already
filled-in narrative topic(s), and use it as reference when entering
(editing) other topics/sections/attributes.
CHAPTER
9
MANAGING SCREEN SPACE EFFICIENTLY WITH SNAPSHOTS
When minimising (to an icon) the "read-mode" main Browser window, also the
snapshots get minimised and are no more visible.
When wishing to use an occurrence snapshot as a fererence while editing, it is
advisable to resize rather than minimize the Browser window.
By doing so the user gains display space on the desktop for the coexistence of
snapshot(s) with the edit occurrence window.
Editing occurrences
9-13
The ECCAIRS Browser
10 P R I N T I N G A N D O T H E R U T I L I T I E S
9.
TITOLO7
PRINTING
FUNCTIONS AVAILABLE
The printing-related functions in ECCAIRS Browser described here are:
Previewing Occurrence Printouts: see page 10-2.
Printing Occurrences: see page 10-4.
and are both invoked from the Occurrence menu and from the
corresponding toolbar items.
In addition there are two other functions which have been introduced
in previous sections of this manual:
Printing Lists of Occurrences: see page 6-7.
Set Default Printer and Margins: see page 5-9.
The first is selected by the File
Print Occurrence List menu-item (and
corresponding toolbar item).
The second is selected by the View
Options menu-item, both in the
Occurrence Edit and in the main ECCAIRS Browser window.
OTHER
UTILITIES
Other utilities dealt with in this section include:
Sending occurrences as E-mail: see page 10-5.
Finding definitions and descriptions: see page 10-6.
Occurrence template: see page 10-7.
Help and system info: see page 10-8.
Printing and other utilities
10-1
PART 2
PREVIEWING
OCCURRENCE PRINTOUTS
The menu bar item Occurrence
Print Preview, or
the corresponding icon-button on the toolbar,
allows to preview the printout of all the occurrence
sections that have been filled-in for the currently
selected occurrence.
A Print Preview window allows to control both the
preview and the printing via a specific menu bar, a
simple top print toolbar and a bottom navigation toolbar.
PRINT PREVIEW MENU BAR.
PRINT TOOLBAR.
NAVIGATION TOOLBAR.
10-2
User Manual
The ECCAIRS Browser
By using the bottom navigation toolbar it is possible to navigate though
all the pages, also by entering a specific page number.
Previous page
First page
CHAPTER
10
Next page
Last page
The print preview menu bar allows to control all the preview and print
functions, preview zoom included, and to recall information on the
program via its Help
About… menu-item (see page 10-8 for details
on the information displayed).
The print toolbar allows to print the currently displayed page or all the
document.
Printing and other utilities
10-3
PART 2
PRINTING
OCCURRENCES
The menu bar item Occurrence
Print allows to
print all the occurrence sections that have been
filled-in for the currently selected occurrence.
The same function can be invoked by pushing the
print icon-button in the toolbar.
The detail level of event descriptions, both to be printed
and displayed, is customisable (see page 5-4).
The printout includes all the
sections that have any
attribute filled in the currently
selected occurrence.
The standard
Windows print
dialog is invoked so
that any other
installed printer can
be specified, beyond
the default ECCAIRS
printer proposed as
pre-selected choice,
before actually
issuing the print
command with the
Print button.
10-4
User Manual
The ECCAIRS Browser
SENDING
OCCURRENCES AS
E-MAIL
It is possible to send selected occurrences also as an attachment to an
E-Mail. To do this, select the required occurrences and select
File Send to E-mail... menu-item or the corresponding toolbar item.
CHAPTER
10
The MAPI-compliant mail
client program, currently
defined as default within in
the operating system (e.g.
Outlook Express, Eudora,
Pegasus, Mozilla/Netscape
Mail, Thunderbird, etc.) is
invoked.
The message body is filled
with a pre-typed test,
including date, time, current
ECCAIRS operator and
related organisation, and the
selected occurrences are grouped and attached as an E4F file.
Printing and other utilities
10-5
PART 2
FINDING
DEFINITIONS AND DESCRIPTIONS
ECCAIRS Browser provides a useful feature for recalling ICAO section
and attribute coding and definition, both in the reading (browsing) and
in the editing phases.
To display ICAO attribute/sections codes and their definitions hold
down the [CTRL] key while clicking ([CTRL]+click) onto the section or
attribute name in the Information Pane (both in view and edit mode).
+
To remove the pop-up
description just click onto it.
The same mechanism can be used to obtain descriptions and definitions of
attribute values in view mode, by [CTRL] + click on already filled-in attribute
values. This holds for values chosen from pre-defined lists and not for
text/numerical values entered (typed) directly by the user.
Detailed information on topics, sections and attributes, including
values allowed for the attributes, can also be obtained via the Dictionary
Browser, which can be started selecting Help
Dictionary Browser…
See page 17-1 for further details.
10-6
User Manual
The ECCAIRS Browser
OCCURRENCE
CHAPTER
TEMPLATE
Whenever you are editing an occurrence you can decide to save it as
your personal default occurrence.
This is the most convenient way to set, for example, your organisation
as the default organisation or your country as the default state
reporting.
10
Every time a new occurrence is created (see page 9-4) the attributes
values saved in the occurrence template are pre-set in the new
occurrence by default.
To set an occurrence as the default occurrence select
File
Set occurrence as default while editing an occurrence in the
Occurrence Edit window (see page 9-6).
To step back to the system default occurrence template (empty
template
–
no
attributes
pre-set),
select
File
Restore default occurrence menu-item within the Occurrence
Edit window.
Printing and other utilities
10-7
PART 2
HELP
AND SYSTEM INFO
The Help menu has three items:
Eccairs 4 Browser Help F1 menu-item and the [F1] keyboard key
both invoke the standard Windows help support.
Dictionary Browser… starts the Dictionary Browser, which can be
useful while editing queries and selecting attributes.
See page 17-1 for details.
10-8
User Manual
The ECCAIRS Browser
About… displays a dialog whose upper pane contains
information about the software version in use.
CHAPTER
10
OK closes this dialog window.
System Info recalls the system application which gives
information on hardware and software configuration of the
user computer.
Contact us allows to send mail to the ECCAIRS development
team by invoking the user mail client program (i.e. the program
currently defined as the default mailer e.g. Outlook Express,
Eudora, Pegasus, Mozilla/Netscape Mail, Thunderbird, etc.)
with the correct address already filled in.
Printing and other utilities
10-9
The ECCAIRS Grapher
P ART 3
THE ECCAIRS GRAPHER
10.
11.
TITOLO9
11
CREATING GRAPHS WITH THE ECCAIRS GRAPHER
Starting ECCAIRS grapher ..................................................... 11-1
Menu Bar overview ............................................................... 11-2
Toolbar................................................................................ 11-3
Multiple document workspace................................................ 11-3
Creating a new graph ........................................................... 11-4
The graph window ................................................................ 11-6
Setting the graph query ......................................................... 11-7
Setting variables and tracing the graph ................................... 11-8
12
SETTING THE GRAPH PROPERTIES
Graph title and query explanation .......................................... 12-1
Text fonts and graph elements colours .................................... 12-2
Graph labels ........................................................................ 12-3
Label Type option ............................................................. 12-3
Chart properties: overview ..................................................... 12-4
Chart properties: general, series ............................................ 12-5
Chart properties: axes ........................................................... 12-6
Axes properties: other panes .................................................. 12-7
Saving the graph and the library ............................................ 12-8
Applying chart settings....................................................... 12-8
Saving the graph .............................................................. 12-9
Saving and closing the graph library .................................... 12-10
13
3D GRAPHS AND OTHER FUNCTIONS
Creating another graph......................................................... 13-1
PART 3 – Table of Contents
PART 3
Defining the z-axis ................................................................ 13-3
Chart type and 3D................................................................ 13-4
Chart properties: 3D............................................................. 13-5
Printing the graph................................................................. 13-6
Copying and pasting the graph ............................................. 13-7
Graph templates .................................................................. 13-8
Rename graph and change graph icon .................................. 13-9
Grapher help and system info.............................................. 13-10
Other graph functions......................................................... 13-12
Other graph library functions............................................... 13-13
14
THE DATA-GRID BEHIND THE GRAPH
Data-grid: an overview ......................................................... 14-1
Sorting graph data ............................................................... 14-3
Adding rows and columns ..................................................... 14-4
Editing, removing and hiding rows and columns...................... 14-6
Filtering data for display........................................................ 14-7
Normalising graph data ........................................................ 14-8
Additional data-grid functions.............................................. 14-10
Decimal places............................................................... 14-10
Load data ...................................................................... 14-10
Saving (exporting) graph data .......................................... 14-10
Command list ................................................................ 14-13
User Manual
The ECCAIRS Grapher
PART 3 – Table of Contents
The ECCAIRS Grapher
11 C R E A T I N G G R A P H S W I T H T H E
ECCAIRS GRAPHER
STARTING ECCAIRS
GRAPHER
The ECCAIRS Grapher application is used to produce information in a
graphical form.
Information is taken from the ECCAIRS database through a query and
displayed on the screen in a graphical representation.
Starting the ECCAIRS Grapher (see Starting an application, page 3-2)
its main window will show up.
The MENU BAR menus and
menu-items allows to access all
the functions in ECCAIRS
Grapher.
See page 11-2 for details.
The TOOLBAR offers a quick
visual access to a set of
commonly used functions in
ECCAIRS Grapher.
See page 11-3 for details.
This area is the WORKSPACE
where the currently opened
graph library and graphs
will be displayed.
See page 11-3 for details.
Creating graphs with the ECCAIRS Grapher
11-1
PART 3
MENU BAR
OVERVIEW
The six ECCAIRS Grapher menus in the menu bar are shown here.
All the menu-items are displayed below, menu by menu.
The numbers reported side of each menu-items refer to the main
manual page(s) where the corresponding function is illustrated.
7-2
11-4
13-1
12-10
12-10
12-8
13-8
13-7
13-6
11-4
13-12
13-1
13-3
13-13
13-5
14-10
13-6
13-1
12-2
12-4
14-1
13-12
11-7
11-8
11-8
11-3
13-3
11-8
11-6
12-3
13-13
13-9
11-2
User Manual
13-10
The ECCAIRS Grapher
CHAPTER
TOOLBAR
The ECCAIRS Grapher toolbar provides shortcuts to the most used
menu-items related to the ECCAIRS Grapher Library (see page 11-4).
11
Positioning the mouse cursor over each toolbar item displays, after a
short pause, a short description (tool-tip). In the picture below all these
tool-tips are shown at once.
MULTIPLE
DOCUMENT WORKSPACE
The ECCAIRS Grapher application can manage several documents at
a time. It is actually its Workspace which may host Multiple
Documents, i.e. the currently opened Graph Library as well as all the
Graphs opened from this Library.
The windows can be:
Tiled (horizontally or vertically),
Cascaded automatically from the
various Window menu-items.
Each window can be minimised,
maximised or restored to the original size,
following standard Windows controls for
multiple document windows
(MDI—multiple document interface).
Creating graphs with the ECCAIRS Grapher
11-3
PART 3
CREATING
A NEW GRAPH
If not yet connected, connect to a database (File
1
Connect, see page 7-2).
The ECCAIRS Grapher application
organises its graphs in graph
libraries, just as queries are
organised in query libraries.
To create a new graph library
either:
Select File
New Library
from the menu bar or
Push the corresponding
icon-button in the toolbar.
The Grapher will
ask the user to save
the newly created
library when either
the Lirary window is
closed or the
Grapher itself is
closed. See page
12-8 for details.
2
A Library window appears inside
the main window. To create a new
graph within the library either:
Push the New button in the
Library window or
Push the New Graph toolbar
icon in the Grapher window
Select
File New Graph
menu-item in the Grapher
window.
3
The New Graph window allows to
select the type of graph needed
from a set of templates listed as
icons and names in the left pane.
A preview of the currently selected
graph is shown in the right pane.
Three icon-buttons on top of the
preview pane allow to display the
graph template list with different
views.
11-4
User Manual
The ECCAIRS Grapher
CHAPTER
11
For instance, select the Line graph
template from those listed in the
General tab, then confirm by either
double-clicking onto it or pushing
the bottom OK button.
4
In addition to the
general “standard”
graph templates
proposed, the user
can define his own
custom graph
templates.
See page 13-8 for
details.
After selecting the graph template
ECCAIRS Grapher asks for the new
graph name. A default unique
name is proposed (Graph n, with
n=1, …). Press OK to confirm.
5
Press the OK button to confirm.
The new graph window is
displayed, with a sample graph
already traced.
The sample graph has the given
new graph name shown in its
caption.
Creating graphs with the ECCAIRS Grapher
11-5
PART 3
THE
GRAPH WINDOW
Initially, before any query has been run to extract data to be plotted,
the graph window contains only exemplary curves (or other plots)
already traced.
The content and the aspect of the graph can be controlled via either:
The Graph menu-items of the ECCAIRS Grapher (shown aside)
The toolbar in the graph window (shown below).
The Graph toolbar is normally shown in the top of the graph window,
but may be both detached from the graph window if dragged away
(and re-docked subsequently) and displayed or hidden through the
main menu Graph
Toolbar item or via the Graph window
“Right-click menu” Toolbar item.
In addition specific display properties can be set in a contextual way by
right-clicking on many elements of the chart and selecting items of the
corresponding contextual menus displayed.
11-6
User Manual
The ECCAIRS Grapher
SETTING
CHAPTER
THE GRAPH QUERY
11
The ECCAIRS Grapher application produces graphs out of information
extracted from the ECCAIRS database through a query.
Select Graph
Query Builder from the menu bar or via the
corresponding icon in the graph toolbar.
This invokes the Query Builder window that has
already been described with the ECCAIRS Browser
(see page 7-8).
The Query Builder opens the last used query
library.
For instance select the exemplary all query
which selects the whole database content.
Confirm by pushing the OK button.
An “all” query can be
set easily by requiring
that one of the
occurrence
mandatory attributes
(e.g. Date entered)
has been assigned a
value.
Since this is true for
each occurrence, the
query selects all the
occurrences in the
{
OPENING QUERY LIBRARIES
Date entered. has value
If you like the Query Builder to open
another library, select Library
Open
from its menu bar, use the Open browse
window to locate and select the file
containing the requested library and click
on the Open button.
One of the most recently used libraries
listed in the Library menu can also be
selected instead.
Creating graphs with the ECCAIRS Grapher
}
11-7
PART 3
SETTING
VARIABLES AND TRACING THE
GRAPH
1
The next step is to define the
occurrence attributes to be plotted
on the axis and their format and
aggregation mode.
In the following sample graph we
will plot the distribution of
occurrences by day of the week.
This
is
done
by
selecting
Graph
Query Define X Axis
(or the corresponding graph toolbar
icon).
2
In the Selection Builder dialog select
the right arrow in the attribute pane
to invoke the dictionary hierarchy
and the tree-navigation window.
Browse and choose the Local date
attribute.
3
11-8
Choose Day of week as layout in
the Function definition pane.
User Manual
The ECCAIRS Grapher
CHAPTER
11
Repeat the same procedure with
Graph
Query Define Y Axis with
the state file number attribute.
4
Choose Value as Layout and
Count ({}) as Aggregate function.
Once the query and axes are set,
the graph can be drawn by
selecting Graph
Execute or the
corresponding graph toolbar icon.
5
Default title and legends, colours
and graph properties are used.
The state file
number attribute has
been used to count
occurrences (on the
Y axes) since all
occurrences have it
defined because it is
mandatory.
Creating graphs with the ECCAIRS Grapher
11-9
The ECCAIRS Grapher
12 S E T T I N G T H E G R A P H
PROPERTIES
12.
TITOLO9
GRAPH
TITLE AND QUERY EXPLANATION
In this chapter the visual properties of a sample graph will be refined.
This will allow to explore some of the ECCAIRS Grapher display
functions and graph library close/save functions.
Right-click within the Graph 1 window (or whatever graph/window name was
given to the sample graph illustrated on page 11-4) and select
“Right-click menu” Edit Title (or the corresponding graph toolbar
icon-button): the text cursor will be put on the title area in the graph. Enter a
suitable title for the graph, for instance “Distribution of Occurrences by Day of
the Week”.
Right-click to display the
contextual menu.
Clicking the Explanation icon or
selecting Graph
Show Query Definition in
the menu bar an explanation of the current
query associated with the graph is displayed in
the Query Explanation box below the graph.
This is the same natural language query
explanation available in the Browser, plus
the description of the attributes chosen for
graph variables (axes), and their format
and grouping indications.
Setting the graph properties
If Show Query
Definition has
been enabled, the
natural language
explanation will
be also included
when printing the
graph.
12-1
PART 3
TEXT
FONTS AND GRAPH ELEMENTS
COLOURS
Select the “drop colour palette” at the right of
the colour icon and then pick a colour from the
palette. The "Right-click menu" Color menualso allows to select a colour.
Select the drop colour icon (showing the currently chosen colour) and drag
and drop it onto any of the graph item, for instance, the graph title.
The same colour drag and drop action
can be applied to all the elements of the
graph (bars, background, legend, etc.).
Colour functions
are not available in
main menu items.
To change the font and style of text items select
either the Font icon-button or Graph Font
menu-item. In the Font dialog window first
choose the target label (or legends) and then
the text properties to associate. Confirm the
choice with the Apply button.
Selecting any
textual graph
element with
"Right-click menu"
Font….brings
up a different,
detailed, Font
dialog for that
specific element.
A label displays a
generic text close to a
specific axis. See page
12-3 for details.
A legend displays the text for
each tick mark at the
particular axis of the graph.
Click on Exit button
to close the Font
dialog.
If Apply has not been selected before , then all the choices made are ignored.
12-2
User Manual
The ECCAIRS Grapher
GRAPH
CHAPTER
LABELS
A label displays a generic text close to a specific axis.
12
ECCAIRS Grapher automatically build descriptive labels from the
attributes and layout function definition chosen for each axis.
Y-AXIS LABEL
X-AXIS LABEL
Label Type option
For those attributes where a multilevel value structure exists it is
sometimes difficult to understand exactly the meaning of the value at
the lowest level since it is normally derived from the hierarchical path
leading to the value. In these cases it is necessary, even if it results in
long strings, to print in the graph the long description of the attribute,
not only the lowest level.
To force graphs to use long descriptions
select Options
Label Type Extended.
Otherwise select
Options
Label Type
is the default setting).
Compact, which
Setting the graph properties
12-3
PART 3
CHART
PROPERTIES: OVERVIEW
The Graph Properties menu-item and the corresponding icon in the toolbar
open the Chart Properties window. Chart properties are divided in four different
groups indicated by the four cards in the properties window:
General, Series, Axes and 3D.
Users are encouraged to experiment with all these four chart aspects.
Some examples of their specific usage can be found on:
page 12-5 (General and Series)
page 12-6 (Axes)
page 13-5 (3D).
The Chart Properties
window can also be
invoked by
positioning the
mouse on the graph
background area
and select
"Right-click menu"
Properties .
Double-clicking. On
the graph elements
also invokes the
Chart Properties
window.
The Details… button gives access to an
additional Axis Properties window
displayed in page 12-6.
12-4
User Manual
The ECCAIRS Grapher
CHART
PROPERTIES: GENERAL, SERIES
Set, for instance, Axes style
to “Math” through the
icon drop-down visual list.
CHAPTER
12
The General properties
card is used to change
effects and colours.
Some sample settings are
shown here.
Set, for instance, both the
Background and the
Chart box colour to “white”.
Set, for instance, the Shape
attribute (in the Markers box)
to a round dot, through the
icon drop-down visual list.
The Series card is used to
set features for each
particular (or all) data
series.
Some sample settings are
shown here.
Set, for instance, the
Show very attribute to 1.
The graph will display a
marker for every value.
Remember to confirm the choices by pushing the Apply button.
Setting the graph properties
12-5
PART 3
CHART
PROPERTIES: AXES
The Axes properties card allows to control display properties associated
to each of the graph axes.
Some sample settings on the
Y Axis (selected by default)
are shown here.
Details…
Click on the
button which invokes in turn
another multi-tab window
dedicated
to
Axis
Properties.
These is for each axis a main
Axes tab-card plus 4 separate detailed setting cards (see page 12-6) within the
Axis Properties multi-tab dialog window:
General
Scale
Labels
Grid lines.
Select, for
Scale card.
instance,
the
Y Axis
Change the Decimal places
attribute to 0, so that no
decimals will be displayed.
This makes sense in the sample graph used in these chapters, since the
Y axis hosts occurrence counts, which are of course integer values.
12-6
User Manual
The ECCAIRS Grapher
AXES
PROPERTIES: OTHER PANES
In the Axis Properties multi-pane window there are also a number of
other feature controls which allow to control of x/y/z axis properties.
CHAPTER
12
Apart from what is shown on the previous page, the graph feature
controls will not be described, but they are reasonably self-descriptive
so we just show them below and encourage the user to experiment.
Setting the graph properties
12-7
PART 3
SAVING
THE GRAPH AND THE LIBRARY
Applying chart settings
The Apply button of the Chart Properties window is used to confirm the
choices without closing the Properties dialog.
The OK button also confirms the choices made but closes the
Properties (or Axis Properties) dialog window.
So to apply the sample settings described in the previous sections of
this chapter and close the properties dialog window(s):
1. Confirm pushing the OK button in the Y Axis Properties window
2. Confirm again pushing
Chart Properties window.
on
the
OK
button
The graph displayed will reflect the modified properties.
12-8
User Manual
in
the
The ECCAIRS Grapher
CHAPTER
Saving the graph
To save the graph with a more significant name select
Graph
Save Graph As… .
Please note that there is no corresponding graph toolbar icon for this
command.
12
In the Set Graph Name window enter the desired name for the graph,
for instance “Occ. Distribution by Day-of-Week”, and push OK to
confirm.
The icon with the new name of the new graph will be listed in the open
library window as soon as the graph is plotted or refreshed
(Graph
Execute menu-item or the corresponding toolbar icon).
Setting the graph properties
12-9
PART 3
Saving and closing the graph library
To save and close the currently open graph library select
File
Save Library and then File
Close Library menu-items (or their
corresponding icons in the toolbar) in the main ECCAIRS Grapher
window (i.e. not in the graph window).
In case the library has never been
saved before, a New file browse dialog
opens. Locate the folder where the
library file will be saved (e.g.
C:\ECCAIRS 4\workspace).
In the File name field type in a sound
name for the new graph library, for
instance mylibrary.
Confirm by pushing the Save button.
ECCAIRS will save the file appending
automatically the .E4g extension.
SAVE GRAPH AND SAVE LIBRARIES ALERTS
If the graph window is closed without
before saving any modification made,
ECCAIRS Grapher displays an alert dialog
to remind the user to:
Save the changes (Yes button)
Discard the changes
(No button)
Cancel the exit action and keep the
graph open (Cancel button).
The same applies to graph libraries (see
related bottom picture on the right).
12-10
User Manual
.
The ECCAIRS Grapher
CHAPTER
12
Setting the graph properties
12-11
The ECCAIRS Grapher
13 3 D
GRAPHS AND OTHER
FUNCTIONS
13.
TITOLO9
CREATING
ANOTHER GRAPH
In this chapter we will extend the sample graph built in the previous
chapters to include a third dimension by further distinguishing between
the class of occurrences (accidents, incidents, …).
First open the previously defined graph:
in the main Grapher window select
File
Open Library... (or push the
open library icon in the toolbar).
In the browse window displayed locate
the destination/workspace folder you
wish to use and select the previously
saved graph library (see page 12-10).
Confirm by pushing the Open button.
The previously
accessed graph
libraries (up to 4)
can also be quickly
opened by selecting
them directly among
the Most Recently
Used file list in the
lower part of the File
menu.
Now inside the library window displaying the graph library select the
graph Occ. Distribution by Day-of-week and press the Open button or
the open icon.
Alternatively it is possible to double-click onto the Occ. Distribution by
Day-of-week icon.
The graph produced in the previous chapter of this manual is opened.
3D graphs and other functions
13-1
PART 3
Since a number of features are going to be added here that will
significantly transform the sample graph, it is
appropriate to save it as a new graph with a
different name:
select Graph
Save Graph As...
In the Set Graph Name dialog that will be
displayed, enter the name “Class Distribution by Day of Week”.
Before getting the new icon and name actually
displayed in the library window, the graph must
be plotted or refreshed (by Graph
Execute or
the corresponding toolbar icon-button).
13-2
User Manual
The ECCAIRS Grapher
DEFINING
CHAPTER
THE Z-AXIS
Select Graph
Define Z Axis from the menu or its toolbar button: the
Z Axis Attribute window opens.
13
Click in the Attribute field and
navigate the ECCAIRS data
definition hierarchy, expanding
and selecting: topic=Occurrence,
section=Classification
and
attribute=Occurrence class.
The lower Function definition pane allows to display the values of the
selected attribute in a specific Layout: the default choice
(Layout=value) is appropriate. Confirm the choices with OK.
Populate and draw the graph by the Graph
Execute menu-item or
the toolbar icon-button. The curves traced are now 2 (automatically
drawn in different colours).
The graph title can be modified to reflect its actual content
(e.g. “Distribution of Occurrence Classes by Day of the Week”).
To add a legend select Graph
or the corresponding icon.
Legend
3D graphs and other functions
13-3
PART 3
CHART
TYPE AND
3D
Now a line chart is probably not the best
choice to present the information in the
exemplary graph built up to now.
To change the graph type select the graph
gallery icon and then pick the Bar graph type
from the palette showing up.
The same result may
be obtained via
Graph
Properties
and the Shape field
in the General
graph properties
card or
“Right-click menu”
Gallery on the
graph window
background.
We can now add some visual impact to the graph by selecting
Graph 3 D from the menu bar or the corresponding icon in the toolbar.
13-4
User Manual
The ECCAIRS Grapher
CHAPTER
CHART
PROPERTIES:
3D
A better view can be achieved using the 3D perspective view: select
Graph
Z Clustered or the corresponding icon in the toolbar.
13
Selecting Graph
Properties menu-item or the corresponding toolbar
icon displays the Chart Properties dialog. In its 3D tab-pane there are
a number of additional 3D view parameters which can be set.
The 3D tab-pane can also
be invoked directly from the
Graph toolbar icon-button.
The Chart Properties window
can also be invoked by
positioning the mouse on the
graph background area and
either
select
"Right-click menu" Properties
or just double-click.
3D graphs and other functions
13-5
PART 3
PRINTING
THE GRAPH
To print a graph, open it and select Graph
Print from the menu bar
or the corresponding icon-button in the toolbar: the graph (and the
query description, if displayed) is sent to the default printer.
The default printer can be set by selecting File
Printer… from the
menu bar and choosing it in the dialogue displayed.
13-6
User Manual
The ECCAIRS Grapher
CHAPTER
COPYING
AND PASTING THE GRAPH
The graph can also be copied to the Windows clipboard and pasted
to any other application accepting bitmap graphics (graphs are copied
to the clipboard in raster format).
13
To copy the currently opened graph to the
clipboard select Graph
Save to Clipboard
from the menu or the corresponding icon from
the toolbar.
It is now possible to paste the graph in another application, for
instance Microsoft Word .
3D graphs and other functions
13-7
PART 3
GRAPH
TEMPLATES
New graphs can be created from any of
15
predefined
graph
templates
distributed with the application, shown
here on the left.
Also the user
can create and
use
its
own
custom
templates.
Any graph can be transformed into a
custom
template
by
selecting
Graph
Save Graph as template...
menu-item.
When a graph has been saved as a template it can be used as the
basis for future new graphs by the user of the workstation.
When creating a new graph the user can click on the Custom Tab in
the New Graph dialog and select the appropriate custom template.
13-8
User Manual
The ECCAIRS Grapher
CHAPTER
RENAME
GRAPH AND CHANGE GRAPH ICON
Each Graph, when it is created, is assigned an icon
and a name.
13
It is however possible to change the Graph name
and/or its icon at anytime.
To rename a graph select it in the library and choose
Edit
Rename.
menu-item
or
“Right-click menu”
Rename
contextual menu-item.
Renaming can also be performed by clicking on the graph name
below the icon (rather than on the icon), and typing over or modifying
the name.
“Right-click menu”
Rename or
“Right-click menu”
Change Icon on the
selected Graph in the Graph Library
window.
To change a graph icon select it in the library and choose
Edit
Change Icon menu-item or “Right-click-menu”
Change Icon
contextual menu-item.
A Set Graph Icon dialog is displayed. Using the horizontal scroll-bar
the available icons (i.e. those used for the standard graph template s
available) can be previewed. The OK button confirms the choice,
Cancel discards the choice.
Custom icons can be used by pushing the
Browse... button and selecting a suitable icon
file (.ico files) through the standard browse
dialog displayed.
3D graphs and other functions
13-9
PART 3
GRAPHER
HELP AND SYSTEM INFO
The Help menu has three items:
Eccairs 4 Grapher Help F1 invokes the standard Windows help
support. This support can also be started via the corresponding
icon-button in the toolbar and by the [F1] keyboard key.
Dictionary Browser… starts the Dictionary Browser, which can be
useful editing queries and selecting attributes.
See page 17-1 for details.
13-10
User Manual
The ECCAIRS Grapher
About… displays a dialog whose upper pane contains
information about the software version in use.
CHAPTER
13
OK closes this dialog window.
System Info recalls the system application which gives
information on hardware and software configuration of the
user computer.
Contact us allows to send mail to the ECCAIRS development
team by invoking the user mail client program (i.e. the program
currently defined as the default mailer e.g. Outlook Express,
Eudora, Pegasus, Mozilla/Netscape Mail, Thunderbird, etc.) with
the correct address already filled in.
3D graphs and other functions
13-11
PART 3
OTHER
GRAPH FUNCTIONS
The Graph functions that have not been introduced or used in the
previous chapters of this manual are listed below, associated to the
corresponding graph toolbar items.
Vertical Grid and Horizontal
Grid: displays a vertical
and/or horizontal grid in the
graph.
Datagrid: the functions related
to the grid of numerical data
laying beyond the graph are
dealt with in chapter 14.
Zoom: zooms in and out
selected areas of the graph
(drag the mouse to define area).
Scrollbar: adds horizontal and
vertical scroll bars. Done
automatically when the graph
exceeds the window display
The same functions are also available in the
Graph menu of ECCAIRS Grapher.
13-12
User Manual
The ECCAIRS Grapher
CHAPTER
OTHER
GRAPH LIBRARY FUNCTIONS
The Graph Library functions that have not been introduced or used in
the previous chapters of this manual are listed below, associated to the
corresponding Grapher toolbar items.
Delete Graph: remove the
selected graph from the
library.
Cut, Copy and Paste: cuts,
copies and pastes graphs in the
graph library. Some Edit
menu-items in the Grapher also
allows to rename graphs and
change the icon associated.
13
Export: exports to a new or
existing library the graph(s)
selected.
Import: imports an existing library into the
currently opened library.
If the selected Library contains a Graph with
the same name as one already existing in the
current Library then the new Graph will have
a number (between parenthesis)
concatenated to its name to make it unique.
The same functions are available in the File and Edit menu of ECCAIRS
Grapher.
3D graphs and other functions
13-13
The ECCAIRS Grapher
14 T H E
DATA-GRID BEHIND
THE GRAPH
14.
TITOLO9
DATA-GRID:
AN OVERVIEW
The data-grid is the spreadsheet-like matrix of values which is fed by
the queries on the database and possibly completed by additional
processing of the data-series (e.g. adding rows or columns, hiding and
filtering data, sorting and ordering information, normalisation, etc)..
The data-grid has then a direct link to the visualised chart in the graph.
This flexibility allows to prepare a number of useful standard graphs
that can be re-executed easily on the data and provide directly a set of
safety indicators.
To make the data-grid visible select
Graph
Datagrid when a graph is open or
use the corresponding icon on the graph
toolbar.
Part of the area
used to visualize the
graph will now be
used to display the
data-grid.
The Data-grid behind the graph
14-1
PART 3
In the data-grid, the first row and column define the labels to be used
at the X-axis and the Z-axis or Legend.
The white inner cells of the matrix contain the values linked to the Yaxis values.
The data-grid's toolbar offers functions to process the data retrieved
from the database.
Most of these functions will be demonstrated in this chapter.
14-2
User Manual
The ECCAIRS Grapher
CHAPTER
SORTING
GRAPH DATA
The data-grid cells are filled exactly following the output of the
database query. It is likely that the order in which the columns or rows
are presented needs to be modified to obtain a clearer result. To
facilitate this, it is possible to order the grid based on row and column
headers as well as on the cell contents (values).
14
Sorting operates on the data values within the grid, i.e. the whitebackground cells. It is performed by selecting a row or a column and
clicking on the two appropriate icons on the toolbar:
Sort ascending
Sort descending.
Re-ordering, instead, operates on the headers (the column labels) and
labels of the columns and rows, i.e. the grey-background cells that are
normally related to the meaning of the data values within the grid.
The value content of the grid is not taken into account in the ordering.
Re-ordering is performed by clicking on the two appropriate icons on
the data-grid toolbar:
Reorder headers
Reorder labels.
Both for headers and labels a dialog is displayed to allow for alphanumeric sorting as well as manually changing the order.
In all cases the
relation between the
row-labels, column
headers and the
data is never
changed since this
would make the
data inconsistent.
The Data-grid behind the graph
14-3
PART 3
ADDING
ROWS AND COLUMNS
In addition to the data retrieved from the database (by setting
properties for Query, X-axis, Y-axis and Z-axis) it is possible to add to
the data-grid rows and columns, whose content is determined by
simple calculations on the other existing data.
To add a row in the grid:
Click on the Insert Row icon-button on
the toolbar to add a row after the last
row of the grid
Alternatively select a row and use the
right-click menu Insert row items.
In this case it is possible to indicate exactly where the row is to
be added, since adding is relative to the currently selected row
(i.e. before... or after...).
To add a column in the grid:
Click on the Insert Column icon-button on the toolbar to add a
column after the last column of the grid
Alternatively select a column and use the right-click menu
Insert column items.
In this case it is possible to indicate exactly where the column is
to be added, since adding is relative to the currently selected
column (i.e. before... or after...).
In the dialog that is consequently displayed the user can specify which function
is used to populate the row/column, which row/columns are taken into account
and specify function options, where suitable (see next page for details).
14-4
User Manual
The ECCAIRS Grapher
The various functions that can be applied are:
Sum: Adds up the selected rows or columns.
CHAPTER
14
Group: Adds up the selected rows or columns and hides these
rows automatically in the graph.
Average: Calculates the average of a selected column or row.
Moving Average: Calculates a moving average over the dataseries indicated, i.e. the average over a column and its 'n'
preceding columns.
The value of 'n' can be set in
the Insert Row/Column dialog.
Min: Calculates the minimum of a selected column or row.
Max: Calculates the maximum of a selected column or row.
Threshold: Inserts a new row or
column with a constant value for
all the cells. The constant value
can be set in the dialog window.
None: Inserts an empty row or column. The user can type in
values for each cell.
“Consider a NULL value as ZERO” check-box allow the user to specify if
empty cells must be interpreted as ZERO.
For instance “Consider a NULL value as ZERO” option would not be
appropriate when dealing with an “average age of pilot” data-grid (a zero
value influences the average age during the computation).
The correct use of the “Consider a NULL value as ZERO” check-box must
be evaluated on a case-by-case basis.
The Data-grid behind the graph
14-5
PART 3
EDITING,
REMOVING AND HIDING ROWS
AND COLUMNS
To edit rows or columns select the item to be edited and either:
Click on the Edit icon-button on the toolbar
“Right-click menu” Edit in the data-grid
Double-click on the item to be edited.
Also single cells may be selected/edited (see below).
The actions allowed vary according to the items selected:
Editing a single cell may allow to modify its value, where
applicable (e.g. in a new row/column added with the
Threshold and None functions).
Editing any normal row/column (i.e. not added to the datagrid) allows to modify the row/column header.
Editing added rows and columns allows also to modify the
function used to produce them, including its options.
Added rows and columns can be deleted by
selecting them and using:
The two appropriate Remove icon-buttons
on the data-grid toolbar on the toolbar
Selecting “Right-click menu” Delete row and
“Right-click menu” Delete column.
Rows and columns resulting directly from the query
cannot be removed from the grid, but they can be made invisible.
Any row or column in the data-grid can be made invisible in the
Graph. This is done by selecting the row or column and either:
Pushing the Hide/Unhide icon-button on the data-grid toolbar
Selecting the
“Right-click menu” Hide
menu-item.
Adding new
rows/columns with
the Group function
(see page 14-4)
automatically hides
the rows/columns
used for grouping.
14-6
Pushing the icon-button again or
selecting
“Right-click menu” Unhide
toggles the visibility status.
User Manual
The ECCAIRS Grapher
FILTERING
DATA FOR DISPLAY
It is likewise possible to automatically hide information by applying a filter on the
data-grid. Filters can be applied and based on any type of row and column,
those generated directly by the query as well as those added in the data-grid.
CHAPTER
14
To filter a data-grid push the Filter icon on the toolbar.
The dialog window showing up allows to identify the various
parameters for the filter:
Show
only
those
Rows/Columns. Selects
filtering by rows or
columns.
Where
column/row.
Selects the column/row
to be used for the
filtering, based on the
operator described in the
Select
item
field.
If rows are to be filtered
then
the
specified
column will be used for
the comparison. Vice versa happens when filtering columns.
Select item. Selects the operator to be used for the
comparison.
The bottom box in the Filter dialog allows to specify the
reference value for the comparison, which can be:
Value: a constant value
Row: the corresponding value of a specific row
Column: the corresponding value of a specific column.
The last choice, Top is not a reference value (see below).
Top. This allows to hide all columns or rows but the top 'n' ones, as
specified in the field to the right of the Top radio-button.
An invisible (hidden or filtered out) row
or column can be recognised in the
data-grid since it has a grey colour.
The Data-grid behind the graph
The concept of
filtering is very
powerful but needs
some exercises to
get used to.
For optimal results it
is recommended to
go create some
examples and
analyze the results.
14-7
PART 3
NORMALISING
GRAPH DATA
Normalisation often helps to gain a more significant perspective out of
numerically inhomogeneous data sets. For instance, in our example,
the total number of incidents is clearly greater than accidents, so direct
day-by-day comparison does not give satisfactory results.
Selecting the Normalise icon-button displays a Normalise dialog which
offers four choices:
Not normalised: to remove
normalisation
Normalised by “X-axis label”
(Local date in the sample)
Normalised by “Z-axis label”
(Occurrence class in the
sample)
Normalised by all values.
The sample graph below shows Normalisation by Occurrence class.
14-8
User Manual
The ECCAIRS Grapher
This means that for each found Z-axis value (blue and red, incident
and accidents) the total of the various X-axis attributes (Monday,
Tuesday etc. ) is set to 100%. Instead of absolute values the resulting
percentages are given. This way it is possible to compare the trend of
the accidents/incidents during the week if the absolute values are
disproportionate.
CHAPTER
14
In addition to normalisation by Z-axis, ECCAIRS Grapher offers:
Normalisation by “X-axis label”: (i.e. by Local Date in the
exemplary graph) for each found X-axis value (Monday,
Tuesday etc.) the total of the various Z-axis attributes (blue and
red) is set to 100% and instead of absolute values the resulting
percentages are given.
This way it is possible to compare the contribution of each
colour for each day of the week.
Normalisation by all values: the sum of all found values (on
the Y-axis) are set to 100% and each bar in the graph is then
expressed as a percentage of this total.
This way it is possible to assess the contribution of each
‘measurement point’ to the total.
In the data-grid toolbar, at the right of
the Normalise icon-button, ECCAIRS
Grapher
displays
a
“current
normalisation status” message.
WHAT IS “NORMALISATION” ?
Normalisation is the process where the sum of all values in a series is set to 1.
Each value is then recalculated appropriately.
In ECCAIRS Grapher normalisation is implemented by expressing each value as
percentage of the total.
The Data-grid behind the graph
14-9
PART 3
ADDITIONAL
DATA-GRID FUNCTIONS
Decimal places
In many cases the data-grid and the graph should display the numbers
using a specific number of decimal places.
This preference can be set from the toolbar by
operating on the Decimals control.
Load data
It is also possible to load external data in the data-grid from a TAB
delimited text file.
To do so click on the Load Data icon-button in the data-grid toolbar
and browse to select the text file with the external data.
In such a case the graph will have no link with the database. It could
be used for simple visualisation purposes.
Saving (exporting) graph data
There might be cases where the pure graph “plotting data”, rather than
the graph itself, may be useful for further processing.
Let us suppose for instance we wish to import the graph data in
Microsoft Excel .
Open the data-grid and select the Save Data icon-button in its toolbar.
14-10
User Manual
The ECCAIRS Grapher
CHAPTER
14
In the browse dialog that will be displayed locate the destinationfolder and enter a file name for the data to be exported.
Click on the Save button: data is saved in a TAB separated text file
format. Two save formats are available:
Text Files (default)
Transposed Text Files.
Both of them save data in a TAB separated text file format with the
“.txt” file extension.
The Transposed Text Files type is in fact a normal text file format where
row and columns data have been swapped.
The Data-grid behind the graph
14-11
PART 3
It is now possible to import the graph, for instance, in Excel through the
standard File
Open command, selecting “Text file” as file type and
then following the import wizard steps.
The data exported can be used, for instance, to create an Excel graph
which may be pasted as object in any Windows application.
14-12
User Manual
The ECCAIRS Grapher
CHAPTER
Command list
All actions the user performs on a graph (for example adding rows and
columns, changing the visibility, editing cells, sorting the grid, etc) are
maintained in a list of commands that will be applied every time the
graph is executed or refresh.
14
Clicking on the Commands List icon-button allows to view and modify
this command list.
In the dialog window that shows up the user can remove any single or
all commands that are attached to the core query of the Graph.
When the dialog window is closed the user will be asked if the changes
are to be applied immediately on the graph.
The command list is
saved with the
graph.
So remind that if no
explicit saving of the
graph is made (by
the Graph
Save ,
Graph
Save As...
, etc) all changes to
the graph and to
the command list
will also be lost.
CLEANING UP THE COMMAND LIST
Every action done after creating the core graph will be registered as a command.
This implies that the command list can grow rather rapidly and might contain
superfluous commands (i.e. hide and unhide of the same row). When the final
result of the graph is satisfactory it is wise to evaluate if there are unused
commands present in the command list and remove them. Sometimes it maybe
wiser to recreate the graph by hand, avoiding unnecessary actions.
This will increase performance and reproducibility of the graph.
The Data-grid behind the graph
14-13
The ECCAIRS Utilities
P ART 4
THE ECCAIRS UTILITIES
15.
TITOLO9
15
E4F GENERATOR
What is the E4F Generator .................................................... 15-1
Starting and operating the E4F Generator............................... 15-2
Select your occurrences ......................................................... 15-3
Define destination file............................................................ 15-4
Define logging options .......................................................... 15-5
Run the generation ............................................................... 15-6
Generation result summary.................................................... 15-7
E4F Generator menu bar items .............................................. 15-8
16
E4F LOADER
What is the E4F Loader ......................................................... 16-1
Starting and operating the E4F Loader.................................... 16-2
Select your E4F files .............................................................. 16-3
Define E4F Loader options .................................................... 16-4
Duplicate occurrences........................................................... 16-5
Define logging options .......................................................... 16-6
Start the loading ................................................................... 16-7
Prompt on duplicate occurrence............................................. 16-8
Loading result summary....................................................... 16-10
E4F Loader menu bar items ................................................. 16-11
17
DICTIONARY BROWSER
What is the Dictionary Browser............................................... 17-1
Starting the Dictionary Browser............................................... 17-2
Using the Dictionary Browser ................................................. 17-3
Browsing the Taxonomy Tree ................................................. 17-4
PART 4 – Table of Contents
PART 4
Reading information in the Identification Pane......................... 17-5
Topic Identification pane ....................................................... 17-6
Section Identification pane .................................................... 17-7
Attribute Identification pane................................................... 17-8
Attribute-values browse window ........................................... 17-10
View Definition, File and Help menus ................................... 17-12
18
EXPORTER
What is the Exporter.............................................................. 18-1
Starting and operating the Exporter ........................................ 18-2
Selecting the occurrences to export ........................................ 18-4
Selecting the attributes to export............................................. 18-6
Export selected attributes in Text, Access or Excel format .......... 18-8
Flat attribute format ............................................................ 18-10
Expanded attribute format ................................................... 18-12
Export occurrences as text-tree............................................. 18-14
Export occurrences using a template (HTML, RTF, TXT format) 18-16
Export de-identified occurrences into an E4F-format file ......... 18-20
The Exporter File menu ....................................................... 18-22
E4E export configuration files............................................... 18-23
The Exporter Help menu...................................................... 18-24
User Manual
The ECCAIRS Utilities
PART 4 – Table of Contents
The ECCAIRS Utilities
15 E 4 F
WHAT
GENERATOR
IS THE
E4F GENERATOR
The E4F Generator is a tool used to generate ECCAIRS 4 Data Files
(*.E4f) from a repository database. E4F files contain any number of
encrypted ECCAIRS occurrences in an XML based format and can be
used to store, exchange and backup occurrences in an ECCAIRS
repository.
Typical usage of the E4F Generator is for backing up the contents of
your database in (a series of) E4F files. It is recommended to perform
such a backup regularly, even if your database administrator makes
back-ups of your databases in the specific database management
environment.
Though it is possible to manage ECCAIRS occurrences from within the
ECCAIRS Browser application, usage of the E4F Generator is
mandatory when you migrate from one version of ECCAIRS to a newer
version of ECCAIRS and the data format and/or data taxonomy has
been changed. In this case passing your data via an E4F file
guarantees you that all appropriate conversion and adaptation is
performed.
The E4F Generator has a peer utility called the E4F Loader, which has
the opposite functionality, namely storing occurrences from an E4F file
into an ECCAIRS repository database (see page 16-1).
E4F Generator
It is important to
know that the
E4F Generator
always respects the
security settings of
the repository's
security profile, so
that confidentiality, if
applied, is
maintained.
15-1
PART 4
STARTING AND
GENERATOR
OPERATING THE
E4F
Start the E4F Generator by selecting
Start
Programs
Eccairs 4
Tools
E4F Generator from the
Windows task-bar and performing the standard ECCAIRS logon (see
page 3-2): its main window will show up.
The approach for generating an E4F file from a database consists of
four steps which will be illustrated in the next pages:
1. Select the occurrences to be extracted from the database
2. Define the destination file, possibly splitting up the output in
multiple files
3. Set the logging options
4. Start the generation procedure and exit on completion or
interruption.
15-2
User Manual
The ECCAIRS Utilities
CHAPTER
SELECT
YOUR OCCURRENCES
The first step to generate E4F files is to define which occurrences to
extract from the database; this means to select and load a query.
15
To load a query, click on the Load Query button.
The Query Builder shows up: here you can either define a new query,
or modify an existing query or just select an existing query.
Once the query is selected, click on the OK button to go back to the
E4F Generator main window. The same action can be achieved by
double-clicking on the query to be executed in the Query Builder pane.
Refer to section
Queries and
subsequent in
chapter Working
with databases
(page 7-6 and
following) for details
on queries, query
libraries and
ECCAIRS Query
Builder.
Note that the name of the selected query is now shown in the
corresponding text box.
E4F Generator
15-3
PART 4
DEFINE
DESTINATION FILE
The second step consists in defining the destination filename and folder
for the output E4F file(s).
You can either specify them by typing in the full output file path name
in the Destination text-box or by browsing in your file system, using the
Browse... button and the standard Windows open-file dialog that will
be consequently displayed.
Optionally, it is possible to split the output in multiple files, each limited
to a specific number of occurrences. It is recommended to have no
more than about 1000 occurrences in a single E4F file, since larger
files would slow down significantly the performance of your ECCAIRS
applications.
Therefore the Split destination file when it reaches check-box and an
1000 Occurrences split-threshold are enabled and set by default.
When the output is split into multiple files, each file will have its base
name (i.e. not the .E4f file extension) extended with the particular
range of occurrences generated.
For example, if the destination file name is IMC_occurrences.E4f
and the query returns a total number of 1789 occurrences, with the
split threshold set to 1000, then E4F Generator will generate two files:
IMC_occurrences1-1000.E4f
IMC_occurrences1001-1789.E4f
15-4
User Manual
The ECCAIRS Utilities
DEFINE
CHAPTER
LOGGING OPTIONS
In the Logging options pane you can enable the system to create a Log text
file. Since the loading process runs in background, it is recommended to
create such a file and therefore logging is enabled by default.
15
To explicitly enable/disable logging, check the Log Activity check-box.
Once logging is enabled, you can set options in the Logging options
pane:
All: generates a log file that will include all the events.
User feedback/Errors only: generates a log of just user
feedback and errors. This option is enabled by default and is
an alternative for the All option (enabling one disables the
other).
Append Date/Time stamp to LOG file name: automatically
appends to the log filename the date and time the file is
generated. This option in enabled by default.
Browse...: allows to specify the log file name by typing it in the
appropriate text-box or interactively by browsing your system
files.
Note that choosing the All option may increase significantly the size of
the log file. Furthermore the log file is always a single text file, and it is
never split up even when the destination file is.
E4F Generator
15-5
PART 4
RUN
THE GENERATION
As soon as the input query and the destination file have been defined,
the Start button on the main window becomes enabled.
To run the generation process, click on the Start button.
To temporarily interrupt
the process, click on the
Pause button.
To stop the process, click
on the Stop button.
During the subsequent processing:
The Pause button and the Stop button become enabled
An Elapsed processing time box and a Progress-bar are
displayed. The latter displays the progress both visually with a
blue bar and numerically (as percentage and as fraction).
15-6
User Manual
The ECCAIRS Utilities
GENERATION
CHAPTER
RESULT SUMMARY
At the end of the generation process a window is displayed with an
overview of the result.
15
Clicking on the View button opens the log file, if generated (see note
box below).
Clicking on the Exit button will return to the E4F Generator main
window.
In the Summary pane you find:
The Upload status at the end of the process
The Time elapsed for processing
A Records count: i.e. an overview of the total number of
occurrences processed, accepted and rejected.
In the Logging pane you find:
The name of the log file generated.
WHEN IS THE LOG FILE ACTUALLY GENERATED ?
Note that clicking on the View button actually opens the log file only if the file has
been generated (i.e. the log output was non-empty).
If the All option has been specified in the Logging options pane of the main
window, then there will always be something to write to the log, and so the log
file will always be generated.
If the User feedback/Errors only option has been specified, the log file is
generated only if errors or warnings were generated during the processing.
E4F Generator
15-7
PART 4
E4F GENERATOR
MENU BAR ITEMS
The E4F Generator has a menu bar with two menus.
The File menu has a single item, Exit, to quit the application
when selected. The E4F Generator can also be quitted with
either the bottom Exit button or the standard Windows top
right close control of its main window.
The Help menu has two items:
Contents... F1 invokes the standard Windows help support.
This support can also be started by the [F1] keyboard key.
15-8
User Manual
The ECCAIRS Utilities
About… displays information about the software
version in use and can give access to the system
information on the computer where ECCAIRS is
currently
running,
through
the
System Info
button.
CHAPTER
15
Select OK to close this window.
E4F Generator
15-9
The ECCAIRS Utilities
16 E 4 F
16.
LOADER
TITOLO9
WHAT
IS THE
E4F LOADER
The E4F Loader is a tool used to load ECCAIRS 4 Data Files (*.E4f) in
a repository's database.
E4F files can be used to store, exchange and backup occurrences in
an ECCAIRS repository. Though it is possible to manage ECCAIRS
occurrences from within the ECCAIRS Browser application, in many
cases using the E4F Loader is more efficient, more clear, less likely to
generate problems and better documented in the form of extensive
logging options.
Usage of the E4F Loader is mandatory when you migrate from one
version of ECCAIRS to a newer version of ECCAIRS and the data
format and/or data taxonomy has been changed. In this case passing
your data via an E4F file guarantees you that all appropriate
conversions and adaptations are performed.
Typical usage of the E4F Loader is for restoring the contents of your
database from (a series of) E4F files. It is recommended to perform
backups regularly (using the related E4F Generator application), even
if your database administrator makes back-ups of your databases in
the specific database management environment.
E4F Loader
It is important to
know that the
E4F Loader always
respects the security
settings of the
repository's security
profile, so that
confidentiality, if
applied, is
maintained.
16-1
PART 4
STARTING
LOADER
AND OPERATING THE
E4F
Start the E4F Loader by selecting
Start
Programs
Eccairs 4
Tools
E4F Loader
from
the
Windows task-bar and performing the standard ECCAIRS logon (see
page 3-2): its main window will show up.
Loading one or more E4F file into a database is a four step procedure
that will be illustrated in the next pages:
1. Select the E4F files to be loaded into the database
2. Define the E4F Loader options, mainly regarding what to do
when duplicate or invalid occurrences are found
3. Set the logging options
4. Start the load procedure and exit on completion or interruption.
16-2
User Manual
The ECCAIRS Utilities
SELECT
YOUR
E4F
CHAPTER
FILES
The first step is to select the E4F files you want to be loaded into the
database.
16
Click on the Add... button to add new E4F files.
A standard Windows open-file dialog will be
displayed, allowing you to select one or more
E4F files.
Once selected, all file details are presented in the top pane of the
main window, including the number of occurrences of each file.
Click on the Remove
button to remove the
curently selected e4f file
from the list
To select E4F files,
you can also directly
drag and drop them
from any standard
explorer window,
opened on your
desktop, into the file
list in the top pane
of E4F Loader.
Click on the Clear button to
remove all e4f from the list
In the Count Total field the
total number of selected
occurrences is shown.
E4F Loader
16-3
PART 4
DEFINE E4F LOADER
OPTIONS
Once the E4F files are selected you must set the Loader options.
Check the Autocorrect inconsistencies box in the Loader options pane
to allow the E4F Loader to automatically detect and repair
inconsistencies.
An example of
inconsistencies
detection is
checking that Total
injuries attribute
value (in the Injury
totals section of the
Occurrence root
topic) corresponds
to the sum of values
for the Injuries
grand total
attributes of each
aircraft involved (in
the Injuries section
of each of the
specific AircraftInjuries topics).
To set the system actions in case a duplicate occurrence is found the
following options are available:
Prompt user: A dialog will appear informing the user about the
situation and asking the user how to proceed.
Overwrite occurrence in database: The duplicate occurrence in
the database is removed and the new occurrence from the E4F
file is inserted.
Keep occurrence in database: The duplicate occurrence in the
database is retained and the new occurrence from the E4F file
is ignored.
If occurrence in database is older, overwrite: If the occurrence from
the E4F file has a more recent date than the occurrence in the
database then replace the duplicate occurrence in the database
with the new occurrence from the E4F file.
Stop uploading: Stops the procedure.
16-4
User Manual
The ECCAIRS Utilities
DUPLICATE
CHAPTER
OCCURRENCES
The ECCAIRS Reporting System offers specific provisions in order to
avoid that occurrences are inserted twice in an E4F file or database.
16
To understand how these provisions work it is necessary to know how
occurrences are uniquely identified and when an occurrence is
considered a duplicate.
The properties that make an occurrence unique are:
The occurrence signature
State File Number/State Reporting.
The occurrence signature
A unique identifier is assigned to each occurrence whenever it is
created. This identifier (the occurrence signature or occurrence key)
never changes; it remains independent from any type of change that
can be made to the occurrence by a user or system.
If two occurrences have the same signature it is 100% sure that the
origin of the occurrence is the same, even if all attributes of the
occurrence, including State File Number and State Reporting, are
different.
State File Number/State Reporting
For each occurrence there are a number of mandatory attributes
namely Organization, State Reporting and State File Number.
The latter two, 'State Reporting' and 'State File Number' are both
considered a unique identifier for the occurrence, based on the
assumption that each state has unique identifiers for their own
occurrence reports.
If two occurrences have the same combination of State Reporting and
State File Number then the ECCAIRS system considers these reports to
refer to the same occurrence.
E4F Loader
16-5
PART 4
DEFINE
LOGGING OPTIONS
In the Logging options pane you can enable the system to create a Log text
file. Since the loading process runs in background, it is recommended to
create such a file and therefore logging is enabled by default.
To explicitly enable/disable logging, check the Log Activity check-box.
Once logging is enabled, you can set options in the Logging options pane:
All: generates a log file that will include all the events.
Choosing this option may increase significantly the size of the
log file.
User feedback/Errors only: generates a log of just user feedback and
errors. This option is enabled by default and is an alternative for the All
option (enabling one disables the other).
Append Date/Time stamp to LOG file name: automatically
appends to the log filename the date and time the file is
generated. This option in enabled by default.
Browse...: allows to specify the log file name by typing it in the
appropriate text-box or interactively by browsing your system files.
LOG FILENAME IS MANDATORY WHEN LOGGING IS ENABLED
If logging has been enabled (as
it is by default) it is then
mandatory to specify the log file
name either by typing it in the
appropriate text-box or though
the Browse... button.
16-6
User Manual
The ECCAIRS Utilities
START
CHAPTER
THE LOADING
As soon as the input E4F files have been defined, the Start button on
the main window becomes
enabled.
16
To start the loading process,
click on the Start button.
During the subsequent processing:
The Pause button and the Stop button become enabled
An Elapsed processing time box and a Progress-bar are
displayed. The latter displays the progress both visually with a
blue bar and numerically (as percentage and as fraction).
To temporarily interrupt
the process, click on the
Pause button.
To stop the process, click
on the Stop button.
At the end of the generation process a window is displayed with an
overview of the result.
E4F Loader
16-7
PART 4
PROMPT
ON DUPLICATE OCCURRENCE
If the “if occurrence exist” Prompt user option has been set in the
Loader options pane, a Duplicate occurrence found dialog is displayed
whenever the E4F Loader finds a duplicate occurrence during the load
process (see page 16-5). This dialog window compares the duplicate
occurrences involved and the user can then decide the action to be
undertaken
for The duplicate occurrence
The correspondent
each case.
already existing in the
occurrence to be loaded
database is displayed on
the left.
from the E4F file database
is displayed on the right.
The uniquely-identifying attributes (see page 16-5) having identical
values are highlighted with a yellow field-background. All the 3
identifying attributes are duplicated in the picture shown above.
The Apply to all
items check box is
not applicable for
the Insert as new
and Cancel buttons.
The Apply to all items check-box, when selected, allows an automatic
re-application of the action associated to the button being selected to
all the subsequent duplicate occurrences possibly detected.
The buttons at the bottom allow to select the action to be undertaken:
Only if Newer: If the occurrence from the E4F file has been
modified at a more recent date than the occurrence in the
database then replace the corresponding occurrence in the
database by the one from the E4F file.
Overwrite: The duplicate occurrence in the database is
removed and the new occurrence from the E4F file is inserted.
Keep: The occurrence from the E4F file is ignored and the
occurrence in the database is retained.
Cancel: The Loading process is stopped and the final overview
window (see page 16-10) is displayed.
16-8
User Manual
The ECCAIRS Utilities
Insert as new: With this choice there are two possible (and
not mutually exclusive) cases and corresponding actions to
be undertaken:
CHAPTER
16
1.
If the combination of State File Number and
State Reporting is identical (i.e. the second and third
row fields are highlighted in yellow) then another dialog
window is displayed.
In this dialog the user can change one or both of the
duplicated attributes in the occurrence from the E4F file
as well as its Headline, Date entered and
Reporting organization attributes.
Once changes are confirmed with the OK button, a
new attempt is done to store the occurrence in the
database.
2.
If the Occurrence signature is identical (i.e. the top row
field is highlighted in yellow), a new signature will be
assigned to the occurrence from the E4F file and a new
attempt is made to insert the occurrence in the
database.
E4F Loader
16-9
PART 4
LOADING
RESULT SUMMARY
At the end of the loading process a window is displayed with an
overview of the result.
Clicking on the View button opens the log file, if generated (see note
box below).
Clicking on the Exit button will return to the E4F Loader main window.
The Summary pane displays:
The Upload status at the end of the process
The Time elapsed for processing
A Records count: i.e. an overview of the total number of
occurrences processed, accepted and rejected.
In the Logging pane the name of the log file generated is shown (see
note box below).
Note that choosing the All option may increase significantly the size of
the log file.
WHEN IS THE LOG FILE ACTUALLY GENERATED ?
Note that clicking on the View button actually opens the log file only if the file has been generated (i.e. the log
output was non-empty).
If the All option has been specified in the Logging options pane of the main window, then there will always be
something to write to the log, and so the log file will always be generated.
If the User feedback/Errors only option has been specified, the log file is generated only if errors or warnings
were generated during the processing.
16-10
User Manual
The ECCAIRS Utilities
E4F LOADER
CHAPTER
MENU BAR ITEMS
16
The E4F Loader has a menu bar with two menus.
File menu
The File menu has a single item, Exit, to quit the application when selected.
The E4F Loader can also be quitted with either the bottom Exit button
or the standard Windows top right close control of its main window.
Help menu
The Help menu has two items:
Contents... F1 invokes the standard Windows help support.
This support can also be started by the [F1] keyboard key.
About…
displays
information about the
software version in
use and can give
access to the system
information on the
computer
where
ECCAIRS is currently
running, through the
System Info button.
Select OK to close it.
E4F Loader
16-11
The ECCAIRS Utilities
17 D I C T I O N A R Y B R O W S E R
17.
TITOLO9
WHAT
IS THE
DICTIONARY BROWSER
The Dictionary Browser is the standard reference dictionary for
ECCAIRS 4 users.
It gives a quick and complete view of the taxonomy used by
ECCAIRS 4, i.e. all topics, sections and attributes available.
For each item an ID, a description (short and long) and a definition are
given.
For each attribute its properties are listed, including all the value
choices available, operators applicable to that attribute in a query, etc.
This application is an on-line Dictionary that will help the ECCAIRS 4
user to understand the standard (ICAO) nomenclature and, ultimately,
provides a guide to fill in data for an occurrence.
Dictionary Browser
17-1
PART 4
STARTING
THE
DICTIONARY BROWSER
Start the Dictionary Browser by selecting
Start
Programs
Eccairs 4
Tools
Dictionary Browser from the
Windows task-bar and performing the standard ECCAIRS logon (see
page 3-2): its main window will show up.
The Dictionary Browser can also be invoked more directly while using
the main ECCAIRS 4 applications: i.e. the Browser, the Grapher and
the Exporter.
The Help menu of these applications includes a
specific menu-item, so that the Dictionary Browser
can
be
started
by
selecting
Help
Dictionary Browser.
17-2
User Manual
The ECCAIRS Utilities
USING
THE
DICTIONARY BROWSER
The Dictionary Browser window is divided into three main sections,
identified in the picture below.
CHAPTER
17
Menu bar. Its menus mainly allows the choice of
a specific View Definition and to invoke help
and info tools.
Taxonomy Tree Pane.
It displays a hierarchical
list of all the topics,
sections and, ultimately,
attributes that an
occurrence description
can have for the selected
view.
Identification Pane.
It displays, in several fieldboxes, the properties
associated with the item
(topic, section, attribute)
currently selected in the
Taxonomy Tree Pane.
Using the Dictionary Browser requires two sort of actions:
1. VIEW SELECTION: Since there are different Views of the
occurrence data-structure available in ECCAIRS 4 (see page 44), the first step is choosing the appropriate view from the
View Definition menu in the menu bar (see next page, 17-12).
2. ITEM SELECTION: The second step involves browsing trough the
displayed taxonomy using the Taxonomy Tree Pane, until the
wanted item (topic, section or attribute) is selected. The
Identification Pane will then display the properties associated
with that item.
The next sections will describe in detail the layout and usage of the
Taxonomy Tree Pane, the Identification Pane and its sub-panes and,
finally, the menu bar
Dictionary Browser
17-3
PART 4
BROWSING
THE
TAXONOMY TREE
The taxonomy of the ECCAIRS Suite is the catalogue describing what
information can be stored in the ECCAIRS Repository and how this
information is (possibly) encoded in the data fields.
The Taxonomy Tree Pane is the
area where all the attributes of
an occurrence can be viewed.
Occurrences are described by a
hierarchical collection of Topics,
and each Topic is organised in
Sections and Attributes (see
pages 2-9 and 9-1).
Clicking on a collapsed node
expands it into its branches.
Clicking on an expanded node
collapses its branches.
At the bottom of the window three
buttons help in the navigation of
the Taxonomy tree:
Collapses the entire tree
Expands the entire tree
Toggles on/off a filter on
the tree view.
The filter is based on the
text entered in the
corresponding field on
the right of the button,
displayed when activating
the filter button.
The filter is applied by
terminating the filter text
with the [ENTER] key.
17-4
User Manual
The ECCAIRS Utilities
READING INFORMATION
IDENTIFICATION PANE
IN THE
CHAPTER
17
The Identification Pane displays the ID, description, definition,
properties and values an item can assume.
As you move up and down the tree node of the Taxonomy Tree Pane,
the Identification Pane will display all the attributes associated to each
level of the tree node.
The specific information displayed form nodes at different level of the
taxonomy tree (topics, sections, attributes) is different and is described
on the next pages.
Dictionary Browser
17-5
PART 4
TOPIC IDENTIFICATION
PANE
Topics (for example, Aircraft-Events) are identified and described in the
identification pane (right pane) by:
Id, the topic identification number used within ECCAIRS
Short Description, which corresponds to the name of that topic
actually displayed in the taxonomy-tree.
Topics are
marked with
blue bold.
This holds for any level topics: the root topic (i.e. Occurrence), second
level topics (for example, Narrative or Aircraft), third level topics (for
example, Aircraft Events) and so on.
17-6
User Manual
The ECCAIRS Utilities
CHAPTER
SECTION IDENTIFICATION
PANE
Sections (for example, Classification) are identified and described in
the identification pane (right pane) by:
Id, the section identification number used within ECCAIRS
17
Short Description
Description
Definition.
Sections are
marked with
light-blue.
In the Definition Pane, there is an exhaustive explanation of the
meaning of the current Section.
The section Id, Short Description and its Definition are used, for instance, in
the ECCAIRS Browser application to show tool-tips about section definitions,
using the [CTRL] + click-on-section-name mechanism (see page 10-6 for
details), both in the browsing and in the editing phases.
Dictionary Browser
17-7
PART 4
ATTRIBUTE IDENTIFICATION
PANE
Attributes (for example, Occurrence class) are identified and described
in the identification pane (right pane) by:
Id, the attribute identification number in the taxonomy
Short Description
Description
Definition
Properties.
Attributes are
marked with
black.
The Properties Pane lists all the attribute properties and values, such as
operators applicable in a query (for example, equal to), or value
format (for example, long integer), measurement units usable to specify
a value, etc.
17-8
User Manual
The ECCAIRS Utilities
The attribute Id can be used, in all ECCAIRS applications needing to
create and edit queries or to specify attributes (Browser, Grapher,
Generator, …) to directly select an attribute in the taxonomy-tree by
typing-in its identifier.
CHAPTER
17
The Operators field in the Properties pane are used to provide the
choice of operator when building criteria in queries. See Criterion
Builder, page 7-13, or Setting variables and tracing the graph, page
11-8, for details.
The attribute Id, Short Description and its Definition are used, for instance,
in the ECCAIRS Browser application to show tool-tips about attribute
definitions, using the [CTRL] + click-on-attribute-name mechanism (see
page 10-6 for details), both in the browsing and in the editing phases.
The attributes also have an additional Values...property, at the very
bottom of the Properties Pane.
Clicking on the corresponding … button, opens a specific
attribute-value browse dialog window (see next section).
Dictionary Browser
17-9
PART 4
ATTRIBUTE-VALUES
BROWSE WINDOW
The attribute-values browse window, accessible through the button of
the Values... field in the main Dictionary Browser window, has the
same structure and functionality, but applied to attribute values.
On the left side, the values-tree pane, there is a hierarchical list of all
the values which can be chosen for the attribute previously selected in
the main window.
The attribute-value currently selected in the values-tree pane (for
instance, Occurrence class = Major incident) are identified and
described in the identification pane (right pane) by:
Id, the value-attribute identification number in the taxonomy
Short Description
Description
Definition.
17-10
User Manual
The ECCAIRS Utilities
As usual in the tree pane, a single node can be collapsed/expanded:
Clicking on a collapsed node
Clicking on an expanded node
expands it into its branches.
CHAPTER
17
collapses its branches.
Three buttons also help in the navigation of the attribute-values tree:
Collapses the entire tree
Expands the entire tree
Toggles on/off a filter on
the tree view. The filter is
applied by terminating the
filter text with the [ENTER]
key.
The attribute-vale Short Description
and Definition provide the text to be
displayed in tool-tips available in ECCAIRS applications when selecting a
value from a hierarchical selection and search box (see page 10-6 for
details).
Value tool-tips are invoked by holding down the [CTRL] key while
clicking
on
the
attribute value in
the value-tree pane.
Dictionary Browser
Selecting a value is
done in the Browser,
in edit mode and with
queries, and in all the
ECCAIRS applications
allowing to edit a
query, hence
specifying a value
definition: i.e.
Grapher, Exporter,
E4F Generator.
17-11
PART 4
VIEW DEFINITION, FILE
AND
HELP
MENUS
The Dictionary Browser has a menu bar with three menus.
View Definition menu
The View Definition menu allows to select the appropriate view over
the occurrence data-structure from those available in ECCAIRS 4 for
display and browsing in the Taxonomy Tree Pane (see page 4-4).
The view selected, either by default or by user
choice on the menu, is marked with a leading tick
sign in front of the corresponding menu-item.
The name, number and actual definition of the
views, as well as their order in the menu, may vary according to
specific settings in the Repository the user is connected to.
The default view used in the Taxonomy Tree Pane is the first view (i.e.
the topmost item) from the View Definition menu-items. Since the
specific views available in the menu may vary, so may the selected
default view.
The name of the currently selected view is
displayed on top right of the Taxonomy Tree
Pane, just below the menu bar.
File menu
The File menu has a single item, Exit, to quit the application
when selected.
The Dictionary Browser can also be quitted with either the bottom right
Exit button or the standard Windows top right close control of the
Dictionary Browser main window.
17-12
User Manual
The ECCAIRS Utilities
CHAPTER
Help menu
17
The Help menu has three items:
Contents... F1 invokes the standard Windows help support.
This support can also be started by the [F1] keyboard key.
Dictionary Info… shows information about the Dictionary in use.
About…
displays
information about the
software version in
use and can give
access to the system
information on the
computer
where
ECCAIRS is currently
running, through the
System Info button.
Select OK to close it.
Dictionary Browser
17-13
The ECCAIRS Utilities
18 E X P O R T E R
18.
TITOLO9
WHAT
IS THE
EXPORTER
The ECCAIRS 4 Exporter is a tool used to export subsets of data from
the database in a variety of different formats.
It is up to the user of the exporter to determine the final usage of the
data which is exported.
Examples of some possible usage include:
Creation of proprietary customised reports
Analysis of sub-sets of information in 3rd party environments
Free text searches on all attribute values
Passing information to users of non compatible systems.
Most probably, as a user, you will find that many (if not all) of your
requirements regarding the extraction of data for your particular
purpose will be met.
In fact, though the Exporter allows to export data in many different
formats, the way this is achieved is very much consistent with the other
ECCAIRS applications.
The application makes use of the same basic building blocks (Query
Builder, logons, user interface elements, etc.) as the standard ECCAIRS
applications.
Exporter
It is important to
know that the
Exporter always
respects the security
settings of the
repository's security
profile, so that
confidentiality, if
applied, is
maintained.
18-1
PART 4
STARTING
AND OPERATING THE
EXPORTER
Start the ECCAIRS 4 Exporter by selecting
Start
Programs
Eccairs 4
Tools
Exporter from the Windows
task-bar and performing the standard ECCAIRS logon (see page 3-2):
its main window will show up.
The Menu bar whose menus allows to save and recall
Exporter setup files and to invoke help and info tools.
The Destination pane allows both to
select the wanted export format and
specify the output file name.
The Source pane allows to specify the
source occurrences and, where
applicable, attributes to be exported.
The upper pane, the Destination pane, allows to specify the targetoutput file-names and choose the specific export format:
Export a number of specified attributes of the query-selected
occurrences from the database into text, Access or Excel file(s)
Export whole occurrences either resulting from a query-on the database or
taken from an E4F file into output files, either in a fixed text-tree format, or in a
template-driven HTML/RTF/TXT format, or de-identified in an E4F file.
The Source pane (the lower pane) allows to either specify the query on the database
or the E4F file (where applicable) providing the occurrences to be exported.
18-2
User Manual
The ECCAIRS Utilities
Also, where applicable, the specific attributes to be exported can be specified.
Export a number of specified attributes of
the query-selected occurrences from the
database into three file formats.
CHAPTER
18
Export whole occurrences either resulting
from a query on the database or taken
from an E4F file either as a text-tree file,
or as a formatted file using a template, or
as a de-identified E4F file.
The general operating sequence to run the Exporter is:
1. Select the desired export format in the Destination pane
2. Select the destination file name and folder
3. Select the source occurrences to be exported, using the Source
pane tools
4. According to the specific export-format choice, either:
a) Select the specific attributes to be exported (only for text,
Excel and Access export-format), or
b) Prepare and select the template file (only for formatted-viatemplate export-format), or
c) Select the attributes not to be exported (only for
de-identified E4F export-format).
5. Push the Execute button
6. According to the specific export-format choice, other dialog
boxes may be displayed for additional choices
7. The export output file is generated
8. When done, push the Exit button to close the Exporter.
Exporter
18-3
PART 4
SELECTING
THE OCCURRENCES TO EXPORT
Selecting the occurrences to export is achieved by specifying a query
on the database. Also, for some of the export formats available, the
occurrences to be exported may be taken from an E4F file.
Occurrences from database
The ECCAIRS Query Builder is used to select the occurrences and the
attributes, with applicable export formats, to be extracted from the database.
Click on the open-file icon-button in the upper left of the Source pane
to invoke the Query Builder
The Query Builder window is displayed,
the last- query library used is
automatically opened and its queries
are available for selection and/or
editing. As usual, it is also possible to open or create other query
libraries or create new queries (for details see page 7-6 onwards).
Once the query has been created or selected and
the Query Builder closed, the name of the query is
displayed in the upper text-box of the Source pane
and its logical description in the lower text-box.
Note that the
actions performed
up to here do not
yet execute the
selected query.
“On the spot” queries
It is also possible to create/edit a query on the spot, without resorting to the
whole Query Builder (i.e. without opening any query library and selecting
any of its existing queries). This is the only way to edit a query which was
stored in a E4E export file and is not available anymore in a Query Library.
Clicking on the pencil icon-button opens a Restriction Editor window (see
next section, page 18-6).
The query specified on the spot with the Restriction Editor is automatically
saved in E4E export configuration files (see page 18-20).
18-4
User Manual
The ECCAIRS Utilities
CHAPTER
Exporting specific attributes
In addition, only the first three choices of export format (text, Excel and
Access) also require the
selection of the attributes to be
exported.
18
See next section, page 18-6,
for details.
Occurrences from E4F file
In the case of tree-text,
formatted-via-template
and
de-identified E4F export-format
choice (the last three in the list),
the source occurrences to be
exported can also, in alternative
to the query on the database,
be provided by an E4F file.
Select the E4F Filename choice
in the Source pane, whose textbox has yellow background to
distinguish it at a glance from
the query text-boxes (pale-blue).
Then either type in the full path to the output export-file in the yellow
text-box, or click on the open-file button to invoke the standard
Windows file browse dialog for selection.
Exporter
18-5
PART 4
SELECTING
THE ATTRIBUTES TO EXPORT
When choosing either text, Excel or Access export-formats in the
Destination pane of the Exporter main window, it is also necessary to
specify the specific attributes to be exported.
To select attributes, click on the pen icon in the Source pane to edit the
currently selected query with the Restrictions Editor of the Query
Builder.
The Restrictions edit pane is the
one normally used to edit
queries used to find specific
occurrences. Click on the
Selections tab to switch to the
Selections edit pane instead.
Attributes can be selected using the functions available both in the
Edit menu and in the Selections Editor toolbar.
The Selections editing functions are a subset of the standard editing
functions available for queries in the Restriction pane (for details see
page 7-9 onwards).
18-6
User Manual
The ECCAIRS Utilities
In addition to the pure selection of attributes to be exported, it is also
possible to change their Layout, determine their Order, apply an
Aggregate function or Group their values. These options are available
in the Function
definitions pane of
the
Selection
builder
dialog,
which is invoked
whenever
adding/editing an
attribute in the
Selections
edit
pane.
Be aware that certain rules apply when combining different functions for the
selected attributes. For example when one attribute is used for grouping, the
other attribute must also have specific functions applied (count, for instance).
CHAPTER
18
It is best to practice
with various options
to understand the
rules for combining
different functions
for the attributes
selected. The system
will give you
appropriate hints
when combinations
not allowed are
chosen.
Once the attributes, and related functions, are specified, the Selections
Editor can be closed by clicking its OK button, at the bottom right
corner. Closing wit with the Cancel button discard any modification
made in the editing session.
The lower box of the Source pane of the main
Exporter window will also display the choice of
attributes to be exported with the query.
Exporter
18-7
PART 4
EXPORT
ACCESS
SELECTED ATTRIBUTES IN
OR
EXCEL
TEXT,
FORMAT
The first three choices in the Source pane allows to export queryselected
occurrences
from the database, with
a specified set of their
attributes,
into
text,
Access or Excel file(s).
Proceed as follows:
1. Select one of the three export formats in the Destination pane
2. Specify the full file path and name for the output file by typing it
into the corresponding text-box or by clicking on the file-open
icon-button to invoke the standard file browse dialog
3. Specify the query to select the occurrences to be exported (see
page 18-4) and specify the attributes to be exported (see page
18-6) through the Source pane
4. To start the export procedure press the Execute button.
The occurrences exported and their selected attributes are always
logically organised in two tables, in all the three export-formats
available: one of the table contains the occurrences in Flat format and
the second table in Expanded format (see page 18-10 onwards for
details).
18-8
User Manual
The ECCAIRS Utilities
CHAPTER
Access and Excel output format
The Access export generates an Access (JET) database where selected
occurrences and attributes are stored in a pair of Access tables, one
named Flat and the other named Expanded.
The Excel export generates an Excel workbook where selected
occurrences and attributes are stored in a pair of Excel spreadsheets,
one named Flat and the other named Expanded.
18
Text output format
The text files export generates a pair of related text files where selected
occurrences/attributes are stored.
The names of the two files will be the name of the file as is displayed in
the text-box, concatenated with "expanded" and "flat'".
For instance, if the destination file name entered is IMC-cloud.txt,
the two export text files generated will be named
IMC cloud-flat.txt and IMC_cloud-expanded.txt.
Pressing the Execute button displays a Text Export Wizard dialog.
This dialog allows to specify:
the separator to be used between the different columns
the Text Qualifier to be used to encapsulate the various strings.
Pushing the OK button starts the actual export process.
Exporter
18-9
PART 4
FLAT
ATTRIBUTE FORMAT
The text, Access or Excel export options all provide a pair of tables as
output: one of the table contains the occurrences, with their selected
attributes, in flat format.
Its first five columns contain the following values:
RN
KEY
SFNR_V
SR_V
SR_VD
Where:
RN ........... Row Number, a sequential number identifying the row
in the output table
KEY .......... Occurrence signature, a code uniquely identifying an
occurrence object in the universe
SFNR_V .... State File Number Value, the unique identifier for an
occurrence within a state's administration
SR_V ........ State Reporting Value, the code for a specific state in
the ECCAIRS Repository
SR_VD ....... State Reporting Value Description, the expanded
readable version of the State reporting the occurrence.
Here is an example of the first five columns of the flat format in Excel.
18-10
User Manual
The ECCAIRS Utilities
Additional attribute columns, corresponding to the attributes chosen for
export, might be added up to a maximum of three for each attribute:
ATTR_V
ATTR_VD
CHAPTER
18
ATTR_VT
Where:
ATTR_V ..... Attribute Value, the value of the attribute as stored in
the ECCAIRS Repository
ATTR_VD ... (optional) Attribute Value Description, the expanded
readable version of the attribute value as generated
by the installed version of ECCAIRS
ATTR_VT
(optional) Attribute Value Type, 0 (coded attribute), 1
(coded attribute with alternative text ) or 2 (coded
attribute with an alternative text proposed as an
extension to the taxonomy).
Here is an example of the attribute columns of the flat format in Excel.
NOT ALWAYS A SINGLE ROW PER OCCURRENCE
Depending on the nature of the attributes exported, there might be more than
one row for each occurrence.
For instance, when exporting the aircraft model, if there are two aircraft involved
in the occurrence two rows will be produced, where the first five columns,
identifying the occurrence, will be in any case identical.
Exporter
18-11
PART 4
EXPANDED
ATTRIBUTE FORMAT
The second table generated by the text, Access or Excel export options
contains the occurrences and selected attributes in expanded format.
Each row will include data related to each attribute to be exported.
Its first four columns contain the following four values:
KEY
SFNR_V
SR_V
SR_VD
Where:
KEY
Occurrence signature, a code uniquely identifying an
occurrence object in the universe
SFNR_V
State File Number Value, the unique identifier for an
occurrence within a state's administration
SR_V
State Reporting Value, the code for a specific state in
the ECCAIRS Repository
SR_VD
State Reporting Value Description, the expanded
readable version of the State reporting the occurrence.
Here is an example of the first four columns of the expanded format in
Excel.
18-12
User Manual
The ECCAIRS Utilities
There are then six other columns which are used to describe each
single attribute on a line:
ATTR_ID ATTR_DESCR
ATTR_V
ATTR_VT ATTR_VD
CHAPTER
18
UNIT
Where:
ATTR_ID ..... Identifier of the attribute following the ECCAIRS
coding of ADREP 2000
ATTR_DESCR Textual description of the attribute as generated by
the installed version of ECCAIRS
ATTR_V ....... Attribute Value, the value of the attribute as stored in
the ECCAIRS Repository
ATTR_VT ..... (optional) Attribute Value Type, 0 (coded attribute),
1 (coded attribute with alternative text) or
2 (coded attribute with an alternative text proposed
as an extension to the taxonomy)
ATTR_VD .... Attribute Value Description, the expanded readable
version of the attribute value as generated by the
installed version of ECCAIRS
UNIT .......... (optional) The measurement Unit in which the
attribute value is expressed.
Here is an example of the additional columns of the expanded format.
In the expanded
format you will see
almost always more
than one row per
occurrence, since
there is a row for each
attribute exported.
To fully appreciate the
export formats it is best
to experiment with
various queries and
analyse the results.
Exporter
18-13
PART 4
EXPORT
OCCURRENCES AS TEXT-TREE
The text-tree export format generates a single output file where the
attributes of the occurrence
are placed in a hierarchical
tree structure (defined by
the chosen view) in their
expanded textual form.
The
(coded)
database
values of the attributes are
not exported.
Proceed as follows:
1. Select the Complete occurrences expanded as a text tree
export format in the Destination pane
2. Specify, into the Destination pane, the full file path and name
for the output file by typing it into the corresponding text-box or
by clicking on the file-open icon-button to invoke the standard
file browse dialog
3. Specify, using the Source pane tools, either the Query to select
the occurrences to be exported (see page 18-4) or,
alternatively, the E4F Filename with the occurrences to be
exported (see page 18-9 for details)
4. Push the Execute button.
The dialog window that shows up displays the list of the
occurrences.
The View Definition drop-down menu
allows to chose the specific view and its
associated hierarchical tree structure.
By right-clicking on one of the columns it
is possible to furtherly restrict the
occurrences to be exported by applying
a filter on the corresponding attribute.
18-14
User Manual
The ECCAIRS Utilities
5. To proceed with the actual exporting click on the Continue...
button.
CHAPTER
18
In the picture below a sample of the text-tree output file, using an
ADREP 2000 view, is displayed.
Exporter
18-15
PART 4
EXPORT OCCURRENCES USING
(HTML, RTF, TXT FORMAT)
A TEMPLATE
The export using a template generates a single output file where the
attributes of the occurrence are placed following a formatted template
defined by the user. The limitation for using this exporter function is
that the template provided, and thus the final document, must be
based on normal text. In practice this makes the exporter usable for
.TXT files, .HTM files and .RTF files.
As in the text-tree export format case, the (coded) database values of
the attributes are not exported.
The RTF and HTML formats open up the application of this export
method for complex pre-formatted documents, i.e. the possibility to
produce custom reports from an ECCAIRS 4 data-source (query or E4F
file). Moreover, because ECCAIRS 4 exporting scripts can be saved as
E4E files (see page 18-20), these document generation templates can
be exchanged in the ECCAIRS community and re-applied anywhere.
In the template document special Data Tags are placed at convenient
places. During the exporting process the content of each occurrence in
input is fed into the template document. The system interprets the Data Tags
and substitutes them with the appropriate values taken from each
occurrence. In order to manage the hierarchical structure of the occurrences
some special Control Tags are also defined and take care of producing
loops and conditional formatting.
18-16
User Manual
The ECCAIRS Utilities
Full details and instructions on building and using template files are
given in an specific ECCAIRS White Paper available on Internet at
ECCAIRS web site (http://eccairs-www.jrc.it).
CHAPTER
18
To export using a template proceed as follows:
1. Select the Occurrences formatted according to a predefined
template export format in the Destination pane.
2. Specify, into the Destination pane, the full file path and name
for the output file either by typing it into the corresponding textbox or by clicking on the file-open icon-button to invoke the
standard file browse dialog.
3. Specify, using the Source pane tools, either the Query to select
the occurrences to be exported (see page 18-4) or,
alternatively, the E4F Filename with the occurrences to be
exported (see page 18-9 for details).
4. Prepare the template file (use the above mentioned White
Paper) and select it by either using the open file icon-button or
typing in the filename and path in the Template pane.
Exporter
18-17
PART 4
5. Push the Execute button.
6. The dialog window that shows up displays the list of the
occurrences to be exported.
By right-clicking on one of the columns it
is possible to furtherly restrict the
occurrences to be exported by applying a
filter on the corresponding attribute.
7. To proceed with the actual exporting click on the Continue...
button.
18-18
User Manual
The ECCAIRS Utilities
The picture below shows an exported file generated using the sample
HTML template available in the installation folder (see side note).
CHAPTER
18
Since ECCAIRS
version 4.2.4 hot fix
3 onward, the
Tools\Export subfolder of ECCAIRS
installation folder
hosts sample
RTF and HTML
template files:
E4ExportTemplate.rtf,
E4ExportTemplate.htm
Exporter
18-19
PART 4
EXPORT DE-IDENTIFIED
AN E4F-FORMAT FILE
OCCURRENCES INTO
This option allows to export de-identified occurrences into a new E4F file.
To de-identify occurrences the specific export attributes to be excluded must
be specified before the proper export phase.
To export using a template proceed as follows:
1. Select the Complete de-identified occurrences in E4F format in
the Destination pane.
2. Specify, into the Destination pane, the full file path and name
for the output file either by typing it into the corresponding textbox or by clicking on the file-open icon-button to invoke the
standard file browse dialog.
3. On the same row click on the mask icon-button to invoke the
Selected Attributes will not be exported dialog.
The View Definition drop-down menu allows to chose the
specific view and its associated hierarchical tree structure.
The contextual right-click menu
also allows to locate in the
left-pane hierarchical view the
attribute selected in the
Most of the
attributes in clued in
Filing information
section are
automatically
excluded. They are
greyed out in the
left pane.
Use the three central icon-buttons to:
Add,
Remove
Clear
the attribute(s) in the “exclude” list
in the right pane.
4. Click on to OK button when the attributes to be removed in the
export have been selected in “exclude” list in the right pane.
18-20
User Manual
The ECCAIRS Utilities
CHAPTER
5. Specify, using the Source pane tools, either the Query to select
the occurrences to be exported (see page 18-4) or,
alternatively, the E4F Filename with the occurrences to be
exported (see page 18-9 for details).
18
8. Push the Execute button.
9. The dialog window that shows up displays the list of the
occurrences to be exported.
By right-clicking on one of the columns it
is possible to furtherly restrict the
occurrences to be exported by applying a
filter on the corresponding attribute.
The number of occurrences to be exported in the
E4F file can be limited by checking this box and
entering the maximum number in the Occurrence
field.
10. To proceed with the actual exporting click on the Continue... button.
Exporter
18-21
PART 4
THE EXPORTER FILE
MENU
The Exporter menu bar has only two menus available: the File menu
and the Help menu.
The Help menu-items are discussed in section The Exporter Help menu,
page 18-24.
The File menu hosts two kind of items/functions:
Menu-items related to export configuration files:
New
Open and open “most-recently-used”
Save and Save as…
Menu-items for functions also available from buttons, as:
Execute (to start the export)
Exit (to quit the application).
E4E export configuration files are discussed in section E4E export
configuration files, page 18-23.
18-22
User Manual
The ECCAIRS Utilities
CHAPTER
E4E
EXPORT CONFIGURATION FILES
The ECCAIRS export configuration files use the .E4e file extension and
are also referred to as E4E files.
18
They allow to store:
1. All the export file names and paths specified in the Destination
pane
2. The currently selected export format choice in the Destination
pane
3. The source E4F file name with paths and/or the source Query,
as well as the template file (if any) name with paths currently
specified in the Source pane
4. The query defined by calling the query builder or created "on
the spot". This query contains restrictions and possibly (see
page 18-6) selections.
The File
Open and File
“most-recently-used” menu-items are
used to open previously saved ECCAIRS export configuration files.
The File
Save and File
Save as… menu-items are used to save
the current configuration into ECCAIRS export configuration files.
The File
New menu-item does not actually create a new
configuration file, but rather cleans all the current configuration items
form the Exporter main window, i.e. choices, file names, queries,
attributes selected, etc.
Exporter
18-23
PART 4
THE EXPORTER HELP
MENU
The Help menu has three items:
Contents... F1 invokes the standard Windows help support.
This support can also be started by the [F1] keyboard key.
18-24
User Manual
The ECCAIRS Utilities
Dictionary Browser… starts the Dictionary Browser, which can be
useful while editing queries and selecting attributes.
CHAPTER
18
About… displays information about the software version in use
and can give access to the system information on the computer
where ECCAIRS is currently running, through the System Info
button.
Select OK to close this window.
Exporter
18-25