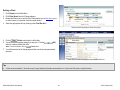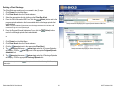
1
Rhode Island
Behavioral Health On-Line Data (BHOLD) Service
USER MANUAL
Version 1.1
May 2011
Ph: 888.600.4777
[email protected]
KIT Solutions®, LLC
5700 Corporate Dr
Suite 530
Pittsburgh, PA 15237
TABLE OF CONTENTS
Introduction ......................................................................................................................................................................................................................................................... 4
Tips for Using the Service Effectively.................................................................................................................................................................................................................. 5
Recommended Computer Settings................................................................................................................................................................................................................. 5
Application Navigating .................................................................................................................................................................................................................................... 6
Menu Information ....................................................................................................................................................................................................................................... 6
Landing Page ............................................................................................................................................................................................................................................. 8
Listing Page ............................................................................................................................................................................................................................................... 9
Edit Forms................................................................................................................................................................................................................................................ 13
Data Fields and Buttons ............................................................................................................................................................................................................................... 15
Edit Form Buttons .................................................................................................................................................................................................................................... 17
Additional Buttons .................................................................................................................................................................................................................................... 17
Login Procedure................................................................................................................................................................................................................................................ 19
Service Announcements............................................................................................................................................................................................................................... 20
Forgot Password? ........................................................................................................................................................................................................................................ 21
Activating Your Account ............................................................................................................................................................................................................................... 22
Home ................................................................................................................................................................................................................................................................ 23
Administration ................................................................................................................................................................................................................................................... 25
Staff Registration .......................................................................................................................................................................................................................................... 25
Adding a Staff Member............................................................................................................................................................................................................................. 25
Editing a Staff Member............................................................................................................................................................................................................................. 29
Deleting a Staff Member........................................................................................................................................................................................................................... 30
Manage Provider .......................................................................................................................................................................................................................................... 31
Viewing and Editing Provider Details........................................................................................................................................................................................................ 31
Viewing and Editing PID Details............................................................................................................................................................................................................... 33
Viewing and Editing Program Details ....................................................................................................................................................................................................... 35
Change Password ........................................................................................................................................................................................................................................ 37
Manage Events............................................................................................................................................................................................................................................. 38
Adding an Event....................................................................................................................................................................................................................................... 38
Editing an Event ....................................................................................................................................................................................................................................... 39
Deleting an Event..................................................................................................................................................................................................................................... 40
Manage Messages ....................................................................................................................................................................................................................................... 41
Adding a Message ................................................................................................................................................................................................................................... 41
Editing a Message.................................................................................................................................................................................................................................... 42
Deleting a Message ................................................................................................................................................................................................................................. 43
Rhode Island BHOLD User Manual
2
© KIT Solutions® 2011
Clients............................................................................................................................................................................................................................................................... 44
Client Information ......................................................................................................................................................................................................................................... 44
Adding a Client......................................................................................................................................................................................................................................... 44
Filter Clients ............................................................................................................................................................................................................................................. 46
Editing a Client ......................................................................................................................................................................................................................................... 47
Deleting a Client....................................................................................................................................................................................................................................... 48
Program Episode Admissions....................................................................................................................................................................................................................... 49
Adding a Program Episode Admission ..................................................................................................................................................................................................... 49
Editing a Program Episode Admission ..................................................................................................................................................................................................... 53
Deleting a Program Episode Admission ................................................................................................................................................................................................... 55
Viewing Admission History ....................................................................................................................................................................................................................... 56
Client Discharge ........................................................................................................................................................................................................................................... 58
Adding a Client Discharge........................................................................................................................................................................................................................ 58
Editing a Client Discharge ........................................................................................................................................................................................................................ 61
Deleting a Client Discharge...................................................................................................................................................................................................................... 63
Utilize Data ....................................................................................................................................................................................................................................................... 65
Standard Reports ......................................................................................................................................................................................................................................... 65
Opening a Report..................................................................................................................................................................................................................................... 65
Printing or Saving Reports (for Window Output) ...................................................................................................................................................................................... 67
Data Export................................................................................................................................................................................................................................................... 68
Import Data................................................................................................................................................................................................................................................... 69
Uploading a File ....................................................................................................................................................................................................................................... 69
Viewing Imported File Details................................................................................................................................................................................................................... 70
Changing Imported Data File Status ........................................................................................................................................................................................................ 71
Knowledge Base............................................................................................................................................................................................................................................... 72
Web Links..................................................................................................................................................................................................................................................... 72
Library .......................................................................................................................................................................................................................................................... 73
Support ............................................................................................................................................................................................................................................................. 74
Web Site....................................................................................................................................................................................................................................................... 74
Chat.............................................................................................................................................................................................................................................................. 75
Appendix........................................................................................................................................................................................................................................................... 76
Grant # / Contract ID # (SSTAR Providers) .................................................................................................................................................................................................. 76
Methadone Providers ................................................................................................................................................................................................................................... 77
Methadone Search................................................................................................................................................................................................................................... 78
Rhode Island BHOLD User Manual
3
© KIT Solutions® 2011
INTRODUCTION
The Rhode Island Behavioral Health On-Line Database (BHOLD) is a service used to collect, analyze and report behavioral healthcare data for both Mental Health and
Substance Abuse Treatment. The results of data collected are used for state and federal reporting purposes, and to assist policy decisions for improved client care.
The Rhode Island BHOLD Implementation Training is provided to introduce the Rhode Island BHOLD Service to the Providers that will be doing the data entry into Rhode
Island BHOLD. The Training Workbook holds sample scenarios to be used during the Implementation Training to give the trainees an idea of the type of information that is
entered into the Service. The Training is done using a demonstration site called a Demo. The Demo site is intended to be identical to the Live site; however the Demo is
not a secured site as the Live site will be, meaning the data base does not encrypt the data entered. *DO NOT enter any real client information into the Demo site.
Rhode Island BHOLD User Manual
4
© KIT Solutions® 2011
TIPS FOR USING THE SERVICE EFFECTIVELY
Recommended Computer Settings
Screen Resolutions
You will get the best screen layout if you set your PC monitor settings to 1024 X 768 or larger. If your screen resolution is smaller (e.g., 800 x 600 pixels), everything on the
screen will appear larger. But, if you use 800 x 600 pixels you will have to scroll more both up and down and left and right to access all the data fields.
To change your PC monitor settings, right click on the Desktop background and select Properties. Next, click on the Settings tab and move the Screen Resolution
scroll bar to the right (towards “more”) to select 1024 X 768 resolution. Click the OK button at the bottom of the window to make the change effective.
Web Browser
The web browser supported by Rhode Island BHOLD (Behavioral Health On-Line Data service) is Microsoft Internet Explorer (IE). Mozilla Firefox, Safari, and other
browsers may not be fully supported by Rhode Island BHOLD. They may function but not to design specifications. We recommend that users have the latest version of IE
installed on their computer along with the updates provided by Microsoft (which are released periodically).
Pop-Up Blockers
Modern computer security technology and usability features development have led to pop-up blocking. Although this new feature of Internet browsers, toolbars and other
3rd party managing software blocks hazardous and annoying pop-ups, sites like the Rhode Island BHOLD require pop-ups to be able to function. If your pop-up blocker is
enabled, then there is a possibility that Rhode Island BHOLD may not function or appear properly. You should either disable the pop-up blocker while using the RI BHOLD
(while remembering to enable it, if desired, when not using the Rhode Island BHOLD) or create exceptions for the pop-up blocker. Although enabling and disabling the popup blocker may be cumbersome, it may be easier than making exceptions to the pop-up blocker.
To create exceptions for the pop-up blocker, open your internet browser window. If using Internet Explorer, click the top toolbar option “Tools” and then go to “Internet
Options”. After the Internet Options window is available, you will want to click on the “Privacy” tab at the top of the window. You will notice while on the “Privacy” tab at the
bottom will be a section on Pop-Up Blockers. If your “Block pop-ups” checkbox is checked, click on the “Settings” button to allow for exceptions. You can now add the
Rhode Island BHOLD links to the “Allowed Sites” list which the pop-up blocker will ignore when trying to block pop-ups from the Rhode Island BHOLD. You will want to add
http://kitservices3.kithost.net/RIBHOLD_Demo/ for the Implementation Training system. Once these sites are added to your “Allowed Sites” list, the pop-up blocker should
no longer prevent pages from loading and appearing while you are using the Rhode Island BHOLD.
*Note: These are instructions for Internet Explorer 6.0 and may be different for other Internet Explorer version.
Rhode Island BHOLD User Manual
5
© KIT Solutions® 2011
Application Navigating
Navigating through Rhode Island BHOLD is set up in such a fashion that you use a Menu to access the various forms. Selecting a Menu item provides a Submenu and a
Landing Page displaying the various forms for data entry. Some of these forms must be filled in before other forms. It is recommended that you work from top to bottom on
the Submenu list, filling out all the information for that area before moving on to the next section. Continuing in this manner will ensure that all of the sections of the
application have enough information to function correctly. If all of the different portions are not completed, some modules will not work correctly.
Menu Information
The Menu for Rhode Island BHOLD is located across the top of the screen. Some Main Menu categories may be broken down into submenu categories to choose from.
The Main Menu categories list the main modules that are within the application. When a Main Menu category is selected, a list of submenu categories will be displayed on
the Landing Page as links to access the modules. (For more information on Landing Pages, see the Landing Page section.)
1. Main Menu
Constant (unchanging). Available at all times.
2. Landing Page
Varies depending on which Main Menu category is selected. Displays the Submenu Categories.
3. Submenu Category
Varies depending on which Main Menu category is selected.
4. Listing Page
Varies depending on which Submenu Category is selected.
1. Main Menu
4. Listing Page
2. Landing Page
3. Submenu Category
Screenshot displaying the Main Menu (1), a Landing Page (2) and a Submenu Category list (3)
Rhode Island BHOLD User Manual
Sample screenshot displaying a Listing Page (4)
6
© KIT Solutions® 2011
Change Font Size
The top of the menu provides links to
Off) of the Service. It also has
(Home page) and to
(Change Font Size).
(Log
Link to Home page
Link to Log Off
Bread Crumb Trail
A “Bread Crumb Trail” is provided to indicate where you currently are in the system.
The links provided in the Bread Crumb Trail also allows you to move backwards in
the system
Rhode Island BHOLD User Manual
Bread Crumb Trail
7
© KIT Solutions® 2011
Landing Page
When first entering a module, you may see a list of the entire categories associated
with that module. This is called a “Landing Page”. The Landing Page of a module
provides a description of what can be done in that module as well as listing each
category as a link to the Listing Page and entry forms. (For more information on the
Listing Pages, see the Listing Page section.) No data is entered on the Landing Page.
Submenu Category link
To open a submenu category:
• Click on the Landing Page Submenu Category link.
Screenshot displaying a Landing Page
Tips
•
A description of the module may be listed on each Landing or Listing Page at the top of the page. A link is displayed in the lower right-hand corner of the gray box where the
description is housed. Clicking this link will toggle the display of the description.
Allows the module description to be hidden from view
Places the module description back in view
Rhode Island BHOLD User Manual
8
© KIT Solutions® 2011
Listing Page
After selecting a submenu category from a Landing Page, you will see the “Listing Page”. When going into an area where a Listing Page is available, the service allows you
to select previously entered data to edit or view its content. No data is entered on the Listing Page.
There are three types of Listing Pages:
1. Grid View
2. Hierarchy View
3. Single Form View
Grid View
The Grid View displays the data in tables. Specific pieces of data will be displayed
within the Grid based on the fields within the Edit form (for additional details on the Edit
Form, see the Edit Forms section).
•
•
•
When first viewing a Listing Page, all of the data is available for Searching (for
additional details, see the Advanced Search section). If no data has been entered yet,
the Listing Page will be blank.
Click the
(Add) button to add new data.
Click the
(Select) button to the left of the data you would like to edit/view.
Select button
Sample screenshot displaying a “Grid View” Listing Page
Tips
•
•
Clicking on the column name (e.g.,
) will allow you to sort your records in that column in ascending or descending order.
The Page numbers (e.g.
) beneath the grids allows to you move from page to page within the specific listing page. There is a maximum of 8 items in a grid, so once you
exceed 8, the application automatically updates the grid to page 2. To get to a desired page click on the number and you will go to that specified page.
Rhode Island BHOLD User Manual
9
© KIT Solutions® 2011
Advanced Search
Most Grid View Listing Pages include a search feature which allows you to find a
(Advanced Search)
particular saved record by clicking the
tab and selecting several variables.
Advanced Search tab
To begin using the Advanced Search feature:
• Click the
(Advanced Search) tab located at the top of the
grid.
Sample screenshot of a Data Grid displaying the Advanced Search tab.
•
Once you have selected the
(Advanced Search) tab, you
will need to select a Category from the dropdown list. Then select an option
from the three search filter fields. Once the three search filter fields have been
selected, click the
(Go) button to see the search results.
•
The three search filter fields are used in the following methods:
1. The first search filter will display the search categories to choose from.
The options in the dropdown list are some of the required fields from
the Edit form.
2. The second search filter allows you to specify how you wish to search.
3. The third search filter is the search criteria. This field will change based
on the second search filter selected.
Filters
Go button
Sample screenshot of the Advanced Search displaying the filter fields
Rhode Island BHOLD User Manual
10
© KIT Solutions® 2011
Hierarchy View
A Hierarchical View is used when there is a relationship between the data. For
example, a client is admitted to a program. All admission records that are entered
are related to the client that the admission is associated with. The need to link the
relationship adds complexity to the process of adding and searching. The
hierarchical view was designed to simplify these tasks.
•
•
When first viewing the Listing Page, you will need to click the (plus sign) to
activate the hierarchy view. The (plus sign) will become a (minus sign)
and all the data will display below the link.
The data located to the right of the (plus sign) is a link to view or edit the
record. Click on the desired link.
minus sign
Screenshot displaying a “Hierarchy View” Listing Page
Rhode Island BHOLD User Manual
11
© KIT Solutions® 2011
Single Form View
A Single Form View is one record that gets edited. The Single Form View is used
when the data entered is updated periodically. The Single Form View displays the
fields on the Edit Form (for additional details on the Edit Form, see the Edit Forms section).
•
The form can be edited at any time, but you must click the
button to update the data.
(Save)
Sample screenshot displaying a “Single Form View” Listing Page
Rhode Island BHOLD User Manual
12
© KIT Solutions® 2011
Edit Forms
The Entry/Edit Form contains the fields for entering and editing data. The buttons
for saving, cancelling, deleting, printing, and in some cases, adding and editing, are
available. (See the Data Fields and Button section for additional details on the function of these
buttons.)
•
•
If you clicked the
(Add) button to enter new information into a form, the
Edit Form data fields will be blank.
When selecting the
(Select) button to view existing data, the Edit form
data fields will display the data entered/selected previously. These fields may
be modified, if needed.
Partial screenshot displaying a blank Edit Form
•
If a required field does not have data entered into it and you try to save the
form, you will receive a message that informs you of the field vacant of data and
you will not be able to save that form until that field has data. Some or all of the
fields may be required in order to save the form. Those fields that are required
are bold and with an asterisk next to the field name.
Rhode Island BHOLD User Manual
Required field
13
© KIT Solutions® 2011
Computer Keys
While entering information into an Edit form, several keys are helpful for moving the cursor from one information box (called a data field) to another. The table below
summarizes those keys:
Key
Description
Function
The Cursor
Points to desired location
The TAB key
Moves the cursor to the next data field
Hold down the SHIFT key and then press the TAB key
Moves the cursor to the previous data field
The Control (Ctrl) key
Enables blocked material to open (due to pop-up blocker)
Use the MOUSE by pointing and clicking to move the cursor
Moves the cursor by pointing and clicking
Rhode Island BHOLD User Manual
14
© KIT Solutions® 2011
Data Fields and Buttons
In Rhode Island BHOLD there are several fields, boxes, and buttons that are used to collect and store data.
Type
Preview/Description
Text Field (aka Text Box)
(fill in the blank)
Dropdown List (aka Pull Down Menu)
(select one)
Radio Buttons
Selected
Not Selected
Check Boxes
Selected
Not Selected
A yellow box around a field denotes a required field
“Calendar” allows you to enter a date or select other data to fill in a field
It does not matter the order in which the above fields are filled in, but if a required field is not filled in and you try to save the form, you will receive a message informing you
what field is missing data and you will not be able to save the form until that field has data.
Tips
•
All the fields within a yellow box are required fields. These must have a value entered before the record can be saved.
•
You can type an identifying letter of an item in a dropdown list and the first selected item beginning with that letter will appear in the box.
Rhode Island BHOLD User Manual
15
© KIT Solutions® 2011
Calendar
Dates can be entered in two different ways: 1) typing the date directly into the field or
2) using the
(Calendar) icon. The icon can be used as an alternative option to
entering a date directly into a date field.
(Calendar) icon. A calendar displaying the current month and
1. Click the
year will display below the date field.
2. The calendar will change depending on the selections chosen from the two
dropdown lists.
3. Select the appropriate month from the first dropdown.
4. Select the appropriate year from the second dropdown
5. Select the date by clicking on a number within the calendar.
6. The calendar will close and the date will appear within the date field.
Screenshot displaying the calendar feature
Rhode Island BHOLD User Manual
16
© KIT Solutions® 2011
Edit Form Buttons
Information is entered and edited on the computer screen through data entry/edit forms. The table below summarizes the buttons used to enter/edit information located to
the left of each form. This is referred to as the “left toolbar”.
Must be pressed first to add new information to a form
Allows the Edit Form fields to be “open” for modifications
Adds the information on a form to the RI BHOLD database
Returns you to previous screen
Removes the information currently on a form from the database
Cancels the Add or Edit without saving any information entered
Additional Buttons
Here is a list of additional buttons you may come across while entering data into Rhode Island BHOLD.
Denotes a Note with more information regarding a field
Allows the permissions of a staff account to be selected or modified
Resets
Changes the size of the text that appears on the screen (for additional details, see the Using the Text Resizer section)
Expands and collapses records of saved data
Opens a record of saved data for viewing or modifying
Adds a modification to the RI BHOLD database
Applies a search filter
Removes the currently selected filters
Removes the information on a form
Rhode Island BHOLD User Manual
17
© KIT Solutions® 2011
Using the Text Resizer
You can alter the size of the text on a form by using the Text Resizer
pointer over one of the
. Clicking on one of the s changes the text size from smallest to largest. Place the mouse
s and left click to change the size.
Provides the smallest text size
Provides the default text size
Provides a medium text size
Provides the largest text size
1. Click the
(Text Resizer) icon.
2. Select the Text Size by selecting the
Rhode Island BHOLD User Manual
symbol that is the desired size.
18
© KIT Solutions® 2011
LOGIN PROCEDURE
Connect to the Internet using an Internet Browser (e.g., Internet Explorer, Mozilla Firefox, etc). In the Address (location) box, type in the following address and press Enter
on your keyboard:
Live Site
Training Site
http://kitservices3.kithost.net/RIBHOLD
http://kitservices3.kithost.net/RIBHOLD_Demo/
1. Type the login name provided by your acting administrator in the User ID field.
2. Type the password in the Password field.
3. Click the
(Login) button.
If you are currently logged in and wish to log out of the application, click the
(Log Off) link in the upper right-hand corner.
Login button
Screenshot displaying the Login page
Tips
•
•
•
The User ID IS NOT case sensitive.
The Password IS case sensitive.
You must activate your account prior to your first login. Once you are registered into the application by your acting administrator, you will receive an email with instructions for
activation. If you do not receive the email, please contact your acting administrator to make sure your account has been created. To ensure that you receive the email, please add the
following domain to your safe list: @kitsolutions.net.
Rhode Island BHOLD User Manual
19
© KIT Solutions® 2011
4. To enter, you must read and agree to the System Use Agreement by clicking the
(Ok) button.
Ok button
Screenshot displaying the System Use Agreement page
Service Announcements
Service Announcements
The Service Announcements that are located on the Login Page are there to notify
users that the Service is receiving any necessary server updates. The Service may
be down for a short period of time which means you will not be able to log into the
Service or save any data at that time.
Service Maintenance typically occurs once a month.
Rhode Island BHOLD User Manual
20
© KIT Solutions® 2011
Forgot Password?
If you are unable to log into Rhode Island BHOLD due to forgetting your UserID and
Password, you can retrieve this information by clicking the Click Here link next to
Forgot Password?
Click Here link
Enter your User ID and click the
(OK) button. You will receive a reply
with your login information as long as the email address entered matches the email
address provided in the Staff module when your account was created by your acting
administrator (IT Manager).
OK button
Screenshot of the Forgot Password screen
Tips
•
If you have not activated your account, you will not be able to use the Forgot Password feature.
Rhode Island BHOLD User Manual
21
© KIT Solutions® 2011
Activating Your Account
Your login information is created for you by your acting administrator (IT Manager).
When you access Rhode Island BHOLD for the first time, you will need to activate
your account first.
1. Once you have been informed by your acting administrator that an account was
created for you, check your email’s Inbox. You should receive an email with
instructions for activation.
2. Click the activation link within the email to activate your account.
Activation link
Sample screenshot of the Account Activation email
3. Enter your password into the Password text box. It must contain the following;
a. Minimum 8 characters in length.
b. Must have 1 Upper Case Character.
c. Must have 1 number.
d. Cannot use login name as part of password.
4. Confirm your password in the Confirm Password text box.
5. Enter your password question into the Password Question text box.
6. Enter your password answer into the Password Answer text box.
(Ok) button. You will now be taken to the Login Page.
7. Click the
*Note: You will receive a confirmation email that your account has been activated.
Ok button
Screenshot displaying the Account Activation page
Tips
•
The activation link is only available for 72 hours. If you did not click the link in time, see your IT Manager to reset your account.
Rhode Island BHOLD User Manual
22
© KIT Solutions® 2011
HOME
The Home Page provides a provider with important messages and upcoming events.
Getting Started
• To view a guide through the initial steps of using the Rhode Island BHOLD
application, click on the Launch “Getting Started” Help link.
• A new window will open displaying some basic information about the Rhode
Island BHOLD application.
• To close the new window, click on the (X) in the upper right hand corner.
Getting Started link
Screenshot displaying the Home Page
Events Calendar
•
•
•
•
•
To view the events calendar click on the (plus sign) next to the Events
Calendar.
The Calendar will expand.
To view Event details for a particular day, click on the calendar date (e.g., ).
Switch to the previous or next month by selecting the link located to the right or
left of the month’s name.
To close the calendar, click on the (minus sign)
Link to the next month
Upcoming Event
*Note: To add events to the calendar, view the Manage Events module.
Screenshot displaying the Calendar of Events
Rhode Island BHOLD User Manual
23
© KIT Solutions® 2011
Messages
•
To view a Message description click on the (plus sign) next to the message
title. The (plus sign) will become a (minus sign) and the message
details will be displayed. To close the description, click on the (minus sign).
*Note: To add events to the calendar, view the Manage Messages module
Message description
Sample screenshot of the Home page displaying an open Message
Dashboard
•
This area is currently Under Construction.
Dashboard
Rhode Island BHOLD User Manual
24
© KIT Solutions® 2011
ADMINISTRATION
Staff Registration
The Staff module allows a user to add and edit personal, login, and permission data
for staff.
Add button
Adding a Staff Member
1. Click Administration from the Main Menu.
2. Click Staff from the Administration Submenu.
3. Click the
(Add) button from the left toolbar.
Screenshot displaying the Staff Listing Page
4. Enter the staff member’s General Information.
a. Select the staff member’s salutation from the Salutation dropdown list.
This is an optional field.
b. Enter the staff member’s last name in the Last Name field.
c. Enter the staff member’s first name in the First Name field.
d. Select the status of the staff member from the Status dropdown list.
i. Active: the staff member is currently with your organization
ii. Inactive: the staff member is no longer with your organization
Screenshot displaying the General Information on the Staff Edit Page
Rhode Island BHOLD User Manual
25
© KIT Solutions® 2011
5. Enter the staff member’s Login Information.
a. The Login Name will be the login name used by the staff member. This
may be anything that you choose. (See the Tips section for additional
information on the Login Name.)
b. A Password will be assigned to the staff member. The staff member
should receive an email to activate the account. (See the Activating Your
Screenshot displaying the Login Information on the Staff Edit Page
Account section for additional information.)
Tips
•
If a staff member has a common name, the Login Name may already be in use. If this is the case, add a number or use a middle initial in the Login Name.
For example, MJones is being used by multiple users for this training. To avoid receiving a message that the Login Name already exists, add your initials to the end of the Login Name
– e.g., MJonesKIT (KIT = KIT Solutions)
6. Enter the staff member’s Contact Information.
a. Enter the staff member’s email address in the Email field.
*Note: This must be a valid email address to ensure the staff member can activate
their account for login purposes.
b. Enter the staff member’s work telephone number in the Work Phone
fields.
*Note: You do not need to use your mouse or tab key to move to the next field for the
Work Phone fields.
c. Enter the staff member’s fax number in the Fax fields, if desired. This is
an optional field.
*Note: You do not need to use your mouse or tab key to move to the next field for the
Fax fields.
7. Click the
(Save) button from the left toolbar.
*Note: To exit the screen without saving any of the details, click the
Screenshot displaying the Contact Information on the Staff Edit Page
(Cancel) button.
8. You will automatically be taken into the Permissions page. If you are not, click
the
(Permissions) button located on the right hand corner of the
form. (See the Staff Permissions section for additional information.)
Tips
•
If the email address is updated on a staff account, the staff member will need to re-activate their account.
Rhode Island BHOLD User Manual
26
© KIT Solutions® 2011
Save button
Staff Permissions
The Staff Permissions module allows a user to assign permissions for various
system functions.
1. From the Staff Permissions page, click the
(Edit) button from the left
toolbar.
2. Select a permission role from the Apply Pre-Defined Permissions dropdown
list. (See the Apply Pre-Defined Permissions section for additional information.)
or
3. Select the radio button next to the appropriate permission level for each module.
a. No Permission: staff member has no access to the module
b. Read Only: staff member is able to view the data only
c. Full: staff member is able to view, add, edit, and delete the data
4. Click the
(Save) button from the left toolbar.
*Note: To exit the screen without saving any of the details, click the
(Cancel) button.
Sample screenshot displaying the Permissions page
Tips
•
When changing permissions, the account must log out for the change in the permission level to take place.
Rhode Island BHOLD User Manual
27
© KIT Solutions® 2011
Apply Pre-Defined Permissions
Usually, staff is assigned a default permission level. Only occasionally will a staff member need special rights. Below are the default permission levels that are available in
the Apply Pre-Defined Permissions dropdown list:
Provider
Function
Clients
Client Information
Program Episode Admissions
Client Discharge
Methadone Search
Utilize Data
Standard Reports
Ad-hoc Reports
Data Export
Fiscal Reporting
Import Data
TEDS Data
Administration
Staff
Manage Provider
Manage Events
Manage Messages
Manage Page Help
Manage Index Tables
Knowledge Base
Web Links
Library (Full is NA at provider level)
IT Manager
Clinical Staff
Reporting
Data Entry
QI/QA
Management
F
F
F
F
F
F
F
F
N
N
N
N
F
F
F
F
F
F
F
F
R
R
R
F
R
F
F
R
F
N
R
N
N
N
N
N
R
N
N
N
N
N
R
N
N
N
F
N
R
F
F
R
N
N
R
N
N
R
N
N
F
R
F
F
N
N
N
R
N
N
N
N
N
R
N
N
N
N
N
R
N
N
N
N
N
F
N
F
N
N
N
F
N
F
N
N
R
R
R
R
R
R
R
R
R
R
R
R
Legend:
(N) None: The user cannot access the function
(R) Read: The user can only review the data
(F) Full: The user can read/add/edit/delete
(NA) Not Applicable
Rhode Island BHOLD User Manual
28
© KIT Solutions® 2011
Editing a Staff Member
1.
2.
3.
4.
Click Administration from the Main Menu.
Click Staff from the Administration Submenu.
Click the
(Select) button next to the Staff member that needs edited.
Click the
(Edit) button from the left toolbar.
Select button
Sample screenshot displaying the Staff Listing Page
Save button
5. The details will appear in edit mode.
6. Make any changes needed to the details.
7. Click the
(Save) button from the left toolbar.
*Note: To exit the screen without saving any of the details, click the
(Cancel) button.
Sample screenshot displaying the Staff Edit Form
Rhode Island BHOLD User Manual
29
© KIT Solutions® 2011
Tips
•
•
If a staff member needs their password reset, do not click the
If permissions is what needs modified, do not click the
(Edit) button from the left toolbar. Click the
(Edit). Instead, click the
(Reset) button from the Password field.
(Permissions) button located on the right-hand side of the Staff Edit form.
Deleting a Staff Member
1. Click Administration from the Main Menu.
2. Click Staff from the Administration Submenu.
3. Click the
(Select) button next to the Staff member that needs deleted.
Select button
Sample screenshot displaying the Staff Listing Page
4. Click the
(Delete) button from the left toolbar.
5. You will receive a message asking if you are sure. Click the
button to continue deleting the staff member.
*Note: To cancel the deletion, click the
(OK)
Delete button
(Cancel) button.
6. You will be returned to the Listing page and the record has been permanently
removed.
Partial sample screenshot displaying the Staff Edit Form
Rhode Island BHOLD User Manual
30
© KIT Solutions® 2011
Manage Provider
The Manager Provider module allows the user to add and edit locations and contact and service information for providers and PIDs. This information only needs to be
updated on an as-needed basis.
Viewing and Editing Provider Details
1.
2.
3.
4.
Click Administration from the Main Menu.
Click Manage Provider from the Administration Submenu.
Click the Provider Name link.
Click the
(Edit) button from the left toolbar.
Provider Name link
Sample screenshot displaying the Manager Provider Listing Page
Rhode Island BHOLD User Manual
31
© KIT Solutions® 2011
5. Edit the Provider Info to include your organization’s information.
a. If your Provider Name has changed, enter the name of your
organization in the Provider Name field.
b. Enter your organization’s street address in the Address field. This is an
optional field.
c. Enter your organization’s city in the City field. This is an optional field.
d. Select the state your organization resides in from the State dropdown
list.
e. Enter your organization’s 5-digit zip code in the Zip field. This is an
optional field.
f. The Status dropdown list is filled in for you. You cannot change this
field.
6. Select a staff member to serve as the contact for each Contact Type from the
Contact dropdown lists.
Save button
*Note: The email, work phone, and fax will populate with information added from the Staff
module.
7. Click the
(Save) button from the left toolbar.
*Note: To exit the screen without saving any of the details, click the
(Cancel) button.
Sample screenshot displaying the Provider Detail Edit Page
Rhode Island BHOLD User Manual
32
© KIT Solutions® 2011
Select button
Viewing and Editing PID Details
The PID Info can be accessed in two (2) ways:
(Select) button from the PIDs
1. From the Provider Detail page, click the
grid.
(Edit) button from the left toolbar.
2. Click the
Access way 1: Sample screenshot displaying the Provider Detail Edit Form
or
1.
2.
3.
4.
5.
Click Administration from the Main Menu.
Click Manage Provider from the Administration Submenu.
Click the Provider Name link.
Click the PID Name link.
Click the
(Edit) button from the left toolbar.
PID Name
Access way 2: Sample screenshot displaying the Manager Provider Listing Page
Rhode Island BHOLD User Manual
33
© KIT Solutions® 2011
1. Edit the PID Info to include your Provider Identification information.
a. If your PID Name has changed, enter the name of your PID in the PID
Name field.
b. Enter your PID’s street address in the Address field. This is an optional
field.
c. Enter your PID’s city in the City field. This is an optional field.
d. Select the state your PID resides in from the State dropdown list.
e. Enter your PID’s 5-digit zip code in the Zip field. This is an optional
field.
f. Enter your PID’s telephone number in the Phone fields. This is an
optional field.
Save button
*Note: You do not need to use your mouse or tab key to move to the next field for the
Work Phone fields.
g. Enter your PID’s fax number in the Fax fields. This is an optional field.
*Note: You do not need to use your mouse or tab key to move to the next field for the
Fax fields.
h. The Status dropdown list is filled in for you. You cannot change this
field.
2. Select a staff member to serve as the Data Contact from the Staff dropdown list.
*Note: The email, work phone, and fax will populate with information added from the Staff
module.
3. Click the
(Save) button from the left toolbar.
*Note: To exit the screen without saving any of the details, click the
(Cancel) button.
Sample screenshot displaying the PID Detail Edit Form
Tips
•
The same person may be selected for multiple PIDs if that person works across several sub-sites of the Provider.
Rhode Island BHOLD User Manual
34
© KIT Solutions® 2011
Viewing and Editing Program Details
Select button
Program Information is entered at the State-Level only. However, you are able to
update the Program Contact.
The Program Information can be accessed in two (2) ways:
1. From the PID Detail page, click the
(Select) button to the right of any
Program from the Programs grid.
2. Click the
(Edit) button from the left toolbar.
Access way 1: Sample screenshot displaying the PID Detail Edit Form
or
1.
2.
3.
4.
5.
6.
Click Administration from the Main Menu.
Click Manage Provider from the Administration Submenu.
Click the Provider Name link.
Click the PID Name link.
Click the Program Name link.
Click the
(Edit) button from the left toolbar.
Program Name
Access way 2: Sample screenshot displaying the Manager Provider Listing Page
Rhode Island BHOLD User Manual
35
© KIT Solutions® 2011
Save button
1. Select a staff member to serve as the Program Contact from the Staff dropdown
list.
*Note: The email, work phone, and fax will populate with information added from the Staff
module.
2. Click the
(Save) button from the left toolbar.
*Note: To exit the screen without saving any of the details, click the
(Cancel) button.
Sample screenshot displaying the Program Detail Edit Form
Rhode Island BHOLD User Manual
36
© KIT Solutions® 2011
Change Password
The Change Password module allows the user to change the password on the
account they are currently logged into.
1.
2.
3.
4.
5.
6.
Click Administration from the Main Menu.
Click Change Password from the Administration Submenu.
Enter the current password for the account in the Password field.
Enter a password you would like to use in the New Password field.
Re-type the new password in the Confirm New Password field.
Click the
(Change) button.
*Note: To exit the screen without saving any of the details, click the
Change button
(Cancel) button.
a. You will receive a confirmation message indicating the password was
changed successfully.
Screenshot displaying the Change Password Edit Form
Tips
•
•
•
Passwords are case sensitive.
Passwords can be any combination of letters, numbers, and/or characters.
You will be prompted to change your password every 90 days.
Rhode Island BHOLD User Manual
37
© KIT Solutions® 2011
Manage Events
Use this area to add events to the Events Calendar, which will be viewable from the
Home page.
Adding an Event
1. Click Administration from the Main Menu.
2. Click Manage Events from the Administration Submenu.
3. Click the
(Add) button from the left toolbar.
Add button
Screenshot displaying the Manage Events Listing Page
4. Enter a name for the event to identify it by in the Event Title field.
5. Enter a description of the event in the Event Description field.
6. If the event has a website associated with it, enter the website address in the
Event URL field. This is an optional field.
7. Select the dates the event will take place using the Event Dates calendar. You
may select multiple dates.
a. Select the month the event will take place from the first dropdown list.
This is defaulted to the current month.
b. Select the year the event will take place from the second dropdown list.
This is defaulted to the current year.
c. Select the days the event will take place using the calendar.
i. To remove a selected date, click the
(Remove) button
to the right of the date.
(Save) button from the left toolbar.
8. Click the
(Cancel) button.
*Note: To exit the screen without saving any of the details, click the
Save button
Remove button
Event Date
Screenshot displaying the Manage Events Edit Form
Rhode Island BHOLD User Manual
38
© KIT Solutions® 2011
Tips
•
If you selected multiple dates for one (1) event, a record will appear on the Listing Page for each date selected on the Events Edit form. When editing, selecting one (1) of the dates on
the Listing Page will allow you to modify all of the dates selected for the Event.
Editing an Event
1.
2.
3.
4.
Click Administration from the Main Menu.
Click Manage Events from the Administration Submenu.
Click the
(Select) button next to the Event that needs edited.
Click the
(Edit) button from the left toolbar.
Select button
Sample screenshot displaying the Manage Events Listing Page
Save button
5. The details will appear in edit mode.
6. Make any changes needed to the details.
7. Click the
(Save) button from the left toolbar.
*Note: To exit the screen without saving any of the details, click the
(Cancel) button.
Sample screenshot displaying the Manage Events Edit Form
Rhode Island BHOLD User Manual
39
© KIT Solutions® 2011
Deleting an Event
1. Click Administration from the Main Menu.
2. Click Manage Events from the Administration Submenu.
3. Click the
(Select) button next to the Event that needs deleted.
Select button
Sample screenshot displaying the Manage Events Listing Page
4. Click the
(Delete) button from the left toolbar.
5. You will receive a message asking if you are sure. Click the
button to continue deleting the event.
*Note: To cancel the deletion, click the
(OK)
Delete button
(Cancel) button.
6. You will be returned to the Listing page and the record has been permanently
removed.
Partial sample screenshot displaying the Manage Events Edit Form
Rhode Island BHOLD User Manual
40
© KIT Solutions® 2011
Manage Messages
Use this area to share information with Providers. The information will be viewable
from the Home page under Messages.
Add button
Adding a Message
1. Click Administration from the Main Menu.
2. Click Manage Messages from the Administration Submenu.
3. Click the
(Add) button from the left toolbar.
Sample screenshot displaying the Manage Messages Listing Page
Save button
4. Enter a name for the message to identify it by in the Message Title field.
5. Enter a description of the message in the Message Body field.
6. Enter the date the message is to first appear on the Home Page in the Start
Date field as mm/dd/yyyy or select the date using the (calendar).
7. Enter the last day the message is to appear on the Home Page in the End Date
field as mm/dd/yyyy or select the date using the (calendar).
8. Click the
(Save) button from the left toolbar.
*Note: To exit the screen without saving any of the details, click the
(Cancel) button.
Screenshot displaying the Manage Messages Edit Form
Rhode Island BHOLD User Manual
41
© KIT Solutions® 2011
Editing a Message
1.
2.
3.
4.
Click Administration from the Main Menu.
Click Manage Messages from the Administration Submenu.
Click the
(Select) button next to the Message that needs edited.
Click the
(Edit) button from the left toolbar.
Select button
Sample screenshot displaying the Manage Messages Listing Page
5. The details will appear in edit mode.
6. Make any changes needed to the details.
7. Click the
(Save) button from the left toolbar.
*Note: To exit the screen without saving any of the details, click the
Save button
(Cancel) button.
Sample screenshot displaying the Manage Messages Edit Form
Rhode Island BHOLD User Manual
42
© KIT Solutions® 2011
Deleting a Message
1. Click Administration from the Main Menu.
2. Click Manage Messages from the Administration Submenu.
3. Click the
(Select) button next to the Message that needs deleted.
Select button
Sample screenshot displaying the Manage Messages Listing Page
4. Click the
(Delete) button from the left toolbar.
5. You will receive a message asking if you are sure. Click the
button to continue deleting the message.
*Note: To cancel the deletion, click the
(OK)
Delete button
(Cancel) button.
6. You will be returned to the Listing page and the record has been permanently
removed.
Partial sample screenshot displaying the Manage Messages Edit Form
Rhode Island BHOLD User Manual
43
© KIT Solutions® 2011
CLIENTS
The Clients module is used to add or edit Client Demographics, Admission Information, and Discharge Information.
Client Information
The Client Information module allows a user to add or modify client demographic
information.
Adding a Client
1. Click Clients from the Main Menu.
2. Click Client Search from the Clients submenu.
(Add Client) button from the Clients Listing page.
3. Click the
Add Client button
Sample screenshot displaying the Client Search Page
Rhode Island BHOLD User Manual
44
© KIT Solutions® 2011
4. Enter the Client Information.
a. Enter the client’s social security number in the SSN fields.
*Note: You do not need to use your mouse or tab key to move to the next field for the
SSN fields.
i.
If you do not know the client’s social security number or wish
not to enter it, select the (checkbox) entitled Check here if
the SSN is unknown.
b. Enter the client’s record number in the Client Rec # field.
c. Enter the client’s date of birth as a mm/dd/yyyy format in the Birth Date
field or select the date using the (calendar).
d. Select the client’s gender in the Gender dropdown list.
e. Select the client’s marital status from the Marital Status dropdown list.
f. Select the client’s veteran status from the Veteran Status dropdown
list.
g. Select the client’s education level from the Highest Level of Education
dropdown list.
5. Select the client’s race from the Race dropdown lists.
6. Click the
(Save) button from the left toolbar.
*Note: To exit the screen without saving any of the details, click the
(Cancel) button.
a. Once the
(Save) button has been clicked, you will be taken
directly to the Program Episode Admission Edit Form. (See the Program
Episode Admissions section for additional information.)
Screenshot displaying the Client Information Edit Form
Tips
•
The Social Security Number (SSN), Client Rec #, and Birth Date must be unique for each client entered within a Provider organization.
Rhode Island BHOLD User Manual
45
© KIT Solutions® 2011
Filter Clients
The Filter Clients feature allows a user to locate the Clients that have been
registered using the Client Information Form.
There are twelve (12) ways to use the Filter Clients feature:
1. Search by Client Rec #
2. Search by SSN
3. Search by Birth Date
4. Search by Gender
5. Search by PID
6. Search by Program Type
7. Search by Primary Payment Source
8. Search by Grant/Contract
9. Search by City
10. Search by Primary Substance
11. Search by Discharge Status
12. Search by Discharge Reason
Apply button
You may search using any of the 12 filters or you may enter in all 12 of the filters if
the information is known.
•
•
Click the
(Apply) button once you have filled in one (1) or all of the
twelve (12) filters.
(Clear) button to reset the Filter Clients form.
Click the
Rhode Island BHOLD User Manual
Sample screenshot displaying the Filter Clients fields
46
© KIT Solutions® 2011
Editing a Client
1. Click Clients from the Main Menu.
2. Click Client Search from the Clients submenu.
3. Browse the Clients List or use the Filter Clients feature (see the Filter Clients section
for additional details) to locate the client that needs edited.
4. Select the appropriate client by clicking on the Client Rec # link.
5. Click the
(Edit) button from the left toolbar.
Client Rec # link
Sample screenshot displaying the Clients Listing Page
Save button
6. The details will appear in edit mode.
7. Make any changes needed to the details.
(Save) button from the left toolbar.
8. Click the
*Note: To exit the screen without saving any of the details, click the
(Cancel) button.
Sample screenshot displaying the Client Information Edit Form
Rhode Island BHOLD User Manual
47
© KIT Solutions® 2011
Deleting a Client
1. Click Clients from the Main Menu.
2. Click Client Search from the Clients submenu.
3. Browse the Clients List or use the Filter Clients feature (see the Filter Clients section
for additional details) to locate the client that needs deleted.
4. Select the appropriate client by clicking on the Client Rec # link.
Client Rec # link
Sample screenshot displaying the Clients Listing Page
5. Click the
(Delete) button from the left toolbar.
6. You will receive a message asking if you are sure. Click the
button to continue deleting the client.
*Note: To cancel the deletion, click the
Delete button
(OK)
(Cancel) button.
7. You will be returned to the Listing page and the record has been permanently
removed.
Partial sample screenshot displaying the Client Information Edit Form
Tips
•
A client cannot be deleted if 1) the client has any Program Admission Episodes associated with it or 2) the client’s SSN exists in multiple Providers.
Rhode Island BHOLD User Manual
48
© KIT Solutions® 2011
Client Rec # link
Program Episode Admissions
The Program Episode Admissions module allows the user to add or modify client
admissions.
Partial sample screenshot displaying the Clients Listing Page
Adding a Program Episode Admission
1.
2.
3.
4.
Click Clients from the Main Menu.
Click Client Search from the Clients submenu.
Select the appropriate client by clicking on the Client Rec # link.
From the Client Information Edit Form, click the
(Add Episode)
button located beneath the Episodes grid.
*Note: If you have just clicked the
steps 1 - 3.
(Save) button from the Client Information Edit Form, skip
Add Episode button
Partial sample screenshot displaying the Client Information Edit Form
Rhode Island BHOLD User Manual
49
© KIT Solutions® 2011
5. Enter the Admission Information for the client.
a. Select the primary location client of the client program
admission/treatment from the Location dropdown list.
*Note: If you are missing a PID in the Location dropdown list, please contact the State.
b. Once the Location is selected, the Program Type dropdown list will
populate. Select the program the client is being admitted to from the
Program Type dropdown list.
c. Enter the date of the first face-to-face contact with the Provider (not just
PID) for the current episode of treatment as a mm/dd/yyyy format in the
First Face-to-Face Contact field or select the date using the
(calendar).
*Note: If a client is transferring to a new Program or a different PID within your
Provider, this should contain the client's original first treatment date at your Provider.
d. Enter the date of admission to the current program as a mm/dd/yyyy
format in the Admission Date field or select the date using the
(calendar). This may be an optional field if a mental health program
was selected. The Admission Date must be greater than or equal to
the First Treatment Date.
e. Select the source of referral to your Provider at the time of program
admission from the Admission Referral Src dropdown list.
f. Select the court referral type from the Court Referral dropdown list.
Screenshot displaying the Admission Information fields on the Program Episode Admissions Edit Form
*Note: The Court Referral Source must be N/A unless the Admission Referral Source
is “Court”.
g. Enter the number of arrests the client has 30 days prior to the current
program admission in the # of Arrests field.
h. Select the number of times the client attended a voluntary self-help
group 30 days prior to admission from the Self Help Involvement
dropdown list.
Tips
•
•
•
If a client is being admitted to more than one Program Type, a separate data collection form should be completed for each admission (at minimum, a separate record should be
ENTERED into the data system for each Program/PID admission).
Several fields may appear as optional if a mental health program is selected as the Program Type.
If the Program Type is Contact, you must enter Unknown as the Marital Status, Veteran Status, and Highest Level of Education for the client (unless this information is known
otherwise).
Rhode Island BHOLD User Manual
50
© KIT Solutions® 2011
6. Enter the Current Client Information.
a. Select the city the client resides in from the City of Residence
dropdown list.
b. Once a city is selected, the Zip Code dropdown list will populate. Select
the zip code the client resides in from the Zip Code dropdown list.
c. Select the type of residence the client lives at from the Residential
Arrangement dropdown list.
d. Enter the number of family members the client has in the Family Size
field.
i. If the Family Size is unknown, click the
(checkbox) entitled
Click here if unknown.
*Note: If the “unknown” checkbox is selected, the Family Size will appear as
“99”.
e. Enter the client’s monthly income in the Monthly Household Income
field.
i. If the Monthly Household Income is unknown, click the
(checkbox) entitled Click here if unknown.
*Note: If the “unknown” checkbox is selected, the Monthly Household
Income will appear as “99999”.
f.
Select the client’s employment status from the Employment Status
dropdown list.
*Note: If more than one option applies, select the one highest on the list that is
applicable (e.g., if client is employed part time and a student, check Employed:Part
Time).
Screenshot displaying the Current Client Information fields on the Program Episode Admissions Edit Form
g. Select the type of employment the client has from the Employment
Type dropdown list.
h. Select the client’s primary payment source from the Payment Src
(Primary) dropdown list.
i. Select the client’s secondary payment source from the Payment Src
(Secondary) dropdown list.
j. Select the client’s third payment source from the Payment Src
(Tertiary) dropdown list.
k. Enter the Grant number or Contract ID number in the Grant #/Contract
ID # field. This is an optional field. (See the Appendix section for additional
details.)
Rhode Island BHOLD User Manual
51
© KIT Solutions® 2011
7. Enter the client’s Current Diagnoses & Co-Occurring Conditions.
a. Enter the client’s Axis diagnoses in the Primary, Secondary, and/or
Tertiary columns or select the diagnoses using the (calendar).
b. Enter the client’s global assessment of functioning score in the GAF
field.
Screenshot displaying the Diagnoses fields on the Program Episode Admissions Edit Form
*Note: If the “unknown” checkbox is selected, enter the number zero (0).
8. Select the appropriate answer from the dropdown lists under Axis IV and CoOccurring Condition.
9. Select the client’s Current Substance Abuse.
a. Select the substance of use from the Substance dropdown lists.
b. Select the route of administration from the Route of Admin dropdown
lists.
c. Select the frequency of use from the Frequency of Use dropdown lists.
d. Select the age the client was at first use from the Age of First Use
dropdown list.
10. Click the
(Save) button from the left toolbar.
(Cancel) button.
*Note: To exit the screen without saving any of the details, click the
a. Once the
(Save) button has been clicked, you will be taken
directly to the Client Discharge Edit Form. (See the Program Episode
Admissions section for additional information.)
Screenshot displaying the remaining fields on the Program Episode Admissions Edit Form
Tips
•
•
•
All required fields must be filled in before saving. If a field does not apply to the client but it is required for saving, select NA - None from the dropdown list.
Only one (1) MH Program Episode can be open per Provider/SSN (with the exception for the Contact Program Type).
Only one (1) SA Program Episode can be open per Provider/SSN (with the exception for the Narcmaint Program Type – See the Appendix section for additional details on Narcmaint
(Methadone)).
Rhode Island BHOLD User Manual
52
© KIT Solutions® 2011
Editing a Program Episode Admission
The Program Episode Admission module can be accessed in two (2) ways:
1. Click Clients from the Main Menu.
2. Click Client Search from the Clients submenu.
3. Select the appropriate client by clicking on the Client Rec # link.
4. From the Client Information Edit Form, click the
(Select) button next to the
program episode admission that needs edited.
5. Click the
(Edit) button from the left toolbar.
Select button
Sample screenshot displaying the Client Information Edit Form
or
1.
2.
3.
4.
Click Clients from the Main Menu.
Click Client Search from the Clients submenu.
Click the (plus sign) next to the appropriate Client Rec #.
The (plus sign) becomes a (minus sign) and a list of Program Episodes
will display. Click the appropriate Program Episode Admission link.
5. Click the
(Edit) button from the left toolbar.
Program Episode link
Sample screenshot displaying the Clients Listing Page
Edit button
*Note: If you have just clicked the
steps 1-4.
(Save) button from the Client Information Edit Form, skip
Sample screenshot displaying the Program Episode Admissions Edit Form
Rhode Island BHOLD User Manual
53
© KIT Solutions® 2011
Save button
6. The details will appear in edit mode.
7. Make any changes needed to the details.
8. Click the
(Save) button from the left toolbar.
*Note: To exit the screen without saving any of the details, click the
(Cancel) button.
Sample screenshot displaying the Client Information Edit Form
Rhode Island BHOLD User Manual
54
© KIT Solutions® 2011
Deleting a Program Episode Admission
The Program Episode Admission module can be accessed in two (2) ways:
1. Click Clients from the Main Menu.
2. Click Client Search from the Clients submenu.
3. Select the appropriate client by clicking on the Client Rec # link.
4. From the Client Information Edit Form, click the
(Select) button next to the
program episode admission that needs deleted.
Select button
Sample screenshot displaying the Client Information Edit Form
or
1.
2.
3.
4.
Click Clients from the Main Menu.
Click Client Search from the Clients submenu.
Click the (plus sign) next to the appropriate Client Rec #.
The (plus sign) becomes a (minus sign) and a list of Program Episodes
will display. Click the appropriate Program Episode Admission link.
*Note: If you have just clicked the
Form, skip these steps.
Program Episode link
(Save) button from the Program Episode Admission Edit
Sample screenshot displaying the Clients Listing Page
(Delete) button from the left toolbar.
5. Click the
6. You will receive a message asking if you are sure. Click the
button to continue deleting the program episode admission.
*Note: To cancel the deletion, click the
(OK)
Delete button
(Cancel) button.
7. You will be returned to the Listing page and the record has been permanently
removed.
Sample screenshot displaying the Program Episode Admissions Edit Form
Rhode Island BHOLD User Manual
55
© KIT Solutions® 2011
Viewing Admission History
The Program Episode Admission module can be accessed in two (2) ways:
1. Click Clients from the Main Menu.
2. Click Client Search from the Clients submenu.
3. Select the appropriate client by clicking on the Client Rec # link.
4. From the Client Information Edit Form, click the
(Select) button next to the
program episode admission that needs edited.
5. Click the
(View History) button.
View History button
or
1.
2.
3.
4.
Click Clients from the Main Menu.
Click Client Search from the Clients submenu.
Click the (plus sign) next to the appropriate Client Rec #.
The (plus sign) becomes a (minus sign) and a list of Program Episodes
will display. Click the appropriate Program Episode Admission link.
(View History) button.
5. Click the
*Note: If you have not yet entered admission information for this client, the
History) button will be grayed out.
Rhode Island BHOLD User Manual
Sample screenshot displaying the Program Episode Admissions Edit Form
(View
56
© KIT Solutions® 2011
6. A new window will open displaying the admission history for the client. The
Admission History table will display all instances of changes made to the
Program Episode Admissions page, as well as who made the changes and
when the changes were made. The rest of the table is displayed based on the
selected admission fields.
a. To add or remove an admission field to the Admission History table,
check or uncheck the appropriate boxes in the Show Admission
Fields table.
b. Click the
(Show Fields) button.
7. To view the Admission History table in Excel, click the
(Download
Excel) button.
a. A message may appear asking you to Open or Save the file. Click the
(Open) button to open the file immediately. Click the
(Save) button if you would like to save it to your computer and open it
later.
*Note: To close the file without exporting it, click the
8. To close the History Viewer window, click the
click the (X) in the upper right corner.
Download Excel button
Show Fields button
(Cancel) button.
(Close) button, or
Tips
•
If the Admission History table is not displaying any changes, make sure the fields that were changed are checked in the Show Admission Fields table. You must also click the
(Show Fields) button anytime a change is made to that table.
Rhode Island BHOLD User Manual
57
© KIT Solutions® 2011
Client Discharge
The Client Discharge module allows the user to add or modify client discharge
information.
Adding a Client Discharge
Select button
The Client Discharge module can be accessed in two (2) ways:
1. Click Clients from the Main Menu.
2. Click Client Search from the Clients submenu.
3. Select the appropriate client by clicking on the Client Rec # link.
(Select) button next to the
4. From the Client Information Edit Form, click the
program episode admission that needs discharged.
5. Click the
(Add Discharge) button located beneath the Discharge
grid.
Sample screenshot displaying the Client Information Edit Form
or
Program Episode link
1.
2.
3.
4.
Click Clients from the Main Menu.
Click Client Search from the Clients submenu.
Click the (plus sign) next to the appropriate Client Rec #.
The (plus sign) becomes a (minus sign) and a list of Program Episodes
will display. Click the appropriate Program Episode Admission link.
(Add Discharge) button located beneath the Discharge
5. Click the
grid.
Sample screenshot displaying the Clients Listing Page
Add Discharge button
*Note: If you have just clicked the
Form, skip steps 1-4.
(Save) button from the Program Episode Admission Edit
Sample screenshot displaying the Program Episode Admissions Edit Form
Rhode Island BHOLD User Manual
58
© KIT Solutions® 2011
5. Enter the Discharge Information for the client.
a. Enter the date of discharge with the Provider (not just PID) for the
episode of treatment as a mm/dd/yyyy format in the Discharge Date
field or select the date using the (calendar).
b. Enter the date of the last face-to-face contact with the Provider (not just
PID) for the episode of treatment as a mm/dd/yyyy format in the Last
Face-to-Face field or select the date using the (calendar).
c. Select the number of times the client attended a voluntary self-help
group 30 days prior to discharge from the Self Help Involvement
dropdown list.
d. Select the reason for discharge from the Discharge Reason dropdown
list.
e. Select the referral type from the Referral dropdown list.
*Note: If no referral is taking place, select NA – None from the dropdown list.
f.
Sample screenshot displaying the Discharge Information fields on the Client Discharge Edit Form
Enter the number of arrests the client had 30 days prior to the discharge
in the # of Arrests field.
6. Enter the Client Information at Discharge for the client.
a. Select the type of residence the client lives at from the Residential
Arrangement dropdown list.
b. Select the client’s employment status at the time of discharge from the
Employment Status dropdown list.
c. Select the type of employment the client has at the time of discharge
from the Employment Type dropdown list.
d. Enter the client’s global assessment of functioning score at the time of
discharge in the GAF field.
Sample screenshot displaying the Discharge Information fields on the Client Discharge Edit Form
*Note: If the “unknown” checkbox is selected, enter the number zero (0).
7. Select the client’s Substance Abuse at Discharge.
a. Select the substance of use from the Substance dropdown lists.
b. Select the frequency of use from the Frequency of Use dropdown lists.
8. Click the
(Save) button from the left toolbar.
(Cancel) button.
*Note: To exit the screen without saving any of the details, click the
Sample screenshot displaying the Substance Abuse at Discharge fields on the Client Discharge Edit Form
Rhode Island BHOLD User Manual
59
© KIT Solutions® 2011
Tips
•
All required fields must be filled in before saving. If a field does not apply to the client but it is required for saving, select NA - None from the dropdown list.
Rhode Island BHOLD User Manual
60
© KIT Solutions® 2011
Editing a Client Discharge
The Client Discharge module can be accessed in two (2) ways:
1. Click Clients from the Main Menu.
2. Click Client Search from the Clients submenu.
3. Select the appropriate client by clicking on the Client Rec # link.
4. From the Client Information Edit Form, click the
(Select) button next to the
program episode admission that is associated with the discharge episode that
needs edited.
Select button
Sample screenshot displaying the Program Episode Admission Edit Form
*Note: A Program Admission Episode that has a discharge associated with it will have a D
located to the right of it in the Episodes grid.
5. From the Program Episode Admissions Form, click the
next to the discharge episode that needs edited.
6. Click the
(Edit) button from the left toolbar.
(Select) button
Discharge Episode link
or
1.
2.
3.
4.
Click Clients from the Main Menu.
Click Client Search from the Clients submenu.
Click the (plus sign) next to the appropriate Client Rec #.
The (plus sign) becomes a (minus sign) and a list of Program Episodes
will display. Click the (plus sign) next to the appropriate Program Episode
Admission link.
5. The (plus sign) becomes a (minus sign) and a list of Discharge Episodes
will display. Click the appropriate Discharge Episode link.
6. Click the
(Edit) button from the left toolbar.
*Note: If you have just clicked the
steps 1-5.
Sample screenshot displaying the Clients Listing Page
Edit button
(Save) button from the Client Discharge Edit Form, skip
Sample screenshot displaying the Client Discharge Edit Form
Rhode Island BHOLD User Manual
61
© KIT Solutions® 2011
Tips
•
If your Program Episode Admission is not showing up in the Episodes grid, uncheck the checkbox entitled “Open Only”. When the checkbox is checked the only
records being displayed are Open episodes.
Save button
7. The details will appear in edit mode.
8. Make any changes needed to the details.
9. Click the
(Save) button from the left toolbar.
*Note: To exit the screen without saving any of the details, click the
(Cancel) button.
Sample screenshot displaying the Client Discharge Edit Form
Rhode Island BHOLD User Manual
62
© KIT Solutions® 2011
Deleting a Client Discharge
The Client Discharge module can be accessed in two (2) ways:
1. Click Clients from the Main Menu.
2. Click Client Search from the Clients submenu.
3. Select the appropriate client by clicking on the Client Rec # link.
(Select) button next to the
4. From the Client Information Edit Form, click the
program episode admission that is associated with the discharge episode that
needs deleted.
Select button
Sample screenshot displaying the Program Episode Admission Edit Form
*Note: A Program Admission Episode that has a discharge associated with it will have a D
located to the right of it in the Episodes grid.
5. From the Program Episode Admissions Form, click the
next to the discharge episode that needs deleted.
(Select) button
or
1.
2.
3.
4.
Click Clients from the Main Menu.
Click Client Search from the Clients submenu.
Click the (plus sign) next to the appropriate Client Rec #.
The (plus sign) becomes a (minus sign) and a list of Program Episodes
will display. Click the (plus sign) next to the appropriate Program Episode
Admission link.
5. The (plus sign) becomes a (minus sign) and a list of Discharge Episodes
will display. Click the appropriate Discharge Episode link.
*Note: If you have just clicked the
these steps.
Rhode Island BHOLD User Manual
Discharge Episode link
Sample screenshot displaying the Clients Listing Page
(Save) button from the Client Discharge Edit Form, skip
63
© KIT Solutions® 2011
6. Click the
(Delete) button from the left toolbar.
7. You will receive a message asking if you are sure. Click the
button to continue deleting the discharge episode.
*Note: To cancel the deletion, click the
(OK)
(Cancel) button.
8. You will be returned to the Listing page and the record has been permanently
removed.
Delete button
Sample screenshot displaying the Client Discharge Edit Form
Rhode Island BHOLD User Manual
64
© KIT Solutions® 2011
UTILIZE DATA
Standard Reports
The Reports section of RI BHOLD has several categories of reports available for use.
Opening a Report
1. Click Utilize Data from the Main Menu.
2. Click Standard Reports from the Utilize Data Submenu.
3. Select the (radio button) to the left of the desired report type.
a. Administration – This section contains provider and contact information.
b. Activity – This section contains reports on activities.
c. Client – This section contains reports on the Client Admission Episodes
and Discharges.
(Select) button next to the report
4. A list of reports will display. Click the
you would like to view.
Radio button
Select button
Screenshot displaying the Client reports on the Standard Reports Landing Page
Rhode Island BHOLD User Manual
65
© KIT Solutions® 2011
5. Select the appropriate report options you desire (parameters).
a. If you would like to look at a specific time frame, you can leave the Time
Period selected as Select One and enter a Begin Date and End Date
as mm/dd/yyyy.
b. Each report may have different parameters to select.
c. Select the format you would like the report to open as from the Output
To: (radio buttons).
i. Window: This is the default view and is a view only of the report.
You must export the report in order to save or print the report if
using this Output.
ii. PDF: The report will open in a PDF Reader.
iii. Excel: The report will open in an Excel spreadsheet.
6. Click the
(Show Report) button.
a. A new window will open with the report details.
b. To close the document, click the (X) in the upper right corner.
(Select New Report) button to return to the
7. Click the
Standard Reports Landing Page.
Select New Report button
Show Report button
Sample screenshot displaying report parameters on the Standard Reports Page
Tips
•
If you have a pop-up blocker on your computer, hold the Control (CTRL) key down on your keyboard while selecting the
appear.
•
•
(Show Report) button. A new window will
- clicking the here link will open a document with instructions for allowing pop-up blockers on your computer.
If you do not have a PDF Reader or Microsoft Excel installed on your computer, selecting these options as the Output To will not work.
Rhode Island BHOLD User Manual
66
© KIT Solutions® 2011
Printing or Saving Reports (for Window Output)
Once you have clicked the
(Show Report) button, you will then see a
print preview screen. This screen is used to only view the data (you cannot print or
save from this screen). If you would like to print or save the report, click the
(Export) link to view that file as the selected format.
Export link
9. Select a format to generate the report as from the Select a Format dropdown
list.
10. Click the
(Export) link located to the right of the Select a Format
dropdown list.
11. A message may appear asking you to Open or Save the report. Click the
(Open) button to open the report immediately. Click the
(Save) button if you would like to save it to your computer and open it later.
*Note: To close the report without exporting it, click the
(Cancel) button.
a. The report will open in a new window.
12. Click the (print) button or to print the report.
13. Click the (disk) button or to save the report.
14. To close the document, click the (X) in the upper right corner.
Sample screenshot displaying a Client report print preview screen
Tips
•
If you have a pop-up blocker on your computer, hold the Control (CTRL) key down on your keyboard while selecting the
appear.
Rhode Island BHOLD User Manual
67
(Show Report) button. A new window will
© KIT Solutions® 2011
Data Export
The Data Export module allows you to export the Rhode Island BHOLD data in its raw form which will enable you to create customized evaluations based on the desired
criteria.
1. Click Utilize Data from the Main Menu.
2. Click Data Export from the Utilize Data Submenu.
3. Select the format you would like the report to open as from the Export To
dropdown list.
4. Select the provider organization from the Provider dropdown list.
5. Select the (radio button) next to the type of tables you would like to
view/export.
File link
*Note: This is defaulted to Table Names.
a. Table Names: Lists all available tables within the database to export
data.
b. Table Groups: Lists a grouping of tables
c. Modules: Lists all available tables within the database based on a
selected module
(Generate) button.
6. Click the
a. To view the generated report, select the File link.
b. Click the
(Details) button.
Generate button
Sample screenshot displaying the Data Export page
Tips
•
If you have a pop-up blocker on your computer, hold the Control (CTRL) key down on your keyboard while selecting the
appear.
•
•
If you do not have a Microsoft Excel or Microsoft Access installed on your computer, selecting these options as the Export To will not work.
(Details) button or the File link. A new window will
To select all of the available checkboxes, click the Check All link. To deselect all of the available checkboxes, click the Uncheck All link.
Rhode Island BHOLD User Manual
68
© KIT Solutions® 2011
Import Data
The Import Data module allows you to upload Client Registration data.
Uploading a File
1. Click Utilize Data from the main menu.
2. Click Import Data from the Utilize Data Submenu.
3. To import a file that has already been saved on your computer, perform the
following steps:
a. Click the
(Browse) button.
b. Select the document you wish to import. Click Open.
c. The file path will now appear in the file field.
Import button
Browse button
*Note: For details regarding the necessary format of the file you will import, see the
Import Manual located In Library module.
4. Click
(Import) to upload the file.
5. The uploaded document will appear in the grid below the file box.
*Note: Uploading the same file twice will not replace the previously loaded file.
Tips
•
Clicking on the column name (e.g.
Rhode Island BHOLD User Manual
) will allow you to sort your records in ascending or descending order.
69
© KIT Solutions® 2011
Viewing Imported File Details
1. Click the
(Details) button to the left of the file you wish to view.
2. A new window appears displaying the Import Details.
Details button
3. Click the
(Download Errors) button to view any errors or
warnings.
4. A window will appear asking you to Open or Save a text file. Click the
(Open) button to open the file immediately. Click the
(Save) button if
you would like to save it to your computer and open it later. To go back to the
previous screen, click the
(Cancel) button.
a. The file will open as a .txt document displaying any errors.
b. To save or print the document, click File, then choose Save As or Print
from the menu.
c. To close the document, click the (X) in the upper right corner.
5. To close the Imported File Details window, click the (X) in the upper right
(Close) button at the bottom of the screen.
corner, or click the
Download Errors button
Rhode Island BHOLD User Manual
70
© KIT Solutions® 2011
Changing Imported Data File Status
1. The status of an imported file is listed under the Status column of the Import
Data page.
*Note: If you have just uploaded a file, it is listed as Pending.
a. Pending: File has completed Phase 1 of the scrubbing process.
b. Done: File has completed Phase 2 of the scrubbing process.
c. Processing: File failed Phase 2 of the scrubbing process. Please
resubmit file with corrections.
d. Cancelled: File will not go through Phase 2 of the scrubbing process.
e. None: File failed Phase 1 of the scrubbing process. Please resubmit
the file with corrections.
Status column
2. To cancel an upload, click the
(Cancel) button to the right of the file’s
status.
3. A confirmation message will open verifying that you want to cancel the upload.
Click
(OK) to cancel the upload or
(Cancel) to return to the
Import Data page without cancelling.
Rhode Island BHOLD User Manual
71
© KIT Solutions® 2011
KNOWLEDGE BASE
The Knowledge Base module is a warehouse of documents and web source information designed to provide pertinent data.
Web Links
The Web Links section of Knowledge Base is useful for finding a wealth of prevention links. The Web Links section can be utilized by following these steps:
1.
2.
3.
4.
5.
6.
7.
Click Knowledge Base from the Main Menu.
Click Web Links from the Knowledge Base Submenu.
Select a category from the Choose Category dropdown list.
Browse the Web Source list for the website you would like to visit.
Click on the link of the name of the Web Source.
A new window will open displaying the website you selected.
To close the new website window, click the (X) in the upper right hand
corner.
Web Source link
Partial screenshot of the Web Links Listing Page
Tips
•
•
If you have a pop-up blocker on your computer, hold the Control (CTRL) key down on your keyboard while selecting the Web Source. A new window appear.
Clicking on the field name in a Category field (e.g.,
Rhode Island BHOLD User Manual
) will allow you to sort through the web sites by ascending or descending order.
72
© KIT Solutions® 2011
Library
The Library section is a repository of commonly requested documents and other general documents that Rhode Island BHOLD would like to make available. Use the
following instructions to view the Library section.
1. Click Knowledge Base from the Main Menu.
2. Click Library from the Knowledge Base Submenu.
3. The Library Listing Page is defaulted to show all available documents. To sort
through the list, select a category from the Choose Category dropdown list.
4. Browse the Name list for the document you would like to view.
5. Click on the link of the name of the document.
6. A new window will open displaying the document you selected.
7. To close the new window, click the (X) in the upper right hand corner.
Document name
Screenshot of the Library Listing Page
Tips
•
•
If you have a pop-up blocker on your computer, hold the Control (CTRL) key down on your keyboard while selecting the document link. A new window appear.
Clicking on the field name in a Category field (e.g.,
) will allow you to sort through the documents by ascending or descending order.
Rhode Island BHOLD User Manual
73
© KIT Solutions® 2011
SUPPORT
Web Site
The RI BHOLD Support Site offers several features to assist you while using the Rhode Island BHOLD Service.
Menu
1. Click Support from the Main Menu.
2. Click Web Site from the Support Submenu.
3. A new window will open displaying the RI BHOLD Support Site.
•
•
To submit a problem, question, or suggestion for improvement to KIT Solutions
Customer Support team, click the Contact Support link.
To find this manual in on online version, click the Manuals link. The Manuals
page will open displaying various documents pertinent to RI BHOLD.
Screenshot of the RI BHOLD Support Site
Rhode Island BHOLD User Manual
74
© KIT Solutions® 2011
Chat
Chat Submenu item
The Chat feature enables users to join an instant messenger to get immediate
assistance from the Customer Support Department.
1. Click Support from the Main Menu.
2. Click Chat from the Support Submenu.
3. A File Download window will open prompting you to run the LogMeInRescue
(Run) button to download the application.
applet. Click the
*Note: You must run this application in order to utilize the chat feature.
Run button
Screenshot of the RI BHOLD Support Site
Tips
•
•
•
You will need to install the LogMeInRescue applet in order to connect with the Support team. This is a free download.
The installation may take a few minutes.
If you are unable to connect with the Support team, it could be that you do not have permissions on your computer to download items. Check with your IT department.
Rhode Island BHOLD User Manual
75
© KIT Solutions® 2011
APPENDIX
PID
Program Type
SST4
DETOXFSM
ERDIVERT
PSYCSTEP
DETOXSTEP
Grant # / Contract ID # (SSTAR Providers)
COD2
If you are a SSTAR Provider, when adding a Program Episode Admission you will
be required to enter a Grant #/Contract ID #.
COD3
COD4
NARCDETOX
COD5
The table to the right shows the which Program Types will require the Grant
#/Contract ID # field to be filled in.
PHX7
DETOXFSM
LMH1
PSYCHOSP
NPH2
RWH1
Rhode Island BHOLD User Manual
76
© KIT Solutions® 2011
Methadone Providers
Those Providers that work with Methadone clients will have the NARCMAINT program types available to them in the Program Episode Admission Edit form. There are
specific rules placed within RI BHOLD regarding these program types.
1. NARCMAINT program type can occur at the same time as another SA program type. The other SA program types that can occur with NARCMAINT are: RESIDENTLT,
RESIDENTST, SAIOP, and SAOP. This means a client may have more than one (1) program type open if these specified programs types are used.
2. If you try to enter a Methadone Episode and an open Episode already exists for
the SSN and your Provider or another Provider, a new window may pop up
displaying a similar screen on your right.
Listed are the staff contact members who may have more information regarding
the open Episode. You will have to contact one (1) of the staff members on the
list to place the client’s Methadone Episode Admission to “Pending Discharge”
or “Discharge”.
You will not be able to save the new Episode until the other Episode has been
updated to “Pending Discharge” or “Discharge”.
Sample screenshot displaying a pop-up message for an existing Open Methadone Episode
Tips
•
•
To set an Episode Admission to Discharge, see the Adding a Client Discharge section.
To set an Episode Admission to Pending Discharge, click the checkbox entitle Pending Discharge from the Program Episode Admissions Edit Form. You will then be required to enter
the date of the last contact with the client in the Last Contact (Dosage) Date field.
Rhode Island BHOLD User Manual
77
© KIT Solutions® 2011
Methadone Search
For those Providers that work with Methadone program types (NARCMAINT), the
Methadone Search filter will be available. The Methadone Search filter allows a
Provider to know which Provider has a Methadone Program Episode entered and
the status of that Episode.
*Note: If it is not available check your permission levels from the Staff module (see the Staff
Permissions section for information on modifying permission levels).
Search button
1. Enter the client’s social security number in the SSN fields.
*Note: You do not need to use your mouse or tab key to move to the next field for the SSN
fields.
2. Enter the client’s date of birth as a mm/dd/yyyy format in the Birth Date field
or select the date using the (calendar).
3. Select the client’s gender from the Gender dropdown list.
4. Click the
(Search) button.
b. Click the
(Reset) button to reset the Methadone Search
form.
Sample screenshot displaying the Methadone Search fields and the results
•
•
Result #1 indicates that an Episode exists for the exact information entered in
the Search filters.
Result #2 indicates that an Episode exists if the social security number is
different but the Birth Date and Gender match an existing Episode.
Rhode Island BHOLD User Manual
78
© KIT Solutions® 2011