1
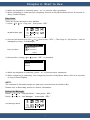
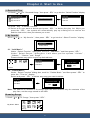
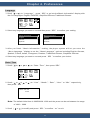
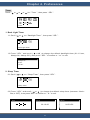
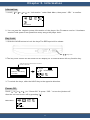
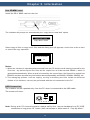
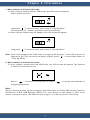
N974 The information contained in this document is subjected to changes without prior notice, and it does not represent any commitment on the part of Infinity System. It is prohibited that reproduction or spreading in any part of this document in any format or means, or in electronic or mechanical way, including the photocopy or recording, for any aim without written permit of Infinity System. Microsoft, MS DOS and Windows are registered trade names of Microsoft Corporation. All rights reserved. Intel and Pentium are registered trade names of Intel Corporation in EE.UU. and in other countries. The rest of products are trade names or registered trade names of their respective proprietors.. INSTRUCTIONS OF SECURITY 1. Read the instructions. Read all the instructions of security before using this product. 2. Keep the instructions in safe place for future references. 3. Read the warnings placed in the product and the manual. 4. Follow the instructions of use and installation of the product. 5. Cleaning. Disconnect the player of any electric current before cleaning. It does not require liquid cleaners or in aerosol. Use a moisten cloth to clean the device. 6. Accessories. Do not use accessories non-recommended by the manufacturer of the equipment , since it can cause damage. 7. Water and humidity. Do not put this product anywhere near the water. 8. Place of installation. Never install this product in unstable places. The equipment may cause system down or being able to produce damage to children , adults and the same product. 9. Current. This single product must be used with correct type of current specified in the label of voltage of the product. If not knowing this safe type of electric current, consult to the company provided in its address. 10. Cable of Current. Place the cable of current in such a way that it cannot be above or be bored by objects put above or next to the cable. 11. Service. Never try to repair this product by user. Always consult to personnel properly qualified by Airis Computer. 12. Substitution of components. When the substitution of some components for the device is necessary, it must assure which technical service pieces are adapted for the repair. The nonauthorized substitution of pieces is strictly prohibited and may cause to be in risk of fire or electric shock. 13. Heat. Install this product far from radiating heat sources , such as bath tubs, carpets or other products (including amplifiers) that can producer heat. 14. Although the unit is robust, never put the product under an excessive pressure. Avoid acids blow or place any excessive objects on product. 15. Move away product from intense magnetic fields. 16. We recommended to follow this instruction at the time of opening packages, electronics supports, ……etc. 17. Use of the Earphone pieces Remember that it is necessary to follow Instructions of security in the use of the Earphone. Not allow to use the earphone at the same time that conduct on Automobiles or Cycles. This behavior is of highly dangerous. When user walks by the street with the plugged earphone, avoid to use them with a high volume, since it causes difficulty to the reception of alarms (i.e. Warning voices, Sirens, Horning of the Automobiles,….. etc.) Always use product with a suitable volume. The continuity to a high volume can cause adnominal or injuries. Use the earphone properly , or lower its volume to a confortable level. Content table Content table ................................................................ 1-2 C h a p t e r 1 . K e y M a p F u nctions .................................... 3-4 D e s c ription of Device ....................................................... D e s c ription of Bottom ....................................................... H o t K ey .......................................................................... P r o d uct Specifications ..................................................... 3 3 3 4 C h a p t e r 2 . S t a r t t o U s e ................................................ 4-10 P o w e r On ........................................................................ P l a y i ng Music ................................................................. P l a y i ng Artists, Albums .................................................... P l a y i ng Year .................................................................... P l a y i ng Genre ................................................................. P l a y i ng Explorer .............................................................. P l a y Lists ....................................................................... U s i n g List Manager .......................................................... R e c o rded Files ................................................................ M y F avorite .................................................................... ※ A d d Music .................................................................. ※ D e lete Music ............................................................... B r o w sing Songs ............................................................... S o n g Content Display ....................................................... Vo l u me Control ................................................................ A - B Mode ....................................................................... U t i l i t y .......................... ................................................... ※ E Q Setting .................................................................. ※ P l ay Options ................................................................ I n f o r mation ..................................................................... Chapter 3. Recording 4 4 4-5 5 5-6 6 7 7 8 8 8 8 8-9 9 9 9 10 10 10 10 .................................................. 11-12 Vo i c e Record .................................................................. 11 P l a y Voice File ................................................................ 11 D e l e t e Voice File ............................................................. 12 1 Content table Chapter 4. Preferences ............................................ 12-16 E Q S etting ................................................................... L C D Contrast ................................................................ P l a y Options ................................................................. L a n g uage ..................................................................... D a t e / Time .................................................................. Ti m e r ........................................................................... ※ B a ck Light Timer ....................................................... ※ S l eep Timer .............................................................. ※ I d l e Timer ................................................................. B o o k Mark .................................................................... Chapter 5. Information 12 13 13 14 14 15 15 15 16 16 ............................................. 17-19 K e y Lock ...................................................................... P o w e r Off ..................................................................... U s e SD/MMC card ......................................................... U S B Connection ............................................................ 17 17 18 18-19 C h a p t e r 6 . I n s t a l l a t i o n of Software ......................... 20 S o f t w are Installation ...................................................... 20 Tr a n sferring Files ......................................................... 20 Chapter 7. Remark .................................................... 21 2 Chapter 1. Key Map Functions Description of Device Mic Play My Music SEL USB Port Description of Botton Item Button Description 1 1. Power on / off / Stop 2 1. Play / Pause 3 1. Scroll up for item selection 4 + 2. Volume up 1. Scroll down for item selection 5 6 1. Increase under specific settings - 1. Decrease under specific settings 2. Volume down 7 1. Press to skip to previous song 2. Press and hold to backward search 3. Decrease under specific settings 8 1. Press to skip to next song 2. Press and hold to forward search 3. Increase under specific settings 9 10 Select item M Back to the previous Menu Hot keys The hot keys can be used when a scroll menu appears: Jump to the first choice of the opt i o n s ( o n t h e t o p o f t h e s c r o l l l i s t ) . Jump to the last choice of the opti o n s ( g e n e r a l l y t h e P R E V o p t i o n ) 3 Chapter 2. Start to Use Product Specifications LCD 128X64 STN dot matrix Size 112(L) X 85(W) X 25(H) mm Weight ±180g Storage 2.5’’ HDD Power Sources Rechargeable 1350 mAH Li battery PC Connection USB 2.0 File System FAT 16 or FAT 32 S/N Ratio 90dB ~ 85dB Typical Earphone O/P 50mW Frequency Response 20Hz~20KHz HDD Digital Jukebox Operation Power On In the Power off condition, you need to press “ ” for 2 second to power on. Main Menu Play My Music Playing Music Scroll( or or or )to “ Play My Music ”, then press “ SEL ”. Main Menu Play My Music Artists View the songs sorted by the names of the Artists Album View the songs sorted by the song’s Album Year View the songs sorted by the song’s Year Genre View the songs sorted by the song’s Genre Explorer View the songs by the folders Play lists View the play lists and songs inside List Manager Enable the edition of the play lists (adding or deleting songs) Songs View all the songs ordered alphabetically (from A to Z, then the special characters) Playing Artists, Albums 1. Scroll ( or or or ) to “ Artists ” or “ Albums ”, then press “ SEL ”. Artists Menu Albums Menu Artists 2. Choose the favorite artist or album ( Albums or ), then press “ SEL ”. 4 Chapter 2. Start to Use ALL>> 3. Choose artist or album of song ( or ), press “ SEL ” to playback. 4. While the playback is underway, press “ M ” to execute other operations. 5. While navigating is underway, use navigating function to My Music Menu. Idle for 6 seconds to Song Content Display. Playing Year 1. Scroll ( or or or ) to “ Year ”, then press “ SEL ”. Year Menu Year 2. Choose the favorite folder ( or ), then press “ SEL ”. ALL>> 2004.15 2004.1 2004.16 2004.2 2004.3 3. Choose title of song ( or ), press “ SEL ” to playback. 01.mp3 02.mp3 03.wma 4. While the playback is underway, press “ M ” to execute other operations. 5. While navigating is underway, use navigating function to My Music Menu. Idle for 6 seconds to Song Content Display. Playing Genre 1. Scroll ( or or or ) to “ Genre ”, then press “ SEL ”. Genre Menu Genre 5 Chapter 2. Start to Use 2. Choose the favorite genre ( or ), then press “ SEL ”. ALL>> JAZZ POP ROCK 3. Choose title of song ( or ), press “ SEL ” to playback. 01.mp3 02.mp3 03.wma 4. While the playback is underway, press “ M ” to execute other operations. 5. While navigating is underway, use navigating function to My Music Menu. Idle for 6 seconds to Song Content Display. Playing Explorer 1. Scroll ( or or or ) to “ Explorer ”, then press “ SEL ”. Explorer Menu Explorer 2. Choose the favorite folder ( or ), then press “ SEL ”. K2 ME2 3. Choose title of song ( or ), press “ SEL ” to playback. 01.mp3 02.mp3 03.wma 6 Chapter 2. Start to Use 4. While the playback is underway,press “ M ” to execute other operations. 5. While navigating is underway,use navigating function to My Music Menu.Idle for 6 seconds to Song Content Display. Play Lists There are 5 play lists built in the Jukebox. 1. Scroll ( or ) to “ Play List ”, then press “ SEL ”. My Music Menu (Idle) Play Lists 2. Choose the favorite play list ( or ),then press “ SEL ”.( The songs in “ My favorite ” can be managed by using “ List Manager ”. Recorded Songs My favorite 1 My favorite 2 Play List Menu PREV 3. Choose title of song ( or ),press “ SEL ” to playback. 01.wav 02.wav 03.wav 4. While the playback is underway, press “ M ” to execute other operations. 5. While navigating is underway, use navigating function to My Music Menu. Idle for 6 seconds to song Content Display. NOTE: The contents of Recorded songs are what user recorded from the build in Mic. Please refer to Recording section for further information. Using List Manager Scroll ( Scroll ( or or ) to “ Play My Music ”, then press “ SEL ”. ) to “ List Manager ”, then press “ SEL ”. List Manager Menu List Manager 7 Chapter 2. Start to Use 1. Recorded Files 1.1 Scroll ( or ) to “ Recorded Songs ”,then press “ SEL ” to go into the “ Select Function” display. Recorded Songs My favorite 1 001.wav Select Function 002.wav Delete Recorded My favorite 2 003.wav 1.2 press “ SEL ” to delete recorded. 1.3 Select a file you want to delete a n d p r e s s “ S E L ” t o d e l e t e t h e p l a y l i s t . W h i l e y o u press the “ SEL ”, the system will automatically pop up a dialog box to confirm the deletion instruction, then just choose yes or not. 2. My favorite Scroll ( or ) to “ My favorite ”, then press “ SEL ” to go into the “ Select Function ” display. Select Function Add Music Delete Music 2.1 “ Add Music ” Under “ Select Function ” dialog box, scroll to “ Add Music ” and then press “ SEL ”. Under “ Select Source ” dialog box, it will show you four options:“ Artists ” , “ Albums ” ,“ Genres ” and “ Songs ”. Please choose any option to pick up desired tune. 001.MP3 002.MP3 Add 001.MP3 003.MP3 YES NO Artists 2.2 “ Delete Music ” Under “ Select Function ”dialog box, scroll to “ Delete Music ” and then press “ SEL ” to enter the “ Title list ” display. Select and press “ SEL ” to delete any song you want to delete. 001.MP3 002.MP3 Delete 001.MP3 003.MP3 YES NO Note: The addition or deletion of the songs from this menu affects only the contents of the play lists, not the songs stored in the HDD. Browsing Songs 1. Scroll ( or ) to“ Songs ”,then press “ SEL ”. My Music Menu Songs 8 Chapter 2. Start to Use 2.Scroll ( or ) to select the first character of each music title, then press “ SEL ” to confirm. ABCDEFGHIJKLMNOPQ A AB ABC 3. Scroll to favorite title ( or ), press “ SEL ” to playback. 4. While navigating is underway, use navigating function to My Music Menu. ldle for 6 seconds to Song Content Display. Song Content Display While playback is underway, song content information will emerge on the LCD screen. Press “ SEL ” and scroll ( or ) to set the A-B Mode, Utility ( EQ setting , play option & variable speed ) or look up information. 6 VOL:17 ID3 7 Information 4 1 3 2 5 0:06:1 0 1.The Jukebox’s status: playback, stopped or paused. 2.The Play options: Normal (sequential) play, Repeat 1 track, Repeat All tracks, or Random. 3.Battery status. 4.Volume (can be adjusted using the + or - keys). 5.Song’s information contained in the ID3 tag (will be shown in scrolling mode if necessary) Note: this option is No Applicable for those MP3 files that don’t have ID3 tags, or WMA format songs which shows only the file’s name. 6.Elapsed time of the current song. 7.Options: A-B or Normal mode, Utility (EQ setting, Play option ), Information. Volume Control Press (+) or (-) to adjust volume (VOL:00~50). A-B Mode 1. While playback is underway, Scroll ( or ) to “ A-B mode ”,then press “ SEL ”. 2. After pressing “ SEL ” the start point will be set and the icon will change from “ ” to “ ”. 3. Press “ SEL ” again to set the end point. The playback will be limited to the segmeny marked with the “ ”&“ ” points. 4. Press “ SEL ” to terminate A-B mode and resume normal playback “ ”. A-B MODE ID3 VOL:17 Information 0:06:1 0 9 Chapter 2. Start to Use Utility While playback is underway, press “ SEL ”. A-B MODE ID3 VOL:17 Information 0:06:1 0 1. EQ Setting 1.1 Scroll ( or ) to “ EQ Setting ” , then press “ SEL ” to change equalizer between Normal, Classic,Jazz,Rock,POP,Bass,Treble,Personal,then press “ SEL ” to confirm. 1.2 Press “ M ” to return. 1.3 If EQ has been set as Personal mode,scroll down ( ) and press “ SEL ” and scroll ( or ) to successive item for high or low frequency settings. +12dB dB < < < < -12dB 1.4 Press “ M ” to return. 2. Play Options 2.1 Scroll ( or ) to “ Play Option ” ,then press “ SEL ” to change play options between Normal(Sequential) Play , Repeat 1 track , Repeat All track, or Random , then press “ SEL ” to confirm. 2.2 Press “ M ” to retum. VOL:17 P l a y O p t i ons Information 1. While playback is underway, press “ SEL ”. 2. Scroll ( or ) to “ Information ”,then press “ SEL ”. 3. The LCD will show “ File Size ”, “ Length ”, “ Bitrate ”, “ Stereo ” (Or Mono). A-B MODE ID3 VOL:17 Information Files Size:5779540 bytes Lenght:361 seconds 128 k 0:06:1 0 Stereo 10 Chapter 3. Recording Voice Record (Recording by Built-in Mic) 1. Scroll ( or ) to “ Record ”, then press “ SEL ”. Record Record 1. Scroll ( or ) to “ Record ”, and press “ SEL ” to record. Record 2. Scroll ( or ) to “ Pause ” and press “ SEL ” or use the “ ” button to pause recording. While pause-recording is underway, scroll “ Resume ” and press “ SEL ” or press “ ” to resume recording. Voice Recording....... VOL:17 0:00:01 Stop Record Pause 3. Scroll ( or ) to “ Stop Recording ” and press “ SEL ” or use “ ” button to terminate recording. Saving File Please Wait... Note: For the digital voice recording, the default settings are the following: Title: yy/mm/dd/hh/mm/ss File format: wav Artist: user Quality: 32 kbit, 16 khz., mono Album: Digital Voice Record Folder: DVR In order to avoid the eventual power down issue during the record process, each 30 minutes the content will be saved to an individual file in the HDD. This means that if the record time exceeds the 30 minutes, the saved content will be split into various files. Play Voice File 1. Scroll ( or ) to “ Play Voice File ” and press “ SEL ” to confirm. Play Voice Files 2. Press “ SEL ” to browse the files. 11 Chapter 4. Preferences 3. Scroll ( or ) and press “ SEL ” to play the file. 050702.wav 050703.wav 050704.wav 050705.wav Delete Voice File 1. Scroll ( or ) to “ Delete Voice File ” and press “ SEL ” to confirm. Delete Voice Files 2. Press “ SEL ” to browse the files. 3. Scroll ( or ) and press “ SEL ” to delete the file. 4. Under “ Confirm Delete ” dialog box,scroll to “ Yes ” to delete or “ NO ” to exit. Preferences Scroll to “ Preferences ”, then press “SEL ” to enter the settings menu. Main Menu Preference Settings Menu EQ Setting EQ Setting 1. Scroll ( or ) to “EQ Setting”, then press “SEL”. 2. Scroll ( or ) to change between “ Normal ”, “ Classic ”, “ Jazz ”, “ Rock ”, “ POP ”, “ Bass ”, “ Treble ”, “ Personal ” mode,then press“ SEL ” to confirm. Bass Treble Personal 3. For personal settings, scroll down for the personal option , press “ SEL ” use ( or ) to select the frequency,and scroll ( or ) to adjust successive item for high or low frequency settings. +12dB dB < < < < -12dB 12 Chapter 4. Preferences 4. Press “ SEL ” to exit. LCD Contrast 1. Scroll ( or ) to “ LCD Contrast ”, then press “ SEL ”. LCD Contrast 2. Press ( or ) to change the default LCD contrast while powered on,then press “ SEL ” to confirm and exit. - + Play Options 1. Scroll ( or ) to “ Play Options ” then press “ SEL ”. Play Options 2. Scroll to “ Normal play ”,“ Repeat 1 track ”,“ Repeat All ”,“ Random ” , then press “ SEL ” to confirm exit. Normal play Repeat 1 track Repeat All Random The Play options: (1) Normal (sequential) play: will play all the following songs (in alphabetical order according to the files allocation) after the Play action was started with the selected song. (2) Repeat 1 track: will repeat the chosen song. (3) Repeat All: will repeat all the tracks. Inside the selected play list or folder. (4) Random: play any song stored in the HDD in random order. 13 Chapter 4. Preferences Language 1. Scroll ( or ) to “ Language ” , press “ SEL” to go into the“Music Information” display with the five languages: English, EUROPE, Simplified Chinese,Traditional Chinese. Language 2. Select any language you want to use and then press “ SEL” to confirm your setting. Music Information Menu Information English English French Deutsch Spanish chinese 3. A f t e r y o u f i n i s h “ M u s i c I n f o r m a t i o n ” s e t t i n g , t h e p l a y e r s y s t e m w i l l l e t y o u e n t e r t h e “ Menu Language ” display to set the “ Menu Language ” options including English,German, Spanish, French, Italian, Portuguese, Russian, Traditional Chinese, Simplified Chinese. 4. Select any language you want to use and press “ SEL ” to confirm your choice. Date / Time 1. Scroll ( or or or ) to “ Date / Time ”, then press “SEL”. Date / Time 2. Scroll ( or or then press “ SEL ”. or ) to “ Year ”, “ Month ”, “ Date ”, “ Hour ” or “ Min ” respectively, 2005 / 08 / 08 12:00 Note: The default initial time is 2005/08/08 12:00 and the years can be set between the range of 1900 ~ 2099 3. Scroll ( or ) to modify and press “ SEL ” to confirm “ M ” to exit. 14 Chapter 4. Preferences Timer Scroll ( or or or ) to “ Timer ”, then press “ SEL ”. Timer 1. Back Light Timer 1.1 Scroll ( or ) to “ Backlight Timer ”, then press “ SEL ”. Back Light Timer 1.2 Press “ SEL ” and scroll ( or ) to change the default backlight timer (01~10 sec, Always On, Always Off ), then press “ SEL ” to confirm or “ M ” to exit. Always Off Always On 5 Sec. 10 Sec. 2. Sleep Timer 2.1 Scroll ( or ) to “ Sleep Timer ”, then press “ SEL ”. Sleep Timer 2.2 Press “ SEL ” and scroll ( or ) to change the default sleep timer (between 10min~ 5hs,or OFF), then press “SEL” to confirm or “ M ” to exit. OFF 00:10 05:00 00:10:00 15 04:59:59 Chapter 4. Preferences 3. Idle Timer 3.1 Scroll ( or ) to “ Idle Timer ”, then press “ SEL ”. Idle Timer 3.2 Press “ SEL ” and scroll ( or ) to change the default standby timer (30~240sec,OFF), then press “ SEL ” to confirm or “ M ” to exit. OFF 30 Sec 240 Sec After the time period, the Jukebox will enter the Idle mode and the Idle screen will emerge. Book Mark You can mark the file which you are playing while you exit music mode provisionally. 1.When you want mark the file,scroll ( or ) to “ Book Mark ”, then press “ SEL ”. Write Bookmark read Bookmark Book Mark 2. Scroll ( or ) to Setting and press “ SEL” for “ Write Bookmark ”. 3. Choose the the bookmark number, then press “ SEL” to confirm. Write Bookmark Bookmark 1 Bookmark 2 Bookmark 3 4. Read Bookmark:Scroll ( or ) to “ Read Bookmark ”,then press “ SEL ”,to read the Bookmark. Read Bookmark Bookmark 1 Bookmark 2 Bookmark 3 16 Chapter 5. Information Information 1. scroll ( or or or ) to “ Information ” under Main Menu, then press “ SEL ” to confirm. Information 2. You can see the related system information of the player like Firmware version / Hardware version/Total space/Free space/How many songs the player hold… Key Lock 1. Slide the HOLD button to Lock the keys.The RED spot will be shown. Key Lock 2.The Key Lock screen will be shown on the display for 2 seconds.When hit any function key. When the keys are locked.this icon will be shown on the LCD. A-B MODE Slide the HOLD key to unlock ID3 VOL:17 Information 0:06:1 0 3. To unlock the keys, slide the HOLD key to the opposite direction. Power Off Scroll ( or or or ) to “ Power Off ” & press “ SEL ” to turn the jukebox off. Also the unit can be turn off by pressing “ ”. Main Menu Power Off 17 Chapter 5. Information Use SD/MMC card Insert the SD or MMC card into the slot. The Jukebox will prompt out automatically the “copy files to hard disk” option. Cop y All Files Copy Music Files Select copy all files or copy music files and the dialog box will appears, select Yes or No to start or cancel the copy operation. Copy Files to hard disk? YES NO Notes: 1. When the Jukebox is operating disconnected from the PC and the card is being inserted for the first time;by default option the files will be copied into a folder named SD0001, which is generated automatically. When a card is inserted by the second time, the files will be copied into SD0002, and then successively into folders named sequentially as SD0003, SD0004, SD0005, etc. 2. The managing options, such as coping, moving or deleting the files inside the different folders of the Jukebox, can only be performed with the unit connected to the PC. USB Connection The Jukebox can be operated only from the PC when is connected to the USB cable. The screen will show: Note: During such PC connecting status, always safely click “remove hardware from PC USB” connection or long press “M” button ,then can escape to Main menu of “ Play My Music ”. 18 Chapter 5. Information 1. When Jukebox is at Power Off mode: 1.1 Once connect Jukebox with the USB Cable, the LCD screen will appear: With 2 options to select. Long press “ ” 2 second to enter main menu of “ Play My Music ”. Or Long press “ M ” button 2 second to enter PC connected. 1.2 Once connect Jukebox with AC Adaptor, the LCD screen will appear: Long press “ ” 2 second to enter main menu of “Play My Music ”. Note: W h e n a f t e r p l u g g i n g t h e U S B c a b l e o r p l u g g i n g A C A d a p t o r , i f t h e L C D s c r e e n n o t appearing any icon as above indicated, always press “ ” to enter Main Menu of “ Play My Music”. 2. When Jukebox is at Power On mode: 2.1 Once connect Jukebox with the USB Cable, the LCD screen will appear Two Options to select PC connecting or not. Select “ ” to enter PC connecting. Or select “ Original playing mode. Note: ” to escape and maintain at When Jukebox already initially plugged with USB cable,or AIRIS USB Docking Station (N97DS),or AIRIS USB Speaker (MP3L170), then power on the Jukebox, User must r e p e at “unplug and plug” the USB con n e c t o r a g a i n , i n o r d e r t o g e t P C c o n n e c t i n g . 19 Chapter 6. Installation of Software Software Installation The AIRIS N974 player is compatible with Windows 98SE, Windows ME, Windows XP and Windows 2000 operating systems. If your PC has Windows 2000 or XP, you will not need to install an additional driver as these operating systems have full support for this type of player. On the contrary, if you have the Windows 98 operating system, you must install the driver contained in the CD-ROM that is provided. Windows 98SE, Windows ME or Windows 2000 users must install the Windows Media Player 9 or a later release. The Microsoft Windows Media Player can be downloaded from the Microsoft website(www.microsoft.com). To find out what Windows Media Player release you have, ececute the application from the Start menu (Start/Programmes/Accessories/Entertainment Windows MediaPlayer). Press the “Help” option on the top menu and select the section “About Windows Media Player”. In the CD-ROM that comes with the AIRIS N974, several addtional applications are also included that will help you to make the most of the player’s functions. Search for HddMP3 File Manager.exe then double click to execute. In addition, it is a very practical way to edit the ID3 tags of the files, where the name of the author, style, etc. is indicated. Transferring Files Once the unit has been connected to the computer through the USB port, there are various ways of transferring files from the AIRIS N974 to the computer,and vice versa. 1.-File explorer Once the player is connected to the computer, the system recognises it as a removable storage unit. In this way, you can use the Windows File Explorer (Start / Programmes / Accessories / File Explorer) to transfer file between different units. The AIRIS N974 will appear in the system under the name “ JUKEBOX ”. IF YOU USE THIS METHOD, THE PLAYER WILLNOTBEABLE TO ORDER THE SONGS BY TITLE,AUTHOR,ETC... 2.-HddMP3 File Manager From your computer, double click on the HddMP3 File Manager.exe icon to execute the tool. From the “ Transfer ” flap you can transferthe files from or to the AIRIS N974. The flap entitled “ Media Library ” lets you create, modify or erase the play lists, or also order the existing songs based on different criteria (by artist, album,genre,year). To access more features of this application or learn how to use it, consult the user guide “Help” menu. 20 Chapter 7. Remark Remark: (1) To optimize the system response time, we strongly suggest coping the audio files into the Music folder only. All non-music files cannot be read by the Jukebox’s built-in system and may slow down the sorting process. (2) When the battery is low, a dialog box will pop up every 10 seconds. Is recommendable to plug the power cord as soon as possible. ! (3) W h e n t h e b a t t e r y i s l o w o r e m p t y , b e f o r e c o n n e c t i n g t h e u n i t t o t h e P C b y U S B , i s necessary to plug the AC adaptor first, in order to keep the HDD working properly (When the battery is empty, the recharging mechanism needs to be triggered from t he AC adaptor). ( 4 ) Reset If you find the Jukebox fails to operate or LCD screen is not showing anything, use a paper clip or any pointed object to push the "RESET" key to boost up the system again. Push this “ RESET ” key to restart 21