1
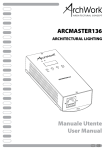
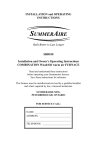
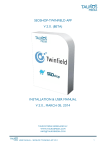
SCRimmer IITM
SCRimmer II
TM
with
Multi-LinkTM
User Manual
070-0520
Reision 4, September 1998
©1998, Electronics Diversified, Inc.
1
SCRimmer IITM
Introduction
Description
This User's Manual is supplied with your Scrimmer II.
Copies of this manual may be obtained from Electronics
Diversified, Inc., for a nominal charge. It is recommended that
you copy those portions of this manual applicable to your present
use in the installation, maintenance or repair and preserve the
original in a safe place.
Copyright 1998, by Electronics diversified, Inc. All rights
reserved.
No part of this Manual may be reproduced by any means,
graphic, electronic, or mechanical, including photocopying,
recording, taping, or information storage and retrieval systems,
without the express written permission of Electronics Diversified,
Inc., except in connection with installation, repair and maintenance
of installed Scrimmer II Power Packs.
The SCRimmer II with Multi-Link dimmer pack is a compact
lighting control system. A variety of plug-in solid-state dimmer
modules with ratings from 1,000 to 12,000 watts are available.
With Multi-Link, a variety of control formats are supported.
It is recommended that you read the following instructions
before operating your dimmer pack for the first time.
Location:
Although very efficient, solid-state dimmers generate heat. Be sure a free flow of air is allowed
through the ventilation openings on the front
and rear of the cabinet. Locate the dimmer
pack close to the power source. Either avoid
long power cable runs or increase the input
power wire size.
Dimmer Type:
This dimmer is designed to properly dim 120VAC
incandescent or quartz lamps. Low voltage
lamps operated through a standard (non-electronic) transformer with a 120VAC primary may
also be operated. Do Not connect any other
type of load such as motors or fluorescent
lamps to this dimmer.
Table of Contents
Description . . . . . . . . . . . . . . . . . . . . . . . . . . . . . . . . . . . . . . . . . 2
Front Panel . . . . . . . . . . . . . . . . . . . . . . . . . . . . . . . . . . . . . . . . 2
Rear Panel . . . . . . . . . . . . . . . . . . . . . . . . . . . . . . . . . . . . . . . . . 4
Input Power Wiring . . . . . . . . . . . . . . . . . . . . . . . . . . . . . . . . . . 4
Three-Phase Wiring . . . . . . . . . . . . . . . . . . . . . . . . . . . . . . 4
Single-Phase Wiring . . . . . . . . . . . . . . . . . . . . . . . . . . . . . . 5
Input Control Connections . . . . . . . . . . . . . . . . . . . . . . . . . . . . . 5
Analog Control . . . . . . . . . . . . . . . . . . . . . . . . . . . . . . . . . . 5
Analog Connector . . . . . . . . . . . . . . . . . . . . . . . . . . . . . . . 5
Connector Wiring . . . . . . . . . . . . . . . . . . . . . . . . . . . . . . . . 5
Multiplex Control . . . . . . . . . . . . . . . . . . . . . . . . . . . . . . . . . 6
Multi-Link Connectors . . . . . . . . . . . . . . . . . . . . . . . . . . . . . 7
USITT DMX-512 Digital . . . . . . . . . . . . . . . . . . . . . . . . . . . 7
USITT AMX-192 Analog Multiplex . . . . . . . . . . . . . . . . . . . 7
Fiber-Link Optical Multiplex . . . . . . . . . . . . . . . . . . . . . . . . 7
Multiplex Cables . . . . . . . . . . . . . . . . . . . . . . . . . . . . . . . . . 7
Self Test . . . . . . . . . . . . . . . . . . . . . . . . . . . . . . . . . . . . . . . . . . . 7
Dimmer Output Test . . . . . . . . . . . . . . . . . . . . . . . . . . . . . . . . . 7
Lamp Preheat . . . . . . . . . . . . . . . . . . . . . . . . . . . . . . . . . . . 8
Calibration . . . . . . . . . . . . . . . . . . . . . . . . . . . . . . . . . . . . . . . . . 8
High End Calibration . . . . . . . . . . . . . . . . . . . . . . . . . . . . . 8
Low End Calibration . . . . . . . . . . . . . . . . . . . . . . . . . . . . . . 8
Wall Mounting . . . . . . . . . . . . . . . . . . . . . . . . . . . . . . . . . . . . . . 9
Solid-State Relay Replacement . . . . . . . . . . . . . . . . . . . . . . . . 9
Troubleshooting Guide . . . . . . . . . . . . . . . . . . . . . . . . . . . . . . 10
Maintenance . . . . . . . . . . . . . . . . . . . . . . . . . . . . . . . . . . . . . . 10
Service . . . . . . . . . . . . . . . . . . . . . . . . . . . . . . . . . . . . . . . . . . . 10
Registration . . . . . . . . . . . . . . . . . . . . . . . . . . . . . . . . . . . . . . . 11
Power Source: This dimmer is designed to operate on 120
volts, 60Hz, AC power. This dimmer should be
connected to a molded-case circuit breaker
properly sized for the load.
Supply Cord:
The dimmer power cord is not supplied. Refer
to the INPUT Power Wiring section for proper
wiring.
WARNING:
Do not connect this Dimmer to other than the specified voltage,
or to direct current.
Front Panel
1.
Input Power Error Indicator:
This indicator will light if there is voltage between the neutral
conductor and the dimmer chassis.
IMPORTANT!
If this indicator is on, disconnect power immediately
and check for improper input power wiring. Refer to
the INPUT POWER WIRING section.
WARNING:
Maximum ambient operation and storage environment for this
equipment is 104°F (40°C), with 90% humidity, non-condensing.
Extreme caution is advised when having liquids, food and
cigarettes around any equipment. During severe electrical
storms, equipment should be disconnected. Failure to adhere to
these requirements may result in malfunction or serious damage.
2.
3.
2
Phase Change Plug:
On phase-change models, this plug allows the dimmer pack
to be wired for either single-phase or three-phase power.
Dimmer Module:
The plug-in dimmer modules contain the power components
of each individual dimmer circuit.
SCRimmer IITM
Front Panel (cont'd)
4.
Dimmer Circuit Breakers:
One fully magnetic circuit breaker is supplied for each
dimming circuit. Turn off the corresponding breaker when
re-lamping or connecting loads.
5.
Control Power Switch:
Turn on this switch to power the control electronics. When
this switch is off, the dimmer will not respond to any external
control signals and the dimmer preheat is off.
6.
Power Indicators:
These green indicators will light when power is applied to the
corresponding phases. All three lights should light on threephase dimmers, and lights 1 and 2 should light on singlephase dimmers.
7.
Control Power Fuses:
These three fuses protect the Multi-Link control module.
8.
Dimmer Output Test Buttons/Status Indicators:
Each yellow indicator will light as bright as the output of the
individual dimmer. When the button is pressed in, the
corresponding dimmer will be forced to full output and the
yellow indicator will be at maximum brightness.
9.
Analog Control Input:
Connect the analog cable from an analog 0- +10V controller
here.
11. Dimmer Pack Number:
These two thumbwheel switches select the dimmer pack
address for multiplexed dimmer formats.
12. Configure Button:
This pushbutton is used to enter new multiplex data formats,
self-test patterns, or different dimmer pack addresses. Press
this pushbutton after any change is made in multiplex data
formats, self-test patterns, or dimmer pack addresses.
13. Multiplex Control Input:
Connect the multiplex cable from the control console here.
14. Multiplex Control Output:
This connector is paralleled to the Multiplex Control Input
connector. Use this connector to add additional dimmers.
15. Multiplex Signal Presence Indicator:
The yellow indicator lights when a valid multiplex signal is
received.
16. Dimmer Overtemp Indicator:
This red indicator will light when the dimmer pack is shut
down due to an over-temperature condition. The dimmer
pack will re-energize when it has cooled down to an
acceptable temperature.
17. Preheat Level:
This control is used to set the preheat level of the lamps.
Turn it clockwise to increase the preheat level.
18. Calibration Access Plate:
Removal of this plate allows access to calibration
potentiometers and test points. Refer to Calibration section.
10. Multiplex Signal Format Switch:
Set this switch to "D" for USITT DMX-512 digital, or "A" for
AMX-192 control formats.
14
10
9
7
12
ØA
MULTIPLEX
18
15
1
2
13
14
ØB
8
6 16
17
13
3
4
5
15 16
PREHEAT
6
17 18
4
7
8
9
10
11 12
19
20 21
22
23 24
SCRIMMER II
CONTROL
POWER
3Ø
OFF
CONFIG.
ØC
1 AMP
125VAC
2 3
1Ø
INPUT
POWER
ERROR
MCU24/L
MUX 1
C DA
FORMAT
ANALOG
3
ON
PACK NUMBER
H 1 2 3 H 1 2 3 GND
2
1
5
11
OT
Multi-LinkTM
SPU 24-2
ELECTRONICS DIVERSIFIED, INC.
HILLSBORO, OREGON 97124
24 2.4KW 120VAC CKTS.
O
N
O
N
O
N
O
N
O
N
O
N
O
N
O
N
O
N
O
N
O
N
O
N
O
N
O
N
O
N
O
N
O
N
O
N
O
N
O
N
O
N
O
N
O
N
O
N
O
F
F
O
F
F
O
F
F
O
F
F
O
F
F
O
F
F
O
F
F
O
F
F
O
F
F
O
F
F
O
F
F
O
F
F
O
F
F
O
F
F
O
F
F
O
F
F
O
F
F
O
F
F
O
F
F
O
F
F
O
F
F
O
F
F
O
F
F
O
F
F
1
2
3
4
6
7
9
10
19
20
21
22
23
24
5
8
11 12
13 14
3
15 16
17 18
SCRimmer IITM
Rear Panel
1.
Convenience Outlet:
External devices of up to 20 amps may be connected here.
2.
Circuit Breaker:
This circuit breaker provides branch circuit protection for the
convenience outlet.
3.
Dimmer Outputs:
Loads should be at least 25 watts.
1
IMPORTANT!
Solid-state dimmers are sensitive to resistance and the resulting
voltage drops in the power feed cable. Excessive voltage drops
may cause the dimmers to interact and flicker. This is especially
true of the neutral conductor. The neutral conductor must be at
least the same size as the line conductors. EDI recommends that
the size of the neutral conductor be125% of the line conductors.
3
2
CONVENIENCE/LOAD TEST
20 AMP
A
21
B
A
17
B
A
13
B
A
9
B
A
5
B
A
1
B
A
22
B
A
18
B
A
14
B
A
10
B
A
6
B
A
2
B
A
23
B
A
19
B
A
15
B
A
11
B
A
7
B
A
3
B
B
A
20
B
A
16
B
A
B
A
B
A
A
24
12
8
4
Three-Phase Wiring -- 120/208 VAC
Three-phase wiring has three seperate hot wires and a neutral.
1. Connect the Ground wire to the lug next to the terminal
block. This unit must be grounded.
B
2.
Connect the Neutral wire to the "N" terminal.
3.
Connect the Phase A wire to the "Ø A" terminal.
Connect the Phase B wire to the "Ø B" terminal.
Connect the Phase C wire to the "Ø C" terminal.
Neutral
IMPORTANT!
Phase B
Phase A
Turn off the correspoding circuit breaker when relamping or connecting loads.
Phase C
Double-check all connections, and make sure all terminals
are tightly secured before replacing cover. Tighten the cable
clamp and connect the cable to a suitable power source.
Apply power to the dimmer and check the Input Power
Indicator. If it is on, the dimmer is miswired. Turn off power
immediately and check the input power wiring.
Turn on the Control Power switch and check the three green
power indicators. All three indicators should light.
Connect the loads and turn on all of the circuit breakers.
The dimmer is now ready to use.
Input Power Wiring
It is strongly recommended that the input power wiring be
installed by a qualified electrician.
This unit must be connected to a grounded power source! If
a grounded power source is not available, contact a qualified
electrician.
IMPORTANT!
Before connecting the input power, make sure the
power source is turned off.
Set all breakers and the control power switch to the off
position.
Unscrew and remove the dimmer cover. The line input
terminal block is located on the right side of the dimmer.
MPORTANT!
Do not connect this dimmer pack to Delta configuration
three-phase power sources. The input power requirement
for this unit varies with the model. Table 1 gives the input
power requirements and suggested wire size for type W
wire. For other types of input power wires, consult the
National Electric Code.
Route the feed cable through the cable clamp and make the
required connections to the terminal block and ground lug inside.
Snug down all terminal and ground lug screws firmly, watching
for stray wire strands which could cause shorts. Replace the
cover and tighten the cable clamp.
The SCRimmer II with Mulit-Link dimmer can be operated on
single- or three-phase power. Each is connected in a different
way. Refer to the following instructions for proper connections.
NOTE: Table 1 is intended for portable installations and shows the
minimum acceptable wire sizes for individual type W
conductors in free air. If distance from the power source to
the dimmer is greater than 50 feet, the wire size will have to
be increased. For other types of wires or permanent
installations, consult the National Electric Code for proper
wire types and sizes.
4
SCRimmer IITM
TABLE 2
TABLE 1
Dimme
Model
Line
Current
SPP 24-1.2
SPP 24-1.8
SPP 24-2
SPP 12-2
SPP 12-3
SPP 06-6
SPP 06-7
SPP 06-12
80 A
120 A
160 A
80 A
120 A
100 A
120 A
100 A
Minimum Wire
Size (Type W)
No. 6 AWG
No. 2 AWG
No. 1 AWG
No. 6 AWG
No. 2 AWG
No. 4 AWG
No. 2 AWG
No. 4 AWG
Dimmer
Model
Line
Current
SPP 24-1.2
SPP 24-1.8
SPP 24-2
SPP 12-2
SPP 12-3
SPP 6-6
SPP 6-7
120 A
180 A
240 A
120 A
180 A
150 A
180 A
Minimum Wire
Size (Type W)
No. 2 AWG
No. 1/0 AWG
No. 3/0 AWG
No. 2 AWG
No. 1/0 AWG
No. 1 AWG
No. 1/0 AWG
Input Control Connections
This dimmer may be controlled by either an analog output
controller 0- +10 volt D.C. or one of three multiplexed output
controllers. The following sections describe all control formats.
Single-Phase Wiring -- 120/240 VAC
Single-phase wiring has two seperate hot wires and a neutral.
1. Connect the Ground wire to the lug next to the terminal
block. This unit must be grounded.
Analog Control
This dimmer is equipped with a male 25-pin "D" connector
for operation from 0 to +10 Volt D.C. analog control voltages.
2. Connect the Neutral wire to the "N" terminal.
3. Connect the hot wires to the Line 1 and Line 2 terminals.
Neutral
No Connection
Line 1
1.
Connect the analog cable to the analog input connector.
2.
Set the pack address switches to 00 to disable the selftest and multiplex input features.
3.
Press the "Configure" button.
Line 2
NOTE: If you are using the analog and multiplex controls at the
same time, ignore steps 2 and 3.
Analog Connector 25-pin D type
Female mating connector: Cannon #DB-25S
Double check all connections and make sure all terminals
are tightly secured before replacing cover. Tighten cable clamp
and connect cable to power source.
Apply power to the dimmer and check the Input Power
Indicator. If it is on, the dimmer is miswired. Turn off power
immediately and check the input power wiring.
Turn on the Control Power switch and check the three green
power indicators. Indicators 1 and 3 should light. Indicator 2
should be off. Connect the loads and turn on all of the circuit
breakers.
The dimmer is now ready to use.
1
2
3
4
5
6
7
8
9
10 11 12 13
14 15 16 17 18 19 20 21 22 23 24 25
Connector Wiring
The analog control signals are wired to the connector as in
Table 3A. If the dimmer you are using is a Model SPP 6-6 (6kw)
or SPP 6-7 (7.2kw), use Table 3B, and use Table 3C for SPP 312 (12kw) dimmer packs. On all models, control ground is
connected to pin 25.
IMPORTANT!
The dimmer pack is intended to be operated from a 120/
240 VAC power source (2 hots and 1 neutral). Do not
connect this dimmer to a single 120 volt power source
(1 hot and 1 neutral).
The input power requirement for this unit varies with the
model. Table 2 gives the input power requirements and
suggested wire size for type W wire. For other types of
input power wires, consult the National Electric Code.
TABLE 3A
Analog Connector Wiring
(12 and 24 dimmer models)
Dimmer
Number
1
2
3
4
5
6
7
8
9
10
11
12
NOTE: Table 2 is intended for portable installations and shows the
minimum acceptable wire sizes for individual type W
conductors in free air. If distance from the power source to
the dimmer is greater than 50 feet, the wire size will have to
be increased. For other types of wires or permanent installations, consult the National Electric Code for proper wire
types and sizes.
5
Control
Pin
1
2
3
4
5
6
7
8
9
10
11
12
Dimmer
Control
Number
Pin
13
13
14
14
15
15
16
16
17
17
18
18
19
19
20
20
21
21
22
22
23
23
24
24
Control Ground 25
SCRimmer IITM
Dimmer
Number
1
2
3
4
5
6
Ground
TABLE 3B
TABLE 4B
Analog Connector Wiring
Dimmer Pack Address Table
(6-dimmer models)
(6- dimmer models)
Control
Pin
1
3
5
7
9
11
25
Dimmer
Number
1
2
3
Ground
Control
Pin
1
5
9
25
TABLE 3C
Analog Connector Wiring
(3-dimmer models)
Dimmer
Number
1
2
3
Ground
Control
Pin
1
3
5
25
Multiplex Control
The Multi-Link controller may be configured for different
control formats. When using the multiplex control option, the
dimmer "Pack Number" thumbwheels must be set to the proper
value.
NONE
1-12
13-24
25-36
37-48
49-60
61-72
73-84
85-96
97-108
109-120
121-132
133-144
145-156
157-168
169-180
181-192
193-204
205-216
217-228
229-240
241-252
22
23
24
25
26
27
28
29
30
31
32
33
34
35
36
37
38
39
40
41
42
22
23
24
25
26
27
28
29
30
31
32
33
34
35
36
37
38
39
40
41
42
127-132
133-138
139-144
145-150
151-156
157-162
163-168
169-174
175-180
181-186
187-192
193-198
199-204
205-210
211-216
217-222
223-228
229-234
235-240
241-246
247-252
(3- dimmer models)
Pack
Address
00
01
02
03
04
05
06
07
08
09
10
11
12
13
14
15
16
17
18
19
20
21
(12- and 24-dimmer models)
00
01
02
03
04
05
06
07
08
09
10
11
12
13
14
15
16
17
18
19
20
21
NONE
1-6
7-12
13-18
19-24
25-30
31-36
37-42
43-48
49-54
55-60
61-66
67-72
73-78
79-84
85-90
91-96
197-102
103-108
109-114
115-120
121-126
Dimmer
Number
TABLE 4C
TABLE 4A
Pack
Address
00
01
02
03
04
05
06
07
08
09
10
11
12
13
14
15
16
17
18
19
20
21
Pack
Address
Dimmer Pack Address Table
Dimmer Pack Address Table
Dimmer
Number
Dimmer
Number
SPP 3-12 (12kw) dimmer packs using an MCU-3 control
module are in groups of three. Use Table 4C for proper addressing.
NOTE: Dimmer pack numbers are in groups of twelve. Pack
number 01 is for dimmers 1-12, 02 is for dimmers 13-24, and
so on. Table 4A gives the corresponding dimmer numbers
for all valid dimmer pack addresses.
Pack
Address
Pack
Address
Dimmer
Number
253-264
265-276
277-288
289-300
301-312
313-324
325-336
337-348
349-360
361-372
373-384
385-396
397-408
409-420
421-432
433-444
445-456
457-468
469-480
481-492
493-504
Dimmer
Number
NONE
1-3
4-6
7-9
10-12
13-15
16-18
19-21
22-24
25-27
28-30
31-33
34-36
37-39
40-42
43-45
46-48
49-51
52-54
55-57
58-60
61-63
Pack
Address
Dimmer
Number
22
23
24
25
26
27
28
29
30
31
32
33
34
35
36
37
38
39
40
41
42
64-66
67-69
70-72
73-75
76-78
79-81
82-84
85-87
88-90
91-93
94-96
97-99
100-102
103-105
106-108
109-111
112-114
115-117
118-120
121-123
124-126
Usually, the first dimmer pack (dimmers 1-12) is set to 01, the
second dimmer pack (dimmers 13-24) to 02, and so on. On 24
dimmer models, each dimmer pack uses two numbers, The first
pack should be set to 01 (dimmers 1-24), the second pack to 03
(dimmers 25-48), etc. Whenever the dimmer pack number is
changed, the Configure button must be pressed to enter the
change. If a pack is set to 00, the Multiplex signal is disabled.
SPP 6-6 and 6-7 dimmer packs using an MCU-6 control
module are in groups of six. Use Table 4B for proper addressing.
6
SCRimmer IITM
NOTE: If the control power switch is off, or power is disconnected to
the dimmer pack, the Fiber-Link signal received at the IN
connector, will not be transmitted by the OUT connector. In
order to use the Fiber-Link multiplex format, an optional
Fiber-Link module must be installed. This module has only
fiber-optic connectors, not Multi-Link connectors. Therefore,
Multi-Link and Fiber-Link dimmers may not be interchanged
unless the control console has dual output.
Multi-Link Connectors
5-pin XLR type mating connectors:
Female connector
Male connector
(to next dimmer pack)
(from console)
Switchcraft No. A5F
Switchcraft No. A5M
1
2
3
4
5
5
4
3
2
1
Multiplex Cables
Standard Multi-Link Cable is used to connect the dimmer
pack to USITT DMX-512, or Multi-Link compatible consoles.
This cable is also used to interconnect packs for all multiplex
formats.
Wiring Connections:
1. Analog Ground
2. Clock/Data 3. Clock/Data +
4. Analog Multiplex
5. Overtemp
Ground
Data Data+
AMX
Overtemp
USITT DMX-512 Digital Multiplex
The USITT DMX-512 Digital multiplex format will allow up to
512 dimmers to be controlled from a single cable. In addition to
the digital signal, the SCRimmer II with Multi-Link sends an
overtemp signal to the control console in the event of an overtemp condition.
1. Set the multiplex signal fromat switch to D (for Digital
multiplex).
2. Set the desired pack number (see Multiplex Control
section).
3. Press the Configure button.
4. Connect a USITT DMX-512 compatible control cable
from the control console to the multiplex control input
connector.
SHIELD
Ground
Data Data+
AMX
Overtemp
FROM CONSOLE
Male Connector
WIRE
Belden #9842
TO DIMMERS
Switchcraft #A5M
or Alpha #5272
Switchcraft #A5F
F e m a l e
Connector
Strand CD80 to Multi-Link Adapter Cable
Strand CD-80 to Multi-Link adapter cable is required for
Strand consoles with smaller 4-pin MINI-XLR-type connectors.
Use this adapter to connect the first dimmer pack to the console.
Additional dimmer packs may be added by using standard MultiLink cables.
Ground
Clock Clock+
Analog
FROM CONSOLE
Male Connector
Switchcraft #TA4ML
USITT AMX-192 Analog Multiplex
The Multi-Link AMX-192 analog multiplex format will allow
up to 192 dimmers to be controlled from a single cable.
1. Set the multiplex signal format switch to A (for Analog
mulitplex).
2. Set the desired pack number. The AMX-192 standard
will only support 192 dimmers. The maximum pack
address number that can be used is 16.
3. Press the Configure button.
4. Connect an AMX-192 adapter control cable from the
control console to the multiplex control input connector.
SHIELD
WIRE
Belden #9842
or Alpha #5272
Ground
Clock Clock+
Analog
TO DIMMERS
Female Connector
Switchcraft #A5F
Self Test
The Multi-Link system has three built-in test patterns. The
patterns are enabled by selecting dimmer pack numbers of 50,
60, and 70.
To enable a self-test pattern,
1. Select the desired pattern
50 - One dimmer on at a time.
60 - Build (starts with dimmer 1 and adds on additional
dimmers).
70 - All dimmers on at once.
2. Press the Configure button. The self-test will start immediately. The right hand thumbwheel switch may be
changed to vary the speed of the test.
0 is the fastest, 9 is the slowest.
Fiber-Link Optical Multiplex
The Fiber-Link multiplex format will allow up to 512 dimmers
to be controlled from a single fiber-optic cable.
1. Set the desired pack number (see Multiplex Control
section).
2. Press the Configure button.
3. Connect a Fiber-Link multiplex cable from the control
console to the fiber-optic receiver (labeled IN).
4. Additional dimmer packs may be daisy-chained by
running a Fiber-Link multiplex cable from the fiberoptic transmitter (labeled OUT) to the fiber-optic receiver
(labeled IN) on the next dimmer.
Dimmer Output Test
There is a yellow button on the front panel for each dimmer
channel. Pressing it will cause that dimmer to immediately go to
full intensity. Pressing the button again will resume normal
operation of that channel. The yellow indicator inside each test
button shows the same percentage of brightness as the
corresponding output.
7
SCRimmer IITM
Lamp Preheat
The lamp preheat adjustment allows a small amount of
current flow through the lamp filaments at all times. This preheat
(warming current) reduces the shock to the filaments when the
lamps are suddenly turned on to full. Increasing the preheat level
will significantly increase lamp life, especially in applications
where the lamps are rapidly flashed on and off.
Turn the lamp preheat clockwise to increase the lamp
preheat and counter-clockwise to reduce it. For optimum preheat
adjustment, turn the control all the way clockwise and then slowly
turn it counter-clockwise until the lamps stop glowing.
Wall Mounting
Mount the dimmer to the wall with the front panel facing
either right or left as shown.
Allow 12" clearance on all sides, and 18" in front (circuit
breaker) side to allow the plug-in dimmers and dimmer control
module to be removed. Do not block any of the ventilation
openings.
Do not use aluminum wire.
Do not run the control wiring and the line (or load) wiring
together or in the same conduits.
Avoid running common neutrals to the load wiring.
1234567890123456789012345678901212
1234567890123456789012345678901212
12" Clearance
1234567890123456789012345678901212
Brackets (4)
1234567890123456789012345678901212
(3 sides)
1234567890123456789012345678901212
1234567890123456789012345678901212
1234567890123456789012345678901212
1234567890123456789012345678901212
18"
Ground Buss
1234567890123456789012345678901212
1234567890123456789012345678901212
1234567890123456789012345678901212
Front
SCRimmer II
Rear
1234567890123456789012345678901212
1234567890123456789012345678901212
1234567890123456789012345678901212
1234567890123456789012345678901212
Neutral Buss
1234567890123456789012345678901212
1234567890123456789012345678901212
1234567890123456789012345678901212
1234567890123456789012345678901212
WALL
1234567890123456789012345678901212
Calibration
This dimmer has been factory calibrated and should never
require additional calibration. Before calibration is attempted,
make sure that all other equipment has been checked for failure
or malfunction, especially the control console.
If the dimmer is ghosting (all lamps glowing), turn the
preheat control counter-clockwise.
The SCRimmer II with Multi-Link is designed to be
calibrated for a 0- +10 volt analog control signal. If the dimmer
is calibrated for other analog control levels, the digital formats
(including the test modes) will not work properly.
H
1
2
3
Calibration Controls
H 1 2 3
High Cal.
Phase A Low Cal.
Phase B Low Cal.
Phase C Low Cal.
GND
If common load neutrals absolutely must be run (retrofit
situations), do not connect circuits of the same phase to the
same common neutral wire. Do not run more than three dimmers
(three-phase) or two dimmers (single-phase) on a common
neutral wire. Choose the size of the neutral wire to handle 120%
of the rated dimmer load.
Refer to Table 5A for normal dimmer phasing. For SPP 6-6
and 6-7, use Table 5B.
SPP 3-12 dimmers are each on a different phase.
Control Ground
Phase C Ramp
Phase B Ramp
Phase A Ramp
High Calibration Test Point
TABLE 5A
Dimmer Phasing
High End Calibration
Remove the calibration access plate. Connect a digital
voltmeter between the test point labeled H (high cal.) and GND.
Adjust the H calibration potentiometer so meter indicates exactly
9.3 volts.
(12-and 24-dimmer models)
Dimmer
Number
01
02
03
04
05
06
07
08
09
10
11
12
Low End Calibration
Set the preheat control to ¼ of the way from full
counterclockwise. Connect identical 100-500 watt clear lamps
to dimmers 1, 5, and 9 (on six-dimmer modules, use 1, 3, 5).
Adjust low cal potentiometer 1 until the lamp connected to
dimmer 1 barely glows.
Adjust low cal potentiometer 2 until the lamp connected to
dimmer 5 glows at the same intensity as the lamp connected to
dimmer 1.
Adjust low cal potentiometer 3 until the lamp connected to
dimmer 9 glows at the same intensity as the lamps connectd to
dimmers 1 and 5. Reset the preheat control for the desired
preheat level.
The dimmer is now properly calibrated.
ThreePhase
Phase A
Phase A
Phase A
Phase A
Phase B
Phase B
Phase B
Phase B
Phase C
Phase C
Phase C
Phase C
Single
Phase
Line 1
Line 1
Line 1
Line 1
Line 1
Line 1
Line 2
Line 2
Line 2
Line 2
Line 2
Line 2
TABLE 5B
Dimmer Phasing
(6-dimmer models)
8
Dimmer
Number
13
14
15
16
17
18
19
20
21
22
23
24
ThreePhase
Phase A
Phase A
Phase A
Phase A
Phase B
Phase B
Phase B
Phase B
Phase C
Phase C
Phase C
Phase C
Single
Phase
Line 1
Line 1
Line 1
Line 1
Line 1
Line 1
Line 2
Line 2
Line 2
Line 2
Line 2
Line 2
Dimmer
Number
1
2
3
4
5
6
Three
Phase
Phase A
Phase A
Phase B
Phase B
Phase C
Phase C
Single
Phase
Line 1
Line 1
Line 1
Line 2
Line 2
Line 2
SCRimmer IITM
Solid-State Relay Replacement
Determine which plug-in dimmer needs repairing and remove
it from the dimmer pack. The solid-state relays are mounted on
the heatsink. Quad dimmer modules have two solid state relays.
Dimmers 1 and 2 are controlled by the relay with the white-withbrown stripe wire connected to it. Dimmers 3 and 4 are controlled
by the relay with the white-with-orange stripe wire connected to
it.
Do not install a plug-in dimmer module with the cover
removed.
1. Note the arrangement of the power connections (large
wires) on the defective solid-state relay, then unplug the
connections.
2. Note the orientation of the control connector, then unplug the connector.
3. Remove the relay by removing the two screws which
secure it to the heatsink.
4. Apply a thin coating of heatsink compound to the bottom
of the new solid-state relay and replace by following
steps 1 - 3 in reverse order.
5. Replace the cover before reinstalling the dimmer module
into the dimmer pack.
Troubleshooting Guide
Symptom
Possible Cause
Remedy
Nothing works, green indicators
1, 2, and 3 are dark.
Control power switch is off.
Input power source is off.
Turn on control power switch.
Check input power source.
Nothing works, green indicator
1 is dark, 2 and 3 are on.
Phase A (Line 1) fuse blown.
Phase A (Line 1) power source off.
Replace fuse.
Check input power source.
Dimmers 5, 6, 7 & 8 don't dim
correctly, or snap on instead
of dimming.
Phase B fuse blown.
Phase B power source off.
Single-phase dimmer pack wired to
three-phase power.
Replace fuse.
Check input power source.
Connect dimmer to single-phase power source.
Green indicator 2 is off.
Three-phase dimmer pack wired to
single-phase power.
Connect dimmer to three-phase power source.
Dimmers 9, 10, 11 or 12 don't dim
Phase C (Line 2) fuse blown.
correctly, or snap on instead of dimming.
Replace fuse.
Green indicator 3 is off.
Phase C (Line 2) power source off.
Check input power source.
A dimmer channel is always on and
the corresponding output status
indicator is on.
Dimmer channel in test mode.
Defective solid-state relay.
Depress the corresponding button to clear the
test.
Replace the solid-state relay.
A dimmer channel is always on and
the corresponding output status
indicator is off.
Defective solid-state relay.
Replace the solid-state relay.
A dimmer channel is always off and
the corresponding output status
indicator is off.
The dimmer module is not
plugged in all the way.
The solid-state relay control
connector is loose, unplugged, or
plugged in backwards.
Defective solid-state relay.
Make sure dimmer is firmly plugged in.
Defective lamp fixture plugged into
dimmer.
Dimmer circuit breaker is off.
Dimmer circuit breaker is tripped.
Check the load with a known good fixture.
A dimmer channel is always off, but
the corresponding output status
indicator operates properly.
All of the lamps "ghost" (glow).
Check control wiring connector to solid state
relays.
Replace the solid-state relay.
Defective solid-state relay.
Turn on the circuit breaker.
Reset the circuit breaker by turning off and then
on.
Replace the solid-state relay.
Lamp preheat set too high.
Dimmer out of calibration.
Rotate the preheat control counter-clockwise.
Re-calibrate the dimmer.
(cont'd)
9
SCRimmer IITM
Troubleshooting Guide (cont'd)
Symptom
Possible Cause
Remedy
Lamps plugged into dimmers 1 - 4,
or 5 - 8, or 9 - 12 ghost.
The corresponding phase low end
calibration is out of adjustment.
Re-calibrate the dimmer.
The multiplex signal indicator
flashes, lamps flicker, or dimmers
refuse to respond to multiplex signal.
Dimmer address set to 00.
Set the dimmer pack address to a valid number.
Bad multiplex cable.
Multiplex format set to wrong setting.
Check the dimmer pack with a known good cable.
Set the format switch to the proper format.
Dimmer address set to test modes
(50-70).
Bad multiplex cable.
Multiplex format set to wrong format.
Set the dimmer pack address to a valid number.
Lamps flash, flicker, or sequence.
Check the dimmer pack with a known good cable.
Set the format switch to the proper setting.
The overtemp lamp is always on or
comes on when a dimmer channel
is brought up.
The dimmer module is not plugged in
all the way.
Make sure dimmer is firmly plugged in.
The dimmer pack overheats.
The cooling vents are blocked.
The dimmer pack is full of dust.
Clear any obstructions to the cooling vents.
Carefully remove dust and dirt with compressed
air or a vacuum cleaner.
Relocate the dimmer to a cooler location.
The dimmer is in a very warm
location.
Lamps go out before the
console sliders reach zero.
Lamps are on full before
console sliders reach full.
Input power error light on.
The analog control console is not
set for 0 - +10V output.
The low-end calibration is out of
adjustment.
Check the output from the console.
The analog control console is not
set for 0 - +10V output.
The high-end calibration is out of
adjustment.
Check the output from the console.
Faulty or incorrect input power
wiring.
Do not touch the dimmer pack or anything
connected to it.
Check for voltage between the ground and neutral
conductor.
Disconnect the power source and check all input
power wiring.
Re-calibrate the dimmer.
Re-calibrate the dimmer.
Maintenance
Service
Disconnect Power First!
About once a year (or more frequently, if the Power Pack is
used often), remove the modules and inspect the connector pins.
Clean them with No. 400 or finer sandpaper and carefully spread
the pins SLIGHTLY with a screwdriver.
Disconnect power from the rack before cleaning pins in the
housing. If the modules become clogged with air-born dirt, they
should be vacuumed. This will increase cooling efficiency and
prolong component life.
EDI offers a 24 hour Service / Support Network.
For technical questions about this product or operational
assistance, ask for Customer Service at: . . . . 1-800-547-2690
You may communicate by FAX: . . . . . . . . . . . 1-503-629-9877
After Hours Emergency contact: . . . . . . . . . . . 1-503-645-5533
Ask for Emergency Assistance.
Internet: . . . . . . . . . . . . . . . . . . . . . . . . . . . . www.edionline.com
Internet E-Mail: . . . . . . . . . . . . . . . . . . . [email protected]
If your SCRimmer Power Pack needs repair, call 503-645-5533
for a Return Materials Authorization number, and a shippping
address will be furnished
10
SCRimmer IITM
Attention SCRimmer II owners!
Please return this registration card immediately.
Your prompt attention to this matter will ensure your receiving updated technical information
for this product as it becomes available. Please complete all information. Look for acknowledgment of your registration within 6-8 weeks.
Name: _______________________________________________________
Title: ________________________________________________________
Facility and/or Company: ________________________________________
_____________________________________________________________
Street Address: _______________________________________________
_____________________________________________________________
City: ____________________________ State: ______ Zip: __________
Phone: ______________________________________________________
Fax: _________________________________________________________
E-mail: ______________________________________________________
CUT ALONG DOTTED LINE
Web site: ____________________________________________________
!
Mail to:
EDI User Manual Registration
1675 NW Cornelius Pass Road
Hillsboro, Oregon 97124
or FAX to: (503) 629-9877
Revision 2, May 1998
11