1
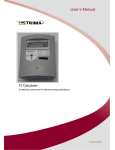
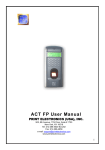
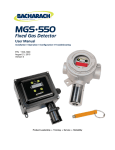
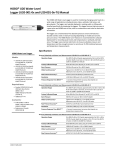
Precision Measurement Engineering, Inc. • www.pme.com
User’s Manual
2015
Precision Measurement Engineering, Inc.
(760) 727-0300
www.pme.com
1
Warranty
1-YEAR LIMITED WARRANTY ON CsenseCO2 HARDWARE
Precision Measurement Engineering, Inc. (PME) warrant that the CsenseCO2 Logger
shall be free of defects in workmanship and materials, under normal use, for a period
of one year from the date of shipment. This warranty is made only to the original
purchaser. In the event a CsenseCO2 Logger covered by this warranty fails to
operate according to our published specifications, then return it freight pre-paid to
PME or an authorized Service Provider. PME will repair the unit at no charge to the
customer and bear the cost of return shipment. Carefully pack all components, as the
customer is responsible for any freight damage.
This warranty does not apply to services or consumable / expendable items (such as
batteries, fuses and ropes) required for general maintenance. Equipment
manufactured by other companies (such as meteorology sensors, solar panels, etc)
are warranted only to the limit of the warranties provided by their original
manufacturer.
PME makes no warranty, either expressed or implied, that the sensors will be
operable after they are exposed to adverse environmental conditions, such as biofouling, oil fouling, freezing temperatures or others.
This warranty is void if, in our opinion, the CsenseCO2 Logger has been damaged by
accident, mishandled, altered, or repaired by the customer, where such treatment has
affected its performance or reliability. In the event of such treatment by the customer,
costs for repairs plus two-way freight costs (no COD shipments will be accepted) will
be borne by the customer. In such cases, an estimate will be submitted for approval
before repair work is started. Items found to be defective should be returned to PME
carefully packed, as the customer will be responsible for freight damage.
Incidental or consequential damages or costs incurred as a result of the product
malfunction are not the responsibility of PME.
For all warranty or non-warranty returns please obtain, complete, and submit a RMA
to PME. This RMA form may be obtained at
http://www.pme.com/HTML%20Docs/RMAform.html.
After submission of this form, then PME will respond with a RMA number. Please
place this number on all shipments and related communications.
Precision Measurement Engineering, Inc.
(760) 727-0300
www.pme.com
2
Safety Information
BURSTING HAZARD
Should water enter the CsenseCO2 Logger and come into contact with the enclosed
batteries, the batteries may generate gas causing the internal pressure to increase.
This gas will likely exit via the same location where the water entered, but not
necessarily.
Revision History
Date
2014JUL14
2014DEC11
2015FEB17
2015FEB24
2015APR01
Revision Description
Initial Document, revised from 3200
Revised for new rechargeable battery housing – polished up.
Included Sample Interval
Changed software names and screen shots
Changed file record interval from hourly to daily
Precision Measurement Engineering, Inc.
(760) 727-0300
www.pme.com
3
CONTENTS
Chapter 1 Quick Start
1.1 The Quickest Start Possible
1.2 A Few Details
Chapter 2 Software
2.1
2.2
2.3
2.4
Overview and Software Installation
CsenseCO2Control
CsenseCO2Plot
CsenseCO2Concatenate
Chapter 3 CsenseCO2 Logger
3.1 Overview
3.2 Recharging the Battery
3.2 Battery Replacement
Precision Measurement Engineering, Inc.
(760) 727-0300
www.pme.com
4
Chapter 1: Quick Start
1.1 The Quickest Start Possible
Your CsenseCO2 Logger has arrived ready to go. It is set to measure and record
time, battery voltage, temperature, and CO2 sensor output once every 10 minutes
and write 1 file of measurements daily. You need only to plug on the sensor cable
and sensor and the CsenseCO2 Logger will start recording files. In this condition the
CsenseCO2 Logger will record measurements for 1400 samples at 10 intervals
before the internal rechargeable battery is drained.
At the end of the deployment period you need only to disconnect the sensor cable
and connect it to a host device via the USB plug. The CsenseCO2 Logger will
appear as a ‘thumb drive’. Your temperature, battery voltage, and CO2 concentration
measurements, together with a time stamp indicating the time the measurement was
made, are recorded in text files in the folder having the serial number of your
CsenseCO2 Logger. These files can be copied onto any Windows or Mac host
computer.
This Manual and other software is also recorded on the CsenseCO2Logger “thumb
drive”.
•
•
•
CsenseCO2Control allows you to see the state of the logger as well as set the
recording interval.
CsenseCO2Plot allows you to see plots of the recorded measurements.
CsenseCO2Concatenate gathers all the daily files into one CAT.txt file.
Follow these steps to start the deployment, logging CO2 & T once each 10
minutes:
Precision Measurement Engineering, Inc.
(760) 727-0300
www.pme.com
5
1) Connect the sensor cable onto the C-sense CO2 sensor. Secure the locking
sleeve. Remove the black cap on the end of the sensor before deployment.
Do NOT touch the sensor face.
2) Connect the sensor and sensor cable onto the CsenseCO2 Logger and secure
the locking sleeve. This will start the recording of CO2 measurements. (Note that
the cable connection to the CsenseCO2 Logger controls logging. Logging will
occur if the cable is connected to the CsenseCO2 Logger even if there is no
sensor connected to the other end of the cable.)
Follow these steps to end the deployment
1) Disconnect the cable from the CsenseCO2 Logger. This will halt measurements.
2) Connect the USB cable to the CsenseCO2 Logger.
3) Connect the USB end of this cable to a Windows or Mac host computer.
CsenseCO2 will appear as a ‘thumb drive’.
4) Copy the folder having the same serial number as the CsenseCO2 Logger
(example 3200-0001) to the host computer.
5) (Suggested, but optional) Delete measurement folder, but NOT
CsenseCO2Control or the other .jar programs.
6) (Optionally) Run the CsenseCO2Control program to see the state of the
CsenseCO2 Logger such as battery voltage or to select a different recording
interval.
7) (Optionally) Run the CsenseCO2PLOT program to see a plot of measurements.
8) (Optionally) Run the CsenseCO2Concatenate program to gather together all the
daily files of measurements into one CAT.txt file.
9) Recording is halted when no cable to sensor is connected. If no more recording
is desired, simply disconnect the USB cable.
10) (Optionally) Recharge the battery.
Sample Interval Minutes
Days of Sampling
Number of Samples
1 minute
7
10,000
10 minutes
20
3,000
Precision Measurement Engineering, Inc.
(760) 727-0300
www.pme.com
6
60 minutes
120
3,000
1.2 A Few Details
The previous section gives instructions for sampling at 10-minute intervals. However
there are a few additional details that will enhance use of the CsenseCO2 Logger.
Recording Interval – The CsenseCO2 Logger measures and records time, battery
voltage, temperature, and dissolved CO2 concentration at equal time intervals. The
default time interval is 10 minutes. However, it is also possible to instruct the
CsenseCO2 Logger to record at different intervals. This is accomplished by running
the CsenseCO2Control.jar program supplied with the CsenseCO2. Recording
intervals must be 1 or more minutes and must be less than or equal to 60 minutes.
Intervals outside this range will be rejected by CsenseCO2Control. (Contact PME for
other recording intervals.)
Please refer to Chapter 2 for instructions on operating the CsenseCO2Control
program.
Time – All CsenseCO2 times are UTC (formerly known as Greenwich mean time
(GMT)). CsenseCO2 measurement files are named by the time of the first
measurement within the file. Each measurement within files has a time stamp. Both
these times are UTC. The time stamp format is Unix Epoch 1970, the number of
seconds that have passed since the first moment of 1970. This is inconvenient. The
CsenseCO2Concatenate software not only concatenates measurement files but also
adds more readable statements of the time stamp.
The CsenseCO2 Logger internal clock will drift in the <10 ppm range (< about 30
seconds/month) so you should plan to connect it occasionally to a host having an
internet connection. The CsenseCO2Control program will automatically set time
based on an internet time server.
Please refer to Chapter 2 for instructions on operating the CsenseCO2Concatenate
and CsenseCO2Control program.
File Information – The CsenseCO2 Logger software creates 1 file daily. The
number of measurements in each file will depend upon the sample interval. Files are
named by the time of the first measurement within the file based on the logger’s
internal clock and expressed in YYYMMDD HHMMSS.txt format.
Rechargeable Battery Life – The CsenseCO2 Logger consumes battery power
mostly from the measurement of dissolved CO2, but also slightly from simply keeping
track of time, writing files, sleeping, and other activities. The following table presents
the approximate endurance of the CsenseCO2 Logger:
Precision Measurement Engineering, Inc.
(760) 727-0300
www.pme.com
7
SAMPLE INTERVAL
(minutes)
1
Main Battery Life
(hours)
160
Number of
Samples
10,000
The numbers in the table above are at the time of this writing only estimated based
on published battery capacity. Actual life will depend upon deployment temperature,
battery wear, and other conditions.
Coin Cell Battery Life – The CsenseCO2 Logger uses a coin cell for backup of the
clock when the power is switched off. This coin cell will supply many years of clock
operation. Should the coin cell discharge it must be replaced. Contact PME.
Chapter 2: Software
2.1 Overview and Software Installation
The CsenseCO2 arrives with these files:
•
•
•
•
CsenseCO2Control allows you to see the state of the logger as well as set the
recording interval.
CsenseCO2Plot allows you to see plots of the recorded measurements.
CsenseCO2Concatenate gathers all the daily files into one CAT.txt file.
Manual yyyymmdd.doc this manual.
These files are located on the root directory of the CsenseCO2 ‘thumb drive’ within
the logger.
PME suggests you leave these programs where they are on the CsenseCO2, but you
may copy them to any folder on your computer’s hard drive.
CsenseCO2Control, CsenseCO2Plot, and CsenseCO2Concatenate are Java
language programs that require the host computer to have the Java Runtime Engine
V1.7 (JRE) or later installed. This engine is commonly required for internet
applications and will likely already be installed on the host computer. You can test
this by running CsenseCO2Plot. If this program displays its graphical user interface
then the JRE is installed. If not then the JRE can be downloaded via internet from
http://www.java.com/en/download/windows_xpi.jsp
At this time CsenseCO2 Logger is supported on Windows operating systems, but
may also operate on Macintosh and perhaps Linux.
2.2 CsenseCO2Control
Begin program operation by clicking on CsenseCO2Control.jar. Software presents
the screen shown below:
Precision Measurement Engineering, Inc.
(760) 727-0300
www.pme.com
8
The CsenseCO2 must be connected to USB at this time.
Click the Connect button. The software will contact the logger. If the connection is
successful the button will turn green and display “Connected”. The Serial Number
and other parameters will be filled in from information taken from the CsenseCO2.
If the host computer is connected to the internet, the current difference between an
internet time server’s time and the CsenseCO2 Logger internal clock will be
displayed. And, if more than a week has passed since time was last set, the
CsenseCO2 clock will be set and check mark icon will appear. If the host computer is
not connected to the internet no time services will occur.
The current CsenseCO2 Logger sample interval will be displayed next to the Set
Sample Interval button. If this interval is acceptable the interval need not be set.
To set the interval, enter an interval not less than 1 minute and not greater than 60
minutes. Click the Set Sample Interval button. Shorter and faster intervals are
available. Contact PME.
End CsenseCO2Control by closing the window. Unplug CsenseCO2 USB
connection.
Precision Measurement Engineering, Inc.
(760) 727-0300
www.pme.com
9
Upon disconnection of the USB cable the CsenseCO2 will begin logging when the
cable to the sensor is connected. The logger will halt logging when this cable is
disconnected.
2.3 CsenseCO2Plot
Begin program operation by clicking on CsenseCO2Plot.jar. Software presents the
screen shown below.
CsenseCO2Plot plots the files recorded by the CsenseCO2 Logger. The software
reads all CsenseCO2 files in a folder, except the CAT.txt file. The software will also
compute CO2 saturation from the voltage measured of the sensor. To do this
software must be given the sensor calibration. The sensor manufacturer supplies the
sensor calibration. If the Use Sensor Calibration is checked the plot will display
calibrated values. If not checked the plot will display sensor output in Volts.
Select the folder that contains the files recorded by CsenseCO2. If CsenseCO2Plot
is run directly from the CsenseCO2 the program will suggest the folder located on the
CsenseCO2. You may accept this by clicking on Process, or you may click on Select
Data Folder to browse to your computer’s hard drive. If the number of measurements
recorded is small, say a few thousand, these can conveniently be plotted directly from
CsenseCO2 storage. However it is best to copy large measurement sets to the host
computer and select them there since file access to on the CsenseCO2 Logger is
slow.
CsenseCO2 measurement folders must NOT contain any files besides those
CsenseCO2 records and the CAT.txt file.
Precision Measurement Engineering, Inc.
(760) 727-0300
www.pme.com
10
Press Plot to begin plotting.
The software reads all CsenseCO2 Logger data files in the selected folder. It
concatenates these and presents the plot shown below
You may zoom this plot by drawing a square from upper left to lower right (click and
hold left mouse button) that defines the zoom region. To zoom completely out,
attempt to draw a square from lower right to upper left. Right click on the plot for
options such as copy and print. The plot can be scrolled with the mouse while the
Control key is held depressed. Copies of the plot can be obtained by right clicking on
the plot and selecting Copy from the pop-up menu.
Different DATA Folders can be selected during one session of the program. In this
case the software produces multiple plots. Unfortunately the plots are presented
exactly on top of each other and so when a new plot appears it is not obvious that the
old plot is still there. It is. Just move the new plot to see it.
The software can be re-run at any time.
End CsenseCO2Plot by closing the window.
2.4 CsenseCO2Concatenate
Precision Measurement Engineering, Inc.
(760) 727-0300
www.pme.com
11
Begin program operation by clicking on CsenseCO2Concatenate.jar. Software
presents the screen shown below.
CsenseCO2Concatenate reads and concatenates the files recorded by the
CsenseCO2 Logger. Software produces CAT.txt in the same folder as selected for
the data. CAT.txt contains all the original measurements and contains two additional
statements of time. If the Use Sensor Calibration is checked the CAT file will contain
an additional column of CO2.
Select the folder that contains the files recorded by CsenseCO2. If CsenseCO2Plot
is run directly from the CsenseCO2 the program will suggest the folder located on the
CsenseCO2. You may accept this by clicking on Process, or you may click on Select
Data Folder to browse to your computer’s hard drive. If the number of measurements
recorded is small, say a few thousand, these can conveniently be plotted directly from
CsenseCO2 storage. However it is best to copy large measurement sets to the host
computer and select them there since file access to files on the CsenseCO2 logger is
slow.
CsenseCO2 measurement folders must NOT contain any files besides those
CsenseCO2 records and the CAT.txt file.
Press Concatenate to begin concatenating files and create the CAT.txt file.
The CAT.txt file will resemble the following:
Precision Measurement Engineering, Inc.
(760) 727-0300
www.pme.com
12
End CsenseCO2Concatenate by closing the window.
Precision Measurement Engineering, Inc.
(760) 727-0300
www.pme.com
13
Chapter 3: CsenseCO2 Logger
3.1 Overview
All of the CsenseCO2 Logger measurements pass from the sensors into files on the
SD card CsenseCO2 contains. Files are transferred to a host computer via USB
connection where CsenseCO2 appears as a “thumb drive”. Measurements may be
plotted by CsenseCO2Plot and files concatenated by CsenseCO2Concatenate. The
CsenseCO2 Logger itself is controlled by CsenseCO2Control software. Logging
begins when the sensor cable is connected to the logger and ends when this cable is
disconnected.
3.2 Recharging The Battery
Connect the battery charger. The charger will require power from a power supply.
The charger has a LED light indicating the status of the charging.
The following table with shows the LED light indications:
LED Indication
Off
Precision Measurement Engineering, Inc.
(760) 727-0300
www.pme.com
Status
No battery detected
14
Power-up
Green flashing
Green Solid
Yellow Solid
Red/Green flashing
Red flashing
Red-Yellow-Green off
Fast Charging
Fully Charged
Out of temperature range
Shorted terminals
Error
3.3 Battery Replacement
Please do not open the logger. This will void PME’s warranty. Please contact PME
for battery replacement.
End of Manual.
Precision Measurement Engineering, Inc.
(760) 727-0300
www.pme.com
15