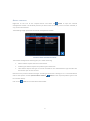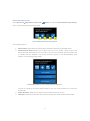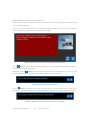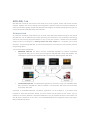
1
iDaq User Manual October 2015 Edition Rev 08 © TOOLS for SMART MINDS 2 iDaq - User Manual Worldwide technical support and product information: www.toolsforsmartminds.com TOOLS for SMART MINDS Corporate headquarter Via Padania, 16 Castel Mella 25030 Brescia (Italy) Copyright © 2012-2013-2014 TOOLS for SMART MINDS. All rights reserved. 3 © TOOLS for SMART MINDS 4 iDaq - User Manual 5 C ONTENTS ABOUT THIS MANUAL 10 CONVENTIONS 10 PREFACE 12 ABOUT THIS MANUAL 12 REQUIREMENTS 13 MINIMUM HARDWARE REQUIREMENTS 13 MINIMUM SOFTWARE REQUIREMENTS 13 INSTALLATION 14 GETTING STARTED WITH IDAQ 15 RUNNING IDAQ 16 IDAQ MAIN WINDOW 16 DEVICES TAB 17 INTRODUCTION 17 Components 17 USER INTERFACE 19 Device consoles 21 CONFIGURING ACQUISITION DEVICES 22 Adding Devices 22 Installing Drivers 23 Editing Devices 23 Tools 26 Checking Device Status at start-up 28 SNAPSHOTS 29 Creating snapshots 29 Re-loading snapshots 30 ADD-ONS TAB 31 INTRODUCTION © TOOLS for SMART MINDS 31 6 iDaq - User Manual USER INTERFACE 32 INSTALLING ADD-ONS 33 ONLINE RESEARCH 34 PROJECTS TAB 36 INTRODUCTION 36 USER INTERFACE 37 CREATING NEW PROJECTS 38 Editing projects 39 Saving current projects 39 Read-only projects 40 OPTIONS TAB 41 USER INTERFACE 41 PROJECT OPTIONS 42 ADD-ON OPTIONS 43 DEVICE OPTIONS 44 GENERAL OPTIONS 45 NETWORK OPTIONS 46 Network settings 47 Network communication: a practical example 49 Factory settings 51 PROTECTION 52 Locking iDaq 52 HELP TAB 53 USER INTERFACE 53 ASSISTANT 54 LOG WINDOW 54 ACTIVATION 55 ADVANCED DEVICE FEATURES 57 7 VIRTUAL CHANNEL CALCULATOR CAPABILITY 57 WAVEFORM PROCESSING UNIT 58 APPENDIX A: CONVENTIONAL SYMBOLS LEGEND 60 TABS BUTTONS 60 COMMON BUTTONS 60 SPECIFIC BUTTONS 61 FIGURE INDEX 62 INDEX © TOOLS for SMART MINDS 65 8 iDaq - User Manual 9 A BOUT THIS M ANUAL C ONVENTIONS The following conventions appear in this manual: Thesymbol leads you through nested menu items and dialog box options to a final action. The sequence Tools Options directs you to pull down the Tools menu, select Options item. Bold Bold text denotes items that you must select or click on the software, such as menu items and dialog box options. Bold text also denotes parameter names. italic Italic text denotes variables, emphasis, a cross reference, or an introduction to a key concept. This font also denotes text that is a placeholder for a word or value that you must supply. monospace Text in this font denotes text or characters that you should enter from the keyboard, sections of code, programming examples, and syntax examples. This font is also used for the proper names of disk drives, paths, directories, programs, subprograms, subroutines, device names, functions, operations, variables, filenames and extensions, and code excerpts. monospace italic Italic text in this font denotes text that is a placeholder for a word or value that you must supply. © TOOLS for SMART MINDS 10 iDaq - User Manual 11 P REFACE iDaq is a general purpose data logger capable to acquire, store and analyze data coming from National Instrument-based test benches and lab tests, cameras and smartphones. Handling multiple data sources simultaneously and executing multi-tasking performances contribute to make data acquisition experiences more and more easy and efficient. iDaq is the perfect data logger for non-technical users who want to visualize and store data avoiding hardware configuration details. No special skills are required because iDaq is the easiest solution to view signals and save data in a few clicks. iDaq recognizes acquisition hardware and automatically configures it to exploit its full potential. Moreover, iDaq has an intuitive interface to help users in every step and it simplifies the management of all the connected sensors and devices. On a last note, a high-level system of data processing features completes the logger, as it allows to perform multiple operations at the same time. A BOUT THIS MANUAL This manual has been prepared to help you to remove any doubt about iDaq usage. Use it to familiarize yourself with iDaq: it contains a lot of examples to teach you step by step all about its features and applications. Throughout each example, you will find illustrations giving details about the concepts explained in that step. This manual is divided in two parts: INSTALLING IDAQ: This section describes the minimum requirements for installing and using iDaq. The user has to know how to install and configure National Instruments acquisition devices in order to succeed in using this section. RUNNING IDAQ: This section describes user interfaces, features, functions and application cases. An exhaustive chapter is dedicated to every part of iDaq, followed by a few examples concerning how to use iDaq. A basic knowledge of electrical signal theory is recommended for a correct use of iDaq. © TOOLS for SMART MINDS 12 iDaq - User Manual R EQUIREMENTS This section contains the list of requirements that users should have before using and installing iDaq. M INIMUM HARDWARE REQU IREMENTS Ensure that your computer fulfill the following hardware requirements: Dual core CPU (quad core CPU is suggested) 2 GB RAM (4 GB is strongly recommended) Display resolution 1024x768 or higher 250 MB free space on disk required by iDaq About 800 MB free space on disk required by National Instruments DAQ-mx drivers Mouse or other pointing device M INIMUM SOFTWARE REQU IREMENTS Ensure that your computer fulfill the following software requirements: OS: Windows 7 or higher. National Instruments DAQ-mx drivers rel 9.3.x or higher. You can download a free copy of the proper device driver for your acquisition device at www.ni.com. 13 I NSTALLATION This section guides you step-by-step through the installation process and introduces you to the first use of iDaq. Before installing iDaq you have to install and configure the National Instruments acquisition device. Check your acquisition device with the National instruments software Measurement & Automation you can find in the NI drivers CD-ROM. After having done it, you can start the guided installation. IDaq is distributed as a ZIP file. Extract iDaq files into a temporary folder and run installation wizard setup.exe. F IGURE 1 - I NSTALLING I D AQ After having clicked it, this window will appear: F IGURE 2 - I D AQ INSTALLATION WIZARD WINDOW Follow the guided procedure till the end of the installation. © TOOLS for SMART MINDS 14 iDaq - User Manual G ETTING STARTED WITH I D AQ iDaq has been designed in order to allow an easy implementation and a good manageability of any of its parts. In order to get the maximum of flexibility and to make it as dynamic and customizable as possible, iDaq is based on a module-based architecture structured on mainly three levels. The following image is a schematic representation of iDaq working principle. ADD-ONs iDaq COMPONENTS DAQ MX SYNC CDAQ MODULES BMP-JPGPNG SIMULATED STATIC SIGNAL CAMERA LITE TDMS FILE TEXT FILE SMARTPHONE F IGURE 3 I D AQ GENERAL WORKING The elements marked as number 1 and 2 in the diagram are two different kinds of modules: 1. ADD-ONs are installable functional utilities that work on the received signals and they allow you to monitor, save and process acquired signals in many different ways. They are conceived to make iDaq able to combine independent, interchangeable tools at any time. T4SM provides you with a wide set of ready-to-use ADD-ONs, but you could also implement your own ADD-ONs using iDaq-DT and then installing them on iDaq: for more information look at the ADD-ONs tab chapter ahead in this manual. 2. COMPONENTS are installable modules that interact directly with your physical measuring devices and allow you to extend the potential of iDaq to acquire, generate and process signals. You can configure iDaq in order to connect it with a great number of devices. For more information, look at the Components chapter ahead in this manual. 15 R UNNING I D AQ To run iDaq click on the icon created on desktop or from Windows Start menu: StartAll programsTOOLS for SMART MINDSiDaq 2015iDaq. At the first time iDaq may take a little longer time to open its main window: that’s because at its first execution iDaq installs default Components and ADD-ONs and it creates default folders to store recorded data, log files and ADD-ON data. I D AQ MAIN WINDOW The iDaq main window is provided with six tabs: Projects tab: It allows the management of all the aspects concerning projects, i.e. the set of running ADD-ONs saved during a data acquisition session. The project tab includes the following functions: name of the current project, create, open, save and edit functions, in addition to a set of settings. Check the Projects tab chapter for more information. ADD-ON tab: It allows you to run one of the ADD-ONs installed on your computer. Moreover, this tab contains the following functions: install, settings and browse for new ADD-ONs. Check the ADD-ONs tab chapter for more information. Devices tab: It includes the list of connected devices and a set of configuration utilities. According to their status, devices tab can change in the following ways: o Green light: All of the devices were configured correctly. o Yellow light: The list of active devices is empty. o Red light: An error occurred during the device configuration. Check the Devices tab chapter for more information. Options tab: It gathers settings regarding different parts of iDaq such as projects, ADD-ONs, devices, network and general options, in addition to a specific tools to lock iDaq. Check the Options tab chapter for more information. Help tab: It provides you with a set of complementary, helpful information to be used during a working session. Check the Help Tab chapter for a complete explanation of the functions gathered under this tab. Close tab: It closes iDaq. © TOOLS for SMART MINDS 16 iDaq - User Manual D EVICES TAB Devices tab includes several functions regarding hardware configuration, data acquisition settings and many more configuration details which are fundamental to get the best out of iDaq. I NTRODUCTION As previously introduced, iDaq handles hardware by using the Components, i.e. a special set of items created to acquire data from different data sources and process them in different ways. Components extends the number of device types supported by iDaq. Before getting started with Devices tab interface, the following subchapter will give you a quick theoretical knowledge about these elements. C OM P ON E N TS COMPONENTS are modules that deal directly with signals and hardware: they are thought to increase the number of possible devices with which iDaq can interface. Their primary purpose is to extend the capacity of acquiring, generating and elaborating signals of iDaq according to your needs. Moreover, the module-based architecture of iDaq allows a continue renewal of its potentialities, so that enables it to be always up-to-date and makes it very suitable to single customers’ requests. There are four different categories of components: 1. P R O D U C T T Y P E S ( D E V I C E S ) are the drivers that enable data acquisition from several different data sources and allows you to connect a wide set of devices. PRODUCT TYPES INSTALLED IN IDAQ LITE 2015: DAQ-MX: It is used to connect NI devices such as multifunction boards (E, M, S, X Series) and a wide range of modules for CompactDAQ. For more info on usage and configuration, refer to the DAQ-mx User Guide (available on the internet or offline in Devices Tab buttonclick on button button). SYNC CDAQ MODULES: It is used to aggregate more CompactDAQ modules into a single device and therefore use them simultaneously. Moreover, Sync cDAQ Modules takes care that the signals of the different modules share the same Source Clock, so that they work in complete synchrony. For more info on usage and configuration, refer to the SyncCDAQMod User Guide (available online or offline in Devices Tab buttonclick on button button) or to the handy tutorial available at the following link: http://idaq-datalogger.com/_tutorialFiles/Sync%20CDAQ%20Modules%20-%20Tutorial.pdf SIMULATED STATIC SIGNALS: It is used to simulate virtual devices provided with analog channels and digital lines, each of them easily settable from a dedicated console. For more info on usage and configuration, refer to the dedicated manual Simulated Static Signals User Guide (available online or offline in Devices Tab buttonclick on 17 button button). TDMS FILE: It is used to create virtual devices for loop-mode reproduction of signals saved in TDMS files. The functions of playing, pausing and restarting are then performed by means of a simple dedicated console. For more info on usage and configuration, refer to the dedicated manual TDMS iDaq Component User guide (available online or offline in Devices Tab buttonclick on button BMP-JPG-PNG: It is used to create a virtual image player that allows the loop-mode reproduction of image files. Functions of play, pause and restart image reproduction are then performed by means of a simple dedicated console. For more info on usage and configuration, refer to the dedicated manual BMP-JPG-PNG User guide (available online or offline in Devices Tab button). buttonclick on button CAMERA LITE: It is used to acquire images from direct show cameras and then save them as .jpg files. For more info on usage and configuration, refer to the dedicated manual CameraLite User guide (available online or offline in Devices Tab button). buttonclick on button SMARTPHONE: It is used to connect iDaq to a smartphone and, in this way, to acquire analog signals, images and digital signals directly on your mobile phone. For more info on usage and configuration, refer to the dedicated manual Smartphone User guide (available online or offline in Devices Tab button). buttonclick on button button). TEXT FILE: It is used as a File Text player and it allows the loop-mode reproduction of DSV files messages. For more info on usage and configuration, refer to the dedicated manual Text file User guide (available online or offline in Devices Tab button). buttonclick on button 2. C A P A B I L I T I E S are components dedicated to perform particular functions such as acquisition, generation and computation of different types of signals. 3. C H A N N E L S are components focused on the analysis of single types of signals and enable you to take advantage of many different types of signal calibration. 4. W A V E F O R M P R O C E S S I N G U N I T S are components dedicated to the elaboration of data extracted from signals. WPU ALREADY INSTALLED IN IDAQ LITE 2015: Direct (no processing); Absolute; RMS; Polynomial; Negate; Filter; Probe; Average; Derivative. More info on WPU are in Waveform processing unit chapter and in the respective manuals. © TOOLS for SMART MINDS 18 iDaq - User Manual U SER I NTERFACE This introductive subchapter gives you a rapid overview of the Devices tab interface and its main functions. Select iDaq main windowDevices tab to open the Devices tab window, which is represented by the next image. Use the numeral tags to refer to the description of the elements following it. F IGURE 4 D EVICES T AB WINDOW 19 Devices tab window includes: 1. Active Devices list: iDaq is able to handle many devices connected at the same time and guarantees simultaneous data acquisitions from up to a maximum of eight data sources. Each item of the list is marked by an icon and a respective status detector. Its purpose is showing the status of every device by means of a colored signal, according to the following pattern: Red light: An error occurred during the processes of device configuration or data acquisition. In this case, click on the detector to read the error description. Green light: Device configured correctly. Moreover, clicking on a device icon opens the Device Editor. This includes a series of device configuration settings in addition to a set of information like device name, model, description and online research capabilities (a more accurate description is supplied by Editing Devices chapter). 2. 3. 4. 5. 6. 7. ADD button: Allows you to add a new device to the Active devices list. You can find further details about this procedure in the Adding Devices chapter. Create Backup button: Allows you to save the configurations you’ve defined, in case you want to restore them later. You can find further details about this procedure in the Snapshots chapter. Load Backup button: Allows you to restore past configurations saved as snapshots. You can find further details about this procedure in the Snapshots chapter. Device Drivers Installation button: Is a useful facility to install the drivers needed for a proper integration of new devices. You can find further details about this procedure in the Installing Drivers chapter. Options button: Includes the list of installed components. You can find further details about it in the Options tab chapter. Consoles button: According to the device in use, iDaq provides you with different consoles. Check them out in the specific manuals of the product type you are using. Otherwise, you can find a general explanation of the main procedure in the Device Consoles subchapter ahead of this chapter. Once you are acquainted with Device tab interface, go ahead to the following sections to get introduced with the procedures to configure and set your devices. © TOOLS for SMART MINDS 20 iDaq - User Manual D E V IC E C ON S O LE S Right-click on the icon of the required device and select the button to open the Console management window. This window provides you with a table containing a list of consoles available, if any, for the active devices. The following image represents the Console management window. F IGURE 5 C ONSOLE MANAGEMENT WINDOW The Console managements window gives you a table containing: Device column: Reports the name of the device. Product type column: Reports the product type of the device. Title column: Reports the type of console available for the selected device type. Double click this field to open its own console. Note that every console interface changes according to the device it belongs to. It is recommended to refer to the specific manuals (Device editor window for consoles details). Click on the button to close the Device tab window. 21 button of the required product type to look C ONFIGURING ACQUISITI ON DEVICES As it was introduced in the previous chapter, Devices tab provides you with several utilities that enables you to configure your data sources. The purpose of this section is guiding you through the main operations of a proper device configuration. A DD IN G D E V IC E S If you want to add a new device to the list active device list, click on the button in the lower part of the window and choose one of the available devices among those of the Supported Device Types list, which is represented by the following image. F IGURE 6 A DD D EVICE WINDOW The list of available devices depends on the components installed in your iDaq. In particular, the lite version of iDaq supports eight basic components: DAQ-mx, SimulatedStaticSignals, TDMS Player, syncCDAQMod, BMP-JPG-PNG player, Text files player, Camera Lite and Smartphone. Select one of them to get a rapid description of it in the lower part of the Add Device window. if you need additional information, click button to open the dedicated manual: each manual includes detailed descriptions about how to set and exploit devices capabilities. Click button to select the device. © TOOLS for SMART MINDS 22 iDaq - User Manual I NS T A LL I N G D R I VE R S If you want to install the iDaq drivers needed to acquire data from a new device, select Devices tab window. button in This opens a file explorer window that allows you to select the drivers .zip file that you should have downloaded before. Once selected, iDaq will install the device and, as soon as it finishes, you will be able to start data acquisition. E DI T IN G D E V IC E S Open the Device tab of iDaq and click on the icon of a device to open its Device editor window. The following image represents a sample one. F IGURE 7 D EVICE EDITOR WINDOW Note that the look of this window changes according to the selected device model: clicking on the Help button you find right in Device editor window or refer to the specific manuals you can find at http://www.idaq-datalogger.com/documentation_tutorial.php for a detailed explanation of the functions you may find. 23 The elements contained in this window are: 1. Device name and model. 2. Device Icon: This icon can also be changed. To see how, look at the © TOOLS for SMART MINDS 24 iDaq - User Manual 3. 4. 5. 6. 7. 8. 9. Tools chapter. Device capabilities list: Is the set of capabilities with which your device is provided. When selected, each of them opens an additional setting window specific to that capability. Refer to the specific manual for further information. If the capability button is disabled and grayed out, it means that the capability does not require any setting. Channels settings: Opens a window listing the available channels for current device. Device description: You can add a personal description to the device by selecting the button. Product page: Provides you with a useful link containing further details about this specific device. Re-Init device function: Allows you to force device re-initialization after closing of the Device editor window. Help button: If you need help, click on it to open the dedicated manual. Click on the button to save the new device configuration and close the window. 25 T O O LS Every device in the Devices list is provided with additional functions. The menu including these functions appears by right-clicking on a device icon. The following image represents the menu containing the device editing functions. F IGURE 8 D EVICE EDITING FUNCTIONS The utilities enlisted in this menu are: 1. 2. 3. Change Icon: iDaq provides you with a range of icons to distinguish different devices. Select one and this will automatically apply over the icon of the selected device. Device Documentation: It includes a box of tools regarding device additional documentation, such as its pinout and any extra documents you would like to attach. Further information is provided in the Device Documentation subchapter, to be found included in this chapter. Device Removal: If you want to remove the device from the Active device list. Nevertheless, when an error occurs during the device configuration, a new function replaces the button, as it is represented in the following image: F IGURE 9 D EVICE R E -I NIT FUNCTION 4. Re-Init button: When device configuration fails, the Re-Initialization function re-starts the whole process of configuration. If the device re-start goes wrong once more, an Error Message window will appear, so as to illustrate the error source. © TOOLS for SMART MINDS 26 iDaq - User Manual DEVICE DOCUMENTATION Select Device TabRight-click on device icon which is represented by the following image. button to open the Documentation tools window, F IGURE 10 D OCUMENTATION T OOLS WINDOW The included tools are: 1. 2. Pinout button: Opens the pinout document (if available) related to the selected device. Add Documents button: Allows you to attach any file, so as to enable a quick access to the device technical specifications. You can confer a name for each attached document. When one or multiple files are attached a list of their shortcuts appears in the Documentation Tools window, as the following image shows. F IGURE 11 D OCUMENTATION TOOL WINDOW WITH DOCUMENT LIST 3. 4. This list can include up to 8 items. Right-clicking on any one of them allows you to remove it from the list. Delete All button: Allows you to remove all the elements of the list at once. Ok button: Allows you to save the document list and close the Documentation tool window. 27 C H E C K IN G D E V IC E S T A T U S AT S T AR T - U P Every time iDaq starts, it automatically restores the set of active devices. During this operation, iDaq runs a checking procedure. If any one of them is disconnected or not properly configured, iDaq shows an error that notifies the issue. The following image represents a sample error message. F IGURE 12 “D EVICE NOT DETECTED ” ERROR WINDOW WHEN REBOOTING I D AQ Click on button when you believe that any possible error source might have been fixed to let iDaq rerun the device configuration process. Otherwise, click on button to let iDaq open regardless of the connection error. In this case, the following window appears to make sure you want to abort the checking process. F IGURE 13 “A BORT D EVICE L OADING ” MESSAGE Click on button to confirm. In this case, iDaq will ask you if current device may or may not be removed from the Active Devices list. The following image represents the message window in question. F IGURE 14 "R EMOVE MISSING DEVICE © TOOLS for SMART MINDS 28 FROM ACTIVE DEVICE L IST " MESSAGE iDaq - User Manual Click on button to remove it from the list of active devices. Click on process without removing the device from the list of active devices. button to abort the checking S NAPSHOTS Snapshots are useful utilities that allows you to save and load iDaq configurations. This function is useful when you change configuration of the devices in use frequently. Snapshots allows you to save different configurations (selected devices, single devices settings and iDaq general settings) and re-load them after. C R E AT I N G S N AP S H O T S Select Device Tab window: button to create a Snapshot. The following image shows the Snapshot creation F IGURE 15 S NAPSHOT CREATION WINDOW Snapshot creation window contains: 1. 2. Name field: Select a name to identify the configuration you are saving. Description field: Insert a description regarding the configuration. 3. Click on button to save your snapshot or Esc to cancel it. Once button is pressed, Snapshot saves the list of active devices, single devices settings and iDaq general settings. 29 R E - LO A D I N G Select S N AP S H OT S button in Device tab window to re-load the snapshots you previously created. The following image represents the Snapshot loader window. F IGURE 16 S NAPSHOT LOADER WINDOW The Snapshot loader window gives you: 1. 2. 3. 4. 5. The list of the saved snapshots. The list of the active devices for every selected snapshot. Time and date in which the snapshot was created. The description (if any) you typed when you created the snapshot. Restore iDaq settings checkbox: If checked, it allows you to load iDaq settings too. 6. Click on button to load your snapshot or button to close the window. Notice that when you load a snapshot iDaq must be rebooted: the next image represents the advice previous to iDaq rebooting. F IGURE 17 R EBOOTING I D AQ TO LOAD A SNAPSHOT The snapshot features allow you to reload your working session without losing time. © TOOLS for SMART MINDS 30 iDaq - User Manual ADD-ON S TAB ADD-ONs tab includes all the functions that allow you to view, organize, handle and process the data acquired, together with several settings and configuration options to obtain the maximum flexibility of performance. Before getting started with ADD-ONs tab interface, the following subchapter will give you a quick theoretical knowledge about these elements. I NTRODUCTION As previously introduced, iDaq enables you to install useful ADD-ONs, additional plug-ins that extend iDaq features, such as different ways of data processing and visualization. The possibility of introducing new tools and increasing iDaq potentialities in such an easy way makes it a flexible and customizable solution (refer to the diagram in Getting started with iDaq chapter for a complete view of iDaq structure). Thanks to iDaq ADD-ONs, you have unlimited access to your devices, even remotely, without programming efforts. There are two types of ADD-ONs: EMBEDDED ADD-ONs are built-in add-ons. Embedded ADD-ONs are add-ons completely integrated in iDaq; you can access them through the ADD-ONs tab in iDaq main window. The next diagram represents the embedded add-ons installed by default together with iDaq: STANDALONE ADD-ONs are independent applications, external to iDaq. Like embedded ADDONs, standalone ADD-ONs are able to establish a communication with iDaq and receive data acquired by iDaq itself. Compared to embedded ADD-ONs, standalone applications can be located on a pc without iDaq installed on. Since iDaq virtualizes devices, you don’t need to use NI drivers. For this reason, you can establish a connection between a standalone ADD-ON on your PC (without NI drivers) and another one with NI drivers installed on it. Vice versa, since embedded ADD-ON are integrated in iDaq, they require iDaq and thereby NI drivers. 31 Embedded and standalone ADD-ONs can be downloaded from the following website: http://www.idaqdatalogger.com/addons.php. Custom embedded and standalone ADD-ONs can be developed through the iDAQ SDK. Check the Creating your own ADD-ON chapter of this manual for more information. U SER I NTERFACE This introductive subchapter gives you a rapid overview of the ADD-ONs tab interface and its main functions. Select iDaq main windowADD-ONs tab to open the ADD-ONs tab window, which is represented by the following image. Use the numeral tags to refer to the description of the elements following it. F IGURE 18 ADD-ON S TAB WINDOW ADD-ONs tab window includes: © TOOLS for SMART MINDS 32 iDaq - User Manual 1. 2. 3. 4. ADD-ONs list: Shows you an inventory of the embedded ADD-ONs installed. Clicking on one will open its specific window: refer to the manuals for an accurate explication about them. These manuals are available either online at http://idaq-datalogger.com/addons.php, or by clicking ADD-ONs tab button. ADD-ON INSTALLATION button: Allows you to installs the ADD-ONs downloaded from http://www.idaq-datalogger.com/addons.php or independently implemented. Check the Installing ADD-ONs chapter for a detailed explanation of the procedure. OPTIONS button: Includes the list of installed ADD-ONs and the paths of the folders in which ADD-ONs data are saved. You can find further details about it in the ADD-ON options chapter. ADD-ON ONLINE SEARCH button: Allows you to look online for new useful ADD-ONs to integrate in iDaq. Check the Online Research chapter for a detailed explanation of how to download a new ADD-ON. I NSTALLING ADD-ON S Click ADD-ONs tab button if you want to install new ADD-ONs. This opens the file explorer window: find the ADD-ON you need (note that only *.iDaq-addon files are accepted as valid files) and click on it to install it into iDaq. At this point, iDaq will show you an advice window to make sure this is the ADD-ON you want to install, as it does in the following image: F IGURE 19 I NSTALLING ADD-ON S ADVICE WINDOW Click on button to stop it; otherwise click on button to initialize the installation. At the end of the process, the new ADD-ON will appear in the ADD-ONs list. 33 O NLINE R ESEARCH Click ADD-ONs tab button to search for new ADD-ONs. T4SM has a set of downloadable ADD-ONs on its website http://www.idaq-datalogger.com/addons.php. A shortcut to this link is provided by the Search online button on the right part of the Installed ADD-ONs table. 1. Click on one of the ADD-ONs enlisted in the table and open the ADD-ON description page. In this example we are going to download the FFT ADD-ON: click on Download as in the following image. F IGURE 20 I NSTALLING ADD-ON S PART 1 2. Fill in the form with your personal data in order to download your ADD-ON. © TOOLS for SMART MINDS 34 iDaq - User Manual F IGURE 21 I NSTALLING ADD-ON S PART 2 3. 4. After submitting, you will receive an e-mail containing the Download link of the required ADDON. Just click on it and you will have it in your Download folder. Once downloaded, you can proceed to install it, as explained in the Installing ADD-ONs chapter. CREATING YOUR OWN ADD-ON If you need something specific and you can’t find the ADD-ON you were looking for in the T4SM list, you can ask for a customized one or even create one on your own. iDaq in fact is able to interface with any LabVIEW–developed plug-in. In order to do this, T4SM developed iDaq-SDK library, which is a practical toolkit created with the aim of enabling you to implement both stand-alone and embedded applications able to expand iDaq capabilities. 5. Check the iDaq Developer Guide manual by clicking on the following link: http://www.idaq-datalogger.com/addons_in.php?id=8 35 P ROJECTS TAB Projects tab includes all the functions that allow you to create, organize, edit and save your projects through a wide set of dedicated utilities. A project contains details concerning all the running ADD-ONs: ADD-ON types, window position, and ADD-ON settings. When a project is loaded, all the ADD-ONs saved in the project and their settings are restored. Before getting started with Projects tab interface, the following subchapter will give you a quick theoretical knowledge about these elements. I NTRODUCTION A project is a repository in which you can save all the operations performed during a working session. In particular, projects carry out the task of: Saving running ADD-ONs; Saving ADD-ONs configuration and settings; Organizing recorded and processed data storage; Saving the position of ADD-ONs windows so that, when opened again, the project is ready for work as if it was never closed; Protecting your work from unwanted changes. © TOOLS for SMART MINDS 36 iDaq - User Manual U SER I NTERFACE This introductive subchapter gives you a rapid overview of the Projects tab interface and its main functions. Select iDaq main windowProjects tab to open the Projects tab window, which is represented by the next image. Use the numeral tags to refer to the description of the elements following it. F IGURE 22 P ROJECTS TAB WINDOW 37 Projects tab window includes: 1. 2. 3. 4. 5. 6. 7. 8. Name of the project and name of the file in which the project is saved. Last saved projects: This list shows you the list of recent projects and allows you to open them directly by clicking on them. On the other hand, right click on them and select to remove it. Add project button: Allows you to create a new project. When clicked, iDaq opens a new project immediately by giving it a provisional default name. Refer to the Creating new projects chapter for further details. Open project button: Allows you to open an already existing project. Edit project button: Allows you to edit projects details like name of the project and name of the file, adding a description or applying protection. Save project button: Allows you to save the changes applied to the current project. Refer to the Saving current projects chapter for more details. Save project with a different name button: Allows you to save the changes applied to the current project while changing the name of the file. Refer to the Saving current projects chapter for more details. Options button: Includes a list of settings for the projects. Refer to the Project options chapter for more details. C REATING NEW PROJECTS Click Projects Tab button to create a new project. iDaq will automatically open the new project without need of re-booting the program. Notice that when you create a new project, iDaq must close the current one and will show the following advice window: F IGURE 23 C LOSING PROJECT ADVICE WINDOW Make sure you have saved the current project, then click on project. button to proceed and open a new You can also define the file path of the folder in which to store them just by selecting the Projects Options button (i.e. button): refer to the Project options chapter for further details. If you want to change the generic name that iDaq gave to the file, select the Edit project button (i.e. button): refer to the Editing Projects button for more details. © TOOLS for SMART MINDS 38 iDaq - User Manual E DI T IN G P R OJ E C TS Select Projects Tab image: button to open the Project Editor window, that is represented by the following F IGURE 24 P ROJECT E DITOR WINDOW Project Editor window allows you to define: 1. 2. 3. 4. Project title field: Insert here the name you want to give to the project. Description field: Insert here a description or a quick resume of the work contained in the project. Project file name: Insert here the name you want to give to the file in which the project is saved. Locking button: Allows you to turn your project to a read-only version until unlocked. More details about this are contained in the Read-only projects chapter. Finally, click on to Projects tab. S A V IN G button to save the changes. Otherwise, click on button to cancel them and return C U R R E N T P R OJ E C TS Select Projects Tab button to save the changes applied to your project. After having saved them, your recent projects will be enlisted in the recent projects list in projects tab. If you also want to change the folder in which it will be saved or change the file name, instead, click on Projects Tab button. Note, however, that iDaq automatically saves your work at the end of the working session, i.e. when you close the project. 39 R E AD - ON L Y P R O J E C TS Select Projects Tab button button and set a secret code to keep your projects safe. iDaq is programmed to save data automatically every time you close it, therefore setting a password can be very useful to protect your work from improper uses or keep it safe if you want use it but worry about saving changes accidentally. Clicking on button will open the Locking Project window. Type the locking code by tracing it through the dedicated points, as shown in the following image: F IGURE 25 L OCKING PROJECTS WIND OW This will set your project to read-only mode and a little Lock icon will appear in Projects tab, in order to remember you that all your records or charts in this session won’t be saved. If you open the project in Read Only mode, you can see all saved data and you can apply modifications, but you can’t save them. Consequently, all your modification remains only while the RO project is opened. When you want to end read-only modality, select again Projects Tab insert the secret code to unlock the project. button button and If the project is closed still under RO modality, at the next project start-up iDaq will ask you to insert the locking code before opening it. © TOOLS for SMART MINDS 40 iDaq - User Manual O PTIONS TAB Projects tab includes all the settings regarding the three main tabs previously analyzed, some general ones and a set of additional settings regarding data sharing and protection. U SER I NTERFACE This introductive subchapter gives you a rapid overview of the Options tab interface and its main functions. Select iDaq main windowOptions tab to open the Options tab window, which is represented by the following image. Options tab window includes the following buttons: 1. Projects Options: Allows you to customize your projects and define details regarding project saving details. Refer to the Project options chapter for further information. 2. ADD-ONs Options: Allows you to organize your ADD-ONs, install new ones or delete others. Refer to the ADD-ON options chapter for further information. 3. Devices Options: Allows you to see a list of your components, install new ones and look for many more to download. Refer to the Device options chapter for further information. 4. General Options: Allows you to customize general aspects regarding iDaq. Refer to the General options chapter for further information. 5. Network Options: Allows you to open network communications and to define connection credentials together with several settings regarding clients authorizations. Refer to the Network options chapter for further information. 6. Locking Options: Allows you to enter a secret code and lock iDaq temporarily. Refer to the Protection chapter for further information. F IGURE 26 O PTIONS TAB WINDOW 41 P ROJECT OPTIONS Select Options tab button to open Project options window. Project options window groups settings that affect the way in which projects are managed by iDaq. This window is represented by next image: use the numeral tags to refer to the description of the elements following it. F IGURE 27 P ROJECT O PTIONS WINDOW 1. 2. 3. 4. 5. 6. 7. 8. Click on Project base folder: is the folder where projects are saved. Automatically add datetime to project filenames: Appends date and time to the project name. This field is checked by default. Remove tasks closed by user: If checked, iDaq won’t save the add-ons closed during your working session. iDaq saves only the charts that you keep open in the project. Show edit window before saving: If you check this option iDaq, every time you are closing a project, opens the Project Editor window. Save projects when closing: If you check this option, iDaq saves automatically your projects when you close your projects. Open selected project at startup: If you check this option, every time iDaq starts, it opens automatically the project inserted in 7. (Project at startup field). Project at startup: This field is enabled when 6. (Open selected project at startup) is checked. Insert here the project you want to open at startup. Show connection parameters in edit window: If you check this option, connection parameters button appears in Project Editor window. This allows you to share that particular project with other clients when you open a network communication. button to save the settings and go back to Options tab. © TOOLS for SMART MINDS 42 iDaq - User Manual ADD-ON OPTIONS Select Options tab button to open ADD-ONs options window. ADD-ON options window groups settings that affect the way in which ADD-ONs are managed by iDaq. This window is represented by next image: use the numeral tags to refer to the description of the elements following it. F IGURE 28 ADD-ON O PTIONS WINDOW 1. ADD-ON folder: It indicates the folder in which the ADD-ONs are stored. You can change it by typing in the folder path you prefer, then click on the OK button (the changes you’ve done will be effective only after next iDaq restart). 2. ADD-ON data folder: It indicates the folder in which the data recorded and processed by ADDONs are stored. 3. Installed ADD-ONs table: It enlists the ADD-ONs installed earlier and indicates name, release version, company and author, folder in which is stored. 4. Install button: It allows you to select an *.iDaq-addon file and install it (as already explained in Installing ADD-ONs chapter). Once installed, the new ADD-ON appears enlisted in 3. Installed ADD-ONs table). 5. Search online button: It opens http://idaq-datalogger.com/addons.php and allows you to look online for new ADD-ONs to download. 6. Remove button: Select an ADD-ON you want to remove in the list and click on eliminate it. Click on button to save the settings and go back to Options tab. 43 button to D EVICE OPTIONS Select Options tab button to open Device options window. Device options window groups settings that regard components installation. This window is represented by next image: use the numeral tags to refer to the description of the elements following it. F IGURE 29 I NSTALLED C OMPONENTS WINDOW This window provides you with: 1 . List of installed components. 2 . Install button: It allows you to select a *.zip file and install it. At the end, the List of installed components will be updated with the new installed components. If the installation process does not complete successfully, an error message will appear. 3. Search online button: If you want more components, this button opens the iDaq web page, where you can look for more components and install them. If you can’t find the component you need, ask T4SM for a customized one: http://idaq-datalogger.com/support.php Click on button to save the settings and go back to Options tab. © TOOLS for SMART MINDS 44 iDaq - User Manual G ENERAL OPTIONS Select Options tab button to open General options window. General options window groups settings that regard iDaq general configuration. This window is represented by next image: use the numeral tags to refer to the description of the elements following it. F IGURE 30 G ENERAL O PTIONS WINDOW This window provides you with: 1. 2. Device Folder: Specifies the folder path where device configuration files are stored. Notify updates: If checked, it sends you a reminder when new downloadable iDaq versions and updates are available. 3. Show Assistant at startup: If checked, it opens Assistant at every iDaq startup. Refer to Assistant chapter for further details. 4. Clear Password at startup: If unchecked, iDaq will be locked when it starts if a password has been set earlier. If checked, iDaq will not be locked when it starts even if a password has been set earlier. 5. Hide at startup: If checked, at every startup iDaq stays minimized in the toolbar and runs in the background. 6. Save log: If checked, iDaq saves all the events occurred since its startup in the log window. Refer to the Log window chapter for further details. 7. Log folder: The folder indicated is where the events recorded in log window are saved. 8. Server description: Is a description to identify the server in use. 9. Supported acquisition devices: Indicates the acquisition device types supported by iDaq. 10. Simultaneous devices: Indicates the maximum number of active devices supported by iDaq. Click on button to save the settings and go back to Options tab. 45 N ETWORK OPTIONS In this tab are grouped all of the details regarding network communication, data distribution and PC connection with other clients. iDaq includes the most advanced technologies for data distribution, to allow users to work with signals, regardless of the physical location of the measurement systems. Thank to this feature, iDaq allows multiple users to access to the same measuring device for different purposes. Several different tests and measurements can be performed using the same acquisition device. iDaq clients can remotely connect to an iDaq server and access to all its connected devices: in other words, every acquisition device is accessible over the net from other iDaq nodes. To enable data distribution feature, enable Allow Remote Clients to connect checkbox (point 1 in the Option window, analyzed in the next subchapter). This feature allows several users to work on the same data simultaneously from different workspaces, using your PC as a data dispenser: the following diagram explains data distribution functioning. PC 2 Computer 1 Data PC 3 Allow Remote Clients to connect PC 4 F IGURE 31 D ATA DISTRIBUTION FUNCTIONING DIAGRAM This can particularly be useful in case PC 2, PC 3 or PC 4 are a little underpowered computers not able to support thousands of data coming directly by the NI device. iDaq has solved similar problems: Computer 1 in the diagram acquires data and distributes them to the other PCs, in order to avoid wasting time and slowing down CPUs. This also means that tests and measurements are finally possible to be performed using the same acquisition hardware, making it unnecessary the physical presence of an hardware for each working station. Thanks to this feature, iDaq permits simultaneous performances of different tests and measurements using the same acquisition hardware. © TOOLS for SMART MINDS 46 iDaq - User Manual N E TW OR K S E T TI N G S Select Options tab button to open Network options window. Network options window groups settings that regard iDaq general configuration. This window is represented by next image: use the numeral tags to refer to the description of the elements following it. F IGURE 32 N ETWORK O PTIONS WINDOW Network Options window includes: 1. 2. 3. 4. 5. 6. 7. 8. Allow Remote Clients to connect: Enables data distribution and therefore enables remote clients to connect with your iDaq. Allow Remote Clients to set Digital Output: Enables remote clients to change the settings regarding Digital Output signals. If it is disabled, Digital Output can be set only by iDaq server. Log Digital Output Activity: Records any Digital Output Activity and its source in the Log Window. Allow Remote Clients to set Analog Output: Enables remote clients to change the settings regarding Analog Output signals. If it is disabled, then Analog Output can be set only by iDaq server. Log Analog Output Activity: Records any Analog Output Activity in the Log Window. Publish GPS location: Enables remote clients to receive the GPS location published by iDaq server. GPS coordinate resolution: Is the minimum distance required to update remote clients on the change of the GPS coordinates. Edit default credentials for ADD-ONs: Contains the default credentials used to communicate with an iDaq server. The following window represents the Editor opened by 47 button: F IGURE 33 D EFAULT C ONNECTION PARAMETERS EDITOR More information about how to fill in these fields is provided both in Network communication: a practical example chapter and Factory settings chapter in this manual. 9. Edit server credentials: Are the credentials of the server in use. It is necessary to know these credentials in order to establish a connection with the server in use. The following window represents the Editor opened by button: F IGURE 34 S ERVER IN USE CREDENT IALS EDITOR More information about how to fill in these fields is provided both in the Factory settings chapter in this manual. 10. Edit services credentials: Are the credentials used for auxiliary services. The following window represents the Editor opened by the Edit server credentials button: F IGURE 35 S ERVICES CREDENTIALS EDITOR More information about how to fill in these fields is provided in the Factory settings chapter in this manual. Click on button to save the changes and re-start iDaq to see them applied. © TOOLS for SMART MINDS 48 iDaq - User Manual N E TW OR K C OM M U N IC A T IO N : A P R AC T IC A L E X AM P LE This chapter shows how to realize a data distribution session in details. Suppose you have two computers: PC1 and PC2. Both of them have iDaq installed on. PC1 has a device physically connected and PC2 wants to read data of the device connected to PC1. 1. D A T A D I S T R I B U T I O N S E T T I N G S : First of all, since PC1 works as a server and PC2 as a client, PC1 must open the Network options window and verify that the Allow remote clients to connect checkbox is CHECKED. F IGURE 36 G ETTING STARTED WITH D ATA DISTRIBUTION : BASIC SETTINGS 2. D E F I N I N G C O N N E C T I O N P A R A M E T E R S : In order to connect with PC1, PC2 needs to be provided with the following connection parameters: IP Address: It is the IP address of server PC1. Server port: It is the TCP port used by server PC1. For further information about how to set this field, look at the Factory settings chapter. Server password: It is the password required to every client in order to establish a connection and acceess to PC1’s data. This password could have been defined by PC1 or still be the default one For further information about setting the server password look at the Factory settings chapter. 49 3. C O N N E C T I N G T O PC 1: As shown in the following figure, in order to open a network between PC1 and PC2, PC2 must select Options tab button (Edit Default credentials for ADD-ONs) button and open the Connection parameters editor. PC1 IP address . F IGURE 37 O PENING NETWORK COMMUNICATION In the Connection parameters editor window, insert PC1’s address, port, and password. Press button to check if parameters are right, then press button to proceed. Once PC2 saved the Connection parameters by clicking button, it can finally start to take advantage of the data distribution and receive the data sent by PC1. On the other hand, PC1 will know when PC2 is running his ADD-ONs because Network connection symbol will appear in ADD-ONs tab button, as represented in the following image: F IGURE 38 ADD-ON S TAB BUTTON WHEN ADD-ON IS ACTIVATED BY REMOTE PC1 is also able to monitor PC2’s activity through Log window. Remember also that PC1 is always able to limit PC2’s actions through Network Options window. © TOOLS for SMART MINDS 50 iDaq - User Manual F AC TOR Y S E T T IN GS Acquiring data from a data source physically connected to your computer and working your own data without taking advantage of remotely distributed data, instead, requires you to check that the General credentials editors are configured as follows: 1. 2. Enable remote connections = False Edit default credentials: edits the Client credentials needed to establish the data communication. The factory settings for it are: Server address = localhost Server port = 9000 Server password = iDaq F IGURE 39 C LIENT CONNECTION PARAMETERS EDITOR 3. Edit server credentials: edits the credentials of the server you are connecting to. Server port = 9000 Server password= iDaq F IGURE 40 S ERVER CONNECTION PARAMETERS EDITOR 4. Default service credentials: to distribute different data types such as GPS coordinates. Server port = 8999 Server password = iDaq F IGURE 41 O THER SERVICES CONNECTION PARAMETERS EDITOR 51 P ROTECTION In addition to the possibility of setting a password to open a project, iDaq allows you to protect your work always, even during the working session. iDaq keeps safe your work when you can’t stay next to your computer and take care that nothing disturbs signal acquisition. L OC K IN G I D A Q Select Options tab button to lock iDaq. The following image represents iDaq Locking window: F IGURE 42 L OCKING WINDOW Insert the secret code and click on the button that appears after iDaq receives your input. Once it is locked, it is impossible to perform any change or operation. When iDaq is locked, the main window is replaced with the code to unlock iDaq. © TOOLS for SMART MINDS 52 iDaq - User Manual button. Click on it and insert the secret H ELP T AB Help tab includes all the features directed to help you during your experience with iDaq, therefore contains several quick references to guides, manuals, contacts, info and additional features purchasing. U SER I NTERFACE This introductive subchapter gives you a rapid overview of the Help tab interface and its main functions. Select iDaq main windowHelp tab to open the Help tab window, which is represented by the following image. Help tab includes the following elements: 1. iDaq user manual: Opens the offline PDF version of this manual. 2. ASSISTANT quick guide: Assistant is a quick, practical guide that rapidly illustrates how to work with the main services of iDaq through a few, easy steps. 3. 4. F IGURE 43 H ELP T AB WINDOW License activation: Opens a License codes table that includes all the packages you own and their respective statuses of activation. Refer to the Activation chapter for more details. 5. Log window: Contains all the events occurred during the working session. Refer to the Log window chapter for a more accurate description. 6. Support request: Opens an online form that allows you to contact us when you need help for specific issues. 7. Current IP Address: Shows you IP address and name of the current machine. 8. iDaq release: Shows you the current iDaq release, license status and date of expiration. 9. Activation codes purchase: Opens iDaq website and allows you to buy the codes of the installed elements you want to activate. 53 A SSISTANT iDaq assistant is a useful quick guide that leads you through iDaq usage by means of simple step-by-step explanations. Select Help tab button to open the Assistant window. Assistant gets you started with the main operations you can carry out on iDaq: click on the one in which you’re interested and you will get to the guided explanation of the procedure. Remember that in case of particular issues you can also contact us through Help tab L OG button. WINDOW The Log window gives you a chronology of all the events iDaq keeps track since has been started. Log window shows events grouped in different sources: System: events related to iDaq main functionality. Project: events related to user action on projects such open, edit and close. Data acquisition: events related to acquisition device such configuration changes. Select Help Tab button to open Log window. F IGURE 44 - L OG WINDOW EXAMPLE . Log window shows a list of events logged by iDaq. When an event is highlighted, its complete message is displayed at the right side, as indicated in figure above. Click on button to close Log window and return to Help tab. © TOOLS for SMART MINDS 54 iDaq - User Manual A CTIVATION Select Help Tab button to open Online activation window. F IGURE 45 O NLINE A CTIVATION WINDOW 1. Packages table: Contains a list of the installed packages and their respective information, like number release, date of expiration and state. The possible statuses of activation are enlisted in the following table: Symbol 2. 3. 4. State Description Evaluation Package used for an evaluation period. Expiration depends on package’s author. Activated Package correctly activated and usable until definite date of expiration. If no date is defined, expiration column indicates “never”. Activated/Expired Package activated but also passed date of expiration. Evaluation expired Evaluation period is passed. Activate the package to use it again. Edit Authorization code and User info: Allows you to insert a new authorization code or change your personal information (which are fundamental to complete the activation successfully). Help button: Opens iDaq website and gives you a complete online guide about how to activate your packages. Save activation request: Allows you to save as the data inserted as a file. 55 5. Import activation file: Allows you to reload the activation data saved previously. It is useful when the internet connection is not available. Contact our support service for the offline license activation. After having inserted the activation code, select the product to activate and click on Activate button. Notice the license activation requires an internet connection. © TOOLS for SMART MINDS 56 iDaq - User Manual A DVANCED D EVICE F EATURES This chapter is a brief introduction to the advanced features offered by iDaq for your devices. V IRTUAL CHANNEL CALCU LATOR CAPABILITY Virtual Channel Calculator is a capability provided by iDaq for several devices, which allows you to define virtual channels calculated from physical channels. Select iDaq main windowDevice tabDevice Icon and check the Capabilities list contained in Device Editor window. The presence of an active V.C.C. Capability button means that your device supports virtual channels. The following figure shows an example of a device with the Virtual Channel Capability. F IGURE 46 D EVICE EDITOR WITH V IRTUAL CHANNEL CALCULATOR CAPABILITY In order to define a Virtual channel, click on the the Virtual Channel Calculator Editor button associated to the V.C.C. capability to open For further details about V.C.C. capability and the modalities to create virtual channels, refer to the specific manual. 57 W AVEFORM PROCESSING U NIT Waveform processing units (WPU) are special components created to process acquired signals. WPUs manipulate raw signals acquired from a wide range of sensors and electronic devices in order to get values in engineering units with specific scales. To define WPUs associated to a channel, click on iDaq main windowDevice tabDevice Icon to view the Device Editor window. Then, click on the view the Channel editor window. button, select a channel and click on the F IGURE 47 H OW TO SET WPU S FOR A CHANNEL © TOOLS for SMART MINDS 58 iDaq - User Manual button to As reported by the following figure, click on the button to define WPUs for a channel. F IGURE 48 H OW TO ACCESS TO THE WPU SETTINGS Notice that the Channel editor window depends on the device type. If the implies that the device in use does not support WPUs. button is not available, it The set of available WPUs can be always up-to-date and customizable, because WPUs are downloadable components. By default, as introduced, iDaq 2015 has the following WPUs available: Direct, Polynomial, Probe, Absolute, Negate, Average, RMS, Filter, Derivative. Moreover, you can perform more than one WPU at the same time: iDaq 2015 allows you to apply on your signals sequences of up to three WPUs simultaneously. For further details about WPUs in general or about every specific type of WPU, refer to the general WPU manual (select button in WPU Setting window) or to the specific manuals of every WPU (right click on WPUs icons in WPU Setting window). 59 APPENDIX A: C ONVENTIONAL SYMBOLS LEGEND The following symbols are used in different iDaq windows. The following table summarize the meanings of those symbols: T ABS BUTTONS Projects tab Project tab: When current project is locked. ADD-ONs tab ADD-ONs tab: When network is open and client runs an ADD-ON. Devices tab: All devices correctly configured. Devices tab: Active devices list is empty Devices tab: Some device is not correctly configured. Options tab Help tab C OMMON BUTTONS Ok button Options button Close button Save button Add button Save as button Open button Remove element Edit button Search online button Install button Search manuals button Refresh button © TOOLS for SMART MINDS 60 iDaq - User Manual S PECIFIC BUTTONS Activation Codes button Lock Project (when unlocked) button Apply Log window button Assistant button Network credentials button Buy Activation Codes button Network credentials test button Change Icon device button Options ADD-ONs button Channels button Options Data distribution button Consoles button Options Device button Contact us button Options General button Current IP address button Options Projects button Device Pinout button Re-init device function button Documentation button Screenshot button iDaq release button Screenshot loader button Lock iDaq button Search error online button Unlock iDaq button 61 F IGURE INDEX FIGURE 1 - INSTALLING IDAQ ............................................................................................................................ 14 FIGURE 2 - IDAQ INSTALLATION WIZARD WINDOW ................................................................................................. 14 FIGURE 3 IDAQ GENERAL WORKING..................................................................................................................... 15 FIGURE 4 DEVICES TAB WINDOW........................................................................................................................ 19 FIGURE 5 CONSOLE MANAGEMENT WINDOW ........................................................................................................ 21 FIGURE 6 ADD DEVICE WINDOW ........................................................................................................................ 22 FIGURE 7 DEVICE EDITOR WINDOW ..................................................................................................................... 23 FIGURE 8 DEVICE EDITING FUNCTIONS ................................................................................................................. 26 FIGURE 9 DEVICE RE-INIT FUNCTION ................................................................................................................... 26 FIGURE 10 DOCUMENTATION TOOLS WINDOW ..................................................................................................... 27 FIGURE 11 DOCUMENTATION TOOL WINDOW WITH DOCUMENT LIST ......................................................................... 27 FIGURE 12 “DEVICE NOT DETECTED” ERROR WINDOW WHEN REBOOTING IDAQ........................................................... 28 FIGURE 13 “ABORT DEVICE LOADING” MESSAGE................................................................................................... 28 FIGURE 14 "REMOVE MISSING DEVICE FROM ACTIVE DEVICE LIST" MESSAGE ............................................................... 28 FIGURE 15 SNAPSHOT CREATION WINDOW........................................................................................................... 29 FIGURE 16 SNAPSHOT LOADER WINDOW ............................................................................................................. 30 FIGURE 17 REBOOTING IDAQ TO LOAD A SNAPSHOT ............................................................................................... 30 FIGURE 18 ADD-ONS TAB WINDOW .................................................................................................................. 32 FIGURE 19 INSTALLING ADD-ONS ADVICE WINDOW.............................................................................................. 33 FIGURE 20 INSTALLING ADD-ONS PART 1 ........................................................................................................... 34 FIGURE 21 INSTALLING ADD-ONS PART 2 ........................................................................................................... 35 FIGURE 22 PROJECTS TAB WINDOW .................................................................................................................... 37 FIGURE 23 CLOSING PROJECT ADVICE WINDOW ..................................................................................................... 38 FIGURE 24 PROJECT EDITOR WINDOW ................................................................................................................. 39 FIGURE 25 LOCKING PROJECTS WINDOW .............................................................................................................. 40 FIGURE 26 OPTIONS TAB WINDOW ..................................................................................................................... 41 © TOOLS for SMART MINDS 62 iDaq - User Manual FIGURE 27 PROJECT OPTIONS WINDOW .............................................................................................................. 42 FIGURE 28 ADD-ON OPTIONS WINDOW............................................................................................................. 43 FIGURE 29 INSTALLED COMPONENTS WINDOW .................................................................................................... 44 FIGURE 30 GENERAL OPTIONS WINDOW ............................................................................................................. 45 FIGURE 31 DATA DISTRIBUTION FUNCTIONING DIAGRAM......................................................................................... 46 FIGURE 32 NETWORK OPTIONS WINDOW ............................................................................................................ 47 FIGURE 33 DEFAULT CONNECTION PARAMETERS EDITOR ......................................................................................... 48 FIGURE 34 SERVER IN USE CREDENTIALS EDITOR .................................................................................................... 48 FIGURE 35 SERVICES CREDENTIALS EDITOR ........................................................................................................... 48 FIGURE 36 GETTING STARTED WITH DATA DISTRIBUTION: BASIC SETTINGS .................................................................. 49 FIGURE 37 OPENING NETWORK COMMUNICATION................................................................................................. 50 FIGURE 38 ADD-ONS TAB BUTTON WHEN ADD-ON IS ACTIVATED BY REMOTE .......................................................... 50 FIGURE 39 CLIENT CONNECTION PARAMETERS EDITOR ............................................................................................ 51 FIGURE 40 SERVER CONNECTION PARAMETERS EDITOR ........................................................................................... 51 FIGURE 41 OTHER SERVICES CONNECTION PARAMETERS EDITOR ............................................................................... 51 FIGURE 42 LOCKING WINDOW ........................................................................................................................... 52 FIGURE 43 HELP TAB WINDOW .......................................................................................................................... 53 FIGURE 44 - LOG WINDOW EXAMPLE. ................................................................................................................. 54 FIGURE 45 ONLINE ACTIVATION WINDOW ........................................................................................................... 55 FIGURE 46 DEVICE EDITOR WITH VIRTUAL CHANNEL CALCULATOR CAPABILITY ............................................................. 57 FIGURE 47 HOW TO SET WPUS FOR A CHANNEL ................................................................................................... 58 FIGURE 48 HOW TO ACCESS TO THE WPU SETTINGS .............................................................................................. 59 63 © TOOLS for SMART MINDS 64 iDaq - User Manual INDEX A TDMS ............................................................... 22 Activation codes ..................................... 53; 55 WPU ................................................................ 18 Activation statuses ...................................... 55 Configuration .................. 16; 17; 22; 28; 44; 47 ADD-ONs ................... 15; 16; 30; 31; 32; 35; 41 Consoles ....................................................... 21 ADD-ONs installation ...................................... 32 D ADD-ONs Installation ...................................... 32 Devices ......................................................... 17 ADD-ONs options ............................... 32; 40; 42 E ADD-ONs research .......................................... 33 Error during configuration ...................... 16; 20 Embedded ADD-ONs ...................................... 30 Error during installation ............................... 43 Network credentials ....................................... 50 F Standalone ADD-ONs ..................................... 30 Folders ADD-ONs creating ........................................ 34 ADD-ON data folder ........................................ 42 ADD-ONs installing ...................................... 34 ADD-ON folder ................................................ 42 C Project base folder .......................................... 41 Capabilities .................................................. 18 G Channel .................................................. 24; 57 GPS Channels ...................................................... 18 Managing iDaq GPS Position ........................... 47 Components .................... 15; 16; 17; 18; 43; 58 Setting Resolution ........................................... 47 Basic components .......................................... 22 I Installation ................................................... 14 Capabilities ..................................................... 18 Installed components ................................... 20 Channels ......................................................... 18 Installing ADD-ONs ................................. 32; 40 DAQ-mx .......................................................... 22 Installing Devices .......................................... 40 Installation...................................................... 43 Installing Devices drivers .............................. 23 Product types ................................................. 17 Installing iDaq......................................... 12; 14 SimulatedStaticSignals ................................... 22 syncCDAQMod ............................................... 22 65 P Save projects ................................................... 37 Product types.................................... 17; 21; 24 Save projects as... ........................................... 37 Projects Save projects when closing ............................. 41 Create ............................................................. 16 Snapshots ..................................................... 28 Current name ................................................. 16 Snapshots loading ........................................ 29 Edit ................................................................. 16 W Open ............................................................... 16 Windows of iDaq Save current project ....................................... 16 Add device window ......................................... 22 Protect your work ADD-ONs options window .............................. 42 Locking iDaq ............................................. 16; 52 ADD-ONs tab window ..................................... 31 Locking options............................................... 40 Advice window .......................................... 32; 37 Locking projects ........................................ 38; 39 Assistant window ............................................ 54 Protecting project........................................... 52 Channel editor window ................................... 58 R Channels editor window ................................. 24 Remote connection...................................... 46 Connection parameters editor window .......... 50 Remote connections Console management window ....................... 21 how to ............................................................ 49 Default connection parameters window ........ 47 Requirements Device editor window ................... 23; 24; 57; 58 Default server credentials ............................. 51 Device options window ................................... 43 Minimum hardware requirements ................. 13 Devices tab window .................................. 19; 23 Minimum software requirements .................. 13 General options window ................................. 44 S Help tab window ............................................. 53 Saving Installation Window ........................................ 14 Last saved projects ......................................... 37 Locking project window .................................. 39 Read-only projects.......................................... 39 Locking window .............................................. 52 Save activation request .................................. 55 Log window ............................. 44; 47; 50; 53; 54 Save logs ......................................................... 44 © TOOLS for SMART MINDS 66 iDaq - User Manual Main window ...................................... 16; 30; 52 Server credentials editor window ................... 48 Network options window ......................... 47; 49 Service credentials editor window.................. 48 Online activation window............................... 55 Single ADD-ON window .................................. 32 Options tab window ....................................... 40 Single capability window ................................ 24 Options window ............................................. 46 Snapshot creation window ............................. 28 Project editor window .............................. 38; 41 Snapshot loader window ................................ 29 Project options window ................................. 41 WPU setting window ...................................... 59 Projects tab window ....................................... 36 67 © TOOLS for SMART MINDS 68 iDaq - User Manual