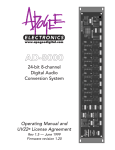
1
Version 2.0 February 2008
User’s Guide
Neurotechnology Research Systems
CinePlex®
Video Capture, Tracking, and Markup System
Plexon Inc
6500 Greenville Ave., Ste 730
Dallas, Texas 75206
USA
Caution
USB Security Key Damage
Before you install Sentinel System security key drivers you must
remove all Sentinel USB keys from the PC. If you install a system
driver with a USB key in the port, the key becomes unusable.
Caution
Electrostatic Discharge
Some devices can be damaged by improper handling. Use appropriate electrostatic discharge (ESD) procedures when handling these
devices. See http://www.esda.org/ for additional information on ESD
procedures.
CAUTION
Camera Damage
Never connect or disconnect the camera while the power is on. The
camera can be permanently damaged.
CinePlex
Video, Capture, Tracking, and Markup System
User’s Guide
Document Number: 07-01-C-5000
Document Issue: 2.0
Document Status: Standard
Software Version and Issue: 2.0
Date: February 2008
Copyright © 1983-2008 Plexon Inc, All Rights Reserved
Printed in the United States of America
Plexon Inc Proprietary
The information contained herein is the property of Plexon Inc. and it is proprietary and restricted solely to assist Plexon Inc. customers. Neither this document nor the contents may be disclosed, copied, revealed or used in whole or in part for any other purpose
without the prior written permission of Plexon Inc. This document must be returned upon request of Plexon Inc.
Information is subject to change without notice. Plexon Inc. reserves the right to make changes in equipment design or components
as progress in engineering or manufacturing may warrant.
Plexon Inc. and the Plexon logo are trademarks of Plexon Inc.
ii
CinePlex
Version 2.0
Plexon Inc
Plexon Inc
iii
Publication History
February 2008
Document Version 2.0 is a complete rewrite for software versions 2.0 of CinePlex
Capture and CinePlex Markup.
March 2007
Document Version 1.4 adds new user interface features, menu items, screenshots,
and updates for CinePlex Capture text and CinePlex Markup text as well as additions and modifications to the appendices.
August 2006
Document Version 1.3 adds new features, menu items, screenshots, and minor
updates to text.
December 2005
Document Version 1.2 adds new menu items, new snap-to capability, a control
for continuous channel loading, and other minor changes.
May 2005
Document Version 1.1 adds Recorder functionality.
March 2005
Version 1.0 is the first release of CinePlex.
CinePlex
iv
CinePlex
Version 2.0
Plexon Inc
Plexon Inc
v
Contents
Publication History
iii
Chapter 1
CinePlex System Overview
1
About the Plexon CinePlex System
2
CinePlex Capture Features
2
CinePlex Markup Features
3
CinePlex System Installation
4
About CinePlex Capture
4
About CinePlex Markup
5
Plexon CinePlex System Architecture
6
Using the CinePlex System with the Plexon MAP System System
Using the CinePlex System with Plexon Recorder
7
Using the CinePlex System with Other Equipment
8
CinePlex System Data Flow
9
Plexon MAP System Data Flow
10
Recorder Data Flow
11
Data Analysis
12
Chapter 2
Using CinePlex Capture
6
13
Getting Started
14
Designing the Experiment
15
Setting up the Equipment
16
Setting up the CinePlex System with the Plexon MAP System
16
Setting up CinePlex with Plexon Recorder
17
Setting up CinePlex with Other Equipment
17
Performing an Operational Test
18
CinePlex Capture and the Plexon MAP System
18
CinePlex Capture and Plexon Recorder
19
CinePlex Capture and Other Equipment
20
Setting up CinePlex Capture
21
Arranging CinePlex Capture Windows
21
Selecting File Locations
21
Positioning the Camera
21
Tracking Mode Adjustments (if tracking option is available)
22
Tracking Mode Properties (if the tracking mode is available)
28
CinePlex
vi
CinePlex
Plexon Inc
Executing the Experiment Plan
31
Digital Video Recording
31
Delayed and Dropped Frames
32
Digital Video Recorder AVI Format Files
32
Synchronizing .avi Files with Neural Data Files
35
Recording Synchronized Video and Neural Data With the Plexon MAP
36
Recording Synchronized Video/Neural Data With Plexon Recorder
38
Managing Video Files
41
Transferring Recorded Files
45
CinePlex Capture Tracking
46
Tracking Window
46
Arena Definition
47
Selecting Tracking Modes
48
Using the Tracking Wizard
50
Object Contour Mode Tracking
51
LED Mode Tracking
58
Reflective Colors Mode Tracking
62
Operating CinePlex Capture with RASPUTIN Sort Client
67
Using VTViewer
68
Operating CinePlex Capture with Plexon Recorder
76
Importing and Analyzing Position Data with NeuroExplorer
77
Chapter 3
CinePlex Capture Reference
79
Overview
80
Main Window
80
Properties Window
81
Arena Window
89
Video Window
90
Messages Window
90
Status Bar
91
Menus
93
File Menu
93
View Menu
96
DVR Menu
97
Tracker Menu
97
Window Menu
99
Help Menu
99
Shrink
99
Toolbars
100
File Toolbar
100
View Toolbar
100
DVR Toolbar
100
Tracker Toolbar
100
Digital VideoTracker (DVT) Files
101
Object Contour Mode
101
LED or Reflective Colors Modes
101
Chapter 4
Using CinePlex Markup
Understanding CinePlex Markup Files
Creating a Project File
104
Importing Data Files
104
Version 2.0
103
104
Plexon Inc
CinePlex
vii
Changing and Saving Project Files
105
Reopening Project Files
105
Exporting Files
105
Getting Started
106
Using the Quick Start Files
106
Setting Up a New Project
107
Understanding the CinePlex Markup Main View
109
Defining a New Marker
111
Creating Marker Occurrences
112
Saving and Exporting the Data
113
Re-opening a Project File
115
Using the Activity Window
116
Understanding Looping
116
Customizing the User Interface
117
Using Markers and Marker Occurrences
117
Defining Markers
117
Inserting Marker Occurrences
118
Editing Markers and Marker Occurrences
122
Automatically Generating Marker Occurrences
125
Using the Levels Editor
128
Using the Zones Editor
130
Operationing with Marker Occurrences
132
Selecting and Editing Marker Occurrences
138
Entering or Editing Coordinate Markers
139
CinePlex Markup How-Tos
143
Printing
143
Denoting Interesting Behavior In the Video
143
Invalidating Artifact Waveforms
144
Freeze Detection
146
Entering Tracker Coordinates
147
Repairing Tracking Coordinates
148
Simple Place Cell Analysis
149
Chapter 5
CinePlex Markup Reference
Overview
152
Main Window
153
Video Window
153
Activity Window
158
Markers Window
162
Input Window
165
Channels Window
166
File Info Window
167
Audio Output Window
169
Messages Window
170
Marker Occurrences Window
Scalar Window
174
Menus
177
File Menu
177
Edit Menu
187
View Menu
191
Animate Menu
192
Looping Menu
193
Find Menu
195
151
171
Version 2.0
Plexon Inc
Tools Menu
196
Window Menu
214
Run Menu
214
Help Menu
214
Toolbars
215
Standard Toolbar
215
Edit Toolbar
215
Views Toolbar
215
Animate Toolbar
215
Looping Toolbar
216
Find Toolbar
216
Tools Toolbar
216
How CinePlex Markup Creates Initial Project Files
217
Reading Video (.avi) Files
217
Reading Plexon (.plx) Files
217
Reading NeuroExplorer (.nex) Files
218
Reading Digital VideoTracker (.dvt) Files
218
Non-Typical Initial File Creation
219
Understanding Markers and Marker Occurrences
220
Marker Occurrences and the Marker Occurrences Window
Correcting for Video Latency
224
Aligning Tracker Coordinates to Frames
226
Analyzing CinePlex Capture data with NeuroExplorer
228
CinePlex
221
Appendix A
Installation
Before You Begin
A-2
Installing CinePlex Capture Hardware
A-3
Plexon MAP System Installation
A-4
Plexon Recorder Installation
A-11
Stand Alone and Other Equipment Installations
A-16
Installing and Upgrading CinePlex System Software
A-20
Installing CinePlex System from the CD
A-21
Installing CinePlex System by Web Update
A-26
Installing CinePlex System Manually from the Plexon Website
Licensing
A-29
CinePlex System Technical Support and Updates
A-30
CinePlex System Technical Support
A-30
CinePlex System Updates
A-30
Web Updates
A-30
Demo Mode
A-30
Appendix B
Problem Resolution
viii
A-1
A-27
B-1
Typical Problems and Solutions
B-2
CinePlex Capture Error Messages
B-4
Appendix C
Setting Up Your Experiment
C-1
Guidelines
C-2
Field of View
C-2
Colors
C-4
Visibility
C-4
Version 2.0
Plexon Inc
CinePlex
Appendix D
Plexon User Interface
ix
D-1
Plexon User Interface
D-2
Screen Elements
D-3
Menus
D-3
Toolbars
D-5
Windows
D-6
Standard Menu Items and Dialogs
D-11
Window Menu
D-11
Run Menu
D-13
Help Menu
D-13
Messages Window
D-17
Right-click Menus
D-18
Current Selections
D-18
. Undo
D-18
Customization
D-19
Toolbars Customization
D-19
Commands Customization
D-20
Keyboard Customization
D-20
Run Menu Customization
D-22
Options Customization
D-23
Appendix E
Interfacing CinePlex Capture to External Equipment
E-1
Overview
E-2
Signal and Data Interface Description
E-3
Electrical Specifications:
E-5
Signals and Data for External Equipment
E-6
Clock Signals
E-6
Remote Control Signals
E-6
Remote Status Signals
E-7
Digital Data Signals
E-7
Universal Capture Cable
E-9
Signals and Data for the MAP Application
E-10
Signals and Data for the Recorder Application
E-11
Data Interpretation
E-12
Target Positions
E-12
Motion Measure
E-12
Appendix F
Installation on a Dedicated Computer
Before You Begin
F-2
Installing CinePlex Capture Hardware
F-3
Plexon MAP System Installation
F-4
Plexon Recorder Installation
F-12
Stand Alone and Other Equipment Installations
F-18
Installing and Upgrading CinePlex System Software
F-23
Installing CinePlex System from the CD
F-24
Installing CinePlex System by Web Update
F-29
Installing CinePlex System Manually from the Plexon Website
Updating CinePlex Capture Files
F-34
Installing PCLinq2 Software and Hardware
F-37
F-1
F-30
Version 2.0
Plexon Inc
Converting from FAT32 to NTFS
F-40
Licensing
F-44
CinePlex System Technical Support and Updates
CinePlex System Technical Support
F-45
CinePlexSystem Updates
F-45
Web Updates
F-45
Demo Mode
F-45
CinePlex
x
F-45
Version 2.0
Plexon Inc
Chapter 1
CinePlex System Overview
1.1 About the Plexon CinePlex System ...................................2
1.2 Plexon CinePlex System Architecture ...............................6
1.3 CinePlex System Data Flow ..............................................9
1.4 Data Analysis ...................................................................12
CinePlex
1
1
1.1 About the Plexon CinePlex System
The Plexon CinePlex System is a digital video recording, tracking, and markup
tool. With the Plexon CinePlex System, you can record (capture) video in Windows-standard audio-video interleaved (AVI) format. You can also synchronize
the video capture with simultaneously recorded neural data files. With the Plexon
CinePlex System, you can play the synchronized video and neural data recordings and add behavioral event markers and time-interval variables. You can then
export the marked-up data from the CinePlex System for further analyses with
other programs.
The Plexon CinePlex System consists of two elements: CinePlex Capture and
CinePlex Markup. CinePlex Capture consists of hardware and software to enable
you to simultaneously capture, track, and record video data synchronized with
neural data. CinePlex Markup is a software tool that enables you to view and edit
the resulting video and neural data files together.
1.1.1 CinePlex Capture Features
CinePlex Capture includes the following features:
•
•
2
General
—
CinePlex Capture is a normal Windows application
—
CinePlex Capture can run on a regular computer with or without a network
—
CinePlex Capture 2.0 can also run on the Capture PC supplied with earlier version of the CinePlex System
Video
—
A video capture capability, which can be synchronized with neural
recordings from the Plexon Multichannel Acquisition Processor
(MAP), or Plexon Recorder, or other equipment, or you can use it as a
stand-alone digital video recorder
—
Produces standard video .avi files in motion JPEG format
—
Allows user-specified prefixes for filenames (up to 3 characters)
—
Essentially unlimited .avi file size (Microsoft extension to NTFS format eliminates the 4 GB file size limit)
—
Selectable image quality settings
—
Recording directly to internal hard drive
—
All-digital imaging with Imaging SourceTM camera (640 x 480 resolution, 30 frames per second)
—
User-selectable frame rate for recording
—
Contact Plexon for near IR (infra-red) tracking
CinePlex
•
•
Tracking and Analysis
—
Features Smart Tracking that uses robust algorithms for LED tracking, object contour tracking, and reflective color tracking
—
Uses strobed words to deliver tracking coordinates directly to the digital input (DI) of an external system
—
Records position and time data in text files
—
Analyzes contour motion across adjacent video frames to detect freezing behavior in fear-conditioning experiments
Interface Capabilities
—
Supports USB-USB link to transfer files to external PCs as included in
pre-2.0 versions of CinePlex
—
Copies files to external drive for archiving purposes
—
Provides flexible input and output (I/O) options
1.1.2 CinePlex Markup Features
CinePlex Markup includes the following features:
•
•
Version 2.0
Viewing
—
Integrated viewing of neural data files (Plexon .plx, .nex) and .avi files
—
Can load some .avi files not produced by CinePlex Capture
—
Display of tracking position data overlaid on video
—
Seek and search based on event markers
—
Full digital video recorder (DVR) playback capabilities
Editing
—
Video-aided insertion of event markers and intervals
—
Removal of temporal segments of neural data during artifact-generating behaviors (chewing, grooming, etc.)
—
Ability to enter and edit position coordinate data from CinePlex Capture
—
Ability to play a sound (standard or user-selected) when event markers
or neural spikes occur during playback
—
Supports Microsoft’s extension to NTFS file format to be able to utilize
.avi files larger than 4Gb
—
Save neural data to Plexon (.plx) and NeuroExplorer (.nex) files, or
export to Excel, MATLAB, or text files
3
1
1.1.3 CinePlex System Installation
For system requirements and installation instructions, see Appendix A, “Installation” on page A-1.
1.1.4 About CinePlex Capture
Plexon CinePlex Capture is the data acquisition portion of the CinePlex System.
As shown in Figure 1-1, "CinePlex General Arrangement for the Plexon MAP
System", CinePlex Capture consists of
•
a Firewire camera and lens
•
an optional computer, which runs the CinePlex Capture software
•
a monitor that displays the CinePlex Capture user interface
•
an optional keyboard to allow user input such as file names
•
a mouse, to control the CinePlex Capture software
•
associated cables
CinePlex Capture provides two main capabilities:
4
1
Digital Video Recording (DVR): CinePlex Capture provides the ability to
capture video to an .avi file for later viewing and analysis. You can use an
external clock to time stamp the video frames, and synchronize them with an
external data acquisition system by using timing signals; or you can use the
CinePlex Capture onboard clock (1 kHz) as a master clock signal for a system. For more information on this capability, see “Digital Video Recording”
on page 2-31.
2
Position Tracking: If you purchase the Tracking option, CinePlex Capture
provides the ability to track the position of subject(s) in the video images, in
real time, and deliver the tracked position coordinates to a data acquisition
system. When you enable the Tracking option, there are three different modes
of operation:
a
Object Contour Mode: In this mode, CinePlex Capture uses a setup
procedure to color contrast and threshold the image until the subject
being tracked is all white and the background is all black. For each
frame, CinePlex Capture computes the centroid of the white pixels to
obtain the tracking coordinates. This mode of tracking operation is
described in “Object Contour Mode Tracking” on page 2-51.
b
LED Tracking Mode: In this mode, CinePlex Capture tracks up to
three light emitting diodes (LED) on the subject or subjects being
tracked. To improve tracking, LED Tracking Mode applies filters that
remove the halo surrounding bright LEDs. This mode of tracking operation is described in “LED Mode Tracking” on page 2-58.
c
Reflective Colors Tracking Mode: In this mode, CinePlex Capture
tracks up to three colors (tape or paint, for example) on the subject or
CinePlex
subjects being tracked. This mode of operation is described in “Reflective Colors Mode Tracking” on page 2-62.
Guidelines for choosing which tracking mode to use for a particular experiment
are discussed in “CinePlex Capture Tracking” on page 2-46.
Note:
You can configure CinePlex Capture to capture video only, or to track positions
only, or to both capture video and track positions simultaneously.
For either function, you must mount the CinePlex Capture video camera a short
distance away from an appropriately designed experimental arena. Adjust the
camera to have the appropriate field of view (see “Field of View” on page C-2) so
that the entire experimental arena is visible on the video images.
CinePlex Capture can be started from an icon or the Programs Menu. Older versions of CinePlex start after the computer is powered on. For a full description of
the user interface elements, “Main Window” on page 3-80.
1.1.5 About CinePlex Markup
CinePlex Markup is a software tool that enables you to view and edit video and
neural data files. With CinePlex Markup, you can view time-correlated video,
neural, and positional data. You can also use CinePlex Markup to add and edit
annotations and perform other operations on the data, such as artifact removal.
CinePlex Markup records your actions to its own separate CinePlex project file,
so you can continue annotation and editing work over several sessions. When you
complete the markup process, you can save the results and export the data for further analysis. For a complete list of CinePlex Markup features, see “CinePlex
Markup Features” on page 1-3.
CAUTION
Upgrade Notice
If you have upgraded to CinePlex Capture 2.0, you should also
update Cineplex Markup. The upgraded CinePlex Markup is
backwards compatible and will also read AVI files created by CinePlex Capture 1.0, 1.1, 1.2, and 1.4.
Version 2.0
5
1
1.2 Plexon CinePlex System Architecture
You can use the Plexon CinePlex System with a variety of equipment. This section provides information on using the Plexon CinePlex System with the Plexon
MAP and Plexon Recorder systems, and information on using the CinePlex System in a generic arrangement with other equipment. Other equipment can
include:
•
experimental equipment you develop
•
devices from vendors other than Plexon
•
a combination of these
1.2.1 Using the CinePlex System with the Plexon MAP System System
The following illustration shows the general arrangement of the CinePlex System
when used in conjunction with a Plexon MAP system.
Figure 1-1
CinePlex General Arrangement for the Plexon MAP System
The CinePlex Capture computer receives and processes the raw video from the
Firewire camera. You can view the raw video on the CinePlex Capture monitor.
CinePlex Capture compresses and stores the captured video on the internal hard
drive, as an .avi file. Through the capture cable, the MAP system signals the
CinePlex Capture computer to start, stop, pause, and resume recording video to
the .avi file. The MAP system also provides a 1 kHz clock signal that enables
CinePlex Capture to time stamp each video frame. For specific information on
the MAP system interface, see “Signals and Data for the MAP Application” on
page E-10 in Appendix E.
Note:
6
Starting with CinePlex version 2.0, the host and CinePlex Capture functions
can be combined in a single PC. This also results in a single monitor for the
host and CinePlex Capture.
CinePlex
1.2.2 Using the CinePlex System with Plexon Recorder
The following illustration shows the general arrangement of the CinePlex System
when used in conjunction with a Plexon Recorder system equipped with a
National Instruments data acquisition (NI DAQ) device.
Figure 1-2
CinePlex General Arrangement for Recorder
The CinePlex Capture computer receives and processes the raw video from the
Firewire camera. You can view the raw video on the CinePlex Capture monitor.
CinePlex Capture compresses and stores the captured video on the internal hard
drive, as an .avi file. In the Recorder application, through the capture cable, the
CinePlex Capture computer signals Recorder to start, stop, pause, and resume
recording neural data to the .plx file. Recorder provides a 1 kHz clock signal that
enables CinePlex Capture to time stamp each video frame. For specific information on the Recorder interface, see “Signals and Data for the Recorder Application” on page E-11 in Appendix E.
Note:
Version 2.0
Starting with CinePlex version 2.0, the Recorder and CinePlex Capture functions can be combined in a single PC. This also results in a single monitor for
the Recorder and CinePlex Capture.
7
1
1.2.3 Using the CinePlex System with Other Equipment
You can arrange the CinePlex System to interface with other equipment you provide. The following illustration shows a general arrangement for the CinePlex
System when used in conjunction with other equipment that can provide the
clock and control signals required by CinePlex Capture. For complete information on the interface and the signaling requirements for CinePlex Capture, see
Appendix E.
Figure 1-3
CinePlex System General Arrangement for Other Equipment
The CinePlex Capture computer receives and processes the raw video from the
Firewire camera. You can view the raw video on the CinePlex Capture monitor.
CinePlex Capture compresses and stores the captured video on the internal hard
drive, as an .avi file. Through the capture cable to other external equipment, the
CinePlex Capture computer can send and receive clock and control signals, and
send data.
8
CinePlex
1.3 CinePlex System Data Flow
In addition, if your CinePlex System includes the Tracking option (see “CinePlex
Capture Tracking” on page 2-46), CinePlex Capture simultaneously analyzes
each frame of video data to determine the positions of the objects being tracked.
In a Plexon MAP arrangement, the computer encodes this position information
into digital words and sends the information back to the MAP system through the
capture cable. In a Recorder arrangement, the computer encodes this position
information into digital words and stores the information on the internal hard
drive. In a generic arrangement, the other equipment you supply determines the
processing of this information. In a MAP arrangement, the MAP also time stamps
and records the position information along with the neural data it collects.
After a recording session, you may transfer the .avi files and the Digital
VideoTracker (.dvt) files to a different computer where the neural data files are
stored. For more information on .dvt files, see “Digital VideoTracker (DVT)
Files” on page 3-101. With all files accessible from the same computer, you can
then use CinePlex Markup on that computer to simultaneously view, annotate,
and process the video, neural data, and position data.
Note:
Version 2.0
The neural data files recorded by the MAP can contain tracking position data.
However, tracking position data for the neural data files recorded with other
equipment or with Recorder can only be stored as a separate .dvt file on the
hard drive.
9
1
1.3.1 Plexon MAP System Data Flow
The following illustration shows a logical view of the data flow in a complete
video and neural data acquisition system using a Plexon MAP System and other
Plexon products:
Figure 1-4
CinePlex Data Schematic for the Plexon MAP System
In the preceding illustration, CinePlex Capture produces an .avi file. CinePlex
Capture can also produce an optional tracking information file in .dvt format.
CinePlex Capture also sends position data, in the form of strobed words, directly
to the digital input (DI) of the MAP system, which records it along with the neural data and other experimental signals into a .plx file using the Plexon MAP System Sort Client data acquisition software. The CinePlex System also includes a
utility program called VTViewer (see “Using VTViewer” on page 2-68), which
works only with the MAP system to read position data. You can use VTViewer to
display, in real time, the position tracking data generated by CinePlex Capture.
10
CinePlex
1.3.2 Recorder Data Flow
The following illustration shows a logical view of the data flow in a complete
video and neural data acquisition system using a Plexon Recorder System and
other Plexon products:
Figure 1-5
CinePlex Data Schematic for Recorder
In the preceding illustration, CinePlex Capture produces an .avi file. CinePlex
Capture can also produce an optional tracking information file in Digital
VideoTracker (DVT) format; for more information on .dvt files, see “Digital
VideoTracker (DVT) Files” on page 3-101. The Recorder application uses a breakout box (BOB) to connect devices to the Recorder PC.
Recorder does not record position data along with the neural data. To analyze
data with OFS or NEX, you must merge the tracking information from the .dvt
file, and the neural data from the Recorder .plx file, using CinePlex Markup.
Version 2.0
11
1
1.4 Data Analysis
After recording, you can process the .plx file with other software, available from
Plexon; for example, you can spike sort the data with Offline Sorter (OFS), or
analyze it with NeuroExplorer (NEX). You can save the results of this processing
to another .plx file or to a .nex file. For more information on OFS and NEX, go to
www.plexoninc.com.
If you transfer the recorded .avi file from the internal CinePlex Capture hard
drive to an offline analysis computer, you can open the file in CinePlex Markup
along with either the original .plx file or the files from OFS or NEX. CinePlex
Markup presents the time-correlated video, neural, and positional data, and
enables you to add and edit annotations and perform other operations on the data,
such as artifact removal. CinePlex Markup records the actions you perform on the
data to a CinePlex project file (.cpj), so that you can do the annotation and editing
work over several sessions. When you complete the markup process, you can
save the results back into .plx or .nex files, or export it into text files, MATLAB
files, or Excel spreadsheets for further analysis.
12
CinePlex
Plexon Inc
Chapter 2
Using CinePlex Capture
2.1 Getting Started .........................................................................14
2.2 Designing the Experiment ........................................................15
2.3 Setting up the Equipment .........................................................16
2.4 Performing an Operational Test................................................18
2.5 Setting up CinePlex Capture ....................................................21
2.6 Executing the Experiment Plan ................................................31
2.7 Digital Video Recording ............................................................31
2.8 CinePlex Capture Tracking.......................................................46
2.9 Operating CinePlex Capture with RASPUTIN Sort Client ........67
2.10 Operating CinePlex Capture with Plexon Recorder ...............76
2.11 Importing and Analyzing Position Data with NeuroExplorer ...77
2.8.7.1 Setting the Threshold .........................................................64
......................................................................................................77
CinePlex
13
2
2.1 Getting Started
This section provides an overall procedure for using CinePlex Capture. Each
step in the procedure is covered in detail in the subsequent sections.
When embarking on a project, you should have a detailed plan in place. The more
detailed the plan, the more successful its execution will be. When using CinePlex
Capture in an experiment, you should perform the following steps:
14
•
Designing the experiment - this step is concerned with animal selection,
stimuli and rewards, physical design, environmental conditions, execution
plan, and/or anything else pertinent to the overall design of the desired experiment. Detailed discussion of this step is beyond the scope of this manual.
•
Setting up the equipment - this step is concerned with setting up all of
the equipment to be used in the experiment (CinePlex Capture workstation,
Plexon MAP system, Plexon Recorder system, the neural data collection systems, computers, monitors, and any other peripheral equipment and their
interconnection).
•
Performing an operational test - this step is concerned with checking
out each piece of equipment, all connections, and all cables for proper operation.
•
Setting up CinePlex Capture - this step is concerned with positioning the
camera so that the desired physical experiment area is within the field of view
of the camera, deciding on the tracking mode to be used, and arranging the
windows, setting the necessary properties of the selected tracking mode,
determining file locations, synchronizing with other equipment, and any other
considerations that may be pertinent.
•
Executing the experiment plan - this step is concerned with implementing the execution plan created in the Designing the experiment step.
Detailed discussion of implementing the execution plan is beyond the scope
of this manual.
CinePlex
2.2 Designing the Experiment
The prime consideration from the CinePlex Capture point of view is whether
CinePlex Capture will work properly with your experimental design. Some possible examples where CinePlex Capture would not work include:
•
The design of the experiment requires tracking of the entire body of a black
rat in the dark. Contact Plexon for near infrared tracking options.
•
The ratio of the size of the size of the trackable arena to the size of the animal
is such that the animal’s image is too small or too large to be tracked.
•
The design of the experiment requires tracking of multiple animals.
If you desire assistance in determining whether CinePlex Capture is applicable
to your experimental design, please contact Plexon at 214-369-4957.
Version 2.0
15
2
2.3 Setting up the Equipment
The following sections cover the different configurations of the CinePlex System
with various equipment.
2.3.1 Setting up the CinePlex System with the Plexon MAP System
The illustrations below shows how CinePlex Capture may be connected to the
Plexon MAP system.
If you are using the post 2.0 CinePlex Capture computer, see “Plexon MAP System Installation” on page A-4. If you are using a dedicated CinePlex Capture
workstation, see “Plexon MAP System Installation” on page F-4. For specific
information on the Plexon MAP system interface, see “Signals and Data for
External Equipment” on page E-6.
16
CinePlex
2.3.2 Setting up CinePlex with Plexon Recorder
The illustration below shows how CinePlex Capture is connected to the Plexon
Recorder system.
If you are using the post 2.0 CinePlex Capture computer, see “Plexon Recorder
Installation” on page A-11. If you are using a dedicated CinePlex Capture workstation, see “Plexon Recorder Installation” on page F-12. For specific information on the Plexon Recorder interface, see “Signals and Data for the Recorder
Application” on page E-11.
2.3.3 Setting up CinePlex with Other Equipment
The illustration below shows how CinePlex Capture is connected to other equipment.
If you are using the post 2.0 CinePlex Capture computer, see “Stand Alone and
Other Equipment Installations” on page A-16. If you are using a dedicated CinePlex Capture workstation, see “Stand Alone and Other Equipment Installations”
on page F-18. For specific information on the interface, see “Signals and Data for
External Equipment” on page E-6.
Version 2.0
17
2
2.4 Performing an Operational Test
Before you begin the experiment, it is best to check out the equipment for proper
operation. The sections below give pointers on what to check for different equipment configurations.
2.4.1 CinePlex Capture and the Plexon MAP System
You may set up the CinePlex Capture System in one of two configurations (using
one PC or two PCs) as shown by the illustrations below.
In this configuration the primary points to check are the camera, both monitors,
all of the connections, and all of the cables.
In this configuration the primary points to check are the camera, the monitor, all
of the connections, and all of the cables.
2.4.1.1 CinePlex Capture Equipment
If proper video is observed at the CinePlex Capture monitor, you can reasonably
be sure the the camera, CinePlex Capture computer, and CinePlex Capture monitor are working correctly.
18
CinePlex
If there is no video, check the cabling, connections, ac power, on/off switches,
lighting, and the iris, zoom, and focus of the camera. The cables may not be connected properly, one or more cables may be broken internally, a pin or pins on a
cable could be bent or broken, the iris on the camera could be shut, the zoom on
the camera could be set improperly, or the focus could be set so that everything is
a blur.
2.4.1.2 MAP Equipment
If the video on the PC monitor is missing, check the cabling, connections, ac
power, on/off switches, and the inputs from the CinePlex Capture computer and
the Behavorial Control computer.
2.4.2 CinePlex Capture and Plexon Recorder
Refer to the illustration below when checking the operation of this configuration.
In this configuration the primary points to check are the camera, both monitors.
all of the connections, and all of the cables.
2.4.2.1 CinePlex Capture Equipment
If proper video is observed at the CinePlex Capture monitor, you can reasonably
be sure the the camera, CinePlex Capture computer, and CinePlex Capture monitor are working correctly.
If there should be no video, check the cabling, connections, ac power, on/off
switches, lighting, and the iris, zoom, and focus of the camera. The cables may
not be connected properly, one or more cables may be broken internally, a pin or
pins on a cable could be bent or broken, the iris on the camera could be shut, the
zoom on the camera could be set improperly, or the focus could be set so that
everything is a blur.
2.4.2.2 Recorder Equipment
If the video on the PC monitor is missing, check the cabling, connections, ac
power, on/off switches, and the inputs from the SCB68/PBOB/C-HUB and the
Version 2.0
19
2
Behavorial Control computer. The SCB68/PBOB/C-HUB could also be faulty as
well as the connections to it.
2.4.3 CinePlex Capture and Other Equipment
In this configuration, the primary points to check are the CinePlex Capture monitor, all of the connections, and all of the cables.
2.4.3.1 CinePlex Capture Equipment
If proper video is observed at the CinePlex Capture monitor, you can reasonably
be sure the the camera, CinePlex Capture computer, and CinePlex Capture monitor are working correctly.
If there should be no video, check the cabling, connections, ac power, on/off
switches, lighting, and the iris, zoom, and focus of the camera. The cables may
not be connected properly, one or more cables may be broken internally, a pin or
pins on a cable could be bent or broken, the iris on the camera could be shut, the
zoom on the camera could be set improperly, or the focus could be set so that
everything is a blur.
2.4.3.2 Other Equipment
If there should be one or more visual indications of operation of the other equipment, you should check those. Again, you need to pay attention to connections,
on/off switches, cabling, and the inputs from the CinePlex Capture computer and
the Behavorial Control computer.
20
CinePlex
2.5 Setting up CinePlex Capture
2.5.1 Arranging CinePlex Capture Windows
The default window layout will be sufficient for most instances. However, if you
wish to change the window layout, see “Windows” on page D-6. If you wish to
load or save a layout configuration, see “Window Menu” on page D-11.
2.5.2 Selecting File Locations
You must decide on the locations to store the recording and archive files.
1
To set their locations, select Change Data Folders from the File menu. The
Choose Folders dialog box appears.
2
Click the Browse button at the right of the Recording Folder textbox to
change the Recording Folder. The Browse for Folders dialog box appears.
3
Navigate to the desired folder and click Open. A new folder may be created
by using the “Make New Folder” button.
4
Click the Browse button at the right of the Archive Folder textbox to change
the Archive Folder. The Browse for Folders dialog box appears.
5
Navigate to the desired folder and click Open. A new folder may be created
by using the “Make New Folder” button.
6
When finished choosing storage folders, click OK.
2.5.3 Positioning the Camera
Version 2.0
1
In general, it is better to position the camera as far from the experiment as
possible, then zoom as much as possible in order to fill the field of view with
the area of interest without distortion. To compute the distance from the
camera to the arena so that the whole arena is visible, see “Guidelines” on
page C-2.
2
When tracking is desired, ensure that the ratio of the object size to the arena
size is such that the system will be able to track the object. If the ratio is too
small (the image size of the object would be less than 1 pixel) the system will
21
2
not be able to distinguish the object from noise. If the ratio is too large (more
that 1/4 of the video image) the system will not track the object.
3
Obtain an initial video image using the default CinePlex Capture settings and
changing only the lens parameters (iris, focus, zoom).
4
If the previous step does not result in a good image, manually change
Camera Settings in CinePlex Capture. Adjust the settings in this order:
Contrast, Brightness, Sharpness, and Saturation.
5
When tracking, create an Arena that includes all areas of interest in the video.
2.5.4 Tracking Mode Adjustments (if tracking option is available)
2.5.4.1 Selecting the Tracking Mode
The table below shows which tracking mode to use under various circumstances.
Table 1:
You are Using
LEDs are the Brightest
Spots in Arena
Tracking Mode to Use
LEDs
Yes
LED or Reflective Colors
LEDs
No
Reflective Colors
Colored Markers
NA
Reflective Colors
No LEDs, no Colored
Markers
NA
Object Contour
2.5.4.2 LED and Reflective Colors Tracking
If you are using LED or Reflective Colors tracking, you must consider the lighting conditions. The illustrations below show examples of the video window with
LED or Reflective Colors tracking modes under different lighting conditions.
22
CinePlex
2.5.4.2.1 LEDs in Darkness with LED Tracking Mode.
In darkness the LEDs are the brightest spots in the window, and the LED Tracking mode is excellent for this condition.
2.5.4.2.2 LEDs in Darkness with Reflective Colors Tracking Mode.
In darkness you may also use Reflective Colors tracking mode with the LEDs
being the reflective colors.
Version 2.0
23
2
2.5.4.2.3 LEDs in Light with Reflective Colors Tracking Mode.
In lighted conditions you may use Reflective Colors Tracking mode with the
LEDs being the reflective colors.
2.5.4.2.4 Reflective Colors Tracking Mode in Light.
In lighted conditions without LEDs you may use the Reflective Colors Tracking
mode with the reflective colors shown in the illustration.
24
CinePlex
2.5.4.3 Object Contour Tracking
When you are using Object Contour tracking, you must consider the background
color and any background objects. The illustrations below show different background and color conditions in conjuction with Object Contour tracking. For
example, suppose that you wish to track a dark animal as shown in the illustration
below.
2.5.4.3.1 Animal with No Background.
This illustration shows the animal to be tracked without any background object in
the window, since the background color is isotropic and contrast to the animal’s
color.
2.5.4.3.2 System Tracking Background Object.
This illustration shows an animal to be tracked along with a background object of
approximately the same color. The background object is larger than the animal
and the system is tracking the background object (the red cross hair is centered on
Version 2.0
25
2
the object and the yellow rectangle is surrounding the object). To avoid this situation, you may define an arena in which to track or you may use background subtraction.
2.5.4.3.3 Arena Defined.
This illustration shows a defined arena (in green) that the system will use to track
the animal. The arena excludes the background object so that the system will
never lock onto the object by mistake.
2.5.4.3.4 Backgound Object.
This illustration shows the background object with nothing else in the window.
You may capture the image of this window to use for background subtraction.
Background subtraction allows the system to disregard the background object or
objects.
26
CinePlex
2.5.4.3.5 Background Subtraction.
This illustration shows the background object and the animal together using
backbround subtraction. Note that the system is tracking the animal.
2.5.4.3.6 Low Color Contrast.
Background subtraction will allow you to do body tracking even at a low color
contrast between the animal and background.
Version 2.0
27
2
2.5.4.3.7 Multicolored Animal.
You will be able to track multiple colored animals using Plexon’s special algorithm of background subtraction. In this case you need to be sure that all colors
contrasted with the background color. You may use different background colors
to try to improve the quality.
2.5.5 Tracking Mode Properties (if the tracking mode is available)
1
Select the desired tracking mode by clicking the appropriate icon on the
Tracker toolbar.
2
The Properties window for the selected tracking mode displays.
3
Perform adjustments as described in section below that corresponds to the
the selected tracking mode.
2.5.5.1 LED Tracking
28
1
In the Visualization group check Show Contour and Fill Contour so that the
objects found by the system are visible.
2
Check the Pure Colors checkbox in the LED Tracker area.
CinePlex
3
Check each color to track in the LED properties area.
4
Change the Threshold (common to all LEDs) so that the correct objects are
filled and outlined on the Video window. Their color crosses (representing the
centers of gravity) should be centered on the correct objects.
5
If pure colors do not give good results, use the pick-up tool to select the color
from the video (see “” on page 2-77). Adjust the Threshold as needed.
2.5.5.2 Reflective Colors Tracking
1
In the Visualization group check Show Contour and Fill Contour so that the
objects found by the system are visible.
2
Check the Pure Colors checkbox in the Reflective Colors Tracker area.
3
Check the color to track (by clicking the corresponding checkbox).
4
Adjust the Threshold of the selected color (see diagram above) so that the
correct object is filled and outlined on the Video window and its color cross is
properly centered.
Note:
Version 2.0
If you are working with pure RGB colors, the Threshold should be
moved to lower values to provide stable tracking.
29
2
5
If pure colors do not give good results, select the color from the video (using
the pick-up tool - see “” on page 2-77). Adjust the Threshold higher to find
and track the object.
6
Repeat steps 2-4 for each color selected.
2.5.5.3 Object Contour Tracking
1
In the Visualization group check Show Contour and Fill Contour so that the
objects found by the system are visible.
2
If the animal has a good contrast relative arena image, and the background is
uniform, i.e., there are no other objects with similar contrast - you can work
without subtraction of the background image. Adjust the threshold to fill the
whole animal.
3
With a non-uniform background, use background subtraction to track better.
4
Remove animal from the tracking area.
5
Capture background image by clicking the Camera icon. The Use
Background control will activate so that you can click it.
6
Check the Use Background checkbox (see diagram above).
7
Replace the animal in the tracking area.
8
Adjust the Threshold (see diagram above) to fill the whole animal.
You can use Detail Filter to remove non-required features of the detected objects
(tail, etc.) or remaining parasite objects in the whole image. Note that object features, such as the tail, slightly shifts the center of gravity of the body, and filtering
helps to correct it.
30
CinePlex
2.6 Executing the Experiment Plan
The steps performed in this part of the process depend on your experiment plan.
Since implementing the experiment plan depends on the contents of the plan and
there are an unlimited number of experiment plans, detailed discussion of this
section is beyond the scope of this manul.
2.7 Digital Video Recording
The Digital Video Recording (DVR) feature of CinePlex Capture stores the video
recording from the camera on the internal hard drive. In most experiments, you
simultaneously collect a neural data file—for example, a .plx file from the
Plexon MAP System—along with the .avi file. With CinePlex Capture, you can
start, stop, and time stamp these .avi files in a way that enables you to subsequently correlate them offline with the simultaneously-captured neural data. For
information on starting, pausing, and stopping recording of files, see “DVR
Menu” on page 3-97. In most cases, you can use the CinePlex Markup software.
For more information, see “Understanding CinePlex Markup Files” on
page 4-104.
To enable this offline analysis, you must bring the pairs of .avi and neural data
files together on the same computer—the “analysis computer”—with CinePlex
Markup. You may use a variety of means to transfer the .avi files from the CinePlex Capture internal hard drive to the analysis computer, if needed. Likewise, if
your neural data files are stored elsewhere, you can transfer the neural data files
to the analysis computer, perhaps by using a network connection or some other
means. If your analysis computer is the Plexon MAP-system computer or the
Plexon Recorder computer, it typically stores the neural data files on its local
disk.
Recording and transferring video files
1
Use CinePlex Capture to record one or more .avi or .dvt files on the internal
hard drive. If the Recording Folder has not been set, a notification message
will display.
2
Transfer the .avi files or .dvt files, or both, onto the analysis computer. When
you finish copying the files to the analysis computer, you can rename the files.
3
Use CinePlex Markup (or some other method) to match up the .avi file with its
partner neural data file, or .dvt file, or both, and analyze the data.
Note:
For a detailed version of this procedure, see “Recording Synchronized Video and Neural Data With the Plexon MAP” on page 2-36 or
“Recording Synchronized Video/Neural Data With Plexon Recorder”
on page 2-38.
CAUTION
Camera Damage
Never connect or disconnect the camera while the power is on. The
camera can be permanently damaged.
Version 2.0
31
2
2.7.1 Delayed and Dropped Frames
Delayed and dropped frames are caused by congestion in the CinePlex Capture
PC. Congestion means that other activities in the PC are preempting resources
required for error-free operation of CinePlex Capture. These resources could be
the CPU, the I/O bus, the video card, or memory. Delayed and dropped frames
can be minimized by removing un-needed applications from the CinePlex Capture PC or, if that is not possible, by not using them while video is being captured.
In particular, automated processes such as Windows Update should be disabled.
2.7.1.1 Delayed Frames
A delayed frame is one that had its time stamp applied later than expected due to
internal congestion in the CinePlex Capture PC. The frame was actually captured
at the expected point in time, but remained in buffers until it could be processed.
2.7.1.2 Dropped Frames
A dropped frame is one that was never taken due to extreme congestion in the
Capture PC. The buffers in between the camera and the Capture PC were full at
the time the frame should have been captured.
2.7.1.3 Treatment of Delayed and Dropped Frames
CinePlex Capture counts delayed and dropped frames separately, while CinePlex
Markup counts them together.
The sum of delayed and dropped frames counted by Capture should approximately equal the Markup count at its default 0.1 tolerance from the average rate.
CAUTION
Increase in Delayed/Dropped Frame Count
You may notice that the delayed/dropped frame count increases
whenever you change the focus back to the Capture screen after
making adjustments in another application. If this happens, try to
make these adjustments before recording starts.
2.7.2 Digital Video Recorder AVI Format Files
CinePlex Capture typically records video into motion-JPEG .avi files at a resolution of 640x480 pixels at 30 frames per second, which implies a raw data rate of
over 100 Gb/hour. It is also possible to record at 15, 10, 5, 2, or 1 frames per second (see “DVR Group” on page 3-83). However, CinePlex Capture compresses
each frame of the video before it writes it to the .avi file. You can vary the file
compression to find a suitable balance between .avi file size and image quality.
At an image quality setting of 65, an .avi file grows at a rate of approximately 2.1
Gb/hour. This growth rate depends on the complexity of the video image, which
affects the compressibility. While it records, CinePlex Capture continually calcu-
32
CinePlex
lates and displays the amount of recording time left until the target hard drive fills
up. As the hard drive capacity is neared, CinePlex Capture stops recording.
Note:
Experiment to find the minimum quality setting that yields an acceptable image.
For example, if you increase the quality setting from 65 to 90, the size of the
AVI file doubles using the same recording time—but it does not dramatically
increase the quality of the image. Conversely, if you reduce the quality setting
from 65 to 20, the size of the AVI file halves using the same recording time—
however, the quality of the image degrades.
The .avi files created by CinePlex Capture are industry-standard AVI-format files
that you can play with many standard tools, including Microsoft Windows Media
Player, which is pre-installed on most Windows computers. You can also use a
variety of commercial software applications to edit and perform other operations
on .avi files.
The AVI format allows the embedding of additional data segments within .avi
files. Each embedded data segment has an identification tag. Typically, an .avi
file reader that does not recognize a tag for an embedded data segment skips that
data segment. CinePlex Capture always produces .avi files with a Plexon-specific
additional tagged data segment that contains time stamp data for each video
frame. CinePlex Markup can read this additional data segment in the .avi files
generated by CinePlex Capture and thus recover the timestamp of each frame.
Other .avi file readers like Windows Media Player ignore this data. This Plexonspecific nondestructive embedded time stamp is not visible on the video frame.
However, CinePlex Capture contains an optional feature that can overlay this
time stamp in visible numerals on the video image itself; see “DVR Group” on
page 3-83.
CinePlex Capture automatically generates filenames for .avi or .dvt files. There
are a number of formats for the filename. The format may contain an optional 3character prefix, an optional date format, and a 3-digit filenumber. The table
below shows the various possiblities.
Version 2.0
33
2
Table 2:
Prefix
Date
File #
Filename Format
None
None
nnn
nnn.avi
PPP
None
nnn
PPPnnn.avi
None
mmddyy
nnn
mmddyynnn.avi
None
ddmmyy
nnn
ddmmyynnn.avi
None
mmddyyyy
nnn
mmddyyyynnn.avi
None
ddmmyyyy
nnn
ddmmyyyynnn.avi
PPP
mmddyy
nnn
PPPmmddyynnn.avi
PPP
ddmmyy
nnn
PPPddmmyynnn.avi
PPP
mmddyyyy
nnn
PPPmmddyyyynnn.avi
PPP
ddmmyyyy
nnn
PPPddmmyyyynnn.avi
Note:
The table shows the format for .avi files. The formats for the .dvt files are identical except that the extension is .dvt.
You may choose to have a prefix and/or a date as part of the filename. The prefix
(PPP in the table) contains any three characters. There are four date formats
(mmddyy, ddmmyy, mmddyyyy, ddmmyyyy) where mm indicates the month, dd
indicates the day, and yy or yyyy indicates the year. The file number contains any
three digits. Unless you specify a different starting number, the filenumber begins
at 001 or at the next available file number if 001 is already used. CinePlex Capture determines the number nnn from the .avi files already recorded and stored on
the internal hard drive. The latest file name is always one greater than the largestnumbered .avi file already on the internal hard drive. If you are using one of the
date formats and midnight occurs, the first file recorded after midnight restarts at
001. The last possible file number is 999. When recording that file number, the
Next Available File property displays N/A (Not Available).
It is important that you be able to “match up” a recorded .avi file with the corresponding neural data file. A convenient way to accomplish this is to compare the
time and date of the two files. If the Windows clock on the neural data acquisition
computer is synchronized to within a few minutes with the clock on the CinePlex
Capture computer, it is easy to match the .avi files to the neural data files by
34
CinePlex
matching time and date. Another method of matching files is to synchronize the
file names using the file naming alternatives listed in Table 2.
CAUTION
Lighting Conditions
If lighting conditions change enough during recording that ‘objects
too large’ or some other condition occurs, the position data will be
valueless from that point forward.
2.7.3 Synchronizing .avi Files with Neural Data Files
To synchronize the .avi files to the neural data files, you must:
•
have all time stamps generated by the same clock
•
start and stop the recording of both files at the same time
Use of the same clock to generate the time stamps in each file avoids longer-term
“drifting” of the time-base of one file relative to the other. For example, say the
clock controlling the time stamp generation for video frames has a frequency difference of 1% from the clock controlling the time stamp generation of neural firing events in the neural data files; after 100 seconds, the occurrences that should
appear as simultaneous in the neural data and .avi files appear instead as one second apart. If you use CinePlex Capture with a Plexon MAP system, synchronization occurs because CinePlex Capture is controlled with a clock signal derived
from the main Plexon MAP clock. Thus, the .plx and .avi files are guaranteed to
have the same time-base.
Note:
The CinePlex Capture clock is 1 KHz. This means that the resolution of time
stamps generated by CinePlex Capture is 1 msec.
Simultaneous starting, stopping, pausing, and resuming of the neural data and
.avi files is also essential to synchronization, because non-coincident start times
make it difficult for you to synchronize the behaviors captured in the video with
their time-coincident neural activity.
Although you can manually start, stop, pause, and resume recording an .avi file at
any time in CinePlex Capture by simply clicking the appropriate toolbar buttons,
Plexon does not recommend this mode of operation for recording synchronized
files, because it produces .avi files that do not have the same start time as the corresponding neural data files. Instead, configure CinePlex Capture to use the
remote start, stop, pause, and resume signals supplied by a data acquisition system through the “Record” and “Pause” electrical control inputs (see Appendix E).
For example, if you use CinePlex Capture with a Plexon MAP System, the MAP
System generates control signals and routes the signals through the control cable
to the appropriate inputs on CinePlex Capture computer. To use this mode of
operation, arm CinePlex Capture to respond to the electrical control signals.
When armed, CinePlex Capture starts recording the .avi file within milliseconds
of the start of the neural data file.
Version 2.0
35
2
Note:
CinePlex Capture resets the time stamp to zero when the “Record” line goes
high, or when you click the Record button to manually start recording an .avi
file. Otherwise the time stamps continue to increment until you shut down CinePlex Capture.
2.7.4 Recording Synchronized Video and Neural Data With the Plexon MAP
The procedures that follow apply to CinePlex Capture when used with a Plexon
MAP system. The Plexon MAP is connected as described in Appendix A so that
the clock and control signals are sent from the Plexon MAP to the CinePlex Capture computer. You can use CinePlex Capture with other hardware that generates
the required clock and control signals. More information about the clock and control signals appears in Appendix E.
Note:
If you need more information on setting up and running Sort Client, refer to the
RASPUTIN User’s Guide.
Recording time-synchronized video and neural data files with the
Plexon MAP
1
At the Plexon MAP, turn the power on and configure the Plexon MAP system
so that neural data appears in Sort Client; see “Operating CinePlex Capture
with RASPUTIN Sort Client” on page 2-67. Do not start recording data to a
.plx file.
2
At the CinePlex Capture computer, turn the power on. Wait for the CinePlex
Capture application main window to appear on the monitor.
3
On the Tools menu, click Configuration.
The Configuration dialog box opens
From the External Equipment list, choose Plexon MAP. Click OK to close
the dialog box and reconfigure CinePlex Capture to work with the Plexon
MAP.
36
4
Make sure that the time and date on the CinePlex Capture computer and the
Plexon MAP computer are synchronized.
5
CinePlex Capture provides a time code that tracks the time elapsed since the
last time you started recording. To view and configure the CinePlex Capture
time display, in the Properties window in the Timecode area, click Visible.
Choose a Location and a Format setting to configure the display. For
CinePlex
example, the following illustration shows the time code in the Upper Left
location in HH:MM:SS.SSS format.
6
In the Properties window in the Camera area, set the Contrast, Brightness,
and Sharpness controls to get a acceptable image on the screen.
7
In the DVR area, set the Image Quality to the default setting of 75.
Note:
You can also use other settings. To evaluate image quality settings,
manually collect a set of .avi files at different settings and use the
Video Library preview tool to determine a minimum acceptable
image quality setting for your use.
HINT
Reducing blurs and color streaks in the video
If your experimental subject moves quickly, blurs and color streaks
can appear in the video. You can reduce or eliminate these problems
by increasing the shutter speed. For more information, see “Shutter”
under “Camera Group” on page 3-82.
8
From the CinePlex Capture DVR menu, click Arm. A yellow flashing icon
appears on the status bar.
9
At the Plexon MAP, from the Sort Client File menu, click Open Data File/Start
Recording. Enter a file name and any other file-related information you need
to add in the Data File Options dialog box. Click the Start and Stop tab; click
Use User Commands (Start Recording and Stop Recording menu
commands). To close the dialog box and start recording, click OK.
Sort Client starts recording and displays status information about the neural
data file on the Sort Client status bar; for information on the Sort Client status,
see the RASPUTIN User’s Guide.
CinePlex Capture starts recording and displays information about the video
file in the CinePlex Capture status bar.
Version 2.0
Note:
The status bar will display the amount of free space remaining. The
file size of a FAT32 file will be limited to 4GB or the amount of free
space, whichever is less.
Note:
After the 4GB limit has been reached for a FAT32 formatted drive, a
warning message appears to notify you that you should consider
changing the format of the drive to NTFS.
37
2
Note:
10
If you need more information about recording files using Sort Client,
refer to the Plexon RASPUTIN User’s Guide; see “Using Sort Client,
Section C, Record.”
To pause recording, at the Plexon MAP, from the Sort Client Datafile menu,
click Pause Recording.
Sort Client pauses recording and displays status information about the neural
data file on the Sort Client status bar; for information on the Sort Client status,
see the RASPUTIN User’s Guide.
CinePlex Capture pauses recording and displays information about the video
file in the CinePlex Capture status bar. The status bar flashes to indicate that
the recording is paused.
To resume recording, click Pause Recording again.
11
To stop recording, at the Plexon MAP, from the Sort Client Datafile menu,
click Stop Recording.
Sort Client stops recording to the neural data file, clears the recording information from the status bar, and saves the file to the location you specified in
Step 9.
CinePlex Capture stops recording to the video file and saves the file to the
location shown in the status bar at Step 8. CinePlex Capture clears the
recording information from the status bar and re-arms itself for the next
recording session.
12
To disarm CinePlex Capture, from the DVR menu, click to clear Arm. The
status bar returns to the disarmed state.
13
To preview the captured video file, follow the procedure at “Managing Video
Files” on page 2-41.
14
To transfer the files to the analysis computer, follow one of the procedures at
“Transferring Recorded Files” on page 2-45.
15
To view the files together, start CinePlex Markup by following the procedures
described in Chapter 4.
Note:
You can also view just the .avi files by using Windows Media Player
on the analysis computer.
2.7.5 Recording Synchronized Video/Neural Data With Plexon Recorder
The procedures that follow apply to CinePlex Capture when used with Plexon
Recorder. Plexon Recorder is connected as described in Appendix A so that the
clock and control signals travel between the CinePlex Capture computer and the
NI DAQ device in the Plexon Recorder PC. More information about the clock
and control signals appears in Appendix E.
Note:
38
If you need more information on setting up and running Plexon Recorder, refer
to the Plexon Recorder User’s Guide.
CinePlex
Recording time-synchronized video and neural data files with Plexon
Recorder
1
At the Plexon Recorder PC, turn the power on and configure Plexon Recorder
to start with an external trigger; see “Operating CinePlex Capture with Plexon
Recorder” on page 2-76. Do not start recording data.
2
At the CinePlex Capture computer, turn the power on. Wait for the CinePlex
Capture application main window to appear on the monitor.
3
On the Tools menu, click Configuration.
The Configuration dialog box opens.
From the External Equipment list, choose the entry that is appropriate for
your equipment. Click OK to close the dialog box and reconfigure CinePlex
Capture to work with Plexon Recorder.
4
Make sure that the time and date on the CinePlex Capture computer and the
Plexon Recorder PC are synchronized.
5
CinePlex Capture provides a time code that tracks the time elapsed since the
last time you started Plexon Recorder. To view and configure the CinePlex
Capture time display, in the Properties window in the Timecode area, click
Visible. Choose a Location and a Format setting to configure the display.
For example, the following illustration shows the time code in the Upper Left
location in HH:MM:SS.SSS format.
6
In the Properties window in the Camera area, set the Contrast, Brightness,
and Sharpness controls to get a acceptable image on the screen.
7
In the DVR area, set the Image Quality to the default setting of 75.
Note:
Version 2.0
You can also use other settings. To evaluate image quality settings,
manually collect a set of .avi files at different settings and use the
39
2
Video Library preview tool to determine a minimum acceptable
image quality setting for your use.
HINT
Reducing blurs and color streaks in the video
If your experimental subject moves quickly, blurs and color streaks
can appear in the video. You can reduce or eliminate these problems
by increasing the shutter speed. For more information, see “Shutter”
under “Camera Group” on page 3-82.
8
At the Plexon Recorder PC, set up file name generation to suit your
experiment.
Note:
9
To arm Plexon Recorder for triggered recording, click Start Recording.
Note:
10
For more information, refer to “File Name Generation” in the Plexon
Recorder User’s Guide.
Recording does not begin until the CinePlex Capture computer provides a trigger signal. When the event channel voltage level goes
high (TTL level), recording begins and continues as long as the voltage remains high.
At CinePlex Capture, on the DVR menu, click Record. CinePlex Capture
starts recording and displays information about the video file in the status bar.
Note:
The status bar will display the amount of space remaining.
Note:
After the 4GB limit has been reached for a FAT32 formatted drive, a
warning message appears to notify you that you should consider
changing the format of the drive to NTFS.
Plexon Recorder starts recording and displays status information about the
neural data file in the Plexon Recorder status area; for information on Plexon
Recorder status, see the Plexon Recorder User’s Guide.
Note:
11
If you need more information about recording files using Plexon
Recorder, refer to the Plexon Recorder User’s Guide; see “Recording
Data to a File.”
To pause recording, at CinePlex Capture, on the DVR menu, click Pause.
CinePlex Capture pauses recording and displays information about the video
file in the CinePlex Capture status bar. The status bar flashes to indicate that
the recording is paused.
Plexon Recorder pauses recording and displays status information about the
neural data file in the Plexon Recorder status area; for information on Plexon
Recorder status, see the Plexon Recorder User’s Guide.
To resume recording, click Pause again.
12
To stop recording, at CinePlex Capture, on the DVR menu, click Stop.
CinePlex Capture stops recording to the video file and saves the file to the
location shown in the status bar at Step 10. CinePlex Capture clears the
recording information from the status bar and re-arms itself for the next
recording session.
40
CinePlex
Plexon Recorder stops recording to the neural data file, clears the recording
information from the status bar, and saves the file to the location you specified
in Step 8.
13
To disarm Plexon Recorder, click Stop Recording.
Plexon Recorder returns to the disarmed state.
14
To preview the captured video file, follow the procedure at “Managing Video
Files” on page 2-41.
15
To transfer the files to the analysis computer, follow one of the procedures at
“Transferring Recorded Files” on page 2-45.
16
To view the files together, start CinePlex Markup by following the procedures
described in Chapter 4.
Note:
You can also view just the .avi files by using Windows Media Player
on the analysis computer.
2.7.6 Managing Video Files
To manage video files you must first set the locations of the Recording and
Archive files.
Setting the Recording and Archive folders
1
At the CinePlex Capture computer, from the Tools menu, click Folders.
The Choose Folders dialog box opens.
When Capture starts for the first time, it creates the Recording folder “C:\PlexonData\” if it does not already exist. Thus, the default location of the Recording folder is the internal hard drive. Initially, the Archive folder will be blank.
2
To set or change one of the folder locations, click on one of the Browse
buttons.
The Browse for Folder dialog box opens.
Version 2.0
41
2
Note:
3
It is possible to delete a folder from this dialog box by selecting the
folder and hitting the Delete key. However, you can not delete the
Recording or Archive folder in this manner.
Create a new folder or navigate to an desired existing folder and click OK
when finished.
The location of the Recording and Archive folders are automatically saved in
the Capture configuration file and loaded at the next launch of the application.
Note:
If either your Archive drive or Recording drive is not NTFS, you will
see a warning message.
Note:
If your Recording drive is external but not an approved Lacie drive,
you will see a warning message.
Note:
The Recording and Archive folders must not be the same. If they are
the same, you will see a warning message.
Note:
If recording is performed to an NTFS drive, the file size is limited to
the remaining space on the drive. The upgraded CinePlex Capture
corrects a previous problem of AVI and DVT file corruption when
there is not enough free disk space to complete file capture. In the
upgraded CinePlex Capture, the AVI and DVT files will no longer be
corrupted when the disk runs out of free space. The files will be
closed normally and will be easily readable.
To help you to conveniently review and manage your video files, CinePlex Capture includes the Video Library tool. Video Library appears only on the CinePlex
Capture computer.
Using the Video Library to manage files
1
At the CinePlex Capture computer, from the File menu, click Video Library.
If the Archive folder has not been set, the Video Library dialog box opens as
shown below.
42
CinePlex
If the Archive folder has been set, the Video Library dialog box opens as
shown below.
2
To preview an AVI file, select the file from the Recording folder or Archive
folder and click Preview.
The Preview window opens showing the first frame of the video file. Preview
is a floating window with a re sizable border. Its size and position are automatically stored in the configuration file so that it is restored at the next launch.
Version 2.0
43
2
3
Note:
You may navigate the files without closing the Preview window.
Note:
If you close the window, you must click Preview to open it again.
Note:
If Preview mode is on, selecting a different DVT file will disable the
Preview button.
To preview a file you can:
•
4
44
drag the scroll cursor to view another frame
To delete a file you no longer need, select the file and click Delete.
Note:
You may select multiple files by using the CTRL, SHIFT, and left
mouse buttons as in other standard applications. It is possible to
select files in both folders, but the last file selected determines the
active folder. The Delete button deletes files in the active folder, and
the Copy and Move buttons copy or move files from the active folder
to the other folder.
Note:
In CinePlex Capture 1.0 the files were deleted in pairs. If you selected
an .avi file and clicked Delete, the corresponding .dvt file was also
deleted. Now you may delete them separately.
5
If you wish to move or copy files, see the detailed instructions for the
appropriate procedure in “Transferring Recorded Files” on page 2-45.
6
To exit the Video Library, click Done or click the window close x in the upper
right hand corner.
CinePlex
2.7.7 Transferring Recorded Files
Note:
This section only applies to implementations with separate capture and analysis computers.
To transfer your files to the analysis computer, CinePlex offers the two methods USB drive or USB-USB link. For information about the USB-USB link, current
customers should contact Plexon Inc. To transfer files using the USB-USB link,
see “Using a USB-USB link to transfer files” on page F-39.
Using an external USB drive or memory stick to transfer files
1
The Archive folder must have already been specified as described in
“Managing Video Files” on page 2-41. The external USB drive must be
plugged into the CinePlex Capture machine. From the File menu select Video
Library.
The Video Library dialog box opens.
2
If you wish to copy files from the Recording Folder to the Archive Folder,
select the file(s) you wish to copy in the Recording Folder pane and click
Copy.
While copying the file(s) a progress dialog box displays.
If a file already exists in the Archive Folder with the same name as the one
being copied, the Confirm File Replace dialog box appears.
3
Version 2.0
If you wish to move files from the Recording Folder to the Archive Folder,
select the file(s) you wish to move in the Recording Folder pane and click
45
2
Move. You may also move the files by using the standard ‘Drag and Drop’
method.
While moving the file(s) a progress dialog box displays.
If a file already exists in the Archive Folder with the same name as the one
being moved, the Confirm File Replace dialog box appears.
Note:
You may also move files by the standard ‘Drag & Drop’ method.
4
Unplug the USB drive from the CinePlex Capture machine.
5
Plug the USB drive into the analysis machine, and copy the files to the
desired location.
Note:
If the Plug and Play framework is enabled, just follow the instructions
on the popup window to navigate to the files you wish to move or
copy. Then, move or copy the files as needed.
Note:
If the Plug and Play framework is disabled, just move or copy the
desired files by using standard move or copy methods.
2.8 CinePlex Capture Tracking
As described in Chapter 1, the CinePlex Capture Tracking option can generate
tracking coordinates in one of three modes: Object Contour, LED, or Reflective
Colors.
CinePlex Capture uses Tracking Windows and Arena Definition to track objects
and reduce unwanted parasite objects. These elements are explained below.
2.8.1 Tracking Window
Tracking windows are used to reduce problems with unwanted parasite objects
(e.g. reflections) and to reduce the processor load by restricting analysis to a
small portion of the video image.
46
CinePlex
The size of the tracking window is set automatically to cover the whole object.
Each object (whole animal, LED, or marker) has its own tracking window. The
tracking window is repositioned automatically. A history of an object’s movement is used to predict its next position. If the object disappears because of occlusion by a cable or other means, its tracking window is moved according to the
speed and movement direction in its most recently detected frames. If the system
is tracking multiple LEDs or markers, the system will also use the positions of the
found LEDs or markers to predict the position of the one that disappeared. If the
object is not found after a certain number of frames, the size of the tracking window will be increased. If the object is not found within two seconds, the system
switches to search in the whole fram (possibly restricted by an arena - see below).
2.8.2 Arena Definition
The Arena Definition is also used to reduce problems with unwanted parasite
objects outside of the working area. If a reflection of other unwanted object
appears outside the arena, it will not be detected by CinePlex Capture.
Version 2.0
47
2
The Arena Definition is also used to reduce the processor load because only the
portion of the video image restricted by the arena is analyzed.
Special drawing tools are available in CinePlex Capture to design the arena. You
may draw many shapes: circles, ovals, rectangles, and freehand polygons. To perform operations on the arena, click the one of the Arena nodes (Arena Outline or
Arena Transparency).
Select the shape you wish to draw. For a rectangle or circle, left-click and hold
the mouse on a desired point on the image and move the mouse to size the arena.
For a freehand polygon, click the left mouse button over desired points that will
be the nodes of the polygon. You may move and resize the arena, and you may
also drag the nodes of a freehand polygon.
2.8.3 Selecting Tracking Modes
In general, for a given experimental setup only one mode is appropriate. The following guidelines can help you to determine which tracking mode to use:
•
In general, you obtain the best tracking results when you attach light-emitting
diodes (LED) to the animal. The easiest way to do this is to mount the LEDs
directly on the animal headstage, as is shown in Figure 2-1. Plexon offers
headstages with LEDs mounted on them.
Figure 2-1
LED Headset
48
CinePlex
Version 2.0
•
If you want to track not only position but head direction, use two or three
LEDs. Because Object Contour Mode can only track the “center of gravity”
of the animal’s contour, you cannot use Object Contour mode with LEDs.
•
If you need Motion Measure, which you can use for fear studies where animal
“freezing” behavior is important, you must use Object Contour mode.
•
If your animals are multicolored, especially with high-contrast colors (e.g.
Long Evans rats), Object Contour mode will not work well only with a contrasting background color, such as red.
•
For LED tracking the brightest spots on the image are found, and their position in the color space is determined. This mode is recommended when LEDs
are to be tracked, and they are the brightest spots on your image.You may
check the Pure Colors option to cause the system to recognize the standard
red, green, and blue colors automatically. Otherwise, you should select the
colors to track.
•
In Reflective Colors mode, pixels having the specified colors are analyzed as
belonging to the corresponding object. You may use this mode for tracking
LEDs or color markers when the arena is lit.
•
In general, to obtain optimal tracking results you must put more effort into
setting up Object Contour mode than either LED or Reflective Colors modes.
Object Contour mode is also more sensitive to changes in background or
lighting conditions.
49
2
2.8.4 Using the Tracking Wizard
CinePlex Capture provides a Tracking Wizard to help you configure each of the
tracking modes. The Tracking Wizard guides you through the same configuration steps that appear in subsequent sections of this manual.
To open the Tracking Wizard dialog box, from the Tracker toolbar, click the
Tracking Wizard icon. Select a tracking mode and click OK.
A warning box will display before the Tracking Wizard starts. Click Yes to continue.
When the Tracking Wizard dialog box closes, the Wizard window opens for you
to select the desired tracking mode. Clicking the green arrow proceeds to the next
step of the wizard.
50
CinePlex
Each step will allow you to change settings in the selected mode’s Properties window. An example step is shown below.
CinePlex Capture highlights those items in the Properties window for you and
automatically makes suggested settings. To step through the Tracking Wizard,
click the right green arrow. To back up, click the left green arros. To exit the
Tracking Wizard, click the Window Close (X) button. The final screen of the
Tracking Wizard is shown below.
2.8.5 Object Contour Mode Tracking
Object Contour mode tracking contrasts and thresholds a monochrome image and
computes its centroid to track the target. Object Contour tracking includes
options that provide detail filtering, background subtracting, contour closing, and
motion measuring. For more information on using the CinePlex Capture optional
capabilities for Object Contour mode, see “Options For Object Contour Mode”
on page 2-54. The flowchart in Figure 2-2 illustrates the steps involved in configuring both the basic setup and the setup options for Object Contour mode.
Detailed procedures follow the flowchart. You may use the Tracking Wizard (see
“Using the Tracking Wizard” on page 2-50) to provide an on-screen step-by-step
guide to the following procedure.
Version 2.0
51
2
Figure 2-2
CinePlex Capture Object Contour Mode Tracking Flowchart
HINT
Use Default Settings
You can use the Restore defaults to factory settings toolbar button
to return all CinePlex Capture and camera settings to their default
values. Set the default values prior to configuring a tracking mode.
52
CinePlex
Configuring CinePlex Capture to track in Object Contour mode
1
Turn on the CinePlex Capture computer. On the File menu, click Restore
Factory Settings.
Note:
To complete this procedure, you must install the CinePlex Capture
system. If you have not completed the system installation, see
Appendix A.
2
On the Tracker menu, click Object Contour.
3
While you observe the display on the monitor, position the camera to capture
the entire arena in the field of view. Minimize the capture of areas outside the
arena.
4
In the Camera area, click to clear the Auto Contrast and Auto Brightness
checkboxes.
5
In the Camera area, adjust the Brightness slider to get a video image that
provides the maximum difference in intensity between the target animal and
the arena. Then, adjust the Contrast slider to maximize the contrast between
the target and the arena.
HINT
Reducing blurs and color streaks in the video
If your experimental subject moves quickly, blurs and color streaks
can appear in the video. You can reduce or eliminate these problems
by increasing the shutter speed. For more information, see “Shutter”
under “Camera Group” on page 3-82.
Version 2.0
6
In the Object Contour Tracker area, click Show Contour/Fill Contour to
view the contour(s) of the object(s) that the system is tracking.
7
Adjust the Threshold setting so that the object is found. For more information
about setting the threshold, see “Setting the Threshold” on page 2-64.
53
2
8
On the File menu, click Save Settings.
or
Click the Save Settings button (
) on the toolbar.
2.8.5.1 Options For Object Contour Mode
CinePlex Capture Object Contour mode includes optional capabilities to handle
special circumstances in the experimental environment:
•
Detail filtering
•
Background subtraction
•
Close contour
•
Motion measurement
2.8.5.1.1 Detail Filtering Adjustment. You can use Detail Filtering to remove
small features of the image that distort the tracking results. For example, a long
tail on a target animal can skew the centroid calculation; cables attached to the
target can also skew the results. The Detail Filtering adjustment has 10 settings
54
CinePlex
that can remove progressively larger features. Use the lowest setting that provides
adequate results for your experiment.
To apply Detail Filtering
1
In the Properties window Object Contour Tracker area, click Show Contour
or Fill Contour. Click Detail Filter and set the slider to 2.
2
Observe the effect on the image. Set the Detail Filter slider to lowest setting
that removes the undesirable features from the target image.
3
On the File menu, click Save Settings.
2.8.5.1.2 Background Option. You can use the Object Contour mode Masking
option to configure CinePlex Capture to ignore areas in the image that are at the
same intensity as the target. Use this option to remove background clutter that
cannot be physically eliminated from the field of view, or image clutter that can-
Version 2.0
55
2
not be eliminated by using CinePlex Capture’s brightness, contrast, and threshold
settings.
To apply the Background option
1
Set up CinePlex Capture to track the target in Object Contour mode. In the
Properties window Object Contour Tracker area, click to clear the Use
background checkbox.
2
In the Object Contour Tracker area, click Show Contour/Fill Contour.
3
In the Camera area, click to clear the Auto Contrast and Auto Brightness
checkboxes.
4
In the Camera area, adjust the Brightness slider to get a video image that
provides adequate discrimination of the target with the least number of white
pixels outside the target area. Do not distort the integrity of the target shape.
Likewise, adjust the Contrast slider to minimize the white pixels outside the
target area.
Note:
You can also use CinePlex Capture to automatically adjust both
brightness and contrast. To do so, in the Camera area, click Auto
Contrast and Auto Brightness.
5
Remove the target animal from the arena.
6
On the Tracker | Background menu, click Capture, or click ( ) on the
toolbar. You may also see the captured background or clear the captured
background image by using the two buttons next to this button.
7
In the Object Contour Tracker area, click Use Background.
8
Return the target animal to the arena and adjust the threshold so that the
desired object is found.
2.8.5.1.3 Close Contour Option. The Close Contour capability causes the
tracker to merge multiple objects in near proximity to each other into a single
object. This can occur when a cable passes between the animal and the camera.
Adjust the setting so that a single object is displayed. The illustration below is
taken before the Close Contour setting is applied.
56
CinePlex
The illustration below is taken after the Close Contour setting is applied.
2.8.5.1.4 Motion Measure Option. CinePlex Capture Motion Measure is an
additional Object Contour mode option that you can use to detect animal “freezing” in fear-conditioning experiments. The Motion Measure option is separate
and distinct from the target-tracking capability. If you select the Motion Measure
option, CinePlex Capture simultaneously writes both the motion-measurement
data and the target position data for each video frame to the Plexon MAP, or to a
.dvt file for use with Plexon Recorder.
CinePlex Capture analyzes the images of the target animal in consecutive frames.
The pixels that lie on the animal in the current video frame but not on the animal
in the previous video frame (and vice versa) are counted. This number is divided
by the total number of animal pixels in the current frame. The maximum result is
nominally 2.0, and the range 0.0 to 2.0 is scaled to the range 0 to 1023 and written
to the Plexon MAP. A value of 1023 indicates that the animal moved so quickly
Version 2.0
57
2
that no pixels were in common with the previous frame. A value of 0 results
when:
•
the frame is the first frame of the file,
•
the previous frame and the current frame are identical,
•
the tracking window switched from small in the previous frame to large in the
current frame,
•
the tracking window switched from large in the previous frame to small in the
current frame, or
•
the object in the previous frame and the object in the current frame are of 0
size.
CinePlex Capture writes the motion measure value to a digital VideoTracker
(DVT) format file; for more information, see “Digital VideoTracker (DVT) Files”
on page 3-101.
The Motion Measure frame-to-frame pixel overlap technique provides information on the movement of the animal’s body over time. For example, a rotating
animal’s centroid might not change, but the Motion Measure feature would indicate that the animal is not actually “frozen” because consecutive video frames are
not identical.
To apply the Motion Measure option
•
On the Object Contour Tracker menu, click the Motion Measure checkbox.
HINT
Use Default Settings
You can use the default settings toolbar button to return all CinePlex
Capture and camera settings to their default values. Set the default
values prior to configuring a tracking mode.
2.8.6 LED Mode Tracking
This section includes the configuration procedure for configuring CinePlex Capture to track colored LEDs. You can track up to three different colored LEDs.
Each tracking mode operates separately. You cannot combine Object Contour
mode and LED mode. You can use the Tracking Wizard (see “Using the Tracking
Wizard” on page 2-50) to provide an on-screen guide to the following procedure.
58
CinePlex
Configuring CinePlex Capture to track in LED mode
1
From the File menu, select Set Defaults.
2
From the Tracker menu, select LED.
3
Place powered LEDs in the camera field of view. At the camera lens, adjust
the zoom, focus, and iris settings for the best picture quality.
4
In the Properties window Camera area, click to clear the Auto Contrast and
Auto Brightness checkboxes.
5
In the Camera area, adjust the Brightness and Contrast sliders to provide
the best quality picture.
HINT
Reducing blurs and color streaks in the video
If your experimental subject moves quickly, blurs and color streaks
can appear in the video. You can reduce or eliminate these problems
by increasing the shutter speed. For more information, see “Shutter”
under “Camera Group” on page 3-82.
6
Version 2.0
To select the first LED to track, in the LED Tracker area, click Color 1.
59
2
7
If you wish CinePlex Capture to recognize the standard red, green, and blue
colors, ensure the Pure Colors checkbox is checked.
If Pure Colors is not selected, the color desired can be selected by clicking in
the color display and positioning the cursor over a pixel of the desired color.
CinePlex Capture changes the mouse cursor to cross hairs and a magnified
view of the screen pixels appears in a window on the image. See “” on
page 2-77.
Position the cross hair over a colored pixel that best represents the color of
the LED you want to track. Click the left mouse button to set the color. Repeat
this step for each color you want to track. Also see “Setting the Threshold” on
page 2-64.
2.8.6.1 Using the Color Pick-up Tool
If you need to adjust Color 1, Color 2, or Color 3 in the LED Tracker or Reflective Colors Tracker modes, follow the procedure below.
60
CinePlex
Version 2.0
1
To use the color pick-up tool, click on the Color Selection box whose color you
wish to adjust. The image below shows a sample video window before you
click the Color Selection box.
2
In the Video window a square area surrounding the mouse cursor displays as
a magnified window. Move the magnified window over the area containing the
you want to be shown in the Color Selection box. The image below shows
the magnified cursor window in the lower left of the diagram - note the
digitization of the area.
61
2
3
Position the crosshair over a representatively colored pixel. The Color
Selection box displays the color of the pixel directly under the crosshair. The
image below shows a red pixel under the magnified area.
4
Click the pixel.
5
The color of the corresponding color box in the properties window will be
changed to that of the clicked pixel.
2.8.7 Reflective Colors Mode Tracking
This section includes the procedure for configuring CinePlex Capture to track in
Reflective Colors mode. You can track up to three different reflective colors, like
painted markers or colored garbs. Each tracking mode operates separately. You
cannot combine Object Contour, LED, and Reflective Colors modes.You can use
the Tracking Wizard (see “Using the Tracking Wizard” on page 2-50) to provide
an on-screen guide to the following procedure.
Configuring CinePlex Capture to track in Reflective Colors mode
62
1
From the File menu, select Restore Defaults.
2
From the Tracker menu, select Reflective Colors.
3
Place color targets in the camera field of view. At the camera lens, adjust the
zoom, focus, and iris settings for the best picture quality
4
In the Properties window Camera area, click to clear the Auto Contrast and
Auto Brightness checkboxes.
5
In the Camera area, adjust the Brightness and Contrast sliders to provide
the best quality picture.
CinePlex
6
To select the first color to track, in the Reflective Colors Tracker area, click
Color 1.
7
If you wish CinePlex Capture to recognize the standard red, green, and blue
colors, ensure the Pure Colors checkbox is checked and also check the color
channels to be tracked.
If Pure Colors is not selected, the color desired can be selected by clicking in
the color display and positioning the cursor over a pixel of the desired color.
CinePlex Capture changes the mouse cursor to cross hairs and a magnified
view of the screen pixels appears in a window on the image. See “” on
page 2-77.
Position the cross hairs over a colored pixel that best represents the color of
the object you want to track. Click the left mouse button to set the color.
8
If the cursor does not track the object accurately, in the Reflective Colors
Tracker area, adjust the Threshold for Color 1 slider until the cursor tracks
accurately.
Note:
9
Version 2.0
If the cursor does not track accurately with the sensitivity at maximum, change the color or adjust the sharpness and saturation.
To track additional colors, repeat Step 5 through Step 8 substituting the Color
2 or Color 3 controls for the Color 1 control and the Threshold for Color 2 or
Threshold for Color 3 controls for the Threshold for Color 1 control. Also
see “Setting the Threshold” on page 2-64.
63
2
10
After you complete the previous steps, verify that the configured CinePlex
Capture system looks like the following illustration, which is set up to track
three colors.
2.8.7.1 Setting the Threshold
CinePlex Capture can locate an object of a specified color by the color contrast
between the desired color and the threshold setting. If the threshold setting is too
low, you may have an image similar to the one shown below. You will probably
need to experiment with the setting to obtain the optimal value.
If the size of the found target object is larger than 1/4 of the frame area, there will
be a red blinking message on the bottom of the screen notifying that the threshold
is probably too low and both the Arm and Record buttons will be disabled.
Try to set the threshold so that the number of parasite objects is as few as possible. You can see all objects by checking the “Show All Objects” checkbox.
64
CinePlex
To see the object recognized as the target object, check the “Show Contour” and
Fill Contour” checkboxes.
Increase the threshold to reduce the number of parasite objects.
Version 2.0
65
2
Increasing the threshold does not work in all cases. If the threshold is too large,
the target object will be smaller. In such cases, detail filtering is helpful.
66
CinePlex
2.9 Operating CinePlex Capture with RASPUTIN Sort Client
All CinePlex Capture tracking data is recorded directly to the .plx files generated
by RASPUTIN Sort Client. After you have set up CinePlex Capture to track animal motion, you must set up Sort Client to record the tracking data. The following procedure explains how to set up Sort Client to record tracking data.
Note:
If you need additional information on setting up and running Sort Client, refer to
the RASPUTIN User’s Guide.
Setting up Sort Client to record CinePlex Capture data
Version 2.0
1
Turn the Plexon MAP on. Turn the PC on.
2
At the PC, start Server.
3
Start Sort Client.
4
On the Sort Client View menu, click Settings Window.
5
In the Settings window, click the Events tab.
6
In the Name column, locate the channel named Strobed. In the Show
column, click to select the check box for the Strobed channel.
67
2
To verify CinePlex Capture data acquisition
1
Configure CinePlex Capture so that it is generating position data. For more
information, see “CinePlex Capture Tracking” on page 2-46.
2
In Sort Client, on the View menu, click Activity Display.
As shown in the following illustration, the Activity Display shows no activity
on the strobed channel.
3
Click Start, or, from the Server menu, select Start Data Transfer.
The red LED on the DSP-board input port turns on. As shown in the following
illustration, when the red LED is on the Activity Display shows the strobed
events from the CinePlex Capture tracking data.
Note:
If the Activity Display does not show the strobed events, or the red
LED on the DSP-board input port is not on, refer to Appendix B, “Typical Problems and Solutions” on page B-2.
2.9.1 Using VTViewer
CinePlex includes a utility program called VTViewer. To view position data with
VTViewer, you must have a Plexon MAP system. After you set up and start Sort
68
CinePlex
Client, you can use VTViewer to see a graphical image of the animal position on
a 1024 by 768 grid. VTViewer provides a grid view for all tracking modes, as
well as a selectable Motion Measure display in the Object Contour mode.
Note:
VTViewer only shows tracking position data. It cannot show captured .avi video
data.
Before you begin
Before you can use VTViewer, you must set up data transfer in Sort Client. To so,
make sure you complete all the steps up to and including those in “To verify
CinePlex Capture data acquisition” on page 2-68.
Starting VTViewer
1
Click the VTViewer icon on the desktop to start VTViewer.
2
As the following illustration shows, the default VTViewer window includes the
following three areas, in addition to the location grid:
3
Version 2.0
•
Control View (panel on the left side)
•
Toolbar
•
Motion Level View (across the bottom)
In the Control View, click Connect. VTViewer plots the real-time location of
the target animal on the grid as shown in the following illustration. The
69
2
illustration shows a Object Contour-mode plot that includes motion measure
data.
4
If CinePlex Capture is set for LED tracking mode or Reflective Colors tracking
mode, and at least one color is defined, VTViewer plots the real-time location
of each colored LED that you set up to track.
Note:
70
If CinePlex Capture is tracking in LED or Reflective Colors mode, you
must define at least one color to have data appear in VTViewer. If you
have not defined a color, data does not appear at the Plexon MAP.
CinePlex
The following illustration shows a plot of a two-LED headset with one red and
one green LED.
Note:
Version 2.0
VTViewer provides the motion measure plot for Object Contour mode
tracking only. If CinePlex Capture is set to LED mode or Reflective
Colors mode, and you select Motion Level View from the View
menu, VTViewer briefly displays the motion level plot below the grid.
Because there is no motion measure data to plot, VTViewer removes
the motion measure display after a few seconds.
71
2
2.9.1.1 Control View
VTViewer displays the Control View by default.
Control View provides the following controls:
72
•
Connect, Pause, and Erase buttons
•
The Mode area, which shows the CinePlex Capture tracking mode.
•
The Position area, which displays X, Y data points in real-time.
•
The Options button, which opens the VTViewer Options dialog box.
•
The Fit Window checkbox, which expands the 1024 X 768 plot to fit the size
of the current window.
•
The Auto-Scrolling checkbox, which enables scrolling of Object Contour
mode displays when the window containing the display is smaller than 1024
X 768.
•
The Draw Arrows checkbox, which enables the display of arrows in LED
mode. For more information, see “Arrows In the LED Mode” on page 2-73.
CinePlex
To expand the display area, you can close the Control View by clicking the close
button, or, from the View menu, click to clear the Control View checkbox.
2.9.1.2 Arrows In the LED Mode
You can set VTViewer to display arrows that point from LED to LED in the order
of their selection. For example, if you want an arrow to point to the nose of the
target animal, select the LED nearest the tail first. Then select the LED nearest
the nose. The resulting arrow in the VTViewer plot points toward the nose of the
animal. The following illustration shows the plot of an animal with a red LED
nearest the tail and a green LED nearest the nose.
Version 2.0
73
2
2.9.1.3 VTViewer Options
The Options button opens the VTViewer Options dialog box. This dialog box
includes controls for display colors, grids, and data input selections. The following illustration shows the Options dialog box default settings.
The VTViewer Options dialog box provides the following controls:
74
•
The Background Color and Axis and Label Color controls set the display
colors. The Current Position Marker Size control sets the size (in pixels) of
the on-screen marker that indicates the animal’s position. The Draw Grid
Lines control applies grid lines to the plot. The Spacing control sets the spacing (in pixels) between the grid lines. The grid-line Color control sets the
color of the grid lines.
•
In the Colors For Positions area, the color controls set the display color for
each LED you are tracking. These position colors apply to the VTViewer display only and they do not apply to the CinePlex Capture image. You can set
these colors to match the LED colors you have set up to track in CinePlex
Capture. You can also set them to your choice of colors.
•
In the Tails area, the controls set the characteristics of the plot line (tail) that
tracks the current position marker. The Length control sets the length of the
tail in data points. The Line Width control sets the width of the line in pixels.
The Fade setting makes the tail slowly fade away as the target animal moves
about the arena. In the Data Point Markers Along Tails sub-area, the Color
control sets the color of the data points on the tails. The Size control sets the
CinePlex
size of the data-point markers in pixels. The Draw Every control sets the frequency that VTViewer plots data-point markers along the tails.
•
In the Motion Level area, the controls set the characteristics of the Motion
Level display. The Background Color, Line Color, and Grid Color controls
set the appearance of the Motion Level display. The Time Range to View
control sets the number of seconds on the horizontal axis of the display.
•
For Plexon MAP systems with two digital input (DI) boards, in the Multiple
DI Board Operation area, the controls select which input board to use. The
Use Data From control buttons can be set to
—
Either DI (default setting) to use data from either the top or the bottom
board, whichever one has a digital input
Note:
Version 2.0
VTViewer cannot accept data from more than one board. Do
not connect a digital input to both boards.
—
First DI Only to use data from the top DI board only
—
Second DI Only to use data from the lower DI board only
75
2
2.10 Operating CinePlex Capture with Plexon Recorder
All CinePlex Capture neural data is recorded directly to the .plx files generated
by Plexon Recorder. After you have set up CinePlex Capture to track animal
motion, you must set up the NI DAQ version of Plexon Recorder to record the
neural data. CinePlex Capture is not compatible with the Plexon Recorder
ADS64 card. The following procedure explains how to set up Plexon Recorder to
record neural data using a NI DAQ device.
Note:
If you need additional information on setting up and running Plexon Recorder,
refer to the Plexon Recorder User’s Guide.
Setting up Plexon Recorder to record CinePlex Capture data
1
At the PC, start Plexon Recorder.
2
On the Plexon Recorder View menu, click Options to open the Options
dialog box. Under the Recording tab, click Event-triggered recording (PLX
only). In the Event Channel box, type the number of the event channel used
for event-triggered recording. Click OK to close the dialog box.
Note:
3
In the Plexon Recorder main window, in the Event Channels area, set an
event channel to receive the external start signal. In the Event Channels list,
for the event channel you specified in Step 2, make sure the setting in the
Polarity column is high=T.
Note:
4
76
For detailed information on setting external triggers in Plexon
Recorder, refer to “Using events to trigger recordings” in the Plexon
Recorder User’s Guide.
For detailed information on setting event channels in Plexon
Recorder, refer to “Event Channel Parameters List” in the Plexon
Recorder User’s Guide.
In the Plexon Recorder main window, click Start DAQ.
Note:
This arms the Plexon Recorder NI DAQ device to receive a start
pulse from the CinePlex Capture computer. The NI DAQ device starts
digitizing when it receives a TTL pulse on the TRIG1 input pin.
Note:
To stop digitizing, click Stop DAQ.
CinePlex
2.11 Importing and Analyzing Position Data with NeuroExplorer
NeuroExplorer is a neurophysiological data analysis package that you can use to
analyze data files offline, or you can use it in real-time with the Plexon MAP system. For more information on NeuroExplorer, see http://www.plexoninc.com/
NEX.htm.
You can import and analyze the X, Y position data in .plx files with NeuroExplorer (NEX), Version 3.088 or later. NEX converts the strobed digital position
data into continuous X and Y position variables, which you can use in NEX Place
Cell Analysis, etc. For more information on position variables, refer to the NeuroExplorer Version 3.0 User Manual and Reference, or a later version.
The following illustration shows the strobed position data and the continuous X,
Y position variables in the Nex 1-D Viewer.
Version 2.0
77
2
78
CinePlex
Plexon Inc
Chapter 3
CinePlex Capture Reference
3.1 Overview..........................................................................80
3.2 Main Window ..................................................................80
3.3 Menus...............................................................................93
3.4 Toolbars..........................................................................100
3.5 Digital VideoTracker (DVT) Files.................................101
CinePlex
79
3
3.1 Overview
This chapter contains detailed reference information about CinePlex Capture.
Use this chapter to identify and locate information for menu items, toolbar buttons, dialog boxes, or windows. The information in this section generally flows
by window and by menu item from left to right across the main window.
3.2 Main Window
The default layout of the CinePlex Capture main window is shown below.
The CinePlex Capture main window is a configurable window contains a status
bar, the main menu, tollbars, and up to four windows that include the following:
•
Properties window
•
Arena window
•
Video window
•
Messages window
This section describes the status bar and the windows. Later sections describe the
menus and toolbars.
80
CinePlex
3.2.1 Properties Window
3.2.1.1 Function
One of three Properties windows will be displayed which will correspond to the
tracking mode being used. The Properties windows are the Object Contour
Properties window, the LED Properties window, and the Reflective Colors
Properties window. The three Properties windows are shown in the diagram
below.
3.2.1.2 Features
There are four groups of properties on each of the Properties windows. Three of
the groups (Camera, DVR, and Visualization) are common and have identical
content for each of the tracking modes. The remaining group contains a list of settings corresponding to the mode being used. There is also an Information box
that is common to all Properties windows. This Information box is located at
the bottom and provides help information whenever the mouse is moved over one
of the settings.
3.2.1.3 Common Areas
This section describes the three groups of properties that are common between
the three Properties windows. Although the values of the settings may differ
between the windows, the names and number of the settings of each group are
identical.
Version 2.0
81
3
3.2.1.3.1 Camera Group. The Camera group is common to all tracking modes.
It contains the following settings:
•
Auto Contrast – If you check the Auto Contrast checkbox, the camera automatically controls the contrast and shutter speed. If the Auto Contrast checkbox is unchecked, the Contrast and Shutter settings will appear.
•
Contrast – This control send commands to the camera to control the contrast
in the video image. If you click Auto Contrast, the camera automatically
controls the contrast and shutter speed and the Contrast and Shutter settings
disappear. Otherwise, use the Contrast slider to manually set the contrast to a
value between 0 and 255, resulting in a pleasing image.
•
Shutter – This control sends commands to the camera to adjust the shutter
speed. The shutter speed controls the length of time that a light-induced
charge builds up at the camera CCD (Charge Coupled Device) sensor before
the video cycle repeats for the next frame. You can adjust the shutter speed
from a slow speed of 2-5 (1/32nd of a second) to a high speed of 2-11(1/2048th
of a second). Rapidly moving experimental subjects can appear blurred in the
video. To reduce blurring you can increase the shutter speed. However, faster
shutter speeds usually result in a darker image and are not as reliable in the
LED mode. You can compensate somewhat for the darker image by adjusting
Brightness and Contrast. If the image is still too dark you can adjust the
manual iris on the camera lens; see Step 3 on page B-3.
Note:
82
When recording under fluorescent lights, use a normal 2-6 (1/64th of a
second) shutter speed. Faster shutter speeds typically result in a
flickering effect in the video as the CCD sensor exposure interval
interacts with the normal flicker of fluorescent lights.
•
Auto Brightness – If you check the Auto Brightness checkbox, the camera
automatically controls the brightness. If the Auto Brightness checkbox is
unchecked, the Brightness setting will appear.
•
Brightness – This control send commands to the camera to control the brightness of the video image. If you click Auto Brightness, the camera automatically controls the brightness and the Brightness setting disappears.
Otherwise, use the Brightness slider to manually set the video image brightness to a value between 0 and 255.
•
Sharpness – This control sends commands to the camera to control the sharpness of the image. The range of the Sharpness control is from 0 to 255.
Adjust this control to achieve a pleasing image.
CinePlex
•
Saturation – This control sends commands to the camera to control the color
saturation. The color saturation determines the amount of color added to the
image. The range of the Saturation control is from 0 to 255. Adjust the control so that colors are pleasing, but not excessive.
Note:
Because Object Contour mode is monochrome, Saturation does not
appear under Camera when Object Contour Tracker is enabled.
3.2.1.3.2 DVR Group. The DVR group is common to all tracker modes.
It contains the following settings:
•
Image Quality – This control sets the quality of the recorded video. You can
adjust this value from 10 (low image quality) to 90 (high image quality).
Video recordings with lower image quality settings take up less disk space.
The default setting is 75. For more information on video quality setting versus
file size, see “Digital Video Recorder AVI Format Files” on page 2-32.
HINT
Viewing Image Quality
The Video window does not show the effect of the Image Quality
setting. You must view the Video in CinePlex Markup or use the
Video Library Preview function to see the effect.
•
Recording Rate - displays the selected recording rate in frames per second.
Output Section
•
AVI File – Click this control to generate a video file in AVI format.
•
DVT File – Click this control to generate a position data file in DVT format.
DVT-format files are useful in standalone scenarios. For information on the
DVT file format, see “Digital VideoTracker (DVT) Files” on page 3-101.
File Name Section
•
Version 2.0
Prefix - When CinePlex Capture begins recording of its first file, the file
name will be 001 (if the Number control is blank). You may specify up to 3
83
3
characters for a prefix to be added to the beginning of the file name. If the
prefix were ‘abc’, then the first file would be ‘abc001’ provided no date format was chosen.
•
Date - this control has a dropdown list of several date formats. Select one to
display the creation date of the file in the filename just before the file number
and after any prefix.
Note:
If any of the date data formats are selected, the next file number will be reset to
001 when midnight occurs.
•
Number - this control allows you to specify a starting number for the file
name sequence. If you specify ‘005’ in the Number control, the first file created will be named ‘005’ (assuming no other files exist with the same prefix).
•
Next Available - this control displays the next file name to be created. If the
Prefix control has a value, the Next Available control displays a filename
with the prefix added to the front of the next file number.
•
In Video - this checkbox allows you to specify if the filename appears in the
video window. The Color Selection box allows you to select the color of the
text of the filename.
•
Location - this dropdown allows you to specify where the filename appears.
Timecode Section
•
Visible – Checking this checkbox will make the timecode visible in the video.
The color selection box allows you to define the font color of the timecode
display.
•
Location – This setting allows you to determine where the timecode will display on the screen.
•
Format – This setting allows you to determine the format of the displayed
timecode.
3.2.1.3.3 Visualization Group. The Visualization group is common to all
tracker modes. It is visible only after one of the tracking modes is selected.
It contains the following settings:
•
84
Show Track – Checking this item shows the animal’s trajectory and color
selection.
CinePlex
•
Track Portion – This allows you to show the whole trajectory or the last
“Point Count” points.
•
Track Transparency – This setting determines the transparency of the trajectory layer. The range of the Track Transparency control is 0.0 (opaque) to
1.0 (transparent).
•
Show Tracking Window – Checking this item shows the tracking window.
•
Show Center of Gravity – Checking this item shows the center of gravity.
•
Cross-Hair Size – This setting determines the size of the “cross” showing the
center of gravity. The range of the Cross-Hair Size control is from 10 to 100.
•
Show Contour – Checking this item shows the contour of the found objectboundaries.
•
Fill Contour – Checking this item fills the contour of the found object.
•
Fill All Objects – Checking this item shows all objects (including parasite
spots) in the current tracking window.
•
Contour Transparency – This setting determines the transparency of the
contour of the found object. The range of the Contour Transparency is from
0.0 (opaque) to 1.0 (transparent).
3.2.1.3.4 Information Box. The Information box displays information about the
selected area in the Properties window, similar to Windows Tool Tips. The following illustration shows a typical item that can appear in the Information box
when you move the mouse pointer over items in the Properties window:
3.2.1.4 Object Contour Tracker Properties
The following illustration shows the Object Contour Tracker group on the
Object Contour Tracker Properties window for Object Contour mode:
From the Tracker menu, if you select Object Contour, the Object Contour
Tracker group appears in this area. The controls are as follows:
•
Version 2.0
Object vs. Background – This setting allows you to select Dark on bright
or Bright on dark. Dark on bright means a dark object on a brighter background. Bright on dark means a bright object on a darker background.
85
3
•
Background Image – This setting allows you to set a background image. A
background image is a reference image containing no animal. To set a background image, click the Camera icon. When a background image has been
captured and Use Background is checked, each video frame is compared
with the background image. The pixels that are different between the two
images will be considered as the object. This option is recommended when
the arena contains objects which are similar in contrast (color) to that of the
animal to be tracked. Clicking the Eye icon after you have captured an image
will display the image in a modal window. Clicking the Scissors icon will
clear the background image.
•
Use Background – Check this option to use a captured background image. If
Use Background is checked, Object vs. Background is disabled.
•
Threshold – This setting selects all pixels that are darker (or brighter) than
the threshold as target objects. This setting depends on the Object vs. Background setting.
•
Close Contour – This setting is used to eliminate the artifact created by the
cable crossing the animal’s body and splitting the image into two parts. It can
also be helpful when tracking multiple-colored animals (e.g., hooded rats).
Close Contour adds and then removes an n-pixel-width layer from the image,
resulting in an object without the occluding cable. The range for the Close
Contour control is 0 to 10.
•
Detail Filter – This setting helps remove parasite objects and unwanted
details from the animal body (for example, the tail). The setting erodes a layer
of pixels from the object. The range for the Detail Filter control is 0 to 10.
Note:
The other modes have a checkbox called Filter Details which will erode a layer
of pixels (1 pixel thickness) from the object. The Detail Filter control allows you
to specify an erosion layer thickness of more than 1 pixel.
•
Min Object Size – This setting determines the minimum area (in pixels)
required for a blob to be identified as an object. The range for the Min Object
Size control is 1 to 10,000.
•
Motion Measure – Checking this item provides a measure of the object’s
movement.
3.2.1.5 LED Tracker Properties
The following illustration shows the Properties window for LED mode:
86
CinePlex
LED Tracker
From the Tracker menu, if you select LED, this area appears. The LED area contains the following controls:
•
Pure Colors – Checking this item forces tracking of pure R, B, and B colors.
When checked colors 1-3 will be set to R, G, and B respectively and cannot be
changed.
•
Min Object Size – This setting determines the minimum area (in pixels)
required for a blob to be identified as an object.
•
Filter Details – Checking this item erodes a 1 pixel layer from the objects.
This helps avoid parasite objects.
•
Threshold – This setting selects pixels that are darker (brighter) than the
threshold as target objects. The range for the Threshold control is 0 to 255.
•
Color1, Color2, Color3 – These controls enable color tracking and set the
color for up to three tracking channels. If Pure Color is not checked, clicking
in a color bar allows dragging the cursor to the defined color.
3.2.1.6 Reflective Colors Tracker Properties
The following illustration shows the Properties window for Reflective Colors
mode:
Reflective Colors Tracker
From the Tracker menu, if you select Reflective Colors this area appears. It
contains the following controls:
Version 2.0
•
Pure Colors – Checking this item forces tracking of pure R, B, and B colors.
When checked colors 1-3 will be set to R, G, and B respectively and cannot be
changed.
•
Min Object Size – This setting determines the minimum area (in pixels) for a
blob to be identified it as an object. The range for the Min Object Size control
is 1 to 10,000.
•
Filter Details – Checking this item erodes a 1 pixel layer from the objects.
This helps avoid parasite objects.
•
Color1, Color2, Color3 – These controls enable color tracking and color
selection for up to three tracking channels. If Pure Color is not checked, clicking in a color bar allows dragging the cursor to the desired pixel color.
87
3
•
88
Threshold Color1, Threshold Color2, Threshold Color3 – These controls
allow you to set the threshold level for Color 1, Color 2, and Color 3 respectively. These controls are normally hidden until their respective Color 1,
Color 2, or Color 3 checkboxes are checked. The range for the Threshold
Color controls is 0 to 255.
CinePlex
3.2.2 Arena Window
3.2.2.1 Function
The Arena window allows you to define an arena within which any tracking is to
be performed.
3.2.2.2 Features
The Arena window contains the following items:
•
Toolbar – The toolbar contains icons to allow you to define the arena as a circle, and ellipse, a square, or a polygon.
•
Arena Outline – If this checkbox is checked the outline of the arena will be
displayed using the color of the color selection box.
Note:
Checking the Arena Outline checkbox requires that an arena be drawn before
tracking will work.
•
Color Selection Box – Selecting a color in this control sets the color of the
outline of the arena.
•
Arena Transparency – This setting controls the transparency of the arena.
The range for the Arena Transparency control is 0.0 to 1.0.
An arena can have only one shape. When you wish to start drawing an arena, you
may activate the arena toolbar by clicking one of the arena nodes - Arena Outline or Arena Transparency. After an arena is drawn, the toolbox is deactivated.
An arena can be moved by placing the cursor inside of the arena and dragging it
to the desired location.
An arena can be deleted by placing the cursor inside of the arena, selecting it, and
pressing Delete. Alternatively, a right-click will bring up a small menu from
which Delete Arena can be selected.
Version 2.0
89
3
3.2.3 Video Window
3.2.3.1 Function
The Video window (always visible) displays the video image from the camera.
3.2.3.2 Features
You may optionally stretch the image to fill the size of the Video window.
Note:
You cannot see the effects of the Image Quality setting in the Video window;
you must view the .avi file to see that effect.
3.2.3.3 Video Right-click Menu
Right-clicking the mouse in the Video window displays the Video Right-click
menu if there is an active arena for the video even though it may not be visible.
•
Delete Arena - Clicking this item deletes the arena. This item is grayed out
unless an arena is active. You may also delete the arena by selecting it and
pressing the Delete key.
•
Clear Trajectory - Clicking this item clears the trajectory.
3.2.4 Messages Window
3.2.4.1 Function
The Messages window displays CinePlex Capture system messages.
90
CinePlex
3.2.4.2 Features
The Messages window displays the timestamp, message code, and description of
each message.
3.2.4.3 Messages Shortcut
Right-clicking the mouse in the Messages window displays the Messages Rightclick menu.
•
Erase - Clicking this item erases all of the messages in the Messages window.
•
Pause - Clicking this item pauses the display of messages. Clicking again
resumes the display.
•
Show Debug Messages - Clicking this item toggles the display of debug
messages. If checked, debug messages will be shown. If not checked, debug
messages will not be shown.
•
Select and Copy All - Clicking this item selects all of the messages and
copies them to the clipboard.
•
Save Log to File - Clicking this item opens a standard windows File Save
dialog box so that you may save the messages to a user-named file.
•
Mail Log to Plexon - Clicking this item attaches the message log to an
email message that you may send to Plexon for troubleshooting.
Note:
This feature will work only if an email client is installed on the PC.
3.2.5 Status Bar
The status bar at the bottom of the screen shows the capture file information,
remote line status, the current time, and the camera frame rate. Descriptions of
the status bar items follows.
Version 2.0
91
3
3.2.5.1 Capture Information
The information that appears in the status bar depends on state of the video
recorder. If CinePlex Capture is armed, the status bar flashes yellow and displays
the name of the video .avi file to create for the video that will be captured.
When CinePlex Capture records, the status bar turns green and displays the name
of the video .avi file, the time recorded thus far, and the time remaining.
If recording is paused, the status bar flashes green.
3.2.5.2 Status Information
The right end of the status bar contains the following status information:
•
DFC - Appears only during a recording. A fraction showing the count of
frames delayed 10% or more as the numerator and the count of missing
frames as the denominator. Delayed frame counts should be in the range of
one to two per hour of recording . There should be no dropped frames. This
box will turn red if any frames are dropped. Excessive counts in the first position and count > 0 in the second position indicate there is too much other
activity on the Capture PC. Exit any non-essential processes or programs. If
the problem persists, contact Plexon Support.
•
Remote Line Status - Remote line status displays the level of the remote
record and pause digital input and output (I/O) lines. When the remote record
line is active, R appears. When the remote pause line is active, P also appears.
For more information on remote signals, see “Remote Status Signals” on
page E-7.
•
Current Time - The current time that appears here should be adjusted to
match the MAP system PC time.
•
Camera Frame Rate - The camera frame rate panel displays the average
frame rate of the camera. The nominal value is between 29 and 31 frames per
second, but should normally show 30.0 fps.
Note:
92
If the camera frame rate area flashes red, CinePlex Capture is either not
receiving a clock signal or the clock signal is the wrong frequency.
CinePlex
3.3 Menus
The CinePlex Capture main menu is shown below. Each menu is described in
more detail.
3.3.1 File Menu
3.3.1.1 Video Library
This item opens the Video Library dialog box.
If there is no default video file archive folder, a message will appear stating that
the default archive folder does not exist. In that case, you should change the
default archive directory with the Change Data Folders menu command. You
may create a directory and use the Change Data Folders menu command to set it
as the default archive directory.
Version 2.0
93
3
The controls on the Video Library dialog box are as follows:
•
Preview - Selecting a video file and then clicking Preview displays the file in
a separate window. You may then use the slider on the window to move back
and forth through the file manually.
•
Confirm File Operations - Checking this checkbox will display standard
Windows confirm dialog boxes when manipulating the files with the Move,
Delete, and Copy buttons.
•
Move - Clicking this button moves selected files from their original directory
to the other director. The original files are removed from the original directory.
•
Change Data Folders - Clicking this button accesses the Change Data
Folders dialog box from the File-Change Data Folders menu command.
•
Delete - Clicking this button deletes selected files.
•
Copy - Clicking this button copies selected files to the other directory. The
original files will now be in both directories.
•
Done - Clicking this button exits the Video Library dialog box.
3.3.1.2 Save Settings
This item saves your configuration settings in the default settings file.
3.3.1.3 Save Settings As
This item allows you to save your configuration settings [and name the file if a
keyboard is connected]. Clicking this item will open the standard File Save dialog box.
94
CinePlex
3.3.1.4 Load Settings
This item loads previously saved configuration settings. Clicking this item will
open the standard File Open dialog box.
3.3.1.5 Restore Factory Settings
This item sets all software and camera settings to their factory default values.
3.3.1.6 Change Data Folders
This item allows you to select the recording and/or archive folders.
3.3.1.7 External Equipment
This item allow you to select the configuration of the external equipment connected to your installation.
Clicking the dropdown box will display a list of configurations.
Version 2.0
95
3
3.3.1.8 Adjust Date and Time
This item is used only for shuttle customers. It allows you to synchronize the date
and time between two machines. The dialog box below displays.
3.3.1.9 Exit
This item closes the application.
3.3.2 View Menu
3.3.2.1 Video
The Video window is always visible and cannot be deselected.
3.3.2.2 Properties
If the Properties window is not visible, clicking this item will display the Properties window. However, to close the Properties window, you must click the
Windows Close (x) button at the top right of the Properties window. When visible, this window’s content depends on the tracking mode currently being used.
3.3.2.3 Area
If the Arena window is not visible, clicking this item will display the Arena window.
96
CinePlex
3.3.2.4 Messages
If the Messages window is not visible, clicking this item will display the Messages window.
3.3.2.5 Full Video Window
Clicking this item will adjust the video image to fill the Video window. Clicking
the item again will restore the previous setting. The text of the item changes to
Radional Video Window when clicked.
3.3.3 DVR Menu
3.3.3.1 Arm
Clicking this item arms CinePlex Capture to accept a remote record command
from the MAP system or other external hardware. For more information on external commands, see “Remote Control Signals” on page E-6.
3.3.3.2 Record
Clicking this item starts manual recording.
3.3.3.3 Pause
Clicking this item pauses and resumes manual recording.
3.3.3.4 Stop
Clicking this item stops manual recording and closes the recorded file.
3.3.4 Tracker Menu
3.3.4.1 Object Contour
Clicking this item sets the tracker mode to Object Contour.
3.3.4.2 LED
Clicking this item sets the tracker mode to LED.
Version 2.0
97
3
3.3.4.3 Reflective Colors
Clicking this item sets the tracker mode to Reflective Colors.
3.3.4.4 Wizard
Clicking this item opens the Tracking Wizard dialog box.
98
CinePlex
3.3.5 Window Menu
The Window menu is a standard menu of the Plexon User Interface. For more
details, see “Window Menu” on page D-11.
3.3.6 Help Menu
The Help Menu is a standard menu of the Plexon User Interface. For more
details, see “Help Menu” on page D-13.
3.3.7 Shrink
Clicking the Shrink menu item saves the current layout to a file and reduces the
user interface to a single small window showing the video as shown in the diagram below. To restore the previous layout, click Expand and the layout previously saved by clicking the Shrink menu item is loaded and displayed. If there
are some wrong settings preventing the Arm and Rec buttons to be enabled, the
Shrink button is disabled as well. The Shrink mode can be useful when more visibility is desired for other applications, e.g. Sort Client for the Plexon MAP.
Version 2.0
99
3.4 Toolbars
The File, View, DVR and Tracker menus may all be displayed as toolbars as
desired (see “Menus” on page D-3 for more details). The buttons from left to
right on each tool equate to the menu commands from top to bottom on the corresponding menu.
3.4.1 File Toolbar
The File toolbar contains buttons that are equivalent to the File menu commands.
For more details, see “File Menu” on page 3-93.
3.4.2 View Toolbar
The View toolbar contains buttons that are equivalent to the View menu commands. For more details, see “View Menu” on page 3-96.
3.4.3 DVR Toolbar
The DVR toolbar contains buttons that are equivalent to the DVR menu commands. For more details, see “DVR Menu” on page 3-97.
3.4.4 Tracker Toolbar
The Tracker toolbar contains buttons that are equivalent to the Tracker menu
commands. For more details, see “Tracker Menu” on page 3-97.
Version 2.0
100
3.5 Digital VideoTracker (DVT) Files
A Digital VideoTracker (DVT) file contains timestamp and tracking information
for an audio video interleave (AVI) format recording. The DVT file is a text file
where each line contains position data for a video frame. An example of a DVT
file for LED mode follows:
1,0.033000,910,35,110,366,19,247
2,0.066000,915,37,112,366,19,247
3,0.099000,927,38,112,366,19,247
…
The format of each line depends on the tracker mode you select.
3.5.1 Object Contour Mode
For Object Contour mode, the format of each line is:
frame,time,x,y,m
where:
•
frame is the frame number
•
time is the time of the frame in seconds
•
x and y is the track position of the target centroid
•
m indicates the motion measure value; see “Motion Measure Option” on
page 2-57
3.5.2 LED or Reflective Colors Modes
For LED or Reflective Colors mode, the format of each line is:
frame,time,x1,y1,x2,y2,x3,y3
where:
•
frame is the frame number
•
time is the time of the frame in seconds
•
x1 and y1 is the track position of color #1
•
x2 and y2 is the track position of color #2
•
x3 and y3 is the track position of color #3
See also “Data Interpretation” on page E-12.
Version 2.0
101
3
102
CinePlex
Plexon Inc
Chapter 4
Using CinePlex Markup
4.1 Understanding CinePlex Markup Files..........................104
4.2 Getting Started ...............................................................106
4.3 Using the Activity Window ...........................................116
4.4 Customizing the User Interface .....................................117
4.5 Using Markers and Marker Occurrences .......................117
4.6 CinePlex Markup How-Tos ...........................................143
CinePlex
103
4
4.1 Understanding CinePlex Markup Files
Although you can use it to work with single files, you typically use CinePlex
Markup with a pair of data files you record in the lab—a video file and a neural
data file. To use CinePlex Markup successfully, you must understand how CinePlex Markup works with files. This section describes what happens to the various files when you create a CinePlex project, import data, edit information, save a
project, re-open a project file, and export data.
Note:
When using an AVI file and a DVT file, the system uses the timestamps from
the DVT file.
Note:
When using an AVI file and a PLX file, the system uses the timestamps from
the AVI file.
When starting CinePlex Markup for the first time, it prompts for a separate file
to store project information. This CinePlex project (.cpj) file can include the following items:
•
File references: locations and names of the neural data file and the video file
•
Marker definitions, which includes the marker type, name, and any zone or
level definitions as appropriate
Note:
•
Markers are a type of indicator or identifier. Marker occurrences are placements of particular markers in a file. For more information on markers, see
“Digital VideoTracker (DVT) Files” on page 3-101.
Information for each marker occurrence
4.1.1 Creating a Project File
Normally the first step is to create a CinePlex Project file. To create a project file
you must specify the neural data file, which is usually either a .plx or a .nex file
(although it can be a .dvt file), and the associated .avi video file. The New
Project Wizard can step you through this process; see “Setting Up a New
Project” on page 4-107. After you specify these files, their file names are stored
in the .cpj file, and the initial import of data into the project begins.
Note:
A CinePlex Project file can accommodate only one pair of data files—usually a
neural data file and a video file.
4.1.2 Importing Data Files
During the initial import of the neural and video data into a project, CinePlex
Markup creates markers and marker occurrences based on the contents of the
neural data and video files. From the neural data file, CinePlex Markup translates any events (for example, Type 4 data from .plx files) or appropriate NEX
variables (event, marker, or interval) into markers and marker occurrences. From
the video file, CinePlex Markup creates a Frame marker and creates occurrences
for the timestamps of each video frame. However, CinePlex Markup does not
store neural data, continuous data, or the video frame images in the .cpj file.
104
CinePlex
4.1.3 Changing and Saving Project Files
After you import the marker information from the data files into CinePlex
Markup and it is in the form of marker occurrences, you can edit, extend, or even
delete the information; then you can save the changes to a .cpj file. When you
save the .cpj file, CinePlex Markup also saves any new marker information that
it creates into the .cpj file. Thus, when you re-load a .cpj file, CinePlex Markup
completely restores the markers and marker occurrences that were present when
you saved the .cpj file.
4.1.4 Reopening Project Files
When you subsequently re-open a .cpj file, CinePlex Markup gets the marker
data exclusively from the .cpj file; CinePlex Markup does not re-import the
markers from the neural data or video files. However, CinePlex Markup does
open the original neural data and video files and reads them to get the neural
spike data, continuous data, and video images.
Note:
If you move the original neural data or video files to another location on the
hard drive, CinePlex Markup prompts you to locate the files when you re-open
the project file.
4.1.5 Exporting Files
Although .cpj files cannot currently be used by any software other than CinePlex
Markup, you can export all of the data stored in .cpj files into other formats, such
as .plx or .nex data files, text files, MATLAB files, or Excel spreadsheets.
Version 2.0
105
4
4.2 Getting Started
This section describes a quick-start example to help you quickly become familiar
with CinePlex Markup. The screens, views, and operations mentioned in the
quick-start procedure appear in much greater detail in the reference chapter; see
Chapter 5, CinePlex Markup Reference.
4.2.1 Using the Quick Start Files
This quick-start example uses two sample data files that do not install with CinePlex Markup: CM_Quickstart.plx and CM_Quickstart.avi. Because these two
files are very large, they are located in the Quickstart folder on the CinePlex
installation CD. As an alternative, instead of using CM_Quickstart.plx and
CM_Quickstart.avi, you can use any video data file (AVI) collected with CinePlex Capture together with a neural data file (PLX, NEX, DVT) collected by a
tool such as Recorder or MAP. Before you use the quick-start sample files,
Plexon recommends that you copy them to the local disk on the PC to improve
performance.
The quick-start example consists of the following series of procedures:
106
•
4.2.2 Setting Up a New Project
•
4.2.3 Understanding the CinePlex Markup Main View
•
4.2.4 Defining a New Marker
•
4.2.5 Creating Marker Occurrences
•
4.2.6 Saving and Exporting the Data
•
4.2.7 Re-opening a Project File
CinePlex
4.2.2 Setting Up a New Project
This procedure takes you through the steps required to set up a new project.
1
Click the CinePlex Markup desktop icon or click CinePlexMarkup on the
Windows Start menu. The Welcome To CinePlex Markup dialog box opens.
Note:
2
Version 2.0
The Welcome to CinePlex Markup dialog box provides a quick way
to start a new project, load an existing project file, or load a recentlyused project file. The first time you run CinePlex Markup, .cpj files do
not appear in the list box and Open the Selected Recent CinePlex
Project is unavailable.
Click Start a New CinePlex Project, which starts the New Project Wizard,
which is a series of dialog boxes that guide you through the process of setting
up a new project. The New Project Wizard opens.
107
4
3
In the Video Data Input File (.avi) area, click Browse, go to the directory into
which you copied the quick-start files and locate CM_Quickstart.AVI. Open
the file. The New Project Wizard changes all the file names to match.
Note:
When you enter a name in the Video Data Input File (.avi) box, the
Neural Data Input File (.plx, .nex, .dvt) and CinePlex Project File
(.cpj) boxes change to reflect the name you enter. This is a typical
example of the helpful behavior of Cineplex Markup, which suggests
file names.
Note:
For use with CinePlex, .avi files must be saved in Motion JPEG
(MJPG) video compression format. If you attempt to open an .avi file
that is not in MJPG format, a notification dialog box appears:
4
For this quick-start procedure, accept the suggested names and click
Continue. The Verify Project Files dialog box opens, which contains some
basic information to enable you to verify the files you've selected.
5
If the file information is correct, click Continue.
The initial import operations begin; Cineplex Markup creates the .cpj file and
opens the Cineplex Markup main view.
108
CinePlex
4.2.3 Understanding the CinePlex Markup Main View
This procedure takes you through the steps required to set up and control the
CinePlex Markup main view.
1
When the CinePlex Markup main view appears, click the maximize button in
the Windows title bar to maximize the CinePlex Markup window.
Note:
2
CinePlex Markup is easier to set up and use when you maximize its
screen area.
Rearrange the windows within the CinePlex Markup main window to look
something like the following illustration:
The first frame of the video file appears in the Video window at the upperright. Because the CM_QuickStart neural and video data files were recorded
using CinePlex Capture with the Tracking option enabled, CinePlex Markup
imports the tracking coordinates from the neural data file, and they appear as
crosshairs superimposed over the video.
The neural data appears in the Activity window at the bottom, which shows
the neural activity at the beginning of the file. Each row in the Activity window
represents either a marker or a channel of data. The marker occurrence times
and neural firing times for each channel appear as tick marks in the view. You
can color code the ticks as appropriate for the marker type and unit designation; for more information, see “Markers Window” on page 5-162 and
“Colors Tab” on page 5-212.
3
On the toolbar, click the Play button
The video plays, and the neural data scrolls from right to left in the Activity
window. This keeps the current video frame at the position marked by the current-time indicator in the Activity window. The current-time indicator is the
Version 2.0
109
4
downward-pointing triangle near the center of the view, which is surrounded
by the current frame time and frame number.
4
Click the Pause button to pause the display.
Note:
5
Click the Previous Frame and Next Frame buttons to move backwards or
forwards to sequentially view each frame in the display.
Note:
6
You can also step through the display by pressing the LEFT
ARROW key or the RIGHT ARROW key.
Click Play. Click the rate buttons to decrease or increase the speed of the
display. Continued decreasing the speed will eventually cause a reversal to
occur, and continued increasing the speed will eventually reach a maximum
speed.
Note:
110
You can also pause the display by pressing the SPACEBAR key. To
restart the display click the Pause button or press the spacebar key.
You can also change the speed by using the UP ARROW key and
the DOWN ARROW key on the PC keyboard. You can also select a
speed from the drop list on the toolbar.
7
Click the Reverse Animation button to switch the direction of play. The speed
of the new direction will be the same as in the old direction.
8
Click the Normal Speed button to reset the playback speed to normal, which
is one times the recorded speed of the video in the forward direction.
9
Click the Rewind button to return to the beginning of the file.
CinePlex
4.2.4 Defining a New Marker
This procedure takes you through the steps required to define a new marker. The
Markers window in the upper left corner of the main view shows the set of
markers imported from the data files.
The >> indicator denotes the current marker. The Markers window shows the
following basic information about each marker:
•
Name shows the name assigned to the marker. Marker names must be unique.
•
Type indicates the abbreviation that denotes the type of the marker; for a
complete list of marker types, see “Table 5-1” on page 5-220.
•
Count shows the number of occurrences or each marker type.
•
Key indicates the keystroke that is associated with this marker, which you can
use to find and insert markers.
•
Show indicates if the occurrences of this marker display in the Activity window.
•
Display Color shows the color of the occurrences of this marker in the display views.
For the purpose of this quick-start example, suppose you want to use CinePlex
Markup to invalidate intervals in the neural data that were corrupted by artifacts,
in this case from the animal chewing. This is done by defining a marker to
bracket the chewing interval as in the procedure below.
1
Click Pause.
Note:
2
Version 2.0
Although pausing is not required, the video can distract you when you
are performing other operations in CinePlex Markup.
Define a new marker to denote the time intervals that are dominated by
artifacts. You can do this in three ways:
•
Click the New Marker button,
•
or, from the Edit menu, click Define New Marker,
•
or, from the right-click menu in the Markers window, select Define New
Marker.
111
4
The Define New Marker dialog box appears.
3
In the Type area, click I to define an interval marker.
4
In the Name box, in the place of the default name Interval type Chewing
Artifact. Retain the default settings for the other items.
Note:
5
For explanations for the other items in the Define New Marker window, see “Define New Marker” on page 5-187.
Click OK.
The Chewing Artifact entry appears in the Markers window, and the >> symbol appears in the left-most column to indicate that this marker is currently
selected. However, there are no occurrences of this marker, so the value in
the Count column is 0.
4.2.5 Creating Marker Occurrences
This procedure takes you through the steps required to create new marker occurrences. You can have more than one occurrence for any given marker. You can
manually enter marker occurrences in three different ways:
•
keystroke
•
button click in the Input window
•
mouse click in an appropriate view
Each method has advantages and disadvantages; we suggest you try each method
to find the method you prefer. For more information on each one of these methods, see “Inserting Marker Occurrences” on page 4-118.
This quick-start example covers only the keystroke method. In the previous procedure you defined the Chewing Artifact marker, which appears in the Markers
112
CinePlex
window in the Name column and its associated key appears in the Key column
as 5. If you press the 5 key, Cineplex Markup expects you to perform an operation with the Chewing Artifact marker.
The available marker operations appear in the Input window, which normally
opens directly beneath the Markers window. The Keystroke radio buttons
define the operations associated with pressing keys. The default selection is Find.
If you press the 5 key, CinePlex Markup finds the next occurrence of the Chewing Artifact marker. However, because you have not created any occurrences of
the Chewing Artifact marker, the 5 key currently has no effect. To create marker
occurrences follow the procedure below.
1
In the Markers window, select the Chewing Artifact marker.
2
To arm CinePlex Markup to insert new marker occurrences when you press
the 5 key, in the Input window at Keystroke, click Insert.
3
Click Play, or press the SPACEBAR key.
4
Although interval markers are easier to insert while CinePlex Markup is
playing, the default 1X playback speed can be too fast for you to precisely
insert markers. Adjust the playback speed by selecting a slower setting from
the speed droplist on the toolbar, for example, 1/8X.
5
To insert an occurrence of the Chewing Artifact marker, press the 5 key once
to define the beginning of the interval and press the 5 key again to define the
end of the interval.
Note:
6
You can use other CinePlex Markup capabilities to change marker
occurrence intervals, so a convenient work method is to quickly insert
placeholder marker occurrences, which you can later edit to set precise start and end times. This is discussed under “Operationing
with Marker Occurrences” on page 4-132.
Insert several more occurrences using the 5 key. As you enter occurrences,
they appear in the ‘Chewing Artifact’ Marker Occurrences window. Each
marker occurrence appears with the start and end times for each interval.
Note:
The Marker Occurrences default window is tall and narrow and it
can obscure the complete window title. Move the mouse cursor over
the title bar to see the complete title. Also, the title of this window
changes to include the currently selected marker in single quotation
marks. The information that appears in the window also changes for
each marker type. For example, a Coordinate marker shows Time, X,
and Y coordinates instead of Start Time and End Time.
7
Click Pause. In the Edit Markers window next to Keystroke, click Find.
8
Press the 5 key to advance to an occurrence of the Chewing Artifact marker.
Press the 5 key several times to cycle through the intervals you entered.
4.2.6 Saving and Exporting the Data
This procedure takes you through the steps required to save the marked up files
from the quick-start example and to export the data to other applications. When
Version 2.0
113
4
you save a project, CinePlex Markup saves all the marker information in the .cpj
file. You can also export the marker data to:
•
a .plx file: The markers become Type 4 Events in the .plx file, along with the
spike and continuous data from the original neural data file.
•
a .nex file: The markers become Nex variables, along with the spike times
and continuous data from the original neural data file.
•
a text file: Each marker occurrence becomes a line in the text file.
•
a MATLAB file: Each marker occurrence becomes a row in a 2D matrix.
•
an Excel spreadsheet: Each marker occurrence becomes a row in the spreadsheet.
Note:
Matlab or Excel must be installed on your computer to export these file types.
Otherwise, all Matlab or Excel functions, or both, appear dimmed.
To save your project and export the data, follow the procedure below.
1
To save your quick-start example work, click Save. The Save As dialog box
opens with the file name CM_Quickstart-01. Click Save to save
CM_Quickstart-01.
Note:
2
If you reload the .cpj file you just saved, it puts CinePlex Markup
back into the same state it was in prior to the save operation. CinePlex Markup reloads with the same markers, marker occurrences,
current marker selection, etc.
For this quick-start example, export the data as a text file. From the File
menu, select Export Markers.
The Export Marker Data dialog box opens.
114
CinePlex
3
In the Format area, accept the default value Text file. The Export Marker
Data dialog box includes various options for how, where, and what data to
export. However, for this quick-start example, accept the defaults values and
click Export!
The Export Complete dialog box appears.
4
Locate CM_Quickstart.txt. Open the file with Windows Notepad or another
text reader to see how the data is exported.
4.2.7 Re-opening a Project File
This procedure takes you through the steps required to re-open a project file.
1
Exit and re-start CinePlex Markup.
The Welcome To CinePlex dialog box opens.
Note:
2
The Welcome To CinePlex dialog box now contains an entry for the
CM_Quickstart.cpj file in the recent projects list box.
Double-click CM_Quickstart.cpj to open the quick-start example project.
CinePlex Markup opens in the same state that it was in when you saved the
project file.
3
Version 2.0
You have completed the last procedure in the Quick-Start Example.
115
4
4.3 Using the Activity Window
In the Activity window, CinePlex Markup provides two frequently-used items
to display neural data—the time pointer and the time range. The time pointer represents the concept of a current instant. The frame in the Video window is the
frame whose occurrence time is no later than the current time pointer and is the
nearest frame on the left side of the current time pointer. The range of neural data
in the Activity window is based on the time pointer.
The inverted white triangle symbol in the Activity window depicts the current
time:
The Activity window displays the current time in seconds (t), and the current
frame number (F). The Activity window default setting positions the current time
symbol at the center of the window, so that an equal span of time before and after
the current time appears in the window. However, you can reposition the current
time symbol by clicking and dragging it with the left mouse button. In this way,
you can configure the Activity window to show an asymmetric span of time
about the current time; for example, from 1 second before to 5 seconds after the
current time.
In general, the time pointer may or may not point to the time of a video frame.
The video frame that appears for a given current time is the frame at the latest
time, which can be less than or equal to the current time. However, you can configure CinePlex Markup to lock the current time to the times of Frame Markers;
see Lock to Video Frames on page 5-193.
You can expand or contract the range of time that appears in the Activity window
by clicking Zoom In or Zoom Out. You can also shift the current time by dragging the scroll bar at the bottom of the window.
You can also override the current time in a more persistent way by using the Find
functions to change the current time to be that of a marker. For example, by clicking the Find Occurrences button, or from the Find menu, select Find Marker
Occurrences..., which opens the Find Marker Occurrences dialog box; see
“Find Marker Occurrences” on page 5-195.
4.3.1 Understanding Looping
By default, CinePlex Markup starts in looping mode, where animation and
searches that run past the end of the file restart from the beginning. To turn off
looping mode, from the Looping menu, click Toggle Looping; for more information, see “Looping Menu” on page 5-193.
116
CinePlex
4.4 Customizing the User Interface
Although the default user interface setup in CinePlex Markup may be adequate
for your needs, you may also customize the user interface. For details on customizing the user interface, see D Plexon User Interface.
Some general principles and conventions repeat throughout the CinePlex
Markup user interface as well as the Plexon User Interface.
•
Right-click Menus – See “Right-click Menus” on page D-18.
•
Current Selections – See “Current Selections” on page D-18. The currently
selected marker and channel also appear in their selected color (bright violet
by default) in the Activity window.
•
Keystroke Shortcuts – See “Keyboard Customization” on page D-20.
•
Views – You can quickly close and re-open windows by using the View
options or the corresponding toolbar buttons.
•
Undo – See “. Undo” on page D-18.
•
Quick Reference – See “Help Menu” on page D-13.
4.5 Using Markers and Marker Occurrences
This section explains how to use markers and marker occurrences. Markers are
designators that you use to identify or describe timepoints in a file. You can have
several types of markers. Each marker type contains specifically-defined information. CinePlex Markup uses seven different marker types; for detailed
descriptions of the content of each marker type, see Table 5-1, “Marker Types,”
on page 5-220. A marker occurrence is a specific circumstance, or instance,
where a marker appears. A marker can have multiple occurrences. Each marker
occurrence contains unique information, which consists of a minimum of a timestamp and the other values defined by its marker type. For a more extensive discussion of markers and their occurrences, see “Digital VideoTracker (DVT)
Files” on page 3-101.
4.5.1 Defining Markers
To define a CinePlex Marker you must designate it as one of the seven available
CinePlex types defined in “Table 5-1” on page 5-220 and you must name it
uniquely. You can add optional information to the definition such as comments,
associated keystroke, display color, and associated event IDs. Follow the procedure below to define markers.
Version 2.0
117
4
1
On the Edit menu, click Define New Marker.
The Define New Marker dialog box appears.
2
In the Type area, click a marker type.
3
In the Name box, type a unique name for the marker.
4
Add any additional items. For more information, see “Define New
on page 5-187.
5
Click OK.
Marker”
The new marker appears as the selected marker in the list in the Markers
window.
4.5.2 Inserting Marker Occurrences
There are three primary methods you can use to insert new marker occurrences:
118
•
Keystroke
•
Button
•
Left-Click (of the mouse button)
CinePlex
In the Input window, you can select an input method. For more information on
the Input window, see “Input Window” on page 5-165.
Note:
You can also use items from the Edit menu to choose one these input methods
to insert new marker occurrences. For more information, see “Edit Menu” on
page 5-187.
Keystroke
To use the keystroke method to insert marker occurrences, you must associate a
key with each marker for which you create occurrences. When you define a
marker, you typically associate a keystroke with it. The associated keystroke
appears in the Key column of the Markers window.
Note:
If there is no associated key with the marker or you if you want to change the
key association, from the right-click menu in the Markers window, click Edit
Selected Marker to open the Edit Marker dialog box. For more information,
see “Edit Selected Marker” on page 5-188.
To insert marker occurrences using the keystroke method, follow the procedure
below.
1
In the Input window, next to Keystroke click Insert.
Note:
2
Version 2.0
This arms CinePlex Markup to insert an occurrence of a marker at
the current time when you press the key associated with that marker.
You can use keystroke insertion when CinePlex Markup is paused or playing.
Enter marker occurrences with keystrokes for each marker type as follows:
•
For Time Only (T) markers – Press the associated key once to insert a
single marker occurrence at the current time.
•
For Interval (I) markers – Press the associated key once to start the interval. Press the key a second time to end the interval.
•
For Scalar (S) markers – The keystroke behavior for Scalar markers
changes with the animation status as follows:
119
4
• If paused – Open a Scalar window for the marker. Press the
associated key and drag the mouse pointer in the Scalar window
to set the value for the new occurrence.
• If playing – Open a Scalar window for the marker. Press the
associated key to pause the animation. Drag the mouse pointer in
the Scalar window to set the value for the new occurrence.
•
For Coordinate (C) markers - Press the associated key and move the
mouse pointer in the Video window and click to enter the coordinate values. If it was playing before you pressed the key, after you click, CinePlex
Markup enters the new marker occurrence, and resumes animation.
Note:
Although you typically insert Level Interval (L) and Zone Interval (Z) markers
automatically by using the Levels Editor and Zones Editor dialog boxes,
you can also enter them with a keystroke.
Note:
For Scalar and Coordinate markers, to use the keystroke or button method
you must have the value of the Scalar or Coordinate marker occurrence set
by clicking the mouse in either the Scalar window or the Video window. For
this reason, the left-click input method is better for entering Scalar or Coordinate marker occurrences. Also, it does not make sense to use the keystroke
or button input methods unless the Scalar or Video windows are open.
Button Insertion
The Input window includes an associated button for each marker. Each button
displays the marker name. CinePlex Markup automatically creates a button for
each new marker you define. As you define new markers or reposition the Input
window, the button palette rearranges itself. Follow the procedure below
1
In the Input window, next to Button click Insert.
2
To insert a marker occurrence, in the Input window click the appropriate
marker button.
CinePlex Markup inserts the occurrence at the current time.
Note:
With button insertion, each marker type behaves exactly the same as
described in the preceding section for keystrokes.
Left-Click Insertion
The Left-Click insertion method is fundamentally different from the other insertion methods. You can use the Left-Click method only to insert occurrences for
the currently selected marker.
Understanding Click-To-Add Mode
Click-To-Add mode is a semi-automatic subset of the Left-Click insertion
method. In Click-To-Add mode, each time you choose a marker and click the left
mouse button, CinePlex Markup inserts an occurrence of the marker and automatically advances the video by a preset number of frames. Two examples follow:
•
120
Example 1: You watch each frame in the Video window and assign a Scalar
value to some on-screen behavior, say a number between 1 and 10 for a rat's
CinePlex
activity level. To assign a range to the Scalar window, see “Scalar Right-click
Menu” on page 5-174. With each frame, left-click in the Scalar window to
enter a Scalar marker occurrence with a value that corresponds to the location
you click in the Scalar window, at the time of the current video frame. After
each left-click, CinePlex Markup automatically advances to the next frame
or to the number of frames you set. To set the number of frames, see Number
of Frames to Advance During Click-To-Add on page 5-208.
•
Example 2: You watch each frame in the Video window and mark some position of interest, for example, the end of the rat's tail. With each frame, leftclick in the Video window to enter a Coordinate marker occurrence with a
value that corresponds to the location you click in the Video window, at the
time of the current video frame. After each left-click, CinePlex Markup
automatically advances to the next frame or to the number of frames you set.
To insert marker occurrences with a mouse click, follow the procedure below.
1
In the Input window, next to Left-Click click Insert.
Note:
2
This arms CinePlex Markup to insert an occurrence of a marker at
the current time when you click (left-click) the mouse.
In the Markers window, click the marker for which to insert occurrences.
A >> appears in the left most column to designate the marker as the currently
selected marker.
3
You can use mouse click insertion when CinePlex Markup is paused or
playing. Enter marker occurrences for each marker type as follows:
•
For Time Only (T) markers – Click in the Activity window only, as follows,
otherwise CinePlex Markup ignores the click.
• If paused – Click anywhere in the window and the occurrence
appears at the time corresponding to the pointer location.
• If playing – Because the display typically moves too fast for
precise insertion, click anywhere in the window and the
occurrence appears at the current time. You can keep the pointer
over the Activity window while you watch the video and click to
insert each occurrence.
•
For Interval (I) markers – Click in the Activity window only, as follows,
otherwise CinePlex Markup ignores the click.
• If paused – Click once to mark the start of the interval. Click a
second time to mark the end of the interval. You can enter the
ends of the interval in either order, but CinePlex Markup always
makes the earlier time the start time for the Interval marker
occurrence.
• If playing – Click once to mark the start of the interval. The start
time appears at the current time and the interval expands. Click a
second time to mark the end of the interval. The end also appears
Version 2.0
121
4
at the current time. You can keep the pointer over the Activity
window while you watch the video, then click to mark the start time
and click again to mark the end time of each occurrence.
•
For Scalar (S) markers – Click in the Scalar window only, as follows, otherwise CinePlex Markup ignores the click.
• If paused – Click-To-Add mode activates; see “Understanding
Click-To-Add Mode” on page 4-120. Click to insert a Scalar
marker occurrence with a value (see Note that follows) that
corresponds to the location you click in the Scalar window, at the
time of the current video frame. With this feature, you can enter a
new Scalar occurrence on every nth frame and then use the
Interpolate Missing Occurrences feature to fill in the skipped
values; see “Interpolate Missing Occurrences” on
page 5-204.
Note:
You must have the Scalar window configured correctly
for the desired range of the Scalar value; see “Scalar
Right-click Menu” on page 5-174.
• If playing – Click to insert an occurrence at the current time with a
value that corresponds to the location you click in the Scalar
window. The animation does not pause.
•
For Coordinate (C) markers – Click in the Video window only, as follows,
otherwise CinePlex Markup ignores the click.
• If paused – Click-To-Add mode activates; see “Understanding
Click-To-Add Mode” on page 4-120. Click in the Video
window to enter a Coordinate marker occurrence with a value that
corresponds to the location you click in the Video window, at the
time of the current video frame. With this feature, you can enter a
new Coordinate occurrence on every nth frame and then use the
interpolate missing occurrences feature to fill in the skipped
values; see “Interpolate Missing Occurrences” on
page 5-204.
• If playing – Click to insert an occurrence at the current time with a
value that corresponds to the location you click in the Video
window. The animation does not pause.
Note:
The left-click method works for Level Interval and Zone Interval markers. However, in general you should automatically generate these
marker types by using the Levels Editor and Zones Editor dialog
boxes. See “Using the Levels Editor” on page 4-128 and “Using
the Zones Editor” on page 4-130.
4.5.3 Editing Markers and Marker Occurrences
This section includes a series of short procedures dealing with markers and
marker occurrences. Each procedure uses the most-efficient primary method, but
additional methods that you can use to accomplish the same task appear in paren-
122
CinePlex
theses after the primary one. Follow the procedure below to delete a selected
marker.
1
In the Markers window, select the marker to delete.
2
From the Markers window right-click menu, choose Delete Selected Marker
(or from the Edit menu, choose Delete Selected Marker, or click the Delete
Selected Marker button):
CinePlex Markup immediately deletes the selected marker and its marker
occurrences.
Note:
CinePlex Markup provides no confirmation before it deletes the
marker. However, to undo the deletion, from the Edit menu, click
Undo.
Deleting all occurrences of a selected marker
1
In the Markers window, select the marker with the marker occurrences to
delete.
2
From the Markers window right-click menu, choose Delete all Occurrences
of Selected Marker (or from the Edit menu, choose Delete all Occurrences
of Selected Marker, or click the Delete all Occurrences of Selected Marker
button):
CinePlex Markup immediately deletes all marker occurrences for the
selected marker.
Note:
CinePlex Markup does not delete the marker itself, but it removes all
occurrences of the marker. CinePlex Markup provides no confirmation before it deletes the marker occurrences. However, to undo the
deletion, from the Edit menu, click Undo.
Copying a selected marker
1
In the Markers window, select the marker to copy.
2
From the Markers window right-click menu, choose Make Copy of Selected
Marker (or from the Edit menu, choose Make Copy of Selected Marker). An
exact copy of the selected marker named Copy of <OldMarker> appears in
the Markers window.
Note:
The new marker has the same marker occurrences. However, the
new marker gets new values for the associated key and for the Event
ID(s), since those values need to be unique among the markers.
Adding new marker occurrences
Version 2.0
1
In the Marker Occurrences window, select the marker for the new
occurrence.
2
From the Marker Occurrences window right-click menu, choose Add New
Marker Occurrence (or from the Edit menu, choose Add New Marker
Occurrence, or click the Add New Marker Occurrence button). The New
Marker Occurrence dialog box for the selected marker opens.
123
4
Note:
3
For more information on the New Marker Occurrence dialog box,
see “Add New Marker Occurrence” on page 5-190.
In the Time box, type a time in seconds for the marker occurrence. If the
marker is a Coordinate marker, type the X and Y coordinates. Click OK.
Editing marker occurrences
1
In the Marker Occurrences window, select the marker occurrence to edit.
2
From the Marker Occurrences window right-click menu, choose Edit
Selected Marker Occurrence (or from the Edit menu, choose Edit Selected
Marker Occurrence, or click the Edit Marker Occurrence button):
The Edit Marker Occurrence dialog box opens.
Note:
3
For more information on the Edit Marker Occurrence dialog box,
see “Edit Selected Marker Occurrence” on page 5-190.
In the Time and End Time boxes, type new times in seconds. If the marker
type includes coordinates, change these as needed. Click OK.
Deleting selected marker occurrences
1
In the Marker Occurrences window, select a marker occurrence to delete.
Note:
2
To delete more than one occurrence, see Step 3.
From the Marker Occurrences window right-click menu, choose Delete
Selected Marker Occurrence (or from the Edit menu, choose Delete
Selected Marker Occurrence, or click the Delete Marker Occurrence
button):
CinePlex Markup deletes the currently selected marker occurrence.
124
CinePlex
3
You can also select multiple occurrences to delete. To delete a currently
selected marker occurrence plus all of the marker occurrences that you
highlight with a black background in the Marker Occurrences window, from
the right-click menu choose Delete Highlighted Marker Occurrences.
CinePlex Markup immediately deletes all of the marker occurrences that you
highlighted in the Marker Occurrences window.
Note:
CinePlex Markup includes other right-click menu entries for selecting and
copying text with marker occurrence information onto the Windows clipboard,
which you can paste into other applications.
4.5.4 Automatically Generating Marker Occurrences
CinePlex Markup can automatically generate marker occurrences. When you
define a new marker using the Define New Marker dialog box (see “Define New
Marker” on page 5-187), you can choose to have CinePlex Markup populate the
new marker with algorithmically-generated marker occurrences. The available
algorithms for generating marker occurrences depend on the marker type, which
the following sections describe.
Automatically generating Time-Only or Frame Marker occurrences
1
To automatically generate Time-Only or Frame Marker occurrences, in the
Define New Marker dialog box, click T then click Generate Occurrences to
open the Generate Marker Occurrences dialog box.
2
To generate occurrences for this marker from the occurrences of another
marker, click Generate from occurrences of another Marker. Otherwise, go
to Step 4.
3
Select a marker from the drop-down list. Click OK.
CinePlex Markup generates marker occurrences at the times of the occurrences of the marker you selected in the drop list.
Version 2.0
125
4
4
To generate occurrences for this marker based on other criteria, click
Generate based on.
5
To generate regularly-spaced marker occurrences, in the Time of First
Occurrence box type an offset from the beginning of the file.
6
To space the occurrences at intervals such that they occur at a specified rate,
in the Occurrence Rate box, type the rate in occurrences per second.
7
To specify the total number of marker occurrences to generate, in the
Number to Generate box, type the total.
Note:
Under some conditions, the New Project Wizard also displays the
Generate Marker Occurrences dialog box so that the required frame
marker occurrences can generate. The suggested values that appear
in the Occurrence Rate and Number to Generate edit boxes when
the dialog box first appears correspond to the frame rate and number
of frames detected in the currently-loaded video data file. In most
cases, you can simply click OK to generate appropriate frame marker
occurrences.
Automatically generating Interval marker occurrences
126
1
To automatically generate Interval marker occurrences, in the Define New
Marker dialog box, click I, then click Generate Occurrences to open the
Generate Interval Marker Occurrences dialog box.
2
From the Generate Intervals that cover time spans drop-down list box,
select one of the following algorithms to generate the intervals:
•
Between Marker 1 and Marker 2 – If you select this algorithm, go to
Step 3.
•
Around Marker 1 – If you select this algorithm, go to Step 4.
•
Between a time offset from Marker 1 and a time offset from
Marker – If you select this algorithm, go to Step 5.
•
Defined by time ranges read in from a file – If you select this algorithm, go to Step 6.
CinePlex
3
Select entries in the Marker 1 and Marker 2 lists. Click OK.
Intervals generate with a start time that corresponds to the occurrence times
of the Marker 1 selection. The end time correspond to the first subsequent
occurrence time of the Marker 2 selection. CinePlex Markup ignores additional occurrences of Marker 1 that occur before an ending Marker 2.
4
Select entries in the Marker 1 list. In the two Time Offset... boxes, enter time
offsets TS and TE in seconds. Click OK.
Note:
5
Select entries in the Marker 1 and Marker 2 lists, and enter time offsets in the
Time Offset... boxes. Offsets can be positive or negative. Click OK.
Note:
6
For every occurrence of Marker 1 at time t, an interval generates from
time t + TS to time t + TE, where TS and TE are the time offsets
entered in the first and second marker boxes respectively. TS and TE
can be positive or negative.
This is a generalization of the first algorithm where the interval is offset in a fashion similar to the second algorithm from the exact times of
the start and end marker occurrences.
In the Ranges File box, type or select a text file that contains the ranges.
Click OK.
Note:
The format of the text file is one range per line of text, with each line
containing the start time and end time in seconds. The delimiter
between the times can be a comma, a space, or a tab.
Automatically generating Scalar and Coordinate marker occurrences
•
In the Define New Marker dialog box, if you select S (Scalar) or C (Coordinate) and click Generate Occurrences, CinePlex Markup just generates
some fake, random data for testing and demonstration purposes. It has no
usefulness in general.
Automatically generating Level Interval and Zone Interval marker
occurrences
•
Version 2.0
In the Define New Marker dialog box, if you select L (Level Interval) or R
(Zone Interval) and click Generate Occurrences, CinePlex Markup defines
the new marker and then opens either the Levels Editor or Zones Editor dialog boxes. Use the editors to generate occurrences based on level crossings
for Scalar markers, or Zone containment for Coordinate markers. For basic
information, see “Using the Levels Editor” on page 4-128 and “Using the
Zones Editor” on page 4-130. For detailed information on each editor, see
“Levels Editor” on page 5-196 and “Zones Editor” on page 5-198.
127
4
4.5.5 Using the Levels Editor
You can use the Levels Editor to define Level Interval markers and insert marker
occurrences for them. To open the Levels Editor dialog box, from the Tools
menu, click Levels Editor (or click the Levels Editor button on the toolbar).
Level Interval Markers
Level Interval marker occurrences indicate the time intervals during which the
values of another Scalar marker satisfied some condition. You can use the Levels
Editor to set up the conditions, apply the conditions to a specific Scalar marker,
and generate occurrences of the selected Level Interval marker or markers.
Level Interval markers are like Interval markers, but they are extended to store
additional information that defines a condition. This additional information
appears with the Level Interval marker definition in the .cpj file. The occurrence
of a Level Interval marker is always tied to the values of the occurrence of a Scalar marker.
The condition for a Level Interval marker can be either one or two level settings,
which can include an above or below flag for each level, and when two levels are
used, a logical operator between them (AND or OR). For example, you can
define a simple thresholding operation that generates the time intervals for which
the value of the Motion Scalar marker went below the value of 175. This definition might be useful as a freezing behavior detector. For more information on
freezing behavior, see “Motion Measure Option” on page 2-57. The generated
Level Interval then represents the episodes during which the animal froze. The
preceding illustration shows the Levels Editor when such a Frozen Level Interval
128
CinePlex
is defined and selected. A more sophisticated condition involving two levels
appears in the following illustration:
In the preceding illustration, Running marker is populated with occurrences that
represent the time intervals for which the Motion Scalar marker is Above the
value of 764 and is also Below the value of 893. You can add, edit, and delete
these Level Interval markers using the buttons in the bottom portion of the Levels
Editor window.
To use the Levels Editor
1
On the Tools menu, click Levels Editor.
The Levels Editor window opens.
2
To define a new Level Interval marker, click Add.
The Define New Marker dialog box (see “Define New Marker” on
page 5-187) opens to enable you to customize the general properties of the
new Level Interval marker.
3
Define the new marker and click OK to close the Define New Marker dialog
box.
A new row appears in the Level Intervals box.
Version 2.0
129
4
4.5.6 Using the Zones Editor
You can use the Zones Editor to define Zone Interval markers and generate
marker occurrences for them. To open the Zones Editor dialog box, on the Tools
menu, click Zones Editor (or click the Zones Editor button on the toolbar):
Zone Interval Markers
Zone Interval marker occurrences indicate the time intervals during which a
Coordinate marker occurrence remains inside a Zone that you define. You can use
the Zones Editor dialog box to define the Zones, to search for the times when the
specified Coordinate marker entered and left the defined Zones, and generate
Zone Interval marker occurrences.
Zone Interval markers are Interval markers, but they are extended to store additional information that defines a Zone. This additional information appears with
the Zone Interval marker definition in the .cpj file. A Zone is an ordered list of
coordinates that are connected with line segments, to form a closed Zone. Zone
Interval marker occurrences are always tied to the values of the occurrence of a
Coordinates marker.
The coordinate system for all Coordinate markers, and therefore also for all Zone
definitions, range from (0,0) to (1023,767), with (0,0) representing the lower left
130
CinePlex
corner of the image. If the video resolution is other than 1024x768, which is usually the case, the coordinates are linearly mapped onto the video.
To use the Zones Editor
1
On the Tools menu, click Zones Editor.
The Zones Editor window opens.
2
To define a new Zone Interval marker, under the Zone Intervals area click
Add.
The Define New Marker dialog box (see “Define New Marker” on
page 5-187) opens to enable you to customize the general properties of the
new Zone Interval marker.
3
Define the new marker and click OK to close the Define New Marker dialog
box.
A new row appears in the Zone Intervals box.
Note:
Immediately after you create a new Zone Interval marker, Zones Editor enables you to click in the video window to set the X and Y Coordinates of the Selected Zone. The box directly above the video then
contains this text:
Left-Click on the view to add a new coordinate; Right-Click to end
Version 2.0
131
4
4
Move the mouse pointer into the Zones Editor video area.
The mouse pointer changes to crosshairs and the current pointer location
coordinates appear under X and Y in the Coordinates of the Selected Zone
area.
5
Move the pointer to the desired location for the first coordinates of the
selected Zone. Click to add the first coordinates.
The first set of coordinates appear as line 1 in the Coordinates of the
Selected Zone box and line 2 indicates the current pointer position.
Note:
As you move the mouse pointer, a line follows it from the first coordinates to its current location. The current location always appears as a
small circle with a white interior.
6
Move the pointer to the desired location and click again to add the second set
of coordinates, and so on. Stop entering coordinates when the next set would
be the starting point.
7
Click the right mouse button.
The Zones Editor automatically closes the Zone by making the last coordinate the same as the first coordinate.
You can select a point at a vertex of a selected Zone Interval by clicking on a line
in the Coordinates of the Selected Zone box. The point you select appears with
a >> in the leftmost column box and as a small circle with a white interior in the
video area.
After you have defined the Zones, you can generate Marker occurrences just for
the selected Zone Interval marker, or for all Zone Interval markers by clicking
Generate Selected or Generate All.
4.5.7 Operationing with Marker Occurrences
With CinePlex Markup, you can perform certain simple operations on marker
occurrences. You can find, move, and delete occurrences. You can also shift,
align and interpolate marker occurrences, and invalidate waveforms that occur
either inside or outside of Interval marker occurrences.
Finding Marker Occurrences
CinePlex Markup includes the following three ways to find marker occurrences:
•
Keystroke
•
Button
•
Using the Find menu items or toolbar buttons
Finding marker occurrences with a keystroke
•
In the Input window next to Keystroke, click Find. Press the key associated
with the marker, which appears in the Key column of the Markers window.
CinePlex Markup advances the file in the Activity window to align the first
occurrence of the marker with the current time triangle.
132
CinePlex
Finding marker occurrences with a button click
•
In the Input window next to Button, click Find. In the Input window, click the
button associated with the marker.
CinePlex Markup advances the file in the Activity window to align the first
occurrence of the marker with the current time triangle.
Interval Operations
For Interval, Level Interval, or Zone Interval markers, you can invalidate spike
waveforms inside or outside of the Intervals, or remove the occurrences of other
markers that fall inside or outside of the intervals.
To use an Interval marker (see “Defining a New Marker” on page 4-111) for
operations, from the Tools menu, click Interval Operations to open the Interval
Operations dialog box:
From the Interval Marker to Use list, choose one of the currently-defined Interval, Level Interval, or Zone Interval markers.
To mark as invalid each waveform (spike time) in every channel that falls inside
the start and end times of all occurrences of the Interval marker, click Invalidate
Waveforms that occur within the Intervals. You can invert this operation;
before you do so see the cautionary note in this section.
If a marker occurrence falls inside an interval you define, you can remove that
marker occurrence. To do so, click Remove Occurrences within the Intervals,
for Marker, and choose a non-Interval marker from the second list. You can also
invert this operation; before you do so see the following cautionary note.
CAUTION
Negate inverts your selection for the entire file
If you click Negate the selected operation, you logically invert your
selection. This means you invalidate or remove all the items you did
not select, which is the entire portion of the file outside the limits of
the Interval occurrences.
Version 2.0
133
4
If you click Negate the selected operation, in the Interval Operations dialog
box, the text in the Operation to Perform Using Interval Marker area changes
as follows:
If you choose an operation and click Negate the selected operation, you either
invalidate all waveforms that do not fall between the start and end times of any
Interval occurrences, or you remove all occurrences of the selected marker that
do not occur inside the time span any Interval marker occurrence. For more information on the Interval Operations dialog box, see “Interval Operations” on
page 5-200.
Shifting Marker Occurrences
You can add a constant offset, which can be negative, to all the timestamps of a
marker. You can use this capability to align neural data files and video files.
Shifting marker occurrences
1
From the Tools menu, click Shift Marker Occurrences to open the Shift
Marker Occurrences dialog box:
2
Choose a marker from the Marker list.
Note:
134
The first, last, and range of times covered by the occurrences of the
chosen marker appear below the Marker list.
CinePlex
3
4
Choose one of the following methods for specifying the time shift:
•
To shift marker occurrences by a fixed amount, in the Shift by box, enter
the amount of the shift in seconds.
•
To shift marker occurrences so that the first occurrence is at a specified
time, enter the specified time in seconds in the Shift so that first Occurrence is at time box. CinePlex Markup applies this shift amount to all
occurrences.
•
To shift marker occurrences so that the first occurrence of a marker to
shift is at the time of another marker occurrence, select the marker representing the time to shift to from the Shift so that first Occurrence is at
time of Marker list, and enter the occurrence of the marker to use by typing its 1-based index in the Occurrence box.
Click OK to shift the marker occurrences and close the dialog box.
Snap-To Marker Occurrences
The Snap-To Marker Occurrences tool shifts all the occurrences of a marker to
match up in time with the occurrences of another marker.
Repositioning marker occurrences to align with others
1
From the Tools menu, choose Snap-To Marker Occurrences
The Snap-To Marker Occurrences dialog box opens.
2
From the Marker To Adjust list, choose the marker to match up in time. From
the Snap-To Occurrences of Marker list, choose the marker representing
the occurrences to match in time.
Note:
Version 2.0
Typically, the entry in Marker To Adjust is the one to align with the
times of the video frames and the entry in Snap-To Occurrences of
Marker is a Frame marker. CinePlex Markup uses the following algorithm: For every occurrence of the entry in Marker To Adjust, CinePlex Markup finds the best match occurrence of the entry in Snap-To
Occurrences of Marker, and makes the occurrence time of the entry
in Marker To Adjust equal to the time of the best match occurrence.
135
4
3
To determine the best match occurrence of the entry in Snap-To
Occurrences Marker, click one of the following items:
•
Snap-to Previous Occurrence: Click this item to use the occurrences
that are positioned immediately before the times of the entry in Marker To
Adjust. This adjustment always reduces the time of the occurrences
being adjusted.
•
Snap-to Next Occurrence: Click this item to use the occurrences that
are positioned immediately after the times of the entry in Marker To
Adjust. This adjustment always increases the time of the occurrences
being adjusted.
•
Snap-to Closest Occurrence: Click this item to use the occurrences that
are closest in time the entry in Marker To Adjust. This adjustment can
shift the occurrence being adjusted either direction in time.
4
If the entry in Marker to Adjust is an Interval-type marker, it consists of two
times—a start time and an end time. To adjust the span, which can change
the duration of the interval by making both the start and the end times snap to
their respective best match occurrences, click Snap interval start and end
times independently. To retain the span, which retains the duration of the
interval by only making the start times snap to their best match occurrences
and shifting the end times to match, click to clear the checkbox.
5
Click OK to adjust the occurrences and close the dialog box. A confirmation
dialog box appears to display how many marker occurrences were moved.
The result may be two or more markers with the same timestamp.
Interpolating Missing Marker Occurrences
This tool is useful for adding entries in any gaps in marker occurrences. For
example, when you are tracking some feature on the video by hand, you can enter
tracking coordinates only for every nth frame, and then interpolate them to complete the remaining frames; this is a form of key-frame animation. Also, CinePlex Capture is occasionally unable to provide valid coordinates for some video
frames, for example, when the headset cable for a rat occludes the LED being
tracked. You can use this tool to complete tracking coordinates for every frame.
136
CinePlex
Interpolating missing occurrences
1
From the Tools menu, choose Interpolate Missing Occurrences.
The Interpolate Missing Occurrences dialog box opens.
Note:
2
3
4
Version 2.0
For detailed information on how the interpolation algorithm runs, see
“How the Interpolation Algorithm Works” on page 5-206.
In the Timestamp Determination area, choose one of the following items:
•
Assume Periodicity: If the results in the Perodicity area indicate that
the data is truly periodic enough so that filling in gaps by assuming a periodicity is valid, click this item.
•
Use Frame Marker Times: If you know a-priori that there should be
marker occurrences for the selected marker for every frame, click this
item; this lets the frame markers—not the periodicity analysis—
determine where missing marker occurrences appear.
In the Value Interpolation area, if the marker being interpolated is a Scalar
marker or a Coordinates marker, choose one of the following methods to
calculate reasonable values to give the added marker occurrences:
•
Sample-and-hold the previous value – Click this item to assign the
value or coordinates of the last pre-gap marker occurrence to the new
marker occurrences that fill the gap.
•
Linear Interpolation – Click this item to assign values to the new marker
occurrences that fall on a line connecting the last pre-gap value or coordinates with the first post-gap value or coordinates.
To have CinePlex Markup define and populate a new marker to identify the
marker occurrences that it generates through interpolation, click Generate
137
4
new Time-only Marker at times for added Occurrences. Otherwise, click to
clear the checkbox.
Note:
5
If you choose this item, CinePlex Markup defines a new marker
name “Interpolated X”, where X represents the name of the interpolated marker; this tags the occurrences that are not part of the original
data.
Click OK to close the dialog box.
CinePlex Markup adds the new occurrences to the file and, if you chose the
item in Step 4, adds an new row entitled “Interpolated __” to the list in the
Activity window.
4.5.8 Selecting and Editing Marker Occurrences
To select a marker, in the Activity window, double-click on any marker time-line,
or on the label for a marker. The label of the marker you select appears in the
highlight color, which is violet by default.
In the Input window (see “Input Window” on page 5-165), if you choose Select
for the Left-Click input, a left click in the Activity window selects the nearest
on-screen marker occurrence for the selected marker. The selected marker occurrence appears with a white box around it:
If you select the end time interval, the white box appears around the end time tick
mark and the interval line:
In the Marker Occurrences window, the newly selected marker occurrence
appears with a > next it, and the window can scroll to position the newly selected
marker occurrence near the top of the view. If the Activity window is in the mode
where it is selecting the nearest marker occurrence, the mouse pointer becomes
white crosshairs.
In the Activity window, the status bar shows useful information about the
selected marker and marker occurrence. The name of the selected marker appears
and the 1-based index of the selected marker occurrence; for example, in the fol-
138
CinePlex
lowing illustration idx indicates the 4th occurrence of this marker and t indicates
its time in seconds:
In the Activity window, you can also drag selected marker occurrences to different times; this enables you to make minor adjustments to the positioning of
marker occurrences. To drag a marker occurrence to a new time, hold down the
SHIFT key, click the marker occurrence, and drag it to a new time. For Intervaltype markers, you can independently adjust the start and end times; for selection
techniques, see the preceding paragraphs.
4.5.9 Entering or Editing Coordinate Markers
In the Input window (see “Input Window” on page 5-165), if you choose Insert
for the Left-Click input and the selected marker is a Coordinate marker, you can
enter or change coordinates by clicking in the Video window. If the Video window is in the mode where a left-click can change or add new Coordinate marker
occurrences, the mouse pointer in the Video window changes to crosshairs and a
line of text at the bottom of the window shows the current coordinates.
Because CinePlex Markup can enable only one marker occurrence for any given
time, if you enter a new coordinate at the time of an existing marker occurrence,
you effectively replace the existing coordinates. Thus, if the Coordinate marker
occurrences occur at the same time as the Frame marker occurrences, you can
touch up existing coordinates with a simple click on the new location.
By default, the Click-To-Add feature (see “Left-Click Insertion” on page 4-120)
automatically advances a number of frames, so if you continually click in the
Video window you can quickly enter a sequence of coordinates on subsequent
video frames.
Importing Markers
CinePlex Markup can import additional markers and marker occurrences from
additional neural data files into an existing project. You can add neural data files
to the project and process them as you would have during the initial import of
neural data when you first created the project (see “Setting Up a New Project” on
page 4-107). You can turn their events (from .plx files) or variables (from .nex
files) into the appropriate markers and marker occurrences.
To import markers, from the File menu, click Import Markers to open a Windows file selection dialog box for the neural data file. After you select the file,
click OK to import the data from that file as new markers. CinePlex Markup
must have unique marker names, so if a marker name from the imported neural
data files conflicts with an existing marker, CinePlex Markup renames the file
by adding “_n” to the name, and increasing the number n until it establishes a
unique name.
Version 2.0
139
4
Exporting Markers to text files, Matlab, or Excel
CinePlex Markup can export marker occurrences data in a tabular format to
either a text file, a Matlab file, or an Excel spreadsheet.
Exporting makers as text, Matlab, or Excel files
1
From the File menu, click Export Markers to open the Export Marker Data
dialog box.
The Export Marker Data dialog box opens.
2
In the Format area, select the type of file to export.
Note:
3
For all formats, CinePlex Markup exports one marker occurrence per row—
or per line for text files, and all rows have the same number of columns. From
the Delimiter to use between values list, select one of the following
delimiters: Comma; Comma, Space; Space; Semicolon; or Tab.
4
If want the file to have a header row, click Export a Row of Column
Headers.
5
In the Which Markers area, click Selected Marker to export only the
occurrences for the selected marker. To export the occurrences for all
markers, click All Markers.
Note:
140
To use the corresponding Matlab or Excel export functionality, those
programs must be installed on the same computer with CinePlex
Markup. Otherwise, the corresponding radio buttons appear dimmed.
If you select All Markers, the selection generally results in a confusing output file.
CinePlex
6
You can set the columns for each row in the What to Export for Each Marker
Occurrence area. For more information on exporting marker data, see
“Export Markers” on page 5-181.
7
In the Output File area, in the File box, type or select the output file name.
Note:
8
Under Format, if you select Text file or Excel, you can click the
Append if existing checkbox to append the marker data onto the
end of a file that already exists on disk. Otherwise, CinePlex Markup
overwrites the existing file.
Click Export! to create the file and close the dialog box. The Export
Complete dialog box appears.
Exporting as a .plx File
CinePlex Markup can export marker occurrences data along with spike and continuous data read in from the original neural data file to a new .plx file.
Mapping Markers to Event IDs
When exporting to a .plx file, the marker occurrences in the project are represented as external events (type 4 data) in the output .plx file. There are two kinds
of external events in the .plx file format:
1
Individual External Events – These events appear only by their Event ID, and
each occurrence includes a timestamp only. There can be many different Individual External Events (with different Event IDs) present in a .plx file.
2
Strobed Events – These events appear only by a special Event ID, so only one
strobed event can be in a .plx file. Each occurrence of a strobed event stores a
timestamp plus a single 16-bit value, called the strobe code.
You must define a mapping between markers and Event IDs before CinePlex
Markup can represent marker occurrences as external events.
Each marker for which the marker occurrences are to be exported to a .plx file
must have its own unique Event ID. You can define or edit the Event IDs in the
Define New Marker or New Marker Occurrence dialog boxes (see “Define
New Marker” on page 5-187 and “Add New Marker Occurrence” on
page 5-190), or you can change them in the Export To .PLX dialog box (see
“Export to .PLX” on page 5-184.
The fact that individual external events do not have any data values associated
with them means that only Time-Only, Frame, and Interval-type (Interval, Level
Interval, or Zone Interval) markers can be represented by using individual external events. For Interval-type markers, you must specify two Event IDs, one to
represent the start time of the interval and one to represent the end time.
Furthermore, the fact that a .plx file can only contain one kind of strobed events
means that only a limited number of Scalar or Coordinates markers can simultaneously appear in a single .plx file. For example, if the strobed events in a .plx
file are to represent all the occurrences of a certain Scalar marker, then there is no
Version 2.0
141
4
way to represent another Scalar marker or any Coordinates markers in the same
.plx file.
Because of the existence of the VideoTracker protocol (see “Data Interpretation”
on page E-12), Coordinates markers can be represented in a .plx file. Up to three
Coordinates markers can be represented using the VideoTracker protocol in a
single .plx file, along with an additional Scalar marker.
Exporting as a NEX file
CinePlex Markup can export marker occurrences data along with spike and continuous data read in from the original neural data file to a new .nex file. For information on mapping from markers to Nex variables, see “Export to .NEX” on
page 5-186.
142
CinePlex
4.6 CinePlex Markup How-Tos
This section contains suggested procedures for several common operations in
CinePlex Markup. These procedures are by no means meant to be an exhaustive
list of what you can do with CinePlex Markup, nor are they intended to be a presentation of the only possible way to achieve any desired end result.
Note:
The following procedures assume you have created a project and that it is currently open. For details on how to create CinePlex projects, see “Setting Up a
New Project” on page 4-107.
4.6.1 Printing
Several windows in CinePlex Markup support rudimentary printing. To print a
specific window, click in the window so the title bar is highlighted. If the window
supports printing, the Print and Print Preview items on the File menu are available. The Input and Scalar windows do not support printing.
4.6.2 Denoting Interesting Behavior In the Video
A basic use for CinePlex Markup is to introduce a new marker occurrence into
the data each time an animal or other subject in the video performs an action that
is of interest in an experiment. For example, perhaps you suspect that you have
found a neuron that is associated with a rat deciding to get a drink of water. You
might test this hypothesis by introducing a time marker into the data whenever
the rat drinks his first sip of water, as shown by the video. You would then like to
perform a peri-event analysis against this new event in Neuroexplorer (NEX) to
see if any neurons are associated with the first sip.
The procedural approach here is to define a new Time-only marker in CinePlex
Markup, then enter marker occurrences whenever the rat starts to sip water. Initially, we rough in all the marker occurrences during one continuous pass through
the video, then we go back and adjust each marker occurrence to be as accurate as
possible. Then this information is saved to a .nex file, from which we can easily
load it into NEX for analysis.
Denoting interesting behavior in the video
Version 2.0
1
Define a new Time-only marker as described in “Defining a New Marker”
on page 4-111. Label it “First Sip.” Assign a keystroke to it that is easy for
you to press quickly.
2
Click Play. Adjust the Faster and Slower settings to a comfortable speed to
view the video, which balances your desire to get through the video quickly
against the risk of missing the behavior should it occur too quickly for you to
spot.
3
Use the Zoom In and Zoom Out buttons at the bottom of the Activity window
to adjust the time range such that you can be reasonably sure that, should
you spot the sip behavior in the video view, you can hit a key on the keyboard
before the time of the first sip scrolls out of the Activity window.
4
In the Input window, at Keystroke, click Insert (You could just as easily use
the Left-click or Button input methods here.). CinePlex Markup is now
143
4
armed to enter new occurrences of the new marker when you press that
marker's associated key.
5
Click Rewind. Click Play. Position your finger over the associated keystroke
for the “First Sip” event.
6
When you see the sip behavior, quickly press the key associated with the
“First Sip” marker. Don't worry about being accurate at this point, we will go
back through and fine-tune the times later. Go through the entire video.
7
Now, lets go back through and adjust the time of the “First Sip” marker
occurrences to be more accurate. We will use the Find function to quickly
locate our marker occurrences. In the Input window, after Keystroke, click
Find.
8
Rewind the video file, then press the assigned key for the “First Sip” marker.
This takes you to the first marker occurrence. Use the left and right arrow keys
on the keyboard to look at each frame of the video to decide where the sip
actually occurs.
9
In the Activity window, drag the marker occurrences to the correct time. To do
so, press and hold the SHIFT key, then click near the tick mark for the
marker occurrence. Drag the tick mark to the desired time and release the
mouse button.
10
To save the data, on the File menu, click Export to .NEX, and if desired,
select the appropriate What to Export checkboxes. Click Export! to write the
file.
4.6.3 Invalidating Artifact Waveforms
Artifact waveforms can occur, for example, because a rat rapidly shakes its head.
You can easily spot this behavior in the video view, and it generally produces a
cluster of spikes and large voltage deviations in a continuous data channel. You
would like to invalidate all spike waveforms that occur during each head-shaking
episode, and save the data to a new .plx file that does not contain those invalidated waveforms. You can then load this file into Offline Sorter and sort it.
The procedural approach here is to define a new Interval marker, whose occurrences start and end when the head-shaking episodes start and end. We then use
this Interval marker to invalidate the spike waveforms that occur within the headshaking episodes. We then save the data to a new .plx file minus the invalidated
spike waveforms.
Invalidating artifact waveforms
144
1
Define a new Interval marker (see “Defining a New Marker” on
page 4-111). Label it “Head Shake”. Make sure that the new marker is the
currently-selected marker.
2
In the Channels window (see “Channels Window” on page 5-166), click
Show for the spike and continuous channels that are the best indicators of
when this artifact occurs, which makes them appear in the Activity window.
3
Use the Zoom Out button at the bottom of the Activity window to expand the
time range as much as possible, which helps you examine the file quickly.
CinePlex
However, do not expand the range so far that you cannot still clearly spot the
artifact should it occur.
Version 2.0
4
In the Input window, at Left-Click, click Insert (You could just as easily use
the Left-click or Button input methods here.). CinePlex Markup is now
armed to enter new occurrences of the new marker when you press that
marker's associated key.
5
Starting at the beginning of the file, click Play. If it doesn't make the behavior
too difficult to spot as it scrolls by, increase the speed of the playback so that
you can review the file quickly.
6
When you see the head shake behavior, quickly press SPACEBAR to pause
the playback. Use the left and right arrows to single-step the frames to verify
the head shake and decide when the head shake behavior begins and ends.
7
In the Activity window, left-click at the starting and ending times of the head
shake episode. This inserts new marker occurrences of the “Head Shake”
marker.
8
Press SPACEBAR to resume playing. Repeat Steps 6, 7, and 8 for each
head shaking episode until you reach the end of the file.
9
From the the Tools menu, click Interval Operations. Select the “Head
Shake” marker from the Interval Marker to Use list. Click Invalidate
Waveforms that occur within the Intervals. Click OK.
10
Now you have invalidated all of the spikes that occur within the head shake
episodes. To hide invalidated spikes in the Activity window, open the rightclick menu and click Hide Invalidated Spikes.
11
To save the data, from the File menu, click Export to .PLX. Verify that the
Export invalidated spikes checkbox is clear (the default). If desired, check
145
4
or clear the Write? checkboxes for any markers that you do or do not want to
export into the new .plx file. Click Export! to write the file.
4.6.4 Freeze Detection
CinePlex Capture can detect freeze behavior using recorded data with the
Motion Measure option. You can define a new interval that occurs whenever a rat
freezes. You can set a threshold level for the motion measure and define a freeze
to be whenever the motion measure falls below that level. You can then export the
freezing episodes to a text file.
The procedural approach here is to use the Levels Editor to define the freezing
threshold and apply it to the Motion Measure data generated by CinePlex Capture, and then import it into CinePlex Markup as the “Centroid Motion” Scalar
marker. This generates occurrences of a newly labelled “Rat Froze” marker. You
can then export this marker to a text file.
Detecting freezing behavior
1
Define a new Interval marker (see “Defining a New Marker” on
page 4-111). Label it “Rat Froze”. From the Define New Marker dialog box,
click Generate Occurrences. This opens the Levels Editor dialog box,
which is described in detail in “Using the Levels Editor” on page 4-128.
2
In the Levels Editor dialog box, make sure you select the “Centroid Motion”
variable in the Scalar Marker To Use list. The display window opens showing
the Centroid Motion values over the duration of the file.
3
Click Center Lev 1 to get the line to the middle of the display window. Adjust it
to a reasonable freeze threshold.
4
Since we want to generate intervals when the “Centroid Motion” value falls
below the threshold, click Below from the list in the first Abv/Blw column for
the “Rat Froze” line in the grid.
5
Click Generated Selected because we only have one Level Interval marker
and it is selected. Click Done.
The Marker Occurrences window and the Activity window now show the
new “Rat Froze” intervals.
6
146
To write the intervals to a text file, from the File menu, select Export Markers.
In the Export Marker Data dialog box, you can accept the default settings,
which produce a reasonable output file. You can change the Delimiter to use
between values, select Export a Row of Column Headers, and clear some
of the checkboxes under What to Export for Each Marker Occurrences.
For a more information, see “Export Markers” on page 5-181. Type a file
CinePlex
name and click Export! The Export Complete! dialog box confirms the
action.
7
Use a text editor such as Windows Notepad to inspect the text file. Most other
analyses programs can import the text format.
4.6.5 Entering Tracker Coordinates
Suppose that you would like to track the movement of some subtle feature on the
video image. Something that CinePlex Capture cannot track automatically, like
the position of the tip of a rat's tail.
The procedural approach here is to define a new Coordinates marker, and use the
Video window to enter—by mouse click—the coordinates that populate the new
marker. Then, we can use the Interpolate Missing Occurrences tool to fill in the
in-between frames.
Entering tracking coordinates
Version 2.0
1
Define a new Coordinates marker (see “Defining
page 4-111). Label it “Tail Position”.
a New Marker” on
2
In the Input window, after Left-Click, click Insert. CinePlex Markup is now
“armed” to create a new occurrence of the “Tail Position” marker whenever
you click in the Video window.
3
Decide how often you need to enter coordinates. The default case is to enter
a Coordinates maker occurrence for each and every video frame. However,
this means that you must advance through the video frame-by-frame, which
can take a long time to do the tracking for an entire experimental run. If you
can accept less accuracy, you can configure CinePlex Markup to
automatically advance N video frames each time you click to enter a
coordinate. This means that you enter a “Tail Position” coordinate only every
Nth frame, but you get through the file N times faster. From the Tools menu,
select Options, and click the General tab in the Options dialog box. Type the
value of N into the Number of Frames to Advance During Click-To-Add
edit box. The default is N = 1, which enters a coordinate for every video
frame.
4
Click Play, then Pause, then Rewind to return to the beginning of the file.
This ensures that CinePlex Markup is ready to take new coordinates.
5
In the Video window, click at the position of the tip of the rat's tail. CinePlex
Markup enters a new marker occurrence, and advances N video frames.
6
Repeat Step 5 until you have gathered all the data you need.
7
When you are finished, in the Input window, at Left-Click, click Select to
“disarm” CinePlex Markup.
8
You can automatically generate new “Tail Position” marker occurrences for
the skipped frames by interpolating the coordinates between the ones you
entered. This is similar to “key-frame” animation techniques. CinePlex
Markup interpolates the coordinates mathematically with no regard for the
video images—the interpolated positions may or may not match the actual
positions of the rat's tail on the skipped video frames. To perform this
operation, from the Tools menu, select Interpolate Missing Occurrences;
147
4
for more information, see “Interpolate Missing Occurrences” on
page 5-204. From the Marker list, select Tail Position. Because we want
coordinates for every frame, in the Timestamp Determination area, click
Use Frame Marker Times. Click OK to close the dialog box and enter the
tracking coordinates.
4.6.6 Repairing Tracking Coordinates
Suppose that you use CinePlex Capture to track an LED mounted to the headstage on a rat. Occasionally, the cable from the headstage can get between the
LED and the camera, so the position data for the LED is missing in some frames.
Or, suppose something caused the tracker to produce bad coordinates for a few
frames, possibly caused by some light leaking into the experimental setup that
confused the tracking algorithms.
In either case, the procedural approach is to put CinePlex Markup into a state
where you can advance the video frame-by-frame and enter new or replacement
tracker coordinates by clicking in the Video window at the desired location.
Repairing tracking coordinates
1
In the Markers window, select the Coordinates marker to repair. Click Show.
To minimize confusion during the procedure, you can clear Show for other
Coordinate markers (if present).
2
For the following procedure to work, the Coordinates markers must be aligned
to the Frame marker times by using the Snap-to Marker Occurrences dialog
box, for more information, see “Snap-To Marker Occurrences” on
page 4-135. Follow the procedure outlined in that section to align the
Coordinate markers to the Frame markers.
3
Locate a section of time that has bad or missing values for the selected
Coordinate marker that you would like to repair. Pause the playback at the
first frame with bad or missing coordinates.
4
From the Tools menu, click Options, and in the Options dialog box click the
General tab. Make sure that the the selection in the Number of Frames to
Advance During Click-To-Add box is 1 (the default). Also, from the Animate
menu, select Lock To Video Frames.
5
In the Input window, at Left-Click, click Insert. This “arms” CinePlex Markup
to enter new (or replace existing) marker occurrences when you click the left
mouse button in the Video window.
6
Position the mouse cursor where you want the new (or replacement)
coordinate and click.
The position is entered (or updated) and the video automatically advances by
one frame.
148
CinePlex
7
Repeat Step 6 until all the coordinates are entered or repaired. Move the file
forward to the next episode of bad tracking coordinates and repeat.
8
When you finish, from the File menu, click Save. You can save and export the
new or updated positions like any other marker data.
4.6.7 Simple Place Cell Analysis
Suppose that you have spotted a neuron that seems to fire only when the rat is in
his nest. As a procedural approach to test this hypothesis, you could define a new
Zone Interval marker that defines the boundaries of the rat's nest. The generated
occurrences of this marker represent the intervals during which the rat was in its
nest. You could then use NeuroExplorer to search for correlations between neural
firing rates and this interval.
Version 2.0
1
Advance the video until a frame shows where the outline of the desired Zone
(the nest) is clearly visible.
2
Define a new Zone Interval marker (see “Defining Markers” on
page 4-117). Label it “Rat In Nest”. In the Define New Marker dialog box,
click Generate Occurrences to open the Zones Editor dialog box (see
“Zones Editor” on page 5-198).
3
In the Coordinates of the Selected Zone area, click Add and then click the
left mouse button repeatedly in the video window in order to define the outline
of the nest. Before you completely close the contour, click the right mouse
button, which closes the contour.
4
In the Coordinates Marker to use list, select the appropriate Coordinates
marker, and click Generate Selected. This generates occurrences of the new
“Rat In Nest” marker. Click Done to close the Zones Editor dialog box.
5
To inspect the “Rat In Nest” intervals, you can use the Find Marker
Occurrences dialog box (see “Find Marker Occurrences” on page 5-195)
to quickly advance through all the occurrences of the “Rat In Nest” marker.
You can also use the Marker Occurrences window (see “Marker
Occurrences Window” on page 5-171) to remove any undesirable “Rat In
Nest” occurrences.
6
From the File menu, click Export to .NEX (see “Export to .NEX” on
page 5-186) to write the data to a .nex file for subsequent analysis. The “Rat
In Nest” marker shows up as an interval variable in NeuroExplorer.
149
4
150
CinePlex
Plexon Inc
Chapter 5
CinePlex Markup Reference
5.1 Overview........................................................................152
5.2 Main Window ................................................................153
5.3 Menus.............................................................................177
5.4 Toolbars..........................................................................215
5.5 How CinePlex Markup Creates Initial Project Files......217
5.6 Understanding Markers and Marker Occurrences .........220
5.7 Correcting for Video Latency ........................................224
5.8 Aligning Tracker Coordinates to Frames.......................226
5.9 Analyzing CinePlex Capture data with NeuroExplorer.228
CinePlex
151
5
5.1 Overview
This chapter contains detailed reference information about menus, toolbars, dialog boxes, and windows for CinePlex Markup. By default, the Welcome To
CinePlex Markup dialog box appears when CinePlex Markup starts. This dialog box provides you with streamlined access to operations that are also available
under the File menu.
•
Start a New CinePlex Project - This button starts the New Project Wizard, which assists you in setting up a new CinePlex project. See “New
Project” on page 5-177.
•
Open an Existing CinePlex Project - This button opens a file browser
that enables you to select an existing .cpj file.
•
Open the Selected Recent CinePlex Project - This button operates on
the listbox of the most recently used .cpj files. Select one and click Open the
Selected Recent CinePlex Project to load that project. Alternately, you can
double-click the project .cpj file in the list box to open it.
You can choose whether or not the welcomes dialog box appears after CinePlex
Markup is started; to prevent the dialog box from appearing, click Do not show
this dialog box on startup. To have the dialog box reappear, from the Tools
menu, click Options, click the Display tab, and select Initially show 'Welcome
To CinePlex' Dialog Box.
152
CinePlex
5.2 Main Window
This section describes the CinePlex Markup Main window as shown below.
Menu and Toolbar
‘__’ Marker Occurrences Window
Video Window
Markers
Window
Input
Window
Channels
Window
Activity
Window
5.2.1 Video Window
The Video window by default is in the upper-right corner of the main window.
5.2.1.1 Function
The Video window displays the current frame of the video file. If the timecode
and/or filename were inserted into the video, they are also displayed..
Version 2.0
153
5
5.2.1.2 Features
Features of the Video window include:
•
154
Customizable Window - You can customize the user interface. CinePlex
Markup features a docking window architecture (see “Windows” on
page D-6) that enables you to
—
float individual windows to any location
—
dock windows to various positions
—
close windows as needed
—
resize windows by clicking and dragging the splitter bars that divide
them.
•
Resizable Video - By default, the Video window stretches or shrinks the
native video resolution (typically 640 X 480) to match the size of the Video
window. You can also configure it to always show the video at its native resolution regardless of the size of the Video window by unchecking the Resize
Video to Fit Window item on the right-click menu.
•
Coordinate Marker Crosshairs - If coordinate markers are present with
their Show checkboxes selected, the coordinates in effect for the current
video frame appear as crosshairs superimposed over the video image. The
crosshairs appear in the display color set for the coordinate marker. The range
for coordinates is always (0,0) to (1023,767) with (0,0) being in the lower-left
corner, regardless of the video resolution. Before plotting the crosshairs,
CinePlex Markup scales the marker coordinates to the video resolution.
Also, the coordinates that appear in the Video window are always those that
are relevant for the frame in the display—not necessarily the selected marker
occurrences. That is, if you select different coordinate marker occurrences in
the Marker Occurrences window, in general it does not change the coordinate crosshairs shown in the Video window. Note that if coordinates have not
been computed or supplied for a frame, the values for the prior frame are
used.
•
Grid Lines - You have the option of showing grid lines overlaid on the video
and also determining the spacing and color of the grid lines.
•
Tails - While the video plays, you can optionally show the crosshairs with a
tail line that shows the coordinate positions of previous frames. You can configure the length and width of this tail. By default, the tail changes color
according to the age of the points. The tail color results from a blending of the
marker color with another color you specify; the blending amount increases
for older points. If you choose a Fade-to Color similar to the background
color of the video, you create a fading effect that makes the tail appear to fade
away. If you rapidly advance the current time frame by using either the find
functions or the Activity window scroll bar, CinePlex Markup can produce a
confusing display for the rendered tails. In this case, from the right-click
menu, select Clear Tails to erase the tail. Also, you can draw a complete ver-
CinePlex
sion of the tail by selecting Show Complete Tail from the right-click menu.
The Show Complete Tail feature is useful, for example, for determining the
locations visited by an animal you are tracking. If you move the mouse
pointer outside of the Video window, you erase the complete tail. This menu
item shows a line connecting the coordinates for all marker occurrences for
the Coordinates marker, as shown in the following illustration:
5.2.1.3 Video Right-click Menu
The right-click menu enables you to change the behavior of the window, which
includes controlling the tail rendering and stretching the video. Click the right
mouse button to open the right-click menu for the Video window:
Version 2.0
•
Resize Video To Fit Window - When checked, this item resizes the video
to fit the Video window. When unchecked, the video appears at its native resolution regardless of the size of the Video window.
•
Clear Tails - Clicking this item clears the tails from the video window if the
Render Tails checkbox has been set on the Video View Properties dialog
box.
•
Show Complete Tail - Clicking this item shows the complete tail from the
whole video file if the Render Tails checkbox has been set on the Video
View Properties dialog box.
•
Properties - Clicking this item opens the Video View Properties dialog
box. The properties are discussed below.
155
5
—
Resize Video to Fit Window - This item stretches or shrinks the video
to fit the size of the Video window. If not checked, the video is shown
at its native resolution of 640x480 pixels.
—
Rendering - This area contains items that controls how the video is
presented in the Video window:
—
156
–
Coordinate Marker Crosshairs Size – This item controls the size
of the crosshairs drawn at the current Coordinates marker position.
–
Draw Grid Lines – This item draws a grid of lines over the Video
window.
–
Spacing – This item controls the spacing of the grid lines, which
appear in Coordinates marker units of (0,0) to (1023,767).
–
Color – This item controls the color of the grid lines. Select a color
from the drop-down list.
Tails - This area contains items that control the appearance of the tracking tell tails:
–
Render Tails – This item toggles on or off the rendering of the tails
that show previous Coordinates marker positions.
–
Length – This item controls the length of the tails, which is measured by the number of previous positions that appear in the window.
–
Line Width – This item controls the width of the line used to draw
tails, which is measured in marker occurrences.
–
Fade – This item controls whether or not the tail fades away.
–
Fade-to Color – This item controls the color to which the tails
fade. Fading occurs as follows:
CinePlex
The color drawn at point p in the tail, where p = 0 for the current position and
p = L (Length) for the oldest position is:
the rendered color at p = (p/L) x FC + (1-(p/L)) x DC
where
DC = display color for the current Coordinates marker
FC = Fade-to Color
—
Version 2.0
Previous Position Dots Along Tails – This area contains the items that
control the rendering of the small dots that indicate the previous positions:
–
Color – This item controls the color of the small dots at the coordinates of previous marker occurrences.
–
Size – This item controls the size in marker occurrences of the
small dots at the coordinates of previous Coordinates marker occurrences.
–
Draw Every – This item controls a factor that only draws a dot at
every Nth previous position.
–
The illustration below shows a segment of the Video window with
larger previous-position dots and Draw Grid Lines enabled.
157
5
5.2.2 Activity Window
In many ways, the Activity window is the heart of CinePlex Markup. The
default docking position is at the bottom of the main window. This truncated view
shows each important item or area in the Activity window.
Channel Zoom Controls
Marker and Unit Labels
Time Range Zoom Controls
Time Range Scroll Bar
Times of Unit Firings
Marker Times
Current File Position
5.2.2.1 Function
The Activity window displays markers and marker occurrences against their
associated timelines.
5.2.2.2 Features
This section describes the various elements in the Activity window as shown in
the illustration above.
•
Channel Zoom Controls - The vertical zoom buttons appear at the left
side under the top banner of the Activity window, as the illustration below
shows. Click + to vertically zoom in on the display so that fewer time-lines
appear, but each time-line is taller. This is the equivalent of selecting Zoom
In to Show Fewer Time-lines from the right-click menu. Click – to zoom
out, which is the equivalent of selecting Zoom Out to show More Timelines from the right-click menu. You can also vertically scroll the time-lines
in any of the following ways:
—
158
If your mouse has a wheel, by rotating it. This works when the mouse
pointer is positioned anywhere inside the Activity window.
CinePlex
Version 2.0
—
By pressing the PAGE UP or PAGE DOWN keys
—
By dragging in the vertical direction in the label area
•
Marker and Unit Labels - A label for each time-line appears on the left
side of the Activity window. You can resize the label area by dragging the
dividing line between it and the rest of the window. By default, CinePlex
Markup selects the Automatically Adjust Label Area Width item in the
right-click menu, which means that the dividing line continually adjusts so
that the labels fit into the label area. To keep the size of the label area constant, click to clear the Automatically Adjust Label Area Width item in the
right-click menu; this means the beginning of larger marker names can get
truncated. If you drag the divider line, CinePlex Markup automatically clears
the Automatically Adjust Label Area Width item.
•
Time Range Zoom Controls - The bottom of the Activity window contains the Zoom Out button, the Zoom In button, and the scrollbar for
expanding, contracting, and moving the time range displayed by the Activity
window. Each end contains boxes showing the current minimum and maximum extents of the displayed time range in seconds.
•
Time Range Scroll Bar - Use the scroll bar at the bottom of the display to
move the time span of the display. When you move the scroll bar, the video
frame that appears in the Video window is always updated to remain synchronized with the Activity window.
•
Times of Unit Firings, Marker Times - The central area of the Activity
window shows the times of marker occurrences and unit firings as colored
tick marks that are arranged along horizontal time-lines. By default, CinePlex Markup provides a horizontal time-line on the display for each marker
or spike channel whose Show column is checked in the Markers window or
the Channels window. The color of the marker ticks results from the displaycolor setting in the Markers window. The colors of the tick marks on the timelines for spike channels correspond to the unit classification of each spike.
You can set the colors to associate with each unit; to do so, from the Tools
menu, select Options and click the Colors tab. Also, if you check their
respective Show column in Channels window, CinePlex Markup provides
line traces on the display for continuous data channels. To improve clarity, the
Activity window devotes twice as much vertical space to the continuous data
channels than it does to the marker or spike channels. You may drag the dividing line that separates the central area from the top banner. You can also drag
a selected marker occurrence to a different time. To drag a marker occurrence
to a new time, hold down the SHIFT key, click the marker occurrence, and
159
5
drag it to a new time. For Interval-type markers, you can independently adjust
the start and end times. For more information on the Activity window, see
“Selecting and Editing Marker Occurrences” on page 4-138. When CinePlex
Markup is appropriately configured, you can click the mouse in the Activity
window to perform the following actions:
•
—
Select the marker occurrence for the currently selected marker nearest
in time (default). Double click to select a new current marker.
—
Add a new marker occurrence
—
Change the timestamp of an existing marker occurrence
Current File Position - The top banner contains the now triangle, which
denotes and displays the current time (or current file position). The current
time indicator (now triangle) is the white triangle in the following illustration.
The current time (t) in seconds appears to the left of the triangle, and the current video frame (F) number appears to the right of it. By default, CinePlex
Markup positions the triangle in the center of the Activity window, but you
can drag it to a new location in the top banner. This causes the Activity window to display an asymmetric range for the activity surrounding the triangle.
For example, from 1 second before to 3 seconds after the triangle position.
You can control the time range shown. The range surrounds the current time,
which is denoted by the small triangle at the top of the display. The text next
to the triangle shows the current time (in seconds) and the current frame number. You can click and drag the current time triangle to a different position
within the window of time shown.
5.2.2.3 Activity Right-click Menu
The Activity window has many options that you can control by using the rightclick menu.
160
CinePlex
Version 2.0
•
Automatically Adjust Label Area Width - This item causes the dividing
line between the labels on the left and the central portion of the view to automatically adjust to accommodate the longest marker name.
•
Show Unsorted Spikes - Selected by default, this item shows tick marks
for unsorted spikes in the color chosen to represent unsorted spikes, or else
the spikes do not appear.
•
Hide Invalidated Spikes - Selected by default, this item hides tick marks
for invalidated spikes; if you clear this item, tick marks appear in a dark grey
color.
•
Show All Units for a Channel on One Time-line - Selected by default,
this item plots each spike channel with a single time-line, and plots spikes
with different units from that channel on the same time-line, but with different colors according to their unit classification. If you clear this item, each
unit appears on a separate time-line. The channel name plus a letter of the
alphabet denoting the unit appear as a label for the per-unit timelines. That is,
if the channel sig001 has two defined units and some unsorted spikes and if
Show Unsorted Spikes is checked, there are 3 time-lines for that channel,
which appear as sig001U (unsorted), sig001a, and sig001b.
•
Show Markers Across All Time-lines - Normally, each marker appears
as its own time-line in the display. Select this item to make each marker
appear as a vertical line drawn across all of the other channels. This arrangement makes it somewhat easier for you to tell when marker occurrences happened with respect to spikes. The following illustration shows the Activity
window with the Show All Units for a Channel on One Time-line item
cleared and the Show Markers Across All Time-lines item selected:
•
Show Markers On Top Time-lines - Selected by default, this item shows
the time-lines for the markers at the top of the view, before the spike or continuous channel time-lines. If you clear this item, the marker channels appear
at the bottom. This item is only relevant if you clear the Show Markers
Across All Time-lines item.
•
Show Line for Each Time-line - This item draws a horizontal line in the
middle of each time-line.
•
Zoom Out ..., Zoom In to Show Fewer Time-lines - As previously discussed, this item shows more or fewer time-lines.
161
5
5.2.3 Markers Window
The Markers window is the central location for information about markers. The
illustration below shows the Markers window.
5.2.3.1 Function
The Markers window shows a quick overview of the important properties of the
markers defined in the current project, and it provides easy access to all markerrelated operations.
5.2.3.2 Features
A >> in the leftmost column indicates the currently selected marker. The columns
in the Markers window show the following information about each marker:
•
Name – Shows the name given to each marker.
•
Type – Indicates the marker type, as listed in “Table 5-1” on page 5-220.
•
Count – Shows the number of occurrences of this marker.
•
Key – Indicates the keyboard key associated with the marker.
•
Show – When selected, this item displays the occurrences of this marker in
the Activity window, and also in the Video or Scalar windows as appropriate
for the marker type.
•
Display Color – Shows the color used to display occurrences of this marker
in the Activity, Video, or Scalar windows. Click a marker in the Display
Color column to open a color selection dialog box, which enables you to
change the display color for a marker.
5.2.3.3 Markers Right-click Menu
Right-clicking the mouse in the Markers window opens a right-click menu.
•
162
Define New Marker - This item opens the Define New Marker dialog box.
CinePlex
—
Type - In the Type area, select a marker type for the new marker. For a
description of all marker types, see “Table 5-1” on page 5-220. Under
most circumstances, you cannot create a new Frame marker.
—
Name - Enter a unique name for the new marker. Marker names must
be unique.
—
Comment - This is an optional box in which you can type a free-form
comment that describes the new marker.
—
Associated Keystroke - This area identifies the keystroke that is associated with this marker, which you can use for finding or inserting new
marker occurrences. CinePlex Markup suggests an unused key; click
Change to open the Assign Key dialog box and select a different key.
When the dialog box appears, press the key to associate and click OK.
Note:
—
—
Version 2.0
Only single-keystrokes (not CTRL- or ALT- key combinations) can be associated with Markers.
Display - This area identifies the display color and the show setting for
the marker.
–
Color – This box shows the display color for this marker in various
windows. You can also set the color directly in the Marker window.
–
Show – This item toggles the appearance of the Marker in various
windows. You can also set this item directly in the Marker window.
Event IDs - This area shows the Event IDs associated with the marker.
Use these IDs only when you export this marker to a .plx file. These
event IDs are the Plexon external event IDs that represent this marker
in the .plx file. For interval-type markers, you must specify a second
event ID to represent the end time for the interval.
163
5
Note:
These IDs must be unique across all markers. CinePlex Markup suggests an
unused and unique value for these IDs, so they do not usually require your
immediate attention when you first create the marker. If you export the data to a
.plx file, you will have an opportunity to change these event IDs.
Note:
You can also click Generate Occurrences to have CinePlex Markup create
the marker and also automatically populate the new marker with algorithmically-generated marker occurrences. The available methods for automatically
populating the marker with marker occurrences varies by marker type; for a
description, see “Automatically Generating Marker Occurrences” on
page 4-125.
—
•
OK - Click OK to close the dialog box and create the new marker.
Edit Selected Marker - This item opens the Edit Marker dialog box.
Note:
You can also open the Edit Marker dialog box from the right-click menus in the
Markers and _Marker Occurrences windows.
You cannot change the marker type for an existing marker. However, you can
change the following marker items:
164
—
Name - Enter a unique marker name. Marker names must be unique.
Duplicates are not accepted during the Add Marker process.
—
Comment - Add, add to, or edit a free-form comment that describes the
marker.
—
Associated Keystroke - This area identifies the keystroke that is associated with this marker; click Change to open the Assign Key dialog
box and select a different key. When the Assign Key dialog box
appears, press the key to associate and click OK.
CinePlex
Note:
—
—
Only single-keystrokes can be associated with markers. CTRL- or ALT- key
combinations are not valid.
Display - This area identifies the display color and the show setting for
the marker.
–
Color – This box shows the display color of this marker in various
windows. Select a new color from the drop-down list.
–
Show – This item toggles the appearance of the marker in various
windows. Change as needed.
Event IDs - This area shows the Event IDs associated with the marker.
These event IDs are used when you export this marker to a .plx file; for
more information, see Event IDs on page 5-188. Change the event IDs
as needed.
•
Delete Selected Marker - This item deletes the selected marker and all of
its occurrences.
•
Delete All Highlighted Markers - This item deletes all selected markers
and all of their occurrences.
•
Delete All Occurrences of Selected Marker - This item deletes all of
the occurrences of the selected marker, but does not delete the selected
marker.
•
Make Copy of Selected Marker - This item copies the selected marker to
the clipboard.
•
Set As Top Row - Sets the highlighted items in the Show or Display Color
columns to the same value or color as the topmost value.
•
Randomize Display Colors - Sets random colors for all of the Display
Color items.
5.2.4 Input Window
5.2.4.1 Function
The Input window consists of an area of option buttons (left side of window) and
an array of marker buttons (right side of window). The option buttons control the
operation occurring with keystrokes, the marker buttons, or the left mouse button.
Version 2.0
165
5
5.2.4.2 Features
The Input window includes selections for the following three actions:
•
Keystroke – You can bind a keystroke to the current marker, which you can
use to Find the next occurrence of the marker or Insert a new occurrence of
the marker.
Note:
If CinePlex Markup is in looping mode (see “Understanding Looping” on page 4-116), the search for the next marker occurrence
wraps around the end of the file and continues the search at the
beginning.
•
Button – Specific marker buttons appear in the array on the right side of the
Input window. Click a marker button to Find the next occurrence of the
marker or Insert a new occurrence of the marker.
•
Left-Click – This item refers to a click of the left mouse button in the Activity window. Select finds the nearest occurrence of the selected marker. Insert
inserts a new occurrence of the selected marker at the time corresponding to
the mouse pointer position when you click the left mouse button.
5.2.5 Channels Window
5.2.5.1 Function
The Channels window displays all of the channels in the neural data file and
their associated properties.
5.2.5.2 Features
The columns in the Channels window list the following information for each
channel:
166
•
Name – Shows the name of the channel
•
Type – Indicates the type of channel, either spike or continuous
•
Count – Shows the number of spikes for spike channels, or the number of
samples for continuous channels
•
Show – When selected, shows the spikes or continuous data from that channel in the Activity window
•
Unsorted, Unit a, b, c, ... – Indicates the number of spikes in the channels
that are unsorted, or that belong to Unit a, Unit b, etc.
CinePlex
Note:
By default, if the Show checkbox is clear, any continuous data channels in the
neural data file do not appear in the Activity window.
5.2.5.3 Channels Right-click Menu
Clicking the right mouse button will open a right-click menu with the following
items:
•
Show All Channels With Spikes - Clicking this item resets the window
to show all channels with spikes.
•
Un-Show All Channels - Clicking this item resets the window to hide all
channels.
•
Show Only Selected Channel - Clicking this item resets the window to
only show the selected channel.
•
Set As Top Row - Clicking this item sets selected columns to the same
value as the same columns in the top row.
5.2.6 File Info Window
The File Info window does not appear by default. To open the File Info window,
from the View menu, select File Info View.
Version 2.0
167
5
5.2.6.1 Function
The File Info window shows various items of information about the neural data
files and video files that are currently loaded into CinePlex Markup.
5.2.6.2 Features
The File Info window contains the following items:
•
•
•
168
CinePlex Project File - This area contains information about the currently
opened CinePlex project file.
—
File Name: - This item contains the name of the project file.
—
Comment: - This editable item contains comments about the project
file.
Video Data File - This area contains information about the currently opened
video data file.
—
File Name: - This item contains the name of the video data file.
—
Time & Date (from file): - This item contains the time and date that
the video data file was last modified.
—
Video Size: - This item contains the resolution of the video data file.
Default is 640 X 480.
—
Frame Rate: - This item contains the frame rate of the video data file.
Default is 30 frames per second.
—
Number of Frames: - This item contains the total number of frames in
the video data file.
—
Has Timestamps: - This item indicates if the frames are timestamped
or not.
Neural Data File - This area contains information about the currently
opened neural data file.
—
File Name: - This item contains the name of the neural data file.
—
Time & Date (from header): - This item contains the time and date
that the neural data file was last modified.
—
Comment: - This item contains comments about the neural data file.
This field is not editable in the File Info window.
—
File Size (bytes): - This item contains the size of the neural data file in
bytes.
—
Experiment Length (sec): - This item contains the duration of the
experiment in seconds.
—
Format Version: - this item contains the format version of the file.
—
Channels: - This item contains the total number of channels.
CinePlex
—
Data Type: - This item contains the data type. Values are Single or
Trodal.
—
Timestamp Frequency (Hz): - This item contains the frequency at
which the timestamps are created. Default is 40,000 Hz.
—
A/D Frequency (Hz): - This item contains the analog-to-digital frequency. Default is 40,000 Hz.
—
Total Number of Waveforms: - This item contains the total number of
waveforms in the neural data file.
—
Cont. Channels: - This item contains the number of continuous channels.
—
Peak Voltage (mV): - This item contains the peak voltage of the signals in millivolts.
—
A/D Resolution (bits): - This item contains the analog-to-digital resolution in bits. Default is 12.
—
Total Number of Units: - This item contains the total number of
occurrences for all channels.
—
Number of Channels with Units: - This item contains the number of
channels that have units.
—
Avg Units per Active Chan: - This item contains the ratio of Total
Number of Units to Number of Channels with Units.
5.2.7 Audio Output Window
The Audio Output window is hidden by default. To open the Audio Output window, hover the mouse over the Audio tab of the sidebar tabs at the right side of
the screen, select Audio Output from the View menu, or click the Audio Output
View button on the toolbar. The illustration below shows the Audio Output window.
5.2.7.1 Function
The Audio Output window controls CinePlex Markup’s ability to play a sound
through the computer’s audio system when Markers or neural spikes occur during
data playback.
Version 2.0
169
5
5.2.7.2 Features
The columns of the Audio Output window include:
•
Name - This column contains the name of each marker.
•
Type - This column contains the type of each marker.
•
Count - This column contains the number of occurrences of each marker.
•
Play - This column contains a checkbox that controls whether any sound will
be played when the Markers or neural spikes of that type pass by the ‘current
time’ marker during animated playback.
•
Sound - This column contains a droplist that lists all the available sounds
that CinePlex Markup can play. If the Play checkbox is checked, the sound
selected in the Droplist will play when an occurrence of the corresponding
Marker or neural spike is encountered during playback. The contents of this
list can be controlled from the Audio tab of the Tools | Options... dialog, see
“Options” on page 5-207.
5.2.7.3 Audio Output Right-click Menu
The Audio Output Window has a right-click context menu that contains the following menu entries:
•
Show Units - The Audio Output view can show just one line per neural
spike channel (the default). In this mode, CinePlex Markup will play the same
selected sound when any spike occurs on that channel, regardless of the unit
designation of that spike. When Show Units is checked, each unit on each
channel gets a separate line, as shown in the above screenshot. In this mode,
every unit can have a different sound mapped to it and can be independently
enabled or disabled for playing. This selection is equivalent to checking or
unchecking the ‘Show Units in the Audio Output Window’ checkbox on the
Tools | Options | Audio tab.
•
Select Sounds - Clicking this item will show the Audio tab on the Tools |
Options dialog box, which allows loading new sounds from .wav files so that
they are available for mapping to Markers or Units.
5.2.8 Messages Window
To open the Messages window (hidden by default), hover the mouse over the
Messages tab of the sidebar tabs at the right side of the screen, select Messages
from the View menu, or click the Messages View button on the toolbar.
170
CinePlex
5.2.8.1 Function
The Messages window displays timestamps and application events and is used
for troubleshooting purposes by Plexon Support.
5.2.8.2 Features
• Time - This column contains timestamps of the events.
•
Message - This column contains decriptions of the events.
5.2.8.3 Messages Right-click Menu
Right-clicking the mouse in the Messages window displays the right-click menu.
•
Erase - Clicking this item erases all messages from the Messages window.
•
Pause - If this item is checked, message logging is paused.
•
Show Debug Messages - If this item is checked, then debug messages
will appear in the Messages window. This can be useful for troubleshooting.
•
Select and Copy All - Clicking this item selects all the messages and copies them to the clipboard.
•
Save Log to File - Clicking this item displays a standard file save dialog
box and allows you to save the message log to a file.
•
Mail Log to Plexon - Clicking this item will sent the messages log to
Plexon for troubleshooting. Note that a mail client and associated account
information must be present on the computer for email to work.
5.2.9 Marker Occurrences Window
The Marker Occurrences window includes an entry for each occurrence of the
currently-selected marker. The currently-selected marker occurrence appears
with a > in the first column. Click any marker to make it the currently-selected
marker. You can open more than one Marker Occurrences window. The win-
Version 2.0
171
5
dow also changes title and columns depending on the marker type of the currently-selected marker.
5.2.9.1 Function
The function of the Marker Occurrences window is to display information
about all occurrences of the currently selected marker.
5.2.9.2 Features
The features of the Marker Occurrences window will vary according to the type
of selected marker. A coordinate marker will have the timestamp, an x-coordinate, and a y-coordinate while an interval marker will have the beginning timestamp and the ending timestamp as shown in the illustrations below.
If you scroll the Activity window or animate time, the Marker Occurrences
window continually updates to show the marker occurrences closest to the current time.
5.2.9.3 Marker Occurrences Right-click Menu
Right-clicking the mouse in the Marker Occurrences window opens a rightclick menu .
•
172
Go to Selected Marker Occurrence Time - Clicking this item makes the
time of the currently-selected marker occurrence the current time. This will
advance the current frame and reposition the Activity window.
CinePlex
•
Add, Edit, and Delete Marker Occurence Menu Items - The items in
the section below ‘Go to Selected Marker Occurrence Time’ except for
“Delete Highlighted Marker Occurrences” are the same as the items on the
Edit menu. For complete information, see “Edit Menu” on page 5-187.
You can choose three different ways to display marker occurrence data:
Version 2.0
•
Show Values in Decimal - Clicking this item displays the marker occurrence data in normal decimal format.
•
Show Values in Hex - Clicking this item displays the marker occurrence
data in hexadecimal format.
•
Show Values as VT Bit Fields - Clicking this item displays the marker
occurrence data as VideoTracker (VT) bit fields. For more information on VT
bit fields, see “Digital VideoTracker (DVT) Files” on page 3-101.
•
Copy and Select All - These items function as standard Windows copy and
select functions.
•
Properties - Clicking this item displays the Marker Occurrences View
Properties dialog box.Clicking this item enables the configuration of marker
occurrence windows to show the marker occurrences of a specific marker
instead of the currently selected marker. You can use this capability to simultaneously display marker occurrences for different markers on screen.
—
Marker To Display - This area contains a drop-down list of markers.
The currently selected marker appears in the dimmed list box.
—
Display Format for Scalar Marker Values - This area contains items
that control the display format for Scalar markers:
–
Decimal – This item displays the Scalar markers in decimal format.
–
Hex – This item displays the Scalar markers in hexadecimal format.
–
VideoTracker – This item displays the Scalar markers in Plexon
VideoTracker format; for more information on this format, see
“Data Interpretation” on page E-12.
173
5
5.2.10 Scalar Window
Scalar windows do not appear by default in CinePlex Markup. To open a Scalar window, from the View menu, select New Scalar View.
5.2.10.1 Function
The Scalar window privides an at-a-glance graphical representation of a scalar
value as a pointer arrow on a scale.
5.2.10.2 Features
The Scalar window re-orients itself depending on the size of the view. If the Scalar window is tall and narrow, the pointer points horizontally. If the Scalar window is short and wide, the pointer points vertically. Like the coordinate crosshairs
in the Video window, the position of the pointer always reflects the value for the
selected marker occurrence. The numerical value also appears next to the pointer.
Like the Marker Occurrences window, you can have multiple Scalar windows
on the screen at once, with each one showing a different scalar marker.
5.2.10.3 Scalar Right-click Menu
Right-clicking in the Scalar window displays the following menu:
•
Reverse Arrow Direction - By default, the Scalar window re-orients itself
depending on its size. If the Scalar window is tall and narrow, the arrow is
horizontal. If the Scalar window is short and wide, the arrow is vertical. By
default, the arrow points either left or up, but you can reverse the direction by
selecting Reverse Arrow Direction from the right-click menu. The position
of the arrow always reflects the value for the selected marker occurrence. As
shown in the following illustration, the numerical value of the selected scalar
marker occurrence also appears at the base of the arrow.
Like the Marker Occurrences window, you can have multiple Scalar windows on
screen at once, with each one showing a different Scalar marker.
174
CinePlex
•
Reset Automatic Range Adjustment - By default, CinePlex Markup
automatically adjusts the range of scalar values to accommodate the range of
scalar values that appear in the data as new Scalar values become current. You
can reset the range by selecting Reset Automatic Range Adjustment from
the right-click menu, which sets the range to dynamically expand based on
the subsequent values that appear. Alternately, you can set a fixed range in the
Scalar View Properties dialog box.
•
Properties - Clicking the Properties item displays the Scalar View Properties dialog box.
—
—
Version 2.0
Marker To Display - This area contains the items that control which
marker appears in the Scalar window:
–
Use Selected Marker – This item displays the current value for a
new marker in the Scalar window, if the marker is a Scalar type.
–
List box – If you click to clear Use Selected Marker, the Scalar
window displays the values of the Scalar marker that appears in the
drop-down list, regardless of which marker you select.
Layout - The area contains the items that control the appearance of the
Scalar window:
–
Automatic – This item sets the Scalar window to automatically
switch its layout from horizontal to vertical based on the current
size of the Scalar window. For example, if the window is taller than
it is wide, a vertical layout appears, otherwise a horizontal layout
appears.
–
Horizontal – This item sets the Scalar window to a horizontal layout, regardless of the dimensions of the Scalar window.
–
Vertical – This item sets the Scalar window to a vertical layout,
regardless of the dimensions of the Scalar window.
175
5
–
—
176
Reverse Arrow Direction – This item toggles the direction that the
indicator arrow points between up/down for horizontal layouts and
left/right for vertical layouts.
Range to Plot - This area contains the minimum and maximum values
to show on the scale:
–
Automatically Set Range from the Data – This item automatically and dynamically adjusts the range as new values are encountered in the Scalar marker occurrences. The current range being
plotted always appear dimmed in the Minimum and Maximum
boxes.
–
Fixed Range – This item enables you to type specific values for the
range in the Minimum and Maximum boxes.
CinePlex
5.3 Menus
Menus provide access to CinePlex Markup features, commands, controls, and
settings. The following sections describe each CinePlex Markup menu in detail.
You can also use the toolbar buttons to execute many of the commands that
appear on the CinePlex Markup menus.
5.3.1 File Menu
The following illustration shows the File menu.
5.3.1.1 New Project
This item opens the New Project Wizard dialog box which will guide you
through the necessary steps to set up a new project. In the Welcome To CinePlex
dialog box, click Start a New CinePlex Project to open the New Project Wizard dialog box. Otherwise, from the File menu, click New Project.
Version 2.0
177
5
The first box in the New Project Wizard dialog box helps you to select filenames.
Note:
178
You must specify a video file or a neural data file, or both.
•
Video Data Input File (.avi) - This box allows you to specify a filename
for the video file. The video file must be an Audio Video Interleave (.avi) file.
•
Neural Data Input File (.plx, .nex, .dvt) - This box allows you to specify
a file name for the neural data file. The neural data file can be a Plexon data
(.plx) file, a NeuroExplorer (.nex) file, or a digital video tracker (.dvt) file.
•
CinePlex Project File (.cpj) - This box requires you to specify a filename
for the CinePlex Project (.cpj) file.
•
Browse - This button allows you to open a file selection dialog box. When
you select one filename, CinePlex Markup suggests names for the remaining
unspecified filenames, which are based on the filename you selected.
•
Select From Directories - This button opens the Select Video and Neural
Data Files dialog box, which provides you with a convenient alternative to
Browse, where you can display and match pairs of files from two directories.
The Select Video and Neural Data Files dialog box provides list boxes for
two different directories. You can use the various features of this dialog box
to create project files.
CinePlex
—
Video Data Input File (.avi) - This area displays AVI files, file system
dates, and times. Click the … button to select a different directory for
the video data files.
—
Neural Data Input File (.plx, .nex, .dvt) - This area displays PLX,
NEX, and DVT files, file system dates, and times. Click the … button
to select a different directory for the neural data files.
—
Sort Files by Date - This checkbox is checked by default and causes
the files to be sorted by date. Click to clear this checkbox to sort by file
name.
—
Sync Directories - If this checkbox is checked, it forces the two directories to be identical, which can save you the effort of having to reselect
the same directory again if the video and neural data files happen to
reside in the same directory.
—
Neural Data Extensions - These checkboxes allow you to select the
extensions for the neural data files to appear in the list box.
Whenever you select a file from one of the list boxes, the dialog box attempts to
select the file from the other list box that best matches the file you selected. This
feature is very convenient for matching up the files you collected using CinePlex
Capture with their corresponding .plx files, because the file dates and times
should be nearly the same.
When you have highlighted the correct files in the two directory listings, click
OK to enter the selected files into the appropriate text boxes in the New Project
Wizard dialog box. After you enter the correct filenames, click Continue >> to
open the Verify Project Files dialog box.
Version 2.0
179
5
The Verify Project Files dialog box provides complete information on the files
you are entering into the project. It lists relevant information for each file type.
180
•
CinePlex Project File - This box lists the project file location and name.
•
Video Data File - This box lists the video file location and name.
•
Date/Time - This box shows the date and time (hh:mm:ss) when the video
file was saved.
•
Duration - This box indicates the duration of the video file in seconds.
•
Frames - This box lists the total number of frames in the video file.
•
Frame Rate - This box indicates the frame rate at which the video was
recorded.
•
Resolution - This box shows the resolution of the video in pixels.
•
Timestamps Present? - This box indicates Yes if timestamps are contained in the video file and No if otherwise.
•
Neural Data File - This box lists the neural file location and name.
•
Date/Time - This box shows the date and time (hh:mm:ss) when the neural
file was saved.
•
Duration - This box indicates the duration of the neural file in seconds.
•
Channels - This box lists the number of data channels in the neural file.
•
Event Types - This box lists the number of different event types contained
in the neural file.
CinePlex
After you verify that the correct files have been selected, click Continue >> to
exit the Wizard. CinePlex Markup creates the initial project file.
Note:
To have the directories containing the files you selected appear as the defaults
the next time you start CinePlex Markup, from the Tools menu, choose
Options, click the General tab, and select Use the last directory of the previous session as Initial Directory.
CAUTION
File Relocation
The project file stores the full paths to the video and neural data files.
If you move the neural or video data files to another location, CinePlex Markup cannot locate the files when you reopen the project
file. In this case, select the neural or video files, or both, from their
new locations. Make sure you select the same files that you used in
the original creation of the project file. Otherwise, the results can be
very confusing.
5.3.1.2 Open Project
This item opens a standard Windows Open dialog box to enable you to choose an
existing project file (.cpj) to open.
5.3.1.3 Save Project, Save Project As, and Close Project
These items apply to a .cpj file and it’s related video file and neural data file.
These commands use standard Windows dialog boxes.
5.3.1.4 Import Markers
This item opens a standard Windows Open file-selection dialog box. When you
select a file, CinePlex Markup imports the file to create new markers in the
project; for more information, see “Importing Markers” on page 4-139.
5.3.1.5 Export Markers
This item opens the Export Marker Data dialog box. The Export Marker Data
dialog box includes all the items to set prior to exporting the file. The following
illustration shows the default view of the dialog box.
Version 2.0
181
5
•
Format - This area provides a choice of three file types: text, Matlab, or
Microsoft Excel.
Note:
•
•
Delimiter to use between values - This dropdown allows you to select
one of the following delimiters to use between the columns of text (if you
selected Text File for the format):
—
Comma
—
Comma, space
—
Space
—
Semicolon
—
Tab
Export a Row of Column Headers - If you selected Text File or Excel
for the format, this checkbox allows you to export the first row as a row of
textual labels for each column, which can be helpful when a human is reading
the exported data file.
Note:
182
You must have Matlab or Excel installed on the computer where CinePlex
Markup is running to allow these to be used. If the Matlab file selection or the
Excel selection, or both, appear dimmed, these format options are unavailable;
install Matlab or Excel, or both, to enable them.
CinePlex Markup exports marker occurrences for all formats as one occurrence per row, or one occurrence per line for text files, and all rows have the
same number of columns. The columns in each row depend on the selections
you make in the What to Export for Each Marker Occurrence area.
CinePlex
•
Which Markers - The default value is Selected Marker only. If you select
All Markers, the occurrences for all markers are exported, which usually
results in a confusing output file; in general, Plexon does not recommend this
option.
•
What to Export for Each Marker Occurrence - The selections in this
area determine which columns appear for each marker occurrence (row). The
available columns always appear in a fixed order; clearing a checkbox
removes the column. The available items for export are:
—
Marker Name (N/A for Matlab) – This item includes the textual
name of the marker in the exported file. The marker name is generally
useful only when you select All Markers to export, otherwise the
marker name is the same for all marker occurrences when you select
Selected Marker only to export. Because the data is output to MATLAB
as a two-dimensional array of doubles, this option is unavailable for the
MATLAB format.
—
Marker Type (Number 1-7) – This item exports a number that indicates the type of the marker, as indicated in the following table:
1
Time-only
2
Frame
3
Interval
4
Scalar
5
Coordinates
6
Level Interval
7
Zone Interval
Note:
5-1” on
—
Marker Event ID – This item exports the Event ID associated with
this marker; for more information, see Event IDs on page 5-188.
—
Marker Event ID 2 - This item exports the second Event ID associated
with this marker. This item applies only if the marker is an Interval,
Level Interval, or Zone Interval type.
—
TimeStamp - This item exports the time of the marker occurrence. For
Interval-type events, this is the start time.
Note:
Version 2.0
For a complete explanation of the marker types, see “Table
page 5-220.
You can export timestamps in units of seconds or in raw clock ticks; see
“Export TimeStamps in units of”, which follows in this list.
183
5
•
—
TimeStamp2 (End Time for Intervals) - This item is only relevant for
Interval-type marker occurrences and it exports the end time.
—
Value 1 (Scalar value, or X Coordinate) - This item exports different
things, which depend on the marker type. For Scalar markers, it exports
the scalar value. For Coordinate markers, it exports the X coordinate
value. For all other markers, it exports -1.
—
Value 2 (Y Coordinate) - This item exports different things, which
depend on the marker type. For Coordinate markers, it exports the T
coordinate value. For all other markers, it exports -1.
—
Export TimeStamps in units of – You can export time stamps in one
of the following units:
–
Seconds – This item exports the values for TimeStamp and
TimeStamp 2 in seconds.
–
Clock Ticks – This item exports the values for TimeStamp and
TimeStamp 2 in raw ticks of the system clock.
Output File - Type or select the output file name in the File box. Under Format, if you select Text file or Excel, you can click the Append if existing
checkbox to append the marker data onto the end of a file that already exists
on disk. Otherwise, the existing file is overwritten.
5.3.1.6 Export to .PLX
This item opens the Export To .PLX dialog box.
184
CinePlex
•
File - Type an export file name and path, or click Browse and select an existing file.
•
Export invalidated spikes - Click this checkbox to export invalidated
spikes to the .plx file. Invalidated spikes appear with a unit number of 0
(unsorted).
•
Marker Mapping to Event IDs - This list box controls which markers
appear in the output file and which event IDs represent them. Only Timeonly, Frame, and Interval-type markers appear in this list box; Scalar and
Coordinates markers must be represented by strobed events. To remove individual markers from the output .plx file, click to clear the Write? checkbox.
You can also change the event IDs by typing a new value in the Event ID column. There are two entries in the list box for each Interval-type marker, one
for the start time and another for the end time.
•
What to Export as Strobed Events - Select one of these items to export:
—
Original Strobed Events (Passthrough Mode) – Select this item to
pass unchanged the strobed event data blocks from the original neural
data file through to the output .plx file. Use this mode when you are not
interested in representing any changes to any Scalar or Coordinates
marker occurrences in the output file, or you do not have any Scalar or
Coordinates data to output.
—
Scalar Marker – Select this item to represent the values from a single
Scalar marker in the strobed events. Select the Scalar marker from the
list.
—
Coordinate Markers – Select one of the following combinations:
–
Click LED 1, LED 2, or LED 3 or any combination of these LEDs.
For each LED, select a corresponding Coordinates marker from the
drop-down list.
–
To export coordinates for the centroid position, click Centroid Pos
and select a corresponding Coordinates marker from the drop-down
list.
–
To include Motion Measure data, click Centroid Pos and click a
corresponding Coordinates marker from the drop-down list; then
click Motion and select a corresponding Scalar marker from the
drop-down list. For more information on the Motion Measure
option, see “Motion Measure Option” on page 2-57.
Note:
•
Version 2.0
Select only one of the preceding combinations. If you have clicked an
LED, do not click Centroid Pos. Likewise, do not click Motion unless
you have clicked Centroid Pos.
Export! - Click Export! to close the dialog box and write the new .plx file.
185
5
5.3.1.7 Export to .NEX
This item opens the Export To .NEX dialog box.
•
File - Type an export file name and path, or click Browse and select an existing file.
•
What to Export - This area includes the following items:
•
—
Frame Markers – CinePlex Markup exports frame markers to the
.nex file as just another marker variable. To inhibit this, click to clear
the Frame Markers checkbox.
—
Unsorted spike timestamps – CinePlex Markup exports both sorted
and unsorted spike timestamps to the .nex file by default. To export
only the sorted spike timestamps, click to clear the Unsorted spike
timestamps checkbox.
—
Continuous data channels – By default, CinePlex Markup exports
any continuous channels present in the original neural data file as continuous variables to the .nex file. To prevent continuous data being
written to the .nex file, click to clear the Continuous data channels
checkbox.
Export! - Click Export! to close the dialog box and create a new .nex file.
5.3.1.8 Print, Print Preview, and Print Setup
These items are standard Windows print commands. The Print command will
output the .CPJ file to an installed printing device.
5.3.1.9 File list
This section includes up to 10 of the most recently opened files.
5.3.1.10 Exit
This item closes all windows and exits CinePlex Markup.
186
CinePlex
5.3.2 Edit Menu
The following illustration shows the Edit menu.
5.3.2.1 Undo
This item provides multiple undo levels. You can undo operations that change the
contents of the project file, but you cannot undo operations that change the user
interface options or colors.
5.3.2.2 Copy
This item is the standard Windows copy command.
5.3.2.3 Define New Marker
This item opens the Define New Marker dialog box.
Version 2.0
187
5
•
Type - In the Type area, select a marker type for the new marker. For a
description of all marker types, see “Table 5-1” on page 5-220. Under most
circumstances, you cannot create a new Frame marker.
•
Name - Enter a unique name for the new marker. Marker names must be
unique.
•
Comment - This is an optional box in which you can type a free-form comment that describes the new marker.
•
Associated Keystroke - This area identifies the keystroke that is associated with this marker, which you can use for finding or inserting new marker
occurrences. CinePlex Markup automatically suggests an unused key; click
Change to open the Assign Key dialog box and select a different key. When
the dialog box appears, press the key to associate and click OK.
Note:
•
•
Only single-keystrokes (not CTRL- or ALT- key combinations) can be associated with Markers.
Display - This area identifies the display color and the show setting for the
marker.
—
Color – This box shows the display color this marker in various windows. You can also set the color directly in the Marker window.
—
Show – This item toggles the appearance of the Marker in various windows. You can also set this item directly in the Marker window.
Event IDs - This area shows the Event IDs associated with the marker. Use
these IDs only when you export this marker to a .plx file. These event IDs are
the Plexon external event IDs that represent this marker in the .plx file. For
interval-type markers, you must specify a second event ID to represent the
end time for the interval.
Note:
These IDs must be unique across all markers. CinePlex Markup suggests an
unused and unique value for these IDs, so they do not usually require your
immediate attention when you first create the marker. If you export the data to a
.plx file, you will have an opportunity to change these event IDs.
You can also click Generate Occurrences to have CinePlex Markup create the
marker and also automatically populate the new marker with algorithmicallygenerated marker occurrences. The available methods for automatically populating the marker with marker occurrences varies by marker type; for a description,
see “Automatically Generating Marker Occurrences” on page 4-125.
•
OK - Click OK to close the dialog box and create the new marker.
5.3.2.4 Edit Selected Marker
This item opens the Edit Marker dialog box. An illustration of the dialog box
follows:
188
CinePlex
Note:
You can also open the Edit Marker dialog box from the right-click menus in the
Markers and _Marker Occurrences windows.
You cannot change the marker type for an existing marker. However, you can
change the following marker items:
•
Name - Enter a unique marker name. Marker names must be unique. Duplicates are not accepted during the Add Marker process.
•
Comment - Add, add to, or edit a free-form comment that describes the
marker.
•
Associated Keystroke - This area identifies the keystroke that is associated with this marker; click Change to open the Assign Key dialog box and
select a different key. When the Assign Key dialog box appears, press the key
to associate and click OK.
Note:
•
•
Version 2.0
Only single-keystrokes can be associated with markers. CTRL- or ALT- key
combinations are not valid.
Display - This area identifies the display color and the show setting for the
marker.
—
Color – This box shows the display color of this marker in various windows. Select a new color from the drop-down list.
—
Show – This item toggles the appearance of the marker in various windows. Change as needed.
Event IDs - This area shows the Event IDs associated with the marker.
These event IDs are used when you export this marker to a .plx file; for more
information, see Event IDs on page 5-188. Change the event IDs as needed.
189
5
5.3.2.5 Delete Selected Marker
This item deletes the selected marker and all occurrences of that marker.
5.3.2.6 Copy Selected Marker
This item copies the selected marker to the clipboard.
5.3.2.7 Add New Marker Occurrence
This item opens the New Marker Occurrence window.
Note:
CinePlex Markup identifies marker occurrences by their time, thus no two
marker occurrences can have the same time. If you add a new marker occurrence with the same timestamp as an existing marker occurrence, you replace
the existing marker occurrence with the new one; that is, you overwrite and
erase the old data values. Likewise, if you edit an existing marker occurrence
by changing its timestamp to be the same as another existing marker occurrence, you replace the existing marker occurrence.
•
Marker - This box shows the marker for which you are adding a new occurrence.
•
Time - This is time of the new marker occurrence and its related data values.
The data values depend on the marker type. For example, for Coordinates
markers, the X and Y data values appear as shown in the illustration, but for
Interval markers, start and end times appear.
5.3.2.8 Edit Selected Marker Occurrence
This item opens the Edit Marker Occurrence dialog box.
190
CinePlex
•
Marker - This box shows the marker for which you are editing the occurrence.
•
Time - This is time of the marker occurrence and its related data values. The
data values depend on the marker type. For example, for Interval markers, the
start Time and End Time appear as shown in the illustration, but for Coordinates markers, X and Y data values appear.
5.3.2.9 Delete Selected Marker Occurrence
This item deletes only the selected occurrence for the marker.
5.3.2.10 Delete All Marker Occurrences
This item deletes all occurrences for the selected marker, but leaves the marker
itself intact.
5.3.2.11 Keystroke ..., Button Press ..., and Left-Click Inserts Marker
These items determine which user action inserts markers. For information on
marker insertion, see “Understanding Markers and Marker Occurrences” on
page 5-220.
5.3.3 View Menu
The following illustration shows the View menu.
All the items in this menu open or close a window in CinePlex Markup.
Version 2.0
191
5
5.3.4 Animate Menu
The following illustration shows the Animate menu.
5.3.4.1 Play
This button automatically advances time at a rate determined by the time multiplier. Selecting Play when already playing causes a Pause condition.
5.3.4.2 Pause
This button halts the automatic advance of time. Play and Pause are mutually
exclusive. Press SPACEBAR to toggle between Play and Pause. Selecting Pause
when already paused resumes play.
5.3.4.3 Slower
If pressed while playing at any speed, this button slows down the rate of time progression by half until the speed is 1/256 of normal. Continued pressing reverses
the direction and increases the speed.
5.3.4.4 Faster
This button speeds up the rate of time progression by a factor of 2. The UP ARROW
key and the DOWN ARROW key are equivalent to the Slower and Faster buttons.
Continued clicking will eventually cause the speed to reach a maximum of 256
times normal.
5.3.4.5 Reset to 1X Speed
This button sets the rate of time progression to 1X normal speed.
5.3.4.6 Step Backwards
This button advances time to the previous video frame. The LEFT ARROW key is
equivalent to this button.
192
CinePlex
5.3.4.7 Step Forward
This button advances time to the next video frame. The RIGHT-ARROW key is
equivalent to this button.
5.3.4.8 Rewind
This button sets the current time to the time of the first video frame.
5.3.4.9 Reverse
This button reverses the flow of time at the current time rate. If already in reverse,
it goes forward.
5.3.4.10 Lock to Video Frames
This button advances time by increments of whole frames only. CinePlex Markup
does not change the current time at all until enough time has elapsed to make a
new video frame the current frame. Then it sets the current time to be the exact
time of the frame marker corresponding to that frame. This is the default mode.
Note:
A potentially confusing effect occurs when CinePlex Markup is in Frame
Locking mode. If the video capture was paused during acquisition so that
there is a gap of time that contains no frame marker occurrences, animation
appears to freeze at the point where the gap starts until enough time passes
such that the next video frame is current, which can be much later. Conversely,
when CinePlex Markup is not in Frame Locking mode, the animation continues smoothly through the gap and time advances without regard to video frame
boundaries. The video frame remains unchanged until the next one is encountered.
5.3.5 Looping Menu
The following illustration shows the Looping menu.
5.3.5.1 Toggle Looping
This item turns looping on or off for the interval you select in the list. You can
select this option to turn looping on during play back when a specific interval you
wish to review appears. Playback loops from the beginning to the end of the interval. Click again to resume normal playback.
5.3.5.2 Select Looping Interval
This item opens the Looping Interval dialog box to enable you to define a looping interval. An illustration of the dialog box follows:
Version 2.0
193
5
•
Loop over entire file - This is the default selection. CinePlex Markup
plays the file to the end and restarts from the beginning.
•
Loop over an Interval Marker Occurrence - This selection makes
CinePlex Markup loop over the time span defined by a specified occurrence
of an interval marker. When you select this option, you can choose the interval marker from the drop-down list and then choose the specific occurrence
of the interval marker to loop over.
•
194
—
Nearest Occurrence – uses the occurrence nearest to the current time
—
Use Selected Occurrence – uses the specific occurrence you select
from the drop-down list
Loop over an arbitrary time interval - This selection makes CinePlex
Markup loop over an arbitrary interval of time, which you specify in the
Start and End boxes. You can use the Looping toolbar controls to control
looping parameters; see “Looping Toolbar” on page 5-216.
CinePlex
5.3.6 Find Menu
The following illustration shows the Find menu.
5.3.6.1 Find Marker Occurrences
This item opens the Find Marker Occurrences dialog box that allows you to
choose which marker you wish to find. You may find the selected marker or
choose from a dropdown list.An illustration of the dialog box follows:
•
Use Selected Marker as Marker To Find - By default, CinePlex
Markup loads the current marker into the Marker To Find list box. To select
another marker from the drop list, click to clear the checkbox and select
another marker in the Marker To Find box.
•
Marker To Find - Click to clear the Use Selected Marker as Marker To
Find checkbox and select a marker from the drop-down list.
5.3.6.2 Find Forward
This item searches forward for the next selected marker.
5.3.6.3 Find Back
This item searches backward for the next selected marker.
Version 2.0
195
5
5.3.7 Tools Menu
The following illustration shows the Tools menu.
5.3.7.1 Levels Editor
This item opens the Levels Editor window. You can use the Levels Editor dialog
box to define level interval markers and generate marker occurrences for them.
An illustration of the dialog box follows:
196
•
Scalar Marker To Use - This box contains the scalar marker to use for generating levels.
•
Generate All - This button generates marker occurrences for all the Level
Interval markers that appear in the Level Intervals box.
CinePlex
•
Generate Selected - This button generates marker occurrences for the
selected level interval, which appears with a >> in the left-most column in the
Level Intervals box.
Note:
When you click either Generate All or Generate Selected, you delete all existing marker occurrences for the affected Level Interval markers, and you generate a new set of occurrences according to the current Scalar marker and
conditions.
The graph in the middle of the Levels Editor window shows the values of the
selected Scalar marker as a function of time. The horizontal range of time that
appears is always the entire file. The vertical scaling of the plot always adjusts to
show the full range of the scalar data values. The levels appear as horizontal lines
on the display, with the above or below setting for each level shown as either
upward- or downward-pointing arrows on the lines. The number on the left indicates whether the line represents Level 1 or Level 2.
Note:
•
Version 2.0
When you position the mouse pointer inside this portion of the editor, the scalar
value corresponding to the pointer position appears in the edit box at the bottom right of the display.
Level Intervals - This area contains a grid that has a line for each defined
level interval. You can select level intervals by clicking in the grid. You can
set the condition by editing the grid fields. You can define multiple Level
Interval markers, but only the one selected in the Level Intervals box displays. Click any level interval to select it. The selected level interval appears
with a >> in the leftmost column of the grid. The columns shown in the grid
are:
—
Level Interval Marker – This column contains the name of the Level
Interval marker. The name can be changed by changing the text in this
field.
—
Color – This column contains the color associated with the Level Interval marker. To change the color, click in this field to bring up a color
selection dialog box.
—
The next five columns together define the condition for the Level Interval marker. The column arrangement forms a condition statement, for
example “Above 175 AND Below 200.”
–
Abv/Blw – This column contains the above or below indicator for
the first level. To change the condition, click in this field to open a
drop-down list and select Above or Below.
–
Level 1 – This column contains the numerical value for the first
level. You can type a numerical value in this field or you can click
and drag horizontal line 1 on the graph.
–
Oper – This column contains the logical operator between the two
halves of the condition. The available selections in the drop-down
list are AND, OR, or N/A. If you select N/A, it means that there is
197
5
only one level in the condition; CinePlex Markup ignores the last
two columns and a second line on the graph does not appear.
–
Abv/Blw – This column contains the Above or Below indicator for
the second level, which only applies if you do not select N/A.
–
Level 2 – This column contains the numerical value for the second
level, which only applies if you do not select N/A. You can type a
numerical value in this field or you can click and drag horizontal
line 2 on the graph.
•
Add - This button opens the Define New Marker dialog box to add a new
Level Interval marker.
•
Delete - This button deletes the selected interval level.
•
Center Lev1 and Center Lev2 - By default, CinePlex Markup sets the
level intervals to the middle of the display range shown in the graph, which it
determines from the range of scalar values encountered for the selected Scalar
marker. Click these buttons to re-position the corresponding level line to the
center of the view again.
•
Done - Click Done to close the editor. CinePlex Markup stores the conditions with the Level Interval marker and displays them when the Levels Editor re-opens.
5.3.7.2 Zones Editor
This item opens the Zones Editor window. An illustration of the dialog box follows:
198
CinePlex
•
Coordinates Marker To Use - This box lists the Coordinates marker used
to define the zone.
•
Generate All - This button generates marker occurrences for all the level
intervals that appear in the Zone Intervals box.
•
Generate Selected - This button generates marker occurrences for the
selected Level Interval marker, which is indicated by the >> in the left-most
column in the Level Intervals box.
Note:
•
•
Version 2.0
When you click either Generate All or Generate Selected, you delete all existing marker occurrences for the affected Zone Interval markers, and you generate a new set of occurrences according to the current Coordinates marker and
conditions.
Zone Intervals - This area lists all the defined Zone Interval markers.
—
The leftmost column lists the interval number; the selected Zone Interval marker appears with a >> in the leftmost column.
—
Zone Interval Marker – This column lists the names of the Zone
Interval markers. Add or change names by typing in this field.
—
Color – This column shows the colors of the zone boundaries. To
change a color, click the color to open a color selection dialog box.
—
Add – This button adds a coordinate to the selected zone.
—
Delete – This button deletes the selected Zone Interval marker.
Coordinates of the Selected Zone - This area lists the coordinates of the
currently selected Zone Interval marker. The zone of a Zone Interval marker
consists of a list of 2D coordinates (X and Y) that define the closed contour.
You can define these contours by clicking on the screen image (see Add that
follows), or by individually adding and typing in the coordinate values in the
columns.
—
The leftmost column lists the coordinate number; the selected coordinate appears with a >> in the leftmost column.
—
X – This column contains the X coordinate distance from the lower left
corner (zero distance).
—
Y – This column contains the Y coordinate distance from the lower left
corner (zero distance).
—
Clear - This button completely clears all points from the current zone.
Click Add to re-enter the zone.
—
Add - This button puts the Zones Editor into the click-to-add mode.
The first left-click in the main window defines the first point in the contour, subsequent left-clicks continue to define the contour. A right-click
ends the drawing and closes the contour.
199
5
—
Edit - This button enables the currently selected point to be re-positioned. After you click Edit, move the mouse pointer to the desired
location on the main window. The contour continually re-adjusts as you
move the mouse pointer. Left-click to select the new position, or rightclick to cancel the operation and revert to the previous position.
—
Delete - This button deletes the currently selected point from the zone
contour. The contour re-adjusts automatically for the remaining points.
When you open the Zones Editor dialog box, the main view shows the same
video frame that CinePlex Markup displays. By default, the zone for the currently
selected Zone Interval marker appears superimposed on the video frame.
•
Show Selected Zone - This is the default setting. It shows the zone for the
currently selected Zone Interval marker superimposed on the video frame
•
Show All Zones - Click this button to see all defined Zone Interval marker
zones simultaneously.
•
Show Complete Tail - Click this button to display a line connecting all the
positions visited by the selected Coordinates marker. This can help you to see
what effect various placements of the zone boundaries can have when you
define a zone.
•
Show Grid every - Click this button to superimpose a grid over the video
image. Enter the grid spacing in the box.
•
Coordinates: X Y - When you move the mouse pointer over the main window, the corresponding coordinates of the mouse pointer appear in the X and
Y edit boxes.
•
Done - Click Done when you have finished defining zone intervals.
5.3.7.3 Interval Operations
This item opens the Interval Operations dialog box.
200
CinePlex
•
•
Interval Marker to Use - From the drop-down list, select a marker of the
following type:
—
Interval
—
Level Interval
—
Zone Interval
Operation to Perform Using Interval Marker - In this area, choose one
of the following operations:
—
Invalidate Waveforms that occur within the Intervals – This selection invalidates all waveforms that occur within (inclusive) the interval
marker. CinePlex Markup compares each waveform (spike time) in
every channel against all occurrences of the interval marker to see if it
falls within the start and end times. If it does, CinePlex Markup marks
the waveform as invalid.
—
Remove Occurrences within the Intervals, for Marker – This selection removes the occurrences of the marker you select from the droplist, from within the intervals. CinePlex Markup compares the times of
the occurrences of this marker to the selected interval occurrences, and
removes any occurrences that fall within (inclusive) of any interval.
Note:
—
Version 2.0
In both cases, CinePlex Markup considers exact matches of the spike timestamp to the interval occurrence start or end times to be within the interval. For
example, if spike time Tspike is inside the interval defined by Tstart and Tend, it
means that the condition (Tspike >= Tstart) and (Tspike <= Tend) is true.
Negate the selected operation – This selection changes either of the
previous selections to an exclusive function. If you select Invalidate
Waveforms that occur within the Intervals, this selection invalidates
all waveforms that do not fall between the start and end times (exclusive) of any interval marker occurrences. If you select Remove Occurrences within the Intervals, for Marker, this selection removes all
occurrences of the selected marker that do not occur within the times
spanned (exclusive) by any interval marker occurrence. The text in the
Interval Operations dialog changes as follows:
201
5
5.3.7.4 Shift Marker Occurrences
This item opens the Shift Marker Occurrences dialog box. An illustration of the
dialog box follows:
Use this dialog box to add a constant offset, which can be negative, to all
timestamps of a marker. It is useful for aligning neural data with the video data.
202
•
Marker - Select a marker to shift from the drop-down list.
•
First Occurrence Time - This is the time that the first occurrence of the
marker appears.
•
Last Occurrence Time - This is the time that the last occurrence of the
marker appears.
CinePlex
•
Range - This is the time span between the first and last occurrences.
•
Shift by _ secs - This selection shifts the occurrences by a constant amount.
Enter the amount of shift directly in the edit box.
•
Shift so that first Occurrence is at time _ secs - This selection calculates the shift amount by determining how much the first occurrence of the
selected marker must be shifted to make it equal to the specified time. CinePlex then applies this shift amount to all occurrences.
•
Shift so that the first Occurrence is at time of Marker - This selection
shifts the time to that of another marker occurrence. Select the shift-determining marker from the drop list.
•
Occurrence - Enter which occurrence of the shift-determining marker to
use by typing its 1-based index into the edit box.
5.3.7.5 Snap-To Marker Occurrences
This item opens the Snap-To Marker Occurrences dialog box. An illustration
of the dialog box follows:
The purpose of the “Snap-To” functionality is to shift the occurrences of one
marker to match up in time with the occurrences of another marker. However,
unlike the Shift Marker Occurrences functionality described on page 5-202, the
“Snap-To” functionality can shift each occurrence by a different amount.
•
Marker To Adjust - From the drop-down list, select the marker occurrences
to match up in time.
•
Snap-To Occurrences of Marker - From the drop-down list, select the
marker occurrence to match up to in time.
Note:
Version 2.0
Typically, the Snap-To Occurrences of Marker are Frame marker types,
which means the Marker To Adjust aligns with the times of the video frames.
203
5
The CinePlex Markup algorithm find the best match occurrence of the Snap-To
Occurrences of Maker entry for every occurrence of the Marker To Adjust
entry, and makes the Marker To Adjust occurrence time equal to the time of the
best match occurrence. There are two ways that CinePlex Markup determines the
best match occurrence of the “Snap-To” marker:
•
—
Snap-to Previous Occurrence – This selection uses the occurrence
that is just before the time of the occurrence being adjusted. The adjustment always reduces the time of the occurrence being adjusted.
—
Snap-to Closest Occurrence – This selection uses the occurrence that
is closest in time to the occurrence being adjusted. The adjustment can
shift the occurrence being adjusted ahead or behind in time.
Snap interval start and end times independently - Because intervaltype markers consist of two times (a start time and an end time), they are
treated differently and they are controlled by this checkbox. When you check
this box, CinePlex Markup snaps both the start and the end times to their
respective best match occurrences. This can change the length of the interval.
When you clear the checkbox, CinePlex Markup uses the best match to the
start time to shift the entire interval. In this case, the end time shifts by the
same amount as is the start time, so the length of the interval remains constant.
5.3.7.6 Interpolate Missing Occurrences
This item opens the Interpolate Missing Occurrences dialog box. An illustration of the dialog box follows:
204
CinePlex
•
Marker - From the drop-down list, select the marker to interpolate.
•
Periodicity - This box displays the periodicity results for the selected
marker as follows:
Tolerances for Gaps – For the gap analysis, the average separation
between markers is determined. If the time gap between any two adjacent marker occurrences is not within the Tolerance for Gaps value (i.e.
between (1-TFG) and (1 + TFG) times the average separation, it is
marked as a gap.
—
pairs – the number of pairs of adjacent times
—
avg – the average time difference between pairs in seconds
—
stddev – the standard deviation around the average time difference
—
min – the smallest time difference encountered in seconds
—
max – the largest time difference encountered in seconds
—
non-gap avg – the average time difference in seconds when the discovered gaps are excluded from the calculation
•
Gap Sizes - This box lists of the distribution of skipped occurrences (gaps);
for example, 0 : nnn indicates the number of number of pairs without a missing timestamp between them, 1 : nnn indicates the number with one timestamp missing, 2 : nnn indicates the number with two missing timestamps,
and so on.
•
Timestamp Determination - The area contains the following two selections:
•
Version 2.0
—
—
Assume Periodicity – This selection assumes that the data is periodic
and adds marker occurrences accordingly.
—
Use Frame Marker Times – This selection adds missing marker
occurrences at the frame markers.
Value Interpolation - The area contains the following two selections:
—
Sample-and-hold the previous value – This selection assigns a value
(or coordinates) to the new marker occurrences added to fill a gap,
which is the same as the value (or coordinates) of the last pre-gap
marker occurrence.
—
Linear Interpolation – This selection assigns values to the new
marker occurrences added to fill a gap that are calculated to fall on a
line connecting the last pre-gap value (or coordinates) with the first
post-gap value (or coordinates).
205
5
If the marker being interpolated is a scalar marker or a coordinates marker, the
tool can calculate reasonable values to apply to the added marker occurrences by
using one of two methods:
Generate new Time-only Marker at times for added Occurrences
• Generate new Time-only Marker at times for added Occurrences This selection enables the tool to define and populate a new marker named
Interpolated X, where X is the name of the marker being interpolated, and
which has occurrences at the times where interpolated marker occurrences are
added. In effect, this differentiates the occurrences of the selected marker that
are generated via interpolation from those that are part of the original data.
How the Interpolation Algorithm Works
The interpolation tool is capable of calculating both the times at which new
marker occurrences need to be added (that is, where the gaps appear), and for
Scalar markers and Coordinates markers, what values need to be given to the
added marker occurrences. Obviously, when finding the times where there are
gaps, there is an implicit assumption of periodicity in the marker occurrences.
This may or may not be the case with the marker occurrences for the selected
marker, but the tool displays information that enables you to determine the extent
to which the periodicity assumption is valid.
When you select a marker, the algorithm analyses the times of the occurrences for
that marker, and displays the results in the two list boxes. The algorithm can use
or ignore the results of this analysis, depending on the following Timestamp
Determination selections. The analysis proceeds as follows:
206
1
Consider each pair of adjacent times for the marker occurrences, and calculate the time difference between each pair. The number of pairs appears in the
left list box.
2
Find the min, max, average, and standard deviation on the set of calculated
time differences. Display this information in the Periodicity list box as avg =
for the average time difference, stddev = for the standard deviation around
the average time difference, min = and max = for the smallest and largest
time differences encountered.
3
Assume that any difference between adjacent occurrences that is larger than
1.1 times the average time difference constitutes a gap, or a skipped occurrence. Using this definition of a gap, compute and display a histogram of the
sizes of the gaps in the Gap Sizes list box. The 0: line in this list box is to be
interpreted as the number of timestamp pairs for which there were no gaps or
missing timestamps between them. The next 1: line is the number of timestamp pairs for which there was a gap of 1 missing timestamp between the
pair, and so on.
4
By ignoring the gaps, compute a new average time difference between adjacent, gap = 0 timestamp pairs. Display this as non-gap avg = in the Periodicity list box. Whereas the avg = value has factored in the gaps and thus
CinePlex
produced a larger average time difference, the non-gap avg = has taken out
the gaps, and so produces a smaller and in many cases more accurate estimate
of the true periodicity. In effect, this is the periodicity you would see if it
weren't for missing samples (gaps) in the occurrences.
5.3.7.7 Mark All Waveforms As Valid
This item re-validates any waveforms you have invalidated with the Interval
Operations tool; see “Interval Operations” on page 5-200.
5.3.7.8 Options
This item opens the Options dialog box with several tabs as described in the following sections.
5.3.7.8.1 General Tab.
•
Version 2.0
Initial Directories for Data Files - This area contains list boxes and controls for the initial project directories as follows:
—
Initial Directory for Project (.cpj) Files – Type a directory location
and name or click Browse and select and existing directory.
—
Initial Directory for Video Files – Type a directory location and name
or click Browse and select and existing directory.
—
Initial Directory for Neural Data Files – Type a directory location
and name or click Browse and select and existing directory.
—
Always use the same Initial Directories – This selection sets the
default initial directories to the directories you typed.
207
5
—
•
Use the last directory of the previous session as Initial Directory –
This item sets the default initial directories to the directories you used
for the last project.
Project File-Save Behavior - When you save a project file, from the dropdown menu you can set one of the following default file-save behaviors:
Note:
On this menu, filename-0n means CinePlex Markup defaults to the first unused
filename and adds a numeric increment 0 (zero) n (digit). For example, Test-01,
Test-02, Test-03, etc.
•
Number of Frames to Advance During Click-To-Add - Type the number of frames to advance when you add or edit coordinates in the Video or
Scalar windows. For more information on Click-To-Add, see “Understanding
Click-To-Add Mode” on page 4-120.
•
Select Marker Occurrence For Current Time - Select this item to have
CinePlex Markup automatically select, in the Marker Occurrences window,
the most appropriate marker occurrence for the current time.
5.3.7.8.2 File Import Tab.
•
208
Reading Buffer Size - This area contains an input box for the reading
buffer size setting and an advisory estimate of the amount of space waveforms take.
CinePlex
—
•
Reading Buffer Size for data files (MB) – Type a size value for the
reading buffer in megabytes (MB).
Continuous Data - This area contains an input box for the size of the continuous-data channel buffer and a checkbox that disables the loading of continuous-data channels to .plx files.
—
Channel Buffer size for continuous data (MB) – Type a size value
for the channel buffer in megabytes (MB).
—
Disable loading continuous data channels for PLX files – This selection inhibits the loading of continuous data channels to .plx files.
—
Default Timestamp Frequency (if not specified in loaded file) – If
the initial neural data file does not specify a timestamp frequency (for
example, a .dvt file), enter a default timestamp frequency in Hz.
5.3.7.8.3 Latency Correction Tab. For more details on latency correction, see
“Correcting for Video Latency” on page 5-224.
•
Automatically compensate for video latency by adjusting Frame
and Position Markers - this setting is checked by default. This setting
compensates for the amount of time elapsed between the camera’s capture of
the image to the computer’s timestamp of the video frame (the video latency).
If you have data that was analyzed with previous versions of CinePlex
Markup, you may notice timestamp shifts and you could uncheck this setting
for that data.
—
Version 2.0
Amount of time to shift Markers - Type the amount of time to shift
the markers in seconds. The number should always be positive because
the number is subtracted from the timestamps.
209
5
•
Automatically snap Position Markers imported from .plx files to
the previous Frame Marker - this setting is checked by default. This setting is applied automatically only when data is initially imported from a .plx
file.
Note:
When CinePlex is being used with Plexon’s MAP system, leaving the MAP on
overnight could result in excessive latency - much greater than 30 milliseconds.
If the MAP has been left on overnight, it is better to reset the MAP system.
5.3.7.8.4 Display Tab.
210
•
Update Animation Every __ Milliseconds - Type an animation update
frequency in milliseconds. This is the screen update rate while the video and
data files play are playing.
•
Initially show ‘Welcome To CinePlex’ dialog box - This selection
makes the Welcome to CinePlex dialog box appear at startup.
•
Initially disable empty Spike Channels - This selection suppresses
empty spike channels in the Activity window at startup.
•
Initially disable Continuous Channels - This selection suppresses continuous channels in the Activity window at startup.
CinePlex
5.3.7.8.5 Audio Tab.
Version 2.0
•
Available Sounds - CinePlex Markup ships with a selection of four .wav
files, and these sounds are available for playback in CinePlex Markup by
default. However, any .wav file can be used, provided that CinePlex Markup
knows where to find it on the hard drive. Before .wav file sounds can be
mapped to Marker or spike occurrences in the Audio Output Window, they
must be loaded into CinePlex Markup. The Available Sounds section lists the
Sounds that are currently available for playback. Each sound has a Label that
shows up in the droplist in the Sounds column of the Audio Output Window,
and the full path to the .wav file that contains the sound.
•
Add - Pressing Add... will show a file selection dialog followed by the Sound
Selection dialog box which allows entering a Label used to represent that
sound. Pressing the Play Sound button will play the sound, which is useful
for previewing.
•
Edit - Highlighting an existing sound in the list and pressing Edit... will show
the Sound Selection dialog box and allow re-selecting the .wav file or changing the Label for a sound.
211
5
•
Remove - Highlighting an existing sound in the list and pressing Remove
will remove the sound.
•
Play Sound - Highlighting an existing sound in the list and pressing Play
Sound will immediately play the sound, allowing you to preview it.
•
Reset to Defaults - Pressing the Reset to Defaults button will reset the list
to contain the four sound files that are shipped with CinePlex Markup.
HINT
Minimizing number of sounds to play
PC audio hardware can only mix a certain number of sound streams
together, so CinePlex Markup can only play about 10 sounds simultaneously. Sounds that overlap in time because they are played
quickly one after the other count as simultaneous sounds. Therefore,
it is quite easy for CinePlex Markup to overwhelm the audio subsystem by attempting to play too many sounds, as Markers or neural
firings may occur at rates too fast for the audio system’s capabilities.
When this happens, CinePlex Markup will play as many sounds as it
can, but you may hear gaps in the audio playback. To minimize this
issue:
a) do not select many units or markers to be played at once. Even a
single neural channel with a high firing rate can saturate the audio.
b) use .wav files that are as short as possible. In this regard the ‘neuralclick.wav’ file is ideal, as it can be played very quickly.
5.3.7.8.6 Colors Tab.
•
212
Display Elements - This area contains the following color choices for the
main display:
CinePlex
•
—
Background – This is the background color of the Activity window.
—
Text – This is the text color in the Activity and Video windows.
—
Grid and zero line – This is the color of the grid and zero line in the
Activity windows.
—
Selection – This is the color of selected items in the Video and Activity
windows.
—
Restore Colors to Defaults – Click to restore the display elements to
their default colors.
Units - This area contains the color choices for each unit and unsorted waveforms.
—
Unsorted – This is the color for unsorted waveforms.
—
Invalidated - This is the color for invalidated waveforms.
—
Unit a: ... Unit p – These are the color selections for up to 16 units.
—
Restore Colors to Defaults – Click to restore the unit colors to their
default colors.
5.3.7.8.7 Printing Options Tab.
The selections on the Printing Options tab are the same as those on the Colors
tab. See “Colors Tab” on page 5-212
Version 2.0
213
5
5.3.8 Window Menu
For more details on the Window menu, see “Window Menu” on page D-11.
5.3.9 Run Menu
5.3.9.1 PlexUtil
This item launches the PlexUtil application.
5.3.9.2 Offline Sorter
This item launches the Offline Sorter application.
5.3.9.3 NeuroExplorer
This item launches the NeuroExplorer application.
5.3.9.4 Explorer
This item opens Windows Explorer.
See also “Run Menu” on page D-13 and “Run Menu Customization” on
page D-22.
5.3.10 Help Menu
For more details on the Help menu, see “Help Menu” on page D-13.
214
CinePlex
5.4 Toolbars
CinePlex Markup includes toolbars that provide access to features, commands,
controls, and settings. Most features and commands are available on the toolbars.
You may also create toolbars from most of the dropdown menus on the menu bar.
Briefly rest the mouse pointer over a button to see the button name. Descriptions
of the toolbars follow:
5.4.1 Standard Toolbar
This toolbar includes typical Windows controls for file New, Open, Save, Cut,
Copy, Paste, Print, Help, Undo, and Options. Except for Options, these are
typical Windows controls. For information on Options, see “Options” on
page 5-207.
5.4.2 Edit Toolbar
The Edit toolbar includes a series of buttons that manage markers and marker
occurrences within CinePlex Markup. This toolbar has eight buttons that correspond to the marker and marker occurrences commands on the Edit menu; see
“Edit Menu” on page 5-187.
5.4.3 Views Toolbar
The Views toolbar includes a series of buttons that open the various windows
within CinePlex Markup. Each window opens at its default size. This toolbar’s
buttons are equivalent to the commands on the View menu; see “View Menu” on
page 5-191.
.
HINT
Missing Buttons on the ViewsToolbar
If there are missing buttons on the toolbar, select Window | Customize | Toolbars, and select the line labeled View in the list box in the
Toolbars tab. Do not uncheck the checkbox -- just select the line.
Then press the Reset button.
5.4.4 Animate Toolbar
The most convenient way to control the flow of time in CinePlex Markup is to
use the time-control toolbar buttons. You may also use the associated Animate
Version 2.0
215
5
menu entries or keyboard shortcuts; see “Animate Menu” on page 5-192. The
Animation Speed list box is the only Animate toolbar control that has no equivalent command on the Animate menu.
•
Animation Speed - This list box provides a choice of time progression rates,
where 1X is the normal speed. It has no equivalent on the Animate menu.
5.4.5 Looping Toolbar
The Looping toolbar includes a list of looping intervals over which you can play
the video file, and two looping control buttons. You may also use the equivalent
Looping menu entries or keyboard shortcuts; see “Looping Menu” on
page 5-193.
5.4.6 Find Toolbar
The Find toolbar provides a drop down list that includes all markers. You may
also use the equivalent Find menu entries or keyboard shortcuts; see “Find
Menu” on page 5-195.
By default, the currently selected marker appears in the list box. However, you
may select another marker from the drop down list.
5.4.7 Tools Toolbar
The Tools toolbar includes two time-interval editors. One editor for a defined
zone of the video window and one editor for level interval markers. You may use
the equivalent commands on the Tools menu; see “Tools Menu” on page 5-196.
216
CinePlex
5.5 How CinePlex Markup Creates Initial Project Files
When you create a new CinePlex project, CinePlex Markup reads both the neural
data file and the video data file, and it generates markers and marker occurrences
based on the contents of the files. After the initial file reading, CinePlex Markup
stores the generated markers and marker occurrences in the project (.cpj) file.
When you re-open the project file, CinePlex Markup reads the markers and
marker occurrences from the project file, not from the original neural data or
video files. In this way, you can add, edit, shift, or delete markers without regard
for what is actually in the original neural or video data files. However, when you
re-open an existing project file, CinePlex Markup still reads the neural data file in
order to obtain the spike timestamps and continuous data, and it still reads the
video file to obtain video frame images.
5.5.1 Reading Video (.avi) Files
When CinePlex Markup reads the video (.avi) file, it looks for timestamps
embedded in the data stored with each frame. CinePlex Capture imbeds these
timestamps. If the embedded timestamps are present, CinePlex Markup creates a
special Frame marker, and it generates a marker occurrence for each video frame.
See “Non-Typical Initial File Creation” on page 5-219 if there are no embedded
timestamps.
CAUTION
Upgrade Notice
If you have upgraded to CinePlex Capture 2.0, you should also
update Cineplex Markup. The upgraded CinePlex Markup will
read AVI files created by CinePlex Capture 1.0, 1.1, 1.2, and 1.4.
However, earlier versions will not be able to read AVI files produced
in version 2.0
5.5.2 Reading Plexon (.plx) Files
When CinePlex Markup reads a Plexon (.plx) file during the initial project creation, depending on the contents of the .plx file, it can create and populate a number of different markers as follows:
Version 2.0
•
Non-strobed external events (type 4 data blocks) become Time-Only markers
•
Strobed events become a single Scalar marker, with the scalar values set to
the strobe values
•
If strobed events are present, and CinePlex Markup identifies them to be in
conformance with the Plexon VideoTracker protocol (see “Data Interpretation” on page E-12), then CinePlex Markup generates additional markers by
interpreting the strobe codes as data produced by Plexon VideoTracker.
Depending on the VideoTracker mode detected, CinePlex Markup creates the
following markers:
217
5
—
One, two, or three Coordinates markers with names like Position n to
denote the tracker positions, when VideoTracker is in LED or Reflective Color tracking modes.
—
A Coordinates marker named Centroid Position, when VideoTracker is
in Object Contour tracking mode.
—
A Scalar marker named Centroid Motion, when you enable the
VideoTracker Motion Measure option.
Note:
In Plexon VideoTracker protocol, if VideoTracker cannot locate the object being
tracked it reports the positions for those frames as (0,0); for example, if a headstage cable occluded the LED for a frame VideoTracker reports that frame as
“0,0”. When CinePlex Markup translates strobed events into Coordinates
marker occurrences, it automatically ignores any (0,0) coordinates, which
leaves gaps where there is no position data. The Interpolate Missing Occurrences tool can fill these gaps, see “Interpolate Missing Occurrences” on
page 5-204.
Note:
Important: Spike waveforms and timestamps and continuous data from a .plx
file are not converted into markers.
5.5.3 Reading NeuroExplorer (.nex) Files
When CinePlex Markup reads a .nex file during the initial project file creation, it
ignores the spike timestamps and continuous data. CinePlex Markup converts
other Nex variables into CinePlex markers as follows:
•
Event variables become Time-Only markers, unless the event variable has the
exact name Frame Marker, in which case it becomes a Frame marker.
•
Nex interval variables become interval markers.
•
Nex marker variables that have one associated value become Scalar markers.
•
Nex marker variables that have two associated values become Coordinates
markers.
•
CinePlex Markup ignores Nex marker variables with more than two associated values, and Nex population vector variables.
5.5.4 Reading Digital VideoTracker (.dvt) Files
When CinePlex Markup reads a .dvt file produced by CinePlex Capture during
the initial project file creation, it always creates Frame marker occurrences. CinePlex Markup also produces Coordinates and Scalar markers for the coordinate
and centroid motion data streams in the file, in a manner analogous to how it
translates the strobed values into markers in a .plx file.
After you create the initial project, you can import additional markers from additional data files into the project; see Import Markers on page 5-181. The import
operation also follows the preceding rules.
218
CinePlex
5.5.5 Non-Typical Initial File Creation
The normal operating mode for CinePlex Markup is to use an .avi file captured
with CinePlex Capture so that frame timestamps are embedded in the .avi file;
then load a neural data file that contains neural firing timestamps. However, you
can use other modes of operation:
•
When you use the New Project Wizard, you can leave either the video-file
filename or the neural-data filename blank, but not both. In effect, this
enables you to use CinePlex Markup to annotate video data without the presence of neural data, and vice versa.
•
If the video data file is blank, you can still use the CinePlex Markup Activity
window. If the neural data file contains VideoTracker coordinates that are
based the Plexon VideoTracker protocol, CinePlex Markup still interprets
them as Coordinates marker occurrences and displays them against a blank
background in the video window. However, you require an extra step in this
case to generate Frame markers artificially. The New Project Wizard detects
when this needs to be done, and it automatically prompts you.
•
If the neural data filename is blank, CinePlex Markup still functions; you can
view the video in the normal way: advance frame by frame, animate, etc.
Note:
Version 2.0
In both of the previous cases, you can still enter and define new markers. You
can still export the markers to any of the supported output-file formats.
•
CinePlex Markup supports the use of .avi files recorded without the CinePlex
Capture system, which therefore does not contain embedded timestamps. To
use these files, you must generate Frame markers before you use CinePlex
Markup.
•
CinePlex Markup can also read certain other .avi files, but those .avi files
must use the Motion JPEG method for encoding and storing the video frames.
219
5
5.6 Understanding Markers and Marker Occurrences
To use CinePlex Markup effectively, you must understand the difference between
a marker and a marker occurrence. A marker is defined by its type and name. A
marker occurrence is a specific insertion of a marker at a designated time. Each
marker can have many marker occurrences associated with it. Before you can create any marker occurrences for a given marker, that marker must exist. If you are
familiar with object-oriented software methodologies, a marker corresponds to a
class, and marker occurrences correspond to instances of that class.
Every marker has a marker type definition. Each marker occurrence stores at least
one timestamp, along with other supplemental data, depending on the marker
type. The following table describes each marker type and the information it stores
for each occurrence:
Table 5-1 Marker Types
Marker
Type
220
Abbr
Information
Stored
Description
Time Only
T
Timestamp
Single happenings, where the only
required information is the time of
the happening. E.g. “Shock Applied”
Frame
F
Timestamp
Single happenings, where the only
required information is the time of
the happening. E.g. “Shock Applied”
Interval
I
Start
Timestamp,
End
Timestamp
Denotes a time interval over which
something occurred. E.g. “Stimulus
Applied” or “Valid Trial”
Scalar
S
Timestamp,
Value
Denotes a value (stored in a 16-bit
number) at a given time. E.g. the
Motion Measure produced by the
CinePlex Capture Tracking Option.
Coordinates
C
Timestamp,
X, Y
Denotes a pair of values (stored in
16-bit numbers) at a given time. E.g.
Animal coordinates produced by the
CinePlex Capture Tracking Option.
Level
Interval
L
Start
Timestamp,
End
Timestamp
A special version of an interval
marker where the intervals are automatically produced by applying a
thresholding operation to the values
of a Scalar marker (using the Level
Editor). E.g. “Rat Froze”
CinePlex
Marker
Type
Zone Interval
Abbr
R
Information
Stored
Start
Timestamp,
End
Timestamp
Description
A special version of an interval
marker where the intervals are automatically produced when the values
of a 2D vector are inside a certain
spatial zone (using the Zones Editor).
E.g. “Rat In Maze Arm 3"
You can open a quick reminder of the marker types and their abbreviations; see
Quick Reference in “Help Menu” on page D-13. Throughout this manual, the
marker types Interval, Level Interval, and Zone Interval are collectively referred
to as interval-type markers or interval markers, as they share many common
characteristics.
CinePlex Markup uses the concepts of both a selected marker and a selected
marker occurrence; that is, you can open a dialog box to edit the characteristics of
a selected marker, and you can delete or edit the selected marker occurrence.
CinePlex Markup also uses the concept of current time and a closely related current video frame.
By default, whenever you change the current time in CinePlex Markup, it automatically selects the most appropriate marker occurrence of the selected marker
for the current time. However, to turn this behavior off, from the Tools menu
select Options and on the General tab, click to clear the Select Marker Occurrence For Current Time checkbox.
5.6.1 Marker Occurrences and the Marker Occurrences Window
This section includes descriptions of the CinePlex Markup facilities for displaying, generating, and editing marker occurrences.
The Activity window graphically shows where marker occurrences occur in time.
The Video window and the Scalar window each show the data values associated
with Coordinates and Scalar markers. But the Marker Occurrences window (see
“Marker Occurrences Window” on page 5-171) contains a concentration of functionality for dealing with marker occurrences. The following Marker Occurrences
window shows the numerical values of the marker occurrences for Position 1.
Version 2.0
221
5
This illustration show the currently selected marker occurrence with a > in the
leftmost column. The shortcut menu (see “Marker Occurrences Window” on
page 5-171) provides several operations that you can perform on marker occurrences. You can use other shortcut menu entries to select and copy text with
marker occurrence information onto the Windows clipboard, and paste into other
applications. In the Marker Occurrences window, the columns change according
to the selected marker type as follows:
Table 5-2 Column Displays for Various Marker Types
Marker Type
Columns
Time Only, Frame
Time
Interval, Level Interval, Zone Interval
Start time, end time
Scalar
Time and value
Coordinates
Time, X, and Y
Note:
Marker Occurrences are identified by time, so no two marker occurrences can
have the same time. If you attempt to add a new marker occurrence with the
same timestamp as an existing marker occurrence, CinePlex Markup replaces
the existing marker occurrence with the new one, which deletes the old data
values by overwriting them. Likewise, if you edit an existing marker occurrence
by changing its timestamp to be the same as another existing marker occurrence, CinePlex Markup replaces the existing marker occurrence.
Also, when Scalar markers appear in the Marker Occurrences window, you can
control the display format of the data values associated with each marker occurrence. You can use the shortcut menu items to display data values in decimal (the
default), hexadecimal, or as Plexon VideoTracker bit fields, where the information appears as comma separated items as follows:
Bit15, Bit14, Bits 10 through 13, Bits 0 through 9
To interpret VideoTracker bit fields, see “Data Interpretation” on page E-12.
222
CinePlex
From the Marker Occurrences window shortcut menu, you can select Properties
to open the Marker Occurrences View Properties dialog box:
By default, the dialog box displays the marker occurrences for the currently
selected marker. However, you can click to clear the Use Selected Marker
checkbox and select a different marker from the list to display the marker occurrences for that marker. When you click OK, the current Marker Occurrences
window will switch to the one selected in the dropdown list. If you have more
than one Marker Occurrences window open, you can use this capability to display marker occurrences for different markers simultaneously.
In the Display Format for Scalar Marker Values area, you can set the display
format for Scalar marker values, which are described in “Table 5-2” on page 5222. In the Marker Occurrences window, the items in the Value column change
the display format you choose.
By default, whenever you change the current time in CinePlex Markup, it automatically selects the most appropriate marker occurrence of the selected marker
for the current time. However, you can turn off this behavior; from the Tools
menu, click Options and then click the General tab; click to clear the Select
Marker Occurrence For Current Time checkbox.
Version 2.0
223
5
5.7 Correcting for Video Latency
If you are using CinePlex Markup to display data obtained using CinePlex Capture, be aware that there is a latency between the times of the video frames / position data sent from CinePlex Capture and the Neural Data. In CinePlex Capture,
the camera takes some time to acquire and transmit each video frame to the Capture computer over the firewire cable. The CinePlex Capture computer will
timestamp the frame as soon as it receives notification from the camera that the
frame has been delivered, but our tests indicate that the camera takes approximately 21 milliseconds after the ‘shutter’ closes to deliver the frame. Therefore,
the timestamps of the video frames and of the position data from CinePlex Capture are about 21 milliseconds after the actual frame. One way to think about this
is that if something suddenly happens in the experimental arena, say an LED suddenly turns on, the video frame that first shows the LED illuminated will have a
timestamp that is about 21 milliseconds later. Note also that there can be substantial jitter in this number, depending on when the LED turned on in relation to
when the ‘shutter’ opened in the camera.
Also, there is a systematic offset that can add a constant amount to the latency of
each frame, having to do with the exact time that is taken to be zero in the .avi file
versus the .plx file recorded on the Plexon MAP system or the Plexon Recorder
system. Because of this effect, the video latency for Recorder is measured to be
closer to 33 milliseconds.
CinePlex Markup contains a feature that will automatically subtract some amount
of time from each video frame timestamp and each position timestamp when a
project is first created. To activate this feature, select the Latency Correction tab
of the Tools – Options dialog box and check the ‘Automatically compensate for
video latency by adjusting Frame and Position Markers’, and enter a amount of
time to subtract from each timestamp:
The amount of time specified is always subtracted from the timestamps, so the
entered number should always be positive. Note that this subtraction will only
occur when the project is first created, when the Frame and Position Markers are
initially created from the video and neural data files (see “How CinePlex Markup
Creates Initial Project Files” on page 5-217), or when a .DVT file is imported. It
is not performed when a .CPJ file is read, or when data from a .NEX file is
imported. Note that the timestamp shift that is performed automatically is equivalent to the shift than can be performed manually using the Tools | Shift Marker
Occurrences.
224
CinePlex
Note that applying this correction can shift Markers to have a negative timestamp
near the beginning of files. When this happens, the timestamps will be assigned
the value of 0.
In addition to the correcting for the camera latency, an independent correction for
the tracking latency can be applied, as discussed in the next section.
Version 2.0
Note:
As of CinePlex Markup version 1.2.0, these latency corrections are now
enabled by default, with a default correction of 21 milliseconds. If you have
analyzed data using previous versions of CinePlex Markup, you may now
notice the timestamp shifts after you upgrade to version 1.2.0. To return to preversion-1.2.0 behavior, you can disable the corrections by unchecking the
checkboxes.
Note:
When CinePlex is being used with Plexon’s Recorder system, there was an
issue with Recorder versions prior to 2.3.2 that could artificially increase this
latency by up to 80 milliseconds. If you are using CinePlex with Recorder,
please upgrade your version of Recorder to version 2.3.2 or later. Also, use a
video latency correction of 33 milliseconds as discussed above.
Note:
When CinePlex is being used with Plexon’s MAP system, leaving the MAP on
overnight could result in excessive latency - much greater than 30 milliseconds.
If the MAP has been left on overnight, it is better to reset the MAP system.
225
5
5.8 Aligning Tracker Coordinates to Frames
If you collect neural and video data files using the Plexon MAP system and CinePlex Capture with tracking enabled, then the temporal relationship between
Frame markers, the arrival of strobe codes to the MAP digital input card, and
video tracker coordinates are depicted in the following illustration of the Activity
window:
Note:
Note: the above screenshot depicts the timing assuming that the automatic corrections for (see previous section) are not enabled.
When the video frame is available, CinePlex Capture immediately timestamps
the file and stores the time in the .avi file along with the video frame image.
When CinePlex Markup initially reads the .avi file, the time for each frame
becomes a Frame Marker time, which appears as the blue tick marks in the previous illustration.
After CinePlex Capture acquires the video frame, it feeds the video image to the
tracking algorithm. Some time later, the tracking algorithm determines the tracking positions and CinePlex Capture encodes the tracking positions using the
VideoTracker protocol (see “Data Interpretation” on page E-12) and outputs a
burst of strobed data words. The time between the frame timestamp and the sending of the strobe codes depends on how quickly the tracking algorithms finish,
but the first strobed data word always occurs before the start of the next video
frame. The words within a burst are clocked out at a constant rate every two milliseconds.
When strobed data words arrive at the MAP, the MAP timestamps them as it
reads them in, and then stores them as events in the .plx file. When CinePlex
Markup in turn reads these strobed events from the .plx file, they become occurrences of a Scalar marker named Strobed; in the preceding illustration, these
occurrences appear as brown tick marks. Also, if CinePlex Markup recognizes
that the strobed codes are in VideoTracker protocol, it decodes them into occurrences of one or more Coordinates markers (see “Table 5-1” on page 5-220).
CinePlex Markup then assigns times to the Coordinate marker occurrences. The
assigned times are derived from the time of the first strobed event in each burst of
strobed events. As a result, CinePlex Markup assigns times to the tracked positions that are later than the timestamps of the corresponding video frames; in the
preceding illustration, the tracked positions (Position 1) are the red tick marks
and the video frames are the blue tick marks.
This time offset between the frame time and the tracking coordinates, although
realistic, is not desirable in some cases. For example, you can simplify subsequent analysis when the coordinates corresponding to a video frame are equal to
the time of the video frame. You can do this with CinePlex Markup, by using the
226
CinePlex
Snap-To Marker Occurrences tool described in “Snap-To Marker Occurrences”
on page 5-203.
To align frame times and tracking coordinates
1
To align the tracking coordinate Position n marker occurrences to video
frames, on the Tools menu, click Snap-To Marker Occurrences.
The Snap-To Marker Occurrences dialog box opens.
2
Select the Position n marker in the Marker To Adjust box. Leave the SnapTo Occurrences of Marker set to the default value Frame Marker.
3
Click Snap-to Previous Occurrence.
4
Click OK. A confirmation box will appear that specifies how many marker
occurrences were moved.
After the Snap-to operation completes, the previous illustration becomes:
The red tick marks are now aligned with the blue tick marks. Thus, the tracker
coordinate Position 1 occurrences are now aligned with the Frame Marker
occurrences.
Note that position data imported from a .DVT file is already timestamped with
the time of the corresponding frame, so this correction is not required.
You can configure CinePlex Markup to automatically perform this snap-to previous operation for newly-created projects by checking the ‘Automatically snap
Position Markers imported from .plx files to the previous Frame Marker’ checkbox in the Latency Correction tab of the Options dialog box. This correction is
only automatically applied when the data is initially imported from a .plx file.
Version 2.0
227
5
5.9 Analyzing CinePlex Capture data with NeuroExplorer
As discussed in “Export to .NEX” on page 5-186, data can be exported from
CinePlex Markup as a .nex file and read into NeuroExplorer. In this case, CinePlex Markup can perform latency corrections as described in the previous sections, and the data read into NeuroExplorer will be already corrected for latency.
However, a .plx file containing coordinates from CinePlex Capture can also be
read directly into NeuroExplorer. NeuroExplorer can decipher the Video Tracker
protocol strobe codes (See Appendix D) and turn them into continuous variables.
In this case, the timestamps for the coordinates should be corrected for latency
within Neuroexplorer. Note that since NeuroExplorer does not have access to the
frame times (stored in .avi and .dvt files), it needs to compensate both for the
video latency (see “Correcting for Video Latency” on page 5-224) and for the
tracking latency (see “Aligning Tracker Coordinates to Frames” on page 5-226)
by subtracting a larger number from the position timestamps. To configure the
latency correction, from the View menu select Data Import Options. In the
Data Import Options dialog box, click the Plexon Files tab. In the Strobed
Events area, enter a latency value in the Position events latency (seconds) field.
The default value for this latency correction in the screenshop is 75 milliseconds
(appropriate for the Plexon Video Tracker product, but too high for CinePlex
Capture). A more appropriate number is 31 milliseconds (21 milliseconds video
latency plus about 10 milliseconds of tracking latency).
228
CinePlex
Plexon Inc
Appendix A
Installation
A.1 Before You Begin ................................................................... A-2
A.2 Installing CinePlex Capture Hardware ................................... A-3
A.3 Plexon MAP System Installation ............................................ A-4
A.4 Plexon Recorder Installation ................................................ A-11
A.5 Stand Alone and Other Equipment Installations................... A-16
A.6 Installing and Upgrading CinePlex System Software........... A-20
A.7 Licensing.............................................................................. A-29
A.8 CinePlex System Technical Support and Updates............... A-30
CinePlex
A-1
A
A.1 Before You Begin
If you are using a dedicated Capture workstation, e.g., the shuttle system, disregard this appendix and follow the instructions in Appendix F: Installation on a
Dedicated Computer
Before you can begin the installation, you need the following items:
•
The following Plexon CinePlex Capture system hardware items:
—
CinePlex Capture Computer with pre-installed software
—
Video camera
—
Lens
—
Mouse
—
Monitor
—
Software keys (2 keys—one each for CinePlex Capture and Markup)
—
Connecting cables:
—
A-2
–
AC power cable for the computer
–
Monitor cable
–
FireWire camera cable—includes camera power cable
–
CinePlex Capture cable from the Capture computer to the MAP,
Recorder, or other equipment
If you have the Recorder version of CinePlex Capture, it includes a
modified Plexon breakout box (PBOB), a modified SCB-68 breakout
box, or a C-HUB.
•
Camera mounting equipment to suit your experimental environment: CinePlex Capture cameras have standard 1/4-20 UNC tripod mounting sockets.
•
A suitable arena for your experiment
CinePlex
A.2 Installing CinePlex Capture Hardware
There are different installation procedures for each CinePlex Capture hardware
application as follows:
1
MAP: For the Plexon Multi-channel Acquisition Processor (MAP) system
application, see “Plexon MAP System Installation” on page A-4.
2
Recorder: For the Plexon Recorder with National Instruments data acquisition (NI DAQ) device application, see “Plexon Recorder Installation” on
page A-11.
3
Other: For the stand alone and other equipment applications, see “Stand
Alone and Other Equipment Installations” on page A-16.
Note:
Version 2.0
If plan to use CinePlex Capture only to record digital video and tracking data,
without neural data, you can set up CinePlex Capture to run in stand-alone
mode.
A-3
A
A.3 Plexon MAP System Installation
Before you begin, you must have Plexon RASPUTIN MAP Control software
Version 2.3.1, or a later version, which must be installed and operational. If you
have an earlier version of RASPUTIN, update to the latest version; for update
instructions, see the Plexon RASPUTIN User’s Guide. Refer to Figure A-1, which
shows the cable connections between CinePlex Capture and the Plexon MAP system. The assembly procedure for the MAP system follows Figure A-1.
Figure A-1
CinePlex Capture Cable Connections for the MAP
A-4
CinePlex
Installing CinePlex Capture system hardware for the MAP
1
At the CinePlex Capture computer, connect the AC power cord. Connect the
unit to an AC power source. Leave the CinePlex Capture computer turned off.
2
Connect the monitor and the mouse to the connections on the rear panel of
the computer.
3
At the MAP, the Digital Input board on the MAP digital signal processing
(DSP) board must be set to Mode 3. If you purchased the CinePlex System
along with a MAP system, Plexon has already configured the DSP board
correctly. Otherwise, remove the DSP board from the MAP chassis. On the
DSP board, locate the DIO3 sub-board. Refer to the following illustration and
locate jumpers W1 through W7.
Set the jumper configurations as follows:
Event
High True
15-bit Word
Mode 3 (+)
Version 2.0
W1
W5
W2
S P
S P
W7
+5V GND
W6
+5V GND
A-5
A
Strobe Polarity
Positive
Note:
A-6
W4
- ST +
Busy Signal Polarity
W3
Positive
For complete information on DSP board, refer to the Digital Input
Board on DSP Module data sheet, which you can download from the
Plexon website at http://www.plexoninc.com/pdf/DigitalInput.pdf.
4
The external clock signal on the timing (TIM) board must be set to 1 kHz. If
you purchased the CinePlex System along with a MAP system, Plexon has
already configured the TIM board correctly. Otherwise, remove the TIM board
from the MAP chassis and set the DIVCLK jumper to 1 kHz as the following
illustration shows:
5
At the MAP, you must make three cable connections:
•
First, connect the small connector on the end of CinePlex Capture cable
to the lower digital-input port on the face of the MAP DSP board. The following illustration shows a typical connector installation.
•
Second, connect the larger connector to the port on the face of the TIM
board.
•
Third, connect the small yellow wire to XS1 BNC connector on the TIM
board
CinePlex
The following illustration shows the three connectors installed on the MAP.
6
If your MAP system includes a National Instruments data acquisition (NI DAQ)
A/D subsystem for continuous analog recording, connect the 9-pin D-Sub
connector on the CinePlex Capture cable to a NI DAQ interface, either a
PBOB, C-HUB, or an SCB-68.
Note:
If your MAP system does not include a NI DAQ A/D subsystem, the
CinePlex Capture cable does not have a 9-pin D-Sub connector.
The following illustrations show connections to the TIM connector on a PBOB
and to the 9-pin connector on the front panel of an SCB-68.
Version 2.0
A-7
A
Note:
A-8
If you are adding the CinePlex System to an existing MAP system
with a NI DAQ A/D subsystem, the CinePlex Capture cable replaces
the existing cable from the MAP TIM card to the NI DAQ interface.
7
At the CinePlex Capture computer, connect the CinePlex Capture cable to the
rear data port, as shown in the following illustration.
8
If you have external digital event data, you can use the second connector on
the DSP card in the MAP to record the event data.
9
Assemble the camera and the lens. Refer to the manufacturer instruction
sheets enclosed with the lens and the camera.
CinePlex
10
At the CinePlex Capture computer, connect one end of the IEEE 1394 cable
(FireWire*) to a “1394” port on the back panel of the CinePlex Capture
computer.
11
At the video camera, connect the other end of the IEEE 1394 cable to the
leftmost camera connector labelled “In”. Do not use the “DaisyChain” port.
The IEEE 1394 cable provides power to the camera.
Note:
Version 2.0
Do not interchange cameras with another processor. Each camera is
individually calibrated to its CinePlex Capture computer.
12
Install a Plexon license key labelled “CPX” or “CPX-T” as follows. If the key is
a parallel-port key, install it on the rear panel of the available CinePlex
Capture computer. If the key is a USB key, install it in any USB port. For more
information on license keys, see “To install the Sentinel hardware key” on
page A-25.
13
Turn the PC on. Turn the MAP on. Turn the CinePlex Capture computer on.
14
At the CinePlex Capture computer, on the Tools menu, click Configuration.
A-9
A
The Configuration dialog box opens.
In the External Equipment box, select Plexon MAP. Click OK to close the
dialog box.
A-10
15
Adjust the camera lens to ensure an image displays on the monitor. If an
image does not appear, see the video tips under “Typical Problems and
Solutions” on page B-2.
16
You have completed the CinePlex Capture hardware installation for the MAP
application. To install CinePlex System software, see “Installing and
Upgrading CinePlex System Software” on page A-20.
CinePlex
A.4 Plexon Recorder Installation
Before you begin the Plexon Recorder installation, verify that you have Plexon
Recorder 2.2.3 or a later version, with a National Instruments data acquisition
(NI DAQ) device; for a complete list of approved NI DAQ devices, see the
Plexon Recorder User’s Guide. Refer to Figure A-2, which shows the cable connections between CinePlex Capture and a Plexon Recorder with an SCB-68 breakout box. The installations for Plexon Recorder with a Plexon breakout box
(PBOB), or C-HUB are similar. The assembly procedure for the Plexon Recorder
system follows Figure A-2.
Figure A-2
CinePlex Capture SCB-68 Cable Connections for Recorder
Version 2.0
A-11
A
Installing CinePlex Capture system hardware for Recorder
A-12
1
At the CinePlex Capture computer, connect the AC power cord. Connect the
unit to an AC power source. Leave the CinePlex Capture computer turned off.
2
Connect the monitor and the mouse to the connections on the rear panel of
the computer.
3
If the system includes a PBOB, on bottom of the circuit board, set the jumper
to PAUSE/REC as shown in the following illustration. Omit this step if the
jumper does not exist on the PBOB -- some PBOBs do not have the jumper.
CinePlex
4
Connect one end of the CinePlex Capture cable to the VTG connector on the
PBOB, to the REC->CPX connector on the C-HUB, or to the CinePlex
connector on the SCB-68 break out box.
The following illustrations show connections to a PBOB and an SCB-68.
Note:
Version 2.0
Plexon modifies the internal connections of the CinePlex SCB-68 to
work with the CinePlex system. You can reset the connections in the
CinePlex SCB-68 to the standard SCB-68 configuration; for instructions, contact Plexon.
5
Connect the remaining cables to the Plexon Recorder system as detailed in
the installation appendix of the Plexon Recorder User’s Guide.
6
At the CinePlex Capture computer, connect the CinePlex Capture cable to the
rear data port, as shown in the following illustration.
A-13
A
7
Assemble the camera and the lens. Refer to the manufacturer instruction
sheets enclosed with the lens and the camera.
8
At the CinePlex Capture computer, connect one end of the IEEE 1394 cable
(FireWire*) to the “1394” ports on the back panel of the CinePlex Capture
computer.
9
At the video camera, connect the other end of the IEEE 1394 cable to the
leftmost camera connector labelled “In”. Do not use the “DaisyChain” port.
The IEEE 1394 cable provides power to the camera.
Note:
10
A-14
Do not interchange cameras with another processor. Each camera is
individually calibrated to its CinePlex Capture computer.
Install a Plexon license key labelled “CPX” or “CPX-T” as follows. If the key is
a parallel-port key, install it on the rear panel of the CinePlex Capture
CinePlex
computer. If the key is a USB key, install it in any USB port. For more
information on license keys, see “To install the Sentinel hardware key” on
page A-25.
11
Turn the Recorder PC on. Turn the CinePlex Capture computer on.
12
At the CinePlex Capture computer, on the Tools menu, click Configuration.
The Configuration dialog box opens.
In the External Equipment box, select the choice that corresponds to your
equipment. Click OK to close the dialog box.
Version 2.0
13
Adjust the camera lens to ensure an image displays on the monitor. If an
image does not appear, see the video tips under “Typical Problems and
Solutions” on page B-2.
14
You have completed the CinePlex Capture hardware installation for the
Recorder application. To install CinePlex software, see “Installing and
Upgrading CinePlex System Software” on page A-20.
A-15
A
A.5 Stand Alone and Other Equipment Installations
You can use CinePlex Capture as a stand alone unit to record video and tracking
data. You can also use CinePlex Capture with other external equipment you supply, which you have set up to receive data and provide the clock and control signals as detailed in Appendix E: Interfacing CinePlex Capture to External
Equipment .. If you use CinePlex Capture as a stand-alone device, you do not
need the CinePlex Capture cable. Refer to Figure A-3, which shows the cable
connections between CinePlex Capture and customer-supplied other equipment.
The assembly procedure for stand alone and other equipment follows Figure A-3.
Figure A-3
CinePlex Capture Cable Connections for other Equipment
A-16
CinePlex
Installing CinePlex Capture for stand-alone use or with other equipment
1
At the CinePlex Capture computer, connect the AC power cord. Connect the
unit to an AC power source. Leave the CinePlex Capture computer turned off.
2
Connect the monitor and the mouse to the connections on the rear panel of
the computer.
3
If you are using other equipment, set up and connect the unfinished (tinned
bare wires) ends of the CinePlex Capture cable to your equipment. For
complete information on cable connections, seeAppendix E: Interfacing
CinePlex Capture to External Equipment .
If you are using CinePlex Capture as a stand-alone device just to record video
and tracking data, you do not require the CinePlex Capture cable. Go to
Step 5.
4
Version 2.0
At the CinePlex Capture computer, connect the CinePlex Capture cable to the
rear data port, as shown in the following illustration.
A-17
A
5
Assemble the camera and the lens. Refer to the manufacturer instruction
sheets enclosed with the lens and the camera.
6
At the CinePlex Capture computer, connect one end of the IEEE 1394 cable
(FireWire*) to the “1394” ports on the back panel of the CinePlex Capture
computer.
7
At the video camera, connect the other end of the IEEE 1394 cable to the
leftmost camera connector labelled “In”. Do not use the “DaisyChain” port.
The IEEE 1394 cable provides power to the camera.
Note:
8
A-18
Do not interchange cameras with another processor. Each camera is
individually calibrated to its CinePlex Capture computer.
Install a Plexon license key labelled “CPX” or “CPX-T” as follows. If the key is
a parallel-port key, install it on the rear panel of the CinePlex Capture
CinePlex
computer. If the key is a USB key, install it in any USB port. For more
information on license keys, see “To install the Sentinel hardware key” on
page A-25.
9
If you are using other equipment, turn the equipment on. Turn the CinePlex
Capture computer on.
10
At the CinePlex Capture computer, on the Tools menu, click Configuration.
The Configuration dialog box opens.
In the External Equipment box, select Plexon Recorder 2.2 or earlier. Click
OK to close the dialog box. The setting of this dropdown determines the operational characteristics of the ‘recording’ remote status signal. When the External Equipment dropdown is set to ‘Plexon MAP’, the ‘recording’ remote status
signal is high when CinePlex Capture is recording and low when recording
has stopped. When the External Equipment dropdown is set to ‘Other’, the
‘recording’ remote status signal is high when CinePlex Capture is recording
and low when recording has paused. See Appendix E: Remote Status
Signals
Version 2.0
11
Adjust the camera lens to ensure an image displays on the monitor. If an
image does not appear, see the video tips under “Typical Problems and
Solutions” on page B-2.
12
You have completed the CinePlex Capture hardware installation for standalone or other-equipment applications. To install CinePlex software, see
“Installing and Upgrading CinePlex System Software” on page A-20.
A-19
A
A.6 Installing and Upgrading CinePlex System Software
The CinePlex system consists of CinePlex Capture, which is a hardware-based
system with pre-installed software, and CinePlex Markup, which is a software
program that can run on a separate computer. If you purchased a Plexon MAP
system along with your CinePlex system, Plexon normally pre-installs the CinePlex Markup software on the MAP computer. To activate the software you must
install the license key; Plexon suggests you install the key in a USB port on the
rear panel of the computer. For information on installing license keys, see “To
install the Sentinel hardware key” on page A-25.
The overall process for installing or upgrading CinePlex software is depicted in
the flowchart and described below.
A-20
CinePlex
1
When embarking on this process, you must establish if CinePlex Markup is
already installed on the target computer. If CinePlex Markup has already been
installed, then go to step 3. If not, then go to step 2).
2
To install CinePlex Markup from the CD, then follow the procedures in
Appendix A: Installing CinePlex System from the CD . If not, go to step 3.
3
If you wish to install CinePlex Markup automatically from the web, follow the
procedure in Appendix A: Installing CinePlex System by Web Update . If you
wish to install CinePlex Markup manually from the Plexon website, follow the
procedure in Appendix A: Installing CinePlex System Manually from the
Plexon Website .
A.6.1 Installing CinePlex System from the CD
If you are installing the CinePlex System on a different PC, continue with the
installation procedure that follows. The software consists of a CD and software
license keys.
There are three steps to installing CinePlex Markup:
1
Install the CinePlex System files from the CD and run the setup program.
2
Install and configure the Rainbow Sentinel system drivers.
3
Install the Sentinel hardware key.
To install CinePlex files
Version 2.0
1
Close all applications before you begin installing CinePlex.
2
Place the CinePlex System setup CD in your computer's CD-ROM drive.
3
Find the CPXv2Setup.exe file on the CD.
4
Double-click CPXv2Setup.exe.
5
When the Welcome screen appears, follow the on-screen instructions. Click
Next to acknowledge your acceptance of the copyright warning and to
proceed with installation.
6
Review the information in the Read Me File window. If you choose to cancel
the installation and you click Cancel, the following Install dialog box opens.
A-21
A
A-22
7
In the Choose Destination Location window, you can specify a location for
the CinePlex files. Click Browse to choose a location. Otherwise, click Next
to accept the default location.
8
If you are upgrading from CinePlex Version 1.0, in the Backup Replaced
Files dialog box, click Yes to create backup copies of the Version 1 software.
Make sure Version 2 is working correctly before you delete the backup copies.
Click Next to continue the installation.
9
In the Select Program Manager Group window, you can choose a program
group for the CinePlex icons. To accept the default group and proceed with
the installation, click Next.
10
At the Start Installation window, if you need to return to the previous window
to change information, click Back. Otherwise, click Next to begin the
CinePlex installation.
11
The Installing window includes progress bars that tell you when the
installation is complete.
12
When the CinePlex System installation process is complete, the Sentinel
System Driver - InstallShield Wizard welcome window opens. Click Next to
proceed with driver installation.
CinePlex
Version 2.0
13
In the Program Maintenance window, click Modify and then click Next to
continue the installation.
14
In the Custom Setup window, click the driver that matches your Sentinel
System security key. The following illustration shows the installation window
with the parallel-port key driver selected.
A-23
A
The following illustration shows the installation window with the USB-key
driver selected.
Caution
USB Security Key Damage
Before you install Sentinel System security key drivers you must
remove all Sentinel USB keys from the PC. If you install a system
driver with a USB key in the port, the key may become unusable.
15
A-24
Make sure you have removed all USB keys from the PC. Click Install to
proceed with the driver installation.
CinePlex
16
When the Sentinel driver installation completes, the following window opens.
Click Finish to complete the driver installation.
17
When the Sentinel System Driver - InstallShield Wizard closes, the
Installation Complete screen is visible. Click Finish to complete the
CinePlex software installation.
To install the Sentinel hardware key
1
Plexon provides two types of hardware keys with the CinePlex System: a
Universal Serial Bus (USB) key and parallel-port key. Either key is marked
with “CPX” to indicate that it is a CinePlex System key. If you purchased the
tracking option, the key is marked with “CPX-T.” Determine which ports are
available on your computer and choose the appropriate key.
2
If you have chosen a USB key, locate an available USB port on your computer
and insert the USB key.
– or –
If you have chosen a parallel-port key, locate an available parallel port on your
computer and continue with Step 3.
Note:
Version 2.0
If your computer has only one parallel port, you can temporarily
remove parallel-port devices like printers or Zip drives to connect the
key. After installing the key, you can reconnect these devices to the
parallel port on the key.
3
Insert the key into the computer parallel port. Tighten the mounting screws.
4
Reconnect any other parallel-port devices to the key.
Note:
If you are connecting a printer to your computer through a Sentinel
key, Sentinel recommends using shielded printer cables.
Note:
More than one parallel-port key can be attached to the same parallel
port. SentinelSuperPro* keys, which are provided with Plexon software, can be cascaded (one key connected to another key in a
series) with other Rainbow Technologies keys that support cascading. If you use cascaded keys, the SentinelSuperPro key must be the
last key in the series, that is, the one located farthest from the computer port.
A-25
A
A.6.2 Installing CinePlex System by Web Update
To install CinePlex System by the Web Update
A-26
1
Open the Help menu in CinePlex Markup.
2
Select Web Update. The Update Wizard displays.
3
Click Next. Follow the instructions to check for updates for the CinePlex
software. If there is an error, you will be notified. You will also be notified if
your software is already up-to-date. Otherwise, the software upgrade will be
downloaded and automatically executed.
CinePlex
A.6.3 Installing CinePlex System Manually from the Plexon Website
To install CinePlex System manually from the Plexon website
Version 2.0
1
Ensure that CinePlex Capture and CinePlex Markup are NOT running.
2
Open your web browser and go to http://www.plexoninc.com/support/
softwaredownloads.html. Click the link marked Download: CinePlex
Version x.y where x.y is the latest software version number.
3
After the software installs, there will be a folder called CaptureUpdate with a
path of c:\Program Files\Plexon Inc\CinePlex\CaptureUpdate.
4
Navigate to the CaptureUpdate folder and open it.
5
Double-click on InstallUpdate.bat.
6
The install/update screen will open while the software is being updated. Do
not close the window -- it will close automatically.
7
The Driver Installation Wizard will open. Click Next.
8
You may see a warning window as shown below. Click Continue Anyway.
A-27
A
9
A-28
When the final screen of the Driver Installation Wizard appears. Click
Finish. Some additional files will be installed and the script window will close.
CinePlex Capture should start automatically.
CinePlex
A.7 Licensing
After you have installed the Sentinel hardware key, it requires no additional attention. However, CinePlex Markup contains facilities for examining the licensing
status of the CinePlex System and other Plexon products, and for performing
remote upgrades to unlock additional features, or product licenses. Use the following procedure to check Plexon licenses.
Opening the License Management Window
1
From the Help menu, click About CinePlex Markup, and select Licensing to
bring up the Plexon License Management window.
Note:
2
Note:
Version 2.0
In the main text area, the window contains a summary of the licensing
status of the hardware key or keys. If CinePlex Markup cannot read a
hardware key, an explanation appears in the window. If CinePlex
Markup can read a hardware key, it interrogates it and displays the
information from it. The Key Serial Number, Customer ID, and Key
Number identify a particular key. You must provide this information to
Plexon to unlock additional Plexon products. The Products Licensed
section tells you which Plexon products are currently unlocked by the
hardware key.
Click Test the Key Again to re-interrogate the key and re-display the
information. The Unlock Additional Program and Features section applies
to remote upgrades. If a remote upgrade applies, Plexon provides instructions
on how to use this feature.
Multiple Plexon hardware keys can be installed on your computer. CinePlex
Markup can find and use a license on any of the keys attached to your computer. If Plexon software detects multiple Plexon keys on your computer, additional Next Key>> and <<Previous Key buttons appear in the license window.
You can use these buttons to step through the keys to individually examine
each key.
A-29
A
A.8 CinePlex System Technical Support and Updates
A.8.1 CinePlex System Technical Support
You can get help with the CinePlex System via e-mail at [email protected].
A.8.2 CinePlex System Updates
You can download the latest version of the CinePlex System from the Plexon
website. CPXv1Setup.exe is the standard CinePlex setup program. To install the
latest version of CinePlex, follow the procedure in “Installing CinePlex System
Manually from the Plexon Website” on page A-27.
A.8.3 Web Updates
If you have installed a previous version of the CinePlex System, from the Help
menu, click Web Update to automatically check for updates at the Plexon web
site, and to download and install them. For more information, see “Installing
CinePlex System by Web Update” on page A-26.
A.8.4 Demo Mode
If you have not connected a valid Plexon hardware key to the computer, CinePlex
Markup runs in Demo Mode. CinePlex Markup opens a startup message box to
inform you that it is running in Demo mode. Plexon provides all CinePlex
Markup features in Demo mode, except the file saving functionality.
A-30
CinePlex
Plexon Inc
Appendix B
Problem Resolution
B.1 Typical Problems and Solutions............................................. B-2
B.2 CinePlex Capture Error Messages ........................................ B-4
CinePlex
B-1
B
B.1 Typical Problems and Solutions
This section includes a list of typical problems with remedies for each one.
The red LED on the MAP input board does not come on when CinePlex
Capture is operating
1
Check the Plexon digital-input cable between the rear panel of the CinePlex
Capture computer and the DSP board on the MAP. Make sure the cable is not
damaged. Check the connectors on each end to make sure they are seated
correctly.
2
Turn the MAP off. Remove the input cables from the DSP board. Remove the
DSP board. Verify that the DSP board is correctly configured for Mode 3
operation as described in the Digital Input Board on DSP Module data sheet.
Verify that all jumpers are in place. Re-seat the DSP board and reconnect the
cables.
3
Turn the MAP on. Push and hold the power button to turn the CinePlex
Capture computer off. Turn the CinePlex Capture computer on.
4
If the red LED does not come on after completing these steps, contact Plexon
for assistance.
The red LED is on, but strobed events do not appear in Sort Client
1
At the PC, start Sort Client. Connect to Server and start data transfer. On the
View menu, click Settings Window.
2
In the Settings window, click the Events tab.
3
On the Events tab, in the Name column, locate the channel named Strobed.
In the Show column, click to select the check box for the Strobed channel.
The following dialog appears when you try to run CinePlex Capture:
B-2
1
If the following CinePlex Capture dialog box appears after you start CinePlex
Capture, read the instructions in the box. Verify the camera connections as
detailed in the steps that follow.
2
Check the 1394 cable between the camera and the CinePlex Capture
computer. Make sure the cable is undamaged. Make sure you connect the
cable to the “In” port on the camera. Do not connect the cable to the
“DaisyChain” port on the camera.
3
Make sure the camera is the same camera that Plexon shipped with your
CinePlex Capture computer. CinePlex cameras and computers are uniquely
calibrated to each another and they are not interchangeable.
CinePlex
The video preview display is black
1
Set the manual iris control on the camera by twisting middle ring (iris) on the
camera lens from closed to open.
2
From the File menu, click Set Defaults.
The video preview display is out of focus
1
Set the zoom and the focus controls on the camera by twisting the outer and
inner rings on the camera lens until you get a clear picture in the Video
window.
2
On CS mount cameras, ensure that the C to CS adaptor ring is not installed
between the lens and the camera.
Excessive DFC counts
1
Stop running all unnecessary applications on the PC while recording. This
includes CinePlex Markup, which has file intensive activity. Use the Task
Manager to display and end unneeded tasks.
2
Disable tasks such as backup and Windows Update. These can cause DFC
increments when they run. Use the Task Scheduler to vie all scheduled tasks.
3
Place the CinePlex System PC on a subnet isolated from intensive internet
traffic.
4
If you are still encountering the problem, please contact Plexon Support.
For details on DFC counts, see “Status Information” on page 3-92 and/or
“Delayed and Dropped Frames” on page 2-32.
Version 2.0
B-3
B
B.2 CinePlex Capture Error Messages
The windows below show all of the CinePlex Capture system error messages.
B-4
CinePlex
Version 2.0
B-5
B
If error message C899 is displayed, you may also need to perform the following
troubleshooting procedure:
B-6
1
Open the Start menu.
2
Open the Control Panel.
3
Open Scanners and Cameras.
4
If the Generic 1394 Desktop Camera icon is not present, check all the
appropriate hardware and cables, reconnect, and repeat steps 1-3. Call
CinePlex
Plexon Support if the Generic 1394 Desktop Camera icon does not appear.
Otherwise, continue to step 5.
Version 2.0
5
Open the Windows Explorer window and navigate to C:\Program
Files\Plexon Inc\CinePlex\CaptureUpdate.
6
Double-click the drvInstaller.exe file to start the Driver Installation wizard. If
the wizard finds the camera, the screen below is displayed. Otherwise, you
will not be permitted to continue until you connect the camera.
B-7
B
B-8
7
Click Next.
8
Click Finish. If the CinePlex system still does not recognize the camera, call
Plexon Support to resolve the problem.
CinePlex
Version 2.0
B-9
B
B-10
CinePlex
Plexon Inc
Appendix C
Setting Up Your Experiment
C.1 Guidelines..............................................................................C-2
CinePlex
C-1
C
C.1 Guidelines
This section covers application guidelines for the following items:
•
Field of View
•
Colors
•
Visibility
C.1.1 Field of View
The field of view (maze, cage, tec.) of the camera depends on the distance
between the camera and the surface and the angle of view of the lens that is used
with the camera. The camera supplied by Plexon generates screen images that are
4 units wide by 3 units high as shown by the diagram below. This aspect ratio
corresponds to the image size of 640 by 480 pixels. Orient the camera to the
experimental arena to take maximum advantage of the rectangular field of view.
As shown in the following illustration, the 4:3 ratio corresponds to a horizontal
dimension (H) that is 1.33 times the vertical dimension (V).
When the camera is placed above the maze, it has a horizontal angle of view and
a different vertical angle of view because of the aspect ratio described above. The
table below shows the horizontal and vertical angles of view that correspond with
C-2
CinePlex
maximum and minimum zoom of the camera, using the normally supplied lens.
Other lenses will differ.
Table C-1 Angles of View
α
Maximum zoom
(minimum angles)
Minimum zoom
(maximum angles)
Horizontal
35.9 degrees
91 degrees
Vertical
26.9 degrees
66.6 degrees
The best way to avoid optical distortions is to install the camera above the maze
as high as possible and choose the angles for mazimum zoom. If the maze has a
round or square shape, use the Vertical - Maximum zoom angle (or 26.9 degrees).
Figure C-1 shows the setup for a square or round maze.
Figure C-1
Field of View Estimation (Maze Size)
The formula to calculate the length (l) of the square (or the diameter of the circle)
will be:
α
l = 2h ⎛ tan ---⎞
⎝
2⎠
where h = the height of the camera over the maze, and α = 26.9 degrees, for the
normal lens.
Version 2.0
C-3
If the maze has a rectangular shape, then l will be the longest side of the rectangular maze and α will be 35.9 degrees (using this value for the angle will ensure that
the entire length of a long maze is included in the field of view).
C.1.2 Colors
To achieve the best tracking accuracy, you must choose colors that contrast at
maximum intensity. For example, if the target animal is white, choose black or
another dark color for the arena floor. Likewise, if the target is dark-colored,
choose a bright white or other light color for the floor. Use floor materials with
solid colors. Avoid floor materials with patterns or textures.
C.1.3 Visibility
Unless otherwise required, the design of the arena should ensure that the target is
completely visible to the camera in all areas. If the target is partially obscured by
overhangs or other obstacles, the centroid calculations that determine target position and orientation can be affected.
Version 2.0
C-4
Plexon Inc
Appendix D
Plexon User Interface
D.1 Plexon User Interface ............................................................D-2
D.2 Screen Elements ...................................................................D-3
D.3 Standard Menu Items and Dialogs....................................... D-11
D.4 Customization ......................................................................D-19
CinePlex
D-1
D
D.1 Plexon User Interface
The Plexon User Interface embodies a standard look-and-feel for Plexon software products. To illustrate the underlying concepts behind the look-and-feel, this
appendix uses screenshots from Plexon’s CinePlex Markup and CinePlex Caputre applications. Although there will be differences in menus and toolbars
between different applications, how you use, handle, and operate the user interface components will be fundamentally the same across future generations of
Plexon’s software products. The will include:
•
CinePlex Capture
•
CinePlex Markup
•
Plexus
•
Offline Sorter
This appendix covers common functionality of the look-and-feel between different Plexon software applications. The discussion includes the following sections:
D-2
•
Screen Elements
•
Standard Menu Items and Dialogs
•
Customization
CinePlex
D.2 Screen Elements
D.2.1 Menus
The menu bar of the application contains the names of all of the menus for the
application. Each menu name has a letter underlined which indicates the hot-key
combination for that menu. To activate a particular menu you may click the left
mouse button on the name or press and hold the ALT key while pressing the
underlined letter. The illustration below is the main menu of CinePlex Markup.
Each menu of the Plexon User Interface contain menu commands and may also
contain Icons, Hot Keys and a Tear-off Menu Handle as shown by the illustration
below of the Edit menu of CinePlex Markup.
Icons
Menu Commands
Tear-off Handle
Hot Key
While all Plexon applications are shipped with their available menu commands
organized into a set of menus, the contents of the menus can be customized and
new menus can be created.
•
Version 2.0
Icons - Icons may be located immediately to the left of the menu commands.
These icons will be displayed on the toolbar associated with the menu. In the
D-3
D
example menu, there are icons associated with all but the last three of the
menu commands. The presence of an icon next to a menu command means
that the icon is also a label on a toolbar button and will execute the same command when clicked as the menu command on the menu.
D-4
•
Hot Keys - Hot Keys are key combinations that will cause a menu command
to execute without having to click the command on the menu. Typically, hot
keys will contain two keys that must be pressed simultaneously for the combination to execute. The area at the far right of the menu commands may display the hot key combinations for the menu commands. In the example menu,
there is a hot key combination (CTRL + C) for the Copy command. Hot keys
may be added or customized via the Tools-Customize dialog.
•
Tear-off Menu Handle - The Tear-off Menu Handle is an area (the one
containing the dots) at the top of the menu, present on many menus. The tearoff feature allows the quick creation of a toolbar that contains all of the commands in the menu that have command icons. You may hover the mouse over
the tool to highlight it, drag the mouse to the toolbar area and place the menu
as a toolbar there. The illustrations below show highlighting the Tear-off
Menu Handle to begin dragging the toolbar, dragging the toolbar across the
screen, and finally docking the toolbar in place.
CinePlex
D.2.2 Toolbars
Each toolbar has a dropdown button at the right that will allow you to add or
remove buttons from toolbars and will also allow you to access the Customize
dialog box. When you click the dropdown button the Add or Remove Buttons
dropdown menu will appear as shown below.
You will see that the dropdown menu also has a dropdown button. If you click
that button you will see a menu list of the available toolbars and a menu command to allow access to the Customize dialog box.
Expanding one of the toolbar menus will display all of the available toolbar buttons for that particular toolbar and a checkbox beside each one that will indicate
whether or not the button is visible on the toolbar. There is also an option to reset
the toolbar back to its factory default setting.
Version 2.0
D-5
D
Clicking the Customize menu command will open the Customize dialog box.
This dialog box is common to Plexon software applications but may have different content on the tabs according to the software application.
For details on using the Customize dialog box, see “Customization” on
page D-19
D.2.3 Windows
The illustration below shows a typical window title bar. It contains (from left to
right) a Title, a Auto Hide button, a Maximize button, and a Close button.
D-6
•
Auto Hide Button
- The Auto Hide button “pins” a window to the
screen to keep it visible or “rolls up” a visible window into a tab. When the
window is pinned, the Auto Hide button points in a vertical direction. If the
window is rolled up, the Auto Hide button points in a horizontal direction.
•
Maximize Button
- The Maximize button may not appear on all windows. It is the standard Windows maximize button. Clicking the Maximize
button on a window will maximize the original window and hide other windows occupying the same horizontal or vertical space. Clicking the Maximize button again will restore the previous layout. When clicked the image
on the button toggles between one window and overlapping windows.
CinePlex
•
Close Button
- The Close button closes the window.
Plexon software applications often display several windows simultaneously.
These windows may be resized by using standard resizing methods, and you may
also reposition windows by dragging and dropping and by using Docking Stickers. The illustration below shows the repositioning of a window (denoted by the
blue transparent rectangle) and various Docking Stickers (with red circles
around them). These Docking Stickers allow you to dock the window being
moved in one of several ways described below.
You may position a window by floating it, docking it at the desired docking
sticker at a window edge or in a tab.
•
Floating a Window - You may drag a window by the Caption Bar near the
center of the screen and release it causing the window to float. Holding down
the CTRL key while dragging will always float the window. Double-clicking
on the Caption Bar will also float a window. Note that the size and position
of the floating window is remembered.
—
Version 2.0
Rolled-up Windows - Floating windows may be enabled for roll up up
by pressing the Auto Hide button. The window will roll up when the
focus is changed to a different window. The first illustration below
shows a floating window before rolling it up. The second illustration
below shows the rolled-up window after the focus has changed.
D-7
D
D-8
•
Docking a Window at the Application Frame - When you begin to drag
a window, a transparent blue rectangle appears to indicate the position of the
window and the four Docking Stickers appear individually at each edge of
the application frame to allow you to dock the window to the respective edge.
To dock just move the mouse to the desired Docking Sticker and release the
mouse button. The docked window will extend along the entire length of the
edge to which it is docked. The illustration below shows all four screen Docking Stickers.
•
Docking a Window at a Window Edge - When you move the window
inside another window, the window Docking Stickers appear inside the window grouped together near the center of the window. Releasing the mouse
button while it is over one of these stickers (except the center one) will dock
the moving window to the respective edge of the window associated with the
window Docking Stickers. The illustration below shows the window Docking Stickers. Note that the shading of these Docking Stickers is different that
the shading of the Docking Stickers in the previous illustration.
•
Placing Windows into Tabs - Releasing the mouse button over the center
Docking Sticker will allow the moving window to occupy the same space as
the window beneath and will create tabs along the bottom for switching the
view between the two windows. The illustration below shows the Marker
Occurrences window without sidebar tabs on the left. On the right, a Channels window has been placed into the same space by using the center docking
sticker. Note that there are two sidebar tabs at the bottom of the window.
CinePlex
—
Version 2.0
Hidden Windows - Docked windows that you do not need to access
often can be hidden or “rolled up” by pressing the Auto Hide button.
When hidden, the window is represented by a sidebar tab. Sidebar tabs
may be located at the left, right, or bottom of the screen and indicate
hidden windows. To show one of these windows, just hover the mouse
over one of the tabs and the window will appear. The File Info window
of CinePlex Markup opened by the sidebar tab is shown below on the
left. If you click the Auto Hide control, the window will be pinned and
D-9
D
remain open after you move the mouse away from the sidebar tab as
shown on the right. The Auto Hide button will also have changed
direction and be pointed downward. Note also that the File Info sidebar
tab is gone on the right illustration.
D-10
CinePlex
D.3 Standard Menu Items and Dialogs
In Plexon software applications, some menu items may have the same functionality across several applications. These items are standard menu items and consist
of the Window menu, the Run menu, and the Help menu.
D.3.1 Window Menu
The Window menu contains three items: Theme, Layout, and Customize.
•
•
Version 2.0
Theme - Clicking on Theme displays a menu as shown below. A theme is a
color scheme that is part of the look-and-feel of the user interface.
—
Theme Group - The top group of items are theme toggle items that
may be selected to apply to the user interface look-and-feel. Only one
of the themes may be selected at a time.
—
Text Below Toolbar Icons - This item is a toggle item to show or not
show text below the toolbar icons.
—
Hide Window Title Bars - This item is a toggle item to hide or show
window title bars.
Layout - Clicking on Layout displays a menu as shown below. A layout is
the size and placement of the windows on the screen. It also remembers the
number and placement of toolbars.
D-11
D
•
—
Reset to Default Layout - Clicking on this item resets the layout to the
factory default.
—
Load Layout Group - Clicking on Apply Layout 1 or Apply Layout
2 applies one of the standard layouts to the user interface. Clicking on
Load Layout From File will allow you to select a layout file to apply
to the user interface.
—
Save Layout Group - Clicking on Save As Layout 1 or Save As Layout 2 saves the current screen layout as one of the two standard layouts.
You may also click Save Layout to File to save the current screen layout to a file that can be loaded by the Load Layout From File item.
Customize - Clicking Customize displays the Customize dialog box as
shown below
For details on using the Customize dialog box, see “Customization” on
page D-19.
D-12
CinePlex
D.3.2 Run Menu
The purpose of the Run menu is to launch other applications quickly. The Run
menu will be populated by default with some common Plexon applications. If
you wish to be able to launch other applications from within the current application, you can add new entries to the Run menu. A sample Run menu is shown
below. For additional information about customizing the Run menu, see “Run
Menu Customization” on page D-22.
D.3.3 Help Menu
The Help menu contains four items: Help, Quick Reference, Web Update, and
About XXXXX where XXXXX is the name of the application.
Version 2.0
•
Help - Clicking Help displays the User’s Guide for the application.
•
Quick Reference - Quick Reference may be missing in some applications.
When present, clicking Quick Reference displays a dialog box similar to the
one shown below. The purpose of the Quick Reference dialog box is to show
keys and mouse buttons that control some of the commonly used functions in
various views. You may print it by clicking Print or close it by clicking OK.
D-13
D
—
D-14
Print – Click Print to print a copy of the Quick Reference.
•
Web Update - This item allows you to update your software via the internet.
Clicking Web Update will first check to see if an update is available. If an
update is available, it will be downloaded and installed.
•
About - Clicking the About item displays the About dialog box. The text of
the About item varies according to the application. The About dialog contains the version number and build data of the application, links to the Plexon
website and support e-mail, and buttons for Licensing, System Report, and
Manage File Extensions.
CinePlex
—
—
Version 2.0
Licensing - Clicking the Licensing button displays the Plexon License
Management dialog box. The Plexon License Management window
includes the complete licensing information for Plexon products. The
window includes the following three areas: information, key testing,
and code entry.
–
The information area includes information on license keys and a list
of all the Plexon products and their licensed status on this PC.
–
If you have moved or added a key, the Test the Key Again button
provides a convenient tool to test license keys to ensure they function correctly.
–
If you have more than one key installed, the Next Key>> and
<<Prev Key buttons appear. You may use these buttons to cycle
through and test all keys.
–
The code entry area is used to enter the unlock codes for optional
programs and features. If you have purchased optional items,
instructions for entering codes and testing keys are included with
Plexon installation programs.
System Report - The purpose of the System Report button is to help
Plexon Support diagnose problems by listing system information.
Clicking the System Report button will first display a dialog box to
D-15
D
allow you to display the system report on the monitor or save the report
to a file that can be sent via E-mail to Plexon Support.
–
—
D-16
After selecting a choice, clicking OK will launch the standard
Microsoft System Information tool. The illustration below shows
the System Information report displayed on the monitor.
Manage File Extensions - Clicking the Manage File Extensions
button opens the Manage File Associations dialog box. The Manage
File Associations dialog box allows you to review and select which file
types are associated with Plexon software applications. For example,
when the .plx file type is associated with Offline Sorter, double-clicking on a .plx file will open Offline Sorter and load that .plx file. If you
have not installed some of the applications, their file extension radio
buttons will be disabled.
CinePlex
D.3.4 Messages Window
The Messages window displays a log of timestamps and associated application
events that Plexon Support can use for troubleshooting purposes.
Note:
The Messages window is not available for all applications.
Right-clicking the mouse in the Messages window will display a right-click
menu with the following items:
Version 2.0
•
Erase - This item clears the window of all messages
•
Pause - This item stops the logging of messages
•
Show Debug Messages - This item is a toggle to show or hide debug
messages
•
Select and Copy All - This item allows you to copy all of the messages to
another application - such as a word processor
•
Save Log to File - This item allows you to save the messages to a log file.
•
Mail Log to Plexon - This item allows you to send the message log to
Plexon for troubleshooting purposes
D-17
D
D.3.5 Right-click Menus
Most windows have right-click menus that control their behavior and options. To
open a right-click menu, place the cursor inside a window and click and release
the right mouse button. The right-click menu appears where you click. To select a
menu item, move the cursor over it and click the left mouse button.
D.3.6 Current Selections
In grid-based windows, the currently selected item always appears with a >> or
> in the left column of the appropriate grid-based window.
D.3.7 . Undo
Plexon applications provide multiple undo levels. To undo an operation, on the
Edit menu, click Undo or click the Undo button on the toolbar. You can undo
operations that change the contents of the project file, but you cannot undo operations that change the user interface options or colors.
D-18
CinePlex
D.4 Customization
Although the menus and toolbars offer a rich set of commands and functions that
should meet the needs of most Plexon customers, the Customize dialog box also
allows you to customize several areas of the interface should the need ever arise.
This section describes the uses of the Customize dialog box.
To open the Customize dialog box, from the Tools menu, select Customize. The
Customize dialog box contains several tabs. The illustrations below show the
Customize dialog box from CinePlex Markup and displays five tabs - Toolbars, Commands, Keyboard, Run Menu, and Options. Although the content of
the tabs will vary according to the application, the functional operation of each
tab is respectively the same across all Plexon software applications.
D.4.1 Toolbars Customization
An illustration of the Toolbars tab follows:
Version 2.0
•
Toolbars - This box contains a list of the toolbars for the application. Click a
toolbar checkbox to have it appear in the main application window.
•
New - This button opens the New Toolbar dialog box. You can use this feature to create a custom toolbar for commands you frequently use. Enter a toolbar name in the Toolbar name box.
•
Rename - If you have selected a toolbar that you previously defined, click
Rename to change the name of the toolbar. The Rename Toolbar dialog box
displays.
•
Delete - If you have defined a new toolbar and selected it, you can click
Delete to remove that toolbar. There are no default values for new toolbars
D-19
D
you define. You cannot delete the standard toolbars. A confirmation dialog
box displays.
•
Reset - If you have selected a standard toolbar, click Reset to restore the
toolbar to its default contents. If you have dragged new buttons to a toolbar,
click Reset to restore the default version of the toolbar. A confirmation dialog
box displays.
D.4.2 Commands Customization
The Commands tab is used to customize which commands are available in toolbars. An illustration of the Commands tab follows:
•
Categories - This is a list of all the toolbar categories. Select a toolbar category to see the buttons in the Commands area.
•
Commands - This area shows all the buttons and the associated menu commands that belong to the category you select. You can select the command
you want and drag it to the toolbar.
D.4.3 Keyboard Customization
The Keyboard tab allows you to bind keystrokes to commands. An illustration of
the Keyboard tab follows:
D-20
CinePlex
Version 2.0
•
Category - This is a list of all the main menu headings. Select a menu heading to category to see the associated commands in the Commands area.
•
Commands - This is a list of all the commands associated with the selected
main menu heading in the Category area.
•
Key assignments - This displays the current key assignment for the command selected in the Commands area.
•
Press new shortcut key - This allows you to enter a shortcut key combination for the command selected in the Commands area.
•
Description - This area displays a description of the currently selected command in the Commands area.
•
Assign - This button assigns the shortcut in the Press New Shortcut Key
area to the selected command in the Commands area. If the shortcut key is
already assigned to another command, a confirmation dialog box displays to
allow or cancel the reassignment.
•
Remove - This button removes the selected shortcut key in the Key Assignments area from the selected command in the Commands area.
•
Reset All - This button removes all custom key assignments. A confirmation
dialog box displays to allow or cancel the operation.
D-21
D
Procedure for Customizing Keystroke Shortcuts
1
From the Window menu, select Customize, and then click the Keyboard tab
of the Customize dialog box.
2
Choose a category from the Category dropdown and from the Commands
list, select the command that you want to bind to a keystroke shortcut.
3
If there is already a key assignment listed in the Key assignments area, you
may remove it by clicking the Remove button if you wish. You may also just
reassign a new key combination to the selected command. (See Step 5)
4
Click the mouse in the Press new shortcut key area.
5
Click the CTRL or ALT key and hold it down while clicking another key. The
dual key combination will be displayed in the Press new shortcut key area.
This combination will be the key assignment for the selected command.
6
Click the Assign button to assign the key combination to the selected
command. If there already is a key assignment for the command, a
confirmation box will display to allow you to confirm or cancel the
reassignment.
Note:
In CinePlex Markup do not bind menu operations to keystrokes that
are associated with markers. Use only CTRL- or ALT- key combinations to bind to menu items, as these key combinations cannot be
associated with markers.
D.4.4 Run Menu Customization
The Run Menu tab allows you to manage menu items on the Run Menu. An
illustration of the Run Menu tab follows:
•
D-22
Menu contents - This is a list of all the menu items in the Run Menu.
Select an item to see its characteristics in the Command, Arguments, and
Initial Directory areas.
CinePlex
•
Buttons - The toolbar buttons allow you to add a new menu item, delete a
selected menu item, move the selected menu item upward in the list, and
move the selected menu item downward in the list.
•
Command - This area contains the name of the file that runs when the menu
item is selected from the Run Menu. The browse button opens the standard
Open dialog box filtered for executable files.
•
Arguments - This is a list of all the arguments to be passed to the file in the
Command area, if any. The browse button opens the standard Open dialog
box filtered for all files. When applicable, the symbol “%1” can be used to
denote the current document.
•
Initial Directory - This contains the path of the file in the Command area.
The path allows the system to find the file and execute it. The Browse button
opens the standard Browse For Folder dialog box.
Procedure for Customizing the Run Menu
1
From the Window menu, select Customize, and click the Run Menu tab.
2
To add a menu item, click the New icon, enter the command in the Command
text box, enter any arguments in the Arguments text box, and set the
applications directory in the Initial Directory text box. In each case you may
use the appropriate Browse button at the right of the text box. The Browse
button for the command opens the standard File Open dialog box filtered for
executable files. The Browse button for the arguments opens the standard
File Open dialog box filtered for all files. Then Browse button for the initial
directory opens the Browse for Folder dialog box.
3
To delete a menu item, select it and click the Delete button.
4
To reorder the menu items, select a menu item and use the Up and/or Down
arrow buttons to reorder.
D.4.5 Options Customization
An illustration of the Options tab follows:
Version 2.0
D-23
D
D-24
•
Personalized Menus and Toolbars - This area contains two check boxes
and a button. The application will hide infrequently used menu items, but you
may customize the display of menu items using these two checkboxes. If you
check the Always show full menus checkbox, the application will always
show full menus and the Show full menus after a short delay checkbox will
be disabled. If you do not check the Always show full menus checkbox, you
will have the option of checking or clearing the Show full menus after a
short delay checkbox. The Reset menu and toolbar usage data button will
allow you to delete the record of commands you have used in the application
and restore the default set of visible commands to the menus and toolbars. A
confirmation dialog displays.
•
Other - This area contains three checkboxes and a dropdown list. If you
check the Large icons checkbox, the application will use large icons on the
toolbar. If you check the Show Screentips on toolbars checkbox you will
also have the option of checking the Show shortcut keys in Screen Tips
checkbox. The Menu animations dropdown list allows you to select the type
of animation to be used on menus that have animation.
CinePlex
Plexon Inc
Appendix E
Interfacing CinePlex Capture to External
Equipment
E.1 Overview ................................................................................ E-2
E.2 Signal and Data Interface Description ................................... E-3
E.3 Signals and Data for External Equipment .............................. E-6
E.4 Signals and Data for the MAP Application ........................... E-10
E.5 Signals and Data for the Recorder Application .................... E-11
E.6 Data Interpretation ............................................................... E-12
CinePlex
E-1
E
E.1 Overview
CinePlex Capture uses the following signal categories to interface with external
equipment like the Plexon MAP and Recorder systems, or any other equipment
you provide:
•
clock
•
remote control
•
remote status
•
digital data
The clock signals synchronize time between CinePlex Capture and the external
equipment. CinePlex Capture can receive or transmit clock signals.
CinePlex Capture can respond to remote control signals from external equipment
to start and stop video recording and to pause and resume a video recording.
When CinePlex Capture starts a recording, it resets the timestamps to zero and
creates an .avi file in which to store the video. When CinePlex Capture stops
recording, it closes the video file. While you pause video recording, CinePlex
Capture discards the digitized video and does not save it to the video file, but
timestamps continue to increment.
Note:
CinePlex Capture resets timestamps only when a video is started. The time
stamp of the first video frame is normally not 0 (zero), but a timestamp within
one frame interval of time 0. Pausing and resuming a video has no affect on the
generation of the timestamps.
CinePlex Capture supplies remote status signals to inform external equipment
when a recording has been started, stopped, paused, or resumed. You can use
these signals to control external equipment from CinePlex Capture—especially
equipment that does supply remote control signals.
CinePlex Capture outputs digital data to the external equipment as it processes
each video frame from the camera. The digital data consists of tracking coordinates and motion measure values.
E-2
CinePlex
E.2 Signal and Data Interface Description
The following illustration shows the available signals and signal directions
through the interface between CinePlex Capture and external equipment:
All communication to and from CinePlex Capture and external equipment flows
through a single 37-pin D-Sub connector on the back of the CinePlex Capture
computer. The following illustration shows the connector pin numbers.
The following table lists the descriptions of the signals carried on each pin:
Table 1: Pinout Descriptions
Version 2.0
Pin
Signal
I/O
7
ClockIn
Input
13
ClockOut
Output
Description
Clocking Scheme
To operate, the CinePlex Capture computer must receive a 1 kHz
clock signal on this pin.
CinePlex Capture generates a 1 kHz free running clock signal. This
clock signal can be used by external equipment and looped back to
ClockIn for synchronization.
E-3
E
8
Record
Input
9
Pause
Input
4
Recording
Output
5
Paused
Output
22
Strobe
Output
23
Data 14
Output
24
Data 13
Output
25
Data 12
Output
26
Data 11
Output
27
Data 10
Output
28
Data 9
Output
29
Data 8
Output
30
Data 7
Output
31
Data 6
Output
32
Data 5
Output
33
Data 4
Output
34
Data 3
Output
35
Data 2
Output
36
Data 1
Output
37
Data 0
Output
Remote Control Signals
External equipment can use this signal to command CinePlex Capture
to start and stop recording. CinePlex Capture, when armed by the user,
starts recording when this signal transitions from low to high and
stops recording when this signal transitions from high to low. The
clock resets to 0 (zero) when recording starts.
External equipment can command CinePlex Capture to pause an
active recording using this signal. When recording, CinePlex Capture
pauses the recording when this signal transitions from low to high and
resumes recording when this signal transitions from high to low. The
clock continues to increment when you pause CinePlex Capture.
Remote Status Signals
External equipment can use this signal to determine when CinePlex
Capture starts and stops a recording. CinePlex Capture transitions this
signal from low to high when a recording starts (by the user or remote)
and transitions this signal from high to low when recording stops and/
or pauses (depending on the CinePlex Capture Configuration setting).
External equipment can use this signal to determine when CinePlex
Capture pauses and resumes a recording. CinePlex Capture transitions
this signal from low to high when a recording is paused (either by the
user or remotely) and transitions this signal from high to low when the
recording is resumed.
Digital Data
This is the data strobe for the digital data (Data 14 through Data 0).
External equipment can use the positive edge (low to high transition)
of this signal to latch the digital data from CinePlex Capture.
This signal is the most significant bit (MSB) of the tracker data and it
is always held high.
These four signals (Data 13 through Data 10) define the type of digital
data sent on signals Data 9 through Data 0.
"
"
"
These 10 signals (Data 9 through Data 0) define a digital data value
from 0 to 1023. This data value is defined by the Data 13 through
Data 10 signals.
"
"
"
"
"
"
"
"
"
Ground Signals
1,19,21
Note:
E-4
Ground
All other pins must be left unconnected.
CinePlex
E.2.1 Electrical Specifications:
Digital Inputs (TTL Compatible):
•
Logic High: 2.0 to 5.0 VDC
•
Input Load (High): 20 µA
•
Logic Low: -0.5 to 0.8 VDC
•
Input Load (Low): -200 µA
Digital Outputs:
Version 2.0
•
Logic High: minimum voltage 2.5 VDC, source 15 mA
•
Logic Low: maximum voltage 0.5 VDC, sink 24 mA
E-5
E
E.3 Signals and Data for External Equipment
This section includes general descriptions of the clock, control, and data signals
for use with external equipment. For specific information on the MAP application, see “Signals and Data for the MAP Application” on page E-10. For specific
information on the Recorder application, see “Signals and Data for the Recorder
Application” on page E-11.
E.3.1 Clock Signals
The ClockIn and ClockOut signals synchronize time between CinePlex Capture
and the external equipment. For CinePlex Capture to operate with external equipment, it must receive a 1KHz clock at the ClockIn pin. If the external equipment
cannot generate a clock signal, you can use the CinePlex Capture 1 KHz clock
signal on the ClockOut pin; loop this signal through the external equipment and
back to the ClockIn pin for synchronization.
E.3.2 Remote Control Signals
Record and Pause are remote control input signals to CinePlex Capture. External
equipment can use the Record and Pause signals to make CinePlex Capture start,
stop, pause, and resume recording. The following table lists the action for each
signal transition:
Pin
Signal
Action
Record
Low to High
Record
Record
High to Low
Stop
Pause
Low to High
Pause
Pause
High to Low
Resume
A timing diagram of the signals follows:
Note:
E-6
If Pause is high when Record goes from low to high, timestamps go to 0 (zero)
and recording pauses.
CinePlex
E.3.3 Remote Status Signals
The Recording and Paused signals are output signals from CinePlex Capture.
These signals allow external equipment to determine when CinePlex Capture
starts, stops, pauses, or resumes a video recording. The following table lists the
action for each signal transition when the CinePlex Capture Configuration is set
to ‘Plexon MAP’:
Pin
Signal
Action
Recording
Low to High
Starts
Recording
High to Low
Stops
Paused
Low to High
Paused
Paused
High to Low
Resumed
The following table lists the action when the CinePlex Capture Configuration is
set to ‘Other’:
Pin
Signal
Action
Recording
Low to High
Starts, Resumed
Recording
High to Low
Paused
E.3.4 Digital Data Signals
CinePlex Capture uses the Strobe signal and 15 data-line (Data 14 to Data 0) signals to send digital data to external equipment; see Table 1 on page E-3. Data 14
is always held high to indicate this is a tracking word. Data 13 through Data 10
determine the data type, and Data 9 through Data 0 represent the data value. All
data values represent the immediately preceding video frame.
The number of digital words sent by CinePlex Capture to the external equipment
depends on the tracking mode. When CinePlex Capture is tracking coutours, it
sends two data words. The first word is the x-coordinate of the center of gravity
(cg) of the target and the second word is the y-coordinate. If you enable the
motion measure option (see “Motion Measure” on page E-12), CinePlex Capture
Version 2.0
E-7
E
sends a third motion data word. The description of the data types for each digital
data value follow:
Data 13 to 10
Data 9 to 0
0000
Contour CG X
0001
Contour CG Y
0100
Motion Measure
When CinePlex Capture is tracking LEDs or reflective color targets, it sends two
data words for each color it tracks; it can track up to three colors. The first word is
the x-coordinate and the second word is the y-coordinate for a given color. The
description of the data types for each digital data value follow:
Data 13 to 10
Data to 9 to 0
0101
Color 1 X
0110
Color 1 Y
0111
Color 2 X
1000
Color 2 Y
1001
Color 3 X
1010
Color 3 Y
As illustrated in the following timing diagram, external equipment can use the
positive edge of the Strobe signal to latch each digital data word:
E-8
CinePlex
E.3.5 Universal Capture Cable
Plexon supplies a universal cable for use with other external equipment. The
cable is finished with a 37-pin connector on the Cineplex Capture computer end,
and bare tinned wires on the external equipment end. A chart of the pin numbers
and wire color codes follows:
Version 2.0
E-9
E
E.4 Signals and Data for the MAP Application
The following illustration shows the available signals and signal directions
through the interface between CinePlex Capture and a Plexon MAP system:
Clock
ClockIn
CinePlex
Capture
Remote Control
Record
Plexon
MAP
System
Pause
Digital Data
Strobe
Data [14:0]
If you purchased CinePlex for a MAP system application, Plexon includes a capture cable configured for the MAP system with the appropriate connectors on
each end. With the MAP application, you control CinePlex Capture with remote
control commands from the MAP system Sort Client software. The timing (TIM)
board on the MAP provides a 1 kHz clock signal to the CinePlex Capture computer.
CinePlex Capture sends position data back to the MAP system, which records it
along with the neural data and other experimental signals into a .plx file using the
MAP-system Sort Client data acquisition software. You can combine the .plx file
containing the neural and tracking data with the video .avi file in a CinePlex
Markup project file; for more information, see “Synchronizing .avi Files with
Neural Data Files” on page 2-35 and “Understanding CinePlex Markup Files” on
page 4-104.
E-10
CinePlex
E.5 Signals and Data for the Recorder Application
The following illustration shows the available signals and signal directions
through the interface between CinePlex Capture and Plexon Recorder:
Clock
ClockIn
CinePlex
Capture
Remote Control
Record
Plexon
Recorder
Pause
If you purchased CinePlex for a Recorder application, Plexon includes a capture
cable configured for Recorder with the appropriate connectors on each end. With
the Recorder application, you control CinePlex Capture directly from the
Recorder software with remote status commands. The clock on the NI DAQ
board in the Recorder PC provides a 1 kHz clock signal to the CinePlex Capture
computer.
CinePlex Capture records position data in DVT format to the internal hard drive.
Recorder records neural data to a .plx file. You can combine the .plx file containing the neural data with the tracking .dvt file and the video .avi file in a CinePlex
Markup project file; for more information, see “Synchronizing .avi Files with
Neural Data Files” on page 2-35 and “Understanding CinePlex Markup Files” on
page 4-104.
Version 2.0
E-11
E
E.6 Data Interpretation
There are two experimental values to interpret for VideoTracker data types: the
position of the target animal and the Motion Measure that indicates freezing
behavior.
E.6.1 Target Positions
X and Y coordinates represent the target positions. The origin is the lower-left
corner of the video frame. X is the horizontal distance from the origin. Y is the
vertical distance from the origin. Both X and Y have 10-bit dynamic ranges.
Because the camera aspect ratio is 4:3, the maximum possible value for X is 1023
and for Y it is 1023 X ¾ = 767.
When no target is present, CinePlex Capture reports the target position as X = 0
Y = 0. This occurs when the contrast between a target and its background is
insufficient to determine the target position, or when a target is not present. CinePlex Markup position data for position 0, 0 is invalid.
E.6.2 Motion Measure
Motion Measure is an optional measurement that can indicate animal “freezing”
in fear conditioning experiments; for more information see “Motion Measure
Option” on page 2-57. CinePlex Capture calculates and reports Motion Measure
data separately from the X and Y target positions.
Motion Measure values range from 1 to 1023. A value of 1023 indicates that the
target moved so quickly that no pixels were in common with the previous frame.
A value of 1 indicates that the frames were literally identical. A value of 0 indicates that the Motion Measure could not be computed.
E-12
CinePlex
Plexon Inc
Appendix F
Installation on a Dedicated Computer
F.1 Before You Begin.................................................................... F-2
F.2 Installing CinePlex Capture Hardware.................................... F-3
F.3 Plexon MAP System Installation............................................. F-4
F.4 Plexon Recorder Installation................................................. F-12
F.5 Stand Alone and Other Equipment Installations ................... F-18
F.6 Installing and Upgrading CinePlex System Software ........... F-23
F.7 Installing PCLinq2 Software and Hardware .......................... F-37
F.8 Converting from FAT32 to NTFS .......................................... F-40
F.9 Licensing .............................................................................. F-44
F.10 CinePlex System Technical Support and Updates ............. F-45
CinePlex
F-1
F
F.1 Before You Begin
This appendix is for a dedicated CinePlex Capture workstation, e.g., a shuttle or
small Dell system. For installation on the latest computers, see Appendix A:
Installation
Before you can begin the installation, you need the following items:
•
The following Plexon CinePlex Capture system hardware items:
—
CinePlex Capture Processor Unit with pre-installed software
—
Video camera
—
Lens
—
Mouse
—
Monitor
—
Software keys (2 keys—one each for CinePlex Capture and Markup)
—
Connecting cables:
—
F-2
–
AC power cable for the processor unit
–
Monitor cable
–
FireWire camera cable—includes camera power cable
–
CinePlex Capture cable from the Capture processor unit to the
MAP, Recorder, or other equipment
–
USB-USB Link cable
If you have the Recorder version of CinePlex Capture, it includes a
modified Plexon breakout box (PBOB), a modified SCB-68 breakout
box, or a C-HUB.
•
Camera mounting equipment to suit your experimental environment: CinePlex Capture cameras have standard 1/4-20 UNC tripod mounting sockets.
•
A suitable arena for your experiment
CinePlex
F.2 Installing CinePlex Capture Hardware
There are different installation procedures for each CinePlex Capture hardware
application as follows:
1
MAP: For the Plexon Multi-channel Acquisition Processor (MAP) system
application, see “Plexon MAP System Installation” on page F-4.
2
Recorder: For the Plexon Recorder with National Instruments data acquisition (NI DAQ) device application, see “Plexon Recorder Installation” on
page F-12.
3
Other: For the stand alone and other equipment applications, see “Stand
Alone and Other Equipment Installations” on page F-18.
Note:
Version 1.2
If plan to use CinePlex Capture only to record digital video and tracking data,
without neural data, you can set up CinePlex Capture to run in stand-alone
mode.
F-3
F
F.3 Plexon MAP System Installation
Before you begin, you must have Plexon RASPUTIN MAP Control software
Version 2.3.1, or a later version, which must be installed and operational. If you
have an earlier version of RASPUTIN, update to the latest version; for update
instructions, see the Plexon RASPUTIN User’s Guide.
Refer to Figure F-1, which shows the cable connections between CinePlex Capture and the Plexon MAP system. The assembly procedure for the MAP system
follows Figure F-1.
F-4
CinePlex
Figure F-1
CinePlex Capture Cable Connections for the MAP
9-pin
D-Sub
Version 1.2
F-5
F
Installing CinePlex Capture system hardware for the MAP
1
At the CinePlex Capture processor unit, connect the AC power cord. Connect
the unit to an AC power source. Leave the CinePlex Capture processor unit
turned off.
2
Connect the monitor and the mouse to the connections on the rear panel of
the processor unit.
3
At the MAP, the Digital Input board on the MAP digital signal processing
(DSP) board must be set to Mode 3. If you purchased the CinePlex System
along with a MAP system, Plexon has already configured the DSP board
correctly. Otherwise, remove the DSP board from the MAP chassis. On the
DSP board, locate the DIO3 sub-board. Refer to the following illustration and
locate jumpers W1 through W7.
Set the jumper configurations as follows:
Event
High True
15-bit Word
Mode 3 (+)
F-6
W1
W5
W2
S P
S P
W7
+5V GND
W6
+5V GND
CinePlex
Strobe Polarity
Positive
Note:
Version 1.2
W4
- ST +
Busy Signal Polarity
W3
Positive
For complete information on DSP board, refer to the Digital Input
Board on DSP Module data sheet, which you can download from the
Plexon website at http://www.plexoninc.com/pdf/DigitalInput.pdf.
4
The external clock signal on the timing (TIM) board must be set to 1 kHz. If
you purchased the CinePlex System along with a MAP system, Plexon has
already configured the TIM board correctly. Otherwise, remove the TIM board
from the MAP chassis and set the DIVCLK jumper to 1 kHz as the following
illustration shows:
5
At the MAP, you must make three cable connections:
•
First, connect the small connector on the end of CinePlex Capture cable
to the lower digital-input port on the face of the MAP DSP board. The following illustration shows a typical connector installation.
•
Second, connect the larger connector to the port on the face of the TIM
board.
•
Third, connect the small yellow wire to XS1 BNC connector on the TIM
board
F-7
F
The following illustration shows the three connectors installed on the MAP.
6
If your MAP system includes a National Instruments data acquisition (NI DAQ)
A/D subsystem for continuous analog recording, connect the 9-pin D-Sub
connector on the CinePlex Capture cable to a NI DAQ interface, either a
PBOB or an SCB-68.
Note:
If your MAP system does not include a NI DAQ A/D subsystem, the
CinePlex Capture cable does not have a 9-pin D-Sub connector.
The following illustrations show connections to the TIM connector on a PBOB
and to the 9-pin connector on the front panel of an SCB-68.
F-8
CinePlex
Note:
Version 1.2
If you are adding the CinePlex System to an existing MAP system
with a NI DAQ A/D subsystem, the CinePlex Capture cable replaces
the existing cable from the MAP TIM card to the NI DAQ interface.
7
At the CinePlex Capture processor unit, connect the CinePlex Capture cable
to the rear data port, as shown in the following illustration.
8
If you have external digital event data, you can use the second connector on
the DSP card in the MAP to record the event data.
9
Assemble the camera and the lens. Refer to the manufacturer instruction
sheets enclosed with the lens and the camera.
F-9
F
10
At the CinePlex Capture processor unit, connect one end of the IEEE 1394
cable (FireWire*) to a “1394” port on the back panel of the CinePlex Capture
processor unit.
11
At the video camera, connect the other end of the IEEE 1394 cable to the
leftmost camera connector labelled “In”. Do not use the “DaisyChain” port.
The IEEE 1394 cable provides power to the camera.
Note:
F-10
Do not interchange cameras with another processor. Each camera is
individually calibrated to its CinePlex Capture processor unit.
12
Install a Plexon license key labelled “CPX” or “CPX-T” as follows. If the key is
a parallel-port key, install it on the rear panel of the available CinePlex
Capture processor unit. If the key is a USB key, install it in any USB port. For
more information on license keys, see “To install the Sentinel hardware key”
on page F-28.
13
Turn the PC on. Turn the MAP on. Turn the CinePlex Capture processor unit
on.
14
At the CinePlex Capture processor unit, on the Tools menu, click
Configuration.
CinePlex
The Configuration dialog box opens.
In the External Equipment box, select Plexon MAP. Click OK to close the
dialog box.
Version 1.2
15
Adjust the camera lens to ensure an image displays on the monitor. If an
image does not appear, see the video tips under “Typical Problems and
Solutions” on page B-2.
16
You have completed the CinePlex Capture hardware installation for the MAP
application. To install CinePlex System software, see “Installing and
Upgrading CinePlex System Software” on page F-23.
F-11
F
F.4 Plexon Recorder Installation
Before you begin the Plexon Recorder installation, verify that you have Plexon
Recorder 2.2.3 or a later version, with a National Instruments data acquisition
(NI DAQ) device; for a complete list of approved NI DAQ devices, see the
Plexon Recorder User’s Guide.
Refer to Figure F-2, which shows the cable connections between CinePlex Capture and a Plexon Recorder with an SCB-68 breakout box. The installation for
Plexon Recorder with a Plexon breakout box (PBOB) is similar. The assembly
procedure for the Plexon Recorder system follows Figure F-2.
F-12
CinePlex
Figure F-2
CinePlex Capture SCB-68 Cable Connections for Recorder
Version 1.2
F-13
F
Installing CinePlex Capture system hardware for Recorder
F-14
1
At the CinePlex Capture processor unit, connect the AC power cord. Connect
the unit to an AC power source. Leave the CinePlex Capture processor unit
turned off.
2
Connect the monitor and the mouse to the connections on the rear panel of
the processor unit.
3
If the system includes a PBOB, on bottom of the circuit board, set the jumper
to PAUSE/REC as shown in the following illustration.
CinePlex
4
Connect one end of the CinePlex Capture cable to the VTG connector on the
PBOB, or to the CinePlex connector on the SCB-68 break out box.
The following illustrations show connections to a PBOB and an SCB-68.
Note:
Version 1.2
Plexon modifies the internal connections of the CinePlex SCB-68 to
work with the CinePlex system. You can reset the connections in the
CinePlex SCB-68 to the standard SCB-68 configuration; for instructions, contact Plexon.
5
Connect the remaining cables to the Plexon Recorder system as detailed in
the installation appendix of the Plexon Recorder User’s Guide.
6
At the CinePlex Capture processor unit, connect the CinePlex Capture cable
to the rear data port, as shown in the following illustration.
F-15
F
7
Assemble the camera and the lens. Refer to the manufacturer instruction
sheets enclosed with the lens and the camera.
8
At the CinePlex Capture processor unit, connect one end of the IEEE 1394
cable (FireWire*) to the “1394” ports on the back panel of the CinePlex
Capture processor unit.
9
At the video camera, connect the other end of the IEEE 1394 cable to the
leftmost camera connector labelled “In”. Do not use the “DaisyChain” port.
The IEEE 1394 cable provides power to the camera.
Note:
10
F-16
Do not interchange cameras with another processor. Each camera is
individually calibrated to its CinePlex Capture processor unit.
Install a Plexon license key labelled “CPX” or “CPX-T” as follows. If the key is
a parallel-port key, install it on the rear panel of the CinePlex Capture
CinePlex
processor unit. If the key is a USB key, install it in any USB port. For more
information on license keys, see “To install the Sentinel hardware key” on
page F-28.
11
Turn the Recorder PC on. Turn the CinePlex Capture processor unit on.
12
At the CinePlex Capture processor unit, on the Tools menu, click
Configuration.
The Configuration dialog box opens.
In the External Equipment box, select the choice that corresponds to your
equipment. Click OK to close the dialog box.
Version 1.2
13
Adjust the camera lens to ensure an image displays on the monitor. If an
image does not appear, see the video tips under “Typical Problems and
Solutions” on page B-2.
14
You have completed the CinePlex Capture hardware installation for the
Recorder application. To install CinePlex software, see “Installing and
Upgrading CinePlex System Software” on page F-23.
F-17
F
F.5 Stand Alone and Other Equipment Installations
You can use CinePlex Capture as a stand alone unit to record video and tracking
data. You can also use CinePlex Capture with other external equipment you supply, which you have set up to receive data and provide the clock and control signals as detailed in Appendix E: Interfacing CinePlex Capture to External
Equipment .
If you use CinePlex Capture as a stand-alone device, you do not need the CinePlex Capture cable. Refer to Figure F-3, which shows the cable connections
between CinePlex Capture and customer-supplied other equipment. The assembly procedure for stand alone and other equipment follows Figure F-3.
F-18
CinePlex
Figure F-3
CinePlex Capture Cable Connections for other Equipment
Version 1.2
F-19
F
Installing CinePlex Capture for stand-alone use or with other equipment
1
At the CinePlex Capture processor unit, connect the AC power cord. Connect
the unit to an AC power source. Leave the CinePlex Capture processor unit
turned off.
2
Connect the monitor and the mouse to the connections on the rear panel of
the processor unit.
3
If you are using other equipment, set up and connect the unfinished (tinned
bare wires) ends of the CinePlex Capture cable to your equipment. For
complete information on cable connections, seeAppendix E: Interfacing
CinePlex Capture to External Equipment .
If you are using CinePlex Capture as a stand-alone device just to record video
and tracking data, you do not require the CinePlex Capture cable. Go to
Step 5.
4
F-20
At the CinePlex Capture processor unit, connect the CinePlex Capture cable
to the rear data port, as shown in the following illustration.
CinePlex
5
Assemble the camera and the lens. Refer to the manufacturer instruction
sheets enclosed with the lens and the camera.
6
At the CinePlex Capture processor unit, connect one end of the IEEE 1394
cable (FireWire*) to the “1394” ports on the back panel of the CinePlex
Capture processor unit.
7
At the video camera, connect the other end of the IEEE 1394 cable to the
leftmost camera connector labelled “In”. Do not use the “DaisyChain” port.
The IEEE 1394 cable provides power to the camera.
Note:
8
Version 1.2
Do not interchange cameras with another processor. Each camera is
individually calibrated to its CinePlex Capture processor unit.
Install a Plexon license key labelled “CPX” or “CPX-T” as follows. If the key is
a parallel-port key, install it on the rear panel of the CinePlex Capture
F-21
F
processor unit. If the key is a USB key, install it in any USB port. For more
information on license keys, see “To install the Sentinel hardware key” on
page F-28.
9
If you are using other equipment, turn the equipment on. Turn the CinePlex
Capture processor unit on.
10
At the CinePlex Capture processor unit, on the Tools menu, click
Configuration.
The Configuration dialog box opens.
In the External Equipment box, select Plexon Recorder 2.2 or earlier. Click
OK to close the dialog box. The setting of this dropdown determines the operational characteristics of the ‘recording’ remote status signal. When the External Equipment dropdown is set to ‘Plexon MAP’, the ‘recording’ remote status
signal is high when CinePlex Capture is recording and low when recording
has stopped. When the External Equipment dropdown is set to ‘Other’, the
‘recording’ remote status signal is high when CinePlex Capture is recording
and low when recording has paused. See Appendix E: Remote Status
Signals
F-22
11
Adjust the camera lens to ensure an image displays on the monitor. If an
image does not appear, see the video tips under “Typical Problems and
Solutions” on page B-2.
12
You have completed the CinePlex Capture hardware installation for standalone or other-equipment applications. To install CinePlex software, see
“Installing and Upgrading CinePlex System Software” on page F-23.
CinePlex
F.6 Installing and Upgrading CinePlex System Software
The CinePlex system consists of CinePlex Capture, which is a hardware-based
system with pre-installed software, and CinePlex Markup, which is a software
program that can run on a separate computer. If you purchased a Plexon MAP
system along with your CinePlex system, Plexon normally pre-installs the CinePlex Markup software on the MAP computer. To activate the software you must
install the license key; Plexon suggests you install the key in a USB port on the
rear panel of the computer. For information on installing license keys, see “To
install the Sentinel hardware key” on page F-28.
The overall process for installing or upgrading CinePlex software is depicted in
the flowchart and described below.
Version 1.2
F-23
F
1
When embarking on this process, you must establish if CinePlex Markup is
already installed on the target computer. If CinePlex Markup has already been
installed, then go to step 3. If not, then go to step 2).
2
To install CinePlex Markup from the CD, then follow the procedures in
Appendix F: Installing CinePlex System from the CD . If not, go to step 3.
3
If you wish to install CinePlex Markup automatically from the web, follow the
procedure in Appendix F: Installing CinePlex System by Web Update . If you
wish to install CinePlex Markup manually from the Plexon website, follow the
procedure in Appendix F: Installing CinePlex System Manually from the
Plexon Website .
4
Update the CinePlex Capture files by following the procedure in Appendix F:
Updating CinePlex Capture Files . Note that this step is performed ONLY if
you are installing CinePlex Markup from the Web.
F.6.1 Installing CinePlex System from the CD
If you are installing CinePlex System on a different PC, continue with the installation procedure that follows. The software consists of a CD and software license
keys.
There are three steps to installing the CinePlex System:
1
Install the CinePlex System files from the CD and run the setup program.
2
Install and configure the Rainbow Sentinel system drivers.
3
Install the Sentinel hardware key.
To install CinePlex files
F-24
1
Close all applications before you begin installing CinePlex.
2
Place the CinePlex System setup CD in your computer's CD-ROM drive.
3
Find the CPXv1Setup.exe file on the CD.
4
Double-click CPXv1Setup.exe.
5
When the Welcome screen appears, follow the on-screen instructions. Click
Next to acknowledge your acceptance of the copyright warning and to
proceed with installation.
6
Review the information in the Read Me File window. If you choose to cancel
the installation and you click Cancel, the following Install dialog box opens.
CinePlex
Version 1.2
7
In the Choose Destination Location window, you can specify a location for
the CinePlex files. Click Browse to choose a location. Otherwise, click Next
to accept the default location.
8
If you are upgrading from CinePlex Version 1.0, in the Backup Replaced
Files dialog box, click Yes to create backup copies of the Version 1 software.
Make sure Version 2 is working correctly before you delete the backup copies.
Click Next to continue the installation.
9
In the Select Program Manager Group window, you can choose a program
group for the CinePlex icons. To accept the default group and proceed with
the installation, click Next.
10
At the Start Installation window, if you need to return to the previous window
to change information, click Back. Otherwise, click Next to begin the
CinePlex installation.
11
The Installing window includes progress bars that tell you when the
installation is complete.
F-25
F
F-26
12
When the CinePlex System installation process is complete, the Sentinel
System Driver - InstallShield Wizard welcome window opens. Click Next to
proceed with driver installation.
13
In the Program Maintenance window, click Modify and then click Next to
continue the installation.
CinePlex
14
In the Custom Setup window, click the driver that matches your Sentinel
System security key. The following illustration shows the installation window
with the parallel-port key driver selected.
The following illustration shows the installation window with the USB-key
driver selected.
Caution
USB Security Key Damage
Before you install Sentinel System security key drivers you must
remove all Sentinel USB keys from the PC. If you install a system
driver with a USB key in the port, the key may become unusable.
Version 1.2
F-27
F
15
Make sure you have removed all USB keys from the PC. Click Install to
proceed with the driver installation.
16
When the Sentinel driver installation completes, the following window opens.
Click Finish to complete the driver installation.
17
When the Sentinel System Driver - InstallShield Wizard closes, the
Installation Complete screen is visible. Click Finish to complete the
CinePlex software installation.
To install the Sentinel hardware key
F-28
1
Plexon provides two types of hardware keys with the CinePlex System: a
Universal Serial Bus (USB) key and parallel-port key. Either key is marked
with “CPX” to indicate that it is a CinePlex System key. If you purchased the
tracking option, the key is marked with “CPX-T.” Determine which ports are
available on your computer and choose the appropriate key.
2
If you have chosen a USB key, locate an available USB port on your computer
and insert the USB key.
– or –
CinePlex
If you have chosen a parallel-port key, locate an available parallel port on your
computer and continue with Step 3.
Note:
If your computer has only one parallel port, you can temporarily
remove parallel-port devices like printers or Zip drives to connect the
key. After installing the key, you can reconnect these devices to the
parallel port on the key.
3
Insert the key into the computer parallel port. Tighten the mounting screws.
4
Reconnect any other parallel-port devices to the key.
Note:
If you are connecting a printer to your computer through a Sentinel
key, Sentinel recommends using shielded printer cables.
Note:
More than one parallel-port key can be attached to the same parallel
port. SentinelSuperPro* keys, which are provided with Plexon software, can be cascaded (one key connected to another key in a
series) with other Rainbow Technologies keys that support cascading. If you use cascaded keys, the SentinelSuperPro key must be the
last key in the series, that is, the one located farthest from the computer port.
F.6.2 Installing CinePlex System by Web Update
To install CinePlex Markup by the Web Update, follow the procedure below.
Version 1.2
1
Open CinePlex Markup.
2
Open the Help menu.
F-29
F
3
Select Web Update. The Update Wizard displays.
4
Click Next. Follow the instructions to check for updates for the CinePlex
System software. If there is an error, you will be notified. You will also be
notified if your software is already up-to-date. Otherwise, the software
upgrade will be downloaded and automatically executed.
F.6.3 Installing CinePlex System Manually from the Plexon Website
To install CinePlex System manually from the Plexon website, follow the procedure below.
F-30
CinePlex
1
Version 1.2
Open your web browser and go to http://www.plexoninc.com.
F-31
F
2
F-32
Click on the Support link at the left of the screen.
CinePlex
Version 1.2
3
Click on the Software Downloads link just to the right of the Support link.
4
Click on the Download CinePlex Version ... link under the CinePlex
heading.
F-33
F
5
You install the CinePlex System by clicking Run. If you wish to download the
setup file and install it by double-clicking on the file, click Save and you will be
prompted for the file path.
F.6.4 Updating CinePlex Capture Files
When you run the CinePlex System installation program, it installs CinePlex
Markup. You also install the files needed to update CinePlex Capture into a folder
named “CaptureUpdate”, which appears below the main CinePlex System installation directory.
CAUTION
Do Not Run Files for CinePlex Capture
Do not run any of the .exe or .bat files in the CaptureUpdate directory on your computer. These files are intended to be run ONLY on
the CinePlex Capture processor unit, and ONLY as part of the
upgrade procedure that follows.
To upgrade CinePlex Capture, you must copy the “CaptureUpdate” folder onto
the CinePlex USB external hard drive so that you can transfer the files to the
CinePlex Capture processor unit and install them on the processor unit hard drive.
To update the CinePlex Capture files on the CinePlex Capture Processor Unit
using the external hard drive, follow the procedure below.
F-34
1
Connect the USB external hard drive to the computer that contains the
updated CinePlex Capture files. Use Windows Explorer to inspect the
contents of the USB hard drive. If there is a folder on the external hard drive
named CaptureUpdate, delete it.
2
Copy the CaptureUpdate folder from under the CinePlex System install
directory onto the root directory of the USB hard drive. For example, if the
USB hard drive appears as “Drive (E:)”, the folder must be located at
E:\CaptureUpdate.
3
Disconnect the USB hard drive and re-connect it to the CinePlex Capture
processor unit.
4
Turn on the CinePlex Capture processor unit.
5
On the Help menu, click Update. In the confirmation dialog box, click Yes.
This automatically shuts down the CinePlex Capture application, performs the
update, and restarts the CinePlex Capture application. Do not shut down the
CinePlex Capture processor unit until the upgrade procedure finishes and the
CinePlex Capture main window reappears. The update procedure will run the
Driver Installation Wizard. Just follow the instructions as shown on the
CinePlex
screens below. After you click Finish on the third screen, the wizard will
automatically install all of the required files and run CinePlex Capture.
To update the CinePlex Capture files on the CinePlex Capture Processor Unit
using a USB-USB link, follow the procedure below. See “Installing PCLinq2
Software and Hardware” on page F-37 for installing a USB-USB link.
Version 1.2
F-35
F
F-36
1
Open the USB-USB link software on the CinePlex System computer.
Navigate to the folder named Capture Update.
2
Drag the Capture Update folder to a CinePlex Capture Processor Unit folder.
3
On the Help menu, click Update. In the confirmation dialog box, click Yes.
This automatically shuts down the CinePlex Capture application, performs the
update, and restarts the CinePlex Capture application. Do not shut down the
CinePlex Capture processor unit until the upgrade procedure finishes and the
CinePlex Capture main window reappears.
CinePlex
F.7 Installing PCLinq2 Software and Hardware
Plexon supplies and recommends a ComPaq USB-USB link cable with its associated PCLinq software. Other alternatives may not provide satisfactory results. If
you plan to use the USB-USB link for file transfers, follow the instructions below
to install the PCLinq2 software on the analysis machine. The CinePlex Capture
machine will have the software already installed.
CAUTION
Possibility of Dropped Frames During Recording
Do not plug or unplug the USB cable, browse Capture folders, or
perform any file operations during recording because it is probable
that the system will drop frames.
Version 1.2
1
Insert the PCLinq2 disc into the CD drive. The installation will start automaticallyCinePlex. Click Next at the screen below.
2
The software will begin installation and display the following screen.
F-37
F
F-38
3
In a few seconds the final screen will display. Click Finish to complete the
installation.
4
Connect the supplied PCLinq2 cable between the CinePlex Markup computer
and the CinePlex Capture Processor Unit.
5
See the procedure below for information on transferring files with the USBUSB link.
CinePlex
Using a USB-USB link to transfer files
1
Before you use the USB-USB link the first time, you will need to install the
software onto the analysis computer. To perform the installation, see
“Installing PCLinq2 Software and Hardware” on page F-37.
An icon will be created on the desktop as shown below. The background color
will depend on the background of your desktop.
2
Double-click the icon to open the link window.
An icon will be created on the desktop as shown below.
Version 1.2
3
Connect the USB-USB link cable between the analysis machine and the
CinePlex Capture machine. The CinePlex Capture files will appear in the right
pane of the window.
4
Move or copy desired folders or files from the right pane to the left pane by
using the right-click menu or drag and drop as in standard explorer windows.
F-39
F
F.8 Converting from FAT32 to NTFS
If you plan to use the Lacie external hard drive with the NTFS format, you should
follow the procedure below.
Note:
F-40
The NTFS format is required to create files larger than 4 GB.
1
If you already have a Lacie drive, you will wish to confirm that its format is
FAT32 before performing the conversion. Ensure that the Lacie drive is
plugged into your computer.CinePlex.
2
Open My Computer and right-click on the Lacie drive and select Properties.
3
The Properties dialog box will appear. Note the file system format. If it reads
‘NTFS’ already, then you may stop here.
CinePlex
Version 1.2
4
Back up the data on the Lacie drive to another location, and delete all of the
files on the Lacie drive.
5
Open the command prompt by clicking Start and then Run.
6
Type cmd into the text box and click OK.
7
A command prompt window will appear. Assuming that the Lacie drive is
drive “E”, enter the following command (chkdsk e: /f) and click the Enter
key. (If the Lacie drive is a different letter, substitute that letter for “e”. When
prompted “Do you wish to force a dismount on this volume? (Y/N)”, type y
and press Enter. It may take a few minutes to perform the operation. The
resulting window should look something like the picture below.
F-41
F
8
F-42
Type the command convert e:/fs:ntfs and press the Enter key. Substitute the
correct letter for the Lacie drive if it should not be ‘e’. When prompted for the
volume label, type LACIE and press the Enter key. It may take a few minutes
to perform the operation. The resulting window should look something like
the picture below.
CinePlex
9
Version 1.2
When the conversion is finished you will see a windows similar to the picture
below.
F-43
F
F.9 Licensing
After you have installed the Sentinel hardware key, it requires no additional attention. However, CinePlex Markup contains facilities for examining the licensing
status of the CinePlex System and other Plexon products, and for performing
remote upgrades to unlock additional features, or product licenses. Use the following procedure to check Plexon licenses.
Opening the License Management Window
1
From the Help menu, click About CinePlex Markup, and select Licensing to
bring up the Plexon License Management window.
Note:
2
Note:
F-44
In the main text area, the window contains a summary of the licensing
status of the hardware key or keys. If CinePlex Markup cannot read a
hardware key, an explanation appears in the window. If CinePlex
Markup can read a hardware key, it interrogates it and displays the
information from it. The Key Serial Number, Customer ID, and Key
Number identify a particular key. You must provide this information to
Plexon to unlock additional Plexon products. The Products Licensed
section tells you which Plexon products are currently unlocked by the
hardware key.
Click Test the Key Again to re-interrogate the key and re-display the
information. The Unlock Additional Program and Features section applies
to remote upgrades. If a remote upgrade applies, Plexon provides instructions
on how to use this feature.
Multiple Plexon hardware keys can be installed on your computer. CinePlex
Markup can find and use a license on any of the keys attached to your computer. If Plexon software detects multiple Plexon keys on your computer, additional Next Key>> and <<Previous Key buttons appear in the license window.
You can use these buttons to step through the keys to individually examine
each key.
CinePlex
F.10 CinePlex System Technical Support and Updates
F.10.1 CinePlex System Technical Support
You can get help with CinePlex via e-mail at [email protected].
F.10.2 CinePlexSystem Updates
You can download the latest version of the CinePlex System from the Plexon
website. CPXv1Setup.exe is the standard CinePlex setup program. To install the
latest version of CinePlex System, follow the procedure in “Installing CinePlex
System Manually from the Plexon Website” on page F-30.
F.10.3 Web Updates
If you have installed a previous version of the CinePlex System, from the Help
menu, click Web Update to automatically check for updates at the Plexon web
site, and to download and install them. For more information, see “Installing
CinePlex System by Web Update” on page F-29.
F.10.4 Demo Mode
If you have not connected a valid Plexon hardware key to the computer, CinePlex
Markup runs in Demo Mode. CinePlex Markup opens a startup message box to
inform you that it is running in Demo mode. Plexon provides all CinePlex
Markup features in Demo mode, except the file saving functionality.
Version 1.2
F-45
F
F-46
CinePlex
* CinePlex, Plexon, and the Plexon logo are trademarks of Plexon Inc. Microsoft, Windows, Windows NT, Windows 2000, and Windows XP are trademarks of Microsoft Corporation. Sentinel,
SentinelPro, and SentinelSuperPro are trademarks of Rainbow Technologies. NI and NI-DAQ are
trademarks of National Instruments. MATLAB is a trademark of The Math Works, Inc. NeuroExplorer is a trademark of Nex Technologies. FireWire is a trademark of Apple Computer, Inc.
CinePlex
Video Capture, Tracking, and Markup System
User’s Guide
Plexon Inc
6500 Greenville Avenue
Suite 730
Dallas, Texas 75206
Telephone: (214) 369-4957
Fax: (214) 369-1775
www.plexoninc.com
Copyright © 1983-2008 Plexon Inc., All Rights Reserved
Plexon Inc. Proprietary
The information contained herein is the property of Plexon Inc. and
it is proprietary and restricted solely to assist Plexon Inc. customers. Neither this document nor the contents may be disclosed, copied, revealed or used in whole or in part for any other purpose
without the prior written permission of Plexon Inc. This document
must be returned upon request of Plexon Inc.
Information is subject to change without notice. Plexon Inc.
reserves the right to make changes in equipment design or components as progress in engineering or manufacturing may warrant.
Plexon Plexon and CinePlex are registered trademarks of Plexon
Inc. The Plexon logo is a trademark of Plexon Inc.
Document number: 07-01-C-5000
Document issue: 2.0
Document status: Standard
Software Version and Issue: 2.0
Date: February 2008