1
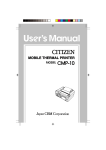
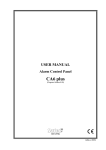
Firmware version 6.11
Alarm Control Panel
QUICK USER GUIDE
The full version of User Manual and other manuals are
available on CD included in the control panel delivery set
or on the website www.satel.eu
SATEL sp. z o.o.
ul. Schuberta 79
80-172 Gdańsk
POLAND
tel. + 48 58 320 94 00
[email protected]
www.satel.eu
ca10_us_en 12/10
We are glad that you have chosen a product offered by us. We wish you satisfaction
with your choice and would like to assure you that we are always ready to provide
expert assistance and information on our products.
Out of concern for the environment, SATEL has decided to reduce its paper
consumption. Instead of comprehensive manuals we offer you a short guide for
control panel users. It contains all the information necessary for daily operation of the
panel. The other manuals are available in electronic form at www.satel.eu
SATEL is a manufacturer of a wide range of dedicated devices for use in security
systems. Additional information on these products can be found on the website
www.satel.eu or at points of sale offering our products.
Hereby, SATEL sp. z o.o., declares that this control panel is in compliance with the
essential requirements and other relevant provisions of Directive 1999/5/EC. The
declaration of conformity may be consulted at www.satel.eu/ce
Read this manual carefully before operating your security system.
Changes, modifications or repairs not authorized by the manufacturer shall void your rights
under the warranty.
IMPORTANT !
The alarm system is not able to prevent a burglary or robbery. Its purpose is to signal
an emergency. The system should be installed by qualified professionals who will
inform you about the rules of using it and ensure its regular maintenance and testing.
We recommend regular testing of the alarm system to ensure that it will react properly
in case of burglary or robbery.
SATEL's goal is to continually improve the quality of its products, which may result in
alterations of their technical specifications and firmware. Current information on the
introduced modifications is available on our website.
Please visit us at:
http://www.satel.eu
1. Keypads description
1.1
LEDs indicating system state
Red
blinking – alarm or alarm memory
Green – the Roman digit corresponds to the partition number
illuminated – partition armed
blinking – exit delay countdown
blinking rapidly [CA-10 KLED-S only] – the partition is currently being handled by
the keypad (information displayed on switching the keypad over to handle another
partition)
Yellow
blinking – trouble or trouble memory (to check the cause of trouble, press and hold
down the 7 key)
Yellow [CA-10 KLED-S only] – illustrates the functioning of the buzzer in the keypad
When using the features available in the control panel, the LEDs can also provide additional
information.
1.2
LEDs indicating zone state [LED keypads]
Numbered LEDs indicate the status of zones (CA-10 KLED – 12 LEDs; CA-10 KLED-S – 16
LEDs):
− LED extinguished – normal zone status,
− LED blinking slowly – zone bypassed,
− LED illuminated – zone violated,
− LED blinking rapidly – alarm memory,
− LED illuminated, briefly extinguishing every 2 seconds – zone tampered,
− LED flashing every 2 seconds – tamper memory.
Note: In the KLED CA-10 keypad, the status of zones indicated by the installer is presented
– the LED numbers do not need to correspond to those of zones.
When using the features available in the control panel, the LEDs can also provide additional
information.
1.3
Display [LCD keypads]
The display provides a range of information, facilitating communication between the alarm
system and the user. The installer determines the display backlight mode and selects
information that is presented on the display when the user does not use the features
available in the keypad.
1.4
Keys
The keys designated with digits and letters enable entering the code and data when using the
keypad.
The key allows you to:
− enter the user menu (after entering the code);
− enter the service mode (after entering the service code);
− exit the submenu and some functions.
2
CA-10
SATEL
The # key allows you to:
− arm/disarm and clear alarm (after entering the code);
− enter the service mode (after entering the service code);
− start the selected function;
− confirm the entered data.
Note: The service mode is not available when there is an alarm or the partition to which the
keypad is assigned is armed.
In the LCD keypads, the arrow keys are available. They allow you to navigate through the
display (to scroll through the displayed messages, functions and options, or to move the
cursor), and also to check:
W - which zones are violated;
X - which zones have triggered alarm;
S - in which partitions there is alarm;
T - to which partitions the keypad is assigned.
Press and hold down selected keys for about 3 seconds to:
1 - switch the keypad over to handle the first partition;
2 - switch the keypad over to handle the second partition;
3 - switch the keypad over to handle the third partition;
4 - switch the keypad over to handle the fourth partition;
5 - view the alarm log;
6 - view the trouble log;
7 - view the current troubles;
8 - enable/disable the CHIME signal in the keypad (signaling violation of selected zones
with 5 short beeps);
9 - change the keypad backlight mode [only in CA-10 KLED-S] – the number of short beeps
indicates which backlight mode is enabled (1 – no backlight; 2 – automatic backlight; 3 –
permanent backlight);
0 - trigger the auxiliary alarm;
- trigger the fire alarm;
# - trigger the panic alarm;
T - switch the display over to zone status presentation mode and back.
1.5
Sound signaling
Beeps generated during operation
1 short beep – pressing any number key.
3 short beeps – to signal:
− arming;
− disarming and/or alarm clearing;
− deactivating the 13. BI SWITCH type output by means of user functions;
− starting the function when you press and hold down a key on the keypad.
4 short beeps and 1 long beep – to signal:
− entering the service function menu;
− activating the 12. MONO SWITCH or 13. BI SWITCH type output by means of user
functions;
− terminating a function which is started by pressing and holding down a key on the
keypad;
SATEL
CA-10
3
− finishing the function and exiting the user menu, after confirming the entered data;
− writing data to the control panel by means of the DLOAD10 program.
2 long beeps – an unknown code, unavailable function, or exiting the function without
confirmation of the data entered (after using key).
3 long beeps – refusal to arm (some zones are violated or battery failure).
Events signaled by sounds
1 short beep every 3 seconds – to signal:
− service mode;
− entry delay countdown.
2 short beeps every 3 seconds – trouble (the sound signaling of trouble will stop after
viewing the current troubles).
5 short beeps – zone violation (CHIME).
1 long beep every second – fire alarm.
1 long beep every 3 seconds – exit delay countdown.
5 long beeps – zone violation:
− the 4. DAY/NIGHT type, when the partition is disarmed;
− the counter type (triggers alarm after a preset number of violations), when the partition
is armed.
Continuous beep – alarm.
Notes:
• Only installer selected events are signaled.
• Alarms will be signaled as long as programmed by the installer.
2. Codes and users
To perform many of the CA-10 control panel functions you must enter a code. By default, the
following codes are preprogrammed in the control panel:
master (administrator) code for partition 1: 1234
master (administrator) code for partition 2: 2345
master (administrator) code for partition 3: 3456
master (administrator) code for partition 4: 4567
service code: 12345
The master user (administrator) can add new users. For security reasons, each user should
have their individual code. The master user defines an authority level for each user. The
functions to which the user has access depend on the authority level. For description of the
authority levels please refer to the full user manual. The master user can create up to 12
users in each partition. Up to 28 users can be created in all partitions.
Note: The installer determines whether the code will enable you to operate all partitions
(global code) or just the partitions zones to which the code is assigned.
The service code enables access to the service functions, but does not allow everyday
operation of the control panel (using this code you will not be able to arm or disarm the
system).
3. Operating several partitions with the keypad
The CA-10 control panel enables the system to be subdivided into partitions. The keypad is
always assigned to one of them, thus making it possible to operate the partition (arm/disarm,
4
CA-10
SATEL
bypass zones, etc.). The installer may allow several partitions being operated with a single
keypad. To switch the keypad over to handle another partition, press and hold down the key
corresponding to the number of that partition (1, 2, 3 or 4). For the LCD keypad which has
been switched over to handle another partition, it is possible to switch it over again to handle
still another one. For the LED keypad, you can only press and hold down the
key to go
back to operate the partition the keypad is assigned to. Irrespective of the keypad type, you
will be automatically brought back to the partition to which the keypad is assigned after 15
seconds of idle time.
4. Partition arming
A partition can only be armed from the keypad assigned to the partition or switched over to
handle it (see: OPERATING SEVERAL PARTITIONS WITH A KEYPAD).
Prior to arming, make sure that there are no violated zones (e.g. open windows or doors),
which may prevent the system from arming (if the system has been so configured by the
installer).
After arming, the exit delay countdown may be running, which allows you to leave the
premises without triggering alarm (the zones will be armed only when the exit delay
countdown is finished).
If, during the exit delay countdown, the control panel will not register leaving the premises
(the zone monitoring the exit route will not be violated), the selected zones can be
automatically bypassed, thus enabling you to stay in the protected premises. The installer
shall define which zones are to be bypassed in such a case.
4.1
Full arming
Enter the code and confirm using # key.
Note: The user having the authority 7 can only activate partial armed mode (the installer
selected zones will be bypassed).
4.2
Quick arming
If your installer has enabled the Quick Arm feature, you will be able to arm the system without
using the code. To quickly arm the system, press in turn the 0# keys.
4.3
Arming in silent mode
During the silent armed mode, the alarms from zones are only signaled on the keypad
(however, the installer can program the control panel output so that it can provide information
about alarms being signaled on the keypad). After activating the silent armed mode, the
installer selected zones will be bypassed.
1. Enter the code and confirm using key.
2. Press the 5 key (to start the ARMING SILENT user function).
5. Disarming and alarm clearing
The partition can be disarmed and the alarm cleared only from the keypad assigned to that
partition or switched over to handle it (see: OPERATING SEVERAL PARTITIONS WITH A KEYPAD).
Alarms triggered from the keypad can be cleared from any keypad.
In order to disarm the partition and clear the alarm, enter the code and confirm with the # key.
SATEL
CA-10
5
6. Triggering the alarm from keypad
If your installer has enabled this feature, the alarms can be triggered from the keypad as
follows:
fire alarm – press and hold down the key for approx. 3 seconds;
auxiliary alarm – press and hold down the 0 key for approx. 3 seconds;
panic alarm – press and hold down the # key for approx. 3 seconds.
7. Viewing alarm log
Press and hold down the 5 key for approx. 3 seconds. The way in which the alarm memory is
presented differs, depending on the keypad type.
7.1
LCD keypad
Information on the alarms is presented on the display. Use the S and T keys to scroll
through the list. To get additional information about an alarm, use the W or X key.
7.2
LED keypad
Information on the alarm is presented on the numbered LEDs:
− a single LED is illuminated – alarm from the zone assigned to the LED;
− a single LED is blinking – tamper alarm from the zone assigned to the LED (double EOL
zone wiring);
Note: The installer defines the status of which zones is to be indicated on the LEDs. The
LED numbers do not need to correspond to those of the zones.
− seven out of the eight LEDs designated by numbers 1-8 are illuminated, one of the
LEDs designated by numbers 1-5 and one of the LEDs designated by numbers 9-12 are
blinking – alarm from keypad. Blinking of the LED has the following meaning:
1 – fire alarm triggered from keypad;
2 – panic alarm triggered from keypad;
3 – auxiliary alarm triggered from keypad;
4 – keypad tamper;
5 – three invalid codes entered;
9 – keypad assigned to partition 1;
10 – keypad assigned to partition 2;
11 – keypad assigned to partition 3;
12 – keypad assigned to partition 4.
Information about the last alarm is displayed first. If you press any key (except for )
information about the previous alarm will be displayed. Press the keys repeatedly to scroll
back the alarm log.
8. Viewing trouble log
Press and hold down the 6 key for approx. 3 seconds. The way in which the trouble memory
is presented differs, depending on the keypad type.
8.1
LCD keypad
Information on troubles is presented on the display. Use the S and T keys to scroll through
the list. To get additional information about a trouble, use the W or X key.
6
8.2
CA-10
SATEL
LED keypad
Information on troubles is presented on the numbered LEDs. Steady light of individual LEDs
has the following meanings:
1 – OUT1 trouble;
2 – OUT2 trouble;
3 – OUT3 trouble;
4 – 230 V AC loss;
5 – battery trouble;
6 – no keypad supply;
7 – time not set;
8 – failure of printer connected to RS-232 port of control panel;
9 – no voltage on telephone line;
10 – monitoring trouble;
12 – OUT4 trouble.
Information about the last trouble is displayed first. If you press any key (except for )
information about the previous trouble will be displayed. Press the keys repeatedly to scroll
back through the trouble log.
9. Viewing current troubles
Press and hold down the 7 key for approx. 3 seconds. The way in which the current troubles
are presented differs, depending on the keypad type.
9.1
LCD keypad
Information on troubles is presented on the display. Use the S and T keys to scroll through
the list.
9.2
LED keypad
Information on troubles is presented on the numbered LEDs. Steady light of individual LEDs
has the following meanings:
1 – OUT1 trouble;
2 – OUT2 trouble;
3 – OUT3 trouble;
4 – 230 V AC loss;
5 – battery trouble;
7 – time not set;
8 – failure of printer connected to RS-232 port of control panel;
9 – no voltage on telephone line;
10 – monitoring trouble;
11 – telephone line trouble;
12 – OUT4 trouble.
If a trouble is signaled on the keypad, but no LED designated by a number is lit on running
the function of viewing current troubles, the control panel RAM malfunction has occurred.
10. Using selected user functions
All the user functions are described in the full version of the user manual. Described below
are just a few selected functions.
SATEL
CA-10
7
10.1 Changing your own code
1. Enter the code and confirm using key.
2. Press the 1 key (to start the CHANGE OWN CODE user function).
3. Enter the new code (4 to 6 characters) and confirm with # key.
10.2 Zone bypassing
The partition zones can be only bypassed/unbypassed from the keypad assigned to that
partition or switched over to handle it (see: OPERATING SEVERAL PARTITIONS WITH A KEYPAD).
1. Enter the code and confirm using key.
2. Press the 4 key (to start the BYPASS ZONES user function).
3. The ways of presenting the zone state differ, depending on the keypad type:
− LCD keypad. The zone state is presented in the lower display line:
– the zone is not bypassed,
blinking digit/letter corresponding to the zone number – the zone is bypassed (zone
numbers from 10 to 16 are designated by letters from A to F).
− LED keypad. LEDs with numbers indicate the zone state:
LED extinguished – the zone is not bypassed,
LED blinking – the zone is bypassed.
4. Using the keypad, enter the number of zone which is to be bypassed (if it is not bypassed)
or unbypassed (if it is bypassed). To enter the zone numbers 10-16, press the key first
(instead of digit 1), and then the key corresponding to the second digit. For example, to
enter the zone number 12, press in turn 2.
5. Having selected the zones to be bypassed / unbypassed, press the # key.
Notes:
• For security considerations, the installer can reduce the number of zones that the user is
authorized to bypass.
• Bypassing the zones reduces the level of security. Prior to arming, make sure that there
are no accidentally bypassed zones, which can allow an intruder to gain access to the
protected area, despite the system being armed.
• If a zone is bypassed because of its malfunctioning (e.g. because of detector trouble), call
the service technician immediately to repair the fault.
10.3 Viewing the event log
The event log can be viewed in the LCD type keypad.
1. Enter the code and confirm using key.
2. Using the S or T key, scroll through the menu until the display arrow shows the EVENTS
REVIEW function.
3. Press the # key.
4. Use the S and T keys to scroll through the event log. To get additional information about
an event, use the W or X key.
8
CA-10
SATEL
11. Quick keypad operating instructions
blinking – alarm or alarm memory
illuminated – partition armed
blinking – exit delay countdown
rapidly blinking [only CA-10 KLED-S] – partition is
currently being handled by keypad (information
displayed after the keypad is switched over to
handle another partition)
blinking – trouble or trouble memory
the LED illustrates the functioning of the buzzer in
the keypad
Entering the user menu
[CODE]
Starting the user functions
[CODE] 1 – Change own code
[CODE] 2 – Add user
[CODE] 3 – Erase user
[CODE] 4 – Bypass zones
[CODE] 5 – Arming silent
[CODE] 6 – Set time
[CODE] 7 – MONO outputs activate
[CODE] 8 – BI outputs switch
[CODE] 9 – Supply reset
[CODE] 0 – Telephone DOWNLOADING start
Entering the service mode
[SERVICE CODE]
or
[SERVICE CODE]#
Exiting the service mode
0#
Toggling the LCD display to present the zone
status, and back
press and hold down the T key for approx. 3
seconds
Partition arming
Partition disarming
Alarm clearing
[CODE]#
Quick partition arming
0#
Keypad switchover to handle another partition
press and hold down the key corresponding to the
partition number for approx. 3 seconds:
1 – partition 1
2 – partition 2
3 – partition 3
4 – partition 4
Triggering the alarm from keypad
fire alarm
- press and hold down the key
for approx. 3 seconds
panic alarm
- press and hold down the # key for
approx. 3 seconds
auxiliary alarm - press and hold down the 0 key for
approx. 3 seconds
Viewing alarm log
press and hold down the 5 key for approx. 3 seconds
Viewing trouble log
press and hold down the 6 key for approx. 3 seconds
Viewing current troubles
press and hold down the 7 key for approx. 3 seconds
Enabling/disabling the CHIME signal
press and hold down the 8 key for approx. 3 seconds
Checking which zones are violated
press the W key in LCD keypad
Checking which zones triggered alarm
press the X key in LCD keypad
Checking which partition is alarming
press the S key in LCD keypad
Checking to which partition the keypad is
assigned
press the T key in LCD keypad
SATEL
CA-10
9