1
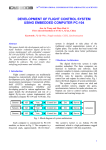
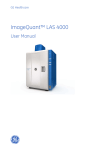
-1-
Manual for INDIGO
Last Revision: December 2001
-2-
1 User Manual
1.1 Introduction
Welcome to INDIGO. Much design and consideration has been put into its construction.
It is designed for use in therapist-supported rehabilitation of acquired brain injury patients.
It is comprised of ten activities, some of which are used for testing the progress of patients
and some of which are used for retraining cognitive abilities.
The files that comprise this program are of different types but all are stored in one folder,
normally “C:\Program Files\INDIGO” but this may vary on individual systems. The
program is normally initiated by either double clicking on the INDIGO icon on the Desktop,
or from the Start Menu. However, it can also be started by double clicking INDIGO.exe
from the INDIGO program folder.
The program uses a game board metaphor and uses the squares on the ‘Board’ as the
launching points for the ten activities. There are also Help, Scores, Exit, and Next Person
squares. The board analogy makes it very easy for the patient to understand how to
initiate each activity and also simplifies navigation. INDIGO allows the user to use either
the keyboard or the mouse to navigate through the program. The Space bar and Enter
are the main keyboard navigation keys. The Space bar cyclically moves the highlighted
focus around the screen.
1.1 Navigating Through INDIGO
1.2.1 Starting the Application
Once the application starts, the user sees an introduction screen with two fields to input
their first and last names. Entries in both fields are required. The mouse can be used to
highlight a required field or button by placing the cursor over it. The Space bar is used to
cyclically move the focus (highlighted area) around the screen, so that any area may be
returned to by repeatedly. Once the user is ready, move the focus to the Go button and
either hit Enter, or left-click the mouse. The INDIGO ‘Game Board’ will load.
1.2.2 Beginning an activity
The activities are initiated using the squares around the ‘Board’. Once again, either the
mouse or the keyboard may be used to select an activity.
When the user chooses an activity, a screen of instructions is displayed. The instructions
are unique for each activity but share the same layout. The instructions include methods
for both keyboard and mouse control. When the patient is ready, selecting the Start
button will go to the next screen, “Options.”
The Options choices are not the same between the activities. Some activities such as:
Number Search, Towers of Hanoi and Memory Challenge, are so intensive that they
involve only one repetition, with no way of increasing this amount. Other activities allow
the therapist or patient to decide how many repetitions to complete. There is no default
repetition that comes up so the patient or therapist must type in a number to continue with
the program. If a necessary input area remains empty the program will not continue on.
At this point the patient has the option of using the Back button to return to the main
‘Board’. This lack of default values is in accordance with feedback from therapists.
SECTION 1
-3-
What is consistent is the general layout of each Option screen, and the Start button,
always the same colour, which is selected once the user has made their choices.
1.2.3 Help Button
The activities are designed to be self-explanatory and very simple, but there is also a Help
button. At any point in the activity the user may hit the Help button to get a screen that is
customized to the current part of the activity. The user reads the help screen and then hits
the Back button to return to the activity. At the bottom of each Help screen is a link, called
‘instructions’, which goes back to the general description of the activity.
If the activity is running (the Go button has been depressed) and the Help button is used,
the activity will continue, including the timing clock. This means that the patient’s recorded
time in the scores will be higher, which is a valid option. Once the patient is familiar with
the activity, there should be less need to use the Help button while the activity is in
progress. Any pauses in the activity allow the patient’s attention to wander.
1.2.4 Scores Button
This button is only active from the ‘Board’ screen. It is a list of the activities completed so
far in the current session, and a set of buttons, one for each activity. The patient or
therapist can see which activities were completed and then click on the appropriate button
to review the score(s). For example, if the patient clicks on the Number Search button, it
will display a list of all the trials that patient made during that session. The only permanent
record of all sessions is in the .csv file that can be found in the Saved Scores folder, a
subfolder located in the INDIGO program folder (accessible using Windows Explorer).
See the section on saving user scores further on.
1.2.5 Keyboard versus Mouse Controls to Complete the Activity
INDIGO is designed so that the patient may use the mouse or the keyboard. For the
majority of activities the expected answer is a letter or a number. The patient may left-click
with the mouse on the appropriate squares, or type in the answer in the answer box,
always located at the bottom of the activity, and then hit Enter. If the patient enters an
inappropriate response, feedback is used to direct them to a valid response.
For the Circle Chase activity the patient must use the mouse to move the inner circle
around the screen. Keyboard controls are only functional for starting and stopping the
activity. In contrast the Missing Number activity requires the patient to type in their answer
using the keyboard.
1.2.6 Exiting an Activity
The patient may abort any activity while at the Options screen.
When the user is engaged in an activity, it was decided that it is preferable to be able to
exit an activity at any point (via the Quit button), to reduce frustration. This is not true for
every activity, however. The exceptions are Missing Number and Reaction Time. Missing
Number cannot be exited once the numbers begin scrolling across the screen; this only
takes a short time period though. If the patient hits the Quit button while the numbers are
scrolling it is ignored. When the scrolling is finished the prompt is displayed. At this point
the patient may exit the activity, skipping the current question. The patient also has an
opportunity to exit between repetitions.
SECTION 1
-4-
A therapist specifically requested that the patient not be able to exit Reaction Time while it
is engaged. This is because of its use in assessing whether a patient is able to drive,
requiring the patient to complete the activity. This activity involves a patient waiting for a
stimulus to occur, and then responding as quickly as possible. If the patient hits any key
on the keyboard or clicks on any button before the stimulus has occurred it is counted as
‘anticipation.’ If for example, the coloured square has not shown up on the screen and the
patient clicks on the Quit button it will be seen as anticipation. Once the stimulus is
present the patient may respond with any keystroke or by left clicking on the screen. If the
patient clicks on the Quit button while the stimulus is presented it is interpreted as a valid
response to the stimulus and the activity continues.
The user must quit an activity and exit back to the ‘Board’ before the program itself can be
terminated.
1.3 The General Instructions for Each Activity
These instructions are the same as the ones that are presented to the patients while
running the INDIGO program so the language used is not formal. After the patient reads
the instructions, a Start button brings the patient to the Options screen.
1.3.1 Logic Sequences
You will see the screen divided into four areas, labeled A, B, C and D. There is also an
orange box in the center. When you are ready, an unfinished sequence will appear in the
central orange box and 4 possible answers in each of the 4 areas. You have to pick which
answer best completes the question or sequence.
Mouse: Left-click on the letter in the corner of the area with the best answer.
Keyboard: Type the letter of the area with the best answer and hit Enter.
1.3.2 Circle Chase
You will see a large circle with a smaller circle inside. When you are ready, left-click on
the inner circle. The larger outer circle will begin to move around on the screen at various
speeds and in random directions. Use the mouse to keep the small circle inside the large
circle.
Mouse: left-click on the inner circle to get started, then just move the mouse around.
Keyboard: the activity cannot be completed with the keyboard. Please use the Quit
button to go back to the main board.
1.3.3 Mirror Image
The screen will be divided in half by a vertical mirror and labeled squares will appear on
each side. When you are ready to start, press GO and various symbols will appear in the
squares. The matching squares on each side will contain the same symbol but in one of
the squares the symbol will be inverted. You must enter the letter of the square that
contains the inverted symbol. You may choose to have 4, 8, 12 or 16 symbols.
Mouse: left-click on the letter of the square that contains the inverted symbol.
Keyboard: type the letter of the square that contains the inverted symbol and hit Enter.
SECTION 1
-5-
1.3.4 Vision Drill
Two vertical bars appear on each side of the screen. When you are ready, the bars will
move towards each other. They will pass each other and continue on to the opposite side
of the screen. It is your job to stop the bars so that they are both in the center of the
screen overlapping each other precisely. You will be able to decide the speed of the bars
before the activity starts.
Start the lines:
Mouse: left-click on the Green button.
Keyboard: Enter key, when Green button lit.
Stop the lines:
Mouse: left-click on the red button.
Keyboard: Enter key if Red button is lit.
1.3.5 Count the Shapes
You will see a grid with squares, triangles and circles spread throughout. The shapes
come in five different colours. You will be asked to count all of one shape, regardless of
the colour. You type your answer in the answer box and then enter.
Mouse: no mouse controls at this time.
Keyboard: type in the number of shapes and hit Enter.
1.3.6 Missing Number
The numbers from zero to nine will scroll across the screen, one number at a time. One
of the numbers will be missing though. You have to watch the numbers and remember
which one did not appear. There are two variations to this game. In the sequential
version the numbers cycle through in proper order, minus the missing number. In the
random version the numbers appear in a scrambled order, but there is still only one
number missing.
Mouse: no mouse controls at this time.
Keyboard: type the missing number in the box at the bottom of the screen and hit Enter.
1.3.7 Number Search
The screen is divided into four areas, with each area labeled either A, B, C or D. Numbers
will be drawn in random order on the screen. You must identify the area in which each
number is located. You pick to have 8, 28 or 40 numbers appear on the screen. You may
choose 3 levels of difficulty.
Mouse: Left-click on the letter of the area.
Keyboard: Type in the letter of the area and then enter.
1.3.8 Reaction Time
This activity will require you to react as quickly as you can to an event. This event can
either be auditory, such as sound, or visual, such as a square on the screen. You get to
decide before the activity starts whether you want the auditory or visual event. The
coloured square will appear in the center of the screen. The sound will be heard as any
other sound.
Mouse: Left-click on the red coloured box to stop the timer.
Keyboard: Hitting any key will stop the stimulus.
SECTION 1
-6-
1.3.9 Towers of Hanoi
This puzzle starts out with three tables, with blocks stacked on table 1. There are two
empty tables. You must move the blocks to table 3 without ever placing a larger block on
top of a smaller one. You move one block at a time. You may use all three tables as
needed.
Mouse: Drag and drop the blocks from one tower to the next.
Keyboard: Type in the number of the starting tower and the number of the tower you want
the block to move to and then hit enter when the green OK button is highlighted.
1.3.10 Memory Challenge
You will see a large box in the center of the screen. A number of smaller boxes will
surround the larger one. In the small boxes letters will appear. Study the letters and when
you are ready to begin press Go. The letters will be replaced by question marks and one
of the letters will appear in the center box. Enter the number of the box where the
matching number hides.
Mouse: Left-click on the box where the matching number hides.
Keyboard: Enter the number of the box and hit Enter.
1.4. Scores
1.4.1 Saving User Scores
When the user is ready to exit the program and the exit button has been used, a prompt is
displayed. The patient may choose to save results or not. If the user answers ‘no’, the
prompt appears once more for confirmation, and then the INDIGO program shuts down. If
the user responds ‘yes’, nothing further needs to be entered. The file is automatically
named with their first and last names as originally entered, with the extension ‘csv’ (ie.
Jane Doe.csv). The file will be stored in a subfolder called Saved Scores within the
original INDIGO folder (usually C:\Program Files\INDIGO\Saved Scores). Most likely only
the therapists should know the location of this file.
If the user has a score file already present in the system, their scores will be added to the
file. Under one activity heading, the different sessions are individually dated. Generally
the patients and therapists jot down the results as each activity is completed but a
permanent back up is available.
Note: If a patient starts up the program and types their name in differently a second file will
be created with the different name.
The files are saved in a format known as Excel Comma Separated files, which can be
opened and read either in Microsoft Excel, Excel Viewer, or as a textfile. The advantage of
having the scores permanently saved in this format is that they are independent of
INDIGO. These files can be opened, read, and printed out by a therapist without having to
be running INDIGO. The files are consistently formatted, and future work will involve
writing software or using a spreadsheet, to derive statistical information relating to a
patient’s improvement over time, or tables of data.
SECTION 1
-7-
If a patient uses different computers each time they use INDIGO, the scores file for that
patient can be moved from one computer to another with a floppy disk. As long as the file
is put into the Saved Scores folder, INDIGO will successfully add new scores to the file.
1.4.2 The Results (and Options) For Each Activity
After an activity is completed, the ‘results’ are displayed. This section came about
because patients did not always understand what the numbers meant. Only the results
that patients had difficulty with are discussed. This section is more useful to therapists or
patients who have attempted an activity and want to know the significance of a score, or
what parameters affect that score. Users should skip this section until gaining some
experience with the different activities.
1.4.2.1 Mirror Image
st
Results displayed are: number of shapes, repetitions, correct 1 answers, average tries,
total time and average time. The numbers of shapes are either 4,8,12 or 16. At the
options section the patient had the choice to only attempt to find the correct object once or
to keep trying until successful. If the patient choose to have only one try at each screen,
st
the text ‘one try’ is displayed instead of a score. The ‘correct 1 answers’ indicates how
many times the patient got the correct answer in one try. The average and total times are
in seconds.
1.4.2.2 Vision Drill
Results displayed are: speed, repetitions, correct, late, average late, early, and average
early. The patient had a choice of three speeds. The patient may have chosen to do zero
repetitions of a particular speed and so only work on one or two speeds. The slowest
repetitions are completed first and then the activity continues on to the next speed without
prompting the patient. The ‘correct’ score is a percentage of how many repetitions at that
speed the patient was able to stop the bars exactly on each other. ‘Late’ is the percentage
of times the bars were stopped after passing each other. ‘Average Late’ is how many
computer cycles it took for the user to stop the bars after the center has been passed; the
average is calculated just within the subset of late responses rather than taken over all the
trials. ‘Early’ results work similarly to ‘Late’ ones.
1.4.2.3 Count the Shapes
Results displayed at the end: repetitions, correct answers, average time, total time and
average difference. The ‘correct answers’ indicates the percentage of repetitions the
patient got absolutely correct (not the percentage of shapes that were found overall). If the
patient does three repetitions and gets the answer correct twice the score will be 67%
even if only one shape was missed. The average difference indicates how many shapes
the patients missed. The average difference is averaged over the repetitions that were not
correct and it doesn’t matter if the patient counts too many or too few shapes. For
example if the patient does three repetitions and two are incorrectly answered, one by one
less shape and one by three more shapes, the average difference will be two.
1.4.2.4 Number Search
Results displayed are: difficulty, numbers displayed, correct first answers, quadrants
chosen in error, quadrants where error occurred, average tries and average duration.
‘Correct first answers’ is a percentage of how many times the patient found the correct
SECTION 1
-8-
quadrant that contained the number on their first try. ‘Quadrants chosen in error’ shows all
four quadrants (A to D) and the number next to each letter is how many times that
quadrant was chosen incorrectly. ‘Quadrants where error occurred’ displays how many
times each quadrant was the target quadrant when an error was made.
2 How To Install INDIGO
2.1 System Requirements
•
•
•
•
Intel Pentium processor or greater
Windows 95, 98, ME, NT4, or 2000
12 MB or more of available RAM
A sound card
Optional:
•
To do further analysis on collected data, Microsoft Excel is recommended.
INDIGO will run without it and data will still be accessible, although the data will
be in a less convenient form if viewed as a text file.
•
A free Excel viewer which will allow you to view but not modify the data files can
be downloaded off the web from:
http://office.microsoft.com/downloads/2000/xlviewer.aspx
2.2 Installation version
There are 2 versions of INDIGO: INDIGO1 and INDIGO2
These may show up as INDIGO1.exe and INDIGO2.exe, depending on the way that
your display is configured. They are the same things.
•
Use INDIGO1 if you have the only account on the computer you are installing on
OR if there is more than one account on the computer, but you only want to
install INDIGO on your account.
•
Use INDIGO2 if there are multiple accounts on the computer that you want to
have access to INDIGO. You must either have Administrator priveleges or be
logged on as the Administrator for this version to install properly.
2.3 To install:
Double click on either the INDIGO1 or INDIGO2 directory. You will see 5 files, either
called Setup, Data, or INDIGO1 or INDIGO2.
Double click on either INDIGO1 or INDIGO2 to start the installation process
SECTION 2
-9-
Installation is mostly automatic except for the following:
• You will need to confirm the directory where INDIGO will be installed.
The default is C:\Program Files\INDIGO and this will work for the setup on most
computers. Only change this if you know that the C drive is not the drive where your
computer stores its application program files. If in doubt, contact your System
Administrator.
• Before the installation is finished, you will be asked if you want to launch the
Program File or launch the Readme.txt. You can do both, one, or neither. Launching
the Readme.txt will actually start the "INDIGO Manual".
Once installation is complete, you can start the INDIGO program from the icon on the
Desktop, as well as from the Start Menu. Other files, such as "How To Uninstall" and
"INDIGO Manual" are also available from the Start Menu.
3 How To Uninstall
3.1 For Windows 95 and NT
1. Click on Start > Settings > Control Panel
2. Double click on Add/Remove Programs
SECTION 3
- 10 -
3. Scroll down until you see “INDIGO,” then click on it to highlight it.
Then click on Add/Remove
4. When prompted, click “Yes” then “OK”
5. Close the Add/Remove program window by clicking “OK” or by clicking the “x” in the
upper righthand corner.
6. INDIGO should now be completely uninstalled.
SECTION 3
- 11 -
3.2 For Windows 2000
Uninstalling in Windows 2000 is very similar to uninstalling in Windows 95/NT, so not all
steps are shown:
1. and 2. Follow steps 1 and 2 from Windows NT (above).
3. a) Make sure you are in “Change or Remove Programs”
3. b) Scroll down and click on “INDIGO” to highlight it.
Click “Remove”.
4. Follow steps 4, 5, 6 from Windows NT (above).
SECTION 3
- 12 -
About INDIGO
INDIGO release version 1.0
Copyright University of Victoria, 2001
INDIGO is a program to assist in the cognitive rehabilitation of those who have suffered serious
traumatic brain injuries. It was developed using Macromedia Director 7.
If you have problems with installation or need more information about INDIGO, please contact:
Dr. Micaela Serra
OR
Email: [email protected]
Tel: (250) 721-8789
Fax: (250) 721-7292
Dr. Jon Muzio
Email: [email protected]
Tel: (250) 721-7298
Fax: (250) 721-7292
Dept. of Computer Science
University of Victoria
P. O. Box 3055
Victoria, BC V8W 3P6
Canada
For the latest INDIGO updates and information, visit our website which at:
http://www.csr.uvic.ca/~mserra/INDIGO.html
SECTION 3