1
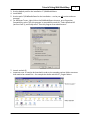
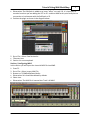
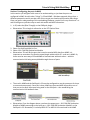
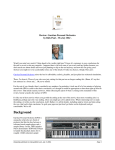
Tutorial: Using Midi WorkShop
1
Introduction
I write this tutorial as I was a bit concerned about the issues that many seem to be having using
MidiWorkShop. As I seem to discover with much of the RML line – there is indeed a bit of
learning curve as you try to “get your head around” the way in which Bob wants us to think and
how to get the most out of his software. This principle applies to MWS – and Yes, even to SAC.
Being a Cubase user for many, many years – it does take a bit of time getting used to the way
in which MWS works – but when you do, it really does makes sense – especially in terms of
workflow.
Note: I have a fourteen-year old son, Joshua – who, two years ago now, took an avid interest in
digital audio – especially in composition, which he is still pursuing. At that time, I was
endeavoring to show him the “in’s-and-out’s” of MIDI using SS and MWS. The following is what
I have come up with. I must also say, that Joshua now knows more about using SS with MWS
than I do now!
About This Tutorial
This section will explain to you how to install and use Midi WorkShop in SawStudio. This tutorial
will make some assumptions that you have a working knowledge of SawStudio and Midi
WorkShop.
To complete this tutorial you will require the following:
1.
2.
3.
4.
5.
§
SawStudio 5.4 Demo
Midi WorkShop 1.8 Demo
E.V.M. GM Module
A MIDI file
ASIO4All
Important note: Only install this application if you are not already using some type of ASIO
driver.
6. The plugin, the MIDI file and ASIO4ALL are all provided in the attached ZIP file.
§ You can download the SawStudio 5.4 and the Midi WorkShop 1.8 demos from the RML Web
site.
§ See: http://www.sawstudio.com/downloads_demos.htm
Note: I strongly recommend that you use the demos and the default installation paths as it will
greatly simplify the use tutorial. This will leave your existing installation folder intact, and, with
the exception of ASIO4All, you can simply delete the SAWStudioDemo installation folder when
you have completed this tutorial.
Section 1: Installation
Note: This tutorial assumes that you are used Widows XP SP3. I have made some minor notes
regarding the installation on Windows 7, but not Windows 8 – as I do not use Widows 8.
In this section you will install ASIO4ALL and the demo versions of SawStudio (SS) and Midi
WorkShop (MWS). You will then copy the plugin to the VST-Plugins folder and the MIDI file to
the Audio folder.
1. Install ASIO4ALL.
2. Install SS.
© 2006 – 2015 Robert Lentini and RML Labs
Tutorial: Using Midi WorkShop
2
3. Use the default path for the installation: C:\SAWStudioDemo.
4. Install MWS.
5. Use the path C:\SAWStudioDemo for the installation – or else you will receive and error
message.
6. For Windows 7 users, right-click on the SAWStudioDemo shortcut, go to Properties,
Compatibility, select “Run this program in compatibility mode for”, select Windows XP
(services Pack 3), and finally select “Run this program as an administrator”.
7. Launch and exit SS.
§ Important note: SS need to be launched in order to the complete various folder structures
that need to be created first – for example the Audio and the VST_PlugIns folders.
© 2006 – 2015 Robert Lentini and RML Labs
Tutorial: Using Midi WorkShop
3
8. Copy the GMSynth.dll to the C:\SAWStudioDemo\VST_PlugIns folder.
9. Copy the Jesu.mid file to C:\SAWStudioDemo\Audio.
10. Section 1 is now completed.
Section 2: Initial SS Configuration
This next section will explain how to perform the initial configuration of SS. Please note that this
configuration is for use with this tutorial only – and it is strongly recommended that you
configure it in the manner suggested.
1.
2.
§
3.
4.
5.
§
Launch SS.
Go to Options > Max Screen Resolution Override
Observation: For the purposes of this tutorial this has been set to 1600 x 900.
Go to Options > Audio Driver Model.
Select Asio Protocol > Select: 01: ASIO4ALL v2.
Go to Options > Audio Device Setup.
Configure your inputs and outputs to your preferences. I am using the default integrated
audio card for this tutorial.
6. Go to Options > Select: Force Single CPU.
7. Go to Options > Select: Force RealTime Priority Class
8. Go to TimeLine > Select: Tempo Mode.
9. Go to File > Preferences File > Select: Save Default.
10. Section 2 is now completed.
Section 3: F-Key Configuration
I have configured two F-Key screen workspace layouts. This next section will explain to you how
to configure the workspaces you will require to complete this tutorial.
1.
2.
3.
4.
Remove all the view windows and save the screen layout as F1.
Save this workspace as F2 also.
Enable the Full Mixer, MultiTrack, FX Choices and FX Pre Patches views.
Arrange the workspace layout as displayed in the diagram below:
© 2006 – 2015 Robert Lentini and RML Labs
Tutorial: Using Midi WorkShop
§
5.
6.
7.
8.
4
Observation: I have moved the O-01 channel to occupy the Track 3 position – as I prefer to
always have access to the input and output faders.
Ensure that the MultiTrack window view is selected and then save this workspace as F1.
Press F2.
Enable the Midi WorkShop window view.
Arrange this workspace layout as shown in the diagram below:
Observation: I have removed the Patch Library view and have resized the MWS view to only
one track. Finally, I resized the entire MWS window view.
9. In MWS, go to File > F-Key File > Select: Link to Saw F-Keys.
10. Go to File > Preferences File > Select: Save Default.
11. Save this workspace as F2.
12. Press F1.
13. Remove MWS.
14. Ensure that the MultiTrack window view is selected and then re-save this screen layout as
F1.
15. Test the F1 and F2 F-Key layouts.
16. Go to File > F-Key File > Select: Save Default.
17. Go to File > Preferences File > Select: Save Default.
18. Section 3 is now completed.
§
Section 4: Creating the session
In this section you will add the GMSynth plugin and save the session. Note that the manual
refers to VSTi plugins as “SoftSynths” and VST plugins as “effects”.
1. Make sure Track I-01 is selected.
2. In FX Choices, select the GMSynth SoftSynth.
3. In FX Pre Patches, select Add.
© 2006 – 2015 Robert Lentini and RML Labs
Tutorial: Using Midi WorkShop
5
Observation: The SoftSynth is added as an insert “effect” on track I-01. It is important to
mention here that you are adding the VSTi to SS – and that MWS at this point really has no
connection or involvement with the SoftSynth or SS.
4. Position the plugin as shown in the diagram below:
§
5. Go to File > Select: Save Session As…
§ Filename: Jesu.
6. Section 4 is now completed.
Section 5: Configuring MWS
In this section you will import the Jesu.mid MIDI file into MWS.
1.
2.
3.
§
4.
§
Press F2.
Go to File > Select: Import Midi File.
Browse to C:\SAWStudioDemo\Audio.
Observation: this should be selected by default.
Select Jesu.
Observation: The Midi file is inserted into Track 1 of MWS.
© 2006 – 2015 Robert Lentini and RML Labs
Tutorial: Using Midi WorkShop
§
6
Observation: Notice the port and channel numbers here. More about this in a moment:
5. Go to Options > Select: Midi Device Setup.
§ Observation: This dialog lists the twenty-four possible Midi input and output ports used by
MWS. These posts can be connected to either hardware or software devices.
6. For Port Out 01. Select: MWS Virtual Port Out 01.
7. Select: Port Out 01 and rename to: EVM GM Synthesizer Module.
§ Observation: Each port listed here should be named to reflect that particular port it is being
assigned to. In this tutorial, we are assigning Port Out 01 to the GMSynth SoftSynth. More
on this in a moment.
8. Select Ok to close Midi Device Setup.
9. In MWS, go to File > Preferences File > Select: Save Default.
§ Observation: There is a quirk with MWS in that the name that was assigned to the MWS
Virtual Port Out 01 will not be displayed correctly until SS is closed and re-launched, as
shown in the diagram below:
10. Close and re-launch SS.
11. Open the Jesu session.
§ Observation: It is interesting to note that the Track/Channel order is saved as part of the
session edl – and I think that this is a great features set of SS. You can see this for yourself
by comparing the launch of SS with the opening of the Jesu session file and observing the
channel order for each session.
12. Section 5 is now completed.
© 2006 – 2015 Robert Lentini and RML Labs
Tutorial: Using Midi WorkShop
7
Section 6: Configuring the ports in MWS
In this section you will glean a bit more of an understanding on just how the ports are
configured in MWS. As with other “things” in SS and MWS – Bob does approach things from a
different perspective and it can take a bit of time to get your head around how he does things.
Once you get an understanding of this methodology however, you do find it very functional – as
well as being a very efficient way to work with audio and MIDI information.
1. In SS, select the [Blue Triangle] on the GMSynth plugin.
§ Observation: This triangle is referred to as the VST Options Zone.
2. Select: Set SoftSynth Midi-In Port.
3. Select: 101: EVM GM Synthesizer Module.
§ Observation: This will be the port that is used to receive MIDI data from MWS. It is
important to remember first that the actual plugin resides within SS – and not in MWS. So,
there must be some way of SS and MWS to communicate with each other – with this
communication link being accomplished through the use of ports.
§
The track in MWS and the SoftSynth in SS must be configured to use the same port for them
to communicate properly. Once this is done, MWS can then send MIDI information out of
that port to the same input port being used on the SoftSynth – thus establishing the
communication link between them.
§
Observation: From the diagram above, you have the output port – 01: EVM GM Synthesizer
Module of MWS connecting to the input port – 101: EVM GM Synthesizer Module, on the
SoftSynth in SS. Remember, it is always MIDI OUT to MIDI IN. As mentioned in the MWS
© 2006 – 2015 Robert Lentini and RML Labs
Tutorial: Using Midi WorkShop
8
User Manual, the MIDI port that is being selected becomes the source of trigger information
for the SoftSynth to create its sounds.
4. Press F2.
5. In MWS, Right-Click on the Track 1 track label.
§ Observation: Notice that the port – 01: EVM GM Synthesizer Module has already been
selected as MWS defaults to Port 1, Channel 1.
6. Save the session.
7. Section 6 is now completed.
Section 7: Test Playback
In this section you will test the playback of the MIDI file in MWS – and the subsequent audio
output in SS.
1. In MWS select the Play button.
§ Observation: Audio is heard. Therefore, MWS and SS must be communicating with other in
order for the MIDI port that is selected to become the source of trigger information for the
SoftSynth to create sounds.
2. Stop Playback.
3. Save the session.
4. Exit SS.
5. Section 7 is now completed.
Summary
Again, I think it is important to understand that MWS does not generate any audio output at all
and that this audio output is entirely generated via the SoftSynth being inserted into a track in
SS. This, in my estimation, is a very interesting – and unique way to work with MIDI.
For example, in the playback of the MIDI file in Section 7, to adjust the output levels, all you
simply need to do is to press F1 to return to SS and then adjust either the input or output levels
using the Full Mixer. Again, if you really think about this for a moment – this is great way to
work with MIDI and audio – as SS is seeing this MIDI information as true audio information –
even though there is no real audio file present. Insert an effect into SS and see what I mean.
© 2006 – 2015 Robert Lentini and RML Labs
Tutorial: Using Midi WorkShop
9
Again, for example, download and install the Studio FX ReverbDemo and insert it as a send
effect on R-01 and listen to reverb on a “MIDI” channel! So, I can now hear the MIDI playback
with effects added – all in real time. I think that this is very interesting indeed!
Update (June 28th, 1015)
I think it is also very important and significant that by using this tutorial, this should rule out
problems that you might be having with the use of other VSTi’s and SS! This point is very
important and worth remembering.
If the information contained within the pages of this tutorial works – and it does, if you should
then be experiencing other problems or issues, then any potential problem must be the direct
result of the plugin-in itself or with the way in which the plug-in has been configured for use
with MWS and SS.
Therefore, you should be able to substitute the E.V.M. GM Module with the VSTi of your choice
and all should be well. I have personally tested this procedure out with many other VSTi’s and
they all work in a very similar – if not identical, manner as the E.V.M. GM Module. VSTi’s such
as Kontakt and Proteus VW work identical to the E.V.M. GM Module – though their internal
implementation is somewhat different.
Closing Comments
Though this tutorial has been somewhat “short ‘n sweet”, I do hope that it will be helpful to
others who are either presently using Midi WorkShop with SawStudio or are contemplating
using it – as they do indeed complement each other. Also, I do hope that others will realize how
powerful the link is between MWS and SS – and more importantly, the workflow aspects of
using MWS with SS.
Updated: June 28, 2015
© 2006 – 2015 Robert Lentini and RML Labs