1
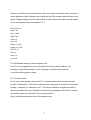
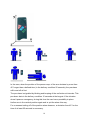
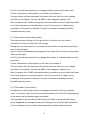
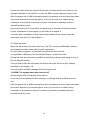
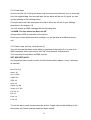
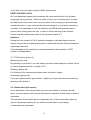
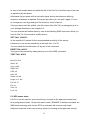
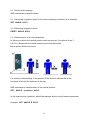
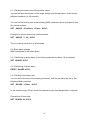
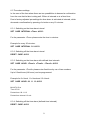
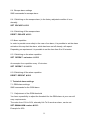
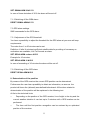
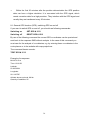
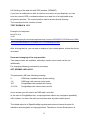
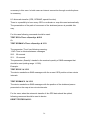
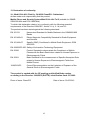
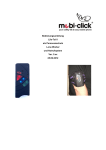
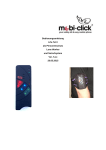
Operating instructions
Life-Tel II
as a personal protection
Lone Worker
and emergency call system
Ver. 5.xx
01.11.2013
Operating instructions Life-Tel II
Introduction
Dear Customer,
thank you for making the decision on purchasing this emergency signal device LifeTel II. It is a further quality product from our assortment of high-class GSM alarm and
emergency call systems.
In case of technical questions please contact:
e-mail: [email protected]
Contents
Page
1.
Basics regarding mode of operation and features
5
2.
Short operating instructions (Quick guide) see attachment
6
3.
Initial start-up of the device
6
3.1
SIM card
6
3.2
Preparing of the SIM card
7
3.3
Transfer of telephone numbers
7
3.4
Changing of the PIN number of the SIM card before the initial start-up
7
3.5
Inserting of the SIM card
8
3.6
Charging and switching on
8
3.7
Additional changing of the PIN number (internal and external)
9
3.8
Mode of operation of buttons
10
3.9
Programming / Initial settings
10
3.9.1 Programming of the emergency call button 1 (deliberate alarm)
10
3.9.2 Programming of the emergency call button 2 (unintended alarm)
11
3.9.3 Programming of the emergency call button 3 (call function)
12
3.9.4 Audio volume control and call signals
13
3.9.5 Changing of the device’s name (Name)
14
3.9.6 Setting up of the language (command „Language“)
14
3.9.7 Setting up of the time
15
3.9.8 Query of the device status
15
4.
Readiness for use
15
5.
Life-Tel II during operation
16
5.1
Fastening on the body
16
5.2
Deliberate making of the emergency call
16
2
5.3
Unintended making of the emergency call
17
5.3.1 Position alarm
17
5.3.2 Silent alarm (dead man’s handle)
19
5.3.3 Time alarm (care function)
19
5.3.4 Escape alarm
20
5.3.5 Loss alarm
21
5.3.6 Alarm resp. security mode (button 2)
21
5.3.7 Call function (button 3)
22
5.4
Tumble alarm (fall sensor)
22
5.5
GPS zones alarm
23
5.5.1 Programming of zones
24
5.5.2 Cancelling of programmed zones
25
5.5.3 Testing of the programmed zone
25
5.6
26
Technical alarms
5.6.1 Battery alarm
26
5.6.2 GSM reception alarm
27
5.6.3 GPS reception alarm
27
5.6.4 Sensor alarm
27
5.7
28
External care / Emergency call centre
5.7.1 Key lock
28
6.
Alarm settings and adjustments
28
6.1
Position alarm settings
29
6.1.1 Switching on position alarm
29
6.1.2 Switching off position alarm
29
6.1.3 Determination of the normal position
29
6.1.4 Setting the alarm time of the position alarm
30
6.2
30
Silent alarm settings
6.2.1 Switching on silent alarm
30
6.2.2 Switching off silent alarm
30
6.2.3 Setting of the alarm time
30
6.3
31
Time alarm settings
6.3.1 Switching on the time alarm interval
31
6.3.2 Switching off the time alarm interval
31
6.3.3 Switching on the time alarm with defined time intervals
31
3
6.3.4 Switching off the time alarm (defined time intervals)
31
6.4
32
Escape alarm settings
6.4.1 Switching on the escape alarm
32
6.4.2 Switching off the escape alarm
32
6.5
32
Alarm repetition
6.5.1 Switching on the alarm repetition
32
6.5.2 Switching off the alarm repetition
32
7.
Technical alarm settings
32
7.1
GSM alarm settings
32
7.1.1 Adjustment of the GSM threshold
32
7.1.2 Switching off the GSM alarm
33
7.2
33
GPS alarm settings
7.2.1 Adjustment of the GPS threshold
33
7.2.2 Switching off the GPS alarm
33
8.
Determination of the position
33
8.1
General GPS location (GPS), switching GPS on and off
34
8.2
Sending of the web link with GPS location (GPSMAP)
35
8.3
Automatic transfer (GPS, GPSMAP, special function)
36
8.4
Energy saver mode (GPSSAVE)
37
8.5
Programming of a GPS zone
37
8.6
GSM cells location (CELL)
41
9.
System functions
42
9.1
Time between two alarm messages (IDLEALARM)
42
9.2
Return to factory settings via SMS (RESET SETUP)
43
10.
Manual return to factory settings
43
11.
Disposal
43
12.
Technical data
43
13.
Declaration of conformity
45
4
1. Basics regarding mode of operation and features
Life-Tel II is an emergency call device with intercommunication (PNG-S) equipped
with many alarm functions.
For transfer of alarm messages and for intercommunication it makes use of the
existing mobile phone network by means of a customary SIM card. This way contrary
to stationary systems it can be used both place bound and at a big distance to the
receiver.
Thanks to transfer of GPS co-ordinates in case of an alarm it is possible to find the
location of the user of Life-Tel II, so that somebody can direct help resp. rescue
forces to a specified place.
It is suitable especially for:
•
people exposed to occupational danger
•
people working in single-user workstations
•
ill, handicapped or weak people
•
seniors
•
•
sportspeople
people exposed to recreational danger
By means of Life-Tel II the user can set off the alarm both deliberate (active) and
unintended (passive).
For the active alarm setting off the user presses the emergency call button 1 (SOS).
Depending on the programming established before immediately after that an alarm
message via SMS and/or via phone call arrives to up to three telephone numbers
saved beforehand.
In the case of the passive alarm setting off Life-Tel II monitors the movement,
position and activity of the user by means of default factory settings.
If there happens a case like e.g. motionlessness or change in position of more than
45°, an alarm message via SMS and/or via phone call will be also sent to up to three
telephone numbers saved beforehand.
For the passive alarm setting off the device must be operated in security (alarm)
mode. This mode can be activated either directly in the device or remotely via SMS.
Furthermore Life-Tel II is equipped with own technical monitoring.
In the case of a technical deficit Life-Tel II sends an SMS message to the recipient.
For this reason and also because of transfer of GPS co-ordinates in case of an alarm
5
at least one recipient must be a receiving unit suitable for SMS (e.g. a mobile phone)
among three telephone numbers and the transfer of telephone numbers of its SIM
card must be on for sender identification by all means.
Further information regarding motion alarm and position alarm as well as regarding
further kinds of alarm can be found in the chapter 5.3., 5.3.1, 5.3.2, 5.3.3, 5.3.4 and
5.3.5.
2. Short operating instructions (Quick guide)
In order to put your all-round emergency call system into operation as soon as
possible we have attached a short operating instructions for you (follows next).
We recommend you to read the following operating instructions carefully regardless.
If there arise any questions afterwards, please turn to our client service under
[email protected].
3. Initial start-up of the device
3.1 SIM card
At first you need an active SIM card of a GSM (mobile phone) network provider. It
hasn't been included in the delivery, in order to enable each user choosing his/her
favourite network provider.
Life-Tel II has a dual band GSM module. Therefore almost all European SIM cards
can be used. In this case it doesn't matter, whether you use a SIM card with a
subscription or a prepaid SIM card.
In case of a prepaid SIM card however we recommend caution, because there must
be always sufficient high free assets on it. Besides the time-wise validity of assets
must be ensured. Furthermore no alarm messages can be generated. It is necessary
that the person responsible for the technical maintenance of the device checks the
assets volume constantly and loads the assets up if necessary.
Therefore we recommend you to sign a mobile phone agreement for reasons of
safety.
6
3.2 Preparing of the SIM card
If you have purchased a prepaid card, please don't forget to activate it. Depending on
the network provider a phone call must be made by means of a customary mobile
phone and a confirmation (e.g. language selection) at first.
For this reason it is necessary to perform a test phone call from a normal mobile
phone before the beginning of operation of Life-Tel II!
Before a SIM card has been inserted into Life-Tel II, please take notice of the below
chapters (especially chapter 3.4.).
3.3 Transfer of telephone numbers
Regardless of whether you use a prepaid card or a card with a subscription, please
take notice to send the telephone number in the alarm message!
Life-Tel II fulfils its purpose only, if the user can be identified on the basis of his/her
telephone number.
If the telephone number hasn't been sent, the suppression should be removed (also
by the normal mobile phone). If it doesn't work, please turn to your network provider
for the purpose of the transfer (revealing in the message) of the mobile phone
number.
3.4 Changing of the PIN number of the SIM card before the initial start-up
Please insert the SIM card, which you are going to use later in Life-Tel II, in the
customary mobile phone.
Please change the existing PIN in 1513.
If you don't know the function for changing of the PIN, please refer to manual
(instruction) corresponding to the mobile phone.
You need this factory-adjusted PIN 1513, so that Life-Tel II accepts your SIM card.
If you insert your card with another PIN there, the SIM card will be suspended after
the third switching on at the latest!
In the case of a suspension you need the PUK number delivered with the SIM card
for releasing. Please perform releasing by use of a customary mobile phone again.
7
3.5 Inserting of the SIM card
In order to insert the SIM card the lid at the back must be opened at first. Please
proceed cautiously while you apply a delicate pressure onto the lid at the back of the
locking lid by means of your finger nail and later you remove it from the enclosure.
Keep the device this way that the rounded, deepened edge is located at the top and
the charging socket on the left side. You can see the SIM card holder now, where
words „OPEN“ (open) and „LOCK“ (closed) and an arrow for a certain direction have
been placed.
If it hasn’t been delivered open by the factory already, please push by a delicate
pressure the black SIM card holder to the right (OPEN), so that you can lift it up
afterwards.
Please slide the SIM card in the guide way of the SIM card holder. Thereby the goldcoloured contacts must be directed to the board and the canted edge to the left.
During flipping it shut you should pay attention that there shouldn’t appear any
bigger, palpable resistance.
Please slide the SIM card holder to the left in order to lock (LOCK).
Attention!
In order that you can switch the device on, a SIM card close fitting to the board is
necessary. Life-Tel II is out of order without a card inserted in a right way.
3.6 Charging and switching on
In order to switch the device on, it must be charged after insertion of the SIM card.
For this purpose you can use the included power supply or charging station.
Therefore the charging socket (mini USB) at the side must be connected with the
plug of the power supply or the charging station.
During the charging process the LED 2 (S. 42) is permanent on in red.
After finishing of the charging process (full charging) the LED 2 is permanent on in
green. Complete the charging process by removing of the charging cable resp. by
removing of Life-Tel II from the station.
You can switch Life-Tel II on by use of the black button ON/OFF (S. 42).
Please press it approx. 3 seconds until a beep is sounded.
Afterwards the device is searching for a mobile phone network. Usually it lasts about
10 - 20 seconds. However it can last longer, when the reception is low.
8
If everything is all right and the device has network reception, it will be signalled by
the regular blinking of the LED 1 (approx. every 5 seconds).
In the case of an unregistered or damaged SIM card the LED 1 is permanent on in
green. In this case please check the card in another mobile phone and use other one
if necessary.
In the case, when you use a false PIN, the LED 1 is permanent on in green/orange
and Life-Tel II sounds a triple double tone at intervals.
In this case please insert the card in the ordinary mobile phone again and change the
PIN number there.
3.7 Additional changing of the PIN number (internal and external)
In order to minimise the danger of malpractice by third parties, you can change the
PIN number after the initial start-up. It can happen also later on.
Life-Tel II must be on and have a network reception, in order to change the PIN
number. It is signalled by the green status LED 1 slowly blinking. If it doesn’t happen
this way, please refer to the chapter 5.2, 5.3.1, 5.3.2, 5.3.3, 5.3.4, 5.4 and 5.6.1.
Please send from your regular mobile phone to Life-Tel II (it has a telephone number
of the inserted SIM card) an SMS with the following text:
Set pin xxxx #1513
In this case XXXX must be numbers and means your new invented PIN code of
course.
Please make sure (also for future SMS commands) that there is always a space
(blank character) between words and numbers.
Except of between the rhomb and the PIN number.
For a better understanding accurately outlined:
Set(Space)pin(Space)xxxx(Space)#1513
If this SMS has been written in the right way, you will receive a confirmation via SMS
on your mobile phone, from which you have written this SMS command, from Life-Tel
II.
M-LifeTel 5.xx
Alarm: off
Accu: 100%
GSM: 78%
9
GPS: off
Area: off
Guard: on 30s
Angle: on,Y 25s
Fall: off 10
Esc: on
Care: on
Lock: off
If the text was incorrect, you will receive an SMS with an error message:
“Command format incorrect”.
Please note that this form of changing of PIN affects not only the SIM card, but also
the internal PIN. It means that cards inserted in the future must have the same PIN.
3.8 Mode of operation of buttons
Before we programme the device for the future operation in the next step, below
please find the overview of the mode of operation:
Button 1 (red) - Emergency call button for setting off of the deliberate (active) alarm
Button 2 (blue) - Activation and deactivation of the alarm mode (unintended alarm)
Button 3 (green) - Set-up of the intercommunication with the saved telephone
number
3.9 Programming / Initial settings
3.9.1 Programming of the emergency call button 1 (deliberate alarm)
You can assign the button 1 to up to three telephone numbers that should be notified
in an emergency, namely via SMS and/or via phone call.
In each case it should be chosen at least one SMS message, so that GPS coordinates can be transferred.
After all it is possible to choose for notification the same telephone number both via
SMS and via phone call.
Each way of notification however demands a memory space.
If you choose a telephone number with both ways of notification, you need two
memory spaces. There are three altogether.
10
For programming of button 1 please send to Life-Tel II an SMS from a normal mobile
phone with the following text:
Set(Space)Panic(Space)S(Space)0041781234567(Space)C(Space)0049528765432
(Space)S(Space)0049789876532(Space)#1513
In this case you can save 3 different telephone numbers resp. SMS numbers.
If you have done everything right, you will receive a status SMS sent by Life-Tel II.
Here will be specified your new programmed number and the way of notification.
M-LifeTel 5.xx
Panic
SMS 1
0041781234567
Call 2
0049528765432
SMS 3
0049789876532
Otherwise you will receive an error message.
3.9.2 Programming of the emergency call button 2 (unintended alarm)
You can assign the button 2 also to up to three telephone numbers that should be
notified in an emergency, namely via SMS and/or via phone call.
Ideally would be also in this case, if both ways of notification have been chosen.
In each case at least one notification via SMS should take place.
On one hand in order to enable the transfer of GPS co-ordinates.
On the other hand, because it is possible to send technical alarms only in this alarm
mode.
It is entirely possible to notify the same telephone number both via SMS and via
phone call.
Each way of notification demands a memory space.
If you choose a telephone number with both ways of notification, you need two
memory spaces. There are three altogether.
11
For programming of button 2 please send an SMS from a normal mobile phone to
Life-Tel II with the following text:
Set(Space)Alarm(Space)C(Space)0049795637889(Space)C(Space)004952876543
2(Space)S(Space)0049789876532(Space)#1513
Explanation: C is for phone call
S for SMS
Space = Blank character
0049795637889 = Your telephone number with prefix number Germany
If you have done everything right, you will receive a status SMS sent by Life-Tel II.
Here will be specified your new programmed number and the way of notification.
M-LifeTel 5.xx
Alarm
Call 1
0049795637889
Call 2
0049528765432
SMS 3
0049789876532
Otherwise you will receive an error message.
3.9.3 Programming of the emergency call button 3 (call function)
For programming of the button 3 please send an SMS from a normal mobile phone to
Life-Tel II with following text:
Set(Space)Tel(Space)0044781234567(Space)#1513
If you have done everything right, you will receive a status SMS sent by Life-Tel II.
Here will be specified your new programmed number.
M-LifeTel 5.xx
Tel
0044781234567
Otherwise you will receive an error message.
12
3.9.4 Audio volume control and call signals
Much the same like in all other mobile phones, you can set individual call signals and
own volume level also in Life-Tel.
SET (Space) AUDIO (Space) 2 (Space) 0 (Space) 3 (Space) 9 (Space) #1513
Loudspeaker volume [0-9]
Microphone volume [0-9]
Call signal number [0-9]
Call signal volume [0-9] acoustic signal (Buzzer)
0 = Mystery
1 = German national anthem
2 = Mozart
3 = Strauss
4 = Puccini
5 = Vici
6 = fast/short signal sequence
7 = Life-Tel call signal (standard)
8 = short signal sequence
9 = sustained signal
Hints:
The volume in loudspeaker and microphone should be controlled carefully; it is not
advisable to select to high volumes for both of them, the voices during the connection
could be sorely afflicted this way and they wouldn't be transferred comprehensible.
General information: "0" is the smallest and "9" is the highest value.
13
3.9.5 Changing of the device’s name (Name)
If many products are going to be operated at the same time, it is recommended to
give an individual name to each device. It is possible to assign alarm messages to
the right device this way.
In order to perform the changes of name in your device, please send the following
SMS command:
SET NAME <new name> # 1513
Example: Change of name of Life-Tel II in „NEWNAME“:
SET NAME NEWNAME # 1513
The confirmation SMS looks in the following way:
NEWNAME 1.xx
…………………..
…
…
The maximal length of the device's name amounts to 16 characters.
Return to factory settings is possible by use of following command:
RESET NAME # 1513
3.9.6 Setting up of the language (command „Language“)
By use of this command you can set the language of the device:
SET LANGUAGE <DE/EN> #1513
Example:
SET LANGUAGE DE #1513
To return to German following command is necessary:
RESET LANGUAGE #1513
For this command there is no TEST command.
3.9.7 Setting up of the time and the date
Life-Tel II is equipped with an internal watch. In order that alarms work in the right
way (especially the time alarm) Life-Tel II must be programmed in the following way:
SET (Space) TIME (Space) 13 (Space) 45 (Space) 16 (Space) 10 (Space) 13
(Space) #1513
14
Time (13:45) and date (16.10.2013) set up
M-LifeTel 5.xx
Time: 13:45
Status: off
CARE hours: Not defined
CARE interval: 12 min
Idle Alarm: 7 min
Repeat Alarm: 0 min
GPS: 0 min
3.9.8 Query of the device status
You have a possibility to programme the time (only full hours), when you will receive
the status SMS. It will provide you with information regarding the battery charge level
and GSM reception etc.. The status message will be sent to all numbers that you
have programmed.
Daily: Set status interval 13 #1513
Time (00-23)
4. Readiness for use
As soon as you have taken all previous steps, your emergency signal device is
configured and ready for use.
In the next chapter you will learn more regarding alarm functions and the way, how
you can use Life-Tel II effectively.
15
5. Life-Tel II during operation
5.1 Fastening on the body
In order to use Life-Tel II in the right way, the position is of vital importance.
Therefore a bag has been included in the delivery, wherein you can carry the device
switched on on your upper arm.
This device can be carried alternatively also on under arm. However the change of
the position sensor angle is necessary then. More regarding sensors you can find
under 5.4 and 5.6.4.
5.2 Deliberate making of the emergency call
In an emergency please press only the red button 1 until it lights up. An acoustic
signal and a faster blink sequence follows then and the alarm will be set off due to
your settings described in the chapter 3.9 (sent via SMS or there happens a phone
call).
After the phone call or SMS message the device sounds an acoustic triple tone alarm
and a blink sequence at intervals approx. every 10 seconds. It is helpful during
localisation of the person in distress, if he/she can't draw somebody's attention
himself/herself any more.
If the keyboard hasn't been locked, it is possible to quit this alarm by switching off of
the Life-Tel II.
Otherwise it is possible to end this alarm only from another mobile phone by use of
the SMS command:
QUIT ALARM #1513
16
Please note that much the same like in case of all other commands, there must be a
space between words. Between the rhomb and the PIN number however there is no
space. Please always mind the correct PIN number. More information on the subject
of key lock please find in the chapter 5.7.1.
M-LifeTel 5.xx
Alarm: off
Accu: 100%
GSM: 78%
GPS: off
Area: off
Guard: on 30s
Angle: on,Y 25s
Fall: off 10
Esc: on
Care: on
Lock: off
5.3 Unintended making of the emergency call
Life-Tel II is equipped with a series of alarm kinds that enable making of an
emergency call automatically in case of change of position of the person.
It includes following alarm kinds:
5.3.1 Position alarm
In the case of the position alarm Life-Tel II monitors permanent, whether the set
position is adhered to. The device carried on the upper arm is situated in the vertical
position. Internally it is referred to as Y. The device has been programmed also in
delivery condition this way. During the activation by pressing of the button 2 exactly
this position alarm is activated in the vertical position.
Other positions please learn from following pictures:
17
In the case, when the position of the person resp. of the arm deviates by more than
45° longer than a defined time (in the delivery condition 25 seconds), the pre-alarm
will be set off at first.
The pre-alarm is signalled by blinking and beeping of the red button at intervals. This
pre-alarm lasts in the delivery condition 15 seconds at the longest. If the situation
doesn't pose an emergency, during this time the user has a possibility to place
his/her arm in the vertical position again and to quit the alarm this way.
For a renewed setting off of the position alarm however, a deviation from 45° for the
time of at least 25 seconds is necessary.
18
Life-Tel II provides an opportunity to change both the angle and the alarm time.
Further information on this subject you will find in the chapter 6.
If the pre-alarm won't be interrupted, the alarm will be set off due to your settings
described in the chapter 3.9 (sent via SMS or there happens a phone call).
After the phone call or SMS message the device sounds an acoustic triple tone alarm
and a blink sequence at intervals approx. every 10 seconds. It is helpful during
localisation of the person in distress, if he/she can't draw somebody's attention
himself/herself any more.
5.3.2 Silent alarm (dead man’s handle)
This alarm ensures setting off of the pre-alarm, if the device (so the user) is
motionless for the time longer than 30 seconds.
During the time of pre-alarm (15 seconds) the silent alarm can be interrupted by the
arm movement again.
Only in case of a repeated motionlessness of more than 30 seconds, the silent alarm
will be set off again.
Life-Tel II provides an opportunity to change the duration of motionlessness until the
pre-alarm.
Further information on this subject you will find in the chapter 6.
If the pre-alarm won't be interrupted, the alarm will be set off due to your settings
described in the chapter 3.9 (sent via SMS or there happens a phone call).
After the phone call or SMS message the device sounds an acoustic triple tone alarm
and a blink sequence at intervals approx. every 10 seconds. It is helpful during
localisation of the person in distress, if he/she can't draw somebody's attention
himself/herself any more.
5.3.3 Time alarm (care function)
During the time alarm there follows a message at intervals (in delivery condition
every 12 minutes), while the red, blue and green button of Life-Tel II are blinking and
at the same time an acoustic signal is sounded.
This signalises to the user that he/she (as far as he/she is doing well and if there
hasn't happened any emergency case) should press one of the two blinking buttons.
If it won't happen, the tone will be more aggressive for three intervals of time.
19
If there still won't follow any press of the button, the alarm will be set off due to your
settings described in the chapter 3.9 (sent via SMS or there happens a phone call).
After the phone call or SMS message the device sounds an acoustic triple tone alarm
and a blink sequence at intervals approx. every 10 seconds. It is helpful during
localisation of the person in distress, if he/she can't draw somebody's attention
himself/herself any more.
Also in this case Life-Tel II provides an opportunity to change the interval duration.
Further information on this subject you will find in the chapter 6.
You have also a possibility to define fixed times instead of the interval. Also this
information you will find in the chapter 6.
5.3.4 Escape alarm
When the alarm resp. security mode is on, Life-Tel II monitors additionally, whether
there happen no hasty resp. frantic motion sequences.
If it is the case for approx. 10 seconds, the pre-alarm will be set off.
It is signalled by blinking of the red and blue button, as well as a tone.
During this time the user has a possibility to quit the pre-alarm by pressing of one of
the two blinking buttons.
If the pre-alarm won't be interrupted, the alarm will be set off due to your settings
described in the chapter 3.9.
You will receive an SMS message with the following text:
“ALARM: The escape alarm has been set off”
And particular GPS co-ordinates of the device.
As far as you have performed such settings, you will get also an additional phone
call.
After the phone call or SMS message the device sounds an acoustic triple tone alarm
and a blink sequence at intervals approx. every 10 seconds. It is helpful during
localisation of the person in distress, if he/she can't draw somebody's attention
himself/herself any more.
20
5.3.5 Loss alarm
As soon as Life-Tel II during the alarm resp. security mode has been torn or removed
from the supplied bag, few seconds later the pre-alarm will be set off, which you can
quit by pressing of the blinking button.
If the pre-alarm won't be interrupted, the alarm will be set off due to your settings
described in the chapter 3.9.
You will receive an SMS message with the following text:
“ALARM: The loss alarm has been set off”
And particular GPS co-ordinates of the device.
As far as you have performed such settings, you will get also an additional phone
call.
5.3.6 Alarm resp. security mode (button 2)
You can activate the alarm mode either by pressing of the button 2 or by use of an
SMS command, which you send to Life-Tel II from another mobile phone.
The command for activation via SMS sounds:
SET SECURITY #1513
As long as the alarm mode is active, the blue button blinks approx. every 5 seconds
at intervals.
M-LifeTel 5.xx
Alarm: off
Accu: 100%
GSM: 78%
GPS: off
Area: off
Guard: on 30s
Angle: on,Y 25s
Fall: off 10
Esc: on
Care: on
Lock: off
To quit the alarm mode, please press the button 2 again (fast double blinking of the
blue button will follow) and the mode has been quitted.
21
If you wish to quit the alarm mode via SMS, please send:
RESET SECURITY #1513
As it can absolutely happen that somebody will just miss the button 2 by accident
(especially during activities, which are close to body), we recommend you to prefer
the SMS mode and to care for the user by means of an emergency call centre resp.
operations centre. In case of the private use accordingly e.g. by a family member or
caretaker. It is reasonable to lock the keyboard via SMS by the particular station /
person that is looking after the user, in order to avoid switching off by accident.
Concerning this matter please refer to the important chapter 5.7.
Attention!
During the user carries Life-Tel II, potential emergency calls and alarms must be
always received by an experienced person or station that will take fast and adequate
supporting measures!
If the whereabouts isn't well-known exactly beforehand, the possibility of GPS
location is indispensable!
5.3.7 Call function (button 3)
Making a phone call:
By pressing of the button 3 you can always call each saved telephone number, which
you have programmed due to chapter 3.9.3.
Quitting a phone call:
For finishing of the conversation please press the button 3 again.
Answering a phone call:
If you get a phone call the green button 3 lights up and you start the conversation by
pressing of the button 3.
5.4 Tumble alarm (fall sensor)
As an alternative to the escape alarm you have a possibility to activate a tumble
alarm. However please mind that the simultaneous operation of both kinds of alarm is
impossible.
The activation of the tumble alarm is reasonable only, if the escape alarm has only
quite a subordinate meaning for you and the tumble alarm is accordingly
considerably more important.
22
In case of the tumble alarm a tumble-like fall of the Life-Tel II and this way of the user
is registered by the sensor.
Afterwards the pre-alarm with an acoustic signal and an simultaneous blinking
sequence of buttons is reported. During the pre-alarm you can quit it again, if it isn't
an emergency case by pressing of the button(s), which is/are on.
If the pre-alarm won't be quitted, you will receive from Life-Tel II message(es) due to
your settings described in the chapter 3.9.
You can activate the tumble alarm by use of the following SMS command, which you
send to Life-Tel II from another mobile phone:
SET FALL 10 #1513
In this case the 10 stands for the recommended sensitivity of the sensor.
However you can set the sensitivity at the level from 1 to 20.
You can switch the tumble alarm off by use of the command:
RESET FALL #1513
The query of the sensitivity takes place by use of the SMS command:
TEST FALL #1513
M-LifeTel 5.xx
Alarm: off
Accu: 100%
GSM: 78%
GPS: off
Area: off
Guard: on 30s
Angle: on,Y 25s
Fall: off 10
Esc: on
Care: on
Lock: off
5.5 GPS zones alarm
Life-Tel II can be used for zones monitoring. As soon as the approved zones have
been programmed (max. 10) and the alarm mode (“ENABLE”) has been activated, an
SMS alarm message with current GPS co-ordinates will be sent to all saved
telephone numbers in the case of every action of crossing of the approved zone(s).
23
5.5.1 Programming of zones
For programming of zones serves the SMS command:
SET GPSZONE <Latitude1> <Longitude1> <Latitude2>
<Longitude2> #1513
Latitude1 = upper border (direction North)
Latitude2 = bottom border (direction South)
Longitude1 = left border (direction West)
Longitude2 = right border (direction East)
Data input format:
Latitude – gg.mmmmmmN gg – degree, mmmmmm
e.g.: 53.551126N 53.54906N
Longitude – ggg.mmmmmmE ggg – degree, mmmmmm
e.g.: 009.989147E 009.993728E
Please make sure that the missing numbers are filled with "0".
Example: e.g. 3° 3.23’E = 003.032300E
Example:
If you wish to monitor a certain zone, please enter the data like it has been shown up
in the following example:
SET GPSZONE 49.548909N 011.925659E 49.54249N 011.952481E
#1513
24
As feedback you will receive:
GPS Zone: 1/1 <---- Number of the zone
Latitude:
53.551126N 53.54906N
Longitude:
009.989147E 009.993728E
Please note that a new zone will be added, every time when the command "SET
GPSZONE" has been used.
M-LifeTel 5.xx
Monitoring: off
GPS Zone:1/0
Latitude:
53.551126N 53.54906N
Longitude:
009.989147E 009.993728E
If the memory limit has been reached, you will receive an error message.
5.5.2 Cancelling of programmed zones
For cancelling of every single zone serves the following command:
RESET GPSZONE <zone number> #1513
5.5.3 Testing of the programmed zone
For testing of the programmed zone in the certain location, please use the SMS
command:
TEST GPSZONE <zone number> #1513
zone number = values from 1 to 10
Example:
TEST GPSZONE 3 #1513
Response SMS:
M-LifeTel 5.xx
GPS Zone: 1/1
Latitude:
25
53.551126N 53.54906N
Longitude:
009.989147E 009.993728E
You can connect many zones to one corridor. The borders of zones run along the
specified longitudes and latitudes. Diagonal zones can't be specified. The zones
must overlap in each other, as far as they belong to one corridor.
5.6 Technical alarms
There are four kinds of alarm for monitoring of the technical operative readiness of
Life-Tel II. These alarms work only if the device is under operation in alarm (security)
mode.
5.6.1 Battery alarm
Already in case of approx. 33% remaining battery capacity, Life-Tel II signifies to the
user that it is about time to charge the battery again by means of optic (red blinking
LED 2) and acoustic signal in the device.
If in the case of approx. 21% of battery capacity there still won't happen any charging
process, Life-Tel II sends to all saved SMS telephone numbers a battery alarm
message with the following text:
26
Technical alarm (1): Battery will be low soon (X % battery capacity)
The sign X stands for the remaining battery capacity.
5.6.2 GSM reception alarm
If the network reception sinks into critical value, Life-Tel II sends to all saved SMS
telephone numbers a GSM alarm message with the following text:
Technical alarm (2): GSM network reception is too poor (reception of
X%)
The sign X stands for reception capacity.
In such cases it is reasonable to speak with the user of Life-Tel II and ask him/her to
proceed to an area with a better reception again.
Please note: In such a case, when the reception is too poor, the transfer of the
emergency call signal isn't possible any more and the monitoring of the user can't be
ensured any more this way!
5.6.3 GPS reception alarm
If the GPS reception sinks into critical value, Life-Tel II sends to all saved SMS
telephone numbers a GPS alarm message with the following text:
Technical alarm (3): GPS signal is too poor (Sat: X)
The sign X stands for the quantity of found satellites.
Please note: In such a case, when too little or no satellites have been found,
determining of location is impossible due to lack of co-ordinates.
The best GPS reception is in the open. In buildings rather near the window.
5.6.4 Sensor alarm
In such a case, when there appears defect of the sensor, Life-Tel II sends to all
saved SMS telephone numbers a sensor alarm message with the following text:
Technical alarm (4): Sensor defect / inoperative
In the case of a sensor alarm the monitoring of the user can't be performed any
more. In this case please observe possible rules e.g. for single-user workstations.
For such a case please consider, whether it wouldn't be reasonable to have one
replacement device available.
27
5.7 External care / Emergency call centre
Multiplex possibilities of configuration of Life-Tel II vial SMS, switching the alarm
mode on or off, as well as performing of status queries are very helpful for the
external care.
During the operational use a competent station or person must supervise the use of
Life-Tel II.
It includes among other things the periodic review of the operative readiness,
ensuring of battery charging and reception of alarm messages, as well as fast and
appropriate reaction to them.
5.7.1 Key lock
An important point is locking of the blue button 2 and the on-off switch against
accidental switching off.
As soon as the Life-Tel, switched on and placed in the bag, has been handed over to
the user, it is reasonable to lock the above mentioned buttons by the care providing
person or station.
For this purpose please use the following SMS command:
SET LOCK #1513
The blue button and the ON/OFF button are locked now. However the user can still
use button 1 (SOS button) and button 3 (making a phone call). Also during the key
lock you can switch the alarm (security) mode on and off and perform status queries
via SMS.
In order to deactivate the key lock again, please send this SMS command:
RESET LOCK #1513
6. Alarm settings and adjustments
In case of kinds of alarm you have a possibility to perform adjustments resp. activate
or deactivate single alarms.
If you use this device commercially, we recommend you to do it in co-ordination with
the safety officer resp. to observe current regulations.
28
6.1 Position alarm settings
SMS commands for position alarm:
6.1.1 Switching on position alarm (in the factory-adjusted condition it is on already):
SET ANGLE #1513
6.1.2 Switching off position alarm
RESET ANGLE #1513
6.1.3 Determination of the normal position
In delivery condition the vertical position has been pre-set. It is referred to as Y.
Life-Tel II allows also two further positions as a normal position.
Below please find the overview:
For a better understanding: In the position Z the device is situated flat at the
horizontal level with the keyboard to the top.
SMS command for determination of the normal position:
SET ANGLE <position> #1513
In this case the sign <position> should be replaced by the current location parameter.
Example: SET ANGLE Z #1513
29
6.1.4 Setting the alarm time of the position alarm
You can set also the duration of the angle change until the pre-alarm. In the factoryadjusted condition it is 25 seconds.
You can set the time by use of the following SMS command, where you specify also
the normal position:
SET ANGLE <Position> <Time> #1513
Example for 60 seconds in the vertical position:
SET ANGLE Y 60 #1513
The time can be set from 2 to 90 seconds.
6.2 Silent alarm settings
SMS commands for the silent alarm:
6.2.1 Switching on silent alarm (in the factory-adjusted condition it is on already):
SET GUARD #1513
6.2.2 Switching off silent alarm
RESET GUARD #1513
6.2.3 Setting of the alarm time
You can define the time of the missing movement until the pre-alarm by use of the
following SMS command:
SET GUARD <Time> #1513
In this case the sign <Time> should be replaced by the time designation in seconds.
Example for 60 seconds:
SET GUARD 60 #1513
30
6.3 Time alarm settings
In the case of the time alarm there are two possibilities to demand a confirmation
from the user that he/she is doing well. Either at intervals or at a fixed time.
Due to factory-adjusted pre-settings the time alarm is activated at intervals, which
demands a confirmation by pressing of a button every 12 minutes.
6.3.1 Switching on the time alarm interval
SET CARE INTERVAL <Time> #1513
For the parameter <Time> please enter the time in minutes.
Example for every 30 minutes:
SET CARE INTERVAL 30 #1513
6.3.2 Switching off the time alarm interval
RESET CARE #1513
6.3.3 Switching on the time alarm with defined time intervals
SET CARE HOUR <Time1> <Time2> <Time3> #1513
For the parameter <TimeX> please enter fixed time by use of two numbers.
Up to 8 fixed times (full hours) can be programmed.
Example for 9 o'clock, 11 o'clock and 13 o'clock:
SET CARE HOUR 09 11 13 #1513
M-LifeTel 5.xx
Time: 07:22
Protect time: 09 11 13
Protect time interval: 12 min
6.3.4 Switching off the time alarm (defined time intervals)
RESET CARE #1513
31
6.4 Escape alarm settings
SMS commands for escape alarm:
6.4.1 Switching on the escape alarm (in the factory-adjusted condition it is on
already):
SET ESCAPE #1513
6.4.2 Switching off the escape alarm
RESET ESCAPE #1513
6.5 Alarm repetition
In order to provide more safety in the case of an alarm, it is possible to set the alarm
activation this way that the alarm, which has been set off already, will repeat.
Depending on requirement it is possible to set the time from 0 to 60 minutes.
6.5.1 Switching on the alarm repetition
SET REPEAT <minutes> #1513
An example for a repetition every 10 minutes:
SET REPEAT 10 #1513
6.5.2 Switching off the alarm repetition
RESET REPEAT #1513
7. Technical alarm settings
7.1 GSM alarm settings
SMS commands for the GSM alarm:
7.1.1 Adjustment of the GSM threshold
You have a possibility to adjust the threshold for the GSM alarm at your own will
resp. requirements.
The value from 10% to 90%, whereby Life-Tel II sends an alarm, can be set.
SET GSMALARM <value> #1513
Example for 30%:
32
SET GSMALARM 30 #1513
In case of lower deviation of 30% the alarm will be set off.
7.1.2 Switching off the GSM alarm
RESET GSMALARM #1513
7.2 GPS alarm settings
SMS commands for the GPS alarm:
7.2.1 Adjustment of the GPS threshold
You have a possibility to adjust the threshold for the GPS alarm at your own will resp.
requirements.
The value from 1 to 60 minutes can be set.
Definition: If after X minutes insufficient satellite data for providing of necessary coordinations are available, Life-Tel II sends an alarm.
SET GPSALARM <value> #1513
Example for 10 minutes:
SET GPSALARM 10 #1513
In case of exceeding of 10 minutes the alarm will be set off.
7.2.2 Switching off the GPS alarm
RESET GPSALARM #1513
8. Determination of the position
By means of the GPS receiver the current GPS position can be determined.
Furthermore the user has a possibility to obtain an information, as soon as the
product will leave the (allowed) area defined beforehand. All functions related to
determination of the position will be explained in the following text.
At first a few technical hints:
•
Depending on the position of the GPS receiver, line of sight to the sky and the
current weather situation it can last up to 5 minutes until a GPS location can be
performed.
•
The time until the first position recognition can be reduced by an optimised
position of the receiver.
33
•
Within the first 30 minutes after the position determination the GPS position
data can have a higher deviation. It is connected with the GPS signal, which
needs correction data for a high precision. They interfere with the GPS signal and
usually they are transferred every 30 minutes.
8.1 General GPS location (GPS), switching GPS on and off
If you want to switch GPS on and off, you should use following commands:
Switching on
SET GPS # 1513
Switching off
RESET GPS # 1513
By use of the following command the current GPS co-ordinates can be queried and
sent back in the response SMS without analysis. In the case of this command you
must care for the analysis of co-ordinates, e.g. by entering these co-ordinates in the
route planner or in the website with map projections.
The command thereto sounds:
TEST GPS # 1513
Example of a response:
M-LifeTel 5.xx
Time: 12:26:52
Latitude:
52.235381N
Longitude:
021.12073E
Altitude above sea level: 98.0m
Quantity of satellites: 05
34
8.2 Sending of the web link with GPS location (GPSMAP)
If you have a mobile phone with an internet connection at your disposal, you can
have the current GPS co-ordinates shown as a web link of an adjustable map
projections provider. The current position can be shown directly this way.
The command for this function sounds:
TEST GPSMAP # 1513
Example of a response:
M-LifeTel 5.xx
13:01
http://maps.google.com/maps/api/staticmap?center=5223458,2112536&zoom=15&si
ze=270x250&markers=+52.23458,+021.12536&sensor=false
After clicking the link, you can see on display of your mobile phone, where the device
is located.
Zoom and changing of the map provider:
Two map provider are available, whereby a certain zoom mode can be set
additionally.
For changing following command is necessary:
SET GPSMAP <NR> #1513
The parameter „NR“ has following meaning:
0
OSM map, standard zoom (basic setting)
1-6
OSM map, with various zoom levels
100
GoogleMaps with updated link format
101-106
GoogleMaps with various zoom levels
As an answer you will receive an SMS with a new link.
In the case of GoogleMaps only a map projection without any navigation possibility
will be shown. In return this site can be shown also by older mobile phone.
The linked web site of OpenStretMap.org demands current internet browser for
indication and navigation of map projections. Therefore a current Smart phone is
35
necessary in this case. In both cases an internet connection through a mobile phone
is necessary.
8.3 Automatic transfer (GPS, GPSMAP, special function)
There is a possibility to have many GPS co-ordinates or map links sent automatically.
The presentation of the path of movement of the sheltered person is possible this
way.
For this case following command should be used:
TEST GPS <Time> <Quantity> #1513
Or
TEST GPSMAP <Time> <Quantity> # 1513
The parameter „Time“ has following meaning:
1-249: Time in minutes between messages
250: 30 seconds
251: 15 seconds
The parameter „Quantity“ stands for the maximal quantity of SMS messages that
should be sent (setting range 1-1000).
Example:
TEST GPS 2 3 # 1513
The device sends three SMS messages with the current GPS position at two-minute
intervals.
TEST GPSMAP 2 3 # 1513
The device sends three SMS messages with the position of the sheltered person
presented on the map at two-minute intervals.
For the case, when the automatic transfer of the GPS data should be quitted,
following command should be sent to device:
RESET TESTGPS #1513
36
8.4 Energy saver mode (GPSSAVE)
If the device is connected to an external power supply, the current location is
checked every second.
In order to save energy under battery operation, the GPS receiver switches off
automatically and is activated only 1x an hour. If the product changes its location
(changing of the GSM radio cell BTS) or the device has received the command
„TEST GPS“, the current GPS location will be updated immediately.
The user has a possibility to change the interval between the automatic updates in
energy saver mode:
SET GPSSAVE <Time> # 1513
The parameter „Time“ stands for the quantity minutes (1……250) in this case. In the
case of setting „0“ the GPS receiver won't be switched off.
The battery service life will be greatly affected by this setting. If e.g. the disconnection
of the GPS receiver will be switched off (GPSSAVE = 0), the battery service life is
reduced to few hours.
Return to factory settings:
Please send the following command to return to factory settings again (60 minutes):
RESET GPSSAVE # 1513
Testing settings:
The performed settings can be tested by use of the following command:
TEST GPSSAVE # 1513
8.5 Programming of a GPS zone
The product can be used for zones monitoring. As soon as the approved zones have
been programmed (max. 10) and the alarm mode (“ENABLE”) has been activated, an
alarm message with current GPS co-ordinates will be sent to all saved telephone
numbers in the case of every action of crossing of the approved zone(s).
37
For programming of zones following command should be used:
SET GPSZONE <Latitude 1><Longitude1><Latitude2><Longitude2> # 1513
Latitude1 = upper border (direction North)
Latitude2 = bottom border (direction South)
Longitude1 = left border (direction West)
Longitude2 = right border (direction East)
In the following example has been presented the data input format:
Latitude – gg.gggggg N (degree)
e.g.: 49° 59,5058’ N = 49.991763 N
Longitude – ggg.gggggg E (degree)
e.g.: 11° 57,0399’ E = 011.950665 E
38
Please make sure that the missing numbers are filled with "0".
Example: 3° 3.23’ E = 003.032300 E
In the case of Life-Tel II GPS co-ordinates are specified in degrees and minutes with
six decimal places. The data input is possible within the range of xx.000000° to
xx.999999°.
Example:
The command for zones monitoring must be entered in the following way:
SET GPSZONE 49.549680N 011924780E 49.537480N 011.957910E # 1513
As a confirmation the following message will be sent back:
M-LifeTel 5.xx
Monitoring: on
GPS Zone:1/1
Latitude:
49.549680N – 49.537480N
Longitude:
011.924780E – 011.957910E
Please note that a new zone will be added, every time when the command "SET
GPSZONE" has been used. If the memory limit has been reached, an error message
will be sent back.
Cancelling of all saved zones:
For cancelling of all saved zones serves the following command:
RESET GPSZONE ALL # 1513
Cancelling of a single zone:
For cancelling of a single zone serves the following command:
RESET GPSZONE <zone number> # 1513
Testing of the programmed zone:
39
In order to test the programmed zones in a certain location, following command
should be used:
TEST GPSZONE <location number> # 1513
For „location number“ values 1 to 10 are possible.
Example:
TEST GPSZONE 3 # 1513
As a confirmation following SMS message will be sent back:
M-LifeTel 5.xx
Monitoring: on
GPS Zone:3/7
Latitude:
49.549680N – 49.537480N
Longitude:
011.924780E – 011.957910E
40
You can connect many zones to one corridor. The borders of zones run along the
specified longitudes and latitudes. Diagonal zones can't be specified. The zones
must overlap in each other, as far as they belong to one corridor.
If the GPS zones monitoring isn't necessary any more (the whereabouts of the user
of the device is known), the module can be switched off, which will lengthen the
operation time of the device. For this purpose serves the command:
RESET GPS #1513
In order to switch the GPS on again, following command should be sent to Life-Tel II
via SMS:
SET GPS #1513
8.6 GSM cells location (CELL)
If the device can't find any GPS location, there is a possibility to determine the
position by means of GSM cells nearby. However it is only a matter of an emergency
solution, if the proper location via GPS isn't possible (any more).
Please use for this purpose the following SMS command:
TEST CELL # 1513
•
For itemisation of the radio cell code please turn to your mobile phone
provider.
•
Please note that the query of the current location isn't approved by all of
providers.
Example: SMS report
M-LifeTel 5.xx
-------------Battery: 92
GSM : 69
Zone: 70C7
Point in time: 2
Cells info:
Warsaw
Adjacent cells:
41
5331
532e
5332
5b93
9. System functions
In this chapter have been explained technically challenging functions. The default
settings have been performed for the majority of areas of application already.
Therefore we recommend you to adjust these parameters only in the corresponding
case of application.
In such a case, when the product has malfunctioning, basic settings should be
reactivated at first.
If a contact with a hotline is necessary, please make sure, whether the device is in its
standard configuration again.
9.1 Time between two alarm messages (IDLEALARM)
In the case of an alarm Life-Tel II sends an alarm message. Further messages of the
same kind can be sent only, if there has been registered a new alarm situation after a
certain interval (factory settings: 7 minutes). Interval can be changed.
Please use for this purpose the following SMS command:
SET IDLEALARM <Time> #1513
The time can be set between 1 and 240 minutes.
Example:
SET IDLEALARM 15 #1513
The interval between alarm messages amounts to 15 minutes in this case.
Attention!
During this interval you won't be informed that the alarm cause has changed again.
You should make sure that you control the parameter during this time yourself.
Return to factory settings
Please send following command in order to return to factory settings (7 minutes):
RESET IDLEALARM #1513
Testing settings
In order to test the required settings, please use following command:
TEST IDLEALARM #1513
42
9.2 Return to factory settings via SMS (RESET SETUP)
If you want to reset the product to factory-adjusted condition, please use following
command:
RESET SETUP 12345678 # 1513
All settings that have been performed so far get lost and are cancelled for good.
The PIN number of the SIM card doesn't get changed during the return to basic
settings. Therefore after reset the product can't register again (SIM card = recently
set PIN, product = 1513).
Alternatively the product can be reset also manually. It has been described in the
separate chapter.
10. Manual return to factory settings
Switch the device off by means of the ON/OFF button. Press the ON/OFF button
again together with the blue, red and green button. A long beep is sounded. It is
recommended to switch the device off and to switch it on again.
11. Disposal
Please dispose of the product at the end of its operational
life span due to applicable legal regulations.
12. Technical data
Temperature range: operating range at least –10°C to +55°C
Storage area: at least –25°C to +80°C
Weight: 92g (with integrated battery)
Dimensions: 116 mm x 42 mm x 21 mm (LxWxH)
Operating voltage: 3,3 Volt to 4,2 Volt (nominal 3,6Volt)
Standby time: at least 72 hours
Time of conversation: up to 160 minutes
Please note: The standby time and the time of conversation depend on the local
reception of Life-Tel II!
Module: Wavecom Q2400
43
Battery: 1100 mAh
Charge time: 45 minutes
SIM card: 3 Volt
Frequency bands: EGSM900 (880 to 960 MHz)
DCS1800 (1.710 to 1.880 MHz)
GSM classes: class 4 (2Watt) by EGSM900
Class 1 (1Watt) by DCS1800
Data service: SMS
GPS module Sirius 1513R, 65 canal receiver, high sensitivity – 161 dBm
Open sky hot start 1 sec, cold start 29 sec location accuracy 2,5m
This device works due to following standards:
GSM 03.03: “Digital cellular telecommunications system (Phase 2+); numbering,
addressing and identification“. Version 6.6.0.
GSM 03.13: “Digital cellular telecommunications system (Phase 2+); Discontinuous
Reception (DRX) in the GSM system“. Version 6.0.0.
GSM 04.02: “Digital cellular telecommunications system (Phase 2+); GSM Public
Land Mobile Network (PLMN) access reference configuration“. Version 6.0.0.
GSM 04.03: “Digital cellular telecommunications system (Phase 2+); Mobile StationBase Station System (MS-BSS) interface Channel structures and access
capabilities“. Version 6.0.0.
GSM 04.04: “Digital cellular telecommunications system (Phase 2+); Layer 1 General
requirements“. Version 6.0.0.
GSM 04.05: “Digital cellular telecommunications system (Phase 2+); Data Link (DL(
layer General aspects“. Version 6.0.1.
GSM 04.07: “Digital cellular telecommunications system (Phase 2+); Mobile radio
interface signalling layer 3 General aspects“. Version 6.5.1.
GSM 04.08: “Digital cellular telecommunications system (Phase 2+); Mobile radio
interface layer 3 specification“. Version 6.11.0.
Production: TSL Elektronik Sp.z o.o.
ul. Płowiecka 5A
PL-04-501 Warsaw
Service:
[email protected]
44
13. Declaration of conformity
We, Mobi-Click AG; Pfad 1A; CH-6330 Cham/ZG - Switzerland
declare under sole responsibility that the product:
Mobile Phone and Security System Mobi-Click Life-Tel II (suitable for GSM/EGSM 900 MHz and PCN 1800 MHz)
To which this declaration relates, is in conformity with the following essential
requirements of the Directive 1999/5/EC: Article 3.1 a), 3.1 b) and 3.2
The product has been tested against the following standards:
EN 301 511
Harmonised Standard for Mobile Stations in the GSM900/1800
EN 301 489-01
EN 301 489-07
Bands
Electro Magnetic Compatibility Standard for Radio Equipment
and Services
Specific (EMC) Conditions for Mobile Radio Equipment, GSM
900/1800
EN 60950/IEC 950 Safety of Information Technology Equipment
EN 50360
Product Standard to demonstrate the Compliance of Mobile
EN 50361
1999/519/EC
Phones with the Basic Restrictions related to Human Exposure to
Electromagnetic Fields
Basic Standard for the measurement of Specific Absorption Rate
related to Human Exposure to Electromagnetic Fields from
Mobile Phones
Council Recommendation on the Limitation of Exposure of the
General Public to Electromagnetic Fields
The product is marked with the CE marking and Notified Body number
according to the Directive 1999/5/EC (R&TTE): Identification mark: CE 0682
Place of Issue: Cham/ZG
Date of Issue: 30.05.2012
45
red button SOS 1
blue button 2
green button 3
socket for power supply/battery charger
microphone speaking
loudspeaker
ON/OFF button (ON/OFF)
LED 2
LED 1
46