1
Citect for Windows
Driver Specification Extract
Fins Driver
Author
Date
Comment
Andrew Heard,Verdant
27/07/1998
Original
Andrew Heard,Verdant
23/10/1998
add software setup notes
Andrew Heard,Verdant
30/11/1998
improve section 3.9 “software setup”
Andrew Heard,Verdant
24/03/2000
Changes following integration
Anna McIntyre
19/05/2000
Update to section 3.6.2.3.2
Lin Gu
14/02/02
Add CS1-Series PLC support
Driver Design Specification
Contents
CONTENTS
2
1.
5
TARGET DEVICE(S) AND PROTOCOL
1.1
Introduction
5
1.2
Device Manufacturer
5
1.3
Device Definition
5
1.4
Communications Method
5
1.5
Controller Link (CLK) Networks
6
1.5.1
Wiring Diagram
6
1.5.2
I/O Device Settings
6
1.5.3
Software Setup
7
1.6
Ethernet (ETN) Networks
8
1.6.1
Wiring Diagram
8
1.6.2
I/O Device Settings
8
1.6.3
Software Setup
1.7
13
Serial Communications
13
1.7.1
Wiring Diagram
13
1.7.2
I/O Device Settings
14
1.7.3
Software Setup
16
1.8
Sysmac Link (SLK) Networks
17
1.8.1
Wiring Diagram
17
1.8.2
I/O Device Settings
17
1.8.3
Software Setup
18
1.9
Software Setup & Configuration
19
1.9.1
Minimum Requirements
19
1.9.2
Setup
19
1.9.3
Starting “Service Manager”
19
1.9.4
Controller Link Settings
21
1.9.5
Network Settings
22
1.9.6
Confirming Communications Operations
23
1.9.7
Uninstalling
24
1.10
Syswin Programming Software
24
1.11
Miscellaneous Notes
25
1.11.1
SYSMAC Support Software set up:
25
1.11.2
OMRON CVM1 PC Settings:
25
1.11.3
OMRON CV500-ETN01 Settings:
26
FINS_Extract.DOC
3/05/2002
2
Driver Design Specification
1.11.4
OMRON PS221 Power Supply Unit Wiring
26
1.11.5
OMRON UDP Port/Socket address Setup
26
1.11.6
OMRON ETN IP address Setup
27
1.11.7
OMRON CVM1-CPU Routing Table Setup
28
1.12
Special Requirements
28
1.13
Maximum Request Length
28
2.
USER INTERFACE
29
2.1
Introduction
29
2.2
Driver Name
29
2.3
Boards Form
29
2.3.1
Board Type
29
2.3.2
Address
29
2.3.3
IO Port
29
2.3.4
Interrupt
29
2.3.5
Special Opt
29
2.4
Ports Form
29
2.4.1
Port number
29
2.4.2
Baud Rate
29
2.4.3
Data Bits
29
2.4.4
Stop Bits
30
2.4.5
Parity
30
2.4.6
Special Opt
30
2.5
IO Devices Form
30
2.5.1
Name
30
2.5.2
Protocol
30
2.5.3
Address
30
2.6
Pulldown lists Help
30
FINS
30
FINS
30
FINS3
30
2.7
IO Device Variable Types
31
2.7.1
Formats and types
31
2.7.2
driver.dbf Entries
32
2.8
PROTDIR.DBF
33
2.9
Parameters and INI options
34
2.9.1
Standard Parameters
34
2.9.2
Driver Specific Parameters
34
2.10
Remapping
34
2.11
Driver Specific Errors
34
2.12
Driver Error Help
34
FINS_Extract.DOC
3/05/2002
3
Driver Design Specification
2.13
Debug Messages
34
2.14
Stats Special Counters
34
2.15
Hints and Tips
35
2.15.1
Recovery From Power Failure / Cable Removal
35
2.15.2
OMRON API Return Codes
35
2.15.3
OMRON PLC Response Codes
36
3.
REFERENCES
3.1
42
References
FINS_Extract.DOC
42
3/05/2002
4
Driver Design Specification
1. Target Device(s) and Protocol
1.1 Introduction
This section defines the types of I/O Devices that are targeted by this driver.
1.2 Device Manufacturer
OMRON Corporation.
1.3 Device Definition
This driver will communicate with any OMRON programmable logic controller supported within
the OMRON FINS network environment. This includes PLCs using the following interfaces:
?? SYSMAC Link
?? Ethernet
?? Host Link/ Controller Link
1.4 Communications Method
The driver communicates with OMRON PLCs via OMRON supplied “middleware” software
running on the same computer as the driver. This “middleware”
?? isolates the driver from dealing with specific communications methods such as
serial or TCP/IP,
?? allows the driver to communicate with any PLC as long as it’s interface is
supported,
?? provides routing and gateway functions between the driver and PLCs,
?? provides an API for the driver via a DLL.
FINS_Extract.DOC
3/05/2002
5
Driver Design Specification
1.5 Controller Link (CLK) Networks
1.5.1 Wiring Diagram
Controller Link
(token bus architecture)
computer with
Citect I/O server
Baud Rate
Settings
3G8F5-CLK21-E
computer board
2Mbps
1Mbps
500Kbps
set terminator switch
on communications
card to on
Max
Transmission
Distance
500m
800m
1km
shield, twisted pair, two-wire cable (specified by Omron)
other nodes, including
computers (max of 32)
C200HW-CLK21
with C200HWCE0** (max of 2
units/CPU)
CUM1-CLK21
set terminator switch on the
last 2 nodes of the bus to
on, set to off on all other
nodes
CV/CUM1
CPU
C200HX/G/E (-Z)E
CPU with C200HWCOM01/04-EUI (max
of 4 units/CPU)
to other (optional) networks,
including Controller Link,
Ethernet, Sysmac Link &
Sysmac Net (max 3 network
hops are possible)
Notes:
?? All nodes have 4 screw terminal connectors.
?? The shield must be externally earthed at one location only.
?? Data links can be configured for all nodes, including computers.
1.5.2 I/O Device Settings
Controller Link (hereafter referred to as CLK) is a 2-wire, token-passing bus network,
supporting up to 32 nodes per network. Currently, only the CV/CVM1 & C200HX/G/E series of
PLCs support CLK & both units will need hardware & software settings to be made. These are
covered in sections 1.5.2.2 & 1.5.2.3 respectively. CLK networks support computer nodes (to
run Citect) via a 3G8F5-CLK21-E interface board; as discussed in section 1.5.2.1.
The cabling needs to be connected so that all the terminals marked with black squares are
connected together and the same for white square terminals, for all nodes. As the CLK
network uses a bus architecture, the in-built terminator at each of the end nodes will need to
be switched to ON. The terminators for all other nodes need to be switched OFF. These are
shown below. The TER led on the node indicates the status of if the resistance. (Refer to
Omron manual W309-E1-1, section 3.3 or more details on wiring, etc.
All nodes in a CLK network must have a unique station number, between 1-32. Also, the baud
rate of the network is variable & all nodes all will need the same in order to communicate. A
data link can be run between the PLCs simultaneously & transparently to Citect.
When a Controller Link network is operating properly, the Run & Ins LEDs will be lit on every
single node. The SD & RD LEDs will flash or remain ON continuously. Ensure that neither the
ERC & ERH LEDs should be lit. A complete fault finding guide is provided in Omron manual
W309-E1-1, section 9.
FINS_Extract.DOC
3/05/2002
6
Driver Design Specification
1.5.2.1 3G8F5-CLK21-E Computer Board Set Up
The 3G8F5-CLK21-E is an ISA compliant computer board, which does not support “Plug-andPlay”, when used in Windows 95. Node number & baud rate settings are made when
configuring the I/O driver in Citect. There are only two hardware settings that need to be made
on the board before installation:
?? Interrupt Request (IRQ), set to either 10 (the default), 11, 12 or 15, but the
setting must be unique for all other devices configured in your computer.
?? Memory address, is set by a 4-pin dip-switch. One of 16 different memory areas
can be configured, with base address C800(hex) being the default. Ensure that
no other device or program requires the memory allocated by this setting.
Refer to Omron manual W307-E1-1, section 2.1 for more details for on these settings.
1.5.2.2 CVM1-CLK21 PLC Set Ups
A maximum of four CVM1-CLK21 units can be installed per CV/CVM1 system. They can be
mounted anywhere on the CPU or CPU Expansion racks. Only three hardware settings need
to be made:
?? Unit number (00-15), which must be unique for all SIOUs connected to the PLC,
?? Node Number (01-32), must be unique for all nodes on the CLK network
?? Baud rate (2M, 1M or 500K), via pins 1 & 2 of the dip-switch bank. The default
baud rate is 2Mb, allowing up to 500M cable to be run. (Refer to Omron manual
W309-E1-1, section 4.2, for more details for this set up)
If more than one network is used, a network number (001-127) needs to be assigned to the
CLK, in the PLC. Full routing tables will need to be set up if inter-network communications are
required. Both these setting can be made by Syswin; from the Project|Routing Table dialogue.
(Refer to Omron manual Syswin-Eman-3.2, pages 8.25-8.27, for more details).
1.5.2.3 C200HW-CLK21 PLC Set Ups
A maximum of two C200HW-CLK21 units can be installed per C200HX/G/E system. They
must be mounted on the right most slot of the CPU rack. A C200H-COM01/04 board & a
C200HW-CE0** bus must be used to connect the CLK21 unit to the CPU. Only three hardware
settings need to be made:
?? Node Number (01-32), must be unique for all nodes on the CLK network
?? Baud rate (2M, 1M or 500K), via pins 1 & 2 of the dip-switch bank. The default
baud rate is 2Mb, allowing up to 500M cable to be run. (Refer to Omron manual
W309-E1-1, section 4.1, for more details for this set up)
?? Level number (0 or 1), via pin 4of the dip-switch bank which must be different
from the other SIOU connected to the PLC.
If more than one network is used, a network number (001-127) needs to be assigned to the
CLK,in the PLC. Full routing tables will need to be set up if inter-network communications are
required. Both these setting can be made by Syswin; from the Project|Routing Table dialogue.
(Refer to Omron manual Syswin-Eman-3.2, pages 8.25-8.27, for more details).
1.5.3 Software Setup
Refer to section 1.8.3 “Software Setup & Configuration” which is common to all supported
OMRON network types.
FINS_Extract.DOC
3/05/2002
7
Driver Design Specification
1.6 Ethernet (ETN) Networks
1.6.1 Wiring Diagram
Ethernet
(10 Base T shown only)
computer with
Citect I/O server
C200HX/G/E/ (-Z)E CPU
with C200HWCOM01/OA-EV1
Network Interface
Card (NIC)
shielded, twisted pair
telephone cables, up
to 100m in length
other nodes (126 are
supported by the FINS
protocol – more are
configurable)
multi-port
hub
other
hubs
CV500ETN01
C200HW-PCU01-EV1 with
Kingston Technology
Ethernet card:
KNE-PCM/T or
KNE-PCM/M
CV/CUM1
CPU
to other (optional) networks,
including Controller Link,
Ethernet, Sysmac Link &
Sysmac Net (max 3 network
hops are possible)
Notes:
?? 10M baud rate used throughout.
?? 10 BASE 5 (ThickNet) supported by the CV500-ETN01 only.
?? 10 BASE 2 (ThinNet) fully supported. It uses a bus type architecture.
?? Data Links can not be configured in Ethernet systems.
?? Automatic address resolutions are not supported, as each node has a table to
map IP address to FINS address.
1.6.2 I/O Device Settings
Ethernet (hereafter referred to as ETN) is a standard industrial network supporting at least 126
nodes per network (more nodes can be configured, but these will not be able to communicate
via the FINS protocol). Currently, only the C200HX/G/E & CV/CVM1 series of PLCs support
ETN & both units will need hardware & software settings to be made. These are covered in
sections 1.6.2.3 & 1.6.2.4 respectively.
All communications between PLCs is via the FINS protocol, over UDP/IP. FINs uses a unique
addressing system, which allows inter-network communications, amongst other things. The
FINS address is unrelated to the IP node address used by Ethernet networks. Each node will
therefore require a table to statically map FINS to IP addresses, as will be discussed. ARP,
RAP or any other automatic IP address resolution system can not be used for nodes that need
to communicate with PLCs.
When a Ethernet network is operating properly, the Run LED will be lit continually. After
applying power the Run LED may take up to 20 seconds to turn on. Before this no
communication will be successful. The SD, RD & the Card LEDs will flash occasionally.
Ensure that the ERR LEDs is not lit. A complete fault finding guide is provided in Omron
manual W313-E1-2, section 12.
FINS_Extract.DOC
3/05/2002
8
Driver Design Specification
1.6.2.1 Computer Node Set Ups
Please refer your computer documentation for all details, including set up, relating to its
Ethernet interface board.
1.6.2.2 CS1 PLC Set Ups
Three hardware settings need to be made:
? ? Unit number (00 – 15). The unit number is used to identify individual CPU Bus Units when
more than one CPU Bus Unit is mounted to the same PC.
? ? Node number (1 – 126). With the FINS communications service, when there are multiple
Ethernet Units connected to the Ethernet network, the Ethernet Units are identified by node
numbers. Do not set a number that has already been set for another node on the same
network.
? ? Local IP Address. The nodes on an Ethernet network are identified by IP addresses. Each IP
address is set with 32 bits of binary data. These 32 bits are divided into four 8-bit fields called
octets, and each octet is expressed as four decimal numbers. At the Ethernet Unit, four bits
are expressed as on hexadecimal digit, and the eight hexadecimal rotary switches (the Local
IP Address Switches) on the back of the Unit are used to set the local IP address.
After the hardware settings and connections have been completed, turn ON the power supply to the
PC and create an I/O table. An I/O table is used to identify Units connected to the PC and to allocate
I/O to them. If any change is made to the Unit configuration of a CS1-series PC, an I/O table must be
created to register the Units to the CPU Unit. To create the I/O table, connect a Programming Device
(such as a Programming Console or CX-Programmer) to the PC. Refer to the CX-Programmer User’s
Manual for an explanation of how to create an I/O table using a CX-Programmer.
FINS_Extract.DOC
3/05/2002
9
Driver Design Specification
When the FINS communications service is used, routing tables must be created in advance. The
routing tables describe the transmission path for FINS messages when the FINS communications are
used. Routing tables must be created by a CX-Programmer connected to the PC. For details on how
to connect and use a CX-Programmer, refer to the CX-Programmer User’s Manual.
The settings for the Ethernet Unit’s basic and special functions are made in the CPU Bus Unit
System Setup. For details on how to make the settings, refer to 4-2 CPU Bus Unit System Setup.
1.6.2.3 CV500-ETN01 PLC Set Ups
A maximum of four CV500-ETN01 units can be installed per CV/CVM1 system. They can be
mounted anywhere on the CPU or CPU Expansion racks. CV500-ETN01 supports 10Base5
(ThickNet), 10BASE2 (ThinNet) and 10BASE2 (Twisted-pair), however, an appropriate MAU
(Media Access Unit) needs to be installed on each ETN unit, for each network type.
Only two hardware settings need to be made:
?? Unit number (00-15), which must be unique for all SIOUs connected to the PLC,
?? Node Number (01-7E hex), must be unique for all nodes on the ETN network
(For more details, refer to Omron manual W242-E1-1, section 2.2).
All other settings need to be made in the PLC, through the Syswin. Once the hardware has
been correctly installed, it is generally best to connect Syswin through the serial port on the
CPU (For more details on how to do this, refer to section 1.8.3).
Once online, settings can be made through the Project|Edit I/O Table menu. Once this menu
is displayed, follow these steps:
?? Press the “Create” to write all the I/O units & their locations into the CPU
?? In the I/O table tree diagram, on the left hand side, the SIO Unit branch should
be displayed in bold, indicating the ERTN unit has been detected. Highlight &
expand this branch by clicking in the ‘+’symbol.
?? The ETN unit should be registered along side its unit number. Highlight it &
Click on the “Unit Setup” button. Any registered setting will now be read in from
the ETN unit.
?? The local IP address & Sub-net mask parameters must be filled in, in
accordance of the network requirements.
?? The following settings are generally the most appropriate ones, although for
certain networks, different options may be required:
?? Keep the FINS UDP Port number at its default value of 9600 (this will allow
PLCs to communicate with each other.
?? IP Address settings – Software switch
?? IP Address Conv. Method - Table
?? Click the “IP Ad Table” button to complete FIN to IP address mapping for each
node in the network.
?? When all settings have been made, click on the “Write” button to download
them to the PLC.
(Refer to Omron manual Syswin-Eman-3.2, pages 6.2,3 & 8, for more details).
If more than one network is used, a network number (001-127) needs to be assigned to the
ETN, in the PLC. Full routing tables will need to be set up if inter-network communications are
required. Both these settings can be made by Syswin; from the Project|Routing Table
dialogue. (Refer to Omron manual Syswin-Eman-3.2, pages 8.25-8.27, for more details).
FINS_Extract.DOC
3/05/2002
10
Driver Design Specification
1.6.2.4 C200HW-PCU01 PLC Set Ups
The C200HW-PCU01-E module handles Ethernet for the C200HX/G/E series. This unit is
actually a 386SX computer & provides two PCMCIA slots, for mounting external memory
modules (for high-capacity data storage) or Ethernet interface cards. Only 10BASE2 (ThinNet)
& 10BASET (Twisted-pair) are supported, not 10BASE5 (ThickNet). A maximum of one
PCU01 unit can be installed per C200HX/G/E system and only one of its slots can be used for
an Ethernet PCMCIA module. It is highly recommended that the KNE-PCM/T PCMCIA module
(made by Kingston Technologies) be used for the Ethernet interface. The PSU01 must be
mounted on the right most slot of the CPU rack. A C200H-COM01/04 board & a C200HWCE01* bus must be used to connect the PCU01 unit to the CPU.
Only one hardware setting needs to be made on the PCU01 & it involves the dip-switch bank
on the front of the unit.
?? Level number (0 or 1), via pin 1of the dip-switch bank. Ensure the level is
different from the other Sysmac communication module in the PLC, if one is
installed.
?? Mode, set both pins 5 & 6 to off to communicate via Ethernet. The run led on
the PCU will turn ON about ten seconds after powering the PLC up. (Refer to
Omron manual W313-E1-2, section 4.3, for more details for this set up)
If more than one network is used, a network number (001-127) needs to be assigned to the
PCU, in the PLC. Full routing tables will need to be set up if inter-network communications are
required. Both these setting can be made by Syswin; from the Project|Routing Table dialogue.
(Refer to Omron manual Syswin-Eman-3.2, pages 8.25-8.27, for more details).
1.6.2.4.1 Software Settings
All other settings need to be made in separate software, which is included in the C200HWPCS01-EV1 package. To operate this software, power down the PLC, set pin 5 of the dipswitch bank to ON & turn on the power again. Connect a RS232 cable between COM1 of your
computer & the RS232 port onboard the PCU01. (Refer to the cable mentioned in section
1.7.2.4 for more details). Install the set up software & run it (Refer to Omron manual W313E1-2, sections 7.5 & 7.6). Ensure that no other software is running at the same time.
The following settings need to be made within the setup software:
?? IP Address & Sub-net mask for the PCU01, as determined by the Ethernet
network. These & other settings will be stored in a file called “Setup.fil”.
?? ODI driver, (SPEC3 must be used, not SPEC4). This file is included in the
Kingston PCMCIA card
?? Host list – creates a file called “Hosts.fil”, listing all the nodes in the network
?? IP to FINS address conversion table – saved in a file called “IP_Fins.fil”.
?? Routing table, even if no routing table is used, the local network address must
be set up to say “7 0” (These are actual keys entered in), where 7 would be the
network number in this case. Relay network addresses need only be set is
internode communications are necessary.
?? Gateway address – if no Gateway address is required, enter “0 0 0 0”. (These
are actual keys entered in)
When all these settings have been made, transmit them to the PCU01 unit. This will take
around 30 minutes.
FINS_Extract.DOC
3/05/2002
11
Driver Design Specification
1.6.2.4.2 Checking/modifying the settings in the PCU01
Once all the files have been downloaded to the PCU01, settings can be checked and/or
changed by following the procedure outlined below:
?? Turn the power off the PLC & set both pins 5 & 6 on the PCU01 to ON. Turn the
power back on the PLC. Note that the Run led on the PCU remains off.
?? The PCU01 will now run MS-DOS, version 5.0 and can be monitored via a
standard computer, running Terminal or Hyperterminal. The communications
settings are: 9600 baud, 8 data bits, 1 stop bit & no parity bit. Connect a RS232
cable between the computer & the port on the PCU01 (not the PLC CPU). The
cable required is the same as the one used in serial communications. Refer to
section 1.7.2.4 for more details.
?? Run a program in the PCU01 called setup2. This program accesses the
parameters in the PCU01. Ensure that all parameters are checked, ie: that all
the options are run at least once to view all parameters. (Changes may not be
effectively made if this is not done).
1. Enter IP address for UNIT.
2. Enter Subnet address for UNIT.
3. Enter ODI Driver Path.
4. Edit HOSTS File.
5. Edit Conversion Table for IP address and FINS Node address.
6. Edit Routing Table for FINS.
7. Edit Gateway address for UNIT.
8. Uninstall.
9. Exit.
Select Number for ITEM(1-9) :
?? Item 4, HOSTS file, all the nodes that you want to talk to the PLC, including
the PLC, must be listed with a unique name, without spaces. It's a good idea to
include spare nodes (as all nodes will need to be entered), but again, give them
unique names without spaces.
Select Number for ITEM(1-9) : 4
Current HOSTS File Name : HOSTS
(0)192.168.10.1 PLC
(1)192.168.10.2 PC
(2)192.168.1.59 Spare node 9
(3)192.168.1.60 Spare node 10
(4)192.168.1.100 Spare PLC 0
(5)192.168.1.101 Spare PLC 1
(6)192.168.1.102 Spare PLC 2
(7)192.168.1.103 Spare PLC 3
(8)192.168.1.104 Spare PLC 4
(9)192.168.1.105 Spare PLC 5
?? Item 5, FINS Table, all nodes need a "FINS address" (as well as the usual IP
address) to be set up, so they can be addressed properly. The table in this step
maps all the IP address to the FINS address. Usually make the FINS address
FINS_Extract.DOC
3/05/2002
12
Driver Design Specification
the same as the last segment of the IP address. The FINS address only goes to
127, so you will need to think of some arbitrary numbers for all your nodes.
Select Number for ITEM(1-9) : 5
Current IP address and FINS Node address : IP_FINS.FIL
(0)192.168.10.1 1
(1)192.168.10.2 2
(2)
(3)
(4)
(5)
(6)
(7)
(8)
(9)
?? When all the changes have been made, exit from setup2 via option 9 in the
software. Hangup the connection from the controlling computer & wait 5
seconds.
?? Turn the power off the PLC & set pins 5 & 6 to off. Ensure that the Run led lights
& the Err led does not light when you repower the PLC.
1.6.3 Software Setup
Refer to section 1.8.3 “Software Setup & Configuration” which is common to all supported
OMRON network types.
1.7 Serial Communications
1.7.1 Wiring Diagram
Host Link Serial network
(Master / Slave architecture)
computer with
Citect I/O server
standard COM ports, require no additional hardware
RS232 (no multiple dropping) (15m max distance)
RS422 (multiple dropping) (500m max distance)
optical fibre (multiple dropping) (800m max distance)
other nodes
CPU mounted (max of 32) rack mounted
host Link unit
host link module
direct connection to
CPU port
separate CIF
interface module
to other (optional)
networks, via remote
connection configuration
FINS_Extract.DOC
3/05/2002
13
Driver Design Specification
Notes:
?? All C & CV series PLCs support the same protocol & can therefore be networked
together.
?? Interface adaptors can be freely used to convert interfaces between RS232 /
RS422 or optical fibre.
?? Omron Unit B500-AL004-EV1 is the recommended unit for this; it supports all
three interfaces.
1.7.2 I/O Device Settings
All of the Omron C, CV & CVM1 series support serial communications, called Host Link. Host
Link supports up to 32 PLCs (multi-dropped) & is available in either RS232, RS422 or optic
fibre interfaces. As the protocol is exactly the same throughout, All Omron PLCs can be
connected to one network and the various interfaces can be used interchangeably.
Host Link connections are made in one of two ways, either directly to the CPU or via some
extra hardware. Set up for both methods is described below.
1.7.2.1 Hardware Devices
Listed below are all the Host Link hardware modules available & the PLCs they can be used
on. When the Host Link unit is working properly, the run LED should be ON continuously & the
RCV & XMT flash accordingly. The ERR led should always remain OFF.
Hardware
CPM1-CIF*1
Applicable PLCs
CPM1/A, SRM1, CQM1 &
C200HX/G/E/S-(Z)E
C200H-LK***
C200H only
C200H-LK***-V1
C200H/S/E/G/X-(Z)E
C500-LK***
C500/C1000H/C2000H
3G2A6-LK***
3G2C7-LK20*-EV1
C**H/C200H/C500/
C1000H/2000H
C20/C**K/C**P
CV500-LK201-EV1
CV/CVM1 series
CS1W/G
CS1 series
Notes
Plugs into the peripheral port, available in
RS232/422. Most settings need to be made
in the software.
Rack mounted module, available in all
three different interfaces.
Like the C200H-LK***, but supports that
later CPUs
Rack mounted unit, providing both
RS232/422
CPU mounted unit, for the older modular
PLC
CPU mounted unit, for the older block-type
PLCs
Requires software settings through Syswin.
Refer to Omron manual W205-E1-3
Requires software setting through CXProgrammer. Refer to the CX-Programmer
User’s Manual for details.
As all dip-switch settings can be made on the actual units them & are clearly marked. The
following notes must be observed when setting the dip-switches:
?? Data parameters – the default host link setting is ASCII data, with 7 data bits,
even parity & 2 stop bits.
?? Baud rate – set all nodes on the network to the same baud rate.
?? Unit number – set all the nodes on the network to a unique number between 00
& 31.
?? Command Levels – enable levels 1, 2 & 3.
?? Procedure – must be set to 1:N.
?? Data format – ASCII
FINS_Extract.DOC
3/05/2002
14
Driver Design Specification
Other settings are generally inconsequential & should be left at defaults.
1.7.2.2 Basic Operation Procedure on CS1-Series PLCs
An overview of the basic operating procedure is provided here.
1. Turn OFF the power supply to the PLC.
2. Set the unit number if a Serial Communications Unit is being used. Set the unit number
switch at the top of the front panel of the Unit to between 0 anf F. the number that is set will
determine which words are allocated as the Setup Area in the DM Area and which words are
allocated in the CIO Area.
3. Install the Board or Unit.
4. Connect the Unit and the external device(s).
5. Turn ON the power supply to the PC.
6. Create the I/O tables if a Serial Communications Units is being used. Creatd the I/O table
using a Programming Device, such as CX-Programmer.
7. Set the serial communications mode and the communications specifications for the Board or
Unit. Use a Programming Device, such as CX-Programmer.
8. make the new settings in the Setup Area valid by performing one of the following.
? ? Turn the power OFF and then ON again. The Setup Area allocated in the DM Area will
be read when the power is turned ON.
? ? Restart the Board by turning ON the Inner Board Restart Bit(A60800) or drestart the Unit
turning ON one of the CS1 CPU Bus Unit Restart Bits (A50100 to A50115, where the bit
number corresponds to the unit number).
? ? Restart the port on the Serial Communications Board by turning ON one of the
Communications Board Port Settings Change Bits (A63601 for port 1 and A63602 for
port 2) or restart the port on the Serial Communications Unit by turning ON one of the
Communications Unit Port Settings Change Bits (A620 to A635: the word will be A620 +
unit number and the bit will be bit 01 for port 1 and bit 02 for port 2).
? ? Execute the STUP(237) instruction. The Board or Unit Setup Area can be changed while
the PC power supply is ON.
Refer to CS1 Serial Communication Board/Module Manual W336-E1-1 for more details.
1.7.2.3 CPU RS232 Ports
Most of the PLCs also have RS232 ports on board that CPUs, which can also be run in other
nodes, to support different protocols or types of communications. The main mode is however
Host Link & this is the only protocol supported by Citect.
Regardless of the software settings, all CPU RS232 ports (except the C**H series) are
controlled by the bank of dip-switches on the front of the CPU. The ports can be set to Host
Link, with “default” parameters, by turning ON pin 5 (for the CQM1 & C200HS/E/G/X series) or
pin 4 (for the CV/CVM1 series). The default settings are: 9600 baud1, 7 data, even parity & 2
stop bits and these can be used to establish communications. (The C**H series requires
DM0920 to be set to 0 to enable the default communication parameters).
When these respect pins are turned OFF, the CPU port will run with its software settings,
which are described below:
Channel
N
N+1
N+2
N+3
N+4
1
Description
Port mode setting: use Host Link, with software settings
19200 baud, 7 data, even parity & 2 stop bits
Leave at 0000
Station node number, between 00-31
Reserved, leave at 0000
Setting
0001
0304
0000
00**
0000
Some older PLCs use 2400 as their default baud rate
FINS_Extract.DOC
3/05/2002
15
Driver Design Specification
Value of channel N
DM6645
DM6650
DM6550
DM6556
Applicable CPU port
RS232 port onboard: C200HX/G/E/S, CQM1 & SRM1
Peripheral port, using a CPM1-CIF*1 interface, for CPM1, SRM1,
CQM1 C200HX/G/E/S
Port B, on the COM board, for the C200HX/G/E series
Port A, on the COM board, for the C200HX/G/E series
When communications are in progress, the COM led on the CPU will flash. This led may be
shared amongst several ports.
1.7.2.4 RS232 Cable Connections
While several cables can be configured, the cables below will are correct for all PLCs & can
be used by both Citect & Syswin. Note that the C**H series has a 9-way connector but uses
the same wiring assignment as the 25-way connector.
Computer (25 pin female)
PC
TD 2-------------------------3
RD 3-------------------------2
SG 7-------------------------9
RTS 4--|
CTS 5--|
(9pin male)
RD
TD
SG
|--4 RTS
|--5 CTS
DTR 20-|
DSR 6 -|
Computer (9 pin female)
PC (9pin male)
RD 2-------------------------2 TD
TD 3-------------------------3 RD
SG 5----------------------|--9 SG {C200H(S), CQM1, CVM1 only}
|--7 SG {C20H, C40H, C60H, C28 only}
CTS 8--|
RTS 7--|
|--4 RTS
|--5 CTS
DTR 4--|
DSR 6--|
Note: The OMRON DB9 pin connections vary between some C/CV series Controllers thus a
universal DB9F cable linking pin 7 to 9 can be used.
1.7.3 Software Setup
Refer to section 1.8.3 “Software Setup & Configuration” which is common to all supported
OMRON network types.
FINS_Extract.DOC
3/05/2002
16
Driver Design Specification
1.8 Sysmac Link (SLK) Networks
1.8.1 Wiring Diagram
Sysmac Link
(token bus architecture)
computer with
Citect I/O server
3G8F5-SLK21-E computer
board (max 1 / network)
75 ohm terminator
adaptor on last node
75 ohm coaxial cable,
2Mbps, 1km transmission
distance, max 62 nodes
C500/ 1000H /
C2000H
C1000H-SLK21-U
(max 2 units / CPU)
C200H/S/E/G/X –(Z)E
CV/CVM1 CPU
CPU with Sysmac
network interface
C200HW-SLK23/24
CV500-SLK21 (max
with C200H(W)-CE**
4 units / CPU)
(max 2 units / CPU)
75 ohm terminator
adaptor on last node
to other (optional) networks,
including Controller Link,
Ethernet, Sysmac Link &
Sysmac Net (max 3 network
hops are possible)
Notes:
?? Fibre optic Sysmac Link is not supported.
?? The Sysmac network interface is provided by the C200HW-COM01/04-EV1 for
the C200HX/G/E series.
?? The maximum number of Sysmac Link units installed is reduced if other high
speed communication units are installed.
1.8.2 I/O Device Settings
Sysmac Link (hereafter referred to as SLK) is a token-passing bus network, supporting up to
62 nodes per network. The CV/CVM1, C200HX/G/E C2000H/1000H & C200H/S series of
PLCs support SLK, which need hardware & possibly software settings to be made. These are
covered in sections 1.8.2.2 & 1.8.2.3. SLK networks support computer nodes (to run Citect)
via a 3G8C2-SLK21-E interface board; as discussed in section 1.8.2.1.
Two cabling systems exist: coaxial (75? ) & fibre optic. The bus architecture requires separate
terminators to be installed in the end nodes for the coaxial system. As shown below.
Terminators are not required in optical systems. (Refer to Omron manual W174-E1-4, section
3.3 or more details on wiring, etc. A fault finding guide is provided in section 9 of the same
manual).
All nodes in a SLK network must have a unique station number, between 1-62 & this is set up
on the hardware. A data link can be run between the PLCs simultaneously & transparently to
Citect.
When a Sysmac Link network is operating properly, the Run & Ins LEDs will be lit on every
single node. The SD & RD LEDs will flash or remain ON continuously. Ensure that neither the
TS, ERC & ERH LEDs are lit. A complete fault finding guide is provided in Omron manual
W174-E1-4, section 8.
If more than one network is used, a network number (001-127) needs to be assigned to the
CLK, in the PLC. Full routing tables will need to be set up if inter-network communications are
FINS_Extract.DOC
3/05/2002
17
Driver Design Specification
required. Both these setting can be made by Syswin; from the Project|Routing Table dialogue.
(Refer to Omron manual Syswin-Eman-3.2, pages 8.25-8.27, for more details).
1.8.2.1 3G8C2-CLK21-E Computer Board Set Up
The 3G8F5-CLK21-E is a ISA compliant computer board, which does not support “Plug-andPlay”, when used in Windows 95. Node number settings are made when configuring the I/O
driver in Citect. There are only three hardware settings that need to be made on the board
before installation:
?? Interrupt Request (IRQ), can be set to either 10 (the default), 11, 12 or 15, but
the setting must be unique for all other devices configured in your computer.
?? Memory address, is set by the 8-pin dip-switch. One of 4 different memory
areas can be configured, with base address D800(hex) being the default. Ensure
that no other device or program requires the memory allocated by this setting.
?? Node number (01-62), is set by two rotary dials & must be unique for all nodes
on the SLK network.
Refer to Omron manual W220-E1-1, section 2.3 for more details for these switch settings.
1.8.2.2 CVM1-SLK11/21 PLC Set Ups
A maximum of four CVM1-CLK21 units can be installed per CV/CVM1 system. They can be
mounted anywhere on the CPU or CPU Expansion racks. Only two hardware settings need to
be made:
?? Unit number (00-15), which must be unique for all SIOUs connected to the PLC,
?? Node Number (01-62), must be unique for all nodes on the SLK network
Refer to Omron manual W212-E1-1, section 2.2, for more details for this set up
1.8.2.3 C1000H-SLK11/21 And C200HW-SLK13/14/23/23 PLC Set Ups
A maximum of two of the above units can be installed per appropriate PLC system.
C2000H/1000H-SLK units can be mounted on any slot on the CPU rack that supports
communications. For all the C200H systems, SLK units must be mounted on the right most
slot of the CPU rack. The C200H/S will require a CPU with Sysmac communications & a
C200H-CE0** bus. The C200HX/G/E will require a C200H-COM01/04 board & a C200HWCE0** bus must be used to connect the SLK21 unit to the CPU.
For all SLK units two hardware settings, need to be made:
?? Node Number (01-62), is set buy the must be unique for all nodes on the SLK
network
?? Both units have dip-switches to set the level number (0 or 1), which must be set
to be different to other SIOUs connected to the PLC. It is important that all other
pins indicated as test switches, be left in the OFF position, as requested.
Refer to Omron manual W174-E1-4, section 2, for more details on the mounting positions &
setting up of these units.
1.8.3 Software Setup
Refer to section 1.9 “Software Setup & Configuration” which is common to all supported
OMRON network types.
FINS_Extract.DOC
3/05/2002
18
Driver Design Specification
1.9 Software Setup & Configuration
This section describes software setup & configuration for OMRON middleware software
redistributed with Citect to support the FINS driver. There is a separate set of files for each of
CLK/ ETN/ serial/ SLK interfaces.
*** only CLK interfaces are currently described by this document
1.9.1 Minimum Requirements
?? Windows NT4.0 or Windows 95
?? PC/AT compatibles
?? Intel Pentium CPU, 90 MHz or faster
?? 32 MB or more RAM
?? 6 MB or more disk space (for OMRON software only)
1.9.2 Setup
?? Determine the hard disk directory into which software is to be installed. The
disk space is approximately 6 MB. Unless you specify otherwise, the software
will
be
installed
in
the
default
directory
"C:\Program
Files\OMRON\FinsServerNT" or “C:\Program Files\OMRON\FinsServer95".
?? Determine the IRQ and shared RAM area address of the Controller Link support
board that is to be installed. Ensure that they do not conflict with any existing
boards.
?? Login your system as “Administrator” group.(on WindowsNT only)
?? Create 2 temporary directories c:\temp\disk1 and c:\temp\disk2. Copy the
following files:
Interface
for CLK network
for ETN network
for serial network
for SLK network
Windows 95
copy ZIP file copy ZIP file
to disk2
to disk1
directory
directory
Windows NT4.0
copy ZIP file copy ZIP file
to disk2
to disk1
directory
directory
clw95dk1.zip
clnt4dk1.zip
clw95dk2.zip
clnt4dk2.zip
?? Uncompress each file into the same directory.
?? disk1 will contain a setup.exe. Run this file. Proceed with the installation
according to the directions given. The only item to decide in the installation is
the directory in which to install the program.
?? The system must be rebooted when setup is completed.
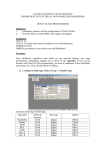
1.9.3 Starting “Service Manager”
The setup process will create a setup of menu items on the startbar. Refer to the following
screen capture.
FINS_Extract.DOC
3/05/2002
19
Driver Design Specification
Run the “Service Manager” program. An icon will appear in the tray of the Task Bar. When this
icon is right-clicked, a menu containing the items “Setting” and “Terminate” will be displayed.
Select “Setting” from the menu and start the required services from the dialog box by selecting
a service and clicking on the start button. CPU_UNIT is always required and should always be
started2. CLK_UNIT0 is required when Controller Link is used.
Services that have started normally will be indicated by "Start" next to the service name. If the
Status column for a selected service does not indicate "Start" or an error dialogue box
appears, the nature of the error can be checked on WindowsNT using the “Event Viewer” on
the menu “Administrative Tools”. With Windows9x, the error is checked with ***3.
Services can be automatically started when the computer is powered up. Check the box
“Automatically Run on logon” to automatically start the Service Manager, and select each
service, click Property button, and set Execute Type to Auto.
2
3
the order of starting services doesn’t matter
Windows95 doesn’t have an event log, not sure how errors are logged
FINS_Extract.DOC
3/05/2002
20
Driver Design Specification
When setting automatic startup, first check that the services start and operate normally by
manual starting. If automatic startup is specified even though there is a problem, the system
itself may fail to start.
1.9.4 Controller Link Settings
Run the “CLK Network Config” program from Programs / FinsGateway group on startbar to
modify Controller Link settings. The following dialog box will be displayed (exact settings will
vary):
Set the node address and unit address as required. The unit address should correspond to the
two thumbwheel switches on front of the CLK21 panel. The network address is set with the
“FINS Network Navigator” program after starting the CLK_UNIT0 service, the network address
is always displayed as 0 here.
The Controller Link Set Driver dialog box will be displayed when the Set Driver button is clicked. Set
the same values for the IRQ and RAM area address of the Controller Link support board as the driver
settings.
FINS_Extract.DOC
3/05/2002
21
Driver Design Specification
1.9.5 Network Settings
Run the “Fins Network Navigator” program from Programs / FinsGateway group on startbar to modify
network settings. The following dialog box will be displayed (exact settings may differ):
?? Confirm that the required (network/ service/ interface) is listed in Network
Information. Network Information indicates the configuration of current networks;
i.e., network address, node address, and unit address. In this example, the
network address is 0, the node address is 1, and the unit address is 17.
?? ‘0’ can be used for the network address (indicates default network) only when
one network exists. When two or more networks a (e.g. Ethernet and Controller
Link), a non-zero address must be assigned to each network. The OMRON
convention is 2 for serial, 4 for CLK and 7 for ETN networks.
?? Select the network, then press the Property button. For example, the following
dialog box will be displayed for a Controller Link network (the network address is
normally enabled):
FINS_Extract.DOC
3/05/2002
22
Driver Design Specification
?? Press the Add button when configuring relay networks.
?? Press the Apply button upon completion of configuring networks. The network
address set will not become valid until the Apply button is clicked, then click Yes
to confirm the Routing Table change. This step must always be performed after
making any change.
?? Click Close button.
1.9.6 Confirming Communications Operations
Run the “Fins Network Tester” program from Programs / FinsGateway group on startbar to
conduct simple communications within the node. The following dialog box will be displayed:
The PeerAddr textbox contains the address to the device to which a message will be sent.
Two addresses are relevant to testing, the Controller Link address (eg. 0.0.17), but more
importantly the CPU address (eg. 0.17.0).
?? Set the PeerAddr textbox to Controller Link address.
?? Set the message as "0501" (to read the controller information).
?? Click the Start button.
?? The received message textbox will display the CLK response if the system is
operating correctly.
?? Set the PeerAddr textbox to CPU address.
?? Click the Start button.
?? The received message textbox will display the CPU response if the system is
operating correctly.
?? Change Send Times to INFINITE, click Start again and observe rapid
sending/receiving of messages. “send SID” field should increment from 00 to FF
continually within 10 seconds without errors.
FINS_Extract.DOC
3/05/2002
23
Driver Design Specification
1.9.7 Uninstalling
Before uninstalling:
?? any Citect project must be exited
?? all running OMRON services must be stopped
?? the Service Manager must be terminated - run the “Service Manager” program
from Programs / FinsGateway group on startbar if not already running, rightclick on tray icon and selected Terminate from context menu
Then,
?? Run “Add/Remove Programs” program from Control Panel. The following dialog
box will be displayed:
?? select the appropriate software to uninstall then click the Remove button
?? after uninstallation, the computer will need to be rebooted
1.10 Syswin Programming Software
Syswin is the programming software used to program & configure all the Omron PLCs &
networks. Version 3.2 is the latest version of Syswin & it runs on all networks that support
programming. A simple upgrade is available for all 2.* & 3.* users.
Syswin is a 16-bit Windows application, meaning that it can be installed on Windows 31., 95 &
NT (both NTFS & FAT). It requires around 8Mb RAM & 10Mb of hard disk space & numerous
other requirements in your computer.
Syswin software is copy protected & requires either a hardware dongle or software token to
operate. It is installed by running the Setup program from the first installation disk. For more
information on the installation & copy-protection of Syswin, refer to Omron manual Syswin
FINS_Extract.DOC
3/05/2002
24
Driver Design Specification
V3.2 Users manual, pages 1-6 to 1-9. For more information on advanced installations (ie:
running on networks or remote servers, etc), refer to chapter 11 of the same manual.
The cable configuration used for serial communications, by Syswin is exactly the same as that
used by Citect & is shown in section 1.7.2.4. While Syswin can run simultaneously to Citect, it
does not use the same communication drivers as Citect & can therefore not communicate to
the same device at the same time.
Running Syswin over Ethernet only requires a standard Ethernet card, with all the appropriate
settings made in Windows Control Panel, under networks. (Refer to page 8-10 of the Syswin
Users manual for more details).
Syswin supports the Controller Link board, but only under Windows 3.1 & 95. This is because
the vclkd.386 driver file needs to be loaded in the System.ini file, in the Windows directory.
(This file is supplied in the master disks). Various other settings need to be made in the
System.ini file. (Refer to page 8-10 of the Syswin Users manual for more details) Note that
Citect can not use Controller Link when this file is installed.
Syswin also supports both Sysmac Link & Sysmac Net computer boards, but only when using
Windows 3.1 or 95. This is because two MS-DOS based drivers need to be loaded in the
config.sys file. Both these files are supplied with the software disk supplied with the actual
computer board. (Refer to pages 8-8 & 8-9 of the Syswin Users manual for more details)
1.11 Miscellaneous Notes
The rest of the notes in section 3 are for specific OMRON PLCs are indicated.
1.11.1 SYSMAC Support Software set up:
?? Install SSS SYSMAC Support Software to C:\SYSMATE, located in
H:\CITECT\TESTING\PROTOCOL\OMFINS\SYSMATE ***
?? Add to AUTOEXEC.BAT
PATH = ... C:\SYSMATE
?? Add to CONFIG.SYS
DEVICE = C:\SYSMATE\SPDWADRV.DEV
DEVICE = C:\SYSMATE\SPDTLDRV.DEV
?? Run C:\SYSMATE\SSS.BAT
?? Type S from the menu
PC Model = CVM1-CPU21
PC interface = host link
SERIAL = COM1, 9600, 7, E, 2
NET=000, NODE=000, NAME=""
Note: To connect to the controller type CTRL+O, followed by F1.
If the device
communications fails a communications error message will appear after the
WATCH_DOG_TIMEOUT has expired.
1.11.2 OMRON CVM1 PC Settings:
?? Set serial communications DIP switch to RS-232
?? Set DIP switch settings behind front panel on host link of CVM1-CPU21 PC to:
FINS_Extract.DOC
3/05/2002
25
Driver Design Specification
DIP SWITCH
6
5
4
3
2
1
DESCRIPTION
TERMINATION
AUTO BOOTING
HOST LINK DEF
HOST LINK
PERIPHERAL BAUD RATE
PERIPHERAL BAUD RATE
VALUE
0
0
1
0
1 (9600)
0 (9600)
?? Turn on power to PC after changes have been made while PC is off.
1.11.3 OMRON CV500-ETN01 Settings:
?? Set front panel switches to the following:
UNIT (01-15) note that 00 appears to be used for the CPU (eg. 01)
NODE (1-126) must be unique for each ETN module(s) sharing a FINS
network (eg. 06)
?? Turn on power to PC after changes have been made while PC is off.
1.11.4 OMRON PS221 Power Supply Unit Wiring
The PS221 start input terminals need to be bridged to start data monitoring using CVSS.
Otherwise a CVSS “CPU waiting” error will appear at some time, and will not disappear until
this is done.
1.11.5 OMRON UDP Port/Socket address Setup
?? By default the OMRON CV-Series uses a UDP port setting of 9600. (NB. if bit
04 of SIOU byte +1 is off, and UDP port number +16, +17 are also 0.
?? To change the UDP port number do the following:
?? Run SSS SYSMAC Support Software
?? Press ESC, (to remove menu)
?? Press CTRL+O, followed by F1 <online programming>, the banner will then
show PROGRAM if successful.
?? Select SSS Menu options as follows:
?? Utility||CPU Base Unit Setup||CPU SIOU Unit System Setup, Note this menu
option will not appear unless in PROGRAM mode
?? Select UDP Port number (must be the same for all CV series that are to
communicate with each other) range 1024 to 65535.
?? Set the SIOU Memory array as follows:
+01
[***1 ****]
Enable non - default UDP port number bit 04
+16
[**** ****]
UDP High byte
+17
[**** ****]
UDP High byte
?? Exit CVSS, press CTRL+O, followed by F1 <off-line programming>, the banner
will then remove PROGRAM if successful.
?? From the Setup menu exit (warning: exit option will be disabled if in PROGRAM
mode).
FINS_Extract.DOC
3/05/2002
26
Driver Design Specification
1.11.6 OMRON ETN IP address Setup
?? Select an IP address (eg205.122.56.6) note that the IP node address “d” must
be the same as the FINS node address set on the front panel of the ETN
module.
?? Run SSS SYSMAC Support Software
?? Use CTRL+O, followed by F1 <online programming>
?? Select SSS Menu options as follows:
?? Utility||CPU Base Unit Setup||CPU SIOU Unit System Setup
?? Note this menu option will not appear unless in PROGRAM mode
?? Select IP address a.b.c.d, where a,b,c,d are 8 bit numbers
?? Set the SIOU Memory array as follows:
+08
[**** ****]
IP Address a.*.*.* as binary
+09
[**** ****]
IP Address *.b.*.* as binary
+10
[**** ****]
IP Address *.*.c.* as binary
+11
[**** ****]
IP Address *.*.*.d as binary
+12
[**** ****]
Subnet Mask 255.*.*.* as binary
+13
[**** ****]
Subnet Mask *.255.*.* as binary
+14
[**** ****]
Subnet Mask *.*.255.* as binary
+15
[**** ****]
Subnet Mask *.*.*.255 as binary
Note: Refer to Ref 1 Sec 2.6 Ethernet Unit System Setup for details
IP Address example: 205.122.56.1
ADDRESS
INDEX
+08
+09
+10
+11
+12
+13
+14
+15
FINS_Extract.DOC
BINARY
HEX
DECIMAL
[1100 1101]
[0111 1010]
[0011 1000]
[0000 0001]
[1111 1111]
[1111 1111]
[1111 1111]
[0000 0000]
0xCD
0x7A
0x38
0x01
0xFF
0xFF
0xFF
0x00
205
122
56
1
255
255
255
0
3/05/2002
27
Driver Design Specification
1.11.7 OMRON CVM1-CPU Routing Table Setup
?? Select a unique FINS network ID (1-127) for the each ETN module connected to
the CPU BUS. (eg 2)
?? Each ETN module on a CVM1 CPU bus will have a unique unit number (eg 01)
?? The Network routing table of the CPU must be configured before
communications can commence.
?? The steps are as follows:
?? Run SSS
?? press [ESC]
?? press [end], [up arrow] to advance to the Utility menu option Network Support
Table
?? Select R: Routing Table
Loc Network # SIOU Unit #
<FIN Net ID>
<as per front panel of ETN>
?? press [end] and select Edit routing table
Note: if more than one ETN module is located on the CPU BUS then
the table will need to be extended by selecting F1 Net #. Must Be off-line to do
this.
?? once values have been entered press F10 to return to menu
?? Select Save Routing Table to C:\NEWRTR [enter], now the required
configuration
is
saved
to
a
file.
(example
in
H:\CITECT\PROTOCOL\OMFINS\ROUTE.RTG)
?? press CTRL+O on the main menu , followed by F1 to enter on-line monitor
mode
?? press [end], [up arrow] to advance to the Utility menu option Network Support
Table
?? Select R: Routing Table
?? press [end] and select Transfer routing table (use defaults)
Select transfer Computer -> PC (to down-load)
?? press CTRL+O on the main menu , followed by F1 to enter off-line monitor
mode
?? Select from the main menu Set-up Exit
?? Cycle power on the CVM1 PC to work with new values
1.12 Special Requirements
WINSOCK.DLL must be installed in Windows for UDP/IP communications.
TCPIP.DLL must be installed in Windows for TCP/IP communications.
1.13 Maximum Request Length
The maximum request length is 256 bytes.
FINS_Extract.DOC
3/05/2002
28
Driver Design Specification
2. User Interface
2.1 Introduction
This section defines how the user will see the driver. This relates directly to how the Citect
forms need to be filled out and any special INI options. For the kernel, the debug trace
messages and the Stats.Special counters are documented.
2.2 Driver Name
FINS
2.3 Boards Form
2.3.1 Board Type
FINS
2.3.2 Address
This value should be 0.
2.3.3 IO Port
Leave this field blank.
2.3.4 Interrupt
Leave this field blank.
2.3.5 Special Opt
Leave this field blank.
2.4 Ports Form
2.4.1 Port number
Enter a unique number.
2.4.2 Baud Rate
Leave this field blank.
2.4.3 Data Bits
Leave this field blank.
FINS_Extract.DOC
3/05/2002
29
Driver Design Specification
2.4.4 Stop Bits
Leave this field blank.
2.4.5 Parity
Leave this field blank.
2.4.6 Special Opt
Leave this field blank.
2.5 IO Devices Form
2.5.1 Name
Enter a unique name (different other IO device names with the same port name, could be
blank if only 1 IO device).
2.5.2 Protocol
Enter FINS for C/CV-Series PLCs
Enter FINS3 for CS1-Series PLCs.
2.5.3 Address
Enter FINS CPU unit destination address in the form:
net.node.unit
where
?? net is the FINS network address (1-127)
?? node is the FINS node address (1-126)
?? unit is the FINS CPU unit address4 (0-15)
For example:
4.17.0 (NOT 4.10.17)
Note that the address is for the CPU unit NOT the serial/ CLK/ ETN/ or SLK unit. Refer to
section 1.9.6 “Confirming Communications Operations” for address testing and confirmation.
2.6 Pulldown lists Help
The following entries should be included in the Citect HELP.DBF spec file.
TYPE
DATA
BOARDTYPE
FINS
PROTOCOL
FINS
PROTOCOL
FINS3
4
FILTER
the CPU is generally unit 0
FINS_Extract.DOC
3/05/2002
30
Driver Design Specification
2.7 IO Device Variable Types
2.7.1 Formats and types
2.7.1.1 For C/CV-Series PLCs
IO Device Type
IO relay
IO relay
IO relay word
data memory
timer PV
Counter PV
step timer
bus link area
bus link area
auxiliary area
auxiliary area
Register area
Register area
timer completion flag
counter completion
flag
step timer flag
action flag
transition flag status
IO relay
link relay
Holding relay
timer / counter
Status
Error
data memory
timer / counter preset
value
Citect data
format
n.b
CIOn.b
CIOn
Dn
Tn
Cn
STn
Gn
Gn.b
An
An.b
Irn
DRn
TFn
CFn
Citect data
types
INTEGER
INTEGER
INTEGER
INTEGER
INTEGER
INTEGER
INTEGER
INTEGER
INTEGER
INTEGER
INTEGER
INTEGER
INTEGER
DIGITAL
DIGITAL
Description/Special Usage/Limitations/ Valid Ranges
0.0 to 2555.15
0.0 to 2555.15
0 to 2555
0 to 24575
0 to 1023
0 to 1023
0 to 1023
0 to 255
0.0 to 255.15
0 to 511
0.0 to 511.15
0 to 2
0 to 2
0 to 1023, read-only
0 to 1023, read-only
STFn
Can
TNn
N
LRn
HRn
TCn
Sn
En
DMn
PVn
DIGITAL
DIGITAL
DIGITAL
DIGITAL
DIGITAL
DIGITAL
DIGITAL
DIGITAL
DIGITAL
INTEGER
INTEGER
0 to 1023, read-only
0 to 2047, read-only
0 to 1023, read-only
0 to 36815
0 to 1023
0 to 1599
0 to 511
0 to 15
0 to 31
0 to 4095
0 to 511
Where
??
Valid ranges will vary between PLC models
??
n is the decimal word address
??
b is the bit address (0 to 15)
2.7.1.2 For CS1-Series PLCs
IO Device Type
IO relay bit
IO relay bit
IO relay word
FINS_Extract.DOC
Citect data
format
n.b
CIOn.b
n
Citect data
types
INT,LONG,REAL
INT,LONG,REAL
INT,LONG,REAL
3/05/2002
Description/Special Usage/Limitations/ Valid
Ranges
0.0 to 6143.15
0.0 to 6143.15
0 to 6143
31
Driver Design Specification
IO relay word
Data memory
Data memory
Degister area
Timer PV
Timer completion flag
Holding relay word
Holding relay bit
Counter PV
Counter completion
flag
Auxiliary area
Auxiliary area
Register area
Work area word
Work area bit
CIOn
Dn
DMn
DRn
Tn
TFn
HRn
HRn.b
Cn
CFn
INT,LONG,REAL
ARn
ARn.b
IRn
WRn
WRn.b
INT,LONG,REAL
INT,LONG,REAL
INT,LONG,REAL
INT,LONG,REAL
INT,LONG,REAL
DIGITAL
INT,LONG,REAL
INT,LONG,REAL
INT,LONG,REAL
DIGITAL
INT,LONG,REAL
LONG
INT,LONG,REAL
INT,LONG,REAL
0 to 6143
0 to 32767
0 to 32767
0 to 15
0 to 4095
0 to 4095, read-only
0 to 511
0.0 to 511.15
0 to 4095
0 to 4095, read-only
0 to 959 (0 – 447 read-only)
0.0 to 959.15 (0.0 – 447.15 read-only)
0 to 15
0 to 511
0.0 to 511.15
Where
??
n is the decimal word address
??
b is the bit address (0 to 15)
2.7.2 driver.dbf Entries
2.7.2.1 FINS.dbf for C-Series and CV-Series PLCs
TEMPLATE
A%U(0,0,511)
A%U(0,0,511).%u(0,0,15)
AC%U(0,0,2047)
AR%U(0,0,27)
AR%U(0,0,27).%u(0,0,15)
C%U(0,0,1023)
CF%U(0,0,1023)
%U(0,0,2555)
CIO%U(0,0,2555)
%U(0,0,2555).%u(0,0,15)
CIO%U(0,0,2555).%u(0,0,15)
D%U(0,0,24575)
DM%U(0,0,24575)
DR%U(0,0,2)
G%U(0,0,255)
G%U(0,0,255).%u(0,0,15)
HR%U(0,0,1599)
HR%U(0,0,1599).%u(0,0,15)
LR%U(0,0,1023)
LR%U(0,0,1023).%u(0,0,15)
PV%U(0,0,511)
S%U(0,0,11)
ST%U(0,0,1023)
STF%U(0,0,1023)
FINS_Extract.DOC
UNITTYPE
0
1
2
3
4
5
6
7
7
8
8
9
9
10
12
13
14
15
17
18
19
20
21
22
RAWTYPE
1
1
0
1
1
1
0
1
1
1
1
1
1
1
1
1
1
1
1
1
1
1
1
0
BITWIDTH
16
16
1
16
16
16
1
16
16
16
16
16
16
16
16
16
16
16
16
16
16
16
16
1
LOW HIGH COMMENT
0
0
0
0
0
0
0
0
0
0
0
0
0
0
0
0
0
0
0
0
0
0
0
0
3/05/2002
0
0
0
0
0
0
0
0
0
0
0
0
0
0
0
0
0
0
0
0
0
0
0
0
Auxiliary area, C series
Auxiliary area, C series, max A511.15
Action Flag, Read Only
Auxiliary Relays, C series only
Auxiliary Relays, C series only
Counter Present Value
Counter Completion Flag, Read Only
IO Relays words
IO Relays words
IO Relays, C series
IO Relays, C series
Data Memory
Data Memory
Register area
Bus link area
Bus link area, max G255.15
Holding Relay, C series, 1599=HR9915
Holding Relay, C series, 1599 =HR9915
Link Relay, C series, 1023=LR6315
Link Relay, C series, 1023=LR6315
Timer/Counter Present Value
Status
Step Timer
Step Timer Flag, Read Only
32
Driver Design Specification
T%U(0,0,1023)
TC%U(0,0,511)
TF%U(0,0,1023)
TN%U(0,0,1023)
TR
TR%U(0,0,7)
23
24
25
26
27
28
1
0
0
0
1
0
16
1
1
1
16
1
0
0
0
0
0
0
0
0
0
0
0
0
Timer Present Value
Timer / Counter
Timer Completion Flag, Read Only
Transition F lag status, Read Only
2.7.2.2 FINS_CS1_Series.dbf for CS1-Series PLCs
TEMPLATE
AR%U(0,0,959)
AR%U(0,0,959).%u(0,0,15)
C%U(0,0,4095)
CF%U(0,0,4095)
%U(0,0,6143)
CIO%U(0,0,6143)
%U(0,0,6143).%u(0,0,15)
CIO%U(0,0,6143).%u(0,0,15)
D%U(0,0,32767)
DM%U(0,0,32767)
DR%U(0,0,15)
HR%U(0,0,511)
HR%U(0,0,511).%u(0,0,15)
IR%U(0,0,15)
T%U(0,0,4095)
TF%U(0,0,4095)
WR%U(0,0,511)
WR%U(0,0,511).%u(0,0,15)
UNIT- RAW- BITLOW
TYPE TYPE WIDTH
3
1
16
0
4
1
16
0
5
1
16
0
6
0
1
0
7
1
16
0
7
1
16
0
8
1
16
0
8
1
16
0
9
1
16
0
9
1
16
0
10
1
16
0
14
1
16
0
15
1
16
0
16
4
32
0
23
1
16
0
25
0
1
0
29
1
16
0
30
1
16
0
HIG
H
0
0
0
0
0
0
0
0
0
0
0
0
0
0
0
0
0
0
COMMENT
Auxiliary Relays, AR000 -AR447 Read Only
Auxiliary Relays, AR000 -AR447 Read Only
Counter Present Value
Counter Completion Flag, Read Onl y
IO Relays words
IO Relays words
IO Relays
IO Relays
Data Memory
Data Memory
Register area
Holding Relay
Holding Relay
Register area
Timer Present Value
Timer Completion Flag, Read Only
Work Area words
Work Area bits
2.8 PROTDIR.DBF
TAG
FILE
BIT_BLOCK
MAX_LENGTH
OPTIONS
FINS
FINS3
FINS
FINS_CS1_Series
2048
2048
2048
2048
0x3b
0x07b
where 0x3b is equivalent to setting the following option bits:
OPT_DIGITAL
OPT_INTEGER
OPT_LONG
OPT_BCD
OPT_LONG_BC
D
OPT_REAL
FINS_Extract.DOC
0x00001
0x00002
0x00008
0x00010
0x00020
0x00040
3/05/2002
33
Driver Design Specification
2.9 Parameters and INI options
2.9.1 Standard Parameters
Name
Block
Delay
MaxPending
Polltime
Timeout
Retry
WatchTime
Defa
ult
256
1
25
0
1000
1
30
Allowable Values
Comments
0 - 20
1 - 32
250 - 10000
0-5
not used by driver
(milliseconds)
(seconds)
2.9.2 Driver Specific Parameters
None.
2.10 Remapping
Remapping is not provided.
2.11 Driver Specific Errors
No driver specific errors are used. All errors returned use generic error codes.
2.12 Driver Error Help
The following entries should be included in the Citect PROTERR.DBF spec file.
PROTOCOL
MASK
ERROR
MESSAGE
REFERENCE
ACTION
COMMENT
2.13 Debug Messages
None.
2.14 Stats Special Counters
Number
0
1
2
3
Label
Write
Read
StatusUnit
LastApiError
Purpose/Meaning of this counter
Number of Citect WriteDCB() requests
Number of Citect ReadDCB() requests
Number of Citect StatusUnit () requests
Last non zero error number returned from a FinsGateway API function
call (refer para. 2.15.1 “Recovery From Power Failure / Cable Removal
It has been observed that the Omron middleware and FINS
driver will recover very quickly from CLK cable removal. #COM
will be displayed immediately the cable is removed, values will
be displayed immediately the cable is reconnected.
5
a value of 10 would occasionally result in "send buffer overflow" event log messages although no
API error code
FINS_Extract.DOC
3/05/2002
34
Driver Design Specification
It has been observed that the Omron middleware and FINS
driver will recover very slowly from PLC power failure. After
power is removed it appears that Omron middleware will cache
values for 5 to 20 seconds before #COM is displayed. Once
power is restored, it may take up to 3 minutes before the driver is
performing at full speed.
4
LastRespCodeMajor
5
LastRespCodeMinor
6
7
8
9
10
Transmit
Receive
ActiveReqs
SIDMatchError
LastRespCodeMinor
OMRON API Return Codes”)
Last non zero response code (1st byte) returned from a response
message (refer para. Error! Reference source not found. “Error!
Reference source not found.”
Last non zero response code (2nd byte) returned from a response
message (refer para. Error! Reference source not found. “Error!
Reference source not found.”
number of Fins_sendData()'s
number of Fins_receiveData()'s
number of outstanding requests
number of InitUnit()'s
2.15 Hints and Tips
2.15.1 Recovery From Power Failure / Cable Removal
It has been observed that the Omron middleware and FINS driver will recover very quickly
from CLK cable removal. #COM will be displayed immediately the cable is removed, values
will be displayed immediately the cable is reconnected.
It has been observed that the Omron middleware and FINS driver will recover very slowly
from PLC power failure. After power is removed it appears that Omron middleware will cache
values for 5 to 20 seconds before #COM is displayed. Once power is restored, it may take up
to 3 minutes before the driver is performing at full speed.
2.15.2 OMRON API Return Codes
See reference 1. para. 6.1.1. Displayed in Stats Special Counter #3.
Code
Definition
Meaning
1
NOT_SUPPORTED
service is not supported
2
INVALID_HANDLE
incorrect network handle
3
NOT_ENOUGH_MEMORY
impossible to execute because of memory shortage
4
ENTRY_ALREADY_EXISTS
unit of the same unit address already exists
5
NETWORK_BUSY
network busy
6
BUFFER_OVERFLOW
receiving buffer overflow
7
DATA_SIZE_TOO_LONG
data size is out of range to handle
8
INVALID_FINS_HEADER
incorrect FINS header
9
RECEIVE_TIMEOUT
receiving time out
10
ILLEGAL_SID
invalid SID setting
11
NOT_SUPPORTED_VERSION
version is not supported; impossible to execute
12
BAD_NETPATH
wrong setting of routing table; can’t reach final
network
FINS_Extract.DOC
3/05/2002
35
Driver Design Specification
13
ROUTE_ILLOGICAL
routing table abnormal
14
CONSUME_GCT
allowed number of gateways exceeded
15
VERSION_ALREADY_LOCKED
version already in locked state and can’t change
16
NO_RESPOND
attempted to make header to response
17
NOT_NEED_ACK
attempted to make response to command which
requires no response
18
EVENT_CREATE_FAILED
couldn’t make event object to be used for send data
notice
19
LIST_CREATE_FAILED
couldn’t make event object to be used for send data
notice (duplicate?)
20
WAIT_MUTEX_FAILED
failed in stand-by process of exclusive control of
shared memory
21
MEMORY_MAPPING
failed in mapping of shared memory
22
NAME_TOO_LONG
name of object is too long
23
DETACH_FREE_UNIT
attempted to release unused unit address
24
UNEXPECTED_FAILED
unexpected error occurred
25
MEMORY_INITIALIZE_FAILED
failed to initialisation of shared memory
26
MEMORY_ATTACH_FAILED
failed in attachment of shared memory
27
NO_MORE_ENTRY_UNITS
number of units (units) simultaneously useable
exceeded
28
NO_PEER_UNIT
send destination unit id no existence
29
SEND_INFORM_FAILED
couldn’t notify data transmission
30
WAIT_ABANDONED
exit from receive stand-by due to abnormal end of
other process
31
RECEIVE_WAIT_FAILED
failed in receive stand-by
32
NO_MORE_HANDLE
all reserved area of network handle is fully used
33
NO_RECEIVE_DATA
incoming data is not received yet
34
INVALID_MESSAGE
invalid windows message type
35
POST_MESSAGE_FAILED
failed in message notice
2.15.3 OMRON PLC Response Codes
Displayed in Stats Special Counters #4 and 5.
Note that not all response codes apply to all PLCs.
FINS_Extract.DOC
3/05/2002
36
Driver Design Specification
Main Code
00: Normal
Completion
01:Local node error
SubCode6
00
Probable Cause
Remedy
---
---
01
Service was interrupted
017
Local node not part of
network
Token time-out, node
number too large
Check the contents of the
destination transmission area of
third code. Check the data link
status.
Add to network.
02
03
04
Send error in local node was
caused by lack of available
space in internal buffers
Maximum number of frames
exceeded
05
Node number setting error
(range)
06
Node number duplication
error
Set the local node’s node number
below the maximum node
number.
Reduce the load (traffic) on the
Ethernet Unit. Check your user
applications.
Either check the execution of
events in the network and reduce
the number of events occurring in
one cycle, or increase the
maximum number of frames.
Make sure the node number is
within specified range and that
there are no duplicate node
numbers.
Make sure that there are no
duplicate node numbers.
6
It appears from experience that the 2 most significant Sub-Code bits may contain error status
indications. At one stage the C200HE CPU had its ERR LED flashing (non-fatal error) and this
resulted in 00/40 Response Codes. The driver currently ignores these bits.
7
This will be the response code when PLC power is removed.
FINS_Extract.DOC
3/05/2002
37
Driver Design Specification
02: Remote node error
01
02
03: Communications
controller error
03
Third node not part of
network
Broadcasting was specified
04
Busy error, destination node
busy
05
Message packet was
corrupted by transmission
error.
01
02
04: Not executable
05: Routing error
Response time-out, response
watchdog timer interval too
short.
The transmission frame may
be corrupted or the internal
reception buffer full.
Error occurred in the
communications controller,
ERC indicator is lit.
CPU error occurred in the
PC at the remote node.
03
A controller error has
prevented a normal response
from being returned
04
Unit number setting error
01
An undefined command has
been used.
02
Cannot process command
because the specified unit
model or version is wrong
Remote node is not set in the
routing tables
Routing tables aren’t
registered completely
01
02
03
FINS_Extract.DOC
IP address of remote node
not set correctly in IP
address table or IP router
table
No node with the specified
unit address
Routing table error
3/05/2002
Set IP address of remote node
into IP address table and, if inter
network transmission is required,
into the IP router table.
Check the remote node’s unit
address and make sure the
correct one is being used in the
control data.
Check the third node’s node
number.
Check the control data and
specify only one node as the third
node.
Increase the number of transmit
retry attempts or re-evaluate the
system so that the destination
node is not so busy receiving
data.
check the protocol and controller
status by reading them with FINS
commands. Increase the number
of transmit retry attempts.
Increase the value for the
response monitor time in the
control data.
Read out the error log and correct
as required.
Take corrective action, referring
to troubleshooting procedures in
this section
Check CPU indicators at the
remote node and clear the error in
the CPU (refer to the PC’s
operation manuals)
Check network communications
status and reset the controller
board. If the error still exists,
replace the controller board.
Make sure the unit number is
specified within range and that
the same unit number is not used
twice in the same network.
Check the command code and be
sure the command is supported
by the Unit to which you are
sending it
Check the unit model and
version.
Set the remote node in the
routing tables
Set routing tables at the local
node, remote node, and any relay
nodes.
Set the routing tables correctly,
FINS services eg. CPU_UNIT
may not be running
38
Driver Design Specification
10: Command format
error
04
The maximum number of
relay nodes (2) was
exceeded in the command.
01
The command is longer than
the max. permissible length.
02
The command is shorter than
minimum permissible length
The designated number of
data items differs from the
actual number in the
command data.
An incorrect command
format has been used
Data for another node on the
same network was received
from the network
03
04
05
Redesign the network or
reconsider the routing table to
reduce the number of relay nodes
in the command.
Communications are possible on
three network levels, including the
local network.
Check the command format of
the command and set it correctly.
Be sure broadcast transmissions
don’t exceed 1,473 bytes.
Check the command format of
the command and set it correctly
Check the number of items and
the data and make sure that they
agree
Check the command format of
the command and set it correctly.
Check the header parameters in
the command data and be sure
the correct command format is
being used.
An attempt was made to
send response data for a
broadcast address.
FINS_Extract.DOC
3/05/2002
39
Driver Design Specification
11: Parameter error
00
01
02
03
04
06
09
23: Environment error
FINS_Extract.DOC
A non-existent program no.
has been specified
The sizes of data items in
the command block are
wrong
0A
The IOM break function
cannot be executed because
it is already being executed
0B
The response block is longer
than the max. permissible
length
An incorrect parameter code
has been specified
0C
22: Status error
The parameters in the
command data were
incorrect or the UDP/TCP
socket number was not
within the proper range.
A correct memory area code
has not been used or
Expansion Data Memory is
not available
The access size specified in
the command is wrong, or
the first address is an odd
number
The first word is in an
inaccessible area or the bit
number is no 00.
The end of specified word
range exceeds the
acceptable range.
0F
The same socket service is
already in progress at the
specified socket number.
10
The specified socket is not
open
05
IP address conversion failed
07
IP address conversion is set
for automatic conversion
only.
3/05/2002
Check the parameters and be
sure the socket number is
between 1 and 8.
Check the command’s memory
area code and set the appropriate
code.
Set the correct access size for the
command.
Set a first word that is in an
accessible area. The bit number
must be 00 for Ethernet Units.
Check the acceptable limits of the
data area and set the word range
within the limits. Check the data
link tables to be sure the limit to
link words has not been
exceeded.
Check the program number and
be sure that it is set correctly.
Check the command data and be
sure that the sizes of the data
items are correct. Check the data
link tables to be sure all nodes in
the refresh parameters are in the
common link parameters.
Either abort the current IOM
break function processing, or wait
until it is completed and execute
the command.
Check the command format and
set the number of items correctly.
Check the command data and
renter it correctly. Check the data
link table file for corruption.
Use the socket status flag in PC
memory to be sure that socket
service has finished before
starting services again.
Open the socket. For TCP
sockets, be sure to wait until
connection is made.
Check the IP address and subnet
mask in the System Setup and be
sure that settings are correct.
Check the mode settings in the
System Setup. This error will be
generated for the READ IP
ADDRESS command only.
40
Driver Design Specification
25: Unit error
03
I/O setting error (The I/O
table differs from the actual
Unit configuration.)
05
CPU bus error (An error
occurred during data transfer
between the CPU and a CPU
Bus Unit.)
An error occurred during CPI
Bus Unit data transfer.
0A
FINS_Extract.DOC
3/05/2002
Either change the actual
configuration to match the
registered one, or generate the
I/O table again.
Check the Units and cable
connections and issue the
ERROR CLEAR command.
Check the Units and cable
connections and issue the
ERROR CLEAR command.
41
Driver Design Specification
3. References
3.1 References
?? Omron manual W227-E1-1 - FINs Command Reference Manual, 6/93.
?? Omron manual W309-E1-1 – PLC module Controller Link Operation Manual,
2/97.
?? Omron manual W307-E1-1 – Controller Link Computer Board Operation
Manual, 2/97.
?? Omron manual W242-E1-1 – CV/CVM1 series Ethernet Operation Manual,
3/94.
?? Omron manual W313-E1-2 – C200HX/G/E Ethernet Operation Manual, 1/97.
?? Omron manual W143-E1-5 – C-Series Host Link Reference Manual, 6/96.
?? Omron manual W182-E1-1 – C20/C**K Host Link Operation Manual, 8/90.
?? Omron manual W174-E1-4 – PLC module Sysmac Link Operation Manual,
8/96.
?? Omron manual W220-E1-4 – Sysmac Link Computer Board Operation Manual,
1/93.
?? Omron manual Syswin-Eman-3.2 - Syswin version 3.2 Users Manual, 8/97
The respective PLC CPU Operation Manual is helpful too.
The following references are for Citect development use only and shouldn’t be given to end
users:
?? FinsGateway FinsApi V1.2 Programmers Manual,
?? FinsGateway CLK_UNIT V1.2 Runtime Edition Manual, 3/1/97
?? FinsGateway ETN_UNIT V1.2 Runtime Edition Manual, 3/1/97
?? FinsGateway Serial V1.2 Runtime Edition Manual, 3/1/97
?? FinsGateway SLK_UNIT V1.2 Runtime Edition Manual, 3/1/97
FINS_Extract.DOC
3/05/2002
42