1
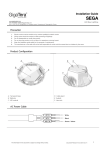
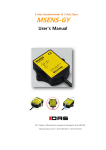
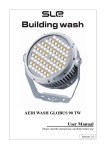
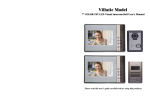
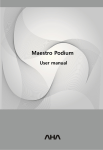
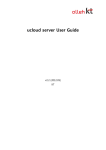
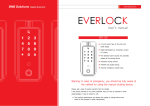
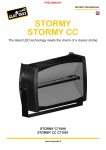
http://www.kmwgigatera.com
Installation & Operation User Guide
Product Installation & Operation User Guide
LED
Panel Lighting (2x2ft)
T-Bar
Bela
40W
45W
50W
R
『Safety Precautions Installation』
This symbol is intended to remind the user the presence of actions and operation that may cause danger.
Please read instructions carefully and follow the instructions to avoid any danger.
This symbol is intended to represent precautions that the user should follow to prevent danger.
WARNING
Serious injury might result if the following precautions are not followed.
• The installation should be performed by certified workers under the relevant regulations of end user's
country / region.
• Never modify or disassemble LED lighting arbitrarily because it can cause serious accidents.
• Never use any input power except the listed rated voltage. If not, it can cause serious accidents.
• Before installation, shut off the power supply and verify it is de-powered using a measuring instrument.
• The wiring should be insulated under end user's respective region's Electric Installations Standards.
• Do not install in a wet environment.
CAUTION
The user may be injured or there would be property damage if the instructions below are not followed.
• Do not forcefully pull on AC/DC lines when wiring up the lighting. (It causes the wires to snap.)
• Do not use this product for any purposes other than what’s specified.
The manufacturer or sellers are not responsible for breakdowns or accidents caused by its improper use.
• When connecting the wires, use proper connection terminals depending on the site of installation.
Do not install in a wet environment.
• Make sure to ground fixture by contacting it to metals around it to prevent damage by static.
• The product may be damaged if static is not removed.
• During the operation, be careful not to disconnect the wires.
• Make sure the grounding is performed under Electricity Standards.
• Using it for any voltage other than specified can cause failure or fire.
• Do not use it in moist environment.
• Be mindful of proper ventilation of product.
• Improper installation or disassembly causes a deformation or breakdown of the product.
• Consider proper protection devices, such as circuit breakers, fuses, switches, etc. for safety precautions.
• Do not install in an enviroment with excessive vibration.
• Do not handle product with contaminated hands or gloves.
• In any event, do not store / install in a contaminated place.
Bela Recessed LED Panel Light Installation & Operation User Guide
R
Product Overview
1) Scope
This manual explains the composition, installation, and operation of the Bela LED recessed light panel.
2) Recessed LED Light Panel
The Bela LED recessed light panel is designed as a complete retrofit / new installation for any indoor application. Illuminance is controlled by provided IR Remote.
3) Description / Function
The Bela LED recessed light panel is the ideal retrofit solution for fluorescent lights in offices, meeting rooms,
hospitals, seminar rooms, schools, and stores.
The Bela recessed light panel disperses a completely even light output.
The Bela is glare-free and up to 10 levels of luminance is controlled by the IR remote control or DMX512.
It composition of light materials allows ease of handling and installation.
Bela 2x2ft and has 3 models, 40W, 45W and 50W. Users are able to choose between 5 different color temperatures (3500K, 4000K, 5000K, 5700K and 6500K).
When fluorescent lights of 80W (FL20W x 4 lights) are replaced with Bela-40W, users are able to save 50%
on energy cost and can expect lower maintenance costs due to its longer life span. (i.e., 50,000 hours).
Product Features
1) Environmental Forward
LED fixtures use an environment-friendly light source that doesn’t contain mercury which is a harmful
component of fluorescent lights.
2) Energy saving & Longevity
The light source of LEDs is a semiconductor device and it ensures reduced power consumption and longer
life. GigaTera's fixtures add an extra energy incentive because it can control brightness depending on room
conditions./ user preference.
3) Design
Its elegant design improves the aesthetics of any interior environment.
4) Lighting Control
Users can control the ON/OFF functions not only by using the IR remote control but also by using the
DMX512 which enables dimming function as well.
The information in this document is subject to change without notice
Copyright ©1991 ~ 2012 KMW TM, All Rights Reserved
Document Revision V0.61 2012.09.19 3
Bela Recessed LED Panel Light Installation & Operation User Guide
R
Checklist before Installation
1) The length between T bar and actual ceiling
At least 3.94"
2) Size Specs
Please refer to the figure below.
3) Others
Weight load capability of T bar framework should be verified before installing the Bela recessed led light panel.
23.62"
22.95"
(Space for fixed frame)
24.02"
(Space for T-bar frame)
(Space for projected frame)
4) When the installation is complete
Recessed light panel is fixed hanging on the T bar frame of a ceiling.
23.03"
The information in this document is subject to change without notice
Copyright ©1991 ~ 2012 KMW TM, All Rights Reserved
Document Revision V0.61 2012.09.19 4
Bela Recessed LED Panel Light Installation & Operation User Guide
R
Package (1-10V)
② Converter
⑥
① Bela
③ Fixing Clip
Detail Description
No
①
②
③
Item
Purpose
Bela
Recessed LED Light Panel
Converter
Power Supply Unit
Fixing Clip
Clips for fixing T-bar frame
Group Dimming
To set up the 1-10V wall dimming function, minor electrical wiring would have to be done using an AWG
#20 wire. Attach one end of the wires to their corresponding (+, -) terminals located on the products's
converter terminal box.
(The 1-10V dimming Bela recessed LED light panel version does not come standard with a group dimming cable. )
The information in this document is subject to change without notice
Copyright ©1991 ~ 2012 KMW TM, All Rights Reserved
Document Revision V0.61 2012.09.19 5
Bela Recessed LED Panel Light Installation & Operation User Guide
R
Package (DMX512/IR)
② Converter
⑥ Remote Control Rest *Option
⑦ Double-sided Tape *Option
⑤ Battery *Option
① Bela
③ Fixing Clip
⑧ RJ-11 Cable *Option
④ Remote Control (R817) *Option
Detail Description
No
①
②
③
④
⑤
⑥
⑦
⑧
Item
Purpose
Bela
Recessed LED Light Panel
Converter
Power Supply Unit
Fixing Clip
Clips for fixing T-bar frame
Remote Control (R817) IR remote control for brightness control (*Option)
Battery
Battery for the remote control (*Option)
Remote Control Rest
Remote control rest (for wall mounting) (*Option)
Double-sided Tape
For mounting the remote control rest on the wall (*Option)
RJ-11 Cable
Communication cable for master/slave operation (*Option)
Group Dimming
You will need RJ-11 cable for IR or DMX512 group dimming.
The RJ-11 cable & remote control is purchased separately from manufacturer.
The information in this document is subject to change without notice
Copyright ©1991 ~ 2012 KMW TM, All Rights Reserved
Document Revision V0.61 2012.09.19 6
Bela Recessed LED Panel Light Installation & Operation User Guide
R
Product Removal
STEP. 01
Place the box on a flat surface and cut the
sealed flaps with a cutter.
At this time, be careful not to damage the
product by penetrating too deeply with cutting
instrument.
STEP. 02
Open the box widely to take out the product
easily.
Remove packing materials from each corner
carefully.
STEP. 03
Grip fixture by the areas shown, and place it on
a work table.
Before putting the product on the table,
we recommend spreading a soft cloth first to
prevent damage to the panel.
Fixing clips should be mounted on the back of
the product.
The information in this document is subject to change without notice
Copyright ©1991 ~ 2012 KMW TM, All Rights Reserved
Document Revision V0.61 2012.09.19 7
Bela Recessed LED Panel Light Installation & Operation User Guide
R
Fastening Clips
STEP. 04
First, fasten the safety clips on the back of the
product.
On the 4 corners of the recessed light panel,
there are assigned holes for safety clips to be
installed as shown in the figure.
STEP. 05
Mount fixing clips onto the assigned holes with
the screws provided as shown in the figure.
Mount fixing clips on the 4 corners in the same
way.
Outward
Please note that the curved side should be
facing outward.
STEP. 06
The recessed light panel is ready for installation
with the 4 safety clips installed as shown in the
figure.
The information in this document is subject to change without notice
Copyright ©1991 ~ 2012 KMW TM, All Rights Reserved
Document Revision V0.61 2012.09.19 8
Bela Recessed LED Panel Light Installation & Operation User Guide
R
Remove the existing light
STEP. 07
The existing light should be detached from
electrical framework.
STEP. 08
Since the existing light is also hung on the T bar
frame, lift it in the direction shown in the figure.
STEP. 09
Rotate the existing light in a diagonal direction
so it can be taken out of the T bar frame.
Make sure all wires and cables are, disconnected.
For safety, this should be per- formed with the
power switch off.
The information in this document is subject to change without notice
Copyright ©1991 ~ 2012 KMW TM, All Rights Reserved
Document Revision V0.61 2012.09.19 9
Bela Recessed LED Panel Light Installation & Operation User Guide
R
Install Light Panel
STEP. 10
Lift Bela carefully by holding as shown in the
figure.
STEP. 11
Since the size of recessed light panel is larger
than the retrofit area, position it inside the
ceiling by rotating it slightly in a diagonal
direction.
STEP. 12
Properly align and fasten safety clips to the T
bar frame.
TEX Separate
To do so, temporary removal of neighboring
ceiling panels is recommended.
TEX Separate
The information in this document is subject to change without notice
Copyright ©1991 ~ 2012 KMW TM, All Rights Reserved
Document Revision V0.61 2012.09.19 10
Bela Recessed LED Panel Light Installation & Operation User Guide
R
Connect AC Power
STEP. 13
Upon removal from packaging, the SMPS should
be completely housed as shown in diagram.
STEP. 14
Installer has options for SMPS access as shown
in the figure.
The various opening caps are designed to be
detached after loosening holders with a small
amount of force.
Bolt for detaching a cover
STEP. 15
After detaching the appropriate cap from the
cover, pull out AC cables from the SMPS
housing.
Below is the breakdown of the colored wiring :
• Black(Brown) : AC (L)
• White(Blue) : AC (N)
• Green(Yellow) : F.G
The information in this document is subject to change without notice
Copyright ©1991 ~ 2012 KMW TM, All Rights Reserved
Document Revision V0.61 2012.09.19 11
Bela Recessed LED Panel Light Installation & Operation User Guide
R
Connect AC Power
STEP. 16
A wire cover may be installed to protect cables
as shown in the figure.
The wire cover is not included in the package and
should be purchased separately if needed.
STEP. 17
Connect AC line first to the power connector.
The figure on the right is only an example.
The connection status of the power supply cable may
vary depending on the condition of site.
The power connector is not included in the package
and should be purchased separately if needed.
STEP. 18
Lastly, test the fixture after connecting the
power connector to the main power supply.
The power connector is not included in the package
and should be purchased separately if needed.
The information in this document is subject to change without notice
Copyright ©1991 ~ 2012 KMW TM, All Rights Reserved
Document Revision V0.61 2012.09.19 12
Bela Recessed LED Panel Light Installation & Operation User Guide
R
Connect Communication Cable
STEP. 19
If there are connection ports for RJ-11 cables
in the SMPS, the product has a master / slave
function.
The recessed LED light panel can be connected to up
to 254 fixtures, with the whole group being able to be
controlled by one master fixture.
STEP. 20
Connect master unit to slave unit by using
provided RJ-11 cable.
Insert the RJ-11 cable to the output terminal
of the SMPS, and connect the other end to the
input terminal of first slave unit.
Repeat as necessary.
• The right port
: Input terminal
• The left port
: Output terminal
The information in this document is subject to change without notice
Copyright ©1991 ~ 2012 KMW TM, All Rights Reserved
Document Revision V0.61 2012.09.19 13
Bela Recessed LED Panel Light Installation & Operation User Guide
R
Schematic & Dimming
1-10V Converter
AC Input
Black / Brown
White / Blue
Green + Yellow
(L)
(N)
(FG)
CONVERTER
+
+
−
−
+
+
−
−
− LED GND
+ LED VCC
1-10V
1-10V Control LED Panel Lighting
AC Power
1-10V
Wall Dimmer
(Lutron, 1-10VDC Interface)
Panel Lighting
Group #1
*Group : Max. 32 LED Lightings
AC Power
1-10V
Wall Dimmer
Panel Lighting
Group #N
*Group : Max. 32 LED Lightings
In the case of implementing a 1-10V dimming control system, it is advised that the wall dimmer (model/manufacturer) shown in the top diagram is used.
The maximum quantity at the time of group control is according to dimmer switch and acturator supply wattage.
The information in this document is subject to change without notice
Copyright ©1991 ~ 2012 KMW TM, All Rights Reserved
Document Revision V0.61 2012.09.19 14
Bela Recessed LED Panel Light Installation & Operation User Guide
R
Schematic & Dimming
IR Converter
AC Input
Black / Brown
White / Blue
Green + Yellow
(L)
(N)
(FG)
+
+
−
−
CONVERTER
OUT IN
− LED GND
+ LED VCC
+
+
−
−
IR RS-485
IR Remote Control (Group Dimming) LED Panel Lighting
AC Power
RJ-11 6P4C(6pin, 4core) Telephone Line Connector & Cable
IR
Master
Slave #1
Slave #2
Slave #3
Slave #4
Panel Lighting
1
Slave #n
Group #1
*Group : Max. 254 LED Lightings
2
3
4
SAVE
RECALL
AC Power
IR Remote Control
RJ-11 6P4C(6pin, 4core) Telephone Line Connector & Cable
(KMW, R817-KMW-K13C20)
IR
Master
Panel Lighting
Slave #1
Slave #2
Slave #3
Slave #4
Slave #n
Group #N
*Group : Max. 254 LED Lightings
The information in this document is subject to change without notice
Copyright ©1991 ~ 2012 KMW TM, All Rights Reserved
Document Revision V0.61 2012.09.19 15
Bela Recessed LED Panel Light Installation & Operation User Guide
R
Schematic & Dimming
DMX-512 Converter
AC Input
Black / Brown
White / Blue
Green + Yellow
(L)
(N)
(FG)
CONVERTER
OUT IN
+
+
−
−
− LED GND
+ LED VCC
+
+
−
−
IR RS-485
DMX512 Control LED Panel Lighting
AC Power
DMX512
RJ-11 6P4C(6pin, 4core) Telephone Line Connector & Cable
Wall Dimmer
(Ltech, LT-3200-DMX512)
Panel Lighting
Group #1
*Group : Max. 254 LED Lightings
AC Power
DMX512
RJ-11 6P4C(6pin, 4core) Telephone Line Connector & Cable
Wall Dimmer
Panel Lighting
Group #N
*Group : Max. 254 LED Lightings
In the case of implementing a DMX512 dimming control system, it is advised that the wall dimmer(model/manufacturer) shown in the top diagram is used.
The information in this document is subject to change without notice
Copyright ©1991 ~ 2012 KMW TM, All Rights Reserved
Document Revision V0.61 2012.09.19 16
Bela Recessed LED Panel Light Installation & Operation User Guide
R
IR Group Dimming Setup
DAY/NIGHT
ALL ON/OFF
1) Set the master
STEP. 1 Press On/Off repeatedly (Minimum 3 times). Set fixture to Off mode.
1
2
3
4
SAVE
RECALL
STEP. 2 Press Button1(Red) for 3 seconds.The fixture is“Ready for setting” and will blink.
STEP. 3 Press Button3(Blue) then press the Recall Button alternately 3 times.
STEP. 4 Press Save button.The fixture will blink once informing the user that the setting is complete.
* Note
All Bela recessed LED light panels are factory set to the Slave mode.
Assign master functions as necessary.
DAY/NIGHT
ALL ON/OFF
2) Release the master
STEP. 1 Press On/Off repeatedly (Minimum 3 times). Set fixture to Off mode.
1
2
3
4
SAVE
RECALL
STEP. 2 Press Button1(Red) for 3 seconds.The fixture is“Ready for setting” and will blink.
STEP. 3 Press Recall button once.
STEP. 4 Press Save button.The fixture will blink once informing the user that the setting is complete.
3) Control the IR brightness
The luminosity is increased/decreased up to 10 levels by pressing the Up/Down button.
Press Left/Right button to set fixture to either min/max luminosity
The information in this document is subject to change without notice
Copyright ©1991 ~ 2012 KMW TM, All Rights Reserved
Document Revision V0.61 2012.09.19 17
Document Revision v0.41
R
Bela Recessed LED Light Panel Remote Controller User Guide
Note
1) The brightness can be set from 1 (min) to 10 (max), a total of 10 levels.
2) The brightness of Button 1, 2, 3, and 4 are not allowed to be changed arbitrarily because they
are given values.
3) A 10 sec. rest period is recommended after repeated on/off modes.
4) 5 meters (16.4ft) is the recommended IR remote parameters.
5) When operating the IR remote, it is recommended to operate near the master fixture.
If not, other unwanted fixtures may be activated at the same time.
6) Press and hold On/ Off button for 1 sec. to allow intended function.
How to use a Remote Control
Model : R817
Stepwise BRGT lvl Increase
10 levels (1 ~ 10)
Turn Off Fixture
DAY/NIGHT
ALL ON/OFF
Turn On/Off Fixture
Select the Max BRGT
Luminosity : 10
Select the Min BRGT
Luminosity : 1
Stepwise BRGT lvl decrease
10 levels (10 ~ 1)
Turn On Fixture
1
2
3
4
SAVE
RECALL
Set Luminosity to 2
Set Luminosity to 4
Set Luminosity to 6
Set Luminosity to 8
No Setting Value
No Setting Value
⇦
Luminosity Level : 1 - more Dimmer
⇨
Luminosity Level : 10 - more Brighter
Copyright ©1991 ~ 2012 KMW TM, All Rights Reserved
RF & Microwave Products
RF & Microwave Products
The Global Leading RF & LED Provider
For America
1521 E. Orangethorpe Ave., Ste. A Fullerton, CA 92831 U.S.A
+1.714.515.1100 [email protected]
For Non-America
183-6, Yeongcheon-ro, Dongtan-myeon, Hwaseong-si, Gyeonggi-do, Korea
+82.31.370.8720 [email protected]