1
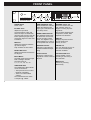
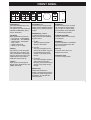
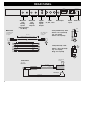
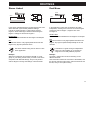
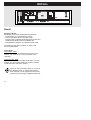
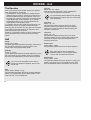
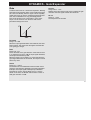
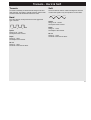
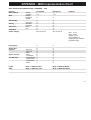
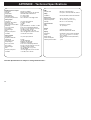
M•ONE
DUAL EFFECTS PROCESSOR
USER’S MANUAL
TABLE OF CONTENTS
APPENDIX
INTRODUCTION
Table of contents . . . .
Introduction . . . . . . . .
Front Panel . . . . . . . .
Rear Panel . . . . . . . .
Soldering Instructions
Signal flow diagram . .
.
.
.
.
.
.
.
.
.
.
.
.
.
.
.
.
.
.
.
.
.
.
.
.
.
.
.
.
.
.
.
.
.
.
.
.
.
.
.
.
.
.
.
.
.
.
.
.
.
.
.
.
.
.
.
.
.
.
.
.
.
.
.
.
.
.
.
.
.
.
.
.
.
.
.
.
.
.
.3
.5
.6
.8
.8
.9
Important Safety Instructions
Certificate of Conformity . . . .
MIDI Implementation Chart .
Technical Specifications . . . .
Trobleshooting . . . . . . . . . . .
Preset List . . . . . . . . . . . . . .
.
.
.
.
.
.
.
.
.
.
.
.
.
.
.
.
.
.
.
.
.
.
.
.
.
.
.
.
.
.
.
.
.
.
.
.
.
.
.
.
.
.
.35
.36
.37
.38
.39
.40
BASIC OPERATION
The M•ONE Display . . . . . . . . . . . . . . .10
I/O Setup . . . . . . . . . . . . . . . . . . . . . . .11
Clock Mismatch . . . . . . . . . . . . . . . . . .11
Utility & MIDI . . . . . . . . . . . . . . . . . . . .12
Routings . . . . . . . . . . . . . . . . . . . . . . .13
Recall . . . . . . . . . . . . . . . . . . . . . . . . .16
Store . . . . . . . . . . . . . . . . . . . . . . . . . .17
Tap . . . . . . . . . . . . . . . . . . . . . . . . . . .17
ALGORITHMS
Reverb
Hall . . . . .
Room . . .
Plate 1 . . .
Plate 2 . . .
Spring . . .
Live . . . . .
Ambience
.
.
.
.
.
.
.
.
.
.
.
.
.
.
.
.
.
.
.
.
.
.
.
.
.
.
.
.
.
.
.
.
.
.
.
.
.
.
.
.
.
.
.
.
.
.
.
.
.
.
.
.
.
.
.
.
.
.
.
.
.
.
.
.
.
.
.
.
.
.
.
.
.
.
.
.
.
.
.
.
.
.
.
.
.
.
.
.
.
.
.
.
.
.
.
.
.
.
.
.
.
.
.
.
.
.
.
.
.
.
.
.
.
.
.
.
.
.
.
.
.
.
.
.
.
.
.
.
.
.
.
.
.
.
.
.
.
.
.
.
.
.
.
.
.
.
.
.18
.19
.20
.21
.22
.23
.24
Other Algorithms
Delay - One Tap & two Tap
Chorus - Classic & 4-Voice
Flange - Classic & 4-Voice .
Pitch - Detune & Pitch Shift
Parametric Equalizer . . . . .
Compressor & Limiter . . . .
Gate/Expander . . . . . . . . .
De-esser . . . . . . . . . . . . . .
Tremolo - Hard & Soft . . . .
Phaser - Vintage & Smooth
.
.
.
.
.
.
.
.
.
.
.
.
.
.
.
.
.
.
.
.
.
.
.
.
.
.
.
.
.
.
.
.
.
.
.
.
.
.
.
.
.
.
.
.
.
.
.
.
.
.
.
.
.
.
.
.
.
.
.
.
.
.
.
.
.
.
.
.
.
.
.
.
.
.
.
.
.
.
.
.
.25
.26
.27
.28
.29
.30
.31
.32
.33
.34
TC Electronic, Sindalsvej 34, DK-8240 Risskov - [email protected]
English version
Rev 3 - SW - V 1.06
Prod. No: E60500101
3
INTRODUCTION
Congratulations on the purchase of your new TC Electronic M•ONE unit.
The M•ONE is a Dual Engine Multi-effects Processor, focusing mainly on high quality Reverbs. The M•ONE can be used for a
number of purposes due to flexible routing of the two Engines and more than 20 TC algorithms. Do you want two independent
Reverbs, controlled from separate Auxiliary sends? Select the Dual Input Routing plus two Reverbs, and you are up and
running. Do you want a compressor in front of a delay? Select the Serial Routing, a Compressor and a Delay. You can even
tap the Delay time on the TAP key. Or maybe you just want stick with that one Routing, no matter the preset? Simply use the
Routing Lock function to avoid routing changes at preset change. It is really as easy as that, go ahead and tweak some keys
and knobs. We hope you have as much pleasure using the M•ONE as we had making it.
Though the M•ONE is focusing on high quality Reverb you will discover that the M•ONE
also covers a wide variety of other algorithms. Experience and enjoy !
• Hall
• Delay One Tap
• Compressor/Limiter
• Room
• Delay Two Tap
• Gate/Expander
• Plates 1&2
• Chorus Classic & 4-voice
• De-esser
• Spring
• Flange: Classic & 4-voice
• Tremolo
• Live
• Pitch: Detune & Pitch Shift
• Phaser
• Ambience
• Parametric EQ
5
FRONT PANEL
POWER button
Power on/off.
IN LEVEL knob
Adjusts the Input level.
At center position a relay will
switch the Input circuit between
consumer and pro level. This will
insure optimal Input gain range
and superb “signal to noise” ratio
is achieved.
MIX knob
Adjusts the global mix between
dry and wet signal.
Fully clockwise is 100% effect.
EFFECT BAL knob
Adjusts the balance between the
two Engines.
INPUT Meters
The Peak meter shows the Input
level of left/right channels.
The meter range is:
0, -3, -6 ,-12, -18, -24, -40.
OVERLOAD LEDs
The OVERLOAD LEDs indicate
one of two situations:
• The Input level is too hot and
therefore overloading.
• There is an internal DSP
overflow.
The Overload LED is lit when
1 sample is @ -1dBFS.
6
ANALOG/DIGITAL LED
ANALOG/DIGITAL indicator
states the selected Input.
Input type is selected in the
"I/O Setup" menu.
SAMPLE RATE indicator
The SAMPLE RATE indicator shows the clock source
and the incoming master
clock. The “DigitaI In” icon
will be blinking if no clock or
unacceptable clock is found.
DYNAMIC meters 1+2
These two meters show the
gain reduction when an
Engine is running Dynamic
algorithms.
The Dynamic algorithms are:
Compressor, Limiter, Gate,
Expander and De-esser.
DISPLAY
Displays the preset number
and the preset type:
Factory or User.
ROUTING indicator
Indication of what Routing
mode the M•ONE currently is
using.
EDITED icon
This icon will be lit as soon as
the current recalled preset
has been modified.
ALGO Indicator
Shows the currently used
algorithms in each of the two
Engines.
FACTORY/USER icon
Shows whether you are
operating in the Factory or
the User bank.
MIDI IN icon
Shows any incoming
MIDI activity.
FRONT PANEL
ROUTING key
Press the ROUTING key to set
the Engine Routing.
The options are: Dual Send /Ret,
Parallel, Parallel/Serial, Serial,
Stereo, Dual Mono.
I/O SETUP
Basic parameters are set here.
• Input source - Analog/Digital.
• Sample Rate - 44.1/48kHz/DI
• Bypass Mode - See Bypass
keys 1 and 2.
• Global Output level.
• Dither 16, 20 or 24(off).
TAP key
Tap this key to enter the global
Tap tempo and to enter the Tap
menu. Subdivision of the tapped
tempo is setup in this menu. The
tapped tempo can be used for
Delay time, Chorus rate etc.
UTILITY
MIDI, Sys-Ex ID, Routing-lock,
Bypass mode, Pedal function and
Display View angle.
ALGO/EDIT 1+2
Press this key to enter the Edit
display and the Algorithm Change
display of the currently selected
Engine.
BYPASS keys 1 and 2
The Bypass mode is set up in
Utility. There are three different
Bypass modes:
1 0% Mix:
The Input signal is passed
directly to the Output.
2 FX Input:
Cuts only the Engine Input in
order to let the effect "ring out",
but will still leave the same
amount of dry signal coming
through.
STORE key
Selects the Store menu. Presets
can be stored in the User bank
only. Location is selected using
the CONTROL wheel. Operation
is confirmed using ENTER.
CURSOR UP/DOWN
Use the cursors to move around
in the display.
ENTER key
Confirms operations. The ENTER
key LED will indicate when this
key can be used.
EXIT key
Is used to exit a menu or to
disapprove an action.
CONTROL wheel
Is used to change values.
3 FX Output:
Cuts only the Engine Output in
order to kill the FX instantaneously, but leaves the same
amount of dry signal coming
through.
RECALL key
Selects the Recall menu.
Select a desired preset using the
CONTROL wheel and press the
ENTER key to enter/load the
selected preset.
7
REAR PANEL
BALANCED INPUTS
LEFT
RIGHT
BALANCED OUTPUTS
LEFT
RIGHT
DIGITAL I/O
MIDI
THRU
IN
OUT
PEDAL
IN
DI
Balanced
Jack
Analog
Outputs
Digital
S/PDIF
Input/
Output
MIDI
In, Out , Thru
(Use Left Input
for Mono)
TC ELECTRONIC
R
UL6500
EN/IEC 60065
C
THIS CLASS B DIGITAL DEVICE MEETS ALL REQUIREMENTS OF THE CANADIAN INTERFERENCECAUSING EQUIPMENT REGULATIONS AND COMPLIES WITH PART 15 OF THE FCC RULES.
OPERATION SUBJECT TO CONDITIONS STATED IN THE MANUAL.
100-240VAC
50-60Hz, 15W
Pedal Input
Sleeve - Pin 1 (Ground)
Tip - Pin 2 (Hot)
Sleeve - Pin 3 (Cold)
DIN CONNECTOR
5POLE - MALE
45 degrees
max. 10m
MADE IN THAILAND
PROFESSIONAL AUDIO EQUIPMENT
Jack (unbalanced) - XLR
MIDI Cable
DIN CONNECTOR
5POLE - MALE
45 degrees
SERIAL NO.
TYPE: MAN001
WARNING
DO
Balanced
Jack
Analog
Inputs
CAUTION
RISK OF ELECTRIC SHOCK
DO NOT OPEN
TO REDUCE THE RISK OF FIRE OR ELECTRIC
SHOCK DO NOT EXPOSE THIS EQUIPMENT TO
RAIN OR MOISTURE
AVIS: RISQUE DE CHOC ELECTRIQUE-NE PAS
OUVRIR.
S/PDIF
Power
Input
US
Serial no.
TIP
GND
SHIELDED CABLE (3 or 5 wires + screen)
Jack (balanced) - XLR
Sleeve - Pin 1 (Ground)
Tip - Pin 2 (Hot)
Ring - Pin 3 (Cold)
PEDAL SWITCH
or similar
Pedal Cable
JACK PLUG
Mono - male
Ø 6.35mm, 1/4”
max. 100m
2 wires
Switch must be
momentary type
shield/ground
Tip
8
TIP
RING
GND
SIGNAL FLOW
INPUT PPM
Left
Input
Selector
Bypass
Right
ANALOG IN
LEVEL
OUT LEVEL
ANALOG
OUT RANGE
Left
Left
Engine 1
ANALOG
INPUTS
[balanced]
A/D
Right
MIX
Engine 2
44.1kHz
S-Rate
48kHz
Digital Input
[S/PDIF]
ANALOG
OUTPUTS
[balanced]
D/A
Bypass
Fx In
Right
Bypass
Fx Out
Bypass
Dither
Digital Output
[S/PDIF]
Digi
DIGITAL IN
9
THE M•ONE DISPLAY
Overload LEDs
Analog/Digital
Routing
O
Input Meters
0
Algo Indicator
Dynamic Meters
Preset Number
L
ANALOG
DIGITAL
R
3
LOCK
6
DUALSEND/RET
12
18
24
40
-dB
INPUT
MORE
UserPreset
EDITED
FACTORYUSER
1
MIDIIN
MIDI Activity
LED
Preset Bank Indicator
Text Line
Analog/Digital
Analog/Digital indicator states the chosen Input.
This choice is done in the "I/O Setup" menu.
The Input choice is global
Icons: Analog, Digital
Dynamic Meters
These two meters are used to show the gain reduction
when one of the Engines is running a dynamic algorithm.
Dynamic algorithms are: Compressor, Limiter, Gate,
De-esser and Expander.
Sample Rate
The Sample Rate indicator shows the clock source and the
incoming master clock.
These can be: Digi In, 44.1kHz, 48kHz.
Preset Number
The current preset number.
Example
• When locked to an external digital signal, the indicator
will display: Digi In and 44.1.
• While using analog Inputs and the internal clock will
display: 44.1.
In case of no clock or unacceptable clock, the Digital In
icon will be blinking indicating the error situation.
The Sample Rate choice is global.
Routing Fig and text
Shows the current Routing.
Options are: Dual Send/Return, Parallel/Serial, True Stereo
and Dual Mono.
Algo Indicator
Shows the running algorithm in each of the two Engines.
Push any of the EDIT keys to scroll through the available
effect algorithms.
Select between:
Rev, Dly, Cho, Fla, Pit, EQ, Dyn, Trm and Pha.
10
Edited
This icon will be lit as soon as the current preset has been
modified.
Factory/User
Shows whether you are operating in the Factory or User
bank.
MIDI In
Indicates the presence of incoming MIDI data.
Text Line
This 20 character text line is used to display preset names
as well as selected functions.
I/O SETUP
I/O Setup
Basic operation
• Press the I/O SETUP key to enter the global setup
parameters of the M•ONE.
• Use the ARROW keys to select parameters and the
CONTROL wheel to change parameter values.
All changes in the I/O Setup menu are instantly effective.
Input Source
Select Analog Input
Select the Source parameter using the ARROW keys.
The source display arrow is lit. Dial the CONTROL wheel
to select between Analog or Digital. When "Analog" is
selected M•ONE automatically defaults to the internal
44.1kHz clock as Sample Rate and analog Input is lit in the
display.
Select Digital Input
When "Digital" is selected the M•ONE attempts to lock to
the S/PDIF Input. The incoming clock will be displayed by
the 44.1 or 48kHz display icons and the Digital In icon will
be lit. During the lock-up period the Digital In icon will be
blinking indicating none or unacceptable clock, and the
Outputs are muted. When "lock" is achieved the matching
Clock Rate icon is lit, and the Outputs are un-muted.
Clock
Analog Input
When Input source is analog the following Sample Rates
are available:
Internal 44.1kHz - The M•ONE runs at internal 44.1kHz.
Internal 48kHz - The M•ONE runs at internal 48kHz.
Digital - The M•ONE locks to the incoming Digital clock.
***Rate Mismatch****
This Error message will occur in the display if the
M•ONE detects slipsamples. Typically this problem
only occurs in very special clock setups e.g. if the M•ONE
is running via internal clock, while processing audio from
the Digital Input. If the incoming clock and the internal
clock do not match the M•ONE will display the above
written error message.
Out Range
Sets the maximum Gain range of the analog Output stage.
Range: 2dBu, 8dBu, 14dBu and 20dBu.
Out level
Controlling the overall digital/analog Output level.
0 to Off (-100dB) in 1dB increments.
Digital In Gain
Sets the digital Input level. This level only affects the digital
level.
Dither
Going from one type of bit resolution to a lower, e.g. from
24 bit to 16 bit, you actually loose 8 bits of information.
The process of cutting off bits is called truncation and it
introduces digital distortion of low level signals, due to the
lack of complete signal information. To compensate for this,
dither must be applied. Dither is a small amount of filtered
noise that generates randomization at the noise floor,
ensuring a less distorted low level signal.
Dithering is relevant only on digital Outputs and it is always
the receiving device that determines the number of bits you
must dither to. A CDR or a DAT recorder should normally
be dithered to 16 bit.
Digital Input
When Input Source is digital the M•ONE following Sample
Rates are available:
Internal 44.1kHz - The M•ONE runs at internal 44.1kHz.
Internal 48kHz - The M•ONE runs at internal 48kHz.
Digital - The M•ONE locks to the incoming Digital clock.
Please note that when using internal clock with
external digital audio, the incoming digital audio
must be in sync with the M•ONE internal clock in
order to avoid slip-samples.
11
UTILITY & MIDI
Utility
Basic operation
• Press the UTILITY key to enter the local setup
parameters of the M•ONE.
• Use the ARROW keys to select parameters and the
CONTROL wheel to change parameter values.
All changes are instantly effective in the Utility menu.
MIDI Channel
Sets the responding MIDI channel of the M•ONE.
Range: Off/1-16/Omni.
MIDI CC
Determines whether the M•ONE should respond to MIDI
Continuous Controllers or not.
Range: On/Off.
MIDI Bulk Dump
Press ENTER to perform a Bulk Dump of all presets to an
external MIDI device. The M•ONE is always ready to
receive MIDI Bulk Dump information.
MIDI Sys-Ex ID
Determines the Sys-Ex ID number of the unit.
All effects parameters; algo changes and routings can be
changed through MIDI Sys-Ex via an external MIDI device.
In order to define which unit the sent MIDI Sys-Ex information should reach, the appropriate ID number must be set.
Program Bank
Determines which bank an external MIDI device will
address in the M•ONE when sending a program change.
The options are: Factory, User or External.
When External is selected controller #32 can be used to
addres either the Factory or the User bank.
Factory bank:
User bank:
Controller #32=0
Controller #32=1
Routing Lock
Locks the current Routing, meaning that the current
selected routing will act as a “global routing” and that “preset routings” will not take effect when presets are recalled.
12
Tap Unit
Selects whether the Tapped tempo in the Tap menu
should be displayed in ms (milliseconds) or BPM (Beats
Per Minute).
Bypass Mode
There are three different Bypass modes:
0% Mix
The Input signal is passed directly to the Output.
FX Input
Shuts off the Engine Input in order to let the effect "ring
out", but leaves the same amount of dry signal through the
unit.
FX Output
Shuts off the Engine Output in order to kill the FX
instantaneously, but leave the same amount of dry signal
coming through.
Pedal setup
Sets the function of the back panel Pedal jack. The Pedal
Input uses momentary switches only.
Range: Bypass 1, Bypass 2, Bypass 1&2, Tap.
Viewing Angle
Adjusts the LCD display backlight for better viewing
comfort.
ROUTINGS
The Routing Menu sets the Routing of the two Engines.
When the Routing menu is entered, the arrow in the
Routing display icon is lit. Routings are stored with
presets, but it is also possible to keep a locked “global
routing” meaning that preset routings do not take
effect. This is set in the Utility menu.
Basic operation
• Press the ROUTING key to enter the Routing display.
• Use the CONTROL wheel to select routing. The ENTER
key is now blinking.
• Press ENTER to activate the selected routing.
Dual S/R - Dual Send/Return
Parallel
M•ONE
DUAL EFFECTS PROCESSOR
L
ENG1
R
ENG2
L
MIXER
STEREO
SEND
R
L
RETURNS
R
FX BAL MIX
The Parallel routing sums left/right Inputs, and both
Engines are fed with the exact same signal. As illustrated
the unprocessed dry signal is mixed with the processed
signal into two channels via the Mix parameter.
EFFECT BAL
Controls the balance between the two Engine’s FX Outputs.
M•ONE
DUAL EFFECTS PROCESSOR
L
ENG1
R
ENG2
L
MIXER
1
2
SENDS
R
L
RETURNS
R
MIX
Controls the amount of dry signal passed around the two
Engines. Dry signal is passed in stereo.
FX BAL MIX
The Parallel routing is perfect when you want to
add two different effects to the same source.
This is the routing to use if you wish to use the M•ONE as
two independent effects processors. Left Input is sent to
Engine 1 and right Input is sent to Engine 2. The four FX
Outputs are summed to two channels.
EFFECT BAL
Controls the balance between the two Engine’s FX Outputs.
Example:
You need a Chorus and a Reverb on the same guitar track.
Select the Chorus in Engine 1, the Reverb in Engine 2 and
the Parallel Routing. Now you have your two effects side
by side, not influencing each other.
MIX
Controls the amount of dry signal passed around the two
Engines. Dry signal is passed in mono. Set MIX fully
clockwise when using the M•ONE in a send/return setup.
Example:
Feed the two M•ONE Engines with signal from e.g. two
separate Aux.’s from your mixer. Connect the M•ONE L/R
Output to a stereo L/R return on your mixer.
You are now using the two Engines in the M•ONE as
separate stereo effects with a common 2 channel Output.
13
ROUTINGS
Parallel/Serial
Serial
M•ONE
ENG 2 FEED
M•ONE
DUAL EFFECTS PROCESSOR
DUAL EFFECTS PROCESSOR
L
L
ENG1
MIXER
MIXER
1
2
SENDS
R
L
RETURNS
1
SENDS
R
ENG2
R
L
RETURNS
L
R
ENG 1
L
R
ENG 2
R
MIX
FX BAL
FX BAL MIX
Parallel-Serial
The Parallel-Serial routing is similar to the Dual Input
routing except for one thing: The Output of Engine 1 can
be fed back to Engine 2's Input. This enables you to e.g.
add reverb to the repeats of a delay. The amount of signal
that is fed to Engine 2 is controlled by the Eng 2 Crossfeed
parameter. The Eng 2 Crossfeed parameter is found in the
Routing menu and is part of the preset.
Serial
In Serial mode the signal always passes Engine 1 before
Engine 2. On the front panel the EFFECT BAL knob and
the MIX knob works as follows:
EFFECT BAL
Controls the balance between the two Engine’s FX Outputs.
EFFECT BAL
Controls the level of dry signal passed around Engine 2.
Please note that the "Dry" signal that passes Eng 2 is
picked up after Engine 1.
This makes it possible to emulate two stand alone effects
in a serial setup. Dry signal is passed in stereo.
MIX
Controls the amount of dry signal passed around the two
Engines. Dry signal is passed in mono.
Eng2 Feed
Controls the amount of signal passed from the Output of
Eng 1 to the Input of Eng 2. This parameter is only active
in the Parallel-Serial routing.
The Parallel-Serial can be used when you want
separate Inputs on the two Engines, but still want
the two effects to be partially combined.
Example:
You have a long Delay running in Engine 1, and a large
Hall Reverb on Engine 2. Both effects are used for the lead
vocal. The level of the two effects are determined by two
independent auxiliary sends from your mixing console.
The repeats from the Delay seams kind of dry when
compared the reverberated vocal, so now you bleed a bit
of the Delay repeats from Engine 1 into the Reverb in
Engine 2 by turning up the Eng 2 Feed parameter. Now
both the Vocal and the Delay repeats are reverberated.
14
MIX
In Serial routing, the MIX knob work as the Mix control of
Engine 1.
Use the Serial mode when you want to combine
the Engines to one effect.
Example:
Select the De-esser in Engine 1, and a bright Reverb in
Engine 2. The De-esser will now suppress the “Sss”
sounds of a vocal, enabling you to use bright and open
Reverbs without getting too much sibilance.
ROUTINGS
Stereo Linked
Dual Mono
M•ONE
M•ONE
DUAL EFFECTS PROCESSOR
DUAL EFFECTS PROCESSOR
L
ENG1
R
ENG2
L
MIXER
STEREO
SEND
R
L
RETURNS
L
ENG1
R
ENG2
L
MIXER
R
FX BAL MIX
In the Stereo Linked Routing the Engines perform the exact
same effect with synchronized parameter settings.
Left I/O are used for Engine 1, Right I/O are used for
Engine 2. When switching to Stereo Linked Routing the
Engine 1 settings are forced into Engine 2.
EFFECT BAL.
Controls the balance between the two Engine’s FX Outputs.
MIX
Controls the amount of dry signal passed around the two
Engines. Dry signal is passed in stereo.
The Stereo Linked routing can be used for a true
stereo application.
Example:
Select the Compressor and insert the M•ONE on a subgroup on your mixing console. Now you have a true stereo
compressor with identical settings, and you only have to
edit one Engine to change the settings of both channels.
2
1
INSERTS
R
FX BAL MIX
In the Dual Mono routing, the two Engines are totally
independent, meaning mono in/mono out of each Engine.
Left I/O are used for Engine 1, Right I/O are used
for Engine 2.
EFFECT BAL.
Controls the balance between the two Engine’s FX Outputs.
MIX
Controls the amount of dry signal passed around the two
Engines. Dry signal is passed independently for the two
channels.
Dual Mono is a great routing for independent
Mono use. This enables you to use the two
Engines for two totally different purposes.
Example:
You need a Tremolo and an EQ for inserting on two
different channels.
Connect the first channel to Left In/Out of the M•ONE, and
the second channel to right In/Out, select the Tremolo and
the EQ, and you are up and running.
15
RECALL
O
0
L
ANALOG
DIGITAL
R
3
LOCK
6
DUALSEND/RET
12
18
24
40
-dB
INPUT
MORE
UserPreset
Recall
Recalling a Preset
Recalling a preset means loading/activating a preset.
• Press RECALL to enter the RECALL menu.
• Use the CONTROL wheel to preview presets.
Preview mode is indicated by blinking preset number and
simultaneously blinking LED in the ENTER key.
• Press ENTER or RECALL to recall/activate the preset.
Press the EXIT key during a preview to return to the
current recalled preset.
Preset types
User presets - RAM
User presets that can be edited and stored in any User
location. You can store up to 100 user presets in the
User bank.
Factory presets - ROM
Factory presets that can be edited and stored in any User
location. You cannot store presets into a Factory location.
The M•ONE holds 100 factory presets.
When you are in the Factory bank you can press
the ARROW UP key to quickly enter the User
bank. Likewise you can quickly enter the Factory
preset bank by pressing the ARROW DOWN key.
16
EDITED
FACTORYUSER
1
MIDIIN
STORE
Preset types
User presets - RAM
User presets that can be edited and stored in any User
location. You can store up to 100 user presets in the
User bank.
Factory presets - ROM
Factory presets that can be edited and stored in any User
location. You cannot store presets into a Factory location.
The M•ONE holds 100 factory presets.
Basic operation:
Press the STORE key to enter the Store page.
The ENTER key and the preset number will be blinking
indicating that the current preset has not yet been stored.
Preset Locations
Presets can be stored in User locations only.
The Store page automatically suggests the first free User
location in the memory as storing space unless the
currently recalled preset is a User preset. In this case the
same User location is suggested.
Storing an edited preset with the same name
at the same location
• Press STORE to enter the Store menu.
• Press ENTER to store the preset. The display reads
"Stored" shortly and returns to the Recall page.
Storing a preset with the same name
at a new location
• Press STORE to enter the Store menu.
• Use the CONTROL wheel to select storing location.
• Press ENTER once to store the preset, the display reads
"Stored" shortly and returns to the Recall page.
Storing a preset with a new name
• Press STORE to enter the Store menu.
• Select storing location using the CONTROL wheel.
• Press the STORE key again or the ARROW DOWN key
to enter the” Naming” display.
• Use the ARROW keys to change cursor position.
• Dial the CONTROL wheel to select characters.
• Press ENTER to store the preset.
Available characters: ABCDEFGHIJKLMNOPQRSTUVXYZ
abcdefghijklmnopqrstuvxyz 0123456789 /*-:."#$%&()_
TAP
The TAP function allows you to tap a global tempo into the
M•ONE. This tempo can be used for Delay time, Chorus
rate etc.
Basic operation
• Press the TAP key once to enter the Tap menu.
• Use the ARROW keys to select parameters.
• Use the CONTROL wheel to select values.
Changes are instantly effective.
Tap
Shows the currently entered Tap tempo.
The tempo is shown in either ms (milliseconds) or
BPM (Beats Per Minute).
Tap Subdivision
The subdivision determines how the M•ONE should
respond to the tapped tempo.
Options are: Ignored, 1, 1/2D, 1/2, 1/2T, 1/4D, 1/4, 1/4T,
1/8D, 1/8, 1/8T, 1/16D, 1/16, 1/16T,
1/32D, 1/32, 1/32T,
Tap Func
Sets what Engine the Tap control is working on.
Range: Eng 1, Eng 2 or Eng 1&2.
You must select “Ignored” in “Tap Subdivision” to
switch off the Tap function.
MIDI Sync
When MIDI Sync is enabled the M•ONE will lock to any
incoming MIDI clock. Eg. when hooked up to a sequencer.
When MIDI Sync is enabled the Tap display will
default to Subdivision indication.
17
REVERB - Hall
The Reverbs
Most of the Reverbs in the M•ONE contains two different
parts; the Reflections and the Tail.
• The Reflections, or Early Reflections, simulate the first
reflections that are heard. In real life, this is the part of a
Reverb that defines the size and character of the room.
• The other part of the Reverb is known as the Reverb Tail
or the diffused field. These reflections are so complex
and disordered that you can no longer determine the
actual direction of the original source.
In conjunction the two parts create the natural sound of an
environment, however in real life the balance between
these two parts of a Reverb may vary quite a bit. Therefore
we provided controls that allow you to change the level,
color and duration or size of the two.
Please try to experiment with the two parts of the Reverbs,
and we guarantee that you will hear some astonishing
effects.
Hall
Decay
Range: 0.02s - 20sec
The Decay parameter determines the length of the Reverb
Tail. The length is defined as the time it takes for the
Reverb Tail to decay approximately 60dB.
Predelay
Range: 0 - 100ms
A short delay placed between the Early Reflections and the
Tail of the reverb. By using predelay the source material is
kept clear and undisturbed by the more diffuse reverb tail.
Try to turn down the Reflect Level in order to
achieve the traditional “slapback ” effect on the
Reverb Tail.
Size
Range: Small - Medium - Large
This parameter determines the size of the Early Reflection
pattern. Try experimenting with the different sizes to hear
what suits your source material best.
18
High Cut
Range: 501.2Hz - 20kHz
Rolls off high frequencies with a slope of 6dB/octave.
Use this to remove sibilance in the Reverb.
Try experimenting with the difference in removing
high frequencies using the High Cut and the High
Color parameters.
High Color
Range: -50 - +50
This parameter adjusts the Decay time in the upper
frequency spectra. By decreasing the upper frequency
Decay time you remove sibilance while preserving the
openness of the Reverb.
Low Color
Range: -50 - +50
This parameter adjusts the Decay time in the lower
frequency spectra. Remove rumble while preserving the
warmth of the Reverb Tail by decreasing the lower
frequency Decay time.
Reflect Level
Range: 0dB to -100dB
This parameter adjusts the level of the Early Reflection.
Many older Reverbs did not utilize Early
Reflection patterns. Try lowering the Reflect
Level in order to achieve this character.
Reverb Level
Range: 0dB to -100dB
This parameter adjusts the Reverb Tail level. Lowering the
Reverb Level will give you a more ambient sound, since
the Early Reflection patterns will become more obvious.
REVERB - Room
Mod Type
Range: Off - Smooth - Vintage
Sets the Type of Modulation used on the Reverb Tail.
Smooth: The Smooth modulation uses a complicated
modulation pattern, that allows the Reverb Tail to be
modulated without detuning the original source signal.
Vintage: Many older reverbs used a very simple modulation
pattern that tended to detune the original source slightly.
The Vintage modulation is an emulation of this old
modulation style, giving you the traditional detuning effect
in the ringout of the reverb.
Mod Speed
Range: -25 - +25
Sets the speed of the modulation. The speed has been
optimized for each Reverb type. The +/-25 range is
calculated as the variation from this optimal setting.
Mod Depth
Range: -25 - +25
Sets the depth of the Modulation. The Depth has been
optimized for each Reverb type. The +/-25 range is
calculated as the variation from this optimal setting.
FX Level
Range: 0 - 100%
The level of the entire effect.
Room
Decay
Range: 0.02s - 2,5s
The Decay parameter determines the length of the Reverb
Tail. The length is defined as the time it takes for the
Reverb Tail to decay approx 60dB.
Predelay
Range: 0 - 100ms
A short delay placed between the Early Reflections and the
Tail of the reverb. By using predelay the source material is
kept clear and undisturbed by the more diffuse reverb tail.
Try to turn down the Reflect Level in order to
achieve the traditional “slapback ” effect on the
Reverb Tail.
Size
Range: Small - Medium - Large
This parameter determines the size of the Early Reflection
pattern. Try experimenting with the different sizes to hear
what suits your source material best.
High Cut
Range: 501.2Hz - 20kHz
Rolls off high frequencies with a slope of 6dB/octave.
Use this to remove sibilance in the Reverb.
Try experimenting with the difference in removing
high frequencies using the High Cut and the High
Color parameters.
High Color
Range: -50 - +50
This parameter adjusts the Decay time in the upper
frequency spectra. By decreasing the upper frequency
Decay time you remove sibilance while preserving the
openness of the Reverb.
Low Color
Range: -50 - +50
This parameter adjusts the Decay time in the lower
frequency spectra. Remove rumble while preserving the
warmth of the Reverb Tail by decreasing the lower
frequency Decay time.
19
REVERB - Room & Plate
Reflect Level
Range: 0dB to -100dB
This parameter adjusts the level of the Early Reflections.
Many older Reverbs did not utilize Early
Reflection patterns. Try lowering the Reflect
Level in order to achieve this character.
Reverb Level
Range: 0dB to -100dB
This parameter adjusts the Reverb Tail level. Lowering the
Reverb Level will give you a more ambient sound, since
the Early Reflection patterns will become more obvious.
Mod
Range: Off - On
Modulating the Reverb tail will create a more chaotic
Reverb Tail, very similar to a natural room.
Mod Speed
Range: -25 - +25
Sets the speed of the modulation. The speed has been
optimized for each Reverb type. The +/-25 range is
calculated as the variation from this optimal setting.
Mod Depth
Range: -25 - +25
Sets the depth of the Modulation. The Depth has been
optimized for each Reverb type. The +/-25 range is
calculated as the variation from this optimal setting.
FX Level
Range: 0 - 100%
The level of the entire effect.
20
Plate 1
Decay
Range: 0.02s - 20s
The Decay parameter determines the length of the Reverb
Tail. The length is defined as the time it takes for the
Reverb Tail to decay approx 60dB.
Predelay
Range: 0 - 100ms
A short delay placed between the Early Reflections and the
Tail of the reverb. By using predelay the source material is
kept clear and undisturbed by the more diffuse reverb tail.
Try to turn down the Reflect Level in order to
achieve the traditional “slapback ” effect on the
Reverb Tail.
Size
Range: Small - Medium - Large
This parameter determines the size of the Early Reflection
pattern. Try experimenting with the different sizes to hear
what suits your source material best.
High Cut
Range: 501.2Hz - 20kHz
Rolls off high frequencies with a slope of 6dB/octave.
Use this to remove sibilance in the Reverb.
Try experimenting with the difference in removing
high frequencies using the High Cut and the High
Color parameters.
High Color
Range: -50 - +50
This parameter adjusts the Decay time in the upper
frequency spectra. By decreasing the upper frequency
Decay time you remove sibilance while preserving the
openness of the Reverb.
REVERB - Plate
Low Color
Range: -50 - +50
This parameter adjusts the Decay time in the lower
frequency spectra. Remove rumble while preserving the
warmth of the Reverb Tail by decreasing the lower
frequency Decay time.
Plate 2
Reflect Level
Range: 0dB to -100dB
This parameter adjusts the level of the Early Reflections.
Predelay
Range: 0 - 100ms
A short delay placed between the Early Reflections and the
Tail of the reverb. By using predelay the source material is
kept clear and undisturbed by the more diffuse reverb tail.
Many older Reverbs did not utilize Early
Reflection patterns. Try lowering the Reflect
Level in order to achieve this character.
Reverb Level
Range: 0dB to -100dB
This parameter adjusts the Reverb Tail level. Lowering the
Reverb Level will give you a more ambient sound, since
the Early Reflection patterns will become more obvious
Mod Speed
Range: -25 - +25
Sets the speed of the modulation. The Speed has been
optimized for each Reverb type. The +/-25 range is
calculated as the variation from this optimal setting.
Mod Depth
Range: -25 - +25
Sets the depth of the Modulation. The Depth has been
optimized for each Reverb type. The +/-25 range is
calculated as the variation from this optimal setting.
FX Level
Range: 0 - 100%
The level of the entire effect.
Decay
Range: 0.02s - 20s
The Decay parameter determines the length of the Reverb
Tail. The length is defined as the time it takes for the
Reverb Tail to decay approximately 60dB.
Try to turn down the Reflect Level in order to
achieve the traditional “slapback ” effect on the
Reverb Tail.
Size
Range: Small - Medium - Large
This parameter determines the size of the Early Reflection
pattern. Try experimenting with the different sizes to hear
what suits your source material best.
High Cut
Range: 501.2Hz - 20kHz
Rolls off high frequencies with a slope of 6dB/octave.
Use this to remove sibilance in the Reverb.
Try experimenting with the difference in removing
high frequencies using the High Cut and the High
Color parameters.
High Color
Range: -50 - +50
This parameter adjusts the Decay time in the upper
frequency spectra. By decreasing the upper frequency
Decay time you remove sibilance while preserving the
openness of the Reverb.
Low Color
Range: -50 - +50
This parameter adjusts the Decay time in the lower
frequency spectra. Remove rumble while preserving the
warmth of the Reverb Tail by decreasing the lower
frequency Decay time.
21
REVERB - Spring
Reflect Level
Range: 0dB to -100dB
This parameter adjusts the level of the Early Reflections.
Many older Reverbs did not utilize Early
Reflection patterns. Try lowering the Reflect
Level in order to achieve this character.
Reverb Level
Range: 0dB to -100dB
This parameter adjusts the Reverb Tail level. Lowering the
Reverb Level will give you a more ambient sound, since
the Early Reflection patterns will become more obvious
Mod
Range: Off - On
Modulating the Reverb tail will create a more chaotic
Reverb Tail, very similar to a natural room.
Mod Speed
Range: -25 - +25
Sets the speed of the modulation. The Speed has been
optimized for each Reverb type. The +/-25 range is
calculated as the variation from this optimal setting.
Mod Depth
Range: -25 - +25
Sets the depth of the Modulation. The Depth has been
optimized for each Reverb type. The +/-25 range is
calculated as the variation from this optimal setting.
FX Level
Range: 0 - 100%
The level of the entire effect.
Spring
A reverb algorithm designed to reproduce the sound of the
old spring reverbs, such as the ones used in vintage guitar
amps.
Decay
Range: 0.02s - 20s
The Decay parameter determines the length of the Reverb
Tail. The length is defined as the time it takes for the
Reverb Tail to decay approximately 60dB.
Predelay
Range: 0 - 100ms
A short delay placed between the direct signal and the Tail
of the reverb. By using predelay the source material is kept
clear and undisturbed by the more diffuse reverb tail.
High Cut
Range: 501.2Hz - 20kHz
Rolls off high frequencies with a slope of 6dB/octave.
Use this to remove sibilance in the Reverb.
Try experimenting with the difference in removing
high frequencies using the High Cut and the High
Color parameters.
High Color
Range: -50 - +50
This parameter adjusts the Decay time in the upper
frequency spectra. By decreasing the upper frequency
Decay time you remove sibilance while preserving the
openness of the Reverb.
Low Color
Range: -50 - +50
This parameter adjusts the Decay time in the lower
frequency spectra. Remove rumble while preserving the
warmth of the Reverb Tail by decreasing the lower
frequency Decay time.
FX Level
Range: 0 - 100%
The level of the entire effect.
22
REVERB - Live
Live
Decay
Range: 0.02s - 20s
The Decay parameter determines the length of the Reverb
Tail. The length is defined as the time it takes for the
Reverb Tail to decay approximately 60dB.
Predelay
Range: 0 - 100ms
A short delay placed between the Early Reflections and the
Tail of the reverb. By using predelay the source material is
kept clear and undisturbed by the more diffuse reverb tail.
Try to turn down the Reflect Level in order to
achieve the traditional “slapback ” effect on the
Reverb Tail.
Size
Range: Small - Medium - Large
This parameter determines the size of the Early Reflection
pattern. Try experimenting with the different sizes to hear
what suits your source material best.
High Cut
Range: 501.2Hz - 20kHz
Rolls off high frequencies with a slope of 6dB/octave.
Use this to remove sibilance in the Reverb.
Try experimenting with the difference in removing
high frequencies using the High Cut and the High
Color parameters.
High Color
Range: -50 - +50
This parameter adjusts the Decay time in the upper
frequency spectra. By decreasing the upper frequency
Decay time you remove sibilance while preserving the
openness of the Reverb.
Low Color
Range: -50 - +50
This parameter adjusts the Decay time in the lower
frequency spectra. Remove rumble while preserving the
warmth of the Reverb Tail by decreasing the lower
frequency Decay time.
Reflect Level
Range: 0dB to -100dB
This parameter adjusts the level of the Early Reflection.
Many older Reverbs did not utilize Early
Reflection patterns. Try lowering the Reflect
Level in order to achieve this character.
Reverb Level
Range: 0dB to -100dB
This parameter adjusts the Reverb Tail level. Lowering the
Reverb Level will give you a more ambient sound, since
the Early Reflection patterns will become more obvious
Mod Speed
Range: -25 - +25
Sets the speed of the modulation. The speed has been
optimized for each Reverb type. The +/-50 range is
calculated as the variation from this optimal setting.
Mod Depth
Range: -25 - +25
Sets the depth of the Modulation. The Depth has been
optimized for each Reverb type. The +/-50 range is
calculated as the variation from this optimal setting.
FX Level
Range: 0 - 100%
The level of the entire effect.
23
REVERB - Ambience
Ambience
As opposed to the Spring reverb, the Ambience algorithm
is a very natural sounding reverb.
Decay
Range: 0.02s - 2,5s
The Decay parameter determines the length of the Reverb
Tail. The length is defined as the time it takes for the
Reverb Tail to decay approximately 60dB.
Predelay
Range: 0 - 100ms
A short delay placed between the Early Reflections and the
Tail of the reverb. By using predelay the source material is
kept clear and undisturbed by the more diffuse reverb tail.
Try to turn down the Reflect Level in order to
achieve the traditional “slapback ” effect on the
Reverb Tail.
Low Color
Range: -50 - +50
This parameter adjusts the Decay time in the lower
frequency spectra. Remove rumble while preserving the
warmth of the Reverb Tail by decreasing the lower
frequency Decay time.
Reflect Level
Range: 0dB to -100dB
This parameter adjusts the level of the Early Reflection.
Many older Reverbs did not utilize Early
Reflection patterns. Try lowering the Reflect
Level in order to achieve this character.
Reverb Level
Range: 0dB to -100dB
This parameter adjusts the Reverb Tail level. Lowering the
Reverb Level will give you a more ambient sound, since
the Early Reflection patterns will become more obvious
Size
Range: Small - Medium - Large
This parameter determines the size of the Early Reflection
pattern. Try experimenting with the different sizes to hear
what suits your source material best.
Mod
Range: Off - On
Switches the Modulation function On/Off.
Modulating the Reverb tail will create a more chaotic
Reverb Tail, very similar to a natural room.
High Cut
Range: 501.2Hz - 20kHz
Rolls off high frequencies with a slope of 6dB/octave.
Use this to remove sibilance in the Reverb.
Mod Speed
Range: -25 - +25
Sets the speed of the modulation. The Speed has been
optimized for each Reverb type. The +/-25 range is
calculated as the variation from this optimal setting.
Try experimenting with the difference in removing
high frequencies using the High Cut and the High
Color parameters.
High Color
Range: -50 - +50
This parameter adjusts the Decay time in the upper
frequency spectra. By decreasing the upper frequency
Decay time you remove sibilance while preserving the
openness of the Reverb.
24
Mod Depth
Range: -25 - +25
Sets the depth of the Modulation. The Depth has been
optimized for each Reverb type. The +/-25 range is
calculated as the variation from this optimal setting.
FX Level
Range: 0 - 100%
The level of the entire effect.
DELAY - One Tap & Two Tap
One Tap
Two Tap
The One Tap Delay mode operates with one delay line only.
The Two Tap Delay mode operates with two Taps, each
with its own set of parameters.
Delay Time
Range: 0 - 4000ms
The length of the the Delay time.
Delay Time 1+2
Range: 0 - 4000ms
The Delay time of the Delay tap.
Feedback
Range: -100 to +100
Controls the amount of signal that is routed back to the
Input of the algorithm. The higher Feedback value the more
repeats you will get.
Offset
Range: 0-200ms
Offsets the Delay in the right Channel.
Pan
Range: 50L - 50R
Controls the panning of the selected voice.
Feedback 1+ 2
Range: -100 to +100
Controls the amount of signal that is routed back to the
Input of the algorithm. The higher the Feedback value the
more repeats you will get.
High Cut
Range: 500Hz - 20kHz
High Cut filter that allows you to reduce the high frequencies of the Delay Taps. This gives you softer and more
analog sounding Delay Taps which in some cases will
seem less disturbing in the overall sound, than a delay with
no High Cut.
Low Cut
Range: 19.9Hz - 2kHz
Low Cut filter reducing the low end frequencies of the
Delay Taps. When using delay on signals with low frequencies a full-range delay might introduce a less tight feeling in
the low frequencies. Use the Low Cut filter to avoid this.
FX Level
Range: 0 - 100%
The over all level of the Delay.
Level 1+2
Range: -100 - 0dB
The level of the selected Tap.
Pan 1+2
Range: 50L - 50R
Controls the panning of the selected voice.
High Cut
Range: 500Hz - 20kHz
High Cut filter that allows you to reduce the high frequencies of the Delay Taps. This gives you softer and more
analog sounding Delay Taps which in some cases will
seem less disturbing in the overall sound than a delay with
no High Cut.
Low Cut
Range: 19.9Hz - 2kHz
Low Cut filter reducing the low end frequencies of the
Delay Taps. When using delay on signals with low frequencies a full-range delay might introduce a less tight feeling in
the low frequencies. Use the Low Cut filter to avoid this.
FX Level
Range: 0 - 100%
The overall level of the Delay.
25
CHORUS - Classic & 4-Voice
Classic
4-Voice
A Chorus/Flanger is basically a delay being pitch-modulated by an LFO (Low Frequency Oscillator).
The M•ONE Classic Chorus is based on 2 voices and
produces a smooth natural sounding chorus.
The 4-voice Chorus is based on two Classic Chorus
blocks connected in serial, phase-reversed and with a fixed
Delay time. This gives you twice the amount on “voices”
and produces a much thicker sounding Chorus effect
compared to the Classic algorithm.
L
CHORUS
R
L
R
LFO
Speed
Range: 0.05 - 19.2Hz
The Speed of the Chorus. Also known as ”Rate”.
Depth
Range: 0 - 100%
The Depth of the Chorus. Also known as ”Intensity”.
Delay
Range: 0 - 100ms
A Chorus is basically a delay being pitch-modulated by an
LFO (Low Frequency Oscillator). The typical Delay time
used in a Chorus is around 10ms.
FX Lev
Range: 0 -100%
The level of the Chorus effect.
26
Speed
Range: 0.05 - 19.2Hz
The speed of the Chorus. Also known as ”Rate”.
Depth
Range: 0 - 100%
The depth of the Chorus. also known as ”Intensity”.
FX Lev
Range: 0 -100%
The level of the Chorus effect.
FLANGE - Classic & 4-Voice
Classic
4-Voice
A Chorus/Flanger is basically a delay being pitch-modulated by an LFO (Low Frequency Oscillator).
The M•ONE Classic Flanger is based on 2 voices.
The 4-voice Flanger is based on two Classic Flanger
blocks connected in serial, phase-reversed and with a fixed
Delay time. This gives you twice the amount on “voices”
and produces a much thicker sounding Flange effect
compared to the Classic algorithm.
Speed
Range: 0.05 - 19.2Hz
The speed of the Flanger. Also known as ”Rate”.
Depth
Range: 0 - 100%
The depth of the Flanger. also known as ”Intensity”.
Speed
Range: 0.05 - 19.2Hz
The speed of the Flanger. Also known as ”Rate”.
Depth
Range: 0 - 100%
The depth of the Flanger. also known as ”Intensity”.
Feedback
Range: -100 to +100
The amount of processed signal that is fed back to the
Input of the algorithm. When the feedback value is
negative, the Feedback signal is phase reversed.
Feedback
Range: -100 - 100
The amount of processed signal that is fed back to the
Input of the algorithm. When the feedback value is
negative, the Feedback signal is phase reversed.
FX Lev
Range: 0 -100%
The level of the Flanger effect.
Delay
Range: 0 - 100ms
The typical delay used in a Flanger is around 5ms.
FX Lev
Range: 0 -100%
The level of the Flanger effect.
27
PITCH - Detune & Pitch Shift
Pitch Detune
Pitch Detune is similar to the Pitch algorithm meaning
that a fixed voice is added to the signal. However the
range in a Detune algorithm is considerably lower and is
often used to create a wide sound as opposed to a second voice.
By using approx. 5-10 cent of Detune amount you will get
a chorus sounding effect without the modulating/swirling
motion that is so characteristic for the chorus, but in
some cases disturbs the clarity of the sound.
Pitch 1+2
Range: -50 - 50 cent
The pitch value of the selected voice.
Level 1+2
Range: -100 - 0dB
The level of the selected voice.
Pan 1+2
Range: 50L to 50R
Controls the panning of the selected voice.
Delay 1+2
Range: 0 - 100ms
The Delay time of the selected voice.
FX Level
Range: 0 - 100%
The level of the entire effect.
Pitch Shift
The M•ONE Pitch algorithm allows you to add 2 separate
fixed voices to the source signal. In the following parameter description these are referred to as 1 and 2.
28
Pitch 1
Range: -1200 - 1200 cent
Determines the pitch value of the first fixed voice.
As 100 cent is one semitone you are able to add a second
voice withing the range of +/- one whole octave.
Level 1
Range: -100 - 0dB
The level of the added voice.
Pan 1
Range: 50L to 50R
Controls the panning of the first voice.
Delay 1
Range: 0 - 100ms
The Delay time of the added voice.
Pitch 2
Range: -1200 - 1200 cent
Determines the pitch value of the second fixed voice.
Level 2
Range: -100 - 0dB
The level of the second added voice.
Pan 2
Range: 50L to 50R
Controls the panning of the second voice.
Delay 2
Range: 0 - 100ms
The Delay time of the added voice.
FX Lev
Range: 0 - 100%
The Level of the entire effect.
PARAMETRIC EQUALIZER
The M•ONE Equalizer is a three band parametric type with
an additional high and low shelving band.
Low Shelving Band:
Low Freq
Range: 19.95Hz to 5.01kHz
Sets the target-frequency for the Low shelving band.
Low Slope
Range: 3dB/oct - 12dB/oct
The Low Slope parameter sets the steepness of the Low
Shelving Band curve.
Low Gain
Range: -12dB - 12dB
The cut or boost of the Low shelving Band.
Parametric Filters:
Freq 1
Range: 19.95Hz to 20kHz
The target frequency for the first of the three EQ bands.
BndWdth 1 - Bandwidth 1
Range: 0.1oct - 4oct
The Bandwidth of the first EQ band.
BndWdth 3 - Bandwidth 3
Range: 0.1oct - 4oct
The Bandwidth of the third EQ band.
Gain 3
Range: -12dB - 12dB
The cut or boost of this band.
High Shelving Band:
High Freq
Range: 501.2Hz - 20kHz
Sets the target frequency for the High Shelving Band.
High Slope
Range: 3dB/oct - 12dB/oct
The High Slope parameter sets the steepness of the High
Shelving Band curve.
High Gain
Range: -12dB - 12dB
The cut or boost of the High Shelving Band.
FX Level
Range: 0 - 100%
The overall Output level of the Equalizer.
Gain 1
Range: -12dB - 12dB
The cut or boost of this band.
Freq 2
Range: 19.95Hz to 20kHz
The target frequency for the second of the three EQ bands.
BndWdth 2 - Bandwidth 2
Range: 0.1oct - 4oct
The Bandwidth of the second EQ band.
Gain 2
Range: -12dB - 12dB
The cut or boost of this band.
Freq 3
Range: 19.95Hz to 20kHz
The target frequency for the third of the three EQ bands.
29
DYNAMICS - Compressor & Limiter
Compressor
A compressor is meant to reduce the dynamic content of
the Input signal and thereby keep the signal at a more
constant level.
Threshold
Range: -60 - 0dB
When the Input signal exceeds the Threshold the
Compressor will be activated. So, the lower the Threshold
the more compression you will get.
Ratio
Range: Off - inf: 1
The Ratio of the gain reduction. On the illustration this is
the angle of the line above the Threshold point.
Example. If the Ratio is set to 4:1 it means that for every
4dB the Input level rises above the set Threshold only one
dB is Output.
Knee Mode
Range: Soft or Hard
The Knee mode sets the bending point of the Compressor.
When Soft knee mode is selected, the Compressor will
gradually reach the Ratio, while Hard knee mode will cause
the Compressor to go directly from no compression to the
specified Ratio.
Release
Range: 10 - 100dB/sec.
Determines the time the Compressor uses to reach a gain
reduction of 1:1 (no reduction) once the Input signal has
dropped below the Threshold.
Gain
Range: -100 - +30dB
Use the Gain parameter to compensate for unwanted gain
reduction caused by heavy compression.
FX Level
Range: 0 - 100%
The Output level of the Compressor
30
Limiter
A Limiter can be conceived as a compressor with a high
Ratio setting. It is primarily used to prevent fullscale
overloads. A fullscale overload means hitting 0dBFS, which
is the absolute max in the digital domain, and it causes a
clipped and distorted signal.
Threshold
Range: -60dB - 0dB
When the Input signal exceeds the Threshold the Limiter
will be activated. So, the lower the Threshold the more
limiting you will get.
Ratio
Range: Off - inf: 1
The Ratio of the gain reduction. On the illustration it is the
angle of the line above the Threshold point.
Example. If the Ratio is set to 4:1 it means that for every
4dB the Input level rises above the set Threshold only 1dB
is output.
Attack
Range: 0.3ms - 100ms
The time it takes for the Limiter to reach the gain reduction
specified by the Ratio parameter when the signal is above
the set Threshold.
Release:
Range: 20ms - 7.0 sec
Release is the time that the Limiter uses to release the
gain reduction when the signal exceeds the Threshold.
Gain
Range: -100dB - 30dB
Use the Gain parameter to compensate for unwanted gain
reduction caused by heavy limiting.
FX Level
Range: 0 - 100%
The Output level of the Limiter.
DYNAMICS - Gate/Expander
Gate
A Gate is also known as a ”downward expander”. Meaning
that when the signal drops below a set Threshold the gate
will ”close” and thereby mute the signal. This is especially
useful when trying to remove unwanted background noise
from source material that is only periodically present.
This can be anything from vocal tracks to noisy guitaramps. You can even use it on drums to add a more
percussive feeling to the track.
Release:
Range: 20ms - 7 sec.
Release is the time that the Gate uses to release the gain
reduction when the signal exceeds the Threshold.
FX Lev
Range: 0 - 100%
The Output level of the Gate.
Threshold
Range: -60 - 0dB
When the Input signal falls below the Threshold, the Gate
starts working. This means that the higher Threshold the
more gating you will get.
Ratio
Range: Off - Inf:1
This is the Ratio of the gain reduction. If the Ratio is set to
4:1 it means that for every 1dB the Input signal decreases,
the Output will decrease by 4dB.
When the Ratio is set to Infinite:1, it means that when the
Input signal falls below the Threshold, the Output is turned
all the way down.
Attack
Range: 0.5 - 100ms
The Attack time is the fallback time that the Gate uses to
reach the gain reduction specified by the Ratio parameter.
Example: If the Input signal suddenly drops 4dB below
Threshold in no time, with the Ratio set to 4:1 and the
Attack set to 20ms, the M•ONE will use 20ms to reach a
total gain reduction of 16dB.
31
DYNAMICS - De-esser
De-esser
A De-esser is used to remove sibilant sounds from various
instruments - especially voices. To remove only the
unwanted (most significant) “esses” a De-esser must work
dynamically. It could therefore be compared to Compressor
working on a specific frequency area only. A dynamic filter
ensures that the De-esser only reduces the high
frequencies when they are too loud.
Threshold
Range: -60dB - 0dB
When the Input level for the specified frequency area
exceeds this level the De-esser will be activated.
Ratio
Range: Off - inf:1
The Ratio of the gain reduction in the specified frequency
area.
Frequency
Range: 1kHz - 20kHz
Sets the center frequency for the area in which the
De-esser should work.
Attack
Range: 0.5 - 50ms
The Attack time is the response time that the De-esser
uses to reach the gain reduction specified by the Ratio
parameter.
Example: If the Input signal suddenly increases to 4dB
above Threshold with the Ratio set to 4:1 and the Attack
set to 20ms, the De-esser will use 20ms to reach the gain
reduction of 3dB.
Release:
Range: 20ms - 7 sec.
Release is the fallback time of the De-esser, after the
signal drops below the Threshold.
FX Lev
Range: -100 - 0dB
The Output level of the De-esser.
32
Tremolo - Hard & Soft
Tremolo
Soft
A tremolo is basically an identical level change in left and
right channels. This effect is typically heard on guitar tracks
or tracks where old Würlitzer E-Pianos are used.
The Soft Tremolo mode is softer sounding than the Hard
mode as the signal is only at its peaks for a short while.
Hard
The Hard Tremolo mode produces the most aggressive
type of tremolo.
Speed
Range: 0.05 - 19.2Hz
The Speed of the Tremolo.
Depth
Range: 0 - 100%
The Depth of the Tremolo.
Speed
Range: 0.05 - 19.2Hz
The Speed of the Tremolo.
Depth
Range: 0 - 100%
The Depth of the Tremolo.
FX Lev
Range: 0 - 100%
The level of the Tremolo effect.
FX Lev
Range: 0 - 100%
The level of the Tremolo effect.
33
PHASER - Vintage & Smooth
Vintage
Smooth
The Vintage Phaser utilizes four All-pass filters. These
filters creates a comb looking characteristic. When the
filtered sound is mixed with the direct sound the “phasing
sound” occurs.
The Smooth Phaser utilizes twelve All-pass filters. These
filters creates a comb looking characteristic. When the
filtered sound is mixed with the direct sound, the “phasing
sound” occurs. Due to the higher number of filters this
version of the Phaser sounds smoother than Vintage.
Speed
Range: 0.05 - 19.2Hz
The Speed of the Phaser.
Depth
Range: 0 - 100%
The Depth of the Phaser.
Range
Range: Low or Mid
The Range parameter determines the frequency area in
which the Phaser is operating.
Feedback
Range: -100 - 100%
The amount of processed signal that is fed back to the
Input of the effect block. When the Feedback value is
negative, the Feedback signal is phase reversed.
Try experimenting with the reversed phase
Feedback.
FX Lev
Range: 0 - 100%
The level of the Phaser effect.
34
Speed
Range: 0.05 - 19.2Hz
The Speed of the Phaser.
Depth
Range: 0 - 100%
The Depth of the Phaser.
Range
Range: Low or High
The Range parameter determines the frequency area in
which the Phaser is operating.
Feedback
Range: -100 - 100%
The amount of processed signal that is fed back to the
Input of the effect block.
Try experimenting with the reversed phase
Feedback.
FX Lev
Range: 0 - 100%
The level of the Phaser effect.
IMPORTANT SAFETY INSTRUCTIONS
Please read, keep, and follow these instructions before connecting this unit. Heed all warnings and instructions.
Retain this notice and the owner´s manual for future reference.
The lightning flash with an arrowhead symbol within an equilateral triangle, is intended to alert the user to the presence of
uninsulated “dangerous voltage” within the product’s enclosure that may be of sufficient magnitude to constitute a risk of
electric shock to persons.
The exclamation point within an equilateral triangle is intended to alert the user to the presence of important
operating and maintenance (servicing) instructions in the literature accompanying the product.
Warning!
•
•
•
•
•
To reduce the risk of fire or electric shock, do not expose this unit to rain or moisture.
Do not open the unit - risk of electric shock inside.
This apparatus must be earthed.
Use a three wire grounding type line chord like the one supplied with the product.
Be advised that different operating voltages require the use of different types of line cord and attachment plugs.
If in doubt please contact your TC distributor.
• Check the voltage in your area and use the correct type. See table below:
Voltage
Line plug according to standard.
110-125V
UL817 and CSA C22.2 no 42.
220-230V
CEE 7 page VII, SR section 107-2-D1/IEC 83 page C4.
240V
BS 1363 of 1984. Specification for 13A fused plugs and switched and un-switched socket outlets.
• Mount in a well ventilated rack with a little space above and below.
• This equipment should be installed near the socket outlet and disconnection of the device should be easily accessible.
• Do not install near heat source, such as radiators, heat registers, stoves or other apparatus.
(including amplifiers) that produce heat.
• Do not rely solely on the front screws when mounted in touring rack. Support the back as well.
• Clean only with a damp cloth.
• Do not defeat the safety purpose of a polarized or grounding type plug. A polarized plug has two blades
with one wider than the other. A grounding type plug has two blades/prongs and a third grounding prong. The wide
blade or the third prong are provided for your safety. When the provided plug does not fit into your outlet,
consult an electrician for replacement of the obsolete outlet.
• Protect the power cord from being walked on or pinched particularly at plugs convenience receptacles, and the
point where they exit from the apparatus.
• Only use attachments/accessories specified by the manufacturer.
• Unplug this apparatus during lightning storms or when unused for long periods of time.
35
IMPORTANT SAFETY INSTRUCTIONS
Service
There are no user-serviceable parts inside. All service must be performed by qualified personnel. Servicing is required when:
• the unit has been damaged in any way, such as when the power-supply cord or plug is damaged.
• the unit has been exposed to rain or moisture, or liquid has been spilled into the unit.
• objects have fallen into the unit .
• the unit does not work properly.
• the unit has been dropped.
This equipment has been tested and found to comply with
the limits for a Class B Digital device, pursuant to part 15
of the FCC rules.
These limits are designed to provide reasonable protection
against harmful interference in a residential installations.
This equipment generates, uses and can radiate radio frequency energy and, if not installed and used in accordance
with the instructions, may cause harmful interference to
radio communications. However, there is no guarantee that
interference will not occur in a particular installation.
If this equipment does cause harmful interference to radio
or television reception, which can be determined by turning
the equipment off and on, the user is encouraged to try to
correct the interference by one or more of the following
measures:
• Reorient or relocate the receiving antenna.
• Increase the separation between the equipment and
receiver.
• Connect the equipment into an outlet on a circuit different
from that to which the receiver is connected.
• Consult the dealer or an experienced radio/TV technician
for help.
The user may find the following booklet, prepared by the
Federal Communications Commission, helpful:
"How to identify and Resolve Radio/TV interference
Problems."
This booklet is available from the US. Government Printing
Office, Washington, DC 20402, Stock No. 004-000-0034-4.
Caution:
You are cautioned that any change or modifications not
expressly approved in this manual could void your authority
to operate this equipment.
For the customers in Canada:
This Class B Digital apparatus meets all requirements of
the Canadian Interference-Causing Equipment Regulations.
Cet appareil numérique de la classe B respecte toutes les
exigences du Réglement sur le matériel brouilleur du
Canada.
Certificate Of Conformity
TC Electronic A/S, Sindalsvej 34, 8240 Risskov,
Denmark, hereby declares on own responsibility that
following product:
M•ONE - Dual Effects Processor
- that is covered by this certificate and marked with CElabel conforms with following standards:
EN 60065
(IEC 60065)
Safety requirements for mains
operated electronic and related
apparatus for household and similar
general use
EN 55103-1
Product family standard for audio,
video, audio-visual and entertainment
lighting control apparatus for
professional use. Part 1: Emission.
EN 55103-2
Product family standard for audio,
video, audio-visual and entertainment
lighting control apparatus for
professional use. Part 2: Immunity.
With reference to regulations in following directives:
73/23/EEC, 89/336/EEC
Issued in Risskov, November 1999
Anders Fauerskov
Chief Executive Officer
36
APPENDIX - MIDI Implementation Chart
DUAL EFFECTS PROCESSOR M•ONE - NOVEMBER - 1999
Function
Basic Channel
Mode
Default
Changed
Default
Messages
Altered
Note Number
Velocity
After Touch
True Voice
Note ON
Note OFF
Key’s
Ch’s
Pitch Bend
Control Change
Transmitted
1
1-16
Recognized
1
1-16
X
X
X
X
X
X
X
X
X
from 16 and up
X
X
X
X
X
X
X
from 16 and up
Remarks
Eng 1: 16-31
Eng 2: 48-63
System: 70-78
All Controllers are
single byte type, scaled to
parameter range.
Prog Change
System Excl.
Common
System real time
Aux Messages
O:YES
X:NO
:Song Pos
:Song Sel
:Tune
:Clock
:Commands
:Local ON/OFF
:All Notes OFF
:Active Sense
:Reset
O
O
O
X
X
X
X
X
X
X
X
X
O
X
X
X
O
X
X
X
X
X
Mode 1: OMNI ON, POLY
Mode 3: OMNI OFF, POLY
Mode 2: OMNI ON, MONO
Mode 4: OMNI OFF, MONO
37
APPENDIX - Technical Specifications
Digital Inputs and Outputs
Connectors:
Formats:
Output Dither:
Sample Rates:
Processing Delay:
Frequency Response DIO:
Analog Inputs
Connectors:
Impedance, Bal / Unbal:
Max. Input Level:
Min. Input Level for 0 dBFS:
Sensitivity:
A to D Conversion:
A to D Delay:
Dynamic Range:
THD:
Frequency Response:
Crosstalk:
Analog Outputs
Connectors:
Impedance Balanced /
Unbalanced:
Max. Output Level:
Output Ranges:
D to A Conversion:
D to A Delay:
Dynamic Range:
THD:
Frequency Response:
Crosstalk:
RCA Phono (S/PDIF)
S/PDIF (24 bit), EIAJ CP-340, IEC 958
HPF/TPDF dither 24/20/16/8 bit
44.1 kHz, 48 kHz
0.1 ms @ 48 kHz
DC to 23.9 kHz ± 0.01 dB @ 48 kHz
1/4" phone jack, balanced
21 kOhm / 13 kOhm
+24 dBu
0 dBu
@ 12 dB headroom: -12 dBu to +12 dBu
24 bit, 128 x oversampling bitstream
0.65 ms / 0.70 ms @ 48 kHz / 44.1 kHz
100 dB typ, 20 Hz - 20 kHz
typ < 92 dB (0,0025 %) @ 1 kHz
+0/-0.1 dB @ 48 kHz, 20 Hz to 20 kHz
<-95 dB, 20 Hz to 20 kHz
1/4" phone jack, balanced
40 Ohm
+20 dBu (balanced)
Balanced: 20/14/8/2 dBu
Unbalanced: 14/8/2 dBu
24 bit, 128 x oversampling bitstream
0.63 ms / 0.68 ms @ 48 kHz / 44.1 kHz
104 dB typ, 20 Hz to 20 kHz
typ <-94 dB (0.002 %) @ 1 kHz,
+20 dBu Output
+0/-0.5 dB @ 48 kHz, 20 Hz to 20 kHz
<-100 dB, 20 Hz to 20 kHz
EMC
Complies with:
Safety
Certified to:
IEC 65, EN 60065, UL6500 and CSA E65
Environment
Operating Temperature:
Storage Temperature:
Humidity:
32° F to 122° F (0° C to 50° C)
-22° F to 167° F (-30° C to 70° C)
Max. 90 % non-condensing
Control Interface
MIDI:
Pedal:
In/Out/Thru: 5 Pin DIN
1/4" phone jack
General
Finish:
Display
Dimensions:
Weight:
Mains Voltage:
Power Consumption:
Warranty Parts and labor:
Technical Specifications are subject to change without notice !
38
EN 55103-1 and EN 55103-2
FCC part 15, Class B, CISPR 22, Class B
Anodized aluminum front
Plated and painted steel chassis
23 character / 280 icon STN-LCD display
19" x 1.75" x 8.2" (483 x 44 x 195 mm)
4.1 lb. (1.85 kg)
100 to 240 VAC, 50 to 60 Hz (auto-select)
<15 W
1 year
APPENDIX - Troubleshooting
Problems sending and receiving MIDI information
You will need to reset the System Parameters! This is done
via a System Parameter reset easily performed if you
follow the procedure below.
The "System Parameter reset", restores the factory
defaults in the I/O and Utility menu's.
The "System Parameter reset" does NOT erase any
presets.
• Press and hold the ENTER key during power up.
• Dial the CONTROL wheel until the display reads "Reset
Sys Param".
• Press the ENTER key to confirm.
• After 2 seconds, the display reads "Clear/Reset done"
• Power Off - On.
The display reads "Kernel cleared" during the first power up.
The M•ONE System parameters are now reset and the
MIDI port is fully functional.
39
PRESET LIST
1
2
3
4
5
6
7
8
9
10
11
12
13
14
15
16
17
18
19
20
21
22
23
24
25
26
27
28
29
30
31
32
33
34
35
36
37
38
39
40
41
42
43
44
45
46
47
48
49
50
40
M-One halls
Vintage Hall & Room
Natural Hall + Ambient
vocal/Choir halls
Vocal ambient & Hall
Vocal Delay & Spring
Vocal Hall/Ahort SN
VOC Large/Med plate
VOC Amb &Liveverb
Large VOC Hall/Room
Vocal Amb+ small Room
Drum &Perc Room
Share/Tom Live/Plate
Big Snare/ Real Room
Toms & a Big Share
Toms & a Short snare
Drum Amb+Short Snare
Perc Plate +S Room
Short Plate + L Room
Ambience & Liveverb
Tap Delay/Small Hall
Small/Large Halls
Gold Plate/Warm Hall
Plate & Spring
Bright Hall & Room
Wide/ Narrow Room
Medium/Small Room
Large /Medium Room
Large/Small Chamber
Slap Dly + Med Room
Detune and Med Room
Genericl Hall/Spring
Generic2 Amb/Live
Live Hall +Slapbak
Saxophone Room
Horns Hit Me
Horns Med/Large Room
Synth Hall+Ambience
Repeats & Slapback
The Pack 1SN 2VOX
Delay bleed-Hall
Detune bleed- Ambient
M-one Magic
Tape Delay - Spring
Phaser - Plate
Delay bleed-Room
Hall bleed - Chorus
Hall bleed -Hall
Room bleed -Hall
Small Hall - Hall
51
52
53
54
55
56
57
58
59
60
61
62
63
64
65
66
67
68
69
70
71
72
73
74
75
76
77
78
79
80
81
82
83
84
85
86
87
88
89
90
91
92
93
94
95
96
97
98
99
100
De-Essed Hall
De-Essed Plate
Chorused Hall
Compresed Live verb
Compresed Room verb
Wet Chorus-Phaser
Party Next Door
Sund Check
Aalog Style Delay
Detuned Tape Delay
Filtered Octaver
70´s Style
Room- Large Hall
Delay Phased
Chorused Ambience
Predelayed Hall
¨Chorused Warm Hall
Compresed Share Verb
Chorused Spring Verb
Gated Live Reverb
Delays and Hall
Five seconds Later
Wurlitzer Verb+Delay
Spread out Verb
Acoustic GTR
BG´s Spread
GTR Spring & Delay
GTR Spring & Chorus
GTR Spread
Rhodes Verb & Chorus
Dual Compressor
Dual Gate/ Expander
Phaser + Termolo
Dual EQ
Dual Delays
Delay and Chorus
Flanger & Chorus
Tremolo & Compressor
Slap Dly+Spring Verb
Phaser & Spring Verb
Stereo Compressor
Stereo Limiter
Stereo Gate / Expander
Stereo EQ-Loudness
Stereo EQ -Low Boost
Stereo EQ HighBoost
Stereo Phaser
Stereo Real Hall
Stereo Real Room
Stereo Hall