1
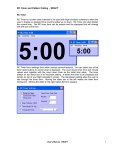
2MPro Sign Software© Version 2.13
3/18/2004
Page 1
2MPRO
Software Program
User Manual
Software License Agreement
This Software was Written Specifically for use on predetermined signs and is not
intended for general use. This software is licensed in agreement with all parties to be
used in accordance with the specific uses only. Any attempt to use this software for
other than specified herein constitutes a violation of this agreement. Use of this
software indicates the acceptance of this license agreement.
2MPro Sign Software© Version 2.13
3/18/2004
Page 2
TABLE OF CONTENTS
1) Introduction
Requirements
Installation
Starting 2MPro
Setting the New Animation Options
2MPro Main Screen
2) Animation Editing
Creating a New Animation
Text Frames
Selecting the Text Type
Normal Text
Setting the Font
Text Colors
Backgrounds and Shadows
Text Spacing
Rich Text
Travel Text
Time, Temperature, and Date
Using Display Effects
Effect Directions
Appear Modes
Hold Effects
Effect Speeds
Hold Time
Auto Effects
Graphic Frames
Graphic Tools
Importing Bitmaps
Importing Video Files
Setting a Frame Rate
General Frame Functions
Adding, Moving, and Deleting Frames
Editing Multiple Documents
Copying Frames Between Animations
Using the Simulator
Field Boundaries
Saving Your Animation Files
4
4
4
4
5
6
7
7
8
8
8
8
9
9
9
10
10
10
11
11
11
11
12
12
12
12
12
14
14
15
15
15
15
16
16
16
17
2MPro Sign Software© Version 2.13
3/18/2004
3) The Scheduler
Scheduler Window
Adding Animations
Setting the General Options
Setting the Timing Options
Adding, Deleting, and Moving Entries
Editing Existing Entries
Simulating
Advertisers
The Advertiser List
Finding Entries
Page 3
18
18
19
19
19
20
20
20
21
21
21
Find First
Find All
21
21
Saving the Schedule File
22
4) Communications
Sign Connections
Adding Connections
Communication Details
RS485 Settings
RS232 Settings
Modem Settings
Changing the Active Sign
Saving your Connection Settings
Connecting to Your Sign(s)
Connection Via Modem
Connection Via RS485 or RS232
Sign Status
Sending Commands
Play Schedule
Play Animation
Stop Sign
Format Flash
Update Status
Disconnect
Sending an Animation Directly to Sign
23
23
23
24
24
24
24
25
25
25
25
25
26
26
26
26
27
27
27
27
27
Appendix A) Updating the Sign Firmware
28
Appendix B) Adjusting the RGB Palette
29
2MPro Sign Software© Version 2.13
3/18/2004
Page 4
1) Introduction
2MPro is a software package that provides all the tools you will need to control your Multimedia LED
display. Animations can be quickly created combining text and graphic frames to dynamically appear
in your sign using one of the built in display effects. 2MPro also provides a scheduler so that each of
your messages will appear only during the times and dates that you specify. Finally, once your content
has been created, 2MPro provides you with the tools to communicate to and control your Multimedia
sign.
Requirements
2MPro is intended for use on PC computers running Windows NT or Windows 2000 / 98 operating
systems. The computer will require several megabytes of free hard disk space for the 2MPro software
and more storage for the animations to be created. It is recommended the computer have a minimum of
128 MB of RAM. Also, the computer will require one unused serial port for communication to the sign
via RS232, RS485 (with converter) or a modem if the sign is to be communicated to via phone line.
Installation
2MPro is provided on either a single CD or a series of floppy disks. Place the CD or the diskette
labeled Disk #1 into the appropriate drive. Through Windows Explorer or the Windows Run function,
start the program Setup.exe from the drive. You will see a Multimedia logo message appear while the
setup is loading. The 2MPro installation screen will appear next. You will be asked to agree to our
software licensing by selecting the Next button. The next screen will prompt you to enter the location
to install the software to. We recommend leaving this at the default folder which by selecting the Next
button. You may change this to any folder on your hard drive if you wish by selecting the Browse
button and choosing a folder. Select the Next button for the next two screens and the Finish button to
complete the installation. This will automatically copy the 2MPro software to your computer.
Starting 2MPro
To start 2MPro, select the Windows Start button and then hilite the Programs menu item. The list of
programs will include 2MPro Sign Software.
This was automatically created for you during the installation. Point to the 2MPro entry and select it.
This will bring up the main screen of the 2MPro software.
2MPro Sign Software© Version 2.13
3/18/2004
Page 5
Setting the New Animation Options
The first time you launch the program you
will get a setup screen like the one shown.
This screen allows you to set the matrix and
available colors of the sign being
programmed. In order to set these fields
you must know the specifics of your signs.
Note: Ensure this is set correctly for your
sign. Animations created with the wrong
settings will not work with your sign.
Consult the documentation that came with
your sign or call Multimedia if you are
uncertain how to set these.
Number of Colors: Set the number
of colors that your sign is capable
of displaying.
Note1 – Colors available are subject to the type of sign you are
programming. You cannot display more colors than you sign can
produce.
Once you have selected all of the settings, click on the
Ok button to apply the settings. If this is the only sign
you are programming with this software, the new setting
will become the default and you will not have to set this
again. If you are programming more than one sign that
have different settings, these can be changed at any time
by selecting, “New Animation Options” from the File
Menu. Once you have changed the settings, all new
animations will be created with the new settings.
Width: Set the number of Pixels
that are across the width of the sign.
Height: Set the number of
Pixels that make up the height
of the sign.
2MPro Sign Software© Version 2.13
3/18/2004
Page 6
2MPro Main Screen
During the course of this manual, we will be referring to menus, tool bars, and icons which appear on
the main screen of 2MPro. Below is a picture with a brief description of the major components of the
user interface.
Main Menu
Main Tool Bar
Document Window
Document Frame
Frame List
Palette Box
Property Sheet
Graphic Tool Bar
2MPro Sign Software© Version 2.13
3/18/2004
Page 7
2) Animation Editing
In the introduction, we mentioned that 2MPro is an animation editor, a scheduler, and a
communications program. We will first look at the animation editing tools. To create a new animation
document, click on the New File icon or select New from the File Menu. A new document window
with no frames will be created.
Creating a New Animation
A 2MPro animation consists of a series of frames. There are three basic type of frames - text, graphic,
and inserted animations. This section will describe the creation of text frames.
To create a new text frame select the text frame icon from the main tool bar or from the Frame menu
item select Insert – Text.
You now have an animation that consists of a single blank text frame. Notice that a text frame icon has
been placed in the frame list view in the right side of the document. This list will update with frames as
they are added or deleted to the animation. Also notice that the title bar of the document has changed to
show Frame 1 of 1. There is also a zoom level control in the right side of the document window. This
can be used to set the viewing size of the document frame.
Saving Your Animation Files
To store your animation, click on the Save icon in the Main Tool Bar or use File – Save from the Main
Menu. If this is a new animation, you will be prompted to enter a name for the file. It is best to create a
name which is descriptive of the animation content. 2MPro will automatically append the file
extension .mme to your file name. All 2MPro animations will be stored with this extension.
2Mpro allows you to store animations anywhere on your drives but we suggest that you use a single
folder to store your work.
2MPro Sign Software© Version 2.13
3/18/2004
Page 8
Text Frames
So now let’s enter some text in the frame. First, we need to open the Frame Properties Sheet. Click on
the Properties icon or select Properties from the Frame Menu, or just double click anywhere on the
document window to open the Frame Properties. You will notice there are three tabs at the top of the
Property Sheet. Select the Text Tab if it is not already selected.
Select the Text Type
(From left to right)
•
•
•
•
•
•
Normal Text
Rich Text
Travel
Time
Temperature
Date
Type in your Text Message Here, see note.
Note: If you have selected
frame type to be Time, Temperature or Date, the text field will not be available.
the
There are six different type of text frames available which are selected with the buttons just below the
text tab. The default type is called Normal Text and is the most common format. The other formats will
be explained a little later in this section.
Normal Text
Text is added to a normal text frame by typing in the text editing box of the text sheet. As you
type, you will notice text being added to the frame data in your document. Also notice that this
text is automatically centered within the frame both horizontally and vertically. The size and
style of the text is determined by the font settings.
Setting the Font
To change the font, select the font button.
The font selection box will now appear. All of
the Windows fonts are available for use within
your text frames. Choose a font, a font style, and
the size from this box and select the OK button
when done. The text in the document frame will
change immediately to reflect the font change.
NOTE: Most of the Windows fonts do not work
well with smaller sign sizes. 2MPro has also
installed a group of fonts that provide a number
of smaller fonts. Multimedia fonts are available
in the font list and begin with the letters MM (eg.
MM6x10, MM4x5)
2MPro Sign Software© Version 2.13
3/18/2004
Page 9
Text Colors
Colors can be added to a text frame for the actual text, the frame
background, and a drop shadow. To set these colors select the Toggle
Palette icon on the main tool bar. This will bring up the palette selection box.
The look of this box will vary according to the color type of your sign. The
palette box shown here is for a full color RGB display. Colors are chosen by
either clicking on a color within the color array or by using the slider bars to
select the intensities. Once a color is selected, you need to move the cursor
back to the text sheet and click in the color box next to the text item you wish
to color (text, background, shadow). The text shown in your document frame will change immediately
with the new color selection.
Backgrounds and Shadows
Combining colors and shadows can help you create text
messages that really stand out with an almost 3-D effect.
Shadowing is applied to the text by using the drop down
shadow control. Shadows can be set to display either left
or right of the text. A rule of thumb for creating text
frames with shadows is that the colors used should be a
combination of a high intensity, a low intensity, and black.
Text Spacing
When adding text to the edit box, multiple lines of text can be added by hitting the Enter key to create
a new line. The text in the frame will automatically space and center the text within the frame. All of
the text you wish to add may not fit within the frame. You have the choice of either adjusting the font
settings or creating a second frame to hold some of the information.
There is a control box in the text sheet labeled Spacing. This can be set to either Normal or
Compressed. This setting controls the amount of spacing between each line of text in the frame. The
Normal setting spaces each line according to the setting inherent in the font itself. You may want to set
this to Compressed to allow you to fit more text on the frame. The amount of compression that occurs
is dependant on the font and font size you are using.
2MPro Sign Software© Version 2.13
3/18/2004
Page 10
Rich Text
Rich text is a text type that allows you to combine various
fonts and colors within a single frame. Select a Rich Text
frame by pressing the Rich Text type button Rich text is
entered into a frame in the same method as Normal text, by typing
into the text editing box. The text will appear with the current font
and color settings. Now, you can change these settings for part of the
text by clicking and dragging your cursor over the text to hilite it.
Changing the font settings or colors will now change only the text
which is hilited. This example shows a rich text frame that uses different colors and fonts on two lines
of text.
Travel Text
Travel is a text frame that allows you to display a long string of text with a single frame. It does this by
scrolling all the text across the sign from right to left. Travel text frames are limited to a single line of
text and therefore the text edit box will not allow you to enter multiple lines. The frame view in your
document window will display the text as left justified and will not display all of the text you have
typed. However, when the animation is simulated or played on the sign, your entire text string will
scroll across the display.
NOTE: There is a limitation to the amount of text you can enter into a travel frame. A message box will
alert you if you have attempted to type in more text than is allowed.
Time, Temperature, Date
These text frames display “real time” information on your sign meaning that the information will
change. Time frames of course display the current time of day. This time is set according to the time
on your computer so this must be set correctly for it to be accurate on your sign. The format control in
the text sheet will allow you to set the time to be either twelve or twenty-four hour format.
Date frames operate similarly and the information is also derived from you computers calendar. The
format control on date frames allow you to select between D/M/Y and M/D/Y formats.
Temperature frames allow you to display the current temperature at your sign. Your Multimedia sign
should be equipped with a temperature sensor, this is what allows you to display the correct readings.
However, the computer you are running 2MPro on has no sensor and therefore you will always see the
temperature default to 0 degrees Celsius or 32 degrees Fahrenheit. Celsius and Fahrenheit types are set
from the format control.
Fonts and colors for all of these text types are set the same way as for the other text types.
NOTE: The signs are not capable of displaying time/temperature/date frames using all of the Windows
fonts. It instead will attempt to use a font that it can display which is a similar size. Therefore these
frames may not appear exactly on the sign as they do in 2MPro.
2MPro Sign Software© Version 2.13
3/18/2004
Page 11
Using Display Effects
We have shown you how to create text
frames in order to get your message
displayed on your sign. Now we need to
add motion to your frames in order to
attract attention to your message. This is
done with the use of display effects. Select
the Effects tab on your Frame Property
Sheet to bring up the Effects Page. This
page is divided into three areas; Appear,
Disappear, and Hold Effects. Appear
effects determine how the frame will
appear onto the sign. Once the frame has appeared, you can apply a hold effect for the duration of the
frame, and a disappear effect can be applied to set how the frame will leave the sign.
NOTE: We recommend not using disappear effects other than Stay except for the last frame in an
animation. This is because a blank period is created between the time one frame disappears and the
next frame appears.
The following is a brief description of the appear/disappear effects available in 2MPro:
•
•
•
•
•
Stay – On or Off Immediately
Unveil – Curtain or cover moving off
Roll – Text rolls on
Coalesce – Random pixels appear
Fade – Fades from low to high intensity
•
•
•
•
•
Zoom – Frame moves in two directions
Wave – Moves in a wave effect
Interleave Horizontal – Moves in stripes horizontally
Interleave Vertical – Moves in stripes vertically
Stretch – Unfolds in given direction
Effect Directions
Some of the appear and disappear effects have directions associated with them. After selecting an
effect, select the arrow on the direction drop down box. The direction list will display the directions
available for the effect you have selected. For example, a Zoom effect can be used in an Up, Down, or
Out direction.
Appear Modes
Appear Modes are used to set the way the appear effect of the current frame will remove the previous
frame. The following is a description of the appear modes:
•
•
•
•
Blank – Blanks the screen prior to appearing the next message
Wipe – The frame will appear on top of the previous frame
Scroll – Scrolls the previous information off as the new message appears
Overlap – Overlays on top of previous frame. Previous frame shows through any black area of new frame.
Hold Effects
The following is a brief description of the hold effects:
•
•
•
•
Hold – No Effect
Blink – Flashes the text on and off repeatedly
Snow – Random pixels appear on giving appearance of snow
Bijou – Lights the outside edge of sign, controlled by speed
2MPro Sign Software© Version 2.13
3/18/2004
Page 12
Effect Speeds
All of the effects have a speed adjustment that is set with a slider bar. The slider can be moved in
increments between the slowest and fastest which set a relative speed for the effect.
Hold Time
A hold time can be set for each frame. This is defined as the amount of time a frame will remain on the
sign after it has appeared and before it will disappear. When a new frame is created, this is set to one
second by default. You can change this by clicking in the hold time box and typing in a new hold time.
You can enter this as a whole number or use a decimal point to enter a time down to 1/100 of a second.
The spin control (arrows) next to the hold time box can also be used to adjust this time.
Auto Effects
In the document window, you may have noticed a check box entitled Auto Effects. This is a quick and
simple method to have your messages run with display effects created at random rather than having to
set these by hand. Simply check this box in order to apply the auto effects function. Once checked,
most of the effect selection tools will be disabled (all except the hold effect and hold time). You can
uncheck this box and manually set the effects for each frame at any time.
Graphic Frames
Graphic frames allow you to draw to each pixel within a frame to create a series of pictures. 2MPro has
a number of graphic editing tools which can be used to create your own graphic frames. Graphic
frames can also be created by importing Windows bitmap (BMP) files. A whole animation consisting
of a series of graphic frames may also be created by importing a video file (AVI or MPG).
Graphic Tools
The graphic tool bar is only available when you are working on a Graphic Frame.
•
•
•
•
•
•
•
•
•
•
•
Cancel: Returns the cursor to nrmal
Pencil: Draw Freehand.
Line: Draws Straight Line.
Text: Adds Text to a Graphic Frame.
Pick: Copies color from the frame.
Fill: Fills objects with selected color.
Selection: Copies, Cuts and Moves selected areas of screen.
Ellipse: Draws an Oval or Circular line.
Rectangle: Draws a Square or Rectangle line.
Filled Ellipse: Draws a filled Oval or Circle, with selected
color.
Filled Rectangle: Draws a filled Square or Rectangle with the
selected color.
2MPro Sign Software© Version 2.13
3/18/2004
Page 13
Before using any of the graphic tools, you must first select a color to draw with. This done by bringing
up the color palette box and choosing your color (see page 9).
Pencil: Use the pencil by pressing the left mouse button to draw while moving the cursor over the
graphic frame. Pixels will be drawn to with the currently selected color.
Line: Move your cursor to the first end for the line, click and hold the left mouse button. Then move
the cursor to the end of the line and release the mouse button. This will draw a line between the two
points in the graphic frame.
Text: Text in a graphic frame is entered differently than in a
text frame. After selecting the text tool, you will see a text
entry dialog box. After entering your text, and choosing the
font and text color, hit the OK button. You should now see
your text in an outlined box in the document frame. Move
your cursor into the outlined box. Now hold the left mouse
button down and drag the box around the frame to position
it where you would like. You can hit the ESC key at any
time to abort the text entry.
NOTE: The text can be set to appear transparently over the frame. This is done from the Tool item in
the main menu which has a selection for Transparent Selection. Text will appear transparently when
this item is checked. Transparency also is used with the Block tool.
Pick Color: This tool is allows you to select a drawing color from a color in the frame rather than
through the palette box. To do this, first select the Pick Color tool. Move the cursor to the frame
window and point to the color within the frame you wish to select. Press the left mouse button. This
will set the new drawing color which can be used with any of the drawing tools.
Fill: Fill is used to fill an area of a graphic frame with the drawing color. After selecting the fill tool,
move the cursor to the frame area to fill and hit the left mouse button. The original pixel and all of the
surrounding pixels of the same color will be filled with the new drawing color.
Block: The Block tool is used to copy, paste and move graphic blocks between graphic frames. To
select a block choose the block tool and move your cursor to the graphic frame. Position the cursor to
one corner of the block you wish to move or copy and hold the left mouse button down. Now drag the
cursor to the opposite corner of the block. You will see the outline of the box as you drag the mouse.
Let the mouse button up when you have outlined your block.
To move the block around the frame, hold the mouse button down while pointing anywhere within the
box. You can now drag the block anywhere on the frame. Let the mouse button up to drop the block in
its new position.
You can also copy and paste a block. Use the steps described above to define the block and select the
copy button from the main tool bar. This copy the graphic block to the Windows clipboard. You can
now paste the block into the same graphic frame by selecting the Paste button. The block is pasted to
the upper left corner of the frame. You can again go in and drag the block to the desired position on the
frame. Blocks can be pasted to any graphic frame in the animation or even to a graphic frame in a
separate animation.
2MPro Sign Software© Version 2.13
3/18/2004
Page 14
Ellipse and Rectangle: These tools allow you to draw the chosen shape to a graphic frame. Select the
tool and point to your graphic frame. Click and hold the left mouse button. As you drag the cursor
around you will see an outline of the shape you are drawing. The shape will be drawn to the frame
once the mouse button is released.
Importing Bitmaps
2MPro can import Windows bitmap files for use in
graphic frames. To do this, in a graphic frame, bring up
the edit properties box and select the Text tab. In a graphic
frame, the text sheet will look as shown here. Select the
browse button which will bring up a file selection box.
Find the bitmap file (extension is .BMP) to import and hit
Open. 2MPro will now import and scale the bitmap for
your sign size and color. This will appear in the graphic
frame.
NOTE: The new graphic frame may not look much like the original bitmap. This is because your sign
might be a much different resolution than the bitmap you are importing. For example, if your sign is a
16 x 64, 256 shades of red, and you are importing a bitmap that is 100 x 100 and full color, you do not
have the resolution necessary to display this bitmap properly.
Importing Video Files
2MPro can also import video files in both AVI and MPEG formats.
Importing a video file will create a complete animation by converting
each frame in the video file and creating a series of graphic frames in
the 2MPro animation. To do this, first create a new animation. Then
from the main menu, select File and then Import Video File. This will
bring up the Import Video File box. There are three conversion options
to choose from. Stretch to sign size will stretch or shrink each frame of
the video file to the resolution of your sign. Crop Left/Top align will
convert the original frames with no scaling and will start at the top left
of the video frame. This will result in only the top left portion of the
video image being used. How much of the image is used depends on
the relative size of the video frames and your sign size. Crop Center is
similar except it will crop the images from the center of the video
frames.
Once you have selected the type of conversion, hit the Browse button to choose the video file. In the
file selection box, you can use the “Files of Type” drop down menu to choose to import either an AVI
file or an MPEG file. Once you have chosen the video file, hit Open to return to the Video File box.
Now hit the Start button to begin the importing process. Once started, you will see the number of
frames in the document title bar advance as new frames are added. You will even see each graphic
frame in the document change. The status bar in the Import box tells you how much of the video file is
left to import. You can hit the Stop button at any point to stop the operation. When completed, you will
have a series of graphic frames. The hold times of these graphic frames will have automatically been
set to play at the speed of the original video file.
2MPro Sign Software© Version 2.13
3/18/2004
Page 15
Setting a Frame Rate
2MPro provides a function for setting the frame rate of animation. This function is normally used only
with an animation that has been created by importing a video file. To set a frame rate, you must first
select the frames you want to apply the new rate to. This is done from the frame list window. Click on
the first frame you wish to apply the new rate to. Now scroll
down to the last frame to change, press and hold the SHIFT key
down and select the last frame with the mouse. This will hilite all
the frames in the list between the two you’ve selected. Now,
choose Frame from the main menu, and select the Apply Frame
Rate function. Use the arrow keys in the hold time area to adjust
the hold times. You will see the frame rate change as well. Adjust
this until you achieve the frame rate that is as close to the desired
rate as possible. Select OK when done. This will apply the new hold time to all of the selected frames
and in turn, the animation will play back at the desired frame rate.
General Frame Functions
Adding, Moving, and Deleting Frames
So far we have described how to add and edit a single text frame. As
we mentioned, most animations consist of a series of frames that can
either be all text or can also use graphic frames. Additional text
frames can be added at any time by selecting the Insert Text button
from the main tool bar. Graphic frames are added in the same manner
with the Insert Graphic button. The frame list on the right side of the
document will update as new frames are added. New frames are
always inserted into the frame list after the current frame. For
instance, in the list shown here, frame number four is the current
frame. The current frame can be selected by pointing and clicking, or
by scrolling to it with the arrow keys. If the user were to select the
Insert Text button, a new text frame would be inserted as frame five
and the rest of the frames would be shifted down.
Frames can be moved by selecting them with the cursor, dragging
them to the new location on the list, and dropping them by letting go
of the mouse button.
Frames to be deleted are first selected with the mouse to hilite them. You may then either press the
Delete key or select the Delete Frame button from the main tool bar.
Editing Multiple Documents
2MPro is a multiple document editor. This means that you can work on more than one animation at a
time. As you create new animations or open existing ones, a new document window is created. As in
all Windows MDI applications, you can choose the document you want to work on by clicking
anywhere in its’ window.
2MPro Sign Software© Version 2.13
3/18/2004
Page 16
Copying Frames Between Animations
Frames can actually be copied from one animation to into another. To do this, select the frame from the
frame list of the animation to copy from Then select the Copy button from the main tool bar. This
copies the frame into the Windows clipboard. Then, select the animation to copy the frame to and
select the spot in the frame list to copy to. Now select the Paste button from the main tool bar. This
will paste the copied frame into the second animation.
NOTE: Both animations must be of the same size and color type for this to work.
Using the Simulator
2MPro comes equipped with a simulator that will display your animations
on the video monitor as they would appear on your sign. To start a
simulation, select the Play Animation button from the main tool bar. You
may receive the following message “Would you like to play from the
current frame? Selecting no will play entire animation”
Press the NO button to play all the frames in the animation. Pressing yes
will play only the frames from the currently selected frame to the end of
the animation. The simulator window has three zoom level buttons. These
can be selected to vary the size of the simulator window. Click the ‘X’ of the simulator window when
you wish to stop.
Field Boundaries
Normally, text or graphic frames are the same height and width as the
sign. However, it is possible to change the size of the any frame. This
allows you to create some interesting effects by leaving one message
on part of the sign while having a new frame appear on another
portion. For example, if your sign were 32 pixels high and 64 pixels
wide, you could have a sale message appear on the top 16 pixels and
in your second frame have information travel across the sign on the
bottom half of the sign.
Fields can be set two different ways. The first way is to drag the boundaries using the cursor. The
frame has a blue border surrounding it. Within this border are eight black marks. When the cursor is
positioned directly over one of these marks, it will
change its shape to a double headed arrow. At this
point you can click and drag the border to a new
location to define a new boundary for the frame.
The second way to create a field is to select the field
tab in the properties box. The field can be adjusted by
entering the new positions. After hitting the Apply
button the blue boundary will move to show the new
position of the field for this frame.
2MPro Sign Software© Version 2.13
3/18/2004
Page 17
Saving Your Animation Files
To store your animation, click on the Save icon in the Main Tool Bar or use File – Save from the Main
Menu. If this is a new animation, you will be prompted to enter a name for the file. It is best to create a
name which is descriptive of the animation content. 2MPro will automatically append the file
extension .mme to your file name. All 2MPro animations will be stored with this extension.
2Mpro allows you to store animations anywhere on your drives but we suggest that you use a single
folder to store your work.
2MPro Sign Software© Version 2.13
3/18/2004
Page 18
3) The Scheduler
The scheduler allows you to program your sign to run multiple animations and control the exact times
and dates of when each animation runs. The scheduler is used to build a schedule file. This file
contains a list of animations along with the time/date information. Once the schedule file has been
created and stored, it can be sent to your sign for playing.
Scheduler
To access the scheduler, select the scheduler icon from the Main Tool Bar. This will bring up the
scheduler window.
Scheduler Window
This is the 2MPro scheduler window. This is a popup window which means you can switch back and
forth between this window and the main 2MPro window at any time. The scheduler will automatically
load the schedule file you were last working on. Here you can see a file with three animations in the
list.
When the schedule runs on the sign, the animations are played from the top of the list. However, each
schedule entry is first tested to see if it is scheduled to run at the current time and date. If it is not, the
next entry is tested and so on. When the last entry is reached, the loop repeats from the top of the list
again.
2MPro Sign Software© Version 2.13
3/18/2004
Page 19
Adding Animations
To add an animation to the schedule click the
Add button and select the file from the open
dialog box.
Note: The first time this dialog box is opened it may
not be in the correct directory and you will need to
locate the directory that your animations are stored
under.
Animation files have an extension of *.mme. Select
the animation file name from the list and click Open.
Setting the General Options
This will bring up the Options box. The General Sheet will
display the name of the file you just selected. It also has a
drop down box for you to associate and advertiser with. It is
not necessary to fill this in, this is a feature only used by
people doing third party advertising. A description of the
advertisers feature is included in Section x.xx. A box
containing the playing time of the animation is shown.
Currently this feature is not active and will always default to
10 seconds.
Setting the Timing Options
To set the times and dates for this entry, click on the
Timing Tab. New entries are defaulted to play all the time,
every day. If you wish to have the animation play between
certain dates, uncheck the Always check box in the Dates.
To set a start date, click on the start date drop box which
will bring up a calendar. Select the date you wish the
animation to start playing. Now click on the end date drop
box and select the last day for the animation will play.
To set a start and stop time, first uncheck the Always box.
Start and stop times are set by clicking the appropriate
box. You can use the arrow keys to set the hours and
minutes or type directly into the box.
The Exclude Days feature allows you to program the entry to play on particular days of the week. To
do this, first uncheck the Always box, then put a check mark next to each day of the week you do not
want the animation to play. For example, if you want this entry to play only on weekdays, check off
the Sat and Sun boxes.
Once you’ve finished with the timing options, click the Apply button to add this entry to the schedule.
2MPro Sign Software© Version 2.13
3/18/2004
Page 20
Adding, Deleting, and Moving Entries
New entries can be added anywhere within the schedule list. The position of new entries is determined
by the position of the hilite cursor. For example if you wanted to add a new entry to the beginning of a
schedule list, you would hilite the first entry by pointing and clicking it. The first entry will now be
hilited in blue. If you now add a new entry, it will be inserted into the first position in the list and the
original entries will all be pushed down one location.
To add an entry to the end of the schedule list, click in the list window below the last entry so that none
of the entries are hilited. Any new entries are added to the end of the list in this condition.
Similarly, entries can be moved within a list by dragging and dropping. Use the cursor to hilite the
entry to be moved and hold the mouse button down. Now move the cursor to the new location in the
list and let the mouse button up. This will drop the entry into the new location.
Entries may also be deleted from a list. Again, you must first hilite the entry to be deleted. Now select
the Delete icon from the tool bar and the entry will be removed from the list.
Editing Existing Entries
It is possible to change the time/date settings of any entry in the schedule after it has been
added. To do this first select the entry(s) to edit. More than one entry can be edited at once. To
select multiple entries, hold the CTRL key down while selecting each entry by pointing and clicking.
You will see each entry hilited by a blue cursor. Then select the Event Options icon from the Tool Bar.
This will bring up the Options Box (the same as when adding a new entry). Please not that if you have
selected multiple entries, any changes you make are applied to each of these
Simulating
Animations added to the schedule list can be played on the simulator. This allows you to verify
that the animation you have entered is actually the one you want in the schedule. To simulate,
hilite the entry with your cursor and click the Simulate icon. This will bring up the simulation window
playing the animation. When done viewing, click the X in the simulation window to close it.
2MPro Sign Software© Version 2.13
3/18/2004
Page 21
Advertisers
The 2MPro scheduler allows you to add advertiser names to your schedule entries. This is useful if you
are doing any third party advertising on your sign and allow you to track the entries which have been
assigned to each advertiser. The use of advertisers is optional.
The Advertiser List
To add advertisers to your schedule entries, you must first
create an advertiser list. To access the advertiser list, select
the File and then Properties.. from the menu. This will
bring up the Global Options box. Select the Advertisers
tab which will bring up the list. Select the Add button to
enter a new advertiser. Enter a name and a number in the
appropriate box. Numbers are arbitrary and are just there
for your reference. Click OK when complete and the new
advertiser will be added to the list. You can use the cursor
to hilite entries and the Edit button to change the name or
number. Advertisers can be deleted by hiliting and
pressing the Del button. Hit the OK button when done to
save the advertiser list.
Your list of advertisers will now be available to add to schedule entries when editing their General
Options.
Finding Entries
The find feature is handy when your schedule file contains so many entries that scrolling through
would be very time consuming. Select “Find” from the edit menu and the find dialog box opens.
You can find an entry in the list by a animation name, advertiser, date, or a combination of the three.
To search by animation name, check the box next
to Search in the “Find by Name” section, and type
in the full file name including extensions.
To find by advertiser, check the box next to Search
in the “Find by Advertiser” section, and select an
advertiser from the pull down list.
To search by date check the box next to Search in
the “Find by Date” section, then select a date from
each of the pull down calendars. Check in the box
“Process Always Events” to include animations
that are set to play always. Check the box “Check
Day of Week” to include non-excluded days.
Find First
Click the “Find First” button to locate the first item
fitting the search criteria. The first entry on the list
will be highlighted.
Find All
If you click the “Find All” button, all entries that fit the search criteria are highlighted.
2MPro Sign Software© Version 2.13
3/18/2004
Saving The Schedule File
Once you have finished editing the schedule, you
need to save it to a file. Click the Save icon from
the Tool Bar or select File – Save from the menu.
If you are editing a previously stored schedule, it
will be automatically updated. If this is a new
schedule, the Save As dialog box will appear.
Enter a name for your new schedule. The
extension for a schedule file is .mms. When you
save a schedule file, the program will
automatically give it a .mms extension. You may
store your schedule file anywhere on your hard
drive but we suggest storing it in the same folder with your animation files.
Page 22
2MPro Sign Software© Version 2.13
3/18/2004
Page 23
4) Communications
2MPro provides you with the functions to communicate to and control your sign(s). Before you can
communicate, you will need to create the connection details. These details are needed for 2MPro to
know the communications method to use to connect to your sign. To create or edit the connection list
select Sign – Edit Sign List from the Main Menu. This will bring up the Sign Connections Box.
Sign Connections
This box will display a list of sign
connections with their connection
types and sign type information.
Most of you will have a single sign
that you are controlling and
therefore will need only a single
entry in your list. Some of you will
have multiple signs to control with
their own communications settings
and you will need to create a
connection for each. Notice the
telephone icon beside the
connection number. This is used to
indicate the active sign which is the sign that will be transmitted to when you initiate communications.
Adding Connections
To add a new connection, click the Add button. This will
bring up the New Sign Connection box.
Sign Name - The first entry is for a sign name. Type a name
for your sign in this box.
Sign Model – This is a drop down selection for the sign
model. Refer to the documentation that came with your sign if
this is in question.
Color – Another drop down to select the color type of your
sign. Again, refer to your sign documentation if in doubt.
Height/Width – Use the arrow keys to enter the number of
pixels in your sign.
Communications – Select the communication method from
the drop down list. Currently there are three selections
available; RS485, RS232, and modem. You will also need to
set the communications details (page 24).
Dimming – You can program times for the sign to switch
between dim and bright mode. You may want to enable this
feature for outdoor signs that appear to bright in the evening.
Use the Sign on Bright section to set the time in the morning
for the sign to switch to bright. Use the Sign On Dim section
to set the time in the evening to switch the sign to dim. The Dimming Enabled check box must also be
checked for this feature to take effect.
2MPro Sign Software© Version 2.13
3/18/2004
Page 24
Temperature Offset – This control allows you to offset the temperature you display on the sign. The
temperature reading from your temperature sensor is displayed on the status box when you connect to
the sign. If for some reason, the reading appears to be higher or lower than it should be, you can
change this with the offset. The spin buttons allow you to adjust this by nine degrees up or down.
Once all the connection information has been filled in, click OK to save the connection in the sign list.
Communications Details
When choosing a communications methods, you must click on the Details button in order to set all of
the parameters.
Above are the settings boxes for the three communications types.
RS485 Settings
Communications via RS485 requires that your computer be equipped with an RS485 converter box.
This is a box that sits outside your computer and is connected with a cable to your computers serial
port. PC computers name their serial ports as COM1, COM2, etc. You must know the name of the
serial port which you are connecting the converter box to. Use the drop down list to set this.
The baud rate is the speed at which you communicate to the sign. Presently, all RS485 connections are
made at 38,400 baud so you should leave this setting at 38,400 which is the default.
The network address is used when you have more than one sign connected to the RS485 cable. This is
referred to as an RS485 network and requires that you set a separate network address for each sign.
This should be left at 255 if there you have only one sign connected.
RS232 Settings
RS232 connections use a cable plugged straight into your PCs’ serial port. The other end of the cable
connects to your sign. The serial port must be set for the COM port that the cable is plugged into. The
baud rate in most cases should be left for 38,400. There is one exception to this rule and that is when
radio modems are being used to communicate. The communications type is set for RS232 when using
radio modems, but the baud rate must be set to 9600.
Modem Settings
2MPro will automatically detect and use any modem which has been installed and configured for the
Windows operating system. Therefore it is generally not necessary for you to set the port and baud rate
settings. The phone number that is used to dial to the sign must be configured. Enter the exact number
needed to dial the modem at the sign. If this is a long distance call, it must include 1 and the area code.
If your phone system requires that a number first be dialed to access an outside line, this must be
entered as well.
2MPro Sign Software© Version 2.13
3/18/2004
Page 25
When you have completed entering the communications details, click the OK button to save the
settings. This will bring you back to the New Sign Connection Box.
Changing the Active Sign
The active sign is the one that will be transmitted to when you request to communicate with the sign. If
you have only one sign in your list, this will always be your active sign. If you have more than one
sign in your list, you can change the active sign by hiliting the sign in your list with the cursor, and
selecting the Active Sign button. This will cause the telephone icon to appear next to your new active
sign selection.
Saving your Connection Settings
All of the settings you have entered for your signs needs to be saved before exiting the Sign
Connections Box. Click the Save button and this will be done automatically. Selecting the Cancel
button will take you out of the Connections Box without saving your changes.
Connecting to Your Sign(s)
Once you have created and saved your connection settings, you can communicate with your
sign. To connect, press the Connect to Sign icon on the Main Tool Bar.
Connection via Modem
If you are connecting via telephone modem, you will see a dialing status box while the modem dials
the phone number for the sign and waits for a response. You may also hear the modem as it dials out
and connects to the sign. If the connection to the sign is made you will see the Connection Status Box.
If the connection is not made, an error condition box will appear with further information about the
cause of the problem. Possible modem connection problems include:
- phone line busy
- no dial tone
- sign is not answering
- can’t detect modem
Connection via RS485 or RS232
With RS485 and RS232 connections, you are directly connected to the sign via a cable. Therefore, a
connection be established immediately after selecting the Connect to Sign icon. If for some reason, you
cannot ocmmunicate with the sign, you will get a “No Response From Sign” message. Possible causes
of this message would be:
- cable not plugged into serial port
- cable not plugged into sign
- bad cable
- bad serial port
- bad RS485 converter box
Consult with the Multimedia Installation manual for a further diagnosis of communication problems.
2MPro Sign Software© Version 2.13
3/18/2004
Page 26
Sign Status
Once connected, the sign status box provides you with the following information:
Status: Indicates whether the sign is currently playing a
schedule or is turned off
Playing: Is the name of the animation currently playing
on the sign. This field will be blank if the sign is
currently off.
Schedule Entries: Is the number of entries in the
schedule currently playing on the sign.
Animation Files: Is the number of animations stored in
the sign controller
Used Memory: Animations are stored in the sign
controller in FLASH memory. FLASH is a type of
memory that holds its information even when powered
down. Used memory is the amount of FLASH being
used for animation storage.
Free Memory: The amount FLASH memory still
available for animation storage.
Temperature: The sign controller is equipped with an
external temperature sensor. This is the reading shown
in the temperature status box.
Software Rev: Is the software revision number of the sign controller. This is useful when reporting
controller problems to Multimedia technical support staff.
Sending Commands
Play Schedule
This command is used to send the schedule file and all the animations used in the schedule to the sign.
After choosing the Start Schedule button, the software will ask if you wish to overwrite files that have
the same name. If you answer yes to this question, all of the animation files that you have programmed
into your schedule will be sent to the sign. Previous versions that had been stored in the controllers
FLASH memory will be overwritten. If you answer no to this question, animations already stored in
the signs’ FLASH memory will not be resent. This allows you to make changes to your schedule and
update the controller without having to send all the animations. As animations are transmitted to the
sign you will see a status box with an indicator bar that shows you the progress of the file download.
Once the schedule and all of the animations to send have been received by the sign, the Sign Status box
will reappear showing that a schedule is now running.
2MPro Sign Software© Version 2.13
3/18/2004
Page 27
Play Animation
This command is used to transmit and play a single animation on the sign (rather than a schedule).
When the Play Animation button is pressed, the file open dialog box will appear. Choose the 2MPro
animation file to send and click OK. If this animation already exists in the signs’ FLASH memory, you
will be asked if you wish to overwrite it. If you answer yes, the animation will be sent and will
overwrite the version of the file stored in the sign controller. Answering no will cause the version of
the animation already stored at the sign to play immediately. In either case, you will be returned to the
Sign Status box which will indicate the sign is playing the animation you requested.
Stop Sign
Pressing the Stop Sign button will cause the sign to stop and go blank immediately.
Format Flash
Similar to formatting a hard drive, this command will format the FLASH memory of the controller.
This will delete all the animations that are currently stored at the sign.
NOTE: You should only format the FLASH when you have exceeded the available storage.
After selecting the Format button, you will be prompted “Formatting will erase all animations, are you
sure?” You can abort the format by selecting No at this point. Pressing Yes will begin the format
process. A box indicating that a format is taking place will appear. The format can take a number of
minutes depending on the size of the FLASH storage in your controller. When complete, the status box
should again appear indicating 0 Animation Files and all memory available for use.
Update Status
The status information shown in the box is only updated when the box is first displayed and in
response to a Play Schedule or Play Animation command. You can update the status information at
any time by hitting the Update Status button.
Disconnect
Hit the Disconnect button when you are finished communicating with the sign. If you are connected
via RS485 or RS232, this command will close the serial port and close the Sign Status box. If you are
connected via modem, this will hang up the phone line and close the Sign Status box.
Sending an Animation Directly to Sign
You can also send an animation you are currently editing in 2MPro directly to instantly display on
the sign. You must have an animation file open for editing in 2MPro for this feature to work. Press
the red telephone icon to connect to the sign. If this is a modem connection, the dialing operation must
be performed. Once connected, the animation you are currently editing will be sent to the sign and
played. When complete, the Sign Status box will appear showing the animation being played at the
sign.
2MPro Sign Software© Version 2.13
3/18/2004
Page 28
Appendix A) Updating the Sign Firmware
The software that resides in the controller that runs the sign is referred to as firmware. Updates to the
firmware are periodically released and you may want to load the newest version into the controller.
Multimedia will provide you with a new software application called DOWNLOAD.EXE. This will be
used to send the firmware file ControllerRom.srec to the controller.
NOTE: The following procedure does not apply for locations that use a telephone modem for
communications to the controller. Upgrades for these signs must be done with an external RS232
cable.
Rebooting the Controller
The first step in the update is to reboot the controller. This is done in 2MPro from the Sign Status
dialog box. The reboot is a hidden command. Double click the right mouse button within the dialog
box. This will bring up the box asking “Are you sure you want to reboot the sign?”. Click the YES and
the sign will reboot and be ready for the download. Exit the 2MPro software.
NOTE: Download.exe requires
that the communication to the
sign be done on the serial port
COM1. If your computer is not
configured this way, please
contact Multimedia.
Using the Download Program
Use the following procedure to download the new firmware:
1) Run download.exe. Notice the Begin Download button is grayed out.
2) Hit the Reset button. The Begin Download button should no longer be grayed. This means you
received a response from the controller.
3) Select the Browse button and choose the ControllerROM.srec file.
4) Hit the Begin Download button. You should now see data packets in the status window.
5) The message - Download Complete will appear when done.
6) Hit the Execute button.
The controller will now restart using the new firmware. Wait several minutes while the controller
completes start up before attempting to re-communicate using 2MPro.
2MPro Sign Software© Version 2.13
3/18/2004
Page 29
Appendix B) Adjusting the RGB Palette
RGB signs require a balanced color setting for each color (red, green and blue) to create the best
possible colors on the sign. The default palette in the controller is ideal for most signs. However, we do
provide you with the tools to adjust the color palette yourself. PaletteGeneration.exe is a utility that
will allow you to adjust the RGB values and store them in a palette file (.plt). 2MPro has a hidden
command that allows you to download and store this file in the sign controller.
Using the Palette Generator Software
All of these controls are used together to create a palette that will make your RGB sign look as good as
possible. The next page has a technical description of how all of these functions work. Typically, you
will want to leave the gamma at 2.4.
Normally, palette adjustments are made because the red, green, or blue value is not balanced. With
RGB on full brightness, the sign should appear white. If, for example, the sign appeared a little pink,
you would want to decrease the percentage of red. The simplest method to accomplish this is to use the
brightness percentage controls. The blue and green values might be set for 100% and the red turned
down to 80% in order to balance the colors. This may take a few attempts to get the balance just right.
Once you have set your values, click the “Save Palette” button to store a .plt file.
Updating the Sign’s Palette
The palette file can be sent to the sign from 2MPro. Connect to the sign to bring up the Sign
Connection Status box. Double click the left mouse button in the status box. This will bring up a file
open dialog box where you will select you palette file (.plt). Once selected, the file will be transmitted
and stored in the sign controller and will automatically change the sign to use your new settings.
2MPro Sign Software© Version 2.13
3/18/2004
Page 30
Gamma Control
The Small Sign Controller uses a table known as a Palette Table to translate input intensity values for
each color (Red, Green, and Blue) that can range from 0-255, into the appropriate output color values.
These output colors can range from 0-4095. The intensity value of each LED may change with each
frame. One typical Palette table may represent a Linear change in intensity. The output value would
change be a constant amount (K) multiplied by the input value. So,
OUT = K x IN
However, our eyes see light intensity non-linearly. That is, the perceived color change for a change in
intensity is not a constant value. Therefore, we generally need a palette table that provides a non-linear
change in output value for a given input value. The general equation for this is of the form
OUT = INGamma
Which says the output value is the input value raised to the Gamma power. Gamma is also known as
contrast adjustment. A typical Gamma value is 2.4.
The palette generation table Normalizes the output from this function to only allow the output values to
range from 0-4095, which is the range of output values allowed by the sign hardware.
The following chart shows a plot of output values as a function of input values for different gamma
values. Note that the Linear plot is the same as a gamma value of one.
Gamma Values
4500
4000
3500
3000
2500
Gamma 2.4
Gamma 3.0
2000
Linear
Full Adjustment (1.7)
1500
1000
500
0
0
-500
50
100
150
200
250
300
2MPro Sign Software© Version 2.13
3/18/2004
Page 31
You can see that as Gamma increases, output values do not change as much as a function of the input
value for lower input values. Our eyes don’t respond to small changes in intensity, so we’re “loading”
the output at the higher end to provide for a higher contrast.
Lower Clipping
The Lower Clipping value is to typically make the sign look black at low intensity values. You can
adjust this value so that any input value below this value is set to zero. Also, the Lower Clipping value
is subtracted from the input value before further calculations are performed. This causes the output
values to increase faster for lower input values.
Upper Clipping
The Upper Clipping value is used to raise the output value to full scale (4095) at a point prior to the
full input intensity value (255). Video rarely hits the maximum input intensity value, so although the
brightest portions of the video data will be “clipped” at the maximum value, overall the sign will look
brighter. Note that decreasing this value “pulls” the plot to the left, giving an overall brighter output
for smaller input values.
Linear Threshold
The Linear Threshold value is used to provide faster changes in the output values as a function of the
input value, for very low input values. Any input value that is below the Linear Threshold value but
above the Lower Clipping value provides an output that is a straight line (linear) until the point where
the input reaches the Linear Threshold value, and then the output is a function of Gamma.
The Full Adjustment plot illustrates the results of these factors. In the chart above, the Full Adjustment
shows a plot where Lower Clipping = 20, Linear Threshold = 50, Gamma = 1.7, and Upper Clipping
= 220.