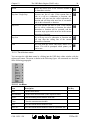
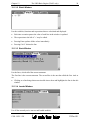
1
User Manual for the Universal Register Debugger (URD)
CSH - DEV / SW
Version: 1.1
Date: 13-Dec-00
CSH - DEV / SW
13-Dec-00
Chapter 1
Table of Contents
2
1 Table of Contents
1
TABLE OF CONTENTS ............................................................................................................................ 2
2
LIST OF TABLES....................................................................................................................................... 5
3
LIST OF FIGURES..................................................................................................................................... 6
4
HISTORY..................................................................................................................................................... 7
5
GENERAL ................................................................................................................................................... 8
5.1
DOCUMENT IDENTIFICATION...................................................................................................................... 8
5.2
PURPOSE .................................................................................................................................................... 8
5.3
SCOPE ........................................................................................................................................................ 8
5.4
DEFINITIONS, ACRONYMS AND ABBREVIATIONS ........................................................................................ 8
5.5
REFERENCE DOCUMENTS ........................................................................................................................... 9
6
INTRODUCTION ..................................................................................................................................... 10
7
GETTING STARTED............................................................................................................................... 10
7.1
HARDWARE REQUIREMENTS.................................................................................................................... 10
7.2
INSTALLATION ......................................................................................................................................... 10
7.3
SUPPORT .................................................................................................................................................. 11
7.4
SAMPLE FILES .......................................................................................................................................... 11
8
ARCHITECTURE..................................................................................................................................... 11
9
USER INTERFACE .................................................................................................................................. 13
10
BOOKMARKS AND “FIND”-FUNCTION............................................................................................ 15
11
12
10.1
BOOKMARKS ....................................................................................................................................... 15
10.2
“FIND”-FUNCTION ............................................................................................................................... 15
ACCESSING A HARDWARE DEVICE................................................................................................. 16
11.1
ACCESSING A DEVICE DESCRIPTION FILE ............................................................................................. 16
11.2
ACCESSING DEVICE REGISTERS ........................................................................................................... 17
11.3
HANDLING DEDICATED TARGET DEVICE CONFIGURATIONS ................................................................. 20
11.4
USING VARIABLES AND SIMPLE MACROS............................................................................................. 21
11.5
ACCESSING MEMORY REGIONS ............................................................................................................ 22
THE URD BASIC ENGINE (WIN32 ONLY)......................................................................................... 22
12.1
INTRODUCTION TO THE URD BASIC ENGINE ....................................................................................... 22
12.1.1
The URD basic toolbar.................................................................................................................. 22
12.1.2
The URD Basic menu .................................................................................................................... 24
CSH - DEV / SW
13-Dec-00
Chapter 1
Table of Contents
12.1.3
12.2
15
URD SPECIFIC COMMANDS ................................................................................................................. 30
ReadAll.......................................................................................................................................... 30
12.2.2
WriteAll ......................................................................................................................................... 30
12.2.3
WriteDefault .................................................................................................................................. 31
12.2.4
ReadReg ........................................................................................................................................ 31
12.2.5
WriteReg........................................................................................................................................ 31
12.2.6
DebugOut ...................................................................................................................................... 32
12.2.7
Inc.................................................................................................................................................. 32
12.2.8
Dec ................................................................................................................................................ 33
12.2.9
Magic............................................................................................................................................. 33
12.2.10
LeftShift..................................................................................................................................... 34
12.2.11
RightShift .................................................................................................................................. 34
SHORT INTRODUCTION TO THE URD BASIC LANGUAGE ...................................................................... 34
12.3.1
Variables ....................................................................................................................................... 34
12.3.2
Arrays ............................................................................................................................................ 36
12.3.3
Subroutines and Functions............................................................................................................ 38
12.3.4
Flow Control ................................................................................................................................. 40
12.3.5
Accessing registers ........................................................................................................................ 44
12.4
14
The URD basic windows ............................................................................................................... 27
12.2.1
12.3
13
3
USING ONLINE HELP ........................................................................................................................... 46
DRIVER DEVELOPMENT ..................................................................................................................... 47
13.1
API REQUIREMENTS DESCRIPTION ...................................................................................................... 48
13.2
DRIVER ARCHITECTURE ...................................................................................................................... 48
13.3
USING A NEW DRIVER ......................................................................................................................... 48
13.4
DRIVER MODES ................................................................................................................................... 48
ERROR CODES AND TROUBLE SHOOTING ................................................................................... 49
14.1
PARSER ERROR MESSAGES .................................................................................................................. 49
14.2
BUILDER ERROR MESSAGES ................................................................................................................ 50
14.3
DRIVER ERROR MESSAGES .................................................................................................................. 53
APPENDIX................................................................................................................................................. 53
15.1
TABLE OF FEATURES OF THE URD PER OS ......................................................................................... 53
15.2
PROGRAMMERS REFERENCE OF THE URD HARDWARE DRIVER API.................................................... 54
15.2.1
LibMain ......................................................................................................................................... 54
15.2.2
UrdOpen........................................................................................................................................ 54
15.2.3
UrdClose ....................................................................................................................................... 55
15.2.4
UrdSetReg ..................................................................................................................................... 55
15.2.5
UrdGetReg .................................................................................................................................... 56
CSH - DEV / SW
13-Dec-00
Chapter 1
15.2.6
16
Table of Contents
4
UrdGetStatus................................................................................................................................. 56
INDEX ........................................................................................................................................................ 57
CSH - DEV / SW
13-Dec-00
Chapter 2
List of Tables
5
2 List of Tables
TABLE 1:
HISTORY OF THIS DOCUMENT
CSH - DEV / SW
7
13-Dec-00
Chapter 3
List of Figures
6
3 List of Figures
FIGURE 1: URD SOFTWARE ARCHITECTURE AND HARDWARE COMMUNICATION
12
FIGURE 2: USER INTERFACE OF THE UNIVERSAL REGISTER DEBUGGER (URD)
13
FIGURE 3: THE VIEW MENU
14
FIGURE 4: THE FIND DIALOG
15
FIGURE 5: MENUS FOR DEVICE DESCRIPTION FILE ACCESS
17
FIGURE 6: POSSIBLE OUTPUT WINDOW CONTENTS AFTER LOADING A DEVICE DESCRIPTION FILE
17
FIGURE 7: REGISTER ACCESS MENUS
19
FIGURE 8: SLIDER OF A REGISTER
19
FIGURE 9: SETTING THE BASIS FOR THE NUMERICAL REGISTER VALUE REPRESENTATION
20
FIGURE 10:
STATUS BAR GIVING INFORMATION OVER REGISTER ACCESSES
20
FIGURE 11:
STORING CURRENT REGISTER SETTINGS OF A TARGET DEVICE
21
CSH - DEV / SW
13-Dec-00
Chapter 4
History
7
4 History
Version
When
Description
Who
0.1
04-Mar-99
Initial version, headlines only.
CE
0.2
01-Apr-99
Updated headers after review
CE
0.3
13-Sep-99
First version
CE
1.0
21-Sep-99
Updated after review
CE
1.1
13-Dec-00
Added chapter 10 and error descriptions B28, B29, B30
PN
Table 1:
History of this document
CSH - DEV / SW
13-Dec-00
Chapter 5
General
8
5 General
5.1 Document identification
Title
:
Subtitle
:
User Manual for the Universal Register Debugger (URD)
Abbreviation :
URD_USR
Date
:
13-Dec-00
Contact
:
Philips Semiconductors
CSH - DEV / SW
+49 / 40 5613 - 3270
5.2 Purpose
This document is intended for engineers using of the URD for hardware debugging on a PC
platform. After reading this document they should be able to use the URD to access their
target devices and adapt the URD to their needs.
5.3 Scope
This document describes the usage of the URD for accessing registers of a target device via
an available communication channel (e.g. I2C, UART). Furthermore accessing memory
regions in general is addressed (e.g. ROMs). Providing the necessary descriptions files of the
hardware is detailed in the URD language reference [URD_LR].
Adaptation of the URD to new communication channels is detailed in the driver development
section.
In addition installation and support are described.
5.4 Definitions, acronyms and abbreviations
API
Application Programming
Interface
SW
Software
DEV
Product development
department
CSH
Consumer systems
Hamburg
DLL
Dynamic Link Library
FAE
Field application engineer
CSH - DEV / SW
I2C
Inter IC connection
IC
Integrated Circuit
MS
Microsoft
OS
Operating System
ROM
Read Only Memory
UART
Universal Asynchronous
Receiver Transmitter
URD
Universal Register
Debugger
13-Dec-00
Chapter 5
WIN16
General
16bit MS Windows
environment (e.g. Windows
3.1)
WIN32
9
32bit MS Windows
environment (e.g. Windows
95/98)
5.5 Reference documents
[URD_LR]
"Universal Register Debugger, Language Reference", Draft, Version 0.7,
13-Dec-2000
[URD_RN]
"Universal Register Debugger, Release Notes", Accepted, Version 3.10
CSH - DEV / SW
13-Dec-00
Chapter 6
Introduction
10
6 Introduction
This user manual describes the handling of the Universal Register Debugger (URD) to access
registers of a target device, which is connected to the host, on which the URD application is
running. In particular, this manual describes:
-
getting started with the URD application (chapter 7)
-
understanding the underlying software architecture and hardware communication structure
(chapter 8)
-
reading and writing of registers and memory areas of a target device (chapter 10)
-
storing and reloading current register settings of a target device (chapter 10)
-
using simple macros for a sequence of register accesses (chapter 10)
-
using URD basic macros for small programs (branches, loops, functions calls) (chapter
12)
-
developing drivers to connect the URD application to the target device through a
communication bus (chapter 13)
A general understanding of the handling of MS Windows OSs is required and assumed
available.
The URD language and its use are described in the language reference manual [URD_LR].
The components of the URD application are described in the release note [URD_RN].
7 Getting Started
7.1 Hardware Requirements
The following minimum hardware is required to run the URD:
-
Pentium 90 CPU
-
16Mbyte main memory
-
20Mbyte hard disk memory space
-
CDROM drive, 2x or network connection, depending on the medium for installation of
the URD
Depending on the communication channel between host and target, additional hardware is
needed (e.g. an I2C transceiver or a JTAG probe)
7.2 Installation
The URD application will be installed by starting the selfextracting file URD.EXE. This
invokes first an installation wizard, which copies all necessary file to a temporary file location
for set-up. Afterwards a set-up wizard is invoked, which guides through the rest of the
installation procedure. During installation, a choice needs to be made between the 16-bit and
32-bit version of the URD. Only by choosing the 32-bit version enhanced features like sliders
or the URD basic engine are available (see also chapter 15.1). Further, several components of
CSH - DEV / SW
13-Dec-00
Chapter 8
Architecture
11
the URD package can be selected, like the application itself, user documentation, sample and
driver files. In addition URD device description files of existing Philips ICs can be installed
by starting URDFILES.EXE and following the set-up wizard instructions.
A detailed description of the contents of the URD application and URD files is available in
the release notes [URD_RN].
7.3 Support
Support, updates and further information can be obtained via the following channels:
N
In general the field application engineers (FAEs) of Philips supports usage of the URD.
In addition Philips can be contacted via email at:
[email protected]
N
Inside Philips information can be obtained in addition via
http://pww-cs:8000/Software/URD/.
7.4 Sample files
Currently the following sample files are provided within an URD installation:
N
A sample file showing details of the URD language
N
A sample device description file ADD32
N
A sample DLL showing the usage of the API without the need of a physical target
N
A sample macro description file directly usable from the URD
N
A sample macro description file called during macro execution indirectly
Further bus specific DLLs and device specific device description files have been developed.
The actually available files are listed in the release notes [URD_RN].
8 Architecture
To debug a target with the URD two major components are needed: the URD environment to
run the URD application and the target to be investigated. Communication between both
components is carried out via a dedicated physical communication channel.
In terms of hardware this involves a PC to run the URD, one of the communication channels
of the PC and a target device. The target device may be located inside the PC on a plug-in
card or outside the PC as a separate piece of hardware. Examples of PC communication
channels are the PCI bus, a serial port or a parallel port. Further channels may be established
by using converters, e.g. a line printer to I2C converter to hook up the URD to an external I2C
bus.
The URD environment consists of two major components: an application core and a set of
support files. The application core provides the basic URD functionality and the support files
customise the URD to access and manipulate the target device (Figure 1).
CSH - DEV / SW
13-Dec-00
Chapter 8
Architecture
12
URD User Interface
Device Description Files
*.URD
Current Register Settings
*.URG
URD
Register
Tree
URD
Basic
Engine
(Win32
only)
URD Basic Macro Files
*.URM (Win32 only)
Driver Interface
Bus Driver
*.DLL
URD
environment
Bus Interface
e.g. PCI, Serial Bus, I2C
Bus Interface
Target Hardware
Figure 1: URD Software Architecture and Hardware Communication
The URD application core in general consists of the following two user relevant parts:
N
User interface:
The user interface shows a graphical representation of the target hardware and allows
access to the registers of the target in the URD register tree.
N
Driver interface:
The driver interface is a generic interface to hook up various bus drivers to the URD
environment for communication with the target hardware.
In a Win32 environment the user interface is extended by the following part:
N
URD basic engine:
The URD basic engine executes the URD basic macros to manipulate the target
hardware.
The set of support files may consist of the following files:
N
Device description file ('*.URD', mandatory):
The device description file describes the registers of the target hardware. It forms the
basis for the graphical representation of the target hardware in the user interface.
N
Current Register Settings ('*.URG', optional):
Next to one device description file sets of current register values can be stored in current
register settings. These files are only usable together with the corresponding device
description file.
N
URD basic macro description file ('*.URM', optional, Win32 only):
Sequences of register accesses can be described with URD basic macros and stored in a
CSH - DEV / SW
13-Dec-00
Chapter 9
User Interface
13
URD basic macro description file. These files are only usable together with the
corresponding device description file.
N
Bus driver ('*.DLL', mandatory):
The bus driver forms the connection to the selected communication channel between the
URD and the target hardware. The driver converts the function calls of the URD to
physical hardware accesses via the chosen bus interface of the PC, the involved bus
system and the bus interface of the target to the target hardware.
To adapt the URD to target hardware at least a device description file and a suited bus driver
needs to be provided. Development of a device description file is described in the URD
language reference [URD_LR]. Bus driver development is described in chapter 13.
9 User Interface
A running URD application, which has a device description file successfully opened, consists
of a set of windows and bars as shown in Figure 2.
Figure 2:
User interface of the Universal Register Debugger (URD)
The most important window is the device description window. It covers all information
available over the target device structure, the current status of the target device and several
elements for access of the target registers.
CSH - DEV / SW
13-Dec-00
Chapter 9
User Interface
14
All information about the structure of the target device are covered in a register tree, which is
accessible via the register tree window. Details of how the register tree is build and the target
device needs to be described are given in the URD language reference manual (URD_LR).
The following elements are in the device description window available for register access: the
macro bar, the slider bar and the URD basic engine window.
N
The macro bar allows execution of a linear sequence of register accesses. This bar is
available automatically only, if at least one macro is part of the loaded device
description file. Further details are given in chapter 11.4.
N
The slider bar allows dynamic change of the contents of the related registers. This bar
is available automatically only, if at least one slider is part of the loaded device
description file. Details can be found in chapter 11.2.
N
The URD basic engine window is the interface to the URD basic engine integrated in
the URD. This window together with an introduction to the integrated basic engine is
given in chapter 13.
The tool bar provides buttons for frequently used action for file handling and register access.
The usage of the buttons is part of the descriptions of chapter 10.
The URD basic bar supports frequently used action for the usage of the integrated URD
basic engine. Details are described in chapter 12.
The output window is the communication interface from the URD application to the user. It
provides status information during loading of a device description file and about errors
occurred. The contents of the output window is described in chapter 11.1. Error codes are
explained in chapter 14.
The status bar provides current information about the URD application. Details are given
with the descriptions of chapter 10.
Help information about functionality of the URD application is available in form of tooltips.
The Help menu entry provides information about the URD application in an About URD box.
To customise the appearance of the user interface, the mentioned bars can be hidden or shown
using the corresponding entries of the View menu (Figure 3).
Figure 3: The View menu
CSH - DEV / SW
13-Dec-00
Chapter 10
Bookmarks and “Find”-Function
15
10 Bookmarks and “Find”-Function
To make the dealing with urd-files more comfortable, there are two functions integrated
N
Bookmarks
N
“Find”- function
10.1 Bookmarks
Setting bookmarks eases the way to find important positions of the “Register Tree”.
They can be set in several ways:
N
using the Toggle Bookmark entry from the View menu
N
using the shortcut Crtl+F2
N
clicking on the left button bar in the “Register Tree Window”
Switching between the bookmarks can be executed by
N
using the previous or next Bookmark entry from the View menu
N
using the shortcuts Shift+F2 or F2
10.2 “Find”-function
The “Find”-function allows the user to look for strings in the register tree. Note that there is
no way to look for an address.
N
To find a string, its name can be written in the “find”- field in the tool bar and pressing
either the Find String button (
N
), or the return key.
Another way is either to use the shortcut Alt+F3, or to use the Find entry in the View menu.
In both cases a dialog appears (Figure 4), where it is possible to specify the strings, the
search direction and to choose, if the results should be bookmarked.
Figure 4: The Find Dialog
CSH - DEV / SW
13-Dec-00
Chapter 11
Accessing a hardware device
16
11 Accessing a hardware device
When the URD application has been installed and the target device has been described, access
to the hardware can start carrying out various tasks:
N
Accessing a device description file.
N
Registers of the target device could be accessed and manipulated
N
A linear sequence of register accesses can be carried out using simple macros.
N
A more complex sequence of register access including e.g. branches or loops can be
carried out using URD basic macros.
N
A set of dedicated register values describing the status of the target at a certain moment
could be handled using register description files.
N
Whole memory regions like an embedded RAM could be written and read.
All these tasks, except the usage of URD basic macros, are described in detail in the following
chapters. URD basic macros are described in chapter 12.
11.1 Accessing a device description file
Accessing a hardware device needs a description of the target in form of a device description
file. This is needed as a file named '<file name>.URD'. Preparation of a device description file
is detailed in the language reference manual [URD_LR].
Accessing a device description file could be either loading a file from the file system or
choosing a loaded one.
Loading a file could be carried out by:
N
using the Open entry from the File menu (Figure 5)
N
using the shortcut Crtl+O
N
using an entry of the least recently used (LRU) list of the File menu (Figure 5)
N
drag and drop from one or files of the file system
Choosing a loaded device description file could be done by selecting the corresponding device
description window or selecting an entry of the windows list of the windows menu (Figure 5).
CSH - DEV / SW
13-Dec-00
Chapter 11
Accessing a hardware device
17
Figure 5: Menus for device description file access
Loading a device description file, the contents of the file will be parsed, linked and loaded
together with the appropriate driver into the main window of the URD. All actions carried out
during the load operation will be logged to the output window. Assuming a successful load
operation, the contents of the device description file will be shown in the device window
(Figure 6).
Any error occurring during the load operation of a device description file is logged to the
Output window (Figure 6).
Figure 6: Possible output window contents after loading a device description file
In this log each error found is shown with an explanation and is preceded by a line number
indicating the location of the error in the device description file. For a complete list of all
errors together with information for error correction, please refer to chapter 14.
11.2 Accessing device registers
Basic ways of accessing device registers are reading and writing.
Reading can be
N
reading a single register, which is selected in the register tree, using the Read Register
button (
) or the Read Register entry of the Register menu
CSH - DEV / SW
13-Dec-00
Chapter 11
N
Accessing a hardware device
reading all registers using the Read Now button (
menu or the Ctrl+R shortcut
18
), the Read Now entry of the Register
Writing can be executed statically or dynamically. Static writing is covered by:
N
directly editing the register value in the register tree. This is a non preserving way of
editing.
N
directly editing the register value with preserving of the previous contents. Therefore the
header field of the data column has to be selected and the field of the selected register
value has to be entered by pressing the return button.
N
rewriting a single register, which is selected in the register tree, with the current register
value using the Write Register button (
menu.
N
) or the Write Register entry in the Register
incrementing the value of a single, selected register using the Increase Value button
( ), the '+' key on the numerical keyboard or the Increase Value entry of the Edit menu.
A single keystroke to the '+' key of the numerical keyboard increases the current register
value by one. Leaving the key pressed continuously increases the value of the selected
register.
N
decrementing the value of a single, selected register using the Decrease Value button
( ), the '-' key on the numerical keyboard or the Decrease Value entry of the Edit menu.
A single keystroke to the '-' key of the numerical keyboard decreases the current register
value by one. Leaving the key pressed continuously decreases the value of the selected
register.
N
writing all registers with the current register values using the Write Now button (
entry of the Register menu or the Ctrl+W shortcut
), the
Write Now
N
writing all registers with default values using the Write Default button (
Default entry of the Register menu or the Ctrl+D shortcut
), the Write
The Edit menu and Register menus are shown in Figure 7.
CSH - DEV / SW
13-Dec-00
Chapter 11
Accessing a hardware device
19
Figure 7: Register access menus
Dynamic writing is carried out using sliders of the slider bar. Sliders are available in Win32
systems only.
A slider belongs to a dedicated register or group of bits and is part of the device description
(Figure 8).
Figure 8: Slider of a register
The slider can be used in several ways:
N
Using the left mouse button pressed down on the slider button, the contents of the
register linked to the slider can be changed quickly over the whole available range of the
register contents.
N
Clicking with the left mouse button into the slider range area changes the current
register contents by 1/16 of the whole range.
N
Using the arrows at the ends of the slider by clicking with the left mouse button
increments or decrements the register value.
N
Leaving the left mouse button pressed down on the arrows continuously changes the
value of the register contents.
In the slider bar at maximum four sliders are shown in parallel. They are ordered in the
sequence of description in the device description file. To move forward or backward to the
next available slider the single arrows of the slider bar can be used (
double arrows (
,
,
). Using the
) moving covers four sliders at a time.
In addition the radix of the numerical representation of the register values can be changed.
Options are binary, decimal or hexadecimal. To switch between the different number systems
either the concerning buttons from the toolbar or the Set Base submenu from the Options menu
of the URD can be used (Figure 9).
CSH - DEV / SW
13-Dec-00
Chapter 11
Accessing a hardware device
20
Figure 9: Setting the basis for the numerical
register value representation
At the toolbar
is used to switch to a binary representation,
for a decimal
representation and
for a hexadecimal representation of the register values. In the submenu
the corresponding entries are Set Bin, Set Dec and Set Hex.
The status of the URD application during reading and writing is shown in the status bar
(Figure 10).
Figure 10: Status bar giving information over register accesses
In the first four windows of the status bar the following information are given over the
selected register:
N
register description
N
access mode (read, write, both, status)
N
numerical basis of the register value
N
actual register value
The status of the current register access is shown in the fifth window using colours:
N
Dark green: no register access ongoing
N
Light green: register access ongoing
N
Blinking dark and light red: register access simulation
Further the first window of the status bar is used to show description of other elements of the
user interface while they are selected.
11.3 Handling dedicated target device configurations
Current register settings could be stored in a file as a snapshot of a certain device
configuration. To store the register settings, the Save Register entry of the File menu is used
(Figure 11).
CSH - DEV / SW
13-Dec-00
Chapter 11
Accessing a hardware device
21
Figure 11: Storing current register settings of a
target device
The stored file type is '*.URG'. A comment can be added in the Comment Field of the used file
dialog box.
Reloading current register settings into a loaded device description file is used to bring the
target device into a predefined state or mode. This is carried out by loading the device
description file first and then using the Open entry of the File menu or the Ctrl+O shortcut
(Figure 5).
For read only registers in the device, a Read Now access need to be executed to fill the "X..X"
value entries in the register tree to restore all current register settings.
11.4 Using variables and simple macros
Variables can be used to have virtual registers for intermediate storage of values available.
The contents of a register or another variable can be assigned to a variable. Accessing
variables need the use of simple macros.
Simple macros are a means to execute a sequence of register or variable accesses. The
accesses are constraint to the assignment of a numeric constant, a register contents or a
variable contents to another writable register or variable contents. Further special sleep
functionality allows wait states between the execution of register accesses.
The implementation of variables and simple macros in a device description file is detailed in
[URD_LR].
Execution of a macro, which is accessible via the macro bar of a device description file, can
be carried out by pressing the corresponding macro button or by selecting the corresponding
macro from the Macro menu of the URD application. At maximum six macro buttons are
shown in parallel. They are ordered in the sequence of description in the device description
file. To scroll to further macros, the arrow buttons needs to be used. Scrolling forward and
backward by one macro (
,
) or by six macros (
,
) is supported by the URD.
Furthermore macros can be executed prior to or directly after a register access. They are
called pre-macros or post-macros. Depending on whether they are executed together with a
read or write access to a register they are called in addition read macros or write macros. This
is useful, when e.g. a reset of an IRQ status register is needed every time the signal condition,
on which an interrupt will be generated, will be changed. Read and write macros are not
accessible via buttons or the macro menu, if not especially allowed. Read and write macros
can be enabled or disabled using the corresponding entries of the Options menu (Figure 9).
CSH - DEV / SW
13-Dec-00
Chapter 12
The URD Basic Engine (Win32 only)
22
11.5 Accessing memory regions
In a memory mapped computer system any memory is accessed via its address. Because the
URD is an application which reads and writes data from given addresses, memory regions can
be accessed as well. The memory part, which should be accessed, needs to be divided into
parts of equal or less than 32 bit and described in a device description file. This then contains
a list of addresses and the organisation form of the data which should be accessed. Hence
memory regions of a system could be accessed by the URD application in the same manner as
registers.
12 The URD Basic Engine (Win32 only)
To access the target device in a dynamic way as a software program runs on a PC the URD
provides the URD basic engine in a Win32 environment. The URD basic engine is an integral
part of the URD and is based on a subset of MS Visual Basic. It provides an integrated
develop environment (IDE) to develop, execute and debug the URD basic macros. In addition
to the subset of Visual Basic, URD specific commands are provided to access registers of the
target hardware.
12.1 Introduction to the URD basic engine
The URD basic language is a powerful enhancement to the standard URD described
functionality so far. It enables you to automate your task. In the following chapters the usage
and some of the basic commands are described to help you writing your own URD basic
macros.
12.1.1 The URD basic toolbar
The following figure shows all buttons of the URD basic toolbar with there short description.
They will be explained in detail in the table below.
Command
Description
New Macro
Creates a new empty macro in the URD basic
editor.
CSH - DEV / SW
Button
13-Dec-00
Chapter 12
The URD Basic Engine (Win32 only)
23
Note: The editor can handle up to 9 files at a time. If you try to open
more, an error message will be displayed, and no macro will be
opened. You have to close one of the already opened macros to
create a new one.
Open Macro
Opens an existing URD basic macro into the editor.
Save Macro
Saves a new or changed macro. This button will be
‘grayed’ until the current macro in the editor has
been changed. If it is a newly created macro, a ‘
Save As’ dialog will be shown, where you can
select the name and folder for the macro. If the
macro already has a name the changed macro will
be saved to the file without further prompting.
Cut
Removes the selection from the active document
and places it on the Clipboard.
Note: This command is available only if you have selected some text in
the URD basic editor.
Copy
Copies the selection to the Clipboard.
Note: This command is available only if you have selected some text in
the URD basic editor.
Paste
Inserts the contents of the Clipboard at the insertion
point, and replaces any selection.
Note: This command is available only if you have cut or copied an
object, text, or contents of a cell.
Browse
The Object Browser shows information about all
the special data types that are available. Please refer
to online help for more detailed information.
User Dialog
To graphically edit a UserDialog place the current
selection in a UserDialog block and click on
.
Please refer to online help for more detailed
information.
Run
Starts the actual selected URD basic macro in the
editor. Before starting the macro, it is checked for
errors, which will be displayed in the status line
below the editor window.
Pause
Pauses a running URD basic macro. The actual line
will be highlighted. You can restart the macro from
the current line with
debug your code.
or use
,
or
to
Stop
Stops the currently running macro.
Set breakpoint
Sets or unsets a breakpoint to the line with the
current selection. (Available only, when the macro
is stopped or paused)
CSH - DEV / SW
13-Dec-00
Chapter 12
The URD Basic Engine (Win32 only)
24
Watch
Shows the actual value of the selected variable in
the Immediate window.
Step Into / Single Step
Executes one line of code. If the current line of
code is a call to a subroutine or function, this
command will step into the called subroutine or
function and will stop at the next line of executable
code in this subroutine or function.
Step Over
This will execute one line of code. If the current
line is a call to a subroutine or function, the whole
subroutine or function will be executed, and the
execution stops again on the next line in the current
subroutine or function.
Step Out
This will step out of a subroutine or function and
will stop after the calling line of the current
subroutine or function.
Print
This will print the actual URD basic macro on a
printer. You will be prompted which printer you
want to use.
12.1.2 The URD Basic menu
You can open the URD Basic menu by clicking into the URD basic editor window with the
right mouse button. The menu is shown in the following figure. All commands are described
in the following paragraphs.
12.1.2.1 File Menu
Item
Description
New
Create a new macro.
New Module
Create a new macro module (code, object or class).
Open...
Load an existing macro/module from disk.
Close
Close the current macro/module.
Save
Save the current macro/module to disk.
Save As...
Save the current macro/module to disk as a particular file.
CSH - DEV / SW
Hot Key
13-Dec-00
Chapter 12
The URD Basic Engine (Win32 only)
Save All
Save all the macros/modules to disk.
Print
Print the current macro/module.
Print Setup...
Select the default printer.
25
12.1.2.2 Edit Menu
Item
Description
Hot Key
Undo
Undo the last edit.
Ctrl+Z
Redo
Redo the last undo.
Ctrl+Y
Cut
Move the selected text to the Clipboard.
Ctrl+X
Copy
Copy the selected text to the Clipboard.
Ctrl+C
Paste
Paste the Clipboard text over the selected text.
Ctrl+V
Delete
Delete the selected text.
Del
Select All
Select all of the text.
Indent
Move selected lines right.
Tab
Outdent
Move selected lines left.
Shift+Tab
Tab As Spaces
Toggle the insert tab as spaces mode on/off.
Find...
Find a string.
Ctrl+F
Replace...
Replace a string with another.
Ctrl+R
Again
Repeat last find or replace.
F3
UserDialog...
Edit a UserDialog. (see UserDialog Editor)
References
Edit the macro/module's references.
Properties
Edit the module's properties.
12.1.2.3 View Menu
Item
Description
Hot Key
Macro
Activate the macro editing window.
Ctrl+A
Immediate
Show the immediate output window.
Ctrl+E
Watch
Show the watch expressions window.
Ctrl+W
Stack
Show the call stack window.
Ctrl+T
Loaded
Show the loaded macros/modules window.
Ctrl+L
Toolbar
Toggle the toolbar on/off.
Status Bar
Toggle the status bar on/off.
CSH - DEV / SW
13-Dec-00
Chapter 12
The URD Basic Engine (Win32 only)
Edit Buttons
Toggle the edit buttons on/off.
Always Split
Toggle the split on/off.
Font...
Set the display font.
Tab Width
Set the tab width.
Object/Proc
Select the Object/Proc list display mode.
26
12.1.2.4 Macro Menu
Item
Description
Hot Key
Run
Run the macro to completion. (If the macro is not active, F5
start it.)
Pause
Stop the macro/module. Execution can be continued.
End
Terminate the macro/module. Execution cannot be
continued.
Design Mode
Toggle the macro design mode.
Esc
12.1.2.5 Debug Menu
Item
Description
Step Into
Execute the current line. If the current line is a subroutine F8
or function call, stop on the first line of that subroutine or
function. (If the macro is not active, start it.)
Step Over
Execute to the next line. If the current line is a subroutine Shift+F8
or function call, execute that subroutine of function
completely.
Step Out
Step out of the current subroutine or function call.
Step to Cursor
Execute until the line the cursor is on is the current line. F7
(If the macro is not active, start it.)
Toggle Break
Toggle the break point on the current line.
Clear
All Clear all break points.
Hot Key
Ctrl+F8
F9
Shift+Ctrl+F9
Breaks
Quick Watch
Show the value of the expression under of the cursor in Shift+F9
the immediate window.
Add Watch
Add the expression under of the cursor in the watch Ctrl+F9
window.
Browse
Show the methods of the expression under of the cursor.
(see Object Browser)
Set Next
Set the next statement to be executed. Only statements in
the current subroutine/function can be selected.
CSH - DEV / SW
13-Dec-00
Chapter 12
Show Next
The URD Basic Engine (Win32 only)
27
Show the next statement to be executed.
12.1.2.6 Sheet Menu
Item
Description
Hot Key
Open Uses
Open all the
macro/module.
Close All
Close all the macros/modules.
1...9
Show this macro/module.
'#Uses
modules
for
the
current
Ctrl+1...Ctrl+9
12.1.2.7 Help Menu
Item
Description
Editor Help
Show the table of contents for Sax Basic Editor.
Language Help
Show the table of contents for the Sax Basic language.
Topic Search
Show Sax Basic language help for the keyword under the F1
cursor.
About Sax
Basic
Hot Key
Shift+F1
Sax Basic Editor's about box.
12.1.3 The URD basic windows
12.1.3.1 Immediate Window
Evaluate an expression, assign a variable or call a subroutine.
N
Type '?expr' <Enter> to show the value of 'expr'.
N
Type 'var = expr' <Enter> to change the value of 'var'.
N
Type 'Set var = expr' <Enter> to change the reference of 'var'.
N
Type 'subname args' <Enter> to call a subroutine or built-in instruction.
N
Type 'Trace' <Enter> to toggle trace mode. Trace mode prints each statement in the
immediate window when a macro/module is running.
CSH - DEV / SW
13-Dec-00
Chapter 12
The URD Basic Engine (Win32 only)
28
12.1.3.2 Watch Window
List the variables, functions and expressions that are calculated and displayed.
N
Each time execution pauses the value of each line in the window is updated.
N
The expression to the left of '->' may be edited.
N
Pressing Enter updates all the values immediately.
N
Pressing Ctrl+Y deletes the line.
12.1.3.3 Stack Window
List the lines, which called the current statement.
The first line is the current statement. The second line is the one that called the first. And so
on.
N
Clicking on a line brings that macro/module into a sheet and highlights the line in the edit
window.
12.1.3.4 Loaded Window
List all the currently active macros and loaded modules.
CSH - DEV / SW
13-Dec-00
Chapter 12
The URD Basic Engine (Win32 only)
29
N
These macros/modules are locked and can only be viewed (not edited).
N
Clicking on a line brings that macro/module into a sheet and activates the sheet.
12.1.3.5 Edit Area
The current macro/module are edited/viewed in this area.
N
Macros/Modules that are not currently loaded may be edited.
N
Changes to a line are automatically capitalized and highlighted when a different line is
selected.
N
Break points may be toggled on/off. A dot at the front of the line indicates a break point.
12.1.3.6 Sheet Tabs
Each sheet has a tab.
N
Clicking once on a tab makes that sheet the current sheet.
N
Double-clicking closes that sheet.
12.1.3.7 Object and Proc List
The object list shows all the objects for the current module.
CSH - DEV / SW
13-Dec-00
Chapter 12
The URD Basic Engine (Win32 only)
30
N
The "(general)" object groups all of the procedures which are not part of any specific
object.
N
The proc list shows all the procedures for the current object.
N
Selecting a procedure that is not bold inserts the proper procedure definition for that
procedure.
12.2 URD specific commands
Next to the standard basic commands there are some special commands which are used to
accesses the registers defined in the URD file. A short description is given in the following
table. A detailed description is given in the subsequent chapters:
Description
Command
Button
ReadAll
Read all registers from the device into the tree
WriteAll
Write all actual values from the tree to the device
WriteDefault
Write the default values from the URD file into the tree and
to the device
ReadReg
Read the content of one register of the device into the tree
WriteReg
Write a value to one register of the device (this will also
update the value in the tree)
DebugOut
Writes a string to the output window of the URD
Inc
Increments a variable
Dec
Decrements a variable
Magic
Several useful functions
12.2.1 ReadAll
Syntax
ReadAll
Description
Read all register values from the actual device. Same functionality, as
the Read Now button in the URD toolbar
Parameter
None
Return
None
Example
Call ReadAll
12.2.2 WriteAll
Syntax
WriteAll
Description
Write all actual register values from the tree to the device. Same
functionality, as the Write Now button in the URD toolbar
Parameter
None
CSH - DEV / SW
13-Dec-00
Chapter 12
The URD Basic Engine (Win32 only)
Return
None
Example
Call WriteAll
31
12.2.3 WriteDefault
Syntax
WriteDefault
Description
Writes all default register values to the device. Same functionality, as
the Write Default button in the URD toolbar
Parameter
None
Return
None
Example
Call WriteDefault
12.2.4 ReadReg
Syntax
ReadReg(lRegister As Long) As Long
Description
Reads a value from a register.
If not successful an error message is written to the URD output
window. In this case 0 is returned
Parameter
lRegister As Long
Return
The value read from the given register. The tree will be updated to the
new value also. In case of an error 0 will be returned.
'#uses "*register.urm"
Dim lMode As Long
lMode = ReadReg(MODE)
Example
Comment
One of the constants defined in *register.urm
(this is automatically generated while loading
the URD file)
To access the registers defined in the tree it is necessary to have a
reference to the automatically generated register constants list. This
must be done with:
'#uses "*register.urm"
Please see also #uses in the online documentation of the basic engine.
12.2.5 WriteReg
Syntax
WriteReg(lRegister As Long, lValue as Long) As Boolean
Description
Writes a value to a register.
Parameter
lRegister As Long
One of the constants defined in *register.urm
(this is automatically generated while loading
the URD file)
lValue As Long
The value to be written to the register. If the
value is to big to fit in the register, only the
CSH - DEV / SW
13-Dec-00
Chapter 12
The URD Basic Engine (Win32 only)
32
least significant bits that will fit will be
written. The tree will be updated to the new
value too.
Return
Example
Comment
TRUE (1)
If successful
FALSE (0)
If not successful
'#uses "*register.urm"
Dim lReturn as Boolean
lReturn = WriteReg(MODE, 3)
If lReturn = True then
DebugOut “Write Successful”
Else
DebugOut “Write Unsuccessful”
End If
To access the registers defined in the tree it is necessary to have a
reference to the automatically generated register constants list. This
must be done with:
'#uses "*register.urm"
Please see also #uses in the online documentation of the basic engine.
12.2.6 DebugOut
Syntax
DebugOut (sString As String) As Boolean
Description
Writes a string to the URD output window
Parameter
sString As String
String to be written to the URD output
window
Return
TRUE (1)
If successful
Example
Comment
FALSE (0)
If not successful
Dim lReturn as Boolean
lReturn = DebugOut(“Hello URD World”)
If lReturn = True then
Debug.Print “Write Successful”
Else
Debug.Print “Write Unsuccessful”
End If
You can also use the call to Debug.Print to write to the Immediate
pane of the URD basic development environment.
12.2.7 Inc
Syntax
Inc (lValue As Variant) As Variant
Description
Increments the value given in lValue
Parameter
lValue As Variant
Return
lValue + 1
CSH - DEV / SW
Value to be incremented
13-Dec-00
Chapter 12
Example
Comment
The URD Basic Engine (Win32 only)
33
Dim k As Single
Do Until k >= 10
DebugOut Inc(k)
Loop
lValue can be an Integer, Long or Single
12.2.8 Dec
Syntax
Dec (lValue As Variant) As Variant
Description
Decrements the value given in lValue
Parameter
lValue As Variant
Return
Example
lValue - 1
Dim k As Single
Do Until k <= 0
DebugOut Dec(k)
Loop
Comment
lValue can be an Integer, Long or Single
Value to be decremented
12.2.9 Magic
Syntax
Magic(lFunc as Long) As Long
Description
Performs the following actions depending on the parameter lFunc
Parameter
lFunc as Long
Return
Depending on lFunc the following values are returned
lFunc = 1
If the window was previously visible, the
return value is True. If the window was
previously hidden, the return value is False
lFunc = 2
True
lFunc = 3
True
lFunc = 4
Returns the value of the pressed key or zero,
if no key is pressed
‘ Wait for a key press
Dim lRet As Long
Do While lRet = 0
lRet = Magic(4)
Loop
Debug.Print lRet
Example
1:
Redraws the entire desktop
2:
Minimizes the URD window
3:
Restores the URD window
4:
Calls the PeekMessage service to
check for a WM_KEYDOWN message
Comment
CSH - DEV / SW
13-Dec-00
Chapter 12
The URD Basic Engine (Win32 only)
34
12.2.10 LeftShift
Syntax
LeftShift(lValue As Variant, Optional lShifts As Long = 1) As Variant
Description
Shifts the bits in lValue to the left.
Parameter
lValue As Variant
Value to be left-shifted
lShifts As Long
Number of positions to shift.
Optional, if lShifts is not specified, the bits
are shifted for one position.
Return
lValue shifted
lValue will be changed too
Example
Dim lValue As Long
lValue = 1
Debug.Print LeftShift(lValue, 3) ‘ gives 8
Debug.Print LeftShift(lValue)
‘ gives 16
Comment
lValue can be an Integer, Long or Single
12.2.11 RightShift
Syntax
RightShift (lValue As Variant, Optional lShifts As Long = 1) As
Variant
Description
Shifts the bits in lValue to the right.
Parameter
lValue As Variant
Value to be right-shifted
lShifts As Long
Number of positions to shift.
Optional, if lShifts is not specified, the bits
are shifted for one position.
Return
lValue shifted
lValue will be changed too
Example
Dim lValue As Long
lValue = 16
Debug.Print RightShift(lValue, 3) ‘ gives 2
Debug.Print RightShift(lValue)
‘ gives 1
Comment
lValue can be an Integer, Long or Single
12.3 Short Introduction to the URD basic language
12.3.1 Variables
Variables temporarily store values during the execution of a URD macro. Variables must have
a name and a data type. For variable names the following applies:
N
they must begin with a letter
N
they must not exceed 255 characters
N
they must be unique within the same scope
CSH - DEV / SW
13-Dec-00
Chapter 12
The URD Basic Engine (Win32 only)
N
they can’t contain a period (.)
N
they can’t contain a type declaration character (@, #, %, !, $)
35
Variables are declared in URD basic with the Dim keyword.
Dim varname [As type][, varname 2 [As type]] …
The various possible types for variables and the range are given in the following table:
Type
Range
Boolean
True or False
Byte
0 to 255
Currency
15 digits before and 4 digits after the period
Date
Date value from 01.01.0100 to 31.12.9999
Time value from 0:00:00 to 23:59:59
Double
± 4.9·10-324 to 1.8·10+308
Integer
-32768 to 32767
Long
-2147483648 to 2147483647
Single
± 1.4·10-45 to 3.4·10+38
String
fixed length: 1 to ~65400 characters
variable length: 0 to ~2·10+9 characters
Variant
This is a universal data type, which can store values of all other data
types. URD Basic knows about the data type in a variant and treats the
value accordingly. Conversions are made automatically.
12.3.1.1 Implicit Declaration
You don't have to declare a variable before using it. For example, you could write a function
where you don't need to declare TempVal before using it:
Function SafeSqr(num)
TempVal = Abs(num)
SafeSqr = Sqr(TempVal)
End Function
URD Basic automatically creates a variable with that name, which you can use as if you had
explicitly declared it. While this is convenient, it can lead to subtle errors in your code if you
misspell a variable name. For example, suppose that this was the function you wrote:
Function SafeSqr(num)
TempVal = Abs(num)
CSH - DEV / SW
13-Dec-00
Chapter 12
The URD Basic Engine (Win32 only)
36
SafeSqr = Sqr(TemVal)
End Function
At first glance, this looks the same. But because the TempVal variable was misspelled on the
next-to-last line, this function will always return zero. When URD Basic encounters a new
name, it can't determine whether you actually meant to implicitly declare a new variable or
you just misspelled an existing variable name, so it creates a new variable with that name.
12.3.1.2 Explicit Declaration
To avoid the problem of misnaming variables, you can stipulate that URD Basic always warn
you whenever it encounters a name not declared explicitly as a variable.
12.3.1.3 To explicitly declare variables
Place this statement in the Declarations section of a module:
Option Explicit
Had this statement been in effect for the form or standard module containing the SafeSqr
function, URD Basic would have recognized TempVal and TemVal as undeclared variables
and generated errors for both of them. You could then explicitly declare TempVal:
Function SafeSqr(num)
Dim TempVal
TempVal = Abs(num)
SafeSqr = Sqr(TemVal)
End Function
Now you'd understand the problem immediately because URD Basic would display an error
message for the incorrectly spelled TemVal. Because the Option Explicit statement helps you
catch these kinds of errors, it's a good idea to use it with all your code.
12.3.2 Arrays
If you have programmed in other languages, you're probably familiar with the concept of
arrays. Arrays allow you to refer to a series of variables by the same name and to use a
number (an index) to tell them apart. This helps you create smaller and simpler code in many
situations, because you can set up loops that deal efficiently with any number of cases by
using the index number. Arrays have both upper and lower bounds, and the elements of the
array are contiguous within those bounds. Because URD Basic allocates space for each index
number, avoid declaring an array larger than necessary.
All the elements in an array have the same data type. Of course, when the data type is Variant,
the individual elements may contain different kinds of data (objects, strings, numbers, and so
on). You can declare an array of any of the fundamental data types, including user-defined
types.
In URD Basic there are two types of arrays: a fixed-size array which always remains the same
size, and a dynamic array whose size can change at run-time. Dynamic arrays are discussed in
more detail later in this chapter.
CSH - DEV / SW
13-Dec-00
Chapter 12
The URD Basic Engine (Win32 only)
37
12.3.2.1 Declaring Fixed-Size Arrays
When declaring an array, follow the array name by the upper bound in parentheses. The upper
bound cannot exceed the range of a Long data type (-2,147,483,648 to 2,147,483,647). For
example, these array declarations can appear in the Declarations section of a module:
Dim Counters(14) As Integer
Dim Sums(20) As Double
' 15 elements.
' 21 elements.
To create a public array, you simply use Public in place of Dim:
Public Counters(14) As Integer
Public Sums(20) As Double
The same declarations within a procedure use Dim:
Dim Counters(14) As Integer
Dim Sums(20) As Double
The first declaration creates an array with 15 elements, with index numbers running from 0 to
14. The second creates an array with 21 elements, with index numbers running from 0 to 20.
The default lower bound is 0.
To specify a lower bound, provide it explicitly (as a Long data type) using the To keyword:
Dim Counters(1 To 15) As Integer
Dim Sums(100 To 120) As String
In the preceding declarations, the index numbers of Counters range from 1 to 15, and the
index numbers of Sums range from 100 to 120.
12.3.2.2 Multidimensional Arrays
Sometimes you need to keep track of related information in an array. For example, to keep
track of each pixel on your computer screen, you need to refer to its X and Y coordinates.
This can be done using a multidimensional array to store the values.
With URD Basic, you can declare arrays of multiple dimensions. For example, the following
statement declares a two-dimensional 10-by-10 array within a procedure:
Static MatrixA(9, 9) As Double
Either or both dimensions can be declared with explicit lower bounds:
Static MatrixA(1 To 10, 1 To 10) As Double
You can extend this to more than two dimensions. For example:
Dim MultiD(3, 1 To 10, 1 To 15)
This declaration creates an array that has three dimensions with sizes 4 by 10 by 15. The total
number of elements is the product of these three dimensions, or 600.
Note When you start adding dimensions to an array, the total storage needed by the array increases dramatically, so use
multidimensional arrays with care. Be especially careful with Variant arrays, because they are larger than other data types.
CSH - DEV / SW
13-Dec-00
Chapter 12
The URD Basic Engine (Win32 only)
38
12.3.2.3 Using Loops to Manipulate Arrays
You can efficiently process a multidimensional array by using nested For loops. For example,
these statements initialize every element in MatrixA to a value based on its location in the
array:
Dim I As Integer, J As Integer
Static MatrixA(1 To 10, 1 To 10) As Double
For I = 1 To 10
For J = 1 To 10
MatrixA(I, J) = I * 10 + J
Next J
Next I
For information about loops, see "Loop Structures" later in this chapter.
12.3.3 Subroutines and Functions
12.3.3.1 Subroutines
A Sub procedure is a block of code that is executed in response to an event. By breaking the
code in a module into Sub procedures, it becomes much easier to find or modify the code in
your application.
The syntax for a Sub procedure is:
[Private|Public] Sub procedurename (arguments)
statements
End Sub
Each time the procedure is called, the statements between Sub and End Sub are executed. Sub
procedures can be placed in modules. Sub procedures are by default Public in all modules,
which means they can be called from anywhere in the application. To be able to use a Sub
procedure in another file, then the one with the calling function, the reference to the other file
must be made by using the ‘#uses keyword. (See online help for details)
The arguments for a procedure are like variable declarations, declaring values that are passed
in from the calling procedure.
A procedure tells the application how to perform a specific task. Once a procedure is defined,
it must be specifically invoked by the application.
Why create general procedures? One reason is that several different event procedures might
need the same actions performed. A good programming strategy is to put common statements
in a separate procedure application call it. This eliminates the need to duplicate code and also
makes the application easier to maintain.
12.3.3.2 Calling Sub Procedures
A Sub procedure differs from a Function procedure in that a Sub procedure cannot be called
by using its name within an expression. A call to a Sub is a stand-alone statement. Also, a Sub
does not return a value in its name as does a function. However, like a Function, a Sub can
modify the values of any variables passed to it.
There are two ways to call a Sub procedure:
CSH - DEV / SW
13-Dec-00
Chapter 12
The URD Basic Engine (Win32 only)
39
' Both of these statements call a Sub named MyProc.
Call MyProc (FirstArgument, SecondArgument)
MyProc FirstArgument, SecondArgument
Note that when you use the Call syntax, arguments must be enclosed in parentheses. If you
omit the Call keyword, you must also omit the parentheses around the arguments.
12.3.3.3 Functions
URD Basic includes built-in, or intrinsic functions, like Sqr, Cos or Chr. In addition, you can
use the Function statement to write your own Function procedures.
The syntax for a Function procedure is:
[Private|Public] Function procname (arguments) [As type]
statements
End Function
Like a Sub procedure, a Function procedure is a separate procedure that can take arguments,
perform a series of statements, and change the value of its arguments. Unlike a Sub
procedure, a Function procedure can return a value to the calling procedure. There are three
differences between Sub and Function procedures:
N
Generally, you call a function by including the function procedure name and arguments on
the right side of a larger statement or expression (returnvalue = function()).
N
Function procedures have data types, just as variables do. This determines the type of the
return value. (In the absence of an As clause, the type is the default Variant type.)
N
You return a value by assigning it to the procname itself. When the Function procedure
returns a value, this value can then become part of a larger expression.
For example, you could write a function that calculates the third side, or hypotenuse, of a right
triangle, given the values for the other two sides:
Function Hypotenuse (A As Integer, B As Integer) As String
Hypotenuse = Sqr(A ^ 2 + B ^ 2)
End Function
12.3.3.4 Calling Function Procedures
Usually, you call a function procedure you've written yourself the same way you call an
intrinsic URD Basic function like Abs; that is, by using its name in an expression:
' All of the following statements would call a function
' named ToDec.
Print 10 * ToDec
X = ToDec
If ToDec = 10 Then Debug.Print "Out of Range"
X = AnotherFunction(10 * ToDec)
It's also possible to call a function just like you would call a Sub procedure. The following
statements both call the same function:
CSH - DEV / SW
13-Dec-00
Chapter 12
The URD Basic Engine (Win32 only)
40
Call Year(Now)
Year Now
When you call a function this way, URD Basic throws away the return value.
12.3.4 Flow Control
Control structures allow you to control the flow of your program's execution. If left
unchecked by control-flow statements, a program's logic will flow through statements from
left to right, and top to bottom. While some very simple programs can be written with only
this unidirectional flow, and while some flow can be controlled by using operators to regulate
precedence of operations, most of the power and utility of any programming language comes
from its ability to change statement order with structures and loops.
12.3.4.1 Decision Structures
URD Basic procedures can test conditions and then, depending on the results of that test,
perform different operations. The decision structures that URD Basic supports include:
N
If...Then
N
If...Then...Else
N
Select Case
12.3.4.2 If...Then
Use an If...Then structure to execute one or more statements conditionally. You can use either
a single-line syntax or a multiple-line block syntax:
If condition Then statement
If condition Then
statements
End If
The condition is usually a comparison, but it can be any expression that evaluates to a
numeric value. URD Basic interprets this value as True or False; a zero numeric value is
False, and any nonzero numeric value is considered True. If condition is True, URD Basic
executes all the statements following the Then keyword. You can use either single-line or
multiple-line syntax to execute just one statement conditionally (these two examples are
equivalent):
If anyDate < Now Then anyDate = Now
If anyDate < Now Then
anyDate = Now
End If
Notice that the single-line form of If...Then does not use an End If statement. If you want to
execute more than one line of code when condition is True, you must use the multiple-line
block If...Then...End If syntax.
If anyDate < Now Then
anyDate = Now
CSH - DEV / SW
13-Dec-00
Chapter 12
The URD Basic Engine (Win32 only)
Timer1.Enabled = False
End If
41
' Disable timer control.
12.3.4.3 If...Then...Else
Use an If...Then...Else block to define several blocks of statements, one of which will execute:
If condition1 Then
[statementblock-1]
[ElseIf condition2 Then
[statementblock-2]] ...
[Else
[statementblock-n]]
End If
URD Basic first tests condition1. If it's False, URD Basic proceeds to test condition2, and so
on, until it finds a True condition. When it finds a True condition, URD Basic executes the
corresponding statement block and then executes the code following the End If. As an option,
you can include an Else statement block, which URD Basic executes if none of the conditions
are True.
If...Then…ElseIf is really just a special case of If...Then...Else. Notice that you can have any
number of ElseIf clauses, or none at all. You can include an Else clause regardless of whether
you have ElseIf clauses.
For example, your application could perform different actions depending on the parameter
Index, which is passed to the subroutine:
Private Sub foo (Index As Integer)
If Index = 0 Then
' Cut command.
CopyActiveControl
' Call general procedures.
ClearActiveControl
ElseIf Index = 1 Then
' Copy command.
CopyActiveControl
ElseIf Index = 2 Then
' Clear command.
ClearActiveControl
Else
' Paste command.
PasteActiveControl
End If
End Sub
Notice that you can always add more ElseIf parts to your If...Then structure. However, this
syntax can get tedious to write when each ElseIf compares the same expression to a different
value. For this situation, you can use a Select Case decision structure.
12.3.4.4 Select Case
URD Basic provides the Select Case structure as an alternative to If...Then...Else for
selectively executing one block of statements from among multiple blocks of statements. A
Select Case statement provides capability similar to the If...Then...Else statement, but it makes
code more readable when there are several choices.
CSH - DEV / SW
13-Dec-00
Chapter 12
The URD Basic Engine (Win32 only)
42
A Select Case structure works with a single test expression that is evaluated once, at the top of
the structure. URD Basic then compares the result of this expression with the values for each
Case in the structure. If there is a match, it executes the block of statements associated with
that Case:
Select Case testexpression
[Case expressionlist1
[statementblock-1]]
[Case expressionlist2
[statementblock-2]]
.
.
.
[Case Else
[statementblock-n]]
End Select
Each expressionlist is a list of one or more values. If there is more than one value in a single
list, the values are separated by commas. Each statementblock contains zero or more
statements. If more than one Case matches the test expression, only the statement block
associated with the first matching Case will execute. URD Basic executes statements in the
Case Else clause (which is optional) if none of the values in the expression lists matches the
test expression.
For example, suppose you added another command to the Edit menu in the If...Then...Else
example. You could add another ElseIf clause, or you could write the function with Select
Case:
Private Sub foo (Index As Integer)
Select Case Index
Case 0
' Cut command.
CopyActiveControl
' Call general procedures.
ClearActiveControl
Case 1
' Copy command.
CopyActiveControl
Case 2
' Clear command.
ClearActiveControl
Case 3
' Paste command.
PasteActiveControl
Case Else
DoSomeThing
' Do something.
End Select
End Sub
Notice that the Select Case structure evaluates an expression once at the top of the structure.
In contrast, the If...Then...Else structure can evaluate a different expression for each ElseIf
statement. You can replace an If...Then...Else structure with a Select Case structure only if the
If statement and each ElseIf statement evaluates the same expression.
CSH - DEV / SW
13-Dec-00
Chapter 12
The URD Basic Engine (Win32 only)
43
12.3.4.5 Loop Structures
Loop structures allow you to execute one or more lines of code repetitively. The loop
structures that Visual Basic supports include:
N
Do...Loop
N
For...Next
12.3.4.6 Do...Loop
Use a Do loop to execute a block of statements an indefinite number of times. There are
several variations of the Do...Loop statement, but each evaluates a numeric condition to
determine whether to continue execution. As with If...Then, the condition must be a value or
expression that evaluates to False (zero) or to True (nonzero).
In the following Do...Loop, the statements execute as long as the condition is True:
Do While condition
statements
Loop
When URD Basic executes this Do loop, it first tests condition. If condition is False (zero), it
skips past all the statements. If it's True (nonzero), URD Basic executes the statements and
then goes back to the Do While statement and tests the condition again.
Consequently, the loop can execute any number of times, as long as condition is nonzero or
True. The statements never execute if condition is initially False. For example, this procedure
counts the occurrences of a target string within another string by looping as long as the target
string is found:
Function CountStrings (longstring, target)
Dim position, count
position = 1
Do While InStr(position, longstring, target)
position = InStr(position, longstring, target) + 1
count = count + 1
Loop
CountStrings = count
End Function
If the target string doesn't occur in the other string, then InStr returns 0, and the loop doesn't
execute.
Another variation of the Do...Loop statement executes the statements first and then tests
condition after each execution. This variation guarantees at least one execution of statements:
Do
statements
Loop While condition
Two other variations are analogous to the previous two, except that they loop as long as
condition is False rather than True.
Loop zero or more times
CSH - DEV / SW
Loop at least once
13-Dec-00
Chapter 12
The URD Basic Engine (Win32 only)
Do Until condition
statements
Loop
44
Do
statements
Loop Until condition
12.3.4.7 For...Next
Do loops work well when you don't know how many times you need to execute the statements
in the loop. When you know you must execute the statements a specific number of times,
however, a For…Next loop is a better choice. Unlike a Do loop, a For loop uses a variable
called a counter that increases or decreases in value during each repetition of the loop. The
syntax is:
For counter = start To end [Step increment]
statements
Next [counter]
The arguments counter, start, end, and increment are all numeric.
Note The increment argument can be either positive or negative. If increment is positive, start
must be less than or equal to end or the statements in the loop will not execute. If increment is
negative, start must be greater than or equal to end for the body of the loop to execute. If Step
isn't set, then increment defaults to 1.
In executing the For loop, URD Basic:
1. Sets counter equal to start.
2. Tests to see if counter is greater than end. If so, URD Basic exits the loop.
3. (If increment is negative, URD Basic tests to see if counter is less than end.)
4. Executes the statements.
5. Increments counter by 1 or by increment, if it's specified.
6. Repeats steps 2 through 4.
This code prints the numbers 0 to 10 on the Immediate window:
Private Sub foo()
Dim I As Integer
For i = 0 To 10
DebugPrint i
Next
End Sub
12.3.5 Accessing registers
All registers defined in the actual ‘.urd’ file can be found as predefined constants in one of the
sheets (Right after opening a ‘.urd’ file it’s the last sheet, but by adding new macros, the new
macros will be appended at the end of the sheets). The sheet has the name ‘*register.urm’, this
is an automatically generated list of constants. The names of the constants are the same, as the
register names in the ‘.urd’ file. The values for these constants can change every time you
open the ‘.urd’ file. So please use the constants names in your code, and not the numbers.
You should never edit or close this macro.
CSH - DEV / SW
13-Dec-00
Chapter 12
The URD Basic Engine (Win32 only)
45
To access the constants from the macros you want to write you need the line:
'#uses "*register.urm"
An example:
If you have the following URD file (taken from the SAA7112), which defines two byte items
with underlying bit items:
#BeginRegisterList "i2curd46.dll"
0: SAA7112 A2 D1
[0x40] << 1.1;
//============================================================================
2: "ANALOG CONTROL";
//============================================================================
//---------------------------------------------------------------------------3:
Analog_Input
[0x02] & 0xff = 0xc5;
//---------------------------------------------------------------------------MODE
[0x02] & 0x0f SL;
//============================================================================
2: "STATUS";
//============================================================================
//---------------------------------------------------------------------------3:
Decoder_status
[0x1f] & 0xff = 0x00 R;
//---------------------------------------------------------------------------HLCK
[0x1f] & 0x40;
#EndRegisterList
The URD tree will look like this:
And ‘*register.urm’ will be:
'DO NOT EDIT THIS CODE!
'Device : SAA7112
'Byte Items
Public Const
Public Const
'Bit Items
Public Const
Public Const
CSH - DEV / SW
Analog_Input As Integer = 0
Decoder_status As Integer = 2
MODE As Integer = 1
HLCK As Integer = 3
13-Dec-00
Chapter 12
The URD Basic Engine (Win32 only)
46
To access the bit item MODE, you can use:
Dim lValue As Long
lValue = ReadReg(MODE)
WriteReg(MODE, &h3)
As the bit item HLCK is defined as readonly, you can’t write to it (but WriteReg will give
you no error, if you still try to do so, but the value will not change). The values passed to
WriteReg can be decimal (without a prefix) or in hexadecimal (use &h before the value).
Reading this bit item can be done by:
Dim lValue As Long
lValue = ReadReg(MODE)
Do display the returned value (which is decimal) in hexadecimal use the URD basic function
Hex or Hex$.
You can also access the byte item directly, so the commands:
WriteReg(Analog_Input, &hC6)
will write the hexadecimal value C6hex to the register Analog_Input
12.4 Using Online help
The URD basic engine comes with context sensitive online help. If you place the current
selection in a keyword and press F1, the online help will open and display the syntax and
example for the keyword. If the keyword can not be found in the help, a index of all
commands will be displayed. The URD basic editor must be selected prior to pressing F1 to
open online help (So if the tree view is currently selected, when you press F1, nothing will
happen).
You can also choose to view the hierarchical content of the help file by selecting the
‘Content’ tab in online help:
CSH - DEV / SW
13-Dec-00
Chapter 13
Driver Development
47
The online help describes all commands, keyword and functions, etc. of the language and the
usage of the URD basic editor.
13 Driver Development
If access to the target hardware should be carried out via a communication channel for which
no driver is available, a new driver could be developed. This results in a DLL, which can be
used within an actually installed URD application. Information about the driver API and the
usage of the newly developed driver are given in the following chapters.
General knowledge about development of a DLL using the MS IDE is assumed to be
available here.
A sample DLL for a WIN32 environment is provided in the sample file collection. It consists
of the two source code files add32urd.c and add32urd.h and the DLL file add32urd.dll. This
DLL is to be used with the ADD32 device description file, which is as well part of the sample
file collection.
CSH - DEV / SW
13-Dec-00
Chapter 13
Driver Development
48
13.1 API requirements description
The URD driver API consists of 6 functions:
- LibMain
Get access to an instance of the driver (WIN16 only)
- UrdOpen
Open and initialise the target device
- UrdClose
Close the target device and free used memory
- UrdSetReg
Set the contents of a register at a given address
- UrdGetReg
Get the contents of a register at a given address
- UrdGetStatus
Get status of Open, Close, GetReg and SetReg access to the driver
In general the URD will call UrdOpen after loading a device description file and UrdClose
when closing the URD. Between these two function calls register accesses will be carried out
using UrdSetReg and UrdGetReg. A register access is initiated by changes in the device
description file. In case of an error, the status of the URD driver will be obtained
automatically using UrdGetStatus.
In case of a driver development for a WIN16 environment, the function LibMain gets access
to an instance of the device driver.
A programmers reference description of the URD API functions is given in the appendix in
chapter 15.2.
13.2 Driver architecture
Two main architectures for an URD device driver can be realised: A complete new driver or
an interface between the URD and an existing driver. For writing a new driver it is
recommended to investigate whether a separation between a Windows kernel mode driver and
an URD interface to this driver is feasible. If yes, the kernel mode driver can be reused for
other applications in the Windows environment as well.
13.3 Using a new driver
To use a newly developed driver in an actually installed URD application the following steps
has to be carried out:
N
A newly developed driver has to be named '<driver name>.DLL'.
N
The driver file has to be placed in the same directory as the 'URD16.EXE' or
'URD32.EXE' file.
N
The driver has to be addressed in the first line of an URD device description file as
follows: #BeginRegisterList '<driver name>.DLL'. Comment lines and empty lines are
excluded from line counting here.
13.4 Driver modes
Concerning drivers, the URD application can run in two modes: in driver mode and in
simulation mode.
CSH - DEV / SW
13-Dec-00
Chapter 14
Error Codes and Trouble Shooting
49
In driver mode the driver named in the line #BeginRegisterList line of the device description
file will be used to access the target hardware. The driver mode is the default mode while
loading a new device description file.
In simulation mode the register accesses to the target hardware will not be executed and hence
reactions of the target hardware to register accesses by the URD application cannot be
expected.
On way to enter simulation mode is during loading of a new device description file. When
either an unavailable driver (in the directory of the URD application file) or no driver is
specified in the device description file, the application queries to switch to simulation mode.
In case of a positive user response the URD application switches to simulation mode. In case
of a negative response the application will be aborted.
A second way to enter simulation mode is to use the simulation entry in the Options menu
(Figure 9). This menu entry allows toggling between simulation mode and driver mode, when
the current device description file was loaded with a valid driver. Switching from simulation
mode to driver mode, when no valid driver was loaded, leads to an error message in the output
window.
To reset a loaded driver into the state, which it enters after loading, the Reset entry of the
Driver menu can be used.
14 Error Codes and Trouble Shooting
While loading an URD device description file the following actions will be carried out:
N
The driver description of the device description file will be used to check the driver to
be loaded.
N
The device description of the device description file will parsed line by line to check it
syntactically.
N
Next the semantics of the syntactically checked line will be checked against already
checked contents of the device description file.
N
Macro description will be linked into register descriptions to extend them with pre and
post macro conditions.
Further hardware accesses will be monitored to check the correct function of the used driver.
All these activities may result in an error, which is represented by an error code. This section
describes all error codes together with an explanation of possible error causes and hints for
solving the problems detected. The error codes are grouped into parser error messages, builder
error messages and driver error messages.
14.1 Parser error messages
Error P00:
Unexpected end of file
This can be either a missing last "#EndRegisterList" or "#EndMacro" or
"#EndBasic" statement, which of them ever is intended to be the last one. If
one of the mentioned statements are missing before a starting
"#BeginRegisterList", "#BeginMacro", "#BeginBasic", a P02 error will be
generated.
CSH - DEV / SW
13-Dec-00
Chapter 14
Error Codes and Trouble Shooting
50
Error P01:
Open comment
At least one closing "*/" comment statement is possibly missing at the end of
the device description file to complete an existing opening "/*" comment
statement.
Error P02:
Wrong syntax %l, expected %l
This is a general parsing error, stating which syntax element was found to be
wrong and explaining which syntax element was expected. All error causes,
which are not covered by other parser error codes, results in this error code.
Error P03:
Hex constants must have at least one hex digit
If "0x" is used as a number format specifier, at least one hexadecimal digit
(0..9, a..f) must follow to make it a number in binary format. If non
hexadecimal digits follow, P02 will be generated.
Furthermore (sub) addresses of bytes and bits are required in hexadecimal
format, e.g. Operand1 [0x00]. To identify the given address as hexadecimal
"0x" must be used as prefix. This error code is generated, when only "0x" is
used as sub address specifier and no address itself is provided.
Error P04:
Dual constants must have at least one dual digit
If "0b" is used as a number format specifier, at least one dual digit (0,1) must
follow to make it a number in dual format. If non dual digits follow, P02 will
be generated.
Error P05:
Newline in constant
Sets and descriptions in a device description file are included in quotation
marks. This error occurs, when the closing quotation marks are not in the same
line as the opening quotation marks.
Error P06:
Number of characters exceeds line size
Maximum number of characters in a line is 200.
Error P07:
Unknown token
The parser detected a language element in the device description file which is
unknown. It must be replaced by a known language element according to the
syntax as described in the language reference [URD_LR]. Known language
elements used at wrong places lead to a P02 error code.
14.2 Builder error messages
Error B01:
Address is not completely defined
The address width of a device is given in number of bytes by an address width
specifier (e.g. A4). The contents of the bytes is detailed in a sub address
specifier (e.g. [0x0000]). If a definition for one of the bytes of an address is
missing this error code is reported. Possible solutions are an extension of the
given address (e.g. from [0x0000] to [0x00000000]) or the usage of an
appropriate address shift specifier and address length specifier (e.g. [0x0000]
<< 0.4).
Error B02:
Address shift constant out of range
Maximum address width is defined as 8 bytes. Hence the range of possible
address shift specifier values is 0 to 7 for a given sub address specifier. Any
CSH - DEV / SW
13-Dec-00
Chapter 14
Error Codes and Trouble Shooting
51
other numerical integer value used as address shift specifier will cause this
error code to be reported.
Error B03:
Address length constant out of range
Maximum address width is defined as 8 bytes. Hence the range of possible
address length specifier values is 1 to 8 for a given sub address specifier. Any
other numerical integer value used as address length constant will cause this
error code to be reported.
Error B04:
Hierarchy label constant out of range
Hierarchy labels as part of a register declaration of a device can range from 1
to 9. Other hierarchy label values will cause this error code to be reported.
Error B05:
No matching hierarchy label is found
The hierarchy label of an element in a device description file is checked
against the label of the previous element. In this case the label of the previous
element is missing, because it is optional and was not used here.
Error B06:
Hierarchy label is already defined
The hierarchy label of an element in a device description file is checked
against the label of the previous element. In this case a label is used, which is
not increased as it should be due to the structure of the language.
Error B07:
Address greater than defined address size
The sub address specifier is greater than the address width specifier of an
address size specifier (e.g. byte address [0x00 00] is greater than "1" of the
address size specifier A1).
Error B08:
Sum of length, shift exceeds address size
The sum of an address length specifier and an address shift specifier of an
address specifier exceeds the address width specifier of an address size
specifier (e.g. [0x00] << 2.2 is greater than A3).
Error B09:
Sum of length, shift overwrites previous address
A combination of address shift specifier and address length specifier of an
address specifier overwrites a given address, e.g. from a device declaration
(e.g. byte [0x01] << 2.1 overwrites A3 [0x00] << 2.1).
Error B10:
Variable bit size out of range
The variable bit size exceeds the address size specifier of a device declaration
(e.g. byte [0x00] << 0.4 exceeds A3).
Error B11:
Address specifier greater than address length.
The sub address specifier is greater than the address length specifier of an
address specifier (e.g. "[0x00 00]" of "[0x00 00] << 0.1" is greater than "0.1").
Error B12:
Mask error
A mask specifier of one item (e.g. a bit direct specifier) specifies a bit at a
position which is not specified in the mask specifier of a corresponding other
item, e.g. a byte specifier (e.g. bit [0x00] & 0x11 and byte [0x00] & 0x18).
Error B13:
Bit address error
The address specifier of a bit specifier specifies a different address than the
address specifier of the corresponding byte specifier (e.g. bit [0x04] of byte
[0x00]).
CSH - DEV / SW
13-Dec-00
Chapter 14
Error Codes and Trouble Shooting
52
Error B14:
Byte has different access type
Descriptions of bytes accessing the same address are overlaping in their access
type (e.g. byte1 [0x00] B and byte2 [0x00] R).
Error B15:
Different default values defined for same register
Different default values are given for a register due to errors in the masking of
that register.
Error B16:
%l: redefinition
The same register name is used more than once for different addresses.
Error B17:
%l: redefinition; different types
The same name is used more than once for different types.
Error B18:
Same address with different memory models
Data size specifier with different data distance specifiers are used at the same
address.
Error B19:
String too large
The maximum size of 30 characters for an identifier or 80 characters for a
string-literal are exceeded.
Error B20:
Concatenated data size error
The number of data bits specified in a joined register is greater than the
maximum number of 32 (4 bytes).
Error B21:
%l not defined in register part
A register was used, which was not defined before.
Error B22:
memory model greater than defined data size
Data distance specifier of the data size specifier bigger than the maximum
value of 8.
Error B23:
data size constant out of range
The data length specifier of a data size specifier is greater than the maximum
value of 4 (e.g. D6).
Error B24:
memory size constant out of range
The data distance of a data size specifier is greater than the allowed maximum
value of 4.
Error B25:
address size constant out of range
Address width specifier of the address size specifier is out of range. Maximum
value is eight.
Error B27:
%l: unresolved macro
A macro name was used, which is not provided in the macro section.
Error B28:
more than four bytes in the byte order
The number of bytes in the byteorder is greater than the maximum of datasize
Error B29:
non allowed byte sequence
Bytes can be defined only once in the byteorder and they must be allowed (e.g.
byte 4 isn’t accessible in a D3)
Error B30:
datasize differs from number of bytes in byte order
The number of bytes in the byteorder has to be the same as the datasize
CSH - DEV / SW
13-Dec-00
Chapter 15
Appendix
53
14.3 Driver error messages
Error D00:
Not valid driver. Do you want to switch in the simulation mode?
The URD driver DLL as specified in the line #BeginRegisterList "<driver
name>.dll" of the device description file is not found in the specified directory.
The default directory is the directory, where the file 'URDxx.EXE' is located
(see as well chapter 13.3).
Error D01:
cannot load the driver %l
The URD driver file is not complete.
Error D02:
cannot find function %l
The URD driver API functions are (partly) not available in the driver file.
Error D03:
cannot open the driver
The OPEN function returns a FALSE value. This is most probably due to a
hardware error.
Error D04:
cannot close the driver
The CLOSE function returns a FALSE value. This is most probably due to a
hardware error.
Error D05:
cannot write to address
The WRITE function returns a FALSE value. This is most probably due to a
hardware error.
Error D06:
cannot read from address
The READ function returns a FALSE value. This is most probably due to a
hardware error.
Error D07:
no valid data to write to address
The WRITE function tries to write a value of "X…X" to the register. This is
the current value of the register in the register tree.
Error D08:
cannot execute the command, driver is not loaded
When starting the URD in simulation mode, the link to the driver file as
described in the line #BeginRegisterList "<driver name>.dll" of the device
description file will not be registered. Switching later back to use a driver
instead of simulation mode without restarting the URD causes this error.
15 Appendix
15.1 Table of features of the URD per OS
The following table summarises the features of the URD depending on the OS used:
Feature
WIN31
16bit
WIN95/98
16bit
WIN95/98
32bit
WINNT4
32bit
Read/write single register
x
x
x
x
Read/write all registers
x
x
x
x
Access memory areas
x
x
x
x
Store actual register settings
x
x
x
x
CSH - DEV / SW
13-Dec-00
Chapter 15
Appendix
Support development of new driver
x
54
x
Use slider to change register values
Use simple macros
x
x
Use basic macros
x
x
x
x
x
x
x
x
15.2 Programmers reference of the URD hardware driver API
The URD API consists of the following functions:
- LibMain
Get access to an instance of the driver (WIN16 only)
- UrdOpen
Open and initialise the target device
- UrdClose
Close the target device and free used memory
- UrdSetReg
Set the contents of a register at a given address
- UrdGetReg
Get the contents of a register at a given address
- UrdGetStatus
Get status of Open, Close, GetReg and SetReg access to the driver
In detail they are to be used as follows:
15.2.1 LibMain
Syntax
int CALLBACK LibMain ( HINSTANCE hModule, WORD wDataSeg,
WORD wHeapSize, LPSTR lpCmdLine )
The main library function that is called when the library is first opened.
Return Value
Parameters
The result of the operation of this function.
1
The operation was successful. No error
occurred.
0
The operation was not successful. An
error occurred.
hModule
Handle of library instance.
wDataSeg
Library data segment.
wHeapSize
Default heap size.
lpCmdLine
Command-line arguments.
15.2.2 UrdOpen
Syntax
BOOL URDAPI_EXPORT UrdOpen ( void )
For the first initialisation of the URD API this function is called. During
this function all necessary initialisation has to be done.
CSH - DEV / SW
13-Dec-00
Chapter 15
Appendix
55
The result of the operation of this function.
Return Value
TRUE
The operation was successful. No error
occurred.
FALSE
The operation was not successful. An
error occurred. Please use the
UrdGetStatus function for more
details of the error.
15.2.3 UrdClose
Syntax
BOOL URDAPI_EXPORT UrdClose ( void )
After all data transfers has been done this function will be called to close
the data transfer path and release all allocated resources.
Return Value
The result of the operation of this function.
TRUE
The operation was successful. No error
occurred.
FALSE
The operation was not successful. An
error occurred. Please use the
UrdGetStatus function for more
details of the error.
15.2.4 UrdSetReg
Syntax
BOOL URDAPI_EXPORT UrdSetReg ( int nAdrBytes, int nDataBytes,
const LPBYTE pucAdr, DWORD dwData )
To send several data bytes to a specific location (address) this function will
be called. Here occurs the data transfer.
Return Value
Parameters
The result of the operation of this function.
TRUE
The operation was successful. No error
occurred.
FALSE
The operation was not successful. An
error occurred. Please use the
UrdGetStatus function for more
details of the error.
nAdrBytes
Number of bytes in the device address.
nDataBytes
Number of bytes in the data (max. 4).
pucAdr
This pointer points to an array which holds the # of address bytes.
dwData
The data bytes are located in this parameter. The most significant byte contains
the first data byte.
Comments
CSH - DEV / SW
There are at most 4 data bytes (DWORD).
13-Dec-00
Chapter 15
Appendix
56
15.2.5 UrdGetReg
Syntax
BOOL URDAPI_EXPORT UrdGetReg( int nAdrBytes, int nDataBytes,
const LPBYTE pucAdr, LPDWORD pdwData )
To receive several data bytes from a specific location (address) this
function will be called. Here occurs the data transfer.
Return Value
Parameters
The result of the operation of this function.
TRUE
The operation was successful. No error
occurred.
FALSE
The operation was not successful. An
error occurred. Please use the
UrdGetStatus function for more
details of the error.
nAdrBytes
Number of bytes in the device address.
nDataBytes
Number of bytes in the data (max. 4).
pucAdr
This pointer points to an array which holds the # of address bytes.
pdwData
The data bytes will be retrieved in this parameter. The most significant byte
contains the first data by.
Comments
There are at most 4 data bytes (DWORD).
15.2.6 UrdGetStatus
Syntax
Parameters
void URDAPI_EXPORT UrdGetStatus ( LPSTR pMessage )
This function has to report the current error status. If no error has occurred
after the last call of this function the return string has to be "No Error".
pMessage
Pointer to a character array that will receive the error message. The buffer has to
be at least 50 characters large.
CSH - DEV / SW
13-Dec-00
Chapter 16
Index
57
16 Index
B
basic bar
basic engine
basic engine window
basic macros
bookmark
O
14
14
14
10, 54
15
D
output window
R
register tree window
sample files
simple macros
slider bar
software architecture
status bar
support
E
T
49, 50
F
features of the URD
find
tool bar
11
10, 16, 21, 54
14, 19
10
14, 20
8, 11, 12
14
U
53
15
I
installation
14
S
device description file11, 12, 13, 14, 16, 17, 19, 21,
22, 47, 48, 49, 50, 53
device description window
13, 14, 16
device registers
17
driver development
8, 13, 48
error codes
14, 17, 49
user interface
12, 14, 20
V
variables
21
8, 10, 11
M
macro bar
memory regions
CSH - DEV / SW
14, 21
8, 16, 22
13-Dec-00
Chapter 16
Index
58
Not described:
- the project menu
- windows basics like file exit, window tile, …
- all details for a windows beginner
CSH - DEV / SW
13-Dec-00