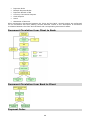
1
ARMENIAN SOFTWARE
AS-ClientBank
Remote Banking System
Yerevan, 2008
Table of Contents
Table of Contents ......................................................................................................... 1
Acknowledgements ...................................................................................................... 4
About “AS-ClientBank” System .................................................................................... 5
System Installation ...................................................................................................... 6
First Launch of the System ........................................................................................... 6
Login .................................................................................................................. 7
Databases and Configurations ...................................................................................... 7
Configuration Creation ....................................................................................... 8
Options ........................................................................................................................ 9
General ............................................................................................................ 10
Client Properties .............................................................................................. 11
Bank Properties................................................................................................ 12
Connection Settings ......................................................................................... 12
Private Keys ..................................................................................................... 14
Document Numbers .......................................................................................... 15
Color Schemes.................................................................................................. 16
Printer .............................................................................................................. 16
Administrator Tools .................................................................................................... 17
Users ................................................................................................................ 17
Backups ........................................................................................................... 19
Archives ........................................................................................................... 19
Database Connections ...................................................................................... 20
Reindex Database ............................................................................................ 20
Create Transactions from Statements .............................................................. 20
Export Data ...................................................................................................... 21
Export Directories .................................................................................. 21
Export Documents .................................................................................. 21
Export Rates of Exchange....................................................................... 21
Import Data ..................................................................................................... 22
Synchronize Documents ................................................................................... 22
Audits ............................................................................................................... 22
Working Environment ................................................................................................ 23
Input Fields ...................................................................................................... 23
Character Fields ..................................................................................... 23
Numeric Fields ....................................................................................... 23
Date Fields ............................................................................................. 24
List Fields ............................................................................................... 24
Account Fields ........................................................................................ 25
Menu Bar .......................................................................................................... 26
Toolbar ............................................................................................................. 29
Shortcut Keys ................................................................................................... 30
Folders ............................................................................................................. 31
Find and Select in Folder, by Data Condition .......................................... 32
Quick Find of Data in Folder ................................................................... 33
Select Visible Columns ........................................................................... 33
Reports ............................................................................................................ 34
Find in Report ........................................................................................ 34
Selection Lists .................................................................................................. 35
Data Directories ......................................................................................................... 36
Accounts .......................................................................................................... 36
Correspondents Inside of RA ............................................................................ 36
Correspondents Outside of RA .......................................................................... 37
Rates of Exchange from Bank ........................................................................... 37
Rates of Exchange from CB RA ......................................................................... 37
Banks Inside of RA ........................................................................................... 38
Banks Outside of RA ......................................................................................... 38
Currencies ........................................................................................................ 38
1
Keys ................................................................................................................. 39
Reports ...................................................................................................................... 39
Transactions..................................................................................................... 39
Grouped Transactions ...................................................................................... 40
Archived Transactions ...................................................................................... 40
Documents Manipulation ............................................................................................ 41
Documents Folders ........................................................................................... 41
Payments Inside of RA (Outgoing) ......................................................... 41
Multiple Payments Inside of RA (Outgoing) ........................................... 42
Payments Outside of RA (Outgoing) ....................................................... 42
Currency Conversion Requests ............................................................... 43
Cash Request ......................................................................................... 43
Letters to Bank ....................................................................................... 44
Payments Inside of RA (Incoming) ........................................................ 44
Payments Outside of RA (Incoming) ...................................................... 44
Statements of Accounts ......................................................................... 45
Letters from Bank .................................................................................. 45
Documents ....................................................................................................... 45
Document Circulation from Client to Bank .............................................. 46
Document Circulation from Bank to Client .............................................. 46
Payment Order ....................................................................................... 46
Multiple Payment Order ......................................................................... 48
Payments Outside of RA ......................................................................... 50
Currency Conversion Request ................................................................ 52
Cash Request ......................................................................................... 53
Letter ..................................................................................................... 54
Statement of Account ............................................................................. 55
Send and Receive Documents........................................................................... 57
Sign Document ....................................................................................... 57
Send Document to Bank ......................................................................... 57
Receive Documents from Bank ............................................................... 58
Document Send/Receive Errors ............................................................. 59
On-Line Requests to Bank .......................................................................................... 59
View Statement of Account .............................................................................. 59
View Accounts’ Balances .................................................................................. 60
View Rates of Exchange ................................................................................... 60
On-Line Request Errors .................................................................................... 60
Print Preview ............................................................................................................. 61
Print Preview Window ...................................................................................... 61
Printing Window .................................................................................... 62
Folder Print Preview ......................................................................................... 62
Report Print ..................................................................................................... 63
How to … ? ................................................................................................................. 63
How to send document to bank ........................................................................ 63
How to check sent document state ................................................................... 64
How to obtain a key approved by bank ............................................................ 65
Create a Key ........................................................................................... 65
Remove a Key ........................................................................................ 66
Key Exchange Password and Code ......................................................... 66
Send Key to Bank ................................................................................... 66
Check Key Status.................................................................................... 66
Example of Key Exchange....................................................................... 67
How to test connection with bank .................................................................... 68
How to move the system to another computer ................................................. 68
How to backup/restore keys ............................................................................ 68
Backup/Restore keys stored in File ........................................................ 68
Backup/Restore keys stored in System Storage ..................................... 68
About System Security ............................................................................................... 71
Basics of Cryptography .................................................................................... 71
Principles of Cryptography ..................................................................... 71
2
How does cryptography work? ............................................................... 71
Symmetric Key Cryptography ................................................................. 71
Public Key Cryptography ........................................................................ 72
Encryption Strength ............................................................................... 72
Digital Signatures................................................................................... 73
Overcoming Cryptography ...................................................................... 74
Public Key Forgery ................................................................................. 75
Digital Certificates.................................................................................. 75
Certificate Revocation ............................................................................ 76
SSL ......................................................................................................... 76
System Security ............................................................................................... 77
System Structure ............................................................................................. 77
Notes ......................................................................................................................... 79
3
Acknowledgements
Special thanks to “Cascade Bank” CJSC for valuable help and assistance through development
of this documentation.
4
About “AS-ClientBank” System
AS-Client Bank system provides an opportunity to bank client to manage his bank accounts
without physically visiting the bank. Client avoids wasting his time and saves expenses
associated with visiting the bank. He controls his bank accounts from his workplace fast and
efficiently. Work can be organized in any time of the day and on any day of the week
independently of bank's business hours.
Documents circulation between client and bank is secure, reliable and protected from outside
interferences. Transmitted and received data are encrypted and digitally signed.
With the help of the system, client may send to the bank the following types of documents:
Payments inside of RA (Republic of Armenia)
Multiple Payments inside of RA (Republic of Armenia)
Payments outside of RA
Cash Requests
Currency Conversion Requests
Letters to Bank
With the help of the system, client may receive from the bank the following types of
documents:
Payment inside of RA
Payment outside of RA
Letters from Bank
Account statements
Capabilities
After connecting to bank, customer receives up-to-date information on his banking accounts
as well as general purpose data (like exchange rates).
It allows customers to efficiently manage their banking accounts, e.g. make currency
conversions in case of change in currency exchange rate or make transfers just after account
replenishment.
Connection with the bank established by the system is not long-term (actually few seconds).
Internet is used exactly for the time necessary for sending prepared documents to bank or
receiving reports from bank. As a result, expenses of Internet usage are minimized.
Customers are provided with comfortable and comprehensible environment. The documents are
grouped by types. It is possible to view documents current status, view the log of operations
made upon it, and make operations.
With the help of the system customer can:
•
Send payment documents: payment orders, currency conversion requests and cash
requests
•
Get information about received payments
•
View reports on bank balances and statements over any period
•
View currency exchange rates established either by bank or by Central Bank of Armenia.
•
Send and receive free format messages with attached files (MS Word, Excel etc.)
System Security and Protection
To provide AS-ClientBank system security, world avowed encrypting and digital signing
technologies are chosen. Such technologies are used by several famous systems working in
compliance with international standards (including SWIFT).
Documents being sent to bank are appended with two digital signatures, which are then
verified in the bank and, if incorrect, are rejected. Due to digital signatures, the bank
may feel confident that the document has been sent by the specified client and has not
been changed after being signed.
The data exchanged between the bank and the client are encrypted (SSL).
5
Additional check-ups are made while sending documents to bank: bank identification,
client identification, client’s key falsification checking, signature authenticity verification,
etc.
Characteristics
AS-ClientBank is a network system: several users can exploit it simultaneously. Each
user has a password and permissions. For example, a document can be created by an
accountant, confirmed by a director, and sent by another employee.
The system provides an opportunity to work with one or more banks.
Different users can
simultaneously.
It is possible to view the document state before sending it to bank as well as track its
state in the bank (pending, confirmed or refused).
The system stores the history of each document (author, date of creation, signing and
transmitting).
For the users of most widely used accounting systems in Armenia – “AS-Accounting 4.0”
and “AS-Accountant” it is possible to export documents to “AS-ClientBank” as well as
import received documents from “AS-ClientBank”.
work in different
languages -
in
Armenian
or in English
Technical Requirements
Pentium 200 MHz, 64 Mb (RAM)
Operating Systems (OS)
o
Microsoft Windows XP
o
Microsoft Windows 2000 Service Pack 1
o
Microsoft Windows NT4.0 Service Pack 6
o
Microsoft Windows Millennium Edition
o
Microsoft Windows 98
Internet Explorer 5.5 or higher
Connection means to Web-server (depending on how bank provides this service, it can
be modem and telephone line or internet connection)
System Installation
In order to install the system, it is necessary to run setup.exe file from the CD.
The AS-ClientBank system uses encrypt library accessible from Internet Explorer 5.5 and
higher. Therefore, when run, the installed software first checks the availability of
Internet Explorer version in your computer and, if necessary, asks to install Internet
Explorer 5.5. After installation of Internet Explorer 5.5, you need to restart your
computer.
In addition, the AS-ClientBank system uses MSSOAP library, including the following
system requirements:
o
Microsoft Windows XP
o
Microsoft Windows 2000 Service Pack 1
o
Microsoft Windows NT4.0 Service Pack 6
o
Microsoft Windows 98
o
Microsoft Windows Millennium Edition
o
Pentium 200 MHz, 64 Mb (RAM)
After the installation of the system or, if the system is already installed, it is necessary to install
the servicing bank's Root Certificate.
First Launch of the System
After the installation of the system, it will not be ready to use yet. There are some preparation
steps necessary to perform immediately after the first launch of the system. Such steps include:
6
1. Create Configuration
During the first launch of the system, the program asks to create a new configuration.
Steps required to create new configuration are described under “Configuration Creation”
section.
2. Login
After completing the first step, system displays “Login” window. During configuration
creation, “ADMIN” user is created, with administrator permissions, and a blank
password: thus, the only thing left is to click “OK” button.
3. Enter Client Properties
Client properties may be edited in the “Client Properties” page opened via “Options”
menu item under “Session” menu. When running the system, in particular, creating
payment documents, client properties are automatically filled out in the relevant field.
That is why it is desirable to fill out those properties once and be free from performing
the same action again. Those properties may be changed in the course of operation of
the system, as well.
4. Enter Key Exchange Password
To enter the password used when sending/receiving keys, go to “Session” menu, select
“Options” menu item, “Private Key” page, and press “Change” button. It is necessary to
remember entered password and inform the bank the new key exchange code. Each
time when sending the new keys to bank, it is necessary to enter the password for the
exchange of keys. Note that in order to change the key exchange password, it is
required to have administrator permissions.
5. Create Users
During configuration creation, “ADMIN” user is created, with administrator permissions
and blank password. New users, with their passwords and signature rights should be
added. It is desirable to add at least one user with an administrative permission and,
during the next login, change the password of the “ADMIN” user. To create or edit users,
select “Users” menu item in “Administrator Tools” under "Session" menu.
6. Create Keys
To view users’ keys list, select “Keys” item under “Data Directories” menu. Steps to
create keys and send them to bank are described under “How to obtain a key approved
by bank” topic.
Login
When launching the system the “Login” window is opened, this consists of two or three fields. If
there is only one configuration, “Configuration” field is not displayed.
"Login" window has the following form:
Field
Description
User Name
Name of the user (see “Users” section)
Password
Enter the password of the user
Configuration
Select one of the configurations, by which the user
will work
Databases and Configurations
The system keeps data in databases. The database contains document circulation information
between a single client and a single servicing bank (documents, directories, etc.). If client
7
wishes to work with another bank or, as a different client of the same bank, it is necessary to
create new database. Database, with assigned name and description, is called a configuration.
The system provides an opportunity to add and delete configurations. With the help of
“Configurations” command under “Session” menu, it is possible to view the list of already
created configurations. The columns of “Configurations” list include data on the below-described
fields:
Field
Description
Name
Name of configuration
Description
Human-readable description of configuration
Database path
Database path of the configuration
The list contains a context menu, which includes “Add” and “Remove” commands.
“Remove” command removes current configuration: the database itself is not removed. In order
to remove the database, it is necessary to delete CB.mdb file manually from the directory
specified in the Database path column of the list (prior to configuration removal). To add a new
configuration, see “Configuration Creation” section below.
If more than one configuration is created, the user, when launching the system, shall select the
configuration in the “Login” window, in addition to entering his/her name and password. After
login, the configuration description will be displayed in the upper right corner of the main
window (near the working period), and all the remaining actions will refer to the database,
corresponding to the current configuration.
In case of a single configuration, the user, when launching the system, shall enter only his/her
name and password.
Note: “Configurations” command under “Session” menu is active only when the user has not
been logged on the system. Otherwise, it is necessary to logout.
Configuration Creation
To create a new database, it is necessary to create new configuration via “Add” command in
“Configurations” list. New configuration is created with the help of the “New Configuration
Wizard” which includes the following steps:
1. Enter the name and the description of the configuration and click “Next”
2. Select whether you want to create a new database for that configuration, or use the one
already created by somebody else (e.g. in case of network version), and then click
“Next”
8
3. If new database is to be created, select the file path with initial data (provided by the
servicing bank) and the path where the database is to be created, and then click “Finish”
If already created database is to be used, enter or select the path of that database and
click “Finish”
After performing above-mentioned steps, the newly created configuration will appear in the list.
Note: Since the database has a fixed name (CB.mdb), two databases cannot be created in the
same directory.
Options
This window is designed to change reports and connection settings, client properties, private
keys and other parameters. It may be called via the “Session” menu or simply by pressing
“Ctrl+O” shortcut key.
The window consists of the following pages:
General
Client Properties
Bank Properties
Connection Settings
9
Private Keys
Document Numbers
Color Scheme
Printer
Note: “Client Properties” and “Bank Properties” pages are visible to users with administrator
permissions.
Note: “Private Keys” page is visible to users with at least one of the following permissions: first
signatory, second signatory, send to/receive from the bank.
Note: “Connection Settings” page is visible to users with send to/receive from the bank
permissions.
General
This page is designed to set up general options. From this page, it is possible to change the
working language and the font, select the settlement account with the bank, the code of the
national currency unit, etc.
“General” page of the “Options” window has the following fields:
Field
Description
Defines the working language of the system
Working Language
It may be either the Armenian or the English. Two versions of
Armenian language as the working language are conditioned by the
availability, or absence of, the Armenian System Font.
Defines the name and the size of the font
Font Name (Size)
Font Size in Reports
National Currency
Code
Settlement Account
with Bank
Precision of Rounding
Amounts
The field value is used when generating the printable version of the
folder.
Defines the font size
The field value is used when producing reports.
Defines the national currency unit
Defines the default account number of the client
The field value will be suggested e.g. when creating payment
orders
Defines the precision of rounding amounts in national currency
10
Export to MS Excel
and Word in Unicode
When set, “Unicode” encoding will be used when exporting folder
rows (rows) to “Excel”, or creating a document form in “Word”.
This may be used, for example, when a deformed text is displayed
after the export
Show Signer Names
When set names of first and second signatories in outgoing
documents folders will be displayed.
Show Day Turnover
and Balance in
Statement
When set daily turnover and balance will be displayed in account
statements.
Request a
Confirmation When
Closing Window
When set, system will request a confirmation for closing the new
document windows, basic directory windows and existing document
windows in edit mode.
Note: The working language parameter of the system is stores in the computer, and the
remaining parameters - in the database. Therefore, each user can select a language
convenient for him/her, whereas the remaining parameters, once changed by a user, will
be changed for all users.
Note: Only system administrator can edit “Natioanal Currency Code” and “Precision of Rounding
Amounts” fields.
Client Properties
This page is designed to set up client properties. In this page, the main properties of the client
are set, such as the name, the address, etc.
“Client Properties” page of “Options” window has the following fields:
Field
Name
Description
Name of the client, which is used, when creating a new document
When set, it is automatically filled-out in the respective field.
English Name
Name of the client in English
Address
Defines the client address
English Address
Defines the client address in English
11
Defines the legal status of the client
Possible values are:
Legal Position
Tax Code
State Registration
No.
Judicial Person
Natural Person
Private Entrepreneur
Other
Defines tax code of the client
The field is not active for clients deemed “Natural Persons”.
Defines the client registration number in the State Registry
The field is active for clients, deemed “Judicial Person”.
Defines the client's registration number in the State Registry
Social Security
Card No.
The field is not active for “Judicial Person” clients. When a new
document is created, this field is automatically filled-out in the
respective field.
Note: Fields in “Client Properties” page can be edited only by the system administrator.
Bank Properties
This page is designed to set up bank properties. In this page, the main properties of the bank
are set, including the English names. This page can be edited only by the system administrator.
“Bank Properties” page of “Options” window has the following fields:
Field
Description
Code Inside of RA
Defines code of the bank inside of RA
Address
Defines address of the bank
BIC
Defines international code of the bank
English Name
Defines name of the bank in English
English Address
Defines address of the bank in English
Client No.
Client number with the bank
Connection Settings
This page is designed to set up connection settings with the bank. In this page, the Web
address and the port of the bank are provided. In addition to direct connection, there is an
12
opportunity to establish a connection through local proxy server, by filling out proxy
information. Connection with the bank can be tested immediately after setting the field values.
This page can be viewed by system administrator only.
“Connection Settings” page of “Options” menu has the following fields:
Field
Description
Bank Web Server (URL)
Defines bank Web server host name
Port
Defines bank Web server port (in general, it is 443).
Web-Service
Defines the Web-Service path on the Web-Server
Use Proxy Server
If set, connection with the Web Server of the bank is
established through Proxy server
Proxy Server
Defines name of the Proxy server
Port
Defines port of the Proxy server
User Name
Defines name of the Proxy server user
Password
Defines password of the Proxy server use
Confirm Password
Confirms password of the Proxy server user
Dial Up Before Sending
Any Request to Bank
If set, prior to inquiries to bank, system establishes telephone
connection via the selected connection. This option is useful if
the bank provides the AS-ClientBank service via modem.
Connection Name
Defines the name of the connection (created by means of
operating system), which the system must use to establish a
telephone connection. It is necessary to select the required
connection name from among the names of all connections
available in the operating system. Connections are created via
Control Panel > Network And Dial-Up Connections >
Make New Connection command.
Hang-Up
Connection
After seconds of being
idle
Determines the idle time (in seconds) passed after the last
inquiry to the bank, after which the telephone connection must
be hanged up.
Note: Values of Proxy fields should match with the values of relevant parameters in Webbrowser.
By clicking “Advanced” button the following window will be displayed:
13
This window contains up to 5 rows with alternate web service descriptions. Each row consists of
Web Server URL, port and Web-Service path.
Private Keys
This page is designed to set up the private keys storage and path. “Private Keys” page can be
viewed by users, which are vested with signatory and bank inquiry send/receive permissions.
“Private Keys” page of the “Options” window has the following fields:
Field
Store
Private
System Storage
Description
Keys
in
When selected, the user private keys will be stored in the
relevant storage of the operating system.
Store Private Keys in File
When selected, the user private keys will be (if confirmed by
the bank) saved in the file.
Path
Defines the path to the user private key
Keys Exchange Code
This is used for sending/verifying the status of keys. It may
be changed by clicking "Change" button and entering the new
password for keys exchange.
The system gives opportunity for each user to determine the storage of his/her private keys:
system storage or file. Below are advantages and disadvantages of each option.
Private Keys
Storage
Advantages
Disadvantages
14
System storage
File
The user avoids excessive
operations of saving the
private key in and reading
from the file.
Private
keys
are
not
accessible to unauthorized
persons, if the computer is
used correctly (e.g., shut
down the computer when
leaving, etc,).
If private keys are stored in
external carrier, the user, if
vested
with
relevant
permissions, may sign, send
to, and receive documents
from the bank from any
computer.
The private keys file is
stored in encrypted form
and if occurred in the hands
of an unauthorized user, it
cannot be used by him.
Operations requiring the
user’s private key can only
be performed on
the
computer where the keys
are stored.
When porting system to
another computer, certain
difficulties associated with
porting private keys occur.
In
case
of
hardware
failure, if keys are not
stored in advance, private
keys of all users working
on that computer will be
lost.
If stored on the local disk,
the same disadvantages,
as they were in case of
system storage occur.
File
operations
are
increased, which may slow
down the system (also, if
stored in Floppy external
carrier, this may cause
failure of the carrier and
loss of private keys).
Taking into account the aforementioned advantages and disadvantages, each user shall
independently determine the type of storage for his/her private keys.
Additional
By clicking “Additional” button the following window will be displayed:
In this window, the user may select CSP (Cryptographic Service Provider, CSP) and RSA key
size in bits. By default, “Microsoft Enhanced Cryptographic Provider v1.0” CSP library is used
with RSA 1024-bit keys.
Key Exchange Code
From this page, the user may change the password for key exchange. After changing the keys
password, the bank must be informed about the 32-length alphanumeric sequence displayed in
Key Exchange Code field. The code and the password are used when sending newly created
keys to bank and checking sent key status (approved or rejected). The process of key exchange
is described under “How to obtain a key approved by bank” section.
Document Numbers
This page is designed to set up sequential document numbering. In this page, the last
sequential number of particular type of document is displayed. When creating a new document
“Document Number” field automatically filled out by the system with next sequential number for
that type of document.
15
“Document Numbers” page of the “Options” window has the following fields:
Field
Description
Document
Document name, to which the sequential number is
assigned
Number
Next sequential
documents
number
of
the
relevant
type
of
Note: If “Number” field is blank, next sequential number is not suggested for that type of
documents.
Color Schemes
This page is designed for changing the colors of constituent parts in document folders,
directories, and reports. The user can either choose the colors available in the system, or add
colors by its own.
Printer
This page is designed to manage printer options. It provides an opportunity to describe the
appearance of report print headers’ forms.
16
“Printer” page of “Options” window has the following fields:
Field
Description
Print header
Turns on/off header printing
Page numbering
Turns on/off page numbering in headers
Print special string
Turns on/off printing of special row in headers
Print date
Turns on/off printing of date in headers
Administrator Tools
Administrator tools are located in “Session” menu. These tools allow the administrator to
administer the database (DB) and the users. The “Administrator Tools” include:
Users
Manage Backups
Archives
Database Connections
Reindex DB
Create Transactions from Statements
Export Data
Import Data
Synchronize Documents
Audits
Users
The “Users” folder is displayed via “Users” command from “Administrator Tools” submenu of
“Session” menu.
The “Users” folder has the following fields:
Field
Description
User Name
(Required) Name of the user
User Description
(Required) Description of the user
17
(Required) Password of the user
Password
The field value is always displayed in non-blank form and is required
only for a newly created user.
(Required) Password confirmation
Confirm Password
Same password must be entered in this field. It is used to avoid
potential accidental errors.
Defines whether the user is admitted to use the system
Admitted
This field can be used to deny temporarily certain users to exploit the
system.
Administrator
If set, the user is system administrator
Can Only View
If set, the user is granted “read only” permission to system
Has a First
Signature Right
If set, the user is granted first signatory permission
Has a Second
Signature Right
If set, the user is granted second signatory permission
Can Delete
Signature
If set, the user is granted signature removal permission
Can Send
To/Receive from
Bank
If set, the user is allowed to make “On-Line” inquires, send signed
documents to the bank and received documents from the bank
Account
Permissions
Account
Displays the client's account number with the bank
Currency
Displays currency code of the particular account
Name
Displays the name of the particular account
Permission
If set, the user is granted permission to work with the particular
account
Context menu, opened from the folder, contains “Add”, “Edit”, and “Remove” commands.
Note: The “Users” folder is accessible to and subject to changes by system administrator only.
Note: System administrator user cannot disable own login or make himself non-administrator. it
must be done by another system administrator.
Note: It is advised to deny access to the system (by changing the value of “Admitted” field) to
previously created users, rather than remove them.
18
Note: For the first and second signatories or users with bank send/receive permissions, the
“User Description” field value will be used in the name of the key created by the user. If
the field value is filled-out in the Armenian language, it will be transliterated into English.
Backups
The “Database Backups” folder is displayed via “Manage Backups” command from
“Administrator Tools” submenu of “Session” menu. The backups are designed to save the
current state of the DB, so that it will be possible to recover workable DB in case of
emergencies.
The “Database Backups” folder has the following fields:
Field
Description
Backup File
Name of the backup file
Size, KB
Actual backup file size in KB
Compressed
KB
Creation Date
Size,
Zip backup file size in KB
Date of backup creation
Within the folder, context menu consists of “Add”, “Delete” and “Restore” commands.
1. Create Backup.
To create a new backup copy of the DB, select “Add” command in from context menu,
which will display the window showing the backup progress and, upon completion,
display a message on successful completion of copying.
2. Restore Backup.
To restore the DB from any backup, select “Restore” command from context menu
opened from the respective folder row. After confirming the warning, the window will
display the recovery progress and, upon completion, a message on successful completion
of the recovery.
It should be considered that data stored in the current database would be deleted.
3. Delete Backup.
To remove any backup of the DB, select “Delete” command in context menu opened
from the respective folder row.
Note: The “Database Backups” folder is accessible and subject to changes by the system
administrator only.
Note: Backup and restore operations can be performed only if other users do not use the DB.
Archives
The “Archives” folder is displayed via “Archives” command from “Administrator Tools” submenu
of "Session" menu. This folder is designed for archiving of documents. That is, archive DB is
created: the documents are moved to archive DB and may be accessed from archive DB only.
Thereby, the size of the DB gets smaller and the system performance improved.
The “Archives” folder has the following fields:
Field
Description
Name
Name of the archive
Description
Archive description
Date Modified
Date and time when the archive was last modified
Within the folder, context menu consists of “Add”, “Edit”, and “Delete” commands.
1. Create Archive.
To create a new archive, select “Add” command from the context menu and the
archiving window will be displayed.
19
After filling-out archive “Name” and “Description” fields and specifying the date, press
“OK” and confirm the performed action. All documents created before specified date will
be archived. The window will display the progress of archiving. Upon completion, a
message on successful completion of archiving will be displayed.
2. Edit Archive, Add Documents to Archive.
To edit any archive, select “Edit” command in context menu on respective folder row.
While editing, it is possible to change the values of “Name” and “Description” fields.
When changing the value of the “Name” field, the file name will be changed as well.
To add new documents to existing archives, select “Edit” command in context menu
opened from the respective folder row. Select “Archive All Documents”, specify the date,
and press “OK”. All documents created before specified date will be added to the archive.
3. Delete Archive.
To remove an archive, select “Delete” command from the context menu of the respective
folder row.
Note: The “Archives” folder is accessible to and subject to changes by the system administrator
only.
Note: While archiving the documents, the “Reindex DB” command is automatically performed.
Note: While archiving the documents, data in “Rates of Exchange from Bank” and “Rates of
Exchange from CB RA” directories are removed until the specified date.
Note: While archiving the documents, all transactions prior to the selected date are archived,
too. Those transactions can be viewed from “Archived Transactions” command.
Database Connections
The “Database Connections” folder is opened through “Database Connections” command in
“Administrator Tools” submenu of "Session" menu. This folder is useful when working in
network environment. It shows all available connections with the database.
The “Database Connections” folder has the following fields:
Field
Description
Station
Computer name, wherefrom connection with database is established
User Name
Name of the user
Login
Date and time when the connection is established
Using Resource
Whether the connection is using a resource at the given time
Note: The “Database Connections” folder is accessible to system administrator only.
Reindex Database
The “Reindex Database” command is designed for speeding up the work with DB and reducing
the DB size.
Note: The “Reindex Database” command is accessible to system administrator only.
Create Transactions from Statements
20
Transactions are created via “Create Transactions from Statements” command from
“Administrator Tools” submenu of "Session" menu, based on statements available for the
specified period.
When creating transactions, statements available in the system are used and, if any statement
is missing for any reason, transactions associated with it are not created.
Note: When receiving new statements, the system automatically creates transactions associated
with it.
Note: “Create Transactions
administrator only.
from
Statements”
command
is
accessible
to
the
system
Export Data
The section “Export Data” contains these three actions: “Export Directories ”, ”Export
Documents” and “ Export Rates of Exchange”.
Export Directories
The action “Export Directories” is used for exporting data from “Correspondents Inside of RA”,
”Correspondents Outside of RA”, ”Banks Inside of RA “, ”Banks Outside of RA”, ”Currencies”
directories.
Before exporting you must select the path for export, the name of the file in which you are
going to export and the directories that must be exported. You can select all directories above
by choosing “Select All” button or select them in column “Export”. Data will be exported to a
special file with .xml extension. That data you can later import by action “Import Data”.
Export Documents
When you choose the “Export Documents” action “Account” dialog appears which has “Period”
and “Document Type” fields. According to chosen values, dialog is making a group of
documents, from where you can select and export data.
Before exporting you must select the path for export, the name of the file in which you are
going to export. Data will be exported to a special file with .xml extension.
Export Rates of Exchange
The action “Export Rates of Exchange” is used for exporting data from “Rates of Exchange from
Bank ” and “Rates of Exchange from CB RA” directories. Before exporting you must select
period, the path for export, the name of the file in which you are going to export and also the
directories that you want to export. Data will be exported in a special file with .xml extension.
21
Import Data
The action “Import Data” is used for importing data to “Correspondents Inside of RA”,
”Correspondents Outside of RA”, ”Banks Inside of RA “, ”Banks Outside of RA”, ”Currencies”
directories. Before importing, you must choose file and the directories that you want to import.
The system will import data and ask about errors if there are.
Note: You can import files only from special files with .xml extension. The data can be imported
to system by using data exported by “Export Directories” action.
Synchronize Documents
The “Synchronize Documents” command synchronizes client’s documents with those held in the
bank. That is, it provides an opportunity to receive such documents that are available with the
bank, but are missing from the DB, for any reasons.
The “Synchronize Documents” command displays “Send and Receive” window, where the period
of synchronization must be specified.
When clicking “OK” button, the list of documents, falling into the specified period, is displayed.
Select documents to be synchronized from the list and click “Receive” button: the system will
perform the synchronization.
Audits
The “Audits” folder is displayed via “Audits” command from “Administrator Tools” submenu of
“Session” menu. It shows audit log of requests made to the bank for the specified period.
The “Audits” folder has the following fields:
Field
Description
22
Date
Date and time of the request to bank
Duration (ms)
Duration of the request in milliseconds
Transaction
Description of the request
Result
Result of the request: successful or failed
Error details
If the request failed, displays error details
Note: The “Audits” folder is accessible to the system administrator only.
Working Environment
When working with the system, several windows may be opened: however only one window
may be active at a time. The active window caption is highlighted on the screen as the main
window of the system. The active window, as compared to other windows, is on the top level.
Keyboard and shortcut keys refer to the active window only.
The following are the main parts of the main window:
Menu bar
The Menu bar consists of menus designed to perform certain actions. When selecting a
command from the menu, a window for further selections is opened, or a relevant
operation is performed.
Toolbar
The content of the Toolbar matches with those of the menu. Mouse click on the picture of
the toolbar provides faster access to the same operation from menu.
Input Fields
When registering the documents, there are several types of fields, designed for input of the
necessary data. They are:
Character fields
Numeric fields
Date fields
List fields
Account fields
Character Fields
Any characters may be entered in the Character field. The initial value of the field is a blank.
In this type of fields characters are entered in overwrite regime. When the entire field is filledout, the insertion of characters terminates. Insertion may be resumed after deleting some
characters (via “Delete” or “Backspace” key).
Numeric Fields
The Numeric fields are designed to enter only numeric values: positive or negative. The initial
value is zero (0).
Negative numbers are represented in red color, with the "-" check mark in front.
Depending on the application, the figures are represented in mil fractions or without any
fraction.
With “-” key, the positive number is converted into negative, and the negative number - into
positive.
With “+” key, the negative number is converted into positive, and the positive number remains
unchanged.
23
“Spacebar” or “Page Down” keys call the calculator, where the current number of the numeric
field is displayed. Required number is calculated with the help of the calculator and immediately
inserted in the numeric field. The work with the calculator is very much like the work with an
ordinary calculator. With the help of the calculator, one can type the figure, do arithmetic, save,
delete the number, etc.
With the help of “OK” button or “Enter” key, the number in the calculator is inserted in the
numeric field. “Esc” means cancel the number in the calculator, in which case the numeric field
remains unchanged. If the calculator is open, the mouse click in the numeric field leaves it
unchanged, and closes the calculator.
Below is the picture of the numeric field, and the calculator.
When leaving the numeric field, the minimum and the maximum permissible limits of the
number are checked.
Date Fields
In Date fields, only dates can be entered. Generally, the initial value is the current date or, in
some cases, the date of the next day.
To view calendar, press arrow key, “Space” or “Page Down”. Select the necessary date and
insert it in the date field.
To work with calendar, click on any date in the calendar or, press “Enter” key, and the date will
appear in the field. “Esc” means cancel the date in the calendar, and leave the date field
unchanged. The mouse click on the calendar, in open status, also cancels the selection. The
necessary date may be available through the auxiliary arrows. By moving right, left, up and
down arrows, the date is gradually changed, then the month, year, and so on. For quick change
of the months and the year, mouse click on the right or the left arrow on the top of the
calendar. The mouse click on the date between the arrows will display the list of months to
select for the given year.
When leaving the field, the maximum (31/12/2049) and the minimum (01/01/1950) limits of
the date are checked.
List Fields
The value entered in the List field must match with any code from the relevant list, or be blank.
If necessary, to select a value, the list may be called with the help of the arrow or the “Page
Down” key. Selection from the list, as well as other operations, is described in the example
below:
24
The screen above shows the “Currencies” directory, with “Code” and “Name” columns.
In general, the directory is displayed by “Code” ascending order. The mouse click on the top of
either “Code” or “Name” column, changes the sorting of the rows from ascending to descending,
and vice versa. The ascending or descending order of any column is indicated by the “A/Z” and
“Arrow” icons (up or down) on the top of the column. The same result can be achieved by
pressing “Ctrl + Right Arrow” or “Ctrl + Left Arrow” keys. The “Ctrl + Up Arrow” key sorts
the list by ascending order on current column; whereas “Ctrl + Down Arrow” sorts by
descending order. The color of the current column differs from that of other columns. The work
with the lists is described in “Selection Lists” section.
When selecting particular row, corresponding “Code” field is filled-out in the input field, and the
“Name” field is displayed next to it, as a comment.
Depending on application, the list may contain arbitrary number of columns, and of any nature,
and the entered value may be out of the list.
Account Fields
Account fields are designed for entering bank accounts. It consists of two parts. The bank code
is written in the first part, and the account number with the bank - in the second part. When
displayed on the screen, these two parts appear divided from each other, as separate fields. For
these fields, “B” and “Arrow” buttons are designed. By clicking on these buttons, the list of
banks or correspondent accounts respectively is displayed. When selecting particular row from
the bank list, corresponding code of the bank is filled in, and the account field remains the
same. When making a selection from the correspondent account list, both the code of the bank
and the account number with the bank are filled in. These lists are also displayed as follows:
depending on which field the cursor is, by pressing “Page Down” or “Ctrl + Down Arrow”,
the list of banks, or the list of corresponding accounts is displayed respectively. When filling in
the account number with the bank, the account number format as per HSBC criterion is
considered automatically, and the account number is displayed in corresponding format.
Opportunities to work with account fields are described in the following example.
The picture above shows two typical applications of the account field. The first is to fill out the
payer's account (Debit), and the second - to fill out the payee's (receiver) account (Credit). In
the first case the “B” button is missing, and the “Arrow” button displays only the list of the
25
given bank accounts, and the account number should be selected from that list only, although,
it is possible to enter account that is not in the list. In the second case, it is possible to call the
list of banks, select the bank from the list, and then enter the account with the bank, or open
frequently used correspondent accounts by “Arrow” button, and make relevant selection from
there. In all cases, the list of banks shall necessarily include the filled-out bank code, whereas
the correspondent account list may not include all potential correspondent accounts, since strict
checking is not performed. However, it is desirable to include frequently used correspondent
accounts in the list (“Correspondent accounts”).
Menu Bar
The Menu is the initial point for everything that could be performed in the system, starting from
creation of a new document ending with report generation and help. The menu bar consists of
six parts:
Session
Folder
Actions
Documents
Reports
Data Directories
Windows
Help
Session menu contains following commands:
Login: opens “Login” window, where the user's name and password are filled in, and the
necessary configuration selected.
Logout: closes all operational windows, menu commands, and shortcut keys. To resume
the operation, select "Login" command.
Change Password: displays the window to change the user's password. Type the old
password correctly, then type the new password and confirm it in the next field.
Receive From Bank:
client.
Send All Ready Documents: sends all “Ready To Be Sent” documents to the bank.
Track Out All Sent Document States: tracks the status of sent documents, which are
in "Sent to Bank", "Signatures Validated" or "Processed in Bank" states. No status checks
for documents in "First Signature Rejected", "Second Signature Rejected", or "Refused
by Bank" statuses are performed. The progress of the document status check can be
viewed in the displayed window. The arrow from the left side of the relevant row of
currently checked document is pointed to and changed upon completion of the check. To
stop the checking of document statuses, click “Stop” button. To view any document after
completion or termination of document status check, click on the relevant row or press
“Enter”.
Send Request to Bank: sends the below-stated On-Line requests (inquiries) to bank:
receives all documents sent from the bank for the particular
o
View Statement of Account: upon the client's request, the bank sends
unofficial account statement as of the required period.
o
View Accounts’ Balances: upon the client's request, the bank sends the list of
all accounts of the client and corresponding balances.
o
View Rates of Exchange: the bank provides the foreign currency exchange
rates for the specified period, established by the bank or the CBA. The bank's
selection is made prior to sending the request.
Print preview: relevant print form of folder or report is generated.
Print: relevant folder or report print form is printed on default printer.
Save As: exports reports in the text file format.
Options: changes current system options, colors, periods, etc.
Administrator Tools: Administrator accessible tools, which include:
26
o
Users: activates “Users” system folder. New users may be created, or existing
users may be removed or edited.
o
Manage Backups: activates “Backups” folder of the current database. It is
possible to create new backups, remove the backup copy or restore it as current
database.
o
Archives: activates “Archives” system folder. It is possible to create new
archives, edit or remove archive, or append archive with existing documents.
o
Database Connections: shows all available connections with the database.
o
Reindex DB: indexes the current database.
o
Create Transaction from Statements: creates transactions based on the
statements available in the specified period.
o
Export Data:
Export Directories: exports data from “Correspondents Inside of RA”,
”Correspondents Outside of RA”, ”Banks Inside of RA “, ”Banks Outside of
RA” and ”Currencies” directories.
Export Documents: exports documents from system.
Export Rates of Exchange: exports data from “Rates of Exchange from
Bank” and “Rates of Exchange from CB RA” directories.
o
Import Data: imports data to “Correspondents Inside of RA”, ”Correspondents
Outside of RA”, ”Banks Inside of RA “, ”Banks Outside of RA” and ”Currencies”
directories.
o
Synchronize Documents: synchronizes documents with that of the bank.
o
Audits: displays “Audits” folder.
Manage Configurations: activates “Manage Configurations” system folder. It is
possible to create new configuration or remove a configuration. This item is active only
when the system is in logout state.
Exit: terminates the session and shuts down the program.
Folder menu contains following commands:
Find: allows making a search in folders or reports by some criteria. In folders, search is
organized by selected columns, searching condition and the relevant value. In reports,
search is organized by string value.
Find Next: continues search in folders or reports.
Quick Find: allows making a search in folders by the currently sorted column.
Refresh: updates current folder from the database.
Folder Print Preview: generates a report, consisting of folder rows.
Export to MS Excel: exports the selected folder rows to Microsoft Excel.
Select Columns: allows selecting visible columns of the folder.
Select All: selects all rows of the folder or report.
Deselect All: removes selection from all selected rows.
Invert Selection: inverts selection of rows, i.e. selects unselected rows and removes
selection from selected ones.
Select by Condition: selects the folder rows by specified condition.
Deselect by Condition: removes selection of folder rows by specified condition.
Actions menu contains following commands:
Add: adds a new row in the folder.
Edit: edits current row of the folder.
View: displays current folder row in view mode.
Delete: deletes the current row from the folder, if no restrictive criteria are set, e.g., the
document-row is sent to bank.
Create a Copy: creates a copy of the current folder row.
27
View Document: displays the document, corresponding to the current row of the folder,
in a printable form.
View Log:
displays the history log of actions performed on the document,
corresponding to the current folder row.
Sign: appends the users’ digital signature(s) (first or second) to the current or selected
document, after which the document gets “Ready to be Sent” status. The document is
allowed to be signed, when it bears either one of the following statuses: “Editable”, “First
Signature Affixed”, or “Second Signature Affixed”. Document can be signed only by user,
who is authorized to put a signature (first, second, or both). The signed document
automatically falls in a status corresponding to signatures (“First signature Affixed”,
“Second Signature Affixed”, “Ready to be Sent”).
Remove Signature: removes all digital signatures from current or selected documents
of the folder, and returns it to “Editable” state.
Check Signature: checks digital signature of documents received from the bank. When
receiving documents, the system automatically checks the digital signatures of received
documents, this item is used in cases, when the system fails, for any reason, to check
the signature.
Send to Bank: sends current or selected documents of the folder in “Ready to be Sent”
state to the bank.
Sign and Send to Bank: sends marked documents of folder to the bank, signing in
advance documents that are not signed. Documents sent to the bank before that, are
not resent, the same refers to any document, whereon signatures are not put.
Check Sent Document State: clarifies the status of the current or selected documents
that are sent to the bank.
Current Key: contains two sub-commands: “Export to File” and “Import from File”,
which are designed for storing and restoring the current key kept in the system storage.
Documents menu contains following commands:
Payments Inside of RA (Outgoing): activates “Payments inside of RA” outgoing
documents folder.
Multiple Payments Inside of RA (Outgoing): activates “Multiple Payments inside of
RA” outgoing documents folder.
Payments Outside of RA (Outgoing): activates “Payments outside of RA” outgoing
documents folder.
Currency Conversion Requests: activates “Currency Conversion Requests” outgoing
documents folder.
Cash Request: activates “Cash Request” outgoing documents folder.
Letters to Bank: activates “Letters” outgoing documents folder.
Payments Inside of RA (Incoming): activates “Payments Inside of RA” incoming
documents folder.
Payments Outside of RA (Incoming): activates “Payments Outside of RA” incoming
documents folder.
Statements of Accounts: activates “Statements” incoming documents folder.
Letters from Bank: activates “Letters” incoming document folder.
Archived Documents: activates selected document folder from the selected archive.
Reports menu contains following commands:
Transactions: displays the folder of transactions showing selected bank account of the
client.
Grouped Transactions: displays the folder of transactions showing selected bank
account of the client, grouped by selected field.
Archived Transactions: displays the folder of transactions showing selected bank
account, from selected archive.
Data Directories menu contains following commands:
Accounts: activates all accounts folder of the client.
28
Correspondents Inside of RA: activates folder of correspondents inside of RA.
Correspondents Outside of RA: activates folder of correspondents outside of RA.
Rates of Exchange from Bank: activates FX rates folder for selected period.
Rate of Exchange from CB RA: activates the folder of foreign exchange rates
established by the Central Bank of Armenia for the selected period.
Banks Inside of RA: activates folder of banks operating in the territory of the RA.
Banks Outside of RA: activates folder of banks outside of RA.
Currencies: activates foreign currencies folder.
Keys: activates users' keys folder.
Windows menu contains following commands:
Cascade: arranges active windows on the screen in sequential order, by occupying
entire working space - one caption after the other.
Tile Horizontal: arranges active windows in horizontal order, completing entire working
space, without covering each other.
Tile Vertical: arranges active windows in vertical order, completing entire working
space, without covering each other.
Arrange Icons: arranges all active windows on the screen.
Close All Windows: closes all opened windows.
Help menu contains following commands:
Contents: shows the system Help opened in content page.
Index: shows the system Help opened in index page.
Search: shows system Help opened in search page.
About: shows brief contents of the system.
Toolbar
The Toolbar is the sequence of fast access buttons. It is located directed below the Menu bar.
The toolbar buttons may not be accessible from all windows. The buttons become accessible
under certain criteria, where their use is sensible.
The Toolbar buttons have the following meaning:
Icon
Name
Description
New
Creates a new document or adds a
new directory row
Edit
Edits selected document
View
Activates the document for view only
View Document
Brings the
document
Delete
Deletes the document
Create a Copy
Creates a
document
Print
Prints selected document
Print Preview
Brings the print form of the initial
document
Export to Word
Exports the document to Word
Sign
Appends the document by the digital
signature of the user
29
print
copy
form
of
the
of
initial
selected
Send to Bank
Sends the document to Bank
Receive from Bank
Receives all documents, which are
sent to the particular Client from the
Bank
Find
Finds the row meeting the specified
criteria
Export to Excel
Exports selected rows in the folder to
Excel
Refresh
Refreshes current folder rows,
reloading them from database
by
Beginning and end of the working
period
Working period
Affects generation of a number of
folders and directories
Shortcut Keys
Shortcut keys are designed for quick “access” to menu commands. E.g., the shortcut key for
“Print Preview” is “Shift+F5”. It means that instead of selecting “Print Preview” command of
“Session” Menu, it is possible to press “Shift” and “F5” keys together (“Shift+F5” shortcut
key). It is possible to open windows on the screen via shortcut keys. Shortcut key for particular
menu item is displayed next to it.
Below are shortcut keys available in the system, and their description:
Keys
Description
F1
Help
F3
Find next row starting from the current row
F5
Create document print form corresponding to current folder row
F6
Activate “RUR6” window for certain fields of “Payments Outside of RA”
document and “Banks Outside of RA” and “Correspondents Outside of
RA” directories
+
Select all rows in the folder
-
Remove selection from all selected rows
*
Invert selection in the folder, i.e. marks all unmarked rows and
removes the marked ones
Ctrl+“+”
Select the row in the folder by condition
Ctrl+“-”
Remove row selection in the folder, by condition
Ctrl+A
Add new row in the folder
Ctrl+C
Copy the value from current field to the clipboard by leaving the field
unchanged
Ctrl+D
Remove current row from the folder
Ctrl+E
Edit current folder row
Ctrl+F
Find the row, by selected condition, in the folder or report
Ctrl+O
Display current options window
Ctrl+P
Print current report
30
Ctrl+Q
Quick find the row in the folder, according to the column by which
folder rows are arranged at that moment (first column with yellow fill)
Ctrl+R
Refresh current folder
Ctrl+S
Send current document to bank
Ctrl+V
Inserts value from the storage to current field
Ctrl+X
Copy the value from current field to storage, by deleting the valued
from the field
Ctrl+Y
Create a copy of the current row of folder
Ctrl+Enter
Shortcut of “OK” button. Shortcut of “Next” button on just created
document forms.
Ctrl+F4
Close current window
Ctrl+F5
Create a report based on folder rows
Ctrl+ Arrow Up
Ctrl+ Arrow
Down
Move cursor in the folder in the direction of the selected rows
Ctrl+R
Refresh the current window
Ctrl+Y
Duplicate the document
Shift+F4
Close all open windows
Shift+F5
Build relevant print form of folder or report
Alt+R
Same as F6
Keyboard conventions
Key
Description
Alt
Activate Menu bar
Tab
Move blinking cursor to the next input field or activate next button
Esc
Same as clicking “Cancel” – closes current window without saving changes
Enter
Same as clicking “OK” – closes current window by saving changes or moves to the
next input field.
Folders
The Folder is an informational records list, to which certain actions are defined depending on the
contents of the folder.
Here is an example of a folder:
In this folder, each row is a document. However, in general, not all folders contain documents,
e.g., “Banks Outside of RA” directory folder. The user may do the following actions with current
active folder:
1. Arrange the folder rows on any column by clicking on the heading of the column. Next
click will invert the direction of arrangement. Click with “Shift” key pressed arranges the
folder by current column, by maintaining the orders of previously arranged columns. The
31
sequence of arrangement and its direction is marked in the left part of column header.
Arranged columns color differs from regular columns by user-assigned color. In the
picture above, the color is light yellow. It is possible to arrange up to five columns
simultaneously. The first and the third columns in the picture are arranged by ascending
order.
2. Hide or Select columns displayed in folder, by right-clicking on column header and
choosing an appropriate action.
3. Mark or remove row selection. Selection of all rows is done via “+” key, and removal of
selection is done by “-” key. Pressing “Insert”, “Shift+Insert”, “Shift+Arrow Down”,
“Shift+Arrow Up” keys on any row either marks it (if not marked), or removes marking
(if marked). Marking rows by “Insert” and “Shift+Arrow Down” or is done in down
direction, and “Shift+Insert” and “Shift+Arrow Up” – in up direction. Reverse
marking of all rows is done by pressing “*” key. The color of marked rows is changes to
user-assigned color, which is turquoise in the picture.
4. Generate report on entire folder or selected rows (“Ctrl+F5”).
5. Find the row by condition. If available, it becomes current (cursor is moved on found
row). Pressing “Ctrl+F” will display a window where the searching condition must be
entered. By pressing “F3”, row search will be continued by already entered condition.
6. Reload folder, by updating it with values available in the database at that moment
(“Ctrl+R”).
7. Export the whole folder, or selected rows only, to Microsoft Excel.
8. View folder print preview form. It is in the form of a table and allows the user to change
font and print properties, and then print (“Shift+F5”).
9. Change color scheme of folder from color options (“Ctrl+O”).
In addition to above-mentioned opportunities regarding the folder rows, the user can:
1. Edit the row (“Ctrl+E”)
2. Create new row, by registering it in the folder (“Ctrl+A”)
3. Create new document based on the selected one (“Ctrl+Y”)
4. Remove document from folder (“Ctrl+D”)
5. Print document (“F5”)
6. Create “Word” template of the document.
7. Perform an action from context menu, by right clicking mouse. Such actions will refer to
current or selected folder rows.
When viewing the folder, the total number of rows, the number of current row and selected
rows count is displayed in the bottom left corner of the status bar.
Find and Select in Folder, by Data Condition
The “Find” window is designed for searching rows, by condition, in the active folder. The row
detected in the result of the search becomes current (cursor is placed on it). In case of selecting
folder rows by condition or removing the selection, the row cursor remains immovable, and the
rows meeting the condition are respectively selected or the selection is removed.
Folder columns are selected through the first column of the window, by which the search is
done. Thereafter, the find condition is selected from the following list:
32
=
Equal to Value
<
Smaller than the value
<=
BE
>
Larger than the value
>=
AE
Between
Between the values
Contain
Contains the value
Start
Starts with the value
Like
Match specified pattern
The value by which the find is made is filled in the “Value” column, in case of selecting
“Between” condition, the initial and the final values are selected. It is clear that initial values
shall not be less than final values.
When “C=S” (Capital letter = Small letter) column value is checked, case insensitive search will
be performed.
The example shows how to find a row with “13/05/02” date, the document number is between
“2” – “4”, and the amount does not exceed “10,000”. When searching, the user may select the
search direction - “Down” or “Up”
In case of “Like” condition, the following characters can be used in the search pattern:
*
Match one or more characters
?
Match one character
#
Match one digit
Example of search pattern is *AR##?NM*, which means that matching string must start with
“AR”, which must be followed by two digits and one arbitrary character, then "NM" pair, and
after that any characters. Patterns are useful when approximate values are known.
After exiting the “Find” window, the search direction and filled-in conditions are maintained until
exiting the folder, and the user may continue the search by pressing F3 key.
Quick Find of Data in Folder
Quick find of data in folder can be performed on column, by which the folder rows are arranged
in the active window (it is a first column marked in yellow). To find the required row quick,
press “Ctrl+Q” key, which generates input field, filled out with corresponding column value of
the current row. Type a string to be searched in the field. The first row that starts with entered
value becomes current. If there is no row matching entered value, the cursor remains unmoved.
To exit quick find window, press “Enter” or “Esc”.
Select Visible Columns
To select visible columns of folder, use “Select Column” command of “Folder” menu. Check
necessary columns in the opened window, which are to be displayed, and uncheck those
columns, which are to be hidden. After confirming the selection, the folder will display only the
checked columns.
33
Reports
Reports are called from menu bar or created based on folder rows. The picture below shows an
example of report.
The report consists of sections. If initial columns have different color, it means that the section
is fixed (frozen). The header of the report is at the beginning (do not confuse with the title bar),
which is the first row of the picture above; below are titles of columns, and the bottom row is
for totals. The user may color the listed rows at his/her convenience.
In the report, the user may:
1. Move to the left or right by pressing “Ctrl+Left Arrow” and “Ctrl+Right Arrow”. If the
report has frozen section (colored in dark grey), the section move is done in the floating
parts of report only.
2. Select rows by condition, or select by “Insert”, “Shift+Insert”, “Shift+Down Arrow”,
“Shift+Up Arrow” keys. Pressing “+” key will select all rows. The color of selected rows
is changed as assigned by the user. In the picture, the color of selected rows is
turquoise. To remove the selection, press one of the following keys: “Insert”,
“Shift+Insert”, “Shift+Up Arrow”, “Shift+Down Arrow”; to remove selection of all
rows, press “-” key. Reverse selection of rows is made via “*” key.
3. Move current row cursor, by pressing “Ctrl+Up Arrow”, “Ctrl+Down Arrow” keys.
4. Find row by condition.
5. Generate print preview of the report (“Shift+F5”).
6. Export report to text file.
7. Copy selected rows to the clipboard (“Ctrl+C”).
When viewing the report, the bottom left corner of the status bar displays the total number of
rows of the report, the number of current row, and selected rows count.
Find in Report
The “Find” window is designed to find data in the report. It may be called from Toolbar, Menu,
or “Ctrl+F” shortcut key.
The found row becomes current (i.e. the cursor is placed on it), and the value found in the row
is colored by the user-assigned color (in the picture the color is red).
34
If “Find by Mask” is specified, then no color change occurs in the result of the find: instead, the
cursor is moved to the relevant found row. Depending on the pressed key, find is done above or
below the current row. If no rows found meeting the condition, “No such record found” message
is displayed. The following fields may be selected in “Find” window.
Ignore Case: If checked, the system performs case insensitive search.
Whole Word: If checked, the system will search whole words. Whole words are
separated from other words by space.
Find by Mask: If checked, the search is performed by pattern.
The following characters can be used for pattern values:
*
Match one or more characters
?
Match one character
#
Match one digit
After closing the “Find” window, last find direction and criteria are saved (of course, until the
report window is closed), and the user may continue the search by pressing “F3”.
Selection Lists
In general, selection lists are displayed in several columns (two or more). In most cases, those
columns are “Code” and “Name”, and the list is sorted by “Code” in ascending order. Mouse
click on the heading of one of the list columns changes rows arrangement; by changing
ascending order into descending, and vice versa. Direction of arrangement is displayed in the
heading of the column, by A/Z and Arrow (up or down) icon. The same result is attained with
“Ctrl+Right Arrow” or “Ctrl+Left Arrow” keys. To find the necessary row from the list, use
“arrow” keys, or fast access. Fast access to the list row is done as follows: when pressing a
character, it is right attached to the previously typed characters, and the first row that starts
with resulting sequence is searched (on arranged column). In case of finding the relevant row,
the cursor appears on that row, otherwise the cursor remains unmoved. The sequence of
searched characters sequence is displayed in the status bar at the bottom of work environment.
Here, the keys have the following meaning:
Keys
Description
Enter
Select row
Double click on a row
Select row
Click on a row
Move cursor on that row
Home
Move cursor on the first row
End
Move cursor on the last row
Page Up
Page the list up
Page Down
Page the list down
Up Arrow/Down Arrow
Move up/down
Backspace
Delete one character from the right of searched sequence
Insert
Clear the sequence of searched characters
Delete
Clear the sequence of searched characters
35
Data Directories
There are several directories available in the system, which are used mainly when filling out
input fields, to ease the user’s work. To avoid errors and double entry of the same data, it is
more reliable and expedient to select the value of the particular field from the respective
directory. In addition, quite often, when selecting a row from the directory, several other
related fields are automatically filled out – this makes the work of the user easier. Directory is a
kind of folder. Some directories provide add, edit and delete actions. Therefore, fixed
(stationary) directories, and directories subject to changes may be distinguished.
The following Directories are available in the system:
Accounts
Correspondents Inside of RA
Correspondents Outside of RA
Rates of Exchange from Bank
Rates of Exchange from CB RA
Banks Inside of RA
Banks Outside of RA
Currencies
Keys
Note: When adding or editing directory rows, the proposed fields to be entered not always
match with fields in the directory and, quite often, include more fields. When describing
the directories, the full list of fields is called. When describing fields of "Keys” directory,
the work with rows is describes as well.
Accounts
This is a directory of client accounts held with the servicing bank, which the client may access
through the AS-ClientBank system. The list of accessible accounts is registered in the bank. It is
used at the time of filling out the payer’s account when creating a document. The directory is
subject to changes by system administrator only.
“Accounts” directory has the following fields:
Field
Description
Account
(Required) Represents the a/c of the client with the bank
Currency
(Required) Represents the currency code of the account
Name
(Required) Represents the name of the account
Balance
Represents the balance of the given account as of date
specified in “Date” field
D/C
Shows whether the account balance is debit (D) or credit (C)
Date
Account balance date
Note: Prior to adding, editing or deleting an account in the directory, the client shall agree, in
advance, about changes with the bank.
Correspondents Inside of RA
This is a directory of frequently used correspondent accounts inside of RA. This directory is
subject to modifications by the user.
“Correspondents Inside of RA” directory has the following fields:
Field
Description
Account
(Required) Represents the correspondent’s a/c
36
Currency
(Required) Represents the currency code of the account
Account Name
(Required) Represents the name of the correspondent
Tax Code
Represents the tax code of the correspondent
Address
Represents the address of the correspondent
Details of Payment
Represents the main purpose of payments to correspondent
Correspondents Outside of RA
This is a directory of frequently used correspondent accounts outside of RA. It is subject to
modifications by the user.
“Correspondents Outside of RA” directory has the following fields:
Field
Description
Account
(Required) Represents the a/c of the correspondent Outside
of RA
Currency
(Required) Represents the currency code of the account
Account Name
(Required) Represents the name of the correspondent
Address
Represents the address of the correspondent
Details of Payment
Represents the main purpose of payments to correspondent
Bank
Represents the BIC code of the correspondent’s bank
Name
(Required) Represents the name of the correspondent’s
bank
Address
Represents the address of the correspondent’s bank
Note: There is “RUS” button next to “Account Name”, “Address”, “Details of Payment”, “Name”
and “Address” fields, which is used to type in Russian transliteration (RUR6).
Rates of Exchange from Bank
This is a directory of foreign currency exchange rates, established and provided by the bank.
The directory is not subject to changes by the user; it is automatically filled out when making
On-Line requests about currency exchange rates of the bank.
"Rates of Exchange from Bank” directory has the following fields:
Field
Description
Date
Exchange rate establishment date
Rate of Purchasing
Buy rate of base currency
Rate of Sale
Sell rate of base currency
Base Currency
Currency code, for which buy and sell rates are established
For
Shows how many units of currency is equivalent to the base
currency
Currency
Currency code, against which the exchange rates are
established
Type
Exchange rate type: “Cash” or “Non-cash”
Rates of Exchange from CB RA
37
This is a directory of foreign currency exchange rates, established by Central Bank of Armenia
(CBA) and provided by the bank. The directory is not subject to changes by the user; it is
automatically filled out when making On-Line inquiry about currency exchange rates of the CBA.
“Rates of Exchange from CB RA” directory has the following fields:
Field
Description
Date
Exchange rate establishment date
Currency
Currency code, for which exchange rates are established
Currency name
Currency name
Rate
The exchange rate for the specified currency
For
Shows how many units of national currency is equivalent to
the established exchange rate
Banks Inside of RA
This is the directory of all banks inside of RA, which is provided by the bank. The directory is
subject to changes by the user, yet it is advised not to change the directory. Changes in the list
are made with the help of a special-type letter sent by the bank, which updates this directory
without user interference.
“Banks Inside of RA” directory has the following fields:
Field
Description
Code
(Required) Represents the code of the bank Inside of RA
Name
(Required) Represents the name of the bank
Account format by
HSBC
If checked, the format of account numbers within specified
bank is set to HSBC-like, otherwise, generic format is used
Banks Outside of RA
This is a directory of banks outside of RA, which is provided by the bank. The directory is
subject to changes by the user.
“Banks Outside of RA” directory has the following fields:
Field
Description
BIC
(Required) Represents the international code of the bank
Name
(Required) Represents the name of the bank
Address
Represents the address of the bank
Note: There is “RUS” button next to “Name” and “Address” fields, which is used to type in
Russian transliteration (RUR6).
Currencies
This is a directory of currencies’ codes, names, big and small coin units. The directory is subject
to changes by the user, yet it is advised not to change the directory. Changes in the list are
made with the help of a special-type letter sent by the bank, which updates this directory
without user interference.
“Currencies” directory has the following fields:
Field
Description
Code
(Required) Represents the foreign currency ISO three-letter
code
38
Name
(Required) Represents the foreign currency name
Unit Name
Represents the cash unit of the foreign currency
Cent Name
Represents the small coins of the foreign currency
Keys
This is a directory of keys created by users of the system. The directory is subject to changes
by users, who have signatory or send to/receive from the bank permissions. The key is used
only by the possessor of the key, both to send requests to bank, and put I and II signatures (if
vested with relevant permissions).
"Keys” directory has the following fields:
Field
Description
Key Thumbprint
This is a 40-digit alphanumeric sequence, which is formed
when creating the key and serves as unique identifier of the
key
It is used during the exchange of keys.
Name of the possessor of the key
Name
It is formed when creating a key, based on the description
of the key creator/user.
State
Status of the key
Date when the key becomes valid
Valid From
The value of this field is blank for a newly created key or a
key rejected by the bank. For a key confirmed by the bank,
this field contains the date when the created key becomes
valid.
Date when the effective period of the key expires
Valid To
The value of this field is blank for a newly created key or a
key rejected by the bank. For a key confirmed by the bank,
this field specifies the date when the effective period of the
key expires.
Creation Date
Date of creation of the key
Creator
Name of creator/user of the key
This directory provides “Add”, “View”, “Delete”, “Send to Bank” and “Check Key State” actions.
“Add” action creates a new key for the currently logged on user.
“Deletes” action deletes the newly created key of the particular user. It is impossible to
remove confirmed, rejected keys, and keys created on another computer or by a
different user.
“Send to Bank” and “Check Key State” actions are described in details under “How to
obtain a key approved by bank” section.
Reports
The Reports menu contains the following commands:
Transactions
Grouped Transactions
Archived Transactions
Transactions
39
The “Transactions” command of “Reports” menu displays the folder of transactions related to
the client’s given bank account. However, prior to the display of the folder, system displays a
dialog that suggests selecting the account, the period and some non-mandatory fields for
filtering.
Columns of “Transactions” folder contain data of the following fields:
Field
Description
Confirmation Date
Date of approval of transaction
Creation Date
Date of creation of transaction document
Code
Type of transaction
Document #
Sequential number of transaction document
Account Number
Account number with the bank
Correspondent Account
Correspondent account number
Debit
The amount debited from the account as a result of
transaction
Credit
The amount
transaction
Payer/Receiver
Name of the payer/payee
Description
Purpose of transaction, comment
credited
to the account
as a
result
of
Grouped Transactions
The “Grouped Transactions” command of “Reports” menu displays transactions related to the
specified account of the client, grouped by selected fields.
Archived Transactions
The “Archived Transactions” command of “Reports” menu displays the “Transactions” folder
form the selected archive.
40
Documents Manipulation
This section describes documents available in AS-ClientBank
manipulation principles. The section includes the following topics:
Documents folders
Documents
Send/Receive documents
system
and
document
Documents Folders
The work with a document in the system starts from “Documents” menu, which contains
commands displaying all document folders available in the system. When selecting any
command from this menu, the relevant type of documents folder is displayed. It contains
documents created during the working period. Each type of documents’ folder contains columns,
common to all folders (Date, Number, State), and columns typical to that particular type.
Documents folders are divided into two parts: one for documents sent to the bank by the client
(outgoing), and the other for documents sent to the client by the bank (incoming).
The following are folders of documents being sent to the bank by the client:
Payments Inside of RA (Outgoing)
Multiple payments Inside of RA (Outgoing)
Payments Outside of RA (Outgoing)
Currency Conversion Requests
Cash Request
Letters to Bank
The following are folders of documents sent to the client by the bank:
Payments Inside of RA (Incoming)
Payments Outside of RA (Incoming)
Statements of Accounts
Letters from Bank
Payments Inside of RA (Outgoing)
“Payments Inside of RA (Outgoing)” folder displays outgoing payment orders. Those are
documents created for making payments inside the RA from the client’s bank accounts.
Columns of “Payments Inside of RA (Outgoing)” folder include data of the following fields:
Field
Description
Date
Date of the document creation
Number
Sequential number of the document
Currency
Currency of amount withdrawn from the payer’s account
Amount
Amount withdrawn from the payer’s account
41
State
Status of the document
Debit
Payer’s account with the bank, wherefrom payment is to be
made
Credit
Payee’s a/c
Receiver
Name of the payee
Details
Details of the payment
First Signer Name
Name of the first signatory
Second
Name
Name of the second signatory
Signer
Note: “First Signer Name” and “Second Signer Name” fields are displayed, when “Show Signers
Names” field is checked in the “General” page of options window.
Multiple Payments Inside of RA (Outgoing)
“Multiple Payments Inside of RA (Outgoing)” folder displays outgoing multiple payment orders.
Those are documents created for making multiple payments Inside of RA from the bank
accounts of the client.
Columns of “Multiple Payments Inside of RA (Outgoing)” folder contain data of the following
fields:
Field
Description
Date
Date of the document creation
Number
Sequential number of the document
Currency
Currency of amount to be withdrawn from the payer’s
account
Amount
Total amount to be withdrawn from the payer’s account
State
Status of document
Debit
Payer’s account with the bank, wherefrom payments are to
be made
Details
Details of the payment
First Signer Name
Name of the first signatory
Second
Name
Name of the second signatory
Signer
Note: “First Signer Name” and “Second Signer Name” fields are displayed, when “Show Signers
Names” field is checked in the “General” page of options window.
Payments Outside of RA (Outgoing)
“Payments Outside of RA (Outgoing)” folder displays outgoing payment documents outside of
RA. Those are documents created to make multiple payments outside the RA from the bank
account of the client.
Columns of “Payments Outside of RA (Outgoing)” folder include data of the following fields:
Field
Description
Date
Date of the document creation
Number
Sequential number of document
Currency
Currency of amount to be withdrawn from the payer’s
account
42
Amount
Amount to be withdrawn from the payer’s account
State
Status of payment order
Debit
Payer’s account with the bank, wherefrom payments are to
be made
Credit
Payee’s a/c
Receiver
Name and address of the payee
Details
Details of the payment
First Signer Name
Name of the first signatory
Second
Name
Name of the second signatory
Signer
Note: “First Signer Name” and “Second Signer Name” fields are displayed, when “Show Signers
Names” field is checked in the “General” page of options window.
Currency Conversion Requests
This folder displays documents on currency conversion requests. With help of these requests, an
instruction is issued to the bank to transfer the specified amounts between client’s bank
accounts that have different currencies.
Columns of “Currency Conversion Requests” folder include data of the following fields:
Field
Description
Date
Date of request creation
Number
Sequential number of the document
Currency
The first currency to be exchanged
Debit Amount
Amount of order, by the first currency
Currency
The second currency to be exchanged
Credit Amount
Amount of order, by the second currency
State
Status of document
Details
Details of the request
First Signer Name
Name of the first signatory
Second
Name
Name of the second signatory
Signer
Note: “First Signer Name” and “Second Signer Name” fields are displayed, when “Show Signers
Names” field is checked in the “General” page of options window.
Cash Request
“Cash Request” folder displays cash request documents. With help of these documents, an order
is issued to the bank to withdraw cash amount from the bank account.
Columns of “Cash Request” folder include data of the following fields:
Field
Description
Date
Date of order creation
Number
Sequential number of the order
Account
Account with
withdrawn.
Currency
Currency of amount
the
bank,
43
wherefrom
cash
is
to
be
Amount
Amount to be withdrawn
State
Status of the order
Details
Details of the order
First Signer Name
Name of the first signatory
Second
Name
Name of the second signatory
Signer
Note: “First Signer Name” and “Second Signer Name” fields are displayed, when “Show Signers
Names” field is checked in the “General” page of options window.
Letters to Bank
“Letters to Bank” folder displays the letter documents. They are used to exchange messages
between the bank and the client, in free format.
Columns of “Letters to Bank” folder contain data of the following fields:
Field
Description
Date
Date of letter creation
Subject
Subject of the letter
State
Status of the letter
First Signer Name
Name of the first signatory
Second
Name
Name of the second signatory
Signer
Note: “First Signer Name” and “Second Signer Name” fields are displayed, when “Show Signers
Names” field is checked in the “General” page of options window.
Payments Inside of RA (Incoming)
“Payments Inside of RA (Incoming)” folder displays incoming payments. Those are documents
sent by the bank when the client receives payments inside the RA on its bank accounts.
Columns of “Payments Inside of RA (Incoming)” folder contain data of the following fields:
Field
Description
Date
Date of document creation
Number
Sequential payment number
Currency
Currency of amount to be withdrawn from the payer’s
account
Amount
Amount to be withdrawn form the payer’s account
State
Status of the payment
Debit
Payer’s a/c, wherefrom payment is made
Payer
Name of the payer
Credit
Account of the payee, i.e. the client’s account with the
bank
Details
Details of the payment
Payments Outside of RA (Incoming)
44
“Payments Outside of RA (Incoming)” folder displays documents on payments outside of RA.
Those are documents sent by the bank to the client, when the latter receives payments outside
the RA on its bank accounts.
Columns of “Payments Outside of RA (Incoming)” folder include data of the following fields:
Field
Description
Date
Date of payment creation
Number
Sequential payment number
Currency
Currency of amount to be withdrawn from the payer’s
account
Amount
Amount to be withdrawn form the payer’s account
State
Status of the payment
Debit
Payer’s a/c, wherefrom payment is made
Payer
Name of the payer
Credit
Account of the payee, i.e. the client’s account with the
bank
Details
Details of the payment
Statements of Accounts
“Statements of Accounts” folder displays statements on client’s bank account received from the
bank. Such statements represent transactions (payment inside of RA /outgoing or incoming/,
cash request, etc.) within the specified period.
Columns of “Statements of Accounts” folder include data of the following fields:
Field
Description
Number
Statement sequential number
Account
Statement account number
Currency
Currency of the statement account
Amount
Account balance as of the end of the period
State
Status of the statement
Date
Starting date of the statement period
Date
Ending date of the statement period
Letters from Bank
“Letters from Bank” folder displays letter documents. They are used to exchange messages
between the bank and the client, in free format.
Columns of “Letters from Bank” folder contain data of the following fields:
Field
Description
Date
Date of letter creation
Subject
Subject of the letter
State
Status of the letter
Documents
Data transferred between the client and the bank is performed through documents. The
following types of documents are available in the system:
45
Payment Order
Multiple Payment Order
Payment Outside of RA
Currency Conversion Request
Cash Request
Letter
Statement of Account
When exchanging documents between the client and the bank, several actions are performed
on the document and thus passing several statuses. Below is the description of document
circulation between the client and the bank and corresponding document’s states.
Document Circulation from Client to Bank
Document Circulation from Bank to Client
Payment Order
46
“Payment Order” document is used to make payments inside of RA from the client’s bank
accounts. “Payment Order” is also sent from the bank, when the client receives payment inside
of
RA.
Below is the appearance of a “Payment Order” in the system.
Field
Description
(Required) Sequential number of the payment order
Number
Date
If sequential numbering is turned on for this payment type, then the field
is automatically filled out with next sequential number.
(Required) Creation date of the payment
The field is automatically filled out with the current date.
(Required) Name of the payer
Payer
The field automatically filled out with the payer’s name based on current
options.
(Optional) Social Security Number of the client
Social Card
The field is automatically filled out with SSN, based on current options.
The field is visible only for “Natural Person” or “Private Entrepreneur”
clients.
(Optional) Taxpayer’s tax number
Tax Code
The field is automatically filled out with corresponding value of current
options.
(Read-only) Name of the payer’s bank
Payer’s Bank
Debit Account
Number
The field is automatically filled out after entering a value in the “Debit
Account Number” field.
(Required) Payer’s account with the bank, wherefrom payment is to be
made
The field is automatically filled out with the value of “Settlement account”
value from current options. The system provides an opportunity to select
the account form “Accounts” directory.
(Read-only) Currency of the amount withdrawn from the payer’s account
Currency
The field is automatically filled out after entering a value in the “Debit
Account Number” field.
(Required) Name of the payee
Receiver
If the “Credit Account Number” is selected from the correspondents list,
the field is automatically filled out with corresponding value.
47
(Read-only) Name of payee’s bank
Receiver’s Bank
The field is automatically filled out after entering a value in the “Credit
Account Number” field.
(Required) Payee’s account with the bank
Credit Account
Number
The system provides opportunity to select the account from
“Correspondents Inside of RA” directory. When selecting a line from this
directory, “Receiver” and “Details of Payment” fields are automatically
filled out.
Amount
(Required) Amount to be withdrawn from the payer’s account.
Amount in Words
(Read-only) Amount in words
The field is automatically filled out after entering values in “Amount” field.
(Required) Details of the payment
Details of Payment
If the “Credit Account Number” is selected from the correspondents list,
the field is automatically filled out with corresponding value.
button allows you to choose necessary account from “Correspondents Inside of RA”
directory. When you press this button “Select Account” dialog appears. Below is the appearance
of a “Select Account” dialog in the system
It allows you to fill the field(fields) you want and to get account(accounts) from
“Correspondents Inside of RA” directory which has the same value of field(fields) that you
choose in dialog. For example, if you want accounts, which have AMD currency you must fill
AMD value in “Select Account” dialogs Currency field and after pressing OK button, you can see
only accounts with AMD currency.
“Payment Order” document will be created after pressing “Next” or “OK” buttons. The difference
is that after pressing “OK” button, the window will be closed, whereas after pressing “Next”
button it is possible to create another “Payment Order”.
Note: All fields of “Payment Order” documents received from the bank are read-only.
Multiple Payment Order
“Multiple Payment Order” document is used to make multiple payments inside of RA from
client’s bank account.
Below is the appearance of “Multiple Payment Order” document in the system:
48
Field
Description
(Required) Sequential number of the multiple payment order
Number
Date
If sequential numbering is turned on for this payment type, then the
field is automatically filled out with next sequential number.
(Required) Creation date of the payment
The field is automatically filled out with the current date.
(Required) Name of the payer
Payer
The field automatically filled out with the payer’s name based on current
options.
(Optional) Social Security Number of the client
Social Card
The field is automatically filled out with SSN, based on current options.
The field is visible only for “Natural Person” or “Private
Entrepreneur” clients.
(Optional) Taxpayer’s tax number
Tax Code
The field is automatically filled out with corresponding value of current
options.
(Read-only) Name of the payer’s bank
Payer’s Bank
Debit Account
Number
Currency
The field is automatically filled out after entering a value in the “Debit
Account Number” field.
(Required) Payer’s account with the bank, wherefrom payment is to be
made
The field is automatically filled out with the value of “Settlement
account” value from current options. The system provides an
opportunity to select the account form “Accounts” directory.
(Read-only) Currency of the amount withdrawn from the payer’s
account
The field is automatically filled out after entering a value in the “Debit
Account Number” field.
49
List of Receivers
Using related toolbar the following actions can be performed: New(adds
new rows), Edit, View, Delete and Find. These actions are also available
on main toolbar.
Credit Account
(Required) Payee’s account with the bank
Receiver
(Required) Name of the payee
Amount
(Required) Amount to be paid.
Total
Amount in Words
Details of Payment
(Required) Amount to be withdrawn from the payer’s account.
(Read-only) Amount in words
The field is automatically filled out after entering values in “Total” field.
(Required) Details of the payment
“Multiple Payment Order” document will be created after pressing “Next” or “OK” buttons. The
difference is that after pressing “OK” button, the window will be closed, whereas after pressing
“Next” button it is possible to create another “Payment Order”.
Payments Outside of RA
"Payments Outside of RA" document is used to make payments outside of RA from bank
accounts of the client. The bank sends to the client "Payments Outside of RA" document, when
the client receives payment from abroad.
Below is the appearance of "Payment Outside of RA" document in the system.
Field
Description
(Required) Sequential number of the payment
Number
Date
If sequential numbering is turned on for this payment type, then the field
is automatically filled out with next sequential number.
(Required) Creation date of the payment
The field is automatically filled out with the current date.
50
(Read-only) Currency of the amount withdrawn from the payer’s account
Currency
The field is automatically filled out after entering a value in the “Payer’s
Account” field.
(Required) Payer’s account with the bank, wherefrom payment is to be
made
Payer’s Account
The field is automatically filled out with the value of “Settlement account”
value from current options. The system provides an opportunity to select
the account form “Accounts” directory.
(Required) Name of the payer
Payer’s Name
The field is automatically filled out with the payer’s name based on
current options.
(Optional) Address of the payer
Payer’s Address
The field is automatically filled out with the payer’s name based on
current options.
Payer’s BIC
(Optional) BIC (Bank International Code) of the payer’s bank
Payer’s Bank Name
(Optional) Name and address of the payer’s bank
Payer’s Bank
Account
(Optional) Account number of the payer’s bank
Do not confuse this field with payer’s account field.
(Optional) Payee’s account number with the bank
Receiver’s Account
The system provides opportunity to select account from “Correspondents
Outside of RA” directory. When selecting a row from that directory,
“Receiver’s Name”, “Receiver’s Address” and “Details of Payment” fields
are automatically filled out.
Receiver’s Name
(Required) Name of the payee
Receiver’s Address
(Optional) Address of the payee
(Optional) Payee’s BIC (Bank International Code)
Receiver’s BIC
Receiver’s Bank
Name
The system provides an opportunity to select the field value from “Banks
Outside of RA” directory. When selecting a row from that directory,
“Receiver’s Bank Name” field is automatically filled out.
(Required) Name and address of the payee’s bank
If the “Receiver’s BIC” is selected from the banks list, the field is
automatically filled out with corresponding value.
Receiver’s Bank
Account
(Optional) Account number of the payee’s bank.
Amount
(Required) Amount to be withdrawn from the payer’s account.
Details of Payment
(Required) Details of the payment
Do not confuse this field with payee’s account field.
(Required) Defines how to charge the fee
Possible values for this field are:
Paying Off Charges
0 - Without charges
Selecting this value means that the fee should be charged from
the beneficiary (BEN).
1 - Amount plus charges
Selecting this value means that the fee should be charged from
the payer (OUR) and the amount is specified without fee.
2 - Amount less charges
Selecting this value means that the fee should be charged from
the payer (OUR) and the fee should be withdrawn from specified
amount.
51
Charges Account
(Optional) Account number, wherefrom the amount is charged.
(Optional) BIC (Bank International Code) of the intermediary bank
Intermediary BIC
Intermediary Bank
Account
Intermediary Bank
Name
Additional
Information
Instructed Amount
Instructed Currency
The system provides an opportunity to select the field value from “Banks
Outside of RA” directory. When selecting a row from that directory,
“Intermediary Bank Name” field is automatically filled out.
(Optional) Account number of the intermediary bank.
(Optional) Name and address of the payee’s bank
If the “Intermediary BIC” is selected from the banks list, the field is
automatically filled out with corresponding value.
(Optional) Additional information provided to the bank by the client
(Read-only) Amount instructed by the payer
This field is visible only for incoming “Payment Outside of RA” order.
(Read-only) The currency of amount instructed by the payer
This field is visible only for incoming “Payment Outside of RA” order.
“Payment Outside of RA” document will be created after pressing “Next” or “OK” buttons. The
difference is that after pressing “OK” button, the window will be closed, whereas after pressing
“Next” button it is possible to create another “Payment Outside of RA”.
There is “RUS” button next to some fields, which is used to type in Russian transliteration
(RUR6), and which is used for payments to be sent to Russia. Pressing this button activates the
following window:
This window may be activated as well by pressing “Alt+R” or “F6” on the relevant field.
Note: All fields of “Payment Outside of RA” documents received from the bank are read-only.
Currency Conversion Request
With the help of “Currency Conversion Request” document, client can issue an order to the
bank, to exchange amount between your accounts having different currencies. Client should
agree with the bank, in advance, on currency exchange rate, otherwise order could be refused.
The system automatically suggests foreign currency exchange rates from “Rates of Exchange
from Bank” or “Rates of Exchange from CB RA” directories, which are automatically filled out
when sending an on-line request thereof to the bank. In case of lack of up-to-date (less than 30
days) information on foreign currency exchange rates, the system will display an appropriate
error and the order will not be created.
“Currency Conversion Requests” document has the following appearance:
52
Field
Description
(Required) Sequential number of the order
Number
Date
Debit Account
If sequential numbering is turned on for the currency conversion
requests, then the field is automatically filled out with next
sequential number.
(Required) Creation date of the order
The field is automatically filled out with the current date.
(Required)
withdrawn
Debit
account,
wherefrom
amount
should
be
The system provides an opportunity to select the account form
“Accounts” directory.
(Required) Credit account, whereto amount should be added
Credit Account
The system provides an opportunity to select the account form
“Accounts” directory.
(Required) Currency exchange rate
Rate
The system automatically fills out the exchange rate from "Rates
of Exchange from Bank” directory for currencies of the specified
accounts.
Debit Amount
(Required) Amount to be withdrawn from account specified in
“Debit Account” field
Credit Amount
(Required) Amount to be added to account specified in “Credit
Account” field
Comment
(Optional) Client’s description of the currency conversion request
To create “Currency Conversion Requests” document, press “OK” button.
Cash Request
With the help of “Cash Request” document, the client may issue an order to the bank, to receive
cash amount.
“Cash Request” document has the following appearance in the system:
53
Field
Description
(Required) Sequential number of the order
Number
Date
If sequential numbering is turned on for the cash requests, then
the field is automatically filled out with next sequential number.
(Required) Preferred execution date of the order
The field is automatically filled out with tomorrow date.
(Required) Client’s account, wherefrom cash should be withdrawn
Account
Currency
Amount
The system provides an opportunity to select the account form
“Accounts” directory.
(Read-only) Currency of the amount withdrawn from the client’s
account
The field is automatically filled out after entering a value in the
“Account” field.
(Required) Amount to be withdrawn from the client’s account.
(Read-only) Amount in words
Amount in Words
The field is automatically filled out after entering values in
“Amount” field.
Description
(Optional) Client’s description of the cash request
To create “Cash Request” document, press “OK” button.
Letter
“Letter” document is used to exchange free-format messages between the bank and the client.
The letter may include files (MS Word, Excel documents, etc.).
“Letter” document has the following appearance in the system:
54
Field
Date
Subject
Body
File attachments
Description
(Required) Creation date of the letter
The field is automatically filled out with the current date.
(Required) Subject of the letter
The field contains brief information on the content of letter.
(Optional) Content of the letter
The length of this field is not restricted by the system.
(Optional) Files attached to the letter
Files can be attached or saved by using related toolbar.
To create “Letter” document, press “OK” button.
Note: All fields of “Letter” documents received from the bank are read-only.
Statement of Account
The bank provides the client with an account statement for a defined period. Such statement
contains information on the account balance as of the beginning and end of the period, and
transactions executed in the defined period. At the discretion of the client (and upon advance
notice to bank), the statement may include the AMD equivalents of account balances and
transaction amounts.
“Statement of Account” document has the following appearance in the system:
55
Field
Description
Account
Client’s account number the statement refers to
Currency
The currency of the client’s account
Opening
Date
Opening date of the statement
Balance
Account balance as of the opening date of the period
Balance
AMD equivalent of account balance as of the opening date
of the period
(Equivalent in AMD)
Balance Type
Account opening balance type: (D) - Debit, (C) – Credit
Transactions List
Date
Transaction execution date
Number
Transaction reference number in the bank
Corr. Account
Transaction correspondent account number
Description
Transaction details
Payer/Receiver
Name of the payer/payee
Debit
Amount debited from the account as a result of the
transaction
Credit
Amount credited to the account as a result of the
transaction
Debit in AMD
AMD equivalent of amount debited from the account as a
result of the transaction
Credit in AMD
AMD equivalent of amount credited to the account as a
result of the transaction
Closing
Date
Closing date of the account statement
Balance
Account balance as of the closing date of the period
Balance
AMD equivalent of account balance as of the closing date
of the period
(AMD equivalent)
56
Type of Balance
Account closing balance type: (D) - Debit, (C) - Credit
Closing Available
Balance
Closing account balance available for use
Type of Balance
Available balance type: (D) - Debit, (C)- Credit
button displays the initial document of selected transaction.
AMD equivalent of amounts specified in “Statement of Account” documents are visible, if the
account is in foreign currency, otherwise those fields are useless.
Send and Receive Documents
The system provides special means to track the progress of signing, sending and receiving of
documents, and to check the status of sent documents. Such means are as follows:
Sign Document
Send Document to Bank
Receive Document from Bank
The process of checking the status of documents is described in “Track Out All Sent Document
States” section.
Sign Document
The system allows appending digital signature to documents in “Editable” state only, and only to
users, with first or second signatory permissions. To sign documents in “Editable” state, open
the document folder where necessary documents are located, move to necessary row therein,
and select “Sign” command from “Actions” menu. When signing a number of documents from
the same folder, mark necessary rows therein, and select “Sign” command from “Actions”
menu.
When signing a document, the window in the picture below is displayed, wherefrom the
document signing process is displayed.
Here are some important opportunities provided by this window:
“Cancel” – cancels the process of signing of documents.
Error description appears when errors occur during the document signing. Depending on
the type of error, the error is displayed either in the same window or in a form of a
report.
Once the document is signed, it is not subject to changes. If for any reasons, (e.g., the field
value contains error), the document is to be changed then the user must first remove the
signatures. With the help of “Remove Signature” command in “Actions” menu, the user may
remove the already put signatures, change the document and thereafter sign the document
again. The system records all the above-described actions as document history. To view
document history, select “View Log” command from “Actions” menu.
Send Document to Bank
The system allows the client to send documents in “Ready to be Sent” state. There are two
ways to send the documents to the bank:
1. Open the document folder containing the required document; Move to the respective row
of to-be sent document. Select “Send to Bank” command from “Actions” menu. When
sending several documents from the same folder, mark respective rows therein, and
then select “Send to Bank” command from “Actions” menu.
57
2. Select “Send All Ready Documents” command from “Session" menu. In this case, the
system will send all available signed documents to the bank.
When sending a document to the bank, “Send” page in “Send and Receive” window will open.
Below are the contents of main fields of the page:
Field
Description
Document Name
Type of the document being sent
Document No.
Sequential number of the document
State
Status of the document
Here are some important opportunities provided by “Send and Receive” window:
“Cancel” – cancels the sending process.
When errors occur while sending documents, “Errors” page is activated to view error
description details.
When there are documents to be sent to the bank, upon completion of send process, “Receive”
page is activated. When pressing “Receive” button, documents from the bank are received.
Receive Documents from Bank
To receive documents sent to the client by the bank, select “Receive from Bank” command from
“Session" menu, which will open “Receive” page of “Send and Receive” window.
Below are the key contents of the fields:
Field
Description
Document Name
Type of the document being received
Size (byte)
Size of the document in bytes
Status
Status of the document
58
Here are some important opportunities of “Send and Receive” window.
Press “Stop” button, to stop the process of document receipt.
Double click particular row to view received document.
If errors occur during the receipt of documents, “Errors” page is activated where the
user can view error description details.
Document Send/Receive Errors
If errors occur during document exchange between the client and the bank, “Errors” page of
“Send and Receive” window is activated. In this page user can view occurred fault details.
Errors mainly occur due to the following four reasons:
1. Client information, filled out at the bank, is incorrect. For example, the name of the
second signatory is incorrect. To correct the error, the client needs to contact the bank.
2. The bank has denied the particular client’s access to the system, or has granted view
only access. In this case, too, the client needs to contact the bank.
3. Cryptographic keys are inaccessible or invalid. E.g., the disk containing the crypto keys
is not installed, the path to keys is incorrect, or the bank has revoked (called back) the
keys.
4. Internet connection with the bank is broken. To test the connection, press “Check
Connection” button from “Connection Settings” page in “Current Options” window.
On-Line Requests to Bank
The system provides an opportunity to the user to make on-line inquiries to the bank. To make
inquiries, select any of the below-listed commands, respectively, from “Send Request to Bank”
submenu of “Session” menu:
“View Statement of Account” – is used to view any one of the clients’ accounts
statements, at random period. The statement is not official, i.e. is not signed by the
bank.
“View Accounts’ Balances” – is used to view balances of all accessible accounts of the
client.
“View Rates of Exchange” – is used to view foreign currency exchange rates established
by the bank or the CBA.
View Statement of Account
When selecting “View Statement of Accounts” from “Send Request to Bank” submenu of
"Session" menu, the window of initial parameters of inquiry is opened. Select the account
number and the period, where you wish to view transactions related to the specified account. In
addition, you may want to view the account statement in a printable form, and view AMD
equivalents. Once parameter values are verified, press “OK”.
59
When establishing connection with, and sending inquiry to, the bank, “Statement of Account”
window is activated or a statement printable form is generated.
Note: If selected account currency is AMD, then “Show Equivalents in AMD” field is not disabled.
View Accounts’ Balances
When selecting “View Accounts’ Balances” command from “Send Request to Bank” submenu of
"Session" menu, the window displaying current balances of the client’s accounts is activated. It
provides numbers, names, currencies and balances of the accounts, as well as the type the
balance - Debit (D), or Credit (C).
View Rates of Exchange
When selecting “View Rates of Exchange” command from “Send Request to Bank” submenu of
"Session" menu, the window of initial parameters of inquiry is opened. In this window, the user
selects the bank and the period, to view currency exchange rates. The user may select the CBA
or the servicing bank. After verifying parameter values, press “OK” button.
When connection is established with, and inquiry is sent to, the bank, the relevant directory of
currency exchange rates is activated.
On-Line Request Errors
When error occurs inquires to the bank, the “Requests to Bank” window displays information
about such error. The error description can help to identify its reason.
During on-line requests, errors mainly occur due to the following three reasons:
1. The bank has denied assess to the system to the client. In this case, the client has to
contact the bank.
2. Crypto keys are inaccessible or invalid. E.g., the disk containing the crypto keys is not
installed, the path to keys is incorrect, or the bank has revoked the keys, etc.
60
3. Internet connection with the bank is broken. To test the connection, press “Check
Connection” button from “Connection Settings” page in “Current Options” window.
Print Preview
Print preview is designed to preview the printable form of folder or report before printing it.
Folder or report print preview can be activated by selecting “Print Preview” command from
“Session" menu, or pressing “Shift+F5” shortcut key.
Print Preview Window
Folder Print Preview
Report Print Preview
Print Preview Window
Print Preview window is displayed from folder or report, by pressing “Shift+F5” shortcut key, or
button in toolbar, or selecting “Print Preview” command from "Session" menu. “Print
Preview” window has the following appearance:
The following actions may be performed from “Print Preview” window:
Move to the next or the previous fragment of the same page;
Move to the same fragment of the next or the previous page;
Export displayed print preview to Microsoft Word, by pressing
selecting “Export to Word” command from “Export” menu;
button in the toolbar, or
Export displayed print preview in HTML format, by pressing
selecting “Export HTML” command from “Export” menu;
button in the toolbar, or
Change the font size of the print preview, by pressing
button in the toolbar, or
selecting “Fonts...” command from “Print Options”. The standard font selection window
will be displayed. After selecting font size and pressing OK button, the preview will be
displayed with the selected size. If the displayed print preview is generated from the
folder, the font name also can be selected from the “Font” window. Selection of the
remaining items will not have any influence on print preview window.
Print displayed preview. By pressing
button in the toolbar, the preview will
immediately be printed on the default printer. When selecting “Print…” command from
“Print Options”, or pressing “Ctrl+P” shortcut key, the print setup window will be
displayed. After pressing “OK”, displayed preview will identically be printed on the printer
(WYSIWYG - What You See Is What You Get);
Change printing parameters. By pressing
button in the toolbar, or selecting “Print
Setup…” command form “Print Options” menu, the standard print setup window will be
displayed, where the user can select printer, paper layout (orientation), and, when
previewing the folder printable form, the paper size as well (A4, A3, Letter, etc);
61
Change page settings. By pressing
button in the toolbar, or selecting “Page Setup…”
command in “Print Options” menu, the standard page setup window will be displayed,
where the user may change page margins (right, left, top and button), select paper
orientation, and, when previewing folder printable form, the paper size as well (A4, A3,
Letter, etc.). Each printer has its minimal margin sizes and, if the selected margins are
less than the allowable ones, the values are automatically adjusted.
Close the window, by pressing “Close” button in the toolbar, or selecting “Close”
command from “Print Options” menu.
Printing Window
By selecting “Print…” command from “Print Options” menu in “Print Preview” window, or
pressing “Ctrl+P” shortcut key, print setup window will be displayed. It has the following
appearance.
From the window, the user can select or mark:
Printer name
Pages range, to be printed
Fragments range, to be printed
Copies count
Copies collation
In the picture above the print preview will be printed on “HP LaserJet 5L” Printer, and fragments
1 and 2 of pages 1, 2, 3, 5 and from 7 to 12, will be printed.
Folder Print Preview
To preview the folder printable form press “Shift+F5” shortcut key or
button in toolbar, or
select “Print Preview” command from "Session" menu. Folder print preview is displayed in “Print
Preview” window, in a form that will be printed. Settings in “Printer” page of current options
affect the folder print form. Below is the printable form of rows marked in the folder.
62
Report Print
To preview the report printable form, press “Shift+F5” shortcut key,
button in toolbar, or
select “Print Preview” command form “Session” menu. When previewing report printable forms,
firstly, it is divided into pages and fragments, which are then displayed in the print preview
window. Settings in “Print” page of current options affect the report printable form. The picture
below shows the report print preview.
How to … ?
The purpose of this page is to mark the sequence of actions, which help the user to achieve the
required result. Among actions available in the system, those that are relatively more frequently
used are selected. They are:
How to send document to bank
How to check sent document state
How to obtain a key approved by bank
How to check connection with bank
How to move the system to another computer
How to backup/restore keys
How to send document to bank
The process of sending a document to bank will be described by the example of “Payment
Orders Inside of RA” document, since this process is independent from the type of document.
1. Activate “Payments Inside of RA (Outgoing)” folder from “Documents” menu.
63
2. To send an non-existing document to the bank:
a. Select “Add” command from “Actions” menu, or the toolbar, or context menu.
b. In the displayed window fill out the fields of payment orders inside of RA and
press “OK”. A new document will be added to the folder, and the row cursor will
be on the relevant line.
c. The users with relevant permissions (authorities) append the first and the second
signatures, respectively, by selecting “Sign” command from “Actions” or context
menu. Thereafter, the status of the document changes to “Ready to be sent”. If
the first and second signatory authorities are granted to the same user, after
performing the “Sign” command once, the document appears in “Ready to be
sent” status.
d. The user with relevant authorities sends the signed document, by selecting “Send
to Bank” command from “Actions” or context menu. If the document was
successfully sent, then its status changes to “Sent to Bank”.
3. To send an existing document to the bank:
a. Select the respective row in the folder, which shall be in “Editable” or “Ready to
be sent” state.
b. Send to the bank, if the document is in “Ready to be send” state (step 2.d), or
sign and then send, if the document is in “Editable” state (steps 2.c and 2.d)
If the signatory and send to/receive from the bank authorities are granted to the same user,
the newly created or existing document can be signed (by appending first and second
signatures) and sent to the bank directly, by selecting “Sign and Send” command from “Actions”
or context menu.
How to check sent document state
To track out the status of the document that was previously sent to bank, it is necessary to
perform following steps:
1. Activate the relevant folder from “Documents” menu;
2. Select the respective row in that folder and select “Track Out Sent Documents State”
from “Actions” or context menu. If the status of the document is changed, the displayed
window and the folder will show the updated status of the document. If rows are
selected, the status track-out will be performed on the selected document.
When tracking out the status of documents, the window in the picture below appears.
64
It is possible to track out statuses of all documents sent to bank in the specified (marked by
working period) period, by selecting “Track Out All Sent Documents States” command from
“Session” menu.
Note: The status track out is performed for the documents that are under one of the following
states: “Sent to Bank”, “Signatures Verified” and “Processed in Bank”.
How to obtain a key approved by bank
To sign documents and send requests to bank, it is necessary to have a key approved by bank
(digital certificate). Such key is used both for digital signing and for user authentication. To
obtain a key approved by bank, it is necessary to learn principles of working with keys in the
system.
Create a Key
Each user with signatory or send/receive authority shall create his/her key. Actually, it is a RSA
key-pair and certificate request creation. The creation of key is also required when the validity
period of the previous key has expired.
To create a key:
1. Select “Keys” command from “Data Directories” menu.
2. Select “Add” command from context or “Actions” menu, which creates a new key for the
particular user.
When the key is created, a row with “Created” status will be added to the directory. After
creating the key, it cannot be used for signing, and send/receive yet; the key has to be
approved by bank. The newly created key has to the following appearance:
The validity period of the key is fixed when it is approved by the bank (when certificate is
generated), rather than when created by the user. Usually, the validity period of key
(certificate) is one year. The user must inform the bank about the loss of key, or suspect of
65
falsification, or other emergencies. In this case, the bank revokes the key (certificate), so that
no one can use it, and the user must create a new key.
Remove a Key
To remove the key (for any reasons), once it is created:
Select “Keys” command form “Data Directories” menu;
Move to the key, which must be removed from “Keys” folder;
Select “Delete” command from context or “Actions” menu to remove the key selected by
the user.
Note that it is not possible to remove sent, approved, denied key, or a key created on a
different computer or by a different user.
Key Exchange Password and Code
When sending the created key to bank or, checking the status of sent key, the bank does not
have enough information to authenticate the client (organization), since the user does not have
a key at that moment. If an outsider succeeds in sending his/her key in the name of some client
and, if such key is approved by bank, such outsider may execute random actions under the
name of the client. To prevent such events, key exchange password and code, and later – the
thumbprint, is used. Each client determines for itself the keys exchange password. The
password may be changed from “Private Keys” page of “Current Options” window, opened from
“Session” menu. Each time when key exchange action is performed, it is necessary to enter the
password. Key exchange password is not stored anywhere, therefore the client has to
remember it (like each user remembers the password). The bank has to check the accuracy of
the password somehow, without knowing the actual password; therefore, it uses the key
exchange code. The code for the key exchange is a sequence of 32 alphanumeric characters,
obtained from the password via special algorithm (MD5-hash). It is impossible to get the initial
password from the code. The client, after changing the key exchange password, shall inform the
bank the key exchange code, which is displayed in “Private Key” page of “Current Options”
window, opened from “Options” command of “Session” menu.
Send Key to Bank
After creating the key, the user with send/receive permission (authority) must send it to the
bank for confirmation. To send the key (certificate request) to bank:
1. Select “Keys” command from “Data Directories” menu;
2. Mark in the displayed “Keys” folder the key(s) to be sent to bank;
3. Select “Send to Bank” command from context or “Actions” menu;
4. Enter key exchange password in the “Key Exchange Password” window. If correct,
current or selected keys will be sent to bank.
Once the key is sent, the status of the respective row in the folder will be changed to “Sent to
Bank”.
Check Key Status
Once the key is sent to bank, it is necessary to inform about thumbprint of key sent to bank,
which is displayed in “Keys” folder. If correct and, after a number of other verifications, the
66
client’s key is approved (certificate is issued), otherwise it is rejected. To check the status of
key with the bank and, to receive the approved keys:
1. Select “Keys” command form “Data Directories" menu;
2. Select “Check States of Keys” Command” from context or “Actions” menu;
3. Enter the key exchange password in “Key Exchange Password” window. If correct, the
status of key sent to bank will be checked and, if approved, appropriate certificate will be
received.
Once the key is verified or denied, the status of the respective row in the folder will changed to
“Valid” or “Denied”. Next time, when the user (whose key is approved) enters the system, a
message on approval of the key will be displayed.
If the user stores his/her keys in the file on external carrier, the system will suggest inserting it
before saving the approved key.
Example of Key Exchange
The example below shows the process of key exchange.
1. When entering the system for the first time, the user determines the key exchange
password, e.g. ArmSoft.
2. Key exchange password can be changed from “Private Keys” page of “Current Options”
window, opened via “Options” command of “Session” menu, by clicking on “"Change"
button and entering and confirming “ArmSoft” password. This password is not stored
anywhere, and the user has to remember it.
3. Key exchange field on the same page will display a sequence of 32 alphanumeric
characters - F1FEC7FC9DBDA028FFEAE36E647FF846 that is obtained from the entered
password.
4. The client reports the bank about the code F1FEC7FC9DBDA028FFEAE36E647FF846 (it is
impossible to get the initial password from this code).
5. When sending key to bank, the system displays a window where the key exchange
password must be entered.
6. The entered password, in encrypted form, is sent to AS-ClientBank server, which
decrypts it and receives the initial password. Thereafter, the code is received from the
password, and checked with the code reported earlier to bank. It should be mentioned
that nobody participates in this process and no one can theft the client’s key exchange
password.
7. After client authentication, the key is accepted for further processing and approval.
8. The bank verifies the key thumbprint and, if correct, approves them (issues a certificate
for the certificate request).
9. When checking the status of the sent key, the window where key exchange password
must be entered is displayed once again, and it is checked in the same manner as when
sending the keys.
10. Once authenticated, the client receives the approved key (certificate) and, if necessary,
this key is saved in file.
67
The key approved by bank (certificate) has the following appearance:
How to test connection with bank
To test connection with bank it is necessary to:
1. Activate “Current Options” window from “Session” menu or press “Ctrl+O” shortcut key;
2. Select “Connection Settings” page;
3. Click on “Test Connection” button, to test the connection.
Once the connection is successfully tested, the window displays “The requested tasks were
completed successfully” message.
How to move the system to another computer
To move the system to a different computer it is necessary to:
1. Install the system on that computer;
2. Move database files with “.mdb” extension. Such databases are located in directories
written in “AsClientBank.config” file;
3. Along with each database move “Backups” and “Archives” subdirectories;
4. If the database paths are changed when moving the system, it is necessary to create
configurations manually, otherwise you may move “AsClientBank.config” file only.
5. To move private keys, perform actions described in “Backup/Restore keys” section.
How to backup/restore keys
When moving the system, or in emergency events (such as, failure of external carrier of private
keys, system failure), to avoid loss of keys, it is necessary to backup private key. Each time
after obtaining a new key, the user shall backup his/her private key. The ways of backing up
and further restoring of private key depends on the storage of private keys, which is marked in
“Private Keys” page of “Current Options” window.
Backup/Restore keys stored in File
If private keys are stored in a file, it is necessary to store the entire directory of private keys.
Once the emergency is eliminated, it is necessary to enter the new location of private keys in
“Private Keys” page of “Current Options” window, and then copy stored directory to new
location.
Backup/Restore keys stored in System Storage
68
If private keys are stored in system storage, special wizard is designed to backup and restore
private keys. By selecting “Export To File” command from “Current Key” submenu of “Actions”
menu, the wizard for exporting private key will be displayed, which consists of the following
steps:
1.
Press “Next”.
2.
Enter and confirm password, which
will be used to protect the private
key, and click on “Next”. This
password is not connected with
other passwords of the user and it is
necessary to remember it, since it
will be used during restoration.
3.
Enter or select the file name, where
the private key is to be exported.
Mark whether you want to delete
the private key in storage after it is
exported, and click on “Next”.
4.
Press “End”
69
After performing above-described steps, it is necessary to store the exported file and remember
the entered password.
By selecting “Import From File” command from “Current Keys” submenu of “Actions” menu, the
private key import wizard is displayed, which is used for restoring of private key, and consists of
the following steps.
1.
Press “Next”.
2.
Enter or select the file name, where
the exported private key is located
and click on “Next”.
3.
Enter the password used to protect
the private key during exporting;
mark whether you wish to allow
further export of imported key, and
click on “Next”.
4.
Press “End”.
70
After the above-described actions, the user restores his/her private key and may continue
working.
About System Security
The topics of this section include:
Basics of Cryptography
System Security
System Structure
Basics of Cryptography
It is obvious that today Internet is becoming the most widely and frequently used means of
data exchange. Being designed as a system for mutual collaboration of scientific-research
institution employees, Internet gradually converted into a means of exchanging data between
vast numbers of persons in various parts of the world. The existence of data exchange network,
involving almost the entire world, and technologies, ensuring data exchange and accessibility,
provide new opportunities for people, such as e-commerce, distance learning, electronic
publications, etc.
The underlying technologies initially were not designed to be used in the mentioned areas,
which impose specific conditions on data privacy, authenticity and prevention of unauthorized
access.
Openness of technology and network availability allows outsiders to read transferred data. The
only way of avoiding such situation is using crypto tools.
Principles of Cryptography
Cryptography allows protecting random-type data, stored on any carrier, regardless of
operating system, data format, etc. It may be stored in file, disc, e-mail message, electronic
documents, and other data. Cryptographic tools may also be used to create virtual channels for
transferring confidential data, ensuring data encryption between two Internet nodes.
Cryptographic protection systems address two basic tasks:
Ensure privacy of data, by encrypting it;
Ensure authenticity of data origin, and verify that data is intact, by digitally signing it.
Modern crypto protection systems are based on three algorithms. Encryption of data may be
done through two types of algorithms: symmetric key cryptography and asymmetric key
cryptography (or public key algorithm). A major benefit of public key cryptography is that it
provides an algorithm for employing digital signatures.
How does cryptography work?
A cryptographic algorithm, or cipher, is a mathematical function used in the encryption and
decryption process. A cryptographic algorithm works in combination with a key - a word,
number, or phrase - to encrypt the plaintext. The same plaintext encrypts to different ciphertext
with different keys. The security of encrypted data is entirely dependent on two things: the
strength of the cryptographic algorithm and the secrecy of the key.
Symmetric Key Cryptography
In symmetric-key cryptography, also called secret-key or conventional encryption, one key is
used both for encryption and decryption. When encrypting, symmetric key algorithm receives
plain text and secret key and produces ciphertext. When decrypting, symmetric key algorithm
receives ciphertext and the same secret key and produces original plain text.
71
There are several algorithms of symmetric key cryptography - DES (Data Encryption Standard)
is the most widely used one, adopted in 1977 by the US Federal Bureau of Standards. RC4,
RC5, IDEA and other algorithms have found certain use, too.
Despite of high effectiveness and stability, symmetric key algorithms have one substantial
drawback: when used for encryption of disseminating data (e-mail, etc.), rather than personal
data (personal files, etc.), it is necessary to share the secret key between recipients, to decrypt
information. This may cause loss of secret key and leak of private information.
Public Key Cryptography
In contrast to symmetric key encryption, public key cryptography uses different keys (public
and private) for data encryption and decryption. It is computationally infeasible to deduce the
private key from the public key. One of the keys is used for encryption, and the other – for
decryption. These algorithms employ notion of a one-way and trapdoor functions.
Key-pair is created by the user, who stores and keeps in secret a key (private key) designed for
data decryption; whereas, the other key (public key) designed for encrypting publishes to the
world. This key cannot be used for data decryption and, therefore, there is no need to worry
about its privacy.
By using the public key of data recipient, other users may encrypt the necessary information:
thus, no one except the recipient can decrypt the information, since the key required for
decrypting, i.e. private key is held with the information recipient only.
Although there are several known public key algorithms, in practice, the RSA algorithm is
deemed standard, invented by US scientists Rivest, Shamir and Adelman, in 1977.
Encryption Strength
The strength of encryption algorithm depends, in geometrical progression, on the length on the
used key. As compared to encryption algorithms with public keys, symmetric encryption
algorithms need considerably smaller key, to ensure equal stability. For example, DES algorithm
that uses 80-bit key ensures as much stability as RSA algorithm that uses 1024-bit public key.
In turn, the speed of encryption/decryption depends on the length of used key and the size of
encrypted data. Thus, symmetric key algorithms ensure higher speed of encryption/decryption,
with same strength, than public key algorithms.
Public key algorithms ensure higher level of confidentiality of keys, since the private key of
recipient is held with him/her only. In practice, symmetric key algorithms are used for personal
72
information encryption, and the combination of those two algorithms is used for shared
information encryption.
Below is the description of combined result of symmetric and public key encryptions. At first,
random one-time-only symmetric (or session) key is generated. The key is used to encrypt the
basic data of user; the result is ciphertext. Afterwards, generated session key is encrypted with
recipient’s public key. This public key-encrypted session key is transmitted along with the
ciphertext to the recipient.
Decryption works in the reverse. First, recipient uses his/her private key to recover the
temporary session key. Then, the received session key is used to decrypt the ciphertext; the
result is original data.
Since the basic portion of information is encrypted with symmetric key, and only a small portion
of information is encrypted with public key (symmetric key), this algorithm combines
advantages of both algorithms: speed of symmetric key encryption and convenience of public
key encryption.
Digital Signatures
As opposed to a handwritten text, an electronic document may be changed unnoticeable to
recipient. Therefore, it is necessary not only to encrypt, but also to ensure the origin and
integrity of the document. For this purpose, digital signature is used. Instead of encrypting
information using someone else's public key, one encrypts it with his/her private key. If the
information can be decrypted with his/her public key, then it must have originated with
him/her.
73
The system described above has some problems. It is slow, and it produces an enormous
volume of data: at least double the size of the original information. An improvement on the
above scheme is the addition of a one-way hash function in the process. A one-way hash
function takes variable-length input and produces a fixed-length output; say, 160-bits. The
hash function ensures that, if the information is changed in any way - even by just one bit - an
entirely different output value is produced.
The process of data signing consists of the following two steps. First, hash function is applied to
the plaintext, which generates a fixed-length data item known as a “message digest”. Second,
the author uses the digest and his/her private key to create the “signature”. Then, the signature
and the plaintext are transmitted together.
Upon receipt of the message, the recipient may verify its authenticity and integrity. The process
of signature verification consists of the following steps. First, the recipient re-computes the
digest of the plaintext. Second, received signature is decrypted with sender’s public key; the
result is the digest computed by the sender. If those two digests match, then identity of
originator and the integrity of plaintext are guaranteed.
Again, digital signature is a plaintext digest, encrypted with originator’s private key; in contrary,
ciphertext is a plaintext, encrypted with recipient’s public key. Thus, digital signature ensures
the originator’s identity, while encryption ensures the recipient’s identity.
Assume that plaintext has to be signed and sent to several recipients. First, the author signs the
plaintext with his private key, to ensure identity and integrity. Then, the plaintext along with
the signature is encrypted for each recipient, using each recipient’s public key; resulting
ciphertext can be decrypted only by recipient.
Overcoming Cryptography
Modern cryptographic algorithms provide static independence of plaintext and ciphertext, i.e. no
one can obtain the plaintext or encryption key, even if he/she has a portion of the plaintext.
Today, the stability of algorithm in practice is determined by the length of key used for
encryption.
The reliability of encryption is measured by the time and resources required for restoration of
the initial text. In general, mega computer is used to estimate the work time. However, this is
empiric estimation, since technologies develop from year to year, so does the computer
performance.
Testing all potential keys is the method requiring the most resources for overcoming
cryptographic protection. The number of all potential keys drastically increases when the key
length is increased. Trying each possible key (if sufficient length of key is selected) is a very
time consuming and becomes simply senseless. Given all of today's computing power and
available time - even a billion computers doing a billion checks a second - it is not possible to
decipher the result of strong cryptography before the end of the universe. For comparison, the
use of 40-bit key causes testing of over a trillion keys.
74
Public key forgery is another method of getting privacy information. This method of overcoming
cryptographic protection called “man-in-the-middle” attack and requires special attention.
Public Key Forgery
While decryption without a key is a quite complicated task, forgery of key is not that much
difficult. In this type of attack, someone posts a phony key with the name and user ID of the
user's intended recipient. Data, encrypted to, and intercepted by the true owner of this bogus
key, is now in the wrong hands.
Of course, cracker could not use the bogus key for a long time. However, such time may be
sufficient that the user, whose key was forged, will never need the encryption. Therefore, it is
vital that you are assured that the public key to which you are encrypting data is in fact the
public key of the intended recipient and not a forgery.
The authenticity of public key may be guaranteed by anyone, whom you absolutely trust. The
same applies to ordinary paper messages. The person whom you trust may guarantee the
authenticity of signature, afterwards you independently determine whether the signature is
authentic, or not.
Digital certificates solve the task of establishing whether a public key truly belongs to the
purported owner.
Digital Certificates
The most common format of digital certificate is X.509 standard, determined by Consultative
Committee in International Telegraphy and Telephony (CCITT). The certificate includes various
identifying information: name, public key for encryption and signature, validity period. The
content of certificate is signed by a trusted third party (Certification Authority, CA) to prove its
authenticity. The Certification Authority is a body or agency: someone whom everyone trusts.
When publishing public keys, digital certificate is used, which guarantees authenticity of public
key contained in it.
When the keys will be used outside the organization, an organization, which is specialized in
public keys certification, may act as CA. VeriSign and Thawte are among the most famous ones.
Since keys used in AS-ClientBank system will not be used elsewhere, the servicing bank will act
as CA (Certification Authority).
Thus, to obtain a certificate, it is necessary to perform the following actions:
Create a key-pair of public and private keys;
Attach personal information (such as name, company name, e-mail address, etc.) to the
public key. A special format is designed for that, which is called Certificate Request;
Send the Certificate Request to the respective CA. Certification Authority will, then,
verify personal information and, if correct, issue a Certificate.
Receive issued Certificate from the CA.
After these actions, the user will have a private key and corresponding digital certificate, which
contains the public key. The user may sign any document, by using his/her private key, and
attach the signature and the certificate to the document.
75
Further, recipient may verify authenticity of the information's origin, and verify that the
information is intact. It also provides non-repudiation, which means that it prevents the sender
from claiming that he or she did not actually send the information.
It should be mentioned that certificate request generation, digital signatures creation and
verification tools are included in software packages, such as Microsoft Internet Explorer, Outlook
Express, AS-ClientBank, etc.
Certificate Revocation
Certificates are only useful while they are valid. It is unsafe to assume simply that a certificate
is valid forever. In all public key environments, certificates have a restricted lifetime. This
constrains the period in which a system is vulnerable should a certificate compromise occur.
Certificates are thus created with a scheduled validity period: a start date/time and an
expiration date/ time. The certificate is expected to be usable for its entire validity period (its
lifetime). When the certificate expires, it will no longer be valid.
There are also situations where it is necessary to invalidate a certificate prior to its expiration
date, such as when the certificate holder terminates employment with the company or suspects
that the certificate's corresponding private key has been compromised. This is called certificate
revocation.
Certification Authority that issued certificate can revoke it in the future. For this purpose, the CA
regularly publishes a Certificate Revocation List, CRL.
Thus, the certificate is usable, if it is valid and not included in the last CRL published by the CA.
SSL
When it comes to electronic commerce, it is vital for the user to be confident that
communication with the server is secure. When making payments, it is necessary to assure
privacy of transmitted data. This problem is addressed via Secure Socket Layer (SSL)
technology. SSL has become a standard for Web-server authentication by the user and channel
encryption between user and the Web-server. There are so-called Server Certificates for this
purpose, which are issued by certification authorities to secure Web sites.
The combination of public key (asymmetric) and a faster symmetric key encryption algorithm is
used by this protocol. The basic process involves the following actions:
To make a payment, the user enters the system and connects to the bank;
The system send request to the Web-server to use protected resources: simultaneously,
the SSL version and other necessary for server information are sent, as well;
The server responds by sending its certificate, employed SSL version and other
information to the system;
The system verifies information contained in the certificate, and gets assured that:
o
The server certificate is valid and not revoked;
o
The CA, which has issued the certificate, is trusted;
o
The CA’s signature is valid;
o
The address specified in the server’s certificate matches with the server address.
If the server is successfully authenticated, the system generates unique “session key”,
which is used for encrypting connection with server with symmetric algorithm.
The system encrypts the session key with public key contained in the server certificate,
and sends it back to the server.
The server decrypts and receives the session key, by using its private key.
The system sends a message informing that further messages from the system will be
encrypted by that session key;
The server, in its turn, responds that further messages from the server will be encrypted
by the same session key.
At that point, the SSL-protected connection is established and from that point on, all
data from the system to the server, and vice versa, will be encrypted and decrypted by
using symmetric algorithm.
76
After completion of the session, the session key is destroyed.
It should be mentioned that the above-described actions are automatically performed by the
system, last for few seconds only, and does not require the user’s interference.
System Security
To provide security of AS-ClientBank system, the following safety measures are used:
1. Each user working with the system has a password, which is used to logon to the
system;
2. There are first, second signatory and send/receive permissions in the system, without
which the user cannot perform relevant actions;
3. To sign and send requests to bank, the user is required to have a key, which is a X.509
certificate with 1024-bit public key;
4. The bank acts as Certification Authority, which is used to issue users’ certificates;
5. All data sent to bank is encrypted with SSL (Secure Sockets Layer) technology;
6. Each user is authenticated on the server by using user’s certificate.
7. Two digital signatures are put on documents being send to bank, which then are verified
and, if invalid, automatically denied;
8. The bank fixes the list of users with first and second signatory permissions and
automatically denies any document that is signed by a user not included in that list;
9. The bank stores the list of revoked certificates (CRL - Certificate Revocation List) and, if
for any reason the user’s certificate is revoked, no action can be performed using it.
System Structure
The picture below describes communication between the client and the server:
SOAP (Simple Object Access Protocol) protocol is used to transfer information from the client to
the bank, and vice versa. Transferred information is encrypted with SSL technology. ASClientBank system has its representative on the Web server - AS-ClientBank Service, which is
implemented as an ASP Web-service and, with the help of which the received messages are
queued and later processed by bank.
In general, there are two queues:
1. Queue of messages sent to bank by the client (to be processes by bank)
2. Queue of messages sent to client by the bank.
Data sending process is displayed in the following picture:
77
Picture narrative:
First, the required document is created.
Users with first and second signatory permissions sign the message with their private
keys (sequence of signatures is irrelevant).
User with send to/receive from the bank permission sends the signed document to bank.
When sending, encryption is performed via SSL technology.
The message is decrypted in the bank, client’s signatures are verified and, if correct, the
document is processed.
Data receipt process is performed as follows:
In the bank, the document to be sent to client is formed and signed.
The user with send to/receive from the bank permission receives the document. When
receiving, encryption is performed via SSL technology.
The message is decrypted at the client, bank’s signature is verified and, if correct, the
document is processed.
78
Notes
79